

Page 1
UK
Universal remote
D
F
E
P
I
NL
URC-7020
701926
Page 2

Table of Contents
UK
UK
PICTURE OF THE ONE FOR ALL 2 REMOTE
INSTALLING THE BATTERIES
FEATURES AND FUNCTIONS
INSTALLATION
Setting up your devices
The Search Method
QUICK CODE REFERENCE
CHANGING THE MODE OF A DEVICE KEY
RESETTING A DEVICE KEY
ADVANCED FEATURES
Colour and Brightness
Volume Punch Through
Auto Scan
Device Sleeptimer
ONE FOR ALL Sleeptimer
ONE FOR ALL Recall
TROUBLE-SHOOTING
Customer Service
SETUP CODES
Televisions
Video Recorders
About Your ONE FOR ALL 2
Congratulations on your purchase of the ONE FOR ALL 2 Universal
Remote Control. By choosing the ONE FOR ALL 2 remote you have opted
for the User Friendly remote control solution. Made according to the
highest quality, the ONE FOR ALL 2 will provide you with long-term
satisfaction. Please read these enclosed instructions carefully before
putting your ONE FOR ALL 2 to use.
Your ONE FOR ALL 2 Remote Package contains:
• Your ONE FOR ALL 2 Remote Control
• Your ONE FOR ALL 2 Manual
Your Manual is divided into two parts: the set-up instructions and the
device codes.
PLEASE DO NOT DISCARD THIS MANUAL AS YOU MAY NEED IT
AGAIN IN THE FUTURE!
Your ONE FOR ALL 2 can operate two devices: a Television and a Video
Recorder.
Your ONE FOR ALL 2 remote needs to be powered by 2 new “AA/LR6”
Alkaline batteries.
3
4
4
6
7
8
9
9
10
10
10
11
11
12
12
13
80
84
2 WWW.ONEFORALL.COM
Page 3
1
10
14
16
2
3
4
6
5
7
8
9
11
12
13
15
WWW.ONEFORALL.COM 3
Page 4

Installing the Batteries
Your ONE FOR ALL 2 Remote needs 2 new "AA/LR6" Alkaline batteries.
1 Remove the battery cover from the back of your ONE FOR ALL 2 by
pressing down on the arrow on the battery cover and sliding it backwards.
2 Match the batteries to the + and – marks inside the battery case,
then insert the batteries.
3 Slide the battery cover back into place until it clicks. Make sure the
battery cover is secure.
Important notes:
- In order to avoid having to re-program your ONE FOR ALL 2 after
you remove the batteries, you will need to insert new batteries
within 5 minutes. Also it is recommended that you do not use
rechargeable batteries.
- On the inside of the battery compartment door you will find a
label on which to write your Set-Up Codes for future reference.
This you will do after setting up your ONE FOR ALL 2 remote for
your devices.
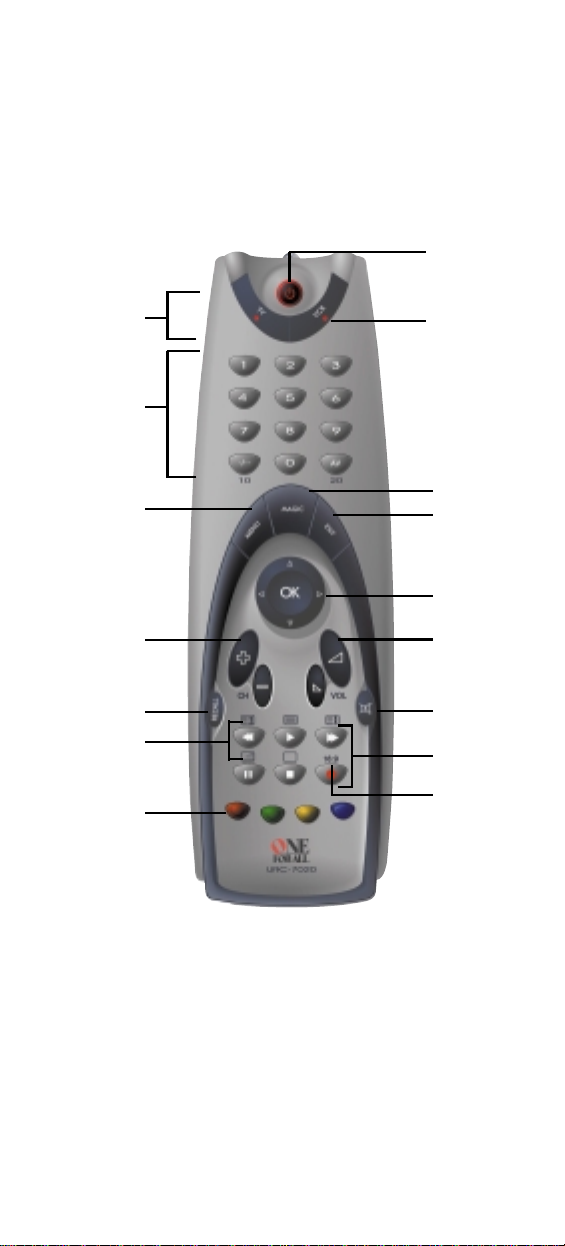
Features and Functions
Please refer to the picture of the ONE FOR ALL 2 Remote Control on
Page 3.
1 Power Key:
The Power key controls the same function as it did on your original
remote.
2 Device Keys:
The TV & VCR keys select the home entertainment device you wish
to control. For example, pressing the TV key allows the remote to
control the functions of your television, etc.
2 Mode Indicator LED’s:
3
During the use of your ONE FOR ALL 2, these LED’s will indicate the
mode you’re using.
4 Number Keys:
The Number keys (0-9, -/--(10), AV (20)) provide the functions just like
your original remote, such as the direct access to programme/channel
selection. If your original remote uses a 10 key, this function can be
found by pressing the -/-- key. If your original remote uses a 20 key,
this function can be found by pressing the AV key.
5 Menu Key:
The Menu key controls the same function as it did on your original
remote control.
6 Magic Key:
The Magic key is used to set-up your ONE FOR ALL 2 Remote Control
and to access special functions.
Exit Key:
7
The Exit key will exit the Menu.
8 Menu Navigator:
The Menu Navigator is a miniature joystick. The movement of the
navigator up, down, left and right operates the same functions as the
up, down, left and right keys of your original remote. By pressing the
Menu Navigator, it will operate the same function as the OK/Select
key on your original remote control. These keys will allow you to
navigate up, down, left and right through the menu of your device.
WWW.ONEFORALL.COM 4
Page 5

9
Channel Up / Down Control:
The Channel Up / Down keys control the same functions as your
original remote control.
Recall Key:
10
The Recall key operates the same function it did on the original
remote control. If your original remote control does not have a
Recall function you can set the Recall function up with the ONE FOR
ALL Recall (see page 12).
11 Volume Up / Down Control:
These keys operate just as those on your original remote.
Mute Key:
12
The Mute key operates the same function it did on your original
remote. It is also used to access the scan feature (see page 10).
13 VCR Playback keys:
After pressing the VCR mode key, the Playback keys operate the
same functions of your Video Recorder Keys. To prevent accidental
recording of your video, the RECORD key must be pressed twice.
14 Teletext Functions:
After pressing the TV mode key, the VCR Playback keys are used to
operate the main teletext functions. The symbols above the keys
represent the teletext functions they will access.
TEXT ON: Puts your television in the teletext mode.
TEXT OFF: Switches the television back to regular viewing mode.
On some televisions, this may be done by pressing the TEXT key
several times.
HOLD/STOP: Stops the television changing text pages.
EXPAND: Shows the top half of the teletext page in larger letters.
By pressing again, you can see the bottom half of the teletext page
enlarged. To return to the regular teletext viewing, press the Expand
key again, or press the Text key, depending on your television.
MIX: Shows the teletext and regular television simultaneously.
You may also use this key for subtitling. On some televisions this
function is accessed by pressing the Text key twice.
15 Wide Screen/Format/16:9 Function:
The 16:9 key allows you to access the wide screen view option of
your television (if the function is available on your original remote).
Fastext Keys:
16
The Red, Green, Yellow and Blue keys will allow you to access the
fastext functions of your television. Again, your television must have
fastext capability to operate these functions. If on your original
remote control these keys are used for Menu operation, the ONE
FOR ALL 2 Remote will operate the same.
Important note: For a more detailed explanation of the Teletext and Fastext
functions, please refer to the manual of your television. Remember, different
televisions control Teletext and Fastext in different ways. Not all Teletext
functions may be available for your particular model.
WWW.ONEFORALL.COM 5
Page 6

Installation
ONE FOR A
Adyson
Agazi
AGB
Agef
0
0
0
9
0
0
8
7
, 0
0
9
3
, 0
3
6
3
, 0
4
1
0
2
1
7
, 0
2
1
6
0
2
6
4
0
5
1
6
0
0
8
7
0
2
1
6
, 0
0
0
9
, 0
0
3
7
, 0
0
0
3
7
, 0
2
7
4
, 0
2
0
8
, 0
3
7
1
M
A
G
IC
TV
VCR
TV
Before you start, please read these instructions carefully
Setting Up Your Devices
Example: To set up the ONE FOR ALL 2 for your television:
1 Make sure your device (television) you wish to ope-
2 Find the code for your device in the Code List (page
3 Press the device mode key (TV) on the ONE FOR ALL 2
4 Press and hold down MAGIC until the red light blinks
5 Enter your four-digit device code using the number
____
6 Now aim the ONE FOR ALL 2 remote at your device
7 Turn your device (television) back on and try all the remo-
8 If your device (television) does not respond to the
9 Write your devicecode in the applicable four digit
rate is switched on (not in standby).
80 - 85). The device codes are listed per device type and
brand name. Also the most popular code for each brand is
listed first.
remote for the device you wish to set up.
twice (the red light will blink once then twice).
keys. The red light will blink twice.
(television) and press POWER. If your device switched
off, the ONE FOR ALL 2 is ready to operate your device.
te’s functions to ensure they are working properly. If the
functions do not work properly, repeat steps 1-6 using
another code listed under your brand.
code entered, follow steps 1-6 with each code listed
for your brand. If none of the codes listed for your
brand operate your device (television), or if your
brand is not listed at all, try the search method
described on page 7.
boxes provided in the battery compartment and on
page 8 for future reference.
Important notes:
- Some codes are quite similar. If your device does not respond or is not
functioning properly with one of the codes, try another code listed under
your brand.
- For VCR setup: If your VCR’s original remote control does not have a
POWER key, press PLAY instead of POWER during step 6.
- Remember to press the correct device mode key before operating your
device. Only one device can be assigned to each device mode key. If your
original remote control operates more than one device, you need to set up
each device separately.
Devices can be found under the following keys:
Television
To set up for a second TV or VCR see Changing the Mode of a
Device Key, Page 9.
6 WWW.ONEFORALL.COM
6 WWW.ONEFORALL.COM
VCR
Page 7

The Search Method
9
9
1
M
A
G
IC
M
A
G
IC
TV
If your device does not respond to the ONE FOR ALL 2 after you have tried
all the codes listed for your brand, try searching for your code. The Search
Method allows you to find the code for your device by scanning through all
the codes contained in the memory of the ONE FOR ALL 2. The search
method may also work if your brand is not listed at all.
Example: To search for your television code:
1 Switch your television on (not in standby) and aim your
2 Press the TV key on the ONE FOR ALL 2.
ONE FOR ALL 2 at your device.
3 Press and hold down MAGIC until the ONE FOR ALL 2 red
light blinks twice (the red light will blink once then twice).
4 Press 9 9 1. The red light will blink twice.
5 Now slowly, alternate between POWER and CHANNEL
DOWN, over and over, until your television turns off. You
may have to press these keys many times (up to 200
times!), so please be patient. Remember to keep pointing
the ONE FOR ALL 2 at your television when you press
these keys.
6 As soon as your television turns off, press MAGIC to store
the code.
The ONE FOR ALL remote should now be ready to operate your TV. Turn
your TV back on and try all the remote’s functions to ensure they are
working properly. If some of the ONE FOR ALL 2’s commands are not
operating correctly, try the search method again. You may be using the
wrong code.
Important notes:
- To search for the code for another device follow the instructions above
only press the appropriate device key instead of TV during step 2.
- If the original remote control of your VCR does not have a POWER key,
press PLAY instead of POWER during step 5.
WWW.ONEFORALL.COM 7
Page 8

Once you have Set-Up your ONE FOR ALL 2, you can blink back your
9
1
2
3
4
9
0
M
A
G
IC
TV
Set-up Code for future reference.
Example: to blink out your television code:
1 Press the TV key once.
2 Press and hold down MAGIC until the ONE FOR ALL 2 red
light blinks twice (the red light will blink once then twice).
3 Press 9 9 0. The red light will blink twice.
4 For the first digit of your four-digit code, press 1 and
count all the red blinks. If there are no blinks, the digit is
"0".
5 For the second digit of your four-digit code, press 2 and
count all the red blinks. If there are no blinks, the digit is
"0".
6 For the third digit of your four-digit code, press 3 and
count all the red blinks. If there are no blinks, the digit is
"0".
7 For the fourth digit of your four-digit code, press 4 and
count all the red blinks. If there are no blinks, the digit is
"0". Now you have your four-digit code.
Important note: To blink back the code for your other devices, press the
appropriate device key during step 1.
Quick Code Reference
Make sure you write down the codes for your devices in the boxes
below and in the battery compartment for future easy reference.
Device Type Code
1._________________________
2._________________________
8 WWW.ONEFORALL.COM
■■ ■■ ■■ ■■
■■ ■■ ■■ ■■
Page 9

Changing the Mode of a Device Key
9
9
2
MA
G
IC
TV
VCR
With your ONE FOR ALL 2 Remote it is possible to change the mode of a
device key. This is useful if you want the ONE FOR ALL 2 to operate more
than one of the same device types such as two Televisions or two Video
Recorders for example.
Example: to program a second Television on the VCR key, you need
to change the VCR key into a TV key.
1 Press and hold down the MAGIC key until the red light
2 Press 9 9 2. The red light will blink twice.
3 Press the TV key (the device mode you want to duplicate).
blinks twice (the red light will blink once then twice).
4 Now press the VCR key (the device mode key you want
changed) and the red light will blink twice.
The VCR key of the ONE FOR ALL 2 is now ready to be set-up for your
Television. To enter the Set-up code for your second TV, proceed with the
setup procedure on page 6 remembering to use TV codes for the VCR key.
Resetting a Device Key
Example: to reset the VCR key back to its original mode.
1 Hold down the MAGIC key until the red light blinks twice (the red
light will blink once then twice).
2 Press 9 9 2. The red light will blink twice.
3 Press the VCR key (the device mode you want to reset).
4 Now press the VCR key again to confirm and the red light will blink
twice.
Now your VCR key of the ONE FOR ALL 2 is ready to be programmed for
your Video Recorder again. To enter the Set-up code for your Video
Recorder, proceed with the setup procedure on page 6.
WWW.ONEFORALL.COM 9
Page 10

Advanced Features
Colour and Brightness
Depending on the functions of your original remote control, the ONE FOR
ALL 2 may operate the colour and brightness settings of your television.
Colour (+) = Press and release MAGIC then hold Volume (+)
Colour (-) = Press and release MAGIC then hold Volume (-)
Brightness (+) = Press and release MAGIC then hold Channel (+)
Brightness (-) = Press and release MAGIC then hold Channel (-)
Important note: You have 5 seconds to press the Volume or Channel keys
for the colour or brightness adjustments after pressing MAGIC.
Volume Punch Through
You may be able to use some functions of your Television or Video
Recorder at the same time.
For example: if you are watching a programme on your Video Recorder,
you can adjust the volume (a TV function) without pressing the TV mode
key on your ONE FOR ALL 2.
Last Device Mode Key Pressed: You Can Control:
VCR TV volume up and down, mute
To punch through to TV volume while in the VCR mode:
1 Press and hold MAGIC until the red light blinks twice.
2 Press 9 9 3.
3 Then press the TV key and the red light will blink twice.
To cancel the "Volume Punch Through":
1 Press and hold MAGIC until the red light blinks twice.
2 Press 9 9 3.
3 Press the Volume (+) key and the red light will blink four times.
Auto Scan
Your ONE FOR ALL 2 comes with a special Scan function which lets you scan
through every channel available on your television.
To scan the channels on your TV:
1 Aim the ONE FOR ALL 2 at your TV. Press the TV key. Press and relea-
se MAGIC then press the MUTE key.
The ONE FOR ALL 2 will send the command to advance through all
the channels available on your television stopping at each channel
for about three seconds. Remember, you must aim the ONE FOR ALL
2 at your television the entire time you are using scan.
2 When you find a channel you would like to watch, simply press any
key to stop the scan.
Important note: Auto Scan may not work with devices that do not have
Channel +/- keys on the original remote control.
10 WWW.ONEFORALL.COM
Page 11

Device Sleeptimer
If your television has a "Sleeptimer" function built in, you can access this
function with your ONE FOR ALL remote. To do so:
1 Make sure your television is switched on (not in standby).
2 Press the device key (TV).
3 Point the ONE FOR ALL at your television and press and release
MAGIC then press POWER. You should see the Sleeptimer activate
on your TV screen.
To increase the timer, simply press POWER again (within 5 seconds)
until the timer gets to the desired time.
To deactivate the Sleeptimer, repeat steps 1-3 above. During step 3,
continue pressing POWER (within 5 seconds) until the timer indicates zero
minutes.
Important note: Depending on how you used the sleeptimer function on
your original remote, you might need to access the sleeptimer of your television in a different way (through menu for example).
ONE FOR ALL Sleeptimer
If your device does not have a sleeptimer function built-in, you can still
install the ONE FOR ALL Sleeptimer function.
Installing the ONE FOR ALL Sleeptimer:
1 Press the device key of the device you want to use the sleeptimer on
(this is only available for TV).
2 Press and hold MAGIC until the red light blinks twice.
3 Press 9 7 0. The red light will blink twice again.
Now your ONE FOR ALL 2 is setup to use the ONE FOR ALL Sleeptimer on
the device you selected in the setup above.
To activate the ONE FOR ALL Sleeptimer:
It is possible to set the ONE FOR ALL Sleeptimer for 15, 30, 45 or 60 minutes. To do this, first make sure your TV is switched on.
4 Press the device mode key (TV).
5 Press and release the MAGIC key and then press POWER. The red
light will blink once to indicate the timer is activated for 15 minutes.
6 To increase the timer, simply press the POWER key again (this must
be done within 5 seconds). The red light will blink twice indicating
the timer is set for 30 minutes (2x15).
7 You can press the POWER to a maximum of four times. This will set
the timer to 60 minutes (indicated by 4 blinks).
Once you have set the timer to the desired time, set your ONE FOR ALL
remote down, pointing it at your device. When the programmed amount
of time has elapsed, the ONE FOR ALL 2 will send the command for
POWER, thereby turning off your device.
Important notes:
- The red light on the ONE FOR ALL 2 will blink every 15 seconds indicating
that the remote is in sleeptimer mode.
- To deactivate the timer, simply press any key on the ONE FOR ALL 2
remote.
- Once the ONE FOR ALL Sleeptimer has been installed it is not necessary to
repeat steps 1-3 above every time you wish to activate the timer. Simply
repeat steps 4-7.
- To uninstall the ONE FOR ALL Sleeptimer back to device sleeptimer, repeat
steps 1-3 above and the red light will blink four times.
- Remember to place the remote so it is pointing to your device when the
timer is activated.
- The ONE FOR ALL Sleeptimer can only be set-up for one device at a time.
WWW.ONEFORALL.COM 11
Page 12

ONE FOR ALL Recall (Previous Channel)
If your television has a Recall or Previous / Last Channel function, the Recall
key allows you to access this function. If, however, your television does not
have a Recall or Previous / Last Channel function, then you can set up your
own two favourite channels with the ONE FOR ALL Recall function.
The ONE FOR ALL Recall function allows you to program up to two channels,
each consisting of a maximum of 4 key presses per channel entry. This allows you
to swap back and forth between two channels with the press of a single key.
1 Press the device key (TV).
2 Press the MAGIC and RECALL keys simultaneously, until the red
light blinks twice.
3 Enter the first channel number exactly as you would on your
original remote (e.g. <-/-->, <1>, <2> to get channel number 12).
4 Press RECALL once and release.
5 Enter the second channel number exactly as you would on your
original remote (e.g. <-/-->, <2>, <3> to get channel number 23).
6 Press the MAGIC key, and the red light blinks twice.
Now, if you press RECALL, you will obtain the second channel programmed
(being <23>) and if you press RECALL again you will obtain the first channel programmed (being <12> in our example).
Important notes:
- To enter only one channel number, skip steps 4 & 5.
- If two channel numbers have been stored previously, entering one new
channel will delete the oldest entry.
To reset the RECALL key:
1 Press the device key (TV).
2 Press MAGIC and RECALL simultaneously until the red light
blinks twice.
3 Press RECALL and release.
4 Press MAGIC and release and the red light will blink twice.
Trouble-Shooting
Problem:
Your brand is not listed in the
code section?
The ONE FOR ALL does not
operate your device(s)?
The ONE FOR ALL is not
performing commands
properly?
Problems changing channels?
Video not recording?
The ONE FOR ALL does not
respond after pressing a key?
The red light do es n ot b link
when you press a key?
Solution:
Try the search method on page 7.
A) Try all the codes listed for your
brand.
B) Try the search method on page 7.
You may be using the wrong code. Try
repeating the Direct Set-Up using
another code listed under your brand
or start the search method over again
to locate the proper code.
Enter the programme number exactly
as you would on your original remote.
As a safety feature on your ONE FOR
ALL, you must press the Record key
twice.
Make sure you are using new batteries
and are aiming the ONE FOR ALL at
your device.
Replace batteries with 2 fresh, new
“AA/LR6” alkaline batteries.
12 WWW.ONEFORALL.COM
Page 13

Customer Service
If you still have questions about the operation of your ONE FOR ALL 2
universal remote and could not find the answer(s) in the trouble shooting
section, you may want to contact the customer service department for
assistance.
You may care to visit our Internet-site:
www.oneforall.com
Our internet-site has many advantages:
- 24 hours access
- no waiting time
- page for Frequently Asked Questions
- info about the ONE FOR ALL product range
Before contacting us, by Fax, E-mail or Phone, make sure you have
the required information available by filling in the table below.
What do we need to know before you contact us:
1 That you have the URC-7020 ONE FOR ALL remote.
2 The date of purchase (.........../.........../...........).
3 A list of your equipment/models/helpcodes(*): (see example below)
Helpcode(*) Device Brand Device Remote SET-UP(***)
3910805 TV Sony KVX-2950B RMT-V131B 0505 (example)
(***) To obtain the SET-UP CODE, please follow the blink back procedure
on page 8.
Type/model numbers can often be found in your equipment owner’s
manual or on the factory plate behind the device.
4. Then Fax, E-mail or Dial us:
In the UK: In Ireland:
e-mail : ofahelp@uebv.com (**) e- mail : ofahelp@uebv.com (**)
fax : +31 53 432 9816 fax : +31 53 432 9816
tel : 0808-1000306(*) tel : 1-800 553199 (*)
In Australia: In South Africa:
e-mail : ofahelp@uebv.com (**) e- mail : support@oneforall.co.za
fax : 03 9672 2479 fax : 011 298 2302
tel : 1-300 888298 tel : 0860 100551
In New Zealand:
e-mail : ofahelp@uebv.com (**)
fax : (06) 878 2760
tel : 0508 ONE 4 ALL (663 4 255)
(*) When you call us you will be asked to enter your helpcode(s). You only
have to enter the helpcode(s) of those devices you have a problem with.
The helpcode is a 7-digit code, which defines the ONE FOR ALL-model
you have, the device type and the brand of your device. This helpcode
can be found in the first column of the setup code list.
(**) Just send a blank message, you’ll get auto-reply.
model nr. model nr. code
tel : 011 298 2300
WWW.ONEFORALL.COM 13
Page 14

3910111 Blacktron 0282
Televisions
Fernseher
Téléviseurs
Televisores
Televisões
Televisori
Televisies
3910991 A.R. Systems 0037
3911306 Accent 0037
3912089 Acec 0012
3910010 Admiral 0087 0093 0418 0264
3910012 Adyson 0217 0216
3911080 Agashi 0216 0264
3910015 AGB 0516
3910997 Agef 0087
3910017 Aiko 0216 0009 0037 0371 0433
3910018 Aim 0037
3910019 Aiwa 0701
3910020 Akai 0208 0371 0037 0433 0009
3910021 Akiba 0218 0282 0455 0037
3910022 Akito 0037
3910023 Akura 0218 0282 0009 0412 0264
3911267 Alaron 0179 0216
3910024 Alba 0218 0235 0009 0418 0370
3910029 Allorgan 0206 0294 0217
3910032 Allstar 0037
3910041 Amplivision 0217 0400 0320 0370
3910042 Amstrad 0177 0009 0516 0264 0354
3911094 Anam 0037 0009
3911268 Anam National 0037
3910044 Anglo 0009 0264
3910045 Anitech 0009 0264 0037
3910047 Ansonic 0370 0292 0102 0009 0037
3910050 Apollo 0473
3910053 Arc en Ciel 0399 0109 0196 0198
3910054 Arcam 0216 0399 0217
3911307 Ardem 0486
3910057 Aristona 0037 0556 0012
3910059 Arthur Martin 0163 0400
3910060 ASA 0105 0346 0070 0104 0087
3910062 Asberg 0037
3911095 Asora 0009
3910070 Asuka 0218 0264 0216 0282 0217
3910072 Atlantic 0037 0216 0206 0259 0320
3910074 Atori 0009
3910075 Auchan 0163 0400
3910080 Audiosonic 0037 0109 0217 0370 0337
3910081 Audioton 0217 0486 0370 0264
3910085 Autovox 0087 0206 0217 0247
3911156 AWA 0011 0036 0009 0157 0374
3911081 Ayomi 0238
3910091 Baird 0109 0193 0190 0192 0072
3910093 Bang & Olufsen 0565 0087
3910094 Barco 0380 0163
3910097 Basic Line 0218 0009 0374 0037 0163
3910098 Bastide 0217
3910099 Baur 0303 0195 0512 0037 0505
3911082 Bazin 0217
3911079 Beaumark 0178
3910103 Beko 0370 0486 0037 0714 0606
3910105 Beon 0037 0418
3910106 Best 0337 0370 0421
3910107 Bestar 0037 0370 0374
3910108 Binatone 0217
3910110 Black Star 0247
0072 0264 0217
0072 0218 0163 0516 0602
0556 0581 0480 0217 0631
0216 0264 0448 0178 0377
0606 0714 0708
0037 0668
0355 0371 0037 0216 0247
0163 0581 0487 0036 0668
0579
0218 0371 0433 0412 0037
0648
0374 0163 0411 0259 0247
0012 0428
0264 0218 0486 0428
0412 0037 0216 0606
0073 0217 0208
0282
0715
3910112 Blackway 0282
3910113 Blaupunkt 0195 0200 0327 0328 0448
3910114 Blue Sky 0218 0282 0455 0037 0487
3910115 Blue Star 0282
3910118 Bondstec 0247
3910119 Boots 0217
3910121 BPL 0282 0037
3910123 Brandt 0109 0399 0196 0198 0335
3910126 Brinkmann 0418 0037
3911030 Brionvega 0037 0087
3910128 Britannia 0216 0217
3911444 Brother 0264
3910133 Bruns 0087
3910134 BSR 0163 0294
3910138 BTC 0218
3910139 Bush 0668 0218 0235 0163 0009
3910149 Capsonic 0264
3911455 Carad 0610 0037
3910150 Carena 0455 0037
3910151 Carrefour 0036 0070
3910153 Carver 0170
3910998 Cascade 0009 0037
3910154 Casio 0037
3910155 Cathay 0037
3911231 CCE 0037 0217
3910160 Centurion 0037
3910161 Century 0087 0247 0238
3910162 CGE 0074 0084 0247 0163 0418
3910167 Cimline 0009 0235 0218
3910169 City 0009
3911073 Clarivox 0418 0070
3910172 Clatronic 0218 0264 0370 0371 0217
3910173 Clayton 0385
3911308 CMS hightec 0217
3910186 Concorde 0009
3910187 Condor 0216 0247 0282 0320 0037
3910191 Contec 0216 0009 0157 0011 0036
3910192 Continental
Edison 0109 0196 0198 0399 0487
3910194 Cosmel 0009 0337
3910196 Crosley 0087 0247 0074 0084 0163
3910197 Crown 0009 0370 0486 0421 0037
3910200 CS Electronics 0247 0216 0218
3910201 CTC 0247
3910202 Curtis Mathes 0093 0166
3910203 Cybertron 0218
3911254 Daenyk 0179
3910205 Daewoo 0009 0037 0216 0374 0218
3910206 Dainichi 0218 0216
3910207 Dansai 0037 0264 0216 0009
3911160 Dansette 0412
3911083 Dantax 0370 0486
3911102 Datsura 0208
3910209 Dawa 0037
3910210 Daytron 0009 0374 0037
3910216 de Graaf 0208 0044 0163
3910214 Decca 0072 0033 0516 0037 0217
3911459 Deitron 0037
3910999 Denko 0264
3911103 DER 0193 0190
3910220 Desmet 0320 0037
3911000 Diamant 0037
3911310 Digiline 0037
3910232 Dixi 0009 0037 0247 0217
3910235 Domland 0394
3911255 Drean 0037
3910239 DTS 0009
3910240 Dual 0217 0259 0037 0394 0399
3910243 Dumont 0087 0104 0102 0217 0070
3911162 Dux 0037 0012
3910247 Dynatron 0037
3910252 Elbe 0435 0238 0259 0292 0370
3910254 Elcit 0087 0247 0516 0102 0163
3910255 Elekta 0264 0282
3912093 ELG 0037
3910259 Elin 0216 0037 0105 0104 0448
3910260 Elite 0218 0037
3910261 Elman 0102
3910263 Elta 0009 0264 0216
0668 0714 0715
0625
0036 0282 0037 0355 0371
0374 0264 0487 0208 0581
0294 0217
0370
0247 0037 0009 0102 0320
0579
0370 0009 0102 0411 0418
0579 0418 0208 0487 0053
0714
0217 0624
0303 0163
0072
0163 0037 0218 0411 0610
0163 0009
80 WWW.ONEFORALL.COM
Page 15

3910265 Emerson 0177 0087 0178 0247 0037
3910267 Emperor 0282
3910271 Erres 0037 0012
3910272 ESC 0037
3910273 Etron 0037 0009 0163
3911632 Eurofeel 0264
3910278 Euroman 0216 0264 0037 0217 0421
3910279 Europa 0037
3910280 Europhon 0037 0516 0102 0217 0247
3910291 Expert 0206 0400 0259 0163
3911001 Exquisit 0037 0247
3911639 Family Life 0037
3910294 Fenner 0374 0009
3910296 Ferguson 0073 0192 0190 0335 0238
3910299 Fidelity 0193 0216 0371 0163 0264
3911164 Filsai 0217
3910301 Finlandia 0208 0346
3910302 Finlux 0105 0104 0037 0346 0217
3910304 Firstline 0294 0216 0037 0374 0385
3910305 Fisher 0104 0217 0036 0208 0370
3910307 Flint 0037 0455 0072 0218
3911002 FNR 0102
3910308 Forgestone 0193
3910309 Formenti 0087 0216 0320 0163
3910310 Fortress 0093 0087
3910313 Fraba 0370 0037
3911106 Friac 0009 0037 0102 0421
3910319 Frontech 0247 0264 0448 0217 0009
3910322 Fujitsu 0179 0206 0072 0102 0217
3911457 Fujitsu General 0009 0217
3910323 Funai 0264 0179 0294
3910326 Galaxi 0102 0037
3910327 Galaxis 0370 0418 0037 0102
3910331 GBC 0163 0009 0374 0218
3910333 GE 0109 0178 0282 0335
3911003 Geant Casino 0163 0400
3910335 GEC 0043 0072 0163 0516 0037
3910336 Geloso 0247 0009 0163 0374
3910337 General 0590 0109
3910338 General Technic 0009
3910339 Genexxa 0218 0037 0412
3910345 Goldhand 0216
3910346 Goldline 0337
3910347 GoldStar 0037 0370 0290 0009 0377
3910349 Goodmans 0036 0072 0037 0009 0264
3910350 Gorenje 0370 0421
3910351 GPM 0218
3911248 Gradiente 0037 0053 0170
3910352 Graetz 0037 0371
3910353 Granada 0037 0400 0226 0012 0045
3910354 Grandin 0282 0218 0400 0037 0009
3911107 Gronic 0102 0217
3910355 Grundig 0195 0487 0070 0037 0556
3910359 Halifax 0264 0216 0217
3910360 Hampton 0216 0217
3911108 Hanimex 0294
3910362 Hanseatic 0037 0292 0282 0163 0394
3910363 Hantarex 0009 0037 0102
3910364 Hantor 0037
3911280 Harley Davidson 0179
3911084 Harwood 0009 0412 0037
3911678 Hauppauge 0037
3910370 HCM 0264 0009 0282 0412 0217
3910372 Hema 0217 0009
3910374 Hifivox 0109 0196 0399
3911682 Highline 0264 0037
3911110 Hikona 0218
WWW.ONEFORALL.COM 81
0179 0371 0070 0282 0320
0370
0163
0193 0109 0625
0037
0072 0163 0516 0070 0087
0179 0102 0411 0631 0480
0714
0247 0009 0163 0102 0217
0411 0238 0072 0235 0668
0208 0624
0045 0087 0157 0163 0303
0072
0163 0009
0217
0217 0247 0216 0163 0178
0044
0516 0290 0179 0374 0487
0371 0556 0235 0480 0217
0624 0335
0072 0108 0208 0217 0036
0339 0516 0473 0335
0320 0163 0455 0579 0610
0714 0715
0320 0428 0370 0009 0294
0217 0087
0218 0418 0037
3910377 Hinari 0208 0179 0036 0037 0218
3910380 Hisawa 0282 0218 0400 0455
3911004 Hit 0087
3910381 Hitachi 0036 0044 0043 0473 0163
3911684 Hitachi Fujian 0108
3911170 Hitsu 0009 0455 0218
3911085 Hornyphone 0037 0012
3910384 Hoshai 0218 0455
3911086 Huanyu 0374 0216
3910388 Hygashi 0217 0216
3910389 Hyper 0009 0216 0217 0247
3910391 Hypson 0037 0264 0217 0282 0455
3911005 Iberia 0037
3910393 ICE 0264 0217 0037 0371 0218
3911006 Ices 0218 0216
3910395 Imperial 0037 0247 0370 0418 0163
3910397 Indiana 0037
3911343 Ingelen 0487 0610
3910398 Ingersoll 0009
3910401 Inno Hit 0009 0072 0037 0218 0290
3911312 Interactive 0411
3910404 Interbuy 0009 0264 0247
3910405 Interfunk 0037 0012 0087 0512 0327
3911113 Internal 0037
3910408 Intervision 0282 0217 0455 0037 0371
3910410 Irradio 0009 0037 0218 0247 0290
3910412 Isukai 0218 0037 0282
3910413 ITC 0217
3910414 ITS 0037 0371 0218 0282 0264
3910415 ITT 0163 0480 0473 0193 0346
3910416 ITT Nokia 0163 0473 0480 0346 0208
3910417 ITV 0264 0037 0247
3911314 Jean 0036
3910425 JVC 0653 0053 0190 0036 0192
3910427 Kaisui 0218 0282 0037 0216 0455
3910428 Kamp 0216
3910429 Kapsch 0206 0163 0259 0104
3910430 Karcher 0037 0421 0370 0282 0102
3911283 Kawasho 0216
3911177 KB Aristocrat 0163
3910432 Kendo 0235 0247 0102 0037 0428
3910433 Kennedy 0206 0163 0435
3910437 Kingsley 0216
3910438 Kneissel 0435 0259 0292 0370 0238
3910441 Kolster 0037 0102
3910442 Konka 0218 0371 0037
3911315 Kontakt 0487
3910443 Korpel 0037
3910444 Korting 0087 0421 0370 0320
3910445 Kosmos 0037
3911181 Kotron 0412 0264
3911350 Kraking 0238
3911287 KTV 0217
3911117 Kyoshu 0264 0412 0418
3910451 Kyoto 0385 0163
3912153 Lecson 0037
3911451 Lemair 0411
3910454 Lenco 0009 0374 0104 0163 0037
3910456 Lenoir 0009
3910458 Lesa 0247
3910461 Leyco 0264 0072 0037 0294 0579
3911072 LG 0037 0370 0290 0009 0377
3911008 Liesenkotter 0037 0327 0328 0012
3910463 Lifetec 0009 0264 0037 0374 0218
3911240 Lloyd's 0009
3910472 Loewe 0512 0037 0087 0292 0370
3910474 Logik 0011 0033 0193 0371
3911456 Logix 0668
3910478 Luma 0206 0037 0163 0259 0411
3911009 Lumatron 0206 0037 0163 0259 0217
3910481 Lux May 0037 0009
0009 0163 0355 0443 0487
0235 0294
0578 0196 0198 0217 0194
0516 0072 0037 0105 0178
0556
0400 0238
0216 0009
0074 0084 0196
0217 0516 0247
0163 0370 0109
0377 0448 0486 0370 0394
0487 0218 0102 0163 0264
0247
0216
0339 0208 0179
0179 0339 0606 0610 0631
0193 0371 0218 0606
0217 0009
0610 0264
0370 0411 0610 0377
0037 0411 0610
0217 0247 0216 0163 0178
0668 0512
0374 0009
0264 0073
Page 16

3910485 Luxor 0194 0290 0480 0208 0163
3911241 LXI 0178
3911316 Madison 0037
3910490 Magnadyne 0087 0247 0516 0102 0163
3910491 Magnafon 0516 0102 0216
3910492 Magnavox 0036 0179 0037
3911071 Magnum 0648
3910495 Mandor 0264
3910496 Manesth 0037 0235 0217 0264 0320
3910497 Manhattan 0037 0668
3910500 Marantz 0037
3910503 Marelli 0087
3910504 Mark 0037 0217 0216 0374 0009
3911342 Masuda 0218 0009 0371
3910508 Matsui 0235 0177 0009 0355 0011
3910513 McMichael 0043
3910517 Mediator 0037 0556 0012
3910518 Medion 0037 0668
3911121 Megas 0610
3911291 Megatron 0178
3910487 Melectronic 0346 0037 0512 0109 0247
3911010 Melvox 0400
3910520 Memorex 0009 0178 0250
3910521 Memphis 0337 0072 0009 0385
3910522 Mercury 0037 0009
3910525 Metz 0087 0195 0447 0367 0388
3910526 MGA 0178
3911317 Micromaxx 0037 0668
3910531 Minerva 0487 0195 0070
3910532 Minoka 0412 0037
3910535 Mitsubishi 0108 0512 0037 0093 0178
3910538 Mivar 0292 0290 0291 0370 0216
3911186 Monaco 0009
3910540 Morgan's 0037
3911297 Motorola 0093
3910543 MTC 0370 0512 0216
3911187 Multibroadcast 0193
3910545 Multistandard 0102
3911452 Multitec 0037 0668
3910547 Multitech 0217 0009 0216 0247 0102
3910551 Murphy 0104 0216 0072 0163
3911791 Musikland 0218
3910553 NAD 0166 0178
3911124 Naiko 0037
3911125 Nakimura 0374 0037
3912099 NAT 0226
3910562 National 0226
3910564 NEC 0170 0036 0320 0455 0009
3910565 Neckermann 0037 0370 0505 0200 0556
3910566 NEI 0037 0337 0371
3910567 Nesco 0247 0179
3911292 Netsat 0037
3910568 Network 0337
3911012 Neufunk 0037 0009 0556 0610
3910572 New Tech 0037 0009 0556 0217 0448
3910571 New World 0218
3910574 Nicamagic 0216
3910576 Nikkai 0072 0218 0037 0217 0264
3910577 Nikko 0178
3911249 Noblex 0037 0264
3910578 Nobliko 0102 0070 0216
3910579 Nogamatic 0399 0109 0196
3910580 Nokia 0163 0480 0473 0339 0208
3910582 Nordmende 0109 0399 0196 0198 0195
3911013 Novatronic 0037 0105 0374
3910588 Oceanic 0163 0400 0294 0208
3912100 Odeon 0264
3910590 Okano 0370 0037 0264 0072
3911014 Omega 0264
3910595 Onwa 0371 0602 0218 0433 0581
3910596 Opera 0037
3910598 Optimus 0250 0166
3911299 Optonica 0093
3910599 Orbit 0037
0346 0473 0179
0294
0033 0072 0036 0037 0556
0487 0217 0354 0294 0371
0433 0443 0579 0455 0516
0163 0208 0045 0195 0335
0105 0104 0374 0009 0217
0480 0216 0411
0587
0354 0087 0033 0036 0193
0609
0486 0370 0037
0374 0217 0037 0011 0704
0163 0327 0418 0087 0247
0217 0411
0337 0216 0009 0036
0374 0631 0606 0346
0037 0335
3910602 Orion 0179 0235 0294 0177 0320
3911015 Orline 0037 0218
3911192 Ormond 0385 0668
3910605 Osaki 0072 0218 0217 0264 0037
3911193 Osio 0037
3910607 Oso 0218
3910608 Osume 0157 0072 0036 0218
3910610 Otto Versand 0505 0036 0093 0512 0037
3910614 Pael 0216
3910616 Palladium 0370 0037 0505 0200 0418
3911129 Palsonic 0264 0412 0037 0217 0377
3910619 Panama 0009 0217 0264 0216 0037
3910620 Panasonic 0226 0650 0250 0367 0516
3910622 Panavision 0037 0411
3910628 Pathe Cinema 0163 0238 0216 0400 0320
3910629 Pathe Marconi 0109 0196 0198 0399
3910631 Pausa 0009
3910632 Perdio 0072 0320 0163 0037
3910633 Perfekt 0037
3911460 Pershin 0400
3910634 Philco 0087 0084 0074 0418 0247
3910635 Philharmonic 0217
3910636 Philips 0037 0556 0012 0043 0087
3910639 Phoenix 0037 0087 0320 0486 0370
3910640 Phonola 0037 0556 0012 0087 0193
3911336 Pilot 0037 0556
3910642 Pioneer 0166 0037 0428 0370 0109
3911132 Pionier 0370 0486
3910644 Plantron 0037 0264 0009
3911066 Playsonic 0217
3910646 Polytron 0697
3910647 Poppy 0009
3910648 Portland 0374
3911846 Powerpoint 0487
3910650 Prandoni-Prince 0247 0516
3910651 Precision 0217
3910655 Prima 0009 0264
3910656 Prinz 0072 0194
3910658 Profex 0009 0163
3910660 Profitronic 0037 0102
3910662 Proline 0072 0037 0012 0625
3910664 Prosonic 0037 0216 0370 0374 0579
3910665 Protech 0037 0217 0009 0247 0102
3910667 Proton 0178
3910669 Provision 0037
3910672 Pye 0037 0374 0556 0012 0087
3910673 Pymi 0009
3911067 Quadra Vision 0400
3910677 Quasar 0247 0250
3910678 Quelle 0037 0011 0109 0512 0036
3910679 Questa 0036
3910680 R-Line 0037
3910682 Radialva 0109 0218 0163 0037
3910684 Radiola 0037 0556 0012
3910685 Radiomarelli 0087 0516 0247 0037
3911088 RadioShack 0037 0178
3910686 Radiotone 0009 0037 0428 0370 0579
3910690 Rank 0070
3910691 RCA 0625 0335 0093
3910693 Realistic 0178
3911016 Recor 0037
3912101 Rectiligne 0037
3910695 Rediffusion 0036
3911017 Redstar 0037
3911018 Reflex 0037
3910698 Revox 0037 0370
3910699 Rex 0206 0411 0247 0163 0259
3910700 RFT 0087 0292 0370 0428 0072
3911338 Rhapsody 0216
3910701 Roadstar 0009 0264 0218 0418 0037
3910703 Robotron 0087
3911885 Rodex 0037
3911197 Roxy 0448
3910711 Royal Lux 0421 0370 0412
0355 0011 0037 0009 0102
0443 0556 0264 0412
0412 0374
0556 0195 0235 0109 0294
0226 0247 0303 0320 0217
0556 0247 0327 0087 0163
0217 0411
0247
0037 0163
0292
0163 0370 0037
0193 0374
0385 0216 0163 0072
0216
0371 0668
0264 0418 0337 0668
0217 0247 0074 0084 0327
0070 0104 0105 0157 0195
0200 0264 0290 0668
0418 0264 0412 0648
0264
82 WWW.ONEFORALL.COM
Page 17

3910715 Saba 0625 0087 0399 0163 0109
3910718 Sagem 0455 0610 0282
3910720 Saisho 0235 0516 0177 0009 0011
3910722 Salora 0290 0194 0163 0516 0339
3910723 Sambers 0516 0102
3910724 Samsung 0037 0556 0587 0009 0217
3910726 Sandra 0216 0217
3911139 Sanela 0238
3910727 Sansui 0037 0371
3912102 Santon 0009
3910729 Sanyo 0208 0157 0292 0036 0011
3911318 Save 0037
3910743 SBR 0037 0556 0012
3910745 Schaub Lorenz 0606
3910746 Schneider 0037 0556 0012 0303 0394
3910750 Scott 0178 0179
3911324 Sears 0178 0179
3910753 SEG 0217 0264 0009 0247 0036
3910754 SEI 0087 0102 0163 0516 0294
3910756 Seleco 0206 0259 0163 0411
3910757 Sencora 0009
3910759 Sentra 0218 0009
3911265 Serie Dorada 0178
3911019 Serino 0455 0610
3910762 Sharp 0093 0157 1193 0036 0294
3910769 Shorai 0294 0179
3911263 Siam 0037
3910772 Siarem 0163 0087 0102
3910773 Siemens 0200 0195 0327 0328 0157
3911916 Siera 0037 0556 0012
3910776 Siesta 0370
3910780 Silva 0216 0037
3910781 Silver 0036 0037 0179
3910782 Singer 0087 0102 0247 0400 0435
3910783 Sinudyne 0177 0087 0235 0102 0294
3911298 Sky 0037
3912120 Skysonic 0696
3910795 Sogera 0320
3910797 Solavox 0072 0163
3911927 Sonawa 0218
3910801 Sonitron 0208 0370 0339 0217
3911035 Sonneclair 0037
3910802 Sonoko 0037 0009 0264 0282 0217
3910803 Sonolor 0208 0163 0400 0505
3910804 Sontec 0037 0370 0294
3910805 Sony 1505 0505 1651 1010 0011
3910806 Sound & Vision 0102 0218 0374
3910807 Soundesign 0178 0179
3910809 Soundwave 0037 0320 0418
3911933 Spectra 0009
3911143 Ssangyong 0009
3910813 Standard 0218 0009 0217 0320 0037
3910817 Starlite 0009 0163 0037 0264
3910822 Stenway 0282 0218
3910823 Stern 0206 0259 0163
3911020 Strato 0037 0264 0009
3910828 Sunkai 0294 0355 0455 0218 0235
3910831 Sunstar 0371 0037 0009 0579
3910833 Sunwood 0037 0009
3910835 Superla 0516 0216
3910838 SuperTech 0009 0037 0216 0556 0218
3910839 Supra 0374 0009
3910840 Susumu 0335
3910841 Sutron 0009
3911319 Swissline 0247
3910842 Sydney 0216 0217
3911021 Sytong 0216
3910849 Tandberg 0367 0411 0109 0337 0196
3910850 Tandy 0218 0072 0217 0247 0093
3910852 Tashiko 0036 0043 0217 0170 0216
3910853 Tatung 0072 0516 0217 0037 0011
3910854 Teac 0037 0698 0512 0455 0264
3910855 TEC 0217 0009 0247 0335 0337
3911320 Tech Line 0037 0668
3912107 Techica 0218
WWW.ONEFORALL.COM 83
0516 0196 0198 0335
0033 0217 0163 0264 0354
0178 0448 0370 0264 0216
0290 0072 0208 0644
0370 0339 0072 0216 0217
0104 0045 0009 0163 0037
0259 0217 0247 0371 0218
0163 0668 0648
0102 0163 0037 0216 0668
0487
0206 0037
0653 0053 0256 0193
0037
0009 0037
0163 0516 0206 0037
0036 0102 0074
0374
0037 0487
0163
0009 0412 0178
0259
3910856 Technema 0320
3910857 Technics 0250
3911453 Tedelex 0217
3911978 Teiron 0009
3911328 Teknika 0179
3910866 Teleavia 0109 0196 0399 0490
3910870 Telecor 0037 0163 0218 0217 0259
3910872 Telefunken 0109 0399 0074 0084 0101
3911213 Telefusion 0037
3910874 Telegazi 0037 0163 0259 0218 0264
3910878 Telemeister 0320 0037
3910882 Telesonic 0037
3910883 Telestar 0037
3910884 Teletech 0009 0247 0337 0037 0668
3910885 Teleton 0217 0206 0163 0259 0036
3910887 Televideon 0320 0163 0216
3911022 Televiso 0400
3910889 Temco 0294
3911334 Tempest 0009 0037
3911991 Tennessee 0037
3910891 Tensai 0104 0218 0037 0217 0294
3911023 Tenson 0320 0009
3911461 Tevion 0037 0648 0668
3910892 Texet 0217 0374 0009
3910895 Thomson 0399 0109 0335 0196 0198
3910897 Thorn 0193 0073 0190 0238 0192
3911329 TMK 0178
3910900 Tokai 0072 0037 0448 0337 0163
3910901 Tokyo 0216 0448
3910902 Tomashi 0282 0218
3910905 Toshiba 0508 0036 0070 0102 0217
3910906 Towada 0102 0217
3912109 Toyoda 0009
3912110 Trakton 0264
3910908 Trans Continens 0217 0037
3912111 Transonic 0037 0455 0587 0512
3912008 Transtec 0216
3910913 Trident 0516 0217
3910915 Tristar 0218 0193
3910916 Triumph 0177 0516 0346 0556 0037
3910919 Uher 0037 0206 0320 0303 0374
3911148 Ultra 0192
3910920 Ultravox 0087 0102 0374 0247 0216
3911024 Unic Line 0037 0473
3911215 United 0037
3910929 Universum 0346 0105 0195 0473 0247
3910930 Univox 0337 0087 0037 0163 0238
3910937 Vestel 0037 0163 0217
3910938 Vexa 0009 0037
3910939 Victor 0053
3910942 Videologique 0216 0218 0217
3910943 VideoSystem 0037
3910944 Videotechnic 0216 0320 0217 0374
3911025 Videoton 0163
3911322 Vidikron 0102
3911330 Vidtech 0036 0178
3910947 Viper 0337
3910949 Visiola 0216
3910950 Vision 0037 0320
3910954 Vistar 0206
3910956 Vortec 0037
3910957 Voxson 0087 0037 0418
3910958 Waltham 0217 0418 0385 0037
3910959 Watson 0037 0320 0163 0218 0579
3910960 Watt Radio 0102 0163 0216
3910961 Wega 0036 0087 0037
3911026 Wegavox 0009
3910963 Weltblick 0037 0320
3911245 Wharfedale 0037
3910967 White
Westinghouse 0320 0216 0037 0337
3911264 Winco 0412
3911027 Windstar 0282
3910976 Xrypton 0037
3910979 Yamishi 0282 0455 0218 0037 0217
3910980 Yokan 0037
3910981 Yoko 0217 0037 0218 0264 0009
0394
0335 0262 0073 0196 0037
0486 0625
0320 0009 0105 0374 0371
0377 0247
0037 0490 0625
0074 0084 0037 0104 0335
0512 0374
0217 0374 0009
0418 0486 0370 0259
0163 0037
0480 0370 0200 0418 0011
0512 0294 0036 0157 0070
0163 0264 0104 0037 0421
0411 0290 0074 0327 0328
0505 0217 0109 0337 0177
0631 0668
0394 0009 0668
0421 0370 0339 0216 0247
Page 18

3910983 Yorx 0218
3910984 Zanussi 0206 0217
3911219 Zenor 0339
Video Recorders
Videorecorder
Magnétoscopes
Vídeos
Vídeo Gravadores
Videoregistratori
Videorecorders
3921028 Adelsound 0004
3920012 Adyson 0072
3920019 Aiwa 0307 0000 0041 0348 0352
3920020 Akai 0106 0315 0041 0020 0352
3920021 Akiba 0072
3920023 Akura 0072 0041
3920024 Alba 0278 0072 0352 0020 0000
3920029 Allorgan 0240
3920032 Allstar 0081
3920037 Ambassador 0020
3920042 Amstrad 0000 0325 0278 0072
3920045 Anitech 0072
3920047 Ansonic 0004
3920057 Aristona 0081
3920060 ASA 0037 0081
3920070 Asuka 0072 0037 0081 0000 0038
3920080 Audiosonic 0278
3920081 Audioton 0020
3921156 AWA 0075 0037 0278 0043
3920091 Baird 0106 0278 0104 0041 0000
3920093 Bang & Olufsen 0499
3920097 Basic Line 0278 0020 0072
3920107 Bestar 0278 0020
3920109 Black Panther 0278
3920113 Blaupunkt 0226 0081 0154 0227 0162
3920114 Blue Sky 0037 0348 0072 0352
3920118 Bondstec 0020 0072
3920120 Bosch 0154
3920123 Brandt 0041 0206 0320 0321 0493
3920126 Brinkmann 0348
3920139 Bush 0072 0278 0315 0352 0000
3920150 Carena 0081
3920151 Carrefour 0045
3920154 Casio 0000
3920155 Cathay 0278
3920156 Catron 0020
3920162 CGE 0041 0000
3920167 Cimline 0072
3920172 Clatronic 0020 0072
3920180 Combitech 0352
3920187 Condor 0020 0278
3920197 Crown 0278 0072 0020
3920205 Daewoo 0278 0020 0045 0352 0637
3920207 Dansai 0072 0278
3920210 Daytron 0278
3920216 de Graaf 0042 0081 0104 0048
3920214 Decca 0000 0041 0081 0008 0067
3921459 Deitron 0278
3920999 Denko 0072
3921000 Diamant 0037
3920240 Dual 0041 0081 0278 0000
3920243 Dumont 0000 0081 0104
3920252 Elbe 0278 0038
3920253 Elcatech 0072
3920259 Elin 0240
3921031 Elsay 0072
3920263 Elta 0072 0278
3920265 Emerson 0072 0045
3920272 ESC 0278 0240 0020
3920274 Etzuko 0072
3920280 Europhon 0020
3920294 Fenner 0020
3920296 Ferguson 0041 0320 0321 0493 0000
3920299 Fidelity 0000 0072 0325 0240
0037
0240
0315 0348
0195
0348
0642
0348
0278
3920301 Finlandia 0104 0081 0042 0000 0048
3920302 Finlux 0000 0081 0104 0042
3920304 Firstline 0072 0348 0043 0037 0045
3920305 Fisher 0047 0104 0038 0020
3920319 Frontech 0020
3920322 Fujitsu 0000
3920323 Funai 0000
3920326 Galaxi 0000
3920331 GBC 0020
3920335 GEC 0081
3920337 General 0020
3920338 General Technic 0348
3920339 Genexxa 0104
3920345 Goldhand 0072
3920347 GoldStar 0037 0000
3920349 Goodmans 0000 0072 0240 0278 0062
3921248 Gradiente 0008
3920352 Graetz 0041 0104 0240
3920353 Granada 0104 0048 0081 0240 0037
3920354 Grandin 0072 0037 0020 0000 0278
3920355 Grundig 0195 0081 0347 0226 0320
3921108 Hanimex 0352
3920362 Hanseatic 0037 0278 0081
3920364 Hantor 0020
3921084 Harwood 0072
3920370 HCM 0072
3920377 Hinari 0004 0072 0352 0041 0278
3920380 Hisawa 0352
3920381 Hitachi 0042 0041 0000 0240 0081
3921085 Hornyphone 0081
3920391 Hypson 0072 0278 0352
3920394 Impego 0020
3920395 Imperial 0000 0240
3920398 Ingersoll 0004 0240
3920401 Inno Hit 0020 0240 0278 0072
3920404 Interbuy 0037 0072
3920405 Interfunk 0081 0104
3921113 Internal 0278
3921114 International 0278
3920408 Intervision 0000 0278 0037 0348
3920410 Irradio 0072 0037 0081
3920415 ITT 0106 0041 0384 0104 0240
3920416 ITT Nokia 0048
3920417 ITV 0278 0037 0020
3920425 JVC 0041 0067 0008 0206 0207
3920427 Kaisui 0072
3920430 Karcher 0278
3920432 Kendo 0106 0315 0348 0072 0037
3920434 Kenwood 0041 0038
3921032 Kimari 0047
3920438 Kneissel 0352 0348 0037
3920443 Korpel 0072
3920448 Kuba 0047
3922095 Kuwa 0226
3920451 Kyoto 0072
3920461 Leyco 0072
3921072 LG 0037 0000 0278
3920463 Lifetec 0348
3920472 Loewe 0081 0037 0004 1162 0162
3920474 Logik 0004 0240 0072 0106
3921009 Lumatron 0278
3920485 Luxor 0106 0043 0072 0062 0104
3920492 Magnavox 0081
3920496 Manesth 0072 0045 0081
3920500 Marantz 0081 0038 0062
3920504 Mark 0278 0020
3920508 Matsui 0004 0348 0037 0240 0352
3920517 Mediator 0081
3920518 Medion 0348 0352
3920487 Melectronic 0000 0037 0038
3920520 Memorex 0104 0000 0037 0048 0047
3920521 Memphis 0072
3920525 Metz 0195 0347 0081 1162 0162
3921323 Micormay 0348
3920529 Migros 0000
3920531 Minerva 0195
3920535 Mitsubishi 0043 0067 0075 0081 0608
3920547 Multitech 0000 0072 0020 0104
3920551 Murphy 0000
3920553 NAD 0104
3920562 National 0226 0162
3920564 NEC 0041 0038 0067 0104 0037
3920565 Neckermann 0041 0081
3920567 Nesco 0072 0000 0352
3920576 Nikkai 0020 0072 0278
3920580 Nokia 0104 0106 0315 0041 0278
0042 0278
0037 0020 0081 0348 0637
0226 0042 0000
0348
0004 0104
0384
0047 0048
0000
0226 0227 0459
0240 0048 0042 0081
84 WWW.ONEFORALL.COM
Page 19

3920582 Nordmende 0041 0384 0320 0321 0207
3920588 Oceanic 0000 0048 0106 0081 0104
3920590 Okano 0315 0348 0072 0278
3920602 Orion 0004 0352 0348
3920604 Orson 0000
3920605 Osaki 0000 0037 0072
3920610 Otto Versand 0081
3920616 Palladium 0072 0315 0037 0041 0004
3921129 Palsonic 0072 0000
3920620 Panasonic 1162 0162 0226 0227 0459
3920628 Pathe Cinema 0004 0043
3920629 Pathe Marconi 0041
3920632 Perdio 0000
3920634 Philco 0038 0072
3920636 Philips 0081
3920640 Phonola 0081
3920642 Pioneer 0067 0081 0042
3920648 Portland 0020 0278
3920656 Prinz 0000
3920660 Profitronic 0081 0240
3920662 Proline 0000 0320 0321
3921194 Prosco 0278
3920664 Prosonic 0278 0000
3920665 Protech 0081
3920669 Provision 0278
3920672 Pye 0081
3920678 Quelle 0081
3920682 Radialva 0037 0072 0081 0048
3920684 Radiola 0081
3920690 Rank 0041
3920699 Rex 0041 0384
3920700 RFT 0020 0072
3920701 Roadstar 0240 0072 0037 0278
3920710 Royal 0072
3920715 Saba 0041 0206 0207 0320 0321
3920720 Saisho 0004 0348
3920722 Salora 0043 0106 0104
3920724 Samsung 0240 0432
3920725 Samurai 0020
3920727 Sansui 0041 0067 0106 0072 0348
3920728 Sanwa 0004
3920729 Sanyo 0104 0047 0048 0067
3920742 Saville 0352 0278 0240
3920743 SBR 0081
3921200 Scan Sonic 0240
3920745 Schaub Lorenz 0041 0104 0000 0106 0315
3920746 Schneider 0072 0000 0037 0081 0278
3922103 Seaway 0278
3920753 SEG 0072 0240 0278 0075
3920755 Sei-Sinudyne 0004 0081
3920756 Seleco 0041 0008 0384 0020 0037
3921250 Semivox 0045
3920759 Sentra 0072 0020
3921910 Setron 0072
3920762 Sharp 0048 0062 0037
3920766 Shintom 0072 0104
3920768 Shivaki 0037
3920769 Shorai 0004
3920773 Siemens 0195 0037 0104 0081
3921916 Siera 0081
3920780 Silva 0037
3920781 Silver 0278
3920783 Sinudyne 0004 0081
3920797 Solavox 0020
3920801 Sonitron 0047
3921035 Sonneclair 0072
3920802 Sonoko 0278
3920803 Sonolor 0048
3920804 Sontec 0037
3920805 Sony 0033 0032 0106 1032
3920809 Soundwave 0037
3921143 Ssangyong 0072
3920813 Standard 0278
3920817 Starlite 0037 0104
3920823 Stern 0278
3920828 Sunkai 0348 0278
3920831 Sunstar 0000
3920832 Suntronic 0000
3920833 Sunwood 0072
3920839 Supra 0037 0240
3920843 Symphonic 0000 0072
3920847 Taisho 0004
3920849 Tandberg 0278
3920852 Tashiko 0000 0048 0240 0081 0037
3920853 Tatung 0000 0041 0081 0048 0043
3920854 Teac 0041 0000 0278 0037 0081
3920855 TEC 0020 0278 0072
3920859 TechniSat 0348
3920866 Teleavia 0041
WWW.ONEFORALL.COM 85
0528 0067 0493
0041
0240
0384 0062 0580 0278
0240
0348 0352
0307
3920872 Telefunken 0041 0320 0321 0384 0493
3920884 Teletech 0072 0278 0000
3921334 Tempest 0020
3920890 Tenosal 0072
3920891 Tensai 0000 0037 0072 0004
3921461 Tevion 0348
3920895 Thomson 0041 0384 0320 0206 0321
3920897 Thorn 0041 0104 0037
3920900 Tokai 0072 0037 0041 0104
3922002 Tokiwa 0072
3920904 Topline 0348
3920905 Toshiba 0045 0041 0384 0043 0081
3920906 Towada 0072
3922110 Trakton 0020
3920918 TVA 0020
3920919 Uher 0037 0240
3920920 Ultravox 0278
3920924 Unitech 0240
3920926 United Quick
Star 0278
3920929 Universum 0000 0325 0081 0240 0037
3920939 Victor 0008 0067
3920959 Watson 0081 0352
3920963 Weltblick 0037
3920979 Yamishi 0072 0278
3920980 Yokan 0072
3920981 Yoko 0037 0072 0020 0240
0278
0493 0528
0106 0348 0195
Page 20

Guarantee UK UNIVERSAL ELECTRONICS INC./ONE FOR ALL warrants to the original purchaser that this
product will be free from defects in materials and workmanship under normal and correct use for a period of one (1)
year from the date of original purchase. This product will be replaced free of charge if it has been proven to be
defective within the one (1) year warranty period. This warranty does not cover cartons, carrying cases, batteries,
broken or marred cabinets or any other item used in connection with the product. Any further obligation than listed
above is excluded. To obtain warranty service during the warranty period, please call us at the number mentioned
on the Customer Service page.Please notice that we need your purchase receipt so that we may establish your
eligibility for service.
GARANTIE D UNIVERSAL ELECTRONICS INC./ONE FOR ALL garantiert dem Kunden, dass dieses Produkt
bei sachgemässem und ordentlichem Gebrauch für die dauer eines Jahres volkommen frei von Defekten materieller
oder technischer Art bleiben wird, gerechnet ab Kaufdatum. Falls erwiesen werden kann, dass innerhalb der
Garantiezeit eines Jahres ein Defekt entstanden ist, wird dieses Produkt gebührenfrei ersetzt, falls besagtes Produkt
innerhalb der Garantiezeit auf Kosten des Kunden zurückgeschickt wird. Diese Garantie erstreckt sich nicht auf
Verpackungen, Transportbehältnisse, Batterien, zerbrochene oder beschädigte Gehäuse oder ander Objekte, die in
Verbindung mit dem Produkt verwendet werden. Jegliche weitere Verpflichtung als die oben aufgeführte wird
ausgeschlossen. Um unseren Garantiesevice innerhalb der Garantiezeit in Anspruch nehmen zu können, wählen Sie
bitte die Nummer die Sie auf der Kundendienstseite finden um weitere Instruktionen zu erhalten. Bitte beachten Sie,
dass wir Ihren Kaufbeleg brauchen um fest zu stellen ob Sie Anspruch auf unseren Garantieservice erheben können.
GARANTIE F UNIVERSAL ELECTRONICS INC./ONE FOR ALL garantit à l’acheteur d’origine que ce produit
est certifié franc de défauts matériels et de main d’œuvre durant une période d’un (1) an à partir de la date d’achat
original à la condition exclusive que ce produit ait été utilisé de manière normale et correcte. Ce produit sera remplacé
gratuitement s’il s’est révélé défectueux pendant ladite période d’un (1) an, produit devant être retourné à la charge du
client durant la période de garantie. Cette garantie ne saurait couvrir d’aucune manière que ce soit emballages en
carton, coffrets portables quelconques, piles, corps d`appareil cassé ou endommagé ou tout autre article utilisé en
combinaison avec ce produit. Nous nous réservons le droit de rejeter tout autre engagement que ceux cités plus
haut. Pour pouvoir obtenir le service de garantie durant la période de garantie, veuillez nous contacter au numéro
mentionné sur la page ”Service Consommateurs” pour les instructions nécessaires. Veuillez noter que la preuve
d’achat est obligatoire afin de pouvoir déterminer votre droit à ce service.
GARANTIA E UNIVERSAL ELECTRONICS/ONE FOR ALL garantiza al comprador que este producto estará
libre de defectos materiales o de fabricación, al menos durante 1 año desde la fecha actual de su adquisición ,y en caso
de que se utilice de un modo normal y correcto. Este producto será sustituido de forma gratuita siempre y cuando se
pueda demostrar que es defectuoso y que esto haya sucedido dentro del año de garantía, corriendo a cuenta del
comprador los gastos de su devolución. Esta garantia no cubre embalajes, maletines, envoltorios, pilas, armarios u
otros objetos utilizados en conexión con este producto. Se excluyen otras obligaciones, cualesquiera que sean,
además de las mencionadas más arriba. Para obtener servicio de garantía dentro del período correspondiente a ésta,
por favor, llámenos al número de teléfono que se menciona en la página de Servicio de Atención al Cliente. Por favor,
asegúrese de tener su recibo o ticket de compra para que podamos establecer su legitimidad a este servicio.
GARANTIA P A UNIVERSAL ELECTRONICS INC>/ONE FOR ALL garante ao cliente a protecção deste produto no que
respeita a defeitos de fabrico de material, dentro de um período de uso correcto e normal de 1 ano a partir da data da compra do
mesmo produto. Este produto será substituido sem qualquer encargo no caso de ter sido comprovada qualquer avaria dentro do
período de 1 ano e após o seu retorno ( custos de envio da responsabilidade do consumidor ) dentro deste mesmo prazo.
Esta garantia não cobre embalagens de cartão , caixas , pilhas, ou outros items usados em conjunto com este produto. Qualquer
outra obrigação para além daquela acima descrita não será tida em consideração. Para obter o serviço de garantia durante o
período a este destinado,
Apoio ao Cliente
sua legitimidade para este serviço.
GARANZIA I La compagnia Universal Electronics inc./ ONE FOR ALL garantisce L’ acquisto originale che
questo prodotto sarà esente da difetti di mano d’ opera dietro l’ utilizzo proprio di 1 anno. Questo prodotto sarà
sostituito gratuitamente se verrà provato che e’ difettoso entro l’ anno di garanzia e ovviamente accompagnato dalla
prova dello scontrino che assicura la data d’ acquisto. La garanzia non copre la scatola, L’ imballaggio, le pile o ogni altro
articolo che abbia a che vedere con il prodotto. Non ci sono ulteriori obblighi di qui sopra elencati.Per accedere al
nostro servizio al cliente durante l’ anno di garanzia potete chiamare al seguente numero telefonico che trovate sulla
pagina ”Servizio Clienti”. Vi chiediamo cortesemente di conservare lo scontrino affinche’ noi possiamo stabilire la
vostra credibilità, per richiedere un nostro servizio.
GARANTIE NL UNIVERSAL ELECTRONICS INC./ONE FOR ALL garandeert de klant, dat dit produkt bij
normaal en correct gebruik vrij van materiële of technische defecten zal blijven voor een periode van één jaar,
gerekend vanaf de datum van aankoop. Als aangetoond kan worden dat binnen de periode van één jaar een defect is
ontstaan, zal dit produkt gratis vervangen worden als het genoemde produkt op kosten van de klant binnen de
garantieperiode teruggestuurd wordt. Deze garantie is niet van toepassing voor verpakkingen, dozen voor transport,
batterijen, gebroken of beschadigde behuizing of enig ander object, dat in verbinding met dit produkt gebruikt wordt.
Elke andere verplichting dan het bovengenoemde wordt uitgesloten. Om gebruik te maken van onze garantieservice
tijdens de garantieperiode, belt u het nummer dat u vindt op de Klantenservice pagina. Wij maken u erop attent dat
wij uw bewijs van aankoop nodig hebben om vast te stellen of u voor deze garantieservice in aanmerking komt.
para mais informações contacte-nos no número mencionado na página do Serviço de
. Por favor tome nota que ser-lhe á pedido o comprovativo de compra, de forma a que possamos confirmar a
URC-7020
701926
Printed on Recycled Paper
DD-1001
 Loading...