

Page 1
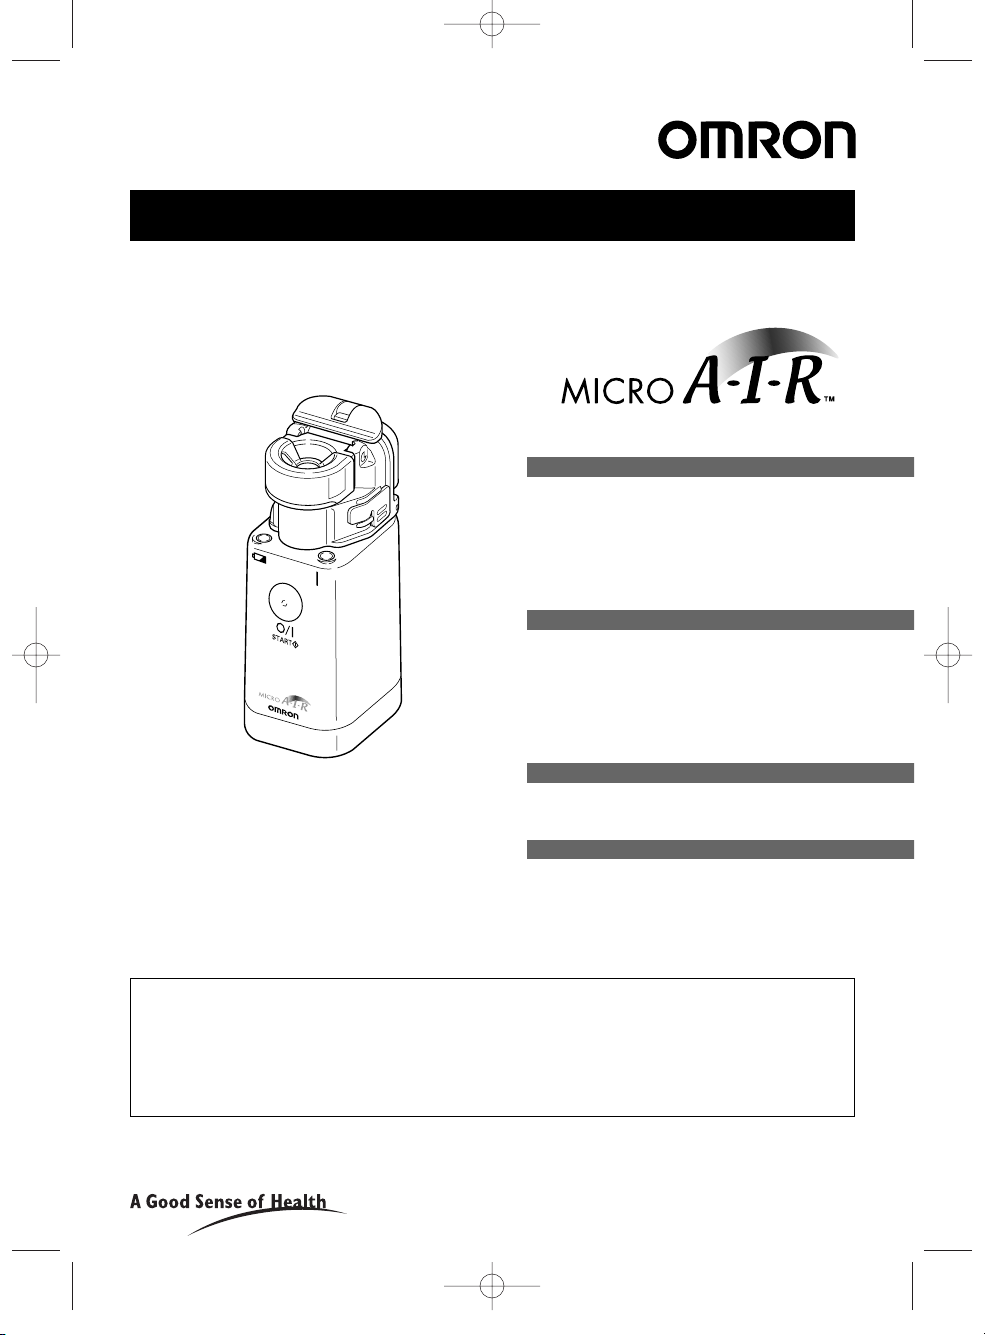
INSTRUCTION MANUAL
Thank you very much for purchasing
OMRON Mesh Nebulizer.
Be sure to read this Instruction Manual
before using the unit for you to use it
safely and correctly.
Keep this Instruction Manual always at
hand for your future reference.
MESH NEBULIZER
Model NE-U22
Before Using the Unit
Notes on Safety . . . . . . . . . . . . . . . . . . . . . 2
Product Features . . . . . . . . . . . . . . . . . . . . 5
Product Contents. . . . . . . . . . . . . . . . . . . . 5
Names and Functions of the Parts . . . . . . 6
How to Assemble the Main Unit. . . . . . . . . 8
Correct Use of the Unit
How to Prepare the Power Source . . . . . 10
How to Fill the Medication . . . . . . . . . . . . 12
How to Select the Nebulization Mode . . . 14
How to Inhale. . . . . . . . . . . . . . . . . . . . . . 15
How to Clean the Unit after Inhalation. . . 16
How to Disinfect the Unit
How to Disinfect. . . . . . . . . . . . . . . . . . . . 18
How to Replace the Mesh Cap . . . . . . . . 19
Troubleshooting
How to Carry the Unit . . . . . . . . . . . . . . . 20
Troubleshooting. . . . . . . . . . . . . . . . . . . . 21
Specifications / Option parts . . . . . . . . . . 22
This unit is a medical instrument. Be sure to follow the instructions of a doctor and use the unit correctly.
For the type, dose, and regimen of medication, be sure to follow the instructions of a doctor.
This unit is not appropriate to use as a household inhalator for humidifying the mucous membranes of throat and nose.
The nebulization characteristics of this unit differ by the properties of medication. Especially with the use of a medication
having high surface activity or viscosity such as medication solubilizing agent or expectorant, the nebulization rate may be
reduced. The nebulization rate may also be reduced when the temperature of medication is low.
This unit cannot nebulize distilled water.
The electromagnetic compatibility of this unit conforms to the Medical
Electric Instrument EMC Standard IEC60601-1-2 (1993 version).
The illustrations in this Instruction Manual are image drawings.
EN-p2-20-(NE-U22)-3 3/25/02 4:48 PM Page 1
Page 2
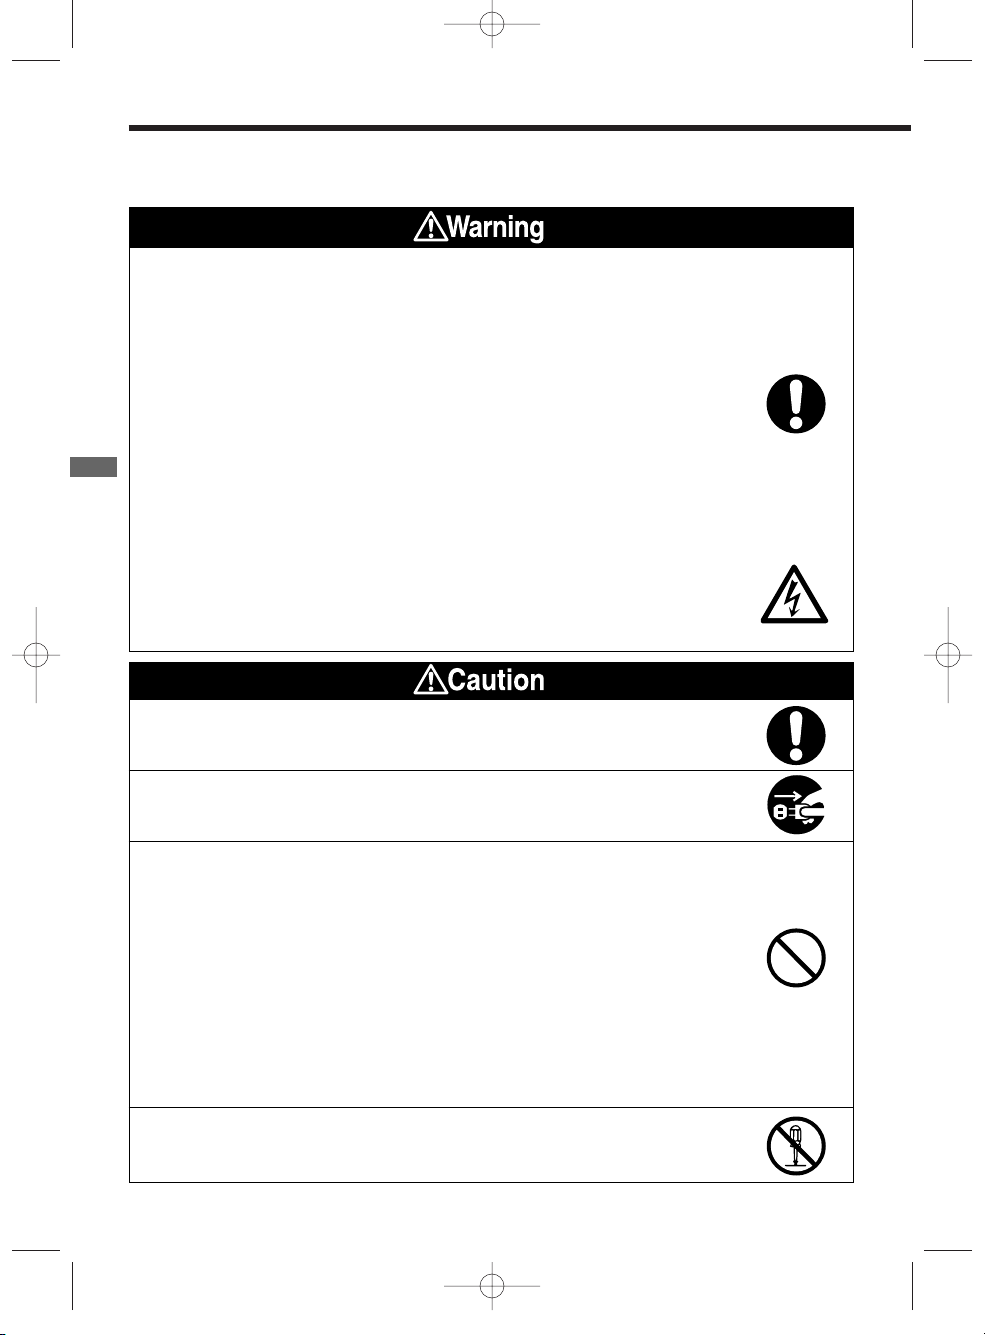
Notes on Safety
Be sure to read the notes on safety before using the unit.
2
Before Using the UnitNotes on Safety
• The warning signs and the sample icons shown here are listed for you to use this product safely and
correctly as well as to prevent the risk and the damage to you and others from happening.
• The icons and meanings are as follows.
For the type, dose, and regimen of the medication, be sure to follow the instructions of a doctor.
• Your symptom(s) may worsen.
When you use the unit for the first time after purchasing it or after not using it for a long period of
time, be sure to clean and disinfect Medication Bottle, Mesh Cap, Inhalation Mask, Mouthpiece,
and Mask Adapter. (Refer to Pages 14 to 16.)
• Miscellaneous bacteria may propagate and you may get infected.
Clean and disinfect Medication Bottle, Mesh Cap, Inhalation Mask, Mouthpiece, and Mask
Adapter after each use. (Refer to Pages 14 to 16.)
Be sure to dry the cleaned and disinfected parts promptly, and store them in a clean place.
• Miscellaneous bacteria may propagate and you may get infected.
When the unit is used by more than one person, be sure to use the disinfected Medication Bottle,
Mesh Cap, Inhalation Mask, Mouthpiece, and Mask Adapter for each user.
• The user may be infected.
Keep the unit out of reach of children or infants.
• They may swallow small pieces such as Mesh Cap. The Main Unit may be damaged or may
cause injury to children or infants. In case a child swallows a Mesh Cap, immediately consult
with a doctor.
Do not plug in or pull out the AC Adapter from the electric outlet with wet hands.
• You may suffer electric shock or get burned.
Do not wash the Main Unit and AC Adapter with water or hot water.
Do not immerse them in water.
• The unit may experience electricity leakage or you may suffer electric shock.
• The unit will cause trouble and may not be able to be used.
Rinse off the disinfectant from the disinfected parts with water thoroughly.
• If you inhale from the nebulizer with residual disinfectant, your symptom(s) may worsen.
If you are not going to use the unit for a long period of time, be sure to unplug the power plug from
the electric outlet.
• You may suffer electric shock or the unit may experience electricity leakage or catch fire.
Do not disassemble, repair, or modify the unit.
• You may suffer electric shock or injure yourself. The unit may experience electricity leakage or
catch fire.
Do not use disinfection solution containing sodium hypochlorite.
• The Mesh may not be able to be used after getting covered with rust.
Do not inhale by using water in the medication bottle.
• Your symptom(s) may worsen.
Do not drop medication on the Main Unit or AC Adapter. If you drop medication, immediately
wipe it off with gauze.
• If you use the unit while it is wet, it may cause trouble or you may suffer electric shock.
Do not poke Mesh or Vibrator with a cotton swab or a pin.
• The unit may be broken and cannot be used.
Do not drop or apply strong shock to the Main Unit, AC adapter, Medication Bottle, or Mesh Cap.
• They may be broken and cannot be used or you may suffer electric shock.
Do not use the AC adapter other than the one supplied by Omron. Do not use a broken
AC adapter. (AC adapter is an optional part.)
• It may catch fire, you may suffer electric shock or the main unit may cause trouble.
EN-p2-20-(NE-U22)-3 3/25/02 4:48 PM Page 2
Page 3

Product Features
3
Before Using the Unit
Features of the Product / Construction of the Product
1
Newly developed alloy mesh and titanium vibrator
Superior mesh technology that improves nebulization
efficiency.
2
Pocket-sized unit.
As the unit is small enough to be placed in the pocket, you can easily carry it
around wherever you go.
3
Inhalation possible at various tilt angles.
The new bottle structure enables inhalation at various tilt angles.
Nebulization remains stable even when the unit is tilted.
To start inhalation, you must assemble the unit.
Please read the section on “How to Assemble the Main Unit” and
understand the points for assembling before starting to use the unit.
(Refer to Pages 6 and 7.)
1. Main Unit
Cover
The following items are contained in the box. If any item is missing, please contact the
store where you purchased the product or the nearest OMRON dealer.
2. Main Unit 3. Medication
Bottle
4. Mesh Cap
(with Mesh)
5. Mask
Adapter
6. Mouthpiece
10. Instruction Manual
7. Inhalation Mask (S)
(with rubber string)
8.Inhalation Mask (L)
(with rubber string)
9. Storage bag
Product Contents Please check the product.
EN-p2-20-(NE-U22)-3 3/25/02 4:48 PM Page 3
Page 4
Names and Functions of the Parts
4
Before Using the UnitNames and Functions of the Parts
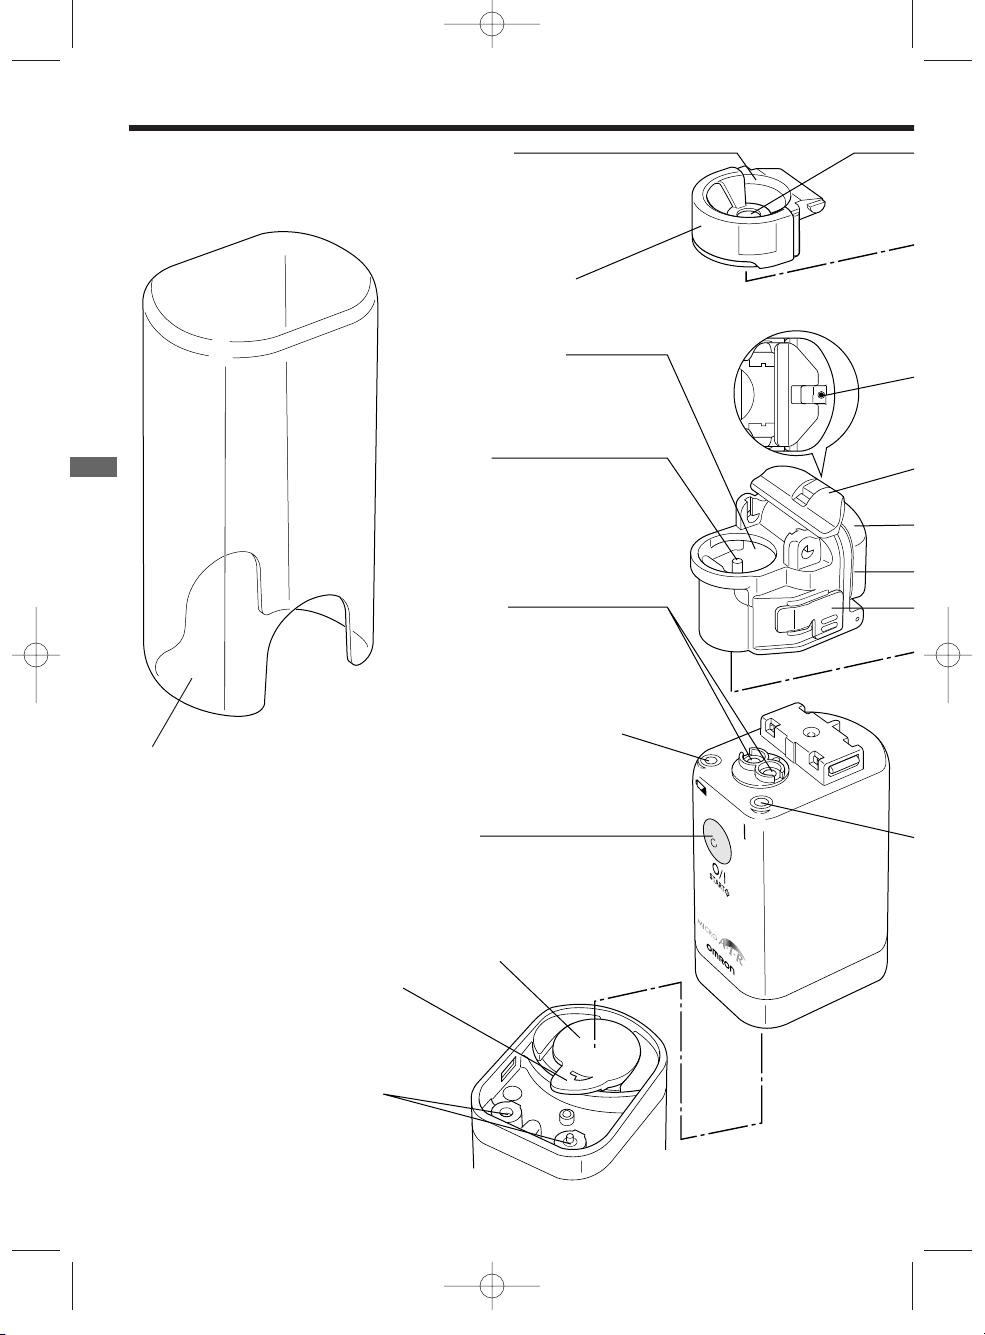
Main Unit Cover
Used for storing or
carrying the unit.
Mesh Cap
An alloy mesh is installed for
nebulization.
- Mesh Cap is consumable.
Mesh Cap Cover
Protects the Mesh.
Medication Port
Fill the medication by
opening the Mesh Cap.
Vibrator
The tip of this Vibrator
vibrates at high frequency
and pushes out medication
from the pores of Mesh.
Electrode
A contact point connecting
the Main Unit and the
Medication Bottle.
Battery Low Indicator
An orange light flashes
when the batteries are worn.
Button
Turns on and off the power
with a push of the Button.
Battery Cover
Disengaging Lever
Opens and closes
the Battery Cover.
AC Adapter Jack
to Electrode
Connects the Main
Unit and AC Adapter.
Battery Cover
A figure viewed
from the above
A figure viewed
from the rear
EN-p2-20-(NE-U22)-3 3/25/02 4:48 PM Page 4
Page 5
5
Before Using the Unit
Names and Functions of the Parts
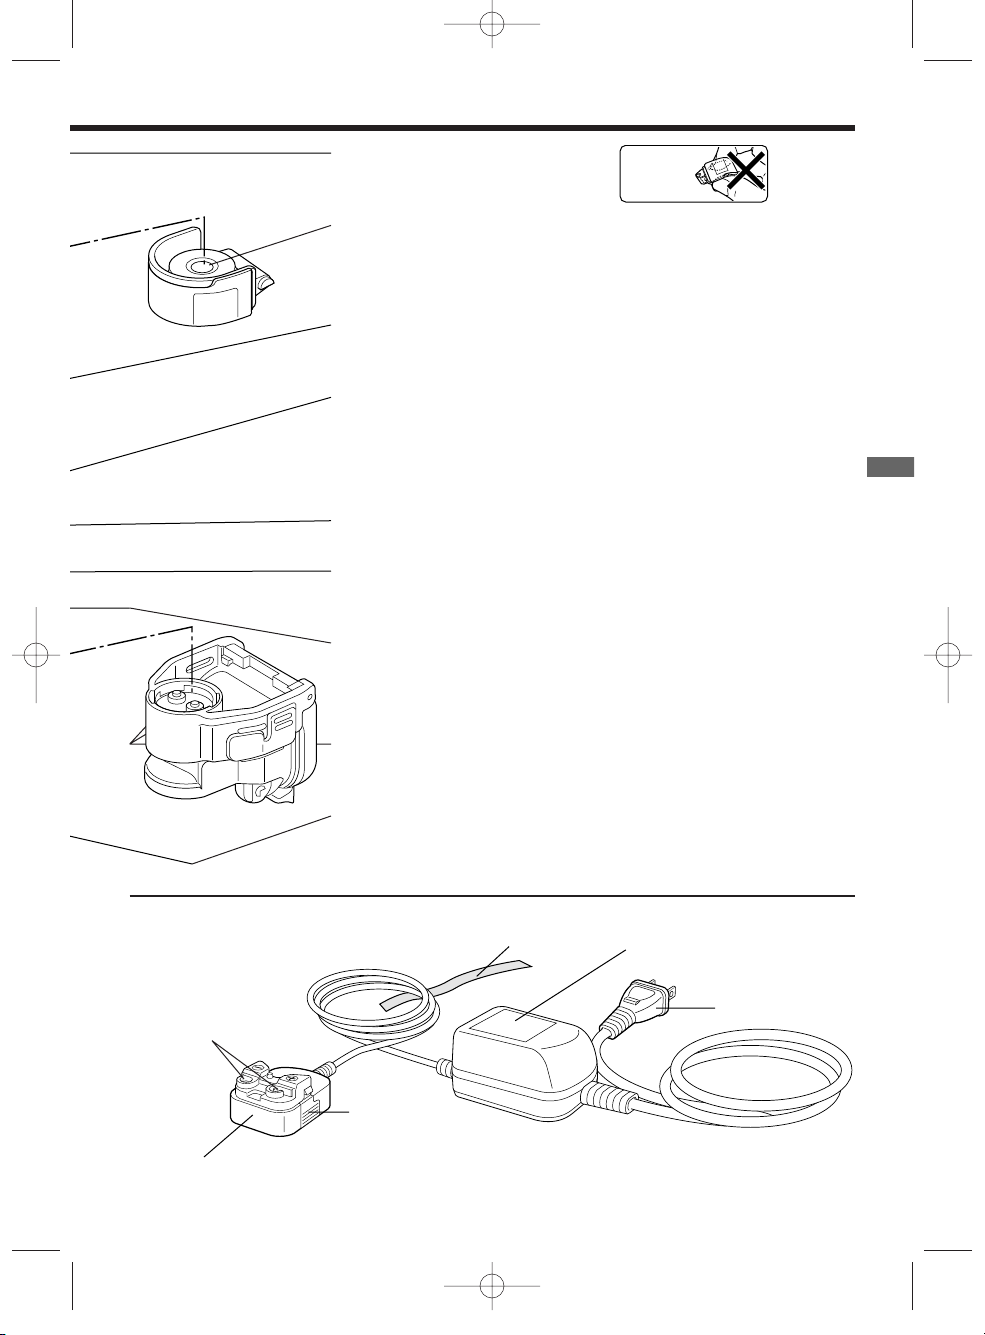
Power Plug*
AC Adapter as Optional Supply
Main Unit
Locking Board
AC Adapter
Cord Band
AC Adapter Connection Stand
Do not insert your
finger into the
Nebulization Port.
Nebulization Port
Nebulize medication here.
Mesh
Efficient nebulization is realized from the minute pores.
- Mesh is an extremely minute part. Handle it carefully.
Air Port
Stabilizes nebulization.
Medication Bottle Cap Locking Lever
Opens the Medication Bottle Cap.
- Do not open Medication Bottle Cap except
when washing Medication Bottle.
Medication Bottle Cap
Medication Bottle
Stores the medication.
Medication Bottle Disengaging Button
Medication Bottle can be removed when the Buttons
on both sides of the Medication Bottle are pressed.
Electrode
Connects the Main Unit and the Power Source.
Electrode
Supplies the power
to the Main Unit.
Power Indicator
A green lamp turns on when the power is on.
A figure viewed
from the rear
A figure viewed
from the rear
* Actual power plug may not be
the same as illustration.
EN-p2-20-(NE-U22)-3 3/25/02 4:48 PM Page 5
Page 6
How to Assemble the Main Unit
6
Before Using the UnitHow to Assemble the Main Unit
First, check how to assemble the unit.
You must assemble the unit before starting to use it.
You may find the parts slightly hard to assemble because they are made to
prevent the medication from leaking.
1 Install the Mesh Cap on the Medication Bottle.
- Do not insert the Mesh Cap in the opposite direction.
2 Install the Medication Bottle to the Main Unit.
Installation is
complete.
Installation is
complete.
Do not open
the Bottle Cap.
Do not insert your
finger into the
Nebulization Port.
Insert the Mesh Cap
perpendicular to the
Medication Bottle.
Align these points.
Clicks.
Align both
Electrodes with
each other.
Be sure to clean and disinfect the unit before using. Dry the unit after cleaning
and disinfecting. (Refer to Pages 14 to 16.)
Securely close the
Mesh Cap and the
Medication Bottle.
Install the Medication
Bottle to the Main Unit.
- If carrying the unit after the Medication Bottle is installed,
hold on the Main Unit. Do not hold on the Medication Bottle.
EN-p2-20-(NE-U22)-3 3/25/02 4:48 PM Page 6
Page 7

7
Before Using the Unit
How to Assemble the Main Unit
3 Install the Mask Adapter
to the Main Unit.
Install the Mouthpiece or
the Inhalation Mask (S) or
(L) to the Mask Adapter.
If you are not going to use the unit soon after it is
assembled.
Remove the supplied Mask Adapter and Mouthpiece,
or Inhalation Mask as shown in the Figure.
Store the unit in the supplied Storage Bag or in a
clean place.
■ How to install the Inhalation Mask (S)
■ How to install the Mouthpiece
Installation is
complete.
Installation is
complete.
Installation is
complete.
Securely cover the
Main Unit with the
Mask Adapter.
Insert the
Inhalation
Mask as far
as it goes.
Insert the
Mouthpiece
as far as it
goes.
End of the
Mouthpiece
with larger
diameter is
on the top.
To remove the Medication
Bottle from the Main Unit
To removie the Mesh Cap from
the Medication Bottle
EN-p2-20-(NE-U22)-3 3/25/02 4:48 PM Page 7
Do not insert your
finger into the
Nebulization Port.
Page 8

How to Prepare the Power Source
8
Correct Use of the Unit How to Prepare the Power Source
How to use the optional AC Adapter
Please note that this AC Adapter is not a battery charger.
1 Place the Main Unit on the AC Adapter
Connection Stand as shown in the Figure.
How to remove the AC Adapter from the Main Unit
(1) Unplug the power plug from the
electric outlet.
(2) Unlock the Main Unit by pushing in
both ends of the Main Unit Locking
Board of the AC Adapter Connection
Stand with your fingers.
2 Plug in the power plug of AC Adapter to the electric outlet.
(1) Unplug
(2) Push both ends to
remove the Main Unit.
Main Unit Locking Board
Main Unit Locking Board
- Push in the AC Adapter until it clicks
and is locked to the Stand.
Connection is completed.
Connect the unit to the power source before starting to use it.
Use batteries or optional AC Adapter as the power source.
EN-p2-20-(NE-U22)-3 3/25/02 4:48 PM Page 8
Page 9

9
Correct Use of the Unit How to Prepare the Power Source
(1)
How to Insert Batteries
Batteries are not supplied. Use two commercially available AA alkaline batteries. You can also use
nickel-hydrogen batteries (rechargeable batteries). If you use a commercially available battery charger,
you can save cost by recharging the batteries repeatedly.
1 Remove the Battery Cover.
(1) Slightly rotate the Battery Cover
Disengage Lever in the direction of
the arrow, and
(2) Remove the Battery Cover.
- The Battery Cover may not be removed easily when the
batteries are not inserted.
2 Insert batteries correctly by
aligning the polarities (+ and -)
with the battery indication mark.
3 Put on the Battery Cover.
Put the Battery Cover on the Battery Case,
and push it in until it catches the claws and
clicks. Push both ends firmly.
- You may find it difficult to push in because the unit is
made to prevent water dropping inside the unit.
Bottom of the
Main Unit
Battery life and battery replacement
■ When using alkaline batteries
The unit can be used for approximately 8 days
(if it is used for 30 minutes a day).
When the Battery Low Indicator (orange)
flashes, batteries will be worn out soon.
Replace both batteries with new ones.
When the Battery Low Indicator
(orange) turns on, batteries are
worn out. As the unit will not
nebulize, immediately replace
both batteries with new ones.
- You may use manganese
batteries. However,
manganese batteries tend to
have a shorter life.
■ When using nickel-hydrogen batteries
The unit can be used for approximately 8 days
(if it is used for 30 minutes a day with the
batteries fully charged.
When the Battery Low Indicator (orange)
flashes, the rechargeable batteries have little
residual power. As the unit does not nebulize,
immediately recharge the batteries with a
commercially available charger.
- The optional AC Adapter does not function
as a battery charger. Use a commercially
available battery charger suitable for the
batteries you are using.
General advice
- Immediately replace the worn batteries with new ones.
- If you are not going to use the unit for a long period of time (3 months or more), remove the batteries or
rechargeable batteries. If you leave the unit without using while keeping the batteries or rechargeable
batteries in it, the batteries may leak and cause trouble to the unit.
- Do not use the batteries other than the ones specified for the unit. Do not use worn and new batteries
together or different types of batteries together.
- Do not insert batteries with the polarities (+ and -) in the wrong direction.
(2)
EN-p2-20-(NE-U22)-3 3/25/02 4:48 PM Page 9
Page 10

How to Fill the Medication
10
Correct Use of the Unit How to Fill the Medication
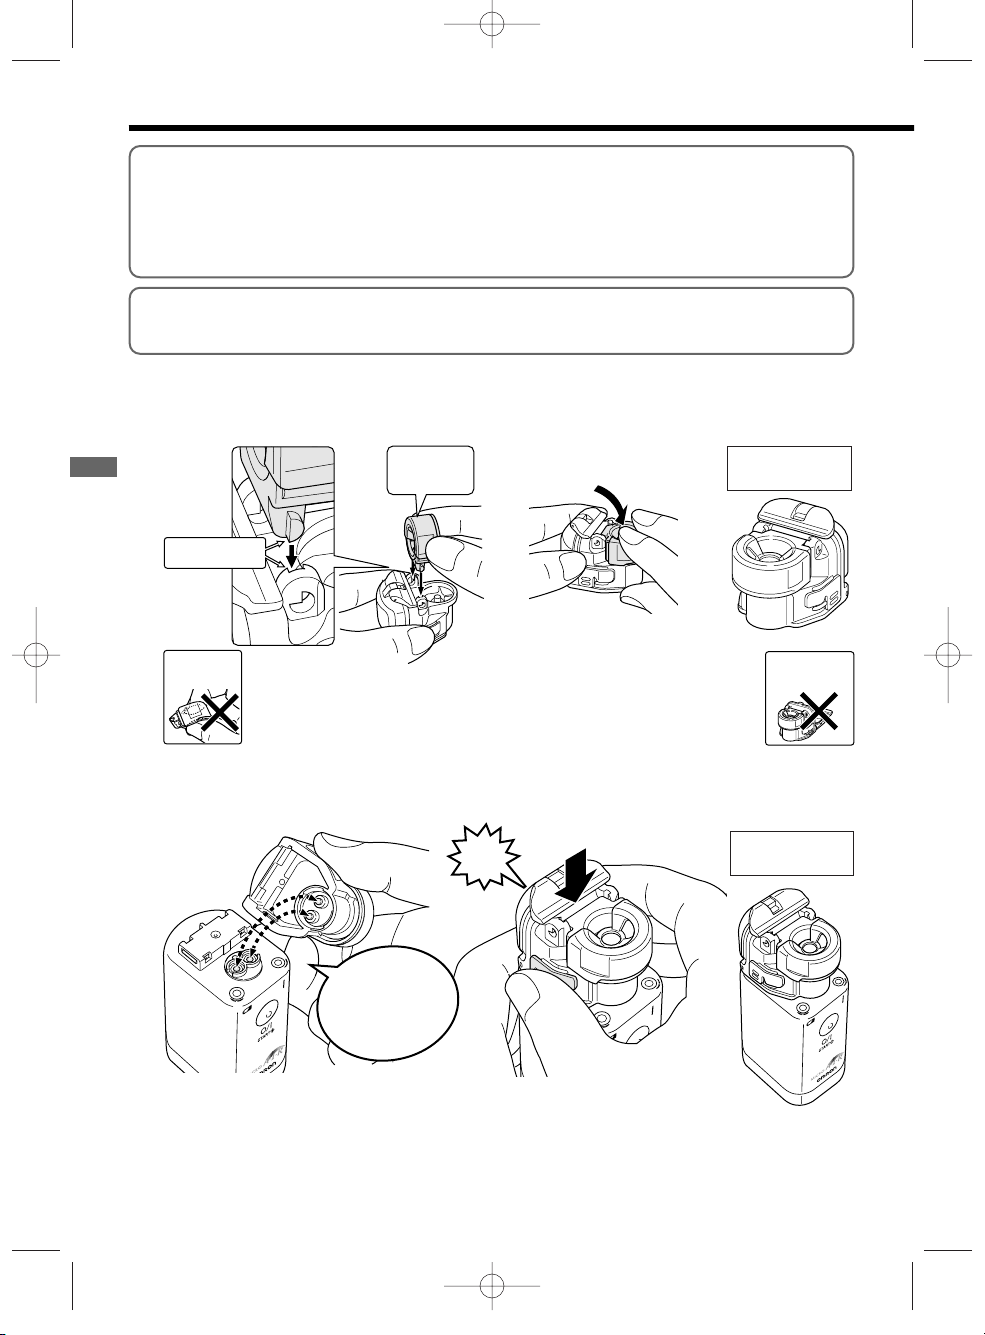
1 Remove the Medication
Bottle from the Main Unit.
Lift up the Medication Bottle by
pushing in the Medication Bottle
Disengaging Buttons on both sides
and releasing the engagement.
2 Remove the Mesh Cap.
Hold the Medication Bottle as if by
covering it with your hand.
3 Fill the medication.
Fill the medication as shown in the
Figure.
- The maximum capacity of
Medication Bottle is 7 ml.
4 Install the Mesh Cap.
- If the Mesh Cap is not securely
closed, medication may leak.
Medication Bottle
Disengaging Button
Insert the Mesh Cap
perpendicular to the
Medication Bottle.
Do not insert your
finger into the
Nebulization Port.
Remove the Mask Adapter, Mouthpiece, or Inhalation Mask (S), then fill the
medication.
Lift up the Mesh Cap by
applying your thumb on
the brim.
Lift up the
Mesh Cap
perpendicular
to the
Medication
Bottle.
Align these points,
then push in as far
as it goes.
Close the Mesh Cap
securely.
EN-p2-20-(NE-U22)-3 3/25/02 4:48 PM Page 10
Do not open
the Bottle Cap.
Do not insert your
finger into the
Nebulization Port.
Page 11

11
Correct Use of the Unit How to Fill the Medication
5 Install the Medication
Bottle to the Main Unit.
- If the Medication Bottle is not
installed correctly, the power will not
turn on.
- If the Electrodes are extremely
stained, the unit will not nebulize
normally. In that case, wipe off the
stain.
6 Install the Mask Adapter.
7 Install the Inhalation Mask
or the Mouthpiece.
Align both
Electrodes with
each other.
Keep the Electrodes clean.
■ How to install the Inhalation Mask (S)
■ How to install the Mouthpiece
Installation is
complete.
Installation is
complete.
Insert the
Inhalation
Mask as far
as it goes.
Insert the
Mouthpiece
as far as it
goes.
Installation is
complete.
Securely cover the
Main Unit with the
Mask Adapter.
EN-p2-20-(NE-U22)-3 3/25/02 4:48 PM Page 11
Page 12

How to Select the Nebulization Mode
12
Correct Use of the Unit How to Select the Nebulization Mode
Continuous Nebulization Mode
If you push the Button and immediately
lift your finger away from the Button
(within approximately 1 second), the unit
nebulizes in Continuous Nebulization
Mode.
If you push the Button again, the unit
stops nebulization.
Manual Nebulization Mode
If you keep pressing the Button
(approximately for 2 seconds or more), the
unit nebulizes in Manual Nebulization
Mode.
The unit nebulizes only while you keep on
pressing the Button and stops nebulization
when you lift your finger from the Button.
You can inhale in tandem with respiration.
- The Power Indicator (green) turns on during nebulization.
Push the Button and
immediately lift your
finger (within
approximately 1
second).
Keep on pressing
(for approximately
2 seconds or more).
You can select the nebulization mode by the way how you push the Button.
EN-p2-20-(NE-U22)-3 3/25/02 4:48 PM Page 12
Page 13

How to Inhale
13
Correct Use of the Unit How to Inhale
1 Hold the Main Unit with
your hand and start
inhalation in relaxed
posture.
Slightly slant the Main unit (the
side of Button) towards yourself.
- If medication or slobber collects on the Mesh, the unit stops nebulization. After
removing the Mask Adapter, Inhalation Mask, or Mouthpiece, turn off the power
once and absorb the medication or slobber with new gauze.
(If a medication has high surface activity, it may exude from Mesh holes or the
Bottle Cap, or the medication may leak from the Air Port.)
2 When you finish inhalation, push the Button to turn
off the power.
- When the optional AC Adapter is used, unplug the power plug from
the electric outlet. (Refer to Page 10.)
Immerse the Vibrator in the
medication. If the Vibrator is not
immersed such as when the Main
Unit is placed on a horizontal
surface, the unit may not nebulize.
Medication
Vibrator
Air Port
- If the medication has high surface activity or viscosity such as medication
solubilizing agent or expectorant, the nebulization rate may be reduced.
- If you push the Button and starts the unit while the Vibrator is not immersed in
the medication,
(1) The Battery life may be shortened or the Battery Low Indicator may turn on.
- Slant the Main Unit and check if the Vibrator is immersed in the medication,
then push the Button and start inhalation.
- Use the unit by immersing the Vibrator of the Inhalation Port in the medication.
- Immediately after the medication is nebulized, turn off the power.
(2) A metallic sound may be generated, but it is not a trouble.
Do not poke the Mesh or the Vibrator
with a cotton swab or a pin.
• The Mesh will be damaged and
cannot be used.
EN-p2-20-(NE-U22)-3 3/25/02 4:48 PM Page 13
Absorb the
medication
or slobber.
Page 14

How to Clean the Unit after Inhalation
14
Correct Use of the Unit How to Care the Unit after Inhalation
1 Remove the parts from the Main Unit.
Remove Inhalation Mask or Mouthpiece, Mask Adapter, and
Medication Bottle from the Main Unit. (Refer to Page 9.)
2 Discard the remaining medication.
After removing the Mesh Cap, open the Medication Bottle
Cap and discard the medication. (Refer to Page 9.)
3 Wash the parts sufficiently in water.
Wash Inhalation Mask or Mouthpiece, Mask Adapter,
Medication Bottle, and Mesh Cap in water.
- Carefully wash the Mesh when using a medication
having high surface activity or viscosity such as
medication solubilizing agent or expectorant because
the medication is often left on the Mesh.
- Please be careful not to spray water on the Main Unit.
Be sure to clean and store the unit after inhalation.
If you do not clean the unit after inhalation, medication will be dried and
adhered, and will not nebulize normally the next time. If this happens, clean the
Mesh Cap by boiling to wash off the adhered medication. (Refer to Page 16.)
Lift up the Mesh Cap by
applying your thumb on
the brim.
Lift up the
Mesh Cap
perpendicular
to the
Medication
Bottle.
(1)
(2)
(3)
Discard the
remaining
medication.
Disengage the
Medication Bottle Cap
Locking Lever and
open the Medication
Bottle Cap.
EN-p2-20-(NE-U22)-3 3/25/02 4:48 PM Page 14
Do not insert your
finger into the
Nebulization Port.
Page 15

15
Correct Use of the Unit How to Care the Unit after Inhalation
6 After assembling the unit, store it in
a clean place.
5 Wipe off the stain on the Main Unit.
Wipe off the stain on the Main Unit with gauze.
If the Main Unit is heavily stained, lightly moisten gauze
with water and wipe the stain off. Then use new gauze
to wipe the Main Unit dry.
4 Dry the parts thoroughly.
Immediately after washing the parts, wipe off water
with new gauze and dry them thoroughly.
General advice
Never try to wipe off water with tissues
or cloth.
• Dust or lint left on the Mesh may
affect nebulization.
General advice
Do not wipe the Main Unit with volatile
agent such as benzene or thinner.
Keep the Electrodes clean.
Immediately dry the cleaned and
disinfected parts, then store them in a
clean place.
• Miscellaneous bacteria may
propagate and may lead to
infection.
How to remove the Mesh Cover
When washing a Mesh
cap, you can remove
the Mesh Cap Cover
as shown in the Figure.
- Do not insert your
finger into the Mesh
Cap.
Do not insert your
finger into the
Nebulization Port.
- Be sure to install
the Mesh Cap
Cover to the Mesh
Cap after cleaning.
EN-p2-20-(NE-U22)-3 3/25/02 4:48 PM Page 15
Do not insert your
finger into the
Nebulization Port.
Page 16

How to Disinfect
16
How to Disinfect the Unit
How to Disinfect
1 Make a 0.1% diluted solution using benzalkonium
chloride, such as Osvan S and soak the unit for 10
minutes.
- As for the dilution method, follow the instruction manual of benzalkonium
chloride.
- Do not leave the unit soaked in the solution for a long time.
2 Remove the unit from the solution and rinse it with water.
3 Immediately dry the unit by wiping off water with new
gauze.
This unit can be easily cleaned and disinfected because the Medication Bottle
and the Mesh Cap can be removed from the Main Unit.
The unit can be disinfected with benzalkonium chloride.
- Disinfection at the medical facility for medical treatment must be done after
confirming the target bacteria and the effects of disinfection method.
Do not disinfect the unit with the
disinfection solution containing
sodium hypochlorite.
• The unit may not be able to be
used after getting covewred with
rust.
The following parts can be cleaned by boiling.
Mesh Cap, Inhalation Mask, Mouthpiece, Mask Adapter
(1) Place the parts in a container filled with sufficient water, and bring to boil.
(2) The parts can be disinfected by boiling for 10 to 30 minutes.
(3) When disinfection is finished, immediately dry the parts by
wiping thoroughly with new gauze.
- Never dry the parts in the microwave oven.
- Never wipe dry with tissues or cloth. Dust or lint left on the
Mesh may affect nebulization.
Parts that cannot be disinfected by boiling
Medication Bottle, Main Unit, Main Unit Cover,
Battery Cover, AC Adapter, Storage Bag
EN-p2-20-(NE-U22)-3 3/25/02 4:48 PM Page 16
Page 17

17
How to Disinfect the Unit How to Replace the Mesh Cap
2 Remove the Mesh Cap
from the Medication Bottle
3 Install a new Mesh Cap.
- The nebulization rate may vary
depending on the type of Mesh
Cap you use.
You can usually use a Mesh Cap for approximately 1 year (according to the test result of
OMRON). However, the unit may not nebulize even before using it a year depending on
how you use it. The unit also may not nebulize or nebulize extremely weak even after
disinfected by boiling. In those cases, replace the Mesh Cap with a new one.
(Mesh Cap is a consumable part.)
For the inquiry on where to purchase the Mesh Cap or the broken or lost accessory,
contact the store where you purchased the unit or the nearest OMRON dealer.
Medication Bottle
Disengaging Button
1 Remove the Medication
Bottle from the Main Unit.
- Lift up the Medication Bottle from
the Main Unit by pushing in the
Medication Bottle Disengaging
Buttons from both sides and
releasing the engagement.
Lift up the Mesh Cap by
applying your thumb on
the brim.
Lift up the
Mesh Cap
perpendicular
to the
Medication
Bottle.
Align these points,
then push in as far
as it goes.
Close the Mesh Cap
securely.
How to Replace the Mash Cap
EN-p2-20-(NE-U22)-3 3/25/02 4:48 PM Page 17
Insert the Mesh Cap
perpendicular to the
Medication Bottle.
Do not insert your
finger into the
Nebulization Port.
Do not insert your
finger into the
Nebulization Port.
Page 18

How to Carry the Unit
18
TroubleshootingTroubleshooting
How to Carry the Unit
You can carry the with the Mouthpiece or
the Inhalation Mask in the Storage Bag.
- When carrying the unit, cover the Main
Unit with a Main Unit Cover.
- Wash the storage bag when it becomes
dirty.
- Do not place the AC Adapter in the
storage bag to avoid the Main Unit
being scratched.
For Optional AC adapter:
Bundle the power cord of AC Adapter and
bind it with the AC Adapter using a Cord
Band as shown in the Figure.
General advice
Do not leave or carry the unit containing
residual medication or water in the
Medication Bottle.
• Medication may leak and damage the
Main Unit or stain the area around
the unit.
Do not place the unit under high
temperature, high humidity, and direct
sunshine.
Cord band
EN-p2-20-(NE-U22)-3 3/25/02 4:48 PM Page 18
Page 19

Troubleshooting
19
Troubleshooting Troubleshooting
If any trouble occurs while you are using the unit, please check the following first.
Replace the batteries with new ones.
(Refer to page 9.)
Clean the Mesh Cap by boiling to
remove the stain. (Refer to Page 16.)
- If the trouble cannot be corrected by
the above-mentioned procedure,
replace the Mesh Cap with a new
one. (Refer to Page 17.)
Insert batteries in the correct
alignment.
(Refer to Page 9.)
Replace batteries with new ones.
(Refer to Page 9.)
Remove the AC Adapter from the
Main Unit and connect it correctly.
(Refer to Page 8.)
Recharge the batteries with a
commercially available recharger or
replace them with new ones.
Install the Medication Bottle correctly.
(Refer to Page 11.)
Fill the medication.
(Refer to Page 10.)
Clean the Mesh Cap by boiling to
remove the stain. (Refer to Page 16.)
- If the trouble cannot be corrected by
the above-mentioned procedure,
replace the Mesh Cap with a new
one. (Refer to Page 17.)
Replace the Mesh Cap with a new
one. (Refer to Page 17.)
Use the unit by slightly slanting the
Main Unit (the side of the Button)
towards yourself. (Refer to Page 13.)
Remove the medication or water.
(Refer to Page 13.)
Wipe off the stain. (Refer to Page 15.)
If the unit does not nebulize normally after taking the above-mentioned procedure, contact the store
where you purchased the unit or the nearest OMRON dealer.
Trouble
The
nebulization
rate is
extremely low.
The Power
Indicator does
not turn on and
the unit does
not nebulize.
The Power
Indicator turns
on but the unit
does not
nebulize.
Possible cause How to correct
The Mesh is stained.
The polarities (+ and -) of batteries
are in the wrong direction.
The batteries are low.
The AC Adapter is not correctly
connected to the electric outlet
of the Connection Port of Main
Unit.
The capacity of rechargeable
batteries (nickel-hydrogen
batteries) is low.
The Medication Bottle is not
installed correctly to the Main Unit.
The Medication Bottle is not
filled with medication.
The Mesh is extremely stained.
The Mesh is broken.
Medication is not supplied to the
Medication Bottle. (Medication is
not in contact with the Vibrator.)
Medication or water is collected
on the Electrodes of the Main
Unit.
The Electrode of the Main Unit
is stained.
The Battery Low Indicator
flashes / turns on, and the
batteries are low/worn out.
EN-p2-20-(NE-U22)-3 3/25/02 4:48 PM Page 19
Page 20

Specifications
20
Troubleshooting
Option Parts
Parts that can be purchased separately
Troubleshooting
Specifications / Option Parts
Product name: Omron Mesh Nebulizer
Model: NE-U22
Power source: 3 VDC (two AA alkaline batteries)
2.4 VDC (two AA nickel-hydrogen batteries)
optional AC adapter
Power consumption: Approximately 1.5 W*
Ultrasonic frequency: Approximately 180 kHz
Nebulization rate: 0.25 ml / minute or more*
Particle size: MMAD approximately 5
µm (Measured by OMRON based on
CEN/TC215)
Capacity of
Medication Bottle:
Maximum of 7 ml
External dimensions: Approximately 38 (W) x 104 (H) x 51 (D) mm
Weight: Approximately 97 g (not including batteries)
Battery life: Approximately 4 hours* with continuous nebulization
Approximately 8 days when used about 30 minutes a day
(with the use of alkaline batteries)
Operating temperature
and humidity:
10 to 40°C, 30 to 85% RH
Accessories: Inhalation Mask (S), Inhalation Mask (L), Mouthpiece, Mask
Adapter, Storage Bag, Instruction Manual
* Under normal temperature of 23°C. When nebulizing physiological saline. (Varies with the type of
medication.)
- Nebulization rate is lowered at low temperature.
- The unit turns off automatically in approximately 30 minutes after the power is turned on.
- Specifications and appearance may be changed without prior notice for improvement.
U10-1-P: Inhalation
Mask (L) (with a
rubber string)
U22-3: Medication
Bottle
U22-5: AC Adapter U22-7: Storage BagU22-4: Mesh Cap
(With a mesh)
U10-2-P: Inhalation
Mask (S) (with a
rubber string)
U22-2: Mask AdapterU22-1: Mouthpiece
For the inquiry on where to purchase the option parts, contact the
store where you purchased the unit or the nearest OMRON dealer.
EN-p2-20-(NE-U22)-3 3/25/02 4:48 PM Page 20
 Loading...