

Page 1
M7 English
SYS
mmHg
DIA
mmHg
M
DA
TE/T
I
M
E
SET
PULS
E
/
m
in.
S
T
A
R
T
M7
Introduction
The OMRON M7 measures your blood pressure and pulse simply and quickly from the arm, without the use of
an inflation bulb or stethoscope. The measurement values are stored in the memory of the OMRON M7.
The OMRON M7 includes the standard cuff for arm circumferences ranging from 22 to 42 cm.
Table of contents
1. How to obtain meaningful blood pressure
readings 2
2. Overview 3
3. Preparation 4
3.1 Insert the batteries 4
3.2 Control functions 4
3.3 Set date and time 5
3.4 Connect cuff 6
3.5 Fit cuff 6
4. Operation 7
4.1 Measurement 7
4.2 Read display 9
5. Memory 10
5.1 Recall previous values 10
5.2 Erase memory 11
6. Storage 12
7. Error: causes and rectifications 13
8. Maintenance and spare parts 14
9. Technical data 14
10. General information about blood pressure 15
1
Page 2
SYS
mmHg
DIA
mmHg
M
DA
TE/T
I
M
E
SET
PUL
S
E
/
m
in.
S
T
A
R
T
M7
M7
Digital Automatic
Blood Pressure Monitor
Instruction manual page 1
Page 3

1 How to obtain meaningful blood pressure readings
M7 English
General
• This manual contains important information for safe
use of the OMRON M7. Follow this manual to
prevent wrong measurement values, injury and
damages.
• The OMRON M7 is not suitable for measuring the
frequency of cardiac pacemakers.
• Consult your doctor during pregnancy, arrhythmia
and arteriosclerosis as this can influence the
measurement.
• Avoid eating, drinking (alcohol), smoking, doing
sports and taking a bath before measurement.
• Be calm and relaxed before and during
measurement.
• You should never change the dose of medicines
prescribed by your doctor.
• Store the OMRON M7 in a dry, closed place with a
temperature between -20°C and 60°C.
• Remove the batteries if you do not intend to use
the OMRON M7 for 3 months or more.
Tips for use
• Check your blood pressure at least twice a day
(before breakfast, after work).
• Use the OMRON M7 only for yourself.
• Measure your blood pressure before taking an
antidepressant.
• Do not discard the air plug.
• When using the AC adapter, keep the batteries in
the main unit.
• Use both the AC adapter and the batteries to
extend battery life.
• Do not measure your blood pressure while you are
in a vehicle.
• Always measure on the same arm.
• Wrap the cuff around your arm before start of
measurement.
Caution
• Only the OMRON M7 cuff can be used on this
device. Other cuffs must not be attached.
• Operating temperature between 10°C and 40°C.
• Operating environment must be free from excessive
vibrations, shocks, electrical noise, corrosive gas,
etc.
• Stay out of sunlight during measuring.
• Keep portable phones 5 meters away during
measurement.
• Do not wrap the cuff around any object other than
your arm.
• Do not fold or crush the cuff and the air tube.
• Do not drop the OMRON M7.
2
Page 4
SYS
mmHg
DIA
mmHg
M
DA
TE/T
I
M
E
S
ET
PUL
S
E
/
m
in.
S
T
A
R
T
A
C
E
K
H
J
F
B
L
G
D
M7
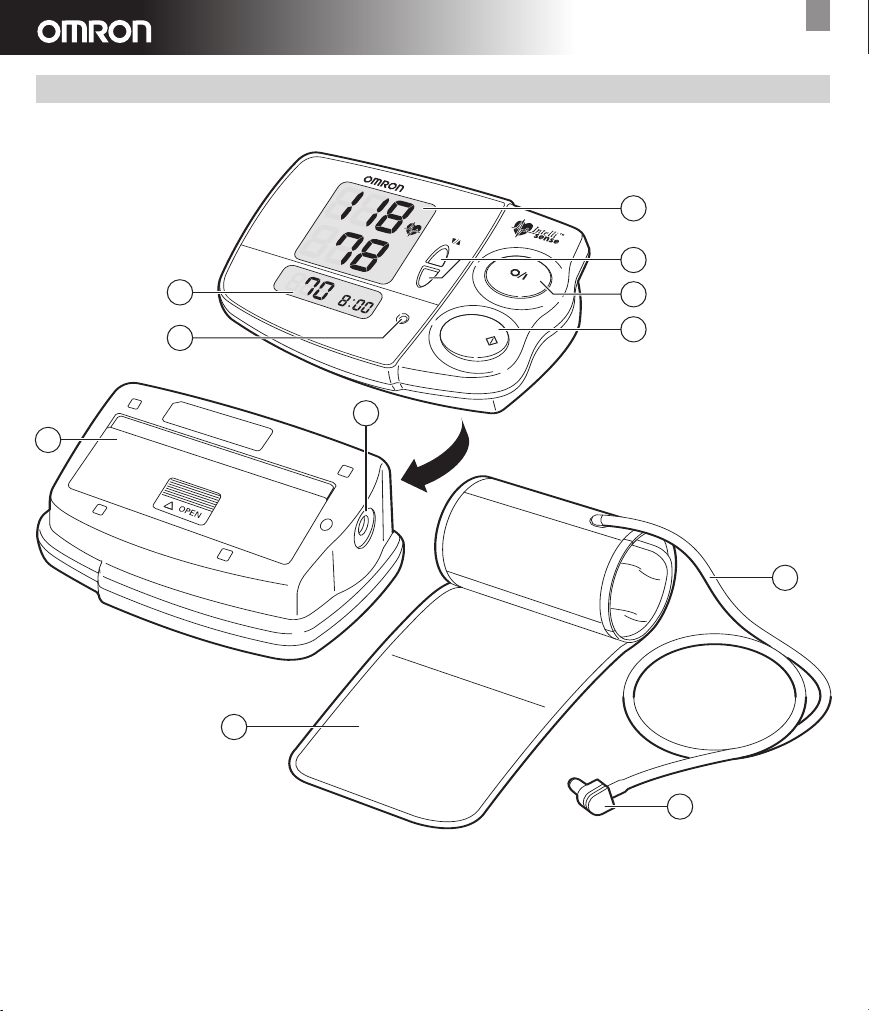
2 Overview
M7 English
A Display blood pressure
B Display pulse, date and time
C Memory buttons (./m)
D Date/time setting button
E Start button
F On/off button
G Cuff
H Air tube
J Air plug
K Air jack
L Battery compartment
3
Page 5
M7 English
SYS
mmHg
DIA
mmHg
M
DATE/T
I
M
E
S
ET
PUL
SE
/m
in.
S
T
A
R
T
A
C
E
F
B
D
M7
3 Preparation
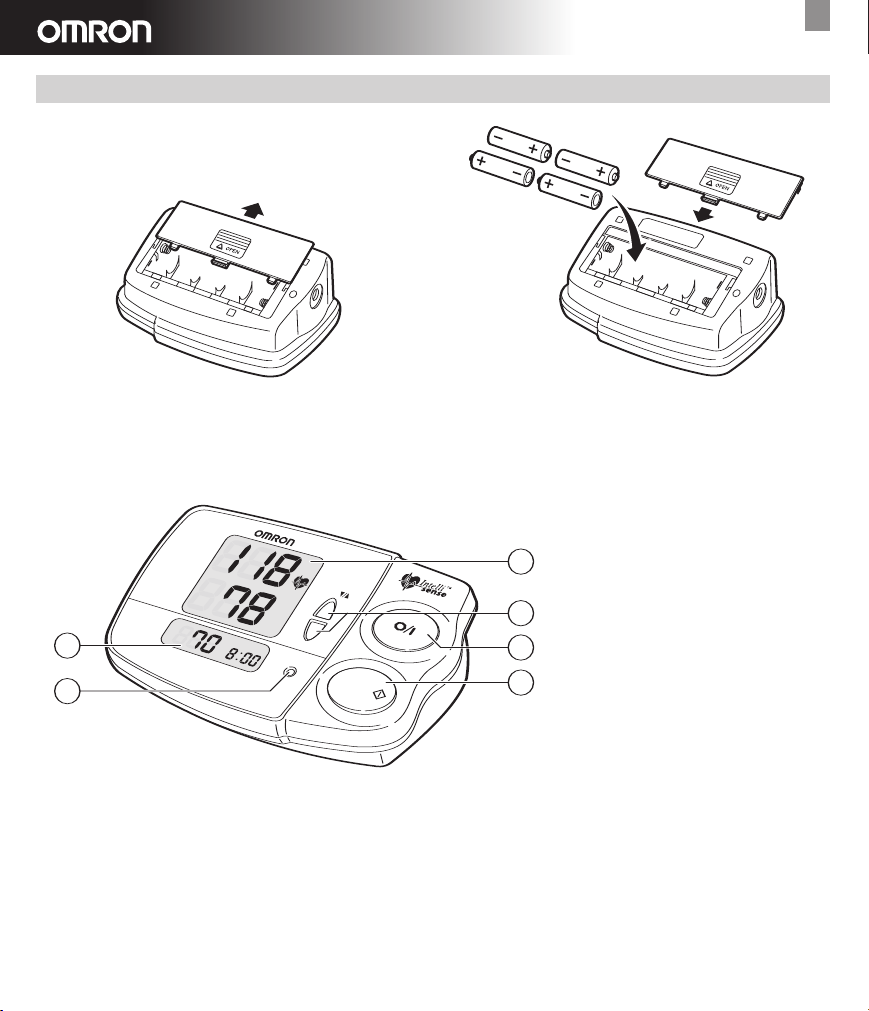
3.1 Insert batteries
1 Slide off the battery cover. 2 Insert four batteries as indicated in the battery
compartment and close compartment.
Caution! Use four identical 1.5V batteries type AA!
3.2 Control functions
A Display blood pressure
B Display pulse, date and time
C Memory buttons (./m)
D Date/time setting button
E Start button
F On/off button
4
Page 6
M7 English
SYS
mmHg
DATE/TIME
SET
S
TAR T
DIA
mmHg
PUL
SE
/min
M7
AVG
M
SYS
mmHg
DATE/TIME
SET
STAR T
DIA
mmHg
PULSE
/
min
M7
AVG
M
M7
M7
AMPM
SYS
mmHg
DATE/TIME
SET
START
DIA
mmHg
PULSE
/min
AVG
AMPM
SYS
mmHg
DATE/TIME
SET
START
DIA
mmHg
PULSE
/min
M7
AVG
MM
M7
SYS
mmHg
DATE/TIME
SET
STAR T
DIA
mmHg
PULSE
/min
M7
AVG
M7
SYS
mmHg
DATE/TIME
SET
STAR T
DIA
mmHg
PULSE
/min
M7
AVG
M7
SYS
mmHg
DATE/TIME
SET
STAR T
DIA
mmHg
PULSE
/min
AVG
M
M7
SYS
mmHg
DATE/TIME
SET
STAR T
DIA
mmHg
PULSE
/min
AVG
M7
MMM
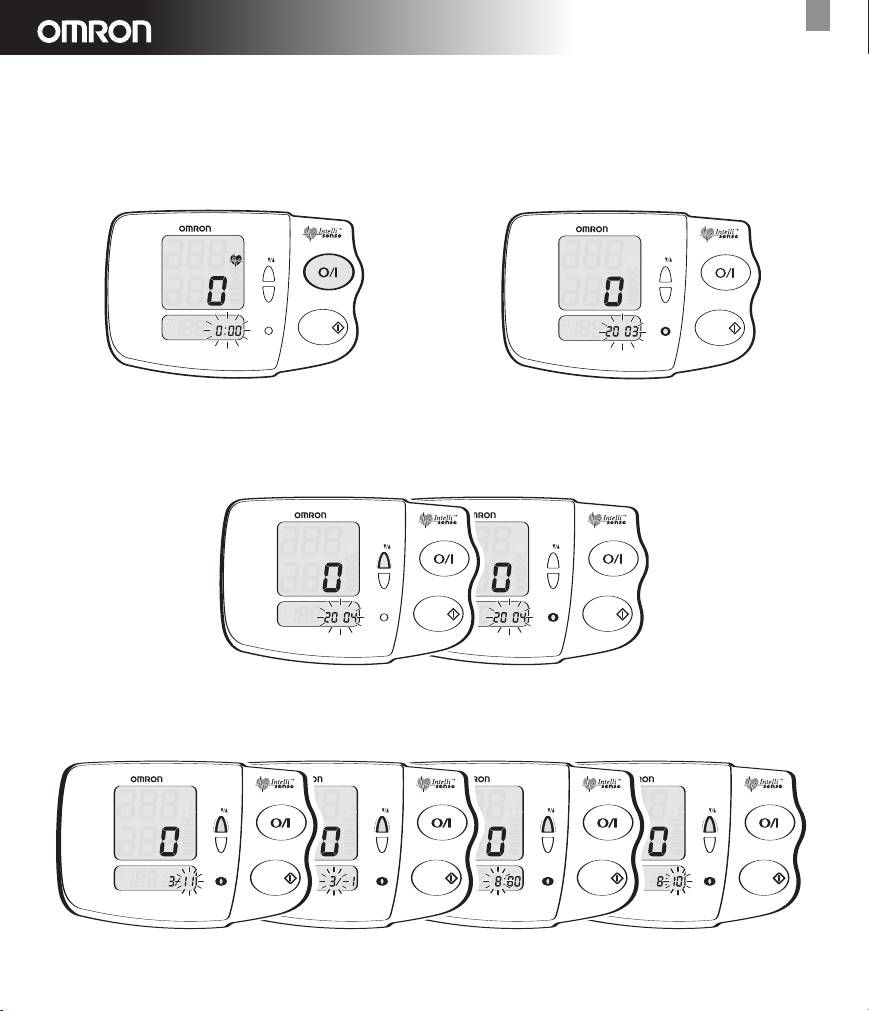
3.3 Set date and time
At the first time you set the OMRON M7 the factory settings (12.00 - 1/1 - 2003) will be displayed. Another
time the actual date and time will be displayed.
Note: use the grey-coloured button to carry out the instruction.
1 Press on/off button. 2 Press date/time setting button for 2 seconds to
proceed to year setting.
Note: use a thin stick to press date/time settings
button.
3 Press memory buttons (./m) to set the year.
Note: keep memory button down to fast forward.
4 Use memory buttons (./m) and date/time setting button to set successively month, hour and minutes.
Note: if display reaches 2030, it will return to 2003.
Press date/time setting button to proceed to date setting.
5
Page 7

3.4 Connect cuff
P
SYS
mmHg
DIA
mmHg
M
DA
TE/T
I
M
E
S
ET
PULS
E
/
m
in.
S
T
A
R
T
M7
1-2 cm
P Air jack 1 Insert air plug in air jack.
3.5 Fit cuff
M7 English
1 Bare your arm.
Caution! Push up your sleeve: avoid constricting
the blood flow!
Caution! Do not inflate the cuff when not wrapped
around the arm!
6
2 Open the cuff with right hand and cover the cuff
over your left upper arm.
Page 8

M7 English
AVG
Q
X
T
Z
Y
VU
S
R
W
Note: keep marked edging on the inside of your
elbow joint.
Note: keep the tube even with your middle finger.
3 Hold the cuff, wrap it around your arm.
Caution! Be sure the cuff fits closely; do not pinch
your arm!
4 Operation
4.1 Measurement
Note: for right arm use, keep the tube under your
elbow and parallel with your little finger.
Q Systolic blood pressure in mmHg.
R Diastolic blood pressure in mmHg.
S Heart symbol: flash - measurement takes place,
light up - measurement finished.
T Battery exhausted: batteries are weak/exhausted.
U Inflation: cuff inflates and measurement starts.
V Deflation: measurement finished and cuff deflates.
W Memory: stored measurements displayed.
X Average: average value of last 3 measurements
displayed.
Y Pulse: heartbeats per minute.
Z Date/time.
7
Page 9

SYS
mmHg
DATE/TIME
SET
START
DIA
mmHg
PULSE
/min
AVG
SYS
mmHg
DATE/TIME
SET
START
DIA
mmHg
PULSE
/min
AVG
SYS
mmHg
DATE/TIME
SET
START
DIA
mmHg
PULSE
/min
AVG
MMM
M7 M7 M7
SYS
mmHg
DATE/TIME
SET
DIA
mmHg
PULSE
/min
AVG
START
SYS
mmHg
DATE/TIME
SET
DIA
mmHg
PULSE
/min
AVG
START
SYS
mmHg
DATE/TIME
SET
DIA
mmHg
PULSE
/min
AVG
START
SYS
mmHg
DATE/TIME
SET
DIA
mmHg
PULSE
/min
AVG
START
M M M M
M7M7 M7M7
Caution! Allow an interval of at least three minutes between two successive measurements!
M7 English
1 Sit comfortably at a table with your feet flat on the
floor and rest your arm on the table.
2 Relax your arm and turn your palm upward.
Caution! Cuff at heart height during measurement!
3 Press on/off button.
Caution! Wait for zero and the heart symbol to continue!
Caution! Do not remove cuff during inflation!
4 Press start button and release within 3 seconds.
Note: the unit inflates the cuff. If required, the unit automatically increases the pressure by 30 mmHg.
Caution! Sit still, do not move or speak!
8
Page 10

M7 English
SYS
mmHg
DATE/TIME
SET
DIA
mmHg
PULSE
/min
AVG
START
M
M7
SYS
mmHg
DATE/TIME
SET
DIA
mmHg
PULSE
/min
AVG
START
SYS
mmHg
DATE/TIME
SET
DIA
mmHg
PULSE
/min
AVG
START
SYS
mmHg
DATE/TIME
SET
DIA
mmHg
PULSE
/min
AVG
START
SYS
mmHg
DATE/TIME
SET
DIA
mmHg
PULSE
/min
AVG
START
M M M M
M7M7M7M7
SYS
mmHg
DATE/TIME
SET
DIA
mmHg
PULSE
/min
M7
AVG
START
M
AVG
Note: Wait for automatic deflation.
5 If your systolic blood pressure is known to be more than 220 mmHg, press and hold the start button until
the monitor inflates 30 or 40 mmHg higher than your estimated systolic blood pressure.
Caution! Do not apply more pressure than necessary. The monitor will not inflate above the 300 mmHg!
4.2 Read display
1 Read values of blood pressure and pulse from
displays.
2 Note values in your personal blood pressure pass.
9
Page 11

3 Press on/off button to turn off power.
SYS
mmHg
DATE/TIME
SET
DIA
mmHg
PULSE
/min
M7
AVG
START
M
SYS
mmHg
DATE/TIME
SET
DIA
mmHg
PULSE
/min
M7
AVG
START
SYS
mmHg
M
DATE/TIME
SET
DIA
mmHg
PULSE
/min
M7
AVG
M
START
X
W
SYS
mmHg
M
DATE/TIME
SET
DIA
mmHg
PULSE
/min
M7
AVG
START
Note: power automatically switches off after 5 minutes.
5 Memory
5.1 Recall previous values
M7 English
W Memory: stored measurements displayed.
X Average: average value of the last 3 measurements
displayed.
2 Press memory button (m).
Note: display shows average value of last 3 blood pressures and heartbeats.
1 Press on/off button to turn on power.
Caution! Wait for zero and the heart symbol to
continue!
10
Page 12

M7 English
SYS
mmHg
DATE/TIME
SET
DIA
mmHg
PULSE
/min
M7
AVG
S
TAR T
SYS
mmHg
DATE/TIME
SET
DIA
mmHg
PULSE
/min
M7
AVG
S
TAR T
SYS
mmHg
DATE/TIME
SET
DIA
mmHg
PULSE
/min
M7
AVG
S
TAR T
SYS
mmHg
DATE/TIME
SET
DIA
mmHg
PULSE
/min
M7
AVG
S
TAR T
M M M M
SYS
mmHg
DATE/TIME
SET
DIA
mmHg
PULSE
/
min
M7
AVG
START
SYS
mmHg
DATE/TIME
SET
DIA
mmHg
PULSE
/
min
M7
AVG
START
M M
AMPM
SYS
mmHg
DATE/TIME
SET
DIA
mmHg
PULSE
/min
AVG
START
SYS
mmHg
M
DATE/TIME
SET
DIA
mmHg
PULSE
/min
M7
AVG
M
M7
START
3 Press memory buttons (./m) for latest and
previous values.
Press on/off button to turn off power.
Note: display shows alternately date and time of
measurement.
Note: keep memory buttons (./m) pushed to fast
forward.
5.2 Erase memory
1 Press on/off button to turn on power.
Caution! Wait for zero and the heart symbol to continue!
2 Press memory button (.) and start button simultaneously to erase memory.
Note: press memory button (.) first because the start button will start inflation.
Caution! All stored values will be erased!
Press on/off button to turn off power.
11
Page 13

6 Storage
M
DA
TE
/
TI
M
E
S
E
T
STA
R
T
SYS
m
m
H
g
D
I
A
m
m
H
g
P
U
LS
E
/m
i
n.
M
7
M7 English
1 Slightly fold air tube and insert in cuff.
2 Put cuff and main unit in storage case.
Note: do not disconnect air tube.
• Remove the batteries if you do not intend to use the OMRON M7 for 3 months or more.
• Store the OMRON M7 in the carton in a dry, closed place with a temperature between -20°C and 60°C.
12
Page 14

7 Error: causes and rectifications
Indication Error Cause Rectification
Incorrect inflation Movement Repeat measurement.
If necessary, hold start
button to inflate manually
Correct Movement, sound Follow instructions, repeat
measurement Incorrect fastening cuff measurement
not possible Operation start button
for more than 3 seconds
Cuff leaks air Fit new cuff
Cuff pressure too high Follow instructions, repeat
measurement
Abnormal Consult your OMRON
memory retail outlet or distributor
function
Low voltage Batteries weak/exhausted Fit four new identical 1.5V
batteries type AA,
follow instructions
M7 English
Display empty AC adapter disconnected Connect AC adapter correctly,
follow instructions
No data in memory Unplugged AC adapter Fit four new identical 1.5V
without batteries batteries type AA
Inexplicable values Wrong working method Follow instructions,
repeat measurement
13
Page 15

8 Maintenance and spare parts
M7 English
Cleaning instruction
• Use a soft, dry cloth to wipe stains from the
OMRON M7.
• Use a soft, slightly moistened cloth and soap to
clean main unit and cuff of the OMRON M7.
Caution! Do not use petrol, thinners or similar
solvents!
Caution! Do not wash the cuff!
• Do not carry out repairs of any kind yourself. If a
defect occurs, consult your OMRON retail outlet or
distributor as mentioned on the packaging.
Replace cuff
• Remove the air plug to re-use it with a new cuff.
Replace batteries
• Remove the battery out of the battery
compartment and insert four new identical 1.5V
batteries type AA.
Spare parts
• Due to high company quality standards, OMRON
considers the main unit as a non-serviceable part
because of the need for proper calibration after
replacement of high tech components.
Calibration
• It is recommended to have the OMRON M7
inspected every two years to ensure correct function
and accuracy. Consult your OMRON retail outlet or
OMRON distributor as mentioned on the packaging.
Attention! Disposal of batteries and the
OMRON M7 should be carried out in
accordance with the national regulations
for the disposal of electronic products.
9 Technical data
Product name OMRON Digital Automatic Blood Pressure Monitor
Model M7
Display Digital LCD
Measurement range Pressure: 0 - 299 mmHg / Pulse: 40 - 180/minute
Accuracy Pressure: ± 3 mmHg / Pulse: ± 5% of display reading
Inflation Automatic inflation (Fuzzy control)
Deflation Automatic air release by controlled air release valve
Pressure detection Electrostatic capacity pressure sensor
Memory 90 Measurements
Power supply 4 x 1.5V batteries type AA / AC adapter (optional part)
Battery life New batteries will last for approximately 300 measurements
Operating temperature / Humidity +10°C to +40°C / 30% to max. 85% relative humidity
Operating environment Free from excessive vibrations, shocks, magnetic fields, electrical noise, etc.
Storage temperature / Humidity -20°C to +60°C /10% to max. 95% relative humidity
Weight Main unit approximately 400 g, excluding batteries, cuff approximately 130 g
Outer dimensions Approximately 165 mm (W) x73 mm (H) x 110 mm (D), cuff approximately
Accessories Cuff model HEM-CUFF-P, hard case, instruction manual, guarantee card, blood pressure pass
Optional parts AC adapter, extended tube
Note Subject to technical modification without prior notice
= Type B 0197
Manufacturer OMRON HEALTHCARE Co., Ltd.
EU-representative OMRON HEALTHCARE EUROPE B.V., Kruisweg 577, NL-2132 NA Hoofddorp
This device fulfils the provisions of the EC dir
according to the European standard EN1060, Non-invasive sphygmomanometers Part 1: General Requirements and Part 3:
Supplementary requirements for electromechanical blood pressure measuring systems.
14
150 mm (W) x 582 mm (L) arm circumference 22 cm to 42 cm
24, Yamanouchi Yamanoshita-cho, Ukyo-ku, Kyoto, 615-0084 Japan
ective 93/42/EEC (Medical Device Dir
ective). This blood pr
essure monitor is designed
Page 16

Optimal blood
pressure
(target value)
Normal blood
pressure
Normal systolic value
Mild hypertension
Moderate hypertension
Severe hypertension
Systolic blood pressure
(mmHg)
Diastolic
blood
pressure
(mmHg)
80
180
160
140
130
120
85 90 100 110
10 General information about blood pressure
M7 English
Blood circulation
The blood circulation is responsible for supplying the
body with oxygen. Blood pressure is the pressure
exerted on the arteries.
The systolic blood pressure value (higher pressure or
top value) represents the blood pressure produced
by contraction of the heart muscle.
The diastolic blood pressure value (lower pressure or
lower value) represents the blood pressure produced
by relaxation of the heart muscle.
Classification of blood pressure
The World Health Organisation (WHO) and the International Society of Hypertension (ISH) developed the
blood pressure classification. This classification is
based on the blood pressure values measured while
sitting on a chair in the outpatient department of a
hospital.
Health and blood pressure
The incidence of hypertension increases with age. In
addition, a lack of exercise, excess body fat and high
levels of cholesterol (LDL), which sticks to the inside
in blood vessels, reduces elasticity of these vessels.
Hypertension accelerates arterial sclerosis which can
lead to very serious conditions such as stroke and
myocardial infarction. For these reasons it is very
important to know whether the blood pressure is
within a healthy range. Blood pressure fluctuates
from minute to minute, throughout the day. Therefore
it is essential to take regular measurements to help
you identify an average blood pressure.
Symptoms of high blood pressure
High blood pressure can go unnoticed for a long
time, since it does not cause noticeable symptoms.
The following are all possible causes of abnormally
high blood pressure:
• Overweight
• High cholesterol level
According to the blood pressure classification by the WHO/ISH.
15
Page 17

M7 English
mmHg
200
150
100
50
6 12 18 24
Upper curve: systolic blood pressure
Lower curve: diastolic blood pressure
Time of day
• Smoking
• Excessive alcohol consumption
• Stress and emotional upset
• Excessive consumption of salt
• Lack of physical exercise
• Genetic/hereditary predisposition
• Underlying illnesses, such as kidney disorders or
endocrine disturbance
Blood pressure measurement
Measuring your blood pressure daily enables you to
recognize high blood pressure at an early stage and
obtain medical treatment.
The oscillometric method of measurement
determines your blood pressure by measuring the
pressure fluctuations caused by the pulse waves.
Since your blood pressure fluctuates within a day
(see graphic next page), you should always measure
it at the same time each day to ensure that the
measurements are genuinely comparable. At the
doctor’s surgery, nervousness and tension may
cause your blood pressure to be higher than in
familiar circumstances at home. This is known as
“White Coat Hypertension”.
Treatment of high blood pressure
If your blood pressure reaches upper values of 140 160 mmHg and lower values of 90 - 95 mmHg in
repeated measurements over several days, you
should consult your doctor for detailed medical
examination. You can assist the treatment prescribed
by your doctor in the following ways:
• Loose weight and lower your cholesterol level by
reducing the calories and fat in your diet. Cut
down on animal fats and eat more fruit and
vegetables.
• Reduce the consumption of alcohol.
• Reduce the intake of salt: the German League for
Combating High Blood Pressure recommends six
grams of salt per day (i.e. one teaspoon) on
average.
• Stop smoking.
• Take regular exercise.
• Monitor your blood pressure.
Example: fluctuation within a day (male, 35 years old)
16
 Loading...