


M7 English
SYS |
M7 |
mmHg |
DIA mmHg
PUL |
|
|
/ |
S |
E |
m |
|
|
|
in. |
|
DA |
|
|
|
TE/T |
|
||
S |
ET |
IM |
E |
|
|
|
|
M 
START 
Introduction
The OMRON M7 measures your blood pressure and pulse simply and quickly from the arm, without the use of an inflation bulb or stethoscope. The measurement values are stored in the memory of the OMRON M7.
The OMRON M7 includes the standard cuff for arm circumferences ranging from 22 to 42 cm.
Table of contents
1. How to obtain meaningful blood pressure |
|
|
4.1 |
Measurement |
7 |
|
readings |
2 |
|
4.2 |
Read display |
9 |
|
2. Overview |
3 |
5. |
Memory |
10 |
||
3. Preparation |
4 |
|
5.1 |
Recall previous values |
10 |
|
3.1 |
Insert the batteries |
4 |
|
5.2 |
Erase memory |
11 |
3.2 |
Control functions |
4 |
6. |
Storage |
12 |
|
3.3 |
Set date and time |
5 |
7. |
Error: causes and rectifications |
13 |
|
3.4 |
Connect cuff |
6 |
8. |
Maintenance and spare parts |
14 |
|
3.5 |
Fit cuff |
6 |
9. |
Technical data |
14 |
|
4. Operation |
7 |
10. General information about blood pressure |
15 |
|||
1
M7
Digital Automatic
Blood Pressure Monitor
SYS |
M7 |
mmHg |
DIA mmHg
PUL |
|
|
/ |
S |
E |
m |
|
|
|
in. |
|
DA |
|
|
TE/TI |
||
S |
ET |
ME |
M 
START 
Instruction manual |
page 1 |

M7 English
1 How to obtain meaningful blood pressure readings
General
•This manual contains important information for safe use of the OMRON M7. Follow this manual to prevent wrong measurement values, injury and damages.
•The OMRON M7 is not suitable for measuring the frequency of cardiac pacemakers.
•Consult your doctor during pregnancy, arrhythmia and arteriosclerosis as this can influence the measurement.
•Avoid eating, drinking (alcohol), smoking, doing sports and taking a bath before measurement.
•Be calm and relaxed before and during measurement.
•You should never change the dose of medicines prescribed by your doctor.
•Store the OMRON M7 in a dry, closed place with a temperature between -20°C and 60°C.
•Remove the batteries if you do not intend to use the OMRON M7 for 3 months or more.
Tips for use
•Check your blood pressure at least twice a day (before breakfast, after work).
•Use the OMRON M7 only for yourself.
•Measure your blood pressure before taking an antidepressant.
•Do not discard the air plug.
•When using the AC adapter, keep the batteries in the main unit.
•Use both the AC adapter and the batteries to extend battery life.
•Do not measure your blood pressure while you are in a vehicle.
•Always measure on the same arm.
•Wrap the cuff around your arm before start of measurement.
Caution
•Only the OMRON M7 cuff can be used on this device. Other cuffs must not be attached.
•Operating temperature between 10°C and 40°C.
•Operating environment must be free from excessive vibrations, shocks, electrical noise, corrosive gas, etc.
•Stay out of sunlight during measuring.
•Keep portable phones 5 meters away during measurement.
•Do not wrap the cuff around any object other than your arm.
•Do not fold or crush the cuff and the air tube.
•Do not drop the OMRON M7.
2

M7 English
2 Overview
B
D
SYS |
M7 |
mmHg |
DIA mmHg
PUL |
SE |
/ |
|
m |
|
in. |
|
DA |
|
|
TE/TIM |
E |
|
S |
ET |
|
|
|
|
M 
START 
K
L
A
C  F E
F E
H
G
|
|
J |
A Display blood pressure |
E Start button |
J Air plug |
B Display pulse, date and time |
F On/off button |
K Air jack |
C Memory buttons (./m) |
G Cuff |
L Battery compartment |
D Date/time setting button |
H Air tube |
|
3
M7 English
3 Preparation
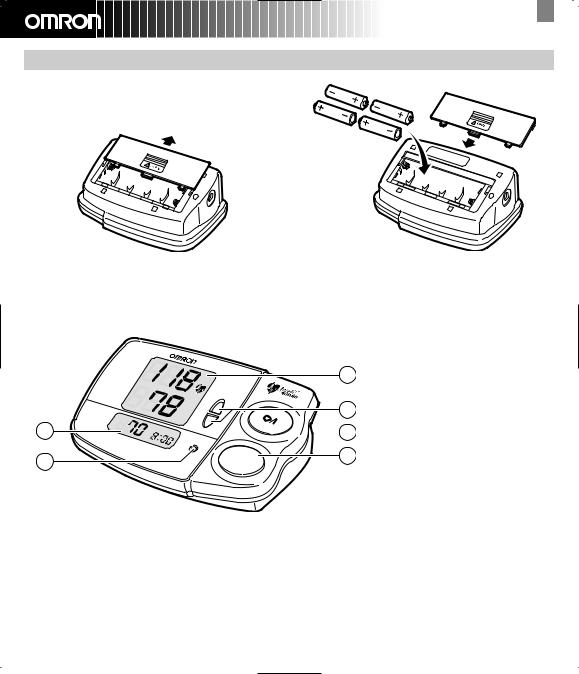
3.1 Insert batteries
1 Slide off the battery cover.
2Insert four batteries as indicated in the battery compartment and close compartment.
Caution! Use four identical 1.5V batteries type AA!
3.2 Control functions
B
D
SYS |
M7 |
mmHg |
DIA mmHg
PUL |
SE |
/ |
|
m |
|
in. |
|
DATE/TIM |
E |
|
S |
ET |
|
|
|
|
M 
START 
A
C
 F A Display blood pressure
B Display pulse, date and time
EC Memory buttons (./m) D Date/time setting button E Start button
F On/off button
4
M7 English
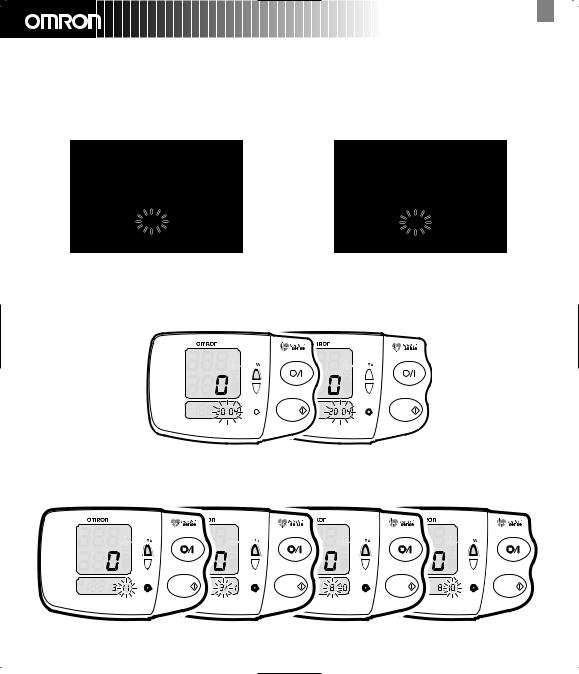
3.3 Set date and time
At the first time you set the OMRON M7 the factory settings (12.00 - 1/1 - 2003) will be displayed. Another time the actual date and time will be displayed.
Note: use the grey-coloured button to carry out the instruction.
|
M7 |
|
|
M77 |
|
SYS |
|
|
SYS |
|
|
mmHg |
M |
|
mmHg |
M |
|
|
|
|
|
||
DIA |
|
|
DIA |
|
|
mmHg |
|
|
mmHg |
|
|
|
DATE/TIME |
|
|
DATE/TIME |
|
PULSE |
SET |
START |
PULSE |
SET |
START |
/min |
AVG |
/min |
AVG |
||
|
|
|
|
1 Press on/off button. |
|
|
2 Press date/time setting button for 2 seconds to |
||
|
|
|
|
proceed to year setting. |
|
|
|
|
|
Note: use a thin stick to press date/time settings |
|
|
|
|
|
button. |
|
|
M77 |
|
|
M7 |
|
SYS |
|
|
|
|
|
mmHg |
|
M |
|
M |
|
|
|
|
|
||
DIA |
|
|
|
|
|
mmHg |
|
|
|
|
|
|
AMPM |
DATE/TIME |
|
DATE/TIME |
|
PULSE |
SET |
START |
SET |
START |
|
/min |
|
|
|
||
AVG
3Press memory buttons (./m) to set the year. Note: keep memory button down to fast forward.
Note: if display reaches 2030, it will return to 2003. Press date/time setting button to proceed to date setting.
|
M7 |
|
M7 |
|
M7 |
|
M7M7 |
|
SYS |
|
|
|
|
|
|
|
|
mmHg |
M |
|
M |
|
M |
|
M |
|
|
|
|
|
|
||||
DIA |
|
|
|
|
|
|
|
|
mmHg |
|
|
|
|
|
|
|
|
|
DATE/TIME |
|
DATE/TIME |
|
DATE/TIME |
|
DATE/TIME |
|
PULSE |
SET |
START |
SET |
START |
SET |
START |
SET |
START |
/min |
|
|
|
|
AVG
4 Use memory buttons (./m) and date/time setting button to set successively month, hour and minutes.
5
 Loading...