

Page 1
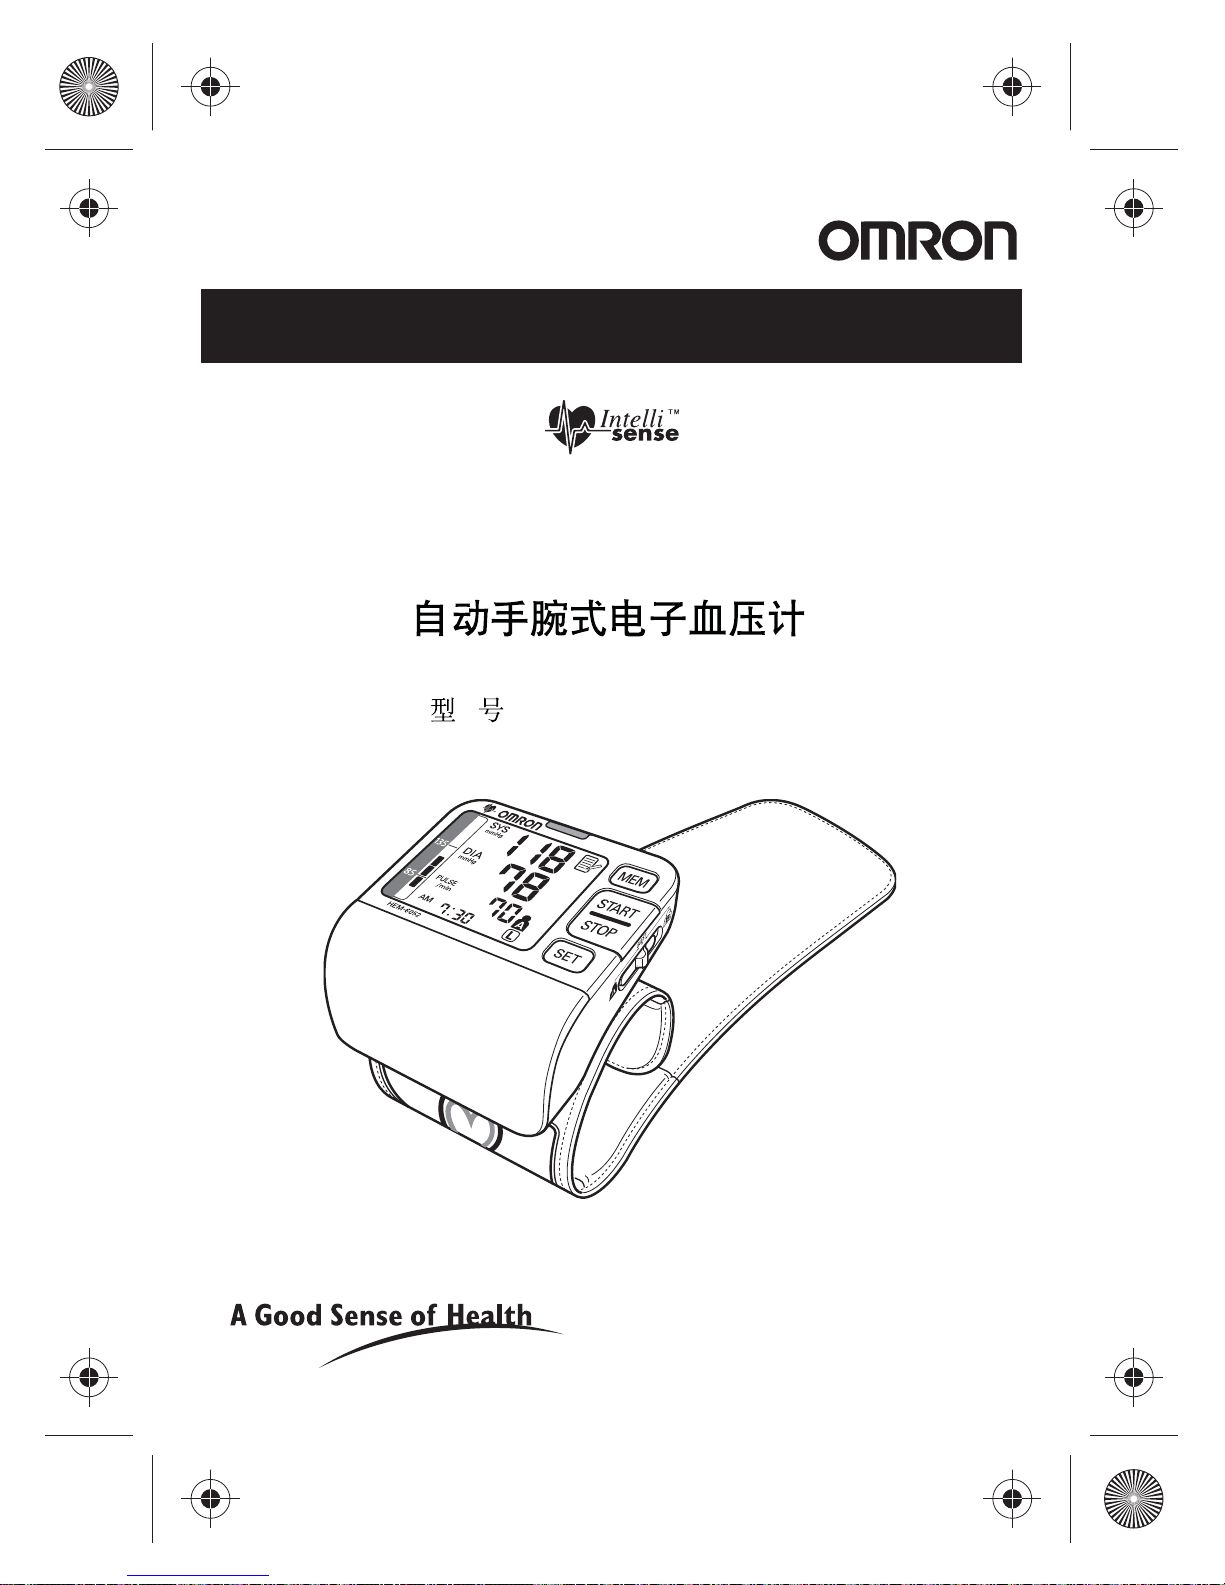
INSTRUCTION MANUAL
Automatic Wrist Blood Pressure
Monitor
Model
HEM-6052
Page 2
HEM-6052-C1_B_M.fm Page 2 Tuesday, March 9, 2010 9:15 AM
Contents
Before using the unit
Introduction.................................................. 3
Important Safety Information...................... 4
1. Overview .................................... ... ... .... ... .. 6
2. Preparation ................ .......................... ... .. 8
2.1 Installing/Replacing the Batteries.......... 8
2.2 Setting the Date and Time .................. 10
2.3 Setting the Advanced Positioning
Sensor (APS)..................................... 12
Operating instructions
3. Using the Monitor................................... 15
3.1 Applying the Wrist Cuff. ....................... 15
3.2 Taking a Reading................ ... ... ... .... ... 17
3.3 Using the Memory Function ......... .... ... 22
Care and maintenance
4. Handling Errors and Problems ............. 24
5. Storage and Maintenance.. .... ... ... ... .... ... 26
6. Technical Data........................................ 27
7. Some Useful Information about Blood
Pressure.................................................. 29
2
Page 3
HEM-6052-C1_B_M.fm Page 3 Tuesday, March 9, 2010 9:15 AM
Before using the unit
Introduction
Thank you for purchasing the HEM-6052 Wrist Blood Pressure
Monitor.
This remarkable, compact and easy to use instrument is ideal for
people who frequently monitor their own blood pressure. The
small, pre-formed wrist cuff is very convenient and easy to apply.
With the push of a button the HEM-6052 measures your blood
pressure and pulse and displays the reading on a clear digital
panel. Perfect for quick, easy readings at home, at work, and
while travelling. It also stores up to 100 sets of measurements in
memory and displays an average reading based on the three
most recent measurements.
The HEM-6052 uses the oscillometric method of blood pressure
measurement. This means the monitor detects the pulse wave
vibrations in the artery of your wrist and converts the oscillations
into a digital reading.
Clinical research has proven a direct relationship between blood
pressure in the wrist and blood pressure in the arm. Changes in
wrist blood pressure reflect changes in arm blood pressure
because the arteries in the wrist and the arm are connected.
Frequently measuring the blood pressure in your wrist will
provide you and your doctor with an accurate indication of
changes in your true blood pressure.
Please read this instruction manual thoroughly
before using the unit. For specific information about
your own blood pressure, CONSULT YOUR DOCTOR.
3
Page 4
HEM-6052-C1_B_M.fm Page 4 Tuesday, March 9, 2010 9:15 AM
Important Safety Information
Consult your doctor during pregnancy, arrhythmia and
arteriosclerosis. P eople with poor peripheral circulation may find
that results for measurements taken at the wrist vary from those
taken on the upper arm. Please read this section carefully before
using the unit.
Warning:
Indicates a potentially hazardous situation which, if not avoided,
could result in death or serious injury.
(General Usage)
• Always consult your doctor. Self-diagnosis of measurement
results and self-treatment are dangerous.
• People with severe blood flow problems, or blood disorders,
should consult a doctor before using the unit. Cuff inflation can
cause internal bleeding.
(Battery Usage)
• If battery fluid should get in your eyes, immediately rinse with
plenty of clean water. Consult a doctor immediately.
Caution:
Indicates a potentially hazardous situation which, if not avoided,
may result in minor or moderate injury to the user or patient or
damage to the equipment or other property.
(General Usage)
• Do not leave the unit unattended with infants or persons who
cannot express their consent.
• Do not use the unit for any purpose other than measuring
blood pressure.
• Do not disassemble the unit or wrist cuff.
• Do not inflate the wrist cuff over 299 mmHg.
4
Page 5
HEM-6052-C1_B_M.fm Page 5 Tuesday, March 9, 2010 9:15 AM
Important Safety Information
• Do not use a mobile phone, or other devices that emit
electromagnetic fields, near the unit. This may result in
incorrect operation of the unit.
• Do not operate unit in a moving vehicle (car, airplane).
(Battery Usage)
• If battery fluid should get on your skin or clothing, immediately
rinse with plenty of clean water.
• Use only two “AAA” alkaline (LR03) batteries with this unit. Do
not use other types of batteries.
• Do not insert the batteries with their polarities incorrectly
aligned.
• Replace old batteries with new ones immediately. Replace
both batteries at the same time.
• Remove the batteries if the unit will not be used for three
months or more.
• When the batteries are replaced, you may need to reset the
date and time. If the year is flashing on the display screen,
refer to “2.2 Setting the Date and Time”.
• Do not use new and used batteries together.
General Safety Precautions
• Do not inflate the wrist cuff when it is not wrapped around your
wrist.
• Do not apply strong shocks and vibrations to or drop the unit.
• Do not take measurements after bathing, drinking alcohol,
smoking, exercising or eating.
• Do not wash the wrist cuff or immerse it in water.
Save these instructions for future reference.
5
Page 6
HEM-6052-C1_B_M.fm Page 6 Tuesday, March 9, 2010 9:15 AM
1. Overview
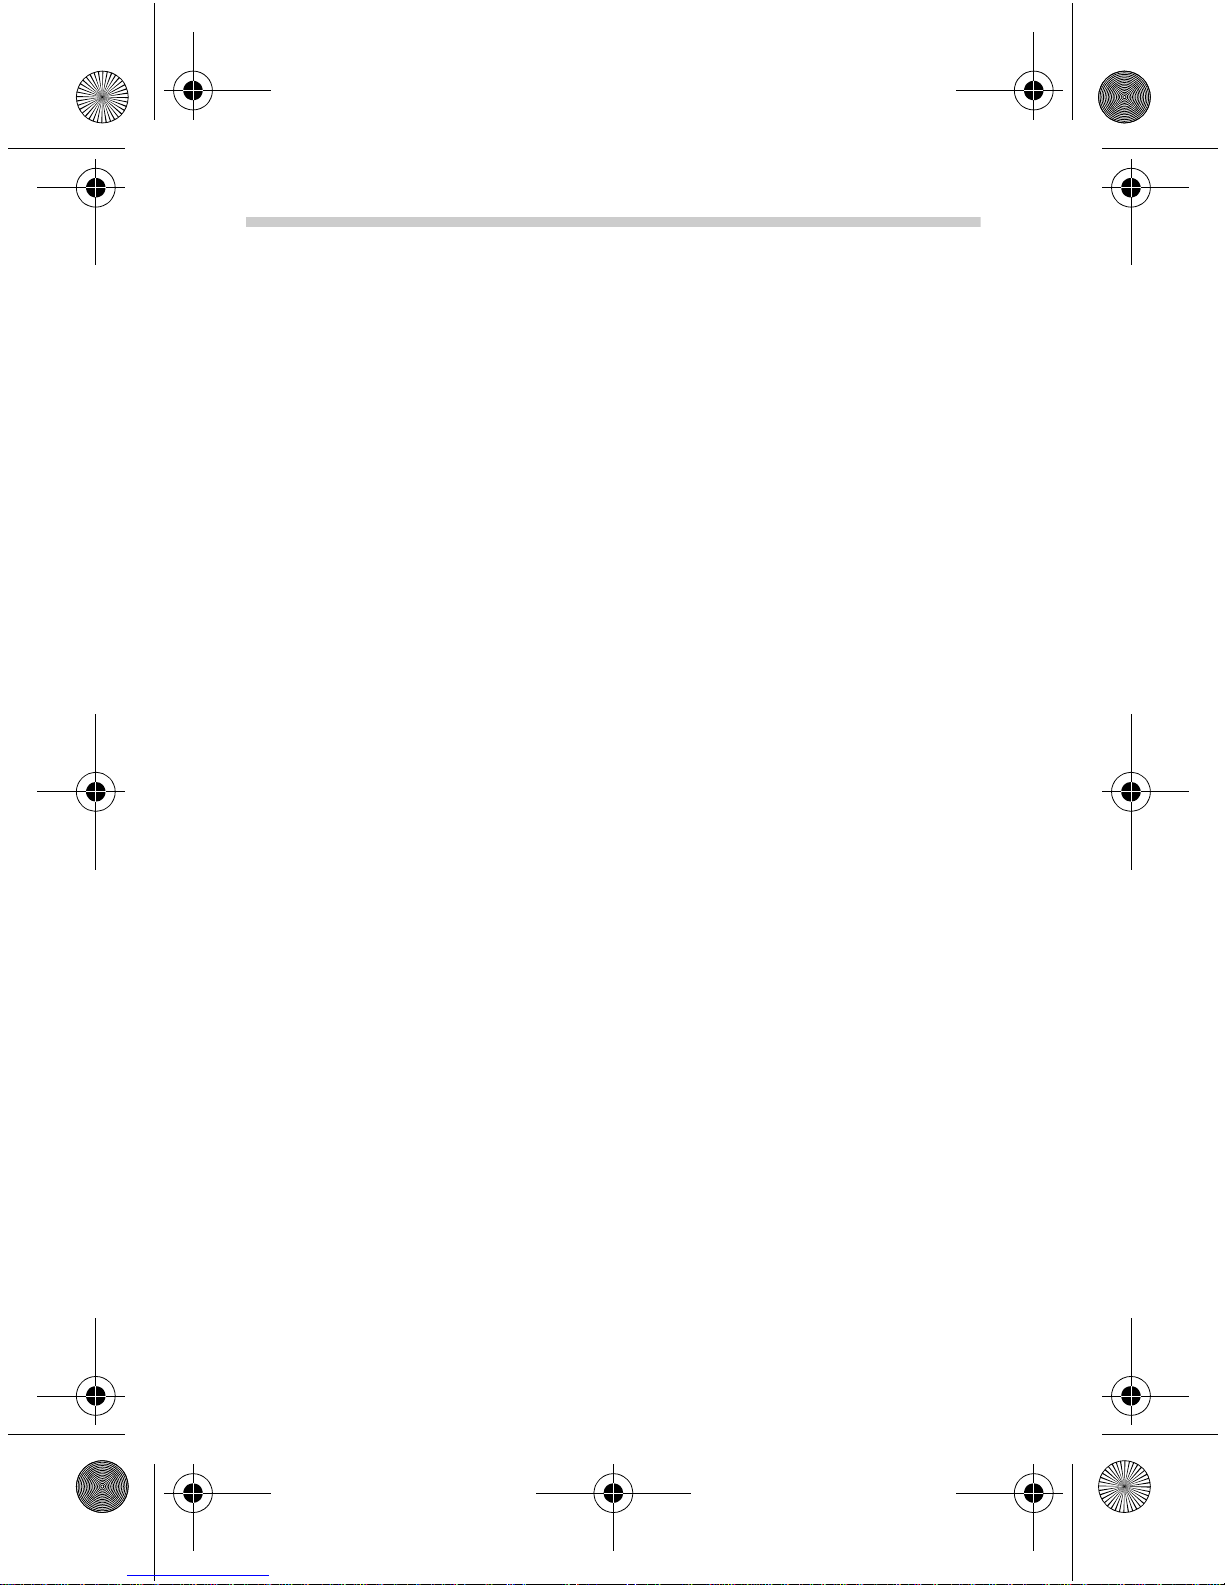
Main Unit
A
C
D
E
IH
A. Display
B. Battery compartment
C. Wrist cuff
D. Memory (MEM) button
E. START/STOP button
Package contents
J
F
G
B
F. User ID selection switch
G. SET button
H. Date/Time setting ( )
button
I. Date/Time setting ( )
button
K
J. Two “AAA” alkaline (LR03)
batteries
• Instruction manual
• Quick reference guide
6
K. Storage case
Page 7
HEM-6052-C1_B_M.fm Page 7 Tuesday, March 9, 2010 9:15 AM
Display
L M N O
P
Q
R
S
T
U
Z Y X W V
AA
1.Overview
L. Deflation symbol
M. Systolic blood pressure
N. Positioning indicator
O. Diastolic blood pressure
P. Memory symbol
(Displayed when viewing
values stored in memory)
Q. Average value symbol
(Refer to section 3.3.)
R. Irregular heartbeat symbol
S. Movement error symbol
(Displayed if you move
your body during the
measurement)
T. User ID symbol (A or B)
(If “GUEST” is selected, A
or B will not be displayed.)
U. Wrist symbol
V. Batter y low symbol
W. Pulse display
X. Heartbeat symbol
(Flashes during
measurement)
Y. Date/Time display
Z. Buzzer symbol
AA.
Blood pressure level
indicator
7
Page 8
HEM-6052-C1_B_M.fm Page 8 Tuesday, March 9, 2010 9:15 AM
2. Preparation
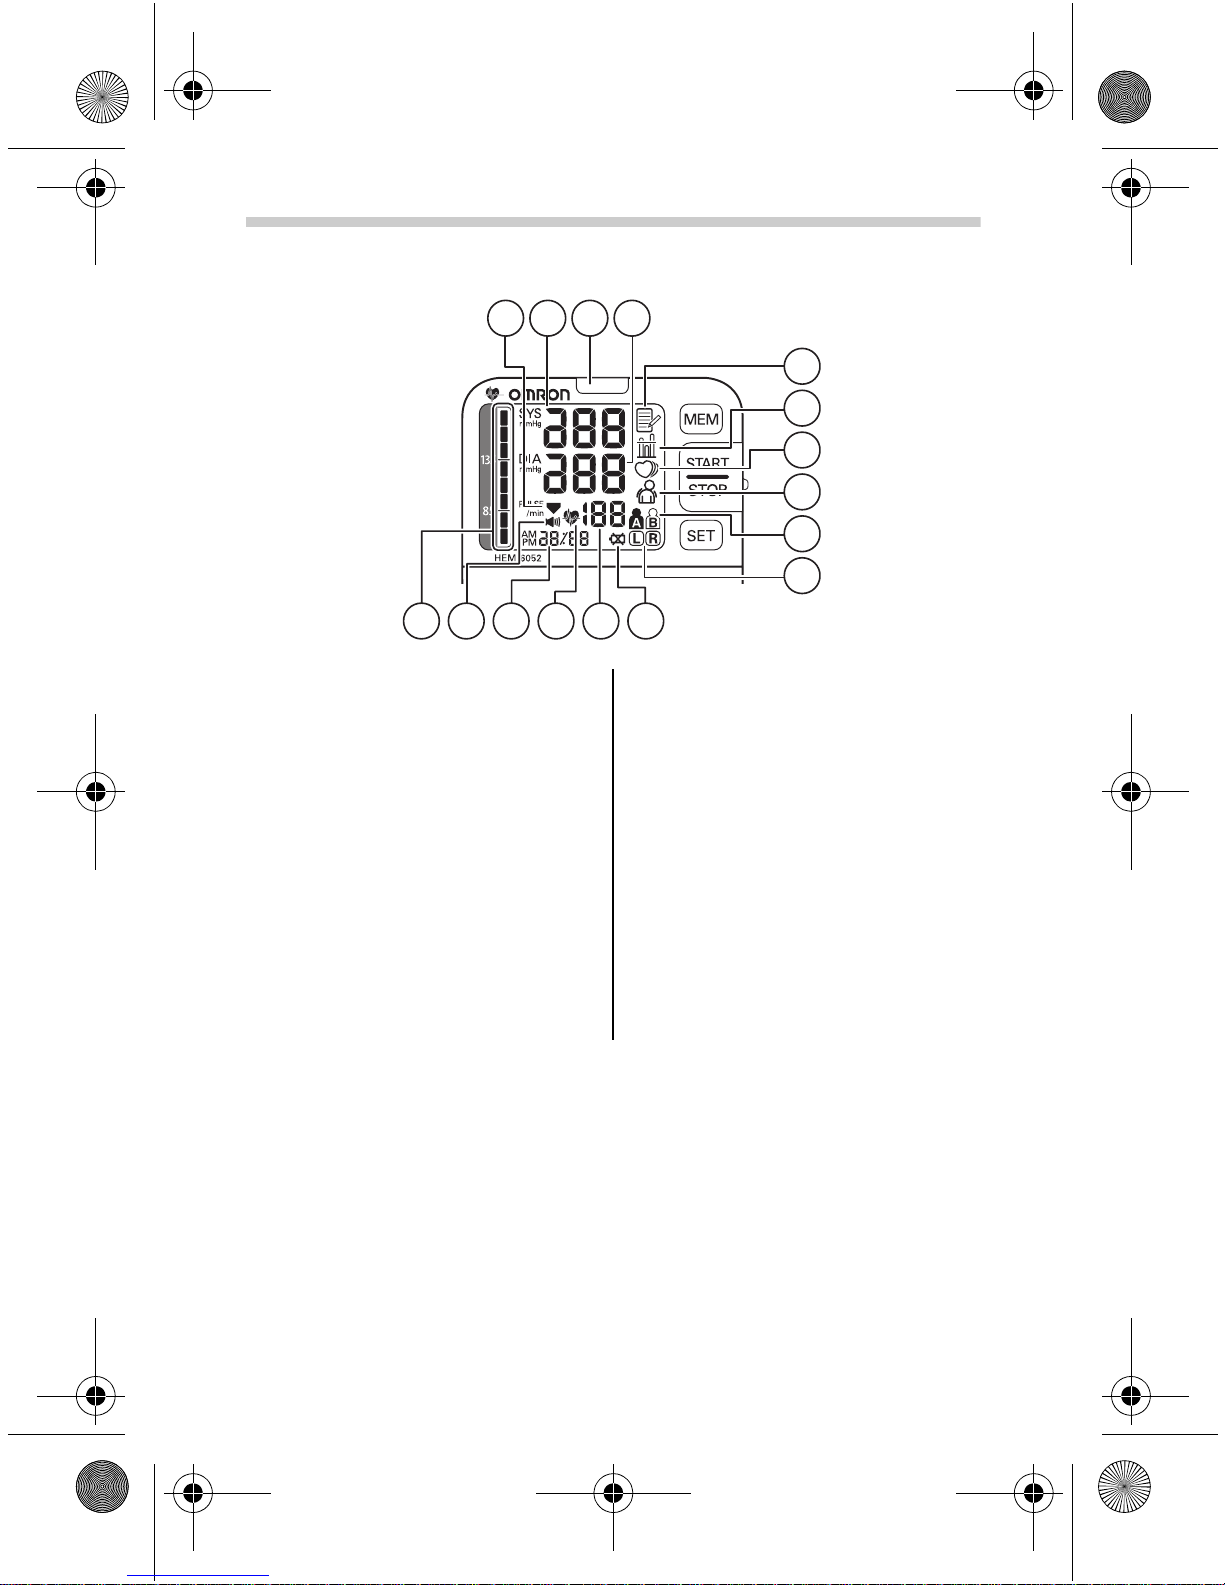
2.1 Installing/Replacing the Batteries
1. Remove the battery cover
by pulling it off in the
direction of the arrow.
2.
Insert two 1.5V “AAA”
alkaline (LR03) batteries in
the battery comp artment.
Make sure their polarity (+/–)
is aligned with the polarity
(+/–) as indicated in the
battery compartment.
3. Set the date and time.
Refer to section 2.2.
4. Put the battery cover back
in place.
Note: Make sure that the
battery cover is
securely in position.
8
Page 9
HEM-6052-C1_B_M.fm Page 9 Tuesday, March 9, 2010 9:15 AM
2.Preparation
Battery Life & Replacement
If the battery low symbol ( ) appears on the display, replace
both batteries at the same time.
- When the battery low symbol ( ) starts to blink, you will still
be able to use the unit for a short while. You should replace
the batteries with new ones ahead of time.
- When the symbol ( ) remains lit, the batteries were
exhausted. You should replace the batteries with new ones at
once.
• Turn the unit off before replacing the batteries.
• Remove the batteries if the unit will not be used for three
months or more.
• If the batteries are removed, the Date/Time setting will need to
be reset. See “2.2 Setting the Date and Time” for details.
• Dispose of batteries according to applicable local regulations.
• T w o new identical 1.5V “AAA” alkaline (LR03) batteries will last
for approximately 300 measurements, when used to take two
measurements a day.
• Since the supplied batteries are for monitoring use only, they
may have a shorter life and not last for 300 measurements.
9
Page 10
HEM-6052-C1_B_M.fm Page 10 Tuesday, March 9, 2010 9:15 AM
2.Preparation
2.2 Setting the Date and Time
Your blood pressure monitor automatically stores up to 100
measurement values in its memory and calculates an average
value based on the last three measurements. To make use of
the memory and average value function:
• Set the monitor to the correct date and time before taking a
measurement for the first time.
• If the batte ries have been removed for a long period of time,
the date and time setting will need to be reset.
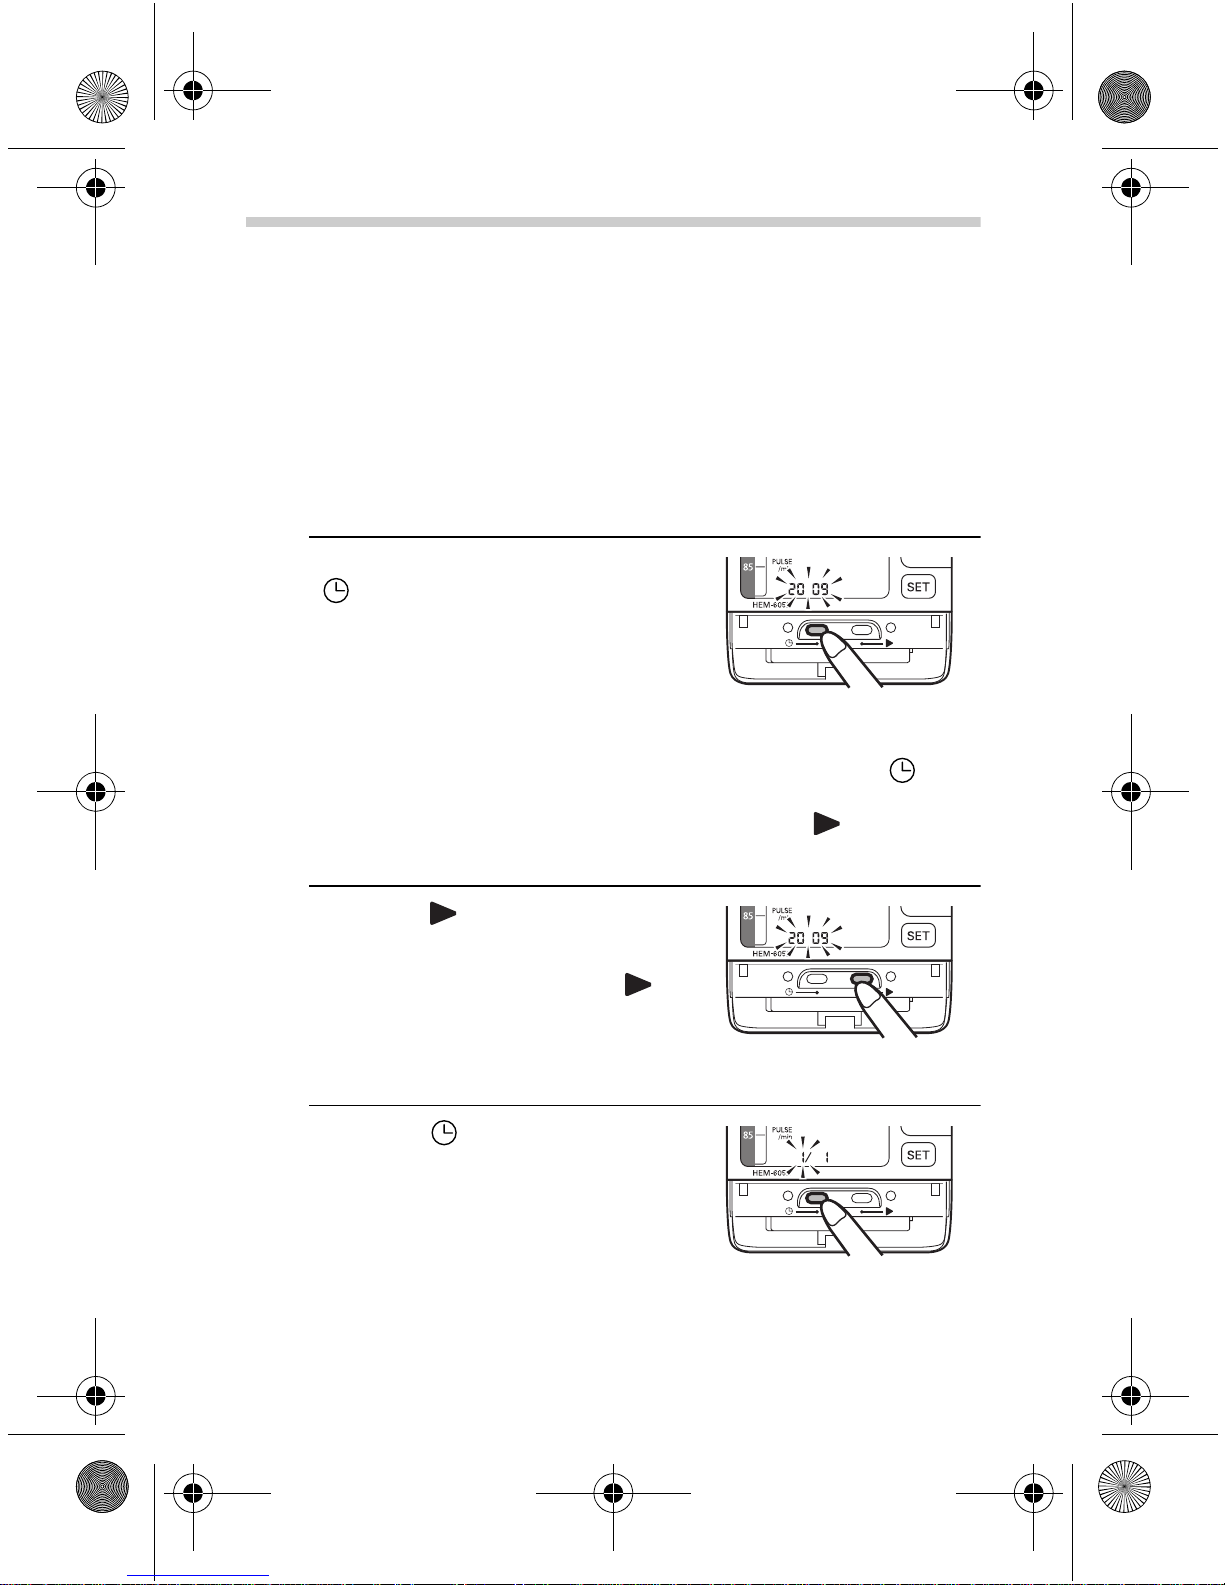
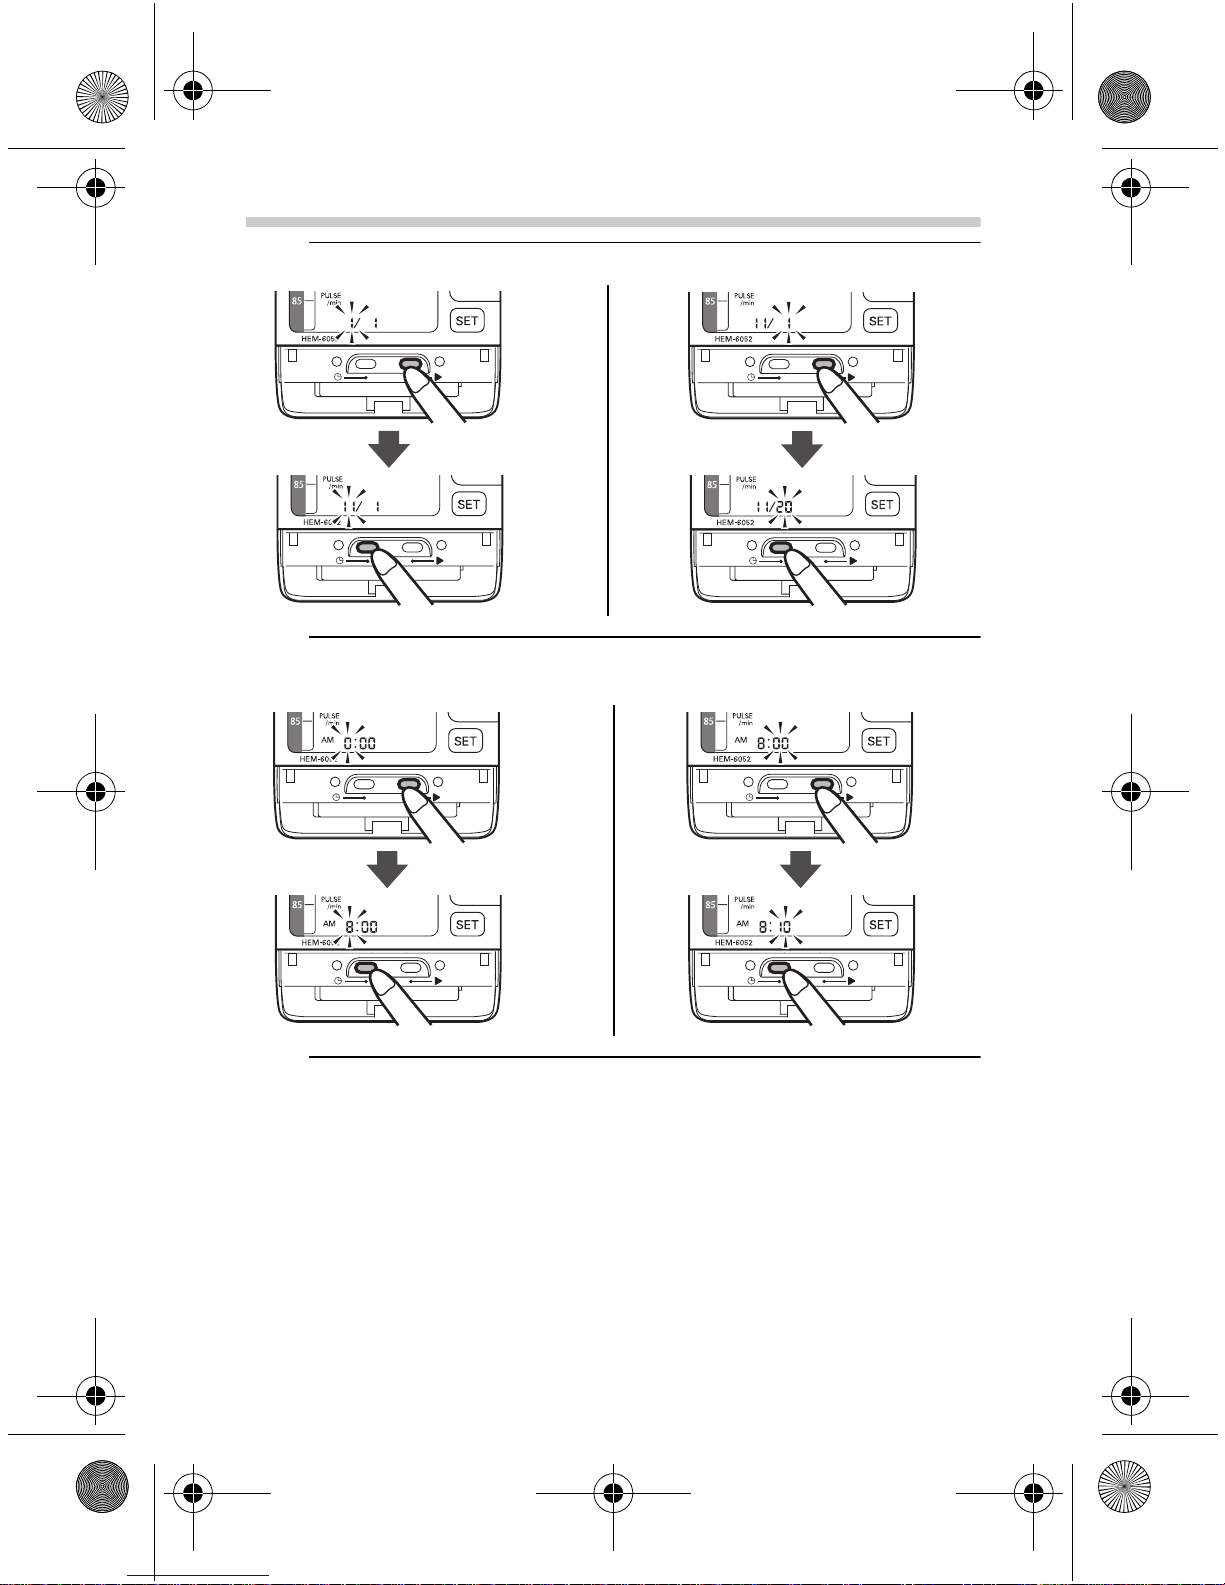
1. Press the Date/Time setting
( ) button. The year digits
(2009) will flash on the display.
Notes:
• The range for the year setting
is 2009 to 2030. If the year
reaches 2030, it will return to 2009.
• If you need to reset the date and time, press the
button until the setting you want to adjust appears on the
display, then press the Date/Time setting ( ) button to
change the setting.
2. Press the button to advance
the digits one at a time.
Note: If you hold down the
button, the digits will
advance rapidly.
3. Press the button to confirm
the setting when the desired
number appears on the display.
The year setting is set and the
month digits will flash.
10
Page 11
HEM-6052-C1_B_M.fm Page 11 Tuesday, March 9, 2010 9:15 AM
2.Preparation
4. Repeat steps 2 and 3 to set the month and day.
5. Repeat steps 2 and 3 to set the hour and minute for the
time.
6. Press START/STOP button to turn the monitor off.
11
Page 12
HEM-6052-C1_B_M.fm Page 12 Tuesday, March 9, 2010 9:15 AM
2.Preparation
2.3 Setting the Advanced Positioning
Sensor (APS)
You can modify the options for the various settings of your
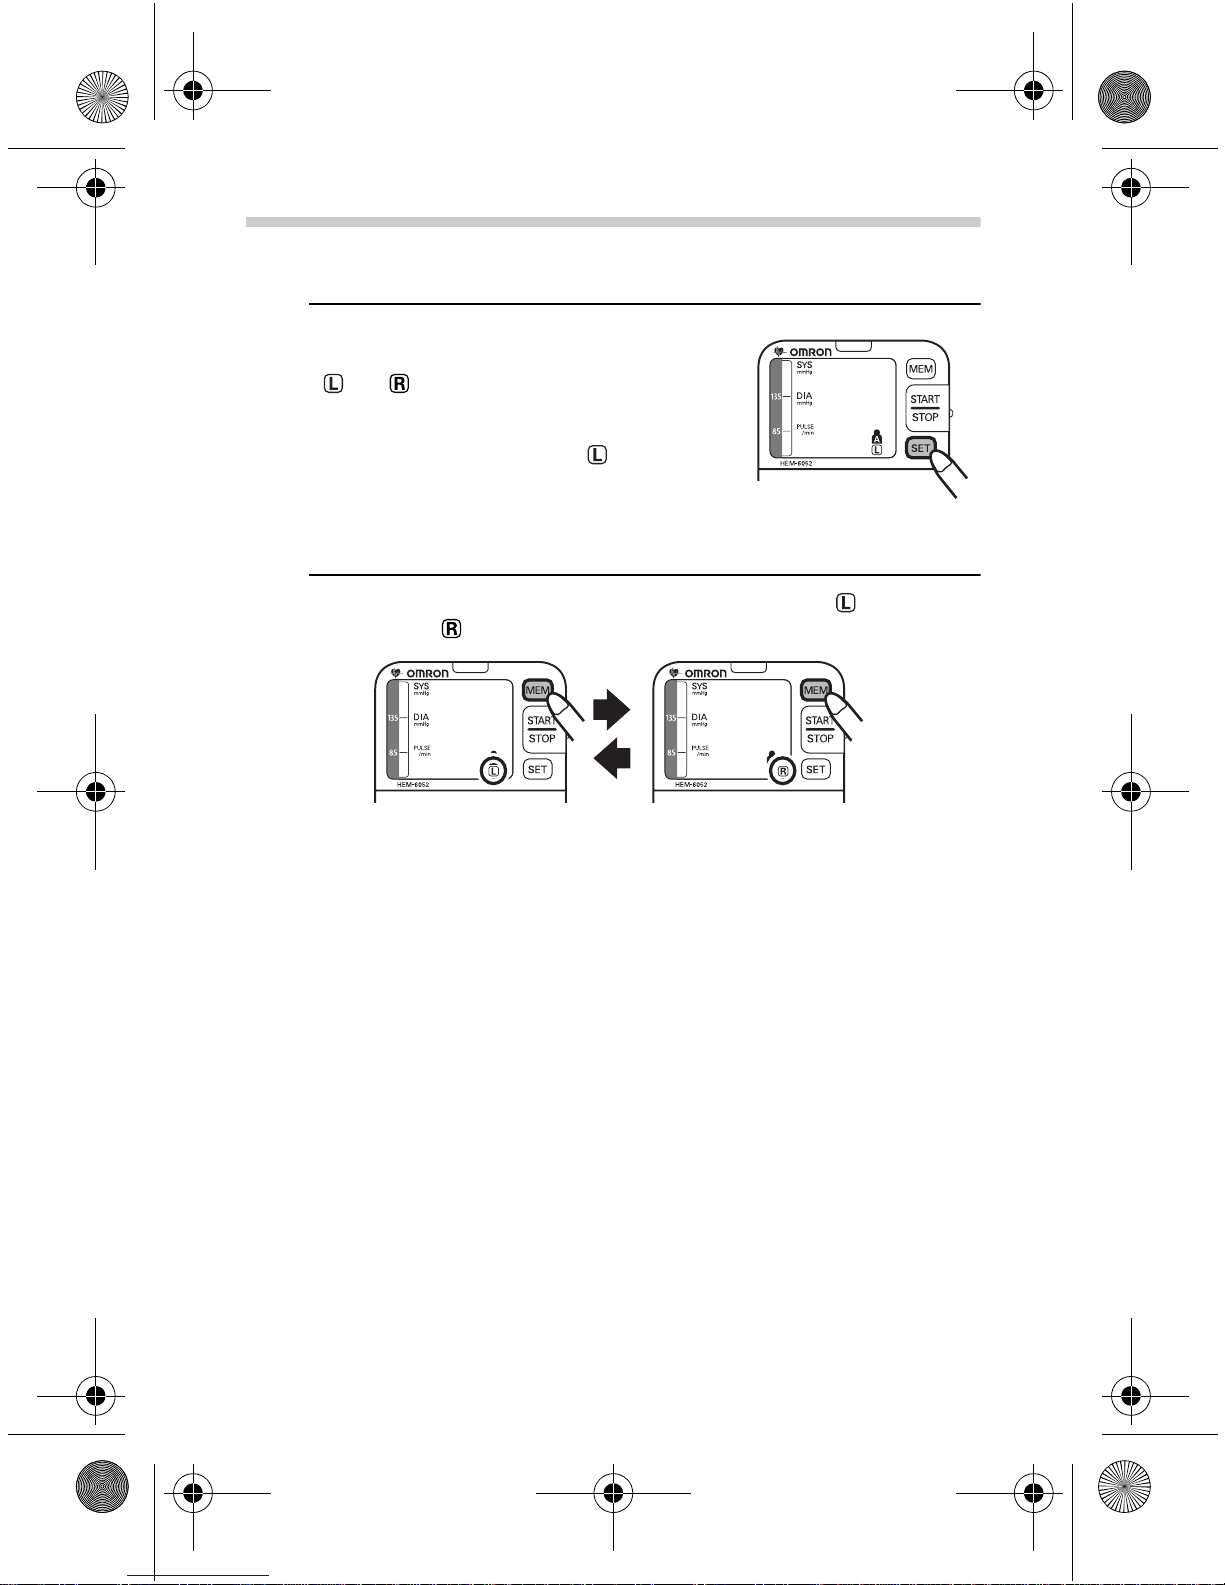
monitor. This is done by pressing the SET button to changing a
setting, then pressing the MEM button to select the options for
that setting. After selecting a setting, press the START/STOP
button to confirm the setting and turn the power off.
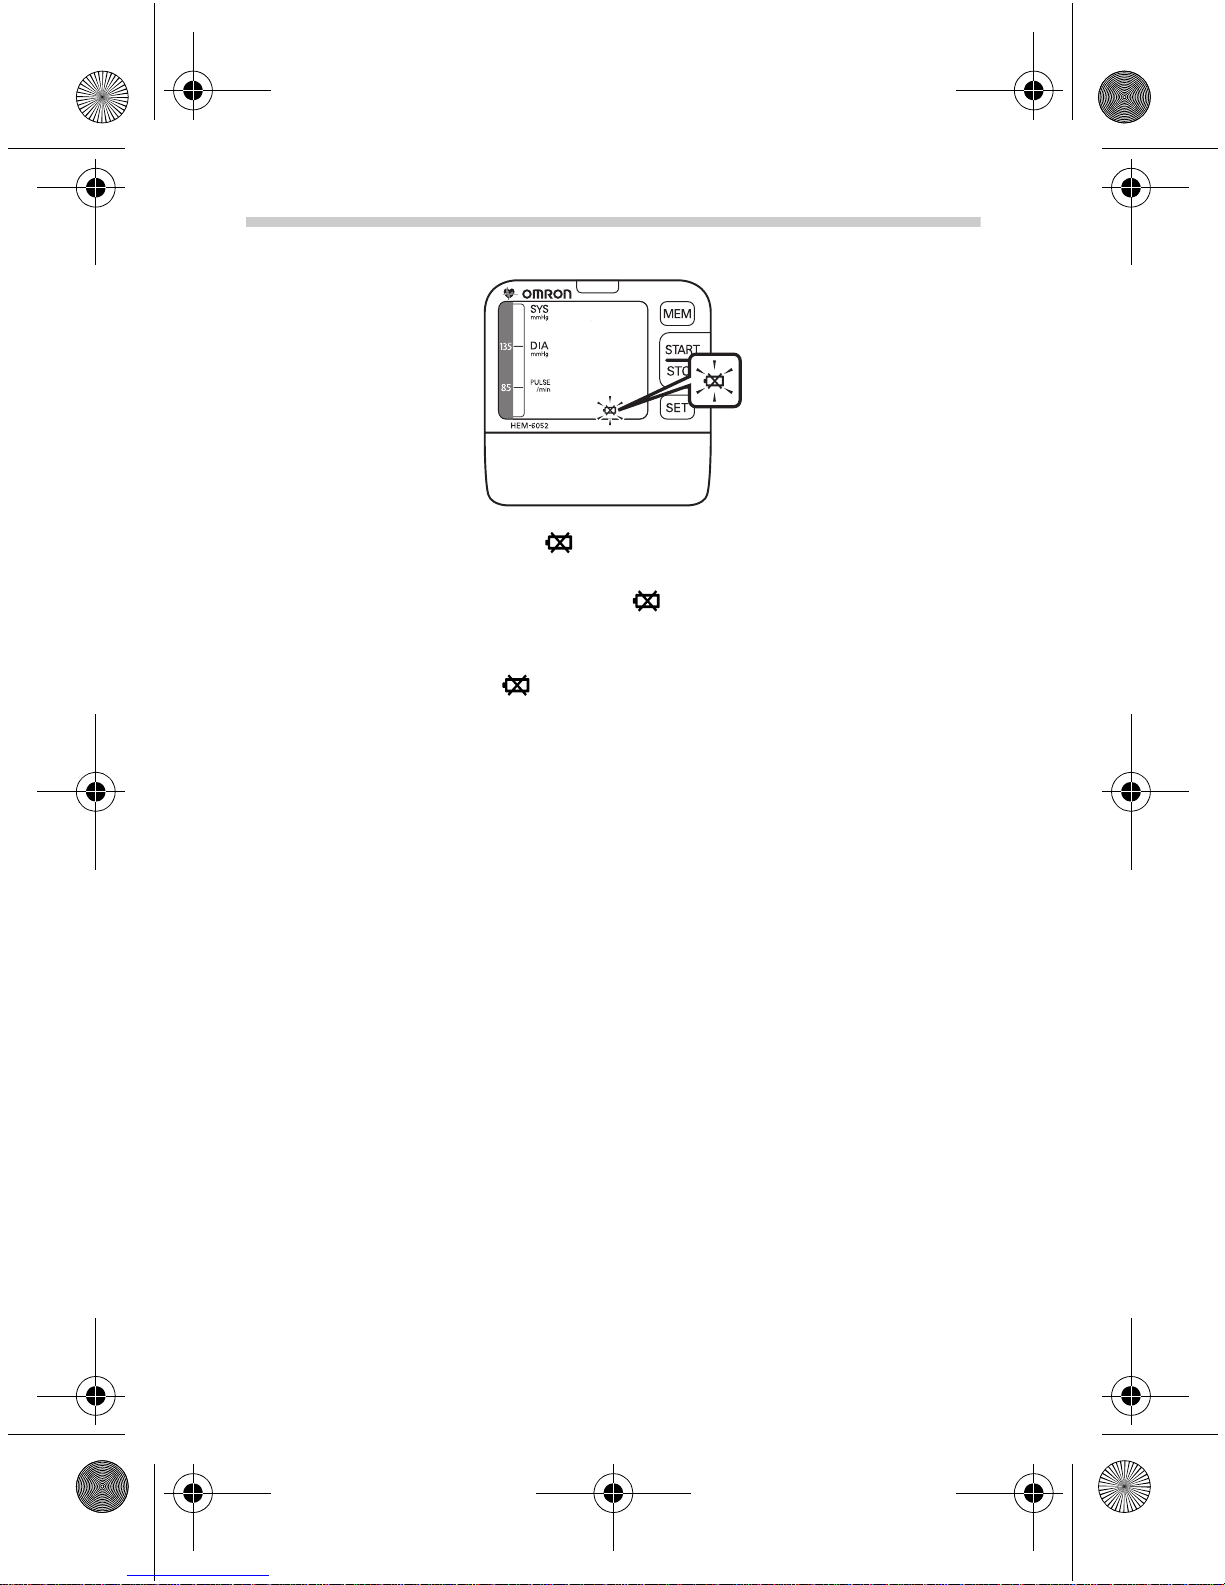
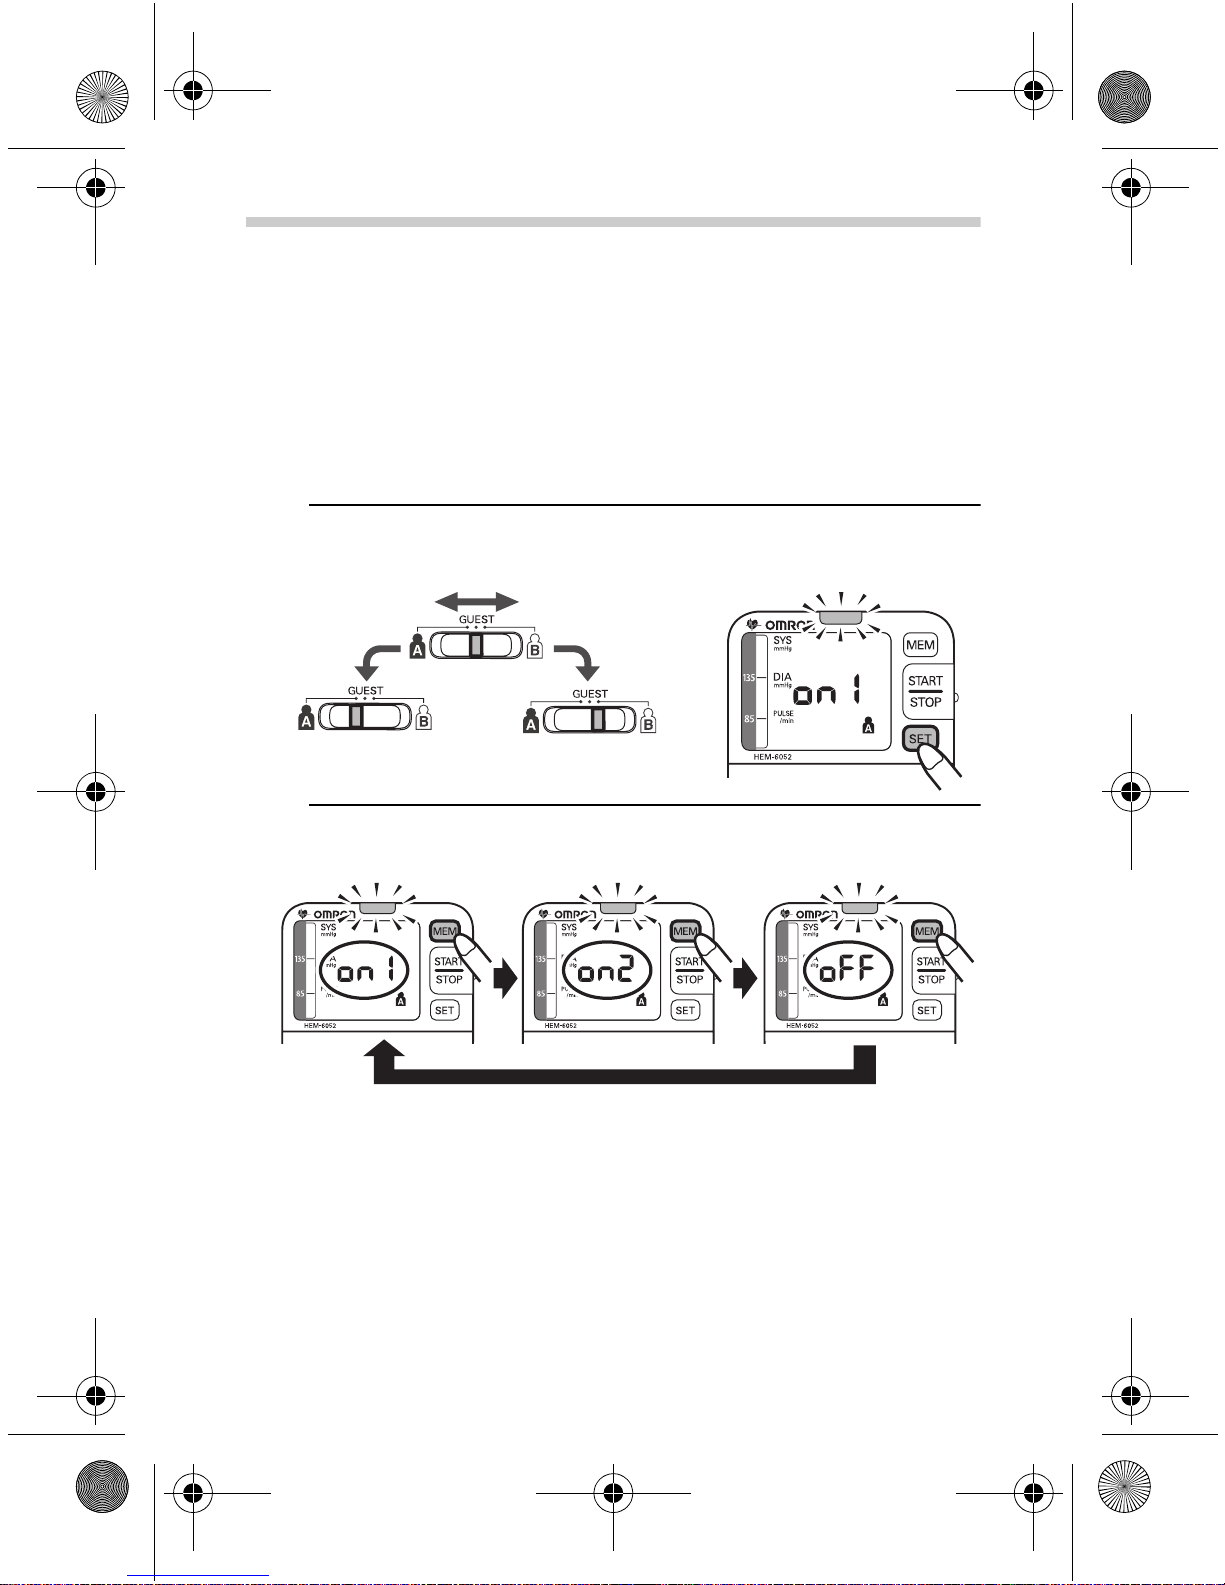
Setting the Positioning Indicator
1. Select your User ID. Press the SET button.
Note: The default setting is “on1”.
User BUser A
2. Press the MEM button to select the Positioning indicator
“on1”,“on2”, or “oFF”.
on1: After the Positioning indicator lights in blue for more
than 2 seconds, or in orange for more than 5
seconds, measurement starts automatically, even
though the monitor is not in the proper position.
on2: The Positioning indicator lights in blue for more than
2 seconds, measurement starts automatically.
Measurement will not start if it lights in orange.
oFF: Measurement starts without the Positioning
indicator.
12
Page 13
HEM-6052-C1_B_M.fm Page 13 Tuesday, March 9, 2010 9:15 AM
2.Preparation
Setting the Wrist for Measurement
1. While in the setting mode, press the
SET button until the wrist symbol
( or ) appears on the display.
Notes:
• The default setting is “ ”.
• After you choose “oFF” for the
Positioning indicator, the monitor
skips this process.
2. Press the MEM button to select the left wrist ( ) or the
right wrist ( ).
13
Page 14

HEM-6052-C1_B_M.fm Page 14 Tuesday, March 9, 2010 9:15 AM
2.Preparation
Setting the Buzzer
1. While in the setting mode, press
the SET button until the buzzer
symbol ( ) appears on the
display.
Note: The default setting is
“on1” or “on”, depending
on the Positioning
indicator you set.
2. Press the MEM button to select the buzzer setting.
If the Positioning indicator is “on1” or “on2”:
on1: The buzzer sounds only when the monitor is in
proper position.
on2: The buzzer sounds a series of two short blips if your
wrist is too far away from the measuring position,
and beeps when your wrist is in the proper position.
oFF: The buzzer will not sound.
If the Positioning indicator is “oFF”:
on: The buzzer sounds when pressing any buttons.
oFF: The buzzer will not sound.
Resetting to the Default Setting
The positioning indicator is set “on1”, the wrist for measurement
is set “ ”, and the buzzer is set “on1” as default.
To reset to the default setting, press and hold the SET button
while in the setting mode, then press the START/STOP button
simultaneously for more than 2 seconds.
14
Page 15
HEM-6052-C1_B_M.fm Page 15 Tuesday, March 9, 2010 9:15 AM
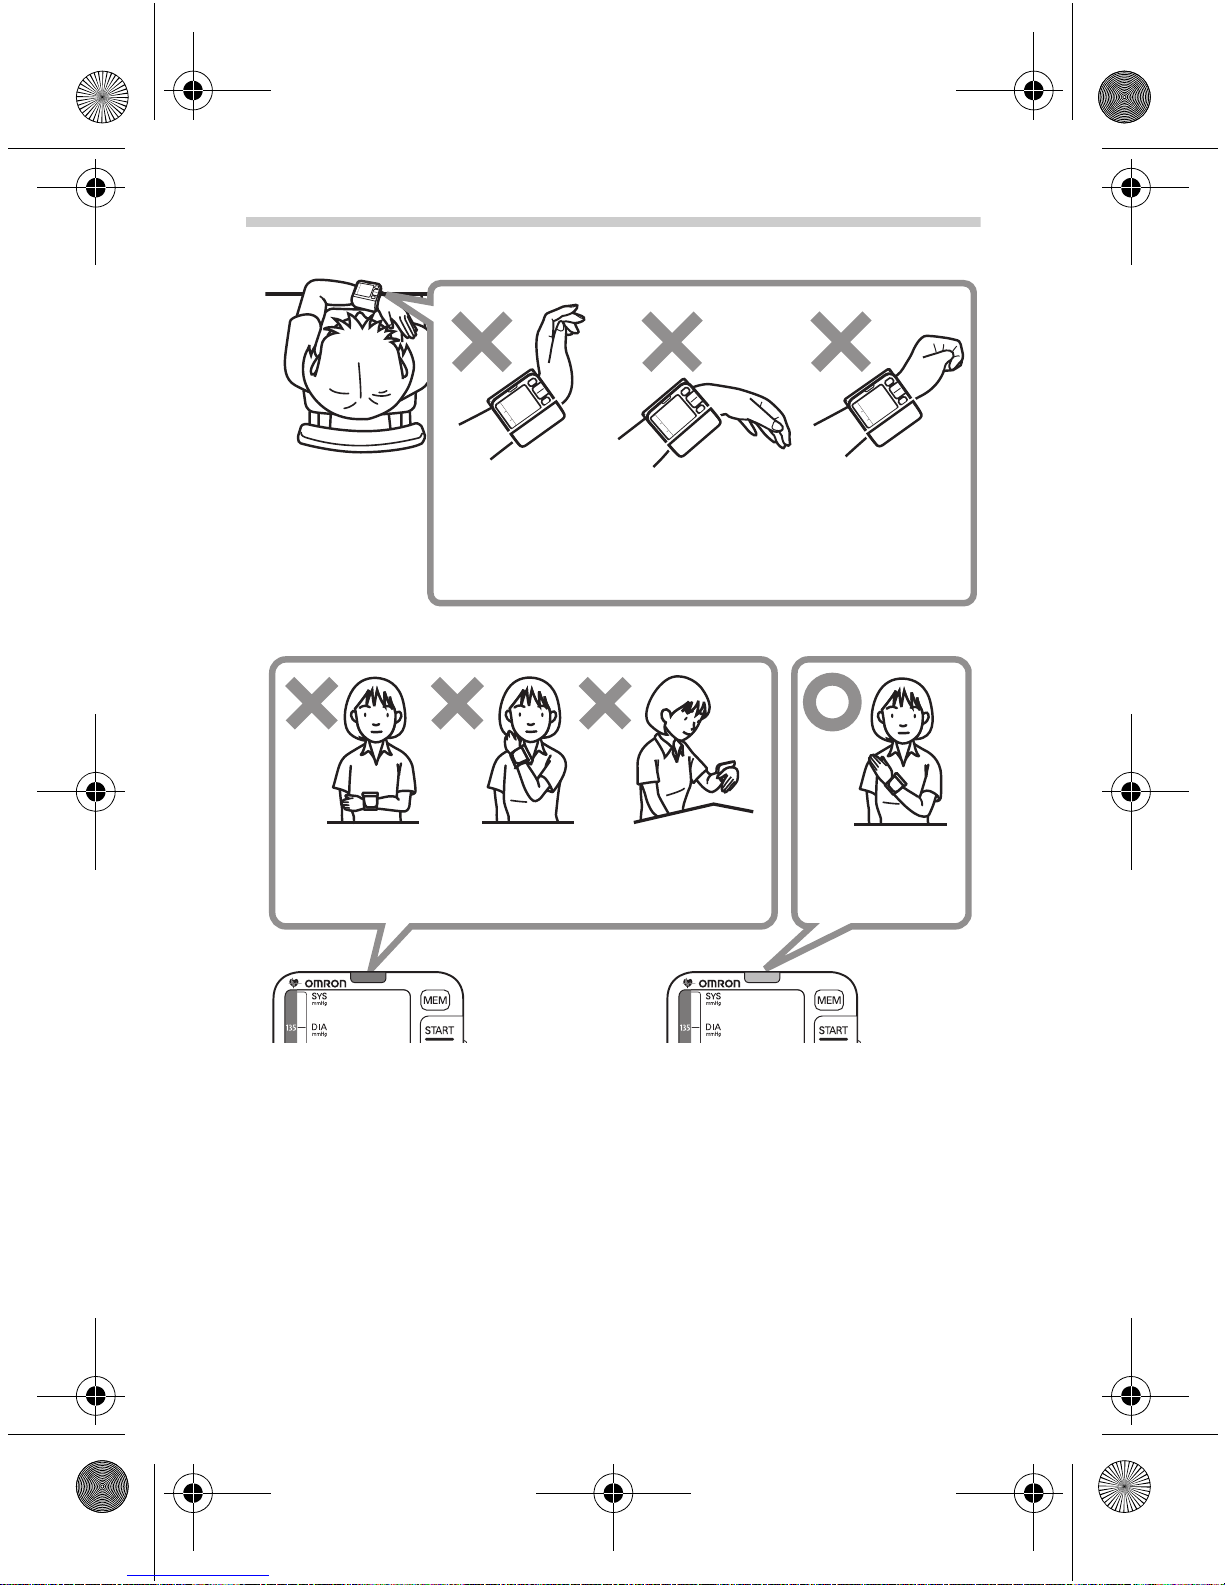
Operating instructions
3. Using the Monitor
3.1 Applying the Wrist Cuff
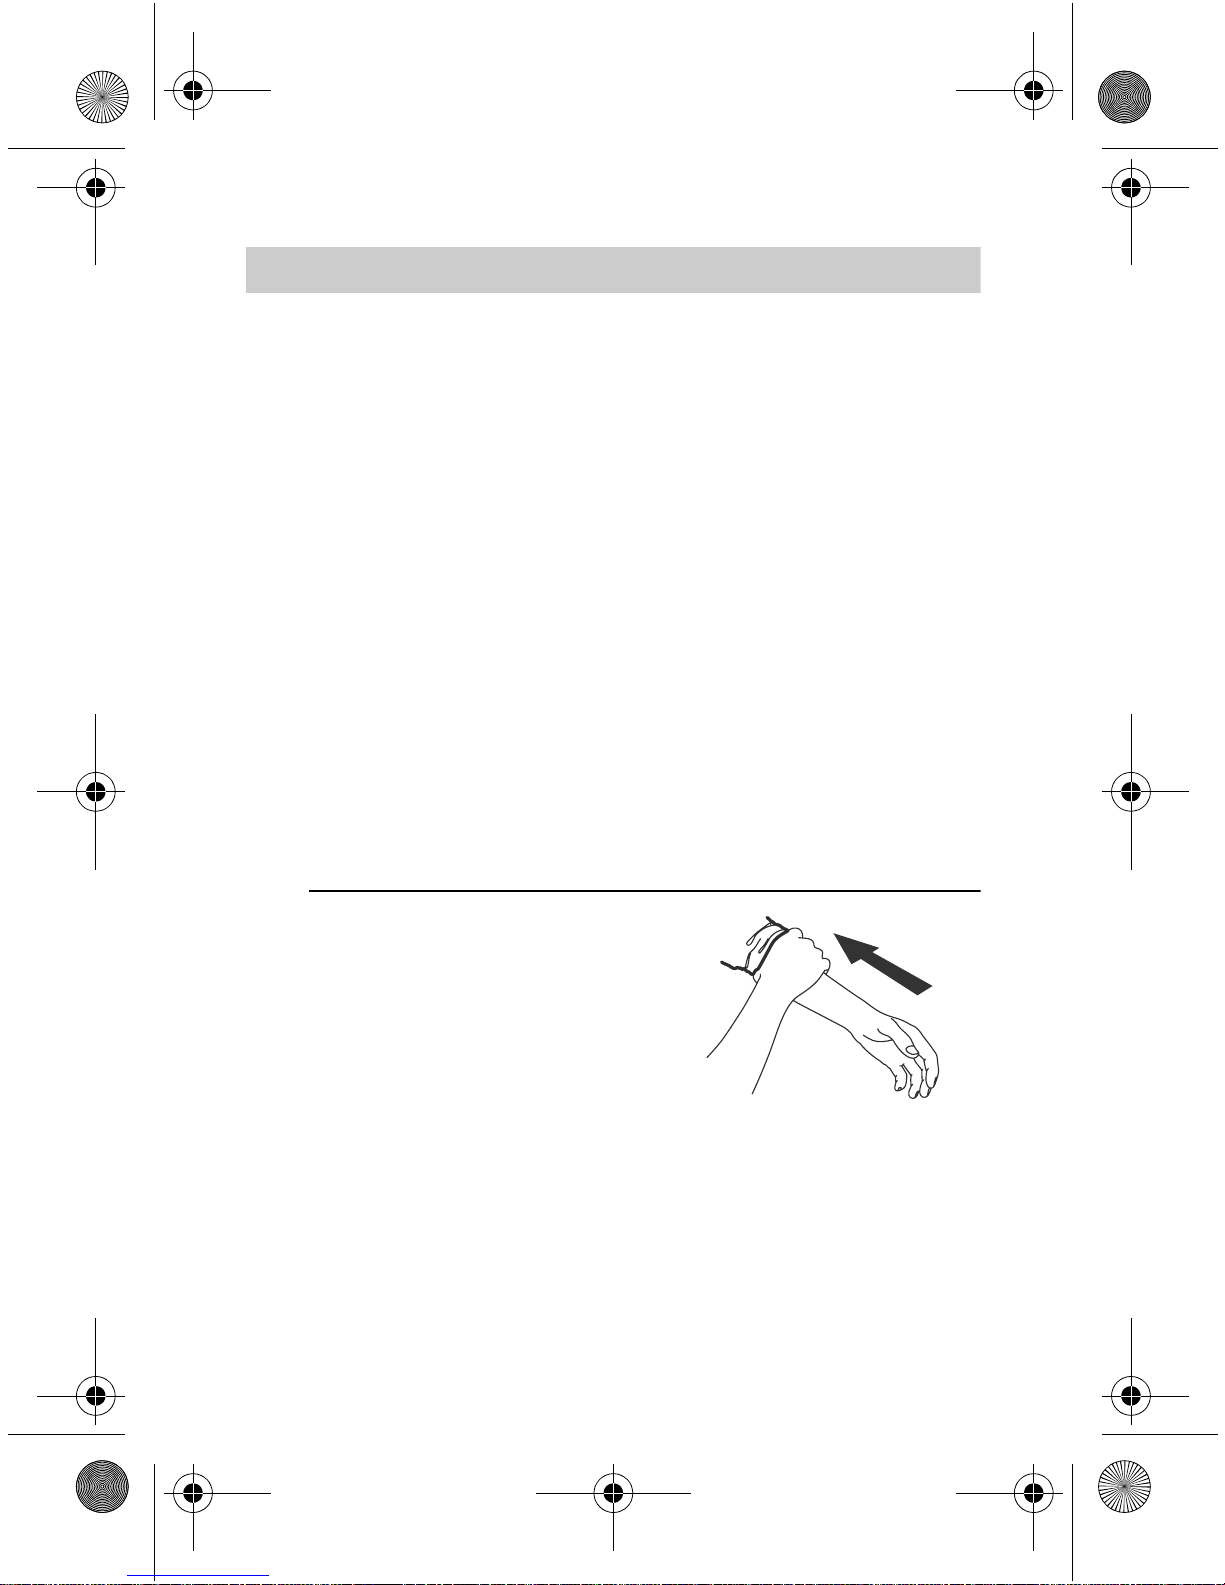
You can take a measurement on either your left or right wrist.
Notes:
• You can take a measurement on either your left or right
wrist. The blood pressure can differ between your right
and left wrist and therefore also the measured blood
pressure values can be different. Omron recommends to
always use the same wrist for a measurement. If the
values between the two wrists differ substantially, please
check with your doctor which wrist to use for your
measurement.
• To ensure correct measurement, apply the wrist cuff so
that it fits comfortably around your wrist.
• Roll up your sleeve so that the unit covers bare skin.
• Do not apply over clothing.
Taking a reading on the left wrist
1. Roll up your sleeve so that the
monitor covers bare skin. Do not
apply over clothing.
Make sure that your sleeve is not
too tight and does not constrict
the flow of blood in your arm.
15
Page 16
HEM-6052-C1_B_M.fm Page 16 Tuesday, March 9, 2010 9:15 AM
3.Using the Monitor
2. Place the wrist cuff over your left wrist with your left thumb
facing upward.
ulna
Note: Make sure that the wrist cuff does not cover the
protruding part of the wrist bone (ulna) on the
outside of the wrist.
3. Hold the bottom part of the wrist cuff and wrap it around
the wrist while pulling so that it fits comfortably.
Unless the wrist cuff is wrapped securely around the wrist,
it may not be possible to take correct measurements.
Taking measurements on the right wrist
Measurements can also be made on
the right wrist.
Fit the monitor on the right wrist as
shown.
Refer to 2.3 about how to modify the
settings.
16
Page 17
HEM-6052-C1_B_M.fm Page 17 Tuesday, March 9, 2010 9:15 AM
3.Using the Monitor
3.2 Taking a Reading
Note: This section is the example for the measurement
with the default setting (the positioning indicator is
“on1”, the wrist for measurement is “ ”, and the
buzzer is “on1”).
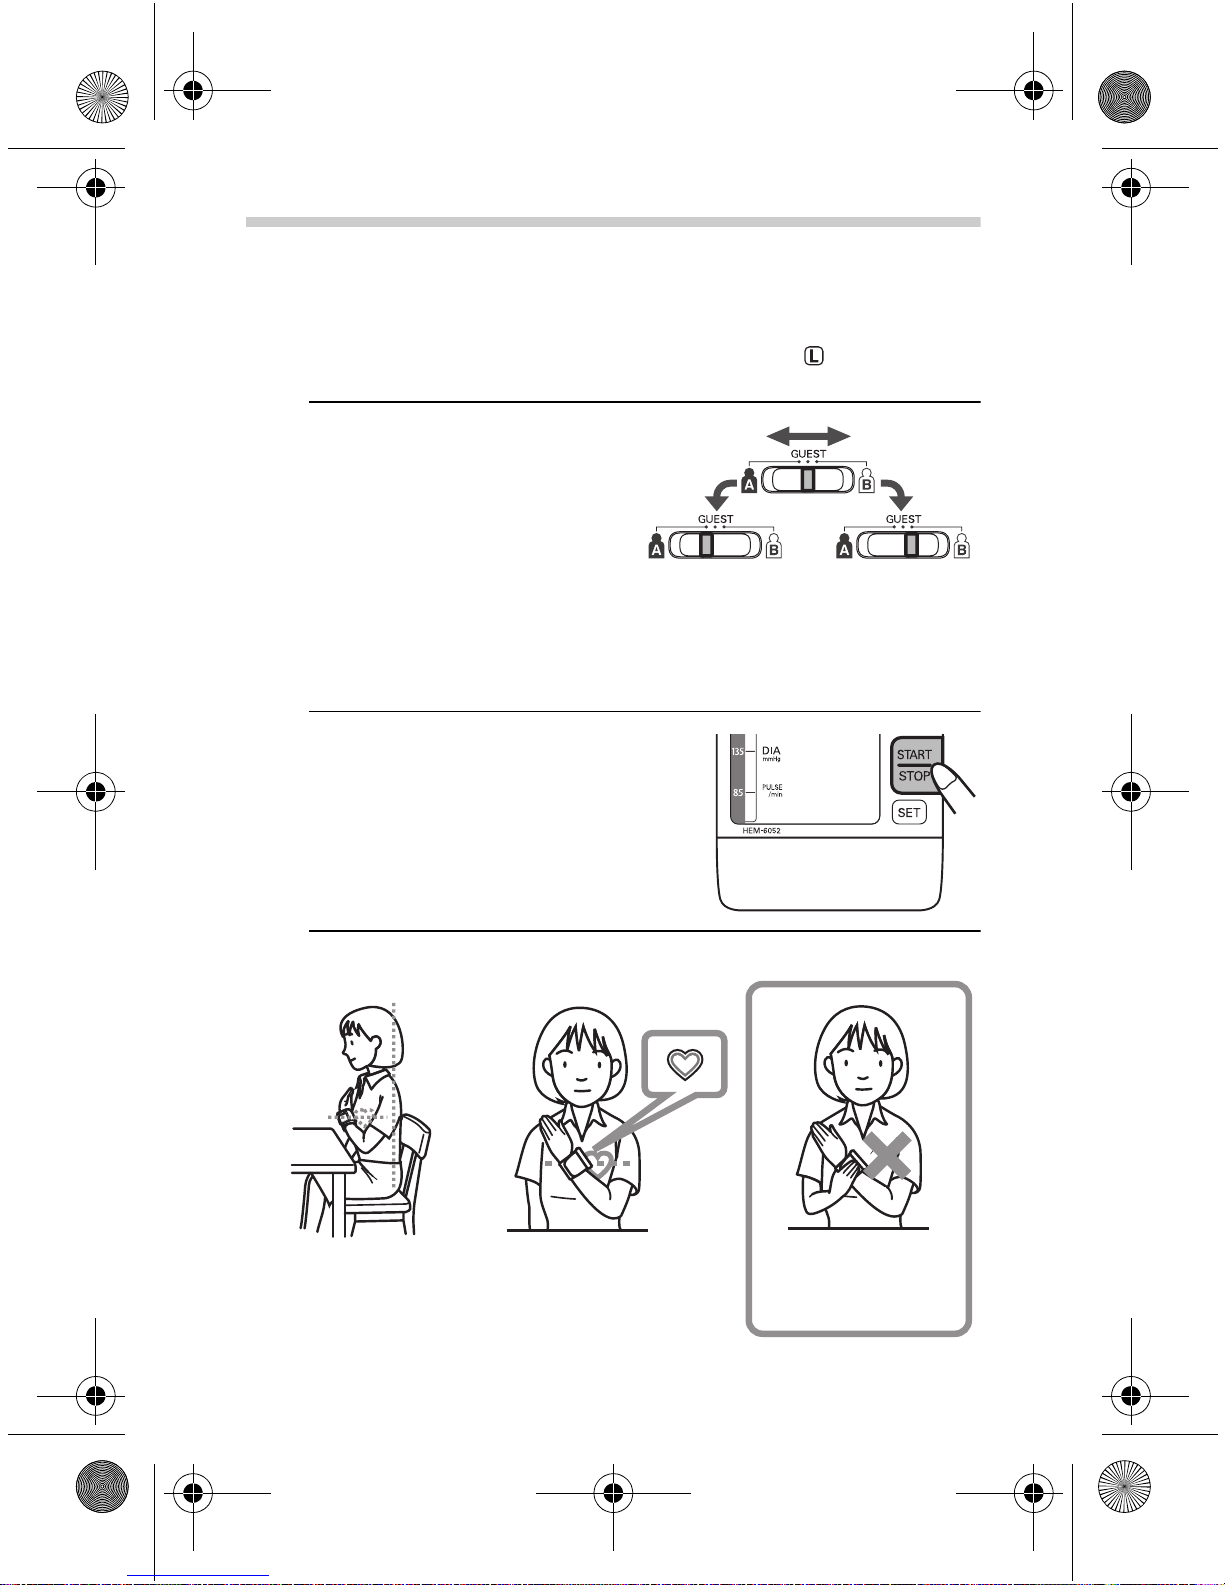
1. Select your User ID.
Always use the same user
ID when taking a
measurement. The unit
stores the measurement
values in the selected user
ID memory.
Slide the User ID selection
switch to select user A or B.
Note: If you select the GUEST, the measurement values
are not stored in the memory.
User A User B
2. Press the START/STOP button.
3.
Keep the h eart mark on the wrist cuff at the center of the chest.
Sit upright with your
back straigh t.
Do not hold the
wrist with the other
hand.
17
Page 18
HEM-6052-C1_B_M.fm Page 18 Tuesday, March 9, 2010 9:15 AM
3.Using the Monitor
Relax.
Bending. Griping.
Do not move your wrist and fingers.
Lower than
the heart.
The orange light The blue light
Higher than
the heart.
Far away
from the
heart.
While your position is improper, the Positioning indicator
lights in orange, when you are in proper position the buzzer
beeps “beep beep beep” and the Positioning indicator
turns to blue. Then the wrist cuff automatically starts to
inflate and measurement starts.
The Positioning indicator will light in the same color, after
measurement completed or when viewing results stored in
the memory.
18
Keep at the
center of the
chest.
beep beep beep
Page 19

HEM-6052-C1_B_M.fm Page 19 Tuesday, March 9, 2010 9:15 AM
3.Using the Monitor
Notes:
• Sit still and do not talk or move until the measurement is
completed.
• Keep the monitor at heart level until the measurement is
completed.
• To cancel the measurement, press the START/STOP
button at any time during measurement.
4. After the monitor has detected
your blood pressure and pulse
rate, the buzzer sounds “beep
pip pip pip”. The cuff
automatically deflates and your
blood pressure and pulse rate
are displayed.
Note: The time and date of the
measurement are
displayed alternately.
5. Press the START/STOP button
to turn the monitor off.
If you forget to turn the monitor
off, it will shut itself off
automatically after two minutes.
Alternating
display
19
Page 20

HEM-6052-C1_B_M.fm Page 20 Tuesday, March 9, 2010 9:15 AM
3.Using the Monitor
Important:
• Recent research suggests that
the following values can be used
as a guide to high blood pressure
for measurements taken at home.
Systolic Blood
Pressure
Diastolic Blood
Pressure
Above 135 mmHg
Above 85 mmHg
This criteria is for home blood pressure measurement.
For professional office blood pressure measurement
criteria, please refer to Chapter 7 “Some Useful
Information about Blood Pressure”.
• Your blood pressure monitor
includes an irregular heartbeat
feature. Irregular heartbeats can
influence the results of the
measurement. The irregular
heartbeat algorithm automatically determines if the
measurement is usable or needs to be repeated. If the
measurement results are affected by irregular heartbeats
but the result is valid, the result is shown together with
the irregular heartbeat symbol ( ). If the irregular
heartbeats cause the measurement to be invalid, no
result is shown. If the irregular heartbeat symbol ( ) is
shown after you have taken a measurement, repeat the
measurement. If the irregular heartbeat symbol ( ) is
shown frequently, please make your doctor aware of it.
• If you move during measurement,
the movement error symbol ( )
will appear on the display. Keep
still and repeat the measurement.
20
Page 21

HEM-6052-C1_B_M.fm Page 21 Tuesday, March 9, 2010 9:15 AM
3.Using the Monitor
What is Irregular Heartbeat?
An irregular
Normal Heartbeat
heartbeat is a
heartbeat rhythm
Pulse
that varies by
more than 25%
from the average
heartbeat rhythm
Blood pressure
Irregular Heartbeat
Short Long
detected while the
unit is measuring
Pulse
the systolic and
diastolic blood
Blood pressure
pressure.
If such an irregular rhythm is detected more than twice
during measurement, the irregular heartbeat symbol ( )
appears on the symbol when the measurement results are
displayed.
What is Arrhythmia?
A heartbeat is stimulated by electrical signals that cause
the heart to contract.
Arrhythmia is a condition where the heartbeat rhythm is
abnormal due to flaws in the bio-electrical system that
drives the heartbeat. Typical symptoms are skipped
heartbeats, premature contraction, an abnormally rapid
(tachycardia) or slow (bradycardia) pulse. This can be
caused by heart disease, aging, physical predisposition,
stress, lack of sleep, fatigue etc. Arrhythmia can only be
diagnosed by a doctor through a special examination.
Whether the appearance of the irregular heartbeat symbol
( ) in the results indicates arrhythmia or not can only be
determined by an examination and diagnosis by your
doctor.
Warning:
If the irregular heartbeat symbol ( ) is shown
frequently, please make your doctor aware of it.
Conducting self-diagnosis and treatment based on
measurement results is dangerous. Be sure to follow
the instructions of your doctor.
21
Page 22

HEM-6052-C1_B_M.fm Page 22 Tuesday, March 9, 2010 9:15 AM
3.Using the Monitor
3.3 Using the Memory Function
The monitor is designed to store the blood pressure and the
pulse rate in the memory for two people (user A and user B)
every time a measurement is completed.
The monitor automatically stores up to 100 sets of measurement
values (blood pressure and pulse rate) for each user (A and B).
The monitor also displays an average reading based on the
three most recent sets of measurement values taken within 10
minutes of the most recent reading.
Notes:
• To ensure that the measurement results are recorded
correctly, make sure that the date and time are set
correctly before taking a measurement.
• When 100 sets of readings are stored in memory, the
oldest set will be deleted to store a new set.
• The date and time of stored readings will be alternately
displayed.
To View the Average Value
Press the MEM button.
22
Page 23

HEM-6052-C1_B_M.fm Page 23 Tuesday, March 9, 2010 9:15 AM
3.Using the Monitor
To View Previous Readings Stored in Memory
1. Press the MEM button, while the average reading is
displayed, to view readings stored in memory from the
most recent to the oldest.
Alternating
display
2. Press the MEM button repeatedly to cycle through the
readings.
To Delete All Values in Memory
The values stored in the memory are deleted by user ID.
You cannot partially delete values stored in the memory. All
values for the user you select will be deleted.
When the memory symbol ( ) appears, first press the MEM
button, then while holding it down, press the START/STOP
button simultaneously for more than 2-3 seconds.
23
Page 24

HEM-6052-C1_B_M.fm Page 24 Tuesday, March 9, 2010 9:15 AM
Care and maintenance
4. Handling Error s and Problems
Symptom Cause Correction
No display appears when
the START/STOP button is
pressed.
Cannot measure or
readings are too high.
Batteries are empty.
Batterie s were
inserted incorrectly.
The wrist cuff is not
at heart level.
The wrist for
measurement is not
set appropriately.
The cuff is not
wrapped snugly
around the wrist.
Your arms and
shoulders are
tense.
Replace with new
batteries.
Insert the batteries
with the correct [+]
[-] polarity.
Measure while in
the correct posture.
Refer to section 3.2.
Make sure that the
setting is set
correctly for the
wrist being used to
take the
measurement.
Refer to section 3.2.
Wrap the cuff
correctly.
Refer to section 3.1.
Relax and try taking
the measurement
again.
There is no pressure but a
reading still appears when
the START/STOP button is
pressed.
The blood pressure is
different each time. The
reading is extremely lo w (or
high).
24
Movement or
talking during
measurement.
You are in memory
mode.
Blood pressure readings constantly vary
with time of measurement and nervous
condition. Take deep breaths to relax
before taki ng a me asurement.
Keep still and do
not talk during
measurement.
Turn power off once
and restart
measurement.
Page 25

HEM-6052-C1_B_M.fm Page 25 Tuesday, March 9, 2010 9:15 AM
4.Handling Errors and Problems
Error Symbol Cause Correction
Cuff is over
inflated.
Movement
during
measurement
The posture
has changed
during
measurement.
Press the START/STOP
button once to turn off the
power. Sit still, restart
measurement and do not talk
during measurement.
Carefully read and repeat the
steps in section 3.2. Make
sure that the setting is set
correctly for the wrist being
used to take the
measurement.
The wrist cuff is
not wrapped
securely.
The user ID has
changed during
measurement.
This symbol
indicates
irregular or
weak pulses
are detected,
but result can
be considered
reliable.
An Er mark is
displayed.
The battery
power is low.
Carefully read and repeat the
steps listed under section 3.1.
Do not change the user ID
during measurement.
Remove the monitor. Wait
2-3 minutes and then take
another measurement.
Repeat the steps in section
3.2. If this error continues to
appear, consult your doctor.
Consult your OMRON
retail outlet or distributor.
Replace the batteries with two
new “AAA”
batteries.
alkaline (LR03)
25
Page 26

HEM-6052-C1_B_M.fm Page 26 Tuesday, March 9, 2010 9:15 AM
5. Storage and Maintenance
To protect your monitor from damage, please avoid the f ollowing:
• Subjecting your monitor to extreme temperatures, humidity, or
direct sunlight.
• Washing the cuff or exposing the cuff or monitor to water.
• Disassembling the monitor.
• Subjecting the monitor to strong shocks or vibrations. Do not
drop the monitor.
• Cleaning the monitor with volatile liquids. The MONITOR
SHOULD BE CLEANED WITH A SOFT, DRY CLOTH.
Calibration and Service
• The accuracy of this blood pressure monitor has been carefully
tested and is designed for a long service life.
It is generally recommended to have the monitor inspected
every two years to ensure correct functioning and accuracy.
Please consult your authorised OMRON dealer.
• If the wrist cuff needs to be replaced have this done by an
authorised expert. Consult your local authorised OMRON
distributor or dealer.
• Do not carry out any repairs yourself. If a defect occurs or you
have doubts about the correct functioning of the device,
consult your local authorised OMRON distributor or dealer.
26
Page 27

HEM-6052-C1_B_M.fm Page 27 Tuesday, March 9, 2010 9:15 AM
6. Technical Data
Name OMRON Wrist Blood Pressure Monitor
Model HEM-6052
Display LCD Digital Display
Measurement Oscillometric method
Measurement Range
Memory
Accuracy
Inflation Automatic inflation by pump
Deflation Automatic rapid deflation
Power Source Two 1.5V “AAA” alkaline (LR03) batteries
Battery Life
Pressure: 0 to 299 mmHg/
Pulse: 40 to 180 beats/min
100 Measurements with date and time for
each user (A and B)
Pressure: Within ±3 mmHg
Pulse rate: Within ±5% of reading
Approximately 300 measurements when
using alkali
temperature of 23°C
ne (LR03) batteries at a room
Applied Part
Protection Against
Electric Shock
Operating Temperature/
Humidity
Storage Temperature/
Humidity/ Air pressure
Weight of Main Unit Approximately 114 g (not including batteries)
Outer Dimensions
Measurable
circumference of wrist
Package Content
= Type B
Internally powered ME equipment
10°C to 40°C, 30 to 85% RH
-20°C to 60°C, 10 to 95% RH, 700-1060 hPa
70 mm (w) x 70 mm (h) x 21mm(d) (not
including the wrist cuff)
Approximately 13.5 to 21.5 cm
Main unit, storage case, two “AA
(LR03) batteries, instruction manual, and
quick reference guide
A” alkaline
Notes:
• Subject to technical modification without prior notice
• Disposal of this product and used batteries should be carried
out in accordance with the national regulations for the disposal
of electronic products.
27
Page 28

HEM-6052-C1_B_M.fm Page 28 Tuesday, March 9, 2010 9:15 AM
6.Technical Data
• This device fulfils the provisions of EC directive 93/42/EEC
(Medical Device Directive).
• This blood pressure monitor is designed according to the European
Standard EN1060, Noninvasive sphygmomanometers Part 1:
General Requirements and Part 3: Supplementary requirements for
electromechanical blood pressure measuring systems.
Important information regarding Electro Magnetic Compatibility (EMC)
With the increased number of electronic devices such as PC’s and mobile (cellular)
telephones, medical devices in use may be susceptible to electromagnetic interference
from other devices. Electromagnetic interference may result in incorrect operation of the
medical device and create a potentially unsafe situation.
Medical devices should also not interfere with other devices.
In order to regulate the requirements f or EMC (Electro Magneti c Compatibility ) with the aim
to prevent unsafe product situations, the EN60601-1-2:2007 standard has been
implemented. This stan dard defines t he le v els of im munity to electromag netic interf ere nces
as well as maximum levels of electromagnetic emissions for medical devices.
This medical device manufactured by OMRON HEALTHCARE conforms to this EN606011-2:2007 standard for both immunity and emissions.
Nevertheless, special precautions need to be observed:
• Do not use mobile (cellular) telephones and other devices, which generate strong
electrical or electromagnetic fields, near the medical device. This may result in incorrect
operation of the unit an d create a potentia lly unsaf e situation . Recommenda tion is to k eep
a minimum distance of 7 m. Verify correct operation of the device in case the distance is
shorter.
Further documentation in accordance with EN60601-1-2:2007 is available at OMRON
HEALTHCARE EUROPE at the address mentioned in this instruction manual.
Documentation is also available at www.omron-healthcare.com
.
Correct Disposal of This Product
(Waste Electrical & Elec t roni c Equipment)
This marking shown on the product or its literature, indicates that it
should not be disposed of, with other household wastes at the end of
its working life. To prevent possib le harm to the environment or human
health from uncontrolled waste disposal, please separate this from
other types of wastes and recycle it responsibly to promote the
sustainable reuse of material resources.
Household users should contact either the retailer where they purchased this
product, or their local government office, for details of where and how they can take
this item for environmentally saf e recycling.
Business users should contact their supplier and check the terms and conditions of
the purchase contract. This product should not be mixed with other commercial
wastes for disposal.
This product does not contain any hazardous substances.
28
Page 29

HEM-6052-C1_B_M.fm Page 29 Tuesday, March 9, 2010 9:15 AM
7. Some Useful Information about
Blood Pressure
What is Blood Pressure?
Blood pressure is a measure of the force of blood flowing
against the walls of the arteries. Arterial blood pressure is
constantly changing during the course of the heart’s cycle.
The highest pressure in the cycle is called the Systolic Blood
Pressure; the lowest is the Diastolic Blood Pressure.
Both pressure readings, the Systolic and Diastolic, are
necessary to enable a doctor to evaluate the status of a patient’ s
blood pressure.
Why is it a Good Thing to measure Blood
Pressure at Home?
Having your blood pressure measured by a doctor can cause
anxiety which is itself a cause of high blood pressure. As a
variety of conditions affect blood pressure, a single
measurement may not be sufficient for an accurate diagnosis.
Many factors such as ph ysical activity, anxiety, or the time of day,
can influence your blood pressure. Thus it is best to try and
measure your blood pressure at the same time each day, to get
an accurate indication of any changes in blood pressure. Blood
pressure is typically low in the morning and increases from
afternoon to evening. It is lower in the summer and higher in the
winter.
Blood pressure is measured in millimetres of mercury (mmHg)
and measurements are written with the systolic pressure before
the diastolic e.g. A blood pressure written as 140/90, is referred
to as 140 over 90 mmHg.
29
Page 30

HEM-6052-C1_B_M.fm Page 30 Tuesday, March 9, 2010 9:15 AM
7.Some Useful Information about Blood Pressure
200
150
mmHg
100
50
6121824
Example: fluctuation within a day (male, 35 years old)
Upper curve: systolic blood pressure
Lower curve: diastolic blood pressure
Time of day
Classification of Blood Pressure by the World
Heath Organization
The World Health Organization (WHO) and the International
Society of Hypertension (ISH) developed the Blood Pressure
Classification shown in this figure.
Systolic blood pressure
(mmHg)
Severe hypertension
180
160
140
Normal systolic value
130
120
Optimal blood
pressure
(target value)
Moderate hypertension
Mild hypertension
Normal blood
pressure
85 90 100 110
80
Diastolic
blood
pressure
(mmHg)
This classification is based on the blood pressure values
measured on people in a sitting position in outpatient
departments of hospitals.
*There is no universally accepted definition of hypotension.
However, those having the systolic pressure below 100 mmHg
are assumed as hypotensive.
30
Page 31

2
3
4
6
8
15
24
26
27
28
Page 32

3
HEM-6052
HEM-6052
100
HEM-6052
着
Page 33

4
•
•
•
•
•
•
299 mmHg
•
•
•
Page 34

5
•
•
•
•
•
•
“AAA” LR03
•
2.2 “ ”
•
•
•
•
Page 35

6
1.
A.
B.
C.
D. (MEM)
E.
F. ID
G.
H. ()
I. ()
J. 2 “AAA” LR03 K.
•
•
A
B
C
D
E
G
F
IH
J
K
Page 36

7
1.
L.
M.
N.
O.
P.
Q.
R.
S.
T. ID A B
U.
V.
W.
X.
Y.
AA.
Z.
P
Q
R
S
T
U
L M N O
Z Y X W V
AA
A
B
Page 37

8
2.
2.1
1.
2. “AAA”
LR03
+/–
+/–
3.
2.2
4.
Page 38

9
2.
-
-
•
•
•
•
•
1.5V “AAA” LR03
300
着
2.2
•
300
Page 39

10
2.
2.2
1.
2009
• 2009 2030
2030 2009
•
2.
3.
100
•
•
Page 40

11
2.
4. 2 3
5. 2 3
6. START/STOP
Page 41

12
2.
2.3
1. ID SET
on1
2. MEM on1 on2
oFF
SET MEM
START/STOP
on1 2 5
on2 2
oFF
Page 42

13
2.
1.
•
• oFF
2. MEM
SET
Page 43

14
2.
1. SET
on1
on
2. MEM
on1 on2
2
on1
on2
oFF
oFF
on
oFF
on1
on1
SET
START/STOP
Page 44

15
3.
3.1
1.
•
Omron
•
•
•
Page 45

16
3.
2.
3.
2.3
Page 46

17
3.
3.2
on1
on1
1. ID
ID
ID
ID A B
GUEST
2. START/STOP
3.
Page 47

18
3.
Page 48

19
3.
• 并且不要說話或
•
• START/STOP
4.
5. START/STOP
Page 49

20
3.
7
•
135 mmHg
85 mmHg
•
如果你測量過程中移動身体,顯示
上將出現移動錯誤符號( )。
保持正确姿勢再次測量。
Page 50

21
3.
25%
Page 51

22
3.
3.3
•
• 100
•
MEM
1.
MEM
A B
A B 100
10
Page 52

23
3.
2. MEM
ID
MEM
2 - 3
START/STOP
Page 53

24
4.
START/STOP
[+] [-]
3.2
3.2
START/STOP
3.1
Page 54

25
4.
START/STOP
3.2
3.1
ID
ID
2-3
3.2
Er
OMRON
“AAA”
LR03
Page 55

26
5.
•
•
•
•
•
•
OMRON
•
Omron
•
Omron
Page 56

27
6.
OMRON
HEM-6052
LCD
0 299 mmHg
40 180
±3 mmHg
±5%
100
A B
2 1.5V “AAA” LR03
23°C
300
10°C 40°C 30 85% RH
-20°C 60°C 10 95% RH
114
70 mm x 70 mm x 21 mm
13.5 cm 21.5 cm
2 “AAA” LR03
= B
ME
•
Page 57

28
7.
mmHg
140/90
140 mmHg 90 mmHg
Page 58

29
7.
mmHg
200
150
100
50
61218 24
(mmHg)
(mmHg)
80
180
160
140
130
120
85 90 100 110
WHO ISH
*
100 mmHg
Page 59

Page 60

HEM-6052-C1_B_M.fm Page 31 Tuesday, March 9, 2010 9:15 AM
Asia Pacific
HQ
OMRON HEALTHCARE Co., Ltd.
24, Yamanouchi Yamanoshita-cho
Ukyo-ku, Kyoto, 615-0084 JAPAN
OMRON HEALTHCARE
EUROPE B.V.
Kruisweg 577, 2132 NA
Hoofddorp THE NETHERLANDS
OMRON HEALTHCARE
SINGAPORE PTE LTD.
438A Alexandra Road, #05-05/08,
Alexandra Technopark,
Singapore 119967
5327998-2B
 Loading...