

Page 1
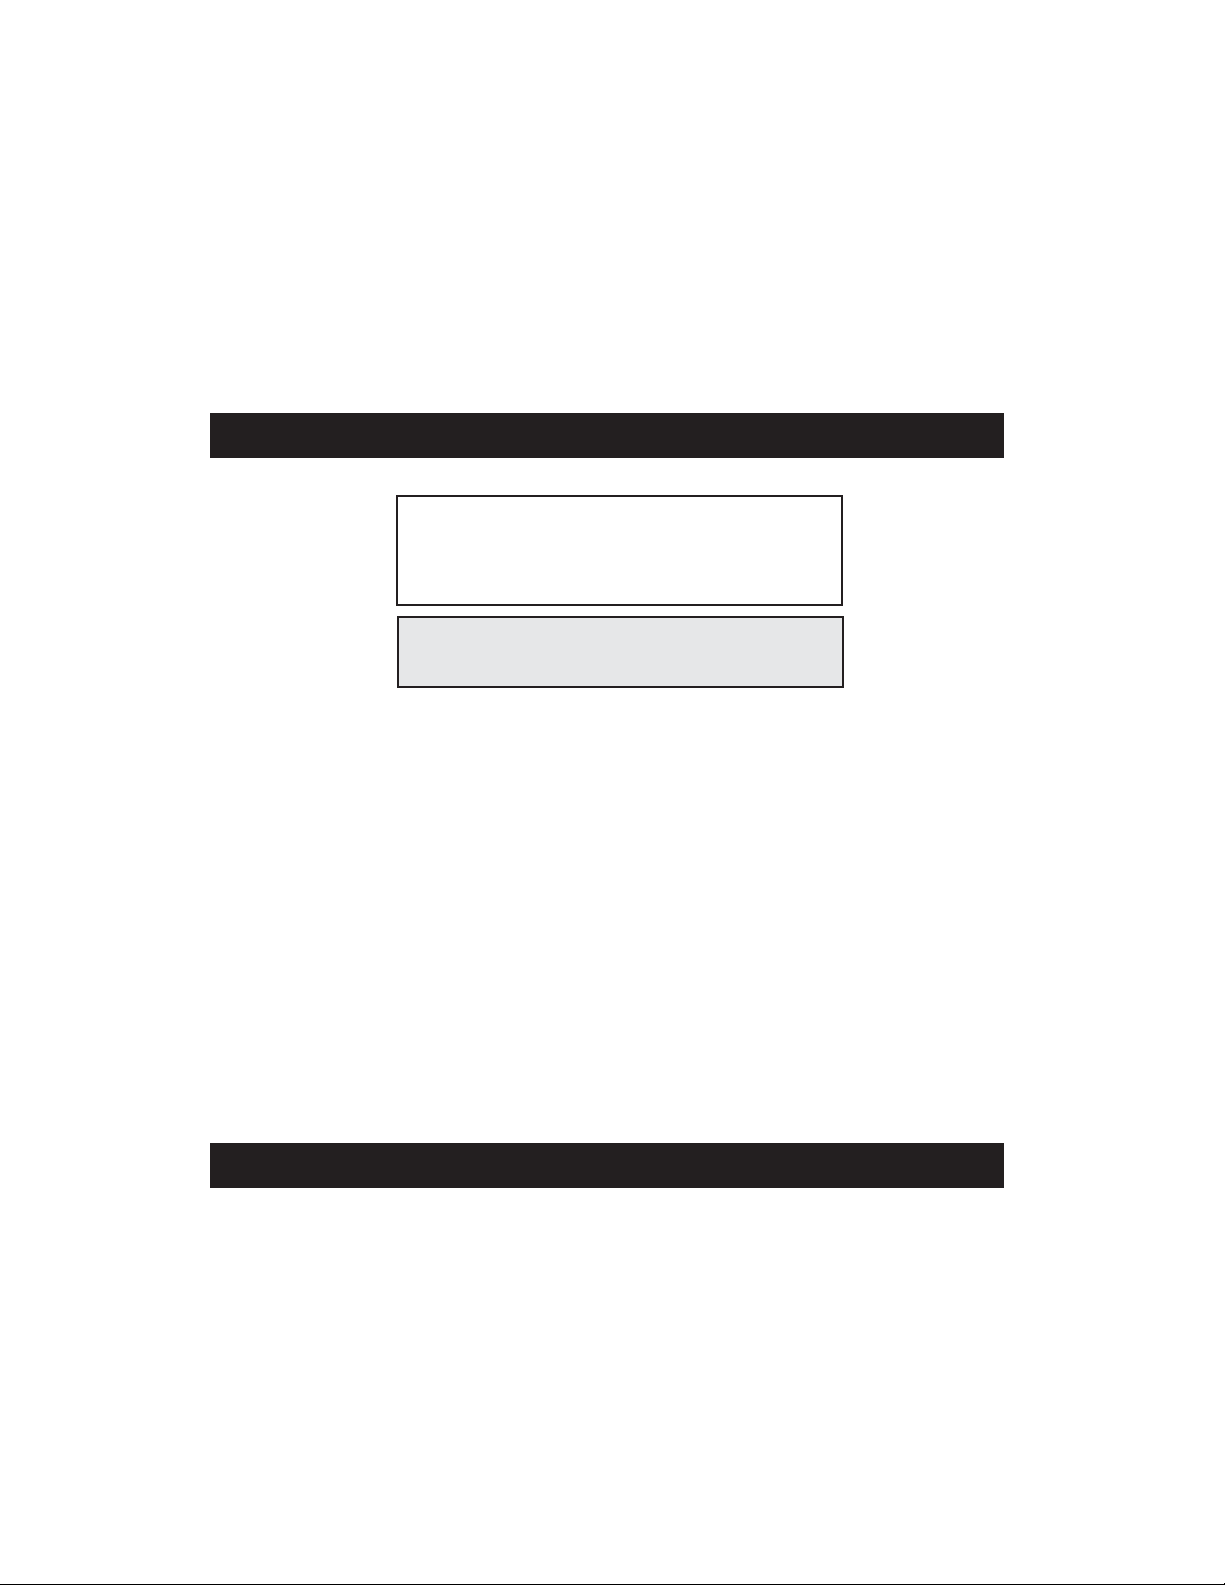
Portable ECG Monitor
Model HCG-801
INSTRUCTION MANUAL
Caution: Federal (USA) law restricts this device to sale by or on the order of a physician.
ESPAÑOL
ENGLISH
Page 2

2
Before Using the Unit
Introduction . . . . . . . . . . . . . . . . . . . . . . . . . . . . . . . . . . . . . . . . . . . . . . . . . . . . . . . . . . . . . . . . . . . . . . . 4
General Information About the Heart and ECG Measurements . . . . . . . . . . . . . . . . . . . . . . . . . . . . . . . 5
Important Safety Notes . . . . . . . . . . . . . . . . . . . . . . . . . . . . . . . . . . . . . . . . . . . . . . . . . . . . . . . . . . . . . . . 6
Know Your Unit . . . . . . . . . . . . . . . . . . . . . . . . . . . . . . . . . . . . . . . . . . . . . . . . . . . . . . . . . . . . . . . . . . . . 9
Operating Instructions
How to Insert and Replace Batteries . . . . . . . . . . . . . . . . . . . . . . . . . . . . . . . . . . . . . . . . . . . . . . . . . . . 13
Battery Life and Replacement . . . . . . . . . . . . . . . . . . . . . . . . . . . . . . . . . . . . . . . . . . . . . . . . . . . . 14
How to Attach the Battery Cover . . . . . . . . . . . . . . . . . . . . . . . . . . . . . . . . . . . . . . . . . . . . . . . . . . . . . . 15
How to Set the Date and Time . . . . . . . . . . . . . . . . . . . . . . . . . . . . . . . . . . . . . . . . . . . . . . . . . . . . . . . . 16
How to Use the SD Memory Card . . . . . . . . . . . . . . . . . . . . . . . . . . . . . . . . . . . . . . . . . . . . . . . . . . . . . 18
Inserting and Ejecting SD Memory Card . . . . . . . . . . . . . . . . . . . . . . . . . . . . . . . . . . . . . . . . . . . 18
Formatting an SD Memory Card . . . . . . . . . . . . . . . . . . . . . . . . . . . . . . . . . . . . . . . . . . . . . . . . . .22
Important Notes on Taking a Measurement . . . . . . . . . . . . . . . . . . . . . . . . . . . . . . . . . . . . . . . . . . . . . . 24
How to Take a Measurement . . . . . . . . . . . . . . . . . . . . . . . . . . . . . . . . . . . . . . . . . . . . . . . . . . . . . . . . . 25
Common Causes of Inaccurate Measurement Results . . . . . . . . . . . . . . . . . . . . . . . . . . . . . . . . . 29
How to Display ECG Data . . . . . . . . . . . . . . . . . . . . . . . . . . . . . . . . . . . . . . . . . . . . . . . . . . . . . . . . . . . 30
How to Adjust the Settings . . . . . . . . . . . . . . . . . . . . . . . . . . . . . . . . . . . . . . . . . . . . . . . . . . . . . . . . . . . 32
Basic Operation . . . . . . . . . . . . . . . . . . . . . . . . . . . . . . . . . . . . . . . . . . . . . . . . . . . . . . . . . . . . . . . 32
Date and Time . . . . . . . . . . . . . . . . . . . . . . . . . . . . . . . . . . . . . . . . . . . . . . . . . . . . . . . . . . . . . . . . 34
Volume . . . . . . . . . . . . . . . . . . . . . . . . . . . . . . . . . . . . . . . . . . . . . . . . . . . . . . . . . . . . . . . . . . . . . 34
Brightness . . . . . . . . . . . . . . . . . . . . . . . . . . . . . . . . . . . . . . . . . . . . . . . . . . . . . . . . . . . . . . . . . . . 35
Contrast . . . . . . . . . . . . . . . . . . . . . . . . . . . . . . . . . . . . . . . . . . . . . . . . . . . . . . . . . . . . . . . . . . . . . 36
Language . . . . . . . . . . . . . . . . . . . . . . . . . . . . . . . . . . . . . . . . . . . . . . . . . . . . . . . . . . . . . . . . . . . . 37
Date Format . . . . . . . . . . . . . . . . . . . . . . . . . . . . . . . . . . . . . . . . . . . . . . . . . . . . . . . . . . . . . . . . . 38
Message . . . . . . . . . . . . . . . . . . . . . . . . . . . . . . . . . . . . . . . . . . . . . . . . . . . . . . . . . . . . . . . . . . . . 39
Overwrite . . . . . . . . . . . . . . . . . . . . . . . . . . . . . . . . . . . . . . . . . . . . . . . . . . . . . . . . . . . . . . . . . . . 40
About the Overwrite Message . . . . . . . . . . . . . . . . . . . . . . . . . . . . . . . . . . . . . . . . . . . . . . . . . . . . 40
TABLE OF CONTENTS
Page 3

How to Erase, Save and Organize ECG Data . . . . . . . . . . . . . . . . . . . . . . . . . . . . . . . . . . . . . . . . . . . .41
Erasing ECG Data . . . . . . . . . . . . . . . . . . . . . . . . . . . . . . . . . . . . . . . . . . . . . . . . . . . . . . . . . . . . . 41
Copying Data to an SD Memory Card . . . . . . . . . . . . . . . . . . . . . . . . . . . . . . . . . . . . . . . . . . . . . 44
Copying Data from the SD Memory Card to a PC . . . . . . . . . . . . . . . . . . . . . . . . . . . . . . . . . . . . 46
Copying Data from a PC to the SD Memory Card . . . . . . . . . . . . . . . . . . . . . . . . . . . . . . . . . . . . 47
Messages . . . . . . . . . . . . . . . . . . . . . . . . . . . . . . . . . . . . . . . . . . . . . . . . . . . . . . . . . . . . . . . . . . . . . . . . . 48
Data Description Messages . . . . . . . . . . . . . . . . . . . . . . . . . . . . . . . . . . . . . . . . . . . . . . . . . . . . . . 48
Criteria of Data Description Messages . . . . . . . . . . . . . . . . . . . . . . . . . . . . . . . . . . . . . . . . . . . . . .49
Heart Rate Message . . . . . . . . . . . . . . . . . . . . . . . . . . . . . . . . . . . . . . . . . . . . . . . . . . . . . . . . . . . . 49
Action Messages . . . . . . . . . . . . . . . . . . . . . . . . . . . . . . . . . . . . . . . . . . . . . . . . . . . . . . . . . . . . . . 49
Lists and Explanations of Messages . . . . . . . . . . . . . . . . . . . . . . . . . . . . . . . . . . . . . . . . . . . . . . .50
Notice Messages . . . . . . . . . . . . . . . . . . . . . . . . . . . . . . . . . . . . . . . . . . . . . . . . . . . . . . . . . . . 50
Warning Messages . . . . . . . . . . . . . . . . . . . . . . . . . . . . . . . . . . . . . . . . . . . . . . . . . . . . . . . . . 50
Error Messages . . . . . . . . . . . . . . . . . . . . . . . . . . . . . . . . . . . . . . . . . . . . . . . . . . . . . . . . . . . . 52
Care and Maintenance
Trouble Shooting . . . . . . . . . . . . . . . . . . . . . . . . . . . . . . . . . . . . . . . . . . . . . . . . . . . . . . . . . . . . . . . . . . 54
Maintenance and Storage . . . . . . . . . . . . . . . . . . . . . . . . . . . . . . . . . . . . . . . . . . . . . . . . . . . . . . . . . . . . 56
FCC Statement . . . . . . . . . . . . . . . . . . . . . . . . . . . . . . . . . . . . . . . . . . . . . . . . . . . . . . . . . . . . . . . . . . . . 58
Warranty Information . . . . . . . . . . . . . . . . . . . . . . . . . . . . . . . . . . . . . . . . . . . . . . . . . . . . . . . . . . . . . . . 59
Specifications . . . . . . . . . . . . . . . . . . . . . . . . . . . . . . . . . . . . . . . . . . . . . . . . . . . . . . . . . . . . . . . . . . . . . 60
Sample Symptom Log . . . . . . . . . . . . . . . . . . . . . . . . . . . . . . . . . . . . . . . . . . . . . . . . . . . . . . . . . . . . . .61
Notes . . . . . . . . . . . . . . . . . . . . . . . . . . . . . . . . . . . . . . . . . . . . . . . . . . . . . . . . . . . . . . . . . . . . . . . . . . . . 63
TABLE OF CONTENTS
3
Page 4
4
Thank you for purchasing the OMRON®Portable ECG Monitor.
INTRODUCTION
Fill in for future reference.
DATE PURCHASED:________________
SERIAL NUMBER: _________________
Staple your purchase receipt here
Your OMRON HCG-801 is an easy-to-use electrocardiograph unit that can record and store
electrocardiogram (ECG) measurements of your heart rhythm. Each ECG reading records an approximately
30-second measurement and these ECG readings can help your doctor monitor your condition. It also
includes guidance screens to help you obtain good data when taking measurements. This unit is intended for
use on the adult population.
The monitor is supplied with an SD memory card that can store up to 300 measurements, including the ECG
data along with the date and time of measurement. Storing ECG data on the SD memory card, or in unit
memory, allows your doctor to view them later.
IMPORTANT: Please note that while the measurements from an ECG monitor are a useful guide for your
doctor, they cannot detect all changes in heart conditions. Always consult your doctor if you
notice any change in your condition, regardless of the measurement results. Consult a
doctor even if “Regular heart rate, Regular heart rhythm” is displayed as the data message,
if you have been diagnosed with a heart condition.
The HCG-801 comes with the following components:
• Main Unit • SD Memory Card • Storage Pouch • 2 × LR03(AAA) Batteries
• Instruction Manual* • Registration Card • Quick Reference Card
* The illustrations used in this manual may differ slightly from the appearance of the actual unit.
SAVE THESE INSTRUCTIONS
Before Using the Unit
Page 5
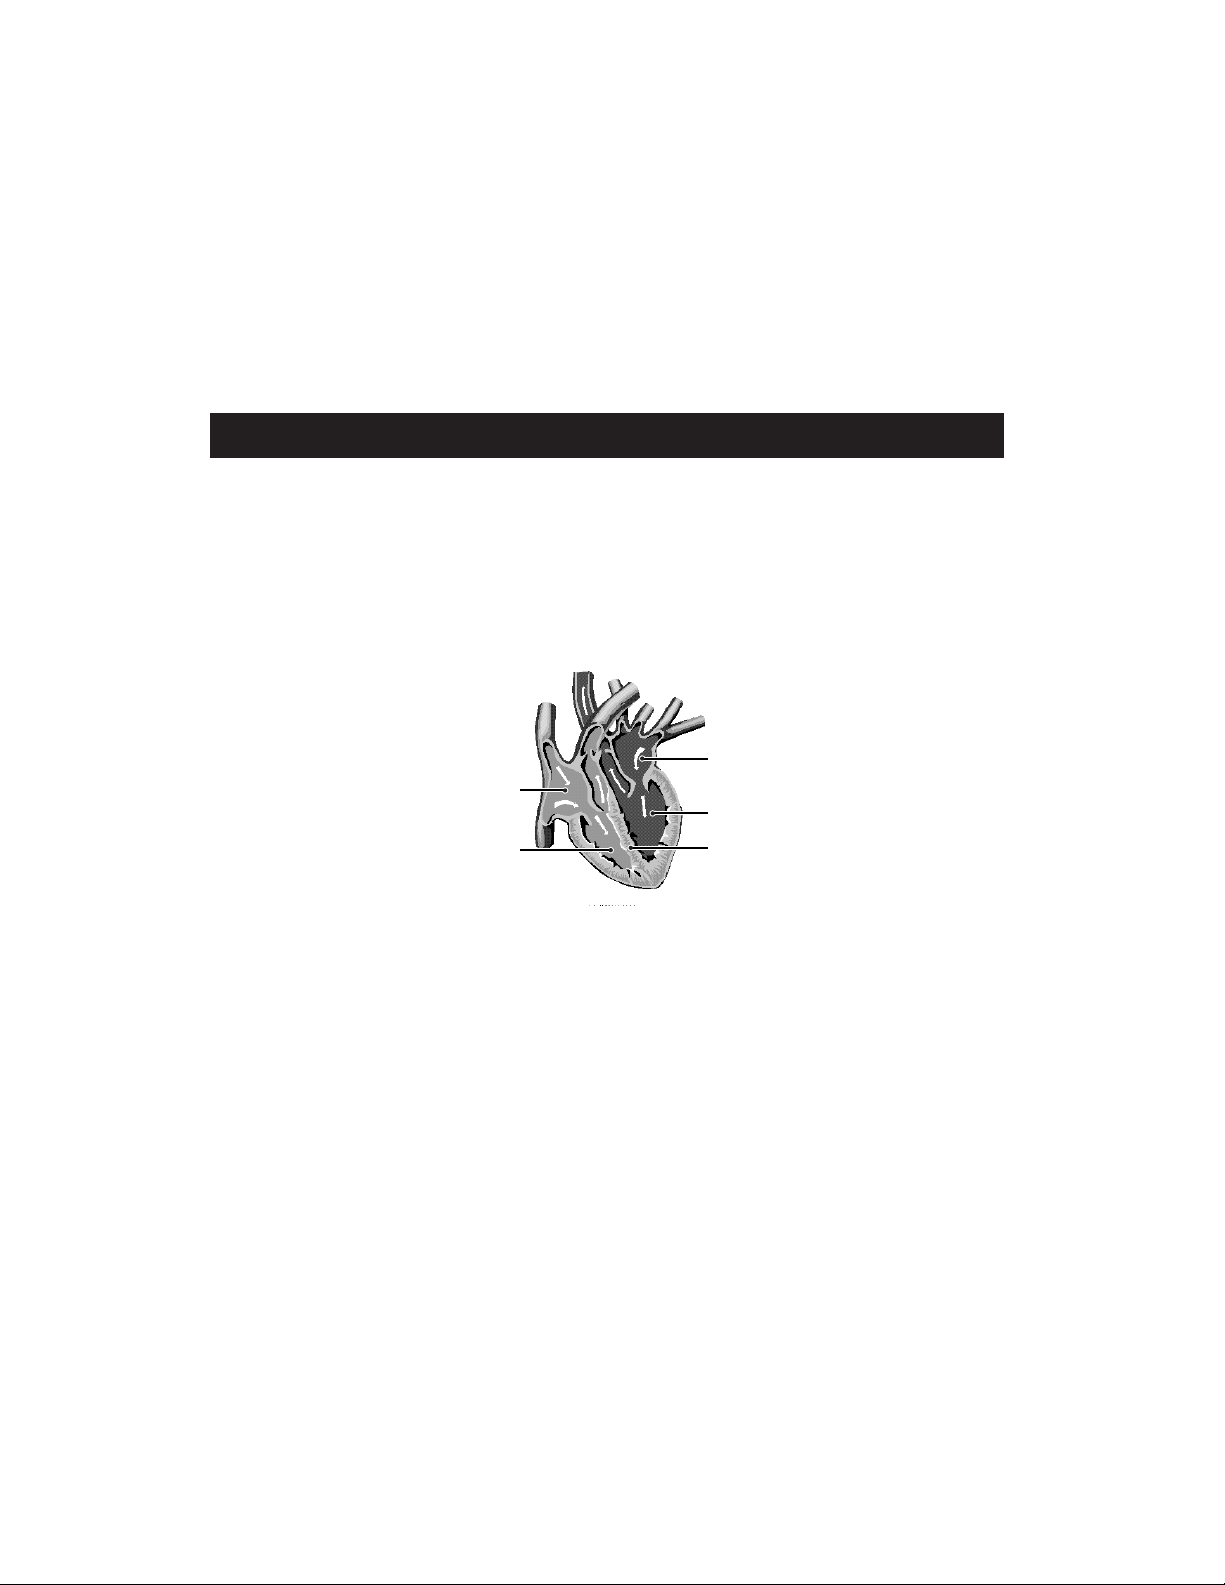
The heart is a muscular pump controlled by electrical impulses generated by the body. It is divided into two
sides by the septa and each side has two chambers – an atrium and a ventricle – linked by a one-way valve.
The left atrium and ventricle control oxygenated blood, and the right atrium and ventricle de-oxygenated
(“used”) blood.
The electrical impulse that causes the heart to beat spreads across the atria, causing the left and right atria to
contract and pump blood into the left and right ventricles respectively. The two ventricles then contract and
pump blood out of the heart. The heart muscle then relaxes, or re-polarizes, allowing blood to fill up the
heart again.
An ECG monitor is able to measure the electrical impulse as it passes across and through the heart, causing
the heart to beat. An ECG does not measure the movement of your heartbeat, but rather the electrical
activity that causes the heart to beat. The measurements recorded by an ECG monitor, when combined with
a medical examination, can help your doctor monitor your heart condition. The ECG measurements
recorded by the unit are NOT designed or intended for medical diagnosis. Conditions such as arrhythmia
can only be diagnosed by a doctor through a special examination.
GENERAL INFORMATION ABOUT THE HEART AND ECG MEASUREMENTS
5
Left atrium
Left ventricle
Septa
Right atrium
Right ventricle
Page 6
6
IMPORTANT SAFETY NOTES
To assure the correct use of the product basic safety measures should always be followed including the
warnings and cautions listed in this instruction manual.
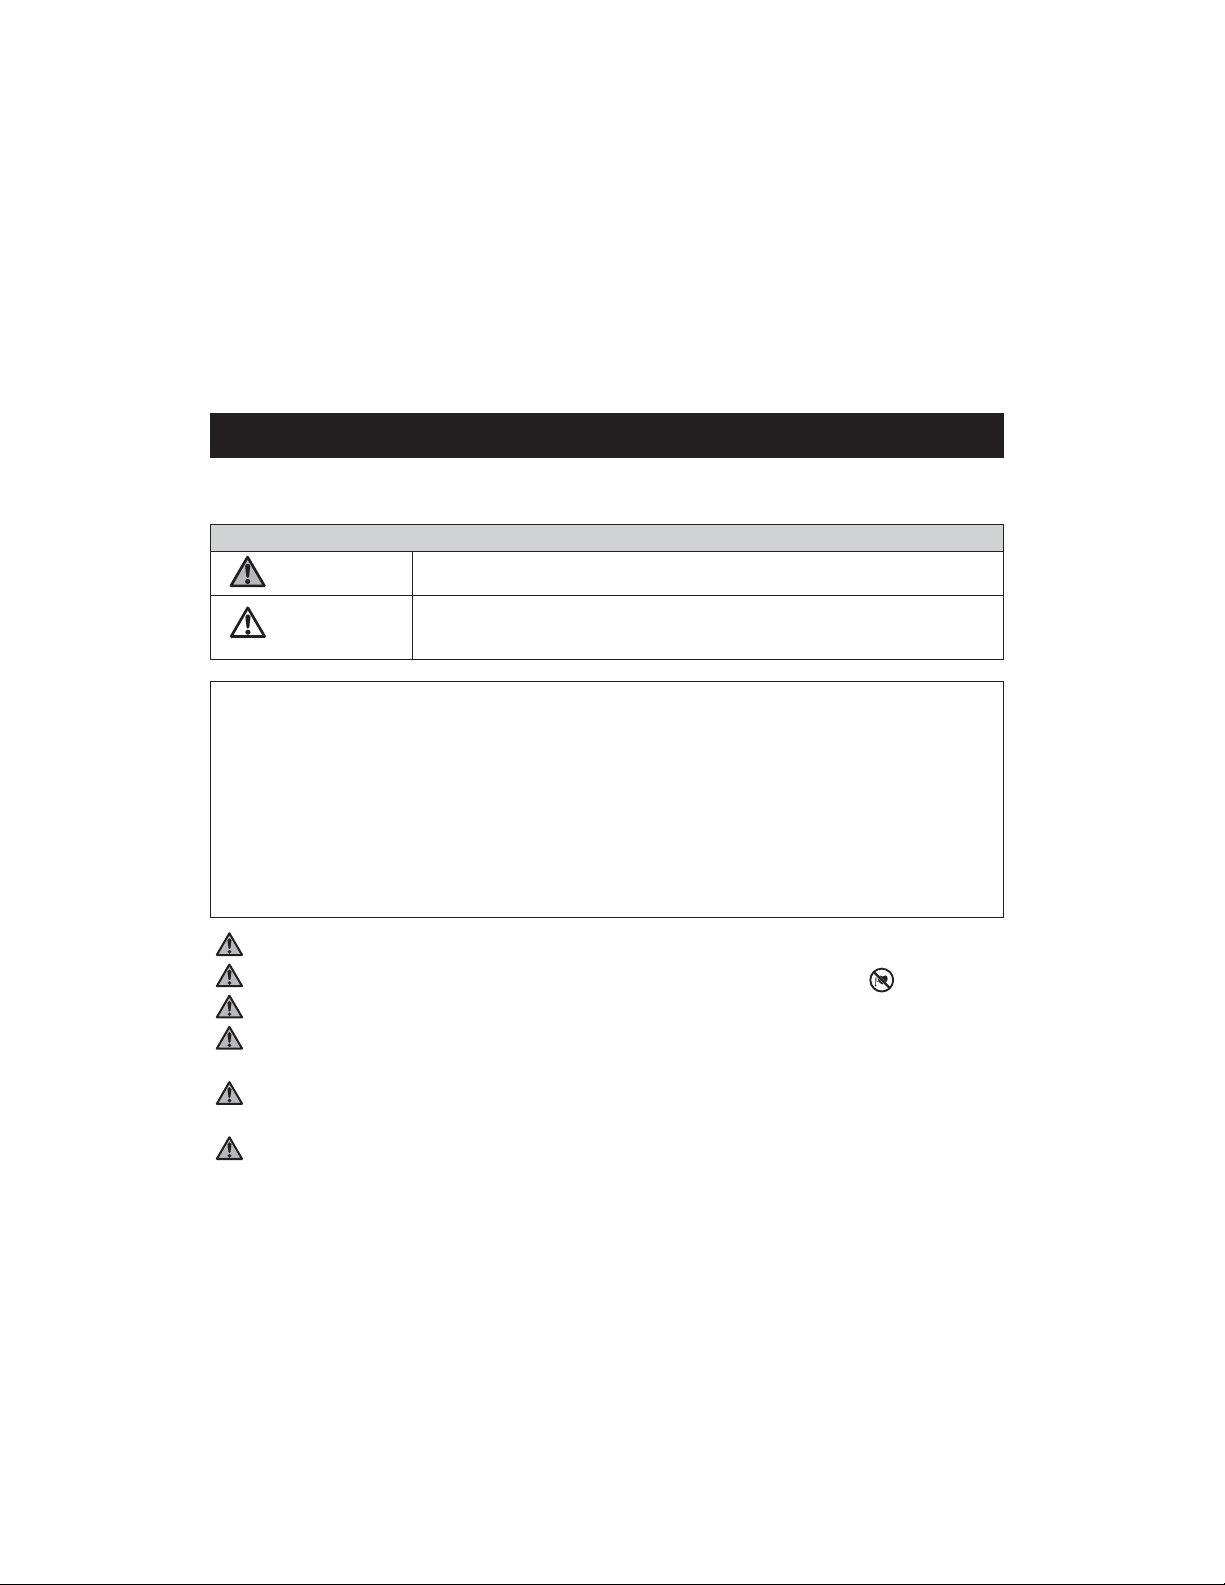
SAFETY SYMBOLS USED IN THIS INSTRUCTION MANUAL
Indicates a potentially hazardous situation which, if not avoided, could result
in death or serious injury.
Indicates a potentially hazardous situation which, if not avoided, may result in
minor or moderate injury to the user or patient or damage to the equipment
or other property.
WARNING
CAUTION
THIS UNIT IS DESIGNED FOR RECORDING THE ECG WAVEFORM IN THE ADULT
POPULATION. IT IS NOT DESIGNED OR INTENDED FOR MEDICAL DIAGNOSIS.
NEVER USE THE UNIT IN CRITICAL CARE SITUATIONS.
• Messages after measurement report heart rate and heart rhythm only.
• This device neither detects nor measures all heart rate, heart rhythm and heart waveform changes,
especially those related to ischemic heart conditions.
• Always consult your doctor if you notice change in your condition, regardless of measurement results
and messages.
WARNING:
Do not use this device if you have a cardiac pacemaker or other implanted devices.
Do not use this device with a defibrillator.
Do not use in the presence of flammable anesthetics, drugs or pressurized oxygen (such as in a hyperbaric
chamber, ultraviolet sterilizer or oxygen tent).
Do not attempt self-diagnosis or self-treatment based on the measurement results and analysis.
Always consult your doctor. Self-diagnosis or self-treatment may lead to deterioration in your condition.
Do not use this device during an MRI scan.
Page 7
WARNING:
Do not use this device on people with sensitive skin or allergies.
Do not attempt to use the device over or through clothing.
Do not attempt to use the device with your left hand.
When you experience symptoms potentially related to heart disease always consult your physician,
even if “Regular heart rate, Regular heart rhythm” is displayed.
If battery fluid should get in your eyes, immediately rinse with plenty of clean water. Consult a doctor
immediately.
CAUTION:
Do not measure if dust is on the electrodes. Clean them first.
If the portion of the body where the electrode is applied has too much body fat, a successful reading
may not be possible.
Do not measure with the electrode upside down (Refer to the illustration on page 26).
Do not expose the unit to static electricity. Always disperse any static electricity from your body
before handling the unit.
Do not take measurements in a moving vehicle.
Do not use a cellular phone near the unit.
Do not disassemble, repair, or modify the unit.
Do not insert batteries with their polarities reversed.
The chest electrode will be impeded by excessive body hair. Regularly remove hair at the electrode
contact point. Omron does not recommend the use of contact gel.
Keep out of reach of infants, small children, and compromised people who cannot express their consent.
IMPORTANT SAFETY NOTES
7
Page 8
CAUTION:
Do not use for any purpose other than obtaining an electrocardiograph.
Do not expose the unit to strong shocks or vibrations. Do not drop or step on the unit.
Do not use batteries of a type other than that specified in this manual.
Do not take measurements when there are drops of water on your skin, such as from sweat or after bathing.
Do not take measurements where the unit will be exposed to strong electromagnetic forces.
If the batteries are removed for more than one hour, the settings and any ECG data stored in the unit
may be erased. If the date and time setting is erased, be sure to reset it before using the unit again.
Any ECG data erased from the unit cannot be recovered.
Avoid extremes in temperature and humidity. Do not use this unit in locations subject to high or low
temperatures or humidity. Use at a temperature within +50 to +104°F (+10 to +40°C) and between 30
and 85%RH.
Do not sterilize this unit in an autoclave or gas sterilizer (EOG, formaldehyde, high density ozone, etc.)
Do not wash this unit with water.
Do not store the unit in the following ambient conditions:
• Locations exposed to direct sunlight.
• Locations subject to high temperatures and high humidity.
• Wet or damp locations where water may get on the unit.
• Dusty locations.
• Near fires or open flames.
• Locations exposed to strong vibration.
• Locations exposed to strong electromagnetic fields.
IMPORTANT SAFETY NOTES
8
Page 9
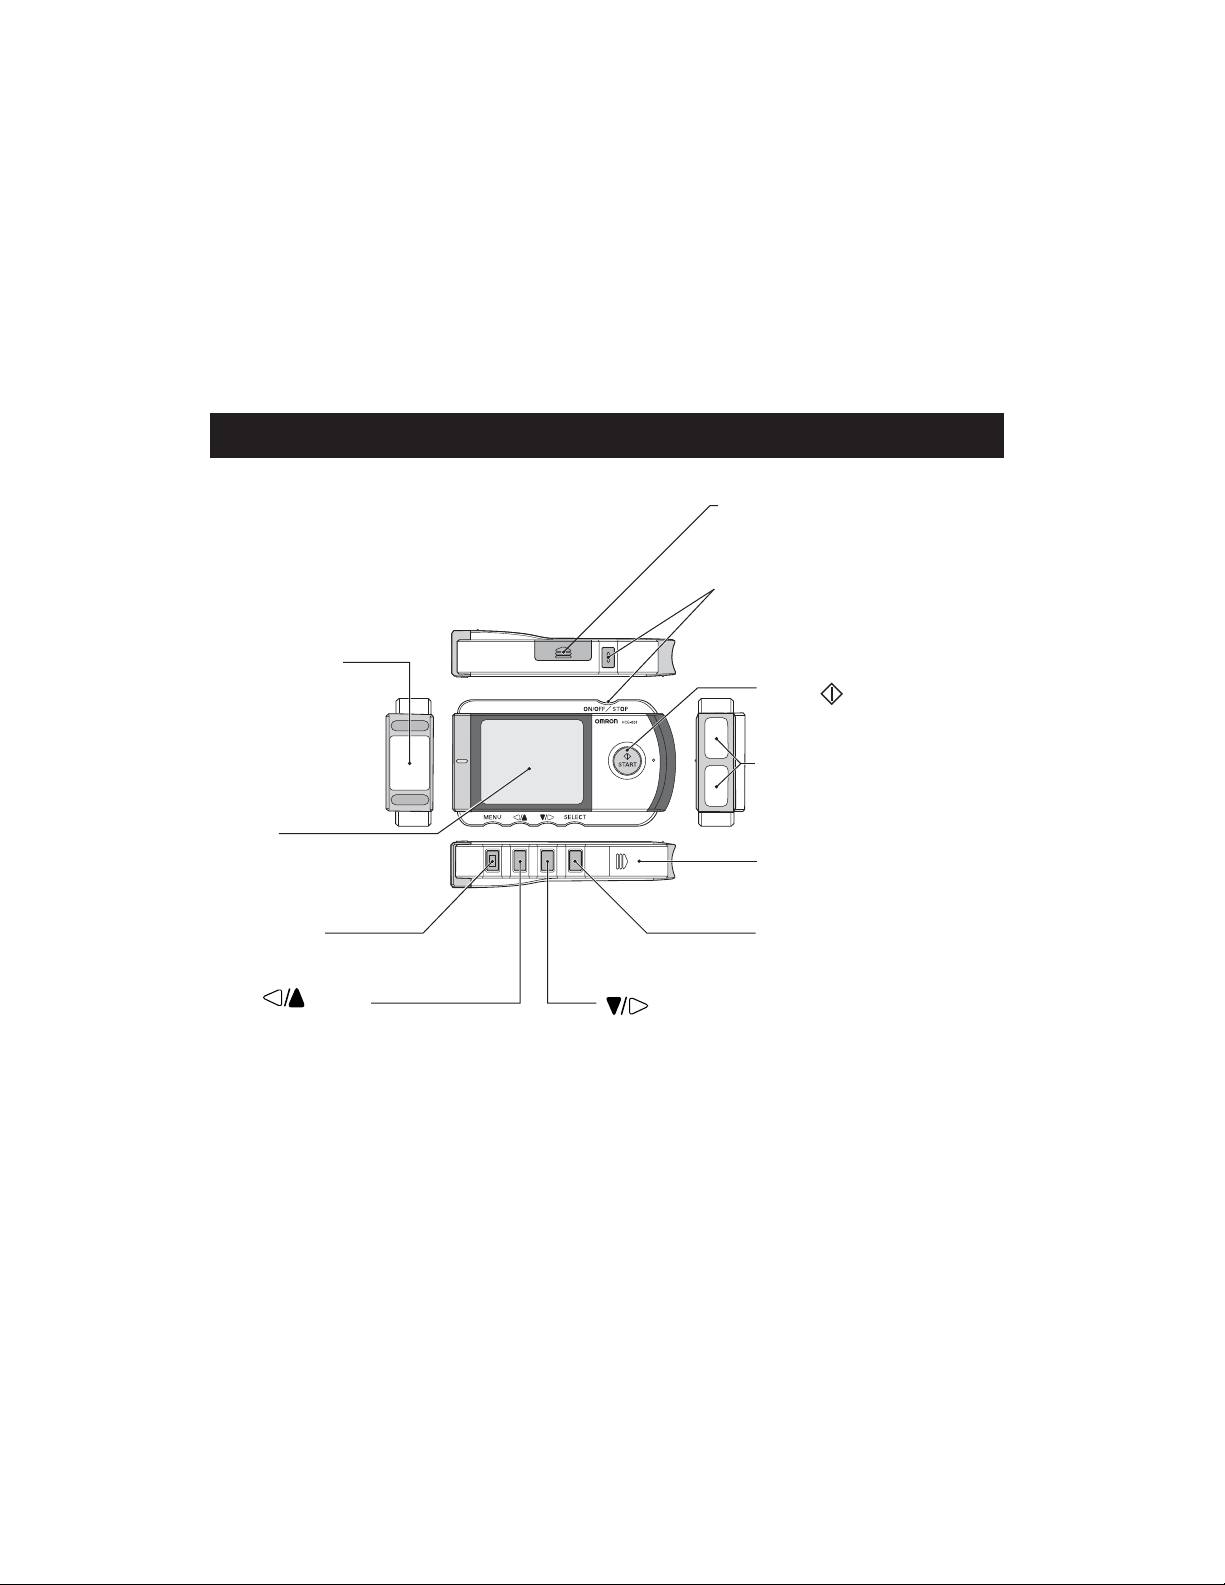
Chest electrode
Place this against your
chest when taking a
measurement.
Display
Displays the wave pattern and
displays menus, messages and
display options.
MENU button
Displays or closes the menu screen.
button
Moves the desired menu or wave
pattern to the left or up and
decreases the number of the
selected field.
button
Moves the desired menu or wave
pattern to the right or down and
increases the number of the
selected field.
SD Memory card slot cover
Open this cover to insert the SD
memory card.
ON/OFF / STOP button
Turns the power on/off and
cancels measurement.
START button
Starts measurement.
Finger electrodes
Place your right index finger over
these when taking a measurement.
Battery cover
Open this cover to insert batteries.
SELECT button
Selects the highlighted menu
option or ECG data.
9
KNOW YOUR UNIT
MAIN UNIT:
Page 10
MAIN UNIT
Display:
The screen is used to display basic instructions and results of ECG readings, to adjust settings, and to
review ECG data stored on the SD memory card or in unit memory.
Menus
KNOW YOUR UNIT
10
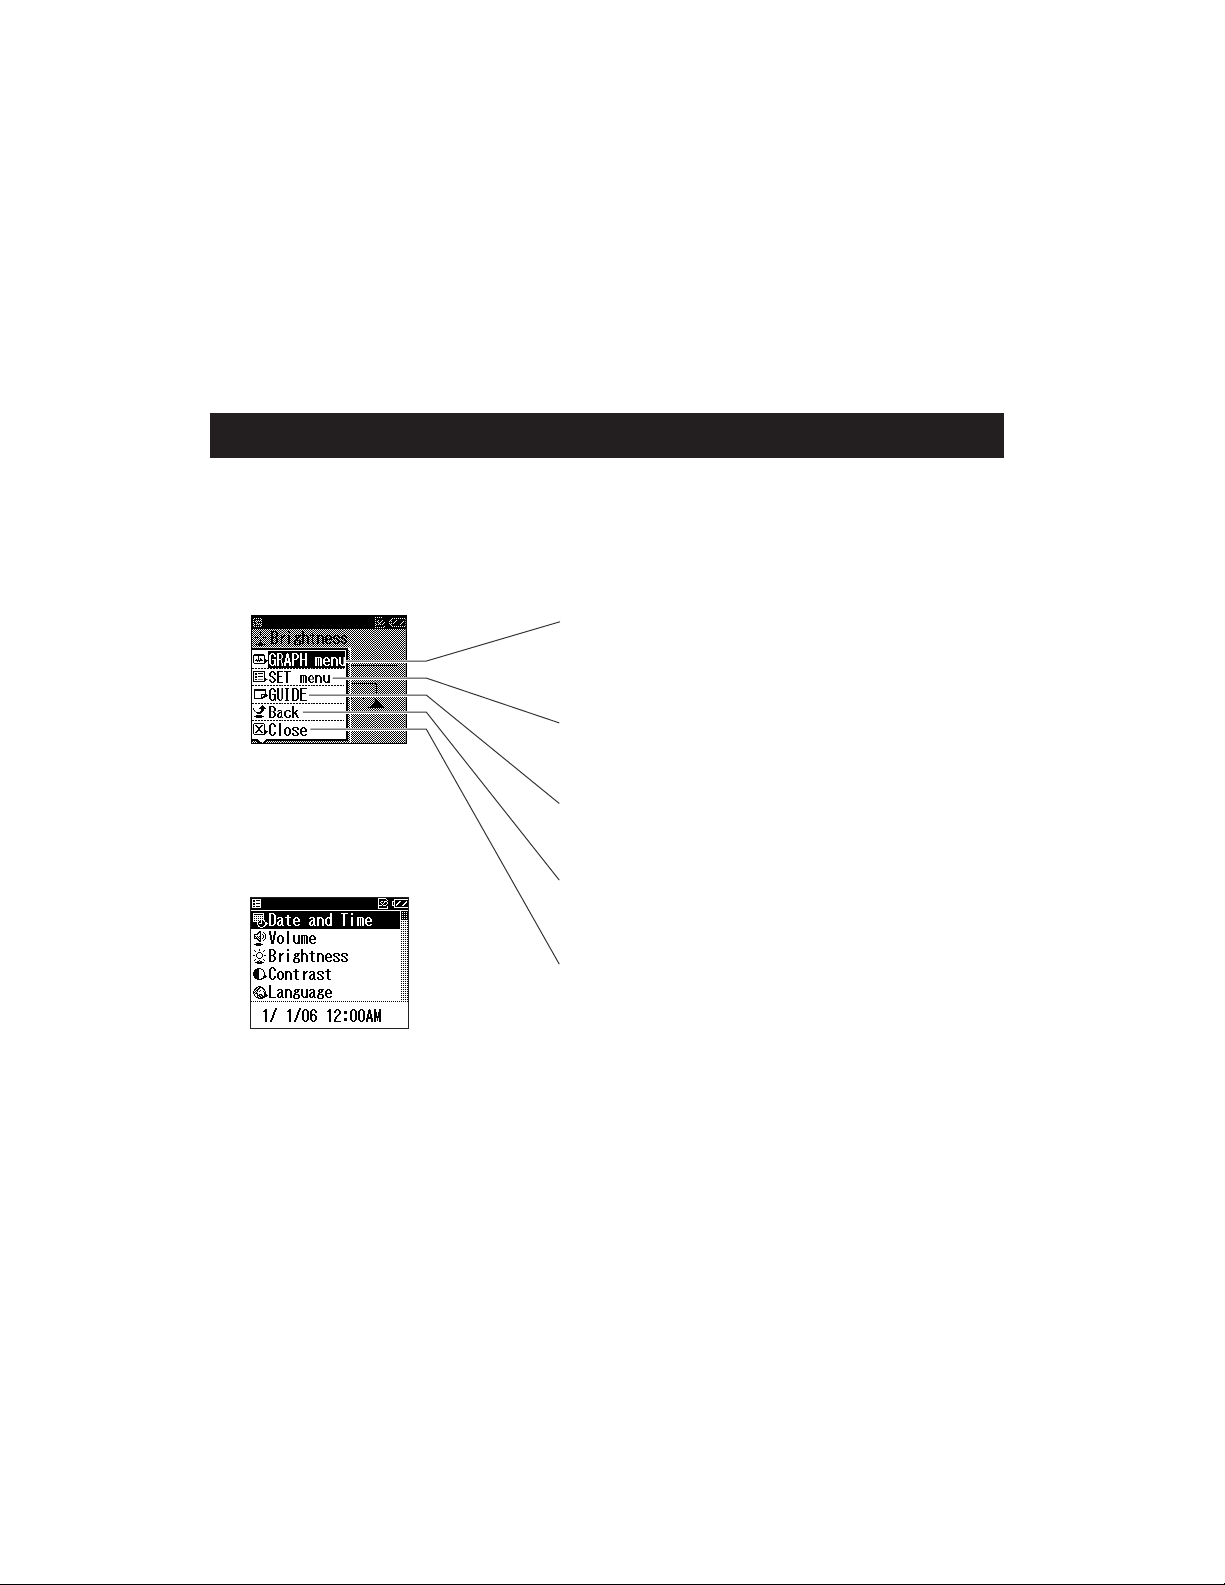
Menu Screen
The main menu screen is
displayed when you press
the MENU button.
SET menu
The SET menu is displayed
when you select the SET
menu and press the
SELECT button.
GRAPH menu
This allows you to view ECG readings stored on
the SD memory card or in unit memory. (page 30)
SET menu
This allows you to set the date and time, and
adjust other settings. (page 32)
GUIDE
This displays the guidance screens that show
you how to take a measurement.
Back
This option takes you back to the previous
screen, from the SET menu.
Close
This option closes the menu screen.
Page 11
MAIN UNIT
Display:
ECG Graph
This screen is displayed when you use the GRAPH menu to select ECG data stored on the unit.
KNOW YOUR UNIT
11
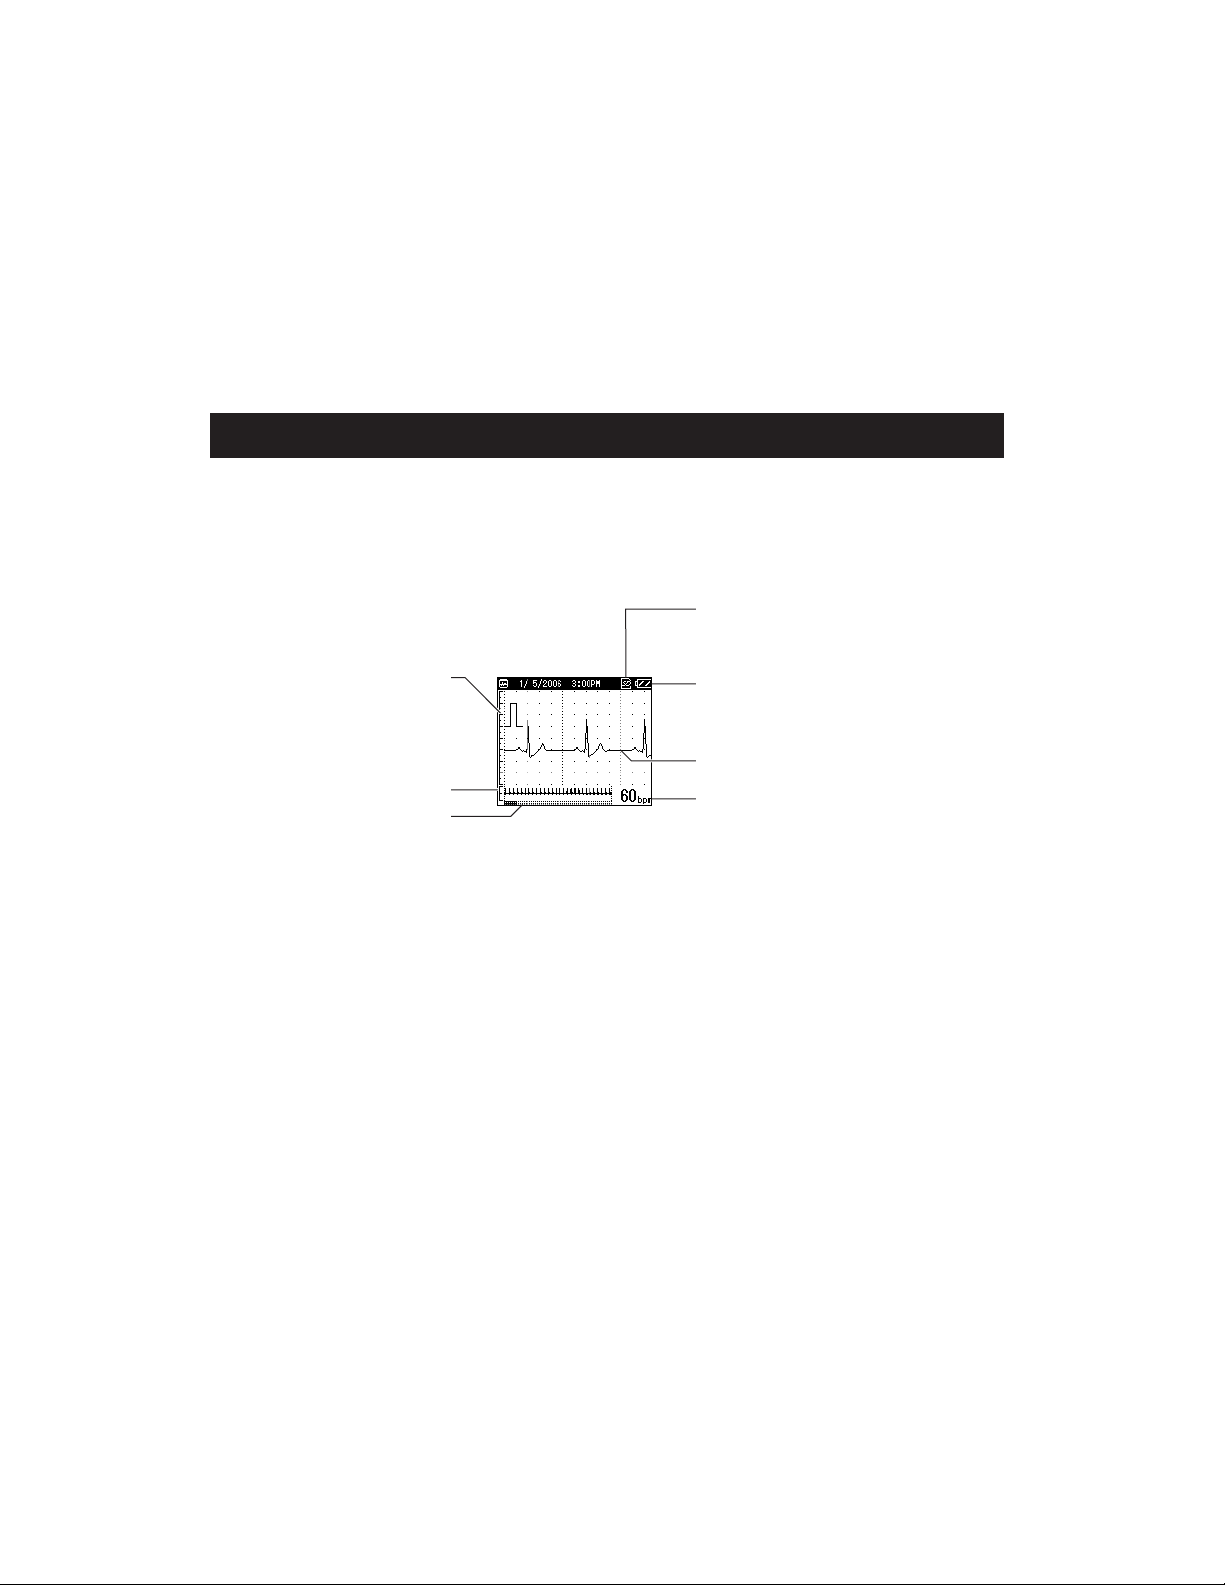
NOTE: During measurement, the screen displays the ECG waveform. The progress bar at the bottom of the
screen displays measurement progress, and the number on the right shows the heart rate.
Depending on the waveform, situations can occur in which the unit cannot assess and display the
heart rate during the measurement.
Calibration guide
Serves as a guide when your
doctor analyzes the stored ECG
data.
Approximately 30-second
waveform
Measurement time indicator
SD memory card indicator
Displayed when the SD memory card is
in the card slot.
Battery level indicator
ECG waveform
Heart rate
(*bpm=beats per minute)
Page 12

KNOW YOUR UNIT
12
COMPONENTS:
• SD memory card
• (801SDMEMORY)
• Storage pouch
• (801STORAGEPOUCH)
• Instruction Manual
• (HCG801INST)
• 2 LR03(AAA)
Batteries
• Quick Reference Card
• Registration Card
Page 13
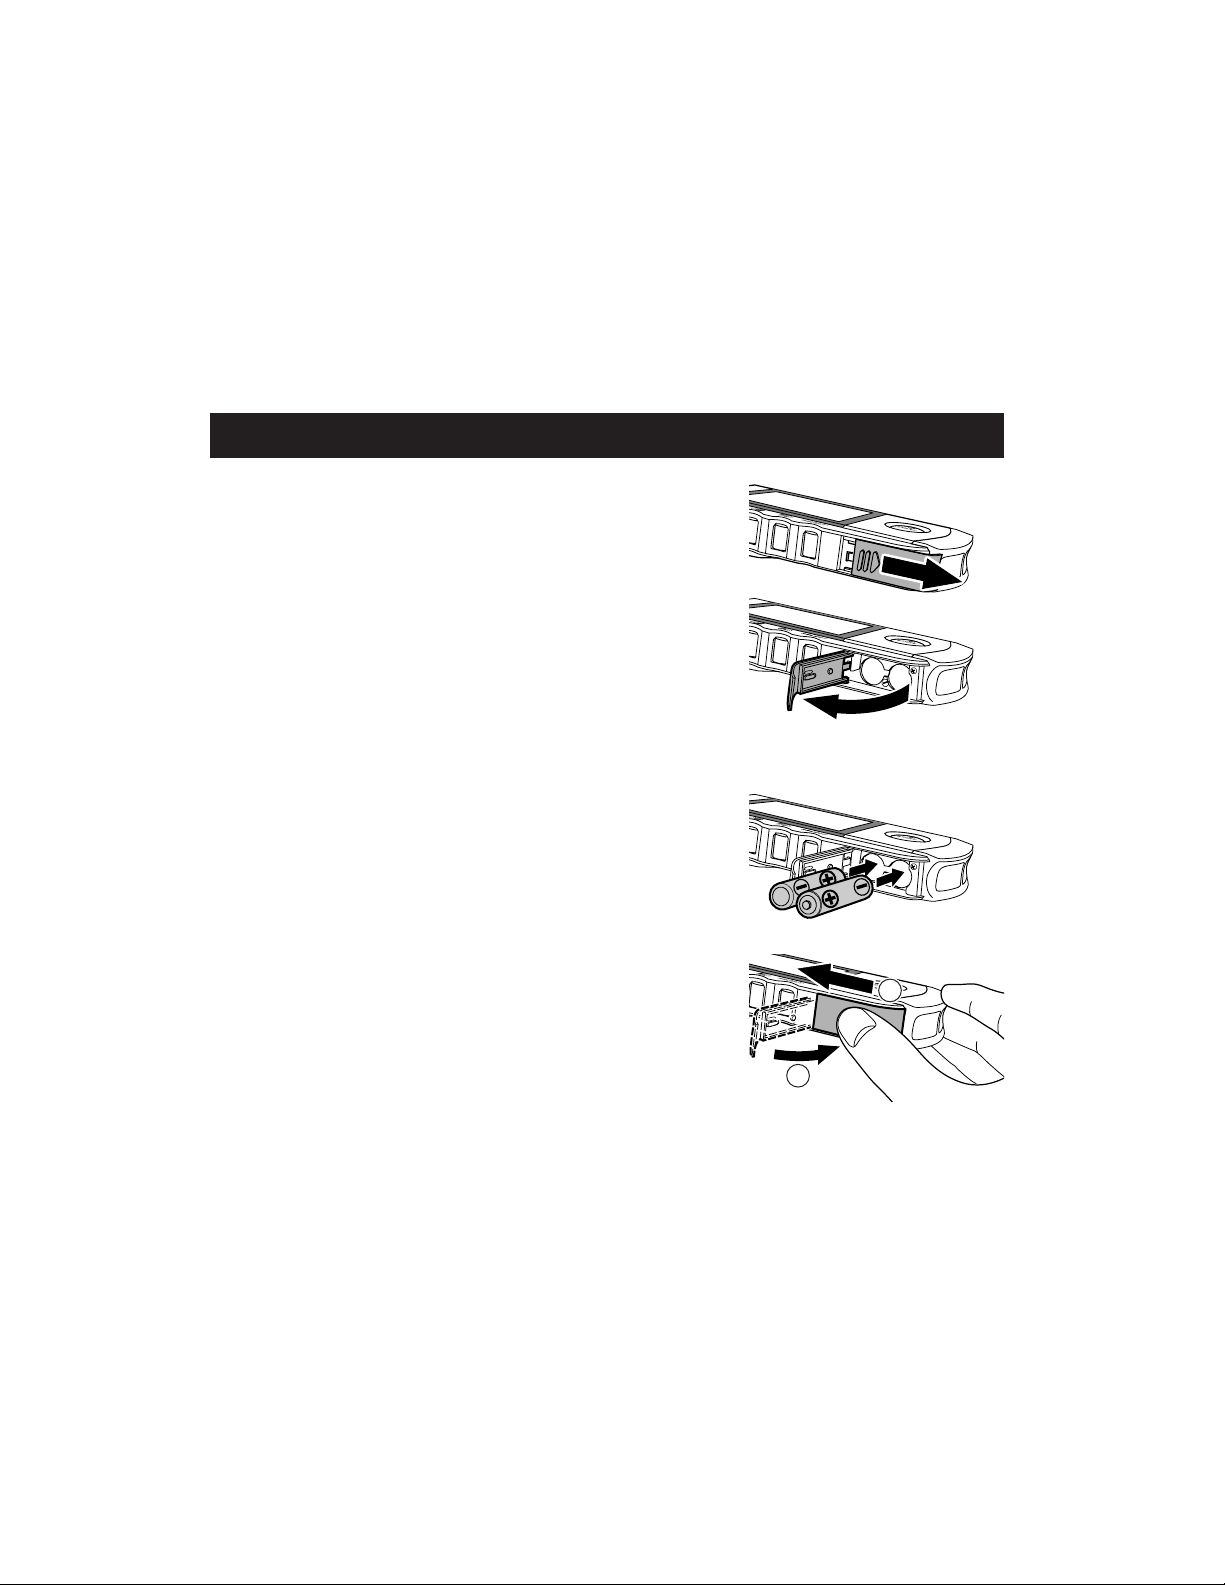
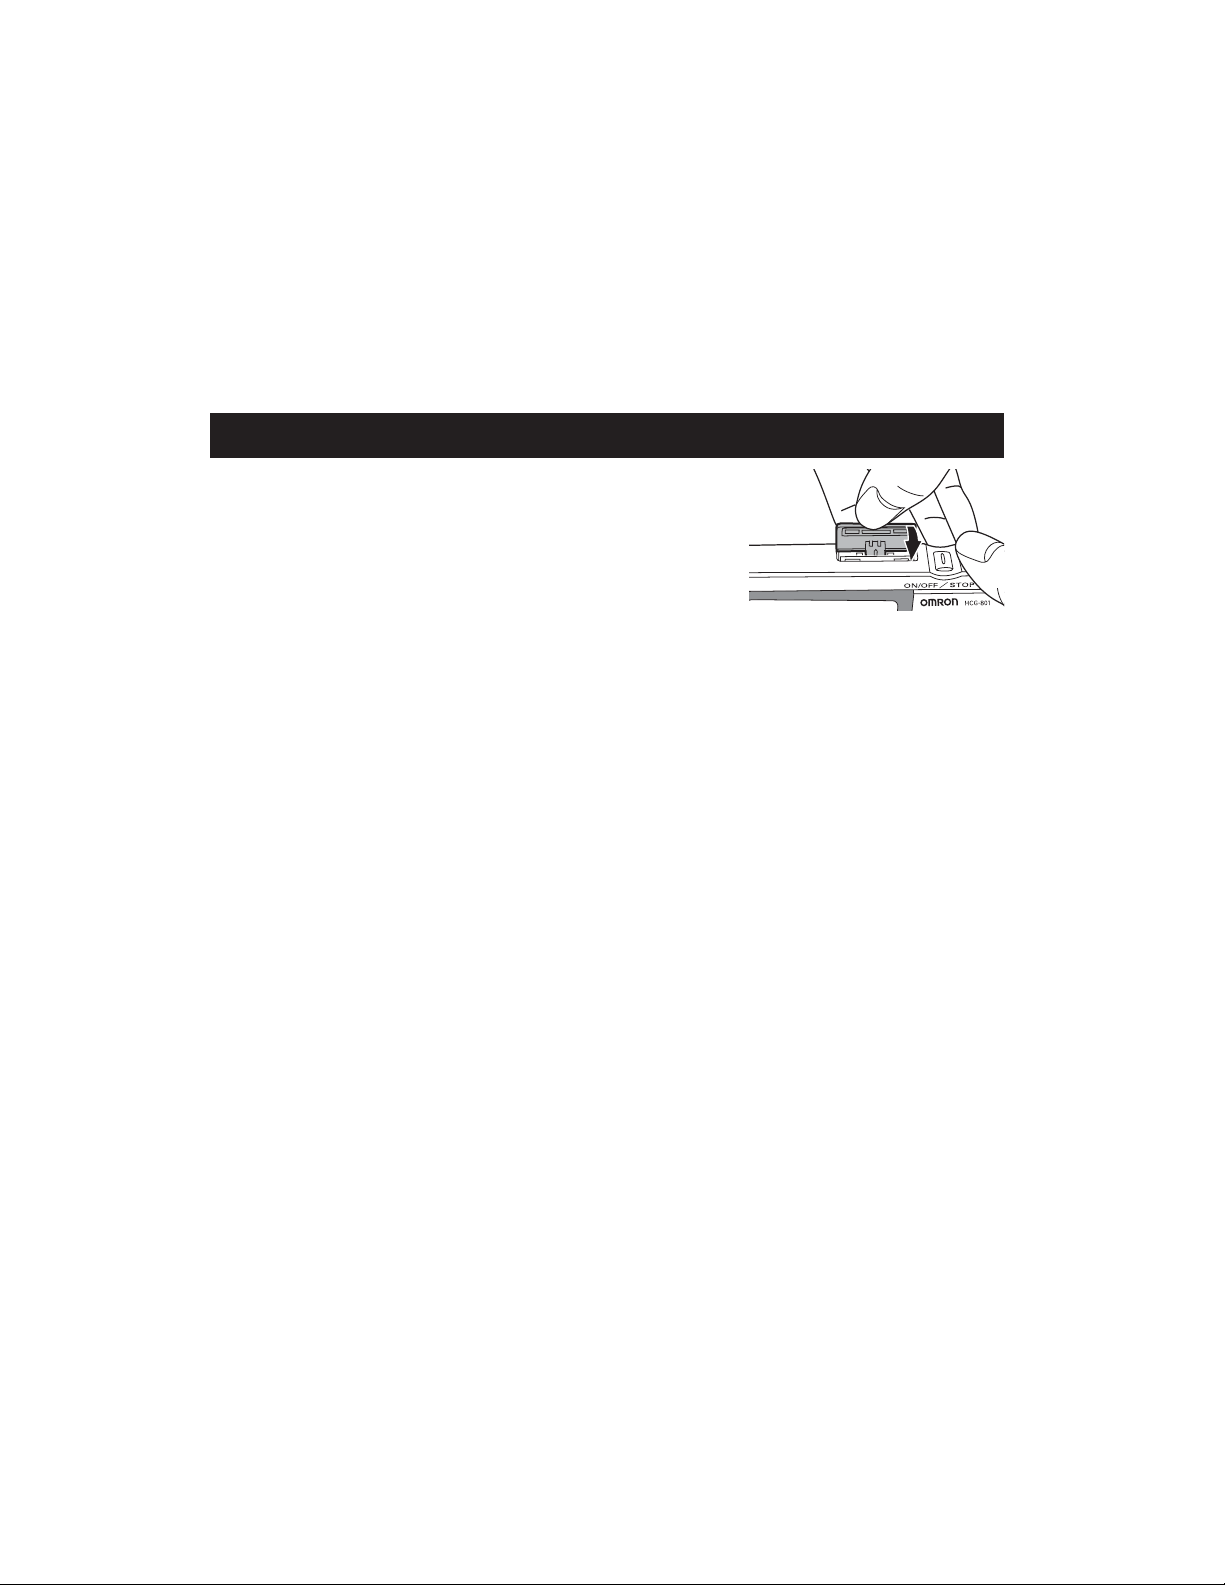
1. Slide the battery cover in the direction of the arrow, and lift the end of
the cover upwards.
NOTE: Do not pull hard on the cover.
2. Insert two LR03(AAA) batteries so the + (positive)
and the - (negative) polarities match the polarities on the
battery compartment as illustrated.
NOTE: Always use LR03(AAA) batteries.
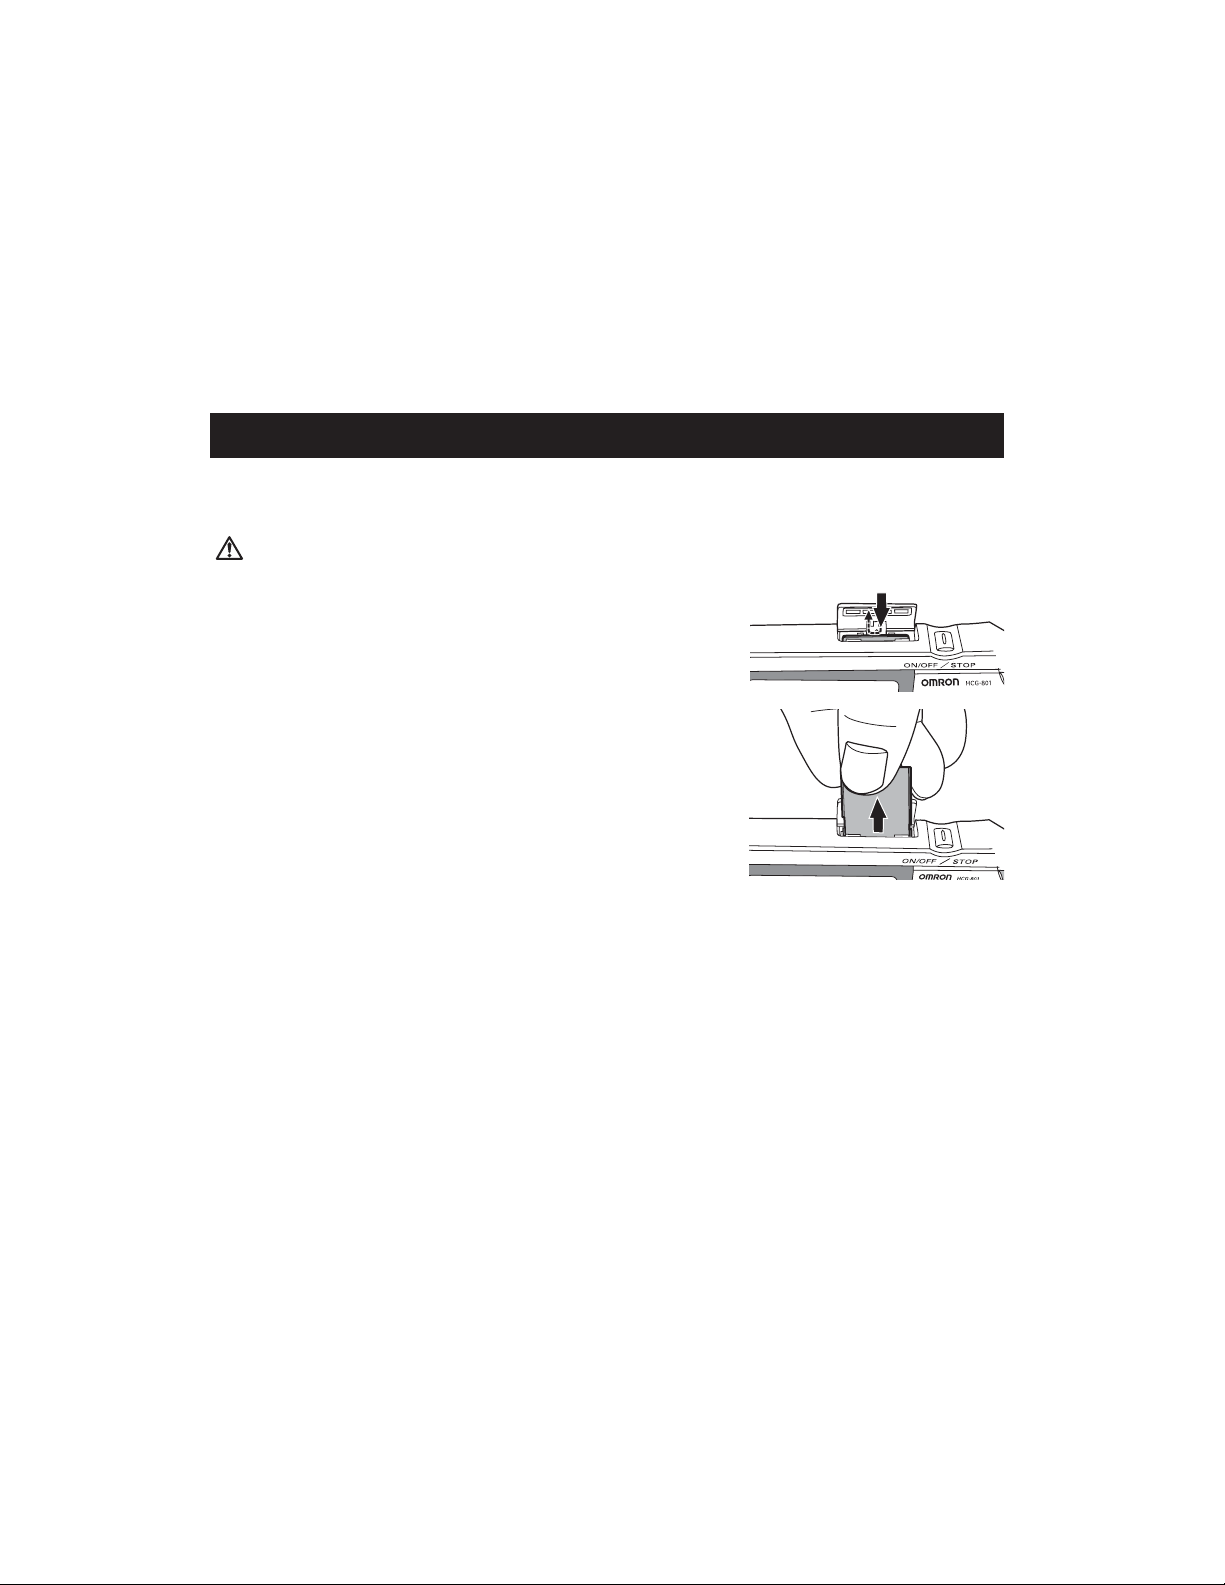
3. Close the battery cover.
Lower the battery cover (1), then while gently pressing the cover
down, slide it in the direction of the arrow (2).
HOW TO INSERT AND REPLACE BATTERIES
13
Operating Instructions
2
1
Page 14
BATTERY LIFE AND REPLACEMENT
When the “Please insert new batteries.” message appears, replace both batteries with new ones.
• Always turn the unit off before replacing the batteries.
• Dispose of the used batteries according to applicable local regulations.
Battery life
• Two new LR03(AAA) batteries will last for approximately 400 measurements, if measurements are taken
once a day at room temperature (72ºF (22ºC)).
• The batteries enclosed in the package are intended for the purpose of demonstration. It is possible these
batteries will not last for 400 measurements.
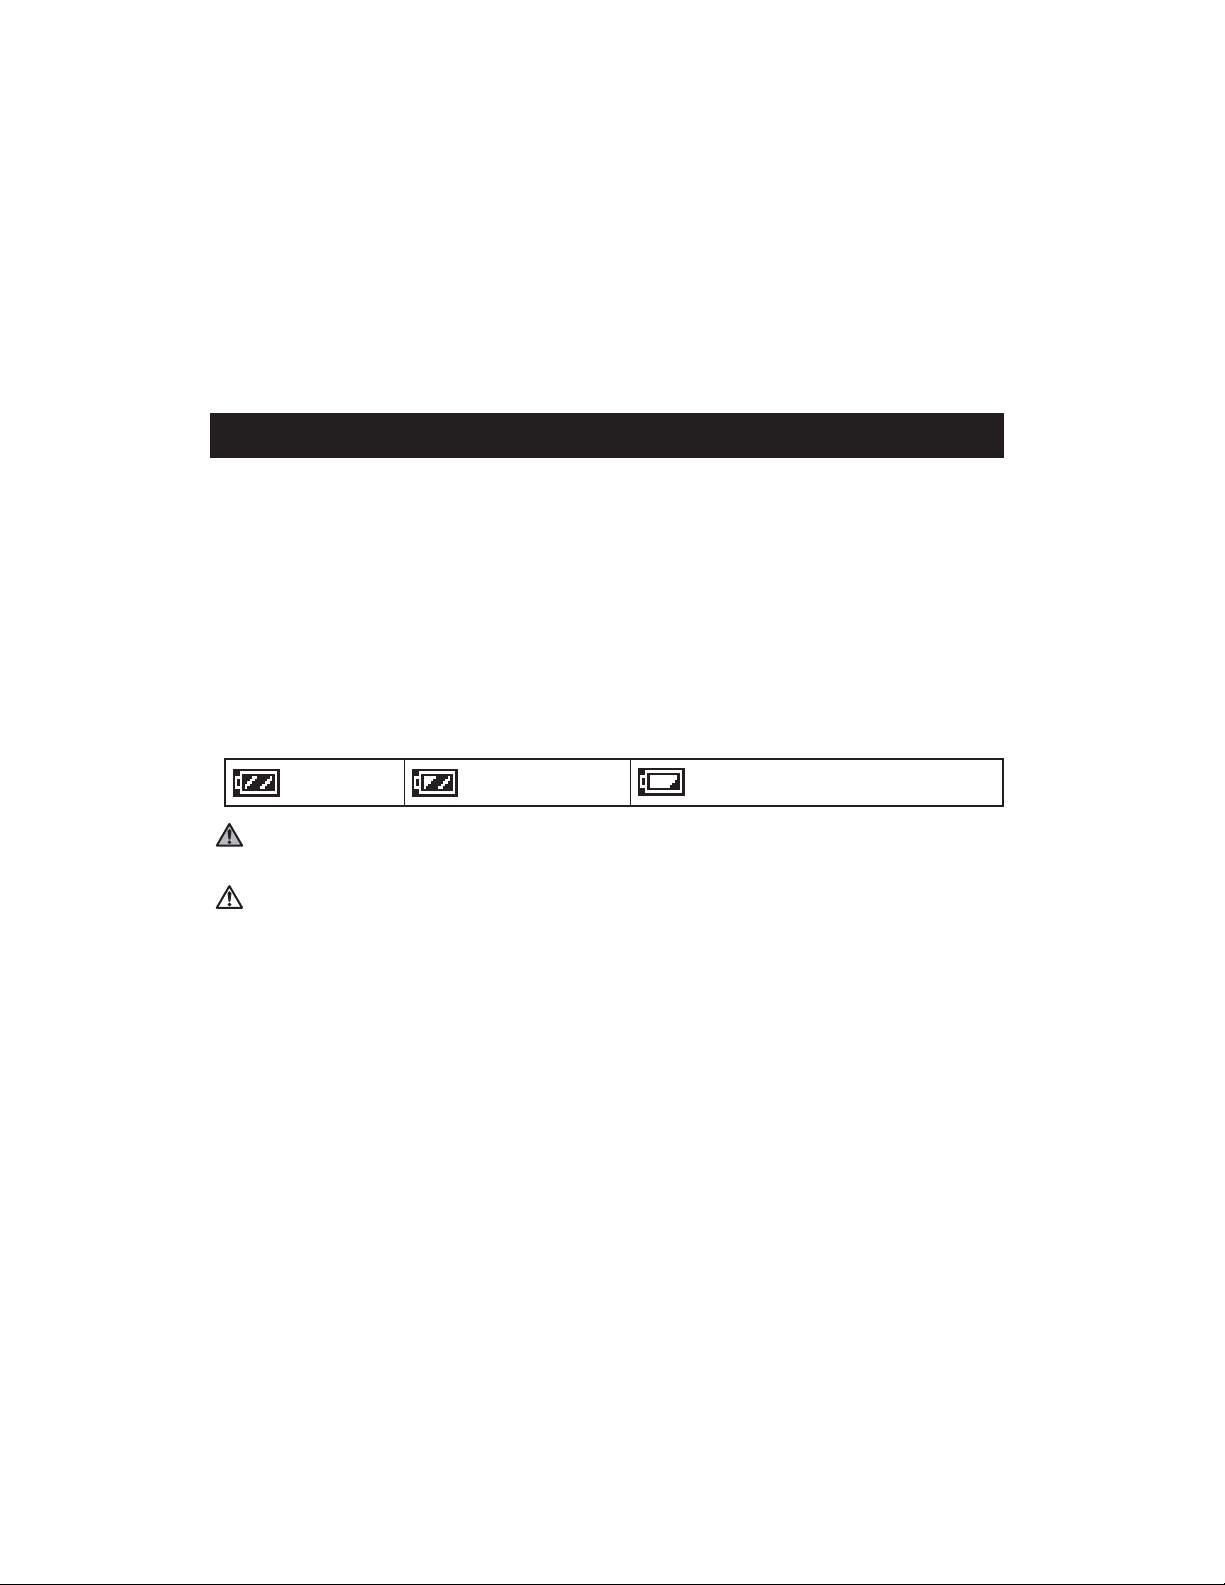
• The battery life can be confirmed in the upper right of the display.
HOW TO INSERT AND REPLACE BATTERIES
14
WARNING: If battery fluid should get in your eyes, immediately rinse with plenty of clean
water. Consult a doctor immediately.
CAUTION:
• If the batteries are removed for more than one hour, the settings and any ECG data stored
in the unit may be erased. If the date and time setting is erased, be sure to reset it before
using the unit again. Any ECG data erased from the unit cannot be recovered.
• Do not use batteries not specified for this unit.
• Do not insert the batteries with the polarities in the wrong direction.
• Do not dispose of batteries in fire.
• If battery fluid should get on your skin or clothing, immediately rinse with plenty
of clean water.
• Remove the batteries from this unit when you are not going to use it for a long period of
time (approximately three months or more).
• Do not use batteries of different types together.
• Do not use new and used batteries together.
Full power. Half remaining.
Remaining power is low.
Replace the batteries with new ones.
Page 15

If the battery cover is accidentally detached,
attach the battery cover as described in the
procedure below.
1. Align the pin of the battery cover with the groove
at the top of battery compartment on the START
button side (front) of the unit (1).
2. Align the other pin of the battery cover with the
groove on the other side of the battery
compartment (2).
While gently pushing the pin already inserted in
the START button side (front), insert the pin
in the groove on the opposite side of the battery
compartment.
NOTE: Do not push the pin in the START
button side of the battery compartment
hard. This could result in damage to the
battery cover.
3. Close the battery cover.
While pressing the battery cover, slide it in the direction of the arrow.
HOW TO ATTACH THE BATTERY COVER
15
Align pin with
groove
Align pin with
groove
Battery cover
START button side
1
2
Page 16

Always set the date and time before using the unit for the first time.
Check that date and time are correct before using the unit, reset them if necessary. The date and time are
important indicators of when a measurement was taken.
NOTE: The date and time format can be changed.
(Refer to “Date Format” on page 38)
1. Press the ON/OFF / STOP button to turn the unit on.
When the unit is used for the first time, or if the Date and Time setting
has been reset, the Date and Time setting screen is automatically
displayed, and the month digits are highlighted.
2. Press the button or button to set the month.
Press the button to increase the number.
Press the button to decrease the number.
HOW TO SET THE DATE AND TIME
16
2006
Page 17

3. Press the SELECT button to confirm the month setting.
The month setting is set and the day setting is highlighted.
The display cycles through the settings,
month -> day -> year -> hour -> minute -> AM/PM, with each
press of the SELECT button.
NOTE: If the setting for the date format has been changed ( refer to
“Date Format” on page 38), the order in which items are
highlighted may differ from the example above.
4. In the same way, set the day, year, hour, minute, and AM/PM.
After you have confirmed the last item on the date and time setting, press
the SELECT button to complete the date and time setting.
NOTE: If you need to set the date and time again, refer to page 34.
5. Press the ON/OFF / STOP button for two seconds to turn off the
power.
The unit beeps, then the power is turned off.
NOTE: If you forget to turn off the power, the unit will turn itself off
automatically after five minutes.
HOW TO SET THE DATE AND TIME
17
Press for two seconds.
2006
Page 18

The unit includes an SD memory card for storing ECG data, which can then be viewed by your doctor later.
This section describes how to insert and eject an SD memory card, and how to format a card so it can be
used to store ECG data.
NOTES:
• If you need to purchase a new SD memory card, contact Omron Healthcare Customer
Service 1-800-829-6427.
• Do not store any data on the card from other devices rather than this unit.
• ECG data stored on an SD memory card can be damaged by static electricity and other causes. Copy data
to PC or other device for additional safety.
INSERTING AND EJECTING SD MEMORY CARD
The SD ( ) mark is displayed in the top right corner of the screen while the SD memory card is inserted,
and the unit is turned on.
Inserting the SD memory card
1. Check that the unit is turned off.
CAUTION: Never insert an SD memory card while the unit is turned on.
HOW TO USE THE SD MEMORY CARD
18
Page 19
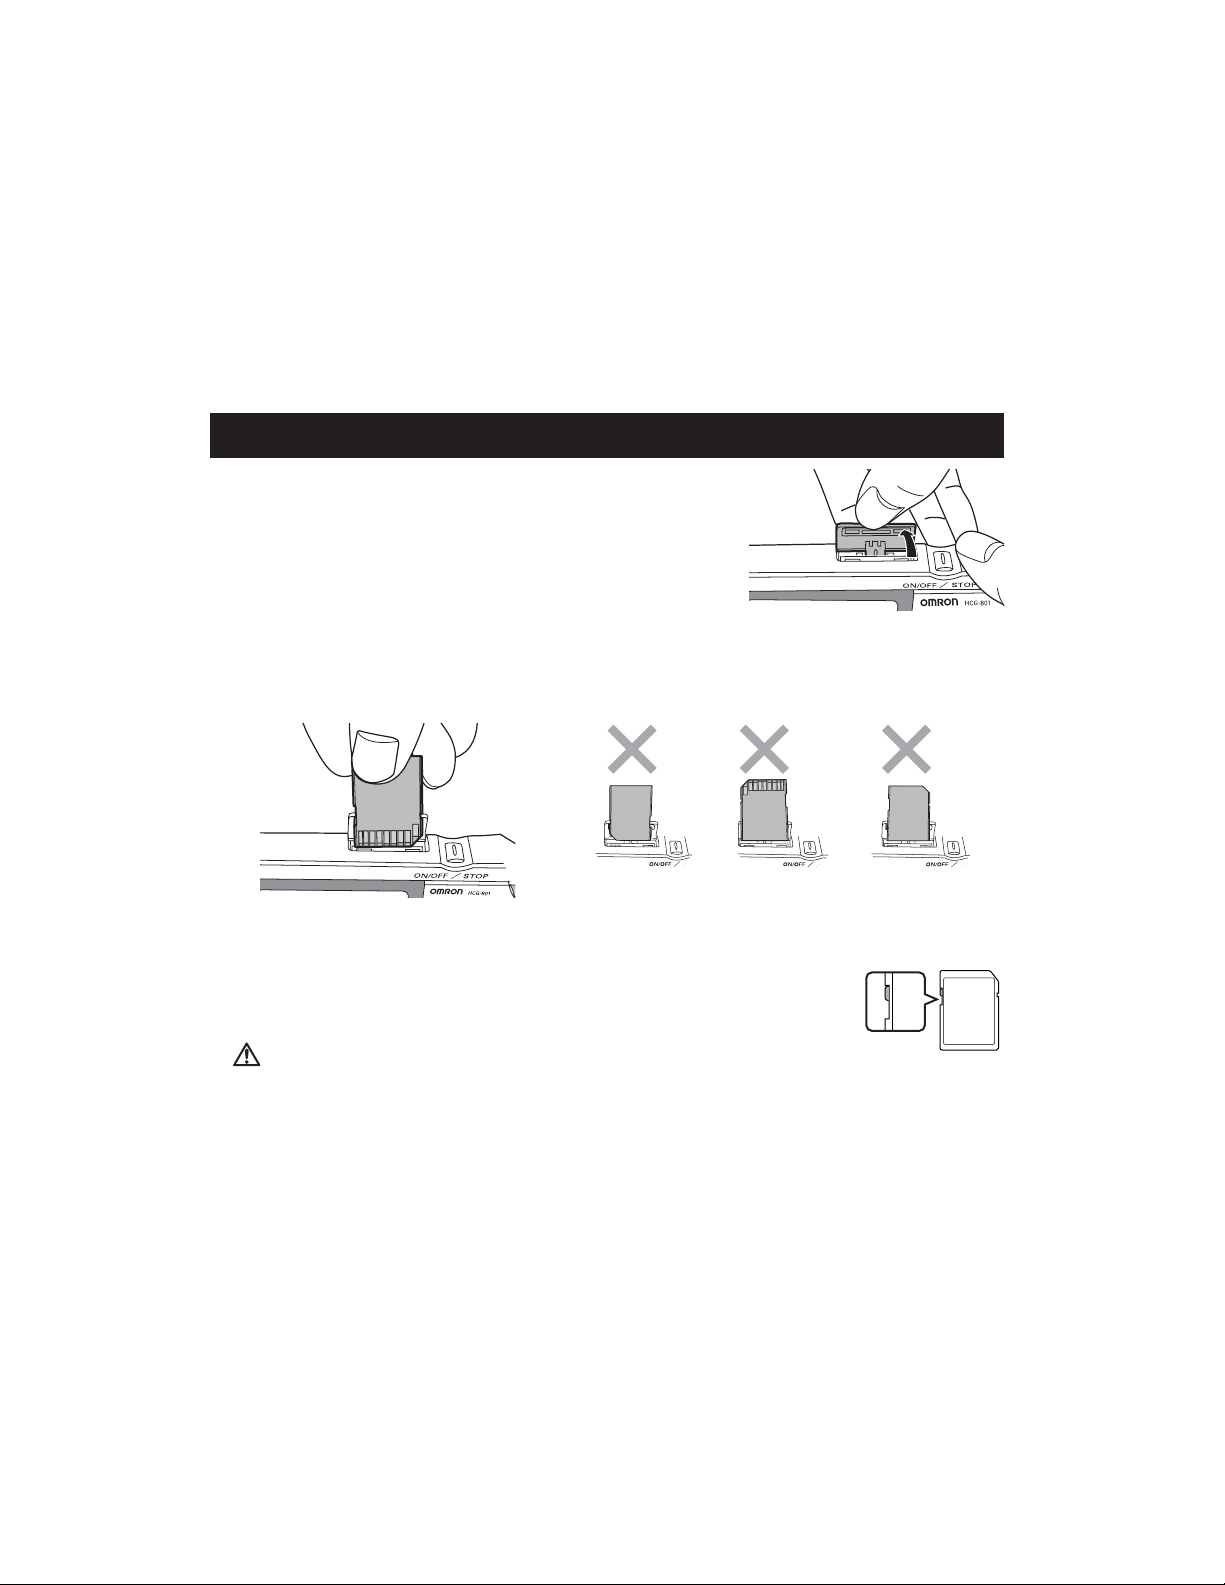
2. Open the SD memory card slot cover and insert the SD memory card
into the slot.
NOTES:
• Check that the card is correctly aligned and insert it into the slot as shown.
• Insert the card until it clicks into position.
Write Protection (Locking the SD Memory Card)
• Make sure that the write-protect switch is not locked, before inserting the SD
memory card. If the write-protect switch is locked (down), you will not be able to
store new ECG data on the SD memory card.
CAUTION:
CAUTION: When inserting the SD memory card, do not try to force the
card into the slot if it is upside down, back to front, etc. This could damage the
card or the unit.
HOW TO USE THE SD MEMORY CARD
19
Back to front
Upside down Back to front and
upside down
CORRECT ALIGNMENT
Page 20
3. Close the SD memory card slot cover.
HOW TO USE THE SD MEMORY CARD
20
Page 21
To eject the SD memory card
1. Check that the unit is turned off.
CAUTION: Eject an SD memory card only when the unit is turned off.
2. Open the SD memory card slot cover and press the card.
The lock is released and the card is ejected slightly.
3. Remove the SD memory card.
4. Close the SD memory card slot cover.
HOW TO USE THE SD MEMORY CARD
21
Page 22
FORMATTING AN SD MEMORY CARD
You will need to format the SD memory card before you use it for the first time, and in the following
circumstances.
• If you use an SD memory card that has been used by other devices.
• If the SD memory error occurs.
NOTES:
• When you format an SD memory card, any data stored on the card is erased. Always copy any data you
wish to keep to a computer before formatting an SD memory card.
• When you format an SD memory card, format it with the unit. Do not format an SD memory card with a
computer.
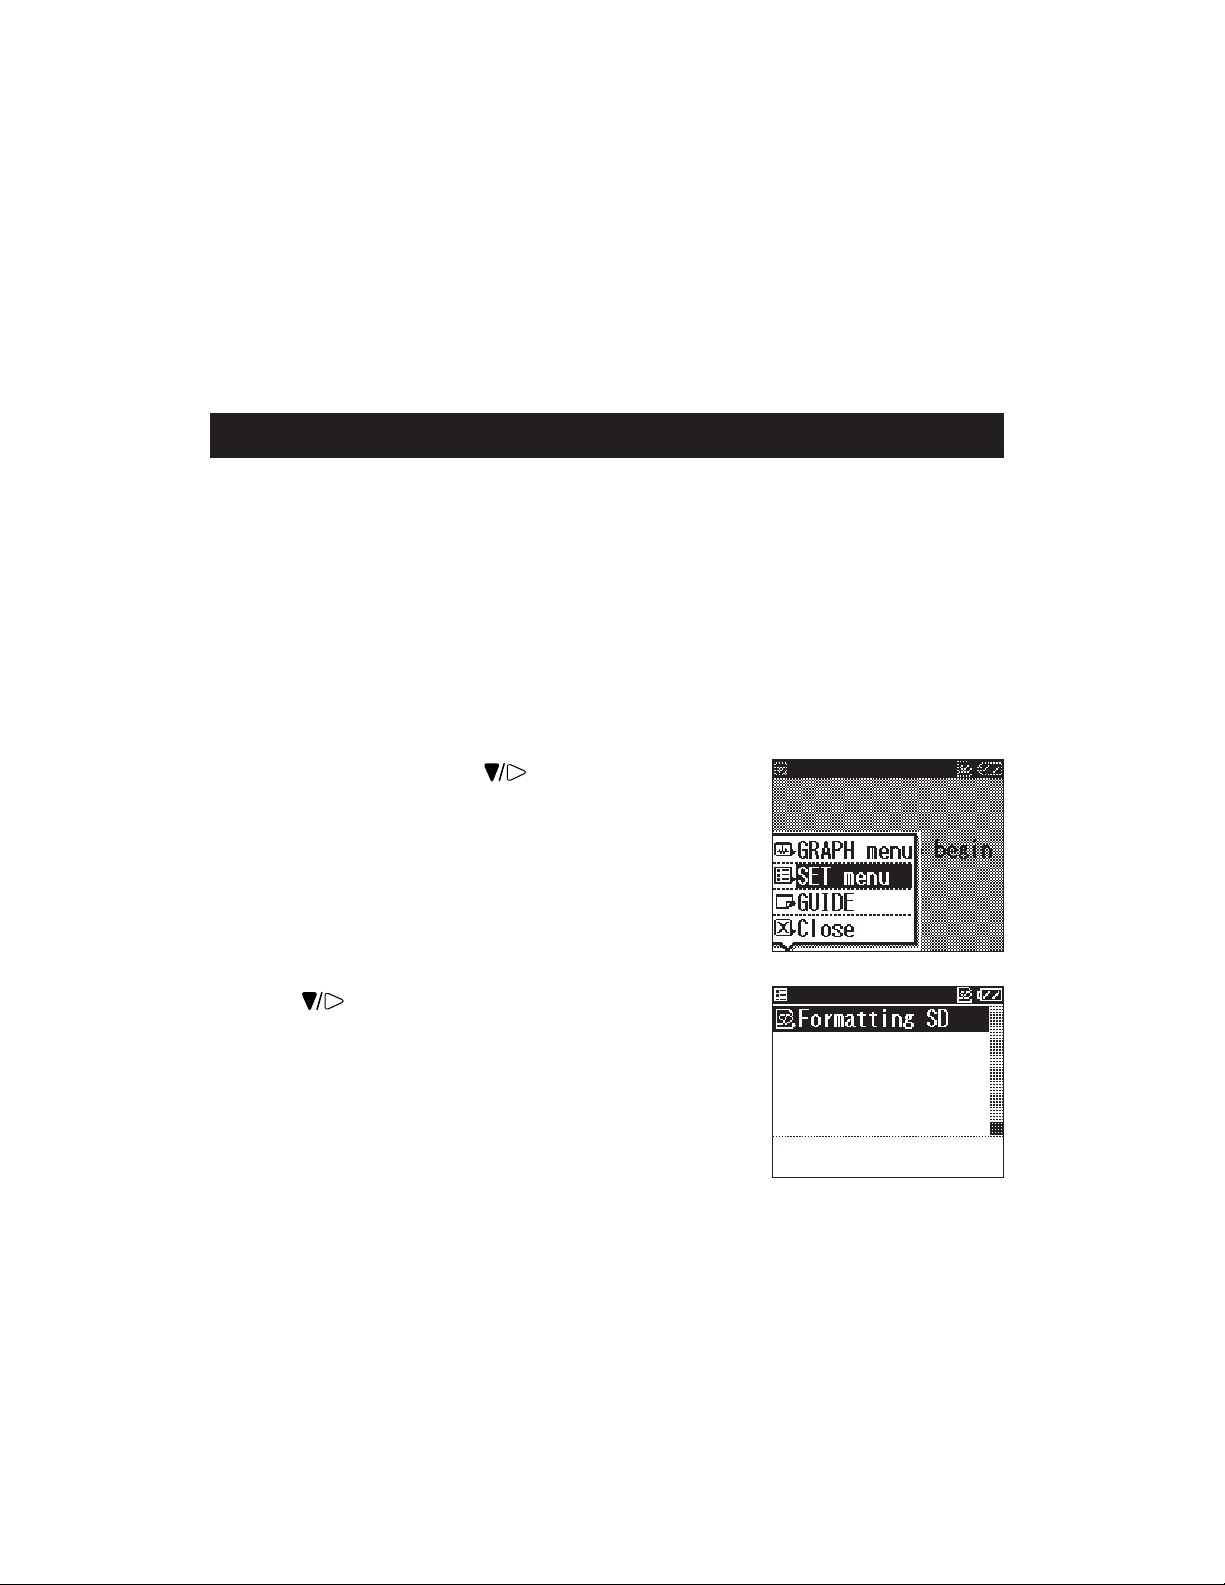
1. Press the MENU button, press the button to select SET menu,
then press the SELECT button.
2. Press the button to scroll through the settings and select
Formatting SD.
HOW TO USE THE SD MEMORY CARD
22
Page 23

3. Press the SELECT button.
The message “All data in SD will be deleted. Format SD?” is displayed.
4. Press the button to select YES, then press the SELECT button.
If you press the SELECT button while NO is selected, the SD memory
card will not be formatted.
5. Press the SELECT button.
A message warning you not to remove the SD memory card while it is
being formatted is displayed and the SD memory card is formatted.
Formatting can take up to eight seconds to complete.
CAUTION: Never remove an SD memory card while
it is being formatted.
HOW TO USE THE SD MEMORY CARD
23
* By default, NO is
Highlighted.
Page 24

In order to obtain a good ECG reading, it is important that measurements are taken correctly.
Before taking a measurement for the first time, read these instructions carefully and make sure you observe
the following points each time you take a measurement.
• Make sure that the electrodes are directly touching your skin.
• If your hands or skin is dry, wipe them with a damp towel so that they are slightly moist.
• If the electrodes are dirty, wipe any dirt off with a soft cloth or a cotton swab moistened with
disinfectant alcohol.
- Do not use too much disinfectant alcohol when cleaning the electrodes.
- Do not use disinfectant alcohol to clean the unit except the electrodes.
• Do not move during measurement.
- Movement including talking, coughing, or sneezing during measurement can affect the
measurement results.
• If the position of your finger or arm is inappropriate during measurement, the results may be
inaccurate, so be sure to check their positions before taking a measurement. (Refer to page 25.)
• After taking a measurement, disinfect the electrodes by wiping them with a soft cloth or cotton swab
moistened with disinfectant alcohol. If you do not disinfect the electrodes there is a risk of skin
disease.
NOTE: If you have difficulty applying the unit so that the chest electrode is flat against your chest, please
ask your doctor for advice.
IMPORTANT NOTES ON TAKING A MEASUREMENT
24
Page 25
1. Press the ON/OFF / STOP button to turn the unit on.
The unit displays the following reminder. “Self-measurement is not the
same as medical diagnosis. Please consult your doctor for proper
interpretation.” Next, the guidance screens are displayed.
NOTES:
• You can press the START button to begin a measurement even
while the guidance screens are being displayed.
• The word “electrode” in this Instruction Manual is described as
“sensor” in the guidance screen.
2. Make sure that you are in a relaxed position.
The ideal posture is one where you are seated comfortably with your back straight.
NOTE: You can also take a measurement while you are standing or while lying down.
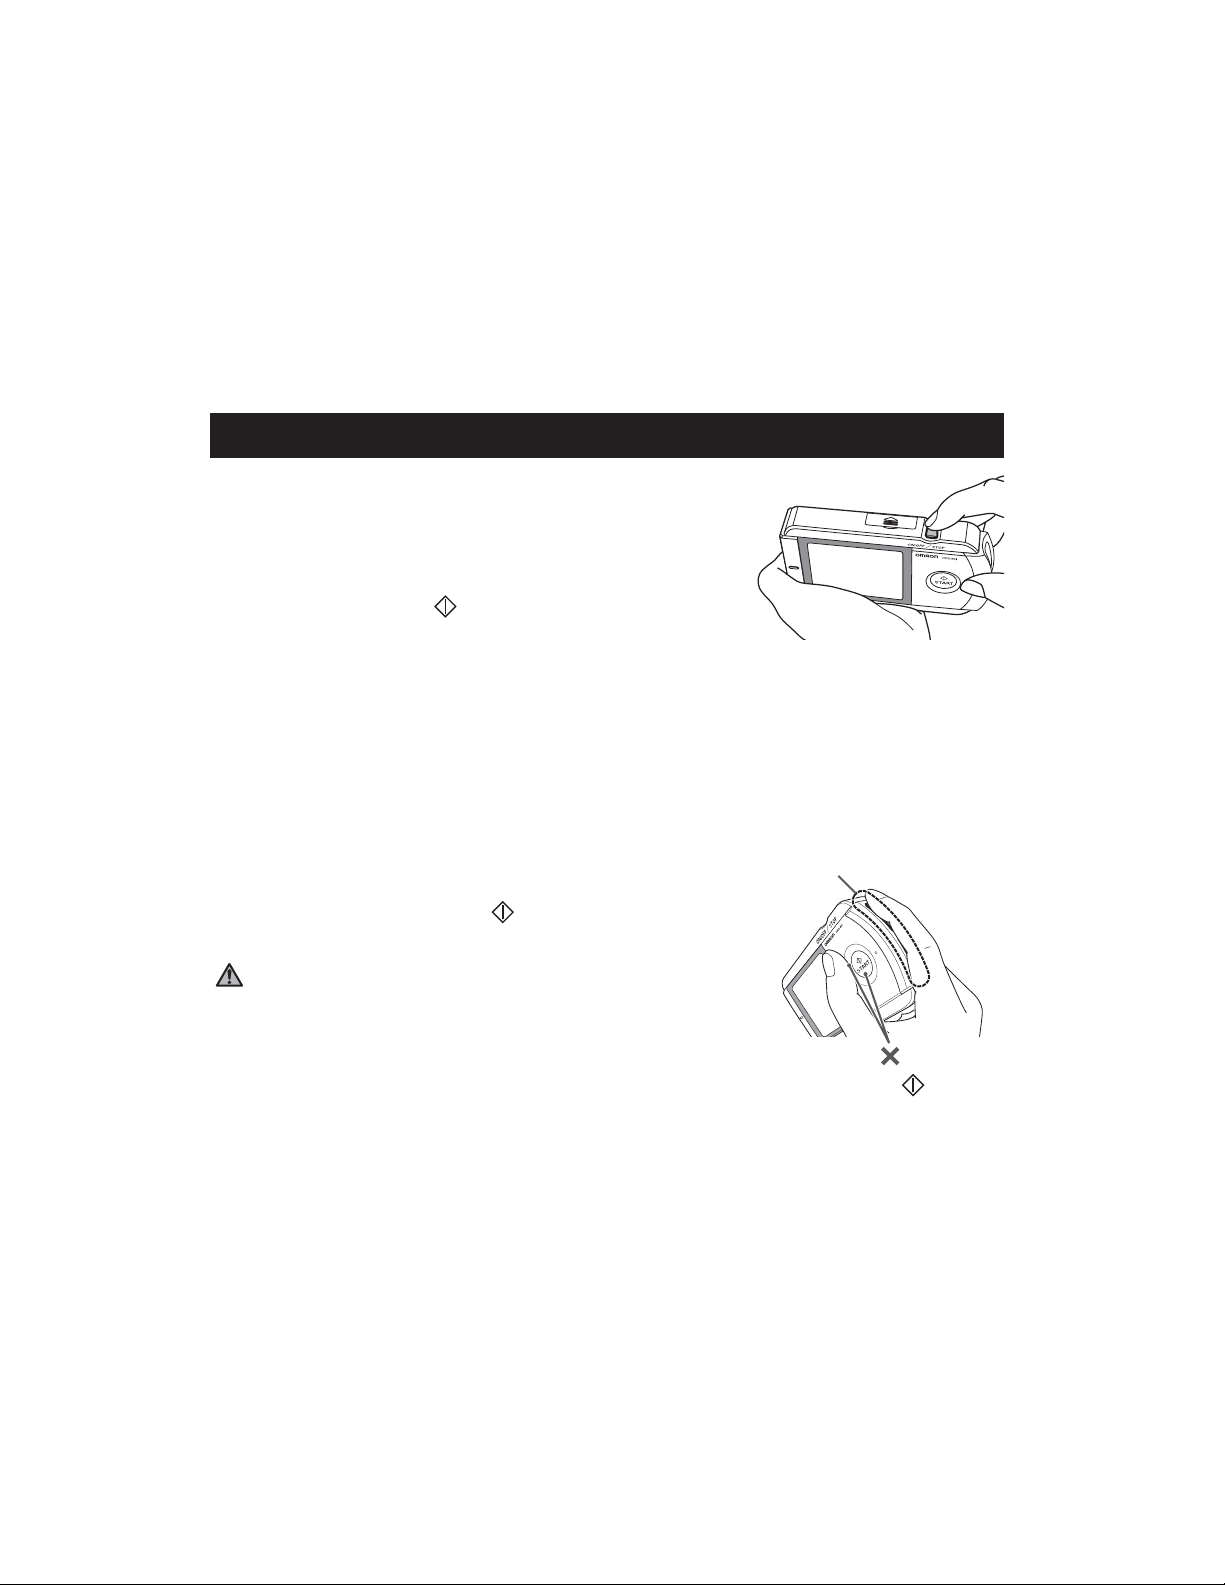
3. Place your index finger so that it fits closely over the two finger
electrodes.
NOTE:
• Take care not to press the START button until you are ready to
take the measurement.
WARNING: Even if you are left-handed, use your right hand
to take a measurement.
HOW TO TAKE A MEASUREMENT
25
Fit finger closely on the
electrodes.
Do not press START button
until ready to take measurement.
Page 26
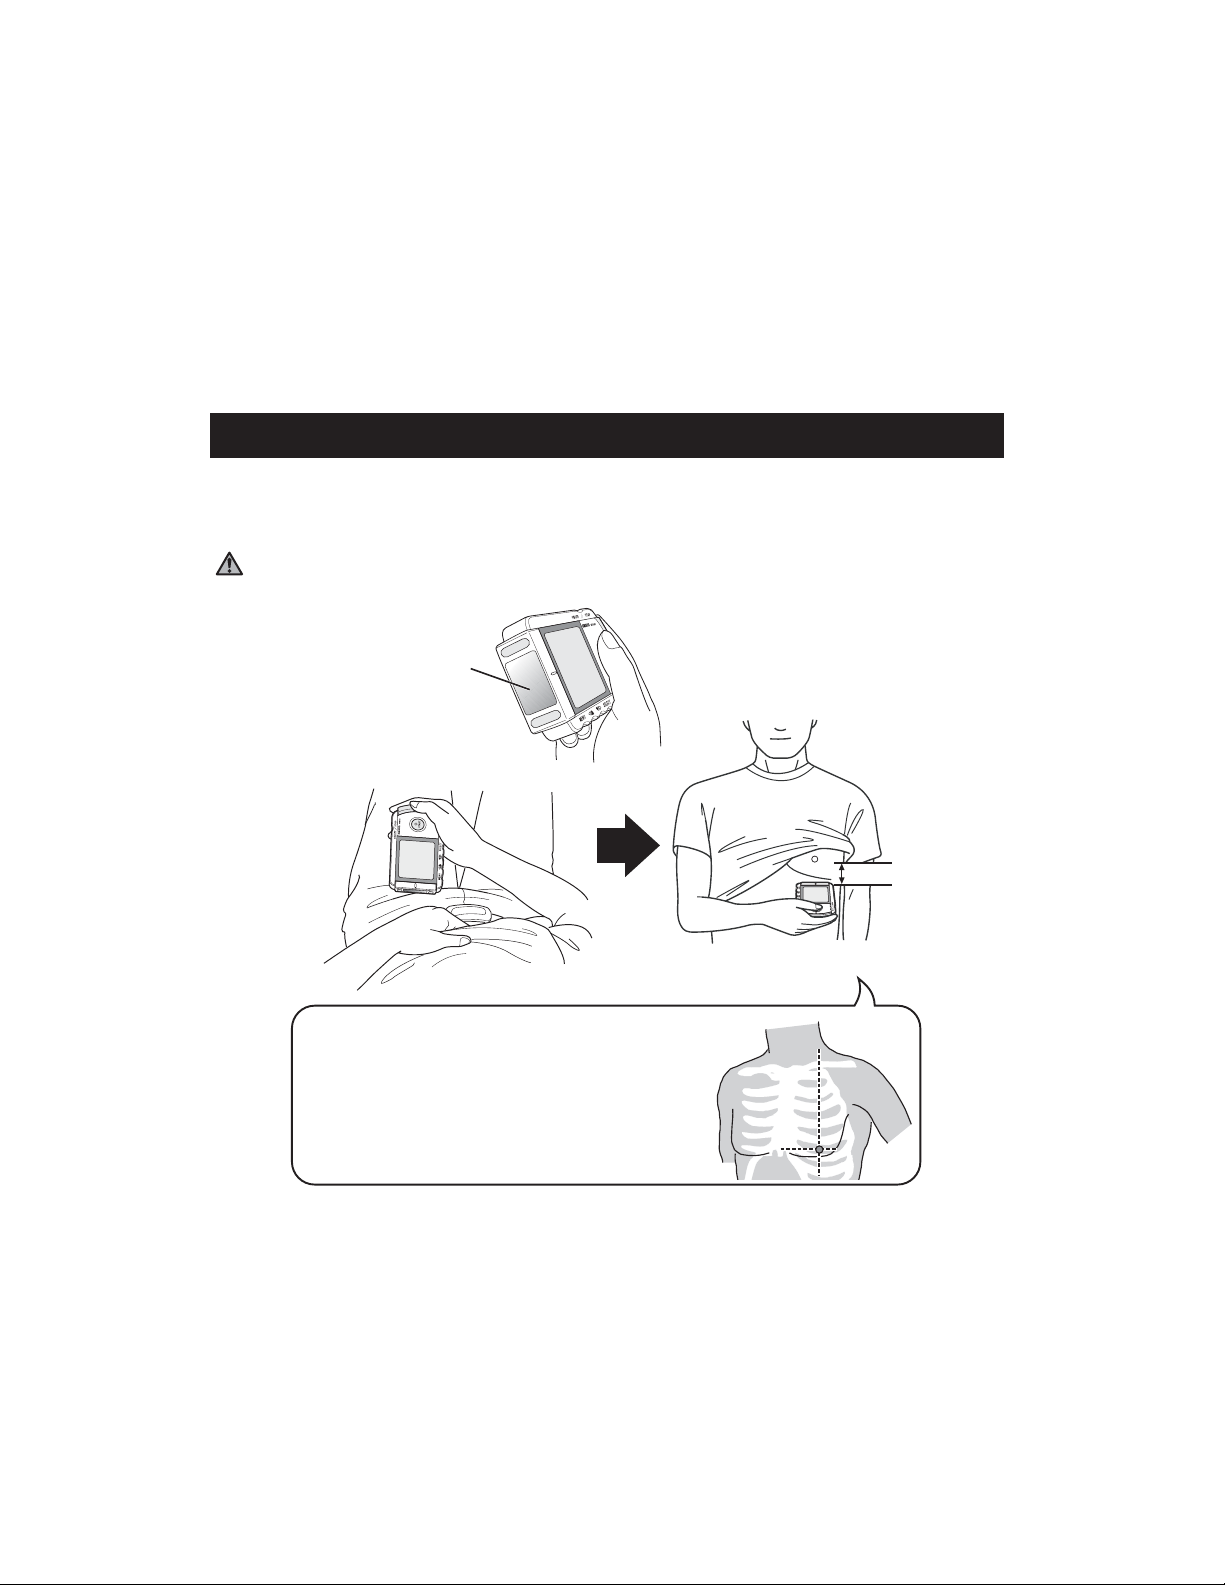
4. Place the chest electrode on bare skin about 2 inches below your left nipple (IMPORTANT - see below
for female application).
NOTE:
• Make sure that you are relaxed and that your chest is free of tension.
WARNING: Press the chest electrode close against your bare chest. Do not place the electrode
on clothing as this will result in an inaccurate measurement.
HOW TO TAKE A MEASUREMENT
26
About 2 inches
Press closely to your chest.
Female:
Locate the ECG monitor at the lower end of the breastbone
and move horizontally to the left to the middle of the left
part of the chest. If necessary, gently lift the breast and place
the Chest Electrode under the left breast. Unless the chest
electrode comes in contact with the brassiere, it is not
necessary to remove it; if you are unsure of exact placement,
please consult your doctor.
Chest electrode
Page 27
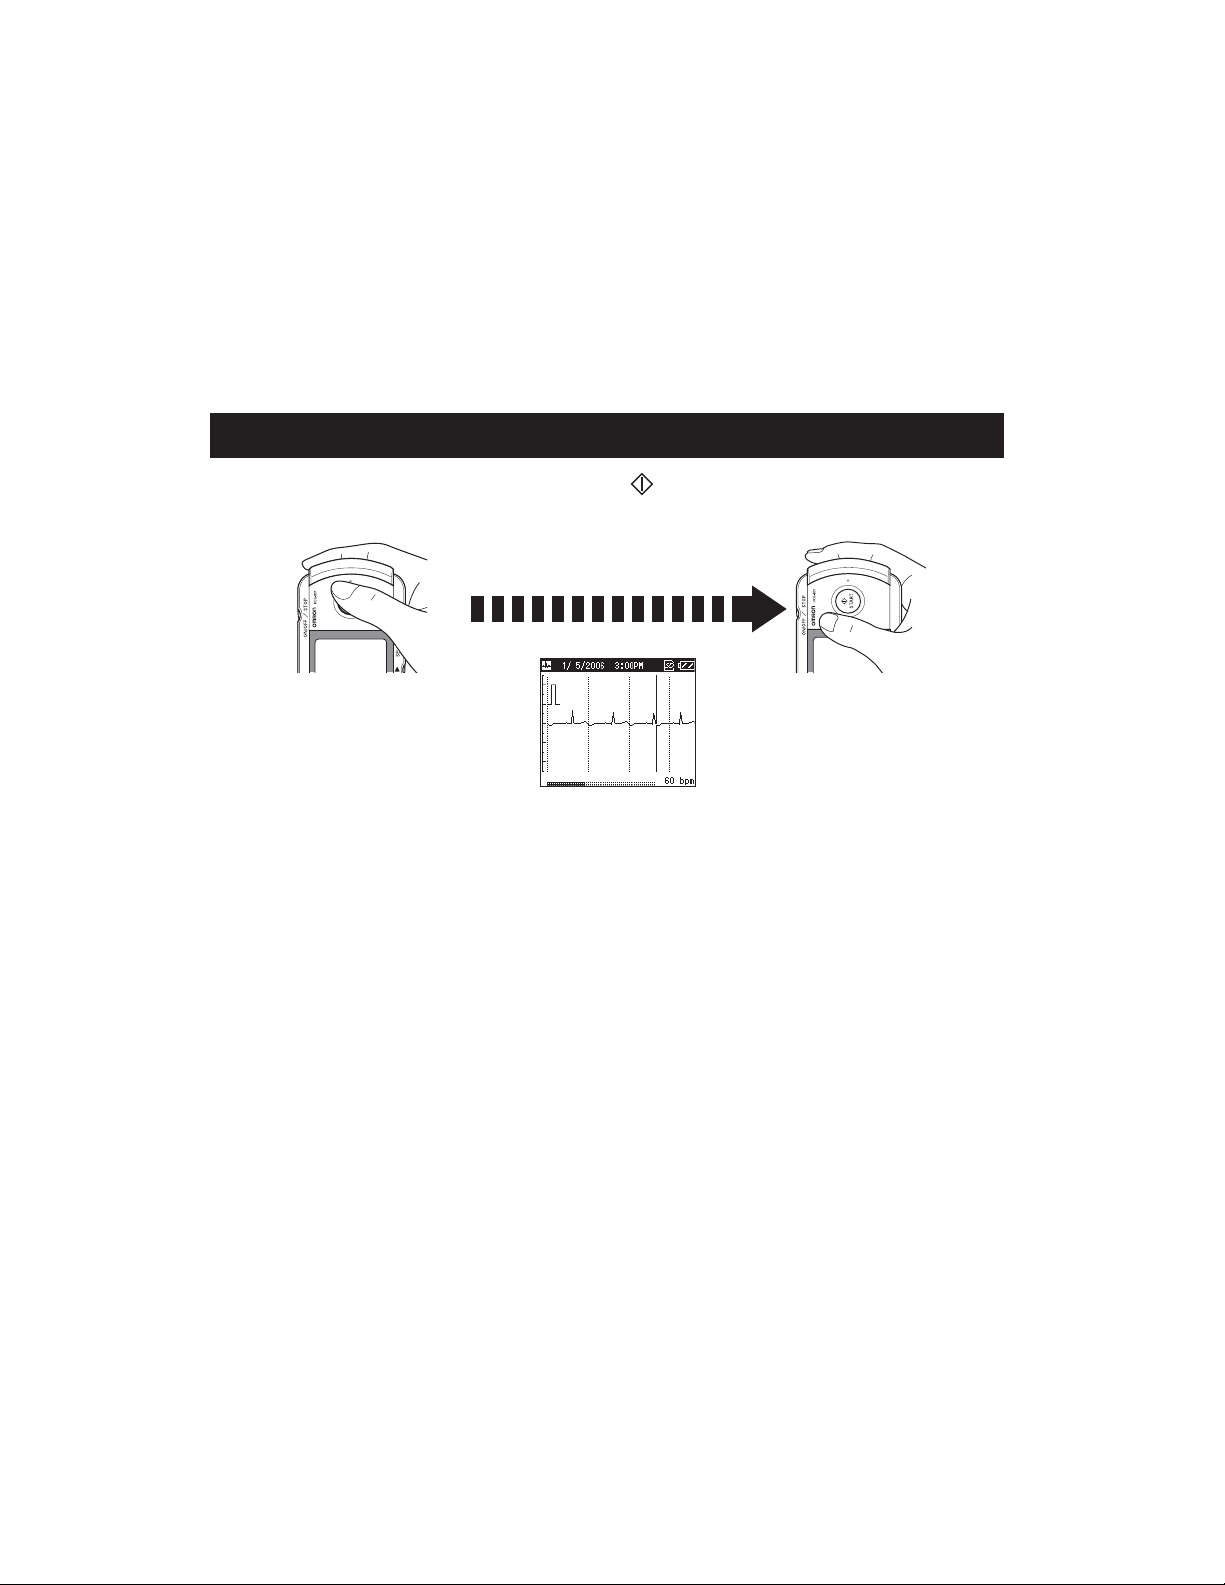
5. While maintaining the same posture, press the START button.
The measurement takes about 30 seconds to complete. The unit beeps every second during measurement.
During measurement, the screen displays the ECG waveform. The progress bar at the bottom of the
screen displays measurement progress, and the number on the right shows the heart rate.
Depending on the waveform, situations can occur in which the unit cannot assess and display the heart
rate during the measurement.
NOTES:
• During measurement the unit will only respond to the ON/OFF / STOP button to discontinue the
measurement.
• If the contact of the electrodes becomes loose, or the conditions change during measurement, the
measurement may not be correct.
IMPORTANT: Keep still and do not move until the measurement is complete.
HOW TO TAKE A MEASUREMENT
27
On/Off
Measurement starts
During measurement
Measurement ends
The measurement ends
automatically, indicated
by 4 rapid beeps.
For about 30 total seconds
The unit beeps every second.
On/Off
Page 28
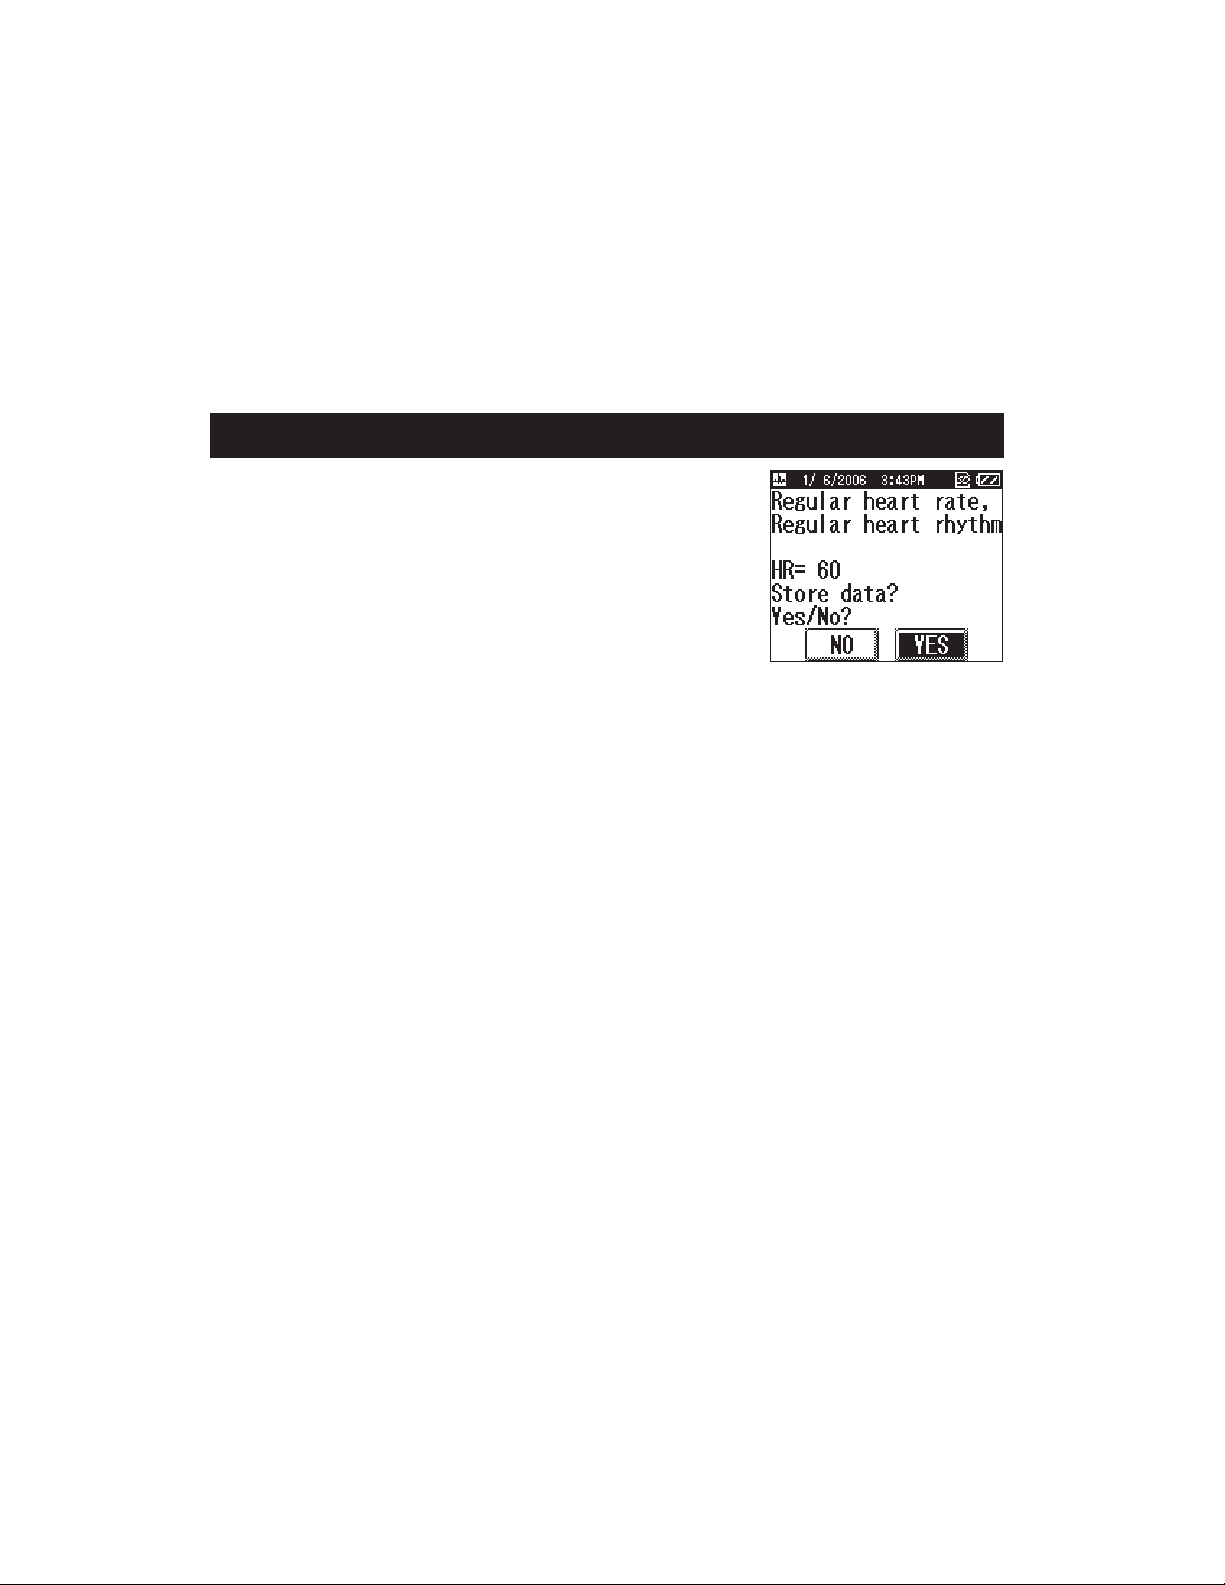
A data description message is displayed when the measurement has been
completed. (Refer to page 48 - 49 for details.)
When the SD momory card is inserted, measurement results will be
saved preferentially on the card.
Otherwise, they will be saved in unit memory.
NOTES:
• “Store date? Yes/No?” might not be displayed. (Refer to “ACTION
MESSAGES” on page 49 for details.)
• A data description message can be selected not to display. (Refer to
page 39 for details.)
If you press the SELECT button while the data description message is displayed, the list of ECG data
stored on the SD memory card or in unit memory is displayed.
NOTE: If the “Please insert new batteries.” error message is displayed immediately after measurement,
the ECG data may not be stored. If this happens, repeat the measurement after replacing the
batteries.
6. Press the ON/OFF / STOP button for two seconds to turn the unit off.
The unit beeps, then the power is turned off.
NOTE: If you forget to turn the unit off, it will automatically turn off after five minutes.
HOW TO TAKE A MEASUREMENT
28
Example of data description
message
Page 29
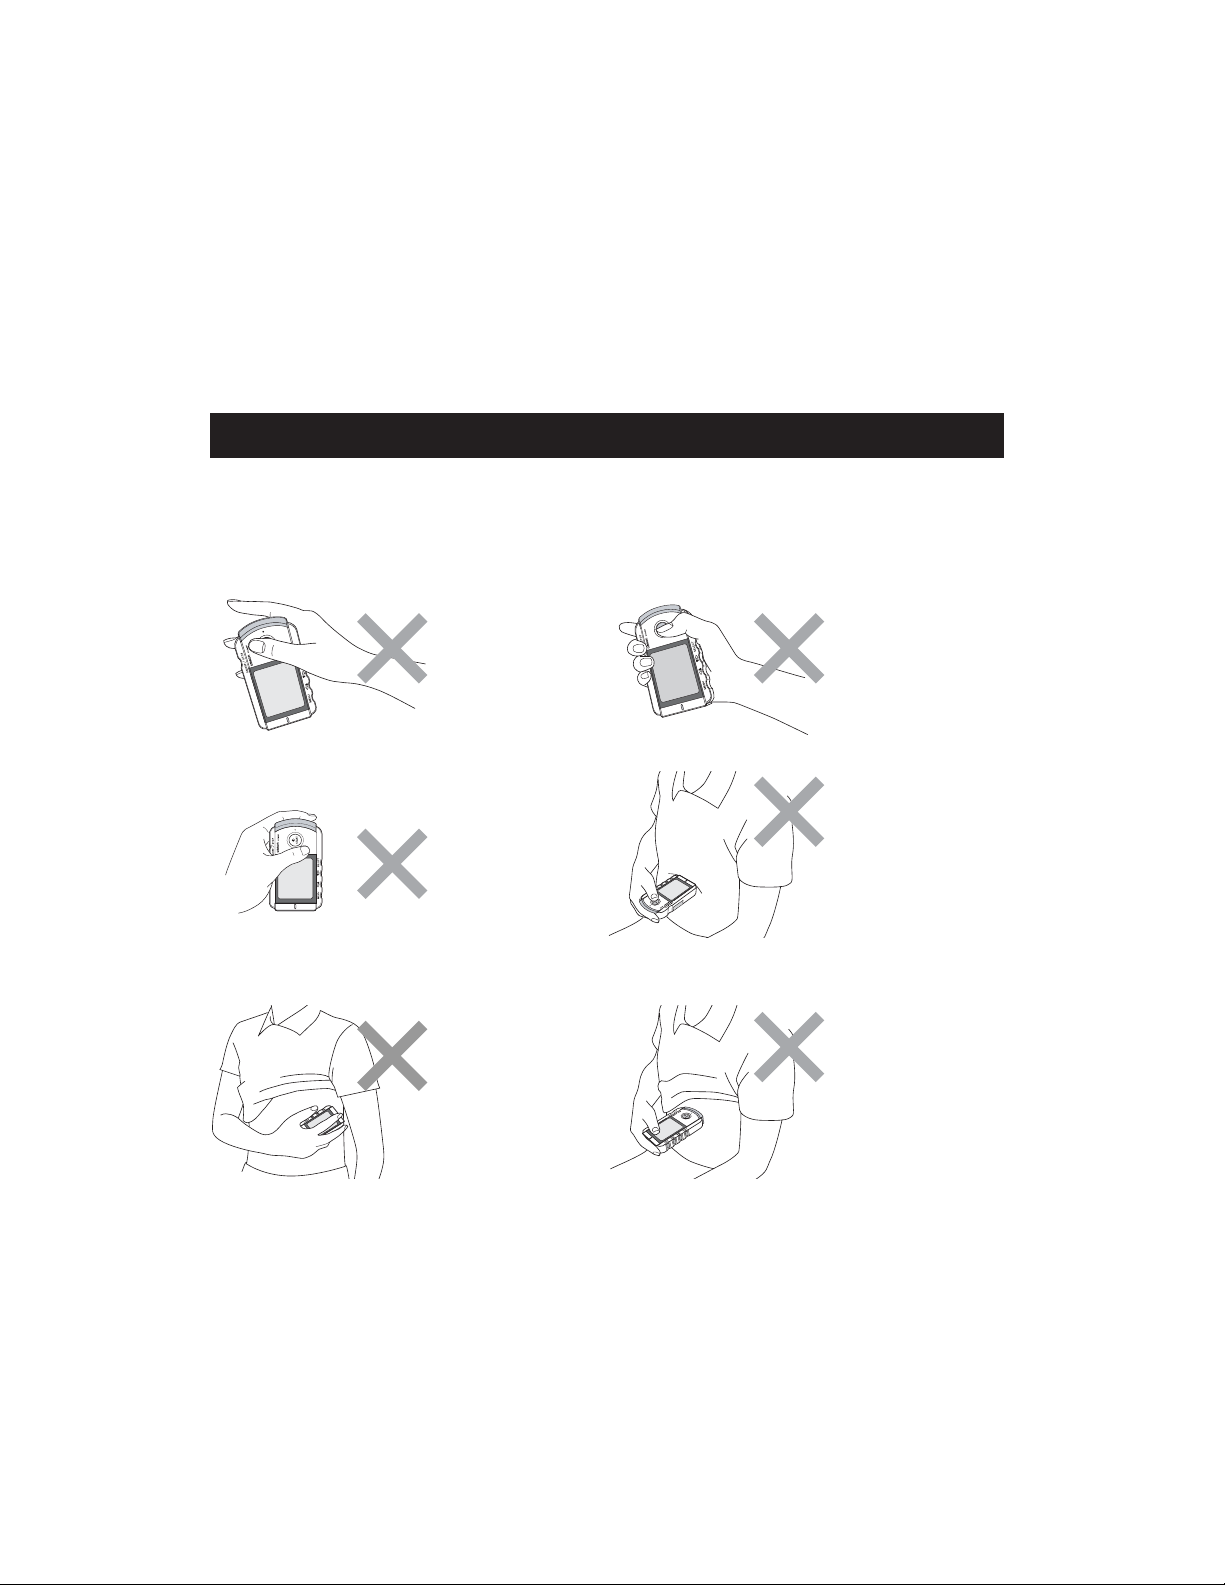
COMMON CAUSES OF INACCURATE MEASUREMENT RESULTS
The following situations can result in inaccurate measurement results or errors.
HOW TO TAKE A MEASUREMENT
29
• The index finger is not placed
firmly on the electrodes.
• The unit is held incorrectly.
• The unit is being held in the left hand.
Always use your right hand to hold
the unit when taking a measurement.
• Unit placed on clothing.
• The rear of the unit is placed against
the chest.
• The chest electrode is against the finger and
the finger electrode is against the chest.
ff
On/O
On/Off
Page 30
The GRAPH menu is used to display the list of ECG data stored on the SD memory card or in unit
memory.
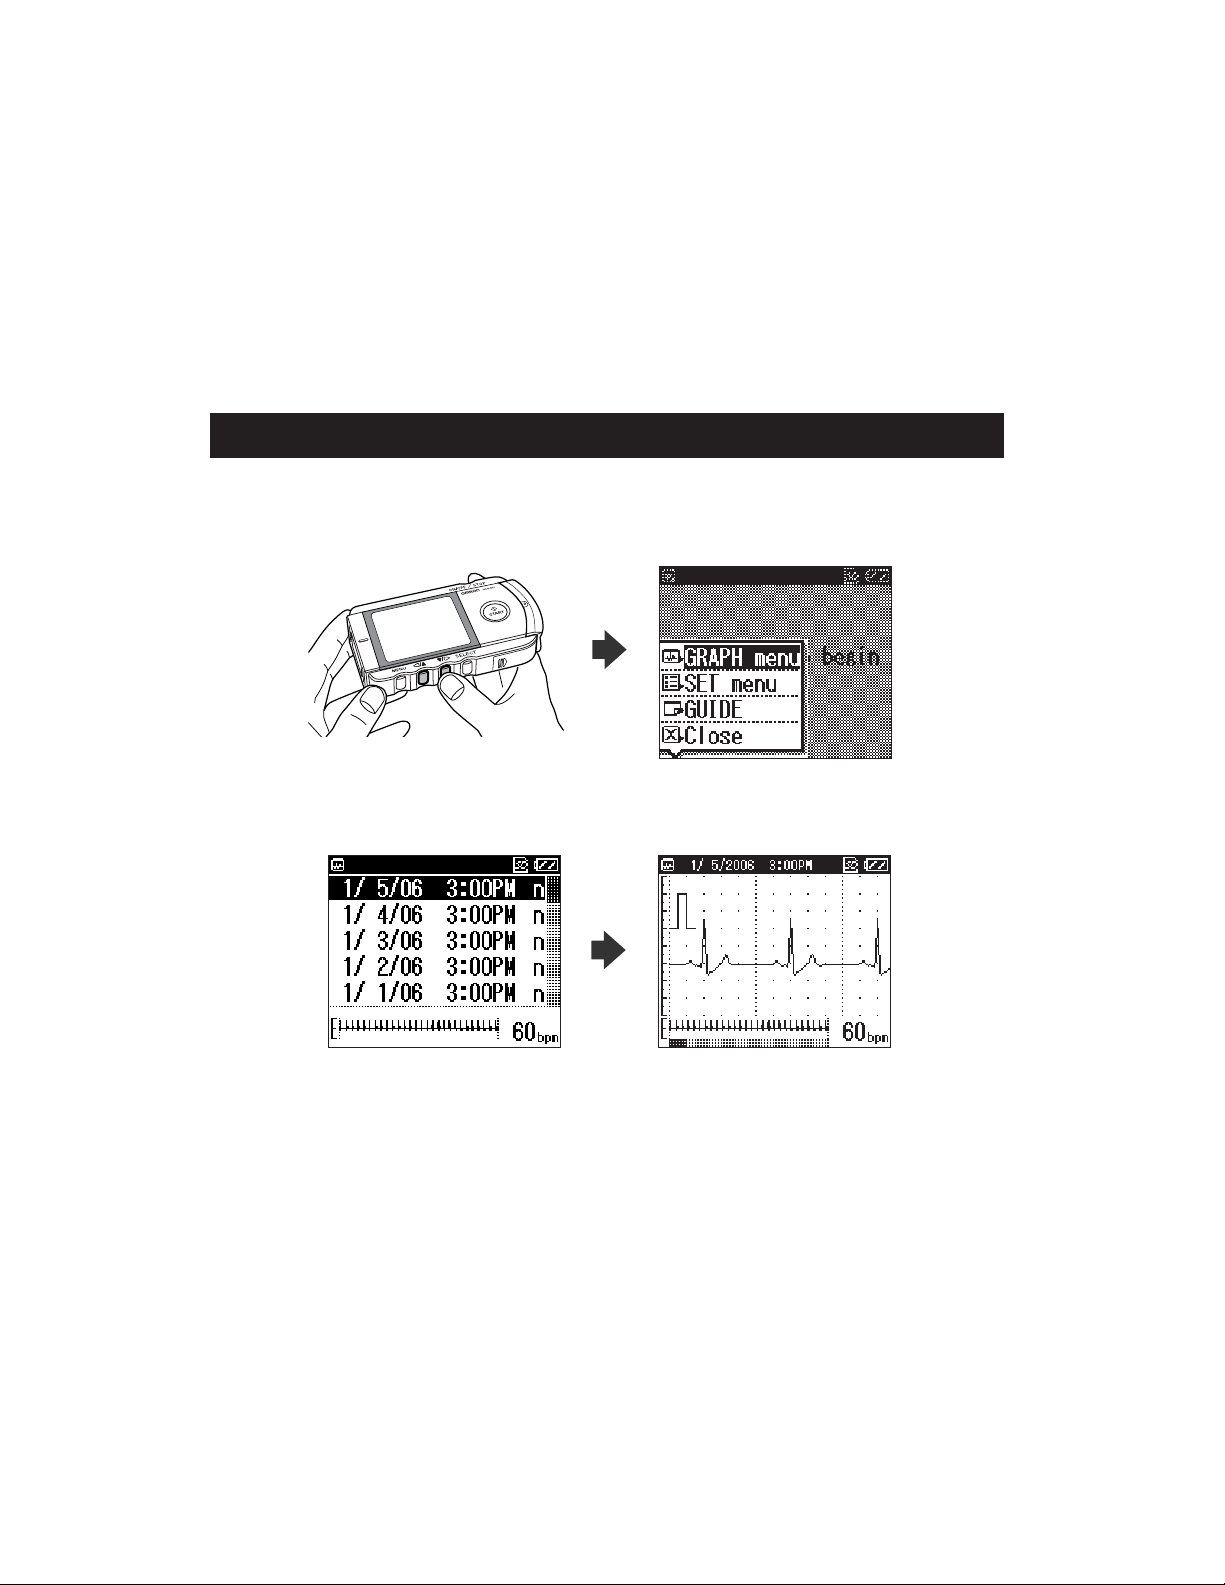
1. Press the MENU button while the unit is turned on, the GRAPH menu is highlighted. If you then press
the SELECT button, the list of ECG data is displayed.
2. Select the ECG data you wish to view from the GRAPH menu list, then press the SELECT button to
display the detailed view of the waveform.
Each stored ECG data is displayed by date, time and a character representing the measurement data
description. Refer to page 48 - 49 for an overview of possible characters and messages.
HOW TO DISPLAY ECG DATA
30
Page 31

Press the button to move down the list, and the button to move up.
The most recent measurement result is displayed at the top of the list and is automatically highlighted,
with any previous measurement results listed below it in chronological order.
When the SD memory card is in the SD memory card slot, the list of ECG data stored on the card is
displayed.
If there is no SD memory card in the card slot, the ECG data stored in unit memory is displayed.
3. If you press the button, you can scroll through the ECG
waveform measurement.
Press the button to return to the previous waveform display.
Two waveforms are displayed (the lower, smaller, waveform being a
view of the whole 30-second measurement.)
At the bottom of the screen is a bar with shaded area which indicates the
section of the ECG waveform displayed.
The heart rate is shown in the lower right corner of the screen.
4. Press the SELECT button again to view the data description messages
and heart rate.
NOTE: You can specify whether a data description message is displayed
or not. Refer to page 39 for details.
5. Press the SELECT button once more to return to the GRAPH menu list.
HOW TO DISPLAY ECG DATA
31
Page 32

You can use the SET menu to adjust various settings.
You can press the START button to begin measurement even while the SET menu is displayed.
BASIC OPERATION
The following procedure describes how to select and adjust a setting. Refer to the following pages for
details of the options available for each setting.
1. Press the MENU button, while the unit is on, to display the menu screen.
2. Press the button to select (highlight) SET menu.
3. Press the SELECT button.
Initially, the Date and Time setting is highlighted.
HOW TO ADJUST THE SETTINGS
32
* Initially, GRAPH
menu is highlighted.
Page 33

4. Press the button or button to select the desired setting, then press the SELECT button to
see the options for that setting.
5. Adjust the settings then press the SELECT button to confirm the changes.
The SET menu can be used to adjust the following settings or to organize ECG data stored on the SD
memory card or in unit memory:
Date and Time, Volume, Brightness, Contrast, Language, Date format, Message, Overwrite, Erase all data,
Data copy to SD, Formatting SD.
Please see the following pages for details on how to change each of these settings.
NOTES:
• Refer to “How to Erase, Save and Organize ECG Data” (pages 41-47) for details on Erase all data and
Data copy to SD.
• Refer to “How to Use the SD Memory Card” (pages 22-23) for details on Formatting SD.
• To return to the menu screen from the SET menu screens, press the MENU button. To return to the SET
menu screen from a setting screen, press MENU button, and highlight Back, then press the SELECT
button.
• If you press the MENU button without first pressing the SELECT button, after changes a setting, the
changes to the setting will not be implemented.
HOW TO ADJUST THE SETTINGS
33
Page 34

DATE AND TIME
Select this item if you need to reset the date and time. For details on setting the date and time,
refer to page 16.
NOTE: You will be prompted to set the date and time when you first insert the batteries.
VOLUME
Press the button or button, to adjust the volume.
The volume can be set to one of four levels.
The volume increases as the mark moves to the right.
The sound is muted (off) when the mark is to the far left.
HOW TO ADJUST THE SETTINGS
34
The current volume level is displayed
at the bottom of the screen.
The mark indicates the volume level.
* The default setting is the maximum volume level.
Page 35

BRIGHTNESS
Press the button or button, to adjust
the brightness.
The brightness can be set to one of nine levels.
Brightness increases as the marker moves to the right.
HOW TO ADJUST THE SETTINGS
35
The current brightness level is displayed
at the bottom of the screen.
The mark indicates the brightness level.
* The default setting is the maximum brightness level.
Page 36

CONTRAST
Press the button or button to adjust the contrast.
Contrast can be set to one of nine levels.
Contrast increases as the marker moves to the right.
HOW TO ADJUST THE SETTINGS
36
The current contrast level is displayed at
the bottom of the screen.
The mark indicates the contrast level.
* The default setting is the medium contrast level.
Page 37

LANGUAGE
Press the button or button to select the desired language, then press the SELECT button to
confirm your selection.
HOW TO ADJUST THE SETTINGS
37
The currently selected language is
displayed at the bottom of the screen.
* The default language is English.
Page 38

HOW TO ADJUST THE SETTINGS
38
DATE FORMAT
You can select one of four formats, MM/DD/YY HH:MM (AM/PM), MM/DD/YY HH:MM (24 hour
clock), DD/MM/YY HH:MM (AM/PM), or DD/MM/YY HH:MM (24 hour clock).
Press the button or button to select the desired format, then press the SELECT button to
confirm your selection.
The date is displayed at the bottom of the
screen using the currently selected format.
* The default date format is
MM/DD/YY HH:MM (AM/PM).
Page 39

MESSAGE
This setting specifies whether to display or hide the data description message.
Press the button or button to highlight the Display or Hide, then press the SELECT button to
confirm your selection.
NOTES:
• Even if Hide is selected, data description messages are saved in unit memory or on the SD memory
card. (Refer to page 28 for details.)
• When Display is selected again, all the saved data description messages will be displayed.
HOW TO ADJUST THE SETTINGS
39
The current setting is displayed at the
bottom of the screen.
* The default setting is Display.
Page 40

OVERWRITE
The unit will overwrite the oldest stored reading when the SD memory card or unit memory is full.
A message will warn that this will happen, you can choose to hide or display this message.
(The default setting is to hide the message.)
Press the button or button to highlight Display or Hide, then press the SELECT button to
confirm your selection.
CAUTION: While Hide is selected, the unit will overwrite (erase and replace) the oldest
measurement data with the results of the new measurement without displaying a
message (when the SD memory card or unit memory is full).
ABOUT THE OVERWRITE MESSAGE
If you select Display, the unit will display a message before you take a
measurement, asking if you want to overwrite existing data with the new
measurement data.
Select Ye s to overwrite the oldest ECG data with the results of the new
measurement.
If you select No, measurement is cancelled.
HOW TO ADJUST THE SETTINGS
40
The current setting is displayed at the
bottom of the screen.
* The default setting is Hide.
Page 41

ERASING ECG DATA
Erasing All ECG Data
You can use the SET menu to erase all the ECG data stored on the SD memory card or in unit memory.
NOTE: If an SD memory card is inserted in the unit, all data on the card will be erased.
1. Press the button to scroll through the settings and select Erase all data.
2. Press the SELECT button.
The message “Erase all data in SD memory?” is displayed.
NOTE: If the SD memory card is not inserted and measurements are being
stored in unit memory, the message “Erase all data in the device?” is
displayed.
HOW TO ERASE, SAVE AND ORGANIZE ECG DATA
41
* By default, NO is
highlighted.
Page 42

3. Press the button and select YES, then press the SELECT button.
The number of sets of data to be deleted is displayed.
4. Press the button and select YES, then press the SELECT button.
All the ECG data is erased and the screen from step 1 appears.
NOTE: If you press the SELECT button after selecting NO, the screen from
step 1 appears.
Erasing Selected ECG Data
Use the GRAPH menu if you only want to delete a selected set of ECG data.
For details on displaying the GRAPH menu, follow step 1 in “How to Display ECG Data” on page 30.
1. Press the button to highlight the data you want to erase.
2. Press the MENU button.
The menu screen is displayed.
3. Press the button and select Erase data.
HOW TO ERASE, SAVE AND ORGANIZE ECG DATA
42
Page 43

4. Press the SELECT button.
The confirmation message “Erase selected data?” is displayed.
5. Press the button to select YES, then press the SELECT button.
The ECG data is erased and the screen from step 1 appears.
NOTE: If you press the SELECT button after selecting NO, the ECG data is
not erased and the screen from step 1 appears.
CAUTION: Never remove an SD memory card while data is being erased.
HOW TO ERASE, SAVE AND ORGANIZE ECG DATA
43
* By default, NO is
highlighted.
Page 44

COPYING DATA TO AN SD MEMORY CARD
You can copy ECG data from the unit’s internal memory to an SD memory card. This allows you to copy
data to the SD memory card if measurements have been taken while the SD memory card was not inserted.
NOTE: The unit’s internal memory can only store a maximum of five measurement results.
1. Press the button and select Data copy to SD.
2. Press the SELECT button.
The confirmation message “Copy data into SD?” is displayed.
3. Press the button to select YES.
NOTES:
• If the SD memory card is full, the “Overwrite data” message may appear.
Refer to page 40 for details.
• ECG data stored on an SD memory card can be damaged by static electricity
and other causes. Copy data to PC or other device for additional safety.
HOW TO ERASE, SAVE AND ORGANIZE ECG DATA
44
* By default, NO is
highlighted.
Page 45

4. Press the SELECT button.
The ECG data is copied to the SD memory card.
CAUTION: Never remove the SD memory card while data is being
copied to it. If the SD memory card is removed while data
is being copied, the data may be lost or damaged.
NOTES:
• The copied data is displayed and the screen from step 1 appears.
• If the same ECG data already exists on the SD memory card, the data is not copied.
HOW TO ERASE, SAVE AND ORGANIZE ECG DATA
45
Page 46

COPYING DATA FROM THE SD MEMORY CARD TO A PC
Please follow these instructions to copy data from the SD memory card to a PC.
1. Make sure the PC is equipped with an SD memory card port or connect a commercially available SD
memory card reader/writer to your PC.
2. Create a new folder on your PC where you want to save a copy of the ECG data.
3. Insert the SD memory card and browse to the SD memory card data as explained in the instruction
manual of your PC and /or software. The ECG data is located in the *:\hcg801\data\
(where * stands for the character of a removable disk).
4. Select all files and copy them in the folder you have created earlier (step 2).
5. When copying is finished, remove the SD memory card.
6. The SD memory card can now be formatted as described in “Formatting an SD Memory Card” on page
22, if you wish to delete data on the SD card.
HOW TO ERASE, SAVE AND ORGANIZE ECG DATA
46
Page 47

COPYING DATA FROM A PC TO THE SD MEMORY CARD
Please follow these instructions to copy data from a PC to the SD memory card.
1. Make sure the PC is equipped with an SD memory card port or connect a commercially available SD
memory card reader/writer to your PC.
2. Insert the SD memory card in the SD port of your PC and confirm that there is an “hcg801” folder in the
SD memory card. If there is not, format the SD memory card in the HCG-801 as described in “Formatting
an SD Memory Card” on page 22.
3. Browse to the folder where you saved the ECG data in the PC. Select all files and copy them to the SD
memory card in the *:\hcg801\data\ (where * stands for the character of a removable disk)
4. When copying is finished, insert the SD memory card in the HCG-801 as described in “Inserting and
Ejecting SD Memory Card” on page 18.
5. Do not store more than 300 measurement files in this folder on the SD memory card. When more than
300 files are copied in this folder, the HCG-801 will display an error message.
HOW TO ERASE, SAVE AND ORGANIZE ECG DATA
47
Page 48

48
This section includes a list of all messages that may appear on the display. Refer to these if you are not sure
what a displayed message means.
DATA DESCRIPTION MESSAGES
After finishing a measurement, the unit will display a message describing the data from the
measurement.
A letter of the alphabet indicates each of the possible messages (see list below). This letter is displayed
together with the time and date of the measurement when the GRAPH menu is displayed.
WARNING:
• Never interpret measurement results yourself. Always consult your doctor.
• These messages support heart rate and heart rhythm only. Waveform changes especially those
related to ischemic heart conditions are not supported.
MESSAGES
Regular heart rate,
Regular heart rhythm
n
Slow heart rate.v
Fast heart rate.w
Irregular
heart rhythm.
x
Slow heart rate,
Irregular
heart rhythm.
y
Fast heart rate,
Irregular
heart rhythm.
z
Analysis impossible.
Please measure again
m
Page 49

HEART RATE MESSAGE
HR - In addition to the above messages the unit will display the heart rate in beats per minute.
ACTION MESSAGES
Finally, the unit will display one of the following messages:
Store data? Yes/No?
This message will be displayed when the unit can find no irregularities (see Data Description Message “n”
on page 48) or when the unit cannot measure properly (see Data Description Message “m” on page 48).
This data can be saved by selecting Yes and pressing the SELECT button.
Data is stored. Please consult your doctor.
This message will be displayed when the unit finds an irregularity (see Data Description Messages “v
through z” on page 48). Always write down your symptoms when you get this message. You will find a
form for tracking your symptoms in the back of this manual. The unit will automatically store the data.
Contact your doctor to determine the data’s significance.
MESSAGES
49
CRITERIA OF DATA DESCRIPTION MESSAGES
MESSAGES CONDITIONS
Fast heart rate Fast (more than 100 BPM)
Slow heart rate Slow (less than 60 BPM)
Irregular heart rhythm
no R-waves detected for 2 seconds and more
R-R variation rate is 10% and above
R-R interval is less than 80% of the normal intervals
when VPC detected
Noise
R-R regulation cannot be analyzed
None of the above
Analysis impossible.
Please measure again
Regular heart rate,
Regular heart rhythm
Page 50

Analyzing. The ECG data is being analyzed.
No action required. Wait until
analysis ends.
MESSAGES
50
MESSAGE CAUSE CORRECTION
Cannot measure.
Please follow the instructions for
use.
An ECG wave-pattern could not
be detected.
Check the instructions and repeat
measurement.
Measurement was stopped.
Push START to begin
measurement again.
The measurement was
interrupted or cancelled.
Press START to resume the
measurement.
Copied
*1
data into SD.
The indicated ECG data has been
copied to an SD memory card.
No action required.
Wait until the message disappears.
Erased
*2
data.
The indicated ECG data has been
erased.
*1: Number of readings from 0 to 5. The number displayed represents the amount of copied ECG data.
*2: Number of readings from 1 to 300. The number displayed represents the amount of erased ECG data.
Warning Messages
Formatting SD memory.
DO NOT REMOVE SD
The SD memory card is being
formatted.
Wait until the message disappears.
Do not remove the SD memory card
until formatting has been completed.
MESSAGE CAUSE CORRECTION
LISTS AND EXPLANATIONS OF MESSAGES
Notice Messages
Page 51

MESSAGES
51
MESSAGE CAUSE CORRECTION
Storing on SD memory.
DO NOT REMOVE SD
ECG data is being written
(saved) to the SD memory card.
Wait until the message disappears.
Do not remove the SD memory card
until data storage has been
completed.
Copying SD memory.
DO NOT REMOVE SD
ECG data is being copied to the
SD memory card.
Wait until the message disappears.
Do not remove the SD memory card
until data copying has been
completed.
Data in device memory is being
erased.
ECG data stored on the unit is
being erased.
Wait until the message disappears.
Data in SD is being erased.
DO NOT REMOVE SD until
erasing finishes.
ECG data stored on the SD
memory card is being erased.
Wait until the message disappears.
Do not remove the SD memory card
until data erasing has been
completed.
Reading data...
DO NOT REMOVE SD.
The unit is loading ECG data
stored on the SD memory card.
Wait until the message disappears.
Do not remove the SD memory card
until the data has been loaded by the
unit.
No SD is inserted.
There is no SD memory card in
the card slot.
Turn off the power and insert the SD
memory card.
Never insert the SD memory card
while the power is turned on.
SD is write-protected.
The unit is unable to access data
because the SD memory card
inserted is write-protected.
Refer to the instruction supplied with
the memory card and insert the SD
memory card with write-protection
turned off.
No saved data.
The battery power has run low
and the ECG data stored on the
unit has disappeared.
Insert new batteries. Reset the Date
and Time and other settings. Any
ECG data that was stored on the unit
cannot be recovered.
Page 52

MESSAGES
52
MESSAGE CAUSE CORRECTION
Set clock.
The battery power has run low
and the Date and Time setting on
the unit has disappeared.
Insert new batteries and reset the
Date and Time from the SET menu.
No saved data.
Set clock.
The battery power has run low
and the ECG data stored on the
unit has disappeared or the clock
has been reset.
Insert new batteries and reset the
Date and Time and other settings.
Error Messages
Please insert new
batteries.
The batteries are worn out.
MESSAGE CAUSE
01
ERROR #
Replace both batteries with new
ones.
CORRECTION
Device memory error.
Cannot read data.
An error occurred while trying to
read ECG data stored in unit
memory.
11
Contact
Omron Healthcare
Customer Service
at 1-800-829-6427.
Device memory error.
Cannot erase data.
An error occurred while trying to
erase ECG data stored in unit
memory.
12
Device memory error.
Cannot write data.
An error occurred while trying to
save ECG data to unit memory.
13
SD memory error.
Cannot read data.
An error occurred while trying to
read ECG data stored on the SD
memory card.
21
Format the SD memory card.
Refer to page 22.
* Copy any important data to a PC
before formatting the SD memory
card as all data on the card will be
erased.
Use a new/different SD memory
card. (Always turn off the unit
before removing or inserting SD
memory cards.)
SD memory error.
Cannot erase data.
22
SD memory error.
Cannot write data.
An error occurred while trying to
save ECG data on the SD
memory card.
23
An error occurred while trying to
erase ECG data stored on the SD
memory card.
Page 53

MESSAGES
53
MESSAGE CAUSEERROR # CORRECTION
Error formatting SD
memory.
An error occurred when
formatting the SD memory card.
24
Use a new/different SD memory
card. (Always turn off the unit
before removing or inserting SD
memory cards.)
SD memory error.
SD memory
unknown.
The SD memory card may be
damaged.
25
Format the SD memory card.
Refer to page 22.
* Copy any important data to a PC
before formatting the SD memory
card as all data on the card will be
erased.
Use a new/different SD memory
card. (Always turn off the unit
before removing or inserting SD
memory cards.)
SD memory full.
Please delete
unnecessary data.
The SD memory card is full and
there is not enough space to save
new ECG data.
26
Either delete unnecessary data or
use a new SD memory card.
(Always turn off the unit before
removing or inserting SD
memory cards.)
The number of data in
SD is over the limit.
Please delete
unnecessary data.
The number of ECG data in
the SD memory card is over
the limit.
27
Device error.
The unit may have been
damaged or is otherwise unable
to operate normally.
91
Turn the unit off, then on again.
If this error still occurs, contact:
Omron Healthcare
Customer Service
at 1-800-829-6427.
Page 54

54
PROBLEM CAUSE SOLUTION
Nothing happens when you press
the ON/OFF / STOP button.
The batteries are worn out.
The batteries are inserted
incorrectly.
Replace both batteries with new ones.
Insert the batteries with their
polarities correctly aligned.
Refer to page 13
Measurement starts but the message
“Cannot measure. Please follow the
instructions for use.” appears.
An ECG wave-pattern could not
be detected.
Check the instructions and repeat
measurement.
Measurement finishes but the
message “Analysis impossible.
Please measure again.” appears.
The electrodes are not making
good contact with your finger or
chest.
Check the instructions and repeat
measurement.
Your body is too tense. Relax and repeat the measurement.
Electrode contact was broken
before 30 seconds of data has
been recorded.
Make sure that your finger and chest
maintain contact with the electrodes
for the full 30 seconds of the
measurement.
The chest electrode has been
applied over clothing.
Apply the chest electrode to bare
skin.
Your skin is dry.
Moisten your skin with a damp
towel.
The ECG signal is too weak.
Make sure that the electrodes are
applied correctly. However, for some
individuals measurement may not be
possible.
TROUBLE SHOOTING
Care and Maintenance
Page 55

TROUBLE SHOOTING
55
PROBLEM CAUSE SOLUTION
ECG data has disappeared.
The batteries are worn out or
have been removed for over one
hour.
The unit will not be able to store
data if left with worn batteries for an
extended period. Replace the
batteries with new ones as soon as
possible after the warning message
appears.
If the problem still occurs, contact Omron Healthcare Customer Service at 1-800-829-6427.
ECG data has disappeared from
an SD memory card.
Erased data cannot be recovered.
Format the SD memory card again.
Other problems
Turn off the uint. Turn on the unit
and try again.
If the date and time or other settings
have been reset to their default
values, set them again.
The SD card was exposed to
strong electromagnetic noise or
static that may damage the stored
data.
Page 56

• Clean the unit with a cloth dampened with water or mild detergent.
Then wipe it dry with a dry cloth. Do not wipe the SD memory card
slot cover.
• Wipe the electrodes using a cloth dampened with disinfectant alcohol.
• Do not wipe the unit with benzene, gasoline, paint thinner, concentrated
alcohol, or other volatile detergents.
• Do not place objects on top of the unit. This could damage the unit.
• Do not disassemble the unit. There are no user serviceable parts.
Repairs should only be carried out by Omron authorized personnel.
• This unit does not require calibration during its expected life cycle.
CAUTION: Do not sterilize the unit in an autoclave, ultraviolet sterilizer or gas sterilizer
(EOG, formaldehyde, high density ozone, etc.)
MAINTENANCE AND STORAGE
56
Page 57

CAUTION:
• Do not wash the unit with water.
• Do not store the unit in the following ambient conditions:
- Locations exposed to direct sunlight.
- Locations subject to high temperatures and high humidity.
- Wet or damp locations where water may get on the unit.
- Dusty locations.
- Near fires or open flames.
- Locations exposed to strong vibration.
- Locations exposed to strong electromagnetic fields.
• Remove the batteries from this unit when you are not going to use it for a long period of time
• (approximately three months or more).
MAINTENANCE AND STORAGE
57
Page 58

NOTE:
POTENTIAL FOR RADIO/TELEVISION INTERFERENCE (for U.S.A. only)
This product has been tested and found to comply with the limits for a Class B digital device, pursuant to
part 15 of the FCC rules.
These limits are designed to provide reasonable protection against harmful interference in a residential
installation. The product generates, uses, and can radiate radio frequency energy and, if not installed and
used in accordance with the instructions, may cause harmful interference to radio communications.
However, there is no guarantee that interference will not occur in a particular installation. If the product
does cause harmful interference to radio or television reception, which can be determined by turning the
product on and off, the user is encouraged to try to correct the interference by one or more of the following
measures:
• Reorient or relocate the receiving antenna
• Increase the separation between the product and the receiver.
• Connect the product into an outlet on a circuit different from that to which the receiver is connected.
• Consult the dealer or an experienced radio/TV technician for help.
POTENTIAL FOR RADIO/TELEVISION INTERFERENCE (for Canada only)
This digital apparatus does not exceed the Class B limits for radio noise emissions from digital apparatus as
set out in the interference-causing equipment standard entitled “ Digital Apparatus”, ICES-003 of the
Canadian Department of Communications.
Changes or modifications not expressly approved by the party responsible for compliance could void the
user’s authority to operate the equipment.
FCC STATEMENT
58
Page 59

Your Portable ECG Monitor HCG-801, excluding the SD memory card and storage pouch, is warranted to
be free from defects in materials and workmanship appearing within 2 years from the date of purchase,
when used in accordance with the instructions provided with the monitor. The above warranties extend only
to the original retail purchaser.
We will, at our option, repair or replace without charge any monitor covered by the above warranties.
Repair or replacement is our only responsibility and your only remedy under the above warranties.
To obtain warranty service contact Omron Healthcare Customer Service at 1-800-829-6427 for the address
of the repair location and the return shipping and handling fee. Information for warranty service is available
on our website at www.omronhealthcare.com.
Enclose the Proof of Purchase. Include a letter, with your name, address, phone number, and description of
the specific problem. Pack the product carefully to prevent damage in transit. Because of possible loss in
transit, we recommend insuring the product with return receipt requested.
ALL IMPLIED WARRANTIES, INCLUDING BUT NOT LIMITED TO THE IMPLIED
WARRANTIES OF MERCHANTABILITY AND FITNESS FOR PARTICULAR PURPOSE, ARE
LIMITED TO THE DURATION OF THE APPLICABLE WRITTEN WARRANTY ABOVE.
Some states do not allow limitations on how long an implied warranty lasts, so the above limitation may
not apply to you.
OMRON SHALL NOT BE LIABLE FOR LOSS OF USE OR ANY OTHER INCIDENTAL,
CONSEQUENTIAL OR INDIRECT COSTS, EXPENSES OR DAMAGES IN ANY WAY
CONNECTED WITH THE GOODS OR USE OF THE GOODS. Some states do not
allow the exclusion or limitation of incidental or consequential damages, so the above exclusions
may not apply to you.
This warranty gives you specific legal rights, and you may also have other rights which may vary
from state to state.
Omron Healthcare Customer Service (US and Canada)
Visit our web site at: www.omronhealthcare.com
Call toll free: 1-800-829-6427
WARRANTY INFORMATION
59
Limited Warranty
Page 60

SPECIFICATIONS
60
Model: HCG-801
Induction system: Bipolar single channel
Heart rate range: 2 to 200 beats/min.
Bandwidth: 0.05 to 40Hz
Sampling Rate: 125Hz
Enclosure ingress protection: IP20
Display: Graphic LCD
Memory: 5 measurements (using the unit’s internal memory)
300 measurements (using the supplied SD memory card)
Electrical Safety: Internally powered equipment, B-type device
Power Supply: 2 × LR03 (AAA) batteries
Battery life: Approximately 400 measurements with alkaline batteries
(When measurements are taken once a day at room temperature (72 ºF (22 ºC)))
Operating Environment: +50 to +104ºF (+10 to +40 ºC), 30 to 85%RH, 700 to 1060 hPa
Storage Environment: -4 to +140 ºF (-20 to +60 ºC), 10 to 95%RH, 700 to 1060 hPa
Weight: Approximately 4 5/8 oz. (130 g) (including batteries)
Dimensions: 4 3/4” (W) × 2 5/8” (H) × 1” (D) (121 mm × 67 mm × 24 mm)
Contents: Main Unit, SD memory card, Storage pouch, 2 × LR03(AAA) batteries,
Instruction manual, Registration card, Quick reference card.
NNOTE: Specifications may be changed without prior notice.
• Disposal of this product, the optional accessories and used batteries should be carried out in accordance with the
national regulations for the disposal of electronic products. Unlawful disposal may cause environmental pollution.
• Do not use in the presence of flammable anesthetics, drugs or pressurized oxygen (such as in a hyperbaric chamber,
ultraviolet sterilizer or oxygen tent).
• This device supports SDA standard SD memory cards.
• OMRON Healthcare, Co., Ltd. is a member of the SD Card Association.
• This device uses bitmap font from Ricoh Co., Ltd.
• The SD logo is a registered trademark.
• This product meets EMC standards IEC60601-1-2:2001. Using this device with or near other medical/electrical
equipment could produce mutual interference. Be sure to read the Instruction Manual for correct installation and use.
Also, be sure to read the Instruction Manuals for all other electronic equipment nearby.
= Type B
ECG TYPE3
SD Logo is a trademark.
with respect to electric shock, fire and mechanical hazards only in accordance with UL60601-1 and CAN/CSA C22.2 No. 601.1
PORTABLE ECG MONITOR
58JN
Page 61

MEASUREMENT
DATE
MEASUREMENT
TIME
WRITE DOWN YOUR SYMPTOMS HERE
SAMPLE SYMPTOM LOG
You may wish to make photocopies of this log and use them to fill in any information. Always
record your symptoms in the right hand column every time you take a measurement. Be sure to
always include the date and time of your measurement so your doctor can effectively review your
data. If you are unsure of what constitutes a symptom, contact your physician for further information.
61
Page 62

62
MEASUREMENT
DATE
MEASUREMENT
TIME
WRITE DOWN YOUR SYMPTOMS HERE
Page 63

NOTES
63
Page 64

Manufactured by Omron Healthcare
Made in Japan
Distributed by:
OMRON HEALTHCARE, INC.
1200 Lakeside Drive
Bannockburn, Illinois 60015
www.omronhealthcare.com
World Rights Reserved
© 2006 Omron Healthcare, Inc.
HCG801INST Rev 1657513-0A
Page 65

Monitor Portátil de ECG
Modelo HCG-801
MANUAL DE INSTRUCCIONES
Precaución: Las leyes federales de EE.UU. establecen que este dispositivo sólo puede ser vendido por
un médico, o por orden de un médico.
ESPAÑOL
Page 66

E2
Antes de usar la unidad
Introducción . . . . . . . . . . . . . . . . . . . . . . . . . . . . . . . . . . . . . . . . . . . . . . . . . . . . . . . . . . . . . . . . . . . . . . E4
Información general acerca del corazón y las mediciones de ECG . . . . . . . . . . . . . . . . . . . . . . . . . . . E5
Notas de seguridad importantes . . . . . . . . . . . . . . . . . . . . . . . . . . . . . . . . . . . . . . . . . . . . . . . . . . . . . . . E6
Conozca su unidad . . . . . . . . . . . . . . . . . . . . . . . . . . . . . . . . . . . . . . . . . . . . . . . . . . . . . . . . . . . . . . . . . E9
Instrucciones de funcionamiento
Cómo colocar y cambiar las pilas . . . . . . . . . . . . . . . . . . . . . . . . . . . . . . . . . . . . . . . . . . . . . . . . . . . . E13
Vida útil y cambio de las pilas . . . . . . . . . . . . . . . . . . . . . . . . . . . . . . . . . . . . . . . . . . . . . . . . . . E14
Colocación de la cubierta del compartimiento de las pilas . . . . . . . . . . . . . . . . . . . . . . . . . . . . . . . . . E15
Configuración de la fecha y horario . . . . . . . . . . . . . . . . . . . . . . . . . . . . . . . . . . . . . . . . . . . . . . . . . . . E16
Uso de la tarjeta de memoria SD . . . . . . . . . . . . . . . . . . . . . . . . . . . . . . . . . . . . . . . . . . . . . . . . . . . . . E18
Cómo insertar y sacar la tarjeta de memoria SD . . . . . . . . . . . . . . . . . . . . . . . . . . . . . . . . . . . . E18
Cómo formatear una tarjeta de memoria SD . . . . . . . . . . . . . . . . . . . . . . . . . . . . . . . . . . . . . . . E22
Notas importantes con respecto a la forma de tomar una medición . . . . . . . . . . . . . . . . . . . . . . . . . . E24
Cómo tomar una medición . . . . . . . . . . . . . . . . . . . . . . . . . . . . . . . . . . . . . . . . . . . . . . . . . . . . . . . . . . E25
Causas comunes de resultados inexactos de medición . . . . . . . . . . . . . . . . . . . . . . . . . . . . . . . . E29
Visualización de los datos del ECG . . . . . . . . . . . . . . . . . . . . . . . . . . . . . . . . . . . . . . . . . . . . . . . . . . E30
Cómo ajustar los valores . . . . . . . . . . . . . . . . . . . . . . . . . . . . . . . . . . . . . . . . . . . . . . . . . . . . . . . . . . . E32
Operación básica . . . . . . . . . . . . . . . . . . . . . . . . . . . . . . . . . . . . . . . . . . . . . . . . . . . . . . . . . . . . . E32
Fecha y horario . . . . . . . . . . . . . . . . . . . . . . . . . . . . . . . . . . . . . . . . . . . . . . . . . . . . . . . . . . . . . . E34
Volumen . . . . . . . . . . . . . . . . . . . . . . . . . . . . . . . . . . . . . . . . . . . . . . . . . . . . . . . . . . . . . . . . . . . E34
Brillo . . . . . . . . . . . . . . . . . . . . . . . . . . . . . . . . . . . . . . . . . . . . . . . . . . . . . . . . . . . . . . . . . . . . . . E35
Contraste . . . . . . . . . . . . . . . . . . . . . . . . . . . . . . . . . . . . . . . . . . . . . . . . . . . . . . . . . . . . . . . . . . . E36
Idioma . . . . . . . . . . . . . . . . . . . . . . . . . . . . . . . . . . . . . . . . . . . . . . . . . . . . . . . . . . . . . . . . . . . . . E37
Formato de fecha . . . . . . . . . . . . . . . . . . . . . . . . . . . . . . . . . . . . . . . . . . . . . . . . . . . . . . . . . . . . E38
Mensaje . . . . . . . . . . . . . . . . . . . . . . . . . . . . . . . . . . . . . . . . . . . . . . . . . . . . . . . . . . . . . . . . . . . E39
Overwrite (Sobreescritura) . . . . . . . . . . . . . . . . . . . . . . . . . . . . . . . . . . . . . . . . . . . . . . . . . . . . . E40
Acerca del mensaje Overwrite (Sobreescritura) . . . . . . . . . . . . . . . . . . . . . . . . . . . . . . . . . . . . . E40
ÍNDICE
Page 67

E3
Cómo borrar, guardar y organizar los datos del ECG . . . . . . . . . . . . . . . . . . . . . . . . . . . . . . . . . . . . . E41
Cómo borrar los datos del ECG . . . . . . . . . . . . . . . . . . . . . . . . . . . . . . . . . . . . . . . . . . . . . . . . .E41
Copia de los datos en una tarjeta de memoria SD . . . . . . . . . . . . . . . . . . . . . . . . . . . . . . . . . . . E44
Copia de los datos desde la tarjeta de memoria SD a una PC . . . . . . . . . . . . . . . . . . . . . . . . . . E46
Copia de los datos desde una PC a la tarjeta de memoria SD . . . . . . . . . . . . . . . . . . . . . . . . . . E47
Mensajes . . . . . . . . . . . . . . . . . . . . . . . . . . . . . . . . . . . . . . . . . . . . . . . . . . . . . . . . . . . . . . . . . . . . . . . . E48
Mensajes de descripción de datos . . . . . . . . . . . . . . . . . . . . . . . . . . . . . . . . . . . . . . . . . . . . . . . . E48
Criterios de los mensajes de descripción de datos . . . . . . . . . . . . . . . . . . . . . . . . . . . . . . . . . . . . E49
Mensaje de frecuencia cardíaca . . . . . . . . . . . . . . . . . . . . . . . . . . . . . . . . . . . . . . . . . . . . . . . . . E49
Mensajes de acción . . . . . . . . . . . . . . . . . . . . . . . . . . . . . . . . . . . . . . . . . . . . . . . . . . . . . . . . . . . E49
Listas y explicaciones de mensajes . . . . . . . . . . . . . . . . . . . . . . . . . . . . . . . . . . . . . . . . . . . . . . . E50
Mensajes de notificación . . . . . . . . . . . . . . . . . . . . . . . . . . . . . . . . . . . . . . . . . . . . . . . . . . . E50
Mensajes de advertencia . . . . . . . . . . . . . . . . . . . . . . . . . . . . . . . . . . . . . . . . . . . . . . . . . . . . E50
Mensajes de error . . . . . . . . . . . . . . . . . . . . . . . . . . . . . . . . . . . . . . . . . . . . . . . . . . . . . . . . . E52
Cuidado y mantenimiento
Solución de problemas . . . . . . . . . . . . . . . . . . . . . . . . . . . . . . . . . . . . . . . . . . . . . . . . . . . . . . . . . . . . . E54
Mantenimiento y almacenamiento . . . . . . . . . . . . . . . . . . . . . . . . . . . . . . . . . . . . . . . . . . . . . . . . . . . . E56
Declaración de la FCC . . . . . . . . . . . . . . . . . . . . . . . . . . . . . . . . . . . . . . . . . . . . . . . . . . . . . . . . . . . . . E58
Información sobre la garantía . . . . . . . . . . . . . . . . . . . . . . . . . . . . . . . . . . . . . . . . . . . . . . . . . . . . . . . . E59
Especificaciones . . . . . . . . . . . . . . . . . . . . . . . . . . . . . . . . . . . . . . . . . . . . . . . . . . . . . . . . . . . . . . . . . . E60
Registro de síntomas de muestra . . . . . . . . . . . . . . . . . . . . . . . . . . . . . . . . . . . . . . . . . . . . . . . . . . . . . E61
Notas . . . . . . . . . . . . . . . . . . . . . . . . . . . . . . . . . . . . . . . . . . . . . . . . . . . . . . . . . . . . . . . . . . . . . . . . . . . E63
ÍNDICE
Page 68

E4
Gracias por adquirir el monitor portátil de ECG de OMRON®.
INTRODUCCIÓN
Complete lo siguiente para consulta futura.
FECHA DE COMPRA:_______________
NÚMERO DE SERIE: _______________
Abroche aquí su recibo de compra.
El monitor OMRON HCG-801 es una unidad de electrocardiografía fácil de usar que puede registrar y
guardar electrocardiogramas (ECG) de su ritmo cardíaco. Cada lectura del ECG registra una medición de
aproximadamente 30 segundos y estas lecturas del ECG pueden ayudar a su médico a monitorear su
condición. También incluye pantallas de guía que lo ayudarán a obtener datos de buena calidad al tomar
mediciones. Esta unidad está destinada para uso en la populación adulta.
El monitor se suministra con una tarjeta de memoria SD que puede guardar hasta 300 mediciones, incluyendo
los datos del ECG y la fecha y hora de la medición. Al guardarse los datos del ECG en la tarjeta de memoria
SD, o en la memoria de la unidad, esto permite que su médico pueda visualizar estos datos posteriormente.
IMPORTANTE: Tenga en cuenta que, aunque las mediciones de un monitor de ECG pueden resultar una
guía útil para su médico, no pueden detectar todos los cambios en las condiciones
cardíacas. Consulte siempre a su médico si observa cualquier cambio en su condición,
independientemente de los resultados de las mediciones. Consulte a un médico incluso si
se visualiza el mensaje “Frecuencia cardíaca regular, ritmo cardíaco regular” como el
mensaje de datos, si se le ha diagnosticado una condición cardíaca.
El monitor portátil de ECG HCG-801 incluye los siguientes componentes:
• Unidad principal • Tarjeta de memoria SD • Bolsa para guardar • 2 × pilas LR03(AAA)
• Manual de instrucciones* • Tarjeta de registro • Tarjeta de referencia rápida
* Las ilustraciones que se utilizan en este manual pueden presentar ligeras diferencias con respecto al aspecto de la unidad real.
GUARDE ESTAS INSTRUCCIONES
Antes de usar la unidad
Page 69

El corazón es una bomba muscular controlada por impulsos eléctricos generados por el cuerpo. Se divide
por la mitad mediante el septo y cada mitad tiene dos cámaras, una aurícula y un ventrículo, unidas por una
válvula que se abre en un solo sentido. La aurícula y el ventrículo izquierdos controlan la sangre oxigenada,
mientras que la aurícula y ventrículo derechos controlan la sangre desoxigenada (“usada”).
El impulso eléctrico que provoca los latidos del corazón se disemina a través de las aurículas, lo que hace
que las aurículas izquierda y derecha se contraigan y bombeen sangre hacia los ventrículos izquierdo y
derecho, respectivamente. Luego, los dos ventrículos se contraen y bombean sangre hacia fuera del corazón.
Luego, el músculo cardíaco se relaja, o repolariza, lo que permite que la sangre vuelva a llenar el corazón.
Un monitor de ECG permite medir el impulso eléctrico a medida que atraviesa el corazón y produce sus
latidos. Un ECG no mide el movimiento del latido cardíaco, sino la actividad eléctrica que hace que el
corazón late. Las mediciones registradas por el monitor de ECG, si se combinan con un examen médico,
pueden ayudar al médico a monitorear su condición cardíaca. Las mediciones del ECG registradas por la
unidad NO están diseñadas ni destinadas para el diagnóstico médico. Las condiciones como la arritmia sólo
pueden ser diagnosticadas por un médico a través de un examen especial.
INFORMACIÓN GENERAL ACERCA DEL CORAZÓN Y LAS MEDICIONES DE ECG
E5
Aurícula izquierda
Ventrículo izquierda
Septo
Aurícula derecha
Ventrículo derecha
Page 70

E6
NOTAS DE SEGURIDAD IMPORTANTES
Para garantizar el uso correcto del producto, siempre se debe cumplir con las medidas de seguridad básicas,
incluyendo las advertencias y precauciones que se enumeran en este manual de instrucciones.
SÍMBOLOS DE SEGURIDAD QUE SE UTILIZAN EN ESTE MANUAL DE INSTRUCCIONES
Indica una situación potencialmente peligrosa que, si no se la evita, puede
provocar la muerte o lesiones graves.
Indica una situación potencialmente peligrosa que, si no se la evita, puede
provocar lesiones leves o moderadas al usuario o al paciente o daños al equipo
u otros bienes.
ADVERTENCIA
PRECAUCIÓN
ESTA UNIDAD HA SIDO DISEÑADA PARA EL REGISTRO DE LA FORMA DE ONDA DE ECG
EN LA POBLACIÓN ADULTA. ESTA UNIDAD NO HA SIDO DISEÑADA NI DESTINADA PARA
DIAGNÓSTICO MÉDICO. NUNCA UTILICE LA UNIDAD EN SITUACIONES DE ATENCIÓN
MÉDICA CRÍTICAS.
• Los mensajes que aparece después de la medición indica sólo la frecuencia cardíaca y el ritmo cardíaco.
• Este dispositivo ni detecta, ni mide, todos los cambios de frecuencia, de ritmo y de forma de onda del
corazón, especialmente aquéllos relacionados con condiciones cardíacas isquémicas.
• Consulte siempre a su médico si observa cualquier cambio en su condición, independientemente de
los resultados de los mensajes.
ADVERTENCIA:
Este dispositivo no puede ser utilizado por personas que tengan un marcapasos u otros dispositivos implantados.
No use este dispositivo con un desfibrilador.
No lo use en presencia de anestésicos inflamables, drogas u oxígeno presurizado (como, por ejemplo, en una cámara
hiperbárica, esterilizador ultravioleta o carpa de oxígeno).
No intente realizar un autodiagnóstico ni automedicarse basándose en los resultados y el análisis de la medición.
Consulte siempre a su médico. El autodiagnóstico o la automedicación pueden provocar el deterioro de su condición.
No use este dispositivo durante la realización de una resonancia magnética.
Page 71

ADVERTENCIA:
No use este dispositivo en personas con piel sensible o que sufran alergias.
No intente usar el dispositivo sobre o a través de la ropa.
No intente usar el dispositivo con la mano izquierda.
Si experimenta síntomas relacionados potencialmente con una enfermedad cardíaca, consulte siempre
a su médico, incluso si se visualiza el mensaje de “Frecuencia cardíaca regular, ritmo cardíaco regular”.
En caso de que el fluido de las pilas entre en contacto con los ojos, enjuague de inmediato con
abundante agua limpia Consulte inmediatamente a un médico.
PRECAUCIÓN:
No tome mediciones si hay polvo en los electrodos. Límpielos antes de tomar una medición.
Si la parte del cuerpo donde se aplica el electrodo tiene demasiada grasa corporal, es posible que no se
pueda lograr una lectura exitosa.
No tome mediciones con el electrodo colocado al revés (Consulte la ilustración de la página 26).
No exponga la unidad a la electricidad estática. Elimine siempre la electricidad estática de su cuerpo
antes de manipular la unidad.
No tome mediciones en un vehículo en movimiento.
No use teléfonos celulares cerca de la unidad.
No desarme, repare ni trate de modificar la unidad.
No coloque las pilas con las polaridades invertidas.
El electrodo del tórax no se podrá colocar si tiene demasiado vello en el pecho. Elimine regularmente
el vello en el punto de contacto del electrodo. Omron no recomienda el uso de gel de contacto.
Mantenga la unidad fuera del alcance de los bebés y niños pequeños y de las personas impedidas que no
pueden expresar su consentimiento.
NOTAS DE SEGURIDAD IMPORTANTES
E7
Page 72

PRECAUCIÓN:
No use la unidad con ningún otro propósito que no sea el de obtener una electrocardiografía.
No exponga la unidad a vibraciones o golpes fuertes. No deje caer la unidad al suelo ni la pise.
No use pilas que no sean las del tipo especificado en este manual.
No tome mediciones cuando la piel está húmeda, como, por ejemplo, debido a la transpiración o después de
bañarse.
No tome mediciones en ningún lugar donde la unidad esté expuesta a fuerzas electromagnéticas potentes.
Si las pilas se retiran por más de una hora, las configuraciones y cualquier otro dato del ECG que se
guardan en la unidad se pueden borrar. Si la configuración de fecha y hora se borra, asegúrese de
volver a ajustar la configuración antes de volver a usar la unidad. Los datos del ECG que se borren de
la unidad no se pueden recuperar.
Evite las temperaturas y humedad extremas. No use esta unidad en lugares expuestos a altas o bajas
temperaturas o humedad. Use la unidad a una temperatura de entre +10 a +40°C y entre 30 y 85%RH.
No esterilice esta unidad en un autoclave o esterilizador a gas (EOG, formaldehído, ozono de alta
densidad, etc.)
No lave esta unidad con agua.
No guarde la unidad en las siguientes condiciones ambientales:
• Lugares expuestos a la luz directa del sol.
• Lugares sujetos a altas temperaturas y humedad.
• Lugares mojados o húmedos donde el agua pueda entrar en contacto con la unidad.
• Lugares en los que haya polvo.
• Cerca del fuego o al alcance de las llamas.
• Lugares expuestos a vibraciones fuertes.
• Lugares expuestos a campos electromagnéticos potentes.
NOTAS DE SEGURIDAD IMPORTANTES
E8
Page 73

Pantalla
Muestra el patrón de la onda y
muestra los menúes, mensajes
y opciones de mostrar.
Botón
Mueve el patrón de onda o menú
deseado hacia la izquierda o hacia
arriba y disminuye el número del
campo seleccionado.
Botón
Mueve el patrón de onda o menú
deseado hacia la derecha o hacia
abajo y aumenta el número del
campo seleccionado.
Cubierta de la ranura de la tarjeta de
memoria SD
Abra esta cubierta para insertar la tarjeta
de memoria SD.
Botón ON/OFF / STOP
(Encendido/Apagado / Detener)
Enciende/apaga el aparato y cancela las
mediciones.
Botón START (Inicio)
Inicia la medición.
Electrodos para los dedos
Coloque el dedo índice derecho
sobre estos electrodos al tomar
una medición.
Tapa del compartimiento de las
pilas
Abra esta tapa para colocar las pilas.
Botón SELECT (Seleccionar)
Seleccione la opción resaltado
del menú o los datos del ECG.
E9
CONOZCA SU UNIDAD
UNIDAD PRINCIPAL:
Botón MENU (Menú)
Muestra o cierra la pantalla de menú.
Electrodo del tórax
Coloque este electrodo
contra el tórax al tomar
una medición.
Page 74

UNIDAD PRINCIPAL
Pantalla:
La pantalla se usa para visualizar instrucciones básicas y resultados de las lecturas del ECG, para ajustar
configuraciones y para revisar los datos del ECG que se guardan en la tarjeta de memoria SD o en la
memoria de la unidad.
Menú
CONOZCA SU UNIDAD
E10
Pantalla de menú
La pantalla del menú
principal se visualiza al
presionar el botón MENU
(Menú).
Menú SET (Configurar)
El menú SET (Configurar) se
visualiza al seleccionar el menú
SET (Configurar) y presionar el
botón SELECT (Seleccionar).
Menú GRAPH (Gráfico)
Le permite visualizar las lecturas del ECG que se
guardan en la tarjeta de memoria SD o en la
memoria de la unidad. (página 30)
Menú SET (Configurar)
Le permite configurar la fecha y hora, y ajustar
otros parámetros. (página 32)
GUIDE (Guía)
Muestra las pantallas de guía que le indican
cómo tomar una medición.
Atrás
Esta opción le permite volver a la pantalla
anterior, desde el menú SET (Configurar).
Cerrar
Esta opción cierra la pantalla de menú.
Page 75

UNIDAD PRINCIPAL
Pantalla:
Gráfico del ECG
Esta pantalla se visualiza cuando utiliza el Menú GRAPH (Gráfico) para seleccionar los datos del ECG que
se guardan en la unidad.
CONOZCA SU UNIDAD
E11
NOTA: Durante la medición, la pantalla muestra la forma de onda del ECG. La barra de marcha ubicada en
la parte inferior de la pantalla muestra el avance de la medición y el número ubicado a la derecha
muestra el ritmo cardíaco.
Según la forma de onda, se pueden producir situaciones en las que la unidad no puede evaluar y
mostrar la frecuencia cardíaca durante la medición.
Aproximadamente onda de
30 segundos completos
Indicador de tiempo de
medición
Indicador de tarjeta de memoria SD
Se visualiza cuando la tarjeta de memoria
SD está en la ranura de la tarjeta.
Indicador de nivel de batería
Forma de onda del ECG
Frecuencia cardíaca
(*bpm=latidos por minuto)
Guía de calibración
Sirve como guía cuando el
médico analiza los datos del
ECG almacenados.
Page 76

CONOZCA SU UNIDAD
E12
COMPONENTES:
• Tarjeta de memoria SD
• (801SDMEMORY)
• Bolsa de almacenamiento
• (801STORAGEPOUCH)
MANUAL DE INSTRUCCIONES
• Manual de instrucciones
• (HCG801INST)
• 2 pilas tamaño
LR03(AAA)
• Tarjeta de referencia rápida
• Tarjeta de registro
Monitor Portátil de ECG
ModeloHCG-801
Precaución: Las leyes federales de EE.UU. establecen que este dispositivo sólo puede ser vendido por
un médico, o por orden de un médico.
ESPAÑOL
Page 77

1. Deslice la tapa del compartimiento de las pilas en la dirección que
indica la flecha, y levante el extremo de la tapa hacia arriba.
NOTA: No ejerza demasiada fuerza al tirar de la tapa.
2. Coloque dos pilas tipo LR03(AAA) de modo que las polaridades +
(positiva) y - (negativa) concuerden con las polaridades que se
indican en el compartimiento de las pilas, como se indica en la
ilustración.
NOTA: Use siempre pilas del tipo LR03(AAA).
3. Cierre la tapa del compartimiento de las pilas.
Baje la tapa del compartimiento (1), luego, mientras presiona
suavemente la tapa hacia abajo, deslícela en la dirección que indica
la flecha (2).
CÓMO COLOCAR Y CAMBIAR LAS PILAS
E13
Instrucciones de funcionamiento
2
1
Page 78

VIDA ÚTILY CAMBIO DE LAS PILAS
Cuando aparece el mensaje “Please insert new batteries” (Coloque pilas nuevas), cambie ambas pilas por
pilas nuevas.
• Apague siempre la unidad antes de cambiar las pilas.
• Respete los reglamentos locales aplicables al desechar las pilas usadas.
Vida útil de la pila:
• Dos pilas nuevas tipo LR03(AAA) duran aproximadamente 400 mediciones, si las mediciones se toman
una vez por día a temperatura ambiente (72ºF (22ºC)).
• Las pilas incluidas en el paquete son para fines de demostración. Es posible que estas pilas no duren 400
mediciones.
• La vida útil de la pila se puede confirmar en la parte superior derecha de la pantalla.
CÓMO COLOCAR Y CAMBIAR LAS PILAS
E14
ADVERTENCIA: En caso de que el fluido de las pilas entre en contacto con los ojos, enjuague de
inmediato con abundante agua limpia Consulte inmediatamente a un médico.
PRECAUCIÓN:
• Si las pilas se retiran por más de una hora, es posible que se borren las configuraciones y
cualquier otro dato del ECG guardado en la unidad. Si la configuración de fecha y hora se
borra, asegúrese de volver a ajustar la configuración antes de volver a usar la unidad. Los
datos del ECG que se borren de la unidad no se pueden recuperar.
• No use pilas que no sean las especificadas para esta unidad.
• No coloque las pilas con las polaridades en la dirección incorrecta.
• No arroje las pilas al fuego.
• Si el fluido de las pilas en contacto con la piel o la vestimenta, enjuague inmediatamente con
abundante agua limpia.
• Retire las pilas de la unidad si no la va a usar durante un período de tiempo prolongado
(aproximadamente tres meses o más).
• No use pilas de distintos tipos al mismo tiempo.
• No use pilas nuevas y usadas al mismo tiempo.
Alimentación
eléctrica completa.
Queda media carga.
La alimentación eléctrica restante es baja.
Cambie las pilas por pilas nuevas.
Page 79

Si la tapa del compartimiento de las pilas se sale
accidentalmente, cuelgue la tapa del
compartimiento como se describe en el
procedimiento que aparece a continuación.
1. Alinee la espiga de la tapa del compartimiento
con la muesca de la parte superior del
compartimiento de las pilas en el lado del botón
START (Inicio) (lado frontal) de la unidad
(1).
2. Alinee la otra espiga de la tapa del
compartimiento de las pilas con la muesca del
otro lado del compartimiento de las pilas (2).
Mientras presiona suavemente la espiga que ya
está insertada en el lado del botón START
(Inicio) (lado frontal), inserte la espiga en la muesca del lado
opuesto del compartimiento.
NOTA: No presione con demasiada fuerza la espiga del lado
del botón START (Inicio) del compartimiento de
las pilas. Esto puede provocar daños en la tapa del
compartimiento.
3. Cierre la tapa del compartimiento de las pilas.
Mientras presiona la tapa del compartimiento, deslícela en la
dirección que indica la flecha.
COLOCACIÓN DE LA CUBIERTA DEL COMPARTIMIENTO DE LAS PILAS
E15
1
Alinee la espiga con la muesca
Alinee la espiga con
la muesca
Tapa del compartimiento de las pilas
Lado del botón
START (Inicio)
2
Page 80

Configure siempre la fecha y hora antes de usar la unidad por primera vez.
Verifique si la fecha y hora son correctas antes de usar la unidad, y continúe a configurarlas si es necesario.
La fecha y hora son indicadores importantes del momento en que se ha tomado una medición.
NOTA: El formato de la fecha y hora se puede cambiar.
(Consulte “Formato de fecha” en la página 38)
1. Presione el botón ON/OFF / STOP (Encendido/Apagado / Detener)
para encender la unidad.
Cuando la unidad se usa por primera vez, o si se ha reajustado la
configuración de fecha y hora, la pantalla de configuración de fecha y
hora se va a mostrar automáticamente, y los dígitos correspondientes al
mes aparecen resaltados.
2. Presione el botón o el botón para configurar el mes.
Presione el botón para aumentar el número.
Presione el botón para disminuir el número.
CONFIGURACIÓN DE LA FECHA Y HORA
E16
2006
Page 81

3. Presione el botón SELECT (Seleccionar) para confirmar la
configuración del mes.
Se establece la configuración del mes y la configuración del día
aparece resaltado.
La pantalla muestra de forma cíclica los valores de
mes -> día -> año -> hora -> minutos -> AM/PM, cada vez que
presiona el botón SELECT (Seleccionar).
NOTA: Si la configuración para el formato de la fecha se ha cambiado
(consulte “Formato de la fecha” en la página 38), el orden en
el que los elementos se resaltan puede ser distinto del orden
del ejemplo anterior.
4. De la misma manera, configurar el día, año, hora, minuto y AM/PM.
Una vez que haya confirmado el último elemento en la configuración
de fecha y hora, presione el botón SELECT (Seleccionar) para
completar la configuración de la fecha y hora.
NOTA: Si necesita volver a configurar la fecha y hora, consulte la
página 34.
5. Presione el botón ON/OFF / STOP (Encendido/Apagado / Detener)
durante dos segundos para apagar la unidad.
La unidad emite un bip y luego se apaga.
NOTA: Si se olvida de apagar la unidad, ésta se apaga
automáticamente después de cinco minutos.
CONFIGURACIÓN DE LA FECHA Y HORA
E17
Presione durante
dos segundos.
2006
Page 82

La unidad incluye una tarjeta de memoria SD para guardar los datos del ECG, para que su médico pueda
verlos posteriormente. Esta sección describe cómo colocar y sacar una tarjeta de memoria SD, y cómo
formatear una tarjeta para que se pueda usar para guardar los datos del ECG.
NOTAS:
• Si necesita adquirir una nueva tarjeta de memoria SD, póngase en contacto con el servicio de atención al
cliente de Omron Healthcare llamando al 1-800-829-6427.
• Guarde en la tarjeta únicamente datos de esta unidad, nunca de otros dispositivos.
• Los datos del ECG que se guardan en una tarjeta de memoria SD se pueden dañar debido a la electricidad
estática y otras causas. Copie los datos en una PC u otro dispositivo como una medida de seguridad
adicional.
CÓMO INSERTAR Y SACAR LA TARJETA DE MEMORIA SD
La marca SD ( ) se visualiza en la parte superior derecha de la pantalla mientras la tarjeta de memoria SD
está colocada y la unidad está encendida.
Cómo colocar la tarjeta de memoria SD
1. Verifique que la unidad esté apagada.
PRECAUCIÓN: Nunca coloque una tarjeta de memoria SD mientras la unidad está encendida.
USO DE LA TARJETA DE MEMORIA SD
E18
Page 83

2. Abra la tapa de la ranura de la tarjeta de memoria SD y coloque una
tarjeta de memoria SD en la ranura.
NOTAS:
• Verifique que la tarjeta esté correctamente alineada y colóquela en la ranura como se indica.
• Inserte la tarjeta hasta que se ajuste en la posición correcta.
Protección contra escritura (Bloqueo de la tarjeta de memoria SD)
• Asegúrese de que el botón de protección contra escritura no esté en posición de
bloqueo antes de colocar la tarjeta de memoria SD. Si el botón de protección contra
escritura está en posición de bloqueo (hacia abajo), no podrá guardar nuevos datos
del ECG en la tarjeta de memoria SD.
PRECAUCIÓN: Esto podría dañar la tarjeta o la unidad.
USO DE LA TARJETA DE MEMORIA SD
E19
Parte de atrás
hacia adelante
Dada vuelta Parte de atrás
hacia adelante y
dada vuelta
ALINEACIÓN CORRECTA
Page 84

3. Cierre la tapa de la ranura de la tarjeta de memoria SD.
USO DE LA TARJETA DE MEMORIA SD
E20
Page 85

Cómo sacar la tarjeta de memoria SD
1. Verifique que la unidad esté apagada.
PRECAUCIÓN: Retire solamente la tarjeta de memoria SD cuando la unidad está apagada.
2. Abra la tapa de la ranura de la tarjeta de memoria SD y haga presión
sobre la tarjeta.
La traba se libera y la tarjeta se levanta levemente.
3. Retire la tarjeta de memoria SD.
4. Cierre la tapa de la ranura de la tarjeta de memoria SD.
USO DE LA TARJETA DE MEMORIA SD
E21
Page 86

CÓMO FORMATEAR UNA TARJETA DE MEMORIA SD
Usted debe formatear la tarjeta de memoria SD antes de usarla por primera vez y en las siguientes
circunstancias.
• Si usa una tarjeta de memoria SD que ya ha sido usada en otros dispositivos.
• Si se causa un error en la memoria SD.
NOTAS:
• Al formatear una tarjeta de memoria SD, todos los datos guardados en la tarjeta se borran. Copie siempre
los datos que desee guardar en una computadora antes de formatear la tarjeta de memoria SD.
• Al formatear una tarjeta de memoria SD, formatéela con la unidad. No formatee la tarjeta de memoria SD
con una computadora.
1. Presione el botón MENU (Menú), luego presione el botón para
seleccionar el menú SET (Configurar) y luego presione el botón
SELECT (Seleccionar).
2. Presione el botón para recorrer los diferentes valores y seleccione
Formatear SD.
USO DE LA TARJETA DE MEMORIA SD
E22
Page 87

3. Presione el botón SELECT (Seleccionar).
Se visualiza el mensaje “Se borrarán todos los datos de la SD.
¿Formatear SD?”
4. Presione el botón para seleccionar Sí, luego presione el botón
SELECT (Seleccionar).
Si presiona el botón SELECT (Seleccionar) mientras está seleccionado
NO, la tarjeta de memoria SD no se formatea.
5. Presione el botón SELECT (Seleccionar).
Aparece un mensaje que le advierte que no saque la tarjeta de memoria
SD mientras se la está formateando y la tarjeta de memoria SD se
formatea.
El formateo puede tardar hasta ocho segundos para completarse.
PRECAUCIÓN: Nunca saque una tarjeta de memoria SD
mientras se la está formateando.
USO DE LA TARJETA DE MEMORIA SD
E23
* Como opción
predeterminada, NO
aparece resaltado.
Page 88

Para obtener una lectura de ECG de buena calidad, es importante que las mediciones se tomen
correctamente.
Antes de tomar una medición por primera vez, lea cuidadosamente estas instrucciones y asegúrese de
cumplir con los siguientes puntos cada vez que tome una medición.
• Asegúrese de que los electrodos estén en contacto directo con la piel.
• Si sus manos o piel están secas, frótelas con una toalla húmeda para que estén levemente húmedas.
• Si los electrodos están sucios, limpie cualquier resto de suciedad con un paño suave o con un trozo
de algodón humedecido con alcohol desinfectante.
- No use demasiado alcohol desinfectante al limpiar los electrodos.
- No use alcohol desinfectante para limpiar ninguna pieza de la unidad, salvo los electrodos.
• No se mueva durante la medición.
- Cualquier tipo de movimiento, incluyendo hablar, toser o estornudar durante la medición, puede
afectar los resultados de la medición.
• Si la posición de su dedo o brazo durante la medición es incorrecta, los resultados pueden ser
inexactos, de modo que asegúrese de verificar sus posiciones antes de tomar una medición.
(Consulte la página 25).
• Después de tomar una medición, desinfecte los electrodos limpiándolos con un paño suave o trozo
de algodón humedecido con alcohol desinfectante. Si no desinfecta los electrodos, corre el riesgo de
sufrir enfermedades en la piel.
NOTA: Si tiene alguna dificultad para colocar la unidad de modo que el electrodo del tórax quede plano
contra el tórax, pídale consejo a su médico.
NOTAS IMPORTANTES CON RESPECTO A LA FORMA DE TOMAR UNA MEDICIÓN
E24
Page 89

1. Presione el botón ON/OFF / STOP (Encendido/Apagado / Detener)
para encender la unidad.
La unidad pone en pantalla el siguiente recordatorio. “Selfmeasurement is not the same as medical diagnosis. Please consult your
doctor for proper interpretation.” (La automedición no es lo mismo
que el diagnóstico médico. Consulte a su médico para obtener una
interpretación correcta). A continuación, aparecen las pantallas de guía.
NOTAS:
• Puede presionar el botón START (Inicio) para comenzar con la
medición incluso mientras se demuestra las pantallas de guía.
• El “electrodo” al que se hace referencia en este manual de instrucciones se
describe como “sensor” en la pantalla de guía.
2. Debe colocarse en una posición relajada.
La postura ideal es sentarse cómodamente con la espalda recta.
NOTA: También puede tomar una medición mientras está parado o
acostado.
3. Coloque el dedo índice de modo que quede bien colocado sobre los
dos electrodos para los dedos.
NOTA:
• Tenga cuidado de no presionar el botón START (Inicio) mientras
no esté listo para tomar una medición.
ADVERTENCIA: Incluso si es zurdo, use la mano derecha para
tomar la medición.
CÓMO TOMAR UNA MEDICIÓN
E25
Coloque el dedo de modo que
quede bien apoyado sobre los
electrodos.
No presione el botón START
(Inicio) hasta que no esté
listo para tomar una medición.
Page 90

4. Coloque el electrodo del tórax sobre la piel desnuda alrededor de 5 cm por debajo de la tetilla izquierda
(IMPORTANTE: vea más adelante las instrucciones de colocación en el caso de las mujeres).
NOTA:
• Asegúrese de estar relajado y que su tórax no esté tenso.
ADVERTENCIA: Presione el electrodo del tórax contra el tórax desnudo. No coloque el electrodo
sobre la vestimenta, dado que esto dará como resultado mediciones imprecisas.
CÓMO TOMAR UNA MEDICIÓN
E26
Electrodo del tórax
Alrededor de 5 cm
Presiónelo contra el tórax.
Mujeres:
Coloque el monitor de ECG en la parte inferior del esternón
y muévalo en sentido horizontal hacia la izquierda hacia el
medio de la parte izquierda del tórax. Si es necesario, levante
ligeramente el pecho y coloque el electrodo del tórax debajo
del pecho izquierdo. A menos que el electrodo del tórax entre
en contacto con la ropa interior, no es necesario que se la
saque; si no está segura de que la unidad esté bien colocada,
consulte a su médico.
Page 91

5. Mientras está en la misma posición, presione el botón START (Inicio).
La medición tarda alrededor de 30 segundos para completarse. La unidad emite un bip por segundo
durante la medición.
Durante la medición, la pantalla muestra la forma de onda del ECG. La barra de marcha ubicada en la
parte inferior de la pantalla muestra el avance de la medición, y el número que aparece a la derecha
muestra la frecuencia cardíaca.
Según la forma de onda, se pueden producir situaciones en las que la unidad no puede evaluar y mostrar
la frecuencia cardíaca durante la medición.
NOTAS:
• Durante la medición, la unidad sólo responde al botón ENCENDIDO/APAGADO / DETENER para
interrumpir la medición.
.
• Si el contacto de los electrodos se afloja, o si las condiciones durante la medición cambian, la medición
puede no ser correcta.
IMPORTANTE: Quédese quieto y no se mueva hasta que la medición se haya completado.
CÓMO TOMAR UNA MEDICIÓN
E27
On/Off
Inicio de la medición
Durante la medición
Fin de la medición
La medición termina
automáticamente, lo que
se indica a través de 4
bips rápidos.
Durante alrededor de 30 segundos en total
La unidad emite un bip por segundo.
On/Off
Page 92

Se demuestra un mensaje de descripción de datos una vez que la
medición se haya completado. (Consulte las páginas 48 - 49 para obtener
información más detallada).
Cuando la tarjeta de memoria SD se encuentra colocada, los resultados
de la medición se guardan preferentemente en la tarjeta. De lo contrario,
se guardan en la memoria de la unidad.
NOTAS:
• Es posible que no se vaya a demostrar “¿Guardar datos? Sí/No?”.
(Consulte “MENSAJES DE ACCIÓN” en la página 49 para obtener
información más detallada.)
• Se puede establecer la preferencia de que un mensaje de descripción de
datos seleccionado no se vaya a demostrar. (Consulte la página 39 para
obtener información más detallada.)
Si presiona el botón SELECT (Seleccionar) mientras se demuestre el mensaje de descripción de datos, se
demuestra la lista de los datos del ECG que se guardan en la tarjeta de memoria SD o en la memoria de la
unidad.
NOTA: Si inmediatamente después de la medición aparece el mensaje de error “Inserte las baterías
nuevas.”, es posible que los datos del ECG no se hayan guardado. De ser así, repita la medición
después de cambiar las pilas.
6. Presione el botón ON/OFF / STOP (Encendido/Apagado / Detener) durante dos segundos para apagar la
unidad.
La unidad emite un bip y luego se apaga.
NOTA: Si se olvida de apagar la unidad, ésta se apaga automáticamente después de cinco minutos.
CÓMO TOMAR UNA MEDICIÓN
E28
Ejemplo de mensaje de
descripción de datos
Page 93

CAUSAS COMUNES DE RESULTADOS INEXACTOS DE MEDICIÓN
Las siguientes situaciones pueden dar como resultado mediciones imprecisas o errores.
CÓMO TOMAR UNA MEDICIÓN
E29
• El dedo índice no está colocado
firmemente en los electrodos.
• No está sosteniendo la unidad
de forma correcta.
• Está sosteniendo la unidad en la mano
izquierda. Use siempre la mano derecha para
sostener la unidad mientras toma una medición.
• La unidad está colocada sobre la vestimenta.
• La parte trasera de la unidad está
colocada contra el tórax.
ff
• El electrodo del tórax está colocado contra el
dedo y el electrodo de los dedos está colocado
contra el tórax.
On/O
On/Off
Page 94

El menú GRAPH (Gráfico) se usa para visualizar la lista de los datos del ECG que se guardan en la tarjeta
de memoria SD o en la memoria de la unidad.
1. Presione el botón MENU (Menú) mientras la unidad está encendida, el menú GRAPH (Gráfico) aparece
resultado. Si luego presiona el botón SELECT (Seleccionar), aparece una lista de los datos del ECG.
2. Seleccione los datos del ECG que desea visualizar en la lista del menú GRAPH (Gráfico), luego
presione el botón SELECT (Seleccionar) para obtener una vista detallada de la forma de onda.
Los datos guardados del ECG se muestran por fecha, hora y un carácter que representa la descripción de
los datos de la medición. Consulte las páginas 48 - 49 para obtener una descripción de los mensajes y
caracteres que pueden visualizarse.
VISUALIZACIÓN DE LOS DATOS DEL ECG
E30
Page 95

Presione el botón para recorrer la lista hacia abajo y el botón para recorrer la lista hacia
arriba.
El resultado de la medición más reciente aparece en la parte superior de la lista y se resalta
automáticamente, con cualquier resultado anterior de la medición enumerado a continuación en orden
cronológico.
Cuando la tarjeta de memoria SD está colocada en la ranura de la tarjeta de memoria SD, se visualiza la
lista de los datos del ECG guardados.
Si no hay ninguna tarjeta de memoria SD en la ranura de la tarjeta, se
visualizan los datos del ECG guardados en la memoria de la unidad.
3. Si presiona el botón , puede desplazarse por la medición de forma
de onda del ECG.
Presione el botón para volver a la pantalla de forma de onda
anterior.
Se visualizan dos formas de onda (la forma de onda inferior, más
pequeña, es una vista de la medición de 30 segundos completa).
En la parte inferior de la pantalla se encuentra una barra con un área
sombreada que indica la sección de la forma de onda del ECG que se
visualiza.
La frecuencia cardiaca aparece en la esquina inferior derecha de la
pantalla.
4. Presione el botón Select (Seleccionar) nuevamente para visualizar la
frecuencia cardíaca y los mensajes de descripción de datos.
NOTA: Usted puede especificar si se muestra o no un mensaje de
descripción de datos. Consulte la página 39 para obtener
información más detallada.
5. Presione el botón SELECT una vez más para volver a la lista del menú GRAPH (Gráfico).
VISUALIZACIÓN DE LOS DATOS DEL ECG
E31
Page 96

Puede usar el menú SET (Configurar) para ajustar diversos valores.
Puede presionar el botón START (Inicio) para comenzar con la medición incluso mientras se visualiza el
menú SET (Configurar).
OPERACIÓN BÁSICA
El siguiente procedimiento describe cómo seleccionar y ajustar un valor. Consulte las páginas que aparecen
a continuación para obtener más detalles con respecto a las opciones disponibles para cada configuración.
1. Presione el botón MENU (Menú) mientras la unidad está encendida para
visualizar la pantalla de menú.
2. Presione el botón para seleccionar (resaltar) el menú SET
(Configurar).
3. Presione el botón SELECT (Seleccionar).
Inicialmente, se resalta la configuración de fecha y hora.
CÓMO AJUSTAR LOS VALORES
E32
* Inicialmente, se resalta el
menú GRAPH (Gráfico).
Page 97

4. Presione el botón o el botón para seleccionar la configuración deseada, luego presione el
botón SELECT (Seleccionar) para ver las opciones para esa configuración.
5. Ajuste los valores y luego presione el botón SELECT (Seleccionar) para confirmar los cambios.
El menú SET (Configurar) se puede usar para ajustar las siguientes configuraciones o para organizar los
datos del ECG que se guardan en la tarjeta de memoria SD o en la memoria de la unidad:
Fecha y hora, Volumen, Brillo, Contraste, Idioma, Formato fecha, Mensaje, Sobreescribir, Borr. tod. dat.,
Copiar dat. SD, Formatear SD.
Consulte las páginas siguientes para obtener más detalles con respecto a la forma de cambiar cada una de
estas configuraciones.
NOTAS:
• Consulte “Cómo borrar, guardar y organizar los datos del ECG” (páginas 41-47) para obtener más
detalles con respecto a Borrar todos los datos y Copiar datos en la SD.
• Consulte “Uso de la tarjeta de memoria SD” (páginas 22-23) para obtener más detalles con respecto al
Formateo de SD.
• Para volver a la pantalla de menú desde las pantallas del menú SET (Configurar), presione el botón
MENU (Menú). Para volver al menú SET (Configurar) desde una pantalla de configuración, presione el
botón MENU (Menú) y resalte Atrás, luego presione el botón SELECT (Seleccionar).
• Si presiona el botón MENU (Menú) sin haber presionado antes el botón SELECT (Seleccionar), después
de haber hecho cambios en una configuración, los cambios para esa configuración no se implementarán.
AJUSTE DE LAS CONFIGURACIONES
E33
Page 98

FECHA Y HORA
Seleccionar este elemento si necesita volver a configurar la fecha y hora. Para obtener más detalles con
respecto a la configuración de fecha y hora, consulte la página 16.
NOTA: Se le indicará que configure la fecha y hora la primera vez que coloque las pilas.
VOLUMEN
Presione el botón o el botón para ajustar el volumen.
El volumen se puede configurar en uno de los cuatro niveles.
El volumen aumenta a medida que la marca se mueve hacia la derecha.
El sonido se anula (desactiva) cuando la marca está ubicada en el extremo izquierdo.
AJUSTE DE LAS CONFIGURACIONES
E34
El nivel de volumen actual se visualiza
en la parte inferior de la pantalla.
La marca indica el nivel de volumen.
* La configuración predeterminada es el nivel de
volumen máximo.
Page 99

BRILLO
Presione el botón o el botón para ajustar el brillo.
El brillo se puede configurar en uno de los nueve niveles.
El brillo aumenta a medida que el marcador se mueve hacia la derecha.
AJUSTE DE LAS CONFIGURACIONES
E35
El nivel de brillo actual se visualiza en la
parte inferior de la pantalla.
La marca indica el nivel de brillo.
* La configuración predeterminada es el nivel de brillo
máximo.
Page 100

CONTRASTE
Presione el botón o el botón para ajustar el contraste.
El contraste se puede configurar en uno de nueve niveles.
El contraste aumenta a medida que el marcador se mueve hacia la derecha.
AJUSTE DE LAS CONFIGURACIONES
E36
El nivel de contraste actual se visualiza
en la parte inferior de la pantalla.
La marca indica el nivel de contraste.
* La configuración predeterminada es el nivel de
contraste medio.
 Loading...