

Page 1
HCG-801-E.book Page 1 Tuesday, December 13, 2011 5:35 PM
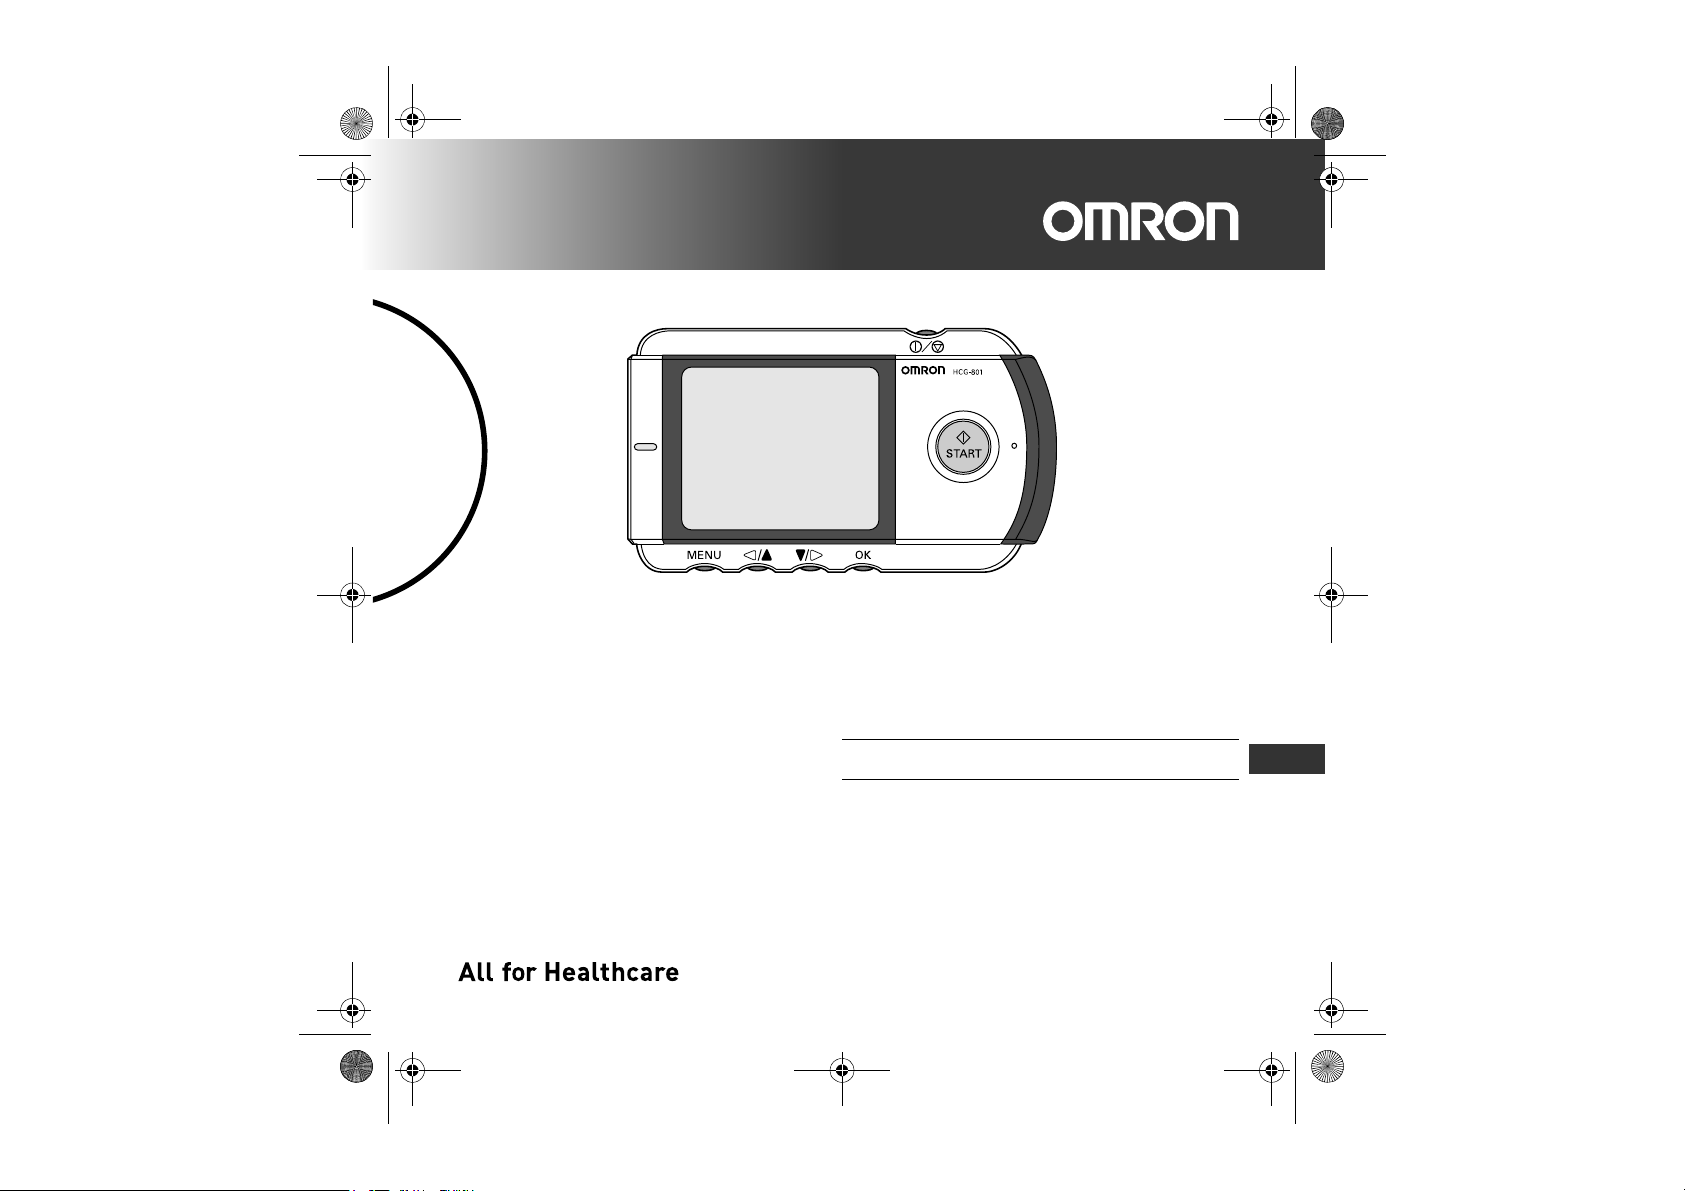
Portable, cordless, single-channel ECG Monitor
Model HCG-801
• Instruction Manual
Thank you for purchasing the OMRON Portable ECG Monitor.
Before using this unit for the first time, please be sure to read this
instruction manual carefully and use the unit properly.
Please keep this instruction manual on hand for future reference.
OMRON assumes no responsibility for personal injury or damage
sustained by or through use of this product.
EN
Page 2
HCG-801-E.book Page 2 Tuesday, December 13, 2011 5:35 PM
Contents
Before Using the Unit
Introduction .............................................................................................................. 3
Intended Use........................................................................................................... 3
Notes on Safety........................................................................................................ 4
1. Know Your Unit ................................................................................................ 6
Operating Instructions
2. Inserting and Replacing Batteries................................................................ 10
3. Setting the Date and Time............................................................................. 13
4. Using SD Memory Card ................................................................................. 15
4.1 Inserting and Ejecting SD Memory Card..................................................................................... 15
4.2 Formatting an SD Memory Card .................................................................................................19
5. Important Notes on Taking a Measurement................................................. 21
6. Taking a Measurement................................................................................... 22
7. Displaying ECG Data ..................................................................................... 28
8. Adjusting the Settings................................................................................... 30
8.1 Basic Operation .......................................................................................................................... 30
8.2 Date and Time ............................................................................................................................ 32
8.3 Volume........................................................................................................................................32
8.4 Brightness................................................................................................................................... 33
8.5 Contrast ......................................................................................................................................34
8.6 Language .................................................................................................................................... 35
8.7 Date Format ................................................................................................................................ 36
8.8 Messages....................................................................................................................................37
8.9 Overwrite.....................................................................................................................................38
9. Managing ECG Data....................................................................................... 39
9.1 Erasing ECG Data ...................................................................................................................... 39
9.2 Copying Data to an SD Memory Card ........................................................................................42
9.3 Copying data from the SD memory card to a PC........................................................................ 44
Care and Maintenance
10. Care and Maintenance................................................................................... 46
10.1 Lists and Explanations of Messages...........................................................................................46
10.2 Troubleshooting ..........................................................................................................................50
11. Maintenance and Storage.............................................................................. 51
12. Technical Data................................................................................................ 52
13. General Information About the Heart and ECG Measurements................. 54
2
Page 3
HCG-801-E.book Page 3 Tuesday, December 13, 2011 5:35 PM
Introduction
Your OMRON HCG-801 is an easy-to-use electrocardiograph unit that can record and store
electrocardiogram (ECG) measurements of your heart rhythm. Each ECG reading records
about 30-second measurement and these ECG readings can help your doctor monitor your
condition. It also includes guidance screens to help you obtain good results when taking
measurements.
The monitor is supplied with an SD memory card that can store up to 300 measurements,
which include the ECG data along with the date and time of measurement. Storing ECG data
on the SD memory card, or in unit memory, allows you or your doctor to view them later.
Intended Use
Medical Purpose The device is used for recording electrocardiographic
waveform when patient feels symptoms of arrhythmia.
Intended User Self-recording by patient
Patient Population It is not intended to use for infants weighing less than 10 kg.
Environment The device can be used anytime except in the cases
stated in the sections of warnings and cautions in the
instruction manual.
Measurement Parameter Electrocardiograph (ECG)
Precautions for use Warnings and cautions described in the instruction manual
should be observed.
Important: Please note that while the measurements from an ECG monitor are a
useful guide for your doctor, they cannot detect all changes in heart
conditions. Always consult your doctor if you notice any change in
your condition, regardless of the measurement results. Consult a
doctor even if “Stable waveform.” is displayed as the measurement
result, if you have been diagnosed with a heart condition.
* The illustrations used in this manual may differ slightly from the appearance of the actual product.
EN
3
Page 4

HCG-801-E.book Page 4 Tuesday, December 13, 2011 5:35 PM
Notes on Safety
This unit is designed for monitoring the ECG waveform. Never use the unit
to monitor vital signs and acute events.
- Self-diagnosis and treatment is dangerous.
The measurement results are for monitoring purposes only, and should never be
used as a basis for starting or modifying treatment without independent
confirmation by medical examination.
- The values displayed by the unit are the values at the time of measurement.
Medical conditions can change suddenly. If you notice any change in your
condition, consult your doctor, regardless of the measurement results.
- This unit has no function to detect pacing spikes.
For a person with a cardiac pacemaker, there are cases where pacing spikes are
recorded or not recorded.
Warning!
• Do not use the unit in intensive care units or operating rooms.
• When using this unit in hospitals or other medical facilities, use the unit under the
supervision of your doctor.
This unit may affect the other medical devices, and vice versa.
• Do not use with a defibrillator.
• Do not use in the presence of flammable anesthetics, drugs or pressurised
oxygen (such as in a hyperbaric chamber, ultraviolet steriliser or oxygen tent).
• Do not attempt self-diagnosis of the measurement results and analysis, always
consult your doctor.
- Self-diagnosis may lead to a deterioration in your condition.
• Do not use on people with sensitive skin or allergies.
- This may result in exanthema, skin irritation, or eczema.
• Keep out of reach of small children and people who can not express their
consent.
• Do not use for any purpose other than obtaining an electrocardiograph.
• Do not expose the unit to strong shocks or vibrations, or drop or step on the unit.
4
Page 5
HCG-801-E.book Page 5 Tuesday, December 13, 2011 5:35 PM
• Do not use batteries of a type other than that specified in this manual.
• Do not apply over clothing or touch the electrodes with your left hand.
• Do not take measurements when there are drops of water on your skin, such as
from sweat or after bathing.
• Do not take measurements where the unit will be exposed to strong
electromagnetic forces.
Caution!
• Do not expose the unit to static electricity. Always disperse any static electricity
from your body before handling the unit.
• Do not take measurements in a moving vehicle.
• Do not use a cellular phone near the unit.
• Do not disassemble, repair, or modify the unit.
• Do not insert batteries with their polarities reversed.
• The chest electrode will be impeded by excessive body hair, regularly remove
hair at the electrode contact point. Omron does not recommend the use of
contact gel.
General
• Avoid extremes in temperature and humidity. Do not use this unit in locations
subject to high or low temperatures or humidity.
Use at a temperature within 10 to 40°C and between 30 and 85% RH.
• Do not sterilise this unit in an autoclave or gas steriliser (EOG, formaldehyde,
high density ozone etc.)
• Do not wash this unit with water.
• Do not store the unit in the following ambient conditions:
- Locations exposed to direct sunlight.
- Locations subject to high temperatures and high humidity.
- Wet or damp locations where water may get on the unit.
- Dusty locations.
- Near fires or open flames.
- Locations exposed to strong vibration.
- Locations exposed to strong electromagnetic fields.
Notes on Safety
EN
5
Page 6
B
A
C
D
E
F
G
H
I
J
K
HCG-801-E.book Page 6 Tuesday, December 13, 2011 5:35 PM
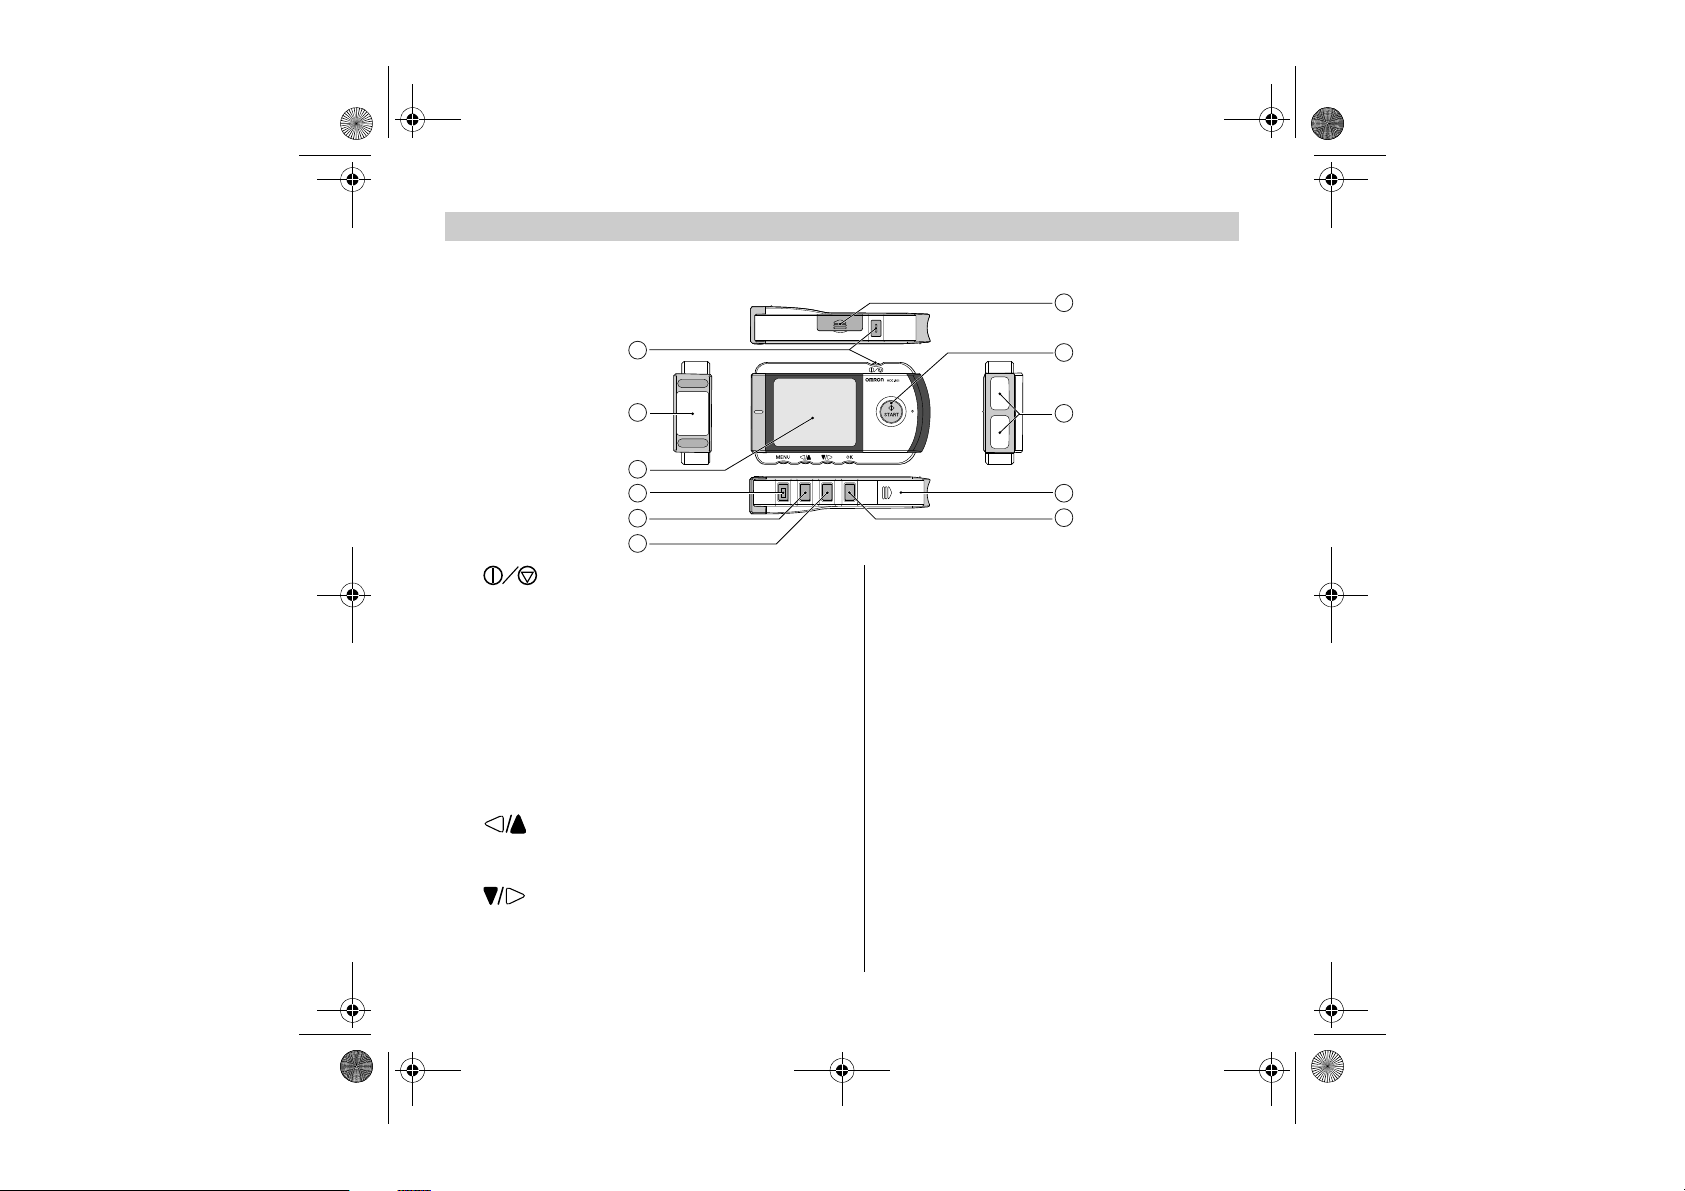
1. Know Your Unit
Main Unit
A. (Power/Cancel) button
Turns the power on/off and cancels measurement.
B. Chest electrode
Place this against your chest when taking a
measurement.
C. Display
Displays the wave pattern after measurement, and
displays menus and setting options.
D. MENU button
Displays or closes the menu screen.
E. button
Moves the desired menu or wave pattern to the left or
up and decreases the number of the selected field.
G. OK button
Selects the highlighted menu option or ECG
data.
Clears error messages.
H. Battery cover
Open this cover to insert batteries.
I. Finger electrodes
Place your right index finger over these when
taking a measurement.
J. START button
Starts measurement.
K. SD memory card slot cover
Open this cover to insert the SD memory card.
F. button
Moves the desired menu or wave pattern to the right
or down and increases the number of the selected
field.
6
Page 7
L
M
HCG-801-E.book Page 7 Tuesday, December 13, 2011 5:35 PM
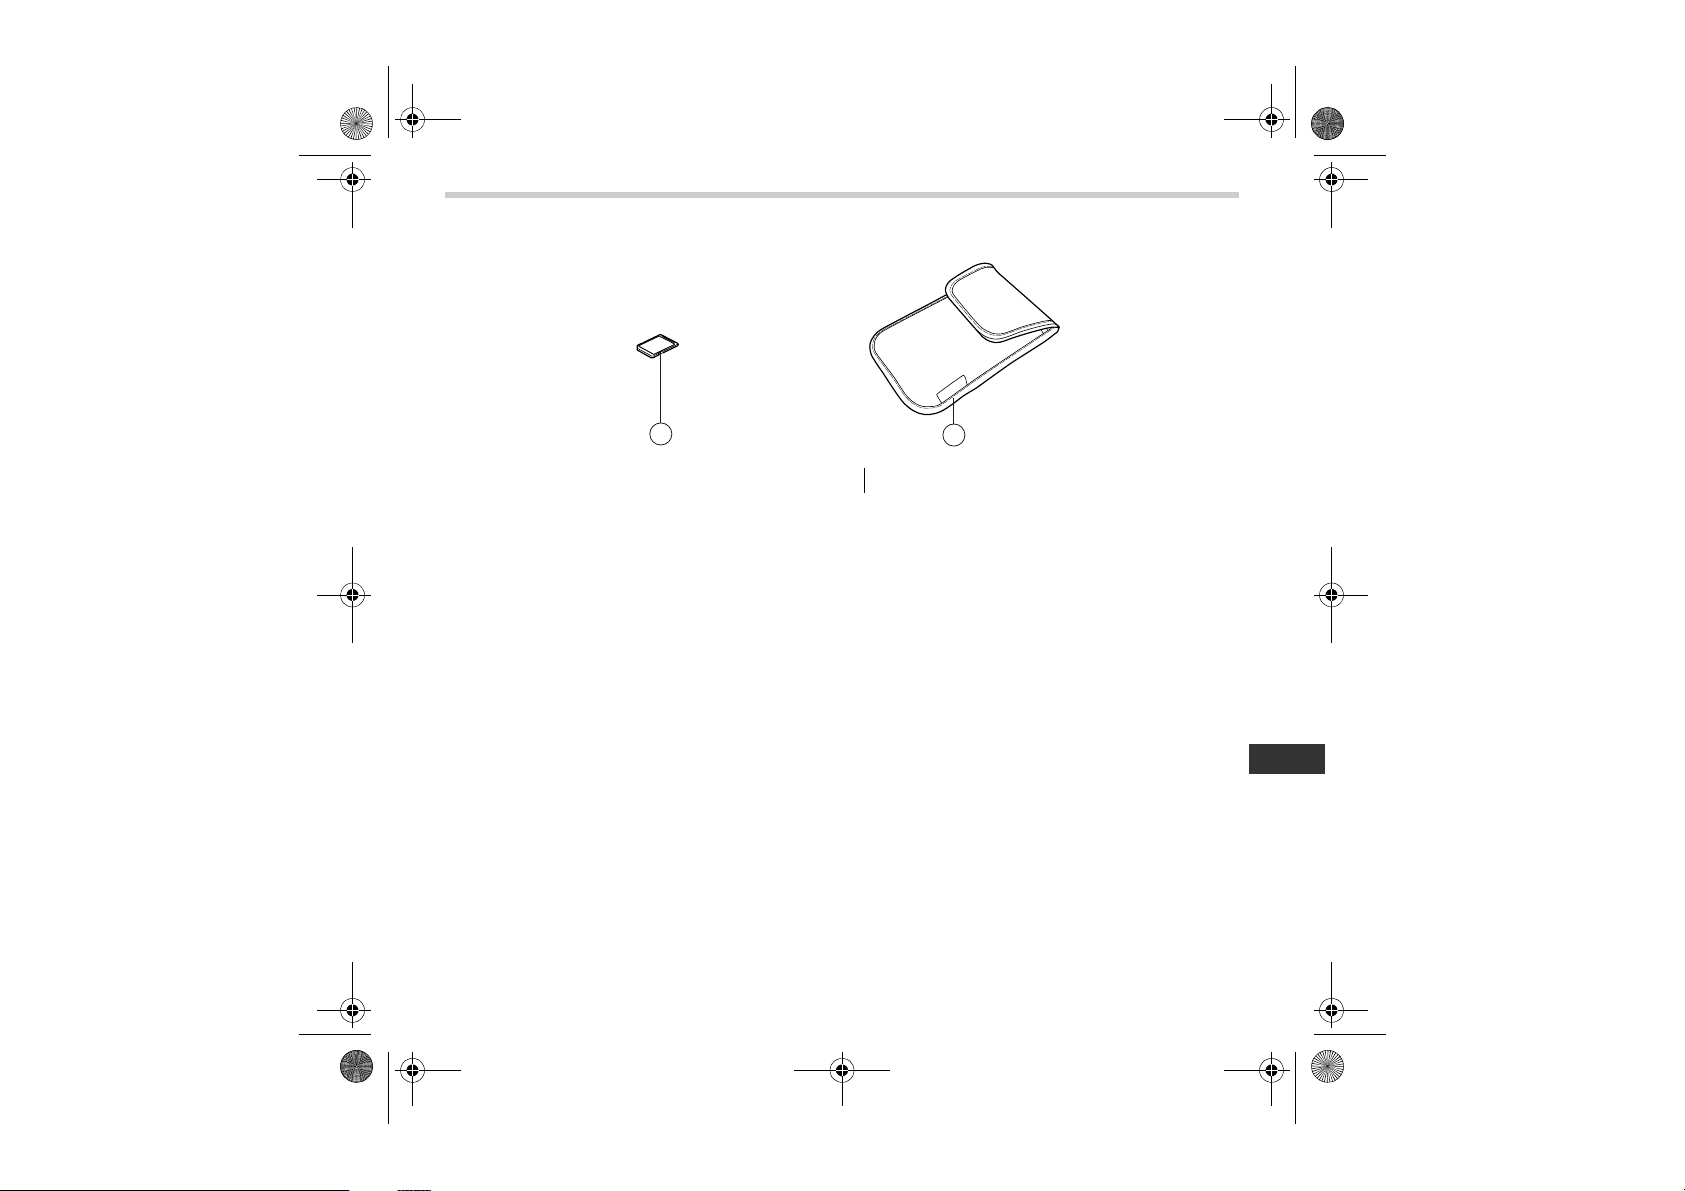
Replacements Parts
L. SD memory card M. Storage pouch
1. Know Your Unit
EN
7
Page 8
N
O
P
Q
R
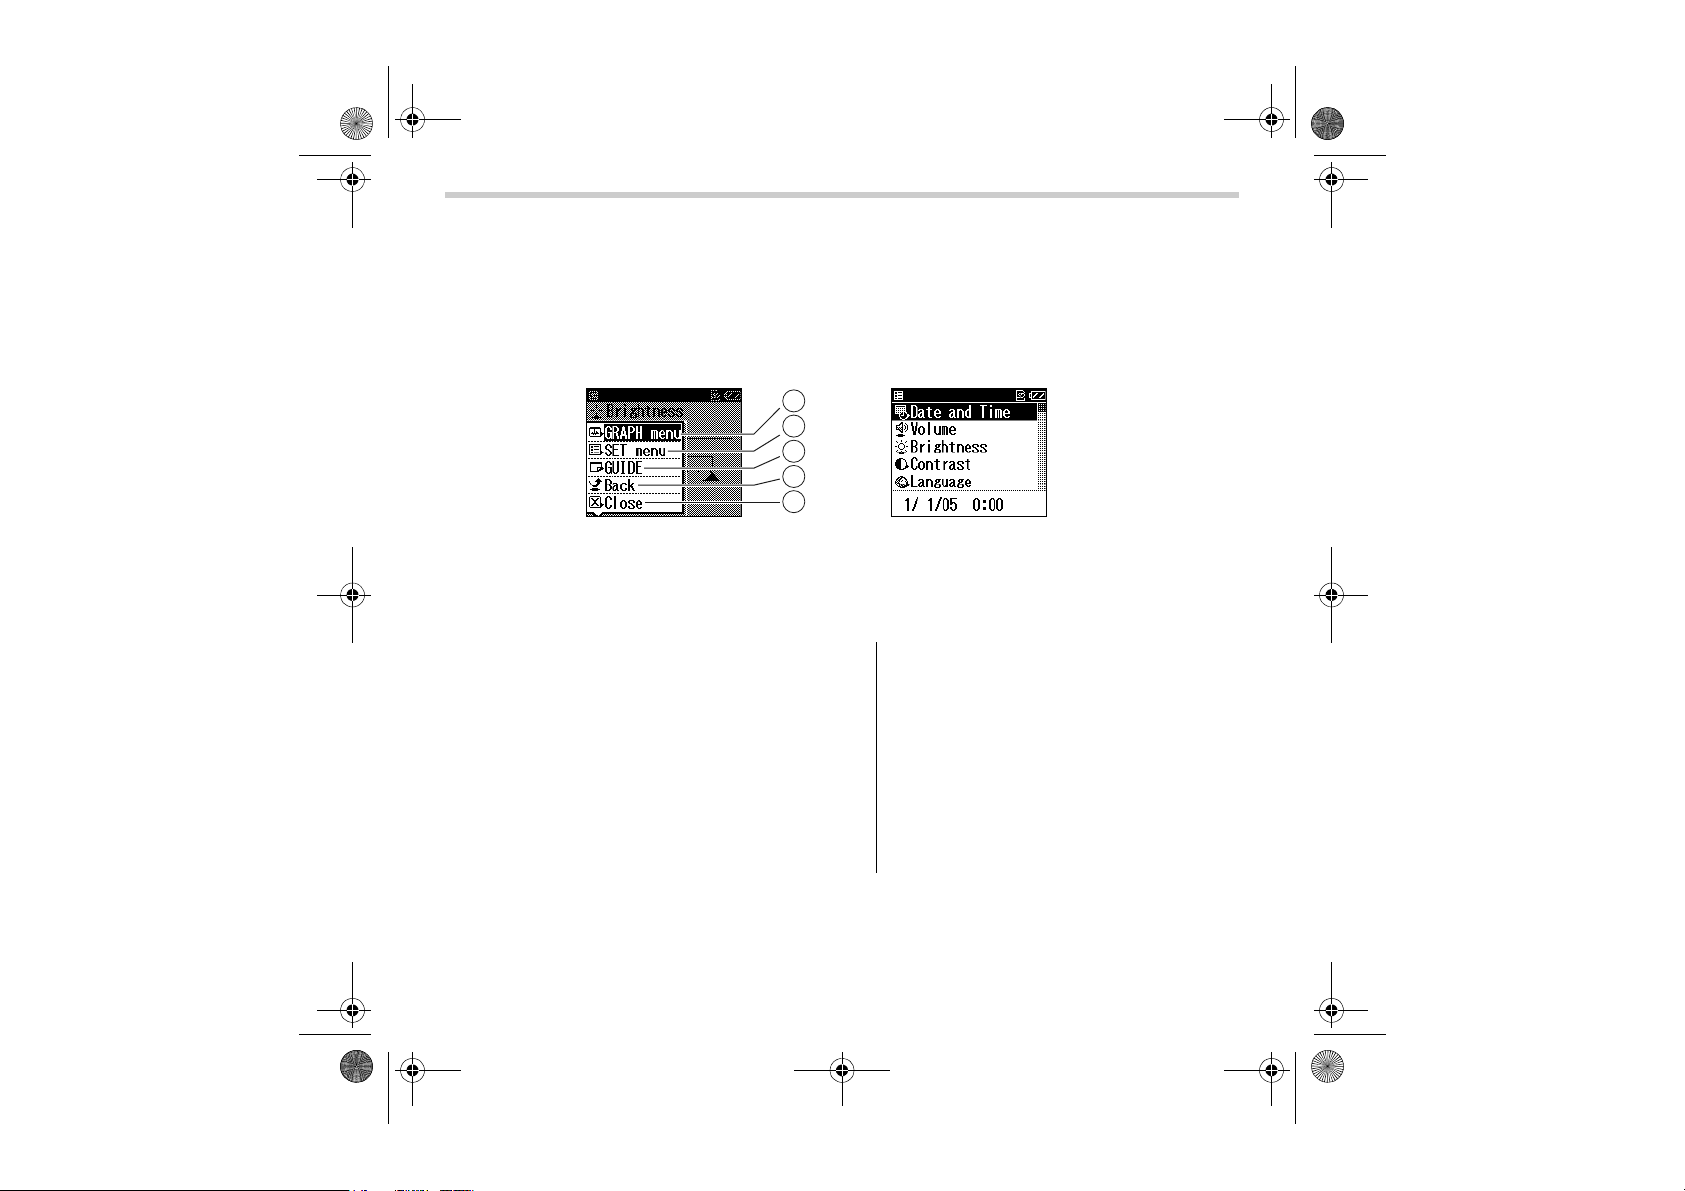
Menu screen Settings (SET menu) screen
The main menu screen is
displayed when you press the
MENU button.
The setting menu screen is displayed
when you select the SET menu and
press the OK button.
HCG-801-E.book Page 8 Tuesday, December 13, 2011 5:35 PM
1. Know Your Unit
Display
The screen is used to display the guidance screens and results of ECG readings,
adjust settings, and manage ECG data stored on the SD memory card or in unit
memory.
Menus
N. GRAPH menu
This allows you to view ECG readings stored
on the SD memory card or in unit memory.
(p. 28)
O. SET menu
This allows you to set the date and time, and
adjust other settings. (p. 30)
P. GU I D E
This displays the guidance screens that
show you how to take a measurement.
8
Q. Back
This option takes you back to the previous
screen, from the SET menu.
R. Close
This option closes the menu screen.
Page 9
S
V
W
X
T
U
Y
HCG-801-E.book Page 9 Tuesday, December 13, 2011 5:35 PM
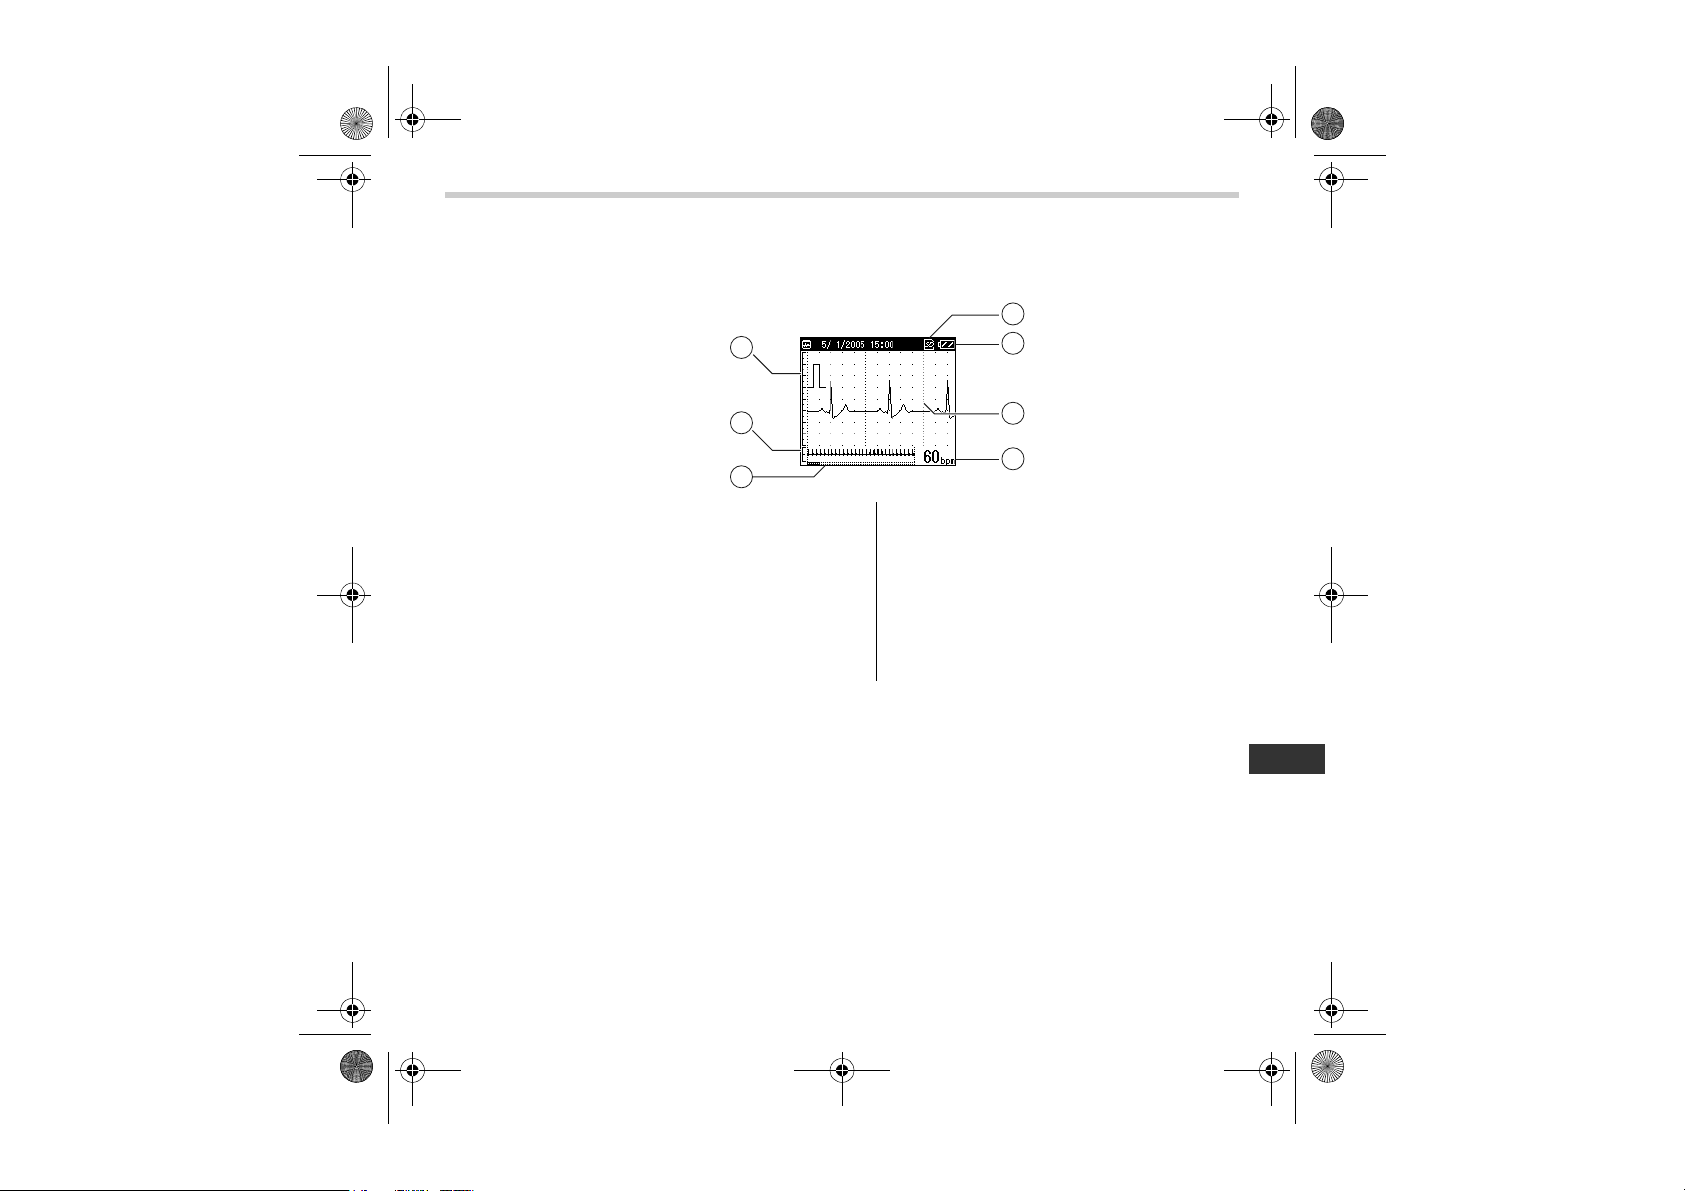
ECG Graph
This screen is displayed when you use the GRAPH menu to select ECG data
stored on the unit.
1. Know Your Unit
S. Calibration guide
Serves as a guide when your doctor
analyses the stored ECG data.
T. Full 30-second waveform
U. Measurement time indicator
V. SD memory card indicator
Displayed when the SD memory card is in
the card slot.
W. Battery level indicator
X. ECG waveform
Y. Heart rate
(*bpm=beats per minute)
Note: During measurement, the screen displays the ECG waveform and the
progress bar at the bottom of the screen displays measurement progress
and a guide to the heart rate.
Depending on the waveform, situations can occur in which the device
EN
cannot assess and display the heart rate during the measurement.
9
Page 10
1
2
HCG-801-E.book Page 10 Tuesday, December 13, 2011 5:35 PM
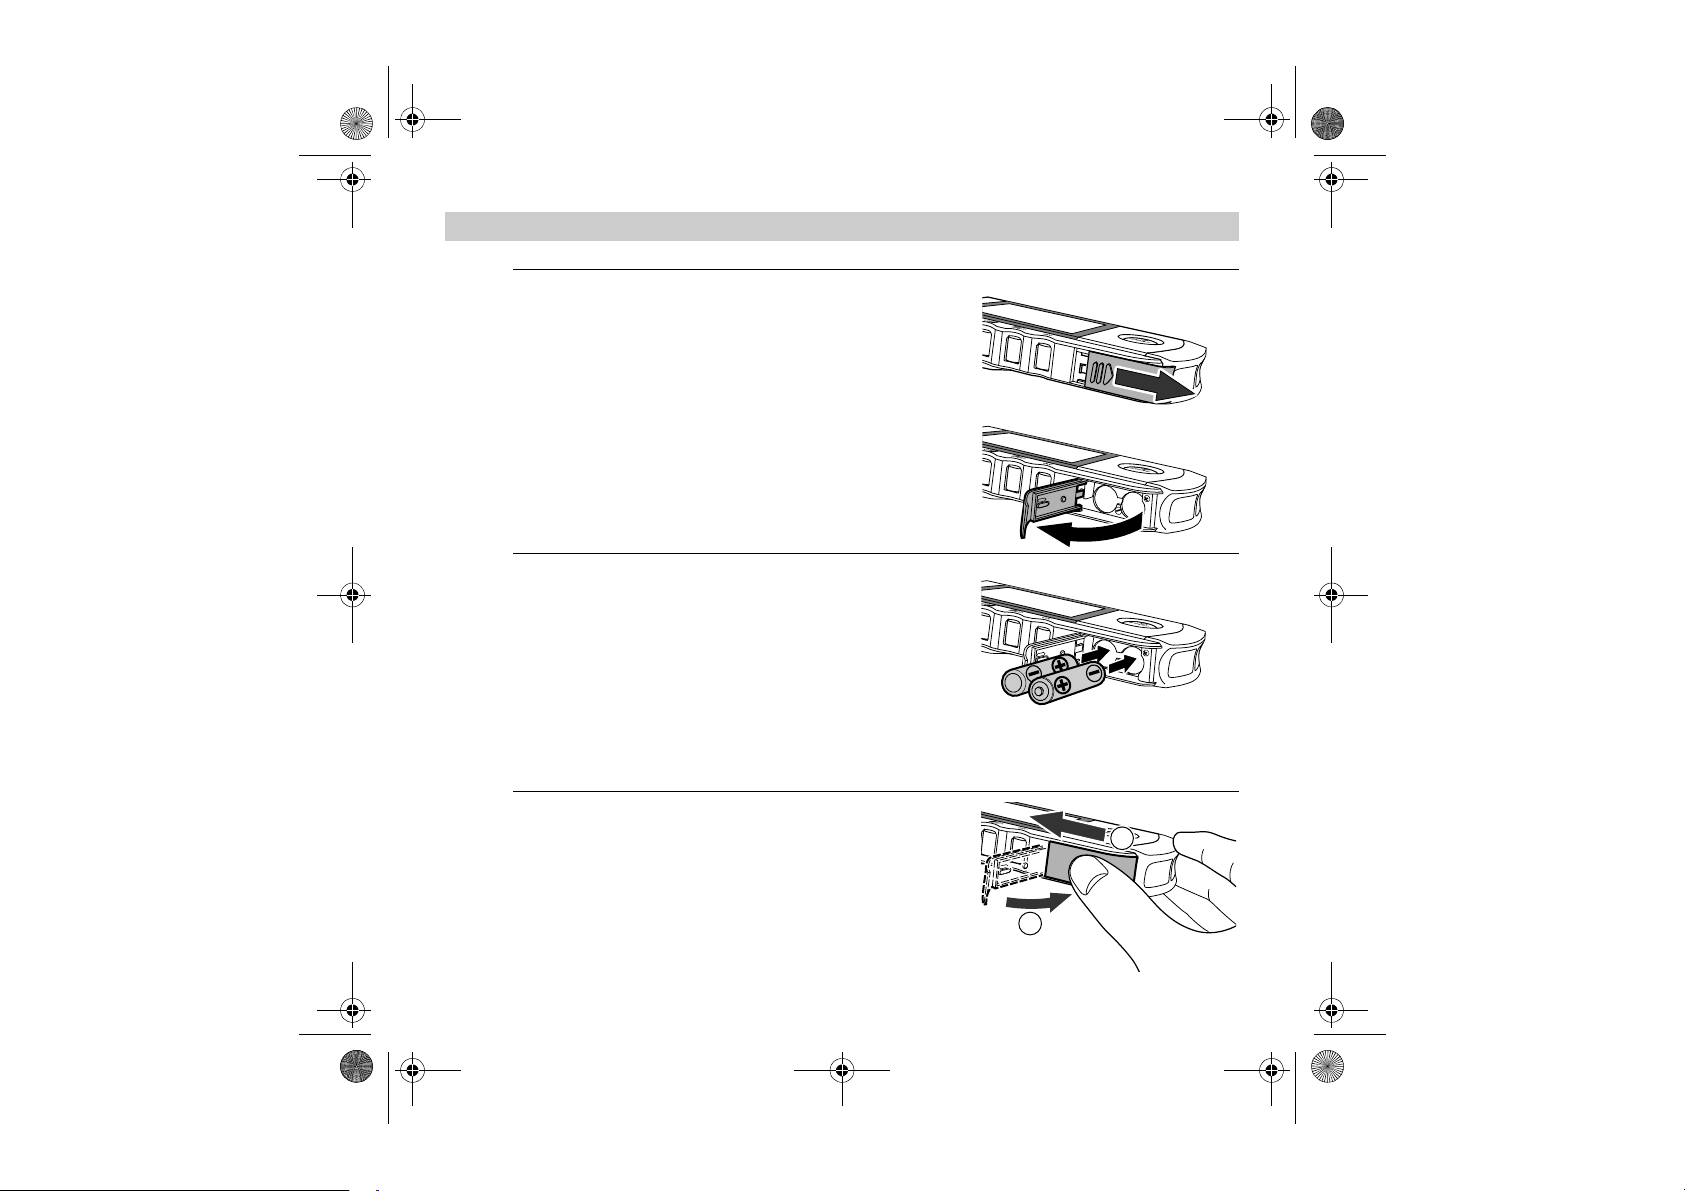
2. Inserting and Replacing Batteries
1. Slide the battery cover in the direction of the arrow,
and lift the end of the cover upwards.
Note: Do not pull too hard on the cover.
2. Insert two LR03 (AAA) batteries as indicated.
Always use LR03 (AAA) batteries.
Note: Make sure that the polarity of the batteries is
correct.
3. Close the battery cover.
Lower the battery cover (1), then while gently
pressing the cover down, slide it in the direction of
the arrow (2).
10
Page 11
HCG-801-E.book Page 11 Tuesday, December 13, 2011 5:35 PM
Battery life and replacement
When the “Please insert new batteries.” message appears, replace both batteries
with new ones.
• Always turn the unit off before replacing the batteries.
• Dispose of the used batteries according to applicable local regulations.
Battery life
• Two new LR03 (AAA) batteries will last for approximately 400 measurements. (If
measurements are taken once a day at room temperature (22 °C).)
• The batteries enclosed in the package are used for demonstration purpose. It is
possible these batteries will therefore not last for 400 measurements.
• If the batteries are removed for more than one hour, the settings and any ECG
data stored in the unit may be erased. If the date and time setting is erased, be
sure to reset it before using the unit again. Any ECG data erased from the unit
cannot be recovered.
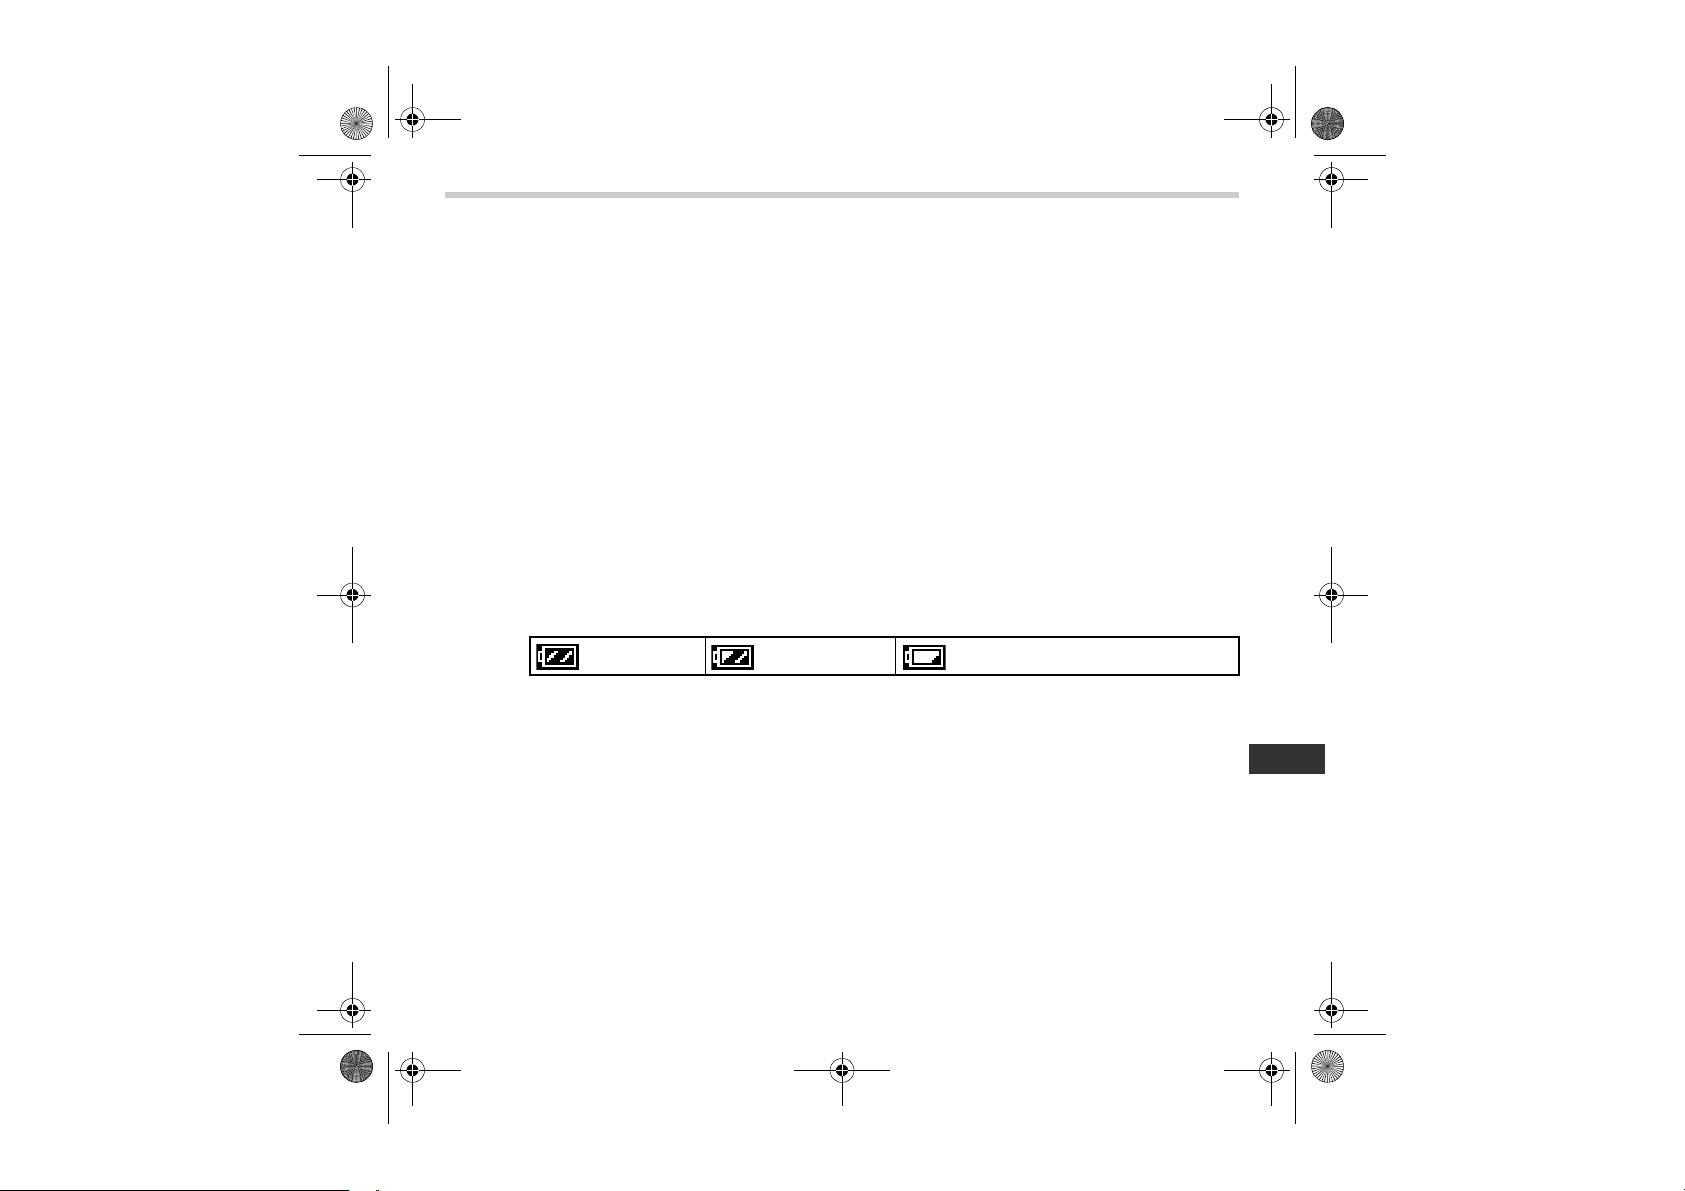
• The battery life can be confirmed in the upper right of the display.
Full power. Half remaining.
2. Inserting and Replacing Batteries
Remaining power is low.
Replace the batteries with new ones.
Warning!
If battery fluid should get in your eyes, immediately rinse with plenty of clean
water. Consult a doctor immediately.
Caution!
• Do not use batteries not specified for this unit. Do not insert the batteries
with the polarities in the wrong direction.
• Do not dispose of batteries in fire.
• If battery fluid should get on your skin or clothing, immediately rinse with
plenty of clean water.
11
EN
Page 12
HCG-801-E.book Page 12 Tuesday, December 13, 2011 5:35 PM
2. Inserting and Replacing Batteries
• Remove the batteries from this unit when you are not going to use it for a
long period of time (approximately three months or more).
• Do not use batteries of a different type together.
• Do not use new and used batteries together.
12
Page 13
HCG-801-E.book Page 13 Tuesday, December 13, 2011 5:35 PM
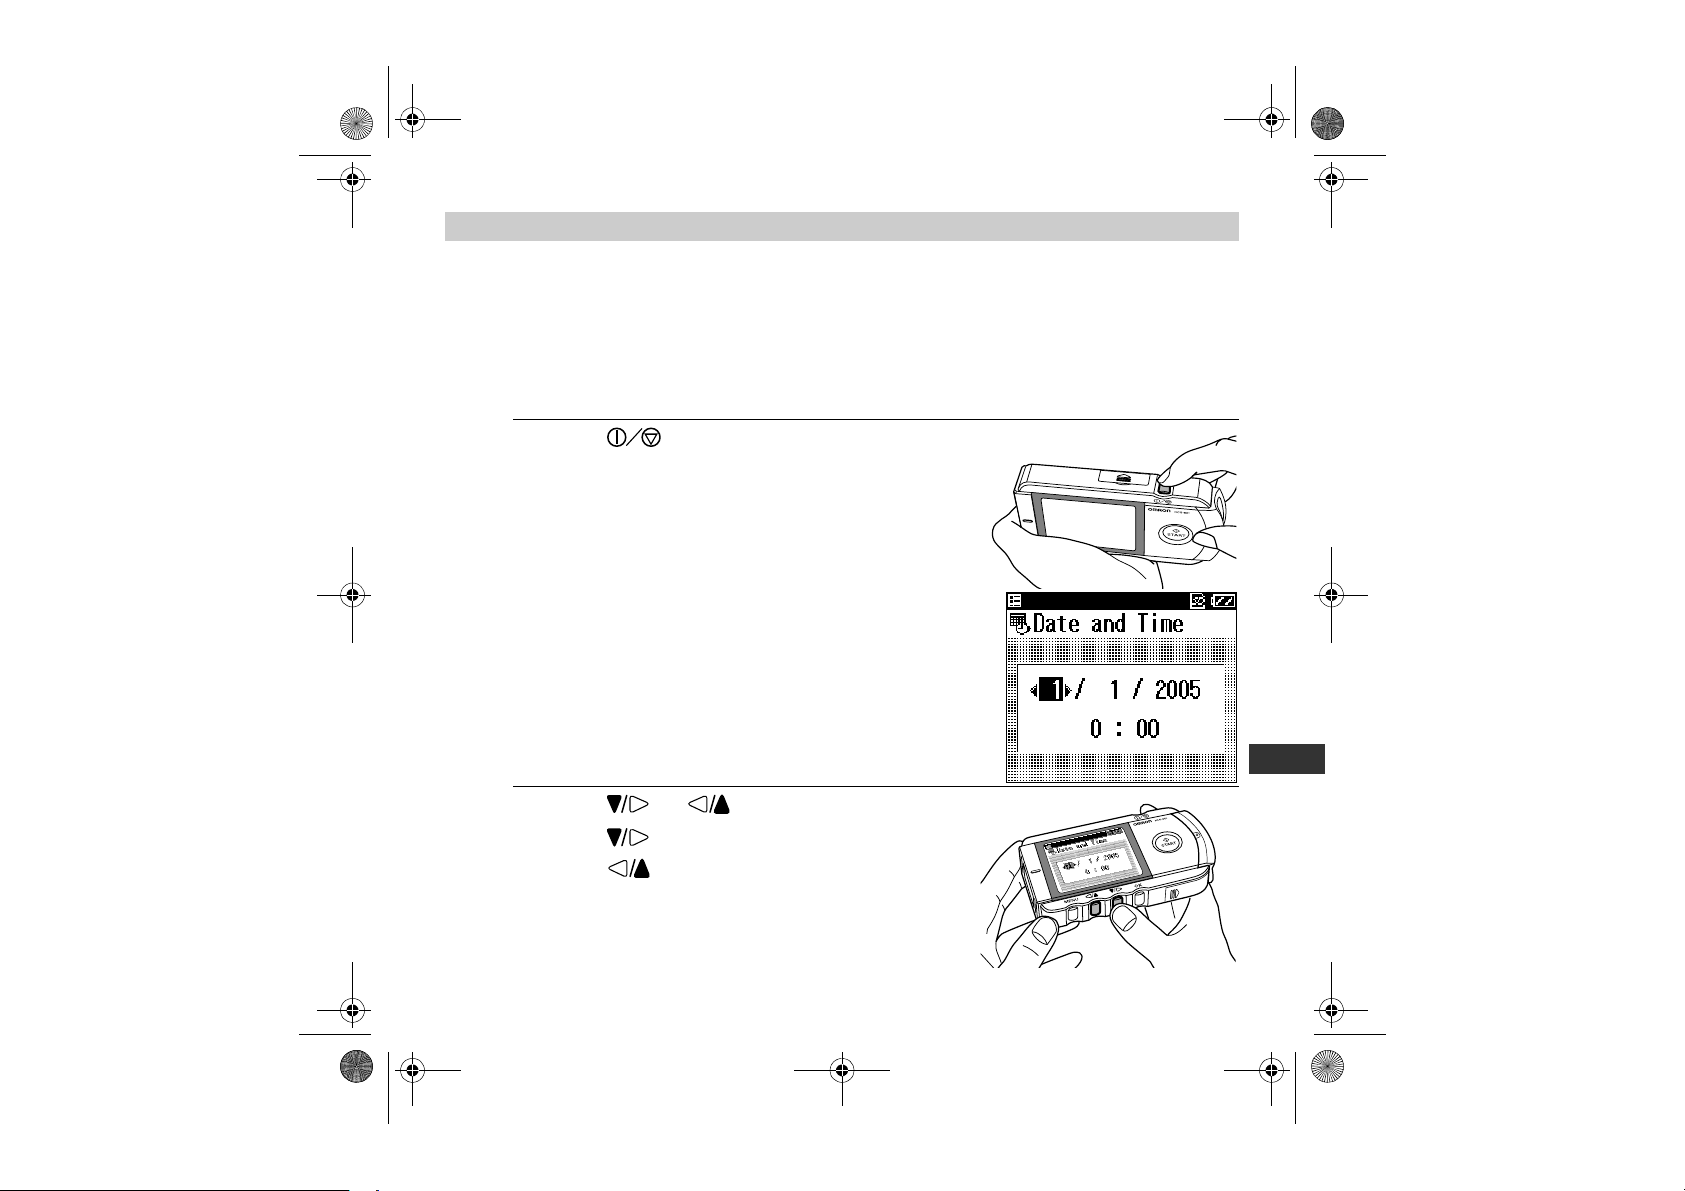
3. Setting the Date and Time
Always set the date and time before using the unit for the first time.
Check the date and time are correct before using the unit, reset them if necessary.
The date and time are important indicators of when a measurement was taken.
Note: The date and time format can be changed to different territorial standards.
(Refer to “8.7 Date Format” on p. 36)
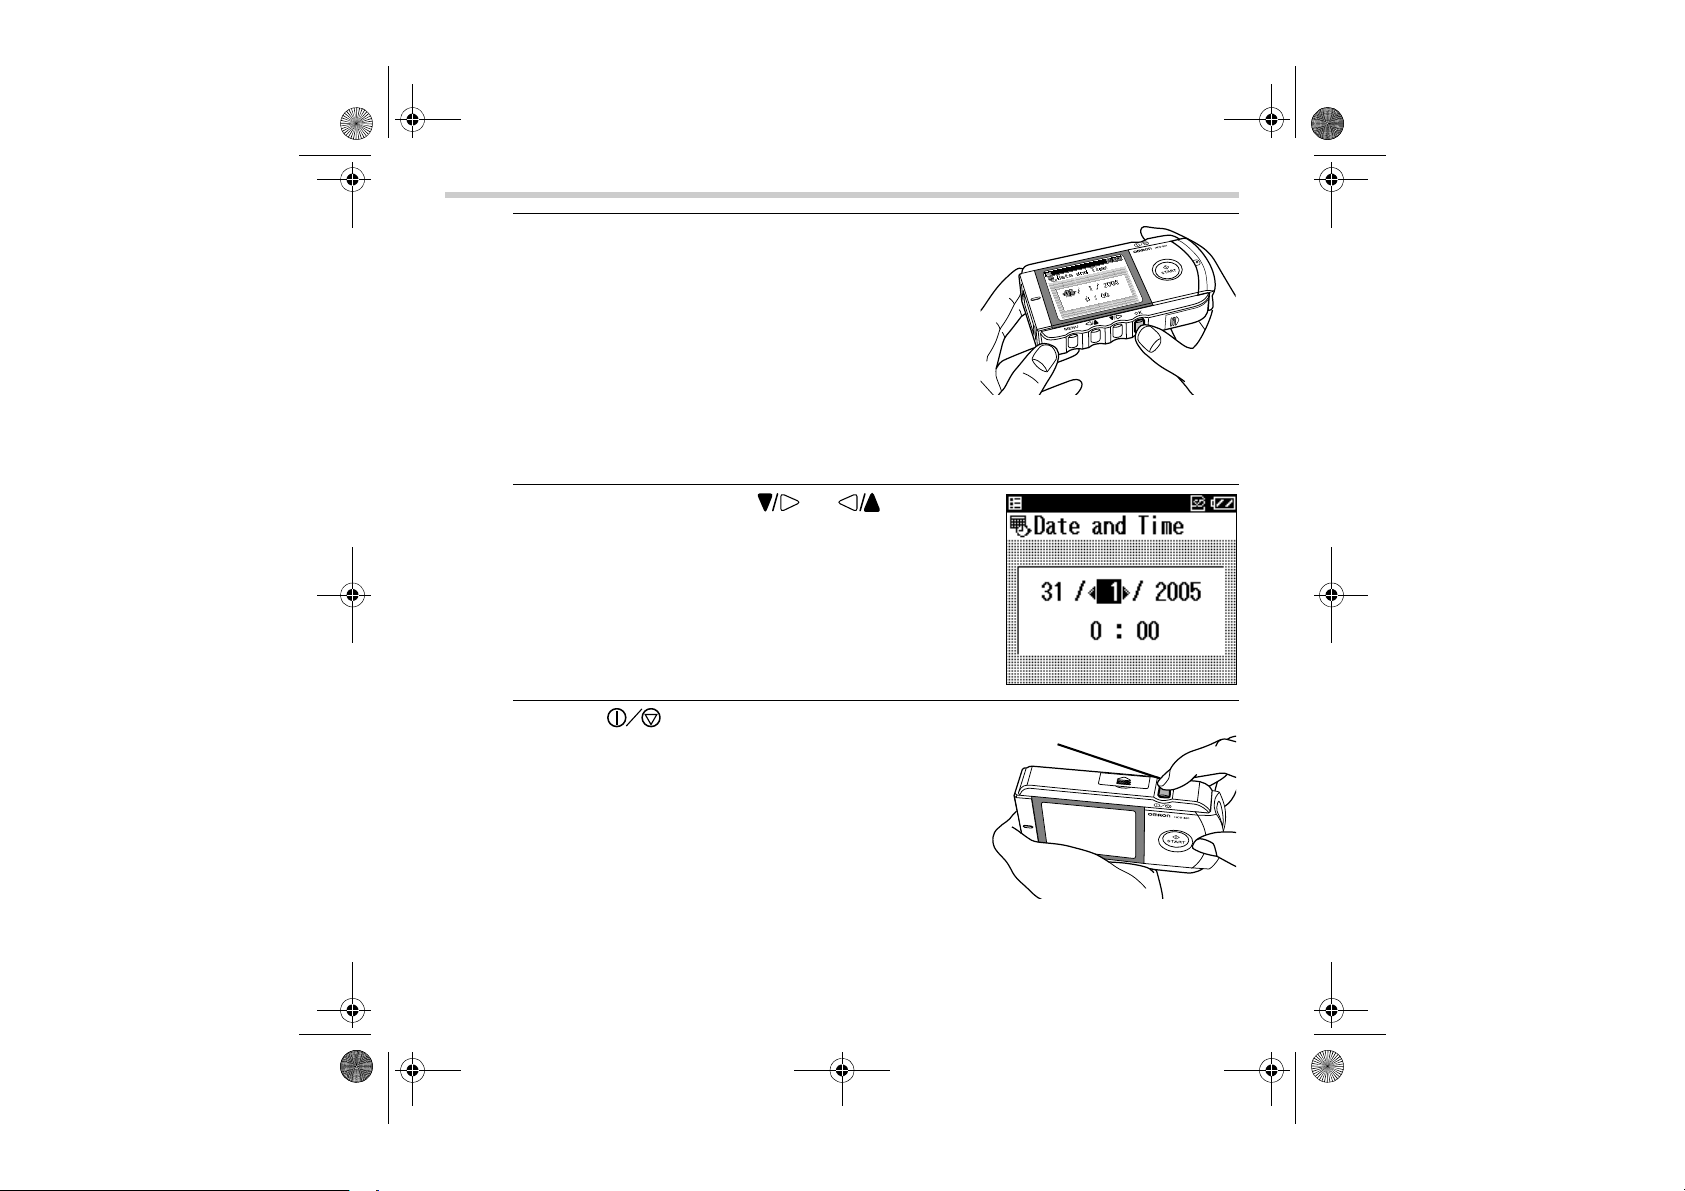
1. Press the (Power/Cancel) button to turn the
unit on.
When the unit is used for the first time, or if the Date
and Time setting has been reset, the Date and Time
setting screen is automatically displayed, and the
day digits are highlighted.
2. Press the or button to set the day.
Press the button to increase the number.
Press the button to decrease the number.
EN
13
Page 14
Press for two seconds.
HCG-801-E.book Page 14 Tuesday, December 13, 2011 5:35 PM
3. Setting the Date and Time
3. Press the OK button to confirm the day setting.
The day setting is set and the month setting is
highlighted.
The display cycles through the settings,
day -> month -> year -> hour -> minute, with each
press of the OK button.
Note: If the setting for the date format has been
changed (refer to “8.7 Date Format” on p. 36), the order in which items are
highlighted may differ from the example above.
4. In the same way, press the or button to
set the month, year, hour, and minute.
After you have confirmed the last item on the date
and time setting, press the OK button to complete
the date and time setting.
Note: If you need to set the date and time again,
refer to p. 30 - 32.
5. Press the button for two seconds to turn off
the power.
The unit beeps, then the power is turned off.
Note: If you forget to turn off the power, the unit will
turn itself off automatically after five minutes.
14
Page 15
HCG-801-E.book Page 15 Tuesday, December 13, 2011 5:35 PM
4. Using SD Memory Card
The unit includes an SD memory card for storing ECG data, which can then be
viewed by your doctor later. This section describes how to insert and eject an SD
memory card, and how to format a card so it can be used to store ECG data.
Notes:
• If you need to purchase a new SD memory card, consult your Omron Customer
Service Department (Tel. 0870-7502771).
• Do not store data other than ECG data from the unit on the card.
4.1 Inserting and Ejecting SD Memory Card
The SD ( ) mark is displayed in the top right corner of the screen while the SD
memory card is inserted, and the unit is turned on.
Inserting the SD memory card
1. Check that the unit is turned off.
Caution!
Never insert an SD memory card while the unit is turned on.
EN
15
Page 16
Back to front Upside down Back to front and
upside down
HCG-801-E.book Page 16 Tuesday, December 13, 2011 5:35 PM
4. Using SD Memory Card
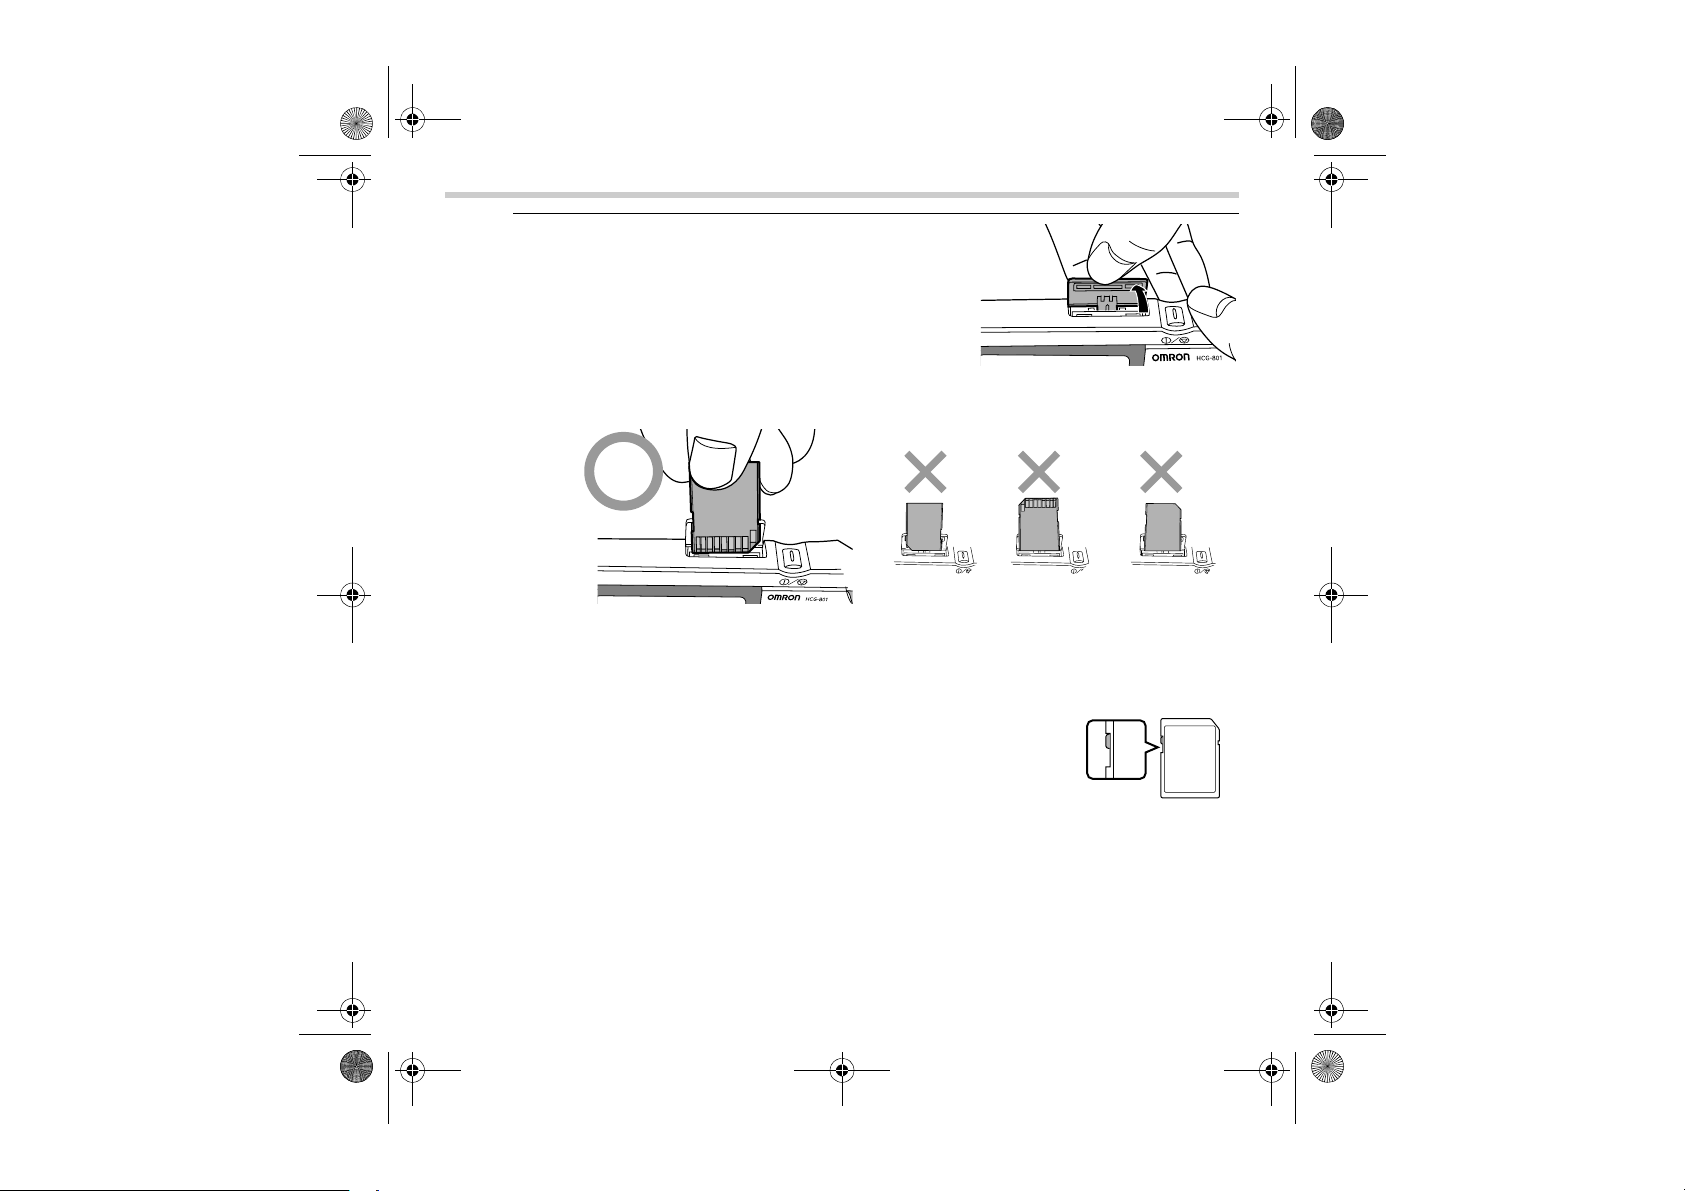
2. Open the SD memory card slot cover and insert the
SD memory card into the slot.
Notes:
• Check that the card is correctly aligned and insert
it into the slot as shown.
• Insert the card until it clicks into position.
Write Protection (Locking the SD Memory Card)
• Make sure that the write-protect switch is not locked, before
inserting the SD memory card. If the write-protect switch is
locked (down), you will not be able to store new ECG data on
the SD memory card.
Caution!
When inserting the SD memory card, do not try to force the card into the slot
if it is upside down, back to front etc. This could damage the card or the unit
itself.
16
Page 17
HCG-801-E.book Page 17 Tuesday, December 13, 2011 5:35 PM
3. Close the SD memory card slot cover.
4. Using SD Memory Card
17
EN
Page 18

HCG-801-E.book Page 18 Tuesday, December 13, 2011 5:35 PM
4. Using SD Memory Card
To eject the SD memory card
1. Check that the device is turned off.
Caution!
Only eject an SD memory card when the unit is turned off.
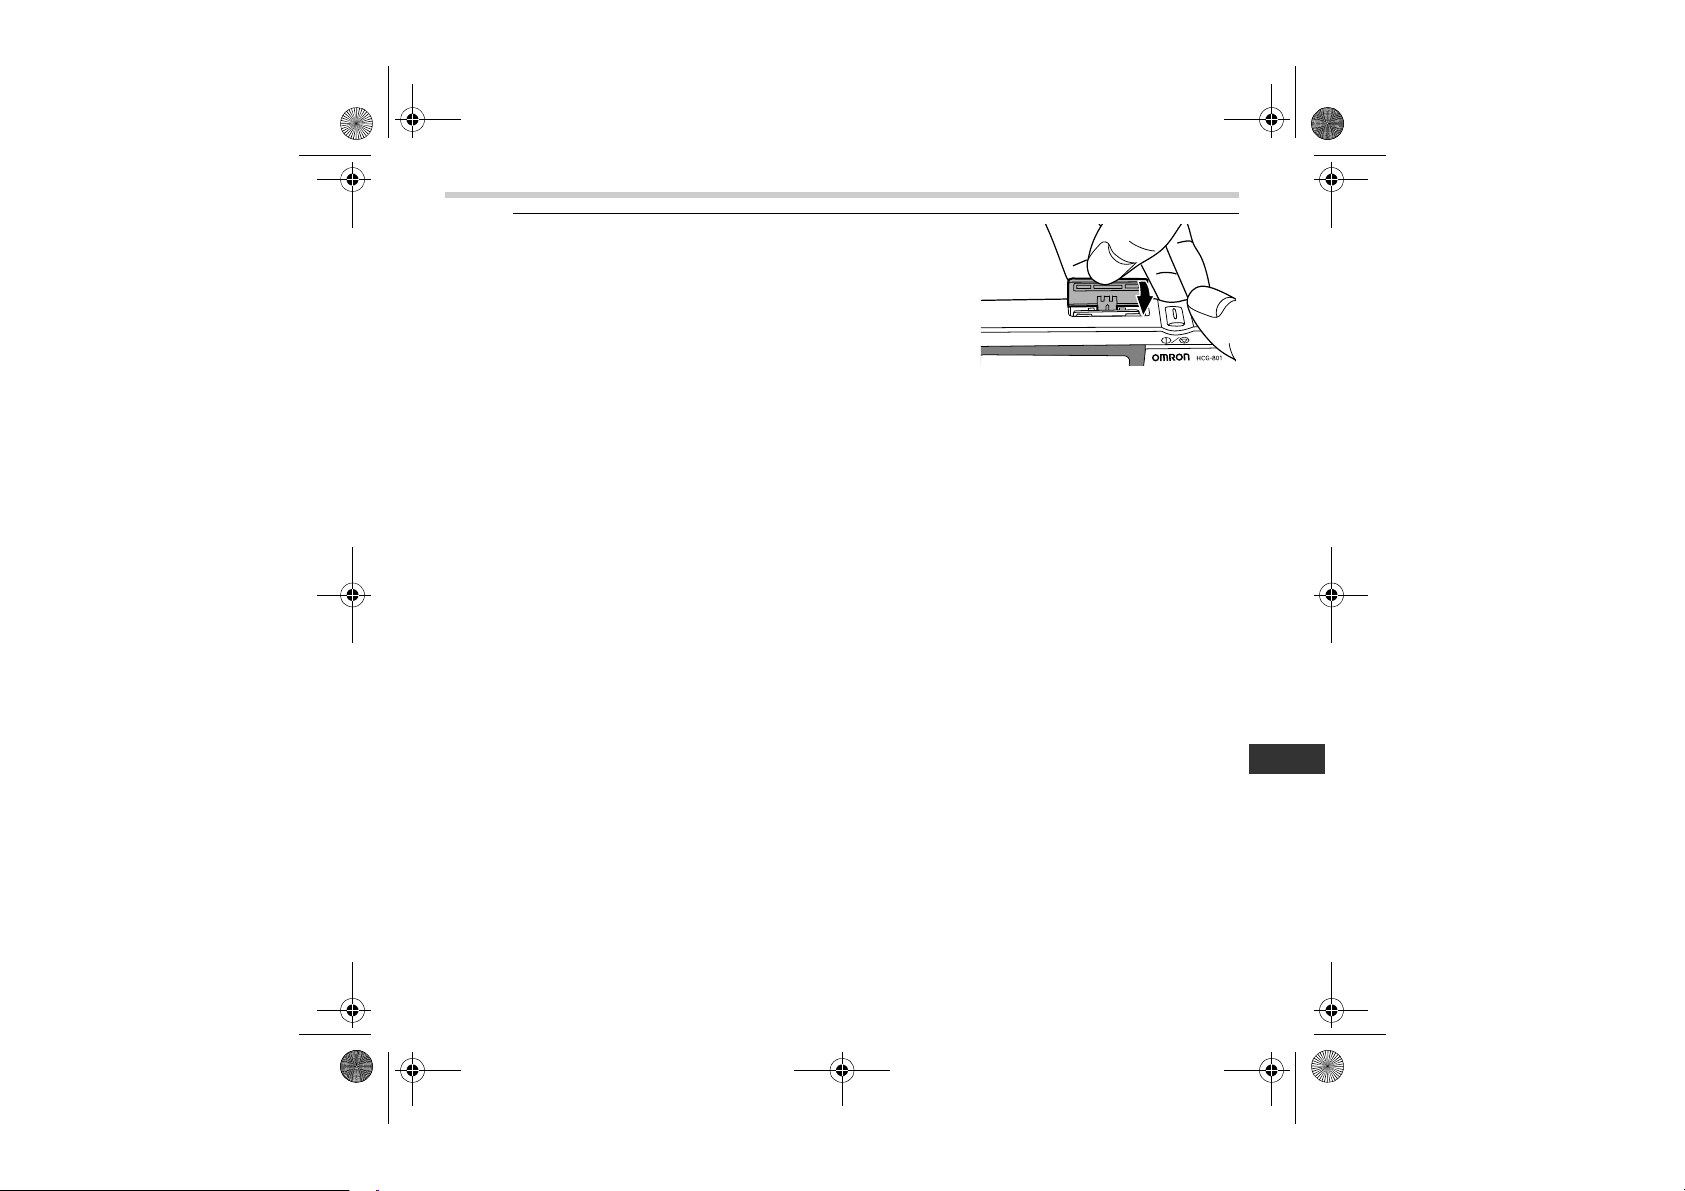
2. Open the SD memory card slot cover and press the
memory card.
The lock is released and the card is ejected slightly.
3. Remove the memory card.
4. Close the SD memory card slot cover.
18
Page 19

HCG-801-E.book Page 19 Tuesday, December 13, 2011 5:35 PM
4.2 Formatting an SD Memory Card
You will need to format the SD memory card before you use it for the first time, and
in the following circumstances.
• If you use an SD memory card that has been used by other devices.
• If a memory card error occurs.
Notes:
• When you format an SD memory card, any data stored on the card is erased.
Always copy any data you wish to keep to a computer before formatting an SD
memory card.
• When you format an SD memory card, format it with the unit. Do not format an
SD memory card with a computer.
1. Press the MENU button, press the button to
select SET menu, then press the OK button.
4. Using SD Memory Card
2. Press the button to scroll through the settings
and select Formatting SD.
EN
19
Page 20

* By default, NO is high-
lighted.
HCG-801-E.book Page 20 Tuesday, December 13, 2011 5:35 PM
4. Using SD Memory Card
3. Press the OK button.
The message “All data in SD will be deleted. Format
SD?” is displayed.
4. Press the button to select YES, then press
the OK button.
If you press the OK button while NO is selected, the
SD memory card will not be formatted.
5. Press the OK button.
A message warning you not to remove the SD
memory card while it is being formatted is displayed
and the SD memory card is formatted.
Formatting can take up to eight seconds to
complete.
Caution!
Never remove an SD memory card while it is
being formatted.
20
Page 21

HCG-801-E.book Page 21 Tuesday, December 13, 2011 5:35 PM
5. Important Notes on Taking a Measurement
In order to obtain a good ECG reading, it is important that measurements are taken
correctly.
Before taking a measurement for the first time, read these instructions carefully
and make sure you observe the following points each time you take a
measurement.
• Make sure that the electrodes are directly touching your skin.
• If your hands or skin are dry, wipe them with a damp towel so that they are
slightly moist.
• If the electrodes are dirty, wipe any dirt off with a soft cloth moistened with
disinfectant alcohol or a cotton swab.
- Take care not to use too much disinfectant alcohol when cleaning the electrodes.
- Do not wipe or get disinfectant alcohol on parts other than the electrodes.
• Do not move during measurement.
- Movement, including talking, coughing, or sneezing, during measurement can affect the
measurement results.
• If the position of your finger or arm is inappropriate during measurement, the
results may be unreliable, so be sure to check their position before taking a
measurement. (Refer to p. 22 and p. 23.)
• After taking a measurement, disinfect the electrodes by wiping them with a soft
cloth or cotton swab moistened with disinfectant alcohol. If you do not disinfect
the electrodes there is a risk of skin disease.
EN
Note: If you have problems applying the unit so that the chest electrode is flat
against your chest, please ask your doctor for advice.
21
Page 22

Fit finger closely on the
electrodes.
Do not press START button
until ready to take
measurement.
HCG-801-E.book Page 22 Tuesday, December 13, 2011 5:35 PM
6. Taking a Measurement
1. Press the button to turn the unit on.
The unit displays a reminder that self-measurement
is not the same as medical diagnosis and then the
guidance screens are displayed. (The guidance
screens are displayed twice.)
Note: You can press the START button to begin a
measurement even while the guidance
screens are being displayed.
2. Make sure that you are in a relaxed position.
The ideal posture is one where you are seated comfortably with your back straight.
Note: You can also take a measurement while you are standing or while lying
down.
3. Place your finger so that it fits closely over the two
finger electrodes.
Notes:
• Even if you are left-handed, use your right hand to
take a measurement.
• Take care not to press the START button until you
are ready to take the measurement.
22
Page 23

Chest electrode
About 5 cm
Press closely to your chest.
Female:
Locate the ECG monitor at the lower end of the breastbone
and move horizontally to the left to the middle of the left part
of the chest. If necessary, gently lift the breast and place the
Chest Electrode under the left breast. Unless the chest
electrode comes in contact with the brassiere, it is not
necessary to remove it; if you are unsure please consult
your doctor.
HCG-801-E.book Page 23 Tuesday, December 13, 2011 5:35 PM
6. Taking a Measurement
4. Place the chest electrode on bare skin about 5 cm below your left nipple.
Notes:
• Make sure that you are relaxed and that your chest is free of tension.
• Press the chest electrode close against your bare chest. Do not place the
electrode on clothing as this will result in an inaccurate measurement.
EN
23
Page 24

Measurement starts During measurement
The unit beeps every second.
About 30 seconds
The measurement ends
automatically, indicated
by 4 rapid beeps.
Measurement ends
HCG-801-E.book Page 24 Tuesday, December 13, 2011 5:35 PM
6. Taking a Measurement
5. While maintaining the same posture, press the START button.
The measurement takes about 30 seconds to complete. The unit beeps every
second during measurement.
During measurement, the screen displays the ECG waveform and the progress
bar at the bottom of the screen displays measurement progress and a guide to the
heart rate.
Depending on the waveform, situations can occur in which the device cannot
assess and display the heart rate during the measurement.
24
Notes:
• During measurement the device will only respond to the button to
discontinue the measurement.
• If the contact of the electrodes becomes loose, or the conditions change during
measurement, the measurement may not be correct.
Important: Keep still and do not move until the measurement is complete.
Page 25

Example result message
HCG-801-E.book Page 25 Tuesday, December 13, 2011 5:35 PM
A measurement result message is displayed when
the measurement has been completed. (Refer to p.
27 for details.)
If you press the OK button while the result message
is displayed, the list of ECG data stored on the SD
memory card or unit is displayed.
Note: If the “Please insert new batteries.” error
message is displayed immediately after
measurement, the ECG data may not be
stored. If this happens, please repeat the
measurement after replacing the batteries.
6. Press the button for two seconds, to turn the unit off.
The unit beeps, then the power is turned off.
Note: If you forget to turn the unit off, it will automatically shut itself off after five
minutes.
6. Taking a Measurement
EN
25
Page 26

• The index finger is not placed
closely on the electrode.
• The unit is held incorrectly.
• The unit is being held in the left hand.
Always use your right hand to hold
the unit when taking a measurement.
• The rear of the unit is placed
against the chest.
• The chest electrode is against the
finger and the finger electrode is
against the chest.
• Unit placed on clothing.
HCG-801-E.book Page 26 Tuesday, December 13, 2011 5:35 PM
6. Taking a Measurement
Common Causes of Inaccurate Measurement Results
The following situations can result in inaccurate measurement results or errors.
26
Page 27

HCG-801-E.book Page 27 Tuesday, December 13, 2011 5:35 PM
Measurement Result
There are 13 messages regarding the measurement result.
A letter of the alphabet indicates each of the 13 possible messages. This letter is
displayed together with the time and date of the measurement when the GRAPH
menu is displayed.
Important: Do not interpret measurement results yourself, consult your doctor.
a Stable waveform.
b Fast heart rate.
c Fast and irregular heart rate.
d Fast heart rate and deviating waveform.
e Fast and irregular heart rate, deviating waveform.
f Slow heart rate.
g Slow and irregular heart rate.
h Slow heart rate and deviating waveform.
i Slow and irregular heart rate, deviating waveform.
j Irregular heart rate.
k Irregular heart rate and deviating waveform.
l Deviating waveform.
m Analysis impossible. Please measure again.
Recommendation on measurement result
In addition to the above messages the device will display the heart rate in beats per minute.
Finally, the device will display one of the following messages:
Store data? Yes/No
This message will be displayed when the unit can find none or only sleight deviations from
normal. This data can be saved by selecting Yes and pressing the OK button.
Data is stored.
This message will be displayed when the unit can find moderate deviation from normal.
The unit will automatically store the data for future analysis by your doctor.
Data is stored. Please show your Dr.
This message will be displayed when the unit can find significant deviation from normal.
The unit will automatically store the data for future analysis by your doctor.
6. Taking a Measurement
EN
27
Page 28

HCG-801-E.book Page 28 Tuesday, December 13, 2011 5:35 PM
7. Displaying ECG Data
The GRAPH menu is used to display the list of ECG data stored on the SD
memory card or in unit memory.
1. Press the MENU button while the unit is turned on, the GRAPH menu is
highlighted. If you then press the OK button, the list of ECG data is displayed.
2. Select the ECG data you wish to view from the GRAPH menu list, then press the
OK button to display the detailed view of the waveform.
28
Each stored ECG data is displayed by date, time and a character representing the
measurement result, refer to p. 27 for the overview of character and measurement
result.
Page 29

HCG-801-E.book Page 29 Tuesday, December 13, 2011 5:35 PM
Press the button to move down the list, and the button to move up.
The most recent measurement result is displayed at the top of the list and is
automatically highlighted, with any previous measurement results listed below it in
chronological order.
When the SD memory card is in the SD memory card slot, the list of ECG data
stored on the card is displayed.
If there is no SD memory card in the card slot, the ECG data stored in unit memory
is displayed.
3. If you press the button, you can scroll through
the ECG waveform.
Press the button to return to the previous
waveform display.
Two waveforms are displayed (the lower, smaller,
waveform being a view of the whole 30-second
measurement.)
At the bottom of the screen is a bar indicating the
progress of the measurement. The current heart
rate is shown in the lower right corner of the screen.
The shaded area in the progress bar indicates the section of the ECG waveform
being displayed.
7. Displaying ECG Data
4. Press the OK button again to view the measurement
comments and heart rate.
Note: You can specify whether a result message is
displayed or not. (Refer to p. 37 for details.)
5. Press the OK button once more to return to the
GRAPH menu list.
EN
29
Page 30

* Initially, GRAPH
menu is highlighted.
HCG-801-E.book Page 30 Tuesday, December 13, 2011 5:35 PM
8. Adjusting the Settings
You can use the SET menu to adjust various settings.
You can press the START button to begin measurement even while the SET menu
is displayed.
8.1 Basic Operation
The following procedure describes how to select and adjust a setting. Refer to the
following pages for details of the options available for each setting.
1. Press the MENU button, while the unit is on, to display the
menu screen.
2. Press the button to select SET menu.
3. Press the OK button.
Initially, the Date and Time setting is highlighted.
30
Page 31

HCG-801-E.book Page 31 Tuesday, December 13, 2011 5:35 PM
8. Adjusting the Settings
4. Press the or button to select the desired setting, then press the OK
button to see the options for that setting.
5. Adjust the settings then press the OK button to confirm the changes.
The SET menu can be used to adjust the following settings or manage ECG data
stored on the SD memory card or unit:
Date and Time, Volume, Brightness, Contrast, Language, Date Format, Message,
Overwrite, Erase all data, Data copy to SD, Formatting SD.
Notes:
Refer to “9. Managing ECG Data” on p. 39 for details on Erase all data and Data
copy to SD.
Refer to “4. Using SD Memory Card” on p. 15 for details on Formatting SD.
• To return to the menu screen from the SET menu screens, press the MENU
button. To return to the previous screen, highlight Back, then press the OK button
or MENU button.
• If you press the MENU button without first pressing the OK button, after making
the changes to a setting, the changes to the setting will not be implemented.
EN
31
Page 32

The current volume level is displayed
at the bottom of the screen.
The mark indicates the
volume level.
* The default setting is the maximum
volume level.
HCG-801-E.book Page 32 Tuesday, December 13, 2011 5:35 PM
8. Adjusting the Settings
8.2 Date and Time
Select this item if you need to reset the date and time for some reason. For details
on setting the date and time, refer to p. 13.
Note: You will be prompted to set the date and time when you first insert the
batteries.
8.3 Volume
Press the button or button to adjust the volume.
The volume increases as the mark moves to the right.
The sound is muted (off) when the mark is to the far left.
32
Page 33

The current brightness level is displayed
at the bottom of the screen.
The mark indicates the
brightness level.
* The default setting is the maximum
brightness level.
HCG-801-E.book Page 33 Tuesday, December 13, 2011 5:35 PM
8.4 Brightness
Press the button or button, to adjust the brightness.
The brightness can be set to one of nine levels.
The brightness increases as the marker moves to the right.
8. Adjusting the Settings
EN
33
Page 34

The current contrast level is displayed
at the bottom of the screen.
The mark indicates the
contrast level.
* The default setting is medium
contrast level.
HCG-801-E.book Page 34 Tuesday, December 13, 2011 5:35 PM
8. Adjusting the Settings
8.5 Contrast
Press the button or button to adjust the contrast.
The contrast can be set to one of nine levels.
The contrast increases as the marker moves to the right.
34
Page 35

The currently selected language is
displayed at the bottom of the screen.
* The default language is English.
HCG-801-E.book Page 35 Tuesday, December 13, 2011 5:35 PM
8.6 Language
This setting specifies the language to be used for the screen display.
Press the button or button to select the desired language, then press
the OK button to confirm your selection.
8. Adjusting the Settings
EN
35
Page 36

The date is displayed at the bottom of the
screen using the currently selected format.
* The default date format is
DD/MM/YY HH:MM (24 hour clock).
HCG-801-E.book Page 36 Tuesday, December 13, 2011 5:35 PM
8. Adjusting the Settings
8.7 Date Format
You can select one of four formats, DD/MM/YY HH:MM (24 hour clock), DD/MM/YY
HH:MM (AM/PM), MM-DD-YY HH:MM (AM/PM), or YY/MM/DD HH/MM (AM/PM).
Press the button or button to select the desired format, then press the
OK button to confirm your selection.
36
Page 37

The current setting is displayed at the
bottom of the screen.
* The default setting is Display.
HCG-801-E.book Page 37 Tuesday, December 13, 2011 5:35 PM
8. Adjusting the Settings
8.8 Messages
This setting specifies whether to display or hide the message that appears after a
measurement has been completed.
1. Press the button or button to highlight the Display or Hide, then press
the OK button to confirm your selection.
Note: Even if Hide is selected, results messages are saved by the unit.
EN
37
Page 38

The current setting is displayed at the
bottom of the screen.
HCG-801-E.book Page 38 Tuesday, December 13, 2011 5:35 PM
8. Adjusting the Settings
8.9 Overwrite
The unit will overwrite the oldest stored reading when the SD memory card or unit
memory is full. A message will warn that this will happen, you can choose to hide
or display this message. (The default setting is to hide the message.)
1. Press the button or button to highlight Display or Hide, then press the
OK button to confirm your selection.
Caution!
While Hide is selected, the unit will overwrite (erase and replace) the oldest
measurement data with the results of the new measurement without displaying a
message, when the SD memory card or unit memory are full.
About the Overwrite message
If you select Display, the unit will display a message before
you take a measurement, asking if you want to overwrite
existing data with the new measurement data.
Select Yes to overwrite the oldest ECG data with the
results of the new measurement.
If you select No, measurement is cancelled.
38
Page 39

* By default, NO is
highlighted.
HCG-801-E.book Page 39 Tuesday, December 13, 2011 5:35 PM
9. Managing ECG Data
9.1 Erasing ECG Data
Erasing All ECG Data
You can use the SET menu to erase all the ECG data stored on the SD memory
card or in unit memory.
Note: If an SD memory card is inserted in the unit, all data on the card will be
erased.
1. Press the button to scroll through the settings and
select Erase all data.
2. Press the OK button.
The message “Erase all data in SD memory?” is
displayed.
Note: If the SD memory card is not inserted and
measurements are being stored in unit memory, the
message “Erase all data in the device?” is
displayed.
EN
39
Page 40

HCG-801-E.book Page 40 Tuesday, December 13, 2011 5:35 PM
9. Managing ECG Data
3. Press the button and select YES, then press the OK
button.
The number of sets of data to be deleted is displayed.
4. Press the button and select YES, then press the OK
button.
All the ECG data is erased and the screen from step 1 appears.
Note: If you press the OK button after selecting NO, the screen from step 1
appears.
Erasing Selected ECG Data
Use the GRAPH menu if you only want to delete a selected set of ECG data.
For details on displaying the GRAPH menu, follow step 1 in “7. Displaying ECG
Data” on p. 28.
1. Press the button to highlight the data you want to erase.
2. Press the MENU button.
The menu screen is displayed.
3. Press the button and select Erase data.
40
Page 41

* By default, NO is
highlighted.
HCG-801-E.book Page 41 Tuesday, December 13, 2011 5:35 PM
4. Press the OK button.
The confirmation message “Erase selected data?” is
displayed.
5. Press the button and select YES, then press the OK
button.
The ECG data is erased and the screen from step 1
appears.
Note: If you press the OK button after selecting NO, the screen from step 1
appears.
Important: Never remove an SD memory card while data is being erased.
9. Managing ECG Data
EN
41
Page 42

* By default, NO is
highlighted.
HCG-801-E.book Page 42 Tuesday, December 13, 2011 5:35 PM
9. Managing ECG Data
9.2 Copying Data to an SD Memory Card
You can copy ECG data from the unit’s internal memory to an SD memory card.
This allows you to copy data to the SD memory card if measurements have been
taken while the SD memory card was not inserted.
Note: The unit’s internal memory can only store a maximum of five measurement
results.
1. Press the button and select Data copy to SD.
2. Press the OK button.
The conformation message “Copy data into SD?” is
displayed.
3. Press the button to select YES.
Notes:
• If the SD memory card is full, the “Overwrite data”
message may appear. Refer to p. 38 for details.
• ECG data stored on an SD memory card can be damaged by static electricity and
other causes. Copy data to PC or other device for additional safety.
42
Page 43

HCG-801-E.book Page 43 Tuesday, December 13, 2011 5:35 PM
4. Press the OK button.
The ECG data is copied to the SD memory card.
Caution!
Never remove the SD memory card while data is being
copied to it. If the SD memory card is removed while
data is being copied, the data may be lost or damaged.
Notes:
• The copied data is displayed and the screen from step 1 appears.
• If the same ECG data already exists on the SD memory card, the data is not
copied.
9. Managing ECG Data
43
EN
Page 44

HCG-801-E.book Page 44 Tuesday, December 13, 2011 5:35 PM
9. Managing ECG Data
9.3 Copying data from the SD memory card to a PC
Copying data from the SD memory card to a PC
Please follow these instructions to copy data from the SD memory card to a PC.
1. Make sure the PC is equipped with an SD memory card port or connect a
commercially available SD memory card reader/writer to your PC.
2. Create a new folder on your PC where you want to save a copy of the ECG data.
3. Insert the SD memory card and browse to the SD memory card data as explained
in the instruction manual of your PC and /or software. The ECG data is located in
the *:\hcg801\data\ folder (where * stands for the character of a removable disk).
4. Select all files and copy them in the folder you have created earlier (2).
5. When copying is finished, remove the SD memory card.
6. The SD memory card can now be formatted as described in “4.2 Formatting an SD
Memory Card” on p. 19, if you wish to delete the data.
44
Page 45

HCG-801-E.book Page 45 Tuesday, December 13, 2011 5:35 PM
9. Managing ECG Data
Copying data from a PC to the SD memory card
Please follow these instructions to copy data from a PC to the SD memory card.
1. Make sure the PC is equipped with an SD memory card port or connect a
commercially available SD memory card reader/writer to your PC.
2. Insert the SD memory card in the SD port of your PC and confirm that there is an
“hcg801” folder in the SD memory card. If there is not, format the SD memory card
in the HCG-801 as described in section 4.2 of the HCG-801 instruction manual.
3. Browse to the folder where you saved the ECG data in the PC. Select all files and
copy them to the SD memory card in the *:\hcg801\data\ folder (where * stands for
the character of a removable disk)
4. When copying is finished, insert the SD memory card in the HCG-801 as
described in “4.1 Inserting and Ejecting SD Memory Card” on p. 15.
5. Do not store more than 300 measurement files in this folder on the SD memory
card. When more than 300 files are copied in this folder, the HCG-801 will display
an error message when activated.
45
EN
Page 46

HCG-801-E.book Page 46 Tuesday, December 13, 2011 5:35 PM
10. Care and Maintenance
10.1 Lists and Explanations of Messages
This section includes a list of all messages that may appear on the display. Refer
to these if you are not sure what a displayed message means.
Notice Messages
Message Description Action
Analysing. The ECG data is being analysed.
Can not measure.
Please follow the instructions
for use.
Measurement was stopped.
Push START to begin
measurement again.
Copied
Erased
*1
data into SD.
*2
data.
A ECG wave-pattern could not
be detected.
The measurement was
interrupted or cancelled.
The indicated number of ECG
data has been copied to an SD
memory card.
The indicated number of ECG
data has been erased.
No action required. Wait until
analysis ends.
Check the instructions and
repeat measurement.
Press START to resume the
measurement.
No action required.
Wait until the message
disappears.
46
*1: Number of readings from 0 to 5. The number displayed represents the amount of copied ECG data.
*2: Number of readings from 1 to 300. The number displayed represents the amount of erased ECG
data.
Page 47

HCG-801-E.book Page 47 Tuesday, December 13, 2011 5:35 PM
Warning Messages
Message Cause Remedy
Formatting SD memory.
DO NOT REMOVE SD
Storing on SD memory.
DO NOT REMOVE SD
Copying SD memory.
DO NOT REMOVE SD
Data in device memory is
being erased.
Data in SD is being erased.
DO NOT REMOVE SD until
erasing finishes.
Reading data...
DO NOT REMOVE SD.
No SD is inserted.
The SD memory card is being
formatted.
ECG data is being written
(saved) to the SD memory card.
ECG data is being copied to the
SD memory card.
ECG data stored on the unit is
being erased.
ECG data stored on the SD
memory card is being erased.
The unit is loading ECG data
stored on the SD memory card.
There is no SD memory card in
the card slot.
10. Care and Maintenance
Wait until the message
disappears.
Do not remove the SD memory
card until formatting has been
completed.
Wait until the message
disappears.
Do not remove the SD memory
card until data storage has been
completed.
Wait until the message
disappears.
Do not remove the SD memory
card until data copying has been
completed.
Wait until the message
disappears.
Wait until the message
disappears.
Do not remove the SD memory
card until data erasing has been
completed.
Wait until the message
disappears.
Do not remove the SD memory
card until the data has been
loaded by the unit.
Turn off the power and insert the
SD memory card.
Never insert the SD memory card
while the power is turned on.
EN
47
Page 48

HCG-801-E.book Page 48 Tuesday, December 13, 2011 5:35 PM
10. Care and Maintenance
Message Cause Remedy
SD is write-protected.
No saved data.
Set clock.
No saved data.
Set clock.
The unit is unable to access data
because the SD memory card
inserted is write-protected.
The battery power has run low
and the ECG data stored on the
unit has disappeared.
The battery power has run low
and the Date and Time setting on
the unit has disappeared.
The battery power has run low
and the ECG data stored on the
unit has disappeared or the clock
has been reset.
Error Messages
Error # Message Cause Remedy
01
11
12
13
Please insert new
batteries.
Device memory error
Cannot read data.
Device memory error
Cannot erase data.
Device memory error
Cannot write data.
The batteries are worn out.
An error occurred while
trying to read ECG data
stored in unit memory.
An error occurred while
trying to erase ECG data
stored in unit memory.
An error occurred while
trying to save ECG data to
unit memory.
Refer to the instruction supplied
with the memory card and insert
the SD memory card with writeprotection turned off.
Insert new batteries and reset the
Date and Time and other
settings. Any ECG data that was
stored on the unit cannot be
recovered.
Insert new batteries and reset the
Date and Time from the SET
menu.
Insert new batteries and reset the
Date and Time and other
settings.
Replace both batteries with new
ones.
Try again.
If the error still occurs, consult
your OMRON service
representative.
48
Page 49

HCG-801-E.book Page 49 Tuesday, December 13, 2011 5:35 PM
Error # Message Cause Remedy
An error occurred while
21
SD memory error
Cannot read data.
trying to read ECG data
stored on the SD memory
card.
An error occurred while
22
SD memory error
Cannot erase data.
trying to erase ECG data
stored on the SD memory
card.
23
24
25
26
27
SD memory error
Cannot write data.
Error formatting SD
memory.
SD memory error.
SD memory unknown.
SD memory full.
Please delete
unnecessary data.
The number of data in
SD is over the limit.
Please delete
unnecessary data.
An error occurred while
trying to save ECG data on
the SD memory card.
An error occurred when
formatting the SD memory
card.
The SD memory card may
be damaged.
The SD memory card is full
and there is not enough
space to save new ECG
data.
The SD memory card is full
and there is not enough
space to save new ECG
data.
The unit may have been
91 Device error.
damaged or is otherwise
unable to operate normally.
10. Care and Maintenance
Format the SD memory card.
Refer to p. 19.
*Copy any important data to a PC
before formatting the SD memory
card as all data on the card will be
erased.
Use a new/different SD memory
card. (Always turn off the unit before
removing or inserting SD memory
cards.)
Use a new/different SD memory
card. (Always turn off the unit
before removing or inserting SD
memory cards.)
Format the SD memory card.
Refer to p. 19.
*Copy any important data to a PC
before formatting the SD memory
card as all data on the card will be
erased.
Use a new/different SD memory
card. (Always turn off the unit before
removing or inserting SD memory
cards.)
Either delete unnecessary data
or use a new SD memory card.
(Always turn off the unit before
removing or inserting SD
memory cards.)
Turn the unit off, then on again.
If this error still occurs, consult
your Omron Customer Service
Department (Tel. 0870-
7502771).
EN
49
Page 50

HCG-801-E.book Page 50 Tuesday, December 13, 2011 5:35 PM
10. Care and Maintenance
10.2 Troubleshooting
Refer to this table for problems that do not result in a message on the display.
Problem Cause Solution
Nothing happens when you press the
button.
Measurement starts but the message
“Analysis impossible. Please
measure again.” appears.
Measurement finishes but no result is
shown.
ECG data has disappeared.
ECG data has disappeared from an
SD memory card.
Other problems
If the problem still occurs, consult your Omron Customer Service Department
(Tel. 0870-7502771)
The batteries are worn out.
The batteries are inserted incorrectly.
The measurement data could not be
analysed.
The electrodes are not making good
contact with your finger or chest.
Your body is too tense. Relax and repeat the measurement.
Electrode contact was broken before
30 seconds of data has been
recorded.
The chest electrode has been applied
over clothing.
Your skin is dry. Moisten your skin with a damp towel.
The ECG signal is too weak.
The batteries are worn out or have
been removed for over one hour.
The card was exposed to a strong
electromagnetic field. electric noise or
static, damaging the data stored on
the card. Or the card is defective.
Replace both batteries with new ones.
Insert the batteries with their polarities
correctly aligned.
Check the instructions and repeat
measurement.
Check the instructions and repeat
measurement.
Make sure that your finger and chest
maintain contact with the electrodes for
the full 30 seconds of the measurement.
Apply the chest electrode to bare skin.
Make sure that the electrodes are
applied correctly. However, for some
individuals measurement may not be
possible.
The unit will not be able to store data if
left with worn batteries for an extended
period. Replace the batteries with new
ones as soon as possible after the
warning message appears.
Erased data cannot be recovered.
Format the SD memory card again.
Turn off the unit and try again.
If the data and time or other settings
have been reset to their default values,
set them again.
50
Page 51

HCG-801-E.book Page 51 Tuesday, December 13, 2011 5:35 PM
11. Maintenance and Storage
• Clean the unit with a cloth lightly dampened with
water, disinfectant alcohol or detergent, then wipe
it dry with a dry cloth. Do not wipe the SD memory
card slot cover.
• Wipe the electrodes using a cloth dampened with
disinfectant alcohol.
• Do not wipe the unit with benzene, gasoline, paint
thinner, concentrated alcohol, or other volatile
detergents.
• Do not place objects on top of the unit. This could
damage the unit.
• Do not disassemble the unit. There are no user
serviceable parts. Repairs should only be carried
out by authorized personnel.
• Do not sterilise this unit in an autoclave, ultraviolet
steriliser or gas steriliser (EOG, formaldehyde,
high density ozone etc.)
11. Maintenance and Storage
EN
• This device does not require calibration during the
expected life cycle of five years.
51
Page 52

HCG-801-E.book Page 52 Tuesday, December 13, 2011 5:35 PM
12. Technical Data
Model
Induction system
Heart rate range
Accuracy
Enclosure ingress
protection
Display
Memory
Type of protection
against electric shock
Classification of Applied
Parts
Power Supply
Battery life
Operating Temperature
and Humidity
Storage Temperature
and Humidity
Weight
Dimensions
Attachments
Other Symbol Mark
HCG-801
Bipolar single channel
2 to 200 beats/min.
Bandwidth: 0.05 to 40Hz
Sampling Rate: 125Hz
IP20
Graphic LCD
5 measurements (using the unit’s internal memory)
300 measurements (using the supplied SD memory card)
INTERNALLY POWERED
TYPE BF
2 LR03 (AAA) batteries
Approximately 400 measurements with alkaline batteries
(When measurements are taken once a day at room temperature (22 °C).)
+10 to +40 °C
30 to 85%RH
-20 to +60 °C
10 to 95%RH
Approximately 130g (including batteries)
121 mm (W) × 67 mm (H) × 24 mm (D)
Batteries 2 × LR03(AAA), SD memory card, Storage pouch, Instruction
manual, Quick reference card, Registration card, Guarantee card.
Please be sure to read this instruction manual carefully.
52
Note: Specifications may be changed without prior notice.
• This device supports SDA standard SD memory cards.
• OMRON Healthcare Inc. is a member of the SD Card Association.
• Uses bitmap font from Ricoh Co., Ltd.
• The SD logo is a registered trademark.
Page 53

HCG-801-E.book Page 53 Tuesday, December 13, 2011 5:35 PM
This device fulfills the provisions of EC directive 93/42/EEC (Medical Device Directive).
Important information regarding Electro Magnetic Compatibility (EMC)
With the increased number of electronic devices such as PC's and mobile (cellular) telephones,
medical devices in use may be susceptible to electromagnetic interference from other devices.
Electromagnetic interference may result in incorrect operation of the medical device and create a
potential unsafe situation. Medical devices should also not interfere with other devices.
In order to regulate the requirements for EMC (Electro Magnetic Compatibility) with the aim to prevent
unsafe product situations, the EN60601-1-2 standard has been implemented. This standard defines
the levels of immunity to electromagnetic interferences as well as maximum levels of electromagnetic
emissions for medical device.
This medical device manufactured by OMRON HEALTHCARE conforms to this EN60601-1-2:2007
standard for both immunity and emissions.
Nevertheless, special precautions need to be observed:
• Do not use mobile (cellular) telephones and other devices which generate strong electrical or
electromagnetic fields, near the medical device.
This may result in incorrect operation of the unit and create a potentially unsafe situation.
Recommendation is to keep a minimum distance of 7 m. Verify correct operation of the device in case
the distance is shorter.
Further documentation in accordance with EN60601-1-2:2007 is available at OMRON HEALTHCARE
EUROPE at the address mentioned in this instruction manual.
Documentation is also available at www.omron-healthcare.com
Correct Disposal of This Product
(Waste Electrical & Electronic Equipment)
12. Technical Data
.
This marking shown on the product or its literature, indicates that it should not be
disposed of, with other household wastes at the end of its working life. To prevent
possible harm to the environment or human health from uncontrolled waste disposal,
please separate this from other types of wastes and recycle it responsibly to promote
the sustainable reuse of material resources.
Household users should contact either the retailer where they purchased this product,
or their local government office, for details of where and how they can take this item for
environmentally safe recycling.
Business users should contact their supplier and check the terms and conditions of the purchase
contract. This product should not be mixed with other commercial wastes for disposal.
This product does not contain any hazardous substances.
Disposal of used batteries should be carried out in accordance with the national regulations for the
disposal of batteries.
EN
53
Page 54

Left atrium
Left ventricle
Right atrium
Right ventricle Septa
HCG-801-E.book Page 54 Tuesday, December 13, 2011 5:35 PM
13. General Information About the Heart and ECG Measurements
The heart is a muscular pump controlled by electrical impulses generated by the
body. It is divided into two by the septa and each side has two chambers – an
atrium and a ventricle – linked by a one-way valve. The left atrium and ventricle
control oxygenated blood, and the right atrium and ventricle de-oxygenated
(“used”) blood.
The electrical impulse that causes the heart to beat spreads across the atria,
causing the left and right atrium to contract and pump blood into the left and right
ventricles respectively. The two ventricles then contract and pump blood out of the
heart. The heart muscle then relaxes, or re-polarises, allowing blood to fill up the
heart again.
54
An ECG monitor is able to measure the electrical impulse as it passes across and
through the heart, causing the heart to beat. An ECG does not measure the
movement of your heartbeat, but rather the electrical activity that causes the heart
to beat. The measurements recorded by an ECG monitor, when combined with a
medical examination, can help your doctor monitor your heart condition.
Conditions such as arrhythmia and Ischemia can only be diagnosed by a doctor
through a special examination.
Page 55

Ventrcular contraction
(QRS complex)
Re-polarization (T wave)Atrial contraction (P wave)
HCG-801-E.book Page 55 Tuesday, December 13, 2011 5:35 PM
About the ECG Waveform
The ECG waveform shows the rhythm of your heartbeat during the 30-second
measurement and displays the electrical activity causing the heart to beat. The
waveform for each heartbeat shows the progress of the electrical impulse across
and through the heart.
The first peak indicates the spread of the impulse over the atria and the beginning
of their contraction. This is known as the P wave. The second peak indicates the
spread of the impulse over the ventricles and the beginning of their contraction.
This is known as the QRS complex. The third peak indicates the activity as the
heart relaxes (re-polarization), and is known as the T wave.
What is Arrhythmia?
Arrhythmia is a condition where the heartbeat rhythm is abnormal due to flaws in
the bio-electrical system that drives the heartbeat. Typical symptoms are skipped
heartbeats, premature contraction, an abnormally rapid (tachycardia) or slow
(bradycardia) pulse. This can be caused by heart disease, ageing, physical
predisposition, stress, lack of sleep, fatigue etc.
Arrhythmia can only be diagnosed by a doctor through a special examination.
13. General Information About the Heart and ECG Measurements
EN
What is Ischemia?
Ischemia is a condition in which insufficient oxygen is supplied to parts of the heart
or other parts of the body. This is usually due to a blockage or partial blockage of
an artery.
Ischemia can only be diagnosed by a doctor through a special examination.
55
Page 56

EC REP
HCG801-E.fm Page 56 Friday, January 6, 2012 5:59 PM
Manufacturer OMRON HEALTHCARE Co., Ltd.
53, Kunotsubo, Terado-cho, Muko, Kyoto,
617-0002 JAPAN
EU-representative OMRON HEALTHCARE EUROPE B.V.
Scorpius 33, 2132 LR Hoofddorp
THE NETHERLANDS
www.omron-healthcare.com
Production facility
OMRON HEALTHCARE Co., Ltd.
Mie, JAPAN
OMRON HEALTHCARE UK LTD.
Opal Drive, Fox Milne, Milton Keynes, MK15 0DG, U.K.
Subsidiary
OMRON MEDIZINTECHNIK HANDELSGESELLSCHAFT mbH
John-Deere-Str. 81a, 68163 Mannheim, GERMANY
www.omron-medizintechnik.de
OMRON SANTÉ FRANCE SAS
14, rue de Lisbonne, 93561 Rosny-sous-Bois Cedex, FRANCE
Made in Japan
IM-HCG-801-E-05-11/2011
1647415-5E
 Loading...