

Page 1

d4336_33_e_basic_01_cover_US_7.fm Page 1 Sunday, November 12, 2006 3:26 AM
DIGITAL CAMERA
FE-230/X-790
FE-240/X-795
Basic
Manual
ENGLISH 2
FRANÇAIS 26
ESPAÑOL 50
PORTUGUÊS
74
Page 2
d4336_33_e_basic_00_bookfile.book Page 2 Sunday, November 12, 2006 4:05 AM
Table of Contents
Gather these items (box contents)................................................... 3
Attach the strap .....................................................................................3
Prepare the battery ............................................................................ 4
Turn the camera on............................................................................ 5
Set the date and time......................................................................... 6
About the date and time setting screen................................................. 6
Set the language ................................................................................ 8
Take a picture..................................................................................... 9
En
Review your pictures....................................................................... 10
Erase pictures ..................................................................................... 10
Basic operation................................................................................ 11
Shooting Mode Buttons ....................................................................... 11
Scene Modes ...................................................................................... 12
Macro Mode ........................................................................................ 12
Flash Modes........................................................................................ 13
Self-Timer............................................................................................ 13
Power Save Feature............................................................................ 13
Menus and settings ......................................................................... 14
Top Menu ............................................................................................14
Erase All Pictures ................................................................................ 14
Connecting the camera ................................................................... 15
Playback on a TV ................................................................................15
Direct Printing (PictBridge) .................................................................. 16
Transfer images ............................................................................... 17
OLYMPUS Master software............................................................. 19
Specifications .................................................................................. 20
Safety Precautions........................................................................... 22
Before using your camera, read this manual carefully to ensure correct use.
We recommend that you take test shots to get accustomed to your camera
before taking important photographs.
Please observe the safety precautions at the end of this manual.
The images on the LCD screen and illustrations of the camera used in this
manual may differ from the actual product. Unless otherwise specified, the
explanation about these illustrations is provided for FE-230/X-790.
2
Page 3

d4336_33_e_basic_00_bookfile.book Page 3 Sunday, November 12, 2006 4:05 AM
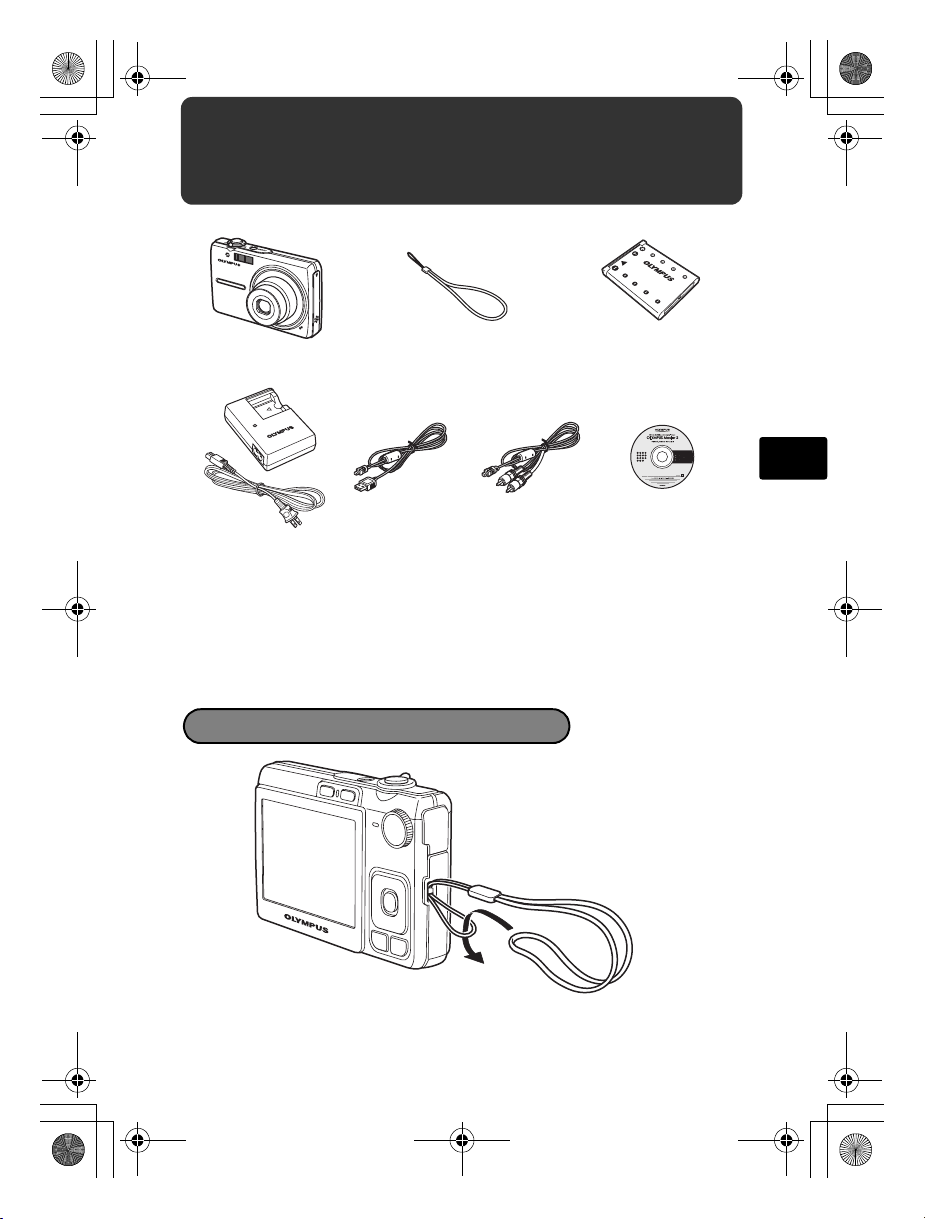
Gather these items (box contents)
Digital Camera Strap Lithium Ion Battery
Battery Charger
(LI-40C)
Items not shown: Advanced Manual (CD-ROM), Basic Manual (this manual),
and the Warranty Card. Contents may vary depending on purchase location.
USB Cable AV Cable OLYMPUS Master
(LI-42B)
CD-ROM
Attach the strap
En
Pull the strap tight so that it does not come loose.
3
Page 4
d4336_33_e_basic_00_bookfile.book Page 4 Sunday, November 12, 2006 4:05 AM
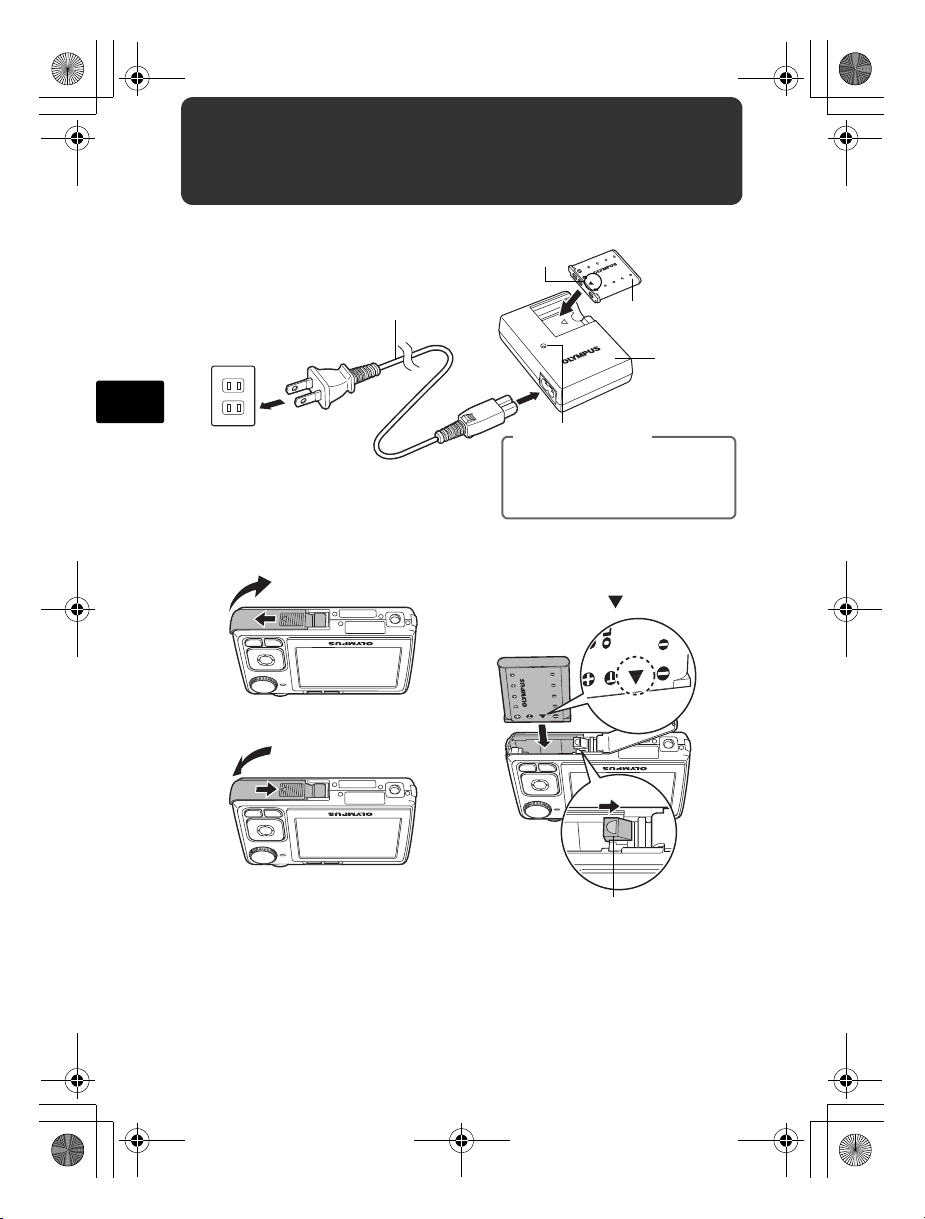
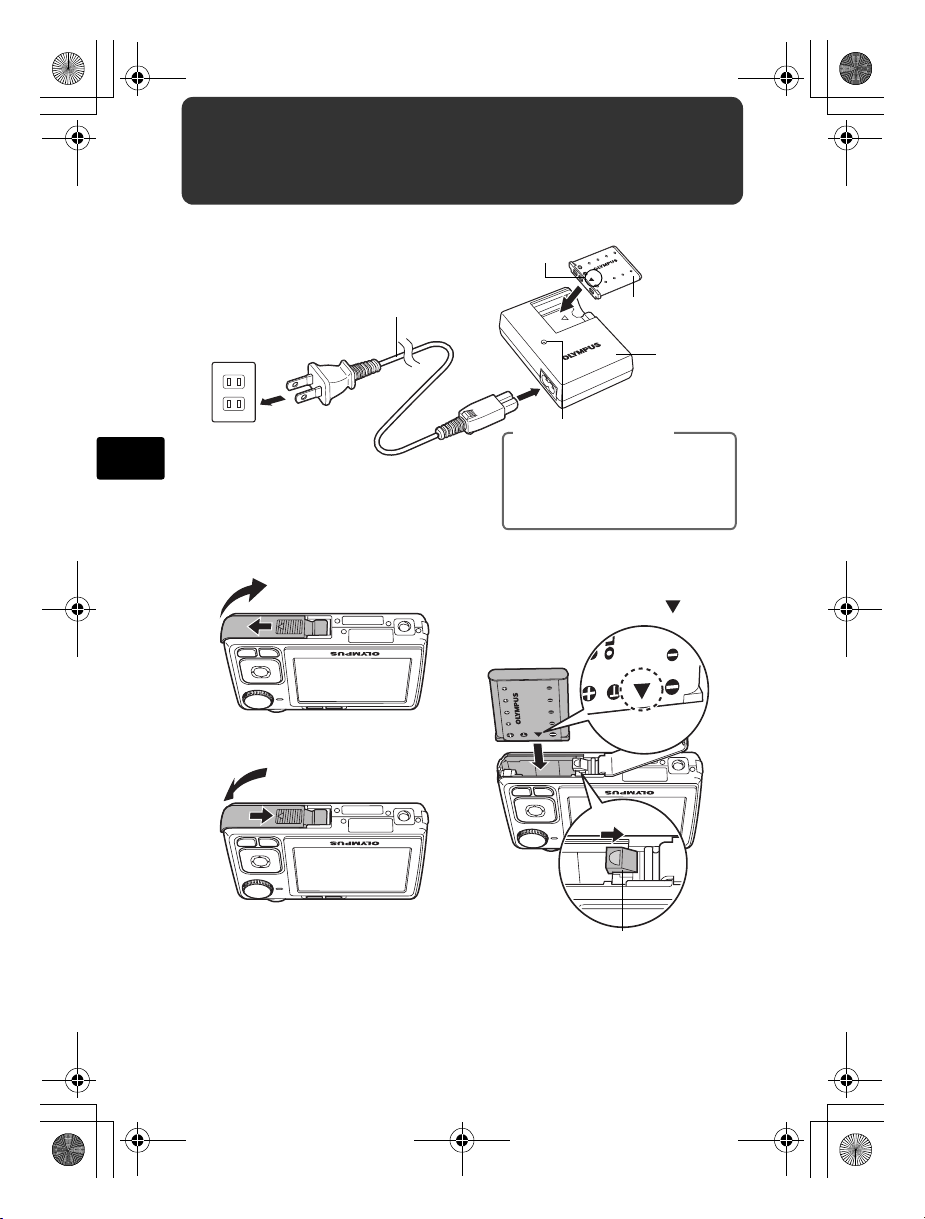
Prepare the battery
a. Charge the battery.
W
3
Power Cable
En
AC Wall
Outlet
2
Battery comes partially charged.
b. Insert the battery in the camera.
2
1
4
5
Lithium Ion
Battery
Battery
1
Charging Indicator
Red light on: Charging
Light off: Charging complete
(Charging time: Approx. 300
minutes)
Charger
Insert the battery in the direction
indicated by the mark.
3
To remove the battery, press the
Battery lock knob
battery lock knob in the direction
of the arrow.
With this camera, you can take pictures without inserting the optional
xD-Picture Card™ (hereinafter referred to as “the card”). For details
on inserting the card, please refer to the Advanced Manual.
4
Page 5
TIME
----
.--.-- --:--
Y / M /
d4336_33_e_basic_00_bookfile.book Page 5 Sunday, November 12, 2006 4:05 AM
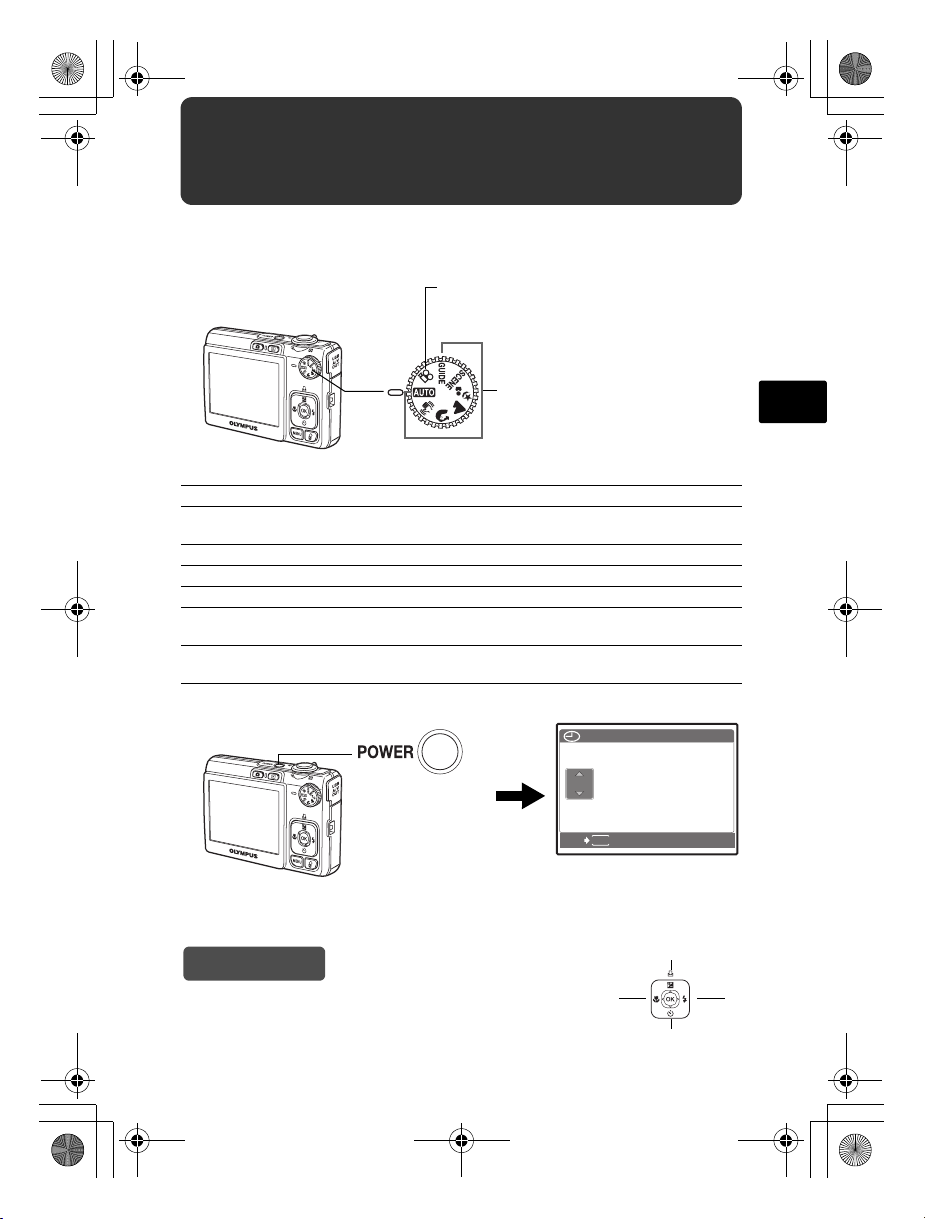
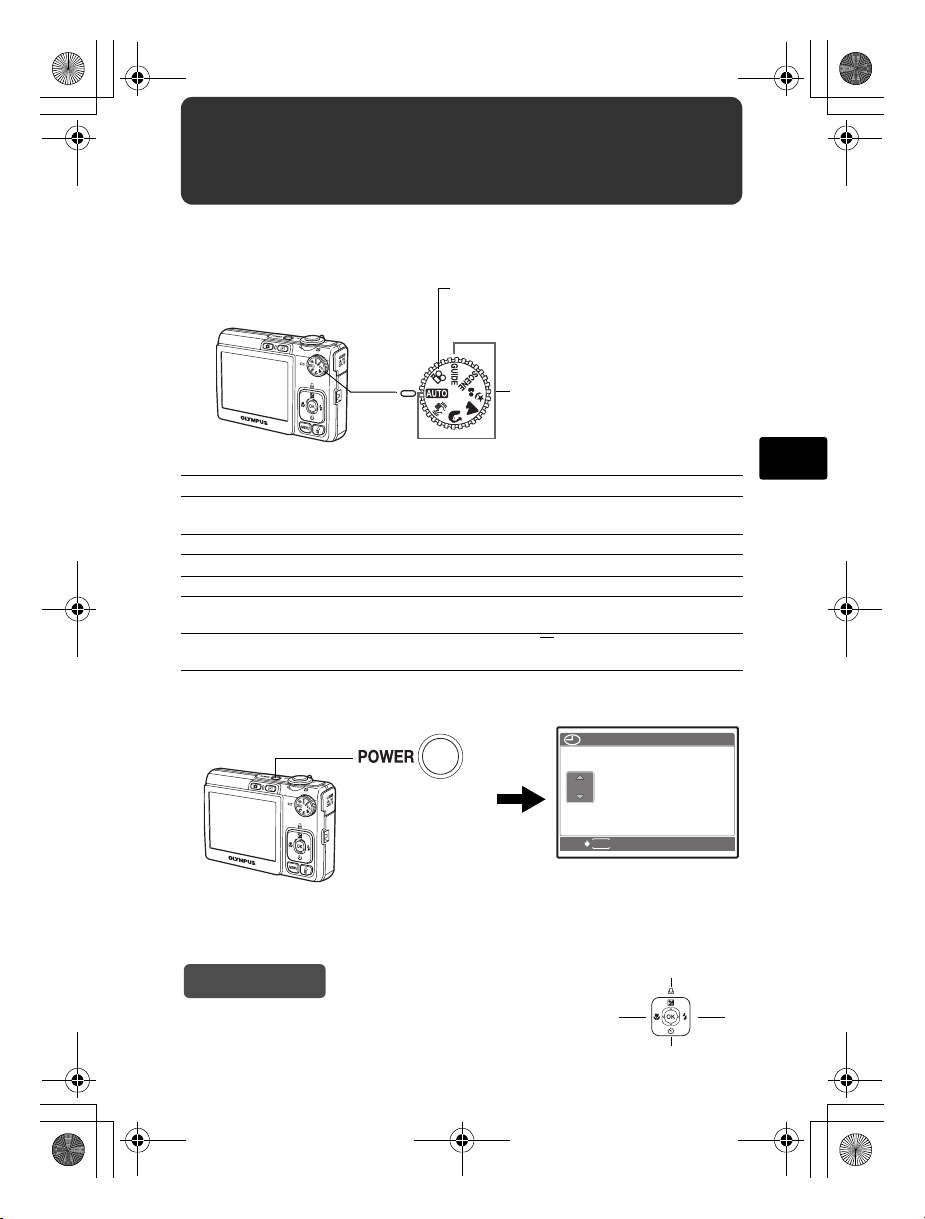
Turn the camera on
This explains how to turn on the camera in shooting mode.
a. Set the mode dial to h.
When shooting movies
When shooting still
pictures
Still picture shooting modes
h For normal shooting.
h This function reduces the blur incurred by a moving subject or camera
B Suitable for taking pictures of people.
E Suitable for taking pictures of a landscape.
M Suitable for taking pictures of people at night.
f Select from 10 available scene modes (FE-240/X-795) or 13 available scene
R Use the shooting guide displayed on the screen to shoot pictures according
movement when taking pictures.
modes (FE-230/X-790), according to the shooting conditions.
to the situation.
b. Press the o button.
TIME
DMY
o button
----
.--.-- --:--
MENU
CANCEL
This screen is
displayed if the date
and time are not set.
To turn off the camera, press the o button once again.
Hint
The directions of the arrow pad is indicated with
ONXY in the supplied instruction manual.
Y/M/
O
N
En
D
YX
5
Page 6

TIME
----
.--.-- --:--
Y / M /
2007
.--.-- --:--
TIME
Y / M /
2007
.-- --:--
TIME
Y / M /
d4336_33_e_basic_00_bookfile.book Page 6 Sunday, November 12, 2006 4:05 AM
Set the date and time
About the date and time setting screen
Y-M-D
Hour
Minute
D
Date formats (Y-M-D, M-D-Y, D-M-Y)
----
DMY
.--.-- --:--
TIME
Y/M/
En
MENU
CANCEL
Cancels the setting
a. Press the OF/< and NY buttons to select [Y].
• The first two digits of the year are fixed.
OF/< button
2007
.--.-- --:--
MENU
NY button
CANCEL
b. Press the Y# button.
Y# button
c. Press the OF/< and NY
buttons to select [M].
2007
.
0202.-- --:--
TIME
DMY
Y/M/
D
TIME
DMY
Y/M/
D
MENU
CANCEL
6
Page 7

2007
--:--
TIME
Y / M /
2007
30
TIME
Y / M /
2007
30
TIME
Y / M /
IN
3072
2304
d4336_33_e_basic_00_bookfile.book Page 7 Sunday, November 12, 2006 4:05 AM
Set the date and time
d. Press the Y# button.
e. Press the OF/< and NY
buttons to select [D].
2007
.
MENU
CANCEL
0202.
DMY
1010 --:--
f. Press the Y# button.
g. Press the OF/< and NY
buttons to select the hours and
minutes.
• The time is displayed in the 24-hour format.
2007
DMY
.
0202.
1010
TIME
TIME
1212:
Y/M/
D
En
Y/M/
30
D
MENU
CANCEL
h. Press the Y# button.
i. Press the OF/< and NY
buttons to select [Y/M/D].
2007
.
MENU
CANCEL
0202.
DMY
1010
j. After all settings have been set, press .
• For a more accurate setting, press when the time signal hits 00
seconds.
[ ]
button
HQHQ3072
TIME
1212:
×2304
OK
SET
D
Y/M/
30
OK
SET
[
]
IN
44
7
Page 8

RESET
PANORAMA
SILENT
MODE
SETUP
IMAGE
QUALITY
SCENE
PICTURE
+ SOUND
RESET
PANORAMA
SILENT
MODE
SETUP
IMAGE
QUALITY
SCENE
PICTURE
+ SOUND
SETUP
d4336_33_e_basic_03_camera_7.fm Page 8 Tuesday, November 14, 2006 7:15 AM
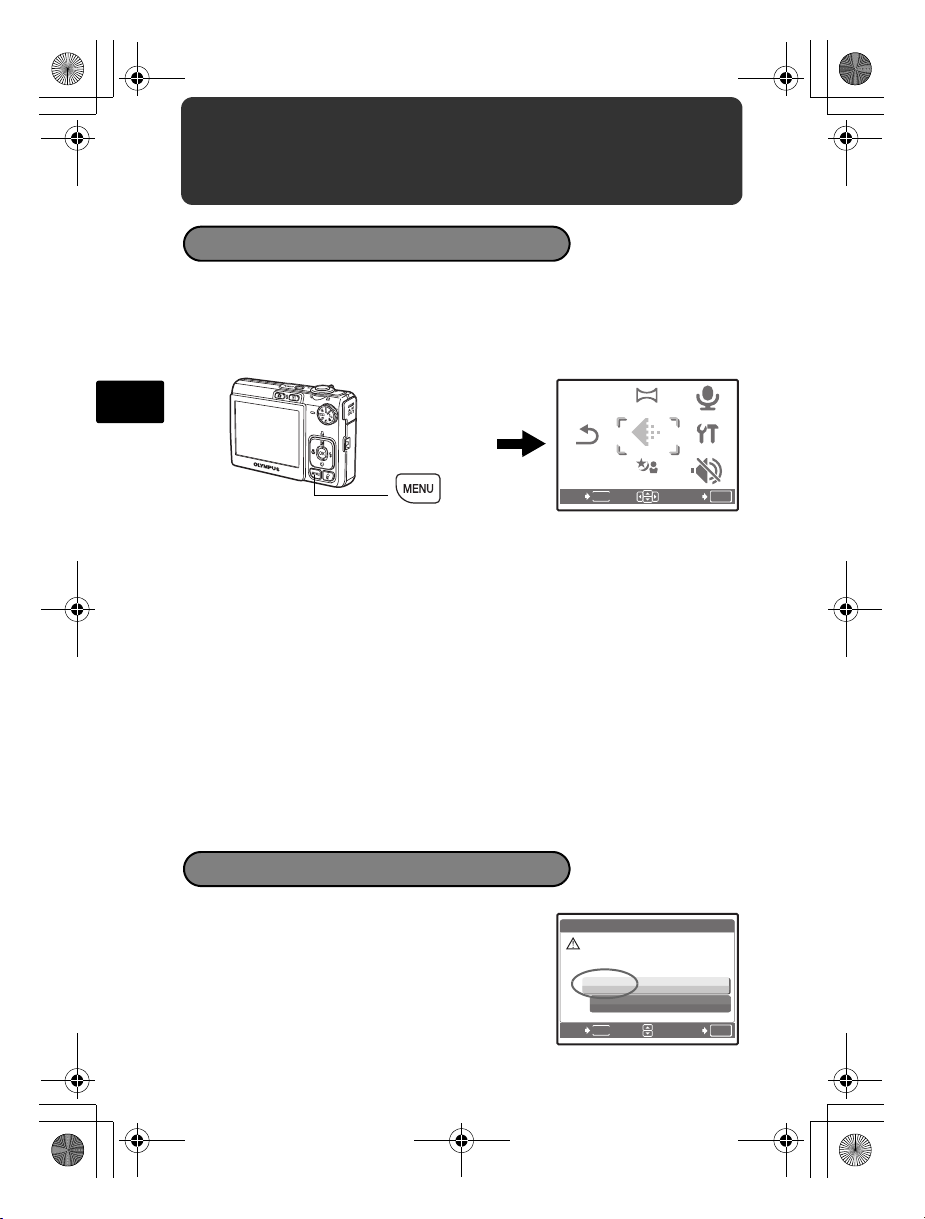
Set the language
a. Press the m button to display the top menu.
m button
En
b. Press the Y# button to select
[SETUP], and press .
c. Press the OF/< and NY
buttons to select [W], and
press .
d. Press the arrow pad (ONXY)
to select a language, and press
.
• You can add other languages to your camera
with the provided OLYMPUS Master software.
Please refer to the Advanced Manual.
RESET
MENU
EXIT
RESET
MENU
EXIT
1
MEMORY FORMAT
2
BACKUP
3
PIXEL MAPPING
MENU
BACK
W
ENGLISH
FRANCAIS
ESPAÑOL
PORTUGUES
MENU
BACK
PANORAMA
IMAGE
IMAGE
QUALITY
QUALITY
SCENE
PANORAMA
IMAGE
IMAGE
QUALITY
QUALITY
SCENE
PICTURE
+ SOUND
SETUP
SETUP
SILENT
MODE
OK
SET
PICTURE
+ SOUND
SETUP
SETUP
SILENT
MODE
OK
SET
ENGLISH
NO
OK
SET
OK
SET
8
Page 9
3072
2304
IN
d4336_33_e_basic_00_bookfile.book Page 9 Sunday, November 12, 2006 4:05 AM
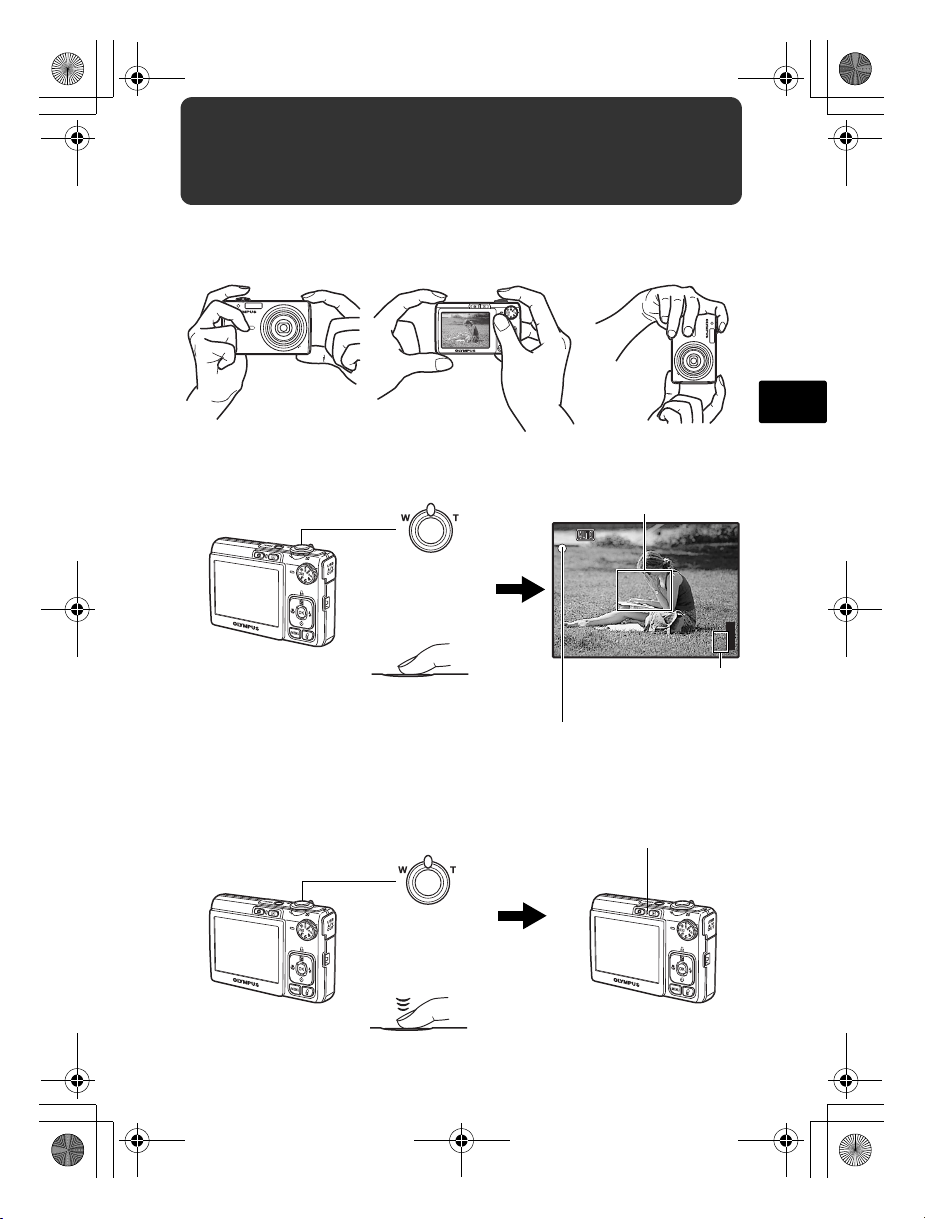
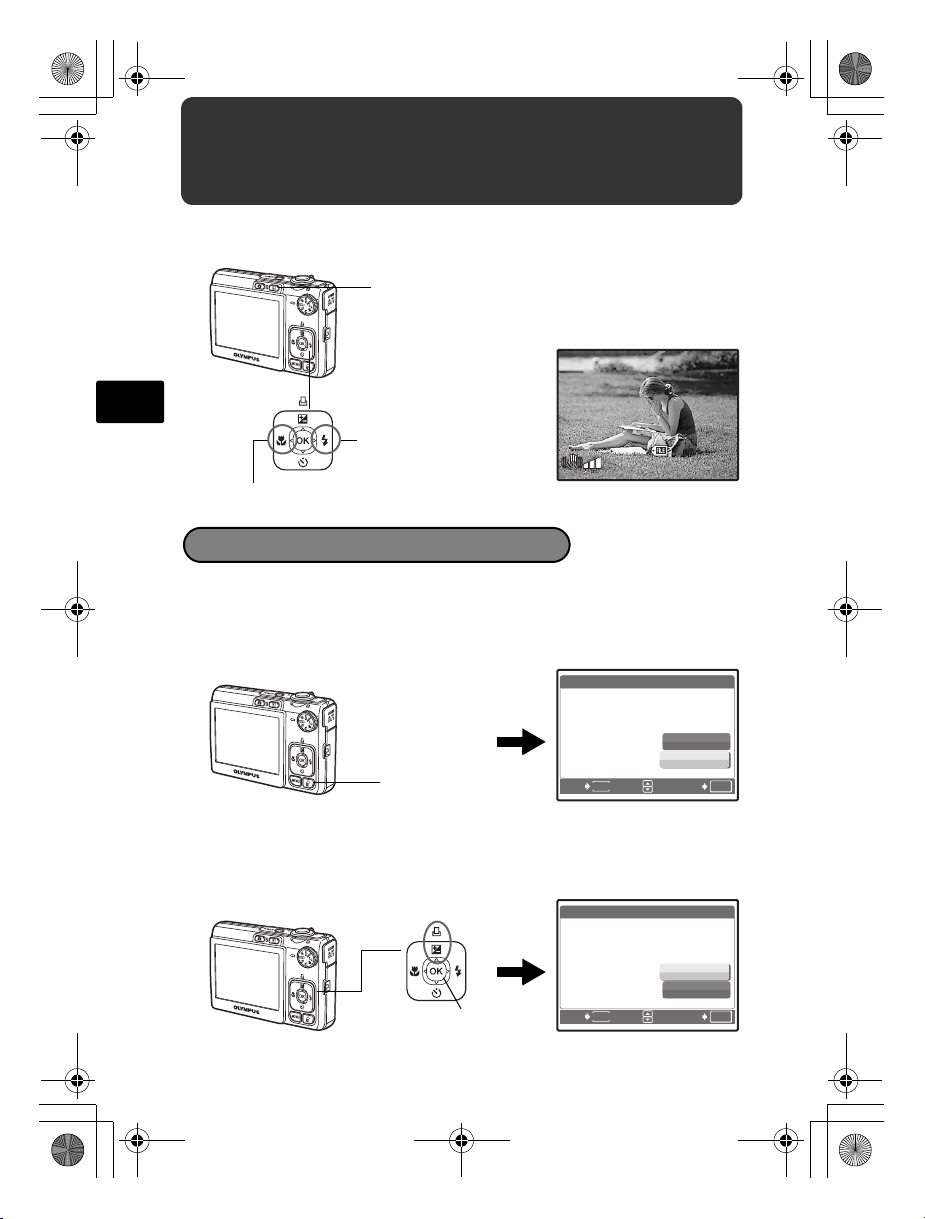
Take a picture
a. Hold the camera.
Horizontal grip Vertical grip
En
b. Focus.
c. Shoot.
Shutter Button
(Press
Halfway)
Shutter Button
(Press
Completely)
Place this mark over
your subject.
[ ]
[
]
HQHQ3072
×2304
The number of pictures
that can be taken is
displayed.
The green lamp indicates the
focus and exposure are locked.
The card access lamp
blinks.
IN
44
9
Page 10
12: 30
'0 7 .0 2.1 0
1 0 0 - 0 0 0 4
HQ
IN
30 7 2
23 0 4
0. 0
d4336_33_e_basic_00_bookfile.book Page 10 Sunday, November 12, 2006 4:05 AM
Review your pictures
a. Press the q button.
q button
En
Arrow pad
[
]
IN
3072
HQ
×2304
0.0
Displays the next image
'07.02.10
12:30
100-0004
Displays the previous image
Erase pictures
a. Press the X& and Y# buttons to display the
picture you want to erase.
b. Press the S button.
[IN]
YES
NO
SET
[IN]
OK
S button
ERASE
MENU
BACK
c. Press the OF/< button, select [YES], and press
.
OF/< button
button
ERASE
MENU
BACK
YES
NO
SET
[IN]
OK
4
10
Page 11

d4336_33_e_basic_00_bookfile.book Page 11 Sunday, November 12, 2006 4:05 AM
Basic operation
Shooting Mode Buttons
While in shooting mode, use these buttons for quick access to some of the more
commonly used features.
1
2
5
6
3
4
1 K button (Shooting)
Selects the shooting mode.
2 q button (Playback)
Selects the playback mode.
3 m button
Displays the top menu.
4 S button (Erase)
Selects the picture you want to erase in playback mode.
5 Arrow pad (ONXY)
Selects scenes, playback pictures and menu items.
6 X& button (Macro Mode)
Enables macro or super macro mode for taking close-up pictures.
7 OF/< button (Exposure Compensation/Print)
While in shooting mode, press this button to adjust the exposure compensation
value, which affects picture brightness.
8 Y# button (Flash Mode)
Selects from 4 flash modes - AUTO, ! (Red-eye reduction), # (Fill-in flash), or
$ (Flash off).
9 button (OK)
Confirms settings.
0 NY button (Self-timer)
Sets the self-timer to take the shot approximately 12 seconds after the shutter
button is pressed.
7
8
9
0
En
11
Page 12

d4336_33_e_basic_00_bookfile.book Page 12 Sunday, November 12, 2006 4:05 AM
Scene Modes
This function allows you to switch the f (scene mode) according to the
subject.
1 Set the mode dial to f.
1
SPORT
En
MENU
OK
SETBACK
button
2 Press O/N to select the scene modes and press .
Shooting Scene Modes
• j SPORT • N INDOOR • W CANDLE
• R
SELF PORTRAIT
• P BEHIND GLASS • V CUISINE • d DOCUMENTS
• i AUCTION • k
• H
UNDER WATER MACRO
*1 Available for the FE-230/X-790 only.
• S SUNSET • X FIREWORKS
UNDER WATER WIDE1*1• l
*1
UNDER WATER WIDE2
Macro Mode
Mode Dial
O/N
*
1
& This mode lets you take pictures as close as 10 cm (3.9 in.) with FE-230/X-790,
20 cm (7.9 in.) with FE-240/X-795 to your subject. (at the widest angle)
% Use this mode to take pictures as close as 5 cm (2.0 in.) with FE-230/X-790,
3 cm (1.2 in.) with FE-240/X-795 to your subject. In % mode, the position of
the zoom lens is fixed.
1 Press the X& button repeatedly to select [&] or [%] and press .
12
Page 13

d4336_33_e_basic_00_bookfile.book Page 13 Sunday, November 12, 2006 4:05 AM
Flash Modes
1 Press the Y# button repeatedly to select the flash mode and press .
2 Press the shutter button halfway.
When the flash is set to fire, the # mark lights.
3 Press the shutter button completely to take the picture.
Icon Flash Mode Description
No
indication
Auto flash The flash fires automatically in low light or backlight
Red-eye
!
reduction flash
Fill-in flash The flash fires regardless of the available light.
#
$ Flash off The flash does not fire even in low light conditions.
conditions.
The red-eye reduction flash mode significantly reduces
this phenomenon by emitting pre-flashes before firing
the regular flash.
Self-Timer
En
1 Press the NY button to select [Y] and press .
Self-timer Lamp
2 Press the shutter button fully to take the picture.
The self-timer lamp lights for approximately 10 seconds after
the shutter button is pressed, then starts blinking. After blinking
for approximately 2 seconds, the picture is taken.
Power Save Feature
To save the battery power, the camera automatically enters sleep mode and
stops operating if not used for approximately 3 minutes. Operate the shutter
button or zoom lever to reactivate the camera.
If the camera is not operated for approximately 12 minutes after the camera
enters sleep mode, it automatically retracts the lens and turns off. To resume
operation, turn on the power again.
13
Page 14
RESET
PANORAMA
SILENT
MODE
SETUP
IMAGE
QUALITY
SCENE
PICTURE
+ SOUND
d4336_33_e_basic_00_bookfile.book Page 14 Sunday, November 12, 2006 4:05 AM
Menus and settings
Top Menu
1 Press the m button to display the top menu on the monitor.
2 Use the arrow pad (ONXY) to select menu items.
Top menu in shooting
En
m button
IMAGE QUALITY
Sets image quality and resolution.
PANORAMA
Creates a panoramic picture.
RESET
Resets to the factory default settings.
SCENE
Select a scene according to the subject and shooting condition.
SILENT MODE
Mutes the operation sounds, warning sounds, shutter sound, etc… during
shooting and playback.
SETUP
Sets the date and time, language and other settings.
PICTURE+SOUND/MOVIE W/SOUND
Records sound during shooting.
RESET
EXIT
MENU
mode
PANORAMA
IMAGE
IMAGE
QUALITY
QUALITY
SCENE
PICTURE
+ SOUND
SETUP
SETUP
SILENT
MODE
OK
SET
Erase All Pictures
1 Press the m button to display the top menu
in playback mode.
2 Select [ERASE], [ALL ERASE], and press .
3 Select [YES], and press .
All the pictures are erased.
14
ALL ERASE
CAUTION ERASING ALL
YES
NO
MENU
BACK
SET
[IN][IN]
OK
Page 15

d4336_33_e_basic_00_bookfile.book Page 15 Sunday, November 12, 2006 4:05 AM
Connecting the camera
Playback on a TV
Use the AV cable provided with the camera to playback recorded images on your
TV. Both still pictures and movies can be played back.
1 Make sure that the TV and camera are turned off. Connect the multi-
connector on the camera to the video input terminal on the TV using the AV
cable.
Multi-connector
AV cable (provided)
2 Turn the TV on and set it to the video input mode.
For details on switching to video input, refer to your TV’s instruction manual.
3 Turn the camera on and press the q button to select the playback mode.
The last picture taken is displayed on the TV. Use the arrow pad (ONXY) to select
the picture you want to display.
Connector cover
Connect to the TV’s video
input (yellow) and audio
input (white) terminals.
En
15
Page 16

d4336_33_e_basic_00_bookfile.book Page 16 Sunday, November 12, 2006 4:05 AM
Direct Printing (PictBridge)
Using the provided USB cable, you may connect your camera directly to a
PictBridge compatible printer to make prints. You can print a picture with simple
operations.
1 In playback mode, display the picture you want to print out on the monitor.
2 Connect one end of the provided USB cable into the camera’s multi-
connector and the other end into the printer’s USB connector.
Multi-connector
En
USB cable
OF/< button
3 Press the OF/< button.
Printing starts.
When you are finished, disconnect the USB cable
from the camera with the picture selection screen
displayed.
EASY PRINT START
PC / CUSTOM PRINT
OK
16
Page 17

d4336_33_e_basic_00_bookfile.book Page 17 Sunday, November 12, 2006 4:05 AM
Transfer images
a. Install the software
1 Insert the OLYMPUS Master CD-ROM.
2 Windows: Click the “OLYMPUS Master 2”
button.
Macintosh: Double-click the “Setup” icon.
3 Simply follow the on-screen instructions.
b. Connect the camera to the computer
1 Connect the camera and computer using the USB cable (provided).
The monitor will turn on automatically.
USB cable
2
1
En
2 Select [PC] on the monitor, and press .
Your PC will now recognize your camera as a
removable storage drive.
USB
PC
EASY PRINT
CUSTOM PRINT
EXIT
SET
OK
17
Page 18

d4336_33_e_basic_00_bookfile.book Page 18 Sunday, November 12, 2006 4:05 AM
c. Transfer images to the computer
1 With the camera now connected, open OLYMPUS Master.
2 Click “Transfer Images” on the browse
window, and then click “From Camera” .
3 Simply follow the on-screen instructions.
En
Tips
• For more detailed information regarding camera setup and usage, please
refer to the camera’s “Advanced Manual” provided on CD-ROM.
• For additional assistance, refer to the “Help” file in the OLYMPUS Master
software.
18
Page 19
d4336_33_e_basic_00_bookfile.book Page 19 Sunday, November 12, 2006 4:05 AM
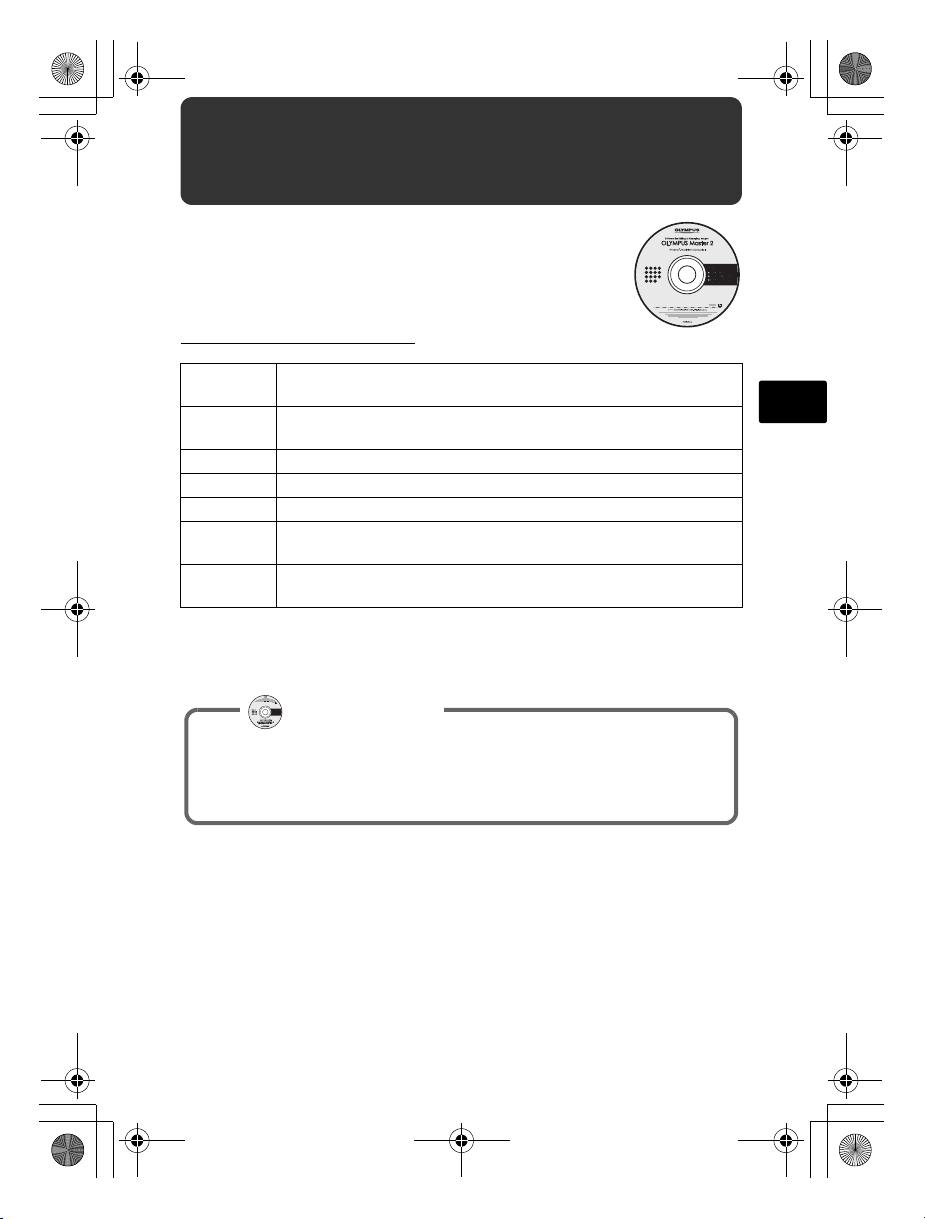
OLYMPUS Master software
OLYMPUS Master Software: Use this software to
download pictures from the camera, view, organize,
retouch, e-mail and print your digital pictures, movies and
more!
(System Requirements
OS Windows 2000 Professional/XP Home Edition/XP Professional/Vista
or Mac OS X (v10.3 or later)
CPU Pentium III 500 MHz/Power PC G3 500 MHz/Intel Core Solo/
Duo 1.5 GHz, or later
RAM 256 MB or more
Hard Disk 500 MB or more free space
Connection USB port/IEEE 1394 port
Monitor 1024 × 768 pixels resolution or more with minimum 65,536 colors
(Windows), 32,000 colors (Macintosh)
Other Internet Explorer 6 or later (Windows), Safari 1.0 or later,
QuickTime 6 or later (Macintosh)
For the latest support information, visit the Olympus website
(http://www.olympus.com/)
User Registration
Register your camera when you install OLYMPUS Master to activate your
warranty, receive notifications for software and camera firmware updates,
and more.
En
19
Page 20

d4336_33_e_basic_00_bookfile.book Page 20 Sunday, November 12, 2006 4:05 AM
Specifications
(Camera
Product type : Digital camera (for shooting and displaying)
Recording system
Still pictures : Digital recording, JPEG (in accordance with Design rule
Applicable
standards
En
Sound with still : Wave format
Movie : AVI Motion JPEG
Memory : Internal memory
Number of effective
pixels
Image pickup device : 1/2.5" CCD (primary color filter),
Lens : FE-230/X-790:
Photometric system : Digital ESP metering
Shutter speed : 4 to 1/2000 sec.
Shooting range : FE-230/X-790:
Monitor : 2.5" TFT color LCD display, 115,000 pixels
Outer connector : USB connector, A/V OUT jack (multi-connector)
Automatic calendar
system
Operating environment
Temperature : 0°C to 40°C (32°F to 104°F) (operation)/
Humidity : 30% to 90% (operation)/10% to 90% (storage)
Power supply : One Olympus lithium ion battery (LI-42B/LI-40B)
for Camera File system (DCF))
: Exif 2.2, Digital Print Order Format (DPOF), PRINT
Image Matching III, PictBridge
xD-Picture Card (16 MB – 2 GB) (Type H/M, Standard)
: 7,100,000 pixels
7,400,000 pixels (gross)
Olympus lens 6.3 to 18.9 mm, f3.1 to 5.9
(equivalent to 38 to 114 mm on a 35 mm camera)
FE-240/X-795:
Olympus lens 6.4 to 32 mm, f3.3 to 5.0
(equivalent to 38 to 190 mm on a 35 mm camera)
0.6 m (2.0 ft.) to ) (W), 1.0 m (3.2 ft) to ) (T) (normal)
0.1 m (0.3 ft.) to ) (W), 0.6 m (2.0 ft.) to ) (T) (macro mode)
0.05 m (0.2 ft.) (super macro mode)
FE-240/X-795:
0.7 m (2.3 ft.) to ) (normal)
0.2 m (0.7 ft.) to ) (W), 0.6 m (2.0 ft.) to ) (T) (macro mode)
0.03 m (0.1 ft.) (super macro mode)
: 2000 up to 2099
-20°C to 60°C (-4°F to 140°F) (storage)
20
Page 21
d4336_33_e_basic_00_bookfile.book Page 21 Sunday, November 12, 2006 4:05 AM
Dimensions : FE-230/X-790:
90.5 mm (W) × 55.0 mm (H) × 16.5 mm (D)
(3.6 × 2.2 × 0.6 in.)
(excluding protrusions)
FE-240/X-795:
93.5 mm (W) × 56.0 mm (H) × 20.0 mm (D)
(3.7 × 2.2 × 0.8 in.)
(excluding protrusions)
Weight : FE-230/X-790: 105 g (3.7 oz) without battery and card
FE-240/X-795: 115 g (4.0 oz) without battery and card
(Lithium ion battery (LI-42B)
Product type : Lithium ion rechargeable battery
Standard voltage : DC 3.7 V
Standard capacity : 740 mAh
Battery life : Approx. 300 full charges (varies on usage)
Operating environment
Temperature : 0°C to 40°C (32°F to 104°F) (charging)/
-10°C to 60°C (14°F to 140°F) (operation)/
-20°C to 35°C (-4°F to 95°F) (storage)
Dimensions : 31.5 × 39.5 × 6 mm (1.2 × 1.5 × 0.2 in.)
Weight : Approx. 15 g (0.5 oz)
(Battery charger (LI-40C)
Power requirements : AC 100 to 240 V (50 to 60 Hz)
3.2 VA (100 V) to 5.0 VA (240 V)
Output : DC 4.2 V, 200 mA
Charging time : Approx. 300 min.
Operating environment
Temperature : 0°C to 40°C (32°F to 104°F) (operation)/
-20°C to 60°C (-4°F to 140°F) (storage)
Dimensions : 62 × 23 × 90 mm (2.4 × 0.9 × 3.5 in.)
Weight : Approx. 65 g (2.3 oz)
En
Design and specifications subject to change without notice.
21
Page 22

d4336_33_e_basic_00_bookfile.book Page 22 Sunday, November 12, 2006 4:05 AM
Safety Precautions
CAUTION
RISK OF ELECTRIC SHOCK
DO NOT OPEN
CAUTION: TO REDUCE THE RISK OF ELECTRICAL SHOCK, DO NOT
REMOVE COVER (OR BACK). NO USER-SERVICEABLE PARTS INSIDE.
REFER SERVICING TO QUALIFIED OLYMPUS SERVICE PERSONNEL.
An exclamation mark enclosed in a triangle alerts you to important operating and
En
DANGER
WARNING
CAUTION
WARNING!
TO AVOID THE RISK OF FIRE OR ELECTRICAL SHOCK, NEVER DISASSEMBLE, EXPOSE THIS PRODUCT
TO WATER OR OPERATE IN A HIGH HUMIDITY ENVIRONMENT.
General Precautions
maintenance instructions in the documentation provided with the product.
If the product is used without observing the information given under this symbol, serious
injury or death may result.
If the product is used without observing the information given under this symbol, injury or
death may result.
If the product is used without observing the information given under this symbol, mino r
personal injury, damage to the equipment, or loss of valuable data may result.
Read All Instructions — Before you use the product, read all operating
instructions. Save all manuals and documentation for future reference.
Cleaning — Always unplug this product from the wall outlet before cleaning. Use
only a damp cloth for cleaning. Never use any type of liquid or aerosol cleaner,
or any type of organic solvent to clean this product.
Attachments — For your safety, and to avoid damaging the product, use only
accessories recommended by Olympus.
Water and Moisture — For precautions on products with weatherproof designs,
read the weatherproofing sections.
Location — To avoid damage to the product, mount the product securely on a
stable tripod, stand, or bracket.
Power Source — Connect this product only to the power source described on
the product label.
Foreign Objects — To avoid personal injury, never insert a metal object into the
product.
Heat — Never use or store this product near any heat source such as a radiator,
heat register, stove, or any type of equipment or appliance that generates
heat, including stereo amplifiers.
22
Page 23

d4336_33_e_basic_00_bookfile.book Page 23 Sunday, November 12, 2006 4:05 AM
Handling the Camera
WARNING
( Do not use the camera near flammable or explosive gases.
( Do not use the flash on people (infants, small children, etc.) at
close range.
• You must be at least 1 m (3 ft.) away from the faces of your subjects. Firing
the flash too close to the subject’s eyes could cause a momentary loss of
vision.
• Keep young children and infants away from the camera.
• Always use and store the camera out of the reach of young children and
infants to prevent the following dangerous situations which could cause
serious injury:
• Becoming entangled in the camera strap, causing strangulation.
• Accidentally swallowing the battery, cards or other small parts.
• Accidentally firing the flash into their own eyes or those of another child.
• Accidentally being injured by the moving parts of the camera.
( Do not look at the sun or strong lights with the camera.
( Do not use or store the camera in dusty or humid places.
( Do not cover the flash with a hand while firing.
CAUTION
( Stop using the camera immediately if you notice any unusual
odors, noise, or smoke around it.
• Never remove the batteries with bare hands, which may cause a fire or
burn your hands.
( Never hold or operate the camera with wet hands.
( Do not leave the camera in places where it may be subject to
extremely high temperatures.
• Doing so may cause parts to deteriorate and, in some circumstances,
cause the camera to catch fire. Do not use the charger if it is covered (such
as a blanket). This could cause overheating, resulting in fire.
( Handle the camera with care to avoid getting a low-temperature
burn.
• When the camera contains metal parts, overheating can result in a lowtemperature burn. Pay attention to the following:
• When used for a long period, the camera will get hot. If you hold on to the
camera in this state, a low-temperature burn may be caused.
• In places subject to extremely cold temperatures, the temperature of the
camera’s body may be lower than the environmental temperature. If
possible, wear gloves when handling the camera in cold temperatures.
( Be careful with the strap.
• Be careful with the strap when you carry the camera. It could easily catch
on stray objects - and cause serious damage.
En
23
Page 24
d4336_33_e_basic_00_bookfile.book Page 24 Sunday, November 12, 2006 4:05 AM
Battery Handling Precautions
Follow these important guidelines to prevent batteries from leaking,
overheating, burning, exploding, or causing electrical shocks or burns.
DANGER
• The camera uses a lithium ion battery specified by Olympus. Charge the
battery with the specified charger. Do not use any other chargers.
• Never heat or incinerate batteries.
• Take precautions when carrying or storing batteries to prevent them from
coming into contact with any metal objects such as jewelry, pins, fasteners, etc.
En
• Never store batteries where they will be exposed to direct sunlight, or subjected
to high temperatures in a hot vehicle, near a heat source, etc.
• To prevent causing battery leaks or damaging their terminals, carefully follow
all instructions regarding the use of batteries. Never attempt to disassemble a
battery or modify it in any way, by soldering, etc.
• If battery fluid gets into your eyes, flush your eyes immediately with clear, cold
running water and seek medical attention immediately.
• Always store batteries out of the reach of small children. If a child accidentally
swallows a battery, seek medical attention immediately.
WARNING
• Keep batteries dry at all times.
• To prevent batteries from leaking, overheating, or causing a fire or explosion,
use only batteries recommended for use with this product.
• Insert the battery carefully as described in the operating instructions.
• If rechargeable batteries have not been recharged within the specified time,
stop charging them and do not use them.
• Do not use a battery if it is cracked or broken.
• If a battery leaks, becomes discolored or deformed, or becomes abnormal in
any other way during operation, stop using the camera.
• If a battery leaks fluid onto your clothing or skin, remove the clothing and flush
the affected area with clean, running cold water immediately. If the fluid burns
your skin, seek medical attention immediately.
• Never subject batteries to strong shocks or continuous vibration.
CAUTION
• Before loading, always inspect the battery carefully for leaks, discoloration,
warping, or any other abnormality.
• The battery may become hot during prolonged use. To avoid minor burns, do
not remove it immediately after using the camera.
• Always unload the battery from the camera before storing the camera for a long
period.
24
Page 25
d4336_33_e_basic_00_bookfile.book Page 25 Sunday, November 12, 2006 4:05 AM
For customers in North and South America
For customers in USA
Declaration of Conformity
Model Number : FE-230/X-790
Trade Name : OLYMPUS
Responsible Party :
Address : 3500 Corporate Parkway, P.O. Box 610, Center Valley,
Telephone Number : 484-896-5000
Tested To Comply With FCC Standards
FOR HOME OR OFFICE USE
This device complies with Part 15 of the FCC rules. Operation is subject to the following
two conditions:
(1)This device may not cause harmful interference.
(2)This device must accept any interference received, including interference that may
cause undesired operation.
For customers in Canada
This Class B digital apparatus meets all requirements of the Canadian InterferenceCausing Equipment Regulations.
FE-240/X-795
PA 18034-0610, U.S.A.
Trademarks
• IBM is a registered trademark of International Business Machines Corporation.
• Microsoft and Windows are registered trademarks of Microsoft Corporation.
• Macintosh is a trademark of Apple Computer Inc.
• xD-Picture Card™ is a trademark.
• All other company and product names are registered trademarks and/or
trademarks of their respective owners.
• The standards for camera file systems referred to in this manual are the
“Design Rule for Camera File System/DCF” standards stipulated by the Japan
Electronics and Information Technology Industries Association (JEITA).
En
25
Page 26
d4336_33_f_basic_00_bookfile.book Page 26 Tuesday, November 14, 2006 4:02 PM
Table des matières
Réunissez ces éléments (contenu de la boîte) ............................. 27
Attachez la courroie............................................................................ 27
Préparer la batterie.......................................................................... 28
Allumer l’appareil photo.................................................................. 29
Régler la date et l’heure .................................................................. 30
A propos de l’écran de réglage de la date et de l’heure...................... 30
Régler la langue............................................................................... 32
Prendre une photo........................................................................... 33
Vérifier les images........................................................................... 34
Fr
Effacer des photos ..............................................................................34
Fonctionnement de base................................................................. 35
Touches du mode prise de vue ...........................................................35
Modes de scène .................................................................................. 36
Mode gros plan....................................................................................36
Modes flash .........................................................................................37
Retardateur .........................................................................................37
Fonctionnalité d’économie d’énergie................................................... 37
Menus et réglages............................................................................ 38
Menu principal .....................................................................................38
Effacement de toutes les photos ......................................................... 38
Connexion de l’appareil photo ....................................................... 39
Affichage sur un téléviseur .................................................................. 39
Impression directe (PictBridge) ...........................................................40
Transfert d’images........................................................................... 41
Logiciel OLYMPUS Master.............................................................. 43
Caractéristiques............................................................................... 44
Précautions de sécurité .................................................................. 46
Avant d’utiliser votre appareil photo, lisez attentivement ce manuel pour
garantir une utilisation correcte.
Nous vous recommandons de prendre des photos-test pour vous habituer à
votre appareil avant de commencer à prendre de vraies photos.
Veillez à ce que les mesures de sécurité présentées à la fin de ce manuel soit
respectées.
Les images sur l’écran ACL et les illustrations de l’appareil photo figurant dans
ce manuel peuvent différer de celles du produit. Sauf indication contraire, les
explications relatives à ces illustrations sont fournies dans les guides relatifs
aux modèles FE-230/X-790.
26
Page 27
d4336_33_f_basic_00_bookfile.book Page 27 Tuesday, November 14, 2006 4:02 PM
Réunissez ces éléments (contenu de la boîte)
Appareil photo
numérique
Chargeur de
batterie (LI-40C)
Eléments non illustrés : Manuel Avancé (CD-ROM), Manuel de Base
(présent manuel), carte de garantie. Le contenu est susceptible de varier en
fonction de l’endroit où l’appareil est acheté.
Câble USB Câble AV CD-ROM
Courroie Batterie au lithium-ion
(LI-42B)
OLYMPUS Master
Attachez la courroie
Fr
Tendez la courroie afin qu’elle ne soit pas relâchée.
27
Page 28
d4336_33_f_basic_00_bookfile.book Page 28 Tuesday, November 14, 2006 4:02 PM
Préparer la batterie
a. Chargez la batterie.
W
3
Câble d’alimentation
1
Fr
Prise
secteur
2
Indicateur de charge
Allumé en rouge :
Chargement en cours
Éteint : Chargement terminé
(Durée de chargement :
Environ 300 minutes)
La batterie est livrée en partie chargée.
b. Insérez la batterie dans l’appareil photo.
2
4
1
5
Insérez la batterie dans le sens
indiqué par la symbole .
3
Batterie au
lithium-ion
Chargeur
de batterie
Bouton de verrouillage de la batterie
Pour retirer la batterie, appuyez sur le
bouton de verrouillage de la batterie
dans le sens indiqué par la flèche.
Avec cet appareil photo, vous pouvez prendre des photos sans insérer la
xD-Picture Card™ en option (appelée ci-après “la carte”). Pour plus
d’informations sur l’insertion de la carte, reportez-vous au Manuel Avancé.
28
Page 29
HEURE
----
.--.-- --:--
A / M / J
d4336_33_f_basic_00_bookfile.book Page 29 Tuesday, November 14, 2006 4:02 PM
Allumer l’appareil photo
Cette rubrique vous explique comment allumer l’appareil en mode de prise de vue.
a. Amenez la molette mode sur h.
Lors de la prise de vidéo
Lors de la prise de vue
fixe
Modes de prise de vue d’images fixes
h Pour la prise de vue normale.
h Cette fonction réduit le flou dû à un mouvement du sujet ou un bougé de
B Idéal pour prendre des photos de personnes.
E Idéal pour prendre des photos de paysages.
M Idéal pour prendre des photos de personnes de nuit.
f Sélectionnez une scène parmi les 10 (FE-240/X-795) ou les 13
R Utilisez le guide de prise de vue affiché à l’écran pour prendre des photos
l’appareil lors de la prise de vue.
(FE-230/X-790) scènes disponibles selon les conditions de prise de vue.
en fonction de la situation.
b. Appuyez sur la touche o.
HEURE
JMA
----
Touche o
.--.-- --:--
MENU
ANNULE
Cet écran s’affiche si
la date et l’heure de
sont pas réglées.
Pour éteindre l’appareil photo, appuyez sur la touche o.
Conseil
Les directions de la molette de défilement sont indiquées
par les symboles ONXY dans le manuel d’instructions
fourni.
A/M/J
O
N
Fr
YX
29
Page 30

----
.--.-- --:--
HEURE
A / M / J
2007
.--.-- --:--
HEURE
A / M / J
2007
.-- --:--
HEURE
A / M / J
d4336_33_f_basic_00_bookfile.book Page 30 Tuesday, November 14, 2006 4:02 PM
Régler la date et l’heure
A propos de l’écran de réglage de la date et de l’heure
A-M-J
Heure
HEURE
JMA
A/M/J
Annule les réglages
Fr
.--.-- --:--
----
MENU
ANNULE
a. Appuyez sur les touches OF/< et NY pour
sélectionner [A].
• Les deux premiers chiffres de l’année sont fixes.
Minute
Formats de date (A-M-J, M-J-A, J-M-A)
Touche OF/<
2007
.--.-- --:--
HEURE
JMA
A / M / J
Touche NY
b. Appuyez sur la touche Y#.
Touche Y#
c. Appuyez sur les touches OF/
< et NY pour sélectionner
[M].
30
ANNULE
2007
ANNULE
MENU
.
0202.-- --:--
MENU
HEURE
JMA
A / M / J
Page 31

2007
--:--
HEURE
A / M / J
2007
30
HEURE
A / M / J
2007
30
HEURE
A / M / J
IN
3072
2304
d4336_33_f_basic_00_bookfile.book Page 31 Tuesday, November 14, 2006 4:02 PM
Régler la date et l’heure
d. Appuyez sur la touche Y#.
e. Appuyez sur les touches OF/
< et NY pour sélectionner [J].
2007
ANNULE
.
MENU
0202.
HEURE
JMA
1010 --:--
f. Appuyez sur la touche Y#.
g. Appuyez sur les touches OF/
< et NY pour sélectionner les
heures et les minutes.
• L’heure est affichée au format 24 heures.
2007
HEURE
JMA
.
0202.
1010
1212:
A / M / J
A / M / J
30
MENU
ANNULE
CONF
h. Appuyez sur la touche Y#.
i. Appuyez sur les touches OF/
< et NY pour sélectionner
[A/M/J].
2007
ANNULE
.
MENU
0202.
JMA
1010
HEURE
1212:
30
CONF
j. Une fois que vous avez paramétré tous ces
réglages, appuyez sur
• Pour un réglage plus précis, appuyez sur lorsque l’horloge franchit 00
seconde.
.
[ ]
Touche
HQHQ3072
×2304
OK
A / M / J
OK
[
IN
]
44
31Fr31
Page 32

RE-
INITIALI.
PANORAMA
SILENCE
REGLAGE
QUALITE
D'IMAGE
SCENE
IMAGE +
SON
RE-
INITIALI.
PANORAMA
SILENCE
REGLAGE
QUALITE
D'IMAGE
SCENE
IMAGE +
SON
REGLAGE
d4336_33_f_basic_00_bookfile.book Page 32 Tuesday, November 14, 2006 4:02 PM
Régler la langue
a. Appuyez sur la touche m pour afficher le menu
principal.
PANORAMA
PANORAMA
QUALITE
RE-
QUALITE
D'IMAGE
D'IMAGE
SCENE
MENU
PANORAMA
PANORAMA
QUALITE
RE-
QUALITE
D'IMAGE
D'IMAGE
SCENE
MENU
FORMATER
SAUVEGARDER
PIXEL MAPPING
MENU
Touche m
Fr
b. Appuyez sur la touche Y#
pour sélectionner [REGLAGE]
et appuyez sur .
c. Appuyez sur les touches OF/
< et NY pour sélectionner
[W], puis appuyez sur .
INITIALI.
QUITTE
INITIALI.
QUITTE
1
2
3
RETOUR
IMAGE +
SON
REGLAGE
SILENCE
SILENCE
CONF
IMAGE +
SON
REGLAGE
SILENCE
SILENCE
CONF
FRANCAIS
NON
CONF
OK
OK
OK
d. Appuyez sur la molette de
défilement (ONXY) pour
sélectionner une langue, puis
appuyez sur .
• Vous pouvez ajouter d’autres langues à votre
appareil à l’aide du logiciel OLYMPUS Master
fourni. Reportez-vous au Manuel Avancé.
32
W
ENGLISH
FRANCAIS
ESPAÑOL
PORTUGUES
RETOUR
MENU
CONF
OK
Page 33

3072××
2304
IN
d4336_33_f_basic_00_bookfile.book Page 33 Tuesday, November 14, 2006 4:02 PM
Prendre une photo
a. Tenez l’appareil photo.
Tenue horizontale Tenue verticale
Fr
b. Effectuez la mise au point.
Déclencheur
(Appuyez
jusqu’à mi-course)
c. Prenez la photo.
Déclencheur
(Appuyez
complètement)
Placez cette marque
sur votre sujet.
[ ]
[
]
HQHQ3072
Le nombre de photos
pouvant être prises est
affiché.
Le voyant vert indique que la mise au
point et l’exposition sont verrouillées.
Voyant d’accès de carte.
2304
IN
44
33
Page 34

12: 30
'0 7 .0 2.1 0
100-0004
HQ
IN
30 7 2
23 0 4
0. 0
d4336_33_f_basic_00_bookfile.book Page 34 Tuesday, November 14, 2006 4:02 PM
Vérifier les images
a. Appuyez sur la touche q.
Touche q
[
]
IN
Molette de
défilement
3072
HQ
×2304
0.0
Affiche l’image suivante
'07.02.10
Fr
Affiche l’image précédente
Effacer des photos
a. Appuyez sur les touches X& et Y# pour afficher
l’image que vous voulez effacer.
b. Appuyez sur la touche S.
EFFACE R
Touche S
RETOUR
MENU
c. Appuyez sur la touche OF/<, sélectionnez [OUI],
et appuyez sur .
Touche OF/<
Touche
EFFACE R
MENU
RETOUR
12:30
100-0004
[IN]
OUI
NON
CONF
[IN]
OUI
NON
CONF
4
OK
OK
34
Page 35

d4336_33_f_basic_00_bookfile.book Page 35 Tuesday, November 14, 2006 4:02 PM
Fonctionnement de base
Touches du mode prise de vue
Lorsque vous êtes en mode prise de vue, ces touches vous permettent
d’accéder rapidement à certaines des fonctions les plus utilisées.
1
2
7
8
9
0
3
5
6
4
1 Touche K (Prise de vue)
Sélectionne le mode de prise de vue.
2 Touche q (Affichage)
Sélectionne le mode d’affichage.
3 Touche m
Affiche le menu principal.
4 Touche S (Effacement)
Sélectionne l’image que vous voulez supprimer en mode d’affichage.
5 Molette de défilement (ONXY)
Sélectionne des scènes, des images affichées et des éléments de menu.
6 Touche X& (Mode gros plan)
Active le mode gros plan ou super gros plan pour la prise de photos rapprochées.
7 Touche OF/< (compensation d’exposition/impression)
En mode prise de vue, appuyez sur cette touche pour régler la valeur de
compensation d’exposition qui modifie la luminosité de la photo.
8 Touche Y# (Mode flash)
Sélectionne un des quatre modes de flash - AUTO, ! (Atténuant l’effet yeux
rouges), # (Flash d’appoint), ou $ (Flash désactivé).
9 Touche (OK)
Confirme les réglage.
0 Touche NY (Retardateur)
Sélectionne le retardateur pour retarder la prise de vue d’environ 12 secondes
une fois que le déclencheur a été enfoncé.
Fr
35
Page 36

d4336_33_f_basic_00_bookfile.book Page 36 Tuesday, November 14, 2006 4:02 PM
Modes de scène
Cette fonction vous permet de sélectionner le mode f (scène) en fonction
du sujet.
1 Amenez la molette mode sur f.
1
SPORT
Molette mode
RETOUR
MENU
CONF
OK
O/N
Touche
Fr
2 Appuyez sur O/N pour sélectionner des modes de scène et appuyez sur .
Modes de scène de prise de vue
• j SPORT • N INTERIEUR • W BOUGIE
AUTO PORTRAIT
• R
• P VITRINE • V
• i ENCHÈRE •
•H SOUS-MARIN MACRO
*1 Uniquement disponible pour le FE-230/X-790.
• S
COUCHER DE SOLEIL
CUISINE • d DOCUMENTS
k
SOUS-MARIN LARGE1*1•l SOUS-MARIN LARGE2
*1
• X FEUX D’ARTIFICES
Mode gros plan
*1
& Ce mode vous permet de prendre des photos à une distance de 10 cm (modèle
FE-230/X-790) ou de 20 cm (modèle FE-240/X-795). (avec le plus grand angle)
% Ce mode vous permet de prendre des photos à une distance de 5 cm (modèle
FE-230/X-790) ou de 3 cm (modèle FE-240/X-795). En mode %, la position du
zoom est fixe.
1 Appuyez plusieurs fois sur la touche X& pour sélectionner [&] ou [%] et
appuyez sur .
36
Page 37

d4336_33_f_basic_00_bookfile.book Page 37 Tuesday, November 14, 2006 4:02 PM
Modes flash
1 Appuyez plusieurs fois sur la touche Y# pour sélectionner le mode de flash
et appuyez sur .
2 Appuyez sur le déclencheur jusqu’à mi-course.
Lorsque le flash est réglé pour se déclencher, l’indication # s’allume.
3 Enfoncez complètement le déclencheur pour prendre la photo.
Icône Mode flash Description
Aucune
indication
Flash
automatique
Flash atténuant
!
l’effet “yeux
rouges”
Flash d’appoint Le flash se déclenche quelles que soient les conditions
#
Flash désactivé Le flash ne se déclenche pas, même dans des
$
Le flash se déclenche automatiquement lorsque
l’éclairage est faible ou à contre-jour.
Ce mode permet d’atténuer considérablement l’effet
“yeux rouges” en émettant une série de pré-éclairs
avant de déclencher le flash principal.
d’éclairage.
situations de faible éclairage.
Retardateur
Fr
1 Appuyez sur la touche NY pour sélectionner [Y] et
appuyez sur .
Voyant du
retardateur
2 Enfoncez complètement le déclencheur pour prendre la
photo.
Le voyant du retardateur s’allume pendant environ 10
secondes après que le déclencheur ait été enfoncé, puis il
clignote. La photo est prise après environ 2 secondes de
clignotement.
Fonctionnalité d’économie d’énergie
Pour économiser l’énergie de la batterie, l’appareil photo passe
automatiquement en mode veille et cesse de fonctionner après 3 minutes
d’inactivité environ. Actionnez le déclencheur ou le levier de zoom pour
réactiver l’appareil photo.
Une fois qu’il est entré en mode veille, si l’appareil n’est toujours pas utilisé au
bout de 12 minutes, l’objectif se rétracte automatiquement et l’appareil
s’éteint. Pour l’utiliser à nouveau, remettez-le sous tension.
37
Page 38

RE-
INITIALI.
PANORAMA
SILENCE
REGLAGE
QUALITE
D'IMAGE
SCENE
IMAGE +
SON
d4336_33_f_basic_00_bookfile.book Page 38 Tuesday, November 14, 2006 4:02 PM
Menus et réglages
Menu principal
1 Appuyez sur la touche m pour afficher le menu principal à l’écran.
2 Utilisez la molette de défilement (ONXY) pour sélectionner des éléments
de menu.
Menu principal en mode
prise de vue
PANORAMA
PANORAMA
QUALITE
RE-
MENU
QUALITE
D'IMAGE
D'IMAGE
SCENE
Fr
Touche m
INITIALI.
QUITTE
QUALITE D’IMAGE
Définit la qualité de l’image et la résolution.
PANORAMA
Crée une image panoramique.
REINITIALI.
Rétablit les réglages d’usine par défaut.
SCENE
Sélectionnez une scène en fonction du sujet et des conditions de prise de vue.
SILENCE
Désactive le son de fonctionnement, d’avertissement, du déclencheur, etc. en
mode prise de vue et d’affichage.
REGLAGE
Définit la date et l’heure, la langue et d’autres paramètres.
IMAGE + SON/VIDEO AVEC SON
Permet d’enregistrer des sons lors de la prise de vue.
IMAGE +
REGLAGE
SILENCE
SILENCE
CONF
SON
OK
Effacement de toutes les photos
1 Appuyez sur la touche m pour afficher le
menu principal en mode d’affichage.
2 Sélectionnez [EFFACER], [TOUT EFFAC] et
appuyez sur .
3 Sélectionnez [OUI] et appuyez sur .
Toutes les images sont effacées.
38
TOU T EFFAC
ATTENTION TOUT EFFAC
OUI
NON
MENU
RETOUR
CONF
[IN]
[IN]
OK
Page 39

d4336_33_f_basic_00_bookfile.book Page 39 Tuesday, November 14, 2006 4:02 PM
Connexion de l’appareil photo
Affichage sur un téléviseur
Utilisez le câble AV fourni avec l’appareil photo pour visualiser les images
enregistrées directement sur votre téléviseur. Vous pouvez lire ainsi à la fois les
images fixes et les vidéos.
1 Assurez-vous que le téléviseur et l’appareil photo sont éteints. Branchez le
connecteur multiple de l’appareil photo à la prise d’entrée vidéo du téléviseur
avec le câble AV.
Connecteur multiple
Câble AV (fourni)
Couvercle du connecteur
À brancher aux born es d’entrée
vidéo (jaune) et d’entrée audio
(blanc) du téléviseur.
2 Allumez le téléviseur et mettez-le en mode entrée vidéo.
Pour en savoir plus sur la commutation de l’entrée vidéo, veuillez consulter le manuel
du téléviseur.
3 Allumez l’appareil photo et appuyez sur la touche q pour sélectionner le
mode d’affichage.
La dernière photo prise est affichée sur le téléviseur. Utilisez la molette de défilement
(ONXY) pour sélectionner la photo que vous voulez afficher.
Fr
39
Page 40

d4336_33_f_basic_00_bookfile.book Page 40 Tuesday, November 14, 2006 4:02 PM
Impression directe (PictBridge)
A l’aide du câble USB fourni, vous pouvez connecter votre appareil photo
directement à une imprimante compatible PictBridge pour effectuer des
impressions. Vous pouvez imprimer facilement des images.
1 En mode d’affichage, affichez la photo que vous souhaitez imprimer sur
l’écran ACL.
2 Connectez une des extrémités du câble USB dans le connecteur multiple de
l’appareil photo et l’autre dans le connecteur USB de l’imprimante.
Connecteur multiple
Fr
Touche OF/<
3 Appuyez sur la touche OF/<.
L’impression démarre.
Lorsque l’impression est terminee, déconnectez le
câble USB de l’appareil photo. L’écran de sélection
des photos s’affiche.
Câble USB
IMPRESSION FACILE DEMARRER
PC / IMPRESSION SPÉCIALE
OK
40
Page 41

d4336_33_f_basic_00_bookfile.book Page 41 Tuesday, November 14, 2006 4:02 PM
Transfert d’images
a. Installez le logiciel
1 Insérez le CD-ROM OLYMPUS Master.
2 Windows: Cliquez sur la touche “OLYMPUS
Macintosh: Double-cliquez sur l’icône
3 Suivez simplement les instructions à l’écran.
Master 2”.
“Setup”.
b. Connectez l’appareil photo à l’ordinateur
1 Connectez l’appareil photo et l’ordinateur à l’aide du câble USB (fourni).
L’écran ACL s’allume automatiquement.
Câble USB
2
2 Sélectionnez [PC] à l’écran ACL et appuyez sur
.
Votre PC reconnaît maintenant votre appareil photo
comme unité de stockage amovible.
1
USB
PC
IMPRESSION FACILE
IMPRESSION SPÉCIALE
QUITTER
CONF
Fr
OK
41
Page 42

d4336_33_f_basic_00_bookfile.book Page 42 Tuesday, November 14, 2006 4:02 PM
c. Transférez les images vers l’ordinateur
1 Gardez votre appareil photo connecté, puis ouvrez OLYMPUS Master.
2 Cliquez sur “Transférer des images” dans
la fenêtre Parcourir, puis cliquez sur “Depuis
l’appareil photo” .
3 Suivez simplement les instructions à l’écran.
Fr
Conseils
• Pour des informations plus détaillées concernant la configuration et
l’utilisation de l’appareil photo, veuillez consulter le “Manuel Avancé” de
l’appareil photo fourni sur le CD-ROM.
• Pour plus d’informations, consultez le fichier “Aide” du logiciel OLYMPUS
Master.
42
Page 43

d4336_33_f_basic_00_bookfile.book Page 43 Tuesday, November 14, 2006 4:02 PM
Logiciel OLYMPUS Master
Logiciel OLYMPUS Master : Utilisez ce logiciel pour
télécharger des photos à partir de l’appareil photo, pour
afficher, organiser, retoucher, envoyer par courrier
électronique et imprimer vos photos et vidéos numériques,
etc.
(Configurations système minimales
SE Windows 2000 Professional/XP Home Edition/XP Professional/Vista
ou Mac OS X (10.3 ou version ultérieure)
UC Pentium III 500 MHz/Power PC G3 500 MHz/Intel Core Solo/
Duo 1.5 GHz, ou ultérieur
RAM 256 Mo ou plus
Disque dur 500 Mo ou plus d’espace disque
Connexion Port USB/port IEEE 1394
Écran ACL Résolution de 1024 × 768 pixels ou plus avec un minimum de 65.536
couleurs (Windows), 32.000 couleurs (Macintosh)
Autres Internet Explorer 6 ou ultérieur (Windows), Safari 1.0 ou ultérieur,
QuickTime 6 ou ultérieur (Macintosh)
Pour obtenir les dernières informations relatives à la prise en charge, consultez
le site Web d’Olympus (http://www.olympus.com/)
Enregistrement de l’utilisateur
Enregistrez votre appareil photo lorsque vous installez OLYMPUS
Master pour activer la garantie, recevoir des notifications pour le logiciel
et les mises à jour de micro-logiciels et plus encore.
Fr
43
Page 44

d4336_33_f_basic_00_bookfile.book Page 44 Tuesday, November 14, 2006 4:02 PM
Caractéristiques
(Appareil photo
Type de produit : Appareil photo numérique (prise de vue et affichage)
Système
d’enregistrement
Photos : Enregistrement numérique, JPEG (conforme à la norme
Normes
applicables
Image fixe avec son
Vidéo : AVI Motion JPEG
Mémoire : Mémoire interne
Fr
Nombre de pixels
effectifs
Capteur d’image : CCD (filtre de couleur primaire) de 1/2,5"
Objectif : FE-230/X-790:
Système de mesure : Mesure ESP numérique
Vitesse d’obturation : 4 à 1/2000 sec.
Portée de prise de vue : FE-230/X-790:
Écran ACL :
Connecteurs externes : Connecteur USB, prise OUT A/V (connecteur multiple)
Calendrier automatique : de 2000 à 2099
Conditions de fonctionnement
Température : 0°C à 40°C (fonctionnement)/
Humidité : 30% à 90% (fonctionnement)/10% à 90% (stockage)
Alimentation : Une batterie au lithium-ion Olympus (LI-42B/LI-40B)
DCF (Design rule for Camera File system))
: Exif 2.2, Digital Print Order Format (DPOF), PRINT
Image Matching III, PictBridge
: Format Wave
xD-Picture Card (16 Mo à 2 Go) (Type H/M, Standard)
: 7.100.000 de pixels
7.400.000 pixels (brut)
Objectif Olympus 6,3 mm à 18,9 mm, f3,1 à 5,9
(équivalent à un objectif de 38 mm à 114 mm sur un
appareil photo de 35 mm)
FE-240/X-795:
Objectif Olympus 6,4 mm à 32 mm, f3,3 à 5,0
(équivalent à un objectif de 38 mm à 190 mm sur un
appareil photo de 35 mm)
0,6 m à ) (W), 1,0 m à ) (T) (normal)
0,1 m à ) (W), 0,6 m à ) (T) (mode gros plan)
0,05 m pour (mode super gros plan)
FE-240/X-795:
0,7 m à ) (normal),
0,2 m à ) (W), 0,6 m à ) (T) (mode gros plan)
0,03 m (mode super gros plan)
Écran couleur à cristaux liquides TFT de 2,5", 115.000 pixels
-20°C à 60°C (stockage)
44
Page 45

d4336_33_f_basic_00_bookfile.book Page 45 Tuesday, November 14, 2006 4:02 PM
Dimensions : FE-230/X-790:
Poids : FE-230/X-790: 105 g sans la batterie et la carte
90,5 mm (P) × 55,0 mm (H) × 16,5 mm (D)
(hors saillies)
FE-240/X-795:
93,5 mm (P) × 56,0 mm (H) × 20,0 mm (D)
(hors saillies)
FE-240/X-795: 115 g sans la batterie et la carte
(Batterie au lithium-ion (LI-42B)
Type de produit : Batterie au lithium-ion rechargeable
Tension standard : 3,7 V CC
Capacité standard : 740 mAh
Durée de vie de la
batterie
Conditions de
fonctionnement
Température : 0°C à 40°C (charge)/
Dimensions : 31,5 × 39,5 × 6 mm
Poids : Environ 15 g
: Environ 300 charges complètes (en fonction de
l’utilisation)
-10°C à 60°C (fonctionnement)/
-20°C à 35°C (stockage)
(Chargeur de batterie (LI-40C)
Alimentation requise : 100 à 240 V CA (50 à 60 Hz)
Sortie : 4,2 V CC, 200 mA
Durée de charge : Environ 300 minutes
Conditions de
fonctionnement
Température : 0°C à 40°C (fonctionnement)/
Dimensions : 62 × 23 × 90 mm
Poids : Environ 65 g
3,2 VA (100 V) à 5,0 VA (240 V)
-20°C à 60°C (stockage)
Fr
La conception et les caractéristiques peuvent être modifiées sans préavis.
45
Page 46

d4336_33_f_basic_00_bookfile.book Page 46 Tuesday, November 14, 2006 4:02 PM
Précautions de sécurité
ATTENTION
RISQUE DE DÉCHARGE
ÉLECTRIQUE NE PAS OUVRIR
Fr
ATTENTION:
RETIRER NI LA PARTIE ANTERIEURE NI POSTERIEURE DU BOÎTIER. AUCUNE
PIÈCE À L’I NTÉRIEUR NE PEUT ÊTRE RÉ PARÉE PAR L’UTILIS ATEUR. SE RÉFÉRER
DANGER
AVERTISSEMENT
ATTENTION
AVERTISSEMENT !
POUR ÉVITER LES RISQUES D’INCENDIE OU DE DÉCHARGE ÉLECTRIQUE, NE JAMAIS DÉMONTER,
EXPOSER CE PRODUIT À L’EAU NI LE FAIRE FONCTIONNER DANS UN ENVIRONNEMENT TRÈS HUMIDE.
Précautions générales
POUR RÉDUI RE LE RISQUE DE DÉCH ARGE ÉLECTRIQUE, NE
À DU PERSONN EL DE DÉPANNAGE QUALI FIÉ POUR UNE RÉPARATI ON.
Le point d’exclamation à l’intérieur d’un triangle vous alerte sur certains points
importants concernant le maniement et l’entretien de l’appareil figurant dans la
documentation fournie avec le produit.
Si le produit est utilisé sans respect er les informations données sous ce symbole,
des blessures graves, voire mortelles pourraient en résulter.
Si le produit est utilisé sans respect er les informations données sous ce symbole,
des blessures voire la mort pourraient en résulter.
Si le produi t est utilisé sans obse rver les information s données sous ce symbole, de s
blessures, des dommages à l’appareil ou des pertes de données pourraient en résulter.
Lire toutes les instructions — Avant d’utiliser l’appareil, lire toutes les
instructions de fonctionnement. Sauvegarder tous les manuels et la
documentation pour s’y référer ultérieurement.
Nettoyage — Toujours débrancher ce produit de la prise de courant avant
nettoyage. N’utiliser qu’un chiffon humide pour le nettoyage. Ne jamais utiliser
de produits de nettoyage liquides ou aérosols, ni de solvants organiques pour
nettoyer ce produit.
Accessoires — Pour votre sécurité, et pour éviter d’endommager le produit,
n’utiliser que des accessoires recommandés par Olympus.
Eau et humidité — Pour les précautions sur des produits avec une conception
imperméable, lire les sections imperméabilisation.
Emplacement — Pour éviter d’endommager l’appareil, monter le produit
solidement sur un trépied ou un sabot stable.
Alimentation — Ne raccorder ce produit qu’à la source d’alimentation décrite
sur l’étiquette du produit.
Entrée d’objets — Pour éviter des blessures, ne jamais introduire d’objet
métallique dans le produit.
Chaleur — Ne jamais utiliser ni ranger ce produit près d’une source de chaleur
telle qu’un radiateur, un accumulateur de chaleur, ou tout type d’appareil qui
génère de la chaleur, comprenant les amplificateurs.
46
Page 47

d4336_33_f_basic_00_bookfile.book Page 47 Tuesday, November 14, 2006 4:02 PM
Maniement de l’appareil
AVERTISSEMENT
( Ne pas utiliser l’appareil à proximité de gaz inflammables ou
explosifs.
( Ne pas utiliser le flash de très près sur des personnes (bébés,
jeunes enfants, etc.).
• Vous devez être au moins à 1 m des visages de vos sujets. Déclencher le
flash trop près des yeux du sujet pourrait causer une perte momentanée
de la vision.
• Ne pas laisser l’appareil à la portée des enfants.
• Toujours utiliser et ranger l’appareil hors de la portée des jeunes enfants
et des bébés pour empêcher les situations dangereuses suivantes qui
pourraient causer des blessures graves :
• S’enrouler dans la courroie de l’appareil, causant la strangulation.
• Avaler accidentellement la batterie, des cartes ou d’autres petites pièces.
• Déclencher accidentellement le flash dans leurs yeux ou ceux d’un autre
enfant.
• Se blesser accidentellement par des parties en mouvement de l’appareil.
(
Ne pas regarder le soleil ni de la lumière puissante avec l’appareil.
( Ne pas utiliser ni ranger l’appareil dans des endroits
poussiéreux ou humides.
(
Ne pas couvrir le flash avec une main pendant le déclenchement.
ATTENTION
(
Arrêter immédiatement d’utiliser l’appareil si vous remarquez une
odeur, un bruit anormal ou de la fumée provenant de l’appareil.
• Ne jamais retirer les batteries les mains nues, ce qui pourrait vous brûler
les mains.
( Ne jamais manipuler l’appareil avec des mains mouillées.
( Ne pas laisser l’appareil dans des endroits où il pourrait être
soumis à des températures très élevées.
•
Ceci pourrait causer une détérioration de certaines pièces et, dans certaines
circonstances, l’appareil pourrait prendre feu. Ne pas utiliser le chargeur s’il
est couvert (par exemple par une couverture). Ce qui pourrait causer une
surchauffe, débouchant sur un incendie.
( Manipuler l’appareil soigneusement afin d’éviter une brûlure à
basse température.
• Lorsque l’appareil contient des parties métalliques, une surchauffe peut
déboucher sur une brûlure à basse température. Faire attention aux
points suivants :
• Utilisé pendant une longue durée, l’appareil devient chaud. Si vous tenez
l’appareil dans ces conditions, une brûlure à basse température risque de
se produire.
Dans des endroits sujets à des températures très froides, la température du
•
corps de l’appareil peut être plus basse que la température ambiante. Si
possible, mettre des gants en tenant l’appareil à des températures basses.
( Faire attention avec la courroie.
• Faire attention avec la courroie en portant l’appareil. Elle peut facilement
s’accrocher à des objets sur le passage et causer des dommages sérieux.
Fr
47
Page 48

d4336_33_f_basic_00_bookfile.book Page 48 Tuesday, November 14, 2006 4:02 PM
Précautions de manipulation de la batterie
Veuillez suivre ces consignes importantes pour éviter le coulage du
liquide de la batterie, une génération de chaleur, des brûlures, une
explosion, ou de causer des décharges électriques ou brûlures.
DANGER
• L’appareil photo utilise une batterie lithium ion spécifiée par Olympus. Chargez
l’appareil avec le chargeur spécifié. N’utilisez aucun autre chargeur.
• Ne jamais chauffer ni mettre au feu la batterie.
• Prendre des précautions en transportant ou rangeant la batterie pour éviter
qu’elle vienne en contact avec des objets métalliques comme des bijoux, des
épingles à cheveux, des agrafes, etc.
• Ne jamais ranger la batterie dans un lieu où elle serait exposée en plein soleil,
ou sujette à des températures élevées dans un véhicule chaud, près d’une
source de chaleur, etc.
Fr
• Pour éviter de causer des coulages de liquide de la batterie ou d’endommager
ses bornes, respecter scrupuleusement toutes les instructions concernant
l’usage de la batterie. Ne jamais tenter de démonter la batterie ni la modifier,
en soudant, etc.
• Si du liquide de la batterie entrait dans vos yeux, les laver immédiatement avec
de l’eau claire et froide du robinet et consulter immédiatement un médecin.
• Toujours ranger la batterie hors de la portée des jeunes enfants. Si un enfant
avale accidentellement une batterie, consulter immédiatement un médecin.
AVERTISSEMENT
• Maintenir à tout moment la batterie au sec.
• Pour éviter un coulage du liquide de la batterie, une génération de chaleur ou
de causer un incendie ou une explosion, n’utiliser que la batterie recommandée
pour l’usage avec ce produit.
• Introduire soigneusement la batterie comme décrit dans les instructions de
fonctionnement.
• Si les batteries rechargeables n’ont pas été rechargées au bout de la durée
spécifiée, arrêter de les charger et ne pas les utiliser.
• Ne pas utiliser une batterie si elle est endommagée ou cassée.
• Si la batterie coule, devient décolorée ou déformée, ou devient anormale sous
d’autres aspects pendant le fonctionnement, arrêter d’utiliser l’appareil.
Si du liquide de la batterie coule sur vos vêtements ou sur votre peau, retirer le
•
vêtement et laver immédiatement la zone affectée avec de l’eau claire et froide du
robinet. Si le liquide vous brûle la peau, consulter immédiatement un médecin.
•
Ne jamais soumettre la batterie à des chocs violents ni à des vibrations continues.
ATTENTION
• Avant sa mise en place, toujours contrôler soigneusement la batterie pour des
coulages, décoloration, gauchissement ou toutes autres anormalités.
• La batterie peut devenir chaude pendant une utilisation prolongée. Pour éviter
des brûlures mineures, ne pas la retirer immédiatement après avoir utilisé
l’appareil.
• Toujours retirer la batterie de l’appareil avant de le ranger pour une longue
durée.
48
Page 49

d4336_33_f_basic_00_bookfile.book Page 49 Tuesday, November 14, 2006 4:02 PM
Pour les utilisateurs d’Amérique du Nord et du Sud
Pour les utilisateurs aux États-Unis
Déclaration de conformité
Modèle numéro : FE-230/X-790
Marque : OLYMPUS
Organisme responsable :
Adresse : 3500 Corporate Parkway, P.O. Box 610, Center Valley,
Numéro de téléphone : 484-896-5000
Testé pour être en conformité avec la réglementation FCC
POUR L’UTILISATION A LA MAISON OU AU BUREAU
Cet appareil est conforme aux normes de la Section 15 des directives FCC. Son
utilisation est soumise aux deux conditions suivantes :
(1) Cet appareil ne doit pas causer de brouillage radioélectrique.
(2) Cet appareil doit pouvoir résister à toutes les interférences, y compris celles
susceptibles d’entraver son bon fonctionnement.
Pour les utilisateurs au Canada
Cet appareil numérique de la catégorie B est conforme à la législation canadienne sur
FE-240/X-795
PA 18034-0610, U.S.A.
Marques déposées
• IBM est une marque déposée de la société International Business Machines
Corporation.
• Microsoft et Windows sont des marques déposées de la société Microsoft
Corporation.
• Macintosh est une marque de Apple Computer Inc.
• xD-Picture Card™ est une marque déposée.
• Tous les autres noms de sociétés et appellations de produits sont des
marques, déposées ou non, des propriétaires respectifs.
• Les normes pour les systèmes de fichiers d’appareil photo indiquées dans ce
manuel sont les normes “Design Rule for Camera File System/DCF” stipulées
par l’association JEITA (Japan Electronics and Information Technology
Industries Association).
Fr
49
Page 50

d4336_33_s_basic_00_bookfile.book Page 50 Tuesday, November 14, 2006 4:06 PM
Tabla de contenidos
Contenido de la caja........................................................................ 51
Fije la correa........................................................................................51
Prepare la batería............................................................................. 52
Encienda la cámara ......................................................................... 53
Ajuste la fecha y hora...................................................................... 54
Información de la pantalla de ajuste de fecha y hora.......................... 54
Ajuste el idioma ............................................................................... 56
Tome una fotografía ........................................................................ 57
Revise sus fotografías..................................................................... 58
Borrado de imágenes .......................................................................... 58
Funcionamiento básico................................................................... 59
Botones del modo de fotografía ..........................................................59
Es
Modos de escena ................................................................................ 60
Modo macro ........................................................................................60
Modos de flash .................................................................................... 61
Disparador automático ........................................................................61
Función de ahorro de energía .............................................................61
Menús y ajustes............................................................................... 62
Menú superior ..................................................................................... 62
Borrar todas las fotografías .................................................................62
Conexión de la cámara.................................................................... 63
Reproducción en un televisor .............................................................. 63
Impresión directa (PictBridge) ............................................................. 64
Transferir imágenes......................................................................... 65
Software OLYMPUS Master ............................................................ 67
Especificaciones.............................................................................. 68
Precauciones de seguridad............................................................ 70
Antes de utilizar la cámara, lea con atención este manual para asegurarse de
su uso correcto.
Antes de tomar fotografías importantes, le recomendamos que realice varias
tomas de prueba para familiarizarse con el uso de su cámara.
Le rogamos observe todas las precauciones de seguridad que figuran al final
de este manual.
Las imágenes que aparecen en la pantalla y las ilustraciones de la cámara
utilizadas en este manual pueden ser distintas que el producto real. A menos
que se indique lo contrario, las ilustraciones están basadas en el modelo
FE-230/X-790.
50
Page 51

d4336_33_s_basic_00_bookfile.book Page 51 Tuesday, November 14, 2006 4:06 PM
Contenido de la caja
Cámara digital Correa Batería de iones de litio
Cargador de
batería (LI-40C)
Componentes no mostrados: Manual Avanzado (CD-ROM), Manual Básico
(este manual) y tarjeta de garantía. Los contenidos pueden variar
dependiendo del lugar de compra.
Cable USB Cable AV OLYMPUS Master
(LI-42B)
CD-ROM
Fije la correa
Es
Tire de la correa para que quede apretada y no se suelte.
51
Page 52

d4336_33_s_basic_00_bookfile.book Page 52 Tuesday, November 14, 2006 4:06 PM
Prepare la batería
a. Cargue la batería.
W
3
Cable de corriente
Toma de
corriente CA
Es
La batería viene cargada parcialmente.
2
b. Inserte la batería en la cámara.
2
4
1
5
Batería de iones
de litio
Cargador
1
Indicador de carga
Luz roja encendida: En carga
Luz apagada: Carga completa
(Tiempo de carga: Aprox. 300
minutos)
de batería
Inserte la batería en la dirección
indicada por la marca .
3
Botón de bloqueo de la batería
Para extraer la batería, presione
el botón de bloqueo de la batería
en la dirección de la flecha.
Esta cámara le permite tomar fotos sin tener que insertar la tarjeta
opcional xD-Picture Card™ (en adelante, “la tarjeta”). Para obtener
información acerca de la inserción de la tarjeta, consulte el Manual
Avanzado.
52
Page 53

HORA
----
.--.-- --:--
/ M /
d4336_33_s_basic_00_bookfile.book Page 53 Tuesday, November 14, 2006 4:06 PM
Encienda la cámara
Esta sección explica cómo encender la cámara en el modo de fotografía.
a. Sitúe el disco de modo en h.
Al grabar vídeos
Al tomar fotografías
Modos de toma de fotografías
h Para toma de fotografías normal.
h Esta función reduce la posibilidad de que las fotografías salgan borrosas
B Adecuado para tomar fotografías de personas.
E Adecuado para tomar fotografías de paisajes.
M Adecuado para tomar fotografías de personas por la noche.
f Seleccione uno de los 10 modos de escena (FE-240/X-795) o 13 modos de
R Utilice la toma de imágenes que se muestra en la pantalla para fotografiar
debido al movimiento del sujeto o de la cámara.
escena disponibles (FE-230/X-790) en función de las condiciones fotográficas.
según la situación.
Es
b. Presione el botón o.
Botón o
Para apagar la cámara, presione de nuevo el botón o.
----
CANCEL.
Esta pantalla
aparece si la fecha y
la hora no están
ajustadas.
Consejo
En el manual de instrucciones suministrado se indica la
dirección de las teclas de control con ONXY.
DMA
.--.-- --:--
MENU
HORA
A /M/
O
N
D
YX
53
Page 54

----
.--.-- --:--
HORA
/ M /
2007
.--.-- --:--
HORA
A / M / D
2007
.-- --:--
HORA
A / M / D
d4336_33_s_basic_00_bookfile.book Page 54 Tuesday, November 14, 2006 4:06 PM
Ajuste la fecha y hora
Información de la pantalla de ajuste de fecha y hora
A-M-D
Hora
HORA
DMA
.--.-- --:--
----
MENU
CANCEL.
A /M/
Cancela el ajuste
a. Presione los botones OF/< y NY para
Es
seleccionar [A].
• Los dos primeros dígitos del año son fijos.
Minuto
D
Formato de fecha (A-M-D, M-D-A, D-M-A)
Botón OF/<
2007
DMA
.--.-- --:--
HORA
A / M / D
Botón NY
b. Presione el botón Y#.
Botón Y#
c. Presione los botones OF/< y
NY para seleccionar [M].
54
CANCEL.
2007
CANCEL.
MENU
.
0202.-- --:--
MENU
DMA
HORA
A / M / D
Page 55

2007
--:--
HORA
A / M / D
2007
30
HORA
A / M / D
2007
30
HORA
A / M / D
IN
3072
2304
d4336_33_s_basic_00_bookfile.book Page 55 Tuesday, November 14, 2006 4:06 PM
Ajuste la fecha y hora
d. Presione el botón Y#.
e. Presione los botones OF/< y
NY para seleccionar [D].
2007
CANCEL.
.
MENU
0202.
HORA
DMA
1010 --:--
f. Presione el botón Y#.
g. Presione los botones OF/< y
NY para seleccionar las horas
y los minutos.
• La hora se muestra en el formato de 24 horas.
2007
HORA
DMA
.
0202.
1010
1212:
A / M / D
A / M / D
30
MENU
CANCEL.
ACEPT.
h. Presione el botón Y#.
i. Presione los botones OF/< y
NY para seleccionar [A/M/D].
2007
CANCEL.
.
MENU
0202.
1010
DMA
HORA
1212:
30
ACEPT.
j. Cuando se hayan realizado todos los ajustes,
presione .
• Para un ajuste más preciso, presione cuando el reloj marque
00 segundos.
[ ]
Botón
HQHQ3072
×2304
OK
A / M / D
OK
[
IN
]
44
55Es55
Page 56

RE-
STAURAR
PANORAMA
MODO
SILENC.
CONFI-
GURAC.
CALIDAD
IMAGEN
SCENE
FOTO
Y SONIDO
RE-
STAURAR
PANORAMA
MODO
SILENC.
CONFI-
GURAC.
CALIDAD
IMAGEN
FOTO
Y SONIDO
SCENE
CONFIGURAC.
d4336_33_s_basic_00_bookfile.book Page 56 Tuesday, November 14, 2006 4:06 PM
Ajuste el idioma
a. Presione el botón m para ver el menú superior.
Botón m
b. Presione el botón Y# para
seleccionar [CONFIGURAC.] y
Es
presione .
c. Presione los botones OF/< y
NY para seleccionar [W], y
presione .
d. Presione las teclas de control
(ONXY) para elegir un idioma
y, a continuación, presione .
• Se pueden añadir otros idiomas a la cámara
con el software OLYMPUS Master
suministrado. Consulte el Manual Avanzado.
RE-
STAURAR
MENU
SALIR
RE-
STAURAR
MENU
SALIR
1
FORMATEAR
2
BACKUP
3
MAPEO PÍX.
MENU
ATR ÁS
W
ENGLISH
FRANCAIS
ESPAÑOL
PORTUGUES
MENU
ATR ÁS
PANORAMA
CALIDAD
CALIDAD
IMAGEN
IMAGEN
SCENE
ACEPT.
PANORAMA
CALIDAD
CALIDAD
IMAGEN
IMAGEN
SCENE
ACEPT.
ACEPT.
ACEPT.
FOTO
Y SONIDO
CONFI-
GURAC.
MODO
SILENC.
OK
FOTO
Y SONIDO
CONFI-
GURAC.
MODO
SILENC.COMP. E X P.
OK
ESPAÑOL
NO
OK
OK
56
Page 57

3072××
2304
IN
d4336_33_s_basic_00_bookfile.book Page 57 Tuesday, November 14, 2006 4:06 PM
Tome una fotografía
a. Sujete la cámara.
Sujeción horizontal Sujeción vertical
b. Enfoque.
(Presionar a
c. Tome la fotografía.
(Presionar
completamente)
Botón
disparador
medias)
Botón
disparador
Coloque esta marca
sobre su sujeto.
[ ]
[
]
HQHQ3072
Se muestra el número
de fotografías que se
pueden tomar.
El piloto verde indica que el enfoque
y la exposición están bloqueados.
El piloto de control de la
tarjeta parpadea.
2304
IN
44
Es
57
Page 58

12: 30
'0 7 .0 2.1 0
100-0004
HQ
IN
30 7 2
23 0 4
0. 0
d4336_33_s_basic_00_bookfile.book Page 58 Tuesday, November 14, 2006 4:06 PM
Revise sus fotografías
a. Presione el botón q.
Botón q
[
]
IN
Teclas de
control
3072
HQ
×2304
0.0
Se muestra la imagen
siguiente
Se muestra la imagen anterior
Es
Borrado de imágenes
a. Presione los botones X& y Y# para ver la
fotografía que desee borrar.
b. Presione el botón S.
BORRAR
c.
Presione el botón
Botón S
OF/<
, seleccione [SI] y presione
ATRÁS
.
Botón OF/<
Botón
BORRAR
ATRÁS
MENU
MENU
'07.02.10
100-0004
SI
NO
ACEPT.
SI
NO
ACEPT.
12:30
4
[IN][IN]
OK
[IN]
OK
58
Page 59

d4336_33_s_basic_00_bookfile.book Page 59 Tuesday, November 14, 2006 4:06 PM
Funcionamiento básico
Botones del modo de fotografía
En el modo de fotografía, puede usar estos botones para acceder rápidamente
a las funciones más habituales.
1
2
5
7
3
6
4
8
9
0
1 Botón K (Fotografía)
Selecciona el modo de fotografía.
2 Botón q (Reproducción)
Selecciona el modo de reproducción.
3 Botón m
Muestra el menú superior.
4 Botón S (Borrar)
Selecciona la imagen que desea borrar en el modo de reproducción.
5 Teclas de control (ONXY)
Selecciona las escenas, reproduce imágenes y elementos de menú.
6 Botón X& (Modo macro)
Activa el modo macro o supermacro para obtener primeros planos.
7 Botón OF/< (Compensación de la exposición/Imprimir)
En modo de fotografía, presione este botón para ajustar el valor de
compensación de la exposición, que influye en la luminosidad de la imagen.
8 Botón Y# (Modo de flash)
Es posible seleccionar de entre 4 modos de flash - AUTO, ! (Reducción del
efecto de ojos rojos), # (Flash de relleno) o $ (Flash desactivado).
9 Botón (OK)
Confirma los ajustes.
0 Botón NY (Disparador automático)
Seleccione el disparador automático para retrasar la toma 12 segundos
aproximadamente desde el momento de presionar el botón disparador.
Es
59
Page 60

d4336_33_s_basic_00_bookfile.book Page 60 Tuesday, November 14, 2006 4:06 PM
Modos de escena
Esta función le permite cambiar el modo de f (escena) en función del
sujeto.
1 Sitúe el disco de modo en f.
1
DEPORTE
MENU
ATRÁS
2 Presione O/N para seleccionar los modos de escena y presione .
Fotografía de modos de escena
Es
• j DEPORTE • N INTERIORES • W VELAS
• R AUTO - RETRATO • S PUESTA SOL • X FUEG.ARTIF.
• P VITRINA • V COCINA • d DOCUMENTOS
• i SUBASTA • k
• H
SUBACUÁTICO MACRO
*1 Disponible únicamente para el modelo FE-230/X-790.
ACEPT.
OK
Botón
SUBACUÁTICO AMPLIO.1*1• l SUBACUÁTICO AMPLIO.2
*1
Disco de modo
O/N
*1
Modo macro
& Este modo le permite tomar fotos del sujeto a tan solo 10 cm de distancia con
el modelo FE-230/X-790, y a 20 cm de distancia con el modelo FE-240/X-795.
(en el ángulo mayor)
% Utilice este modo para tomar fotos del sujeto a tan solo 5 cm de distancia con
el modelo FE-230/X-790, y a 3 cm de distancia con el modelo FE-240/X-795.
En el modo %, la posición del objetivo zoom está fijada.
1
Presione varias veces el botón X& para seleccionar [&] o [%] y presione .
60
Page 61

d4336_33_s_basic_00_bookfile.book Page 61 Tuesday, November 14, 2006 4:06 PM
Modos de flash
1 Presione varias veces el botón Y# para seleccionar el modo de flash y
presione .
2 Presione a medias el botón disparador.
Si el flash está ajustado para dispararse, se ilumina la marca #.
3 Presione el botón disparador a fondo para tomar la fotografía.
Icono Modo de flash Descripción
Sin
indicación
!
#
$
Flash
automático
Flash con
reducción de
ojos rojos
Flash de relleno El flash se dispara independientemente de la luz
Flash
desactivado
El flash se dispara automáticamente en condiciones de
baja iluminación o de contraluz.
El modo de flash con reducción de ojos rojos reduce
significativamente este fenómeno emitiendo destellos
previos antes de dispararse el flash normal.
disponible.
El flash no se dispara, incluso en condiciones de baja
iluminación.
Disparador automático
Es
1 Presione el botón NY para seleccionar [Y] y presione
.
LED del disparador
automático
2 Presione el botón disparador a fondo para tomar la
fotografía.
El LED del disparador automático se ilumina durante unos
10 segundos después de presionar el botón disparador, luego
empieza a parpadear. Tras parpadear durante 2 segundos
aproximadamente, se toma la fotografía.
Función de ahorro de energía
Para ahorrar energía de la batería, la cámara entra automáticamente en el
modo de reposo y deja de funcionar después de unos 3 minutos de
inactividad en modo de fotografía. Utilice el botón disparador o el mando de
zoom para reactivar la cámara.
Si la cámara no se utiliza durante aproximadamente 12 minutos después de
entrar en el modo de reposo, se retrae automáticamente el objetivo y se
apaga. Para volver a utilizarla, enciendala otra vez.
61
Page 62

RE-
STAURAR
PANORAMA
MODO
SILENC.
CONFI-
GURAC.
CALIDAD
IMAGEN
SCENE
FOTO
Y SONIDO
d4336_33_s_basic_00_bookfile.book Page 62 Tuesday, November 14, 2006 4:06 PM
Menús y ajustes
Menú superior
1 Presione el botón m para ver el menú superior en el monitor.
2 Use las teclas de control (ONXY) para seleccionar los elementos de
menú.
Menú superior en modo
de fotografía
PANORAMA
CALIDAD
RE-
MENU
CALIDAD
IMAGEN
IMAGEN
SCENE
Botón m
Es
STAURAR
SALIR
CALIDAD IMAGEN
Ajusta la calidad de imagen y la resolución.
PANORAMA
Crea una fotografía panorámica.
RESTAURAR
Permite restaurar los ajustes predefinidos de fábrica.
SCENE
Seleccione una escena en función del sujeto y las condiciones fotográficas.
MODO SILENC.
Desactiva los sonidos de las funciones, los sonidos de advertencia, el sonido del
disparador, etc. durante la toma de fotografías y la reproducción.
CONFIGURAC.
Ajusta la fecha y hora, el idioma y otros ajustes.
FOTO Y SONIDO/VíDEO Y SONIDO
Graba el sonido durante la filmación.
Y SONIDO
ACEPT.
FOTO
CONFI-
GURAC.
MODO
SILENC.
OK
Borrar todas las fotografías
1 Presione el botón m para ver el menú
superior en modo de reproducción.
2 Seleccione [BORRAR], [BORRAR TODO] y
presione .
3 Seleccione [SI] y presione .
Se borran todas las fotografías.
62
BORRAR TODO
PRECA UC. BORR. TODO
SI
NO
MENU
ATR ÁS
ACEPT.
[IN][IN]
OK
Page 63

d4336_33_s_basic_00_bookfile.book Page 63 Tuesday, November 14, 2006 4:06 PM
Conexión de la cámara
Reproducción en un televisor
Utilice el cable AV suministrado con la cámara para reproducir imágenes
grabadas en un televisor. Puede reproducir tanto fotografías como vídeos.
1 Compruebe que el televisor y la cámara estén apagados. Conecte el
multiconector de la cámara al terminal de entrada de vídeo del televisor
usando el cable AV.
Multiconector
Cable AV (incluido)
2 Encienda el televisor y cambie al modo de entrada de vídeo.
Para más información sobre cómo cambiar a entrada de vídeo, consulte el manual
de instrucciones del televisor.
3 Encienda la cámara y presione el botón q para seleccionar el modo de
reproducción.
En el televisor aparecerá la última fotografía tomada. Utilice las teclas de control
(ONXY) para seleccionar la fotografía que desea ver.
Tapa del conector
Conéctelo al terminal de entrada
de vídeo (amarillo) y al de entrada
de sonido (blanco) del televisor.
Es
63
Page 64

d4336_33_s_basic_00_bookfile.book Page 64 Tuesday, November 14, 2006 4:06 PM
Impresión directa (PictBridge)
Usando el cable USB suministrado, puede conectar la cámara a una impresora
compatible con PictBridge para imprimir fotografías. Puede imprimir una imagen
realizando unas sencillas operaciones.
1 En el modo de reproducción, localice en el monitor la fotografía que desea
imprimir.
2 Conecte un extremo del cable USB suministrado al multiconector de la
cámara y el otro extremo al conector USB de la impresora.
Multiconector
Cable USB
Es
Botón OF/<
3 Presione el botón OF/<.
Se inicia la impresión.
Cuando haya terminado, desconecte el cable USB
de la cámara con la pantalla de selección de
fotografías activa.
IMPR.SIMPLE INICIO
PC / IMPR.PERSONAL
OK
64
Page 65

d4336_33_s_basic_00_bookfile.book Page 65 Tuesday, November 14, 2006 4:06 PM
Transferir imágenes
a. Instale el software
1 Inserte el CD-ROM de OLYMPUS Master.
2 Windows: Haga clic en el botón “OLYMPUS
Macintosh: Haga doble clic en el icono
3 Siga las instrucciones en pantalla.
b. Conecte la cámara a un ordenador
1 Conecte la cámara y el ordenador usando el cable USB (incluido).
El monitor se encenderá automáticamente.
Master 2”.
“Setup”.
2
Cable USB
1
Es
2 Seleccione [PC] en el monitor y presione .
Ahora el ordenador reconocerá su cámara como
una unidad de almacenamiento extraíble.
US B
PC
IMPR.SIMPLE
IMPR.PERSONAL
SALIR
ACEPT.
OK
65
Page 66

d4336_33_s_basic_00_bookfile.book Page 66 Tuesday, November 14, 2006 4:06 PM
c. Transfiera las imágenes al ordenador
1 Ahora, con la cámara conectada, abra el programa OLYMPUS Master.
2 Haga clic en “Transferir imágenes” en la
ventana de examinar y haga clic en “De
cámara” .
3 Siga las instrucciones en pantalla.
Es
Consejos
• Para obtener información más detallada sobre la configuración y el uso de la
cámara, consulte el “Manual Avanzado” de la misma incluido en el CD-ROM.
• Si necesita ayuda adicional, consulte el archivo “Ayuda” del software
OLYMPUS Master.
66
Page 67

d4336_33_s_basic_00_bookfile.book Page 67 Tuesday, November 14, 2006 4:06 PM
Software OLYMPUS Master
Software OLYMPUS Master: Utilice este software para
descargar fotografías de la cámara, ver, organizar,
retocar, enviar por correo electrónico e imprimir sus
fotografías y vídeos digitales, y mucho más.
(Requisitos del sistema
SO
CPU Pentium III 500 MHz/Power PC G3 500 MHz/Intel Core Solo/
RAM 256 MB o más
Disco duro 500 MB de espacio libre o más
Conexión Puerto USB/puerto IEEE 1394
Monitor 1024 × 768 píxeles de resolución o más con un mínimo de 65.536
Otres Internet Explorer 6 o posterior (Windows), Safari 1.0 o posterior,
Para obtener la información técnica más reciente, visite la página web de Olympus
(http://www.olympus.com/)
Registre su cámara cuando instale OLYMPUS Master para activar su
garantía, recibir notificaciones sobre actualizaciones de software y
firmware de la cámara, y mucho más.
Windows 2000 Professional/XP Home Edition/XP Professional/Vista o
Mac OS X (10.3 o posterior)
Duo 1.5 GHz, o posterior
colores (Windows), 32.000 colores (Macintosh)
QuickTime 6 o posterior (Macintosh)
Registro de usuario
Es
67
Page 68

d4336_33_s_basic_00_bookfile.book Page 68 Tuesday, November 14, 2006 4:06 PM
Especificaciones
(Cámara
Tipo de producto : Cámara digital (para fotografía y reproducción)
Sistema de grabación
Fotografías : Grabación digital, JPEG (según la norma Design rule
Estándares
aplicables
Sonido con
fotografías
Vídeo : AVI Motion JPEG
Memoria : Memoria interna
Número de píxeles
efectivos
Dispositivo de captura
Es
de imagen
Objetivo : FE-230/X-790:
Sistema fotométrico : Medición ESP digital
Velocidad de
obturación
Alcance de fotografía : FE-230/X-790:
Monitor : Pantalla LCD TFT en color de 2,5", 115.000 píxeles
Conector exterior : conector USB, jack A/V OUT (multiconector)
Sistema de calendario
automático
Entorno de funcionamiento
Temperatura : 0 °C a 40 °C (funcionamiento)/
Humedad : 30% a 90% (funcionamiento)/
Fuente de alimentación : Una batería de iones de litio Olympus (LI-42B/LI-40B)
for Camera File system (DCF))
: Exif 2.2, Formato de reserva de impresión digital
(DPOF), PRINT Image Matching III, PictBridge
: Formato WAVE
xD-Picture Card (16 MB – 2 GB) (Type H/M, Standard)
: 7.100.000 píxeles
: CCD de 1/2,5" (filtro de colores primarios),
7.400.000 píxeles (brutos)
Objetivo Olympus 6,3 a 18,9 mm, f3,1 a 5,9
(equivalente a un objetivo de 38 a 114 mm en una
cámara de 35 mm)
FE-240/X-795:
Objetivo Olympus 6,4 a 32 mm, f3,3 a 5,0
(equivalente a un objetivo de 38 a 190 mm en una
cámara de 35 mm)
: 4 a 1/2000 seg.
0,6 m a ) (W), 1,0 m a ) (T) (modo normal)
0,1 m a ) (W), 0,6 m a ) (T) (modo macro)
0,05 m (modo supermacro)
FE-240/X-795:
0,7 m a ) (modo normal)
0,2
m a )
0,03 m (modo supermacro)
(W), 0,6
: 2000 hasta 2099
-20 °C a 60 °C (almacenamiento)
10% a 90% (almacenamiento)
m a )
(T) (
modo macro
)
68
Page 69

d4336_33_s_basic_00_bookfile.book Page 69 Tuesday, November 14, 2006 4:06 PM
Dimensiones : FE-230/X-790:
90,5 mm (ancho) × 55,0 mm (altura) × 16,5 mm (prof.)
(sin incluir los salientes)
FE-240/X-795:
93,5 mm (ancho) × 56,0 mm (altura) × 20,0 mm (prof.)
(sin incluir los salientes)
Peso : FE-230/X-790: 105 g sin la batería ni la tarjeta
FE-240/X-795: 115 g sin la batería ni la tarjeta
(Batería de iones de litio (LI-42B)
Tipo de producto : Batería recargable de iones de litio
Voltaje estándar : CC 3,7 V
Capacidad estándar : 740 mAh
Duración de la batería : Aprox. 300 recargas completas (varía según el uso)
Entorno de
funcionamiento
Temperatura : 0 °C a 40 °C (durante la carga)/
-10 °C a 60 °C (funcionamiento)/
-20 °C a 35 °C (almacenamiento)
Dimensiones : 31,5 × 39,5 × 6 mm
Peso : Aprox. 15 g
(Cargador de batería (LI-40C)
Requisitos de potencia : CA de 100 a 240 V (50 a 60 Hz)
3,2 VA (100 V) a 5,0 VA (240 V)
Salida : CC 4,2 V, 200 mA
Tiempo de carga : Aprox. 300 min.
Entorno de
funcionamiento
Temperatura : 0 °C a 40 °C (funcionamiento)/
-20 °C a 60 °C (almacenamiento)
Dimensiones : 62 × 23 × 90 mm
Peso : Aprox. 65 g
Es
El diseño y las especificaciones están sujetos a cambios sin previo aviso.
69
Page 70

d4336_33_s_basic_00_bookfile.book Page 70 Tuesday, November 14, 2006 4:06 PM
Precauciones de seguridad
PRECAUCIÓN
RIESGO DE DESCARGAS
ELÉCTRICAS
NO ABRIR
Es
PRECAUCIÓN:
NO RETIRE LA CUBIERT A (O PARTE TRASERA). EN EL INTERIOR NO H AY
PIEZAS QUE EL USUARI O PUEDA REPARAR. REMITA LA REPARACIÓN A
PELIGRO
ADVERTENCIA
PRECAUCIÓN
¡ADVERTENCIA!
PARA EVITAR EL RIESGO DE INCENDIO O DESCARGAS ELÉCTRICAS, NUNCA DESMONTE NI EXPONGA
ESTE PRODUCTO AL AGUA NI LO UTILICE EN UN ENTORNO MUY HÚMEDO.
Precauciones Generales
PARA REDUCIR EL RIESGO DE DESCARGAS ELÉCTRICAS,
PERSONAL DE SERVICI O ESPECIALIZA DO OLYMPUS.
El signo de admiración dentro de un triángulo equilátero tiene como finalidad alertar
al usuario de la existencia de importantes instrucciones de operación y
mantenimiento en la documentación sumini strada con el producto.
Si el producto es utilizado sin observar l a información representada bajo este
símbolo, podría causar serias lesiones o muerte.
Si el producto es utilizado sin observar l a información representada bajo este
símbolo, podría causar serias lesiones o muerte.
Si el producto es uti lizado sin observar la inform ación representada bajo es te símbolo, podría
causar lesiones per sonales menores, daños al equipo, o p érdida de datos importantes.
Lea todas las instrucciones — Antes de utilizar este producto, lea todas las
instrucciones operativas. Guarde todos los manuales y la documentación
para futuras consultas.
Limpieza — Siempre desenchufe el producto de la toma de corriente antes de
limpiarlo. Para la limpieza use sólo un paño húmedo. Nunca use limpiadores
líquidos o aerosoles, ni solventes orgánicos de ningún tipo para limpiar este
producto.
Accesorios — Para su seguridad y evitar daños al producto, utilice únicamente
los accesorios recomendados por Olympus.
Agua y humedad — En las precauciones de los productos diseñados a prueba
de la intemperie, consulte las secciones de resistencia a la intemperie en sus
respectivos manuales.
Ubicación — Para evitarle daños al producto, monte el producto sobre un
trípode, caballete o soporte estable.
Fuentes de alimentación — Conecte este producto únicamente con la fuente
de alimentación descrita en la etiqueta del producto.
Objetos extraños — Para evitar daños personales, nunca inserte objetos de
metal en el producto.
Calentadores — Nunca utilice ni guarde este producto cerca de fuentes de
calor, tales como radiadores, rejillas de calefacción, estufas o cualquier tipo
de equipo o aparato generador de calor, incluyendo amplificadores estéreo.
70
Page 71

d4336_33_s_basic_00_bookfile.book Page 71 Tuesday, November 14, 2006 4:06 PM
Manejo de la cámara
ADVERTENCIA
( No utilice la cámara cerca de gases inflamables o explosivos.
( No utilice el flash a corta distancia de las personas
(especialmente niños menores y mayores, etc.).
• Cuando dispare el flash, deberá mantener, por lo menos, una distancia de
1 m de la cara de los sujetos. El disparo demasiado cercano de los ojos
del sujeto podrá causarle la pérdida de visión momentánea.
• Mantenga a los niños menores y mayores alejados de la cámara.
• Utilice y guarde siempre la cámara fuera del alcance de los niños menores
y mayores, para prevenir las siguientes situaciones de peligro que
podrían causarles serias lesiones:
• Enredarse con la correa de la cámara, ocasionando asfixia.
• Ingerir accidentalmente una batería, tarjetas, u otras piezas pequeñas.
• Disparar el flash accidentalmente hacia sus propios ojos o hacia los ojos
de otro niño.
• Lesionarse accidentalmente con las piezas móviles de la cámara.
( No mire al sol ni a luces fuertes a través de la cámara.
( No utilice ni guarde la cámara en lugares polvorientos o
húmedos.
( No cubra el flash con la mano mientras efectúa el disparo.
PRECAUCIÓN
( Interrumpa inmediatamente el uso de la cámara si percibe
algún olor, ruido o humo extraño alrededor de la misma.
• Nunca retire las baterías con las manos descubiertas, ya que podría
causar un incendio o quemarle las manos.
( Nunca sujete ni utilice la cámara con las manos mojadas.
( No deje la cámara en lugares donde pueda estar sujeta a
temperaturas extremadamente altas.
• Si lo hace puede provocar el deterioro de las piezas y, en algunas
circunstancias, provocar que se prenda fuego. No utilice el cargador si
está cubierto (por ejemplo con una manta). Esto podría causar
recalentamiento, resultando en incendio.
(
Manipule la cámara con cuidado para evitar una quemadura leve.
•
Ya que la cámara contiene partes metálicas, el recalentamiento puede resultar
en una quemadura de baja temperatura. Preste atención a lo siguiente:
• Cuando utilice la cámara durante un largo período, ésta se recalentará. Si
mantiene la cámara en este estado, podría causar una quemadura de
baja temperatura.
• En lugares sujetos a temperaturas extremadamente bajas, la temperatura
de la carcasa de la cámara puede ser más baja que la temperatura
ambiente. Si es posible, póngase guantes cuando manipule la cámara en
temperaturas bajas.
( Tenga cuidado con la correa.
• Tenga cuidado con la correa cuando transporte la cámara. Podría
engancharse en objetos sueltos y provocar daños graves.
Es
71
Page 72

d4336_33_s_basic_00_bookfile.book Page 72 Tuesday, November 14, 2006 4:06 PM
Precauciones acerca del uso de la batería
Siga estas importantes indicaciones para evitar que se produzcan fugas,
recalentamientos, incendios o explosión de la batería, o que cause
descargas eléctricas o quemaduras.
PELIGRO
• La cámara utiliza una batería de iones de litio especificada por Olympus.
Cargue la batería con el cargador especificado. No utilice otros cargadores.
• Nunca caliente ni incinere las baterías.
• Tome precauciones al transportar o guardar las baterías a fin de evitar que
entren en contacto con objetos metálicos, tales como alhajas, horquillas,
cierres, etc.
• Nunca guarde las baterías en lugares donde queden expuestas a la luz solar
directa o sujetas a altas temperaturas en el interior de un vehículo con
calefacción, cerca de fuentes de calor, etc.
• Para evitar que ocurran fugas de líquido de las baterías o daños de sus
terminales, siga cuidadosamente todas las instrucciones respectivas al uso de
las baterías. Nunca intente desarmar una batería ni modificarla de ninguna
manera, por soldadura, etc.
Es
• Si el fluido de la batería penetrara en sus ojos, lávelos de inmediato con agua
corriente fresca y limpia, y solicite atención médica inmediatamente.
• Siempre guarde las baterías fuera del alcance de los niños menores. Si un niño
ingiere una batería accidentalmente, solicite atención médica inmediatamente.
ADVERTENCIA
• Conserve la batería siempre seca.
• Para evitar que ocurran fugas de líquido, recalentamiento de la batería, o que
cause incendio o explosión, utilice únicamente la batería recomendada para el
uso con este producto.
• Inserte la batería cuidadosamente, tal como se describe en el manual de
instrucciones.
• Si las baterías recargables no han sido recargadas dentro del tiempo
especificado, interrumpa la carga y no las utilice.
• No utilice una batería si está rajada o quebrada.
• Si se producen fugas de líquido, decoloración o deformación de la batería, o
cualquier otra anormalidad durante la operación, interrumpa el uso de la
cámara y consulte a su distribuidor o a un centro de servicio autorizado
Olympus. El uso continuo de la cámara puede resultar en incendio o choques
eléctricos.
• Si se producen fugas de líquido, decoloración o deformación de la batería, o
cualquier otra anormalidad durante la operación, interrumpa el uso de la
cámara.
• Nunca exponga la batería a fuertes impactos ni a vibraciones continuas.
PRECAUCIÓN
•
Antes de colocarla, siempre inspeccione la batería atentamente para verificar si
no ocurre fugas de líquido, decoloración, deformación o cualquier otra anomalía.
•
La baterías puede recalentarse durante el uso prolongado. Para evitar
quemaduras menores, no la retire inmediatamente después de utilizar la cámara.
• Siempre retire la batería de la cámara antes de guardar la cámara por un largo
tiempo.
72
Page 73

d4336_33_s_basic_00_bookfile.book Page 73 Tuesday, November 14, 2006 4:06 PM
Para los clientes de Norte y Sudamérica
Para los clientes de Estados Unidos
Declaración de conformidad
Número de modelo : FE-230/X-790
Nombre comercial : OLYMPUS
Entidad responsable :
Dirección : 3500 Corporate Parkway, P.O. Box 610, Center Valley,
Número de teléfono : 484-896-5000
Se ha probado su cumplimiento con las normas FCC
PARA USO DOMÉSTICO O COMERCIAL
Este dispositivo cumple con el Apartado 15 de las normas FCC. La operación se
encuentra sujeta a las dos condiciones siguientes:
(1)Este dispositivo podría no causar interferencia perjudicial.
(2)Este dispositivo debe aceptar cualquier interferencia que se reciba, incluyendo
aquellas interferencias que pueden provocar un funcionamiento no deseado.
Para los clientes de Canadá
Este aparato digital de Clase B cumple con todos los requerimientos de las
FE-240/X-795
PA 18034-0610, U.S.A.
Marcas comerciales
• IBM es una marca registrada de International Business Machines Corporation.
• Microsoft y Windows son marcas registradas de Microsoft Corporation.
• Macintosh es una marca comercial de Apple Computer Inc.
• xD-Picture Card™ es una marca comercial.
• Todos los demás nombres de compañías y productos son marcas registradas
y/o marcas comerciales de sus respectivos propietarios.
• Las normas para sistemas de archivos de cámara referidas en este manual
son las “Normas de Diseño para Sistema de Archivos de Cámara/DCF”
estipuladas por la Asociación de Industrias Electrónicas y de Tecnología de
Información de Japón (JEITA).
Es
73
Page 74

d4336_33_p_basic_00_bookfile.book Page 74 Monday, November 13, 2006 9:12 AM
Índice
Reunir estes itens (conteúdo da embalagem) .............................. 75
Colocar a correia.................................................................................75
Preparar a bateria ............................................................................ 76
Ligar a câmara ................................................................................. 77
Definir a data e hora ........................................................................ 78
Sobre o ecrã de definição da data e hora ...........................................78
Definir o idioma................................................................................ 80
Fotografar......................................................................................... 81
Ver as suas imagens ....................................................................... 82
Apagar imagens ..................................................................................82
Funcionamento básico.................................................................... 83
Botões Modo Fotografia ...................................................................... 83
Modos Cena ........................................................................................84
Modo Macro ........................................................................................84
Modos de Flash...................................................................................85
Pt
Temporizador ......................................................................................85
Função Economia Energia ..................................................................85
Menus e definições.......................................................................... 86
Menu principal .....................................................................................86
Apagar todas as imagens.................................................................... 86
Ligar a câmara ................................................................................. 87
Reproduzir numa TV ...........................................................................87
Impressão directa (PictBridge) ............................................................88
Transferir imagens........................................................................... 89
Software OLYMPUS Master ............................................................ 91
Especificações................................................................................. 92
Precauções de segurança............................................................... 94
Antes de usar a sua câmara, leia atentamente o presente manual de modo a
garantir a sua correcta utilização.
É aconselhável testar as fotografias de modo a familiarizar-se com a sua
câmara antes de fotografar imagens importantes.
Cumpra rigorosamente as precauções de segurança indicadas no final do
manual.
As imagens no ecrã LCD e as ilustrações da câmara usadas neste manual
podem variar ligeiramente deste equipamento. Salvo indicaçâo em contrário,
a explicaçâo sobre estas ilustrações é fornecida no modelo FE-230/X-790.
74
Page 75

d4336_33_p_basic_00_bookfile.book Page 75 Monday, November 13, 2006 9:12 AM
Reunir estes itens (conteúdo da embalagem)
Câmara Digital Correia Bateria de iões de lítio
Carregador de
bateria (LI-40C)
Itens não visualizados: Manual Avançado (CD-ROM), Manual Básico
(o presente manual) e o Certificado de Garantia. O conteúdo pode variar
mediante o local de aquisição.
Cabo USB Cabo AV CD-ROM
(LI-42B)
OLYMPUS Master
Colocar a correia
Pt
Puxar bem a correia de modo a que não fique solta.
75
Page 76

d4336_33_p_basic_00_bookfile.book Page 76 Monday, November 13, 2006 9:12 AM
Preparar a bateria
a. Carregar a bateria.
W
3
Cabo de alimentação
Tomada
de CA
2
A bateria vem parcialmente carregada.
b. Introduzir a bateria na câmara.
Pt
2
45
1
Bateria de iões
de lítio
Carregador
1
Indicador de Carregamento
Luz vermelha acesa: A carregar
Luz desligada:
Carregamento concluído
(Tempo de carregamento:
Aprox. 300 minutos)
de bateria
Introduzir a bateria na direcção
indicada pela marca .
3
Para remover a bateria, prima o
Travão da bateria
travão da bateria na direcção
indicada pela seta.
Com esta câmara, pode-se tirar fotografias sem introduzir o xD-Picture
Card™ opcional (a partir de aqui designado apenas por “cartão”). De modo
a obter informacoes sobre como introduzir o cartão, consultar o
avançado
.
Manual
76
Page 77

----
.--.-- --:--
HORA
A / M /
d4336_33_p_basic_00_bookfile.book Page 77 Monday, November 13, 2006 9:12 AM
Ligar a câmara
Este modo explica como ligar a câmara no modo fotografia.
a. Colocar o selector de modo em h.
Para gravar vídeos
Para fotografar
Modos de fotografia
h Para uma fotografia normal.
h Esta função reduz o efeito de arrastamento resultante de um tema fotográfico
B Ideal para fotografar pessoas.
E Ideal para fotografar uma paisagem.
M Ideal para fotografar pessoas à noite.
f Seleccione de entre os 10 (FE-240/X-795) ou 13 (FE-230/X-790) modos de
R Usar o assistente de fotografia, visualizado no ecrã, para fotografar
b. Premir o botão o.
em movimento ou da própria oscilação da câmara ao fotografar.
cena disponíveis, de acordo com as condiç
imagens mediante a situação.
ões fotográficas.
Pt
Botão o
Para desligar a câmara, premir novamente o botão o.
Sugestão
As direcções do selector em cruz são indicadas com
ONXY no manual de instruções fornecido.
HORA
DMA
----
.--.-- --:--
MENU
CANCEL
No caso da data e da
A/M/
hora não estarem
definidas, é visualizado
o ecrã seguinte.
O
X
N
D
Y
77
Page 78

----
.--.-- --:--
HORA
A / M /
2007
.--.-- --:--
HORA
A / M / D
2007
--:--
HORA
A / M / D
d4336_33_p_basic_00_bookfile.book Page 78 Monday, November 13, 2006 9:12 AM
Definir a data e hora
Sobre o ecrã de definição da data e hora
A-M-D
Hora
HORA
DMA
.--.-- --:--
----
MENU
CANCEL
A/M/
Cancela a definição
a. Premir os botões OF/< e NY de modo a
seleccionar [A].
• Os primeiros dois dígitos do ano são fixos.
Minuto
D
Formatos de data (A-M-D, M-D-A, D-M-A)
Pt
Botão OF/<
b. Premir o botão Y#.
c. Premir os botões OF/< e
NY para seleccionar [M].
78
Botão NY
Botão Y#
2007
.--.-- --:--
MENU
CANCEL
2007
.
MENU
CANCEL
0202.
HORA
DMA
HORA
DMA
1010 --:--
A/M/D
A/M/D
Page 79

2007
--:--
HORA
A / M / D
2007
30
HORA
A / M / D
2007
30
HORA
A / M / D
IN
3072
2304
d4336_33_p_basic_00_bookfile.book Page 79 Monday, November 13, 2006 9:12 AM
Definir a data e hora
d. Premir o botão Y#.
e. Premir os botões OF/< e
NY de modo a seleccionar [D].
2007
CANCEL
.
0202.
MENU
HORA
DMA
1010 --:--
f. Premir o botão Y#.
g. Premir os botões OF/< e
NY para seleccionar as horas
e minutos.
• A hora é visualizada no formato de 24 horas.
2007
CANCEL
.
0202.
MENU
1010
DMA
HORA
1212:
h. Premir o botão Y#.
i. Premir os botões OF/< e
NY para seleccionar [A/M/D].
2007
HORA
DMA
.
0202.
1010
1212:
30
30
A/M/D
A/M/D
DEF
A/M/D
OK
j. Depois de configuradas todas as definições,
premir .
• Para uma definição mais precisa, premir quando o sinal de hora
chegar aos 00 segundos.
Botão
MENU
CANCEL
HQHQ3072
[ ]
×2304
DEF
OK
[
]
IN
44
79Pt79
Page 80

SCENE
RE-
STAURAR
PANORAMA
MODO SILÊNCIO
CONFIG.
QUALID
IMAGEM
IMAGEM
+ SOM
RE-
STAURAR
PANORAMA
CONFIG.
QUALID
IMAGEM
SCENE
MODO SILÊNCIO
IMAGEM
+ SOM
CONFIG.
d4336_33_p_basic_00_bookfile.book Page 80 Monday, November 13, 2006 9:12 AM
Definir o idioma
a. Premir o botão m para visualizar o menu
superior.
Botão m
b. Premir o botão Y# para
seleccionar [CONFIG.] e premir
.
Pt
Premir os botões
c.
NY
para seleccionar [
e premir
OF/<
.
d. Pressione o selector em cruz
(ONXY) para seleccionar um
idioma e pressione .
• Pode adicionar outros idiomas à sua câmara
usando o software OLYMPUS Master
fornecido. Consultar o Manual Avançado.
e
W
]
PANORAMA
RE-
STAURAR
MENU
SAIR
PANORAMA
RE-
STAURAR
MENU
SAIR
1
FORMATACAO
2
BACKUP
3
MAP PIXEL
MENU
RETROCEDER
W
ENGLISH
FRANCAIS
PORTUGUES
ESPAÑOL
MENU
RETROCEDER
QUALID
QUALID
IMAGEM
IMAGEM
SCENE
QUALID
QUALID
IMAGEM
IMAGEM
SCENE
IMAGEM
+ SOM
CONFIG.
MODO SILÊNCIO
OK
DEF
IMAGEM
+ SOM
CONFIG.
MODO SILÊNCIO
OK
DEF
PORTUGUES
NÃO
OK
DEF
OK
DEF
80
Page 81

3072
2304
IN
d4336_33_p_basic_00_bookfile.book Page 81 Monday, November 13, 2006 9:12 AM
Fotografar
a. Segurar a câmara.
Segurar na horizontal Segurar na vertical
b. Focagem.
c. Fotografar.
Botão
disparador
(Premir até
meio)
Botão
disparador
(Premir
totalmente)
Centrar esta marca sobre
o seu tema fotográfico.
[ ]
[
]
HQHQ3072
×2304
É visualizado o número
de imagens disponíveis
para fotografar.
A luz verde indica que a focagem
e a exposição estão bloqueadas.
A luz de acesso ao cartão
fica intermitente.
IN
44
Pt
81
Page 82

12: 30
'0 7 .0 2.1 0
100-0004
HQ
IN
30 7 2
23 0 4
0. 0
d4336_33_p_basic_00_bookfile.book Page 82 Monday, November 13, 2006 9:12 AM
Ver as suas imagens
a. Premir o botão q.
Botão q
[
]
IN
Selector
em cruz
3072
HQ
×2304
0.0
Mostra a imagem
'07.02.10
seguinte.
Mostra a imagem anterior
Apagar imagens
Pt
a. Premir os botões X& e Y# de modo a visualizar
a imagem que pretende apagar.
b. Premir o botão S.
APAGAR
Botão S
MENU
RETROCEDER
c. Premir o botão OF/<, para seleccionar [SIM], e
premir .
Botão OF/<
Botão
APAGAR
MENU
RETROCEDER
12:30
100-0004
[IN]
[IN]
SIM
NAO
DEF
[IN]
SIM
NAO
DEF
4
OK
OK
82
Page 83

d4336_33_p_basic_00_bookfile.book Page 83 Monday, November 13, 2006 9:12 AM
Funcionamento básico
Botões Modo Fotografia
No modo Fotografia, utilize estes botões de modo a ter um acesso rápido a
algumas das funções mais utilizadas.
1
2
7
5
3
6
4
8
9
0
1 Botão K (Fotografia)
Selecciona o modo fotografia.
2 Botão q (Reprodução)
Selecciona o modo reprodução.
3 Botão m
Visualiza o menu principal.
4 Botão S (Apagar)
Selecciona a imagem que pretende eliminar no modo reprodução.
5 Selector em cruz (ONXY)
Selecciona cenas, imagens a reproduzir e itens de menu.
6 Botão X& (Modo Macro)
Activa o modo macro ou super macro para fotografar imagens em grande plano.
7 Botão OF/< (Compensação da exposição/Imprimir)
No modo fotografia, premir este botão para ajustar o valor de compensação da
exposição, que afecta o brilho da imagem.
8 Botão Y# (Modo Flash)
Selecciona 4 modos de flash - AUTO, ! (Redução olhos vermelhos),
# (Activação Forçada) ou $ (Flash desligado).
9 Botão (OK)
Confirma as definições.
0 Botão NY (Temporizador)
Define o temporizador para fotografar aproximadamente 12 segundos depois de
se premir o disparador.
Pt
83
Page 84

d4336_33_p_basic_00_bookfile.book Page 84 Monday, November 13, 2006 9:12 AM
Modos Cena
Esta função permite alterar o f (modo cena) mediante o tema fotográfico.
1 Coloque o selector de modo em f.
1
DESPORTO
Selector de modo
O/N
MENU
RETROCEDER
DEF
OK
Botão
2 Premir O/N para seleccionar a Cena e premir .
Modos Cena disponíveis
• j DESPORTO • N INTERIORES • W VELA
• R AUTO-RETRATO • S PÔR-DO-SOL • X FOGO DE ARTIFÍCIO
• P ATRÁS DE VIDRO • V
• i LEILÕES • k
Pt
•H SOB ÁGUA MACRO
*1 Disponível apenas para o modelo FE-230/X-790.
CULINÁRIA • d DOCUMENTOS
SOB ÁGUA AMPLO.1*1• l SOB ÁGUA AMPLO.2
*1
Modo Macro
*1
& Este modo permite tirar fotografias a uma distância de 10 cm, com o modelo
FE-230/X-790, ou 20 cm, ou com o FE-240/X-795. (na posição grande angular)
% Utilize este modo para tirar fotografias a uma distância de 5 cm, com o modelo
FE-230/X-790, ou 3 cm, com o FE-240/X-795. No modo % , a posição da
objectiva do zoom é fixada.
1 Premir o botão X& repetidamente para seleccionar [&] ou [%] e premir
.
84
Page 85

d4336_33_p_basic_00_bookfile.book Page 85 Monday, November 13, 2006 9:12 AM
Modos de Flash
1 Premir o botão Y# repetidamente de modo a seleccionar o modo flash e
premir .
2 Premir o disparador até meio.
Quando o flash estiver definido para disparar, a marca # ilumina-se.
3 Premir totalmente o disparador para fotografar.
Ícone Modo Flash Descrição
Sem
indicação
Flash
automático
Flash de
redução do
!
efeito olhos
vermelhos
Activação
#
forçada
$ Flash desligado O flash não dispara mesmo em situações de luz fraca.
O flash dispara automaticamente em condições de luz
fraca ou contraluz.
O modo flash de redução do efeito de olhos vermelhos
reduz significativamente este fenómeno, emitindo préflashes antes de disparar o flash habitual.
O flash dispara independentemente da luz disponível.
Temporizador
1
Premir o botão NY para seleccionar [Y] e premir .
2 Premir totalmente o disparador para fotografar.
A luz do temporizador acende-se durante aproximadamente
10 segundos, depois de se premir o disparador, em seguida
começa a piscar. Depois de piscar durante aproximadamente
2 segundos, a imagem é fotografada.
Luz
temporizador
Pt
Função Economia Energia
De modo a economizar a bateria, a câmara entra automaticamente no modo
descanso e deixa de funcionar caso não seja usada durante
aproximadamente 3 minutos. Premir o botão disparador ou a alavanca de
zoom para reactivar a câmara.
Se a câmara não for usada durante aproximadamente 12 minutos depois de
entrar no modo descanso, a objectiva retrair-se-á automaticamente e a
câmara desliga-se. Para retomar o funcionamento, ligar novamente a
câmara.
85
Page 86

SCENE
RE-
STAURAR
PANORAMA
MODO SILÊNCIO
CONFIG.
QUALID
IMAGEM
IMAGEM
+ SOM
d4336_33_p_basic_00_bookfile.book Page 86 Monday, November 13, 2006 9:12 AM
Menus e definições
Menu principal
1 Premir o botão m de modo a visualizar o menu principal no monitor.
2 Usar o selector em cruz (ONXY) para seleccionar itens de menu.
Menu principal no modo
fotografia
PANORAMA
RE-
MENU
IMAGEM
IMAGEM
SCENE
Botão m
STAURAR
SAIR
QUALID IMAGEM
Define a qualidade e resolução.
Pt
PANORAMA
Cria uma imagem panorâmica.
RESTAURAR
Reinicia as predefinições de origem.
SCENE
Seleccione a cena de acordo com o objecto e as condiçoes de disparo.
MODO SILÊNCIO
Desliga os sons de funcionamento, sons de aviso, som do obturador etc. ao
fotografar e reproduzir.
CONFIG.
Define a data e a hora, idioma e outras definições.
IMAGEM + SOM/VÍDEO C/SOM
Grava som durante o disparo.
QUALID
QUALID
IMAGEM
+ SOM
CONFIG.
MODO SILÊNCIO
OK
DEF
Apagar todas as imagens
1 Premir o botão m para visualizar o menu
principal no modo reprodução.
2 Seleccionar [APAGAR], [APAG IMAGS] e
premir .
3 Seleccionar [SIM] e premir .
Todas as imagens serão apagadas.
86
APAG IMAGS
ATENCAO-APAGA TUDO
SIM
NAO
MENU
RETROCEDER
DEF
[IN][IN]
OK
Page 87

d4336_33_p_basic_00_bookfile.book Page 87 Monday, November 13, 2006 9:12 AM
Ligar a câmara
Reproduzir numa TV
Usar o cabo AV fornecido com a câmara para reproduzir as imagens gravadas
na sua TV. Pode reproduzir fotografias e vídeos.
1 Deve certificar-se de que a TV e a câmara estão desligadas. Ligar o
conector múltiplo na câmara ao terminal de entrada de vídeo na TV usando
o cabo AV.
Tampa do conector
Conector múltiplo
Ligar aos terminais da entrada
de vídeo da TV (amarelo) e
entrada de som (branco).
Cabo AV (fornecido)
2 Ligar a TV e defini-la no modo entrada de vídeo.
Para obter mais informações sobre como alterar para entrada de vídeo, consulte o
manual de instruções da sua TV.
3 Ligar a câmara e premir botão o q para seleccionar o modo reprodução.
A última imagem fotografada é visualizada na TV. Usar o selector em cruz (
para seleccionar a imagem que pretende visualizar.
ONXY
87
Pt
)
Page 88

d4336_33_p_basic_00_bookfile.book Page 88 Monday, November 13, 2006 9:12 AM
Impressão directa (PictBridge)
Usando o cabo USB fornecido, poderá conectar a sua câmara directamente a
uma impressora PictBridge compatível para imprimir. Poderá imprimir uma
imagem com uma operação simples.
1 No modo reprodução, a imagem a imprimir é visualizada no ecrã.
2 Ligar uma extremidade do cabo USB fornecido ao conector múltiplo da
câmara e a outra extremidade ao conector USB da câmara.
Conector múltiplo
Cabo USB
Botão OF/<
Pt
3 Premir o botão OF/<.
A impressão começa.
Depois de concluída, desligue o cabo USB da
câmara visualizando o ecrã de selecção da
imagem.
IMP. FÁCIL INICIAR
PC / IMP. PERSON.
OK
88
Page 89

d4336_33_p_basic_00_bookfile.book Page 89 Monday, November 13, 2006 9:12 AM
Transferir imagens
a. Instalar o software
1 Introduzir o CD-ROM OLYMPUS Master.
2 Windows: Fazer clique no botão
Macintosh: Fazer duplo clique no ícone
3 Seguir as instruções no ecrã.
b. Ligar a câmara ao computador
1 Ligar a câmara e computador usando o cabo USB (fornecido).
O ecrã ligar-se-á automaticamente.
“OLYMPUS Master 2”.
“Setup”.
Cabo USB
2
1
Pt
2 Seleccionar [PC] no ecrã e premir .
O seu PC reconhecerá a câmara como uma
unidade de armazenamento amovível.
USB
PC
IMP. FÁCIL
IMP. PERSON.
SAIDA
DEF
OK
89
Page 90

d4336_33_p_basic_04_menu_7.fm Page 90 Monday, November 13, 2006 2:53 PM
c. Transferir imagens para o computador
1 Agora, com a câmara ligada, abrir o OLYMPUS Master.
2 Fazer clique em “Transferir Imagens” na
janela de navegação e, depois, em “Da
câmara” .
3 Seguir as instruções no ecrã.
Pt
Dicas
• Para obter informação mais detalhada relativamente à configuração e
utilização da câmara, consultar o “Manual avançado” da câmara fornecido
com o CD-ROM.
• Para obter mais informações, consulte o ficheiro “Help” (Ajuda) no software
OLYMPUS Master.
90
Page 91

d4336_33_p_basic_00_bookfile.book Page 91 Monday, November 13, 2006 9:12 AM
Software OLYMPUS Master
Software OLYMPUS Master: Usar este software para
transferir imagens da câmara, visualizar, organizar,
retocar, enviar por e-mail e imprimir as suas imagens
digitais e vídeos e muito mais!
(Requisitos do Sistema
SO Windows 2000 Professional/XP Home Edition/XP Professional/
Vista ou Mac OS X (10.3 ou superior)
CPU Pentium III 500 MHz/Power PC G3 500 MHz/Intel Core Solo/
Duo 1.5 GHz, ou superior
RAM 256 MB ou superior
Disco rígido 500 MB ou mais de espaço disponível
Ligação Porta USB/porta IEEE 1394
Ecrã Resolução de 1024 × 768 pixels ou superior com no mínimo 65.536
cores (Windows), 32.000 cores (Macintosh)
Outro Internet Explorer 6 ou superior (Windows), Safari 1.0 ou superior,
QuickTime 6 ou superior (Macintosh)
Para obter a informação de suporte mais recente, visite o sítio da web da Olympus
(http://www.olympus.com/)
Registo do utilizador
Registe a sua câmara ao instalar o OLYMPUS Master de modo a activar
a sua garantia, receber avisos para actualizações de software e firmware
da câmara, e muito mais.
Pt
91
Page 92

d4336_33_p_basic_00_bookfile.book Page 92 Monday, November 13, 2006 9:12 AM
Especificações
(Câmara
Tipo de produto : Câmara Digital (para fotografar e visualizar)
Sistema de gravação
Fotografias : Gravação Digital, JPEG (de acordo com a Norma de
Normas aplicáveis : Exif 2.2, Digital Print Order Format (DPOF), PRINT
Som com fotografia : Formato Wave
Vídeo : AVI Motion JPEG
Memória : Memória interna
Número de pixels
efectivos
Dispositivo de captação
de imagens
Objectiva : FE-230/X-790:
Pt
Sistema fotométrico : Medição ESP digital
Velocidade obturador : 4 a 1/2000 seg.
Amplitude de focagem : FE-230/X-790:
Ecrã : Monitor LCD a cores de 2,5" TFT, 115.000 pixeis
Conector exterior : Conector USB, ficha A/V OUT (conector múltiplo)
Sistema de calendário
automático
Ambiente de funcionamento
Temperatura : 0°C a 40°C (funcionamento)/
Humidade : 30% a 90% (funcionamento)/
Alimentação : Uma bateria de iões de lítio Olympus (LI-42B/LI-40B)
concepção para sistemas de ficheiros de câmara
(DCF))
Image Matching III, PictBridge
xD-Picture Card (16 MB – 2 GB) (Type H/M, Standard)
: 7.100.000 pixeis
: CCD de 1/2,5" (filtro de cor primário),
7.400.000 pixeis (brutos)
Objectiva Olympus 6,3 a 18,9 mm, f3,1 a 5,9
(equivalente a 38 a 114 mm numa câmara 35 mm)
FE-240/X-795:
Objectiva Olympus 6,4 a 32 mm, f3,3 a 5,0
(equivalente a 38 a 190 mm numa câmara 35 mm)
0,6 m a ) (W), 1,0 m a ) (T) (modo normal)
0,1 m a ) (W), 0,6 m a ) (T) (modo macro)
0,05 m (modo super macro)
FE-240/X-795:
0,7 m a ) (modo normal)
0,2 m a ) (W), 0,6 m a ) (T) (modo macro)
0,03 m (modo super macro)
: 2000 até 2099
-20°C a 60°C (armazenamento)
10% a 90% (armazenamento)
92
Page 93

d4336_33_p_basic_00_bookfile.book Page 93 Monday, November 13, 2006 9:12 AM
Dimensões : FE-230/X-790:
Peso : FE-230/X-790: 105 g sem bateria e cartão
90,5 mm (L) × 55,0 mm (A) × 16,5 mm (P)
(excepto saliências)
FE-240/X-795:
93,5 mm (L) × 56,0 mm (A) × 20,0 mm (P)
(excepto saliências)
FE-240/X-795: 115 g sem bateria e cartão
(Bateria de iões de lítio (LI-42B)
Tipo de produto : Bateria recarregável de iões de lítio
Voltagem normal : CC 3,7 V
Capacidade padrão : 740 mAh
Duração da bateria : Aprox. 300 cargas completas
Ambiente de
funcionamento
Temperatura : 0°C a 40°C (carregamento)/
Dimensões : 31,5 × 39,5 × 6 mm
Peso : Aprox. 15 g
(varia mediante a utilização)
-10°C a 60°C (operação)
-20°C a 35°C (armazenamento)
(Carregador de bateria (LI-40C)
Requisitos de energia : CA 100 a 240 V (50 a 60 Hz)
Saída : CC 4,2 V, 200 mA
Tempo de
carregamento
Ambiente de
funcionamento
Temperatura : 0°C a 40°C (funcionamento)/
Dimensões : 62 × 23 × 90 mm
Peso : Aprox. 65 g
3,2 VA (100 V) a 5,0 VA (240 V)
: Aprox. 300 min.
-20°C a 60°C (armazenamento)
Pt
O design e as especificações estão sujeitas a alterações sem aviso prévio.
93
Page 94

d4336_33_p_basic_00_bookfile.book Page 94 Monday, November 13, 2006 9:12 AM
Precauções de segurança
CUIDADO
NÃO ABRIR, PERIGO DE
CHOQUE EL ÉCTRICO
CUIDADO:
PARA REDUZIR O RISCO DE CHOQUE ELÉCTRI CO, NÃO RETIRE A
TAMPA (OU COBERTURA POSTERIOR). NÃO T OQUE NAS PARTES INTERNAS
CONTACTE OS SERVIÇOS TÉCNICOS QUALIFICADOS DA OLYMPUS.
O ponto de exclamação dentro de um triângulo, alerta o utilizador sobre a presença
de partes importantes para o funcionamento e m anutenção (serviços técnicos). Ver
as instruções que acompanham este produto.
PERIGO
ADVERTÊNCIA
PRECAUÇÃO
Se o produto for utilizado s em observância das informações acompanhadas deste
símbolo, poderão ocorrer lesões graves ou morte .
Se o produto for utilizado s em observância das informações acompanhadas deste
símbolo, poderão ocorrer lesões ou morte.
Se o produto for utilizado s em observância das informações acompanhadas deste
símbolo, poderão ocorrer lesões pessoais, da nos no equipamento ou a perda de
dados importantes.
Pt
ATENÇÃO!
PARA REDUZIR O RISCO DE FOGO OU DE CHOQUES ELECTRICOS, NÃO EXPONHA ESTE EQUIPAMENTO
À CHUVA, EM CONTACTO COM LÍQUIDOS OU EM LOCAIS COM HUMIDADE.
Precauções Gerais
Leia todas as instruções — Antes de utilizar o produto, leia todas as instruções
de funcionamento. Guarde todos os manuais e instruções de segurança para
futuras consultas.
Limpeza — Desligue sempre da tomada, antes de o limpar. Utilize apenas um
pano macio para limpeza. Para limpar, nunca use nenhum tipo de líquido ou
aerossol, ou solvente orgânico.
Acessórios — Para sua segurança a para evitar danos no produto, utilize
apenas acessórios recomendados pela Olympus.
Água e Humidade — Para consultar as precauções sobre os produtos com
características à prova de água, leia as respectivas secções.
Localização — Para evitar danos no produto, monte-o com segurança sobre
um tripé, estante ou suporte estável.
Fonte de energia — Ligue este aparelho à fonte de energia designada para ele.
Objectos estranhos — Para evitar lesões pessoais, nunca insira objectos
metálicos dentro do produto.
Calor — Nunca use ou guarde este produto perto de fontes de calor, tais como
radiadores, aquecedores ou qualquer tipo de equipamento ou ferramenta que
produza calor, incluindo amplificadores de som.
94
Page 95

d4336_33_p_basic_00_bookfile.book Page 95 Monday, November 13, 2006 9:12 AM
Manuseamento da Câmara
ADVERTÊNCIA
( Não utilize a câmara perto de gases inflamáveis ou explosivos.
( Não utilize o flash a curta distância das pessoas
(especialmente crianças, adolescentes, etc.).
• Deverá manter-se a uma distância mínima de 1 m da face das pessoas.
Se disparar o flash muito próximo dos olhos da pessoa, pode causar uma
perda momentânea da visão.
• Mantenha as crianças e adolescentes fora do alcance da câmara.
• Utilize e guarde sempre a câmara fora do alcance das crianças e
menores, para prevenir as seguintes situações de perigo que poderiam
causar sérias lesões:
• Ficar preso na correia da câmara, ocasionando asfixia.
• Ingerir acidentalmente uma pilha ou uma pequena peça.
• Disparar o flash acidentalmente sobre os seus próprios olhos ou sobre os
olhos de uma criança.
• Lesionar-se acidentalmente com as peças móveis da câmara.
( Não olhe para o sol ou para luzes fortes através da câmara.
(
Não utilize nem guarde a câmara em locais com pó ou humidade.
( Durante o disparo, não obstrua o flash com a mão.
PRECAUÇÃO
( Interrompa imediatamente a utilização da câmara se notar
algum cheiro, ruído ou fumo estranho a sair.
• Nunca remova as pilhas com as mãos desprotegidas, pois pode provocar
fogo ou queimar as suas mãos.
( Nunca segure nem opere a câmara com as mãos molhadas.
( Não deixe a câmara em locais onde possa estar sujeita a
elevadas temperaturas.
• Caso contrário, as peças da câmara podem deteriorar-se e, em algumas
circunstâncias, provocar incêndio na câmara. Não usar o carregador se
estiver coberto (por exemplo, com um cobertor). Caso contrário, pode
provocar sobreaquecimento ou fogo.
( Manuseie a câmara com cuidado de modo a evitar alguma
queimadura provocada por baixo calor.
• Quando a câmara contém peças metálicas, pode ocorrer o sobreaquecimento das mesmas, resultando em queimaduras provocadas por
baixo calor. Ter em atenção o seguinte:
• Quando usada durante um longo período, a câmara ficará quente. Se
continuar a segurar a câmara nestas condições, pode ocorrer uma
queimadura de baixo calor.
• Em locais sujeitos a temperaturas extremamente frias, a temperatura do
corpo da câmara pode ser inferior à temperatura ambiente. Se possível,
usar luvas ao manusear a câmara a baixas temperaturas.
( Tenha cuidado com a correia.
• Quando transportar a câmara tenha cuidado com a correia, já que, uma
vez que é fácil enlaçá-la em objectos soltos em objectos soltos e causar
sérios danos.
Pt
95
Page 96

d4336_33_p_basic_00_bookfile.book Page 96 Monday, November 13, 2006 9:12 AM
Precauções a respeito da manipulação das pilhas
Siga estas importantes indicações para evitar que ocorram fugas de
líquido, sobre-aquecimento, incêndio ou explosão das pilhas ou para
evitar choques eléctricos ou queimaduras.
PERIGO
• Utilize somente as bateria de iões de lítio e o carregador apropriado de marca
Olympus. Carregar a bateria com o carregador especificado. Não usar outros
carregadores.
• Nunca aqueça ou queime as pilhas.
• Tome precauções ao transportar ou guardar as pilhas a fim de evitar que
entrem em contacto com objectos metálicos, tais como agrafos, ganchos,
jóias, etc.
• Nunca guarde as pilhas em lugares onde fiquem expostas à luz solar directa
ou sujeitas a altas temperaturas ou no interior de um veículo com
aquecimento, perto de uma fonte de calor, etc.
• Para evitar que ocorram fugas de líquido das pilhas ou danos dos seus
terminais, siga cuidadosamente todas as instruções respeitantes ao uso das
pilhas. Nunca tente desmanchar a pilha nem modificá-la de nenhuma maneira,
por soldadura, etc.
• Se o líquido da pilha penetrar nos seus olhos, lave-os de imediato com água
Pt
corrente fresca e limpa, procurando assistência médica logo em seguida.
• Guarde as pilhas sempre fora do alcance das crianças. Se um menor ingerir
uma pilha acidentalmente, procure assistência médica imediatamente.
ADVERTÊNCIA
• Mantenha as pilhas sempre secas.
• Para evitar fugas de líquido, sobre-aquecimento, incêndio ou explosão, utilize
exclusivamente as pilhas recomendadas para este produto.
• Insira a bateria cuidadosamente conforme descrito nas instruções de
operação.
• Se baterias recarregáveis não forem recarregadas dentro do tempo
especificado, pare com o carregamento e não use.
• Não use uma bateria se estiver rachada ou quebrada.
• Se uma bateria vazar, se ficar sem cor, deformada ou se apresentar alguma
outra anormalidade, pare de usar a câmara.
• Se cair líquido da bateria na sua roupa, tire-a e lave logo a área afectada com
água corrente, fria e limpa. Se o líquido queimar a sua pele, procure cuidados
médicos imediatamente.
• Nunca sujeite as baterias a pancadas fortes ou a vibrações contínuas.
PRECAUÇÃO
• Antes de carregar, sempre inspeccione a bateria cuidadosamente para ver se
há vazamentos, descoloração, deformação ou qualquer outra anormalidade.
• A bateria pode ficar quente devido ao uso prolongado. Para evitar
queimaduras menores, não remova a bateria imediatamente depois de usar a
câmara.
• Retire sempre a bateria da câmara antes de guardá-la por um longo período.
96
Page 97

d4336_33_p_basic_00_bookfile.book Page 97 Monday, November 13, 2006 9:12 AM
Para Clientes na América do Norte e do Sul
Para Clientes nos EUA
Declaração de Conformidade
Modelo Número : FE-230/X-790
Nome Comercial : OLYMPUS
Parceiro Responsável:
Morada : 3500 Corporate Parkway, P.O. Box 610, Center Valley,
Telefone Número : 484-896-5000
Testada Em Conformidade Com O Standard FCC
PARA USO DOMÉSTICO OU NO ESCRITÓRIO
Este aparelho está em conformidade com a Capítulo 15 das Regras FCC. O seu
funcionamento está sujeito a duas condições:
(1) Este aparelho não pode causar perigo de interferência.
(2) Este aparelho pode receber qualquer tipo de interferência, inclusive interferências
que possam originar o seu mau funcionamento.
Para Clientes no Canadá
Este aparelho digital da Classe B está em conformidade com a Regulamentação
Canadiana para Equipamentos Causadores de Interferências.
FE-240/X-795
PA 18034-0610. U.S.A.
Marcas Comerciais
• A IBM é uma marca comercial registada da International Business Machines
Corporation.
• Microsoft e Windows são marcas comerciais registadas da Microsoft
Corporation.
• Macintosh é uma marca comercial registada da Apple Computers Inc.
• xD-Picture Card ™ é uma marca registada.
• Todas as outras companhias e nomes de produtos são marcas comerciais
registadas e/ou marcas comerciais dos respectivos fabricantes.
• Os standards referidos neste manual para os sistemas de ficheiro da câmara
são os standards DCF (“Design Rule for Camera File System”) estipulados
pela JEITA (“Japan Electronics and Information Technology Industries
Association”).
Pt
97
Page 98

d4336_33_p_basic_00_bookfile.book Page 98 Monday, November 13, 2006 9:12 AM
Memo
98
Page 99

d4336_33_p_basic_00_bookfile.book Page 99 Monday, November 13, 2006 9:12 AM
Memo
99
Page 100

d4336_33_e_basic_01_cover_US_7.fm Page 2 Sunday, November 12, 2006 3:26 AM
Printed in Japan
1AG6P1P3341-- VK557401
 Loading...