

Page 1
VT905001
QuickStart Guide
Two Corporate Center Drive, PO Box 9058, Melville,
NY 11747-9058, U.S.A.
http://www.olympusamerica.com/support
D-535 ZOOM / C-370 ZOOM / X-450
Thank you for purchacing an Olympus digital camera.
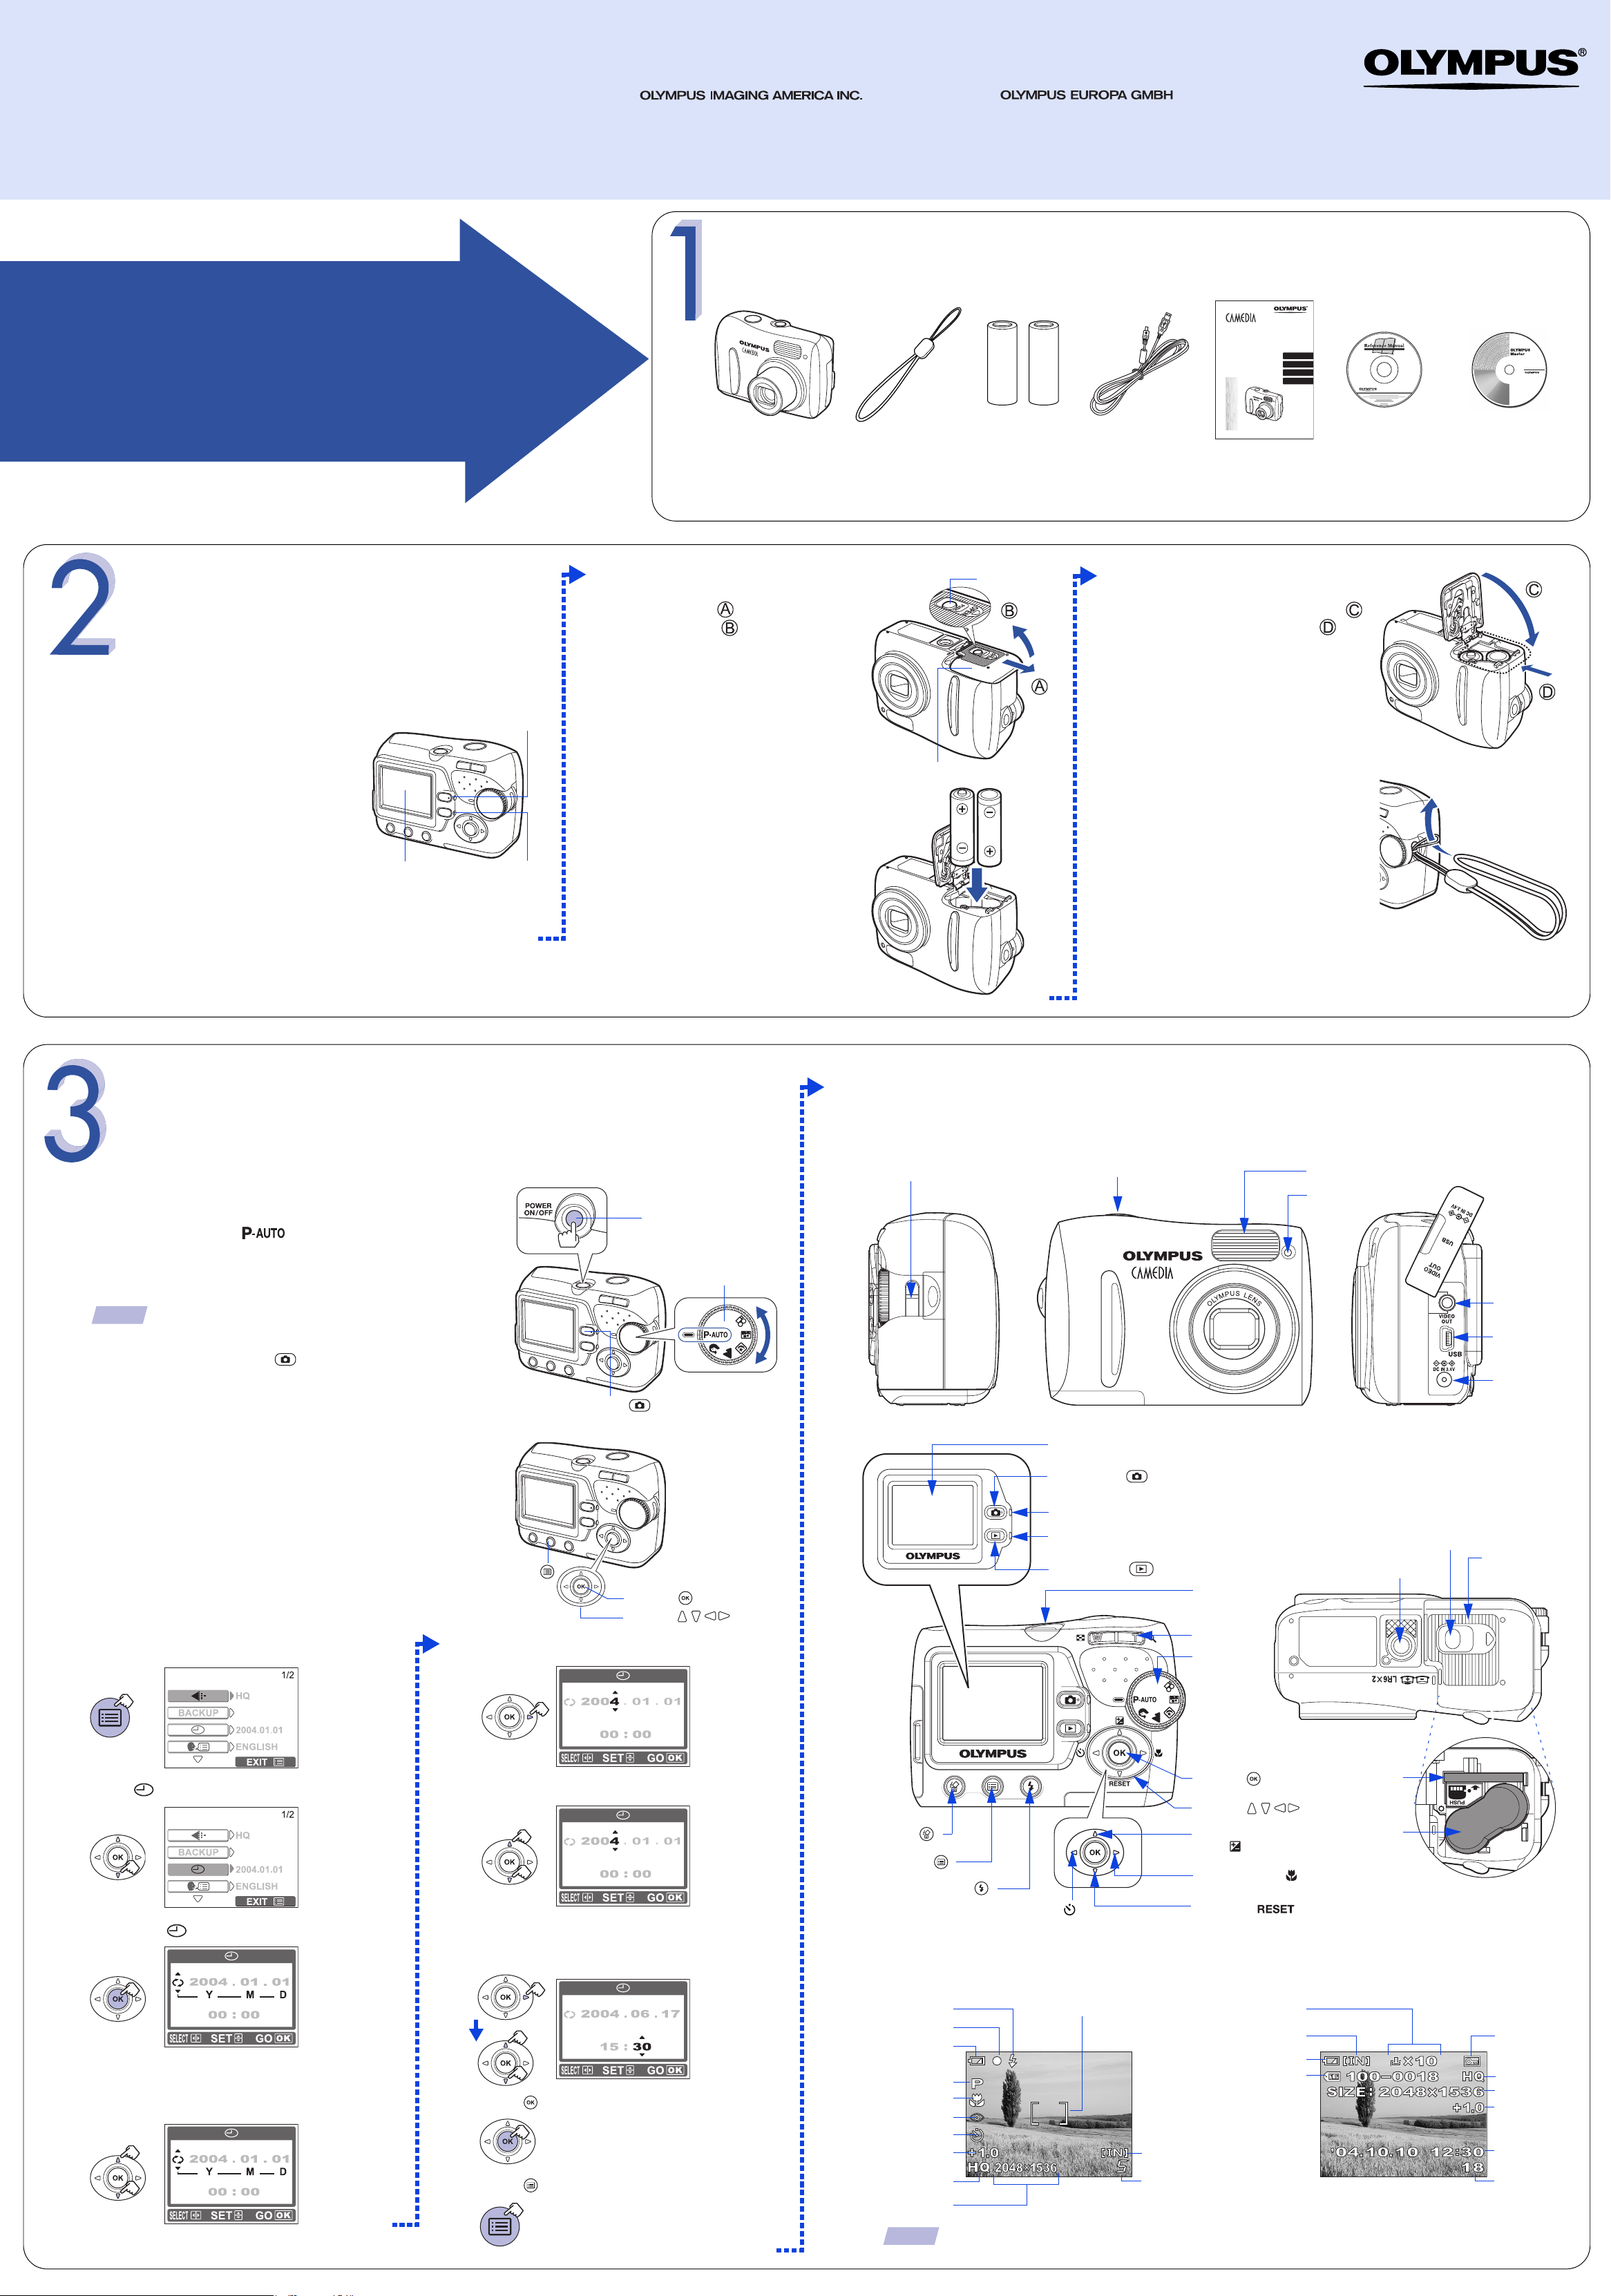
UNPACKING THE BOX CONTENTS
Gather your digital camera and the parts as shown in the illustration. If any accompanying item is missing or damaged, contact
the store where you purchased the camera.
START HERE
It is strongly recommended that you follow these step-by-step
numbered instructions to set up and quickly begin using your
new Digital camera.
Digital camera Strap AA (R6) alkaline
Wendenstrasse 14-18,
20097 Hamburg, Germany
http://www.olympus-europa.com
USB cable Basic manual Reference Manual
batteries (2)
DIGITAL CAMERA
APPAREIL PHOTO NUM
DIGITALKAMERA
CÁMARA DIGITAL
D-535 ZOOM
C-370 ZOOM
X-450
BASIC MANUAL
MANUEL DE BASE
EINFACHE ANLEITUNG
MANUAL BÁSICO
ÉRIQUE
ENGLISH..........2
FRANÇAIS.....40
DEUTSCH...... 78
ESPAÑOL.... 116
http://www.olympus.com/
OLYMPUS Master CD-ROM/
CD-ROM
Installation guide
PREPARING THE
CAMERA FOR USE
Before you begin using your Olympus Digital camera…
a. Loading the batteries
1 Make sure the camera is turned off.
• The monitor is off.
• The green lamp and the orange lamp
on the camera are off.
• The lens is not extended.
Monitor
Orange lamp
Green lamp
The following items are also included in the Digital camera package: video cable, warranty card, registration card (not provided in
some areas), and safety precautions booklet.
2 Holding the lock button, slide the
battery compartment/card cover in
the direction of , and then lift it in
the direction of .
3 Insert the batteries, making sure that
they are correctly oriented as shown
in the illustration.
Lock button
Battery compartment/card cover
4 Holding the batteries down with the
battery compartment/card cover,
close the cover in the direction of
and slide it in the direction of .
b.Attaching the strap
TURNING ON THE CAMERA
Turn the camera on and check the monitor indications.
a. Turning the Camera On (Shooting mode)
Set the mode dial to and press the power
switch.
• The camera turns on in the shooting mode.
• The lens extends and the monitor turns on.
TIPS
• To turn the camera off, press the power switch.
To maximize battery life, the monitor turns off and the
camera enters sleep mode after approximately 30
seconds of non-use.To reactivate the camera, press
the shutter button or .
b.Setting the Date and Time
Set the date and time before using the camera for
the first time.
The information will be recorded with each picture.
1 Display the menu.
Shooting button ( )
Menu button ( )
5 Move to the year field.
Power switch
Mode dial
OK button ( )
Arrow pad ( )
c. Camera Diagram and Controls
Now take a moment to familiarize yourself with the key areas of camera controls by reviewing the
illustrations.
Strap eyelet
Shutter button
Monitor
Shooting button ( )
Orange lamp
Green lamp
Playback button ( )
Power switch
Zoom button
Mode dial
Flash
Self-timer lamp
Tripod socket
Lock button
PUSH
VIDEO OUT jack
USB connector
DC-IN jack
Battery compartment/
card cover
OPEN
2 Select .
3 Display the screen.
4 Select the date format.
• The following steps show the procedure
used when Y-M-D is selected.
6 Set the year.
7 Repeat Steps 5 and 6 until all date/time fields
have been set.
• Time is entered using the 24-hour format.
8 Press to set the date and time.
Card slot
Erase button ( )
Menu button ( )
Flash mode button ( )
Self-timer button ( )
OK button ( )
Arrow pad ( )
Exposure compensation
button ( )
Macro mode button ( )
Reset button ( )
Battery compartment
Monitor Indications in Shooting Mode Monitor Indications in Playback Mode
Flash standby
Green lamp
Battery check
Shooting mode
Macro mode
Flash mode
Self-timer
Exposure compensation
AF target mark
Current memory
Print reservation,
Number of prints
Current memory
Battery check
File number
Protect
Record mode
Resolution
Exposure
compensation
Date and time
9 Press to exit the menu.
Record mode
Resolution
TIPS
Number of storable
still pictures
Depending on the camera settings, not all indicators will be displayed.
Number of frames
Printed in China
Page 2
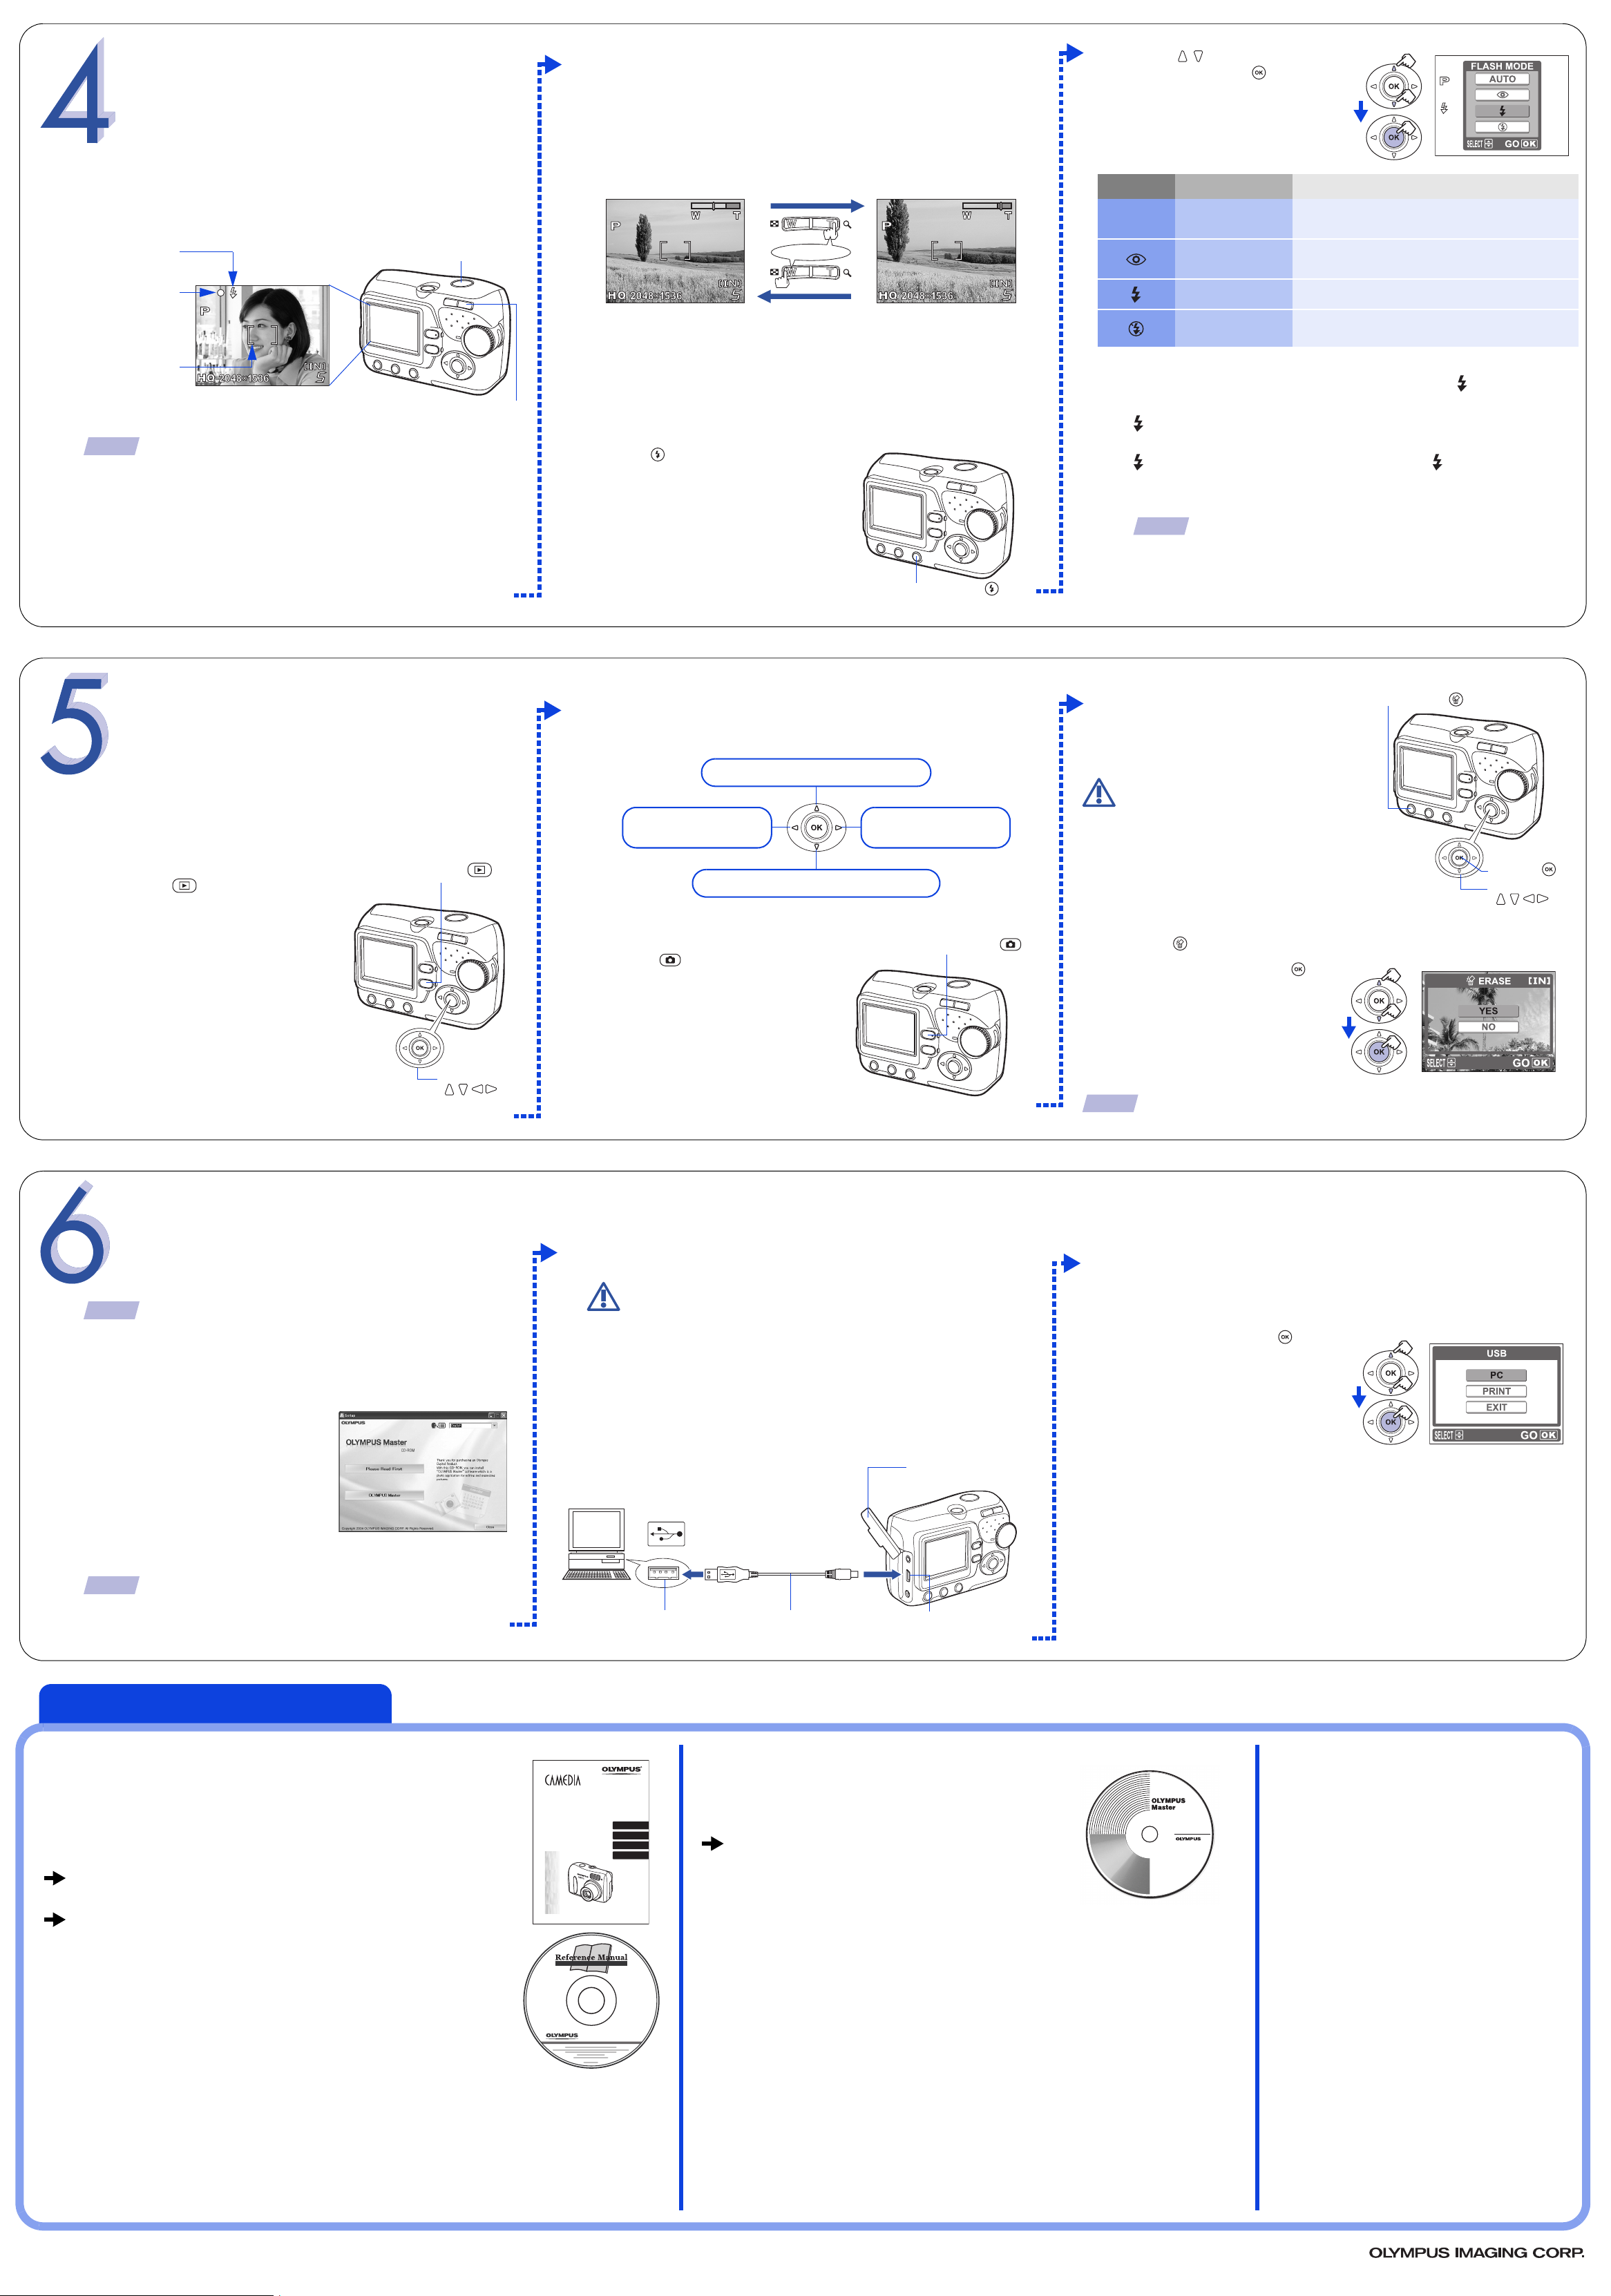
TAKING PICTURES
Let’s press the shutter button and take a picture – it’s easy.
b.Zooming
Use the zoom button to zoom in closer to the subject or zoom
out for a wide-angle shot.
2 Press to select the flash
mode, and press .
a. Taking a Picture
1 Position the AF target mark on the subject while looking at the
monitor and decide on composition.
(Lights when taking pictures
(Lights when the subject is in
(Indicates the area on which
Flash standby
with flash)
Green lamp
focus)
AF target mark
the camera is focused)
TIPS
Icons representing camera settings appear on the monitor, telling
you important information such as the flash and record modes,
battery life and the number of frames remaining.
2 Press the shutter button gently (halfway) to adjust the focus.
• The focus is properly set when the green lamp lights.
•The # indicator lights steadily when the flash is ready to fire.
Shutter button
Zoom button
Press toward W to zoom
out and get everything
into the picture.
c. Flash Modes
This digital camera features multiple flash modes. Choose
the mode best suited to the shooting conditions and the kind
of picture you want.
1 Press .
Press
Press toward T to choose
telephoto shooting and
make the subject bigger.
Icon Flash Mode Description
No
indication
Auto flash
Red-eye Reduction
Flash
Fill-in Flash
Flash Off
The camera automatically decides if the flash is
needed.
Reduces incidence of red eyes by emitting preflashes.
The flash always fires with every picture.
The flash does not fire regardless of the light
conditions.
3 When the shutter button is pressed halfway, the mark lights or
blinks.
lights: The flash is ready to fire when the shutter button is fully
depressed.
blinks: The flash is charging. Wait until the mark changes from
brinking status to steady.
TIPS
Not all flash modes are available depending on the shooting mode
selected. Refer to the Reference Manual for more information.
3 Press the shutter button completely to take the picture.
VIEWING AND ERASING
PICTURES
With a digital camera, you can easily view the photos you
want - and delete the ones you don’t.
a. Viewing Pictures
1 With the camera in the shooting
mode, press .
• Playback mode is set.
• The last picture taken appears in
the monitor.
Playback button ( )
Flash mode button ( )
2 Use the arrow pad to playback other pictures.
Jumps to the picture 10 frames back.
Displays the previous
picture.
Jumps to the picture 10 frames ahead.
• To return to the shooting mode,
press .
Displays the next
picture.
Shooting button ( )
b.Erasing Pictures
Deletes only the picture currently
displayed in the monitor.
Once erased, pictures cannot
be restored. Check each
Note
picture before erasing to avoid
accidentally erasing pictures
you want to keep.
1 Display the picture you want to
erase.
2 Press .
3 Select [YES], and press .
• The picture will be erased.
Erase button ( )
OK button ( )
Arrow pad
()
CONNECTING THE CAMERA TO A COMPUTER
Olympus makes it simple to connect your camera to a
computer and download pictures.
TIPS
Olympus recommends using the optional AC adapter to ensure a
consistent power supply when downloading images
a. Installing OLYMPUS Master
1 Insert the CD-ROM into the CD-
ROM drive.
• The OLYMPUS Master installation
screen is displayed.
Arrow pad
()
.
b.Connecting to a computer
Make sure that the camera is turned off before
connecting it to your computer.
Note
1 Make sure the camera is turned off.
• The monitor is off.
• The green lamp and the orange lamp on the camera are off.
• The lens is not extended.
2 Plug the USB cable provided with the camera into the USB port
on your computer.
Connector cover
TIPS
The “all-frame erase” function erases all frames stored in the camera. Refer
to the Reference Manual for more information.
3 Plug the other end of the USB cable into the USB connector on
your camera.
•
The camera starts communicating with the PC and the selection
screen for the USB connector is displayed on the camera’s monitor.
4 Select [PC], and press .
• When the camera is recognized
by the PC, a new icon appears
on the desktop.
2 Click the [OLYMPUS Master] button.
• Installation starts.
• Follow the on-screen instructions
to complete the installation.
TIPS
For more information on operating environment and installation
procedure of OLYMPUS Master, refer to the Reference Manual.
For advanced users
About the functions and
DIGITAL CAMERA
APPAREIL PHOTO NUM
DIGITALKAMERA
detailed instructions on
how to use them...
CÁMARA DIGITAL
D-535 ZOOM
C-370 ZOOM
X-450
BASIC MANUAL
MANUEL DE BASE
EINFACHE ANLEITUNG
MANUAL BÁSICO
See “BASIC MANUAL” to find out the capabilities of
your camera.
Insert the CD-ROM provided with the camera to your PC,
and refer to “REFERENCE MANUAL” on the CD-ROM for
more information.
• Take pictures using the optimal settings according to the
shooting conditions.
• Record movies.
• Increase the maximum number of pictures to take with an
optional xD-Picture Card inserted.
• Play back pictures on your TV using the video cable provided with the camera.
• Use the direct print function, connecting the camera and PictBridge-compatible
printer with the USB cable provided with the camera.
ÉRIQUE
ENGLISH..........2
FRANÇAIS..... 40
DEUTSCH ......78
ESPAÑOL ....116
Look for this mark.
USB connectorUSB cableUSB port
To enjoy the images
on your PC...
Insert the Olympus Master CD-ROM
provided with the camera to your PC, and
enjoy pictures with the OLYMPUS Master
software.
• Play back still pictures and movies.
• Perform the editing such as rotating and trimming of images.
• Manage images using the calendar function.
• Print images easily.
• Make online user registration of camera (confirm that your PC is
connected to Internet beforehand).
Technical Support (USA)
1-888-553-4448 (Toll-free)
8:00 AM - 10:00 PM ET
Monday - Friday
European Technical Customer
Support
00800 - 67 10 83 00 (Toll-free)
+49 180 5 - 67 10 83 or
+49 40 - 237 73 899 (Charged)
9:00 AM - 6:00 PM MET
Monday - Friday
© 2004
 Loading...