

Page 1

DIGITAL VOICE RECORDER V-90
Instructions
Always do a test recording to avoid recording problems
Page 2

CONTENTS
BEFORE YOUR FIRST RECORDING
Parts Identification 3
Liquid Crystal Display (LCD) 4
Installing the Battery 5
Changing the Battery 5
Clock Adjustment 6
BASIC OPERATIONS
Recording (REC) 7
Recording-Pause (REC PAUSE) 8
Playback (PLAY) 9
Playback-Pause (PAUSE) 10
Fast Playback 10
Fast Forward/Fast Reverse 11
Forward Skip (F-SKIP)/Reverse Skip (R-SKIP) 12
Erasing (ERASE) 13
MESSAGE FOLDER MANAGEMENT
Types of Folders 15
Selecting a Folder 15
Moving a Message Between Folders [A] and [B]
(MOVE) 15
ADDITIONAL FEATURES
Schedule Recording 16
Schedule Playback 16
Customized Alarm Playback 17
Schedule Notification 18
Recording with VCVA (VCVA REC)
(Variable Control Voice Actuator) 19
Hold (HOLD) 20
Remaining Memory Display 20
Checking Available Recording Time 21
ENTERING OPTIONS
Recording Mode (MODE) Setting 22
Microphone Sensitivity (MIC) Setting 22
VCVA Recording (VCVA REC) Setting 23
Alarm (ALARM) Setting/Cancellation 23
Beep Tone (BEEP) Setting 24
Current Time Setting 24
CARE IN HANDLING 25
BATTERY PRECAUTIONS 26
TROUBLESHOOTING 27
SPECIFICATIONS 28
ACCESSORIES (OPTIONAL) 28
2
Page 3
BEFORE YOUR FIRST RECORDING
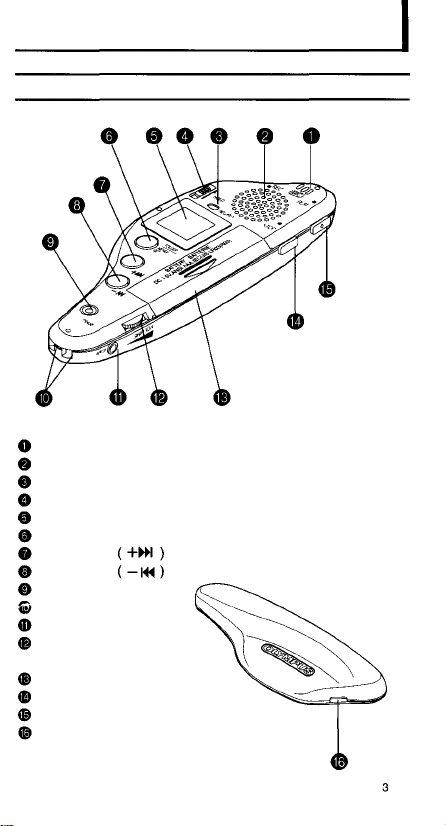
Parts Identification
Built-in microphone
Speaker
REC/PLAY indicator (LED)
HOLD switch
Liquid crystal display panel (LCD)
FOLDER/MENU button
Fast forward
Fast reverse
ERASE button
Strap holes
Earphone jack (EAR)
Volume control knob
(VOLUME)
Battery cover
STOP button
PLAY button
REC button
button
button
Page 4
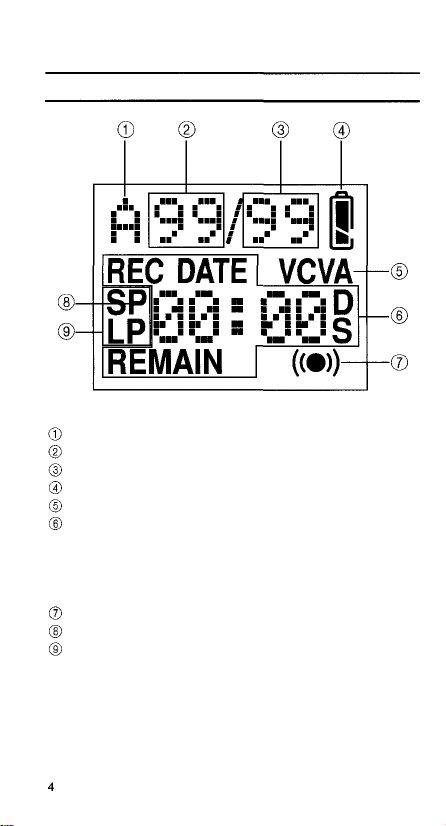
Liquid Crystal Display (LCD)
Current folder (A, B or S)
Current message number
Total number of messages in the folder
Remaining battery power
Voice-activated recording
• Current time
• Recording time remaining (REMAIN)
• Remaining message time
• Recording date (REC DATE)
• Menu and notice
Alarm
A.M./P.M. time (P)
Recording mode
Page 5
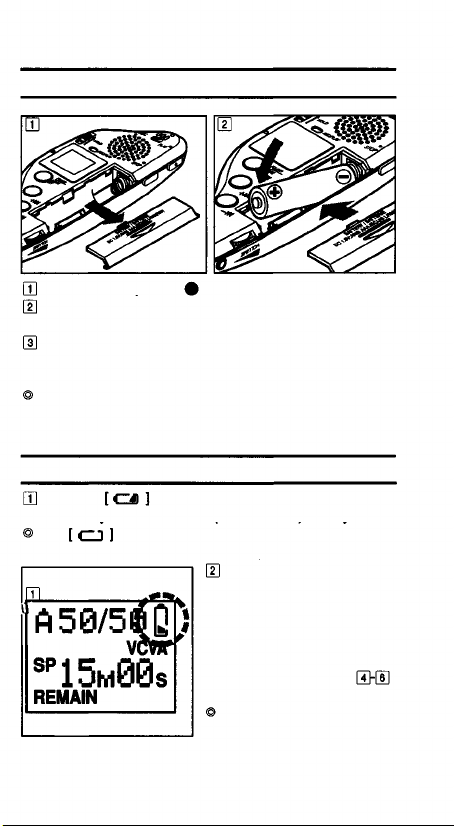
Installing the Battery
Slide the battery cover in the direction of arrow.
Insert an AAA (LR03 or R03) battery according to the
polarity (+, -) indications and close the battery cover.
[CLOCK] is displayed on the LCD and the voice
recorder enters the clock adjustment mode (see
on page 6).
If the battery cover is not closed tightly, [OPEN] is
shown on the LCD and the recorder will not function.
Make sure the cover is closed correctly.
Changing the Battery
When the
the battery with a new AAA (LR03 or R03) battery.
The
the voice recorder cannot be operated.
and
mark is shown on the LCD, replace
mark indicates that the battery is depleted
After the battery has been
replaced, [CLOCK] is
displayed on the LCD,
indicating that the recorder
is in the clock adjustment
mode. Adjust the clock to
the current time (see
on page 6).
The battery can be
removed easily by gently
pushing the [-] end.
5
Page 6

Clock Adjustment
Make sure that the HOLD
switch
Press and hold the
FOLDER/MENU button
for at least one second.
The LCD
[MODE].
Each time you press the
FOLDER/MENU button,
the displayed mode
changes:
When [CLOCK] is
displayed, the "hour" figure
will blink. Set the "hour" by
pressing the
button button
P.M. is indicated by a [P]
to the left of the "hour".
After setting the "hour",
press the FOLDER/MENU
button. When the "minute"
figures start to blink, set
the "minute" by pressing
the
button.
Each time you press the FOLDER/MENU button, the
blinking figures change: "year", "month" and "day". Adjust
each item in the same way as "hour" and "minute".
After setting the "day", press the FOLDER/MENU button
again to complete the clock adjustment.
If you press any button other than the FOLDER/MENU,
and
the clock adjustment mode will be canceled.
If no buttons are pressed for three minutes during clock
adjustment, the clock adjustment mode will be canceled.
Any adjustments that have been made will not take
6
effect.
buttons during clock adjustment,
is released.
will display the
Page 7
BASIC OPERATIONS
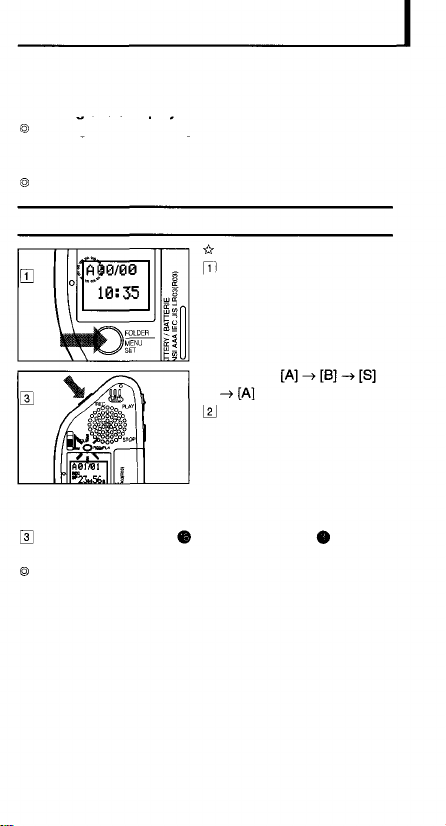
The V-90 has three folders: [A], [B] and [S].
Folders [A] and [B] are designed for use in normal
recording or alarm playback.
Messages can be arranged in each folder
Folder [S] is designed for use in schedule
management (see page 16).
Messages can be sorted by date
Recording (REC)
Normal recording
Press and release the
FOLDER/MENU button,
then select folder [A] or [B]
Each time you press the
FOLDER/MENU button,
the selected folder
changes
Select the recording mode
The recorder's default
setting is the SP mode
(about 33 minutes of
recording) To change the
recording mode, refer to
page 22
Press the REC button
red and recording starts
The LCD shows the current folder name, current
message No , total number of messages in the current
folder, recording mode and recording time remaining.
The LED indicator
lights
7
Page 8
Press the STOP button
to stop recording.
When available recording
time falls below 1 minute,
the red LED indicator
starts blinking.
Additional recording is not possible when [FULL] is
shown on the LCD. To continue recording, first erase
unnecessary messages (see page 13)
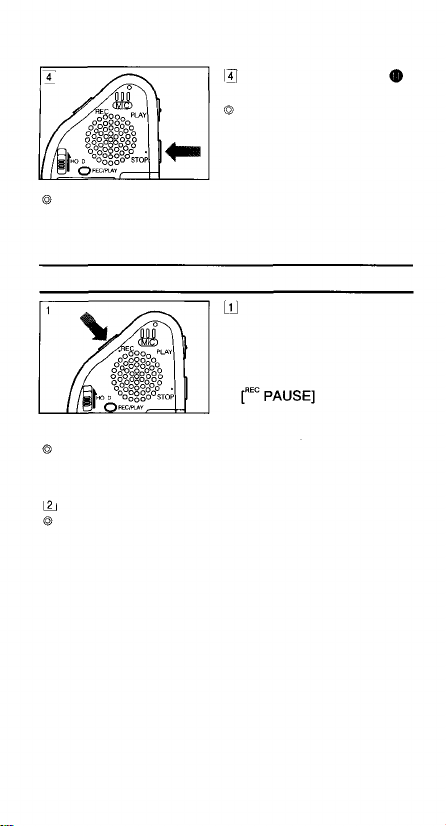
Recording-Pause (REC PAUSE)
Press the REC button
once during recording to
enter recording-pause
mode.
During recording-pause,
the LCD and the red LED
indicator goes out.
The Stop mode is automatically engaged if the recorder
is left in the recording-pause mode for 30 minutes or the
STOP button is pressed during recording-pause mode.
Press the REC button again to resume recording.
Using the recording-pause mode allows you to continue
recording in the same message.
is shown on
8
Page 9
Playback (PLAY)
Press the FOLDER/MENU
button to select a folder
(see page 15).
Press the
button so that the
LCD shows the message
No. to be played.
Press the PLAY button
The LED indicator lights
green and playback starts.
LCD display
For the first 4 seconds
playback:
[REC DATE], the date
(year, month, day) and the
time (hour:minute) of the
recording are displayed in
sequence.
More than 4 seconds after
the start of playback:
The remaining time of the
message being played is
Adjust the volume to a suitable level.
Press the STOP button to stop playback and enter the
Stop mode.
The Stop mode is automatically engaged at the end of
each message.
displayed.
9
Page 10

Playback-Pause (PAUSE)
Press the PLAY button
once during playback to
enter the Playback-Pause
mode. In the PlaybackPause mode, [PAUSE]
alternates with the current
message remaining
playback time on the LCD
and the green LED
The Stop mode is automatically engaged if the recorder
is left in the Playback-Pause mode for 30 minutes or the
STOP button is pressed during Playback-Pause mode.
Press the PLAY button again to resume playback.
indicator goes out.
Fast Playback
Press and hold the PLAY
button for more than 1
second in the Stop,
Playback or PlaybackPause mode to start fast
playback at 30% faster
than normal playback
Press the PLAY button again to start playback at the
normal speed.
Pressing the STOP button during fast playback stops
playback and engages the Stop mode.
speed.
10
Page 11

Fast Forward/Fast Reverse
Press and hold the Fast Forward
Reverse
than 1 second in Playback, Fast Playback or PlaybackPause mode. The message will be fast forwarded or fast
reversed for as long as the button pressed.
When the end of message (with fast forward) or
beginning of message (with fast reverse) is reached, the
recorder pauses (for about 1/2 second), then starts fast
forward or fast reverse of the next or previous message
(as long as the button is pressed throughout).
When the Fast Forward
button is released, normal playback or fast playback
resumes at that point.
When this is done during playback pause, playback will
start after Fast Forward/Fast Reverse.
button for more
or Fast
or Fast Reverse
Indicates playback or fast playback operation.
Indicates fast forward or fast reverse operation.
Indicates button operation. 11
Page 12

Forward Skip (F-SKIP)/Reverse Skip (R-SKIP)
Press and release (for less than a second) the Forward
Skip
Playback, Fast Playback or Playback-Pause mode.
Each time you press the button, the recorder skips to
the beginning of the next message or the beginning of
the message in the corresponding direction.
When the button is pressed in the Playback, Playback-
Pause or Fast Playback mode, playback or fast
playback automatically starts at the beginning of the skip
destination message.
When this is done during playback pause, playback will
start from the beginning of the message.
Pressing and holding the button for
more than 1 second in the Stop mode enables you to
forward skip or reverse skip messages successively.
Release the button to stop skipping.
or Reverse Skip button in the Stop,
Skips to the beginning of
message 1 and enters Playback
or Fast Playback mode.
Displays [END] on the LCD.
returns to the beginning of
message 3 and enters stop
mode.
Indicates playback or fast playback operation
Indicates forward skip or reverse skip operation
Indicates button operation.
Page 13

Erasing (ERASE)
Erasing a single message (ERASE)
select the message number to be erased.
After a message has been erased, the message number
of subsequent messages will be decreased by 1.
Erasing all messages in a folder (ALL ERASE)
Press the ERASE button again within 4 seconds. The
LCD shows [WAIT] and all of the messages in the
selected folder will be erased.
button in the Stop mode toPress the
Press the ERASE button
for less than 2 seconds.
The displayed message
No. blinks and the LCD
also shows [ERASE] and
[YES?] alternately.
Press the ERASE button
again within 4 seconds.
The LCD shows [ERASE]
and the selected message
will be erased.
Performing this operation
during playback, fast
playback or playbackpause will erase the
message being played.
Press the FOLDER/MENU
button to select the folder
to be erased (see page
15).
In the Stop mode, press
and hold the ERASE
button for more than 2
seconds. The folder name
and [ALL] blink. The LCD
also shows [ERASE] and
[YES?] alternately.
13
Page 14

When folder [S] is selected, you cannot erase all the
messages it contains. Only messages of a selected date
can be erased.
Resetting the recorder to the initial status (RESET)
Press and hold the STOP and ERASE buttons
simultaneously for more than 2 seconds. The LCD
shows [RESET] and [YES?] alternately.
Press the ERASE button again within 4 seconds. The
LCD shows [WAIT]. All messages in all folders are
erased and the recorder is reset to the default setting.
(This takes about 30 seconds.)
This also resets the current time and other settings
to their initial status, and the recorder enters the
clock adjustment mode.
If any button other than the ERASE button is pressed
while the LCD shows [ERASE], [ALL ERASE] or
[RESET] and [YES?] alternately or if the ERASE button
is not pressed again within four seconds of the start of
the alternate display, the message erase or reset
operation will be aborted and the LCD returns to the
previous display condition.
14
Page 15

MESSAGE FOLDER MANAGEMENT
Types of Folders
This recorder uses three folders, [A], [B] and [S].
Folders [A], [B]
These folders are convenient for recording ordinary
messages. Each folder can store up to 99 messages.
Folder [S]
This folder is convenient for schedule management. The
folder can store up to 15 messages on a given date and 99
messages in the whole folder. You can check the stored
schedule at the selected time. By using the alarm playback
feature, this folder automatically playbacks messages
(see page 18).
Selecting a Folder
Every time the
FOLDER/MENU button is
pressed for less than 1
second in the Stop mode,
the displayed folder is
switched:
Moving a Message Between Folders [A]
and [B] (MOVE)
While playing back (or
pausing playback) a
message in folder [A] or
[B], press and hold the
FOLDER/MENU button for
more than 1 second. This
will move the current
message to the last
position in the other folder
([A]
Messages in folder [S] cannot be moved to another
to [B] or [B] to
folder.
[A]).
15
Page 16

ADDITIONAL FEATURES
Schedule Recording
Schedule Playback
Press the FOLDER/MENU
button for less than 1
second and select folder
[S].
Select the date for which
you want to record a
schedule by pressing the
button.
Press the REC button. The
LED indicator lights red
and recording starts.
Press the STOP button to
stop recording. The
recorder enters the Stop
mode.
In the Stop mode, press
the
button for less than 1
second to select the date
for the schedule you want
to check.
When the
than 1 second in the Stop mode, the date where the
next message is recorded will be selected and the
recorder will enter the Stop mode.
Press the PLAY button. The LED indicator lights green
and all messages recorded for the selected date will be
played in succession.
Press the STOP button to stop playback. The recorder
enters the Stop mode.
Messages in folder [S] cannot be forward skipped or
reverse skipped in the Stop mode. Forward skip and
reverse skip are available only during playback, fast
playback or playback-pause operation.
16
button is pressed for more
Page 17

Customized Alarm Playback
Setting the alarm
Select the message you
want to use as an alarm
playback by pressing the
button so
that the message No. is
displayed on the LCD (see
page 12).
Press and hold the
FOLDER/MENU button for
more than 1 second to
enter the Options mode
(see page 22).
In the Options mode,
select the [ALARM] setting
and press the
button to switch the
alarm [ON]. (Press the
FOLDER/MENU button.)
The LCD shows
The "hour" and "minute"
will start to blink. Set the
desired alarm time by
pressing the
buttons
(see page 23).
Press the FOLDER/MENU button to continue through
the other options, or hit the STOP button to exit the
Options mode.
Alarm playback
At the specified alarm time, the recorder emits short
electronic beep tones.
Press any button while the beep tones are being emitted
to playback the message set for that time.
Press the STOP button to stop alarm playback.
The electronic beep tones stop automatically if no button
is pressed for 5 minutes after the beeping starts. The
message is not played back in this case.
/or
Page 18

To change the message used for alarm playback, set
the alarm setting once to [OFF] and then again to [ON].
If no message has been recorded in the current folder,
the alarm is composed only of electronic beep tones.
The alarm will be activated every day unless it is turned
[OFF].
Schedule Notification
When a message in folder [S] is selected for alarm
playback, the day's schedule can be listened to at the
selected time.
Press the FOLDER/MENU
button for less than 1
second and select folder
[S].
The LCD shows the
current date.
Set the alarm (see
"Setting the alarm", on
page 17).
At the set alarm time, the
recorder beeps. Press any
button to play all of the
messages recorded for the
current date.
Press the STOP button to
stop playback.
18
Page 19

Recording with the VCVA (VCVA REC)
(Variable Control Voice Actuator)
Press and hold the
FOLDER/MENU button for
more than 1 second to
enter the Options mode. In
the Options mode, select
[VCVA] and set it to [ON]
The VCVA activation level varies depending on the
microphone sensitivity.
In the Options mode, select the microphone sensitivity and
set it as follows. (see page 22).
HI: Recording will be activated at low volume.
LOW: Recording will be activated at high volume.
To determine the appropriate activation level, perform a
test recording now.
(see page 23).
Press the REC button.
When the recorder detects
a voice input, it
automatically starts
recording and the LED
indicator lights red. When
the voice input stops, the
recorder automatically
stops recording within
about 1 second and enters
the Standby mode.
In the Standby mode, the
LCD shows [STNBY] and
the red LED indicator
blinks.
19
Page 20

Hold (HOLD)
When the HOLD switch is
set to [HOLD], the current
mode is locked and all
buttons are disabled. This
helps to prevent accidental
pressing of buttons that
operations and is convenient when carrying the recorder
in a bag or pocket.
To conserve battery power, the LCD display disappears
when the voice recorder is set to the Hold status in the
Stop mode.
can activate undesired
Remaining Memory Display
During recording, the LCD shows the remaining memory
capacity in time.
When memory capacity
has run
out,
shows [00m00s] together
with [FULL]. Recording is
no longer possible.
If you want to record a
message, erase
unnecessary messages
(see page 13).
When 100 messages have
been recorded in a folder,
the LCD shows [FULL] and
recording is no longer
possible.
If you want to record a
message, use another
folder or erase
unnecessary messages.
the LCD
20
Page 21

When 16 messages have
been recorded for a
specific date in folder [S],
the LCD shows [FULL] and
recording is no longer
possible.
If you want to record a
message, erase
unnecessary messages.
Checking Available Recording Time
Press and hold the STOP
button in the Stop mode.
The LCD shows the
recording time remaining,
current message number,
total number of messages
in the folder and remaining
battery power for as long
as the button is pressed.
While using folder [S], the
LCD will display the total
number of messages in
folder [S]. This is a handy
way to determine if you
are near the message limit
(99 messages per folder).
21
Page 22

ENTERING OPTIONS
Press and hold the FOLDER/MENU button for more
than 1 second in the Stop mode to enter the Options
mode.
In the Options mode, each time you press the
FOLDER/MENU button the displayed setting item
changes in the following order:
To exit from the Options mode, press any button except
the FOLDER/MENU,
If no buttons are pressed for three minutes during
Options mode, the Options mode will be canceled.
buttons.
Recording Mode (MODE) Setting
In the Options mode,
display [MODE] and press
the
button to switch the
recording mode:
SP: Standard Playback mode (recording time approx. 33
minutes)
LP: Long Playback mode (recording time approx. 90
minutes)
Press the FOLDER/MENU button to go to the next
setting item.
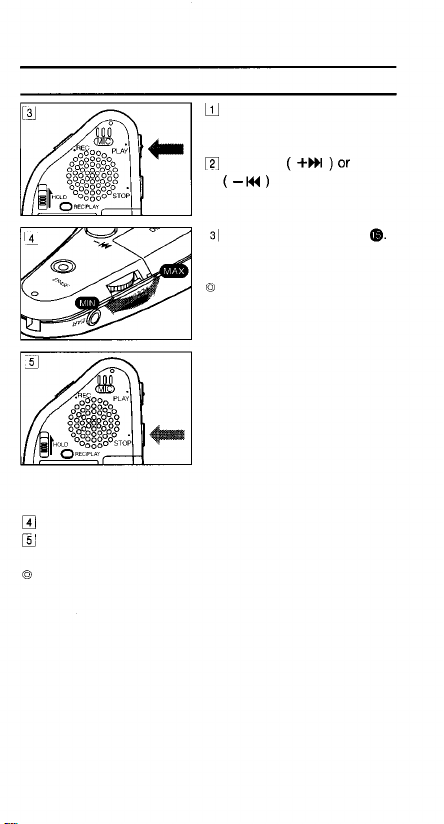
Microphone Sensitivity (MIC) Setting
In the Options mode,
display [MIC] and press
the
button to switch the
microphone sensitivity:
HI: High Sensitivity mode recommended.
LOW: Low Sensitivity mode. Use this mode when there is
a lot of background noise.
Page 23

The microphone sensitivity setting also affects the
VCVA activation level.
Press the FOLDER/MENU button to go to the next
setting item.
VCVA Recording (VCVA REC) Setting
In the Options mode,
display [VCVA REC] and
press the
button to switch
the VCVA recording
between ON and OFF.
Press the FOLDER/MENU button to go to the next
setting item.
Alarm (ALARM) Setting/Cancellation
In the Options mode,
display [ALARM] and press
the
button to switch the alarm
setting between ON and
OFF.
After switching [ALARM] ON, each time you press the
FOLDER/MENU button "minute" and "second" figures
will blink in succession. Select the values for each item
by pressing the
the FOLDER/MENU button.
When you have finished setting an item, press the
FOLDER/MENU button to go to the next setting item.
button and pressing
23
Page 24

Beep Tone (BEEP) Setting
In the Options mode,
display [BEEP] and press
the
button to switch the beep
tone between ON and
OFF.
When [BEEP] is OFF, no electronic beep tone will be
produced when a button is pressed (but the alarm tone
will still be generated).
When you have finished setting an item, press the
FOLDER/MENU button to go to the next setting item.
Current Time Setting
See "Clock Adjustment" on page 6.
24
Page 25

CARE IN HANDLING
Avoid subjecting the unit to direct
sunlight, high temperature, high
humidity or strong magnetic fields.
If the unit is exposed to water
(especially rain or condensation),
wipe it off with a clean, dry cloth.
Always avoid contact with salt
components.
Do not use alcohol, thinner or other
organic compounds for cleaning.
Do not place the unit on top of a
television, refrigerator or other
electrical equipment.
Be careful not to get dust or sand
on the unit. This may damage the
unit and prevent operation.
Do not subject the unit to strong
vibration or shock.
This may make it impossible for the
unit to playback what you have
recorded.
If a magnetic card (i.e. ATM card or
credit card) is placed too close to
the earphone, damage to the data
stored in the magnetic card may
occur.
25
Page 26

BATTERY PRECAUTIONS
Always use the battery correctly. Fluid leakage, heat
generation or explosion may occur if the battery is used
incorrectly. When the battery is replaced, be sure the +
- polarity position is correct.
Some batteries are the same size but have different
voltages.
Note the difference between dry type and rechargeable
batteries. Read the explanation for the batteries before
using them.
When there is fluid leakage, wipe off the fluid from the
battery compartment and then insert the battery.
Remove the battery when the unit is not used for more
than one month.
If a battery is short-circuited, disassembled, charged or
thrown into a fire, damage or ignition may occur.
Poor contact may occur if the + - polarity symbols are
obscured with oil or sweat. Wipe off the battery with a
clean cloth before use.
Be sure to bring extra batteries if the unit will be used for
long periods of time, i.e. lengthy speeches or lectures.
26
Page 27

TROUBLESHOOTING
Nothing happens when an operation button is
Q
pressed.
• The unit may be set to the [HOLD] status.
A
• The battery may be depleted.
• The battery may be inserted incorrectly.
• The battery cover may not be closed properly.
No sound is output.
Q
• The volume may be set to the minimum level.
A
• The earphone plug may be plugged into the unit.
Recording is not possible.
Q
• The available recording time in the selected folder
A
may have been reached [00m00s].
• The number of recorded messages in the selected
folder may have reached 99.
• The number of messages of the same date in folder
[S] may have reached 15.
The recording level is low.
Q
The microphone sensitivity may be set to [LOW].
A
The playback speed is too high.
Q
The unit may be set to fast playback.
A
Operation is not normal.
Q
To recover, remove the battery and press and hold
A
the erase button for more than 10 seconds.
27
Page 28

SPECIFICATIONS
Recording media: Built-in flash memory
Recording time: SP mode: Approx. 33 min.
Speaker: 23 mm diameter Dynamic internal
Practical Max. Output: 90 mW
Earphone jack: 2.5 mm diameter, impedance 8
Power source: One AAA (LR03 or R03) battery
Continuous Battery Duration Time:
Dimensions: 4.6 (L) x 1.6 (W) x 0.6 (T) inches
Weight: 1.6 oz (45g) (including battery)
Your recorded contents are for your personal use or
pleasure only. It is prohibited to use the tapes to record
copyrighted material without permission of the copyright
holders according to copyright law.
Specifications and design are subject to change without
notice for improvement of performance.
ACCESSORIES (Optional)
• Earphone: E98
• Connecting cord: KA232
(For connection to other equipment, such as earphone
jack to microphone jack.)
LP mode: Approx. 90 min.
speaker
Recording time approx. 10 hours
(using alkaline dry cell battery)
(116(L)x40(W)x16(T)mm)
Please contact an Olympus service for further information.
Olympus homepage: http://www.olympus.com
Customer support: 1-800-622-6372
28
Page 29

USA RFI
This equipment has been tested and found to comply with the
limits for a Class B digital device, pursuant to part 15 of the
FCC Rules. These limits are designed to provide reasonable
protection against harmful interference in a residential
installation. This equipment generated, uses and can radiate
radio frequency energy and, if not installed and used in
accordance with the instructions, may cause harmful
interference to radio communications. However, there is no
guarantee that interference will not occur in a particular
installation. If this equipment does cause harmful interference
to radio or television reception, which can be determined by
turning the equipment off and on, the user is encouraged to try
to correct the interference by one or more of the following
measures:
• Reorient or relocate the receiving antenna.
• Increase the separation between the equipment and
receiver.
• Connect the equipment into an outlet on a circuit different
from that to which the receiver is connected.
• Consult the dealer or an experienced radio/TV technician for
help.
Canadian RFI
This digital apparatus does not exceed the Class B limits for
radio noise emissions from digital apparatus as set out in the
Radio interference Regulations of the Canadian Department
of Communications.
Cet apparail numerique ne depasse pas les limites de
Categorie B pour les emissions de gruit radio emanant
d'appareils numeriques, tel que prevu dans les Reglements
sur I'lnterference Radio du Department Canadian des
Communications.
29
Page 30

San-Ei Building, 22-2, Nishi Shinjuku 1-chome, Shinjuku-ku,
Two Corporate Center Drive, Melville, NY 11747-3157, U.S.A.
(Letters) Postlach 10 49 08. 20034 Hamburg. Germany.
2-8 Honduras Street, London EC1Y 0TX, United Kingdom,
"CE" mark indicates that this product complies with the
European requirements for safety, health, environment and
customer protection.
La marque "CE" indique que ce produit est conforme aux
exigences
I'environnement
Durch die CE-Kennzeichnung wird slchergestellt,
Produkt die
Sicherheit, Gesundheit, Umwelt und
II marchio "CE" indica che questo prodotto e conforme alle
norme europee per la tutela della slcurezza, della salute,
dell'ambiente e degii acquirenti.
La marca "CE" indica que este producto cumple con los
requisitos europeos sobre seguridad, salud, entorno y
protecci n al cliente.
OLYMPUS OPTICAL CO., LTD
Tokyo, Japan. Tel. 03-3340-2211
OLYMPUS AMERICA INC.
Tel. 631-844-5000/1-800-622-6372
OLYMPUS OPTICAL CO. (EUROPA) GMBH.
(Premises/Goods delivery) Wendenstrasse 14-16,
20097 Hamburg, Germany. Tel. 040-237730
OLYMPUS OPTICAL CO., (U.K.) LTD.
Tel. 0171-253-2772
europeennes
europaischen
pour la
securite,
la
et la protection du consommateur.
Anforderungen
sante,
daB
hinsichtlich
Benutzerschutz
dieses
erfullt.
E1-2586-01
 Loading...