

Page 1
OLYMPUS
DIGITAL CAMERA
STYLUS TOUGH-80001
_1 TOUGH-8000
instruction Manual
Page 2
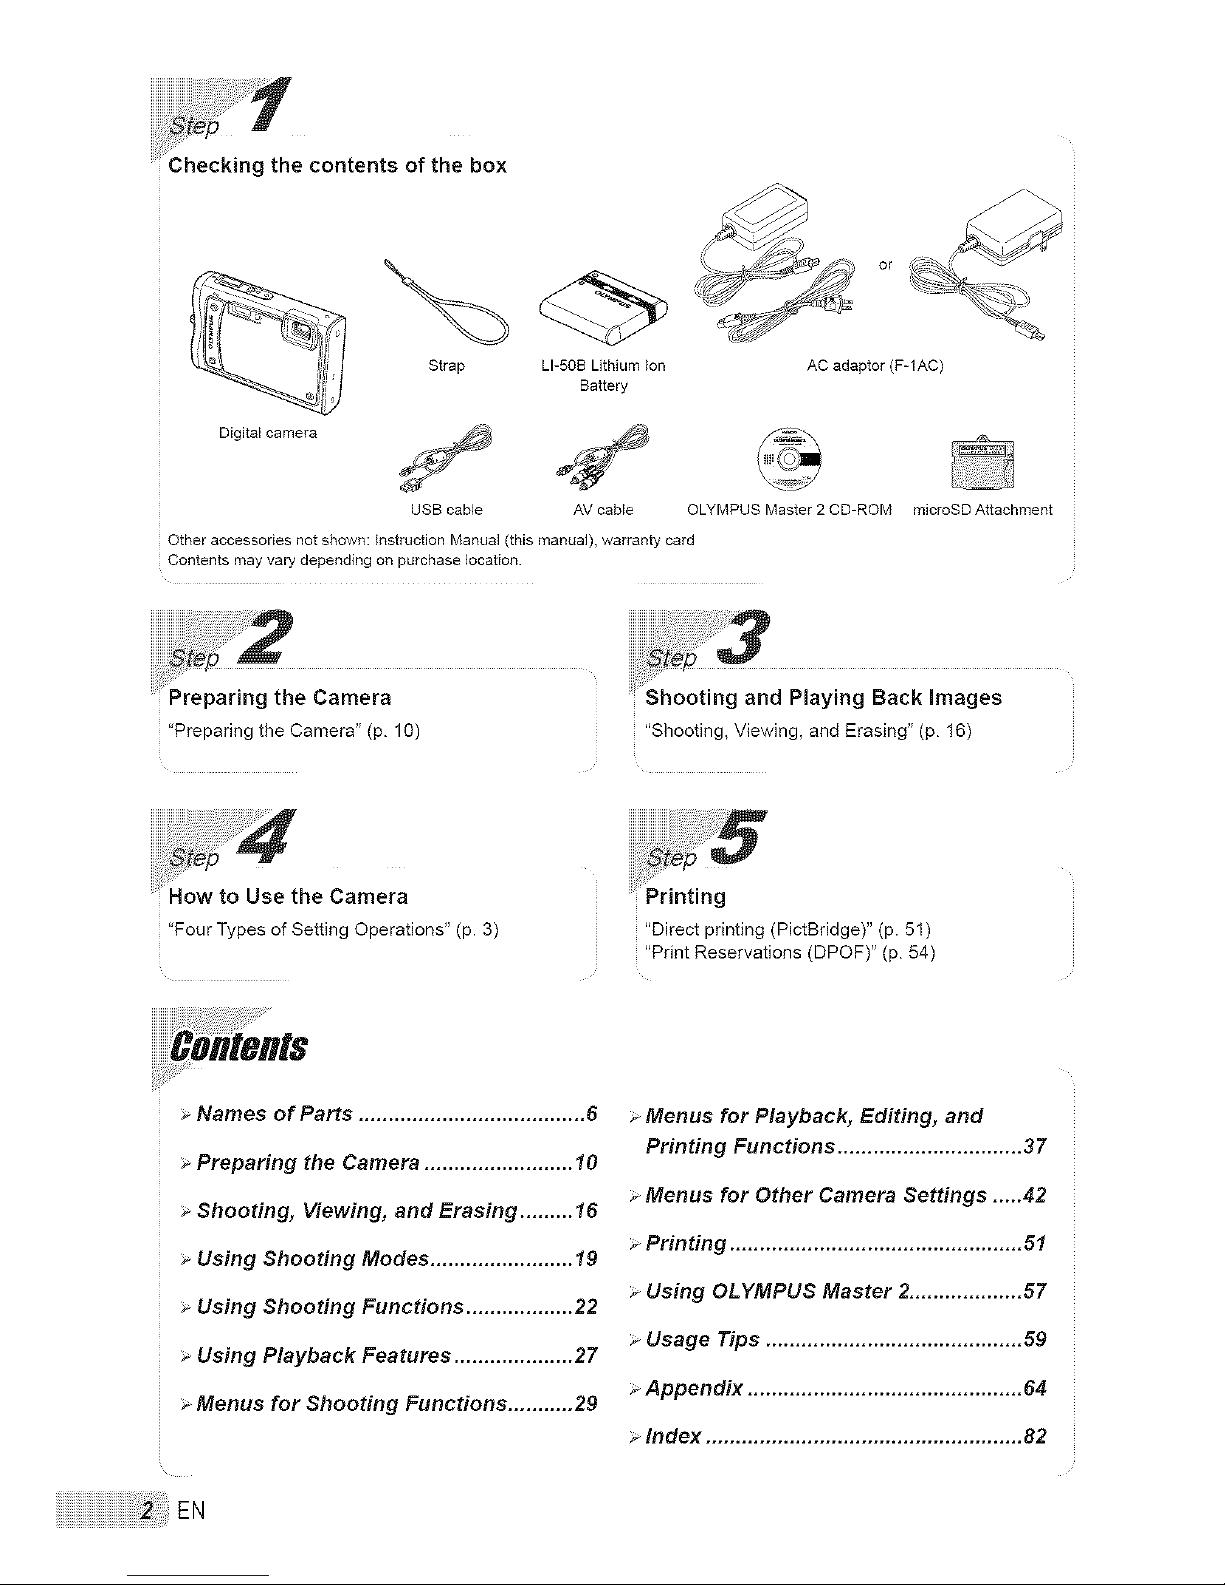
..... econtentsoft.e bo×
Digital camera
Strap LI-5OB Lithium ion AC adaptor (F-1AC)
Battery
USB cable AV cable OLYMPUS Master 2 CD-ROM microSD Attachment
Other accessories not showm instruction Manual (this manual), warranty card
Contents may vary depending on purchase location.
paring the Camera
"Preparing the Camera" (p. 10) "Shooting, Viewing, and Erasing" (p. 16)
"Four Types of Setting Operations" (p. 3) "Direct printing (PictBridge)" (p. 51)
"Print Reservations (DPOF)" (p. 54)
> Names of Parts ...................................... 6
> Preparing the Camera ......................... 10
> Shooting, Viewing, and Erasing ......... 16
> Using Shooting Modes ........................ 19
> Using Shooting Functions .................. 22
> Using Playback Features .................... 27
> Menus for Shooting Functions ........... 29
> Menus for Playback, Editing, and
Printing Functions ............................... 37
> Menus for Other Camera Settings .....42
> Printing ................................................. 51
> Using OLYMPUS Master 2................... 57
> Usage Tips ........................................... 59
> Appendix .............................................. 64
> Index ..................................................... 82
Page 3
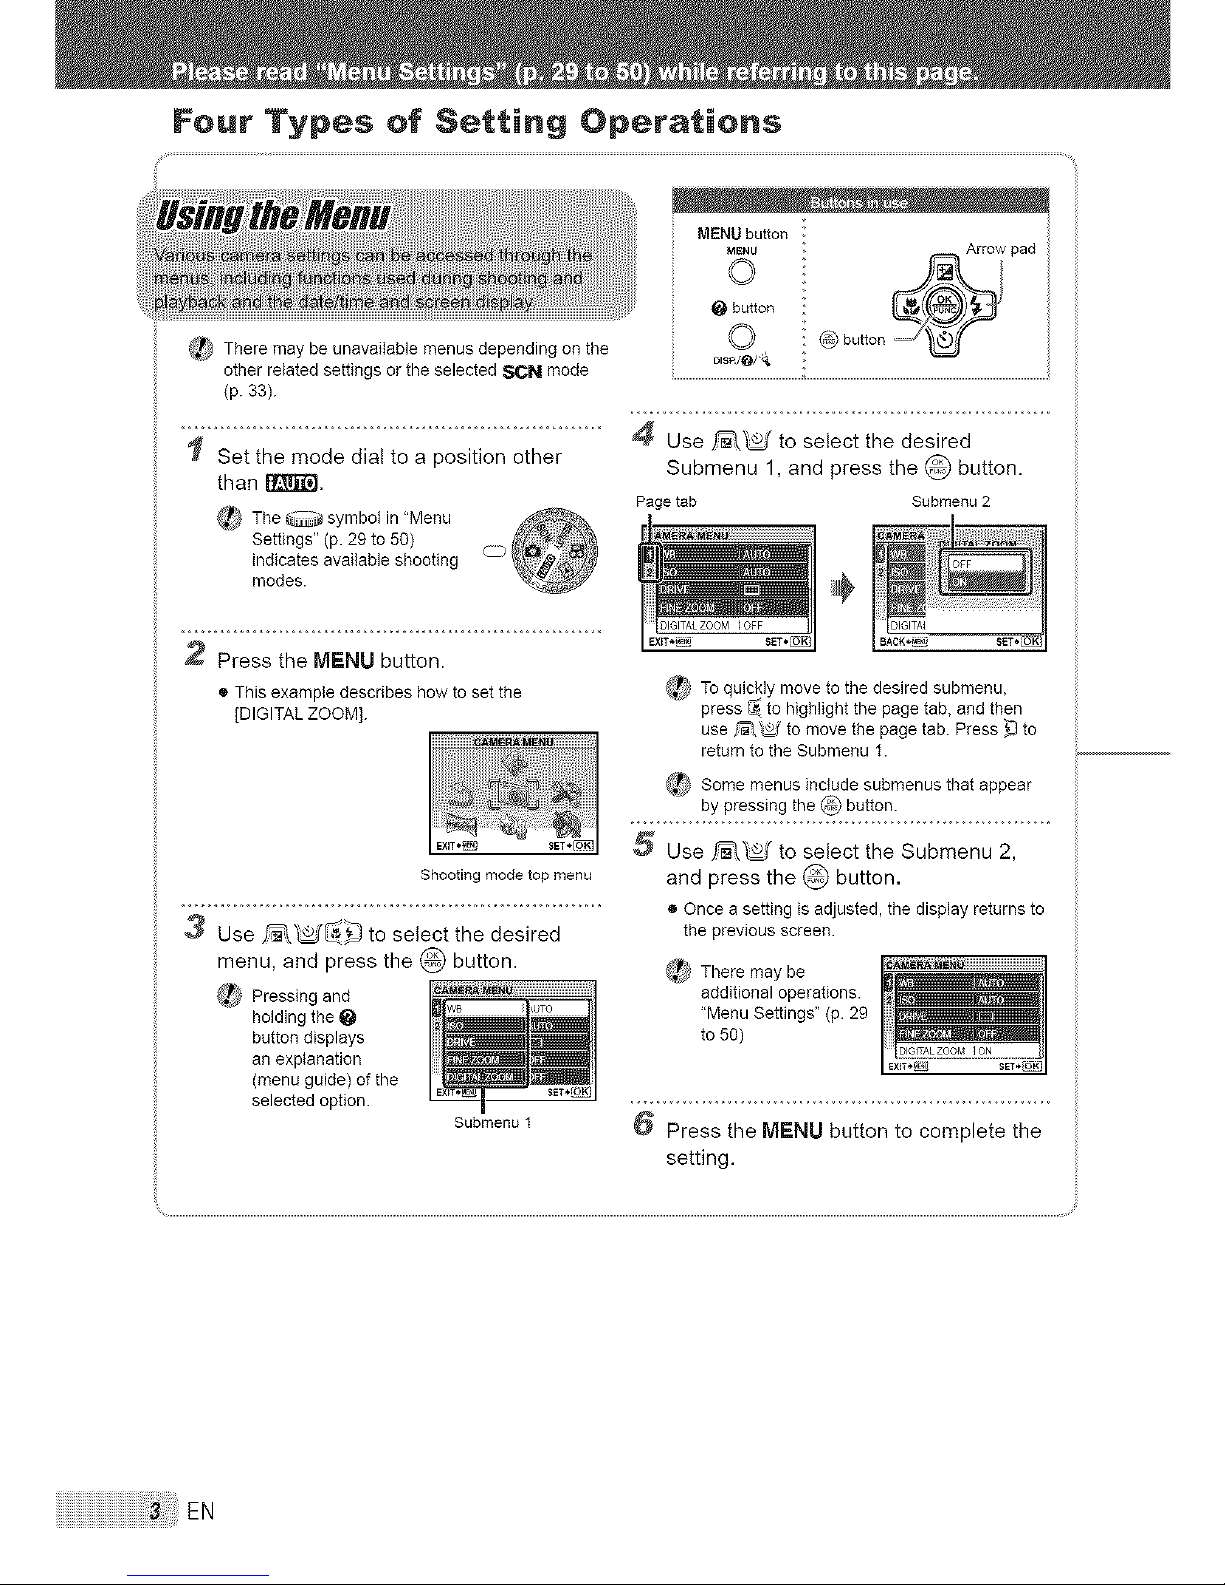
Four Types of Setting Operations
MENUbutton
MENU Arrowpad
° @
button
button
_ There may be unavailable menus depending on the
ether related settings or the selected 810N mode
(p. 33).
.................................................................................... 4 Use _W to select the desired
Set the mode dial to a position other Submenu 1, and press the @ button.
than I_.
Pagetab Submenu 2
_ The _._&_)symbol in "Menu _? _
Settings" (p. 29 to 50) 4 _'M_ I
indicates available shooting
modes.
Press the MENU button.
® This example describes how to set the @_ To quickly move to the desired submenu,
[DIGITAL ZOOM]. press _ to highlight the page tab, and then
use )a'_f to move the page tab. Press _ to
i _ return to the Sub .... I.
_S ........ include sub..... that appear
Use _ to select the Submenu 2,
Shooting mode top menu and press the @ button.
....................................................................._ • Once a setting is adjusted, the display returns to
J Use _ to select the desired the previous screen.
menu, and press the @ button. _!_
There
may
be
_ Pressing and additional operations.
holding the _ "Menu Settings" (p. 29
button displays to 50)
an explanation
(menu guide) of the
selected option.
Sub..... I _-Press'the MENUbutton to comDlete_the -
/
setting.
EN
Page 4
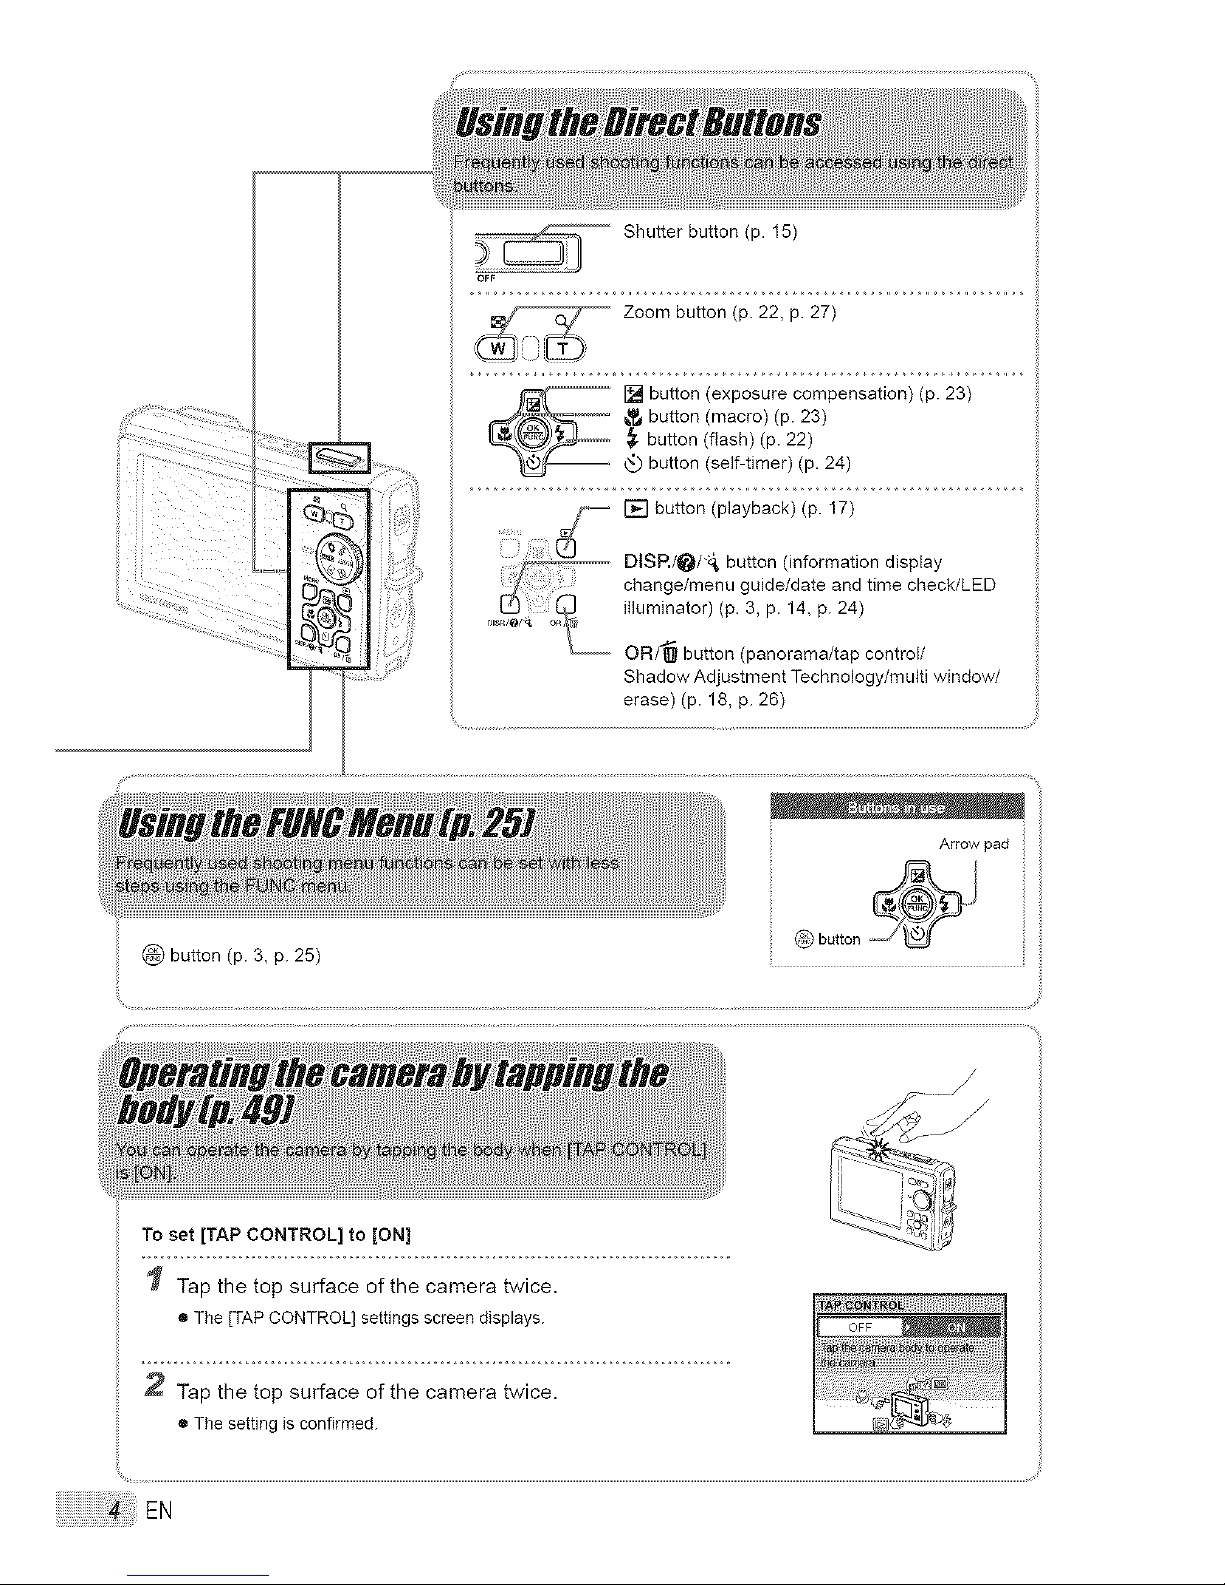
[] button (exposure compensation) (p. 23)
button (macro) (p. 23)
_, button (flash)(p. 22)
button (self-timer) (p. 24)
_ [] button (playback) (p. 17)
D_SP./e/_,butto_(_nf.... t_ond_sp_ay
change/menu guide/date and time check/LED
,, iItuminator) (p. 3, p. 14. p. 24)
OR/_ button (panorama/tap control/
Shadow Adjustment Technology/muki window/
erase) (p. 18, p. 26)
To set [TAP CONTROL] to [ON]
Tap the top surface of the camera twice,
• The [TAP CONTROL] settings screen displays.
2 Tap the top surface of the camera twice.
• The setting is confirmed.
Page 5
Menu _nde×
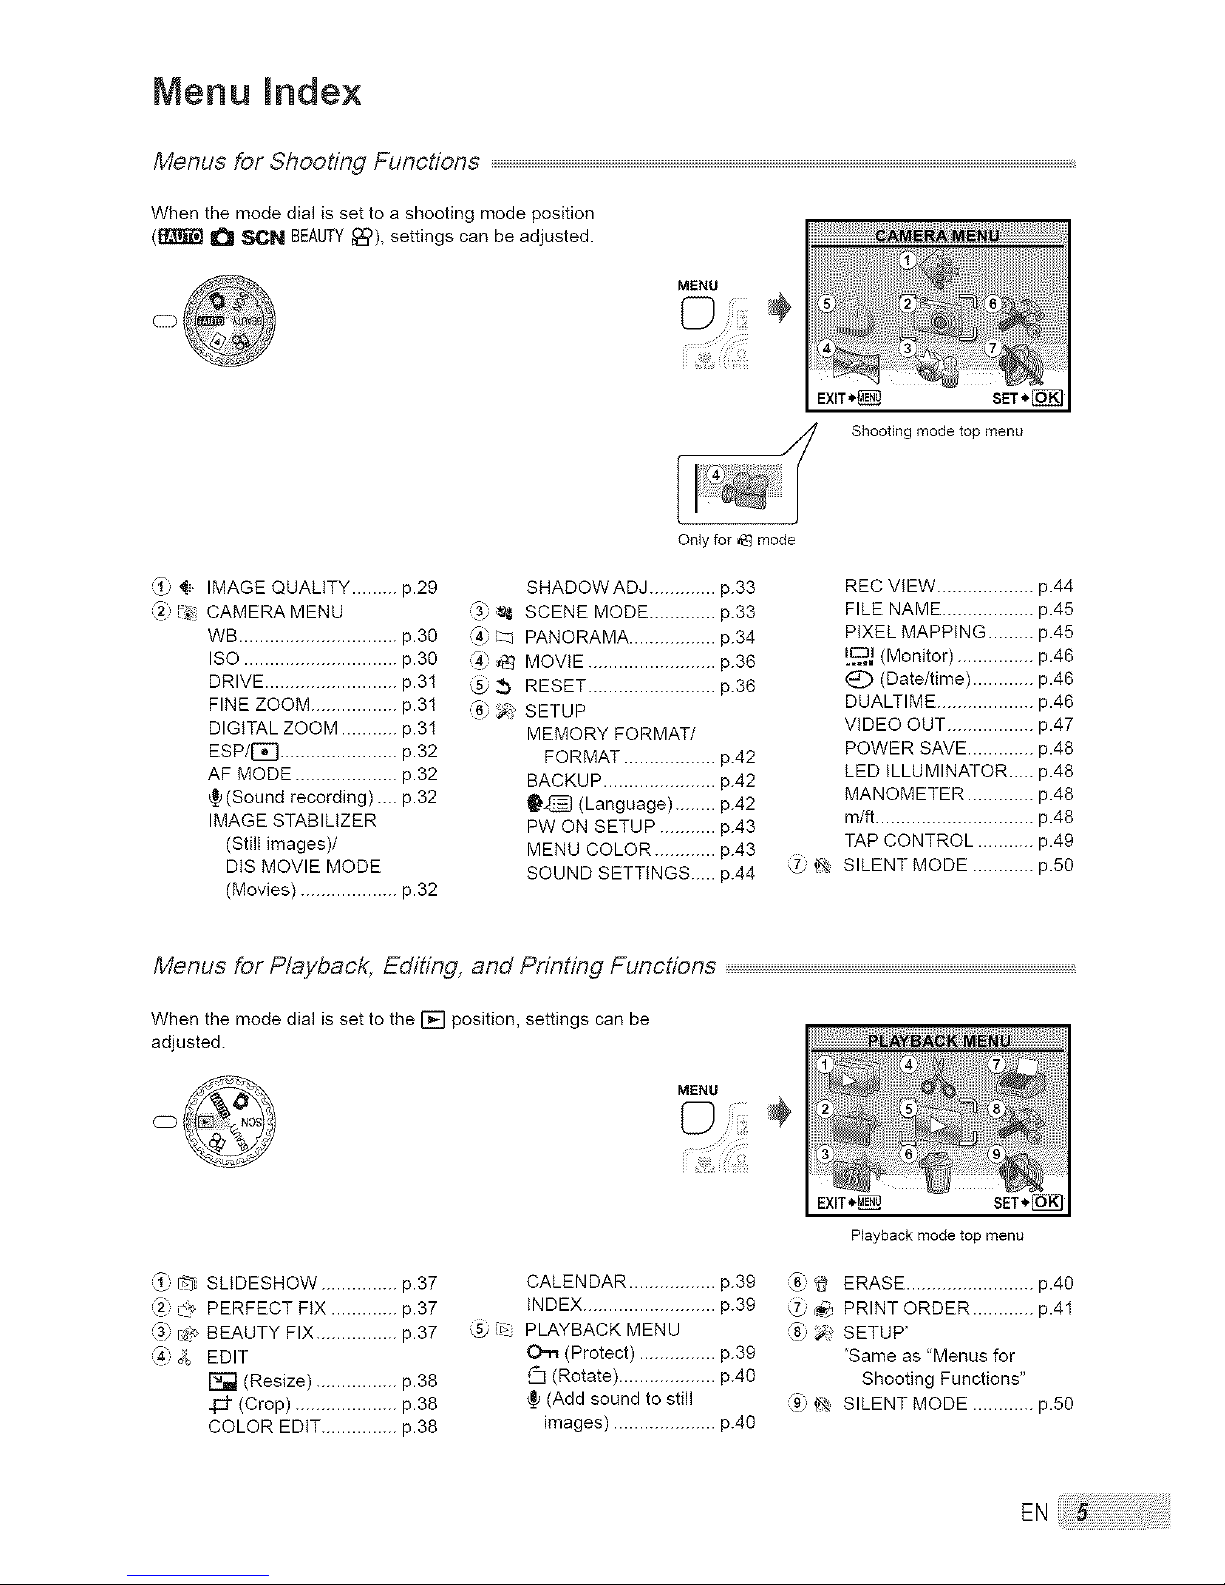
Menus for Shooting Functions ......................................................................................................................................................................................................................................................................................................................................................................................................,
When the mode dial is set to a shooting mode position
(_ _ ,_C_N BEAUTY_:_), settings can be adjusted.
_: _, IMAGE QUALITY ......... p.29
_2 :_ CAMERA MENU
WB ............................... p.30
ISO .............................. p.30
DRIVE .......................... p.31
FINE ZOOM ................. p.31
DIGITAL ZOOM ........... p.31
ESP/[_ ....................... p.32
AF MODE .................... p.32
_ (Sound recording) .... p.32
IMAGE STABILIZER
(Stilt images)/
DIS MOVIE MODE
(Movies) ................... p.32
Only for _ mode
SHADOW ADJ ............. p.33
SCENE MODE ............. p.33
PANORAMA ................. p.34
MOVIE ......................... p.36
RESET ......................... p.36
SETUP
MEMORY FORMAT/
FORMAT .................. p.42
BACKUP ...................... p.42
l_'_ (Language) ........ p.42
PW ON SETUP ........... p.43
MENU COLOR ............ p.43
SOUND SETTINGS..... p.44
Shooting mode top menu
REC VIEW ................... p.44
FILE NAME .................. p.45
PIXEL MAPPING ......... p.45
[.c_.J (Monitor) ............... p.46
_) (Date/time) ............ p.46
DUALTIME ................... p.46
VIDEO OUT ................. p.47
POWER SAVE ............. p.48
LED ILLUMINATOR..... p.48
MANOMETER ............. p.48
m/ft ............................... p.48
TAP CONTROL ........... p.49
_ SILENT MODE ............ p.50
Menus for Playback, Editing, and Printing Functions
When the mode dial is set to the [] position, settings can be
adjusted.
MENU
© ÷
_: I_ SLIDESHOW ............... p.37
_ 2:_, PERFECT FIX ............. p.37
3_i;_ BEAUTY FIX ................ p.37
_4 2_ EDIT
[_ (Resize) ................ p.38
4:::J"(Crop) .................... p.38
COLOR EDIT ............... p.38
CALENDAR ................. p.39
INDEX .......................... p.39
,[_. PLAYBACK MENU
(Protect) ............... p.39
_q (Rotate) ................... p.40
(Add sound to still
images) .................... p.40
Playback mode top menu
_6)_ ERASE ......................... p.40
_ PRINT ORDER ............ p.41
_8 _: SETUP"
*Same as 'Menus for
Shooting Functions"
_9 _ SILENT MODE ............ p.50
ENiiiii_i_ii_i_iii_i!_!_!!_!_!_!_!_!_!_!_!_!_!_!_!_!_!_!_!_!_!_i_i!_!_i_i_i_i_!!i!i!i!i!_!_
Page 6
of Parts
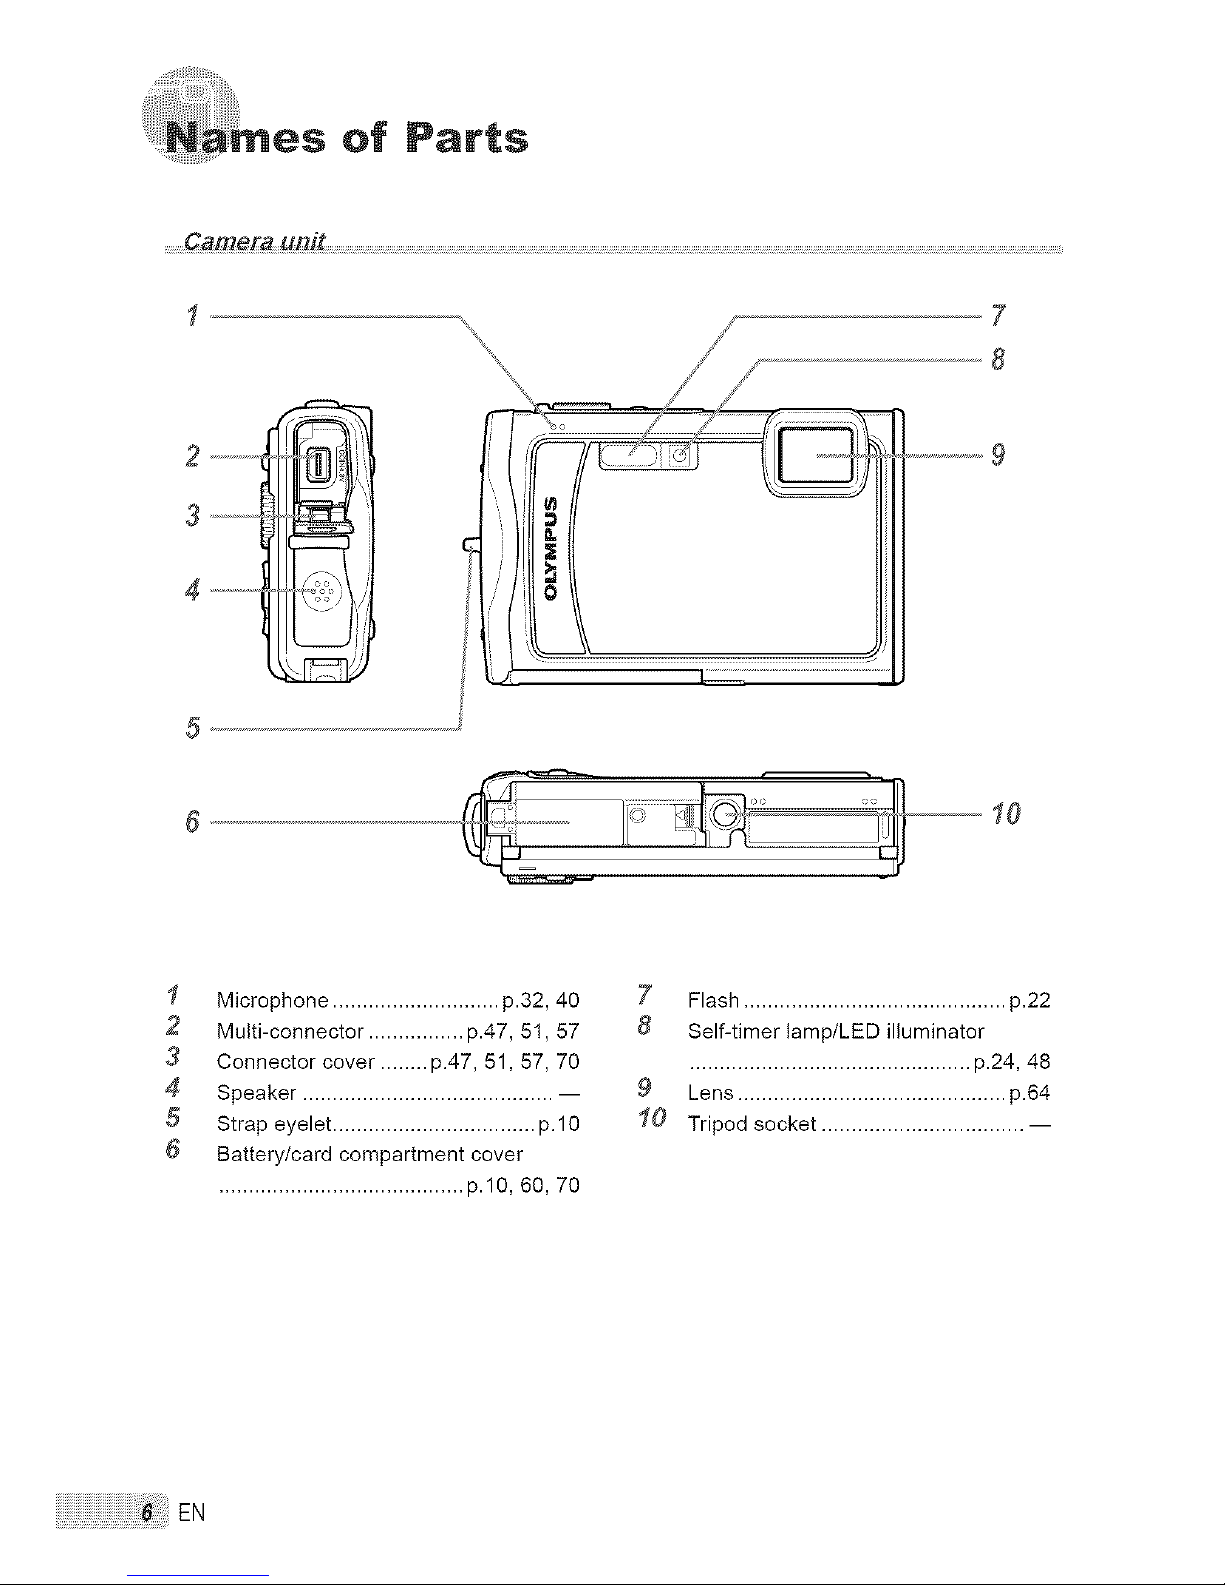
........Camera unit
..........
7
8
le
I Microphone ............................ p.32, 40
2 Multi-connector ................ p.47, 51, 57
3 Connector cover ........ p.47, 51, 57, 70
4 Speaker .......................................... --
5 Strap eyelet .................................. p.lO
6 Battery/card compartment cover
......................................... p.lO, 60, 70
7 Flash ............................................ p.22
8 Self-timer lamp/LED illuminator
............................................... p.24, 48
9 Lens ............................................. p.64
I0 Tripod socket .................................. --
EN
Page 7
1 8
2
5--
6--
7_
.....
..............12
...................13
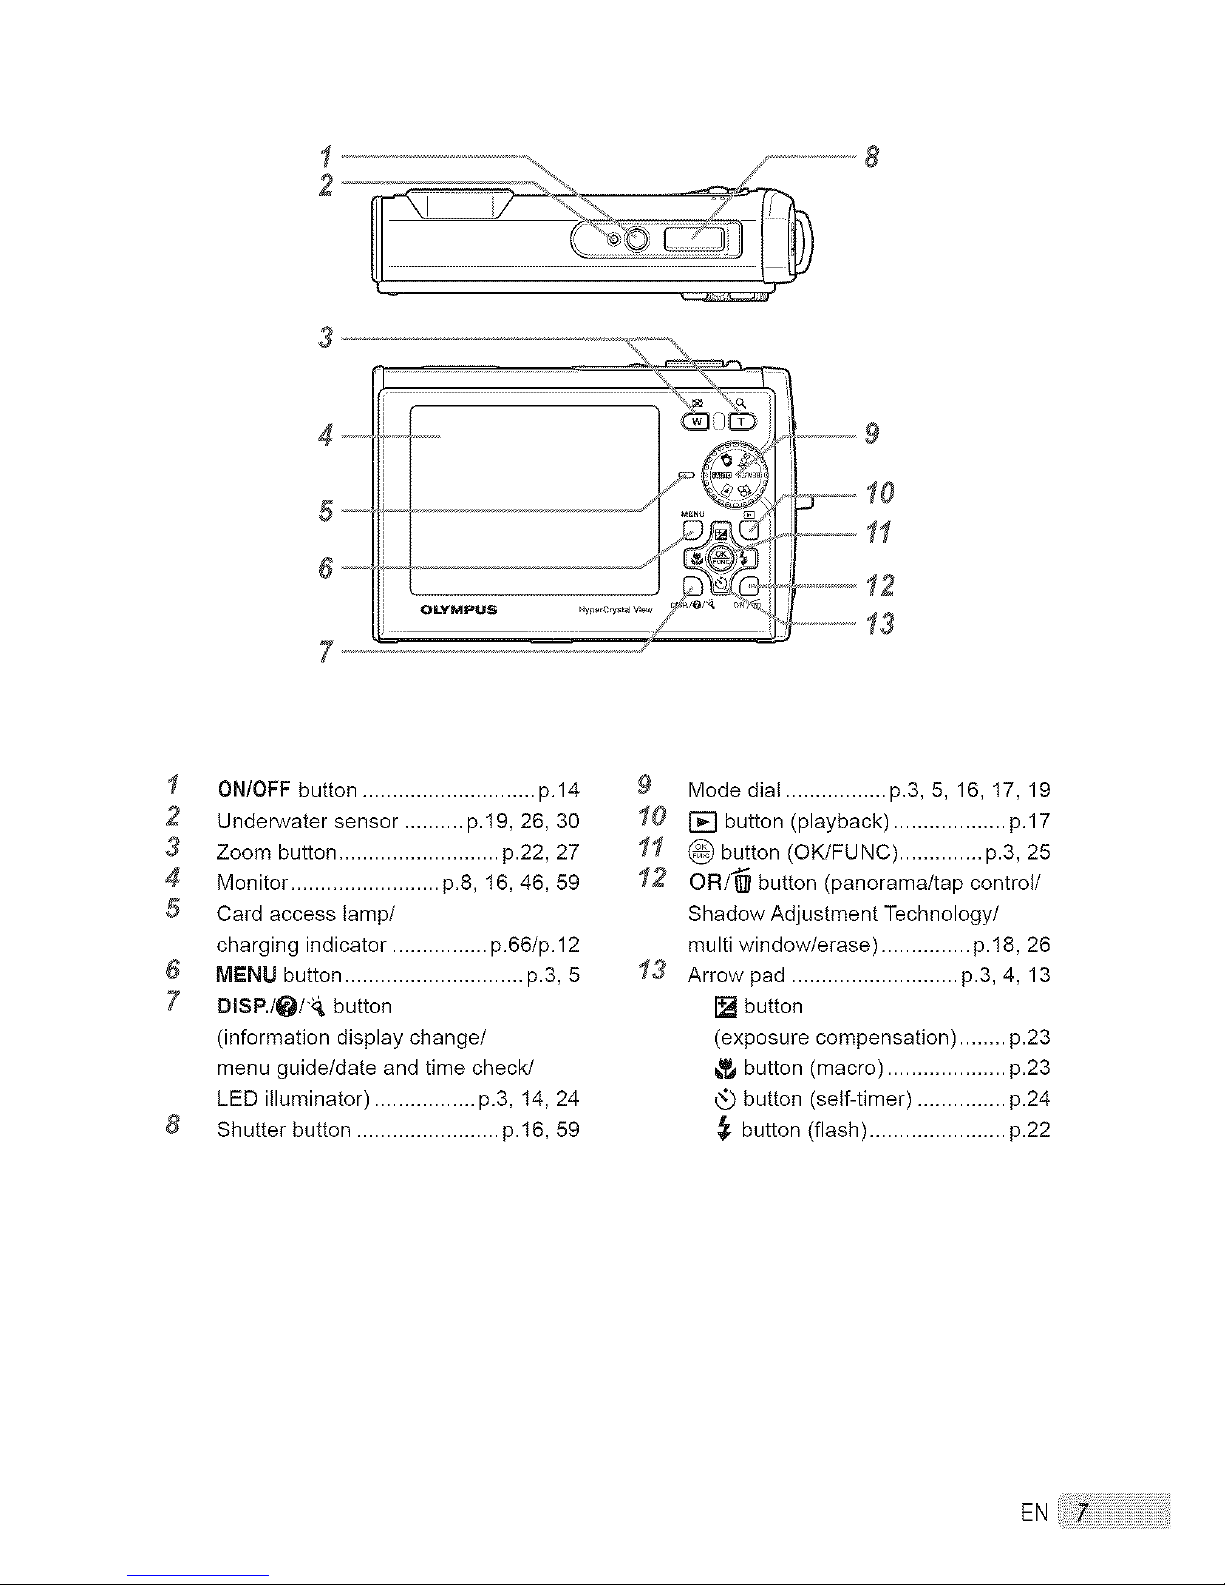
I ON/OFF button ............................. p.14
2 Underwater sensor .......... p.19, 26, 30
3 Zoom button ........................... p.22, 27
4 Monitor ......................... p.8, 16, 46, 59
5 Card access tamp/
charging indicator ................ p.66/p.12
6 MENU button .............................. p.3, 5
7 DISP./_/'_, button
(information display change/
menu guide/date and time check/
LED illuminator) ................. p.3, 14, 24
8 Shutter button ........................ p.16, 59
9 Mode dial ................. p.3, 5, 16, 17, 19
I0 [] button (playback) ................... p.17
I1 @ button (OK/FUNC) .............. p.3, 25
I2 OR/'_ button (panorama/tap control/
Shadow Adjustment Technology/
multi window/erase) ............... p.!8, 26
I3 Arrowpad ............................ p.3, 4, 13
[] button
(exposure compensation) ........ p.23
_,_button (macro) .................... p.23
button (self-timer) ............... p.24
button (flash) ....................... p.22
Page 8
21 20 19 18 17 16 21 18 17 16
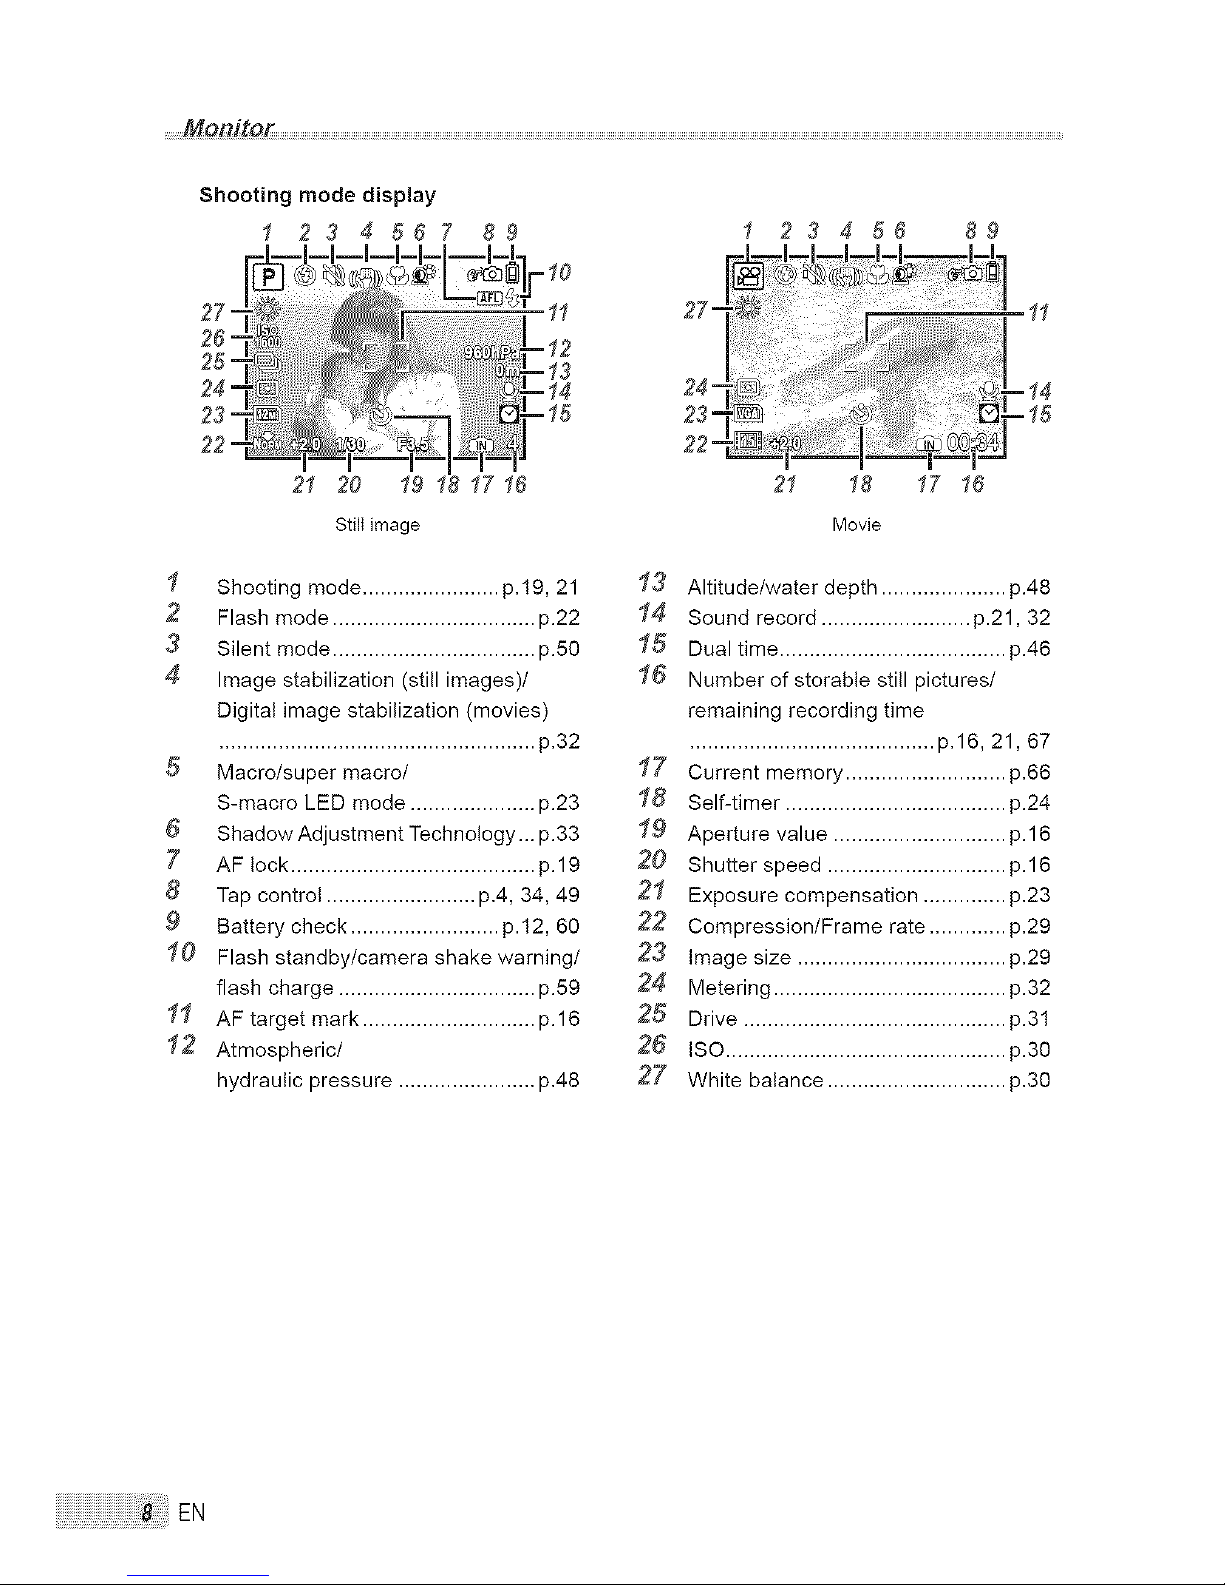
Still image Movie
I Shooting mode ....................... p.19, 21 I3
2 Flash mode .................................. p.22 I4
3 Silent mode .................................. p.50 I5
4 Image stabilization (still images)/ I6
Digital image stabilization (movies)
..................................................... p.32
5 Macro/super macro/ I7
S-macro LED mode ..................... p.23 I8
6 Shadow Adjustment Technology... p.33 I9
7 AF tock ......................................... p.19 20
8 Tap control ......................... p.4, 34, 49 21
9 Battery check ......................... p.12, 60 22
I0 Flash standby/camera shake warning/ 23
flash charge ................................. p.59 24
I1 AF target mark ............................. p.16 25
I2 Atmospheric/ 26
hydraulic pressure ....................... p.48 27
Altitude/water depth ..................... p.48
Sound record ......................... p.21, 32
Dual time ...................................... p.46
Number of storable still pictures/
remaining recording time
......................................... p.16, 21, 67
Current memory ........................... 3.66
Self-timer ..................................... 3.24
Aperture value ............................. 3.16
Shutter speed .............................. 3.16
Exposure compensation .............. 3.23
Compression/Frame rate ............. 3.29
Image size ................................... 3.29
Metering ....................................... 3.32
Drive ............................................ 3.31
ISO ............................................... 3.30
White balance .............................. 3.30
EN
Page 9
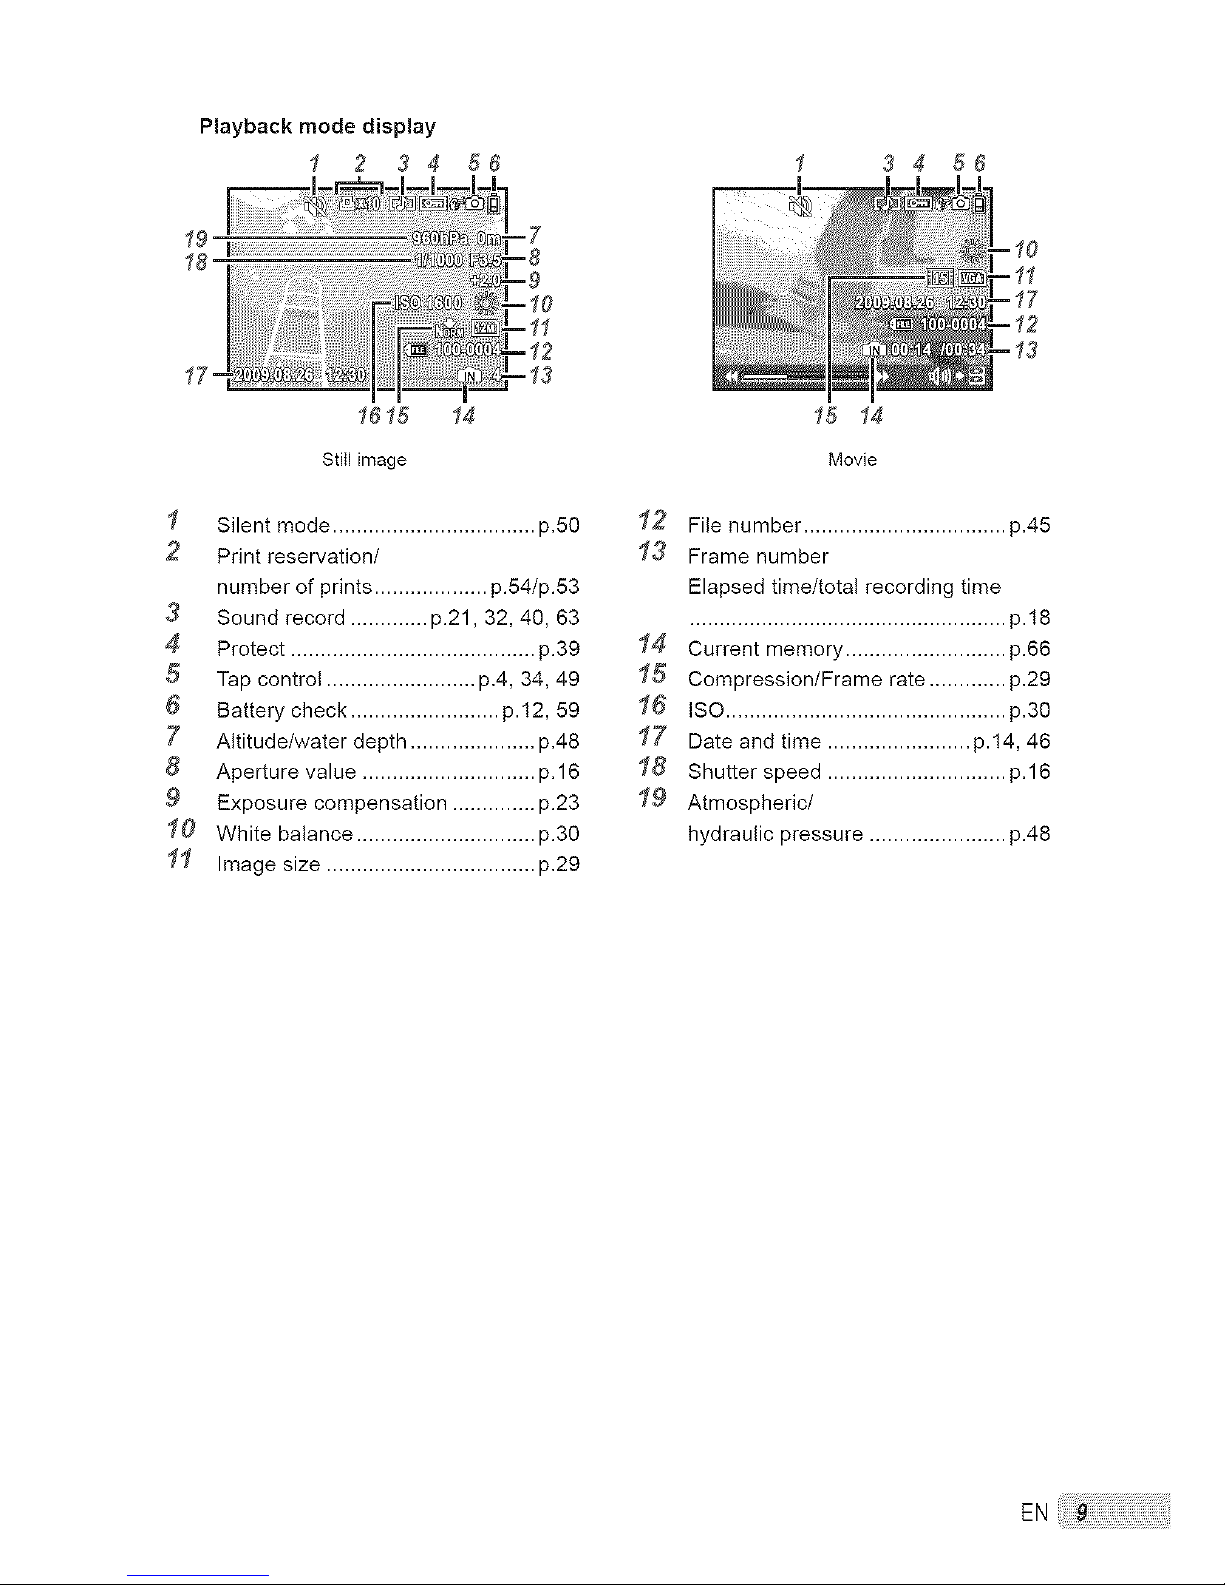
Playback mode display
1 2 34 56 34 56
19
18
1615 14
stiII image
I Silent mode .................................. p.50
2 Print reservation/
number of prints ................... p.54/p.53
3 Sound record ............. p.21,32, 40, 63
4 Protect ......................................... p.39
5 Tap control ......................... p.4, 34, 49
6 Battery check ......................... p.12, 59
7 Attitude/water depth ..................... p.48
8 Aperture value ............................. p.16
9 Exposure compensation .............. p.23
I0 White balance .............................. p.30
II Image size ................................... p.29
15 14
Movie
I2 File number .................................. p.45
I3 Frame number
Elapsed time/total recording time
..................................................... p.lS
I4 Current memory ........................... p.66
I5 Compression/Frame rate ............. p.29
I6 ISO ...............................................p.30
I7 Date and time ........................ p.14, 46
I8 Shutter speed .............................. p.16
I9 Atmospheric/
hydraulic pressure ....................... p.48
EN
Page 10

the Camera
.......Attaching the camera _trap ....................2
_) Pull the strap tight so that it does not come
loose.
Loading the battery and
the xD-Picture Card TM (sold
_ Do not insert anything other than an
xD-Picture Card or the microSD Attachment
into the camera.
Battery lock knob
_} The battery has front side and back side.
Insert the battery in the correct direction
as illustrated. If the battery is not inserted
correctly, the camera does not operate.
_ Insert the battery while sliding the battery
lock knob in the direction of the arrow.
_ Sliding the battery lock knob in the direction
of the arrow to unlock, and then remove the
battery.
_ Be sure to turn off the camera when you
open or close the battery/card compartment
cover.
Battery/card compartment cover
EN
Page 11
3
4
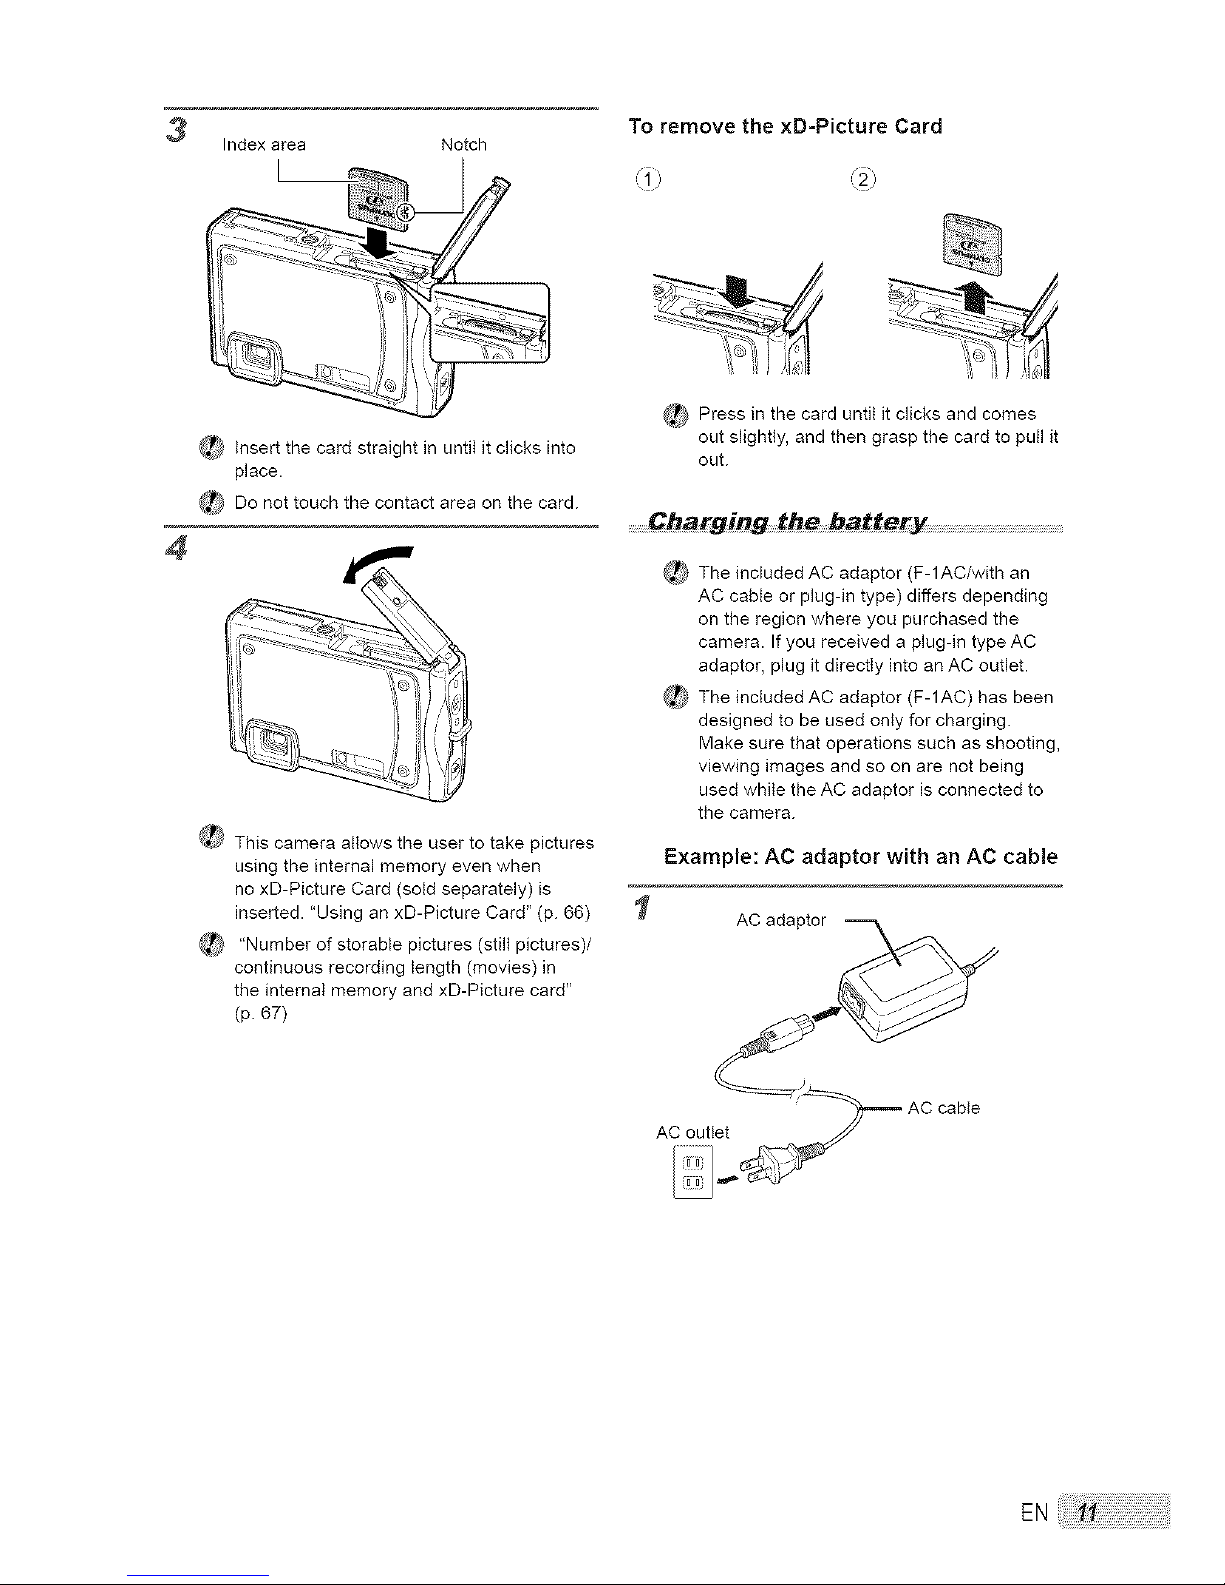
Index area Notch
_ Insert the card straight in untiI it clicks into
place.
_ Do not touch the contact area on the card.
_ This camera allows the user to take pictures
using the internal memory even when
no xD-Picture Card (sold separately) is
inserted. "Using an xD-Picture Card" (p. 66)
_ "Number of storable pictures (still pictures)/
continuous recording length (movies) in
the internal memory and xD-Picture card"
(p. 67)
To remove the xD-Picture Card
@_ Press in the card until it clicks and comes
out slightly, and then grasp the card to pull it
out.
.........Charging the battery
_ The included AC adaptor (F-1AC/with an
AC cable or plug-in type) differs depending
on the region where you purchased the
camera. If you received a plug-in type AC
adaptor, plug it directly into an AC outlet.
_ The included AC adaptor (F-1AC) has been
designed to be used only for charging.
Make sure that operations such as shooting,
viewing images and so on are not being
used while the AC adaptor is connected to
the camera.
Example: AC adaptor with an AC cable
1
AC adaptor
Page 12

£
When to charge the battery
Charge the battery when the error message
shown below appears.
Flashes in red
Monitor top right Error message
3
ch r n ndcato
.,0hts/o on0e Cho 0,o0
Lights (blue) : Charged
Battery comes partially charged. Before
use, be sure to charge the battery until the
charging indicator goes off (for approx.
2.5 hours).
_ If the charging indicator does not light
or it blinks, there may be cases in which
the connections are not correct, or the
battery, camera, and/or AC adaptor may be
damaged.
_ For details on the battery and the AC
adaptor, see "Battery, AC adaptor (included),
Charger (sold separately)" (p. 64).
EN
Page 13
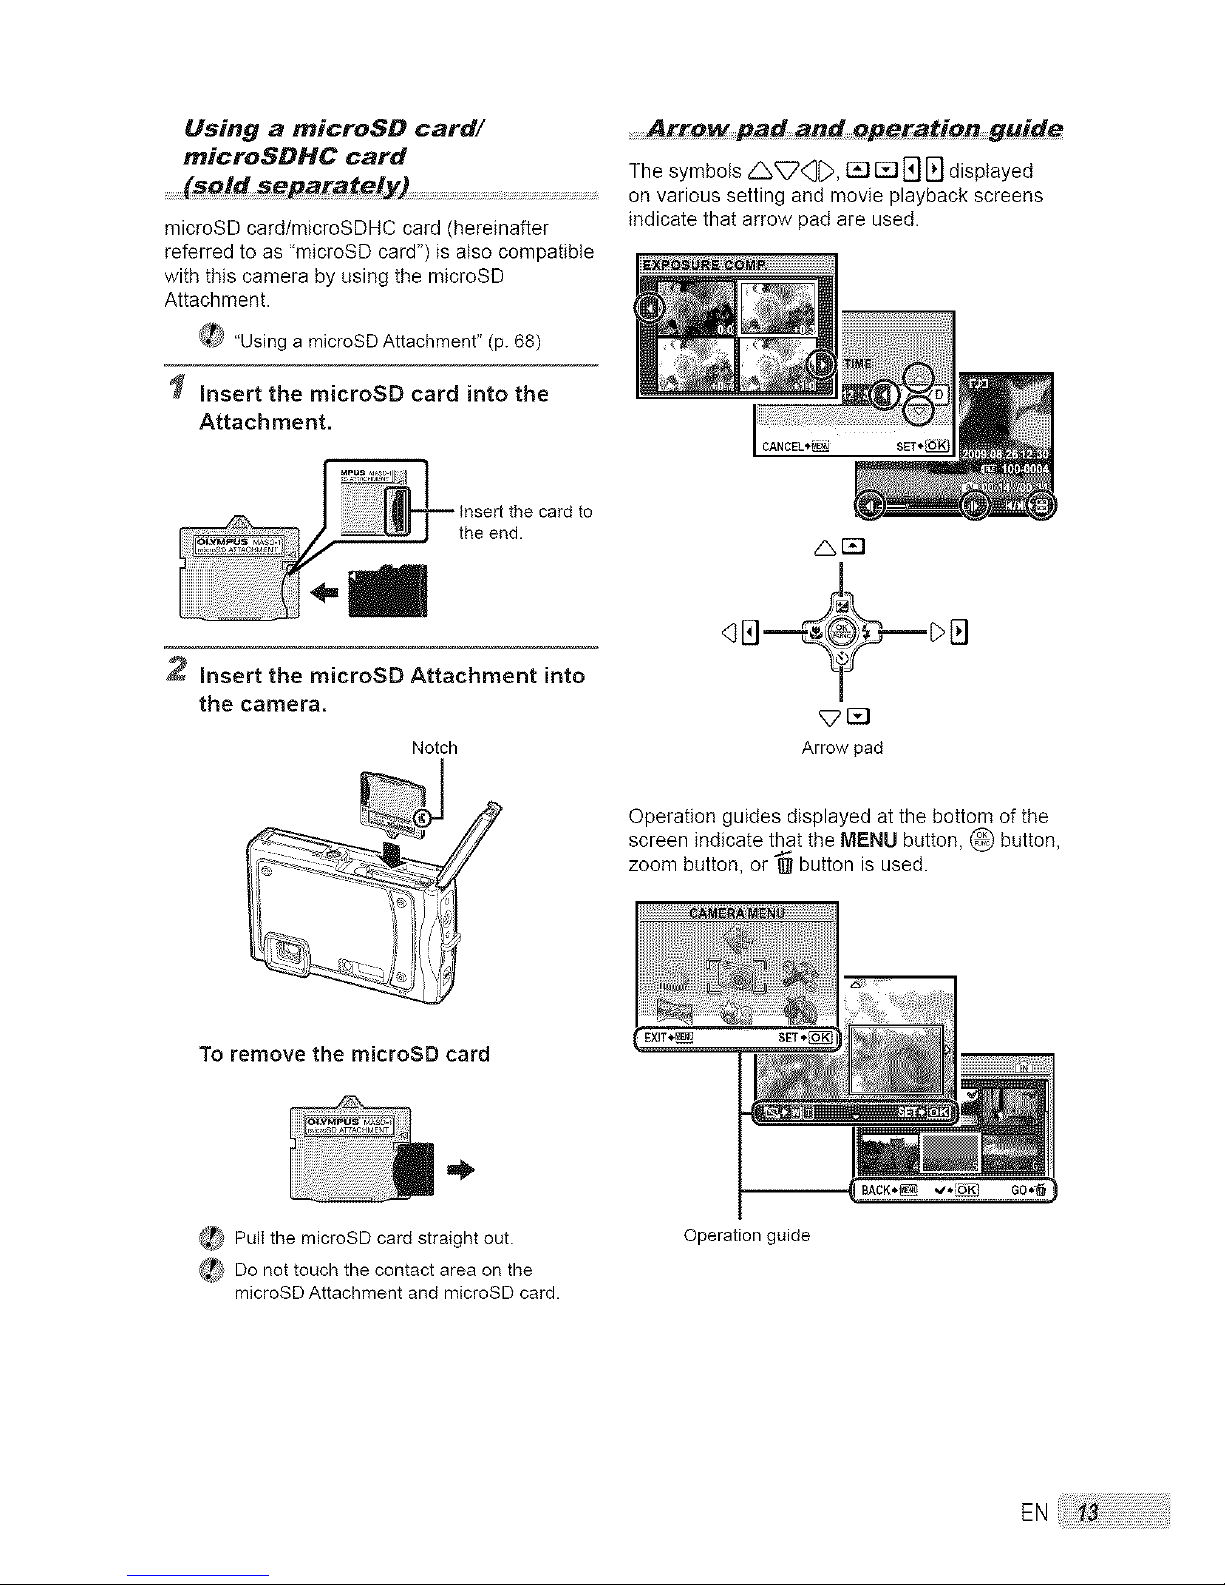
Using a microSD card/
microSOHC card
microSD card/microSDHC card (hereinafter
referred to as "microSD card") is also compatible
with this camera by using the microSD
Attachment.
_ "Using a microSD Attachment" (p. 68)
Insert the microSD card into the
Attachment.
........Arrow pad and eperation guide
Thesymbols_<3_>, _ r_E]I;]displayed
on various setting and movie playback screens
indicate that arrow pad are used.
2 Insert the microSD Attachment into
the camera,
Notch
_r_l
Arrow pad
Operation guides displayed at the bottom of the
screen indicate that the MENU button, _ button,
zoom button, or "_ button is used.
To remove the microSD card
_ Pull the microSDcard straight out.
_ Do not touch the contact areaon the
microSDAttachment and microSD card.
Operation guide
Page 14
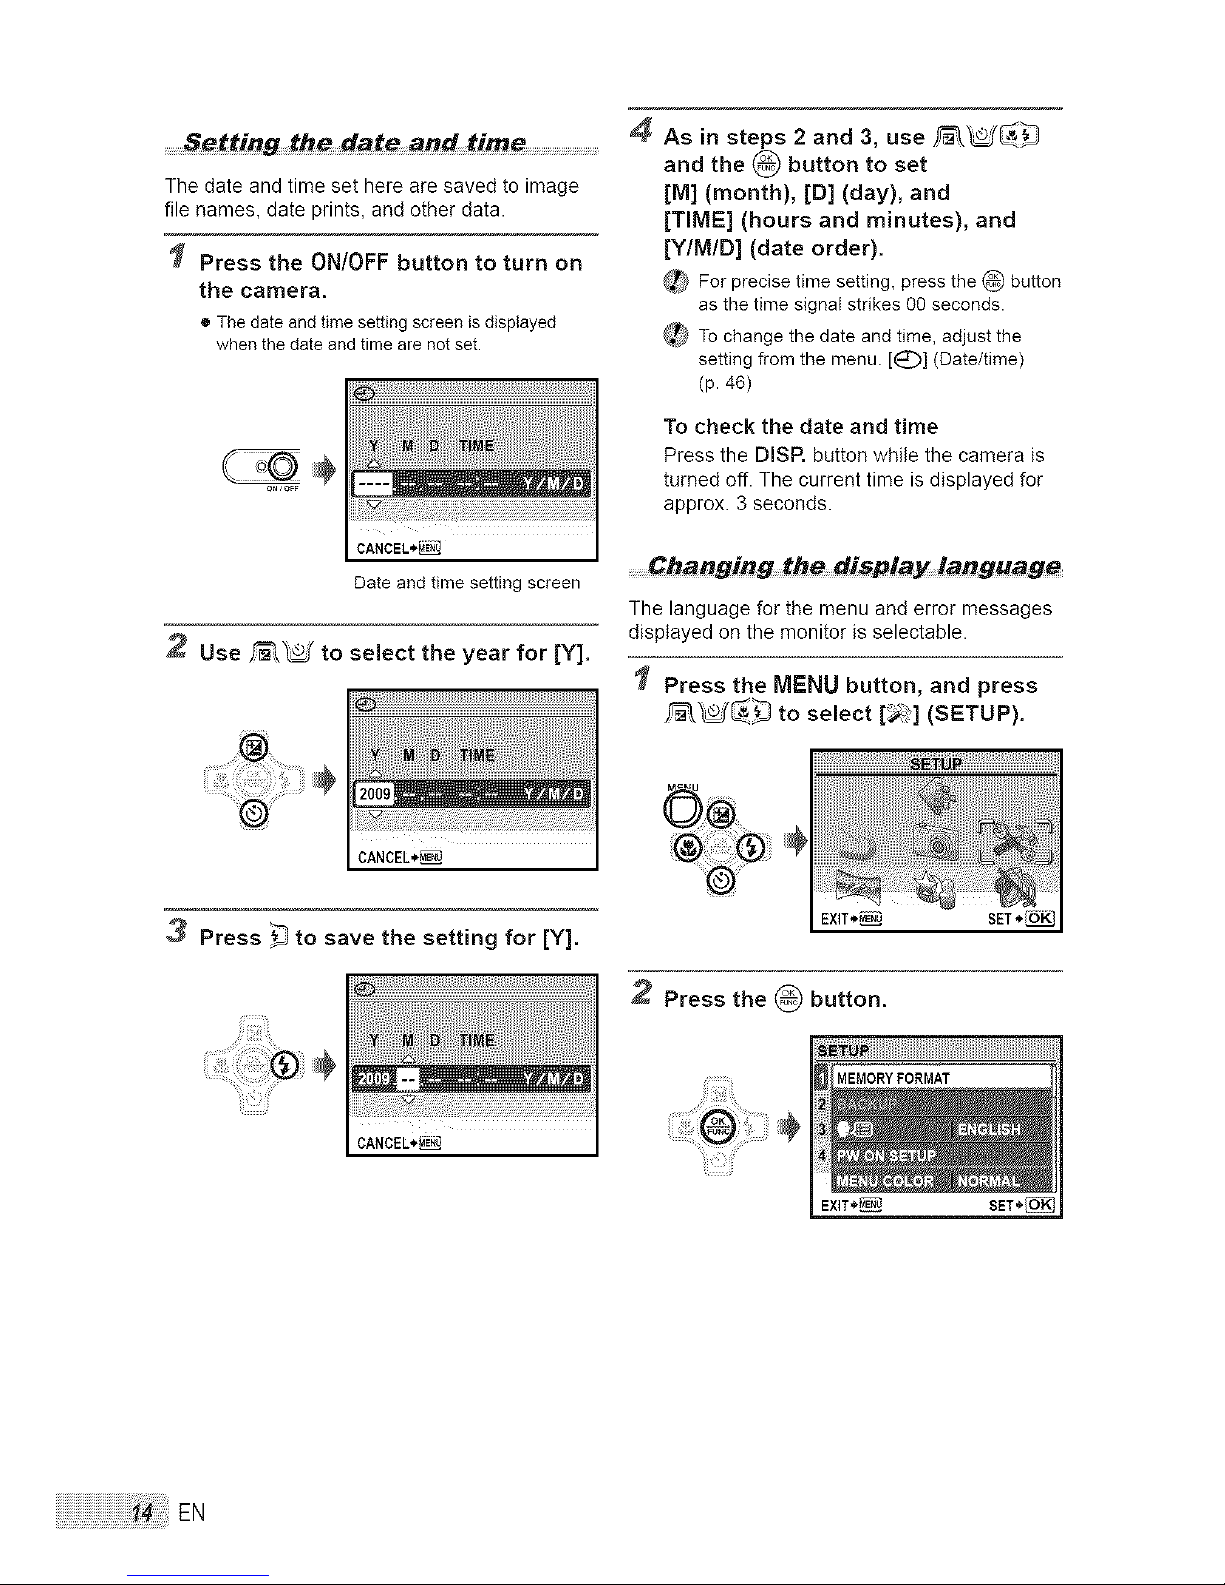
S_ting fhe date an_ tim_
The date and time set here are saved to image
file names, date prints, and other data.
Press the ON/OFF button to turn on
the camera,
• Thedateandtimesettingscreenis displayed
whenthedate andtimeare notset.
CANCEL*_
Date and time setting screen
2 Use _ to select the year for [Y].
CANCEL*_
3 Press _ to save the setting for [Y].
i
CANCEL*_
4
As in steps 2 and 3, use _
and the _ button to set
[M] (month), [D] (day), and
(TIME) (hours and minutes), and
[Y/M/D] (date order).
_t_ For precisetime setting, press the _ button
as the time signal strikes go seconds.
_# Tochange the date andtime, adjust the
setting from the menu. [0] (Date/time)
(p. 46)
To check the date and time
Press the DISP. button while the camera is
turned off. The current time is displayed for
approx. 3 seconds.
........Changing the display la_guag_
The language for the menu and error messages
displayed on the monitor is selectable.
Press the MENU button, and press
_ to select [_1 (SETUP).
Press the _ button.
Page 15
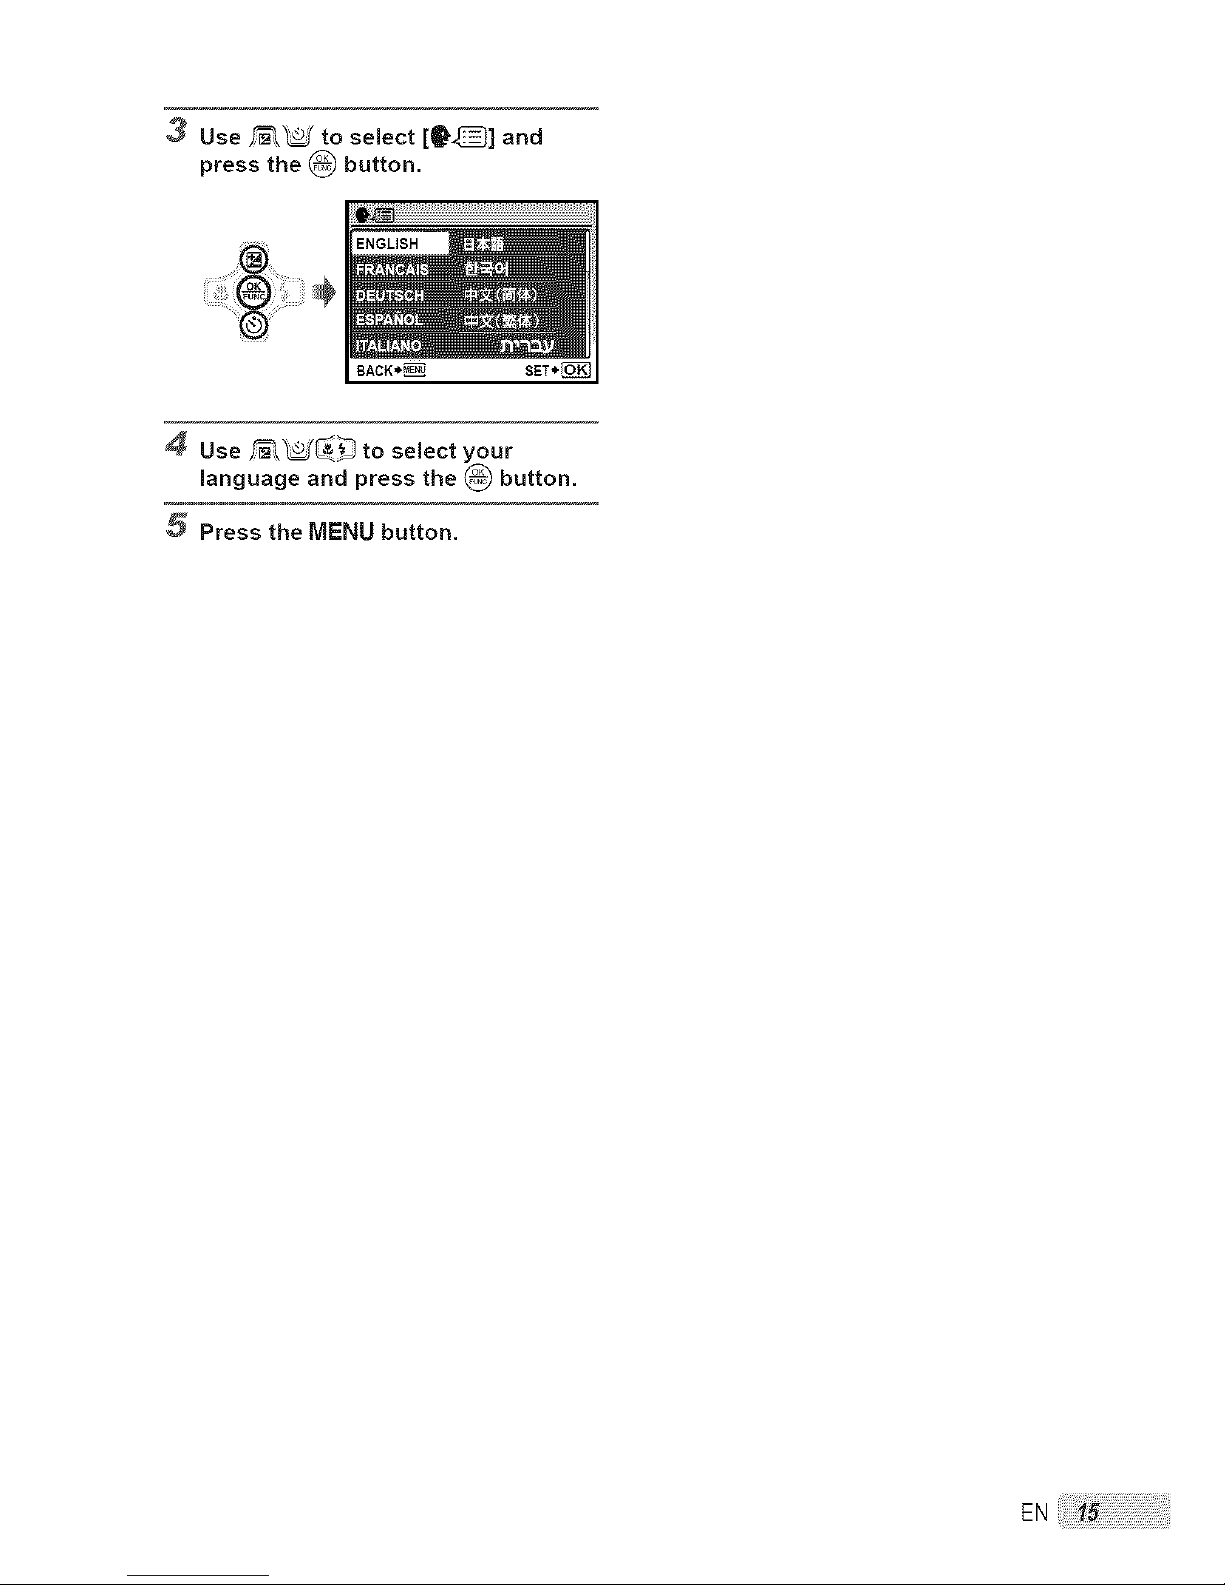
3 Use _W to select [_] and
press the _ button,
4 Use _ to select your
language and press the _ button.
5 Press the MENU button.
E.
Page 16
g, Viewing, and Erasing
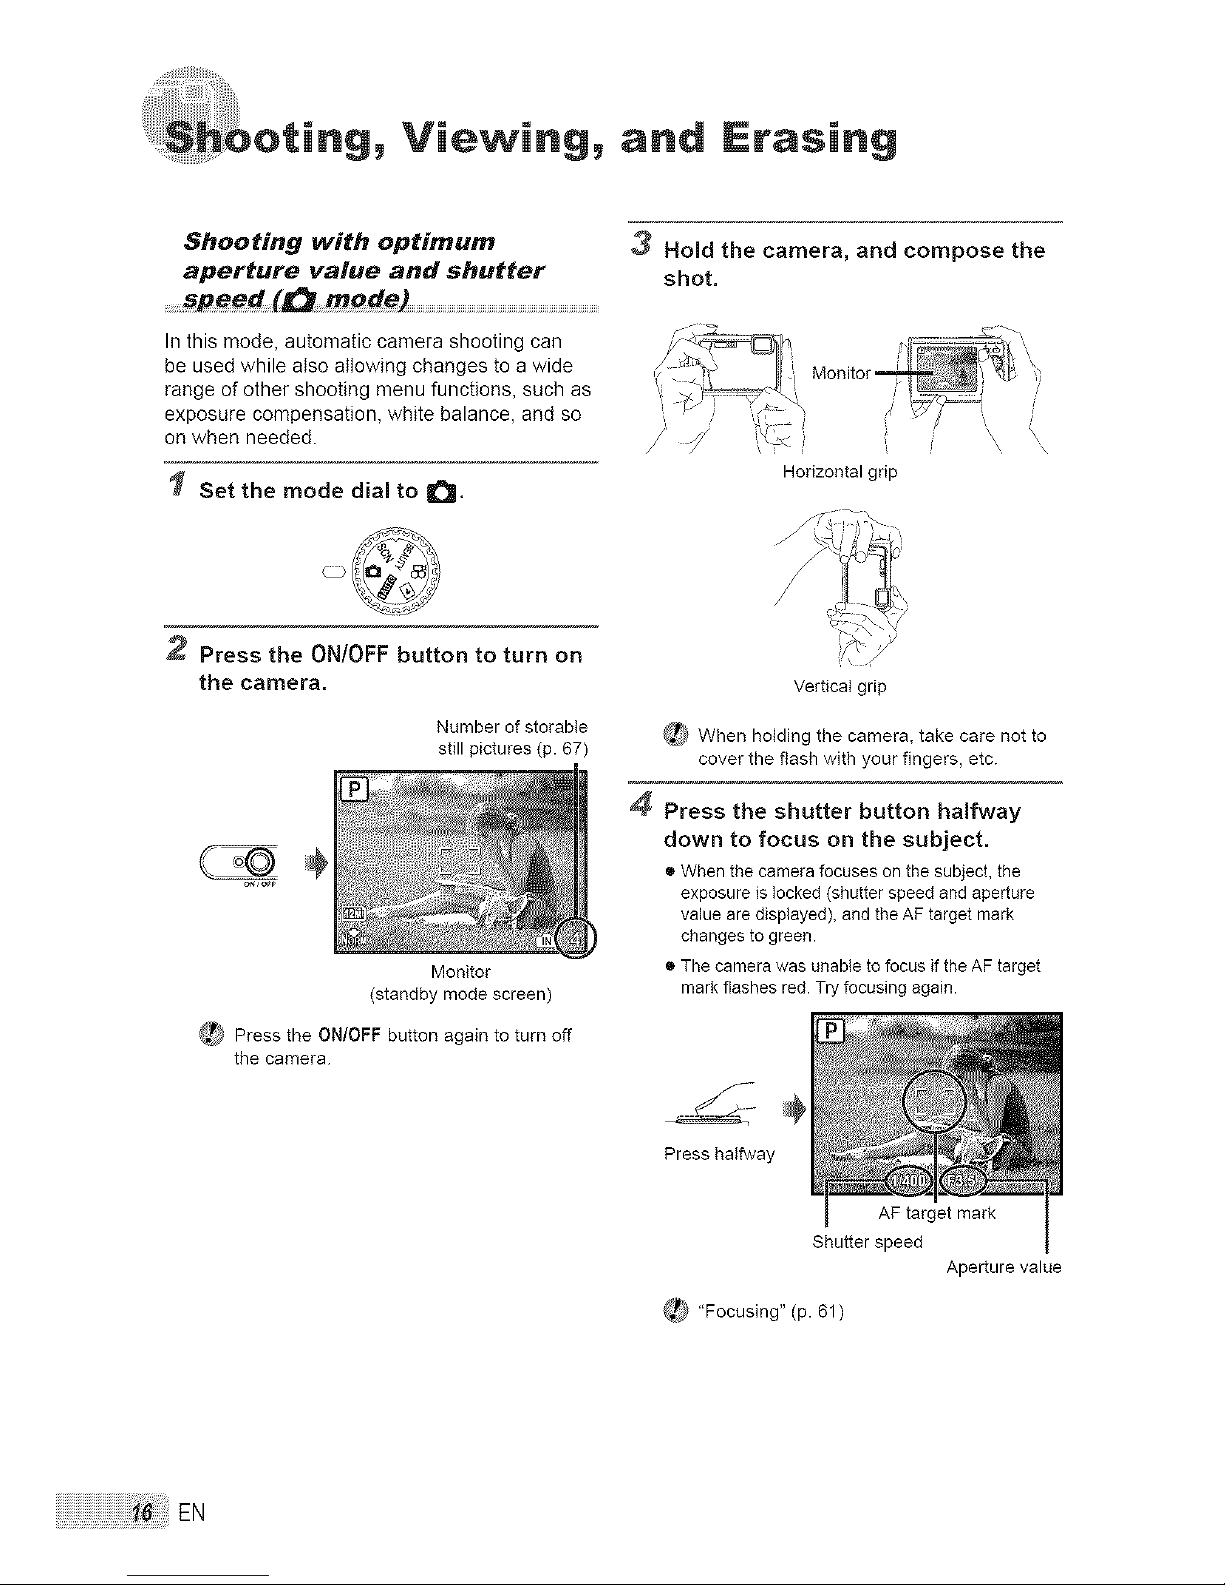
Shooting with optimum
aperture value and shutter
...........speed (_ mode)
In this mode, automatic camera shooting can
be used while also ailowing changes to a wide
range of other shooting menu functions, such as
exposure compensation, white balance, and so
on when needed.
Set the mode dial to i_ll.
3 Hold the camera, and compose the
shot.
Horizontal gnp
2 Press the ON/OFF button to turn on
the camera,
Number of storable
still pictures (p. 67)
Monitor
(standby mode screen)
_?_ Press the ON/OFF button again to turn off
the camera.
Vertical grip
When hotding the camera, take care not to
cover the flash with your fingers, etc.
4 Press the shutter button halfway
down to focus on the subject.
® When the camera focuses on the subject, the
exposure is locked (shutter speed and aperture
value are displayed), and the AF target mark
changes to green.
® The camera was unable to focus if the AF target
mark flashes red. Try focusing again.
Press halfway
Shutter speed
Aperture value
_ "Focusing" (p. 61)
EN
Page 17
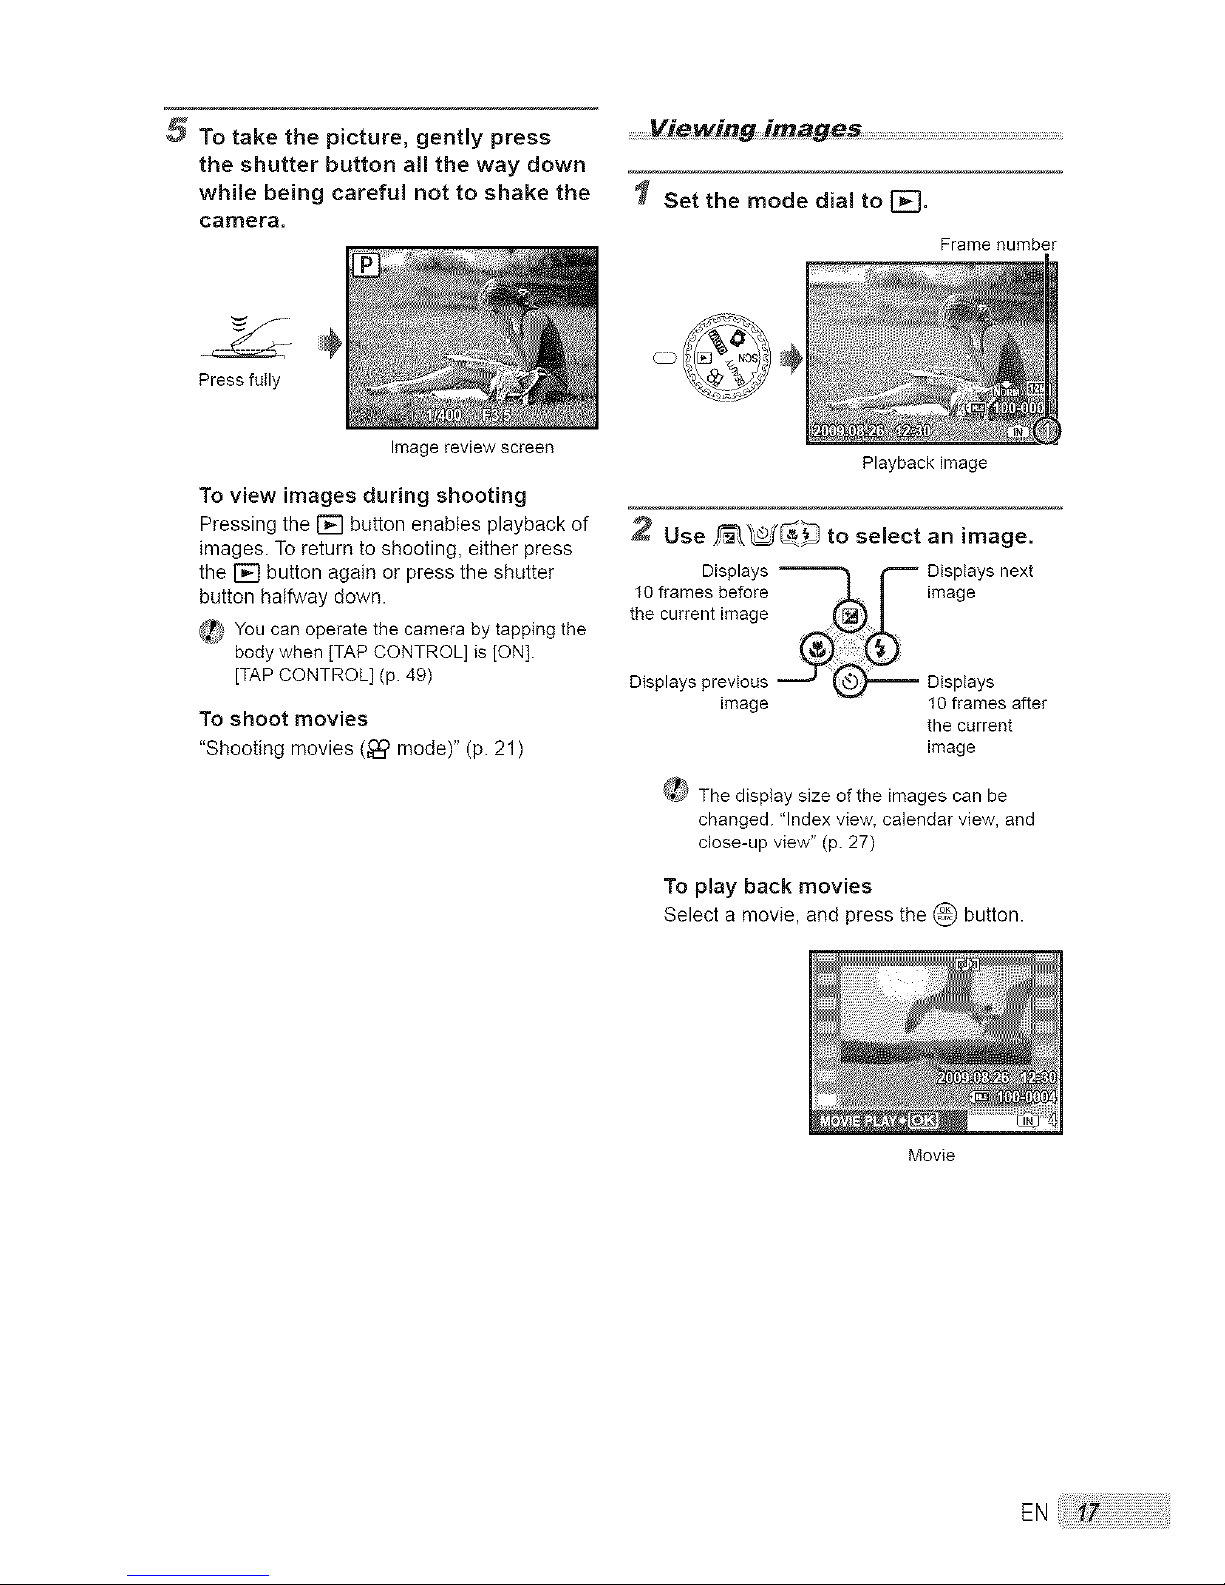
5 To take the picture, gently press
the shutter button all the way down
while being careful not to shake the
camera.
Image review screen
..........Viewingjmages
Set the mode dial to r;-q.
Framenumber
Press fully
To view images during shooting
Pressing the _ button enabtes playback of
images To return to shooting, either press
the lIE] button again or press the shutter
button halfway down
_ You canoperate the camera by tapping the
bodywhen [TAPCONTROL] is [ON].
[TAP CONTROL](p. 4g)
To shoot movies
"Shooting movies (_ mode)" (p. 21)
Playback image
Use _ to select an image.
Displays
10 frames before
the current image
Displays previous
image
Displays next
image
10 frames a_er
the current
image
_ The display size of the images can be
changed. "Index view, calendar view, and
c_oee-up view" (p. 27)
To play back movies
Select a movie, and press the @ button.
Movie
E.
Page 18
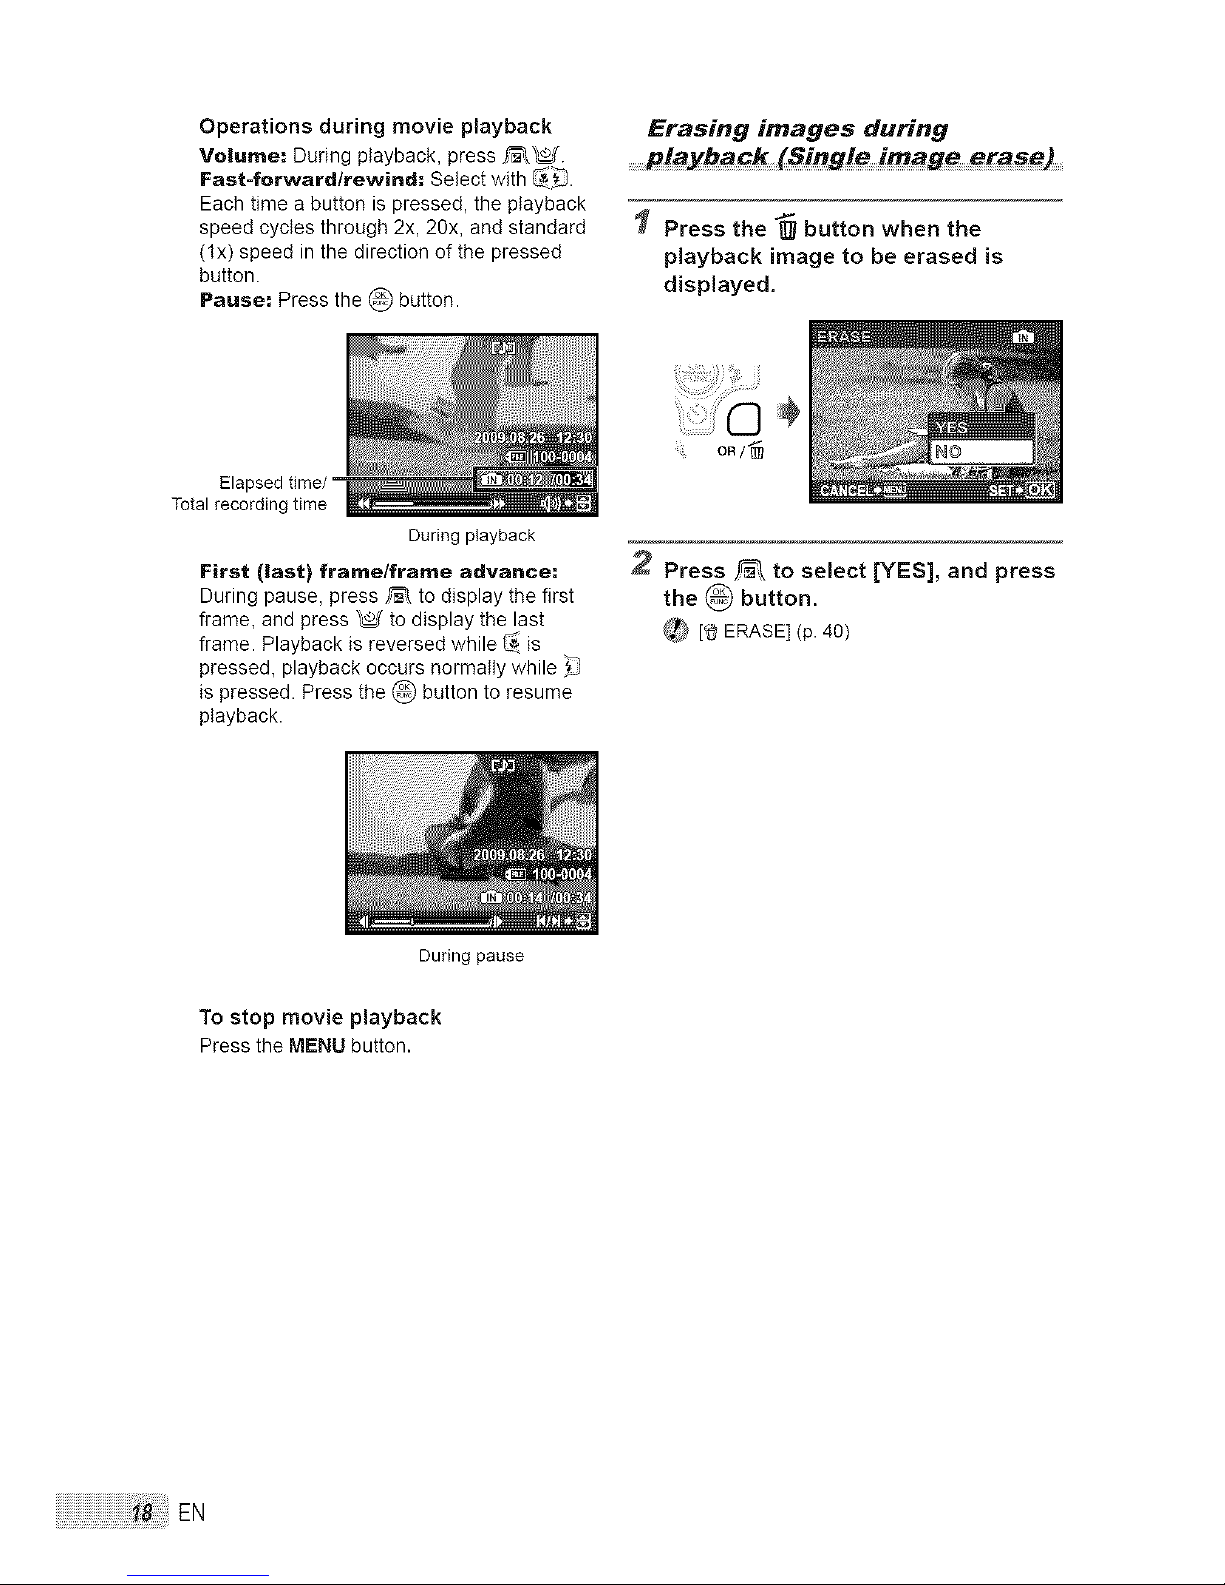
Operations during movie playback
Volume; During playback, press _.
Fast=fa_vard/rewind: Select with _.
Each time a button is pressed, the playback
speed cycles through 2x, 20x, and standard
(lx) speed in the direction of the pressed
button.
Pause: Press the _ button.
During playback
Erasing images during
playback (Single imag@ era_e)
Press the "_ button when the
playback image to be erased is
displayed.
Elapsed time/
Total recording time
First (last) frarae/frante advance:
During pause, press _ to display the first
frame, and press _ to display the last
frame. Playback is reversed while _ is
pressed, playback occurs normally while
is pressed. Press the _ button to resume
playback.
During pause
ORI'_
2 Press _ to select [YES], and press
the _ button.
_ [_ ERASE] (p. 40)
To stop movie playback
Press the MENU button.
EN
Page 19
Shooting Modes
This section describes the available shooting
modes. Depending on the mode, some settings
can be changed. For details on the functions
that can be adjusted, see "Menus for Shooting
Functions" on page 29.
Using the best mode for the
............... mode)
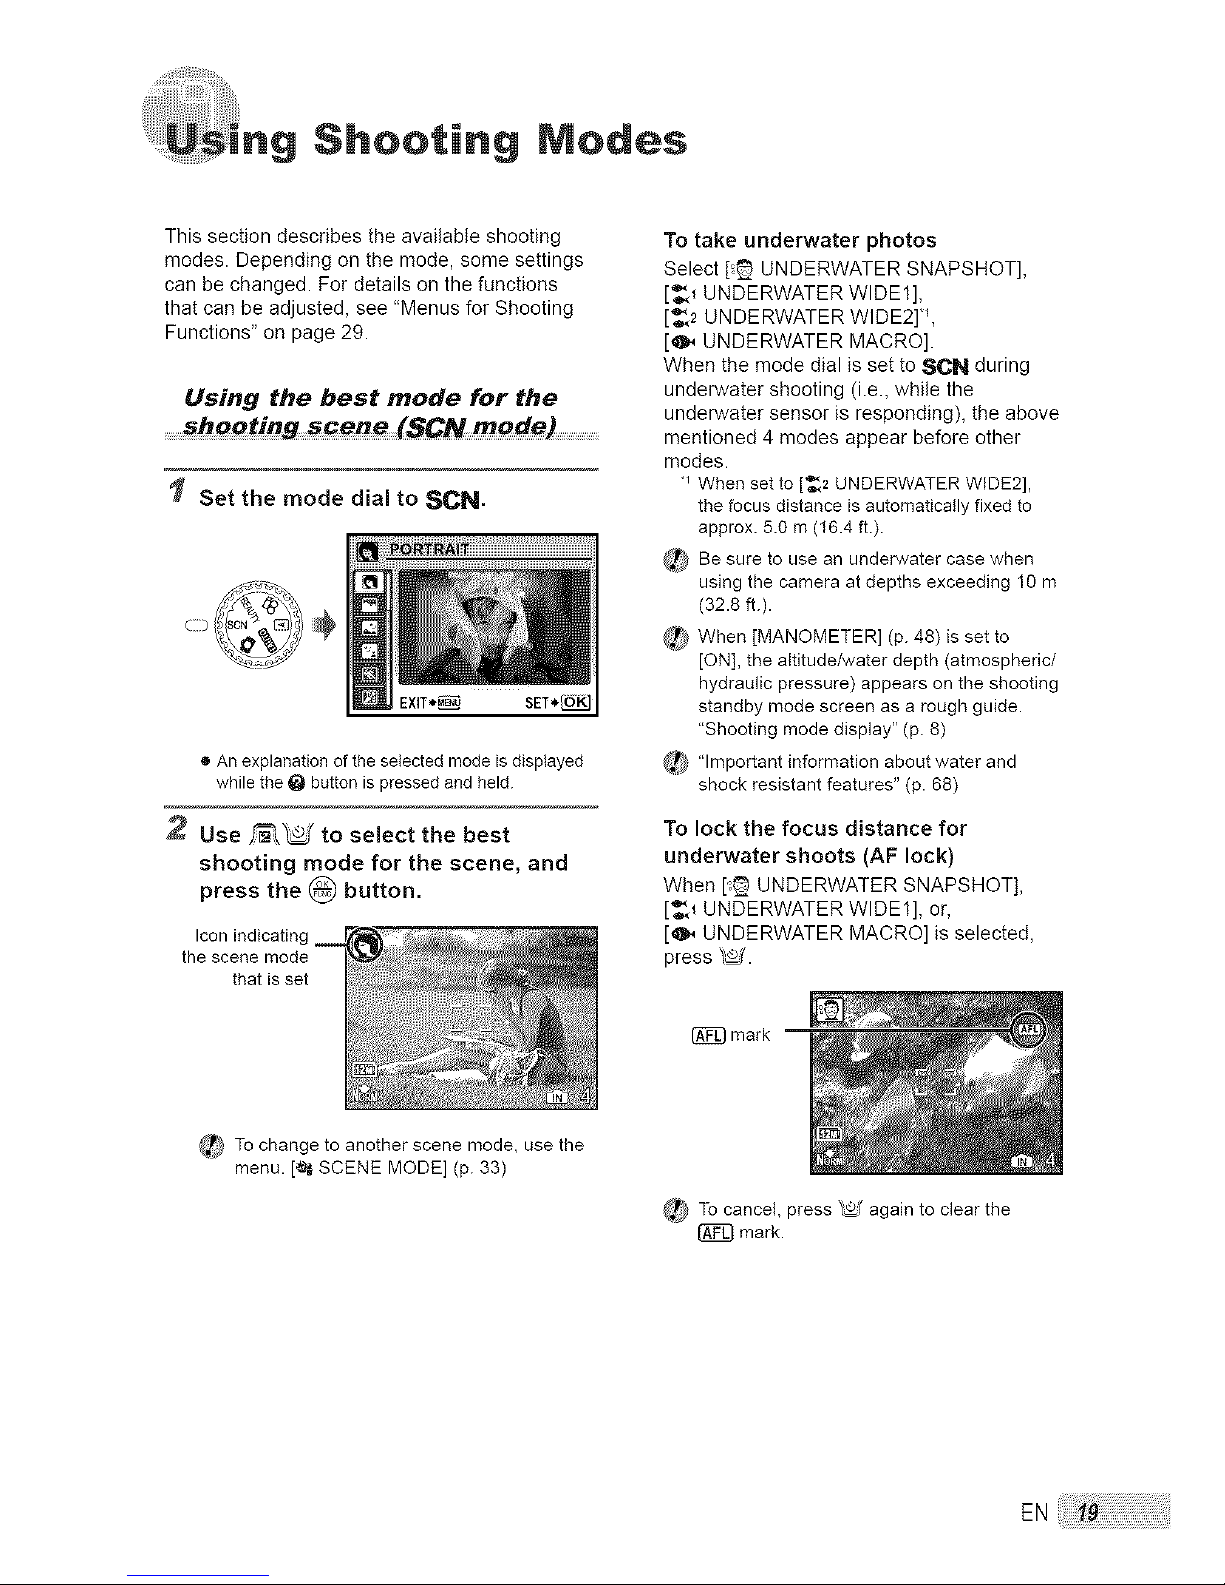
Set the mode dial to SCN.
• An explanation of the selected mode is displayed
while the _ button is pressed and held.
Use _W to select the best
shooting mode for the scene, and
press the _ button,
Icon indicating
the scene mode
that is set
To take underwater photos
Select [_ UNDERWATER SNAPSHOT],
[_ UNDERWATER WIDE1],
[_2 UNDERWATER WIDE2] _,
[_ UNDERWATER MACRO].
When the mode dial is set to SeN during
underwater shooting (i.e., while the
underwater sensor is responding), the above
mentioned 4 modes appear before other
modes.
"_When set to [_2 UNDERWATER WIDE2],
the focus distance is automatically fixed to
approx. 5.0 m (16.4 ft.).
{_ Be sure to use an underwater case when
using the camera at depths exceeding 10 m
(32.8 ft.).
_ When [MANOMETER] (p. 48) is set to
[ON], the altitude/water depth (atmospheric/
hydraulic pressure) appears on the shooting
standby mode screen as a rough guide.
"Shooting mode display" (p. 8)
_ "Important information about water and
shock resistant features" (p. 68)
To lock the focus distance for
underwater shoots (AF lock)
When [_ UNDERWATER SNAPSHOT],
[_ UNDERWATER WIDE1], or,
[_ UNDERWATER MACRO] is selected,
press _.
_}mark
_P_ To change to another scene mode, use the
menu. [_ SCENE MODE] (p. 33)
_,_ To cancel, press _ again to clear the
[_ mark.
EN
Page 20
Enhancing skin tone and
texture (BEAU_ mode)
The camera finds a person's face and gives the
skin a smooth, translucent look for taking the
picture.
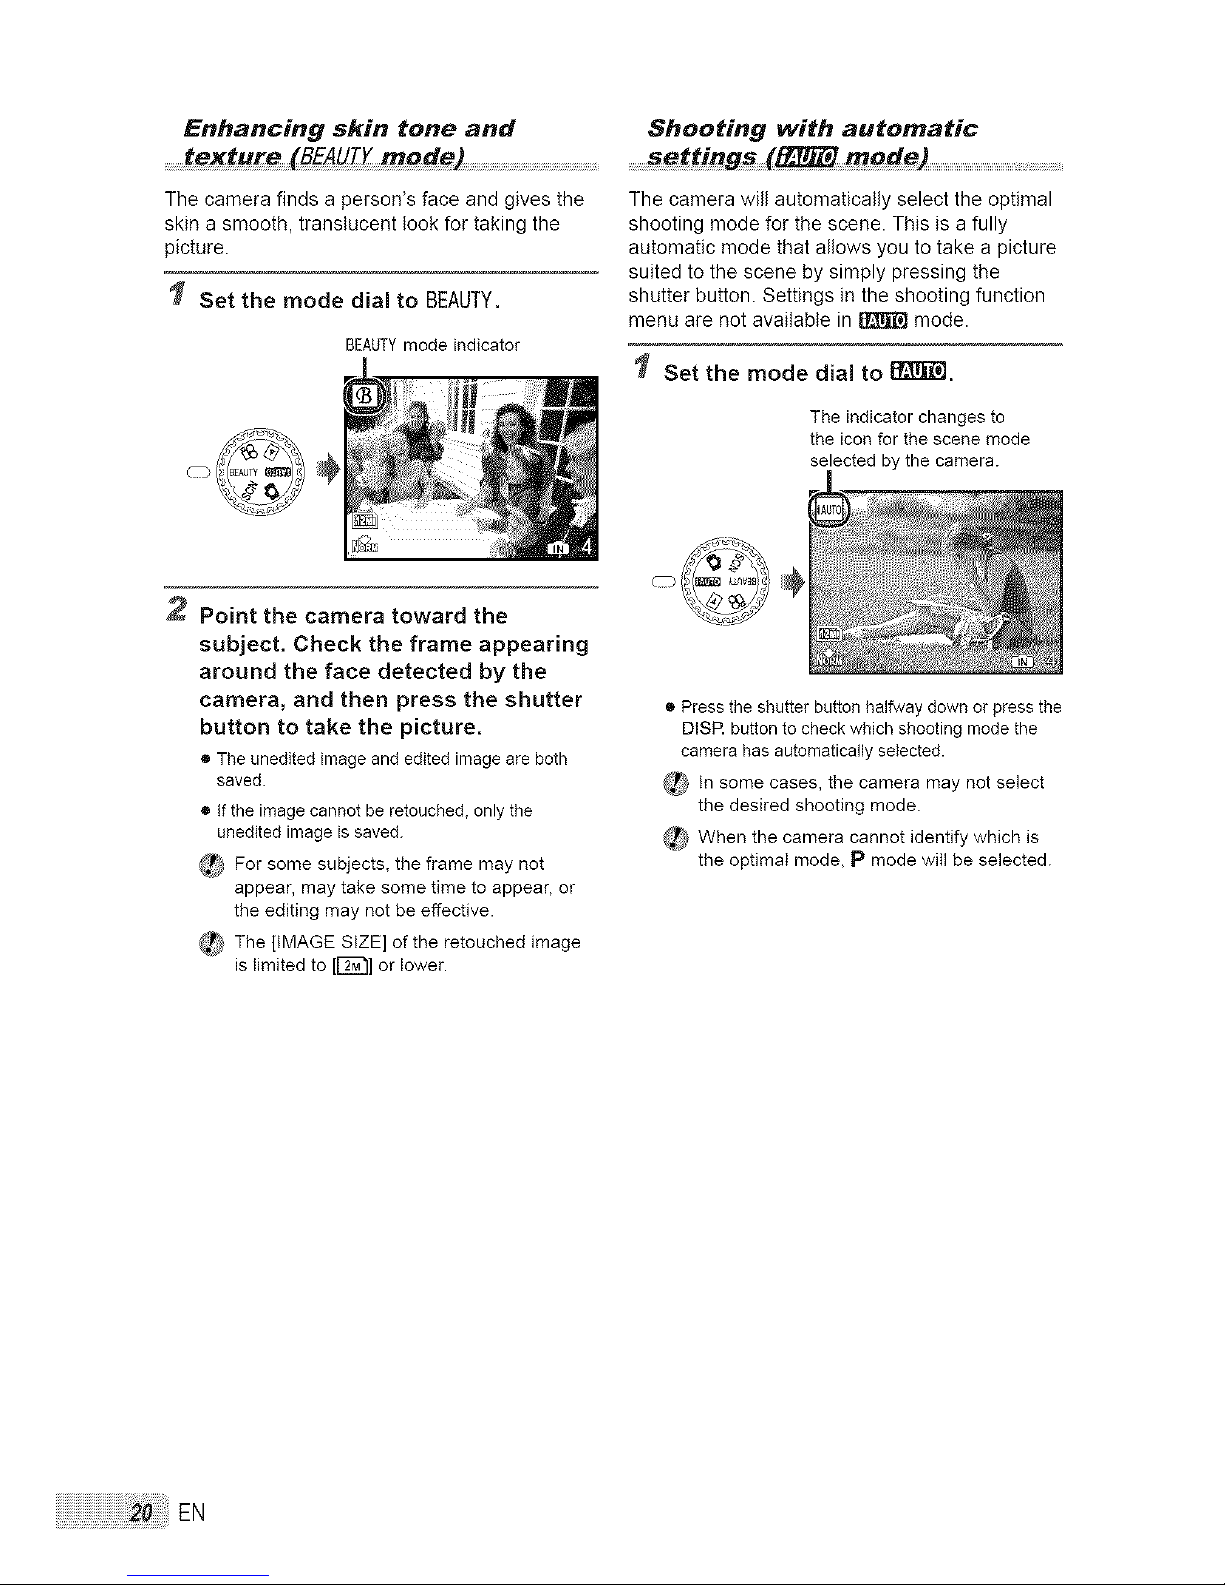
Set the mode dial to BEAUTY.
BEAUTYmode indicator
Point the camera toward the
subject. Check the frame appearing
around the face detected by the
camera, and then press the shutter
button to take the picture,
• The unedited image and edited image are both
saved.
• If the image cannot be retouched, only the
unedited image is saved.
_ For some subjects, the frame may not
appear, may take some time to appear, or
the editing may not be effective.
_ The [IMAGE SIZE] of the retouched image
is limited to [E_] or lower.
Shooting with automatic
The camera will automatica@ select the optimal
shooting mode for the scene. This is a fully
automatic mode that allows you to take a picture
suited to the scene by simply pressing the
shutter button. Settings in the shooting function
menu are not available in _ mode.
Set the mode dial to I_Tj_
The indicator changes to
the icon for the scene mode
selected by the camera.
® Press the shutter button halfway down or press the
DISR button to check which shooting mode the
camera has automatically selected.
In some cases, the camera may not select
the desired shooting mode.
_ When the camera cannot identify which is
the optimal mode, P mode will be selected.
EN
Page 21
Shooting movies f_ mode) ........................
Audio is recorded with the movie.
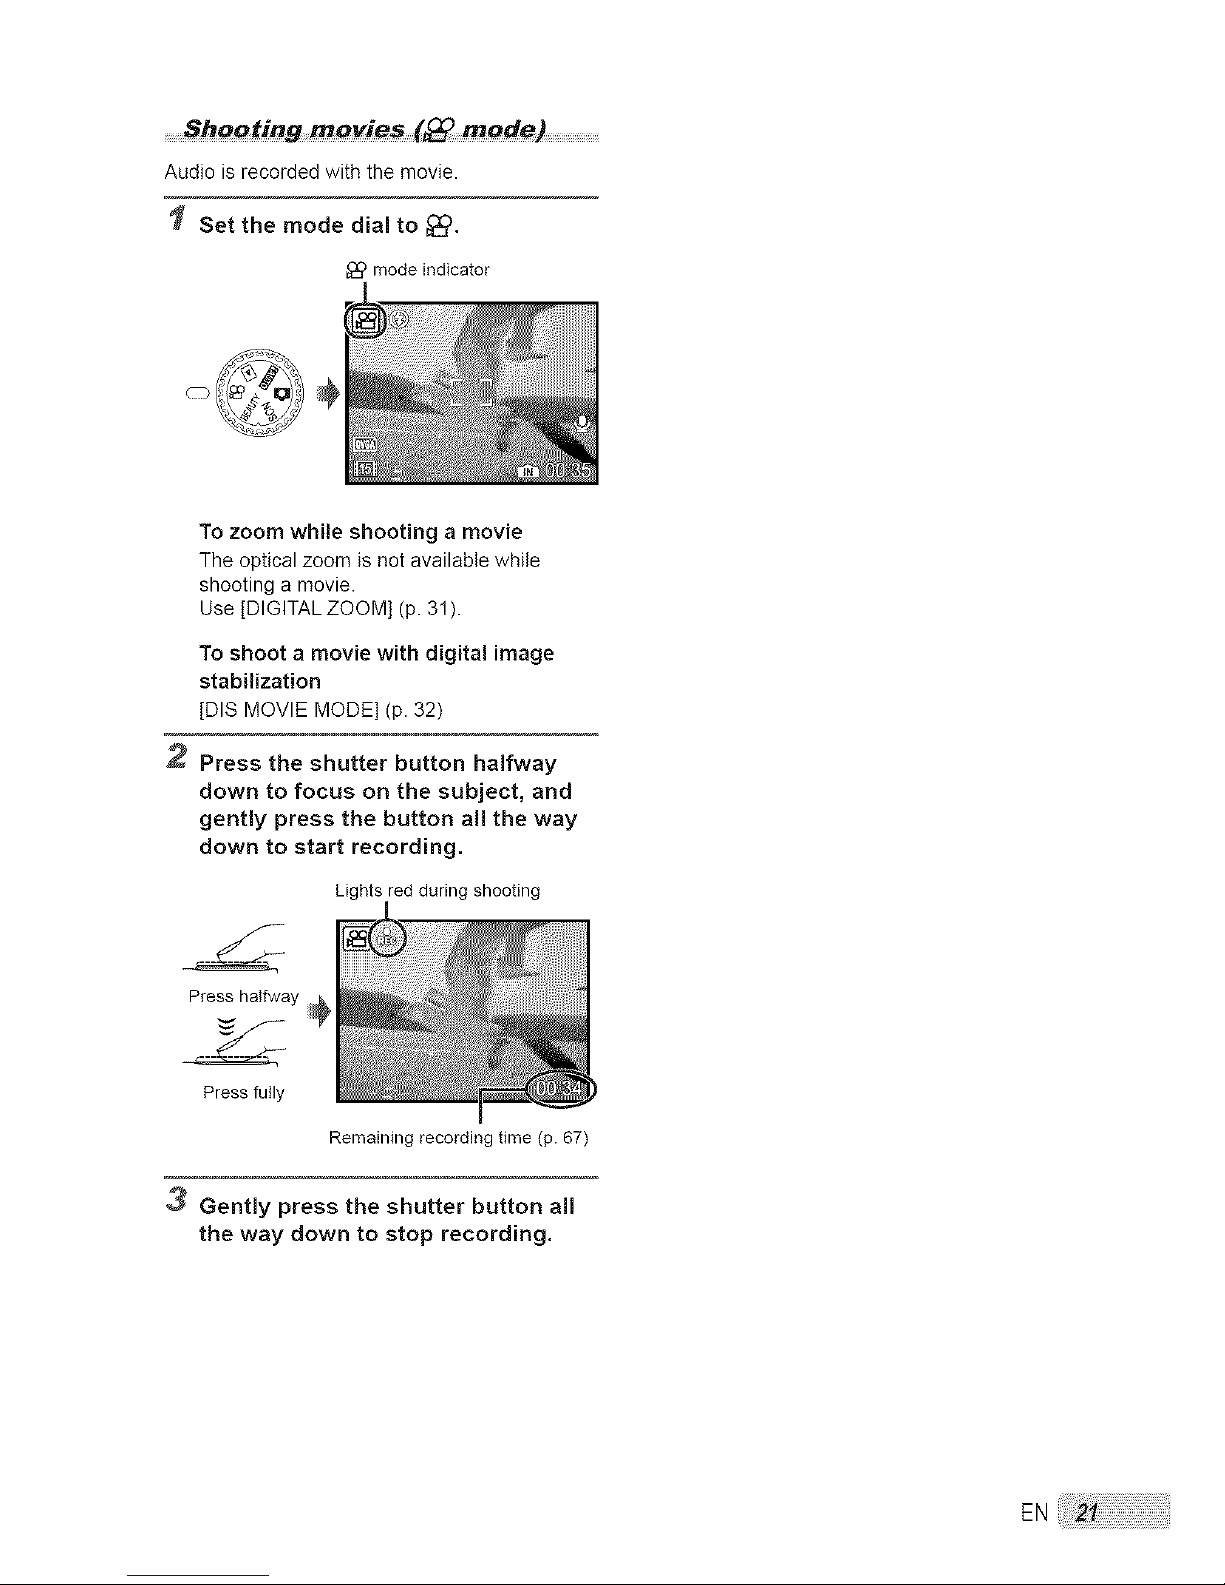
Set the mode dial to _).
modeindicator
To zoom while shooting a movie
The optical zoom is not available while
shooting a movie.
Use [DIGITAL ZOOM] (p. 31 ).
To shoot a movie with digital image
stabilization
[DIS MOVIE MODE] (p. 32)
2 Press the shutter button halfway
down to focus on the subject, and
gently press the button all the way
down to start recording.
Lights red during shooting
Press halfway ;_
Press fully
Remaining recording time (p. 67)
3 Gently press the shutter button all
the way down to stop recording.
EN
Page 22

Shooting Functions
In addition to the wide variety of shooting modes,
the camera has functions that broaden the
expressive range and shooting options available
to the photographer.
........Using thf_ optica/ zoom
Pressing the zoom button adjusts the shooting
range.
Pressing the wide (W) Pressing the telephoto
button (T) button
Q
Zoom bar
_ Opticat zoom: 3.6×, Digitat zoom: 5.0×.
Use of)IMAGE STABILIZER] (StJlJimage)./
[DiS MOVIE MODE] (Movie) (p. 32) is
recommended when shooting with the
telephoto zoom.
To take larger images without reducing
image quality
[FINE ZOOM] (p. 31)
To take larger images
[DIGITAL ZOOM] (p. 31)
_ The zoom bar appearance identifies the
status of the fine zoom/digital zoom.
When using
opticai zoom
m
Optical zoom range
When using __ _
fine zoom WL,,,,,,,,_
Fine zoom range
When using j _
digital zoom ...................................................
L==_=J_==_
Digital zoom range
_,Using the flash ......................................................._...................................._
The flash functions can be selected to best
match the shooting conditions and render the
desired image.
Press the _ button.
(_ You can operate the camera by tapping the
body when [TAP CONTROL] is [ON].
[TAP CONTROL] (p. 49)
Page 23
FLASH AUTO
REDEYE
FILLIN
FLASH OFF
2 Use _ to select the setting option,
and press the _ button to set.
The flash fires automatically in
low-light or backlight conditions.
This emits pre-flashes to reduce
the occurrence of red eye in your
)hotos.
The flash fires regardless of the
available light.
The flash does not fire.
Shooting closeups
(Macro shooting)
This function enables the camera to focus and
shoot subjects at close distances.
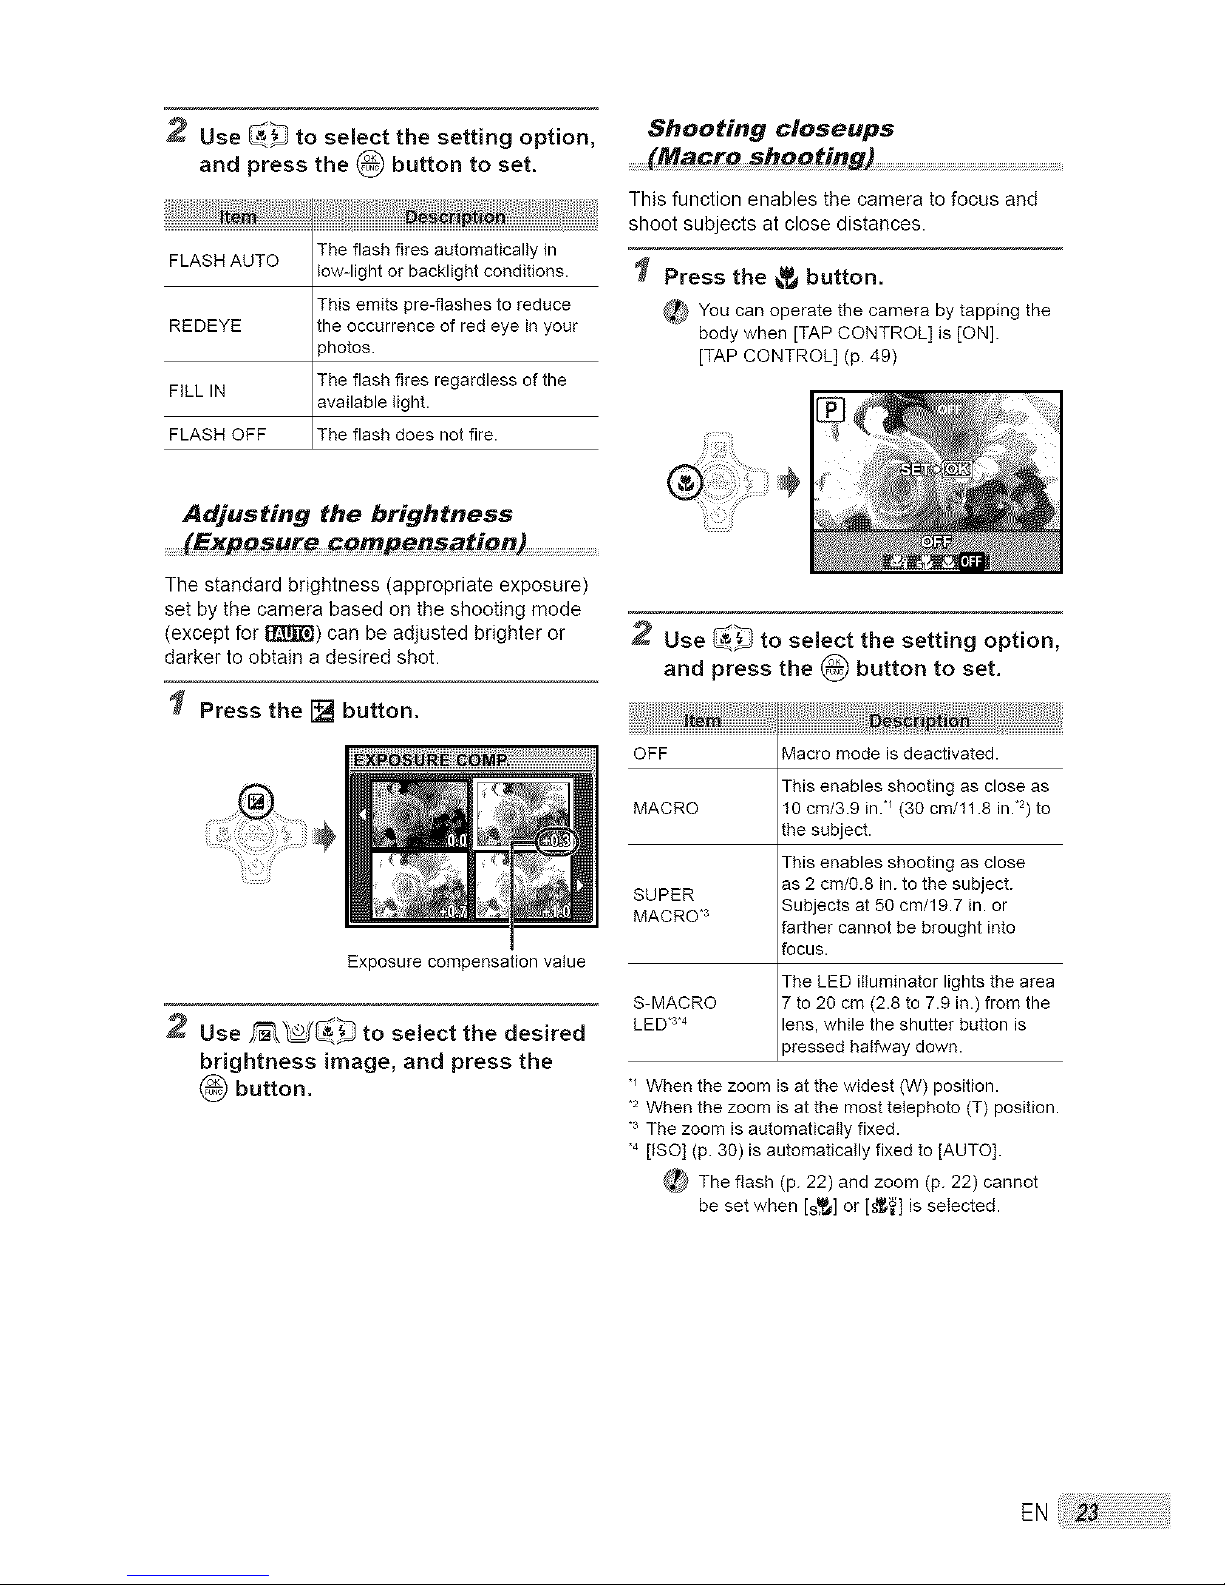
Press the _ button.
_ You can operate the camera by tapping the
body when [TAP CONTROL] is [ON].
[TAP CONTROL] (p. 49)
Adjusting the brightness
.......(Exposure _ompensation)
The standard brightness (appropriate exposure)
set by the camera based on the shooting mode
(except for _) can be adjusted brighter or
darker to obtain a desired shot.
Press the [] button.
Exposure compensation value
Use _ to select the desired
brightness image, and press the
button.
Use _ to select the setting option,
and press the _ button to set.
OFF Macro mode is deactivated.
This enables shooting as close as
MACRO 10 cm/3.9 in.n (30 cm/11.8 in."2)to
the subject.
This enables shooting as close
SUPER as 2 cm/0.8 in. to the subject.
MACROS Subjects at 50 cm/19.7 in. or
farther cannot be brought into
focus.
The LED illuminator lights the area
S-MACRO 7 to 20 cm (2.8 to 7.9 in.) from the
LED *s4 lens, while the shutter button is
pressed halfway down.
n When the zoom is at the widest (W) position.
,2 When the zoom is at the most telephoto (T) position.
,s The zoom is automatically fixed.
,4 [ISO] (p. 30) is automatically fixed to [AUTO].
_ The flash (p. 22) and zoom (p. 22) cannot
be set when [s,_] or [s_] is selected.
Page 24
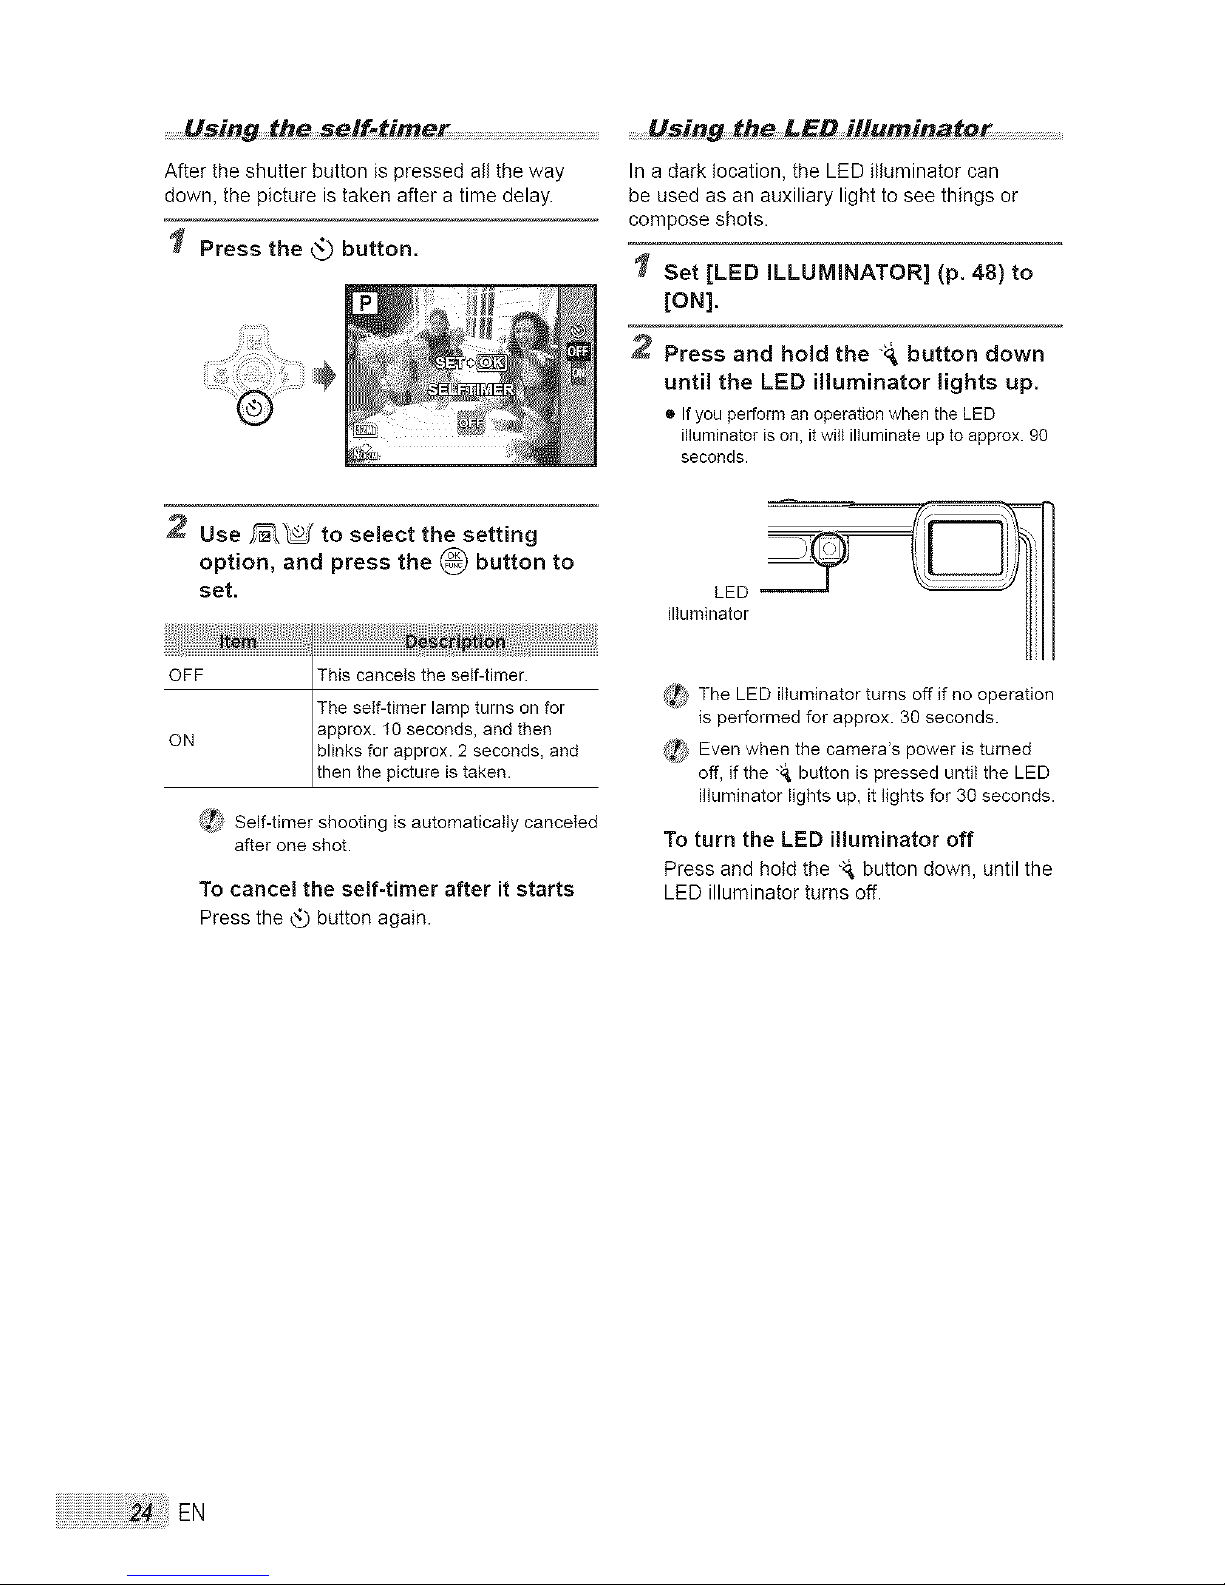
Aftertheshutterbuttonispressedalltheway Inadarklocation,theLEDilluminatorcan
down,thepictureistakenariel-atimedelay, beusedasanauxiliarylighttoseethingsor
composeshots.
Pressthe_ button,
Set [LED ILLUMINATOR] (p. 48) to
[ON].
2 Press and hold the _, button down
until the LED illuminator lights up.
®Ifyou performan operationwhentheLED
illuminatorison,itwill illuminateup toapprox.90
seconds.
Use _ to select the setting
option, and press the _ button to
set.
_'_ Self-timer shooting is automatically canceled
after one shot.
To cancel the self-timer after it starts
Press the _ button again.
ir---Ii 'i
LED >_ _ ,,,_L_____J i /
illuminator _1
_} The LED illuminator turns off if no operation
is performed for approx. 30 seconds.
_¢_ Even when the camera's power is turned
off, if the -_ button is pressed until the LED
illuminator lights up, it lights for 30 seconds.
To turn the LED illuminator off
Press and hold the "_ button down, until the
LED illuminator turns off.
24 EN
Page 25
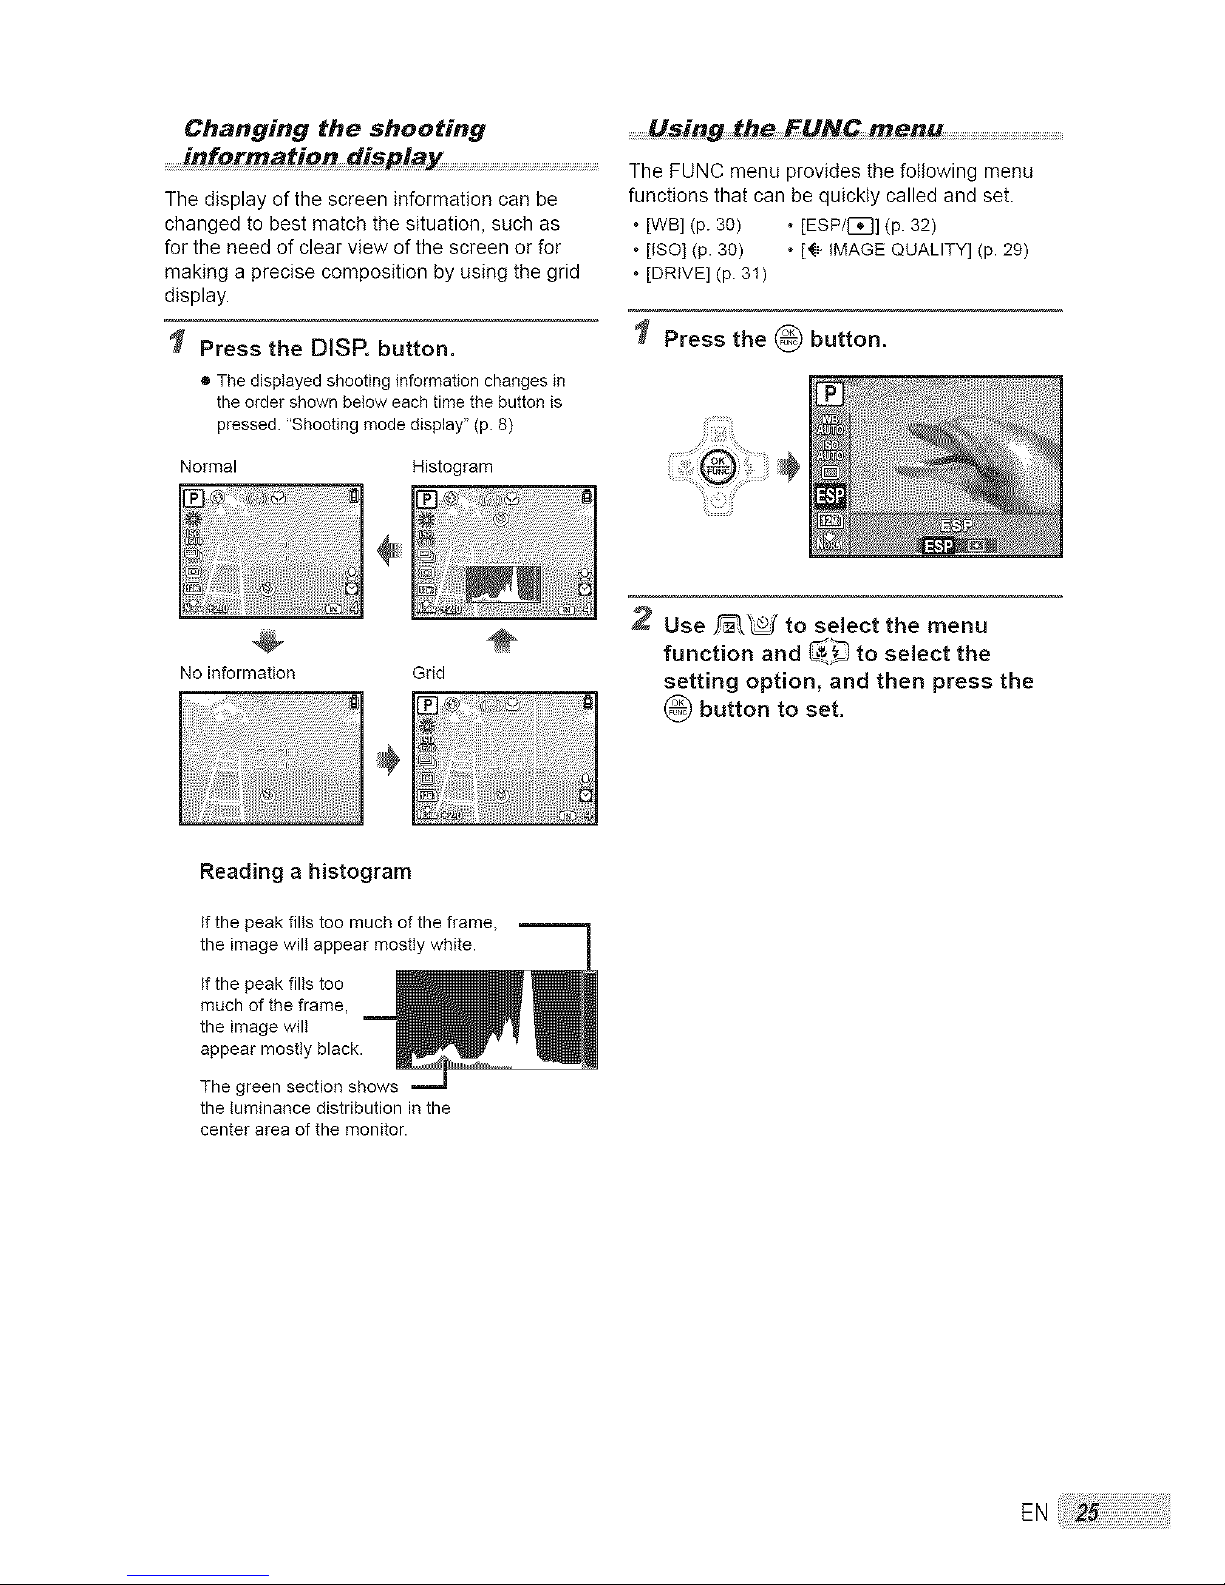
Changing the shooting
information disp/ay
Tile display of the screen information can be
changed to best match the situation, such as
for the need of clear view of the screen or for
making a precise composition by using the grid
display.
Press the DISR button.
• The displayed shooting information changes in
the order shown below each time the button is
pressed. "Shooting mode display" (p. 8)
Normal Histogram
@
.........Using the _UNC menu
The FUNC menu provides the following menu
functions that can be quickly called and set.
• [WB] (p. 30) • [ESP/[_}] (p. 32)
• [ISO] (p. 30) * [_, IMAGE QUALITY] (p. 29)
• [DRIVE] (p. 31)
Press the _ button,
No information Grid
2 Use _ to select the menu
function and _ to select the
setting option, and then press the
button to set.
Reading a histogram
If the peak fills too much of the frame,
the image will appear mostly white.
If the peak fills too
much of the frame,
the image will
appear mostly black.
The green section shows
the luminance distribution in the
center area of the monitor.
EN
Page 26
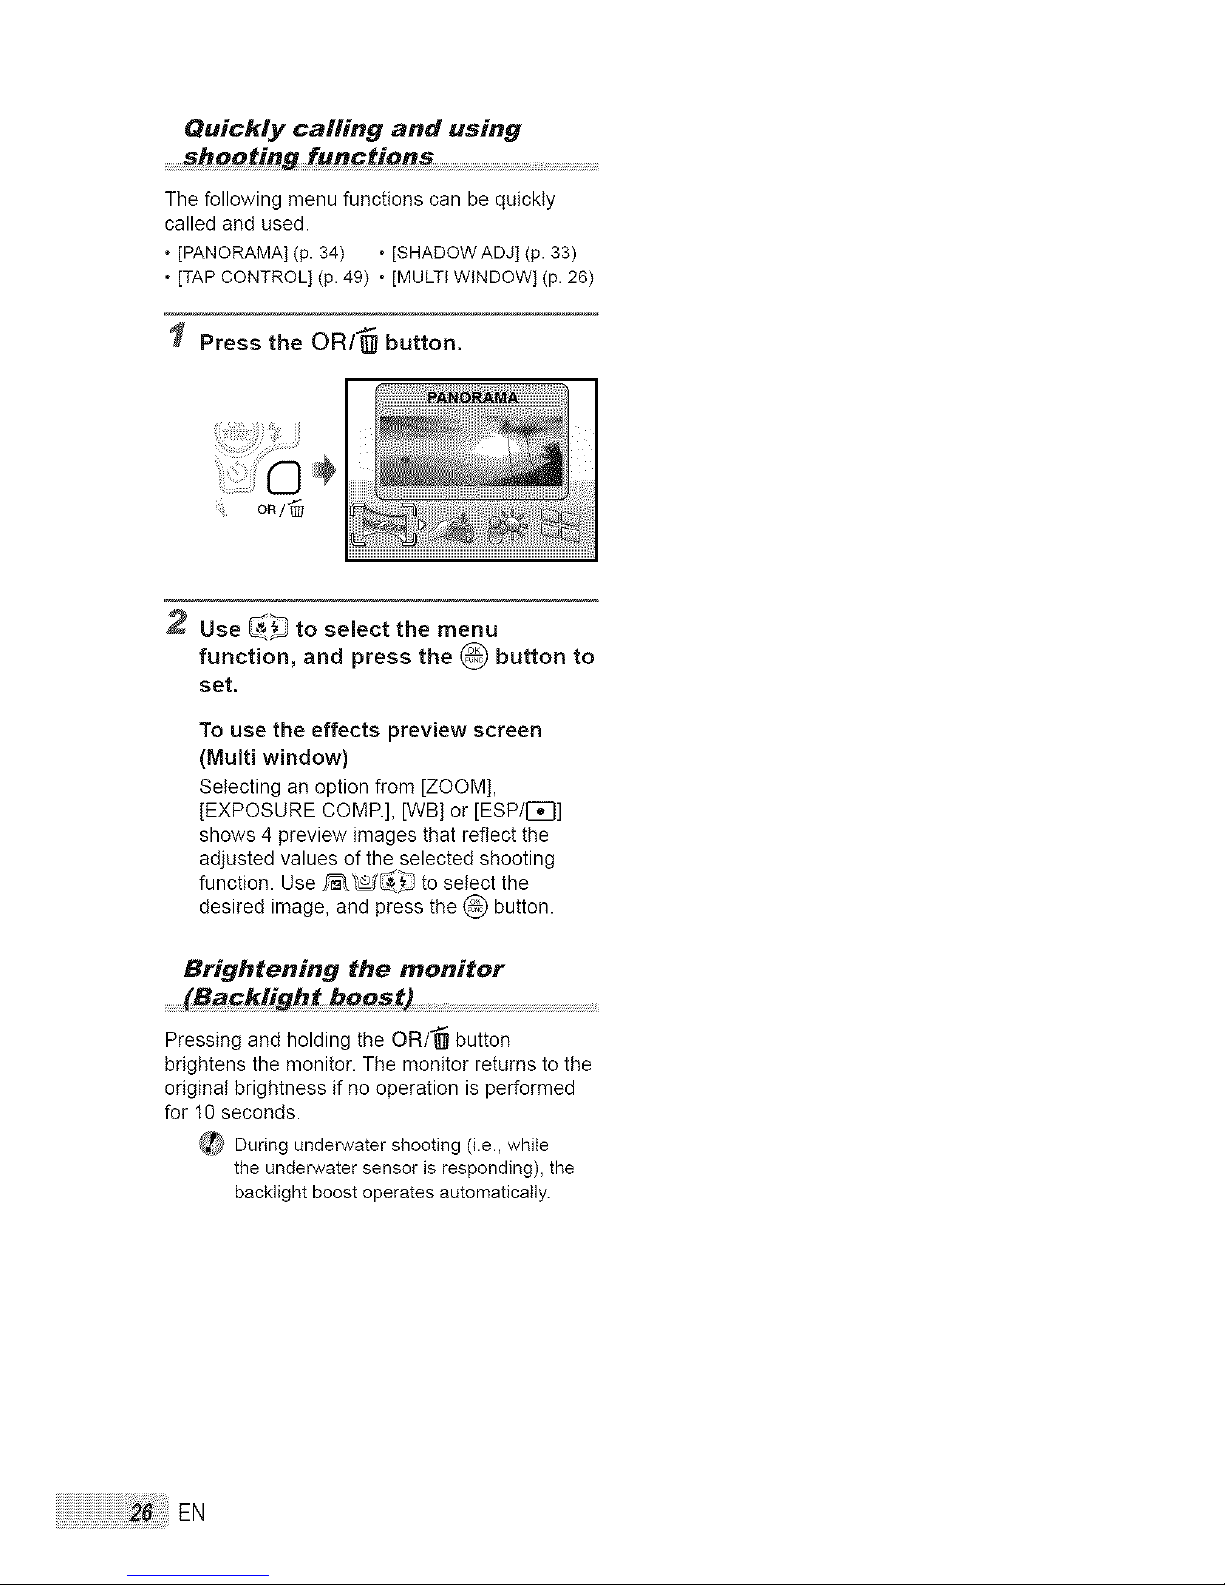
Quickly calling and using
shooting functions ..................................................................
The following menu functions can be quickly
called and used.
• [PANORAMA] (p. 34) • [SHADOW ADJ] (p. 33)
• [TAP CONTROL] (p. 49) • [MULTI WINDOW] (p. 26)
Press the OR/_ button.
: oR/
£
Use _ to select the menu
function, and press the _ button to
set.
To use the effects preview screen
(Multi window)
Selecting an option from [ZOOM],
[EXPOSURE COMP.], [WB] or [ESP/I_]
shows 4 preview images that reflect the
adjusted values of the selected shooting
function. Use _ to select the
desired image, and press the _ button.
Brightening the monitor
Pressing and holding the OR/'_ button
brightens the monitor. The monitor returns to the
original brightness if no operation is performed
for 10 seconds.
_ During underwater shooting (i.e., while
the underwatersensor is responding), the
backlight boost operates automatically.
26: EN
Page 27

PlaybackFeat,,res
index view_ calendar view_ and
Index view and calendar view enable quick
selection of a target image. Close-up view (up
to 10x magnification) allows checking of image
details.
Press the zoom button.
[] o.
To select an image in index view
Use _ to select an image, and
press the _ button to display the selected
image in single-image view.
To select images in calendar view
Use _ to select a date and press
the @ button or T on the zoom button to
view the images taken on the selected date.
To scroll an image in close-up view
Use _Cg._ to move the viewing area.
Changing the image
................information disp/ay ......................................................................
Shooting information displayed on the screen
can be changed.
Press the DISR button.
® The displayed image information changes in
the order shown below each time the button is
pressed.
Normal Histogram
Detailed No information
_j} "Reading a histogram" (p. 25)
Page 28

Playing back panorama
Panorama images that were combined together
using [COMBINE IN CAMERA 1]or [COMBINE
IN CAMERA 2] can be scrolled for viewing.
_ "Creating panoramic images
[_ PANORAMA]"(p. 34)
Select a panorama image during
playback.
(_ "Viewing images" (p. 17)
2 Press the _ button.
Current viewing area
To control panorama image playback
Zoom in/Zoom out: Press the zoom button.
Playback direction: Press _ to
scroll in the direction of the pressed button.
Pause: Press the _ button.
Restart scrolling: Press the @ button.
Stop playback: Press the MENU button.
EN
Page 29

Menus for Shooting Functions
When the mode dial is set to a shooting mode position (l_i_ II_ 8CN BEAUTY_), settings can be
adjusted.
_ @ indicates positions of the mode dial at which the function can be set.
_ The default settings of the function are highlighted in
Selecting the appropriate image quality for your application [_.o.IMAGE QUALITY]
........ tALIIY ............
@ : _ !_1 ,_I_1 BEAUTY
Still images
IMAGE SIZE
COMPRESSION
5M (2560× 1920)
3M (2048× 1536)
2M (1600×1200)
1M (1280×960)
VGA (640×480)
16:9 (1920x1080)
FINE
iii
Suitable for printing pictures over A3 (11× 17 in.).
Suitable for printing pictures at A4 (8.5×11 in.).
Suitable for printing pictures up to A4 (8.5×11 in.).
Suitable for printing pictures at A5 (5×7 in.).
Suitable for printing pictures at postcard size.
Suitable for viewing pictures on aTV or using pictures on emails and
web sites.
Suitable for playing pictures on wide screen TV.
Shooting at high quality.
Shooting at normal quality.
Movies
IMAGE SIZE
FRAME RATE
VGA (640x480) / Setect the image quality based on the image size and frame rate.
H gher frame rates prov de smoother mov es.
" frames per second
_ "Number of storable pictures (still pictures)/continuous recording length (movies) in the internal
memory and xD-Picture Card" (p. 67)
E.
Page 30

Adjusting to a natural color scheme
[WB]
: _ ,SCN BEAUTY
Still images/
Movies (During non=water shooting)
The camera automatically adjusts
TO the white balance according to the
shooting scene.
For shooting outdoors under a
_;_ clear sky
c_ For shooting outdoors under a
cloudy sky
For shooting under tungsten
_6,_ lighting
For shooting under daylight
_i fluorescent lighting (household
lighting, etc.)
For shooting under neutral
_2 fluorescent lighting (desk lamps,
etc.)
For shooting under white
_3 fluorescent lighting (offices, etc.)
Movies (During underwater shooting)
_2/ For shooting underwater.
Selecting the ISO sensitivity [ISO]
.......:_ GAMBBA MBNU _ !80 .........................................................::
_ Abbreviation for the International
Organization for Standardization. ISO
standards specify the sensitivity for digital
cameras and film, thus codes such as "ISO
100" are used to represent sensitivity.
_r_ In the ISO setting, although smaller values
result in less sensitivity, sharp images can
be taken under fully lit conditions. Larger
values result in higher sensitivity, and
images can be taken at fast shutter speeds
even under dimly lit conditions. However,
high sensitivity introduces electrostatic noise
into the resulting picture, which may give it a
grainy appearance.
The camera automatically adjusts
th..... itivity ..... ding to the
shooting scene.
The camera uses a higher
HIGH ISO AUTO sensitivity compared to [AUTO] to
minimize blur caused by a moving
subject or by camera shake.
64/100/200/400/ The ISO (sensitivity) setting is
800/1600 fixed by manually selecting it.
EN
Page 31

Shooting pictures sequentially while Shooting at higher magnifications than
the shutter button is held down optical zoom without reducing the
[DRIVE] image quafity [FINE ZOOM]
....... ............. _ E!NE _OOM
_ : _ SeN _ : _ ,_:_N BEAUTY
_: One frame is shot each time the
shutter button is pressed.
Sequential shooting at the focus,
_._ brightness (exposure), and white
balance that is locked in the first
frame.
Sequential shooting at a higher
_JJ speed than [_].
i The shooting speed varies depending on the
settings for [{J, IMAGE QUALITY] (p. 29).
_) When set to [_], [_] (Sound recording)
(p. 32) is not available.
When set to [_Jj], flash is set fixed [(_]
(FLASH OFF) and [ISO] is fixed to [AUTO].
_ When set to [_Jj], [IMAGE SIZE] is limited
to [[_] or lower. Moreover, [FINE ZOOM]
(p. 31), [DIGITAL ZOOM] (p. 31), and [_]
(Sound recording) (p. 32) are not available.
Only optical zoom is used to zoom
in for shooting.
Optical zoom and image cropping
ON are combined to zoom in for
shoot ng Approx. 21x (max.)).
This function wilt not reduce the image
quality since it dose not convert the data
with fewer pixels into the data with larger
pixels.
_i_ When set to [ON], [IMAGE SIZE] is limited
to [E_]] or lower,
_Z} This function is not available when
[DIGITAL ZOOM] is [ON].
_ This function is not available when
[s_ SUPER MACRO] (p. 23) or
[s_ S-MACRO LED] (p. 23) is selected,
Shooting at higher magnifications than
optical zoom [DIGITAL ZOOM]
....... _ B!G!TAL ZOOM ..........
@ : _ _N BEAUTY
Only optical zoom is used to zoom
in for shooting.
Optical zoom and digital zoom are
ON combined to zoom in for shooting
Approx. 18x (max.)).
_ This function is not available when
[FINE ZOOM] is [ON].
This function is not available when
[s,_ SUPER MACRO] (p. 23) or
[s_ S-MACRO LED] (p. 23) is selected.
EN
Page 32

Selecting the range for measuring the Recording sound when shooting still
brightness [ESP/_] images [_]
........ .... :-:_CAMERA MENU _ _1 ....
Shoots to obtain a balanced
brightness over the entire screen.
_ (Meters the brightness at the
center and surrounding areas of
the screen separately.)
Shoots the subject at the center
EEl (spot) dur ng back ght ng.
_P_ When set to [ESP], the center may
appear dark when shooting against strong
backlighting.
Q: i_ SCN
ON
No sound is recorded.
The camera automatically starts
recording for approx. 4 seconds
after taking the picture. This is
useful for recording notes or
comments about the picture.
_ When recording, aim the microphone (p. 6)
at the source of the sound you want to
record.
Selecting the focusing area [AF MODE] Reducing the blur caused by the
camera shake when shooting
....... MQDE [IMAGE STABILIZER] (still images) /
_ : _ SCN [DIS MOVIE MODE] (movies)
FACE DETECT .1
iESP
This is used for taking pictures of
people. (The camera automatically
detects a face and displays a
frame on the monitor). Press the
shutter button halfway, when the
camera focuses on a face the AF
target mark lights green. When the
AF target mark lights orange, this
indicates the camera has focused
on something other than a face.
This enables you to compose the
shot without worrying about the
focusing position. The camera
finds the subject to focus on and
automatically adjusts the focus.
The camera focuses on the
subject within the AF target mark.
For some subjects, the frame may not appear or
may take some time to appear.
EN
:-_;,CAMERA MENU !_"IMAGE STABILIZER /
........DiS MOglE MODE.....................................................................
_ : _ ,_::_N BEAUTY
The image stabilizer is deactivated.
This is recommended for shooting
OFF when the camera is fixed in place
on a tripod or other stable surface.
ON The mage stab zer s act vated.
The camera's default settings are [IMAGE
STABILIZER] (still images) to [ON] and [DIS
MOVIE MODE] (movies) to [OFF].
While [IMAGE STABILIZER] (still images)
is set to [ON], noises may occur from the
inside of the camera if the shutter button is
pressed.
(_ Images may not be stabilized if camera
shake is too severe.
@_ When the shutter speed is extremeIy slow,
such as when taking still shots or taking
pictures at night, the stabiIizer may not be
as effective.
_ When shooting while the [DIS MOVIE
MODE] (movies) is set to [ON], the image
witl be enlarged somewhat before saving.
Page 33

Brightening the subject against
backlight [SHADOW ADJ]
......../:_ CAMERA MENU _ SUABQW ADJ........
: _ ,_::_N BEAUTY_1
ON
Shoots without using [SHADOW
ADJ].
The camera finds a person's
face that has been darkened by
backlight and makes it appear
brighter for taking the picture.
(Point the camera toward the
subject. Check the frame that
appears around the face detected
by the camera, and then press the
shutter button to take the picture.)
For some subjects, the frame may not
appear or may take some time to appear.
@_'_When set to [ON], [ESP/E_] (p. 32)
is automatically fixed to [ESP], and
[AF MODE] (p. 32) is automatically fixed to
[FACE DETECT].
Selecting a scene mode according
to the shooting situation
[_ SCENE MODE]
......_ SCENEMODE .....................................................................................................................
_ In _N mode, the optimum shooting
settings are pre-programmed for specific
shooting scenes. For this reason, settings
may not be changed in some modes.
i LANDSCAPE/
P_ NIGHT SCENEW
*_ NIGHT+PORTRAIT*V
€_, SPORT/
_ INDOOR/
CANDLEW
SELF PORTAIT/
SUNSETW
FIREWORKSW
tCUISINE/_ DOCUMENTS/
_IF_BEACH & SNOW/
s_ UNDERWATER
SNAPSHOT/
_1 UNDERWATER WIDE1/
_2 UNDERWATER WIDE2/
UNDERWATER MACRO/
_ PRE-CAPTURE MOVIE/
8SNOW
The camera takes a
picture in the mode
for the shooting
scene.
_ When the subject is dark, noise reduction is
automatically activated. This approximately doubtes
the shooting time, during which no other pictures
can be taken.
To shoot with the selected mode
"Using the best mode for the shooting scene
(SeN mode)" (p. 19)
E.
Page 34

Capturing the perfect moment when
shooting ([_PRE-CAPTURE MOVIE]
mode)
J_' Use _ to select [_PRE-CAPTURE
MOVIE], and then press the @ button to
set.
® This function is ready for shooting
immediately after setting this option.
Press the shutter button to start movie
shooting.
® A 7-second movie, including 2-second movie
immediately before pressing the shutter
button, is taken.
• The optical zoom and auto focus function are
available during movie recording.
_ Sound is not recorded.
¢_ AF target mark does not appear on the
monitor.
_ Select [IMAGE SLZE] from [VGA] or [QVGA],
and select [FRAME RATE] from [_30fps]
or [_ 15fps].
Tapping the camera to shoot a picture
([_SNOW] mode)
J_,Select [_SNOW], and then press the
button.
® [TAPCONTROL](p.49) automatically
becomesactiveandthecameracanbe
operatedbytapping.
Tap the back of the camera body twice.
® [SELFTtMER]becomesactiveandthe picture
isautomaticallytaken after2 seconds.
Creating panoramic images
[_z_ PANORAMA]
Three frames are taken and
combined by the camera. The
user only composes the shots
so that the target marks and
pointers overlap, and the camera
.........................................automatically releases the shutter.
The shooting functions are already
preset to the optimum settings for
_anoramic shooting.
Three frames are taken and
COMBINE IN combined by the camera. The
CAMERA 2*_.2 user composes the shots using
the guide frame and manually
releases the shutter.
The frames that were taken are
combined into a panorama image
using the OLYMPUS Master 2
COMBINE IN PC software from the provided CD-
ROM. Pictures are taken in the
last [ISO] or [,_ SCENE MODE]
settings (except for some scene
modes).
_ Not available in _I_N mode (p. 19).
_2The [€. IMAGE QUALITY] (p. 29) setting cannot be
changed.
_ The focus, exposure (p. 23), zoom position
(p. 22), and [WB] (p. 30) are locked at the
first frame.
The flash (p. 22) is fixed to (_ (FLASH OFF)
mode.
_ Panorama images can be edited using
[SHADOW ADd] (p. 33), [COLOR EDIT]
(p. 38) only.
_) "Playing back panorama images" (p. 28)
EN
Page 35

Taking pictures with
[COMBINE iN CAMERA 1]
::1_,Press the shutter button to take the first
frame.
Move the camera slightly in the direction
of the second frame.
Target
Pointer
Screen when combining
images from left to right
3_ Move the camera slowly while keeping it
straight, and stop the camera where the
pointer and target mark overlap.
® The camera releases the shutter
automatically.
Taking pictures with
[COMBINE IN CAMERA 2]
_ Use _ to select the direction that the
frames are combined.
Direction for
combining the
next frame
_) Press the shutter button to take the first
frame.
® A guide frame appears as a reference.
Guide frame
Joint area
_i_ To combine only two pictures, press the
button before taking the third frame.
(4j Take the third frame in the same way as
Step (3_.
® After the third frame is taken, the camera
automatically processes the frames and the
combined panorama image is displayed.
_} To cancel making panoramic picture during
shooting, press the MENU button.
_ When the shutter does not automatically
release, try [COMBINE IN CAMERA 2] or
[COMBINE IN PC].
1st frame
3> Compose the second shot so that the
joint area overlaps the guide frame.
Composition of the 2nd frame
E.
Page 36

,4j Press the shutter button to take the
second frame.
To combine only two pictures, press the
@ button before taking the third frame.
,:.5_Take the third frame in the same way as
Steps 3_ to 4_.
® After the third frame is taken, the camera
automatically processes the frames end the
combined panorama image is displayed.
(_ To cance{ making panoramic picture during
shooting, press the MENU button.
Taking pictures with [COMBINE IN PC]
J_'Use _C,_._ to select the direction that
the frames are combined.
Press the shutter button to take the first
frame, and then compose the second
shot.
® Composethe shotusingtheguideframeso
thatthetwoadjacentframesoverlap.
3_Repeat Step 21 until the number of
required frames are taken, and then press
the @ button when finished.
¢_ Whenthe [_1 mark is displayed, youcannot
continue shooting any further.Panorama
shooting is possible for up to 10 frames.
_ Refer to the OLYMPUSMaster 2 help
guide for detaitson how to makepanorama
images.
Selecting movie shooting mode
[,_ MOVIE]
........_ MQ_IE
Restoring the shooting functions to the
default settings [_ RESET]
........_ RESEZ ........
: _ I_ _N BEAUTY
YES
Restores the following menu
functions to the default settings.
Flash (p. 22)
Exposure compensation (p. 23)
Macro (p. 23)
Self-timer (p. 24)
[{_- IMAGE QUALITY] (p. 29)
Menu functions in
[,k_CAMERA MENU]
(p. 30 to 33)
The current settings are not
changed.
¢_) First the [MOVIE] setting screen appears
when you set the mode dial to _ during
underwater shooting (i.e., while the
underwater sensor is responding).
EN
Page 37

Menus for Playback, Editing, and
Printing Functions
_ The default settingsofthe function are highlightedin.
When the mode dial is set to the [] position, settings can be adjusted.
Playing back automatically [_ SLIDESHOW]
STILL PICTURE/
MOVIE/CALENDAR
_ _ *_/ / Selects the range of images for the siideshow, the
FADER* /SLIDE / JOFF/ !2 type oftransition effect ([TYPE]) used between
ZOOM*/date .2 Lmages, and the background mus c ( BGM ).
Only when [STILL PICTURE] is selected in Submena 1.
2 Only when [CALENDAR] is selected in Submena 1.
To start a slideshow
After pressing the @ button to make the [BGM] settings, the slideshow starts. To stop the
slideshow, press the @ button or the MENU button.
[BGM] is not available when [_ SILENT MODE] (p. 50) is setto [ON].
Retouching images [L_ PERFECT FIX] Retouching the skin and eyes
.......J/_ REREEGT FiX [_ BEAUTYFIX]
........_ BEA_I_ EIX
_) Depending on the picture, the editing may
not be effective. _:_ Depending on the picture, the editing may
_P_ The retouching process may lower the not be effective,
image resolution.
SHADOW ADJ
REDEYE FIX
[SHADOW ADJ] and
[REDEYE FIX] are applied
together.
Only sections darkened by
backlighting and dim lighting are
brightened.
Eyes that are reddened by the
flash are corrected.
U_'Use _ to select a correction method
and press the @ button.
Use _ to select an image for
retouching, and press the @ button.
®The retouchedimageissavedasaseparate
image.
CLEAR SKIN
SPARKLE EYE
DRAMATIC
EYE
SOFT/AVG/
HARD
[CLEAR SKIN],
[SPARKLE EYE] and
[DRAMATIC EYE] are
applied together.
Makes skin took
smooth and
translucent. Select the
desired effect from
among 3 levels.
Enhances the contrast
of the eyes.
Enlarges the subject's
eyes.
_t Use _ to select a correction method,
and press the @ button.
Use _ to select an image for
retouching, and press the @ button.
®Theretouchedimageissavedas aseparate
image.
E.
Page 38

When [CLEAR SKIN] is selected
Use _ to select the retouching level,
and press the _ button.
Changing the color tone of image
[COLOR EDIT]
Changing the image size [_]
Slack & white This changes the image to bIack
and white.
This changes the image to a
Sepia sepia tone.
This increases the color saturation
Saturation(hard) of the image.
This slightty increases the color
Saturation (soft) saturation of the image.
Sepia
BIack &
'J Use _ to select an image.
Use _ to select an image size and
press the @ button.
• The image with the selected size is saved as a
separate image.
Cropping a picture [#:_]
,_gEDIT I_:_
J_,Use _ to select an image, and press
the @ button.
Use the zoom button to select the size of
the cropping frame, and use _ to
move the frame.
Saturation
Saturation (soft)
_ Use _}3 to select an image, and press
the @ button.
Use _ to select the desired
color, and press the @ button.
• Theimagewiththeselectedcolorissavedas
a separateimage.
Cropping frame
'_ Press the @ button.
• Theeditedimageis savedasa separateimage.
E.
Page 39

Adding a calendar to an image Creating an index of 9 frames from a
[CALENDAR] movie [INDEX]
_; Use _ to select a movie, and press the
button.
::1_,Use _ to select an image, and then
press the @ button.
Use _ to select a calendar, and use
_ to select the image orientation,
and press the @ button.
3_Use _ to select the Year of the
calendar, and then press 2.
(4sUse _ to select the Month of the
calendar, and then press the @ button.
• Theeditedimageis savedasa separateimage.
® This function extracts 9 frames from a movie
and saves them as a new picture (INDEX)
containing thumbnails of each frame.
Protecting images [On]
........L_]RLAYBAGK ......................................................................
_ Protected images cannot be erased by
[ERASE] (p. 18), [SEE IMAGE],or [ALL
ERASE] (p. 40), but all images areerased
by [MEMORY FORMAT]/[FORMAT](p.42).
Imagescan be erased,
Imagesare protectedso that
they cannotbe erasedexcept
ON byformatting of the internal
memory/card.
_1_Use C,_ to select an image.
Use _ to select [ON].
3_ If necessary, repeat Steps ,::1_,and ,2
to protect other images, and press the
button.
E.
Page 40

Rotating images [_] Erasing images [_ ERASE]
....... ....................... EBASE....
_ Check each picture before erasing to avoid
erasing any important pictures you may
_| +90° The image is rotated 90 ° want to keep.
clockwise.
The image is not rotated.
_90° The image is rotated 90 °
counter-clockwise.
J_'Use _ to select an image.
Use _ to select the rotation direction.
3_If necessary, repeat Steps % and
to adjust settings for other images, and
press the _ button.
_ The new pictureorientation will be saved
evenafter the power is turned off.
Adding sound to still images [_]
The camera adds (records) sound
for approx. 4 seconds while
playing back the image. This
is useful for recording notes or
comments about the image.
NO No sound s recorded.
,::1_,Use _ to select an image.
Aim the microphone towards the sound
source.
_ When erasing pictures in the internal
memory, do not insert the card into the
camera.
_ When erasing pictures from the card, insert
a card into the camera in advance.
To individually select and erase
images [SEL, IMAGE]
% Use _ to select [SEL. IMAGE], and
press the _ button.
Use _ to select the image to be
erased, and press the _ button to add a
",7" mark to the image.
mark
Microphone
,3 Use _ to select [YES], and press the
button.
® Recording starts.
(3_Repeat Step to select the images to be
erased, and then press the _ button to
erase the selected images.
4_ Use _ to select [YES], and press the
button.
®Theimageswitha "-it"markare erased.
To erase all images [ALL ERASE]
% Use _ to select [ALL ERASE], and
press the _ button.
Use _ to select [YES], and press the
button.
EN
Page 41

Saving print settings to the image data
[_ PRINT ORDER]
........_ RB!N! ORDEB ................................................................................................................................................
_} "Print Reservations (DPOF)" (p. 54)
_t_ Print reservation canonty be set for stiII
images thatare recordedto the card.
EN
Page 42

Menus for Other Camera Settings
_ The default settings of the function are highlighted in.
Erasing data completely
[MEMORY FORMAT]/[FORMAT]
_, Before formatting, check that no important
data is left inthe internat memoryor card.
_ Non-Olympus cards andcards that have
been formatted by a computer must be
formatted with this camera before use.
Completely erases the image data
YES in the internal memory* or card
(including protected images).
N Cance s formatt ng.
Be sure to remove the card before formatting the
internal memory.
Changing the display language [_]
........_ 8B_uR_
_; "Chang ng the display language" (p. 14)
The language for the menus and
Languages "_ error messages displayed on the
Imonitor is selected.
n The available languages vary depending on the
country and/or region where the camera was
purchased.
Copying images in the internal memory
to the card [BACKUP]
Backs up image data inthe
YES internal memory to the card.
Cance s the backup.
_ It takes some time to back up data. Check
that the battery has sufficient power before
starting the backup, or use a separately sold
AC adapter.
"Using a separately sold AC adapter" (p. 65)
EN
Page 43

Setting the startup display screen and sound when the camera is turned on
[PW ONSETUP]
OFF No image is displayed.
2OFF A preset image is displayed.
SCREEN A still image stored in the internal memory or card is
registered for display. (This option leads to the setup
screen.)
(N d)/
VOLUME2_s _!H GH The vo ume of the star up sound s se ected.
This image cannot be changed.
2 When [SCREEN] is set to [OFF], this setting is not available.
3 When [_ SILENT MODE] (p. 50) is set to [ON], this setting is not available.
To register a startup image
'#DSelect [2] in Submenu 3 for [SCREEN], and press the @ button.
Use _ to select the image to be registered, and press the @ button.
Selecting the menu screen color and background [MENU COLOR]
......._sE_u_ .............................................................................................
N _ COLOR 1/ Selects the menu screen color or background image according to your preference.
COLOR 2/COLOR 3
EN
Page 44

Selecting the camera sound and its volume [SOUND SETTINGS]
BEEP
SHUTTER SOUND
O_]VOLUME
SOUND TYPE
VOLUME
SOUND TYPE
VOLUME
OFF (No sound)/
OFF (No sound)/
_iOW/HIGH
_2
OFF (No sound)/
_!HIGH
1/2/3
OFF (No sound)/
_!HIGH
iiiii_iiiiii_i@i@iiiiiii_iiiiii@i_i@_i_!iii!_iiiiiiiHiliiiiii_ii@iiiiiiiiiiii_
Selects the operating sound and volume
of the camera buttons (except the shutter
button).
Selects the type and volume of the shatter
sound.
-- Adjusts the warning sound volume.
-- Adjusts the image playback volume.
_ To turn off all sounds at once, adjust the setting from [_ SILENT MODE] (p. 50).
Viewing the image immediately after shooting [REC VIEW]
....... vtEw .... ...... ...... :
_i_iiilli!i_ii! !i,!,!,!,:ili:iiii!!,!,!,,,L£!,,,,,_:!,,iS! _iiii!i!,,,,,,,,,,,J!',,i!!!!:!L,,_i,iiii_,_!..........ii,L:!,,,L! L:L::ii£ i,,l,,:i!__......
The image being recorded is not displayed. This allows the user to prepare for the next
OFF shot while following the subject in the monitor after shooting.
The image being recorded is displayed. This allows the user to briefly check the image
O:i'4 that was ust taken.
Even when set to [ON], you can resume shooting while the image is being displayed.
EN
Page 45

Resetting the file name numbers of Adjusting the CCD and adjusting the
pictures [FILE NAME] image processing function
........ [PIXEL MAPPING]
Folder name
DCIM
Folder name File name
!.JPg
.jPg
Automatic Automatic
numbering numbering
-- Month: 1 to C
(A=October,
B=November,
C=December)
......._,_8BIUB _ B!XSLMABB!NG................................................................
_ This function has already been adjusted
at factory shipping, and no adjustment is
needed right after purchase. Approximately
once a year is recommended,
_ For best results, wait at least one minute
after taking or viewing pictures before
performing pixel mapping. If the camera is
turned off during pixel mapping, be sure to
perform it again.
To adjust the CCD and the image
processing function
Press the _ button when [START]
(Submenu 2) is displayed.
• Thecamerachecksand adjuststheCCDandthe
imageprocessingfunctionatthe sametime.
Day: 01 to 31
AUTO
This resets the sequential number
for the folder name and file name
whenever a new card is inserted. _1
This is useful when grouping
images on separate cards.
Even when a new card is inserted,
this continues the numbering for
the folder name and file name from
the previous card. This is useful for
managing all image folder names
and files names with sequential
numbers.
The number for the folder name is reset to 100, and
the one for the file name is reset to 0001.
E.
Page 46

Adjusting the brightness of the monitor Setting the date and time for another
[I.L_J] time zone [DUAL TIME]
To adjust the monitor brightness
J_,Use _ to adjust the brightness while
viewing the screen, and then press the
button.
_[_ By setting [DUALTIME] to [ON] and setting
the date and time, the set date and time is
reflected in the image file names, date prints
and so on.
ON
.........................................Switches to the date and
-- time set in [(_)] (Date/
time).
Switches to the date
(Proceeds and time that were set in
to the [DUALTIME] when using
setting
screen.L) the camera in another
time zone.
Setting the date and time [_)]
_ "Setting the date and time" (p. 14)
_ The setting procedure is identical to that in "Setting
the date and time" (p. 14).
_} The date display order is the same as that
set with [_].
To select the date and time display
order
d_,Press _ after setting "Minute", and use
_ to select the date display order.
Date orde*
I CANCEL*_ SET*_
EN
Page 47

Selecting the video signal system to match your TV [VIDEO OUT]
_#) The TV video signal system varies depending on the countries and regions. Before viewing camera
images on your TV, select the video output according to your TV's video signal type.
NTSC Connecting the camera to a TV in North America, Taiwan> Korea, Japan, and so on
PAL Connecting the camera to a TV in European countries, China, and so on
_ The factory defaultsettings differaccording to the region where the camera is sold.
To play back camera images on a TV
,J_,Connect the TV and camera.
Connect to the TV video
input jack (yellow) and _ Multi-connector
audio input jack (white).
, j_' _
AV cable (supplied)
Connector cover
Use the camera to select the same video signal system as the one of connected TV ([NTSC]/
[PAL]).
3j Turn on the TV, and change "INPUT" to "VIDEO (an input jack connected to the camera)."
_} Fordetails on changing the inputsource of the TV,refer to the TV's instruction manual.
4j Set the mode dial to [_, and use _ to select the image for playback.
_ Depending on the TV's settings, the displayed images and information maybecome cropped.
E.
Page 48

Saving battery power between shots Displaying the current altitude/
[POWER SAVE] water depth (atmospheric/hydraulic
......... ............pressure) [MANOMETER]
......._,_ MANOMSIF-R ..........................................................................
¢_ Th.... dings mayh ....... gin of .....
Cancels[POWERSAVE]. dependingon meteorologicalconditions,
When the camera is not being Use the readings only for your reference.
usedforapprox. 10seconds,the
ON monitorautomaticallyturns offto
save batterypower,
To resume standby mode
Press any button or turn the mode dial.
Using the LED illuminator as an
auxiliary light [LED ILLUMINATOR]
Disables the LED illuminator.
ON Enables the LED illuminator.
_ "Using the LED illuminator" (p. 24)
OFF Cancels the manometer display.
Displays the current altitude/
water depth (atmospheric/
ON hydraulic pressure) in the
shooting standby mode screen.
-10 m to 5,000 m)
CALIBRATE Proceed to the setting screen.
See below.
_ When set to [ON], a warning message
appears in the monitor as a water depth
close to 10 m (32.8 ft) is reached.
To adjust the altitude/water depth
display
% Use _'@_ to select the current altitude/
water depth, and press the _ button to
set.
Selecting the display units for the
manometer [m/ft]
..... sBzuR_m/_t.....................
ft
This displays in meters.
This displays in feet.
EN
Page 49

Operating the camera by tapping the body [TAP CONTROL]
Cancels [TAP CONTROL].
ON [TAP CONTROL] isactivated.
Adjuststhetap strengthand intervalsbetween multipletapson each side ofthe camera
CALIBRATE body. top, eft, rght, & back
Functions available when [TAP CONTROL] is set to [ON]
Camera's top [TOP]: Tap twice
• Confirms the selected menu.
• Switches [TAP CONTROL] to [ON] or [OFF]. (p. 4)
Camera's left side [LEFT]:
Tap once
Sets the macro mode. (p. 23)
Camera's back [BACK]: Tap once
Switches to playback mode. (p.50)
_11 Camera's right side [RIGHT]: Tap once
Sets the flash mode. (p. 22)
EN
Page 50

Operating during shooting mode (Example: Flash mode)
_:1_,Tap the right side of the camera body once.
® The flash mode selection screen is displayed.
Tap the right or left side of the camera body to select a
function.
3_ Tap the top of the camera body twice to confirm your
selection.
_P) Tap the camera firmly using the pad of your finger.
When the camera is stabilized on a tripod for example, tap control
may not work properly.
_ To prevent dropping the camera when using tap control, strap the
camera to your wrist.
Operating during playback mode
When switched to playback mode by tapping the back of the
camera body once, the operations below can be used.
Display next image: Tap the right side of the camera once.
Display previous image: Tap the left side of the camera When tapping the camera's top
once.
Start slideshew: Tap the top surface of the camera twice. (The slideshow will automatically
start for all images stored in internal memory or on the card, with [BGM] set to [OFF].)
Display next image during a slideshew: Tilt the camera right or tap the right side of the
camera once.
Display previous image during a slideshow: Tap the left side of the camera once.
Stop slideshow: Tap the top surface of the camera twice.
Return to the shooting mode: Tap the back side of the camera once.
To adjust the tap control
J_, Select [CALIBRATE] in Submenu 2 and press the _ button.
Select the part to adjust with _ and press the _ button.
(_ Select the [STR] setting with _ and press the }3 button.
(4/Select the [INTVL] setting with _ and press the _ button.
SET*_
_t_ Check the operation of the camera by tapping on the camera after making
the settings.
Turning off the camera sounds [_ SILENT MODE]
Activates the [SOUND SETTINGS] setting.
ON The electronic sounds (operating sound, shutter sound, warning sound) and playback
sounds are muted.
_ [SOUND SETTINGS] (p. 44)
EN
Page 51

By connecting the camera to a PictBridge-
compatible printer, you can print images directly
without using a computer.
To find out if your printer supports PictBridge,
refer to the printer's instruction manual.
• PictBridge is a standard for connecting digital
cameras and printers of different makers and
printing out pictures directly.
The printing modes, paper sizes, and other
parameters that can be set with the camera
vary depending on the printer that is used.
For details, refer to the printer's instruction
manuat.
_} For details on the available paper types,
loading paper, and installing ink cassettes,
refer to the printer's instruction manual.
Printing images at the
printer's standard settings
........[EAS Y PR IN T] ...........................................................................................................................................................................................................
Display the image to be printed on
the monitor,
_ "Viewing images" (p. 17)
_ Printing can also be started when the
camera is turned off. After performing Step
2, use _ to select [EASY PRINT], press
the _ button. Use _ to select an image,
and press the _ button.
2 Turn on the printer, and then
connect the printer and camera.
button
3 Press _ to start printing.
4 To print another image, use _
to select an image, and press the
button.
To exit printing
After a selected image is displayed on the
screen, disconnect the USB cable from the
camera and printer.
EN
Page 52

Changing the printer's settings
fo_ printing [CUSTOM PRINT]
Follow Steps I and 2 for [EASY
PRINT] (p. 51), then press the
button.
4 Use _ to select [SIZE]
(Submenu 3), and press _.
_ If the [PRINTPAPER] screen is not
displayed, the [SIZE[, [BORDERLESS],
and [PICS/SHEET] are set to the printer's
standard.
2 Use _ to select [CUSTOM
PRINT], and press the _ button.
3 Use _ to select the print mode,
and press the _ button.
ALL PRINT
MULTI PRINT
ALL INDEX
PRINT ORDER "1
This prints the image selected in
Step 6.
This prints all images stored in the
internal memory or card.
This prints one image in a multiple
layout format.
This prints an index of all images
stored in the internal memory
or card.
This prints images based on the
)rint reservation data on the card.
[PRINT ORDER] is available only when print
reservations have been made. "Print Reservations
(DPOF)" (p. 54)
5 Use _ to select the
[BORDERLESS] or [PICS/SHEET]
settings, and press the _ button.
The image is printed with a border
around it ([OFF]).
OFF/ON'_ The image is printed to fill the
entire paper ([ON]).
(The number of The number of images per sheet
images per sheet ([PICS/SHEET]) is selectable only
varies depending when [MULTI PRINT] is selected
on the printer.) n Step 3.
_ The available settings for [BORDERLESS] vary
depending on the printer.
_} If [STANDARD] is selected in Steps 4 and 5,
the image is printed at the printer's standard
settings.
EN
Page 53

6 Use _ to select an image.
7 Press _ to make a [SINGLE PRINT]
reservation for the current image,
Press _ if you wish to adjust
detailed printer settings for the
current image.
To adjust detailed printer settings
,::1_.Use _C,_ to adjust the detailed
printer settings, and press the @ button.
DATE
FILE NAME
4_
To crop an image [-I:J']
_b Use the zoom button to select the size
of the cropping frame, use _C,_._
to move the frame, and then press the
button.
Cropping
frame
Use _ to select [OK], and press the
button.
WITH/
WITH/
_i_6
(Proceeds
to the
setting
screen.)
This selects the number
of prints.
Selecting [WITH] prints the
images with the date.
Selecting [WITHOUT]
prints the images without
the date.
Selecting [WITH] prints the
file name on the image.
Selecting [WITHOUT] does
not print any file name on
the image.
This selects a portion of
the image for printing.
If necessary, repeat Steps 6 and 7
to select the image to be printed,
make the detailed settings, and set
[SINGLEPRINT].
Press the _ button.
E.
Page 54

_0Use _ to select [PRINT], and
the _ button,press
• Printing starts.
• When [OPTION SET] is selected in [ALL PRINT]
mode, [PRINT INFO] screen is displayed.
• When printing is finished, the [PRINT MODE
SELECT] screen is displayed.
To cancel printing
_:1_.Press the _ button while
[TRANSFERRING] is displayed.
Use _ to select [CANCEL], then
press the _ button.
_ Press the MENU button.
_2When the message [REMOVE USB
CABLE] is displayed, disconnect
the USB cable from the camera and
printer.
In print reservations, the number of prints and
date imprint option are saved in the image on
the card. This enables easy printing at a printer
or print shop supporting DPOF by using only the
print reservations onthe card without a computer
or a camera.
*_DPOFisa standardfor storingautomaticprintout
informationfrom digitalcameras.
Print reservations can be set only forthe
imagesstored on the card. Inserta card
with recordedimages before making print
reservations.
_ DPOF reservations set by another DPOF
device cannotbe changed bythis camera.
Make changes using the originat device.
Making newDPOF reservationswith this
camera',,viiierase the reservations made by
the other device.
_ DPOF print reservations can be made for up
to 999 images percard.
Single=frame print
reservations [_] ...........................................................................
Set the mode dial to I%q, and then
press the MENU button to display
the top menu.
Use _W_ to select [c_rj PRINT
ORDER], and press the _ button,
EN
Page 55

3 Use _ to select [r[]_], and press
the _ button.
4 Use _ to select the image for print
reservation. Use _ to select the
quantity. Press the _ button.
5 Use _ to select the [(_] (date
print) screen option, and press the
button.
NO This prints the image only.
This prints the image with the
DATE shooting date.
This prints the image with the
TIME shoot ng time.
Reserving one print each of all
Follow Steps I and 2 in IRES](p. 54).
2 Use _ to select [rr_L], and press
the _ button.
3 Follow Steps 5 to 6 in [t[]_].
Resetting all print reservation
Set the mode dial to [_], and then
press the MENU button to display
the top menu.
Use _ to select [cZ_PRINT
ORDER], and press the _ button.
3 Select either [r[]_] or [_L], and press
the _ button.
8ACK*_ SET*_
4 Use _ to select [RESET], and
press the _ button.
6 Use _ to select [SET], and
press the _ button.
EN
Page 56

Resetting the print reservation
........ selected
Follow Steps I and 2 of "Resetting
all print reservation data" (p. 55).
2 Use _ to select [_]_], and press
the _ button.
3 Use _ to select [KEEP) and
press the _ button.
4 Use _ to select the image with
the print reservation you want to
cance!. Use _ to set the print
quantity to "0".
5 If necessary, repeat Step 4, and then
press the _ button when finished.
6 Use _ to select the [(_)] (date
print) screen option, and press the
button.
• Thesettingsare appliedtotheremainingimages
with theprintreservationdata.
7 Use _ to select [SET], and
press the _ button.
iiiiiiiiiiiiiiiiiiiiiiiiiiiiiii'i_!;i_ii!,ii_
iii%%%%!i!i!i!:_:,,,,::iiiilili!!ilEN
Page 57

OLYMPUS Master 2
System requirements and
installation of OLYMPUS
Master 2 ............................
Instal{ the OLYMPUS Master 2 software by
referring to the included installation guide.
Connecting the camera to a
computer
m Make sure the camera is turned off,
• The monitor isoff.
2 Connect the camera to a computer.
• The camera automatically turns on.
Multi-connector
U
_ You can charge the battery by selecting
and pressing the @ button.[EXIT]
_F'_ The [USB] screen above does not appear
and charging may automatically start in
cases where there is an insufficient charge
or the camera is connected to a computer
via a USB hub.
Locate the position of the USB port by
referring to your computer's instructions
manual.
3 Use _ to select [PC], and press
the @ button.
®Thecomputerautomaticallydetectsthecameraas
a newdeviceonthefirst connection.
Windows
After the computer detects the camera, a
message indicating the completion of the
setting appears. Confirm the message and
click "OK". The camera is recognized as a
removable disk.
Macintosh
When iPhoto started, exit iPhoto and start
OLYMPUS Master 2.
_ While the camera is connected to the
computer, shooting functions are disabled.
_ Connecting the camera to a computer via a
USB hub may cause unstable operation.
When [MTP] is set for the submenu that
appears by pressing _ after selecting [PC]
in Step 3, images cannot be transferred to a
computer using OLYMPUS Master 2.
.........Sta_ting OLYMPUS Master 2
Double=click the OLYMPUS Master 2
icon.
Windows
app...... thedeektop.
Macintosh
"_ appears in the OLYMPUS Master 2 folder.
• Browse window appears after starting the
software.
_,_) When you start OLYMPUS Master 2 for the
first time after installation, "Default Settings"
and "Registration" screens appear. Follow
the instructions on the screen.
Page 58

YMPUS Master 2
When OLYMPUS Master 2 is started, Quick
Start Guide appears on the screen that
helps you to handle the camera without any
question. When the Quick Start Guide is not
displayed, click _ in the toolbar to show
the Guide.
For details on the operation, refer to the help
guide of the software.
Transferring and saving
images without using
OLYMPUS Master 2 .......................................................................
This camerais compatible withtile USB Mass
StorageClass, You can transfer and savethe
imagedata on your computerwhile the camera
andthe computer are connected,
System requirements
Windows : Windows 2000 Professional/
XP Home Edition/
XP Professional/Vista
Macintosh : Mac OS X v10.3 or later
On a computer running Windows Vista, if
[MTP] is set for the submenu that appears
by pressing _ after selecting [PC] in Step 3
of "Connecting the camera to a computer"
(p. 57), Windows Photo Gallery will become
available.
_i_ Even if a computer has USB ports, proper
operation is not guaranteed in the following
cases.
® Computers with USB ports installed using an
expansion card, etc.
® Computers without a factory-installed OS and
home-built computers
EN
Page 59

If the camera does not work as intended, or if
an error message is displayed on the screen,
and you are unsure of what to do, refer to the
information below to fix the problem(s).
TroubleshQoting
Battery
"The
battery is installed"
• Insert recharged battery in the correct _ir
"Charging the battery" (p.
and the xD-Picture Card TM
the camera" (p. I0)
• Battery performance may have been reduced
temporarily due to low temperature. Take the
battery out of the camera, and warm it by putting it
in your pocket for awhile.
Monitor
"Difficult to see"
® Condensation *_may have for_d. Turn off the
power and wait for the camer_ B_dy to become
acclimated to the surrounding _emperature and diy
out before taking pictures. ..................
": Dew drop.... form in the camera w_ it
suddenly taken from e cold location intc__ _arm
humid room.
"Vertical lines appear on the screen"
® Vertical lines may appear on the screen at
times such as when the camera is pointed at an
extremely bright subject under a clear sky. The
lines do not appear, however, in the final image.
"The light is caught in the picture"
® Shooting with flash in dark situations results in
an image with many flash reflections on dust in
the air.
Card/Internal memory
"Anerrormessageisdisplayed"
"Error message" (p. 60)
Sh.tterb,,tton
"No picture is taken when the shQ_
button is pressed"
• Cancel sleep mode.
To save battery power, the eame_e autematical/y
goes into sleep mode and the monitor turns off
if there is no operation after 3 minutes when the
camera is turned on. No picture istaken even if
the shutter button is fully pressed in this mode.
Operate the zoom button or other buttons to
restore the camera from sleep mode before taking
a picture. If the camera is left for 15 minutes, it
automatically turns off. Press the ON/OFF button to
tun1 on the camera.
• Set the mode dial to a position other than [_:j.
• Wait until _.(flash charge) stops blinking before
taking pictures.
® If the battery is removed and te_ QU_Qf the camera
:
for about 1 day* ,the date and time settings return
to the default setting and must be reset.
-2 The time until the date and time settings return
to the default setting varies depending on how
long the battery have been loaded.
"Setting the date end time" (p. I4)
Others
"Noises occur from the inside of the
camera in shooting standby mode"
® Auto focusing operation may cause lens
movement noises even if you do not make any
camera operation.
Page 60

Error message
_P_ When one of the messages below is
displayed on the monitor, check the
corrective action.
D
CARD ERROR
D
WRITE
PROTECT
@
MEMORY FULL
D
CARD FULL
E::}
NO PICTURE
OJ
PICTURE
ERROR
Card problem
Insert a new card.
Card problem
Use a computer to cancel the
read-only setting.
Internal memory problem
• Insert a card.
• Erase unwanted imagesN
Card problem
• Replace the card.
, Erase unwanted imagesN
Card problem
• Use _ to select [CLEAN
CARD], and press the
button. Take out the card,
wipe the contact area (p. 66)
with a soft, dry cloth, and then
load the card again.
• Use _ to select
[FORMAT], and press the
_ button. Next, use _
to select [YES], and press the
_ button/_
Internal memory problem
Use _ to select [MEMORY
FORMAT], and press the
button. Next, use _
to select [YES], and press the
button. _
Internal memory/Card problem
Take pictures before viewing
them.
Problem with selected image
Use photo retouch software,
etc. to view the image on a
computer. If the image stitl
cannot be viewed, the image file
is corrupted.
[_ Problem with selected image
THE iMAGE
CANNOT Use photo retouch softw'are, etc.
BE EDITED to edit the image on a computer.
Operation problem
Close the battery/card
CARD-COVER compartment cover.
OPEN
(Z]
BATTERY Battery problem
EMPTY Charge the battery.
_[}_X Connection problem
Connect the camera and
NO computer or printer correctly.
CONNECTION
Printer problem
Load paper into the printer.
NO PAPER
Printer problem
Refill the ink in the printer.
NO INK
'/'_V" Printer problem
Remove the jammed paper.
JAMMED
SETTINGS Printer problem
Return to the status where the
CHANGED "_
printer can be used.
Printer problem
r_ Turn off the camera and printer,
check the printer for any
PRINT ERROR problems, and then turn the
power on again.
E_ Problem with selected image
CANNOT PRINT 4 Use a computer to print.
_ Before erasing important images, download them to
a computer.
_2All data will be erased.
,s This is displayed, for instance, when the printer's
paper tray has been removed. Do not operate
the printer while making the print settings on the
camera.
_4This camera may be unable to print images taken by
other cameras.
EN
Page 61

.....ShQoting tips ............................................................................................................
When you are unsure of how to take a picture
that you envision, refer to the information below.
Focusing
"Focusing on the subject"
• Taking a picture of a subject not in the center
of the screen
After focusing on an object at the same distance
as the subject, compose the shot, and take the
picture.
Pressing the shutter button halfway (p. 16)
AF lock (p. 19)
• Set [AF MODE] (p. 32) to [iESP]
• Taking a picture of subjects where autofocus
is difficult
In the following cases, after focusing on an object
(by pressing the shutter button halfway down) with
high contrast at the same distance as the subject,
compose the shot, and take the picture.
Subjects with low contrast
When extremely bright objects r. _-I
appear in the center of the _'_!i_,kz4"--__-,__._?_ t
...... _F [-1_i[,'_' j _' _
_ ...._ 1
When objects are at different
distances
Fast-moving object
The subject is not inthe
center of the frame
Object with no vertical lines "_
It is also effective to compose the shot by holding
the camera vertically to focus, and then returning to
the horizontal position to take the picture.
E.
Page 62

"Taking pictures (or movies) without
camera shake"
• Taking pictures using [IMAGE STABILIZER]
(p. 32)
When a picture is taken of a shadowy subject, the
CCD "_shifts to correct for camera shake even if
the ISO speed is not increased. This function is
also effective when taking pictures at a high zoom
magnification.
• A device that takes light received through the
lens and converts it into electric signals.
• Shooting movies using IBIS MOVIE MODE]
(p. 32)
• Taking picture with ['_ SPORT] (p. 33)
Since you can take pictures with a high shutter
speed by setting [¢_ SPORT], it's also effective for
blurry subjects.
• Taking pictures at a high ISO sensitivity
If ahigh ISO sensitivity is selected, pictures can
be taken at ahigh shutter speed even at locations
where a flash cannot be used.
[ISO] (p. 30)
"Taking pictures with the right
brightness"
• Taking pictures of a subject against abacklight
A face against the backlight is brightened.
[SHADOW ADJ] (p. 33)
• Taking pictures using [FACE DETECT] for
[AF MODE] (p. 32)
Appropriate exposure is obtained for a face
against the backlight, and the face is brightened.
• Taking pictures using [[j_] for [ESP![];-I] (p. 32)
The picture can be taken based on the brightness
at the center of the monitor, so it's not affected by
the light in the background.
• Taking pictures using [FILL IN] (p. 23) flash
A subject against a backlight is brightened.
• Taking pictures of a white beach or snow
scene
Set the mode to [_ BEACH & SNOW],
[8 SNOW] (p.33)
® Taking pictures using exposure compensation
(p. 23)
Adjust the brightness while viewing the screen
for taking the picture. Normally, taking pictures of
white subjects (such as snow) results in images
that are darker than the actual subject. Use the
[] button to adjust inthe positive (+) direction
to express whites as they appear. When taking
pictures of black subjects, on the other hand, it is
effective to adjust in the negative (-) direction.
Color hue
"Taking pictures with colors at the same
shade as they appear"
® Taking pictures by selecting [WB] (p. 30)
Best results in most environments can normally
be obtained with the AUTO setting, but for some
subjects, you should try experimenting with
different settings. (This is especially true for
sunshade under a clear sky, mixed natural and
artificial light settings, and so on.)
"Taking sharper pictures"
® Taking pictures with the optical zoom
Avoid using [DIGITAL ZOOM] (p. 31) to take
pictures.
® Taking pictures at a low ISO sensitivity
If the picture is taken with a high ISO sensitivity,
noise (small colored spots and color unevenness
that were not in the original image) can occur, and
the image can appear grainy.
[ISO] (p. 30)
"Taking pictures so that the frames are
stitched smoothly"
® A tip for panoramic shooting
Taking pictures by pivoting with the camera at the
center prevents shifting of the image. When taking
pictures of close objects in particular, pivoting with
the lens end at the center produces favorable
results.
[_ PANORAMA] (p. 34)
62 EN
Page 63

"Making battery last longer"
• Avoid performing the following operations as
much as possible as they use up battery power
even if no pictures are actually taken
® Repeatedly pressing the shutter button
halfway.
• Repeatedly using the zoom.
• Set [POWER SAVE] (p. 48) to [ON]
"Viewing images in the internal memory
and card"
• Remove the card when viewing pictures in the
internal memory.
® "Loading the battery and the xD-Picture
Card TM(sold separately) into the camera"
(p. 10)
• "Using the microSD card/microSDHC card
(sold separately)" (p. 13)
"Erasing the sound recorded to a still
image"
• Record over the sound with silence when
playing back the image
[_] (Add sound to still images) (p. 40)
EN
Page 64

........Camera Gare
Exterior
• Wipe gently with a soft cloth. If the camera is
very dirty, soak the cloth in mild soapy water
and wring well. Wipe the camera with the
damp cloth and then dry it with a dry cloth. If
you have used the camera at the beach, use a
cloth soaked in clean water and wrung well.
• If any dirt, dust, sand, or other foreign material
adheres to the periphery of the lens cover
after use, or the lens cover does not move
smoothly, wash the camera using the method
described on P. 69.
Monitor
• Wipe gently with a soft cloth.
Lens
• Blow dust off the lens with a commercial
blower, then wipe gently with a lens cleaner.
Battery/AC adaptor
• Wipe gently with a soft, dry cloth.
_ Do not use strong solvents such as benzene
or alcohol, or chemically treated cloth.
@_/ Mold may form on the lens surface if the
lens is left dirty.
• When storing the camera for extended
periods, remove the battery, AC adapter and
card, and keep in a cool, dry place that is well
ventilated.
• Periodically insert the battery and test the
camera functions.
_ Avoid leaving the camera in places where
chemical products are handled since this
may result in corrosion.
Batter_ AC adaptor (included)_
Charger (sold _eparately) .................................
• This camera uses one Olympus lithium ion
battery (LI-50B). No other type of batteries can
be used.
_ Caution:
There is a risk of explosion ifthe battery is
replacedwith the incorrectbattery type.
Dispose of the used batteryfollowing
the instructions in"Battery Handling
Precautions"(p. 73).
• Power consumption by the camera varies
depending on which functions are used.
• During the conditions described below, power
is consumed continuously and the battery
becomes exhausted quickly.
• The zoom is used repeatedly.
• The shutter button is pressed halfway
repeatedly in shooting mode, activating the
auto focus.
• A picture is displayed on the monitor for an
extended period of time.
• The camera is connected to a computer or
printer.
. Using an exhausted battery may cause the
camera to turn off without displaying the
battery level warning.
• The rechargeabte battery is not fully charged
at the time of purchase. Charge the battery
fully with the included AC adapter (F-1AC)
or the separately sold AC adaptor (D-7AC)/
charger (LI-50C) before use.
• When the included AC adaptor (F-1AC) is
used, charging usually takes approximately
2.5 hours (varies on usage).
• The included AC adaptor (F-1AC) has been
designed to be used only for charging.
Make sure that operations such as shooting,
viewing images and so on are not being used
while theAC adaptor is connected to the
camera.
• The included AC adaptor (F-1AC) is designed
to be used only with this camera. Other
cameras cannot be charged with this AC
adaptor.
• For plug-in type AC adaptor:
The included AC adaptor (F-1AC) is intended
to be correctly orientated in a vertical or floor
mount position.
64 EN
Page 65

Charging the battery by
connecting the camera to a
To charge the battery, connect the camera to
a computer via USB cable, select [EXIT] in the
[USB] screen below, and press the @ button.
@
®
®
If the camera is connected to a printer or
an old computer, the operation may be
unstable, or charging may take longer than
that with the included AC adaptor. Charging
time varies depending on the performance
of a computer or printer. (There may be
cases in which it takes approx. 10 hours.)
Even if [REMOVE USB CABLE] is
displayed, the battery is charging while the
charging indicator is lit in orange. Be sure
to remove the USB cable after the battery
is charged (the charging indicator turns to
blue).
If the camera without a battery is connected
to a computer, by inserting a battery into
the camera, the camera wilt start charging
without showing the [USB] screen above.
Using a separately sold AC
adapter ...................................................................................
An AC adapter (D-7AC/separately sold) is
useful for time-consuming tasks such as image
downloads to a computer or when running a
slideshow for a long period of time. To use a
separately sold AC adapter for this camera,
the multi-adapter (CB-MAl/separatety sold) is
required. The battery can also be charged by
connecting the camera with its power turned off
to the AC adaptor.
Do not use any other AC adapter with this
camera.
Using a separately sold
A charger (LI-50C/separatety sold) can be used
to charge the battery. In this case, remove the
battery from the camera and set the battery to
the charger.
Using your charger and AC
........adapter abroad
* The charger and AC adapter can be used in
most home electrical sources within the range
of 100 V to 240 VAC (50/60Hz) around the
world. However, depending on the country
or area you are in, the AC wall outlet may be
shaped differently and the charger and AC
adapter may require a plug adapter to match
the wall outlet. For details, ask at your local
electrical shop or travel agent.
* Do not use travel voltage converters as they
could damage your charger and AC adapter.
E.
Page 66

.........Using an xD-Picture Card
A card (and internal memory) also corresponds
to the film that records images in a film camera.
Otherwise, the recorded images (data) can be
erased, and retouching is also available with
the use of a computer. Cards can be removed
from the camera and exchanged, but this is
not possible with the internal memory. Use of
larger capacity cards enables you to take more
pictures.
Index area
(Notes can be filled in
here)
Contact area
(Contact section of the
card with the internal
camera terminal)
_} Do not touchthe contact area directly.
Cards compatible with this camera
xD-Picture Card (16MB to 2GB)
(TypeH/M/M+, Standard)
Using a new card
Before using a non-Olympus card or a card
that was used for another purpose in a
computer or other device, use [MEMORY
FORMAT]/[FORMAT] (p. 42) to format the
card.
Checking the image saving location
The memory indicator shows whether the
internal memory or card is being used during
shooting and playback.
Current memory indicator
_: Internal memory is being used
None: Card is being used
Current memory
indicator
Shooting mode
Playback mode
_ Even if [MEMORY FORMAT]/[FORMAT],
[ERASE], [SEE IMAGE], or [ALL ERASE]
is performed, the data in the card is not
completely erased. When disposing of
the card, damage the card to prevent the
disclosure of personat data.
Readout/recording process of the card
Never open the battery/card compartment
cover or unplug the USB cable while the
camera is reading or writing data, which
is indicated by blinking of the card access
lamp. This can not only damage the image
data but also render the internal memory or
card unusable.
Cardaccess lamp
EN
Page 67

Number of storable pictures (still pictures)/continuous recording length (movies) in the
internal memory and xD-Picture Card
Still pictures
!_ ] _968×297
F_ !560×19,_
IT_ !048×15::
I-_ 600x12C
1_ 1280x961
640×48C
920×10E
F_
N_M
F_
N_M
F_
N_M
F_
N_M
F_
N_M
F_
N_M
F_
N_M
7 7 173 174
15 15 340 343
18 18 404 410
36 37 820 841
27 28 815 627
55 58 1254 1305
46 47 1031 1066
87 93 1938 2063
70 74 1560 1640
131 144 2907 3198
228 271 4920 5815
368 496 7996 10661
42 44 954 984
82 87 1827 1938
Movies
25 sec. 25 sec.
49 sec. 50 sec.
59 sec. 59 sec. 22 min. 3 sec.
1 rain. 56 sec. 1 min. 59 sec. 43 min. 37 sec. min. 32 sec.
_ When [MOVIE] (p. 36) is set to [NON-WATER MOVIE], see "With sound", and for [UNDERWATER
MOVIE], see "Without sound."
The maximum file size of a single movie is2 GB, regardless of the capacity of the card.
* The maximum length is 10 seconds when using a TypeM or Standard xD-Picture Card.
E.
Page 68

Increasing the number of pictures that
can be taken
Either erase unwanted imagos, or connect
the camera to a computer or other device to
save the imagos, and then erase the images
in the internal memory or card.
[ERASE] (p. 18), [SEL. IMAGE] (p. 40),
[ALL ERASE] (p. 40), [MEMORY FORMAT]/
[FORMAT] (p. 42)
.........Using a microSD A#a_hme_t
_t_ Do not use the attachment with Olympus
digital cameras that do not support this
microSD Attachment, as well as with other
brands of digital cameras, computers,
printers, and other devices that support
xD-Picture Card. Doing so not only may
damage the pictures taken, but may also
result in the malfunction of the device.
_ If the microSD card cannot be removed,
do not use force. Contact authorized
distributors/service centers.
Cards compatible with this camera
microSD card/microSDHC card
_ For atist of tested microSD cards, please
visit our website (http://www.olympus.com/).
Sending images
You can send images to a computer or
printer by using the USB cable provided with
the camera.
To send data to other devices, remove
the attachment from the camera and use
a commercially available microSD card
adapter.
Handling precautions
Do not touch the contact area of the
attachment or microSD card. Doing so
may cause failure in reading the images.
When fingerprints or stains are found on
the contact area, wipe the area with a soft
dry cloth.
Important information about
water and shock resistant
Water resistance: The waterproof feature is
warranted *_to operate at depths up to 10 m
(32.8 feet) for up to one hour. The waterproof
feature may be compromised if the camera is
subject to substantial or excessive impact.
Shock resistance: The anti-shock feature
warrants .2the operation of the camera against
accidental impact incurred from everyday use
of your digital compact camera. The anti-shock
feature does not unconditionally warrant all
defective operation or cosmetic damage.
Cosmetic damage, such as scratches and dents,
are not covered under the warranty.
As with any electronic device, proper care
and maintenance are required to preserve
the integrity and operation of your camera. To
maintain camera performance, please take your
camera to the nearest Olympus Authorized
Service Center to have it inspected after
any major impact. Inthe event the camera is
damaged as a result of negligence or misuse,
the warranty will not cover costs associated
with the service or repair of your camera. For
additional information on our warranty, please
visit to the Olympus website for your local area.
Please observe the following care instructions
for your camera.
"1 As determined by Olympus pressure testing
equipmentin accordancewith IECStandard
Publication 529 IPX8 - This meansthat the
cameracan beused normallyunder water
ata specified waterpressure.
*2 This anti-shock performance is confirmed by
Olympus'testing conditions in accordance
with MIL-STD-81OF,Method516.5,
Procedure IV (TransitDrop Test).For more
details ofOlympus' testingconditions,
please refer to the Olympus website for your
Iocatarea.
EN
Page 69

Before Use:
• Check the camera for foreign material
including dirt, dust or sand.
• Be sure to close the battery/card compartment
cover and connector cover firmly so that each
lock makes clicking sound.
• Do not open the battery/card compartment
cover and connector cover with wet hands,
while under water, or ina damp or dusty
environment (e.g. beach).
After Use:
Be sure to wipe off any excess water or debris
after using the camera under water.
• After the camera is used under seawater,
immerse the camera in a bucket containing
fresh water for about 10 minutes (with
the battery/card compartment cover and
connector cover firmly closed). After
that, dry the camera in a shade with good
ventilation.
• Water drops may be observed on the inner
surface of the battery/card compartment
cover or connector cover after you open
each cover. If any water drops are found,
be sure to wipe them off before using the
camera.
Notes after use
• Foreign materials may be attached to the
periphery of the lens cover from using the
camera in conditions with foreign materials
such as dirt, dust or sand, or when the lens
cover is not moving smoothly. If you continue
to use the camera in such conditions, the lens
could become damaged or the lens cover
could stick causing additional damage to the
camera. To avoid such damage, wash the
camera using the following method.
J_,Insert the battery and close the battery/
card compartment cover and connector
cover firmly so that each lock makes the
clicking sound.
(2 Fill a bucket with fresh water, immerse
the camera in the bucket with the lens
surface downward and shake the camera
thoroughly.
(3_Press the ON/OFF button several times in
the water and close/open the lens cover
repeatedly.
(4j Furthermore, shake the camera further
with the cover opened.
Follow the Steps _ to 4_,,then check if the
lens cover moves smoothly.
If the lens cover does not move smoothly,
rinse the lens face by placing it directly under
a strong stream of tap water and pressing the
ON/OFF button repeatedly.
Storage and Maintenance
• Do not leave the camera in an environment at
high temperature (40°C (104°F) or more) or at
low temperature (-10°C (14°F) or tess). Failure
to do so may break down water resistance.
• Do not use chemicals for cleaning, rust
prevention, anti-fogging, repairing, etc. Failure
to do so may break down water resistance.
• Do not leave the camera in water for a long
time. Failure to do so will cause damage to
the camera's appearance and/or deteriorate
water resistance.
• In order to preserve the water resistant
feature, as with any underwater housing,
it is recommended that the waterproof
packing (and seals) are replaced annually.
For the Olympus distributors or service
stations where the waterproof packing can
be replaced, visit Olympus website for your
local area.
EN
Page 70

Closing Battery/card compartment cover
and Connector cover
Battery/card compartment cover
Connector cover
(_ The included accessories (e.g. AC adaptor)
do not offer shock or water resistance.
EN
........SAFETY PRECAUTIONS
CAUTION: TO REDUCETHE RISK OF ELECTRICAL
SHOCK.DO NOT REMOVECOVER (ORBACK).
NOUSER-SERVICEABLEPARTSINSIDE.
REFERSERVICINGTO QUALIFIEDOLYMPUS
SERVICEPERSONNEL
/_ An exclamation mark enclosed in a
tdang}e alerts you to important operating
and maintenance instructions in the
documentation provided with the product.
Ifthe product is used without observing
the information given under this symbol,
serious injury or death may result.
Ifthe product is used without observing the
information given under this symbol, injury
or death may result.
Ifthe product is used without observing the
information given under this symbol, minor
personal injury, damage to the equipment,
or loss of valuable data may result.
l WARNING' 1
TO AVOID THE RISK OF FIRE OR ELECTRICAL SHOCK,
NEVER DISASSEMBLE, EXPOSE THIS PRODUCT TO
WATER OR OPERATE IN A HIGH HUMIDITY ENVIRONMENT.
//_ DANGER
Z_ WARNING
Z_ CAUTION
General Precautions
Read All Instructions -- Before you use the
product, read alt operating instructions. Save all
manuals and documentation for future reference.
Cleaning --Always unplug this product from the
wall outlet before cleaning. Use only a damp
cloth for cleaning. Never use any type of liquid or
aerosol cleaner, or any type of organic solvent to
clean this product.
Attachments -- For your safety, and to avoid
damaging the product, use only accessories
recommended by Olympus.
Water and Moisture -- For precautions on
products with weatherproof designs, read the
weatherproofing sections.
Location -- To avoid damage to the product, mount
the product securely on a stable tripod, stand,
or bracket.
Power Source -- Connect this product only to the
power source described on the product label.
Lightning -- If a lightning storm occurs while using
an AC adapter, remove it from the wall outlet
immediately.
Foreign Objects -- To avoid personal injury, never
insert a metal object into the product.
Heat -- Never use or store this product near any
heat source such as a radiator, heat register,
stove, or any type of equipment or appliance that
generates heat, including stereo amplifiers.
Page 71

Handling the Camera
•/_ WARNING
• Do not use the camera near flammable or
explosive gases.
• Do not use the flash and LED on people
(infants, small children, etc.) at close range.
• You must be at least 1 m (3 ft.) away from the
faces of your subjects. Firing the flash too close
to the subject's eyes could cause a momentary
loss of vision.
• Keep young children and infants away from
the camera.
• Always use and store the camera out of the
reach of young children and infants to prevent
the following dangerous situations which could
cause serious injury:
• Becoming entangled in the camera strap,
causing strangulation.
• Accidentally swallowing the battery, cards or
other small parts.
• Accidentally firing the flash into their own eyes
or those of another child.
• Accidentally being injured by the moving parts
of the camera.
• Do not look at the sun or strong lights with the
camera.
• Do not use or store the camera in dusty or
humid places.
• Do not cover the flash with a hand while firing.
• Do not insert anything into the microSD
Attachment other than the microSD card.
This attachment is exclusive for use of microSD
cards only. Other types of cards cannot be
installed.
• Do not insert anything other than an xD-Picture
Card or the microSD Attachment into the
camera
If you insert a card by mistake, such as a microSD
card, do not use force. Contact authorized
distributors/service centers.
Z_ CAUTION
• Stop using the camera immediately if you
notice any unusual odors, noise, or smoke
around it.
• Never remove the batteries with bare hands,
which may cause a fire or burn your hands.
• Do not leave the camera in places where it may
be subject to extremely high temperatures.
• Doing so may cause parts to deteriorate and, in
some circumstances, cause the camera to catch
fire. Do not use the charger orAC adapter if it is
covered (such as a blanket). This could cause
overheating, resulting in fire.
• Handle the camera with care to avoid getting a
tow-temperature burn.
• When the camera contains metal parts,
overheating can result in a low-temperature
burn. Pay attention to the following:
• When used for a long period, the camera will
get hot. If you hold on to the camera in this
state, a low-temperature burn may be caused.
• In places subject to extremely cold
temperatures, the temperature of the camera's
body may be lower than the environmental
temperature, tf possible, wear gloves when
handling the camera in cold temperatures.
• Be careful with the strap.
• Be careful with the strap when you carry the
camera. It could easily catch on stray objects
and cause serious damage.
• Do not touch the metallic parts of the camera
for a long period of time at tow temperatures.
• This may damage your skin. At low
temperatures, handle the camera while wearing
gloves.
EN
Page 72

Battery Handling Precautions
Follow these important guidelines to
prevent batteries from leaking, overheating,
burning, exploding, or causing electrical
shocks or burns.
Z_ DANGER
• Tile camera uses a lithium ion battery specified
by Olympus. Charge the battery with the specified
AC adaptor or charger. Do not use any other AC
adaptors or chargers.
• Never heat or incinerate batteries.
• Take precautions when carrying or storing
batteries to prevent them from coming into contact
with any metal objects such as jewelry, pins,
fasteners, etc.
• Never store batteries where they will be
exposed to direct sunlight, or subjected to high
temperatures in a hot vehicle, near a heat source,
etc.
• To prevent causing battery leaks or damaging their
terminals, carefully follow all instructions regarding
the use of batteries. Never attempt to disassemble
a battery or modify it in any way, solder, etc.
• If battery fluid gets into your eyes, flush your eyes
immediately with clear, cold running water and
seek medical attention immediately.
• Always store batteries out of the reach of small
children. If a child accidentally swallows a battery,
seek medical attention immediately.
,A.'_ WARNIN G
• Keep batteries dry at all times.
• To prevent batteries from leaking, overheating,
or causing a fire or explosion, use only batteries
recommended for use with this product.
• Insert the battery carefully as described in the
operating instructions.
• If rechargeable batteries have not been recharged
within the specified time, stop charging them and
do not use them.
• Do not use a battery if it is cracked or broken.
• If a battery leaks, becomes discolored or
deformed, or becomes abnormal in any other way
during operation, stop using the camera.
• If a battery leaks fluid onto your clothing or skin,
remove the clothing and flush the affected area
with clean, running cold water immediately. If
the fluid burns your skin, seek medical attention
immediately.
• Never subject batteries to strong shocks or
continuous vibration.
/_ CAUTION
• Before loading, always inspect tile battery carefully
for leaks, discoloration, warping, or any other
abnormality.
• The battery may become hot during prolonged
use. To avoid minor burns, do not remove it
immediately after using the camera.
• Always unload the battery from the camera before
storing the camera for a long period.
Caution for Usage Environment
• To protect the high-precision technology contained
in this product, never leave the camera in the
places listed below, no matter if in use or storage:
• Places where temperatures and/or humidity
are high or go through extreme changes.
Direct sunlight, beaches, locked cars, or near
other heat sources (stove, radiator, etc.) or
humidifiers.
• In sandy or dusty environments.
• Near flammable items or explosives.
• In wet places, such as bathrooms or in the rain.
When using products with weatherproof designs,
read their manuals as well.
• In places prone to strong vibrations.
• Never drop the camera or subject it to severe
shocks or vibrations.
• When mounted on a tripod, adjust the position of
the camera with the tripod head, De net twist the
camera.
• Do not touch electric contacts on cameras.
• Do not leave the camera pointed directly at the
sun. This may cause lens or shutter curtain
damage, color failure, ghosting on the CCD, or
may possibly cause fires.
• Do not push or pull severely on the lens.
• Before storing the camera for a long period,
remove the batteries. Select a cool, dry location
for storage to prevent condensation or mold from
forming inside the camera. After storage, test the
camera by turning it on and pressing the shutter
button to make sure that it is operating normally.
• Always observe the operating environment
restrictions described in the camera's manual.
• The altitude/depth measurement function is
not approved by an official institution. Use the
readings only for your reference.
EN
Page 73

Battery Handling Precautions
• This camera uses a tithium ion battery specified by
Olympus. Do not use any other type of battery.
• If the battery's terminals get wet or greasy, camera
contact failure may result. Wipe the battery well
with a dry cloth before use.
• Always charge a battery when using it for the first
time, or if it has not been used for a long period.
• When operating the camera with battery power
at low temperatures, try to keep the camera and
spare battery as warm as possible. A battery that
has run down at low temperatures may be restored
after it is warmed at room temperature.
• The number of pictures you can take may vary
depending on the shooting conditions or battery.
• Before going on a long trip, and especially before
traveling abroad, purchase extra batteries. A
recommended battery may be difficult to obtain
while traveling.
• Please recycle batteries to help save our planet's
resources. When you throw away dead batteries,
be sure to cover their terminals and always
observe local laws and regulations.
: LCD Monitor
• Do not push the monitor forcibly; otherwise the
image may become vague, resulting in a playback
mode failure or damage to the monitor.
• A strip of light may appear on the top/bottom of the
monitor, but this is not a malfunction.
• When a subject is viewed diagonally in the
camera, the edges may appear zigzagged on the
monitor. This is not a malfunction; it will be less
noticeable in playback mode.
• In places subject to low temperatures, the LCD
monitor may take a long time to turn on or its
color may change temporarily. When using the
camera in extremely cold places, it is a good idea
to occasionally place it in a warm place. An LCD
monitor exhibiting poor performance due to low
temperatures will recover in normal temperatures.
• The LCD used for the monitor is made with
high-precision technology. However, black spots
or bright spots of light may appear constantly on
the LCD monitor. Due to its characteristics or the
angte at which you are viewing the monitor, the
spot may not be uniform in color and brightness.
This is not a malfunction.
Legal and Other Notices
• Olympus makes no representations or warranties
regarding any damages, or benefit expected by
using this unit lawfully, or any request from a third
person, which are caused by the inappropriate use
of this product.
• Olympus makes no representations or warranties
regarding any damages or any benefit expected
by using this unit lawfully which are caused by
erasing picture data.
EN
Page 74

Disclaimer of Warranty
Olympus makes no representations or warranties,
either expressed or implied, by or concerning any
content of these written materials or software, and
in no event shall be liable for any implied warranty
of merchantability or fitness for any particular
purpose or for any consequential, incidental or
indirect damages (including but not limited to
damages for loss of business profits, business
interruption and loss of business information)
arising from the use or inability to use these
written materials or software or equipment. Some
countries do not allow the exclusion or limitation of
liability for consequential or incidental damages,
so the above limitations may not apply to you.
• Olympus reserves all rights to this manual.
Warn_ng
Unauthorized photographing or use of
copyrighted material may violate applicable
copyright taws. Olympus assumes no
responsibility for unauthorized photographing,
use or other acts that infringe upon the rights of
copyright owners.
Copyright Notice
All rights reserved. No part of these written
materials or this software may be reproduced
or used in any form or by any means, electronic
or mechanical, including photocopying and
recording or the use of any type of information
storage and retrieval system, without the prior
written permission of Olympus. No liability
is assumed with respect to the use of the
information contained in these written materials
or software, or for damages resulting from
the use of the information contained therein.
Olympus reserves the right to alter the features
and contents of this publication or software
without obligation or advance notice.
FCC Notice
• Radio and Television Interference
• Changes or modifications not expressly approved
by the manufacturer may void the user's authority
to operate this equipment. This equipment has
been tested and found to comply with the limits for
a Class B digital device, pursuant to Part 15 of the
FCC Rules. These limits are designed to provide
reasonable protection against harmful interference
in a residential installation.
• This equipment generates, uses, and can radiate
radio frequency energy and, if not installed
and used in accordance with the instructions,
may cause harmful interference to radio
communications.
• However, there is no guarantee that interference
will not occur in a particular installation. If this
equipment does cause harmful interference
to radio or television reception, which can be
determined by turning the equipment off and
on, the user is encouraged to try to correct the
interference by one or more of the following
measures:
• Adjust or relocate the receiving antenna.
• increase the distance between the camera and
receiver.
• Connect the equipment to an outlet on a circuit
different from that to which the receiver is
connected.
• Consult your dealer or an experienced radio/TV
technician for help. Onty the OLYMPUS-supplied
USB cable should be used to connect the
camera to USB enabled personal computers
(PC).
Any unauthorized changes or modifications to
this equipment would void the user's authority
to operate it.
EN
Page 75

Ropreseo,o.,vop,u0o.powe.sopp,ycordo.oount.es,roo,onsaround,.e
world
GOG G 0
AType B Type BF Type B3 Type C Type SE Type O Type
(America°Type) (British Type) (British Type) (British Type) (CEE Type) (OEE Type) (Oceania Type)
The representative supply voltage and plug type are described in this chart.
Depending on the area, different types of plugs and supply voltages are used.
Attention: Power cord meeting demands from each country shall be used.
- For only the United States
Use a UL Listed, 1.5 - 4.5 m (5 - 15 ft), Type SPT-2 or NISPT-2, AWG no. 18 power supply cord, rated for
125 V 7 A, with a non-polarized NEMA 1-15P plug rated for 125 V 15 A".
Europe North America
Countries/Re,qions Voltage Frequency(Hz)Plugtype Countries/Reqions Voltage Frequency(Hz)Plu,gtype
Austria 230 50 C Canada 120 60 A
Belgium 230 50 C USA 120 60 A
Czech 220 50 C
Denmark 230 50 C Central America
Finland 230 50 C Countries/Regions Voltage Frequency(Hz) Plugtype
France 230 50 C Bahamas 120/240 60 A
Germany 230 50 C Costa Rica 110 60 A
Greece 220 50 C Cuba 110/220 60 A/C
Hungary 220 50 C Dominican (rep) 110 60 A
Iceland 230 50 C El Salvador 110 60 A
Ireland 230 50 C/BF Guatemala 120 60 A
Italy 220 50 C Honduras 110 60 A
Luxemburg 230 50 C Jamaica 110 50 A
Netherlands 230 50 C Mexico 120/127 60 A
Norway 230 50 C Nicaragua 120/240 60 A
Poland 220 50 C Panama 110/220 60 A
Portugal 230 50 C
Romania 220 50 C South America
Russia 220 50 C Countries/Regions Volta,qe Frequency(Hz) Plu,gtype
Slovak 220 50 C Argentina 220 50 C/BF/O
Spain I27/230 50 C Brazil 127/220 60 A/C
Sweden 230 50 C Chile 220 50 C
Switzerland 230 50 C Colombia 120 60 A
UK 240 50 BP Peru 220 60 A/C
Venezuela 120 60 A
Asia
Countries/Re_qions Voltaqe Frequency(Bz) Pluq type
China 220 50 A
Hong Kong 200/220 50 BP
India 230/240 50 C
Indonesia I27/230 50 C
Japan 100 50/60 A
Korea (rep) 220 60 C
Malaysia 240 50 BP
Philippines 220/230 60 A/C
Singapore 230 50 BP
Taiwan 110 60 A
Thailand 220 50 C/BF
Vietnam 220 50 A/C
Oceania
Countries/Reqions Voltage Frequency(Hz)Plugtype
Australia 240 50 O
New Zealand 230/240 50 O
Middle East
Cauntries/Re_ians Valtaqe Frequency(Hz)Pluqtype
Iran 220 50 C/BF
Iraq 220 50 C/BF
Israel 230 50 C
Saudi Arabia 127/220 50 A/C/BF
Turkey 220 50 C
UAE 240 50 C/BP
Africa
Countries/Reqions Volta,qe Frequency(Hz) Plu,gtype
Algeria 127/220 50 C
Congo (dem) 220 50 C
Egypt 220 50 C
Ethiopia 220 50 C
Kenya 240 50 C/BP
Nigeria 230 50 C/BP
South Africa 220/230 50 C/BP
Tanzania 230 50 C/BP
Tunisia 220 50 C
E.
Page 76

Forous,omers,°.or,.andSou,.
America
For customers in USA
Declaration of Conformity
Model Number : STYLUS TOUGH-8000/
p TOUGH-8000
Trade Name : OLYMPUS
Responsible Party
OLYMPUS iMAGiNG AMERICA |NC.
Address : 3500 Corporate
Parkway, P.O. Box
610, Center Valley, PA
18034-0610, U.S.A.
Telephone Number : 484-896-5000
Tested To Comply With FCC Standards
FOR HOME OR OFFICE USE
This device complies with Part 15 of the FCC
rules. Operation is subject to the following two
conditions:
(1) This device may not cause harmful interference.
(2) This device must accept any interference
received, inc{uding interference that may cause
undesired operation.
For customers in Canada
This Class B digital apparatus meets all
requirements of the Canadian Interference-
Causing Equipment Regulations.
Use Only Dedicated Rechargeable Battery
and Battery Charger
We strongly recommend that you use only
the genuine Olympus dedicated rechargeable
battery and battery charger with this camera.
Using a non-genuine rechargeabte battery
and/or battery charger may result in fire or
personal injury due to leakage, heating, ignition
or damage to the battery. Olympus does not
assume any liability for accidents or damage
that may result from the use of a battery and/or
battery charger that are not genuine Olympus
accessories.
OLYMPUS WORLDWIDE LIMITED
WARRANTY - IMAGING PRODUCTS
Olympus warrants that the enclosed Olympus@
imaging product(s) and related Olympus@
accessories (individually a 'Product" and
collectively the "Products") will be free from
defects in materials and workmanship under
normal use and service for a period of one (1)
year from the date of purchase.
If any Product proves to be defective within the
one-year warranty period, the customer must
return the defective Product to any of Olympus
Service Centers, following the procedure
set forth below (See "WHAT TO DO WHEN
SERVICE IS NEEDED").
Olympus, at its sole discretion, will repair,
replace, or adjust the defective Product,
provided that Olympus investigation and
factory inspection disclose that (a) such defect
developed under normal and proper use and
(b) the Product is covered under this limited
warranty.
Repair, replacement, or adjustment of defective
Products shall be Olympus's sole obligation and
the customer's sole remedy hereunder.
The customer is liable and shall pay for shipment
of the Products to the Olympus Service Center.
Olympus shall not be obligated to perform
preventive maintenance, installation,
deinstallation, or maintenance.
Olympus reserves the right to (i) use
reconditioned, refurbished, and/or serviceable
used parts (that meet Olympus's quality
assurance standards) for warranty or any other
repairs and (ii) make any internal or external
design and/or feature changes onor to its
products without any liability to incorporate such
changes on or to the Products.
EN
Page 77

WHAT IS NOT COVERED BY THIS
LIMITED WARRANTY
Excluded from this limited warranty and not
warranted by Olympus in any fashion, either
express, implied, or by statute, are:
(a) products and accessories not manufactured by
Olympus and/or not bearing the "OLYMPUS"
brand label (the warranty coverage for products
and accessories of other manufacturers,
which may be distributed by Olympus, is the
responsibility of the manufacturers of such
products and accessories in accordance with
the terms and duration of such manufacturers'
warranties);
(b) any Product which has been disassembled,
repaired, tampered with, altered, changed, or
modified by persons other than Olympus's own
authorized service personnel unless repair
by others is made with the written consent of
Olympus;
(c) defects or damage to the Products resulting
from wear, tear, misuse, abuse, negligence,
sand, liquids, impact, improper storage,
nonperformance of scheduled operator and
maintenance items, battery leakage, use of non-
"OLYMPUS" brand accessories, consumables, or
supplies, or use of the Products in combination
with non-compatible devices;
(d) software programs;
(e) supplies and consumables (including but not
limited to lamps, ink, paper, film, prints, negatives,
cables and batteries); and/or
(f) Products which do not contain a validly placed
and recorded Olympus serial number, unless they
are a model on which Olympus does not place
and record serial numbers.
EXCEPT FOR THE LIMITED WARRANTY
SET FORTH ABOVE, OLYMPUS MAKES
NOAND DISCLAIMS ALL OTHER
REPRESENTATIONS, GUARANTIES,
CONDITIONS, AND WARRANTIES
CONCERNING THE PRODUCTS, WHETHER
DIRECT OR INDIRECT, EXPRESS OR
IMPLIED, OR ARISING UNDER ANY STATUTE,
ORDINANCE, COMMERCIAL USAGE OR
OTHERWISE, INCLUDING BUT NOT LIMITED
TO ANY WARRANTY OR REPRESENTATION
AS TO THE SUITABILITY, DURABILITY,
DESIGN, OPERATION, OR CONDITON OF
THE PRODUCTS (OR ANY PART THEREOF)
OR THE MERCHANTABILITY OF THE
PRODUCTS OR THEIR FITNESS FOR A
PARTICULAR PURPOSE, OR RELATING
TO THE INFRINGEMENT OFANY PATENT,
COPYRIGHT, OR OTHER PROPRIETARY
RIGHT USED OR INCLUDED THEREIN.
IF ANY IMPLIED WARRANTIES APPLY AS
A MATTER OF LAW,THEY ARE LIMITED
IN DURATION TO THE LENGTH OF THIS
LIMITED WARRANTY.
SOME STATES MAY NOT RECOGNIZE
A DISCLAIMER OR LIMITATION OF
WARRANTIES AND/OR LIMITATION OF
LIABILITY SO THE ABOVE DISCLAIMERS AND
EXCLUSIONS MAY NOTAPPLY.
THE CUSTOMER MAYALSO HAVE
DIFFERENTAND/OR ADDITIONAL RIGHTS
AND REMEDIES THAT VARY FROM STATE
TO STATE.
THE CUSTOMER ACKNOWLEDGES AND
AGREES THAT OLYMPUS SHALL NOT
BE RESPONSIBLE FORANY DAMAGES
THAT THE CUSTOMER MAY INCUR FROM
DELAYED SHIPMENT, PRODUCT FAILURE,
PRODUCT DESIGN, SELECTION, OR
PRODUCTION, IMAGE OR DATA LOSS OR
IMPAIRMENT OR FROM ANY OTHER CAUSE,
WHETHER LIABILITY IS ASSERTED IN
CONTRACT, TORT (INCLUDING NEGLIGENCE
AND STRICT PRODUCT LIABILITY) OR
OTHERWISE. IN NO EVENT SHALL OLYMPUS
BE LIABLE FORANY INDIRECT, INCIDENTAL,
CONSEQUENTIAL OR SPECIAL DAMAGES OF
ANY KIND (INCLUDING WITHOUT LIMITATION
LOSS OF PROFITS OR LOSS OF USE),
WHETHER OR NOT OLYMPUS SHALL BE OR
SHOULD BE AWARE OF THE POSSIBILITY OF
SUCH POTENTIAL LOSS OR DAMAGE.
Representations and warranties made by any
person, including but not limited to dealers,
representatives, salespersons, or agents of
Olympus, which are inconsistent or in conflict
with or in addition to the terms of this limited
warranty, shall not be binding upon Olympus
unless reduced to writing and approved by an
expressly authorized officer of Olympus.
This limited warranty is the complete and
exclusive statement of warranty which
Olympus agrees to provide with respect to the
Products and it shall supersede all prior and
contemporaneous oral or written agreements,
understandings, proposals, and communications
pertaining to the subject matter hereof.
This limited warranty is exclusively for the
benefit of the original customer and cannot be
transferred or assigned.
E.
Page 78

WHAT TO DO WHEN SERVICE IS NEEDED
The customer must transfer any image or other
data saved on a Product to another image or
data storage medium and/or remove any film
from the Product prior to sending the Product to
Olympus for service.
IN NO EVENT SHALL OLYMPUS BE
RESPONSIBLE FOR SAVING, KEEPING OR
MAINTAINING ANY IMAGE OR DATA SAVED
ON A PRODUCT RECEIVED BY IT FOR
SERVICE, OR ON ANY FILM CONTAINED
WITHIN A PRODUCT RECEIVED BY IT
FOR SERVICE, NOR SHALL OLYMPUS BE
RESPONSIBLE FORANY DAMAGES IN
THE EVENTANY IMAGE OR DATA IS LOST
OR IMPAIRED WHILE SERVICE IS BEING
PERFORMED (INCLUDING, WITHOUT
LIMITATION, DIRECT, INDIRECT, INCIDENTAL,
CONSEQUENTIAL OR SPECIAL DAMAGES,
LOSS OF PROFITS OR LOSS OF USE),
WHETHER OR NOT OLYMPUS SHALL BE OR
SHOULD BE AWARE OF THE POSSIBILITY OF
SUCH POTENTIAL LOSS OR IMPAIRMENT.
Package the Product carefully using ample
padding material to prevent damage in transit
and either deliver it to the Authorized Olympus
Dealer that sold you the Product or ship it
postage prepaid and insured to any of our
Olympus Service Centers.
When returning Products for service, your
package should include the following:
I Sales receipt showing date and place of
purchase.
2 Copy of this limited warranty bearing the
Product serial number corresponding to the
serial number on the Product (unless it is a
model on which Olympus does not place and
record serial numbers).
3 A detailed description of the problem.
4 Sample prints, negatives, digitat prints (or files on
disk) if available and related to the problem.
When service is completed, the Product will be
returned to you postage prepaid.
WHERE TO SEND PRODUCT FOR
SERVICE
See "WORLDWIDE WARRANTY" for the
nearest service center.
INTERNATIONAL WARRANTY SERVICE
International warranty service is available under
this warranty.
Trademarks
• IBM is a registered trademark of International
Business Machines Corporation.
• Microsoft and Windows are registered trademarks
of Microsoft Corporation.
• Macintosh is a trademark of Apple Inc.
• xD-Picture Card TM iS a trademark.
• microSD is a trademark of the SD Association.
• All other company and product names are
registered trademarks and/or trademarks of their
respective owners.
• The standards for camera file systems referred to
in this manual are the 'Design rule for Camera File
system/DCF" standards stipulated by the Japan
Electronics and Information Technology Industries
Association (JEITA).
EN
Page 79

........SPECIFICATIONS
Camera
Product type : Digital camera (for shooting and displaying)
Still pictures : Digital recording, JPEG (in accordance with Design rule for Camera File
s_stem(Drip!!
Applicable standards : Extt 2.2, Digital Print Order Format (DPOF), PRINT Image Matching Ill,
Sound with still pictures : Wave format
Movie : AVI Motion JPEG
Memory : Internal memory
xD-Picture Card (16 MB to 2 GB) (TypeH/M/M+, Standard)
microSD card/microSDHC card (with the supplied microSD Attachment)
N__ eff_!v,e_J_!_ i !2,°°°,°°°_,ix_[s..........................................................
Lens : Olympus lens 5.0 to 18.2 mm, f3.5 to 5.1
Shooting range : 0.5 m (1.6 ft.) to _ (W/T) (normal)
0.1 m (0.3 ft.) to = (W), 0.3 m (1.0 ft.) to _o(T) (macro mode)
0.02 m (0.8 in.) to 0.5 m (1.6 ft.) (W only) (super macro mode)
0.07 m (2.8 in.) to 0.2 m (0.7 ft.) (W only) (S-macro LED mode)
Flash charge time : Approx. 3.5 sec. (for full flash discharge at room temperature using a
new fully charged battery)
Connector : Multi-connector (DC-IN jack USB connector, AN OUT jack)
Water resistance
Type : Equivalent to IEC Standard publication 529 IPX8 (under OLYMPUS test
conditions), available in 10 m (32.8 feet) deep water
Meaning : Camera can normally be used under water at a specified water
pressure.
Dust resistance : IEC Standard publication 529 IP6X (under OLYMPUS test conditions)
Opera t)ng e nv[[ortn? ent
Temperature : -10 °C to 40 °C (14 °F to 104 °F) (operation)/
-20 °C to 60 °C (-4 °F to 140 °F) (storage)
Power supply : One Olympus lithium ion battery (LI-50B) or Olympus AC adapter
Dimensions : 95.0 mm (W) × 8f.7 mm (H) × 21.5 mm (D) (3.7 × 2.4 × 9.8 in.)
!exc!ud!ng plot rUS!OnS2
Weight : 182 g (5.9 oz) (excluding battery and card)
"Shadow Adjustment Technology" function contains patented
technologies from Apical Limited.
apical
Page 80

Lithium ion battery (Ll=508)
Product type : Lithium ion rechargeable battery
Model No. : LP50BA/LI-50BB
Standard voltage : DC 3.7 V
Standard capacity : 925 mAh
Battery life : Approx. 300 full charges (varies on usage)
operatjnge_v!ro_me_t
Temperature : 0°C to 40°C (32°F to 104°F) (charging)/
-10°C to 60°C (14°F to 140°F) (operation)/
D!mens!ons 34:4 mm _W!, _ 40 0 m !_ mm (D)!1 ! 0 !n.!
Weight : Approx. 20 g (0.7 oz)
AC adaptor (F-1AC)
Model No. : F-1AC-1/F-1AC-2/F-1AC-3
Power requirements : AC 100 to 240 V (50/60 Hz)
Output : DC 5 V, 700 mA
Charging time : Approx. 2.5 hours
Operating environment
Temperature : 0°C to 40°C (32°F to 104°F) (operation)/
Dimensions : 48.0 mm (W) × 60.0 mm (H) × 21.0 mm (D) (1.9 × 2.4 x 0.8 in.) (F-fAC-f)/
39.0 mm (W) ×67.0 mm (H) x 21.0 mm (D) (1.5 × 2.6 × 0.8 in.) (F-fAC-2)/
Weight : Approx. 80.0 g (2.8 oz) (F-1AC-1)/
Approx. 70.0 g (2.5 oz) (F-1AC-2)/
Connecting cord : Approx. 1.5 m (4.9 ft.)
!t_gth
Using in low temperatures
Low temperature operation of the optional Olympus xD-Picture Card and lithium ion battery are guaranteed to
0°C (32°F). However, the following have been tested for use with this product intemperatures up to -10°C (14°F).
Olympus xD-Picture Card
16MB 32MB 64MB 128MB 256MB 512MB 1GB 2GB
Standard ,/ ,/ ,/ ,/ ,/ ,/ - ,-..... -........
TypeM/M+ .... -........ -....... -....... -........ v" v" v" v"
TypeH ..... -....... - - ..... - ,/ ,/ ,/ ,/
,/Operation confirmed
Olympus lithium ion battery
LI-50B
® The number of storable still pictures is reduced in low temperatures.
EN
Page 81

microSD Attachment
Temperature : -10°C to 40°C (14 to 104°F) (operation)/
-20°C to 65°C (-4 to 149°F) (storage)
Dimensions : 25.0 mm (W) x 20.3 mm (H) x 1.7 mm (D) (1.0 × 0.8 × 0.07 in.)
Weight : Approx. 0.9 g (0.03 oz)
Design and specifications subject to change without notice.
E.
Page 82

J_dfii/i_i!iiiiiiii/iJiiii_....
AC adapter ........................................ 2, 65
AF lock .................................................. 19
AF MODE ............................................. 32
ALL (PERFECT FIX) ............................. 37
ALL (SLIDESHOW) .............................. 37
ALL INDEX ........................................... 52
ALL PRINT ............................................ 52
All-image print reservation [[_L.............. 55
AUTO (FILE NAME) ............................. 45
AUTO (ISO) .......................................... 30
AUTO (WB) ........................................... 30
AV cable ............................................ 2, 47
B
BACKUP ............................................... 42
Battery ............................ 2, 10, 59, 63, 64
BEAUTYmode ......................................... 20
BEAUTY FIX _,_ ................................... 37
BEEP .................................................... 44
BGM ...................................................... 37
Black & White ....................................... 38
CALENDAR .......................................... 39
CALENDAR (SLIDESHOW) ................. 37
CALIBRATE .......................................... 49
Calendar view ....................................... 27
CAMERA MENU/_j .............................. 30
Card .......................................... 10, 13, 66
CLEAR SKIN ........................................ 37
Close-up view Q, .................................. 27
Cloudy day d2_ ..................................... 30
COLOR 1/2/3 ........................................ 43
COLOR EDIT ........................................ 38
COMBINE IN CAMERA1 ...................... 34
COMBINE IN CAMERA2 ..................... 34
COMBINE IN PC .................................. 34
COMPRESSION ................................... 29
Connection
To Computer ................................... 57
To Printer ........................................ 51
To Television ................................... 47
EN
Cropping a picture 4::J".................... 38, 53
CUSTOM PRINT .................................. 52
DATE (_::)) ........................................... 55
DATE (PRINT INFO) ............................. 53
Date and time Q .......................... 14, 46
DIGITAL ZOOM .................................... 31
Direct printing ........................................ 51
Display language _'._ .................. 14, 42
DIS MOVIE MODE (Movies) ................. 32
DPOF .................................................... 54
DRAMATIC EYE ................................... 37
DRIVE ................................................... 31
DUALTIME ............................................ 46
EASY PRINT ........................................ 51
EDIT 2_............................................ 38, 39
Erase
ALL ERASE .................................... 40
ERASE _ ........................................ 40
SEL.IMAGE .................................... 40
Single image erase ......................... 18
ESP ....................................................... 32
ESP/[2_} ................................................ 32
Exposure ............................................... 16
Exposure compensation [] .................. 23
........F ...................................................................................................................................................................................
FACE DETECT ..................................... 32
FADER (SLIDESHOW) ......................... 37
FILE NAME ........................................... 45
File name .............................................. 45
FILE NAME (PRINT INFO) ................... 53
FILL IN _ ............................................. 23
FINE ...................................................... 29
FINE ZOOM .......................................... 31
FLASH AUTO ....................................... 23
Flash charge ......................................... 59
Flash mode _ ...................................... 22
FLASH OFF _ ..................................... 23
Page 83

Fluorescentlamp1/2/3_i_2_3..........30
FORMAT...............................................42
Format..................................................42
FRAMERATE.......................................29
FUNCmenu..........................................25
mode...........................................20
iESP......................................................32
IMAGEQUALITY{_..............................29
IMAGESIZE.........................................29
IMAGESTABILIZER(Stillimages).......32
INDEX...................................................39
Indexview[] .......................................27
Informationdisplays........................25,27
Internalmemory..............................11,67
ISO........................................................30
LEDILLUMINATOR........................24,48
Lithiumionbattery..................................2
M
MACRO _ ........................................... 23
Macro mode _,_..................................... 23
MEMORY FORMAT .............................. 42
Menu ....................................................... 3
MENU COLOR ..................................... 43
Menu guide ............................................. 3
microSD Attachment ................... 2, 13, 68
microSD card .................................. 13, 68
microSDHC card ............................. 13, 68
Monitor brightness adjustment !.c_,_....... 46
MOVIE _ ............................................. 36
MOVIE (SLIDESHOW) ......................... 37
MULTI PRINT ....................................... 52
MULTI WINDOW .................................. 26
NO (_)) ............................................... 55
NORMAL .............................................. 29
NORMAL (MENU COLOR) ................... 43
NORMAL (SLIDESHOW) ..................... 37
NTSC .................................................... 47
Number of prints (,Jinx).......................... 53
OLYMPUS Master 2 ......................... 2, 57
Optical zoom ......................................... 22
PAL ....................................................... 47
PANORAMA L:_..................................... 34
Panorama playback .............................. 28
PC ......................................................... 57
PERFECT FIX 1_.................................. 37
PictBridge ............................................. 51
Picture rotation .¢m................................. 40
PIXEL MAPPING .................................. 45
PLAYBACK MENU L-¢)..................... 39, 40
Ptayback mode [] ............................... 17
Ptayback on a TV .................................. 47
POWER SAVE ...................................... 48
PRINT ORDER ..................................... 52
PRINT ORDER _ ................................ 41
Print reservations .................................. 54
Printing pictures .................................... 51
Protect O"11........................................... 39
PW ON SETUP ..................................... 43
REC VIEW ............................................ 44
REDEYE @ ....................................... 23
REDEYE FIX ........................................ 37
RESET _ .............................................. 36
RESET (FILE NAME) ........................... 45
Resizing _ ......................................... 38
E.
Page 84

S
Saturation (Hard) .................................. 38
Saturation (Soft) .................................... 38
SCN (SCENE MODE) _ ............... 19, 33
SCREEN ............................................... 43
SELFTIMER _ ..................................... 24
Sepia ..................................................... 38
Sequential shooting _ ....................... 3t
SETUP _ ............................................. 42
SHADOW ADJ ................................ 26, 33
Shooting mode ...................................... 19
Shooting movies _ .............................. 21
Shooting still pictures
(Full auto mode) _ .................... 20
Shooting still pictures _ ..................... 16
SHUTTER SOUND ............................... 44
SILENT MODE _ ................................. 50
Single-image print reservation r[_ ......... 54
Single-frame shooting E3 .................... 31
SLIDE (SLIDESHOW) .......................... 37
SLIDESHOW _; ................................... 37
S-MACRO LED s_ .............................. 23
Sound recording
Adding sound to still pictures _ ...... 40
Recording sound with still pictures
........................................................ 32
SOUND SETTINGS .............................. 44
SPARKLE EYE ..................................... 37
SPOT (AF MODE) ................................ 32
Spot metering _ ................................. 32
STILL PICTURE (SLIDESHOW) .......... 37
Strap ....................................................... 2
Sunny day -,'6_....................................... 30
SUPER MACRO s_ ............................. 23
TAP CONTROL ..................................... 49
TIME (_::)) ............................................ 55
Top menu ................................................ 5
Tungsten light ;,,6_.................................. 30
Turn the camera on ........................ 14, 16
TYPE .................................................... 37
USB cable ................................... 2, 5!, 57
VIDEO OUT .......................................... 47
VOLUME ............................................... 43
VOLUME [] ........................................ 44
..........W ....................................................................................................
Warning sound m)))................................ 44
White balance WB ................................ 30
X
xD-Picture Card .............................. 10, 66
........Z
Zoom ..................................................... 22
ZOOM (SLIDESHOW) .......................... 37
EN
Page 85

OLYMPUS
http://www.olympusamerica.com/
OLYMPUS iMAGiNG AMERICA iNC.
3500 Corporate Parkway, P.O. Box 610, Center Valley, PA 18034-06t0, U.S.A. TeL 484-896-5000
TechnicaJ Support (USA)
24/7 online automated help: http://www.olympusamerica.com/support
Phone customer support: Tel. 1-888=553=4448 (Toll-free)
Our phone customer support is available from 8am to 10pm (Monday to Friday)
and 9am to 5pm (Sunday) ET
http://olympusamerica.com/contactus
Olympus software updates can be obtained at: httpd/www.olympusamerica.com/digital
TO find the nearest Service Centers, please visit: http://www.olympusamerica.com/digitaJ,
and click on the Worldwide Warranty icon at the bottom of the page.
U.S.A.:
California
NewYork
Canada:
Mexico:
Argentina:
Brazil:
Service Centers
Chile:
Olympus imaging America inc.
10805 Holder Street Suite 170
Cypress, CA 90630-5145
Tel: (888) 553-4448
Olympus imaging America Inc. Colombia:
400 Rabro Drive
Hauppaage, NY 11788-4258
Tel: (888) 553-4448
Olympus Canada inc.
Consumer Products Group
151 Telson Road
Markham, Ontario Canada L3R 1E7
Tel. (888)553-4448
Olympus imaging de Mexico S.A. de C.V.
WTC Mexico, Panama:
Montecito No.38 - Lobby - Office 3
Col. Napoles, Mexico D.F. 03810
Tel. (01800)800-2128
E-mail: oimx@olympus.com
Jesus Labrador
Paraguay755PB, 01057AAI - BuenosAires
Te1:(011)4313-3174 Fax: (011)4312-B239 Peru:
E-Mail: olympus@)esuslabrador.com.ar
Jesus Labrador
Bartolome Mitrte 860
Cl03BAAP - BuenosAires
Tel: (011)4331-1227 Fax:(011)4331-1247
E-mail: olympus@jesuslabrador.com.ar
Olympus OpticaJ do Brasil Ltda.
Ruado R6cio 430- 2 andar- VilaOlimpia
CEP04552-906 - SEePaulo- Brasil
Tel: 0 800 72 66 72 0 Uruguay:
Fax: +55 11 3046-6412
E-mail: obl-cameras@olympus.com
Venezue|a:
REiFSCHNEIDER S.A.
Camino El Conquistador del Monte5024
Huechuraba, Santiago
Tel: 56-2-6781200 Fax: 56-2-6781202
E-mail: olympus@reifschneider.cl,
serviciotecnico@reifschneider.cl
CV Tronica LTDA
Calle 68 No 12-57, Bogota
Tel: (0571)235-7260/348-1573
Fax: (0571) 348-1574
E-mall: servicio@cvtronica.com
CV Tronica LTDA
Cra9 No23-49Local215C,CIntercentr0,Bogota
Tel: (0571)284-4365
CV Tronica LTDA
Av,Cra 15No105A-22Piso2Local5,Bogota
Tel: (0571) 637 4540 - 619 1682
TECNOTEK
Centre Comercial Multimax
Via Ricardo J. Alfaro, Local #14
Apartado 083%00333 Bethania, Panama
Tel: 507-360-3500
Pax: 507-360-3549
E-mail: daniels@multitek.com.pa
ELECTRONICA LAU SI
Av. Oscar R. Benavides 4703/4707
Callao (Ex-Av. Colonial) Lima, Peru
Te1:452-1333 Fax:451-6403
E-mail:Olympus@elausi.com.pe
ELECTRONICA LAU SI
Av. Carlos izaguire 1334
Los Olivos, Lima - Peru
Tel. 542-3647
Pax:523-4819
E.mail: ventas@elausi.com.pe
Fotocamara S.R.L.
Rondeau 1470 Montevideo
Tel: (02) 900-2004 Fax: (02) 900-8430
E-mail: FOTOCAM@ADINET.COM.UY
Micron C.A.
4ta. transversal Urb. Horizonte,
EdificioAmerica,Mezanine, Caracas1070-A
Tel: (0212)238-3528 Fax: (021B)239-8598
E-mail: serviciotecnico@micron.com.ve
© 2009 OLYMPUS IMAGING CORP.
Printed in China VN049601
 Loading...