

Olympus STYLUS 720 User Manual
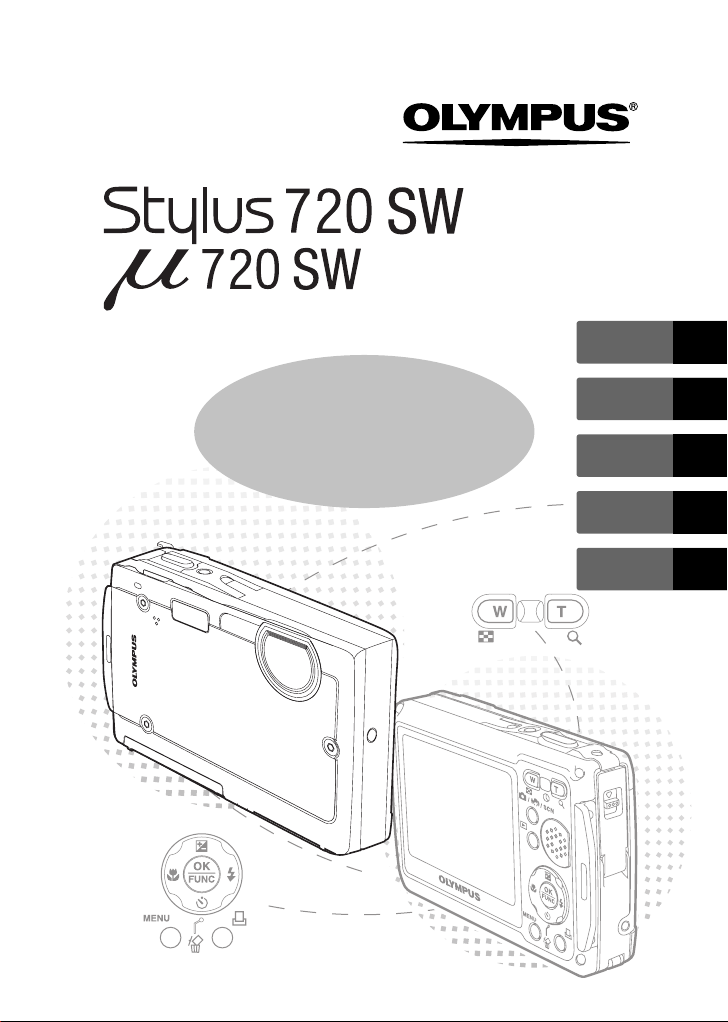
DIGITAL CAMERA
/
ENGLISH 2
Basic
Manual
FRANÇAIS 30
ESPAÑOL 58
DEUTSCH 86
РУССКИЙ 114

Table of Contents
CAMERA DIAGRAM ...............................................................................3
IMPORTANT INFORMATION ABOUT WATER AND SHOCK RESISTANT FEATURES
BEFORE YOU BEGIN...............................................................................6
GETTING STARTED.................................................................................7
Step 1 Get Started .................................................................................... 7
Step 2 Take a Picture................................................................................. 8
Step 3 Review or Erase a Picture................................................................ 9
Step 4 Transfer Images............................................................................ 10
En
BASIC OPERATION ...............................................................................12
Holding the Camera................................................................................ 12
Shooting and Playback Mode Buttons ..................................................... 12
Shooting Mode Buttons .......................................................................... 13
s Modes (Scene)............................................................................... 14
Macro Mode........................................................................................... 14
Self-Timer ............................................................................................... 15
Flash Modes............................................................................................ 15
Power Save Feature................................................................................. 15
MENUS AND SETTINGS .......................................................................16
Top Menu............................................................................................... 16
Erase All Pictures..................................................................................... 16
Select a Language................................................................................... 16
Monitor Symbols & Icons......................................................................... 17
Thumbnail (Index) Display........................................................................ 18
CONNECTING THE CAMERA................................................................19
Playback on a TV..................................................................................... 19
Direct Printing (PictBridge)....................................................................... 20
OLYMPUS Master SOFTWARE ............................................................21
SPECIFICATIONS...................................................................................22
SAFETY PRECAUTIONS ........................................................................24
....4
Before using your camera, read this manual carefully to ensure correct use.
We recommend that you take test shots to get accustomed to your camera before
taking important photographs.
Please observe the safety precautions at the end of this manual.
The screen and camera illustrations shown in this manual were produced during
the development stages and may differ from the actual product.
2
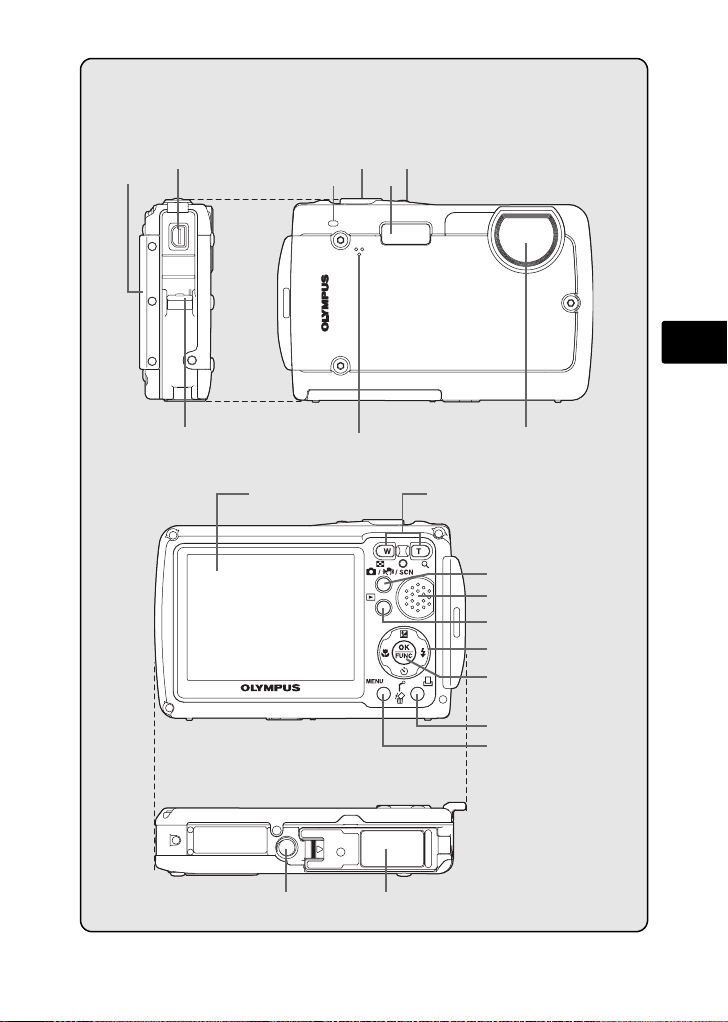
CAMERA DIAGRAM
Strap Eyelet
Connector Cover
Multi-Connector
Shutter Button o Button
Self-Timer Lamp
Microphone
Monitor
Flash
En
Lens
Zoom Button
K/h/s Button
Speaker
q Button
Arrow Pad (1243)
o Button (OK/FUNC)
< Button (Print)
m Button (MENU)
Battery Compartment/Card CoverTripod Socket
3

IMPORTANT INFORMATION ABOUT WATER AND SHOCK RESISTANT FEATURES
Water resistance: The waterproof feature is warranted*1 to operate at depths up to
3m (10 feet) for up to one hour. The waterproof feature may be compromised if the
camera is subject to substantial or excessive impact.
Shock resistance: The anti-shock feature warrants
against accidental impact incurred from everyday use of your digital compact camera.
The anti-shock feature does not unconditionally warrant all defective operation or
cosmetic damage. Cosmetic damage, such as scratches and dents, are not covered
under the warranty.
As with any electronic device, proper care and maintenance are required to preserve
the integrity and operation of your camera. To maintain camera performance, please
En
take your camera to the nearest Olympus Authorized Service Center to have it
inspected after any major impact. In the event the camera is damaged as a result of
negligence or misuse, the warranty will not cover costs associated with the service or
repair of your camera. For additional information on our warranty, please visit to the
Olympus website for your local area.
Please observe the following care instructions for your camera.
Before Use:
• Check the camera for foreign material including dirt, dust or sand.
• Be sure the battery compartment/card cover lock and connector cover lock are
firmly closed.
• Do not open the battery compartment/card cover and connector cover with wet
hands, while under water, or in a damp or dusty environment (e.g. beach).
After Use:
• Be sure to wipe off any excess water or debris after using the camera under water.
• After the camera is used under sea water, immerse the camera in a bucket
containing fresh water for about 10 minutes (with the battery compartment/card
cover and connector cover firmly closed). After that, dry the camera in a shade with
good ventilation.
• Water drops may be observed on the inner surface of the battery compartment/
card cover or connector cover after you open each cover. If any water drops are
found, be sure to wipe them off before using the camera.
*2
the operation of the camera
Storage and Maintenance
• Do not leave the camera in an environment at high temperature (40°C or more) or
at low temperature (0°C or less). Failure to do so may break down water resistance.
• Do not use chemicals for cleaning, rust prevention, anti-fogging, repairing, etc.
Failure to do so may break down water resistance.
• Do not leave the camera in water for a long time. Failure to do so will cause
damage to the camera’s appearance and/or deteriorate water resistance.
In addition do not pour water over the camera directly from the water faucet.
4
• In order to preserve the water resistant feature, as with any underwater
housing, it is recommended that the waterproof packing (and seals) are
replaced annually.
For the Olympus distributors or service stations where the waterproof
packing can be replaced, see the supplied “Olympus Distributors’ List” or
visit Olympus website for your local area.
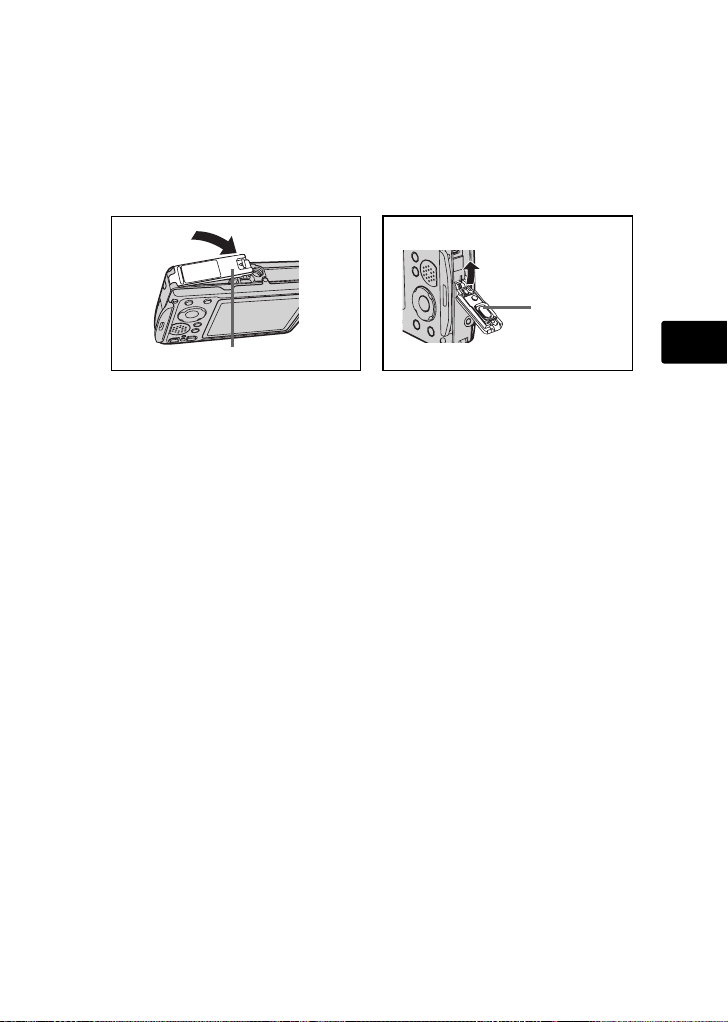
Closing Battery Compartment /Card cover and Connector cover
Connector cover
Battery Compartment/Card Cover
Note: The included accessories (e.g. charger) do not offer shock or water resistance.
*1
as determined by Olympus pressure testing equipment in accordance to IEC
Standard Publication 529 IPX8 - This means that the camera can normally be used
under water at a specified water pressure.
*2
This anti-shock performance is confirmed by Olympus’ testing conditions in
accordance with MIL-STD-810F, Method 516.5, Procedure IV (Transit Drop Test).
For more details of Olympus’ testing conditions, please refer to the Olympus
website for your local area.
En
5
En
BEFORE YOU BEGIN
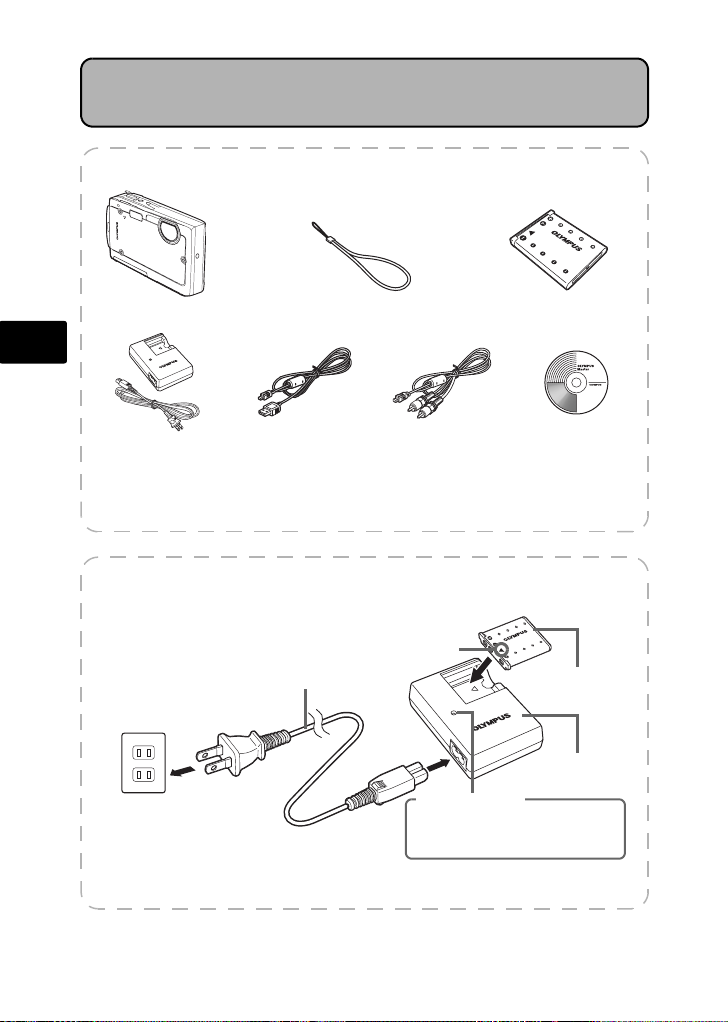
Gather these items (box contents)
Digital Camera Strap LI-42B Lithium Ion Battery
LI-40C Battery Charger USB Cable AV Cable
OLYMPUS Master
Software CD-ROM
Items not shown: Advanced Manual (CD-ROM), Basic Manual (this manual),
warranty card. Contents may vary depending on purchase location.
Charge the battery (recommended*)
3
LI-42B Lithium Ion
Battery
LI-40C Battery
Charger
AC Wall Outlet
6
Power Cable
2
*Battery comes partially charged.
1
Charging Indicator
Red light on: Charging
Light off: Charging complete
(Charging time: Approx. 300 minutes)

GETTING STARTED
ijııķġįġıIJġįġıIJ
ııġĻġıı
SETU P
Step 1Get Sta rted
GET STARTED
a. Attach the strap b. Insert the battery
1 Slide
2 Lift
Strap
1
Pull the strap tight so that it does
not come loose.
1 Press o button to turn the camera on.
2 Press m button to display the top menu,
and select [SETUP] > [X].
3 Press 12 to set an item. Press 43 to select
the next field.
IJ
FILE NAME RESET
ij
PIXEL MAPPING
Ĵ
s
ĵ
X
DUALTIME
MENU
BACK
3 Insert
c. Set the date and time
m Button
Date format
X
ijııķġįġıIJġįġıIJ
x
Ƚ
ȆȆȆȆŽȆȆȆȆ
ĨıķįıIJįıIJ
OFF
SET
ȼ
ııĻıı
OK
Y Y ȁM ȁD
ııġĻġıı
SETMOVE
o Button
ŜŊŏŞ
OK
Battery
lock knob
Operation
guide
En
7
TAKE A PICTURE
Ĵıĸij
ijĴıĵ
IN
Ĵıĸij
ijĴıĵ
IN
Ĵıĸij
ijĴıĵ
IN
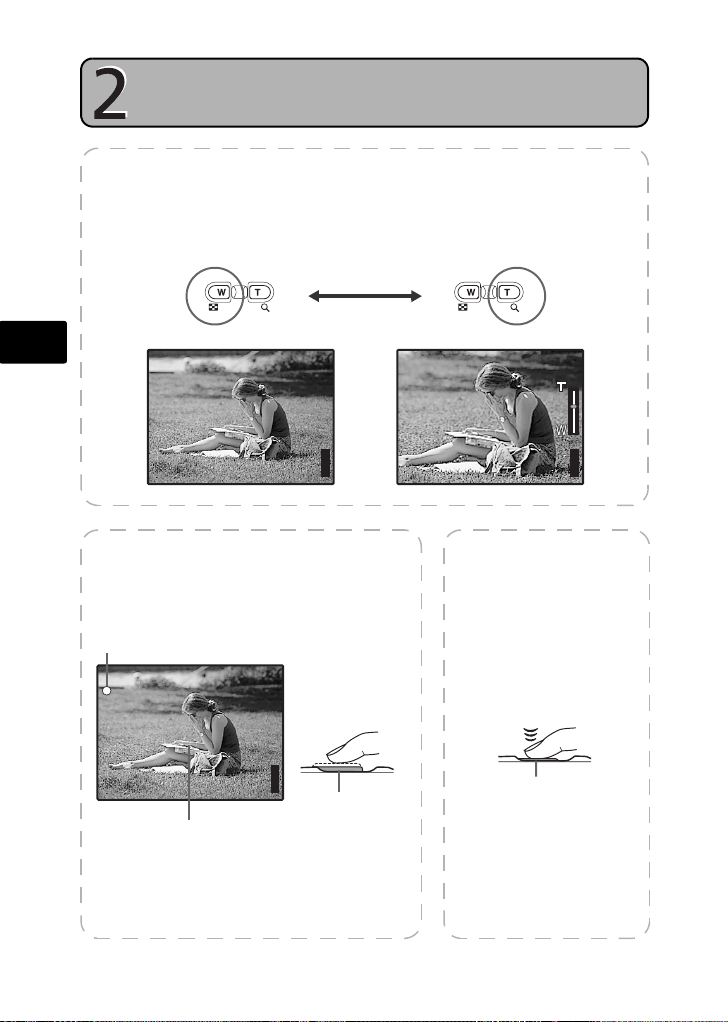
a. Zoom
Zoom Out: Zoom In:
Step 2Take a Pi cture
En
P
[ ]
ʼnŒʼnŒĴıĸij
ȿijĴıĵ
b. Focus
1 Using the monitor, place the AF target
mark over your subject.
Green Lamp
P
[ ]
[
]
ʼnŒʼnŒĴıĸij
ȿijĴıĵ
AF Target Mark
2 Press and hold the shutter button halfway
to lock the focus.
The green lamp indicates the focus is locked.
IN
44
[
]
IN
44
(Pressed Halfway)
Shutter Button
P
[ ]
[
]
ʼnŒʼnŒĴıĸij
ȿijĴıĵ
IN
44
c. Take the picture
1 Press the shutter
button completely to
take the picture.
(Pressed Completely)
Shutter Button
Pictures are recorded in the
internal memory.
Pictures can also be
recorded to an optional xDPicture Card (It is called just
“card” in the attached
instruction manual.)
8
Step 3Review o r Erase a Picture
REVIEW OR ERASE A PICTURE
a. Select the playback
mode
1 Press the q button.
The last picture taken will be
displayed.
Zoom Button
q Button
Prev. Picture Next Picture
c. To erase a picture
b. Take a closer look
Press T or W to zoom in
or out.
Press o to return to
the original size.
Press 12 or 43 to
scroll around.
Press the K/h/s button to
return to the shooting mode.
S ERASE ŜŊŏŞ
YES
NO
BACK
MENU
SET
OK
En
2Y/S Button
1 Display the picture you want to
erase.
Select the single-frame playback.
A single image cannot be erased
while the close-up playback/index
playback is operated.
2 Press the 2Y/S button.
3 Select [YES], and press o.
The picture is permanently erased.
9
 Loading...