

Page 1
DIGITAL CAMERA
Read this first
Preparations
Basic Manual
Basic Manual
Taking still pictures
Viewing still pictures
Creating and sharing images using a computer
Appendix
Page 2

Introduction
Thank you for purchasing an Olympus digital camera.
The reference manuals for this camera consist of the following two
guides. To ensure correct and safe use of the camera, please read the
manuals before using the camera and refer to them whenever
necessary during use.
Basic manual
(this manual)
Contains
instructions for
setup and
some for basic
Reference
manual
(on CAMEDIA
Master CD-ROM)
operations.
We recommend
first-time users to
read this manual
first.
The contents of this manual are subject to change without notice. Contact an
authorized Olympus service center for the product name, model number, and the
latest information.
While every care has been taken in the preparation of this manual, if you find any
errors, omissions, or points which are unclear, please contact an authorized
Olympus service center.
The contents of this manual may not be reproduced in whole or in part except for
personal use. It may not be transferred without permission.
Olympus accepts no responsibility for losses suffered by the customer or a third
party as a result of improper use of this product.
Olympus accepts no responsibility for any damage due to a loss of image data
resulting from malfunction of this product, repair by a third party not authorized by
Olympus, or other reason.
Voluntary radio interference control
This equipment is a Class B digital device based on the standards of the Voluntary
Control Council for Interference by Information Technology Equipment (VCCI). This
equipment is designed for use in a home environment, but it may cause
interference to radio or television reception if used in the vicinity of the receiver.
Follow the instructions in the manuals to ensure correct use.
Do not use the camera inside an aircraft during take-off or landing.
Use of a cable other than that specified herein when connecting the equipment
may result in VCCI limits being exceeded. Use only the specified cable.
Trademarks
Windows is registered trademark of Microsoft Corporation.
Macintosh is trademark of Apple Computer, Inc.
All other company and product names are registered trademarks and/or
trademarks of their respective owners.
Design rule for Camera File System (DCF)
The standards for camera file systems referred to in this manual are the “Design
Rule for Camera File System/DCF” standards stipulated by the Japan
Electronics and Information Technology Industries Association (JEITA).
Contains a
description of all
the camera
functions.
Use this manual
to get the most out
of all the features
and functions of
your camera.
2
Page 3

Contents
* Refer to the Reference Manual for items in black. Basic
Introduction.........................................................................2 2
Contents .............................................................................3 3
Read this first . . . . . . . . . . . . . . . . . . . . . . 7 8
Unpacking the box contents ...............................................7 8
For safe use of your camera ..............................................8 9
Weatherproof feature .......................................................12 13
Names of parts (P.14) / Monitor indications (P.15)
Preparations . . . . . . . . . . . . . . . . . . . . . . 13 16
Before operating your camera..........................................13 16
Attaching the strap........................................................................13 16
Charging the battery.....................................................................14 17
Loading and removing the battery ................................................15 18
Inserting and removing the picture card .......................................18 22
Power on/off .................................................................................21 26
Camera settings ...............................................................23 28
Menu operations........................................................................... 23 28
Selecting your language for on-screen display (W) ................24 29
Setting the date and time (X) ....................................................26 31
AC adapter (sold separately) (P.21)
xD-Picture Card (P.25)
When taking pictures (Shooting mode) ...................................21 26
When viewing pictures (Playback mode) ................................22 27
When connecting the camera to the computer........................ 22 27
Saving the settings (ALL RESET) (P.33) / Checking the picture you
have just taken (REC VIEW) (P.36) / Setting the beep sound (8)
(P.38) / Setting the shutter sound (SHUTTER SOUND) (P.40) / Setting
the volume (VOLUME) (P.42) / Setting the power on/off screen and
sound (PW ON SETUP) (P.44) / Setting the screen color (COLOR)
(P.46) / Setting serial numbers for file names (FILE NAME) (P.48) /
Turning off the monitor (MONITOR OFF) (P.51) / Formatting a picture
card (I FORMAT) (P.52) / Adjusting the brightness of the monitor
(s) (P.54) / Adjust the CCD and image processing functions (PIXEL
MAPPING) (P.56)
3
Page 4

Contents
* Refer to the Reference Manual for items in black. Basic
Taking still pictures. . . . . . . . . . . . . . . . . 28 58
Shooting ...........................................................................28 58
Holding the camera correctly........................................................ 28 58
Taking still pictures .......................................................................29 59
When to use the monitor and viewfinder (P.62) / Focusing on a subject
that is not in the center of the frame (Focus lock) (P.63)
Settings suited to situation and purpose ..........................32 65
Changing shooting modes............................................................ 32 65
Using the zoom............................................................................. 35 68
Using the flash (#)....................................................................... 36 72
Changing the image size and quality (K) ..................................38 74
Enabling the digital zoom (P.70)
Selecting the white balance according to the surrounding lighting (WB)
(P.77) / Adjusting the settings to suit a bright/dark subject (F) (P.79) /
When the brightness of the subject and background differ (n) (P.80)
Shooting mode settings . . . . . . . . . . . . . . . . . . . . . . . . . . . . . . . . . . . 82
Taking close-up pictures (&) (P.82) / Setting up Super macro mode
(%) (P.83) / Using the self-timer (Y) (P.85) / Using the remote control
(<) (P.86) / Taking successive pictures (j) (P.87) / Panorama
shooting (PANORAMA) (P.89) / Stitching together two images (2 IN 1)
(P.92) / Recording sound with still pictures (R) (P.94)
Viewing still pictures . . . . . . . . . . . . . . . 40 96
PLAYBACK ......................................................................40 96
Playback.......................................................................................40 96
Playback mode settings . . . . . . . . . . . . . . . . . . . . . . . . . . . . . . . . . . . 97
Displaying several pictures at once (G) (P.97) / Selecting the number
of pictures (P.98) / Enlarging pictures (U) (P.100) / Rotating pictures
(y) (P.101) / Displaying pictures one after another (m) (P.103) /
Playback on a TV (P.104) / Displaying shooting information (INFO)
(P.107)
Editing still pictures . . . . . . . . . . . . . . . . . . . . . . . . . . . . . . . . . . . . . . 108
Creating black and white pictures (P.108) / Creating sepia-toned
pictures (P.110) / Changing the size (Q) (P.112) / Protecting pictures
(P.114)
Erasing pictures................................................................41 116
Single-frame erase (S) ................................................................41 116
All-frame erase (R) (P.117)
4
Page 5

Contents
* Refer to the Reference Manual for items in black. Basic
Recording movies . . . . . . . . . . . . . . . . . . . 119
Shooting. . . . . . . . . . . . . . . . . . . . . . . . . . . . . . . . . . . . . . . . . . . . . . . 119
Recording movies N (P.119)
Settings suited to situation and purpose . . . . . . . . . . . . . . . . . . . . . . 122
Enabling the digital zoom N (P.122) / Changing the image size
(K) N (P.123) / Selecting the white balance according to the
surrounding lighting (WB) N (P.125) / Adjusting the settings to suit a
bright/dark subject (F) N (P.125) / When the brightness of the
subject and background differ (n) N (P.125)
Shooting mode settings . . . . . . . . . . . . . . . . . . . . . . . . . . . . . . . . . . . 126
Close-up shooting (&) N (P.126) / Using the self-timer N (P.126) /
Remote control shooting N (P.126)
Playing back movies . . . . . . . . . . . . . . . . . 127
Playback. . . . . . . . . . . . . . . . . . . . . . . . . . . . . . . . . . . . . . . . . . . . . . . 127
Playing back movies (MOVIE PLAY) N (P.127) / Playing back movies
frame by frame (P.128) / Playback on a TV (P.129) / Displaying
shooting information (Information display) (P.129) / Erasing movies
(S) (P.129)
Editing movies . . . . . . . . . . . . . . . . . . . . . . . . . . . . . . . . . . . . . . . . . . 130
Creating an indexN (P.130) / Protecting movies N (P.131)
Printing . . . . . . . . . . . . . . . . . . . . . . . . . . . 132
Selecting a printing method . . . . . . . . . . . . . . . . . . . . . . . . . . . . . . . . 132
Making print reservations (DPOF) . . . . . . . . . . . . . . . . . . . . . . . . . . . 134
All-frame reservation (U) (P.134) / Single-frame reservation (<)
(P.136) / Canceling print reservations (P.139)
Printing with a PictBridge-compatible printer . . . . . . . . . . . . . . . . . . . 141
Using the direct printing function (P.141) / Connecting the camera to a
printer (P.142) / Printing pictures (P.143) / Print mode/Multi Print mode
(P.144) / All Print mode (P.148) / All Index mode/Print Order mode
(P.151) / Exiting direct printing (P.153)
Creating and sharing images using a computer
Before using your computer .............................................42 154
Operating procedure..................................................................... 42 154
Identifying the operating system...................................................44 156
Determining how to connect the camera to a computer ............... 45 157
. . 42 154
5
Page 6

Contents
* Refer to the Reference Manual for items in black. Basic
Windows...........................................................................46 158
Installing the USB driver (When using Windows 98/98SE) ..........46 158
Connecting the camera to the computer ......................................48 160
Confirming the computer recognizes the camera......................... 49 161
Transferring camera images to the computer (P.164)
Using the provided CAMEDIA Master software ...............51 176
Installing the CAMEDIA Master software – for first time usage.... 51 176
Windows..................................................................................51 176
Macintosh (P.181)
Starting/Exiting the CAMEDIA Master software ...........................54 186
Transferring camera images to the computer............................... 56 189
Viewing still images (P.194) / Viewing movies (P.195) / Panorama
shooting (P.197) / Printing images (P.200)
Disconnecting the camera from your computer............................ 60 168
Macintosh. . . . . . . . . . . . . . . . . . . . . . . . . . . . . . . . . . . . . . . . . . . . . . 170
Connecting the camera to the computer (P.170) / Confirming the
computer recognizes the camera (P.170) / Transferring camera
images to the computer (P.172) / Disconnecting the camera from your
computer (P.175)
Other features...............................................................................62 203
Troubleshooting . . . . . . . . . . . . . . . . . . . . . 204
Error messages displayed on the monitor (P.204) / If a problem arises
(P.207) / When the camera is not recognized by the computer (P.211)
Appendix . . . . . . . . . . . . . . . . . . . . . . . . 63 213
Green and orange lamps and flash stand by indication. . . . . . . . . . . 213
Menu List...................................................................................... 63 214
Camera specifications ..................................................................67 221
Specifications of accessories .......................................................69 223
6
List of functions by shooting mode (P.218) / Camera maintenance
(P.219)
Index (P.224)
Page 7
Read this first
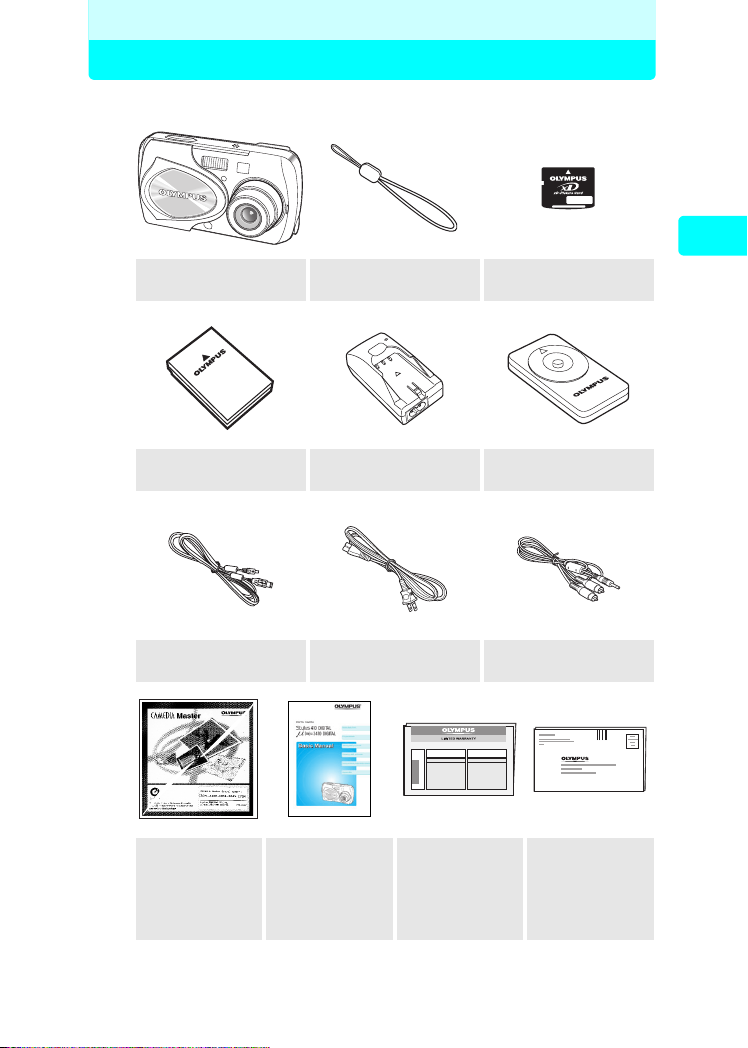
Unpacking the box contents
Digital Camera Strap
LI-10B lithium ion
battery
USB cable
LI-10C battery charger Remote control
AC cable
for the charger
Picture card
(xD-Picture Card)
RC-300C
REMOTE CONTROL
A/V cable
Read this first
CD-ROM
(CAMEDIA
Master/
Reference
Manual)
* The QuickStart Guide is also included in the Digital camera package.
Basic manual Warranty card
Registration
card
7
Page 8

For safe use of your camera
Various symbols are used to warn of hazards to yourself and others and
prevent damage to property through misuse of the camera. The symbols
and their meanings are explained below.
Danger
Warning
Read this first
Caution
Precautions when handling the camera
Danger
Do not use in the presence of flammable or explosive gas. Do not use the
camera if there is the possibility of the presence of such gases in the air as this
could result in fire or explosion.
Do not attempt to disassemble or modify the camera. Such action could lead to
electric shock or injury.
Warning
Do not fire the flash close to your subject’s eyes (particularly in the case of
young children). Using the flash at close range could cause visual impairment.
Keep out of the reach of children.
• Strangulation caused by wrapping the strap round the neck.
• Swallowing of small items such as the card. If this happens, seek medical
attention immediately.
• Visual impairment caused by the flash being fired at close range.
• Injury caused by the camera’s operating parts.
Do not look at the sun or strong light through the viewfinder. This could cause
visual impairment.
Do not use or store the camera for a long time in an environment where there is
a lot of dust, dampness, smoke or steam.
Do not cover the flash with your fingers when using the flash. Touching the
flash during firing or after successive firing could result in burns.
Do not let any water or other foreign object get inside the camera. Should the
camera be dropped in water or water get into the internal parts, it could result in fire
or electric shock. Remove the battery immediately and contact your nearest dealer
or Olympus service center.
Caution
Should you notice smoke or an unusual smell or noise, stop using the camera
immediately, remove the battery taking care to avoid burns, and contact your
nearest dealer or Olympus service center. Continued operation could result in fire
or burns. (Remove the battery outdoors, away from anything combustible, and
avoid touching it with your bare hands.)
This symbol indicates that failure to observe the instructions will
likely result in serious injury or possibly even death.
This symbol indicates that failure to observe the instructions may
result in serious injury or possibly even death.
This symbol indicates that failure to observe the instructions may
result in injury or damage to property.
Care should be taken to prevent the following accidents.
This could result in fire or electric shock.
8
Page 9

For safe use of your camera
Be careful with the strap when carrying the camera as it can easily catch on stray
objects, causing injury or damage.
Do not leave the camera in places of high temperature. Avoid touching the battery
with your bare hands when replacing it, as it may cause burns.
Use only the specified AC adapter. Use of an unauthorized adapter may result in
damage or malfunction of the camera or power source, leading to accidents. Olympus
is not responsible for any damages arising from use of an unauthorized adapter.
Avoid touching the metal parts on the outside of the camera for long periods of
time. The camera becomes hot during continued use and prolonged contact with
the metal parts may result in low temperature burns. When exposed to low
temperature, the temperature of the camera exterior will also drop. This may cause
injury by the skin adhering to the camera. To avoid low temperature burns or injury,
wear gloves when handling the camera.
Conditions for use of the camera
This camera contains precision electronic parts. Avoid using or leaving the camera for
long periods of time in the following places as this could result in failure or malfunction.
•
Places of high temperature and high humidity or where the temperature and
humidity fluctuate greatly, such as in direct sunlight, on the beach in summer, in a
car with the windows closed, or next to air conditioning equipment or a humidifier
• Places where there is a lot of sand, dust or dirt
• Near fire
• Near water
• Places that are subject to considerable vibration
Avoid dropping or hitting the camera or subjecting it to severe vibration or impact.
Do not take pictures or leave the camera with the lens aimed directly at the sun.
If the camera is subjected to a sudden temperature change, for example by bringing
it from a cold place into a warm room, condensation may form on the inside. Place
the camera in a plastic bag until the temperature difference has subsided.
If the camera is left unused for a long period of time, mold may form, causing failure
or malfunction. We recommend that you check that the camera is still working
properly before using it.
Precautions regarding the monitor
Read this first
Do not apply excessive pressure to the monitor as this may cause smears, prevent
pictures from being played back properly or damage the monitor. Should the
monitor break, avoid getting any of the liquid crystal in your mouth. If it gets on your
hands or feet or on your clothing, wash it off immediately with soap and water.
Lines, like strips of light, may appear at the top or bottom of the monitor, but this is
not a malfunction.
When photographing an oblique subject, the subject may appear on the monitor
with ragged edges, but this is not a malfunction. The ragged edges will disappear
when the picture is played back.
In general, the lower the temperature, the longer it takes the monitor to turn on. Pictures
may also appear temporarily discolored. Keep the camera warm when taking pictures in
a cold region. Performance of the monitor may deteriorate in low temperatures, but will
be restored when the camera is returned to normal temperatures.
Continued on next page
9
Page 10

For safe use of your camera
The latest high precision technology has gone into the making of the
camera’s monitor, but there are some pixels which are permanently lit or
which do not light at all. These pixels do not affect the recorded picture. Also,
depending on the angle at which the monitor is viewed, the colors and
brightness may appear uneven, but this is due to the structure of the monitor
and is not a malfunction.
Precautions for handling the charger
Read this first
Danger
The charger should not be used where it may come in contact with water and
it should never be connected or disconnected with wet hands.
Do not cover the charger with anything such as a cloth or blanket when in use
as this may cause overheating, resulting in fire.
Do not attempt to disassemble or modify the charger. Such action could lead to
electric shock or injury.
Use the charger at the specified voltage. Use at any other voltage could result in
fire, explosion, emission of smoke, overheating, electric shock or burns.
Warning
Prolonged contact with the charger during use
Do not damage the AC cable for the charger by pulling it and do not attempt
to extend it
cable. Discontinue use of the charger immediately in the event of the following and
contact your nearest dealer or Olympus service center.
• If the plug or cable is hot, there is a smell of burning, or smoke is emitted.
• If the cable is damaged or ruptured or the plug connection is faulty.
. Always disconnect the cable by removing the plug and not by pulling the
could result in low temperature burns.
Caution
Do not charge the battery continuously for over 24 hours. If the battery is not fully
charged when the charging time has elapsed, discontinue charging.
Before cleaning the charger, unplug the AC cable from the wall outlet. Failure to do
so could result in electric shock or injury.
Precautions when handling the battery
Danger
Keep the battery out of the reach of children.
Do not expose the battery to fire or excessive heat as this could result in fire
or explosion.
Do not use or leave the battery in places of high temperature such as in
strong sunlight, inside a car under a blazing sun or in front of a heater as this
could result in fire or explosion.
Do not attempt to directly solder the battery, change its shape, modify it or disassemble
it as this could damage the terminal safety valve or cause the battery to leak.
10
Page 11

For safe use of your camera
Do not bring the plus or minus terminals into contact with anything metal. Do
not transport or store the battery with metal objects such as necklaces or hairpins.
Should battery fluid get in your eyes, wash your eyes immediately with clean
water and do not rub them. Seek medical attention immediately as blindness
could result.
Warning
Do not expose the battery to water or immerse it in water or in the sea.
Do not expose the battery to strong impacts or damage.
Discontinue use immediately should you notice anything unusual such as
leakage, discoloration or deformation.
If battery fluid gets on your skin or clothing, wash immediately in clean water
as the fluid could cause harm.
Caution
The battery is exclusively for use in Olympus digital cameras. Do not use in any
other equipment.
Dirt on the
The battery becomes hot after prolonged use of the camera. Do not attempt to
remove it immediately as this could result in burns.
In general, as the temperature falls, battery performance also temporarily deteriorates.
When taking pictures in cold regions, keep the camera warm by putting it inside your
coat or clothing. Performance of the battery may deteriorate in low temperatures, but
will be restored when the camera is returned to normal temperatures.
Repeated recharging leads to gradual deterioration in the performance of the battery.
When the working time of the battery starts getting shorter even though it has been
charged for the specified length of time, the battery can be regarded as having reached
the end of its serviceable life. When this happens, replace it with a new battery.
Used batteries are a valuable resource. Cover the plus and minus terminals with
tape and take the battery to an electrical shop for recycling.
plus or minus
terminals may cause contact failure. Wipe with a dry cloth.
Precautions for handling the picture card
Read this first
The picture card is a precision electronic device. Do not bend it or subject it to
impact and keep it away from static electricity. The data stored on the picture card is
saved in a nonvolatile semiconductor memory, but it can be accidentally destroyed.
Do not expose the picture card to water or leave it where there is a lot of dust.
Avoid using or storing the card in places of high temperature and high humidity.
Avoid using near heat-generating or combustible materials.
Fingerprints or dirt on the picture card contacts may prevent correct reading/writing
of data. Wipe the contacts gently with a soft dry cloth.
The picture card is a consumable item. After long use, writing to the picture card and
erasing of data no longer becomes possible. When this happens, replace it with a new card.
Olympus is not responsible for any damage to data saved in other media or loss of
data stored on the card.
11
Page 12

Weatherproof feature
This camera is weatherproof, but it cannot be used underwater.
Observe the following precautions when using the camera.
Olympus will not assume any responsibility for malfunction of the
camera caused by water getting inside as a result of misuse by the user.
The camera is weatherproof and is not damaged by water spray from
any direction.
Read this first
Do not wash the
camera with water.
Water may get inside the camera if the battery compartment
cover, connector cover or DC-IN jack cover are in the following
conditions.
c The cover is not firmly closed.
d The rubber packing is cracked or peeling.
e Dust or sand is sticking to the rubber packing.
Firmly close the
battery
compartment cover.
If the camera gets splashed, wipe the water off as soon as possible
with a dry cloth.
If the rubber packing becomes worn or damaged, contact your nearest
Olympus service center. (A charge is made for replacement of parts.)
The rechargeable battery and other camera accessories are not
weatherproof.
Do not drop the
camera into water.
Firmly close the
connector cover.
Do not take pictures
underwater.
Firmly close the
DC-IN jack cover.
12
Page 13
Before operating your camera
Preparations
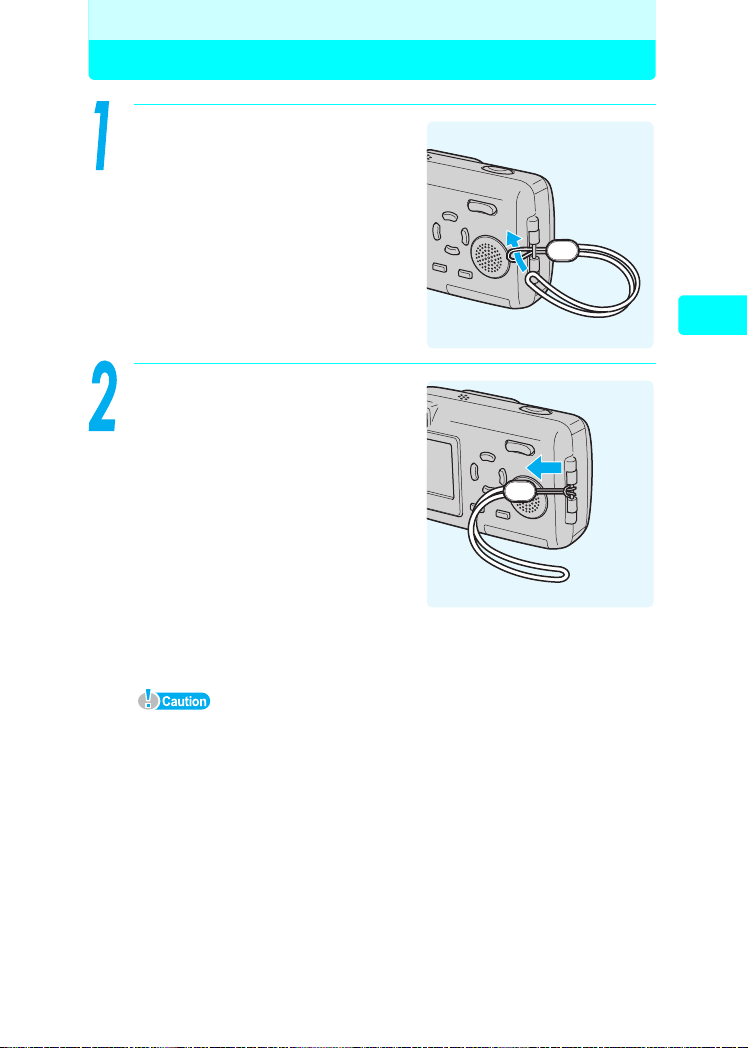
Attaching the strap
Thread the strap through the
strap eyelet as shown.
Pull the strap tight, making sure
that it is securely fastened and
does not come loose.
Preparations
Do not swing the camera around by the strap or pull the strap with excessive
force as this may cause the strap to break.
Attach the strap correctly so that it does not come off. Olympus is not
responsible for any damages if the strap is attached incorrectly and the
camera is dropped.
13
Page 14

Charging the battery
This camera uses an Olympus lithium ion battery (LI-10B). Do not use
any other type of battery.
The battery is not fully charged when the camera is purchased. Fully
charge the battery before first use.
Charging time Approx. 2 hours
Plug in the AC cable in
the sequence
indicated by c and d.
Preparations
c
d
AC wall outlet
Before operating your camera
When the battery is set in the
battery charger, the red lamp
lights and charging begins.
Charging is finished when the
lamp on the battery charger
turns green.
Use only the specified charger.
We recommend that you keep a
spare battery (sold separately)
with you if you are planning to use
the camera for long periods or in a
cold region.
The charger can be used within
the range of AC100V to AC240V (50/60Hz). When using the charger
abroad, you may need a plug adapter to convert the plug to the shape of the
electrical outlet. For details, ask at your local electrical shop or travel agent.
Do not use voltage converters sold in stores traveling overseas as this could
damage your charger.
14
Lithium ion battery
(LI-10B)
Insert as
indicated by
the arrow.
Charge
indicator
Red: Charging
Green: Charging
is finished.
Page 15

Loading and removing the battery
This camera uses an Olympus lithium ion battery (LI-10B).
Check the following items before loading or removing the battery:
c The lens barrier is closed.
d The lamps on the right of the
viewfinder are off.
e The monitor is off.
2
1
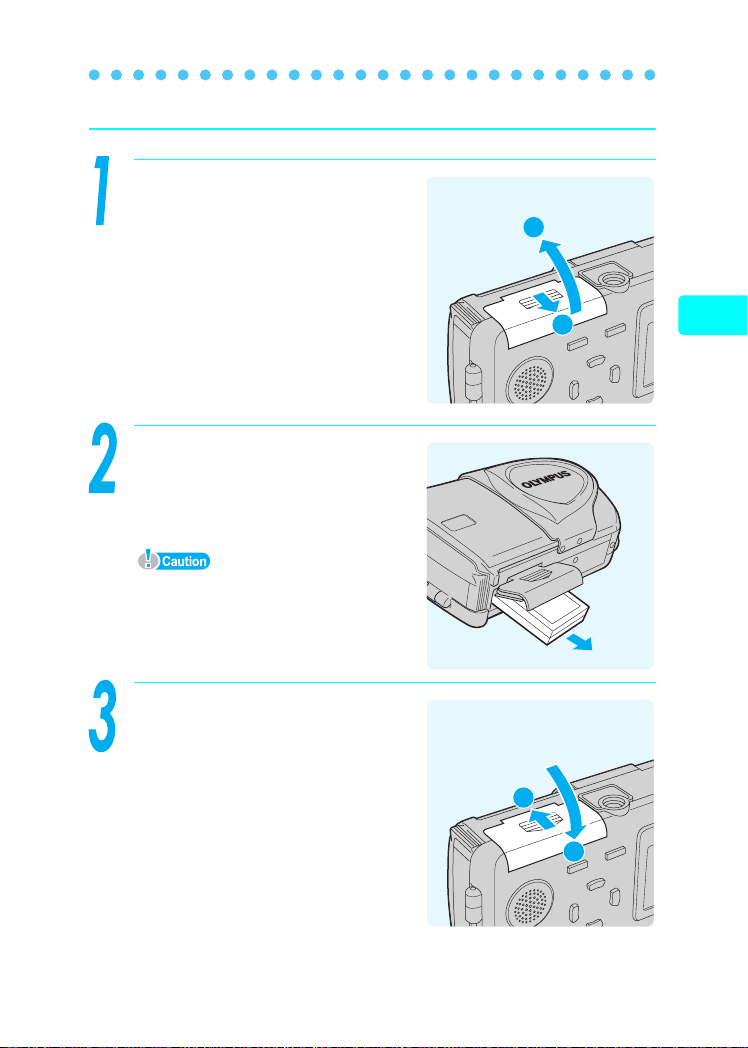
Loading the battery
Slide the battery compartment
cover in the direction of c and lift
up in the direction of d.
Insert the battery into the bottom
of the camera as shown.
If the battery is not correctly inserted,
the battery compartment cover will not
close.
3
Preparations
Before operating your camera
2
1
Continued on next page
15
Page 16

Loading and removing the battery
Close the battery compartment
cover as indicated by the arrows
c d.
Do not force the cover. The
compartment cover closes easily when
the battery is properly oriented. If the
cover does not close easily, check the
Preparations
Before operating your camera
orientation of the battery.
The number of pictures that can be
taken with the camera when the new battery is fully charged is shown below.
Number of storable pictures Minimum about 150
Measuring was conducted under the following conditions.
• 2 pictures taken in succession → No operation performed for 10 minutes
→ 2 pictures taken in succession → No operation performed for 10
minutes (in a repeated cycle).
• Room temperature 25ºC (77ºF) / Image quality: HQ / Monitor on and
flash 50% / DIGITAL ZOOM: OFF / No playback or connection to a
computer
2
1
16
If the camera is left for about a day with the battery removed, the date and
time settings will revert to the factory default settings.
Power is consumed continuously during the conditions described below.
This may drain the battery power more quickly.
• When the monitor is on for long periods.
• Repeated zoom adjustments.
• Repeated auto-focus by depressing the shutter button halfway.
• When the camera is connected to a computer by USB cable.
Page 17
Removing the battery
Slide the battery compartment
cover in the direction of c and lift
up in the direction of d.
Loading and removing the battery
2
Remove the battery.
Do not open the battery compartment
cover with the camera facing down, as
the battery will fall out and may
become damaged.
Close the battery compartment
cover as indicated by the arrows
c d.
1
Preparations
Before operating your camera
2
1
17
Page 18

Inserting and removing the picture card
A
V
OPEN
CLOSE
This camera stores image data on an xD-Picture Card. No pictures can
be taken unless a card has been inserted in the camera.
Make sure that
c The lens barrier is closed.
d The lamps on the right of the
viewfinder are off.
e The monitor is off.
2
1
Preparations
Inserting the card
Press down firmly at the point
Before operating your camera
indicated by the arrow labeled
A. While pressing, pull
connector cover open.
Open the brown colored picture
card cover. Use your fingertips to
pull the picture card cover catch
towards you.
3
A
Connector cover
Picture card cover
Card cover catch
18
Connector cover
Page 19

Inserting and removing the picture card
A
V
OPEN
CLOSE
PUSH
tO
EJECt
A
V
OPEN
CLOSE
OUT
USB
(
MONO
)
A
V
OPEN
CLOSE
Insert the card into the springloaded card slot as shown.
The card will lock into place when
fully inserted.
Card
Push the card in as far as it will go.
To remove the card, press it in again
to eject it.
Close the picture card cover
before closing the connector
cover.
Preparations
Before operating your camera
Close the connector cover while
pressing A in the direction
indicated by the arrow.
If the connector cover does not fully
close, check that the brown picture
card cover is closed.
Continued on next page
A
19
Page 20

Inserting and removing the picture card
A
V
OPEN
CLOSE
PUSH
tO
EJECt
OPEN
CLOSE
AV
PUSH
tO
EJECt
Removing the card
Open the connector cover and then open the picture card
cover.
Push the card all the way in to
unlock it, then let it return slowly.
Preparations
The card will be ejected.
Before operating your camera
Releasing your finger quickly after
pushing the card in may cause it to
eject forcefully out of the slot.
Remove the card.
Do not push the card in with a hard or pointed item such as a ballpoint pen.
Never open the picture card cover while the camera is turned on. Such
action could destroy all the data on the card. Once destroyed, data cannot
be restored.
20
Page 21

Power on/off
The camera can be turned on in “shooting mode”, “playback mode” or
“computer connection mode”.
Do not do any of the following while the camera is turned on. Such actions could
destroy all the data on the card. Once destroyed, data cannot be restored.
• Open the picture card cover or the battery compartment cover.
• Connect or disconnect the AC adapter.
When taking pictures (Shooting mode)
Turn the camera on.
Î Open the lens barrier by sliding it
in the direction of the arrow.
The lens extends and the subject is
displayed on the monitor.
Lens barrier
If the lens does not extend, make sure
that the lens barrier is fully open.
To save battery power, the camera
automatically enters the sleep mode
and stops operation after about 3
minutes of non-operation. After another
15 minutes, the lens will automatically
retract. Press the q to activate the
camera again.
Turn the camera off.
Monitor
Î Move the lens barrier slightly in
the direction of the arrow. The
lens will begin retracting. Once
the lens has fully retracted, close
the lens barrier.
Lens barrier
Preparations
Before operating your camera
The monitor turns off.
Continued on next page
21
Page 22

Power on/off
$04.03.17 15:30
When closing the lens barrier, do not press the lens barrier hard against the
lens as this could damage the lens or cause malfunction.
When viewing pictures (Playback mode)
Turn the camera on.
Î Press the q.
Preparations
Before operating your camera
The picture you have just taken is
displayed.
To save battery power, the camera
automatically turns off after about 3
minutes of non-operation.
If the q is pressed while the lens
barrier is open (shooting mode), the
camera will enter playback mode.
Turn the camera off.
Î Press q again.
$04.03.17 15:30
The monitor turns off.
When the lens barrier is opened, the camera returns to the shooting mode.
When connecting the camera to the computer
Turn the camera on.
Î g“Connecting the camera to the computer” (P.48)
Turn the camera off.
Î g“Disconnecting the camera from your computer” (P.60)
22
Page 23

Camera settings
ESP
OFF
OFF
OFF
Menu operations
The screen that appears on the monitor when you turn the camera on
and press the OK button is called the “First menu”. There are three first
menus, one for the shooting mode, playback mode (still picture) and
playback mode (movie).
Use the arrow pad to select a menu on the first menu and press the OK button.
MOVIE PLAY
0.0
SELECT
Press
MODE MENU
ERASE
+
-
GO
INFO
Operational buttons
(arrow pad and OK button)
MODE MENU
ERASE
MODE MENU
MONITOR OFF
INFO
Shooting mode Playback mode (still picture) Playback mode (movie)
The shooting mode screens will be used here to explain how to use
the menus.
CANCEL
Exposure compensation
Preparations
Image quality mode
Press
MODE MENU
MONITOR OFF
MONITOR OFF
SHQ
CANCEL
HQ
SQ1
SQ2
SELECT
17042272
17042272
15362048
480640
GO
Press
Monitor turns off
Operational buttons
(arrow pad and OK button)
See gP.63 for the Menu List.
To cancel the menu display, press the OK button again.
MODE MENU
Press
ESP/ESP/
DRIVEDRIVE
DIGITAL ZOOMDIGITAL ZOOM
ESPESP
OFFOFF
OFFOFF
OFFOFF
CAMERA
Ta b
PIC
CARD
SET
Use the arrow pad to
select a tab and a mode.
Function
23
Page 24

Selecting your language for on-screen display
ENGLISH
HIGH
ON
NORMAL
ENGLISH
HIGH
NORMAL
ON
()
You can select the language in which the menus and error messages
are displayed on the monitor.
Open the lens barrier and press
the OK button.
The first menu is displayed.
Press to go to the MODE
MENU.
Preparations
MODE MENU
MONITOR OFF
Press or to select the
Camera settings
SETUP tab.
Press to go to the SETUP
menu.
ALL RESETALL RESET
PLAY
EDIT
PW ON SETUPPW ON SETUP
CARD
COLORCOLOR
SETUP
ONON
ENGLISHENGLISH
NORMALNORMAL
HIGHHIGH
24
Press or to select W.
Press to go to the language
settings.
ALL RESETALL RESET
PLAY
EDIT
PW ON SETUPPW ON SETUP
CARD
COLORCOLOR
SETUP
ONON
ENGLISHENGLISH
NORMALNORMAL
HIGHHIGH
Page 25

Selecting your language for on-screen display (W)
Press or to select the
language you want to use.
Press the OK button.
The selected language is set.
SELECT
ENGLISH
FRANCAIS
DEUTSCH
ESPAÑOL
GO
Preparations
Press the OK button again to exit
the menu.
Camera settings
25
Page 26
Setting the date and time
ENGLISH
HIGH
ON
NORMAL
0 1010 1
0 4
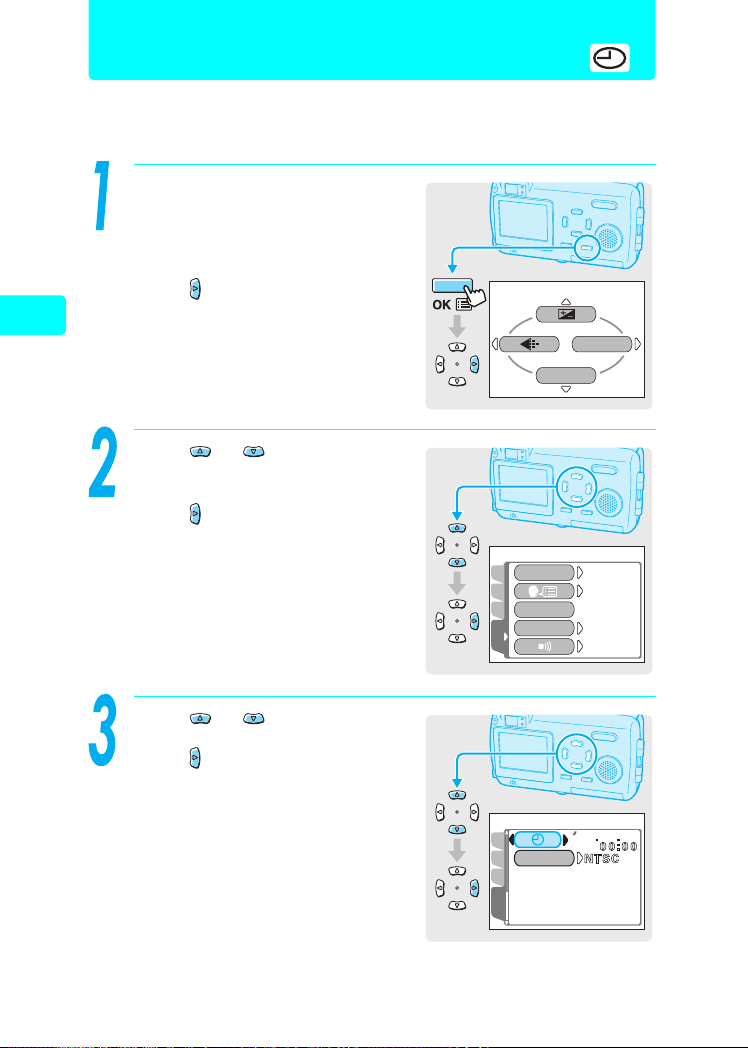
Set the date and time before you use the camera. This feature is handy
when managing pictures on a computer or printing pictures.
Open the lens barrier, or press
the q and then the OK button.
The first menu is displayed.
Press to go to the MODE
MENU.
Preparations
MONITOR OFF
Press or to select the
Camera settings
SETUP tab.
Press to go to the SETUP
menu.
ALL RESETALL RESET
PLAY
EDIT
PW ON SETUPPW ON SETUP
CARD
COLORCOLOR
SETUP
()
MODE MENU
ONON
ENGLISHENGLISH
NORMALNORMAL
HIGHHIGH
26
Press or to select X.
Press to go to the date setting.
CAM
VIDEO OUTVIDEO OUT
PIC
CARD
SETUP
04
01
Page 27

Press or to select one of the
2004
01
2004
01
2004
17
following date formats: Y-M-D (Year/
Month/Day), M-D-Y (Month/Day/
Year), D-M-Y (Day/Month/Year).
Press to go to the year field.
The following steps show the procedure
used when the date format is set to Y-M-D.
Setting the date and time (X
2004
.
0101 .
01
MDY
SELECT
SET
GO
)
Preparations
Press
or
to set each of the
last two digits of the year. Press
to go to the month field.
Repeat the above steps to set the
time.
The time is displayed in 24-hour format.
For example, 1:00 p.m. is displayed as
13:00.
Press the OK button.
Press the OK button again to exit
the menu.
For a more accurate setting, press the
OK button when the time hits 00
seconds. The clock starts when you
press the button.
If the camera is left for about a day with
the battery removed, the date and time
settings will revert to the factory default settings.
SELECT
SELECT
2004
SET
2004
SET
. 03 .
GO
.
0303 .
GO
Camera settings
01
17
27
Page 28
Shooting
Taking still pictures
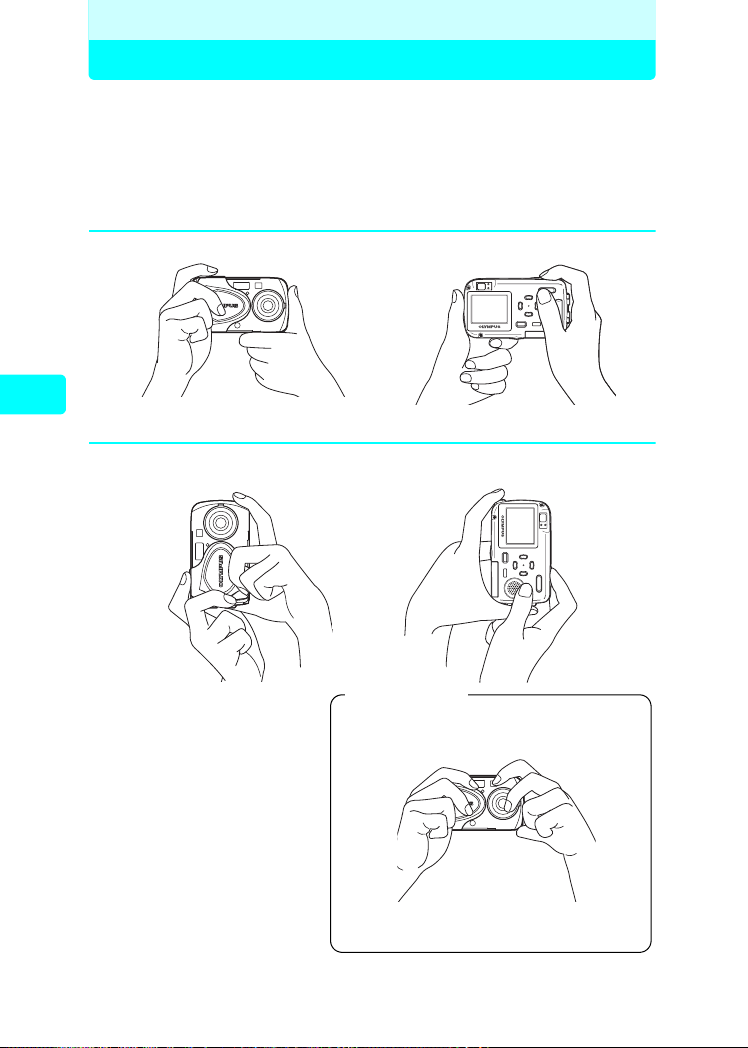
Holding the camera correctly
When taking pictures, hold the camera firmly with both hands while
keeping your elbows at your sides to prevent the camera from moving.
It may cause camera movement, extending your arms or not keeping
your elbows at your sides.
Horizontal grip
Taking still pictures
Vertical grip
28
Incorrect grip
Keep your fingers and the strap away
from the lens and flash.
Page 29
Taking still pictures
2272*1704
HQ
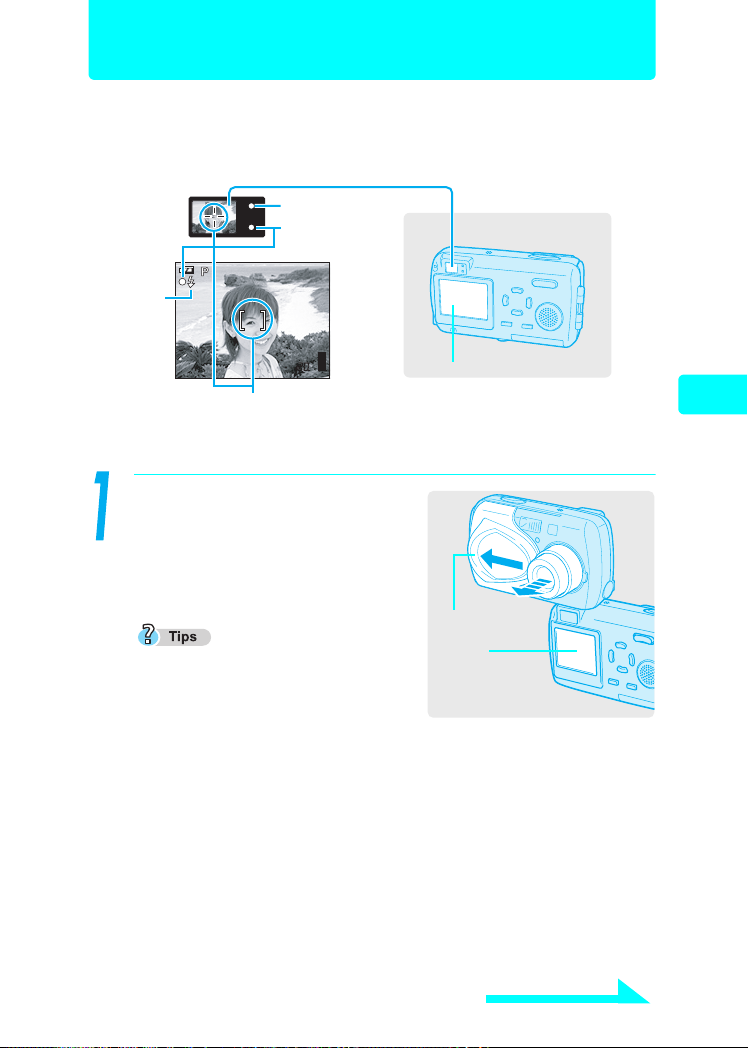
The following section describes how to take pictures using the monitor.
Shutter button operation is the same as when taking pictures using the
viewfinder.
Viewfinder
Orange lamp
Green lamp
Flash
stand-by
2272*1704
HQ
AF target mark
g “Green and orange lamps and flash stand by indication” (P.213)
Open the lens barrier.
When power is turned on, the lens
extends, the monitor turns on, and
the camera enters shooting mode.
Monitor
Taking still pictures
If the lens fails to extend, the lens
barrier may not be completely open.
Lens barrier
Monitor
Continued on next page
Shooting
29
Page 30

Taking still pictures
2272*1704
2272*1704
Confirm on the monitor that the
battery check indication is e
(green).
The battery check indication only
appears for the first 10 seconds after
turning on the camera.
Battery check
Taking still pictures
The battery check indication changes as follows.
e Lights (Green)
Monitor
Battery check
2272*1704
Pictures can be taken.
Shooting
30
f Lights (Red)
Monitor turns off
Green lamp and
orange lamp blink
The battery is running low. Replace with a charged
battery or charge the battery.
The battery is exhausted. Replace with a charged
battery or charge the battery.
Place the AF target mark on the
subject.
The number of remaining pictures is
displayed on the monitor.
If the monitor is hard to see:
Bright light, such as direct sunlight, may
cause vertical lines to appear on the monitor
screen. In this case, use the viewfinder.
When you point the camera lens toward
a bright subject, smears (lines like
beams of light) may appear on the image
in the monitor. This does not affect recorded pictures.
AF target
mark
2272*1704
Number of remaining pictures
Page 31

Taking still pictures
2272*1704
Press the shutter button gently,
and keep the button half
Orange lamp
pressed.
The focus and exposure are locked
and the green lamp lights steadily.
Green lamp
When the flash is going to fire, the
orange lamp lights.
If the green lamp blinks (when closer
than 50 cm (19.7 in.) from the subject), this means that the focus is not yet
locked. Press the shutter button again gently.
Press it all the way (fully) to take
the picture.
The picture is stored on the card.
The orange lamp blinks while the
picture is being stored on the card.
To view the picture you have just
taken, press q (g P. 4 0 ) .
Taking still pictures
Shooting
Memory gauge
The memory gauge lights up when you
take a picture. While the gauge is lit,
the camera is storing the picture on the
card. When the memory gauge is fully
lit (as shown on right), no more pictures
can be taken. Wait until the gauge turns
off before taking the next picture.
2272*1704
Memory gauge
The power turns off when the lens barrier is closed.
31
Page 32

Settings suited to situation and purpose
Changing shooting modes
There are ten shooting modes to choose from on this camera. To easily
create the effects you want, simply select the mode best suited to your
picture. g“Shooting modes” (P.33)
Until you become familiar with the camera, it is recommended that
PROGRAM AUTO be used to take pictures.
Press in shooting mode.
The virtual dial screen for selecting
the shooting mode is displayed.
Taking still pictures
PROGRAM
AUTO
32
Press or to select shooting
mode, and press the OK button.
The selected shooting mode is set.
The shooting mode will change and the
virtual dial screen will disappear
automatically after three seconds even
if the OK button is not pressed.
SELECT
Virtual dial screen
SELECT
GO
PORTRAIT
GO
Page 33
Changing shooting modes
2272*1704
2272*1704
2272*1704
2272*1704
Shooting modes
P (PROGRAM) AUTO
All you need to do is press the shutter button. The camera selects the
optimal settings.
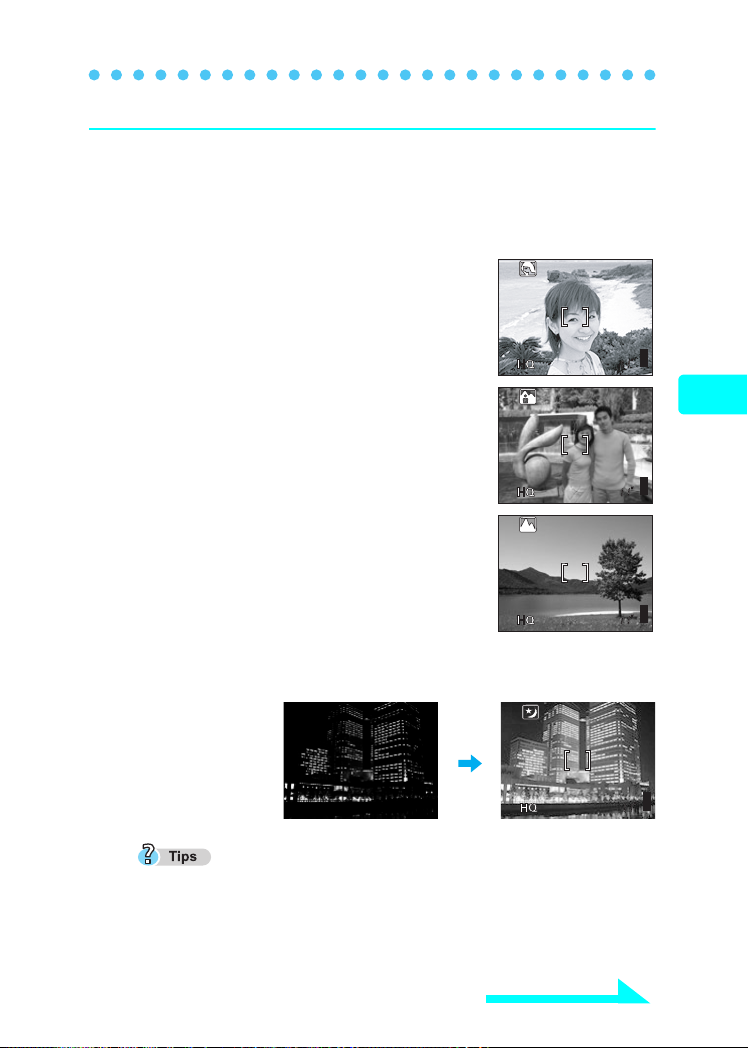
PORTRAIT I
Suitable for taking a portrait-style shot of a
person. Ideal for capturing accurate skin tones.
2272*1704
LANDSCAPE + PORTRAIT K
Suitable for taking photos of both your subject
and the landscape.
2272*1704
LANDSCAPE L
Lets you take clear and sharp pictures of distant
scenery. Creates a very broad depth of field to
keep the entire view in focus.
2272*1704
NIGHT SCENE m
Suitable for taking pictures of night views such as illuminated buildings.
Taking still pictures
Settings suited to situation and purpose
2272*1704
The maximum shutter speed is not fixed at 1/30 seconds even when the
flash is activated and may be extended up to 4 seconds depending on the
subject and the shooting conditions. The use of a tripod is recommended to
prevent your pictures from being blurred by camera movement when the
shutter speed is slow.
Continued on next page
33
Page 34

Changing shooting modes
SQ2
12 80
96 0
2272*1704
2272*1704
INDOOR H
The flash is set to reach farther away for taking
pictures indoors. [W:Approx. 5.1m (16.7ft):
T:Approx. 2.8m (9.2ft)]
However, the record mode is limited to 1280 × 960.
BEACH & SNOW F
Suitable for taking pictures at a beach or in snow.
Lets you take beautiful pictures of scenery with
white sand or snow.
CUISINE G
Taking still pictures
Lets you take beautiful pictures of food. The
saturation, sharpness and contrast settings are
increased to take sharp, vivid pictures of the subject.
SELF-PORTRAIT o
Enables you to take a picture of yourself
while holding the camera.
SQ2
1280
2272*1704
2272*1704
960
Settings suited to situation and purpose
The optical zoom and digital zoom are
locked at the W position and cannot be
used while in self-portrait mode.
Spot metering is not available in this mode.
MOVIE N
Lets you record movies.
gReference Manual P.119 (CAMEDIA Master CD-ROM)
34
Page 35

Using the zoom
This camera can shoot at 3× magnification.
Press the zoom button to set shooting range and composition.
Press the zoom button in shooting
mode.
Press and hold the T side of the zoom
button to zoom in on a distant object.
(Telephoto)
Press and hold the W side of the zoom
button to zoom out and obtain a broader
view. (Wide-angle)
Zoom button
Taking still pictures
Settings suited to situation and purpose
35
Page 36

Using the flash
The camera is initially set to Auto-flash, but you can select from the
following four flash modes according to the shooting conditions.
Auto-flash (Factory default setting)
The flash fires automatically in low light or backlight conditions.
!Red-eye reduction flash
The light from the flash may make the subject’s eyes appear red in
pictures taken in dark places. The red-eye reduction flash mode
reduces this phenomenon by emitting pre-flashes before firing the
regular flash. This helps accustom the subject’s eyes to the bright light
and minimizes the red-eye phenomenon.
Taking still pictures
After the pre-flashes, it takes about 1 second until the picture is taken. Hold
the camera firmly to avoid camera movement.
Effectiveness may be limited if the subject is not looking directly at the pre-
flashes, or if the shooting range is too far. Individual physical characteristics
may also limit effectiveness.
#Fill-in flash
Settings suited to situation and purpose
The flash fires regardless of the available light. This mode is useful for
eliminating shadows on the subject’s face (such as shadows from tree
leaves), in a backlight situation, or for correcting the color shift produced
by artificial lighting (especially fluorescent light).
()
$Flash off
The flash does not fire even in low-light conditions. Use this mode in
places such as art museums where flash photography is prohibited.
Since a slow shutter speed is automatically selected in low light situations
when in the flash off mode, the use of a tripod is recommended to prevent
your pictures from being blurred by camera movement.
36
Page 37
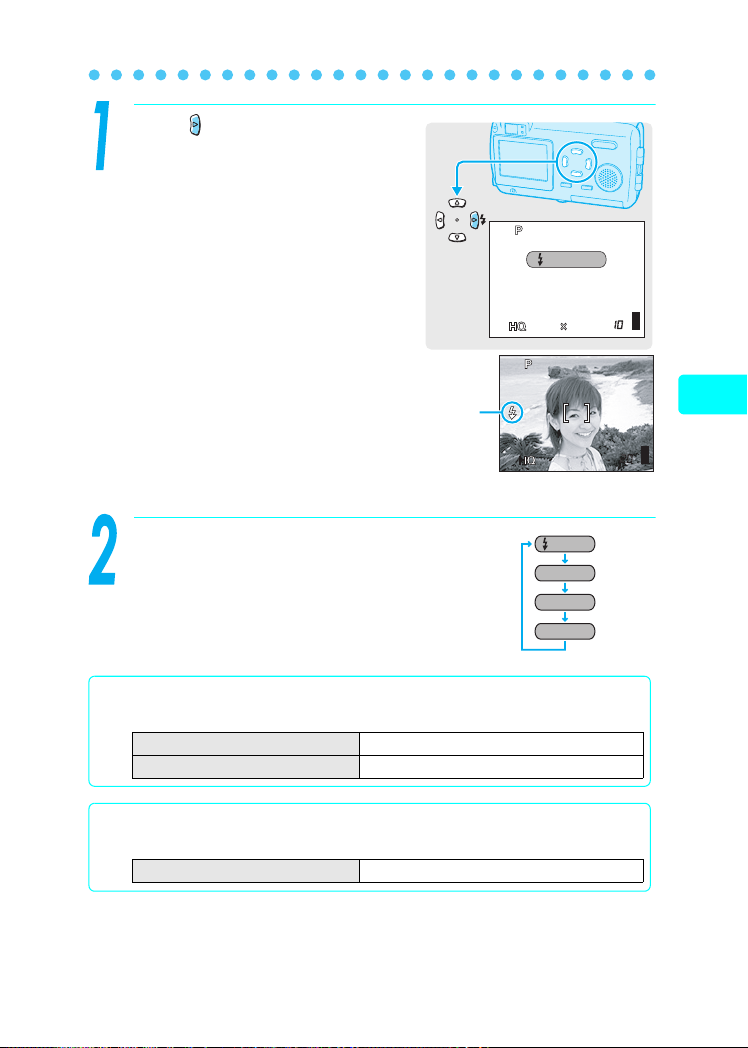
Press repeatedly in shooting
2272
1704
2272*1704
2272*1704
mode to change the flash setting.
The flash mode indication is
displayed on the screen when a
flash mode other than auto-flash is
selected.
flash mode
indication
Using the flash (#)
AUTO
2272
1704
2272*1704
2272*1704
Taking still pictures
The flash settings change in the order
of the arrow. After “Flash off”, the setting
returns to “Auto flash”.
Flash working range
The appropriate shooting distance when using the flash is shown below.
Shooting distance (W) 0.2 to 3.6 m (0.7 to 11.8 ft.)
Shooting distance (T) 0.2 to 2.0 m (0.7 to 6.6 ft.)
Flash charging time
The orange lamp blinks while the flash is charging.
Flash charging time Approx. 6 seconds
AUTO
!
#
$
Settings suited to situation and purpose
37
Page 38
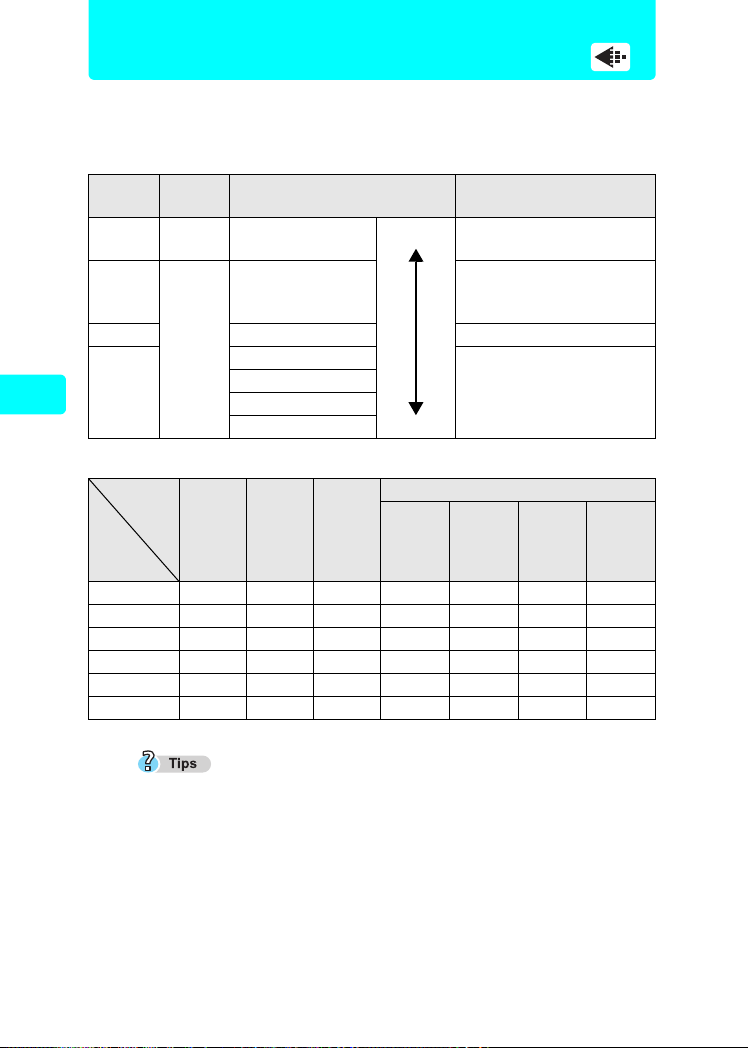
Changing the image size and quality
L
This function lets you select the image size and quality when recording
pictures on the card. It is best to choose the size and quality according
to the purpose. The camera is preset to HQ mode.
Record
mode
SHQ Detailed
SQ1 2048 × 1536 For printing 3" × 5" prints.
SQ2
Taking still pictures
Picture card capacity and number of storable still pictures
Card
capacity
Settings suited to situation and purpose
128MB 45 133 163 199 307 469 798
256MB 90 266 326 399 614 940 1598
512MB 181 532 652 798 1229 1879 3195
Quality Resolution Usage examples
2272 × 1704
(Low compression)
2272 × 1704
HQ
Normal
Record
mode
16MB 5 162024385899
32MB 11 33 40 49 76 117 199
64MB 22 66 81 99 153 234 398
(Below standard
compression)
1600 × 1200
1280 × 960
1024 × 768
640 × 480
SHQ HQ SQ1
Small
1600 ×
1200
For making large prints
arge
or editing on a computer.
For printing in postcard
size.
For small prints, posting
on the Internet or attaching
to e-mail.
SQ2
1280 ×
960
1024 ×
768
()
640 ×
480
The number of storable pictures listed in the table is approximate.
The number of remaining pictures may change according to the subject or
factors such as whether print reservations have been made. The number of
remaining pictures sometimes does not change even when a picture is
taken or a stored image is erased.
Recording sound with still pictures reduces the number of pictures you can
take.
38
Page 39
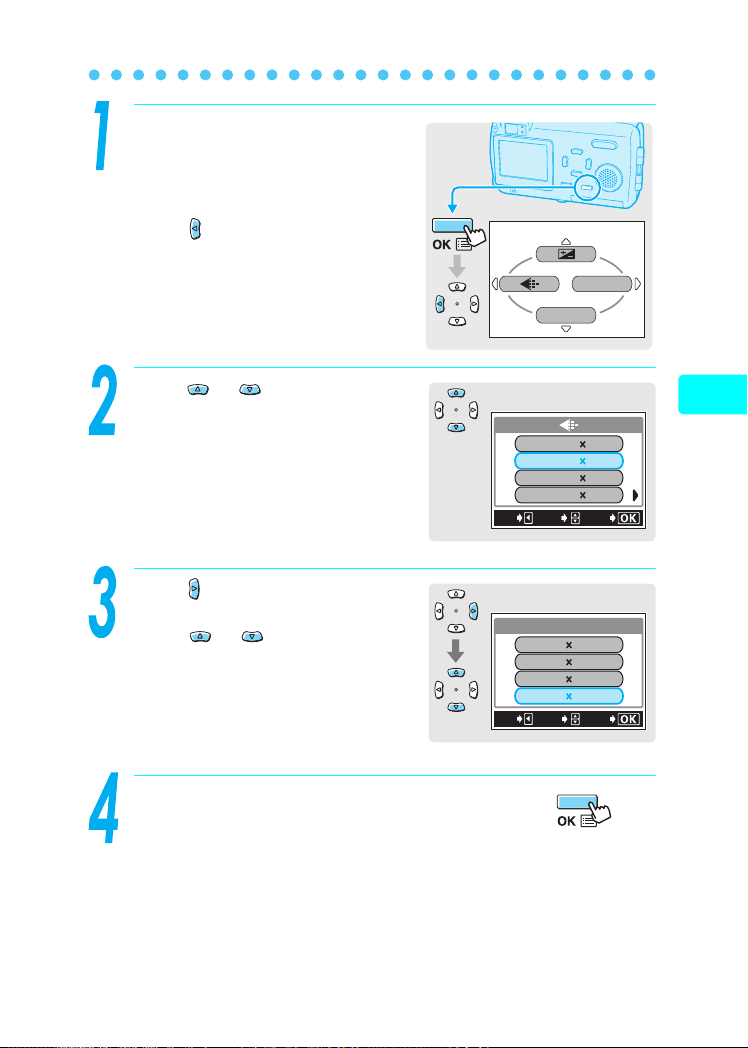
Changing the image size and quality (K)
Press the OK button in shooting
mode.
The first menu is displayed.
Press to go to the record
mode settings.
Press or to select SHQ,
HQ, SQ1 or SQ2.
If you selected SHQ, HQ or SQ1, go
to gstep 4.
If you selected SQ2, go to gstep 3.
Press to display the SQ2 setup
screen.
Press or to choose an
image size and press the OK
button.
SHQ
SQ1
SQ2
CANCEL
CANCEL
MONITOR OFF
HQ
SELECT
SQ2
SELECT
MODE MENU
17042272
17042272
15362048
480640
GO
12001600
9601280
7681024
480640
GO
Taking still pictures
Settings suited to situation and purpose
Press the OK button.
The selected record mode is set.
39
Page 40

PLAYBACK
Viewing still pictures
Playback
When the playback mode is activated, the last picture taken is displayed
on the monitor. Press the arrow pad to change the picture.
Press the q.
Playback mode is selected and the
last picture taken is displayed on the
monitor. (QUICK VIEW)
Pressing the arrow pad while
playback switches the picture.
Viewing still pictures
Viewing still pictures
Displays the
previous picture
Jumps to the picture
10 frames back
Displays the
next picture
Arrow pad
40
Jumps to the picture
10 frames ahead
If the lens barrier is opened and q is pressed in shooting mode, causing
the playback mode to be selected, the following operations can be used to
return to shooting mode.
Press q, or press the shutter button halfway
Pressing the q exits playback mode.
The power turns off when the lens barrier is closed.
When the lens barrier is opened, the camera enters the shooting mode.
Page 41

Erasing pictures
Single-frame erase
()
Digital cameras let you erase pictures that you do not want to keep.
When you erase an unwanted picture, the number of pictures you can
take increases.
Once erased, pictures cannot be restored.
While in playback mode, display the picture you want to erase.
g “Playback” (P.40)
Press the OK button.
The first menu is displayed.
Press to select R ERASE.
INFO
MODE MENU
ERASE
Viewing still pictures
Press to select YES.
Press the OK button.
The picture displayed on the monitor
is erased.
SELECT
ERASE
YES
NO
GO
41
Page 42
Before using your computer
Creating and sharing images using a computer
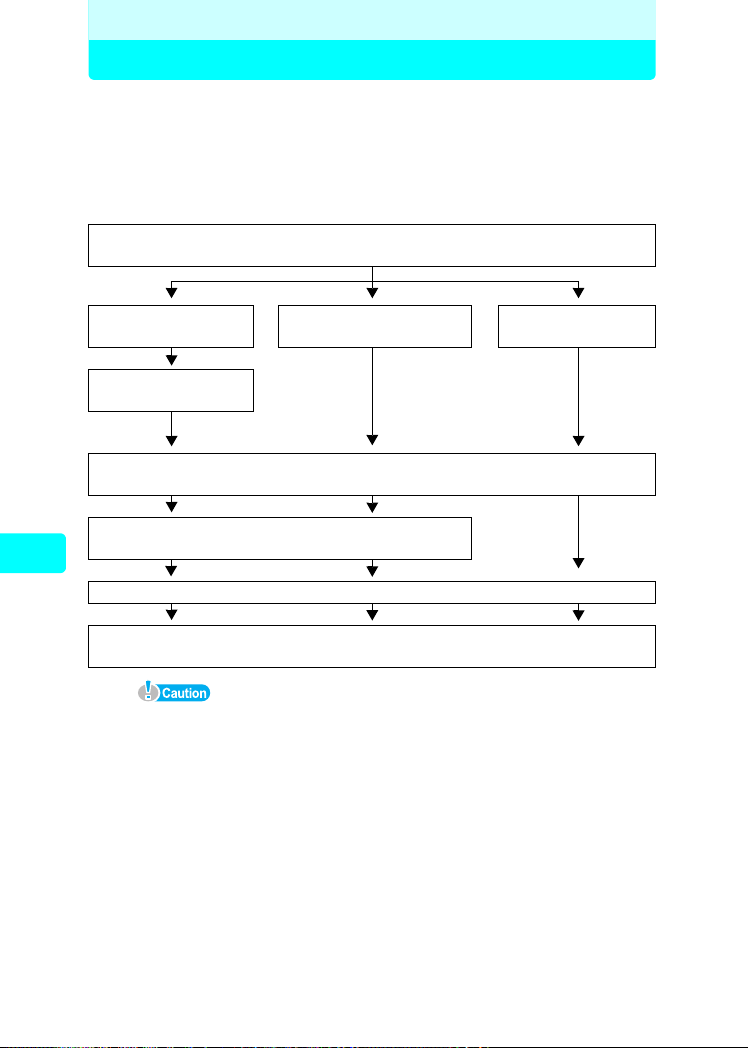
Operating procedure
You can transfer images from the picture card in the camera to your
computer by connecting the camera to the computer with the supplied
USB cable. Depending on the Operating System of your computer, you
may have to configure your computer before connecting it to the
camera. Follow the steps below.
Windows 98/
98SE (Second Edition)
USB driver
installation
Confirm the computer recognizes the camera
Creating and sharing images using a computer
Creating and sharing images using a computer
Normal operations cannot be guaranteed on computers with the following
Operating Systems and specifications, even when equipped with a USB
connector.
Windows 95/NT 4.0
Windows 98/98SE when upgraded from Windows 95
Macintosh OS 8.6 or lower
(However, operations have been confirmed for Macintosh OS 8.6 originally
shipped with a USB connector and USB MASS Storage Support 1.3.5.)
Computer with an add-on USB connector on an expansion card, etc.
Computers without a pre-installed Operating System or a self-built computer
Determining how to connect the camera to a computer
Identifying the Operating System
Windows Me/2000/XP
Connect the camera to the computer
(Windows P.48)
(Windows P.49)
Transfer camera images to the computer
Disconnect the camera from your computer
(Windows P.60)
OS 9.0 - 9.2/OS X - 10.3
Macintosh
42
Page 43

Operating procedure
When using the camera connected to the computer, be sure that the camera
has sufficient battery power. Note that the camera’s battery will continuously
discharge (use energy) when connected (communicating) with a computer.
If the battery becomes exhausted, the camera will stop operating. If the
camera stops operating, the computer may malfunction and the image data
(files) being transferred may be lost. Please keep this in mind when the
camera is connected to the computer for extended periods. Use of the AC
adapter (sold separately) is recommended when using the camera with a
computer.
If the AC adapter is removed when the camera is connected to the computer
and powered by the battery, the image data on the picture card may be lost
and the computer may malfunction. Before removing the AC adapter, be
sure to first disconnect the camera from the computer and turn off the
camera.
If the camera is connected to the computer via a USB hub, reliable
operation cannot be guaranteed. If a malfunction should occur, connect the
camera directly to the computer without using the USB hub.
Be sure to copy an image to the computer before editing the image.
Depending on the application software used, editing an image (such as
rotating) on the picture card may corrupt the file data on the picture card.
Images transferred to the computer can be viewed using graphic software, such
as CAMEDIA Master, Paint Shop Pro or Photoshop, Internet browsing software,
such as Netscape Communicator or Microsoft Internet Explorer, or a similar
JPEG-compatible application software. For information on using commerciallyavailable image editing software, please refer to the instruction manual of that
software.
To play back movies on your computer, you will need to have QuickTime
installed. QuickTime is provided on the supplied CD-ROM.
Before using your computer
Creating and sharing images using a computer
43
Page 44

Identifying the operating system
To determine the available methods for transferring images from the
camera to your computer, you must first identify the operating system
(OS) of your computer.
gFor Macintosh users, see the Reference Manual P.156 (CAMEDIA
Master CD-ROM)
Windows
Before using your computer
Right click the “My Computer” icon on your desktop and select
“Properties”. For users running Windows XP, right click “My
Computer” from the Start menu and select “Properties”.
Note and record the “System”
(Operating System) information.
Creating and sharing images using a computer
44
Page 45

Determining how to connect the camera to a computer
Select one of the following three methods for connecting the camera to
the computer.
1.Using the provided USB cable to connect the camera to your
computer.
g“Windows” (P.48)
gFor Macintosh users, see the Reference Manual P.170
(CAMEDIA Master CD-ROM)
2.Inserting and using the optional computer card adapter (such as
the Olympus MAPC-10) in your computer. g For details, refer
to the instruction manual of the computer Card adapter.
3.Inserting and using the optional USB card reader/writer (such as
the Olympus MAUSB-10) to connect to your computer. g For
details, refer to the instruction manual of the USB reader/writer.
1
USB cable
Windows Me/2000/XP
Windows 98/98SE
Windows NT 4.0
Windows 95
Macintosh 9.0 to 9.2,
10.1 to 10.3
Macintosh 8.6 or lower –
See the Olympus Web site for details about the optional Card adapter and
USB reader/writer.
ghttp://www.olympus.com
999
999
–––
–
999
2
Computer Card adapter
(sold separately)
9
99
3
USB reader/writer
(sold separately)
–
Before using your computer
Creating and sharing images using a computer
45
Page 46

Windows
Installing the USB driver (When using Windows 98/98SE)
If your Operating System is Windows 98/98SE, you must install the
USB driver before connecting the camera to your computer for the first
time.
Follow the instructions below to install the USB driver in your computer.
Once it is fully installed, you do not need to repeat the procedure again.
Insert the provided software CD
into the CD-ROM drive of your
computer.
Click the “USB Driver” button.
Creating and sharing images using a computer
If this window does not display
automatically, perform the following
steps.
1. Double click the “My Computer” icon
on your desktop.
2. Right click the CD-ROM icon and click “Open”.
Click “Continue”.
The installation of the USB driver will
start.
46
Page 47

Installing the USB driver (When using Windows 98/98SE)
When the installation is
complete, the window on the
right is displayed. Click “OK” to
restart your computer.
Windows
Creating and sharing images using a computer
47
Page 48

Connecting the camera to the computer
Use the provided USB cable to connect the camera to the computer.
Users running Windows 98/98SE need to install the USB driver before
connecting the camera to the computer.
g“Installing the USB driver” (P.46)
Turn the computer on. Make sure that the camera is off (the
lens barrier should be closed and the monitor turned off).
Connect one end of the USB cable to the USB port on the
computer.
Connect the other end of the USB cable to the USB connector
on the camera.
The camera turns on automatically and the green lamp next to the viewfinder lights.
Windows
USB connector
Creating and sharing images using a computer
USB port
48
The first time when the camera is connected to your computer, the computer
automatically installs the software to recognize the camera. What until
recognition is completed.
Press or to select PC and
press the OK button.
USB
P C
PRINT
EXIT
SELECT
OK
Page 49
Confirming the computer recognizes the camera
Confirming the computer recognizes the camera
Windows 98/98SE/Me/2000
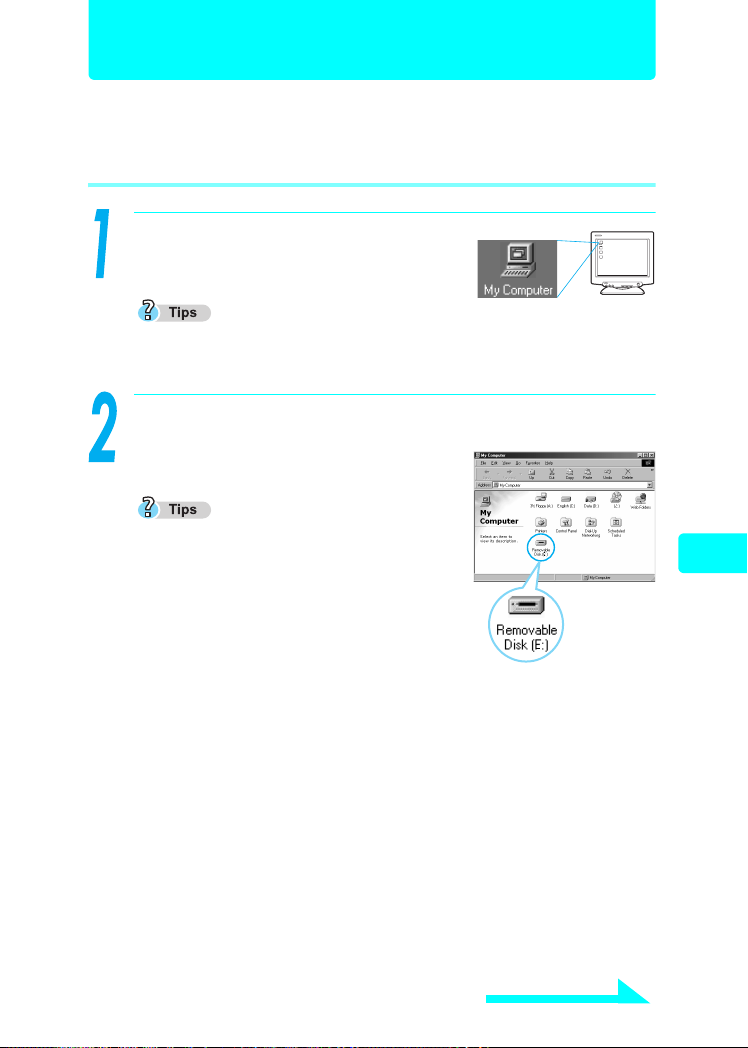
Double click the “My Computer” icon
on the desktop.
If the camera is properly recognized by the computer, the “Removable Disk”
icon is displayed.
Double click the “Removable Disk” icon.
A “DCIM” folder is displayed.
The letter of the drive (E:) in “Removable Disk
(E:)” may differ depending on the operating
environment of your computer.
If you cannot find the icon or an error
message appears, there may be a problem
with one of the following:
c the camera’s power source (the AC
adapter is not properly connected or the
battery power is low)
→ Make sure that the AC adapter is correctly connected or that the
battery power is sufficient.
d the card (there is no card in the camera or there is a problem with the
card)
→ Check that you can play back pictures stored on the card on the
monitor of your digital camera. You must disconnect the camera from
the computer to perform this action.
e the connection between the camera and the computer
→ Check the USB cable connection.
Windows
Creating and sharing images using a computer
Continued on next page
49
Page 50

Confirming the computer recognizes the camera
Check for the “DCIM” folder.
This confirms that the camera is
recognized by the computer. You can
now operate the files on the
computer.
Windows XP
When the computer has recognized the camera, a window is displayed,
prompting you to select the operation for the image files.
Windows
If this window is not displayed, click “My Computer” from the “Start” menu
and then Double click the “Removable Disk” icon. gGo to step 2.
Select “Open folder to view files
Creating and sharing images using a computer
using Windows Explorer” and
click “OK”.
50
Check that the “DCIM” folder is displayed.
This confirms that the camera is recognized by the computer. You can
now operate the files on the computer.
Page 51

Using the provided CAMEDIA Master software
Installing the CAMEDIA Master software – for first time usage
gFor Macintosh users, Reference Manual P.181 (CAMEDIA Master
CD-ROM)
Windows
The following are the system requirements for CAMEDIA Master 4.2.
Operating System Windows 98/98SE/Me/2000/XP
CPU Pentium II or later
RAM 128MB or greater (256MB or higher
Hard disk space 120MB or greater (during installation)
Connector USB port (USB interface)
Monitor 800 × 600 dots or higher, 65,536 colors or
CD-ROM drive
Internet Explorer 4.0 or later (for display of online help)
This software is for use on computers with a pre-installed Operating System.
For Windows XP systems, only Windows XP Professional/Home Edition is
supported.
For Windows 2000 systems, only Windows 2000 Professional is supported.
recommended)
higher
Turn on your computer and insert the CD-ROM into the CDROM drive. The screen below appears.
Choose the appropriate language.
This button only appears when the
USB Driver has not been previously
installed on a Windows 98 computer.
If the menu screen does not display automatically, Double click the “My
Computer” icon on your desktop and then Double click the CD-ROM icon.
Continued on next page
Creating and sharing images using a computer
51
Page 52
Installing the CAMEDIA Master software – for first time usage
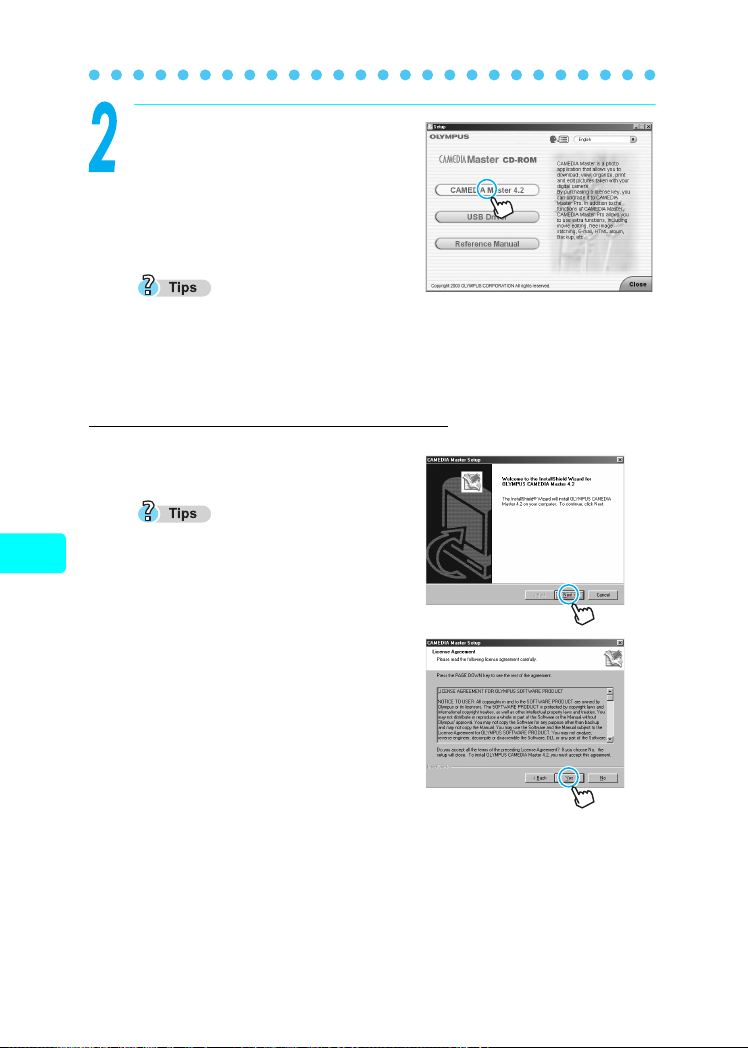
Click the “CAMEDIA Master 4.2” button.
Read the descriptions on the right-hand
Using the provided CAMEDIA Master software
side of the window and click “Next”.
QuickTime, CAMEDIA Master, and
Acrobat Reader will be installed in order.
If your computer has the latest version of QuickTime or Acrobat Reader
installed, the installation window for that application software will not be
displayed.
Installing the CAMEDIA Master software
c Click “Next”.
If QuickTime is already installed,
proceed from here.
Creating and sharing images using a computer
d When the software license
agreement window is displayed,
review the agreement and click
“Yes”.
52
Page 53
Installing the CAMEDIA Master software – for first time usage
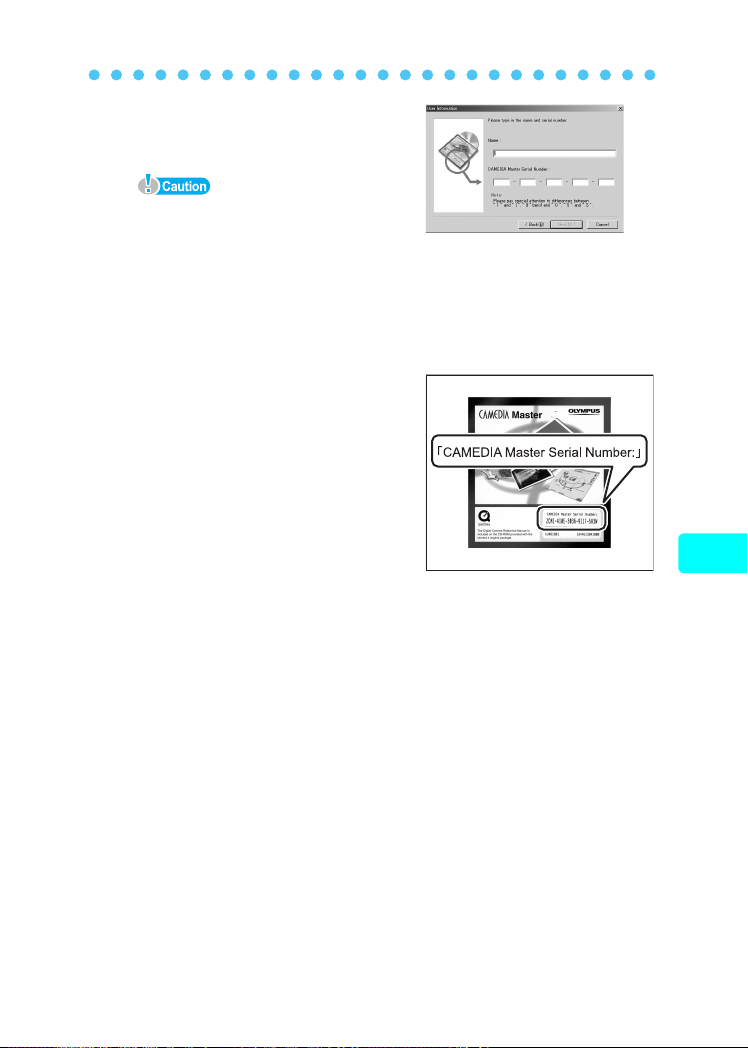
e Type in your name and the software
serial number.
When entering the serial number, be
careful to distinguish between “0”
(zero) and “O” (upper case o), “0”
(zero) and “D” (upper case d), “1” (one)
and “I” (upper case i), “2” (two) and “Z”
(upper case z), “8” (eight) and “B”
(upper case b), and “U” (upper case u)
and “V” (upper case v).
The serial number can be found on the
bottom of the cover of the CD-ROM
package.
After typing in this information,
repeatedly click “Next”.
The installation setup begins.
Using the provided CAMEDIA Master software
After the installation of the CAMEDIA
Master software is complete, Acrobat
Reader is installed.
If Acrobat Reader is already installed in your computer, the installation
process finishes.
g“Starting/Exiting the CAMEDIA Master software” (P.54)
Creating and sharing images using a computer
53
Page 54

Starting/Exiting the CAMEDIA Master software
Windows
Using the provided CAMEDIA Master software
Double click the “CAMEDIA Master” icon on
your desktop.
The main menu is displayed.
CAMEDIA Master main menu
1
Creating and sharing images using a computer
10
1 Transfer images
From Camera
From Media
2 Browse images
Displays images stored in media or the CAMEDIA Master software (My Album).
3 Help
Displays help files.
OLYMPUS Web Site
4
Displays the Olympus Web site.
Transfers images from the camera connected to the computer.
Transfers images from media (floppy disk, magneto-optical
disk (MO), CD-ROM, SmartMedia, and other storage media)
to the computer.
2
3
4
5
6
789
54
Page 55

Starting/Exiting the CAMEDIA Master software
5 Get Pro Version
Displays information on how to purchase the Pro version of the CAMEDIA
Master software.
Create and Share
6
Auto
Panorama
Wallpaper Sets an edited image as the wallpaper of the computer.
7
Close
Closes the CAMEDIA Master software.
Don’t show this screen.
8
If you check this box and exit the CAMEDIA Master software, next time you
start the application, the Album Window is displayed instead of the main
menu.
Options
9
Allows you to change the background color of the menu screen and select
the storage location of “My Album”.
Print Images
10
Allows you to position and print image(s) stored in media or the CAMEDIA
Master software (My Album) in any of four formats (photo, index, calendar, or
postcard).
The Online User Registration window is displayed. If your computer is
connected to the Internet, follow the onscreen instructions to complete user
registration. If you do not want to continue with the registration, click
“Cancel”.
To view the CAMEDIA Master manual – From the “Start” menu, select
“Programs” – “OLYMPUS CAMERA” – “Reference Manual”.
Stitches two or more images together to create a single
horizontal panorama image.
Using the provided CAMEDIA Master software
Creating and sharing images using a computer
To exit CAMEDIA Master, click
“Close” on the main menu. The
CAMEDIA Master software
closes.
55
Page 56

Transferring camera images to the computer
The following explains how to transfer images from “CAMERA” to a
computer, create an album, and then save it on the computer.
Using the provided CAMEDIA Master software
When using “From Camera” to transfer images, you must be connected to
an Olympus camera. g“Connecting the camera to the computer” (P.48)
Images can also be transferred from “Media.” For details, see the CAMEDIA
Master help information.
Transfer images from the camera
In the main menu, click “Transfer
Images – From Camera”.
Creating and sharing images using a computer
The camera is automatically
searched for images and the
Transfer Images window is
displayed.
Thumbnails of all of the camera
images are displayed on the lefthand side of the window.
The album in the computer to which
the images will be transferred is
displayed on the right-hand side of the window.
Now you can create groups and albums to which to save the images.
When the software is initially installed, the “Panorama” and “Samples”
albums are placed in the “Sample” group for use as samples.
Now let’s transfer the images using a group we will name “Photos” and
an album we will name “20031110”.
56
Page 57

Transferring camera images to the computer
Create a group.
c Click the “New Album”
button in the lower righthand corner of the Transfer
Images window.
The “Create New Album” dialog
box is displayed.
d Select “Group”, type in
“Photos” for the group name,
and click “OK” to create the
group.
The group “Photos” appears on
the right-hand side of the
window.
Using the provided CAMEDIA Master software
Creating and sharing images using a computer
Create an album named
“20031110” inside the “photos”
group.
c Click the “New Album” button
in the lower right-hand
corner.
The “Create New Album” dialog
box is displayed.
Continued on next page
57
Page 58

Transferring camera images to the computer
d Type in “20031110” for the
name of the album and click
“OK”.
Using the provided CAMEDIA Master software
An album named “20031110” has
now been created inside the
“Photos” group on the right-hand
side of the window.
You are now ready to transfer the
camera images to the
“20031110” album.
Transfer images.
c Select “All images” below the “Transfer Images” button and
click “Transfer Images”.
Creating and sharing images using a computer
58
To transfer images to an existing album, single-click the album to which you
want to transfer the images and then click the “Transfer Images” button.
To transfer only a selected image, click the “Selected Images” radio button
below the transfer images button, select the image you wish to transfer, and
then click “Transfer Images”. To select multiple images, hold down the Ctrl
key (Command key in Macintosh) while clicking the desired images.
d The “Transfer Images” dialog
box is displayed. When the
transfer of images is
complete, click “OK”.
The transfer of images to the album is now complete.
Page 59

Transferring camera images to the computer
e Click the “Menu” icon in the
upper left-hand corner of the
Transfer Images window to
return to the main menu.
Disconnect the camera from your computer.
g “Windows 98/98SE” (P.60)
g “Windows Me/2000/XP” (P.61)
g For Macintosh users, Reference Manual P.175 (CAMEDIA Master
CD-ROM)
To save camera battery power, disconnect the camera from the computer
once you have done transferring images to the computer.
Using the provided CAMEDIA Master software
Creating and sharing images using a computer
59
Page 60
Disconnecting the camera from your computer
Windows 98/98SE
Using the provided CAMEDIA Master software
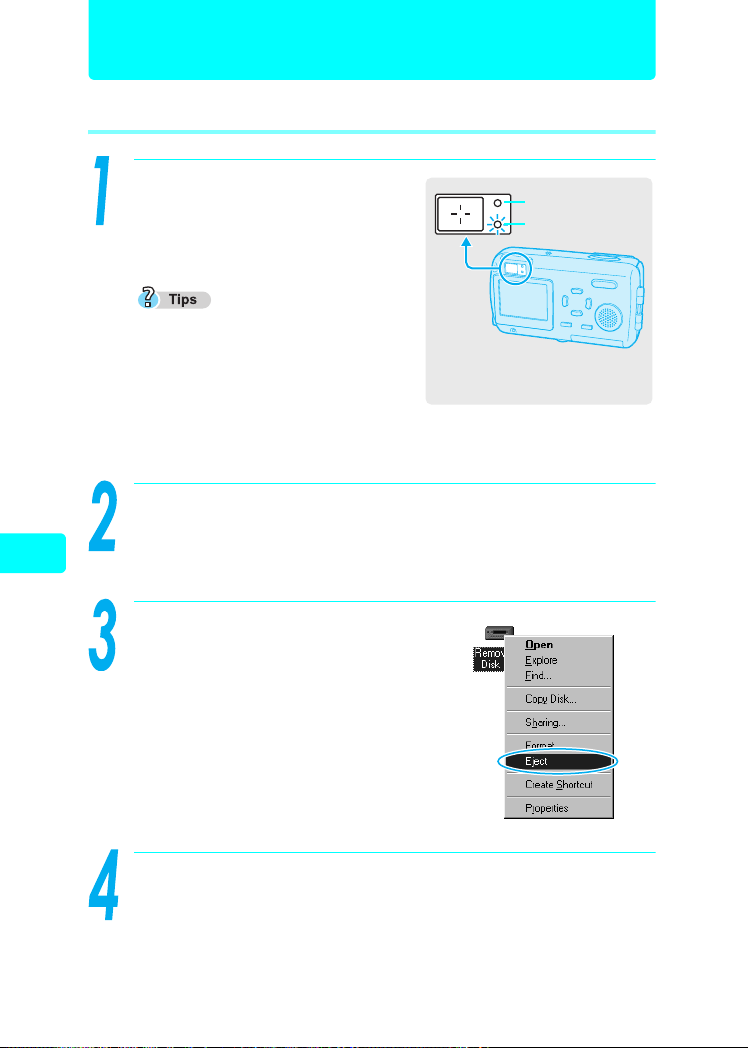
Make sure that the orange lamp
on the camera is not lit.
The green lamp, however, is lit.
If the orange lamp is lit or blinking, wait
until the lamp turns off before
proceeding.
If the orange lamp does not turn off,
this may indicate that the camera is
accessing the software on the computer. Close the software that you are
using.
Double click the “My Computer” icon and right click the
“Removable Disk” icon to display the menu.
Creating and sharing images using a computer
Click “Eject” on the menu.
Orange lamp
Green lamp
60
Disconnect the USB cable from the computer and camera.
The green lamp on the camera turns off.
Page 61
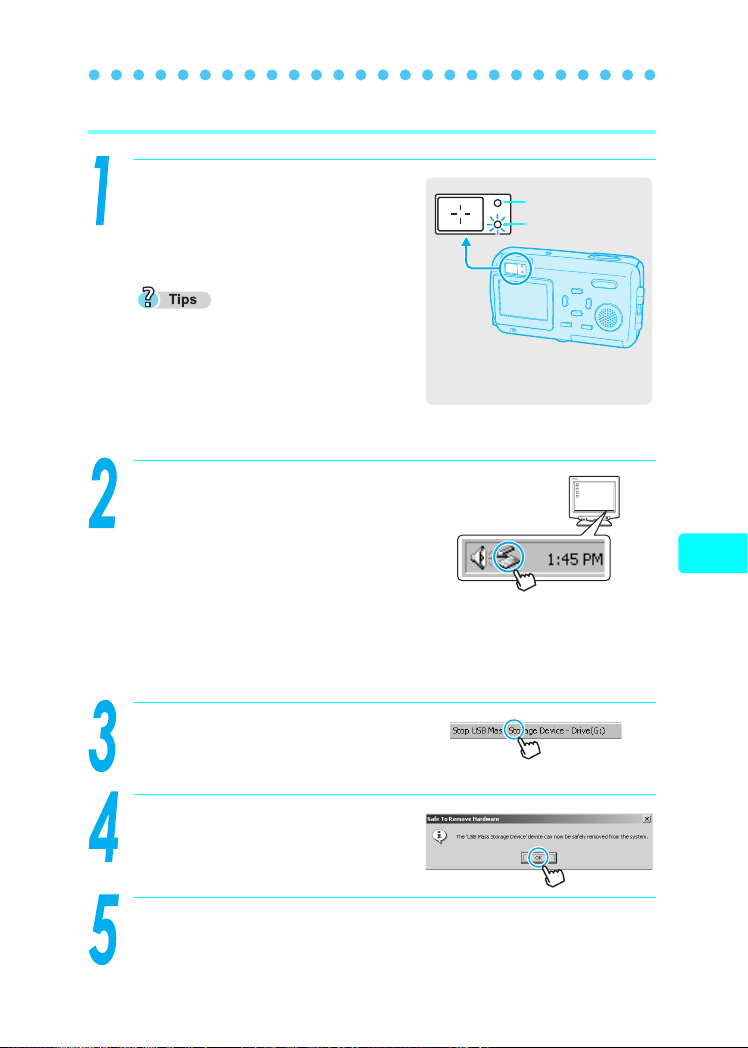
Disconnecting the camera from your computer
Windows Me/2000/XP
Make sure that the orange lamp
on the camera is not lit.
The green lamp, however, is lit.
If the orange lamp is lit or blinking, wait
until the lamp turns off before
proceeding.
If the orange lamp does not turn off, this
may indicate that the camera is accessing
the software on the computer. Close the software that you are using.
Orange lamp
Green lamp
Single click the “Unplug or Eject
Hardware” icon on the taskbar.
For Windows XP, click the “Safely
Remove Hardware” icon. The
message “Safely Remove USB
Mass Storage Device” or “Stop USB
Mass Storage Device” appears.
The message saying that the drive has been stopped appears.
Single click the message.
Using the provided CAMEDIA Master software
Creating and sharing images using a computer
A confirmation window appears.
When the window appears, click
“OK”.
Remove the USB cable from the computer and camera.
The green lamp on the camera turns off.
61
Page 62

Other features
The CAMEDIA Master software on the CAMEDIA Information CD-ROM
enables you to easily manage and enjoy the pictures taken with your
digital camera. CAMEDIA Master has the following functions.
Using the provided CAMEDIA Master software
Transfer images
View images
Edit images
Print
Creating and sharing images using a computer
Other uses
Manage files
Transfer images from the camera
Transfer images from media
Specify where images are transferred to
(album, calendar or folder)
View still images
View movies
Change the display mode
Play back sound
Search for files
Check/change file information
Rotate/flip/resize/crop images, insert text,
add templates, correct distortions, and use
filter function
Paste cut/copied images
Save images
Make photo prints and index prints
Make calendars, postcards, albums, and
contact sheets
Use an image to create wallpaper
Create a panorama image
Create groups and albums
Create folders
Manage images and files
gFor details, see the CAMEDIA Master instruction manual installed
together with CAMEDIA Master. The manual is displayed by
clicking the “Help” icon at the upper right of the main menu window.
62
Page 63
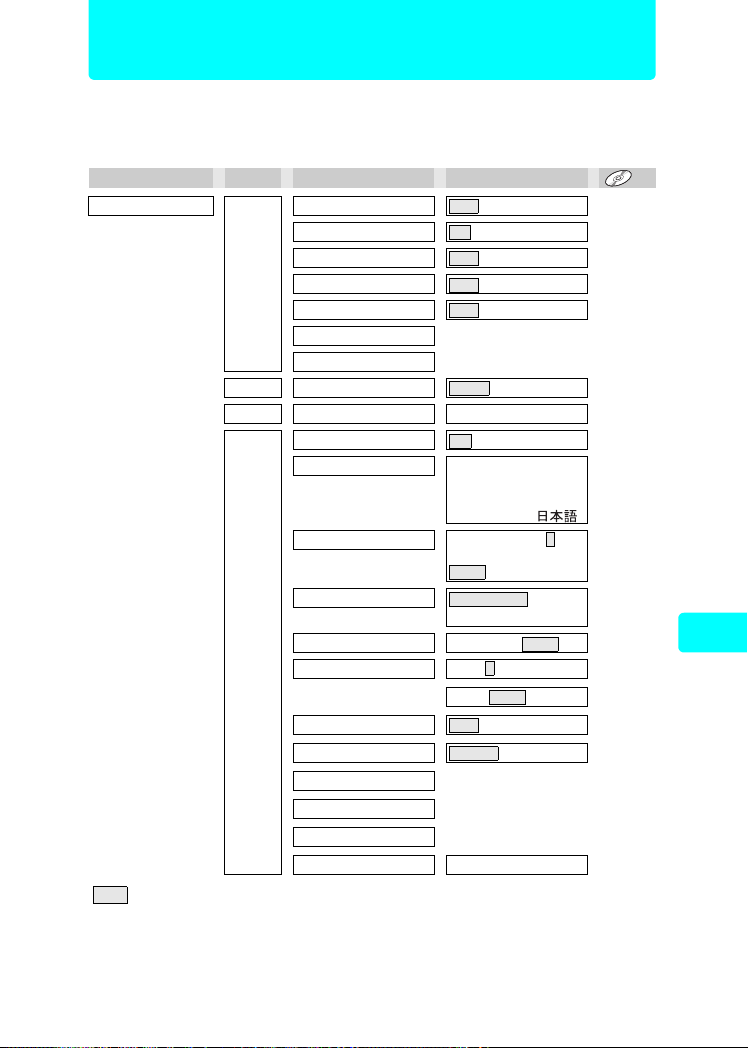
Menu List
The shooting mode and playback mode menus for still pictures and
movies are shown separately below.
Shooting mode menu (Still picture)
First menu Ta b Function Setting
MODE MENU
CAMERA
IMAGE WB /5/3/1/
CARD CARD SETUP YES, NO
SETUP
is the setting when shipped from the factory (default setting).
∗
Setting differs according to the region where the camera is sold.
5
ESP/
DRIVE
DIGITAL ZOOM
R
%
PANORAMA
2 IN 1
ALL RESET
∗
W
PW ON SETUP
SCREEN COLOR
8
SHUTTER SOUND OFF, , 2, 3
REC VIEW
FILE NAME
PIXEL MAPPING
s
X
VIDEO OUT
∗
ESP
5
,
o
j
,
OFF
, ON
, ON
OFF
OFF
, ON
AUTO
ON
ON, OFF
ENGLISH, FRANCAIS,
DEUTSCH, ESPAÑOL,
ITALIANO, РУССКИЙ,
PORTUGUES,
SCREEN: OFF, , 2, 3
SOUND: OFF, LOW
HIGH
HIGH
STANDARD
GREEN, BLUE
OFF, LOW,
1
HIGH
LOW,
OFF
, ON
RESET
,
NTSC, PAL
>
1
, PINK,
HIGH
AUTO
P. 8 0
P. 8 7
P. 7 0
P. 9 4
P. 8 3
P. 8 9
P. 9 2
P. 7 7
P. 5 2
P. 3 3
P. 2 9
P. 4 4
P. 4 6
P. 3 8
P. 4 0
P. 3 6
P. 4 8
P. 5 6
P. 5 4
P. 3 1
P. 1 0 4
Appendix
63
Page 64

Menu List
K
F
MONITOR ON MONITOR OFF,
SHQ, , SQ1, SQ2
–2.0 ~ 0 ~ +2.0
MONITOR ON
Shooting mode menus (Movie)
First menu Ta b Function Setting
MODE MENU
CAMERA
IMAGE WB
CARD CARD SETUP YES, NO
SETUP
Appendix
K
F
MONITOR ON MONITOR OFF,
is the setting when shipped from the factory (default setting).
∗
Setting differs according to the region where the camera is sold.
5 , 5
ESP/
DIGITAL ZOOM
%
ALL RESET ON, OFF
∗
W
PW ON SETUP
SCREEN COLOR
8
FILE NAME
PIXEL MAPPING
s
X
VIDEO OUT
∗
ESP
OFF
OFF
AUTO
ON
ENGLISH, FRANCAIS,
DEUTSCH, ESPAÑOL,
ITALIANO, РУССКИЙ,
PORTUGUES,
SCREEN: OFF, , 2, 3
SOUND: OFF, LOW
HIGH
HIGH
STANDARD
GREEN, BLUE
OFF, LOW,
RESET
NTSC, PAL
HQ
–2.0 ~ 0 ~ +2.0
MONITOR ON
HQ
0
, ON
, ON
/5/3/1/
, AUTO
, SQ
0
,
PINK,
HIGH
P. 7 4
P. 7 9
P. 5 1
P. 8 0
P. 7 0
P. 8 3
>
P. 7 7
P. 5 2
P. 3 3
P. 2 9
1
P. 4 4
P. 4 6
P. 3 8
P. 4 8
P. 5 6
P. 5 4
P. 3 1
P. 1 0 4
P. 1 2 3
P. 7 9
P. 5 1
64
Page 65

Playback mode menus (Still picture)
First menu Ta b Function Setting
MODE MENU
0
PLAY
EDIT
CARD CARD SETUP
y
<
BLACK & WHITE
SEPIA SEPIA, CANCEL
Q
OFF
, ON
0°
, +90°, –90°
<, U
BLACK & WHITE,
CANCEL
640 × 480, 320 × 240,
CANCEL
ALL ERASE,
FORMAT
Menu List
P. 11 4
P. 1 0 1
P. 1 3 4
P. 1 0 8
P. 11 0
P. 11 2
P. 11 7 ,
52
ALL RESET ON, OFF
∗
W
PW ON SETUP
SETUP
m
INFO
S YES, NO
is the setting when shipped from the factory (default setting).
∗
Setting differs according to the region where the camera is sold.
SCREEN COLOR
VOLUME
8
s
X
VIDEO OUT
G
∗
ON
ENGLISH, FRANCAIS,
DEUTSCH, ESPAÑOL,
ITALIANO, РУССКИЙ,
PORTUGUES,
,
PINK,
HIGH
HIGH
1
SCREEN: OFF, , 2, 3
SOUND: OFF, LOW
HIGH
HIGH
STANDARD
GREEN, BLUE
OFF, LOW,
OFF, LOW,
NTSC, PAL
9
4, , 16
P. 3 3
P. 2 9
P. 4 4
P. 4 6
P. 4 2
P. 3 8
P. 5 4
P. 3 1
P. 1 0 4
P. 9 7
P. 1 0 3
P. 1 0 7
P. 11 6
Appendix
65
Page 66

Menu List
Playback mode menus (Movie)
First menu Ta b Function Setting
MODE MENU PLAY 0
CARD CARD SETUP
ALL RESET ON, OFF
∗
W
PW ON SETUP
SETUP
MOVIE PLAY MOVIE PLAYBACK
Appendix
INFO
S YES, NO
is the setting when shipped from the factory (default setting).
∗
Setting differs according to the region where the camera is sold.
SCREEN COLOR
VOLUME OFF, LOW,
8
s
X
VIDEO OUT
G
INDEX INDEX, CANCEL
∗
OFF
ALL ERASE,
FORMAT
ON
ENGLISH, FRANCAIS,
DEUTSCH, ESPAÑOL,
ITALIANO, РУССКИЙ,
PORTUGUES,
SCREEN: OFF, , 2, 3
SOUND: OFF, LOW
HIGH
HIGH
STANDARD
GREEN, BLUE
OFF, LOW,
NTSC, PAL
9
4, , 16
PLAYBACK, FRAME BY
FRAME, EXIT
, ON
,
PINK,
HIGH
HIGH
P. 11 4
P. 11 7 ,
52
P. 3 3
P. 2 9
1
P. 4 4
P. 4 6
P. 4 2
P. 3 8
P. 5 4
P. 3 1
P. 1 0 4
P. 9 7
P.127,
128
P. 1 3 0
P. 1 0 7
P. 11 6
66
Page 67

Camera specifications
Product type : Digital camera (for shooting and displaying)
Recording system
Still picture : Digital recording, JPEG (in accordance with Design rule
Compatible
standards
Movie : QuickTime Motion JPEG support
Memory : xD-Picture Card (16 MB to 512 MB)
Number of storable
pictures
(when a 16 MB
card is used)
for Camera File system (DCF)
: Exif 2.2, DPOF, PRINT Image Matching II, PictBridge.
: Still picture
Quality Resolution
SHQ
HQ 16
SQ1
SQ2
Movie
Sequential shooting time (seconds)
Quality
HQ
SQ
2272 × 1704
2048 × 1536
1600 × 1200
1280 × 960
1024 × 768
640 × 480
Resolution Recording time
320 × 240
(15 frames/sec.)
160 × 120
(15 frames/sec.)
No. of storable
pictures
5
20
24
38
58
99
20
90
Number of effective
pixels
Image pickup
device
Lens : Olympus lens 5.8 mm to 17.4 mm (equivalent to 35 mm
Photometric system
Shutter speed : 1/2 to 1/1000 sec. (max. 4 sec. in Night scene mode)
Shutter shooting
distance
Viewfinder : Optical real image viewfinder
Monitor : 1.5" TFT color LCD display, 134,000 pixels
Flash charging time : Approx. 6 seconds
Outer connector : DC-IN jack, USB connector (mini-B), AUDIO/VIDEO
: 4,000,000 pixels
: 1/2.5" CCD (primary color filter)
to 105 mm lens on a 35 mm camera), F3.1 to F5.2
: Digital ESP metering, Spot metering
: 0.5 m (1.6 ft.) to ) (normal),
0.2 m (0.7 ft.) to ) (macro mode)
0.09 m (3.5 ft) to 0.5 m (1.6 ft) (super macro mode)
OUT jack
Continued on next page
Appendix
67
Page 68

Camera specifications
Automatic calendar
system
Weatherproof
Type
Meaning : Camera is not damaged by water spray from any
Operating
environment
Temperature
Humidity : 30 to 90% (operation) / 10 to 90% (storage)
Power supply : Specified lithium ion rechargeable battery or AC adapter
Dimensions
Mass : 159 g (0.4 lb.) (without battery or card)
SPECIFICATIONS ARE SUBJECT TO CHANGE WITHOUT ANY NOTICE OR OBLIGATION
ON THE PART OF THE MANUFACTURER.
: Automatic adjustment in range of 2000 to 2099
: Equivalent to IEC Standard publication 529 IPX4
(under OLYMPUS test conditions)
direction.
: 0 to 40°C (32 to 104°F) (operation) / –20 to 60°C (–4 to
140°F) (storage)
99 × 56 × 33.5 mm (3.9" × 2.2" × 1.3") (excluding
:
protrusions)
Appendix
68
Page 69

Specifications of accessories
xD-Picture Card
Product type : xD-Picture Card for digital cameras
Memory type : NAND flash EEP-ROM
Memory capacity :
Operating voltage : 3V (3.3V)
Ambient temperature : 0 to 55°C (32 to 131°F) (operation) /
Ambient humidity : Less than 95% (operation and storage)
Dimensions : Approx. 20 × 25 × 1.7 mm
Battery Charger (LI-10C)
Rated input : AC100 to 240V (50/60Hz)
Rated output : DC4.2V, 700mAh
Charging time : Approx. 120 min.
Ambient temperature : 0 to 40°C (32 to 104°F) (operation) /
Dimensions :
Mass : Approx. 75g (2.6 oz.)
Lithium ion rechargeable battery (LI-10B)
Product type : Rechargeable lithium ion battery
Nominal voltage :
Nominal capacity :
Number of chargings : Approx. 300
Ambient temperature : 0 to 40°C (32 to 104°F) (charging) /
Dimensions :
Mass : Approx. 35g (1.2 oz.)
Shows the size of the card.
(16/32/64/128/256/512MB)
–20 to 65°C (– 4 to 149°F) (storage)
(0.8" × 1.0" × 0.07")
10VA (100V) to 13VA (240V)
–20 to 60°C (–4 to 140°F) (storage)
46 × 37.5 × 86 mm (1.8" × 1.5" × 3.4")
DC3.7V
1090 mAh
(Varies according to conditions of use.)
–10 to 60°C (14 to 140°F) (operation) /
0 to 30°C (32 to 86°F) (storage)
31.9 × 45.8 × 10 mm (1.3" × 1.8" × 0.4")
Appendix
SPECIFICATIONS ARE SUBJECT TO CHANGE WITHOUT ANY NOTICE OR OBLIGATION
ON THE PART OF THE MANUFACTURER.
69
Page 70

MEMO
MEMO
70
Page 71

MEMO
71
Page 72

http://www.olympus.com/
OLYMPUS CORPORATION
Shinjuku Monolith, 3-1 Nishi-Shinjuku 2-chome, Shinjuku-ku, Tokyo, Japan
OLYMPUS AMERICA INC.
Two Corporate Center Drive, Melville, NY 11747-3157, U.S.A. Tel. 631-844-5000
Technical Support (USA)
24/7 online automated help: http://www.olympusamerica.com/support
Phone customer support: Tel. 1-888-553-4448 (Toll-free)
Our phone customer support is available from 8 am to 10 pm
(Monday to Friday) ET
E-Mail: distec@olympus.com
Olympus software updates can be obtained at: http://www.olympus.com/digital
Olympus Europa GmbH
Basic Manual
Premises/Goods delivery: Wendenstrasse 14-18, 20097 Hamburg, Germany
Letters: Postfach 10 49 08, 20034 Hamburg, Germany
Tel: +49 40-23 77 3-0 / Fax: +49 40-23 07 61
European Technical Customer Support:
Please visit our homepage http://www.olympus-europa.com
or call our TOLL FREE NUMBER* : 00800 - 67 10 83 00
for Austria, Belgium, Denmark, Finland, France, Germany, Italy, Luxemburg,
Netherlands, Norway, Portugal, Spain, Sweden, Switzerland, United Kingdom
• Please note some (mobile) phone services/provider do not permit access
or request an additional prefix to +800 numbers.
For all not listed European Countries and in case that you can’t get connected
to the above mentioned number please make use of the following
CHARGED NUMBERS: +49 180 5 - 67 10 83 or +49 40 - 237 73 899
Our Technical Customer Support is available from 9 am to 6 pm MET (Monday to
Friday)
© 2004 OLYMPUS CORPORATION
Printed in China VT692802
 Loading...