

Olympus SP-350, SP 310 - Digital Camera - 7.1 Megapixel, SP 350 - Digital Camera - 8.0 Megapixel Advanced Manual
Thank you for purchasing an Olympus digital camera. Before you start to use your
new camera, please read these instructions carefully to enjoy optimum performance
and a longer service life. Keep this manual in a safe place for future reference.
We recommend that you take test shots to get accustomed to your camera before
taking important photographs.
In the interest of continually improving products, Olympus reserves the right to update
or modify information contained in this manual.
DIGITAL CAMERA
Advanced
Manual
Detailed explanations of all the
functions for getting the most out
of your camera.
SP-310
SP-350
Online Pictures
Basic Operation
Basic Shooting
Advanced Shooting
Playing Back
Printing
Camera Settings

2
How to use this manual
(About the SP-310 and SP-350
This reference manual is for both the SP-310 and SP-350. The camera
illustrations shown in this manual are based on the SP-350. The model
name is specified when a function or configuration is unique to one model.
(Basic and Advanced Manuals
The instruction manual accompanying this camera is divided into two
parts: the Basic Manual and the Advanced Manual (this document).
(Indications used in this manual
Below is an explanation of how to read the instructions in this manual.
Please read it carefully before proceeding.
Basic
Manual
This manual gives you easy-to-follow explanations on how to take
pictures and view them so that you can get started quickly. Go ahead
and take some pictures! You will also find information on the camera’s
main functions as well as how to make prints and enjoy your pictures
on a computer.
Advanced
Manual
This manual introduces you to the camera’s many functions after you
have mastered the basics. It will help you to use the camera’s
capabilities to take much more creative pictures, with more fun!
Note
Important information on factors which may lead to a malfunction or operational
problems. Also warns of operations that should be absolutely avoided.
TIPS
Useful information and hints that will help you get the most out of your camera.
g
Reference pages describing details or associated information.

3
11
Composition of the manual
The title page of each chapter gives a short description of the contents. Be
sure to check it out.
Basic operation
Tips before you start
taking pictures
Basic shooting
functions
Additional shooting
functions
Playback
Settings
Printing pictures
Connecting the camera
to a computer
Appendix
Miscellaneous
Troubleshooting.
For when you want to know
the names of parts, see a list
of menus, or find what you are
looking for.
You’ll find important points for
getting the most out of your
camera here.
Read this part before taking
pictures.
To view, edit and sort the
pictures you have taken.
Settings to make your camera
easier to use.
To print the pictures you have
taken.
To enjoy the pictures you have
taken on a computer. To use
OLYMPUS Master.
P. 9
P. 21
P. 36
P. 69
P. 78
P. 108
P. 123
P. 139
P. 155
P. 176
Explanations of techniques
from basic to advanced, giving
you an understanding of all the
functions related to taking
pictures.
Advanced shooting
functions
P. 53
1
2
3
4
5
6
7
8
10
9

4
Table of Contents
How to use this manual....................................................................... 2
Composition of the manual ................................................................. 3
1 Basic operation - - - - - - - - - - - - - - - - - - - - - - -9
Mode dial........................................................................................... 10
Direct buttons .................................................................................... 12
Using the direct buttons in shooting mode .................................. 12
Using the direct buttons in playback mode ................................. 13
Menus ............................................................................................... 14
About the menus ......................................................................... 14
Using the menus ......................................................................... 17
Using the GUIDE function ........................................................... 19
How to read the procedure pages..................................................... 20
2 Tips before you start taking pictures - - - - - -21
Turning the camera on and off.......................................................... 22
When to use the monitor and viewfinder........................................... 23
If the correct focus cannot be obtained............................................. 24
How to focus (focus lock) ............................................................ 24
Subjects that are difficult to focus on .......................................... 25
Record mode ............................................................................. 26
Still picture record modes............................................................ 26
Movie record modes.................................................................... 28
Number of storable still pictures/remaining recording time ......... 28
Changing the record mode.......................................................... 31
The internal memory and memory card ............................................ 33
The card ...................................................................................... 34
Inserting and removing the card.................................................. 34
3 Basic shooting functions- - - - - - - - - - - - - - - 36
Selecting a scene mode according to the situation........................... 37
Zooming in on your subject ............................................................... 41
Using the zoom ........................................................................... 41
Using the digital zoom................................................................. 41
Using macro/super macro mode ..................................... 42
Flash shooting .............................................................................. 43
Flash intensity control .......................................................... 45
Synchro ......................................................................... 46
Selecting the flash ( FLASH)........................................................ 47
Using the external flash (optional) (SP-350) ............................... 47

Table of Contents
5
Using commercially available external flashes (SP-350) ............ 48
Using the slave flash ................................................................... 49
Recording movies ....................................................................... 50
Camera movement compensation ....................................... 51
Recording sound with movies ................................................ 52
4 Advanced shooting functions - - - - - - - - - - -53
Changing the aperture value for shooting pictures ...................... 54
Changing the shutter speed for shooting pictures ....................... 55
Changing the aperture value and
shutter speed for shooting pictures ................................. 56
My Mode ..................................................................................... 56
Focusing applications........................................................................ 57
AF mode (iESP/SPOT/AREA)..................................................... 57
Manual focus (FOCUS MODE) ........................................... 58
Fulltime AF .................................................................................. 59
AF lock ................................................................................... 59
AF illuminator .............................................................................. 60
Changing the area for measuring the brightness of a subject
(ESP/ ).............................................................................. 61
AE lock ...................................................................................... 61
Changing ISO sensitivity (ISO) ......................................................... 63
Changing picture brightness ....................................................... 63
Adjusting the white balance ..................................................... 64
White balance compensation ............................................. 66
Adjusting a picture for recording
(SHARPNESS/CONTRAST/SATURATION) ........ 67
Reducing picture noise (NOISE REDUCTION) ......................... 68
5 Additional shooting functions - - - - - - - - - - -69
Sequential shooting .................................... 70
Timelapse shooting ..................................................................... 71
Self-timer shooting ..................................................................... 72
Panorama shooting ........................................................................... 73
Recording sound with still pictures ............................................... 74
Changing the monitor display (DISP./GUIDE) .................................. 75
Histogram ............................................................................. 76
Frame assist................................................................................ 77

Table of Contents
6
6 Playback - - - - - - - - - - - - - - - - - - - - - - - - - - -78
Playing back still pictures ........................................................... 79
Playing back pictures in a calendar (CALENDAR)...................... 80
Picture rotation ...................................................................... 80
Playing back movies .................................................................. 81
Selecting the position to begin movie playback
(INDEX PLAY)....................................................................... 82
Playing back albums ................................................................... 83
Adding pictures to an album (ALBUM ENTRY)........................... 83
Viewing pictures in albums (SEL. ALBUM) ................................. 85
Selecting an album cover (SELECT TITLE IMAGE) ................... 86
Undoing album entries (UNDO ENTRY)..................................... 87
Erasing pictures from albums ................................................ 88
Slideshow .................................................................................. 89
Adding sound to still pictures ....................................................... 91
Editing still pictures (RAW DATA EDIT/ / /REDEYE FIX/
BLACK & WHITE/SEPIA)...................................................... 92
Creating composite pictures
(FRAME/TITLE/CALENDAR/LAYOUT) ................................ 95
Adjusting pictures (BRIGHTNESS/SATURATION) ........................... 98
Editing movies................................................................................... 99
Creating an index...................................................................... 100
Editing a movie.......................................................................... 101
Playing back pictures on a TV......................................................... 102
Video output .............................................................................. 103
Protecting pictures ................................................................... 104
Copying pictures in the internal memory to the card (BACKUP)..... 104
Erasing pictures .................................................................. 105
Single-frame erase .............................................................. 106
All-frame erase .................................................................. 106
Formatting the internal memory or card
(MEMORY FORMAT/FORMAT) .............................. 107
7 Settings- - - - - - - - - - - - - - - - - - - - - - - - - - - 108
Resetting the settings to the default (RESET) ................................ 109
Selecting a display language ................................................ 109
Changing the startup screen and shutdown screen
(PW ON SETUP/PW OFF SETUP)..................................... 110
Screen setup ............................................................................. 110
Viewing pictures immediately (REC VIEW)..................................... 111

Table of Contents
7
Setting camera sounds
( /BEEP/SHUTTER SOUND/VOLUME)......................... 112
Resetting file names (FILE NAME) ................................................. 113
Adjusting the image processing function (PIXEL MAPPING) ......... 114
Adjusting the monitor brightness ............................................. 115
Setting the date and time ........................................................ 116
Setting the date and time in another time zone
(DUAL TIME SETUP) .................................................... 117
Setting the measurement unit (m/ft) ................................................ 118
Customizing the camera (MY MODE SETUP/SHORT CUT/
CUSTOM BUTTON) ................................................ 118
8 Printing pictures - - - - - - - - - - - - - - - - - - - - 123
Direct printing (PictBridge) .............................................................. 124
Using the direct printing function ............................................... 124
Printing pictures (EASY PRINT)................................................ 125
Printing pictures (CUSTOM PRINT).......................................... 126
Other print modes and print settings ......................................... 130
If an error message is displayed ............................................... 133
Print settings (DPOF) ................................................................ 134
How to make print reservations................................................. 134
Single-frame reservation ..................................................... 136
All-frame reservation .......................................................... 137
Resetting print reservation data .......................................... 138
9 Connecting the camera to a computer - - - - 139
Flow................................................................................................. 140
Using OLYMPUS Master ................................................................ 141
What is OLYMPUS Master?...................................................... 141
Installing OLYMPUS Master ..................................................... 142
Connecting the camera to a computer ............................................ 146
Starting up OLYMPUS Master ........................................................ 147
Displaying camera images on a computer ...................................... 149
Downloading and saving images .............................................. 149
Viewing still pictures and movies .................................................... 151
Printing pictures .............................................................................. 152
To download and save images to a computer without
using OLYMPUS Master ..................................................... 154

Table of Contents
8
10 Appendix - - - - - - - - - - - - - - - - - - - - - - - - - 155
Troubleshooting .............................................................................. 156
Error messages......................................................................... 156
Troubleshooting ........................................................................ 158
Camera care ................................................................................... 165
Batteries .......................................................................................... 166
Accessories (optional)..................................................................... 167
AC adapter................................................................................ 167
Using commercially available external flashes.......................... 168
Safety Precautions.......................................................................... 169
Glossary of terms ............................................................................ 173
11 Miscellaneous - - - - - - - - - - - - - - - - - - - - - 176
Menu list.......................................................................................... 177
List of factory default settings.......................................................... 186
Functions available in shooting modes and scenes........................ 188
Index ............................................................................................... 191

9
1 Basic operation
Sequential shooting
Movies
OK
OK
HOLD
HOLD
RESET
RESET
MODE MENU
DRIVE
1/2/3/4
ISO
ESP
AUTO
OFF
SET
PIC
CAMERAMEM
ESP
/
00:36
00:36
00:36
HQ
HQ
1
Are you ever overwhelmed by all of the
advanced shooting and editing functions?
Professional photographers use these
functions to achieve a variety of effects. Now
you too can achieve such effects simply by
pressing the buttons on your digital camera.
You can use the various functions available to
adjust the brightness and white balance of
your pictures, alter the focusing range, and
much more.
Just display a menu on the monitor and use
the buttons to choose a setting. Familiarize
yourself with the buttons and menus before
reading the explanations of the various
functions.
Basic operation
10
1
Basic operation
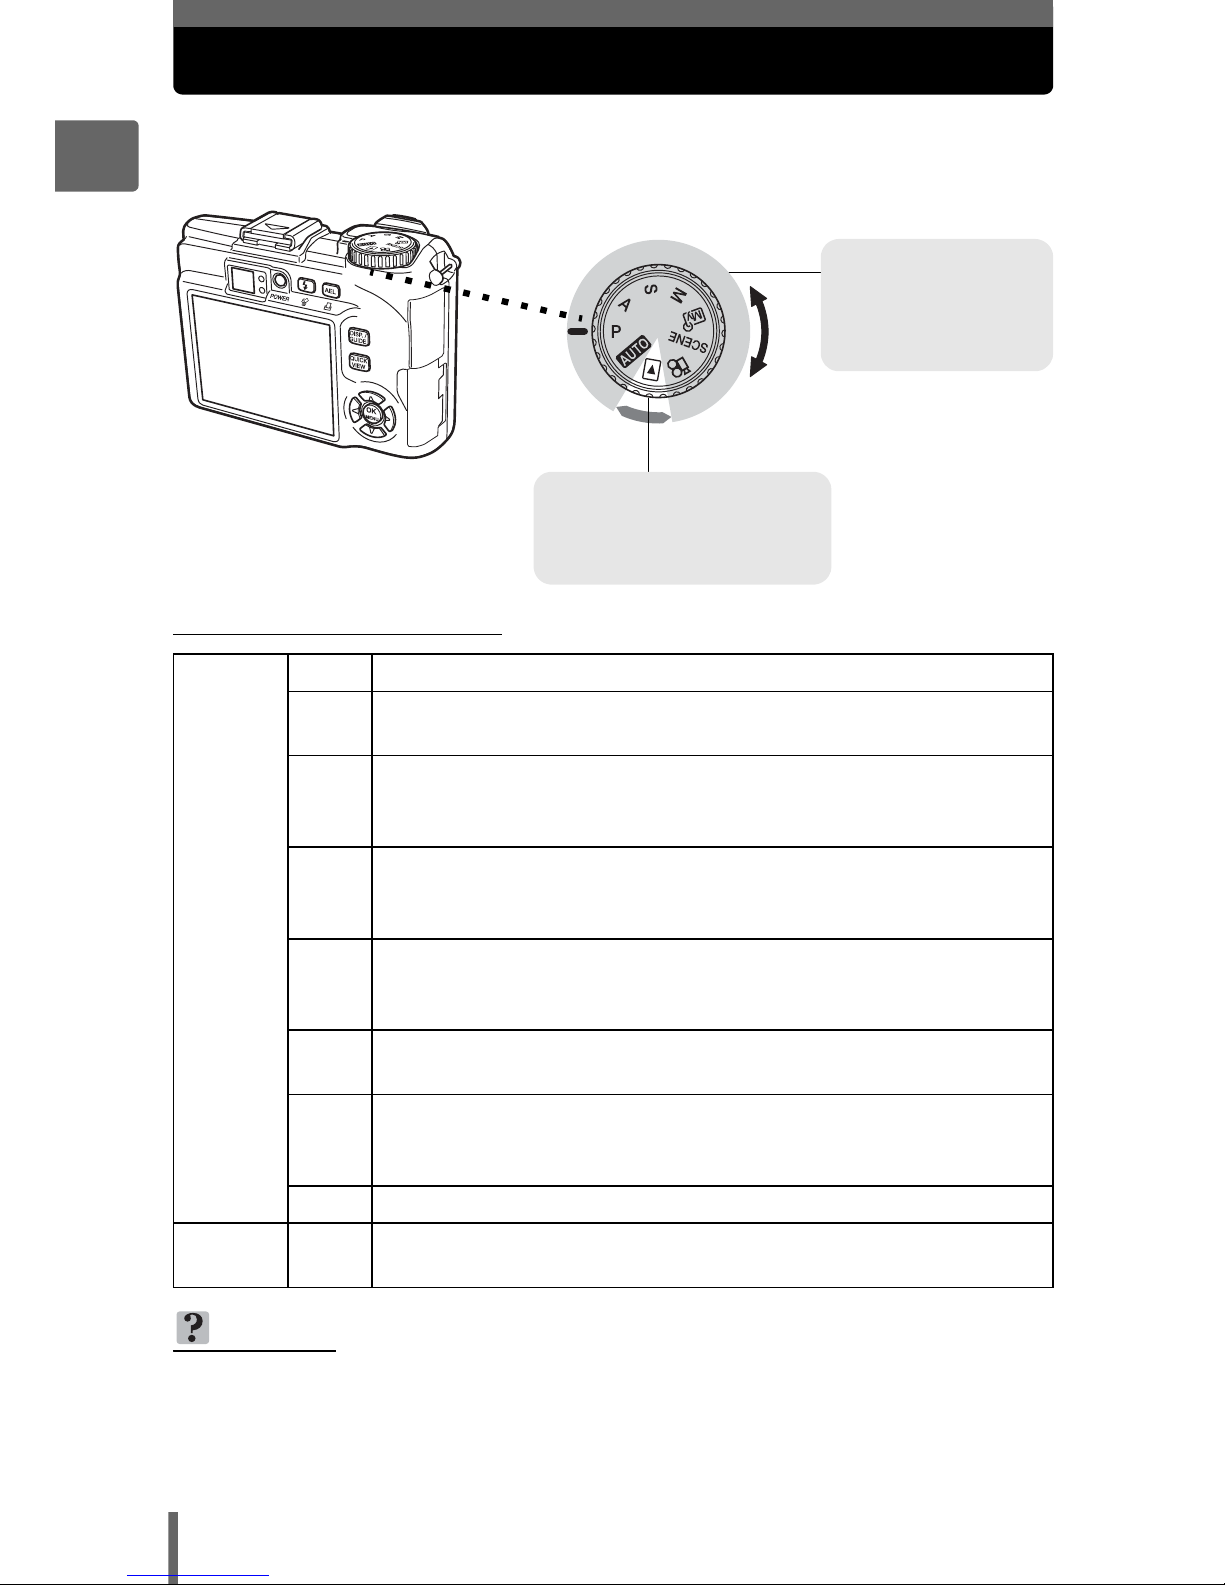
Mode dial
This camera features a shooting mode and a playback mode. Use the
mode dial to make settings. Set the desired mode and turn the camera on.
(About the mode dial
h
This function allows you to take pictures with full automatic settings.
P
The camera automatically sets the optimum aperture value and
shutter speed for the brightness of the subject.
A
This function allows you to set the aperture manually. The
camera sets the shutter speed automatically. g“Changing the
aperture value for shooting pictures” (P. 54)
S
This function allows you to set the shutter speed manually. The
camera sets the aperture automatically. g“Changing the
shutter speed for shooting pictures” (P. 55)
M
This function allows you to set the aperture and shutter speed
manually. g“Changing the aperture value and shutter speed
for shooting pictures” (P. 56)
r
This function allows you to set your own shooting parameters
and register them as your original mode. g“My Mode” (P. 56)
f
This function allows you to select from 24 situation-related
modes set to the shooting conditions.
g“Selecting a scene mode according to the situation” (P. 37)
n
This function lets you record movies.
g
“Recording movies” (P. 50)
Playback
mode
q
This function allows you to play back still pictures or movies.
You can also play back sound. g“Playback” (P. 78)
TIPS
•
Direct button functions and menu contents vary depending on the position of the
mode dial.
g
“Direct buttons” (P. 12), “Menus” (P. 14), “Menu list” (P. 177)
• You can change the mode before and after turning the camera on.
Shooting modes
Set the mode dial to
one of these
positions to take
pictures or movies.
Playback mode
Set the mode dial to this
position to view pictures or
movies.
Shooting
modes
Mode dial
11
1
Basic operation
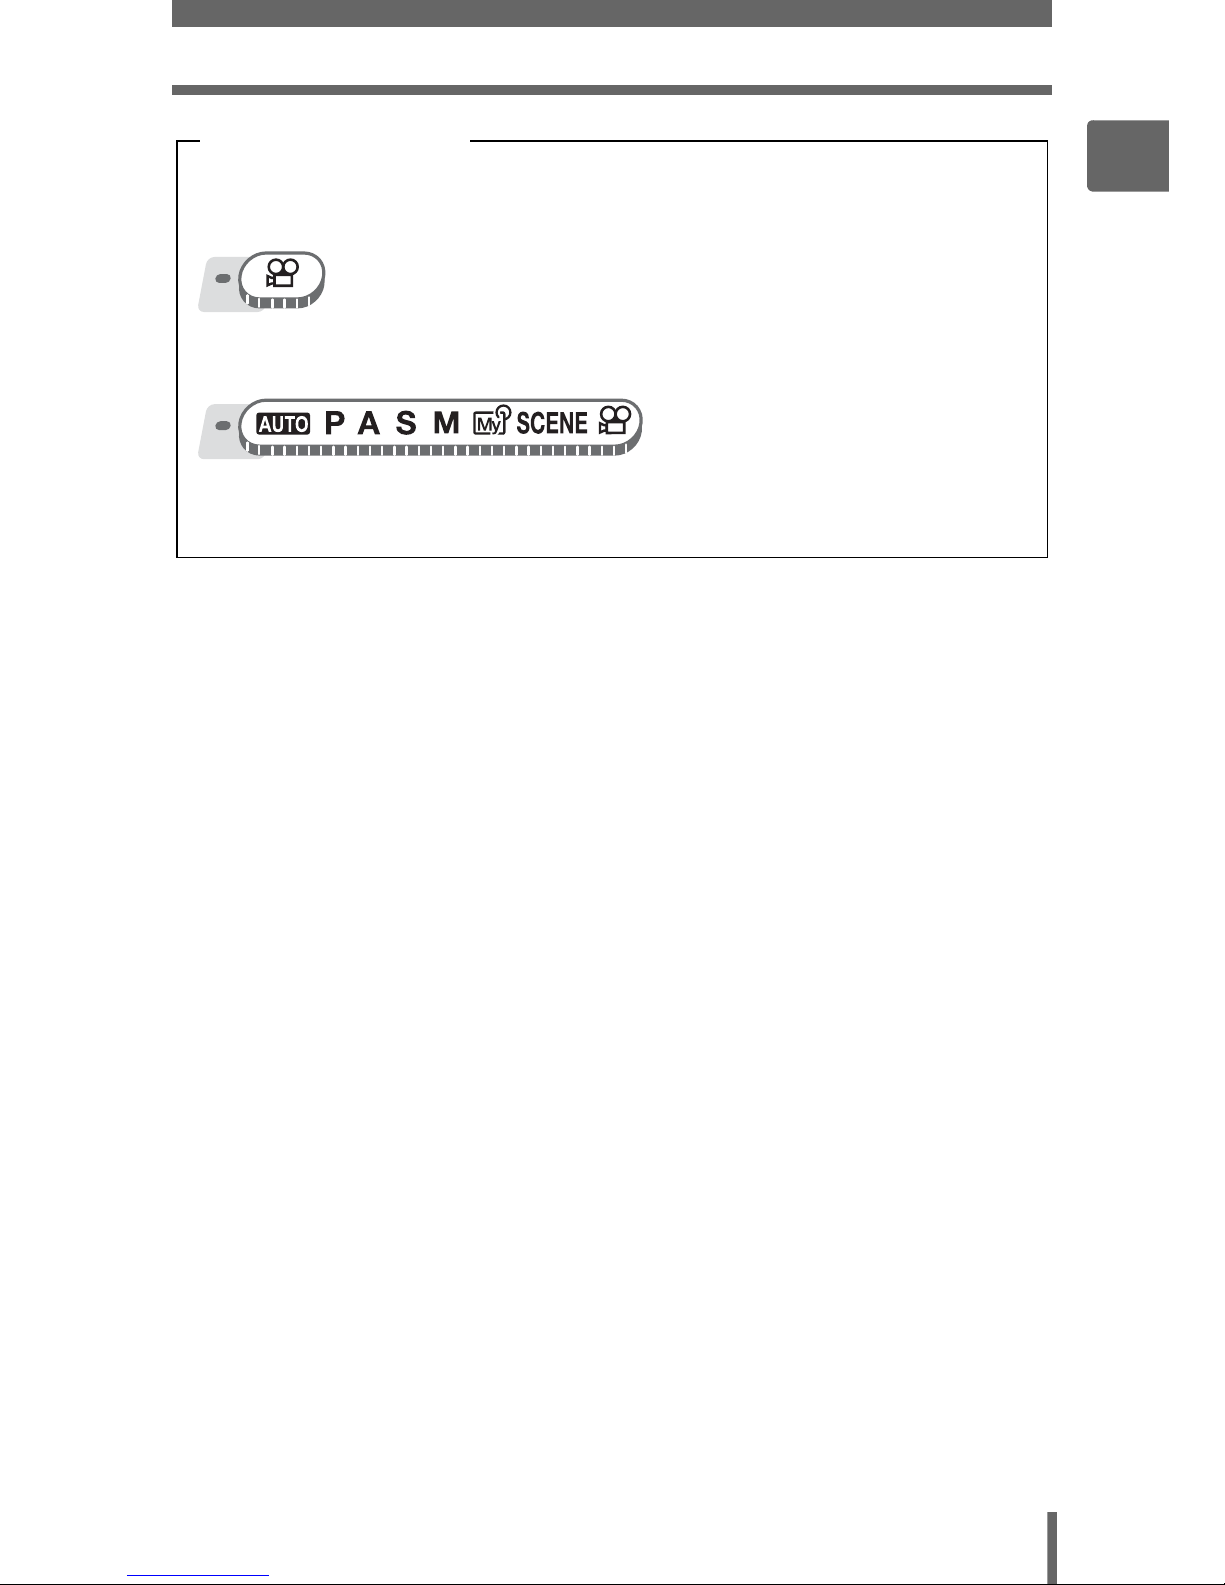
In this manual, the following icons indicate the position of the mode dial
necessary for operating functions.
This indicates an operation when the mode dial is set to n.
This indicates an operation when the mode dial is set to any of the following
modes: hPASMrfn.
Mode dial notation
12
1
Basic operation
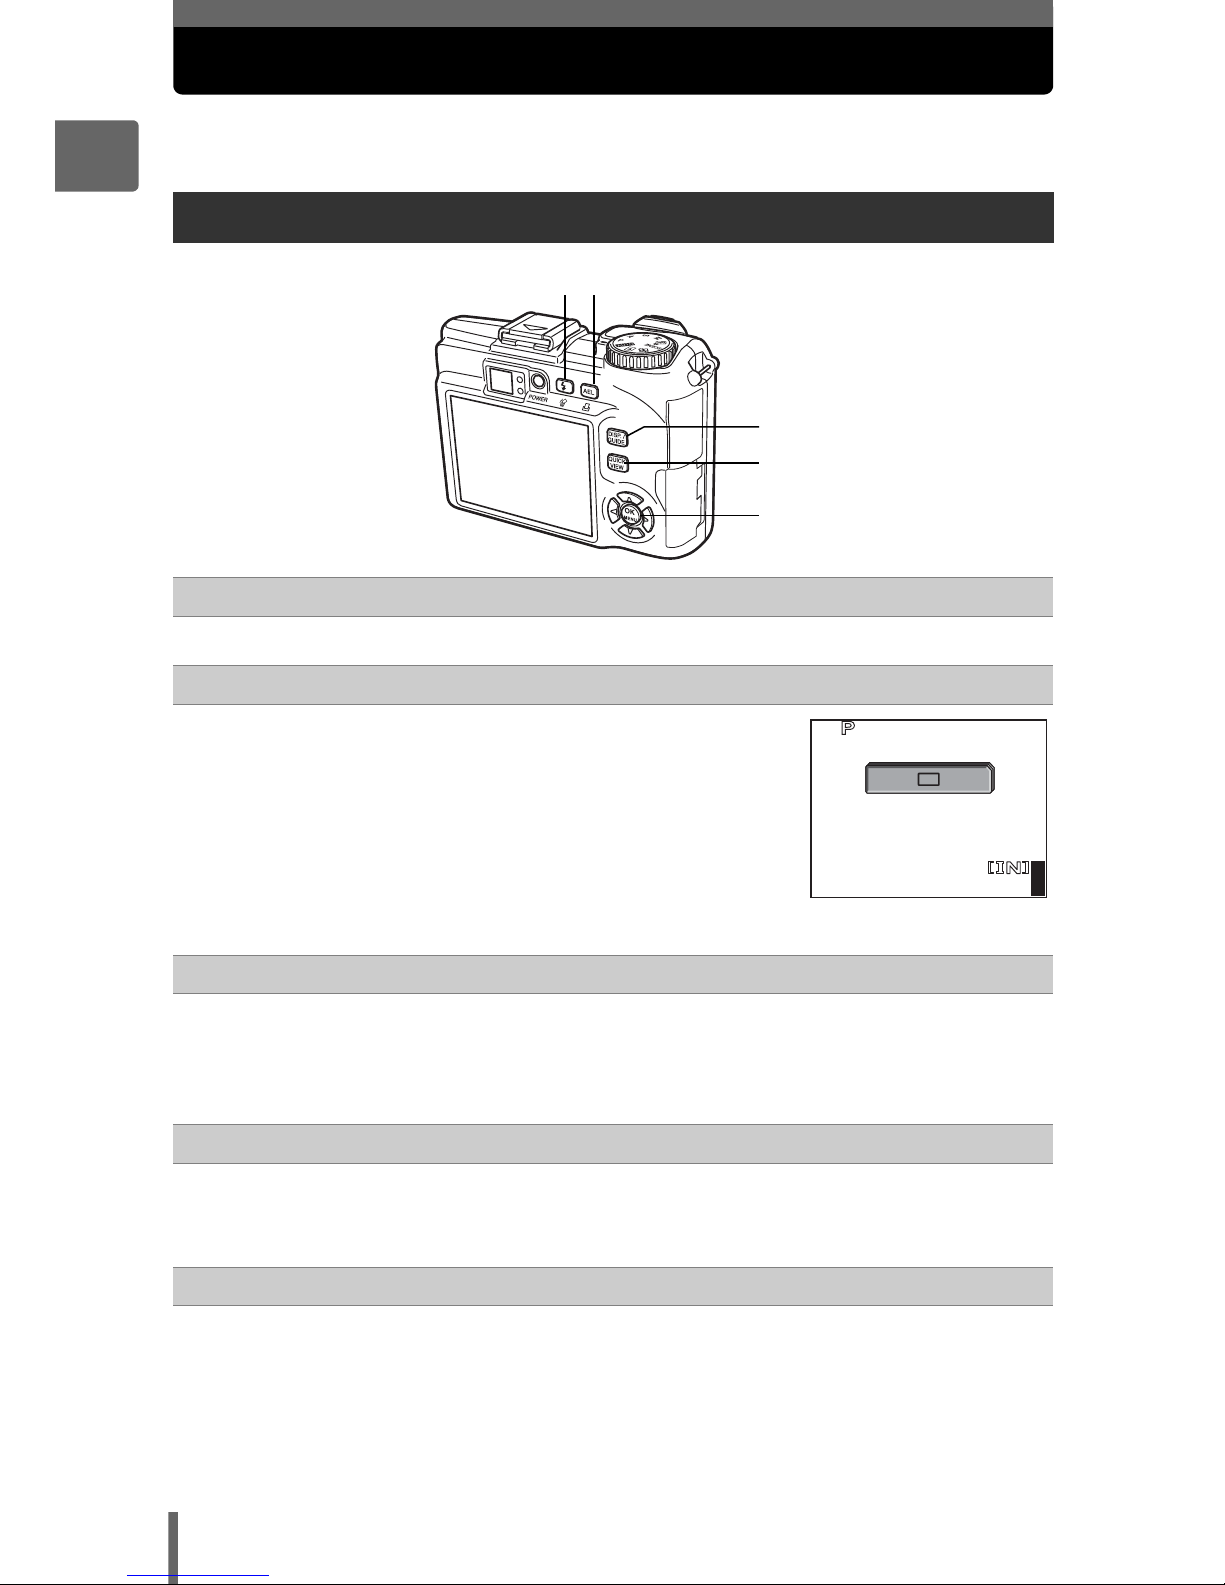
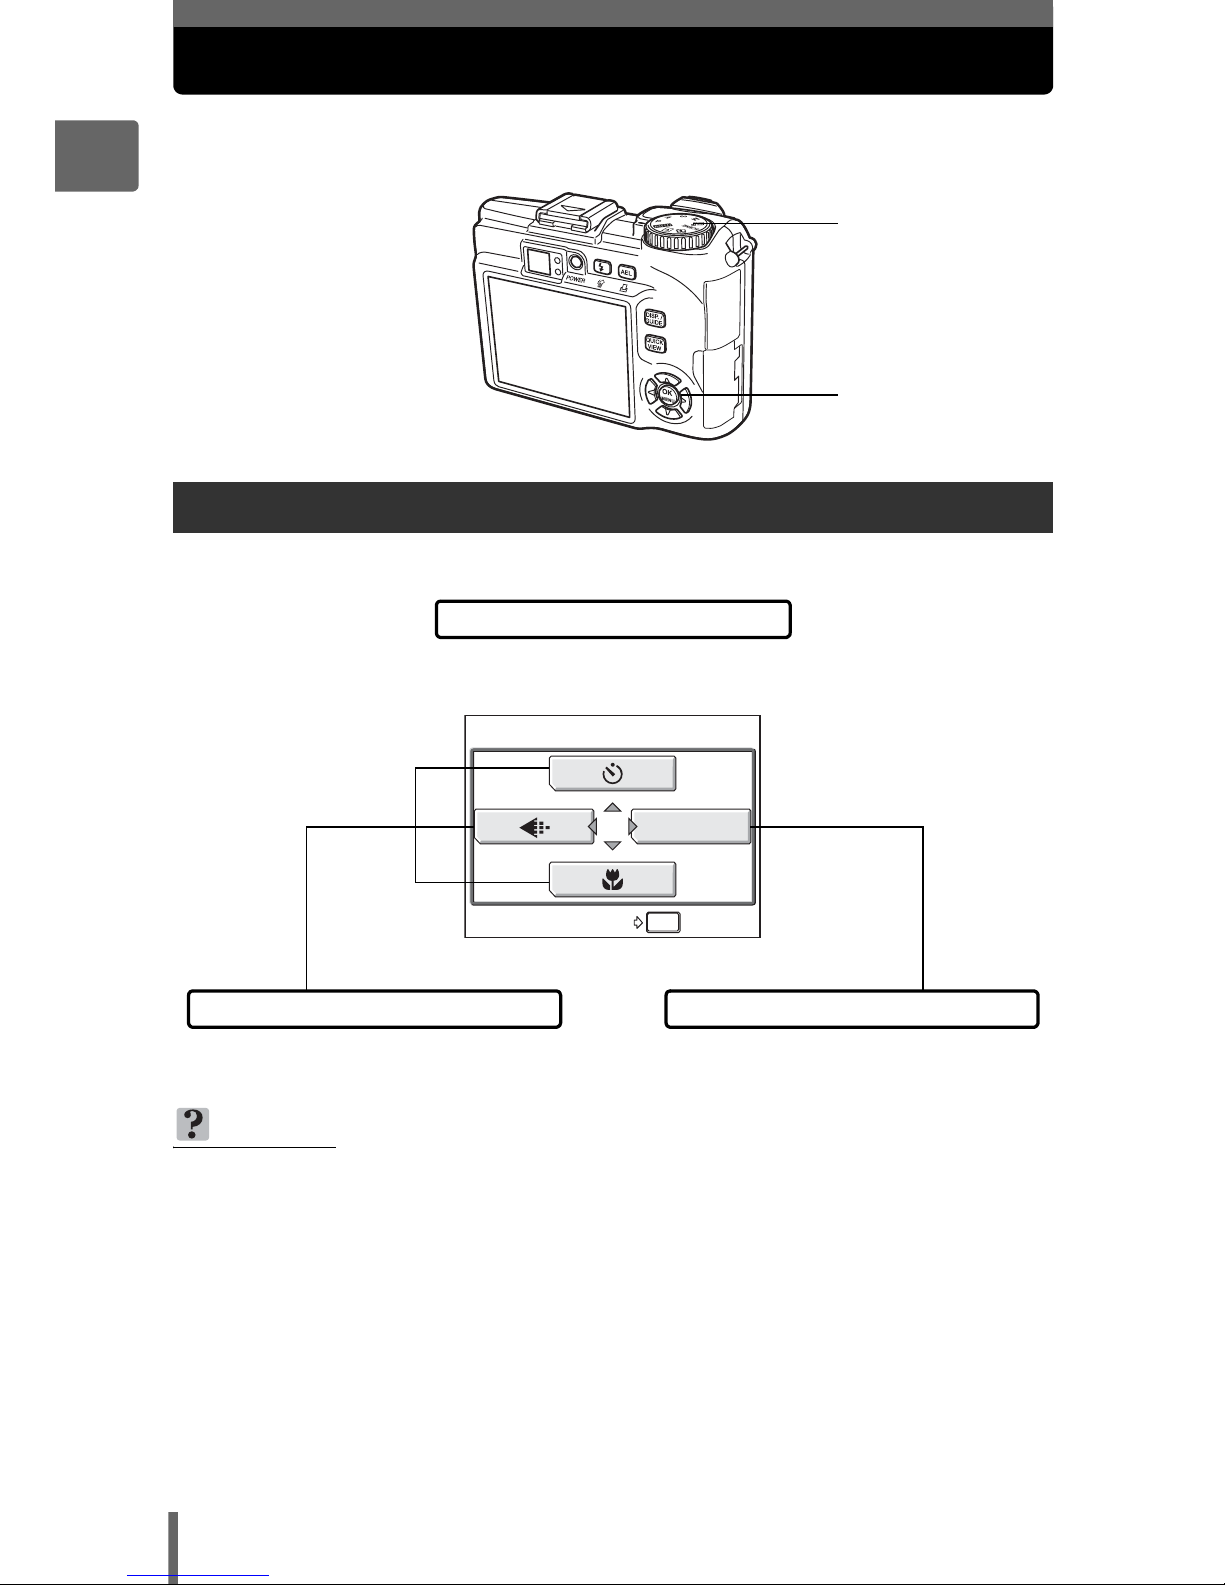
Direct buttons
This camera features buttons for setting functions directly.
The direct buttons have different functions in shooting mode and in playback mode.
Using the direct buttons in shooting mode
1
# button (Flash mode) gP. 43
Selects the flash mode.
2
[ button (AE lock)/Custom button gP. 61, P. 118
Locks the exposure. The lock function is
alternately activated and canceled each time
you press the button. Frequently used functions
can be assigned to the custom button. The
assigned function setting changes each time
you press the button.
The screen on the right shows when [DRIVE] is
assigned to the custom button.
3
DISP./GUIDE button gP. 19, P. 75
Select a menu item, and press this button to display an explanation of its
function.
Press this button repeatedly to display the lines and histogram. Also
press the DISP./GUIDE button to turn off the monitor.
4
QUICK VIEW button gP. 79
The last picture taken is displayed on the monitor. All the functions in
playback mode are available. To return to shooting mode, press the
QUICK VIEW button or press the shutter button halfway.
5
Z button (OK/MENU) gP. 14
Displays the top menu of shooting mode.
1
4
5
3
2
441600
1600
×
1200
1200
SQ1
SQ1
0.0
0.0
F4.0
F4.0
1/200
1/200

Direct buttons
13
1
Basic operation
Using the direct buttons in playback mode
1
S button (Erase) gP. 88, P. 105
Erases pictures displayed on the monitor.
2
< button (Print) gP. 125
Prints pictures displayed on the monitor.
3
DISP./GUIDE button gP. 19
Select a menu item, and press this button to display an explanation of its function.
Press this button repeatedly during playback to change the display in the
following order. The histogram is not displayed while displaying movies.
4
Z button (OK/MENU) gP. 14
Displays the top menu of playback mode.
1
4
3
2
SQ1
SQ1
’0505.
0909.
2626 12
12
:
30
30
4
ISO
ISO
400
400
+
2.01/100
1/ 100
F4F4.
0
:
1600
1600
×
1200
1200
SIZE
SIZE
100
100
-
0004
0004
The histogram is displayed.
SQ1
SQ1
’0505.
0909.
2626 12
12
:
30
30
4
100
100
-
0004
0004
Only f is displayed.
SQ1
SQ1
’0505.
0909.
2626 12
12
:
30304
ISO
ISO
400
400
+
2.0
1/100
1/ 100
F4.0
F4 .0
Detailed camera information is
displayed.
The playback screen is
displayed.
14
1
Basic operation
Menus
Set the mode dial to any mode and press Z to display the menus on the
monitor. Menus are used to make each camera setting.
The menu items displayed in shooting mode and playback mode differ.
About the menus
TIPS
• Press and hold down Z on the top menu to jump directly to one of the following
functions.
Shooting mode (except r)
The [RESET] screen is displayed. g“Resetting the settings to the default
(RESET)” (P. 109)
Playback mode
The [ALBUM ENTRY] screen is displayed. g“Adding pictures to an album
(ALBUM ENTRY)” (P. 83)
Album playback mode
The [UNDO ENTRY] screen is displayed. g“Undoing album entries
(UNDO ENTRY)” (P. 87)
Press Z
Mode dial
OK
OK
HOLD
HOLD
RESET
RESET
MODE MENU
Mode menu
Top menu
Shortcut menus
Menus are divided into shortcut
menus and mode menus.
For setting menu items directly. Settings are categorized by function
into tabs.

Menus
15
1
Basic operation
Shortcut menus
(
Shooting mode
(Playback mode
In album playback mode
TIPS
• The shortcut menus can also be accessed from the mode menu. Also, you can
change short cut menus in any mode other than h, n, and q.
g“Customizing the camera (MY MODE SETUP/SHORT CUT/CUSTOM
BUTTON)” (P. 118)
OK
OK
HOLD
HOLD
RESET
RESET
MODE MENU
gP. 72
gP. 42
gP. 26
DIGITAL ZOOM
MODE MENU
OK
OK
HOLD
HOLD
RESET
RESET
gP. 41
gP. 51
gP. 26
For moviesFor still pictures
(default value)
ALBUM
MOVIE PLAY
CALENDAR
MODE MENU
OK
OK
HOLD
HOLD
ALBUM ENTRY
ALBUM ENTRY
For moviesFor still pictures
ALBUM
EDIT
CALENDAR
MODE MENU
OK
OK
HOLD
HOLD
ALBUM ENTRY
ALBUM ENTRY
gP. 80
gP. 83 gP. 83
gP. 92
95, 98
gP. 81
gP. 80
MOVIE PLAY
CLOSE ALBUM
SEL. ALBUM
ALBUM MENU
OK
OK
HOLD
HOLD
UNDO ENTRY
UNDO ENTRY
For moviesFor still pictures
CLOSE ALBUM
SEL. ALBUM
ALBUM MENU
OK
OK
HOLD
HOLD
UNDO ENTRY
UNDO ENTRY
gP. 85
gP. 86 gP. 86
gP. 89 gP. 81
gP. 85
Menus
16
1
Basic operation
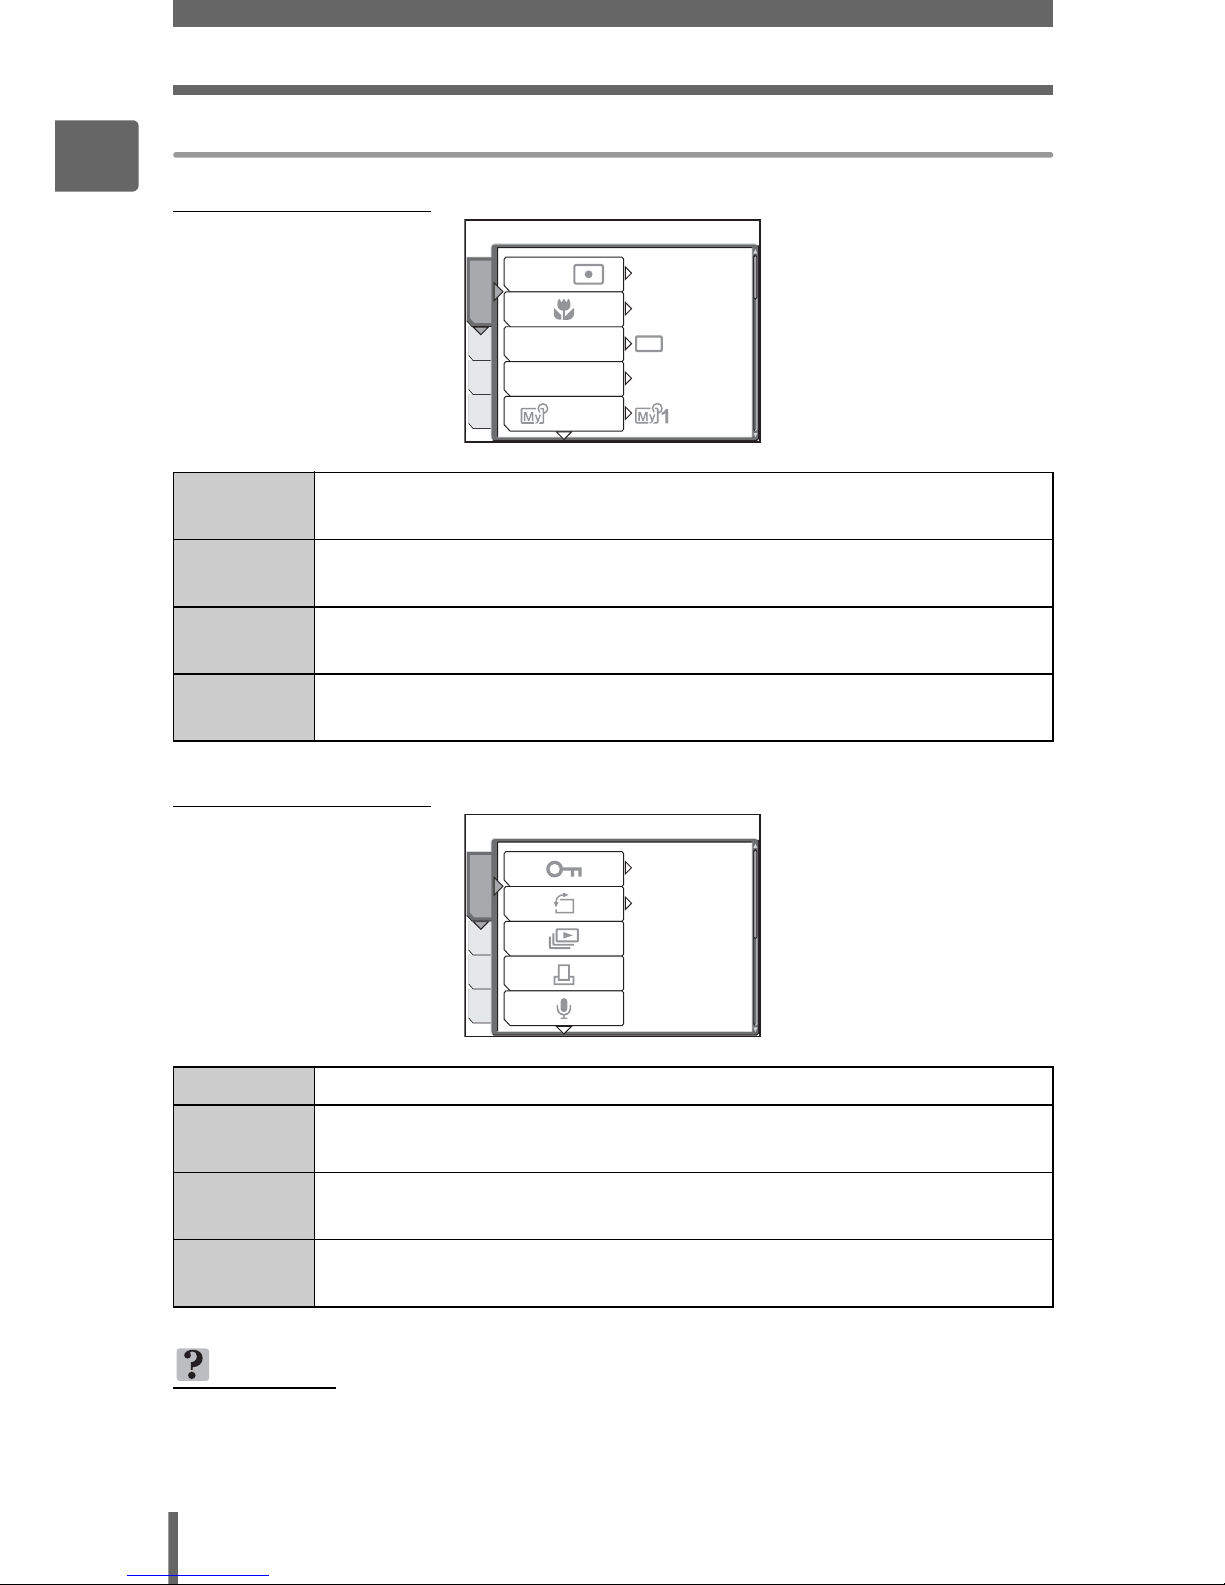
Mode menu
(
Shooting mode
(Playback mode
CAMERA
tab
For setting shooting-related functions.
PICTURE
tab
For setting picture-related functions, such as record mode and white
balance.
MEMORY/
CARD tab
For formatting internal memory or a card. Also saves internal memory
data to a card.
SETUP tab For setting basic camera functions and settings that make the camera
easier to use.
PLAY tab For setting playback-related functions.
EDIT tab For editing saved pictures. The same screen is displayed when
[EDIT] is selected from the top menu.
MEMORY/
CARD tab
For formatting internal memory or a card, and erasing all image data.
Also saves internal memory data to a card.
SETUP tab For setting basic camera functions and settings that make the camera
easier to use.
TIPS
• The [MEMORY] tab is displayed when the internal memory is in use. The
[CARD] tab is displayed when a card is inserted in the camera.
• For a list of mode menu items, see “Menu list” (P. 177).
DRIVE
1/2/3/4
ISO
ESP
AUTO
OFF
SET
PIC
CAMERAMEM
ESP
/
0
°
OFF
PLAY
EDITMEM
SET
Menus
17
1
Basic operation
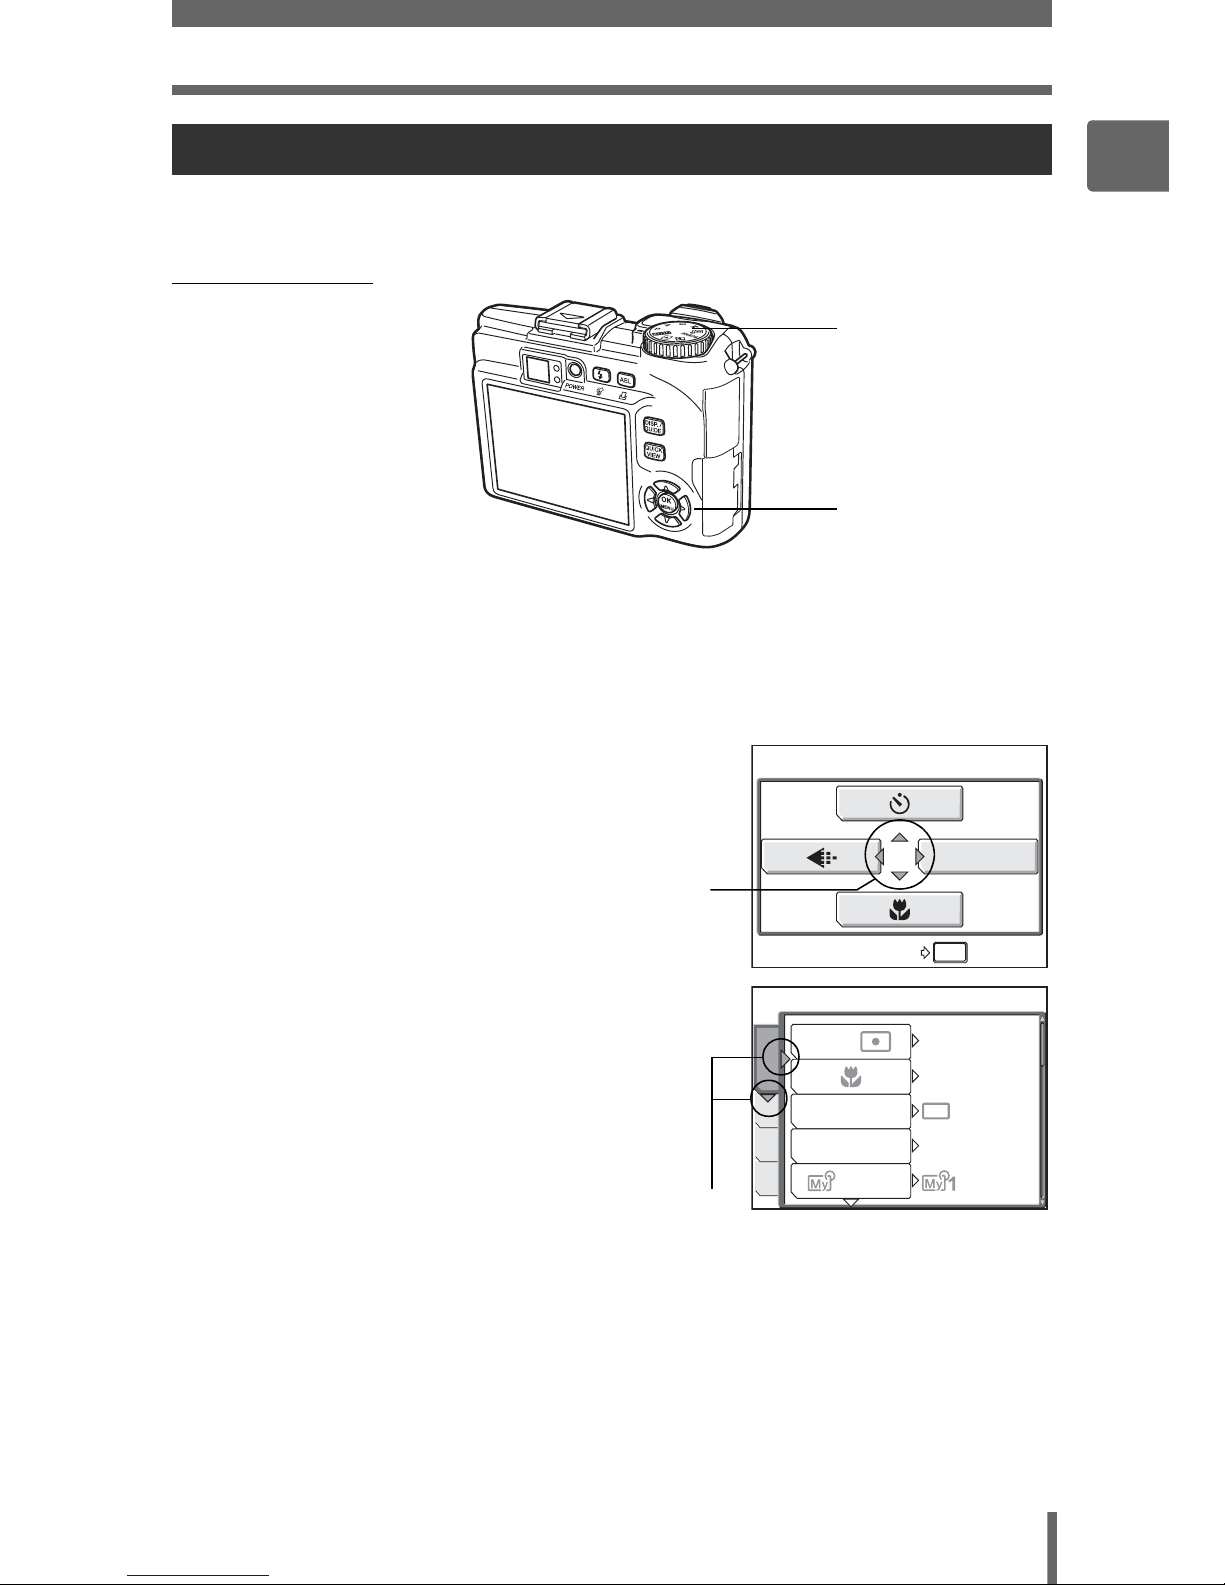
Use the arrow pad and Z to set menu items.
Follow the operation guide and arrows on the screen to select and change settings.
Ex: Setting [ISO]
1 Set the mode dial to any of the following modes:
PASMrfn.
2 Press Z.
• The top menu is displayed.
3 Press q to select [MODE MENU].
4 Press sr to select the
[CAMERA] tab, and press q.
• Refer to the arrows on the screen to
select and make settings with the arrow
pad.
Using the menus
srpq buttons
Z button
Mode dial
OK
OK
HOLD
HOLD
RESET
RESET
MODE MENU
Top menu
This refers to the arrow
pad (srpq).
DRIVE
1/2/3/4
ISO
ESP
AUTO
OFF
SET
PIC
CAMERAMEM
ESP
/
This refers to the arrow
pad (qr).
Menus
18
1
Basic operation
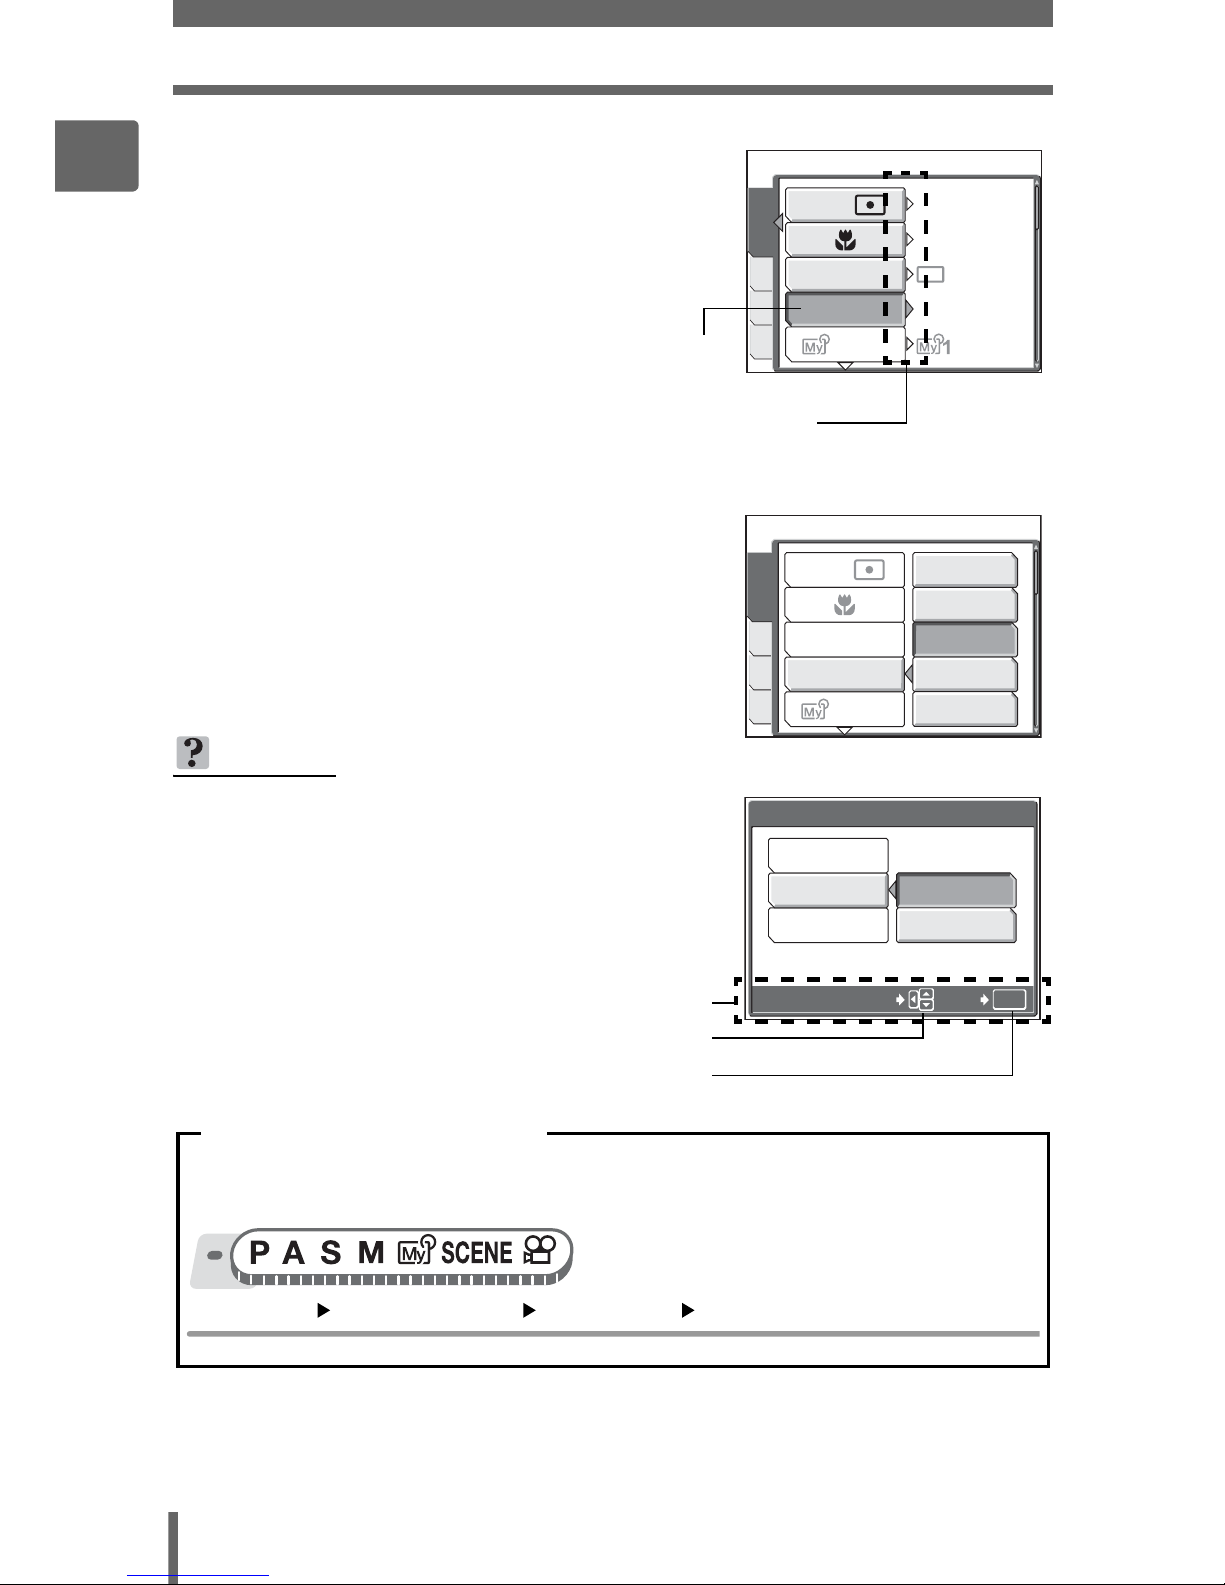
5 Press sr to select the [ISO],
and press q.
• Refer to the arrows on the screen to
select and make settings with the arrow
pad.
• Unavailable settings cannot be
selected.
6 Press sr to select [AUTO],
[64], [100], [200], or [400], and
press Z.
•Press Z repeatedly to exit the menu.
TIPS
• The operation guide displayed at the
bottom of the screen depends on the menu
to be set. In this case, follow the operation
guide to set or change settings using the
arrow pad.
1/2/3/4
ESP
DRIVE
ISO
AUTO
OFF
SET
PIC
CAMERAMEM
ESP
/
The selected item is displayed
in a different color.
Press q to go on to
the following setting.
AUTO
1/2/3/4
DRIVE
ISO
SET
PIC
CAMERAMEM
ESP
/
400
64
100
200
OK
2
1
GO
SELECT
LOW
HIGH
BEEP
OFF
In this manual, procedures for using the menus are expressed as follows:
• Ex: Steps 1 to 5 for setting [ISO]
Top menu [MODE MENU] [CAMERA] [ISO]
Menu operation notation
Operation guide
Press psr to select a setting.
Press Z to finalize the setting.

Menus
19
1
Basic operation
This camera has a GUIDE function. Pressing the DISP./GUIDE button during menu
display in shooting mode or playback mode automatically displays a menu guide
explaining the menus.
1 With a menu selected, hold down
the DISP./GUIDE button.
• The menu explanation is displayed.
• Release the DISP./GUIDE button to
close the menu guide.
Using the GUIDE function
Sets the format for
naming folders and files
that are to be saved to
a new card.
FILE NAME
When [FILE NAME] is selected
20
1
Basic operation
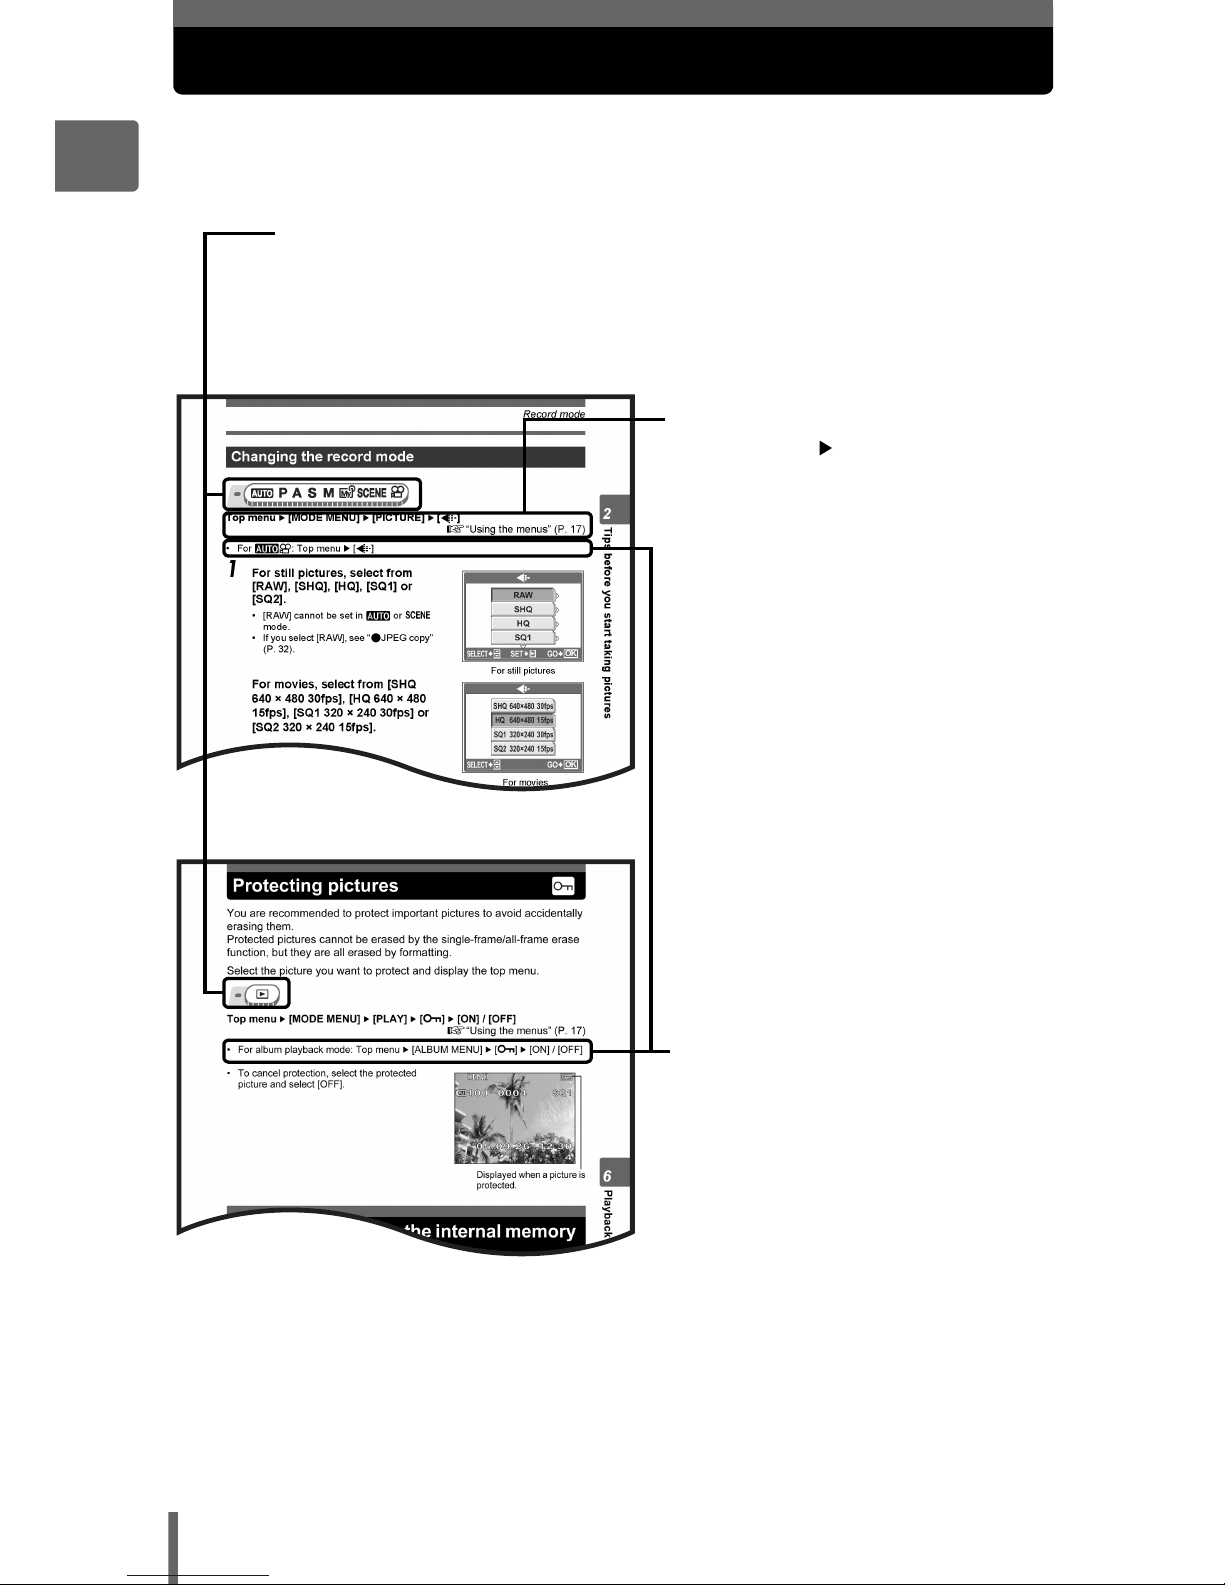
How to read the procedure pages
A sample of a procedure page is shown below explaining the notation.
Look at it carefully before taking or viewing pictures.
Select the menus in the order
indicated by . g“Using the
menus” (P. 17), “Menu operation
notation” (P. 18)
This sample page is only for your reference. It may differ from the actual page in this
manual.
This indicates the position of the mode dial.
If multiple icons are displayed, the described function can be used in
any of these modes.
g“Mode dial” (P. 10), “Mode dial notation” (P. 11)
Procedures differ for h mode,
n mode, and album playback
mode.
21
2 Tips before you start taking pictures
SHQ
SHQ
SQ2
SQ2
SHQ
SQ2
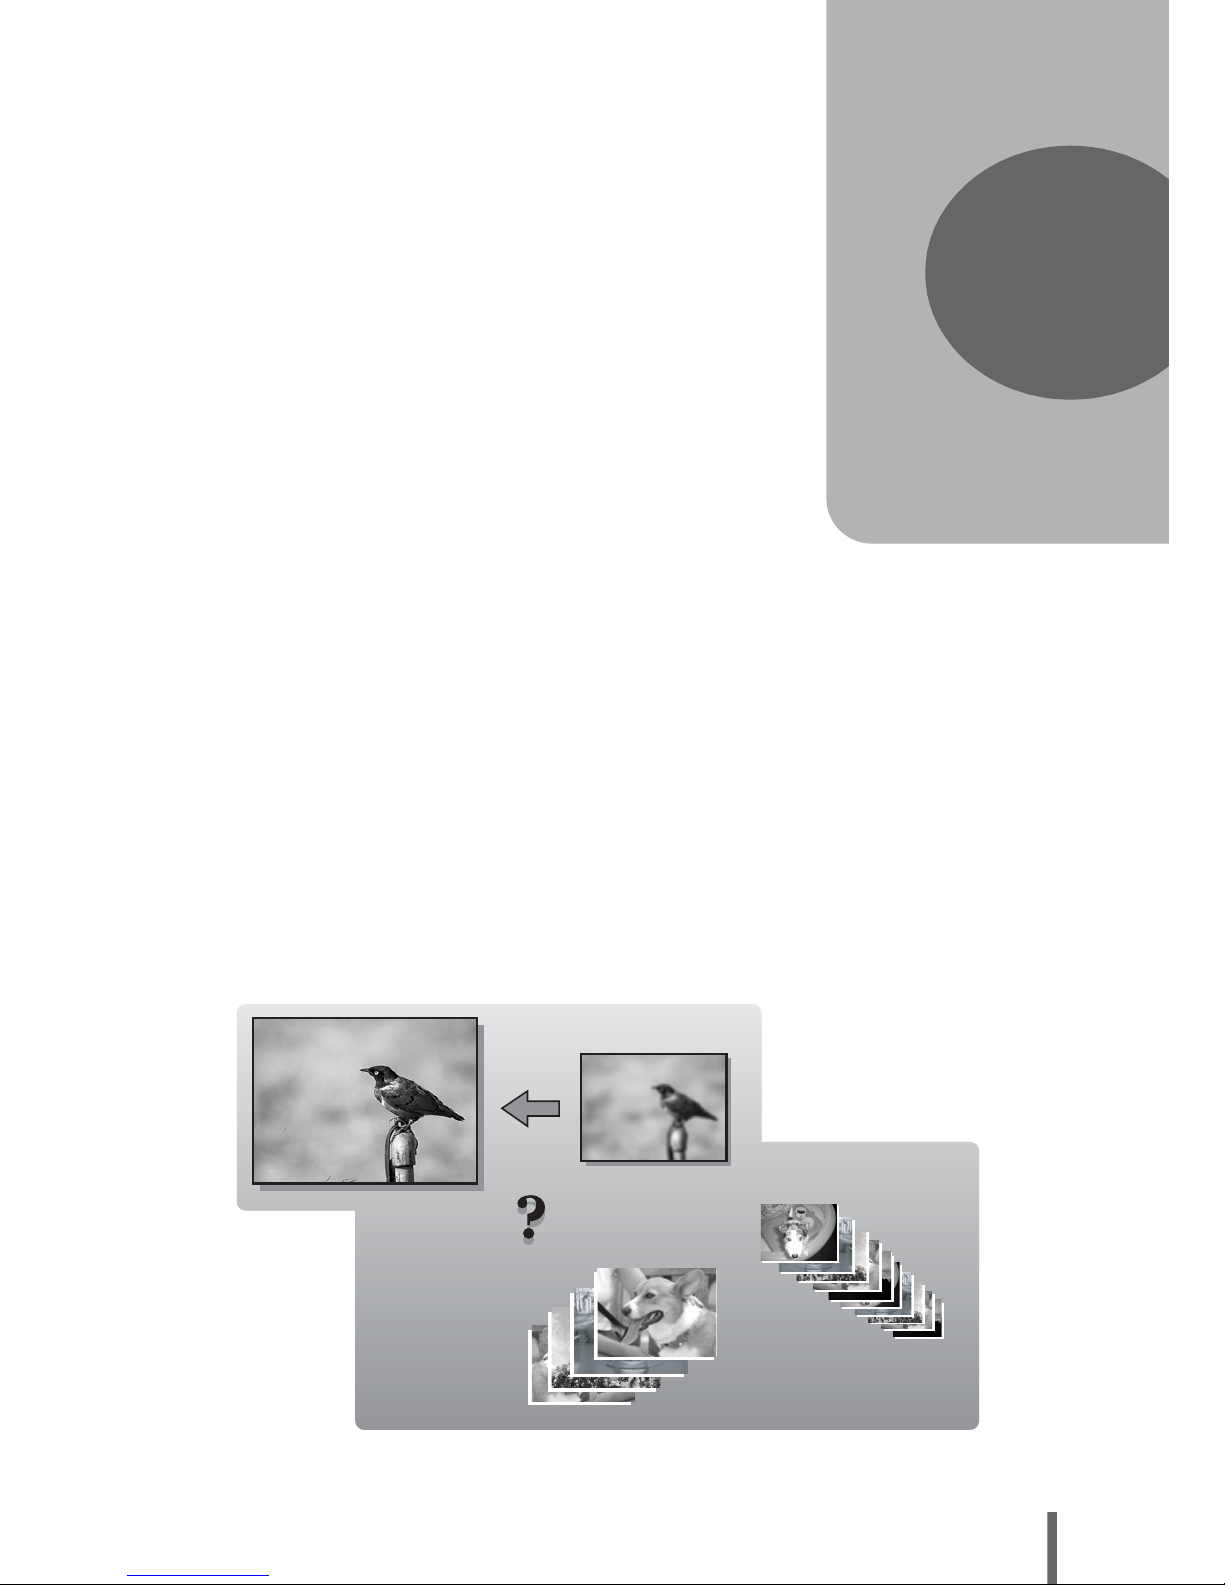
Online applications
Ideas
Ideas
Printing
applications
Tips before you
start taking pictures
Your pictures are almost guaranteed to come
out well just by setting the mode dial to h
and pressing the shutter button. But
occasionally, you can’t focus on your subject,
the subject is too dark, or the picture doesn’t
come out the way you want.
Just knowing which button to press or which
setting to change can help you solve these
problems.
And did you know that by selecting an image
size according to how you plan to use the
pictures afterwards, you can store more
pictures in the internal memory and on the
memory card? These are just some of the
hints provided in this chapter.
2
22
2
Tips before you start taking pictures
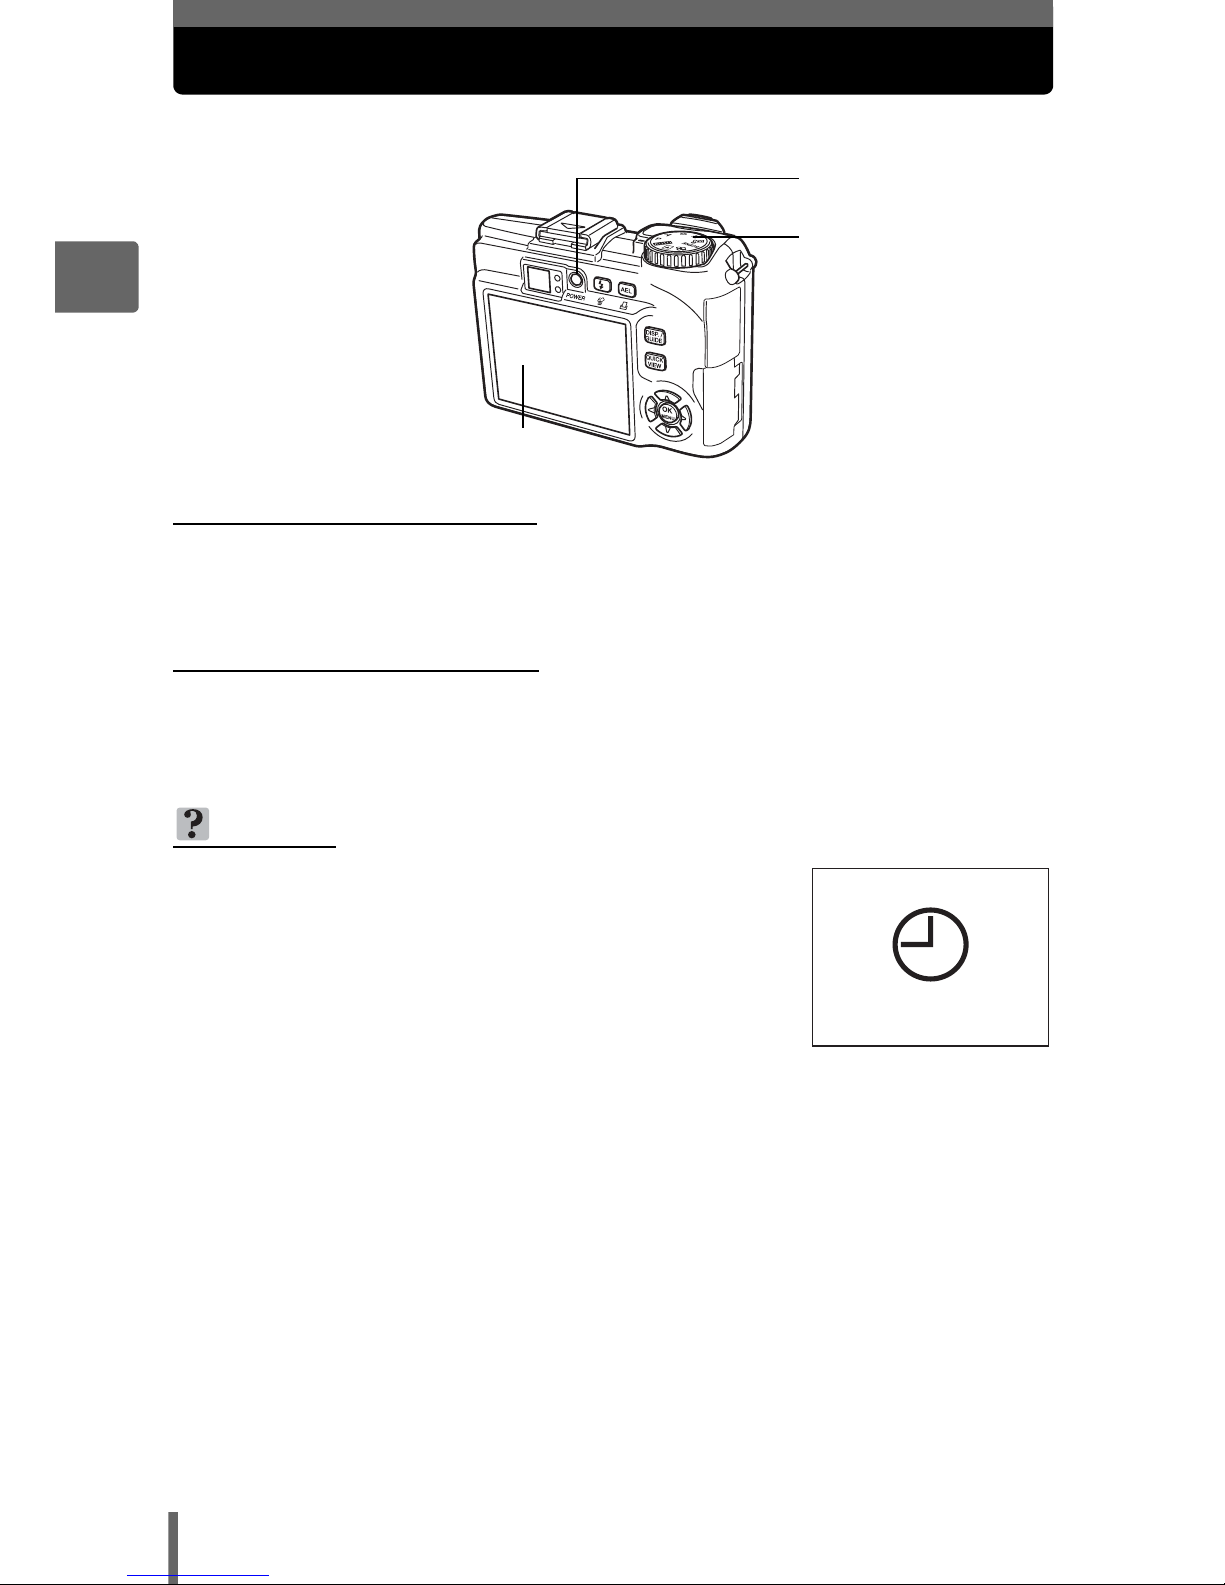
Turning the camera on and off
Press the POWER button to turn the camera on.
(Turning the camera on
Set the mode dial to any mode, and press the POWER button.
• The monitor turns on.
• When you turn on the camera in shooting mode, the lens extends.
(Turning the camera off
Press the POWER button.
• The monitor turns off.
• The lens retracts.
TIPS
• The screen on the right is displayed when the
date and time setting has returned to the factory
default setting. Setting the date and time makes
your pictures easier to manage, such as when
you view them with calendar display.
g“Setting the date and time” (P. 116)
POWER button
Mode dial
Monitor
Y/M/D
23
2
Tips before you start taking pictures
When to use the monitor and viewfinder
You can take pictures using either the monitor or the viewfinder. Use the
one that is most apt for the situation.
To turn the monitor on or off, press the
DISP./GUIDE button several times.
g“Direct buttons” (P. 12)
Monitor Viewfinder
Advantages
You can check the picture area
that the camera actually
records.
Camera movement does not
occur easily and subjects can be
seen clearly even in bright
places. Little battery power is
used.
Disadvantages
Camera movement occurs easily
and subjects may be difficult to
see in bright/dark places. The
monitor uses more battery power
than the viewfinder.
When close to a subject, the
image in the viewfinder differs
slightly from the picture that the
camera actually records.
Tips
Use the monitor when you need
to know the exact area the
camera records, or to take a
close-up of a person or flower
(macro shooting).
Use the viewfinder for general
snapshots, landscape pictures
and other casual shots.
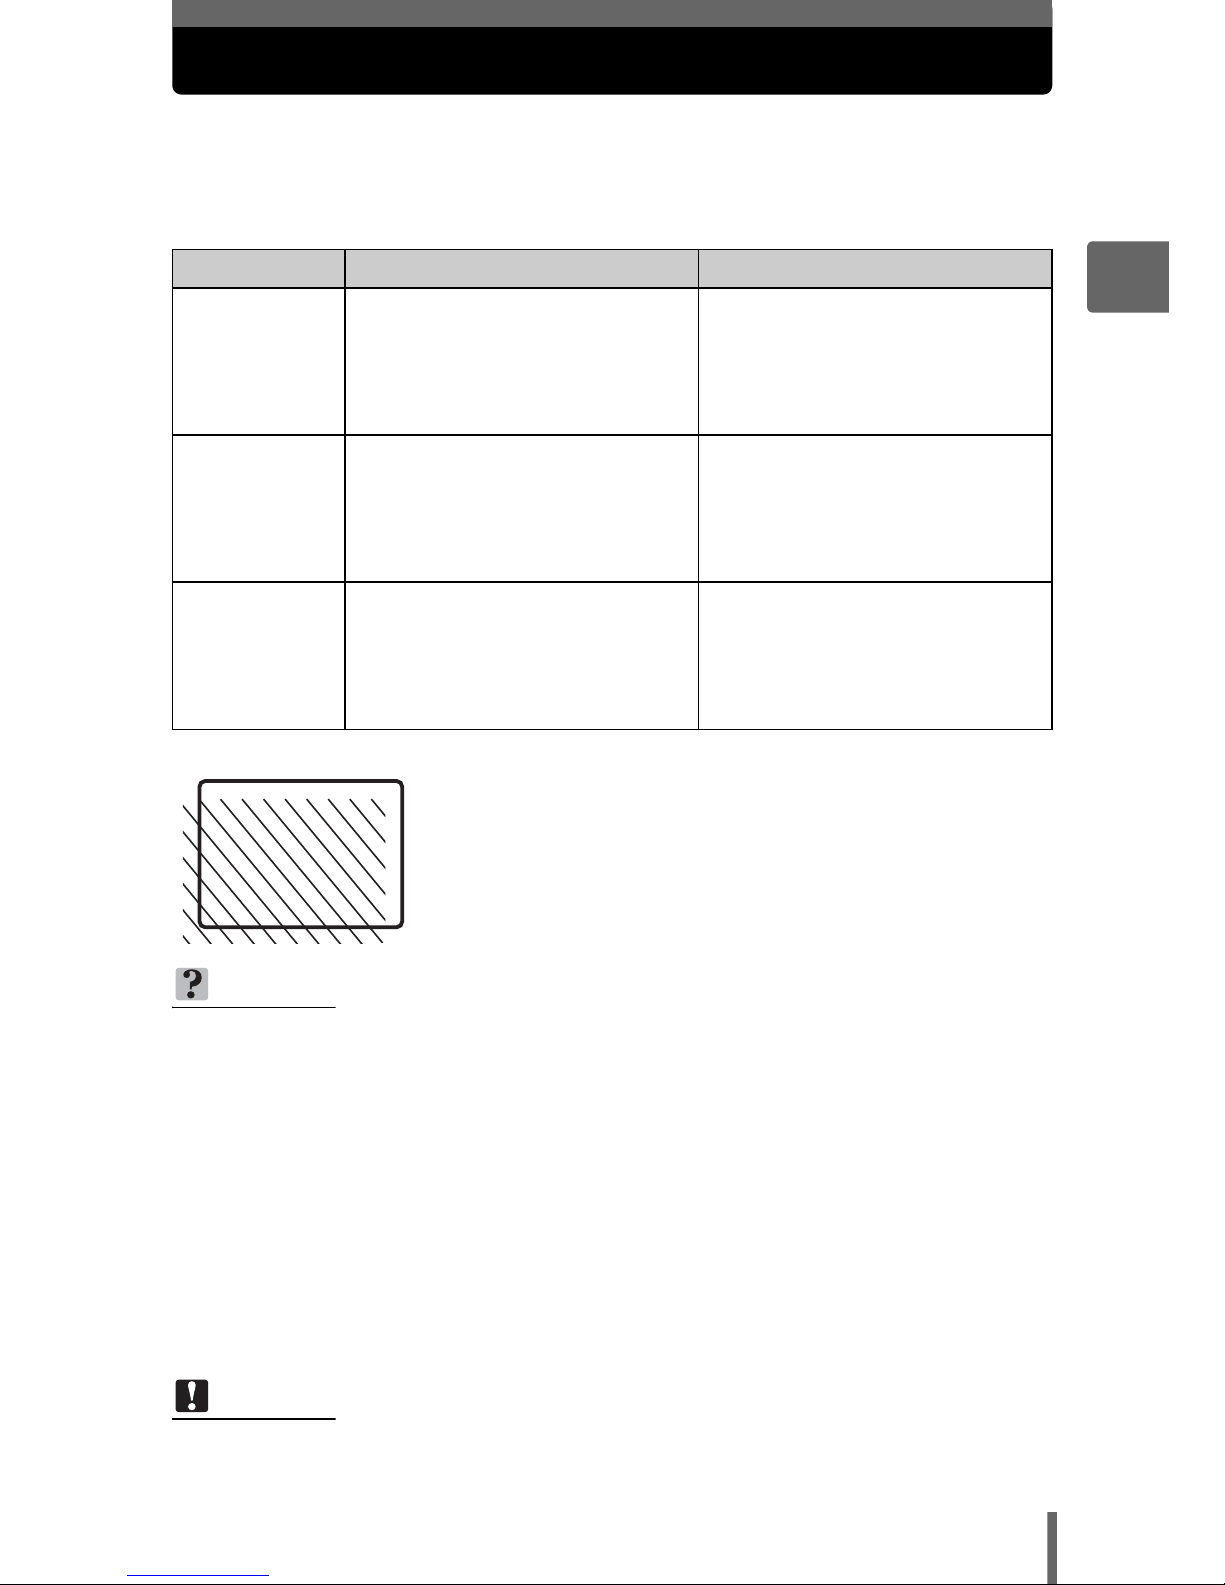
Viewfinder
• The camera records a wider area than the image in the
viewfinder.
• As you get closer to the subject, the actual image recorded
(the shaded area in the illustration on the left) differs
slightly from the image in the viewfinder.
TIPS
When the monitor darkens
j If the camera is not used for 10 seconds or more, the monitor darkens
slightly. After that, if the camera is not used for 3 minutes or more, the
monitor turns off automatically. Press the shutter button or use the zoom
lever to turn the monitor on.
To adjust the brightness of the monitor
j Adjust the brightness with the [s] settings. g“Adjusting the monitor
brightness” (P. 115)
When the monitor is hard to see
j Bright light, such as direct sunlight, may cause vertical lines (smears) to
appear on the image in the monitor. This does not affect recorded pictures.
Note
• When a conversion lens is attached to the camera, vignetting may occur in the
viewfinder so use the monitor.
24
2
Tips before you start taking pictures
If the correct focus cannot be obtained
The camera automatically detects the focus target in the frame. The level
of contrast is one of the criteria it uses to detect the subject. The camera
may fail to determine subjects with lower contrast than the surroundings or
with an area of extremely strong contrast in the frame. If this happens, the
simplest solution is to use the focus lock.
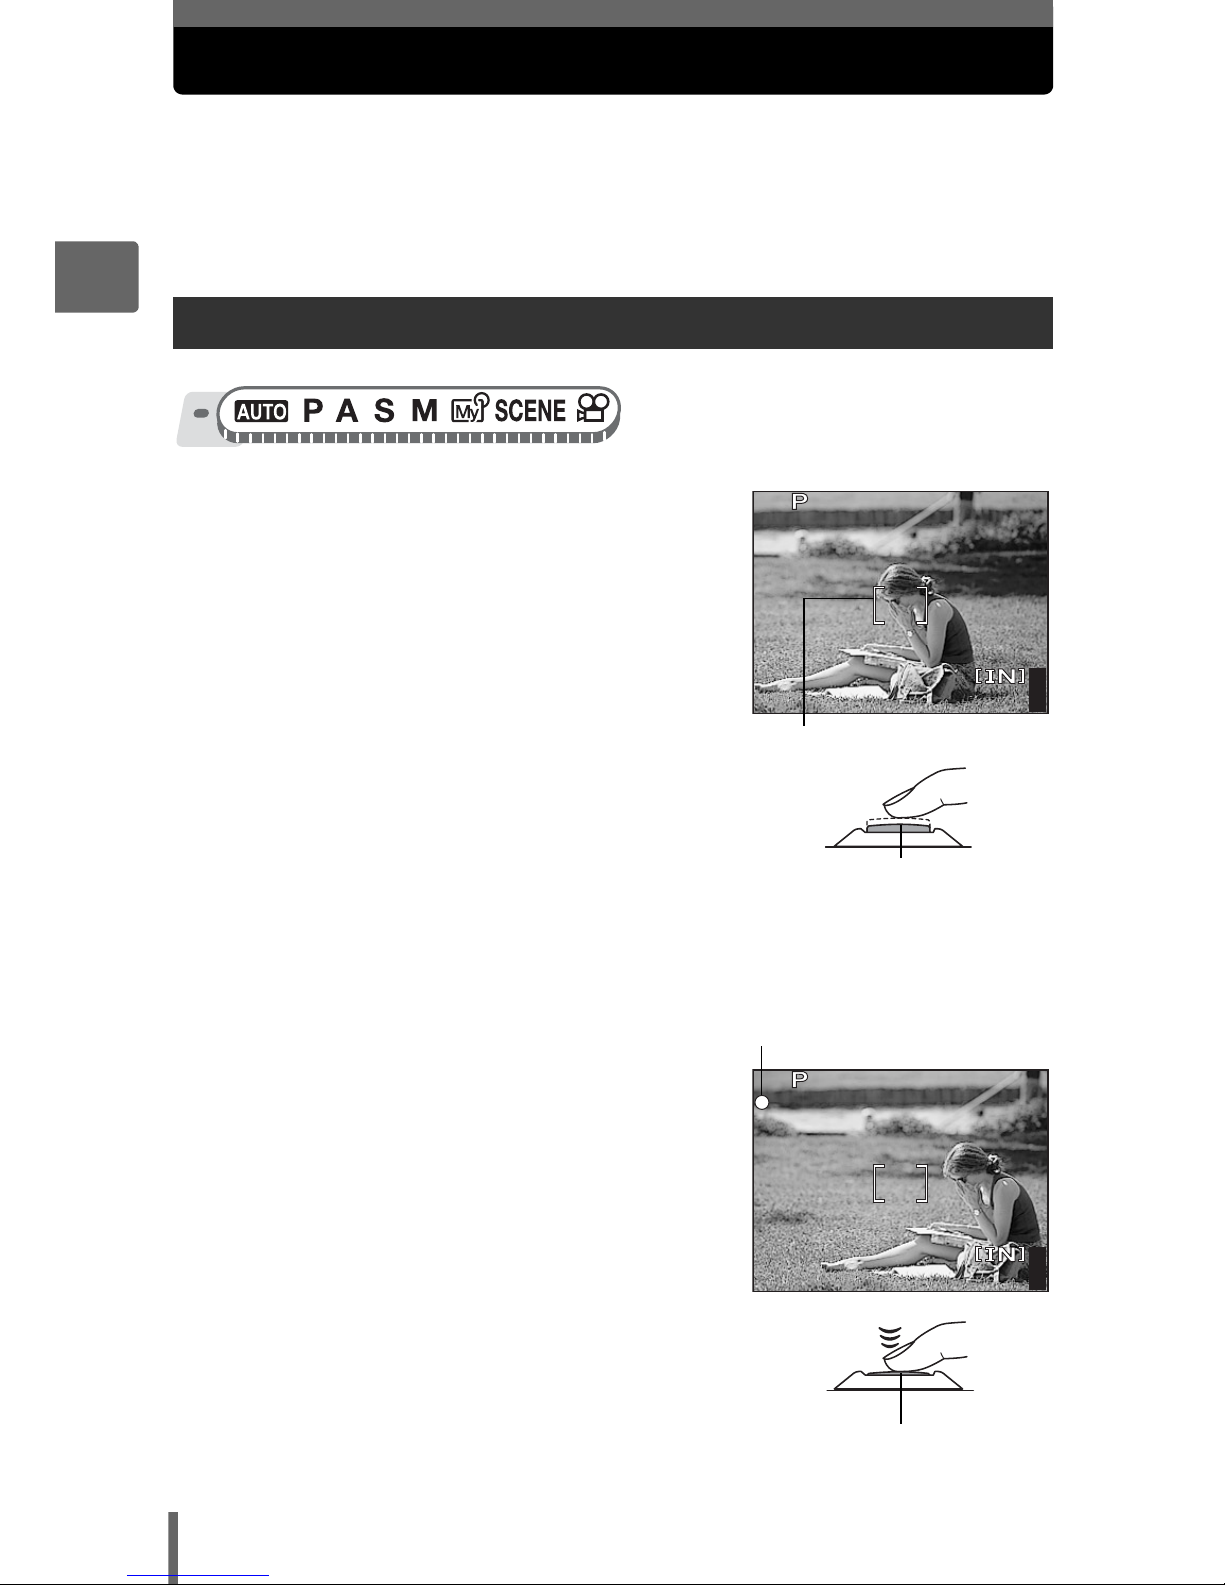
1 Position the AF target mark on
the subject you want to focus on.
• When shooting a hard-to-focus or fastmoving subject, focus the camera on an
object about the same distance away as
the subject.
2 Press the shutter button halfway
until the green lamp lights.
• The green lamp lights when the focus
and exposure are locked.
• When the green lamp blinks, the focus
and exposure are not locked. Release your finger from the shutter button,
re-position the AF target mark on the subject and press the shutter button
halfway again.
3 Keeping the shutter button
pressed halfway, recompose
your shot.
4 Press the shutter button fully.
• The camera takes the picture. The
orange lamp blinks while the picture is
recorded.
How to focus (focus lock)
441600
1600
×
1200
1200
SQ1
SQ1
0.0
0.0
F4.0
F4.0
1/200
1/200
AF target mark
Shutter button
441600
1600
×
1200
1200
SQ1
SQ1
F4.0
F4.0
1/200
1/200
0.0
0.0
Green lamp
Shutter button
If the correct focus cannot be obtained
25
2
Tips before you start taking pictures
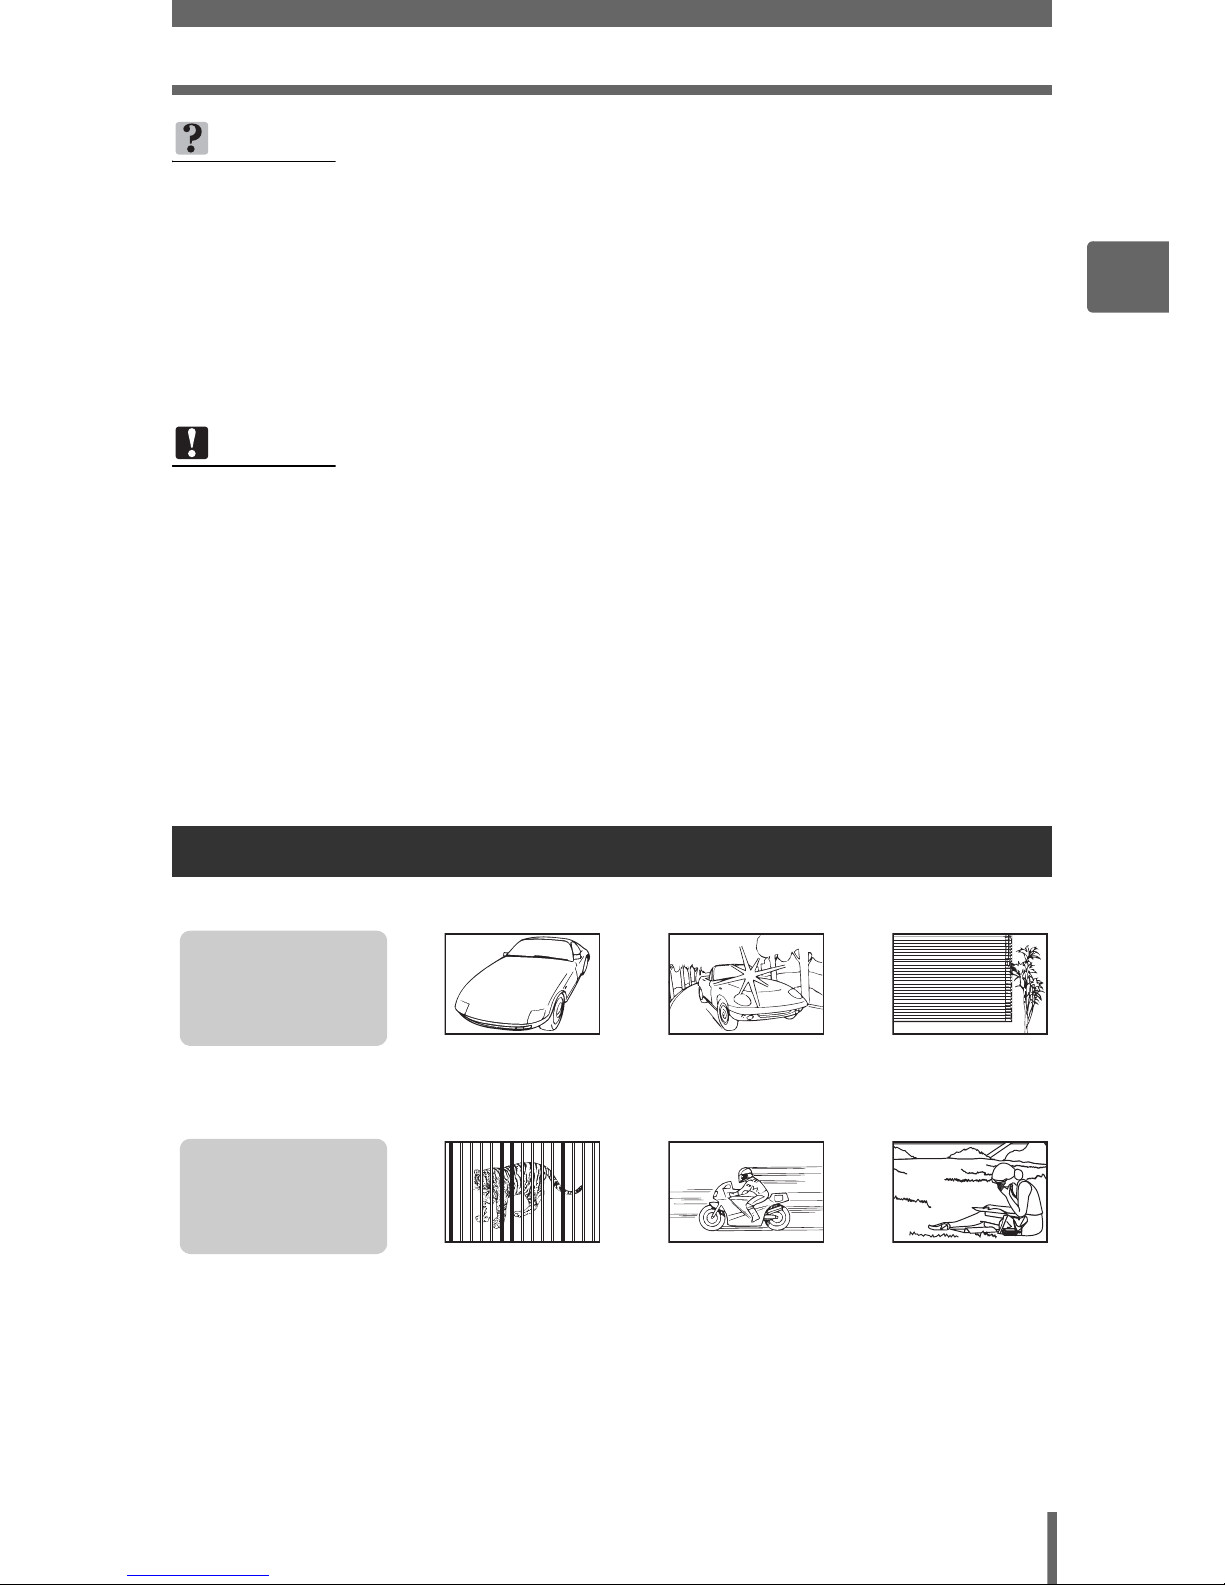
Under certain types of conditions, the auto focus may not work properly.
In these cases, focus (focus lock) on an object with high contrast at the same
distance as the intended subject, recompose your shot and then take the picture.
If the subject has no vertical lines, hold the camera vertically and focus the camera
using the focus lock function by pressing the shutter button halfway, then return the
camera to the horizontal position while keeping the button pressed halfway and take
the picture.
TIPS
To focus on the subject in the center of the frame
g“AF mode (iESP/SPOT/AREA)” (P. 57)
When the frame in which you focus on a subject is different from the
frame in which you lock the exposure
g“AE lock” (P. 61)
To fix the focus
g“AF lock” (P. 59)
Note
• Press the shutter button gently. If it is pressed forcefully, the camera may move
causing the picture to blur.
• Never remove the batteries or disconnect the AC adapter while the orange
lamp on the side of the viewfinder is blinking. Doing so could destroy stored
pictures and prevent storage of pictures you have just taken.
• Recorded pictures are saved in the camera regardless of whether the camera
is turned off or the batteries are replaced or removed.
• When taking pictures against strong backlight, the area of the picture in shadow
may appear colored.
• When a conversion lens is attached to the camera, the edges of the picture may
appear dark. Check the recorded image on the monitor.
Subjects that are difficult to focus on
The green lamp
blinks.
The subject cannot
be brought into focus.
Subject with
low contrast
Subject with an
extremely bright
area in the center
of the frame
Subject without
vertical lines
Subjects at
different
distances
Fast-moving
subject
The subject is
not in the center
of the frame
The green lamp
lights, but the
subject cannot be
brought into focus.
26
2
Tips before you start taking pictures
Record mode
You can select a record mode in which to take pictures or shoot movies.
Select the best record mode for your purpose (printing, editing on a
computer, website editing, etc.). For information on the image sizes for
each record mode and the number of storable still pictures/movie
recording time, see the tables on P. 28 to 30.
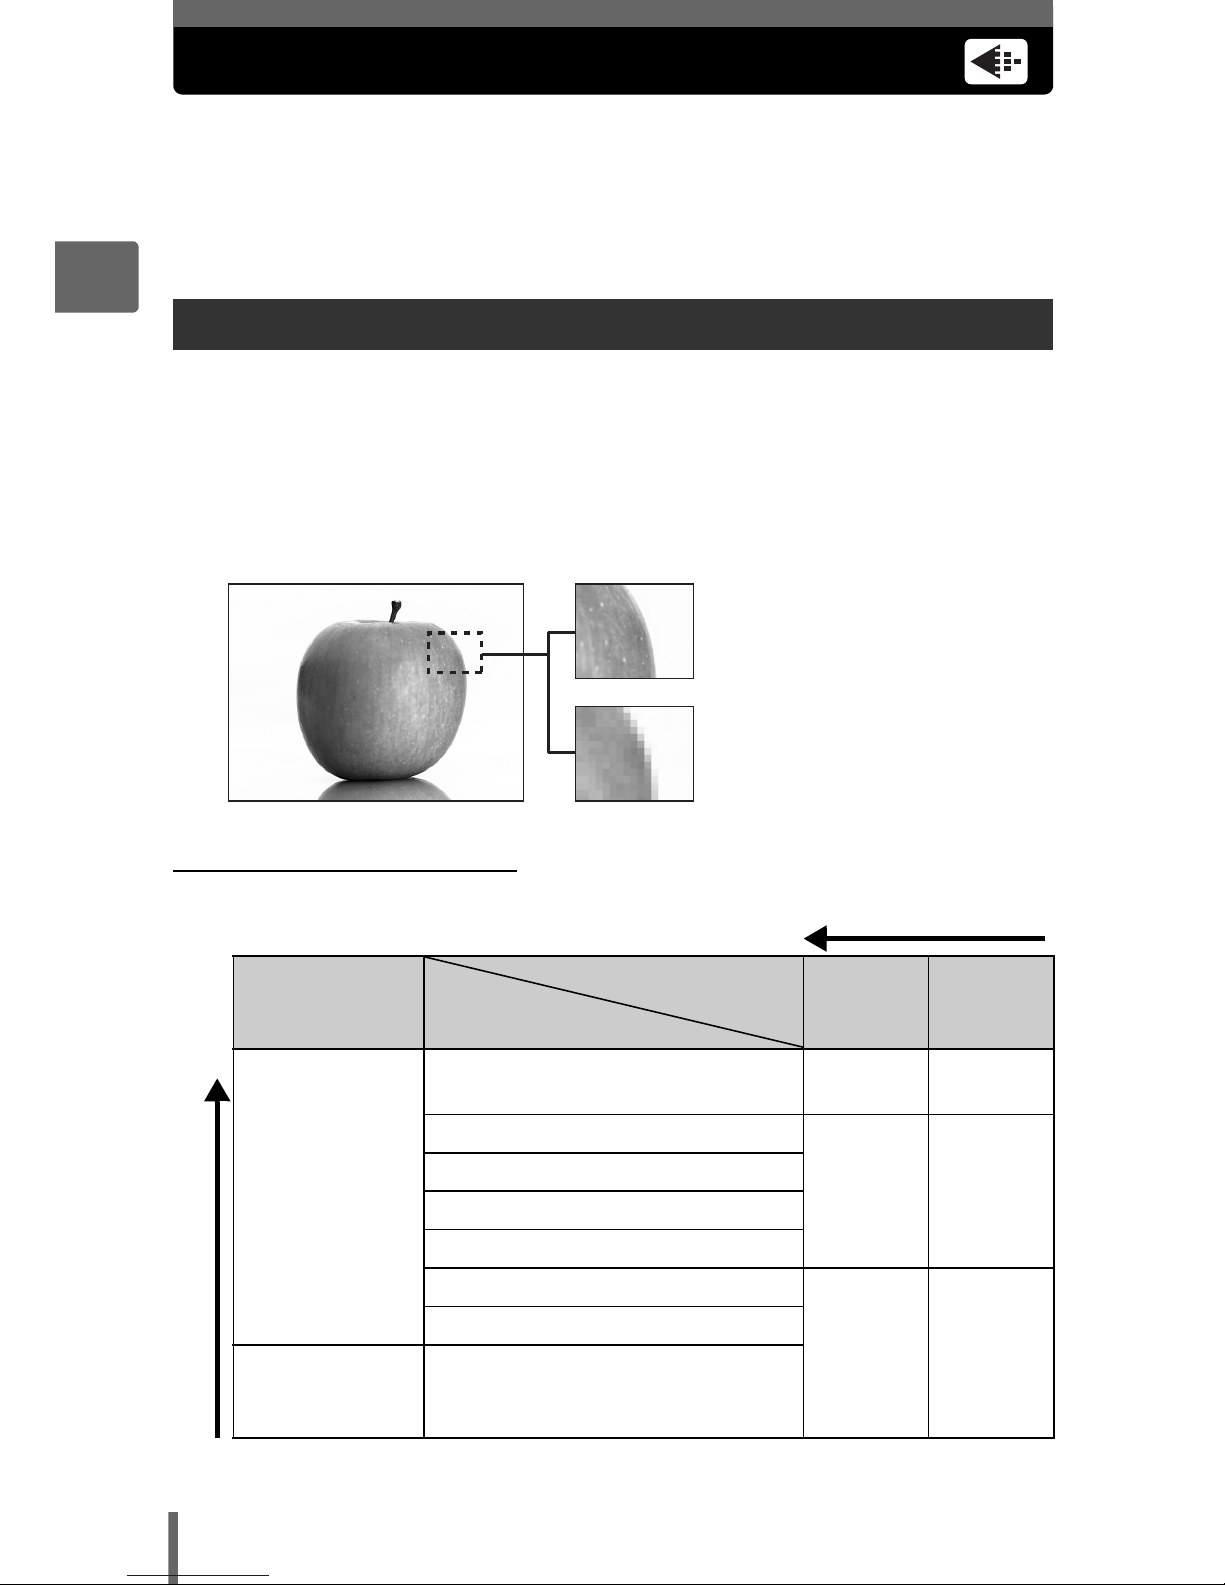
Still pictures (other than those in raw data format) are recorded in JPEG format.
Record mode depicts the image size and compression rate of your pictures.
Pictures are made from thousands of dots (pixels). If a picture with relatively few
pixels is enlarged, it looks like a mosaic. Pictures with more pixels are denser and
clearer but require more space (larger file size), thus decreasing the number of
pictures that can be saved. Though a high compression rate results in a small file
size, this also produces a grainy look.
(Normal image modes
Still picture record modes
Image becomes clearer
Image size becomes larger
Application
Compression
Image size
Low com-
pression
High com-
pression
Select according
to print size
3072 × 2304 (SP-310)
3264 × 2448 (SP-350)
SHQ HQ
2592 × 1944
SQ1
HIGH
SQ1
NORMAL
2288 × 1712
2048 × 1536
1600 × 1200
1280 × 960
SQ2
HIGH
SQ2
NORMAL
1024 × 768
For small-sized
prints and
websites
640 × 480
Picture with high number of pixels
Picture with low number of pixels

Record mode
27
2
Tips before you start taking pictures
Image size
The number of pixels (horizontal × vertical) used when saving an image. You can
save your pictures at a large image size to get clearer prints. However, as the image
size increases, the file size (data size) also increases, which decreases the number
of pictures that can be saved.
Compression
In record modes other than [RAW], pictures are compressed and saved. The higher
the compression, the less clear the image will be.
(Special record modes
Raw data
This is unprocessed data which has not been subjected to color conversion or white
balance, sharpness and contrast adjustment. Use the OLYMPUS Master software
to display the picture data on a computer. You can also view the data with Photoshop
software by installing the Plug-in available from the Olympus website. Raw data
cannot be displayed using ordinary software, and print reservations cannot be made.
Pictures taken with the record mode set to raw data can be edited with this camera.
g“Editing still pictures (RAW DATA EDIT/Q/P/REDEYE FIX/BLACK &
WHITE/SEPIA)” (P. 92)
3:2
The image aspect ratio is normally 4:3. If the
aspect ratio is changed to 3:2, the image can be
printed at a photo store without losing the image
borders.
Record mode Features
Image size
SP-310 SP-350
RAW
Raw uncompressed data. Data is
in ORF format.
3072 × 2304 3264 × 2448
3:2
(SHQ, HQ)
This is useful for ordering prints
from a photo store.
3072 × 2048 3264 × 2176
443264
3264
×
2176
2176
HQ
HQ
F4.0
F4.0
1/200
1/200
0.0
0.0
Monitor display when
3:2 is set

Record mode
28
2
Tips before you start taking pictures
Movies are recorded in Motion-JPEG format.
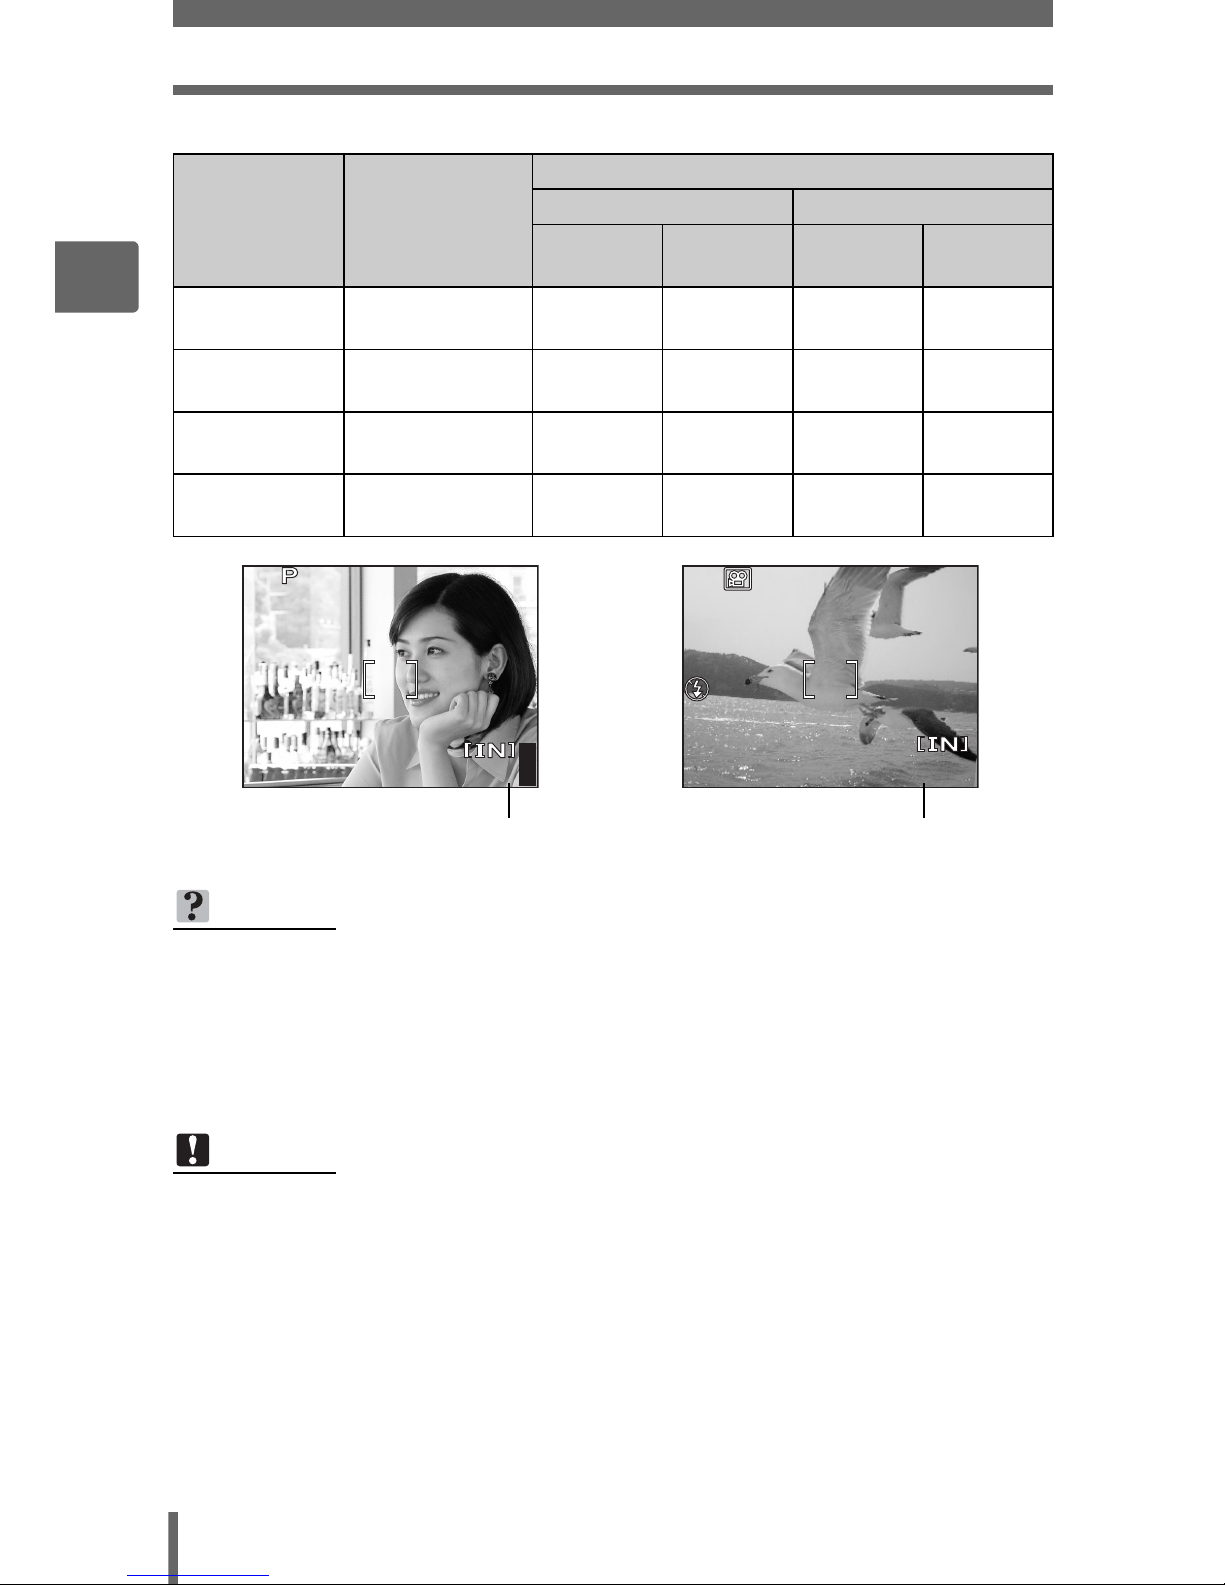
For still pictures (SP-310)
Movie record modes
Number of storable still pictures/remaining
recording time
Record
mode
Image size
Number of storable still pictures
Internal memory
Using a 128 MB
card
With
sound
Without
sound
With
sound
Without
sound
RAW 3072 × 2304 2 2 12 12
SHQ
3072 × 2304 5 5 24 24
3072 × 2048 5 5 27 27
HQ
3072×2304 14157173
3072×2048 16178082
SQ1
2592 × 1944
HIGH 7 7 34 34
NORMAL 20 21 99 102
2288 × 1712
HIGH 9 9 44 44
NORMAL 26 27 126 130
2048 × 1536
HIGH 11 11 54 55
NORMAL 32 33 156 162
1600 × 1200
HIGH 18 18 88 90
NORMAL 50 53 241 257
SQ2
1280 × 960
HIGH 28 29 135 140
NORMAL 75 82 362 399
1024 × 768
HIGH 42 44 204 215
NORMAL 110 127 532 614
640 × 480
HIGH 97 110 469 532
NORMAL 207 276 997 1330
3:2
3:2

Record mode
29
2
Tips before you start taking pictures
For still pictures (SP-350)
Record
mode
Image size
Number of storable still pictures
Internal memory
Using a 128 MB
card
With
sound
Without
sound
With
sound
Without
sound
RAW 3264 × 2448 2 2 10 10
SHQ
3264 × 2448 4 4 22 22
3264 × 2176 5 5 24 24
HQ
3264×2448 13136364
3264×2176 14157172
SQ1
2592 × 1944
HIGH 7 7 36 37
NORMAL 20 21 99 102
2288 × 1712
HIGH 9 9 44 44
NORMAL 26 27 126 130
2048 × 1536
HIGH 11 11 54 55
NORMAL 32 33 156 162
1600 × 1200
HIGH 18 18 88 90
NORMAL 50 53 241 257
SQ2
1280 × 960
HIGH 28 29 135 140
NORMAL 75 82 362 399
1024 × 768
HIGH 42 44 204 215
NORMAL 110 127 532 614
640 × 480
HIGH 97 110 469 532
NORMAL 207 276 997 1330
3:2
3:2
Record mode
30
2
Tips before you start taking pictures
For movies
Record mode Image size
Remaining recording time
Internal memory Using a 128 MB card
With
sound
Without
sound
With
sound
Without
sound
SHQ
640 × 480
(30 frames/sec.)
14 sec. 14 sec.
1 min.
10 sec.
1 min.
10 sec.
HQ
640 × 480
(15 frames/sec.)
29 sec. 29 sec.
2 min.
20 sec.
2 min.
21 sec.
SQ1
320 × 240
(30 frames/sec.)
39 sec. 40 sec.
3 min.
10 sec.
3 min.
13 sec.
SQ2
320 × 240
(15 frames/sec.)
1 min.
18 sec.
1 min.
20 sec.
6 min.
15 sec.
6 min.
26 sec.
TIPS
• When a picture is transferred to a computer, the size of the picture on the
computer screen varies depending on the computer’s monitor setting. For
instance, a picture taken with an image size of 1,024 × 768 fills the screen if you
set the picture to 1× when the monitor setting is 1,024 × 768. However, if the
monitor setting is over 1,024 × 768 (such as 1,280 × 1,024), the picture only
takes up part of the screen.
Note
• The number of storable still pictures and remaining recording time listed in the
tables are approximate.
• The number of storable still pictures may change according to the subject or
factors like whether print reservations or album entries have been made or not.
In certain instances, the number of remaining pictures does not change even
when you take new pictures or erase stored pictures.
441600
1600
×
1200
1200
SQ1
SQ1
F4.0
F4.0
1/200
1/200
0.0
0.0
Number of storable still pictures
00:36
00:36
00:36
HQ
HQ
0.0
0.0
Remaining recording time
 Loading...