

Page 1

USER’S MANUAL
Digital Audio Player
MR-F10 Series
Page 2
Introduction
Thank you for purchasing the Olympus Digital Audio Player MR-F10 Series.
• The product information this USER’S MANUAL conveys is subject to change without
notice. Contact an authorized Olympus service center with the product name and model
number for the latest information.
• While every care has been taken in the preparation of this USER’S MANUAL, if you find
any errors, omissions, or points which are unclear, please contact an authorized Olympus
service center.
• The contents of this USER’S MANUAL may not be reproduced in whole or in part except
for personal use. It may not be transferred without permission.
• Olympus accepts no responsibility for losses suffered by the customer or a third party as
a result of improper use of this product.
• Olympus accepts no responsibility for any damage due to a loss of data resulting from
malfunction of this product, repair by a third party not authorized by Olympus, or other
reason.
• Illustrations in this USER’S MANUAL may not be the same as the actual product.
2
Page 3

Trademarks/Fonts
• m:robe is a trademark of OLYMPUS CORPORATION.
• Windows is a registered trademark of Microsoft Corporation.
• All other company and product names are registered trademarks and/or trademarks of
their respective owners.
• The screen fonts used by this product belong to Ricoh Corporation.
• “SRS,” “TruBass,” “WOW” and “ ” are trademarks or registered trademarks of
SRS Labs, Inc. The technology of Trubass and WOW is incorporated under license from
SRS Labs, Inc.
• MPEG Layer-3 audio coding technology is licensed from Fraunhofer IIS and Thomson
Multimedia.
Copyright and copyright protection feature (DRM)
By the Copyright Act, any music files and music CDs downloaded from the Internet without
the copyright holder’s permission are not allowed to be reproduced, distributed, publicized/
re-publicized on the Internet, or converted into MP3 or WMA files for the purpose of
commercial business or sale.
A WMA file may be provided with DRM (Digital Right Management) for copyright
protection. DRM limits the file to copy or distribute music files that are converted (ripped)
from a music CD or downloaded from music distribution services.
3
Page 4

About sample tracks incorporated into this product
The copyrights of the sample tracks are owned by the artists or their suppliers.
These sample materials must not be reproduced or used for profit and must not be transferred
or resold to third parties.
Failure to comply with these limitations may result in penalties for infringement of
copyrights.
Olympus accepts no responsibility in cases where these copyrights are violated.
Note about loosing data
Data stored in memory could be damaged or lost by operational mistakes, malfunctions, or
repairs, etc. Be sure to back up your data, for example, on the hard disk of your PC. Olympus
will not compensate for any loss or damage of data.
4
Page 5
Main features
• With the 256 MB*1/512 MB*2/1 GB*3 built-in flash memory, you can transfer and store
approximately 60*
1*4
/120*2*4/240*3*4 music tracks to enjoy anytime, anywhere.
• The organic EL display provides a clearer screen than existing LCD displays.
• You can play not only MP3 files but also WMA and OGG files.
• Improved stereoscopic 3D surround and bass sounds provide deep and sonorous tones
(SRS function).
• You can adjust the alarm with the clock function.
• Playback can be started from the desired point within a file even if the playback time of
the file is long (Bookmark).
• The adjustable pivoting display is convenient and versatile (LCD Pivot).
• A microphone is built-in for you to make your own recordings.
• Contents of CDs and cassette tapes, etc., can also be recorded (Direct Encoding).
*1MR-F11
2
MR-F12
*
3
MR-F13
*
4
*
For typical 4-minute tracks recorded at 128 kbps in WMA format
5
Page 6

Table of contents
Introduction. . . . . . . . . . . . . . . . . . . . . . . . . . . . . . . . . . . . . . . . . . . . . . . . . . . . . . . . . . . . . . 2
Main features . . . . . . . . . . . . . . . . . . . . . . . . . . . . . . . . . . . . . . . . . . . . . . . . . . . . . . . . . . . . 5
Table of contents. . . . . . . . . . . . . . . . . . . . . . . . . . . . . . . . . . . . . . . . . . . . . . . . . . . . . . . . . . 6
Read this first
Safety Precautions . . . . . . . . . . . . . . . . . . . . . . . . . . . . . . . . . . . . . . . . . . . . . . . . . . . . . . . . 9
Controls: location and function . . . . . . . . . . . . . . . . . . . . . . . . . . . . . . . . . . . . . . . . . . . . . 16
Getting Started
Setting up your m:robe . . . . . . . . . . . . . . . . . . . . . . . . . . . . . . . . . . . . . . . . . . . . . . . . . . . . 18
Charging battery (using the USB cable). . . . . . . . . . . . . . . . . . . . . . . . . . . . . . . . 18
Transferring music to your m:robe. . . . . . . . . . . . . . . . . . . . . . . . . . . . . . . . . . . . . . . . . . . 20
Disconnecting your m:robe from your PC . . . . . . . . . . . . . . . . . . . . . . . . . . . . . . 22
Connecting the earphones embedded necklace to your m:robe . . . . . . . . . . . . . . . . . . . . . 23
Basic operations
Turning the power of your m:robe on/off. . . . . . . . . . . . . . . . . . . . . . . . . . . . . . . . . . . . . . 24
Mode selection . . . . . . . . . . . . . . . . . . . . . . . . . . . . . . . . . . . . . . . . . . . . . . . . . . . . . . . . . . 25
Searching for a file . . . . . . . . . . . . . . . . . . . . . . . . . . . . . . . . . . . . . . . . . . . . . . . . . . . . . . . 27
Deleting files . . . . . . . . . . . . . . . . . . . . . . . . . . . . . . . . . . . . . . . . . . . . . . . . . . . . 28
Basic operation of the menu . . . . . . . . . . . . . . . . . . . . . . . . . . . . . . . . . . . . . . . . . . . . . . . . 29
Using the HOLD switch . . . . . . . . . . . . . . . . . . . . . . . . . . . . . . . . . . . . . . . . . . . . . . . . . . . 31
6
Page 7

Listening to music
About the playback screen. . . . . . . . . . . . . . . . . . . . . . . . . . . . . . . . . . . . . . . . . . . . . . . . . 32
Playing back music . . . . . . . . . . . . . . . . . . . . . . . . . . . . . . . . . . . . . . . . . . . . . . . . . . . . . . 33
Using the playlist. . . . . . . . . . . . . . . . . . . . . . . . . . . . . . . . . . . . . . . . . . . . . . . . . . . . . . . . 34
Registering to the playlist . . . . . . . . . . . . . . . . . . . . . . . . . . . . . . . . . . . . . . . . . . 34
Playing back the playlist . . . . . . . . . . . . . . . . . . . . . . . . . . . . . . . . . . . . . . . . . . . 35
Setting playback mode. . . . . . . . . . . . . . . . . . . . . . . . . . . . . . . . . . . . . . . . . . . . . . . . . . . . 36
Selecting playback mode. . . . . . . . . . . . . . . . . . . . . . . . . . . . . . . . . . . . . . . . . . . 36
Setting StudyMode . . . . . . . . . . . . . . . . . . . . . . . . . . . . . . . . . . . . . . . . . . . . . . . 38
Setting interval repeat (A-B) . . . . . . . . . . . . . . . . . . . . . . . . . . . . . . . . . . . . . . . . 39
Setting EQ/WOW . . . . . . . . . . . . . . . . . . . . . . . . . . . . . . . . . . . . . . . . . . . . . . . . . . . . . . . 40
Selecting EQ . . . . . . . . . . . . . . . . . . . . . . . . . . . . . . . . . . . . . . . . . . . . . . . . . . . . 40
Setting WOW . . . . . . . . . . . . . . . . . . . . . . . . . . . . . . . . . . . . . . . . . . . . . . . . . . . 41
Bookmarking music. . . . . . . . . . . . . . . . . . . . . . . . . . . . . . . . . . . . . . . . . . . . . . . . . . . . . . 42
Deleting the registered information. . . . . . . . . . . . . . . . . . . . . . . . . . . . . . . . . . . . . . . . . . 43
Recording
About the music recording screen . . . . . . . . . . . . . . . . . . . . . . . . . . . . . . . . . . . . . . . . . . . 44
Recording voice. . . . . . . . . . . . . . . . . . . . . . . . . . . . . . . . . . . . . . . . . . . . . . . . . . . . . . . . . 45
Recording over Line-in connection. . . . . . . . . . . . . . . . . . . . . . . . . . . . . . . . . . . . . . . . . . 47
Setting and adjusting
Setting your m:robe. . . . . . . . . . . . . . . . . . . . . . . . . . . . . . . . . . . . . . . . . . . . . . . . . . . . . . 50
7
Page 8

Additional information
Cleaning . . . . . . . . . . . . . . . . . . . . . . . . . . . . . . . . . . . . . . . . . . . . . . . . . . . . . . . . . . . . . . . 55
Notes when you dispose of your m:robe . . . . . . . . . . . . . . . . . . . . . . . . . . . . . . . . . . . . . . 56
Troubleshooting . . . . . . . . . . . . . . . . . . . . . . . . . . . . . . . . . . . . . . . . . . . . . . . . . . . . . . . . . 60
Rebooting your m:robe . . . . . . . . . . . . . . . . . . . . . . . . . . . . . . . . . . . . . . . . . . . . . 63
Service and maintenance . . . . . . . . . . . . . . . . . . . . . . . . . . . . . . . . . . . . . . . . . . . . . . . . . . 64
Specifications . . . . . . . . . . . . . . . . . . . . . . . . . . . . . . . . . . . . . . . . . . . . . . . . . . . . . . . . . . . 65
Menu list. . . . . . . . . . . . . . . . . . . . . . . . . . . . . . . . . . . . . . . . . . . . . . . . . . . . . . . . . . . . . . . 67
Index . . . . . . . . . . . . . . . . . . . . . . . . . . . . . . . . . . . . . . . . . . . . . . . . . . . . . . . . . . . . . . . . . . 69
Before you contact us . . . . . . . . . . . . . . . . . . . . . . . . . . . . . . . . . . . . . . . . . . . . . . . . . . . . . 71
8
Page 9

Read this first
Safety Precautions
Before using this product, read this first to ensure that you know how to operate it safely and
correctly.
Various symbols are used to warn of hazards to yourself and others and prevent damage to
property through misuse of this product. The symbols and their meanings are explained
below.
Danger
Warning
Caution
This symbol indicates that failure to observe the instructions will
likely result in serious injury or possibly even death.
This symbol indicates that failure to observe the instructions may
result in serious injury or possibly even death.
This symbol indicates that failure to observe the instructions may
result in injury or damage to property.
Precautions when handling this product
Warning
• Do not use in a place where there is running water. Doing so may cause electric
shock, fire, overheating or explosion. Take extra caution when using this product in rain,
snow, at the seaside or a waterfront. Also, do not use in a bathroom or shower room.
• Do not use or leave this product near a stove or fire. Doing so may cause
overheating, explosion or fire. Be especially careful during charging. Also, if the AC cord
cover is damaged, fire or electric shock may result.
Read this first
9
Page 10

• Do not use in the presence of flammable or explosive gas. Do not use this
product if there is the possibility of the presence of such gases in the air. Failure to do so
could result in fire or explosion.
• Keep out of the reach of children. Do not let children use this product without adult
Read this first
supervision.
• Avoid prolonged contact with the device while applying current. The device
becomes hot during charging. Prolonged contact with the device during use could result
in minor burns.
• Do not use or store this product for a long time in an environment where
there is a lot of dust, dampness, oily smoke or steam. This could result in fire
or electric shock.
• Stop using this product immediately when thunder has occurred. Failure to
do so may cause electric shock. Refrain from using.
• Do not use while driving. Doing so may cause injury or accident. Never watch the on
screen display while driving.
• Do not let any water or other foreign object get inside the device. Should the
device be dropped in water, or water gets into the internal parts, fire or electric shock may
result. Turn the power off immediately and contact an authorized Olympus service center.
• Should you notice an unusual smell, overheating, discoloration, distortion
or smoke, stop using this product immediately. Leaving as it is may cause fire,
electric shock or burns. Contact an authorized Olympus service center.
• Should you notice leakage or an unusual smell, keep this product away
from fire. Failure to do so may cause explosion or fire.
• Do not attempt to disassemble or modify this product. Such action could lead
to electric shock or injury by high-voltage parts inside.
10
Page 11

Caution
• Do not leave this product in places of high temperature, such as in a
sun-heated car. Doing so could result in battery leakage, deterioration of parts or fire.
• Do not touch any leakage that has occurred. Battery leakage, etc., may have
occurred. Getting the liquid into your eyes or touching it may cause injury. In such a case,
wash immediately with clean water and seek medical attention immediately.
Read this first
11
Page 12

Conditions for use of this product
• This product contains precision electronic parts. Avoid using or leaving this product for
Read this first
long periods of time in the following places as this could result in failure or malfunction.
– places of high temperature and high humidity or where the temperature and humidity
fluctuate greatly, such as in direct sunlight, on the beach in summer, in a car with the
windows closed, or next to air conditioning equipment or a humidifier
– places where there is a lot of sand, dust or dirt
– near fire
– near water
• Avoid dropping or hitting this product or subjecting it to severe vibration or impact.
• If the device is subjected to a sudden temperature change, for example by bringing it from
a cold place into a warm room, condensation may form on the inside. Wait until the device
is adjusted to the room temperature before using.
• Do not turn up the volume excessively. Loud sounds can cause hearing loss or injury.
12
Page 13

About the organic EL display (OLED)
The latest high precision technology has gone into the making of the organic
EL display of this product, but there are some pixels which are permanently
lit or which do not light at all. Also, depending on the angle at which the screen
is viewed, the colors and brightness may appear uneven. This is due to the
structure of the organic EL display and is not a malfunction.
13
Read this first
Page 14

Information regarding the built-in battery
The built-in battery is exclusively for use with m:robe MR-F10 Series. Never use it in other
Read this first
equipment.
• Discharging
The built-in battery self-discharges while it is not in use. Be sure to charge it regularly
before use. We recommend charging the built-in battery once every 6 months to maintain
its performance if it is not to be used for an extended period of time.
• Life of the built-in battery
– The built-in battery is good for about 500 complete charges and discharges, depending
on usage.
– The life of the built-in battery is limited. The built-in battery’s charge becomes shorter
after repeated use. If the built-in battery discharges soon after charging, it may be time
to replace it. Please contact an authorized Olympus service center for assistance.
• Operating temperature
Built-in batteries are chemical products. The built-in battery’s efficiency may vary, even
when operating within the recommended temperature range, but this is not a malfunction.
– Recommended temperature: 5 °C to 35°C (during charging)
Using this product outside the above temperature range may result in reduced efficiency
and shorter battery life.
14
Page 15

• Disposal
This product has a built-in lithium polymer battery. Lithium polymer batteries are
recyclable.
When you dispose of this product, return the built-in battery to a recycling location. For
details on removing the built-in battery, refer to “Notes when you dispose of your m:robe”
(g page 56).
Never disassemble this product except when disposing of it.
Read this first
15
Page 16

Controls: location and function
Read this first
16
J
K
L
D
A
B
F
G
H
I
C
E
Page 17

A Earphones jack
B Organic EL display
C button
Power on/off
Playing/pausing file
Pausing recording/StopWatch
D Necklace hook
E HOLD switch
Locking buttons to prevent
unintentional operation
F Microphone
G button
Starting/Canceling Navigation search
H button
Displaying menu screen/mode select
screen
Initializing Stop Watch
Selecting/Entering setting item
I button
During playback: Selecting the
previous/next file
During Navigation search*: Searching
for files in a folder
During menu operation*: Selecting the
desired item
J USB port/RESET button
K button
Voice recording/Music recording
During playback: Playing back
repeatedly between A and B
Bookmarking and playing back the
music
L button
Volume Adjusting
During Navigation search*: Searching
for files in a folder
During menu operation*: Selecting the
desired item
Read this first
* You can use L button instead of I
button. In this USER’S MANUAL,
the button is used.
17
Page 18

Getting Started
Setting up your m:robe
Operating system requirements
One of the following operating systems is required for m:robe operation:
– Windows 98SE*, Windows Me, Windows 2000 Professional, Windows XP Professional/
Getting Started
Home Edition
– Mac OS 9.x/X v10.x
* The USB driver should be installed.
Charging battery (using the USB cable)
Connect the USB cable to your PC and your m:robe.
Charging starts.
USB
To USB
port
PC
The following screen appears after charging completes.
To USB port
18
Page 19

After charging, perform the disconnect procedure. When the following screen appears,
disconnect your m:robe from your PC.
For details, refer to “Disconnecting your m:robe from your PC” (g page 22).
About the battery power indication
: Battery is fully charged.
/ : Battery power is reduced.
: Battery power is exhausted. Charge the battery.
The following cases indicate the battery power is exhausted or nearly exhausted. Charge the
battery.
– “Low Battery” appears on the screen.
– Your m:robe suddenly stops working, or does not work at all.
– The display does not light up even though you operate your m:robe.
Tips
• The battery is fully charged after approximately 3 hours.
• You can charge the battery while transferring files from your PC.
19
Getting Started
Page 20

Transferring music to your m:robe
1 Connect the USB cable to your PC and your m:robe.
Your PC recognizes your m:robe as a removable disk.
Getting Started
USB
To USB
port
PC
2 Transfer files from your PC to your m:robe.
Drag and drop the desired file to m:robe on the screen display of your PC.
File formats supported by m:robe
Music file
– WMA (including VBR)
– MP3 (including VBR)
– OGG
To USB port
20
Page 21

Notes
• Do not change, on your PC, the names of MUSIC, RECORD, LINE-IN, VOICE or other folders in your
m:robe. If you do, it may cause your m:robe to malfunction.
• The maximum number of files you can transfer to your m:robe is 400; the maximum number of folders
is 35; the maximum number of hierarchy levels is 5.
• Use the dedicated applications provided by music distributors (contents provider) when you transfer
files under DRM protection.
• When you connect your m:robe to a USB hub or a USB port on the keyboard etc., m:robe may not be
recognized. In this case, connect your m:robe directly to the USB port on your PC body.
Getting Started
21
Page 22
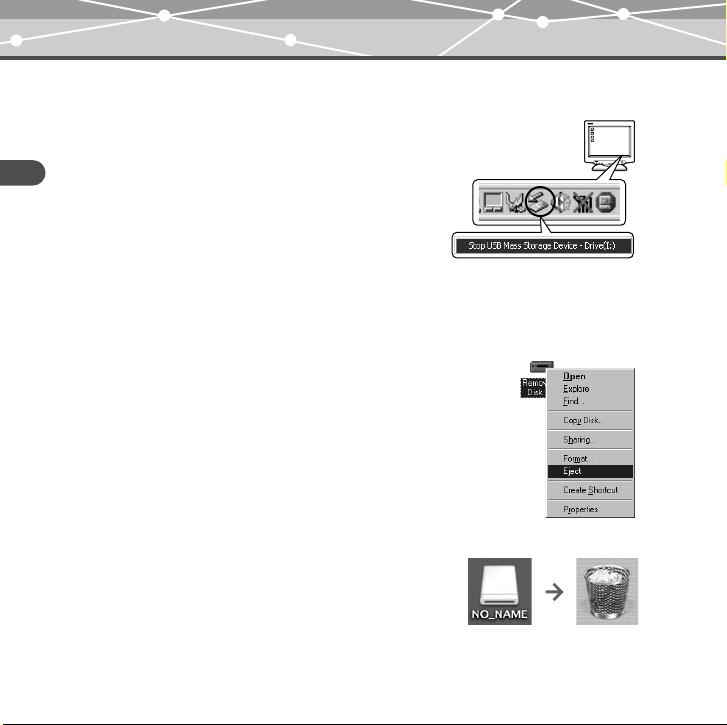
Disconnecting your m:robe from your PC
For Windows Me/2000/XP users:
1 Click [Remove the hardware] icon on the
Getting Started
system tray.
2 Click the displayed message.
3 [The USB storage device can now be safely
removed from the system, remove the USB
cable from computer.] appears. Click [OK].
For Windows 98SE users:
1 Double-click [My Computer] icon, then right-
click [Removable Disk] to open a pop-up
menu.
2 Click [Eject] on the menu.
For Macintosh users:
Drag and drop [NO_NAME] icon to [trash box].
The icon to indicate the connection of your PC and m:robe
disappears, and your m:robe is disconnected from your PC.
22
Page 23

Connecting the earphones embedded necklace to your m:robe
Connect the supplied earphones embedded necklace to your m:robe.
To the earphones jack
Notes
• Set the volume level to minimum before wearing earphones embedded necklace to avoid
hurting your ears. For details on adjusting volume, refer to “To control volume”
(g page 33).
• Do not raise the volume excessively. Loud sounds can cause hearing loss or damage.
23
Getting Started
Page 24

Basic operations
Turning the power of your m:robe on/off
Turning on your m:robe
Press the button.
The power is turned on.
Basic operations
To turn off the power
Press and hold the button.
Notes
• Before turning on your m:robe, make sure the HOLD switch is set to off. When the HOLD function is
on (g page 31), even if you press the button, “ ” appears, and the power will not be turned
on.
• Charge the battery before turning on your m:robe. If “Low Battery” appears or the display does not light
up, charge the battery (g page 18).
Tip
“Auto PWR Off” or “Sleep Mode” can be set (g page 53).
24
Page 25

Mode selection
There are 3 modes, and available functions and setting items differ depen ding on the selected
mode.
1 Press and hold the button.
The mode select screen appears.
2 Press the button to select the desired mode.
The mode changes in the following order: “MUSIC MODE”
“PLAYLIST” “SETTINGS” “MUSIC MODE.”
3 Press the button.
The desired mode screen appears.
Basic operations
25
Page 26

MUSIC MODE
Selecting playback mode/music playback/setting sound quality
(g page 32)
PLAYLIST
Playing back the desired track in the playlist easily (g page 34)
Basic operations
SETTINGS
Setting the screen display/system/watch etc. (g page 50)
26
Page 27

Searching for a file
– Navigation search
1 Press the button while the playback screen is displayed.
The Navigation search screen appears.
2 Press the button to select the desired folder, then press the
button.
You can go to the next sublevel of folder hierarchy.
3 Repeat step 2 to select the desired file, then press the
button.
Playback starts.
To go back to the previous level folder: Press the button.
To finish Navigation search
Press and hold the button.
Basic operations
27
Page 28

Deleting files
1 Press the button while the playback screen is displayed.
The Navigation search screen appears.
2 Press the button to select the desired folder, then press the
Basic operations
3 Repeat step 2 to select a file you want to delete, then
press the button.
The editing menu appears.
button.
4 Press the button to select “Delete,” then press
the button.
The confirmation screen appears.
5 Press the button to select “OK,” then press the button.
The selected file is deleted.
To cancel Delete
Select “Cancel” in step 5, then press the button.
28
Page 29

Basic operation of the menu
The items you can operate in the menu differ depending on the selected mode. For details on
each menu item, refer to the “Menu list” (g page 67).
1 Select the desired mode.
For details, refer to “Mode selection” (g page 25).
2 Press the button.
The main menu screen appears.
3 Press the button to select a setting category,
then press the button.
The sub menu screen appears.
Basic operations
29
Page 30

4 Press the button to select the desired item, then
press the button.
The setting menu screen appears.
Basic operations
5 Press the button to select the desired setting, then press the
button.
To go back to the previous level screen: Press the button.
To finish operating menu
Press and hold the button.
Note
After selecting the desired setting in step 5, press the button. If you go back to the previous
level screen without doing so, your selection will not be set.
30
Page 31

Using the HOLD switch
– HOLD function
This is used to prevent unintentional operation when carrying your m:robe in a pocket or a
bag.
Slide the HOLD switch in the direction of the arrow on your m:robe.
When the HOLD function is on, “ ” appears on the screen, and the buttons become
inactive.
To set HOLD to off
Slide the HOLD switch in the reverse direction of the arrow.
Basic operations
31
Page 32

Listening to music
About the playback screen
ABC
Listening to music
H
I
J
K
MUSIC MODE
A Mode indication (MUSIC)
B Time indication
D
C Remaining battery power indication
E
D Current play file number/Total number
F
G
of playback files indication
E Track name indication
F File progress indication
G Elapsed time of track/Total playback
time of track indication (g page 51)
H Repeat play between A and B
indication
I Play mode indication
J EQ indication
K Playback condition indication
(play/pause/fast-forward/fast-rewind)
32
Page 33

Playing back music
To select the desired music file
Press the button while the playback screen is displayed, then press the
button to select the desired music file (g page 27).
To play/pause music
Press the button.
To control volume
Press the button.
To search for the desired music file (Skip)
Press the button to skip to the previous/next music file.
To search for the desired point of the music file (Search)
Press and hold the button while playing back, then release your hold at the desired
point.
Tip
The Skip function is available only when “StudyMode” is set to “Off” (g page 38).
Listening to music
33
Page 34

\
Using the playlist
The desired track should be registered to the playlist before playback.
Registering to the playlist
1 Press the button while the playback screen is displayed.
The Navigation search screen appears.
Listening to music
2 Press the button to select a music file you want
to register, then press the button.
The editing menu appears.
3 Press the button to select “Playlist,” then press the
button.
The file icon is changed from to , then the file is added to the playlist.
To finish the editing menu
Select “Exit” in step 3, then press the button or the button.
34
Page 35

Playing back the playlist
1 Press and hold the button while the playback screen is
displayed.
The mode select screen appears.
2 Press the button to select “PLAYLIST ,” then
press the button.
The playback screen appears.
3 Press the button.
The playlist appears.
4 Press the button to select the desired music file, then press the
button.
Playback starts.
To delete files in the playlist
Select a file you want to delete in step 3, then press the button. The icon of the
selected file is changed from to . Press the button again to cancel.
Listening to music
35
Page 36

Setting playback mode
Selecting playback mode
1 Press the button while the playback screen is displayed.
2 Press the button to select “Play,” then press the
button.
Listening to music
3 Press the button to select “PlayMode,” then press the
button.
4 Press the button to select the desired playback mode, then press
the button.
(Normal): Music files are played back in sequence.
(Intro): Only the beginning part (10 sec) of the music is played back.
(Repeat): The specified music file is played back repeatedly.
(Repeat All): All the music files are played back repeatedly.
(Random): Music files are played back in random order once.
(Random All): Music files are played back repeatedly in random order.
Tip
In playback mode, the files of the folder selected in “Repeat Folder” are played back (g page 37).
36
Page 37

Setting Repeat Folder
You can select to play back the music files in just the current folder or in all folders.
1 Press the button while the playback screen is displayed.
2 Press the button to select “Play,” then press the
button.
3 Press the button to select “Repeat Folder,” then press the
button.
The setting menu screen appears.
“Current”: Music files in the current folder are played back.
“All”: Music files in all the folders are played back.
4 Press the button to select the desired setting, then press the
button.
Listening to music
37
Page 38

Setting StudyMode
You can fast-rewind/fast-forward and resume the currently playing file by pressing the
button.
1 Press the button while the playback screen is displayed.
2 Press the button to select “Play,” then press the
button.
Listening to music
3 Press the button to select “StudyMode,” then press the
button.
4 Press the button to select “On/Off,” then press the
button.
5 Press the button to select “On,” then press the button.
6 Press the button to select “Step,” then press the
button.
7 Press the button to select the desired time (2sec/5sec/15sec/
30sec/60sec), then press the button.
To cancel StudyMode
Select “Off” in step 5, then press the button.
38
Page 39

Setting interval repeat (A-B)
A music file is repeated in the set interval.
1 Play back a music file, and press the button at the point where
you want to start interval repeat (Repeat A).
2 Press the button at the point where interval repeat is finished
(Repeat B).
The set interval is played back repeatedly.
To deactivate interval repeat
Press the button.
Tips
• If Repeat B (the point where interval repeat is finished) is not set, the set of Repeat A is canceled.
• Repeat B (the point where interval repeat is finished) can be set in 2 seconds after you set Repeat A (the
point where interval repeat is started).
Listening to music
39
Page 40

Setting EQ/WOW
Selecting EQ
1 Press the button while the playback screen is displayed.
2 Press the button to select “EQ,” then press the button.
3 Press the button to select “EQ,” then press the button.
Listening to music
4 Press the button to select the desired EQ, then press the
button.
Adjusting User EQ
1 Press the button while the playback screen is displayed.
2 Press the button to select “EQ,” then press the button.
3 Press the button to select “User EQ1” or “User EQ2,” then press
the button.
4 Press the button to adjust the level, then press
the button.
5 Repeat step 4 to adjust the level of each frequency.
To finish adjusting User EQ
Press the button.
40
Page 41

Setting WOW
You can enjoy natural stereophonic music (SRS) and sonorous bass sounds (Trubass).
1 Press the button while the playback screen is displayed.
2 Press the button to select “EQ,” then press the button.
3 Press the button to select “WOW,” then press the
button.
The setting menu screen appears.
“SRS”: Adjusts 3D surround sounds.
“Trubass”: Adjusts bass sounds.
“Adjust”: Sets for Earphone or Speaker.
4 Press the button to select the desired item, then press the
button.
5 Push the button to select the desired level, then press the
button.
Note
WOW setting may cause playback in loud sounds.
Listening to music
41
Page 42

Bookmarking music
Press and hold the button during playback of the desired music.
A message is displayed, and the music is bookmarked.
Note
A Bookmark cannot be set when a track is not being played.
Listening to music
Playing back bookmarked music
Bookmarked music is playable in MUSIC MODE .
1 Press the button in playback stop mode.
2 Push the button to select the desired
bookmark, then press the button.
Playback starts at the bookmarked point.
42
Page 43

Deleting the registered information
You can delete registered bookmarks and playlist.
1 Press the button while the playback screen is displayed.
2 Press the button to select “Delete,” then press the
button.
3 Press the button to select “Bookmark” or “Playlist,” then press
the button.
The registered files are displayed.
4 Press the button to select a file you want to delete, then press
the button.
The icon of the selected file is changed from or to . To cancel, press the
button again.
Note
Only the information of the bookmark or playlist is deleted, but the original file is not deleted.
Listening to music
43
Page 44

Recording
About the music recording screen
ABC
D
E
F
Recording
G
Recording mode
A Mode indication (REC)
B Time indication
C Remaining battery power indication
D Recording type indication (MIC/ LINE)
E File name indication
I
F Bit rate indication
H
G Sampling frequency indication
H Recording condition indication
(in recording/recording pause)
I Recording progress time indication
44
Page 45

Recording voice
1 Press the button while the playback screen is displayed.
2 Press the button to select “REC Source,” then press the
button.
3 Press the button to select “MIC in,” then press the
button.
4 Press and hold the button in playback
stop mode.
Recording starts.
To pause/resume recording
Press the button.
To stop recording
Press the button.
MIC
Listening to recorded voice files
While the playback screen is displayed, press the button to display the Navigation
search screen, select “RECORD” : “VOICE” : the desired voice file, then press the
button.
Setting the sound quality
Press the button while the playback screen is displayed, then select “REC
Quality” : “Voice” : the desired bit rate.
45
Recording
Page 46

Deleting recorded voice files
Refer to “Deleting files” (g page 28).
Notes
• If the memory is full, rec ording stops automatically, and the file is saved up to the point where recor ding
stopped.
• The recording sound sensitivity depends on the distance to the sound source.
• You cannot record correctly if the battery power is not enough.
Tips
• You can listen to what you are recording with the earphones.
• The higher bit rate you set, the higher music quality will be provided, but the size is larger.
Recording
• The recorded files are named automatically, such as VR001.MP3, VR002.MP3…, and stored in the
VOICE folder in MP3 format.
46
Page 47

Recording over Line-in connection
1 Connect the line-in cable to your m:robe and the external audio device.
To the audio (Line-out)
jack of an external audio
device
USB
2 Press the button while the playback screen is displayed.
3 Press the button to select “REC Source,” then press the
button.
4 Press the button to select “Line in,” then press the
button.
5 In playback stop mode, play the external audio device, then press and
hold the button.
Recording starts.
To pause/resume recording
Press the button.
To stop recording
Press the button.
47
Recording
Page 48

Listening to recorded files
While the playback screen is displayed, press the button to display the Navigation
search screen, select “RECORD” : “LINE-IN” : the desired file, then press the
button.
Setting the sound quality
Press the button while the playback screen is displayed, then select “REC
Quality” : “Line In” : the desired bit rate.
Deleting recorded files
Refer to “Deleting files” (g page 28).
Recording
Notes
• If the memory is full, rec ording stops automatically, and the file is saved up to the point where recor ding
stopped.
• You cannot record correctly if the battery power is not enough.
Tips
• You can listen to what you are recording with the earphones.
• The higher bit rate you set, the higher music quality will be provided, but the size is larger.
• The recorded files are named automatically, such as AD001.MP3, AD002.MP3…, and stored in the
LINE-IN folder in MP3 format.
48
Page 49

Setting Auto Sync
When music is recorded, a new file is created at where no sound is recorded.
1 Press the button while the playback screen is displayed.
2 Press the button to select “REC Quality,” then press the
button.
3 Press the button to select “Auto Sync,” then press the
button.
4 Press the button to select “On,” then press the button.
“On”: Creates music files track by track.
“Off”: Creates one music file including all tracks.
To cancel Auto Sync
Select “Off” in step 4, then press the button.
49
Recording
Page 50

Setting and adjusting
Setting your m:robe
You can customize and adjust system setting, screen display, timer, watch, and operating
system.
1 Press and hold the button.
The mode select screen appears.
2 Press the button to select “SETTINGS ,” then press the
button.
3 Press the button to select the desired item, then press the
Setting and adjusting
The setting menu screen appears.
4 Press the button to select the desired setting, then press the
To go back to the previous level screen: Press the button.
To finish operating menu
Press and hold the button.
button.
button.
50
Page 51

Settings
Set the system functions.
Subjects Explanations
Resume When power is turned on, you can resume playback of the last file
from the point where it was stopped before power was turned off.
Search Speed Speed control to search file can be adjusted (×4/×8/×16).
Fade In You can gradually increase the volume up to the set point.
Time The time display of music playback can be selected.
“Normal”: Displays elapsed playback time.
“Remain”: Displays remaining playback time.
“Total”: Displays both elapsed time and total playback time.
Language The following languages can be selected for the menu screen:
“ ,” “ENGLISH,” “ ,” “ ” and “ .”
LCD Pivot The information display can be adjusted depending on the direction
of the display.
“On”: Pivots the displayed information 180°.
“Off”: Displays in the ordinary direction.
Setting and adjusting
51
Page 52

Display
Set the functions of the screen display.
Subjects Explanations
Contrast The screen brightness can be adjusted from “0” to “10.”
Scroll Speed Scroll Speed of file name can be set from “1” to “5.”
Backlit Time The light emitting time of organic EL (5sec/15sec/30sec/60sec/
120sec) can be set.
Graphic EQ The type of graphic equalization (Wave/Stereo Image/Pumping/
Watch/File Info) can be selected.
Track Title The information displayed as a music title (File Name/ID3 Tag) can
Setting and adjusting
be set.
52
Page 53

Timer
Set the timer functions.
Subjects Explanations
Auto PWR Off The power can be set to turn off automatically when no button is
pressed for a certain time (1min to 10min) in pause/stop mode.
Sleep Mode When the set time (10min to 90min) elapses, the power will be
turned off automatically.
Watch
Set the watch functions.
Subjects Explanations
Watch Watch is displayed, if there is no operation for a certain time.
“On/Off”: Displays/hides the watch.
“Setting”: Sets year, month, day and time.
Alarm The alarm is turned on at the set time.
“On/Off”: Turns on/off the alarm.
“Setting”: Sets time and occurrence of alarm.
StopWatch Press the button to start counting. Press the button again to
stop counting.
To reset, press the button.
Setting and adjusting
53
Page 54

System
Set the OS functions.
Subjects Explanations
Information You can view the OS version, memory capacity and available
Reset You can return all m:robe settings to the factory default status.
Setting and adjusting
memory.
54
Page 55

Additional information
Cleaning
Exterior
Wipe gently with a soft cloth. If the device is very dirty, wipe it using a cloth dampened with
a diluted mild detergent and wrung tightly. If you used the device at the beach, clean it using
a cloth dampened with fresh water and wrung tightly.
Organic EL display
Wipe any dust or dirt on the organic EL display gently with a soft cloth.
Note
Do not use strong solvents such as benzine or alcohol, or chemically treated cloths.
Additional information
55
Page 56

Notes when you dispose of your m:robe
Remove the built-in battery when you dispose of this product. Never disassemble this
product except when disposing of it.
Danger
• Do not allow the +/- terminals of the built-in battery to come in contact with
metal objects, or subject the built-in battery to strong shock. Also, do not carry
or store with a necklace or hairclip, etc. This may cause short-circuiting, resulting in
overheating, explosion or fire.
• Do not heat, disassemble or modify the built-in battery, expose it to water,
or leave it in scorching heat. Doing so may cause overheating, explosion or fire.
• Do not pierce with a nail, beat with a hammer, throw or step on the built-in
Additional information
battery. Doing so may cause overheating, explosion, fire or battery leakage.
• Before disposing, tape the connector of the built-in battery with insulating
tape. Otherwise, short-circuiting may occur, and result in overheating explosion or fire.
Warning
• Keep the built-in battery out of the reach of children. Failure to do so may cause
accident or injury.
• When battery leakage has occurred and the liquid gets into your eyes, wash
immediately with clean water and seek medical attention immediately.
Failure to do so may cause eye or skin injury.
56
Page 57

How to remove the battery
1 Press and hold the button to turn off your m:robe if it is turned on.
2 Remove the four screws on the back using a screwdriver.
Remove the USB port/RESET button cover, then open the back cover.
Additional information
57
Page 58

3 Remove the back cover.
4 Remove the built-in battery from your m:robe.
Take out the battery, then disconnect the connector.
Additional information
After taking out the battery, tape the cable to the battery body, making sure to cover the
connector part, then put the battery in a plastic bag.
58
Page 59

Notes
• Check that the battery is completely exhausted before removing it.
• Make sure that your m:robe is turned off before removing the battery.
• Do not reuse the battery once it has been removed.
• Take the removed built-in battery to a recycling location.
• When you dispose of this product, you should obey the local ordinance or rules of your municipality.
For details, contact your local authority.
Additional information
59
Page 60

Troubleshooting
Before sending the product for repair, refer to the following checklist to resolve the problem.
If the problem persists, contact an authorized Olympus service center.
In addition, be sure to back up the data in your m:robe before sending this product for repair
or service. Writing to the memory or deleting data etc., may be necessary during the repair
or service. Due to copyright restrictions, we cannot copy stored data for repair or service.
Restoring the data is not possible. We also recommend backing up your data often to prevent
data loss problems.
Problem Cause Resolution
The power cannot be
turned on.
Additional information
The player turns off
automatically.
The m:robe functions
cannot be operated.
The device becomes
hot.
The HOLD function
is set to on.
“Auto PWR Off” or
“Sleep Mode” is set.
The “Auto PWR Off”
or “Sleep Mode” is
activated.
The HOLD function
is set to on.
The temperature of
the device increases
after extended periods
of operation.
Slide back the HOLD switch to release
the HOLD function, then press the
button (g page 31).
Set the “Auto PWR Off” or “Sleep
Mode” to “Off” or set the desired time
(g page 53).
Press the button to turn the power
on (g page 24).
Slide back the HOLD switch to release
the HOLD function (g page 31).
This is not a malfunction.
60
Page 61

Problem Cause Resolution
The battery
discharges soon after
charging.
Nothing is on the
display.
The display is not
clear.
The display is turned
off.
There is no sound. The volume is set to
You cannot find a file
you transferred.
The built-in battery is
good for about 500
complete charges and
discharges, depending
on usage.
The battery is empty. Charge the battery (g page 18).
The battery is empty. Charge the battery (g page 18).
The brightness setting
is too low.
The timer of the light
emitting time of
organic EL is
activated.
the minimum.
The earphones
embedded necklace
are not connected
properly.
The file you
transferred is saved in
an unsupported
format.
Contact an authorized Olympus
service center for a replacement.
Adjust settings of the “Contrast”
(g page 52).
Set the desired backlight time
(g page 52).
Adjust the volume (g page 33).
Check if the earphones jack is
connected properly (g page 23).
Check and correct the saving format,
then transfer the file again (delete
unrecognized files in your m:robe).
Additional information
61
Page 62

Problem Cause Resolution
You cannot find a file
or folder you
transferred.
The file name
characters, etc., are
displayed as blanks or
garbled characters.
Additional information
The maximum of
folder hierarchy
levels, folders or files
is surpassed.
Special symbols are
used for the files
names or ID3 tags.
Check the maximum number, then
transfer again (g page 21).
They can be displayed correctly by
setting “Language” to “English” and
“Track Title” to “File Name”
(g page 51, 52). However, some
special symbols cannot be displayed
correctly due to the font limits of this
unit.
62
Page 63

Rebooting your m:robe
If a problem persists after trying the suggested solution, rebooting your m:robe may solve
the problem.
Push a pointed object, such as a pen, into the RESET button.
Tip
Rebooting your m:robe does not delete data.
Additional information
63
Page 64

Service and maintenance
• The product will come with a Warranty card. Make sure that the dealer name and purchase
date are written or stamped on the warranty. If any of the necessary information is
missing, contact the dealer. Please read through the Warranty card and store it in a safe
place.
• If you have a query about after-sale services for this product or encounter a failure, contact
the dealer or an authorized Olympus service center. Within 1 year of the purchase date,
we will repair the product free of charge if it beco mes faulty, provided that the instructions
in this USER’S MANUAL were observed.
• Maintenance parts for this product will be stored for about 5 years after production stops.
Within this period, we can accept repair requests. Even after this period, repair may be
possible. Contact the dealer or an authorized Olympus service center.
• Olympus will not compensate for any damage or loss (including cost when purchase/
Additional information
obtain audio files) incurred as a consequence of a failure of this product. Postage and
packing costs are the responsibility of the sender.
• When sending this product to us for maintenance, pack the product with sufficient
cushioning to avoid damage during transportation. Use a door-to-door package delivery
service or registered parcel mail so that you have proof of sending the product.
• Ownership of removed parts during repair will belong to us.
• Stored data on the memory may be lost, and writing to the memory or deleting data, etc.,
may be necessary during repair or service. Be sure to back up your data before sending
this product for repair or service. Olympus will take no responsibility for any loss due to
changes of stored data.
• We cannot accept any request for the recovery/restoration of lost data.
Due to copyright restrictions, we cannot copy stored data for repair or service. Therefore,
we may not be able to accept repair of service where restoring data is required.
64
Page 65

Specifications
m:robe
Product name DIGITAL AUDIO PLAYER
Model name MR-F10
Built-in battery Lithium-polymer rechargeable battery
Weight Approx. 25 g (including battery)
Dimensions Approx. 32 mm × 65 mm × 15 mm
Display OLED (organic EL display)
Storage Built-in flash memory
Supported file formats Music file:
Encode format MP3
Recording format MP3
Number of storable tracks Approx. 60 music tracks (MR-F11)*
Continuous playback time Approx. 10 hours (MP3)*
(W×H×D, protruding parts excluded)
96 × 64 pixels, 65,000 colors
256 MB(MR-F11)*
512 MB(MR-F12)*
1 GB(MR-F13)*
1
1
1
Windows Media Audio (WMA)
MPEG1/2/2.5, Audio Layer 3 (MP3)
Ogg Vorbis (OGG)
Approx. 120 music tracks (MR-F12)*
Approx. 240 music tracks (MR-F13)*
3
Additional information
2
2
2
65
Page 66

Bit rate WMA: 32 to 192 kbps (including VBR)
MP3: 16 to 320 kbps (including VBR)
OGG: 16 to 256 kbps (Mono),
64 to 320 kbps (Stereo) (including VBR)
Operating conditions Temperature: 5ºC to 35ºC
Humidity: 30 to 90% (no condensation)
Charge time Approx. 3 hours (using the dedicated USB cable)
USB port USB2.0
Earphones jack 3.5 mm jack/stereo type
1
1 GB = 1 billion bytes: the actual formatted capacity is somewhat less
*
(The actual capacity after formatting will be less than 256 MB/512 MB/1 GB.)
2
For typical 4-minute tracks recorded at 128 kbps in WMA format
*
3
*
When playing WMA/MP3/OGG formatted 128 kbps, 44.1 kHz audio data at room
temperature (25ºC), with the backlight turned off, and with the audio volume set to a
Additional information
medium level
This value is subject to the operating conditions, an ambient temperature, number of
charging/discharging times, etc., and is for reference only and is not guaranteed.
Specifications and design are subject to change without notice.
66
Page 67

Menu list
MUSIC MODE
Play
EQ
Repeat Folder
PlayMode
StudyMode
EQ
WOW
User EQ1
User EQ2
Current
All
Normal
Intro
Repeat
Repeat All
Random
Random All
Step
Normal
Rock
Jazz
Classic
Pop
WOW
User EQ1
User EQ2
SRS
Trubass
Adjust
OnOn/Off
Off
2sec
5sec
15sec
30sec
60sec
1~10
1~10
Earphone
Speaker
REC Quality
REC Source
Delete
Voice
Line In
Auto Sync
MIC in
Line in
Bookmark
Playlist
32
64
96
128
64
96
128
192
On
Off
67
Additional information
Page 68

SETTINGS
Settings
Resume
Search Speed
Fade In
Time
Language
On
Off
X4
X8
X16
On
Off
Normal
Remain
Total
English
Watch
System
Watch
Alarm
StopWatch
Information
Reset
Setting
Setting
OK
Cancel
OnOn/Off
Off
OnOn/Off
Off
LCD Pivot
Display
Contrast
Scroll Speed
Backlit Time
Additional information
Graphic EQ
Track Title
Timer
Auto PWR Off
Sleep Mode
On
Off
0~10
1~5
5sec
15sec
30sec
60sec
120sec
Wave
Stereo Image
Pumping
Watch
File Info
File Name
ID3 Tag
Off~10min
Off~90min
68
Page 69

Index
A
Alarm . . . . . . . . . . . . . . . . . . . . . . . . . . 53
Auto PWR Off . . . . . . . . . . . . . . . . . . . 53
Auto Sync . . . . . . . . . . . . . . . . . . . . . . . 49
B
Backlit Time . . . . . . . . . . . . . . . . . . . . . 52
Battery . . . . . . . . . . . . . . . . . . . . . . 14, 57
Bit rate . . . . . . . . . . . . . . . . . . . . . . 45, 48
Bookmark . . . . . . . . . . . . . . . . . . . . . . . 42
C
Contrast . . . . . . . . . . . . . . . . . . . . . . . . . 52
D
Delete
Bookmark . . . . . . . . . . . . . . . . . . . 43
Files . . . . . . . . . . . . . . . . . . . . . . . . 28
Playlist . . . . . . . . . . . . . . . . . . . . . . 43
Display setting . . . . . . . . . . . . . . . . . . . 52
E
Earphones embedded necklace . . . . . . . 23
EQ . . . . . . . . . . . . . . . . . . . . . . . . . . . . . 40
F
Fade In . . . . . . . . . . . . . . . . . . . . . . . . . 51
G
Graphic EQ . . . . . . . . . . . . . . . . . . . . . .52
H
HOLD . . . . . . . . . . . . . . . . . . . . . . . . . . .31
I
Information . . . . . . . . . . . . . . . . . . . . . . .54
Interval repeat (A-B) . . . . . . . . . . . . . . .39
Intro . . . . . . . . . . . . . . . . . . . . . . . . . . . .36
L
Language . . . . . . . . . . . . . . . . . . . . . . . .51
LCD Pivot . . . . . . . . . . . . . . . . . . . . . . .51
M
Menu list . . . . . . . . . . . . . . . . . . . . . . . .67
Microphone . . . . . . . . . . . . . . . . . . . . . .45
MUSIC MODE . . . . . . . . . . . . . . . . . . .32
Music recording . . . . . . . . . . . . . . . . . . .47
N
Navigation search . . . . . . . . . . . . . . . . . .27
O
Organic EL display . . . . . . . . . . . . . . . .13
69
Additional information
Page 70

P
Playback
Music file . . . . . . . . . . . . . . . . . 33, 35
Recorded file . . . . . . . . . . . . . . . . . . 48
Voice file . . . . . . . . . . . . . . . . . . . . 45
PLAYLIST . . . . . . . . . . . . . . . . . . . . . . 34
PlayMode . . . . . . . . . . . . . . . . . . . . . . . .36
Power . . . . . . . . . . . . . . . . . . . . . . . . . . .24
R
Random . . . . . . . . . . . . . . . . . . . . . . . . . 36
Random All . . . . . . . . . . . . . . . . . . . . . . 36
Recording
Music . . . . . . . . . . . . . . . . . . . . . . .47
Additional information
Voice . . . . . . . . . . . . . . . . . . . . . . . . 45
Repeat . . . . . . . . . . . . . . . . . . . . . . . . . . 36
Repeat All . . . . . . . . . . . . . . . . . . . . . . . 36
Repeat Folder . . . . . . . . . . . . . . . . . . . . . 37
Reset . . . . . . . . . . . . . . . . . . . . . . . . . . .54
RESET button . . . . . . . . . . . . . . . . . . . .63
Resume . . . . . . . . . . . . . . . . . . . . . . . . . 51
S
Scroll Speed . . . . . . . . . . . . . . . . . . . . . .52
Search Speed . . . . . . . . . . . . . . . . . . . . . 51
SETTINGS . . . . . . . . . . . . . . . . . . . . . . 50
Settings . . . . . . . . . . . . . . . . . . . . . . . . .51
Sleep Mode . . . . . . . . . . . . . . . . . . . . . . 53
StopWatch . . . . . . . . . . . . . . . . . . . . . . . 53
StudyMode . . . . . . . . . . . . . . . . . . . . . . . 38
System setting . . . . . . . . . . . . . . . . . . . .54
70
T
Time . . . . . . . . . . . . . . . . . . . . . . . . . . . 51
Timer setting . . . . . . . . . . . . . . . . . . . . . 53
Track Title . . . . . . . . . . . . . . . . . . . . . . . 52
U
USB charging . . . . . . . . . . . . . . . . . . . . 18
V
Voice recording . . . . . . . . . . . . . . . . . . . 45
Volume . . . . . . . . . . . . . . . . . . . . . . . . . 33
W
Watch . . . . . . . . . . . . . . . . . . . . . . . . . . 53
Watch setting . . . . . . . . . . . . . . . . . . . . . 53
WOW . . . . . . . . . . . . . . . . . . . . . . . . . . 41
Page 71

Before you contact us
• Confirm the following points before contacting us so that we can provide quick and
accurate answers.
• Please fill out this check sheet if you want to contact us by fax or mail.
• Symptom, displayed messages, frequency, and other details of the problem:
PC-related problems are difficult to accurately identify. Please provide as much detail as
possible.
•Name:
• Contact information: Postal code
Address (your residential address or office address)
Phone/Fax
E-mail
• Product name (model):
• Serial number (located on the side of the product):
• Purchase date:
* Please provide the following information if you are using the storage unit connected to
a PC, or if you are using third party application software:
• Type of PC:
• Manufacturer, model, and other:
• Memory size and free hard disk space:
• Type of operating system and version:
• Settings on Control Panel/System/Device Manager:
• Other peripheral devices connected:
• Name and version of the application software related to your problem:
• Name and version of the OLYMPUS software product related to your problem:
Additional information
71
Page 72

P2-NG0893-01Printed in Korea
 Loading...