

Page 1

LINEAR PCM RECORDER
LS-7
Linear PCM Recorder
DETAILED
INSTRUCTIONS
Thank you for purchasing an Olympus Digital Voice Recorder. Please read these
instructions for information about using the product correctly and safely.
Keep the instructions handy for future reference. To ensure successful recordings,
we recommend that you test the record function and volume before use.
EN
Register your product on www.olympus-consumer.com/register
and get additional benefits from Olympus!
Page 2

Introduction
• The contents of this document may be changed in the future without advanced notice.
Contact our Customer Support Center for the latest information relating to product names
and model numbers.
• The illustration of the screen and the recorder shown in this manual may differ from the
actual product. The utmost care has been taken to ensure the integrity of this document
but if you find a questionable item, error or omission, please contact our Customer
Support Center.
• Any liability for passive damages or damage of any kind occurred due to data loss incurred
by a defect of the product, repair per formed by the third party other than Olympus or an
Olympus authorized service station, or any other reason is excluded.
Trademarks and registered trademarks
• IBM and PC/AT are the trademarks or registered trademarks of International Business
Machines Corporation.
• Microsoft, Windows and Windows Media are registered trademark s of Microsoft
Corporation.
• Macintosh and iTunes are the trademarks of Apple Inc.
• microSD and microSDHC are the trademarks of SD Card Association.
• MPEG Layer-3 audio coding technology licensed from Fraunhofer IIS and Thomson.
• EUPHONY MOBILE™ and DVM™ are the trademark of DiMAGIC Corporation.
• The product was developed based on noise-canceling technology under license from NEC
Corporation.
• Voice Activity Detection technology licensed from NTT Electronics Corporation.
Other product and brand names mentioned herein may be the trademark s or registered
trademarks of their respec tive owners.
EN
2
Page 3

Table of contents
Introduction
Safet y precaut ions ............................................ 4
1 Getting started
Main fe atures .................................................... 8
Check ing the cont ents of the box ......................10
Identi ficatio n of parts ......................................11
Display (LC D panel) ..................................................12
Power sup ply .................................................... 15
Inser ting batter ies ..................................................15
Batte ry setti ngs .......................................................16
Chargin g by connecti ng to a computer v ia USB ......17
Connec t to the USB connec ting AC adapter
(optiona l) to charge ..........................................18
Turning on/o ff the power ........................................20
HOLD ................................................................21
Setti ng time and da te [Time & Date] .................22
Changin g the time and dat e ....................................23
Inser ting and eje cting a mic roSD card ...............24
Inser ting a microSD c ard .........................................24
Eject ing a microSD car d ...........................................2 5
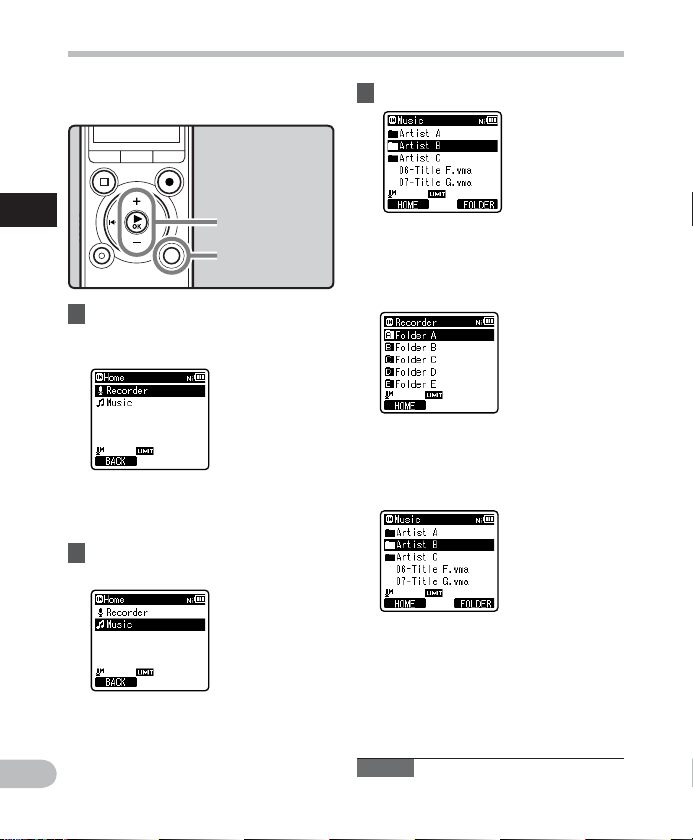
[Home] dis play operat ions ................................26
Notes on t he folder s .........................................27
About th e folders fo r voice record ings .................... 27
About th e folder for mu sic playback .......................28
Selec ting the fo lders and f iles ..........................29
2 About recording
Record ing .........................................................30
Changin g the recordi ng scene [Rec S cene] .............33
Recomme nded sett ings by record ing conditi on ....34
Record ing from ex ternal micro phone or othe r
device s ............................................................... 35
3 About playback
Playback ..........................................................37
Changin g the playback s peed .................................41
Sett ing an index mar k or a temp mark ................... 42
How to beg in segment rep eat playback .................43
Changin g the playback s cene [Play Scene] .............44
Erasi ng .............................................................45
Erasing f iles .............................................................45
Erasing a f older ........................................................45
Parti ally erasing a f ile .............................................46
4 Menu setting
Menu set ting meth od ...................................... 48
+ File Menu ............................................................50
, Rec Menu ............................................................50
- Play Menu ...........................................................57
. LCD/Sound M enu................................................60
/ Device Me nu ....................................................... 61
Rearra nging file s [Replace] .....................................63
Moving/C opying fil es [File Move/Cop y] ..................64
Dividi ng files [Fil e Divide] .......................................66
Timer re cording [Ti mer Rec] ...................................67
Alarm pla yback func tion [Alarm] ............................69
Guidanc e [Voice Guide] ...........................................72
Changin g the USB class [USB Se ttings] ...................73
Format ting the rec order [Forma t] ..........................74
5 Using the recorder on your PC
Opera ting envir onment ....................................77
Using Ol ympus Son ority ....................................79
Functi ons available i n the Olympus S onority .........79
Instal ling soft ware ..................................................80
Uninst alling sof tware .............................................82
Copying v oice guide dat a ........................................83
Upgrad e function ....................................................84
Using onl ine help .....................................................86
Connec ting to you r PC .......................................87
Discon necting fr om your PC ....................................88
Transfe r the voice fi les to your PC .....................89
Using as e xternal m emory of th e PC ..................90
6 Other information
Alarm m essage lis t ...........................................91
Trouble s hooti n g ............................................... 93
Access ories (optio nal) .......................................96
Speci ficatio ns...................................................97
Technic al assist ance and sup port ....................102
1
2
3
4
5
6
EN
3
Page 4

Safety precautions
Before using you r new recorder, rea d this
manual c arefully to ens ure that you know
how to operate it safely and c orrectly.
Keep thi s manual in an easily accessible
location for future reference.
• The warning symbols indicate important
safety related information. To protect
yourself and others from personal injury
or damage to property, it is essential
that you always read the warnings and
information provided.
f Danger
If the product is used without
observing the information given
under this symbol, serious injury
or death may result.
f Warning
If the product is used without
observing the information given
under this symbol, injury or
death may result.
f Caution
If the product is used without
observing the information
given under this symbol, minor
personal injury, damage to the
equipment, or loss of valuable
data may result.
EN
4
Caution for usage environment
• To protect the high-precision
technology contained in this
product, never leave the recorder
in the places listed below, no
matter if in use or storage:
• Places where temperatures and/or
humidit y are high or go through
extreme changes. Direct sunlight,
beaches, locked cars, or near other
heat sources (stove, radiator, etc.) or
humidifiers.
• In sandy or dusty environments.
• Near flammable items or explosives.
• In wet places, such as bathrooms or
in the rain. When using products with
weatherproof designs, read their
manuals as well.
• In places prone to strong vibrations.
• Never drop the recorder or subject
it to severe shocks or vibrations.
• The recorder may malfunction
if it is used in a location where
it is subject to a magnetic/
electromagnetic field, radio waves,
or high voltage, such as near a
TV set, microwave, video game,
loud speakers, large monitor unit,
TV/radio tower, or transmission
towers. In such cases, turn the
recorder off and on again before
further operation.
• Avoid recording or playing back
near cellular phones or other
wireless equipment, as they may
cause interference and noise.
If you experience noise, move
to another place, or move the
recorder further away from such
equipment.
• Do not use organic solvents such
as alcohol and lacquer thinner to
clean the unit.
Page 5

Safety precautions
• When attaching this recorder to a
tripod, be sure to rotate only the
screw of the tripod in the tripod
socket of this recorder. Never
rotate the recorder.
Warning regarding data loss:
• Recorded content in memory may
be destroyed or erased by operating
mistakes, unit malfunction, or during
repair work. It is recommended to back
up and save important content to other
media such as a computer hard disk.
• Any liability for passive damages or
damage of any k ind occurred due to data
loss incurred by a defect of the product,
repair performed by the third part y other
than Olympus or an Olympus authorized
service station, or any other reasons is
excluded from the Olympus’s liability.
Handling the recorder
f Warning:
• Do not use the recorder near
flammable or explosive gases.
• Keep young children and infants
away from the recorder.
Always use an d store the recorde r out of
the reach of yo ung children and inf ants to
prevent the f ollowing dange rous situations
which coul d cause serious inju ry:
1 Becoming entangled in the recorder
strap, causing strangulation.
2 Accidentally swallowing the battery,
cards or other small parts.
3 Accidentally being injured by the
moving par ts of the recorder.
• Do not use or store the recorder
in dusty or humid places.
• Do not disassemble, repair or
modify the unit yourself.
• Use microSD/microSDHC memory
cards only. Never use other types
of cards.
If you accidently inser t another type
of card into the recorder, contact an
authorized distributor or ser vice center.
Do not try to remove the card by force.
• Do not operate the unit while
operating a vehicle (such as a
bicycle, motorcycle, or car).
f Caution:
• Stop using the recorder
immediately if you notice any
unusual odors, noise, or smoke
around it.
Never remove the batteries with bare
hands, which may cause a f ire or burn
your hands.
• Be careful with the strap.
Be careful with the strap when you carry
the recorder. It could easily catch on stray
objects and cause serious damage.
• Do not leave the recorder in
places where it may be subject to
extremely high temperatures.
Doing so may cause parts to deteriorate
and, in some circumstances, cause the
recorder to catch fire. Do not use the
charger or AC adapter if it is covered
(such as a blanket). This could cause
overheating, resulting in fire.
• Handle the recorder with care to
avoid getting a low-temperature
burn.
• When the recorder contains metal
parts, overheating can result in a lowtemperature burn. Pay attention to the
following:
• When used for a long period, the
recorder will get hot. If you hold on
to the recorder in this state, a lowtemperature burn may be caused.
EN
5
Page 6

Safety precautions
• In places subject to ex tremely cold
temperatures, the temperature of the
recorder’s body may be lower than
the environmental temperature. If
possible, wear gloves when handling
the recorder in cold temperatures.
Battery handling precautions
Follow these imp ortant guide lines
to prevent batteries from leaking,
overheating, burning, exploding, or
causin g electrical shock s or burns.
f Danger:
• Do not attempt to recharge
alkaline, lithium or any other nonrechargeable batteries.
• Batteries should never be exposed
to flame, heated, short-circuited or
disassembled.
• Never heat or incinerate batteries.
• Take precautions when carrying or
storing batteries to prevent them
from coming into contact with any
metal objects such as jewelry, pins,
fasteners, etc.
• Never store batteries where they
will be exposed to direct sunlight,
or subjected to high temperatures
in a hot vehicle, near a heat source,
etc.
• To prevent causing battery leaks
or damaging their terminals,
carefully follow all instructions
regarding the use of batteries.
Never attempt to disassemble a
battery or modify it in any way,
solder, etc.
• Do not connect the battery directly
to a power outlet or a cigarette
lighter of an automobile.
EN
• If battery fluid gets into your eyes,
flush your eyes immediately with
clear, cold running water and seek
medical attention immediately.
f Warning:
• Keep batteries dry at all times.
• If rechargeable batteries have
not been recharged within the
specified time, stop charging them
and do not use them.
• Do not use a battery if it is cracked
or broken.
• Never subject batteries to strong
shocks or continuous vibration.
• If a battery leaks, becomes
discolored or deformed, or
becomes abnormal in any other
way during operation, stop using
the recorder.
• If a battery leaks fluid onto your
clothing or skin, remove the
clothing and flush the affected
area with clean, running cold water
immediately. If the fluid burns
your skin, seek medical attention
immediately.
• Keep battery out of the reach of
children.
• If you notice anything unusual
when using this product such as
abnormal noise, heat, smoke, or a
burning odor:
1 remove the batter y immediately while
being careful not to burn yourself, and;
2 call your dealer or local Olympus
representative for service.
6
Page 7

f Caution:
• Please recycle batteries to help
save our planet’s resources. When
you throw away dead batteries,
be sure to cover their terminals
and always observe local laws and
regulations.
• Always charge a rechargeable
battery when using it for the first
time, or if it has not been used for a
long period.
• Rechargeable battery have limited
lifetime. When the operating
time becomes shorter even if
the rechargeable battery is fully
charged under the specified
condition, replace it with a new
one.
Safety precautions
EN
7
Page 8

Main features
s Built-in 3-microphone system (high-
sensi tivity ste reo microph ones and
center microphone).
With a combination of the highsensitivity stereo microphones and
center microphone, balanced, wideband
1
recordings from the high to low
Main features
frequencies are enabled.
s Util izes a high se nsitivit y, low
noise stereo microphone capable
of faithfully capturing the original
sound.
Fixing the stereo microphones at a 90°
angle enables recording with a natural
and expansive stereo feel.
s Supports t he linear PCM format ,
which i s capable of re cording sou nd
quali ty equivalent to or surpass ing
CD-level.
Capable of realistically recording various
different sound sources. High resolution
recording at a high sampling frequency
and bit count equivalent or superior to
that of a music CD (Sampling frequenc y
44.1 kHz, Bit count 16bit) is possible
(☞ P. 51).
s Supports a wide rang e of recordin g
format s. Can handle t he MP3 format
(MPEG -1/ MPEG-2 Au dio Layer 3) and
the Win dows Media Aud io (WMA)
format.
This devi ce can save files in a high ly
compressed manner, thereby allowing for
extend ed recording times (☞ P. 51).
In additio n, when connected to a n external
device, the r ecorder can encode in coming
analog au dio signals withou t a PC (☞ P.3 5) .
s You can play back WAV, WMA, and
MP3 form at files tran sferred from
a compu ter in addit ion to files
recor ded by the device i tself.
This allows you to use this recorder as a
EN
music player.
8
Getting started
s Supports high capacity recording
media . Besides th e built-in m emory,
you can al so record int o a microSD
card (☞ P.2 4) .
s Equi pped with a pre-re cording
funct ion that enables the recorder
to star t recording up to 2 seconds*
befor e the recordi ng button is
pressed.
This func tion allows you, for example, to
start recording a bird’s singing up to 2
seconds* before its start even if you press
the recording button at the moment it
start s singing (☞ P. 56).
* Recording star t time will vary
according to [Rec Mode] settings.
s Equi pped with a va riety of feat ures
that support audio recording.
With this reco rder you can customize a
variet y of recording func tions such as the
recordin g level and microphon e sensitivity
to suit the recording conditions and
personal preferences (☞ P.5 0) .
s It has a b uilt-in Var iable Contro l Voice
Actuator (VCVA) function (☞ P.53 ).
s The Low Cut Filter m inimizes air
condi tioner noise and ot her similar
noise s while recor ding (☞ P.5 2).
s A Noise Cancel funct ion (☞ P. 57)
and a Voice Fi lter function (☞ P. 57)
cut noi se and enable c lear audio
playback.
s Has re cording scene sett ing and
playba ck scene setting fu nctions to
register the best setting according to
different usages (☞ P. 33, P.44, P.55,
P. 59 ).
s It features v arious repeat func tions
(☞ P. 43, P.5 8).
Page 9

Main features
s EUPHONY MOB ILE has been in cluded
to prod uce a natural, reali stic
exper ience witho ut degradin g sound
quali ty (☞ P.5 7).
s You can move or copy file s between
the built- in memory and microSD
card, and wit hin the folde rs in the
memory (☞ P. 6 4).
s You can eras e part of a PCM- format
file that has be en recorde d with this
recorder (☞ P. 4 6).
s You can divide a fil e (PCM, MP3) that
has bee n recorded wi th this reco rder
into tw o files (☞ P. 6 6) .
s Inde x mark and temp mark feat ures
allow yo u to quickly find des ired
locat ions (☞ P.4 2) .
s The playback s peed can be con trolled
as preferred ( ☞ P.41) .
s The gui dance featu re (in English
and oth er language s) gives a udio
notificat ion of operat ing conditi ons.
This allows you to easily operate various
functions with the support of voice
guidance (☞ P. 7 2).
s You may assign your own names t o
folde rs (☞ P. 61) .
s Timer Recor ding (☞ P.67) and Alarm
playback (☞ P. 69) enable automat ic
recor ding and playb ack at a set time .
s A conven ient intro pl ay feature has
been includ ed for when sea rching
for a fil e that you want to l isten to
(☞ P. 6 0) .
s Comes with “Olympus Sonorit y”
soft ware for Window s and Macintosh
(☞ P.7 7) .
• If you transfer voice files recorded with
the recorder to a PC, you can easily
playback , organize, and edit the files.
• You can perform waveform editing,
file joining, and file splitting.
s The “Ol ympus Sonority ” can be
upgraded to a “O lympus Sonority
Plus”, whic h is equippe d with a
enhanced functionality (Optional)
(☞ P. 84) .
In addition to the “Olympus Sonority”
functions, editing of MP3 files and
creation of music CDs can be performed.
s This re corder is compati ble with USB
2.0, e nabling fast d ata transfe r to a
computer.
s It has a USB char ging function
(☞ P.17 ).
s It has a b acklight fu ll-dot display
(LCD panel).
1
Main features
EN
9
Page 10

Checking the contents of the box
The following items are include d with the recorder.
If anything is missing or damaged, contact the dealer from whom you purchased the recor der.
1
Check ing the conten ts of the box
• Contents may vary depending on purchase location.
• Warranty differs depending on purchase location. Warranty card may not be included.
Voice Reco rder USB cabl e
Carrying case
Windscreen
• Ni-MH Rechargeabl e
batteries (2)
• Olympus Sonor ity CD-ROM
• INSTRUCTIONS
• Warranty car d
Strap
4 Attaching the strap:
EN
10
4 Attaching the windscr een:
• Start recording after attaching the
windscreen (included within) to the
microphone. The noise may occur even if
a windscreen is attached when a strong
wind blows against a microphone.
Page 11
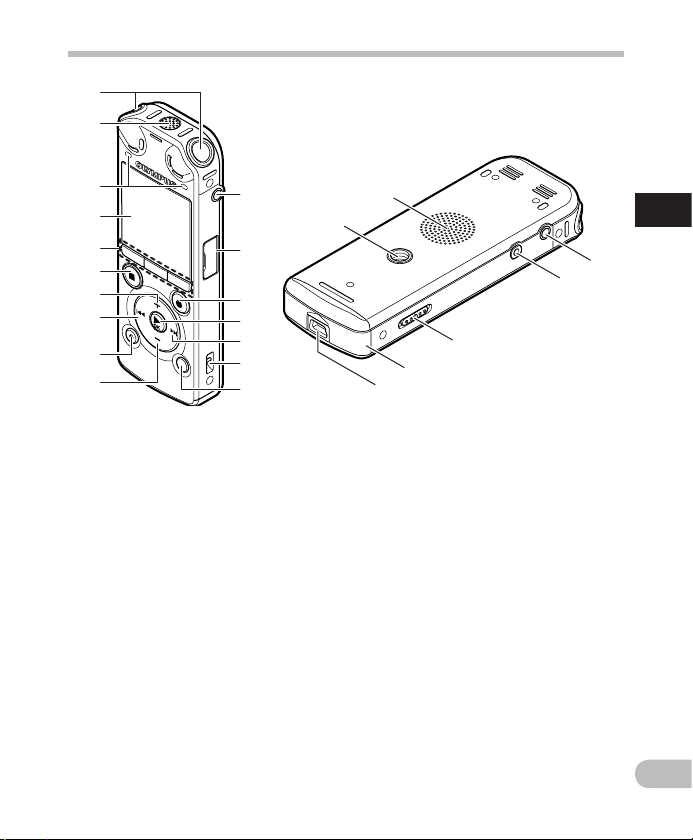
Identification of parts
1
2
3
4
5
6
7
8
9
0
1 Built-in stereo microphone (L/R)
2 Built-in center microphone
3 PEAK indicator light (LED)
LED indicator light (LED)
4 Display (LCD panel)
5 F1 button
MENU/SCENE button
F2 button
6 STOP (4) button
7 + button
8 0 button
9 ERASE button
0 – button
! MIC (Microphone) jack
@ Card cover
# REC (s) (Record) button
Recording indicator light (LED)
!
@
#
$
%
^
&
(
*
=
q
w
$ `OK button
% 9 button
^ Strap ho le
& LIST button
* Tri po d s oc ket
( Built-in speaker
) EAR (Earphone) jack
- REMOTE jack
Connect the receiver for the exclusive
remote control set RS30W (optional). This
enables operation of the start and stop
recording functions through the remote
control.
= POWER/HOLD switch
q Batte ry cover
w USB connector
1
Identification of parts
)
-
EN
11
Page 12
1 2 3 4
12 3
1 2 3
Display (LCD panel)
4 [Recorder] mode display:
Folder list display
Identification of parts
File dis play
1
Identification of parts
4
5
1 Recording media indicator
[l]: Built-in flash memory
m]: microSD card
[
2 Current folder name
3 Battery indicator
4 Folder name
5 Function guide indicator
File lis t display
4
5
1 Recording media indicator
2 Current folder name
3 Battery indicator
4 File name
EN
5 Function guide indicator
12
5
6
7
8
9
0
!
@
1 Recording media indicator
2 Current file name
3 Current file number/ Total
number of recorded files in the
folder
4 Battery indicator
5
Folder indicator, File Lock indicator,
Recording mode indicator
6 Recorder status indicator
[K]: Record indicator
[≠]: Pause indicator
[L]: Stop indicator
[•]: Play indicator
[ß]: Forwarding indicator
[™]: Rewinding indicator
[N]: F. Play indicator
[M]: S. Play indicator
7 Icon display (☞ P.14 )
8 Remaining recording time,
File length
9 Elapsed recording time,
Elapsed playback time
0 Remaining memory bar indicator,
Playback position bar indicator
!
Level mete r, Record ing date and time
@ Function guide indicator
Page 13
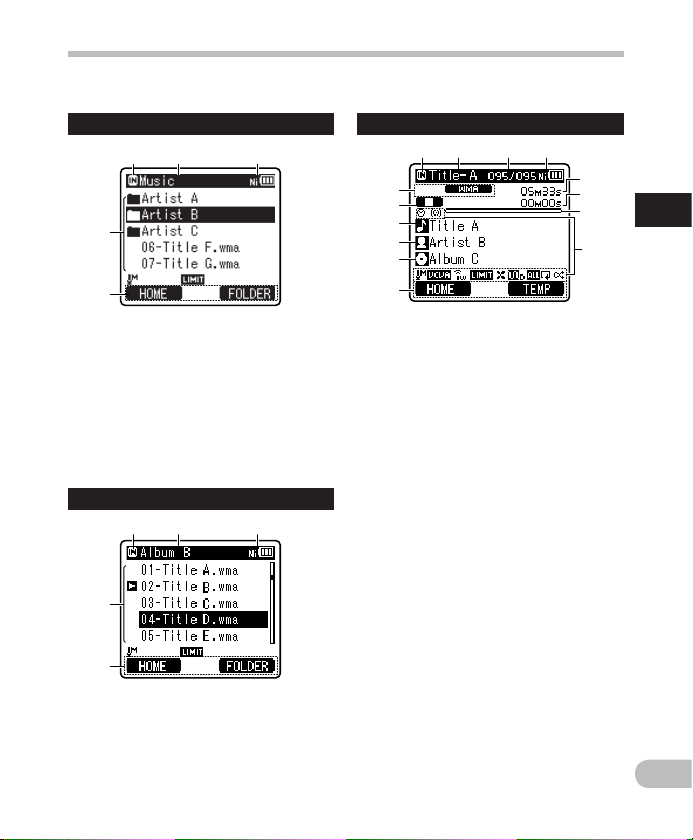
1 2 43
1 2 3
1 2 3
4 [Music] mode display:
List di splay
1
Identification of parts
File dis play
4
5
When the re are files and
folder s in the folder
1 Recording media indicator
[l]: Built-in flash memory
[m]: microSD card
2 Current folder name
3 Battery indicator
4 Folder name, File name
5 Function guide indicator
List di splay
2
4
5
When the re are only file s in
the folder
1 Recording media indicator
2 Current folder name
3 Battery indicator
4 File name
5 Function guide indicator
5
6
7
8
9
0
!
@
#
$
1 Recording media indicator
2 Current file name
3 Current file number/ Total
number of recorded files in the
folder
4 Battery indicator
5 File format
6 Recorder status indicator
[•]: Play indicator
[L]: Stop indicator
[ß]: Forwarding indicator
[™]: Rewinding indicator
[N]: F. Play indicator
[M]: S. Play indicator
7 Title name
8 Artist name
9 Album name
0 Function guide indicator
! File length
@ Elapsed playback time
# Playback position bar indicator
$ Icon display (☞ P.14 )
1
Identification of parts
EN
13
Page 14
[«]: Timer
[A]: Alarm
[?]: Microphone Sensitivity
[û]: VCVA
[Æ]: Voice sync
1
Identification of parts
[ü]: Pre-recording
[ù]: Rec Level
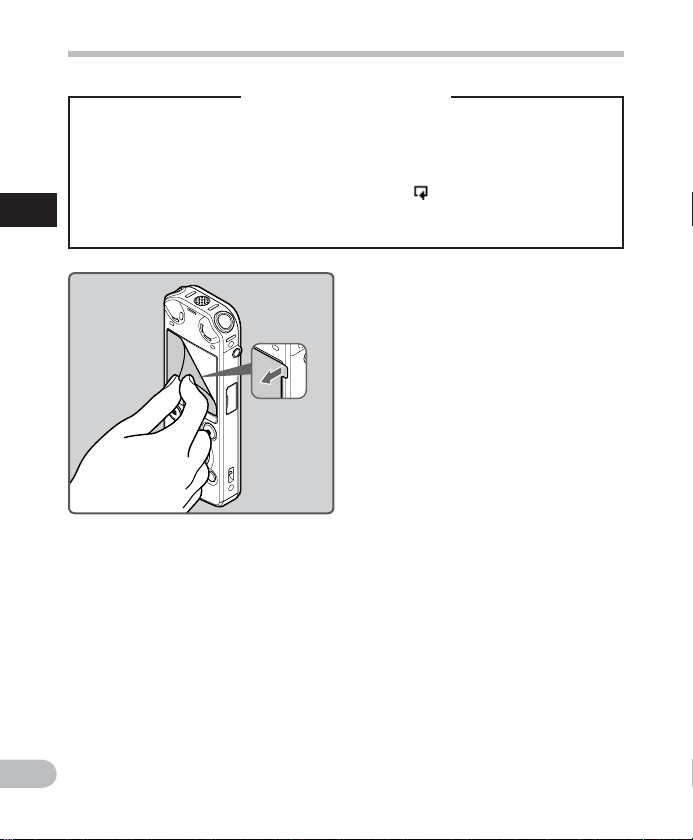
• Remove the screen protector on the
display.
Icon display(For all modes)
[0]: Low Cut Filter
[≤]: Zoom Mic
[%]: Noise Cancel
[$]: Voice Filter
[Ü] [á] [
[∞] EUPHONY
[≥]: Reverb
Identification of parts
]: Playback mode
EN
14
Page 15
Power supply
Inserting batteries
This recorder can be used with either Ni-MH
Rechargeable Bat teries or AAA Alkaline
Batteries.
• Whe n charging with the re corder,
be sure to use th e supplied Ni- MH
recharg eable batter ies (BR404).
• The supplied rechargeable
batteries are not fully charged.
Before using the recorder or
after long periods of disuse,
it is recommended that you
continuously charge them until
full (☞ P.17 ).
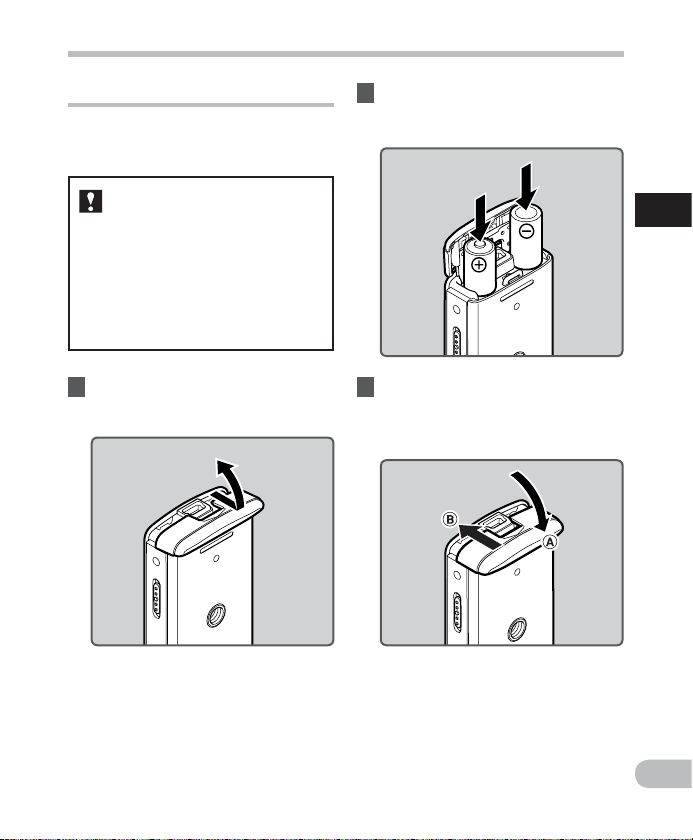
1 Lightly press down on the arrow
and slide the battery cover open.
2 Insert size-AAA batteries,
observing the correct = and
- polarities.
1
Power supp ly
3 Close the battery cover
completely by pressing to the
direction A, then sliding to the
direction B.
EN
15
Page 16
Power supply
Notes
• Manganese batteries may not be used in
this recorder.
• When changing batteries, AAA alkaline
batteries or Olympus Ni-MH rechargeable
batteries are recommended.
• Be sure to stop the recorder before
replacing the batteries. Unloading the
1
batteries while the recorder is in use may
Power supp ly
cause a malfunction such as corrupting
the file, etc. If you take out the bat teries
while recording, you will lose your
currently recorded file because the f ile
header will not be able to close.
• If it takes longer than 15 minutes to
replace the dead batteries or if you take
the batteries in and out repeatedly at
short intervals, you may have to redo the
batter y and time settings. In this case, the
[Battery] screen will appear. For more
details, see “Battery settings
• Remove the batteries if you are not going
to use the recorder for an extended
period of time.
• When replacing rechargeable batteries,
be sure to use Ni-MH rechargeable
batteries (optional). The use of other
manufac turers’ products can damage the
recorder and should be avoided.
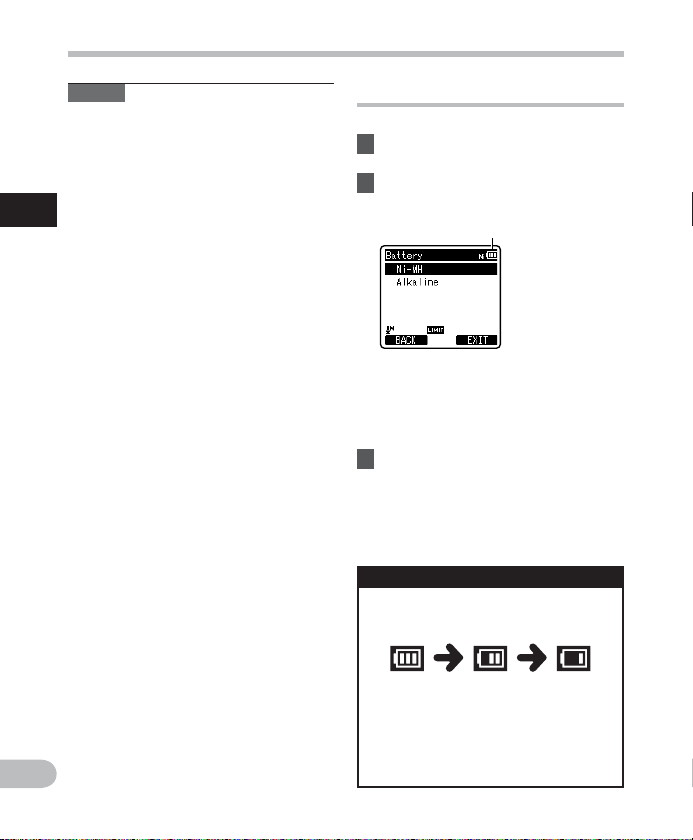
Battery settings
Select to match the battery you are using.
1 Replace the batteries and turn on
the recorder (☞ P.15 ).
2 Press the + or − button to change
the setting.
Battery type
[Ni-MH] (õ):
Select when using the Olympus
”.
Ni-MH rechargeable batteries
(BR404).
[Alkaline] (ú):
Select when using alkaline batteries.
3 Press the `OK button to
complete the setting.
• If the “Hour” indicator flashes in the
display, see “Setting time a nd date
[Time & Date]” (☞ P. 22 ).
Battery indicator
The battery indicator on the display
changes as the batteries lose power.
EN
16
• When [æ] appears on the display,
replace the batteries as soon as
possible. When the batteries are
too weak, [s] and [Battery Low]
will appear on the display and the
recorder will shut down.
Page 17
Power supply
Note
• When playing a voice/music file, the
recorder may be reset due to the
reduction of the voltage output of the
batteries depending on the volume level
even if [º] is displayed in the bat tery
indicator. In this case, lower the volume of
the recorder.
Charging by connecting to a
computer via USB
You can charge the batteries by connecting
to a PC’s USB port. When charging, be sure
to correctly place the rechargeable batteries
(supplied) into the recorder (☞ P.1 5).
Before connecting the USB cable,
exit HOLD mode (☞ P. 21) .
Do not cha rge primar y batteries su ch
as alkal ine or lithiu m batteries . It may
cause ba ttery leak age or heatin g, which
may cause t he recorder t o malfunct ion.
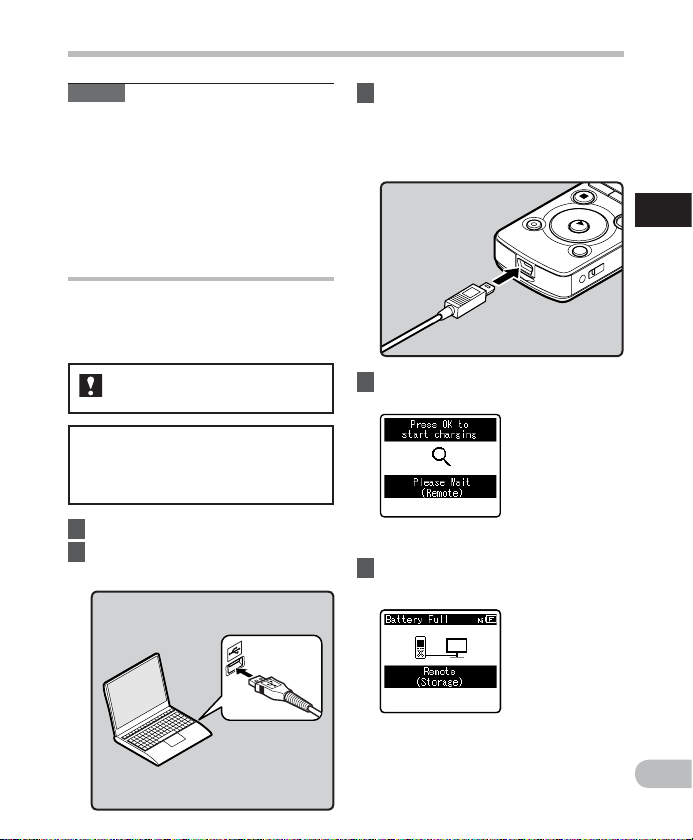
1 Boot the PC.
2 Connect the USB cable to the USB
port of the PC.
3 While the recorder is during stop
mode or turned off, connect
the USB cable to the connecting
terminal on the bottom of the
recorder.
4 Press the ` OK button to start
charging.
• While [Press O K to start charging] is
flashing, press the `OK button.
5
Charging is completed when batter y
indication becomes to [¿].
1
Power supp ly
Charging time: approximately 3 hours *
* It shows the approximate time when
charging the rechargeable battery
fully from no remaining power at the
room temperature. The charging time
EN
17
Page 18
Power supply
will be changed depending on the
remaining amount and the state of
batteries.
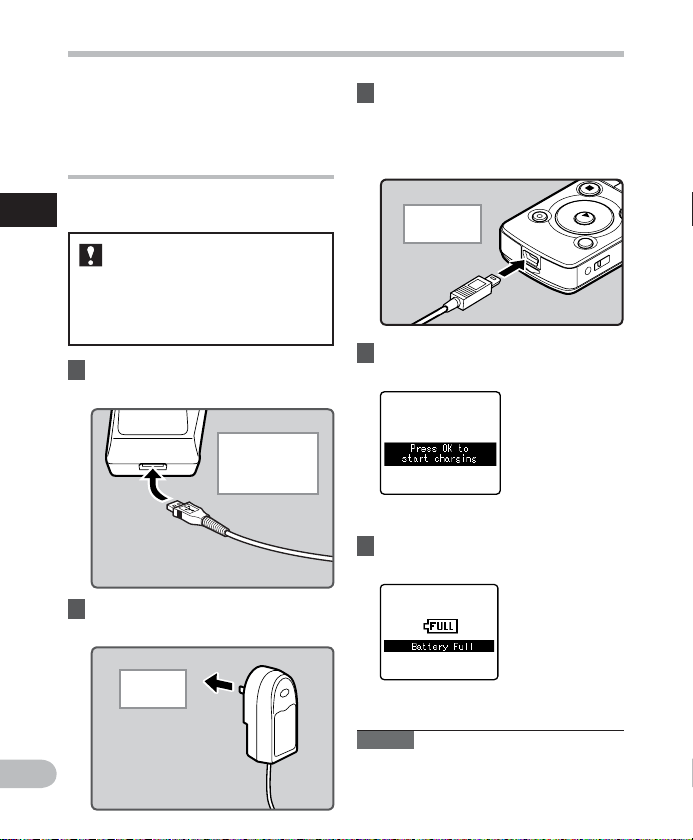
Connect to the USB connecting AC
adapter (optional) to charge
It can be charged by connecting to the USB
connecting AC adapter (A514) (optional).
1
Power supp ly
• Before connecting the AC
adapter, switch the USB
connection setting to
[AC Adapt er] (☞ P.7 3).
• Before connecting the USB
cable, exit HOLD mode (☞ P. 21) .
1 Plug the recorder’s USB cable
into the AC adapter.
To the USB
connectin g AC
adapter ’s (A514)
USB connector
2 Plug the AC adapter into AC
outlet.
3 While the recorder is during
stop mode or turned off,
connect the USB cable to the
connecting terminal on the
bottom of the recorder.
To the USB
connector
4 Press the ` OK button to start
charging.
• While [Press O K to start charging] is
flashing, press the `OK button.
5 Charging is completed when
[Battery Full] is displayed.
EN
18
To the
AC outlet
Notes
• The recorder cannot be charged when
the PC is not turned on. It may not also
be charged when the PC is in standby,
hibernate, or sleep mode.
Page 19

Power supply
• Do not charge the recorder with the USB
hub connected.
• Insert the supplied rechargeable battery
and set [Battery] to [Ni-MH]. If [Battery]
is set to [Alkaline], you cannot recharge
(☞ P.16 , P.61) .
•
You cannot charg e when [ø]*1 or [√]*2
blinks. Charge the batteries at a
temperature in the range of 5°C to 35°C
(41°F to 95°F).
ø
*1 [
]: When the surrounding
temperature is low.
*2 [√]: When the surrounding
• When using time becomes notably short
• Be sure to push the USB connector all the
• Be sure to use the included dedicated
• Selecting [Composite] in the USB
• In case you would like to charge using
temperature is high.
even after the batteries are fully charged,
replace them with new ones.
way in. Otherwise, the recorder may not
operate properly.
USB cable. If any other company’s cable
is used, it may lead to malfunction of the
recorder. Also, never use this dedicated
cable with any other company’s products.
connection settings will prevent the
recorder to charge via USB. Select
[Storage class] in the USB connection
settings if you would like to charge
(☞ P.73) .
the [Composite] setting, select [Option]
in the USB connection settings, then
connect the USB cable to the recorder.
Select [AC adapter] at the [USB Co nnect]
display to start charging (☞ P. 73).
Cautions concerning the rechargeable
batteries
Read the following descriptions carefully
when you use the Ni-MH rechargeable
batteries.
Discharging:
The rechargeable batteries self-discharge
while this is not in use. Be sure to charge
them regularly before use.
Operating temperature:
The rechargeable batteries are chemical
products. The rechargeable batteries
efficiency may fluc tuate even when
operating within the recommended
temperature range. This is an inherent
nature of such products.
Recommended temperature range:
When operating applia nce:
0°C - 42°C/ 32°F - 107.6°F
Charging:
5°C - 35°C/ 41°F - 95°F
Storage f or a long period:
–20°C - 30°C/ – 4°F - 86°F
Using the rechargeable batteries outside
the above temperature range may result in
declining efficiency and shor ter battery life.
In order to prevent battery leakage or rust,
remove the rechargeable batteries from the
products when you will not be using them
for a long time, and store them separately.
Notes
• This recorder is designed to fully charge
batteries regardless of their energy level.
However, for best results when charging
newly purchased rechargeable batteries
or batteries that have not been used
for a long time (more than one month),
It is recommended to fully charge the
batteries then discharge rep eatedly for 2
to 3 times.
1
Power supp ly
EN
19
Page 20

Power supply
• When disposing rechargeable batteries,
always observe the local laws and
regulations. Contact your local recycling
center for proper disposal methods.
• If Ni-MH rechargeable bat teries are not
fully discharged, protect against shortcircuiting (e.g. by taping the contac ts)
before disposing.
1
Power supp ly
Turning on/off the power
When the recorder is not being used,
turn the power off to reduce battery
consumption to a minimum. Even if
the power is turned of f, existing data,
mode set tings, and clock settings will be
maintained.
Turning o n the power
While the recorder is turned off,
slide the POWER/HOLD switch to
the direction of the arrow.
Turning o ff the powe r
Slide the POWER/HOLD switch to
the direction of the arrow, and hold
it for 0.5 seconds or longer.
• The display shuts of f, and the power will
be turned off.
• The resume function remembers the stop
position before the power is turned off.
Power save m ode
If the recorder is on and stops for 10
minutes or longer (default), the display
shuts of f and it goes into power save
mode (☞
P.61).
• To exit power save mode, press any
button.
• The display will turn on, and the power
will be turned on.
EN
20
Page 21

HOLD
If you set the recorder to HOLD mode, the running conditions will be preserved, and all
buttons will be disabled. This feature is useful when the recorder has to be carried in a bag or
pocket. This mode can also prevent you from accidentally stopping recording.
Set the r ecorder to HO LD mode
Slide the POWER/HOLD switch to
the [HOLD] position.
• After [Hold] appears on the display, the
recorder is set to HOLD mode.
Notes
• If you press any button in HOLD mode, the clock display lights for 2 seconds, but it will not
operate the recorder.
• If HOLD is applied during playback (recording), operation is disabled with the playback
(recording) state unchanged (When playback has ended or the recording has ended due
to the remaining memory being used up, it will stop).
• The recorder can be effectively operated via the exclusive remote control set RS30W
(optional), even when it is in HOLD mode.
Exit HOLD mode
Slide the POWER/HOLD switch to
the A position.
1
HOLD
EN
21
Page 22
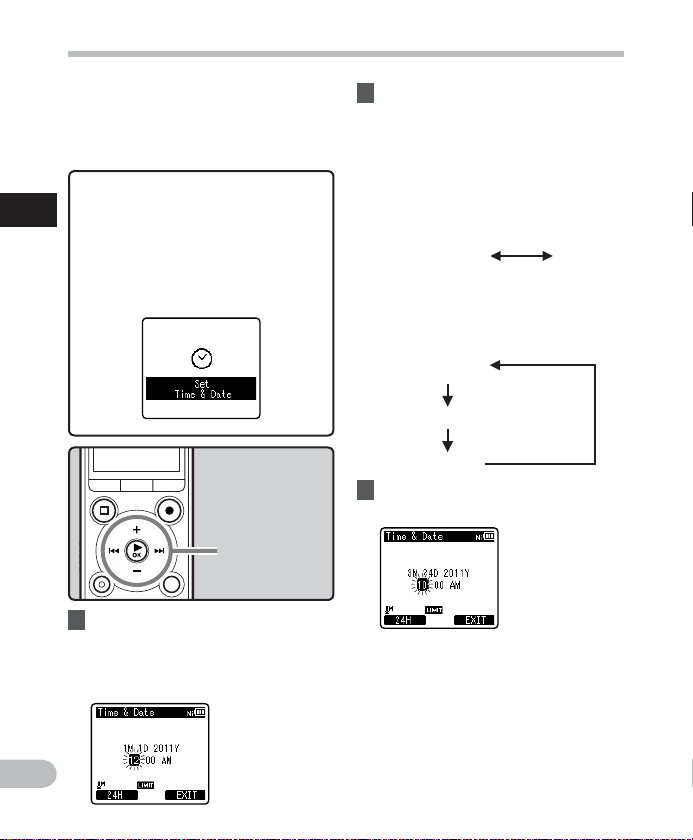
Setting time and date [Time & Date]
If you set the time and date beforehand,
the information when the file is recorded is
automatically stored for each file. Setting
the time and date beforehand enables easier
file management.
When you use the recorder f or
the fir st time after purchas ing it,
1
or when the batte ries have been
Setti ng time and date
inser ted without th e device having
been used in a long time, the
[Set Time & Date] will a ppear. When
the “Hour” is flashing, conduct t he
setup from Step 1.
+− button
9 0 button
`OK button
1 Press the 9 or 0 button to
select the item to set.
• Select the item from the “Hour”,
“Minute”, “ Year ”, “ Month” and “Day”
with a flashing point.
2 Press the + or − button to set.
• Follow the same steps by pressing the
9 or 0 button to select the next
item, and pressing the + or − button
to set.
• You can selec t between 12 and 24
hour display by pressing the F1
button while setting the hour and
minute.
Example : 10:38 P.M
10:3 8 PM
(Initial sett ing)
• You can selec t the order of the
“Month”, “ Day” and “Yea r” by
pressing the F1 button while setting
them.
Example : March 24, 2011
3M 24D 2011Y
(Initial sett ing)
24D 3M 2011Y
2011Y 3M 24D
22:38
3 Press the `OK button to
complete the setting.
• The clock will star t from the set date
and time. Press the `OK button
according to the time signal.
EN
22
Page 23
Setting time and date [Time & Date]
Notes
• If you press the ` OK button during the
setup operation, the recorder will save
the items that were set to that point.
• After setup, a message will sound saying
that If the guidance is not required, select
[Off], and the screen goes into [Vo ice
Guide] (☞ P.72) setup. If you don’t want
the guidance feature, select [Off].
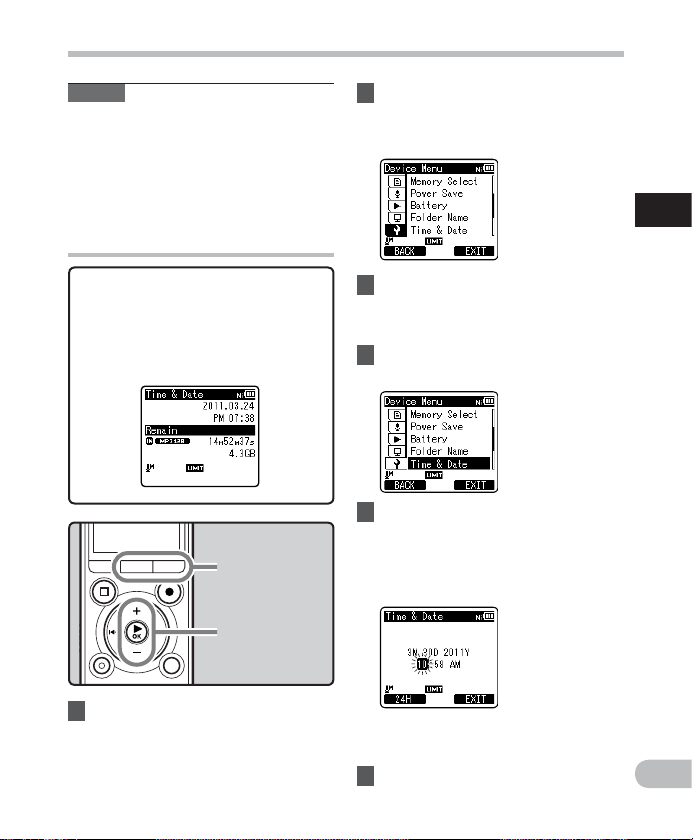
Changing the time and date
While the recorder is during stop
mode, press and hold the STOP (4)
button to display the [Time & Dat e]
and [Remain]. If the current time and
date is not correct, set it using the
procedure below.
MENU/SCENE
button
F2 button
+ − button
`OK button
2 Press the + or − button to select
[Device Menu] tab.
• You can change the menu display by
moving the settings tab cursor.
3 Press the `OK button to move
the cursor to the item to set.
• [Device Menu] will appear on the
display.
4 Press the + or − button to select
[Time & Date].
5 Press the `OK button.
• [Time & D ate] will appear on the
display.
• The “Hour
indicating the start of the Time and
Date setup process.
” will flash on the display,
1
Setti ng time and date
1 While the recorder is during stop
mode, press the MENU/SCENE
button.
• The menu will appear on the display
(☞ P. 48).
The following steps are the same as
Step 1 through Step 3 of “Setting time
and date [ Time & Date]” (☞ P. 22 ).
6 Press the F2 (EXIT) button to
close the menu screen.
EN
23
Page 24
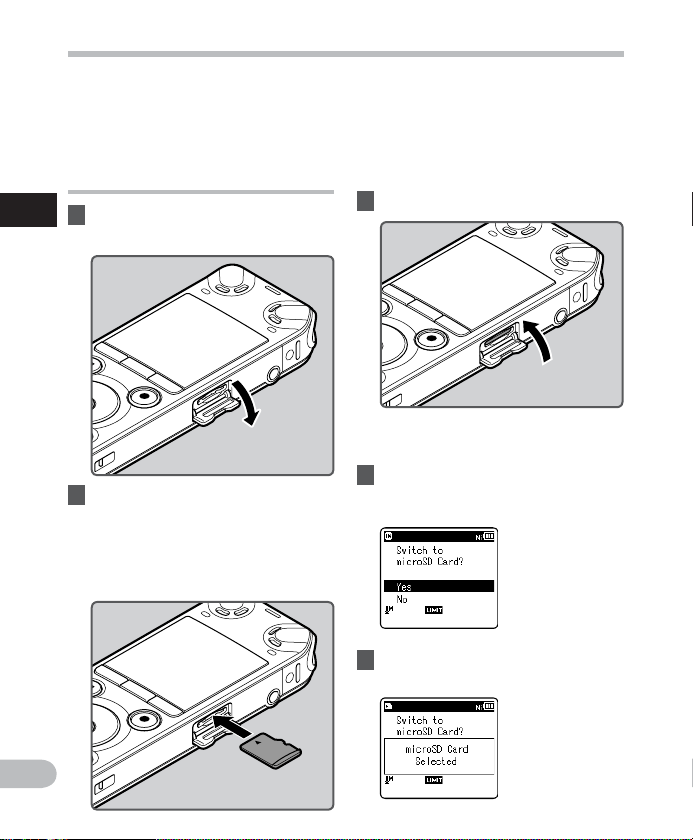
Inserting and ejecting a microSD card
The “microSD” indicated in the instruction
manual refers to both microSD and
microSDHC . With this recorder, besides the
built-in memory, you can store the data in
the commercially available microSD card.
Inserting a microSD card
1
1 While the recorder is during stop
mode, open the card cover.
Inser ting and ejec ting a micr oSD card
2 Face the microSD card in the
correct way and insert into
the card slot as shown in the
diagram.
• Insert the microSD card keeping it
straight.
• Inserting the microSD card in the
wrong way or at an angle could
damage the contact area or cause the
microSD card to jam.
• If the microSD card is not inserted all
the way, data may not be written to
the microSD card.
3 Close the card cover securely.
• When you insert the microSD card,
the recording media changeover
display will appear.
4 To record on a microSD card,
press the + or − button and select
[Ye s].
5 Press the `OK button to
complete the setting.
EN
24
Page 25
Inserting and ejecting a microSD card
Notes
• It is possible to switch the recording
media over to the built-in memory
(☞ P. 61).
• In some cases microSD cards which have
been formatted (initialized) by another
device, such as a computer, may not be
recognized. Be sure to format microSD
cards with this recorder before using
them (☞ P.74 ).
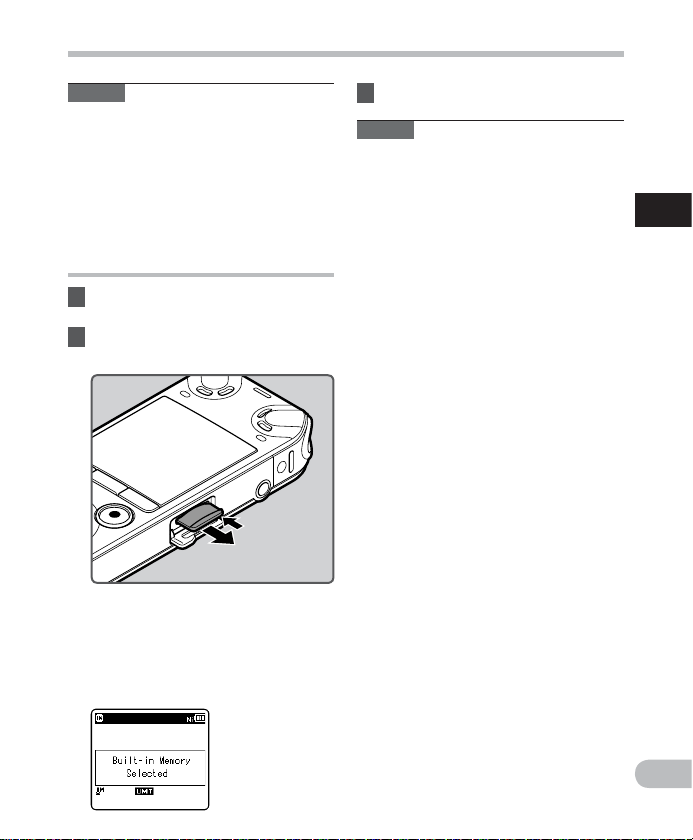
Ejecting a microSD card
1 While the recorder is during stop
mode, open the card cover.
2 Push the microSD card inward to
unlock it, and let it eject partially.
• The microSD card is visibly out of the
slot and can be removed safely.
• If you ejec t the microSD card when
[Memory Select] is set to [microSD
Card], it will be automatically
changed to [Built-in Memory
Selected].
3 Close the card cover securely.
Notes
• Releasing your finger quickly after
pushing the microSD card inward may
cause it to eject forcefully out of the slot.
• Check the Olympus website regarding
microSD cards which are confirmed
operation with this recorder.
• This recorder may not recognize correctly
on some microSD cards which are not
compatible with this recorder.
• In the case when the microSD card cannot
be recognized, remove the microSD card
then put it in again to see if this recorder
recognizes the microSD card.
• The processing per formance reduces in
a microSD card when you repeat writing
and deleting. In this case, format the
microSD card (☞ P.74 ).
1
Inser ting and ejec ting a micr oSD card
EN
25
Page 26
[Home] display operations
You can use this recorder as a digital voice
recorder, as well as a digital music player.
1
[Home] display operations
+ − button
`OK button
LIST button
1 Press the LIST button repeatedly
to set the [Home] display.
• [Home] will appear on the display.
• When [Home] is displayed in the
Function Guide display section, press
the F1 button to return to the home
screen.
2 Press the + or − button to select
the mode.
3 Press the `OK button.
When [Recorder] is selecte d:
The recorder will go into [Recorder]
mode. You will be able to record
and playback files recorded by the
recorder (☞ P.30, P. 37 ).
When [Music] is selected:
The recorder will go into [Music]
mode, and you will be able to
playback music files transferred to the
recorder (☞ P.37 ).
EN
26
Note
• During recording, you cannot switch the
mode without stopping the recorder.
Page 27
Notes on the folders
The built-in memor y or the microSD card can be used for the recording media. The voice
files and the music files are separated into folders for voice recordings and folders for music
playback that are organized in a branching tree-st yle and saved.
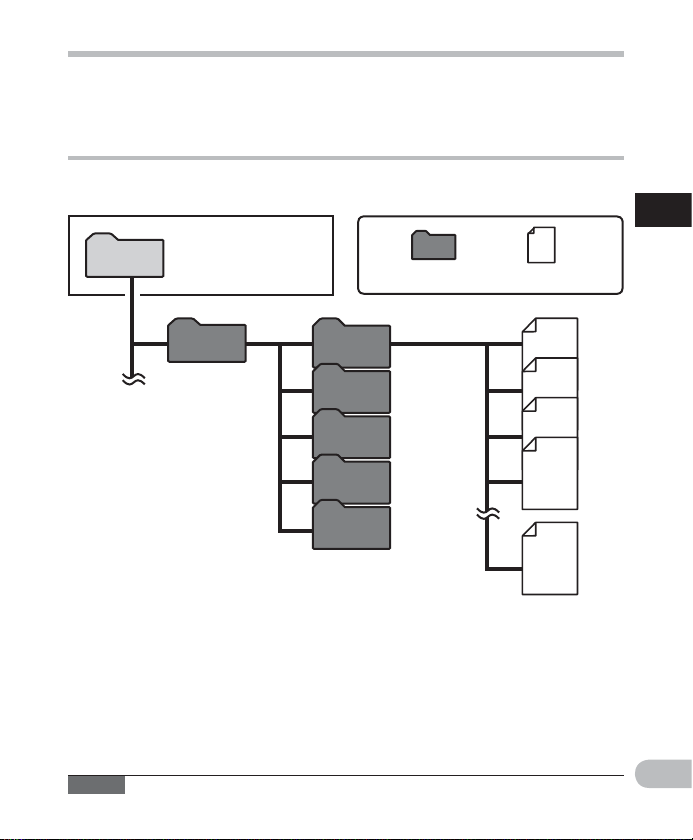
About the folders for voice recordings
[Folder A] - [Folder E] within the [Recorder] folder are the folders for voice recordings. When
recording with this recorder, select any one of the five folders and then record.
You can chang e the mode
Home
on the [Home] disp lay.
Folder File
1
Notes on th e folders
Recorder
Note
• Files or folders located under the folder [Recorder] will not be indicated on the recorder.
Folder A
Folder B
Folder C
Folder D
Folder E
Each fol der can store up to
200 files .
001
002
003
004
200
EN
27
Page 28
Notes on the folders
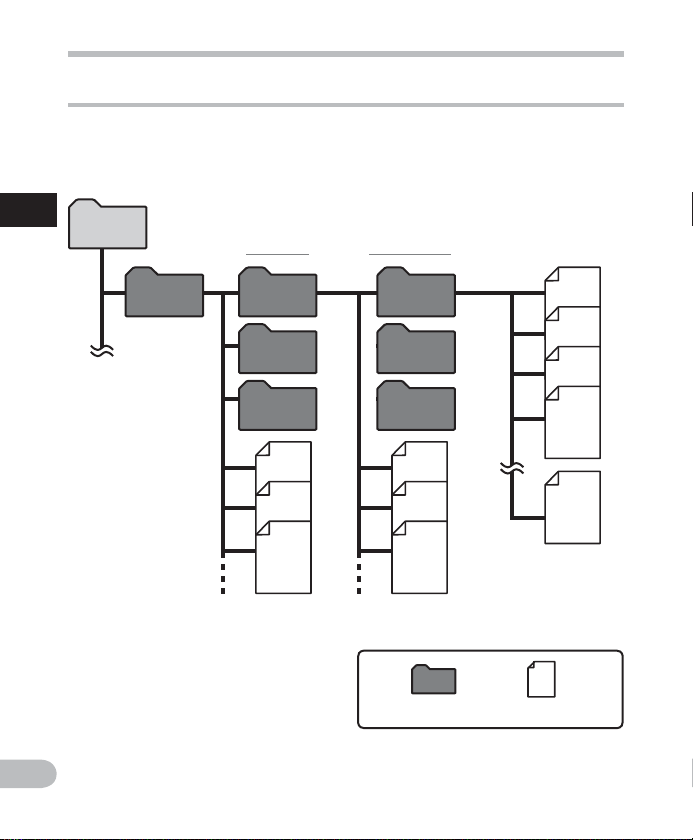
About the folder for music playback
When trans ferring music files to the device using Windows Media Player, a folder is
automatically created within the music playback folder which has a layered structure as
shown in the diagram below. Music files that are in the same folder can be rearranged in
preferential order and replayed (☞ P.63).
1
Home
Notes on th e folders
First layer Second layer
EN
28
Music
Artist 01
Artist 02
Artist 03
Album 01
001
002
Album 02
Album 03
003
004
200
Each fol der can store
up to 200 f iles.
Up to 200 fol ders can be crea ted under the [Music]
folder, including [Music].
Folder File
Page 29
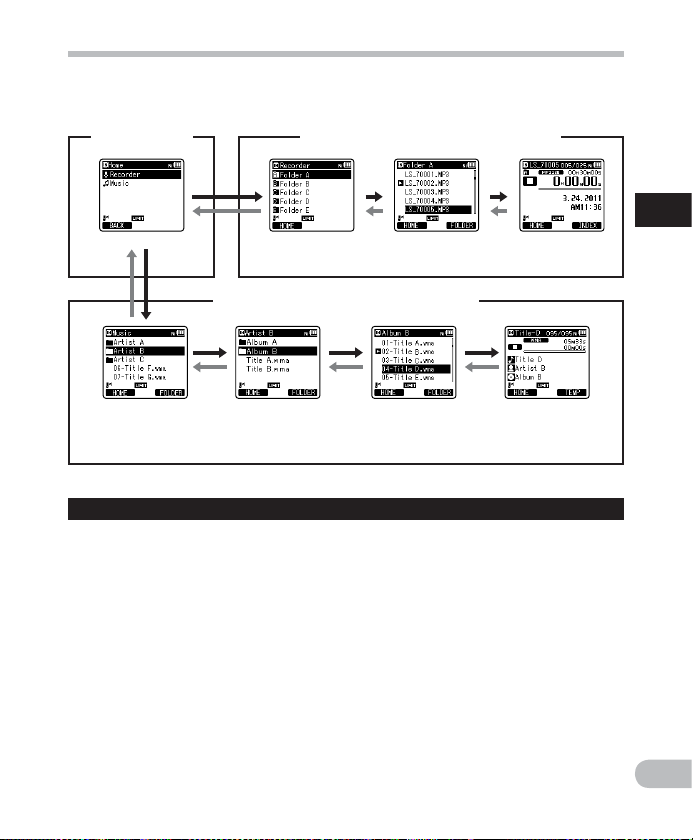
Selecting the folders and files
Change folders while the operation is stopped or during play. For information on the layered
structure of the folders, see the section entitled “Notes on t he folders” (☞
[Home] display
Operation of the folders for music playbacks
Folder list
display
(First layer)
Moving t hrough th e levels
(Second l ayer)
} Return: LIST button
Each time you press this it returns up one
level. The 0 button can also ser ve as
the LIST button on a list display.
• When you press and hold the LIST
button while moving in a hierarchy of
folders, it will return to the file display.
{ Proceed: `OK button
Each time you press this it opens the
folder or file selected in the list display
and proceeds down one level.
• The 9 button can also ser ve as the
`OK button on a list display.
Operation of the folders for voice recordings
Folder list
Folder list
display
display
File list d isplay File disp lay
File list d isplay File disp lay
+ or – button
Select the folder or file.
[Home] display:
Allows the mode of the recorder to be
changed (☞ P.26).
File display:
Information of the selected file is
displayed. Enters in playback standby
mode.
List display:
The folders and files recorded in this
recorder are displayed.
P. 27) .
1
Selec ting the fol ders and fil es
EN
29
Page 30
Recording
Before starting recording, selec t a folder
among [&] to [*]. These five folders can be
selectively used to distinguish the kind of
recording; for example, Folder [ &] might
be used to store private information, while
Folder ['] might be dedicated to holding
business information.
2
Recording
REC (s) bu tton
About recording
• This recorder is designed to be able
to record cleanly and evenly, even in
recording conditions such as when
the volume of the source sound
changes significantly. However, even
higher sound quality recordings
can be achieved by adjusting the
recording level manually (☞ P. 51) .
3 Press the REC (s) button to start
recording.
• The recording indicator light grows
and [K] will appear on the display.
1 Select the recording folder
(☞ P. 2 7) .
2 Press the REC (s) button to
prepare recording.
• The recording indicator light will flash
and [≠] will appear on the display.
• Turn the microphone in the direction
of the source to be recorded.
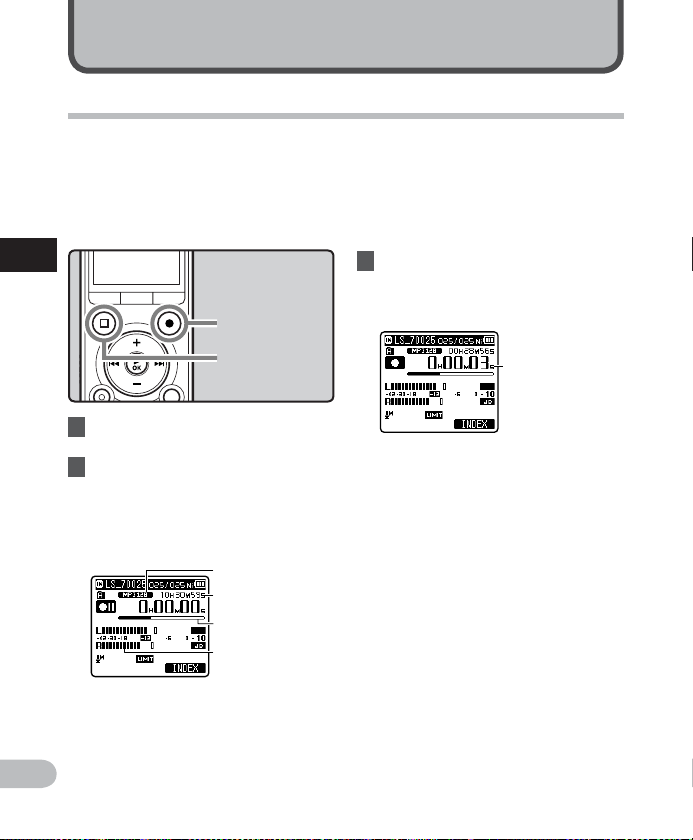
a Recording mode
b Remaining recording time
c Remaining memory bar indicator
d Level meter (changes according to
the recording level and recording
EN
function settings)
30
STOP (4) bu tton
a
b
c
d
e
e Elapsed recording time
• [Rec Mode] cannot be changed in
the recording standby mode or while
recording. Configure this while the
recorder is stopped (☞ P. 51).
• Placing the built-in stereo
microphone over the display is the
proper position for performing stereo
recording. If it is below the display
when recording then proper stereo
recording cannot be performed
because the position of the original
sound will be recorded in reverse
phase.
Page 31

Recording
4 Press the STOP (4) button to
stop recording.
• [L] will appear on the display.
f
f File length
Notes
• To ensure that you do not lose the
beginning of the recording, confirm that
the recording is activated by checking the
recording indicator or the mode indicator
in the display.
• When remaining recording time is less
than 60 seconds, the LED indicator light
starts flashing. When the recording time
is decreasing to 30 or 10 seconds, the
light flashes faster.
• [Folder Full] will appear when the
recording cannot be made any further.
Select other folder or delete any
unnecessary files before recording
(☞ P. 45) .
• [Memory Full] will appear when the
memory is full. Delete any unnecessary
files before recording any further
(☞ P. 45) .
• When a microSD card is inserted in the
recorder, be sure to confirm the recording
media as either [Built-in Memory]
or [microSD Card] so that there is no
mistake (☞ P. 61) .
• If the REC (s ) button is pressed when a
function other than the record function
is specif ied, [Cannot record in this
folder] is displayed. Select a folder from
[Folder A] through [Folder E] and star t
recording again.
• We recommend formatting the record
media in the recorder before recording
(☞ P.74 ).
It is possible to rec ord
exceeding 2GB:
The recording will continue even if the
volume of a single file exceeds 2 GB in
the linear PCM format recording.
• The file is saved ever y 2 GB in
separate f iles. It will be treated as
multiple files when playing back.
• When the recording exceeds 2 GB,
the number of files in the folder may
exceed 200 files. The 201st file and
later will not b e recognized by the
recorder, so check by connecting the
recorder to a PC.
2
Recording
EN
31
Page 32

Recording
Settings relating to Recording
[Mic Sel ect]
(☞ P. 50)
[Mic Sen se]
(☞ P. 50)
[Rec Mode]
(☞ P. 51)
2
[Rec Level]
(☞ P. 51)
Recording
[Zoom Mic]
(☞ P.52)
[Low Cut Filter]
(☞ P.52)
[VCVA]
(☞ P. 53)
[V-Sync. Rec]
(☞ P. 54)
[Timer Rec]
(☞ P. 67)
[Rec Scene]
(☞ P. 55)
[Rec Monito r]
(☞ P. 55)
[Plug-inPowe r]
(☞ P. 56)
[Pre-Re cording]
(☞ P. 56)
EN
Selec t whether or not th e
built-in center microphone is
to be turn ed On or Off.
Sets the r ecording sens itivity.
Sets the r ecording rate fo r
each recording format.
You can conf igure whether
to adjust t he recording lev el
automati cally or to adjus t it
manually.
Sets the d irectivit y of the
builtin stereo microphone.
This fun ction can redu ce
noise fr om air condition ers,
projectors and other similar
noises.
Sets the t hreshold leve l for
the Varia ble Control Voice
Actuator (VCVA).
Sets the s tart level fo r voice
sync recording.
Sets timer recording.
Sets the r ecording set tings
which matc hes the recordin g
condition or environment.
Selec t whether or not to
output t he recording mo nitor
sound fr om the EAR jack.
Selec t whether or not to u se
the plug -in power func tion
according to the external
microphone connected to
the MIC jack.
Pre-recording enables you
to star t recording up to 2
second s before you pres s the
button for recording.
Pause
While the recorder is during
recording mode, press the REC (s)
button.
• [≠] will appear on the display.
• The recorder will time out after 120
minutes when left in [Rec Pause].
Resume Recording:
Press the REC (s) button again.
• Recording will resume at the point of
interruption.
To quick ly check on t he record ed content s
While the recorder is during
recording mode, press the `OK
button.
• [•] will appear on the display.
• Recording will stop, and the file that was
just recorded will be played back .
32
Page 33

Recording
Listen ing while a udio is rec orded
If you star t recording after inserting the
earphone into the EAR jack on the recorder,
you can hear the sound being recorded. The
recording monitor volume can be adjusted
by pressing the + or − button.
Connect the earphone to the EAR
jack on the recorder.
• After recording has started, you can hear
the sound being recorded through the
earphone.
To EAR jack
Notes
• Recording level cannot be controlled
using the volume button.
• To avoid irritation to the ear, inser t the
earphone after turning down the volume
level.
• Do not place earphones near a
microphone as this may cause feedback.
• When the ex ternal speaker is connected
while recording, there is a risk that audio
feedback will occur. It is recommended
that you use earphones for the recording
monitor, or turn [Rec Monitor] to [Off]
while recording (☞ P. 55 ).
Changing the recording scene
[Rec Scene]
You can easily change the recording set tings
by selecting the scene which best matches
your usage (☞ P. 55) .
MENU/SCENE
button
+ − button
`OK button
1 While the recorder is during
stop mode, press and hold the
MENU/SCENE button.
2 Press the + or − button to select
[Rec Scene].
3 Press the `OK button.
4 Press the + or − button to select
the recording scene.
2
Recording
5 Press the `OK button.
EN
33
Page 34

Recommended settings by recording condition
The recorder is initially set to [PCM 44.1kHz] mode so that you can make high quality stereo
recordings immediately after purchasing it. The various functions relating to recording
can be conf igured in detail to suit the recording conditions. The following table shows the
recommended settings for some example recording conditions.
Recording
condition
2
Lectures in large
rooms
Recording
Conferences with
a large nu mber of
people
Meetings
and business
negotiations with
a small nu mber of
people
Dict ation with a
lot of background
noise
Music p laying,
wild birds singing,
and railway
sounds
Recommended settings
[Rec Mode] (☞ P. 51)
[PCM]: [44.1kHz/16bit]
[MP3]: [128kbps]
[WMA]: [128 kbp s]
[MP3]: [128kbps]
[WMA]: [128 kbp s]
[MP3]: [128kbps]
[WMA]: [128 kbp s]
[WMA]: [6 4 kbps] [Low]
[PCM]: [96kHz /24bit]
[Mic Sen se]
(☞ P. 50)
[High]
[Middl e]
Set the
microphone
sensitivity
accordin g to the
volume b eing
recorded.
[Low Cut Fil ter]
(☞ P.52)
[On]
[Off ]
File names will be automatically created for files recorded by this recorder.
LS_7 0001 .MP3
123
1 User ID:
The user ID name that has been set on
the Digital Voice Recorder.
3 Extension:
These are the f ile name extensions for
the recording format when recording
with this device.
• Linear PCM format .WAV
• MP3 format . MP3
• WMA format .WMA
2 File number:
A file number is consecutively
EN
assigned regardless of the changes in
the recording media.
34
Recording
[Zoom Mic]
(☞ P.52)
[+6]
[Off ]
Page 35

Recording
Recording from external
microphone or other devices
The external microphone and other devices
can be connected and the sound can be
recorded. Connect as follows according to a
device to be used.
• Do not plug and unplug devices into the
recorder ’s jack while it is recording.
Recording with external mic rophone:
Connect an external microphone to
the MIC jack of the recorder.
To MIC jack
Applicable external microphones
(optional) (☞ P.96)
Stereo microphone: ME51S
The built-in large- diameter microphone
enables sensitive stereo recording.
2-channel microphone (omnidirectional): ME30W
These are highly sensitive omni-
directional microphones supported by
plug-in power which are well-suited to
recording musical performances.
Compact G un Microphone
(unidirectional): ME31
The directional microphones useful for
recordings such as outdoor recording
of wild birds singing.
Compact zoom microphone
(unid irecti onal): ME 32
The microphone is integrated with a
tripod, making it suitable to place on a
table and record conferences or lecture
from a distance.
Highly sensitive noise-cancellation
monaural microphone (unidirectional):
ME52W
This microphone is used to record
sound at a distance while minimizing
surrounding noise.
Tie clip microp hone (omni-directional):
ME15
Small concealing microphone with a
tie-clip.
Telephone pickup: TP7
Earphone type microphone can be
plugged into your ear while phoning.
The voice or conversation over the
phone can be clearly recorded.
Notes
• The built-in microphone will become
inoperable when an external microphone
is plugged into the recorder’s MIC jack.
• Microphones supported by plug-in
power can also be used. When the plugin power function is set to [On] power
will be supplied by the recorder to the
microphone (☞ P.56) .
• Turn the plug-in power function to
[Off] when an external microphone
not supported by plug-in power is
connected, as there is the risk that noise
may be generated while recording
(☞ P. 56).
• When an external monaural microphone
is used while [Rec Mode] is set to a stereo
recording mode, audio will be recorded
to the L channel only (☞ P. 51) .
2
Recording
EN
35
Page 36

Recording
• When the ex ternal stereo microphone
is used while [Rec Mode] is set to a
monaural recording mode, it enables
recording only with the L channel
microphone (☞ P.51).
Recording the sound of other devices
with this recorder:
The sound can be recorded when
connecting to the audio output terminal
2
(earphone jack) of the other device and the
Recording
MIC jack of the recorder with the connecting
cord K A333 (optional) for dubbing.
To MIC jack
Note
• If you are unable to produce a clear
recording with this recorder even af ter
adjusting the recording level (☞ P.51), this
could potentially be because the output
level for the connected devices is too
high or too low. When external devices
are connected, per form a test recording
and then adjust the output level for the
external devices.
To audio outp ut
terminal of other
devices
Recording the sound of this r ecorder
with other devices:
The sound of this recorder can be recorded
to other devices when connecting the audio
input terminal (microphone jack) of other
devices and the EAR jack of this recorder,
with the connecting cord KA333 (optional).
To EAR jack
To audio inpu t
terminal of other
devices
Note
• When you adjust the various sound
quality settings related to playback on
the recorder, the audio output signal sent
out from the EAR jack will change as well
(☞ P. 57, P. 59) .
EN
36
Page 37

e
About playback
Playback
The recorder can play WAV, MP3 and WMA
format files. To playback a file recorded with
other machines, you need to transfer (copy)
it from a computer.
STOP (4) bu tton
+ − button
`OK button
1 Select the file to be played back
from the folder which contains
it (☞ P. 2 9) .
2 Press the `OK button to start
playback.
• [•] will appear on the display.
a
b
c
d
3 Press the + or − button to adjust
to a comfortable listening
volume.
• The volume can be adjusted within a
range from [00] to [30].
4 Press the STOP (4) button at any
point you want to stop playback.
• [L] will appear on the display.
• This will stop the file being played
back midway. When the resume
function is activated the stopped
location will be registered, even if the
power is turned off. The next time the
power is turned on, playback may be
resumed from the registered stopped
location.
3
Playback
a Recording media indicator, File name,
Folder indicator
b File length
c Elapsed playback time
d Playback position bar indicator
e Level meter
EN
37
Page 38

Playback
Settings relating to playback
[Noise Cance l]
(☞ P. 57)
[EUPHONY ]
(☞ P. 57)
[Voice Filter]
(☞ P. 57)
3
Playback
[Play Mod e]
(☞ P. 58)
[Skip Sp ace]
(☞ P. 58)
[Alar m]
(☞ P. 69)
[Play Scene]
(☞ P. 59)
[Reverb]
(☞
P. 59)
If recor ded audio is dif ficult
to under stand becaus e of
noisy su rroundings, a djust
the Noise Cancel setting
level.
The EUPHO NY setting can
be set to on e of the 4 levels
accordin g to your prefere nce.
The reco rder has a Voice
Filter Fun ction to cut low
and high frequency tones
during n ormal, fast, or s low
playba ck, and enable cl ear
audio pl ayback.
You can sele ct the playback
mode that f its your
preference.
The skip interval length can
be set.
The alar m playback func tion
can be set t o play a selecte d
file at a p re-set time.
Playback sett ings of your
choice ca n be saved to suit
different sound qualities and
playback methods.
You can enjoy th e
reverbe rant sound of var ious
space siz es such as from
the recor ding studio to th e
dome.
Playback through earphone
An earphone can be connected to the EAR
jack of the recorder for listening.
• When the earphone is used, the recorder
speaker will be switched-of f.
To EAR jack
Notes
• To avoid irritation to the ear, inser t the
earphone after turning down the volume
level.
• When you listen with the earphone
during playback, do not raise the
volume too much. It may cause hearing
impairment and decrease in hearing
ability.
EN
38
Page 39

Playback
Forwarding
While the recorder is during stop
mode in the file display, press and
hold the 9 button.
• [ß] will appear on the display.
• If you release the 9 button, it will stop.
Press the `OK button to star t playback
from where it was stopped.
While the recorder is during
playback mode, press and hold the
9 button.
• When you release the 9 button the
recorder will resume normal playback.
• If there is an index mark or temp mark in
the middle of the file, the recorder will
stop at that location (☞ P.42 ).
• The recorder stops when it reaches the
end of the file. Continue pressing the
9 button to proceed with the cue
from the beginning of the next file.
Rewinding
While the recorder is during stop
mode in the file display, press and
hold the 0 button.
• [™] will appear on the display.
• If you release the 0 button, it will stop.
Press the `OK button to star t playback
from where it was stopped.
While the recorder is during
playback mode, press and hold the
0 button.
• When you release the 0 button the
recorder will resume normal playback.
• If there is an index mark or temp mark in
the middle of the file, the recorder will
stop at that location (☞ P.42 ).
• The recorder stops when it reaches the
beginning of the file. Continue pressing
the 0 button to proceed with the
review from the end of the previous file.
3
Playback
EN
39
Page 40

Playback
Locat ing the begi nning of a f ile
While the recorder is during stop
mode or playback mode, press the
3
9 button.
Playback
• The recorder skips to the beginning of
the next file.
While the recorder is during
playback mode, press the 0
button.
• The recorder skips to the beginning of
the current file.
While the recorder is during stop
mode, press the 0 button.
• The recorder skips to the beginning of
the previous file. If the recorder is in
the middle of a file, it will return to the
beginning of the file.
While the recorder is during
playback mode, press the 0
button twice.
• The recorder skips to the beginning of
the previous file.
Notes
• When you skip to the beginning of the
file during playback, the recorder will
stop at the position of the index mark
or temp mark. The index mark and temp
mark will be skipped when you perform
the operation in stop mode (☞ P. 42).
• When [Skip Space] is set to other than
EN
[File Skip], the recorder will skip forward/
reverse the specified time, then will start
40
playback (☞ P.5 8) .
About m usic file
In cases where the recorder is unable
to playback music files that have been
transferred to it, check to make sure that the
sampling rate and bit rate are in the range
where playback is possible. Combinations of
sampling rates and bit rates for music f iles
which the recorder can playback are given
below.
File format
WAV for mat
MP3 format
WMA format
• Variable bitrate MP3 files (in which
conversion bitrates can vary) may not be
played back properly.
• For WAV files, this recorder can only
play back those in the linear PCM format.
WAV files other than these cannot be
played back.
• Even if the format of the file is compatible
for playback on this recorder, the recorder
does not support every encoder.
Sampling
frequency
44.1 kHz, 4 8 kHz,
88.2 kH, 96 kH
MPEG1 Layer3:
32 kHz, 44.1 kHz,
48 kHz
MPEG2 Laye r3:
16 kHz, 22.05 kHz,
24 kHz
8 kHz, 11 kHz,
16 kHz, 22 kHz,
32 kHz, 44.1 kHz,
48 kHz
Bit rate
16 bi t or
24 bit
From 8 kbps
up to 320
kbps
From 5 kbps
up to 320
kbps
Page 41

Playback
Changing the playback speed
Change the speed according to need such as
listening to meeting content at a fast speed
or reviewing spots that you couldn’t catch
in a language lesson at a slow speed. The
tone will be automatically adjusted digitally
without changing the voice so it sounds
natural.
+ − button
`OK button
1 While the recorder is during
playback mode, press the
` OK button.
2 Press the + or − button to select
playback speed.
3 Press the ` OK button.
a
a Playback speed indicator
• Even if playback is stopped, the
changed playback speed will be
retained. The next playback will be at
that speed.
About t he limits o f fast playb ack
Normal operation may not be available
depending on the sampling frequency
and the bit rate of the file to be played
back. In such a case, reduce the speed
of the fast playback.
Notes
• As in normal playback mode, you can
stop playback, cue a file, or insert an
index or temp mark in slow playback and
fast playback modes as well (☞ P. 42).
• The slow playback or fast playback is
available even if either [Voi ce Filter] is
set (☞ P. 57 ).
• When using the slow playback or
fast playback func tion, the following
functions are not available.
• [Noise Cancel] (☞ P. 57)
• [EUPHONY] (☞ P. 57 )
• [Reverb] (☞ P.59 )
• The [Speed] setting in the [Voice Guide]
settings (☞ P.72) is disabled during file
playback.
3
Playback
EN
41
Page 42

Playback
Setting an index mark or a temp
mark
If index marks and temp marks are placed,
you can quickly find a location you want to
listen to in fast forward and fast rewind and
when cuing a file. Index mark s can only be
placed on f iles created by Olympus voice
recorders, but temp marks can be placed
instead to temporarily remember desired
locations.
3
Playback
F2 (INDEX) button
90 button
ERASE button
1 While the recorder is during
recording mode or playback
mode, press the F2 (INDEX)
button.
• A number appears on the display and
an index mark or temp mark will be
placed.
• Even after an index or temp mark is
placed, recording or playback will
continue so you can place index or
temp marks in other locations in a
similar manner.
EN
42
Clear ing an index m ark or a temp m ark
1 Select a file in which index or
temp marks you wish to erase are
contained.
2 Press the 9 or 0 button to
select the index or temp mark to
erase.
3 While the index or temp number
is displayed for approximately 2
seconds on the display, press the
ERASE button.
• The index or temp mark is erased.
• Index or temp numbers after the
erased index or temp number will be
automatically decreased by 1.
Notes
• Temp marks are temporar y markings, so
if you transmit a file to the PC or move
it with a PC, they will be automatically
erased.
• Up to 16 index and temp marks can be
set in a file. If you tr y to place more than
16 index or temp marks, [Index Full]
message will appear for index marks, and
[Temp Ma rk Fu ll] for temp marks.
• Index or temp marks cannot be set or
erased in a locked file (☞ P. 50 ).
Page 43

Playback
How to begin segment repeat
playback
This func tion enables repeated playback of
part of the file being played.
F1 (A-B) butto n
1 Select a file that has a segment
you would like to play back
repeatedly, and start playback.
2 Press the F1 (A-B) button at the
point you want to start segment
repeat playback.
• [w] will flash on the display.
• You can fast for ward, rewind, or
change playback speed as you can
operate in normal mode while [ w]
is flashing to find the end position
(☞ P. 41).
• When it reaches the end of the file
while [w] is flashing, point [x]
becomes the end of the f ile, and
repeat playback will start.
3 Press the F1 (A- B) button again
at the position where you want to
end segment repeat playback.
• The recorder continuously plays back
the segment until the segment repeat
playback is canceled.
Note
• As in normal playback mode, playback
speed can be changed during segment
repeat playback as well (☞ P.41). If an
index mark and temp mark are placed
or cleared during segment repeat
playback , segment repeat playback will
be canceled and it will return to normal
playback mode (☞ P. 42).
3
Playback
EN
43
Page 44

Playback
Cance ling the se gment repe at playbac k
function
Pressing any of the following
buttons will release the segment
repeat playback.
3
Playback
a Press the F1 (CANCEL) button
Pressing the F1 (CANCEL) button will
release segment repeat playback, and it
will return to normal playback mode.
b Press the STOP ( 4) button
Pressing the STOP ( 4) button will
release segment repeat playback, and
stop playback.
c Press the 9 button
Pressing the 9 button will release
segment repeat playback, and make the
recorder to skip to the beginning of the
next file.
d Press the 0 button
Pressing the 0 button will release
segment repeat playback, and make the
recorder to skip to the beginning of the
current f ile.
Changing the playback scene
[Play Scene]
If you register your preferred playback
setting as a playback scene, you can easily
select the setting later (☞ P.5 9).
MENU/SCENE
button
+ − button
`OK button
1 While the recorder is during
stop mode or playback mode,
press and hold the MENU/SCENE
button.
2 Press the + or − button to select
[Play Scene].
3 Press the `OK button.
4 Press the + or − button to select
the playback scene.
EN
44
5 Press the `OK button.
Page 45

Erasing
Erasing files
A selected file can be erased from a folder.
Also, all files in a folder can be erased
simultaneously.
+ − button
`OK button
ERASE button
1 Select the file you want to erase
(☞ P. 2 9) .
2 While the recorder is during stop
mode in the file display, press the
ERASE button.
• If an action is not selected within 8
seconds, the recorder will return to
stop mode.
3 Press the + or − button to select
[Erase in Folder] or [File Erase].
4 Press the `OK button.
5 Press the + button to select
[Start].
6 Press the `OK button.
• The display changes to [Erase!] and
erasing will start.
• [Erase Done] is displayed when the
file is erased. File numbers will be
reassigned automatically.
Erasing a folder
You can erase files by deleting folders.
+ button
`OK button
ERASE button
1 Select the folder you want to
erase (☞ P. 2 9 ).
2 While the recorder is during stop
mode in the folder list display,
press the ERASE button.
• If an action is not selected within 8
seconds, the recorder will return to
stop mode.
3
Erasing
EN
45
Page 46

Erasing
3 Press the + button to select
[Start].
4 Press the `OK button.
• The display changes to [Erase!] and
3
Erasing
erasing will start.
• [Erase Done] is displayed when the
folder is erased.
Partially erasing a file
An unwanted part of a file can be erased.
Only a PCM file recorded in the
recorder can be partially erased.
ERASE button
1 Play the file you want to partially
erase.
• Forward a f ile to the position that
shall be erased. If the file is long,
use the 9 but ton to move to the
position you want to delete.
2 In the starting position of the
partial erase, press the ERASE
button.
• While [Erase start] is f lashing,
playback continues and you can
rewind or fast-forward as usual to
locate the erase end position quickly.
If the end of the file is reached
while this indication is flashing, that
position will become the erase end
position.
3 In the position you want to end
partial erase, press the ERASE
button again.
• [Start point] and [E nd point] on the
display flash alternatively.
EN
46
Page 47

Erasing
4 Press the ERASE button.
• The display will switch to [Partial
erasin g !] and start the partial
erase. The deletion is completed
when [Partial erase completed.] is
displayed.
• Playback will stop at the end location
of the partial erase.
• If you do not press the ERASE button
within 8 seconds, the partial erase
operation will be canceled and the
recorder will return to playback
mode.
Notes
• You cannot recover a f ile once it has been
erased. Please check carefully before
erasing.
• When an microSD card is inserted in the
recorder, be sure to confirm the recording
media as either [Built-in Memory]
or [microSD Card] so that there is no
mistake (☞ P. 61) .
• The file creation date will not change
even if the file is par tially erased.
• The locked files and files set as read-only
cannot be erased (☞ P. 50 ).
• The default folders of the recorder,
namely [Recorder] (including [Folder A]
to [Folder E]), [Music] cannot be erased.
• In the [Music] folder, all folders except
[Music] can be deleted.
• If there is a f ile that cannot be recognized
by the recorder, the file and the folder
which contains that file will not be
erased. Please connect the recorder to
your PC to erase.
• It may take over 10 seconds to complete
processing. Never perform operations
such as the following while processing, as
they may damage the data. In addition,
replace the batter y with a new one in
order to ensure that the battery will not
run out while processing.
1 Disconnecting the AC Adapter while
processing.
2 Removing the battery while
processing.
3 Remove the microSD card during
processing when [microSD Card] is
being used as the recording media.
3
Erasing
EN
47
Page 48

Menu setting
Menu setting method
Items in menus are categorized by tabs, so
select a tab first and move to a desired item
to quickly set it. You can set each menu item
as follows.
MENU/SCENE
button
F2 button
3 Press the `OK button to move
the cursor to the item to set.
+ − button
`OK button
4
Menu setting method
1 While the recorder is during stop
mode, press the MENU/SCENE
button.
• The menu will appear on the display.
• Menu items can be set during a
recording or playback.
2 Press the + or − button to move
to the tab that contains the item
you want to set.
• You can change the menu display by
moving the settings tab cursor.
EN
48
4 Press the + or − button to move
to the item you want to set.
5 Press the `OK button.
• Moves to the set ting of the selected
item.
6 Press the + or − button to change
the setting.
Page 49

Menu setting method
7 Press the `OK button to
complete the setting.
• You will be informed that the settings
have been established via the screen.
• Pressing the 0 button without
pressing the`OK button will cancel
the settings and return you to the
previous screen.
8 Press the F2 (EXIT) button to
close the menu screen.
• When in the menu screen during
recording or playback, pressing the
F2 (EXIT) button will allow you to
return to the recording or playback
screen without interrupting recording
or playback.
Notes
• The recorder will stop if you leave it
idle for 3 minutes during a menu setup
operation, when a selected item is not
applied.
• When entering menu set tings during
recording or playback, the menu settings
will be canceled if 8 seconds elapse with
no buttons being pressed.
4 Setting menu during recording:
Function Setting
[Mic Sen se]
[Rec Level]
[Zoom Mic]
[Low Cut Filter]
[VCVA]
[Rec Monito r]
[Plug-in Power]
[Backlig ht]
[LED]
To menu item
options
4 Setting menu during playback:
Function Setting
[Propert y]
[Noise Cancel]
[EUPHONY ]
[Voice Filter]
[Play Mod e]
[Skip Sp ace]
[Reverb]
[Backlig ht]
[LED]
To menu item
options
4
Menu setting method
EN
49
Page 50

Menu setting method
+ File Menu
File Loc k
Locking a f ile keeps important data from
being accidentally erased. Locked files are
not erased when you select to erase all files
from a folder (☞ P. 45).
[On]: Locks the file and prevents it from
being erased.
[Off]: Unlock s the file and allows it to be
erased.
Replace
See “Rearranging files [Replace]” (☞ P.63).
4
File Move /Copy
Menu setting method
See “Moving/Copyin g file s [File Move/
Copy]” (☞ P. 64 ).
File Div ide
See “Di viding files [File Divid e]” (☞ P. 66 ).
Property
File and folder information can be
confirmed from the menu screen.
When a file is selected :
[Name] (File name), [Date] (Time stamp),
[Size] (File size), [Bit Rate]*1 (File format),
[Artist]*2 (Artist name) and [Album]*2
(Album name) will appear on the display.
*1 When a linear PCM format file has been
selected, [Bit Rate] area displays the
sampling frequency and bit rate.
*2 When a file contains no tag information,
[UNKNOWN_ARTIST],
[UNKNOWN_ALBUM] will appear on the
display.
When a folder is se lected:
[Name] (Folder name), [Folder] (Number
of folders) and [File]* (Number of files) will
appear on the display.
* Files which cannot be recognized by this
recorder are not included in the number
of files.
• Select a file for which you would like to
confirm information in advance before
operating the menu.
, Rec Menu
Mic Select
Select whether or not the built-in center
microphone is to be turned On or Off.
[Central Mic ON]: Recording will be
performed in 3-microphone mode.
[Central Mic OFF]: Recording will be
performed, using only the built-in stereo
microphones.
Mic Sen se
Microphone sensitivity is adjustable to meet
recording needs.
[High]: Highest recording sensitivit y suitable
for recording at a distance or low volume,
such as conferences with a large number
of people.
[Middle]: Suitable for recording meetings
and seminars with a small number of
people.
[Low]: Lowest recording sensitivity suitable
for dictation.
• When you would like to clearly record
a speaker’s voice, set [Mic Sense] to
[Low] and hold recorder’s built-in stereo
microphone close to the speaker’s mouth
(5-10 cm) when recording.
EN
50
Page 51

Menu setting method
Rec Mode
The recor der can record in the li near PCM format.
High reso lution recording at a hi gh sampling rate
and high bi t rate equivalent or su perior to that of
a music CD is poss ible. Moreover, it also su pports
the MP3 and WMA fo rmats.
1 Select the recording format.
[PCM]: This is an uncompressed audio
format which is used for music CDs
and the like.
[MP3]: MPEG is the international
standard established by a working
group of the ISO (International
Organization for Standardization).
[WMA]: This is an audio compression
encoding method that was
developed by the Microsoft
Corporation in the US.
2 Select the recording rate.
When [PCM] is select ed:
[96 kHz/24 bit] to [44.1 kHz/mono]
When [MP3] is sel ected:
[320 kbps] to [mono]
When [WMA] is selec ted:
[128 k bps] to [mono]
• If the directional microphone func tion
is used, you cannot change [PCM]
setting in [Rec Mode] to one other than
[44.1kHz/16 bit]. You can use the all
modes in [MP3] or [WMA] of [Rec Mode].
• When [mono] of [MP3] is selected, the
recording rate will be set to 64kbps.
• When [mono] of [WMA] is selec ted, the
recording rate will be set to 8kbps.
• To record a meeting and lecture clearly,
set [Rec Mode] to a position other than
[
mono].
• When the ex ternal monaural microphone
is used while [Rec Mode] is set to a stereo
recording mode, it enables recording
only with the L channel microphone.
Rec Level
You can set the device to automatically or
manually adjust the recording level.
1 Select [Manual] or [Auto].
[Manual]:
Recording is performed by manually
adjusting the recording level.
[Auto]:
Recording is performed by
automatically adjusting the recording
level. This is useful for when you will
be recording right away.
• If you select [Manual], proceed to the
operation of step 2.
2 Select limiter function.
[Limiter ON]:
This func tion will adjust the input
level when sudden high volume is
encountered. This will prevent sound
distortion.
[Compressor ON]:
This func tion will adjust the level
variation when high- and low-volume
input signals are mixed. The input
level will be generally equalized to a
listenable sound.
[Limit/Comp off]:
Use this position when adjusting
the input levels without using the
correction function.
Adjust t he recording leve l:
1 Press the 9 or 0 button
while the recorder is recording or
paused to adjust the recording
level.
• Distorted sound will be recorded
while [OVER] is displayed. Adjust the
recording level so that [OVE R] will not
be displayed. If sound distor tions do not
disappear even after the recording level
has been adjusted, change the setting
for microphone sensitivity (☞ P.50) and
adjust the recording level again .
4
Menu setting method
EN
51
Page 52

Menu setting method
• If too big sound is input, the noise may
occur even if [Rec Level] is set to [Auto]
or [Limiter ON]. Also, in certain cases
the [PEAK] indicator light, which notifies
large input, may not light. To ensure
successful recordings, we recommend
that you test the record function and
volume before use.
• The level can be adjusted from [01] to
[16]. The higher the number, the higher
the level and the larger the indicator
position on the level meter.
Zoom Mic
The directional microphone function utilizes
DiMAGIC’s (DiMAGIC Co., Ltd.) DiMAGIC
Virtual Microphone (DVM) technology.
4
DVM is an audio pickup system which
Menu setting method
allows you to record by focusing on sound
from any direction. From expansive stereo
recording to high directivity recording, DVM
represents the latest in directional control
methods that can be switched, using the
built-in stereo microphone.
• When you increase the value, the
directivity will narrow.
• Decreasing the value widens the
directivity, enables you to record in a
expansive stereo sound.
• If you reduce the direc tivity and widen
the recording range, you can record in a
sound with expansive stereo feeling.
About the Zoom Mic function:
Directivity
(high)
Directivity
(low)
Low Cut Fil ter
The recorder has a Low Cut Filter function to
minimize low-frequency sounds and record
voices more clearly. This function can reduce
noise from air conditioners, projectors and
other similar noises.
[300Hz]:
[100H z]:
[Off]:
Sound
collecti on
(narrow)
Use this setting when sufficient ef fects
cannot be obtained with the [100 Hz]
setting.
This setting will reduce the noise
generated from air conditioners or
projectors. It is effective for indoor
recording.
Disables this func tion.
Sound
collecti on
(wide)
EN
52
Page 53

Menu setting method
VCVA
When the microphone senses that
sounds have reached a preset threshold
volume level, the built-in Variable Control
Voice Actuator (VCVA) star ts recording
automatically, and stops when the volume
drops below the threshold level. The
VCVA feature extends recording time and
conserves memory by stopping recording
during silent periods, which helps the
playback to be more efficient.
1 Select [On/Off] or [Standby].
2 Sets the VCVA function.
When [On/O ff] is selec ted:
[On]:
Enables the VCVA function. Will start
recording in VCVA mode.
[Off]:
Disables this func tion. Will resume
recording in normal mode.
When [Standby] is selected:
[On]: With this setting, the recording
monitor (earphone output) is
disabled during VCVA standby
(☞ P.33), which allows you to conf irm
VCVA actuation status by the
earphone output.
[Off]: The audio signal is always output
from the earphone jack.
Adjust the start/stop actuation level:
1 Press the REC (s) button to start
recording.
• When the sound volume is lower than
the preset threshold sound level,
recording automatically stops af ter
1 sec approximately, and [Standby]
flashes on the display. The recording
indicator light glows when recording
starts and flashes when recording
pauses.
2 Press the 9 or 0 button to
adjust the start/stop actuation
level.
• The VCVA level can be set to any of 23
different values.
• The higher the value, the more
sensitive the recorder will be to
sounds. At the highest value, even the
faintest sound will activate recording.
a
b
a Level meter (varies according to the
sound volume being recorded)
b Start level (moves to the right/left
according to the set level)
• When using the [VCVA] function, the
following functions are not available.
• [V-Sync . Rec]
• [Pre-Recording] (☞ P. 56 )
• When [Rec Monitor] is set to [Off], the
[Standby] function is disabled (☞ P. 55 ).
• If the start/stop actuation level is not
adjusted within 2 seconds, the display
will return to the previous one.
• If the surrounding noise is loud, the star t/
stop actuation sensitivit y of the VCVA can
be adjusted according to the recording
situation.
• To ensure successful recordings, prior
testing and adjustment of the start/stop
actuation level is recommended.
4
Menu setting method
EN
53
Page 54

V-Sync. Rec
Voice sync recording starts when a voice
louder than the voice sync level (detection
level) is detected. When the voice becomes
low, recording will automatically stop.
When voice sync recording is on and the
input level falls below the voice sync level
(detection level) for a period of at least the
specified detection time, the recorder will
return to the standby mode.
1 Select [On] or [Off].
[On]: Enables the Voice sync recording
function.
[Off]: Disables this function.
• If you select [On], proceed to the
4
Menu setting method
operation of Step 2.
2 Sets the detection time.
[1 second] [2 seconds] [3 secon ds]
[4 seconds] [5 seconds] [10 s econd s]:
If the input (recording level) is equal
to or below the specif ied level for
longer than the specified detection
time, the recorder will return to the
standby mode.
Adjust t he voice sync level:
1 Press the REC (s) button to start
recording.
• To use voice sync recording, set
[V-Sync . Rec] to [On] and specify a
detection time.
2 Press the 9 or 0 button to
adjust the voice sync level.
• The voice sync level can be set to any
of 23 different values.
• The higher the value, the more
sensitive the recorder will be to
sounds. At the highest value, even the
faintest sound will activate recording.
Menu setting method
a
a Voice sync level (moves to the
right/left according to the set level)
3 Press the REC (s) button again.
• The recorder will go into standby.
[Standby] will flash on the display
and the recording indicator light will
flash.
• When the input is at or above the
voice sync level, recording will start
automatically.
4 Voice sync recording stops
automatically.
• If sound at a volume below the voice
sync level continues for the specified
time, voice sync recording will end
automatically, and the recorder
will return to the standby mode of
Step 3. Every time the recorder enters
standby mode, the file will be closed
and recording will continue in a
different file.
• To stop the recorder during voice
sync recording, press the STOP (4)
button.
• When using the [V-Sync. Rec] function,
the following func tions are not available.
• [VCVA] (☞ P. 53 )
• [Pre-Recording] (☞ P. 56 )
Timer Re c
See “Timer re cording [Tim er Rec]” (☞ P. 67) .
EN
54
Page 55

Menu setting method
Rec Sce ne
You can save recording settings of your
preference that will suit different recording
scenes or situations.
1 Select [Scene Select] or
[Scene Save].
[Scene Select]: You can select a
recording setting from among the
previously saved settings.
[Scene Save]: You can save up to 3 sets
of menu set tings relating to a current
recording.
• If you select [Scene Select], proceed
to the operation of Step 4.
When [Scene Save] is selected:
2 Set the recording settings
according to your preferences.
3 Specify a save destination.
• You can select the save destination
from [User Setting 1], [User
Setting 2] and [User Setting 3].
When [Scene Select] is selected:
4 Select a recording scene.
• When a recording scene is selec ted,
recording-related menu settings
cannot be changed. If you wish to use
these functions, set [Rec S cene] to
[Off].
To check the settings:
On the [Scene Select] display, select
a recording scene using the + and
– buttons, and press the 9 button.
Press the 0 but ton to return to the
[Scene Select] display.
Rec Monitor
Select whether or not to output audio while
recording from the earphone jack.
[On]: Enables the recording monitor
function. Sound will be output from the
EAR jack.
[Off]: Disables this function. Sound will not
be output from the EAR jack.
• When the ex ternal speaker is connected
while recording, there is a risk that audio
feedback will occur. It is recommended
that you use earphones for the recording
monitor, or turn [Rec Monitor] to [Off]
while recording.
4
Menu setting method
EN
55
Page 56

Menu setting method
Plug-inPower
External microphones which are suppor ted
by plug in power can also be used.
Whether or not to supply power to external
microphones can be configured.
[On]: When the plug-in power function
is activated, power will be supplied to
the connected external microphone.
Select this when ex ternal microphones
supported by plug-in power are
connected (☞ P. 35).
[Off]: Disables this function. Select
this when ex ternal microphones
not supported by plug-in power are
connected.
• Turn the plug-in power function to
4
[Off] when an external microphone
not supported by plug-in power is
Menu setting method
connected, as there is the risk that noise
may be generated while recording.
• Phantom power cannot be supplied, even
when the plug in power function is set to
[On
].
Pre-Recording
Pre-recording enables you to start recording
up to 2 seconds* before you press the
button for recording. This function allows
you, for example, to start a recording bird’s
singing up to 2 seconds* before its start
even if you press the recording button at the
moment it starts singing.
[On]: For recording sound continuously from
up to 2 seconds* before the recording
button is pressed.
[Off]: For normal recording start.
How to enable pre-recording:
To enable pre-recording, set
[Pre-Recording] to [On].
1 While the recorder is during
recording mode, press the
REC (s) button.
• The recorder enters recording
pause mode. However, recording
is performed continuously, and
recorded data for up to 2 seconds*
will be refreshed every second.
2 Press the REC (s) button.
• Recording pause will be released and
recording will star t. The recorded
data will include those from up to 2
seconds* before the REC ( s) button
was pressed.
* Recording star t time will vary
according to [Rec Mode] settings.
• When using the [Pre-Recording]
function, the following functions are not
available.
• [VCVA] (☞ P. 53 )
• [V-Sync . Rec] (☞ P.5 4)
EN
56
Page 57

Menu setting method
- Play Menu
Noise Cancel
If recorded audio is difficult to understand
because of noisy surroundings, adjust the
Noise Cancel setting level.
[High] [Low]: Enables the Noise Cancel
function. Noise will be reduced in the file
when it’s played back for better sound
quality.
[Off]: Disables this function.
• When using the [Noise Cancel] function,
the following func tions are not available.
• Slow/Fast speed playback (☞ P. 41)
• [Voi ce Filter]
• [EUPHONY]
• [Reverb] (☞ P.59 )
EUPHONY
This recorder is equipped with “EUPHONY
MOBILE”, the latest in surround sound
systems which combines bandwidth
correction, expansion technology, and
virtual acoustical source processing
technology. In addition to its natural,
expansive feel, the recorder is equipped
with the exceptional feature wherein
listeners are less prone to developing a
compressed or closed-in feel, or to growing
tired over ex tended listening. On top of
this, listeners are less prone to developing
an oppressed or closed-in feel, or to
growing tired over extended listening. Level
adjustments of the EUPHONY setting can be
set to four stages according to preference.
[Power]: This mode focuses more on lower
sound registers.
[Wide]: This mode has an even more
expansive feel.
[Natural]: This mode achieves natural
bandwidth correction and acoustical f ield
expansion.
[Off]: Disables this function.
• When using the [EUPHONY] function,
the following func tions are not available.
• Slow/Fast speed playback (☞ P. 41)
• [Noise Cancel]
• [Voi ce Filter]
• [Reverb] (☞ P.59 )
• When playing back using the builtin speaker, the EUPHONY func tion is
disabled.
Voice Fil ter
The recorder has a Voice Filter Function to
cut low and high frequency tones during
normal, fast, or slow playback , and enable
clear audio playback .
[On]: Enables the Voice Filter function.
[Off]: Disables this function.
• When using the [Voice F ilter] function,
the following func tions are not available.
• [Noise Cancel]
• [EUPHONY]
• [Reverb] (☞ P.59 )
4
Menu setting method
EN
57
Page 58

Menu setting method
Play Mode
You can select the playback mode that fits
your preference.
Selec t the desired playback range:
1 Select [Play Area].
2 Select [File], [Folder] or [All].
[File]: Selects the current file.
[Folder] Selects the current folder.
[All]: Selects all files in the current
memory.
Selec t the desired playback mode:
1 Select [Repeat] or [Random].
[Repeat]: Sets to repeat playback mode.
4
[Random]: Sets to random playback
Menu setting method
mode.
2 Select [On] or [Off].
[On]: Sets the playback range to be
played back repeatedly or randomly.
[Off]: Disables this function.
• In [File] mode, when the recorder comes
to the end of the last file in the folder,
[End] flashes for two seconds on the
display and the recorder stops at the start
of the last f ile.
• In [Folder] mode, when the recorder
comes to the end of the last f ile in the
folder, [End] flashes for t wo seconds on
the display and the recorder stops at the
start of the first file in the folder.
• In [All] mode, after playing the last file in
the folder, the recorder will star t playing
from the f irst file in the next folder. When
it comes to the end of the last f ile in the
recorder, [End] flashes for two seconds
on the display and the recorder stops at
the star t of the first file in the recorder.
Skip Space
This function enables you to skip (forward)
or reverse skip (rewind) a file being played
for a set period. This function is convenient
for quickly skipping to another playback
position or repeatedly playing back short
phrases.
1 Select [Forward Skip] or
[Reverse Skip].
2 Set the skip space.
When [Forward Skip] is selec ted:
[File Skip] [10 sec. Skip] [30sec. Skip]
[1min . Skip ] [5min. Skip]
[10mi n. Skip]
When [Reverse Skip] is sel ected:
[File Skip] [1s ec. Sk ip] to [5sec. Skip]
[10sec. Skip] [30sec. Skip]
[1min . Skip ] [5min. Skip]
[10mi n. Skip]
Forward/Reverse Skip
Playback:
1 Press the `OK button to start
playback.
2 Press the 9 or 0 button.
• The recorder will sk ip (forward) or
reverse skip (rewind) a set space and
start playing back.
• If there is an index mark/temp mark or
a cue closer than the skip space, the
recorder will forward skip/reverse skip to
that position.
Alarm
See “Alarm playback func tion [Alarm]”
(☞
P.69) .
EN
58
Page 59

Menu setting method
Play Scene
Voice files recorded in the recorder and
music files downloaded from the PC can be
saved in the playback set tings of your choice
to suit the dif ferent sound qualities and
playback methods.
1 Select [Scene Select] or
[Scene Save].
[Scene Select]: Select a playback scene
customized to your preferences.
[Scene Save]: You can save up to 3 sets
of menu set tings relating to a current
playback.
• If you select [Scene Select], proceed
to the operation of Step 4.
When [Scene Save] is selected:
2 Set the playback settings
according to your preferences.
3 Specify a save destination for the
settings.
• You can select the save destination
from among [User Setting 1] to [User
Setting 3].
When [Scene Select] is selected:
4 Select a playback scene.
To check the settings :
On the [Scene Select] display, select
a playback scene using the + and −
buttons, and press the 9 button.
Press the 0 but ton to return to the
[Scene Select] display.
Reverb
You can enjoy the reverberant sound
of various space sizes such as from the
recording studio to the dome.
[Off]: Disables the reverb function. Select
this when playing back original sounds
as they are.
[Studio] [Club] [Hall] [Dome]: Select the
preferred acoustical environment.
• This func tion is only available during
playback. This recorder cannot perform
recording by using the playback results.
• When using the [Reverb] function, the
following functions are not available.
• Slow/Fast speed playback (☞ P. 41)
• [Noise cancel] (☞ P. 57)
• [EUPHONY] (☞ P. 57 )
• [Voi ce Filter] (☞ P. 57 )
4
Menu setting method
EN
59
Page 60

Menu setting method
. LCD/Sound Menu
Backlight
The display will remain lit for about 10 (Initial
setting) seconds when a button on the
recorder is pressed.
1 Select [Lighting Time] or
[Brightness].
2 Select the setting.
When [Lighting Time] is selected:
[Off]:
Disables this func tion.
[5seconds] [10sec onds] [30seconds]
[1min ute]:
Enables the Backlight function.
4
When [Brightness] is selec ted:
Menu setting method
[High] [Low]:
Sets the brightness of the backlight
when lit.
Contrast
Display contrast can be adjusted in 12 levels.
• You can adjust the LCD display contrast
level from [01] to [12].
LED
You can set it so the LED indicator light does
not turn on.
[On]: LED light will be set.
[Off]: LED light will be canceled
Beep
The recorder beeps to alert you to button
operations or warn you of errors. System
sounds may be turned off.
[Vol ume3]:
Increase the volume of beeps.
[Vol ume2]:
Return the volume of beeps to normal.
[Vol ume1]:
Decrease the volume of beeps.
[Off]: Disables this function.
Language(Lang)
You can selec t the display language for this
recorder.
[English] [França is] [Español]
[Português (BR)]:
• The selectable languages differ
depending on the region.
Voice Gu ide
See “Guidance [Voice Guide]” (☞ P. 72).
Intro Play
You can listen to the f irst few seconds of a
file by touching the cursor to a file within
a folder. This feature is convenient when
looking for files.
[10se conds]:
.
The first 10 seconds of a f ile will be
played.
[5seconds]:
The first 5 seconds of a file will be played.
[3seconds]:
The first 3 seconds of a file will be played.
[Off]:
Disables this func tion.
EN
60
Page 61

Menu setting method
/ Device Menu
Memory Select
When a microSD card is inserted you
can select to record to either the built-in
memory or to the microSD card (☞ P. 24 ).
[Built-in Memory]: Built-in memory.
[microSD Card]: microSD card.
Power Save
Forgetting to turn the power off can be
prevented. If the recorder remains in stop
mode for over 10 minutes (Initial setting)
while the power is turned on, the power will
be turned off.
[5minutes] [10min utes] [30minutes]
[1hou r]:
Set the length of time before the power
will be turned off.
[Off]: Disables this function.
• If any button is pressed, the elapsed time
count before the power turns off will star t
over again.
Battery
Select to match the battery you are using.
[Ni-MH] (õ):
Select when using the Olympus Ni-MH
rechargeable batteries (BR404).
[Alkaline] (ú):
Select when using alkaline batteries.
Folder Na me
You can change the f older names of Folde r &
to Folder * for audio recording into names
preset in the template. You can also change
folder names registered in the template with
"Olympus Sonority".
1 Select a folder the name of which
you want to change.
2 Select a folder name from the
preset template.
Time & Dat e
See “Setting time an d date [Time & Date]”
(☞ P. 22).
USB Settings
See “Changing t he USB class
[USB Settings]” (☞ P.7 3).
Reset Setting s
This returns the func tions back to their initial
settings (factory default).
[Start]: Returns the settings to their initial
values.
[Cancel]: Takes you back to [Device Menu].
• After resetting the settings, the time
settings, file numbers and folder name
will be preserved, will not return to their
initial settings.
Menu settings after resetting (initial
settings):
, Rec Menu:
[Mic Select] [Central Mic O N]
[Mic Sense] [Middle]
[Rec Mode]
[PCM] [44.1kHz]
[Rec Leve l] [Manual]
([Li miter ON])
[Zoom Mic] [Off]
[Low Cut Fil ter] [Off]
[VCVA] [Off]
[On/Off] [Off]
[Standby] [Off]
[V-Sync . Rec] [Off]
[Time r Rec] [Off]
[Rec Sc ene] [Off]
[Rec Mo nitor] [Off]
[Plug-inPower] [On]
[Pre-Recording] [Off]
- Play Menu:
[Noise Cancel] [Off]
[EUPHONY] [Off]
[Voi ce Filte r] [Off]
[Play Mode]
[Play Area] [File]
[Repeat] [Off]
[Random] [Off]
4
Menu setting method
EN
61
Page 62

Menu setting method
[Skip Space]
[Forward Sk ip] [File Skip]
[Reverse Skip] [File Skip]
[Alarm] [Off]
[Play Scene] [Off]
[Reverb] [Off ]
. LCD/Sound Menu:
[Backlight]
[Lighting Time] [10Sec onds]
[Brightness] [Low]
[Contrast] [Level 06]
[LED] [On]
[Beep] [Volume 2]
[Language(Lang)] [English]
[Voice G uide]
[On/Off] [On]
[Speed] [Speed 3]
[Vol ume Spea ker] [Vol ume 3]
[Intro Play] [Off]
4
/ Device Menu:
Menu setting method
[Memory Select] [Built-in Memory]
[Power Save] [10mi nutes ]
[Battery] [Ni-MH]
[USB Settings]
[USB Connect] [PC]
[USB Class] [Storage Class]
Format
See “Formatting the rec order [Format]”
(☞ P.74 ).
Memory Info.
The recordable capacity remaining and
overall capacity of the recording media can
be seen from the menu.
• The recorder will use some capacity of
the memor y to keep the management
file. For microSD card, the remaining
capacit y will be shown less than the total
capacit y of the card due to characteristic
of the microSD card, but this is not a
malfunction.
System In fo.
You can check the recorder’s information on
the menu screen. [Model] (Model Name),
[Ver sion] (System version) and [Serial No.]
(Serial Number) appear on the display.
EN
62
Page 63

Menu setting method
Rearranging files [Replace]
You can move a file in a folder to change the
order of playback. First select the folder (file)
for which you want to change the playback
order.
F2 button
+ − button
`OK button
1 Select the folder for which you
would like to rearrange the file
order (☞ P. 29 ) .
2 Select [Replace] from the menu
on the [File Menu].
• For details on how to enter the menu
settings, see “M enu setting method ”
(☞ P. 48).
3 Press the + or − button to select
the file you want to move.
4 Press the `OK button.
• The cursor will flash to confirm that
the file can be moved.
5 Press the + or − button to select
the location to move it to.
6 Press the `OK button to
complete the setting.
• If there are more files to move, repeat
Steps 3 through 6.
• Pressing the 0 button without
pressing the `OK button will cancel
the settings and return you to the
previous screen.
7 Press the F2 (EXIT) button to
close the menu screen.
4
Menu setting method
EN
63
Page 64

Menu setting method
Moving/Copying files
[File Move/Copy]
Files saved in the built-in memory or the
microSD card can be moved or copied
within the memory. Files can also be moved
or copied between memory.
F2 button
+ − button
`OK button
4
Menu setting method
1 Select the folder where the file
you want to move or copy is
saved (☞ P. 2 9 ).
2 Select [File Move/Copy] from the
menu on the [File Menu].
• For details on how to enter the menu
settings, see “M enu setting method ”
(☞ P. 48).
3 Press the + or − button to select
the position to move or copy the
file to.
[move > memory]:
Move a file in the built-in memory or
microSD card to another folder within the
built-in memory.
[copy > memory]:
Copy a file in the built-in memory or
microSD card to another folder within the
built-in memory.
[move > microSD]:
Move a file in the built-in memory or
microSD card to another folder in the
microSD card.
[copy > microSD]:
Copy a file in the built-in memory or
microSD card to another folder in the
microSD card.
4 Press the `OK button.
5 Press the + or − button to select
the number of files to move or
copy.
[1fil e]:
Select only the specified file.
[Selected files]:
Select multiple files.
[All files]:
Select all files in the folder.
6 Press the `OK button to move to
the respective setting.
EN
64
Page 65

Menu setting method
When you s elect [1fi le]:
1 Press the + or − button to select the file
you want to move or copy.
2 Press the `OK button to select the file.
When you s elect [Se lected f iles]:
1 Press the + or − button to select the file
you want to move or copy.
2 Press the `OK button to check the file(s)
selected.
3 Repeat ste ps 1 and 2 until all the files
you want to move/copy are selected then
press the F2 (GO) button.
When you s elect [All f iles]:
When all files are selected, all the f iles in the
folder will be automatically selected and the
recorder will move to the [Folder to move]
screen.
7 Press the 9 , 0 or + , −
button to select the folder you
want to move or copy the file to.
8 Press the F2 (GO) button.
• File move or file copy will start if
[Moving!] or [Copying!] appears
on the display. During the process,
the progress status will be shown in
percentage. The process is completed
when [File move completed] or [File
copy completed
Notes
• The recorder cannot copy when the
memory capacit y is not sufficient.
• The recorder cannot move or copy when
the number of files exceeds 200.
• Do not remove the batteries during
moving or copying. This may damage the
data.
• A file cannot be moved or copied to the
same folder.
• When the op eration is canceled during
moving or copying, only the file that is
being moved or copied is effec tive, all
other files will not be moved or copied.
• Files which are locked will remain so even
after they are moved or copied.
• DRM files cannot be moved or copied.
• Files cannot be moved or copied direc tly
under the [Recorder] folder.
] is displayed.
4
Menu setting method
EN
65
Page 66

Menu setting method
Dividing files [File Divide]
Files with large capacities and long
recording times can be divided so that they
are easier to manage and edit.
F2 button
+ − button
`OK button
4
Menu setting method
Only MP3 files and PCM f iles
recorded on this recorder can be
divided.
1 Stop playback at the divide
position.
• While the recorder is during playback
mode, press and hold the 9
or 0 button to fast-forward or
rewind.
• It is useful to set index marks on
marking in advance at the divide
position.
2 Select [File Divide] from the
menu on the [File Menu].
• For details on how to enter the menu
settings, see “M enu setting method ”
(☞ P. 48).
EN
66
3 Press the + button to select
[Start].
4 Press the `OK button.
• [Dividing!] will appear and file
dividing will start.
• File dividing is completed when [File
divide completed] appears.
5 Press the F2 (EXIT) button to
complete the setting.
Notes
• File dividing can be performed only when
the file list is displayed.
• The recorder cannot divide files when the
number of f iles in the folder exceeds 199.
• Locked files cannot be divided (☞ P. 50 ).
• After splitting the file, the front par t of
the file will be renamed as [File name_
1.M P3] and the latter part of the f ile will
be named as [File name _2.MP3].
Page 67

Menu setting method
• If a file has an extremely short recording
time, it may not be divided even if it is a
MP3 file or PCM file.
• Do not remove the battery while dividing
a file. This may damage the data.
Timer recording [Timer Rec]
Timer recording is the function to execute a
recordin g at a set time. You can prog ram up to
three desired settings (Preset 1-3) ([On/Off],
[Day], [Time], [Rec Mode], [Folder], and
[Mic Sense]).
F2 button
+ − button
`OK button
1 Select [Timer Rec] from the menu
on the [Rec Menu].
• For details on how to enter the menu
settings, see “M enu setting method ”
(☞ P. 48).
2 Press the + or − button to select a
preset number.
3 Press the `OK button.
4 Press the + or − button to select the
item to set.
• Select items you want to set from
among [On/Off], [Day], [Time], [Rec
Mode], [Folder], and [Mic Sense].
5 Press the `OK button to move to
the respective setting.
[On/O ff] se tting:
1 Press the + or – button to select between
[On] and [Off].
[On]: Setting will be applied.
[Off]: Setting will not be applied.
2 Press the `OK button to exit [On/Off]
selection.
[Day] setti ng:
1 Press the + or – button to select from
[One Time], [Everyday], and [Every
Week].
[One Time]: Records only once at the
specif ied time.
[Everyday]: Records every day at the
specif ied time.
[Every Week]: Make a recording at a set
time on a specified day of the week.
Select [Every Week] and press the `OK
button to move to the selec tion of [Day].
Press the + or – button to select a day of
the week.
2 Press the `OK button to exit [Day]
selection.
4
Menu setting method
EN
67
Page 68

Menu setting method
[Time] setting:
1 Press the 9 or 0 button to select
"Hour" and "Minute" in the [Start Time]
and "Hour" and "Minute" in the [Stop
Time].
2 Press the + or – button to set.
3 Press the `OK button to exit [Time]
selection.
[Rec Mode] se tting:
Regardless of the regular [Rec Mode] (☞ P. 51) ,
timer recording will start in a set recording
mode.
1 Press the + or – button to select a
recording mode.
2 Press the `OK button.
4
3 Press the + or – button to select a
Menu setting method
recording rate.
4 Press the `OK button to exit Recording
mode selection.
[Folder] set ting:
1 Press the + or – button to select the
destination to save to (Memory).
2 Press the `OK button to move to the
[Folder] setting.
3 Press the + or – button to select the
destination to save to (Folder).
4 Press the `OK button to exit [Folder]
setting selection.
[Mic Se nse] setti ng:
Regardless of the recorder’s microphone
sensitivity setting (☞ P.50), timer recording
will star t at a set microphone sensitivity.
1 Press the + or – button to select from
[High], [Middle], and [Low].
2 Press the `OK button to exit [Mic Sense]
selection.
EN
68
6 Press + or − button to select
[Finish].
7 Press the `OK button to
complete the setting.
When set ting to [ON]
• Programmed settings will be applied
and the display will return to the
preset number selection menu.
• To set other preset numbers, repeat
the abovementioned procedure.
• When the 9 button is pressed
in the Select in Advance Menu, the
settings selected can be confirmed.
8 Press the F2 (EXIT) button to
complete the setting.
• The [«] will appear on the display.
Notes
• If the recorder is in use at the preset star t
time, the timer recording will start directly
after stopping the recorder.
• Even if the power is turned off or the
recorder is put on Hold, timer recording
will star t at a specified time.
• If three timer recordings have the same
starting times, [Preset 1] has the highest
priority and [Preset 3] has the lowest.
• If the starting time for timer recording
and alarm playback (☞ P.69) is set for
the same time, timer recording will have
priority.
Page 69

Menu setting method
• If the batteries run out while recording
based on th e timer setti ng, the recorde r will
stop recording. Check the battery power
before starting the timer recording.
• If the [Time & Date] is not correct, timer
recording cannot be set at the specified
time, so make sure the [Time & Date] is
correct before setting timer recording.
If it is not correct, reset [Ti me & Date]
(☞ P. 23).
• The recorder will record in the built-in
memory [Folder A] when the microSD
card is selected as the recording
destination and the microSD card is not
inserted during Timer Recording.
Alarm playback function [Alarm]
The alarm p layback func tion can be set to p lay
a selected file at a pre-set time.
You can program up to three desired settings
(Preset 1-3) ([On/Off], [Day], [Start Time],
[Vo lume], [Alarm Sound] and [Playback
File]).
F2 button
+ − button
`OK button
1 Select [Alarm] from the menu on
the [Play Menu].
• For details on how to enter the menu
settings, see “M enu setting method ”
(☞ P. 48).
2 Press the + or − button to select a
preset number.
3 Press the `OK button.
4
Menu setting method
EN
69
Page 70

Menu setting method
4 Press the + or − button to select
the item to set.
• Select items you want to set from
among [On/Off] [Day] [Start Time]
[Vol ume] [Alarm So und] [Playback
File].
5 Press the `OK button to move to
the respective setting.
4
[On/Off] setting:
Menu setting method
1 Press the + or – button to select between
[On] and [Off].
[On]: Setting will be applied.
[Off]: Setting will not be applied.
2 Press the `OK button to exit [On/Off]
selection.
[Day] setting:
1 Press the + or – button to select from
[One Time], [Everyday], and [Every
Week].
[One Time]: Alarm Playback will be
performed only once at the specified
time.
[Everyday]: Alarm Playback will be
performed at the specif ied time every
day.
[Every Week]: Make a Alarm Playback
at a set time on a specif ied day of the
week.
Select [Every Week] and press the `OK
button to move to the selec tion of [Day].
Press the + or – button to select a day of
the week.
2 Press the `OK button to exit [Day
EN
selection.
70
[Start Time] setting:
1 Press the 9 or 0 button to select
"Hour" and "Minute" in the [Start Time].
2 Press the + or – button to set.
3 Press the `OK button to exit [Start Time]
selection.
[Vol ume] setting:
1 Press the + or – button to adjust the
volume. Press the F1 button to check the
volume.
2 Press the `OK button to exit [Volu me]
selection.
[Alarm Sound] set ting:
1 Press the + or – button to select an alarm
sound from among [Alarm1], [Alarm2]
and [Alarm3]. Press the F1 button to
check the alarm sound.
2 Press the `OK button to exit
[Alarm Sound] selection.
[Playback File] setting:
1 Press the + or – button to select from [No
File Play], [File Select].
[No File Play]: Sounds alarm only.
[File Select]: Plays back a selec ted file
after the alarm.
• When [File Select] is selected and the
`OK button is pressed, the recorder
will move to the [Memory Select]
setting.
• Select the memory with an alarm
playback f ile using the + or – button
and press the `OK button. The
recorder will move to the folder
settings with the f ile with alarm
playback.
]
Page 71

Menu setting method
• Select the folder using the + or
– buttons and press the `OK button
to move to file selection. Use the + or
– button to select the file in the same
way.
2 Press the `OK button to exit
[Playback File] selection.
6 Press + or − button to select
[Finish].
7 Press the `OK button to
complete the setting.
When set ting to [ON]
• Programmed settings will be applied
and the display will return to the
preset number selection menu.
• To set other preset numbers, repeat
the abovementioned procedure.
• When the 9 button is pressed
in the Select in Advance Menu, the
settings selected can be confirmed.
8 Press the F2 (EXIT) button to
complete the setting.
• The [ A] will appear on the display.
Notes
• If [Everyday] is selected, the alarm will
sound at the scheduled time ever y day
unless alarm playback is canceled.
• The alarm will sound for five minutes and
then stop. In such a case, even if a file is
selected for Alarm Playback, it will not be
automatically played.
• If three alarm playback have the same
starting times, [Preset 1] has the highest
priority and [Preset 3] has the lowest.
• If the recorder is in use or if operations are
being performed at the scheduled time,
the Alarm Playback func tion will not be
available.
• The alarm will sound at the scheduled
time even if the power is turned off or
the recorder is set to Hold mode. The
recorder begins to play the selec ted file
when you press any button, and stops
playing when you press the STOP (4)
button.
• If the selected file is moved, erased or the
microSD card removed, file playback will
not be per formed and only the alarm will
sound.
• If the starting times for timer recording
and alarm playback are set for the same
time, timer recording will have priority
(☞ P. 67) .
• If the recorder is formatted (☞ P. 74), al ar m
data will also be erased, so you won’t be
able to set an alarm. When the data has
been erased by accident, connec t to PC
and copy the alarm sound data to the
recorder by using the supplied "Olympus
Sonority" (☞ P. 83 ).
4
Menu setting method
EN
71
Page 72

Menu setting method
Guidance [Voice Guide]
This feature gives audio announcements
of recorder operating conditions. Adjust
the speed and the volume of guidance
announcements.
F2 button
+ − button
`OK button
4
Menu setting method
1 Select [Voice Guide] from the
menu in [LCD/Sound Menu].
• For details on how to enter the menu
settings, see “M enu setting method ”
(☞ P. 48).
2 Press the + or − button to select
the item to set.
• Select items you want to set from
among [On/Off], [Speed] and
[Vol ume].
3 Press the `OK button to move to
the respective setting.
[On/Off] setting:
1 Press the + or – button to select between
[On] and [Off].
[On]: Guidance will be provided.
[Off]: Guidance will be canceled.
2 Press the `OK button to exit [On/Off]
selection.
[Speed] setti ng:
1 Press the + or – button to select from
[Speed5], [Speed4], [Speed3], [Speed2],
and [Speed1].
2 Press the `OK button to exit [Speed]
selection.
[Volume] setting:
1 Press the + or – button to select from
[Vol ume5], [Vo lume4 ], [Volume 3],
[Vol ume2], and [ Volume1].
2 Press the `OK button to exit [Volu me]
selection.
4 Press the F2 (EXIT) button to
complete the setting.
Notes
• The star ting tune/closing tune when the
power is turned On/Off (☞ P.20) can be
canceled if you set the guidance to [Off].
• If you format the recorder (☞ P.74), voice
guide data will be erased as well. If you
want to recover the voice guide data,
connect to a PC and copy the guide
data to the recorder by using supplied
“Olympus Sonority” (☞ P. 83 ).
• Set the volume of the starting tune/
closing tune at the guidance [Vo lume]
setting.
• The [Speed] setting in the [Voice Guide]
settings is disabled during file playback.
EN
72
Page 73

Menu setting method
Changing the USB class
[USB Settings]
Besides setting to [PC] (Connect to PC to
transfer files) or [AC Ad apter] (Connect to
AC adapter to recharge the battery), you
can switch the USB class according to your
usage.
F2 button
+ − button
`OK button
1 Select [USB Settings] from the
menu on the [Device Menu].
• For details on how to enter the menu
settings, see “M enu setting method ”
(☞ P. 48).
2 Press the + or − button to select
[USB Connect] or [USB Class].
[USB Conne ct]: Setting for connecting
to the PC.
[USB Class]: Setting for USB class.
3 Press the ` OK button.
• If you select [USB Class], proceed to
the operation of Step 6.
When [USB Co nnect] is s elected :
4 Press the + or − button to change
the setting.
[PC]: Setting for when the recorder is
connected to the PC and used as a
storage device or composite device.
Connected as storage or composite.
[AC Adapt er]: Setting for when the
recorder is connected to the PC for
charging or to the AC Adapter (A514)
(opti onal).
[Optional]: Setting to conf irm the
connection method each time a USB
connection is made.
5 Press the ` OK button to
complete the setting.
• If you select [USB Connect], proceed
to the operation of Step 8.
When [USB C lass] is sele cted:
6 Press the + or − button to change
the setting.
[Storage Class]: Recognized as an
external memory device from the PC.
[Composite]: Setting when connected
to the PC and used as an external
memory device, USB speaker or
microphone.
4
Menu setting method
EN
73
Page 74

Menu setting method
7 Press the ` OK button to
complete the setting.
8 Press the F2 (EXIT) button to
close the menu screen.
Notes
• When you first connect the recorder to
your PC as an ex ternal storage device,
the driver for the recorder will be
automatically installed in your PC.
• The PC cannot recognize when the
recorder is connected to the PC when
setting for the [USB Connect] is set to
[AC Adapt er].
• When the recorder is not recognized
by the PC as an ex ternal storage device,
4
change the [USB Class] setting to
Menu setting method
[Storage Class].
Formatting the recorder [Format]
+ − button
`OK button
If you format the re corder, all
files will be removed and all
function settings will return to
defaul ts except date and time
settings. Transfer any important
files to a comput er before
formatting the recorder.
1 Select [Format] from the menu
on the [Device Menu].
• For details on how to enter the menu
settings, see “M enu setting method ”
(☞ P. 48).
2 Press the + or − button to select
the recording media to format.
EN
74
3 Press the `OK button.
Page 75

Menu setting method
4 Press the + button to select
[Start].
5 Press the `OK button.
• After [Data will be cleared] message
is on for two seconds, [Start] and
[Cancel] will turn on.
6 Press the + button again to select
[Start].
7 Press the `OK button.
• Formatting begins and [Format !]
flashes on the display.
• [Format Done] appears when
formatting ends.
Notes
• Never format the recorder from a PC.
• When the recorder is formatted, all the
saved data, including locked files and
read-only files, are erased.
• After formatting, recorded voice file
names may start from [0001].
• For returning the settings for the
functions to their initial set tings, use
[Reset Settings] (☞ P.61) .
• When a microSD card is inserted in the
recorder, be sure to confirm the recording
media as either [Built-in Memory]
or [microSD Card] so that there is no
mistake (☞ P. 61) .
4
Menu setting method
EN
75
Page 76

• It may take over 10 seconds to complete
processing. Never perform operations
such as the following while processing, as
they may damage the data. In addition,
replace the batter y with a new one in
order to ensure that the battery will not
run out while processing.
1 Disconnecting the AC Adapter while
processing.
2 Removing the battery while
processing.
3 Remove the microSD card during
processing when [microSD Card] is
being used as the recording media.
• Formatting on the recorder will be
Quick Format. If you format the microSD
card, information of file management
4
is refreshed and the data inside the
microSD card is not deleted completely.
Menu setting method
When handing over and disposing the
microSD card, be careful about the
data leakage from the microSD card.
We recommend the microSD card to be
destroyed when you dispose the microSD
card.
• If you format the recorder (☞ P.74), voice
guide data will be erased as well. If you
want to recover the voice guide data,
connect to a PC and copy the guide
data to the recorder by using supplied
“Olympus Sonority” (☞ P. 83) .
Menu setting method
EN
76
Page 77

Using the recorder on your PC
By being connec ted to a PC, the re corder enables you to do the following:
• Voice files recorded on the recorder can be played and managed on the PC using the
“Olympus Sonority”.
If an upgrade (Optional) to the “Olympus Sonority Plus” is executed or a Music Editing
Plug-in is added (Optional), various additional functions can be utilized (☞ P. 84 ).
• You can transfer files recorded with this recorder to a computer, play them back , and
manage them by using Windows Media Player or iTunes.
• In addition to its uses as a voice recorder and a music player, this recorder can also be used
as external memor y for a computer by storing data from a computer and reading it back
out (☞ P. 90 ).
Operating environment
Windows
Operating System:
Microsoft® Windows® XP Service Pack 2, 3
Microsof t® Windows® XP Professional x64
Edition Ser vice Pack 2
Microsoft® Windows Vista® Service Pack 1,
2 (32bit/64bit)
Microsof t® Windows® 7 (32bit/64bit)
CPU:
32 bits (x86) of 1GHz or above or 64 bits
(x64) processor
RAM:
512 MB o r more
Hard drive space:
300 MB or more
Notes
• The support ser vice will not cover if your PC has been updated from Windows 95/98/
Me/2000 to Windows XP/Vista/7.
• Any failure on a self-modified PC will not be covered under the operational warranty.
Drive:
CD-ROM, CD-R, CD-RW, DVD-ROM drive
Browser:
Microsoft Internet Explorer 6.0 or later
Display:
1024 x 768 pixels or more, 65,536 colors
or more (16,770,000 colors or more is
recommended)
USB port:
One or more free por ts
Others:
• Audio device
• Environment where the Internet can be
utilized.
5
Operating environment
EN
77
Page 78

Operating environment
Macintosh
Operating System:
Mac OS X 10.4.11 - 10.6
CPU:
PowerPC® G5 or Intel Multicore Processor
1.5 GHz or above
RAM:
512 MB o r more
Hard drive space:
300 MB or more
Drive:
CD-ROM, CD-R, CD-RW, DVD-ROM drive
Browser:
Macintosh Safari 2.0 or later
Preca utions on us ing the rec order con nected to a PC
5
• When you are downloading a file from the recorder or uploading a file to the recorder,
Operating environment
do not remove the USB cable even if the screen is indicating you can. Data is still being
transferred while the LED indicator light is blinking. When removing the USB cable, be sure
to follow the description in ☞ P.88. If the USB cable is removed before the drive is stopped,
data may not be successfully transferred.
• On a PC, do not format the drive of the recorder. Initialization is not successfully achieved
on a PC. For initialization, follow the instructions in the [Format] display of the recorder
(☞ P.74 ).
• Folder (directory) names displayed by file management tools such as E xplorer in Microsoft
Windows and Finder in Macintosh are different from the folder names that can be set with
the recorder or the “Olympus Sonority ”.
• If folders or files stored on the recorder are moved or rename d by using a file management
tool in Windows or Macintosh, the order of files may be changed or files may become
unrecognizable.
• Data can be written or uploaded to the recorder even though the attribute of the recorder
drive is shown as Read- only by the operating system of the PC.
• As the noise may cause adverse effects on electronics devices nearby the recorder, unplug
the external microphone and earphone when you connect the recorder to a PC.
Display:
1024 x 768 pixels or more, 32,000 colors
or more (16,770,000 colors or more is
recommended)
USB port:
One or more free ports
Others:
• Audio device
• Environment where the Internet can be
utilized.
EN
78
Page 79

Using Olympus Sonority
Functions available in the Olympus Sonority
Various functions such as file management and editing are installed in the “Olympus
Sonorit y”. For information on operating procedures and detailed settings, please refer to the
respective items on online help (☞ P. 86 ).
Waveform editing function:
Using the Waveform Editing Function
Tab, you can easily process the voice
data. In the Waveform Editing Mode,
you can also delete unnecessary
parts, paste and re-save the data.
One-touch effect function:
Using the One -touch Effect Function,
you can easily apply special ef fects
to the voice file and carry out noise
reduction in any specified area.
Changing the Use r ID:
The user ID will be automatically
given to files that are recorded with
the recorder.
Changing a folde r name:
You can change a folder name. A
folder name can be up to 12 characters long and cannot use \ /:*?”<>|.
If you change the folder name using
an OS in a language not supported by
this recorder, the words may become
garbled.
* A function to convert PCM and WMA files to MP3 format is available by upgrading to
the “Olympus Sonority Plus” (☞ P. 84).
Changing the file format to other
format: *
The current file format can be
changed to other format s.
Joinin g files: *
In “Olympus Sonority” , designated
multiple voice files can be joined and
one voice file can be created.
Splitting fi les: *
One designated voice file can be
split into the two files in “Olympus
Sonority”.
5
Using Ol ympus Sono rity
EN
79
Page 80

Using Olympus Sonority
Installing software
Before you connect the recorder to your PC and use it, you must first install the “Olympus
Sonority” software from the included Software CD.
Be sure to conf irm the following before installation:
• Exit all running applications.
• You need to log on as an Administrator.
Windows
1 Insert “Olympus Sonority” into
the CD-ROM drive.
• The installation program will start
automatically. Once the program
starts, jump to step 4. If it does not,
follow the procedures in steps 2 and
3.
2 Open contents in the CD-ROM
with [Explorer].
5
3 Double-click [Setup] in the
Using Ol ympus Sono rity
CD-ROM.
4 When the “Olympus Sonority”
launch screen is displayed, click
the desired language to select it.
5 When [Olympus Sonority Setup]
is clicked, the Installer Opening
display will start up. Follow the
Installer Wizard instructions.
6 Confirm your acceptance of
the terms of the Licensing
Agreement.
• You must accept the terms of the
Licensing Agreement to install
“Olympus Sonority”. After checking
the [Agree] box, click [Next].
7 [Registration of User Registration
Information]
• Please enter your name, company
name and serial number which is
listed on the separate sheet. Click
[Next] after entering.
8 [Select Setup Type]
• The installation destination can be
changed. Click [Next] if you do not
want to change (Select [Custom] if
you want to change).
9 [Start Installation]
• Click [Install] to start installing. Do
not carr y out other operations before
the installation is completed and the
[Complete] display is displayed.
10 [Installation Complete]
• When the installation is completed,
the completed [Install Shield]
display will be displayed.
EN
80
Page 81

Macintosh
Using Olympus Sonority
1 Insert “Olympus Sonority” into
the CD-ROM drive.
• Proceed to step 3 when the content of
CD-ROM is displayed, and go to steps
2 and 3 when nothing is displayed.
2 Open contents in the CD-ROM
with [Finder].
3 Double-click [Setup] in the
CD-ROM.
4 When the “Olympus Sonority”
launch display is displayed, click
the desired language to select it.
5 When [Olympus Sonority Setup]
is clicked, the installer opening
display will start up. Follow the
Installer wizard instructions.
6 Confirm your acceptance of
the terms of the licensing
agreement.
• You must accept the terms of the
licensing agreement to install
“Olympus Sonority”. After checking
the [Agree] box, click [Next].
7 [Changing the Installation
Destination]
• The installation destination can be
changed. Click [Next] if you do not
want to change (Select [Change
Installation Destination] if you want
to change).
8 [Start Installation]
• When the installation is completed,
the completed [Installer] display will
be displayed.
• After starting up the “Olympus
Sonority”, the serial number entry
dialog box will appear. Enter the
serial number which is listed on the
separate sheet. After entering, click
[OK] and the “Olympus Sonority” will
start up.
5
Using Ol ympus Sono rity
EN
81
Page 82

Using Olympus Sonority
Uninstalling software
To uninstall any of the soft ware component of the “Olympus Sonority” software installed on
your PC, follow the steps below.
Windows
1 Exit “Olympus Sonority”.
2 Select [Control Panel] from
[Start] menu.
3 Click [Add/Remove programs] in
the control panel window.
4 When the installed application
list is displayed, select [Olympus
Sonority].
5 Click [Change/Remove].
5
6 Confirmation of deleting the file.
Using Ol ympus Sono rity
• Click the [OK] button to start
uninstalling. An additional message
may appear, if so, read it carefully and
follow the instructions given.
Macintosh
1 Exit “Olympus Sonority”.
2 Open [Finder] and double-click
the [SonorityUninstaller.pkg] in
the application folder.
3 The Uninstaller will start up.
Follow the wizard instructions.
4 When the administrator
password is asked, enter the
password then click [OK].
5 Uninstall will start and when
[Successful] is displayed, click
[Close].
7 When the [Maintenance
Complete] display is displayed,
click [Finish] to complete
uninstalling.
Files le ft after u ninstal lation
The voice files you made are stored in the [MESSAGE] folder. If you don’t need them, delete
them.
You can confirm the location of the [MESSAGE] folder by clicking [Options] in the [Too ls]
menu before uninstalling.
EN
82
Page 83

Using Olympus Sonority
Copying voice guide data
If you format the recorder and erase data by mistake, you can copy the voice guide data from
"Olympus Sonorit y" to the recorder.
1 Make sure that the recorder’s
voice guide is set to [On].
• If the recorder’s voice guide is set to
[Off] the voice guide data cannot be
copied.
2 Connect the recorder to a PC.
• For how to connect to a computer,
see [Connecting to your PC]
(☞ P. 87).
3 Start "Olympus Sonority".
• If the recorder does not have voice
guide data, the [File Trans fer
will appear.
4 Copy voice guide data.
• If you click the [OK] button in the
[File Transfer] dialog, it will start
copying voice guide data, and a
window indicating copying progress
will appear.
5 Copying of the voice guide data
will be completed.
] dialog
{
4
5
Using Ol ympus Sono rity
Notes
• The alarm sound (☞ P.69), the Starting tune that plays when the recorder is starting up,
and the Closing tune that plays when the recorder is turning off (☞ P.20), will be copied
together with the voice guide data.
• NEVER disconnect the USB cable while the LED indicator light is flashing. If you do, the
data will be destroyed.
EN
83
Page 84

Using Olympus Sonority
Upgrade function
The "Olympus Sonority" can be upgraded to the Plus Version (Optional) to expand and
improve its functions. In addition, in the "Olympus Sonority Plus", you can purchase a Music
Editing Plug-in to enjoy high-quality effect editing. To add a Music Editing Plug-in, you will
need to upgrade the "Olympus Sonority Plus".
Purch ase and upg rade
How to purchase "Olympus Sonority Plus"
and upgrade from "Olympus Sonorit y" is
shown in the following procedures.
1 Start the "Olympus Sonority".
2 Select [Purchase Olympus
Sonority Plus] in the [Help] Menu
or click the [ ] button in the Tool
Bar.
• The web browser will start and
5
Using Ol ympus Sono rity
the purchase site of the "Olympus
Sonorit y Plus" will be displayed.
Please operate according to guidance
on the screen. When the purchase
procedure is completed, the Upgrade
Key will be issued by mail.
Upgra ding to Oly mpus Sonor ity Plus
Click the root of the Main Treeview,
[Olympus Sonority], in the Browse
Screen to display the Information
Screen. You can confirm that the
upgrade key is registered. In addition,
when [Version Information] in the
[Help] Menu is selected, the upgrade
key registered in "Olympus Sonority
Plus" will be displayed. The Music
Editing Plug-in includes more than 20
types of effect func tions and spectrum
analyzer functions. For details, please
refer to the Online Help (☞ P. 86 ).
3 Select [Upgrade to Olympus
Sonority Plus] from the [Help]
menu.
• The [Upgrad e to Olympus Sonority
Plus] dialog will be displayed.
4 In the [Upgrade to Olympus
Sonority Plus] dialog, enter the
Upgrade Key of your purchase,
and click the [OK] button.
• When starting the application nex t
time, "Olympus Sonority" will be
upgraded to "Olympus Sonority Plus".
Notes
EN
• To purchase the Upgrade Key, it requires an environment where the Internet can be
utilized.
• Please refer to the details in the website regarding the purchase of the Upgrade Key.
84
Page 85

Using Olympus Sonority
Functions available in the Olymp us
Sonority Plus:
Besides the usual functions, the “Olympus
Sonorit y Plus” also includes various
functions to edit music files. For information
on operating procedures and detailed
settings, please refer to the Online Help
(☞ P. 86).
MP3 editing:
MP3 file and tag editing and writing
function.
Creating music CD:
Function to create music CD from
voice files registered in the CD
writable folder.
Recorder menu setting:
Function for settings in this
recorder (detailed settings such as
alarm setting, timer recording, etc.).
Functions available with the music
editing plug-in:
By purchasing a music editing plug-in, you
can add high-quality functions to expand
the music editing range in the “Olympus
Sonorit y Plus”. For detailed purchasing
method and operating procedures, please
refer to the Online Help (☞ P. 86 ).
Effect functions:
You can use more than 20 highquality effect functions to edit your
music files.
Spectrum analyzer:
The frequency spectrum of the
sound file being played will be
displayed on the waveform editing
screen in real time.
Besides unres tricted trac k editing:
It also removes the restriction on
the number of tracks that can be
edited.
5
Using Ol ympus Sono rity
EN
85
Page 86

Using Olympus Sonority
Using online help
To open Online Help:
• While “Olympus Sonority” is running, select [Contents] from the [Olympus S onority
Help] menu.
4 Search by contents:
1 Once the Online Help display
appears, click the Contents tab.
2 Double-click the icon of the
desired topic heading.
3 Double-click the icon of the
desired topic.
• An explanation of the topic is
displayed.
5
4 Search by keyword:
Using Ol ympus Sono rity
1 Open Online Help and click the
[Index] item.
• Matching keywords are located
automatically.
2 Click keyword.
• An explanation of the topic is
displayed.
2
3
1
2
Note
EN
• For more information on menus and operations, refer to Online Help. You will be able to
use Online Help after Olympus Sonority is installed.
86
Page 87

Connecting to your PC
Before you connect the recorder to
your PC and use it, you must first
install the “Olympus Sonority”
software from the included
Software CD (☞
P. 80).
1 Boot the PC.
2 Connect the USB cable to the USB
port of the PC.
3 While the recorder is during stop
mode or turned off, connect
the USB cable to the connecting
terminal on the bottom of the
recorder.
• [Remote (Storage)] is displayed
on the recorder if the USB cable is
connected.
• When the recorder is using the
USB connection setting, it will
not be connected to the PC when
[AC Adapt er] is selected. Select
[PC] in the USB connection setting
(☞ P.73) .
Windows:
When you connect the recorder to
Windows and open [My Computer],
it will be recognized by the drive
name of the product name. Inserting a
microSD card will allow you to use it as
[Removable Disk].
Macintosh:
When you connect the recorder to
Mac OS, it will be recognized by the
drive name of the product name on the
desktop. If a microSD card is inserted,
[Untitled] will be displayed.
Notes
• Before connecting the USB cable, exit
HOLD mode.
• Refer to the user’s manual for your PC
regarding the USB por t on your PC.
• Be sure to push the cable connector all
the way in. Otherwise, the recorder may
not operate properly.
• When connecting the recorder through
an USB hub the operation may become
unstable. In such cases, refrain from using
a USB hub.
• Be sure to use the included dedicated
USB cable. If any other company’s cable
is used, it may lead to malfunction of the
recorder. Also, never use this dedicated
cable with any other company’s products.
5
Connec ting to your PC
EN
87
Page 88

Disconnecting from your PC
Connecting to your PC
Windows
1 Click [ ] on the task bar
located at the lower-right corner
of the screen. Click [Safely
remove USB Mass Storage
Device].
• The drive letter will differ depending
on the PC being used.
• When the window indicating that it
is safe to remove hardware window
5
Connec ting to your PC
appears, close the window.
2 Confirm that the recorder LED
indicator light is gone before
disconnecting the USB cable.
Macintosh
1 Drag and drop the drive icon for
this recorder displayed on the
desktop to the Recycle Bin icon.
2 Confirm that the recorder LED
indicator light is gone before
disconnecting the USB cable.
Note
EN
• NEVER disconnect the USB cable while the LED indicator light is flashing. If you do, the
data will be destroyed.
88
Page 89

Transfer the voice files to your PC
The 5 voice folders of this recorder are named as [Folder A], [Folder B], [Folde r C], [Folder D]
and [Folder E
Windows
1 Connect the recorder to your PC
2 Open the Explorer window.
3 Open the product name folder.
4 Copy the data.
5 Disconnect the recorder from the
Macintosh
1 Connect the recorder to your PC
2 Double-click the product name
3 Copy the data.
4 Disconnect the recorder from the
], and the recorded voice files are saved in these folders.
(☞ P. 8 7) .
• When you connect the recorder to
Windows and open [My Computer],
it will be recognized by the drive
name of the product name. Inserting
a microSD card will allow you to use it
as [Removable Disk].
PC (☞ P. 88 ) .
(☞ P. 8 7) .
• When you connect the recorder to
Mac OS, it will be recognized by the
drive name of the product name
on the desk top. If a microSD card is
inserted, [Untitled] will be displayed.
icon on the desktop.
PC (☞ P. 88 ) .
4 Drive names and folder names
when a PC is connected:
Built-in flash memory
Drive name Folder name
LS_7
Recorder
Music
microSD card
Drive name Folder name
Removable
Disk
Windows
Untitled
Macintosh
Recorder
Music
Notes
• While transmitting data, [Busy] is
displayed, and the LED indicator light
flashes. NEVER disconnect the USB cable
while the LED indicator light is flashing. If
you do, the data will be destroyed.
• In the Mac OS operational environment,
WMA format f iles cannot be played back.
• In a Windows standard environment,
24-bit wav-format files cannot be played.
Use “Olympus Sonority” for playback of
such files.
Folder A
Folder B
Folder C
Folder D
Folder E
Folder A
Folder B
Folder C
Folder D
Folder E
5
Transfer t he voice files t o your PC
EN
89
Page 90

Using as external memory of the PC
In addition to its uses as a voice recorder and a music player, this recorder can also be used as
external memor y for a computer by storing data from a computer and reading it back out.
With the recorder connected to your PC, you can download data from the memory to your PC
and upload data stored on your PC to the memor y.
Windows
1 Connect the recorder to your PC
(☞ P. 8 7) .
2 Open the Explorer window.
• When you open [My Computer], it
will be recognized by the drive name
of the product name.
3 Open the product name folder.
4 Copy the data.
5 Disconnect the recorder from the
PC (☞ P. 88 ) .
5
Macintosh
1 Connect the recorder to your PC
(☞ P. 8 7) .
• When you connect the recorder to a
Mac OS, it will be recognized by the
drive name of the product name on
the desktop.
2 Double-click the product name
icon on the desktop.
3 Copy the data.
4 Disconnect the recorder from the
PC (☞ P. 88 ) .
Using as external memory of the PC
Note
EN
• While transmitting data, [Busy] is displayed, and the LED indicator light flashes. NEVER
disconnect the USB cable while the LED indicator light is f lashing. If you do, the data will
be destroyed.
90
Page 91

Other information
Alarm message list
Message Meaning Explanation Action
[Batter y Low] Low battery power.
[File Protec ted] Erase-locked.
[Cannot record in this
folder]
[Index Full] Index f ull.
[Temp Mar k Full] Temp mark full.
[Folde r Full] Folder full.
[Memor y Error] Error in th e memory. Error in the memor y.
[Card Er ror] Error in the memo ry.
Not an audio-recording
folder.
Batter y power is get ting
low.
Tried to dele te a locked
file.
Record ing has been
attempted with a [Music]
folder.
The fil e is full of index
marks (ma ximum of 16
marks).
The fil e is full of Temp
marks (ma ximum of 16
marks).
The fold er is full of fil es
(maximu m of 200 files).
microSD ca rd is not
recognized co rrectly.
Charge th e batteries
or repla ce with new
batter ies (☞ P.15 , P.17 ).
Unlock th e file (☞ P. 50 ).
Select a folder from
among [ &] to [*] an d try
recording again (☞ P.2 6,
P. 29 ) .
Erase ind ex marks that
are no longer required
(☞ P. 42) .
Erase Temp mar ks that
are no longer required
(☞ P. 42) .
Erase unn ecessary f iles
(☞ P. 45) .
This is a mal function, s o
go to the sto re where
you purchased the
record er or an Olympus
serv ice station for re pair
(☞ P.1 02) .
Remove th e microSD
card, an d put it again
(☞ P. 24 t o P. 25 ).
6
Alarm message list
[License Mi smatch] Illegally copied file.
[Memor y Full] Zero rem aining memor y. No re maining memor y.
[No File] No file.
[Format Error] Formatting error.
The musi c files copied
illegally.
No file s were found in
the fold er.
There wa s an error while
formatting the recorder’s
memory.
Erase the f ile (☞ P.4 5) .
Erase unn ecessary f iles
(☞ P. 45) .
Select another folder
(☞ P. 27 t o P. 29 ).
Reformat the memory
(☞ P. 74).
EN
91
Page 92

Message Meaning Explanation Action
[Can’t ma ke the
syste m file. Conne ct
to PC and de lete
unnecessary file]
[Cannot play this file]
[Pleas e Select The
File]
[Same fol der. Can't
be moved(copied).]
[Some fi les. Can't be
moved(copied).]
[This f ile can’t be
divided]
The mana gement file
cannot be created.
File whic h cannot be
played.
Unselected File File is not selected.
File cann ot be moved
(copie d).
File cann ot be moved
(copie d).
File which cannot be
split.
The fil e for manageme nt
cannot b e created due
to a shor tage of capacit y
for remaining memory.
Incompatible format.
Attem pting to mov e (copy)
into the sa me folder.
A file wi th the same
filen ame exists in th e
destin ation folder fo r a
move (copy) operation.
Attempt ing to split a file
other than MP3 or PCM
files r ecorded in this
recorder.
6
Alarm message list
Alarm message list
Connec t the recorder to
a compute r and delete
any unnecessary files.
Please co nfirm the fil e
that can b e played on this
recorder (☞ P.4 0) .
Please se lect a file th en
carry o ut the operati on
(☞ P. 27 t o P. 29 ).
Please select another
folder.
Please select another file.
Please select another file.
EN
92
Page 93

Troub lesho oti ng
Symptom Probable cause Action
Verify that the batteries’ polarities =
and - are correc t (☞ P.15) .
Charge th e batteries or re place with
new batt eries (☞ P.15 , P.1 7).
Turn the power o n (☞ P.2 0) .
Charge th e batteries or re place with
new batt eries (☞ P.15 , P.1 7).
Turn the power o n (☞ P.2 0) .
Releas e the recorder fr om HOLD
(☞ P. 21).
Erase unn ecessary f iles (☞ P.4 5) .
Change to a ny other folder
(☞ P. 27 t o P. 29 ).
Set [Plug-inPower] to [On] when an
external microphone supported by
plug- in power is connec ted (☞ P. 56) .
Unplug th e earphones to us e the
internal speaker.
Adjust th e volume level (☞ P. 37 ).
Adjust th e recording leve l and then try
recordi ng once more (☞ P. 51) .
Set [Mic Sense] to [High] or [Middle]
(☞ P. 50 ).
Adjust th e output level for t he
connected dev ices.
Adjust th e recording leve l and then try
recordi ng once more (☞ P. 51) .
If you can not record clear ly even
after a djusting the re cording level,
then adju st the output lev el for the
connec ted devices (☞ P. 51) .
Nothi ng appears on
the display
Won’t st art
Unable to record
Unable to record
throu gh an extern al
microphone
No playback sound
heard
Recor ding level too
low
Recor ding level too
high
The bat teries are not lo aded properl y.
Batter y power is get ting low.
The powe r is off.
Batter y power is get ting low.
The powe r is off.
The reco rder is in HOLD mod e.
Low remai ning memory.
The max imum number of f iles has
been reached.
An external microphone supported by
plug- in power is connec ted but [Plug-
in Power] is set to [Off].
The earphone is connected.
The volu me level is set to [00].
The reco rding level has no t been
adjusted.
The microphone sensitivity is too low.
This coul d potentially b e because
the outp ut level for the con nected
exter nal devices are to o low.
The reco rding level has no t been
adjusted.
This coul d potentially b e because
the recor ding level and ou tput level
for conne cted exter nal devices are
too high.
6
Troubleshooting
EN
93
Page 94

Symptom Probable cause Action
The connected external microphone
is monaural.
Voice fil es are not
recorded in stereo
Cannot f ind the
recorded Voice File
Noise h eard during
playback
Unabl e to hear any
6
sound f rom the
Troubleshooting
earphone through the
recording monitor
Unabl e to erase the
file
Unabl e to erase the
folders
Noise i s audible
through the recording
monitor
[Rec Mode] is set to a mona ural
recording mode.
[Zoom Mic] is set to the + side.
Wrong fol der.
The recorder was shaken during
recording.
The reco rder was placed n ear a cell
phone or f luorescent l amp while
recording or during playback.
The set tings of the conn ected exter nal
microp hone do not corres pond to
those of th e recorder.
[Rec Monitor] is set to [Off].
The file is locked.
The fil e is read-onl y.
There is a f ile which cann ot be
recogni zed by the record er in the
folder.
Acoustic feedback is occurring.
EN
Tro ubl esh ooti ng
When rec ording while an e xternal
monaural microphone is connected,
sound wi ll only be record ed by the
L-c ha nn el .
Set [Rec Mode] to the stereo
recordi ng mode (☞ P. 51) .
Set [Zoom Mic] to [Off] (☞ P. 52) .
Switch to the co rrect folde r
(☞ P. 27 t o P. 29 ).
———
Move the re corder.
When a mic rophone not sup ported
by the plug -in power fun ction is
connected , turn the [Plug-inPower]
setti ng to [Off] (☞ P.5 6) .
Set [Rec Monitor] to [On] (☞ P. 55).
Unlock th e file (☞ P. 50 ).
Unlock th e file or cance l the read-onl y
setti ng of the file on th e PC.
Connec t the recorder to yo ur PC and
erase a fo lder (☞ P.8 7) .
When the b uilt-in speake r amps and
the like ar e connected the re is a risk
that audi o feedback will o ccur while
recording. It is recommended that
you use ear phones for the re cording
monitor, or t urn the [Rec Monitor] to
[Off] while r ecording (☞ P. 5 5) .
Perfor m adjustments , such as furthe r
distancing the earphones from
the microphones, not pointing the
microphones at the earphones, or
lowerin g the volume of the r ecording
monitor.
94
Page 95

Symptom Probable cause Action
Unabl e to set index
marks, temp marks
Cannot recharge
The PC is un able
to reco gnize the
recorder
The max imum number of mar ks has
been reached.
The file is locked.
The fil e is read-onl y.
[Battery] is set to [Alkaline].
You have not pres sed the
`OK button.
[USB Class] is set to [Compos ite].
[USB Connect] is set to [PC].
Erase unnecessary marks (☞ P.4 2) .
Unlock th e file (☞ P. 50 ).
Unlock th e file or cance l the read-onl y
setti ng of the file on th e PC.
When usi ng the supplied r echargeable
batter ies, set the bat tery settin g to
[Ni-MH]. Also, p lease avoid using th e
batter ies outside th e recommended
temper ature range (☞ P.1 6, P.19, P.6 1).
When usi ng the USB connect ion,
follow the confirmation display and
press the `OK button.
Set [USB Class] to [Storage class]
(☞ P. 73) .
Set [USB Connect] to [PC] (☞ P. 73) .
Tro ubl esh ooti ng
6
Troubleshooting
EN
95
Page 96

Accessories (optional)
Accessories exclusive to the Olympus voice recorder can be purchased directly from Online
Shop on our company’s website. Sales of accessories are different according to the country.
s Stereo microphone: ME51S
The built-in large -diameter microphone
enables sensitive stereo recording.
s 2-channel microphone (omni-
directional): ME30W
Two ME30 monaural microphones come
in a set with a miniature tripod and a
connection adapter. These are highly
sensitive omni-directional microphones
supported by plug-in power which
are well-suited to recording musical
performances.
s Compact Gun Microphone
(unidirectional): ME31
The directional microphones useful for
recordings such as outdoor recording
of wild birds singing. The metal body
provides a sturdiness to the high rigidity.
s Compact zoom microphone
6
(unidirectional): ME32
Accessories (optional)
The microphone is integrated with a
tripod, making it suitable for when
you wish to record from a distance,
such as from your table at a meeting or
conference.
s Highly sensitive noise-
cancellation monaural
microphone (unidirectional):
ME52W
This microphone is used to record
sound at a distance while minimizing
surrounding noise.
s Tie clip microphone
(omni-directional): ME15
Small concealing microphone with a
tie-clip.
s Telephone pickup: TP7
Earphone type microphone can be
plugged into your ear while phoning.
The voice or conversation over the phone
can be clearly recorded.
s Ni-MH rechargeable battery:
BR404
High-efficiency rechargeable long life
batteries.
s USB connecting AC adapter: A514
DC5V AC Adapter for USB connection.
s Connecting cord: KA333
Connecting cord which has stereo
mini-plugs (ø3.5) with resistance at both
ends. Use to connect from the earphone
jack output of the recorder to the
microphone input jack when recording.
Converting plug adapters (PA331/PA231)
which conver t to the monaural mini plug
(ø3.5) or monaural mini plug (ø2.5) are
also enclosed.
s Exclusive remote control set:
RS30W
When the receiver is plugged into the
REMOTE jack the recorder’s recording
and stop functions can be operated
through the remote control. The
receiving position can be adjusted,
thereby allowing you to operate the
recorder from various different angles.
EN
96
Page 97

Specifications
General points
4 Recording format:
Linear PCM (Pulse Code Modulation)
MP3 (MPEG-1 Audio Layer3)
WMA (Windows Media Audio)
4 Input level:
—
70 dBv
4 Sampling frequency:
Linear PCM format
96 kHz 24 bit 96 kHz
88.2 kHz 24 bit 88.2 kHz
48 kHz 16 bit 48 kHz
44.1 kHz 16 bit 44.1 kHz
44.1 kHz mono 44.1 kHz
MP3 format
320 kbp s
256 kbps
128 k bps
mono
WMA format
128 k bp s 4 4.1 k Hz
64 kbps 44.1 kHz
32 kbps 22 kHz
mono 8 kHz
44.1 kHz
44.1 kHz
44.1 kHz
44.1 kHz
4 Maximum working output:
400 mW (8 Ω speaker)
4 Maximum headphone output:
â 150 mV (according to EN 50332-2)
4 Recording medium:
Built-in NAND FLASH memory: 4 GB
microSD card: 512 MB to 32 GB
4 Speaker:
Built-in ø 20 mm round dynamic speaker
4 MIC jack:
ø 3.5 mm mini -jack, impedance 2.2 kΩ
4 EAR jack:
ø 3.5 mm mini -jack, impedance 8 Ω or
more
4 Input power requirement:
Batteries:
AAA battery (LR03) or
Olympus Ni-MH rechargeable batter y
External power supply:
USB connecting AC adapter(A514) 5 V
4 External dimensions:
112 mm × 39.8 mm × 15.9 mm
(without protrusions)
4 Weight:
90 g (including batteries)
4 Operating temperature:
0°C - 42°C/ 32°F - 107.6°F
6
Specifi cations
EN
97
Page 98

Freque ncy res ponse:
4 During recording mode
(Microphone jack):
Linear PCM format
96 kHz 24 bit 40 Hz to 44 k Hz
88.2 k Hz 24 bit 40 Hz to 42 kH z
48 kHz 16 bit 40 Hz to 23 kH z
44.1 kHz 16 bit 40 H z to 21 kHz
44.1 kHz mono 40 Hz to 21 kHz
MP3 format
6
Specifi cations
320 kbp s
256 kbps
128 k bps
mono
WMA format
128 kbps 40 Hz to 19 kHz
64 kbps 40 Hz to 16 kHz
32 kbps 40 Hz to 9 k Hz
mono 40 Hz to 3 kH z
40 Hz to 20 kHz
40 Hz to 20 kHz
40 Hz to 17 kHz
40 Hz to 13 kHz
4 During recording mode (Built-in
microphone):
20 Hz to 20 kHz ([Central Mic ON])
70 Hz to 20 kHz ([Central Mic OFF ])
(However, when recording in the MP3
format or the WMA format, the upper
limit value of the frequency response
depends on each recording mode)
4 During playback mode:
20 Hz to 20 kHz
Specifications
EN
98
Page 99

Guide t o battery l ife
The following values are strictly references.
4 Alkaline batteries:
Recording mode
Linear PC M format 44.1 kHz 16 bit 30h. 41h.
MP3 format 320 kbps 33h. 48h.
WMA format
128 k bp s 34h . 47h .
mono 44h. 51h.
Built-in stereo microphone
(During recording mode)
(Durin g playback mod e)
4 Ni-MH Rechargeable batteries:
Recording mode
Linear PC M format 44.1 kHz 16 bit 22h. 30h .
MP3 format 320 kbps 21h. 34h.
WMA format
128 kbps 23h. 33h.
mono 31h. 37h.
Built-in stereo microphone
(During recording mode)
(Durin g playback mod e)
Specifications
Earphone playback
Earphone playback
6
Specifi cations
Note
• Batter y life is measured by Olympus. It varies greatly according to the type of batteries
used and the conditions of use.
EN
99
Page 100

Guide t o recordi ng times
The following values are strictly references.
4 Linear PCM format:
Recording
mode
96 kHz 24 bit
88.2 k Hz 24 bit
48 kHz 16 bit
44.1 kHz 16 bit
44.1 kHz mon o
Built-in memory
4 MP3 format:
6
Specifi cations
Recording
mode
320 kbp s
256 kbps
128 k bps
mono
Built-in memory
4 WMA format:
Recording
mode
128 k bp s 64 h. 32h .
64 kbps 128h.
32 kbps 257h. 128h. 259h. 522h. 1046h.
mono 1007h. 502h. 1014h. 2042h. 4089h.
Built-in memory
Specifications
(
4 GB)
1h.
45min.
1h.
55min.
5h.
25min.
5h.
55min.
11h .
55min.
(
4 GB)
26h. 13h.
32h.
30min.
65h.
30min.
131h. 66h. 132h. 267h. 536h.
(
4 GB)
2 GB 4 GB 8 GB 16 GB
55min.
55min. 2h. 4h .
2h.
45min.
2h.
55min.
5h.
55min.
2 GB 4 GB 8 GB 16 GB
16h.
30min.
33h. 66h. 133h. 268h.
2 GB 4 GB 8 GB 16 GB
64h.
30min.
microSD card
1h.
50min.
5h.
30min.
6h.
12h .
microSD card
26h.
30min.
33h.
microSD card
64h.
30min.
129 h. 261h . 52 3h .
3h.
40min.
11h .
5min.
12h .
5min.
24h.
10mi n.
53h. 107h.
66h.
30min.
130 h. 2 62h .
25min.
5min.
22h.
20min.
24h.
15mi n.
48h.
35min.
134 h.
7h.
8h.
Notes
• Available recording time may be shorter if many short recordings are made
(The displayed available recording time and recorded time are approximate indications).
EN
• Variations in the available recording time will arise as there may be dif ferences in the
100
available memory depending on the microSD card.
 Loading...