

Page 1

Instructions Guide for G3 WorkStation
Procedure Setup
G3 WorkStation
ENT
Page 2
2 G3 WORKSTATION
The G3 WorkStation provides precise delivery and control of PK
Technology for head and neck surgical procedures. In addition
to PlasmaCision, the G3 supports TCRFTM (TemperatureControlled Radio Frequency) for the Somnoplasty procedures.
As a result, one technology platform can be used for a growing
variety of surgical procedures, providing enhanced value and
versatility, now and in the future.
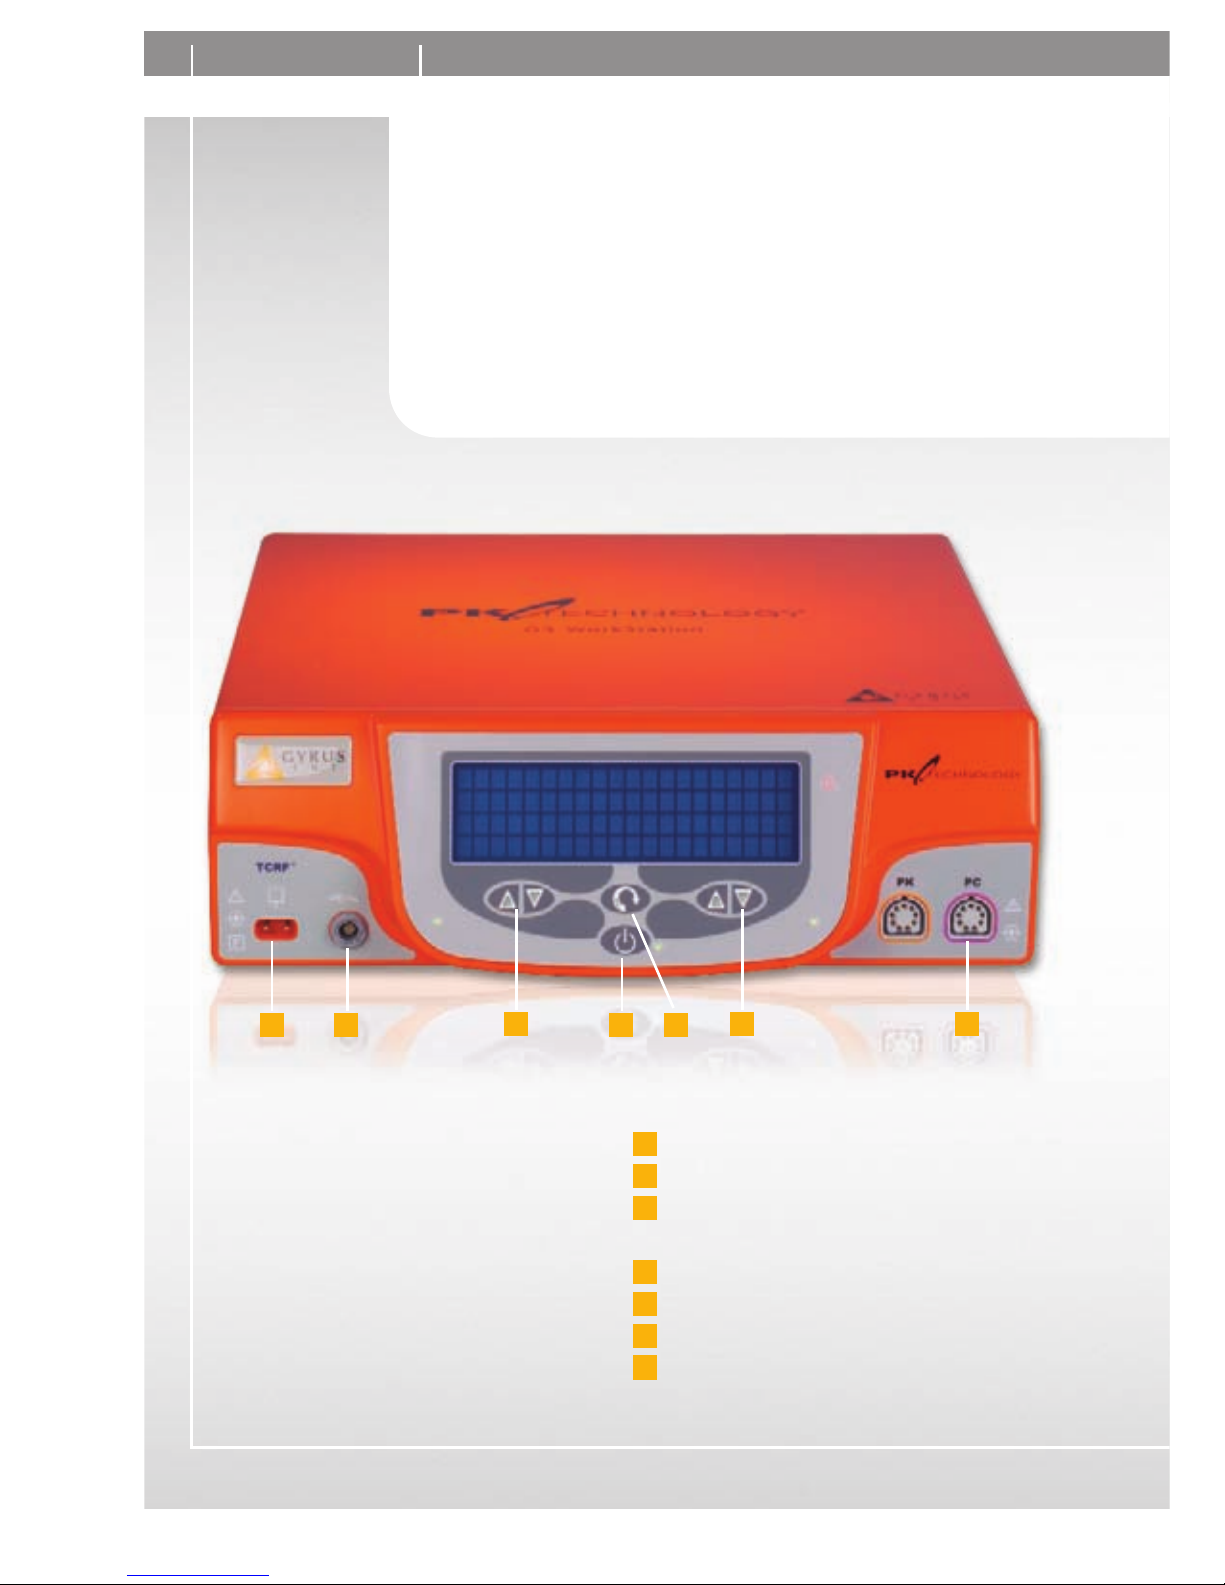
G3 WORKSTATION
1 2 4
3 6 7
5
1
Return Electrode Connection
2
TCRF Handpiece Cable Connection
3
TCRF Set Target Temperature/
PlasmaCision, PlasmaBlend Settings
4
Standby/Power Button
5
Mode/ Menu
6
TCRF Set Target
7
PlasmaCision Handpiece Connection
Page 3

PROCEDURE SETUP GUIDE
Using Temperature Controlled Radio Frequency (TCRF)
Initial Setup:
A
Connect the power cord and footswitch on the rear panel of the WorkStation.
B
Turn the machine on at the back of the unit.
C
Press the Stand-By button on the center of the front panel (the “apple” switch).
D
Place the grounding pad on the patient and connect the cord to the front of the
controller.
E
CAREFULLY connect the handpiece (Green or Gray) cable to the front of the controller
(Use the green cable for turbinate, tonsil, and dual-channel tongue-base and the gray
cable for palate and single-channel tongue base).
F
Set the temperature using arrows on the left side of the controller.
G
Set the Joules using arrows on the right side of the controller.
H
See the charts below for temperature and Joules settings for each procedure.
Rapid Lesion Mode:
A
Press the temperature arrow until 85ºC is reached.
B
Release and press once more to reach the RAPID LESION menu.
C
The temperature is now set for rapid lesion.
D
Maximum Joule output for single channel instruments using rapid lesion is 300.
E
Maximum Joule output for dual channel instruments using rapid lesion is 600.
F
Do not use rapid lesion for palate reduction.
• • • • • • • • • • • • • • • • • • • • • • • • • • • • • • • • • • • • • • • • • • • • • • • • • • • • • • • • • • • • • • • • • • • • • • • • • • • • • • • • • • • • • • • • • • • • • • • • • • • • • • • • • • • • • • • • • •
• • • • • • • • • • • • • • • • • • • • • • • • • • • • • • • • • • • • • • • • • • • • • • • • • • • • • • • • • • • • • • • • • • • • • • • • • • • • • • • • • • • • • • • • • • • • • • • • • • • • • • • • • • • • • • • • • •
Page 4

4 G3 WORKSTATION
Begin Treatment:
A
Press and release the BLUE foot pedal OR press the MODE button (located in
the center of the controller with a round arrow) ONCE (This will set the system to RF
SENSING OFF).
B
Press and release the BLUE foot pedal OR press the Mode button a second time.
(This will set the system to RF SENSING ON, Impedance values are recognized here).
C
Press and release the BLUE foot pedal OR press the Mode button a third time.
(This initiates the energy delivery sequence).
Pause: Press the BLUE foot pedal•
Restart: Press BLUE foot pedal once more•
Reset and Additional treatment:
A
After each completed lesion, press the BLACK mode foot pedal once to reset the
system to RF SENSING OFF.
B
Press and release the BLUE foot pedal will set the system to RF SENSING ON
(Impedance values are recognized).
C
Press the BLUE foot pedal once more to initiate energy delivery to the additional
site.
D
Audible tone is recognized every 50 Joules.
Settings using TCRF for turbinate:
Temperature: 85ºC•
Joules: 350-500•
Rapid lesion mode:
Temperature: Set to Rapid Lesion Mode•
Joules: Single channel instruments: 300 peak•
Impedance: 110 - 160 OHMS•
Page 5

Settings using TCRF for palate reduction:
Temperature: 85ºC•
Joules: 600 to 750 for midline lesion•
Joules: 300 to 350 for lateral lesions•
Impedance: 110 - 160 OHMS•
IMPORTANT NOTE: Rapid Lesion is not recommended for soft palate.
Settings using TCRF for base of tongue:
Temperature: 85ºC•
Joules: Single channel instrument: 600 - 750 per site•
Joules: Dual channel instrument: 1200 - 1500 per site•
Rapid lesion mode:
Temperature: Set to Rapid Lesion Mode•
Joules: Single channel instruments: 300 peak•
Impedance: 110 - 160 OHMS•
Settings using TCRF for base of tongue:
Temperature: 85ºC•
Joules: 800 - 1000•
Rapid lesion mode:
Temperature: Set to Rapid Lesion Mode•
Joules: Dual channel instrument: 600 peak•
Impedance: SETTINGS USING TCRF FOR BASE OF TONGUE: 120 - 170 OHMS•
Page 6

6 G3 WORKSTATION
Using Plasmacision
Initial Setup:
A
Connect the power cord and footswitch on the rear panel of the WorkStation.
B
Turn the machine on at the back of the unit.
C
Press the Stand-By button on the center of the front panel (the “apple” switch).
D
Connect the PlasmaKnife cable to the purple “PC” plug on at the far right side of
the G3 WorkStation.
E
The WorkStation will automatically identify the PlasmaKnife and set the appropriate
default PlasmaBlend setting.
F
To change the PlasmaBlend CUT/COAG ratio, press the BLACK mode foot pedal
for 1 second until a beep is heard.
G
Press the YELLOW pedal to increase the cut component in 5% increments, or the
BLUE pedal to increase the COAG component in 5% increments.
H
Press the BLACK mode foot pedal to select the new PlasmaBlend ratio.
I
Alternatively, use the “up/down” PlasmaBlend buttons on the left side of G3
WorkStation to adjust the CUT/COAG to desired settings.
J
Press YELLOW pedal for PlasmaBlend CUT output.
K
Press BLUE pedal for COAG output.
• • • • • • • • • • • • • • • • • • • • • • • • • • • • • • • • • • • • • • • • • • • • • • • • • • • • • • • • • • • • • • • • • • • • • • • • • • • • • • • • • • • • • • • • • • • • • • • • • • • • • • • • • • • • • • • • • •
• • • • • • • • • • • • • • • • • • • • • • • • • • • • • • • • • • • • • • • • • • • • • • • • • • • • • • • • • • • • • • • • • • • • • • • • • • • • • • • • • • • • • • • • • • • • • • • • • • • • • • • • • • • • • • • • • •
Page 7

Cleaning the cutting surface:
Keep the PlasmaKnife clean for optimum performance.•
Wipe the instrument tip frequently with a wet 4 x 4 gauze.•
Periodic dipping in a container of saline may help to keep the suction channel •
patent.
If the WorkStation gives a “clean tip” message; clean the instrument tip and reset •
the WorkStation by pressing the BLACK mode foot pedal.
EG70353001 G3 WorkStation
EG70353002 Footswitch for G3 WorkStation
EG720100901 Powercord USA
EG70353003 Tonsil PlasmaKnife (4-pack)
EG70353005 Dissector PlasmaKnife (4-pack)
EG70353006 jPlasmaKnife (5-pack)
EG1120411005 TCRF Turbinate Handpiece (5-pack)
EG1010211005 TCRF Palate Handpiece (5-pack)
EG2220221005 TCRF Dual Channel Tongue Base Handpiece (5-pack)
EG1200211005 TCRF Single Channel Tongue Base Handpiece (5-pack)
EG2420132805 TCRF Tonsil Handpiece (5-pack)
EG7201013 RC2 Cable for 1010 and 1200 (20 reuses)
EG7201017 RC20 Cable for 1120, 2220 and 2420 (20 reuses)
EG7201010 Bending Tool
EG7201001 Return Electrode (5-pack)
Ordering Information
Cat. No. Description
Page 8

8 G3 WORKSTATION
Specifications, design and accessories are subject to change without any notice or obligation on the part of the manufacturer.
Postbox 10 49 08
20034 Hamburg, Germany
www.olympus-europa.com
E0499049 · 3.000 · 03/10 · e7
 Loading...