

Page 1
VOICE RECORDER
NOTE CORDER
EN
INSTRUCTIONS
Thank you for purchasing an Olympus Digital Voice Recorder.
Please read these instructions for information
about using the product correctly and safely.
Keep the instructions handy for future reference.
To ensure successful recordings, we recommend that
you test the record function and volume before use.
Shinjuku Monolith, 3-1 Nishi-Shinjuku 2-chome, Shinjuku-ku, Tokyo 163-0914, Japan.
3500 Corporate Parkway, P.O. Box 610, Center Valley, PA 18034-0610, U.S.A.
Tel. +81 (0)3-3340-2111
http://www.olympus.com
Tel. 1-888-553-4448
http://www.olympusamerica.com
DP-201
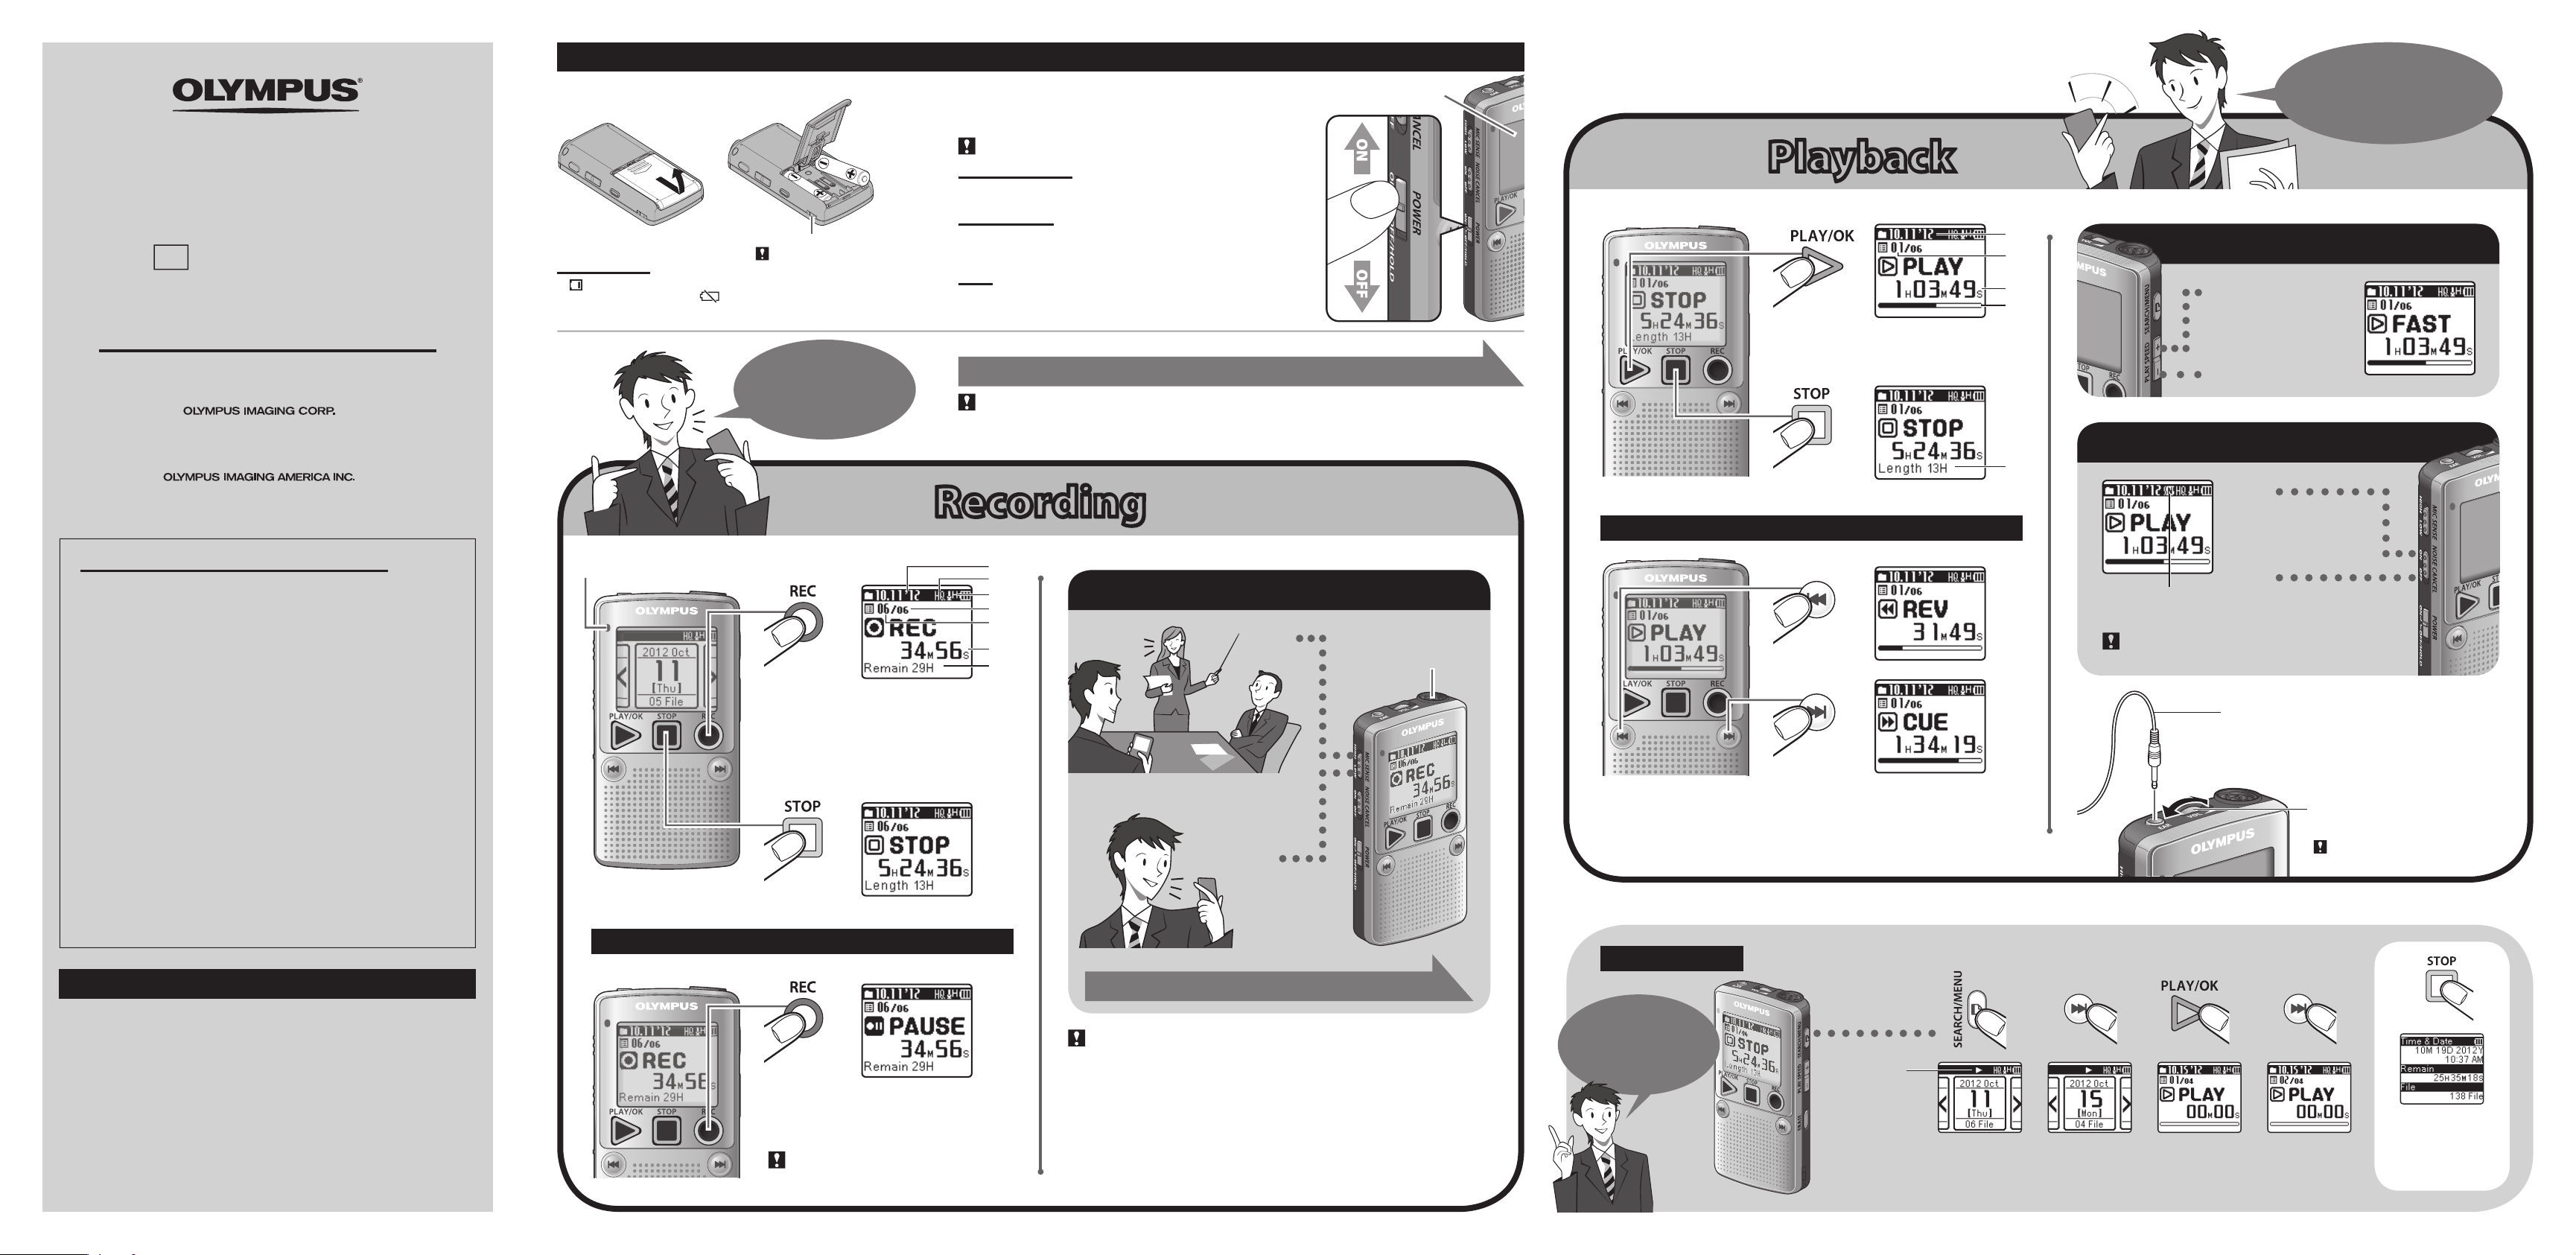
Getting started
1 Insert batteries. 2 Turn on the power.
Slide the POWER switch to ON.
•
Be sure to remove the protective lm on the display before using this product.
To turn off the power:
While the recorder is in the stop mode, slide the
```
Strap eyelet
•
Battery indicator:
If [ ]isdisplayedonthescreen,replacebatteriesassoonaspossible.Ifthe
battery level becomestoo low,[
therecorderautomaticallyturnsoff.
]and[Battery Low] are displayed and then
A strap is not supplied with this product.
You can
change the
recording
mode!
OFF/HOLD.
Power save mode:
If no operations are performed for more than 10 minutes when the
power is on, the display automatically turns off andthe recorderenters
the power save mode. To exit the power save mode, press any button.
HOLD:
If sliding the
operation, all buttons and switches are disabled without interrupt
ing the current operations.
POWER swich to OFF/HOLD while the recorder is in
Set the time and date.
• The[Set Time & Date] screen appears when you use the recorder for the rst time or when the recorder is turned on after more
than 30 minutes without power supply.
• If the time and date are not set, the time and date of the default settings are recorded to les .
Recording
Recording
Protective lm
POWER switch to
-
“Setting time and date” (Verso)
Playback
Playback
```
Forwarding and Rewinding
Recording date
a
Current le number
b
Elapsed playback time
c
Playback position bar indicator
d
Approximate le length
e
Recorded files are
grouped by date.
a
b
c
d
Changing the playback speed
Fast
Playback speed is changed
between0.5x, 0.75x, normal,
1.2 x, 1. 5x, a nd 2. 0x b y eac h
press of thebuttons.
Slow
Noise cancel
e
On
Noise is reduced when
played back to achieve
better sound quality.
For customers in North and South America
USA RFI:
Thisequipmenthasbeentestedandfoundtocomplywiththelimits
foraClassBdigitaldevice,pursuanttopart15oftheFCCRules.These
limits are designed to provide reasonable protection against harmful
interference in a residential installation. This equipment generates, uses
and can radiate radio frequency energy and, if not installed and used in
accordance with the instructions, may cause harmful interference to radio
communications. However, there is no guarantee that interference will
not occur in a particular installation. If this equipment does cause harmful
interference to radio or television reception, which can be determined by
turning the equipment off and on, the user is encouraged to try to correct
the interference by one or more of the following measures:
• Reorient or relocate the receiving antenna.
• Increase the separation between the equipment and receiver.
• Connect the equipment into an outlet on a circuit different from that to
which the receiver is connected.
• Consultthedealeroranexperiencedradio/TVtechnicianforhelp.
Canadian RFI:
This digital apparatus does not exceed the Class B limits for radio noise
emissions from digital apparatus as set out in the Radio Interference
Regulations of the Canadian Department of Communications.
Cet appareil numérique ne dépasse pas les limites de Catégorie B pour les
émissions de bruit radio émanant d’appareils numériques, tel que prévu
dans les Règlements sur l’Interférence Radio du Département Canadien
des Communications.
Introduction
Recording indicator lights while recording.
Pause
```
Current date
a
Recording mode indicator
b
Microphone sensitivity indicator
c
Total number of recorded les
d
for the date
Current le number
e
Elapsed recording time
f
Remaining recording time
g
a
b
c
d
e
f
g
Microphone sensitivity
High
Tur n t he m ic rop hon e
toward a soundsource to
be recorded.
Press and hold
Noise Cancel indicator
• When the NOISE CANCEL switch is set to ON,playback
speed returns to normal.
Off
The file is played back as it
was recorded.
When an earphone is connected, the speaker is turned
off. Playback soundfor an earphone is monaural.
Volume
To avoid irritation to the ear, turn down
Highly sensitive modewhich can record surrounding noises (
H)
Low
Standard sensitivity
L)
(
Select the sensitivity according to the surrounding conditions.
s To fast-forward or rewind a le, press and hold
back a le.
s To skip to the next le or previous le, press
s Fast-forwarding or rewinding continues to the next le.
0or9
0or9
File search
button while playing
button.
s
When searching for a le recorded on October 15.
Low
High
the volume before inserting an earphone.
Do not raise thevolume too high when
using an earphone. It may cause hearing
impairment and a decrease in hearing
ability.
• An earphone is not supplied with
this product.
“Changing the recording mode” (Verso)
• The contents of this document may be changed in the future without advanced
notice. Contact our Customer Support Center for the latest information relating
to product names and model numbers.
• The screen and recorder illustrations shown in this manual were produced during
the development stagesand may differ from the actualproduct. Theutmost care
hasbeentakentoensuretheintegrityofthecontentsofthisdocument.Inthe
unlikelyeventthataquestionableitem,error,oromissionisfound,pleasecontact
our Customer Support Center.
• Any liability for passive damages or damage of any kind occurred due to data loss
incurred by a defect of the product, repair performed by the third party other
than Olympus or an Olympus authorized service station, or any other reason is
excluded.
U1-BS0952-01
TR1111
To pauserecording, press the REC (-)buttonwhile
recording. Toresume the recording, pressthe
button again.
• Recording is automatically stopped if 60
minuteselapsedafterrecordingispaused.
REC (-)
• Toensuresuccessfulrecordings,werecommendyoutotestrecordingwiththeselected
functions and volume beforehand.
• To ensure recording from the beginning, start recording a sound source after the
recording indicator lights.
• Therecordercannotrecordif[
displayed.Deleteunnecessarylestofreeupsomespaceinmemory.
• If the recorder is placed directly on a table, the vibrations of the table are likely to be
recorded.Torecordsoundclearly,placeanotebookorhandkerchiefbetweenthe
recorder and the table to prevent the vibrationsfrom being recorded.
• When the available recording time becomes less than 60 seconds, the recording
indicatorstartsashing.Theindicatorashesfasteriftheavailabletimedecreasesto30
seconds and to10 seconds.
Memory Full]or[Maximum Fi le Size is reache d]is
Search for files
by the date they
were recorded.
Recorder status
indicator
: During playback
: During fast playback
F
: During slow playback
S
The datedisplay
appears.
``` ``` ```
Select October 15. The first file is
played back.
If the file is skipped,
the recorder plays
back the next file.
When the recorder is in
stop mode, press and
STOP ( /)but-
hold the
ton todisplay the[
Date]and[Remain].
Time &
Page 2
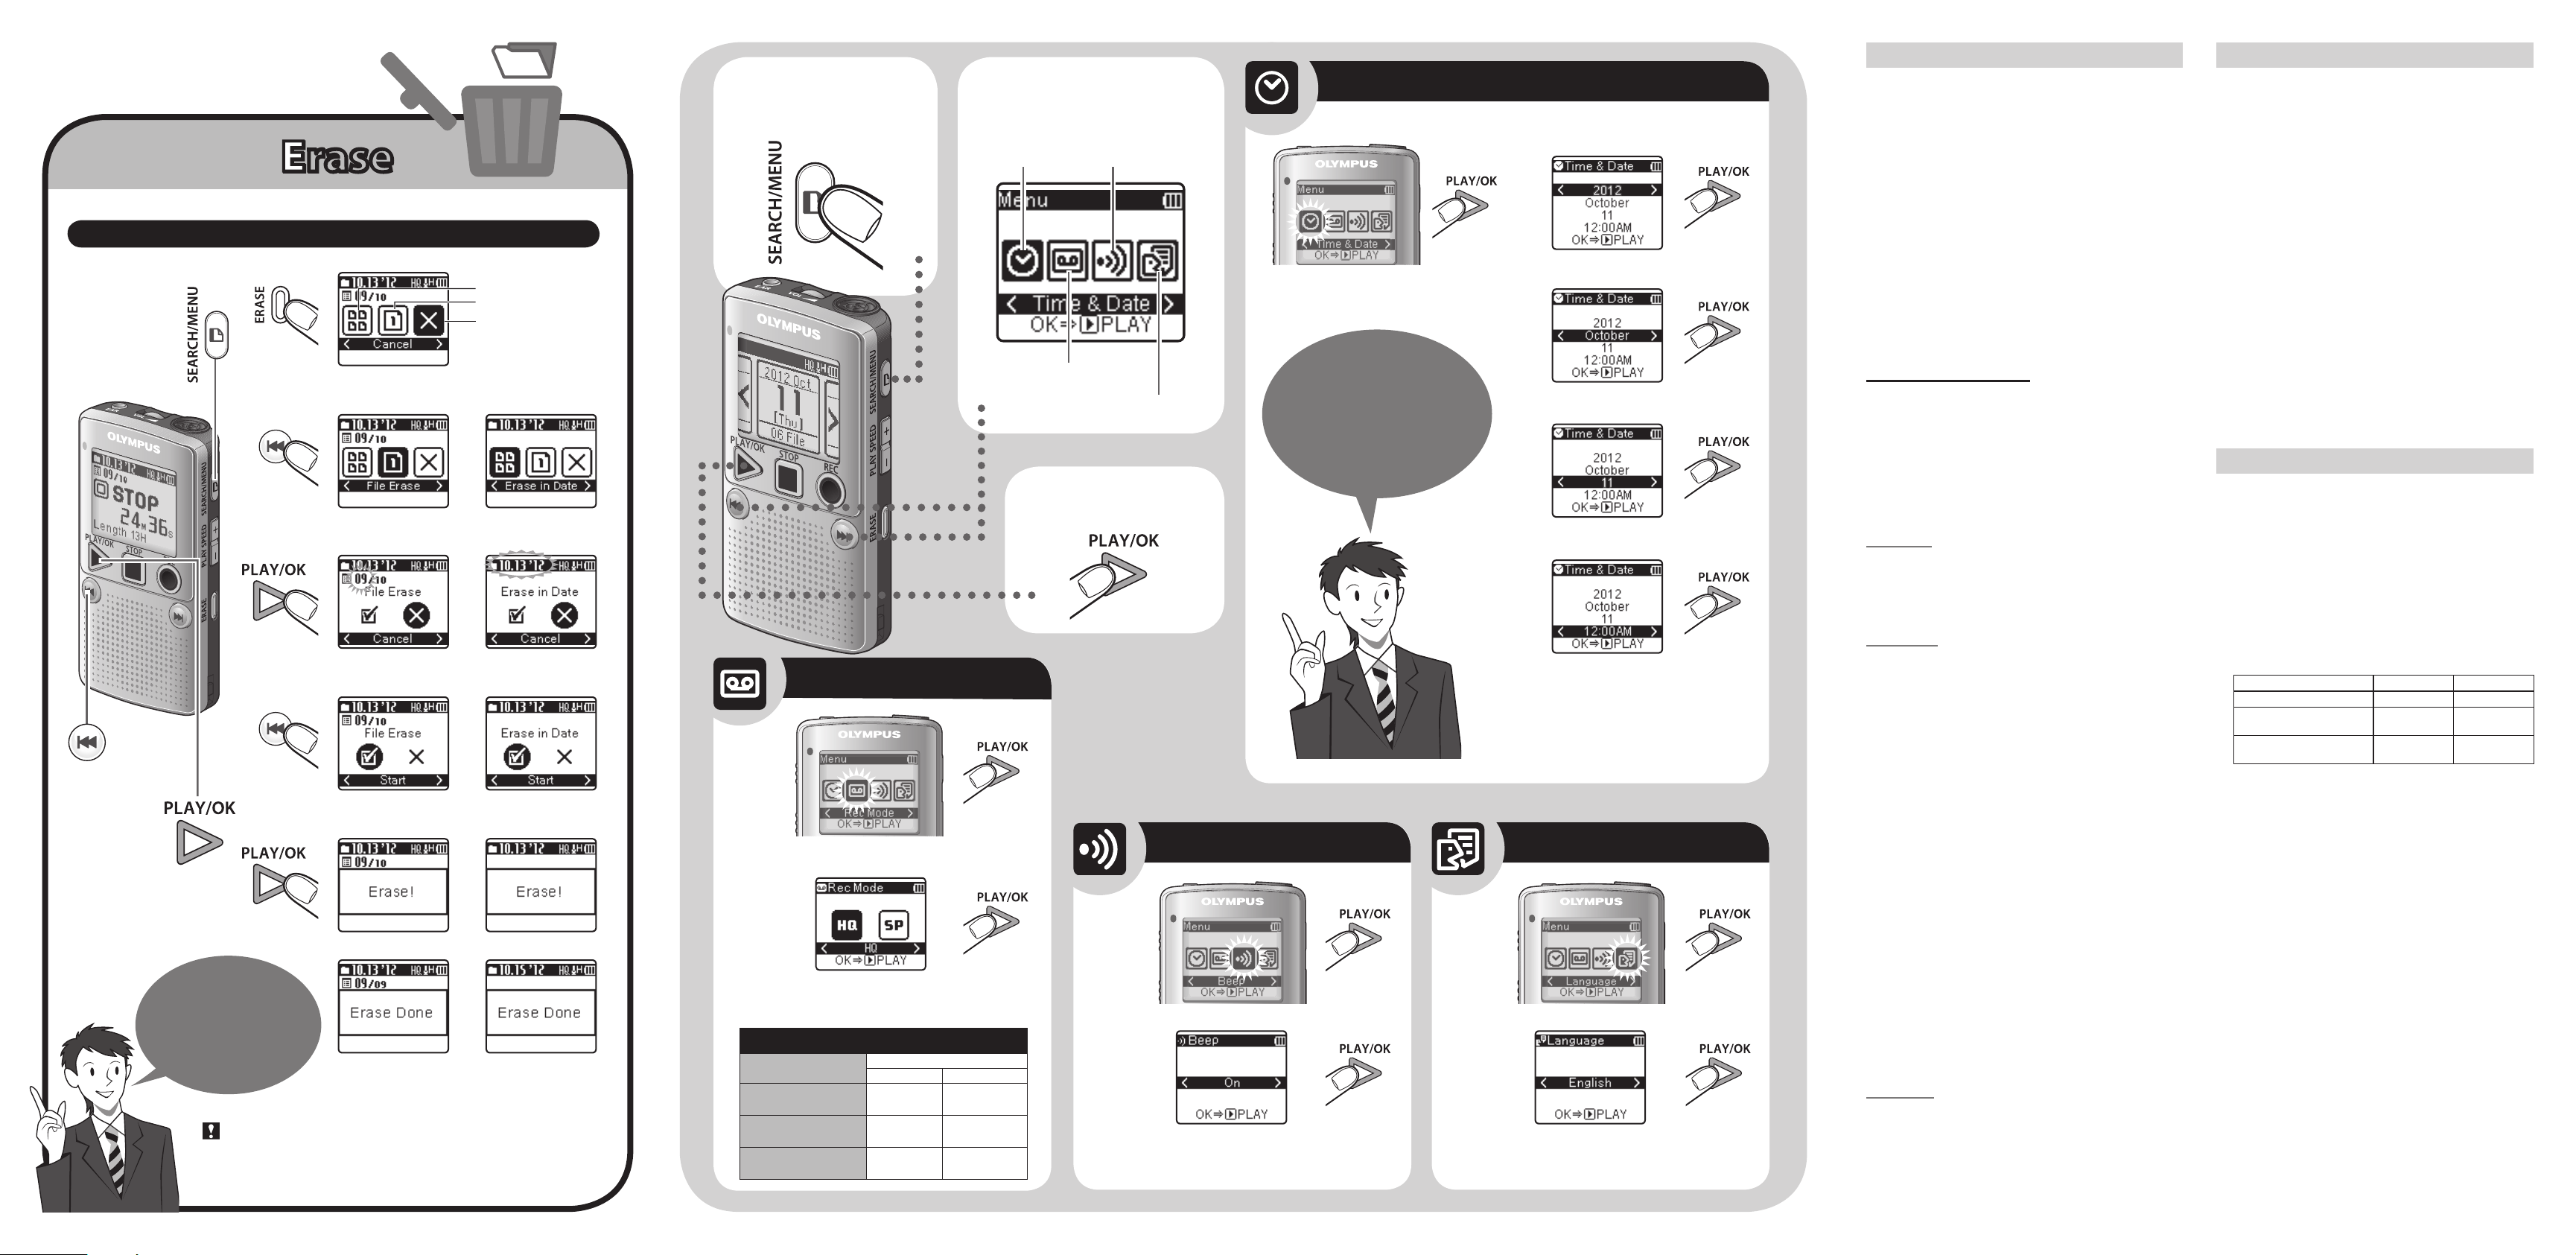
Safe and proper usage
Troubleshooting
Erase
Erase
Select the file you want to delete and stop playback beforehand.
Erase in Date
To deleteall files
recorded on a
specific date, press
SEARCH/MENU
the
button to switchto
the date display.
``` ``` ``` ```
File Erase
Cancel
If [Cancel]isselectedand
the
PLAY/OK (.)buttonis
pressed,therecorderreturns
to the stop mode.
File Erase Erase in Date
Thenumberoffilestobe
deleted flashes.
Select
Set
Thedateofallthefilesto
be deleted flashes.
`
An erased
file cannot be
restored. Take care
when deleting
files.
•
If no operations are performed for 8seconds, the recorder returns tothe stop mode.
• Itmaytakeformorethan10secondstocompletetheprocessing.Donotremove
batterieswhileprocessing.Thedatamaybecorrupted.
Check the battery level beforehand to ensure that that the batteries do not run out
while processing.
After deletion, files are
renumbered consecu
tively, and the recorder
stops at the beginning of
the next file.
-
After deletion, the next
date with recorded files
available is displayed.
`
1 Press SEARCH/
MENU for more
than 1 second.
Changing the recording mode
Use the 0 and 9 buttonstoswitchrecordingmodes.
Recommended settings by recording condition
Recording condition
Dictation with a lot of
background noise.
Recordings for lessons and
meetings.
Lengthy recordings.
Recommended settings
Rec Mode MIC SENSE
[HQ]
(high quality
sound recording)
[HQ]
(high quality
sound recording)
[SP]
(standard
recording)
2 Press 0 or 9 to
highlight the item you
want to set.
Time & Date
Rec Mode
Beep
Language
3 Confirm the
selection.
```
Turning the beep On/Off
[LOW]
[HIGH]
Use the 0 and 9 buttonstoturnthe
[HIGH]
operating sound On/O.
Setting time and date
File management
will be easier by
setting the time
and date.
```
```
``` ``` ```
Press
0or9
s
The clock will start from the set date and time.
Press the PLAY/OK (.) button according to
the time signal.
s
Check the time and date settings before using
the product again if it is left unused for long
periods of time.
to set a date.
Changing the display language
```
Use the 0 and 9 buttons to select the display language.
General precautions
• Do not leave the recorder in hot, humid locations such as inside
a closed automobile under direct sunlight or on the beach in the
summer.
• Do not store the recorder in places exposed to excessive moisture or
dust.
• Do not use organic solvents such as alcohol and lacquer thinner to
clean the unit.
• Do not place the recorder on top of or near electric appliances such
as TVs orrefrigerators.
• Avoid recording or playing back near cellular phones or other
wireless equipment, as they may cause interference and noise.If
you experience noise,move to another place, or move the recorder
further away from suchequipment.
• Avoid sand or dirt. These can cause irreparable damage.
• Avoid strong vibrations or shocks.
• Do not disassemble, repair or modify the unit yourself.
• Do not operate the unit while operating a vehicle (such as a bicycle,
motorcycle, or go-cart).
• Keep the unit out of the reach of children.
<Warning regarding data loss>
• Recorded content in memory may be destroyed or erased by
operating mistakes, unit malfunction, or during repair work.
• For important recorded content, we recommend you to write it down
some where.
• Any liability for passive damages or damage of any kind occurred due
to data loss incurred by adefect of the product, repair performed by
the third party other than Olympus or an Olympus authorized service
station, or any otherreasons is excluded from Olympus’s liability.
Batteries
Danger:
f
• Batteries should never be exposed to flame, heat, short-circuited or
disassembled.
• Never store batteries where they will be exposed to direct sunlight,
or subjected to high temperatures in a hot vehicle, neara heat
source, etc.
Warning:
f
• Do not solder lead wires or terminals directly onto a battery or
modify it.
• Do not connect the
overheating or electric shock.
• When carrying or storing the batteries, be sure to put them in the
provided case toprotect their terminals. Donot carry or store the
batteries with anymetal objects (such as key rings).
If this warning is not followed, fire, overheating or electric shock may
occur.
• Do not insert the batteries with their = and - terminals reversed.
• If any liquid from a battery gets into your eyes, promptly wash it off
with clean water and consult your doctor at once.
• Do not attempt to recharge alkaline, lithium or any other nonrechargeable batteries.
• Never use any batteries with a torn or cracked outer cover.
• Keep batteries out of the reach of children.
• If you notice anything unusual when using this product such as
abnormal noise, heat, smoke, or a burning odor:
1 remove the batteries immediately while being careful not to burn
yourself, and;
2 call your dealer or local Olympus representative for service.
• Do not expose the batteries to water. Do not allow water to contact
the terminals.
• Do not remove or damage the batteries insulating sheet.
• Do not use the batteries if you find something wrong with them such
as leakage, color change or deformity.
• Unplug the charger if the charging is still incomplete after the
specified time it should take.
• Should any batteries liquid get on skin or clothing, promptly wash it
off with clean water.
• Keep batteries away from fire.
Caution:
f
• Do not subject batteries to strong shocks.
• When using rechargeable batteries that have not been used for a
while, be sure to recharge them before use.
• Rechargeable batteries have a limited lifetime. When the operating
time becomes shorter even if the rechargeable battery is fully
charged under the specified condition, replace it with a new one.
= and - terminals together. This may cause fire,
Q1: The power cannot be turned on.
A1: • Batteries are exhausted.
• Batteries are inserted incorrectly.
Check = and - before inserting new batteries.
• Terminals are soiled.
Clean them with a dry cloth.
Q2: Nothing happens when a button is pressed.
A2: • The POWER switch is set to [OFF/HOLD] position.
Slide the POWER switch to the [ON] position.
Q3: No sound or quiet sound is heard from the speaker
while playing back.
A3: The earphone plug is plugged into the recorder.
The volume is set to the low level.
Q4: Recording is not possible.
A4: By pressing the
• Check if the display shows [Memory Full].
• Check if the display shows [Maximum File Size is
reached].
Delete unnecessary files before recording. A maxi-
mum of 99 files can be recorded in a day.
Q5: The playback speed is too fast (slow).
A5: The recorder is set to fast (slow) Playback.
Use the
back.
REC
(-) button:
PLAY SPEED button to set to normal play-
Specifications
Recording medium: Built-in flash memory (2GB)
Overall frequency: HQ mode: 70 to 7,900 Hz
Guide to recording times: HQmode:Approx.98h.
Microphone: Electret Condenser Microphone (monaural)
Speaker: Built-in ø 36 mm round dynamic speaker
Maximum power: 180 m W
Earphone jack (monaural):
ø 3.5 mm diameter, impedance 8 Ω or more
Power supply:
Two AAA(LR03) batteries
Continuous battery: Guide to alkaline battery life
Recording mode HQ SP
During recording mode approx.
During playback mode
(Built-in speakers)
During playback mode
(Earphone)
Dimensions: 95(L)mmx50(W)mmx18.2(T)mm
(without protrusions)
Weight: 78 g (including battery)
Operating temperature: 0°C - 42°C
• Battery life is measured by Olympus. It varies greatly according to the
type of batteries used and the conditions of use.
• Your recorded contents are for your personal use or pleasure only. It is
prohibited to record copyrighted material without permission of the
copyright holders according to copyright law.
• Specications and design are subject to change without notice for
improvement of performance.
SP mode: 70 to 4,700 Hz
SP mode: Approx. 202 h.
67 h. approx. 80 h.
approx. 21 h. approx. 21 h.
approx. 45 h. approx. 49 h.
 Loading...