

Olympus Camedia P-330E Instructions Manual

P-330E
Digital color printer
Imprimante couleur numérique
Digitaler Farbdrucker
3-865-711-21(1)
P-330E
GB
FR
DE
CT
Instructions
•Thank you for purchasing this Olympus digital color printer.
•Before using this product, read this manual carefully to
ensure correct use.
•Nous vous remercions d’avoir choisi cette imprimante couleur
numérique.
•Avant d’utiliser votre imprimante couleur numérique, nous
vous recommandons de lire attentivement ce mode d’emploi.
•Vielen Dank für der Kauf dieses Digitaler Farbdruckers von
OLYMPUS.
•Bitte lessen Sir diese Angaben durch, ehe Sie ihren Digitaler
Farbdrucker in Betrieb nehmen.

Introduction
Precautions
Thank you for purchasing this
OLYMPUS digital color printer.
Read this manual and warranty and
keep them for future reference and use
them when requesting service.
Make sure that the date of purchase
and dealer’s name are included on
your warranty.
Before using the printer, read the
safety precautions given on pages 4
through 9 and follow them to ensure
proper handling. Keep this manual
handy for future reference.
Restrictions on duplication
If duplicating documents with the
printer, pay special attention to the
following.
• Duplication of banknotes, coins, or
securities is against the law.
• Duplication of blank certificates,
licenses, passports, private securities,
or unused postal stamps is also
against the law.
• Paintings, photographs, and books
under copyright cannot be
duplicated without permission of the
copyright holder, unless you use the
duplications for private purposes.
Notes for illustrations used in this
manual
Illustrations in this manual are
intended only for explaining the
operations visually. They may differ
from what are actually displayed or
printed.
GB
2

Table of contents
Safety precausions ................................... 4
Getting Started
Unpacking the printer........................... 10
What you can do with the Digital
Color Printer P-330E ....................... 11
Identifying the parts ..............................12
Setting Up
Connecting the printer ..........................14
Inserting the Smart Media into the
printer ............................................... 14
Connecting to the digital camera .. 15
Connecting to the video
equipment......................................... 16
Connecting to the computer ..........17
Connecting the AC power cord .... 18
Using print packs (optional) ................19
Loading the ink ribbon cartridge ........20
Inserting the print paper....................... 22
Inserting the print paper into the
automatic feeder .............................. 22
Attaching the automatic feeder
to the printer .................................... 24
Making Basic Prints
Printing an image recorded on
the Smart Media .............................. 25
Preparations ..................................... 25
Printing ............................................. 26
Printing an image recorded by digital
cameras .............................................30
Printing an image from the video
equipment......................................... 31
Preparations ..................................... 31
Printing ............................................. 32
Making Various Prints
Making split prints ................................ 35
Selecting the same image for split
planes ................................................ 35
Selecting different images for split
planes ................................................ 37
Printing all the recorded or protected
images in the Smart Media ............ 39
Printing the date .................................... 41
Printing the trimmed image................. 43
Printing with the card function ........... 46
Adding touches to a print (mirror/
sharpness) .........................................48
Flipping the image horizontally.... 48
Adjusting the sharpness ................. 48
For Your Information
Troubleshooting..................................... 49
If the indicators are on ....................51
If the print paper is jammed .......... 53
About the ink ribbon cartridge and
print paper........................................ 54
Optional supplies (print packs)..... 54
Specifications.......................................... 55
Index ........................................................56
Print index .............................................. 57
GB
GB
3

Safety precautions
It is dangerous to tamper with the printer because this
can cause fire or electric shock possibly resulting in
death or serious injury. Before use, read the safety
precautions thoroughly and follow them for proper
handling.
This manual uses the following icons to indicate
hazardous situations.
Icon
WARNING
NOTE
Description
Indicates a hazardous situation that, if not
avoided, may cause fire or electric shock
possibly resulting in death or serious
injury.
Indicates a hazardous situation that, if not
avoided, may cause an electric shock or
other accidents possibly resulting in minor
injury and/or property damage.
GB
4

WARNING
p If anything strange occurs with the printer, unplug the power cord.
If the printer emits smoke, strange smells, or strange sounds, turn off and unplug
the printer to prevent fire or electric shock. Then contact your dealer.
p Should any liquid or foreign object fall into the printer, unplug the power
cord.
Do not allow any liquids, metals, or inflammable objects to get into the printer
through the vent. This may cause fire or electric shock. Turn off and unplug the
printer, and then contact your dealer.
p If the printer cabinet is damaged, unplug the power cord.
Using the printer when the cabinet is damaged may cause fire or electric shock.
Turn off and unplug the printer, and then contact your dealer.
p If the power cord is damaged, unplug it.
A damaged power cord may result in fire or electric shock. Turn the printer off
and unplug the power cord while being careful not to touch the wires in the cord.
Then contact your dealer.
p Do not damage the power cord.
A damaged power cord may result in fire or electric shock.
To prevent the cord from being damaged, pay attention to the following.
• Do not pull the cord with a jerk.
• Do not bend the cord excessively.
• Do not heat the cord.
• Do not place heavy objects on the cord.
• Do not rewire the cord.
If the power cord is damaged, contact your dealer.
GB
5

WARNING
p Do not disassemble or modify the printer.
The printer has both hot and high voltage parts on the inside. To prevent an
electric shock or printer malfunction, do not attempt to disassemble or modify
the printer. For service or repair, contact your dealer.
p Do not place liquids on the printer.
Should any liquid sleep into the printer, it may result in fire or electric shock.
p Do not place heavy objects on the printer.
Doing so may deform the printer cabinet, resulting in fire or electric shock. If the
printer falls out of place or is dropped, it may be damaged.
p Do not install the printer in the following places.
To prevent fire, electric shock, and printer malfunction do not install the printer in
the following places.
• Dusty, humid, or oily places
Should any dust or liquid get into the printer, it may result in fire or electric
shock.
• Extremely hot places
Do not expose the printer to direct sunlight or extremely high temperature such
as near a heater. Doing so may deform the printer cabinet, resulting in fire or
electric shock.
Use the printer at the ambient temperature of 5 to 35 °C (41 to 95° F) and
humidity of 20 to 80 %.
p Do not use the printer with a power supply other than that specified.
Incorrect voltage may damage printer parts, possibly resulting in fire or electric
shock.
p Connect the power cord correctly.
For example, if the power cord is plugged in loosely, it may cause a fire or electric
shock. Push the plug all the way into the outlet.
GB
6

WARNING
p Make sure that excessive dust and foreign matter do not accumulate on the
power cord.
Dust and foreign matter conduct electricity, which can cause fire and electric
shock. If excessive dust and foreign matter accumulate on the cord, unplug the
cord and clean it.
p Immediately unplug the power cord when an electric storm starts outside.
The induced electricity from storms may cause fire, electric shock, or printer
malfunction.
p Do not overload the power outlet.
This printer should be plugged into a separate 220 - 240 V AC, 50/60 Hz circuit. If
the printer is on a circuit with other appliances, an overload may cause fire or
electric shock.
GB
7

NOTE
p Do not block the vent.
Doing so may cause the printer to heat up, possibly resulting in fire or electric
shock.
• Do not block the top or side vent.
• Do not put the printer in the following places.
– Badly-ventilated place
– On a soft surface like a rug or bed
p Do not put the printer on an unstable surface such as a shaky table.
If the printer falls out of place, it may injure someone. This may also damage the
printer or cause the printer to malfunction.
p Do not touch the non-user-serviceable parts inside the printer.
Doing so may cause injury or burns. This applies especially to children and those
unfamiliar with the printer.
p Do not move the printer when the power cord is taut.
Doing so may damage the cord, possibly resulting in fire or electric shock. When
moving the printer, unplug and bundle the power cord.
p Do not pull the cord with a jerk.
To unplug the power cord, hold it by the plug.
Pulling on the cord may damage it, possibly resulting in fire or electric shock.
p Do not hold the power cord plug with wet hands.
Doing so may cause an electric shock. Be sure hands are dry before handling.
GB
8

NOTE
p Unplug the power cord from the power outlet before cleaning the printer.
Accidentally touching a non-user-serviceable part may cause electric shock.
p Unplug the printer if it will not be used for an extended period of time, for
example while you are on a long trip.
Otherwise, deteriorated insulation or leakage current may cause fire or electric
shock.
p Beware of moisture condensation.
Moisture condensation means that water vapor in the air becomes liquid and
sticks to the printer surface. This phenomenon is caused by the following.
• Rapidly heating the room in which the printer is placed
• Cool air (from an air conditioner, etc.) blown directly at the printer
• Moving the printer from a cold place to a warm place
Moisture in the air will condense on the paper, deteriorating print quality or
causing paper jams.
Under conditions where moisture condensation has occurred or may occur, keep
the printer turned on and wait until there is no possibility that condensation will
occur.
p Do not spray volatile solvent on the printer or allow the printer to be in
contact with rubber or plastic products for an extended period of time.
For example, spraying an insecticide on the printer or wiping it with thinner or
benzine may deteriorate or discolor the printer cabinet. Such deterioration and
discoloring also occurs if the printer is in contact with rubber or plastic products
for an extended period of time.
GB
9
Getting Started
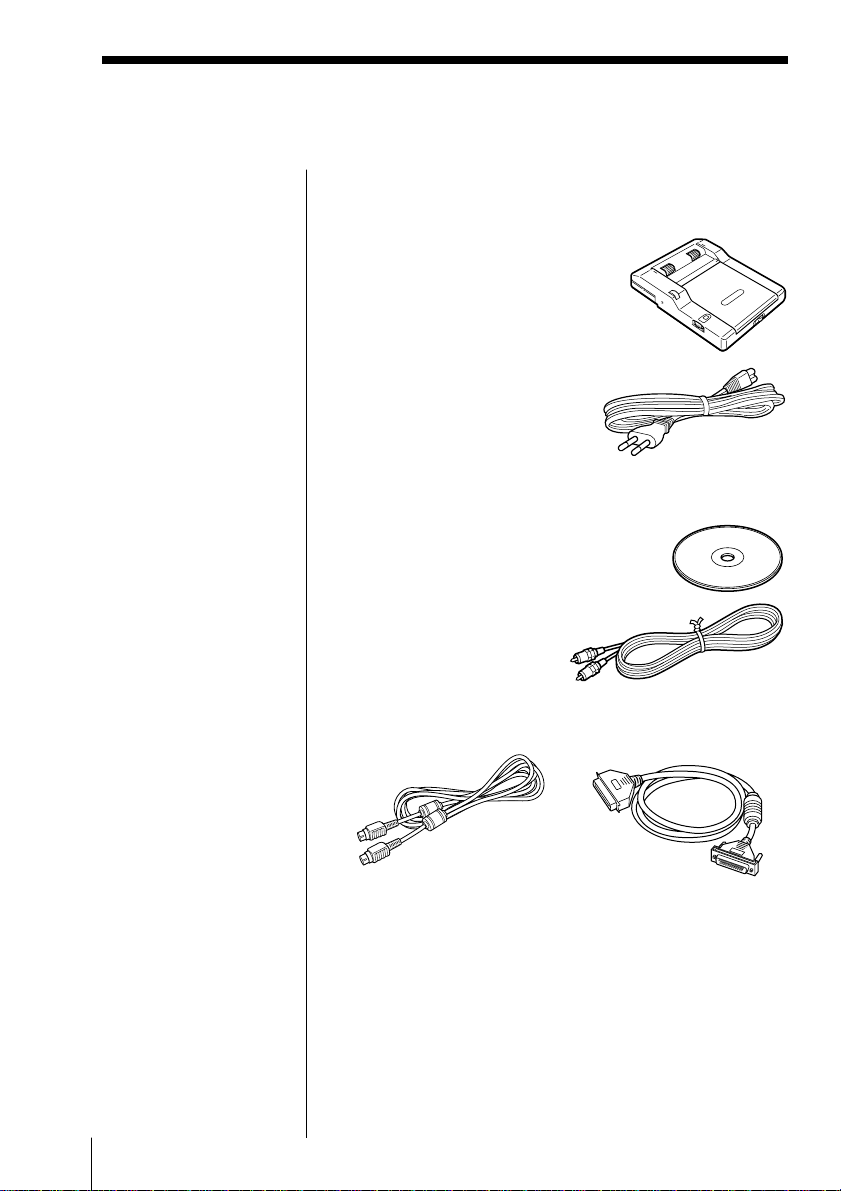
Unpacking the printer
Make sure that the following accessories are supplied
with your printer.
• Automatic feeder (1)
• AC power cord (1)
• CD-ROM (for Windows 95/98, 3.1 and Macintosh)
(1)
• Video connecting cable (1)
10
GB
• Connecting cable for computer (for Macintosh x 1,
for IBM PC/AT and its compatibles x 1)
• Instruction Manual (1)
• Installation Guide (1)
• Sample kit (Ribbon, 10 sheets of exclusive paper)
• European warranty (1)
Getting Started

What you can do with the Digital Color Printer P-330E
The Digital Color Printer P-330E enables you to print
images from the OLYMPUS Digital Cameras directly
or via a Smart Media. You can also print input images
from the video equipment such as a video camera
connected to the P-330E.
By connecting the P-330E to your PC or Macintosh, you
can make prints of images from your computer.
Direct printing of the image from a OLYMPUS
Digital Cameras
You can directly print the images recorded with the
OLYMPUS CAMEDIA C-1400L/C-1000L/and C1400XL Digital Cameras.
Printing of the images recorded on a Smart Media
You can print the images on the Smart Media recorded
with the OLYMPUS Digital Cameras.
Making a variety of prints
You can make a variety of prints: split prints with
multiple images in a print paper, trimming prints with
enlarged and cropped image, and mirror prints. You
can also print an image with the date, or adjust the
picture quality of an image. By using the title card
Smart Media M-4NE, you can print an image with a
title image.
Getting Started
Printing of the images from a PC or Macintosh
The P-330E is supplied with the printer driver CDROM for Windows 95/98, 3.1 and Macintosh. By
installing the printer driver into your computer and
connecting it to the P-330E, you can make prints of the
images from your computer. For how to make prints
from the computer, see the supplied installation guide.
Durable passport photo print paper available
In addition to standard or sticker print paper, durable
passport photo print paper is available, keeping the
printed image in a good condition for an extended
period of time.
Printing 30 sheets continuously
The supplied automatic feeder enables you to print up
to 30 sheets continuously.
Getting Started
11
GB
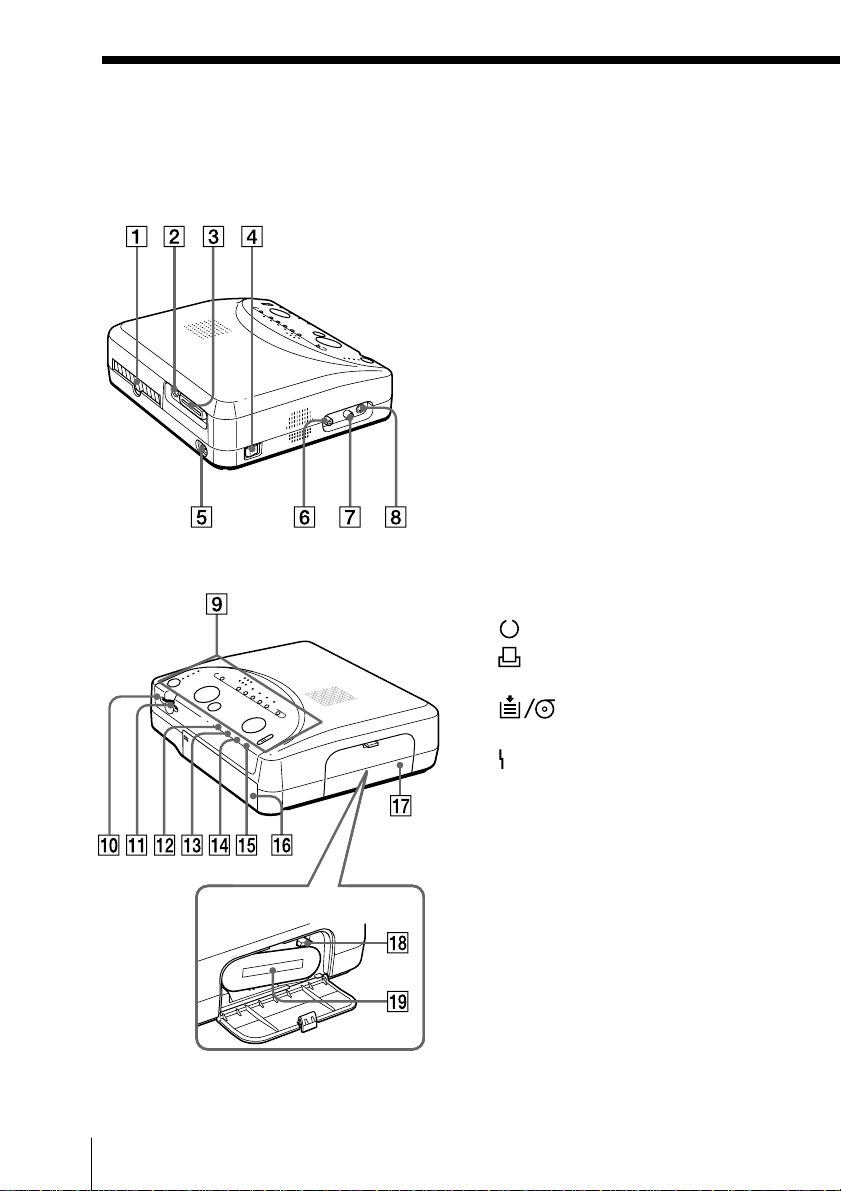
Identifying the parts
Cartridge compartment
See the pages given in parentheses for
use of the parts.
1 Paper outlet (p. 53)
2 Serial port (p. 18)
3 Parallel port (p. 17)
4 Power (on/off) switch (p. 18)
5 AC power connector (p. 18)
6 VIDEO OUT (output) connector
(p. 14, 16)
7 VIDEO IN (input) connector (p. 16)
8 S-VIDEO IN (input) connector
(p. 16)
9 Operation panel (next page)
0 Access indicator (p. 26, 52)
!¡ Smart Media slot (p. 14)
(power) indicator (p. 25, 49, 52)
!™
(printing) indicator (p. 28, 50,
!£
52)
!¢
(p. 21, 24, 51)
!∞
!§ Automatic feeder compartment lid
(p. 24)
!¶ Cartridge compartment lid (p. 20)
!• Eject lever (p. 21)
!ª Ink ribbon cartridge (p. 21)
(paper/ribbon) indicator
(error) indicator (p. 52)
12
GB
Getting Started
1
2
3
4
5
6
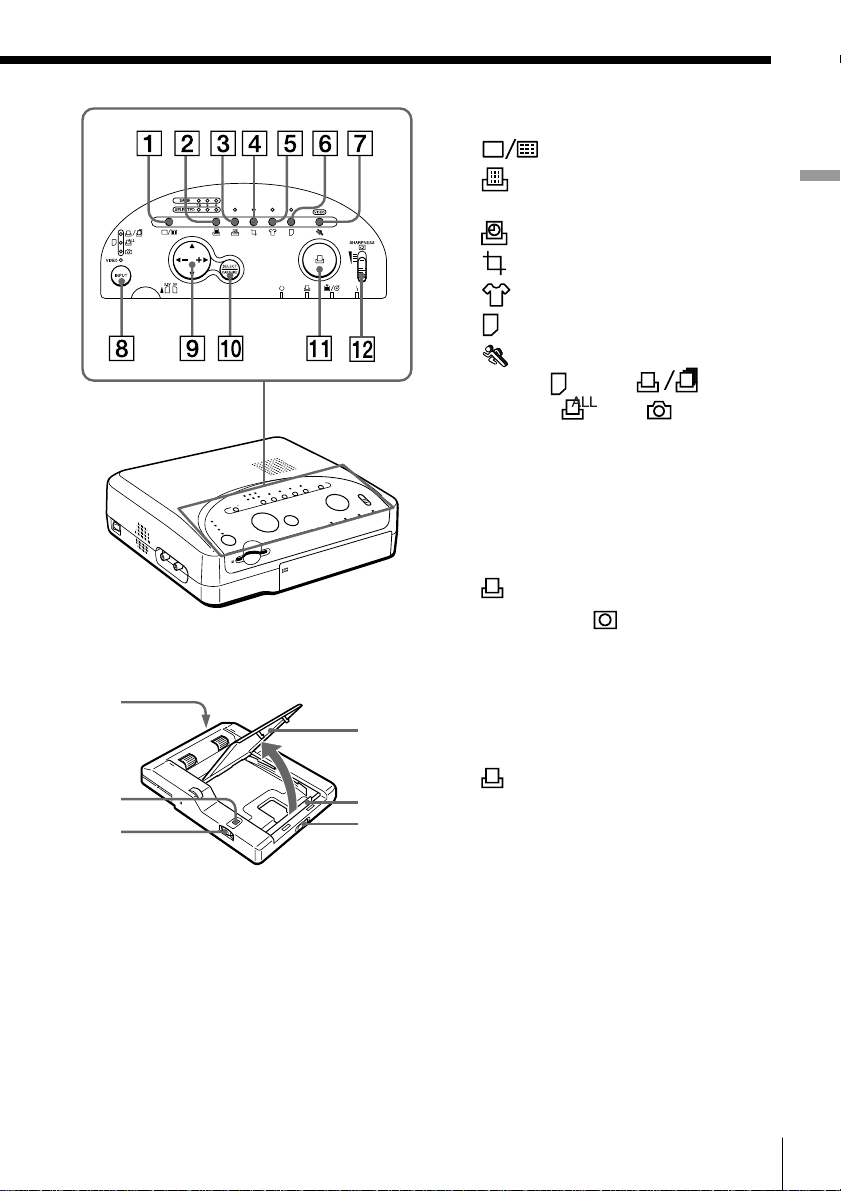
Operation Panel
1 (display) button (p. 27)
(split) (SAME/SELECTED 16/
2
9/4) button (p. 35, 49)
3
(date) button (p. 42)
4
(trimming) button (p. 44)
5
6
7
8 INPUT (
9 Arrow (“/”/$/4), +/– buttons
0 SELECT/CAPTURE button
!¡
!™ SHARPNESS
(mirror) button (p. 48)
(card function) button (p. 46)
(motion picture) button (p. 33)
(card) : (single/
random),
camera)/VIDEO) button (p. 25, 31,
39)
(p. 26)
(p. 32, 35)
(print) button (p. 28, 34)
(all), (select with
switch (p. 48)
Automatic feeder
1 Connecting terminal
2 Window showing number of copies
(p. 27, 33)
3
(number of copies) dial
(p. 27, 33)
4 Cover (p. 22)
5 Spacer (p. 22)
6 Slide switch (p. 22)
Getting Started
Getting Started
13
GB

Setting Up
Connecting the printer
Notes
• Before making
connections, turn off
the power of the
printer, television,
digital camera, video
camera, the computer
or any other equipment
to be connected to the
printer.
• Also refer to the
operating instructions
of the equipment to be
connected to the
printer.
Notes
• If the Smart Media does
not fit properly, do not
attempt to force it into
the slot. Confirm the
inserting direction
again and re-insert it
into the slot.
• Print the images of the
Smart Media as they
were recorded with the
OLYMPUS digital
camera. For the images
retouched or saved
with the computer or
the images recorded
with a digital camera of
other manufacturers,
proper display and
printing performances
are not guaranteed.
• You can use the Smart
Media of the following
capacities with the
printer:
– 2MB (3.3V/5V)
– 4MB (3.3V/5V)
– 8MB (3.3V)
– 16MB (3.3V)
• When printing from the Smart Media, see below.
• When printing from the OLYMPUS CAMEDIA C1400L/C-1000L/C-1400XL digital cameras, see page
15.
• When printing from the video equipment with the
video input connector, see page 16.
• When printing from the computer, see page 17.
After making connections, connect the AC power cord
of the printer to the wall outlet. (page 18)
Inserting the Smart Media into the
printer
When printing the images recorded on the Smart
Media, insert the Smart Media into the slot of the
printer. Also connect the printer to the television to
display the images to be printed.
For printing operations, see page 25.
Television
Set TV/
VIDEO
selector to
“VIDEO.”
To VIDEO
OUT
With the notch facing
forward and the
electrode facing down.
Video connecting cable (supplied)
Smart
Media
Rear
Electrode
14
GB
Setting Up
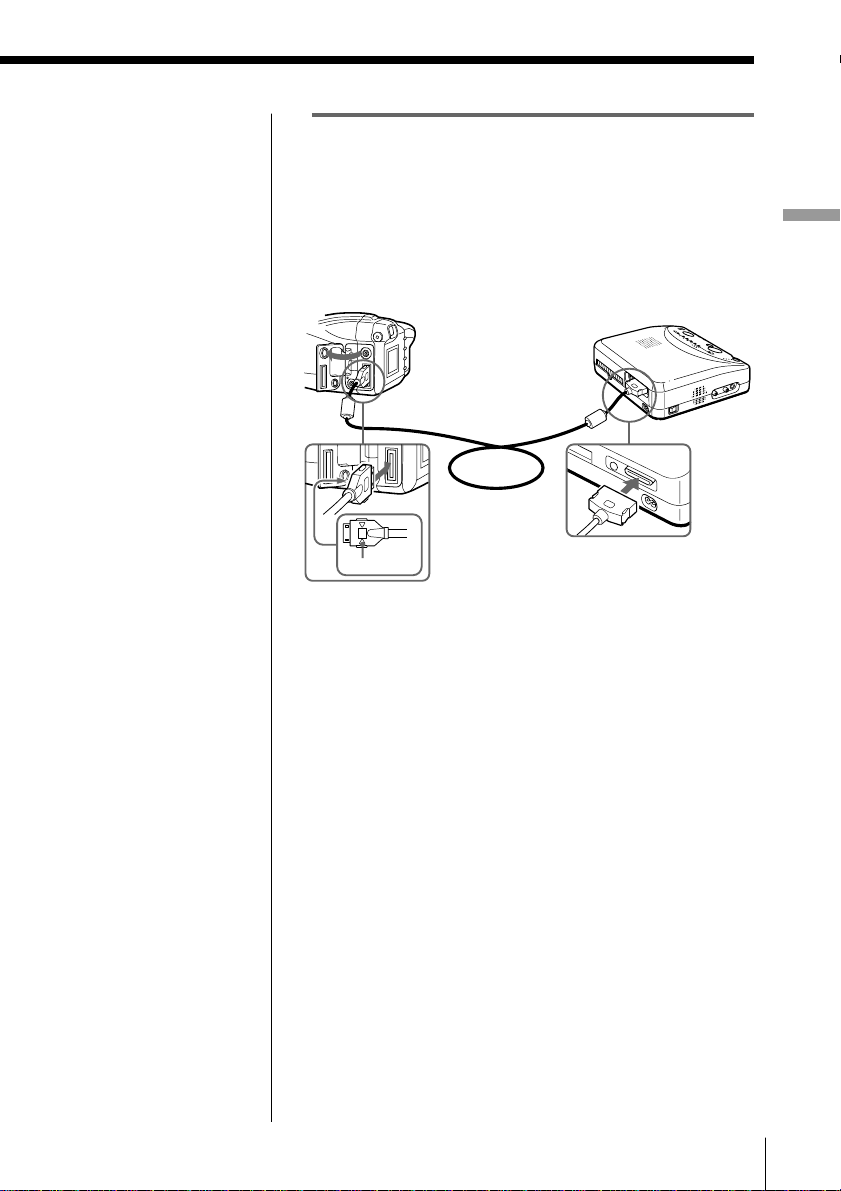
Connecting to the digital camera
When printing images from the OLYMPUS CAMEDIA
C-1400L/C-1000L/C-1400XL digital cameras, connect
the parallel port of the printer to the printer port of the
digital camera with the parallel type print cable CB-P14
(not supplied).
For printing operations, see page 30.
Parallel type print
cable CB-P14
(not supplied)
Setting Up
¢ mark
to printer port
to parallel port
Setting Up
15
GB
Connecting the printer (continued)
Tips
• If the video equipment
has an S-Video output
connector, connect it to
the S-VIDEO IN (input)
connector of the printer
for printing in good
picture quality.
Connection to the SVIDEO IN (input)
connector is
recommended.
• When both the SVIDEO IN (input) and
VIDEO IN (input)
connectors of the
printer are connected,
the input signals from
the S-VIDEO IN (input)
connector are
automatically selected.
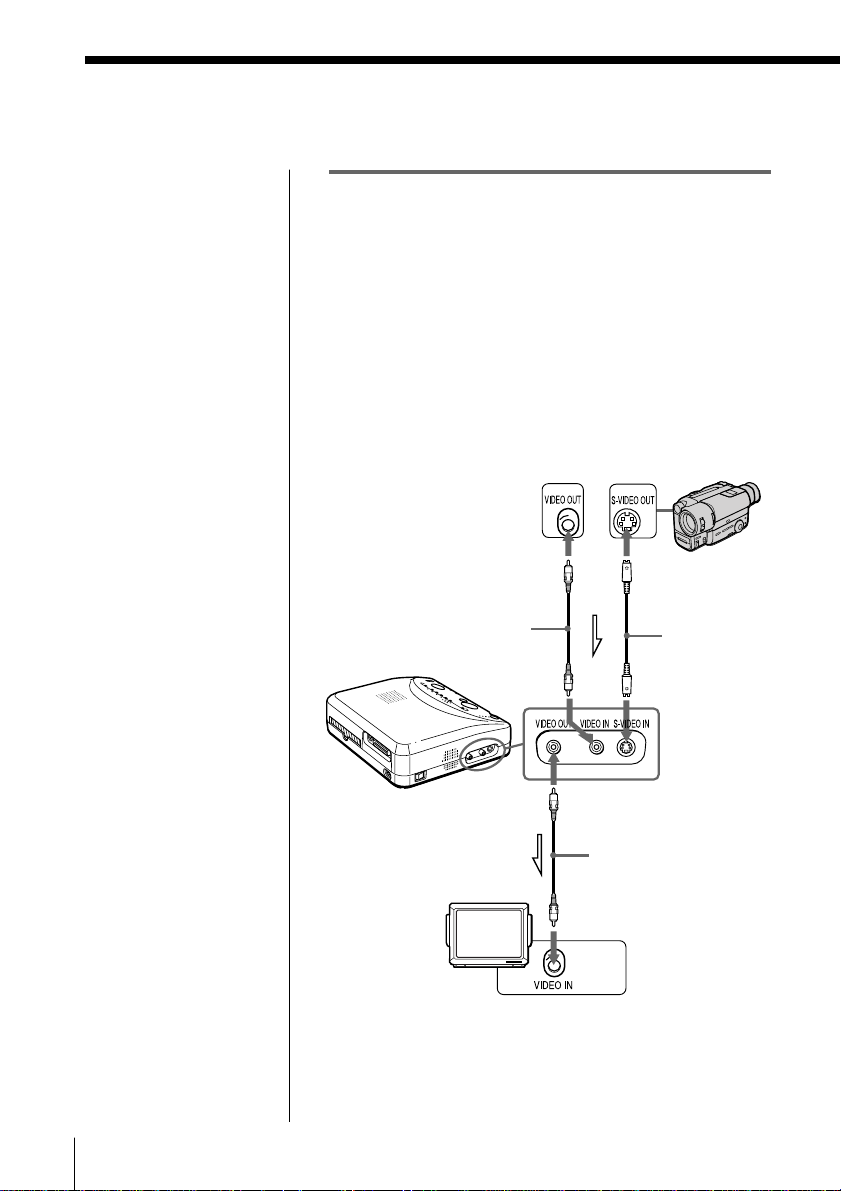
Connecting to the video equipment
When printing the images from a video camera or
other video equipment having a video output
connector, use a commercially available video
connecting cable to connect the video equipment to the
VIDEO IN (input) connector of the printer. Also
connect the printer to the television to display the
images to be printed.
For printing operations, see page 31.
Video cameras
equipped with an
S-video or video
output connector
Or
Video connecting cable
(not supplied)
S-video
connecting
cable (not
supplied)
16
GB
Video connecting
cable (supplied)
Television
Set TV/VIDEO
selector to
“VIDEO.”
ç: Signal flow
Setting Up
Notes on connection
• Connect either the
serial cable or the
parallel cable.
• If a camera is
connected, you cannot
print from the
computer. Disconnect
the camera.
• Use a shielded printer
cable which is shorter
than 2 m.
For IBM PC/AT:
If your computer does
not match the plug
Use a commercially
available cable having an
Anfenole full 36-pin plug
to connect to the printer
and a matching plug to
connect the computer.
Note
You may not be able to
use the printer and the
printer driver on a
network or a
commercially available
printer buffer.
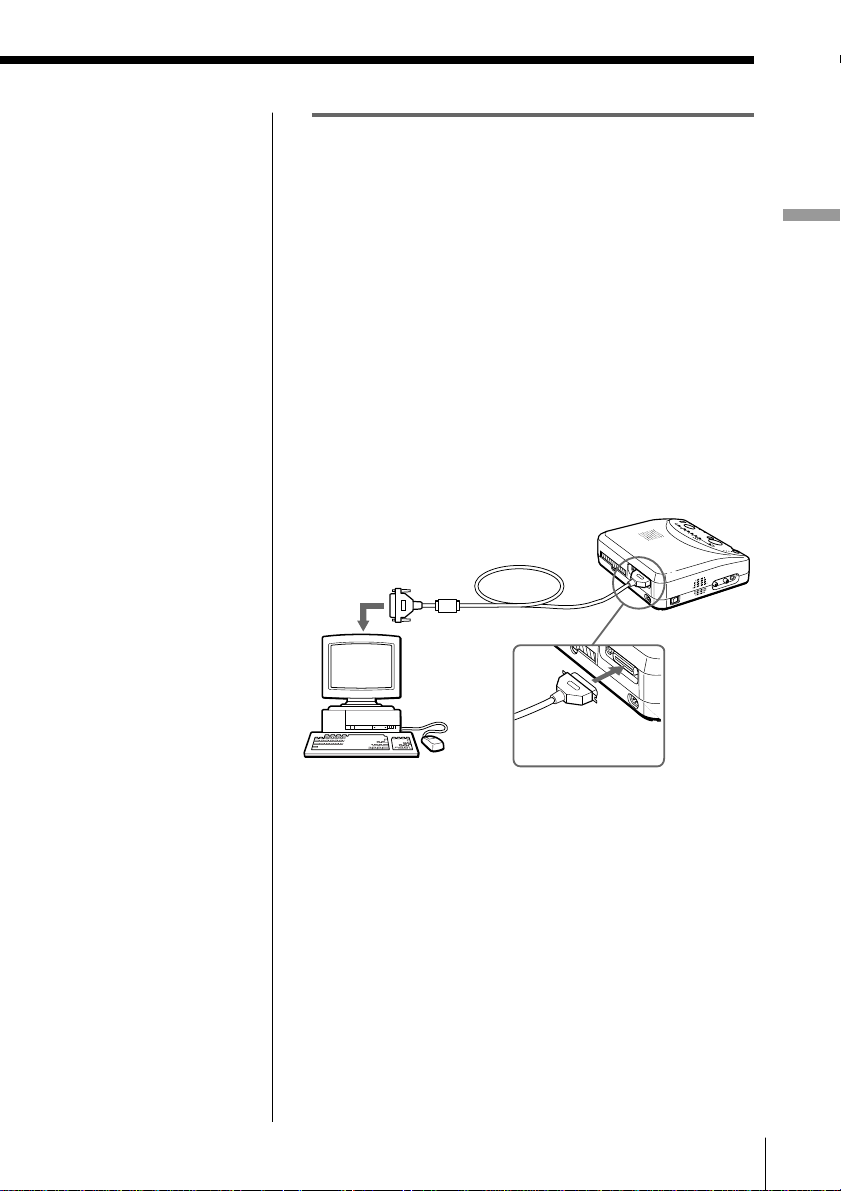
Connecting to the computer
For how to install the printer driver and print from
the computer, refer to the supplied installation
guide.
By connecting the printer to your computer and
installing the supplied printer driver into your
computer, you can print the images from the computer
using a photo retouch application software.
Connecting to an IBM PC/AT and its
compatibles
Use the supplied cable (D-sub 25-pin plug, male/
Anfenole full 36-pin plug, male) to connect the IBM
PC/AT and its compatibles to the parallel port of the
printer.
To the printer port
(D-sub 25-pin plug)
Printer cable
(supplied)
Setting Up
IBM PC/AT and
its compatibles
Anfenole full 36pin plug
To parallel port
Setting Up
17
GB
Connecting the printer (continued)
For Macintosh:
If your computer does
not match the plug
Use a commercially
available cable having a
Mini DIN 8-pin plug to
connect the printer and a
matching plug to connect
the computer. (Standard
Macintosh serial cable)
Note
You cannot use the
printer and the printer
driver on a network.
Connect the printer
directly to the computer.
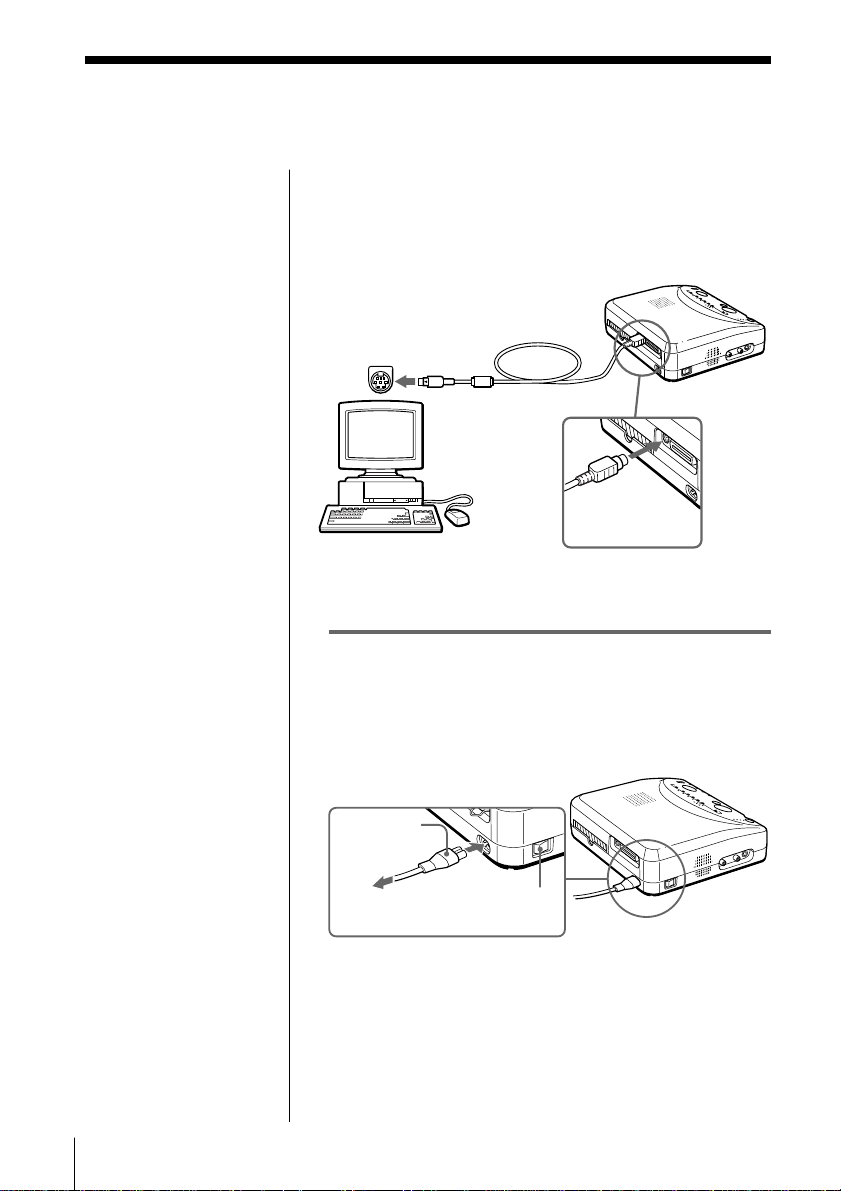
Connecting to a Macintosh and its compatibles
Use the supplied cable (Mini DIN 8-pin plug, male/
Mini DIN 8-pin plug, male) to connect the computer to
the serial port of the printer.
To the printer or
modem port
(Mini DIN 8-pin
plug)
Macintosh and its
compatibles
Printer cable
(supplied)
Mini DIN 8-pin
plug
To serial port
Connecting the AC power cord
After you make connections, connect the supplied AC
power cord to the AC power connector of the printer
and then to the AC outlet. Then turn on the power
switch of the printer.
18
GB
Power cord
(supplied)
Power switch
To the AC outlet
Setting Up

Using print packs (optional)
Notes
• Use the set of the print
paper and ink ribbon
cartridge supplied
together in the same
carton. If you use them
in a different
combination, proper
printing results may
not be obtained, or
paper jam or other
trouble may occur.
• Use the print paper and
ink ribbon cartridge
within two years from
the date of
manufacturing
specified on the print
pack carton.
• Do not print on used
paper.
Tip
When you want to keep
the printed image for an
extended period of time
in better condition, we
recommend you use the
Passport photo paper set
P-60LE.
You need a print pack (not supplied) for printing. A
print pack contains a set of print paper and ink ribbon
cartridge.
Use the following set for printing purposes:
Print Model Print paper Ink ribbon
cartridge
Standard P-60NE Standard type for 60 prints
Sticker P-60NS1E 1-cut sticker for 60 prints
Adhesive-label sheet
P-60NS4E 4-cut sticker for 60 prints
Adhesive-label sheet
P-60NS16E 16-cut sticker for 60 prints
Adhesive-label sheet
Passport P-60LE Passport photo paper for 60 prints
Setting Up
Setting Up
19
GB
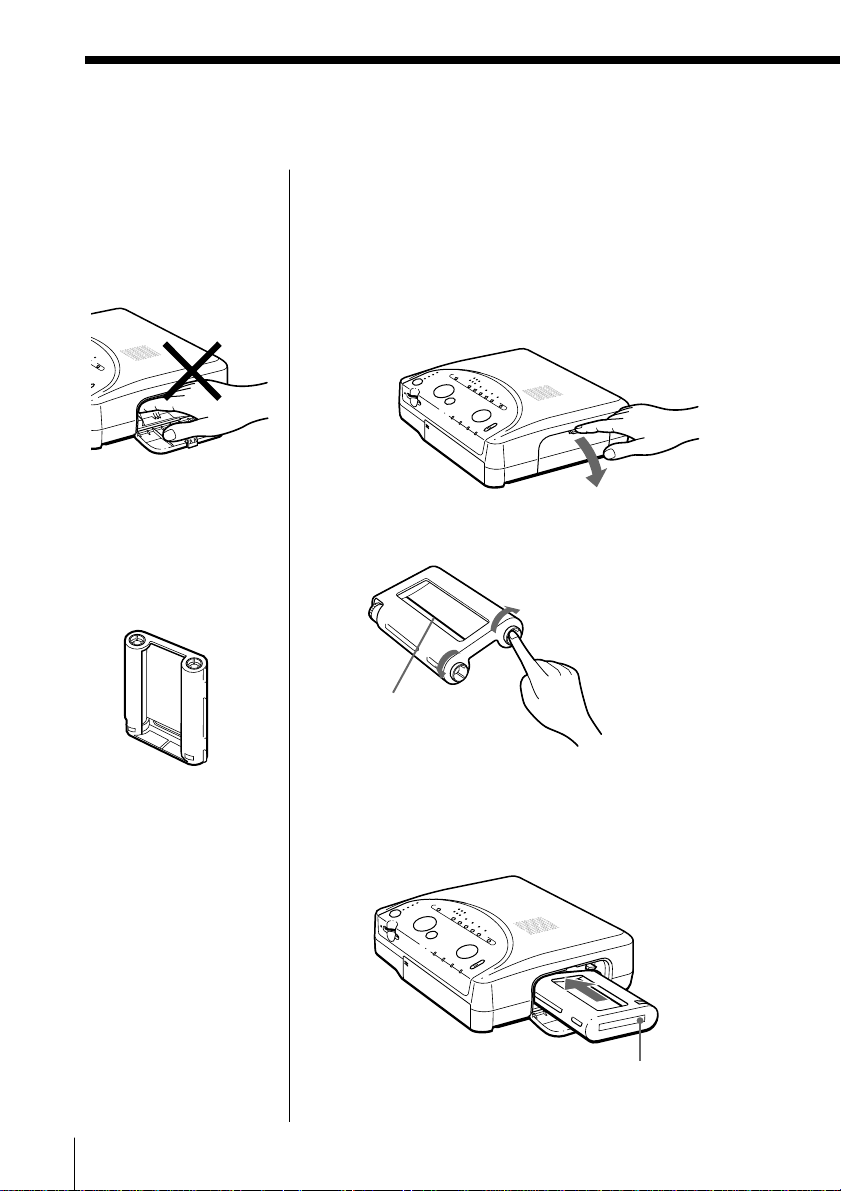
Loading the ink ribbon cartridge
Caution
Never put your hand into
the cartridge
compartment. The
thermal head reaches high
temperatures, especially
after repeated printing.
Notes
• When installing the ink
ribbon cartridge, stand
it as illustrated so that
dust will not get on the
ink ribbon.
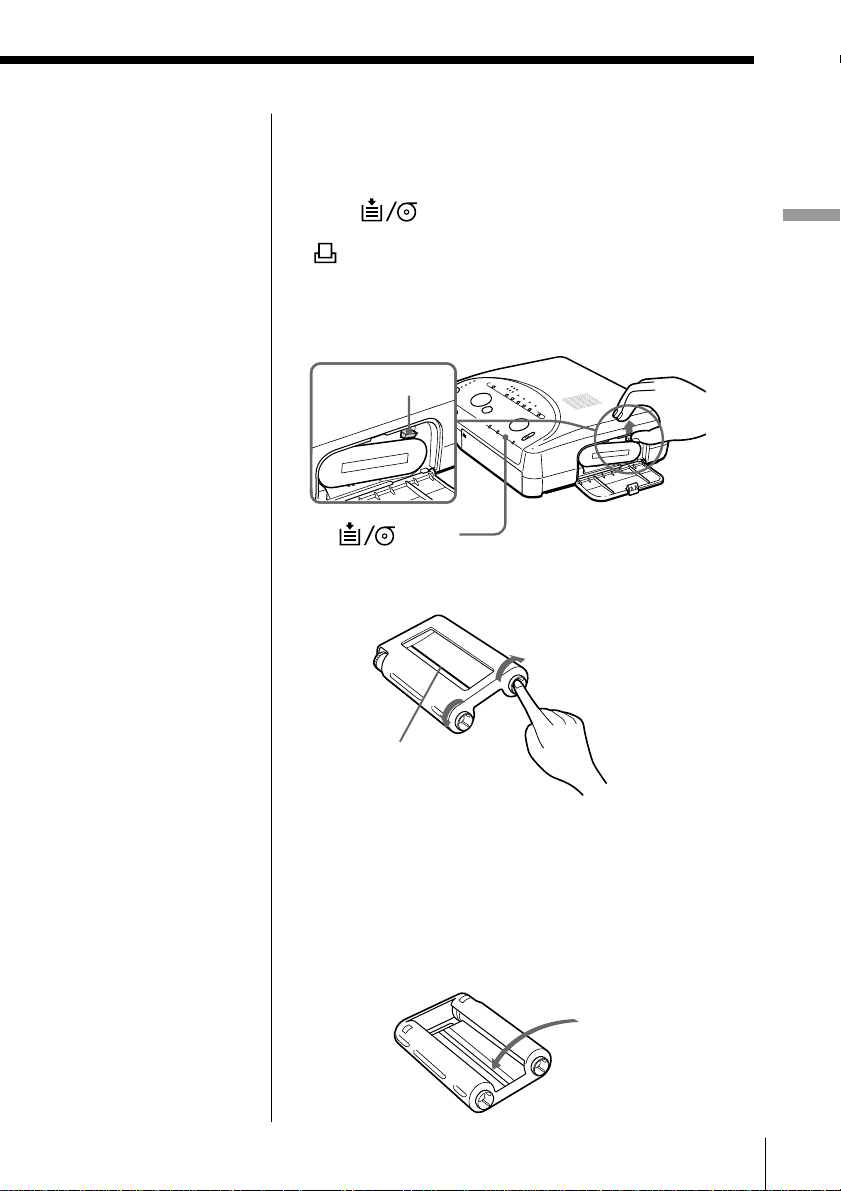
Insert the ink ribbon cartridge into the printer.
Use only the ink ribbon cartridge supplied with the
print paper packed in the same carton.
1 While pressing down the lever, open the cartridge
compartment lid.
2 Wind up the ink ribbon to remove the slack.
While pressing the center of
the reel, wind the ink ribbon
in the direction of the arrow.
Wind the ribbon until
the black line comes to
the left edge.
• Do not touch the ink
ribbon or place the ink
ribbon cartridge in a
dusty location.
Fingerprints or dust on
the ink ribbon may
result in imperfect
printing.
GB
20
Setting Up
3 Insert the ink ribbon cartridge firmly until it clicks
into place and close the cartridge compartment lid.
Labeled side
Notes on storing the ink
ribbon cartridge
• Avoid placing the
cartridge in a location
subject to:
– high temperatures
– high humidity
– excessive dust
– direct sunlight
• When you are going to
store a partially-used
cartridge for an
extended period of
time, store it in its
original bag.
If the cartridge compartment lid does not close
Remove the ink ribbon cartridge, and then re-insert it.
To remove the used ink ribbon cartridge
If the
(paper/ribbon) indicator flashes slowly
(at intervals of about 0.5 second) after you press the
(print) button, the ink ribbon cartridge has run out.
Open the cartridge compartment lid and push up the
eject lever. Remove the used ink ribbon cartridge and
replace it with a new one.
Eject lever
(paper/
ribbon) indicator
To load the half-used ink ribbon cartridge
While pressing the
center of the reel, wind
the ink ribbon in the
direction of the arrow.
Setting Up
Wind the ribbon
until the black line
comes to the left
edge.
If ink ribbon should tear
Repair the ribbon with transparent tape. There should
be no problem with using the remaining portion of the
ribbon. Before loading the ink ribbon cartridge into the
printer, turn the reel until the transparent tape is
hidden.
Repair with
transparent tape.
Setting Up
21
GB
Inserting the print paper
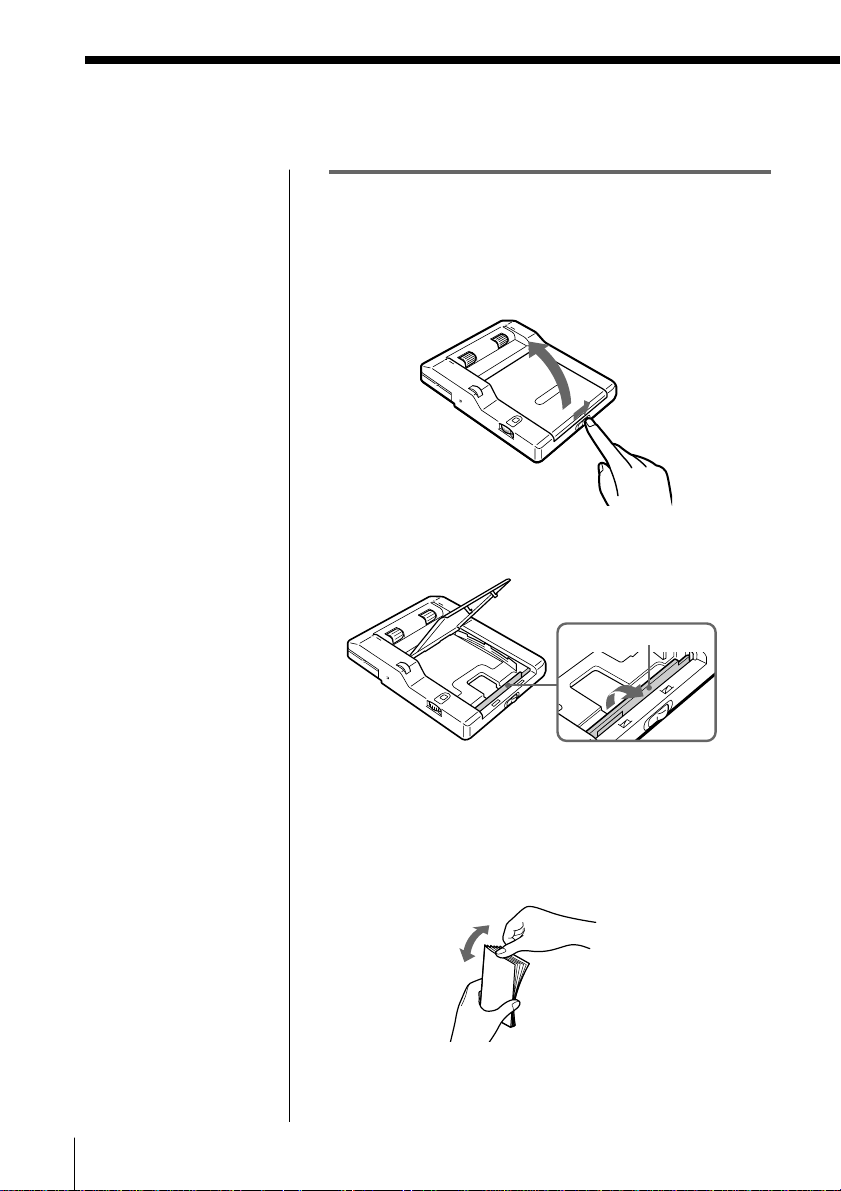
Inserting the print paper into the
automatic feeder
1 To open the cover, slide the front switch to the
right.
2 Stand the spacer up.
Spacer
22
GB
3 To avoid paper jamming, riffle the print paper.
Make sure not to touch the printing surface (shiny
side where nothing is printed).
Setting Up
Notes
• When handling the
print paper, do not
touch the printing
surface (shiny side
where nothing is
printed).
• Do not place the print
paper in a dusty
location. Fingerprints
or dust on the printing
surface may result in
imperfect printing.
• Use the print paper
recommended for this
printer only. If you use
a different type of
paper, it may cause
problems and the
printer may not print
properly.
• The automatic feeder
can hold up to 30 sheets
of standard paper,
sticker paper, or
passport photo paper.
To prevent paper jams,
when you add paper to
a partially full feeder,
make sure that the total
number of sheets does
not exceed this limit.
• To prevent paper jams,
do not place different
types of paper in the
automatic feeder.
• Do not fold or bend the
print paper.
• Do not use the sticker
papers which have
been peeled off.
• Do not write or type
anything on the reverse
side of the print paper
before printing. This
may cause paper
jamming or failure in
printing.
• You cannot type on the
printing surface; use an
oil ink pen to write
greetings or other
characters or to draw
on the printing surface.
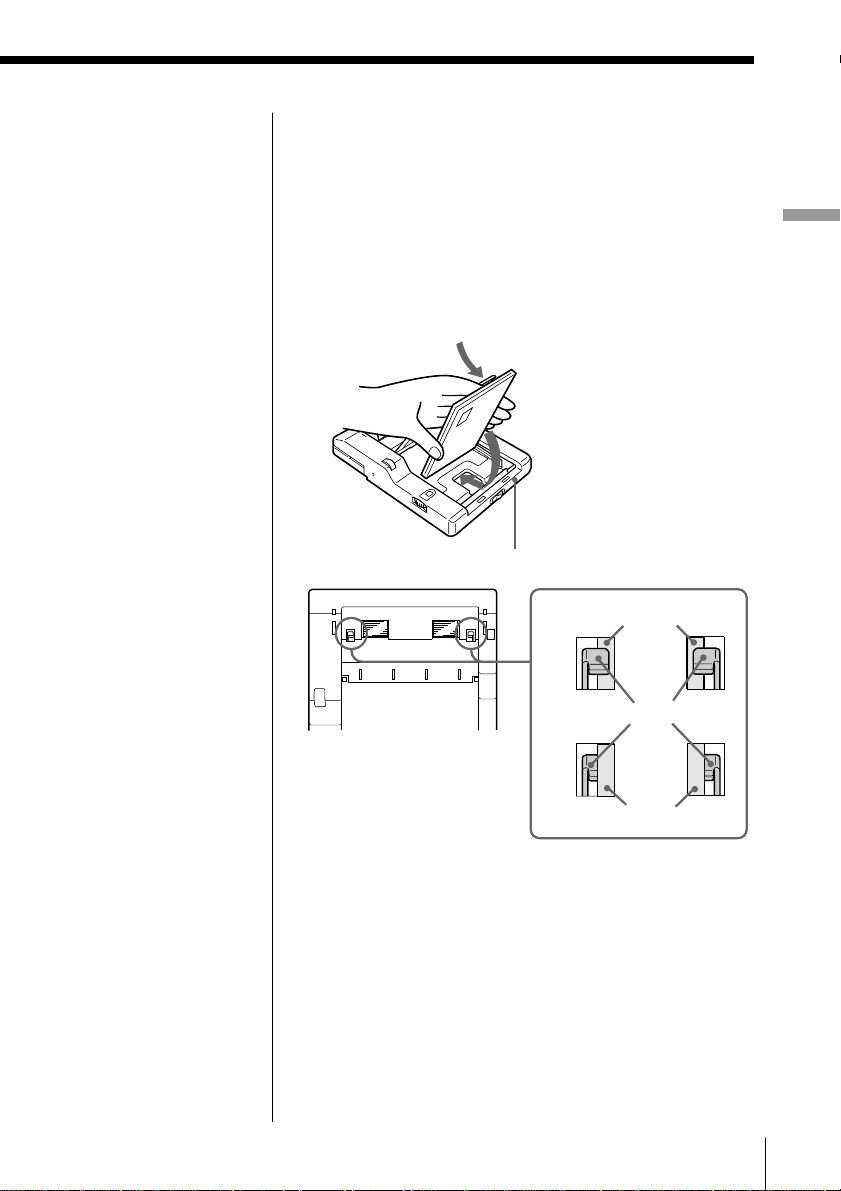
4 Insert print paper with its printing surface facing
up.
You can load up to 30 sheets of standard paper into
the automatic feeder.
Do not push the paper too hard into the automatic
feeder. Make sure that the metal tabs in the
automatic feeder are not covered by the paper.
Printing surface
For stickers, place the side
with “OLYMPUS” face
down, and for standard
and passport photo
papers, place the stamp
mark side face down.
front
Correct
Incorrect
Make sure that the metal
tabs are not covered by
the paper.
Paper
Metal tabs
Paper
5 Close the automatic feeder cover.
Setting Up
Setting Up
23
GB
Inserting the print paper (continued)
Notes on storing the
print paper
• Avoid placing the print
paper in a location
subject to:
– high temperatures
– high humidity
– excessive dust
– direct sunlight
• When you are going to
store the partially-used
print paper for an
extended period of
time, store it in its
original bag.
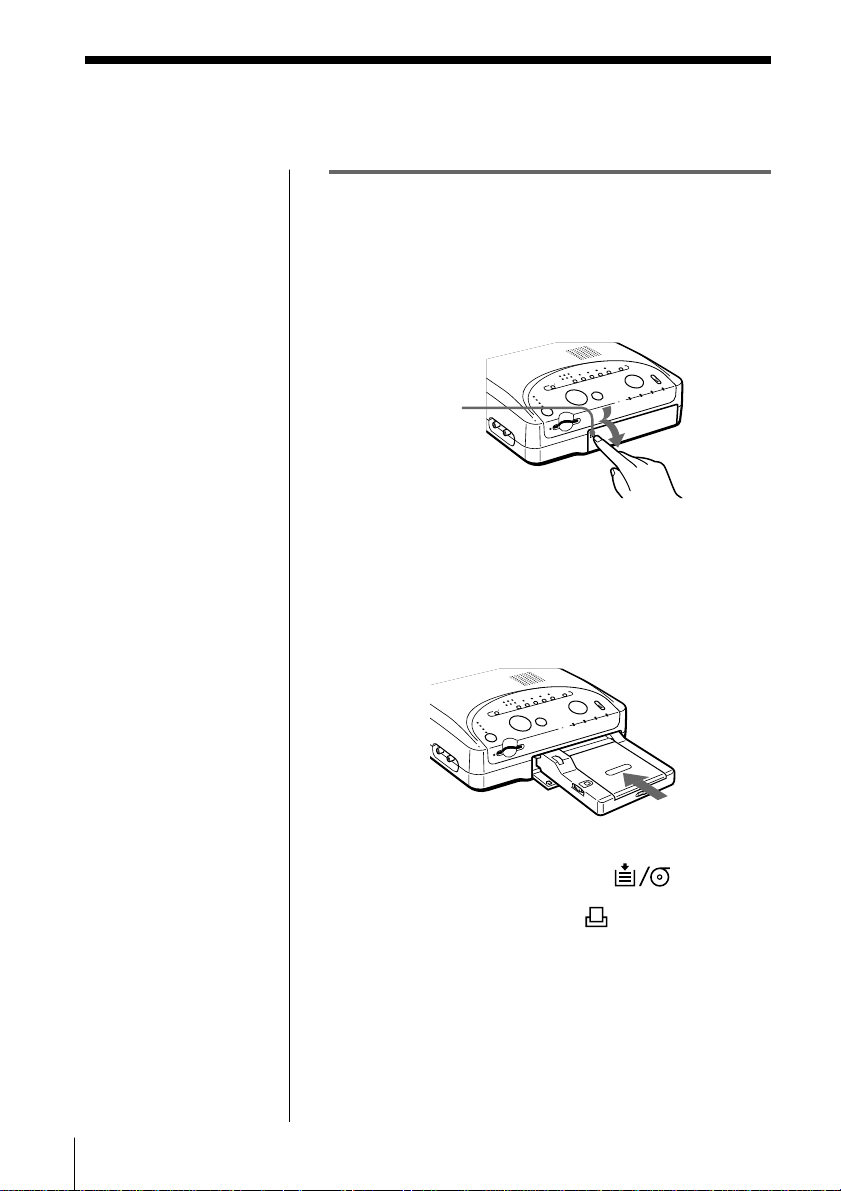
Attaching the automatic feeder to the
printer
1 Push the automatic feeder compartment lid.
The lid of the automatic feeder compartment opens.
Push the
[PUSH] mark.
To close the lid, press [PUSH] until it clicks shut.
2 Insert the automatic feeder firmly into the
compartment.
24
GB
Setting Up
If the print paper runs out
When the print paper runs out, the (paper/
ribbon) indicator flashes quickly (at intervals of about
0.25 second) after you press the
Remove the automatic feeder from the printer and
insert print paper.
(print) button.

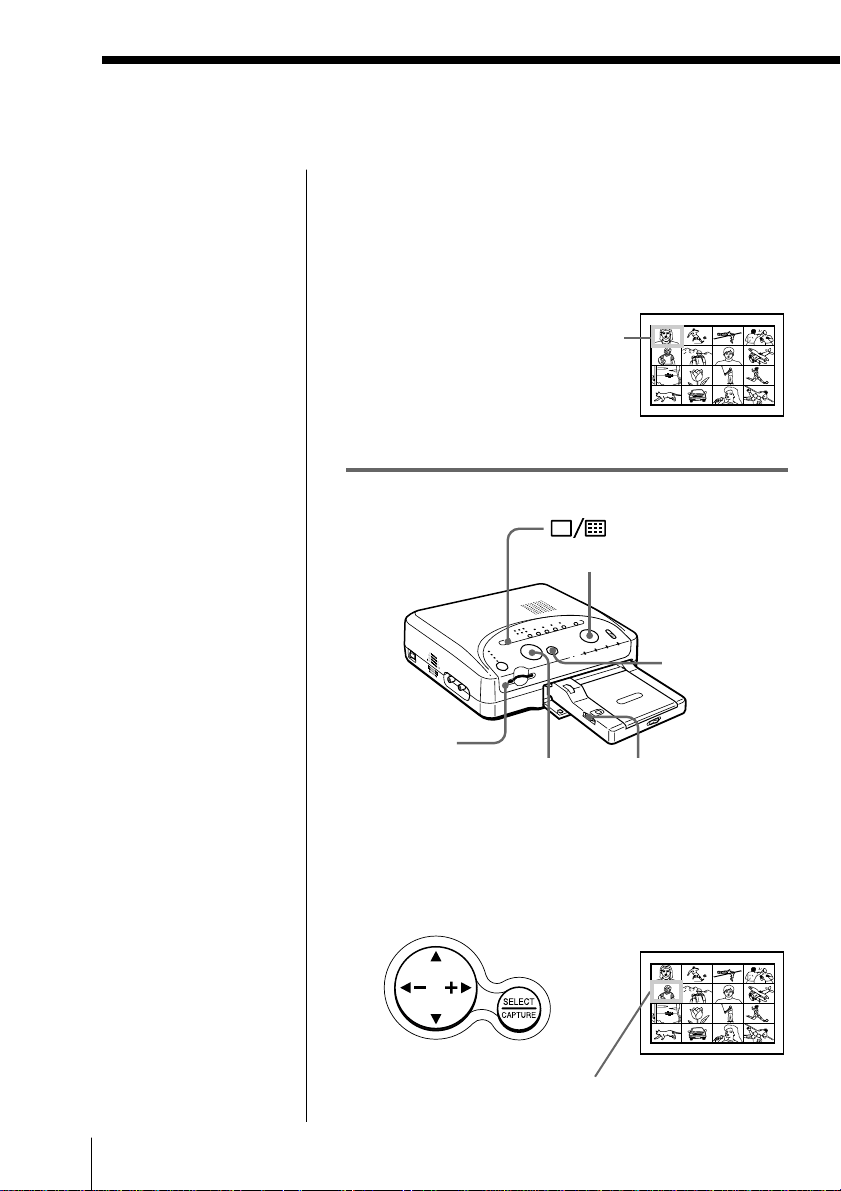
Making Basic Prints
Printing an image recorded on the Smart Media
You can select an image recorded on the Smart Media
and print it in full-size (standard print).
Standard print
Preparations
INPUT button
1
(split) button
Making Basic Prints
(power)
indicator
Notes
• If the (single/
random) indicator is
off, press the INPUT
button until the
(single/random)
indicator turns on.
• If any of the indicators
of the
is on, press the
(split) button until all
the (split)
indicators go off.
(split) button
Access
indicator
2
1 Turn on the printer and television and set the TV/
VIDEO selector of the television to “VIDEO.”
• The
• The
INPUT button turns on.
• Make sure that all the indicators of the
(split) button are off; you can print the image in
full-size (standard print).
(power) indicator turns on.
(single/random) indicator of the
continued
Making Basic Prints
25
GB
Printing an image recorded on the Smart Media (continued)
Notes
• Print the images of the
Smart Media as they
were recorded with the
OLYMPUS digital
camera. For the images
retouched or saved
with the computer or
the images recorded
with a digital camera of
other manufacturers,
we cannot guarantee
proper display and
printing performances.
• You can use the Smart
Media of the following
capacities with the
printer:
– 2MB (3.3V/5V)
– 4MB (3.3V/5V)
– 8MB (3.3V)
– 16MB (3.3V)
• Do not remove the
Smart Media while the
access indicator is on.
Remove it before
turning off the printer.
Changing the pages
When multiple pages
exist, you can change the
pages back and forth. To
display the next page,
move the white frame to
the bottom line of the
image list and press $.
To go back to the
previous page, move the
white frame to the top
line and press 4. The
access indicator flashes
and pages switch.
2 Insert the Smart Media recording images into the
printer’s slot.
While accessing the Smart Media, the access
indicator next to the slot flashes. After the images
of the Smart Media are read, they are displayed as
thumbnails (small image) in the list.
Cursor (white frame)
Television
Printing
(display) button
3
SELECT/
CAPTURE
button
Access
indicator
1 2
1 Press the arrow (“/”/$/4) buttons to move the
white frame (cursor) to the image you want to
print.
Move the white frame up (4), down ($), rightward
(” ) , or leftward (“).
GB
26
Making Basic Prints
Television
Move the white frame.
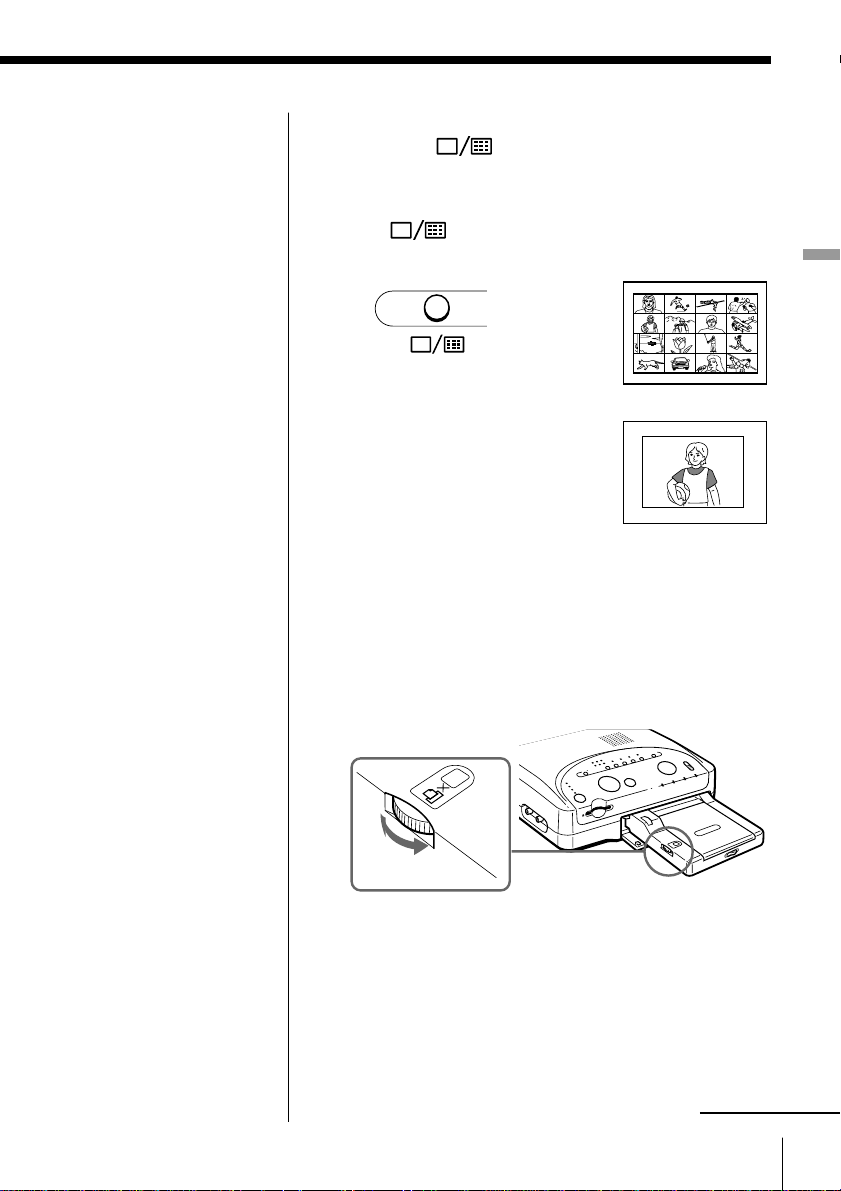
Displaying the selected image in full-size
Press the
(display) button. The image
selected with the white frame is displayed in fullsize. You can view the previous or next image by
pressing “ or ” . To go back to the image list, press
the
(display) button again.
<
Making Basic Prints
Printing a number of
copies not specified on
the dial
You can print a number of
copies not specified on
the dial. For example, to
print 4 copies, set the dial
to 30. Remove the
automatic feeder from the
printer and insert 4
sheets. Then reinstall the
automatic feeder. The
atutomatic feeder can
hold a maximum of 30
sheets.
2 Turn the dial of the automatic feeder to set the
number of copies to be printed.
You can set 1, 2, 3, 5, 10, 15 or 30 copies.
Turn the dial until the desired number appears in
the window. Make sure it clicks at that time.
Otherwise, you may get the wrong number of
copies.
m
Dial to set the number
of copies.
continued
Making Basic Prints
27
GB
Printing an image recorded on the Smart Media (continued)
To stop continuous
printing
Set the dial of the
automatic feeder to 1.
The printer stops after the
current printing.
Notes
• While the access
indicator of the
printer’s slot is
flashing, never remove
the Smart Media; the
format inside the Smart
Media may be
damaged so that it
cannot be used any
longer.
• Do not remove or insert
the Smart Media
during printing. You
may not get a correct
print.
• An image which is
damaged or has some
trouble appears white
in the image list. If the
original image data is
damaged, the
indicator flashes when
you move the white
frame to the white
image or attempt to
display it in full-size.
• If there are no images
stored in the Smart
Media, the screen
appears blue and the
(error) indicator
flashes.
• The time required to
display the image in
full-size differs
depending on the size
of the image recorded
by the digital camera.
(error)
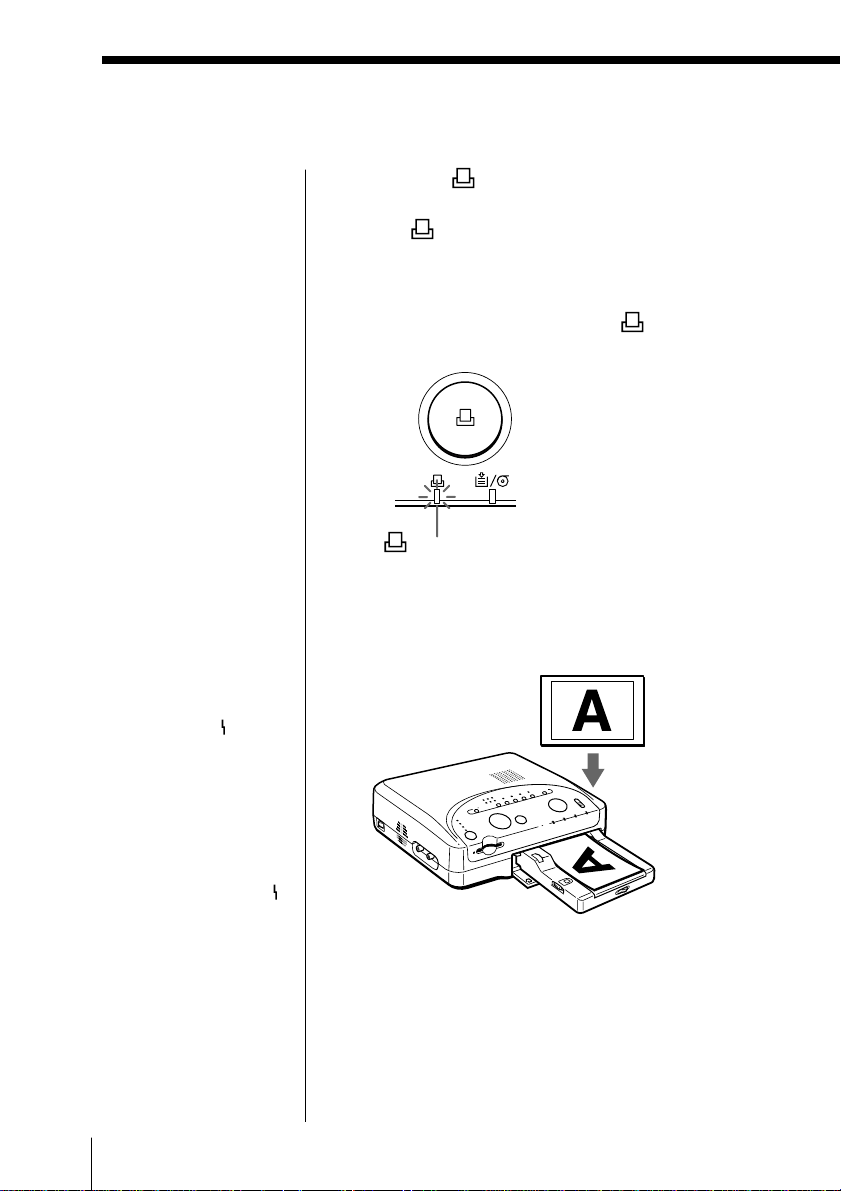
3 Press the (print) button of the printer to start
printing.
The
prints the number of copies you have set. If you
select multiple images, they are printed in the order
of selection.
After the printing finishes, the
indicator goes off.
Printing direction
The image displayed on the TV is printed in the
direction as shown below.
If print paper runs out
If the print paper is not inserted or runs out during
printing, remove the automatic feeder from the printer
and insert the print paper. Then install the automatic
feeder again. The printer prints the remaining copies.
(printing) indicator lights and the printer
(printing)
(printing) indicator
Displayed
image
Printed image
GB
28
Making Basic Prints

• If you press (print)
button when the image
is displayed in full size,
only the displayed
image is printed. After
the printing finishes,
the image list appears.
• Normally, perform
printing with the image
list displayed.
• While printing, never
move or turn off the
printer. The ink ribbon
cartridge or the paper
may become stuck. If
this occurs, turn off the
printer, and turn it on
again and resume
printing from the
beginning.
• During printing, the
print paper is partially
ejected from the paper
outlet several times.
Never pull out the
paper by force.
• Avoid storing the paper
with the printed faces
contacting each other or
contacting with rubber
or plastic products
including vinyl
chloride or plasticizer
for an extended period
of time; the ink may
transfer on to them.
Selecting and printing multiple images at a time
Press the SELECT/CAPTURE button with the white
frame on the desired image in step 1; the red frame
appears inside the white frame showing that the image
selection is fixed.
Making Basic Prints
The selection is fixed
(red frame inside).
To select multiple images, press the arrow (“/”/$/4)
buttons to move the white frame to the desired image
and press the SELECT/CAPTURE button. Repeat
these steps to frame the desired images in red.
Follow steps 2 and 3 of the “Printing” procedures
(pages 27 and 28) to print the selected images.
To cancel the selection, press the SELECT/CAPTURE
button again; the red frame disappears.
Making Basic Prints
29
GB
Printing an image recorded by digital cameras
Tip
One-sheet print, Index
print, Multi print, Mirror
print, All print, Random
print, and Date print are
available. See the
instruction manual of the
digital camera for details.
Notes
• The image from the
digital camera is not
displayed on TV.
• We recommend using
the digital camera with
the AC power adapter.
• While printing, never
move or turn off the
printer. The ink ribbon
cartridge or the paper
may become stuck. If
this occurs, turn off the
printer, and turn it on
again and resume
printing from the
beginning.
• During printing, the
print paper is partially
ejected from the paper
outlet several times.
Never pull out the
paper by force.
• Avoid storing the paper
with the printed faces
contacting each other or
contacting with rubber
or plastic products
including vinyl
chloride or plasticizer
for an extended period
of time; the ink may
transfer on to them.
You can directly print the image recorded by
OLYMPUS CAMEDIA C-1400L/C-1000L/C-1400XL
Digital Cameras. For other models, you cannot make
direct printing with the connecting cable.
1 Connect the printer and the digital camera with the
direct print cable. (page 15)
2 Turn on the printer.
The
(power) indicator turns on.
3 Press the power button of the digital camera to turn
it on.
4 Operate the digital camera to print.
See the instruction manual of the digital camera.
You cannot use the buttons of the printer or set the
print quantity.
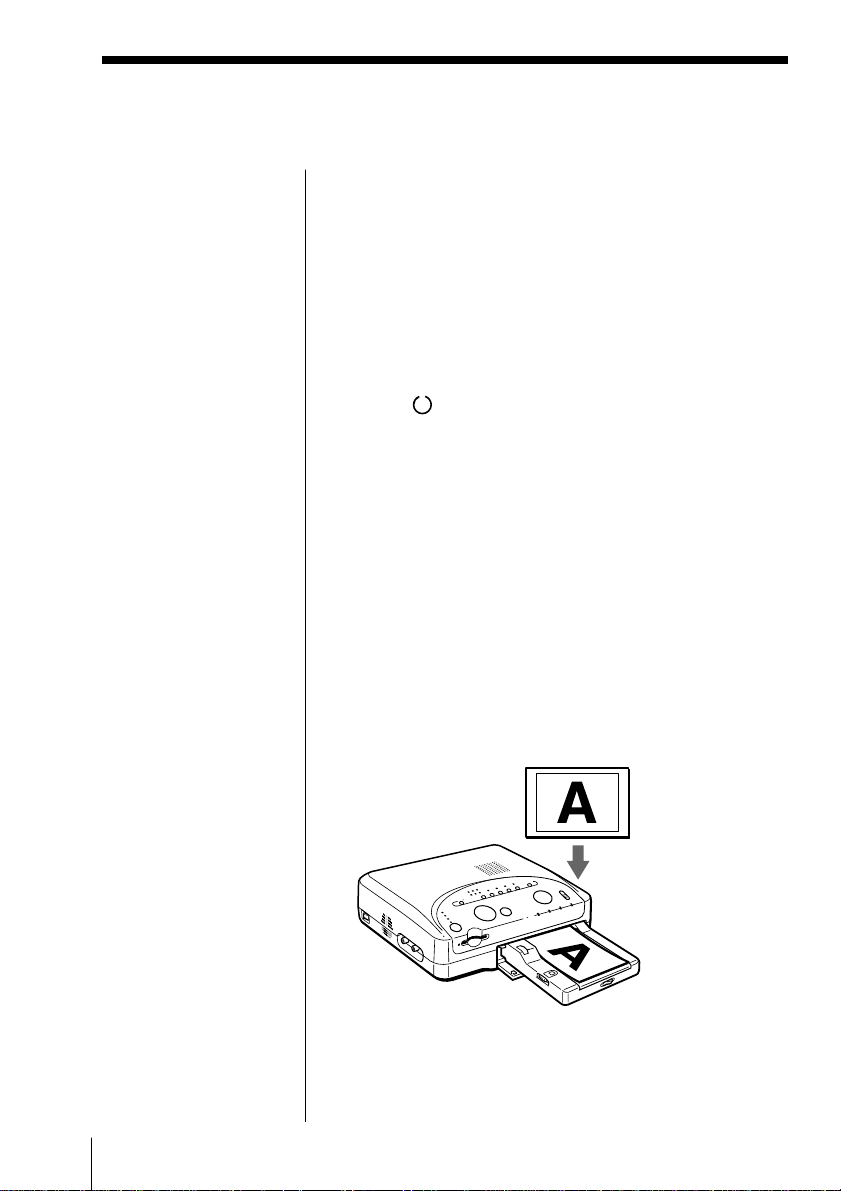
Printing direction
The image displayed on the LCD of the digital camera
is printed in the direction as shown below.
Displayed
image
Printed image
GB
30
Making Basic Prints
 Loading...