

Page 1

Software for Editing and
Managing Images
CAMEDIA Master 4.1/Pro
Operating Instructions
Page 2

Table of Contents
Introduction ................................................................................... 5
Note ............................................................................................................ 5
Trademarks .................................................................................................5
Intellectual property rights ........................................................................... 5
Purchasing the Pro Version ........................................................................6
Purchasing the Pro version and upgrading ...................................... 6
How to Use This Manual ............................................................................. 8
Conventions used in this manual ...................................................... 8
Terminology ......................................................................................8
Help information................................................................................8
Overview ........................................................................................ 9
Features ...................................................................................................... 9
Intuitive operation ............................................................................. 9
Album creation functions ................................................................ 10
Slide show ...................................................................................... 10
Find function ...................................................................................10
Convenient editing functions...........................................................11
Correction functions ........................................................................ 11
Filter functions ................................................................................ 12
Support for movie and sound files ..................................................12
Full printing functions ...................................................................... 13
Enjoying images with your computer .............................................. 13
Starting and Closing ................................................................... 14
System Requirements............................................................................... 14
Starting the Software ................................................................................ 15
Automatic starting .....................................................................................15
Closing the Software ................................................................................. 15
Main Menu ................................................................................................ 16
Main menu for version 4.1 ..............................................................16
Main menu for Pro version..............................................................18
Changing the Background Color ............................................................... 20
Changing the My Album location .............................................................. 21
Quick Reference .......................................................................... 22
Transferring Images.................................................................... 23
Transferring Images from a Camera ......................................................... 23
Connecting the camera to the computer (Windows)....................... 23
Connecting the camera to the computer (Macintosh) ..................... 24
Transferring images ........................................................................ 25
Transferring Images from Media ............................................................... 26
Specifying Where to Save the Images ...................................................... 27
Saving to an album .........................................................................27
Saving with the calendar.................................................................28
Saving to a folder ............................................................................ 30
2
Page 3

Browsing Images ........................................................................ 31
Album Window ..........................................................................................31
Display Modes .......................................................................................... 34
Browse mode and view mode.........................................................34
Album display and folder tree display ............................................. 35
Viewing Files ............................................................................................. 37
Thumbnail indications .....................................................................37
To sort the files ...............................................................................38
Finding a File ............................................................................................ 39
Viewing Images......................................................................................... 41
Viewing images...............................................................................41
Watching movies ............................................................................ 43
Playing Back Sound .................................................................................. 45
Checking File Information ......................................................................... 46
Checking file information ................................................................ 46
Changing the shooting date ............................................................ 49
Playing linked sound ....................................................................... 50
Recording linked sound ..................................................................51
Organizing Files .......................................................................... 52
Conventions for File Organization............................................................. 52
Creating a Group or Album .......................................................................53
Creating a Folder ...................................................................................... 55
Selecting Files........................................................................................... 57
Copying Files ............................................................................................58
Copying an Image ..................................................................................... 59
Moving Files .............................................................................................. 60
Deleting Files ............................................................................................60
Renaming a File ........................................................................................ 62
Renaming Files in a Single Operation ...................................................... 63
Converting Images to a Format Viewable on the Camera ........................65
Printing......................................................................................... 67
Print Window ............................................................................................. 67
Printer Settings ......................................................................................... 69
Automatic compensation settings ............................................................. 70
Photo Printing ........................................................................................... 71
Making Index Prints .................................................................................. 74
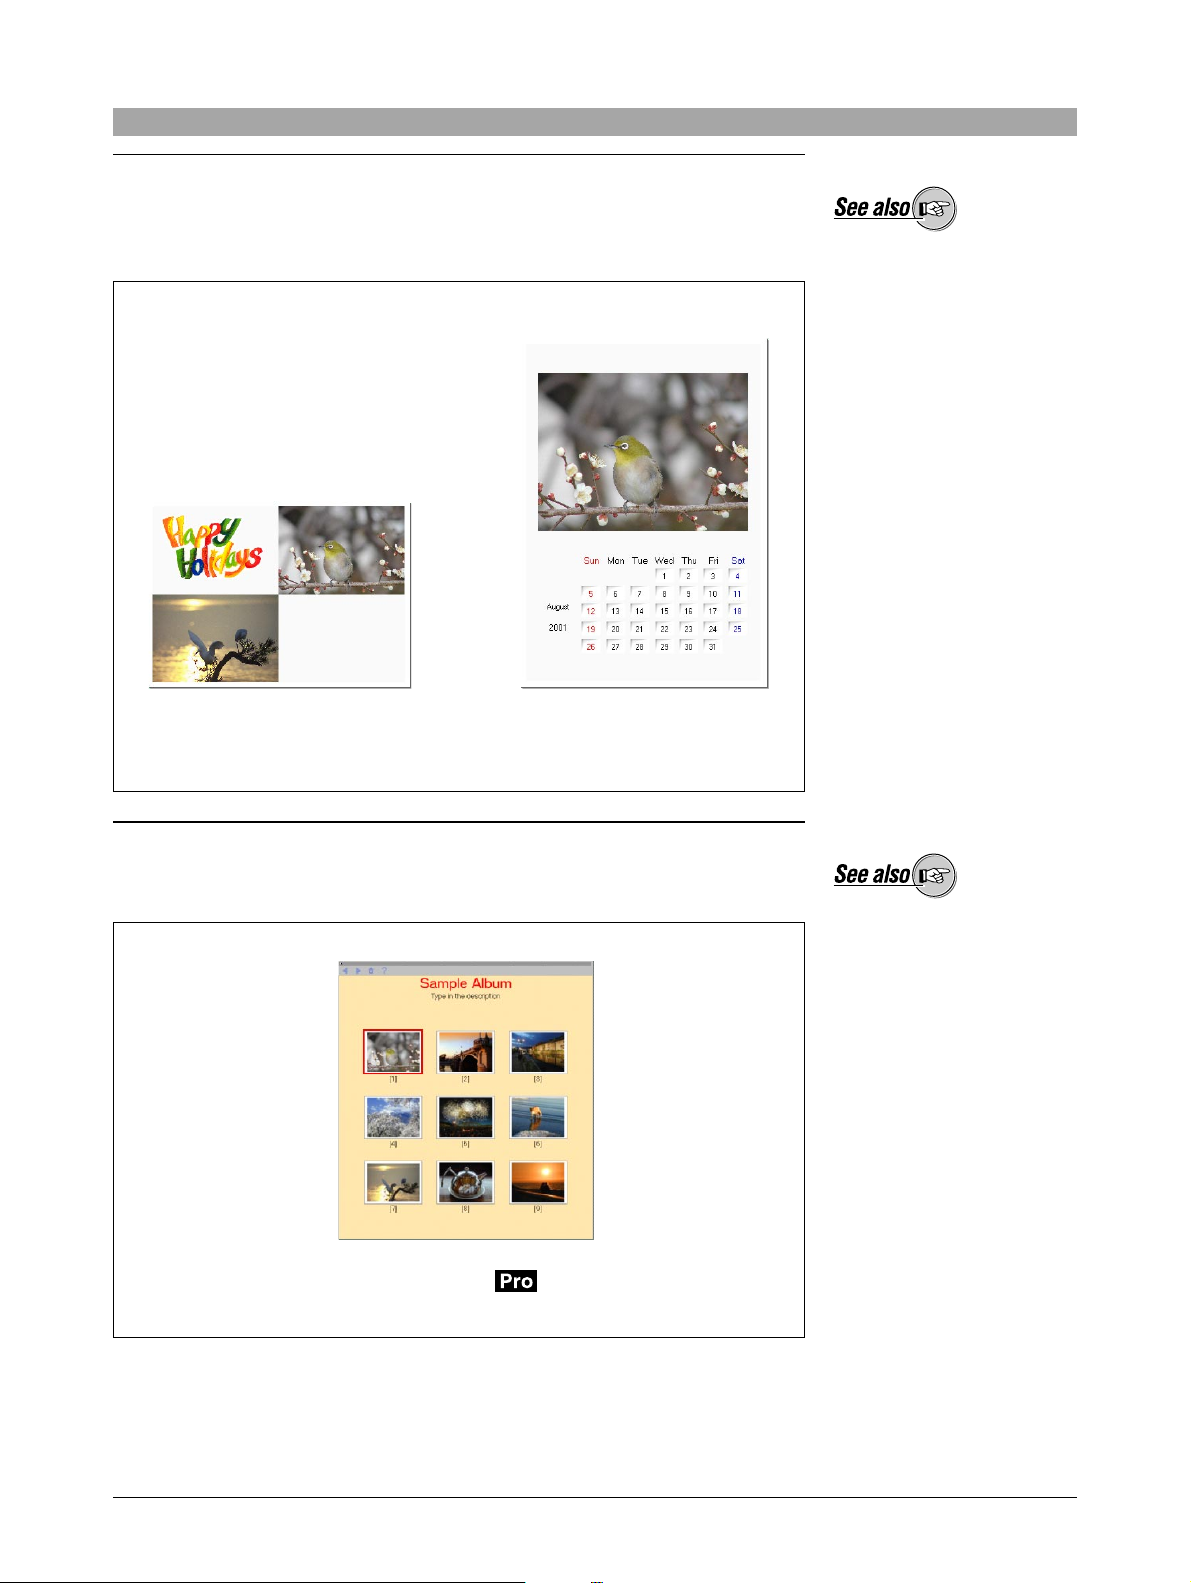
Creating and Printing a Calendar.............................................................. 76
Creating and Printing a Postcard ..............................................................78
Creating and Printing an Album ................................................................81
Creating and Printing a Contact Sheet ..................................................... 85
3
Page 4

Create and Share......................................................................... 88
Sending Images by E-mail ........................................................................88
Sending images by e-mail .............................................................. 88
Setting up an e-mail account ..........................................................91
Saving e-mail addresses in the address book ................................ 93
Creating an HTML Album ......................................................................... 96
Setting an Image as the Wallpaper ......................................................... 100
Watching a Slide Show ...........................................................................103
Using the whole screen ................................................................ 103
Saving a slide show as a screen saver.........................................105
Making a movie.............................................................................106
Automatic Panorama Function................................................................107
Free Stitch Panorama Function ..............................................................109
Backing Up ................................................................................ 112
Making a Backup Direct to Storage Media..............................................112
Creating Temporary Folders ...................................................................113
Editing Images........................................................................... 114
Image Editing Window ............................................................................114
Basic Operations.....................................................................................117
Zooming the display......................................................................117
Moving the image ......................................................................... 117
Making a selection ........................................................................118
Cutting and pasting part of an image ............................................ 118
Copying and pasting part of an image ..........................................119
Undoing an operation ................................................................... 119
Redoing an operation ................................................................... 119
Saving an image ........................................................................... 120
Editing Operations .................................................................................. 122
Rotation ........................................................................................ 122
Flipping .........................................................................................123
Resizing ........................................................................................124
Cropping .......................................................................................125
Inserting text .................................................................................127
Adding a template ......................................................................... 128
Correcting distortion......................................................................129
Using the filter functions ............................................................... 130
Editing Movies ........................................................................... 134
Movie Editing Window.............................................................................134
Editing Operations .................................................................................. 137
Rotating the movie ........................................................................ 137
Saving a frame..............................................................................138
Making a cut ................................................................................. 139
Using the filter functions ............................................................... 140
Appendixes ................................................................................ 141
Technical Support ...................................................................................141
Cameras Supported by This Software ....................................................142
File Formats ............................................................................................143
Functions Supported ............................................................................... 144
Index ........................................................................................... 146
4
Page 5

Introduction
Thank you for purchasing this Olympus product.
Please read these instructions carefully in order to get the best results from it.
Note
The contents of this software and this manual may not be reproduced in whole
or in part except for personal use. It may not be transferred without permission.
Olympus can accept absolutely no responsibility in respect of losses suffered by
the customer or a third party as a result of use of this software.
While every care has been taken in the preparation of this manual, if you find
any points which are unclear, errors, or omissions, please contact an authorized
Olympus service center.
This software is only guaranteed to operate in the specified operating
environment.
The software specification and the content of this manual are subject to change
without notice. For the latest information, visit the Olympus web site at:
http://www.olympus.com
© 2002 OLYMPUS OPTICAL CO., LTD.
Trademarks
• Windows is a registered trademark of Microsoft Corporation in the USA and
other countries.
• QuickTime and the QuickTime logo are trademarks of Apple Computer Inc.,
and Macintosh is a registered trademark of the same company in the USA and
other countries.
• Adobe and Acrobat are registered trademarks, and Acrobat Reader is a
trademark of Adobe Systems Incorporated.
• Other company and product names appearing in this manual are trademarks
or registered trademarks of their respective owners.
Intellectual property rights
This software supports “PRINT Image Matching”. This enables both the output
to a printer supporting PRINT Image Matching or supporting PRINT Image
Matching II and the screen image processing in this software to reflect faithfully
the shooting conditions and user specifications.
Intellectual property rights in PRINT Image Matching and PRINT Image Matching
II are owned by Seiko Epson Corporation.
5
Page 6
Purchasing the Pro Version
There are two versions of this software:
• CAMEDIA Master 4.1
This provides a wide range of functions, allowing you to view images and
movies, edit, get and print images, and use automatic panorama, wallpaper
and other functions.
• CAMEDIA Master Pro
In addition to the functions in version 4.1, this version allows you to use
extra functions, including movie editing, contact sheet printing, E-mail,
HTML album, free stitch panorama, and slide show.
For Users of Version 4.1
If you are using version 4.1, you can upgrade to the Pro version.
We recommend upgrading to the Pro version, which gives you a wider range of
functions.
Purchasing the Pro version and upgrading
To purchase a license number of the Pro version and upgrade from version 4.1,
use the following procedure. (If you purchased the Pro version separately, skip
this section.)
For the differences between
the versions, see the
Appendix “Functions
Supported” (page 144).
1
Start this software (CAMEDIA Master 4.1).
2
In the version 4.1 main menu, click the [Get Pro Version] button , or in
any window click the [Help] button and select [Upgrade].
The [Upgrade] dialog box appears.
3
Purchase a license number.
Using the Internet
In the [Upgrade] dialog box, click the [Get] button to start a web browser,
and access the upgrade site.
Follow the directions on the web page.
When this process is completed, close the web browser and return to the
[Upgrade] dialog box.
On how to start the software,
see “Starting the Software”
(page 15) under “Getting
Started.”
6
Page 7

If you cannot access the Internet
Contact your authorized Olympus service center.
4
In the [Upgrade] dialog box, enter your name and the license number you
have obtained, then click the [OK] button.
The upgrade to the Pro version is carried out automatically.
When the upgrade is completed, the software functions as the Pro version.
To check that the upgrade to the Pro version has completed
successfully
Check that the title in the main menu has changed to “CAMEDIA Master
Pro” and the extra icons have appeared.
Alternatively, click the [Help] button
and check that “CAMEDIA Master Pro” appears.
in any window, and select [About],
See “Main menu for Pro
version” (page 18) under
“Main Menu.”
7
Page 8

How to Use This Manual
This manual describes how to use the CAMEDIA Master 4.1/Pro software for
editing and managing images. It is organized with a section for each function;
you can read these independently, in order to understand particular functions.
Once you have an overall understanding of the functions, you can use the Help
information for reference while using the software.
Conventions used in this manual
The symbol indicates functions which can only be used in the Pro version.
Functions indicated with this symbol are not available in version 4.1.
Terminology
The following terms appear throughout this manual.
File
A file is the unit in which data is handled on a computer or digital camera. In this
software, this refers to the following file types.
• Image files
• Movie files
• Sound files
Thumbnail
This refers to the reduced images used as an index.
Help information
To access the help information, use any of the following methods:
• In the main menu, click the [Help] button .
• In any window, click the tool button [Help] and select [Index].
• In any dialog box, click the help button .
8
Page 9

Overview
Features
CAMEDIA Master 4.1/Pro is a software application providing a range of functions
for enjoying digital photography using a computer.
Using this software for editing will also allow you to become more expert in
using your digital camera.
The following are some of the features of this software.
Intuitive operation
The groups of functions are identified by easily recognizable icons, making
individual functions easy to find. You can use the functions directly on images,
without requiring complicated settings.
Example screen: the main menu
9
Page 10
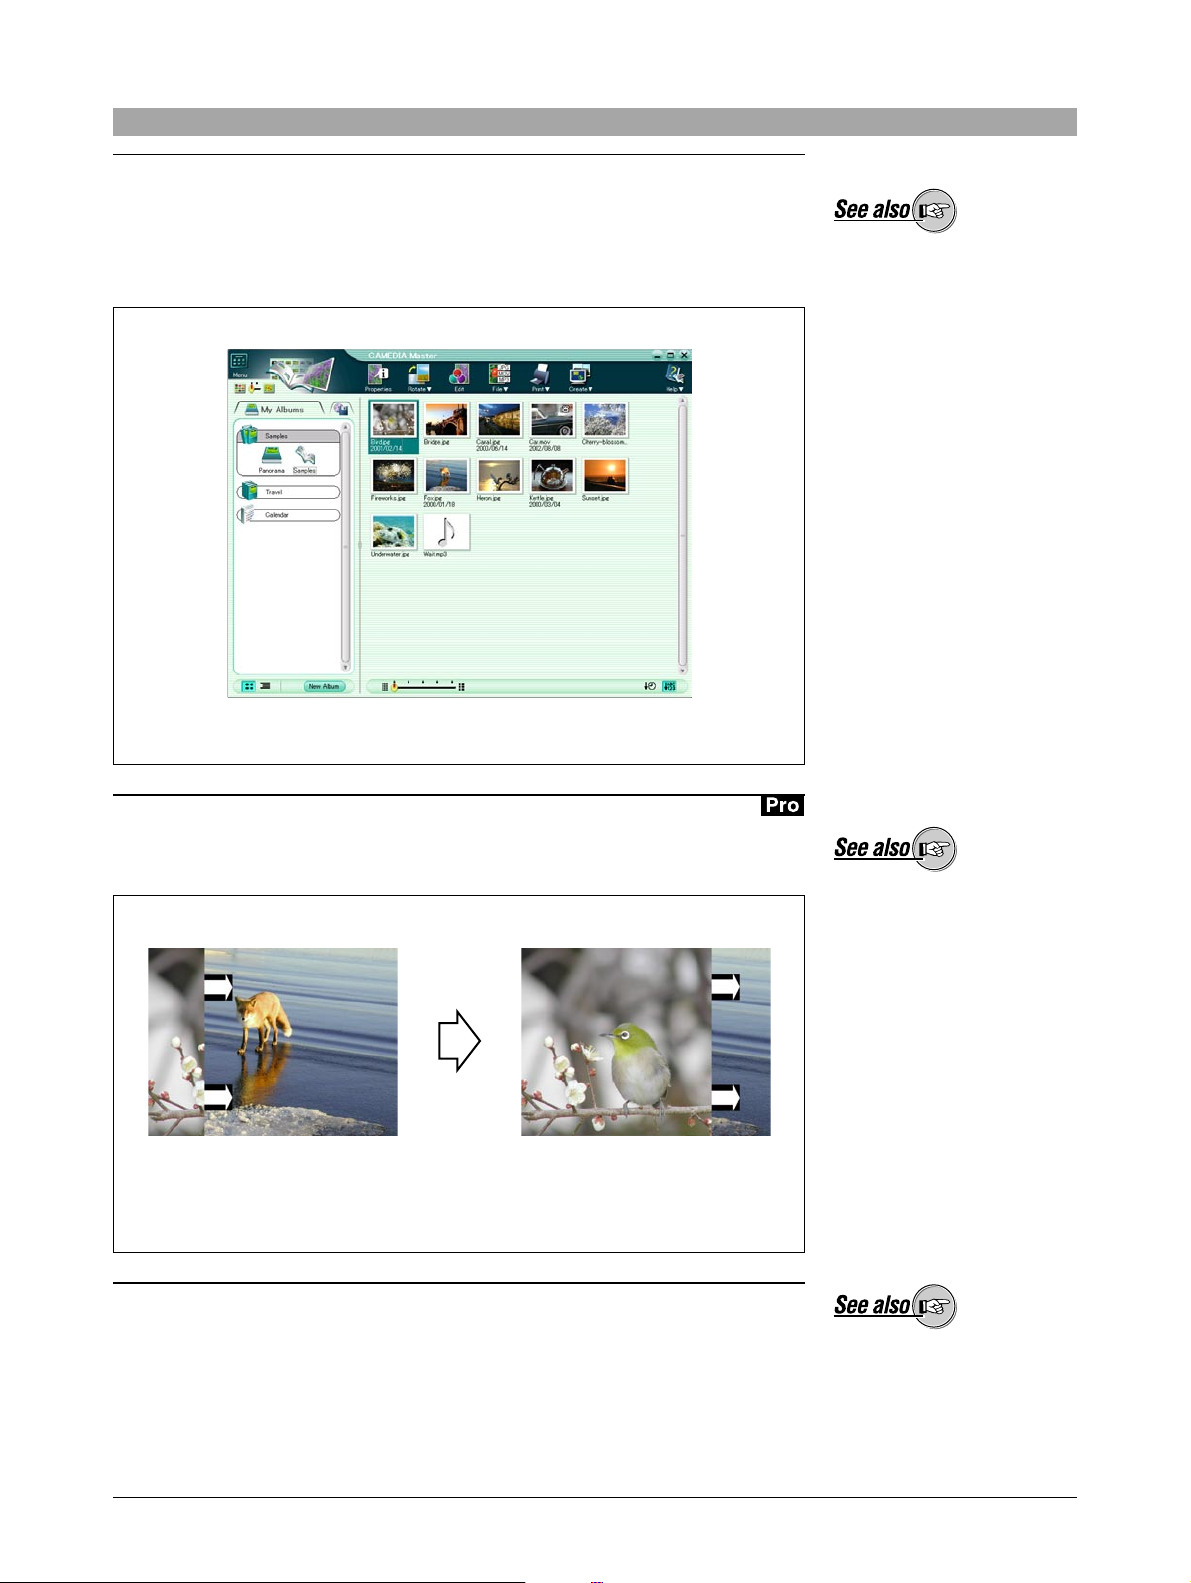
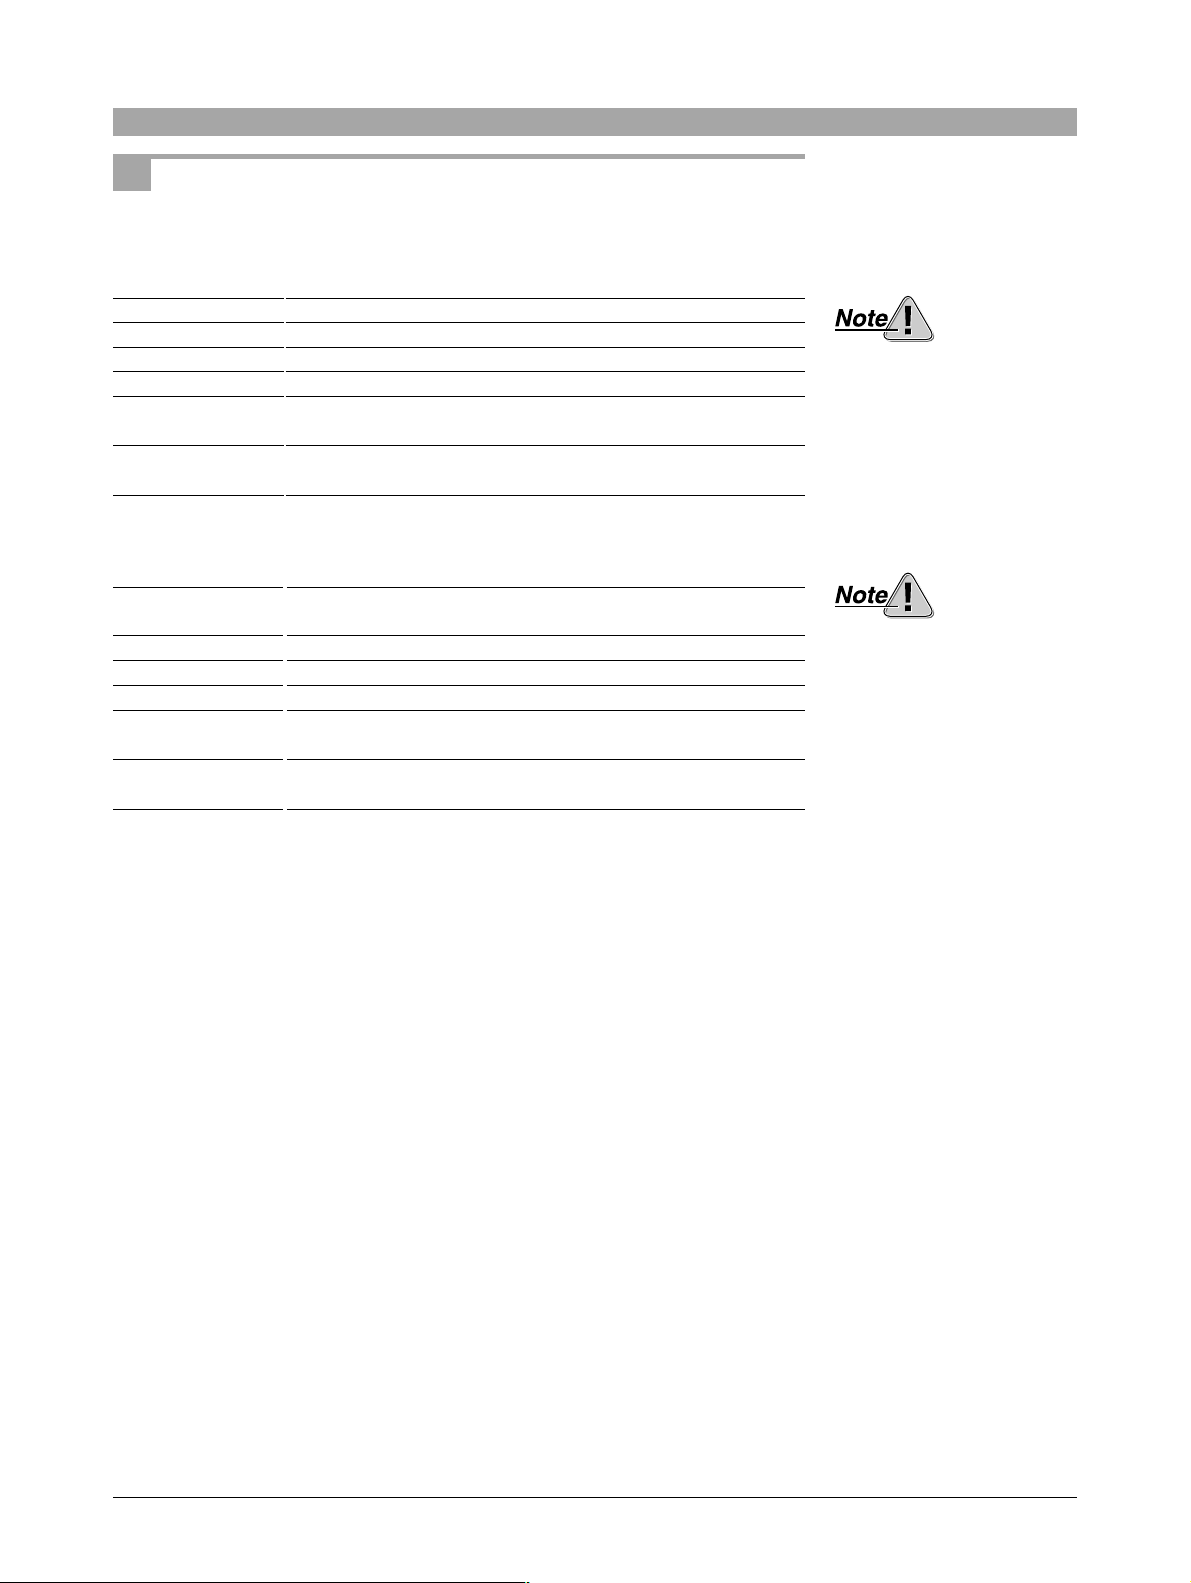
Album creation functions
You can capture images from a digital camera or storage media such as magnetooptical (MO) disks and CD-ROMs, to create an album.
The software provides a thumbnail display function, for easy access to images
for organization or editing.
Using albums to organize images
• On how to transfer images,
see “Transferring Images”
(page 23).
• About albums, see also
“Album Window” (page 31)
under “Browsing Images.”
Slide show
You can select images from an album to create a slide show on the monitor
screen .
Using a wipe transition in a slide show
(The arrows are not part of the actual display.)
Find function
You can find images on the basis of recorded shooting date, or attached
comments.
About slide shows, see also
“Watching a Slide Show”
(page 103) under “Create and
Share.”
About the find function, see
also “Finding a File” (page 39)
under “Browsing Images.”
10
Page 11
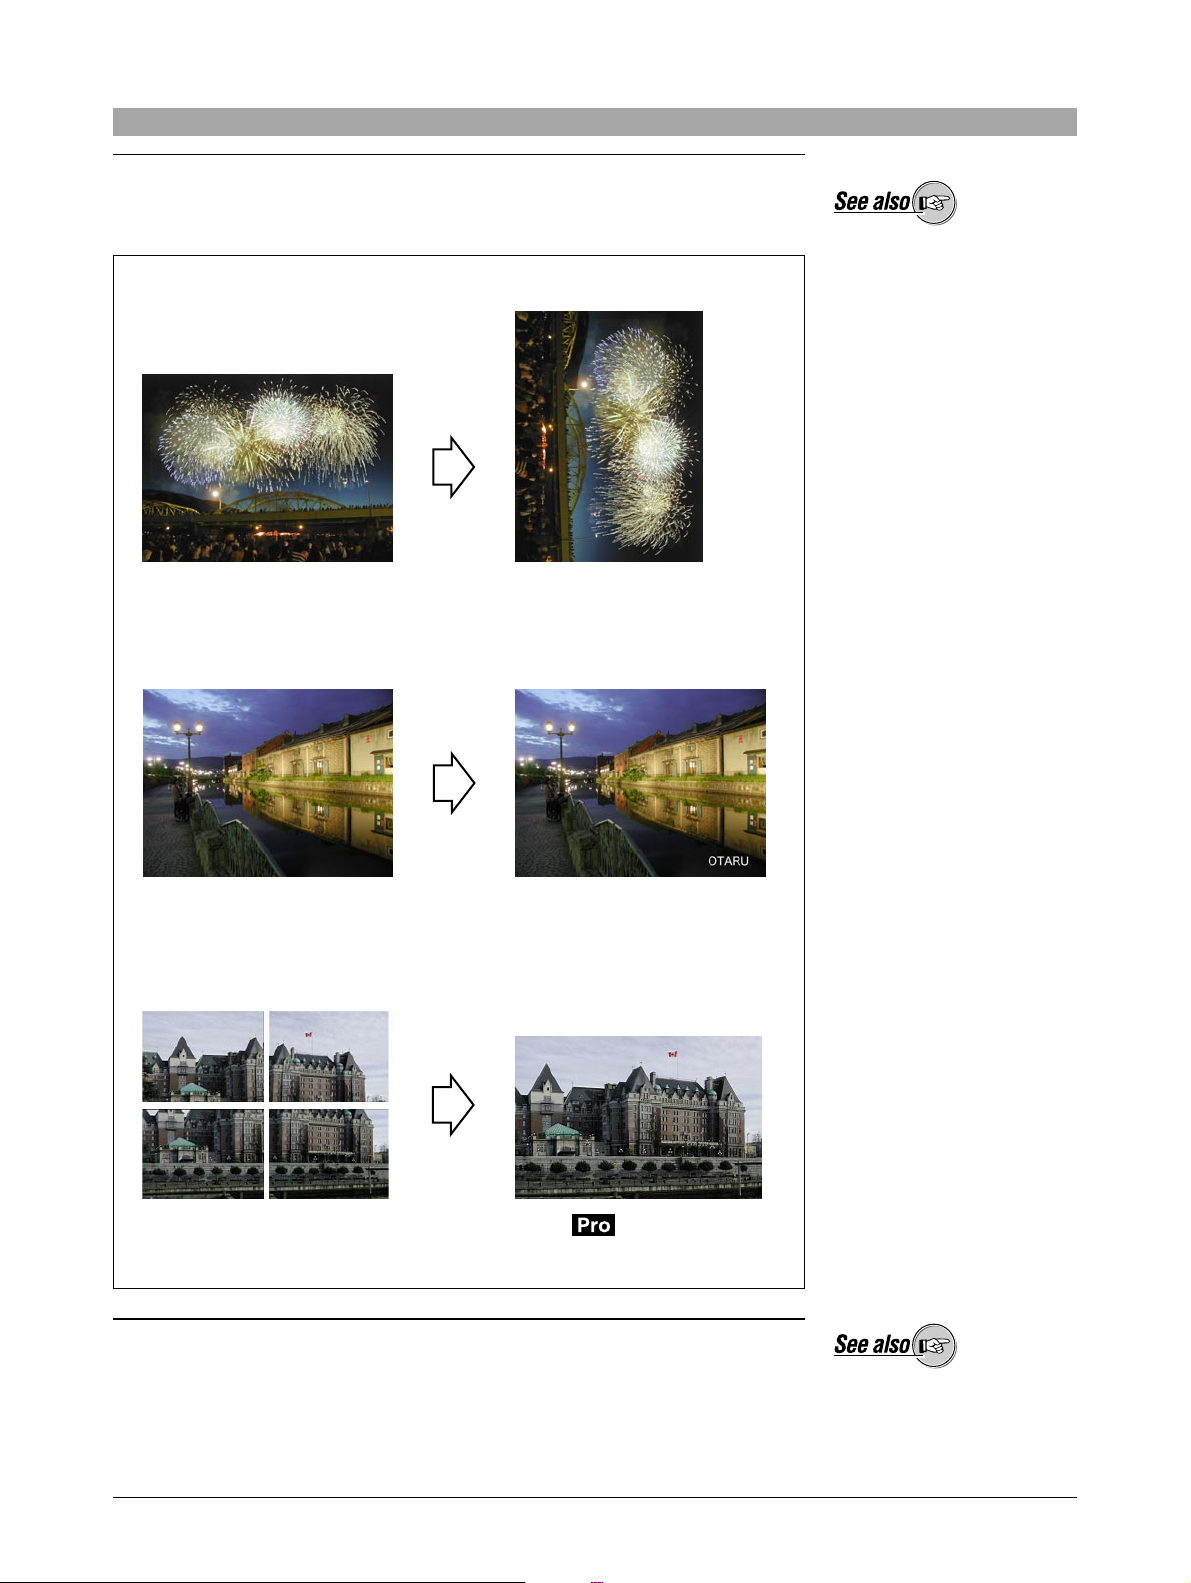
Convenient editing functions
In addition to basic editing functions, you can insert text, superimpose templates,
or stitch images together.
Rotation
About the editing functions,
see also the following:
• “Automatic Panorama
Function” (page 107) under
“Create and Share”
• “Free Stitch Panorama
Function” (page 109) under
“Create and Share”
• “Editing Images” (page 114)
• “Editing Movies” (page 134)
Inserting text
Free stitch panorama function (
Examples of editing
)
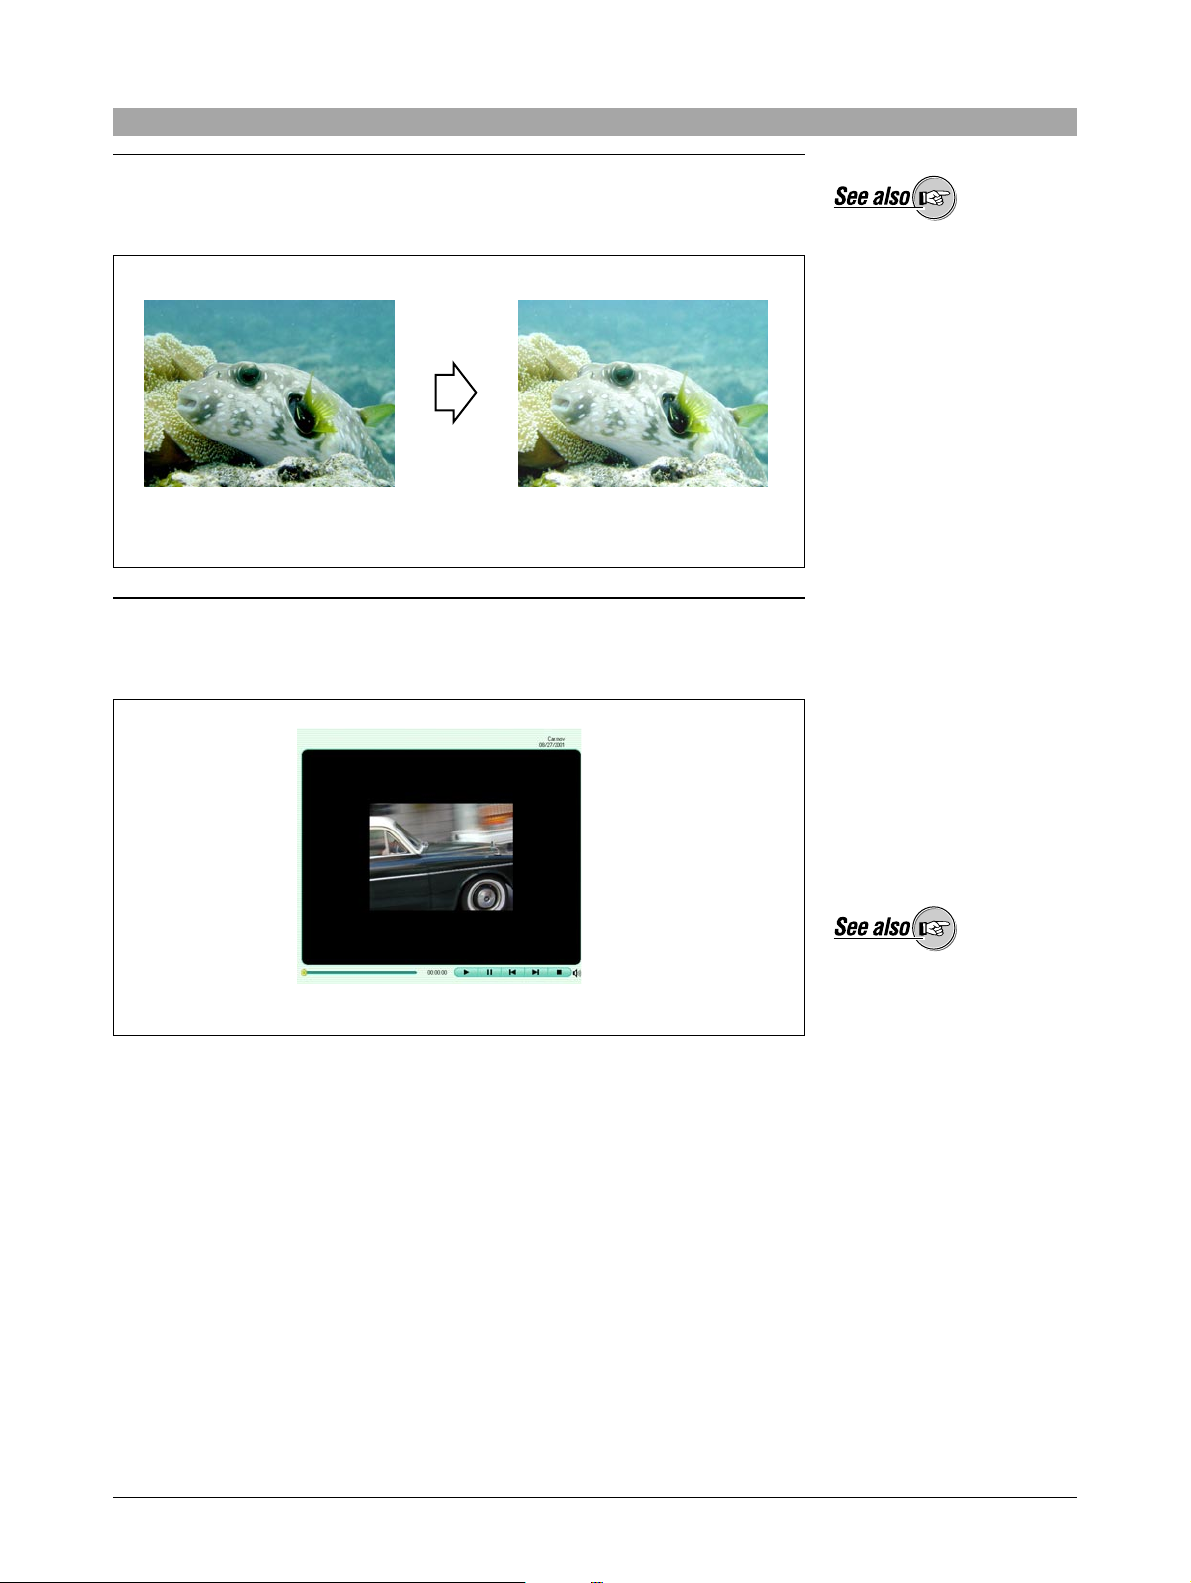
Correction functions
You can correct for variations in shooting conditions using the instant fix function,
red-eye reduction function or other correction functions.
About the correction functions,
see also “Using the filter
functions” (page 130) under
“Editing Images.”
11
Page 12
Filter functions
You can apply various filter effects, adjusting the brightness and contrast, and
applying sepia and other effects.
Example filter function: brightness adjustment
Support for movie and sound files
About the filter functions, see
also “Using the filter functions”
(page 130) under “Editing
Images.”
The software supports not only image files, but also movie and sound files. You
can attach a sound file to an image to act as a memo (“sound link” function).
Playing a movie file
To use all of the sound
functions, your computer must
be equipped with a
microphone, speaker and
sound card. For more details,
refer to the operating
instructions provided with your
computer.
About movies, see also the
following:
• “Watching movies” (page
43) under “Browsing
Images”
• “Editing Movies” (page 134)
About sound files, see also
the following:
• “Playing Back Sound” (page
45) under “Browsing
Images.”
• “Recording linked sound”
(page 51) under “Browsing
Images.”
12
Page 13
Full printing functions
Standard layouts allow easy printing of standard photograph sizes, index prints,
and other creative possibilities. You can also create original postcards and
calendars.
Postcard Calendar
About the printing functions,
see also “Printing” (page 67).
Examples of print functions
Enjoying images with your computer
The software includes a function to attach images to e-mail, the HTML album
function to help you create web sites, and a wallpaper function.
HTML album (
)
About the creative computer
functions, see “Create and
Share” (page 88).
13
Page 14
Starting and Closing
System Requirements
This software is designed to run in the following systems.
Windows version
OS
CPU
RAM
Hard disk capacity
Connector
Monitor
Macintosh version
OS
CPU
RAM
Hard disk capacity
Connector
Monitor
Windows 98/98SE/Me/2000 Professional/XP
Pentium II or later
64 MB or more (128 MB or more recommended)
120 MB or more (for installation)
USB port (USB interface)
RS-232C interface (serial interface)
Minimum 800 × 600 pixel resolution
Minimum 65,536 colors
Mac OS 9.0 or later/OS X 10.1 (USB interface)
Mac OS 8.6 to 9.2 (serial interface)
Power PC G3 or later
40 MB or more for applications
120 MB or more (for installation)
USB port (USB interface)
Serial port Mini-DIN 8-pin connector (serial interface)
Minimum 800 × 600 pixel resolution
Minimum thousands of colors
This software only operates
on a computer with a
preinstalled operating system.
Only a Macintosh with a builtin USB port can be used.
To access the online help, a
web browser is required.
• For information on support for the latest versions of operating systems, visit
the Olympus web site (http://www.olympus.com).
• The functions for connecting a camera to the computer and directly transferring
images are only available with an Olympus digital camera.
• Operation of the USB connection between computer and camera has been
confirmed for Mac OS 8.6 with USB Mass Storage Support 1.3.5.
14
Page 15
Starting the Software
You can use any of the following methods to start this software.
For Windows
• Double-click the [CAMEDIA Master] icon on the desktop.
• Click the [Start] button, then click [Programs], [OLYMPUS CAMEDIA], and
[CAMEDIA Master] in this order.
For Macintosh
• Double-click the [CAMEDIA Master] icon on the desktop.
• Double-click the [CAMEDIA Master] icon in the folder in which this software
is installed.
The main menu (page 16) appears.
Automatic starting
When you connect an Olympus USB camera, the connection is recognized
automatically, and this software starts.
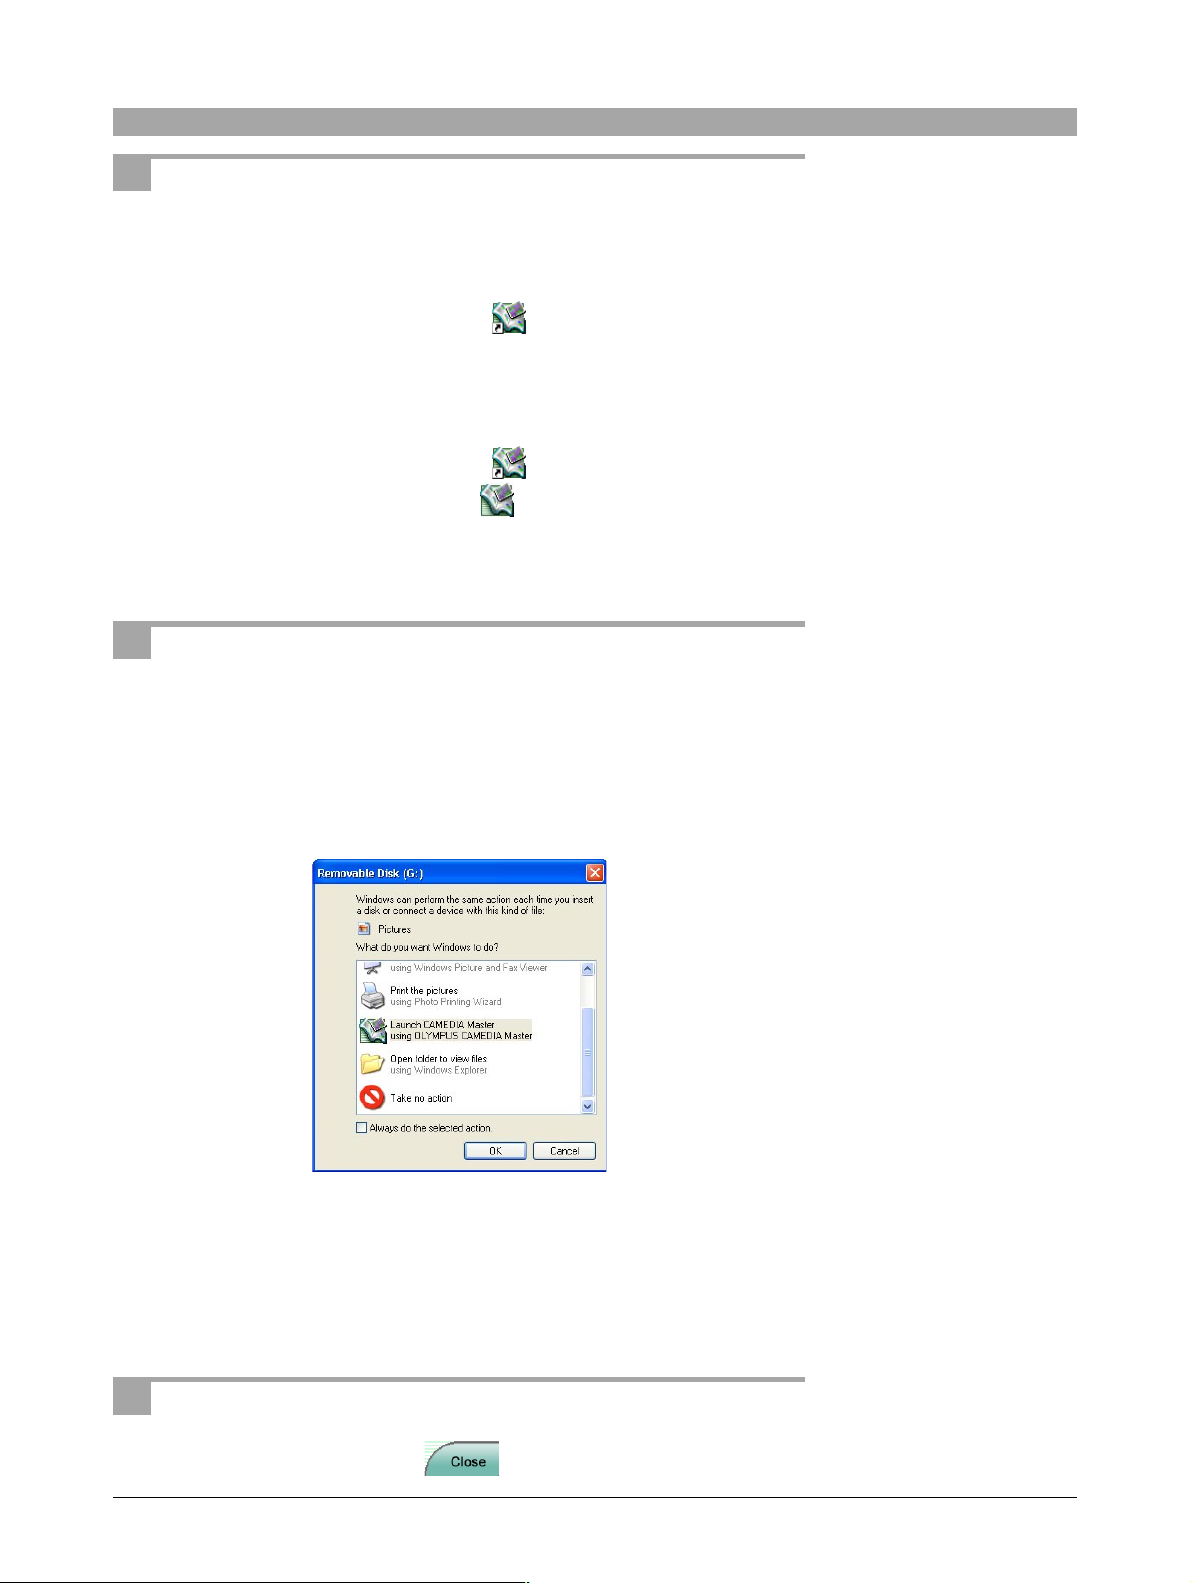
For Windows XP
[Launch CAMEDIA Master] is added to the [Removable Disk] dialog box. Select
from the list and click the [OK] button to start this software.
In Mac OS X, no [CAMEDIA
Master] icon appears on the
desktop.
This function is not available
in the Macintosh version.
For details of automatic
playback settings, refer to the
Windows XP Help.
For Windows 98/98SE/Me/2000
A confirmation dialog box appears, asking if you want to start this software.
Click the [OK] button to start this software.
Removing the software from the system tray
Right-click on the icon in the system tray, and select [Exit].
Closing the Software
In the main menu, click the [Close] button.
15
Page 16
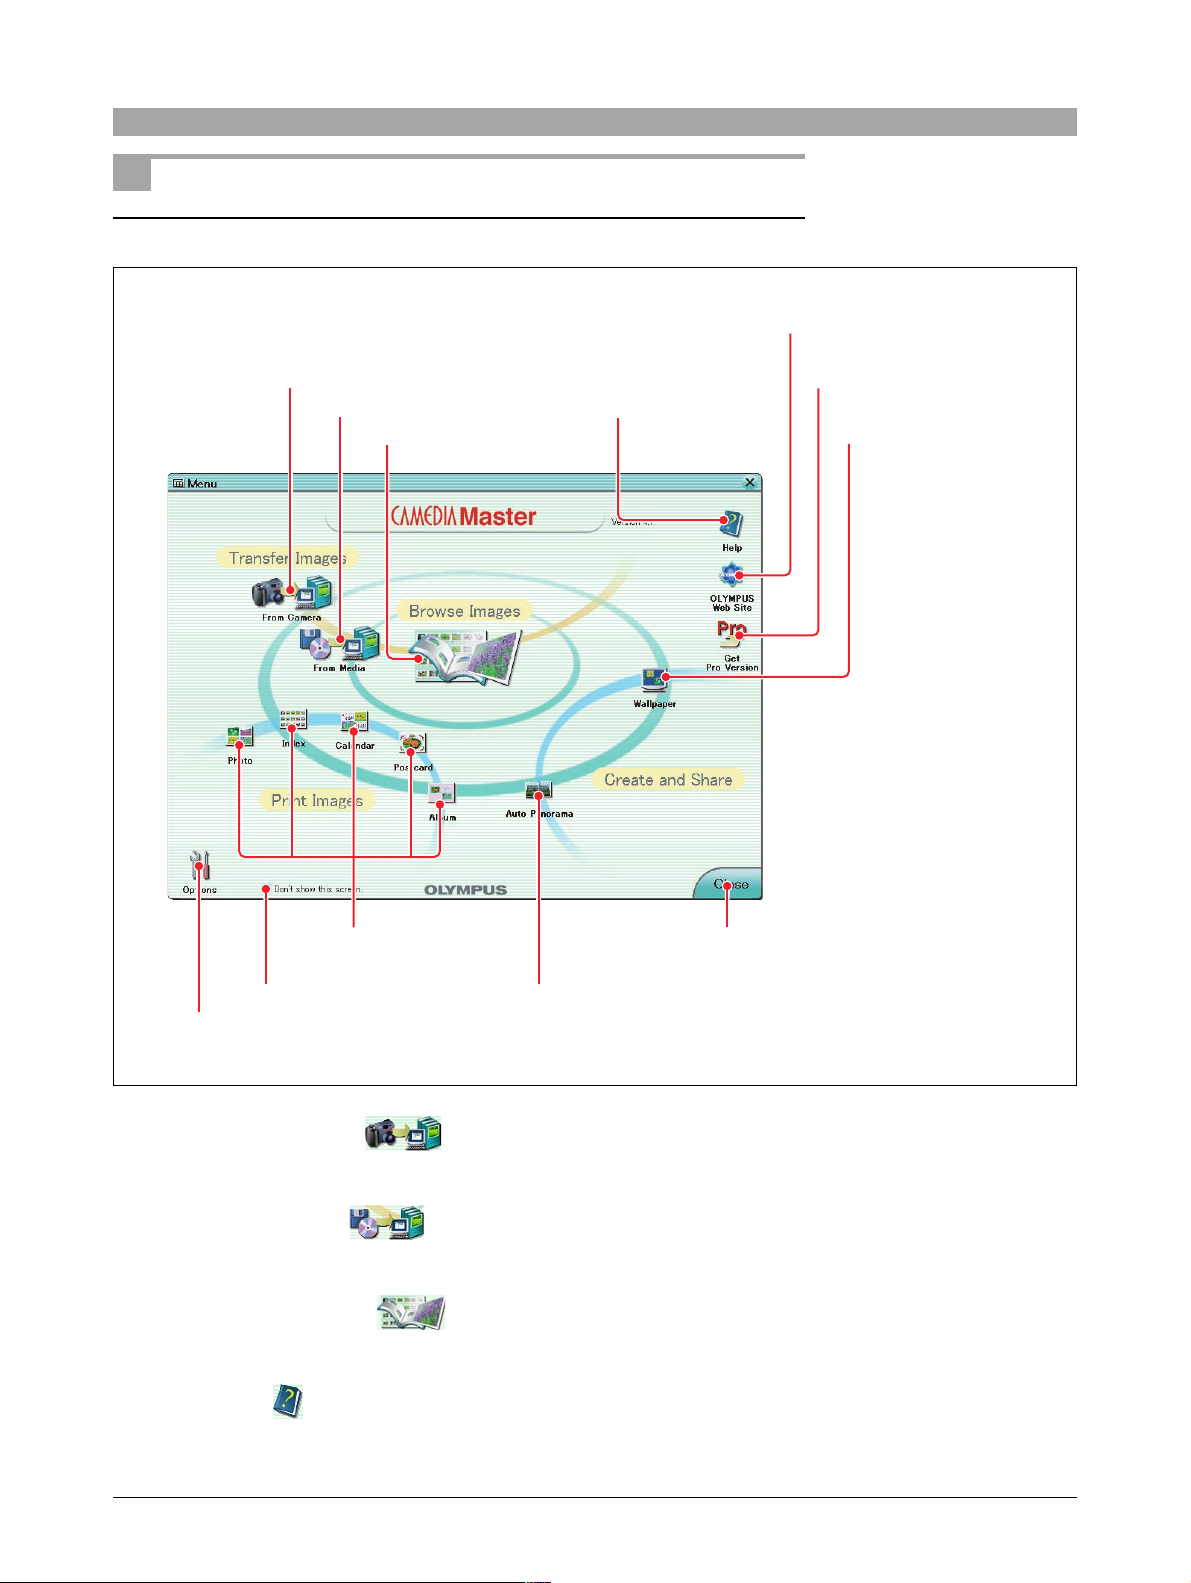
Main Menu
Main menu for version 4.1
t OLYMPUS Web Site button
q From Camera button
w From Media button
e Browse Images button
!0 Print Images
buttons
y Get Pro Version button
r Help button
u Wallpaper button
!2 Close button
o Don’t show this screen
i Options button
!1 Auto Panorama button
q From Camera button
This displays the Transfer Images window (page 25).
w From Media button
This displays the Transfer Images window (page 26).
e Browse Images button
This displays the album window (page 31).
r Help button
This displays Help information for this software.
16
Page 17
t OLYMPUS Web Site button
This launches a web browser, and displays the Olympus web site.
y Get Pro Version button
This displays the [Upgrade] dialog box.
From the [Upgrade] dialog box, you can start a web browser, and access the
site for purchasing the Pro version.
u Wallpaper button
This displays the Wallpaper window (page 100).
i Options button
This displays the [Options] dialog box (page 20).
o Don’t show this screen
When this is checked, from the next time this software starts, it bypasses the
main menu and goes directly to the album window.
You can also access the main menu from the album menu.
!0 Print Images buttons
The [Photo] , [Index] , [Calendar] , [Postcard] , and
The computer you are using
must be set up to
automatically connect to the
Internet.
On how to purchase the Pro
version, see “Purchasing the
Pro Version” (page 6) under
“Introduction.”
[Album] buttons give access to various specialized Print windows.
!1 Auto Panorama button
This displays the Auto Panorama window (page 107).
!2 Close button
This closes the software.
17
Page 18
Main menu for Pro version
q From Camera button
w From Media button
y OLYMPUS Web Site button
e Browse Images button
r Backup Images button
t Help button
u Slide Show button
i Wallpaper button
o HTML Album
button
!2 Print
Images
!1 Don’t show
buttons
this screen
!0 Options button
!4 Auto Panorama button
!3 E-mail button
q From Camera button
This displays the Transfer Images window (page 25).
w From Media button
This displays the Transfer Images window (page 26).
e Browse Images button
This displays the album window (page 31).
r Backup Images button
This displays the Backup window (page 112).
!6 Close button
!5 Free Stitch Panorama button
18
Page 19
t Help button
This displays Help information for this software.
y OLYMPUS Web Site button
This launches a web browser, and displays the Olympus web site.
u Slide Show button
This displays the Slide Show window (page 103).
i Wallpaper button
This displays the Wallpaper window (page 100).
o HTML Album button
This displays the HTML Album window (page 96).
!0 Options button
This displays the [Options] dialog box (page 20).
!1 Don’t show this screen
When this is checked, from the next time this software starts, it bypasses the
main menu and goes directly to the album window.
You can also access the main menu from the album menu.
The computer you are using
must be set up to
automatically connect to the
Internet.
!2 Print Images buttons
The [Photo] , [Index] , [Calendar] , [Postcard] , [Album]
and [Contact Sheet] buttons give access to various specialized
Print windows.
!3 E-mail button
This displays the E-mail window (page 88).
!4 Auto Panorama button
This displays the Auto Panorama window (page 107).
!5 Free Stitch Panorama button
This displays the Free Stitch Panorama window (page 109).
!6 Close button
This closes the software.
19
Page 20
Changing the Background Color
You can select the background color used for all windows and dialog boxes in
this software.
Use the following procedure to change the background color.
1
In the main menu click the [Options] button.
The Options dialog box appears.
2
Click the [Background Color] tab.
Background Color tab
OK button
Select one of the background colors.
3
Select one of the background colors, and click the [OK] button.
This changes the background color for all CAMEDIA Master windows and
dialog boxes.
20
Page 21
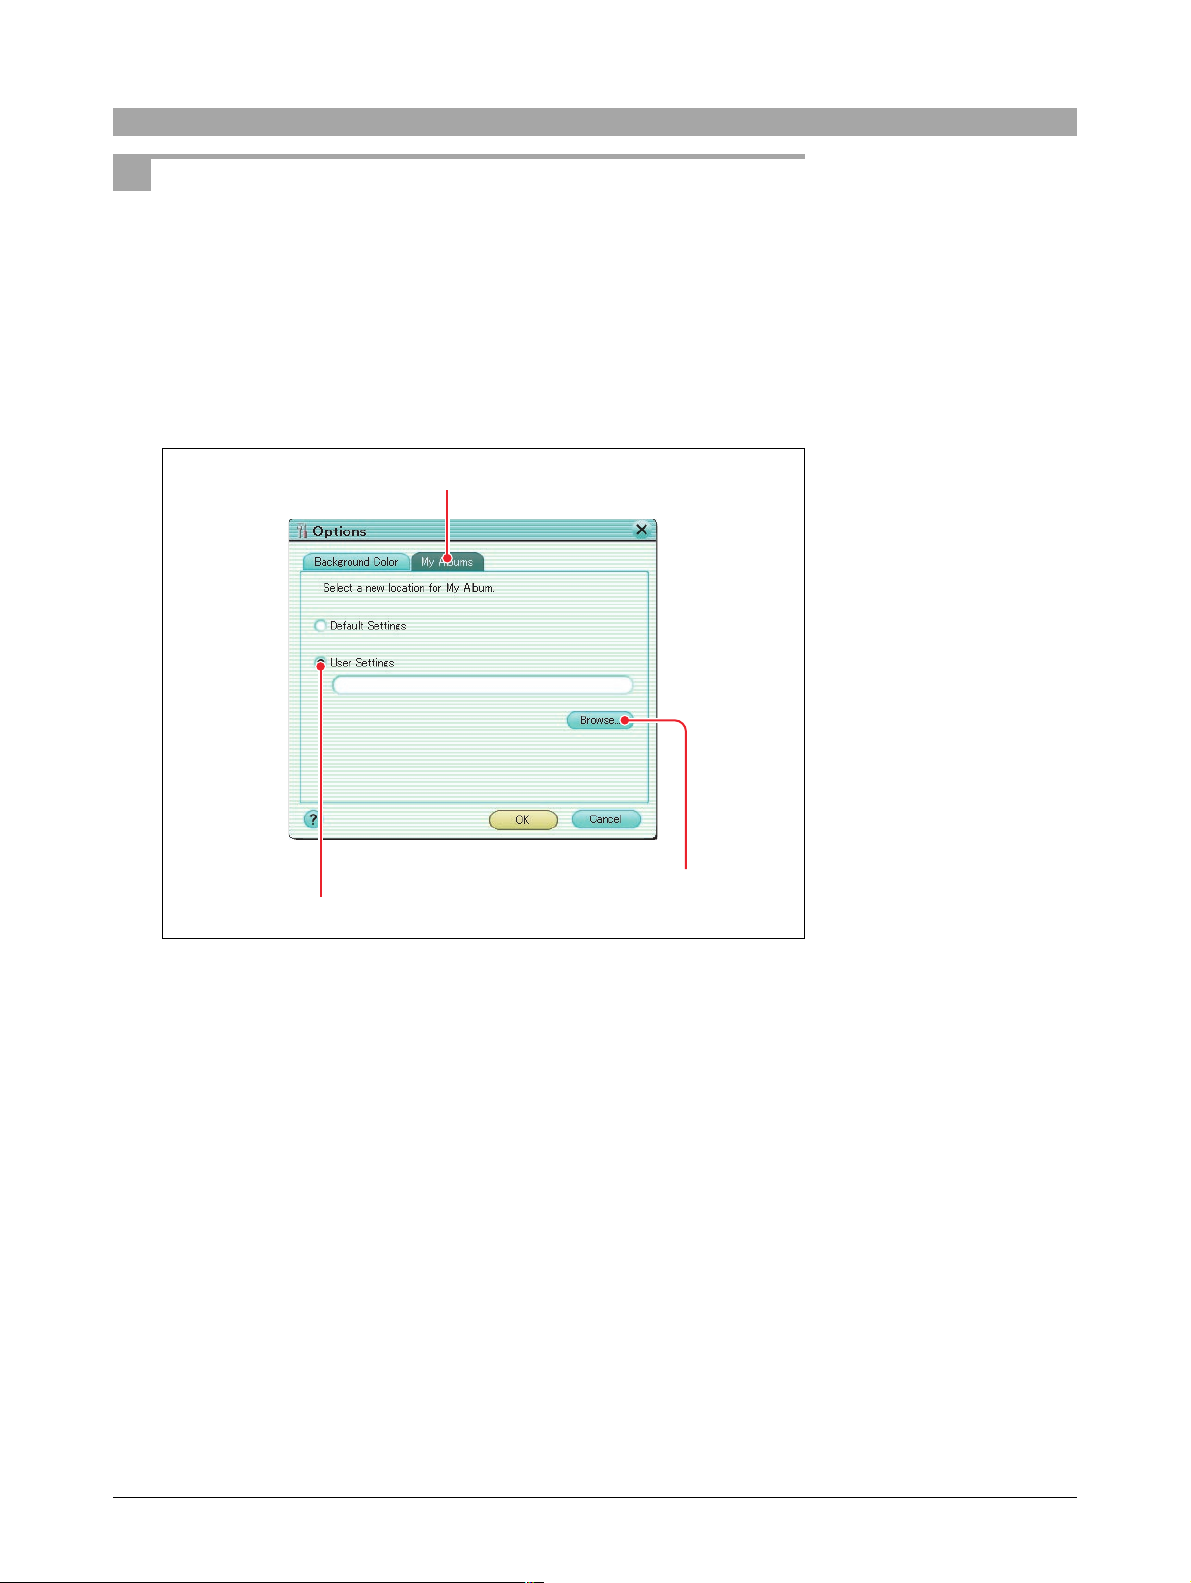
Changing the My Album location
You can change the location of the My Album folder used by this software.
To change the location of the My Album folder, use the following procedure.
1
Click the [Options] button in the main menu.
The Options dialog box appears.
2
Click the [My Albums] tab.
My Albums tab
Browse button
User Settings
3
Check [User Settings], and click the [Browse] button.
The select folder dialog box appears.
4
In the select folder dialog box, select the new location for My Album, and
click the [OK] button.
5
In the Options dialog box, click the [OK] button.
21
Page 22

Quick Reference
Use this chart to find the relevant section of this manual for common situations.
To view images from your
camera on the computer
To print images from your
camera
To send images with e-mail
To use your images on a
web site
To create a slide show of
your images on a computer
To view a movie
“Transferring Images”
- “Transferring Images from
a Camera” (page 23)
“Transferring Images”
- “Transferring Images from
a Camera” (page 23)
“Transferring Images”
- “Transferring Images from
a Camera” (page 23)
“Transferring Images”
- “Transferring Images from
a Camera” (page 23)
“Create and Share”
- “Watching a Slide Show”
(page 103)
“Browsing Images”
- “Display Modes” (page 34)
- “Viewing Files” (page 37)
- “Watching movies” (page 43)
“Browsing Images”
- “Display Modes” (page 34)
- “Viewing Files” (page 37)
- “Viewing Images” (page 41)
“Printing”
- “Printer Settings” (page 69)
- “Photo Printing” (page 71)
“Create and Share”
- “Sending Images by
E-mail” (page 88)
“Create and Share”
- “Creating an HTML Album”
(page 96)
To keep your images safe
When you have forgotten
where you saved an image
To apply effects to images
To create a panorama
“Organizing Files” (page 52)
“Browsing Images”
- “Finding a File” (page 39)
“Browsing Images”
- “Album Window” (page 31)
- “Viewing Images” (page 41)
“Create and Share”
- “Free Stitch Panorama
Function” (page 109)
“Backing Up”
(page 112)
“Editing Images”
- “Using the filter functions”
(page 130)
22
Page 23
Transferring Images
You can transfer images direct from an Olympus digital camera using a USB
cable or serial cable, or from storage media such as Smart Media cards and
magneto-optical (MO) disks .
Transferring Images from a Camera
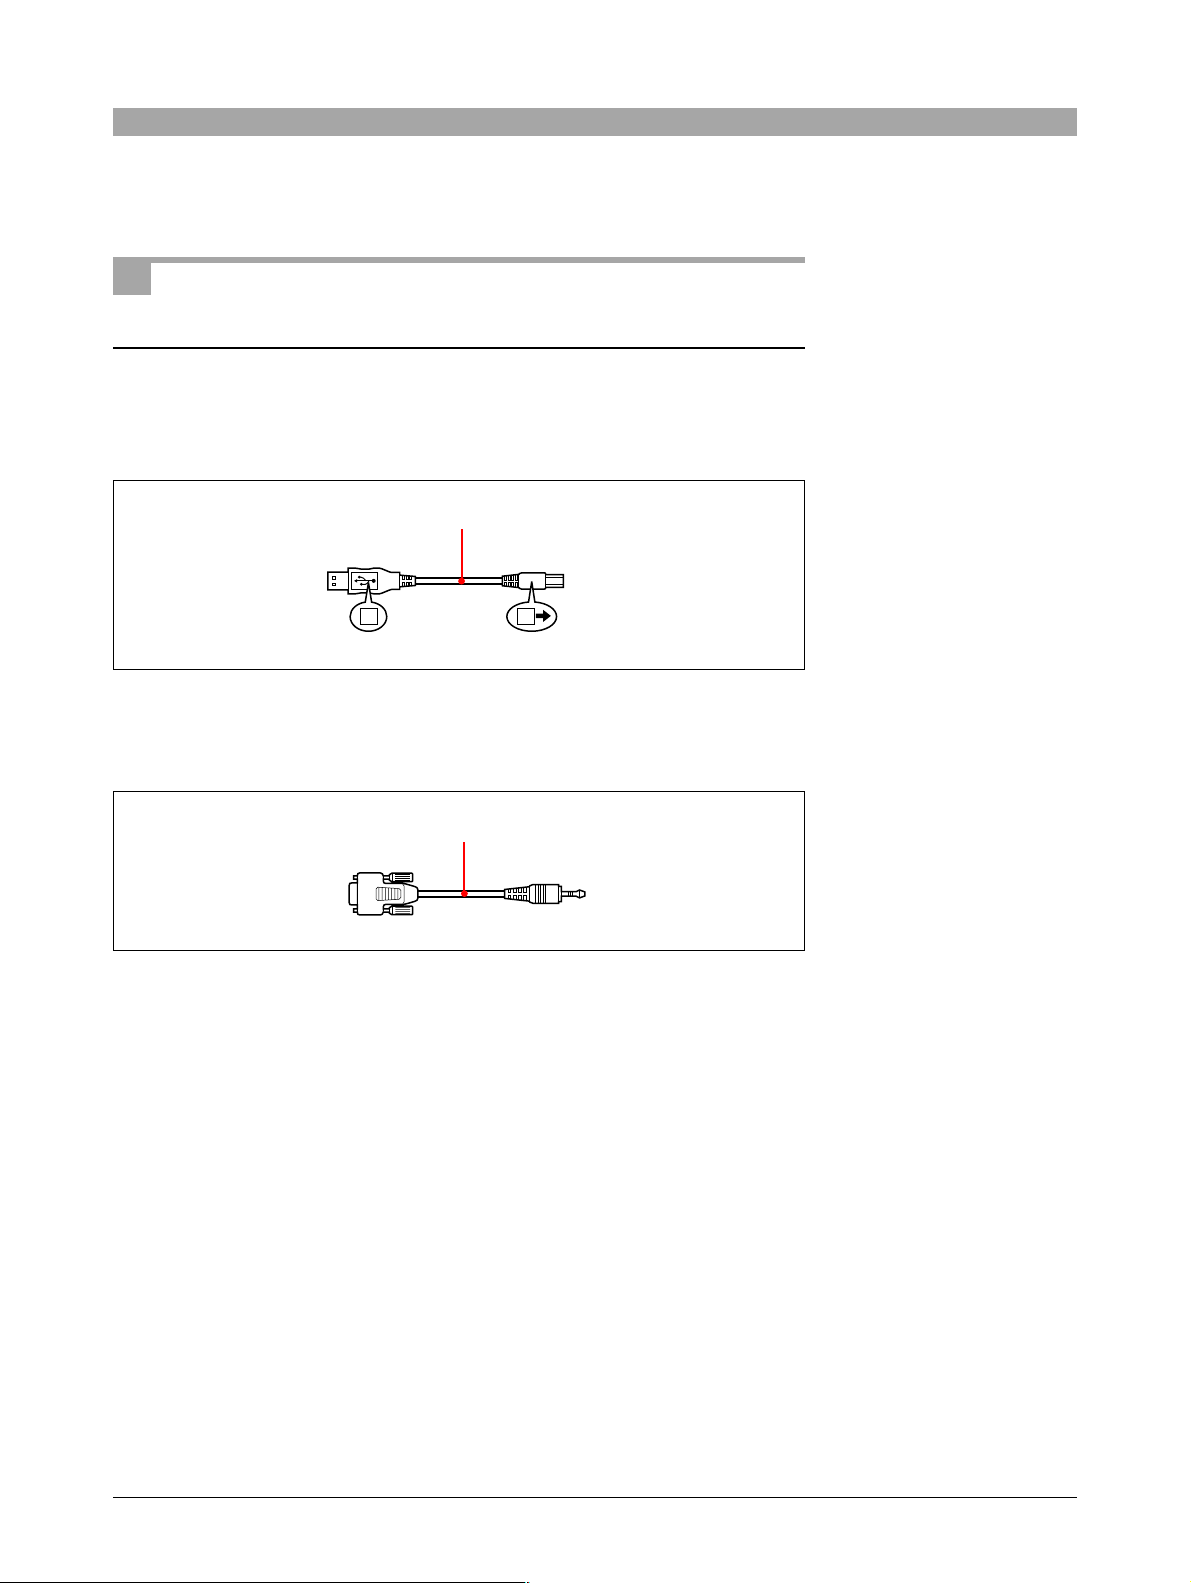
Connecting the camera to the computer (Windows)
Using a USB interface
Plug the larger connector marked Å of the USB cable into the USB port of the
computer, and connect the smaller connector marked ı to the camera.
USB cable
to USB port of PC
A B
Using a serial interface
Connect the serial ports on the computer (IBM/AT compatible) and camera with
a serial cable.
Serial cable
to serial port of PC
to camera
to camera
23
Page 24
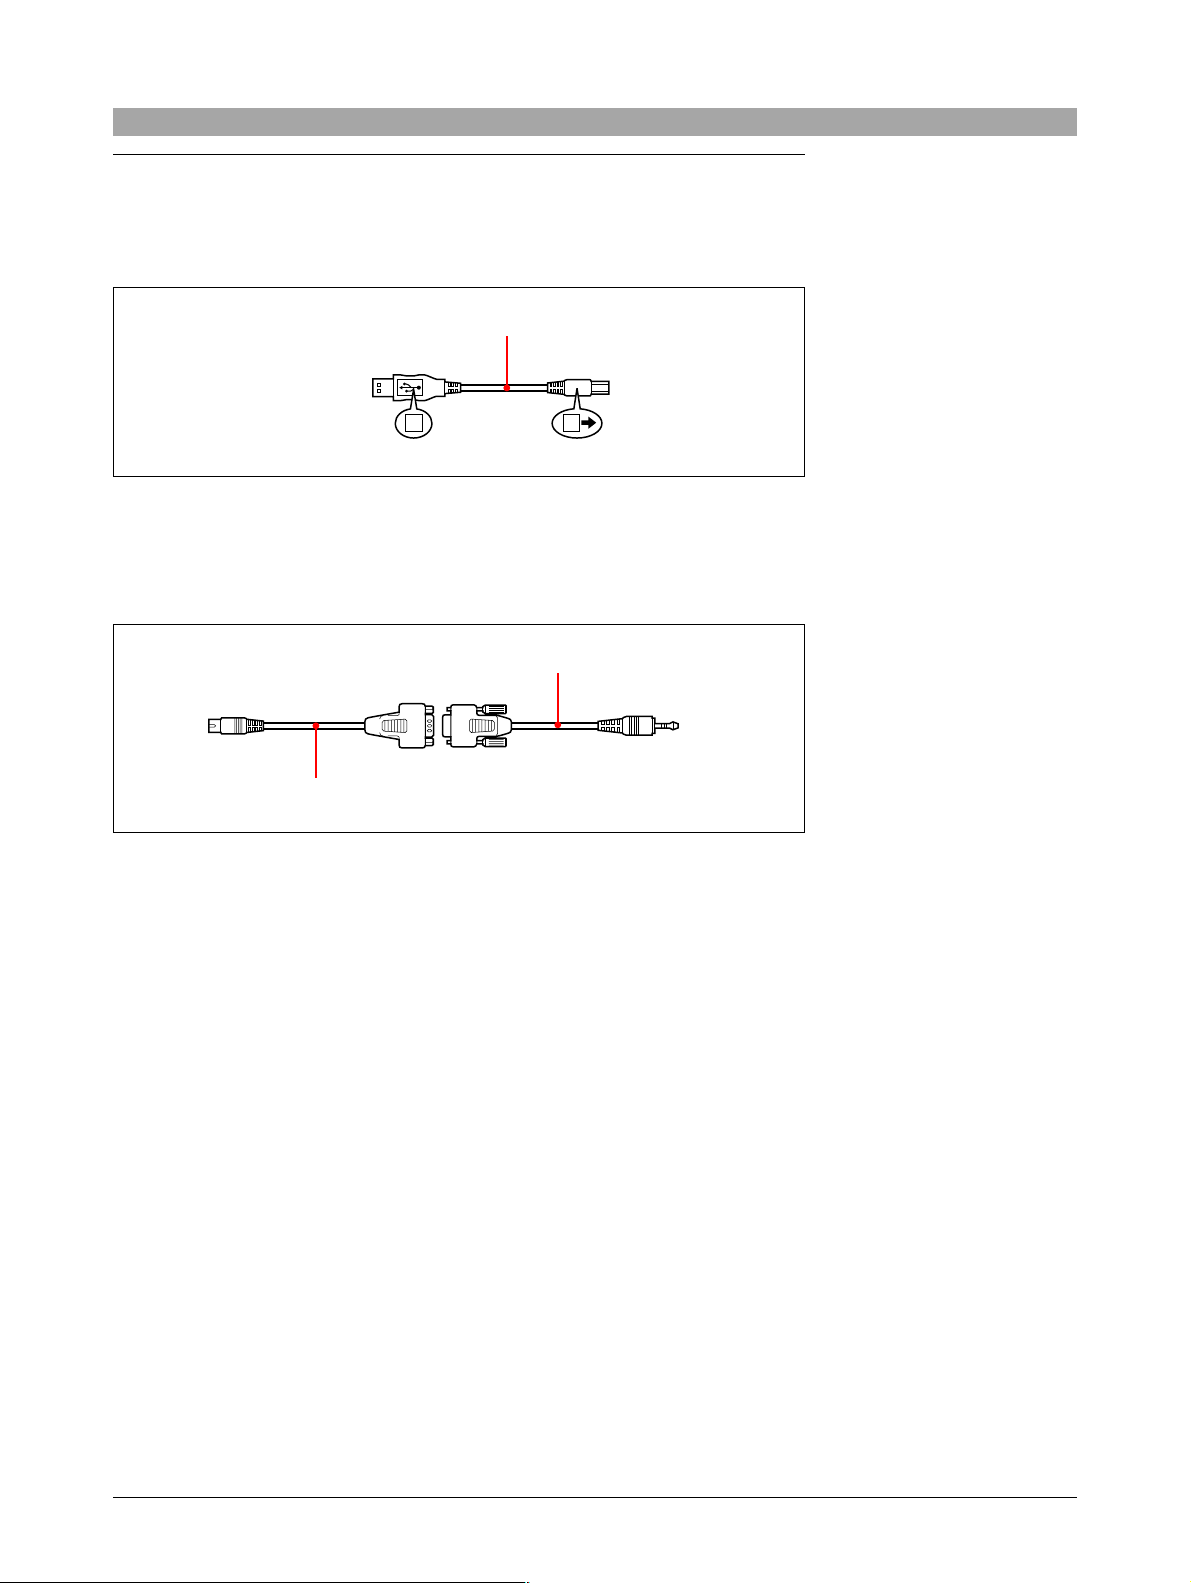
Connecting the camera to the computer (Macintosh)
Using a USB interface
Plug the larger connector marked Å of the USB cable into the USB port of the
computer, and connect the smaller connector marked ı to the camera.
USB cable
to USB port of PC
A B
to camera
Using a serial interface
Connect a serial cable to an adapter for conversion to Macintosh interface, then
connect the 8-pin connector of the cable to the printer or modem port of the
computer and the plug on the other end of the cable to the camera.
to printer or modem
port of PC
Adaptor for Macintosh
Serial cable
to camera
For more details of the
camera-to-computer
connection, refer to the
operating instructions supplied
with the camera.
24
Page 25
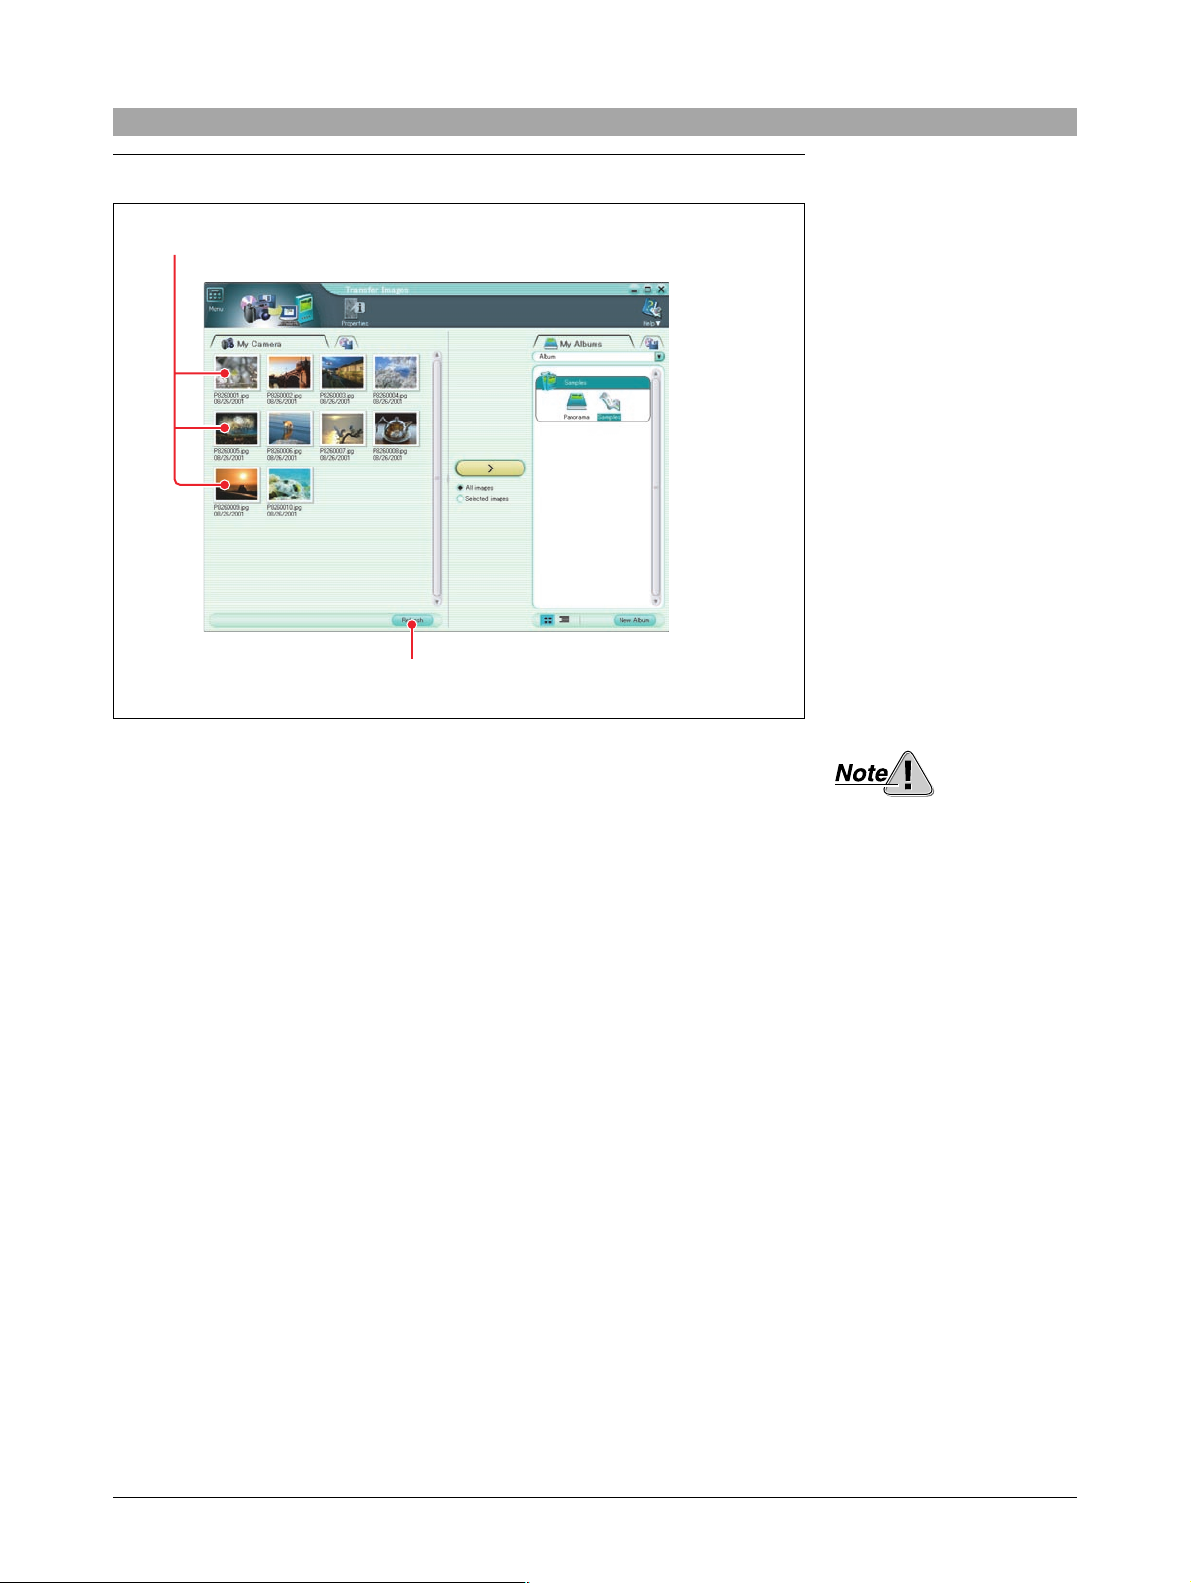
Transferring images
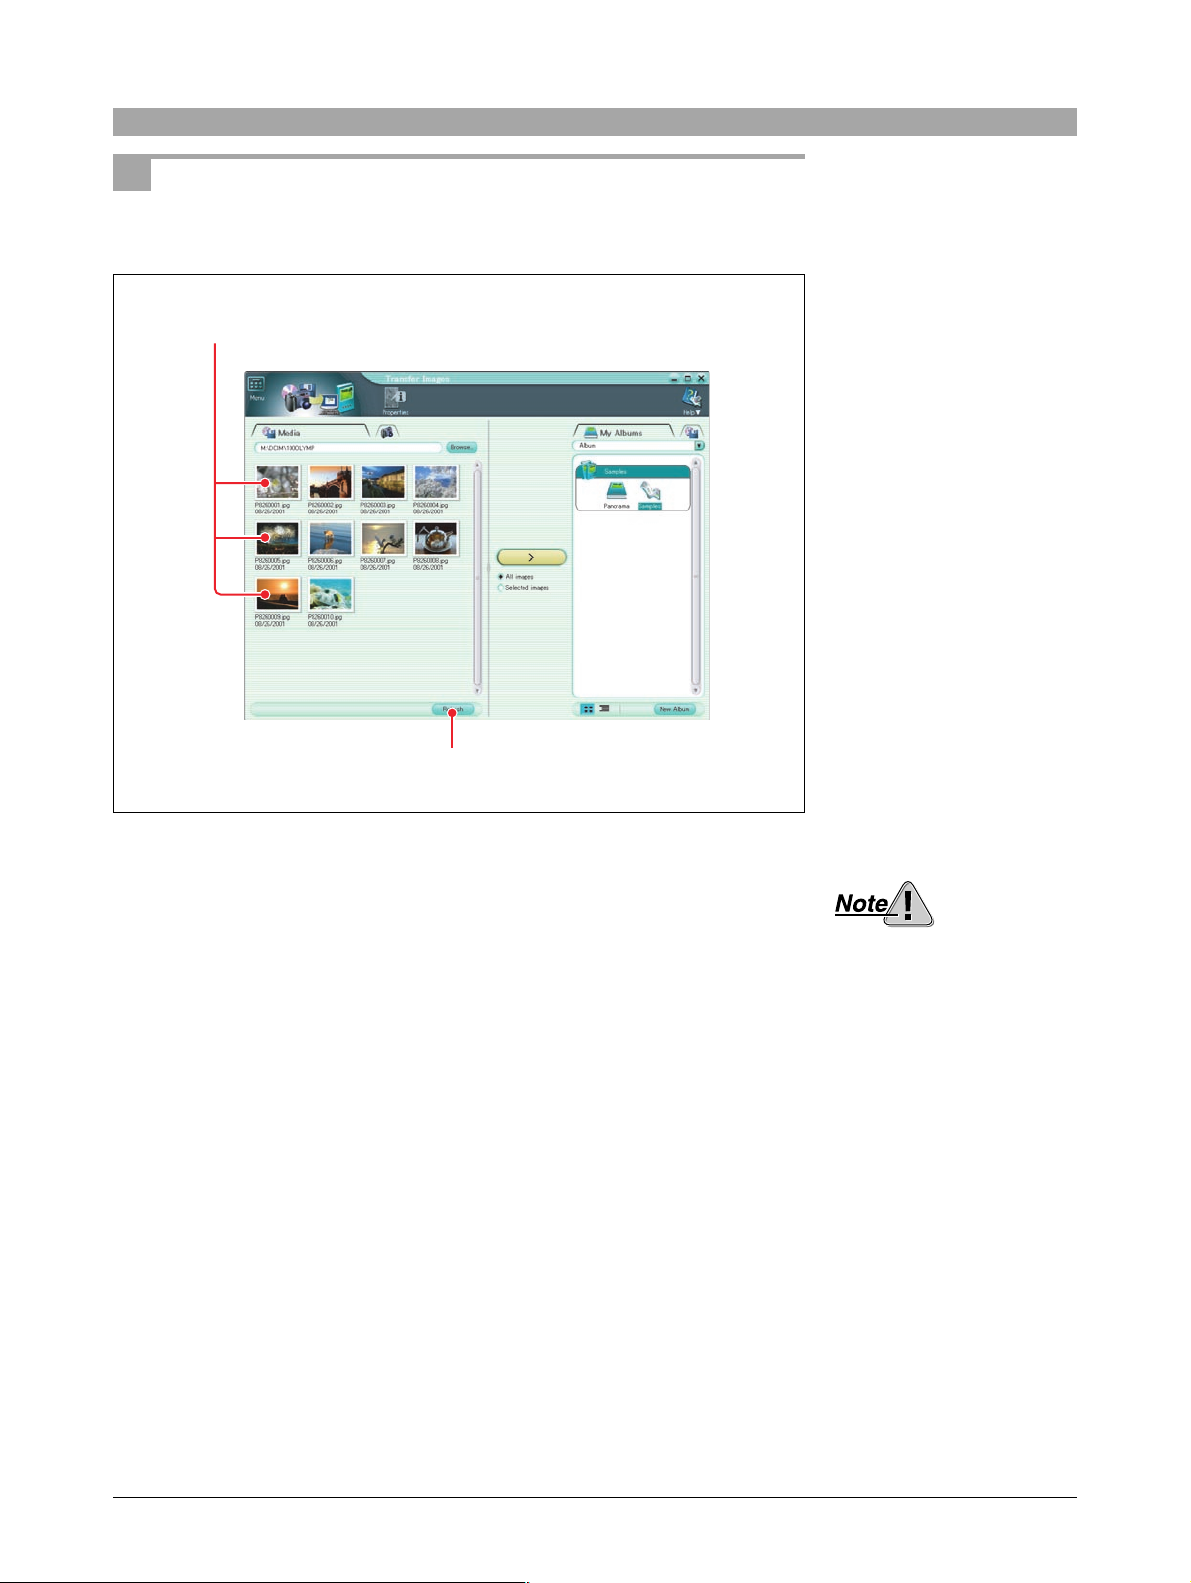
Thumbnails
Refresh button
1
Start this software (page 15).
2
Connect the camera to the computer (page 23).
My Albums and Media tabs
Do not power off the camera
or disconnect the interface
cable while the software is
either starting up or running.
This can cause a camera
failure or software instability.
3
In the main menu, click the [From Camera] button.
The camera is detected automatically, and the Transfer Images window
appears. This shows thumbnails of all of the images in the camera, with
the file name and shooting date appearing below each thumbnail.
25
If you start this software
without displaying the main
menu, going directly to the
album window
In the album window, click the
tool button [Menu], to display
the main menu.
To refresh the display
Click the [Refresh] button.
Page 26
Transferring Images from Media
This section describes how to transfer images from media such as Smart Media
cards and magneto-optical (MO) disks.
Thumbnails
Refresh button
1
Start this software (page 15).
2
In the main menu, click the [From Media] button.
The Transfer Images window and [Select Folder] dialog box appear.
3
In the [Select Folder] dialog box, select the folder from which you want to
transfer the images and click the [OK] button.
This shows thumbnails of all of the images in the selected folder, with the
file name appearing below each thumbnail.
If the image was taken with an Olympus or DCF-compliant digital camera,
the shooting date is also shown.
Do not power off the camera
or disconnect the interface
cable while the software is
either starting up or running.
This can cause a camera
failure or software instability.
If you start this software
without displaying the main
menu, going directly to the
album window
In the album window, click the
tool button [Menu] to display
the main menu.
To refresh the display
Click the [Refresh] button.
26
Page 27
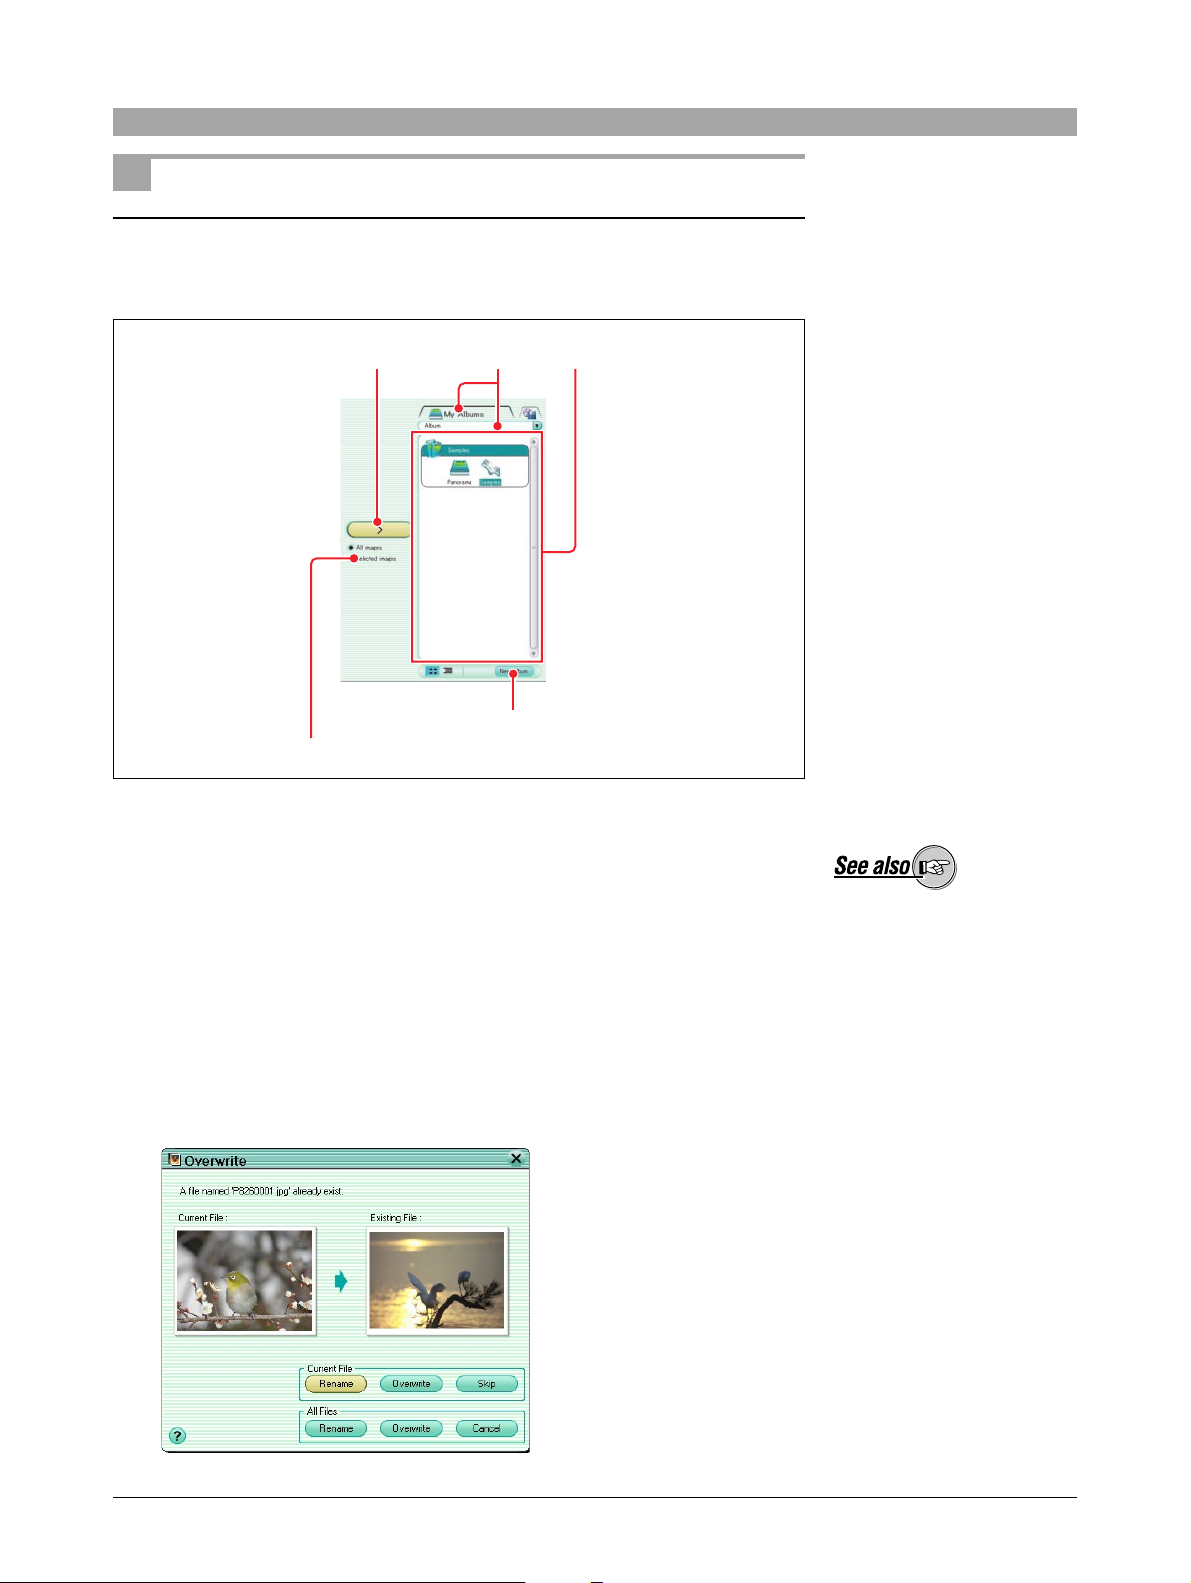
Specifying Where to Save the Images
Saving to an album
Use the following procedure to copy images from a digital camera or from media
to an album.
132
New Album button
Selected images
1
In the Transfer Images window, select the [My Albums] tab, and select
[Album].
2
Select an album from the list of albums, or create a new album to hold the
images and select that album.
3
Click the [Transfer Images] button.
This copies all images to the selected album.
If an existing file has the same file name as one of the files to be transferred,
the [Overwrite] dialog box appears. You can select [Rename], [Overwrite],
or [Skip]/[Cancel] for each separate file, or for all files.
On how to create a new
album, see “Creating a Group
or Album” (page 53) under
“Organizing Files.”
27
Page 28
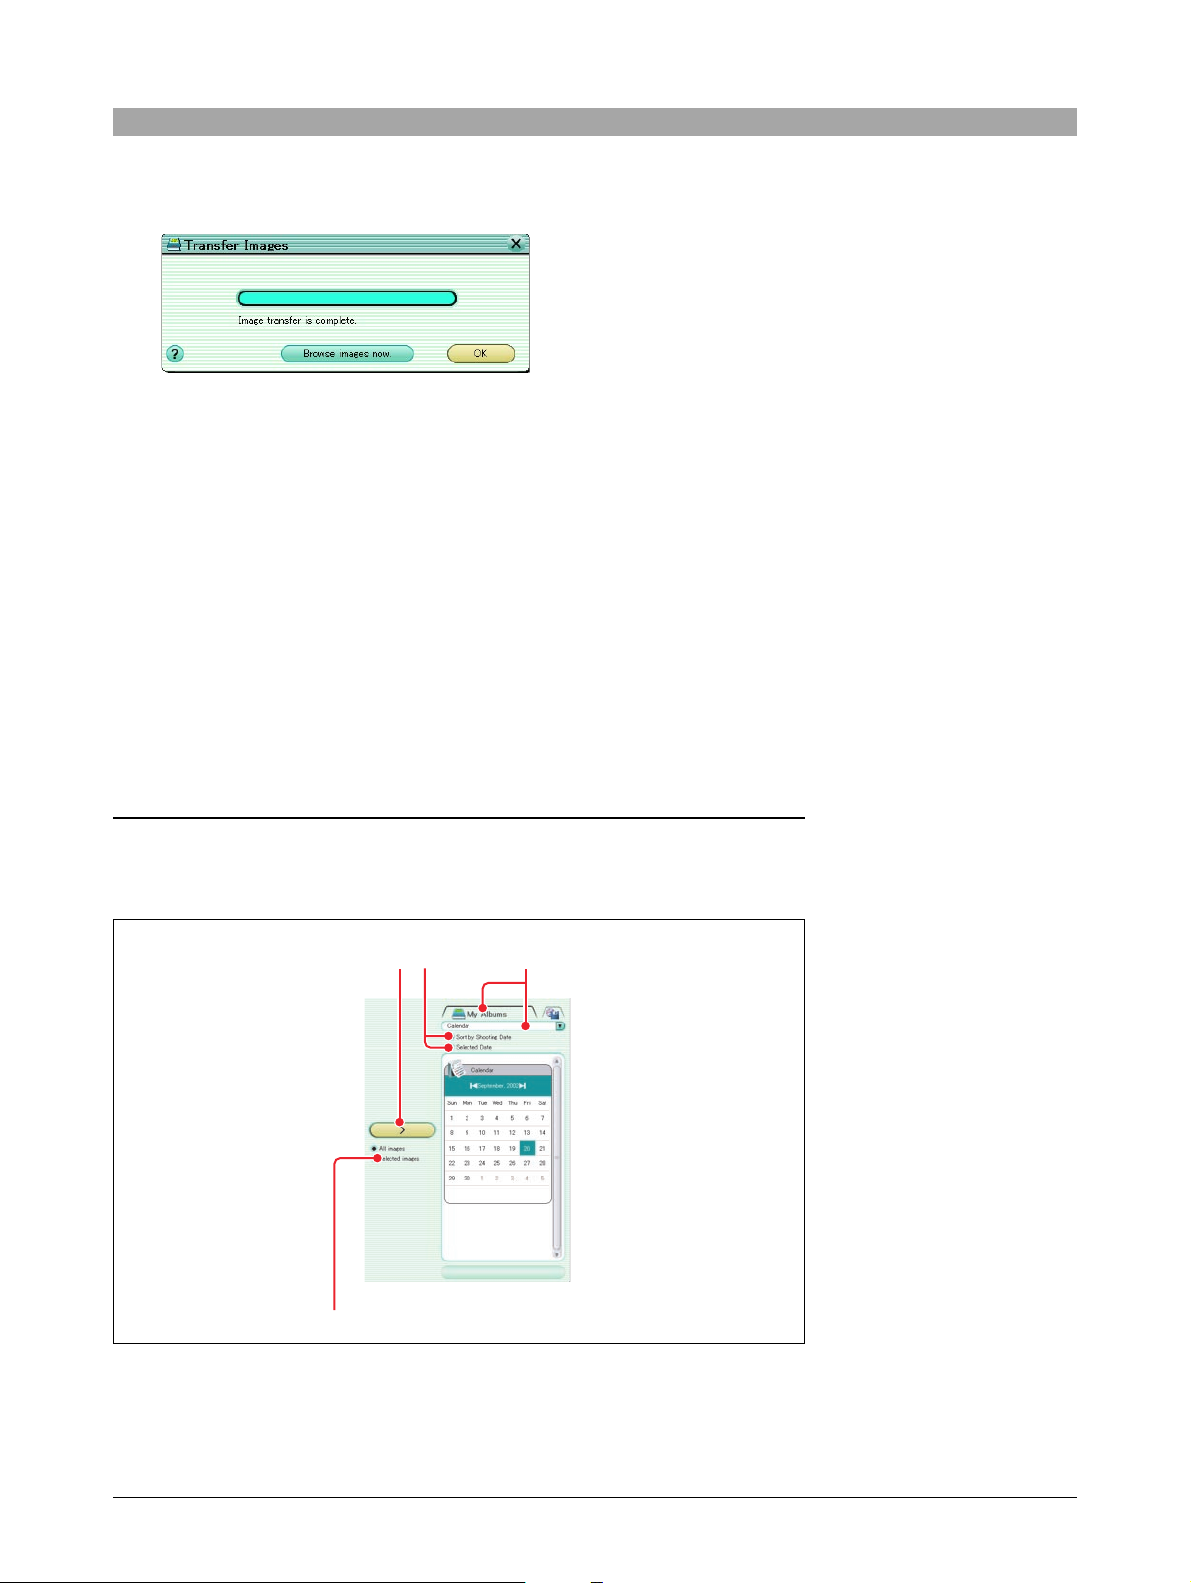
When all of the images have been transferred, the [Transfer Images] dialog
box appears. Clicking [Browse images now] displays the album window, in
which you can view the images that have been transferred.
To copy only selected images
Click [Selected Images], then select the thumbnails by any of the following
methods, and click the [Transfer Images] button.
• To select a single image
Click on the image.
• To add an image to the selection
Hold down the Ctrl key (for Windows) or command key (for Macintosh),
and click on the image.
• To select a range of images
Click the first or last image in the range (rectangular area), then holding
down the Shift key, click the image at the other end of the range.
Alternatively, drag the mouse to select the range.
A green frame appears around the selected image or images.
Saving with the calendar
Use the following procedure to transfer images from a digital camera or from
media using the calendar to specify albums by shooting date.
132
Selected Images
28
Page 29
1
In the Transfer Images window, select the [My Albums] tab, and select
[Calendar].
2
Select [Sort by Shooting Date] or [Selected Date].
• Sort by shooting date: Create a new album for each date of shooting,
and assign the images to the corresponding album.
The date setting must have been made on the camera before
shooting the images.
• Selected date: Select a date on the calendar, and save the images in
the album for that date.
3
Click the [Transfer Images] button.
This copies all images into albums as specified in step 2.
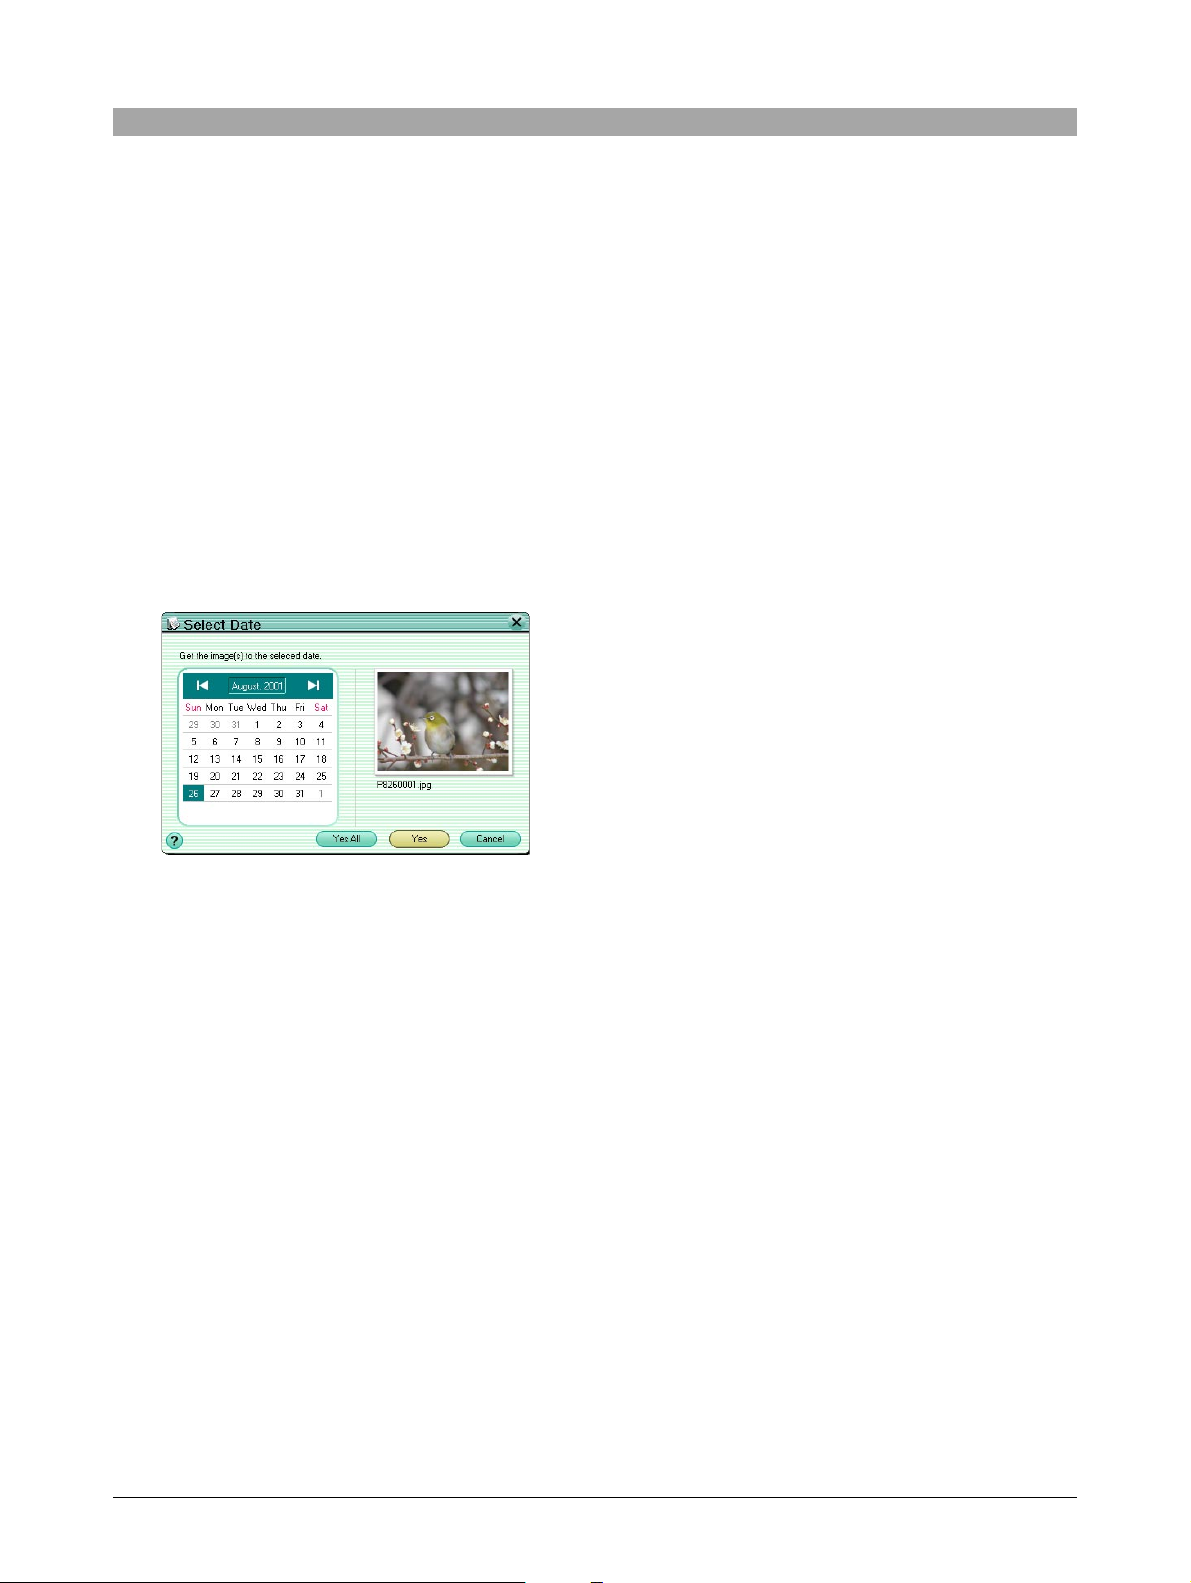
If an image has no recorded shooting date, the [Select Date] dialog box
appears; specify the shooting date using the calendar.
If an existing file has the same file name as one of the files to be transferred,
the [Overwrite] dialog box appears (page 27).
When all of the images have been transferred, the [Transfer Images] dialog
box appears (page 28). Clicking [Browse images now] displays the album
window, in which you can view the images that have been transferred.
To copy only selected images
See the description for saving to an album (page 28).
29
Page 30
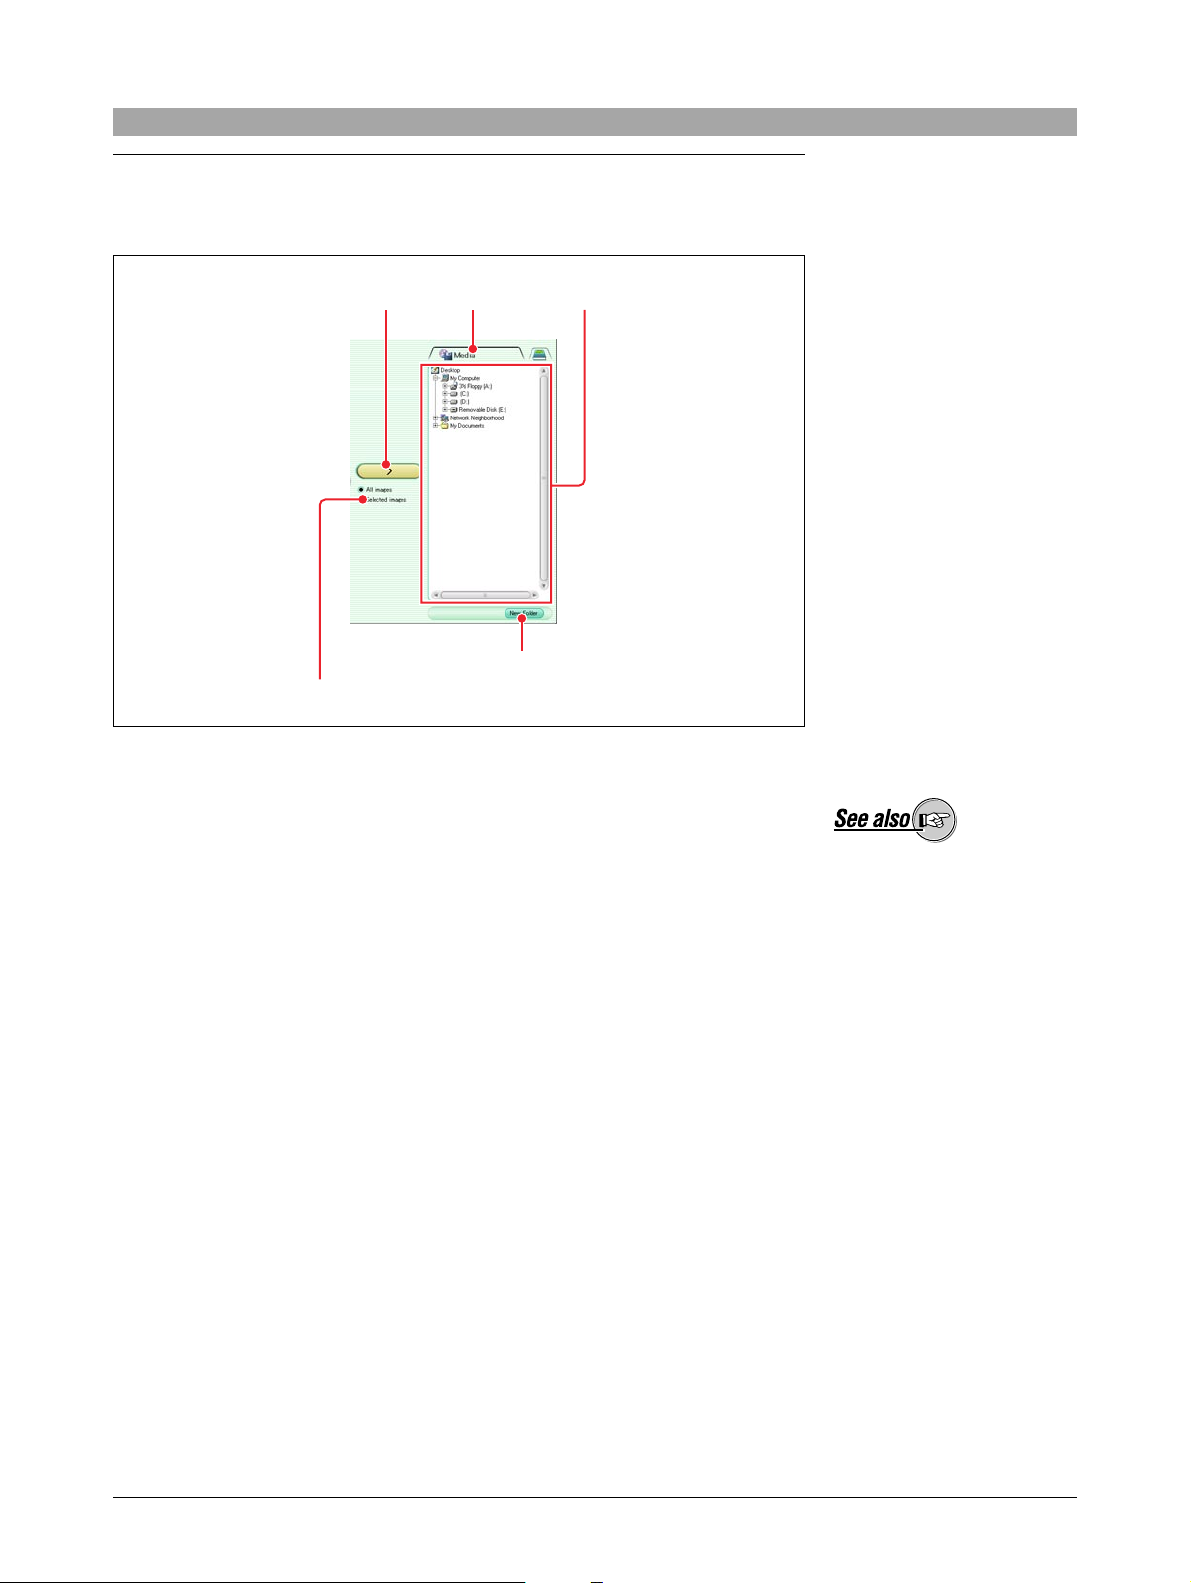
Saving to a folder
Use the following procedure to copy images from a digital camera or from media
to a folder.
132
New Folder button
Selected Images
1
In the Transfer Images window, select the [Media] tab.
2
Select a folder from the folder tree, or create a new folder to hold the
images and select that folder.
3
Click the [Transfer Images] button.
This copies all images into the folder.
If an existing file has the same file name as one of the files to be transferred,
an [Overwrite] dialog box appears (page 27).
When all of the images have been transferred, a confirmation message
appears (page 28). Clicking [Browse images now] displays the album
window.
To copy only selected images
See the description for saving to an album (page 28).
On how to create a new
folder, see “Creating a Folder”
(page 55) under “Organizing
Files.”
30
Page 31

Browsing Images
Album Window
Clicking the [Browse Images] in the main menu displays the album window.
q Display mode slider
w Display source selection tab
e Tool buttons
When [Don’t show this screen]
in the main menu is checked,
from the next time this
software starts, it bypasses
the main menu and goes
directly to the album window.
i Image display
u Thumbnail size slider
y New Album/Folder button
t Icon/tree display selection buttons
r Album or folder tree display
q Display mode slider
Drag this slider to change the display mode (page 34).
w Display source selection tab
This switches between the album display and the folder tree display.
31
o Thumbnail sorting
order buttons
Page 32

e Tool buttons
The following tool buttons are provided.
Menu
Rotate
File
Edit
Properties
Create
Print
• Menu
Return to the main menu.
• Properties
Display the properties information for the selected image, movie or
sound file.
• Rotate
Display a menu for rotating the selected image (clockwise or
counterclockwise 90˚ , and 180˚).
• Edit
Display the window for editing the selected image or movie.
• File
Display a menu for file operations (copy, copy image, paste, rename,
rename all, exif maker, find, and delete).
• Print
Display a menu for opening various Print windows (photo, index,
calendar, postcard, album, and contact sheet).
• Create
Display a menu for using images on your computer (auto panorama,
free stitch panorama, e-mail, HTML album, slide show, wallpaper).
• Help
Display a menu for information about this software (Index, Upgrade,
OLYMPUS Web Site, and About).
Help
r Album or folder tree display
The albums appear either as icons or in a tree; the folders are shown as a
tree.
t Icon/tree display selection buttons
These select the icon or tree display.
y [New Album/Folder] button
This displays a dialog box for creating a new album or group.
In the folder tree display, this button changes to a [New Folder] button, and
the [Create New Folder] dialog box appears. To create a new folder, first
switch to the folder tree display.
32
On how to create albums and
groups, see “Creating a
Group or Album” (page 53)
under “Organizing Files.”
Page 33

u Thumbnail size slider
Drag the slider to vary the thumbnail display size.
There are five size steps, in increasing size from left to right. The smaller the
thumbnail images, the more you can display in the image display area.
i Image display
In browse mode this shows thumbnail images of the image, movie and sound
files within the selected album or folder; in view mode it shows a selected
image or movie file.
o Thumbnail sorting order buttons
These sort the thumbnails of the image, movie and sound files within the
selected album or folder in order of shooting date or file name.
33
Page 34

Display Modes
Browse mode and view mode
The album window has two display modes, as follows.
• Browse mode
Displays thumbnails of the image, movie and sound files within an album
or folder.
• View mode
Displays a single image or movie file selected in browse mode.
Display mode slider Thumbnails
Selected image,
movie or sound file
Selected album
or folder
Browse mode
Display mode slider
Thumbnails of the image, movie and sound files
in the selected album or folder
View mode
To select browse mode
When you open the album window it is initially in browse mode.
Use either of the following methods to switch from view mode to browse mode.
• Double-click on the image.
• Drag the display mode slider to the left.
Selected image or movie
To select view mode
Use either of the following operations to switch from browse mode to view mode:
• Double-click on any thumbnail.
• Select one thumbnail, then drag the display mode slider to the right.
34
Page 35

Album display and folder tree display
In browse mode, there are two display views, of the albums and of the folder
tree, as follows.
• Album display
Displays the groups, albums, and calendars managed by this software,
either as icons or as a tree.
• Folder tree display
Displays the drives and folders managed by the operating system, as a
tree.
Albums
Media tab
Groups
Calendar
In the album display, to
switch between the icon
display and tree display
Click the icon/tree display
selection buttons.
Icon display
Tree display
Icon/tree display
selection buttons
New Album button
Album display
Drives
My Albums tab
To create a new album or
folder
Click the [New Album] or [New
Folder] button.
• On how to create a new
album, see “Creating a
Group or Album” (page 53)
under “Organizing Files.”
• On how to create a new
folder, see “Creating a
Folder” (page 55) under
“Organizing Files.”
Folders
Folder tree display
35
Page 36

To switch to the folder tree display
In the album display, click the [Media] tab.
To switch to the album display
In the folder tree display, click the [My Albums] tab.
36
Page 37

Viewing Files
In the album or folder tree display, click an album or folder to display thumbnails
of the image, movie and sound files within the selected album or folder.
Thumbnail indications
For image and movie files
When a thumbnail is selected, it is marked by a green frame as shown below.
For a movie, the thumbnail image is the first frame.
Each thumbnail display includes the following information.
Icon
File name
Shooting date
• Icons
The following icons indicate file properties.
: Image file shot with an Olympus digital camera in panorama mode
: Movie file
: Image file with linked sound
• File name
Shows the file name.
• Shooting date
If the image was taken with an Olympus or DCF-compliant digital camera,
shows the date of shooting.
For the terms “file” and
“thumbnail,” see
“Terminology” (page 8) under
“Introduction.”
For sound files
The sound icon and file name appear as shown below.
Sound icon
File name
37
Page 38

To sort the files
To sort the files (thumbnail images), use the thumbnail sorting order buttons.
Click the left button to sort them in order of shooting date, and the right button to
sort by file name.
To change the size of thumbnails
Drag the thumbnail size slider.
The size of the thumbnails varies in five steps, increasing in size from left to
right.
When images are sorted by
shooting date, any image for
which no shooting date is
recorded appears at the end.
38
Page 39

Finding a File
1
In the album window, click the tool button [File], and select [Find].
The Find window appears.
Search Condition
Browse button
Find button
Location
2
Under [Search Condition], enter the items you want to match for finding a
file.
• File Name
• Shooting Dates (or creation dates for sound files)
• Comments
You may enter more than one item.
39
Page 40

3
Select the location to search for the files as follows.
• My Albums (All albums)
• My Computer (All drives and folders in the computer)
• Location specified from the albums or media displayed by clicking the
[Browse] button
4
Click the [Find] button.
This displays the thumbnails for the files that match the search conditions
set in step 2.
The file search may take a
short while to complete.
40
Page 41

Viewing Images
With the album window in view mode, you can view the selected image or movie.
Viewing images
In view mode, when an image is selected it appears as follows.
Thumbnails
q Image display area
w File information
On how to switch to view
mode, see “To select view
mode” (page 34) under
“Display Modes.”
e Thumbnail display
i Image number
u Back/Next buttons
y Zoom Out/Zoom In buttons
t Actual Size display button
r Fit to Window button
o Slide Show button
q Image display area
This shows the selected image.
w File information
This shows the file name and shooting date.
If the file has linked sound, the icon appears on the thumbnail.
e Thumbnail display
These are thumbnails of the images within the album or folder.
The thumbnail size is the same as the size selected in browse mode.
Click on any thumbnail to display it in the image display area.
r Fit to Window button
This automatically resizes the image to the size of the image display area.
To change the thumbnail
display size, switch to browse
mode.
41
Page 42

t Actual Size display button
This displays the image at its actual size.
y Zoom Out/Zoom In buttons
Click these buttons to shrink or enlarge the image display.
u Back/Next buttons
Click to move to the previous or next image.
i Image number
This shows the position of the image out of the total number in the album or
folder.
o Slide Show button
Click this to display the images in sequence on the whole screen (simple
slide show).
To interrupt the playback, click the stop button of the controller or press the
Esc key.
• The slide show speed is
fixed: each frame appears
for three seconds.
• No special effects are
available for the transitions
between frames.
42
Page 43

Watching movies
When a movie is selected, the view mode appears as follows.
q File information
w Movie display area
e Playback
slider
i Stop button
u 1 Frame Back/1 Frame Forward
buttons
y Pause button
t Play button
r Time indication
o Volume button
q File information
This shows the file name and shooting date.
w Movie display area
This shows the selected movie.
e Playback slider
By moving the slider, you can move to any frame.
As you move the slider to the right the movie plays, and as you move the
slider to the left it plays in reverse. The playback speed depends on the
speed of slider movement.
r Time indication
This shows the time elapsed during playback.
t Play button
This plays the movie.
y Pause button
This pauses playback.
43
Page 44

u 1 Frame Back/1 Frame Forward buttons
Steps to the previous or next frame.
i Stop button
This stops playback, and returns to the first frame.
o Volume button
This displays the volume control slider (page 45).
The functions of the other buttons and parts of the display are the same as for
an image in view mode. For more details, see “Viewing Images” (page 41).
The volume button does not
appear when no sound is
recorded.
44
Page 45

Playing Back Sound
When the album window is in browse mode, double-click the sound icon in the
image display area to display the Sound Player panel and automatically play
back the sound file.
Double click.
Sound icon
Elapsed time
Total time
w Stop button
q Pause button
e Volume button
Volume control slider
To play the sound, your
computer must have a
speaker and sound card
installed. For more details,
refer to the operating
instructions provided with your
computer.
On the sound file formats
supported for playback, see
the Appendix, “File Formats”
(page 143).
Sound Player panel
q Pause button
This pauses sound playback.
When playback is paused, this button changes to the play button. Click it to
resume playback.
w Stop button
This stops sound playback.
e Volume button
This displays the volume control slider.
Use the slider to adjust the volume.
45
Page 46

Checking File Information
Checking file information
In the album window, select a file and click the tool button [Properties] to display
information relating to the file.
The information displayed depends on the file type, and includes the following
items.
For image files
General tab
[General] tab
• File Name
• Thumbnail
• Format
• Pixels
• Color Depth
• File Size
• File Location
• Shooting Date
• Updated Date
• Linked sound - record and play functions
• Comments
[Detail] tab
• Mode
• Aperture
• Shutter Speed
• Exposure compensation
• ISO
• Focal Length
• Flash
• Macro
Detail tab
• If the file format is ExifJPEG or Exif-TIFF, click the
[Modify] button to change
the shooting date. You can
also add a comment
(maximum 117 characters of
text).
• When there is linked sound,
click the [Play] button to play
it back.
On how to record linked
sound, see “Recording linked
sound” (page 51).
46
Page 47

• Image title
• Image input equipment manufacturer
• Image input equipment model
• Orientation
• Software used
• File change date and time
• Exposure time
• F number
• Exposure program
• ISO speed rating
• Exif version
• Date and time of original data generation
• Date and time of digital data generation
• Exposure bias
• Maximum lens aperture
• Metering mode
• Light source
• Flash
• Lens focal length
• User comments
• Supported Flashpix version
• Color space information
• Custom image processing
• Exposure mode
• White balance
• Digital zoom ratio
• Scene capture type
• Gain control
• Contrast
• Saturation
• Sharpness
47
Page 48

For movie files
• File Name
• Thumbnail (first frame)
• Format
• Frame Size
• Frame Rate
• File Size
• File Location
• Shooting Date
• Updated Date
For sound files
When the file format is
QuickTime movie, clicking the
[Modify] button allows you to
change the shooting date.
• File Name
• Sound icon
• Format
• Title
• Artist
• Total Time
• File Size
• File Location
• Updated Date
48
Page 49

Changing the shooting date
If the image file format is Exif-JPEG or Exif-TIFF or the movie file format is
QuickTime movie, you can change the shooting date.
If you forgot to set the shooting date, or the battery has gone dead, resetting the
date, this function allows you to set the shooting date of an image at a later
stage.
Use the following procedure to change the shooting date.
1
In the album window, select an image or movie file whose format is ExifJPEG (*.jpg), Exif-TIFF (*.tif) or QuickTime movie (*.mov), and click the
tool button [Properties].
The [Properties] dialog box appears.
(The example shown below is for an image file.)
49
Modify button
Page 50

2
Click the [Modify] button.
The [Modify Date] dialog box appears.
Date
OK button
3
Set the date and time, and click the [OK] button.
This changes the shooting date in the [Properties] dialog box.
Time
Playing linked sound
When an image has linked sound, the sound icon appears as part of the file
information.
Click
To play the linked sound
Click the sound icon.
To stop playback
Click the sound icon again, or press the Esc key.
50
Page 51

Recording linked sound
The linked sound function associates a sound file with an image. This allows
you to record a memo in audio.
The maximum recording time is 60 seconds, and the file format is Wave (*.wav).
Use the following procedure to record linked sound.
1
In the album window, select an image file and click the tool button
[Properties].
The [Properties] dialog box appears.
To record linked sound, your
computer must have a
microphone, speaker and
sound card installed.
For more details, refer to the
operating instructions
provided with your computer.
About linked sound playback,
see “Playing linked sound”
(page 50).
OK button
Record button
Play button
2
Click the [Record] button, and provide the sound through the microphone.
When you click the [Record] button, the [Stop] button appears.
3
Click the [Stop] button to stop recording.
To check the recorded sound
Click the [Play] button.
4
Click the [OK] button.
This saves the recorded sound.
51
Page 52

Organizing Files
Conventions for File Organization
This software handles images and other files within My Album in Albums and
Groups of Albums.
The following figure illustrates this.
My Album
Group A
Group B
This software organizes albums with the following conventions.
• Image, movie, and sound files can only be held within albums, and cannot be
held directly within a group.
• A group can only be created within the My Album.
• An album can only be created within a group.
Album 1
Album 2
Album 3
Album 4
Image/movie/sound file
Image/movie/sound file
Image/movie/sound file
Image/movie/sound file
For the term “file,” see
“Terminology” (page 8) under
“Introduction.”
52
Page 53

Creating a Group or Album
When the album window is showing the album display, to view images, or play
sound, the corresponding files must be stored in albums.
This section describes how to create a new album to hold files, or a new group
to hold albums.
2
You can also create a new
group or album in the Transfer
Images window.
Album display
3
Album window
44
5
Create New Album dialog box
1
Check that the album window is in browse mode, showing the album display.
2
In the album display, click the group where you want to save the new
album to be created.
6
3
Click the [New Album] button.
The [Create New Album] dialog box appears.
53
Page 54

4
Creating a group
Select [Group].
Do not enter anything in the [Create In] box.
Creating an album
1) Select [Album].
2) Click the
A list of the current groups appears.
3) Select the group to contain the album.
5
In the [Name] box enter the name of the group or album.
6
Click the [OK] button.
The new group or album appears in the album display.
button on the [Create In] pull-down list.
54
Page 55

Creating a Folder
When the album window is showing the folder tree, you can view images within
the folders.
This section describes how to create a new folder to hold files.
2
Folder tree display
3
Album window
54
Create New Folder dialog box
1
Check that the album window is in browse mode, showing the folder tree
display.
2
In the folder tree display, click the folder to contain the new folder.
Example: To create a folder in drive D, click “D:”.
3
Click the [New Folder] button.
The [Create New Folder] dialog box appears.
55
Page 56

4
In the [Name] box enter the name of the folder.
5
Click the [OK] button.
The new folder appears in the folder tree display.
56
Page 57

Selecting Files
When the album window is in browse mode, use the following procedures to
select files.
To select a single file
Click on the desired file.
To add files to the selection
In Windows, hold down the Ctrl key, and on a Macintosh hold down the Command
key, then click on the extra file or files in turn.
To select a range of files
Click the first or last file in the range (rectanguar area), then holding down the
Shift key, click the file at the other end of the range.
Alternatively, drag the mouse to select the range.
57
Page 58

Copying Files
Use the following procedure to copy a file from one album or folder to another.
1
With the album window in browse mode, select the file to be copied.
2
Click the tool button [File] and select [Copy].
3
Select the album or folder in which you want to make the copy.
4
Click the tool button [File] and select [Paste].
You can also select multiple
files and copy them in a single
operation.
58
Page 59

Copying an Image
This function allows you to paste an image into another application program.
Use the following procedure to copy an image.
1
With the album window in browse mode, select the image file or movie file
you want to copy.
2
Click the tool button [File] and select [Copy Image].
3
Carry out the paste operation in the other application.
This pastes a copy of the file you selected in step 1.
For a movie file, this copies
the first frame.
For details of the paste
operation, refer to the
operating instructions for the
other application.
59
Page 60

Moving Files
Use the following procedure to move a file from one album or folder to another.
1
With the album window in browse mode, select the file to be moved.
2
Drag the selected file to its new album or folder.
Deleting Files
You can also select multiple
files, and move them in a
single operation.
Use the following procedure to delete a file.
1
In the album window, select the file to be deleted.
2
Click the tool button [File] and select [Delete], or press the Delete key.
This operation may
completely delete files from
the computer hard disk,
without transferring them to
the Windows recycle bin or
Macintosh trash.
You can also select multiple
files, and delete them in a
single operation.
The [Delete] dialog box appears.
60
Page 61

3
When a single file is selected
Click the [Yes] button.
When multiple files are selected
Click the [Yes All] button to delete all selected files.
To delete the files one at a time, click the [Yes] button. Every time you
press the [Yes] button, the file whose name is shown in the dialog box is
deleted.
61
Page 62

Renaming a File
Use the following procedure to rename a file.
1
In the album window, select the single file you want to rename.
2
Click the tool button [File] and select [Rename].
The [Rename] dialog box appears.
To rename multiple files in a
single operation, see the next
item “Renaming Files in a
Single Operation.”
3
Enter the new name in the [New Name] box.
4
Click the [OK] button.
OK button
New name
62
Page 63

Renaming Files in a Single Operation
Use the following procedure to rename multiple files in a single operation.
1
In the album window, select the files you want to rename.
2
Click the tool button [File] and select [Rename All].
The [Rename All] dialog box appears.
Shooting Date
Base Name
Number from
OK button
Date format
Number of digits
New names
63
Page 64

3
Select the [Base Name] or the [Shooting Date].
4
When [Base Name] is selected
Enter the name stem common to all of the renamed files.
When [Shooting Date] is selected
Select the date format from the pull-down list.
• Select [Base Name] when
you want to start all of the
new names with the same
stem; select [Shooting Date]
to use the shooting date as
part of the name.
• If a file does not have a
shooting date, the date of
last update is used instead.
5
In the [Number from] box enter the number to be added to the stem for the
first file, and in the [Digits] box enter the number of digits of the number
(including leading zeros).
6
Check the new names listed.
7
Click the [OK] button.
The numbering sequence
follows the file name order of
the original files, or the
shooting date.
64
Page 65

Converting Images to a Format
Viewable on the Camera
You can convert the format of a selected image file to Exif-JPEG format, and
save it on a removable disk (Smart Media or Compact Flash).
By loading the Smart Media or Compact Flash holding the image file in the
converted format in the digital camera, you can view the images on
the LCD monitor of the digital camera.
Use the following procedure to convert to a format that can be viewed on the
camera.
1
In the album window, click the tool button [File] and select [Exif Maker].
The Exif Maker window appears.
Drag and drop
Add button
2
Select a file you want to convert to a format viewable in the camera, and
click the [Add] button, or drag the selected file to the image display area.
Select drive for saving
Convert button
Display size
65
Page 66

3
In the [Select Media], select where you want to save the converted file.
4
In [Size], select the size of the converted image.
5
Click the [Convert] button.
After format conversion, if you insert the SmartMedia or Compact Flash
card holding the images in the digital camera, you can play back the images
on the digital camera LCD monitor.
It is not possible to specify a
CD-R for saving the images.
66
Page 67

Printing
Print Window
To open a Print window, do one of the following.
• In the main menu, click one of the [Print] buttons.
• In the album window, click the tool button [Print] and select [Photo], [Index],
[Calendar], [Postcard], [Album], or [Contact Sheet].
q Image display area
r Add button
w Tool buttons
i Add Page button
u Remove button
y Preview display area
t Preview layout slider
e Print setting panel
o Print button
q Image display area
This shows thumbnails of the images in the selected album or folder.
w Tool buttons
The following tool buttons are provided. These are common to all of the Print
windows.
Properties
Menu/Back
Rotate
Edit
Printer Settings
Help
67
Page 68

• Menu/Back
Return to the main menu or album window.
• Properties
Display the properties information for the image file selected in the
image display area.
• Rotate
Rotate the image selected in the preview display area.
• Edit
Display an image editing window (page 114) for editing the image
selected in the preview display area.
• Printer Settings
Display the [Printer Settings] dialog box.
• Help
Displays Help information for the Print window.
e Print setting panel
This makes settings for printing.
r Add button
This puts the images selected in the image display area into the preview
display area.
t Preview layout slider
Drag the slider to change the number of pages shown in the preview display.
You can select 1, 2 or 4 pages.
y Preview display area
This previews the printed page.
u Remove button
This deletes the selected image from the layout page, or deletes the selected
page.
i Add Page button
This adds a page to the layout.
o Print button
This prints the images shown in the preview display area.
68
Page 69

Printer Settings
These settings are necessary before printing images.
1
Click the tool button [Printer Settings] in the Print window.
The [Printer Settings] dialog box appears.
Printer
Paper
OK button
Margin equivalent
2
Click the button on the [Printer] pull-down list, then select the printer to
be used for printing.
3
Click the [Properties] button to make detailed settings on the selected
printer.
Properties button
The Macintosh version shows
the settings dialog box for the
printer selected with the
selector.
For more about the detailed
printer settings, refer to the
instructions for your printer.
4
Click the button on the [Paper] pull-down list, then select the paper size.
5
If you want to make the margins equal, check the [Margin equivalent] box.
If this box is not checked, the image is printed to fill the printable area.
If this box is checked, the margins at left and right and at top and bottom
are made the same.
6
Click the [OK] button.
69
Page 70

Automatic compensation settings
Using Exif Print (Exif 2.2) or PRINT Image Matching, you can print with automatic
image compensation.
When you shoot with a digital camera that supports the Exif Print function, extra
data including information about the scene is recorded with the image. Using
this extra data allows the printed image to be compensation for ideal results.
With a combination of a digital camera and printer that both support the PRINT
Image Matching function, you can easily print using the PRINT Image Matching
function. PRINT Image Matching is a new technology that connects the digital
camera and printer. A digital camera equipped with this function includes printer
commands together with the image files, allowing the digital camera to determine
the ideal color settings for printing.
1
In the print window, click the [Printer Settings] button.
The printer settings dialog box appears.
You can only select [PRINT
Image Matching] for a printer
that supports it. Further,
depending on the printer,
carrying out automatic
correction may require you to
make detailed settings, such
as changing the paper type.
2
To apply automatic corrections, check the [Automatic compensation] box.
3
Check [ExifPrint] or [PRINT Image Matching].
4
Click the [OK] button.
The check box is inoperative if
the function is not supported
by the printer.
70
Page 71

Photo Printing
Thumbnails
2
Preview layout slider
43
6
64
7
Add Page button
Remove button
1
Do one of the following.
• In the main menu, click the [Print - Photo] button.
• In the album window, click the tool button [Print] and select [Photo].
The Photo Print window appears.
2
Select the album or folder containing the image or images you want to
print.
A thumbnail display appears in the image display area.
If you accessed the Photo
Print window from the album
window, the images in the
selected album or folder
appear in the image display
area.
71
Page 72

3
In the print setting panel, select [Standard Paper] or [Pre-cut Paper], and
select a layout.
The layouts for [Pre-cut Paper] support the divided paper formats for
Olympus printers (either adhesive labels or perforated sheets), and are as
follows.
• P-A4P
A4, 2 divisions
• P-A4L
A4, 4 divisions
• P-60NS4E
A6, 4 divisions
• P-60NS16E
A6, 16 divisions
The print layout appears in the preview display area.
4
Do one of the following.
• Select an image in the image display area and click the [Add] button.
• Drag an image from the image display area onto the layout.
5
Repeat step 4 to fill the layout with the images you want to print.
To rotate an image
In the preview display area, select the image you want to rotate, and click
the tool button [Rotate], then select [Clockwise 90˚], [Counterclockwise
90˚], or [180˚].
To edit an image
In the preview display area, select the image you want to edit, and click the
tool button [Edit] to open the image editing window.
72
On how to edit an image, see
“Editing Images” (page 114).
Page 73

To delete an image from the layout
Select the image you want to delete, and click the [Remove] button.
To add a new layout page
Click the [Add Page] button.
To delete a layout page
Select the page you want to delete, then click the [Remove] button.
To change the number of pages shown in the preview display
Drag the preview layout slider.
You can select 1, 2, or 4 pages.
6
Set the following items.
• Whether or not to print the shooting data (date or date and time) below
each image
• Number of copies to print
7
Click the [Print] button.
73
Page 74

Making Index Prints
3
6
Thumbnails
2
1
Do one of the following.
• In the main menu, click the [Print - Index] button.
• In the album window, click the tool button [Print] and select [Index].
The Index Print window appears.
4
Preview layout slider
Footer button
Header button
Remove button
7
644
If you access the Index Print
window from the album
window, the images in the
selected album or folder
appear in the image display
area.
2
Select the album or folder containing the images you want to print.
A thumbnail display appears in the image display area.
3
Set the following items.
• Orientation (Portrait or Landscape)
• Layout (Rows and Columns)
• Print same image/Print different images
4
Do one of the following.
• Click the [Add All] button.
• Select an image in the image display area and click the [Add] button.
• Drag an image from the image display area onto the layout.
74
Page 75

5
Repeat step 4 to fill the layout with the images you want to print.
To rotate an image
In the preview display area, select the image you want to rotate, and click
the tool button [Rotate], then select [Clockwise 90˚], [Counterclockwise
90˚], or [180˚].
To edit an image
In the preview display area, select the image you want to edit, and click the
tool button [Edit] to open the image editing window.
To delete an image from the layout
Select the image you want to delete, and click the [Remove] button.
To change the number of pages shown in the preview display
Drag the preview layout slider.
You can select 1, 2 or 4 pages.
6
Set the following items.
• Whether or not to print a header or footer
• Whether or not to print image information (file name and shooting date)
• Number of copies to print
On how to edit an image, see
“Editing Images” (page 114).
To add extra information to the header or footer
Click the header or footer button to open a dialog box, then select date,
page, or page number/total number of pages, or enter a comment. Click
the [OK] button to confirm.
Header dialog box Footer dialog box
7
Click the [Print] button.
75
Page 76

Creating and Printing a Calendar
Thumbnails
2
Rotate button
43
Edit button
74
Remove button
Calendars created here
cannot be saved.
86
1
Do one of the following.
• In the main menu, click the [Print - Calendar] button.
• In the album window, click the tool button [Print] and select [Calendar].
The Calendar Print window appears.
2
Select the album or folder containing the image or images you want to use
in the calendar.
A thumbnail display appears in the image display area.
3
Set the following items.
• Orientation (Portrait or Landscape)
• Templates (One month, Two months, Three months, Six months, One
year)
• Calendar layout
• Start Month (Year and Month)
If you accessed the Calendar
Print window from the album
window, the images in the
selected album or folder
appear in the image display
area.
76
Page 77

4
Do one of the following.
• Select an image in the image display area, and click the [Add] button.
• Drag an image from the image display area onto the layout.
5
Repeat step 4 to fill the layout with the images you want to use in the
calendar.
To rotate an image
In the preview display area, select the image you want to rotate, and click
the tool button [Rotate], then select [Clockwise 90˚], [Counterclockwise
90˚], or [180˚].
To edit an image
In the preview display area, select the image you want to edit, and click the
tool button [Edit] to open the image editing window.
To delete an image from the layout
Select the image you want to delete, and click the [Remove] button.
6
Click the [Calendar Settings] button to display the [Calendar Settings] dialog
box, then set the following items.
• Language (current language or English)
• Month style (long or short)
• Font
• Style
• Basic colors for Sundays, Saturdays, and weekdays
• Color for the selected date (select from the 16 standard colors)
On how to edit an image, see
“Editing Images” (page 114).
The “Month style” (long or
short) determines the month
format as in the following
example.
• Long: August
• Short: Aug
7
Set the number of copies to print.
8
Click the [Print] button.
77
Page 78

Creating and Printing a Postcard
6
Thumbnails
2
1
Do one of the following.
• In the main menu, click the [Print - Postcard] button.
• In the album window, click, the tool button [Print] and select [Postcard].
The Postcard Print window appears.
45
Remove button Stamp button
874
3
Postcards created here
cannot be saved.
If you accessed the Postcard
Print window from the album
window, the images in the
selected album or folder
appear in the image display
area.
2
Select the album or folder containing the image or images you want to use
for the postcard.
A thumbnail display appears in the image display area.
3
Select the paper orientation (Portrait or Landscape).
4
Do one of the following.
• Select an image in the image display area, and click the [Add] button.
• Drag an image from the image display area onto the layout.
To rotate an image
In the preview display area, select the image you want to rotate, and click
the tool button [Rotate], then select [Clockwise 90˚], [Counterclockwise
90˚], or [180˚].
To edit an image
In the preview display area, select the image you want to edit, and click the
tool button [Edit] to open the image editing window.
To delete an image from the layout
Select the image you want to delete, and click the [Remove] button.
On how to edit an image, see
“Editing Images” (page 114).
78
Page 79

5
Select the postcard template type and template.
To add a stamp
1) Click the [Stamp] button.
[Stamp] dialog box appears.
2) Select the stamp collection.
3) Select the stamp.
4) Click the [OK] button.
The selected stamp appears in the layout.
5) Adjust the stamp position and size.
To change the position, drag the stamp with the mouse.
To change the size, drag the edges of the stamp with the mouse.
To delete a stamp
Select the stamp you want to delete, and click the [Remove] button.
79
Page 80

6
Enter text using the following procedure.
1) Click the [Text] button.
The [Text] dialog box appears.
2) Select the font, style (regular, bold, italic, bold italic), size, and color.
3) Enter the text.
4) Click the [OK] button.
The text now appears in the layout.
5) Adjust the text position and size.
To change the position, drag the text with the mouse.
To change the size, drag the edges of the text with the mouse.
To delete text
Select the text you want to delete, and click the [Remove] button.
7
Set the number of copies to print.
8
Click the [Print] button.
80
Page 81

Creating and Printing an Album
4
Background button
Thumbnails
2
5
Preview layout slider
Stamp button
Frame button
Add Page button
Remove button
Albums created here cannot
be saved.
3
9785
1
Do one of the following.
• In the main menu, click the [Print - Album] button.
• In the album window, click the tool button [Print] and select [Album].
The Album Print window appears.
2
Select the album or folder containing the images you want to put in the
album.
A thumbnail display appears in the image display area.
3
Select the paper orientation (Portrait or Landscape).
If you accessed the Album
Print window from the album
window, the images in the
selected album or folder
appear in the image display
area.
81
Page 82

4
Select an album template.
To add a frame
1) Click the [Frame] button.
The [Frame] dialog box appears.
2) Select the frame collection.
3) Select the frame.
4) If necessary, check the [Add frame to all images] box.
5) Click the [OK] button.
The frame is added to the selected image or all images.
To add a stamp
1) Click the [Stamp] button.
The [Stamp] dialog box appears.
2) Select the stamp collection.
3) Select the stamp.
4) Click the [OK] button.
The selected stamp appears in the layout.
5) Adjust the stamp position and size.
To change the position, drag the stamp with the mouse.
To change the size, drag the edges of the stamp with the mouse.
82
Page 83

To delete a stamp
Select the stamp you want to delete, and click the [Remove] button.
To set a background
1) Click the [Background] button.
The [Background] dialog box appears.
2) Select the background collection.
3) Select the background.
4) Click the [OK] button.
The selected background appears in the layout.
5
Do one of the following.
• Select an image in the image display area, and click the [Add] button.
• Drag an image from the image display area onto the layout.
6
Repeat step 5 to fill the layout with the images you want to put in the
album.
To rotate an image
In the preview display area, select the image you want to rotate, and click
the tool button [Rotate], then select [Clockwise 90˚], [Counterclockwise
90˚], or [180˚].
To edit an image
In the preview display area, select the image you want to edit, and click the
tool button [Edit] to open the image editing window.
To delete an image from the layout
Select the image you want to delete, and click the [Remove] button.
To add a new layout page
Click the [Add Page] button.
On how to edit an image,
see “Editing Images” (page
114).
To delete a layout page
Select the page you want to delete, and click the [Remove] button.
83
Page 84

To change the number of pages shown in the preview display
Drag the preview layout slider.
You can select 1, 2, or 4 pages.
7
Add the text.
1) Click the [Text] button.
The [Text] dialog box appears.
2) Select the font and style (regular, bold, italic, or bold italic).
3) Enter the text.
4) Click the [OK] button.
The text appears in the layout.
5) Adjust the text position and size.
To change the position, drag the text with the mouse.
To change the size, drag the edges of the text with the mouse.
To delete text
Select the text you want to delete, and click the [Remove] button.
8
Set the number of copies to print.
9
Click the [Print] button.
84
Page 85

Creating and Printing a Contact Sheet
6
Thumbnails
2
Preview layout
slider
4
Remove button
Footer button
Header button
Add Page button
3
764
1
Do one of the following.
• In the main menu, click the [Contact Sheet] button.
• In the album window, click the tool button [Print] and select [Contact Sheet].
The Contact Sheet Print window appears.
2
Select the album or folder containing the images you want to print.
A thumbnail display appears in the image display area.
3
Set the following items.
• Orientation (Portrait or Landscape)
• Layout (Columns and Rows)
4
Do one of the following.
• Select an image in the image display area, and click the [Add] button.
• Drag an image from the image display area onto the layout.
If you accessed the Contact
Sheet Print window from the
album window, the images in
the selected album or folder
appear in the image display
area.
85
Page 86

5
Repeat step 4 to fill the layout with the images you want to print.
To rotate an image
In the preview display area, select the image you want to rotate, and click
the tool button [Rotate], then select [Clockwise 90˚], [Counterclockwise
90˚], or [180˚].
To edit an image
In the preview display area, select the image you want to edit, and click the
tool button [Edit] to open the image editing window.
To delete an image from the layout
Select the image you want to delete, and click the [Remove] button.
To add a new layout page
Click the [Add Page] button.
To delete a layout page
Select the page you want to delete, and click the [Remove] button.
To change the number of pages shown in the preview display
Drag the preview layout slider.
You can select 1, 2, or 4 pages.
On how to edit an image, see
“Editing Images” (page 114).
6
Set the following items.
Whether or not to print image information (following items)
• File Name
• Shooting Date
• Image Size
• Shutter Speed
• Aperture
• ISO
• 35mm equivalent focal length
• Manufacturer
• Camera model
• Comments
Number of copies to print
86
Page 87

To add extra information to the header or footer
Click the header or footer button to open a dialog box, then select date,
page, or page number/total number of pages, or enter a comment. Click
the [OK] button to confirm.
7
Click the [Print] button.
Header dialog box
Footer dialog box
87
Page 88

Create and Share
8
Sending Images by E-mail
Sending images by e-mail
Use the following procedure to send an image by e-mail.
Rotate button
Thumbnails
2 56
3
7
Edit button
To use this function, your
computer must already be set
up to send and receive e-mail.
(You will need an Internet
service provider, network
software, and so on.) For
more details, refer to the
operating instructions
provided with your computer
or Internet service provider.
To e-mail images using this
software, your Internet
Service Provider (ISP) must
be able to provide you with a
Simple Mail Transfer Protocol
server address (SMTP).
An SMTP is the standard
method to send e-mail
messages between servers.
Internet-based e-mail
accounts may not use this
type of setup. Please check
with your ISP before
attempting to e-mail images.
3
1
Do one of the following.
• In the main menu, click the [E-mail] button.
• In the album window, click the tool button [Create] and select [E-mail].
The E-mail window appears.
2
Select the album or folder containing the image or images you want to
send by e-mail.
A thumbnail display appears in the image display area.
Remove button
9
3
Do one of the following.
• Select an image in the image display area, and click the [Add] button.
• Drag an image from the image display area to the file attachment area.
4
Repeat step 3, to place the images you want to send in the file
attachment area.
If you accessed the E-mail
window from the album
window, the images in the
selected album or folder
appear in the image display
area.
88
Page 89

To rotate an image
Select the image you want to rotate in the file attachment area and click
the tool button [Rotate], then select [Clockwise 90˚], [Counterclockwise
90˚ ], or [180˚].
To edit an image
Select the image you want to edit in the file attachment area, and click the
tool button [Edit] to open the image editing window.
To delete an image from the file attachment area
Select the image you want to delete, and click the [Remove] button.
5
Select the sender.
If the sender is not set, see “Setting up an e-mail account” (page 91).
6
Set the addressee.
1) Click the [Address] button.
This opens the [Address Book] dialog box.
Address selection
For image editing operations,
see “Editing Images” (page
114).
Remove button
OK button
Add button
2) Select the addressee, and click the [Add] button.
This adds the selected addressee to the addressee list.
If the mail address is not in the address book, see “Saving e-mail
addresses in the address book” (page 93).
To delete an addressee from the list
Select the addressee you want to delete, and click the [Remove] button.
89
Page 90

3) Click the [OK] button.
The selected addressee appears in the addressee list in the e-mail
window.
7
Enter the subject and message text.
8
Set the following items as required.
• Message size
Upper limit on the total size of the e-mail text plus attachments
• Resize
Resize the attached files (when transmitting)
• Convert to JPEG
Convert the attached files to JPEG format at the selected compression
ratio (when transmitting)
• JPEG compression
Select high, standard, or low image quality
• Connection
Dial-up or network
9
Click the [Send] button.
If in step 8 you set [Connection] to [Dial-up], the [Connection] dialog box
appears.
If a message exceeds the
allowable size, it is split into
two or more mails.
The mail you have sent is not
saved on this computer.
Select the connection, and enter the user name and password, then click
the [OK] button.
To save the password, check the [Save Password] box.
90
Page 91

Setting up an e-mail account
Enter the e-mail address and other information identifying the user.
Use the following procedure to set up an e-mail account.
1
Click the [Account] button to the right of the [From:] box.
The [Sender] dialog box appears.
Edit button
New button
OK button
Remove button
Once the mail account is set
up, as long as there are no
changes, you do not need to
make the settings each time
you send mail.
2
Click the [New] button.
The [E-mail Account] dialog box appears.
Name
3
Enter the following items.
• Sender's Name
• E-mail Address
• Outgoing Mail Server (SMTP)
E-mail Address
Outgoing Mail Server (SMTP)
OK button
You can get details of the email address and mail
transmission (SMTP) server
from your Internet service
provider.
91
Page 92

4
Click the [OK] button.
The set e-mail account appears in the [Sender] dialog box.
To modify an e-mail account
In the [Sender] dialog box, select the e-mail account you want to modify,
and click the [Edit] button, then make the changes in the [E-mail Account]
dialog box.
To delete an e-mail account
In the [Sender] dialog box, select the e-mail account you want to delete,
then click the [Remove] button.
5
Repeat steps 2 to 4 as required, to set all the e-mail accounts.
6
In the [Sender] dialog box, click the [OK] button.
This saves the set e-mail accounts.
If the SMTP server for
sending e-mail is not
available, you cannot send
mail.
92
Page 93

Saving e-mail addresses in the address book
By saving the e-mail addresses of people you will be sending to, you can save
having to enter e-mail addresses each time you send an e-mail.
Use the following procedure to save an e-mail address in the address book.
1
Click the [Address] button to the right of the [To:] box.
The [Address Book] dialog box appears.
New button
Remove button
Edit button
OK button
Import button
2
Click the [New] button.
The [E-mail Address] dialog box appears.
Name
OK button
3
Enter the name and e-mail address, and click the [OK] button.
E-mail address
The new e-mail address appears in the [Address Book] dialog box.
93
Page 94

To change an e-mail address
In the [Address Book] dialog box, select the address you want to change,
and click the [Edit] button, then change the values in the [E-mail Address]
dialog box.
To delete an e-mail address
In the [Address Book] dialog box, select the address you want to delete,
and click the [Remove] button.
To import e-mail addresses from a file
1) Click the [Import] button.
The [File Open] dialog box appears.
2) In the [File Open] dialog box, click the [Browse] button.
The [Select Folder] dialog box appears.
It is first necessary to export
the address book from the
other e-mail software, as a
text file in CSV (comma
separated value) format. For
details, see the instructions for
the e-mail software you are
using.
3) In the [Select Folder] dialog box, select the location of the file containing
the e-mail addresses you want to import, and click the [OK] button.
In the [File Open] dialog box, a list including the file with the e-mail
addresses appears.
94
Page 95

4) In the [File Open] dialog box, select the file of e-mail addresses you
want to import, and click the [OK] button.
The [Import Address] dialog box appears with Import Sheet showing the
e-mail addresses and other relevant information.
5) In the [Import Address] dialog box, select the columns containing the
names and e-mail addresses (if the names are in column A, select “A”,
if the e-mail addresses are in column B, select “B”), and click the [OK]
button.
6) In the [Import Address] dialog box, select the e-mail addresses you
want to import, and click the [OK] button.
This imports the selected e-mail addresses into the [Address Book] dialog
box.
4
Repeat steps 2 to 3 as required, to set the e-mail addresses.
5
In the [Address Book] dialog box, click the [OK] button.
This saves the e-mail addresses in the address book.
95
Page 96

Creating an HTML Album
3
You can create an HTML album from images edited with this software, which
you can then view with a web browser.
Use the following procedure to create an HTML album.
Thumbnails
Rotate button
4
2
Remove button
Preview layout slider
Edit button
Confirm button
Add Page button
6
74
6
1
Do one of the following.
• In the main menu, click the [HTML Album] button.
• In the album window, click the tool button [Create] and select [HTML
Album].
The HTML Album window appears.
2
Select the album or folder containing the image or images you want to put
in the HTML album.
A thumbnail display appears in the image display area.
3
Set the thumbnail layout (Size, Rows and Columns).
The layout appears in the preview display area.
4
Do one of the following.
• Select an image in the image display area, and click the [Add] button.
• Drag an image from the image display area onto the layout.
If you accessed the HTML
album window from the album
window, the images in the
selected album or folder
appear in the image display
area.
96
Page 97

5
Repeat step 4, to fill the HTML album layout with the images you want to
put in the HTML album.
To rotate an image
Select the image you want to rotate in the preview display area, and
click the tool button [Rotate], then select [Clockwise 90˚],
[Counterclockwise 90˚], or [180˚].
To edit an image
Select the image you want to edit in the preview display area, and click the
tool button [Edit] to open the image editing window.
To delete an image from the layout
Select the image you want to delete, and click the [Remove] button.
To add a new page
Click the [Add Page] button.
To change the number of pages shown in the preview display
Drag the preview layout slider.
6
Enter the following settings.
• Title
• Description
• Image Size
Size of the image shown when the thumbnail in the HTML album is
clicked
• Shooting Date
Whether or not to display the shooting date on the thumbnails and the
enlarged images displayed by clicking a thumbnail in the HTML album
• Comments
Whether or not to display comments on the enlarged images displayed
by clicking a thumbnail in the HTML album
• Background
Background design for the HTML album
For image editing operations,
see “Editing Images” (page
114).
97
Page 98

To enter the title and description
1) Click the [Title] or [Description] button.
The [Text] dialog box appears.
2) Select the font, style (regular, bold, italic, or bold italic), size and color.
3) Enter the text.
4) Click the [OK] button.
The entered title or description appears in the layout.
To enter comments
You can attach a comment to each image.
1) Select the thumbnail of the image for which you want to display a
comment in the layout.
2) In the Information field, check the [Comments] box.
3) Click the [Comments] button.
The [Comments] dialog box appears.
4) Enter a comment.
5) Click the [OK] button.
The comment you have entered appears under the enlarged image
displayed by clicking the thumbnail in the HTML album.
98
Page 99

To select a background
1) Click the [Background] button.
The [Background] dialog box appears.
2) Select the background collection.
3) Select the background.
4) Click the [OK] button.
The selected background appears in the layout.
Checking with a web browser
Click the [Confirm] button to start a web browser, and display the HTML
album which was in the preview display area. You can click the thumbnails
in the HTML album to view enlarged images.
7
Click the [Save] button.
The [Save As] dialog box appears.
8
Select the folder where you want to save the HTML album, and click the
[Save] button.
99
Page 100

Setting an Image as the Wallpaper
You can use images edited with this software to be the computer wallpaper.
Use the following procedure to set the wallpaper.
Thumbnails
2
Rotate button
4
Edit button
3
If you accessed the Wallpaper
window from the album
window, the images in the
selected album or folder
appear in the image display
area.
In Mac OS X, administrator
privileges are required to set
the wallpaper.
4
1
Do one of the following.
• In the main menu, click the [Wallpaper] button.
• In the album window, click the tool button [Create] and select [Wallpaper].
The Wallpaper window appears.
2
Select the album or folder containing the images you want to use as
wallpaper.
A thumbnail display appears in the image display area.
3
Select a layout template.
The layout is shown in the monitor screen displayed in the preview display
area.
4
Do one of the following.
• Select an image in the image display area, and click the [Add] button.
• Drag an image from the image display area onto the layout.
Remove button
6
Background button
Text button
100
 Loading...