

Olympus CAMEDIA D-250, CAMEDIA C-2 QUICK START GUIDE
Caution
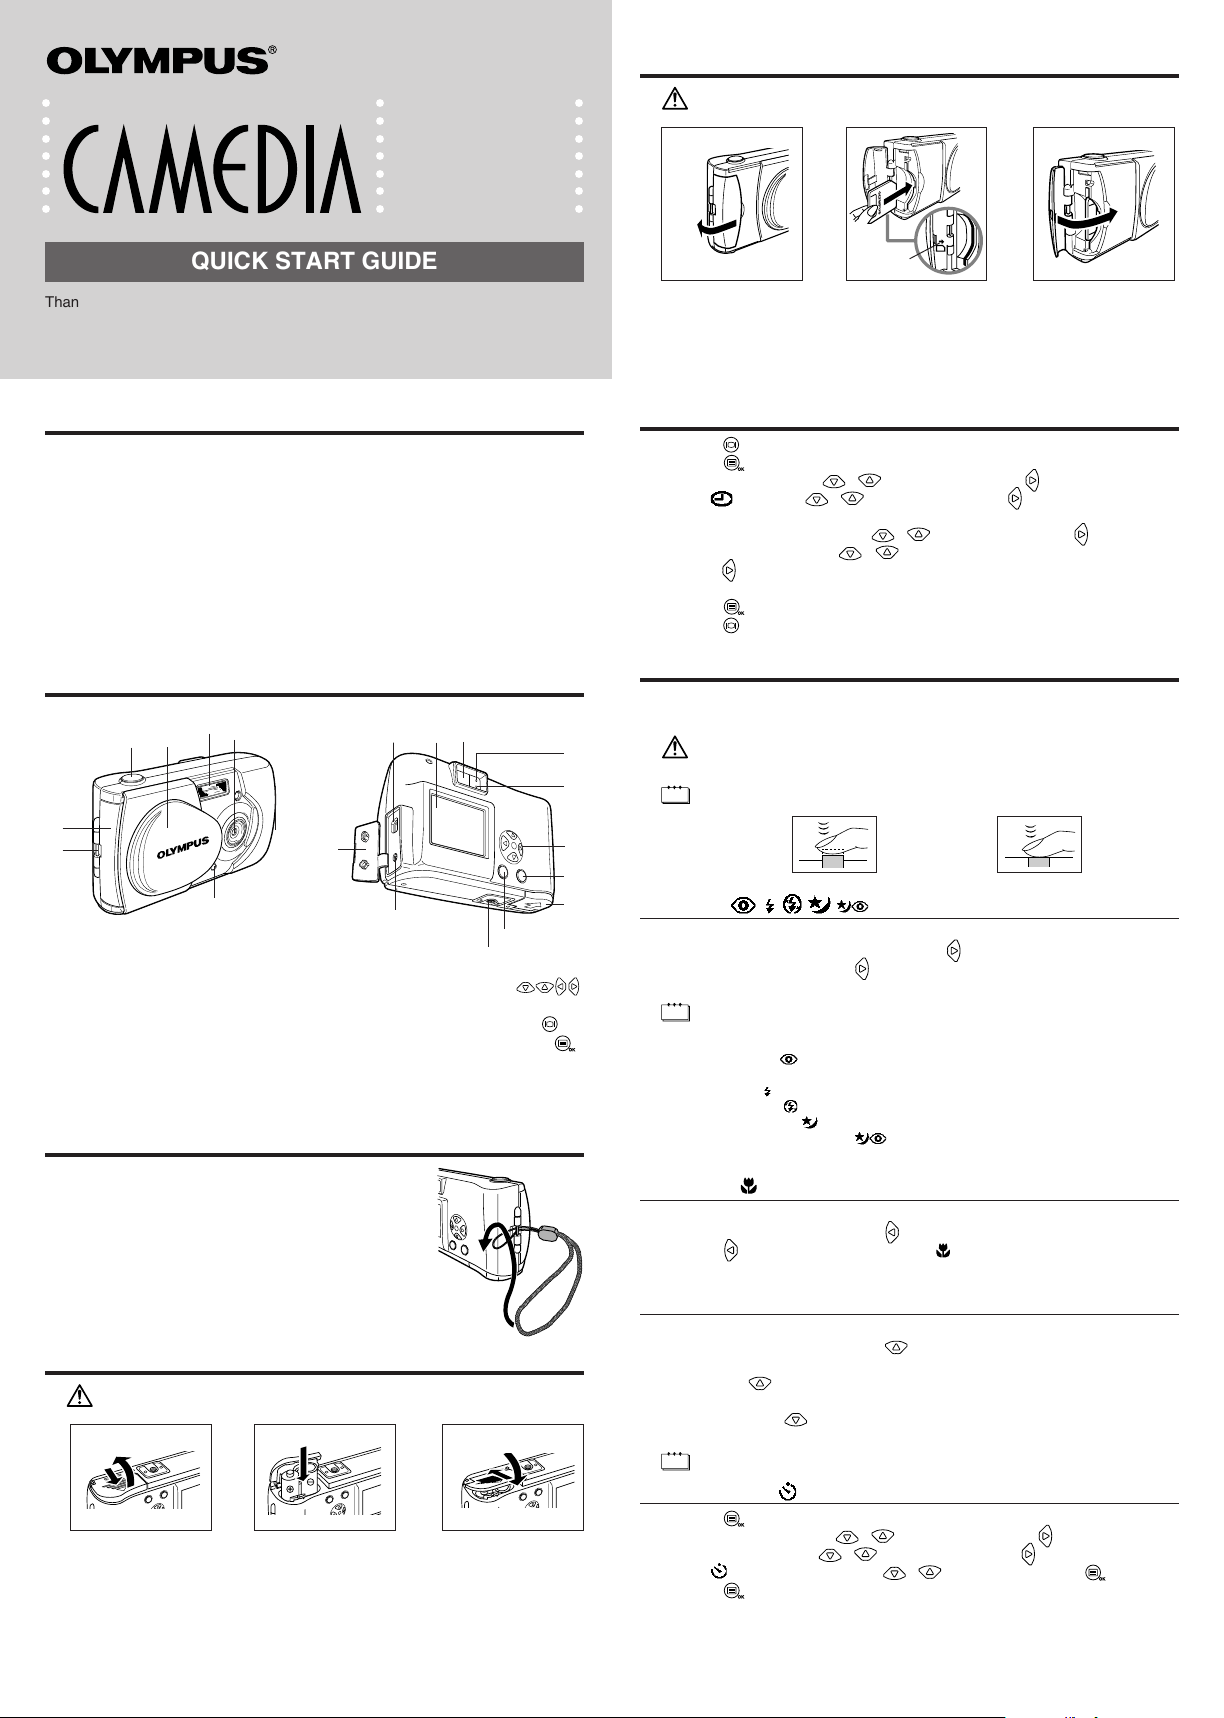
■ INSERTING THE SMARTMEDIA CARD
Caution
Caution
Note
Note
Note
○○○○○○○
○○○○○○○
○○○○○○○
DIGITAL CAMERA
C-2
D-230
QUICK START GUIDE
Thank you for purchasing an Olympus digital camera.
Please read the operation manual supplied with the camera carefully before using
your camera. We recommend that you become familiar with your camera by taking
a number of test shots before performing important shooting.
■ PACKAGE CONTENTS
Check that your digital camera comes complete with the items listed below in the specified
quantities.
Digital camera ..................................................................................................... 1
Strap ................................................................................................................... 1
AA Alkaline batteries ........................................................................................... 2
SmartMedia card (16MB) .................................................................................... 1
USB cable ........................................................................................................... 1
CD-ROM (CAMEDIA Master and reference manual) ......................................... 1
Quick Start Guide ............................................................................................... 1
✓
Basic Manual ...................................................................................................... 1
Warranty Card .................................................................................................... 1
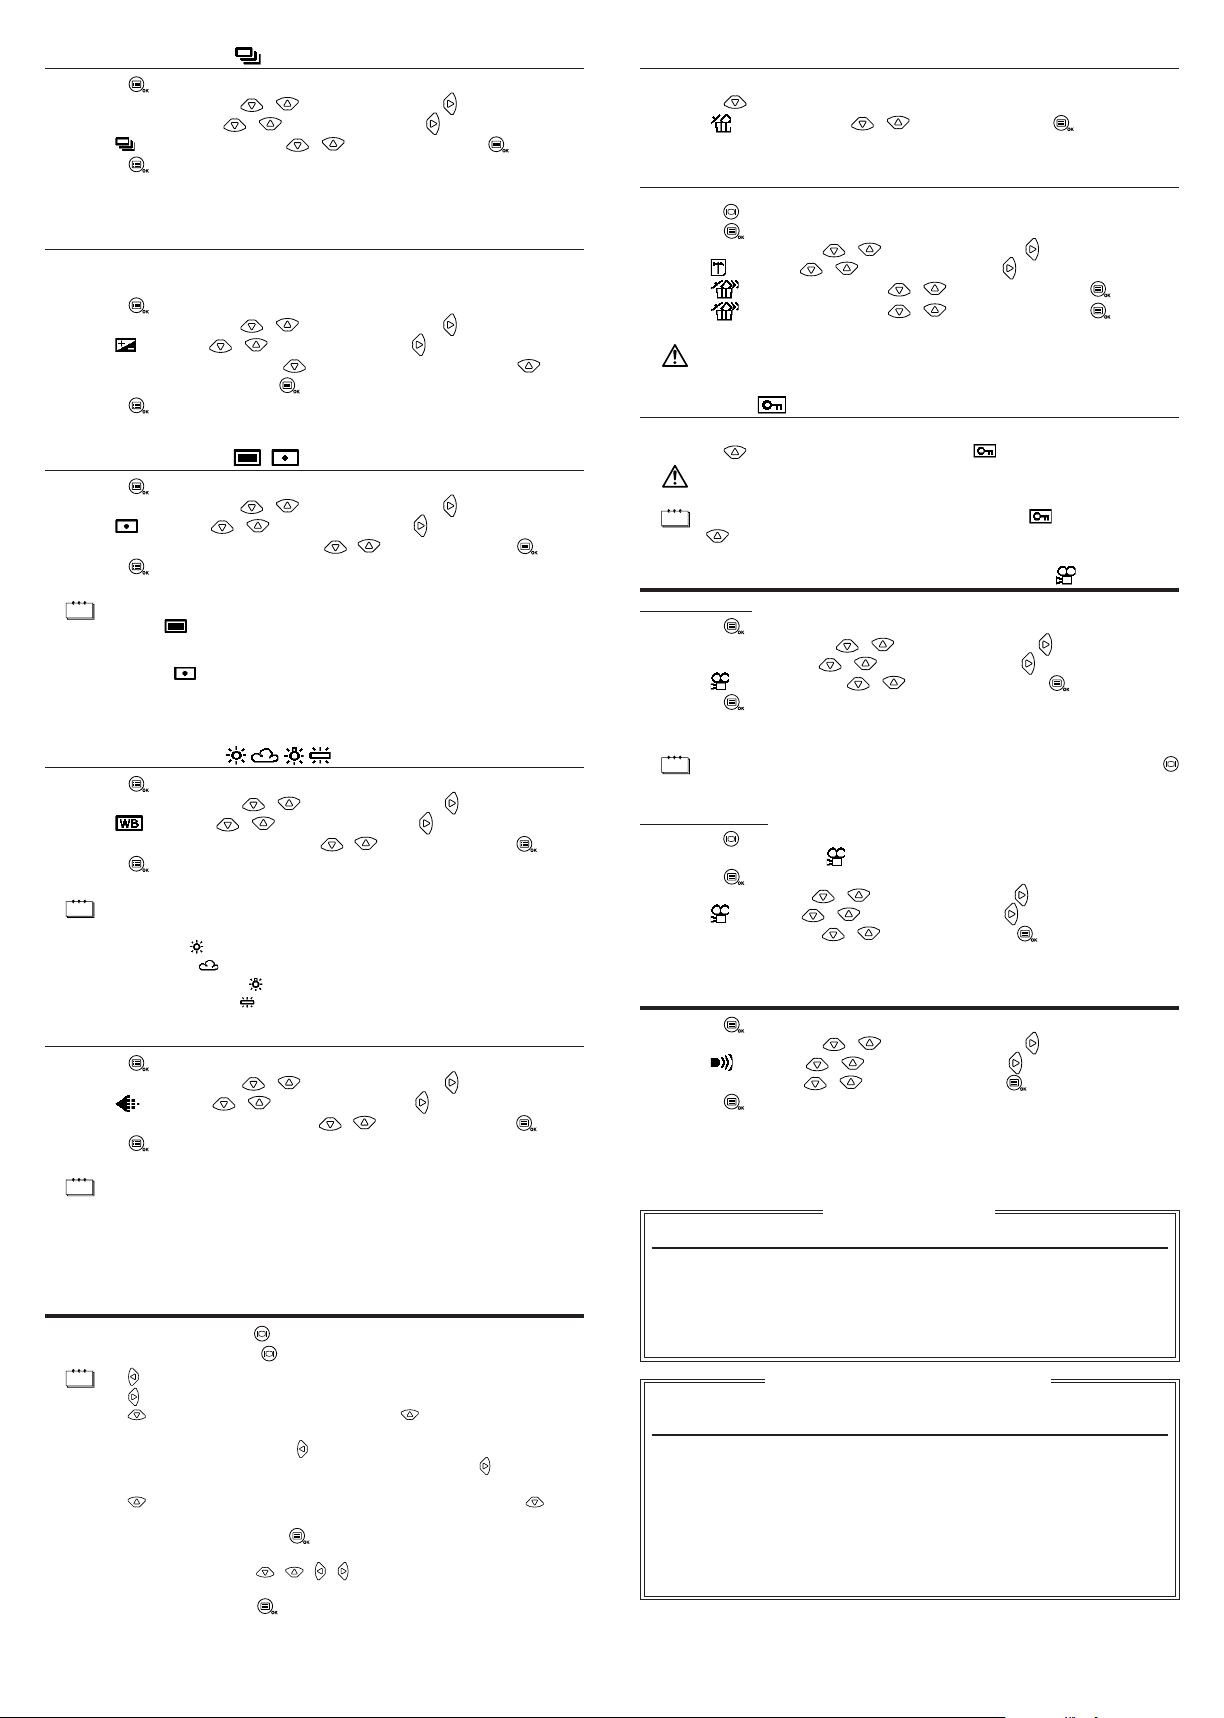
■ NAMES OF PARTS
3
2
1
4
6
78
5
1 Shutter button 8 Connector cover E Arrow pad
2 Lens barrier 9 USB connector F Tripod socket
3 Flash 0 DC-IN jack G Monitor button
4 Lens A Monitor H OK/Menu button
5 Self-timer lamp B Viewfinder I Battery compartment
6 Card cover C Orange lamp cover
7 Strap eyelet D Green lamp
■ ATTACHING THE STRAP
1 Pass the short end of the strap through the strap eyelet.
2 Pass the long end of the strap through the loop.
3 Pull tight and check that it is securely attached.
■ LOADING THE BATTERIES
Check that the lens barrier is closed and both the monitor and the orange lamp are
off.
12 3
B
A
1 Slide the battery compartment cover toward A and lift it up in the direction of B.
2 Insert the batteries as shown, making sure that they are correctly oriented.
3 Push down the battery compartment cover in the direction of the arrow C and close
firmly in the direction of D until it clicks.
9
A
B
C
D
E
H
0
I
G
F
C
D
➜➜
Check that the lens barrier is closed and both the monitor and the orange lamp
are off.
12 3
➜➜
Card
insertion
direction
marking
1 Open the card cover.
2 Insert the card in the direction shown in the figure.
There is a mark inside the card cover, indicating the direction in which the card should
be inserted.
3 Close the card cover securely until it clicks.
■ SETTING THE DATE AND TIME
1 Press the button to turn the monitor on.
2 Press the
3 Select [SETUP] using the
4 Select [
5 Select the date format “Y-M-D (Year-Month-Day)”, “M-D-Y (Month-Day-Year)” or “D-
M-Y (Day-Month-Year)” using the
6 Set the first figure using the
using the
7 Repeat the above procedure until the date and time settings are adjusted.
8 Press the
9 Press the
button to display the menu.
/ buttons and press the button.
] using the / buttons and press the button.
/ buttons and press the button.
/ buttons, and then proceed to the next figure
button.
button when the clock reaches 00 seconds.
button to turn the monitor off.
■ TAKING PICTURES
To turn the camera on : Open the lens barrier. (You are now ready to take pictures.)
To turn the camera off : Close the lens barrier.
Never attempt to open the card cover or remove the card or batteries while the
orange lamp is blinking. Otherwise, the image data on the card may be destroyed.
Remember that it is impossible to restore image data once it has been destroyed.
Press the shutter button halfway A and then press it fully B.
AB
➜
■ FLASH ( )
1 Open the lens barrier.
2 Check the current flash mode by pressing the
3 To change the setting, press the
Setting of the flash mode is completed.
Flash mode settings
Auto (AUTO) Automatically fires in low light or backlight
Red-eye (
Fill In (
Flash Off (
Night Scene (
Night Scene/Red-eye (
) Reduces the phenomenon of the subject’s eyes
) Fires regardless of the light conditions.
) Does not fire even in dark conditions.
button until the appropriate flash mode is displayed.
) For taking pictures at night.
) For taking pictures of people against a night
■ MACRO ( )
This mode is for taking close-up pictures at distance of 10cm-50cm (4in-1.6ft).
1 Open the lens barrier and press the
2 Press the
3 Take a picture by looking at the monitor.
button again to set the Macro ( ) mode.
button to display the current setting [OFF].
■ DIGITAL TELE
This mode enables you to take pictures in six magnifications: 1.6×, 2×, 2.5×, 3.2×, 4× and 5×.
1 Open the lens barrier and press the button to turn the monitor on.
2 The image is magnified in the sequence [1.6× → 2.0× → 2.5× → 3.2× → 4.0× → 5.0×]
each time the
The image is zoomed out in the sequence [4.0× → 3.2× → 2.5× → 2.0× → 1.6× →
OFF] each time the
3 Take a picture by looking at the monitor.
The image quality needs to be set to SQ2 to magnify 3.2×, 4× or 5×.
button is pressed.
button is pressed.
■ SELF-TIMER ( )
1 Press the button with the lens barrier open to display the Camera menu.
2 Select [CAMERA] using the
3 Select [DRIVE] using the
4 Select [
5 Press the
6 Press the shutter button.
The self-timer lamp on the front of the camera lights up for 10 seconds and then blinks
for 2 seconds, before the picture is taken.
SELF-TIMER] using the / buttons and press the button.
button again to exit the menu.
/ buttons and press the button.
/ buttons and press the button.
button.
conditions.
appearing red in the image.
background.
■ SEQUENCE MODE ( )
Note
Note
Note
Note
Caution
Caution
Note
Note
1 Press the button with the lens barrier open to display the Camera menu.
2 Select [CAMERA] using the
3 Select [DRIVE] using the
4 Select [
5 Press the
SEQUENCE] using the / buttons and press the button.
button again to exit the menu.
/ buttons and press the button.
/ buttons and press the button.
6 Take pictures. (Picture-taking continues while the shutter button is pressed and stops
when the button is released.)
■ EXPOSURE COMPENSATION
This mode enables you to change the brightness of the image. (Compensation of ±2 in
0.5 steps)
1 Press the
2 Select [CAMERA] using the
button with the lens barrier open to display the Camera menu.
/ buttons and press the button.
3 Select [ ] using the / buttons and press the button.
4 Adjust the compensation using the
(to brighten image), and press the
button (to darken image) and the button
button.
5 Press the button again to exit the menu.
6 Take a picture.
■ METERING MODE ( )
1 Press the button with the lens barrier open to display the Camera menu.
2 Select [CAMERA] using the / buttons and press the button.
3 Select [
4 Select the Metering mode setting using the
] using the / buttons and press the button.
/ buttons and press the button.
5 Press the button again to exit the menu.
6 Take a picture.
Metering mode settings
ESP (
) The camera measures the light at the center of the
SPOT (
) The camera measures the light levels only at the center
viewfinder and around the periphery of the picture
separately and then selects the optimal exposure.
of the viewfinder, allowing you to obtain the correct
exposure for backlight subjects since the exposure is not
affected by the background light.
■ WHITE BALANCE ( )
1 Press the button with the lens barrier open to display the Camera menu.
2 Select [PICTURE] using the
3 Select [
] using the / buttons and press the button.
4 Select the white balance setting using the / buttons and press the button.
5 Press the
button again to exit the menu.
6 Take a picture.
White balance settings
Auto (AUTO) The white balance is controlled automatically.
Clear sky ( ) In outdoors under a clear sky.
Cloudy sky (
Incandescent Lamp (
Fluorescent Lamp (
/ buttons and press the button.
) In outdoors under a cloudy sky.
) Under incandescent lighting.
) Under fluorescent lighting.
■ IMAGE QUALITY (SHQ, HQ, SQ1, SQ2)
1 Press the button with the lens barrier open to display the Camera menu.
2 Select [PICTURE] using the / buttons and press the button.
3 Select [
4 Select the image quality setting using the
] using the / buttons and press the button.
/ buttons and press the button.
5 Press the button again to exit the menu.
6 Take a picture.
Image quality settings (pixel size)
SHQ (1600 × 1208) For best print quality.
HQ (1600 × 1200) For good print quality with small print size.
SQ1 (1024 × 768) For e-mail attachments or small print size.
SQ2 (640 × 480) For e-mail or web use.
■ PLAYING BACK IMAGES
To turn the monitor on :
To turn the monitor off : Press the button again to turn the monitor off.
• button : Displays the previous image.
•
•
•
Press the button with the lens barrier closed to turn the monitor on.
button : Displays the next image.
button : Displays several images. Press the button to return to display an
image.
If you press the
moves to the previous image, and if you press the
to the next image.
button : Magnifies the image (1.5× → 2× → 2.5× → 3×). Press the button
to return to 1×.
If you press the
is enabled.
Press the
or right.
Press the
button in the index playback, the green frame
button, it moves
button while magnifying the image, scroll mode
/ / / buttons to move the image up, down, left
button again to exit scroll mode.
■ ERASING AN IMAGE
1 Display the image you want to erase.
2 Press the button for more than 1 second to display the Erase menu.
3 Select [ ERASE] using the / buttons and press the button.
The selected image is erased.
■ ERASING ALL IMAGES
1 Press the button with the lens barrier closed.
2 Press the
3 Select [SETUP] using the
4 Select [
button to display the Play menu screen.
/ buttons and press the button.
] using the / buttons and press the button.
5 Select [ ALL ERASE] using the / buttons and press the button.
6 Select [
ALL ERASE] using the / buttons and press the button.
All the images are erased.
Once erased, images cannot be restored. Check the image before erasing to avoid
accidentally erasing image you want to keep.
■ PROTECT ( )
1 Display the image you want to protect.
2 Press the
■
RECORDING/PLAYING BACK MOVIES ( )
Recording movies
1 Press the
2 Select [CAMERA] using the
3 Select [DRIVE] using the
4 Select [
5 Press the
6 Record movies by looking at the monitor. (Press the shutter button to start recording
movies. Recording stops when the shutter button is pressed again.)
Playing back movies
1 Press the
Display the movie with the
2 Press the
3 Select [PLAY] using the
4 Select [
5 Select [START] using the
The movie is played back.
button for more than 1 second. The symbol is displayed.
Protected images cannot be erased by “Erasing an image” or “Erasing all images”,
but they are erased by formatting the card.
To cancel the protect setting, display the image with the symbol and press the
button for more than 1 second.
button with the lens barrier open to display the Camera menu.
/ buttons and press the button.
/ buttons and press the button.
MOVIE] using the / buttons and press the button.
button again to exit the menu. The monitor will turn on.
The movie mode is cancelled when the monitor is turned off by pressing the
button.
button with the lens barrier closed.
symbol indicated.
button to display the Play menu.
/ buttons and press the button.
] using the / buttons and press the button.
/ button and press the button.
■ MUTING THE BEEP TONES
1 Press the button with the lens barrier open to display the Camera menu.
2 Select [SETUP] using the
3 Select [ ] using the / buttons and press the button.
4 Select [OFF] using the
5 Press the
Two Corporate Center Drive, Melville, NY 11747-3157, U.S.A. Tel. 631-844-5000
Technical Support (USA):
24/7 online automated help: http://support.olympusamerica.com
Phone customer support: Tel. 1-888-553-4448 (Toll-free)
Our Phone customer support is available from 8 am to 10 pm (Monday to Friday) ET
E-Mail: distec@olympus.com
Olympus software updates can be obtained at: http://olympus.com/digital/
button again to exit the menu.
OLYMPUS OPTICAL CO.(EUROPA) GMBH.
(Premises/Goods delivery) Wendenstraße 14-18, 20097 Hamburg, Germany. Tel. 040-237730
(Hotline Numbers for customers in Europe)
Tel. 01805-67 10 83 for Germany
Tel. 00800-67 10 83 00 for Austria, Belgium, Denmark, France, Netherlands, Norway,
Tel. +49 180 5-67 10 83 for Finland, Italy, Luxemburg, Portugal, Spain, Czech
Tel. +49 40-237 73 899 for Greece, Croatia, Hungaria and the Rest of Europe
Our Hotline is available from 9 am to 6 pm (Monday to Friday)
(E-Mail) di.support@olympus-europa.com
© 2001 OLYMPUS OPTICAL CO., LTD.
Printed in Japan
1AG6P1P1146-- VT296801
(Letters) Postfach 10 49 08, 20034 Hamburg, Germany.
/ buttons and press the button.
/ buttons and press the button.
OLYMPUS AMERICA INC.
Sweden, Switzerland, United Kingdom
Republic
 Loading...