

Olympus CAMEDIA C-3030 ZOOM QUICK START GUIDE
0" / 88"
CANCEL
OK
0" / 88"
CANCEL
OK
NEW ERASE
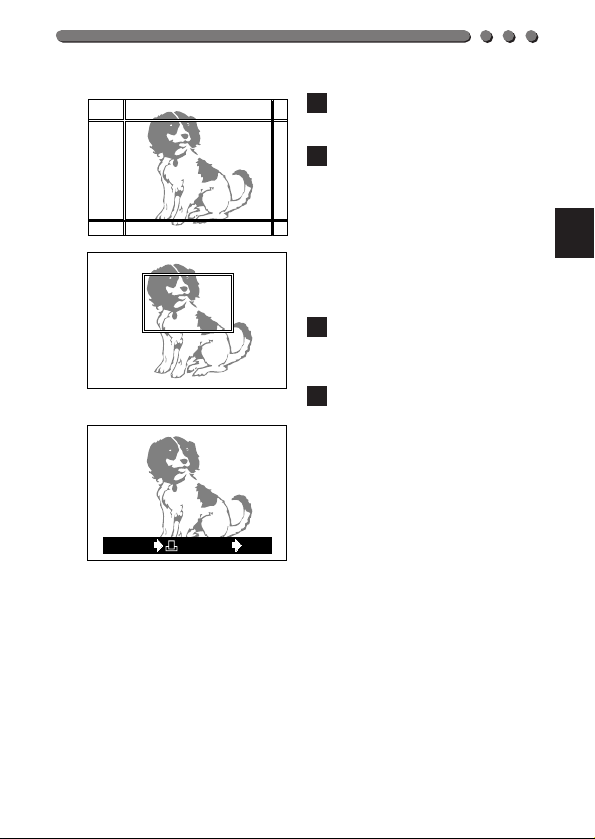
6
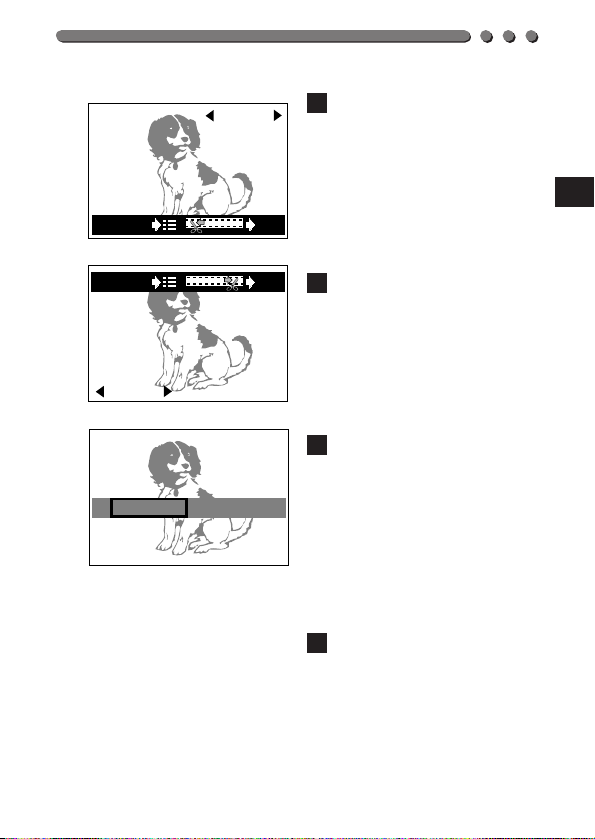
Press the right/left arrows on
the Jog dial to select the first
frame, then press the OK
button.
• If the top arrow on the Jog dial
is pressed, the first frame of
the movie is displayed, and if
the bottom arrow is pressed,
the last frame is displayed.
7
Press the right/left arrows on
the Jog dial to select the last
frame, then press the OK
button.
• Just as when selecting the top
frame, the top/bottom arrows
on the Jog dial can be used to
select the frame.
8
Press the right/left arrows on
the Jog dial to select NEW or
ERASE.
• If NEW is selected, the edited
movie is saved as a new
movie with a different name.
• If ERASE is selected, the
edited movie is saved under
the original name. The original
movie is discarded.
9
Press the OK button to record
the movie and cancel the
Menu.
159
CARD SETUP
YES
NO
P
A/S/M
OFF
P
O
W
E
R
/
M
O
D
E
D
I
A
L
[
1/1
]
24
MOVIE
PLAY
CARD
SETUP
MODE
SETUP
FUNCTION
INFO
YES
NO
ALL-FRAME ERASE
542
1
76
3
1
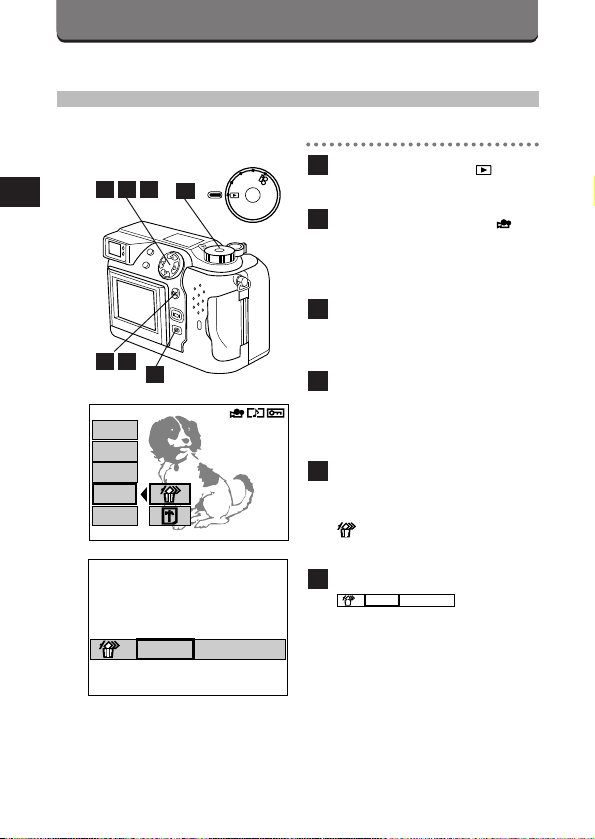
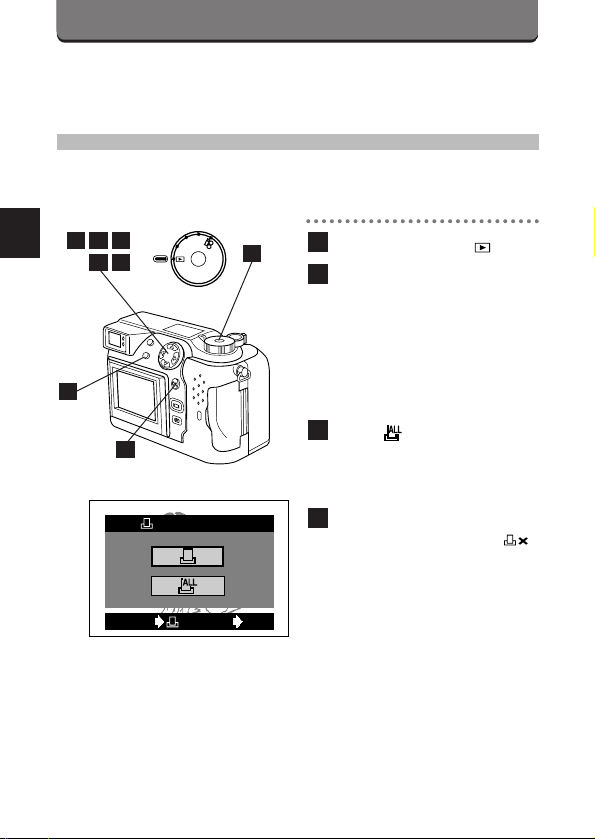
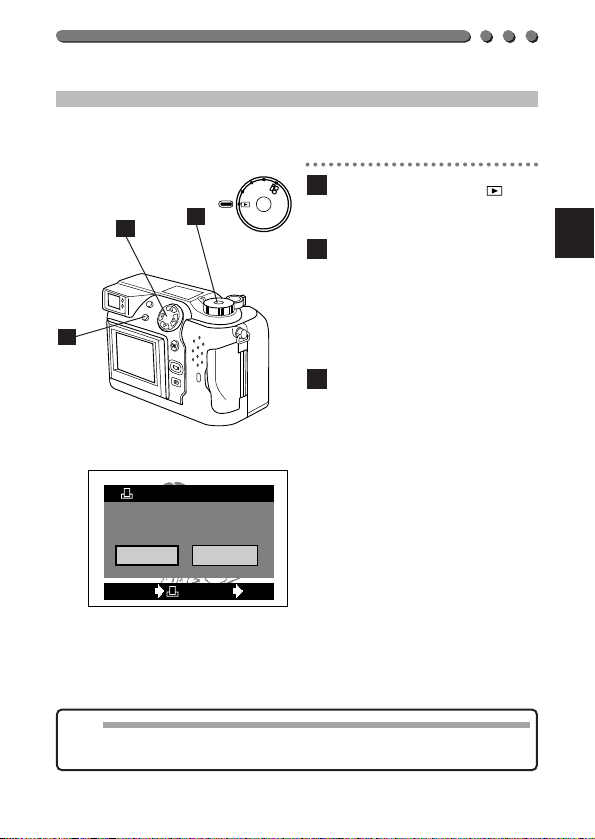
Set the Mode dial to .
2
Display a picture with on
the LCD monitor using the
Jog dial.
3
Press the Menu button to
display the Menu.
4
Press the top/bottom arrows
on the Jog dial to select CARD
SETUP.
5
Press the right arrow on the
Jog dial, then press the
top/bottom arrows to select
.
6
Press the OK button to display
.
160
7
Press the OK button with YES
selected to erase all the
pictures in the card.
• To cancel, select NO using the
right arrow on the jog dial.
8
When complete, NO PICTURE
appears on the LCD monitor.
• Protected frames will remain in
the card, and the last frame will
be displayed. (p. 112)
Caution:
Be careful not to erase important picture data by mistake as it cannot
•
be retrieved.
•
Never open the card cover, eject the card, remove the batteries, or pull
the plug while erasing pictures. It may destroy the data in the card.
•
When a write-protect adhesive seal is placed on the card, the camera
does not enter the Erase mode.
161
YES
NO
CARD SETUP (Cont.)
P
A/S/M
OFF
P
O
W
E
R
/
M
O
D
E
D
I
A
L
[
1/1
]
24
MOVIE
PLAY
CARD
SETUP
MODE
SETUP
FUNCTION
INFO
YES
NO
CARD FORMAT
You can format the card.
542
1
76
3
162
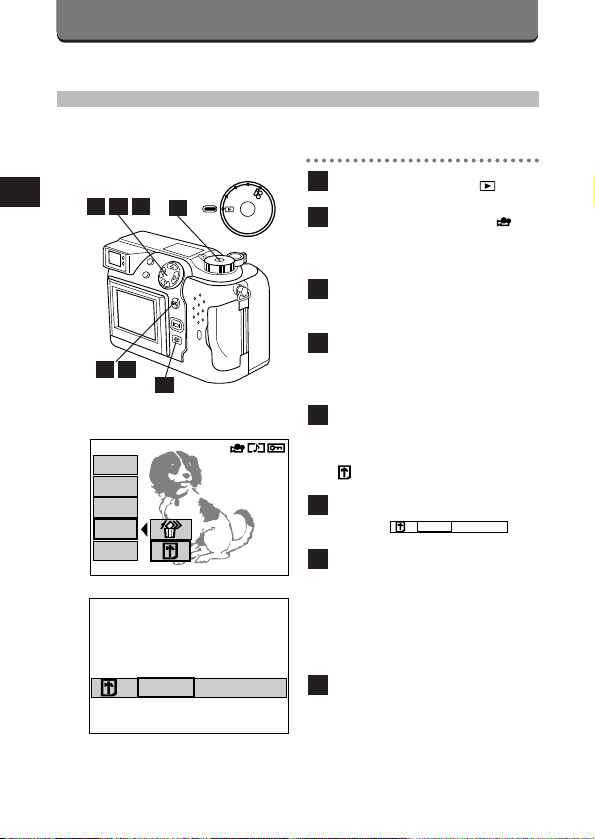
1
Set the Mode dial to .
2
Display a picture with on
the LCD monitor using the
Jog dial.
.
3
Press the Menu button to
display the Menu.
4
Press the top/bottom arrows
on the Jog dial to select CARD
SETUP.
5
Press the right arrow on the
Jog dial, then press the
top/bottom arrows to select
.
6
Press the OK button to
display .
7
Press the OK button again
with YES selected to format
the card.
• To cancel, select NO using the
right arrow on the Jog dial and
press the OK button.
8
When complete, NO PICTURE
appears on the LCD monitor.
Note:
• Formatting the card erases the existing data, including pictures which
have been write-protected from the camera. Be careful not to erase
important data when formatting a recorded card.
• Formatting will not be engaged when a write-protect adhesive seal is
placed on the card.
• Non-Olympus brand cards or cards formatted from or used in a computer
must be formatted by the camera. These cards may take longer to record
than recommended Olympus brand cards.
• It is highly recommended that you confirm the contents before formatting.
163

164

4
STORING DATA FOR
PRINTING PICTURES
● Recorded images can be printed out with a printer.
● Selected images can be reserved in a SmartMedia
card for printing on a printer or at a photo lab that
supports the DPOF (Digital Print Order Format)
system.
OLYMPUS DIGITAL CAMERA

ABOUT PRINT SETTINGS
You can make prints of images stored in a SmartMedia, using one of the
following methods:
1. Images in the SmartMedia can be selected for printing, as well as the
number of copies for each and whether or not to print the date and
time with them. This information is saved in the card (Print-reserve)
for later printing from a printer or at a photo lab that supports DPOF.
2. If a SmartMedia with Print-reserve data recorded in it is inserted into
an Olympus CAMEDIA P-330N/P-300 printer, printing can be
performed at the touch of a button. For more information, consult
your printer’s user manual.
3. Images can be transferred directly to a personal computer via USB or
a PC connection kit, or by using an optional FlashPath, PC Card
Adapter or USB SmartMedia Reader/Writer. Images can then be
printed on a printer connected to the personal computer using a
softtware application. For more information, consult the software’s
user manual.
About DPOF
DPOF (Digital Print Order Format) is a system that allows you to
select images in a SmartMedia card to be printed as well as the
number of copies to make of each. This information is stored in the
card for use by printers or photo labs that support this system to
make prints automatically.
166
Note:
• Images taken with this camera can also be printed using a printer or at a
photo lab that supports the Design rule for Camera File system/DCF.
• DPOF reservations set by another device cannot be changed by this
camera. Make changes using the original device.
• If a card contains DPOF reservations set by another device, entering
reservations using this camera may overwrite the previous reservations.
• Even if an image appears with the message "PICTURE ERROR", print
reserve may be performed on it. In such a case, the print reserve icon
( ) does not appear on the screen where an image is displayed for full
view. Since appears on the screen where multiple images are
displayed (index-display mode), it is possible to confirm the print reserve
status.
• This camera cannot be directly connected to printers such as the
Olympus P-300 digital printer.
• Not all functions may be available on all printers or at all photo labs.
167
PRINT-RESERVE
P
A/S/M
OFF
P
O
W
E
R
/
M
O
D
E
D
I
A
L
CANCEL
PRINT ORDER
SET
OK
You can store data for making prints with a printer or at a lab that
supports this system.
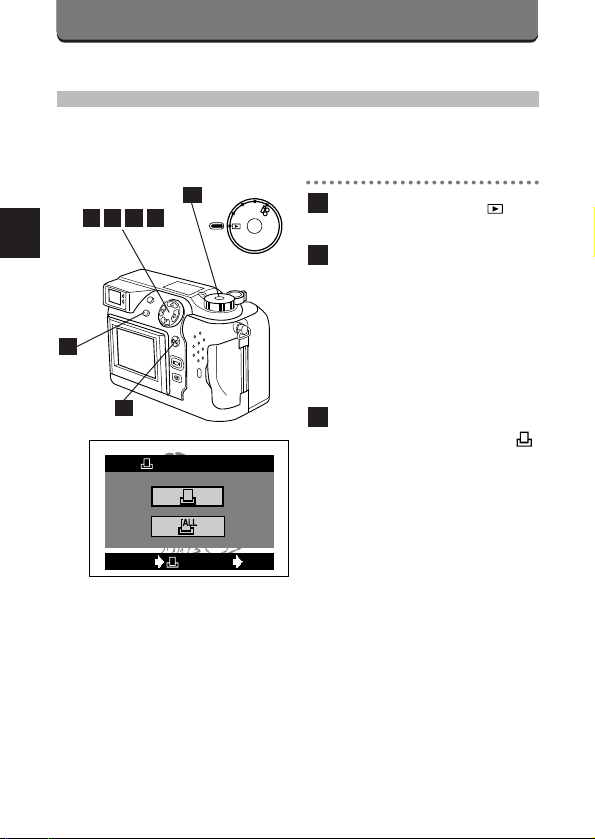
ALL-FRAME PRINT RESERVE
You can store data for printing all the pictures in the card as well as
choose the number of prints to make.
2
168
543
76
8
1
1
Set the Mode dial to .
2
Press the Print button to
display the Print reserve
setting screen.
• If Print-reserve data is already
stored in the card, a screen
will appear giving you the
choice of resetting the data or
keeping it. (p. 177)
3
Select using the Jog dial,
then press the OK button.
• The print number and date
setting screen is displayed.
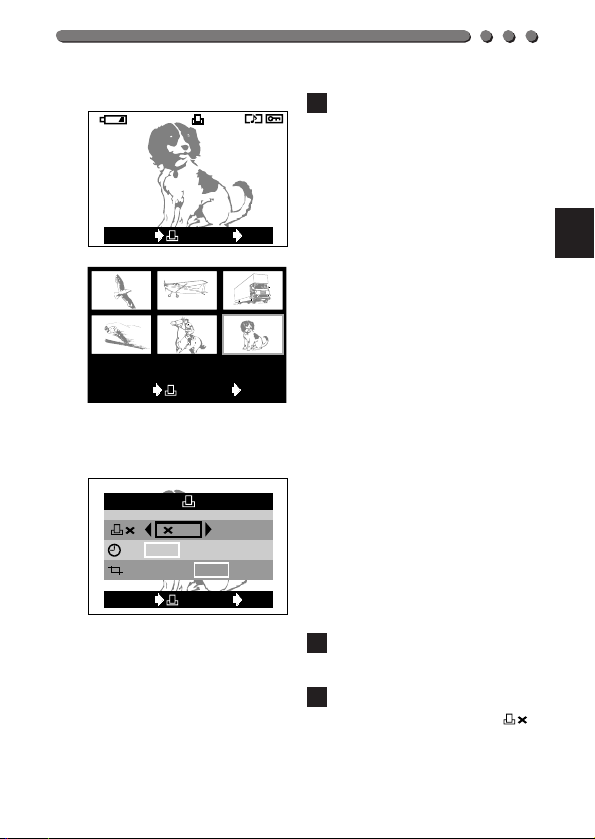
4
Press the top/bottom arrows
on the Jog dial to select .
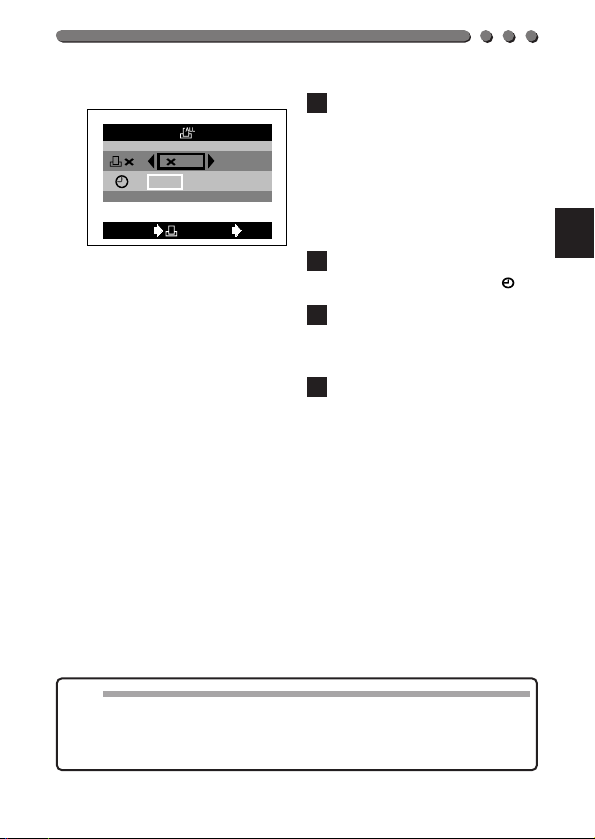
: 1
:
DATE TIME NO
CANCEL SET
OK
5
Press the left/right arrows on
the Jog dial to enter the
number.
• Press the left arrow to decrease
the number, and the right arrow
to increase it.
• The number of prints can be
set from 0 to 10.
6
Press the top/bottom arrows
on the Jog dial to select .
7
Press the left/right arrows on
the Jog dial to select DATE,
TIME or NO.
8
Press the OK button.
• The Menu screen disappears
and the print reserve indicator
and the number of prints are
displayed on the screen.
Note:
• The setting will remain until it is readjusted.
• If you are printing using the P-330N or P-330, only the first 255 images
can be printed.
• Print reserve may take considerable time in some cases.
169
PRINT-RESERVE (Cont.)
CANCEL
PRINT ORDER
SET
OK
P
A/S/M
OFF
P
O
W
E
R
/
M
O
D
E
D
I
A
L
SINGLE-FRAME PRINT RESERVE
You can store data for making prints with a printer or at a lab that
supports this system.
170
2
6543
6
1
1
Set the Mode dial to and
display a still picture.
2
Press the Print button to
display the Print reserve
setting screen.
• If Print-reserve data is already
stored in the card, a screen
will appear giving you the
choice of resetting the data or
keeping it. (p. 177)
3
Press the top/bottom arrows
on the Jog dial to select ,
then press the OK button.
• The Print reserve setting
screen is displayed. If the
zoom lever is pressed toward
T, printing with trimming is
available. (p. 174)
Print reserve selection screen
CANCEL SET
OK
: 1
:
DATE
:
YES
TIME NO
NO
HQ
6453
x10
CANCEL SET
OK
1234 1235 1236
1237 1238
CANCEL SET
1239
OK
4
Press the arrows on the Jog
dial to select the image you
would like to print.
• Left arrow: Displays the image
in the previous frame.
Right arrow: Displays the
image in the next frame.
Top arrow: Displays the image
10 frames back.
Bottom arrow: Displays the
image 10 frames forward.
• Press the Zoom lever toward
W to display an index of
images.
Left arrow: Moves to the
previous frame.
Right arrow: Moves to the next
frame.
Top arrow: Displays the
previous page.
Bottom arrow: Displays the
next page.
The index is displayed as
follows: when the number of
frames shown in the IndexDisplay mode (p. 211) is 4, 9
or 16 frames, then 2, 6 or 12
frames are displayed
respectively.
5
Press the OK button to
display the setting menu.
6
Press the top/bottom arrows
on the Jog dial to select .
171
PRINT-RESERVE (Cont.)
P
A/S/M
OFF
P
O
W
E
R
/
M
O
D
E
D
I
A
L
CANCEL SET
OK
: 1
:
DATE
:
YES
TIME NO
NO
CANCEL SET
OK
: 1
:
DATE
:
YES
TIME NO
NO
7
Press the left/right arrows on
1110
987
the Jog dial to enter the
number of prints.
• Press the left arrow to
decrease the number, and the
right arrow to increase it.
• The number of prints can be
set from 0 to 10.
• If the number of prints has
already been set for the
selected image, the previously
set number is displayed.
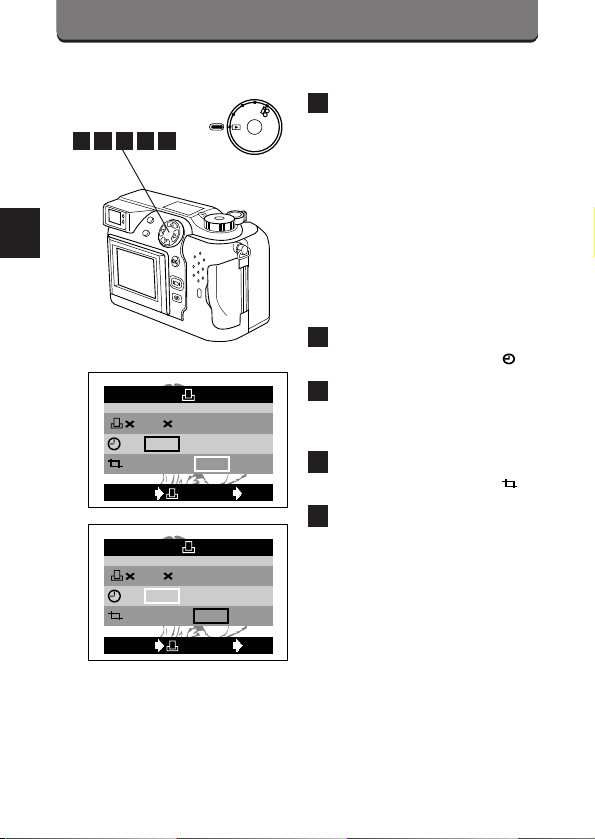
8
Press the top/bottom arrows
on the Jog dial to select .
9
Press the left/right arrows on
the Jog dial to select DATE,
TIME or NO.
10
Press the top/bottom arrows
on the Jog dial to select
11
Press the left/right arrows on
the Jog dial to select YES or
NO.
• If trimming is not set, YES
cannot be selected.
• Refer to “Trimming Print
Reserve” for setting trimming.
(p. 174)
.
172

12
P
A/S/M
OFF
P
O
W
E
R
/
M
O
D
E
D
I
A
L
12
Press the OK button.
• The Menu screen disappears
and the print reserve indicator
and the number of prints are
displayed on the screen.
• To set print reserve for more
images, repeat steps 4
through 12.
13
Press the Print button to exit
the Print reserve mode and
13
return to the Display mode.
Note:
• Images taken with this camera can be printed using a printer or at a lab
that supports the Design rule for Camera File system/DCF.
• If you are printing using the P-330N or P-330, only the first 255 images
can be printed.
• Print reserve may take considerable time in some cases.
173
PRINT-RESERVE (Cont.)
P
A/S/M
OFF
P
O
W
E
R
/
M
O
D
E
D
I
A
L
HQ
6453
x10
CANCEL SET
OK
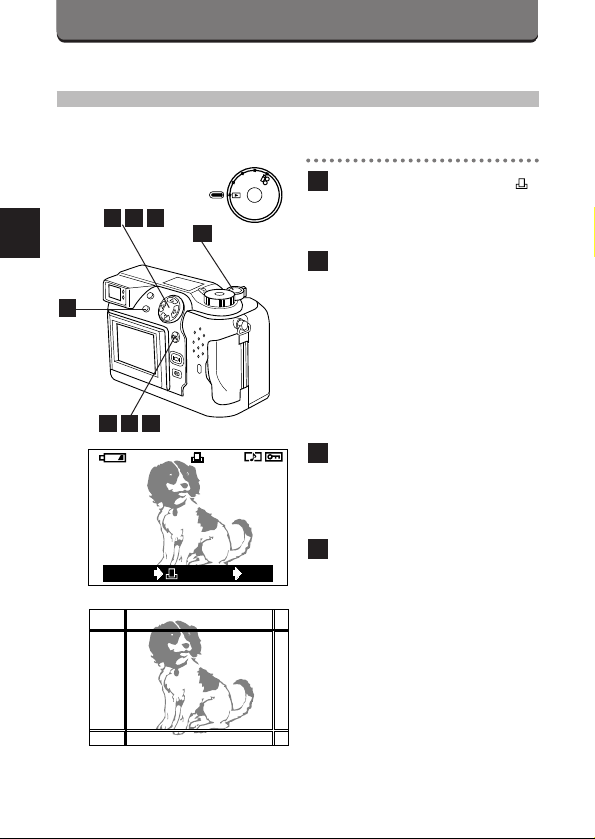
TRIMMING PRINT RESERVE
You can print an enlarged part of a recorded picture.
1
Select PRINT ORDER— ,
then press the OK button. The
Print reserve selection screen
appears. (p. 170)
2
Press the arrows on the Jog
dial to display the image you
want to print.
• Left arrow: Displays the image
in the previous frame.
Right arrow: Displays the
image in the next frame.
Top arrow: Displays the image
10 frames back.
Bottom arrow: Displays the
image 10 frames forward.
3
Press the zoom lever toward T
to display the Trimming mode
screen.
• The selected item is displayed
in green.
4
Move the cursor to set the top
left corner of the image you
would like to print.
• Move the cursor up and down
by pressing the top/bottom
arrows on the Jog dial, and
move it left and right by
pressing the left/right arrows.
• Press the zoom lever toward
W to move the cursor to the
top left edge of the image, and
press it toward T to move it to
the bottom right edge.
1
174
642
3
875
Trimming mode display
OK
CANCEL SET
OK
Displayed for 1 second.
When the setting is finished, the
image and frame are displayed for
1 second, then the PRINT
ORDER menu reappears.
5
When the position is set,
press the OK button.
6
Move the cursor to set the
bottom right corner of the
image that you would like to
print.
• Use the same procedure as in
step 4.
• Press the Print button to go
back to the upper left corner
setting screen.
7
Press the OK button to set the
trimming size. The image is
displayed on the LCD monitor.
8
Press the OK button again to
display the Single-frame print
reserve screen.
• Following the procedure for
Single-frame print reserve, set
the number of prints, date/time,
and trimming. (p. 170)
• If you would like to continue to
trim other images, repeat the
above procedure from steps 1
to 8.
175

PRINT-RESERVE (Cont.)
Note:
• The size of the printed image will vary depending on the print reserve
settings. An image trimmed to a small size will have lower resolution.
• For best results with close-up prints, it is recommended to use the TIFF,
SHQ or HQ mode.
• The vertical to horizontal ratio in the trimming screen can be changed
using the Jog dial, but if the zoom lever is used, the ratio is fixed at 4:3.
176
RESETTING PRINT RESERVE
This resets all the print reserve settings for images saved in a card.
A/S/M
P
OFF
P
O
3
1
2
PRINT ORDER SETTING
PRINT ORDERED
RESET
KEEP
1
Set the Mode dial to and
L
A
I
display a still picture.
D
E
D
W
O
E
M
/
R
2
Press the Print button to
display the Print order setting
screen.
• If there are no images in the
card, this screen is not
displayed.
3
Press the left/right arrows on
the Jog dial to select RESET,
then press the OK button.
• To keep the print order, select
KEEP and press the OK
button.
• To remove the selected image
only, set the number of prints in
Single-frame print reserve to 0.
CANCEL SET
OK
Note:
• If RESET is selected, the print reserve will be canceled for all the images
in the card.
177

178

5
USING A
PERSONAL
COMPUTER
OLYMPUS DIGITAL CAMERA
COMPUTER SYSTEM REQUIREMENTS
When using the provided utility software:
Personal computers used with this camera must conform to the following
minimum standards.
To connect this camera directly to a personal computer, it must have
either a serial port or USB port.
● Windows
CPU: Pentium or later
OS: Windows 98/98 Second Edition/2000 Professional (USB)
Windows 95/98/98 Second Edition/2000 Professional/NT 4.0 SP3
or later
Available HD space: 100MB or more
RAM: 32MB or more (64MB or more recommended)
Connectors: USB port (USB connection)
Monitor: Thousands of colors recommended
Minimum monitor resolution: 800 x 600 pixels
QuickTime 4.0 must be installed to play back movies.
Note:
• USB support is not available under the following environments, even for
PCs equipped with a USB port.
Windows 98 upgrade (from Windows 95)
Windows 95
Windows NT 4.0
• To record or play back sound, a sound card and a microphone are
required.
RS-232C port (serial connection)
D-SUB 9-pin connector (serial connection)
180
● Apple Macintosh
CPU: PowerPC
OS: Mac OS 8.6 to 9 (USB)
Mac OS 7.6.1 to 9 (serial)
Available HD space: 100MB or more
RAM: 32MB or more (8MB or more free memory for the included
application)
Connectors: USB port
Monitor: Thousands of colors recommended
Minimum monitor resolution: 800 x 600 pixels
QuickTime 4.0 must be installed to play back movies.
Note:
• For USB connection, your Macintosh must have a USB port.
• To record sound, microphone is required.
Serial port
INSTALLING PROVIDED
SOFTWARE
To take full advantage of a wide range of functions, including download,
display, storage and panorama, your Olympus digital camera comes with
software applications and CAMEDIA Master. For installation and
operation, please refer to the software’s online documentation.
QuickTime 4.0 must be installed on the computer to play back movies.
181
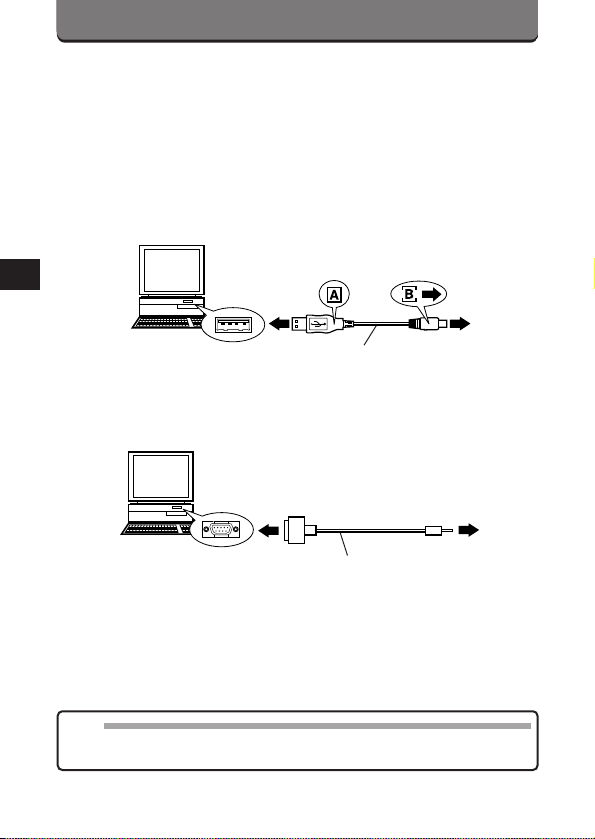
CONNECTING TO A PERSONAL
COMPUTER
Use the appropriate connector according to your computer’s
specifications.
● For USB-equipped computers (IBM PC/AT compatible, Apple
Macintosh)
Connect the provided USB cable to the USB port on your computer.
USB port
USB connection cable
● For serial port-equipped computers (IBM PC/AT compatible)
Connect the optional RS-232C PC serial cable to the serial port
(COM1, COM2, etc.) on your computer.
Serial port
RS-232C PC serial cable
Note:
• In order to prevent battery consumption, use of the optional AC adapter
(C-7AU) is recommended.
Camera’s
USB
connector
Camera’s
Computer
connector
182
 Loading...