

Page 1

3
Other Ways to Use Your
Camera
E
Page 2
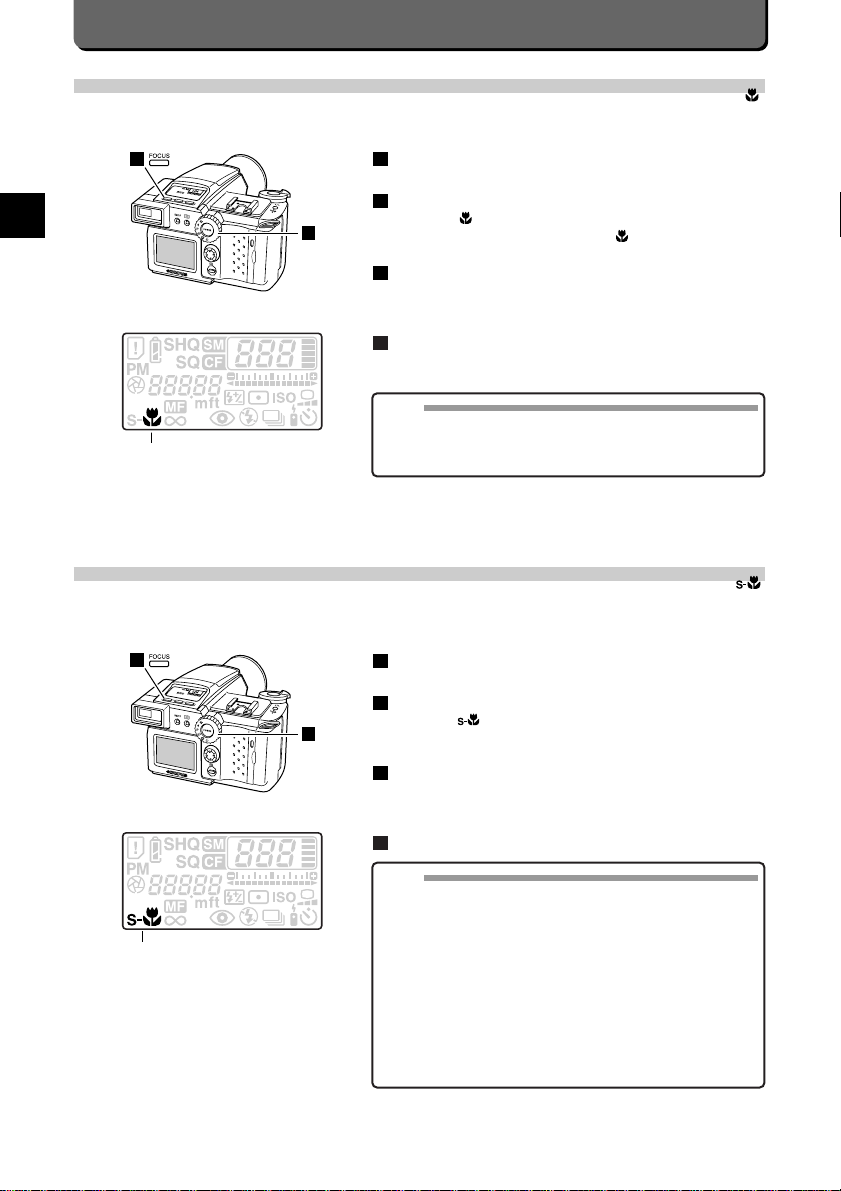
Macro Mode
The macro mode is for taking pictures of small subjects at very close distance.Ranges as small as 9 x 11 cm ( 3.5 x 4.3 in.) can
be taken when photographed from 0.3 (1 ft.)m away.(TELE)
Set the mode dial to "P", "A" or "M".
Press the [FOCUS] button.
Check that appears on the control panel. If not, press the
[FOCUS] button several times to display .
Press the shutter release button down halfway.
This will lock the focus. The green lamp inside the viewfinder will light
up to indicate the camera is ready to take the picture.
Press the shutter release button down all the way.
4
3
2
1
E-30
MEMO
• The shutter can click at distances within 0.3 m (1 ft.)of the subject.In
such a case, check focus on the LCD monitor after taking the picture.
For images at less than 0.3 m (1 ft.) from the subject, it is recommended to use the super macro mode.(P.30)
1
2
Macro
Super Macro
The super macro mode is for taking pictures at even closer distances than that offered in the macro mode.You can get as close
as 2 cm (0.8 in.) from the subject.
Set the mode dial to "P", "A" or "M".
Press the [FOCUS] button.
Check that appears on the control panel. If not, press the
[FOCUS] button some times until it appears.
Press the shutter release button down halfway.
This will lock the focus. The green lamp inside the viewfinder will light
up to indicate the camera is ready to take the picture.
Press the shutter release button down all the way.
4
3
2
1
NOTE
• The built-in flash which is in the fill-in flash mode can be used in the
super macro mode. However, the lens can cast a shadow over the
subject or the subject might not otherwise be properly illuminated.
• In the super macro mode, you can get as close as 60 cm (2 ft.) to
2 cm (0.8 in.) of subjects, but subjects closer than 0.3 m (1 ft.) will
appear to be out of focus in the "TELE" mode.Use the edge of the
"WIDE" mode.
• Outlines of subjects may be awry when you get as close as 2 cm
(0.8 in.) of subjects.
• It takes more time than usual to focus when you are in the Macro
mode right after taking pictures of subjects at a distance.
• Using the optional Wide conversion lens (WCON-08) or Macro conversion lens (MCON-40) in the super macro mode may not achieve
sufficient effect.
1
2
Super Macro
Page 3
Other Ways to Use Your Camera
E
E-31
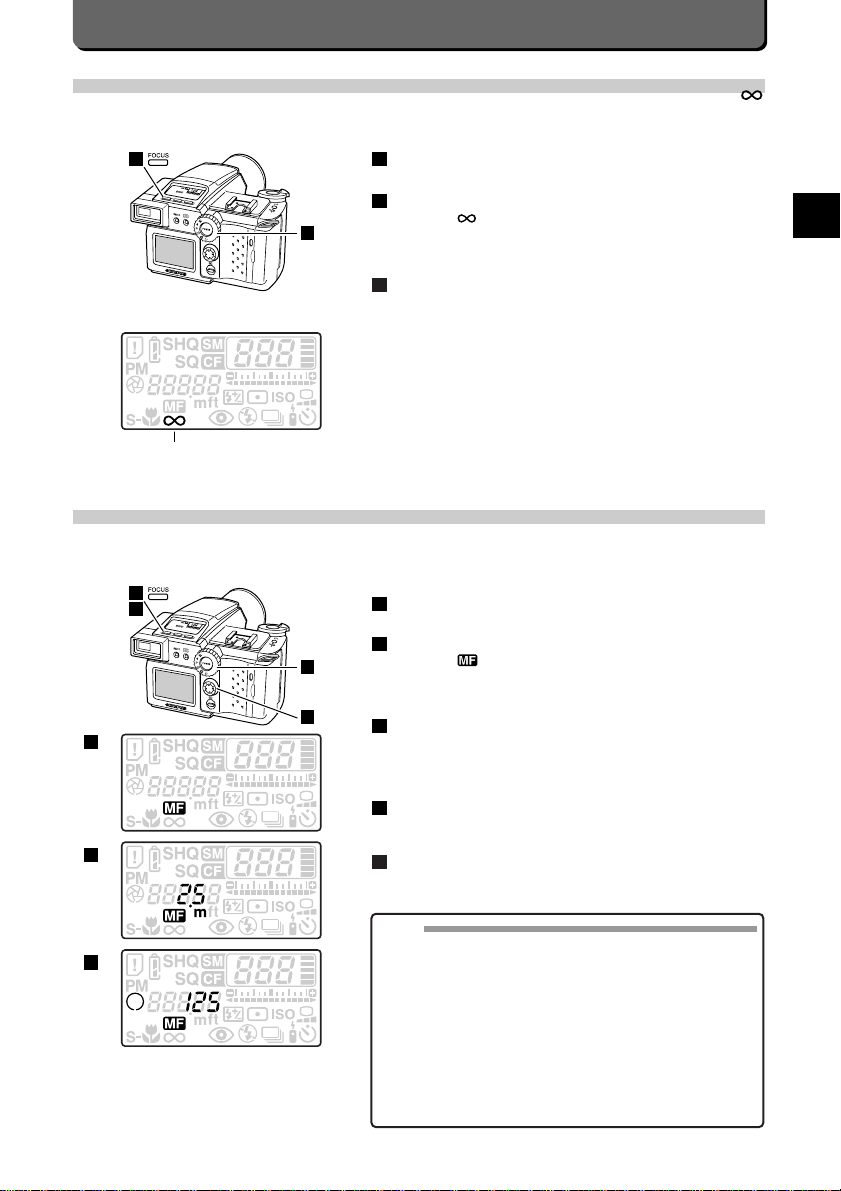
Infinity Mode
The infinity mode is used to take pictures of faraway subjects.
Set the mode dial to "P", "A" or "M".
Press the [FOCUS] button.
Check that mark appears on the control panel.
If it does not appear, press the [FOCUS] button a number of times
until it appears.
Press the shutter release button down all the way.
3
2
1
1
2
Infinity
Manual Focusing
It is possible to set the distance manually and focus on subjects.Manual focusing is effective with - for example - subjects which
cannot be brought into focus with the autofocus feature (P.17).
Set the mode dial to "P", "A" or "M".
Press the [FOCUS] button.
Check that appears on the control panel.
If it does not appear, press the [FOCUS] button a number of times
until it appears.
Set the focal distance with the top / bottom point of the jog dial.
If a picture was already taken with manual focusing, the previous
value will be displayed.
Values displayed on the LCD are just standard references.
Press the shutter release button down halfway.
Shutter speed and aperture will be displayed on the control panel.
Press the shutter release button down all the way.
To change the focal distance again, press the [FOCUS] button.
5
4
3
2
1
1
3
2
5
3
2
4
MEMO
• Pressing the shutter release button with the [OK] button held down
will enable quick focus mode.
• It is recommended to check the focus of the images right after taking
them.
• The unit of distance can be meters (m) or feet (ft) (P. 75).
• Only the following operations are available during manual focusing
distance setting operation: – Card change. – Mode dial. – ON/OFF
button. – Shutter release button. – Card compartment cover opening/closing. – Flash opening/closing. – Zooming. – Jog dial up/down.
– Focus locking.
• Sudden temperature change or other external effect may cause the
focus setting to deviate.If this happens, try to take pictures with the
focus set one step closer or farther.
Page 4
E-32
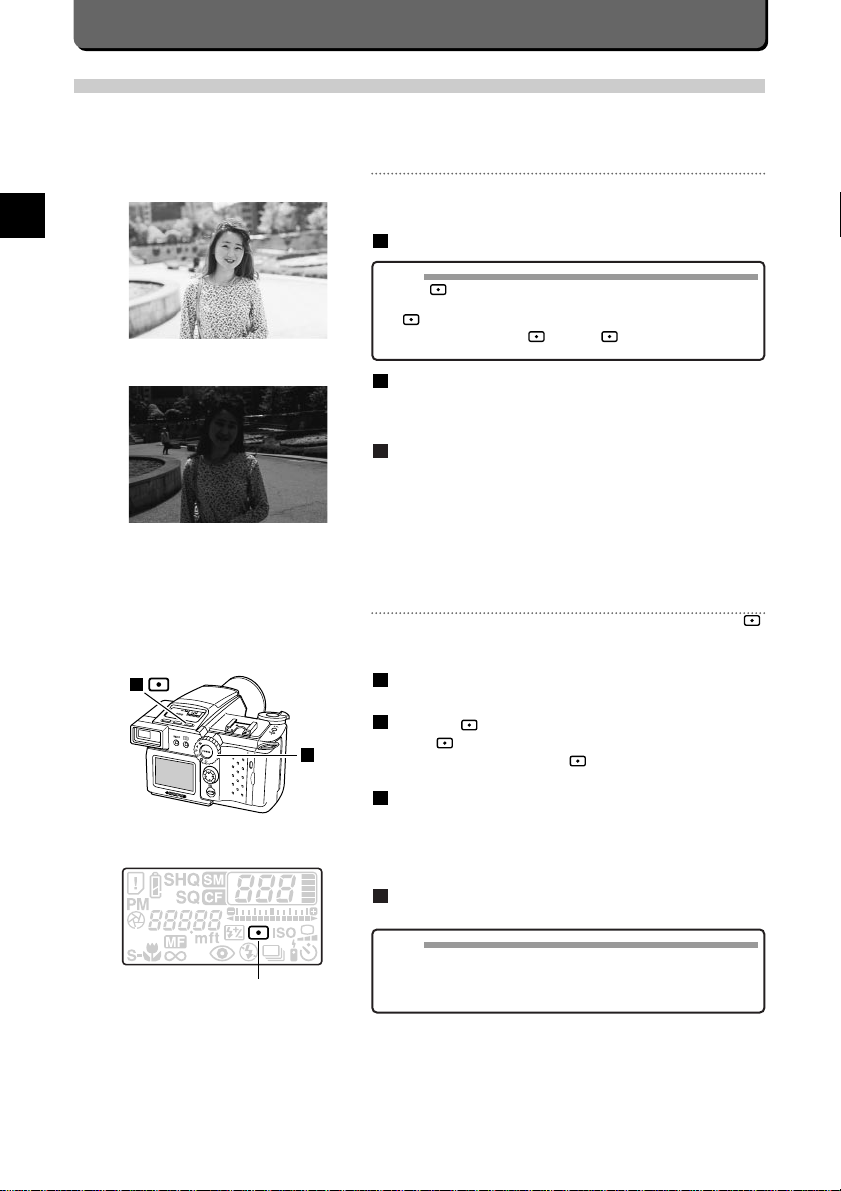
Spot Metering
Spot metering is used to get the right exposure with dark subjects.With
backlighted subjects, images are not affected by background light.
Set the mode dial to "P", "A" or "M".
Press the [ ] button.
Check appears on the control panel.
If it does not appear, press the [ ] button.
Position the autofocus mark over the subject and press the
shutter release button down halfway.
This will lock the focus and exposure.The green lamp inside the
viewfinder will light up to indicate the camera is ready to take the picture.
Press the shutter release button down all the way.
4
3
2
1
1
2
Spot Metering mode
NOTE
• At spot metering, when you use the built-in flash, a preliminary flash
light is emitted to do metering by pressing the shutter release button
down halfway.The regular flash light is emitted by pressing the shutter release button down all the way.
Setting Metering Mode
Metering measures the brightness of the subject before the picture is taken.This information is used then to determine exposure.With the Camedia C-2500L , you can select between centre metering and spot metering.The default is centre metering.
Centre Metering
This is the metering technique used generally in picture-taking. Light is
metered across a wide area around the centre of the image.
Set the mode dial to "P", "A" or "M".
Press the shutter release button down halfway.
The green lamp inside the viewfinder will light up to indicate the camera is ready to take the picture.
Press the shutter release button down all the way.
This will lock the focus and exposure.
3
2
1
Spot Metering
Centre Metering
MEMO
• Check does not appear on the control panel.
The default is centre metering with the C-2500L.
If appears on the control panel, spot metering is the set metering technique. Press the [ ] button. will disappear from the
control panel and center metering will be set.
Page 5
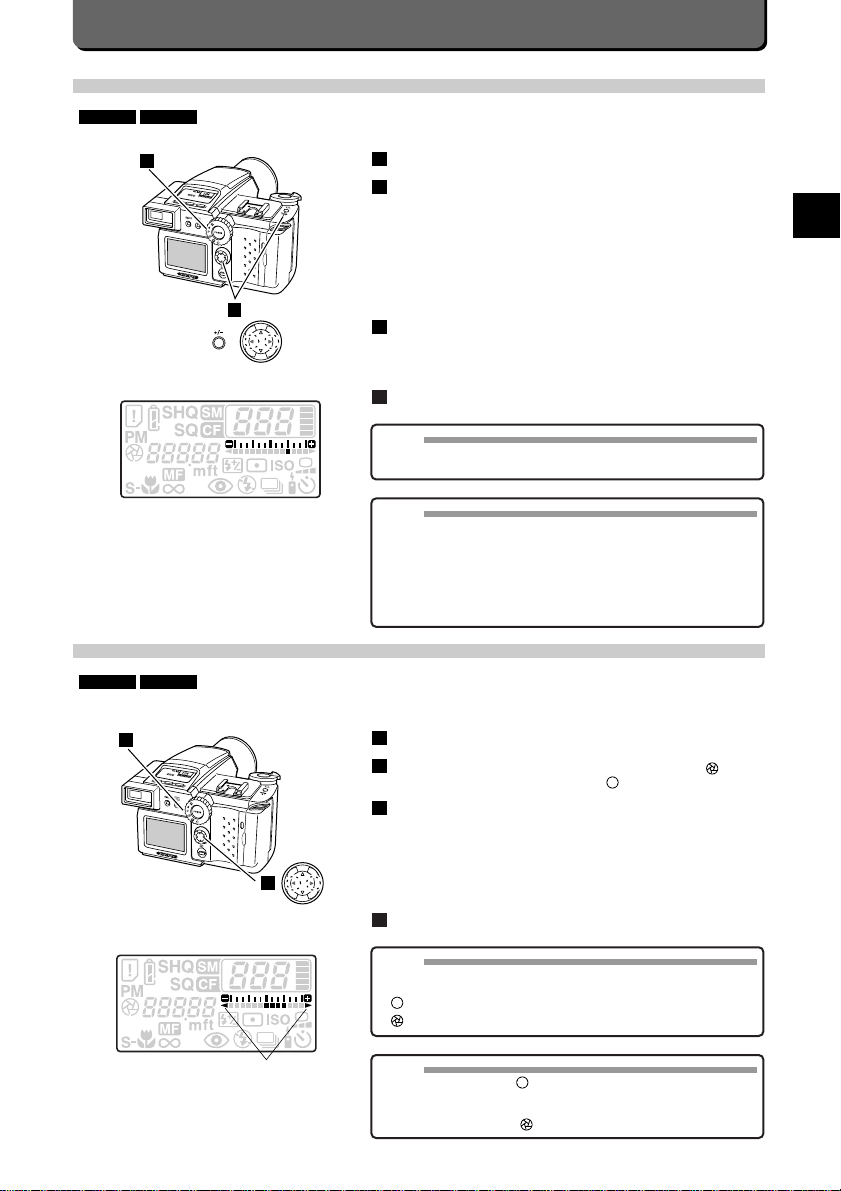
Setting Aperture
By setting the aperture manually, you can take sharp pictures from foreground to background or with the foreground and background deliberately out-of-focus.
Set the mode dial to "A" or "M".
Use the left point of the jog dial to set the aperture at and
the right point to set the aperture at .
Press the shutter release button down halfway to lock the focus.
The green lamp inside the viewfinder will light up to indicate the camera is ready to take the picture.
The exposure level will be displayed on the control panel when you
are in the M mode.
If exposure is off by more than ±2 EV, a triangle blinks on the panel.
If metering is impossible, the entire exposure indications blinks.
Press the shutter release button down all the way.
4
3
2
1
M MODEA MODE
Other Ways to Use Your Camera
E
E-33
Exposure Compensation
In the P and A modes, you can compensate exposure to ±2EV in 1/3 EV steps.
Set the mode dial to "P" or "A".
While holding down the [+/-] button, set the exposure compen-
sation with the right / left point of the jog dial.
Pressing the right point of the jog dial with the [+/-] button held down
increases (+) compensation.
Pressing the left point of the jog dial with the [+/-] button held down
increases (-) compensation.
Exposure compensation will be displayed on the control panel.A
tone is emitted when either the highest or lowest value of the exposure compensation is reached.
Once the exposure compensation is decided, press the shutter
release button down halfway.
The green lamp inside the viewfinder will light up to indicate the camera is ready to take the picture.
Press the shutter release button down all the way.
4
3
2
1
A MODEP MODE
2
1
"P" / "A"
MEMO
• The flash light is not compensated automatically.See P. 47 about
how to change the amount of the flash light.
Triangle
1
2
"A" / "M"
MEMO
• Aperture has varying values in the TELE and the WIDE modes.
WIDE TELE
F2.8 F3.9
F5.6 F7.8
NOTE
• If exposure is compensated in the positive direction when the flash is
used, the shutter speed will be reduced in order to expose the background more clearly.In this case, hold the camera firmly to avoid picture blur.
• The selected exposure compensation value is stored in memory
although the power is switched off.Check the value when turning on
the camera again.
NOTE
• If the aperture is set at , smear may occur in the picture frame in
areas where there is a bright object (e.g., reflected sunlight).This
phenomenon is a normal characteristic of the CCD.Should this happen, set the aperture to .
Page 6
E-34
Setting Shutter Speed
Setting shutter speed enables you to capture objects in motion.
Set the mode dial to "M".
Set shutter speed with the top / bottom point of the jog dial.
Pressing the top point of the jog dial will fasten up shutter speed.
Pressing the bottom point of the jog dial will slow down shutter
speed.
Press the shutter release button down halfway.
The green lamp inside the viewfinder will light up to indicate the camera is ready to take the picture.
The exposure level will be displayed on the control panel.
If exposure is off by more than ±2 EV, a triangle blinks on the panel.
If metering is impossible, all the exposure indications blink.
Press the shutter release button down all the way.
4
3
2
1
M MODE
NOTE
• A 1/250-sec. or faster shutter speed may eliminate the effect of the
flash light.
1
2
"M"
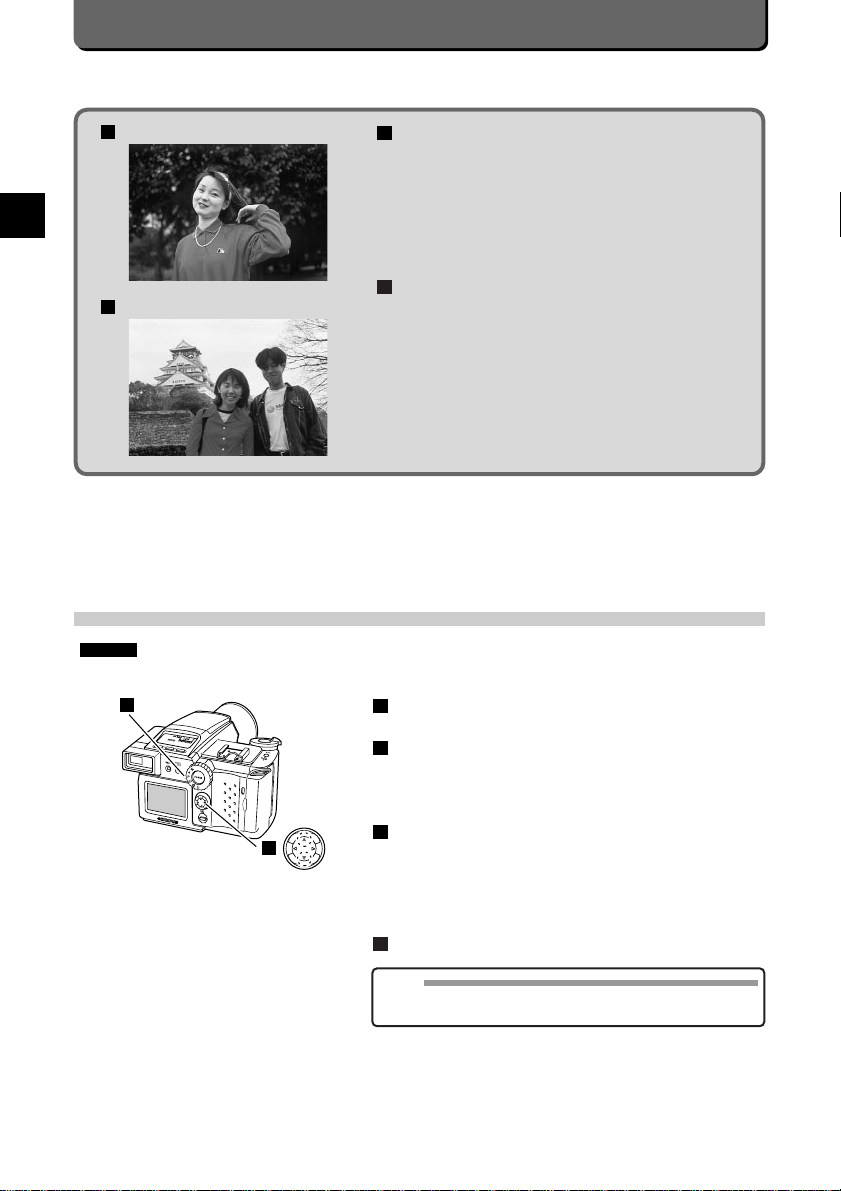
Portraits
Try recalling a portrait you have seen. Many times, a portrait of a
singer or movie star shows the subject in focus with a plain or out-offocus background.You can take portrait-like shots by making the background hazy so that the subject stands out.This is done easily in the A
mode by simply setting a narrow aperture.
To make the background blurry, the aperture must be F 2.8. The wider
the aperture, the narrower the range of focus is, hence the background
falls out-of-focus.
Group Photographs
Try recalling a group photograph such as a class photo taken on a
school trip. Everyone stands in a row and a wide area including the
background is brought into focus.You, too, can take group photographs
that focus not only on the subject but the background as well.This is
done easily in the A mode by simply setting a wide aperture.
To include the background within the range of focus, the aperture must
be F 5.6.The wider the aperture, the narrower the range of focus is,
hence the background falls out-of-focus.The narrower the aperture, the
wider the range of focus is, hence the background can be brought
within focus.
B
A
A
B
Portraits
Group Photographs
Page 7
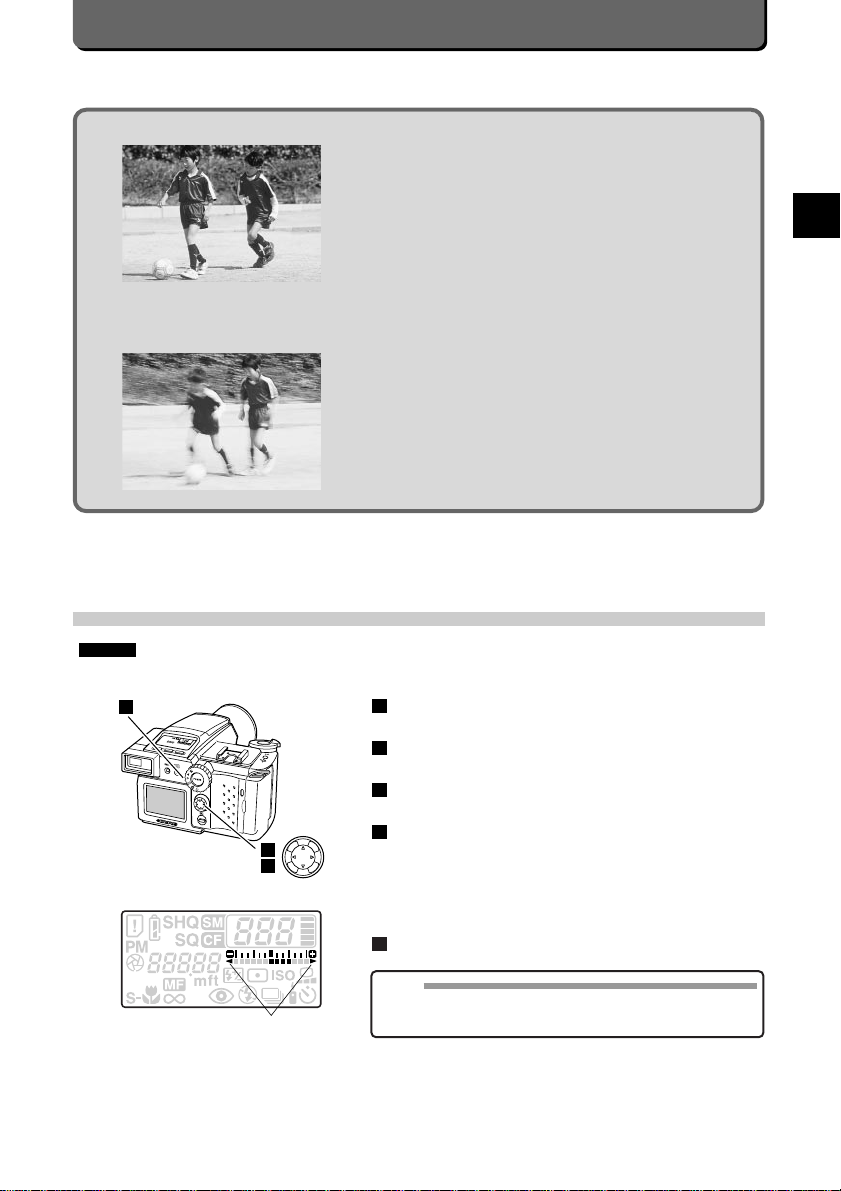
Taking Pictures of Moving Objects
By changing the shutter speed, you can change the way someone running or a car in a race comes out.This special effect is done in the M
mode with the manual shutter speed feature.
The faster the shutter speed (1/500, 1/1000 sec, etc.), the more an
object in motion seems frozen.
The slower the shutter speed (1/15, 1/30 sec, etc.), the more an object
in motion seems to be flowing.
Shutter Speed
Shutter speed is displayed as a unit of time:1/15, 1/8, 1/4, 1/2, (sec) ….
Fast Slow
1/2000 1/1000 1/500 1/125 1/60 1/30 1/15 1/8 1/4 1/2 1 2
On the control panel, " 1/125 " is displayed like " 125 " and " 2 " like " 2'' ''.
Other Ways to Use Your Camera
E
E-35
Fast
Slow
Manual Exposure
Setting shutter speed and aperture yourself lets you take highly expressive photographs.
Set the mode dial to "M".
Set aperture with the left / right point of the jog dial.
Set shutter speed with the top / bottom point of the jog dial.
Press the shutter release button down halfway.
The green lamp inside the viewfinder will light up to indicate the camera is ready to take the picture.
The exposure level will be displayed on the control panel.
If exposure is off by more than ±2 EV, a triangle blinks on the panel.
If metering is impossible, all the exposure indications blink.
Press the shutter release button down all the way.
5
4
3
2
1
M MODE
1
2
3
"M"
Triangle
NOTE
• When you specify slow shutter, the available range of the film speed
(ISO number) will be limited. Plus, this can make images noisier
according to the sensitivity of the CCD.
Page 8
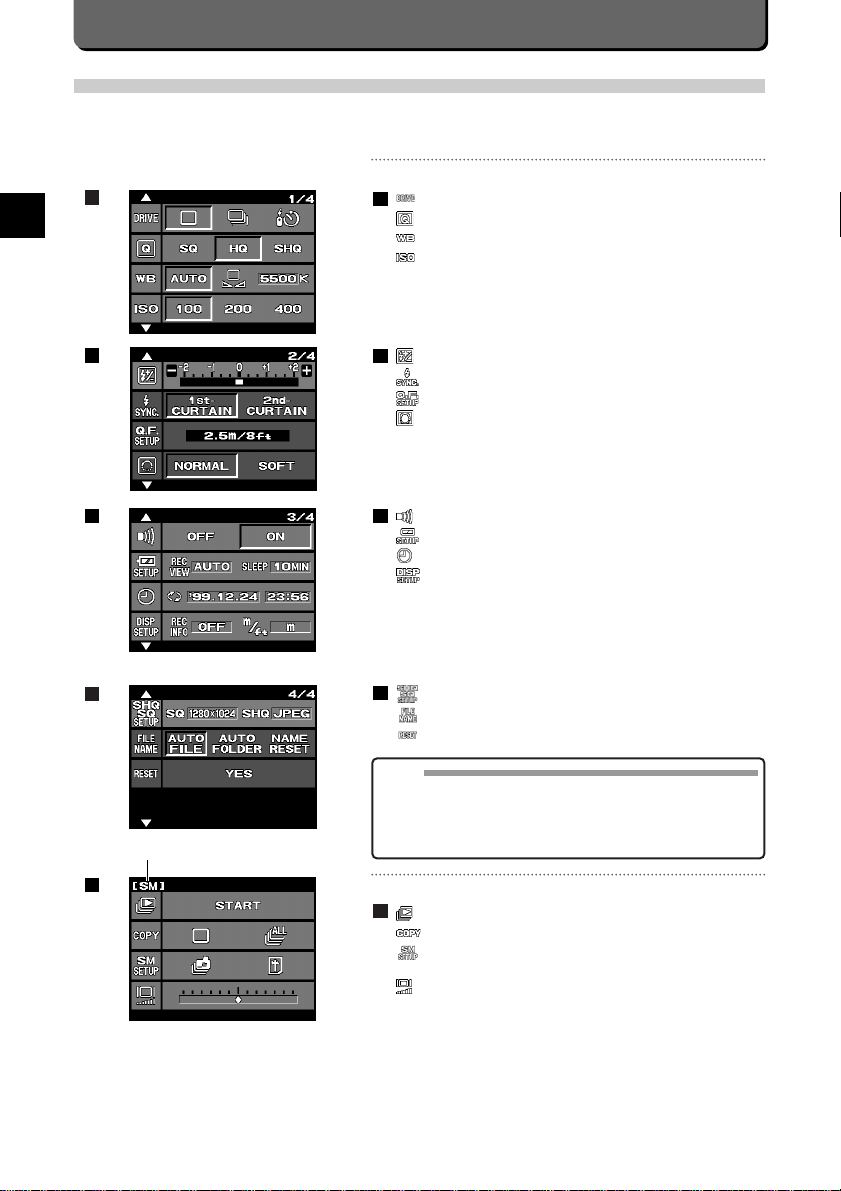
Types of Menu
This section explains menus displayed on C-2500L.
The menus vary according to modes: shooting modes ( P mode, A mode and M mode ) and playback mode.
Menus in the P mode, A mode and M mode
• • • Set the drive mode.
• • • • Specifies the quality mode of images.
• • • Sets white balance.
• • • Specifies the film speed.
• • • • Sets the flash control.
• • • Specifies flash synchronization effect.
• • • Sets the distance in quick focus.
• • • • Specifies sharpness.
• • • • Sets the beep.
• • • Sets the period of REC-VIEW/SLEEP.
• • • • Sets the date/time.
• • • Sets RECINFO/unit of distance
• • • Specifies image types in SHQ/SQ.
• • • Specifies how to name folders and files.
• • • Returns menu settings to defaults.
Menus in the playback mode.
• • • • Specifies automatic frame-forwarding.
• • • Specifies the way to copy images.
• • • Specifies the way to erase images saved in SmartMedia /
CompactFlash memory cards.
• • • • Sets brightness of the LCD monitor.
5
4
3
2
1
E-36
4
5
MEMO
• Even during setting in the shooting mode, the shutter release button
can be enabled by using the cursor.
• The menu display will be OFF during shooting.
• While an image is being stored, the camera accepts no menu operation.Wait until the camera finishes storing.
1
2
3
Selected card
Page 9
Other Ways to Use Your Camera
E
E-37
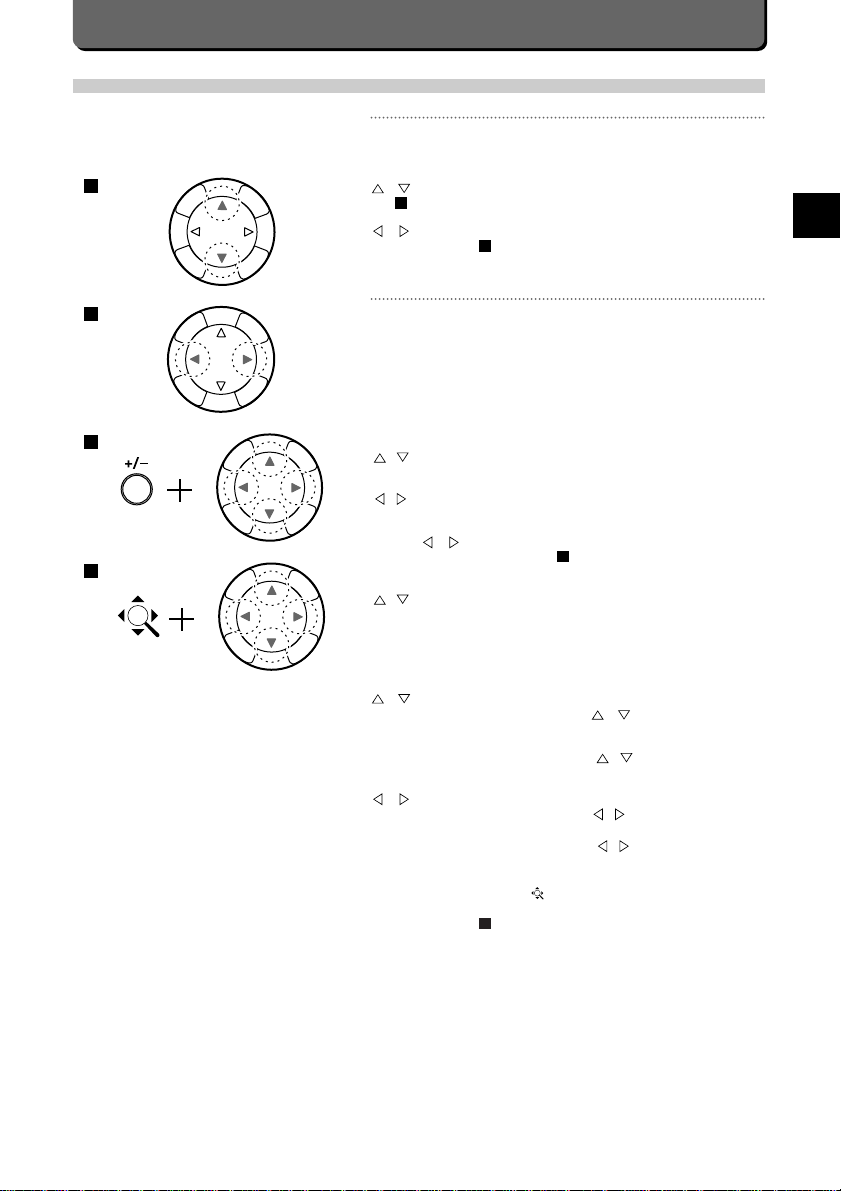
Using the Jog Dial
How to Use the Jog Dial in Each Menu
The jog dial is used to shift the cursor in each menu. See “Setting
Menus”, P.38 for the Menu.
/ button: Specifies item when the cursor is on it. (See the illustra-
tion )
/ button: Specifies the settings of a certain menu.
(See the illustration )
How To Use the Jog Dial In Each Mode
The jog dial specifies aperture, shutter speed, flash compensation and
the distance in shooting mode. It specifies display units ( indexes ) to
scroll down as well as images to display.
The function of the jog dial varies according to the mode.
Shooting Modes
The function of the jog dial is as follows.
Shutter speed (in the M mode)
/
button specifies the shutter speed.
Aperture (in the A/M modes)
/
button specifies the aperture.
Exposure compensation (in the A/P modes)
[+/-] plus
/
buttons specify value of the exposure
compensation.(See the illustration )
Focal distance (in the manual focus mode)
/
button specifies the focal distance.
PlayBack Mode
The function of the jog dial is as follows.
/ button:
When a frame is displayed, pressing the / button forwards frames
by increments of ten frames (e.g. first frame
➝ the eleventh ➝ the twentyfirst).
When an index is displayed, pressing the / button displays the
next page of the index.
/ button:
When a frame is displayed, pressing the / button forwards frames
by one frame.
When an index is displayed, pressing the / button moves the cursor by one frame.
Pressing the jog dial with the button pressed down scrolls enlarged
images.
(See the illustration .)
4
3
2
1
1
2
3
4
Page 10
E-38
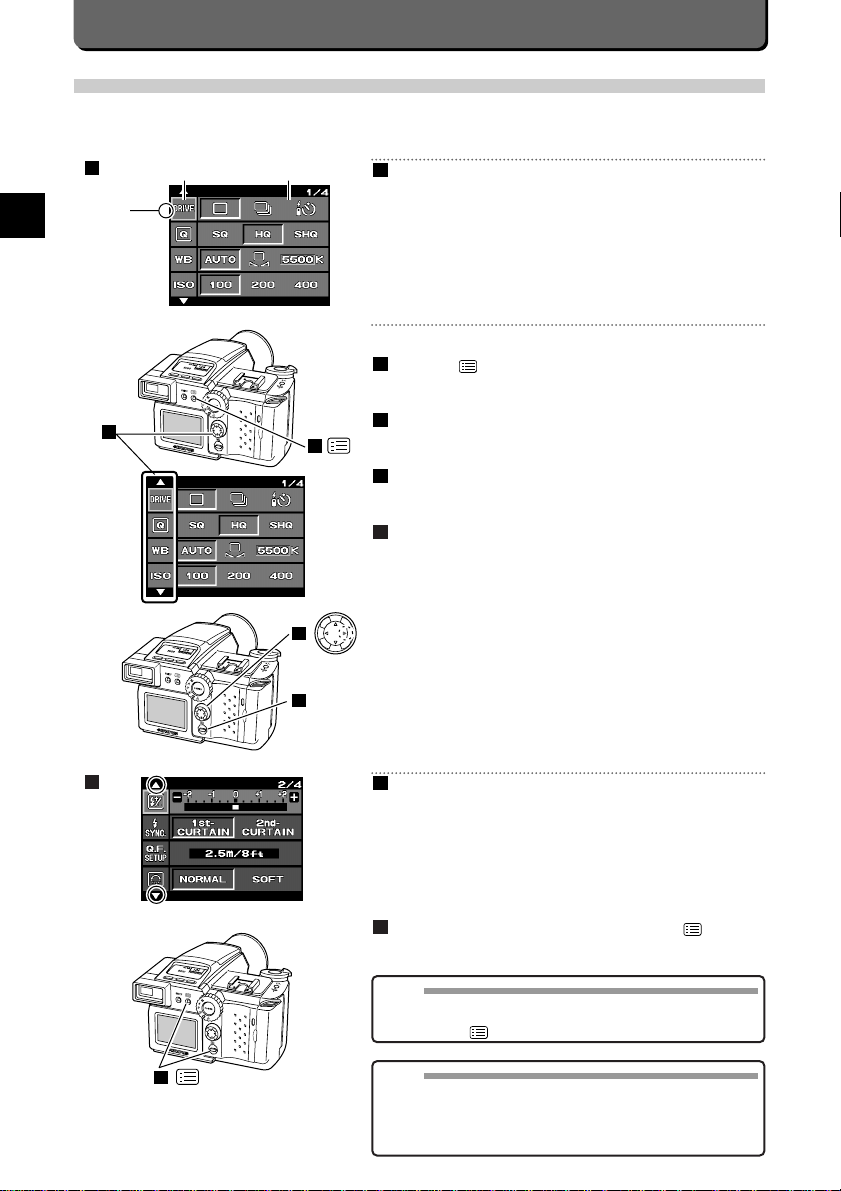
How to Switch the Page of Menus
4 items are displayed on each menu.You can scroll through these items
in order to get to the next menu.
Using the top and bottom points of the jog dial, you can switch the Pages
of menus.
Closing Menus
Close menus after settings.
Select one of the menu items and then press the [ ] button or
the [OK] button.
Menu vanishes from the LCD monitor.
1
B
NOTE
• Select the menu items and then press the [OK] button to enter the
setting.The setting will be canceled and remain previous settings if
you press the [ ] button without pressing the [OK] button.
1
or OK
B
Setting Menus
Menus can be displayed on the LCD monitor so that you can select and set up camera features.This section explains the menu
format and how to operate them.
About Menus
Setting Menus
Press the [ ] button.
The first menu will appear on the LCD monitor.
Press the top and bottom points of the jog dial until aligning the
cursor on the item you want to set.
Press the right point of the jog dial to align the cursor with the
setting.
Press the [OK] button.
This will enter the setting.
4
3
2
1
A
Available user-setting
Cursor
Item
1
1
3
4
OK
A
2
MEMO
• If the shutter is released while a menu is displayed, the current settings will apply to the shot.When the menu button is pressed after
shooting, the menu used in the last setting can be recalled without
returning to the first menu page.This is convenient when you want to
shoot multiple pictures with different settings.
Page 11

Other Ways to Use Your Camera
E
E-39
Setting Resolution
Resolution is available as SQ (standard quality), HQ (high quality) and SHQ (super high quality).Definition increases in this
order.Resolution can be selected as follows.
Set the mode dial to "P", "A" or "M".
Press the [ ] button.
The first menu will appear on the LCD monitor.
Align the cursor with with the top / bottom point of the jog
dial.
Press the right / left point of the jog dial to select a resolution
from SQ, HQ and SHQ.
To cancel the setting, press the button.
Press the [ok] button.
The resolution will be entered and the cursor will return to .
The selected resolution will appear on the control panel.
(See the illustration .)
A
5
4
3
2
1
2
1
3
4
A
MEMO
• Pictures taken at SQ or SHQ resolution can be saved in one of two
file formats: SQ: 640 x 512 pixels / 1280 x 1024 pixels ,SHQ:
JPEG/TIFF. For an explanation on how to set file format, see
"Selecting Image Size for SQ Images" (P. 39) and "Specifying File
Format (JPEG/TIFF) for SHQ Images" (P. 40) .
Selecting Image Size for SQ Images
With SQ images, you can select the size of the images.Obviously, the
smaller the size, the more images can be stored on a card.
Set the mode dial to "P", "A" or "M".
Press the [ ] button.
The first menu will appear on the LCD monitor.
Align the cursor with with the top / bottom point of the jog
dial.
Select [SQ] with the right / left point of the jog dial.
Using the top/bottom point of the jog dial, select image size:
"640
2 512 (1/8)" or "1280 2 1024 (1/8)".
To cancel the setting, press the button.
Press the [OK] button.
The file size will be set and the cursor will return to .
6
5
4
3
2
1
2
1
3
4
Page 12

E-40
Specifying File Format (JPEG/TIFF) for SHQ
Images
With SHQ images, you can save files in a JPEG (compressed) format or
TIFF (noncompressed) format.
Set the mode dial to "P", "A" or "M".
Press the [ ] button or the [OK] button.
The first menu will appear on the LCD monitor.
Align the cursor with with the top / bottom point of the jog
dial.
Select [SHQ] with the right / left point of the jog dial.
Using the top/bottom point of the jog dial, select an image file
format: "JPEG" (compressed) or "TIFF" (non-compressed).
To cancel the setting, press the button.
Press the [OK] button.
The file format will be entered and the cursor will return to .
6
5
4
3
2
1
2
1
3
4
Page 13

Other Ways to Use Your Camera
E
E-41
Setting Sharpness
Sharpness is the degree of clarity of an image.This camera lets you
select between NORMAL and SOFT. NORMAL renders the standard
degree of image clarity, whereas SOFT softens edges of images.
While NORMAL is adequate for an appreciation of prints, SOFT is for
image editing on your computer.See the results for yourself, but
SOFT adds atmospheric effect to images, while NORMAL just makes
them clear.
Set the mode dial to "P", "A" or "M".
Press the [ ] button.
The first menu will appear on the LCD monitor.
Align the cursor with with the top / bottom point of the jog
dial.
Select from "NORMAL" and "SOFT" with the right / left point of
the cross the button.
To cancel the setting, press the button.
Press the [OK] button.
The sharpness will be entered and the cursor will return to .
5
4
3
2
1
A
2
1
3
Setting ISO Rating
You can set ISO rating to that of 35mm film.There are 3 ratings: 100, 200 and 400. The higher the level, the better photographs
taken in dark places or photographs of rapidly moving objects come out.
Set the mode dial to "P", "A" or "M".
Press the [ ] button.
The first menu will appear on the LCD monitor.
Align the cursor with with the top/ bottom point of the jog
dial.
Select the ISO rating from “100”,“200” and “400”with the right /
left point of the jog dial.
To cancel the setting, press the button.
Press the [OK] button.
The speed will be set and the cursor will return to .
"ISO" will appear on the control panel when you select "200" or
"400".
5
4
3
2
1
MEMO
• When you select "100", "ISO" will not appear on the control panel.
That’s because “100” is the standard.
• Though photographs taken in dark places come out better the higher
the ISO rating is, the images will be grainy.Learn to use this effect to
your advantage.
• In the M mode, the maximum selectable shutter speed varies
depending on the ISO rating.
2
1
3
ISO 100 200 400
Max. 1/2 sec. 1/4 sec. 1/8 sec.
Page 14

E-42
Sequence Mode
The Camedia C-2500L lets you take up to five images in quick succession by simply holding down the shutter release button.
Set the mode dial to "P", "A", or "M".
Press the [ ] button.The first menu appears on the LCD monitor.
Align the cursor with with the top/bottom point of the jog
dial.
Select with the right/left point of the jog dial.
Press the [OK] button.
Check that appears on the control panel.
Pictures are then taken continuously at any time while the shutter release button is held down.
Up to 5 pictures can be taken in the Sequence Mode.The number of
frames taken can be checked on the control panel memory scale.
6
5
4
3
2
1
1
2
3 4
MEMO
• Sequential shooting is possible, irrespective of the image resolution
(SQ, HQ, SHQ).
MEMO
• The Power button cannot be operated while the Card access lamp is
blinking.
• If the card is full when the Shutter release button is pressed, the
image memory block(s) and the number of remaining pictures on the
control panel blink, and the picture cannot be taken.(See the illustration at left.)
NOTE
• The Self-timer cannot be used in this mode.
• The Red-Eye Reducing Flash cannot be used in this mode.
• When using the main flash, keep the shutter release button pressed
until the flash is charged.The shutter will not be released until the
Orange lamp inside the viewfinder lights up.
5
6
Page 15

Other Ways to Use Your Camera
E
E-43
Taking Pictures Using Exclusive Extension Flash (Model No.FL-40)
You can take various flash-lit pictures using an extension flash (sold separately ) designed specifically for the Camedia C-2500L.
Both an extension flash and the built-in flash as well as the built-in flash only can be used.
For details about preparation for the built-in flash, flash illumination range, and the flash mode, see "Flash Photography" (P. 20)
in “Taking Pictures”.
How to Connect the Extension Flash
The extension flash is connected to the Camedia C-2500L as follows.
Remove the hot shoe cover.
Hold the camera with your left hand, as you do when taking pictures.
Hold both ends of the hot shoe cover between your thumb and forefinger and push it with your forefinger in the direction indicated by the
arrow to remove it.
Attach the FL-40 to the camera's hotshoe.
Turn ON power to the camera.
Turn ON power to the extension flash.
4
3
2
1
MEMO
• This camera is equipped with a cover to protect the hot shoe. When
you want to use an exclusive extension flash, remove the cover. After
removing the cover, keep it in a safe place so that it doesn't get lost.
After removing the exclusive extension flash, reattach the cover.
• When you connect the extension flash,it may fire by mistake according to its condition.
• With close-up shots (1.5 m (4.9 ft.) or less), it is recommended to
use only the built-in flash to prevent glare and vignetting.
• In the super macro mode, you can obtain fill-in flash by setting the
exclusive extension flash’s power to ON. However, note that the presence of the lens may produce a shadow in the picture or make correct brightness control impossible. If you do not want light supplied
by the flash, set the exclusive extension flash to OFF.
3
4
2
Using Extension Flash in P / A Mode
The camera automatically detects an attached extension flash.Both an
extension flash and the built-in flash can be used simultaneously.
Using Extension Flash Only
An extension flash lights up further than the built-in flash.
Retract the built-in flash when you use only the exclusive extension flash
in the P / A mode. It works like the built-in flash.
For more information, see "Taking Flash-Lit Pictures".
• AUTO-FLASH mode (P. 21)
• RED-EYE REDUCING FLASH mode (P. 22)
• FILL-IN FLASH mode (P. 22)
Hot shoe cover
1
NOTE
Be careful of the following points when using the extension flash with
the Camedia C-2500L.
• Close-up shots can be overexposed.Either adjust the extension flash
to the camera's exposure or use the camera's built-in flash.
• When using both the extension flash and the built-in flash, the built-in
flash provides supplementary lighting only.Therefore, if the extension
flash does not render enough illumination, images may come out
underexposed.
• When you use the extension flash other than the FL-40, images will
change according to surrounding conditions, the type of flash and
camera setup.Be aware that Olympus does not guarantee picture
quality when taken with the extension flash other than FL-40.
NOTE
• To override flash emission from the exclusive extension flash, set its
power to OFF.
Page 16

Using Both Extension Flash and Built-In Flash
Simultaneously
You can use both the extension flash and the built-in flash simultaneously.
Shadows can be reduced by bouncing the extension flash light off of ceilings or walls. Please experiment for best results.
Press the flash pop-up button.
The built-in flash will popup.
Turn ON the power to the extension flash.
Select one of the flash modes.
The flash has four modes: Auto-flash, Red-eye reducing flash, and Fill-in
flash. See “Flash Mode Selection“ (P. 21) for more information.
Press the shutter release button down halfway.
The orange lamp inside the viewfinder will light up.
Press the shutter release button down all the way.
Both the extension flash and the built-in flash will fire.
5
4
3
2
1
E-44
1
2
Taking Pictures Using Extension Flash
Check that the built-in flash is retracted.
If not, retract it.
Turn ON power to the extension flash.
Select one of the flash modes.
The flash has four modes: Auto-flash, Red-eye reducing flash, and Fill-in
flash. See “Flash Mode Selection“ (P. 21) for more information.
Press the shutter release button down halfway.
The orange lamp and the green lamp inside the viewfinder will light
up.
Press the shutter release button down all the way.
The flash will fire.
Check that the flash has fired correctly.
If the flash has fired correctly, the auto check lamp on the extension
flash will start blinking.
6
5
4
3
2
1
2
1
NOTE
• To override flash emission from the exclusive extension flash, set its
power to OFF.
NOTE
• To override flash emission from the exclusive extension flash, set its
power to OFF.
Page 17

Other Ways to Use Your Camera
E
E-45
Using Extension Flash in M Mode
You can select either "TTL-AUTO" or "MANUAL" of the extension flash in
the M mode.
Using Extension Flash Only
Retract the built-in flash when you use an extension flash only.
The auto-flash and red-eye reducing flash modes are not enabled in the
M mode.
When the exclusive extension flash is turned on, the Fill-In Flash mode is
engaged.
Check that the built-in flash is retracted.
If not, retract it.
Turn ON power to the extension flash.
The extension flash automatically enters the fill-in flash mode.
Select "TTL-AUTO" or "MANUAL" on the control panel of the
extension flash.
For more information on the mode selection, see the documentation
supplied with the respective product.
Press the shutter release button down halfway.
The orange lamp and the green lamp inside the viewfinder will light
up.
Press the shutter release button down all the way.
The flash will fire.
5
4
3
2
1
3
1
2
‘
Using Both Extension Flash and Built-In Flash
Simultaneously in M mode
You can use both the extension flash and the built-in flash simultaneously.
Shadows can be reduced by bouncing the extension flash light off of ceilings or walls. Please experiment for best results.
Press the flash pop-up button.
The built-in flash will popup.
Turn ON power to the flash.
The extension flash automatically enters the fill-in flash mode.
Press the shutter release button down halfway.
The orange lamp and the green lamp inside the viewfinder will light
up.
Press the shutter release button down all the way.
Both the extension flash and the built-in flash will fire.
4
3
2
1
1
2
Page 18

E-46
Connecting a non-exclusive Extension Flash
Non-exclusive Extension Flash That Can Be Used with This Camera
Use the flash (sold separately) designed specifically for the Camedia C-2500L if possible.If you want to use non-exclusive
extension flashes on the market, extension flashes must satisfy the following conditions in order to be used with the Camedia
C-2500L.
• When the extension flash is used, the flash intensity must be controlled from the extension flash side.If used in the auto
flash mode, the extension flash must use an F stop of F2.8 (applicable with normal shooting mode) or F5.6 (applicable with
macro mode) as its auto flash mode.
• Depending on photographic conditions, a suitable exposure may not be obtained even when using an extension flash at
F2.8 or F5.6. In such case, change the flash's F stop or ISO rating, or set the guide number figured out from the focal distance in the manual mode. In any case, F-stop in the auto flash mode and ISO rating generally are adjusted in 1 EV increments, and exposure cannot be compensated any less than this. When using an extension flash, the camera's exposure
compensation feature cannot be used.
• The angle of illumination must cover the range of a lens with 35-mm focal length (when converted into 35-mm film).
However, with wide close-ups, it is recommended to use a flash with a wide adapter for distributing light because the lower
part of the image does not come out sometimes.
• A full flash must last no more than 1/200 of a second.With ring flashes of long flash duration, part of the light might not be
included in the exposure.
• Connecting a non-exclusive extention flash with communicating function which does not meet the contditions above may
damage the camera or flash.
NOTE
When a commercially available extension flash is used in the “P” or “A” mode with low ambient light, the shutter speed is
reduced and picture blur may occur.When using a flash under low light conditions, we recommend using the “M” mode and
setting the shutter speed between 1/40 and 1/100.
Page 19

Other Ways to Use Your Camera
E
E-47
Quick Focus
Quick focus lets you focus on objects easily. The focal distance must be set in advance from its menu.
Taking Quick Focus Pictures
Set the mode dial to "P", "A" or "M".
While holding down the [OK] button, press the shutter release
button down halfway.
Focus will be locked at the set focal distance (P. 48), and the green
lamp will light in the viewfinder.
The focal distance will be displayed on the control panel.
If the focal distance of manual focus is displayed, however, the focal
distance of quick focus will not be displayed.
Press the shutter release button down all the way.
The picture will be taken at the set focal distance.
3
2
1
2
1
3
MEMO
• Quick focus cannot be used if the shutter release button is pressed
down halfway before holding down the [OK] button.
• If using a flash, take the picture within the flash illumination range for
the flash illumination range, see "Flash illumination Range" (P.20).
• This function is convenient for taking images of hard-to-auto focus
subjects.
• Sudden temperature change or other external effect may cause the
focus setting to deviate.If this happens, try to take pictures with the
focus setting one step closer or farther.
Setting Flash Control
Flash control is set as follows.
Set the mode dial to "P", "A" or "M".
Press the [ ] button.
Align the cursor with with the top / bottom point of the button.
Set exposure compensation with the right / left point of the jog
dial.
Pressing the left point of the jog dial moves the cursor to the direction
of (-) compensation by 1/3 EV steps.
Pressing the right point of the jog dial moves the cursor to the direction of (+) compensation by 1/3 EV steps.
Exposure compensation is in the range of ±2EV.
Press the [OK] button.
Automatic Flash Control
The amount of flash is controlled for both the extension flash and the
built-in flash when you select the "TTL-AUTO" mode and use them simultaneously.
The amount of flash is controlled for the built-in flash only when you
select the "MANUAL" mode and use them simultaneously.
5
4
3
2
1
2
1
3
4
NOTE
• When the shutter speed is fast, the camera does not fully effect this
function.
Page 20

E-48
Quick Focus Range
Quick focus range is given above by distance. Use this chart as a reference for taking quick-focus pictures and setting quick-focus focal distance.
Quick Focus Distance
The focal distance used in quick focus picture-taking is set as follows.
Set the mode dial to "P", "A" or "M".
Press the [Menu] button.
The first menu will appear on the LCD monitor.
Align the cursor with with the top / bottom point of the jog
dial.
Press the right point of the jog dial.
Select the focal distance with the top / bottom point of the jog
dial.
Focal distance can be selected from among 0.3 m, 0.35m, 0.4 m,
0.5m, 0.6m, 0.8m, 1 m, 1.2m, 1.5 m, 2 m, 2.5 m, 3.5 m, 5 m, 8 m,
15 m or
∞
.
(1 ft., 1.15ft, 1.3 ft., 1.6ft, 2 ft., 2.6ft, 3.3 ft., 3.9ft., 4.9 ft., 6.6 ft., 8.2 ft.,
9.8 ft., 16.4 ft., 26.2 ft., 49.2 ft., or
∞
)
Press the [OK] button.
The focal distance will be entered and the cursor will return to "QF
SET".
6
5
4
3
2
1
2
1
4
TELE
WIDE
0.3m
(1ft.)
0.4m
(1.3ft.)
0.6m
( 2ft.)
1.0m
( 3.3ft.)
TELE
WIDE
1.0m
( 3.3ft.)
2.5m
( 8.2ft.)
3.0m
( 9.8ft.)
7.5m
( 24.6ft.)
TELE
WIDE
1.0m
(3.3ft.)
2.5m
(8.2ft.)
3.0m
(9.8ft.)
15m
(49.2ft.)
4.0m
(13.1ft.)
0.4m (1.3 ft.)Quick focus
2.5m (8.2 ft.) Quick focus
Quick focus
(Out of flash working range/ISO 100)
(Out of flash working range/ISO 100)
2
1
3
Page 21

Other Ways to Use Your Camera
E
E-49
White Balancing with Reference
A white balancing reference can be used when colors do not come out
right with auto white balancing. In this mode, the camera memorizes a
white light as a reference for balancing white against the overall color of
the image.
Set the mode dial to "P", "A" or "M".
Press the [ ] button.
The first menu will appear on the LCD monitor.
Align the cursor with with the top / button point of the jog
dial.
Select with the right / left point of the jog dial.
Press the [OK] button.
The selection display of settings will appear on the LCD monitor.
To set white balancing again,position a white sheet of paper or
have someone hold it so that it is illuminated by a light source.
Then, focus on the paper so that it fills the viewfinder and press
the [OK] button.
To use the previous setting,press the [ ] button and move to
step .
7
6
5
4
3
2
1
2
1
4
6
Setting White Balance
By setting the white balance, images are not affected by the surrounding light.
Auto White Balancing
In auto white balancing, white light is automatically detected and balanced against the overall color of the photograph.It can be set as follows.
Set the mode dial to "P", "A" or "M".
Press the [ ] button.
The first menu will appear on the LCD monitor.
Align the cursor with with the top / bottom point of the jog
dial.
Select [AUTO] with the right / left point of the jog dial.
Press the [OK] button.
When the [OK] button is pressed again or the [ ] button is
pressed, the menu will disappear.
Press the shutter release button down halfway to lock the focus
on the subject.
Press the shutter release button down all the way.
7
6
5
4
3
2
1
MEMO
• For more information on white balancing, see "Taking Natural Color
Pictures Under Fluorescent Light" (P.64).
2
1
3
Page 22

E-50
When the white light is memorized, "GOOD" will be displayed on the
LCD monitor.
Press the [OK] button again to execute the white balancing reference
setting. If the light source is not properly memorized, “NO GOOD X”
is displayed on the LCD monitor.In this case, press the [OK] button
again to return to the display in while keeping the previously set
white balancing reference value. To reset the white balancing reference value, repeat steps to .
will appear on the control panel.
Press the shutter release button down halfway.
This will lock the focus and exposure.The green lamp inside the
viewfinder will light up to indicate the camera is ready to take the picture.
Press the shutter release button down all the way.
The picture will be taken using the memorized white as a reference.
8
7
64
3
7
White Balance
MEMO
• Select [AUTO] of the menu to return to auto white balancing.
• Ruled paper such as notebook paper can be used to set white balance.
Manual White Balance
Manual white balancing lets you change the tone of the color in your photographs.
When setting the color temperature higher than 4500 K stresses the red
color of the sunset.
By reverse, lowering the color temperature makes the sunset image look
like blue sky even when the sky is red.
Set the mode dial to "P", "A" or "M".
Press the [ ] button.
The first menu will appear on the LCD monitor.
Align the cursor with with the top / button point of the jog
dial.
Select with the right / left point of the jog dial.
Set white balancing with the top / bottom point of the jog dial.
White balancing can be selected from 3000K, 3700K, 4000K, 4500K,
5500K or 6500K.
Press the [OK] button.
will appear on the control panel.
6
5
4
3
2
1
2
1
3
Page 23

Flash Synchronization Effect
This feature fires the flash at the beginning or end of a slow shutter.You can use it to create special effects in photographs.
The 1st/2nd curtain effect is most effective when the shutter is set to a slower speed (slow shuttering) in the “M”mode.
1st Curtain Effect
In this case, the flash is fired at the beginning of the slow shutter. If done for example - when taking a picture of a moving vehicle at nighttime, the
lights from the headlights flow in the direction in which the vehicle is going.
Set the mode dial to "P", "A" or "M".
Press the [ ] button.
The first menu will appear on the LCD monitor.
Align the cursor with with the top / button point of the jog
dial.
Select [1st-CURTAIN] with the right / left point of the jog dial.
Press the [OK] button.
5
4
3
2
1
Press the shutter release button down halfway.
This will lock the focus and exposure.The green lamp inside the
viewfinder will light up to indicate the camera is ready to take the picture.
Press the shutter release button down all the way.
The picture will be taken using the memorized white balance as a
reference.
8
7
Other Ways to Use Your Camera
E
E-51
2
1
3
MEMO
• Always check color reproduction from the play mode after shooting.
MEMO
• It is recommended to set white balancing to the auto mode when you
take flash-lit images.
• When taking flash-lit pictures, please set the color temperature to
6500 K at manual white balancing. (Color temperature varies
depending on the flash-lit conditions.)
7
Guideline on the souce of Light and the Color Temperature
White Balance
Page 24

E-52
2nd Curtain Effect
In this case, the flash is fired at the end of the slow shutter.If done - for
example - when taking a picture of a moving vehicle at nighttime, the
lights trail from the tail lamps behind the car.
Set the mode dial to "P", "A" or "M".
Press the [ ] button.
The first menu will appear on the LCD monitor.
Align the cursor with with the top / button point of the jog
dial.
Select [2nd-CURTAIN] with the right / left point of the jog dial.
Press the [OK] button.
Press the flash pop-up button.
The flash will pop up.
Press the shutter release button down halfway to lock the focus
on the subject.
The green lamp next to the viewfinder will light.
Press the shutter release button down all the way.
The picture will be taken with the flash being fired at the end of the
shutter release.
8
7
6
5
4
3
2
1
3
6
2
1
Press the flash pop-up button.
The flash will popup.
Press the shutter release button down halfway to lock the focus
on the subject.
Press the shutter release button down all the way.
The picture will be taken with the flash being fired at the beginning of
the shutter release.
8
7
6
6
Page 25

Other Ways to Use Your Camera
E
E-53
Viewing Photo Information
You can display information on the pictures you have taken on the LCD monitor.Other than the date and time of each image,
information on camera setup at the time each picture was taken, such as aperture, shutter speed and exposure compensation,
is displayed, too.
Set the mode dial to .
Press the [SM/CF] button and select the card storing the images
to view.
The images on the selected card will appear on the LCD monitor.
Press the [INFO] button .
The image information will be displayed on the LCD monitor.
To cancel the image information, press the [INFO] button again.
Information display when viewing images.
Pressing the [INFO] button when viewing images switches between
three information displays in the following order:“Card being played”
R
“Card being played + Resolution mode + Protection + Date/time +
Frame No.”
R
“Shutter speed and other shooting information”.
3
2
1
Reset Settings of Shooting Modes
You can reset settings you set to their initial states.This is helpful when you forget what settings you made.
Set the mode dial to "P", "A" or "M".
Press the button.
The first menu will appear on the LCD monitor.
Align the cursor with with the top / bottom point of the jog
dial.
Select [YES] with the right point of the jog dial.
To cancel the reset, press the [ ] button.
Press the [OK] button.
This will reset all settings to its initial state.
Items which can be reset and defaults
• Record mode : HQ
• Drive mode : rapid shooting (single mode)
• Focus mode : normal (auto focus)
• Quick focus : 2.5 m (8.2 ft.)
• Flash mode : AUTO
•
Exposure compensation
:±0
• Flash control : ±0
• Metering mode : centre metering
• White balancing : AUTO
• Flash synchronization effect
: 1st curtain effect
• Sharpness : normal
• ISO : 100
5
4
3
2
1
1
2
3
Page 26

E-54
ISO
SmartMedia/CompactFlash
memory card
Folder name
Protect ON/OFF
Resolution
Exposure compensation
Flash compensation
Date/Time
File name
White balance compensation
[SM]
101OLYMP
PC240001.JPG
’99.12.24 10:47
SHQ
[1712 ~1368]
F5.6 1/5000 +2.0
WB 4500K
ISO 200
-
0.7
[SM]
Shutter speed
52
Aperture
Pixels
Frame No.
Picture information display
Slide Shows
Images displayed on the LCD monitor can be automatically forwarded one frame at a time, as in a slide show.
Set the mode dial to .
Press the [SM/CF] button and select the card which contains the
images you want to view.
An image on the selected card will appear on the LCD monitor.
Press the [ ] button.
The first menu will appear on the LCD monitor.
Align the cursor with with the top/bottom point of the jog
dial.
Select [START] with the right point of the jog dial.
Press the [OK] button.
The slide show will begin with images displayed for about 5 seconds
each.
6
5
4
3
2
1
MEMO
• Even while the camera is reading images from the SmartMedia or
CompactFlash memory card, the next image can be displayed by
pressing the right point of the jog dial. Pressing the left point displays
the previous image.
• To abort the slide show, press the [ ] button.
• Index slide show is also possible.
1
2
3
4
Page 27

Other Ways to Use Your Camera
E
E-55
Copy All Images
Set the mode dial to .
Press the [SM/CF] button and select the card storing the images
to be copied.
Press the [ ] button.
The first menu will appear on the LCD monitor.
Align the cursor with with the top / button point of the jog
dial.
Select [ ] with the right / left point of the jog dial.
Press the [OK] button.
The progress bar will appear on the LCD monitor.
When copying is complete, "FINISH" will appear on the LCD monitor.
6
5
4
3
2
1
1
2
3
4
6
NOTE
• Names of copied images will be automatically changed.The year,
month and day on which you took the pictures will not be changed.
• Warning "CARD FULL" will appear when the destination memory
card does not have enough free space.
Warning "WRITE PROTECT" will appear when the write-protect
adhesive seal is placed on the destination SmartMedia.
• To go back to the playback mode, press the [OK] or the [ ] button.
Copying Images
You can copy images you take.Copying can be done from the SmartMedia to the CompactFlash memory card, or vice-versa.
Set both cards to the camera and start copying to back up the images easily.
Copy One Image
Set the mode dial to .
Press the [SM/CF] button and select the card storing the image
to be copied.
Press the [ ] button.
The first menu will appear on the LCD monitor.
Align the cursor with with the top / button point of the jog
dial.
Select [ ] with the right / left point of the jog dial.
Press the [OK] button.
Select the image to be copied with the jog dial.
Press the [OK] button.
The progress bar will appear on the LCD monitor.
When copying is complete, it is possible to proceed with another
copy.
To exit from the copy mode, press the [ ] button.
8
7
6
5
4
3
2
1
2
7
1
2
3
MEMO
• When sound files or thumbnail files accompany (main) image files to
be copied on a card, copying (main) image files will automatically
copy them.
Page 28

E-56
Clearing All the Frames
The entire SmartMedia / CompactFlash can be cleared as follows.
Set the mode dial to .
Press the [SM/CF] button and select the card to clear all the
frames.
Press the [ ] button.
The menu will appear on the LCD monitor.
Align the cursor with (or in the case of CompactFlash)
with the top/bottom point of the jog dial.
Select with the right / left point of the jog dial.
Press the [OK] button.
The screen confirming whether all images should be erased will be
displayed.
Select "YES" with the right point of the jog dial.
Press the [OK] button.
All images on the card will be erased.
8
7
6
5
4
3
2
1
MEMO
•Only images which are not write-protected are erased.
•To erase protected images, first cancel the protection and then per-
form the above procedure, or reformat the card.
•The above procedure only erases images in the DCF (Design rule for
Camera File system) format.To erase images in other formats, you
must erase them frame by frame.
1
2
3
4
Displaying Images on TV
Using the included video cable, you can display pictures you have taken on a TV. Even without a personal computer, you can
enjoy viewing your photographs on a big screen.
Plug the video cable into the camera's video output connector.
Plug the other end of the video cable into the TV's video input
jack.
Turn ON the TV.
Set the mode dial to .
Turn power to the camera ON.
The image in the SmartMedia will appear on the TV.
Select the images for playback with the jog dial.
6
5
4
3
2
1
NOTE
• Check that the power to the TV and camera is OFF before connecting the cable.
MEMO
• Because of TV adjustments, the image can appear off-center.There
is nothing wrong with the equipment.
• Depending on the type of TV you use, a black frame may appear
around the images.This black frame will appear in printouts if sent
from the TV to a video printer.
• It is recommended to use the AC adapter (sold separately).
6
5
4
To video-IN connector
on TV
Video-OUT connector
Page 29

Print Setup
You can print out images stored on the SmartMedia or CompactFlash memory card.
About Print Setup
Images made with the Camedia C-2500L and stored on SmartMedia or
CompactFlash memory card can be printed in the following ways.
• Using the Camedia C-2500L, you can specify the number of copies to
print out, the position where the date and the time should appear on the
print and other information (Preprint Setup). This information is stored
on the card itself.Then, when the card is loaded into a DPOF printer,
the images are printed out automatically without having to set up the
printer.
Other than printing out images from a printer, you can bring the card to
a photo studio which offers DPOF system printer services. Images
already setup for printing on the Camedia C-2500L can be printed out
automatically without requiring printer commands.
The maximum number of preprintable images is 998.
• The Camedia C-2500L can be connected to a personal computer and
print out from the computer's printer.This will require a PC connection
kit and either a Flash Path, Smart Media adapter or CompactFlash
memory card adapter.
NOTE
• Images cannot be printed out via such printers as print out directly
by connecting the camera to printers like the Olympus P-300 digital
printer.
• When printing with P-330, the following operations are NOT possible.
¥ Printing JPEG images recorded in SHQ mode.
¥ Printing more than 256 images recorded on a SmartMedia. P-330
cannot recognize files that exceed 256.
¥ Printing multiple copies of images, index images, and images with
date and time whose preprint setup have been set with DPOF
equipment. Set it with P-330.
Other Ways to Use Your Camera
E
E-57
MEMO
• It is possible to specify the number of copies in advance.
• The P-330 does not exercise full capability when connected to the
video-OUT connector on the C-2500L.
Page 30

E-58
Preprint Setup
You can store information such as the number of copies to print out on either SmartMedia or a CompactFlash. This procedure is
called "preprint setup".
Preprint setup is only effective for prints made at stores that can print out using DPOF-ready printers and DPOF systems.
Setting the Number of Copies to Print Out
This procedure stores the number of copies to print out via a printer, etc.
The actual printing is done by simply loading the card media into a printer.The images will be printed out in the specified number of copies.
Set the mode dial to .
Select images to set preprint with the jog dial.
Press the [ / ] button.
The window where you specify the number of copies will appear on
the LCD monitor.
Specify the number of copies with the right / left point of the jog
dial.
Press the [OK] button.
The green mark will appear when the number is one, and the red
mark and the specified number when the number is more than one,
in the upper right-hand corner of the image as it is displayed on the
LCD monitor.
5
4
3
2
1
MEMO
• To cancel preprint setup, select "0" after displaying images to cancel,
or select
"CLEAR ALL" from the menu.
2
1
SHQ[SM]
2
~2
Preprint mark The number
4
Preprinting of All Images
Preprinting of All Images
The below procedure explains how to set up all images on the media
selected at preprinting.
Set the mode dial to .
Press the [ ] button.
The first menu will appear on the LCD monitor.
Align the cursor with with the top / bottom point of the jog
dial.
Select [SELECT ALL] with the right point of the jog dial.
Press the [OK] button.
5
4
3
2
1
MEMO
• To cancel the preprint of all images, select "CLEAR ALL" under
and press the [OK] button.
1
2
Page 31

Other Ways to Use Your Camera
E
E-59
Printing Date / Time
The below procedure explains how to set the shooting date and time
being printed on images which are preprinted.
Set the mode dial to .
Press the button.
The first menu will appear on the LCD monitor.
Align the cursor with with the top / bottom point of the jog
dial.
Select [DATE] when you want the shooting date being printed
and [TIME] when you want the shooting time being printed with
the right / left point of the jog dial.
If you select “OFF”, neither date nor time will be printed.
Press the [OK] button.
5
4
3
2
1
1
2
3
Preprint Indexes
The below procedure explains how to set up index printing of all images
stored on the card which were selected at preprinting.
Set the mode dial to .
Press the button.
The first menu will appear on the LCD monitor.
Align the cursor with [CARD INDEX] with the top / bottom point
of the jog dial.
Select [ON] with the right point of the jog dial.
To cancel index-print setup, select [OFF].
Press the [OK] button.
5
4
3
2
1
1
2
3
MEMO
• Any images taken after you set up the index print will not be printed
in the index. If there are any images that will not be included in the
print, the CARD INDEX in the menu reads "CARD INDEX ON /
OFF".
To print an index of all images, set up preprint again.
NOTE
• Date / time printing depends on the specifications of the printer
you’re using. The position and fonts may also differ depending on the
specifications of the printer.For details, refer to your printer’s instruction manual.
Page 32

E-60
 Loading...