

Page 1
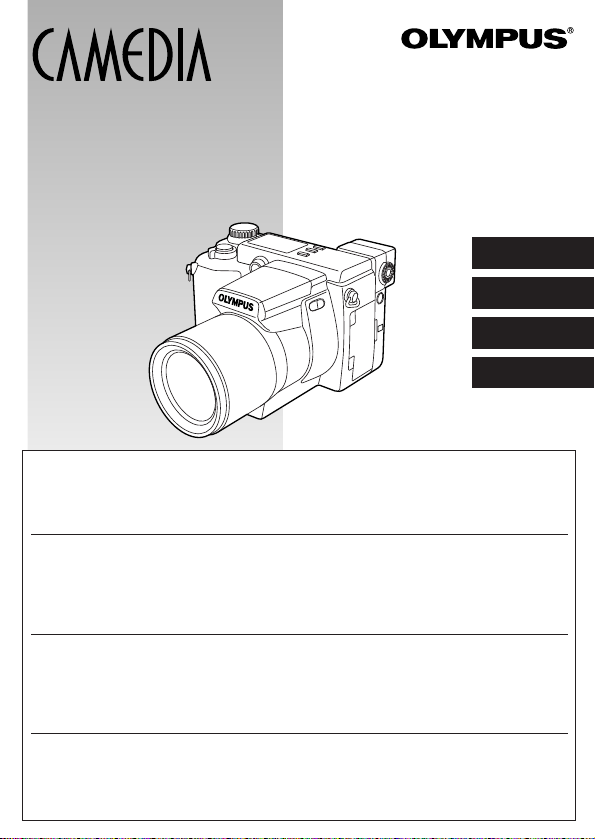
DIGITAL CAMERA/APPAREIL PHOTO NUMÉRIQUE
DIGITAL-KAMERA/CAMARA DIGITAL
C-2100 Ultra Zoom
INSTRUCTIONS/MODE D’EMPLOI
BEDIENUNGSANLEITUNG/INSTRUCCIONES
ENGLISH
FRANÇAIS
DEUTSCH
ESPAÑOL
nBefore using your camera, read this manual carefully to ensure correct use.
nWe recommend that you take test shots to get accustomed to your camera before taking
important photographs.
nThese instructions are only a concise version. For more details on the functions described here,
refer to the software CD’s instructions on CD-ROM.
nAvant d’utiliser votre appareil photo, veuillez lire attentivement ce mode d’emploi, de manière à
obtenir les meilleurs résultats possibles.
nAvant d’effectuer des prises de vues importantes, nous vous conseillons par ailleurs de faire
quelques essais afin de vous familiariser avec le maniement de l’appareil photo.
nCes instructions ne sont qu’une version concise. Pour plus de détails sur les fonctions décrites
ici, se référer aux instructions du CD logiciel sur le CD-ROM.
nBitte lesen Sie vor Gebrauch dieser Kamera sorgfältig diese Bedienungsanleitung, um optimale
Ergebnisse beim Fotografieren zu erzielen.
nWir empfehlen, vor wichtigen Aufnahmen Probeaufnahmen durchzuführen, um sich mit der
Bedienung und den Funktionen der Kamera vertraut zu machen.
nDies ist eine Kurzanleitung. Falls Sie ausführlichere Angaben zu den hier beschriebenen
Funktionen benötigen, steht Ihnen die Bedienungsanleitung auf der CD-ROM zur Verfügung.
nAntes de usar su cámara lea este manual detalladamente para asegurar el uso correcto.
nNosotros le recomendamos que tome fotografías de prueba para familiarizarse con su cámara
antes de tomar fotografías importantes.
nEstas instrucciones son sólo una versión concisa. Para más detalles de las funciones descritas
aquí, refiérase a las instrucciones del software CD en el CD-ROM.
Page 2
These instructions are only a concise version. For more details on the functions
described here, refer to the software CD’s instructions on CD-ROM
.
GETTING STARTED
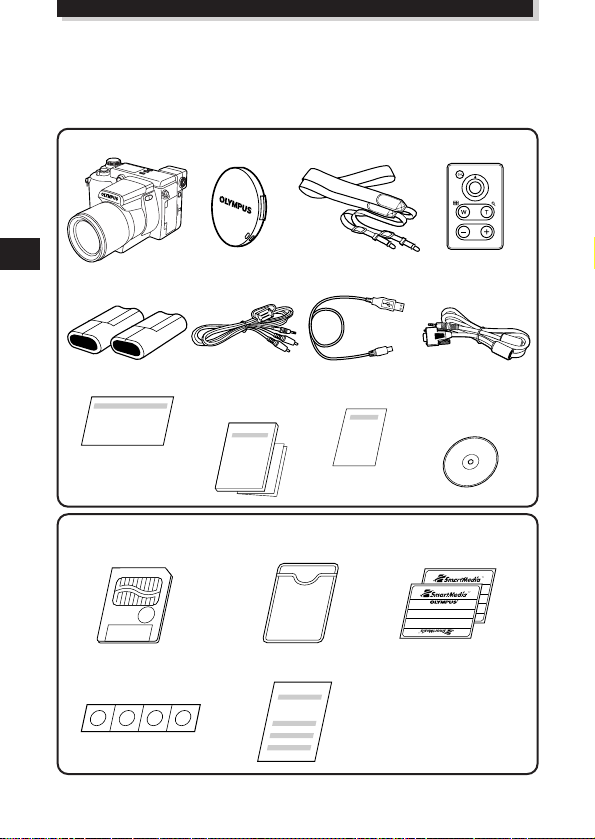
PACKAGE CONTENTS
Camera Lens cap Strap Remote control
CR-V3 lithium A/V cable USB cable RS-232C PC
battery (2 packs) serial cable
Warranty card Instructions Remote control Software CD’s
SmartMedia Static-free case Index labels
(SSFDC-8MB) (2 pieces)
Write-protect adhesive Instructions
seals (4 pieces)
(concise version)/ instructions (including
Quick Start Guide instructions
on CD-ROM)
2
Page 3
1
9
8
0
!
#
@
9
% ^
&
*
(
$
2 3 4 5 6 7
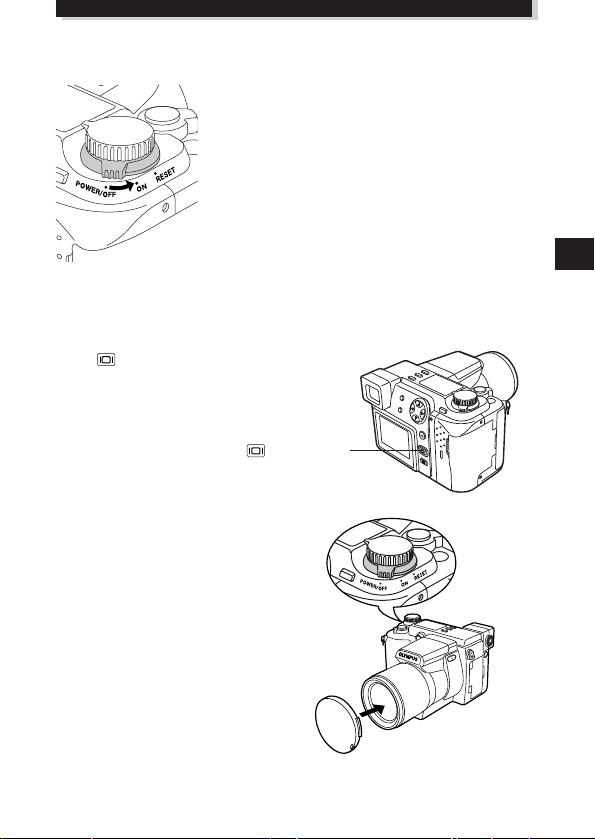
ATTACHING THE STRAP
Thread the strap through the strap eyelet as shown in the illustration. Pull on it to make
sure it is securely fastened to the stopper.
NAMES OF PARTS
m Camera
1 Zoom lever (T/W)/
Index-display lever (T/W)
2 Shutter button
3 Mode dial
4 Self-timer lamp/AF assist lamp
5 Control panel
6 Diopter adjustment dial
7 5-pin external flash socket
8 Microphone
9 Strap eyelet
Camera strap eyelet
Stopper
0 Remote control receiver
! Lens
@ Flash (built-in)
# Flash switch
$ Connector cover
% Serial connector (RS-232C)
^ USB connector
& DC-IN jack
* External microphone jack
( A/V OUT jack
3
Page 4
)
i
u
o
p
Q
R
T Y U
q w e r t y
W
E
GETTING STARTED (Cont.)
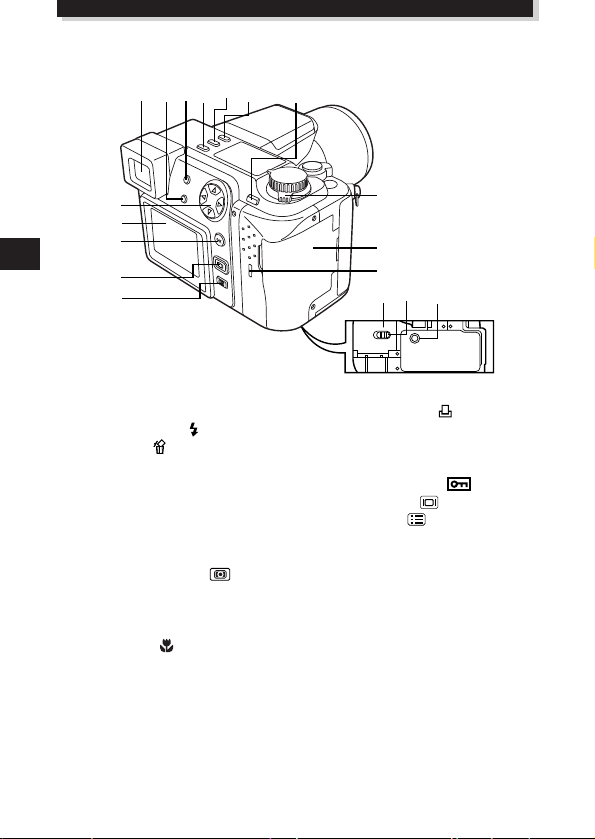
NAMES OF PARTS (Cont.)
) Viewfinder
q INFO button
w Flash mode button ( )/
Erase button ( )
e DRIVE button
● Returns vertically-oriented pictures
rotated using the Macro button or
Metering mode button to their
original position during display
mode.
r Metering mode button ( )
● Rotates the vertically-oriented
pictures 90° counterclockwise
during display mode.
t Macro button ( )
● Rotates the vertically-oriented
pictures 90° clockwise during
display mode.
4
y AE lock button (AEL)/Multi-metering
button/Print button( )
u Arrow pad
i Monitor
o OK button/Manual focus button
(MF)/Protect button ( )
p Monitor button ( )
Q Menu button ( )
W Power switch
(POWER OFF/ON/ RESET)
E Card cover
R Card access lamp
T Battery compartment cover
Y Battery compartment lock
U Tripod socket
Page 5
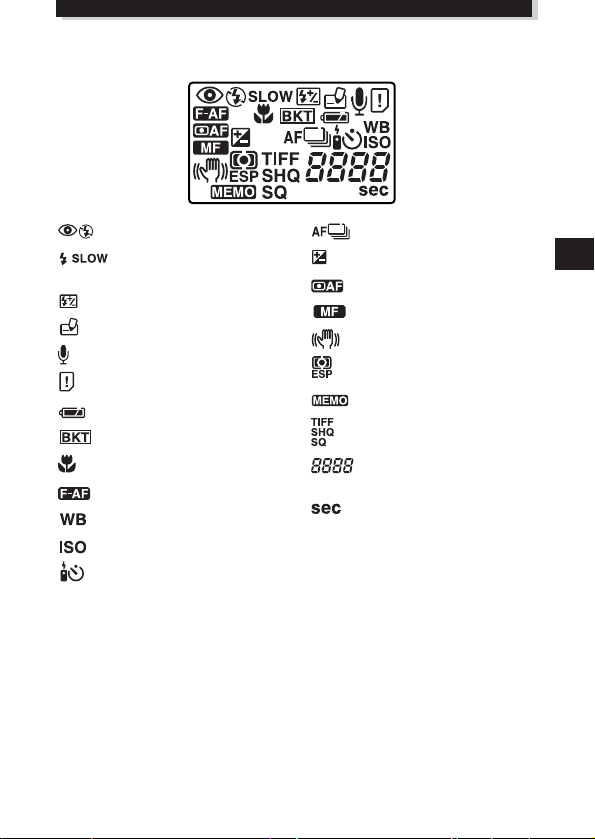
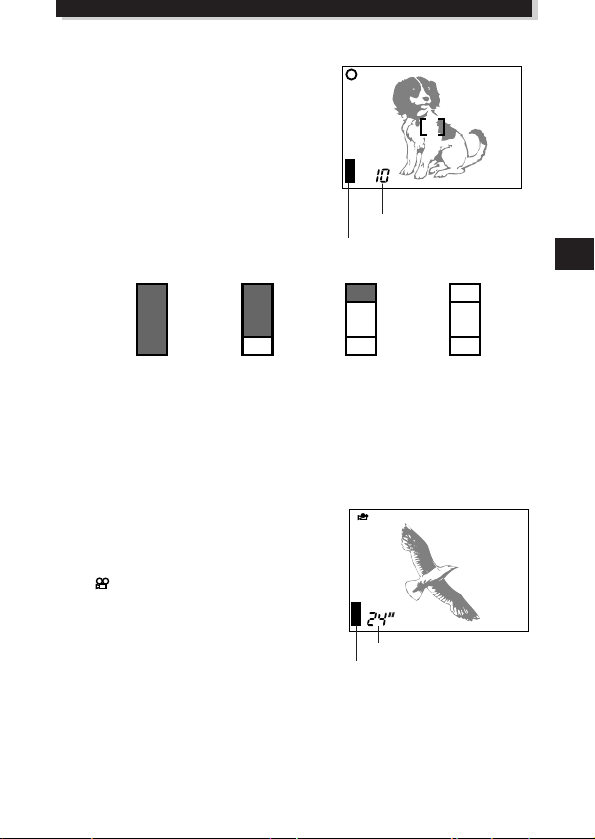
m Control panel indications
Flash mode
Slow shutter
synchronization flash
Flash intensity control
Card writing
Sound record
Card error
Battery check
Auto bracket
Macro mode
Full-time AF
White balance
ISO
Self-timer/Remote control
Sequential shooting
Exposure compensation
AF system
Manual focus
Stabilization system
Metering mode
AE memory
Record mode
Number of storable still
pictures
Seconds remaining in movie
mode
5
Page 6
F2.8 1/800 +2.0 P
2
8
3
4
1
5
6 7
9
0
F2.8 1/800 +2.0
ISO100
SQ
P
SLOW1
!
@
#
$
%
^
&
*
(
GETTING STARTED (Cont.)
NAMES OF PARTS (Cont.)
m
Viewfinder/Monitor indications (Picture information)
Press the Monitor button ( ) to select whether images appear on the Monitor or in
the viewfinder. Press the INFO button to select how much information is displayed. The
following 3 types of display are available.
Record mode
Only the AF target mark: Warnings (AF correct
mark and battery check) appear when required.
Settings that are changed are displayed for approx.
2 seconds.
Partial information: When using the camera, these
indications are displayed for approx. 2 seconds.
Full information: These indications are displayed
constantly in the Record mode.
1 Flash stand-by/Jitter warning/flash
charge
2 AF confirmation mark
3 Shooting mode
4 Battery check (displayed after the
camera is turned on and when
warnings appear)
5 Aperture value
6 Shutter speed
7 Exposure compensation/ Exposure
differential
8 AF target mark
9 Memory gauge
6
0 Number of storable pictures
! Drive mode
@ Metering mode
# Macro mode
$ White balance
% ISO
^ Record mode
& Flash mode
* Slow shutter synchronization flash
(not displayed when the flash is in the
flash override mode)
( Stabilization system
Page 7
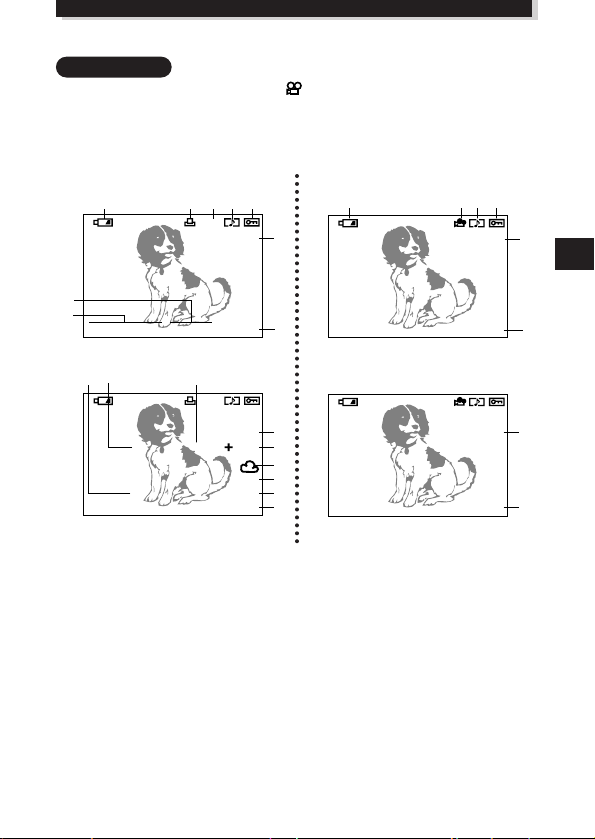
Display mode
345623.12.,00 21:56
HQ
x10
1
2 43 5
6
7
8
9
FILE:123-3456
HQ
SIZE: 1600x1200
F2.8 1/800 2.0
ISO400
23.12.,00 21:56
x10
!
$
@9 #
%
^
8
&
3456
HQ
1
0 54
6
7
FILE: 123-3456
HQ
SIZE: 320x240
!
&
No information: Only battery check and are displayed.
Partial information: These indications disappear after a certain amount of time has
Full information: All indications are displayed all the time while in the Display
Still picture
elapsed.
mode.
Movie picture
Partial information
Full information
1 Battery check
2 Print reserve
3 Number of prints
4 Sound record
5 Protect
6 Record mode
7 Frame number
! Number of pixels
@ Aperture value
# Shutter speed
$ Exposure compensation
% White balance
^ ISO
& File number (In the Movie picture
8 Time
9 Date
0 Movie picture
Note:
The indications that appear on a movie picture that has been selected and displayed
from the thumbnail display are different from those that appear when the movie picture
is displayed using the Movie play function.
Partial information
Full information
display mode, the total recording time
is displayed.)
7
Page 8
GETTING STARTED (Cont.)
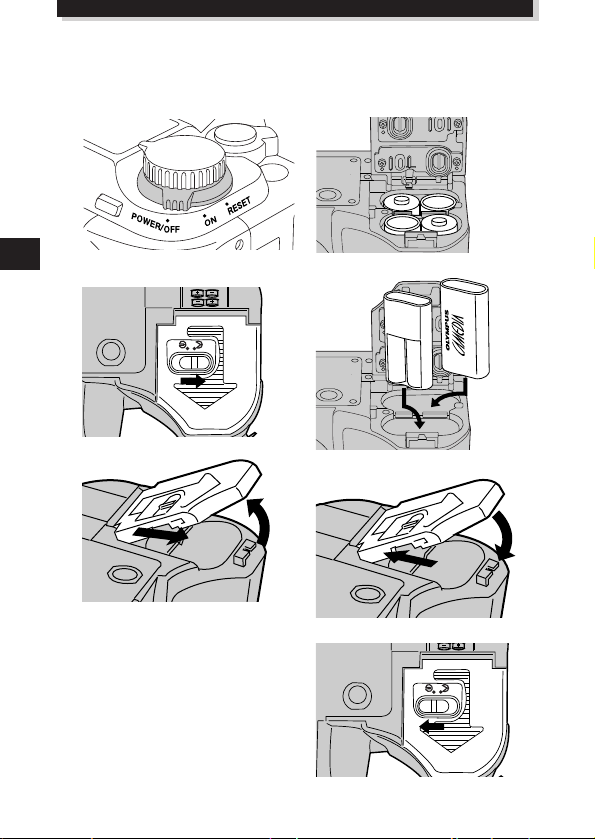
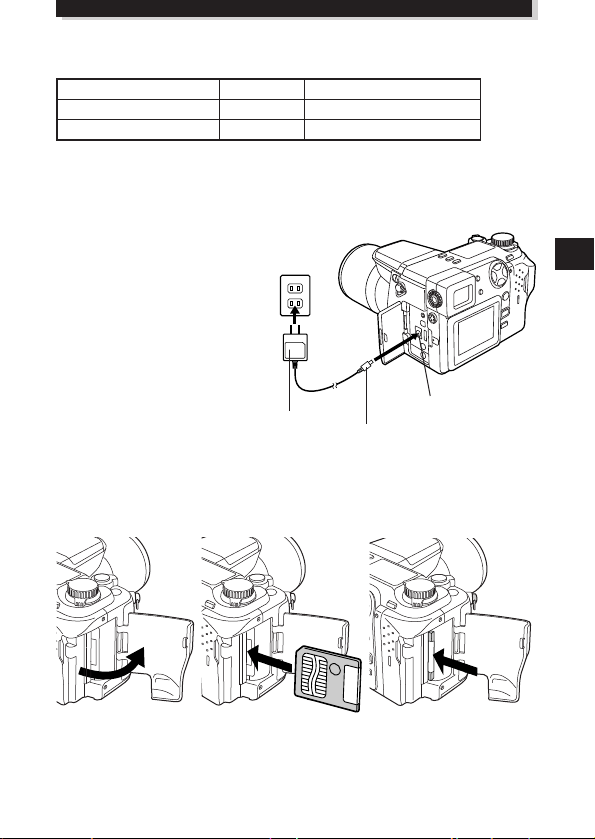
LOADING THE BATTERIES
Make sure the camera Power switch is set to OFF and load the batteries as shown in
the illustration. A CR-V3 lithium battery pack cannot be charged.
1
5
2
When using AA batteries
When using lithium battery packs
4
3
6
7
8
8
Page 9
m Service life of lithium battery pack
Shooting/Displaying Condition Battery life
Number of photos
Display time
* These figures are for reference only and are not guaranteed.Tests based on conditions set by Olympus.
1
2
Approx. 200 frames
Approx. 330 minutes
m Using the AC power adapter (optional)
Use an AC adapter designed for the
area where the camera is used.
Consult your nearest Olympus
dealer or Service center for details.
AC wall
outlet
Power
plug
AC adapter
Connection cord plug
DC-In jack (Black)
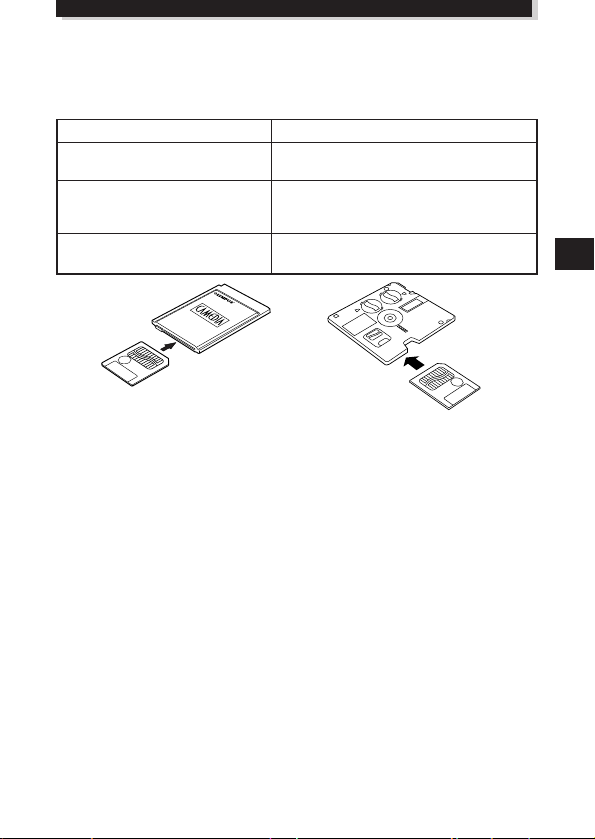
INSERTING AND EJECTING SmartMedia
Be sure to use a 3V (3.3 V) card. Do not use a 5 V card. Non-Olympus 3 V (3.3 V)
cards must be formatted with the camera.
Insert the card fully until
you feel it lock into place.
Push the card in to eject it.
9
Page 10
M
O
D
E
D
I
A
L
S
M
S-Prg
A
P
GETTING STARTED (Cont.)
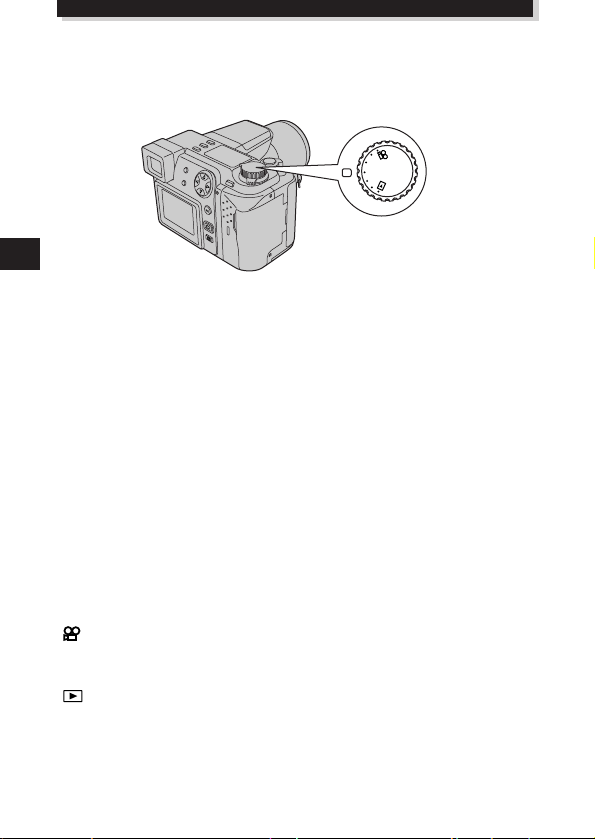
SETTING THE MODE DIAL
You can change modes by turning the mode dial on the top righthand side of the
camera.
P (Program mode):
In program mode, you can take a properly exposed photograph by simply aiming the
camera and pressing the shutter button. Aperture and shutter speed are set
automatically by the camera.
A (Aperture priority mode):
Aperture can be set manually in the aperture priority mode. This is useful when you
want to have more control over image exposure. Shutter speed is set automatically by
the camera.
S (Shutter priority mode):
Shutter speed can be set manually in the shutter priority mode. Set it to a high speed
for a still picture of a moving object. Set it to a low speed to show motion. Aperture is
set automatically by the camera.
M (Manual mode):
You can set both aperture and shutter speed independently in the manual mode.
S-Prg (Scene program mode):
The camera will automatically optimize the combination of aperture and shutter speed
according to the type of subject. You can select from Portrait, Sports, Landscape and
Night Scene. Selections are displayed in the menu.
(Movie mode):
You can shoot motion pictures in the movie mode. Aperture and shutter speed are set
automatically by the camera.
(Display mode):
Allows you to view a display of your photographs.
10
Page 11
HOW TO USE THE MENU
[
1/5
]
F2.8 1/800 0.0 P
OFF
ISO
WB
ON
AUTO
AUTO
DIGITAL
ZOOM
[
1/5
]
F2.8 1/800 0.0 P
ISO
WB
DIGITAL
ZOOM
AUTO
[
1/5
]
F2.8 1/800 0.0 P
OFF
ISO
WB
ON
AUTO
AUTO
DIGITAL
ZOOM
[
2/5
]
F2.8 1/800 0.0 P
SLOW
MULTI
METERING
OFF
OFF
1.0 x3
O
BKT
Press (Menu button) to display the menu, press
on the Arrow pad to select the desired menu
option. Press to select the additional menu options.
When the menu option is set as desired, press the OK
button. The setting is stored and the frame reappears on
the menu. Press the OK button repeatedly until the
menu disappears.
Example: When the white is set
F2.8 1/800 0.0 P
ON
DIGITAL
OFF
ZOOM
WB
AUTO
AUTO
ISO
[
]
1/5
To set up
Scroll
Monitor
1/5 page
Current settings
Example: When moving to the
following pages
or
OK
The adjustment
is saved.
• If you finish by pressing
(Menu button), any adjustments
you have made will not be saved.
• If you press at page 1/5,
the monitor displays page 5/5.
11
Page 12
SETUP
[
5/5
]
F2.8 1/800 0.0 A
MODE
SETUP
S-Prg
[
3 /3
]
m /f t m
RESET
FILE NAME
2 3. 12 . ’0 0
1 2: 34
[
3/3
]
m/ft
FILE NAME
SETUP
GETTING STARTED (Cont.)
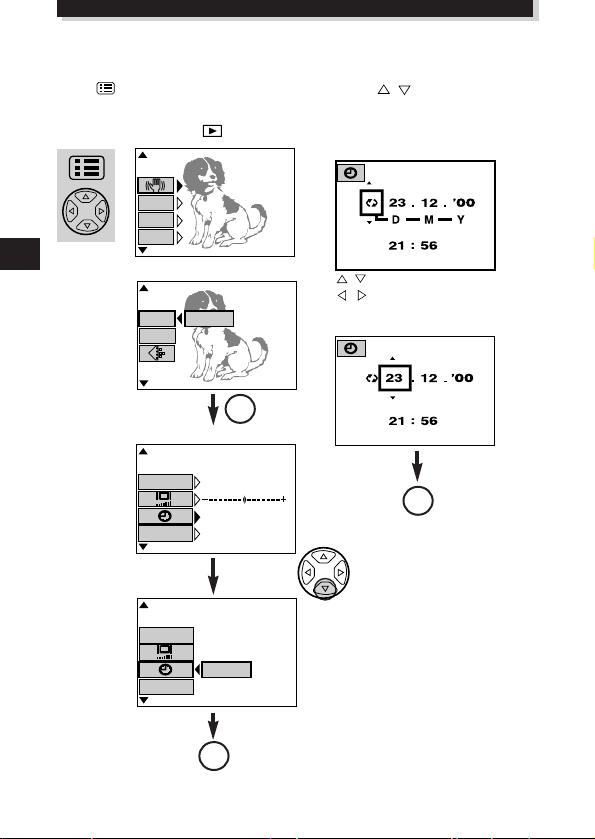
SETTING THE DATE AND TIME
Press (Menu button) to display the menu. Press on the Arrow pad to
select SETUP and press the OK button. When no images are recorded on the card, you
can set any mode except .
F2.8 1/800 0.0 P
ON
DIGITAL
OFF
ZOOM
WB
AUTO
AUTO
ISO
[
1/5
Still picture record menu
Mode setting screen
]
OK
Date and time screen
: Changes the setting.
: Moves to other settings.
●The year 2000 is displayed as ’00.
OK
12
OK
Page 13
BASIC FUNCTIONS
TURN THE POWER ON
OFF : Power off
ON : Power on
RESET : ● Move the switch to reset momentarily and
Remove the lens cap, set the Mode dial to the desired mode and set the Power switch
to ON.
TAKING PICTURES WHILE USING THE MONITOR
Press (Moniter button). The same sign
on the finder will be displayed on the monitor.
The displayed subject will switch between the
viewfinder and monitor each time you press
this button.
TURN OFF THE POWER
Turn the camera's power switch off.
Put on the lens cap.
then release, and the power switch will
automatically move back to ON. All
settings except the mode setting menu
will be reset to the factory-preset (initial
settings).
● Hold the switch in the reset position for
over 3 seconds, and all settings, except for
the date and time, will be reset to the initial
settings.
(Monitor button)
13
Page 14
BASIC FUNCTIONS (Cont.)
CARD FULL
CONFIRMING THE DISPLAY
m Checking the batteries
When the power is turned on, the remaining
battery power will be displayed on the control
panel. If it is low, please replace the batteries.
lights and turns off automatically.
The batteries are OK. You are ready to take pictures.
blinks and other indicators on the control panel are displayed normally.
The battery power is low and the batteries should be replaced. You can shoot with the
remaining power, but the batteries may die soon.
blinks and then turns off after 12 seconds. Other indicators on the control
also go out.
The batteries are dead and should be replaced immediately.
m Checking the number of storable pictures left
When the power is turned on in the still picture mode, the number of storable pictures
left will appear on the control panel. For movie pictures, the seconds remaining will
appear.
The number of storable pictures The seconds remaining will appear.
left will appear.
Number of storable
pictures left
Control panel
Battery
check
Remaining
time
● When there is no storable space left for
pictures in the still picture record mode :
Beeps will emit when the card cannot store
anymore pictures and the displays below will
appear on the control panel and viewfinder. If this
happens, replace the card with a new/storable card
or erase unwanted images in the existing card to
make space.
14
Control panel
Viewfinder
Page 15
m Number of storable pictures left
Recording mode
Number of
pixels
Memory capacity
(Image only/Image with sound)
File
2MB 4MB 8MB 16MB 32MB 64MB
0/–
0/–
0/–
2/–
1/1
4/3
2/2
6/5
3/3
9/8
8/7
21/15
1600x1200
1280x960
1024x768
640x480
1600x1200
1600x1200
1280x960
0/–
1/–
1/–
4/–
2/2
8/7
4/4
12/11
6/6
18/16
16/14
40/30
1/–
2/–
3/–
8/–
5/5
16/15
8/8
24/22
13/12
38/32
32/29
82/61
2/–
4/–
6/–
17/–
11/11
31/30
17/16
49/45
26/25
76/66
66/58
165/123
5/–
8/–
13/–
34/–
22/22
64/60
34/33
99/90
53/51
153/132
132/117
331/248
11/–
17/–
27/–
68/–
45/44
128/120
69/67
199/181
107/102
306/265
265/234
664/498
TIFF
*
SHQ
HQ
SQ
TIFF
JPEG
HIGH (quality)
NORMAL
HIGH (quality)
NORMAL
HIGH (quality)
NORMAL
1024x768
640x480
Recording mode Number of pixels
Memory capacity
2MB 4MB 8MB 16MB OVER
7/6
31/26
320x240
160x120
14/13
62/53
28/27
126/109
43/42
174/158
SQ
HQ
Number of still pictures that can be taken
* If the recording mode is set to TIFF, sound will not be recorded with a picture when
the Mode dial is set to P or A/S/M, but it can be added later during playback.
The number of seconds that you can record movie pictures:
Longest continuous recording time per movie frame
15
Page 16
BASIC FUNCTIONS (Cont.)
P F2.8 1/30 0.0
P F2.8 1/30 0.0
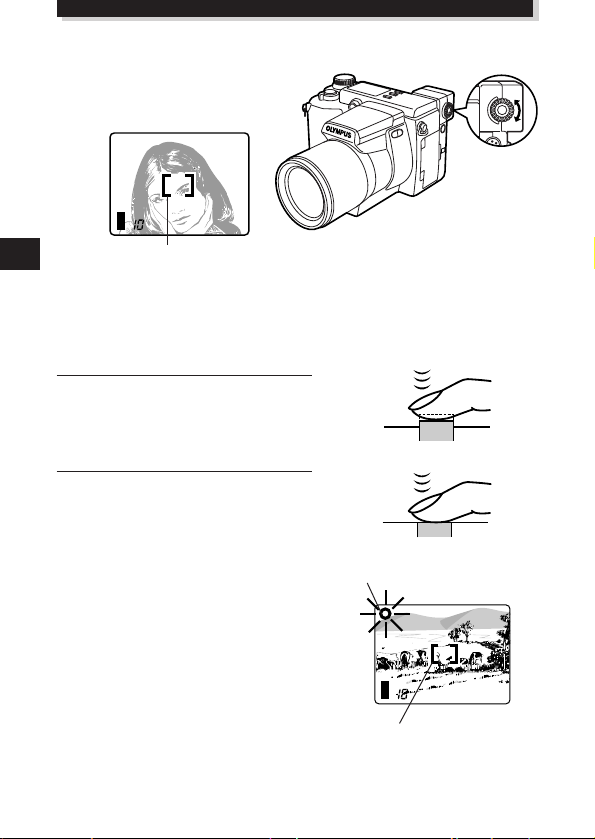
ADJUSTING THE DIOPTER
Turn the Diopter adjustment dial to see
the AF target mark clearly.
Viewfinder
AF target mark
TAKING PICTURES
Proper shutter release
There are 2 steps when releasing the shutter.
Practice well before actually taking photos.
Press the shutter button halfway.
1
● The AF confirmation mark will light
when the focus and exposure are
locked. It will blink if the focus or
exposure are not locked.
Press the shutter button fully to release
2
the shutter and take a picture.
● The camera emits a beep when the
shutter is released.
● The card access lamp blinks while the
picture is being recorded.
Press halfway
Shutter button
Press fully
Shutter button
AF confirmation mark
16
AF target mark
Page 17
WHEN TAKING A STILL PICTURE
P F2.8 1/30 0.0
F2.8 1/30 0.0
●A beep means that the photograph was
taken successfully.
●Soon after displaying the picture just taken,
the viewfinder will again show the area it is
being aimed at.
●Continuous shooting is available if the
memory gauge shows there is space in the
card.
●When the memory gauge is full, the upper
block will light up and no more pictures can
be taken.
Number of storable pictures
Memory gauge
Before shooting/
No picture taken
One picture
taken
More than one
taken
No recordable
space
● NEVER open the card cover, eject the card, remove the batteries, or pull the plug
when the card access lamp is blinking. Doing so could destroy stored pictures and
prevent storage of pictures you have just taken.
RECORDING MOVIES
Press the shutter button fully. Recording will
start. To stop recording, press the shutter
button fully again.
●The mark will light up in red while
shooting movies.
●When recording starts, correct focusing and
exposure is maintained continuously.
Seconds remaining
Memory gauge
17
Page 18
BASIC FUNCTIONS (Cont.)
P F2.8 1/800 0.0
P F2.8 1/800 0.0
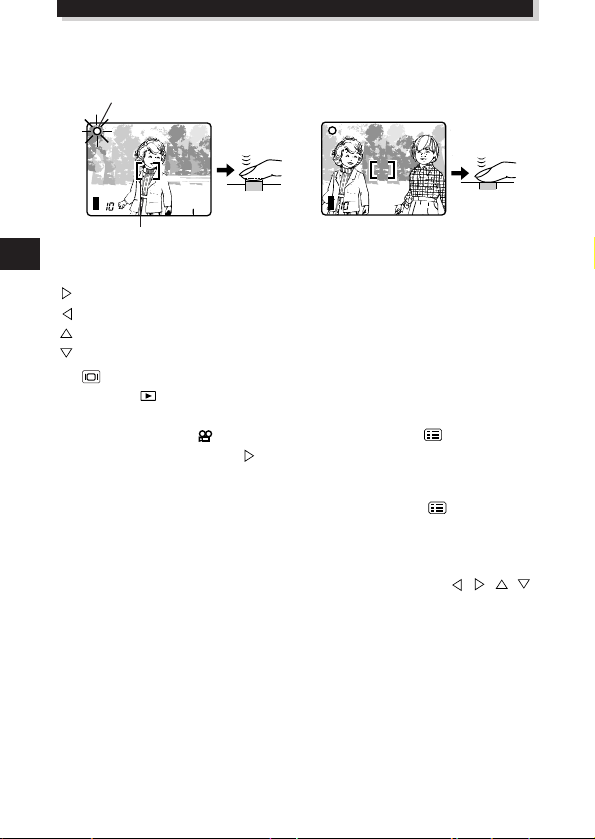
m Focus lock
When your main subject is not within the AF target marks , follow the procedure below.
AF confirmation mark
1
AF target mark
m Displaying pictures
All stored pictures in the card can be displayed by pressing the Arrow pad.
: Displays the next picture.
: Displays the previous picture.
: Jumps to the picture 10 frames ahead.
: Jumps to the picture 10 frames behind.
●If (Monitor button) is pressed twice quickly in the record mode or if the Mode
dial is set to , the camera enters the Display mode and pictures are displayed.
m Displaying movies
Select images with the mark using the Arrow pad. Press (Menu button).
Select MOVIE PLAY, then press to select START. Press the OK button to read the
data from the card. When the card access lamp stops blinking, the movie display
starts. To pause, press the OK button while displaying movies. Use the Arrow pad to
display the previous/next frame. To end the movie display, press (Menu button).
The menu display is restored.
m Close-up display
By moving the zoom lever to the T side, images can be enlarged 1.5x, 2x, 2.5x, or 3x.
To see a different area of the picture enlarged, press the Arrow pad ( / / / )
to slide the enlarged picture and view in the directions § / ©/¶/Ä on the screen.
m Index display
Turning the zoom lever to W displays multiple pictures simultaneously. You can select
the desired picture with the Arrow pad. To view it separately, turn the zoom lever to T.
You can change the number of pictures displayed by accessing the appropriate menu
setting.
Compose your shot.
2
18
Page 19
RECORDING FUNCTIONS
m Zoom
You can select telephoto or wide-angle with the 10x zoom. When the digital zoom in
the menu is turned on, 27x zoom is available with the 2.7x digital zoom.
●The speed of the zoom-in/out can be adjusted by changing the angle of the zoom
lever.
m
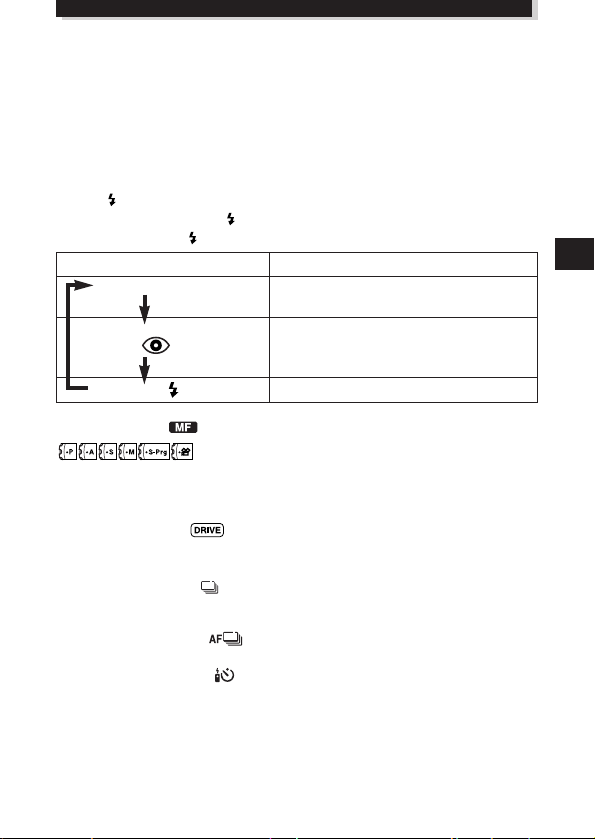
Auto flash
Slide the flash switch located under the flash to raise the flash. Press the shutter button
halfway.
●When lights on the viewfinder, the flash is activated.
●The flash charges while is blinking. The shutter cannot be released at
this time. Wait until turns off before taking pictures.
Flash mode/Control panel Use
Auto-Flash Automatically fires in low-light and
Red-Eye Reduction Significantly reduces the
Flash phenomenon of “red-eye”
Fill-In Flash Fires regardless of available light.
m Manual focus
Press the OK button. Select MF in the focus mode selection menu and select the focal
length with the Arrow pad. Press the OK button. The selected focal length is stored.
m Sequential mode
Single-picture Shooting (no display): Takes only one picture when you press the
shutter button. (Initial setting)
Sequential Shooting ( ): Takes pictures in sequence. Focus, brightness
(exposure), and white balance are locked at the first frame. Up to 5 frames can be
taken in sequence at once.
AF sequential Shooting ( ): Takes pictures in sequence. Focus, brightness
(exposure), and white balance are metered and adjusted in each frame.
Self-timer/remote-control ( ): Takes pictures with the self-timer/remote-control.
Auto bracket (BKT): Takes pictures in sequence. The camera will adjust the brightness
(exposure) in each frame. Focus and white balance are locked at the first frame.
backlight conditions.
(subject’s eyes appearing red).
19
Page 20
RECORDING FUNCTIONS (Cont.)
m Exposure compensation
You can adjust exposure manually by +/– 2 (in increments of approx. 1/3). If you want
a white object to appear as white as possible, adjust + to increase the exposure. If you
want a black object to appear as black as possible, adjust – to decrease the exposure.
m AE Lock
By pressing the AEL button, you can lock the exposure at the setting you prefer. This is
useful when you want to set an exposure that is different from what the camera would
normally choose.
m Metering mode
You can select the area of the brightness for metering. When you know the area is
properly exposed, press the to choose the metering mode.
Setting mode/Control panel display
Standard Meters the center of the subject
(digital ESP metering) and the area around the subject
Center-weighted Meters the center of the subject
averaging metering primarily.
Spot metering primarily. Use this mode when
(digital ESP metering)
Meters within the AF target mark
backlight is making the subject darker.
Functions
20
Page 21
USING MENUS FOR DETAILED ADJUSTMENTS
m Compensating for image blur — Stabilization system
When you take pictures with at wide-angle or telephoto, camera shake is more likely to
affect the picture, causing image blur. If this happens to you, you can compensate for
camera shake with the camera shake prevention feature.
Under some conditions, may not work effectively.
●When the camera angle is changed very quickly
●Night-view recording
●Overexposure
●When the battery indicator is blinking
m Using the 27X zoom — DIGITAL ZOOM
You can take a 2.7X zoom photograph with the maximum optical zoom. If you use a
10X optical zoom, you can take an 27X zoom photograph with DIGITAL ZOOM.
m White Balance — WB
Color reproduction differs depending on the lighting conditions. You can adjust the
white balance to match the lighting conditions and assure natural looking colors.
Settings for tungsten and fluorescent lights are also available, allowing you to get
better results indoors.
m Changing the ISO —
Increase the ISO when you want to take pictures in low-light situations with a fairly
high shutter speed. You can select from AUTO, as well as 100, 200 and 400. When you
set to AUTO, the sensitivity is automatically changed depending on the shooting
conditions. The higher the ISO, the faster the shutter speed that can be used and the
less light required.
m Slow synchronization flash mode —
This mode allows you to synchronize the light emitted by the flash with a slow shutter
speed. Setting the shutter speed to a lower value lets you capture a sharper image.
Select SLOW1 or SLOW2 on the menu. SLOW2 is 2nd-CURTAIN.
21
Page 22
RECORDING FUNCTIONS (Cont.)
m Auto bracket — BKT
Use this mode to record images with different exposures. Focus and white balance will
be measured first and fixed during sequential shooting. You can select the number of
pictures to take sequentially. Before taking a picture, press until
disappears from the control panel.
m Multi-Metering — MULTI METERING
Meters the brightness of the subject at up to 8 different points to set the correct
exposure based on the average brightnes.
m AF MODE
You can select the focus range of your subject.
iESP : Focus selection is based on the entire image on the screen (factory preset).
SPOT : Focus selection is based on the image within the AF target mark.
m FULL – TIME AF
With FULL TIME AF, focusing time may be shorter. FULL TIME AF keeps the image on
the LCD monitor/viewfinder in focus at all times. To select/cancel FULL TIME AF, set it
to ON or OFF in the Menu.
m
Sound record
Still Picture Recording: 4-second sound recording is possible.
Movie Recording: Simultaneous sound recording is possible.
m
Function Card
The Olympus SmartMedia card has a Panorama Mode that allows you to take extrawide panoramic shots.
You can use CAMEDIA Master to connect several images end to end to create a single
panorama picture.
22
Page 23
m Function Shooting — FUNCTION
“BLACK & WHITE” lets you shoot in black and white picture, while “SEPIA” adds a
sepia (brownish tint) to your image. “WHITE BOARD” lets you take a picture and
superimpose letters on a white board, while “BLACK BOARD” does the same with a
black board. When the Mode dial is set to , only “BLACK & WHITE” and “SEPIA”
are available.
m CARD SETUP
Initialization is performed to format the card so that it allows devices to write data on it.
Olympus-formatted cards are highly recommended. When using non-Olympus cards
or cards formatted by a PC, be sure to format them with the camera before use.
m Scene program mode — S-Prg
Select the mode according to the subject:
: Portrait pictures.
: Pictures of moving subjects.
: Pictures focusing on both the subject and background.
: Night scenes.
m Setting the record mode — TIFF SHQ HQ SQ
Select the desired record mode.
● With the mode dial set to P, A, S, M or S-Prg (for still pictures)
You can select from TIFF, SHQ, HQ and SQ. Image quality increases in the order of
[HQ[SHQ[TIFF. TIFF is the highest quality image format. The higher the
SQ
quality, the better the printed images will look. Pictures shot in the SHQ or TIFF mode
take longer to record and play back than picture shot in SQ and HQ.
● With the mode dial set to (for motion picture recording)
You can select from HQ and SQ. The image quality increases in the order of SQ[HQ.
23
Page 24

RECORDING FUNCTIONS (Cont.)
USING THE FLASH
m Flash intensity control
You can adjust the amount of light emitted by the flash to correspond with your
shooting requirements.
Press (Menu button) to display the menu. Select and adjust the flash
intensify.
m Using an external flash
The FL-40 external flash (optional) can be used when taking flash pictures, either by
itself or together with the main flash. To connect the FL-40 to the camera, the
exclusive FL-BK01 flash bracket (optional) and FL-CB01 bracket cable (optional) are
required. Without these options, the FL-40 will not perform differently from nonOlympus external flashes.
24
Page 25
DISPLAY FUNCTIONS
TV
23.12.’00 21:56 10
SQ
23.12.’00 21:56 10
SQ
23.12.’00 21:56 10
SQ
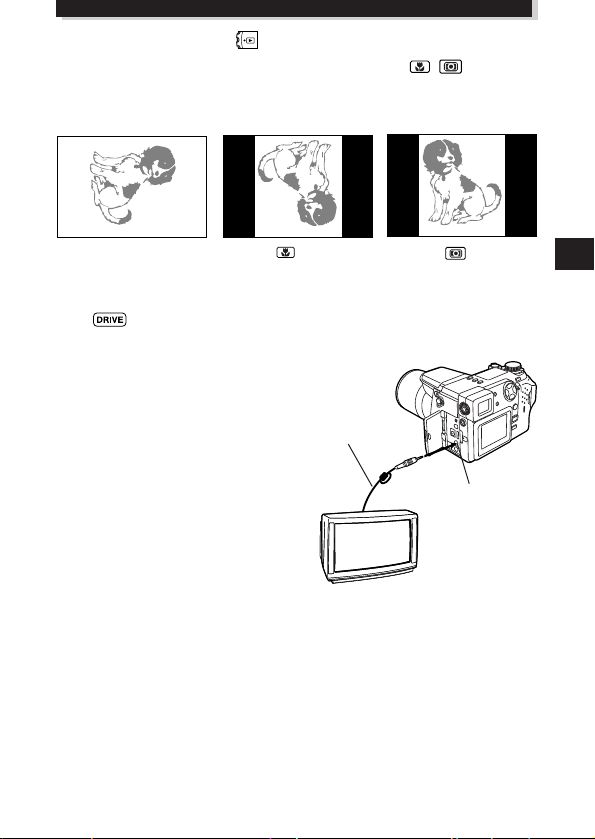
m Rotating and Checking Vertically Oriented Pictures /
When you take a shot with the camera held in the vertical position, the image will be
oriented vertically, ie. longer vertically than horizontally. You can turn it horizontally,
90° clockwise or counter-clockwise. Display a vertically oriented picture.
A vertically oriented picture
To restore the original position...
Press (Drive button).
m Displaying on TV
Recorded images and sound can be displayed
on TV with the AV cable.
1 Connect the AV cable to the camera's A/V
OUT jack (black).
2 Connect the AV cable to the TV's video
input (yellow) and audio input (white)
connectors.
Pressing (macro button)
turns the picture 90˚
clockwise.
AV cable
Pressing (metering
button) turns the picture 90˚
counter-clockwise.
Connect to the A/V OUT
jack (black).
25
Page 26
DISPLAY FUNCTIONS (Cont.)
m Single frame erasure
Switch the mode dial to .Select the images you want to erase using the Arrow pad.
Press (Erase button). A message asking you to confirm the erasure will appear.
Make sure that YES is selected, then press the OK button.
m All-frame erasure
Set the mode dial to . Press (Menu button). Select CARD SETUP, then .
Press the OK button. Make sure that OK is selected and press the OK button.
m Protection
Set the mode dial to . Display the picture you want to protect. Press the OK button.
The displayed picture will then be protected. will appear on the monitor.
USING MENUS FOR DETAILED ADJUSTMENTS
m Slide-show
This mode allows you to automatically run through multiple pictures stored on the
card. Press on the Arrow pad to select the slide-show mode, then press to
select START.
m Add Sound Memo to Still Pictures
You can add sound to still pictures or change the audio that has already been recorded.
m FUNCTION
MOVIE INDEX:
To check a movie at a glance, you can make an index. You can also store the index on
a SmartMedia card as still pictures.
MOVIE EDIT:
You can select the scenes you want and record them together as a new movie.
26
Page 27
MODE SETUP
Change the camera to your desired setting. For more details, refer to the software CD’s
instructions on CD-ROM.
m Mode Setting Menu Table
Item
ALL RESET
TIFF *1, *2
SQ *1, *2
AF ILLUMINATOR*1, *2
REC VIEW *2
SLEEP
FILE NAME*2
m/ft *2
*3
*1 During movie recording (with the Mode dial set to ), mode setting does not appear in the menu
screen.
*2 When displaying (with the Mode dial set to ), mode setting does not appear in the menu
screen.
*3 This menu is only available when displaying a picture.
Objection
Set the initial state of the
camera when turned on.
Set the level of picture
sharpness
Select image size in TIFF.
Select image size and quality
in SQ mode.
Adjust the volume of the
sound produced by each
camera control.
Select AF assist lamp ON/OFF.
Select whether or not the
recorded image is displayed.
Set the duration of time after
the last action before the
camera goes to sleep.
Specify how to memorize file
names on the card.
Adjust the brightness of the
Monitor and viewfinder.
Date setting
Set the focal length
measurement units.
Sets the number of picture
displayed on the screen at one
time.
Initial Setting
ON
NORMAL
1600 x 1200
640 x 480 (NORMAL)
HIGH
ON
OFF
1 MIN
RESET
–
m
9
27
Page 28
PRINTING PICTURES
Selected images can be reserved in a SmartMedia card for printing on a printer or at a
photo lab that supports the DPOF (Digital Print Order Format) system.
●Print reserve cannot be performed for a picture displayed with .
m Single-frame print reserve
Press . The Print reserve setting screen is displayed. Press on the Arrow pad
to select , then press the OK button. The print reserve selection screen is displayed.
Press the Arrow pad to select the picture you wish to print. Press the OK button. The
setting menu is displayed. Press to select x, then press to enter
the number. Press to select ( ), then press to select DATE or TIME.
Press to select ( TRIMMING), then press to select YES or NO. Press
the OK button to complete the setting. Press . The screen exits the Print reserve
mode and returns to the Display mode.
m All-frame print reserve
Allows you to store print data for all the pictures on the card, as well as allowing you to
choose how many prints you want.
m Trimming print reserve
You can print an enlarged part of a recorded picture.
Note:
●This camera cannot be directly connected to printers.
●If a card contains DPOF reservations set by another device, entering reservations
using this camera may overwrite the previous reservations. Be sure to use this
camera for reservations.
28
Page 29
TRANSFERRING PICTURES TO A COMPUTER
Capturing directly from a card
Card adapters enable you to capture images on your personal computer without using
any special software.
Personal computer type
Personal computer equipped
with 3.5" floppy disk-drive
Personal computer equipped with
a PC card slot (PCMCIA) or an
external PC card reader/writer
Personal computer equipped with
an USB port
Important:
● Check for compatibility. The above devices may not function properly in some
operating environments. Function may also be affected by the SmartMedia memory
capacity.
● OLYMPUS CAMEDIA Master is not necessary to capture pictures from a card. The
pictures can processed as normal PC files, using any commercially available image
processing application.
Note:
● Do not try to use a write-protected Smart Media on a computer as doing so will
cause errors. Refer to the instructions of the adapter you are using for more details.
Required card adapter
FlashPath floppy disk adapter (optional)
PC card adapter (optional)
SmartMedia Reader/Writer (MAUSB-2)
(optional)
29
Page 30

TRANSFERRING PICTURES TO A COMPUTER (Cont.)
Cable connection
Connect the camera to a personal computer (IBM PC/AT compatible, Apple Macintosh).
This camera is equipped with 2 transfer connectors.
If your computer is equipped with a USB interface and is running either are Windows
98/98 Second Edition/2000 Professional or Macintosh OS, you can transfer picture
data via a USB cable.
If your personal computer is not equipped with a USB interface or is running Windows
95/NT4.0 or Macintosh OS, you can transfer data via a serial cable.
To connect this camera directly to a personal computer, it must have either a serial
port or USB port.
Note:
● It is not possible to transfer data to a personal computer via a cable unless you use
CAMEDIA Master 2.0 to capture pictures.
For more details, refer to the software CD’s instructions on CD-ROM.
30
Page 31

ERROR CODES
Error codes appear when there is a problem with the camera.
Error codes displayed on the control panel will flash.
Control panel
Viewfinder/
monitor
CARD
COVER
OPEN
NO CARD
CARD FULL
Error content
The card cover is
open.
The card is not
inserted, or it
cannot be
recognized.
No more pictures
can be taken.
Insert a card and close the
cover.
Insert a card. Or insert the
card again.
Replace the card or erase
unneeded pictures.
Remedy
(No display)
WRITE
PROTECT
CARD
ERROR
PICTURE
ERROR
(Format
confirmation
screen)
Writing to the card
is prohibited.
Cannot record, play
back or erase
pictures in this
card.
The recorded
image cannot be
played back with
this camera.
The card is not
formatted.
If you are taking pictures,
remove the write-protect
adhesive seal.
If the card is dirty, wipe it
with a clean tissue and
insert it again. Or, format
the card. If the problem is
still not corrected, this card
cannot be used.
Load the image using
personal computer image
processing software. If that
cannot be done, the image
file is partially damaged.
Format the card.
31
Page 32

ERROR CODES (Cont.)
Control panel
Viewfinder/
monitor
NO
PICTURE
CARD FULL
Error content
There are no
picutures in the
card, so there is
nothing to play
back.
There is no empty
space in the card,
so print data or
sound cannot be
recorded.
Remedy
Insert a card which contains
images.
Replace the card or erase
unneeded picrures.
PRECAUTIONS
CAUTION
Caution concerning the flash
● Be careful when taking pictures at close range.
● Do not take pictures of people’s faces (babies in particular) at close range. If the flash goes
off too close to someone’s eyes it may cause a loss of vision. In particular, when taking
pictures of babies, be sure that the distance is at least 1 m.
Be careful when handling the unit
● Do not use in an unstable position. If you lose your balance, you might get hurt.
● Be careful that no foreign substance (dirt, rain, sand) can enter the unit, particularly
when the battery cover or lens barrier is open, as it may cause damage.
● To prevent damage, do not drop the camera or subject it to severe shock or vibration.
● This camera is not water-resistant. Do not put it in water, and be careful to protect it
from rain, sea water, etc.
● Do not use the camera outside during a storm or when there is lightning.
● When replacing the batteries, make sure the power is OFF. If it is left ON, it may damage
the internal circuits.
Storage environment
● To avoid damage or mis-operation of the camera, only store it where the temperature is
–20 ~ 60°C and the humidity 10 ~ 90%.
● Do not store in humid places, as condensation may form and cause damage.
● To prevent injuries or accidents, keep the camera out of the reach of children.
32
Page 33

Usage environment
● Do not use where there may be a large concentration of flammable or explosive gases, as
it may cause a fire or explosion.
● To avoid damage or mis-operation of the camera, use it only if the temperature is 0 ~
40°C and the humidity 30 ~ 90%.
● Do not move the camera suddenly from a hot to cold place, or vice versa. It may cause
the formation of condensation inside the unit that may damage it. To prevent the
formation of condensation, put the camera in a plastic bag, etc. to protect it and wait
until the camera has reached the ambient temperature before taking it out.
● If used in low temperatures, the batteries will have a shorter life span than normal.
Precautions when handling the batteries
To prevent leakage, fire, or damage, please read the instructions carefully and observe the
following points:
● Do not heat or throw the batteries into a fire.
● Do not disassemble, modify or solder.
● Do not install with inverted polarity (+, –).
● Do not let metal objects touch the contacts. Do not store or carry loosely with necklaces
or hairpins.
● Do not use old batteries together with new ones, and do not use different types of
batteries at the same time.
● Do not store them in humid places as they may corrode.
● Do not use if something seems to be wrong.
● Do not use if there is leaking, swelling, a rise in temperature, or any other abnormal
condition.
● When using them for the first time, if there are signs of corrosion or if they are warm,
please take them back to where they were bought.
● NEVER use any battery whose body is not fully covered by the insulating sheet or the
sheet is torn as it may cause leak, fire or injury. Some commercially available batteries
are also partially covered, or not covered at all by the insulating sheet. Never use these
batteries.
If there is a leak
● If the liquid gets into your eyes, do not rub them. Rinse with clean water, then seek
medical attention immediately.
● If the liquid gets in contact with your skin or clothing, rinse with clean water.
● If the liquid has leaked inside the battery compartment, clean it carefully with a wet rag
before inserting new batteries.
When the batteries are dead, take them out of the camera
● If old batteries are left inside the camera they may leak. If the camera is going into
storage or if you intend not to use the camera for a long period of time, remove the
batteries.
Do not use in an airtight device
● If may cause the batteries to leak and/or the camera to be damaged.
Do not recharge alkaline or lithium batteries
● If you try to recharge them, it may cause the batteries to leak and/or the camera to be
damaged.
33
Page 34

PRECAUTIONS (Cont.)
CAUTION
Keep out of the reach of children
● Make sure children do not take the batteries out when using the camera. If a child is
going to use the camera, be sure to teach the child proper usage according to this
manual.
● When disposing of old batteries, be sure to do so in accordance with all applicable
regulations in your area.
Precautions on using accessories
● Be sure to use only the supplied accessories, or accessories recommended by the
manufacturer, otherwise fire, electric shock or damage may result. For more information,
please consult the dealer where the unit was purchased.
● Do not keep the AC adaptor connected when not using the camera, otherwise fire,
electric shock or damage may result.
● To prevent electric shock and damage, do not plug, connect or handle the AC adaptor
with wet hands.
● Do not modify, bend forcibly, pull strongly, scratch, etc., or otherwise alter the AC
adaptor power cord. Also, do not put heavy objects on the power cord, or place it close
to a heat source as it may result in a fire or electric shock.
Points to verify before using the camera
● If taking particularly important pictures or if you have not used the camera for a long
period, first confirm that it functions properly, or consult an Authorized Service Centre.
● We decline all responsibility concerning the loss of data, down time, loss of revenue or
any other direct or indirect damage or claims caused by this camera.
Do not use or store in a hot place (e.g. inside a closed car on a hot and sunny
day)
● If may shorten their service life. Store in a dry cool place protected from direct sunlight.
Notes on display and backlight
●The Control panel and the fluorescent lamps used in the LCD monitor have a limited
service life. If they begin to darken or flicker, contact your nearest service center.
●In cold conditions, the display backlight may be slow to come on or may change
color suddenly. To avoid this, keep the camera warm when using in cold
temperatures. Backlight performance will return to normal under normal temperature
conditions.
●When the color LCD monitor shows different pictures, some pixels may not change
color and remain on or off. This phenomenon may be due to a lag in some circuits,
but is considered to be within the normal operating tolerances of the LCD monitor. In
addition, the brightness of the color LCD monitor may vary between pictures.
34
Page 35

IMPORTANT NOTICE
Disclaimer of Warranty
Olympus makes no representations or warranties, either expressed or implied, by or
concerning any content of these written materials or software, and in no event shall be
liable for any implied warranty of merchantability or fitness for any particular purpose
or for any consequential, incidental or indirect damages (including but not limited to
damages for loss of business profits, business interruption and loss of business
information) arising from the use or inability to use these written materials or software.
Some states do not allow the exclusion or limitation of liability for consequential or
incidental damages, so the above limitations may not apply to you.
Copyright Notice
All rights reserved. No part of these written materials or software may be reproduced
or used in any form or by any means, electronic or mechanical, including photocopying
and recording and the use of any kind of information storage and retrieval system,
without prior permission in writing from Olympus. No liability is assumed with respect
to the use of the information contained in these written materials or software, or for
damages resulting from the use of the information contained in these written materials
or of the software. Olympus reserves the right to alter the features and contents of this
publication or software without obligation or advance notice.
WARNING:
Unauthorized photographing or use of copyrighted material may violate applicable
copyright laws. Olympus assumes no responsibility for unauthorized photographing,
use or other acts that infringe upon the rights of copyright owners.
• IBM is a registered trademark of International Business Machines Corporation.
• Microsoft and Windows are registered trademarks of Microsoft Corporation.
• Macintosh is a trademark of Apple Computer Inc.
• All other company and product names are registered trademarks and/or trademarks
of their respective owners.
35
Page 36

SPECIFICATIONS
Product type ; Digital camera (for shooting and displaying)
Recording System
Memory : 3V (3.3V) SmartMedia 2MB, 4MB, 8MB, 16MB,
No. of storable pictures : Record without sound
(When an 8 MB card is used)
Erase : One-Frame erase / All-Frames erase
Image pickup element : 1/2 inch CCD solid-state image pickup
Recording image : 1600 x 1200 pixels (TIFF/SHQ/HQ)
White balance : Full Auto TTL (iESP auto), Preset (Daylight, Overcast,
Lens : Olympus lens 7.0 mm to 70.0 mm, F2.8 to F3.5, 13
Photometric system : Digital ESP metering, Center-weighted averaging
Exposure control : Program auto exposure, Aperture priority auto
Working range : W : 0.6 m to ∞ (No Macro mode)
Still : Digital recording, JPEG (in accordance with Design
Sound with
still images : Wave format
Movie : QuickTime Motion JPEG support
Aperture : W : F2.8 to F8.0
Shutter speed : Used with mechanical shutter
Still : 1/2 to 1/800 sec. (16 to 1/800 sec. with manual
Movie : 1/30 to 1/10000 sec.
rule for Camera File system (DCF)), TIFF (noncompression), Digital Print Order Format (DPOF)
32MB, 64MB
Approx. 1 frame (TIFF: 1600 x 1200)
Approx. 5 frames (SHQ)
16 frames (HQ)
Approx.
Approx.
38 frames (SQ: 1024 x 768 NORMAL)
Approx.
82 frames (SQ: 640 x 480 NORMAL)
2,110,000 pixels (gross)
1280 x 960 pixels (TIFF/SQ)
1024 x 768 pixels (TIFF/SQ)
640 x 480 pixels (TIFF/SQ)
Tungsten light, Fluorescent)
elements in 10 groups (equivalent to 38 mm to 380
mm lens on 35 mm camera), aspherical glass
metering, Spot metering system
exposure, Shutter priority auto exposure, Manual
exposure, Scene program exposure
T : F3.5 to F8.0
setting)
0.1 m to 0.6 m (Macro mode)
: T : 2.0 m to ∞ (No Macro mode)
1.0 m to 2.0 m (Macro mode)
36
Page 37

Viewfinder : 0.55" TFT color LCD display,
Monitor : 1.8" TFT color LCD display
No. of monitor pixels : Approx. 114,000 pixels
On-screen display : Date/Time, Frame number, Protect, Recording mode,
Battery charging time
for flash : Approx. 6 sec. (at normal temperature with new
Flash working range : W : Approx. 0.3 m to 4.0 m
Flash modes : Auto-Flash (automatic flash activation in low light and
Autofocus : TTL system iESP autofocus, Spot autofocus, Contrast
Focusing range : 0.1 m to ∞
Effective range of the
AF assist lamp : 0.3 m to 3.0 m
Selftimer : Electronic Selftimer with 12-sec. delay
Outer connector : DC-IN jack, Serial connector (RS-232C), A/V OUT
Date and time : Recorded with picture data simultaneously
Automatic calendar system : Up to 2030
Power supply for calendar : Built-in lithium battery
Operating environment
Temperature : 0°C to 40°C (operation)
Humidity : 30% to 90% (operation)
Power supply : For batteries, use 2 CR-V3 lithium battery packs, or 4
Dimensions : 112.5 mm (W) x 77.5 mm (H) x 141 mm (D)
Weight : 540g (without batteries/card)
approx. 114000 pixels
Battery check, Picture information, Print-reserve,
Menu, AF correct mark, Flash stand-by mark, AF
target mark, etc.
batteries)
T : Approx. 1.0 m to 3.2 m
backlight), Red-Eye Reducing Flash, Fill-In Flash
(forced activation), Off (no flash)
detection system
jack, USB connector (USB 1.0 compatible), 5-pin
external flash socket, External microphone jack
– 20°C to 60°C (storage)
10% to 90% (storage)
AA (R6) NiMH batteries, NiCd batteries, alkaline
batteries or lithium batteries. AC adapter (optional)
Zinc-carbon batteries cannot be used.
SPECIFICATIONS ARE SUBJECT TO CHANGE WITHOUT ANY NOTICE OR OBLIGATION ON THE PART
OF THE MANUFACTURER.
37
Page 38

Ces instructions ne sont qu’une version concise. Pour plus de détails sur les
fonctions décrites ici, se référer aux instructions du CD logiciel sur le CD-ROM.
PRÉPARATIFS
CONTENU
Appareil photo Bouchon d’objectif Bandoulière Télécommande
Piles au lithium CR-V3 Câble A/V Câble USB Câble de connexion
(ensemble de 2) série RS-232C pour
PC (IBM)
Carte de garantie Mode d’emploi/ Mode d’emploi CD logiciels
SmartMedia Étui antistatique 2 autocollants pour
(SSFDC-8MB) disquettes
4 autocollants Mode d’emploi
verrouillagedes
images en mémoire
Guide rapide de la (comprenant le
de démarrage télécommande mode d’emploi sur
CD-ROM)
38
Page 39

1
9
8
0
!
#
@
9
% ^
&
*
(
$
2 3 4 5 6 7
FIXATION DE LA BANDOULIÈRE
Passer la bandoulière par l’oeillet de bandoulière comme montré dans l’illustration.
Puis tirer dessus pour s’assurer qu’elle est bien serrée dans la pièce d’arrêt.
NOMENCLATURE DES PIÈCES
m Appareil photo
1 Levier de zoom (T/W)/
de planche d’affichage (T/W)
2 Déclencheur
3 Molette Mode
4 Voyant de retardateur/voyant d’aide à
la mise au point automatique
5 Écran de commande
6 Molette de réglage dioptrique
7 Prise de flash externe à 5 broches
8 Microphone
9 Oeillet de bandoulière
Oeillet de bandoulière de l’appareil
0 Fenêtre de réception de télécommande
! Objectif
@ Flash (incorporé)
# Commutateur de flash
$ Couvercle de connecteur
% Connecteur série (RS-232C)
^ Connecteur USB
& Prise d’entrée CC (DC-IN)
* Prise de microphone externe
( Prise de sortie A/V
Pièce d’arrêt
39
Page 40

PRÉPARATIFS (Suite)
NOMENCLATURE DES PIÈCES (Suite)
)
q w e r t y
u
i
o
p
Q
) Viseur
q Touche INFO
w Touche de mode de flash ( )/touche
d’effacement ( )
e Touche DRIVE
● Fait revenir dans leur position
originale pendant le mode
d’affichage des vues en format
vertical tournées en utilisant la
touche Gros plan ou de mode de
mesure.
r Touche de mode de mesure ( )
● Fait tourner pendant le mode
d’affichage des vues en format
vertical de 90˚ dans le sens inverse
des aiguilles d’une montre.
t Touche Gros plan macro ( )
● Fait tourner pendant le mode
d’affichage des vues en format
vertical de 90˚ dans le sens des
aiguilles d’une montre.
W
E
R
T Y U
y Touche de mémorisation AE (AEL)
/touche de mesure multiple/touche
d’impression ( )
u Molette de défilement
i Écran ACL
o Touche OK/touche de mise au point
manuelle (MF)/touche de protection
( )
p Touche de l’écran ACL ( )
Q Touche Menu ( )
W Interrupteur d’alimentation (POWER
OFF/ON/RESET)
E Couvercle du logement de carte
R Voyant d’accès de carte
T Couvercle du compartiment des piles
Y Verrou du compartiment des piles
U Embase filetée de trépied
40
Page 41

m Indications de l’écran de commande
Mode flash
Flash synchronisé à
vitesse lente
Commande d’intensité du
flash
Écriture sur la carte
Enregistrement du son
Erreur carte
Contrôle des piles
Fourchette automatique
Mode Gros plan
Autofocus à plein temps
Balance des blancs
ISO
Retardateur/télécommande
Prise de vues en série
Compensation
d’exposition
Système AF
Mise au point manuelle
Système de stabilisation
Mode de mesure
Mémoire AE
Mode d’enregistrement
Nombre de vues
enregistrables
Secondes restantes de
film enregistrable
41
Page 42

PRÉPARATIFS (Suite)
F2.8 1/800 +2.0 P
2
8
3
4
1
5
6 7
9
0
F2.8 1/800 +2.0
ISO100
SQ
P
SLOW1
!
@
#
$
%
^
&
*
(
NOMENCLATURE DES PIÈCES (Suite)
m
Indications dans le viseur/sur l’écran ACL (Informations d’image)
Appuyer sur la touche de l’écran ACL ( ) pour sélectionner si les images
apparaissent sur l’écran ACL ou dans le viseur. Appuyer sur la touche INFO pour
sélectionner comment les informations sont affichées. Les 3 types suivants d’affichage
sont disponibles.
Mode Enregistrement
Uniquement les repères de mise au point
automatique: Des avertissements (voyant de mise
au point correcte et contrôle des piles)
apparaissent quand c’est nécessaire. Les réglages
qui sont changés sont affichés pendant 2 secondes
environ.
Information partielle: En utilisant l’appareil, ces
indications sont affichées pendant 2 secondes
environ.
Information complète: Ces indications sont
affichées en permanence en mode Enregistrement.
1 Attente flash/avertissement d’instabilité/
recharge du flash
2 Marque de correction AF
3 Mode Photo
4 Contrôle des piles (affiché après la
mise de l’alimentation de l’appareil et
quand des avertissements
apparaissent)
5 Valeur de l’ouverture
6 Vitesse d’obturation
7 Compensation d’exposition/ exposition
différentielle
8 Repères de mise au point automatique
42
9 Bloc mémoire d’image
0 Nombre de vues enregistrables
! Mode Drive
@ Mode de mesure
# Mode Gros plan
$ Balance des blancs
% ISO
^ Mode Enregistrement
& Mode Flash
* Flash synchronisé à vitesse lente (non
affiché quand le flash est dans un
autre mode de flash)
( Stabilisateur
Page 43

Mode Affichage
3456
HQ
1
0 54
6
7
FILE: 123-3456
HQ
SIZE: 320x240
!
&
345623.12.,00 21:56
HQ
x10
1
2 43 5
6
7
8
9
FILE:123-3456
HQ
SIZE: 1600x1200
F2.8 1/800 2.0
ISO400
23.12.,00 21:56
x10
!
$
@9 #
%
^
8
&
Pas d’indications: Uniquement le contrôle des piles et sont affichés.
Information partielle: Ces indications disparaissent au bout d’un certain temps.
Information complète: Toutes les indications sont affichées en permanence pendant le
mode Affichage.
Image fixe
Information partielle
Information complète
1 État des piles
2 Réservation d’impression
3 Nombre de tirages
4 Enregistrement du son
5 Protection
6 Mode d’enregistrement
7 Numéro de vue
8 Heure
9 Date
Remarque:
Les indications qui apparaissent sur une image cinéma qui a été sélectionnée et
affichée à partir de l’affichage d’index sont différentes de celles qui apparaissent quand
l’image cinéma est affichée en utilisant la fonction de lecture de film.
Image cinéma
Information partielle
Information complète
0 Image cinéma
! Nombre de pixels
@ Valeur d’ouverture
# Vitesse d’obturation
$ Compensation d’exposition
% Balance des blancs
^ ISO
& Numéro de fichier (En mode
d’affichage d’images cinéma, la durée
totale d’enregistrement est affichée.)
43
Page 44

PRÉPARATIFS (Suite)
MISE EN PLACE DES PILES
S’assurer que l’interrupteur d’alimentation de l’appareil est réglé sur OFF et introduire
les piles comme montré dans l’illustration. Les piles au lithium CR-V3 ne peuvent pas
être rechargées.
1
5
44
2
En utilisant des piles AA
En utilisant des piles au lithium
4
3
6
7
8
Page 45

m Durée de service d’une pile au lithium
Prise de vues/Affichage Condition Durée des piles
Nombre de photographies
Durée d’affichage
* Ces chiffres sont donnés uniquement comme référence et ne sont pas garantis. Essais établis à partir
de conditions déterminées par Olympus.
1
2
200 vues environ
330 minutes environ
m Utilisation de l’adaptateur secteur (Option)
Utiliser un adaptateur secteur
conçu pour la région où l’appareil
est utilisé. Consulter le revendeur
Olympus le plus proche ou un
centre de service pour des détails.
Fiche
d’alimentation
Prise
secteur
Adaptateur secteur
Prise d’entrée CC (Noire)
Fiche de raccordement
INTRODUCTION ET ÉJECTION DE LA CARTE SmartMedia
Bien s’assurer d’utiliser une carte 3 V (3,3 V). Ne pas utiliser de carte 5 V. Les cartes 3
V (3,3 V) de marque autre que “Olympus” doivent être formatées par l’appareil.
Introduire complètement
la carte jusqu’à sentir
qu’elle est bien en place.
Pousser sur la carte pour
l’éjecter.
45
Page 46

M
O
D
E
D
I
A
L
S
M
S-Prg
A
P
PRÉPARATIFS (Suite)
UTILISATION DE LA MOLETTE MODE
Vous pouvez changer le mode en tournant la molette Mode sur le côté supérieur droit
de l’appareil photo.
P (Mode programmé):
En mode programmé, vous pouvez prendre une photo correctement exposée
simplement en pointant l’appareil sur le sujet et en appuyant sur le déclencheur.
L’ouverture et la vitesse d’obturation sont réglées automatiquement par l’appareil
photo.
A (Mode à priorité à l’ouverture):
L’ouverture peut être réglée manuellement dans le mode à priorité à l’ouverture. C’est
utile lorsque vous voulez avoir plus de contrôle sur l’exposition de l’image. La vitesse
d’obturation est réglée automatiquement par l’appareil photo.
S (Mode à priorité à la vitesse):
La vitesse d’obturation peut être réglée manuellement dans le mode à priorité à la
vitesse. La régler sur une vitesse rapide pour saisir un sujet en mouvement. La régler
sur une vitesse lente pour exprimer le mouvement. L’ouverture est réglée
automatiquement par l’appareil photo.
M (Mode manuel):
Vous pouvez régler manuellement l’ouverture et la vitesse d’obturation en mode
manuel.
S-Prg (Mode programmé de scène):
L’appareil optimisera automatiquement la combinaison ouverture et vitesse
d’obturation selon le type de sujet. Vous pouvez choisir entre Portrait, Sports, Paysage
et Scène de nuit. Les sélections sont affichées dans le menu.
(Mode Cinéma):
Vous pouvez prendre des images animées dans le mode cinéma. L’ouverture et la
vitesse d’obturation sont réglées automatiquement par l’appareil photo.
(Mode Affichage):
Vous permet d’examiner les vues que vous avez prises.
46
Page 47

UTILISATION DU MENU
[
1/5
]
F2.8 1/800 0.0 P
OFF
ISO
WB
ON
AUTO
AUTO
DIGITAL
ZOOM
[
1/5
]
F2.8 1/800 0.0 P
ISO
WB
DIGITAL
ZOOM
AUTO
[
1/5
]
F2.8 1/800 0.0 P
OFF
ISO
WB
ON
AUTO
AUTO
DIGITAL
ZOOM
[
2/5
]
F2.8 1/800 0.0 P
SLOW
MULTI
METERING
OFF
OFF
1.0 x3
O
BKT
Appuyer sur (touche Menu) pour afficher le menu,
appuyer sur de la molette de défilement pour
choisir l’option de menu désirée. Appuyer sur pour
afficher les options de menu supplémentaires. Lorsque
l’option de menu est réglée comme désirée, appuyer sur
la touche OK. Le réglage est mémorisé et l’image
réapparaît sur le menu. Appuyer plusieurs fois sur la
touche OK jusqu’à la disparition du menu.
Défilement
Exemple: Lorsque la balance des
blancs est réglée
F2.8 1/800 0.0 P
ON
DIGITAL
OFF
ZOOM
WB
AUTO
AUTO
ISO
[
]
1/5
Pour régler
Écran ACL
Page 1/5
Réglages courants
Exemple: Pour passer aux pages
suivantes
ou
OK
Le réglage est
sauvegardé.
• Si vous finissez en appuyant sur
(touche Menu), les réglages
que vous avez faits ne seront pas
sauvegardés.
• Si vous appuyez sur à la
page 1/5, l’écran affiche la page
5/5.
47
Page 48

SETUP
[
5/5
]
F2.8 1/800 0.0 A
MODE
SETUP
S-Prg
[
3/3
]
m/ft
FILE NAME
SETUP
PRÉPARATIFS (Suite)
[
3 /3
]
m /f t m
RESET
FILE NAME
2 3. 12 . ’0 0
1 2: 34
RÉGLAGE DE LA DATE ET DE L’HEURE
Appuyer sur (touche Menu) pour afficher le menu. Appuyer sur de la
molette de défilement pour choisir SETUP et appuyer sur la touche OK. Quand il n’y a
pas d’images enregistrées sur la carte, vous pouvez régler n’importe quel mode
sauf .
F2.8 1/800 0.0 P
ON
DIGITAL
OFF
ZOOM
WB
AUTO
AUTO
ISO
[
]
Menu d’enregistrement d’images fixes
1/5
OK
Écran de réglage de mode
Écran de date et heure
: Change le réglage.
: Passe à un autre réglage.
● L’année 2000 est affichée comme
‘00.
OK
48
OK
Page 49

FONCTIONS DE BASE
MISE EN MARCHE DE L’APPAREIL
OFF : Alimentation coupée
ON : Alimentation en marche
RESET : ● Déplacer momentanément l’interrupteur sur
Retirer le bouchon d’objectif, régler la molette Mode sur le mode désiré et régler
l’interrupteur d’alimentation sur ON.
PRISE DE VUES À L’AIDE DE L’ÉCRAN ACL
Appuyer sur (Touche de l’écran ACL). Le
même signe dans le viseur sera affiché sur
l’écran ACL. Le sujet affiché sera commuté
entre le viseur et l’écran ACL chaque fois que
cette touche est pressée.
COUPURE DE L’ALIMENTATION
Tourner l’interrupteur d’alimentation de
l’appareil sur l’arrêt. Mettre le bouchon sur
l’objectif.
RESET et relâcher, et l’interrupteur
reviendra automatiquement sur ON. Tous
les réglages sauf le menu de réglage de
mode seront remis aux réglages en usine
(réglages initiaux).
● Maintenir l’interrupteur dans la position
RESET pendant plus de 3 secondes, et tous
les réglages, sauf pour la date et l’heure,
seront remis aux valeurs initiales.
(Touche de l’écran ACL)
49
Page 50

FONCTIONS DE BASE (Suite)
CARD FULL
CONTRÔLE DES AFFICHAGES
m Vérification de l’état des piles
Lorsque l’appareil est mis en marche, l’état
des piles est affiché sur l’écran de commande.
Si les piles sont faibles, veuillez les remplacer.
L’indicateur s’allume et s’éteint automatiquement.
Les piles sont bonnes pour prendre des photos.
L’indicateur clignote et tous les autres indicateurs de l’écran de commande
apparaissent normalement.
Les piles sont faibles et doivent être remplacées. Vous pouvez encore prendre des
photos, mais les piles risquent d’être épuisées rapidement.
L’indicateur clignote puis s’éteint au bout de 12 secondes. Les autres
indicateurs de l’écran de commande sont également éteints.
Les piles sont vides et doivent être immédiatement remplacées.
m Contrôle du nombre de vues enregistrables
Lorsque l’appareil est mis en marche dans le mode d’images fixes, le nombre de vues
enregistrables apparaît sur l’écran de commande. Pour les images cinéma, la durée
restante en secondes apparaît.
Le nombre de vues enregistrables Les secondes restantes apparaissent.
restant apparaît.
Nombre de vues
enregistrables restant
Écran de commande
Contrôle
des piles
Durée
restante
● Quand il n’y a plus de place disponible pour
des vues en mode d’enregistrement d’images
fixes:
Un avertissement sonore est émis lorsque la carte
ne peut plus mémoriser de vues et l’affichage cidessous apparaît sur l’écran de commande et dans
le viseur. Lorsque ceci arrive, remplacer la carte
par une nouvelle ou par une carte enregistrable ou
effacer des images non désirées sur la carte
existante pour faire de la place.
50
Écran de commande
Viseur
Page 51

m Nombre de vues enregistrables restant
Mode
d’enregistrement
Nombre de
pixels
Capacité de mémoire
(Image seule/Image avec son)
Fichier
2Mo 4Mo 8Mo 16Mo 32Mo 64Mo
0/–
0/–
0/–
2/–
1/1
4/3
2/2
6/5
3/3
9/8
8/7
21/15
1600x1200
1280x960
1024x768
640x480
1600x1200
1600x1200
1280x960
0/–
1/–
1/–
4/–
2/2
8/7
4/4
12/11
6/6
18/16
16/14
40/30
1/–
2/–
3/–
8/–
5/5
16/15
8/8
24/22
13/12
38/32
32/29
82/61
2/–
4/–
6/–
17/–
11/11
31/30
17/16
49/45
26/25
76/66
66/58
165/123
5/–
8/–
13/–
34/–
22/22
64/60
34/33
99/90
53/51
153/132
132/117
331/248
11/–
17/–
27/–
68/–
45/44
128/120
69/67
199/181
107/102
306/265
265/234
664/498
TIFF
*
SHQ
HQ
SQ
TIFF
JPEG
HIGH (Haute qualité)
NORMAL
HIGH (Haute qualité)
NORMAL
HIGH (Haute qualité)
NORMAL
1024x768
640x480
Mode
d’enregistrement
Nombre de pixels
Capacité de mémoire
2Mo 4Mo 8Mo
Supérieure à 16Mo
7/6
31/26
320x240
160x120
14/13
62/53
28/27
126/109
43/42
174/158
SQ
HQ
Nombre d’images fixes pouvant être prises
* Si le mode d’enregistrement est réglé sur TIFF, le son ne sera pas enregistré avec
l’image lorsque la molette Mode est réglée sur P ou A/S/M, mais il peut être ajouté
plus tard pendant la lecture.
Nombre de secondes d’images cinéma pouvant être prises:
Durée d’enregistrement continu la plus longue par film
51
Page 52

FONCTIONS DE BASE (Suite)
P F2.8 1/30 0.0
P F2.8 1/30 0.0
RÉGLAGE DIOPTRIQUE
Tourner la molette de réglage dioptrique
pour voir clairement le repère de mise au
point automatique.
Viseur
Repère de mise au point automatique
PRISE DE VUES
Déclenchement correct
Il y a 2 étapes pour déclencher l’obturateur.
Bien pratiquer avant de prendre réellement
des vues.
Appuyer sur le déclencheur jusqu’à mi-
1
course.
● La marque de correction AF s’allume
lorsque la mise au point et l’exposition
sont mémorisées. Elle clignote si la
mise au point ou l’exposition n’est pas
mémorisée.
Appuyer complètement sur le
2
déclencheur pour prendre la photo.
● L’appareil photo émet un signal sonore
lorsque l’obturateur est déclenché.
● Le voyant d’accès de carte clignote
alors que la vue est en cours
d’enregistrement.
Appuyer jusqu’à
mi-course
Déclencheur
Appuyer
complètement
Déclencheur
Marque de correction AF
52
Repère de mise au point automatique
Page 53

PRISE D’UNE VUE FIXE
P F2.8 1/30 0.0
F2.8 1/30 0.0
●Un signal sonore signifie que la photo a été
prise correctement.
●Juste après l’affichage de la vue prise,
l’appareil est prêt pour prendre la vue
suivante.
●La prise de vues en série est disponible si le
bloc mémoire montre qu’il y a de la place
sur la carte.
●Si la mémoire tampon est pleine, le bloc
supérieur s’allumera et aucune autre vue ne
pourra être prise.
Nombre de vues enregistrables
Bloc mémoire
Avant la prise de vues/
Aucune vue n’est prise
Une vue prise
Plus d’une vue prise
Pas de place
d’enregistrement
● NE JAMAIS ouvrir le couvercle du logement de carte, éjecter la carte, retirer les piles
ni tirer la fiche lorsque le voyant d’accès de carte clignote. Faire ainsi pourrait
détruire des vues enregistrées et empêcher la mémorisation de vues que vous venez
juste de prendre.
ENREGISTREMENT DE FILMS
Appuyer complètement sur le déclencheur.
L’enregistrement commence. Pour l’arrêter,
appuyer de nouveau complètement sur le
déclencheur.
●Le symbole s’allume en rouge pendant
l’enregistrement de films.
●Lorsque l’enregistrement commence, la
mise au point et l’exposition correctes sont
maintenues en permanence.
Secondes restantes
Bloc mémoire
53
Page 54

FONCTIONS DE BASE (Suite)
P F2.8 1/800 0.0
P F2.8 1/800 0.0
m Mémorisation de la mise au point
Suivre la procédure ci-dessous si votre sujet principal n’est pas dans le repère de mise
au point automatique.
Marque de correction AF
Recadrer l’image
1 2
Repère de mise au point automatique
m Affichage de vues
Toutes les vues enregistrées sur la carte peuvent être affichées en appuyant sur la
molette de défilement.
: Affiche la vue suivante.
: Affiche la vue précédente.
: Saute à la vue 10 images en avant.
: Saute à la vue 10 images en arrière.
●Si Touche de l’écran ACL) est pressée rapidement deux fois dans le mode
d’enregistrement ou si la molette Mode est réglée sur , l’appareil passe en mode
d’affichage et des vues sont affichées.
m Affichage de films
Sélectionner des images avec le symbole en utilisant la molette de défilement.
Appuyer sur (touche Menu). Sélectionner MOVIE PLAY, puis appuyer surs
pour choisir START. Appuyer sur la touche OK pour lire les données de la carte.
Lorsque le voyant d’accès de carte s’arrête de clignoter, la lecture du film commence.
Pour faire une pause, appuyer sur la touche OK pendant l’affichage de films. Utiliser la
molette de défilement pour afficher l’image précédente/suivante. Pour terminer
l’affichage du film, appuyer sur (touche Menu). L’affichage du menu revient.
m Affichage gros plan
En déplaçant le levier de zoom vers T, des images peuvent être agrandies de 1,5x, 2x,
2,5x ou 3x. Pour voir une partie différente de l’image agrandie, appuyer sur la molette
de défilement ( / / / ) tpour décaler l’image agrandie et visionner dans les
sens § / ©/¶/Ä sur l’écran.
m Affichage d’index
Si vous tournez le levier de zoom vers W, vous pouvez afficher plusieurs vues à la fois.
Vous pouvez sélectionner la vue que vous voulez voir en utilisant la molette de
défilement. Pour la visionner seule, tourner le levier de zoom vers T. Vous pouvez
changer le nombre de vues affichées en accédant au réglage de menu approprié.
54
Page 55

FONCTIONS D’ENREGISTREMENT
m Zoom
Vous pouvez sélectionner téléobjectif ou grand angle avec le zoom 10x. Si le zoom
numérique dans le menu est activé, un zoom 27x est disponible avec le zoom
numérique 2,7x.
●La vitesse du zoom avant/arrière peut être ajustée en changeant l’angle du levier de
zoom.
m
Flash automatique
Glisser le commutateur de flash situé sous le flash pour relever le flash. Appuyer sur le
déclencheur jusqu’à micourse.
●Lorsque s’allume dans le viseur, le flash est activé.
●Le flash est en cours de recharge alors que clignote. L’obturateur ne peut
pas être déclenché à ce moment-là. Attendre que s’éteigne avant de
prendre la photo.
Mode de flash/Écran de commande Utilisation
Flash automatique Se déclenche automatiquement dans des
Flash atténuant l’effet Atténue sensiblement l’effet “yeux rouges”
“yeux rouges” (les yeux du sujet apparaissant rouges).
Flash d’appoint conditions d’éclairage.
conditions de faible éclairage et de contre-jour.
Se déclenche quelles que soient les
m Mise au point manuelle
Appuyer sur la touche OK. Choisir MF dans le menu de sélection de mode de mise au
point et sélectionner la distance avec la molette de défilement. Appuyer sur la touche
OK. La distance sélectionnée est mémorisée.
m Mode de prise de vues en série
Prise d’une seule vue (pas d’affichage): Ne prend qu’une seule vue en appuyant sur
le déclencheur. (Réglage initial)
Prise de vues en série ( ): TPrend des vues en série. La mise au point,
l’exposition et la balance des blancs sont mémorisées pour la première vue.
Jusqu’à 5 vues à la fois peuvent être prises en série.
Prise de vues en série AF ( ): Prend des vues en série. La mise au point,
l’exposition et la balance des blancs sont mesurées et ajustées pour chaque vue.
Retardateur/télécommande ( ): Prend des vues avec le retardateur ou la
télécommande.
Fourchette automatique (BKT): Prend des vues en série. L’appareil ajuste l’exposition
pour chaque vue. La mise au point et la balance des blancs sont mémorisées pour
la première vue.
55
Page 56

FONCTIONS D’ENREGISTREMENT (Suite)
m Compensation d’exposition
Vous pouvez ajuster manuellement l’exposition de +/– 2 (pas de 1/3 environ). Si vous
voulez qu’un objet blanc apparaisse aussi blanc que possible, ajuster + pour augmenter
l’exposition. Si vous voulez qu’un objet noir apparaisse aussi noir que possible, ajuster
– pour réduire l’exposition.
m Mémorisation AE
En appuyant sur la touche AEL, vous pouvez mémoriser l’exposition sur le réglage que
vous préférez. C’est très utile quand vous voulez régler une exposition qui est différente
de celle que l’appareil aurait normalement choisi.
m Mode de mesure
Vous pouvez sélectionner la zone de luminosité pour la mesure. Lorsque vous savez
que la zone est correctement exposée, appuyer sur la touche pour choisir le
mode de mesure.
Mode de réglage/
Affichage de l’écran de commande
Standard Mesure le centre du sujet et
(Mesure ESP numérique) a zone autour du sujet
Mesure moyenne pondérée Mesure essentiellement
au centre le centre du sujet.
Mesure ponctuelle (Spot) repère de mise au point automatique.
(Mesure ESP numérique)
Mesure essentiellement dans le
Utiliser ce mode lorsqu’un
contre-jour rend le sujet plus sombre.
Fonctions
56
Page 57

UTILISATION DE MENUS POUR DES AJUSTEMENTS DÉTAILLÉS
m Compensation de flou d’image — Système de stabilisation
En prenant des vues en position téléobjectif, le tremblement de l’appareil risque
d’affecter davantage l’image en causant une image floue. Si cela vous arrive, vous
pouvez compenser le tremblement de l’appareil avec la fonction de correction de
tremblement de l’appareil.
Sous certaines conditions, la fonction risque de ne pas être efficace.
●Si l’angle de l’appareil est changé très rapidement
●En enregistrement des scènes de nuit
●Avec une longue durée d’exposition
●Si l’indicateur des piles clignote.
m Utilisation du zoom 27X — ZOOM NUMÉRIQUE
Vous pouvez obtenir une photographie agrandie de 2,7X avec le zoom numérique. Si
vous utilisez en même temps un zoom optique 10X, vous pouvez prendre une
photographie zoom 27X.
m Balance des blancs — WB
La reproduction des couleurs diffère en fonction des conditions d’éclairage. Vous
pouvez ajuster la balance des blancs pour s’adapter aux conditions d’éclairage et
assurer des couleurs semblant naturelles. Des réglages pour des éclairages au
tungstène et fluorescent sont également disponibles, vous permettant d’obtenir les
meilleurs résultats en intérieur.
m Changement de la sensibilité (ISO) —
Augmenter la sensibilité lorsque vous voulez prendre des vues sous faible éclairage
avec une vitesse d’obturation assez élevée. Vous pouvez choisir entre AUTO, 100, 200
ou 400. Si vous réglez sur AUTO, la sensibilité est changée automatiquement en
fonction des conditions de prise de vues. Plus la valeur ISO est élevée, plus la vitesse
d’obturation utilisable peut être élevée et moins de lumière est nécessaire.
m Mode flash synchronisé à vitesse lente —
Ce mode vous permet de synchroniser la lumière émise par le flash avec une vitesse
d’obturation lente. Régler la vitesse d’obturation sur une valeur plus faible vous permet
de saisir une image plus claire. Sélectionner SLOW1 ou SLOW2 sur le menu,
SLOW2 est le second rideau.
57
Page 58

FONCTIONS D’ENREGISTREMENT (Suite)
m Fourchette automatique — BKT
Utiliser ce mode pour enregistrer des images avec des expositions différentes. La mise
au point et la balance des blancs seront d’abord mesurées et fixes pendant la prise de
vues en série. Vous pouvez sélectionner le nombre de vues à prendre en série. Avant
de prendre une vue, appuyer sur jusqu’à la disparition de e l’écran de
commande.
m Mesure multiple — MULTI METERING
Mesure la luminosité du sujet sur jusqu’à 8 points différents pour régler l’exposition
correcte basée sur la luminosité moyenne.
m AF MODE
Vous pouvez sélectionner la plage de mise au point de votre sujet.
iESP : La sélection de mise au point est déterminée sur l’image entière sur l’écran
SPOT : La sélection de mise au point est déterminée sur la partie de l’image dans
m FULL – TIME AF
Avec l’autofocus à plein temps, la durée de mise au point peut être plus courte.
L’autofocus à plein temps garde l’image au point sur l’écran ACL/dans le viseur à tout
moment. Pour sélectionner/annuler l’autofocus à plein temps, régler le paramètre sur
ON ou OFF dans le menu.
m
Enregistrement d’images fixes: L’enregistrement de 4 secondes de son est possible.
Enregistrement de films: L’enregistrement simultané du son est possible.
m
(réglage en usine).
le repère de mise au point automatique.
Enregistrement du son
Carte de fonction
La carte SmartMedia Olympus a un mode Panorama qui vous permet de faire des
prises de vues panoramiques extra larges.
Vous pouvez utiliser le logiciel CAMEDIA Master pour raccorder plusieurs images bout
à bout pour créer une seule image panoramique.
58
Page 59

m Fonction en prise de vues — FUNCTION
“BLACK & WHITE” vous permet de prendre des vues en noir et blanc, alors que
“SEPIA” ajoute une teinte sépia (brunâtre) à votre image. “WHITE BOARD” vous
permet de prendre une vue et de superposer des lettres sur un tableau blanc, alors que
“BLACK BOARD” fait la même chose avec un tableau noir. Lorsque la molette Mode est
réglée sur , uniquement “BLACK & WHITE” et “SEPIA” sont disponibles.
m CARD SETUP
L’initialisation est effectuée pour formater la carte pour permettre l’écriture de données
sur celle-ci. Les cartes formatées Olympus sont vivement recommandées. En utilisant
des cartes d’une autre marque ou des cartes formatées par un PC, bien s’assurer de les
formater avec l’appareil avant utilisation.
m Mode programmé de scène — S-Prg
Sélectionner le mode en fonction du sujet:
: Vues de portrait.
: Vues de sujets en mouvement.
: Vues avec à la fois le sujet et l’arrière-plan nets.
: Scènes de nuit.
m Réglage du mode d’enregistrement — TIFF SHQ HQ SQ
Sélectionner le mode d’enregistrement désiré.
● Avec la molette Mode réglée sur P, A, S, M ou S-Prg (pour des images fixes)
Vous pouvez sélectionner entre TIFF, SHQ, HQ et SQ. La qualité d’image augmente
dans l’ordre SQ
qualité. Plus la qualité est élevée, meilleures seront les images imprimées. Pour des
images prises dans le mode SHQ ou TIFF, la durée d’enregistrement et de lecture est
plus longue qu’en SQ ou HQ.
● Avec la molette Mode réglée sur (pour l’enregistrement d’images cinéma)
Vous pouvez sélectionner entre HQ et SQ. La qualité d’image augmente dans l’ordre SQ
[HQ.
[HQ[SHQ[TIFF. TIFF est le format d'image de la plus haute
59
Page 60

FONCTIONS D’ENREGISTREMENT (Suite)
UTILISATION DU FLASH
m Commande d’intensité du flash
Vous pouvez ajuster la quantité de lumière émise par le flash pour répondre à vos
besoins de prise de vues.
Appuyer sur (touche Menu) pour afficher le menu. Choisir et ajuster
l’intensité du flash.
m Utilisation d’un flash externe
Le flash externe FL-40 (en option) peut être utilisé pour prendre des photographies au
flash, soit seul ou avec le flash principal. Pour raccorder le FL-40 à l’appareil, le
support de flash FL-BK01 exclusif (en option) et le cordon de support FL-CB01 (en
option) sont nécessaires. Sans ces options, le FL-40 ne fonctionnera pas différemment
des flashes externes d’autres marques.
60
Page 61

FONCTIONS D’AFFICHAGE
TV
23.12.’00 21:56 10
SQ
23.12.’00 21:56 10
SQ
23.12.’00 21:56 10
SQ
m Rotation et contrôle de vues en format vertical /
Lorsque vous prenez une vue avec l’appareil tenu en position verticale, l’image obtenue
est en format vertical, la hauteur est plus grande que la largeur. Vous pouvez la tourner
en format horizontal, de 90˚ dans le sens des aiguilles d’une montre ou le contraire.
Afficher une vue en format vertical.
Une vue en format vertical
Pour restituer la position originale…
Appuyer sur .
m Affichage sur un téléviseur
Les images et le son enregistrés peuvent être
sortis sur un téléviseur avec un câble AV.
1 Raccorder le câble AV à la prise de sortie
A/V (noire) de l’appareil photo.
2 Raccorder le câble AV aux connecteurs
d’entrée vidéo (jaune) et audio (blanc) du
téléviseur.
Une pression sur
(touche Gros plan macro)
tourne la vue de 90˚ dans le
sens des aiguilles d’une
montre.
Câble AV
Téléviseur
Une pression sur
(touche de mode de
mesure) tourne la vue de
90˚ dans le sens inverse
des aiguilles d’une montre.
Raccorder à la prise de
sortie A/V (noire)
61
Page 62

FONCTIONS D’AFFICHAGE (Suite)
m Effacement d’une seule vue
Régler la molette Mode sur . Sélectionner l’image que vous voulez effacer en
utilisant la molette de défilement. Appuyer sur (Touche d’effacement). Un message
vous demandant de confirmer l’effacement apparaît. S’assurer que YES est sélectionné,
puis appuyer sur la touche OK.
m Effacement de toutes les vues
Régler la molette Mode sur . Appuyer sur (Touche Menu). Sélectionner CARD
SETUP, puis . Appuyer sur la touche OK. S’assurer que OK est sélectionné et
appuyer sur la touche OK.
m Protection
Régler la molette Mode sur . Afficher la vue que vous voulez protéger. Appuyer sur
la touche OK. La vue affichée sera alors protégée. apparaît sur l’écran ACL.
UTILISATION DE MENUS POUR DES AJUSTEMENTS DÉTAILLÉS
m Diaporama
Ce mode vous permet de faire défiler automatiquement les vues enregistrées sur la
carte. Appuyer sur de la molette de défilement pour choisir le mode diaporama,
puis appuyer sur pour sélectionner START.
m Ajouter du son à des images fixes
Vous pouvez ajouter du son à des images fixes ou changer l’audio qui a déjà été
enregistré.
m FUNCTION
MOVIE INDEX:
Pour contrôler rapidement un film, vous pouvez créer un index. Vous pouvez
également enregistrer l’index sur une carte SmartMedia comme des images fixes.
MOVIE EDIT:
Vous pouvez sélectionner les scènes que vous voulez et les enregistrer ensemble
comme un nouveau film.
62
Page 63

MODE SETUP
Changer l’appareil sur votre réglage désiré. Pour des détails, se référer aux instructions
du CD logiciel sur le CD-ROM.
m Tableau du menu de réglage de mode
Poste
ALL RESET
TIFF *1, *2
SQ *1, *2
AF ILLUMINATOR*1, *2
REC VIEW *2
SLEEP
FILE NAME*2
m/ft *2
*3
*1 Pendant l’enregistrement cinéma (avec la molette Mode réglée sur ), le réglage de mode
n’apparaît pas sur l’écran de menu.
*2 En affichage (avec la molette Mode réglée sur ), le réglage de mode n’apparaît pas sur l’écran
de menu.
*3 Ce menu n’est disponible qu’en affichant une image.
Description
Remet l’appareil à l’état initial
quand il est mis en marche.
Règle le niveau de netteté de
l’image
Sélectionne la résolution de
l’image en mode TIFF.
Sélectionne la résolution et la
qualité d’image en mode SQ.
Ajuste le volume du son
produit par les signaux
sonores de l’appareil.
Sélectionne la marche ou
l’arrêt du voyant d’aide à la
mise au point automatique.
Sélectionne si l’image
enregistrée est affichée ou non.
Règle la durée après la
dernière action avant de faire
passer l’appareil en mode
d’attente.
Spécifie comment mémoriser
des noms de fichier sur la
carte.
Ajuste la luminosité de l’écran
ACL et du viseur.
Réglage de date
Règle les unités de mesure de
longueur focale.
Règle le nombre d’images à
afficher en même temps sur
l’écran.
Réglage initial
ON
NORMAL
1600 x 1200
640 x 480 (NORMAL)
HIGH
ON
OFF
1 MIN
RESET
–
m
9
63
Page 64

IMPRESSION DES IMAGES
Des images sélectionnées peuvent être réservées sur une carte SmartMedia pour
l’impression sur une imprimante ou dans un laboratoire photo qui supporte le système
DPOF (Digital Print Ordre Format).
●La réservation d’impression ne peut pas être effectuée pour une image affichée avec
.
m Réservation d’impression d’une seule image
Appuyer sur . L’écran de réglage de réservation d’impression est affiché. Appuyer
sur de la molette de défilement pour sélectionner , puis appuyer sur la
touche OK. L’écran de sélection de réservation d’impression est affiché. Appuyer sur la
molette de défilement pour sélectionner l’image que vous voulez imprimer. Appuyer
sur la touche OK. Le menu de réglage est affiché. Appuyer sur pour
sélectionner x, puis appuyer sur pour entrer le nombre de tirages. Appuyer
sur pour sélectionner ( ), puis appuyer sur pour sélectionner DATE ou
TIME. Appuyer sur pour sélectionner ( TRIMMING), puis appuyer sur
sur YES ou NO. Appuyer sur la touche OK pour terminer le réglage. Appuyer sur .
L’écran sort le mode de réservation d’impression et revient au mode Affichage.
m Réservation d’impression de toutes les images
Vous permet de mémoriser des données pour imprimer toutes les images sur la carte
et de choisir également le nombre de tirages que vous voulez.
m Réservation d’impression avec rognage
Vous pouvez imprimer une partie agrandie d’une image enregistrée.
Remarque:
●Cet appareil photo ne peut pas être raccordé directement à des imprimantes.
●Si une carte contient des réservations DPOF réglées à partir d’un autre matériel,
entrer des réservations en utilisant cet appareil peut détruire les réservations
précédentes. Bien utiliser cet appareil pour des réservations.
64
Page 65

TRANSFERT D’IMAGES VERS UN ORDINATEUR
Saisie directement d’une carte
Des adaptateurs de carte vous permettent de saisir des images sur votre ordinateur
personnel sans utiliser de logiciel spécial.
Type d’ordinateur personnel
Ordinateur personnel disposant
d’un lecteur de disquette 3.5”
Ordinateur personnel disposant
d’une case carte PC (PCMCIA) ou
d’un lecteur/enregistreur de carte
PC externe
Ordinateur personnel disposant
d’un port USB
Important:
● Vérifier la compatibilité. Ce matériel peut ne pas fonctionner correctement sur tous
les systèmes d’exploitation. Le fonctionnement peut être affecté par la capacité
mémoire de la carte SmartMedia.
● OLYMPUS CAMEDIA Master n’est pas nécessaire pour saisir des images à partir
d’une carte. Les images peuvent être traitées comme des fichiers PC normaux, en
utilisant toute application de traitement d’image disponible dans le commerce.
Remarque:
● Ne pas essayer d’utiliser une carte SmartMedia protégée contre l’écriture sur un
ordinateur, ce qui pourrait causer des erreurs. Se référer aux instructions de
l’adaptateur que vous utilisez pour plus de détails.
Adaptateur de carte nécessaire
Adaptateur de disquette FlashPath
(en option)
Adaptateur de carte PC (en option)
Unité de lecture/écriture SmartMedia
(MAUSB-2) (en option)
65
Page 66

TRANSFERT D’IMAGES VERS UN ORDINATEUR (Suite)
Raccordement par câble
Raccorder l’appareil photo à un ordinateur personnel (compatible IBM PC/AT, Apple
Macintosh).
Cet appareil photo dispose de 2 connecteurs de transfert.
Si votre ordinateur dispose d’une interface USB et fonctionne soit sous Windows 98/98
Second Edition/2000 Professional ou sous Macintosh OS, vous pouvez transférer des
données d’image via un câble USB.
Si votre ordinateur personnel ne dispose pas d’une interface USB ou fonctionne sous
Windows 95/NT4.0 ou sous Macintosh OS, vous pouvez transférer les données via un
câble série.
Pour raccorder directement cet appareil photo à un ordinateur personnel, il doit
disposer d’un port série ou d’un port USB.
Remarque:
● Il n’est pas possible de transférer des données vers un ordinateur personnel via un
câble si vous n’utilisez pas CAMEDIA Master 2.0 pour saisir les images.
Pour plus de détails, se référer aux instructions du CD logiciel sur le CD-ROM.
66
Page 67

CODES D’ERREUR
Des codes d’erreur apparaissent quand il y a un problème avec l’appareil. Les codes
d’erreur affichés sur l’écran de commande clignoteront.
Écran de
commande
(Aucun affichage)
Viseur/Écran
ACL
CARD
COVER
OPEN
NO CARD
CARD FULL
WRITE
PROTECT
CARD
ERROR
PICTURE
ERROR
(Écran de
confirmation
de format)
Contenu d’erreur
Le couvercle de
carte est ouvert.
La carte n'est pas
insérée, ou elle ne
peut être reconnue.
Aucune vue
supplémentaire ne
peut être prise.
L’écriture sur la
carte est interdite.
Impossible
d’enregistrer, de
lire ou d’effacer
des vues sur cette
carte.
L’image
enregistrée ne peut
être lue avec cet
appareil.
La carte n’est pas
formatée.
Solution
Insérez la carte et fermez le
couvercle.
Introduire correctement la
carte. Introduire une autre
carte.
Remplacez la carte ou
supprimez les vues inutiles.
Si vous prenez des vues,
retirez le sceau adhésif de
protection contre l’écriture.
Si la carte est sale, nettoyezla avec un tissu de
nettoyage et insérez-la à
nouveau. Ou formatez la
carte. Si le problème
persiste, cette carte ne peut
pas être utilisée.
Visualisez l'image à l'aide
d'un logiciel de traitement
d'image pour ordinateur
personnel. Si ce n'est pas
possible, le fichier de
l'image est partiellement
endommagé.
Formatez la carte.
67
Page 68

CODES D’ERREUR (Suite)
Écran de
commande
Viseur/Écran
ACL
NO
PICTURE
CARD FULL
Contenu d’erreur
Aucune image
n’est enregistrée,
alors il n’y a rien à
lire.
Il n’y a plus
d’espace libre sur
la carte, par
conséquent, des
données
d’impression ou du
son ne peuvent pas
être enregistrés.
Solution
Insérez une carte qui
contient des images.
Remplacez la carte ou
supprimez les vues inutiles.
PRÉCAUTIONS
ATTENTION
Précautions à prendre avec le flash
● Faire attention en prenant des photos de très près.
● Ne pas photographier les visages de très près (les bébés en particulier). En effet, si le flash se
déclenche trop près des yeux de la personne photographiée, ceci peut lui provoquer une perte
de la vision. En prenant des photographies de bébés, bien s’assurer que la distance est au
moins de 1 mètre.
Manipuler l’appareil délicatement
● Ne pas utiliser l’appareil en prenant une posture instable. Si vous perdez l’équilibre, vous
risquez de vous blesser.
● Faire en sorte qu’aucun corps étranger (saleté, pluie, sable) ne puisse s’infiltrer dans
l’appareil, notamment lorsque le couvercle du compartiment des piles ou le capot de
protection d’objectif est retiré, au risque de l’endommager.
● Afin de ne pas abîmer l’appareil, ne pas le faire tomber ni le soumettre à un choc violent
ou à des vibrations.
● Cet appareil n’est pas étanche. Ne pas le plonger dans l’eau et le protéger de la pluie, de
l’eau de mer, etc.
● Ne pas utiliser l’appareil à l’extérieur pendant un orage ou en présence d’éclairs.
● Au moment de changer les piles, bien couper l’alimentation au préalable. Les circuits
internes risquent d’être endommagés si l’appareil est sous alimentation pendant cette
opération.
Conditions de rangement
● Pour éviter des dommages ou mauvais fonctionnement de l’appareil, le ranger
uniquement dans un endroit où la température se situe entre –20 et 60° C avec un taux
d’humidité entre 10 et 90 %.
● Ne pas le ranger dans un lieu humide parce que la condensation qui se formerait sur
l’appareil pourrait l’endommager.
● Pour éviter tout risque de blessure ou d’accident, ne pas laisser l’appareil à la portée des
enfants.
68
Page 69

Environnement d’utilisation
● Ne pas utiliser l’appareil en présence d’une forte concentration de gaz inflammables
ou explosifs, ce qui pourrait provoquer un incendie ou une explosion.
● Pour éviter des dommages ou un mauvais fonctionnement de l’appareil, ne l’utiliser que
si la température est comprise entre 0 et 40° C avec un taux d’humidité de 30 à 90 %.
● Ne pas apporter soudainement l’appareil d’un endroit chaud à un endroit froid ou
l’inverse. Ce qui pourrait favoriser la formation de condensation à l’intérieur de l’appareil
et l’endommager. Pour empêcher la formation de condensation, placer l’appareil dans un
sac en plastique ou tout autre type d’enveloppe pour le protéger et attendre que l’appareil
ait atteint la température ambiante de la pièce où il a été amené avant de le sortir.
● Si l’appareil est utilisé à basse température, les piles auront une durée d’utilisation plus
courte que d’habitude.
Précautions à prendre pendant la manipulation des piles
Pour éviter tout risque de fuite, incendie ou endommagement, veuillez lire attentivement les
indications et respecter les points suivants.
● Ne pas chauffer ni jeter les piles au feu.
● Ne pas démonter, modifier ou souder.
● Ne pas mettre en place avec la polarité inversée (signes (+), (–)).
● Ne pas laisser d’objets métalliques toucher les contacts. Ne pas ranger ni transporter
sans protection avec des colliers ou des pinces à cheveux.
● Ne pas utiliser des piles usées avec des piles neuves et ne pas mélanger différents types
de piles.
● Ne pas ranger dans un endroit humide parce qu’il y a risque de corrosion.
● Ne pas utiliser si quelque chose d’anormal est constaté.
● Ne pas utiliser si elles fuient, si elles sont gonflées, si un accroissement de leur
température est constaté ou si tout autre phénomène anormal est relevé.
● Lorsque les piles sont utilisées pour la première fois, si des signes de corrosion sont
relevés ou si elles sont chaudes, les rapporter au magasin où vous les avez achetées.
● NE JAMAIS utiliser de pile ou batterie dont le corps n’est pas complètement couvert par
une feuille isolante ou la feuille est retirée, ce qui pourrait causer une fuite, un incendie
ou des blessures. Certaines piles disponibles dans le commerce sont également
partiellement recouvertes ou pas du tout recouvertes par une feuille isolante. Ne jamais
utiliser ces piles.
Si les piles fuient
● Si le liquide est rentré dans vos yeux, ne pas les frotter. Rincer à grande eau et se faire
soigner immédiatement par un spécialiste.
● Si le liquide est venu en contact avec la peau ou les vêtements, rincer à grande eau.
● Si le liquide s’est écoulé dans le compartiment des piles, essuyer soigneusement les
traces avec un chiffon humide avant de remettre des piles neuves en place.
Retirer les piles de l’appareil quand elles sont usées
● Si des piles usées restent dans l’appareil, elle risquent de fuir. Retirer les piles de
l’appareil si celui-ci est rangé pendant une longue période ou s’il n’est pas prévu de
l’utiliser avant longtemps.
Ne pas utiliser dans un dispositif étanche
● Ceci risque de favoriser un suintement des piles ou d’endommager les piles et/ou
l’appareil.
69
Page 70

PRÉCAUTIONS (Suite)
ATTENTION
Ne pas recharger des piles alcalines ou au lithium
● Elles risquent de suinter et de provoquer des dommages si on essaie de les recharger.
Ne pas laisser à la portée des enfants
● Faire en sorte que les enfants ne sortent pas les piles de l’appareil au moment de s’en
servir. Si un enfant doit utiliser l’appareil, lui indiquer très précisément la façon exacte de
s’en servir conformément aux instructions de ce mode d’emploi.
● Quand les piles usées doivent être jetées, faire en sorte que cela soit effectué
conformément aux lois en vigueur dans votre pays.
Précautions à prendre avec les accessoires
● N’utiliser que les accessoires fournis ou des accessoires recommandés par le fabricant.
Prenez conseil auprès du magasin qui vous a vendu l’appareil. En procédant autrement, il
y a risque d’incendie, de décharge électrique ou endommagement.
● Ne pas brancher l’adaptateur d’alimentation secteur si l’appareil ne sert pas. Débrancher
le cordon de l’adaptateur d’alimentation secteur si l’appareil n’est pas utilisé. Autrement,
il y a risque d’accident ou d’endommagement.
● Pour éviter tout risque de décharge électrique ou d’endommagement, ne pas débrancher,
brancher ni manipuler l’adaptateur d’alimentation secteur les mains mouillées.
● Ne pas modifier, plier par la force, tirer fortement, gratter ou bricoler le cordon
d’alimentation de l’adaptateur secteur d’une façon ou d’une autre. Ne poser aucun objet
lourd sur le cordon d’alimentation ni le faire passer près d’une source de chaleur qui
pourrait causer un incendie ou provoquer des décharges électriques.
Points à vérifier avant d’utiliser l’appareil
● Si vous êtes sur le point de prendre des photos importantes ou si l’appareil n’a pas été
utilisé depuis longtemps, vérifier tout d’abord qu’il fonctionne normalement ou demander
conseil à un centre de dépannage autorisé au préalable.
● Nous déclinons toute responsabilité pour la perte de données, perte de temps de loisirs,
manque à gagner ou tout autre dommage direct ou indirect ou réclamation provoqués
par cet appareil photo.
Ne pas utiliser des piles ni les ranger dans un endroit chaud (par exemple, à
l’intérieur d’une voiture toutes glaces relevées par une journée d’été
ensoleillée).
● Ceci risque d’écourter la durée d’utilisation prévue à l’origine. Les conserver dans un
endroit frais et à l’abri d’une exposition directe au soleil.
Remarques sur le rétro-éclairage de l’écran ACL
●L’écran de commande et les lampes fluorescentes utilisées dans l’écran ACL ont une durée
de vie limitée. Si l’un ou l’autre de ces écrans s’assombrit ou scintille, veuillez vous mettre
en rapport avec le service de dépannage le plus proche.
●Lorsque la température est très basse, le rétro-éclairage de l’écran peut mettre un certain temps à
réagir ou provoquer de brusques variations de couleurs. Pour prévenir ce phénomène, préserver
l’appareil du froid quand on l’utilise à basse température. Le rétro-éclairage de l’écran
recommence à fonctionner correctement dès que la température ambiante redevient normale.
● Lorsque l’écran à cristaux liquides affiche des images différentes, il peut arriver que certains
pixels ne changent pas de couleur ou n’apparaissent pas du tout. Si ce phénomène est
éventuellement dû à un dysfonctionnement des circuits, il demeure toutefois dans les limites
de tolérance de fonctionnement d’un écran couleur ACL. La luminosité de l’écran ACL
couleur peut en outre varier d’une image à l’autre.
70
Page 71

REMARQUE IMPORTANTE
Refus de responsabilité relatif à la garantie
La firme Olympus décline toutes autres représentations ou garanties, expresses ou
implicites, pour ou relatives au contenu de la documentation écrite ou du logiciel et ne
pourra en aucun cas être tenue pour responsable de toute autre garantie implicite de
commercialisation ou d’adaptation à des fins particuliers ou pour les dommages
encourus de quelque nature que ce soit, qu’ils soient indirects, imprévus ou issus
d’une autre cause (y compris et sans limitation aux dommages entraînés par la perte
de bénéfices financiers, l’interruption de travail et la perte d’informations
professionnelles) qui proviendraient d’une utilisation ou de l’impossibilité d’utiliser
cette documentation écrite ou du logiciel. Certains Etats n’autorisent pas l’exclusion ni
la limitation de la responsabilité des dommages indirects ou imprévus, de sorte que les
limitations ci-dessus peuvent ne pas vous concerner directement.
Note relative aux droits d’auteur
Tous droits réservés. Toute reproduction partielle ou intégrale de cette documentation
écrite ou du logiciel, par quelque procédé que ce soit ou sous quelque forme que ce
soit, électronique ou mécanique, y compris par reproduction photographique ou
enregistrement et par l’usage de quelque moyen de stockage et de récupération des
renseignements que ce soit, n’est permise sans autorisation écrite et préalable de la
firme Olympus. Aucune responsabilité ne sera assumée quant à l’utilisation des
renseignements contenus dans la documentation écrite ou du logiciel ou pour les
dommages résultant de l’utilisation des renseignements contenus dans la
documentation écrite ou du logiciel. La firme Olympus se réserve le droit d’apporter
toute modification nécessaire aux caractéristiques et au contenu de cette publication et
du logiciel sans obligation quelconque ni préavis
AVERTISSEMENT:
Toute reproduction photographique ou tout usage illicite de matériel protégé par les
droits d’auteur peuvent constituer une contrefaçon entraînant des poursuites judiciaires
conformément aux lois sur les droits d’auteur. Olympus n’assume aucune responsabilité
quant à la reproduction photographique illicite, l’usage ou tout autre acte interdit portant
atteinte aux droits des auteurs.
• IBM est une marque déposée de la firme International Business Machines
Corporation.
• Microsoft et Windows sont des marques déposées de la firme Microsoft.
• Macintosh est une marque de Apple Computer Inc.
• Tous les autres noms de sociétés et appellations de produits sont des marques
déposées et/ou des marques de fabrique des propriétaires respectifs.
71
Page 72

FICHE TECHNIQUE
Type d’appareil : Appareil photo numérique (prise de vues et affichage)
Système d’enregistrement
Mémoire : Carte SmartMedia 3 (3,3) volts, 2Mo, 4Mo, 8Mo,
Capacité d’enregistrement : 1 vue (TIFF: 1600 x 1200)
de vues (Lorsqu'une carte 5 vues environ(SHQ)
8 Mo est utilisée.) 16 vues environ (HQ)
Effacement : Effacement d’une vue / Effacement de toutes les vues
Capteur d’image : Capteur CCD de 1/2 pouce
Résolution d’image : 1600 x 1200 pixels (TIFF/SHQ/HQ)
Balance des blancs : TTL entièrement automatique(iESP auto), Préréglage
Objectif : Objectif Olympus de 7,0 mm à 70,0 mm, F2.8 à F3.5,
Posemètre : Système de mesure ESP numérique, système de
Commande d’exposition : Automatique programmée, priorité à l’ouverture,
Limites de prise de vues : W : 60 cm à ∞ (mode Normal)
Viseur : Écran d’affichage couleur à cristaux liquides TFT de
Photo : Enregistrement numérique, JPEG (conformément au
système DCF (Design rule for Camera File), TIFF
(sans compression), support pour système Digital
Print Order Format (DPOF))
Son avec
images photo : Format Wave
Cinéma : Support QuickTime Motion JPEG
16Mo, 32Mo, 64Mo
38 vues environ (SQ: 1024 x 768 NORMAL)
82 vues environ (SQ: 640 x 480 NORMAL)
2.110.000 pixels (brut)
1280 x 960 pixels (TIFF/SQ)
1024 x 768 pixels (TIFF/SQ)
640 x 480 pixels (TIFF/SQ)
(lumière du jour, ciel couvert, tungstène, fluorescent)
13 éléments en 10 groupes (équivalant à un objectif
de 38 mm à 380 mm sur un appareil de 35 mm),
lentille asphérique.
mesure pondérée au centre, Système de mesure
ponctuelle
priorité à la vitesse, manuelle, programmée de scène
Ouverture : W : F2.0 à F8.0
T : F3.5 à F8.0
Vitesse d’obturation : Utilisée avec un obturateur mécanique
Photo : 1/2 à 1/800 s (16 à 1/800 s avec réglage manuel)
Cinéma : 1/30 à 1/10000 s
10 cm à 60 cm (mode Gros plan)
T : 2 m à ∞ (mode Normal)
1 m à 2 m (mode Gros plan)
0,55”, 114.000 pixels environ
72
Page 73

Écran ACL : Ecran d’affichage couleur à cristaux liquides TFT de
Nombre de pixels de l’écran
ACL :
Affichage sur écran : Date et heure, numéro de vue, repère de protection,
Temps de charge du flash : 6 s environ (à température ambiante avec des piles
Portée du flash : W : 0,3 m à 4,0 m environ
Modes flash : Mode automatique (déclenchement automatique du
Autofocus : Système de mise au point automatique à travers
Plage de mise au point : 0,1 m à l’infini.
Portée de du voyant
d’aide à la mise au point
automatique : 30 cm à 3 m
Retardateur : Electronique, temps de retardement: 12 secondes.
Connecteurs externes : Prise d’entrée CC (DC-IN), connecteur série
Date et heure : Enregistrement simultané avec les données d’images.
Calendrier automatique : Jusqu’à l’an 2030.
Alimentation pour calendrier
Conditions de fonctionnement
Température : 0 °C à 40 °C (fonctionnement)
Humidité : 30 % à 90 % (fonctionnement)
Alimentation : Pour les piles, utilisez 2 piles au lithium
Dimensions : 112,5 (L) x 77,5 (H) x 141 (P) mm
Poids : 540 g (sans piles ni carte)
CARACTÉRISTIQUES MODIFIABLES SANS PRÉAVIS NI OBLIGATIONS DE LA PART DU
FABRICANT.
4,5 cm
114.000 pixels environ
mode d’enregistrement, état des piles, informations
d’image, réservation présélection d’impression,
menu, mise au point automatique correcte, symbole
de flash, repères de mise au point automatique etc.
neuves)
T : 1,0 m à 3,2 m environ
flash en faible éclairage et en contre-jour), réduction
de l’effet “yeux rouges”, flash d’appoint
(déclenchement forcé), arrêt (flash débrayé)
l’objectif iESP, mise au point spot, système de
détection des contrastes
(RS-232C), prise de sortie A/V, connecteur USB
(compatible USB 1.0), prise de flash externe à 5
broches, prise de microphone externe
: Pile au lithium incorporée
–20 °C à 60 °C (stockage)
10 % à 90 % (stockage)
CR-V3, ou 4 piles AA au NiMH, au NiCd, alcalines ou
au lithium, Adaptateur d’alimentation secteur (option)
Les piles zinc-carbone ne peuvent pas être utilisées.
73
Page 74

Dies ist eine Kurzanleitung. Falls Sie ausführlichere Angaben zu den hier
beschriebenen Funktionen benötigen, steht Ihnen die Bedienungsanleitung auf der
CD-ROM zur Verfügung.
VORBEREITUNG
LIEFERUMFANG
Kamera Objektivdeckel Tragriemen Fernauslöser
CR-V3 Lithium- AV-Kabel USB-Kabel Serielles (RS-232C)
Batterieblock Anschlußkabel
(2 Stück) für PC
Garantiekarte Bedienungsanleitung Gebrauchsanleitung Software-CD-ROM
SmartMedia Antistatische Hülle Etikettaufkleber
(SSFDC-8MB) (2 Stück)
Schreibschutzaufkleber Bedienungsanleitung
(4 Stück)
Kurzfassung/Quick für Fernauslöser (Einschließlich
Start-Kurzanleitung Bildschirm-
Bedienungsanleitung)
74
Page 75

1
9
8
0
!
#
@
9
% ^
&
*
(
$
2 3 4 5 6 7
TRAGRIEMEN ANBRINGEN
Den Riemen in der gezeigten Pfeilrichtung durch den Riemenstraffer führen und dann
am Riemen ziehen, um zu gewährleisten, dass dieser einwandfrei sitzt.
Riemenöse
BESCHREIBUNG DER BEDIENUNGSELEMENTE
m Kamera
1 Zoomregler (T/W)/
Indexanzeigeregler (T/W)
2 Auslöser
3 Programmwählscheibe
4 Selbstauslöser-LED/AF-Messleuchte
5 LCD-Feld
6 Dioptrienausgleichsregler
7 5-pol. Blitzsynchronisationsbuchse
8 Mikrofon
9 Riemenöse
0 Fernauslöser-Sensor
! Objektiv
@ Blitz (eingebaut)
# Blitzentriegelung
$ Anschlussbuchsenabdeckung
% Computeranschlussbuchse
(seriell, RS-232C)
^ USB-Buchse
& Gleichspannungseingang
* Mikrofonbuchse
( AV-Ausgang
Riemenstraffer
75
Page 76

VORBEREITUNG (Forts.)
BESCHREIBUNG DER BEDIENUNGSELEMENTE (Forts.)
)
q w e r t y
u
i
o
p
Q
) Sucher
q INFO-Taste
w Blitztaste ( )/Löschtaste ( )
e DRIVE-Taste
● Wird diese Taste bei Wiedergabe
gedrückt gehalten, kann eine
Hochkantaufnahme mit der
Nahaufnahme- oder
Messmodustaste gedreht werden.
r Messmodustaste ( )
● Kann im Wiedergabemodus
verwendet werden, um eine
Hochkantaufnahme gegen den
Uhrzeigersinn um 90° zu drehen.
t Nahaufnahmetaste ( )
● Kann im Wiedergabemodus
verwendet werden, um eine
Hochkantaufnahme im Uhrzeigersinn
um 90° zu drehen.
W
E
R
T Y U
y AE-Speichertaste (AEL)/
Mehrfachmesstaste/Drucktaste ( )
u Jogregler
i LCD-Monitor
o OK-Taste/MF-Taste/
Schreibschutztaste ( )
p LCD-Monitor-Taste ( )
Q Menütaste ( )
W Hauptschalter (POWER OFF/ON/
RESET)
E Kartenfachabdeckung
R Schreibanzeige
T Batteriefachdeckel
Y Batteriefachriegel
U Stativgewinde
76
Page 77

m LCD-Feld-Anzeigen
Blitzprogramm
Lange Blitzsynchronisation
Blitzhelligkeit
Aufzeichnen
Tonaufnahme
Kartenfehler
Batteriezustand
Automatische
Belichtungsreihen
Nahaufnahmemodus
Permanenter Autofocus
Weißabgleich
ISO
Selbstauslöser/Fernauslöser
Serienaufnahme
Belichtungskorrektur
AF-Messung
Manuelle Scharfstellung
Verwackelungskorrektur
Messmodus
AE-Speicher
Aufnahmemodus
Bildzählwerk (Restbilder)
Bildzählwerk (Movie-
Restaufnahmezeit in
Sekunden)
77
Page 78

VORBEREITUNG (Forts.)
F2.8 1/800 +2.0 P
2
8
3
4
1
5
6 7
9
0
F2.8 1/800 +2.0
ISO100
SQ
P
SLOW1
!
@
#
$
%
^
&
*
(
BESCHREIBUNG DER BEDIENUNGSELEMENTE (Forts.)
m
Sucher-/LCD-Monitor-Anzeigen (Bildinformationen)
Mit der Monitortaste ( ) kann bestimmt werden, ob die Bildwiedergabe auf dem
LCD-Monitor oder dem Sucher erfolgt. Mit der INFO-Taste kann der
Bildinformationsumfang gewählt werden. Die folgenden drei Modi sind wählbar:
Aufnahmemodus
Es wird nur die AF-Markierung gezeigt:
Warnanzeigen (AF-Abweichung und
Batteriezustand) werden im erforderlichen Fall
eingeblendet. Bei einer Modus-/FunktionsNeueinstellung erscheint die zugehörige Anzeige
für ca. 2 Sekunden.
Kurzanzeige: Diese Anzeigen werden bei
Kameragebrauch jeweils für ca. 2 Sekunden
eingeblendet.
Ständdige Anzeige: Diese Anzeigen werden im
Aufnahmemodus permanent eingeblendet.
1 Blitzbereitschaft/
Verwackelungswarnung/
Blitzladebetrieb
2 AF-Einstellstatus
3 Einzelbild-Modus
4 Batteriezustand (erscheint nach der
Kameraeinschaltung und als
Warnanzeige)
5 Blendenwert
6 Verschlusszeit
7 Belichtungskorrektur/
Belichtungsabweichung
8 AF-Markierung
9 Speicherblocksymbol
78
0 Restbilder
! Serienaufnahmemodus
@ Messmodus
# Nahaufnahmemodus
$ Weißabgleich
% ISO-Empfindlichkeit
^ Aufnahmemodus
& Blitzprogramm
* Lange Blitzsynchronisation (wird nicht
angezeigt, wenn der Blitz deaktiviert
ist)
( Verwackelungskorrektur
Page 79

Wiedergabemodus
345623.12.,00 21:56
HQ
x10
1
2 43 5
6
7
8
9
FILE:123-3456
HQ
SIZE: 1600x1200
F2.8 1/800 2.0
ISO400
23.12.,00 21:56
x10
!
$
@9 #
%
^
8
&
3456
HQ
1
0 54
6
7
FILE: 123-3456
HQ
SIZE: 320x240
!
&
Keine Anzeigen: Es werden nur der Batteriezstand und das Symbol gezeigt.
Kurzanzeige: Diese Anzeigen werden nach einer bestimmten Zeitspanne eingeblendet.
Ständige Anzeige: Diese Anzeigen werden im Wiedergabemodus permanent
eingeblendet.
Einzelbild-Modus
Kurzanzeige
Ständige Auzeige
1 Batteriezustand
2 Druckvorauswahl
3 Anzahl der Ausdrucke
4 Tonaufnahme
5 Schreibschutz
6 Aufnahmemodus
7 Bildnummer
8 Uhrzeit
9 Datum
Hinweis:
Der Anzeigeumfang bei der Darstellung eines Movie-Bildes hängt von der MovieWiedergabebildwahl (Indexbild oder Movie-Wiedergabemodus) ab.
Movie-Modus
Kurzanzeige
Ständige Auzeige
0 Movie-Bild
! Pixelanzahl
@ Blendenwert
# Verschlusszeit
$ Belichtungskorrektur
% Weißabgleich
^ ISO-Empfindlichkeit
& Dateinummer Im Movie-
Wiedergabemodus wird hier die
Gesamtaufnahmezeit angezeigt.
79
Page 80

VORBEREITUNG (Forts.)
EINLEGEN DER BATTERIEN
Vergewissern Sie sich, dass die Kamera ausgeschaltet (OFF) ist. Dann die Batterien wie
in der Abbildung gezeigt einlegen. Die Batterieblöcke CR-V3 können nicht
wiederaufgeladen werden.
1
5
80
2
Bei Verwendung von Batterien (AA)
Bei Verwendung der Lithium-Batterieblöcke
4
3
6
7
8
Page 81

m Lebensdauer von Lithium-Batterieblöcken
Aufnahme/Wiedergabe Zustand Batterielebensdauer
Anzahl der Aufnahmen
Wiedergabedauer
* Diese Angaben stellen Bezugswerte (basierend auf Olympus Testergebnissen) dar und können nicht
garantiert werden.
1
2
Ca. 200 Bilder
Ca. 330 Minuten
m Verwendung des Netzteils (gesondert erhältlich)
Achten Sie darauf, dass Sie ein
für die jeweilige Region/das
jeweilige Land geeignetes Netzteil
verwenden. Bei diesbezüglichen
Fragen wenden Sie sich bitte an
Ihren nächsten Olympus Service.
Netzsteckdose
Netzstecker
Netzteil
Gleichspannungseingang (schwarz)
Gleichspannungsstecker
EINLEGEN UND AUSWERFEN EINER SmartMedia-KARTE
Es dürfen ausschließlich Karten mit 3 V (3,3 V) verwendet werden. Karten mit 5 V sind
ungeeignet. 3 V- (3,3 V)-Karten eines Drittherstellers müssen in dieser Kamera
formatiert werden.
Die Karte vorsichtig bis
zum Anschlag in das
Kartenfach einschieben.
Die Karte muss zum
Auswurf nach innen
gedrückt werden.
81
Page 82

M
O
D
E
D
I
A
L
S
M
S-Prg
A
P
VORBEREITUNG (Forts.)
MODUSWAHL MIT DER PROGRAMMWÄHLSCHEIBE
Mit der Programmwählscheibe, die sich rechts oben auf der Kamera befindet, können
Sie alle Kameramodi aufrufen.
P (Vollautomatikmodus):
Im Vollautomatikmodus steuert die Kamera die Einstellung von Blende und
Verschlusszeit automatisch. Sie brauchen nur Ihr Motiv anzuvisieren und den Auslöser
zu drücken, um korrekt belichtete Aufnahmen zu erhalten.
A (Automatik mit Blendenvorwahl):
Im Automatikmodus mit Blendenvorwahl können Sie die Blende manuell wählen, die
Kamera bestimmt automatisch die geeignete Verschlusszeit. Dies ist vorteilhaft, wenn
Sie die Schärfentiefe gestalterisch einsetzen möchten.
S (Automatik mit Verschlusszeitvorwahl):
Im Automatikmodus mit Verschlusszeitvorwahl können Sie die Verschlusszeit manuell
wählen, die Kamera bestimmt automatisch die geeignete Blende. Wählen Sie eine kurze
Verschlusszeit, wenn Sie ein sich bewegendes Motiv scharf abbilden wollen. Bei
Verwendung einer langsamen Verschlusszeit können Sie die Bewegungsunschärfe
gestalterisch einsetzen.
M (Manueller Modus):
Im manuellen Modus können Sie Verschlusszeit und Blendenöffnung wählen.
S-Prg (Szenen-Programmautomatik):
Je nach Motiv kann die Kamera automatisch eine optimale Blenden-/VerschlusszeitKombination wählen. Als Szenenprogramme sind verfügbar: Porträt, Sport,
Landschaftsaufnahme und Nachtaufnahme. Der gewählte Modus wird im Menü
angezeigt.
(Movie-Modus):
Im Movie-Modus können Sie bewegte Bilder aufnehmen. Blende und Verschlusszeit
werden von der Kamera automatisch gewählt.
(Wiedergabemodus):
Sie können sich Ihre Aufnahmen bequem auf dem LCD-Monitor betrachten.
82
Page 83

[
1/5
]
F2.8 1/800 0.0 P
OFF
ISO
WB
ON
AUTO
AUTO
DIGITAL
ZOOM
SO VERWENDEN SIE DAS MENÜ
[
1/5
]
F2.8 1/800 0.0 P
OFF
ISO
WB
ON
AUTO
AUTO
DIGITAL
ZOOM
[
1/5
]
F2.8 1/800 0.0 P
ISO
WB
DIGITAL
ZOOM
AUTO
[
1/5
]
F2.8 1/800 0.0 P
OFF
ISO
WB
ON
AUTO
AUTO
DIGITAL
ZOOM
[
2/5
]
F2.8 1/800 0.0 P
SLOW
MULTI
METERING
OFF
OFF
1.0 x3
O
BKT
Mit Taste (Menü) das Menü aufrufen. Am Jogregler
oder drücken, um einen Menüeintrag zu
wählen. Mit weitere Menüoptionen aufrufen. Wenn
der gewünschte Menüeinstellstatus vorliegt, die OKTaste drücken, um die Einstellung zu speichern. Der
Suchrahmen wird erneut gezeigt. Die OK-Taste
wiederholt antippen, bis das Menü geschlossen wird.
Scrollfunktion
Beispiel: Weißabgleich
Seite 1/5
LCD-Monitor
Gültige Einstellung
Einstellschritte
oder
OK
Die Einstellung
wird gespeichert.
• Wird abschließend die Taste
(Menü) gedrückt, werden die
vorgenommenen Einstellungen
nicht gespeichert.
Beispiel: Umblättern auf die
folgenden Seiten
• Wird bei Seite 1/5
gedrückt, zeigt der LCD-Monitor
Seite 5/5.
83
Page 84

SETUP
[
5/5
]
F2.8 1/800 0.0 A
MODE
SETUP
S-Prg
[
3 /3
]
m /f t m
RESET
FILE NAME
2 3. 12 . ’0 0
1 2: 34
[
3/3
]
m/ft
FILE NAME
SETUP
VORBEREITUNG (Forts.)
EINSTELLUNG VON DATUM UND ZEIT
Mit Taste (Menü) das Menü aufrufen. Am Jogregler oder drücken, um
SETUP zu wählen, und dann die OK-Taste drücken. Wenn die Karte keine Bilddaten
enthält, ist jede Moduseinstellung (außer ) möglich.
F2.8 1/800 0.0 P
ON
DIGITAL
OFF
ZOOM
WB
AUTO
AUTO
ISO
[
]
1/5
Einzelbild-Aufnahmemenü
OK
Modus-Einstellmenü
Datum/Zeit-Einstellmenü
: Dient der Versetzung auf einen
anderen Menüeintrag.
: Dient der Einstellung
●Das Jahr 2000 wird mit ´oo angezeigt.
OK
84
OK
Page 85

GRUNDSÄTZLICHE FUNKTIONEN
KAMERA EINSCHALTEN
OFF : Kamera ausgeschaltet
ON : Kamera eingeschaltet
RESET : ● Wenn Sie den Finger von diesem Schalter
Den Objektivdeckel abnehmen, die Programmwählscheibe auf die gewünschte Position
und den Hauptschalter auf ON stellen.
FOTOGRAFIEREN BEI VERWENDUNG DES LCD-MONITORS
Die Taste (LCD-Monitor) drücken. Das
Bildsignal wechselt vom Sucher auf den LCDMonitor.
Diese Taste antippen, um das Bildsignal
zwischen LCD-Monitor und Sucher
abwechselnd umzuschalten.
KAMERA AUSSCHALTEN
Den Hauptschalter auf OFF stellen.
Den Objektivdeckel anbringen.
nehmen, wechselt der Hauptschalter
automatisch zurück auf ON. Alle
Einstellungen, mit Ausnahme des ModusEinstellmenüs, werden auf die
Anfangseinstellung (Einstellung ab Werk)
zurückgestellt.
● Wird dieser Schalter für länger als 3
Sekunden betätigt, werden alle
Einstellungen mit Ausnahme von Datum
und Zeit auf die Anfangseinstellung
zurückgestellt.
(LCD-Monitor-Taste)
85
Page 86

GRUNDSÄTZLICHE FUNKTIONEN (Forts.)
CARD FULL
ANZEIGEN ÜBERPRÜFEN
m Batteriezustand überprüfen
Beim Einschalten der Kamera wird der
Batteriezustand auf dem LCD-Feld angezeigt.
Bei unzureichender Batterieleistung einen
Batteriewechsel vornehmen.
wird kurzzeitig angezeigt.
Die Batterien sind einwandfrei, Sie können die Kamera verwenden.
blinkt, wobei die anderen LCD-Feldanzeigen normal gezeigt werden.
Die Batterien sind schwach und sollten ausgewechselt werden. Sie können die Kamera
weiterhin verwenden, allerdings reicht die Batterieleistung nicht mehr lange aus.
blinkt und erlischt nach 12 Sekunden. Die anderen LCD-Feldanzeigen
erlöschen gleichfalls.
Die Batterien sind entladen und müssen umgehend ausgewechselt werden.
m Speicherkapazität überprüfen
Wird die Kamera im Einzelbild-Modus eingeschaltet, wird die Zahl der Restbilder auf
dem LCD-Feld angezeigt. Im Movie-Modus wird die noch verbleibende Aufnahmezeit
angezeigt.
LCD-Feld
Batteriezustand
Die Zahl der Restbilder wird angezeigt. Die verbleibende Aufnahmezeit wird
Zahl der
Restbilder
● Wenn im Einzelbild-Aufnahmemodus keine
freie Speicherkapazität verfügbar ist:
Kann die Karte keine weiteren Daten
abspeichern, werden Warntöne
abgegeben und die rechts gezeigte
Anzeigen erscheinen auf Sucher und
LCD-Feld. In diesem Fall die Karte gegen
eine neue/freie Speicherkarte
austauschen oder auf der vollen Karte
nicht benötigte Aufnahmen löschen, um
erneut freien Speicherplatz zu erhalten.
86
angezeigt.
Restzeit
LCD-Feld
Sucher
Page 87

m Anzahl der Restbilder
2MB 4MB 8MB 16MB 32MB 64MB
0/–
0/–
0/–
2/–
1/1
4/3
2/2
6/5
3/3
9/8
8/7
21/15
1600x1200
1280x960
1024x768
640x480
1600x1200
1600x1200
1280x960
0/–
1/–
1/–
4/–
2/2
8/7
4/4
12/11
6/6
18/16
16/14
40/30
1/–
2/–
3/–
8/–
5/5
16/15
8/8
24/22
13/12
38/32
32/29
82/61
2/–
4/–
6/–
17/–
11/11
31/30
17/16
49/45
26/25
76/66
66/58
165/123
5/–
8/–
13/–
34/–
22/22
64/60
34/33
99/90
53/51
153/132
132/117
331/248
11/–
17/–
27/–
68/–
45/44
128/120
69/67
199/181
107/102
306/265
265/234
664/498
TIFF
*
SHQ
HQ
SQ
TIFF
JPEG
1024x768
640x480
Aufnahmemodus
Anzahl
der Pixel
Datei
Speicherkapazität
(Nur Bild/Bild mit Ton)
HIGH
(Hohe Qualität)
NORMAL
NORMAL
NORMAL
HIGH
(Hohe Qualität)
HIGH
(Hohe Qualität)
Aufnahmemodus
Anzahl der Pixel
Speicherkapazität
2MB 4MB 8MB 16MB OVER
7/6
31/26
320x240
160x120
14/13
62/53
28/27
126/109
43/42
174/158
SQ
HQ
Anzahl der verfügbaren Einzelbild-Aufnahmen
* Im TIFF-Modus ist die gleichzeitige Tonaufnahme nicht möglich, wenn die
Programmwählscheibe auf P oder A/S/M gestellt ist. Ein TIFF-Bild kann bei der
Wiedergabe jedoch nachvertont werden.
Verfügbare Movie-Aufnahmezeit in Sekunden:
Jeweils längste verfügbare durchgehende Movie-Aufnahmezeit.
87
Page 88

GRUNDSÄTZLICHE FUNKTIONEN (Forts.)
P F2.8 1/30 0.0
P F2.8 1/30 0.0
DIOPTRIENEINSTELLUNG
Den Dioptrienausgleichsregler drehen,
bis die AF-Markierung einwandfrei scharf
erkennbar ist.
Sucher
AF-Markierung
FOTOGRAFIEREN
Richtiges Auslösen
Der Auslöser arbeitet mit zwei Druckpunkten.
Sie sollten die Auslöserbedienung vor dem
Fotografieren zunächst einmal üben.
Den Auslöser halb hinunterdrücken.
1
● Das AF-Einstellsymbol leuchtet, wenn
Entfernung und Belichtung eingestellt
sind. Die Symbolanzeige blinkt, wenn
Entfernung und/oder Belichtung noch
nicht eingestellt sind.
Zum Aufnehmen den Auslöser
2
vollständig hinunterdrücken.
● Beim Auslösen gibt die Kamera einen
Warnton ab.
● Beim Abspeichern der Bilddaten blinkt
die Schreibanzeige.
Halb
hinunterdrücken
Vollständig
hinunterdrücken
AF-Einstellsymbol
Auslöser
Auslöser
88
AF-Markierung
Page 89

EINZELBILDAUFNAHME
P F2.8 1/30 0.0
F2.8 1/30 0.0
●Ein Warnton bestätigt, dass die Aufnahme
einwandfrei durchgeführt wurde.
● Nach der Abbildung der hergestellten
Aufnahme zeigt der Sucher erneut den
Motivbereich, auf den die Kamera gerade
ausgerichtet ist.
●Weiter Aufnahmen sind möglich, wenn die
Speicherblocksymbole anzeigen, dass die
Karte ausreichende Speicherkapazität
vorweist.
●Wenn der Zwischenspeicher voll ist, leuchtet
das obere Speicherblocksymbol. In diesem
Fall ist keine weitere Aufnahme möglich.
Anzahl der speicherbaren Aufnahmen.
Speicherblock
Vor der Aufnahme/Noch
keine Aufnahme
Eine Aufnahme
hergestellt
Mehr als eine
Aufnahme
hergestellt.
Keine
Speicherkapazität
● NIEMALS die Kartenfachabdeckung öffnen, die Karte auswerfen, die Batterien
entnehmen oder das Kabel abziehen, wenn die Schreibanzeige blinkt. Andernfalls
können alle auf der Karte gespeicherten Daten beschädigt werden und/oder neue
Bilddaten können nicht auf die Karte geschrieben werden.
MOVIE-AUFNAHME
Zum Aufnahmestart den Auslöser
vollständig hinunterdrücken. Nochmals
vollständig drücken, um die Aufnahme zu
stoppen.
●Bei aktivierter Movie-Aufnahme leuchtet
in Rot.
●Beim Aufnahmestart werden Schärfe- und
Belichtungseinstellung beibehalten.
Restzeit in Sekunden
Speicherblock
89
Page 90

GRUNDSÄTZLICHE FUNKTIONEN (Forts.)
P F2.8 1/800 0.0
P F2.8 1/800 0.0
m Schärfespeicher
Wenn sich das bildwichtige Motiv nicht innerhalb der AF-Markierung befindet, wie folgt
vorgehen:
AF-Einstellsymbol
Die Bildkomposition bestimmen
1 2
AF-Markierung
m Wiedergabe von Einzelbildern
Alle auf der Speicherkarte enthaltenen Bilder können mit dem Jogregler zur Wiedergabe
aufgerufen werden.
: Wiedergabe des nächsten Bildes.
: Wiedergabe des vorherigen Bildes.
: Wiedergabesprung um 10 Bilder vorwärts.
: Wiedergabesprung um 10 Bilder rückwärts.
●Wenn Sie im Aufnahmemodus die Taste (LCD-Monitor) zweimal kurz drücken
oder bei auf gestellter Programmwählscheibe schaltet die Kamera auf den
Wiedergabemodus.
m Movie-Wiedergabe
Ein Bild, das mit gekennzeichnet ist, mit dem Jogregler anwählen.
Die Taste (Menü) drücken. Im Menü MOVIE PLAY wählen und dann drücken,
um START zu wählen. Die OK-Taste drücken, um die Movie-Bilddaten von der Kamera
zu lesen. Die Movie-Wiedergabe startet, sobald die Schreibanzeige nicht mehr blinkt.
Während der Wiedergabe kann mit der OK-Taste auf Pause geschaltet werden. Mit dem
Jogregler können Einzelbilder in Vorwärts- oder Rückwärtsrichtung aufgerufen werden.
Die Taste (Menü) drücken, um die Movie-Wiedergabe zu beenden. Es wird erneut
das Menü gezeigt.
m Wiedergabe mit Ausschnittsvergrößerung
Bei Wiedergabe den Zoomregler in Richtung T drücken, um das Bild um den Faktor 1,5,
2, 2,5 oder 3 zu vergrößern. Mit dem Jogregler ( / / / ) können andere
Bildausschnitte in Richtung § / ©/¶/Ä zur vergrößernden Darstellung gewählt
werden.
m Indexbild-Wiedergabe
Bei Wiedergabe den Zoomregler in Richtung W drücken, um gleichzeitig mehrere
Indexbilder auf dem Bildschirm aufzurufen. Zur Bildwahl dient der Jogregler. Soll das
gewählte Bild in Normalgröße gezeigt werden, den Zoomregler in Richtung T drücken.
Die Zahl der gleichzeitig gezeigten Indexbilder kann mittels Menüeinstellung vorgewählt
werden.
90
Page 91

AUFNAHMEFUNKTIONEN
m Zoomen
Mit dem 10x Zoom kann die Brennweite stufenlos zwischen Weitwinkel- und
Telebereich geändert werden. Wenn die Digitalzoomfunktion per Menü aktiviert wird,
kann mit dem 2,7x Digitalzoom die Wirkung eines 27x Zooms erzielt werden.
●Die Zoomgeschwindigkeit (Ein- und Auszoomen) kann durch Veränderung des
Zoomreglerwinkels beschleunigt oder verlangsamt werden.
m
Automatische Blitzabgabe
Den Blitz mit der Blitzentriegelung, die sich neben dem Blitz befindet, ausklappen. Den
Auslöser halb hinunterdrücken.
●Wenn das Symbol im Sucher leuchtet, ist die Kamera blitzbereit.
●Wenn das Symbol blinkt, wird der Blitz geladen. In diesem Fall arbeitet
der Auslöser nicht. Zur Aufnahme warten, bis erlischt.
Blitzprogramm/LCD-Feld Anwendung
Automatische Bei schwacher Umgebungshelligkeit oder bei
Blitzabgabe Gegenlicht wird der Blitz automatisch
Blitz mit Vorblitz zur Verringert deutlich den ”Rote-Augen-Effekt”
Unterdrückung des bei Blitzaufnahmen.
”Rote-Augen-Effektes”
Aufhellblitz stets gezündet.
m Manuelle Scharfeinstellung
Die OK-Taste drücken. Im Modusmenü für Scharfstellung mit dem Jogregler MF
wählen. Die OK-Taste drücken. Der gewählte Entfernungsbereich wird gespeichert.
m Serienaufnahmen
Einzelbildaufnahmemodus (ohne Anzeigesymbol): Beim Drücken des Auslösers wird
nur eine Aufnahme hergestellt. (Anfangseinstellung)
Serienaufnahmen ( ): Es wird eine Bildfolge aufgenommen. Schärfe, Helligkeit
(Belichtung) und Weißabgleich werden für die erste Aufnahme gespeichert. In
einem Serienaufnahmevorgang können bis zu 5 Bilder aufgenommen werden.
AF-Serienaufnahmen ( ): Es wird eine Bildfolge aufgenommen. Schärfe,
Helligkeit (Belichtung) und Weißabgleich werden für die jede Aufnahme neu
gespeichert.
Selbstauslöser/Fernauslöser ( ): Die Aufnahme wird verzögert ausgelöst.
Automatische Belichtungsreihen (BKT): Es wird eine Bildfolge aufgenommen. Schärfe
und Weißabgleich werden für die erste Aufnahme gespeichert. Die Kamera
verändert die Belichtung bei jeder Aufnahme.
gezündet.
Wird ungeachtet der Umgebungshelligkeit
91
Page 92

GRUNDSÄTZLICHE FUNKTIONEN (Forts.)
m Belichtungskorrektur
Die Belichtungseinstellung kann manuell im Bereich von ± Belichtungsstufen 2 (in 1/3Schritten) korrigiert werden. Zur Motivaufhellung in Richtung + korrigieren. Zur
Motivabdunkelung in Richtung – korrigieren.
m AE-Speicher
Mit der AEL-Taste kann die Belichtung in der bevorzugten Einstellung gespeichert
werden. Dementsprechend können Sie einen anderen als den von der Kamera
ermittelten Belichtungswert wählen.
m Belichtungsmessung
Sie können bestimmen, welcher Motivbereich zur Belichtungsmessung verwendet wird.
Der Messmodus kann mit der Taste gewählt werden.
Einstellmodus/LCD-Feld
Standard Integrierte Messung mit
(digitale ESP-Messung) Mittengewichtung
Mittengewichtete Mittengewichtete Messung
Messung
Spotmessung der AF-Markierung). Empfiehlt sich
(digitale ESP-Messung).
Spotmessung (Bereich innerhalb
bei Gegenlichtaufnahmen.
Funktionen
92
Page 93

MENÜBEZOGENE EINSTELLUNGEN
m Verwackelungsfreies Fotografieren — Bildstabilisierung
Insbesonders beim Fotografieren im Weitwinkel- oder Telebereich können leicht
Verwackelungen auftreten, wenn die Kamera nicht ruhig gehalten wird. Wenn Sie
Verwackelungen vermeiden möchten, können Sie die Bildstabilisierfunktion der Kamera
verwenden.
Unter bestimmten Aufnahmebedingungen kann ggf. nicht einwandfrei arbeiten.
●Wenn die Kameraausrichtung schnell gewechselt wird.
●Bei Nachtaufnahmen
●Bei Überbelichtung
●Bei blinkender Batteriezustandsanzeige
m Verwendung der 27X Zoomfunktion — DIGITAL ZOOM
Bei Verwendung der optischen Zoomfunktion wird das Bild bis zu 2,7fach vergrößert.
Bei Verwendung der DIGITAL-ZOOM-Funktion kann das Bild bis zu 27fach vergrößert
werden.
m
Weißabgleich
Die Farbreproduktion hängt von der bei der Aufnahme vorherrschenden Farbtemperatur
ab. Der Weißabgleich dient der Ermittlung der Farbtemperatur und trägt zu einer
natürlichen Farbreproduktion bei. Festwerte für Glühlicht und Fluoreszenzlicht sind
gleichfalls verfügbar, um farbechte Aufnahmen bei Kunstlicht zu ermöglichen.
m Einstellung der Empfindlichkeit (ISO) —
Sie können die Empfindlichkeit anheben, wenn bei dunklen Lichtverhältnissen eine
relativ kurze Verschlusszeit verwendet werden soll. Die folgende
Empfindlichkeitseinstellungen können gewählt werden: AUTO, sowie 100, 200 und 400.
Im Einstellstatus AUTO wird die Empfindlichkeit den Aufnahmebedingungen angepasst.
Je höher der ISO-Wert, desto kürzer kann die Verschlusszeit gewählt werden und desto
weniger Licht wird zur Aufnahme benötigt.
m Blitzaufnahmen mit langer Synchronisationszeit —
Wenn eine lange Verschlusszeit gewählt wurde, kann der Zeitpunkt der Blitzabgabe,
d.h. die Blitzsynchronisation, vorgewählt werden. Das durch den Blitz aufgehellte
Motiv wird schärfer abgebildet. Im Menü SLOW1 oder SLOW2 wählen.
SLOW2 ist die Blitzabgabe am Ende der Belichtung.
— WB
93
Page 94

AUFNAHMEFUNKTIONEN (Forts.)
m Automatische Belichtungsreihen — BKT
Bei der automatischen Belichtungsreihe wird das gleiche Motiv mehrmals
aufgenommen, wobei jedesmal eine andere Belichtung gewählt wird. Entfernung,
Weißabgleich werden nur für das erste Bild gemessen. Die Anzahl der
Belichtungsreihen-Bilder kann vorgewählt werden.
Vor der Aufnahme die Taste drücken, bis die LCD-Feld-Anzeige erlischt.
m
Mehrfachmessung
Die Messwerte von bis zu 8 Motivbereichen können bei der Belichtungsmessung zur
Berechnung des Durchschnittswertes addiert werden.
m AF MODE
Der zur Entfernungsmessung verwendete Bildbereich kann vorgewählt werden.
iESP : Die Messung erfasst den gesamten Bildbereich (Einstellung ab Werk).
SPOT : Die Messung erfasst das in der AF-Markierung abgebildete Motiv.
m FULL – TIME AF
Bei aktiviertem FULL TIME AF-Modus kann die gewünschte Scharfstellung schneller
erzielt werden. Bei aktiviertem FULL TIME AF-Modus wird das Motiv ständig
scharfgestellt und auf dem LCD-Monitor oder Sucher gezeigt.
Um den FULL TIME AF-Modus zu aktivieren/deaktivieren, im Menü den Status ON oder
OFF wählen.
m
Tonaufnahme
— MULTI METERING
Einzelbildaufnahme: Die Tonaufnahme ist bis zu 4 Sekunden lang möglich.
Movie-Aufnahme: Die gleichzeitige Tonaufnahme ist möglich.
m
Funktionskarte
Die Olympus Smartmedia-Karten bieten eine Panorama-Funktion. PanoramaAufnahmen können mittels CAMEDIA Master-Software nahtlos aneinandergefügt
werden.
94
Page 95

m Spezialeffekte — FUNCTION
Im BLACK & WHITE-Modus erfolgen Aufnahmen in Schwarzweiß, im SEPIA-Modus
sind die Aufnahmen sepiabraun eingefärbt. Im WHITE BOARD- und BLACK BOARDModus können Titel und Kommentare auf einem weißen bzw. schwarzen Hintergrund
abgebildet werden. Bei auf gestellter Programmwählscheibe sind nur der BLACK &
WHITE- und der SEPIA-Bildeffekt verfügbar.
m CARD SETUP
Für diese Kamera verwendete Speicherkarten müssen eine geeignete Formatierung
vorweisen. Bereits formatierte Olympus-Karten werden empfohlen. DrittherstellerKarten müssen vor Gebrauch in dieser Kamera formatiert werden.
m Szenen-Programm-Modus — S-Prg
Für die folgenden Motive kann ein besonders geeigneter Programm-Modus gewählt
werden:
: Porträtaufnahmen
: Sich bewegende Motive
: Aufnahmen mit scharfer Abbildung von Vorder- und Hintergrund
: Nachtaufnahmen
m Aufnahmemodus wählen — TIFF SHQ HQ SQ
Den gewünschten Aufnahmemodus wählen.
● Bei auf P, A, S, M oder S-Prg gestellter Programmwählscheibe (EinzelbildAufnahmen)
Die Aufnahmemodi TIFF, SHQ, HQ und SQ sind verfügbar. Die Bildqualität nimmt in der
[HQ[SHQ[TIFF zu. Im TIFF-Format liegt die höchste Bildqualität vor. Je
Folge SQ
höher die Bildqualität, desto besser das Druckresultat. Bilder im SHQ- or TIFF-Modus
benötigen mehr Zeit zum Abspeichern und Bildaufbau bei Wiedergabe als Bilder im SQund HQ-Modus.
● Bei auf gestellter Programmwählscheibe (Movie-Aufnahmen)
Die Aufnahmemodi HQ und SQ sind verfügbar. Die Bildqualität nimmt in der Folge SQ
[HQ zu.
95
Page 96

AUFNAHMEFUNKTIONEN (Forts.)
FOTOGRAFIEREN MIT BLITZ
m Blitzhelligkeit einstellen
Die Blitzhelligkeit kann den Aufnahmeerfordernissen entsprechend eingestellt werden.
Mit der Taste (Menü) das Menü aufrufen. wählen und die Blitzhelligkeit
einstellen.
m Zusatzblitz
Zusatzblitz FL-40 (gesondert erhältlich) kann zusammen mit dem eingebauten Blitz
oder alleine verwendet werden. Zum Anschluss von FL-40 an die Kamera sind die
Blitzhalterung FL-BK01 und das Blitzsynchronisationskabel FL-CB01 (beide gesondert
erhältlich) erforderlich. Bei Anschluss ohne diese Zubehörkomponenten arbeitet FL-40
wie das Zusatzblitzgerät eines Drittherstellers.
96
Page 97

WIEDERGABEFUNKTIONEN
Fernsehgerät
23.12.’00 21:56 10
SQ
23.12.’00 21:56 10
SQ
23.12.’00 21:56 10
SQ
m Bilddrehung und Darstellung von Hochformat-Aufnahmen /
Eine im Hochformat hergestellte Aufnahme wird bei Wiedergabe im Hochformat
gezeigt. Das Bild kann im oder gegen den Uhrzeigersinn um 90° gedreht werden. Eine
Hochformat-Aufnahma wiedergeben.
Hochformat-Aufnahme
Zur Wiedergabe im ursprünglichen Format:
Die Taste (Serienaufnahme) drücken.
m Wiedergabe auf einem Fernsehgerät
Bild- und Tonsignale können bei AVKabelanschluss über ein Fernsehgerät
wiedergegeben werden.
1 Das AV-Kabel an der AV OUT-Buchse
(schwarz) der Kamera anschließen.
2 Das AV-Kabel an der Video-
Eingangsbuchse (gelb) und AudioEingangsbuchse (weiß) des Fernsehgeräts
anschließen.
Mit der Taste
(Nahaufnahme) kann das
Bild im Uhrzeigersinn um
90° gedreht werden.
AV-Kabel
Mit der Taste
(Messmodus) kann das Bild
gegen den Uhrzeigersinn
um 90° gedreht werden.
An die AV OUT-Buchse
(schwarz)
97
Page 98

WIEDERGABEFUNKTIONEN (Forts.)
m Löschen von einzelnen Aufnahmen
Die Programmwählscheibe auf stellen. Die zu löschenden Bilder mit dem
Jogregler wählen. Die Taste (Löschen) drücken. Eine Rückfragemeldung, ob die
Löschung gewünscht wird, erscheint. Sicherstellen, dass YES gewählt wurde, und
dann die OK-Taste drücken.
m Gesamtlöschung
Die Programmwählscheibe auf stellen. Die Taste (Menü) drücken. Zuerst
CARD SETUP und dann wählen. Die OK-Taste drücken. Sicherstellen, dass YES
gewählt wurde, und dann die OK-Taste drücken.
m Löschschutz
Die Programmwählscheibe auf stellen. Das zu schützende Bild aufrufen. Die OKTaste drücken. Das gezeigte Bild wird gegen Löschung geschützt. wird auf dem
LCD-Monitor gezeigt.
MENÜBEZOGENE EINSTELLUNGEN
m Dia-Show
Auf der eingelegten Karte gespeicherte Bilder können automatisch wie bei einer DiaShow nacheinander wiedergegeben werden. Am Jogregler oder drücken, um
den Dia-Show-Modus zu wählen. Zum Dia-Show-Start mit START wählen.
m Nachvertonung von Einzelbildern
Eine bereits hergestellte Aufnahme kann nachvertont bzw. neu vertont werden.
m FUNCTION
MOVIE INDEX:
Wenn die Karte mehrere Movie-Aufnahmen enthält, können Sie ein Movie-Verzeichnis
in Form von Indexbildern anlegen. Dieses Movie-Indexbildverzeichnis kann gleichfalls
auf der Karte gespeichert werden.
MOVIE EDIT:
Movie-Aufnahmeabschnitte könne ausgewählt und zu einer neuen Movie-Aufnahme
zusammengefügt werden.
98
Page 99

MODUSEINSTELLUNGEN
Sie können Funktionen nach Ihren Aufnahmeerfordernissen voreinstellen. Siehe auch
die Bedienungsanleitung auf der CD-ROM.
m Modus-Einstellmenü
Eintrag
ALL RESET
TIFF *1, *2
SQ *1, *2
AF ILLUMINATOR*1, *2
REC VIEW *2
SLEEP
FILE NAME*2
m/ft *2
*3
Aufgabe
Bei Kamera-Einschaltung die
Anfangseinstellung wählen.
Einstellung der Bildschärfe.
Bildgröße im TIFF-Modus
wählen.
Bildgröße und -qualität im SQModus wählen.
Einstellung der Warntonlautstärke (Warnton ertönt zur
Betätigungsbestätigung).
AF-Messleuchte ON/OFF
wählen.
Wählen, ob das Bild nach der
Aufnahme gezeigt wird oder
nicht.
Zeit eingeben, bis Kamera
nach jeweils letztem
Bedienschritt auf den SleepModus schaltet.
Eingeben, wie Dateinamen auf
der Karte abgespeichert
werden.
Helligkeitseinstellung von
LCD-Monitor und Sucher.
Datumseinstellung
Einstellung der Brennweiten-
Maßeinheit.
Einstellung der Indexbildzahl.
Anfangseinstellung
ON
NORMAL
1600 x 1200
640 x 480 (NORMAL)
HIGH
ON
OFF
1 MIN
RESET
–
m
9
*1 Im Movie-Aufnahmemodus (bei auf gestellter Programmwählscheibe) entfällt der Menüeintrag
für die Moduseinstellung.
*2 Im Wiedergabemodus (bei auf gestellter Programmwählscheibe) entfällt der Menüeintrag für
die Moduseinstellung.
*3 Dieses Menü ist nur im Wiedergabemodus verfügbar.
99
Page 100

DRUCKBEZOGENE EINSTELLUNGEN
Mittels der Druckvorauswahlfunktion können Bilder zum Ausdrucken vorgemerkt und
von jedem Drucker oder Fotolabor, die den DPOF-Druckdaten-Standard (Digital Print
Order Format) unterstützen, ausgedruckt werden.
●Die Druckvorauswahl arbeitet nicht für mit gekennzeichnete Bilder.
m Druckvorauswahl für ausgesuchte Bilder
Die Taste drücken. Das Druckvorauswahleinstellmenü wird gezeigt. Am Jogregler
oder drücken, um zu wählen und dann die OK-Taste drücken.
Das Druckvorauswahl-Vormerkmenü wird gezeigt. Mit dem Jogregler das
auszudruckende Bild wählen. Die OK-Taste drücken. Das Einstellmenü wird gezeigt.
Mit oder x wählen und dann mit die Anzahl der Ausdrucke eingeben.
Mit oder wählen und dann mit DATE oder TIME wählen. Am
Jogregler oder drücken, um TRIMMING zu wählen. Dann mit oder
YES oder NO wählen. Abschließend die OK-Taste drücken. Die Taste drücken. Der
Druckvorauswahlmodus wird geschlossen und es erfolgt erneut die normale Anzeige.
m Druckvorauswahl für alle Bilder
Sie können alle auf der Karte gespeicherten Bilder ausdrucken und dabei die Anzahl der
Fotoprints bestimmen.
m Druckvorauswahl für eine Ausschnittsvergrößerung
Die Ausschnittsvergrößerung eines Bildes kann ausgedruckt werden.
Hinweis:
●Diese Kamera kann nicht direkt an einen Drucker angeschlossen werden.
●Wenn die Karte bereits mit einem anderen Gerät erstellte DPOF-Vormerkdaten enthält,
können diese bei Verwendung der Druckvorauswahlfunktionen dieser Kamera
gelöscht werden. Zur Druckvorauswahl sollte diese Kamera verwendet werden.
100
 Loading...