

Page 1
GO TO THE CONTENTS
Page 2

Contents
Please Read First! .........................................................................1
Trademark Information .................................................................1
1. Printer Drivers for Windows 95................................................2
1-1 Opening the Properties dialog box......................................2
1-2 Properties dialog box..........................................................3
1-3 Setup tab .............................................................................4
1-4 Paper tab .............................................................................6
1-5 Print Quality tab..................................................................7
1-6 Accessories tab..................................................................9
1-7 Watermark tab...................................................................10
1-8 Postscript tab (for PS Printer Driver only).........................12
1-9 Fonts tab (for PS Printer Driver only) ................................13
1-10 Font Download tab (for PS Printer Driver only)..............15
2. Printer Drivers for Windows NT 4.0 .......................................16
2-1 Opening the Properties dialog box....................................16
2-2 Properties dialog box........................................................17
2-3 Setup tab ...........................................................................18
2-4 Paper tab ...........................................................................20
2-5 Print Quality tab................................................................21
2-6 Accessories tab................................................................23
2-7 Watermark tab...................................................................24
2-8 Postscript tab (for PS Printer Driver only).........................26
2-9 Fonts tab (for PS Printer Driver only) ................................27
2-10 Font Download tab (for PS Printer Driver only)..............29
2-11 Device Settings tab (for PS Printer Driver only) .............30
3. “WinPanel” Status Monitor.....................................................31
3-1 Using the “WinPanel” Status Monitor.................................31
3-2 “WinPanel” Status Monitor window ....................................32
3-3 Status messages and icons ...............................................33
4. Macintosh PPD dialog boxes .................................................35
4-1 Configure dialog box .........................................................35
4-2 Page Setup dialog box.......................................................36
4-3 Options dialog box.............................................................37
4-4 Print dialog box..................................................................38
4-5 Print Options dialog box ...................................................39
5. Printer Drivers and Status Monitor for Windows 3.1 ...........40
5-1 Opening the properties dialog box......................................40
5-2 Properties dialog box..........................................................40
5-3 Using the “WinPanel” Status Monitor .................................41
5-4 “WinPanel” Status Monitor window.....................................41
Page 3

-1-
Please Read First!
This On-Line Manual offers additional information to – and should be read in
combination with – your Printing System (H) Instruction Handbook.
This manual contains detailed information on the Properties dialog box that
appears in the Printer Drivers as well as information on the Status Monitors, both
for use with Windows computers.
The explanations in this manual were written with the assumption that the user
has a basic understanding of how to work in Windows. For further information on
using Windows, refer to Windows-related material and other information from
Microsoft Corporation.
Trademark Information
• Windows and Windows NT are registered trademarks of Microsoft Corporation.
• PCL is a registered trademark of Hewlett-Packard Company.
• PS (PostScript) and Acrobat are registered trademarks of Adobe Systems
Incorporated.
All other company or product designations indicated in this manual are
trademarks or registered trademarks of their respective companies.
The designations ™ and ® will not be used in this manual.
Page 4
-2-
1. Printer Drivers for Windows 95
This section contains explanations on the basic functions of the Printer Drivers supplied for this printer when operating under
Windows 95. These explanations were written with the assumption that the desired Printer Driver has already been installed in
your computer.
* There are 3 PDLs (Printer Description Languages) compatible for use with this printer: PCL5e, PCL6 and PS, and each has its
own Printer Driver. Thus, depending upon which PDL you are actually using, the explanations, settings and illustrations shown in
this manual may differ slightly from what will actually appear on your computer screen.
1-1 Opening the
Properties
dialog box
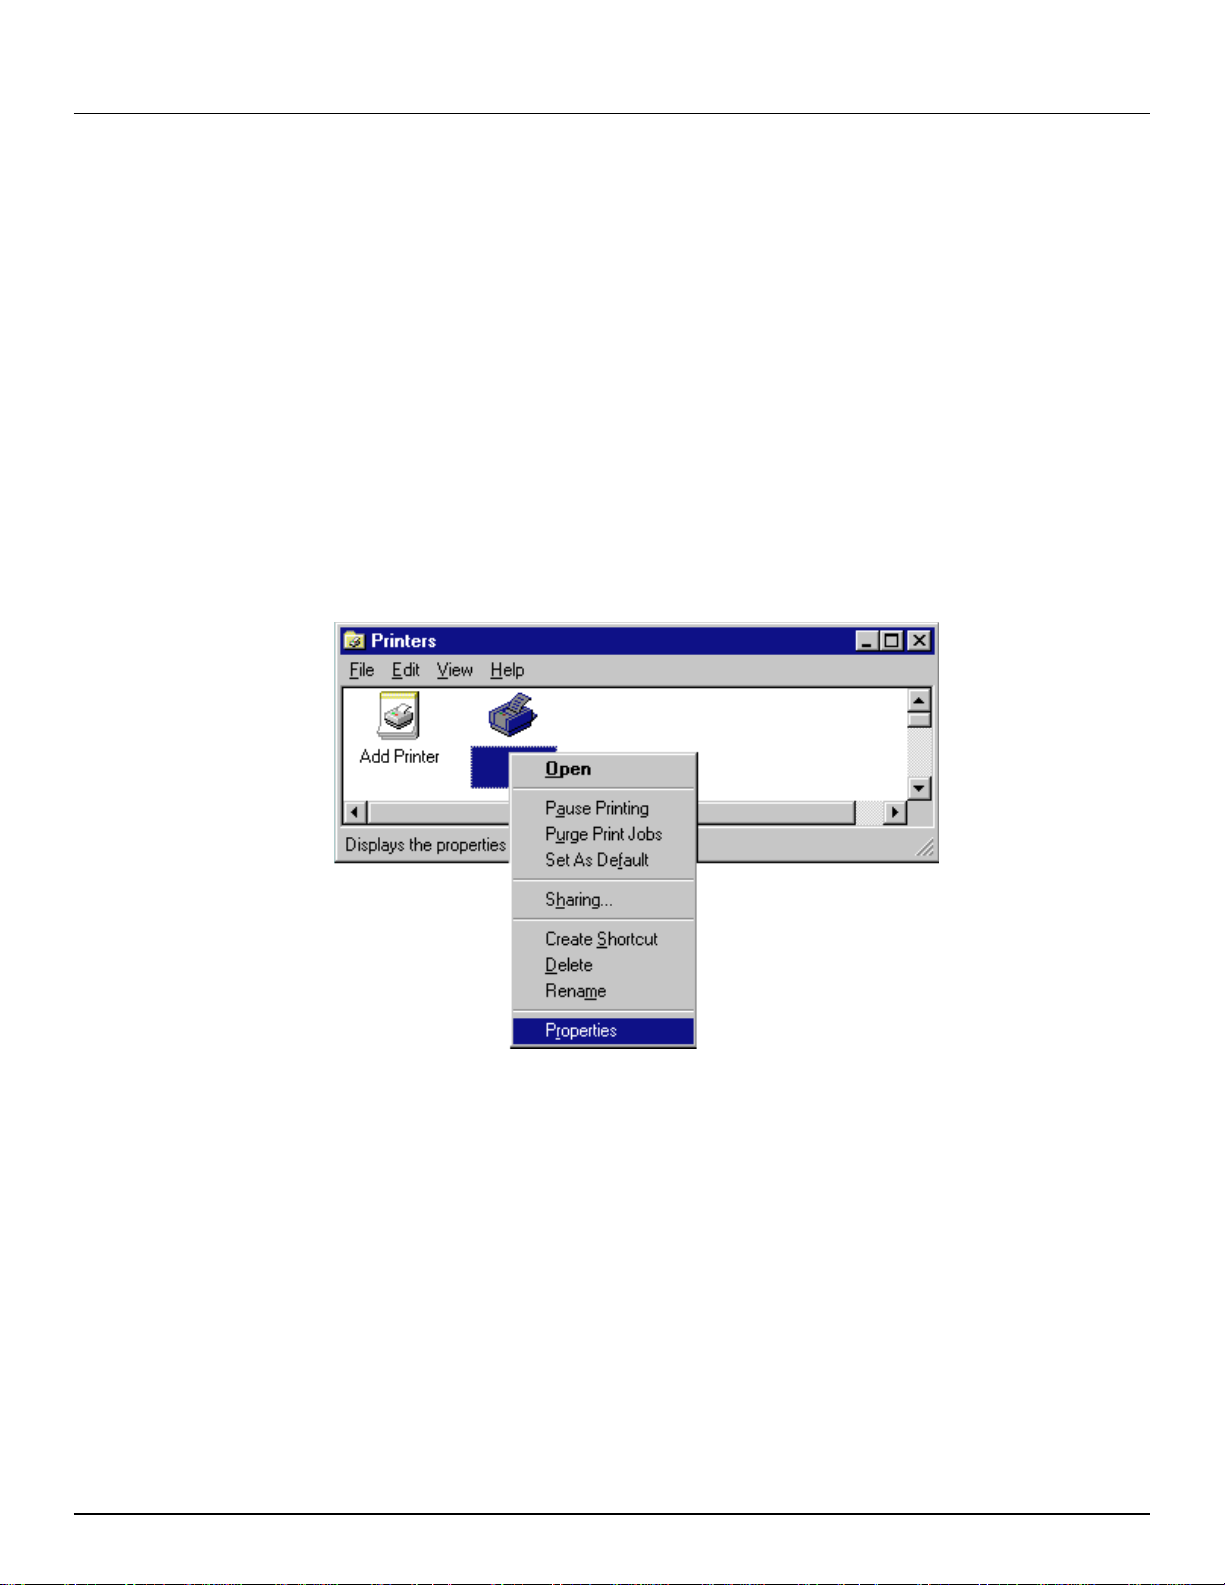
1. Start up Windows 95.
2. Click on Start in the Task Bar. The Start menu will be displayed.
3. Use the mouse to point to Settings and click on Printers in the submenu that is displayed. The Printers folder will open.
4. Use the right mouse button to click on the icon that corresponds to both this printer and the appropriate PDL. A pop-up menu
will be displayed.
5. Click on Properties in the pop-up menu. The Properties dialog box will be displayed.
Page 5
-3-
1. Printer Drivers for Windows 95
1-2
Properties
dialog box
A
Tabs: Click on a tab to display its contents.
B
Arrow [▼]: Click to display a list of selections available for that field.
C
Field: Displays the currently selected setting. If the cursor ( | ) is displayed within the field, characters and numerals can be
entered directly into that field.
D
Drop-down list: Displays a list of selections available for a specific field when the arrow (▼) is clicked.
E
About button: Click to display information for this Printer Driver such as its name and version number.
F
Restore Defaults button: Click to reset all settings back to their factory default values.
G
OK button: Click to close the Properties dialog box and save all of the currently selected settings.
H
Cancel button: Click to close the Properties dialog box without changing any of the previous settings.
I
Apply button: Click to save all of the currently selected settings without closing the Properties dialog box.
J
Help button: Click for more detailed information on something you don’t understand regarding the Properties dialog box.
A
C
GHIJ
E
B
D
F
Page 6
-4-
1. Printer Drivers for Windows 95
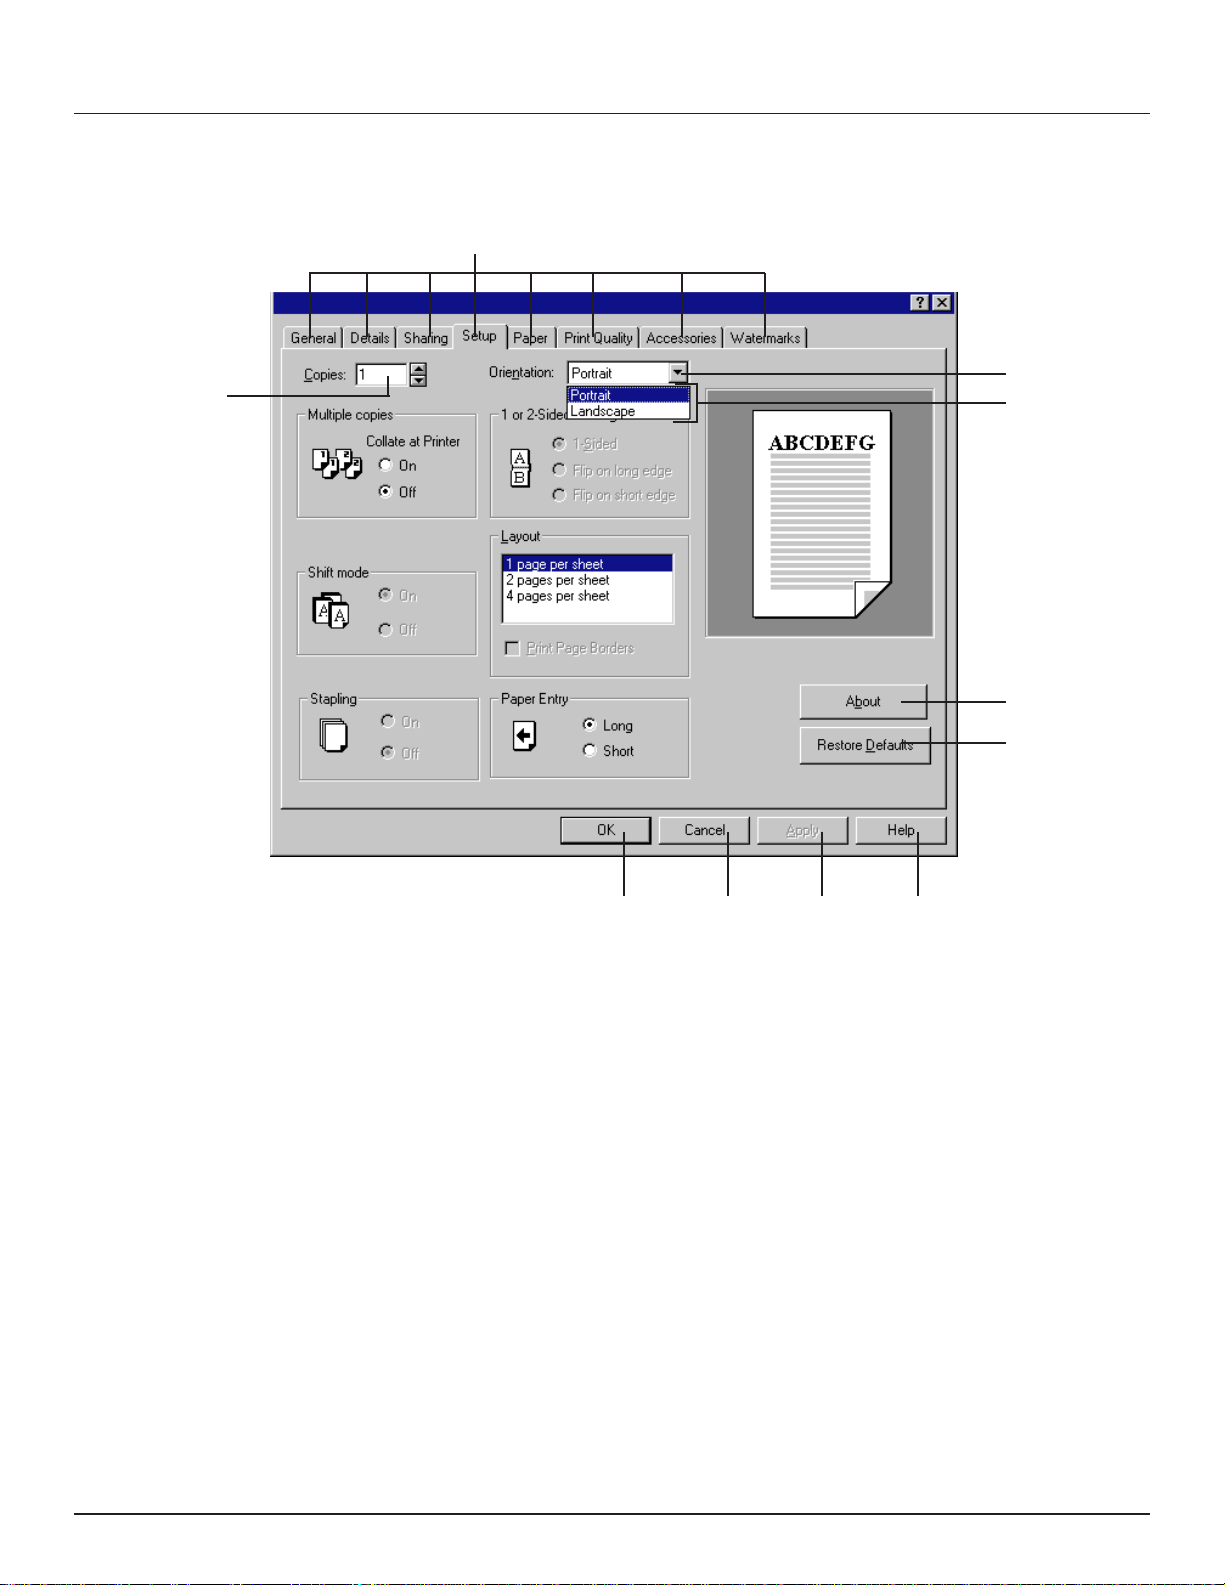
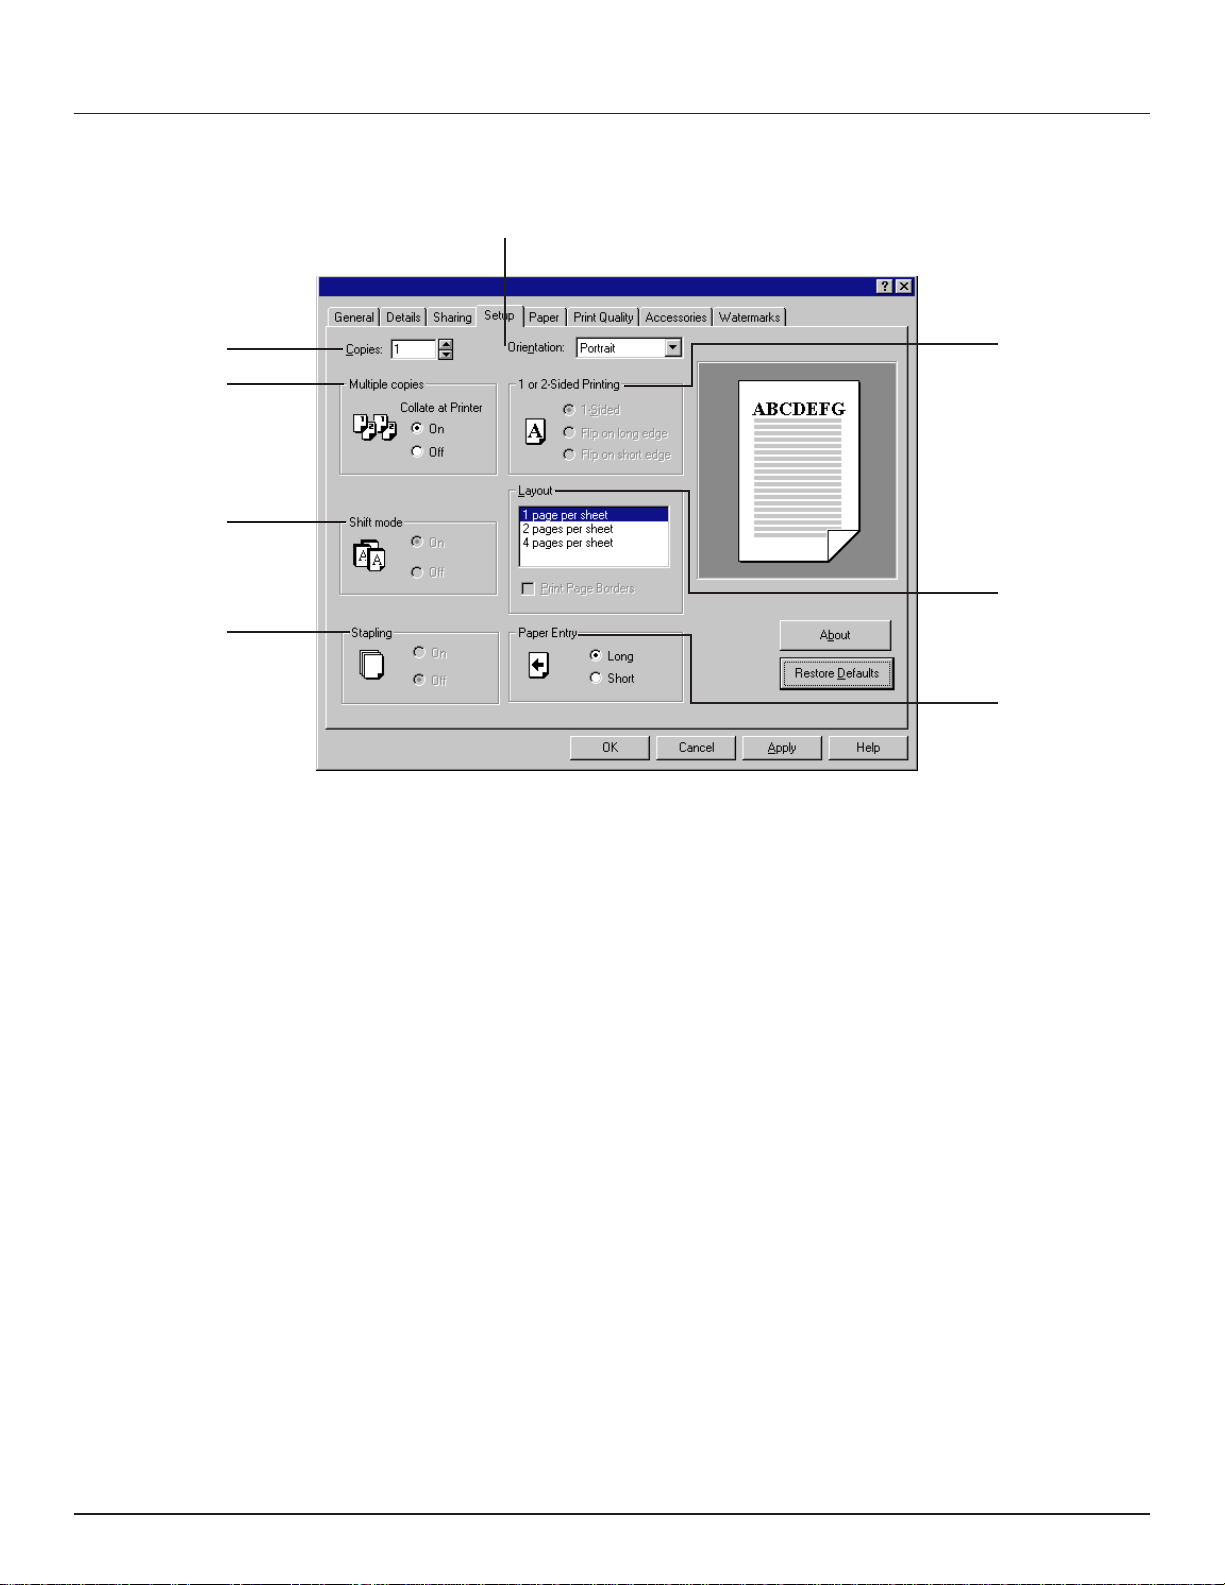
1-3
Setup
tab
A
Copies field: Displays the selected number of prints to be made (1 -
999). The desired number can be selected by typing it directly into this
field or by clicking on the (▼, ▲) arrows.
B
Multiple copies radio buttons: Select the On radio button in order to
collate multiple sets of printed documents.
C
Shift mode radio buttons: Select the On radio button when the
optional Finisher is installed on the printer to have each successive set
of printed documents shifted slightly from the previous one when
ejected.
D
Stapling radio buttons: Select the On radio button when the optional
Finisher is installed on the printer in order to staple each set of printed
documents.
* Stapling is only available when using 11" x 17", 8 1/2" x 14", 8 1/2" x
11", A3 or A4 size paper.
* To staple prints, the On radio button under Collate at Printer should
be selected and the number of prints to be made should be set to 2
or more.
* If the Stapling options are not available even though the optional
Finisher is installed on the printer, perform the appropriate setting in
the Accessories tab. (Refer to page 9.)
E
Orientation field: Displays the selected orientation of the printed
documents: Portrait (length-wise) or Landscape (width-wise).
F
1 or 2-Sided Printing radio buttons: When the optional Duplex Unit is
installed in the printer, the following options are available:
• 1-Sided: Duplex printing will NOT be accomplished.
• Flip on long edge: Select this radio button in order to have the
paper turned over by its longer edge during Duplex printing.
• Flip on short edge: Select this radio button in order to have the
paper turned over by its shorter edge during Duplex printing.
* If the 1 or 2-sided Printing options are not available even though
the optional Duplex Unit is installed on the printer, perform the
appropriate setting in the Accessories tab. (Refer to page 9.)
> If the Portrait option is selected in the Orientation field, Duplex
printing will be accomplished with the resulting 2-sided documents
looking like that in books, magazines and the like.
> If the Landscape option is selected in the Orientation field, Duplex
printing will be accomplished with the resulting 2-sided documents
looking like that in calendars and the like.
G
Layout list: Displays the available N-up (thumbnails) and Booklet
layout options.
• The N-Up (thumbnails) layout options enable you to print out the
reduced images of either 2 or 4 full pages onto a single sheet of
paper. For more detailed information, refer to “1N-Up
(thumbnails)”, page 5.
• The Booklet layout options enable open-face and duplex (2-sided)
printing during the same print job to allow printing of pamphlets,
magazines and the like by simply stacking and folding the resulting
prints. For more detailed information, refer to “2Booklet”, page 5.
(The Booklet layout options are only available in the PS Printer
Driver and only when the optional Duplex Unit is installed in the
printer.)
* Print Page Borders check box: Place a check in this check box in
order to have a border line drawn between each page.
H
Paper Entry radio buttons: Enable selection of the location where
stapling will occur when the optional Finisher is installed on the printer
and the Stapling setting is turned On. Select the Long radio button to
staple the long edge of the documents and the Short radio button to
staple the short edge.
A
B
C
D
H
G
F
E
Page 7
-5-
1. Printer Drivers for Windows 95
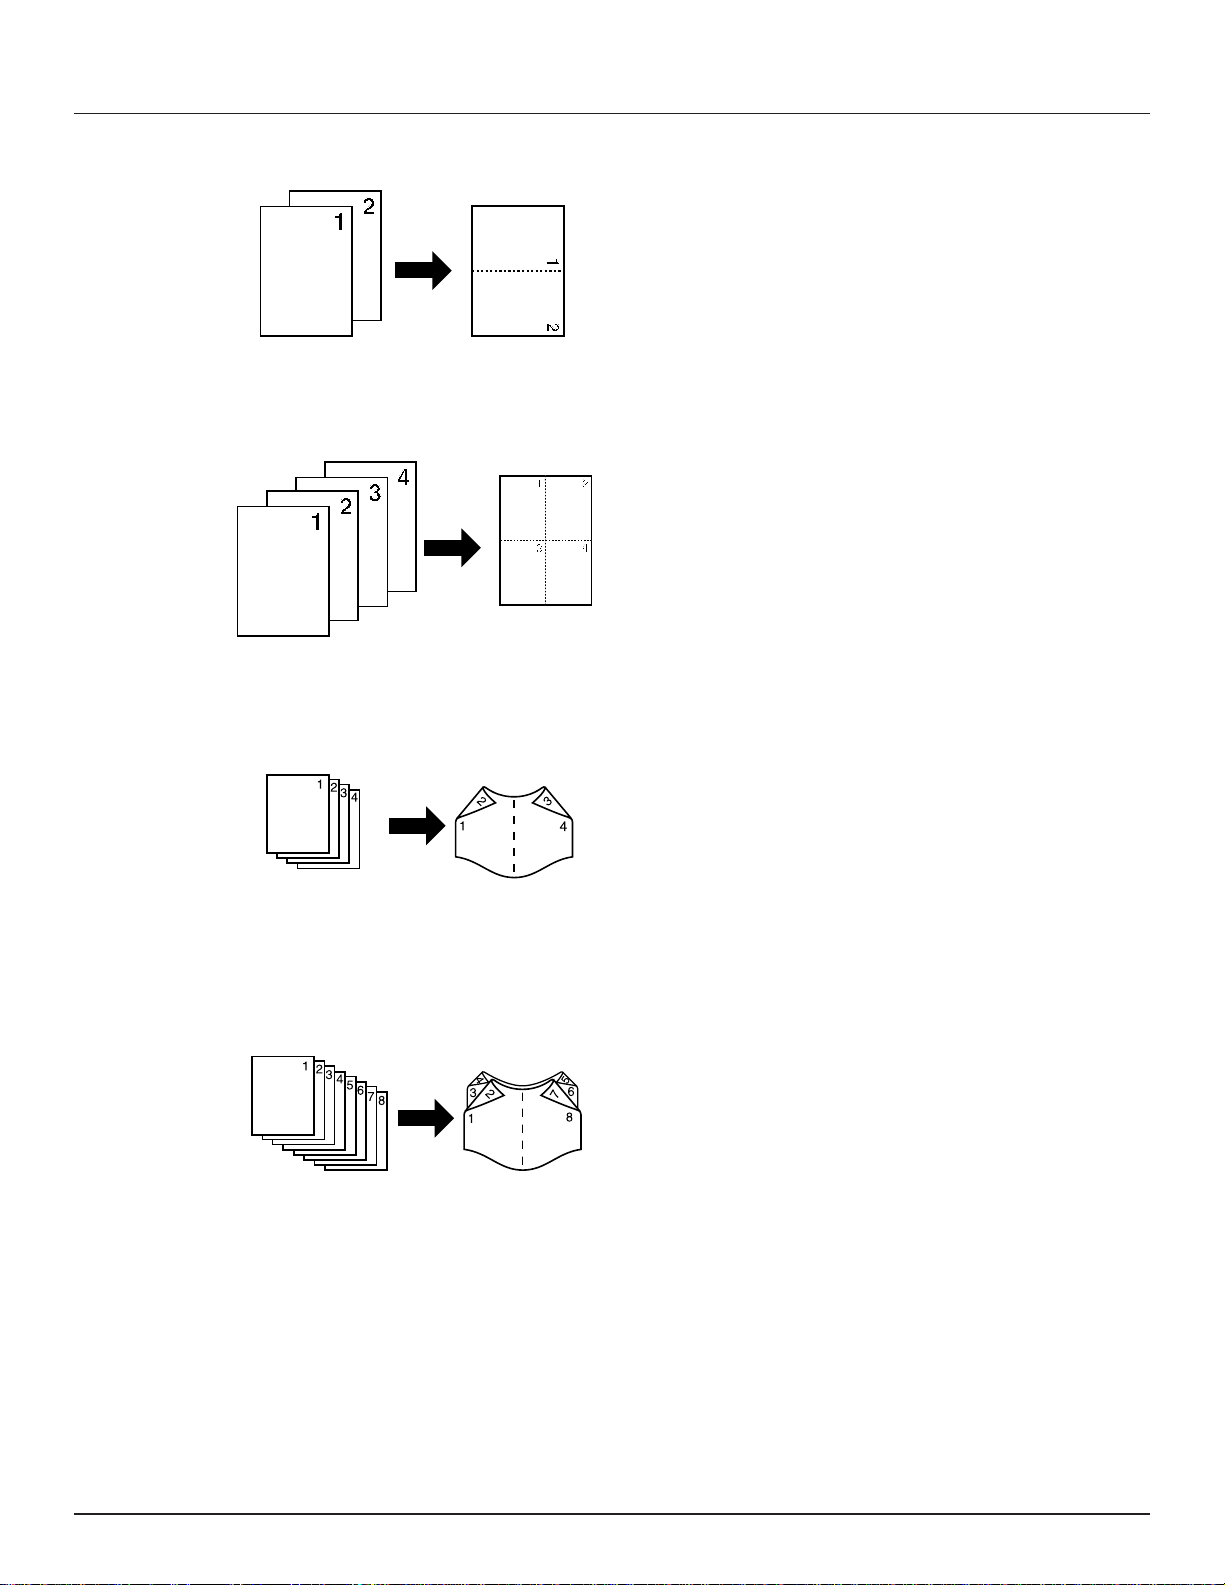
11
N-Up (thumbnails)
A
2 pages per sheet: The reduced images of 2 full pages will be printed
out onto a single sheet of paper.
* If the orientation or size of a page within a single file is different from the
previous page, the image of that next page – and successive pages –
will be printed out onto the next piece of paper.
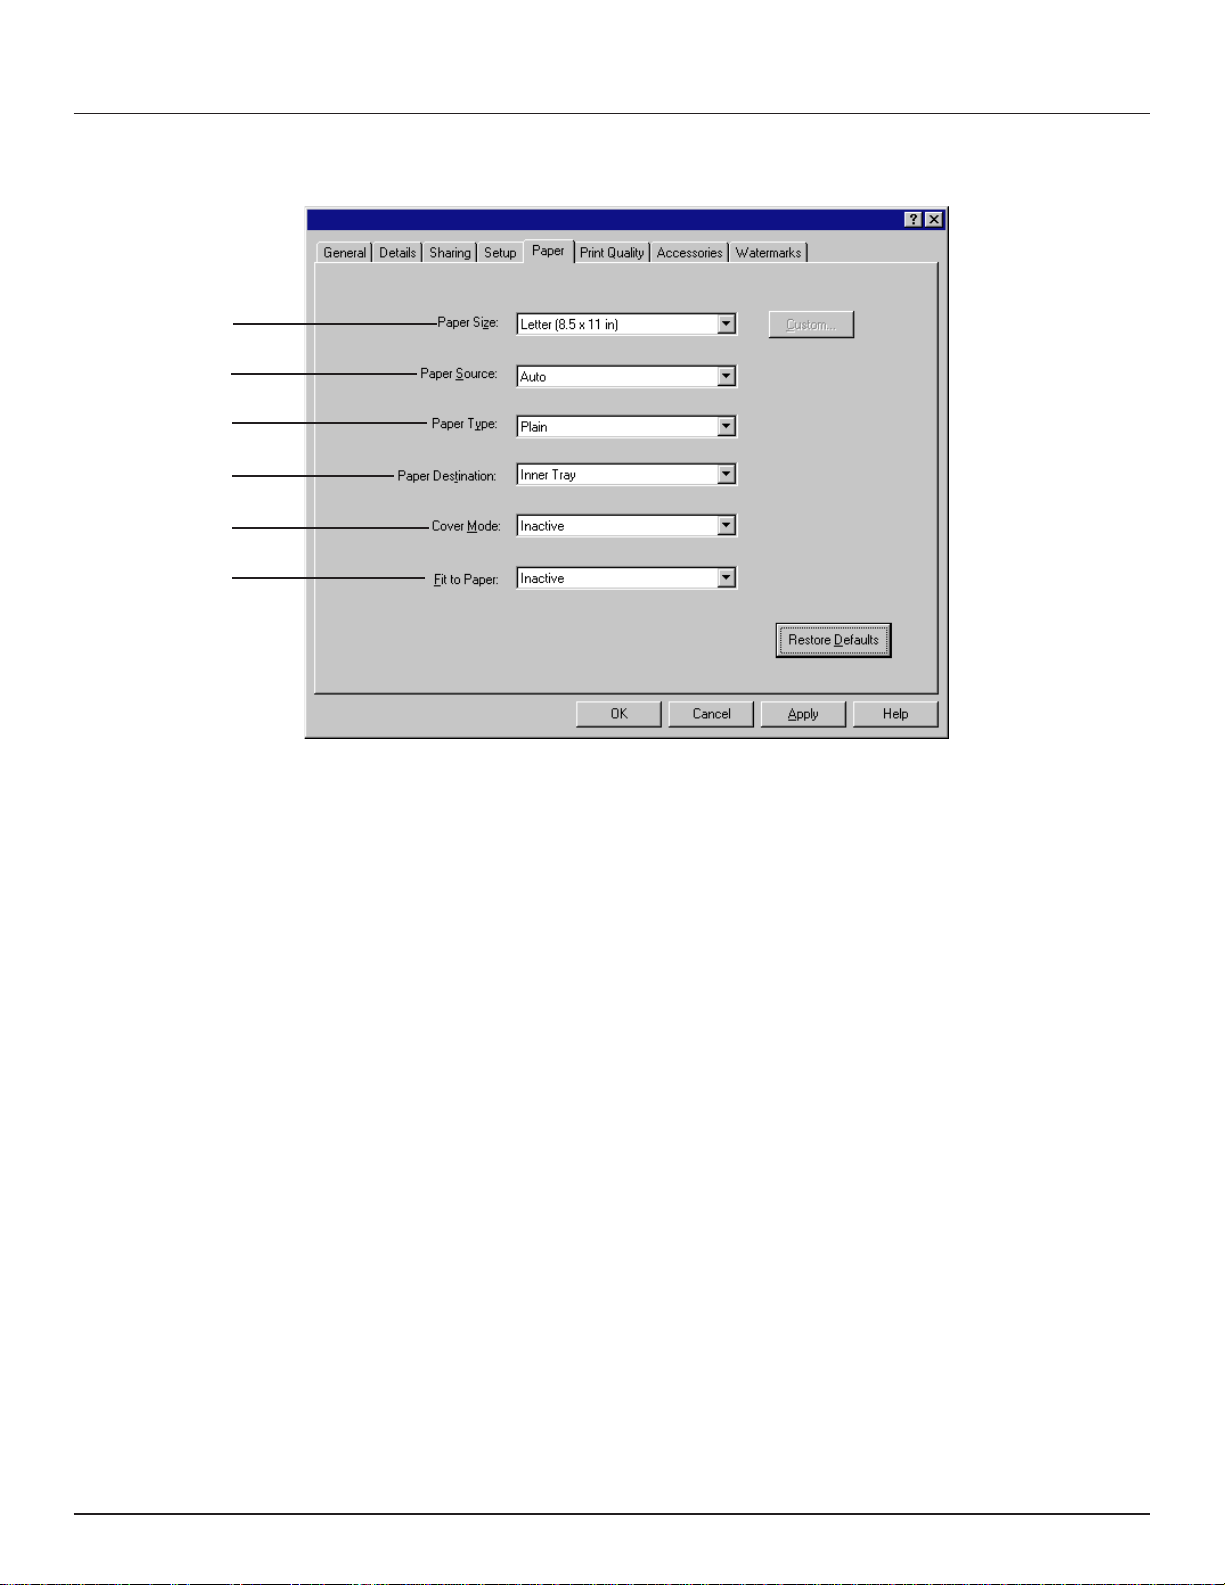
22
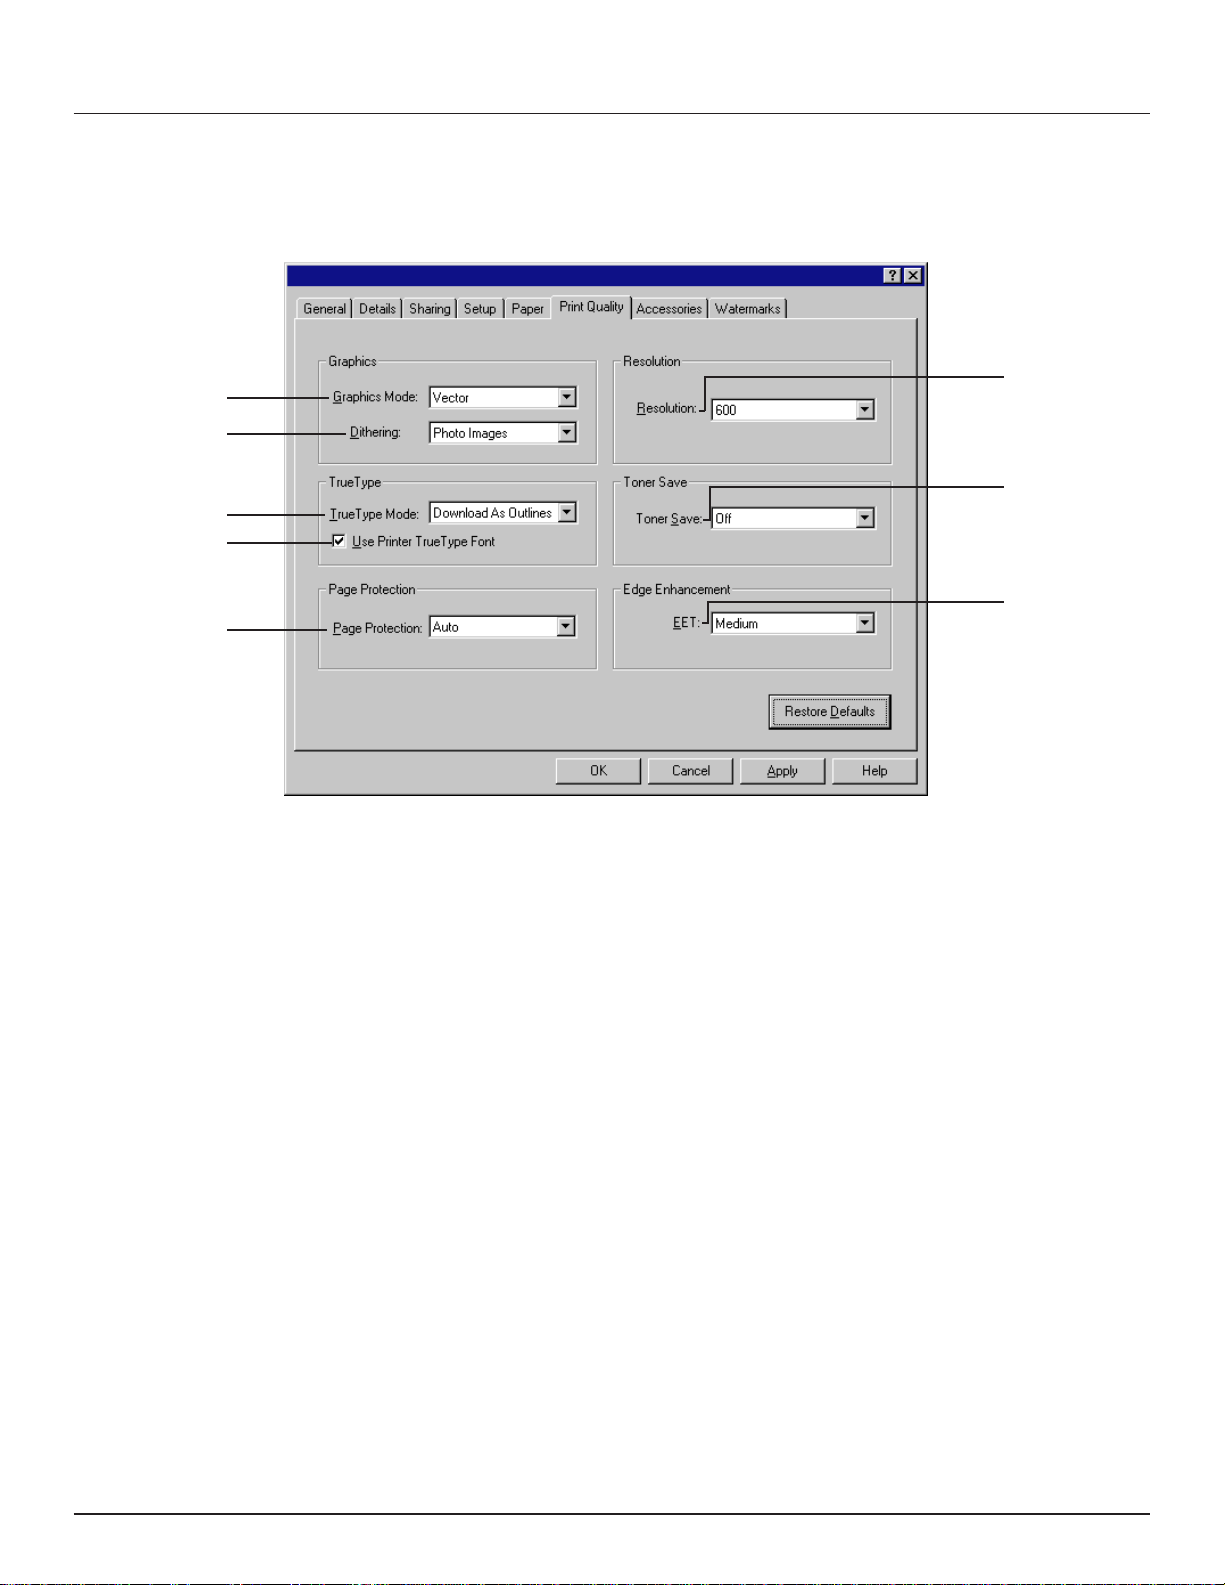
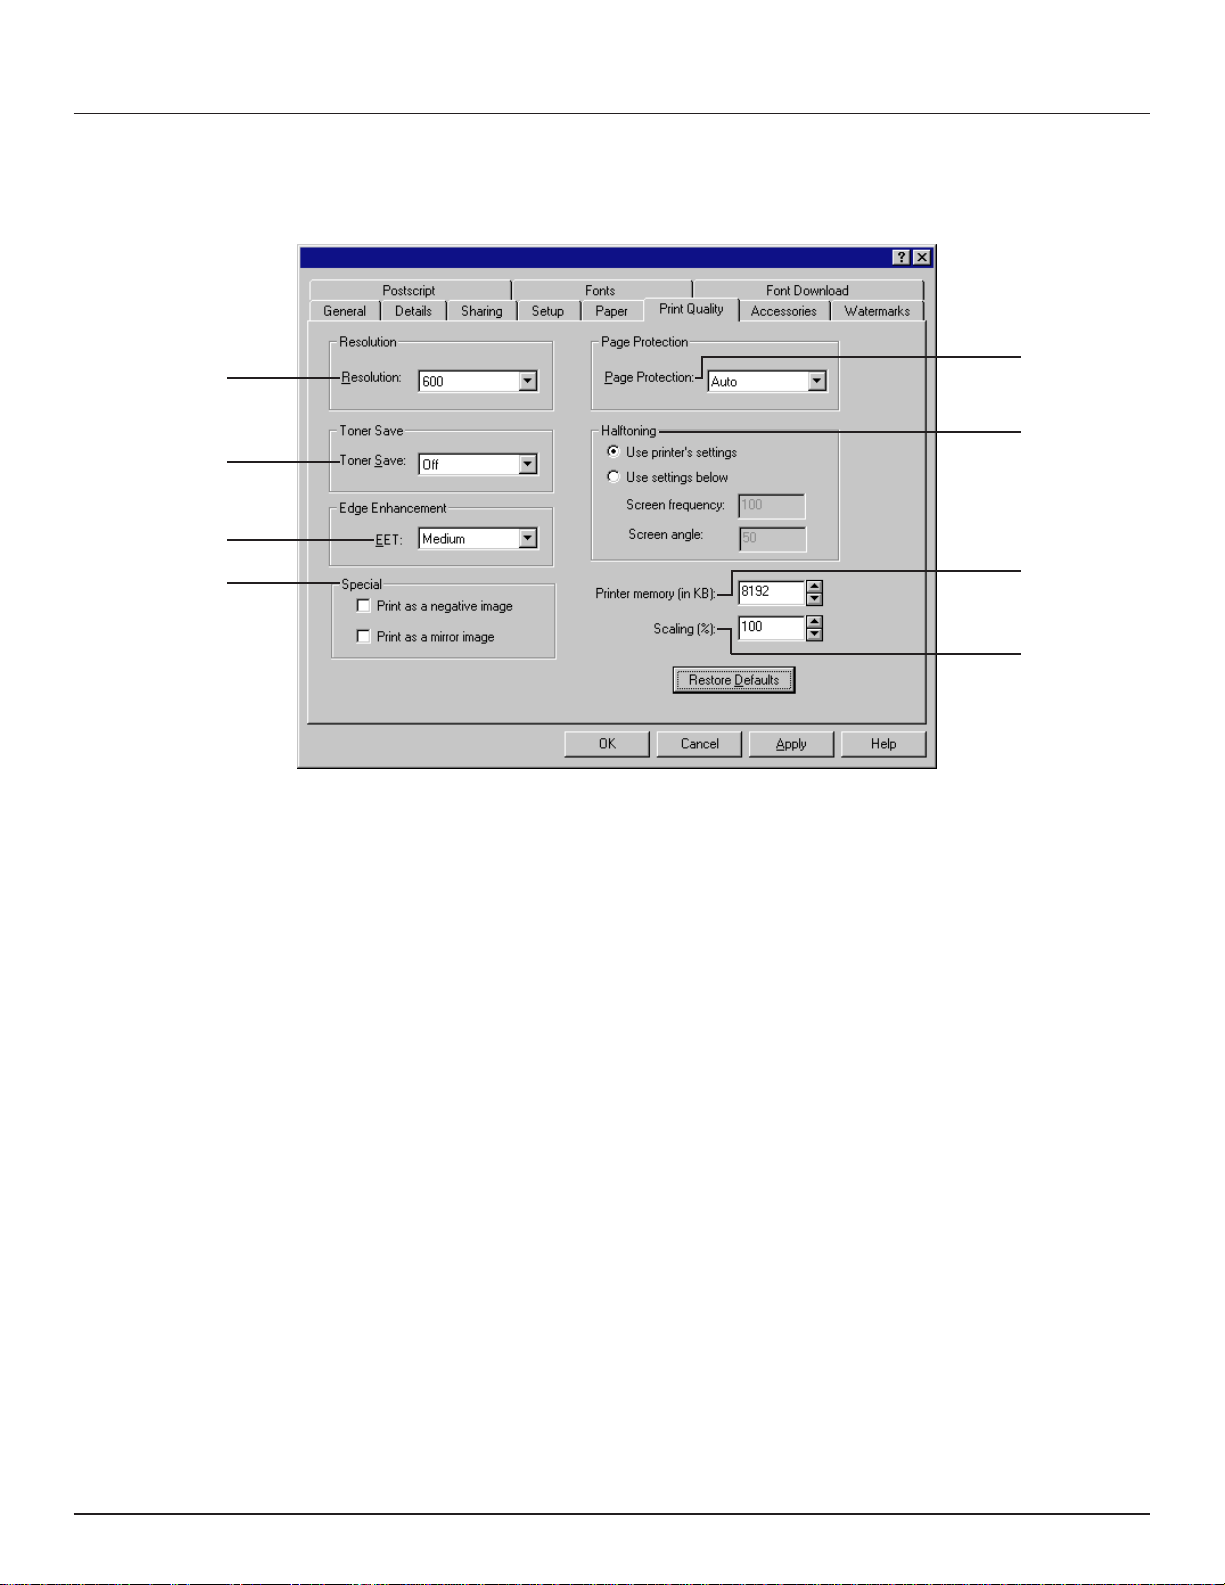
Booklet
The Booklet on
[XX]
options (wherein
[XX]
refers to the size of the paper
to be printed onto) enable the printing of 2 pages of a document onto one
side of a single sheet of paper, or the printing of 4 pages onto a single
sheet of paper using Duplex printing.
If 4 pages are to printed, the resulting print will look like that in illustration
A
, and if 8 or more pages are to printed, the resulting prints will look like
that in illustration B.
* If the orientation or size of a page within a single file is different from the
previous page, print out will be accomplished WITHOUT a blank page.
B
4 pages per sheet: The reduced images of 4 full pages will be printed
out onto a single sheet of paper.
* If the orientation or size of a page within a single file is different from the
previous page, the image of that next page – and successive pages –
will be printed out onto the next piece of paper.
A
B
A
B
Page 8
-6-
1. Printer Drivers for Windows 95
1-4
Paper
tab
A
Paper Size field: Displays the currently selected paper (or envelope)
size. To change the current setting, click on the arrow (▼) to display a
drop-down list of selections available for this field, and then choose
from that list.
* The acceptable sizes of paper that can be used with this printer is
A3, A4, A5, A6, B4, B5, B6, Folio, 11" x 17", 8 1/2" x 14", 8 1/2" x 11"
and 5 1/2" x 8 1/2". The acceptable sizes of envelopes are COM-10,
Monarch, DL and C5.
* When printing onto paper or envelopes of a size other than those
sizes noted above, select Custom Size in the drop-down list and
click on Custom…. Then enter the desired width of the paper or
envelope (metric: 98.4 mm - 297 mm; inches: 3.88" - 11.69") and
length (metric: 148 mm - 431.8 mm; inches: 5.83" - 17") in the
corresponding dialog box.
* The size selected within the application in use will take priority over
the size setting made here.
* BE SURE to select a size of paper or envelope that is already loaded
or set in the printer. If printing is attempted onto a size of paper or
envelope that is not loaded or set in the printer, an error will occur.
B
Paper Source field: Displays the currently selected location from
which paper will be fed. Click on the arrow (▼) to display a drop-down
list, and then choose from that list the desired paper feed source.
Select Auto to have the printer automatically select an appropriate
paper feed source.
* The setting made within the application in use will take priority over
the setting made here. If print out is not as expected, check the
setting made within the application in use.
C
Paper Type field: Displays the type of paper currently selected for
print out. If that type of paper is loaded in the printer, printout will be
accomplished onto that paper. Click on the arrow (▼) to display a
drop-down list, and then choose from that list the desired type of
paper: Plain, Special, Transparency or Other.
* If you select Transparency, the transparencies must be fed from the
optional multi-bypass and the resulting prints will be ejected onto the
copy store section. If the optional multi-bypass is not installed on the
printer, the Transparency setting will not be available.
D
Paper Destination field: Displays the currently selected destination for
paper to be ejected. Click on the arrow (▼) to display a drop-down list,
and then choose from that list the desired destination.
* If the optional Finisher or Mailbox Unit are not installed on the printer,
the Paper Destination setting will not be available.
E
Cover Mode field: Displays the currently selected setting for the Cover
Mode which feeds cover pages from the multi-bypass. Click on the
arrow (▼) to display a drop-down list, and then choose from that list
the desired setting:
• FrontPRINT: A front cover page will be fed and printing will be
accomplished onto the front side only.
• Front2Sided: A front cover page will be fed and printing will be
accomplished onto the front AND back sides of that page.
• FrontNONPRINT: A front cover page will be fed and that page will
be left blank.
• FrontPRINT/BackNONPRINT: A front AND rear cover page will be
fed and printing will be accomplished onto the front side of the front
page but the rear page will be left blank.
• Front2Sided/BackNONPRINT: A front AND rear cover page will be
fed and printing will be accomplished onto the front AND back sides
of the front page but the rear page will be left blank.
• FrontNONPRINT/BackNONPRINT: A front AND rear cover page will
be fed and both pages will be left blank.
* If the optional Duplex Unit is not installed in the printer, the 2-sided
(duplex) printing settings will not be available.
F
Fit to Paper field: Displays the currently selected setting for having the
image of the document to be printed adjusted to fit the size of the
paper to be printed onto. Click on the arrow (▼) at the right of the field
to display a drop-down list, and then choose from that list the desired
paper size. (This field is NOT available in the PCL5e Printer Driver.)
• The following button is only available in the PS Printer Driver.
Unprintable Area button: Click to open the Unprintable Area dialog
box in order to set the desired margins for the top, bottom, left and right
sides of the printed page. (This button is only available in the PS Printer
Driver.) The available margin settings are:
Top/Bottom - metric: 4.3 mm - 74 mm; inches: 0.17" - 2.91"
Left/Right - metric: 4.3 mm - 49.2 mm; inches: 0.17" - 1.94"
A
B
C
D
E
F
Page 9
-7-
1. Printer Drivers for Windows 95
1-5
Print Quality
tab
(For the PCL5e and PCL6 Printer Drivers)
A
Graphics Mode field: Displays the currently selected method of
sending graphics data from your computer to the printer. Click on the
arrow (▼) to display a drop-down list, and then choose from that list
the desired setting.
• Vector: Sends graphics data to the printer as a mixture of HP-GL/2
and raster images. If this option is selected, data will be sent to the
printer and printing will be accomplished faster than with the Raster
option but image quality will be lowered.
• Raster: Sends graphics data to the printer as raster images.
* It is not possible to send graphics data only as HP-GL/2 images.
If HP-GL/2 images do not print as they appear on your computer
screen when you use the Vector option, change this setting to the
Raster option and try to print again.
B
Dithering field: Displays currently selected dithering setting. (This field
is NOT available in the PCL6 Printer Driver.)
• Photo Images: Select this option for the smoothest reproduction of
photographs, etc.
• Line Art Images: Select this option when printing documents that
contain thin or detailed lines in order to reproduce the clearest
contrast between lines and shading.
• Scanned Images: Select this option to get improved results from
scanned images.
C
TrueType Mode field: Click on the arrow (▼) to display a drop-down
list, and then choose from that list the desired printing option in regard
to fonts.
• Download As Outlines: Select in order to print as quickly as
possible.
• Download As Bitmaps: Select in order to print the document just as
it appears on your computer screen. Printing speed will be
decreased somewhat.
• Print as Graphics: Select when there are graphics or non-repetitive
text in the documents to be printed. Select this option as well when
the document contains graphics overlaid onto text.
* This option is only available when Raster is selected in the
Graphics Mode field.
D
Use Printer TrueType Font check box: Enables selection of whether
to use the fonts installed in the printer or to have the font data
downloaded to the printer.
> If this box is NOT checked, print out will be accomplished basically
as it appears on your computer screen.
> If this box IS checked, the printer will use its installed fonts and – as
long as it has the appropriate fonts – it will not download any other
font data. This option will use less memory in the printer and this will
result in faster printing.
E
Page Protection field: Displays whether or not a portion of the
printer’s memory has been designated for printing documents that
contain both text and graphics. This option enables the printer to
create an image of the entire page in memory BEFORE paper is fed
into the printer. This ensures that the entire page will be printed and
helps prevent print overrun errors.
It is normally recommended that this setting be left on Auto. On the
other hand, if you experience difficulty with printing documents such as
those that contain complex graphics, it is recommended that On be
selected. However, selecting On will use more memory in the printer.
F
Resolution field: Displays the currently selected printing resolution 600 dpi or 300 dpi. It is normally recommended that this setting be left
on 600 dpi, the highest resolution.
G
Toner Save field: Depending upon the setting made here, toner use
can be reduced. It is recommended that this setting be utilized when
printing documents that contain only text. Click on the arrow (▼) to
display a drop-down list, and then choose from that list the desired
setting: Light, Medium, Dark or Off.
H
EET field: Displays the currently selected setting for edge
enhancement which enables the clearest reproduction of edges and
curves when printing text and graphics. Click on the arrow (▼) to
display a drop-down list, and then choose from that list the desired
setting: Light, Medium, Dark or Off.
A
B
C
D
E
F
G
H
Page 10
-8-
1. Printer Drivers for Windows 95
(For the PS Printer Drivers)
A
Resolution field: Displays the currently selected printing resolution 600 dpi or 300 dpi. It is normally recommended that this setting be left
on 600 dpi, the highest resolution.
B
Toner Save field: Depending upon the setting made here, toner use
can be reduced. It is recommended that this setting be utilized when
printing documents that contain only text. Click on the arrow (▼) to
display a drop-down list, and then choose from that list the desired
setting: Light, Medium, Dark or Off.
C
EET field: Displays the currently selected setting for edge
enhancement which enables the clearest reproduction of edges and
curves when printing text and graphics. Click on the arrow (▼) to
display a drop-down list, and then choose from that list the desired
setting: Light, Medium, Dark or Off.
D
Special check boxes: Place a check in the appropriate check box in
order to print a negative or a mirror image of the document.
• Print as a negative image: Prints a negative image of the
document. This option is useful for black-and-white or coarse RGB
images.
• Print as a mirror image: Prints a mirror image of the document.
E
Page Protection field: Displays whether or not a portion of the
printer’s memory has been designated for printing documents that
contain both text and graphics. This option enables the printer to
create an image of the entire page in memory BEFORE paper is fed
into the printer. This ensures that the entire page will be printed and
helps prevent print overrun errors.
It is normally recommended that this setting be left on Auto. On the
other hand, if you experience difficulty with printing documents such as
those that contain complex graphics, it is recommended that On be
selected. However, selecting On will use more memory in the printer.
F
Halftoning radio buttons: Enable selection of the number of lines per
inch (frequency) and angle of the pattern for halftone screens. Adjust
the setting if such irregularities such as moire patterns appear when
printing photographs or complex images.
* Depending upon the application in use, this setting may not be
effective.
G
Printer memory field: Displays the currently selected size of the
printer memory. The Printer Driver uses this setting when sending
information such as font data to the printer. The desired memory size
can be selected by typing it directly into this field or by clicking on the
(▼, ▲) arrows.
H
Scaling field: Displays the currently selected magnification ratio
(25% - 400%). The desired magnification can be selected by typing it
directly into this field or clicking on the (▼, ▲) arrows.
* If your application provides a scaling feature, adjust the scaling in the
application rather than in this Printer Driver.
A
B
C
D
H
G
F
E
Page 11
-9-
1. Printer Drivers for Windows 95
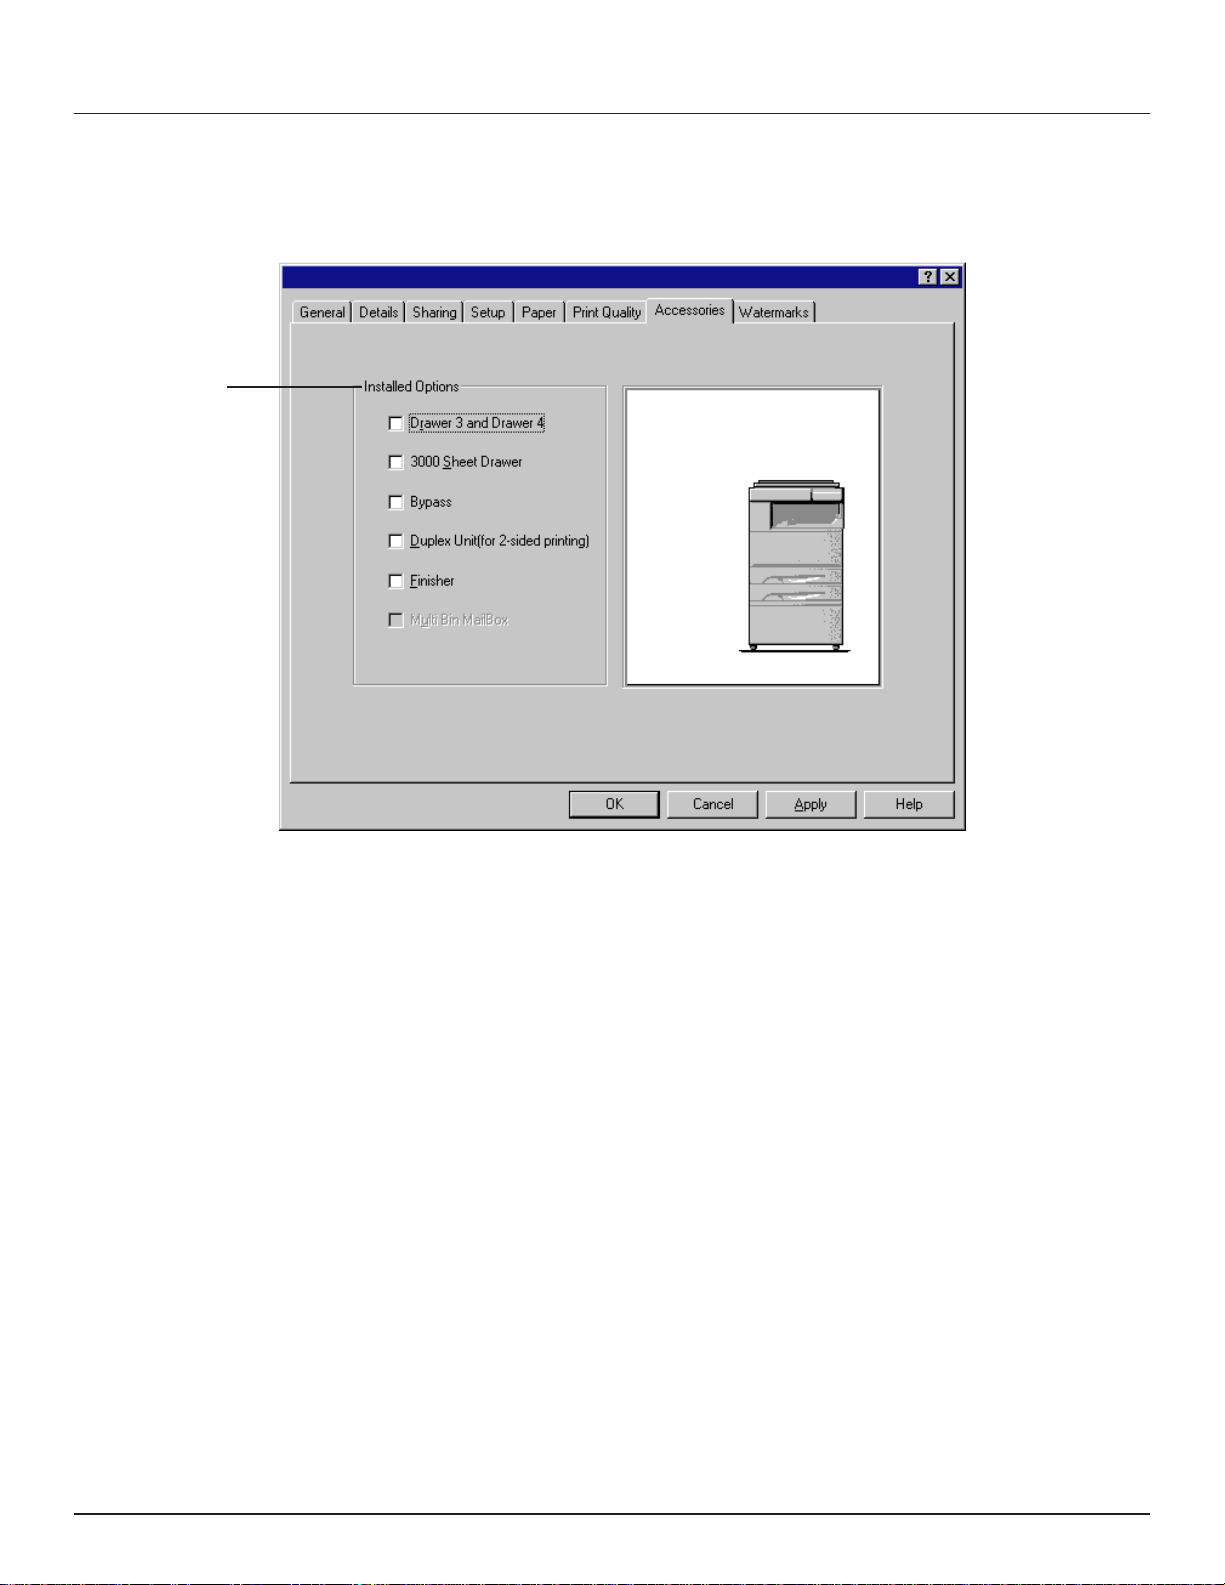
1-6
Accessories
tab
A
Installed Options check boxes: Enable selection of those optional accessories that are installed in and on the printer.
Note: If you do not select the appropriate installed accessories here, the corresponding settings and options in the various
tabs of the Properties dialog box will not be available. For example, if the optional Duplex Unit IS installed but the Duplex
Unit check box is left unchecked, Duplex printing will not be possible.
A
Page 12
-10-
1. Printer Drivers for Windows 95
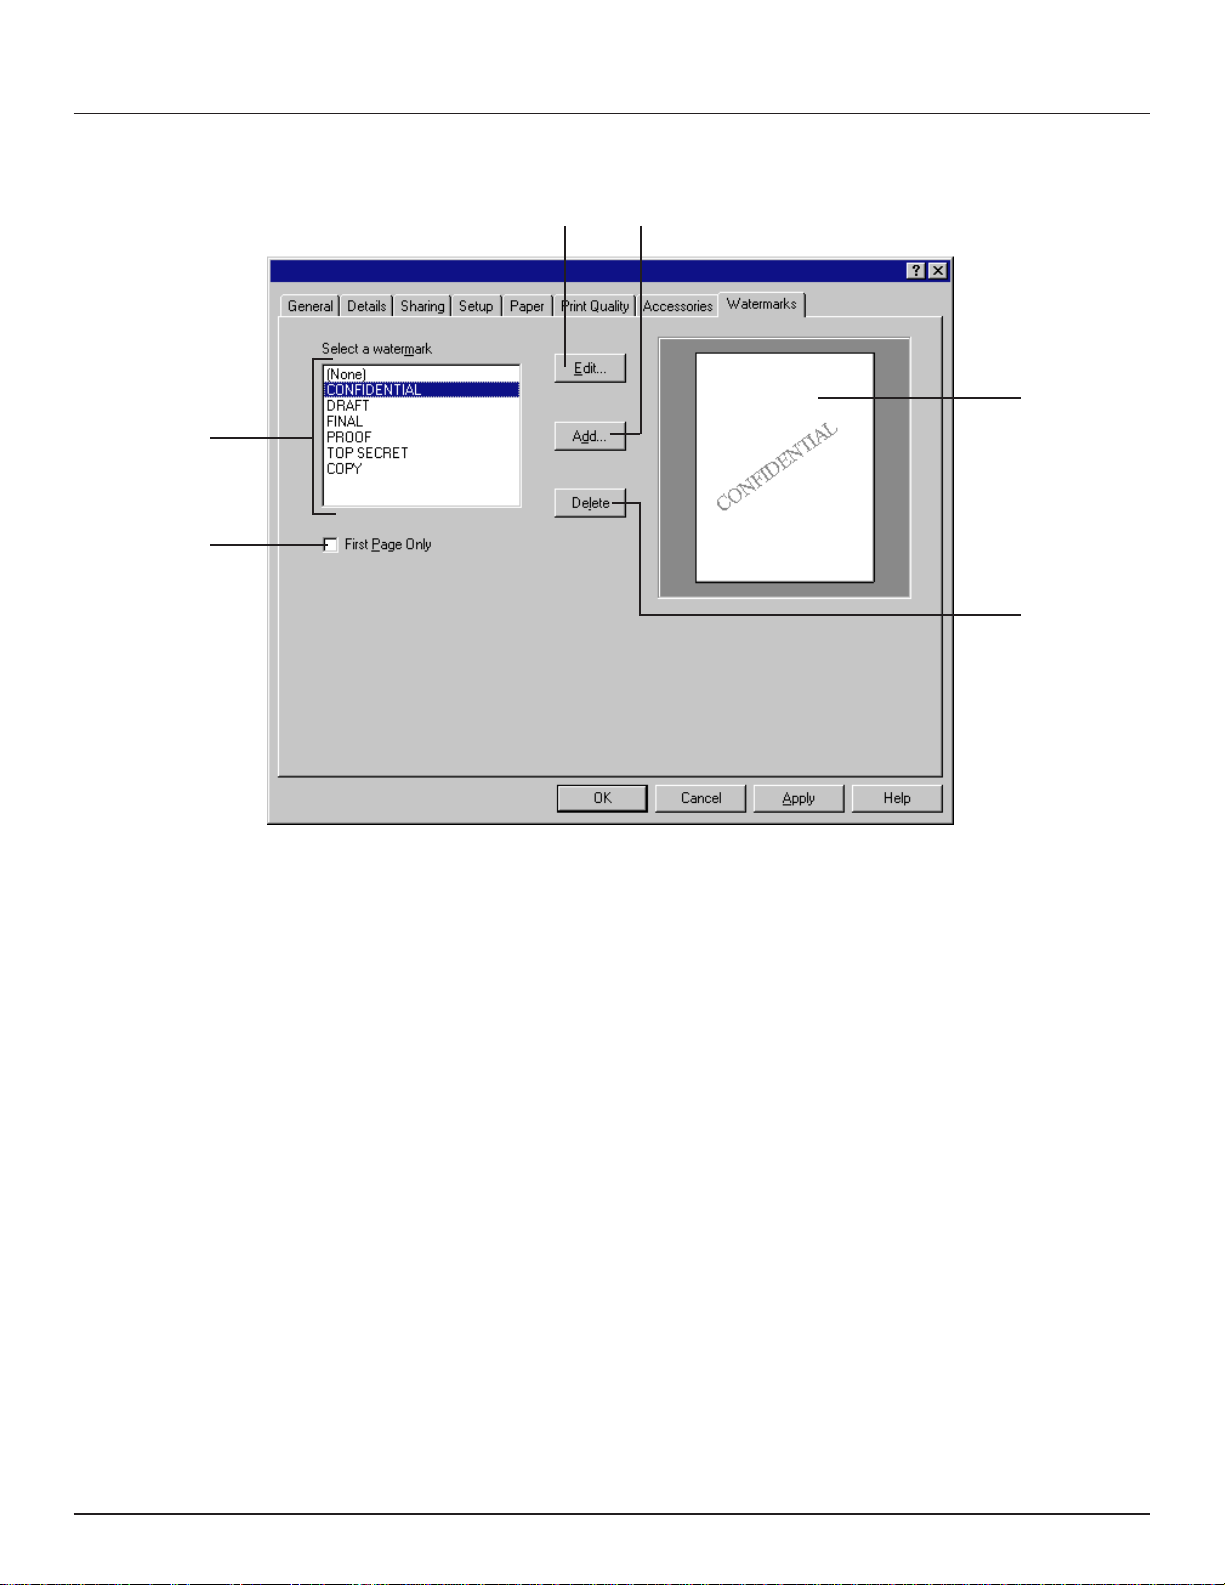
1-7
Watermarks
tab
The Watermarks tab allows you to have desired text printed in the background behind graphics, etc. This text may indicate that
the document is “Confidential” or indicate some other special message. You may select from among the text that is pre-registered
in the printer or create your own watermark text. The darkness and size of each watermark can be adjusted as well.
A
Select a watermark list: Lists text registered to be printed out as a watermark. Click on the desired text to select it.
B
Edit... button: Click to edit the watermark that is currently selected in the Select a watermark list. A dialog box that will allow
you to edit that watermark will be displayed. Refer to “●Dialog box for adding or editing watermarks”, page 11, for more
detailed information on editing watermarks.
C
Add... button: Click to add new text to be used as a watermark. A dialog box that will allow you to add a new watermark will be
displayed. Refer to “●Dialog box for adding or editing watermarks”, page 11, for more detailed information on adding
watermarks.
D
Delete button: Click to delete the watermark that is currently selected in the Select a watermark list.
E
First Page Only check box: Place a check in this check box in order to have the selected watermark printed out only on the
first page of the documents.
F
Sample image: Displays how the selected watermark will appear on the document to be printed.
A
E
BC
F
D
Page 13
-11-
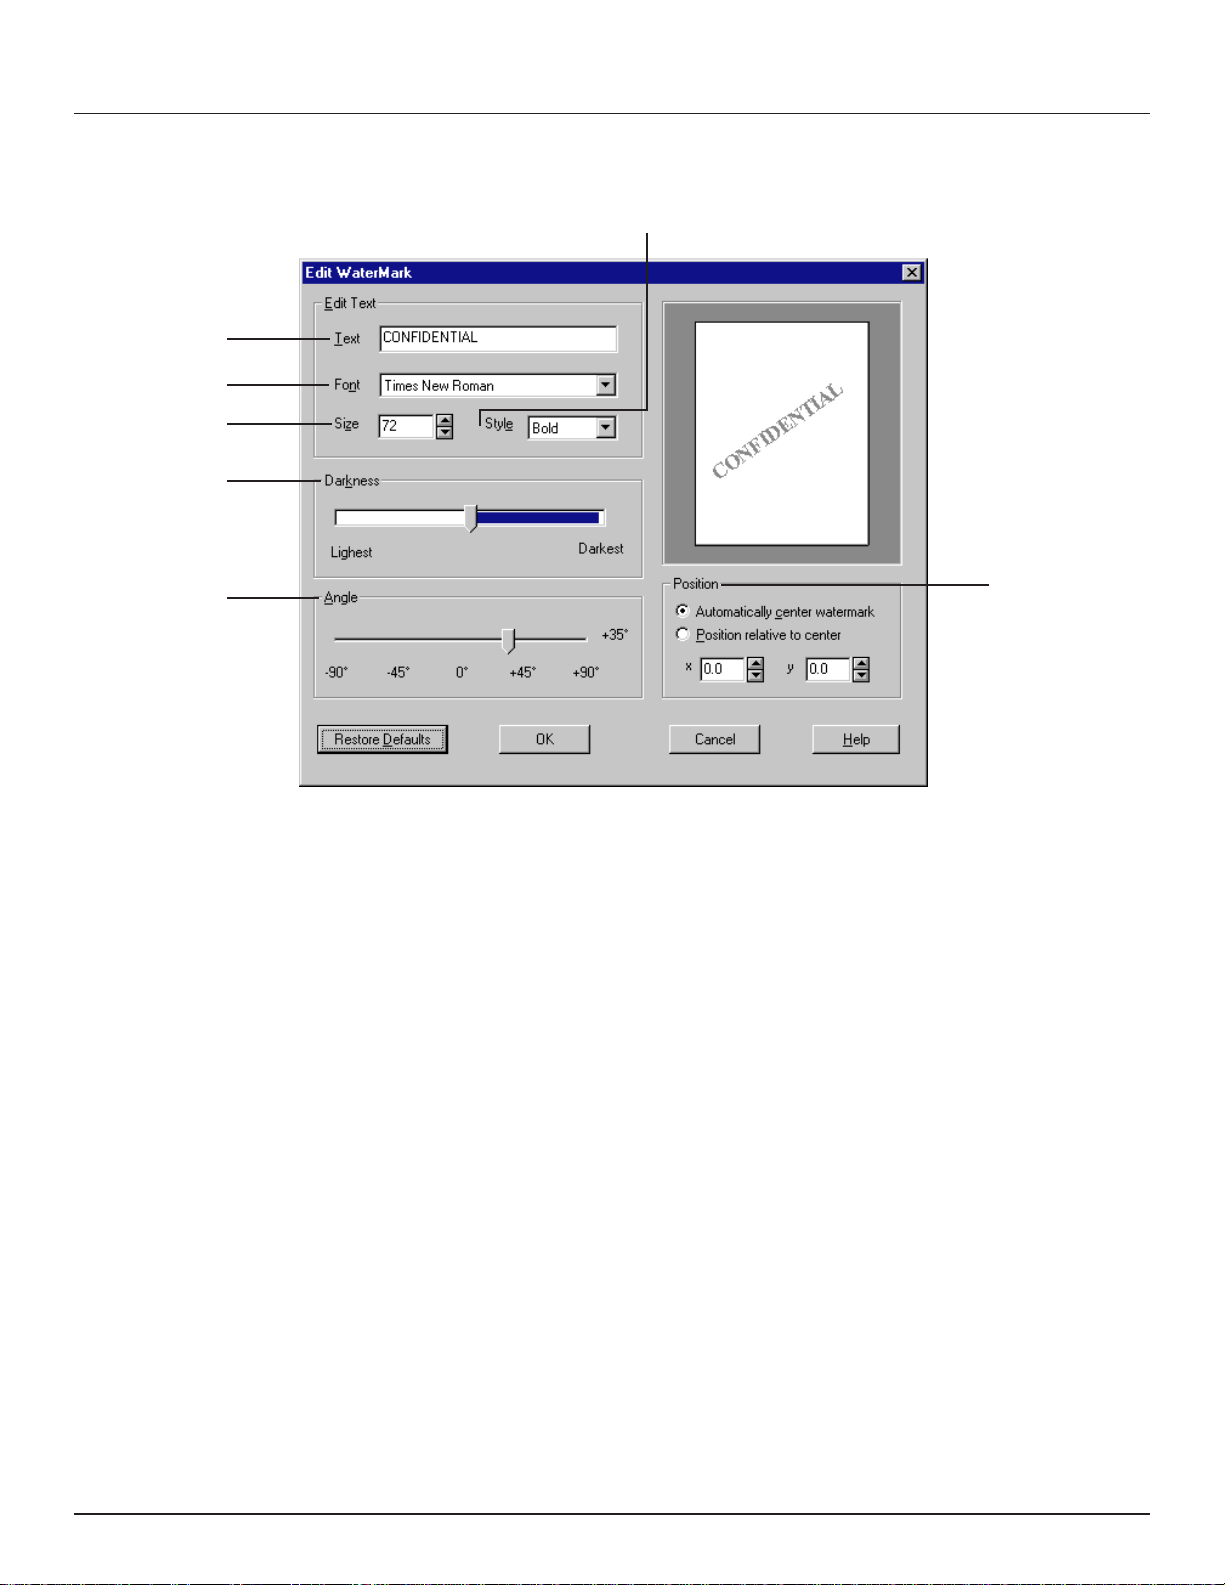
1. Printer Drivers for Windows 95
●
Dialog box for adding or editing watermarks
G
Text field: Whether editing existing text or creating a new watermark, type the desired text to be used as the watermark in this
field.
H
Font field: Click on the arrow (▼) to display a drop-down list, and then choose from that list the desired font.
I
Size field: Displays the selected point size of the font. The desired size can be selected by clicking on the (▼, ▲) arrows.
J
Style field: Click on the arrow (▼) to display a list of available font styles, and then choose from that list the desired style:
Bold, Italic or Regular.
K
Darkness: Drag the scroll bar slider to change the darkness of the text to that desired.
L
Angle: Drag the scroll bar slider to change the angle of the text to that desired.
M
Position radio buttons: Enable selection of the location of the watermark on the document page.
• Automatically center watermark: Select this radio button in order to have the watermark text automatically centered on the
document.
• Position relative to center: Select this radio button in order to adjust the location of the watermark on the document page.
The desired location can be selected by typing the desired values directly into the corresponding fields (x, y) or by clicking on
the (▼, ▲) arrows at the right of each field.
G
J
H
I
K
L
M
Page 14

-12-
1. Printer Drivers for Windows 95
1-8
Postscript
tab (for PS Printer Driver only)
A
Postscript output format field: Displays the currently selected
PostScript file format. Click on the arrow (▼) to display a list of
available file formats, and then choose from that list the desired
format:
• PostScript (optimize for speed): This is the standard setting.
• PostScript (optimize for portability-ADSC): Select this option in
order to create a file that complies with the Adobe Document
Structuring Conventions (ADSC). Each page of your document will
be saved as an individual file. This setting is useful when your
computer and printer communicate through a print spooler.
• Encapsulated PostScript (EPS): Select this option in order to
enable the displayed page to be added to and then print from, for
example, a document created in another program.
B
Postscript header radio buttons: Enable selection of whether or not
header information will be sent to the printer each time a document is
printed. If this printer is being used as a local printer, having the
header information sent to the printer only once will save printing time.
However, it is recommended that for normal print jobs – and especially
when this printer is being used as a network printer – the header be
downloaded with each print job.
* This setting is ignored with EPS and Archive files.
C
Send Header Now… button: Click to immediately send the PostScript
header to the printer where it will be retained until the printer is turned
off. Once this button is clicked, the Printer Driver will automatically
select the Assume header is downloaded and retained option under
Postscript header.
D
Job timeout field: Displays the currently selected time (in seconds)
that the printer – after receiving data from the computer for one page –
will wait for the data for the next page before it cancels the print job.
Change the time to that desired by typing it directly into this field or by
clicking on the (▼, ▲) arrows. Enter “0” here if you do not want the
print job to be canceled in this manner. However, DO NOT enter “0” if
you are using the printer over a network.
E
Wait timeout field: Displays the currently selected time (in seconds)
that the printer will wait to receive the next batch of data related to any
individual page from the computer before it cancels a print job.
Change the time to that desired by typing it directly into this field or by
clicking on the (▼, ▲) arrows. Enter “0” here if you do not want the
print job to be canceled in this manner. However, DO NOT enter “0” if
you are using the printer over a network.
F
Bitmap Compress radio buttons: Enable selection of whether or not
to have graphics compressed before being sent to the printer.
• Compress bitmap images: Select this radio button when you are
using PostScript Level 1 or Level 2 with the printer connected to a
serial port.
• No bitmap compression: Select this radio button when you are
using PostScript Level 1 with the printer connected to a parallel port
or being used over a network.
G
Print PostScript error information check box: Enables selection of
whether or not to have an error report printed out whenever a printing
error occurs. The PostScript Printer Driver can detect certain errors
that occur when printing from Windows. Place a check in this check
box if you are having trouble printing.
H
Send CTRL+D before job check box: Enables selection of whether or
not to send a CTRL+D command in order to notify the printer that the
current print job is complete and to reset the printer. Place a check in
this check box to have the command sent.
I
Send CTRL+D after job check box: Enables selection of whether or
not the Printer Driver will display an alert message if a running
application might be incompatible with some features of the driver.
Place a check in this check box to have the alert message displayed.
A
B
D
E
G
H
I
C
F
Page 15

-13-
1. Printer Drivers for Windows 95
1-9
Fonts
tab (for PS Printer Driver only)
A
Send TrueType fonts to printer according to the font Substitution Table radio button: It is possible to use the
Substitution dialog box to instruct the Printer Driver which PostScript printer fonts to use in place of which TrueType fonts.
If this radio button is selected, ALL TrueType fonts will be replaced by PostScript printer fonts as specified in that dialog box
and this will result in faster printing. To select which printer fonts to use in place of which TrueType fonts, click on Edit the
Table… and refer to “2Substitution dialog box”, page 15.
By default, each TrueType font will be replaced by the printer font that resembles it most, but, when there is no similar
PostScript font, the TrueType font will be sent to the printer in the format specified in the Send TrueType fonts as field of the
Send Fonts As… dialog box. To open the Send Fonts As… dialog box, click on Send Fonts As… and refer to “1Send
Fonts As… dialog box”, page 14.
* If the wrong printer font is selected for any TrueType font, the printed document will not appear as it does on your computer
screen.
B
Always use built-in printer fonts instead of TrueType fonts radio button: If this radio button is selected, the Printer Driver
will ignore the settings made in the Substitution dialog box and will use standard font-matching rules to find the best
PostScript printer fonts to use in place of the TrueType fonts in the document. In this case, no TrueType fonts will be sent to
the printer. This will result in faster printing, but printed text will not appear as it does on your computer screen.
C
Always use TrueType fonts radio button: If this radio button is selected, any TrueType fonts in the document will be sent to
the printer. In this case, printed text will appear just as it does on your computer screen, but printing time will be increased.
TrueType fonts will be sent to the printer in the format specified in the Send TrueType fonts as field of the Send Fonts As…
dialog box. To open the Send Fonts As… dialog box, click on Send Fonts As….
A
B
C
Page 16

-14-
1. Printer Drivers for Windows 95
11
Send Fonts As…
dialog box
A
Send TrueType fonts as field: Displays the currently selected format in which those TrueType fonts that are not replaced by
PostScript fonts will be sent to the printer. Click on the arrow (▼) to display a drop-down list, and then choose from that list the
desired setting:
• Outlines: This option will send outlines, most appropriate for larger point sizes. (However, all smaller point sizes will
automatically be sent as bitmap data.)
• Bitmaps: This option will send bitmaps, most appropriate for smaller point sizes.
• Don’t Send: If this option is selected, no TrueType fonts will be sent to the printer. This option is most appropriate when
sending data to the printer through a print spooler.
B
Threshold size field: Displays the size of the font (in pixels) at which the Printer Driver should switch from sending a TrueType
font as an outline to sending it as bitmap data. The most effective size to enter here will vary depending upon the complexity of
the font. For example, at 600 dpi it is more effective to send TrueType fonts as outlines when non-ornamental fonts are about
14 points or larger. Enter “0” here if you ALWAYS want outline fonts to be sent.
C
Favor system TrueType fonts over printer fonts check box: Enables selection of whether to use system TrueType fonts instead
of PostScript printer fonts when the same font is found in both the computer and the printer. Using printer fonts will result in
faster printing, but printed text will not appear as it does on your computer screen.
D
Send PostScript fonts as field: Displays the currently selected format in which those TrueType fonts that are not replaced by
PostScript fonts will be sent to the printer. Click on the arrow (▼) to display a drop-down list, and then choose from that list the
desired setting:
• In Native Format: This option will send the PostScript font data to the printer before printing.
• Don’t Send: If this option is selected, no font data will be sent to the printer. This option is most appropriate when sending
data to the printer through a print spooler.
A
B
C
D
Page 17

-15-
1. Printer Drivers for Windows 95
22
Substitution
dialog box
In the For TrueType Font list, select the TrueType font to be replaced
and, in the Use Printer Font list, select the PostScript printer font to
replace it with. Then click OK.
1-10
Font Download
tab (for PS Printer Driver only)
A
New Soft Font Directory field: Type in the path of the directory that
contains the new font data.
B
New Soft Font list: Lists the names of the fonts contained in the
directory that was entered in the New Soft Font Directory field.
C
Installed Soft Fonts list: Lists those fonts in the New Soft Font list
that are actually selected for installation.
D
Open button: Click to display – in the New Soft Font list – the names
of the fonts contained in the directory that was entered in the New
Soft Font Directory field.
E
Add button: Click to have the font that is currently selected in the New
Soft Font list listed in the Installed Soft Fonts list.
F
Delete button: Click to delete the currently selected font from the
Installed Soft Fonts list.
G
Begin Download Fonts button: Click to have the fonts listed in the
Installed Soft Fonts list downloaded to the printer’s hard disk.
A
B
D
E
G
F
C
Page 18

-16-
2. Printer Drivers for Windows NT 4.0
This section contains explanations on the basic functions of the Printer Drivers supplied for this printer when operating under
Windows NT 4.0. These explanations were written with the assumption that the desired Printer Driver has already been installed
in your computer.
* There are 3 PDLs (Printer Description Languages) compatible for use with this printer: PCL5e, PCL6 and PS, and each has its
own Printer Driver. Thus, depending upon which PDL you are actually using, the explanations, settings and in the illustrations
shown in this manual may differ slightly from what will actually appear on your computer screen.
2-1 Opening the
Properties
dialog box
1. Start up Windows NT 4.0.
2. Click on Start in the Task Bar. The Start menu will be displayed.
3. Use the mouse to point to Settings and click on Printers in the submenu that is displayed. The Printers folder will open.
4. Use the right mouse button to click on the icon that corresponds to both this printer and the appropriate PDL. A pop-up menu
will be displayed.
5. Click on Document Defaults… in the pop-up menu. The Properties dialog box will be displayed.
Page 19

-17-
2. Printer Drivers for Windows NT 4.0
2-2
Properties
dialog box
A
Tabs: Click on a tab to display its contents.
B
Arrow [▼]: Click to display a list of selections available for that field.
C
Field: Displays the currently selected setting. If the cursor ( | ) is displayed within the field, characters and numerals can be
entered directly into that field.
D
Drop-down list: Displays a list of selections available for a specific field when the arrow (▼) at the right of that field is clicked.
E
About button: Click to display information for this Printer Driver such as its name and version number.
F
Restore Defaults button: Click to reset all settings back to their factory default values.
G
OK button: Click to close the Properties dialog box and save all of the currently selected settings.
H
Cancel button: Click to close the Properties dialog box without changing any of the previous settings.
I
Help button: Click for more detailed information on something you don’t understand regarding the Properties dialog box.
(This button is NOT available in the PCL5e and PCL6 Printer Drivers.)
A
C
B
D
E
F
I
HG
Page 20

-18-
2. Printer Drivers for Windows NT 4.0
2-3
Setup
tab
A
Copies field: Displays the selected number of prints to be made (1 -
999). The desired number can be selected by typing it directly into this
field or by clicking on the (▼, ▲) arrows.
B
Multiple copies radio buttons: Select the On radio button in order to
collate multiple sets of printed documents.
C
Shift mode radio buttons: Select the On radio button when the
optional Finisher is installed on the printer to have each successive set
of printed documents shifted slightly from the previous one when
ejected.
D
Stapling radio buttons: Select the On radio button when the optional
Finisher is installed on the printer in order to staple each set of printed
documents.
* Stapling is only available when using 11" x 17", 8 1/2" x 14", 8 1/2" x
11", A3 or A4 size paper.
* To staple prints, the On radio button under Collate at Printer should
be selected and the number of prints to be made should be set to 2
or more.
* If the Stapling options are not available even though the optional
Finisher is installed on the printer, perform the appropriate setting in
the Accessories tab. (Refer to page 23.)
E
Orientation field: Displays the selected orientation of the printed
documents: Portrait (length-wise) or Landscape (width-wise).
F
1 or 2-Sided Printing radio buttons: When the optional Duplex Unit is
installed in the printer, the following options are available:
• 1-Sided: Duplex printing will NOT be accomplished.
• Flip on long edge: Select this radio button in order to have the
paper turned over by its longer edge during Duplex printing.
• Flip on short edge: Select this radio button in order to have the
paper turned over by its shorter edge during Duplex printing.
* If the 1 or 2-sided Printing options are not available even though
the optional Duplex Unit is installed on the printer, perform the
appropriate setting in the Accessories tab. (Refer to page 23.)
> If the Portrait option is selected in the Orientation field, Duplex
printing will be accomplished with the resulting 2-sided documents
looking like that in books, magazines and the like.
> If the Landscape option is selected in the Orientation field, Duplex
printing will be accomplished with the resulting 2-sided documents
looking like that in calendars and the like.
G
Layout list: Displays the available N-up (thumbnails) and Booklet
layout options.
• The N-Up (thumbnails) layout options enable you to print out the
reduced images of either 2 or 4 full pages onto a single sheet of
paper. For more detailed information, refer to “1N-Up
(thumbnails)”, page 19.
• The Booklet layout options enable open-face and duplex (2-sided)
printing during the same print job to allow printing of pamphlets,
magazines and the like by simply stacking and folding the resulting
prints. For more detailed information, refer to “2Booklet”, page 19.
(The Booklet layout options are only available in the PCL6 Printer
Driver and only when the optional Duplex Unit is installed in the
printer.)
* Print Page Borders check box: Place a check in this check box in
order to have a border line drawn between each page.
H
Paper Entry radio buttons: Enable selection of the location where
stapling will occur when the optional Finisher is installed on the printer
and the Stapling setting is turned On. Select the Long radio button to
staple the long edge of the documents and the Short radio button to
staple the short edge.
A
B
C
D
E
F
G
H
Page 21

-19-
2. Printer Drivers for Windows NT 4.0
11
N-Up (thumbnails)
A
2 page per sheet: The reduced images of 2 full pages will be printed
out onto a single sheet of paper.
* If the orientation or size of a page within a single file is different from the
previous page, the image of that next page – and successive pages –
will be printed out onto the next piece of paper.
B
4 page per sheet: The reduced images of 4 full pages will be printed
out onto a single sheet of paper.
* If the orientation or size of a page within a single file is different from the
previous page, the image of that next page – and successive pages –
will be printed out onto the next piece of paper.
A
B
A
B
22
Booklet
The Booklet on
[XX]
options (wherein
[XX]
refers to the size of the paper
to be printed onto) enable the printing of 2 pages of a document onto one
side of a single sheet of paper, or the printing of 4 pages onto a single
sheet of paper using Duplex printing.
If 4 pages are to printed, the resulting print will look like that in illustration
A
, and if 8 or more pages are to printed, the resulting prints will look like
that in illustration B.
* If the orientation or size of a page within a single file is different from the
previous page, print out will be accomplished WITHOUT a blank page.
Page 22

-20-
2. Printer Drivers for Windows NT 4.0
2-4
Paper
tab
A
Paper Size field: Displays the currently selected paper (or envelope)
size. To change the current setting, click on the arrow (▼) to display a
drop-down list of selections available for this field, and then choose
from that list.
* The acceptable sizes of paper that can be used with this printer is
A3, A4, A5, A6, B4, B5, B6, Folio, 11" x 17", 8 1/2" x 14", 8 1/2" x 11"
and 5 1/2" x 8 1/2". The acceptable sizes of envelopes are COM-10,
Monarch, DL and C5.
* When printing onto paper or envelopes of a size other than those
sizes noted above, select Custom Size in the drop-down list and
click on Custom…. Then enter the desired width of the paper or
envelope(metric: 98.4 mm - 297 mm; inches: 3.88" - 11.69") and
length (metric: 148 mm - 431.8 mm; inches: 5.83" - 17") in the
corresponding dialog box.
* The size selected within the application in use will take priority over
the size setting made here.
* BE SURE to select a size of paper or envelope that is already loaded
or set in the printer. If printing is attempted onto a size of paper or
envelope that is not loaded or set in the printer, an error will occur.
B
Paper Source field: Displays the currently selected location from
which paper will be fed. Click on the arrow (▼) to display a drop-down
list, and then choose from that list the desired paper feed source.
Select Auto to have the printer automatically select an appropriate
paper feed source.
* The setting made within the application in use will take priority over
the setting made here. If print out is not as expected, check the
setting made within the application in use.
C
Paper Type field: Displays the type of paper currently selected for
print out. If that type of paper is loaded in the printer, printout will be
accomplished onto that paper. Click on the arrow (▼) to display a
drop-down list, and then choose from that list the desired type of
paper: Plain, Special, Transparency or Other.
* If you select Transparency, the transparencies must be fed from the
optional multi-bypass and the resulting prints will be ejected onto the
copy store section. If the optional multi-bypass is not installed on the
printer, the Transparency setting will not be available.
D
Paper Destination field: Displays the currently selected destination for
paper to be ejected. Click on the arrow (▼) to display a drop-down list,
and then choose from that list the desired destination.
* If the optional Finisher or Mailbox Unit are not installed on the printer,
the Paper Destination setting will not be available.
E
Cover Mode field: Displays the currently selected setting for the Cover
Mode which feeds cover pages from the multi-bypass. Click on the
arrow (▼) to display a drop-down list, and then choose from that list
the desired setting:
• FrontPRINT: A front cover page will be fed and printing will be
accomplished onto the front side only.
• Front2Sided: A front cover page will be fed and printing will be
accomplished onto the front AND back sides of that page.
• FrontNONPRINT: A front cover page will be fed and that page will be
left blank.
• FrontPRINT/BackNONPRINT: A front AND rear cover page will be
fed and printing will be accomplished onto the front side of the front
page but the rear page will be left blank.
• Front2Sided/BackNONPRINT: A front AND rear cover page will be
fed and printing will be accomplished onto the front AND back sides
of the front page but the rear page will be left blank.
• FrontNONPRINT/BackNONPRINT: A front AND rear cover page will
be fed and both pages will be left blank.
* If the optional Duplex Unit is not installed in the printer, the 2-sided
(duplex) printing settings will not be available.
F
Fit to Paper field: Displays the currently selected setting for having the
image of the document to be printed adjusted to fit the size of the
paper to be printed onto. Click on the arrow (▼) to display a drop-down
list, and then choose from that list the desired paper size. (This field is
NOT available in the PCL5e Printer Driver.)
• The following button is only available in the PS Printer Driver.
Unprintable Area button: Click to open the Unprintable Area dialog
box in order to set the desired margins for the top, bottom, left and right
sides of the printed page. The available margin settings are:
Top/Bottom - metric: 4.3 mm - 74 mm; inches: 0.17" - 2.91"
Left/Right - metric: 4.3 mm - 49.2 mm; inches: 0.17" - 1.94"
A
B
C
D
E
F
Page 23

-21-
2. Printer Drivers for Windows NT 4.0
2-5
Print Quality
tab
(For the PCL5e and PCL6 Printer Drivers)
A
Graphics Mode field: Displays the currently selected method of
sending graphics data from your computer to the printer. Click on the
arrow (▼) to display a drop-down list, and then choose from that list
the desired setting.
• Vector: Sends graphics data to the printer as a mixture of HP-GL/2
and raster images. If this option is selected, data will be sent to the
printer and printing will be accomplished faster than with the Raster
option but image quality will be lowered.
• Raster: Sends graphics data to the printer as raster images.
* It is not possible to send graphics data only as HP-GL/2 images.
If HP-GL/2 images do not print as they appear on your computer
screen when you use the Vector option, change this setting to the
Raster option and try to print again.
B
TrueType Mode field: Click on the arrow (▼) to display a drop-down
list, and then choose from that list the desired printing option in regard
to fonts.
• Download As Outlines: Select in order to print as quickly as
possible.
• Download As Bitmaps: Select in order to print the document just as
it appears on your computer screen. Printing speed will be
decreased somewhat.
• Print as Graphics: Select when there are graphics or non-repetitive
text in the documents to be printed. Select this option as well when
the document contains graphics overlaid onto text.
* This option is only available when Raster is selected in the
Graphics Mode field.
C
Use Printer TrueType Font check box: Enables selection of whether
to use the fonts installed in the printer or to have the font data
downloaded to the printer.
> If this box is NOT checked, print out will be accomplished basically
as it appears on your computer screen.
> If this box IS checked, the printer will use its installed fonts and – as
long as it has the appropriate fonts – it will not download any other
font data. This option will use less memory in the printer and this will
result in faster printing.
D
Page Protection field: Displays whether or not a portion of the
printer’s memory has been designated for printing documents that
contain both text and graphics. This option enables the printer to
create an image of the entire page in memory BEFORE paper is fed
into the printer. This ensures that the entire page will be printed and
helps prevent print overrun errors.
It is normally recommended that this setting be left on Auto. On the
other hand, if you experience difficulty with printing documents such
as those that contain complex graphics, it is recommended that On be
selected. However, selecting On will use more memory in the printer.
E
Resolution field: Displays the currently selected printing resolution 600 dpi or 300 dpi. It is normally recommended that this setting be left
on 600 dpi, the highest resolution.
F
Toner Save field: Depending upon the setting made here, toner use
can be reduced. It is recommended that this setting be utilized when
printing documents that contain only text. Click on the arrow (▼) to
display a drop-down list, and then choose from that list the desired
setting: Light, Medium, Dark or Off.
G
EET field: Displays the currently selected setting for edge
enhancement which enables the clearest reproduction of edges and
curves when printing text and graphics. Click on the arrow (▼) to
display a drop-down list, and then choose from that list the desired
setting: Light, Medium, Dark or Off.
A
E
F
G
B
C
D
Page 24

-22-
2. Printer Drivers for Windows NT 4.0
(For the PS Printer Drivers)
A
Page Protection field: Displays whether or not a portion of the
printer’s memory has been designated for printing documents that
contain both text and graphics. This option enables the printer to
create an image of the entire page in memory BEFORE paper is fed
into the printer. This ensures that the entire page will be printed and
helps prevent print overrun errors.
It is normally recommended that this setting be left on Auto. On the
other hand, if you experience difficulty with printing documents such as
those that contain complex graphics, it is recommended that On be
selected. However, selecting On will use more memory in the printer.
B
EET field: Displays the currently selected setting for edge
enhancement which enables the clearest reproduction of edges and
curves when printing text and graphics. Click on the arrow (▼) to
display a drop-down list, and then choose from that list the desired
setting: Light, Medium, Dark or Off.
C
Special check boxes: Place a check in the appropriate check box in
order to print a negative or a mirror image of the document.
• Print as a negative image: Prints a negative image of the
document. This option is useful for black-and-white or coarse RGB
images.
• Print as a mirror image: Prints a mirror image of the document.
D
Resolution field: Displays the currently selected printing resolution 600 dpi or 300 dpi. It is normally recommended that this setting be left
on 600 dpi, the highest resolution.
E
Toner Save field: Depending upon the setting made here, toner use
can be reduced. It is recommended that this setting be utilized when
printing documents that contain only text. Click on the arrow (▼) to
display a drop-down list, and then choose from that list the desired
setting: Light, Medium, Dark or Off.
F
Scaling field: Displays the currently selected magnification ratio
(25% - 400%). The desired magnification can be selected by typing it
directly into this field or clicking on the (▼, ▲) arrows.
* If your application provides a scaling feature, adjust the scaling in the
application rather than in this Printer Driver.
G
Halftone Color Adjustment… button: Click to open a related dialog
box. For more detailed information on that dialog box, refer to your
Windows NT Instruction Manual.
A
B
C
G
D
E
F
Page 25

-23-
2. Printer Drivers for Windows NT 4.0
2-6
Accessories
tab
A
Installed Options check boxes: Enable selection of those optional accessories that are installed in and on the printer.
Note: If you do not select the appropriate installed accessories here, the corresponding settings and options in the various
tabs of the Properties dialog box will not be available. For example, if the optional Duplex Unit IS installed but the Duplex
Unit (for 2-sided printer) check box is left unchecked, Duplex printing will not be possible.
A
Page 26

-24-
2. Printer Drivers for Windows NT 4.0
2-7
Watermarks
tab
The Watermarks tab allows you to have desired text printed in the background behind graphics, etc. This text may indicate that
the document is “Confidential” or indicate some other special message. You may select from among the text that is pre-registered
in the printer or create your own watermark text. The darkness and size of each watermark can be adjusted as well.
A
Select a watermark list: Lists text registered to be printed out as a watermark. Click on the desired text to select it.
B
Edit... button: Click to edit the watermark that is currently selected in the Select a watermark list. A dialog box that will allow
you to edit that watermark will be displayed. Refer to “●Dialog box for adding or editing watermarks”, page 25, for more
detailed information on editing watermarks.
C
Add... button: Click to add new text to be used as a watermark. A dialog box that will allow you to add a new watermark will be
displayed. Refer to “●Dialog box for adding or editing watermarks”, page 25, for more detailed information on adding
watermarks.
D
Delete button: Click to delete the watermark that is currently selected in the Select a watermark list.
E
First Page Only check box: Place a check in this check box in order to have the selected watermark printed out only on the
first page of the documents.
F
Sample image: Displays how the selected watermark will appear on the document to be printed.
A
E
B
C
F
D
Page 27

-25-
2. Printer Drivers for Windows NT 4.0
●
Dialog box for adding or editing watermarks
G
Text field: Whether editing existing text or creating a new watermark, type the desired text to be used as the watermark in this
field.
H
Font field: Click on the arrow (▼) to display a drop-down list, and then choose from that list the desired font.
I
Size field: Displays the selected point size of the font. The desired size can be selected by clicking on the (▼, ▲) arrows.
J
Style field: Click on the arrow (▼) to display a list of available font styles, and then choose from that list the desired style:
Bold, Italic or Regular.
K
Foreground check box: Place a check in this check box in order to have the selected watermark printed out in the foreground
rather than the background. (This check box is NOT available in the PCL5e and PCL6 Printer Drivers.)
L
Outline check box: Place a check in this check box in order to have the selected watermark printed out as outlined text. (This
check box is NOT available in the PCL5e and PCL6 Printer Drivers.)
M
Darkness: Drag the scroll bar slider to change the darkness of the text to that desired.
N
Angle: Drag the scroll bar slider to change the angle of the text to that desired.
O
Position radio buttons: Enable selection of the location of the watermark on the document page.
• Automatically center watermark: Select this radio button in order to have the watermark text automatically centered on the
document.
• Position relative to center: Select this radio button in order to adjust the location of the watermark on the document page.
The desired location can be selected by typing the desired values directly into the corresponding fields (x, y) or by clicking on
the (▼, ▲) arrows at the right of each field.
G
H
I
K
M
N
O
JL
Page 28

-26-
2. Printer Drivers for Windows NT 4.0
2-8
Postscript
tab (for PS Printer Driver only)
A
Postscript output format field: Displays the currently selected
PostScript file format. Click on the arrow (▼) to display a list of
available file formats, and then choose from that list the desired
format:
• PostScript (optimize for speed): This is the standard setting.
• PostScript (optimize for portability-ADSC): Select this option in
order to create a file that complies with the Adobe Document
Structuring Conventions (ADSC). Each page of your document will
be saved as an individual file. This setting is useful when your
computer and printer communicate through a print spooler.
• Encapsulated PostScript (EPS): Select this option in order to
enable the displayed page to be added to and then print from, for
example, a document created in another program.
B
Postscript header radio buttons: Enable selection of whether or not
header information will be sent to the printer each time a document is
printed. If this printer is being used as a local printer, having the
header information sent to the printer only once will save printing time.
However, it is recommended that for normal print jobs – and especially
when this printer is being used as a network printer – the header be
downloaded with each print job.
* This setting is ignored with EPS and Archive files.
C
Send Header Now… button: Click to immediately send the PostScript
header to the printer where it will be retained until the printer is turned
off. Once this button is clicked, the Printer Driver will automatically
select the Assume header is downloaded and retained option under
Postscript header.
D
Bitmap Compress radio buttons: Enable selection of whether or not
to have graphics compressed before being sent to the printer.
• Compress bitmap images: Select this radio button when you are
using PostScript Level 1 or Level 2 with the printer connected to a
serial port.
• No bitmap compression: Select this radio button when you are
using PostScript Level 1 with the printer connected to a parallel port
or being used over a network.
E
Print PostScript error information check box: Enables selection of
whether or not to have an error report printed out whenever a printing
error occurs. The PostScript Printer Driver can detect certain errors
that occur when printing from Windows. Place a check in this check
box if you are having trouble printing.
F
Send CTRL+D before job check box: Enables selection of whether or
not to send a CTRL+D command in order to notify the printer that the
current print job is complete and to reset the printer. Place a check in
this check box to have the command sent.
G
Send CTRL+D after job check box: Enables selection of whether or
not the Printer Driver will display an alert message if a running
application might be incompatible with some features of the driver.
Place a check in this check box to have the alert message displayed.
A
B
D
C
E
F
G
Page 29

-27-
2. Printer Drivers for Windows NT 4.0
2-9
Fonts
tab (for PS Printer Driver only)
A
Send TrueType fonts to printer according to the font Substitution Table radio button: It is possible to use the Font
Substitution Table in the Device Settings tab to instruct the Printer Driver which PostScript printer fonts to use in place of
which TrueType fonts. If this radio button is selected, ALL TrueType fonts will be replaced by PostScript printer fonts as
specified in that dialog box and this will result in faster printing. To select which printer fonts to use in place of which TrueType
fonts, refer to “2-11 Device Settings tab”, page 30, and perform the appropriate settings under the Font Substitution Table.
By default, each TrueType font will be replaced by the printer font that resembles it most, but, when there is no similar
PostScript font, the TrueType font will be sent to the printer in the format specified in the Send TrueType fonts as field of the
Send Fonts As… dialog box. To open the Send Fonts As… dialog box, click on Send Fonts As… and refer to “●Send
Fonts As… dialog box”, page 28.
* If the wrong printer font is selected for any TrueType font, the printed document will not appear as it does on your computer
screen.
B
Always use built-in printer fonts instead of TrueType fonts radio button: If this radio button is selected, the Printer Driver
will ignore the settings made under the Font Substitution Table in the Device Settings tab and will use standard fontmatching rules to find the best PostScript printer fonts to use in place of the TrueType fonts in the document. In this case, no
TrueType fonts will be sent to the printer. This will result in faster printing, but printed text will not appear as it does on your
computer screen.
C
Always use TrueType fonts radio button: If this radio button is selected, any TrueType fonts in the document will be sent to
the printer. In this case, printed text will appear just as it does on your computer screen, but printing time will be increased.
TrueType fonts will be sent to the printer in the format specified in the Send TrueType fonts as field of the Send Fonts As…
dialog box. To open the Send Fonts As… dialog box, click on Send Fonts As….
A
B
C
Page 30

-28-
2. Printer Drivers for Windows NT 4.0
●
Send Fonts As…
dialog box
A
Send TrueType fonts as field: Displays the currently selected format in which those TrueType fonts that are not replaced by
PostScript fonts will be sent to the printer. Click on the arrow (▼) to display a drop-down list, and then choose from that list the
desired setting:
• Outlines: This option will send outlines, most appropriate for larger point sizes. (However, all smaller point sizes will
automatically be sent as bitmap data.)
• Bitmaps: This option will send bitmaps, most appropriate for smaller point sizes.
• Don’t Send: If this option is selected, no TrueType fonts will be sent to the printer. This option is most appropriate when
sending data to the printer through a print spooler.
B
Threshold size field: Displays the size of the font (in pixels) at which the Printer Driver should switch from sending a TrueType
font as an outline to sending it as bitmap data. The most effective size to enter here will vary depending upon the complexity of
the font. For example, at 600 dpi it is more effective to send TrueType fonts as outlines when non-ornamental fonts are about
14 points or larger. Enter “0” here if you ALWAYS want outline fonts to be sent.
C
Favor system TrueType fonts over printer fonts check box: Enables selection of whether to use system TrueType fonts instead
of PostScript printer fonts when the same font is found in both the computer and the printer. Using printer fonts will result in
faster printing, but printed text will not appear as it does on your computer screen.
D
Send PostScript fonts as field: Displays the currently selected format in which those TrueType fonts that are not replaced by
PostScript fonts will be sent to the printer. Click on the arrow (▼) to display a drop-down list, and then choose from that list the
desired setting:
• In Native Format: This option will send the PostScript font data to the printer before printing.
• Don’t Send: If this option is selected, no font data will be sent to the printer. This option is most appropriate when sending
data to the printer through a print spooler.
A
B
C
D
Page 31

-29-
2. Printer Drivers for Windows NT 4.0
2-10
Font Download
tab (for PS Printer Driver only)
A
New Soft Font Directory field: Type in the path of the directory that contains the new font data.
B
New Soft Font list: Lists the names of the fonts contained in the directory that was entered in the New Soft Font Directory
field.
C
Browse… button: Click to search for the directory that contains the new font data.
D
Installed Soft Fonts list: Lists those fonts in the New Soft Font list that are actually selected for installation.
E
Open button: Click to display – in the New Soft Font list – the names of the fonts contained in the directory that was entered in
the New Soft Font Directory field.
F
Add button: Click to have the font that is currently selected in the New Soft Font list listed in the Installed Soft Fonts list.
G
Delete button: Click to delete the currently selected font from the Installed Soft Fonts list.
H
Begin Download Fonts button: Click to have the fonts listed in the Installed Soft Fonts list downloaded to the printer’s hard
disk.
A
B
C
D
G
H
E
F
Page 32

-30-
2. Printer Drivers for Windows NT 4.0
2-11
Device Settings
tab (for PS Printer Driver only)
To open the Device Settings tab, use the right mouse button to click on the icon corresponding to the PS Printer Driver for this printer in the Printers
folder. A pop-up menu will be displayed. Click on Properties in the pop-up menu. The Properties dialog box will be displayed. Click on the Device
Settings tab. Double-click on the desired item in order to open the corresponding dialog box and perform the desired settings for that item.
A
Available PostScript Memory: Enables selection of the amount of printer memory to use. The desired memory size can be
selected by clicking on the (▼, ▲) arrows. This memory designated here will be used for receiving such information as the font
data from the computer.
B
Halftone Setup…: Enables selection of the halftone pattern, the device gamma, the pixel diameter and the luminance.
C
Font Substitution Table: Enables selection of which PostScript printer fonts to use in place of which TrueType fonts when the
Send TrueType fonts to printer according to the font Substitution Table radio button is selected in the Fonts tab. In the
tree below the Font Substitution Table item, select the TrueType font to be replaced and, in the Change ‘XXXX’ Setting list,
select the PostScript printer font to replace it with. Then click OK.
D
Job Timeout field: Displays the currently selected time (in seconds) that the printer – after receiving data from the computer
for one page – will wait for the data for the next page before it cancels the print job. Change the time to that desired by typing it
directly into this field or by clicking on the (▼, ▲) arrows. Enter “0” here if you do not want the print job to be canceled in this
manner. However, DO NOT enter “0” if you are using the printer over a network.
E
Wait Timeout field: Displays the currently selected time (in seconds) that the printer will wait to receive the next batch of data
related to any individual page from the computer before it cancels a print job. Change the time to that desired by typing it
directly into this field or by clicking on the (▼, ▲) arrows. Enter “0” here if you do not want the print job to be canceled in this
manner. However, DO NOT enter “0” if you are using the printer over a network.
A
B
C
D
E
Page 33

-31-
3. “WinPanel” Status Monitor
It is possible to use the “WinPanel” Status Monitor to monitor – from your computer screen – the status of print jobs, as well as the
status of the printer if an error occurs. This is very useful for those using the printer from a remote location.
* Refer to the Instruction Handbook for your printer in order to install the “WinPanel” Status Monitor.
3-1 Using the “WinPanel” Status Monitor
In order to use the Status Monitor, perform the following procedure to run the “WinPanel” Status Monitor program.
1. Start up Windows 95, Windows 98 or Windows NT 4.0.
* Quit all other applications that may be open.
2. Click on Start in the Task Bar. Then click on Program. Next, click on 2310/3010 Tools (for inch versions) or Mita Vi230/310
Tools (for metric versions) and select WinPanel. The Status Monitor window will open.
Inch versions
Metric versions
Page 34

-32-
3. “WinPanel” Status Monitor
3-2 “WinPanel” Status Monitor window
The “WinPanel” Status Monitor window contains the following information.
A
File menu: Click on this menu and select Exit when you are finished
using the Status Monitor.
B
Options menu: Click on this menu to display the following menu items
(a check mark next to the item indicates that it is currently selected):
• Beep on Printer Error…Indicates whether or not to have an alarm
sound whenever a printing error occurs.
• Display on Printer Error…Indicates whether or not to have the
“WinPanel” Status Monitor window displayed automatically whenever
a printing error occurs.
C
Help menu: Click on this menu to display the following menu items:
• Contents…Displays the contents of the Help file.
• How to use Help…Explains how to use the Help file.
• About…Displays the name and version number of the “WinPanel”
Status Monitor.
D
Status icon: Indicates the status of the print job or of an error that has
occurred.
E
Status message: Indicates the status of the printer and the specifics of
an error.
F
Procedure: Displays troubleshooting tips when a printing error occurs.
G
Options icons: Displays all currently installed optional accessories.
D
E
F
A
B
C
G
H
: The Hard Disk is installed
: The Network Board is installed
: The memory expansion SIMM is installed
: The Hard Disk is NOT accessible
: The Network Board is NOT accessible
: The memory expansion SIMM is NOT accessible
H
Printer illustration: This is an illustration of the front of the printer
together with all optional accessories installed. When a paper jam
occurs, the location of the jam will be indicated in this illustration.
Page 35

-33-
3. “WinPanel” Status Monitor
3-3 Status messages and icons
If trouble occurs, refer to the Instruction Handbook for your copier and for your printer for more detailed information.
Status Message Status Icon Status
Power off/Cable Problem The printer cable is not connected correctly to the printer and your computer.
Warming up The printer is now warming-up.
Ready Printing is possible.
Paper Jam
A paper jam has occurred in the printer or in one or more of the installed optional
accessories.
Printer Overrun
When trying to print documents containing complex data, the speed your computer sent
data for printing did not match the speed of the print engine and printing was not
accomplished properly.
Memory Overflow The printer memory has become full during reception of data for a print job.
No Drawer The selected drawer is not set properly in the printer.
Paper Mismatch The size of the document is different than the size of paper loaded in the selected drawer.
Cover Open One or more of the covers to the printer or to the optional accessories are open.
Paper Empty There is no paper in the selected drawer.
Toner Empty There is insufficient toner in the printer.
Service Call
An electrical or mechanical problem has occurred. Contact your service representative or
an authorized service center.
Staple Empty The optional Finisher has run out of staples.
Page 36

-34-
3. “WinPanel” Status Monitor
Status Message Status Icon Status
Staple Overflow The number of sheets to be stapled has exceeded the maximum acceptable number.
Stack Overflow The optional Finisher has reached the maximum number of prints that it can hold.
Duplex Size Error Duplex printing can not be accomplished onto the selected paper size.
Mailbox Size Error The selected paper size is not compatible with the optional Mailbox Unit.
Finish Size Error The selected paper size is not compatible with the optional Finisher.
Drawer Size Error The size of the paper loaded in the selected drawer is not an acceptable size.
Hard Disk Error A mechanical problem has occurred with the optional Hard Disk.
Hard Disk Read Fail A hard disk error has occurred. The hard disk can not be read.
Network Error A network error has occurred.
Option Installation Error One of the optional accessories (Duplex Unit, Finisher, Mailbox Unit) is not set correctly.
Finish Release Error The optional Finisher is not connected properly to the printer.
Off line The printer is off-line.
SIMM Error
A SIMM memory error has occurred.
Page 37

-35-
4. Macintosh PPD dialog boxes
This section contains explanations regarding the settings that can be made in certain dialog boxes when using this printer with a Macintosh computer
over a network. The explanations in this section were written with the assumption that the necessary PPD files have already been installed and that this
printer has been selected as the current printer.
* Refer to the Instruction Handbook for your printer for more detailed information regarding the procedure to install the Macintosh PPD files and select
this printer.
* The LaserWriter chooser extension must be installed in order to view the following dialog boxes.
4-1 Configure dialog box
When options such as the Duplex Unit, Hard Disk or one of the Paper Feed Units are installed, perform the appropriate settings in the Configure dialog
box. Those optional accessories NOT installed will not be displayed in the Installable Options list.
* The actual layout of each dialog box may differ somewhat depending upon the version of LaserWriter that you are using.
11
Opening the
Configure
dialog box
1. Select Chooser from the Apple menu. The Chooser will appear.
2. Double-click on the LaserWriter 8 icon and then click on the Setup…
button.
3. Click on Configure. The Configure dialog box will open.
22
Settings in the
Configure
dialog box
Use the mouse to point to the drop-down list at the right of each option
name and select Installed. Once all of the settings have been completed,
click on OK. To cancel the new settings, click on Cancel.
* If the settings performed in this dialog box are not correct, those settings
that are related to the optional accessories in the Print dialog box (refer
to page 38) and the Printer Options dialog box (refer to page 39) will
not be available.
Page 38

-36-
4. Macintosh PPD dialog boxes
4-2
Page Setup
dialog box
Settings for paper size, page layout, magnification ratio and print direction (orientation) are performed in the Page Setup dialog box. To display the
Page Setup dialog box, select Page Setup… in the File menu of the corresponding application.
* The actual layout of each dialog box and the available options and settings may differ somewhat depending upon the application and the version of
LaserWriter that you are using.
A
Paper pop-up list: Select in this pop-up list the desired paper size. Choose from among Letter, Legal, Folio, Statement, A3, A4,
B4-JIS, A5, B5-JIS, A6, B6-JIS, Envelopes (Monarch, Com-10, DL, C5) and Custom sizes.
* ALWAYS use the multi-bypass to feed the following sizes: A6, B6-JIS and Envelopes (Monarch, Com-10, DL, C5)
* When Custom is selected, the paper size can be set as desired. The acceptable paper width is between 98.4 mm - 297 mm
(metric) or 3.88" - 11.69" (inches). The acceptable paper length is between 148 mm- 431.8 mm (metric) or 5.83" - 17.00"
(inches).
B
Layout pop-up list: Select in this pop-up list the desired layout option.
C
Reduce or Enlarge field: Type the desired magnification ratio directly into this field. Select a ratio between 25% - 400%.
D
Orientation icons: Enable selection of the desired print direction.
E
OK button: Click to close the Page Setup dialog box and save all of the currently selected settings.
F
Cancel button: Click to cancel the new settings.
G
Options button: Click to open the Options dialog box. For more detailed information regarding the Options dialog box, refer
to “4-3 Options dialog box”, page 37.
H
Help button: Click to display the Help window related to the Page Setup dialog box.
ABC
E
F
G
H
D
Page 39

-37-
4. Macintosh PPD dialog boxes
4-3
Options
dialog box
* The actual layout of each dialog box and the available options and settings may differ somewhat depending upon the application and the version of
LaserWriter that you are using.
A
Visual Effects check boxes: Visual effects such as horizontal and vertical flip and image inverting can be selected here. Place
a check in the check box next to the desired visual effects to select that effect.
B
Printer Options check boxes: Place a check in the check box next to the desired printing options to select that option.
C
OK button: Click to close the Options dialog box and save all of the currently selected settings.
D
Cancel button: Click to cancel the new settings.
E
Help button: Click to display the Help window related to the Options dialog box.
A
B
C
D
E
Page 40

-38-
4. Macintosh PPD dialog boxes
4-4
Print
dialog box
To display the Print dialog box, select Print… in the File menu of the corresponding application.
* The actual layout of each dialog box and the available options and settings may differ somewhat depending upon the application and the version of
LaserWriter that you are using.
A
Copies field: Type the desired number of prints to be made (or the number of files to be saved to disk) directly into this field.
Select a number between 1 - 999.
B
Pages radio buttons: To print all of the pages in a file, select the All radio button. To print only certain pages, type in from what
page (in the From field) to what page (in the To field) you want to print.
C
Paper Source radio buttons: To have the paper to be printed onto selected automatically from among all of the available
drawers, select the All radio button. To select a specific drawer, select the desired drawer from that drop-down list.
D
Destination radio buttons: Enable selection of whether to print the present file at the printer or save the data to disk as a file.
E
Print button: Click to start printing or to save the data to disk.
F
Cancel button: Click to cancel printing/saving.
G
Options button: Click to open the Print Options dialog box. For more detailed information regarding the Print Options dialog
box, refer to “4-5 Print Options dialog box”, page 39.
H
Help button: Click to display the Help window related to the Print dialog box.
BD
A
C
E
F
G
H
Page 41

-39-
4. Macintosh PPD dialog boxes
4-5
Print Options
dialog box
* The actual layout of each dialog box and the available options and settings may differ somewhat depending upon the application and the version of
LaserWriter that you are using.
If the following settings are not available, there is a possibility that the
settings for the optional accessories that were made in the Configure
dialog box are not correct. In this case, refer to “4-1 Configure dialog
box”, page 35.
A
Cover Page radio buttons: Enables selection of whether a cover page
will be added before or after the documents, or not at all.
B
Print drop-down list: Select the desired printing mode in this dropdown list. Choose from among Black and White, Color/Grayscale,
ColorSync Color Matching and PostScript Color Matching.
C
PostScript™ Errors drop-down list: Select in this drop-down list
whether or not to have an error report printed out, or have the content
of the error displayed on the screen, whenever a printing error occurs.
D
Output Destination drop-down list: When the optional Finisher or
Mailbox Unit is installed, select the desired printing destination in this
drop-down list.
E
Toner Saving drop-down list: Toner use can be reduced. Choose
from among Default, Off Light, Medium and Dark in this drop-down
list.
F
Edge Enhancement drop-down list: Select the desired setting for
edge enhancement which enables the clearest reproduction of edges
and curves when printing text and graphics. Choose from among
Default, Off Light, Medium and Dark in this drop-down list.
G
Staple When drop-down list: Select On in this drop-down list in order
to staple each set of printed documents in the optional Finisher.
H
Collate Copies drop-down list: Select On in this drop-down list in
order to Collate multiple sets of printed documents. In this case,
however, the optional Hard Disk must be installed in the printer.
I
Shift Mode drop-down list: Select On in this drop-down list in order to
have each successive set of printed documents shifted slightly from
the previous one when ejected.
J
Duplex Printing drop-down list: Select in this drop-down list whether
to have the paper turned over by its longer edge or its shorter edge
during Duplex printing.
K
Paper Type drop-down list: Select in this drop-down list the desired
type of paper for print out. Choose from among Plain, Transparency
and Other.
* If the multi-bypass is selected under Paper Source in the Printer
dialog box, this setting will not be available.
L
Resolution drop-down list: Select in this drop-down list the desired
printing resolution. Choose either 300 dpi or 600 dpi.
M
OK button: Click to close the Print Options dialog box and save all of
the currently selected settings.
N
Cancel button: Click to cancel the new settings.
O
Help button: Click to display the Help window related to the Print
Options dialog box.
P
Save button: Click to save all of the currently selected settings.
A
M
N
O
P
B
C
LD
~
Page 42

-40-
5. Printer Drivers and Status Monitor for Windows 3.1
This section contains explanations on opening the properties dialog box of the Printer Drivers supplied for this printer, as well as
explanations on running the Status Monitor, when running under Windows 3.1.
* There are 2 PDLs (Printer Description Languages) compatible for use with this printer: PCL5e and PCL6, and each has its own
Printer Driver.
5-1 Opening the properties dialog box
1. Start up Windows 3.1.
2. From within the Program Manager, double-click on the Main group to open the corresponding window and then double-click on
the Control Manager icon in that window.
3. Double-click on the Printers icon in the new window and select the name of the Printer Driver for this printer from the Installed
Printers list in the Printers window.
4. Click on Setup…. The properties dialog box will be displayed.
5-2 Properties dialog box
For information regarding the properties dialog box for Windows 3.1, refer to the corresponding explanation for Windows 95 on
pages 3 through 11. While the layout of the two properties dialog boxes differs slightly, the contents are essentially the same.
Page 43

-41-
5. Printer Drivers and Status Monitor for Windows 3.1
5-3 Using the “WinPanel” Status Monitor
In order to use the Status Monitor, perform the following procedure to run the “WinPanel” Status Monitor program.
1. Start up Windows 3.1.
2. From within the Program Manager, double-click on 2310/3010 Tools (for inch versions) or Mita Vi230/310 Tools (for metric
versions) group to open the corresponding window. Then double-click on the WinPanel icon in that window. The Status Monitor
window will open.
5-4 “WinPanel” Status Monitor window
Refer to ‘3-2 “WinPanel” Status Monitor window’, page 32, and ‘3-3 Status messages and icons’, page 33, for information
regarding the contents of the Status Monitor window.
 Loading...