

Page 1

PRINTER
PR2 plus
USER'S GUIDE
GUIDA OPERATIVA
GUIDE D'UTILISATION
BEDIENUNGSANLEITUNG
GUIA OPERATIVA
Page 2

Your attention is drawn to the following actions that could compromise the characteristics of the product:
! incorrect electrical supply;
! incorrect installation; incorrect or improper use, or, in any case, not in accordance with the warnings given in the User Guide supplied with the product;
! replacement of original components or accessories with others of a type not approved by the manufacturer, or carried out by unauthorized personnel.
To clean the machine, use a vacuum cleaner or soft cloth.
First remove the mains plug from the wall socket.
Do not use alcohol, solvents, or hard brushes.
Do not let water or other liquids get inside the machine.
Si richiama l'attenzione sulle seguenti azioni che possono compromettere la conformità sopra attestata, oltre, naturalmente, le caratteristiche del prodotto:
! errata alimentazione elettrica;
! errata installazione o uso errato o improprio o comunque difforme dalle avvertenze riportate sul manuale d'uso fornito col prodotto;
! sostituzione di componenti o accessori originali con altri di tipo non approvato dal costruttore, o effettuata da personale non autorizzato.
Per pulire la macchina, utilizzare un aspirapolvere o un panno morbido.
Prima di ogni operazione, scollegare il cavo di alimentazione elettrica dalla presa di rete.
Non utilizzare alcol, solventi o spazzole dure.
Assicurarsi che acqua o altri liquidi non penetrino all'interno della stampante.
Nous attirons l'attention sur certaines opérations qui pourraient compromettre la conformité attestée ci-dessus et le caractéristiques du produit même:
! Alimentation électrique erronée;
! Installation ou utilisation incorrecte, non appropriée ou ne respectant pas les indications reportées dans le manuel d'utilisation fourni avec le produit;
! Remplacement des consommables ou des accessoires originaux par d'autres types non approuvés par le constructeur ou effectué par du personnel non autorisé.
Pour nettoyer la machine, utiliser un aspirateur ou un chiffon souple.
Avant d'effectuer toute opération, débrancher la câble de l'alimentation électrique de la prise de réseau.
Ne pas utiliser de l'alcool, des solvants, ni des brosses dures.
Vous assurer que ni l'eau ni aucun autre liquide ne pénètrent dans l'imprimante.
Wir möchten Sie darauf hinweisen, daß folgende Aktionen die oben bescheinigte Konformität und die Eigenschaften des Produkts beeinträchtigen können:
! Falsche Stromversorgung;
! Installations- oder Bedienungsfehler bzw. Nichtbeachtung der Hinweise in der Bedienungsanleitung, die mit dem Produkt geliefert wurde;
! Das Auswechseln von Bauteilen oder Originalzubehör durch Unbefugte oder das Ersetzen durch Teile, die nicht vom Hersteller anerkannt werden.
Le rogamos que preste mucha atención a las siguientes acciones que pueden comprometer la conformidad arriba certificada, y obviamente las
caraterísticas del producto:
! Alimentación eléctrica errónea;
! Instalación o uso erróneos, impropios o no conformes a las advertencias detalladas en el manual de utilización suministrado con el producto;
! Sustitución de componentes o accesorios originales con otros no aprobados por el fabricante, o bien efectuada por parte de personal no autorizado.
Zum Reinigen der Maschine einen Staubsauger oder einen weichen Lappen benutzen.
Zuersten den Hauptstecker aus der Netzsteckdose ziehen.
Keinen Alkohol, Lösungsmittel oder harte Bürsten verwenden.
Darauf achten, dass kein Wasser oder andere Flüssigkeiten in die Maschine eindringen.
Para limpiar la máquina, utilíce una aspiradora o un paño suave.
Antes de cualquier operación, desconécta el cable de alimentación eléctrica de la toma de red.
No utilíce alcohol, solventes o cepillos duros.
Asegúrese de que agua u otros líquidos no penetren dentro de la impresora.
Publication issued by:
Olivetti S.p.A.
Via Jervis, 77 - 10015 Ivrea (Italy)
Copyright © 2013 by Olivetti
All rights reserved
The mark affixed to the product
certifies that the product satisfies
the basic quality requirements.
ENERGY STAR is a U.S. registered mark.
The ENERGY STAR program is an energy reduction plan introduced by theUnited States Environmental Protection Agency in response
to environmental issues and for the purpose of advancing the development and utilization of more energy efficient office equipment.
Page 3
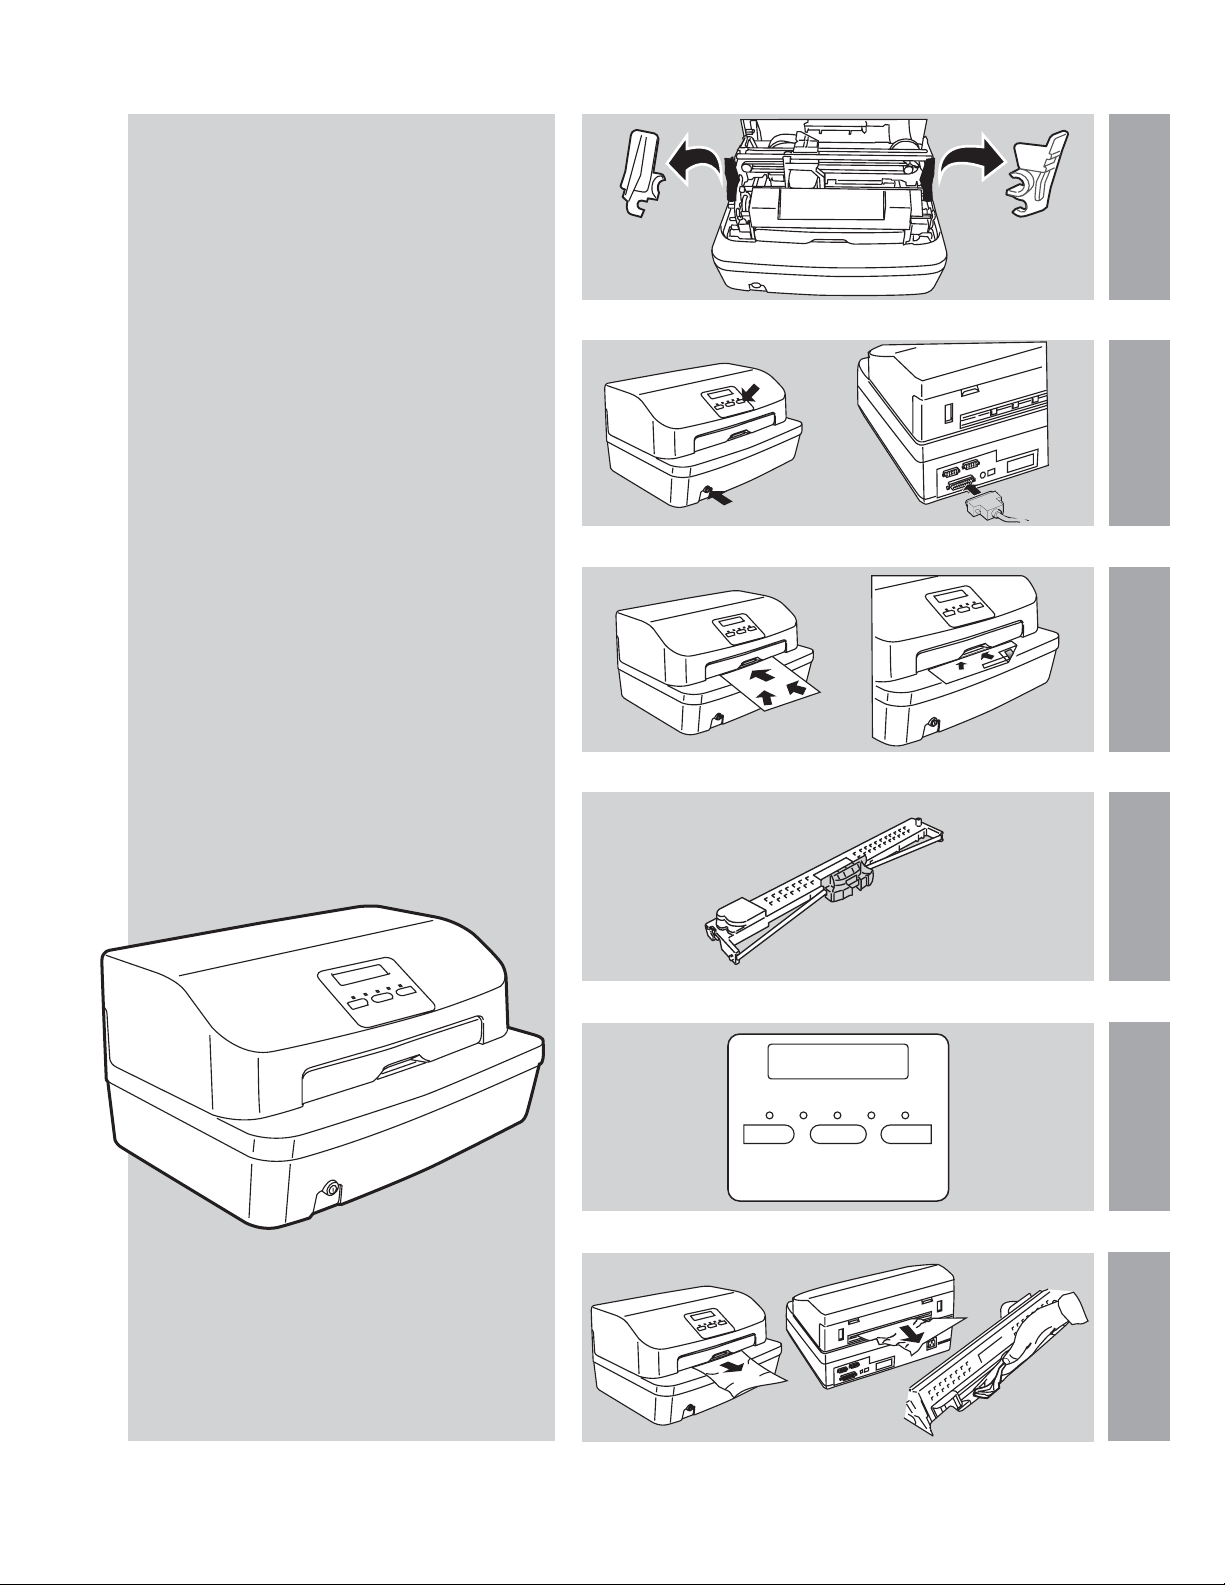
Table of contents
Indice
Table des matières
Inhaltsverzeichnics
Indice
READY ON
STATION1
EJECT EJECTBREAK
PR2
plus
STATION2LOCAL
Page 4

For all models excluding RFID versions:
For PR2 plus RFID version:
This equipment is available with an optional RFID reader/writer.
RFID version comply with EN 300 330, EN 301 489-1 V1.8.1 (2008-04)
and EN 301 489-3 V1.4.1 (2002-08). Notifier body number is:
CE 0682
)
In the case of the Passport (PNS 5907) and Honk Kong (PNS 6014) printer models, to
obtain the best print quality it is suggested that you insert the passport or passbook at the
center of the slot.
)
Per modelli di stampante Passaporto (PNS 5907) e Hong Kong (PNS 6014), si consiglia di
introdurre il passaporto o il libretto al centro della bocchetta in modo da ottenere la
migliore qualità di stampa.
)
Pour les modèles d'imprimante Passeport (PNS 5907) et Hong Kong
(PNS 6014), il est conseillé d'introduire le passeport ou le carnet au centre de
l'embouchure pour une meilleure qualité d'impression.
)
Bei den Druckermodellen Pass, sollte der Pass oder das Buch in der Mitte der öffnung
eingeführt werden, da so die beste Druckqualitat erreicht wird.
)
Con los modelos de impresora Pasaporte (PNS 5907) y Hong Kong
(PNS 6014), se aconseja, para obtener una óptima cualidad de impresión, introducir el
pasaporte o el cuaderno en el centro de la rendija
THIS CLASS B DIGITAL APPARATUS MEET ALL REQUIREMENTS OF THE CANADIAN INTERFERENCECAUSING EQUIPMENT REGULATIONS ICES-003.
CET APPAREIL NUMERIQUE DE LA CLASSE B EST CONFORME A LA NORME NMB-003 DU CANADA.
FCC REGULATIONS NOTICE
THIS DEVICE HAS BEEN TESTED AND FOUND TO COMPLY WITH THE LIMITS FOR A CLASS B
DIGITAL DEVICE, PURSUANT TO PART 15 OF THE FCC RULES.
THIS LIMITS ARE DESIGNED TO PROVIDE REASONABLE PROTECTION AGAINST HARMFUL
INTERFERENCE IN A RESIDENTIAL INSTALLATION. THIS EQUIPMENT GENERATES, USES AND
RADIATE RADIO FREQUENCY ENERGY AND, IF NOT INSTALLED AND USED IN ACCORDANCE WITH
THE INSTRUCTIONS, MAY CAUSE HARMFUL INTERFERENCE TO RADIO COMMUNICATIONS.
HOWEVER, THERE IS NO GUARANTEE THAT INTERFERENCE WILL NOT OCCOUR IN A PARTICULAR
INSTALLATION, IF THIS EQUIPMENT DOES CAUSES HARMFUL INTERFERENCE TO RADIO OR
TELEVISION RECEPTION, WHICH CAN BE DETERMINED BY TURNING THE EQUIPMENT OFF AND
ON, THE USER IS ENCOURAGED TO TRY TO CORRECT THE INTERFERENCE BY ONE OR MORE OF
THE FOLLOWING MEASURES:
- REORIENT OR RELOCATE THE RECEIVING ANTENNA
- INCREASE SEPARATION BETWEEN EQUIPMENT AND RECEIVER
- CONNECT THE EQUIPMENT INTO AN OUTLET ON A DIFFERENT CIRCUIT FROM THAT TO
WHICH THE RECEIVER IS CONNECTED.
- CONSULT THE DEALER OR AN EXPERIENCED RADIO/TV TECHNICIAN FOR HELP.
Page 5
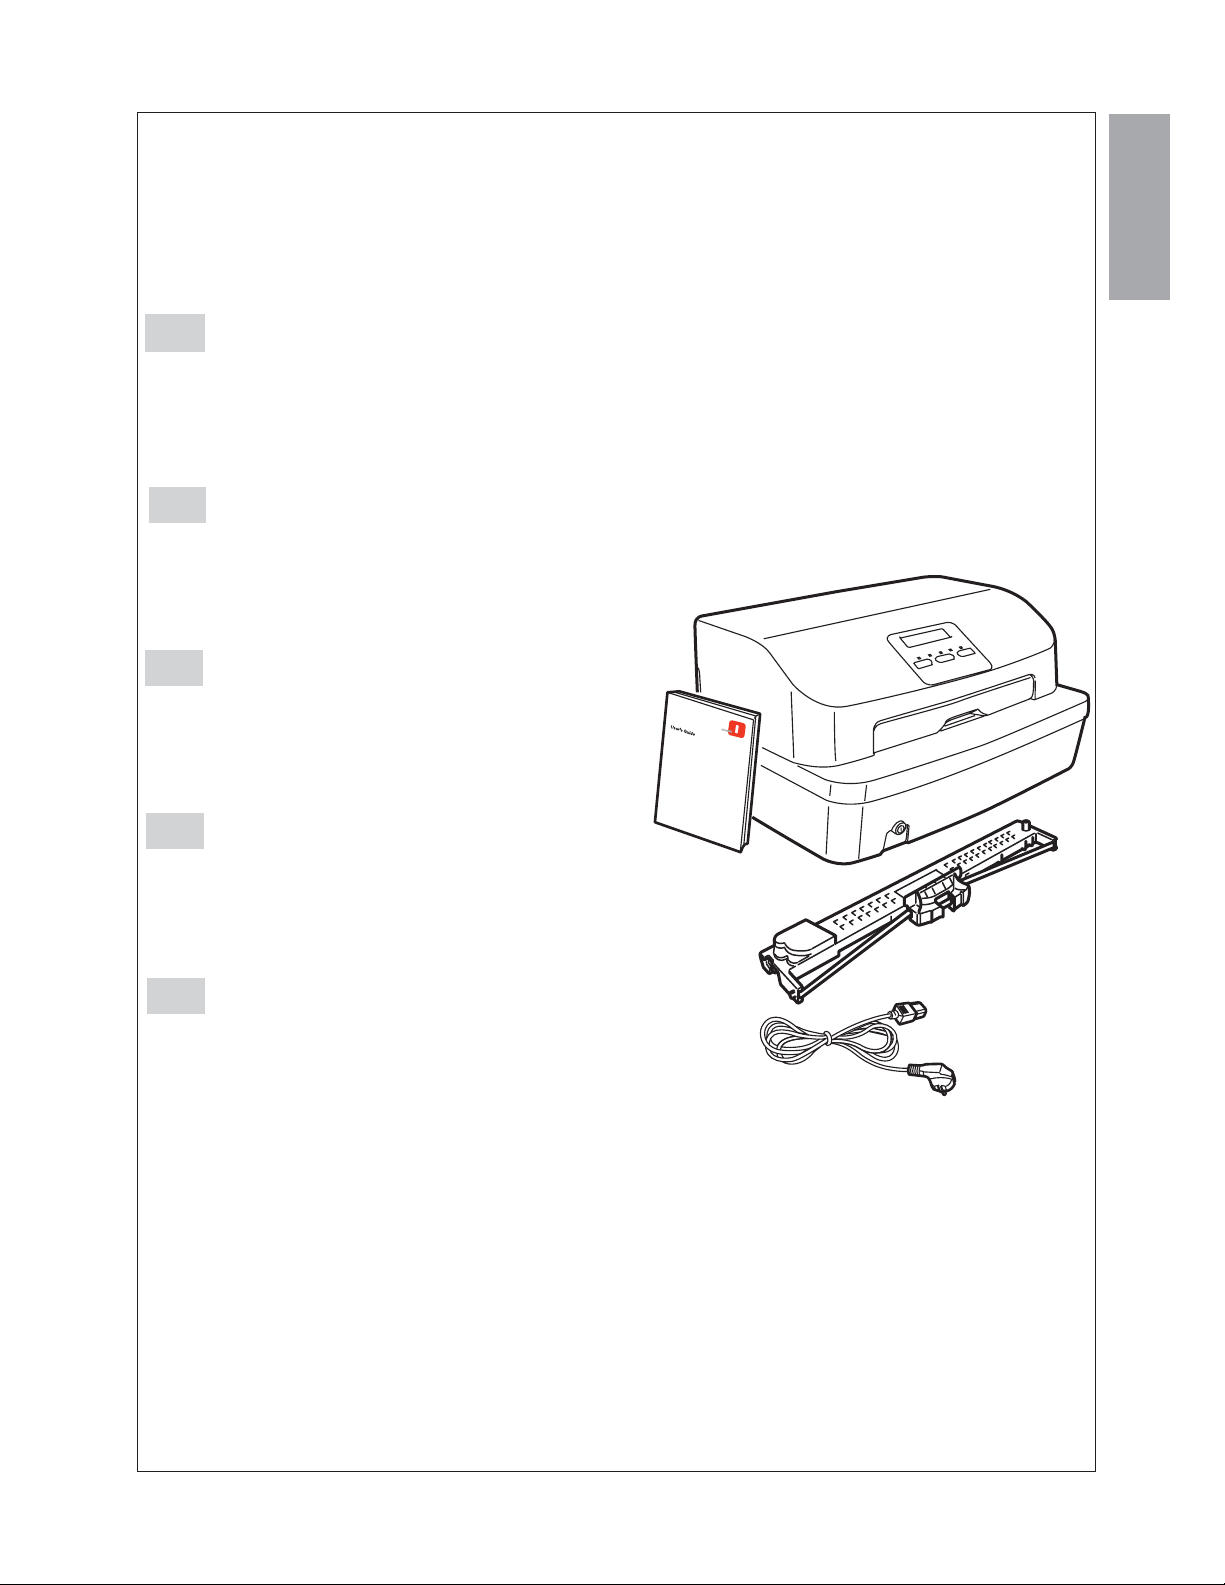
Package Contents
Note:
Contenuto dell’imballo
The display (option) located on
the console is used to view useful
information for the correct management
of your printer.
Nota: Il display (opzionale) presente
sulla console è utilizzato per
visualizzare indicazioni utili alla corretta
gestione della stampante.
Contenu de l’emballage
Nota:
Verpackungsinhalt
Contenido del embalaje
l'afficheur (facultatif) présent sur
la console est utilisé pour afficher les
indications utiles pour la bonne gestion
de l'imprimante.
Anmerkung: die Anzeige (optional) auf
der Konsole wird zum Visualisieren von
Hinweisen benutzt, die zum rechten
Betreiben des Druckers dienen.
Nota: La pantalla (opcional) presente
en la consola permite visualizar las
indicaciones útiles para la gestión
correcta de la impresora.
.
GB
I
F
D
E
1
Page 6
1
2
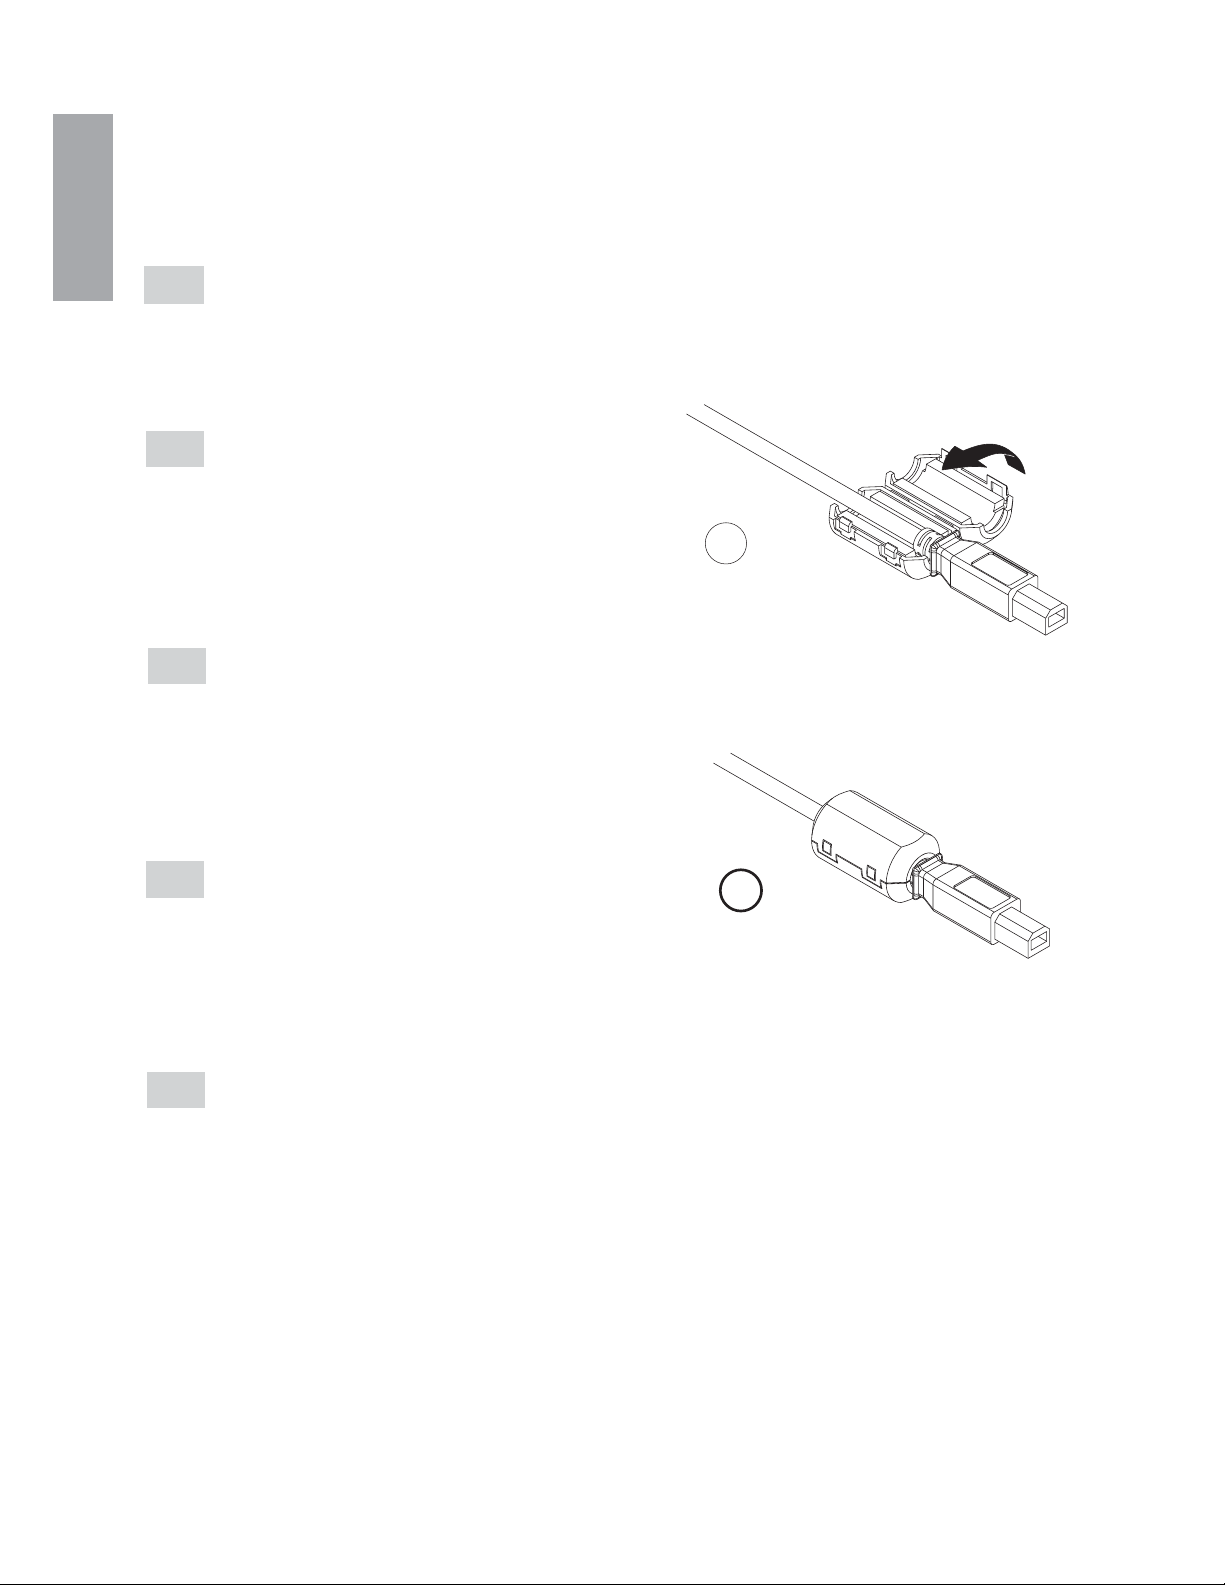
Installation of ferrite core
Instalación del núcleo de ferrita
Position the USB cable (not included)
inside the open ferrite core (not
included) close to the printer connector,
then close until clamped.
Coloque el cable USB (no incluido)
dentro del núcleo de ferrita (no
incluido) abierto, cerca del conector de
la impresora, ahora ciérrelo hasta que
quede bloqueado, tal como indica la
figura
à
Placer le câble USB (non inclus) à
l'intérieur du noyau de ferrite (non
inclus) ouvert, près du connecteur de
l'imprimante, puis le fermer jusqu'à ce
qu'il se bloque, comme illustré sur la
figure.
Das USB-Kabel (nicht eingeschlossen)
in den offenen Ferritkern (nicht
eingeschlossen) in der Nähe des
Druckerverbinders legen, diesen dann
wie in der Abbildung bis zur
vollständigen Sperrung verschließen.
Installation dans le noyau de ferrite
Ferritkern installieren
Installazione nucleo di ferrite
Posizionare il cavo USB (non incluso)
all interno del nucleo di ferrite aperto
, in prossimit del
connettore stampante, quindi chiuderlo
fino al bloccaggio come indicato in
figura.
’
(non inclusa)
GB
I
F
D
E
2
Page 7
3
GB
I
F
D
E
Removing the Transportation
Restraints
Warning: Remove the internal
transportation restraints before using the
printer.
Open the printer cover and proceed to
remove the restraints.
(*) Indicates the locks present only for
MICR or magnetic reader models.
Enlever les calages d'amortissement
Attention: avant utilisation,débarrassez
l'imprimante des calages d'amortissement.
Ouvrez le couvercle de l'imprimante et
ôtez les calages.
(*) Indique les verrouillages présents
uniquement pour les modèles avec
magnétique ou MICR.
Entfernen der Transportsicherungen
Achtung: vor Benutzen des Druckers
die Transportsicherungen entfernen.
Den Druckerdeckel öffnen und die
Sicherungen herausnehmen.
(*) Steht für die Sperren, die nur bei den
Modellen mit Magnet oder MICR
vorhanden sind.
Remoción bloqueos de transporte
Atención: remueva los bloqueos antes
de utilizar la impresora.
Abra la tapa de la impresora y remueva
los bloqueos.
(*) Indica los bloqueos presentes sólo
para los modelos dotados de magnético
o MICR.
Rimozione bloccaggi di trasporto
Attenzione: rimuovete i bloccaggi prima
dell’utilizzo macchina.
Aprite il coperchio della stampante e
rimuovete i bloccaggi
(*) Indica i bloccaggi presenti solo per i
modelli con magnetico o MICR.
READY ON
EJECT EJECTBREAK
LOCAL
PR2 plus
STATION1
STATION2
Page 8
*
4
4
Page 9

5
Refitting the Transportation
Restraints
Warning: Refit the internal transpor-
tation restraints before shipping or
moving the printer.
Open the printer cover and proceed to
refit the restraints.
imontaggio bloccaggi di trasporto
Attenzione: prima di spedire o
trasportare la macchina è
indispensabile rimontare i bloccaggi.
Aprite il coperchio della stampante e
rimontare i bloccaggi.
(*) Indica i bloccaggi presenti solo per i
modelli con magnetico o MICR.
(*) Indicates the locks present only for
MICR or magnetic reader models.
R
Remontage blocages de transport
Attention: avant d'expédier ou de
tranporter la machine, il faut absolument remonter les blocages.
Ouvrir le couvercle de l'imprimante et
remonter les blocages.
(*) Indique les verrouillages présents
uniquement pour les modèles avec
magnétique ou MICR.
Wiedermontage der
Transportsicherungen
Achtung: vor Verschicken oder
Transportieren der Maschine müssen
unbedingt die Transportsicherungen
wieder angebracht werden.
Den Deckel des Druckers öffnen und
die Sicherungen montieren.
(*) Steht für die Sperren, die nur bei den
Modellen mit Magnet oder MICR
vorhanden sind.
Remontaje de los bloqueos de
transporte
¡Atención¡: antes de expedir o
transportar la máquina es indispensable volver a montar los bloqueos.
Abrir la cubierta de la impresora y
montar los bloqueos.
(*) Indica los bloqueos presentes sólo
para los modelos dotados de magnético
o MICR.
GB
I
F
D
E
*
Page 10

!
6
!
Page 11

7
Connecting the printer
A - Connection to electrical power outlet
B - Serial cable connection
C - Parallel cable connection
D - USB cable connection
Note: the printer must be powered off
when connecting it to the computer.
Collegamento della stampante
A - Collegamento alla rete elettrica
B - Collegamento del cavo seriale
C - Collegamento del cavo parallelo
D - Collegamento del cavo USB
Nota: il collegamento al computer deve
essere eseguito con la stampante
spenta.
Connexion de l'imprimante
A - Branchement au courant électrique
B - Branchement du câble sériel
C - Branchement du câble parallele
D - Branchement du câble USB
Note: la connexion à l'ordinateur doit
être effectuée l'imprimante hors circuit.
Anschluss des Druckers
A - Anschluss an das Stromnetz
B - Anschluss der seriellen Leitung
C - Anschluss der Parallelleitung
D - Anschluss der USB Leitung
Hinweis: der Anschluss an den
Computer muss bei ausgeschaltetem
Drucker erfolgen.
Conexión de la impresora
A - Conexión a la red eléctrica
B - Conexión cable serial
C - Conexión del cable paralelo
D - Conexión del cable USB
Nota: la conexión a la computadora se
debe realizar cuando la impresora está
apagada.
GB
I
F
D
E
= off - spento - éteint - aus - apagado
= lit - acceso - allumé - ein - encendido
= flashing - lampeggiante - clignotant -
blinkt - parpadeante
A
B
C
D
1
2
2
1
2
1
2
READY ON
EJECT EJECTBREAK
LOCAL
PR2 plus
STATION1
STATION2
Page 12

8
Printing test
Prova di stampa
Test d'impression
Drucktest
Prueba de imprenta
Turn on the printer while holding the
STATION 2 button down. Hold the
button down for a few seconds. Insert a
single sheet of paper (A4 format). The
test character sequence will be printed.
Warning: Do not touch the printhead
when it is hot.
Tenendo premuto il tasto STATION 2,
accendete la stampante. Tenete
premuto il tasto per qualche secondo.
Inserite un foglio di carta singolo
(formato A4). Verrà stampato il testo di
prova.
Attenzione: Non toccate la testina di
stampa quando è calda.
Appuyez sur la touche STATION 2 et
simultanément allumez l'imprimante ;
maintenez encore la touche enfoncée
pendant quelques secondes puis
Introduisez une feuille de papier (format
A4) pour que le test d'impression
s'imprime.
Attention: Ne pas toucher la tête
d'impression chaude.
Die Taste STATION 2 niederhalten und
den Drucker einschalten. Die Taste für
einige Sekunden gedrückt halten. Ein
Einzelblatt (Format A4) einlegen. Die
Testseite wird ausgedruckt.
Achtung: den Druckkopf nicht
berühren, wenn dieser heiß ist.
Manteniendo presionado el botón
STATION 2, encienda la impresora.
Presione el botón durante unos
segundos. Introduzca sólo una hoja de
papel (formato A4). Se imprimirá el texto
de prueba.
Atención: No toque la cabeza de
impresión cuando esté caliente.
GB
I
F
D
E
READY ON
EJECT EJECTBREAK
LOCAL
PR2 plus
STATION1
STATION2
Page 13

9
Loading a document
Laden des Dokuments
Documents
New passbooks
Caricamento del documento
Documenti
Libretti nuovi
: NOT crumpled or torn.
: fold them along the
binding so that they stay completely flat.
Push the document and release it as
soon as the automatic alignement is activated. Do not hold the document back.
: NON stropicciati o strappati.
: apriteli e comprimete il
dorso per farli rimanere piatti.
Spingete il documento e lasciatelo andare
non appena viene attivato l'allineamento
automatico. Non trattenete il documento.
Chargement du document
Carga del documento
Document
Livrets neufs
Dokumente
Neue Bücher
Documentos
Libretas nuevos
: PAS froissé ou déchiré.
: posez-le à plat en
appuyant sur son dos. Poussez le
document dans l'introducteur jusqu'à ce
que l'alignement automatique s'active. Ne
retenez pas le document.
: Sie dürfen WEDER
zerknittert NOCH eingerissen sein.
: Das Buch öffnen und am
Buchrücken flach drücken.Das Dokument
einschieben und loslassen, sobald die
automatische Ausrichtung aktiviert wird.
Das Dokument nicht festhalten
.
: NO arrugados ni rasgados.
: abrálas y comprímalas
bien para que queden planas.Empuje el
documento y suéltelo en cuanto se active
la alineación automática. No retenga el
documento.
GB
I
F
D
E
READY ON
EJECT EJECTBREAK
LOCAL
PR2
plus
STATION1
STATION2
Page 14

10
Reading the check's code line
Align the check to the edge of the
inlet and push it forward until it is
gripped. Place the stripe face down.
Lettura della code line dell'assegno
Allineate l'assegno a destra e
spingetelo in avanti. La code line
dev'essere rivolta verso il basso.
Lecture de la ligne de
programmation du chèque
Alignez le chèque sur la droite et
poussez-le vers l'avant. La ligne de
programmation doit être tournée
vers le bas.
Lesen der Scheckcodezeile
Den Scheck rechts anlegen und
nach vorne schieben. Die Codezeile
muss nach unten zeigen.
Lectura de la code line del cheque
Alinee el cheque a la derecha y
empújelo hacia adelante. La code
line debe estar orientada hacia
abajo.
GB
I
F
D
E
READY ON
EJECT EJECTBREAK
LOCAL
PR2 plus
STATION1
STATION2
Page 15

11
Replacing the ribbon cartridge
Always use manufacturer-recommended
ribbon cartridges.
Sostituzione della cartuccia nastro
Il buon funzionamento della stampante è
assicurato dall’uso delle cartucce nastro
originali.
Remplacement de la cartouche ruban
Pour un bon fonctionnement de l’imprimante il est recommandé d’utiliser une
cartouche-ruban d’origine.
Auswechseln des Farbbandes
Der einwandfreie Betrieb des Druckers
ist durch den Gebrauch von Originalfarbandkassetten gew hrleistet.
Sustitución del cartucho de cinta
El buen funcionamiento de la impresora
estäá garantizado por el uso de los
cartuchos de cinta originales.
GB
I
F
D
E
!
!
!
!
!
READY ON
EJECT EJECTBREAK
LOCAL
PR2 plus
STATION1
STATION2
Page 16

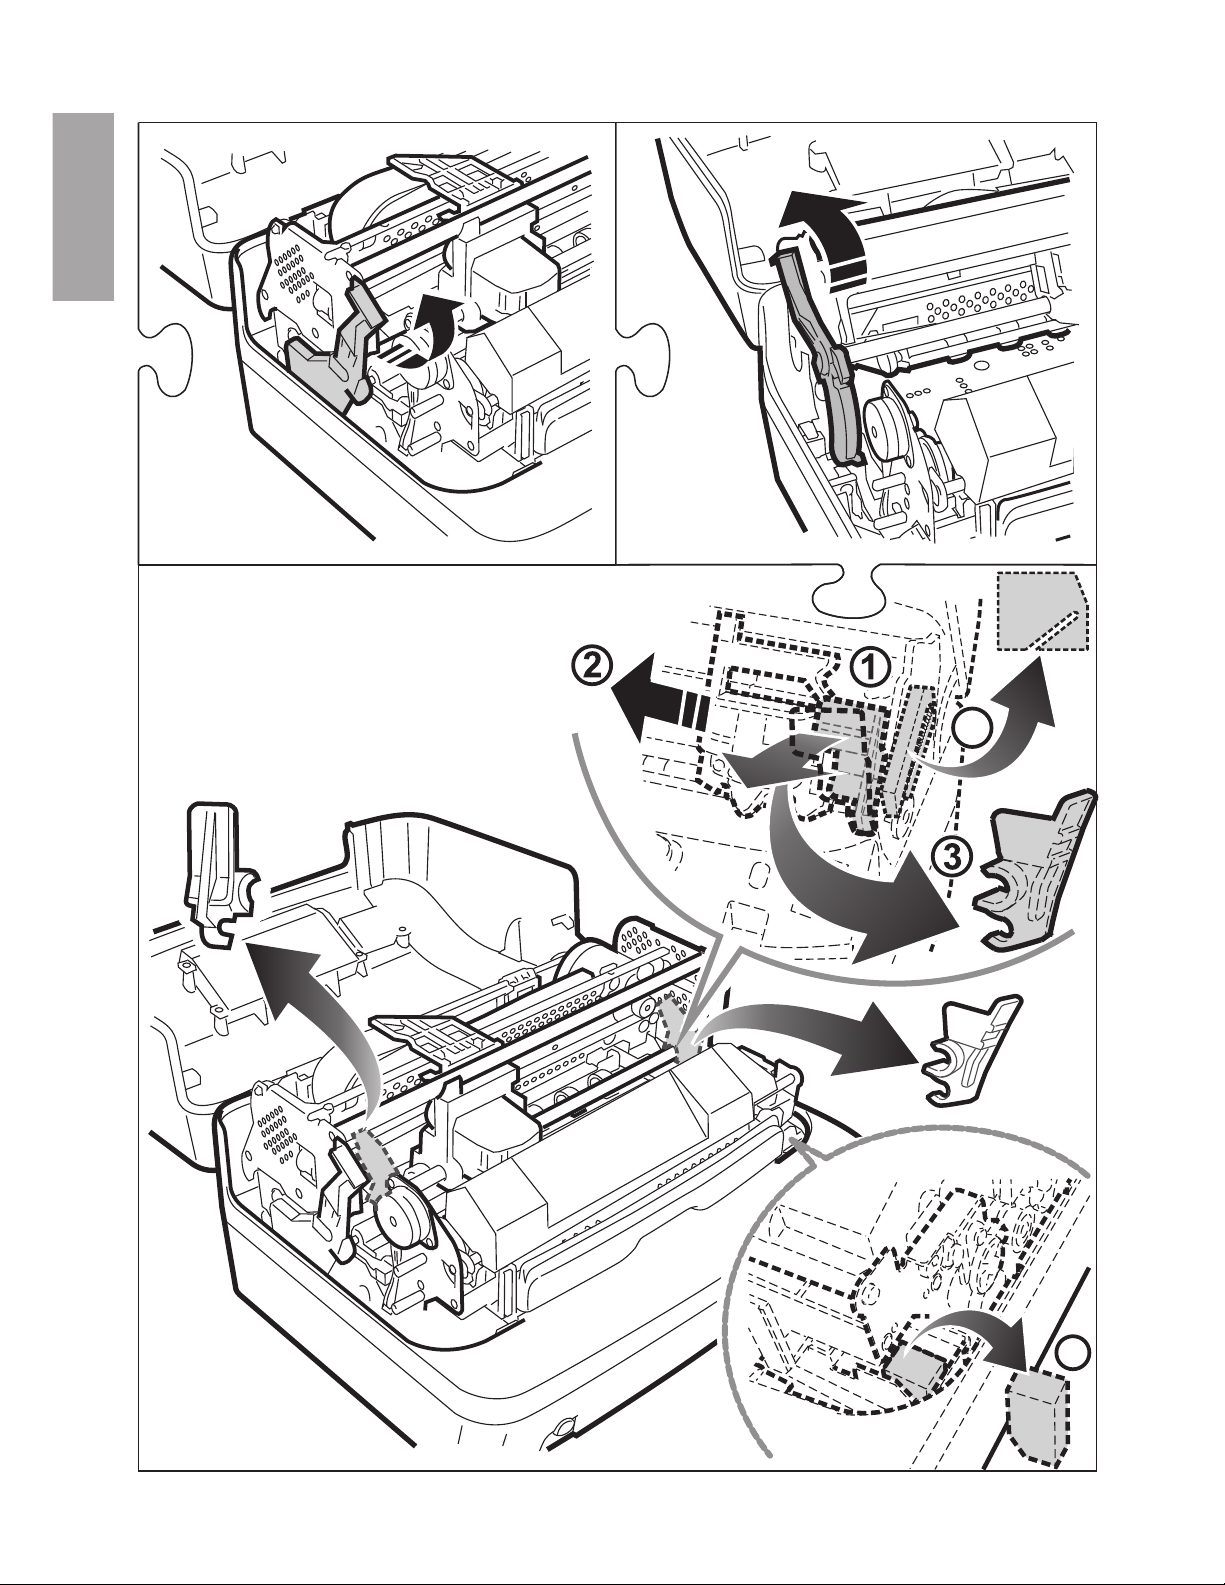
12
Replacing the ribbon cartridge
Sostituzione della cartuccia nastro
Rimuovete la cartuccia esaurita
(punti 1-3)
Remplacement de la cartouche ruban
Auswechseln des Farbbandes
Sustitución del cartucho de cinta
Remove the spent cartridge (steps 1-3).
Enlevez la cartouche épuisée
(étapes 1 à 3).
Die verbrauchte Kassette herausnehmen
(Punkte 1-3).
Quite el cartucho consumido (puntos 1-3).
GB
I
F
D
E
1
2
3
READY ON
EJECT EJECTBREAK
LOCAL
PR2 plus
STATION1
STATION2
Page 17

13
5
5
4
6
Replacing the ribbon cartridge
Sostituzione della cartuccia nastro
Inserite la nuova cartuccia (punti 4-6)
Remplacement de la cartouche ruban
Auswechseln des Farbbandes
Sustitución del cartucho de cinta
Insert the new cartridge (steps 4-6).
.
Mettez en place la nouvelle cartouche
(étapes 4 à 6).
Die neue Kassette einsetzen (Punkte 4-6).
Introduzca el nuevo cartucho (puntos 4-6).
GB
I
F
D
E
Page 18

14
7
1
2
7
8
9
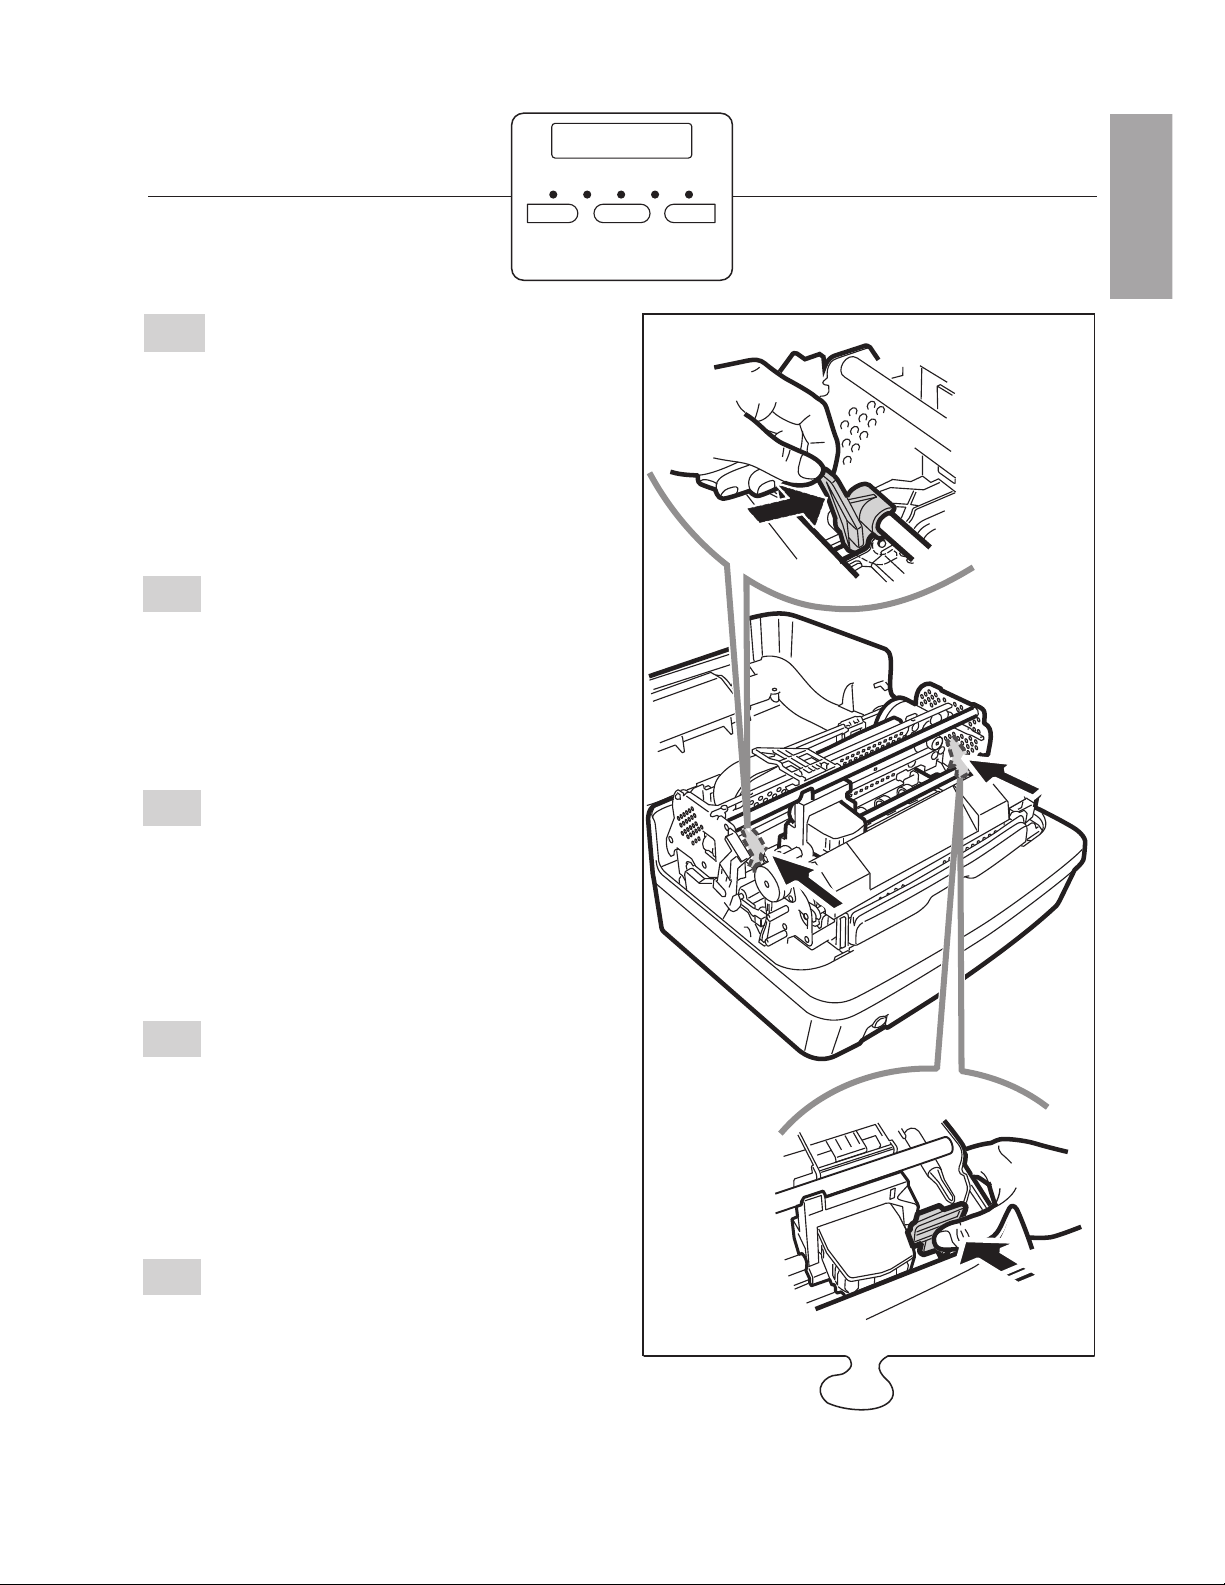
Replacing the ribbon cartridge
Sostituzione della cartuccia nastro
Agganciate ("clac") il guidanastro
spingendolo contro il carrello e tirandolo
verso l'alto (punto 7). Tendete il nastro,
rimuovete la linguetta di protezione e
abbassate il gruppo carrello (punti 8-9).
Remplacement de la cartouche ruban
Auswechseln des Farbbandes
Sustitución del cartucho de cinta
Latch ("click") the ribbon guide pushing it
against the carriage and pulling it upwards
(step 7). Tension the ribbon, remove the
protective tab and lower the carriage
assembly (steps 8-9).
Fixez le guide-ruban (un “clac” retentira”)
en le poussant contre le chariot porte-tête
et en le tirant vers le haut (étape 7).
Tendez le ruban, ôtez la languette de
protection et abaissez le chariot porte-tê te
(étapes 8 et 9).
Die Farbbandführung gegen den Schlitten
drücken und nach oben ziehen (Punkt 7),
um sie einzuhaken ("klick"). Das Farbband
spannen, die Schutzlasche entfernen und
das Druckwerk herablassen (Punkte 8-9).
Enganche ("clac") la guía-cinta
empujándola contra el carro y tirándola
hacia arriba (punto 7). Extienda la cinta,
quite la lengüeta de protecció
n y baje el carro (puntos 8-9).
GB
I
F
D
E
Page 19

15
ON
READY:
LOCAL:
STATION 1:
STATION 2:
ON:
READY:
LOCAL:
STATION 1:
STATION 2:
ON:
READY:
LOCAL:
STATION 1:
STATION 2:
ON:
READY:
LOCAL:
STATION 1:
STATION 2:
: Printer powered on
Printer on-line/receiving a document or document present (*)
Printer in the LOCAL mode (off-line)
LED on: Awaiting document from operator 1 or printer assigned to operator 1 or document present (*)
Flashing LED: Awaiting document from operator 1 or data present in the buffer (*)
LED on: Awaiting document from operator 2 or printer assigned to operator 2 or document present (*)
Flashing LED: Awaiting document from operator 2
Machine allumée
Imprimante en ligne/en réception ou document présent (*)
Machine en LOCAL (hors ligne)
Voyant allumé : Attente document opérateur 1 ou machine attribuée à l'opérateur 1 ou document présent (*)
Voyant clignotant : Attente document opérateur 1 ou données présentes dans le buffer (*)
Voyant allumé : Attente document opérateur 2 ou machine attribuée à l'opérateur 2 ou document présent (*)
Voyant clignotant : Attente document d'opérateur 2
Maschine an
Drucker online / in Empfang oder Dokument vorhanden (*)
Maschine in LOCAL (offline)
Anzeige an: Warten auf Dokument von Bediener 1 oder Maschine Bediener 1 zugewiesen oder Dokument
vorhanden (*)
Anzeige blinkt: Warten auf Dokument von Bediener 1 oder Daten im Puffer (*)
Anzeige an: Warten auf Dokument von Bediener 2 oder Maschine Bediener 2 zugewiesen oder Dokument
vorhanden (*)
Anzeige blinkt: Warten auf Dokument von Bediener 2
Máquina encendida
Impresora en línea/en recepción o documento presente (*)
Máquina en estado LOCAL (off-line)
Indicador encendido: Espera documento del operador 1 ó máquina asignada a operador 1 ó
documento presente (*)
Indicador con luz intermitente: Espera documento del operador 1 ó datos presentes en el buffer (*)
Indicador encendido: Espera documento del operador 2 ó máquina asignada a operador 2 ó
documento presente (*)
Indicador con luz intermitente: Espera documento del operador 2
ON
READY
LOCAL
STATION 1:
STATION 2:
: Macchina accesa
: Stampante in linea/in ricezione o documento presente (*)
: Macchina in LOCALE (off-line)
Indicatore acceso: Attesa documento da operatore1omacchina assegnata a operatore 1 o
documento presente (*)
Indicatore lampeggiante: Attesa documento da operatore 1 o dati presenti nel buffer (*)
Indicatore acceso: Attesa documento da operatore2omacchina assegnata a operatore 2 o
documento presente (*)
Indicatore lampeggiante: Attesa documento da operatore 2
(*) According to the emulation selected.
(*) Secondo l'emulazione selezionata.
(*) Selon l'émulation sélectionnée.
(*) Entsprechend der gewählten Emulation.
(*) Dependiendo de la emulación seleccionada.
Indicator lights
Témoin lumineux
Leuchtanzeigen
Indicadores luminoso
Indicatori luminosi
READY ON
EJECT EJECTBREAK
LOCAL
PR2
plus
STATION1
STATION2
Page 20

STATION 1:
STATION 2:
LOCAL/BREAK:
EJECT (ST. 1):
EJECT (ST. 2):
STATION 1:
STATION 2:
LOCAL/BREAK:
EJECT (ST. 1):
EJECT (ST. 2):
STATION 1:
STATION 2:
LOCAL/BREAK:
EJECT (ST. 1):
EJECT (ST. 2):
Reserves operator 1 or assigns the printer to operator 1 (*)
Reserves operator 2 or assigns the printer to operator 2 (*)
Toggles the printer between on-line and off-line
Ejects the document of operator 1 or ejects the document present (*)
Ejects the document of operator 2 (*)
Bediener 1 vormerken oder Maschine Bediener 1 zuweisen (*)
Bediener 2 vormerken oder Maschine Bediener 2 zuweisen (*)
schaltet zwischen online und offline um
wirft das Dokument des Bedieners 1 oder das vorhandene Dokument aus (*)
wirft das Dokument des Bedieners 2 aus (*)
Reserva el operador 1 ó asigna la impresora al operador 1 (*)
Reserva el operador 2 ó asigna la impresora al operador 2 (*)
Conmuta la impresora entre los estados on-line y off-line
Expele el documento del operador 1 o expele el documento presente (*)
Expele el documento del operador 2 (*)
STATION 1
LOCAL/BREAK
EJECT (ST. 1):
: Prenota l’operatore 1 o assegna la stampante all’operatore 1 (*)
: Commuta la stampante tra gli stati on-line e off-line
Espelle il documento dell’operatore 1 o espelle il documento presente (*)
(*) According to the emulation selected.
(*) Secondo l'emulazione selezionata.
(*) Selon l'émulation sélectionnée.
(*) Entsprechend der gewählten Emulation.
(*) Dependiendo de la emulación seleccionada.
: Prenota l’operatore 2 o assegna la stampante all’operatore 2 (*)
Espelle il documento dell’operatore 2 (*)
Réserve l'opérateur 1 ou attribue l'imprimante à l'opérateur 1 (*)
Réserve l'opérateur 2 ou attribue l'imprimante à l'opérateur 2 (*)
Commute l'imprimante de l'état en ligne à l'état hors ligne
Expulse le document de l'opérateur 1 ou expulse le document présent (*)
Expulse le document de l'opérateur 2 (*)
STATION 2
EJECT (ST. 2):
STATION 1:
STATION 2:
LOCAL/BREAK:
EJECT (ST. 1):
EJECT (ST. 2):
Buttons
Tasti
Touches
Tasten
Botones
16
READY ON
STATION1
EJECT EJECTBREAK
STATION2LOCAL
PR2
plus
Page 21

17
Paper jam: external
Inceppamento carta: esterno
Bourrage papier: externe
Papierstau: auben
Atasco papel: exterior
Per rimuovere un documento inceppato
nella bocchetta di introduzione
anteriore, o nella feritoia posteriore,
tirate il documento delicatamente,
facendo attenzione a non strapparlo.
To remove a document jammed in the
front inlet, or in the rear slot, gently pull
on the document, taking care not to tear
it.
Pour enlever un document coincé dans
l'introducteur antérieur ou dans la fente
postérieure de la machine, tirez
délicatement le document en faisant
attention de ne pas le déchirer.
Ein gestautes Dokument im vorderen
Einzugsschlitz oder hinteren Schlitz wird
entfernt, indem es vorsichtig
herausgezogen wird, ohne es zu
zerreißen.
Para quitar un documento atascado en
la boca de introducció
n anterior, o en la ranura posterior, tire
del documento delicadamente,
poniendo atención de que no se rompa.
GB
I
F
D
E
READY ON
STATION1
EJECT EJECTBREAK
STATION2LOCAL
PR2
plus
Page 22

18
Paper jam: internal (1)
Inceppamento carta: interno (1)
Aprite il coperchio della stampante.
Agendo sulla leva apposita, aprite la parte
superiore interna della macchina.
Rimuovete il documento inceppato tirandolo
delicatamente.
Bourrage papier: interne (1)
Papierstau: innen (1)
Atasco papel: interior (1)
Open printer cover.
Acting on the appropriate lever, open the
inner top part of the machine.Remove
jammed document by gently pulling it. If you
cannot see the document, go to page 17.
Se il documento non è
visibile, fate riferimento alla pag. 17.
Ouvrez le couvercle de l'imprimante.
A l'aide du levier approprié, ouvrez la partie
supérieure interne de la machine.
Otez le document coincé en le tirant
délicatement. Si vous ne voyez pas le
document, reportez-vous à la page 17.
Den Druckerdeckel öffnen.
Den dafür vorgesehenen Hebel betä
tigen, um den internen oberen Teil der
Maschine zu öffnen.Das gestaute
Dokument vorsichtig herausziehen und
entfernen. Wenn das Dokument nicht
sichtbar ist, auf Seite 17 nachschlagen.
Abra la tapa de la impresora. Presionando
la palanca apropiada, abra la parte superior
interna de la máquina. Saque el documento
atascado tirándolo delicadamente. Si el
documento no está visible, consulte la pág.
17.
GB
I
F
D
E
READY ON
EJECT EJECTBREAK
LOCAL
PR2 plus
STATION1
STATION2
Page 23

19
Paper jam: internal (2)
Inceppamento carta: interno (2)
Aprite il coperchio superiore e la parte superiore
interna della macchina, spegnete la stampante e
quindi riaccendetela tenendo premuto il tasto
STATION 1. Attendete la segnalazione acustica e
premete STATION 1 (o STATION 2) per far avanzare
(o arretrare) il documento, sino a poterlo rimuovere.
Dopo aver eliminato l'inceppamento richiudete il
gruppo meccanica superiore ed il coperchio,
spegnete e riaccendete la stampante.
Bourrage papier: interne (2)
Papierstau: innen (2)
Atasco papel: interior (2)
Open the top cover and then lift the machine internal
upper assebly, turn printer off and on while holding
down the STATION 1 button.Wait for the beep and
press STATION 1 (or STATION 2) to move the
document forward (or backward), until it can be
removed. After having cleared the paper jam, close
the printer's internal upper assembly and top cover,
then power the printer off and on again.
Ouvrez le couvercle supérieur et la partie supérieure
interne de la machine, éteignez puis rallumez
l'imprimante tout en maintenant enfoncée la touche
STATION 1. Attendez le signal acoustique et
appuyez sur STATION 1 (ou STATION 2) pour faire
avancer (ou reculer) le document, jusqu'à ce que
vous puissiez le saisir et l'extraire. Après avoir
éliminé le bourrage papier, refermez le groupe mé
canique supérieur et le couvercle, puis éteignez et
rallumez l'imprimante.
Den oberen Deckel und den oberen Innenteil der
Maschine öffnen, die Taste STATION 1 niederhalten
und den Drucker bei geöffnetem. Das akustische
Signal abwarten und STATION 1 (oder STATION 2)
drücken, um das Dokument vorzuschieben (oder
zurück-zuziehen) und anschließend zu entfernen.
Nach Beseitigen des Staus die oberen
Mechanikgruppe und den Deckel wieder schließen.
Den Drucker aus - und wieder einschalten.
Abra la tapa superior y la parte superior interna de la
máquina, apague y encienda la impresora
manteniendo pulsada la tecla STATION 1. Espere la
señal acústica y presione STATION 1 (o STATION 2)
para que avance (o retroceda) el documento, hasta
sacarlo. Después de haber eliminado el atasco de
papel, vuelva a cerrar el grupo mecánico superior y
la tapa, apague y vuelva a encender la impresora.
GB
I
F
D
E
READY ON
STATION1
EJECT EJECTBREAK
STATION2
LOCAL
2
1
READY ON
EJECT EJECTBREAK
LOCAL
PR2 plus
STATION1
STATION2
PR2 plus
Page 24

Printed in China
Part Number XYAA6355 - 0
9
 Loading...