


Contents
Introduction 1
Using the Online CD-ROM 1
Unpacking 2
Selecting a Location 2
Control Locations and Functions 3
Front View 3
Rear View 4
Inside 4
Installing the Toner Cartridge 5
Loading Paper 6
Connecting to Your Computer 8
Using Parallel Port 8
Using The USB Port 9
Powering On the Printer 10
Installing Software 11
Installing Printer Driver 12
System Requirement 12
Windows 95/98/NT 4.0 Installation 12
Windows 95/98 Plug and Play 13
If Windows Does Not Run the CD-ROM 13
Windows 3.1x Installation 14
Uninstalling the Printer Driver 15
Installing Printer Utilities 15
Windows 3.1x Installation 15
Windows 95/98/NT 4.0 Installation 15
DOS Installation 15
Printing on Network Printer 16
Setting Up Host PC Printer 16
Client PC Sharing Setup 16
Setting Up Your Printer
Operator’s manual
QUICK START-UP
ENGLISH

Selecting Paper Types and Feed Source 17
Loading Print Material 18
Feeding Manually 22
Using Face-up Stacker 23
Paper Guidelines 24
Paper Handling
Operating Your Printer
Operator Panel 25
Indicator Lights 25
Button Function 26
Selecting Your Printer 27
Windows 95/98/3.1x/NT 4.0 27
Printing a Document 28
Print Settings 28
Accessories 30

ENGLISH
Introduction
This Operator ’s Manual is intended as a quick introduction into working with the printer
and also to enable inexperienced users to operate the device properly. It describes the most
important functions of the printer and contains the essential information for your everyday
work with the printer. A more detailed description of the printer, its characteristic features,
and further information is contained in the Reference Manual on the Online CD-ROM,
which is inserted at the back of this manual.
Using the Online CD-ROM
First install the Adobe Acrobat Reader on your hard disk, unless the program has already
been installed. To install it, follow the steps described in the README file in the READER
directory.
To start the online documentation, call the File Manager (Windows 3.1) or Explorer
(Windows 95/ 98, Windows NT3.51/ NT4) and double click on the START. PDF file. Then
follow the instructions and menus on the screen.
1
Setting Up Your Printer

2
Setting Up Your Printer
Setting Up Your Printer
Unpacking
Remove the printer and all accessories from the packing carton. Save the carton and
packing materials in case you need to repack the printer.
Make sure you have the following items:
• Toner cartridge (Please, refer to page 4 and page 5)
• Power cord
• Setup CD-ROM
• Quick Install Guide
Notes:
• If you need help during setup, or if any items are missing or damaged, notify your dealer
immediately.
• You need a Centronics-compatible parallel printer cable. The cable is not shipped with your
printer. You can purchase this cable from your dealer or retailer. Make sure the cable is IEEE
1284-compliant. Ask your dealer for assistance if you need help selecting the right cable.
Selecting a Location
Place your printer on a flat, stable surface near your workstation. Leave enough space
around the printer, so that you can easily:
• open the printer cover
• load the paper
• retrieve the paper
• open the front output tray and retrieve the paper from the front output tray
• allow air circulation around the vents to prevent the printer from overheating
Do not place the printer:
• In direct sunlight
• Near heat sources or air conditioners
• In dusty or dirty environments
3
Setting Up Your Printer
ENGLISH
Automatic Paper Feeder
Holds 150 sheets of paper.
Paper Guides
Adjust to the
width of paper.
Face-down Stacker
Holds printed documents.
If printed on plain paper,
a maximum of 100 sheets
can be held.
Stacker Extender
Supports paper stacked in the
paper output bin.
Face-up Stacker
Holds a single sheet of special media (transparency,
label, envelope, and heavy weight paper) with print
side facing up.
Operator Panel
Tray Extender
Supports paper stacked in the
automatic paper feeder.
Manual Paper Feeder
Used to feed a single sheet of paper.
Control Locations and Functions
Front View

4
Setting Up Your Printer
Rear View
Inside
Power Switch
Power Cord Connector
USB Port
Printer Cable
Connector
Front Cover
Toner Cartridge
5
Setting Up Your Printer
ENGLISH
Installing the Toner Cartridge
2. Unpack the Toner Cartridge.
Carefully remove the sealing tape.
3. Rock the Cartridge 5 or 6 times to
distribute the toner.
4. Find the cartridge slots inside the
printer, one on each side.
5. Grasp the handle and slide the
Cartridge down between the toner
cartridge slots, until it drops into
place.
6. Close the cover.
1. To open the printer cover, hold the
cover using both hands and pull it
toward you.
6
Setting Up Your Printer
3. Insert the paper in the paper feeder.
If the paper has a preferred print side,
place the print side facing you. If you
use letterhead paper, load the paper
with the letter-head edge down and
facing you.
Loading Paper
For best results, use high quality 75g/m2 (20 lb) xerographic paper.
Note: For more information on loading paper and other print material, refer
to ‘Loading Print Material’ on page 18.
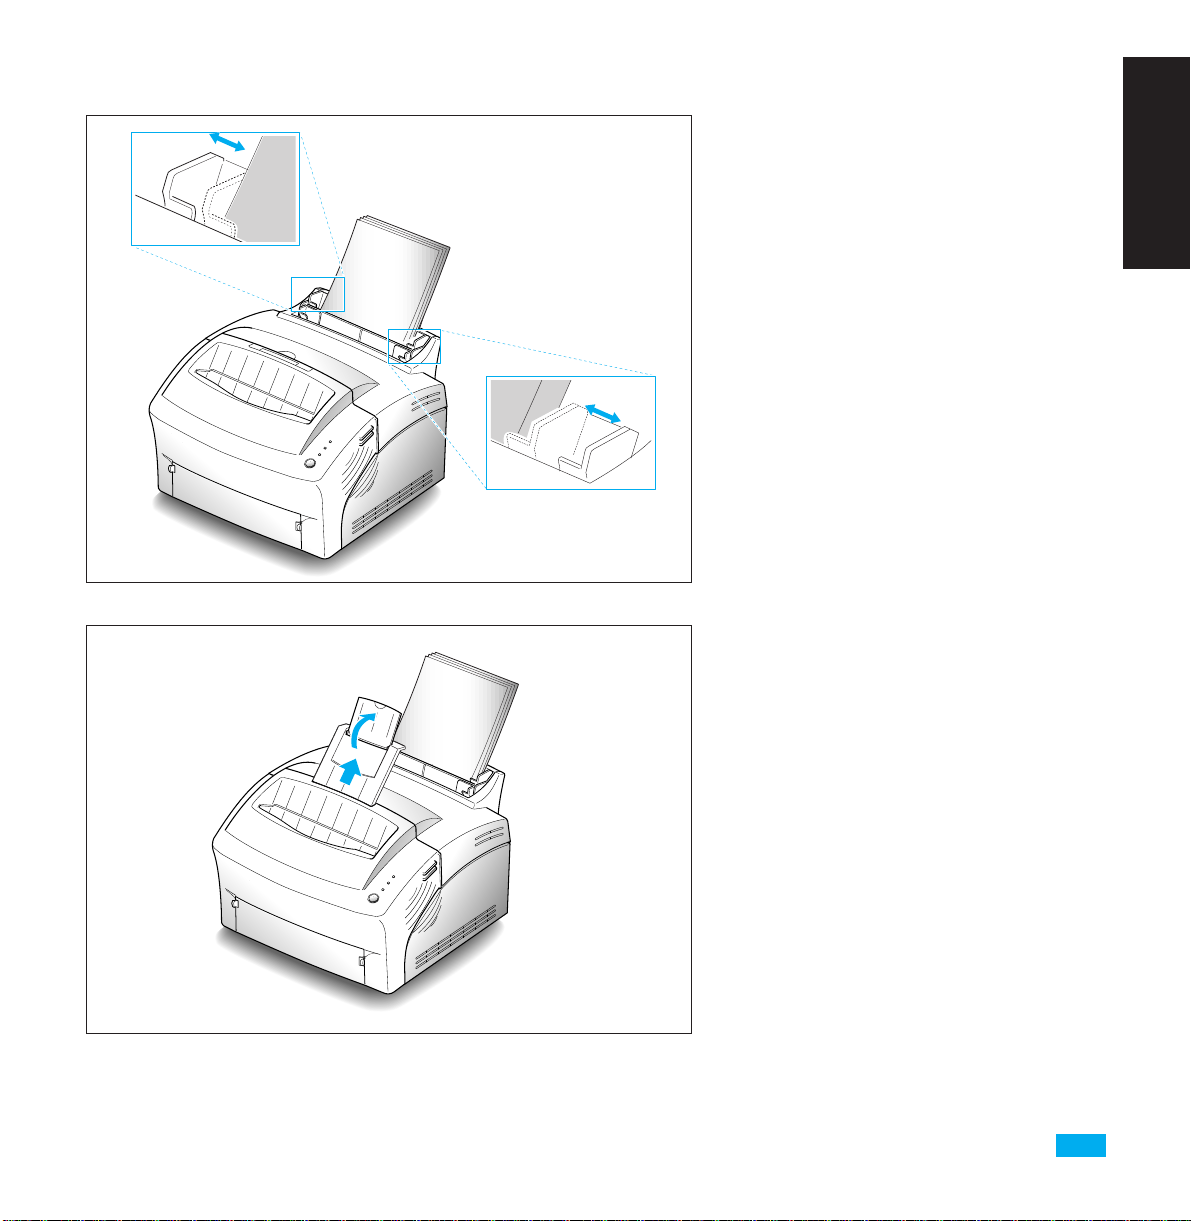
1. Pull the extender on the automatic
paper feeder up, until it stops.
2. Before loading the paper, flex the
sheets back and forth to loosen them,
then fan them. Tap the edges on a
table top to straighten them. Doing
this before you load paper helps
prevent paper jams.
Don’t load too much. This feeder
holds up to 150 sheets.
7
Setting Up Your Printer
ENGLISH
5. Pull up the extender on the facedown stacker. The face-down stacker
can hold up to 100 printed pages.
4. Adjust the paper guides to the width
of the paper.

8
Setting Up Your Printer
Note: Make sure the printer power is off when you connect it to the
computer.
Connecting to Your Computer
Your printer has parallel interface port, which allows you to use it with IBM PCs and
compatible computers. You have to purchase a Centronics compatible parallel interface
cable that supports bi-directional communications (IEEE standard 1284). Ask your dealer
for assistance if you need help selecting the right cable.
Your printer also has Universal Serial Bus (USB) port. The Universal Serial Bus is an
interface which allows the printer to be connected to multiple peripheral devices. If your
PC has USB port, you can connect your printer to your PC by using USB interface.
Using Parallel Port
1. Plug the parallel interface cable into
the connector on the back of the
printer. Push the clips at each end of
the connector into the notches on the
printer cable. The clips snap when
pushed into the notches.
2. Attach the other end of the parallel
cable to your computer.

9
Setting Up Your Printer
Using The USB Port
The USB port requires USB v1.0-compliant cable. Ask your dealer for assistance if you need
help selecting the right cable.
1. Make sure that both the printer and computer are turned off.
Note: To print using USB interface, you must install the USB driver. See page 15.
2. Plug the USB cable into the
connector on the back of the printer.
3. Connect the other end of the cable to
the USB port on your computer. See
your computer documentation if you
need help.
ENGLISH

10
Setting Up Your Printer
Powering On the Printer
2. Turn the printer on. As the printer
powers up, all control panel lights
turn on briefly.
1. Plug one end of the power cord into
the connector at the back of the
printer, and the other end into a wall
outlet.

11
Setting Up Your Printer
ENGLISH
Installing Software
Included with your printer is a CD-ROM containing printer drivers for some of the most
popular Windows software applications. To operate your printer, you must install a printer
driver, which translates data from your application into data the printer understands.
(Installation procedures follow this section.)
The CD-ROM shipped with your printer contains the following printer drivers and utilities.
• PCL printer driver for Windows NT 4.0.
• PCL 6 printer driver for Windows 95/98 and Windows 3.1x.
• Status Monitor enables you to monitor the status of print jobs.
• Remote Control Panel, which allows you to set up your printer to work properly with
Window applications run inside a Windows 3.1x/95/98 or NT Windows.
• USB driver, which allows your printer to connect USB peripheral.
3. When only the READY light is steadily
on, press and hold the button for about
3 seconds. All the indicators blink. Then
let it go. Atest page should print out.
ERROR
PAPER
READY

12
Setting Up Your Printer
Installing Printer Driver
System Requirement
Before you start, make sure you have the following computer setup. (These are the
minimum requirements.)
• IBM or compatible with a 386 or higher processor
• Windows 95, Windows 98, Windows 3.1x, or Windows NT
• 4 MB of available hard disk space
• 4 MB of RAM
• Centronics-compatible parallel cable (IEEE 1284-compliant)
Windows 95/98/NT 4.0 Installation
1. Turn on the computer and start Windows.
If Windows 95/98 recognizes the new printer, go to the section “Windows 95/98 Plug and
Play” on page 13.
2. Insert the setup CD-ROM into your CD-ROM drive.
If Windows does not automatically run the CD-ROM, go to the section “If Windows Does
Not Run the CD-ROM” on page 13.
3. Click the language you want.

13
Setting Up Your Printer
ENGLISH
Windows 95/98 Plug and Play
1. At the ‘New Hardware Found’ dialog box, click on the OK button.
2. Insert the setup CD-ROM into your CD-ROM drive.
3. Follow the instructions on the screen.
If Windows Does Not Run the CD-ROM
1. Select Run from the Start menu.
2. Type d:\setup.exe on the command line (where “d” is your
CD-ROM drive letter), then click OK.
3. Follow the instructions on the screen.
4. Click the Item you want to install.
5. Follow the instructions on the screen.

14
Setting Up Your Printer
Windows 3.1x Installation
1. Make sure the printer is plugged and connected to your computer. Turn on your
printer and computer.
2. Insert the CD-ROM disk into your CD-ROM drive.
3. From the Program Manager window, double-click Main, and File Manager.
4. From the File Manager window, select your CDROM drive, execute setup16.exe and click the
language you want.
5. Click the Item you want to install.
6. Follow the instructions on the screen.

15
Setting Up Your Printer
Uninstalling the Printer Driver
An uninstall utility is supplied with the printer driver to enable you to remove the driver
and all associated files from your hard disk, if so required.
To uninstall the driver, proceed as follows:
Windows 95/98/NT 4.0: From the Start menu, select Programs, Olivetti PG L8en,
Uninstall Olivetti PG L8en Driver.
Installing Printer Utilities (USB & Remote Control Panel)
Windows 3.1x Installation
1. From the Program Manager window, double-click Main, and File Manager.
2. From the File Manager window, select your CD-ROM drive, execute setup16.exe and
click the language you want.
3. Select the Item you want to install.
4. Follow the instructions on the screen.
Windows 95/98/NT 4.0 Installation
1. Select Run from the Start menu.
2. Type d:\setup.exe on the command line (where ‘d’ is your CD-ROM drive letter), and
click the language you want.
3. Select the Item you want to install.
4. Follow the instructions on the screen.
DOS Installation
1. Go to e:\dosutl in the CD-ROM and select the language you want.
2. Copy dosrcp.exe in the selected language to your HDD.
ENGLISH

Printing on Network Printer
Setting Up Host PC Printer
1. Start Windows.
2. Click Start, select Control Panel, and double-click on the Network icon.
3. Click File and Print Sharing, check box(es), then click OK.
Close the window.
4. Click Start and select Printers from Settings, then double-click your printer name
(Olivetti PG L8en).
5. Select Properties in Printer menu.
6. Click the Sharing tab, then check Shared As, fill in the Shared Name field, and click
OK.
Client PC Sharing Setup
1. Right-click the Start button, and select Explore.
2. Open your network folder in the left column.
3. Right-click the shared name, and select Capture Printer Port.
4. Select the port you want, click Reconnect at log on check box, the click OK button.
5. From the Start menu, select Settings, then Printers.
6. Double-click your printer icon (Olivetti PG L8en).
7. From the Printer menu, select Properties.
8. Press the Details tab, select the printer port, then press OK button.
16
Setting Up Your Printer

ENGLISH
Capacity
150 sheets
(Approx.)
1 sheet
10 envelopes
(Approx.)
1 envelope
10 items
(Approx.)
1 item
Notes:
•When you print, select the correct paper size and source in your application.
•Depending on paper thickness, the maximum capacity may be reduced.
Paper Handling
Selecting Paper Types and Feed Source
One of the most important things you can do to assure the best possible print quality from
your printer is to select the correct paper. Your printer produces letter quality output on
most plain bond papers, including cotton bond and photocopying papers; it does not
require special papers. However, the print quality varies with different paper types. Be sure
to test a small quantity of paper before you purchase a large quantity.
You can print on any of the following paper types:
Type
Plain paper
(20 to 30 Ib)
Envelopes
Transparency
Film Paper
Labels
Size
Letter: 8
1/2
x 11”
Legal: 8
1/2
x 14”
Executive: 7
1/4
x 10
1/2
”
A4: 210 x 297 mm
A5: 148 x 210 mm
B5: 182 x 257 mm
Folio: 8
1/2
x 13”
Custom size
COM-10: 4
1/8
x 9
1/2
”
Monarch: 3
7/8
x 7
1/2
”
C5: 162 x 229 mm
C6: 114 x 162 mm
DL: 110 x 220 mm
Feed Source
Automatic feeder
Manual feeder
Automatic feeder
Manual feeder
Automatic feeder
Manual feeder
17
Paper Handling

18
Paper Handling
2. Prepare the print material for
loading.
• For paper and envelopes:
- Flex paper or fan envelopes back
and forth. Do not fold or crease the
paper. Straighten the edges on a
level surface.
Note: If envelopes jam while printing, try reducing the number of envelopes in the automatic feeder.
Loading Print Material
You can stack paper, envelopes, card stocks, labels, or transparencies in the automatic paper
feeder to feed automatically. The automatic feeder can hold a maximum of 150 sheets of
plain paper, or 10 envelopes or other print media. The maximum capacity may reduce,
depending on the thickness.
Note: If you experience feeding problems, try printing one at a time from the manual feeder. See
page 22.
Extender
Automatic feeder
Manual feeder
1. Pull the extender on the automatic
feeder up until it stops.

19
Paper Handling
ENGLISH
3. Load the print material in the
automatic feeder. Do not load too
much print material. Do not mix
types. See the following directions to
load each type of print material.
• Load paper or transparencies with
the print side facing you.
• For transparencies:
- Hold the transparencies by the
edges and avoid touching the
print side.
- Fan the stack of transparencies to
prevent feeding failures. Be careful
not to scratch or leave fingerprints
on the print sides.
Place the print side
facing you.

20
Paper Handling
• Load envelopes with the flap side
facing away from you. The stamp area
is on the right side. The end of the
envelope with the stamp area enters
the feeder first.
• Load letterhead paper with the design
facing you. The top edge of the sheet
with the logo should enter the printer
first.
Notes:
• Do not feed stamped envelopes. The stamp is shown for placement only.
• Never use envelopes with clasps, snaps, windows, coated lining, or self-stick adhesives.
• These envelopes may severely damage the printer.
LETTERHEAD

21
Paper Handling
ENGLISH
5. Pull up the extender on the face-
down stacker. The face-down stacker
can hold a maximum of 100 printed
pages.
6. Before starting your print job, make
sure you select the correct paper size
and feed source in your application.
4. Adjust the guides to the width of
the print material. Slide the
guides until they lightly touch the
stack of print material. Do not
bend the print material.
Paper guide
Paper guide
Face-down
stacker

22
Paper Handling
Feeding Manually
Use the manual feeder to feed one sheet at a time into your printer.
1. If necessary, open the face-up
stacker. See page 23.
2. Load the print material in the
manual feeder and adjust the paper
guides to the width of the print
material.
See the instructions to load each type
of material on page 17.
3. Push it all the way in.
4. Before starting your print job, make sure you select the correct paper size and feed
source in your application.
5. Press the button on the operator panel. Printing starts.
6. If you have more than one page to print, the PAPER indicator blinks to alert you to
feed the next sheet each time the printer is ready to print the next page. Press and hold
the button for about 2 seconds until the printer pulls in the paper, and starts printing.
Note: If you press the button without paper in the manual feeder, the printer will
automatically use paper into the automatic paper feeder.
Automatic paper feeder
Paper guide
Paper guide
Manual paper feeder
The manual feeder is in front of the
automatic feeder.

23
Paper Handling
ENGLISH
2. If you use the face-up stacker, printed
pages exit through the front output
path, with the printed side up.
Using Face-up Stacker
Notes:
• The face-up stacker may not hold the printed materials properly.
• The printed pages will not stack in the standard face-down stacker unless you close the face-up
stacker. The face-down stacker can hold up to 100 printed pages. When you finish using the faceup stacker, you must close the face-up stacker.
1. Push both sides of the stacker marked
, and the stacker will open.

24
Paper Handling
Paper Guidelines
When selecting or loading paper, envelopes, or other special media, keep these guidelines
in mind:
• Attempting to print on damp, curled, wrinkled, or torn paper can cause paper jams and
poor print quality.
• Use cut-sheet paper only. You cannot use multipart paper.
• Use only high quality, copier grade paper. Avoid paper with embossed lettering,
perforations, or texture that is too smooth or too rough.
• Colored paper should be of the same high quality as white photocopy paper. The
pigments must withstand the printer ’s fusing temperature of 392 oF (200 oC) for 0.1
second without deterioration. Do not use paper with a colored coating that was added
after the paper was produced.
• Pre-printed forms must be printed with non-flammable, heat-resistant inks that do not
melt, vaporize, or release hazardous emissions when subject to the printer’s
approximately
392 oF (200 oC) fusing temperature for 0.1 second.
• Store paper in its ream wrapper until ready to use. Place cartons on pallets or shelves, not
on the floor. Do not place heavy objects on top of the paper, whether it is packaged or
unpackaged. Keep it away from moisture, or other conditions that can cause it to wrinkle
or curl.
• During storage, moisture-proof wrap (any plastic container or bag) should be used to
prevent dust and moisture from contaminating your paper.
• Always use paper and other media that conform with those listed under ‘Specifications’
on page 58.
• When you choose envelopes, use only well-constructed envelopes with sharp, and well
creased folds.
- DO NOT use envelopes with clasps and snaps.
- DO NOT use envelopes with windows, coated lining, self-stick adhesives, or other
synthetic materials.
- DO NOT use damaged or poorly made envelopes.

ENGLISH
INDICATOR DESCRIPTION
READY (on) The printer is ready to receive and process data.
READY (blink) The printer is receiving or processing data, or the print engine is
running.
READY (off) The printer is off-line.
ERROR (on) • There is no image cartridge installed, or the cover is open
• Print error occurs.
• If PAPER light is also on, there is a paper jammed.
ERROR (blink) The printer memory is insufficient for printing.
PAPER (on) The paper bin is empty.
PAPER (blink) The printer is in manual feed mode and waiting you to feed paper
into the manual feeder.
All lights Blinking System error occurs.
Operating Your Printer
Operator Panel
The operator panel has the indicator lights and one button. Depending on the light
sequence, pressing the button activates different printer functions, such as resetting the
printer, or running self-test. See page 26.
ERROR
PAPER
READY
Indicator Lights
25
Operating Your Printer

26
Operating Your Printer
Button Function
Image Cartridge
Cleaning
When you print a file if you have selected `Manual Feed’ source, the printer waits you to
feed paper into the manual feeder. When you are ready, press and hold down the button
for about 2 seconds.
The printer pulls in the page, and starts printing.
Press the button each time you feed paper manually.
FUNCTION USAGE
On-line/Off-line Pressing the button toggles the printer between on-line (READY light on) and off-line
(READY light off) status.
Manual Feed Start
Reset To clear all data from the printer ’s memory except permanent fonts and macros, and
then restore the user default settings:
Press the button to turn the printer off-line. With the READY light off, press and hold
down the button until all lights are blinking (approximately four seconds), then release the
button.
Self-test To perform a printer self-test:
While the printer is on-line (READY light on), press and hold down the button until all
three lights are blinking (approximately four seconds), then release the button. A one-page
printer status sheet will be printed.
To remove excess toner from the image cartridge: While the printer is on-line (READY
light on), press and hold down the button until all three lights remain lit (not blinking;
approximately seven seconds) and the printer begins to cycle up (starts feeding paper),
then release the button. One sheet will be printed.

27
Operating Your Printer
ENGLISH
Selecting Your Printer
To use all of the features of your Olivetti PG L8en printer, make sure it is selected as the
default printer. When you install the printer driver, Olivetti PG L8en is automatically set as
the default printer. If you use more than one printer, select PG L8en as the default printer as
follows:
Windows 95/98
1. Select Start, Settings, then Printers.
2. Double-click Olivetti PG L8en PCL 6.
3. Select Set As Default from the Printer menu.
Windows 3.1x
1. Double-click the Control Panel icon from the Main program group.
2. Double-click the Printers icon.
3. Select Olivetti PG L8en PCL 6.
4. Click Set As Default Printer.
Windows NT 4.0
1. Select Start, Settings, then Printers.
2. Double-click Olivetti PG L8en PCL.
3. Select Set As Default from the Printer menu.

28
Operating Your Printer
Printing a Document
This procedure describes the general steps required for printing from various Windows
applications. The exact steps for printing a document may vary depending on the
application you are using. Refer to your application’s documentation for the exact printing
procedure.
1. Start the program you are using to create the document, and/or open the document you
want to print.
2. Choose Print or Print Setup from the File menu. The Print or Print Setup dialog
appears to make changes to the printer setting.
3. If you click on Properties, Setup, or Options in the dialog box, you’ll access the
printer driver and you can make any additional setting as appropriate for printing
your document. See ‘Print Settings’ in the reference manual on page 31. The settings you
can change depend on the printer you selected.
4. Select OK to close the dialog box.
5. After making any necessary changes to the print parameters, select OK to start the
print job.
Note: The way you access the printer driver varies depending on the programs you use.
Print Settings
Most Windows applications allow you to make changes to the printer settings. This
changes the number of copies, sequence of the pages, paper orientation, and margins.
If you click Properties, Setup, or Options in the Print dialog box, you’ll access the printer
driver ’s dialog box. It allows you to change additional printer settings.
Note: Most Windows applications will override settings you specify in the printer driver. Change all
printer settings available in the software application first, and any remaining settings with
the printer driver.

29
Operating Your Printer
ENGLISH
Overlays
Using this tab, you can create, delete and load over lay. For detailed information about each setting, click Help at
the bottom of the dialog box.
Watermarks
Using this tab, you can edit, save, delete and control watermartk. For detailed information about each setting,
click Help at the bottom of the dialog box.
About
This tab shows the software version and useful information about your printer.
Olivetti PG L8en PCL 6 driver includes 5 tabs.
Paper Options
Using this tab, you can change the number of copies, page
orientation, paper size, paper source, and so on. For
detailed information about each setting, click Help at the
bottom of the dialog box.
Graphics
Using this tab, you can change graphics mode, resolution,
text mode, toner saver, and so on. For detailed information
about each setting, click Help at the bottom of the dialog
box.

30
Accessories
4 Mbyte memory module
8 Mbyte memory module
16 Mbyte memory module
32 MByte memory module
Process unit B0 335
Drivers and documentation, CD-ROM
Operating Your Printer
 Loading...