

Page 1
Monochrome led page printer
PG L26 - PG L26 Special
User’s Guide
537207EN
Page 2

PUBLICATION ISSUED BY:
i S.p.A.
Olivett
Gruppo Telecom Italia
Via Jervis, 77 - 10015 Ivrea (ITALY
www.olivetti.co
Copyright
All rights reserved
May 2007
The
manufacturer reserves the right to carry out modifications to the product described in this manual at any time
and
without any notice.
Your attention is drawn to the following actions which could compromise the conformity attested to above, as well
as
the characteristics of the product:
• incorrect electrical power supply;
• incorrect installation, incorrect or improper use or use not in compliance with the warnings provided in the
User’
• replacement of original components or accessories with others of a type not approved by the manufacturer, or
performed
m
© 2007, Olivetti
s Manual supplied with the product;
by unauthorised personnel.
)
The mark affixed to the product certifies that
th e
pr o duc t sat i sfi e s th e bas i c qu a lit y
requirements
.
All rights reserved. No part of this material may be reproduced or transmitted in any
form or by any means, electronic or mechanical, including photocopying, recording or
by any information storage and retrieval system, without permission in writing from
the
Publisher.
Page 3

DIRECTIVE 2002/96/CE ON THE TREATMENT, COLLECTION, RECYCLING AND
DISPOSAL
1. FOR COUNTRIES IN THE EUROPEAN UNION (EU)
The disposal of electric and electronic devices as solid urban waste is strictly prohibited: it must be collected separately.
dumping of these devices at unequipped and unauthorized places may have hazardous effects on health and the
The
environment.
Offenders will be subjected to the penalties and measures laid down by the law.
O DISPOSE OF OUR DEVICES CORRECTLY
T
a) Contact the Local Authorities, who will give you the practical information you need and the instructions for handling the
waste
b) When you purchase a new device of ours, give a used device similar to the one purchased to our dealer for disposal.
OF ELECTRIC AND ELECTRONIC DEVICES AND THEIR COMPONENTS
INFORMATION
:
correctly, for example: location and times of the waste collection centres, etc.
The
crossed dustbin symbol on the device means that:
- when it to be disposed of, the device is to be taken to the equipped waste collection centres and is to be
- Olivetti guarantees the activation of the treatment, collection, recycling and disposal procedures in accordance
separately from urban waste;
handled
Directive 2002/96/CE (and subsequent amendments).
with
2. FOR OTHER COUNTRIES (NOT IN THE EU)
The treatment, collection, recycling and disposal of electric and electronic devices will be carried out in accordance with the
laws in force in the country in question.
Page 4

P
REFACE
Every effort has been made to ensure that the information in this document is
complete, accurate, and up-to-date. The manufacturer assumes no responsibility
for the results of errors beyond its control. The manufacturer also cannot guarantee
that changes in software and equipment made by other manufacturers and referred
to in this guide will not affect the applicability of the information in it. Mention of
software products manufactured by other companies does not necessarily constitute
endorsement by the manufacturer.
While all reasonable efforts have been made to make this document as accurate and
helpful as possible, we make no warranty of any kind, expressed or implied, as to
the accuracy or completeness of the information contained herein.
Copyright © 2007. All rights reserved.
Hewlett-Packard, HP, and LaserJet are registered trademarks of Hewlett-Packard
Company.
Microsoft, MS-DOS and Windows are registered trademarks of Microsoft
Corporation.
Apple, Macintosh, Mac and Mac OS are registered trademarks of Apple Computer.
Other product names and brand names are registered trademarks or trademarks of
their proprietors.
Please note that Microsoft Windows XP was used to produce all screenshots in this
manual. These screenshots may vary if you are using any other operating system,
but the principle is the same.
E
MERGENCY FIRST AID
Take care with toner powder:
If swallowed, induce vomiting and seek medical attention. Never attempt
to induce vomiting if person is unconscious.
If inhaled, move the person to an open area for fresh air. Seek medical
attention.
If it gets into the eyes, flush with large amounts of water for at least 15
minutes keeping eyelids open. Seek medical attention.
Spillages should be treated with cold water and soap to help reduce risk
of staining skin or clothing.
PG L26/PG L26 Special User’s Guide – Preface > 4
Page 5

C
ONTENTS
Preface . . . . . . . . . . . . . . . . . . . . . . . . . . . . . . . . . . . . 4
Emergency First Aid . . . . . . . . . . . . . . . . . . . . . . . . . 4
Introduction . . . . . . . . . . . . . . . . . . . . . . . . . . . . . . . . 9
Printer features . . . . . . . . . . . . . . . . . . . . . . . . . . . . 9
Using your printer. . . . . . . . . . . . . . . . . . . . . . . . . . 10
About this manual . . . . . . . . . . . . . . . . . . . . . . . . . . . 11
Online usage . . . . . . . . . . . . . . . . . . . . . . . . . . . . . 11
Printing Pages . . . . . . . . . . . . . . . . . . . . . . . . . . . . 12
Abbreviations used . . . . . . . . . . . . . . . . . . . . . . . . . 13
Printer components . . . . . . . . . . . . . . . . . . . . . . . . . 14
Operator panels . . . . . . . . . . . . . . . . . . . . . . . . . . . . 17
PG L26 . . . . . . . . . . . . . . . . . . . . . . . . . . . . . . . . . 17
Operator panel. . . . . . . . . . . . . . . . . . . . . . . . . . 17
LED indicators . . . . . . . . . . . . . . . . . . . . . . . . . . 17
Online button. . . . . . . . . . . . . . . . . . . . . . . . . . . 19
Status Monitor . . . . . . . . . . . . . . . . . . . . . . . . . . 21
Menu functions . . . . . . . . . . . . . . . . . . . . . . . . . 24
Printing menu settings . . . . . . . . . . . . . . . . . . . . 32
PG L26 Special . . . . . . . . . . . . . . . . . . . . . . . . . . . . 33
Operator panel. . . . . . . . . . . . . . . . . . . . . . . . . . 33
Panel elements . . . . . . . . . . . . . . . . . . . . . . . . . 33
Menu functions . . . . . . . . . . . . . . . . . . . . . . . . . 34
Printing menu settings . . . . . . . . . . . . . . . . . . . . 41
Paper recommendations . . . . . . . . . . . . . . . . . . . . . . 42
Paper and envelope types . . . . . . . . . . . . . . . . . . . . 42
Transparencies and adhesive labels . . . . . . . . . . . . . 43
Installing paper . . . . . . . . . . . . . . . . . . . . . . . . . . . 44
Face up and face down printing . . . . . . . . . . . . . . . . 45
Automatic feed sequence. . . . . . . . . . . . . . . . . . . . . 46
Printing envelopes . . . . . . . . . . . . . . . . . . . . . . . . . 46
Heavyweight paper or cardstock. . . . . . . . . . . . . . . . 47
Paper feed, size and media setting . . . . . . . . . . . . . . 47
PG L26 . . . . . . . . . . . . . . . . . . . . . . . . . . . . . . . 47
PG L26 Special. . . . . . . . . . . . . . . . . . . . . . . . . . 49
Interfaces . . . . . . . . . . . . . . . . . . . . . . . . . . . . . . . . . 52
Printer drivers. . . . . . . . . . . . . . . . . . . . . . . . . . . . . . 53
Windows operating systems. . . . . . . . . . . . . . . . . . . 53
Installed options . . . . . . . . . . . . . . . . . . . . . . . . 53
PG L26/PG L26 Special User’s Guide – Preface > 5
Page 6

Macintosh operating systems . . . . . . . . . . . . . . . . . . 54
Installed options . . . . . . . . . . . . . . . . . . . . . . . . 54
Choosing a Mac driver . . . . . . . . . . . . . . . . . . . . 54
Operation . . . . . . . . . . . . . . . . . . . . . . . . . . . . . . . . . 55
Printer settings in Windows . . . . . . . . . . . . . . . . . . . 55
Printing preferences in Windows applications. . . . . 55
PCL emulation . . . . . . . . . . . . . . . . . . . . . . . . . . 56
Setting from Windows Control Panel. . . . . . . . . . . 64
Printer settings in Macintosh . . . . . . . . . . . . . . . . . . 69
2-sided printing (Windows only) . . . . . . . . . . . . . . . 70
Manual duplex printing using the paper tray . . . . . . . 70
Manual duplex printing using the Manual Feed
Tray . . . . . . . . . . . . . . . . . . . . . . . . . . . . . . . . 71
Consumables and maintenance . . . . . . . . . . . . . . . . 72
Consumable order details . . . . . . . . . . . . . . . . . . . . 72
Toner cartridge life . . . . . . . . . . . . . . . . . . . . . . . . . 72
When to replace the toner cartridge . . . . . . . . . . . . . 73
PG L26 . . . . . . . . . . . . . . . . . . . . . . . . . . . . . . . 73
PG L26 Special. . . . . . . . . . . . . . . . . . . . . . . . . . 73
Replacing the toner cartridge . . . . . . . . . . . . . . . . . . 73
Image drum life . . . . . . . . . . . . . . . . . . . . . . . . . . . 74
When to replace the image drum . . . . . . . . . . . . . . . 74
PG L26 . . . . . . . . . . . . . . . . . . . . . . . . . . . . . . . 74
PG L26 Special. . . . . . . . . . . . . . . . . . . . . . . . . . 75
Replacing the image drum . . . . . . . . . . . . . . . . . . . . 75
Resetting the drum counter . . . . . . . . . . . . . . . . . . . 76
PG L26 . . . . . . . . . . . . . . . . . . . . . . . . . . . . . . . 76
PG L26 Special. . . . . . . . . . . . . . . . . . . . . . . . . . 76
Generating a cleaning page . . . . . . . . . . . . . . . . . . . 77
PG L26 . . . . . . . . . . . . . . . . . . . . . . . . . . . . . . . 77
PG L26 Special. . . . . . . . . . . . . . . . . . . . . . . . . . 78
Cleaning the LED array . . . . . . . . . . . . . . . . . . . . . . 78
Troubleshooting . . . . . . . . . . . . . . . . . . . . . . . . . . . . 79
Status and error messages . . . . . . . . . . . . . . . . . . . 79
PG L26 . . . . . . . . . . . . . . . . . . . . . . . . . . . . . . . 79
PG L26 Special. . . . . . . . . . . . . . . . . . . . . . . . . . 79
Paper Jams . . . . . . . . . . . . . . . . . . . . . . . . . . . . . . 79
Input jam . . . . . . . . . . . . . . . . . . . . . . . . . . . . . . . 80
Feed jam or exit jam. . . . . . . . . . . . . . . . . . . . . . . . 80
Print quality problems . . . . . . . . . . . . . . . . . . . . . . . 82
Software problems . . . . . . . . . . . . . . . . . . . . . . . . . 84
Hardware problems. . . . . . . . . . . . . . . . . . . . . . . . . 84
PG L26/PG L26 Special User’s Guide – Preface > 6
Page 7

Installing options . . . . . . . . . . . . . . . . . . . . . . . . . . . 86
Installation procedure . . . . . . . . . . . . . . . . . . . . . . . 87
Specifications . . . . . . . . . . . . . . . . . . . . . . . . . . . . . . 88
General . . . . . . . . . . . . . . . . . . . . . . . . . . . . . . . . . 88
Paper and tray information . . . . . . . . . . . . . . . . . . . 90
Notes/symbols/terms . . . . . . . . . . . . . . . . . . . . . 91
Index. . . . . . . . . . . . . . . . . . . . . . . . . . . . . . . . . . . . . 92
PG L26/PG L26 Special User’s Guide – Preface > 7
Page 8

N
OTES
, C
AUTIONS AND
NOTE
A note appears in this manual like this. A note provides
additional information to supplement the main text which
may help you to use and understand the product.
W
ARNINGS
CAUTION!
A caution appears in this manual like this. A caution
provides additional information which, if ignored, may
result in equipment malfunction or damage.
WARNING!
A warning appears in this manual like this. A warning
provides additional information which, if ignored, may
result in a risk of personal injury.
PG L26/PG L26 Special User’s Guide – Preface > 8
Page 9

I
NTRODUCTION
Congratulations on purchasing this 26 pages per minute
monochrome page printer.
Your new printer is designed with a range of advanced features
to give you crisp black and white pages at high speed on a wide
range of print media.
For your information, a summary of the main features of your
printer is given below.
P
RINTER FEATURES
> 2 different models to choose from: PG L26,
PG L26 Special
> Memory: 32MB
> High speed printing: 26 pages per minute
> Resolution: 1200 x 600 dpi
> Paper handling: 250 sheets (80g/m²).
> Emulation: Printer Control Language PCL5e, PCL6, Epson
FX, IBM ProPrinter
> Barcodes: embedded for SIDM emulations
> USB 2.0 and Parallel interfaces
Additionally, the following optional features are also available:
> 10/100 BASE-TX Network Interface Card: to make the
PG L26 and PG L26 Special network compatible
> 16, 32, 64, 128, 256MB RAM DIMM: to extend the main
memory of your printer and speed up the processing of
large files
> RS232C Card: to provide serial interface capability for the
PG L26 and PG L26 Special
> Second paper tray: to increase your printer’s paper
handling capacity by 500 sheets (80g/m²)
> Multi-purpose tray: to extend the range of media your
printer can accommodate (capacity 100 sheets (80g/m²)
or 50 envelopes)
PG L26/PG L26 Special User’s Guide – Introduction > 9
Page 10

> One of the following can be added:
> 8MB Flash DIMM: to allow the storage of additional
fonts or bar codes for the PG L26, PG L26 Special
> 16MB Flash DIMM: to allow the storage of additional
fonts or bar codes for the PG L26, PG L26 Special
> PostScript PS level 3 DIMM: to add PostScript
emulation to the PG L26 Special. Cannot be added in
conjunction with extra flash memory. (See the section
entitled “Installing Options” for full details.)
U
SING YOUR PRINTER
To help you get the most from your printer, the manufacturer has
provided a variety of supporting materials. A summary of these
materials and their purposes is given in the following chapter.
PG L26/PG L26 Special User’s Guide – Introduction > 10
Page 11

A
BOUT THIS MANUAL
This manual is the user’s guide for your printer and forms part of
the overall user support listed below:
> Quick Set-up Guide: to describe how to unpack, connect
and power up your printer.
> This User’s Guide: to help you to operate your printer
and make the best use of its many features. Also included
are guidelines for troubleshooting and maintenance to
ensure that it performs at its best. Additionally,
information is provided for adding optional accessories as
your printing needs evolve.
> Installation Guides: accompany consumable items and
optional accessories to describe how to install them.
> Online Help: online information associated with the
printer driver and Status Monitor software.
This manual has been written using more than one printer as a
model and the illustrations/screenshots reflect this. What you see
will be appropriate to the model you are using.
O
NLINE USAGE
This manual is intended to be read on screen using an Adobe
Acrobat Reader. Use the navigation and viewing tools provided in
Acrobat.
You can access specific information in two ways:
> In the list of bookmarks down the left hand side of your
screen, click on the topic of interest to jump to the
required topic. (If the bookmarks are not available, use
the Table of Contents.)
> In the list of bookmarks click on Index to jump to the
Index. (If the bookmarks are not available, use the Table
of Contents.) Find the term of interest in the
alphabetically arranged index and click on the associated
page number to jump to the page containing the subject.
PG L26/PG L26 Special User’s Guide – About this manual > 11
Page 12
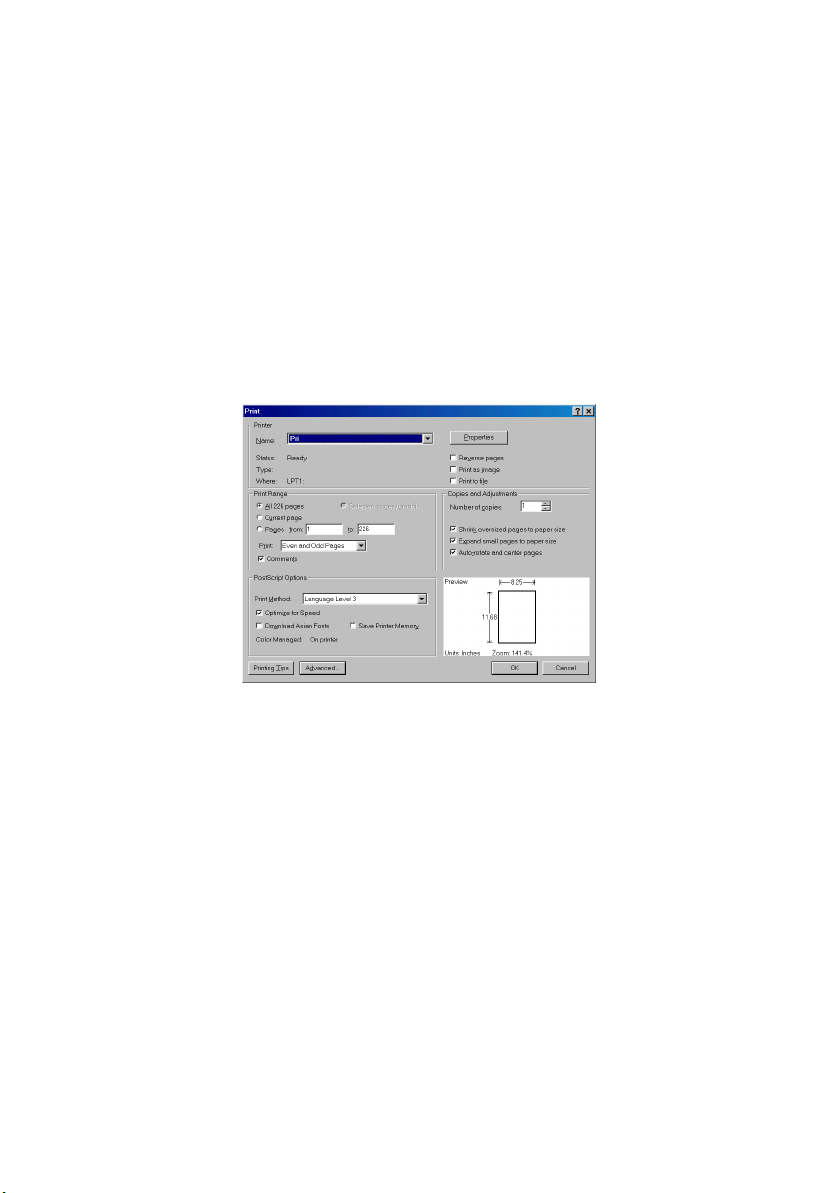
P
RINTING PAGES
The whole manual, Individual pages, or sections may be printed.
The procedure is:
1. From the toolbar, select File > Print (or press the
Ctrl + P keys).
2. Choose which pages you wish to print:
(a) [All pages], for the entire manual.
(b) [Current page] for the page at which you are
looking.
(c) [Pages from] and [to] for the range of pages you
specify by entering their page numbers.
3. Click on OK.
PG L26/PG L26 Special User’s Guide – About this manual > 12
Page 13
A
BBREVIATIONS USED
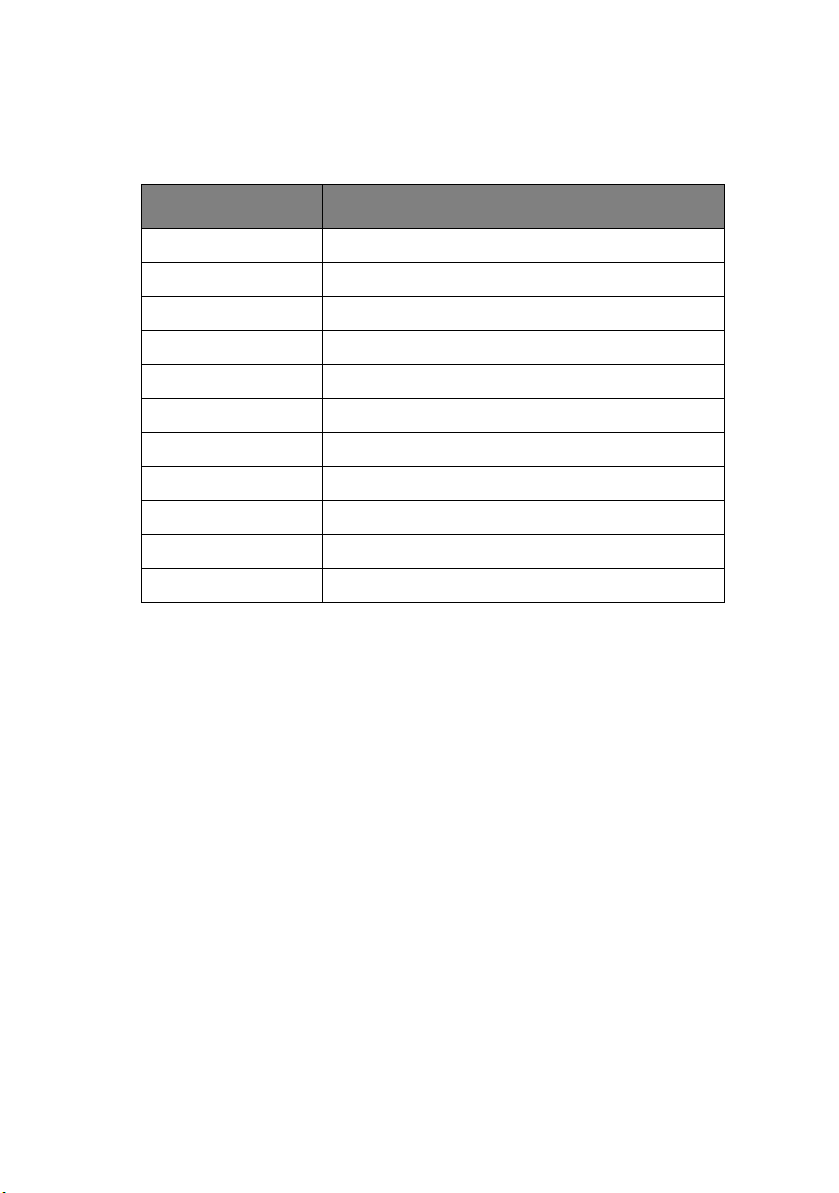
The following abbreviations are used in this manual:
ABBREVIATION MEANING
Ctrl Control
dpi dots per inch
DIMM Dual In-line Memory Module
n network card installed
LED Light Emitting Diode
NIC Network Interface Card
PCL Printer Control Language
PS PostScript (emulation)
PSE PostScript Emulation
RAM Random Access Memory
SIDM Serial Impact Dot Matrix
PG L26/PG L26 Special User’s Guide – About this manual > 13
Page 14
P
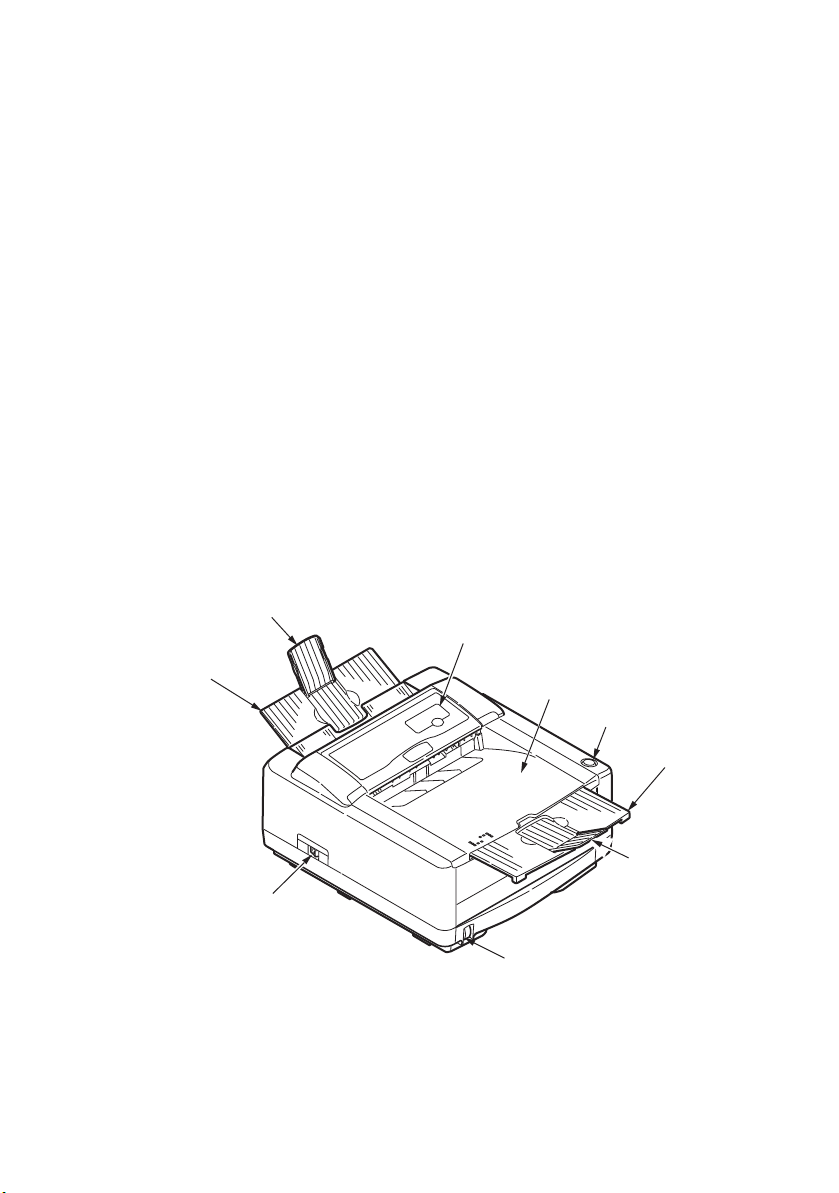
RINTER COMPONENTS
Apart from the Operator panels, which are described in the next
chapter, the PG L26 and PG L26 Special printers look similar from
the outside. The important components are identified in the
representations below.
1. Operator panel (PG L26 shown)
2. Output Stacker (150 sheets, face down)
3. Top cover release button
4. Output Stacker extension
5. Output Stacker extension paper guide
6. Paper Tray content indicator
7. ON/OFF switch
8. Rear Output Stacker (50 sheets, face up)
9. Rear Output Stacker paper guide
9
1
8
2
3
7
6
PG L26/PG L26 Special User’s Guide – Printer components > 14
4
5
Page 15
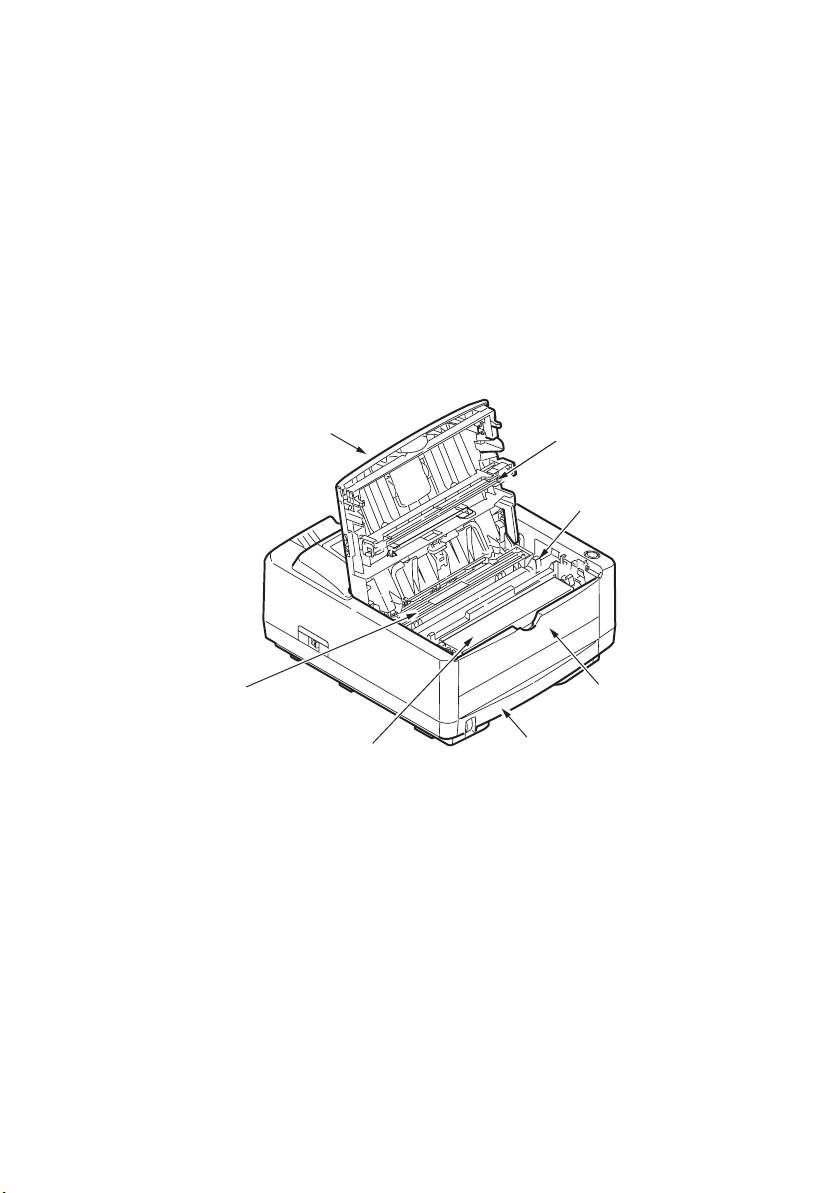
10. LED array
11. Image drum
12. Manual Feed Tray (single sheet) (shown in closed position)
13. Paper Tray (250 sheets)
14. Toner cartridge
15. Fuser unit
16. Top c o ver
15
16
14
10
11
12
13
PG L26/PG L26 Special User’s Guide – Printer components > 15
Page 16
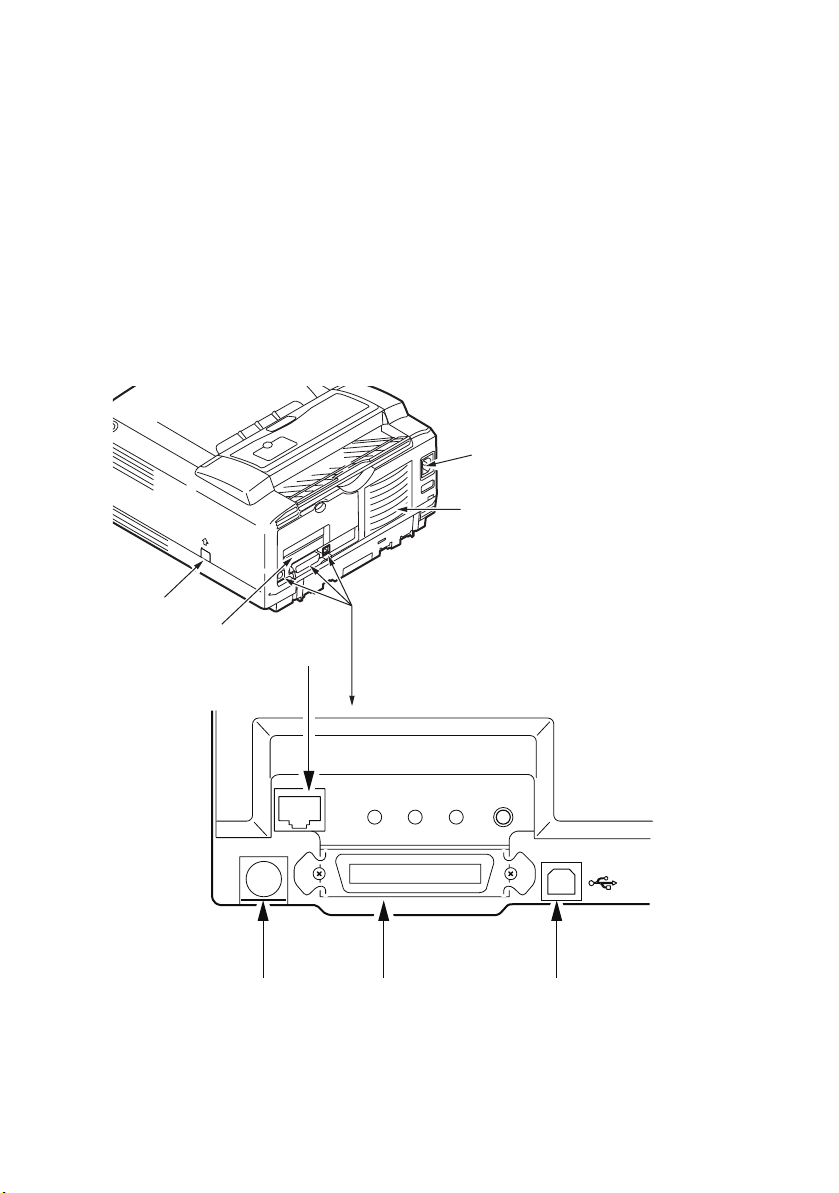
17. Power cable connection
18. Cooling fan
19. USB interface connection
20. Parallel interface connection
21. Second paper tray (optional) connection
22. Network card (optional)
23. RS232 serial interface card (optional)
24. Optional Multi Purpose Tray connection
17
18
24
23
22
192021
PG L26/PG L26 Special User’s Guide – Printer components > 16
Page 17

O
PERATOR PANELS
This chapter describes the function of the operator panel on your
printer. It is useful to describe the Status Monitor software at this
point as it provides the PG L26 status information and the
equivalent of the menu control panel on the PG L26 Special. (See
“Printer Drivers” for installation of the Status Monitor.)
PG L26
O
PERATOR PANEL
The PG L26 operator panel consists of 4 indicating LEDs and an
Online button. From left to right, the LEDs indicate Power On,
Ready, Manual feed and Error.
LED
INDICATORS
The LED indicators show the status of the printer and have five
operating conditions as follows:
> Indicator off
> Indicator on
> Flash 1 - slow blink - 1 long flash every 4 seconds
> Flash 2 - blink - 1 flash per second
> Flash 3 - rapid blink - 4 flashes per second.
All four LED indicators come on momentarily when power is
switched on using the main power switch.
PG L26/PG L26 Special User’s Guide – Operator panels > 17
Page 18
Power on LED (green)
This indicator comes on and stays on when the printer is switched
on using the main power switch.
Ready LED (green)
> Indicator on - the printer is on-line and ready to receive
data.
> Indicator off - the printer is off-line and cannot receive
data.
The meaning of the indicator LEDs when they flash (x) is
summarised as follows:
FLASH
TYPE
Flash 1 –
slow
blink
READY
LED
(GREEN)
x The printer is data
MANUAL
FEED LED
(AMBER)
ERROR
MEANING
LED
(AMBER)
processing when
printing has been
suspended.
xThe image drum
requires changing,
toner is low or paper
tray is empty but no
job is processing.
PG L26/PG L26 Special User’s Guide – Operator panels > 18
Page 19

FLASH
TYPE
READY
LED
(GREEN)
MANUAL
FEED LED
(AMBER)
ERROR
LED
(AMBER)
MEANING
Flash 2
—
blink
Flash 3
—
rapid
blink
O
NLINE BUTTON
x The printer is
x The printer is
x There is a printing
x x x There is a minor
x x x There is a major
receiving and
processing data
during printing or
the printer is
resetting.
requesting that a
Manual Feed Tray is
used for paper feed.
error, for example, a
problem with paper,
the cover is open or
the paper tray is
empty while a job is
processing.
error with the
printer, for example,
toner is low and the
image drum needs
to be changed.
error with the
printer, requiring a
service call, for
example, a
hardware problem.
The primary functions of the Online button are activated by
pressing the switch momentarily and releasing. The primary
functions are as follows:
> Turning the printer off-line.
> Turning the printer on-line (ready).
> Resuming printing after a print overrun, page overflow, or
receiving buffer overflow.
> Interrupting data processing when the printer is receiving
and processing data.
PG L26/PG L26 Special User’s Guide – Operator panels > 19
Page 20

> Resuming data processing.
The secondary functions of the Online button are activated after
turning the printer off line, then pressing and holding the switch
for four seconds before releasing. The secondary functions are as
follows:
> Printing the demo and menu pages.
NOTE
Demo and menu pages can also be printed using the printer
Status Monitor.
> Printing any data held in the buffer after printing has been
cancelled.
The other functions of the Online button are activated after
turning the printer off line then pressing and holding the switch
for seven seconds before releasing. The other functions are as
follows:
> Printing a cleaning page.
NOTE
A cleaning page can also be printed using the printer Status
Monitor.
> Resetting the printer and clearing the buffer after printing
has been cancelled.
NOTE
To reset the printer to the default settings of the
manufacturer, the Online button is pressed and held down
while the printer is switched on with the main power switch.
The LED indicators blink when the printer has reset to the
default settings.
PG L26/PG L26 Special User’s Guide – Operator panels > 20
Page 21
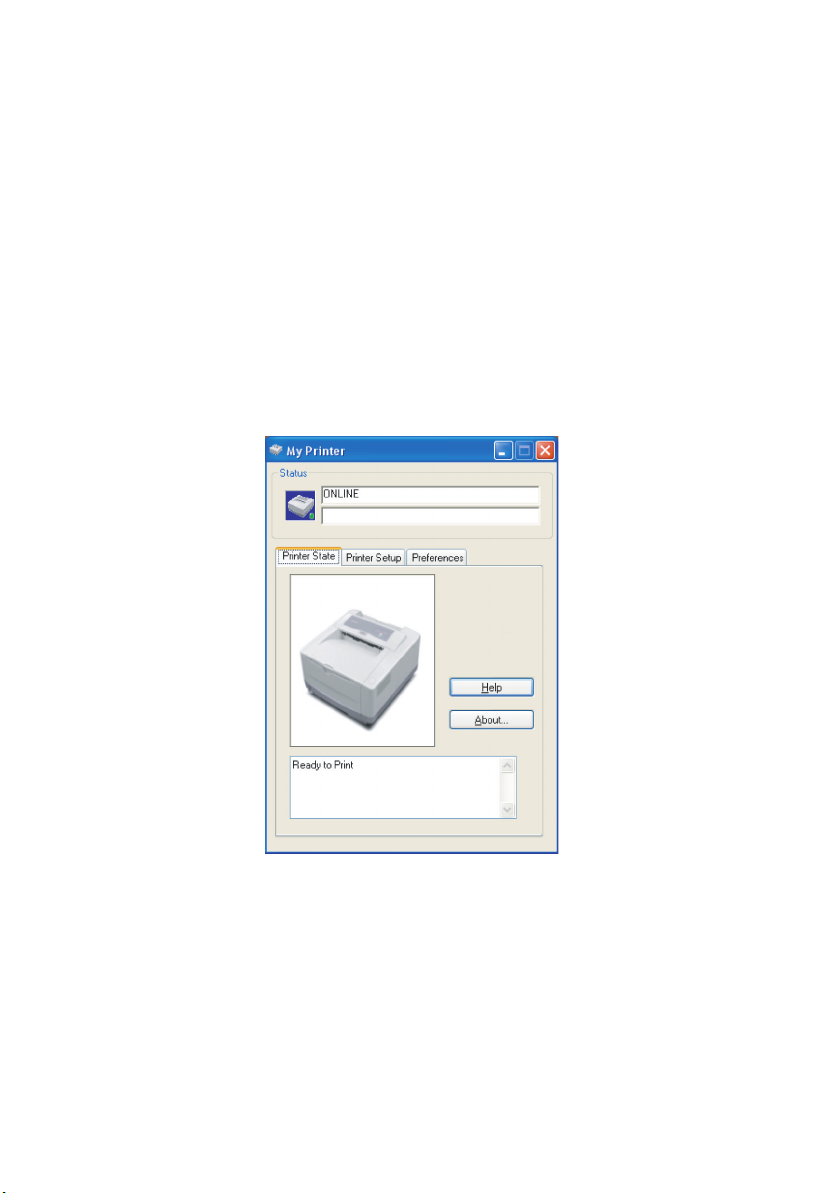
S
TATUS MONITOR
After installing the printer driver software onto your computer,
the Status Monitor is then installed to indicate what is happening
to the printer when it is being used. (See the chapter entitled
“Printer Drivers”.) This Status Monitor is also used to control and
change the various printer settings.
Using the Printer Status Monitor
Viewing the status of the printer, and viewing or changing the
printer settings are carried out as follows:
Click on Start > All Programs > Olivetti > Status Monitor and
select the Status Monitor. The current printer status is shown.
PG L26/PG L26 Special User’s Guide – Operator panels > 21
Page 22
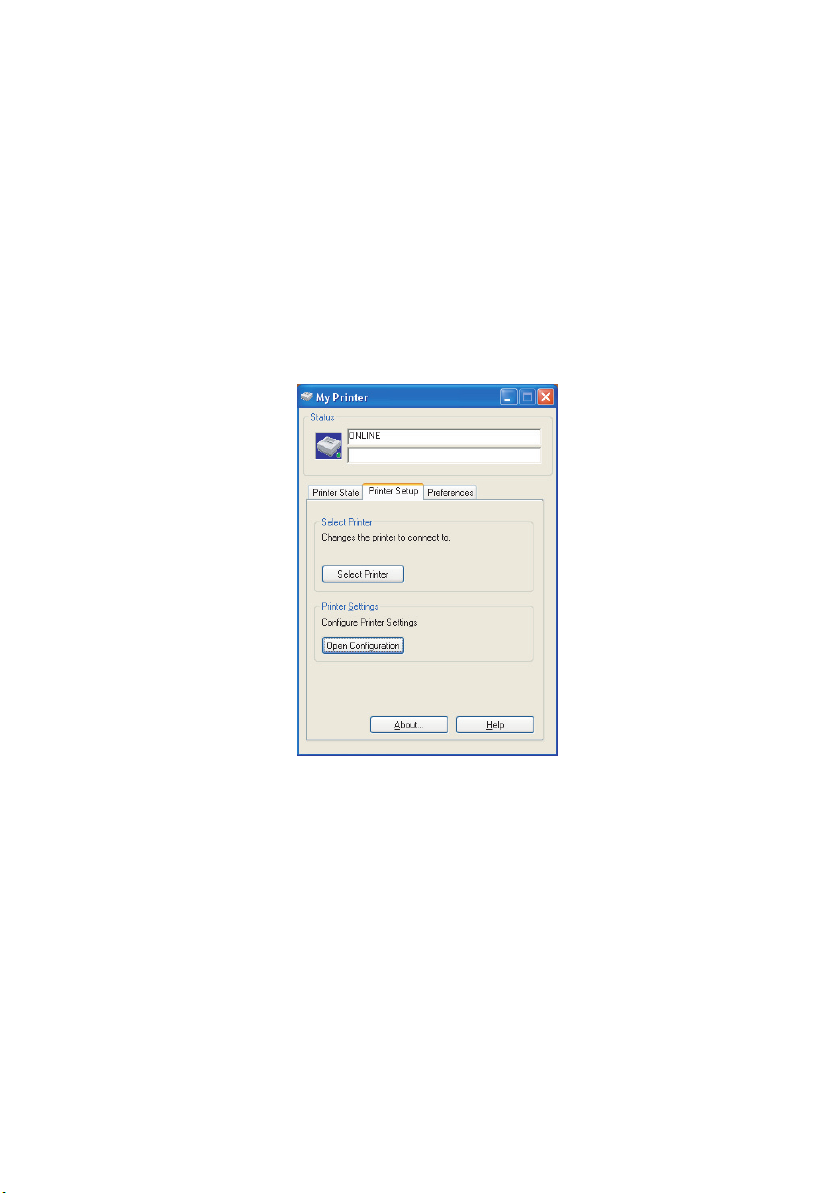
Printer Setup Tab
Selecting the Printer Setup tab provides access to the Printer
Menu button, which, when selected, enables you to:
> Select which printer to connect to via the Select Printer
button.
> Configure the printer settings via the Open
Configuration button.
At all stages, detailed on-line help is provided via the Help
button.
PG L26/PG L26 Special User’s Guide – Operator panels > 22
Page 23
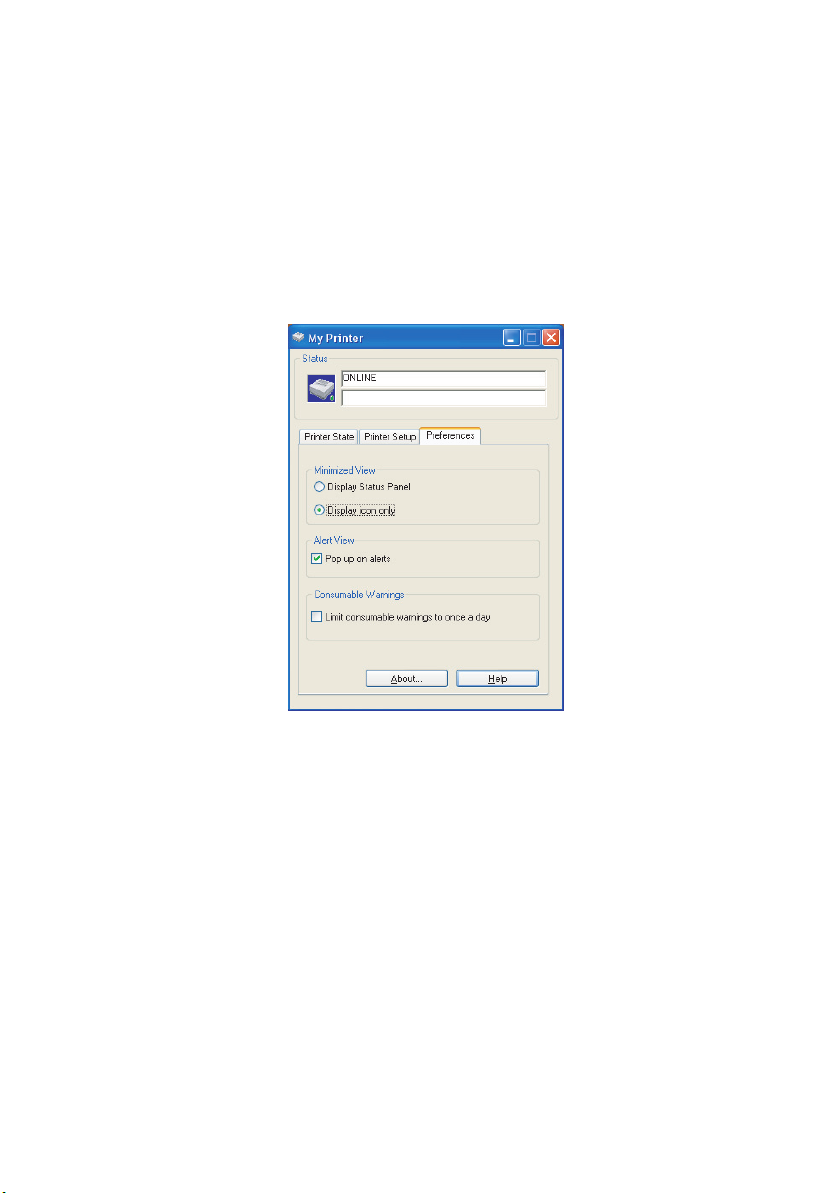
Preferences Tab
Selecting this tab provides the means to choose the information
displayed by the Status Monitor and how/when the Status
Monitor appears.
The default Alert view setting ensures that the Status Monitor
pops up to inform you of a condition that requires your attention
e.g. toner low.
PG L26/PG L26 Special User’s Guide – Operator panels > 23
Page 24
M
ENU FUNCTIONS
The Printer Menu allows you to view and change the printer’s
internal settings. You can think of this as the software equivalent
of an LCD operator panel display that appears on the front of
some printers.
The settings are grouped into categories or “menus” such as
Information Menu or Print Menu.
Some of these settings are similar to those found in your printer
driver or application software. The settings that you can change
using this software act as the printer’s defaults. These can be
overridden by the settings in your printer driver or application.
For example, if you have set the number of copies in the Printer
Menu settings to one, this will be overridden if you select three
copies of your document in the printer driver.
PG L26/PG L26 Special User’s Guide – Operator panels > 24
Page 25

Information Menu
This menu provides a quick method of listing various items stored
within the printer.
INFORMATION MENU
ITEM ACTION
PRINT MENU MAP Apply
PRINT FILE LIST Apply
PRINT PCL FONT Apply
PRINT PSE FONT Apply When PSE is installed
PRINT IBM PPR FONT Apply
PRINT EPSON FX FONT Apply
PRINT DEMO 1 Apply
Print menu
This menu provides adjustment of various print job related
functions.
PRINT MENU
ITEM DEFAULT REMARKS
COPIES 1
MANUAL FEED MODE OFF
PAPER SOURCE TRAY1
AUTO TRAY CHANGE OFF
ON
AUTO TRAY SEQUENCE DOWN
PAPER SIZE CHECK ENABLE
RESOLUTION 600
TONER SAVE DISABLE
ORIENTATION PORTRT
LINES PER PAGE 64LNS
EDIT SIZE CASSETT
No optional tray installed
When Tray2 or MPF is
installed
PG L26/PG L26 Special User’s Guide – Operator panels > 25
Page 26

Media Menu
This menu provides adjustment to suit a wide range of print
media.
MEDIA MENU
ITEM DEFAULT REMARKS
TRAY1 MEDIA SIZE A4 SIZE
TRAY1 MEDIATYPE PLAIN
TRAY1 MEDIAWEIGHT MEDIUM
TRAY2 PAPERSIZE A4 SIZE When tray 2 is installed
TRAY2 MEDIATYPE PLAIN When tray 2 is installed
TRAY2 MEDIAWEIGHT MEDIUM When tray 2 is installed
MPF MEDIA SIZE DL ENV When MPF is installed
MPF MEDIATYPE PLAIN When MPF is installed
MPF MEDIAWEIGHT MEDIUM When MPF is installed
MANUAL TRAY MEDIA SIZE A4 SIZE
MANUAL TRAY MEDIA TYPE PLAIN
MANUAL TRAY MEDIA WEIGHT MEDIUM
CUSTOM PAPER SIZE UNIT mm
CUSTOM PAPER WIDTH 210 mm
CUSTOM PAPER LENGTH 297 mm
System configuration menu
This menu adjusts general printer settings to suit the way you
prefer to work.
SYSTEM CONFIGURATION MENU
ITEM DEFAULT REMARKS
POWER SAVE 10 MIN
EMULATION AUTO
PARA PORT ASCII
USB PORT RAW
NW PORT RAW When NIC is installed
RS PORT ASCII When RS232 is installed
CLEAR ALARMS ON
CLEAR ERRORS ON
MANUAL FEED TIMEOUT 60 SEC
WAIT TIMEOUT 40 SEC
PRINT CONFIGURATION AT
TONER LOW
JAM RECOVERY ON
ERROR REPORT OFF
PG L26/PG L26 Special User’s Guide – Operator panels > 26
CONT
Page 27

SYSTEM CONFIGURATION MENU
ITEM DEFAULT REMARKS
STATUS DISPLAY LANGUAGE ENGLISH
PCL emulation
This menu controls the printer’s PCL emulation.
PCL MENU
ITEM DEFAULT REMARKS
FONT SOURCE RESDENT
FONT No. I000
FONT PITCH 10.00
FONT SIZE 12.00 Not displayed in default
SYMBOL SET PC-8
A4 WIDTH 78 COL
WHITE PAGE SKIP OFF
CR FUNCTION CR
LF FUNCTION LF
UNPRINTABLE AREA NORMAL
PEN ADJUST ON
setup
PPR Emulation
This menu controls the printer’s PPR emulation.
PPR MENU
ITEM DEFAULT REMARKS
FONT PITCH 10 CPI
FONT PITCH IN CONDENSE
MODE
CHARACTER SET SET-2
SYMBOL SET IBM-437
LETTER O STYLE DISABLE
ZERO CHARACTER NORMAL
LINE PITCH 6 LPI
WHITE PAGE SKIP OFF
CR FUNCTION CR
LF FUNCTION LF
LINE LENGTH 80 COL
FORM LENGTH A4
TOF POSITION 0.0 INCH
PG L26/PG L26 Special User’s Guide – Operator panels > 27
12 to 20
Page 28

PPR MENU
ITEM DEFAULT REMARKS
LEFT MARGIN 0.0 INCH
FIT TO LETTER DISABLE
TEXT HEIGHT SAME
FX Emulation
This menu controls the printer’s FX emulation.
FX MENU
ITEM DEFAULT REMARKS
FONT PITCH 10 CPI
CHARACTER SET SET-2
SYMBOL SET IBM-437
LETTER O STYLE DISABLE
ZERO CHARACTER NORMAL
LINE PITCH 6 LPI
WHITE PAGE SKIP OFF
CR FUNCTION CR
LINE LENGTH 80 COL
FORM LENGTH A4
TOF POSITION 0.0 INCH
LEFT MARGIN 0.0 INCH
FIT TO LETTER DISABLE
TEXT HEIGHT SAME
Parallel menu
This menu controls the operation of the printer’s parallel data
interface.
PARALLEL PORT MENU
ITEM DEFAULT REMARKS
PARALLEL PORT ENABLE
BI-DIRECTIONAL ENABLE
ECP MODE ENABLE
ACK WIDTH NARROW
BUSY/ACK OUTPUT SEQUENCE IN
I-PRIME DISABLE
OFF REC DISABLE Only when PSE is
PG L26/PG L26 Special User’s Guide – Operator panels > 28
installed
Page 29

RS232C menu
This menu controls the operation of the printer’s RS232C data
interface.
RS232C MENU
ITEM DEFAULT REMARKS
RS232C ENABLE Only when RS232C is
FLOW CONTROL DTR HI Only when RS232C is
BAUD RATE 9600 Only when RS232C is
DATA BITS 8 BITS Only when RS232C is
PARITY NONE Only when RS232C is
MIN. BUSY TIME 200mSEC Only when RS232C is
OFF REC DISABLE Only when both RS232C
installed
installed
installed
installed
installed
installed
and PSE are installed
USB menu
This menu controls the operation of the printer’s USB data
interface.
USB MENU
ITEM DEFAULT REMARKS
USB ENABLE
SOFTWARE RESET DISABLE
OFF REC DISABLE Only when PSE is
SERIAL NUMBER ENABLE
installed
Network menu
This menu controls the operation of the printer’s 10Base-T/
100Base-TX network interface.
NETWORK MENU
ITEM DEFAULT REMARKS
TCP/IP ENABLE Only when NIC is installed
NETBEUI ENABLE Only when NIC is installed
NETWARE ENABLE Only when NIC is installed
PG L26/PG L26 Special User’s Guide – Operator panels > 29
Page 30

NETWORK MENU
ITEM DEFAULT REMARKS
ETHERTALK ENABLE Only when NIC is installed
FRAME TYPE AUTO Only when NIC is installed
IP ADDRESS SET AUTO Only when NIC is installed
IP ADDRESS Only when NIC is installed
SUBNET MASK Only when NIC is installed
GATEWAY ADDRESS Only when NIC is installed
INITIALIZE NIC? Only when NIC is installed
WEB/IPP ENABLE Only when NIC is installed
TELNET ENABLE Only when NIC is installed
FTP ENABLE Only when NIC is installed
SNMP ENABLE Only when NIC is installed
LAN NORMAL Only when NIC is installed
HUB LINK SETTING AUTO
NEGOTIATE
Only when NIC is installed
Memory menu
This menu determines how printer memory is used.
MEMORY MENU
ITEM DEFAULT REMARKS
RECEIVE BUFFER SIZE AUTO
RSRC SAV OFF
System adjustment menu
This menu provides fine adjustment of image position on the
printed page in steps of 0.25mm.
SYSTEM ADJUSTMENT MENU
ITEM DEFAULT REMARKS
X ADJUST 0.00 mm
Y ADJUST 0.00 mm
TRAY ID
PLACE PAGE CENTER
PG L26/PG L26 Special User’s Guide – Operator panels > 30
Page 31

Maintenance menu
This menu provides access to various printer maintenance
functions.
MAINTENANCE MENU
ITEM DEFAULT REMARKS
RESET MENU
RESET DRUM COUNT
POWER SAVE MODE ENABLE
TRANSFER SETTING 0
DARKNESS 0
PRINT CLEANING PAGE
Usage menu
This menu is for information only, and provides an indication of
total usage of the printer and the expected life left in its
consumable items. This is particularly useful if you do not have a
full set of replacement consumables to hand and you need to
know how soon you will need them.
USAGE MENU
ITEM DEFAULT REMARKS
TOTAL SHEETS REMAINING The total number of
DRUM LIFE REMAINING% An indication of how soon
TONER LIFE 3K=% An indication of how
sheets the printer has
printed.
you will need to replace
the drum.
much toner is left in the
cartridge.
PG L26/PG L26 Special User’s Guide – Operator panels > 31
Page 32

P
RINTING MENU SETTINGS
The menu settings can be printed as a menu map as follows.
Using the Online button
1. Press the Online button to take the printer off-line.
2. Press and hold down the Online button for at least four
seconds, but less than seven seconds.
3. The printer prints a list of the menu settings and a demo
print page.
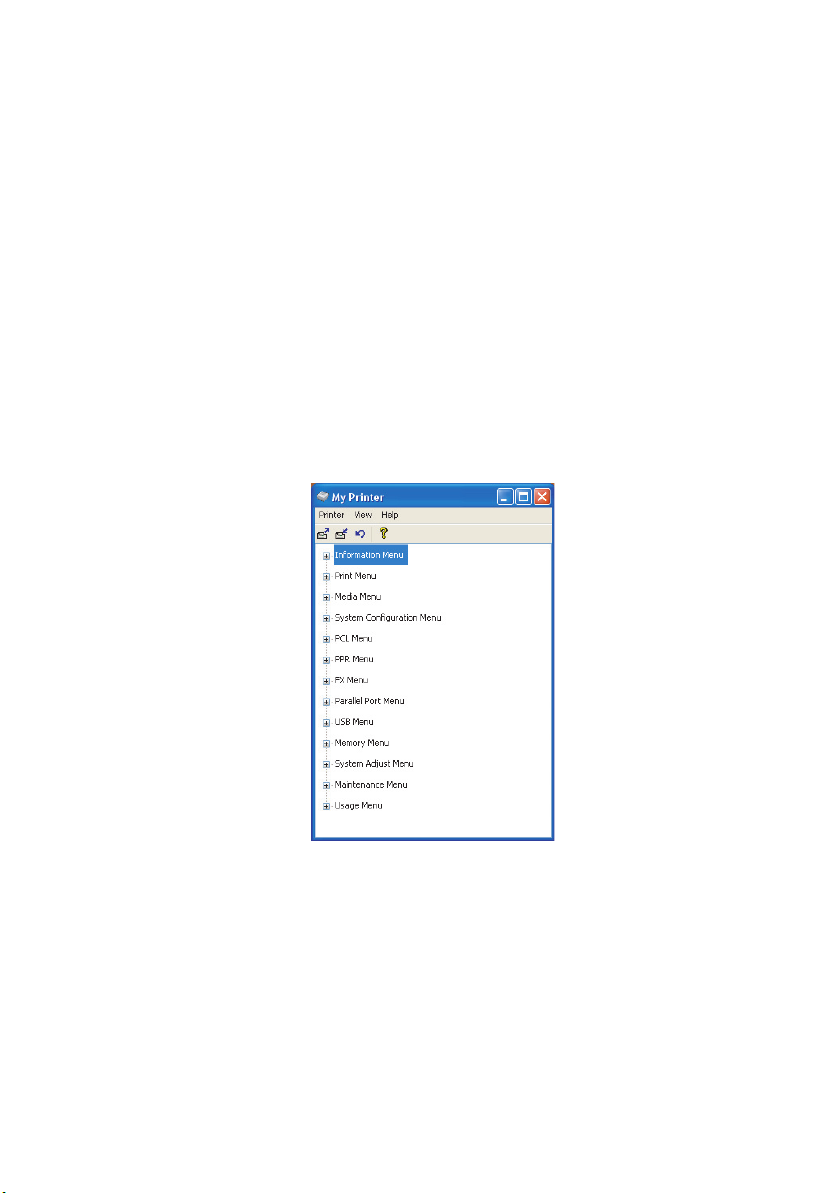
Using the Status Monitor
1. Select Start > All Programs > Olivetti > Status Monitor.
2. Select the Printer Setup Tab.
3. Click on the Open Configuration button. The Printer
Menu is displayed.
4. Expand the Information Menu.
5. To print a demo page or Menu Map, select either “Print
Demo1” or “Print Menu Map” and click on the Apply
button.
PG L26/PG L26 Special User’s Guide – Operator panels > 32
Page 33

PG L26 S
O
PECIAL
PERATOR PANEL
The PG L26 Special operator panel consists of a menu driven
control panel, an LCD display and a LED indicator.
MENU
ITEM VALUE SELECT
READY
P
ANEL ELEMENTS
ON LINE
-
++
-
-
CANCEL
Ready indicator (green). ON - ready to receive data. FLASHING
indicates processing data or error.
1. Liquid crystal display. (LCD) panel. Two rows of up to 8
alphanumeric digits displaying print status, menu items in
menu mode and error messages.
2. Menu Button. Press briefly to enter the MENU mode.
Press briefly again to select the next menu. Press for more
than 2 seconds to scroll through the different menus.
3. Item (+) button. Press briefly to scroll forward to the
next menu item.
4. Value (+) button. Press briefly to scroll forward to the
next value setting for each menu item.
5. Select button. Press briefly to select the menu, item or
value indicated on the LCD panel.
6. Cancel button. Press to cancel a print job.
7. Value (–) button. Press briefly to scroll backward to the
previous value setting for each menu item.
8. Item (–) button. Press briefly to scroll backward to the
previous menu item.
PG L26/PG L26 Special User’s Guide – Operator panels > 33
Page 34

9. Online button. Press to switch between online and offline
status.
NOTE
When pressed in Menu mode, the Online button returns the
printer to ONLINE status. When pressed with DATA PRESENT
displayed, it forces the printer to print out the remaining data
in the printer. Also when there is an error indicating wrong
paper size, pressing the Online button forces the printer to
print.
M
ENU FUNCTIONS
The Printer Menu allows you to view and change the printer’s
internal settings.
The settings are grouped into categories or “menus” such as
Information Menu or Print Menu.
Some of these settings are similar to those found in your printer
driver or application software. The settings that you can change
using this software act as the printer’s defaults. These can be
overridden by the settings in your printer driver or application.
For example, if you have set the number of copies in the Printer
Menu settings to one, this will be overridden if you select three
copies of your document in the printer driver.
Factory default settings are shown in the following tables.
Information Menu
This menu provides a quick method of listing various items stored
within the printer.
INFORMATION MENU
ITEM ACTION
MENU MAP Apply
PCL FONT Apply
PSE FONT Apply When PSE is installed
IBM PPR FONT Apply
EPSON FX FONT Apply
DEMO 1 Apply
PG L26/PG L26 Special User’s Guide – Operator panels > 34
Page 35

Print menu
This menu provides adjustment of various print job related
functions.
PRINT MENU
ITEM DEFAULT REMARKS
COPIES 1
MANUAL FEED OFF
PAPER FEED TRAY1
AUTO TRAY SWITCH OFF
ON
TRAY SEQUENCE DOWN
PAPER SIZE CHECK ENABLE
RESOLUTION 600 DPI
TONER SAVE MODE DISABLE
ORIENTATION PORTRAIT
PER PAGE 64 LINES
LINES
EDIT SIZE CASSETTE
SIZE
No optional tray installed
When Tray2 or MPF is
installed
Media Menu
This menu provides adjustment to suit a wide range of print
media.
MEDIA MENU
ITEM DEFAULT REMARKS
TRAY1 PAPERSIZE A4
TRAY1 MEDIATYPE PLAIN
TRAY1 MEDIAWEIGHT MEDIUM
TRAY2 PAPERSIZE A4 When tray 2 is installed
TRAY2 MEDIATYPE PLAIN When tray 2 is installed
TRAY2 MEDIAWEIGHT MEDIUM When tray 2 is installed
MPF PAPERSIZE DL ENV When MPF is installed
MPF MEDIATYPE PLAIN When MPF is installed
MPF MEDIAWEIGHT MEDIUM When MPF is installed
MANUAL PAPERSIZE A4
MANUAL MEDIATYPE PLAIN
MANUAL MEDIAWEIGHT MEDIUM
UNIT OF MEASURE mm
X DIMENSION 210 mm
Y DIMENSION 297 mm
PG L26/PG L26 Special User’s Guide – Operator panels > 35
Page 36

System configuration menu
This menu adjusts general printer settings to suit the way you
prefer to work.
SYSTEM CONFIGURATION MENU
ITEM DEFAULT REMARKS
POWER SAVE DELAY TIME 10 MIN
EMULATION AUTO
PARA PORT ASCII
USB PORT RAW
NW PORT RAW When NIC is installed
RS PORT ASCII When RS232 is installed
CLEARABLE WARNING ON
AUTO CONTINUE ON
MANUAL TIMEOUT 60 SEC
WAIT TIMEOUT 40 SEC
TONER LOW CONTINUE
JAM RECOVERY ON
ERROR REPORT OFF
LANGUAGE ENGLISH
EMULATION
PCL emulation
This menu controls the printer’s PCL emulation.
PCL MENU
ITEM DEFAULT REMARKS
FONT SOURCE RESDENT
FONT No. I000
FONT PITCH 10.00 CPI
FONT HGT 12.00 Not displayed in default
SYMBOL SET PC-8
A4 PRINT WIDTH 78 COLUMN
WHITE PAGE SKIP OFF
CR FUNCTION CR
LF FUNCTION LF
PRINT MARGIN NORMAL
PEN WIDTH ADJUST ON
setup
PG L26/PG L26 Special User’s Guide – Operator panels > 36
Page 37

PPR Emulation
This menu controls the printer’s PPR emulation.
PPR MENU
ITEM DEFAULT REMARKS
CHARACTER PITCH 10 CPI
FONT CONDENSE 12 CPI to
CHARACTER SET SET-2
SYMBOL SET IBM-437
LETTER O STYLE DISABLE
ZERO CHARACTER NORMAL
LINE PITCH 6 LPI
WHITE PAGE SKIP OFF
CR FUNCTION CR
LF FUNCTION LF
LINE LENGTH 80 COLUMN
FORM LENGTH 11.7 INCH
TOF POSITION 0.0 INCH
LEFT MARGIN 0.0 INCH
FIT TO LETTER DISABLE
TEXT HEIGHT SAME
20 CPI
(A4)
FX Emulation
This menu controls the printer’s FX emulation.
FX MENU
ITEM DEFAULT REMARKS
CHARACTER PITCH 10 CPI
CHARACTER SET SET-2
SYMBOL SET IBM-437
LETTER O STYLE DISABLE
ZERO CHARACTER NORMAL
LINE PITCH 6 LPI
WHITE PAGE SKIP OFF
CR FUNCTION CR
LINE LENGTH 80 COLUMN
FORM LENGTH 11.7 INCH
TOF POSITION 0.0 INCH
LEFT MARGIN 0.0 INCH
PG L26/PG L26 Special User’s Guide – Operator panels > 37
(A4)
Page 38

FX MENU
ITEM DEFAULT REMARKS
FIT TO LETTER DISABLE
TEXT HEIGHT SAME
Parallel menu
This menu controls the operation of the printer’s parallel data
interface.
PARALLEL MENU
ITEM DEFAULT REMARKS
PARALLEL ENABLE
BI-DIRECTION ENABLE
ECP ENABLE
ACK WIDTH NARROW
ACK/BUSY TIMING ACK IN BUSY
I-PRIME 3 MICRO SEC
OFF REC DISABLE Only when PSE is
installed
RS232C menu
This menu controls the operation of the printer’s RS232C data
interface.
RS232C MENU
ITEM DEFAULT REMARKS
RS232C ENABLE Only when RS232C is
FLOW CTL DTR HI Only when RS232C is
BAUD RATE 9600 Only when RS232C is
DATA BITS 8 BITS Only when RS232C is
PARITY NONE Only when RS232C is
MIN. BUSY 200mSEC Only when RS232C is
OFF REC DISABLE Only when both RS232C
installed
installed
installed
installed
installed
installed
and PSE are installed
PG L26/PG L26 Special User’s Guide – Operator panels > 38
Page 39

USB menu
This menu controls the operation of the printer’s USB data
interface.
USB MENU
ITEM DEFAULT REMARKS
USB ENABLE
SOFT RESET DISABLE
OFF REC DISABLE Only when PSE is
SERIAL NUMBER ENABLE
installed
Network menu
This menu controls the operation of the printer’s 10Base-T/
100Base-TX network interface.
NETWORK MENU
ITEM DEFAULT REMARKS
TCP/IP ENABLE Only when NIC is installed
NETBEUI ENABLE Only when NIC is installed
NETWARE ENABLE Only when NIC is installed
ETHERTALK ENABLE Only when NIC is installed
FRAME TYPE AUTO Only when NIC is installed
IP ADDRESS SET AUTO Only when NIC is installed
IP ADDRESS Only when NIC is installed
SUBNET MASK Only when NIC is installed
GATEWAY ADDRESS Only when NIC is installed
INITIALIZE NIC? Only when NIC is installed
WEB/IPP ENABLE Only when NIC is installed
TELNET ENABLE Only when NIC is installed
FTP ENABLE Only when NIC is installed
SNMP ENABLE Only when NIC is installed
LAN NORMAL Only when NIC is installed
HUB LINK SETTING AUTO
NEGOTIATE
Only when NIC is installed
PG L26/PG L26 Special User’s Guide – Operator panels > 39
Page 40

Memory menu
This menu determines how printer memory is used.
MEMORY MENU
ITEM DEFAULT REMARKS
RECEIVE BUFF SIZE AUTO
RSRC SAV OFF
System adjustment menu
This menu provides fine adjustment of image position on the
printed page in steps of 0.25mm.
SYSTEM ADJUSTMENT MENU
ITEM DEFAULT REMARKS
X ADJUST 0.00 mm
Y ADJUST 0.00 mm
PCL MANUAL ID 2
PCL TRAY1 ID 1
PCL TRAY2 ID 5
PCL MP ID 6
PLACE PAGE CENTER
Maintenance menu
This menu provides access to various printer maintenance
functions.
MAINTENANCE MENU
ITEM DEFAULT REMARKS
EEPROM RESET
DRUM COUNT RESET
POWER SAVE ENABLE
SETTINGS 0
DARKNESS 0
CLEANING PAGE
PG L26/PG L26 Special User’s Guide – Operator panels > 40
Page 41

Usage menu
This menu is for information only, and provides an indication of
total usage of the printer and the expected life left in its
consumable items. This is particularly useful if you do not have a
full set of replacement consumables to hand and you need to
know how soon you will need them.
USAGE MENU
ITEM DEFAULT REMARKS
DRUM LIFE REMAINING% An indication of how soon
TONER 7K=%
P
RINTING MENU SETTINGS
3K=%
you will need to replace
the drum.
An indication of how
much toner is left in the
cartridge.
Current menu settings can be confirmed by printing a Menu Map.
1. Press the Menu button until the Information Menu is
available.
2. Press the Item button until the display prompts you to
print the menu map.
3. Press the Select button to print the menu map.
PG L26/PG L26 Special User’s Guide – Operator panels > 41
Page 42

P
APER RECOMMENDATIONS
For guidance on the media you can use with your printer, which
input tray and which ejection method to use, see the section
entitled “Paper and tray information” in the “Specifications”
chapter.
P
APER AND ENVELOPE TYPES
The manufacturer of this printer recommends the following
guidelines when selecting paper and envelopes for use in your
printer:
> Paper and envelopes should be stored flat and away from
moisture, direct sunlight and heat sources.
> Use a smooth finished paper such as copier or laser type
paper with a Sheffield (smoothness) rating of 250 or less.
If in doubt, please ask your paper supplier.
> Use envelopes designed for use in laser type printers.
> The use of heavily laid or textured paper will seriously
impact on the life of the image drum.
> Do not use very smooth, shiny/glossy paper.
> Do not use heavily embossed headed paper.
> Avoid printing on both sides and putting paper through
the printer twice.
> Avoid using paper with perforations, cut-outs and ragged
edges.
> Do not use envelopes with windows or metal clasps.
> Do not use envelopes with self sealing flaps.
> Avoid using damaged or curled envelopes.
PG L26/PG L26 Special User’s Guide – Paper recommendations > 42
Page 43

T
RANSPARENCIES AND ADHESIVE LABELS
The manufacturer of this printer recommends the following
guidelines when selecting transparencies and adhesive labels for
use in your printer:
> Always manually feed single sheets using a Manual Feed
Tray.
> Always use rear output.
> Media must be designed for use in laser printers or
photocopiers and must be able to withstand 200°C for 0.1
sec.
> Do not use media designed for use in colour laser printers
and photocopiers.
> Labels should cover entire carrier sheet.
> Carrier sheet or adhesive must not be exposed to any part
of the printer.
PG L26/PG L26 Special User’s Guide – Paper recommendations > 43
Page 44

I
NSTALLING PAPER
NOTE
If you are topping up the paper in a paper tray, it is
recommended that you remove the remaining paper from the
tray first then add the new paper stock followed by the paper
you removed. This ensures that the oldest paper is used first
to help prevent paper jams.
1. Remove the paper tray from the bottom of the printer and
place plain paper in the tray, keeping the level of the
paper in the tray below the guide arrowheads shown on
the paper guides (1).
1
3
4
2
PG L26/PG L26 Special User’s Guide – Paper recommendations > 44
Page 45

NOTE
Load letter headed paper face down and top edge towards the
front of the paper tray.
2. Adjust the rear paper support (2) to the size of paper you
are using by gripping the lugs (3), tilting and sliding the
support forwards or backwards as necessary.
3. Adjust the paper guides (1). It is important to adjust the
paper guides correctly to ensure that the paper is not
skewed in the print process. Paper jams may occur if this
operation is not carried out correctly.
4. Replace the tray in the printer. The paper level indicator
(4) provides a visual indication of how much paper is left
in the tray.
NOTE
If you have the optional second paper tray (Tray 2) and you
are printing from the first (upper) tray (Tray 1), you can pull
out the second (lower) tray to reload it. However, if printing
from the second (lower) tray, do not pull out the first (upper)
tray as this will result in a paper jam.
F
ACE UP AND FACE DOWN PRINTING
For face down printing, make sure the Rear Output Stacker is
closed (the paper exits from the top of the printer). The Output
Stacker on the top of the printer stacks printed pages face down,
capacity 150 sheets of weight 80 g/m². Pages printed in reading
order (page 1 first) will be sorted in reading order (last page on
top, facing down).
For face up printing, make sure the face up Rear Output Stacker
is open and the paper guide is extended if required. In this
condition, paper will exit via this path, regardless of driver
settings. Paper is stacked in reverse order, capacity 50 sheets of
weight 80 g/m².
Always use this tray in conjunction with the Manual Feed Tray for
heavyweight stocks to reduce the possibility of paper jams.
PG L26/PG L26 Special User’s Guide – Paper recommendations > 45
Page 46

A
UTOMATIC FEED SEQUENCE
With no optional feed trays installed, the Autotray function in the
Print Menu is set by default to OFF and the Tray sequence
function is set to DOWN. Ensure that the Autotray function is set
to ON (default) when you have either or both optional feed trays
installed. In this way, if a tray runs out of paper, automatic feed
will take place in the order Tray 1, Tray 2 (if fitted), optional Multi
Purpose Tray (if fitted), provided that these trays are set up for
identical media.
P
RINTING ENVELOPES
1. Pull out the Rear Output Stacker (1) until it locks and lift
out the paper guide (2).
2
1
3
2. Pull down the Manual Feed Tray (3) and adjust the paper
guides to the width of the envelope.
3. Insert the envelope, flap down and to the left, until the
printer grips it.
4. Set envelope size and landscape orientation in your
software, then issue the print command.
PG L26/PG L26 Special User’s Guide – Paper recommendations > 46
Page 47

H
EAVYWEIGHT PAPER OR CARDSTOCK
The normal paper path from a main paper tray to the top output
stack involves two complete U-turns. This may sometimes cause
very heavyweight paper or cardstock to jam or misfeed.
Use the Manual Feed Tray to feed this type of paper and the Rear
Output Stacker to collect printed output. This gives a nearly
straight paper path through the machine and may prove more
reliable in this type of application.
P
APER FEED, SIZE AND MEDIA SETTING
The process used to fuse (fix) the printed image to the paper
involves a mixture of pressure and heat. Too much heat will
cause lightweight paper to crease or curl and corrugations in
transparencies. Too little heat will cause the image not to fuse
fully into heavyweight paper.
NOTE
Although media properties can be set in the printer driver for
particular jobs, when filling a tray with media it is
recommended that you manually set the printer to match the
media as described here.
PG L26
The print quality for different types of paper is adjusted by
changing the media type as follows:
1. Start the Status Monitor.
2. Select the Printer Setup tab and click on the Printer
Menu button.
3. Select the Paper tab. Click on the button for the paper
tray being used. Adjust the media type to the required
setting and, if necessary, the paper size to the size of the
paper being used.
4. Click on the Apply button, Close button then OK button
to set the printer to the new media type and printing
quality.
PG L26/PG L26 Special User’s Guide – Paper recommendations > 47
Page 48

Printing transparencies
When printing transparencies, the Manual Feed Tray must be
used and the media type changed to transparencies as follows:
CAUTION!
Damage to the printer may occur if the incorrect
setting is used when printing transparencies.
1. Open the Manual Feed Tray on the printer and place the
transparency face up between the paper guides.
2. Adjust the paper guides to the width of the transparency.
3. Start the Status Monitor.
4. Select the Printer Setup tab and click on the Printer
Menu button.
5. Select the Paper tab and click on the Manual Feed
button. Adjust the media type to Transparency and the
paper size to the size of the transparency being used.
6. Click on the Apply button, Close button then OK button
to set the printer for transparencies.
NOTE
Remember to reset the printer for normal paper after printing
transparencies.
PG L26/PG L26 Special User’s Guide – Paper recommendations > 48
Page 49

PG L26 S
PECIAL
Using the control panel on your printer, you can choose:
> which paper to use
> the size of the paper you wish to use
> the weight of the paper (thickness)
> the type of paper
NOTE
> If the settings in the printer differ from those selected on
your computer, the printer will not print and the LCD will
display an error message.
> The following printer settings are given as a guide only.
Some software applications require the paper feed, size
and media settings to be selected from within the
application (page setup).
> Although media properties can be set in the printer driver
for particular jobs, it is recommended that when filling a
tray with media you manually set the printer to match
the media as described here.
Paper feed selection
The paper feed, paper size, paper weight and media type can be
set manually on the printer using the control panel as follows.
1. Press the Online button to return the printer to offline
status.
2. Press the Menu button repeatedly until PRINT MENU is
displayed, then press the Select button.
3. Press the Item button until the required paper feed is
displayed.
4. Press the Select button. A plus (+) appears next to the
selected paper feed.
NOTE
Whe n t he A U T O T R A Y S W I TC H i s se t t o O N a nd m o re t h a n o n e
paper tray is fitted, paper feed automatically switches to the
next available paper tray, providing non-stop printing.
PG L26/PG L26 Special User’s Guide – Paper recommendations > 49
Page 50

Paper size
Set the paper size as follows.
NOTE
> When using paper trays, standard paper sizes are
recognised automatically with CASSETTE SIZE (default
setting) selected. Paper size need only be set for custom
paper sizes.
> When using the Manual Feed Tray, the paper size has to
be selected.
1. Press the On Line button to return the printer to offline
status.
2. Press the Menu button until PRINT MENU is displayed,
then preset Select button.
3. Press either Item (+) or (-) button repeatedly until EDIT
SIZE is displayed.
4. Press either Value (+) or (-) button until the required
paper size is displayed, then press the Select button. A
plus (+) appears next to the selected paper size.
5. Press the Online button to return the printer to ONLINE
status.
6. Select the correct paper settings in the printer driver
before printing the file.
Media type and weight
Set media type and weight as follows:
CAUTION!
If media type or media weight are not correctly set,
print quality deteriorates and the fuser roller may be
damaged.
1. Press the Online button to return the printer to offline
status.
2. Press the Menu button until MEDIA MENU is displayed,
then press the Select button.
PG L26/PG L26 Special User’s Guide – Paper recommendations > 50
Page 51

3. Press the Item (+) or (-) button until MEDIA TYPE or
MEDIA WEIGHT for the required tray is displayed.
4. Press the Value (+) or (-) button until the required paper
type or weight is displayed, then press the Select button.
A plus (+) appears next to the selected paper type or
weight.
5. Press the Online button to return the printer back to
online status.
Select the correct paper settings in the printer driver before
printing the file.
PG L26/PG L26 Special User’s Guide – Paper recommendations > 51
Page 52

I
NTERFACES
Your printer is equipped with a selection of data interfaces:
1. Parallel – For direct connection to a PC. This port
requires a bi-directional (IEEE 1284 compliant) parallel
cable.
2. USB – For connection to a PC running Windows 98 or
above (not Windows 95 upgraded to Windows 98) or
Macintosh. This port requires a cable conforming to USB
version 2.0 or above.
The operation of a printer is not assured if a USB
compatible device is connected concurrently with other
USB-compatible machines.
When connecting multiple printers of the same type, they
appear as *****, ***** (2), ***** (3), etc. These
numbers depend on the order of connecting or turning on
each printer.
3. Serial – for direct connection to a device that uses serial
printing (available as an option).
4. Ethernet – For network cable connection (available as an
option).
NOTE
> It is not recommended that you connect serial/USB and
parallel cables to the printer simultaneously.
> Interface cables are not supplied with your printer.
If you are connecting your printer directly to a stand alone
computer proceed to the chapter entitled “Printer Drivers”.
If your printer is to be installed as a network printer, please refer
to the relevant section in the User’s Guide for the network
interface card for further details on how to configure the network
connection before installing the printer drivers.
NOTE
Administrator’s authority is required when installing a
network connection.
PG L26/PG L26 Special User’s Guide – Interfaces > 52
Page 53

P
RINTER DRIVERS
This chapter describes how to install a printer driver on two types
of operating system – Windows and Macintosh.
The printer drivers are all contained on the printer driver CDROM. Please refer to the readme file on this CD for the latest
information on printer driver installation.
W
INDOWS OPERATING SYSTEMS
1. With Windows running, insert the printer driver CD-ROM
into your CD-ROM drive.
2. A message should be displayed explaining how to install
your printer driver and utilities. If this is not displayed
automatically, use Start > Run... and enter
E:\readme.htm (where E is your CD-ROM drive) in the
Open field.
3. Click on OK.
NOTE
The printer driver must be installed first before installing any
utilities.
4. For the PG L26, ensure that the Windows Status Monitor is
installed to enable you to keep track of the printer status.
5. For the PG L26 Special, you can use the Operator Panel
Language Setup utility to change the language on the
printer’s LCD display.
I
NSTALLED OPTIONS
Certain options may have been installed in your printer. For those
that are installed, check that they appear enabled on the Menu
Map (See “Confirming current settings” in “Operator panels”.)
Ensure that your options are set up in the printer driver(s) by
making the appropriate settings on the Device Options tab (PCL
emulation) and/or Device Settings tab (PS emulation) described
in the chapter entitled “Operation”.
PG L26/PG L26 Special User’s Guide – Printer drivers > 53
Page 54

M
ACINTOSH OPERATING SYSTEMS
Please refer to the readme file on CD for details on installing the
appropriate Macintosh drivers.
I
NSTALLED OPTIONS
Ensure that any installed options are enabled in the printer
driver.
C
HOOSING A MAC DRIVER
The PG L26, PG L26 Special models allow you to use a PCL Mac
driver.
If the PS option is installed on the PG L26 Special, a PS driver
must always be used with Macintosh operating systems.
PG L26/PG L26 Special User’s Guide – Printer drivers > 54
Page 55

O
PERATION
This chapter provides a broad outline of how to operate your
printer from either a Windows or a Macintosh environment. In the
former, while PCL emulation is available on all printer models, PS
emulation is optional on the PG L26 Special.
P
RINTER SETTINGS IN WINDOWS
NOTE
The illustrations in this guide relate to Windows 2000 PCL and
PS emulations – other operating system windows may appear
slightly different but the principles are the same.
The operator panel controlled menus and Status Monitor
controlled menus (described in the chapter entitled “Operator
panels”) provide access to many options.
The Windows printer driver also contains settings for many of
these items. Where items in the printer driver are the same as
those in the operator panel and Status Monitor menus, and you
print documents from Windows, the settings in the Windows
printer driver will override those settings in the operator panel
and Status Monitor menus.
P
RINTING PREFERENCES IN WINDOWS APPLICATIONS
When you choose to print your document from a Windows
application program a Print dialogue box appears. This dialogue
usually specifies the name of the printer on which you will print
your document. Next to the printer name is a Properties button.
When you click Properties a new window opens which contains
a short list of the printer settings available in the driver, which
you can choose for this document. The settings available from
within your application are only those which you may want to
change for specific applications or documents. Settings you
change here will usually only last for as long as the particular
application program is running.
PG L26/PG L26 Special User’s Guide – Operation > 55
Page 56

PCL
EMULATION
The tabs available are the Setup Tab, the Job Options Tab and
the Image Tab.
Setup Tab.
1. Paper size should be the same as the page size of your
document (unless you wish to scale the printout to fit
another size), and should also be the same as the size of
paper you will feed into the printer.
2. You can choose the source of the paper to feed, which
may be Tray 1 (the standard paper tray), Manual Feed
Tray, Tray 2 (if you have the optional second paper tray
installed) or the optional Multi Purpose feeder. You can
also click on the appropriate part of the screen graphic to
select your preferred tray.
If you select manual, the Weight selection box becomes
visible. You can leave the setting at Printer Setting or
select as required.
3. A variety of document finishing options can be selected,
such as normal one page per sheet, or N-up (where N can
be 2 or 4) for printing scaled down pages at more than
one page per sheet.
PG L26/PG L26 Special User’s Guide – Operation > 56
Page 57

4. Under Manual 2-sided Printing, you can choose to print on
one side of a sheet only or to use 2-sided printing (duplex
printing). Your printer allows you to carry out manual
duplex printing, meaning you must pass the paper
through the printer twice. For more information, see “2sided printing (Windows only)” on page 70. The Duplex
Help button also offers guidelines on how to carry out
manual duplex printing.
5. If you have changed some printing preferences before and
saved them as a set, you can recall them to avoid having
to set them individually each time you need them.
6. A single on-screen button restores the default settings.
Job Options tab
1. The output resolution of the printed page can be set as
follows.
> The Best Quality setting prints at 2400 x 600dpi. This
setting requires the most printer memory and takes
the longest to print. Your printed pages can be scaled
to fit larger or smaller stationery. It is the best option
for printing photographs.
PG L26/PG L26 Special User’s Guide – Operation > 57
Page 58

> The High Quality setting prints at 1200 x 600dpi is the
best option for printing vector objects such as graphics
and text.
> The Normal setting prints at 600 x 600dpi and is
suitable for most printing jobs.
> The Draft setting prints at 300 x 300dpi and is suitable
for printing draft documents that contain mainly text.
You can select Toner Saving to save toner for some
print jobs.
2. Page orientation can be set to either portrait (tall) or
landscape (wide). Both views can be rotated by
180 degrees.
3. You can print watermark text behind the main page
image. This is useful for marking documents as draft,
confidential, etc.
4. In Raster (bitmap) mode, processing of the page image is
done in the computer leaving little processing for the
printer to do, although the file size may be large. In
Vector mode, file sizes may be smaller and so
transmission over a network, for example, may be faster.
These effects are more pronounced for graphics printing
than for text printing.
5. You can select up to 999 copies to print consecutively,
although you will need to top up the paper tray during
such a long print run.
6. Your printed pages can be scaled to fit larger or smaller
stationery, within a range of 25% to 400% of the original
size.
7. A single on-screen button restores the default settings.
PG L26/PG L26 Special User’s Guide – Operation > 58
Page 59

Image tab
1. Dithering produces an intermediate greyscale by adjusting
the combination of dots used in printing. Selecting a
setting determines the degree of detail with which a
graphics image will be printed. Mesh determines that a
screen of dots is used for dithering while Line Art
determines that an array of lines is used for dithering.
2. Select dithering texture by setting the size of dots used in
the halftone screen.
3. Set this control to print greyscale effects in black without
dithering. Select the check-box to disable greyscale
printing or de-select the check-box to enable greyscale
printing.
4. You can manually adjust lightness (the higher the setting
the lighter the print) and contrast (the higher the setting
the greater the contrast).
PS emulation
The tabs available are the Layout Tab, the Paper/Quality Tab
and the Job Options Tab.
PG L26/PG L26 Special User’s Guide – Operation > 59
Page 60

Layout tab
1. Page orientation can be set to portrait (tall), landscape
(wide) or landscape rotated by 180 degrees.
2. Printed page order can be set as front to back or back to
front of the document.
3. Set the number of pages to be printed on a single sheet.
PG L26/PG L26 Special User’s Guide – Operation > 60
Page 61

4. Click the Advanced button to be able to set further
document options as follows:
1. Select the required printed paper size.
2. You can substitute another font for TrueType Font.
3. You can set other document options as required, including
PostScript options and printer features.
PG L26/PG L26 Special User’s Guide – Operation > 61
Page 62

Paper/Quality tab
You can set the paper source or leave it as automatic selection
and by using the Advanced button you have access to the same
set of options as described above for the Layout Tab.
PG L26/PG L26 Special User’s Guide – Operation > 62
Page 63

Job Options tab
1. The output resolution of the printed page can be set as
follows.
> The Best Quality setting prints at 2400 x 600dpi. This
setting requires the most printer memory and takes
the longest to print. It is the best option for printing
photographs.
> The High Quality setting prints at 1200 x 600dpi and is
the best option for printing vector objects such as
graphics and text.
> The Normal setting prints at 600 x 600dpi and is
suitable for most printing jobs. You can select Toner
Saving to save toner for some print jobs
2. You can print watermark text behind the main page
image. This is useful for marking documents as draft,
confidential, etc.
3. You can select up to 999 copies to print consecutively,
although you will need to top up the paper tray during
such a long print run.
4. Your printed pages can be scaled to fit larger or smaller
stationery.
PG L26/PG L26 Special User’s Guide – Operation > 63
Page 64

5. Using the Advanced button gives you access to the
facility to set mirror image printing or negative image
printing.
6. A single on-screen button restores the default settings.
S
ETTING FROM WINDOWS CONTROL PANEL
When you open the driver properties window directly from
Windows, rather than from within an application program, a
somewhat more extensive range of settings is provided. Changes
made here will generally affect all documents you print from
Windows applications, and will be remembered from one
Windows session to the next.
PCL emulation
The main tabs are the General Tab, Advanced Tab and Device
Options Tab.
PG L26/PG L26 Special User’s Guide – Operation > 64
Page 65

General tab
1
2
3
1. This area lists some of the main features of your printer,
including optional items.
2. This button opens the same windows as described earlier
for items which can be set from within application
programs. Changes you make here, however, will become
the new default settings for all Windows applications.
3. This button prints a test page to ensure that your printer
is working.
NOTE
The above features are provided by the Windows 2000
operating system and will vary with other operating systems.
PG L26/PG L26 Special User’s Guide – Operation > 65
Page 66

Advanced tab
1
2
3
4
5
6
7
8
9
10
1. You can specify which times of day your printer will be
available.
2. Indicates current priority, from 1 (lowest) to 99 (highest).
Highest priority documents will print first.
3. Specifies that documents should be spooled (stored in a
special print file) before being printed. The document is
then printed in the background, allowing your application
program to become available more quickly. Options
follow:
This specifies that printing should not start until the last
page has been spooled. If your application program needs
a lot of time for further computation in the middle of
printing, causing the print job to pause for more than a
short period, the printer could prematurely assume that
the document has finished. Selecting this option would
prevent that situation, but printing will be completed a
little later, as the start is delayed.
This is the opposite choice to the one above. Printing starts
as soon as possible after the document begins spooling.
PG L26/PG L26 Special User’s Guide – Operation > 66
Page 67

4. This specifies that the document should not be spooled,
but printed directly. Your application will not normally be
ready for further use until the print job is complete. This
requires less disk space on your computer, since there is
no spool file.
5. Directs the spooler to check the document setup and
match it to the printer setup before sending the document
to print. If a mismatch is detected, the document is held
in the print queue and does not print until the printer
setup is changed and the document restarted from the
print queue. Mismatched documents in the queue will not
prevent correctly matched documents from printing.
6. Specifies that the spooler should favour documents which
have completed spooling when deciding which document
to print next, even if completed documents are lower
priority than documents which are still spooling. If no
documents have completed spooling, the spooler will
favour larger spooling documents over shorter ones. Use
this option if you want to maximise printer efficiency.
When this option is disabled the spooler chooses
documents based only on their priority settings.
7. Specifies that the spooler should not delete documents
after they are completed. This allows documents to be re
submitted to the printer from the spooler instead of
printing again from the application program. If you use
this option frequently it will require large amounts of disk
space on your computer.
8. Specifies whether advanced features, such as pages per
sheet, are available, depending on your printer. For
normal printing keep this option enabled. If compatibility
problems occur you can disable the feature. However,
these advanced options may then not be available, even
though the hardware might support them.
9. This button provides access to the same setup windows as
when printing from applications. Changes made via the
Windows Control Panel become the Windows default
settings.
10. You can design and specify a separator page that prints
between documents. This is particularly useful on a
PG L26/PG L26 Special User’s Guide – Operation > 67
Page 68
shared printer to help each user find their own documents
in the output stack.
NOTE
The above features are provided by the Windows 2000
operating system and will vary with other operating systems.
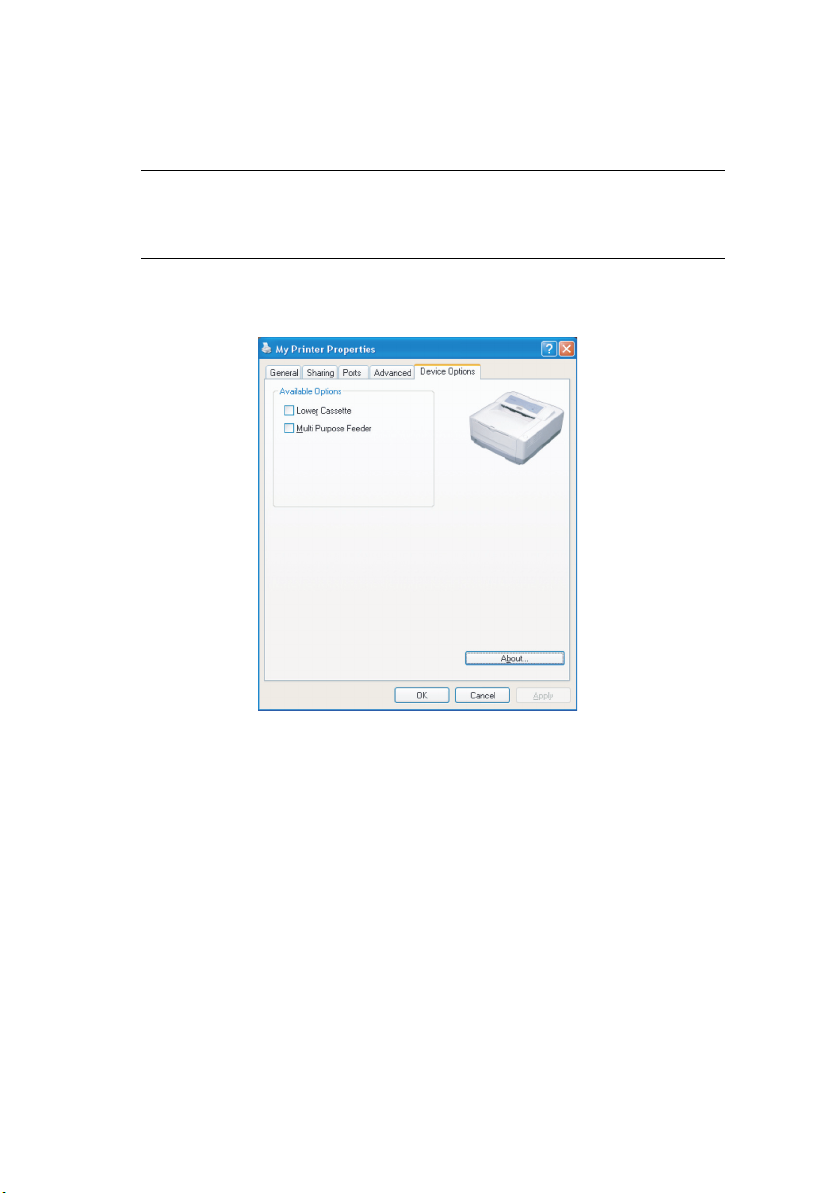
Device Options tab
In this window you can select which optional upgrades are
installed on your printer. See the chapter entitled “Installing
options”.
PS emulation
The main tabs are the General Tab, Advanced Tab and Device
Settings Tab. The General and Advanced tabs are the same as
for PCL emulation described earlier.
PG L26/PG L26 Special User’s Guide – Operation > 68
Page 69
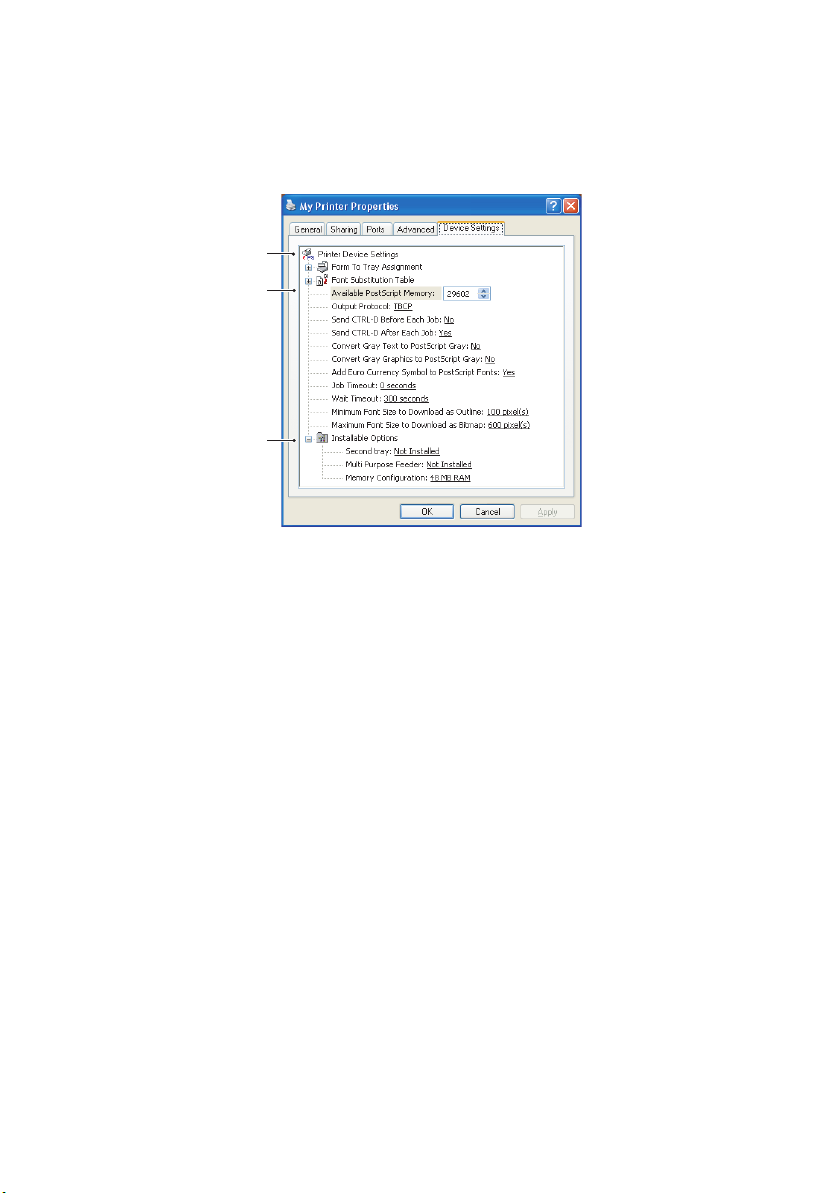
Device Settings tab
1
2
3
1. You can set the desired paper sizes in each of the
available paper feed trays.
2. You can make a variety of font settings depending on your
application.
3. You can set which optional upgrades are installed on your
printer. See the chapter entitled “Installing options”.
P
RINTER SETTINGS IN MACINTOSH
Refer to the readme file on the drivers CD and the online help
provided in the driver software.
PG L26/PG L26 Special User’s Guide – Operation > 69
Page 70

2-
SIDED PRINTING
To carry out 2-sided, or Manual Duplex Printing you must pass
paper through the printer twice. You can carry out 2-sided
printing using the Paper Tray or the Manual Feed Tray.
2-sided Printing is supported on Windows operating systems
only.
M
ANUAL DUPLEX PRINTING USING THE PAPER TRAY
1. Ensure that there is enough paper in the Paper Tray to
carry out the print job.
2. Select File -> Print and click the Preferences button. In
the 2-sided printing drop down menu, select either “Long
Edge” or “Short Edge” according to your printing
preferences. If you require further information, click the
Duplex Help button. Then, Click the Print button.
(W
INDOWS ONLY
)
3. Every second page of your document is printed first.
When this is complete, a message appears on screen
prompting you to take the paper, flip it and replace it in
the Paper Tray.
PG L26/PG L26 Special User’s Guide – 2-sided printing (Windows only) > 70
Page 71

4. Open the Paper Tray.
5. Take the printed paper from the Output Stacker and place
it in the Paper Tray, ensuring that the printed side is facing
up and the bottom of the page facing into the printer.
6. Close the Paper Tray and press the Online button. The
message window should disappear from your screen and
the document finishes printing the remaining pages of
your document.
M
ANUAL DUPLEX PRINTING USING THE MANUAL FEED TRAY
NOTE:
When using the Manual Feed Tray, feed pages one sheet at a
time. You can use either the standard Manual Feed Tray or
the optional Multi Purpose Tray, providing that this is
installed.
1. Position the paper guides on the Manual Feed Tray
according to the paper size.
2. Place paper one sheet at a time in the Manual Feed Tray.
The paper is automatically gripped in position.
3. Select File -> Print to display the Print dialog box.
4. Click the Preferences button. On the 2-sided printing
drop down menu, select either “Long Edge” or “Short
Edge” according to your printing preferences. If you
require further information, click the Duplex Help button
5. When every second page has printed, take the paper from
the output stacker.
6. Set the paper one page at a time in the Manual Feed Tray
with the printed side facing down and the top of the page
facing into the printer. Ensure that the paper is gripped in
place.
7. Press the Online button. The remaining pages of your
document print on the blank side of the paper, one sheet
at a time as you feed it into the Manual Feed Tray.
PG L26/PG L26 Special User’s Guide – 2-sided printing (Windows only) > 71
Page 72

C
ONSUMABLES AND MAINTENANCE
This section deals with the replacement of the toner cartridge and
image drum and general maintenance.
C
ONSUMABLE ORDER DETAILS
ITEM LIFE
Toner, standard, PG L26,
PG L26 Special
Toner, high capacity, PG L26 Special 7,000 A4 @ 5%
Image drum 25,000 A4 pages*
*typical for continuous printing
Please always use genuine consumables.
T
ONER CARTRIDGE LIFE
How long your toner cartridge lasts depends on the print density;
the percentage of the page that prints black. A typical letter has
3% to 5% print density; graphics usually have higher density.
Higher print density means toner is used up faster. At 5% print
density, a standard toner cartridge will print an average of 3,000
pages. Remember, this is only an average: actual results may
vary.
The first toner cartridge installed in a new printer has to fill the
image drum reservoir and saturate the developing roller with
toner. The first standard toner cartridge normally produces about
1,000 pages after installation.
3,000 A4 @ 5%
PG L26/PG L26 Special User’s Guide – Consumables and maintenance > 72
Page 73

W
HEN TO REPLACE THE TONER CARTRIDGE
PG L26
Replace the toner cartridge after Toner Low displays in the printer
Status Monitor. Also, the Error LED indicator slowly blinks when
toner is low. After Toner Low displays, the printer will print about
100 more pages then display Toner Empty and stop printing.
Printing will resume after a new toner cartridge has been
installed.
PG L26 S
When the toner is running low, TONER LOW is displayed in the
operator panel LCD. If printing continues without replacing the
toner cartridge, CHANGE TONER is displayed and printing is
cancelled. Printing will resume after a new toner cartridge has
been installed.
R
EPLACING THE TONER CARTRIDGE
It is recommended that you clean the LED array at the same time
as you change the toner cartridge.
The toner used in this printer is a very fine dry powder contained
in the toner cartridge.
Have a sheet of paper handy so that you have somewhere to
place the used cartridge while you install the new one.
Dispose of the old cartridge responsibly, inside the pack that the
new one came in. Follow any regulations, recommendations, etc.,
which may be in force concerning waste recycling.
If you do spill any toner powder, lightly brush it off. If this is not
enough, use a cool, damp cloth to remove any residue. Do not
use hot water, and never use solvents of any kind. They will make
stains permanent.
PECIAL
WARNING!
If you inhale any toner or get it in your eyes, drink a
little water or bathe your eyes liberally in cold water.
Seek medical attention immediately.
PG L26/PG L26 Special User’s Guide – Consumables and maintenance > 73
Page 74

Switch off the printer and allow the fuser to cool for about
10 minutes before opening the top cover.
1. Press the top cover release button and open the printer’s
top cover fully.
WARNING!
If the printer has been powered on, the fuser may be
hot. This area is clearly labelled. Do not touch.
2. Pull the coloured lever on the right side of the toner
cartridge towards the front of the printer to close the
cartridge then remove the used toner cartridge.
3. Follow the installation instructions on or inside the box
containing the new toner cartridge to install the new
cartridge.
4. Gently wipe the LED array surface with a soft tissue.
5. Close the top cover and press it down to latch it closed.
I
MAGE DRUM LIFE
The life of an image drum depends on a number of factors,
including temperature and humidity, the type of paper used, and
the number of pages per job.
The image drum should last approximately 25,000 pages
continuous printing. This number is approximate because
different numbers of pages are printed each time and the
environmental conditions and the paper type used may vary.
W
HEN TO REPLACE THE IMAGE DRUM
PG L26
When the drum reaches 90% of its life, a CHANGE DRUM
message is displayed in the printer Status Monitor. Also, the Error
LED indicator blinks fast when the image drum requires
changing. Change the image drum when the print becomes faint
or begins to deteriorate.
PG L26/PG L26 Special User’s Guide – Consumables and maintenance > 74
Page 75

PG L26 S
When the drum reaches 90% of its life, a CHANGE DRUM
message is displayed in the operator panel LCD. Change the
image drum when the print becomes faint or begins to
deteriorate.
R
EPLACING THE IMAGE DRUM
It is recommended that you change the toner cartridge
and clean the LED array at the same time as you change
the image drum.
PECIAL
CAUTION!
The green image drum surface at the base of the
cartridge is very delicate and light sensitive. Do not
touch it and do not expose it to normal room light for
more than 5 minutes. If the drum unit needs to be out
of the printer for longer than this, please wrap the
cartridge inside a black plastic bag to keep it away
from light. Never expose the drum to direct sunlight
or very bright room lighting. Always hold the image
drum unit by the ends or from the top.
1. Press the cover release and open the printer’s top cover
fully.
WARNING!
If the printer has been powered on, the fuser may be
hot. This area is clearly labelled. Do not touch.
2. Remove the used image drum and toner cartridge.
3. Follow the installation instructions on or inside the box
containing the new image drum to install the new image
drum.
4. Follow the installation instructions on or inside the box
containing the new toner cartridge to install the new toner
cartridge.
PG L26/PG L26 Special User’s Guide – Consumables and maintenance > 75
Page 76

5. Gently wipe the LED array surface with the LED lens
cleaner that came with the new toner cartridge or soft
tissue.
6. Close the top cover and press it down to latch it closed.
R
ESETTING THE DRUM COUNTER
After replacing the image drum, reset the drum counter to keep
a correct count of the number of pages printed on the image
drum.
PG L26
1. Start the Status Monitor for the printer.
2. Select the Printer Setup tab, click on the Printer Menu
button and then select the Maintenance Menu.
3. Select “Reset Drum Count” and click on the Apply button
to reset the drum counter.
PG L26 S
1. Press the Online button to return the printer to offline
2. Press the Menu button repeatedly until MAINTENANCE
3. Press the Item button until DRUM COUNT RESET is
4. Press the Select button and the Drum Counter is reset.
5. Return the printer on line by pressing the Online button.
PG L26/PG L26 Special User’s Guide – Consumables and maintenance > 76
PECIAL
status.
MENU is displayed, then press the Select button.
displayed.
Page 77

G
ENERATING A CLEANING PAGE
If the printed page shows signs of fading, streaking or erratic
marks, the problem may be cleared by generating a drum
cleaning page as follows.
PG L26
Using the printer Status Monitor
1. Start the Status Monitor for the printer.
2. Select the Printer Setup tab and click on the Printer
Menu button.
3. Select the Test Print tab and click on the Cleaning button.
4. Open the Manual Feed Tray and insert a sheet of A4 plain
paper between the paper guides, then click the OK
button.
5. The printer grips the paper and prints a cleaning page.
6. If subsequent printing appears faded or uneven, try
replacing the toner cartridge.
Using the Online button
1. Press the Online button to take the printer off line.
2. Open the Manual Feed Tray and insert a sheet of A4 plain
paper between the paper guides.
3. Press and hold down the Online button for at least five
seconds.
4. The printer grips the paper and prints a cleaning page.
5. Return the printer on line by pressing the Online button.
6. If subsequent printing appears faded or uneven, try
replacing the toner cartridge.
PG L26/PG L26 Special User’s Guide – Consumables and maintenance > 77
Page 78

PG L26 S
1. Open the Manual Feed Tray and insert a sheet of A4 plain
2. Press the Menu button repeatedly until MAINTENANCE
3. Press the Item button until CLEANING PAGE is displayed.
4. Press the Select button.
5. The printer grips the paper and prints a cleaning page.
6. Press Cancel to exit the menu. The printer should now be
7. If subsequent printing appears faded or uneven, try
C
LEANING THE
Clean the LED array whenever a new toner cartridge is installed
or if there are faded vertical areas or light printing down a page.
Wipe the LED array gently with an anti-static cleaning pad that is
generally available for computer cleaning.
PECIAL
paper between the paper guides. To print from the Paper
Tray, press the Online button when the LCD display
prompts you to insert a sheet of paper in the Manual Feed
Tray.
MENU is displayed, then press the Select button.
on line.
replacing the toner cartridge.
LED
ARRAY
PG L26/PG L26 Special User’s Guide – Consumables and maintenance > 78
Page 79

T
ROUBLESHOOTING
S
TATUS AND ERROR MESSAGES
Your printer has been designed to give you helpful status
feedback not only during normal operation but also if a printing
problem occurs so that you can take appropriate corrective
action.
PG L26
Both status and error messages are displayed in your chosen
language in the Status Monitor, error messages being
accompanied by the appropriate flashing of the Error indicator.
You can set the Status Monitor to pop up on your computer
screen when an alert condition occurs from the Preferences tab
in the Status Monitor.
PG L26 S
The LCD on the printer operator panel provides the selfexplanatory status and error messages in your chosen language.
Error messages are accompanied by the Ready indicator being
extinguished.
P
APER JAMS
Provided that you follow the recommendations in this guide on
use of print media, and you keep the media in good condition
prior to use, your printer should give years of reliable service.
However, paper jams occasionally do occur, and this section
explains how to clear them quickly and simply.
Jams can occur due to paper misfeeding from a paper tray or at
any point on the paper path through the printer. When a jam
occurs, the printer immediately stops, and the operator panel
informs you of the event. If printing multiple pages (or copies),
do not assume that having cleared an obvious sheet that others
will not also be stopped somewhere along the path. These must
also be removed in order to clear the jam fully and restore normal
operation.
PECIAL
PG L26/PG L26 Special User’s Guide – Troubleshooting > 79
Page 80

The printer may experience a paper jam in one of three areas.
> INPUT JAM - paper has failed to leave the selected feed
tray and enter the internal paper path of the printer. A
typical message indicates a paper jam and identifies the
tray to check.
> FEED JAM - paper has entered the printer but failed to
reach the exit. A typical message indicates a paper jam
and advises you to open the top cover for access.
> EXIT JAM - paper has reached the exit but has failed to
exit completely from the printer. A typical message
indicates an exit jam and advises you to open the top
cover for access.
I
NPUT JAM
1. Remove the paper tray from the printer.
2. Remove any crumpled or folded paper.
3. Remove any paper from the underside of the printer.
4. Replace the paper tray.
After successful removal of any damaged or misfed paper, the
printer should continue printing.
F
EED JAM OR EXIT JAM
1. Remove the tray and clear any misfed sheets as given
above.
2. Open the top cover.
WARNING!
The fuser area will be hot. This area is clearly marked.
Do not touch it.
PG L26/PG L26 Special User’s Guide – Troubleshooting > 80
Page 81

CAUTION!
Never expose the image drum unit to light for more
than 5 minutes. Never expose the image drum unit to
direct sunlight. Always hold the image drum unit by
the ends or from the top. Never touch the surface of
the green drum inside the image drum unit.
3. Carefully lift out the image drum, complete with the toner
cartridge. Be careful not to touch or scratch the green
drum surface.
4. Remove any jammed sheets from the paper path.
5. Re-install the image drum complete with toner cartridge,
ensuring that it correctly locates into the slots on each
side of the printer.
6. Close the top cover and press down to latch it closed.
7. The printer will warm up and commence printing when
ready. The page lost through the jam will normally be
reprinted.
NOTE
If the edge of the jammed paper protrudes (or can be seen)
from the exit, reinstall the image drum, close the top cover
and switch the printer on. Remove the jammed paper from
the exit when the exit roller begins rotating after a few
seconds after switching on. However, if the jammed paper
cannot be removed, contact a service representative.
PG L26/PG L26 Special User’s Guide – Troubleshooting > 81
Page 82

P
RINT QUALITY PROBLEMS
Before consulting a service representative regarding a print
quality problem, check the table below to see if there is a
solution, or something you might have overlooked.
SYMPTOM PROBLEM SOLUTION
Blank sheets
printed.
Entire page
prints faintly.
Page has gr ey
background.
Page prints all
black.
Page has
repetitive
marks.
Oblong area of
faint print
appears on each
page.
Vertical white
streaking or
faint areas on
page.
Image drum
cartridge not
properly installed.
Empty or missing
toner cartridge.
Empty toner
cartridge. Pages
get fainter when
toner is used up.
LED array is dirty. Clean LED array.
Static electricity,
generally from dry
environments,
causes toner to
stick to
background.
Hardware problem. Contact service.
Damaged image
drum cartridge
causes repetitive
marks every 1.6
inches (4.06 cm)
due to surface
nicks and
scratches.
Drop out caused by
using paper
exposed to high
humidity.
Tone r i s l o w a n d
does not distribute
properly, or the
drum is worn out.
Reinstall image drum cartridge.
Install new toner cartridge.
Install new toner cartridge.
Change paper to a smoother laser
bond or use a humidifier.
Generate a cleaning page,
repetitive marks may be
temporary.
Change paper stocks, check paper
storage environment or use a
dehumidifier; check toner level.
Replace toner cartridge. Check
drum and replace the drum, if
necessary. Contact service.
LED array is dirty. Clean LED array.
Vertical black
lines.
PG L26/PG L26 Special User’s Guide – Troubleshooting > 82
Hardware problem. Contact service.
Page 83

SYMPTOM PROBLEM SOLUTION
Fuzzy print. LED array is dirty. Clean LED array.
Distorted print. Paper path, lamp
Faded print. Toner cartridge is
assembly, or fusing
unit problem.
not correctly
installed.
Tone r l o w .
Generate cleaning page.
Contact service.
Install toner cartridge correctly.
Replace toner cartridge.
Smeared or
blotched print.
Printed page is
light/blurred.
Bold characters
and dark lines
are smeared.
Print is darker
than usual.
Pages curl
excessively.
Dirty rollers; toner
dropped inside
printer or image
drum problem.
Is toner low? Replace toner cartridge.
Is paper meant for
laser printers?
LED array is dirty. Clean LED array.
Toner is low. Install new toner cartridge.
Darkness setting is
too high.
Printing on wrong
side of paper.
Moisture in paper.
Improper storage.
High humidity. Recommended operating humidity:
Replace image drum and toner.
Contact service.
Use recommended paper.
Change darkness setting.
Turn paper over in tray. (Note
arrow on paper package). Install
paper print side down in tray.
Avoid storing paper in areas of
excessive temperature and
humidity. Store paper in protective
wrapping.
20-80%
PG L26/PG L26 Special User’s Guide – Troubleshooting > 83
Page 84
S
OFTWARE PROBLEMS
Your software (operating environment, applications and printer
drivers) controls the printing process. Make sure you have
selected the right driver for use with your printer. See your
software documentation for more information.
SYMPTOM PROBLEM SOLUTION
Printing is
garbled.
Printer’s output
is below rated
speed.
Size of top
margin
increases with
each page
printed.
H
ARDWARE PROBLEMS
Incorrect driver is
installed.
Much of the
printing delays will
be caused by your
application.
Sometimes purely
text documents will
print slowly
depending on the
selected fonts and
how they are
transferred to the
printer.
Creeping text.
Number of lines per
page in software is
not equal to
number of lines per
page of printer.
SYMPTOM PROBLEM SOLUTION
Graphic image
prints partly on
one page, partly
on the next.
When you try to
print nothing
happens, but
printer indicates
it is ready to
receive data.
Insufficient printer
memory for this
image at this
resolution.
Configuration error. Check cable connection. If more
Install an appropriate driver.
For maximum speed, use text in
your document and use a printer
resident font.
Many software packages assume
66 lines per page, but your
printer’s default is 64. Adjust
software accordingly, or set LINES
Per PAGE in the soft control panel
to equal lines per page in your
software.
Change the resolution, reduce the
image size, or install more memory
in your printer.
than one printer is available, make
sure your printer has been
selected.
Garbage prints. Incorrect cable
PG L26/PG L26 Special User’s Guide – Troubleshooting > 84
configuration. Also,
see Software
Problems.
Check cable configuration,
continuity, and length.
Page 85

SYMPTOM PROBLEM SOLUTION
Printer freezes
or displays error
message when
computer is
rebooted.
Odours. Gases are given off
Printer is on but
must warm up
before a job is
printed.
Booting the
computer while the
printer is on can
cause a
communications
error.
by forms or
adhesives passing
through the hot
fusing unit.
Power Save mode is
set on to conserve
energy. The fuser
must heat up
before you can
begin printing the
next job.
Turn printer off before rebooting
computer.
Make sure the forms you use can
withstand heating, and provide
adequate ventilation.
To eliminate warm up delay, change
Power Save setting
PG L26/PG L26 Special User’s Guide – Troubleshooting > 85
Page 86

I
NSTALLING OPTIONS
The following options are available to extend the performance of
your printer:
> 10/100 BASE-TX Network Interface Card: to make the
PG L26 and PG L26 Special network compatible
> 16, 32, 64, 128, 256MB RAM DIMM: to extend the main
memory of your printer and speed up the processing of
large files
> RS232C Card: to provide serial interface capability for the
PG L26 and PG L26 Special
> Second paper tray: to increase your printer’s paper
handling capacity by 500 sheets (80g/m²)
> Multi Purpose Tray: to extend the range of media your
printer can accommodate (capacity 100 sheets (80g/m²)
or 50 envelopes)
> One of the following can be added:
(a) 8MB Flash DIMM: to allow the storage of additional
fonts or bar codes for the PG L26, PG L26 Special
(b) 16MB Flash DIMM: to allow the storage of additional
fonts or bar codes for the PG L26, PG L26 Special
(c) PostScript PS level 3 DIMM: to add PostScript
emulation to the PG L26 Special. Cannot be added in
conjunction with extra flash memory.
(d) The PG L26 Special PS option is supplied as 2
DIMMs: a PS DIMM and a 16MB RAM DIMM. When
fitted into a basic PG L26 Special (i.e. one with no
memory upgrade already fitted) the PS DIMM will
expand into the 16MB RAM DIMM in order to work,
and the amount of memory available for general
operation of the printer will therefore not change. It
will remain at 16MB, which is the printer's base
memory.
(e) If you require to install a PS upgrade into a
PG L26 Special which already has a memory upgrade
installed, discard the 16MB RAM DIMM which ships
with the PS option and install only the PS DIMM. The
PG L26/PG L26 Special User’s Guide – Installing options > 86
Page 87

result will be that the amount of overall memory
available to the printer will decrease by 16MB as the
PS code expands into 16MB of RAM currently
installed. For example, a user who already has
128MB installed (total memory is therefore
128+16=144MB) will fit only the PS DIMM and will
then have 128MB of RAM left for printing.
I
NSTALLATION PROCEDURE
To install any of the above options, follow the detailed installation
sheet that accompanies the option.
PG L26/PG L26 Special User’s Guide – Installing options > 87
Page 88

S
PECIFICATIONS
G
ENERAL
A summary of the basic characteristics of your printer appears in
the table below:
ITEM SPECIFICATION
Dimensions PG L26 (N22105B):
Weight 9 kg approximately
Printing
method
Print colour Monochrome
Print speed 26 pages per minute maximum
Resolution 1200 x 600 dots per inch
Emulations PCL6, PCL5e, PCLXL, Epson FX, IBM ProPrinter for PG L26,
Interfaces Parallel port in compliance with IEEE 1284-1994 standard
Processor 266 MHz PowerPC
Memory 16 MB expandible to 272MB
Paper sizes A4, A5, A6, B5, Letter, Legal 13, Legal 14, Executive, Custom,
Paper feed Automatic feeding via paper trays (including optional tray and
Paper feed
capacity
at 80g/m²
Paper output Face up, face down depending on paper size, type and
355mm x 395mm x 200mm (W x D x H)
PG L26 Special (N22106B):
355mm x 395mm x 215mm (W x D x H)
Electro-photographic printing using LEDs as light source
PG L26 Special
PCL6, PCL5e, Epson FX, IBM ProPrinter, PS for PG L26 Special
USB 2.0 full speed
Optional 100BASE-TX/10Base-T
Optional RS232C Serial interface
Envelopes (5 types)
optional Multi Purpose Tray)
Manual feeding of single sheets
Tray 1: 250 sheets
Optional Tray 2: 500 sheets
Optional Multi-purpose feeder: 100 sheets
thickness
PG L26/PG L26 Special User’s Guide – Specifications > 88
Page 89

ITEM SPECIFICATION
Power
consumption
Paper output
capacity at
80g/m²
Monthly duty
cycle
Consumables Toner cartridge, Image drum
Power cable Approximately 1.8 m max. length (not provided)
Noise level Operation: 53 dB(A)
Environmental
conditions
Typical: 400W
Idle: 70W
Power save mode : 7-10W
Face up: 50 sheets
Face down: 150 sheets
30,000 pages
Standby mode: 30dB(A)
Power saving mode: Background level
Operation: 10 - 32°C, 20% - 80% RH,
Storage: 14 - 110°C, 10% - 90% RH
When the printer is stored, it should be in its original
packaging, with no moisture formation.
PG L26/PG L26 Special User’s Guide – Specifications > 89
Page 90

P
APER AND TRAY INFORMATION
Feed and ejection methods vary depending on the type, size and
thickness of medium used. Use the chart below and the notes/
symbols/terms on the following page for initial guidance. (Minor
variations to settings may be necessary depending on user setup
and environmental conditions.)
PAPER
TYPE
Plain
paper
Envelopes
Labels A4
Tra ns p arencies
SIZE WEIGHT T1 T2 MPF MF FU FD
A4
A5
B5
Letter
Executive
Legal
(13)
Legal
(14)
A6 L, ML, M o x o o o x
Custom
W: 90 –
216
L: 148 –
356
Com-9
Com-10
DL
C5
Monarch
Custom
W: 90 –
216
L: 148 –
356
Letter
A4
Letter
FEED
CASSETTE
L, ML, M o o o o o o
MH, H x x o o o x
L, ML, M o o x o o o
MH, H x x x o o x
MH, H x x o o o x
L, ML, M o o o o o o
MH, H x x o o o x
–xxooox
–xxooox
–xxooox
EJECTION
METHOD
PG L26/PG L26 Special User’s Guide – Specifications > 90
Page 91

N
OTES/SYMBOLS/TERMS
Notes:
1. When an optional second paper tray is used, the original
tray is referred to as Tray 1 and the optional tray as Tray
2.
2. It is not possible to use custom paper sizes with the PS
emulation driver.
3. Tray 2 can accommodate paper with width of 148 to
216mm and length of 210 to 316mm.
4. Paper smaller than A5 (i.e. less than 210mm long) should
be ejected face up.
SYMBOL/
MEANING
TERM
T1 Paper Tray 1
T2 Paper Tray 2 (optional)
MPF Multi Purpose Tray (optional)
MF Manual Feed Tray
FU Face Up printing from the rear of the printer
FD Face Down printing from the top of the printer
W, L Width, Length in mm
L Light paper weight: 59 - 66g/m²
ML Medium Light paper weight: 67 - 73g/m²
M Medium paper weight: 74 - 88g/m²
MH Medium Heavy paper weight: 89 - 104g/m²
H Heavy paper weight: 105 - 122g/m²
oCan be used
x Cannot be used
PG L26/PG L26 Special User’s Guide – Specifications > 91
Page 92

I
NDEX
Numerics
2-sided printing ............................ 70
A
Adhesive labels ............................ 43
Advanced features
enabling or disabling................. 67
C
Cleaning page
PG L26 ................................... 77
D
Drum counter............................... 76
E
Envelopes
Printing................................... 46
Types ..................................... 42
Exit paper jam ............................. 80
F
Feed jam or exit jam ..................... 80
Feed paper jam ............................ 80
G
Generating a cleaning page
PG L26 ................................... 77
H
Heavyweight paper or
cardstock .................................. 47
I
Image drum
Life ........................................ 74
Replacing ........................... 74, 75
Resetting counter PG L26 .......... 76
Resetting counter
PG L26 Special ...................... 76
Input paper jam ........................... 80
installed options
Macintosh ............................... 54
Windows ................................. 53
Installing
Paper ..................................... 44
installing drivers
Macintosh ............................... 54
Windows ................................. 53
Installing paper ............................ 44
interface
network .................................. 52
parallel ................................... 52
serial....................................... 52
USB ........................................52
L
Labels..........................................43
LCD
PG L26 Special .........................33
LED array ..................................... 78
LED indicators
PG L26 ....................................17
M
Maintenance
Cleaning LED array....................78
Cleaning page PG L26................77
Manual Duplex
Multi Purpose Tray ....................71
Paper Tray ...............................70
Manual Duplex printing .................. 70
media settings
PG L26 ....................................47
PG L26 Special .........................49
menu functions
PG L26 ....................................24
PG L26 Special .........................34
menu settings
PG L26 ....................................32
PG L26 Special .........................41
Menus
FX menu ............................ 28, 37
Information menu ............... 25, 34
Maintenance menu .............. 31, 40
Media menu ....................... 26, 35
Memory menu .................... 30, 40
Network menu.................... 29, 39
Parallel menu ..................... 28, 38
PCL menu .......................... 27, 36
PPR menu .......................... 27, 37
Print menu ......................... 25, 35
RS232C menu .................... 29, 38
System adjustment menu .... 30, 40
System configuration
menu .............................. 26, 36
Usage menu ....................... 31, 41
USB menu ......................... 29, 39
O
online button
PG L26 ....................................19
operator panel
PG L26 ....................................17
PG L26 Special .........................33
options
installing..................................86
PG L26/PG L26 Special User’s Guide – Index > 92
Page 93

P
Page orientation
setting in Windows .............. 58, 60
Paper
Envelope types ........................ 42
Exit jam.................................. 80
Feed jam ................................ 80
feed sequence ......................... 46
Input jam................................ 80
Installing ................................ 44
Label types ............................. 43
Paper types ............................. 42
size setting in Windows ............. 56
Transparencies ........................ 43
tray selection in Windows .......... 56
Paper and envelope types .............. 42
paper and trays ............................ 90
Paper jams .................................. 80
Power on LED
PG L26 ................................... 18
Preferences Menu ......................... 23
Print order
face down printing.................... 45
face up printing ....................... 45
Print quality problems ................... 82
Print settings
how to save............................. 57
printer components....................... 14
Printer default settings
Windows defaults ..................... 64
printer features .............................. 9
Printing
Cardstock ............................... 47
different media ........................ 71
Envelopes ............................... 46
Heavyweight paper................... 47
Label types ............................. 43
Paper & envelope types............. 42
Quality problems...................... 82
Transparencies ........................ 48
Transparency types .................. 43
Priority
print queue priority .................. 66
R
Ready LED
PG L26 ................................... 18
PG L26 Special......................... 33
Resolution
setting in Windows .............. 57, 63
S
Separator page
separating print jobs on a shared
printer.................................. 67
Software problems........................ 84
specifications
general ................................... 88
paper and trays ........................90
Spooling
Windows settings ......................66
status & error messages
PG L26 ....................................79
PG L26 Special .........................79
status monitor .............................. 21
support materials ..........................11
T
Toner
Cartridge life ............................72
how to replace.......................... 73
Replacing.................................73
Troubleshooting
Hardware problems ................... 84
Paper jams...............................80
Print quality problems................82
Software problems ....................84
U
user’s guide
printing ................................... 12
viewing....................................11
W
Watermark
printing in Windows............. 58, 63
PG L26/PG L26 Special User’s Guide – Index > 93
 Loading...