

PUBLICATION ISSUED BY:
Olivetti Lexikon, S.p.A.
Via Jervis, 77 - 10015 Ivrea (Italy)
Copyright © 2000 Olivetti
All rights reserved
Important Information
This equipment generates and uses radio frequency energy and
if not installed and used properly, that is, in accordance with the
manufacturer’s instructions, may cause interference in radio and
television reception. It has been type tested and found to comply
with the limits for class B computing devices in accordance with the
specification in subpart J of part 15 of FCC rules, which are
designed to provide reasonable protection against such interference in a residential installation. However, there is no guarantee that interference will not occur in a partial installation. If this
equipment does cause interference to radio or television reception,
which can be determined by turning the equipment off and on, the
user is encouraged to try to correct the interference by one or more
of the following measures:
■ Reorient the receiving antenna,
■ Relocate the peripheral away from the receiver,
■ Move the peripheral away from the receiver
■ Plug the peripheral into a different outlet, so that the peripheral
and receiver are on different branch circuits
If necessary, the user should consult the dealer or an experienced
radio/ television technician for additional suggestions.The user may
find the following booklet, prepared by the Federal
Communications Commission, helpful: “How to Identify and
Resolve Radio-TV Interference Problems”.
This booklet is available from the U.S. Government Printing Office,
Washington DC 20402 Stock No. 004.000.00345.4.
WARNING: To comply with FCC regulations on electromagnetic
interference for a class B computing device, the printer cable
must be shielded. To assure compliance with FCC regulations for
a computing device, use a shielded interface cable with a metal
shell connector. The use of cables not properly shielded may
result in violating FCC regulations.
This digital apparatus does not exceed the class B limits for radio
noise emissions from digital apparatus as set out in the radio interference regulations of the Canadian department of communications.
This unit complies with DOC standard C108.8-M 1983
ATTENTION: Le présent appareil numérique n’ement pas de bruits
radioélectriques déspassant les limites applicables aux appareils
numériques de la classe B prescrites dans le règlement sur le
brouillage radio-électrique édicté par le minstère des communications du Canada.
WARNING Only trained and qualified personnel may open covers or remove parts that are not explicitly shown and described in the User Guide as
being accessible to the operator.
WARNUNG Das Entfernen oder Öffnen von Abdeckungen und Teilen darf nur durch geschultes Fachpersonal vorgenommen werden. Ausgenommen
hiervon sind nur solche Abdeckungen und Teile, deren Entfernen bzw. Öffnen in der Bedienungsanleitung ausdrücklich gekennzeichnet
und beschrieben sind.
ATTENTION Seul un personnel qualifié et formé est habilité à démonter les sous-ensembles de la machine qui ne sont pas formellement indiqués
dans le Manuel d’utilisation meme s’ils sont accessibles par l’opérateur.
ATTENZIONE Solo personale qualificato puo’accedere a parti che non siano esplicitamente descritte nelle Istruzioni per l’operatore come accessibill
all’operatore.
ADVERTENCIA Las cubiertas y piezas sólo deberán ser quitadas o abiertas por personal especializado. Se exceptúan de esta regla sólo las cubiertas
y piezas cuya retirada y apertura estén indicadas y descritas expresamente en las Instrucciones de uso.
Your attention is drawn to the following actions that could compromise
the characteristics of the product:
•
incorrect electrical supply;
•
incorrect installation; incorrect or improper use, or, in any case, not in
accordance with the warnings given in the User Manual supplied with
the product;
•
replacement of original components or accessories with others of a
type not approved by the manufacturer, or carried out by unauthorized
personnel.
Wir möchten Sie darauf hinweisen, daß folgende Aktionen die oben
bescheinigte Konformität und die Eigenschaften des Produkts beeinträchtigen können:
•
Falsche Stromversorgung;
•
Installations- oder Bedienungsfehler bzw. Nichtbeachtung der
Hinweise in der Bedienungsanleitung, die mit dem Produkt geliefert
wurde;
•
Das Auswechseln von Bauteilen oder Originalzubehör durch
Unbefugte oder das Ersetzen durch Teile, die nicht vom Hersteller
anerkannt werden.
Nous attirons l'attention sur certaines opérations qui pourraient compromettre la conformité attestée ci-dessus et les caractéristiques du produit
même :
•
Alimentation électrique erronée ;
•
Installation ou utilisation incorrecte, non appropriée ou ne respectant
pas les indications reportées dans le manuel d’utilisation fourni avec
le produit ;
•
Remplacement des consommables ou des accessoires originaux par
d’autres types non approuvés par le constructeur ou effectué par du
personnel non autorisé.
Si richiama l'attenzione sulle seguenti azioni che possono compromettere la conformità sopra attestata, oltre, naturalmente, le caratteristiche
del prodotto:
•
errata alimentazione elettrica;
•
errata installazione o uso errato o improprio o comunque difforme
dalle avvertenze riportate sul manuale d'uso fornito col prodotto;
•
sostituzione di componenti o accessori originali con altri di tipo non
approvato dal costruttore, o effettuata da personale non autorizzato.
Le rogamos que preste mucha atención a las siguientes acciones que
pueden comprometer la conformidad arriba certificada, y obviamente
las características del producto:
•
Alimentación eléctrica errónea;
•
Instalación o uso erróneos, impropios o no conformes a las advertencias detalladas en el manual de utilización suministrado con el producto;
•
Sustitución de componentes o accesorios originales con otros no
aprobados por el fabricante, o bien efectuada por parte de personal no
autorizado.
I requisiti qualitativi di questo prodotto sono attestati
dall’apposizione della marcatura sul prodotto.
The mark affixed to the
product certifies that the
product satisfies the basic
quality requirements.
Les qualités requises pour
ce produit sont garanties
par le label appliqué sur
le produit même.
Die Qualitätsanforderungen
dieses Produkts werden durch
die -Kennzeichnung
bescheinigt, die am Produkt
angebracht ist.
Los requisitos de calidad
de este producto son atestiguados mediante la aplicación de la Marca
en il producto.
The paper used is made of raw materials treated with a chlorine-free bleaching process.
Das venvendete Papier ist aus chlorfrei gebleichten
Rohstoffen hergestellt.
Le papier utilisé est fabriqué à partir de matières premières
blanchis sans chlore.
La carta utilizzata è prodotta con materiali sbiancati senza
cloro.
El papier utilizado ha sido fabricado con un proceso de blanqueo libre de cloro.

ENGLISH
Operator’s manual
QUICK START-UP
Contents
Introduction 1
Using the Online-CD-ROM 1
Unpack Your Printer 2
Printer Components 3
Install the Toner Cartridge 4
Load Paper 6
To Change Paper Size in Tray 7
Selecting the Output Tray 8
Printing to the Top Output Tray (Face down) 8
Printing to the Rear Output Tray(Face up) 8
Loading Paper 10
Using the Multi-Purpose Tray 10
Connect to the Computer with a Parallel Cable 13
Turn on the Printer 14
Print a Demo Page 14
Install the Printer Software 15
Before Installing the Printer Software 16
Installing the Printer Software from the CD-ROM 16
Printer Driver Features 17
Control Panel Buttons 18
Control Panel Lights 21
Printer Specifications 23
Supported Sizes of Paper 24
Accessories 26

Introduction
ENGLISH
1
Quick Start-Up Introduction
This Operator's Manual is intended as a quick introduction into working with the printer
and also to enable inexperienced users to operate the device properly. It describes the
most important functions of the printer and contains the essential information for your
everyday work with the printer. A more detailed description of the printer, its characteristic features, and further information is contained in the Reference Manual on the
Online CD-ROM, which is inserted at the back of this manual.
Using the Online-CD-ROM
First install the Adobe Acrobat Reader on your hard disk, unless the program has already
been installed. To install it, follow the steps described in the README file in the READER
directory.
To start the online documentation, call the File Manager (Windows 3.1) or Explorer
(Windows95/98, Windows NT 4) and double click on the START.PDF file. Then follow the
instructions and menus on the screen.
2
Unpack Your Printer
Unpack Your Printer
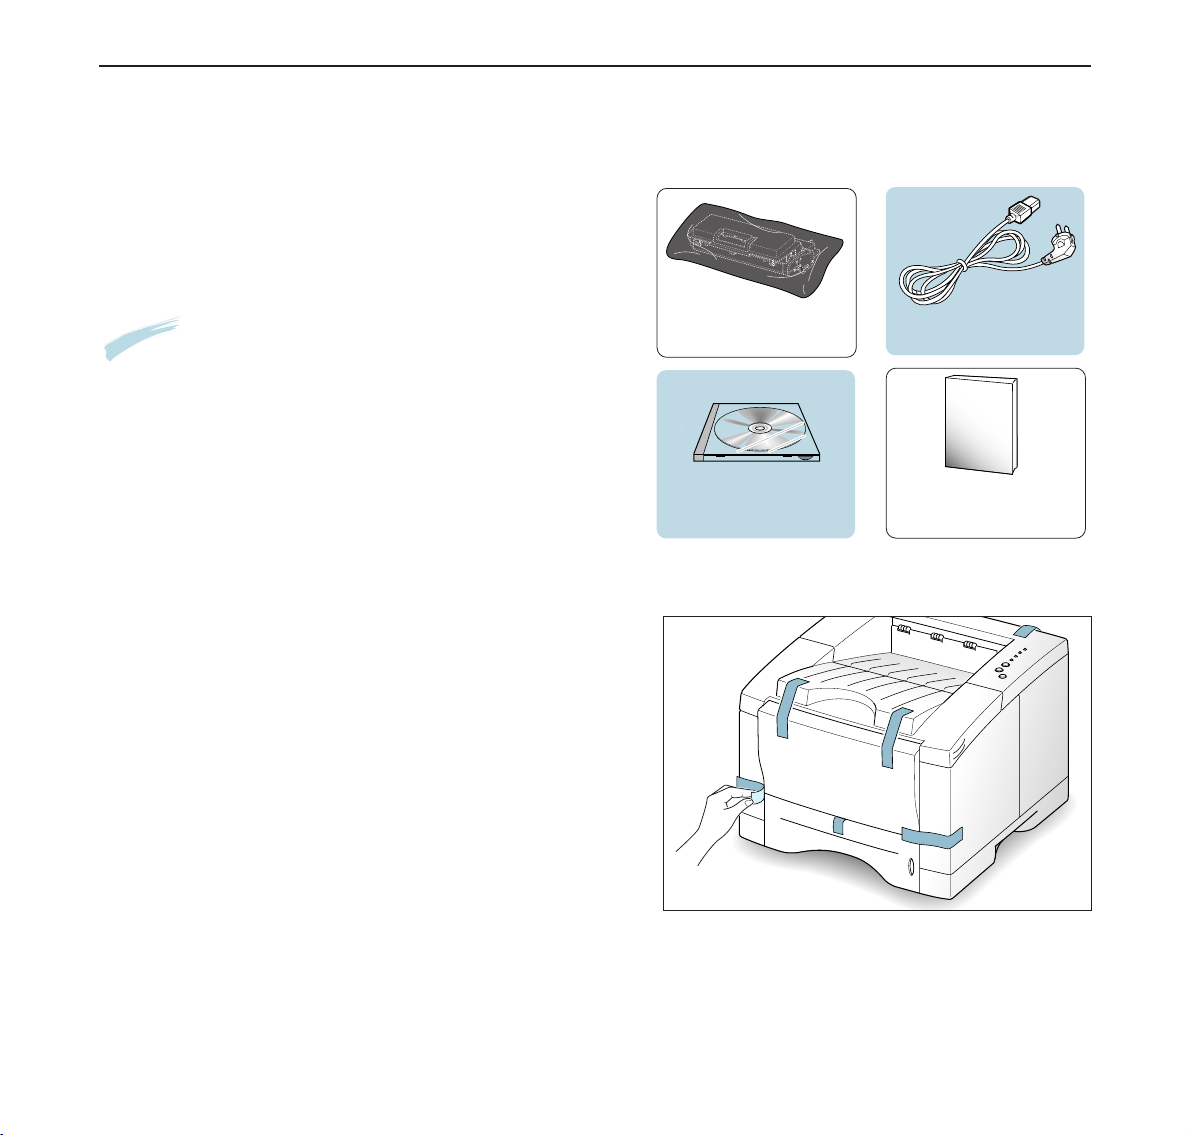
1
Remove the printer and all accessories from the
packing carton. Make sure that your printer has
been packed with the following items:
Notes
:
• If any items are missing or damaged, notify your dealer
immediately.
• Components may differ from one country to another.
Toner cartridge
Power cord
CD-ROM
Operator’s Manual
Quick Start-Up
2
Carefully remove all packing tapes from the printer.
Quick Start-Up
3
Printer Components
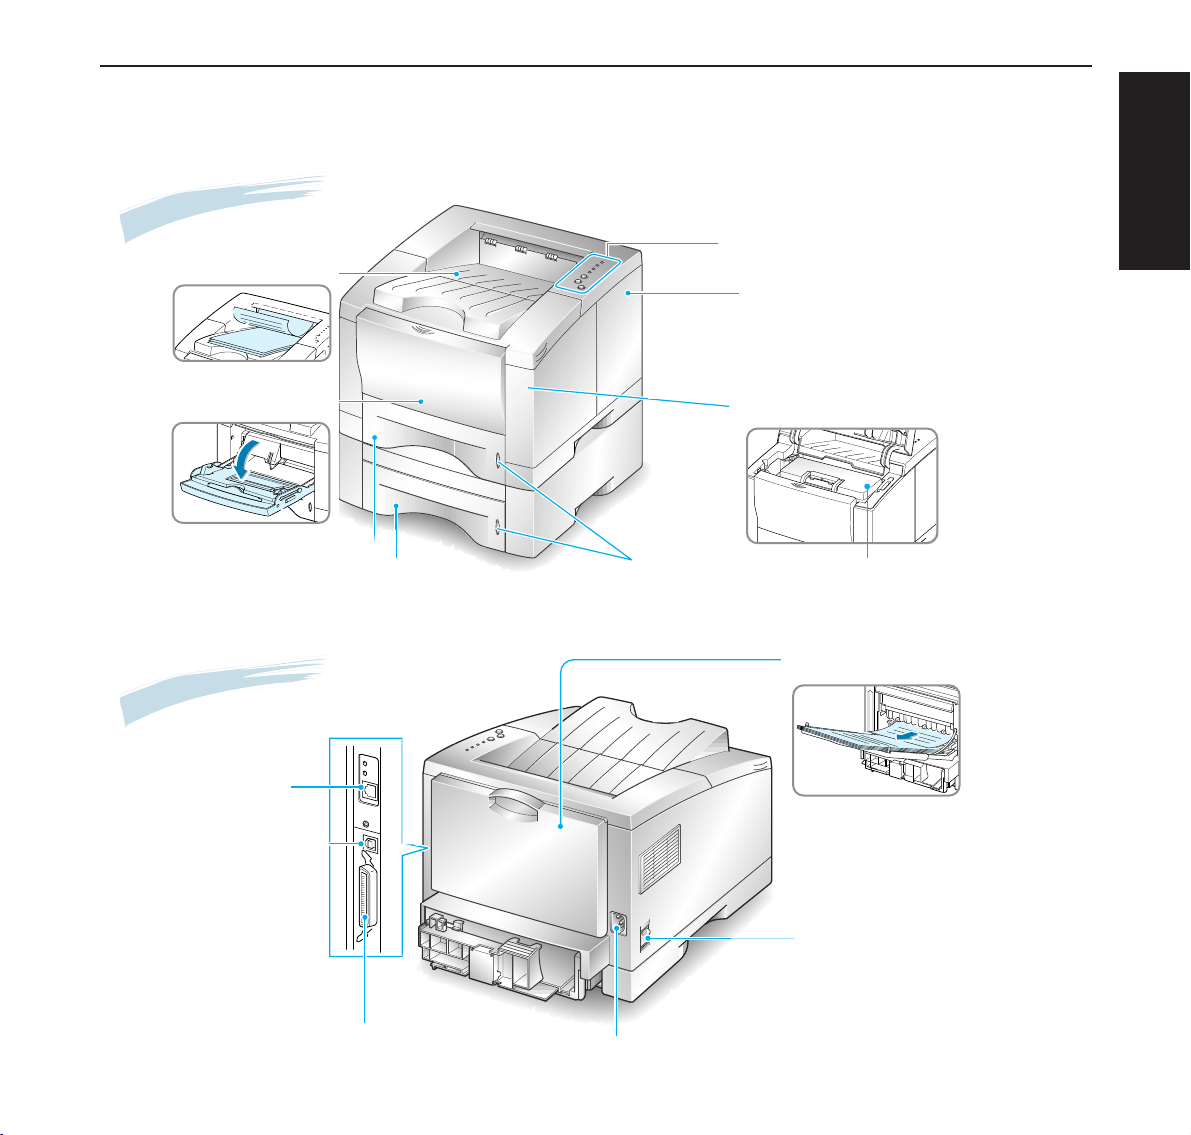
Front View
Control panel
Top output tray
Control board cover
(needed to access the
control board to install
printer options)
Paper level
indicators
(Face down output )
Top cover
Tray 1
(550-sheet paper feeder)
Multi-Purpose Tray
Tray 2
(Optional 550-sheet
paper feeder)
(
Inside
)
(
Face up output
)
Power switch
Rear output tray door
Power receptacle
Parallel port
USB port
Network port
(PGL 12en: Option)
Rear View
Toner cartridge
Quick Start-Up Printer Components
ENGLISH
1
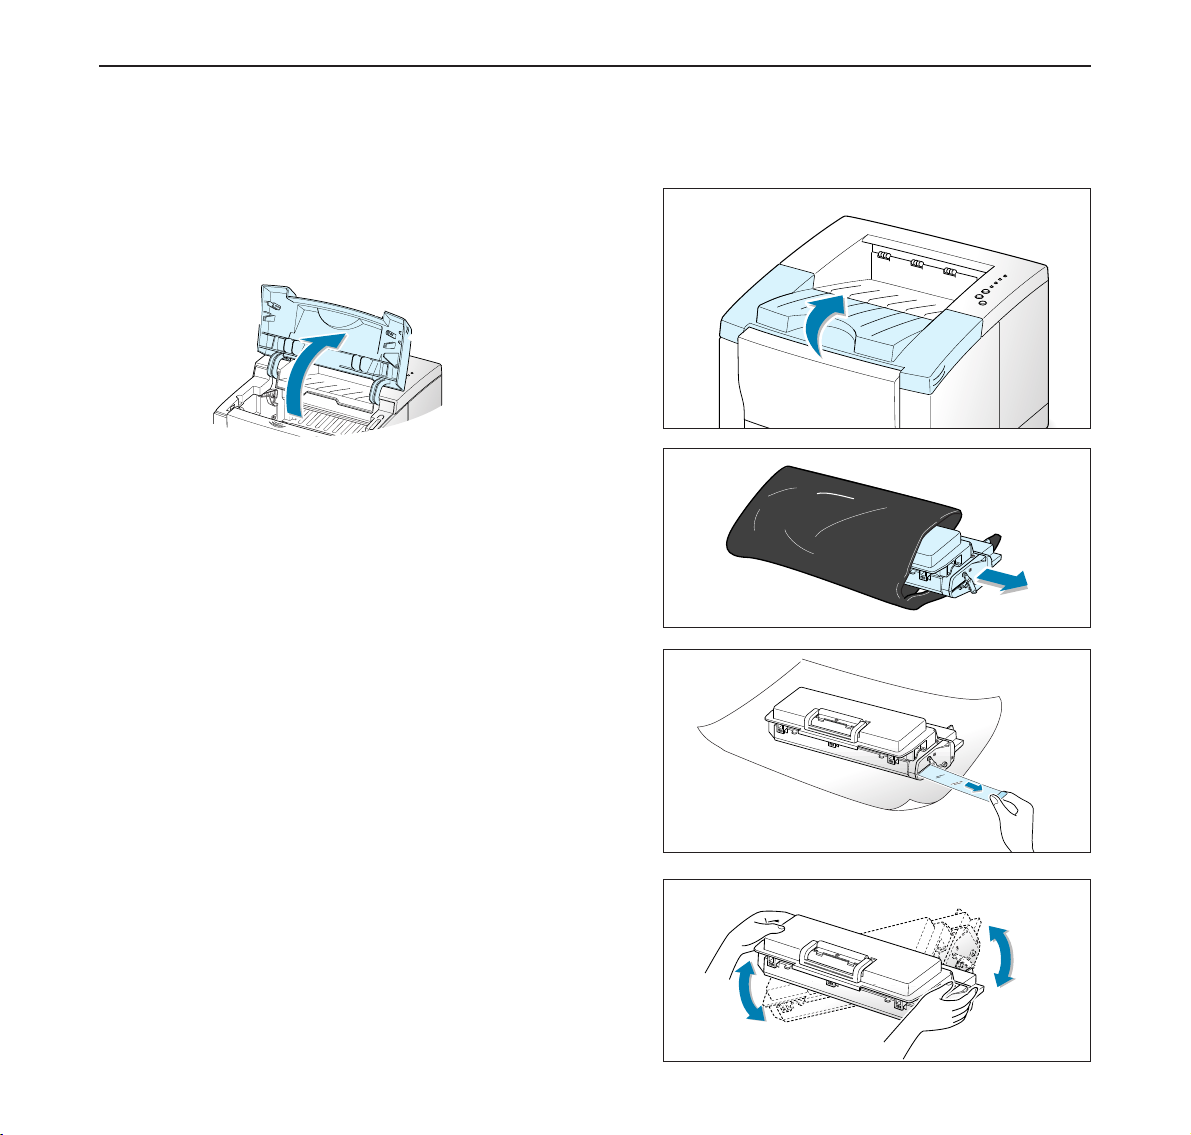
Open the top cover door. Pull up on the handle to
open the door.
2
Carefully tear one end of the plastic bag.
Don’t use a knife or other sharp objects as it might
scratch the drum of the cartridge.
3
Locate the sealing tape at the end of the toner cartridge. Carefully pull the tape completely out of the
cartridge. Discard the tape.
4
Gently shake the cartridge from side to side to distribute the toner evenly inside the cartridge.
Install the Toner Cartridge
Handle
Install the Toner Cartridge Quick Start-Up
4
CAUTION:
To prevent damage, do not expose the toner cartridge to light for more than a few minutes. Cover it with a
piece of paper if left exposed for more than a few minutes.
If toner gets on your clothing, wipe it off with a dry cloth and wash clothing in cold water. Hot water sets
toner into fabric.
6
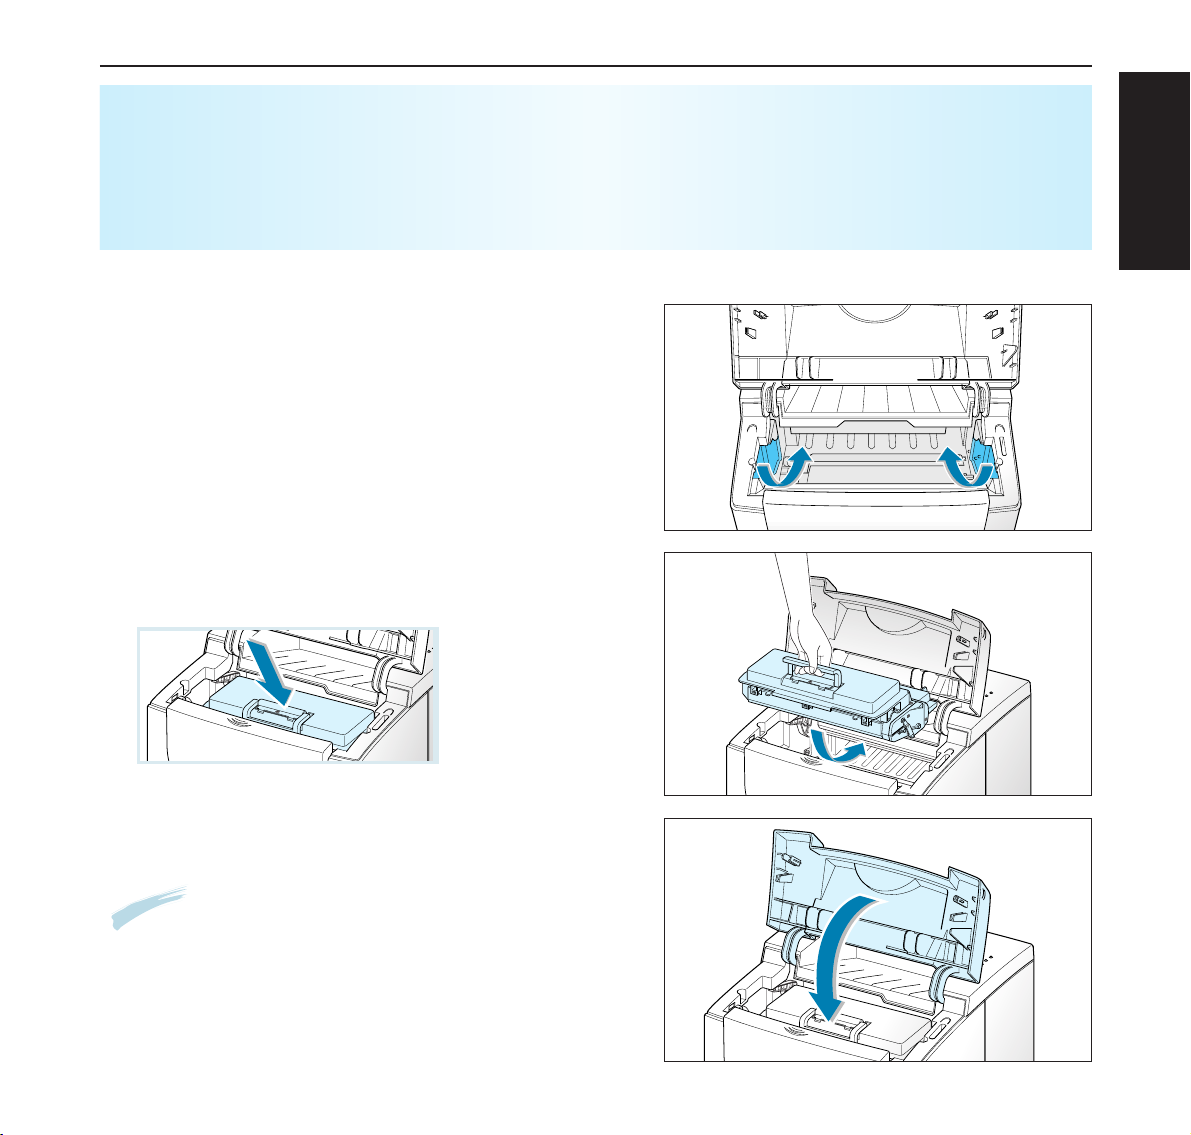
Grasp the handle and insert the cartridge in the printer until it drops into place.
7
Close the top cover. Make sure that the cover is
securely closed.
5
Locate the cartridge slots inside the printer, one on
each side.
Notes: When printing text at 5% coverage, you can
expect a toner cartridge life of approximately
6,000 pages (3,000 pages for the toner cartridge
that is shipped with the printer)
Quick Start-Up Install the Toner Cartridge
5
ENGLISH
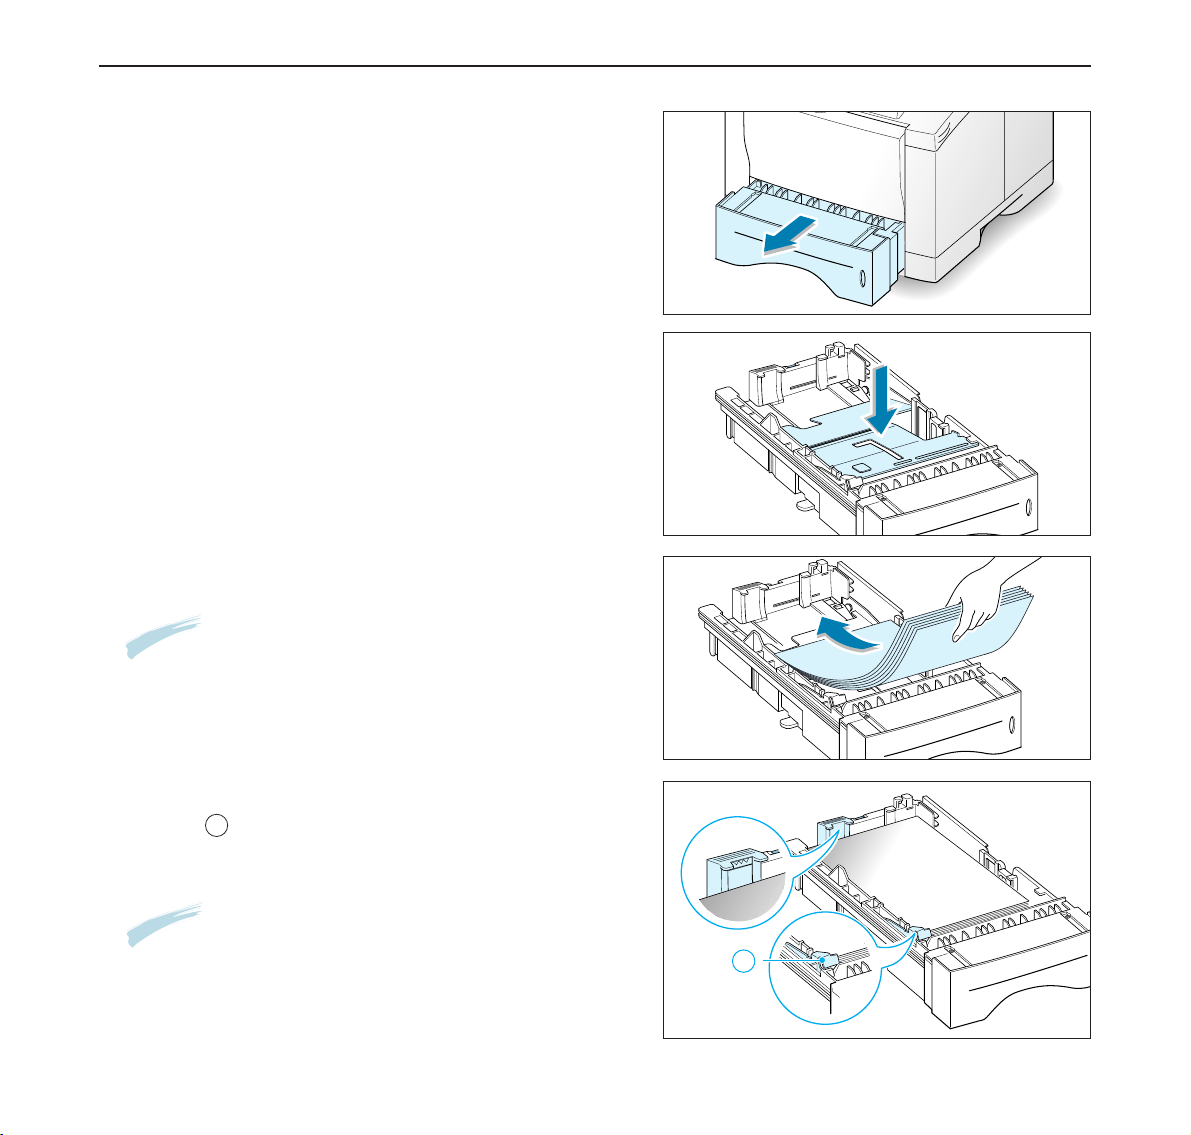
6
1
Pull the paper tray out of the printer.
2
Push down on the metal paper lift plate to lock it in
place.
Load Paper
Notes: You can load transparencies, letterheads, or
other print media using the same method.
Make sure it is flat in the tray at all four corners.
Notes: If you want to change paper size in tray, see
below: “To Change Paper Size in Tray.
4
Make sure that the stack goes under the metal retaining clip and the plastic tabs on the end guides.
Paper overloading may cause paper jams.
5
Slide the tray back into the printer.
3
Load paper with the print side facing down.
A
Load Paper Quick Start-Up
A
7
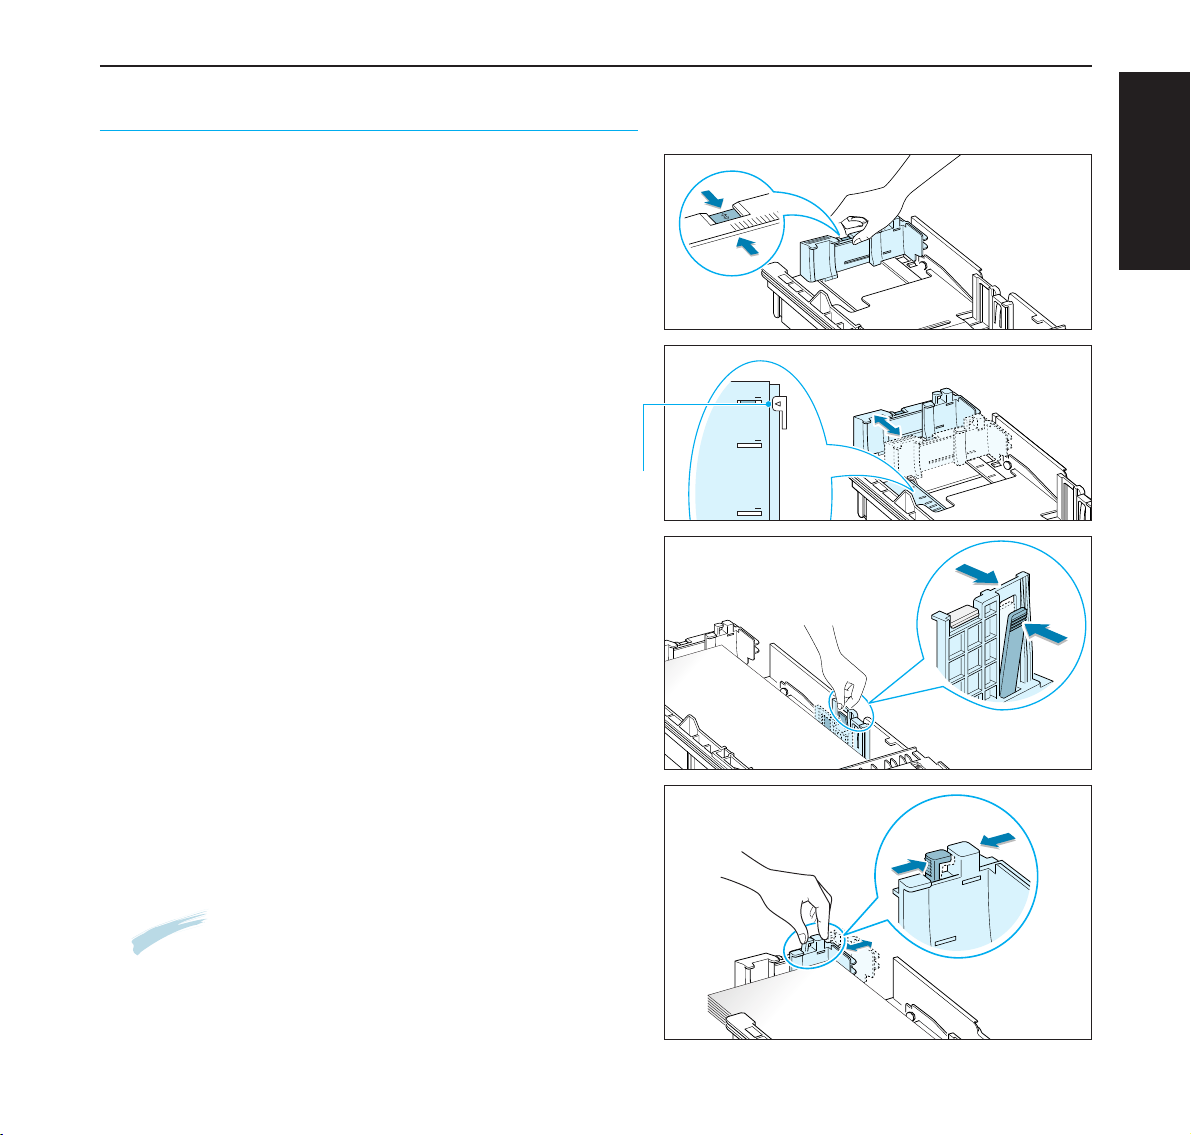
1
Squeeze the metal tab on the rear paper guide to
adjust for the paper length.
To Change Paper Size in Tray
3
After loading paper, squeeze the side guide as shown
and slide it to the left flush against the paper.
2
Adjust the paper length guide so the pointer matches
the desired paper size.
LGL
FOLIO
A4
Pointer
4
If necessary, use the rear width guide. Squeeze the rear
width guide as shown and slide it to the left.
Notes:
• Do not push the width guide far enough to cause the
media to warp.
• If you do not adjust the width guide, it may cause
paper jam.
Quick Start-Up Load Paper
ENGLISH
8
Selecting the Output Tray
The printer has two output locations: the rear output tray and the top output tray.
To use the top output tray, be sure the rear output tray is closed. To use the rear output tray, open it.
• If paper coming out of the top output tray has problems, such as excessive curl, try printing to the rear
output tray.
• To avoid paper jams, do not open or close the rear output tray while the printer is printing.
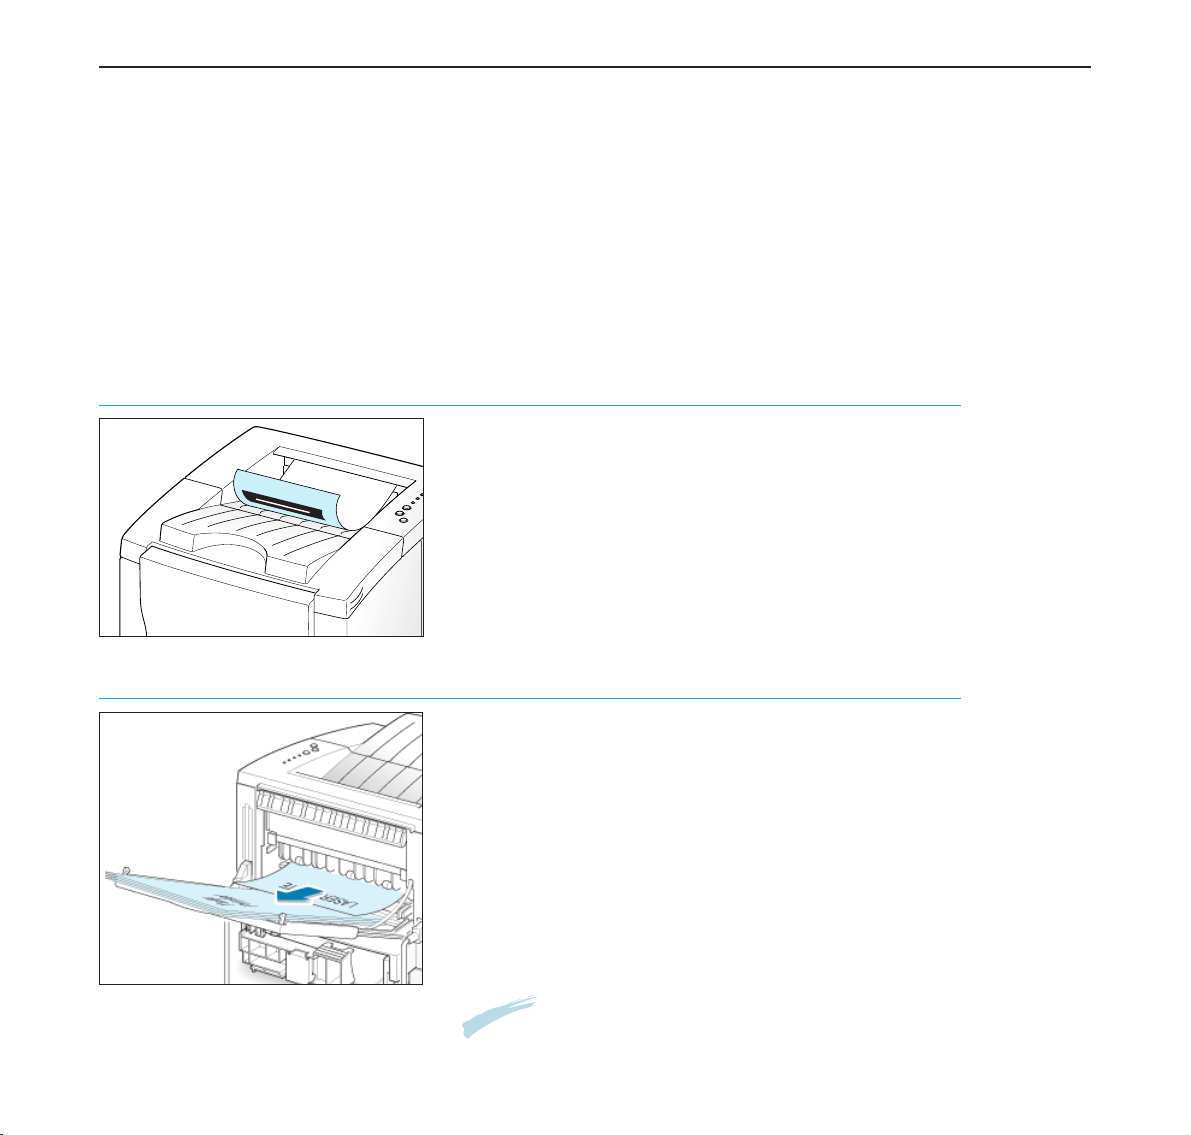
The top output tray collects paper face-down, in correct order.
The top output tray should be used for most print jobs and is recommended for printing the following:
• over 250 sheets of paper, continuously
Printing to the Top Output Tray
(Face down)
The printer always prints to the rear output tray if it is open. Paper comes out of
the printer face-up, with the last page on top.
Printing from the Multi-Purpose Tray to the rear output tray provides the
straight paper path. Opening the rear output tray might improve output quality
with the following:
• over 100 sheets of paper, continuously
• envelopes
• labels
• small custom-size paper
• postcards
• paper lighter than 16 lb (75 g/m
2
) or
heavier than 28 lb (105 g/m
2
)
• transparencies:
Printing to the Rear Output Tray (Face up)
Notes: Some special transparencies may have stacking problem by curl. In that
case, please use the face down tray
Selecting the Output Tray Quick Start-Up
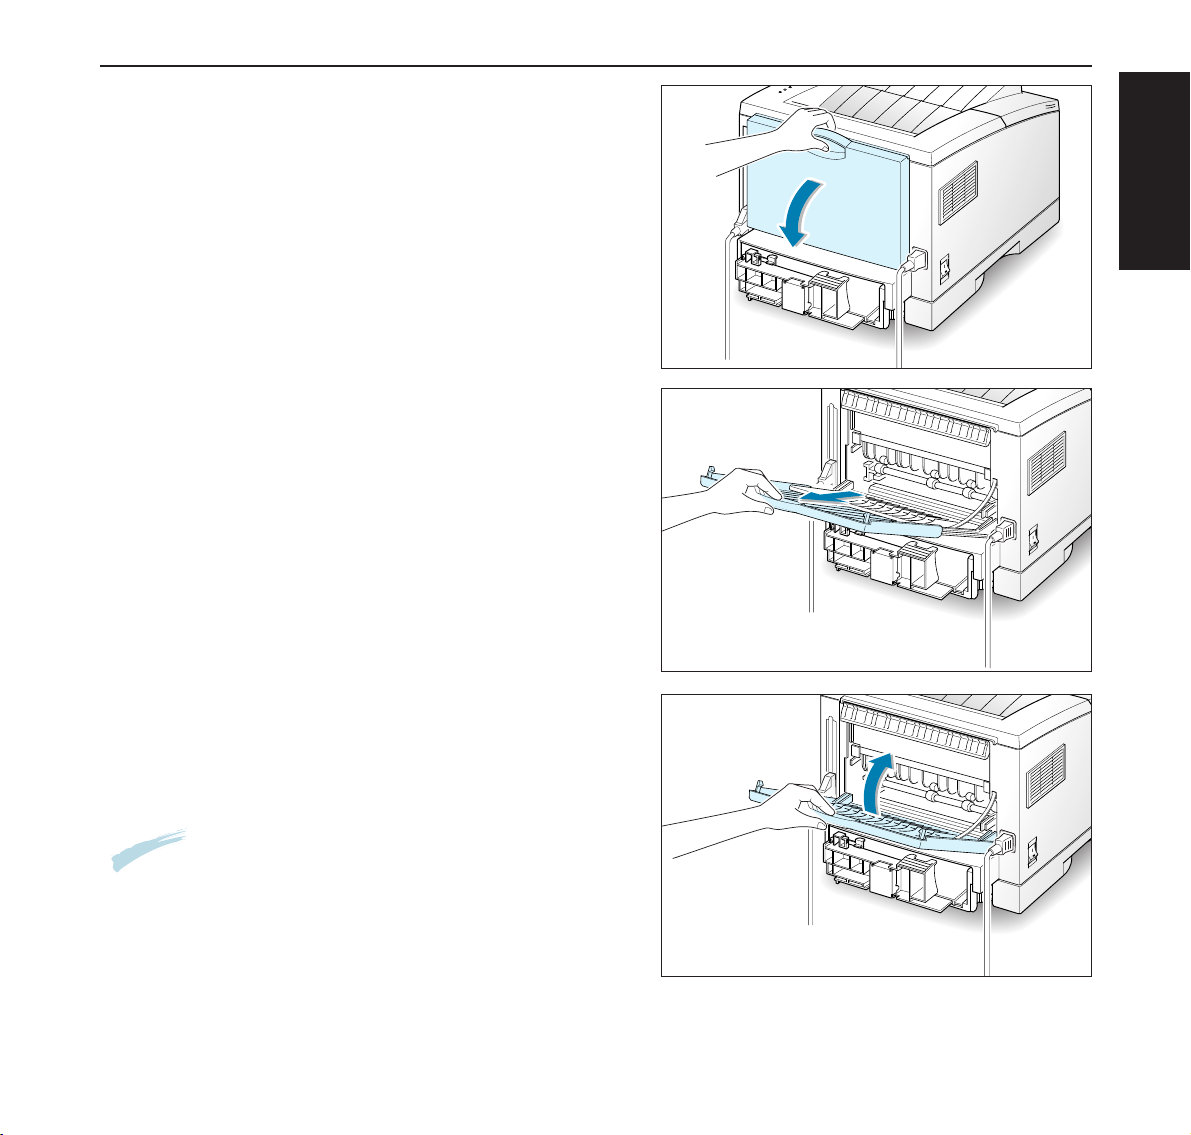
1
Open the rear door
by pulling it down
. The cover func-
tions as the output tray.
To open the rear output tray:
2
Pull the extender to extend the output tray to its fulllength position to hold longer paper.
3
If you do not want to stack the printed pages on the
rear output tray, slide the extender to its place and
close the tray. The pages will then stack on the top
output tray.
Notes: The capacity of the rear output tray is the same
as that of the Multi-Purpose Tray. If the tray is overloaded with printed pages, it may fall from the printer.
Remove the pages so that the tray is not overloaded.
Quick Start-Up Selecting the Output Tray
9
ENGLISH
Loading Paper
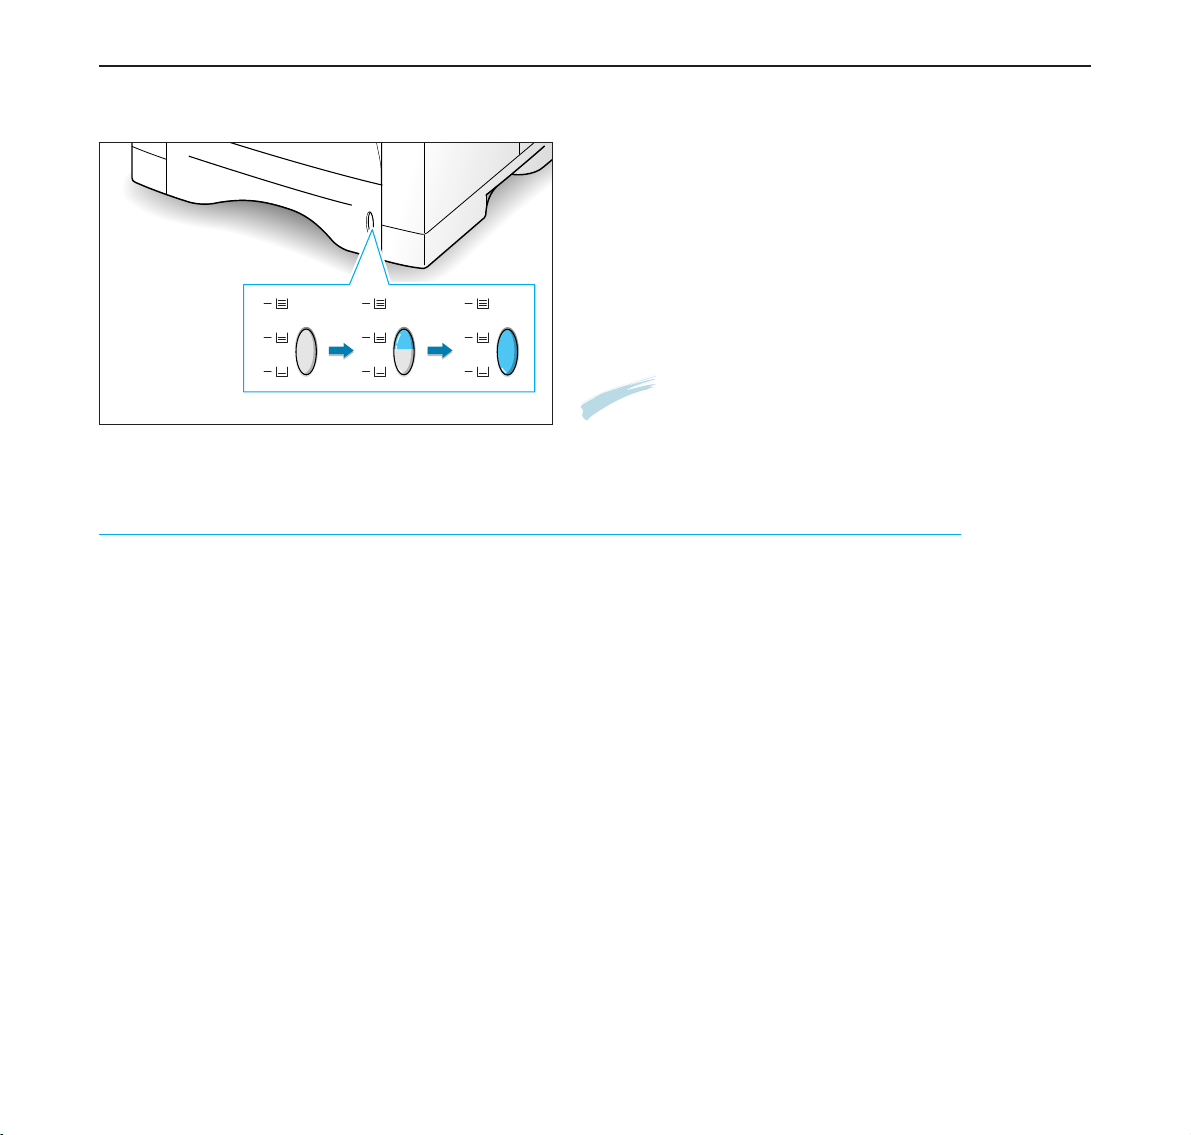
Paper full Paper empty
Using the Multi-Purpose Tray
The Multi-Purpose Tray is located in the front of your printer.
It can be closed when you are not using it, making the printer more compact. The
Multi-Purpose Tray can hold several sizes and types of paper, such as transparencies,
cards, and envelopes. You may also want to use the Multi-Purpose Tray for single page
print jobs on letterheads, colored paper for use as separator sheets, or other special
paper that you do not normally keep in the paper tray.
You can load approximately 100 sheets of paper, 10 envelopes, 20 transparencies, 10
card stocks or 25 labels at a time.
When you print from the Multi-Purpose Tray, you must select Multi-Purpose Tray for
Paper Source from your software application, and then select the paper size and
type from the software application for the paper you have loaded. See Reference
Manual, page 5.3.
• Load only one size of print media at a time in the Multi-Purpose Tray.
• To prevent paper jams, do not add paper when there is still paper in the MultiPurpose Tray. This also applies to other types of print materials.
• Print media should be loaded face up with the top of the print media going into the
Multi-Purpose Tray first and
be placed against the left edge of the tray.
• Do not place objects on the Multi-Purpose Tray. Also avoid pressing down or applying excessive force on it.
Proper paper loading helps prevent paper jams and
ensure trouble-free printing. Do not remove paper
tray(s) while a job is printing. Doing so may cause a
paper jam.
The paper level indicator on the front of the paper
tray(s) shows the amount of paper currently left in the
tray. When the tray is empty, the indicator turns red.
Notes:
Additional Information to Load Paper is provided in the
Reference Manual on the online CD-ROM.
Loading Paper Quick Start-Up
10
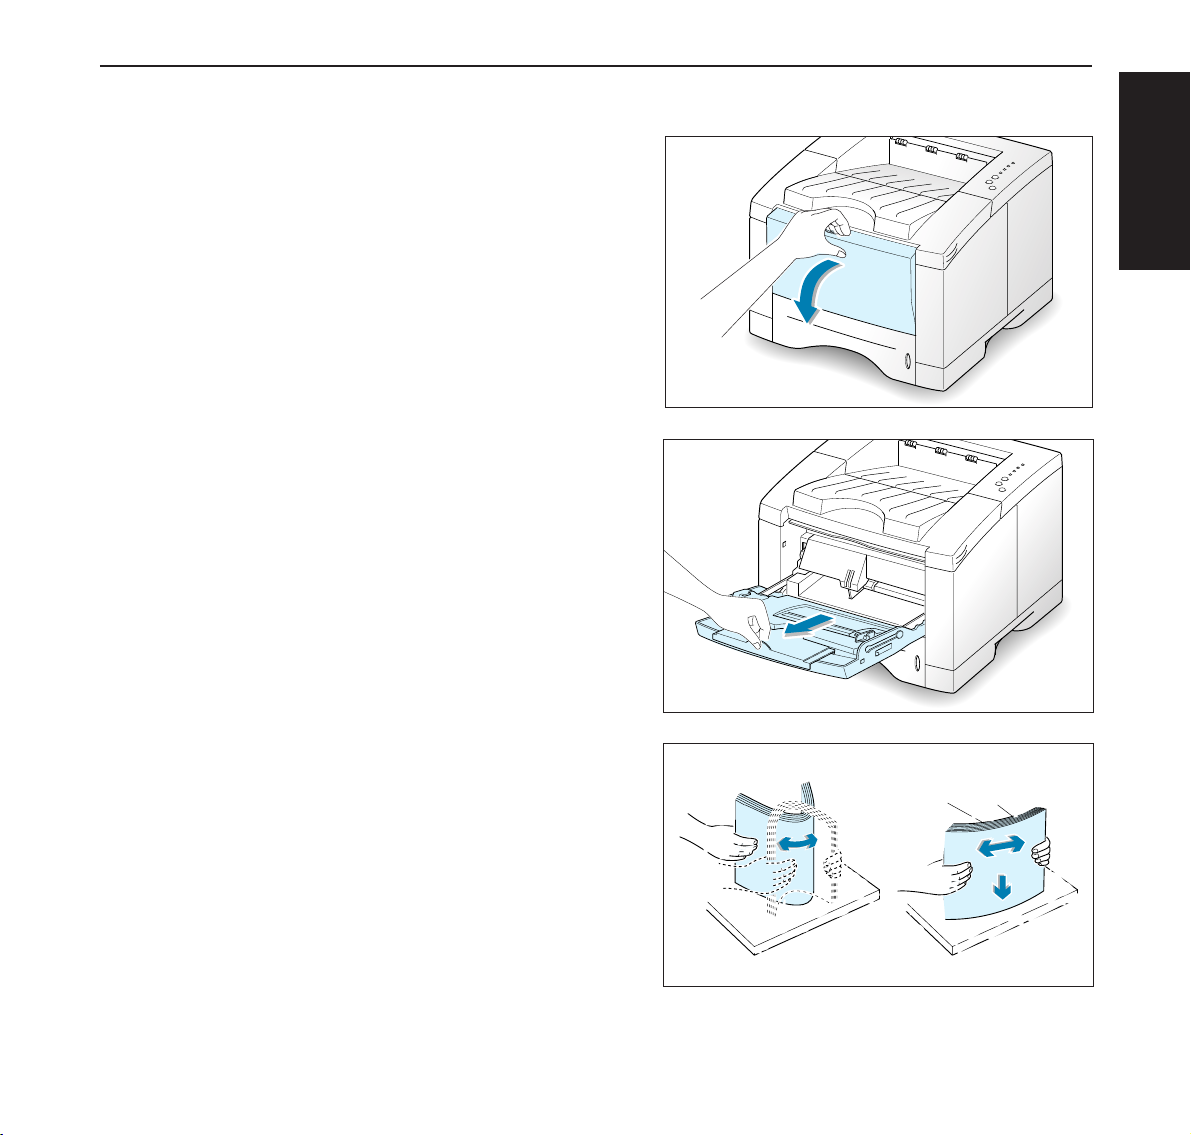
1
Pull the Multi-Purpose Tray down toward you.
To load paper in the Multi-Purpose Tray:
2
Slide the extender to extend the tray to its full-length
position to hold longer paper.
3
Prepare a stack of paper for loading by flexing or fanning them back and forth. Straighten the edges on a
level surface.
Quick Start-Up Loading Paper
11
ENGLISH

4
Place paper with the print side face up, and
against the left edge of the tray.
5
Slide the paper width guide to the left flush against
the stack of print material without bending.
6
After printing, push the extender back to its place
and close the Multi-Purpose Tray.
Notes: Make sure that you have not loaded too much
print media. The stack should be under the stack height
limit mark. The print media buckles if you load a stack
that is too deep, or push it in too far.
Stack height limit mark
Loading Paper Quick Start-Up
12
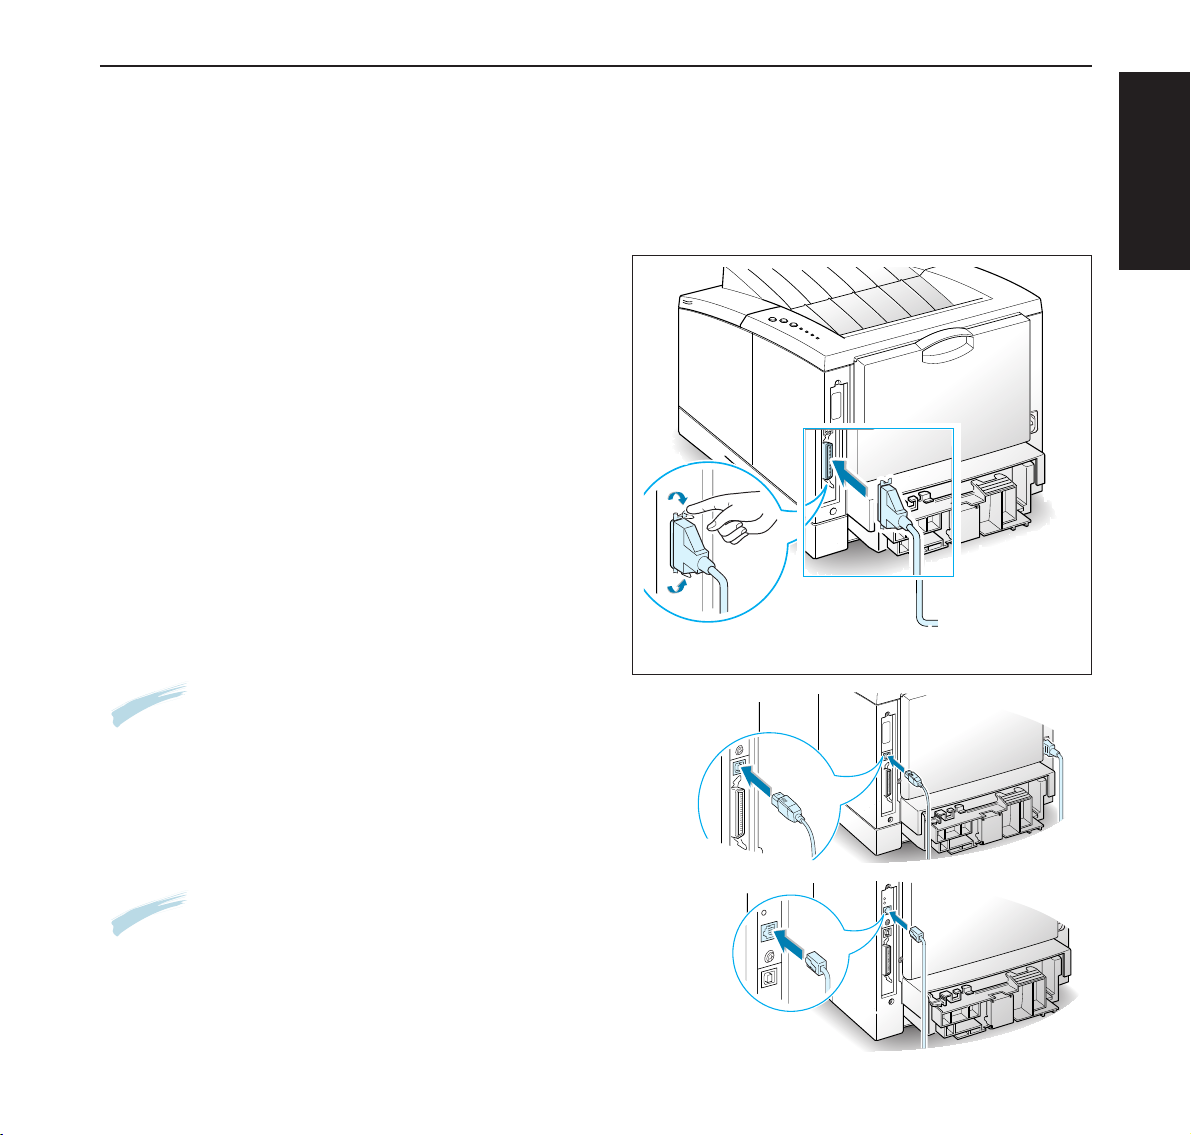
1
Make sure both the printer and the computer are turned off.
2
Plug the parallel printer cable into the connector on
the back of the printer.
Push the metal clips down to fit inside the notches
on the cable plug.
3
Connect the other end of the cable to the parallel
interface port on your computer, and tighten the
screws.
See your computer documentation if you need help.
Connect to the Computer with a Parallel Cable
➞➞
To the parallel
port on PC
If you are using a USB interface
Go to Appendix B of the Reference Manual, “Using
Your Printer with a USB Cable.”
If you are using an optional network interface
Go to Appendix F of the Reference Manual, “Using
Your Printer on Network.”
Quick Start-Up
Connect to the Computer with a Parallel Cable
13
ENGLISH
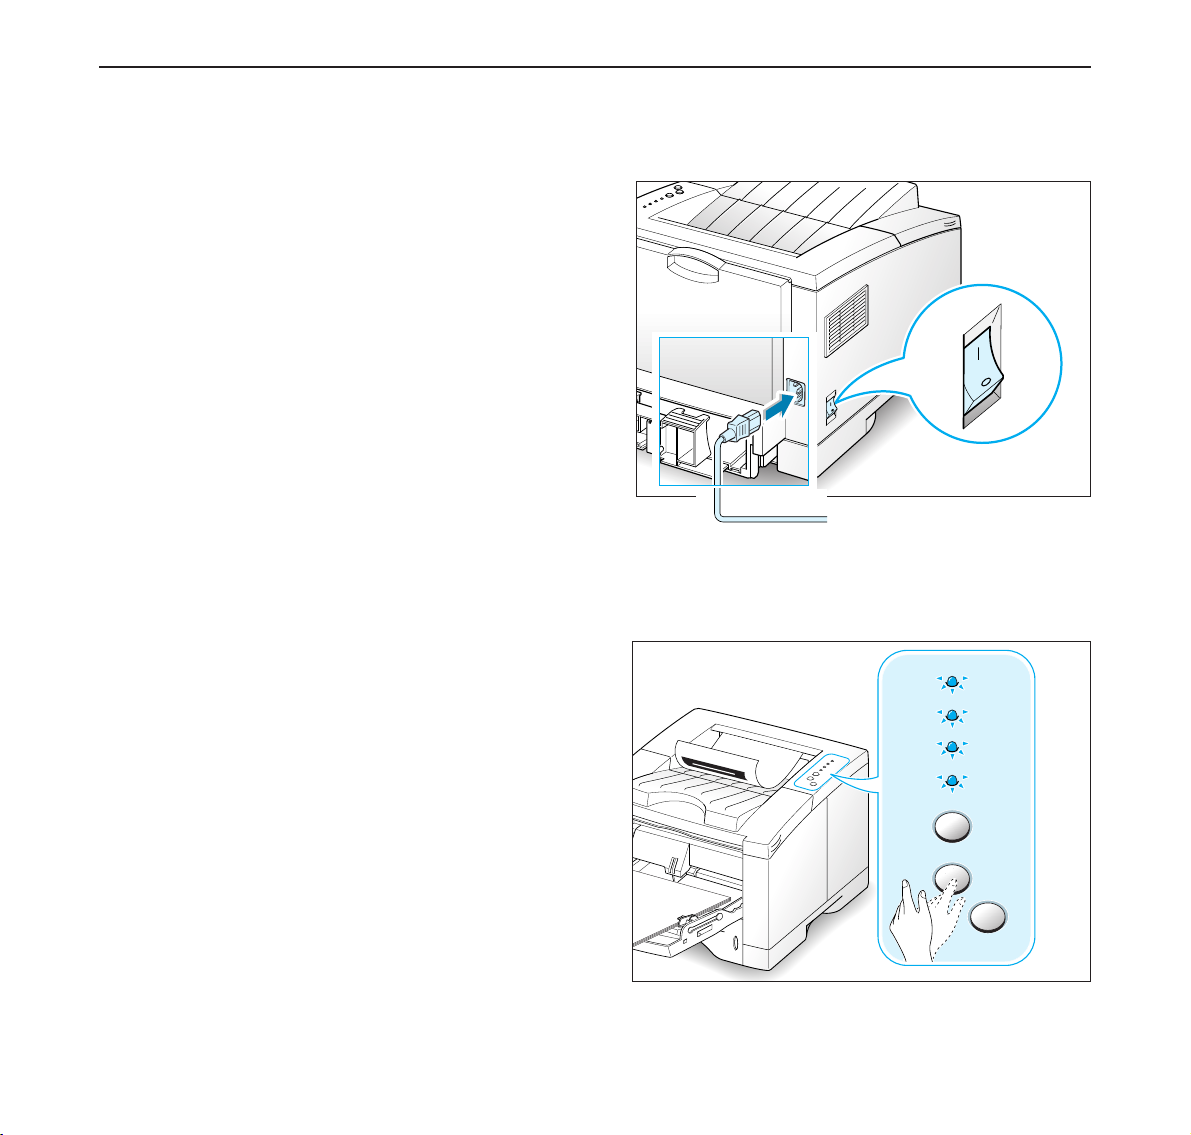
1
Plug the power cord into the power receptacle on
the back of the printer.
2
Plug the other end into a properly grounded AC outlet.
3
Turn on the power.
Turn on the Printer
➞➞
To AC outlet
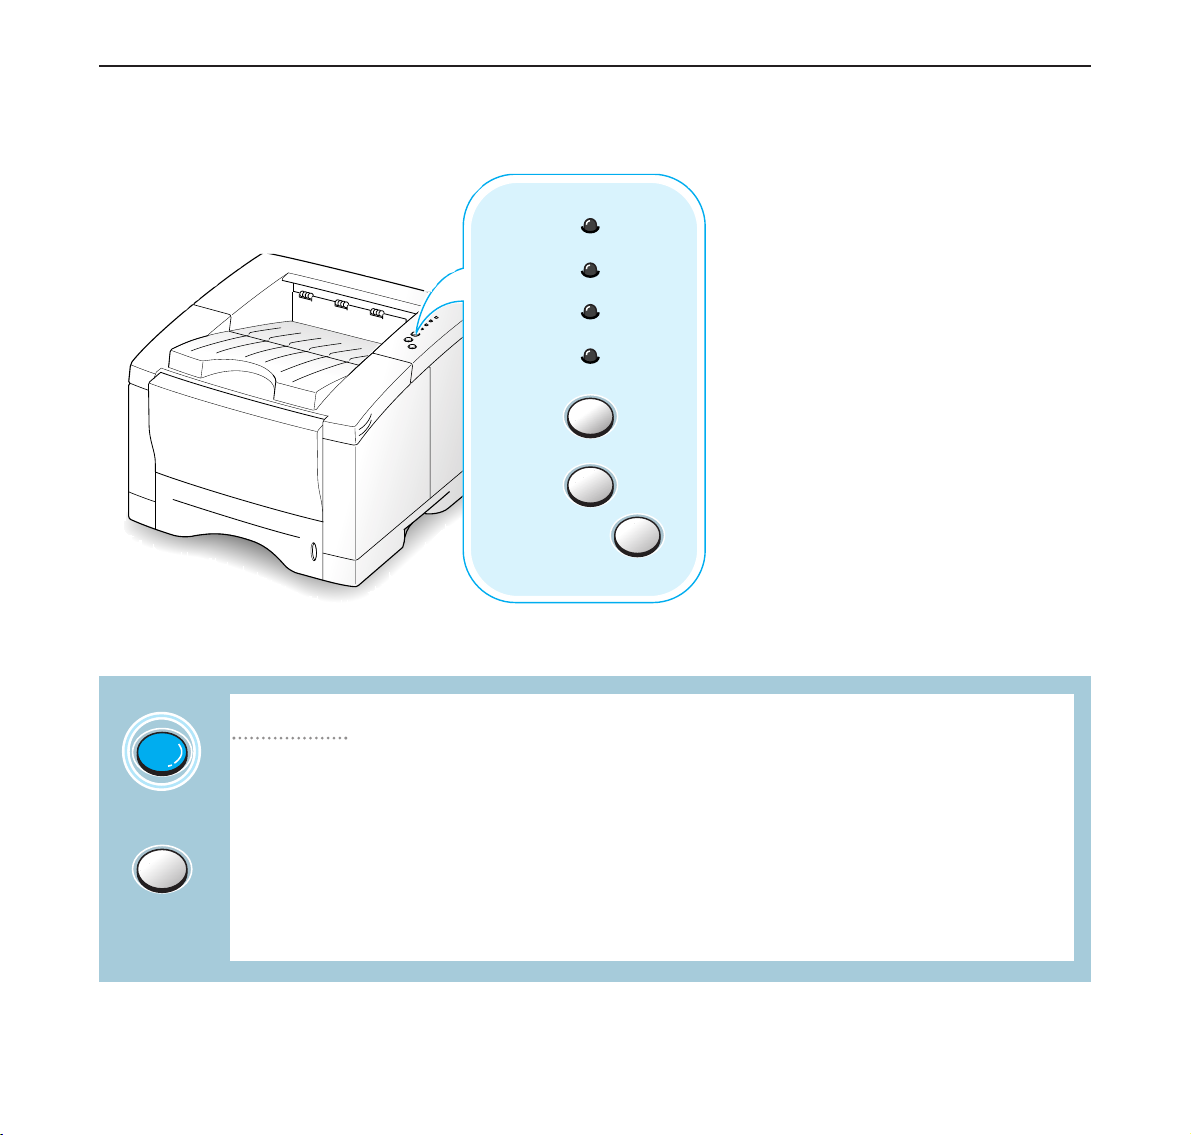
Error
Manual
Paper
Data
Cancel/Reprint
Demo
Toner Save
As the printer powers up, all the printer control panel
lights turn on briefly. When only the Data light remains
on, press and hold the Demo button.
Hold down the button for about 2 seconds until all lights
blink slowly, then release, the demo page will print.
The demo page provides a sample of the print quality
and help you verify the printer is printing correctly.
Print a Demo Page
Turn on the Printer Quick Start-Up
14

ENGLISH
15
Included with your printer is a CD-ROM containing the printer drivers for some of
the most popular Windows software applications. To operate your printer, you must
install a printer driver, which translates data from your application into data that
the printer understands.
The CD-ROM shipped with your printer contains the following:
• PCL 6 printer driver for Windows. Use this driver to take full advantage of your
printer’s features.
• PostScript Printer Description (PPD) file for Windows and Macintosh to allow
installation of the PostScript driver.
If you are printing from a computer with a parallel cable
Go to page 16 for information on installing the printing software on a computer
that is attached directly to the printer with a parallel cable.
If you are printing with a USB
Go to Appendix B of the Reference Manual, “Using Your Printer with a USB Cable”,
for information on installing the print software on a USB-enabled computer.
If you are printing from a Macintosh
Go to Appendix C of the Reference Manual, “Using Your Printer with Macintosh”, for
information on installing the PostScript option for Macintosh.
If you are printing from DOS
Go to Appendix D of the Reference Manual, “Printing from DOS Applications”, for
information on installing the DOS print software and printing from DOS application.
If you are printing with PostScript driver
Go to Appendix E of the Reference Manual, “Using Windows PostScript Driver”, for
information on installing the PPD file.
If you are using Linux
Go to Appendix I of the Reference Manual, “Using Your Printer in Linux”, for information on installing the Linux driver.
Install the Printer Software
Quick Start-Up Install the Printer Software
16
Verify the following:
• At least 16 MB or more of RAM is installed on your PC.
• There is at least 30 MB of free disk space on your PC.
• All applications are closed on your PC before beginning installation.
• Windows 95, Windows 98, Windows NT 4.0 or Windows 2000.
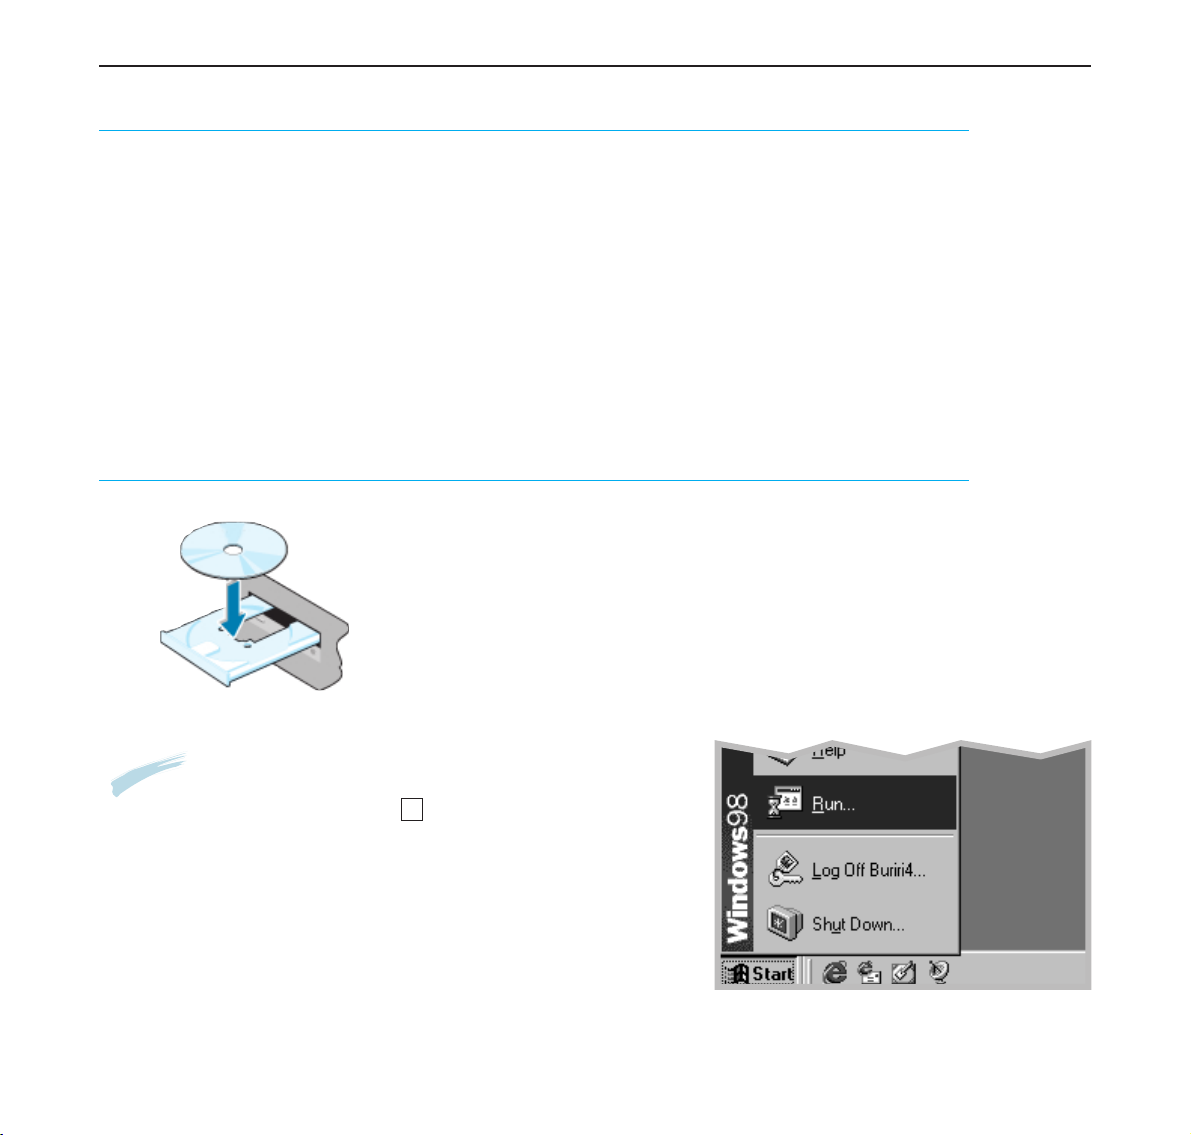
1
Place the CD-ROM in the CD-ROM drive. Installation will start automatically.
If the CD-ROM drive does not automatically run:
Select Run from the Start menu, and type x:\cdsetup.exe in the Open
box (where x is the drive letter for the CD-ROM drive), then click OK.
Before Installing the Printer Software
Installing the Printer Software from the CD-ROM
Notes: If the New Hardware Found box appears during the
installation procedure, click the x in the upper right corner of
the box, or click Cancel.
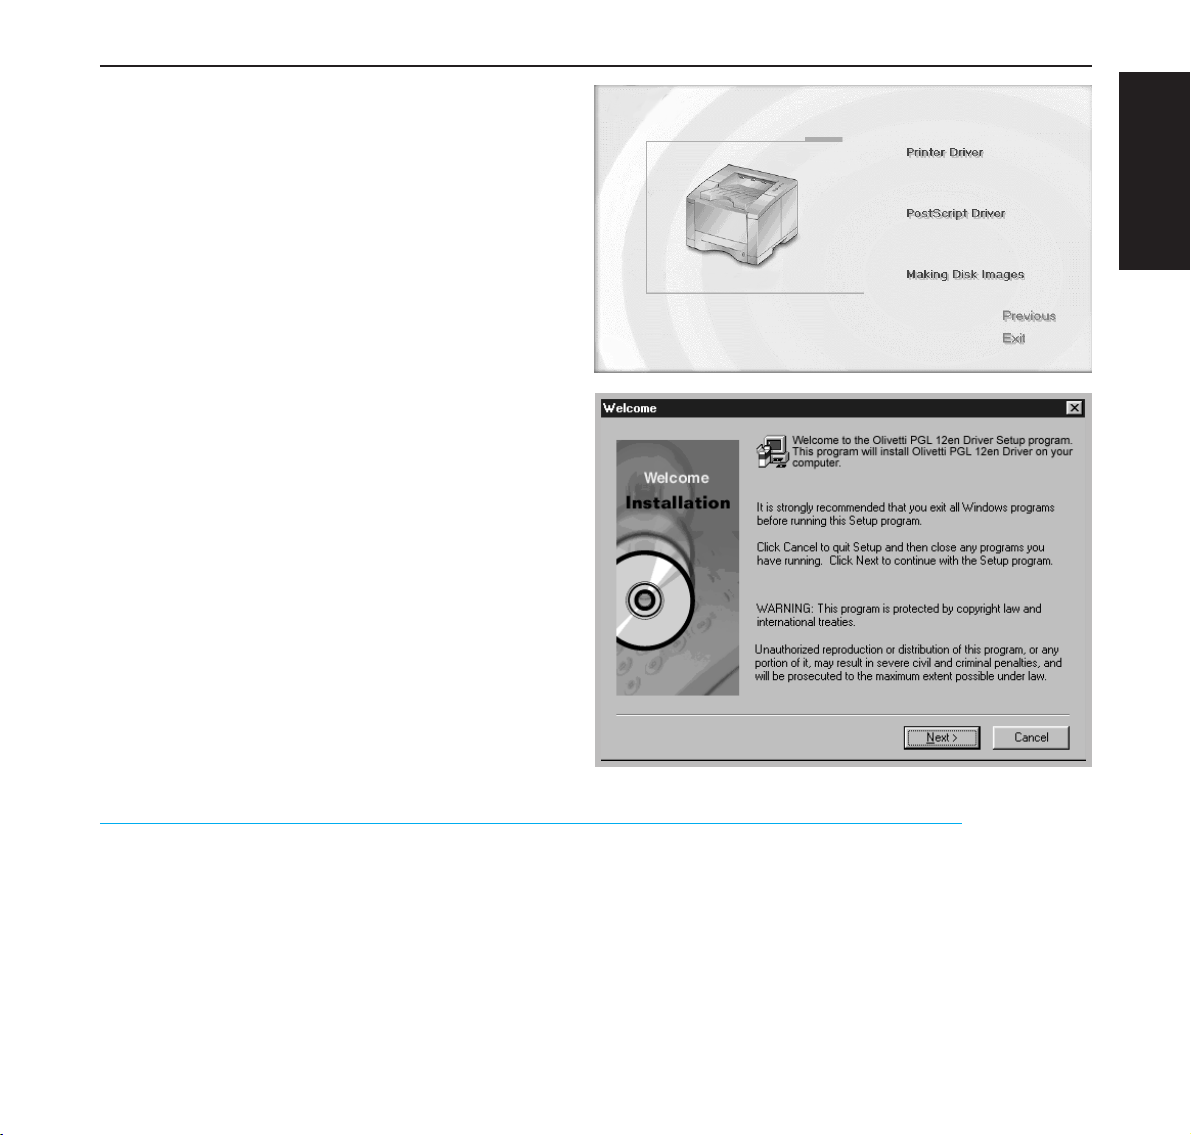
2
When the opening screen appears, select the appropriate language.
Install the Printer Software Quick Start-Up
ENGLISH
17
3
Click Printer Driver.
4
The Welcome window opens. Click Next.
5
Follow the instructions on the screen to complete
the installation.
PGL 12en printer drivers will support the following standard features:
• Input tray selection
•
paper size, orientation and media type
•
number of copies
The Reference Manual lists on page 2.12 a general overview of features supported
by the PGL 12en printer drivers.
Printer Driver Features
Quick Start-Up Install the Printer Software
18
Error
Manual
Paper
Data
Cancel/Reprint
Demo
Toner Save
Control Panel Buttons
The printer has three buttons:
Cancel/Reprint, Demo and Toner
Save.
(on)
(off)
Toner save
Press Toner Save to turn the toner save mode on or off. The printer must be in the ready
mode.
• If the button backlight is on, toner save mode activates and the printer uses less toner
to print a document.
• If the button backlight is off, toner save mode is disabled and you will print in normal
quality. For further information on Toner Save mode, see Reference Manual, page 5.6.
Control Panel Buttons Quick Start-Up
Toner Save
Toner Save
ENGLISH
19
Reprint last page of the job
Press Cancel/Reprint and hold until the control panel lights blink to cancel a job
the printer is currently printing. The Error light will blink while the print job is
cleared from both the printer and the computer, and then return to the ready mode.
This may take some time, depending on the size of the print job.
Note: If the Cancel/Reprint button is accidentally pushed, the job must be reprinted.
There is no undo function.
If you press Cancel/Reprint in the ready mode, the printer prints the last page of
the last print job.
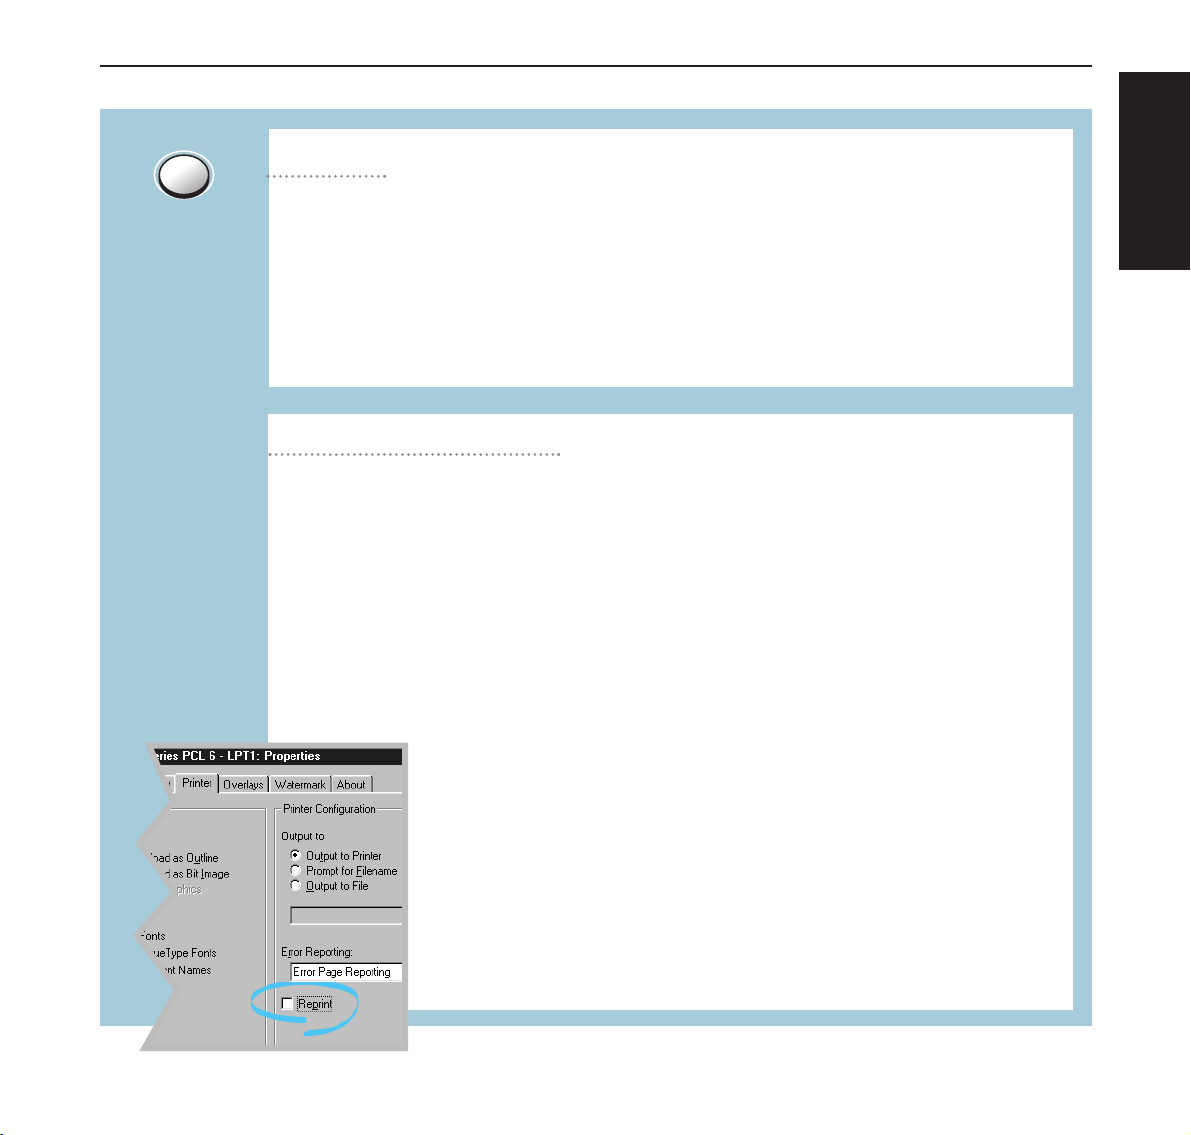
Note: If you want to prevent somebody from reprinting your document, you can turn
the Reprinting feature off in the printer’s properties dialog box. When you turn the feature off in the printer’s properties, the Cancel/Reprint button on the control panel does
not perform the reprinting operation.
To disable this feature:
1. From the Start menu, select Settings then Printers.
Cancel job
2. Click the right mouse button on the Olivetti PGL 12en PCL 6 printer
icon and select Properties to open the properties window.
3. From the Printer tab, click Reprint to empty the checkbox.
With the box empty, you cannot reprint the last page from the control
panel.
When you want to reprint the last page on the control panel, you
must put a check mark on this check box.
4. Click OK.
Quick Start-Up Control Panel Buttons
Cancel/Reprint
20
Cleaning the inside of the printer
Press and hold Demo for about 10 seconds until the control panel lights remain illuminated to automatically clean the printer inside. After cleaning the printer, one cleaning sheet prints. For further information, see Reference Manual, page 7.6.
Print demo page and configuration sheet
Start manual feeding
When you select Manual Feed for Paper Source from your software application, you
should press Demo each time you feed a sheet of paper manually. For further information, see Reference Manual, page 4.10.
Press and hold Demo for about 2 seconds until the control panel lights blink slowly to
print a demo page. The printer must be in the ready mode.
Press and hold Demo for about 6 seconds until the control panel lights blink rapidly to
print a configuration sheet. The printer must be in the ready mode. For further information, see Reference Manual, page 7.6.
Control Panel Buttons Quick Start-Up
Demo
ENGLISH
21
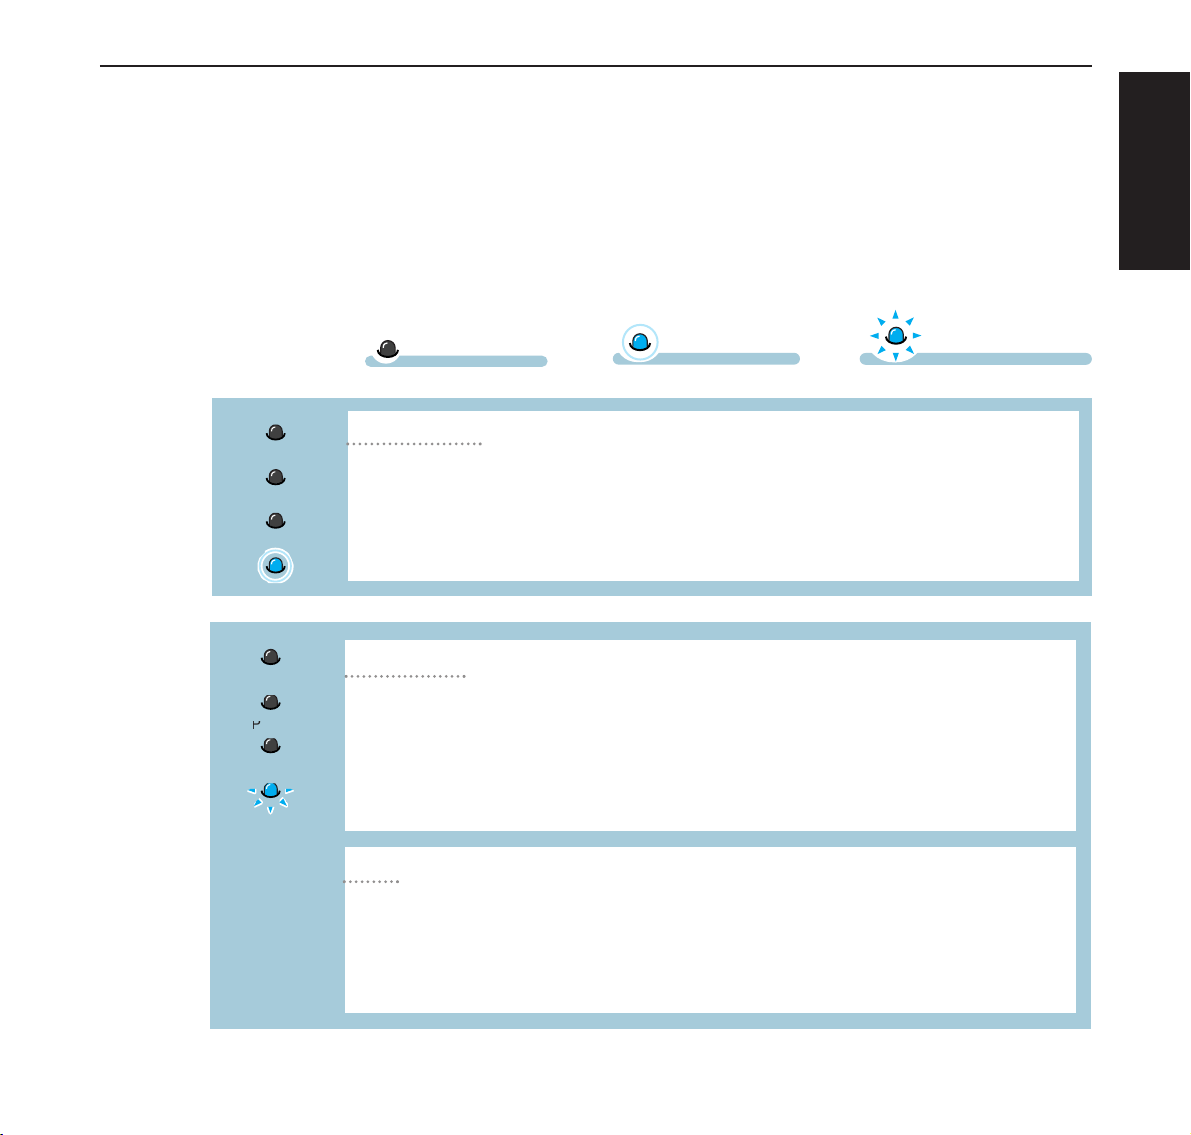
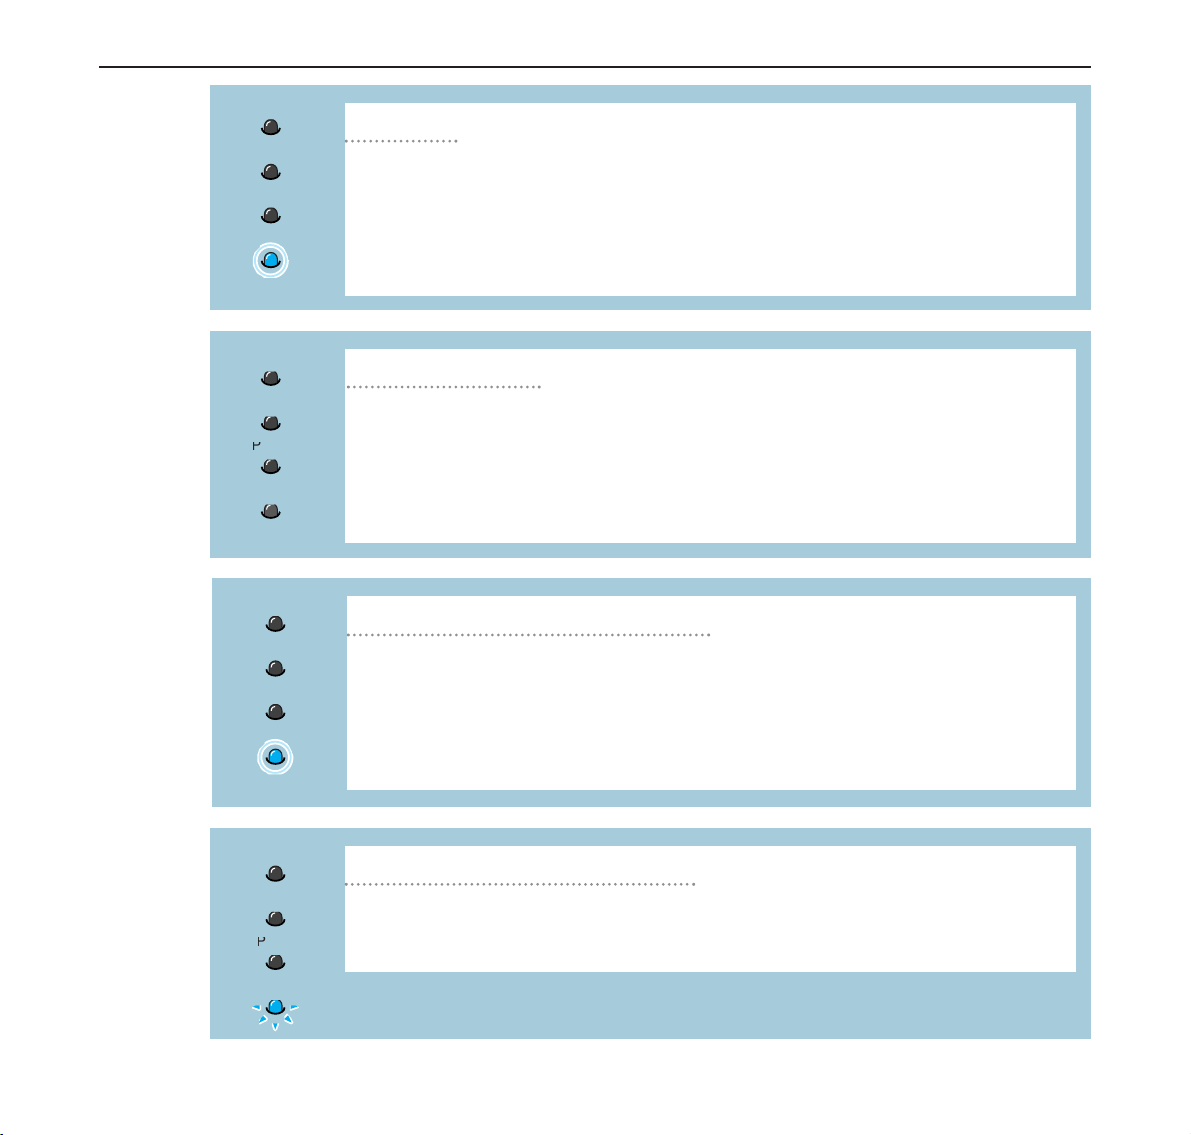
Control Panel Lights
The control panel lights indicate the status of your printer. If the Error light is on, the printer is
experiencing an error. See Reference Manual, “Troubleshooting Error Messages” on page 7.22.
symbol for “light on”
Control Panel Light Message
The Data light is on and the printer is ready to print.
No action is needed. If you press and hold the Demo button for about 2
seconds, a demo page will print. If you press and hold the button for about
4 seconds, a configuration sheet will print.
Ready Mode
Error
Paper
Data
symbol for “light
blinking”
symbol for “light off”
Light status
legend
The printer is receiving or processing data. Wait for the job to print.
Pressing the Cancel/Reprint button cancels the current job. One or two
pages may print as the printer clears the print job. The printer will return to
the ready mode after the job has been canceled.
Processing
Error
Manual
Paper
Data
The Data light blinks rapidly. Data is in the printer memory waiting to be
printed.
Pressing the Cancel/Reprint button cancels the current job and the printer
returns to the ready mode.
Data
Quick Start-Up Control Panel Lights
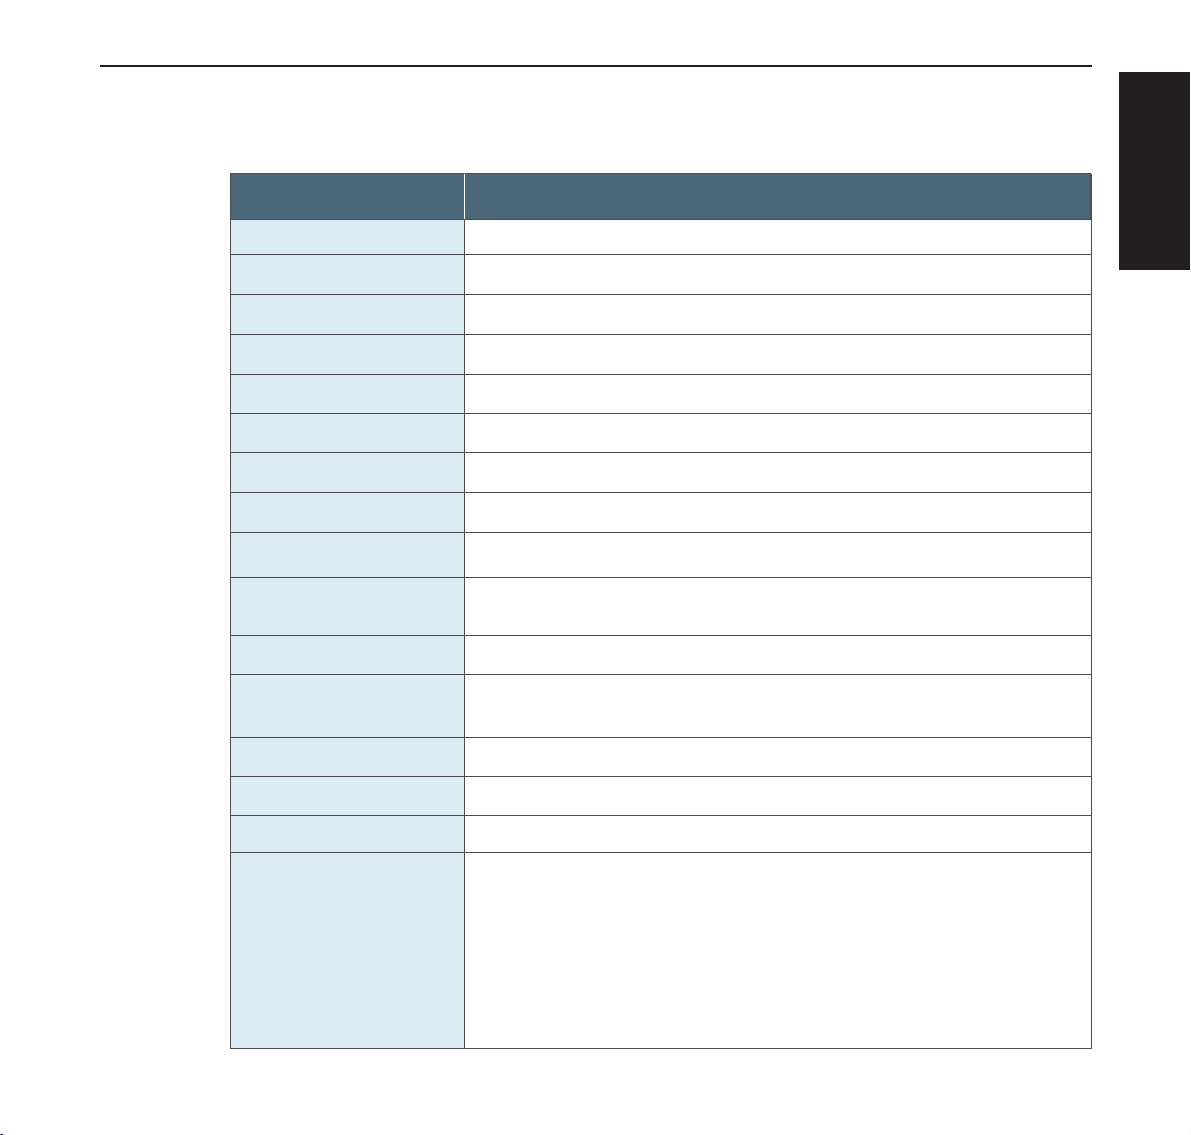
22
The printer is out of paper. The Paper light blinks until paper is added.
Load paper into the printer. There is no need to press any button to reset.
Paper out
Error
Paper
Data
The printer is set to Manual Feed mode. You have to feed paper manually
through the Multi-Purpose Tray. If you do not want to be in the Manual Feed
mode, change the setting from your printer properties. For details on the
Manual Feed mode, see Reference Manual, page 4.10.
Manual feed mode
Error
Paper
Data
The printer is processing data in the Manual Feed mode. Wait for the job to
print.
Printing in the manual feed mode
Error
Manual
Paper
Data
In the Manual Feed mode, the printer picks up paper from the Multi-Purpose
Tray, one sheet at a time.
Feed the correct paper in the Multi-Purpose Tray, and press the Demo but-
ton to start printing.
Paper out in the manual feed mode
Error
Paper
Data
Control Panel Lights Quick Start-Up
ENGLISH
23
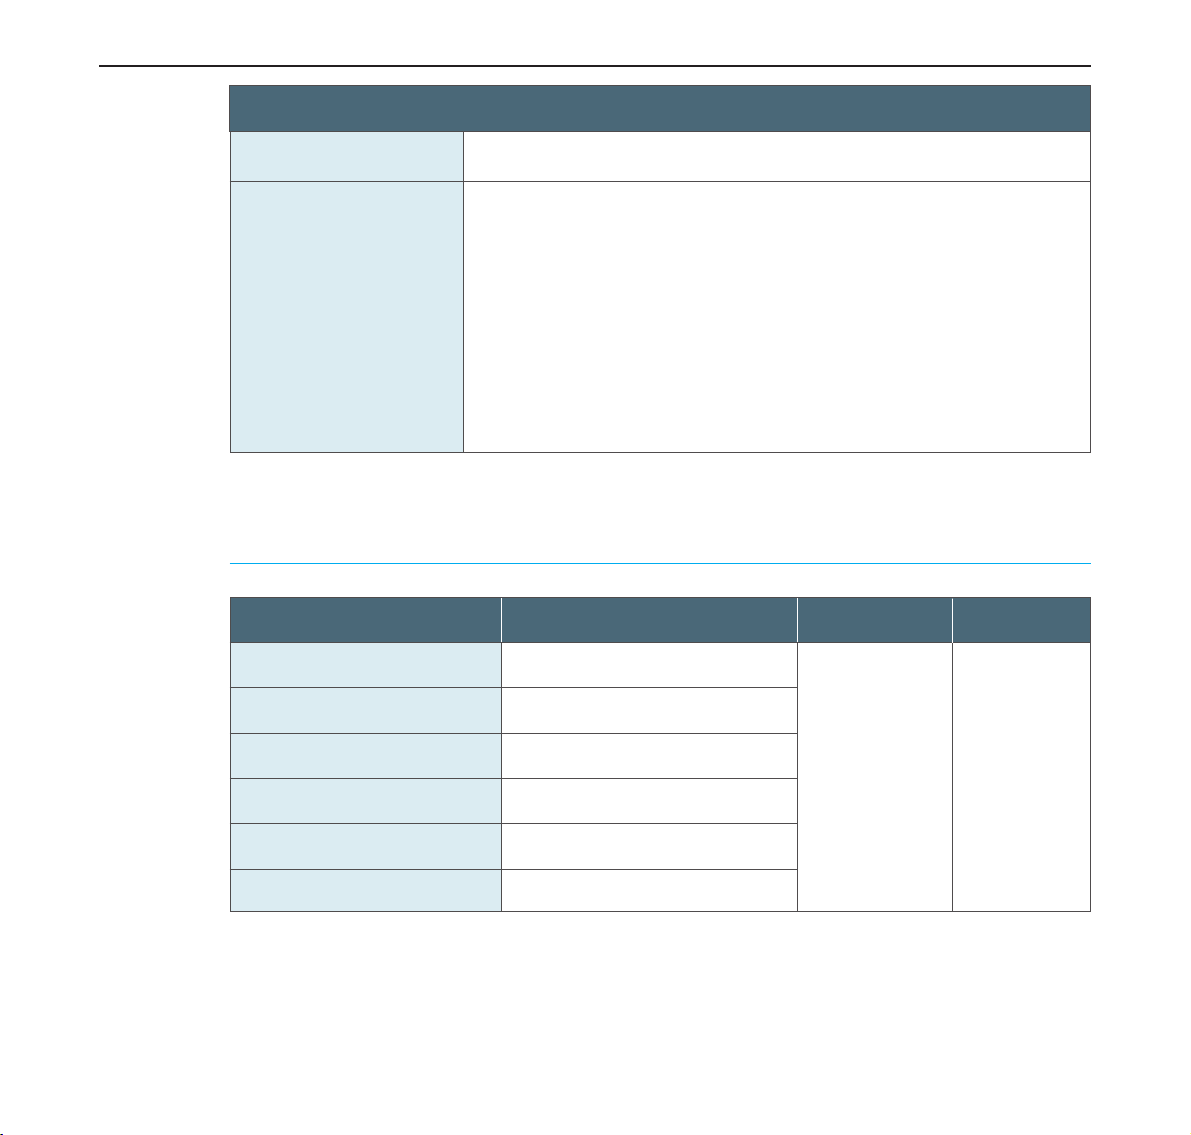
Quick Start-Up Printer Specifications
Item
Specification and Description
Printer Specifications
12 PPM (A4), 12.6 PPM (Letter)
1200 dpi (Memory expansion recommended)
First Printing Time
WarmUp Time
Less than 15 seconds
Power Consumption
350 W average during operation / Less than 12 W in power-save mode
Power Rating
AC 100 ~ 120 V (USA, Canada) / 220 ~ 240 V (Others), 50 / 60 Hz
Acoustic Noise
Stand by: Less than 35 dB; Operating: Less than 48 dB
Toner Supply
Single cartridge
Toner Cartridge Life
6,000 pages (for starter, 3,000 pages), 5% area coverage
Less than 30 seconds
Duty Cycle
Monthly: 12,000 pages maximum
Machine life: 150,000 pages (5 years)
Print Speed
Resolution
Emulation
PCL6, EPSON FX-850, PostScript Level 3 optional
Random Access
Memory (RAM)
Standard 4 MB
Expandable to 68 MB
: 72 pin, EDO, non-parity, 60ns;
4 MB, 8 MB, 16 MB, 32 MB, or 64 MB available
Weight
12.4 Kg / 27.3 lb.
External Dimensions
361 (W) x 409 (D) x 294.5 (H) mm (without options)
Temperature:10 ~ 32 °C / 50 ~ 90 °F; Humidity: 20 ~ 80 % RH
Package Weight
Paper: 1.83 Kg
Plastic: 0.33 Kg
Operating Environment
Fonts
1 bitmap, 45 scalable
Item
Specification and Description
24
Printer Specifications Quick Start-Up
Supported Sizes of Paper
Interface Switching
Automatic (Parallel, USB, Network)
Interface
•
12PPM (A4) Bidirectional Parallel Standard
- Modes supported: Compatible, Nibble, Byte, ECP
•
USB Interface Standard
- USB 1.0 compliant
- 12Mbps 1 port
•
Network Optional
- Ethernet 10/100M Base T
- Novell
- TCP/IP and AppleTalk
- LPD
Tray 1 or Optional Tray 2
Letter
Dimensions
a
8.5 ✕11 in. (
216
✕
279 mm
)
16 to 28 lb Bond
(60 to 105 g/m
2
)
550 sheets of
20 lb Bond
(75 g/m
2
) paper
Weight Capacity
b
A4
210 ✕297 mm (8.3 X 11.7 in.)
Executive
Legal
B5 (JIS)
Folio
7.3 X 10.5 in. (191 X 267 mm)
8.5 ✕14 in. (
216 ✕356 mm
)
182 ✕257 mm
(7.2 ✕10 in.)
216 ✕330 mm
(8.5 ✕13 in.)
a. The printer supports a wide range of media sizes. See “Printing on Card Stock or Custom-Sized Media” on
page 4.17 of the Reference Manual.
b. Capacity may vary depending on media weight and thickness, and environmental conditions.

ENGLISH
25
Quick Start-Up Printer Specifications
Multi-Purpose Tray
Minimum Size (custom)
Dimensions
a
98 X 148 mm (3.9 X 5.83 in.)
60 to 163 g/m
2
Bond
(16 to 43 lb )
100 sheets of
75 g/m
2
Bond
(20 lb) paper
Weight Capacity
b
Maximum Size (custom)
216 ✕356 mm (8.5 X 14 in.)
Transparency
Labels
c
Envelopes
Same minimum and maximum paper sizes as listed
above.
Thickness:
.10 X .14 mm
(0.0039 X 0.0055 in.)
Thickness:
.10 X .14 mm
(0.0039 X 0.0055 in.)
up to 90 g/m
2
(16-24 lb)
20 typical
25 typical
up to 10
a. The printer supports a wide range of media sizes. See “Printing on Card Stock or Custom-Sized Media” on
page 4.17 of the Reference Manual.
b. Capacity may vary depending on media weight and thickness, and environmental conditions.
c. Smoothness - 100 to 250 (Sheffield)
Note: You may experience some paper jams when using any media with a length of less than
148 mm (5.83 in.). For optimum performance, make sure you are storing and handling the paper
correctly. Please refer to “Printer and Paper Storage Environment” on page A.6 of the
Reference Manual.

26
Accessories
Memory module 4 MB
Memory module 8 MB
Memory module 16 MB
Memory module 32 MB
Memory module 64 MB
Ethernet interface
Postscript emulation
Paper cassette 2
Process unit BØ349
Drivers and
documentation
Accessories Quick Start-Up

DEUTSCH
Bedienungsanleitung
DER SCHNELLE
EINSTIEG
Inhalt
Einführung 1
Arbeiten mit der Online-CD-ROM 1
Auspacken 2
Druckerkomponenten 3
Einsetzen der Tonerkartusche 4
Einlegen von Papier 6
Ändern des Papierkassettenformats 7
Auswahl des Ausgabefachs 8
Oberes Ausgabefach (bedruckte Seite nach unten) 8
Hinteres Ausgabefach (bedruckte Seite nach oben) 8
Papiereinzug 10
Mehrzweckeinzug 10
Anschluss an den Computer mit Parallel-Kabel 13
Einschalten des Druckers 14
Drucken einer Testseite 14
Installation der Drucker-Software 15
Bevor Sie mit der Installation der Software
beginnen 16
Installation der Drucker-Software von der
CD-ROM 16
Druckertreiberfunktionen 17
Bedienungstasten 18
Kontrollleuchten 21
Technische Daten 23
Papierformat 24
Zubehör 26

Einführung
DEUTSCH
1
Der schnelle Einstieg Einführung
Die Bedienungsanleitung dient dem schnellen Einstieg in das Arbeiten mit dem Drucker
und soll auch dem ungeübten Benutzer den Umgang mit dem Gerät ermöglichen. Sie
beschreibt die wichtigsten Funktionen des Druckers und enthält unerläßliche
Informationen für die alltägliche Arbeit mit dem Gerät. Eine ausführliche Beschreibung
des Druckers, seiner Leistungsmerkmale und weiterführende Informationen enthält das
Referenzhandbuch auf der Online-CD-ROM, die Sie auf der vorletzten Seite dieser
Bedienungsanleitung finden.
Arbeiten mit der Online-CD-ROM
Installieren Sie zuerst den Adobe Acrobat Reader auf Festplatte, falls dieses Programm
nicht schon vorhanden ist. Befolgen Sie zur Installation die in der Readme-Datei im
Verzeichnis READER aufgeführten Schritte.
Doppelklicken Sie zum Starten der Online-Dokumentation im Datei-Manager (Windows
3.1) oder Explorer (Windows 95/98, Windows NT3.51/NT4) auf die Datei START.PDF.
Folgen Sie dann der Bedienerführung.

2
Auspacken
Auspacken
1
Nehmen Sie den Drucker und alle Zubehörteile aus dem
Karton. Überprüfen Sie, ob die folgenden Teile vorhan-
den sind:
Hinweis
:
• Wenn Teile fehlen oder beschädigt sind, setzen Sie sich umgehend mit
Ihrem Fachhändler in Verbindung.
• Einige Teile können je nach Land unterschiedlich sein.
Tonerkartusche
Netzkabel
CD-ROM
Bedienungsanleitung
Der schnelle Einstieg
2
Entfernen Sie vorsichtig alle Klebebänder vom Drucker.
Der schnelle Einstieg

3
Druckerkomponenten
Vorderseite
Bedienfeld
Oberes Ausgabefach
Abdeckung der Steuerplatine
(bietet Zugriff zur Steuerplatine für die
Installation von Druckeroptionen)
Papierfüllstandanzeige
(bedruckte Seite nach unten)
Obere Abdeckung
Papierkassette 1
(550 Blatt)
Mehrzweckeinzug
Papierkassette 2
(Option: 550 Blatt)
(Innenseite)
(bedruckte Seite nach oben)
Netzschalter
Hinteres Ausgabefach
Netzkabelanschluss
Parallel-Port
USB-Port
Netzwerk-Port
(PGL 12en: Option)
Rückseite
Tonerkartusche
Der schnelle Einstieg Druckerkomponenten

1
Öffnen Sie die obere Abdeckung.
Zum Öffnen der Abdeckung, fassen Sie diese am Griff an.
2
Reißen Sie vorsichtig das eine Ende der Schutzhülle ab.
Wenn Sie die Schutzhülle unvorsichtig mit einem Messer
öffnen, kann die Trommel der Tonerkartusche eventuell
verkratzt werden.
3
Legen Sie die Trommelkartusche vorsichtig auf ein Blatt
Papier. Ziehen Sie den Versiegelungsstreifen vorsichtig heraus.
4
Bevor Sie die Tonerkartusche einsetzen, sollten Sie die
Kartusche in horizontaler Richtung vorsichtig hin und her
schütteln, damit der Toner gleichmäßig verteilt werden
kann.
Einsetzen der Tonerkartusche
Griff
Einsetzen der Tonerkartusche Der schnelle Einstieg
4

VORSICHT:
Die Kartusche darf nicht länger als ein paar Minuten dem Licht ausgesetzt werden, sonst können Beschädigungen
auftreten. Bedecken Sie diese mit einem Blatt Papier.
Wenn Toner auf Ihre Kleidung gerät, waschen Sie den Toner mit kaltem Wasser heraus.
6
Fassen Sie die Kartusche am Griff und schieben Sie
diese in den Drucker hinein, bis sie einrastet.
7
Schließen Sie die obere Abdeckung. Vergewissern Sie sich,
dass die Abdeckung gut verschlossen ist.
5
Suchen Sie die Kartuschenführungen an beiden Seiten
des Druckerinnenraums.
Hinweis: Wenn Textseiten mit einer Druckfläche von ca.
5% gedruckt werden, können Sie mit einer
Tonerkartusche bis zu 6000 Seiten drucken (mit
der mitgelieferten Kartusche 3000 Seiten).
Der schnelle Einstieg Einsetzen der Tonerkartusche
5

6
1
Ziehen Sie die Papierkassette aus dem Drucker heraus.
2
Drücken Sie die Metallbodenplatte herunter, bis diese einrastet.
Einlegen von Papier
Hinweis: Sie können Transparentfolien, Briefköpfe und
andere Druckmedien auf die gleiche Weise laden.
Achten Sie darauf, dass die Kanten des Papierstapels bündig
abschließen.
Hinweis: Wenn Sie das Papierformat in der Kassette
ändern wollen, sehen Sie unten im Abschnitt „Ändern des
Papierkassettenformats“ nach.
4
Vergewissern Sie sich, dass sich der Stapel unter der
Metallklemme und unter den Kunststoffanschlägen der
Papierführung befindet.
Bei Überladung kann es zu einem Papierstau kommen.
5
Schieben Sie die Papierkassette wieder in den Drucker ein.
3
Legen Sie den Papierstapel mit der zu bedruckenden Seite
nach unten in die Papierkassette hinein.
A
Einlegen von Papier Der schnelle Einstieg
A

7
1
Drücken Sie den Metallknopf an der hinteren
Papierführung ein, um die Papierlänge einzustellen.
Ändern des Papierkassettenformats
3
Nachdem Sie das Papier eingelegt haben, drücken Sie, der
Abbildung entsprechend, die Breitenführung ein. Schieben
Sie die Breitenführung nach links, bis sie leicht an der Kante
des Papierstapels anliegt.
2
Verstellen Sie die Papierlängenführung so, dass der
Längenanzeiger die der gewünschten Papierlänge
entsprechende Position erreicht.
LGL
FOLIO
A4
Längenanzeiger
4
Bei Bedarf verwenden Sie die hintere Breitenführung. Drücken
Sie wie abgebildet den Knopf an der hinteren Breitenführung
und schieben Sie diese nach links.
Hinweis:
• Verschieben Sie die Breitenführung nicht so weit, dass
sich das Papier von der Bodenplatte hebt.
• Ist die Breitenführung nicht richtig eingestellt, kann es zu
Papierstaus kommen.
Der schnelle Einstieg Einlegen von Papier

8
Auswahl des Ausgabefachs
Der Drucker hat zwei Ausgabefächer: das Hintere Ausgabefach und das Obere Ausgabefach. Wenn beim
Drucken das obere Ausgabefach benutzt werden soll, stellen Sie sicher, dass das hintere Ausgabefach geschlossen
ist. Öffnen Sie das hintere Ausgabefach nur, wenn es benutzt werden soll.
• Falls Probleme wie zerknitterte Seiten bei der Ausgabe aus dem oberen Ausgabefach auftreten, versuchen Sie
den Druck aus dem hinteren Ausgabefach.
• Um Papierstaus zu vermeiden, öffnen oder schließen Sie das hintere Ausgabefach nicht während des
Druckvorganges.
Im oberen Ausgabefach sammeln sich die Seiten in der korrekten Reihenfolge
mit der bedruckten Seite nach unten. Das obere Ausgabefach ist das meist
benutzte Ausgabefach, und empiehlt sich besonders für folgende Druckaufträge:
• über 250 Papierseiten, fortlaufend
Oberes Ausgabefach (bedruckte Seite nach unten)
Der Drucker legt die Ausdrucke ausschließlich im hinteren Ausgabefach ab, wenn
es geöffnet ist. Die Ausdrucke werden mit der bedruckten Seite nach oben
abgelegt. Die letzte Seite wird sich ganz oben auf dem Stapel befinden.
Das Drucken aus dem Mehrzweckeinzug in das hintere Ausgabefach ist der
direkte Papierweg. Das hintere Ausgabefach bietet sich besonders für folgende
Druckaufträge:
• über 100 Papierseiten, fortlaufend
• Briefumschläge
• Etiketten
• kleine benutzerdefinierte Papierformate
• Postkarten
• Papiere, die leichter als 75 g/m
2
oder schwerer als 105 g/m2sind
• Transparentfolien
Hinteres Ausgabefach (bedruckte Seite nach oben)
Hinweis: Bestimmte Transparentfolien lassen sich aufgrund ihrer gewellten Form
nicht problemlos stapeln. Verwenden Sie in diesem Fall das Gesicht-unten-Tablett.
Auswahl des Ausgabefachs Der schnelle Einstieg

1
Öffnen Sie das hintere Ausgabefach, indem Sie es herunterklappen. Die Abdeckung dient selbst als Ausgabefach.
Nutzung des hinteren Ausgabefachs:
2
Ziehen Sie die Verlängerung heraus, so dass auch größere
Papierbögen aufgenommen werden können.
3
Wenn Sie das hintere Ausgabefach nicht benutzen wollen,
schieben Sie die Verlängerung wieder hinein und schließen
Sie das hintere Ausgabefach. Die Ausdrucke werden dann im
oberen Ausgabefach abgelegt.
Hinweis: Die Kapazität des hinteren Ausgabefachs
entspricht der des Mehrzweckeinzugs. Wenn das
Ausgabefach mit gedruckten Seiten überfüllt wird, kann es
herunterfallen. Nehmen Sie daher die Ausdrucke rechtzeitig aus dem Fach, bevor es überfüllt ist.
Der schnelle Einstieg Auswahl des Ausgabefachs
9

Papierzufuhr
Papier voll Papier leer
Mehrzweckeinzug
Der Mehrzweckeinzug befindet sich an der Vorderseite Ihres Druckers. Sie können den
Einzug schließen, so wird Ihr Drucker noch kompakter. Der Mehrzweckeinzug kann
mehrere Papierformate und -arten aufnehmen, beispielsweise Transparentfolien, Karten
und Umschläge. Sie möchten den Mehrzweckeinzug möglicherweise zum Drucken einzelner
Seiten mit Briefkopf, für farbige Papiere, die als Trennseiten fungieren oder für andere
spezielle Papiersorten verwenden, die sich normalerweise nicht im Papierfach befinden.
Sie können jeweils bis zu 100 Blatt Papier, 10 Umschläge, 20 Transparentfolien,
10 Karteikarten oder 25 Etiketten einlegen.
Wenn Sie beim Drucken den Mehrzweckeinzug benutzen wollen, müssen Sie in Ihrer
Software-Anwendung zunächst Mehrzweckeinzug als Papierquelle wählen und
anschließend Papierformat und -art für das von Ihnen eingelegte Druckmaterial auswählen
(siehe Referenzhandbuch, Seite 5.3).
• Legen Sie jeweils nur Papier eines Formats in den Mehrzweckeinzug ein.
• Legen Sie kein weiteres Papier ein, wenn sich noch Papier im Mehrzweckeinzug befindet,
andernfalls können Papierstaus auftreten. Dies gilt auch für anderes Druckmaterial.
• Legen Sie das Druckmaterial so ein, dass die zu bedruckende Seite nach oben weist und
die obere Seitenkante zuerst eingezogen wird und linksbündig ist.
• Legen Sie keine Gegenstände auf den Mehrzweckeinzug und drücken oder ziehen Sie
nicht daran.
Sie können Papierstaus vermeiden und einen fehlerfreien
Druck gewährleisten, indem Sie Papier korrekt einlegen.
Ziehen Sie die Papierkassette während des
Druckvorgangs nicht heraus. Dies kann zu Papierstaus
führen.
Anhand der Papierfüllstandanzeige an der Vorderseite der
Papierkassette(n) erkennen Sie, wie viel Papier sich noch
in der Papierkassette befindet. Die Papierfüllstandanzeige
zeigt rot, wenn die Papierkassette leer ist.
Hinweis:
Weitere Informationen zum Einlegen von Papier finden Sie
im Referenzhandbuch auf Online-CD-ROM.
Papierzufuhr Der schnelle Einstieg
10

1
Klappen Sie den Mehrzweckeinzug in Ihre Richtung
herunter.
Einlegen von Papier in den Mehrzweckeinzug:
2
Ziehen Sie die Verlängerung heraus, um den Einzug für
größere Papierformate zu verwenden.
3
Fächern Sie den Papierstapel auf und legen Sie ihn vorsichtig auf einer ebenen Fläche auf, um die Papierränder
auszurichten.
Der schnelle Einstieg Papierzufuhr
11

4
Legen Sie den Papierstapel mit der zu bedruckenden
Seite nach oben ein, und achten Sie darauf, dass der
Papierstapel linksbündig ist.
5
Schieben Sie die Papierbreitenführung nach links, bis sie
den eingelegten Stapel leicht berührt.
6
Nach dem Drucken schieben Sie die Verlängerung des
Einzugs wieder ein und schließen Sie den
Mehrzweckeinzug.
Hinweis: Legen Sie nicht zu viel Druckmaterial auf ein-
mal ein. Der Stapel muss unterhalb der Markierung für die
maximale Papierhöhe liegen. Das Druckmaterial wird sich
wellen, wenn der Stapel zu hoch ist oder zu weit in den
Drucker hinein geschoben wird.
Markierung für die maximale Höhe
Papierzufuhr Der schnelle Einstieg
12

1
Stellen Sie sicher, dass der Drucker und der Computer ausgeschaltet sind.
2
Stecken Sie das parallele Druckerkabel in die
Anschlussbuchse auf der Rückseite des Druckers. Sichern
Sie den Stecker mit den Klemmbügeln.
3
Stecken Sie das andere Ende des Druckerkabels in den
Parallel-Port Ihres Computers ein und ziehen Sie die
Schrauben fest. Falls Sie weitere Hilfe benötigen, schlagen Sie im Benutzerhandbuch zu Ihrem Computer nach.
Anschluss an den Computer mit Parallel-Kabel
➞➞
in den ParallelPort am
Computer
Wenn Sie die USB-Schnittstelle verwenden
Siehe Referenzhandbuch, Anhang B „Anschluss des
Druckers mit einem einem USB-Kabel“.
Wenn Sie die optionale NetzwerkSchnittstelle verwenden
Siehe Referenzhandbuch, Anhang F „Drucker am Netzwerk“.
Der schnelle Einstieg Anschluss an den Computer mit Parallel-Kabel
13

1
Stecken Sie das eine Ende des Netzkabels in den
Anschluss an der Rückseite des Druckers.
2
Stecken Sie das andere Ende in eine ordnungsgemäß
geerdete Netzsteckdose.
3
Schalten Sie den Drucker ein.
Einschalten des Druckers
➞➞
in die Netzsteckdose
Error
Manual
Paper
Data
Cancel/Reprint
Demo
Toner Save
Wird der Drucker eingeschaltet, leuchten alle Anzeigen im
Bedienfeld kurz auf. Wenn nun nur die Data-Anzeige ständig
leuchtet, drücken Sie auf die Demo-Taste.
Halten Sie die Taste ca. 2 Sekunden lang gedrückt, bis alle
Anzeigen langsam zu blinken beginnen. Lassen Sie dann die
Tasten wieder los, damit die Testseite gedruckt wird.
Die Testseite bietet Ihnen die Möglichkeit, die Druckqualität
und den fehlerfreien Druckvorgang zu überprüfen.
Drucken einer Testseite
Einschalten des Druckers Der schnelle Einstieg
14

DEUTSCH
15
Auf der mit Ihrem Drucker mitgelieferten CD-ROM befinden sich Druckertreiber für die
gängigsten Windows-Anwendungen. Sie müssen einen Druckertreiber installieren, damit
die Daten aus Ihren Anwendungen für den Drucker verständlich aufbereitet werden
können.
Auf der mitgelieferten CD-ROM befinden sich folgende Druckertreiber:
• PCL 6-Druckertreiber für Windows. Verwenden Sie diesen Treiber, um alle Vorteile
Ihres Druckers zu nutzen.
• PostScript-Printer-Description(PPD)-Datei für Windows und Macintosh, um den
PostScript-Treiber zu installieren.
Wenn Sie von einem Computer mit Parallelanschluss drucken
Informationen über die Installation der Drucker-Software in einem Computer, der direkt
mit dem Drucker parallel angeschlossen ist, erhalten Sie auf Seite 16.
Wenn Sie über die USB-Schnittstelle drucken
Informationen über die Installation der Drucker-Software in einem USB-anwendbaren
Computer erhalten Sie im Referenzhandbuch, Anhang B „Anschluss des Druckers mit
einem USB-Kabel“.
Wenn Sie unter Macintosh drucken
Informationen über die Installation von Postscript-Option für Macintosh erhalten Sie im
Referenzhandbuch, Anhang C „Drucker unter Macintosh“.
Wenn Sie unter DOS drucken
Informationen über die Installation der DOS-Drucker-Software und das Drucken unter
DOS erhalten Sie im Referenzhandbuch, Anhang D „Drucken unter DOS“.
Wenn Sie mit PostScript-Treiber drucken
Informationen über die Installation der PPD-Datei erhalten Sie im Referenzhandbuch,
Anhang E „PostScript-Treiber unter Windows“.
Wenn Sie Linux verwenden
Weitere Informationen zur Installation des Linux-Treibers erhalten Sie im
Referenzhandbuch, Anhang I, „Drucken unter Linux“.
Installation der Drucker-Software
Der schnelle Einstieg Installation der Druckersoftware

16
Stellen Sie folgende Punkte sicher:
• In Ihrem PC sind mindestens 16MB Arbeitsspeicher installiert.
• Auf Ihrem PC sind mindestens 30 MB freier Speicherplatz auf der Festplatte
vorhanden.
• Alle Anwendungen in Ihrem Computer sind geschlossen, bevor Sie mit der Installation
beginnen.
• Windows 95, Windows 98 oder Windows NT 4.0 oder Windows 2000.
1
Legen Sie die CD-ROM in Ihr CD-ROM-Laufwerk ein. Der Installationsvorgang wird
automatisch gestartet.
Falls das CD-ROM-Laufwerk nicht automatisch startet:
Wählen Sie Ausführen im Start-Menü und geben Sie x:\cdsetup.exe in der
Zeile „Öffnen“ ein (x steht für den Laufwerksbuchstaben Ihres CD-ROMLaufwerks). Klicken Sie auf OK.
Bevor Sie mit der Installation der Software beginnen
Installation der Drucker-Software von der CD-ROM
Hinweis: Wenn die Anzeige Neues Gerät gefunden während des
Installationsverfahrens erscheint, klicken Sie auf x in der oberen
rechten Ecke der Anzeige, oder klicken Sie auf Abbrechen.
2
Wählen Sie die gewünschte Sprache aus.
Installation der Druckersoftware Der schnelle Einstieg

DEUTSCH
17
3
Klicken Sie auf Drucker Treiber.
4
Das Willkommen-Fenster wird geöffnet. Klicken Sie
auf Weiter.
5
Folgen Sie den Anweisungen auf dem Bildschirm, um
mit der Installation fortzufahren.
Die Druckertreiber der PGL 12en bieten folgende Standardfunktionen:
• Auswahl der Papierzufuhr
• Papierformat, Ausrichtung und Druckmaterial
• Anzahl der Kopien
Eine Übersicht über alle Funktionen der Druckertreiber des PGL 12en finden Sie im
Referenzhandbuch auf der Seite 2.12.
Druckertreiberfunktionen
Der schnelle Einstieg Installation der Druckersoftware

18
Error
Manual
Paper
Data
Cancel/Reprint
Demo
Toner Save
Bedienungstasten
Der Drucker ist mit drei
Bedienungstasten ausgestattet:
Cancel/Reprint, Demo und Toner
Save.
(an)
(aus)
Toner sparen
Drücken Sie auf die Toner Save-Taste, um den Tonersparmodus ein- oder auszuschalten. Der
Drucker muss sich hierbei im Bereitschaftsstatus befinden.
• Wenn die Tastenbeleuchtung aufleuchtet, ist der Tonersparmodus eingeschaltet. Der Drucker
wird beim Drucken von Dokumenten weniger Toner verbrauchen.
• Wenn die Tastenbeleuchtung aus ist, ist der Tonersparmodus nicht in Betrieb. Der Drucker
wird mit normaler Qualität drucken. Mehr Informationen über den Tonersparmodus erhalten
Sie im Referenzhandbuch auf Seite 5.6.
Bedienungstasten Der schnelle Einstieg
Toner Save
Toner Save

DEUTSCH
19
Letzte Seite des Druckauftrags wieder drucken
Halten Sie die Taste Cancel/Reprint gedrückt, bis die Kontrollleuchten auf dem
Bedienfeld zu blinken beginnen, danach wird der laufende Druckauftrag abgebrochen.
Die Error-Kontrollleuchte wird blinken, während der Druckauftrag vom Drucker und vom
Computer gelöscht wird und der Drucker wieder zum Drucken bereit ist. Dies wird je
nach Umfang des Druckauftrages einige Zeit in Anspruch nehmen.
Hinweis: Wenn aus versehen auf die Cancel/Reprint-Taste gedrückt wird, muss der
Druckauftrag nochmal gedruckt werden. Es gibt keine Undo-Funktion.
Wenn Sie im Bereitschaftsstatus auf Cancel/Reprint drücken, druckt der Drucker die
letzte Seite des letzten Druckauftrags.
Hinweis: Wenn Sie vermeiden möchten, dass eine andere Person Ihr Dokument erneut
druckt, können Sie die Reprint-Funktion über das Dialogfeld für Druckereigenschaften
deaktivieren. Wenn Sie die Funktion Cancel/Reprint in den Druckereigenschaften deaktiviert haben, kann der Reprint-Vorgang nicht mehr über das Bedienfeld durchgeführt werden.
So aktivieren Sie diese Funktion:
1. Wählen Sie im Startmenü zunächst die Option Einstellungen und anschließend
Drucker.
Druckauftrag abbrechen
2. Klicken Sie mit der rechten Maustaste auf das Druckersymbol Olivetti
PGL 12en PCL 6, und wählen Sie Eigenschaften, um das Fenster
Properties zu öffnen.
3. Klicken Sie in der Registerkarte Papier auf Erneut drucken, um das
Kontrollkästchen zu deaktivieren.
Wenn das Kontrollkästchen deaktiviert ist, kann die letzte Seite nicht
mehr über das Bedienfeld gedruckt werden.
Wenn Sie die letzte Seite über das Bedienfeld drucken möchten,
müssen Sie das Kontrollkästchen aktivieren.
4. Klicken Sie auf OK.
Der schnelle Einstieg Bedienungstasten
Cancel/Reprint

20
Druckerinnenraum reinigen
Halten Sie die Demo-Taste etwa 10 Sekunden lang gedrückt, bis die Kontrollleuchten
ständig leuchten. Dann wird der Druckerinnenraum gereinigt. Nach der Reinigung wird ein
Reinigungspapier gedruckt. Mehr Informationen erhalten Sie im Referenzhandbuch auf
Seite 7.6.
Testseite und Konfigurationsblatt drucken
Manuelle Papierzufuhr starten
Wenn Sie in der Software-Anwendung Manuelle Zufuhr für Papierquelle wählen, müssen
Sie jedes Mal bei der manuellen Papierzufuhr auf die Demo-Taste drücken. Mehr
Informationen erhalten Sie im Referenzhandbuch auf Seite 4.10.
Halten Sie die Demo-Taste etwa 2 Sekunden lang gedrückt, bis die Kontrollleuchten
anfangen, langsam zu blinken. Dann wird eine Testseite gedruckt. Der Drucker muss sich
hierbei im Bereitschaftsstatus befinden.
Halten Sie die Demo-Taste etwa 4 Sekunden lang gedrückt, bis die Kontrollleuchten
anfangen, schnell zu blinken. Dann wird ein Konfigurationsblatt gedruckt. Der Drucker
muss sich hierbei im Bereitschaftsstatus befinden. Mehr Informationen erhalten Sie im
Referenzhandbuch auf Seite 7.6.
Bedienungstasten Der schnelle Einstieg
Demo

DEUTSCH
21
Kontrollleuchten
Die Kontrollleuchten weisen auf den Zustand des Druckers hin. Wenn die Error-Kontrollleuchte an ist,
befindet sich der Drucker im Fehlerzustand. Weitere Informationen erhalten Sie im Referenzhandbuch, Abschnitt „Fehlermeldung“ auf Seite 7.22.
„Leuchte an“
Meldungen der Kontrollleuchten
Die Data-Leuchte ist an und der Drucker ist zum Drucken bereit.
Keine Betätigung erforderlich. Wenn Sie die Demo-Taste etwa 2 Sekunden lang
gedrückt halten, wird eine Testseite gedruckt. Wenn Sie die Taste etwa 4
Sekunden lang gedrückt halten, wird ein Konfigurationsblatt gedruckt.
Bereit
Error
Paper
Data
„Leuchte blinkt“
„Leuchte aus“
Symbole
Der Drucker empfängt oder verarbeitet Daten. Warten Sie auf den Druckvorgang.
Wenn Sie auf die Cancel/Reprint-Taste drücken, wird der momentane
Druckauftrag abgebrochen. Währenddessen können ein oder zwei Seiten ausgedruckt werden. Der Drucker wird wieder in den Bereitschaftsstatus zurückkehren,
nachdem der Druckauftrag abgebrochen ist.
Verarbeitung
Error
Manual
Paper
Data
Die Data-Leuchte blinkt schnell. Daten warten im Druckerspeicher auf den
Druckvorgang.
Wenn Sie auf die Taste Cancel/Reprint drücken, wird der aktuelle Druckauftrag
abgebrochen, und der Drucker kehrt in den Bereitschaftsstatus zurück.
Data
Der schnelle Einstieg Kontrollleuchten

22
Im Drucker ist kein Papier vorhanden. Die Paper-Leuchte blinkt, bis Papier
nachgeladen wird.
Legen Sie Papier in den Drucker ein. Das Zurücksetzen des Druckers mittels einer
der Tasten ist nicht erforderlich.
Kein Papier vorhanden
Error
Paper
Data
Der Drucker ist auf manuellen Zufuhr-Modus eingestellt. Sie müssen Papier
manuell durch den Mehrzweckeinzug zuführen. Wenn Sie nicht im manuellen
Zufuhr-Modus drucken wollen, ändern Sie die Einstellung in den
Druckereigenschaften. Mehr Informationen erhalten Sie im Referenzhandbuchauf
Seite 4.10.
Manueller Papierzufuhr-Modus
Error
Paper
Data
Der Drucker verarbeitet Daten im manuellen Papierzufuhr-Modus. Warten Sie auf
den Druckvorgang.
Im manuellen Papierzufuhr-Modus drucken
Error
Manual
Paper
Data
Im manuellen Papierzufuhr-Modus wird jeweils ein Blatt Papier vom
Mehrzweckeinzug eingezogen.
Legen Sie geeignetes Papier in den Mehrzweckeinzug und drücken Sie auf die
Demo-Taste, um den Druckvorgang zu starten.
Kein Papier im manuellen Papierzufuhr-Modus
Error
Paper
Data
Kontrollleuchten Der schnelle Einstieg

DEUTSCH
23
Der schnelle Einstieg Technische Daten
Merkmal
Technische Daten und Beschreibung
Druckgeschwindigkeit
12 Seiten pro Minute (A4), 12,6 Seiten pro Minute (Letter)
Auflösung
1200 dpi (Speichererweiterung empfohlen in PGL 12en)
Erste Druckzeit
Aufwärmzeit
Weniger als 15 Sekunden
Stromverbrauch
Aktivierungszeit: 350 W / Stromsparbetrieb: weniger als 12 W
Netzspannung
AC 100~120 V (USA, Kanada) / 200~240 V (sonstige), 50/60 Hz
Betriebsgeräusch
Ruhezustand: unter 35 dB , Druckzustand: unter 48 dB
Toner
Einzel Tonerkartusche
Lebensdauer der
Tonerkartusche
Lebensdauer: 6.000 Seiten bei einem
Schwärzungsgrad von 5% (anfangs: 3.000 Seiten)
Emulation
PCL6, EPSON FX-850, PostScript Level 3 Option
Arbeitsspeicher (RAM)
Standard 4 MB
Erweiterbar auf 68 MB:
72 pin, EDO, non-parity, 60ns;
4 MB, 8 MB, 16 MB, 32 MB oder 64 MB anwendbar
Weniger als 30 Sekunden
Gewicht
12,4 kg / 21,3 Ib.
Abmessungen
361 (Breite) x 409 (Tiefe) x 294,5 (Höhe) mm (ohne Option)
Temperatur: 10~32 °C/50~90 °F Luftfeuchtigkeit: 20~80 % (relativ)
Verpackung
Papier: 1,83 Kg
Kunststoff: 0,33 Kg
Duty-Zyklus
Monatlich: maximal 12.000 Seiten
Lebensdauer der Maschine: 150.000 (5 Jahre)
Betriebsanforderungen
Technische Daten
Schriftart
1 Bitmap-Schriftart
45 skalierbare Schriftarten

Merkmal
Technische Daten und Beschreibung
24
Technische Daten Der schnelle Einstieg
Schnittstellenumschaltung
Automatisch (Parallel, USB, Netzwerk)
Schnittstellen
• 12 PPM (A4) Bidirektionaler Parallelstandard
- Unterstützte Modi: Compatible, Nibble, Byte, ECP
• USB-Schnittstelle (Standard)
- USB 1.0 kompatibel
- 12 Mbps 1 Port
• Netzwerk (Option)
- Ethernet 10/100M Base T
- Novell
- TCP/IP und AppleTalk
- LPD
Papierkassette 1 oder
optionale Papierkassette 2
Letter
Abmessung
a
216 ✕279 mm
(8,5 ✕11 Zoll)
60 bis 105 g/m
2
(16 bis 28 lb
Bond)
75 g/m
2
(550 Blatt von
20 lb Bond)
Papier
Gewicht Kapazität
b
A4
210 ✕297 mm (8,3 X 11,7
Zoll
)
Executive
Legal
B5 (JIS)
Folio
191 X 267 mm (7,3 X 10,5
Zoll
)
216 ✕356 mm
(8,5 ✕14 Zoll)
182 ✕257 mm
(7,2
✕
10 Zoll)
216 ✕330 mm
(8,5 ✕13 Zoll)
a. Der Olivetti Laserdrucker unterstützt eine weite Palette von Druckmaterialformaten. Siehe
Referenzhandbuch, Abschnitt „Drucken auf Karten oder benutzerdefinierte Formate“ auf Seite 4.17.
b. Die Kapazität ist je nach Materialgewicht, Dicke und Umfeld unterschiedlich.
Papierformat

DEUTSCH
25
Mehrzweckeinzug
Minimalgröße (custom)
Abmessung
a
98 X 148 mm (3,9 X 5,83 Zoll)
60 bis 163 g/m
2
Bond
(16 bis 43 lb)
100 Blatt von
75 g/m
2
Bond
(20 lb) Papier
Gewicht Kapazität
b
Maximum Größe (custom)
216 ✕356 mm (8,5 X 14 Zoll)
Transparentfolien
Etiketten
c
Briefumschläge
Gleiche minimale und maximale Größe wie oben aufgelistet.
Dicke:
0,10 x 0,14 mm
(0,0039 x 0,0055 Zoll)
Dicke:
0,10 x 0,14 (0,0039 x
0,0055 Zoll)
bis 90 g/m
2
(16-24 lb)
20 typical
25 typical
bis 10
a. Der Drucker unterstützt eine weite Palette von Druckmaterialformaten. Siehe Referenzhandbuch, Abschnitt
„Drucken auf Karten oder benutzerdefinierte Formate“ auf Seite 4.17.
b. Die Kapazität ist je nach Materialgewicht, Dicke und Umfeld unterschiedlich.
c. Glätte - 100 bis 250 (Sheffield).
Hinweis: Es werden Papierstaus auftreten, wenn Sie Material, dessen Format kürzer als
148 mm (5,83 Zoll.) ist, verwenden. Dies wird bei Papieren auftreten, die von Umfeldbedingungen negativ beeinflusst wurden. Zur optimalen Leistung sollten Sie das Papier korrekt
lagern und handhaben. Siehe Referenzhandbuch, Abschnitt „Umfeld für Drucker und
Papierlagerung“ auf Seite A.6.
Der schnelle Einstieg Technische Daten

26
Zubehör
Zubehör Der schnelle Einstieg
Speichermodul 4 MB
Speichermodul 8 MB
Speichermodul 16 MB
Speichermodul 32 MB
Speichermodul 64 MB
Ethernet-Schnittstelle
PDL-Emulation
Papierkassette 2
Prozeßeinheit B∅349
Treiber und Dokumentation

FRANÇAIS
Table des matières
Manuel d’utilisation
INITIATION RAPIDE
Introduction 1
Utilisation du CD-ROM Online 1
Déballage de l’imprimante 2
Composants de l’imprimante 3
Installation de la cartouche d’encre 4
Chargement du papier 6
Pour changer de format de papier 7
Sélection du plateau récepteur 8
Réception par le bac de sortie standard 8
Réception par le bac de sortie arrière 8
Chargement du papier 10
Utilisation du bac universel 10
Branchement sur l’ordinateur par un
câble parallèle 13
Branchement du cordon d’alimentation 14
Impression d’une page-Demo 14
Installation du logiciel d’impression 15
Avant d’installer le logiciel de l’imprimante 16
Installation du logiciel de l’imprimante à partir
du CD-ROM 16
Propriétés du pilote de l’imprimante 17
Touches du panneau de commande 18
Voyants du panneau de commande 21
Spécifications de l’imprimante 23
Formats de papier pris en charge 24
Accessoires 26

Introduction
FRANÇAIS
1
Initiation rapide Introduction
Ce manuel d'utilisation est une initiation rapide sur la manière d'utiliser l'imprimante et
permet également aux utilisateurs inexpérimentés de se servir de l'imprimante. Il décrit
les fonctions principales de l'imprimante et contient des informations indispensables à
connaître pour le travail quotidien avec l'imprimante. Vous trouverez une description
détaillée de l'imprimante, de ses caractéristiques et des informations supplémentaires
dans le manuel de référence sur le CD-ROM Online, qui se trouve à l'avant-dernière
page de ce manuel d'utilisation.
Utilisation du CD-ROM Online
Installer d'abord l'Adobe Acrobat Reader sur le disque dur dans la mesure où ce programme n'est pas déjà disponible. Pour l'installation, suivre les opérations détaillées
dans le fichier Readme du répertoire READER.
Pour démarrer la documentation Online dans le Gestionnaire de fichiers (Windows 3.1)
ou l'Explorateur (Windows 95/98, Windows NT 4), double-cliquez sur le fichier
START.PDF. Suivre ensuite le guide utilisateur.

2
Déballage de l’imprimante
Déballage de l’imprimante
1
Sortez l’imprimante et tous les accessoires du carton.
Vérifiez qu’il ne manque aucun élément:
N.B.
:
• S’il manque des éléments ou si certains d’entre eux sont
endommagés, signalez-le immédiatement à votre revendeur.
• Les pièces peuvent varier selon les pays.
Cartouche d’encre
Cordon d’alimentation
CD-ROM
Manuel d’utilisation
Initiation rapide
2
Retirez soigneusement les bandes adhésives collées
sur l’imprimante.
Initiation rapide

3
Composants de l’imprimante
Vue avant
Panneau de commande
Bac de sortie standard
Panneau d’accès au panneau de
contrôle
(utilisé pour accéder au panneau de contrôle lors de l’installation des options de
l’imprimante)
Indicateurs de
niveau du papier
(Sortie face vers le bas)
Capot supérieur
Bac 1
(550 feuilles)
Bac universel
Bac 2 optionnel
(550 feuilles)
(
intérieur
)
(Sortie face vers le haut)
Commutateur
Plateau du bac de sortise
arrière
Alimentation secteur
Port parallèle
Port USB
Port réseau
(PGL 12en : en option)
Vue arrière
Cartouche d’encre
Initiation rapide Composants de l’imprimante
FRANÇAIS

1
Ouvrez le capot supérieur de l’imprimante. Pour
l’ouvrir, il faut tenir la poignée.
2
Ouvrez le sac plastique en déchirant une extrémité
avec précaution.
Attention: ouvrir à l’aide d’un objet pointu tel qu’un
couteau peut érafler le tambour de la cartouche.
3
Repérez le ruban d’étanchéité au bout de la
cartouche. Retirez-le complètement avec soin.
4
Secouez la cartouche doucement afin de répartir
l’encre uniformément dans toute la cartouche.
Installation de la cartouche d’encre
Poignée
Installation de la cartouche d’encre Initiation rapide
4

Attention
:
Pour éviter les dommages, prenez garde de ne pas exposer la cartouche à la lumière plus de quelques
minutes : couvrez-la avec du papier.
Au cas où l’encre tacherait vos vêtements, essuyez-les avec un chiffon sec et lavez-les à l’eau froide. L’eau
chaude fait adhérer l’encre au tissu.
6
Tenez la cartouche par sa poignée et glissez-la entre
les rainures jusqu’à ce qu’elle soit bien ajustée à sa
place.
7
Fermez le capot supérieur et assurez-vous qu’il est
bien fermé.
5
Repérez les rainures de la cartouche sur les deux
côtés à l’intérieur de l’imprimante.
N.B.: A 5 % de remplissage, une cartouche d’encre
devrait suffire pour environ 6 000 pages (3 000
pour la cartouche contenue dans l’imprimante lors
de la livraison).
Initiation rapide Installation de la cartouche d’encre
5
FRANÇAIS

6
1
Ouvrez le bac à papier en le tirant vers vous.
2
Appuyez sur la plaquette en métal jusqu’à ce qu’elle se
bloque.
Chargement du papier
Remarque: Vous avez la possibilité de charger des
transparents, des en-têtes de lettres ou d'autres supports
d'impression en utilisant la même méthode.
Prenez bien garde que le papier reste plat sur les quatre coins du bac.
N.B. : Si vous voulez imprimer sur un autre format que
A4, consultez plus loin la rubrique « Pour changer de
format de papier ».
4
Vérifiez que la pile de papier est insérée sous le clip
de retenue métallique et sous les languettes de plastique montées sur les guide-papier. Un excès de papier
dans le bac peut entraîner des bourrages.
5
Réinsérez le bac à papier dans l’imprimante.
3
Mettez le papier face à imprimer vers le bas.
A
Chargement du papier Initiation rapide
A

7
1
Pincez l’onglet en métal du guide papier arrière pour
l’ajuster à la longueur du support.
Pour changer de format de papier
3
Après le chargement du papier, pincez le guide latéral
comme indiqué sur l’illustration et faites-le glisser
vers la gauche le long de la pile de papier.
2
Grâce à cet onglet, réglez le guide de longueur en
mettant l’index à la valeur de votre choix.
LGL
FOLIO
A4
Index
4
Si nécessaire, manipulez le guide largeur arrière :
pincez-le comme indiqué
ci-contre et glissez-le vers la gauche.
N.B. :
• Ne poussez pas le guide de telle manière que le papier
se plie.
• Si vous laissez le guide latéral non réglé, cela risque
d’entraîner des bourrages.
Initiation rapide Chargement du papier
FRANÇAIS

8
Sélection du plateau récepteur
L’imprimante a deux récepteurs : le bac de sortie arrière et le bac de sortie standard situé sur le capot
supérieur de l’imprimante. Pour vous servir du plateau récepteur standard, n’oubliez pas de fermer le bac
arrière. Mais si vous voulez utiliser celui-ci, il faut que le volet arrière reste ouvert.
• Au cours de l’utilisation du bac standard, si vous avez des incidents tels que la courbure excessive du
papier, essayez d’imprimer avec le bac de sortie arrière.
• Pour éviter les bourrages de papier, vous ne devez pas ouvrir ni fermer le bac de sortie arrière en cours
d’impression.
Le bac de sortie standard empile les pages imprimées face imprimée vers le
bas en ordre croissant. Ce bac s'utilise^pour la majorité des travaux. Il est
conseillé pour :
• impression continue de plus de 250 feuilles
Réception par le bac de sortie standard (Face imprimée vers le bas)
L’imprimante sort les pages imprimées toujours par le bac de sortie arrière si
celui-ci est ouvert. Les pages imprimées sortent face imprimée vers le haut,
la dernière page étant en haut.
Imprimer à partir du bac universel et recevoir par le bac de sortie arrière constitue un circuit papier en ligne droite. Le recours au bac de sortie arrière
aide à améliorer la qualité de l’impression pour les supports suivants :
• impression continue de plus de 100 feuilles
• enveloppes
• étiquettes autocollantes
• petits papiers de format sur mesure
• cartes postales
• papiers de moins de 60g/m
2
(16 livres) ou de plus de 105 g/m2(28 livres)
• transparents :
Réception par le bac de sortie arrière (Face imprimée vers le haut)
Remarque : Il est possible que des bourrages surviennent si le papier se gondole. Dans ce cas-là, veuillez utiliser le bac Face imprimée vers le bas.trop lourd.
Sélection du plateau récepteur
Initiation rapide

1
Ouvrez le volet arrière en le tirant vers le bas. Le volet
sert de plateau récepteur.
Pour ouvrir le bac de sortie arrière :
2
Tirez sur la rallonge pour rallonger le bac de sortie au
maximum de sa longueur si vous voulez charger du
papier plus long.
3
Si vous ne voulez pas recevoir les pages imprimées
par le bac de sortie arrière, refermez le volet en
faisant glisser doucement la rallonge. Les pages
imprimées s’empileront dans le bac de sortie standard.
N.B. : La capacité du bac de sortie arrière est identique à celle du bac universel. Au cas où le bac serait
surchargé, il peut se détacher du corps de l’imprimante :
il vaut mieux enlever les pages imprimées avant qu’elles
ne pèsent trop lourd.
Initiation rapide
Sélection du plateau récepteur
9
FRANÇAIS

Chargement du papier
Bac Plein Bac Vide
Utilisation du bac universel
Le bac universel est situé à l’avant de votre imprimante. Quand vous ne l’utilisez pas, vous
pouvez le refermer : cela rend votre imprimante moins encombrante. Le bac universel
peut contenir plusieurs formats et types de papier, tels que transparents, cartes et
enveloppes. Si vous désirez imprimer une page avec en-tête ou utiliser du papier spécial,
sélectionnez le bac multiusages.
Vous pouvez charger environ 100 feuilles de papier, 10 enveloppes, 20 transparents, 10
cartes, 25 feuilles d’étiquettes autocollantes.
Pour imprimer depuis le bac universel, vous devez sélectionner, à partir de votre logiciel
d’application, d’abord le Bac universel comme Source, puis le format et le type de papier correspondant au papier chargé. Pour en savoir plus, reportez-vous à la page 5.3.
• Ne chargez que du papier d’un seul format à la fois dans le bac universel.
• Pour éviter les bourrages de papier, n’ajoutez pas de papier tant qu’il en reste dans le
bac universel. Ce conseil est valable également pour les autres supports d’impression.
• Les supports doivent être chargés côté à imprimer vers le haut, bord gauche de la pile
contre le bord gauche du bac, le côté en-tête étant le premier à s’introduire dans le circuit.
• Ne placez aucun objet sur le bac universel et évitez toute pression ou application d’une
force excessive dessus.
Charger convenablement le papier aide à prévenir les
bourrages et assure un fonctionnement de l’imprimante sans incidents. N’enlevez pas le bac à papier
pendant que la machine imprime. Cela peut bloquer le
papier.
L’indicateur de niveau du papier présent sur le devant
du bac à papier indique la quantité de papier restant
dans le bac. Lorsque le bac est vide, le voyant tourne
au rouge.
N.B.:
Vous trouverez des informations supplémentaires dans le
manuel de référence sur le CD-ROM Online.
Chargement du papier Initiation rapide
10

1
Tirez le volet du bac universel vers vous.
Pour mettre du papier dans le bac universel
2
Tirez sur la rallonge pour rallonger au maximum le
bac, en cas de chargement de papier plus long.
3
Préparez une pile de feuilles à imprimer en les incurvant et en les aérant. Alignez les côtés de la pile de
papier sur une surface plane.
Initiation rapide Chargement du papier
11
FRANÇAIS

4
Mettez du papier dans le bac, face à imprimer vers
le haut, la pile de papier contre le bord gauche du
bac.
5
Faites coulisser le guide de largeur de papier vers la
gauche, jusqu’à ce qu’il touche légèrement la pile de
papier sans la bomber.
6
L’impression terminée, rangez la rallonge en la poussant vers le fond et fermez le volet du bac universel.
N.B. : Assurez-vous que vous n’avez pas surchargé les
supports. La pile devrait se situer sous le repère de limite d’empilage. Si la pile est trop basse ou si le guide de
longueur est trop poussé, cela risque de recourber les
supports.
Repère de limite d’empilage
Chargement du papier Initiation rapide
12

1
Veillez à ce que l’imprimante et l’ordinateur soient hors tension.
2
Brancher le câble dans le connecteur situé au dos
de l’imprimante.
Appuyez sur les agrafes de verrouillage jusqu’à ce
qu’elles s’engagent dans les encoches à l’extérieur
du câble.
3
Raccordez l’autre extrémité du câble au port parallèle de votre ordinateur et serrez les vis.
Consultez le mode d’emploi de votre ordinateur en
cas de besoin.
Branchement sur l’ordinateur par un câble parallèle
➞➞
Au port parallèle
de l’ordinateur
Si vous utilisez l’interface USB :
Reportez-vous à manuel de référence, annexe B
«Pour utiliser votre imprimante avec un câble USB».
Si vous avez l’option carte d’interface réseau :
Consultez manuel de référence, annexe F «Utilisation
de votre imprimante sur réseau».
Initiation rapide
Branchement sur l’ordinateur par un câble parallèle
13
FRANÇAIS

1
Branchez une extrémité du cordon dans le connecteur d’alimentation situé au dos de l’imprimante.
2
Branchez l’autre extrémité du cordon sur une prise
de courant.
3
Mettez l’imprimante sous tension.
Branchement du cordon d’alimentation
➞➞
A la prise de courant
alternatif
Error
Manual
Paper
Data
Cancel/Reprint
Demo
Toner Save
Pendant que l’imprimante se met sous tension, tous les
voyants du panneau de commande s’allument brièvement. Au moment où seul le voyant Data reste allumé,
appuyez sur le bouton Demo pendant quelques temps.
Maintenez le bouton enfoncé pendant
2 secondes env., jusqu’à ce que tous les voyants clignotent lentement, puis relâchez-le; une page de test s'imprime automatiquement.
La page-demo sert à montrer la qualité de l’impression
et vous permet de vérifier si l’imprimante fonctionne
correctement.
Impression d’une page-Demo
Branchement du cordon d’alimentation
Initiation rapide
14

FRANÇAIS
15
Le CD-ROM fourni avec votre imprimante contient les pilotes d’impression adaptés
à certaines des applications Windows les plus répandues. Pour pouvoir utiliser votre
imprimante, vous devez installer un pilote de ce type qui traduit les données de
votre application dans un format que l’imprimante peut lire.
Le CD fourni avec votre imprimante comprend les éléments suivants :
•
Pilote d’impression PCL 6 pour Windows et Macintosh : utilisez ce pilote si
vous voulez profiter entièrement des propriétés de votre imprimante.
•
Fichier PPD (PostScript Printer Description) pour Windows et Macintosh : ce
fichier permet l’installation du pilote PostScript.
Si vous imprimez à partir de l’ordinateur avec un câble parallèle :
Consultez la page 16 pour les renseignements sur l’installation du logiciel d’impression sur un ordinateur relié directement à l’imprimante par un câble parallèle.
Si vous imprimez via la connexion USB :
Référez-vous à l’annexe B du manuel de référence «Pour utiliser votre imprimante
avec un câble USB», pour les informations sur l’installation du logiciel d’impression
sur l’ordinateur équipé du port USB.
Si vous imprimez sous Macintosh :
Consultez l’annexe C du manuel de référence «Pour utiliser votre imprimante sous
Macintosh», pour les instructions précises sur l’installation de l’option PostScript
pour Macintosh.
Si vous imprimez sous DOS :
Reportez-vous à l’annexe D du manuel de référence «Pour imprimer à partir des
applications DOS», pour les renseignements sur l’installation du logiciel d’impression DOS et sur l’impression à partir des applications DOS.
Si vous utilisez Linux,
reportez-vous à l'Annexe I du manuel de référence « Utilisation de votre imprimante sous Linux », pour obtenir plus d'informations sur l'installation du gestionnaire Linux.
Installation du logiciel d’impression
Initiation rapide
Installation du logiciel d’impression

16
Vérifiez les points suivants :
•
Votre ordinateur est doté d’au moins 16 Mo de mémoire vive (RAM).
•
Il reste au moins 30 Mo de libre sur le disque dur votre ordinateur.
•
Toutes les applications ont été fermées avant de commencer l’installation.
•
Windows 95, Windows 98, Windows NT 4.0 ou Windows 2000.
1
Insérez le CD dans le lecteur approprié. L’installation commence automatiquement.
Si le lecteur CD ne démarre pas automatiquement :
Sélectionnez Exécuter à partir du menu Démarrer et tapez x:\cdsetup.exe (où le «x» représente la lettre affectée au lecteur de CD) dans la
zone Ouvrir, puis cliquez sur OK.
Avant d’installer le logiciel de l’imprimante
Installation du logiciel de l’imprimante à partir du CD-ROM
N.B. : Si la boîte Détection d’un nouveau matériel apparaît
pendant l’installation, cliquez sur le x en haut à droite de la
boîte ou sur Annuler.
2
Quand la fenêtre d’installation apparaît, sélectionnez la langue requise.
Installation du logiciel d’impression
Initiation rapide

FRANÇAIS
17
3
Cliquez sur Gestionnaire d’imprimante.
4
La fenêtre d’accueil apparaît. Cliquez sur
Suivant.
5
Suivez les instructions qui s’affichent à l’écran
pour achever l’installation.
Les pilotes d’impression de la PGL 12en prennent en charge les propriétés standard
ci-dessous :
•
sélection du bac d’alimentation
•
caractéristiques du papier, orientation et type de support
•
nombre d’exemplaires
Le manuel de référence (page 2.10) montre toutes les options prises en charge par
les pilotes d’impression de la PGL 12en.
Propriétés du pilote de l’imprimante
Initiation rapide
Installation du logiciel d’impression

18
Error
Manual
Paper
Data
Cancel/Reprint
Demo
Toner Save
Touches du panneau de commande
L’imprimante a trois touches :
Cancel/Reprint, Demo et Toner
Save.
(marche)
(arrêt)
Économie de toner
Appuyez sur la touche Toner Save afin d’activer ou de désactiver la fonction Économie de toner.
L’imprimante doit être en veille.
• Quand le voyant de la touche est allumé, le mode Économie de toner est activé et l’imprimante
consomme moins d’encre pour imprimer chaque feuille.
• Quand le voyant de la touche est éteint, le mode Économie de toner est désactivé et l’imprimante
produit un travail de qualité normale. Pour plus d’informations sur le mode Économie de toner,
référez-vous à la page 5.6 du manuel de référence.
Touches du panneau de commande
Initiation rapide
Toner Save
Toner Save

FRANÇAIS
19
Réimprime la dernière page du travail
Pour annuler une tâche d’impression en cours, appuyez sur Cancel/Reprint et maintenez le
bouton enfoncé jusqu’à ce que les voyants du panneau de commande clignotent. Le voyant
Error continuera de clignoter pendant que l’imprimante et l’ordinateur annulent le travail
avant de se trouver en état de veille. Cela prendra un certain temps et la durée varie selon
l'importance du travail .
N.B. : Au cas où la touche Cancel/Reprint serait activée par accident, l’impression
reprendra. Dans ce cas, il n’existe pas de moyen pour annuler le travail.
Si vous appuyez sur Cancel/Reprint en mode Prêt, l’appareil imprime la dernière page de
la dernière tâche d'impression.
Remarque : Si vous voulez empêcher la réimpression de votre document par une
tierce personne, vous pouvez désactiver la fonction de réimpression à partir de la
fenêtre de dialogue des propriétés de l’imprimante. Une fois cette fonction désactivée,
toute réimpression à partir du bouton Cancel/Reprint du panneau de commande est
impossible.
Pour désactiver cette fonction :
1. Sélectionnez Paramètres puis Imprimantes à partir du menu Démarrer.
Annule l’impression
2. Cliquez sur l'icône de l'imprimante Olivetti PGL 12en PCL 6 avec le
bouton droit de la souris et sélectionnez Propriétés pour ouvrir la
fenêtre des propriétés.
3. Cliquez sur Réimprimer pour supprimer la coche de l'onglet
Imprimante.
Une fois la coche effacée, il n'est plus possible de réimprimer la dernière
page
à partir du panneau de commande.
Si vous souhaitez réimprimer la dernière page à partir du panneau de
commande, vous devez à nouveau cocher cette case.
4. Cliquez sur OK.
Initiation rapide
Touches du panneau de commande
Cancel/Reprint

20
Nettoie l’intérieur de l’imprimante
Appuyez sur la touche Demo pendant environ dix secondes. Tous les voyants du panneau de commande resteront allumés et le nettoyage de l’intérieur s’effectuera. Après le nettoyage, une feuille
s’engagera dans le circuit papier afin de nettoyer l'imprimante. Pour plus d’informations, reportezvous à la page 7.6 du manuel de référence.
Imprime la page-demo et le relevé de configuration
Déclenche l’alimentation manuelle
Quand vous sélectionnez Alimentation manuelle comme Source à partir de votre logiciel
d’application, vous devez appuyer sur la touche Demo avant chaque alimentation manuelle.
Pour plus d’informations, consultez la page 4.10 du manuel de référence.
Appuyez sur la touche Demo pendant environ deux secondes. Les voyants commenceront à
clignoter lentement et une page-demo sera imprimée. Pour ce faire, l’imprimante doit être en
veille.
Appuyez sur Demo pendant environ six secondes jusqu’à ce que les voyants clignotent rapidement. L’impression d’un relevé de configuration s’effectuera. L’imprimante doit être en veille.
Pour plus d’informations, consultez la page 7.6 du manuel de référence.
Touches du panneau de commande
Initiation rapide
Demo

FRANÇAIS
21
Voyants du panneau de commande
Les voyants du panneau de commande indiquent l’état de votre imprimante. Si le voyant Error
est allumé, cela veut dire qu’il y a une erreur dans le fonctionnement de l’imprimante. Pour en
savoir plus, consultez la rubrique « Messages d’erreur » du manuel de référence, page 7.22.
Allumé
Voyants du panneau de commande
Le voyant Data est allumé et l’imprimante est prête à imprimer.
Vous n’avez aucune mesure à prendre. Appuyez sur la touche Demo pendant envi-
ron deux secondes et une page-demo s’imprimera. Appuyez sur le même bouton
pendant environ quatre secondes et l’impression d’un relevé de configuration
s’effectuera.
En veille
Error
Paper
Data
Clignotant
Éteint
Symbole
L’imprimante est en train de recevoir ou de traiter les données. Attendez l’impression.
Appuyer sur la touche Cancel/Reprint provoque l’annulation du travail en cours. Une
ou deux pages de plus s’imprimeront pendant que l’imprimante supprime le travail de
sa mémoire. L’annulation terminée, l’imprimante entre en état de veille.
Traitement
Error
Manual
Paper
Data
Le voyant de Data clignote rapidement. Cela signifie que les données restent dans la
mémoire de l’imprimante en attendant l’impression.
Si vous appuyez sur le bouton Cancel/Reprint, la tâche d’impression en cours est
annulée et l’appareil passe en mode Prêt.
Données
Initiation rapide
Voyants du panneau de commande

22
Il n’y a pas de papier dans l’imprimante. Le voyant Paper clignote jusqu’à ce que vous
rechargiez le papier.
Mettez donc du papier dans l’imprimante. Il n'est pas nécessaire d’appuyer sur un
bouton pour réinitialiser l’appareil.
Manque de papier
Error
Paper
Data
L’imprimante est en mode Alimentation manuelle. Vous devez charger du papier
dans le bac universel à la main. Si vous ne souhaitez pas ce mode, modifiez la configuration à partir des propriétés de votre imprimante. Pour les instructions précises
sur ce mode, consultez la page 4.10 du manuel de référence.
Mode alimentation manuelle
Error
Paper
Data
L’imprimante est en train de traiter des données en mode Alimentation manuelle.
Attendez que l’impression se fasse.
Impression en mode alimentation manuelle
Error
Manual
Paper
Data
En mode alimentation manuelle, l’imprimante ne prend du bac universel qu’une seule
page à la fois.
Introduisez du papier adapté dans le bac universel. Vous appuyez ensuite sur la
touche Demo afin de déclencher l’impression.
Manque de papier en mode alimentation manuelle
Error
Paper
Data
Voyants du panneau de commande
Initiation rapide

23
Initiation rapide
Spécifications de l’imprimante
Spécifications de l’imprimante
Caractéristiques
Description
Vitesse d’impression 12 pages/minute (A4). 12,6 pages/minute (Lettre)
Résolution 1 200 ppp
Première copie
Durée de réchauffement
Moins de 15 secondes
Consommation électrique
En impression : 350 W (en moyenne);
En mode Économie d’énergie : moins de 12 W
Alimentation électrique CA 100-120 V (Etats-Unis, Canada) / 220-240V (autres pays); 50/60 Hz
Niveau de bruit
En attente : moins de 35 dB; En cours d’impression : moins de 48 dB
Alimentation encre
Cartouche d’encre simple
Durée de vie de la
cartouche d’encre
6 000 pages
Émulations PCL6, EPSON FX-850, PostScript Niveau 3 optionnelle
Mémoire RAM
4 Mo en configuration standard
Extensible à 68 Mo
: 72 broches, EDO, sans parité, 60 ns;
modules de 4, 8, 16, 32 ou 64 Mo disponibles
Moins de 30 secondes
Poids
12.4 Kg/ 27.3 livres
Dimensions 361 (L) x 409 (P) x 294,5 (H) mm (sans options)
Température : 10 à 32 °C/ 50 à 90 °F; Humidité relative : 20 à 80%
Poids de l’emballage
Carton : 1,83 Kg
Plastique : 0,33 Kg
Fiabilité
Utilisation mensuelle : jusqu’à 12 000 pages
Durée de vie : 150 000 pages (ou 5 ans)
Conditions de
Fonctionnement
Polices 1 police bitmap., 45 polices vectorielles
FRANÇAIS

24
Spécifications de l’imprimante
Initiation rapide
a. L’imprimante accepte des formats très variés. Référez-vous à la rubrique « Impression sur cartes ou sup-
ports sur mesure », du manuel de référence, page 4.17.
b. La capacité peut varier selon le grammage et l’épaisseur du papier et également selon les conditions de
l’environnement de la machine.
Formats de papier pris en charge
Caractéristiques
Description
Commutation des Interfaces
Automatique (interfaces parallèle, USB, réseau)
Interfaces
• 12 PPM (A4) parallèle bidirectionnelle standard
- Modes pris en charge : Compatible, Nibble, Byte et ECP
• USB (standard) :
- conforme à USB 1.0
- 1 port à 12 Mo
• Réseau optionnel
- Ethernet 10/100M Base T
- Novell
- TCP/IP et AppleTalk
- LPD
Bac 1 ou Bac 2 Optionnel
Lettre
Dimension
a
216 x 279 mm (8,5 x 11 pouces)
60 à 105 g/m
2
bond (16 à 28
livres)
550 feuilles du
papier de
75g/m
2
bond
(20 livres)
Grammage Capacité
b
A4 210 x 297 mm (8,3 x 11,7 pouces)
Executive
Legal
B5 (JIS)
Folio
191 x 267 mm (7,3 x 10,5 pouces)
216 x 356 mm (8,5 x 14 pouces)
182 x 257 mm (7,2 x 10 pouces)
216 x 330 mm (8,5 x 13 pouces)

FRANÇAIS
25
a. L’imprimante accepte des formats très variés. Référez-vous à la rubrique « Impression sur cartes ou sup-
ports sur mesure », du manuel de référence, page 4.17.
b. La capacité peut varier selon le grammage et l’épaisseur du papier et également selon les conditions de
l’environnement de l’imprimante.
c. Texture - 100 à 250 (Sheffield)
N.B. : Vous pouvez rencontrer des bourrages de papier lorsque vous utilisez un support de
longueur de moins de 148 mm (5,83 pouces). Certaines conditions de l’environnement non
respectées peuvent également avoir le même effet. Pour optimiser la performance de l’imprimante, assurez-vous de stocker et de manier le papier comme conseillé. Veuillez vous référer
à la rubrique «Environnement de l’imprimante et du stockage du papier» du manuel de
référence, page A.6.
Initiation rapide
Spécifications de l’imprimante
Bac universel
Taille minimale (sur mesure)
Dimension
a
98 x 148 mm (3,9 x 5,83 pouces)
60-163 g/m
2
bond
(16-43 livres)
100 feuilles du
papier 75 g/m
2
bond (20 livres)
Grammage Capacité
b
Taille maximale (sur mesure) 216 x 356 mm (8,5 x 14 pouces)
Transparents
Étiquettes
c
Enveloppes
Mêmes tailles minimales et
maximales que ci-dessus
Épaisseur : 10 x 14 mm
(0,0039 x 0,0055
pouces)
Épaisseur :10 x 14 mm
(0,0039 x 0,0055
pouces)
Jusqu’à 90 g/m
2
(16-24 livres)
20 typicals
25 typiques
Jusqu’à dix

26
Accessoires
Module du tampon 4 MB
Module du tampon 8 MB
Module du tampon 16 MB
Module du tampon 32 MB
Module du tampon 64 MB
Interface Ethernet
Postscript emulation
Bac du papier 2
Unité de procécus BØ349
Pilotes et Documentation
Accessoires Initiation rapide

ITALIANO
Indice
Manuale utente
PER COMINCIARE
SUBITO
Introduzione 1
Utilizzo del CD-ROM online 1
Estrazione della stampante dall’imballaggio 2
Componenti della stampante 3
Installazione della cartuccia del toner 4
Caricamento della carta 6
Per cambiare il formato della carta nel vassoio 7
Selezione del vassoio di emissione 8
Stampa sul vassoio di emissione superiore 8
Stampa sul vassoio di emissione posteriore 8
Caricamento della carta 10
Utilizzo del vassoio multifunzione 10
Connessione al computer con un cavo parallelo 13
Accensione della stampante 14
Stampa di una pagina di prova 14
Installazione del software della stampante 15
Prima di installare il software della stampante 16
Installazione del software della stampante
da CD-ROM 16
Funzioni del driver della stampante 17
Pulsanti del pannello di controllo 18
Indicatori luminosi del pannello di controllo 21
Specifiche della stampante 23
Formati della carta supportati 24
Accessori 26

Introduzione
ITALIANO
1
Per cominciare subito Introduzione
Le presenti istruzioni per l'uso consentono di cominciare subito a lavorare con la stampante, anche a utenti inesperti. Vi sono descritte le principali funzioni della stampante e
vi sono riportate le informazioni indispensabili per il lavoro giornaliero con la stessa. Una
descrizione dettagliata della stampante e delle sue caratteristiche, unitamente ad altre
informazioni, è riportata nel manuale d'uso sul CD-ROM online, inserito nella tasca della
penultima pagina delle presenti istruzioni per l'uso.
Utilizzo del CD-ROM online
Se Adobe Acrobat Reader non è già caricato, installare innanzitutto questo programma
sul disco fisso. Per l'installazione, attenersi alle indicazioni riportate nel file Readme,
nella directory READER.
Per lanciare la documentazione online da File Manager (Windows 3.1) o in Explorer
(Windows95/98, Windows NT 4), cliccare due volte sul file START.PDF. Attenersi quindi
alle indicazioni di guida per l'utente.

2
Estrazione della stampante dall’imballaggio
Estrazione della stampante dall’imballaggio
1
Rimuovere la stampante e tutti gli accessori dalla
scatola di imballaggio. Assicurarsi che la confezione
della stampante contenga i seguenti elementi:
Note:
• Se alcuni elementi risultano mancanti o danneggiati,
comunicarlo immediatamente al rivenditore.
• I componenti possono differire in base al paese di
acquisto.
Cartuccia del toner
Cavo di alimentazione
CD-ROM
Istruzioni per l’uso
Per communiciare subito
2
Rimuovere con cautela il nastro adesivo dalla stampante.
Per cominciare subito

3
Componenti della stampante
Vista frontale
Pannello di controllo
Vassoio di emissione
superiore
Coperchio della scheda di controllo
(per accedere alla scheda di controllo e
installare le opzioni per la stampante)
Indicatori del livello
della carta
(emissione facciata verso il basso)
Coperchio superiore
Vassoio 1
(Alimentatore da 550 fogli)
Vassoio multifunzione
Vassoio 2
(Alimentatore opzionale
da 550 fogli)
(Interno)
(emissione facciata verso l’alto)
Interruttore di alimentazione
Sportello del vassoio di emissione
posteriore
Presa per il cavo elettrico
Porta parallela
Porta USB
Porta di rete
(PGL 12en: Opzionale)
Vista posteriore
Cartuccia del toner
Per cominciare subito
Componenti della stampante
ITALIANO

Installazione della cartuccia del toner
1
Aprire il coperchio superiore. Sollevare la maniglia per
aprire lo sportello.
2
Aprire con cautela un’estremità della busta di plastica.
Non utilizzare un coltello né altri oggetti appuntiti, in
quanto il tamburo della cartuccia potrebbe graffiarsi.
3
Individuare il nastro sigillante sull’estremità della cartuccia del toner. Estrarre completamente e con cautela
il nastro dalla cartuccia. Gettare via il nastro.
4
Scuotere con delicatezza la cartuccia per distribuire
uniformemente il toner al suo interno.
Maniglia
Installazione della cartuccia del toner
Per cominciare subito
4

ATTENZIONE:
Per evitare danni alla cartuccia del toner, non esporla alla luce per periodi di tempo prolungati. Se, verrà lasciata esposta per qualche minuto, coprirla con della carta.
Se ci si sporca i vestiti di toner, pulirli con un panno asciutto e lavarli in acqua fredda. L’acqua calda fissa il
toner nei tessuti.
6
Afferrare la maniglia e inserire completamente la cartuccia nella stampante.
7
Chiudere il coperchio superiore. Assicurarsi che il
coperchio sia chiuso saldamente.
5
Individuare gli alloggiamenti delle cartucce all’interno
della stampante, uno su ciascun lato.
Nota: Quando si stampa testo con circa il 5% di coper-
tura della pagina, la durata approssimativa della
cartuccia del toner è di circa 6.000 pagine (3.000
pagine per la cartuccia del toner in dotazione con
la stampante).
Per cominciare subito
Installazione della cartuccia del toner
5
ITALIANO

6
1
Estrarre il vassoio della carta dalla stampante.
2
Spingere verso il basso la piastra di sollevamento carta
fino a bloccarla.
Caricamento della carta
Nota: Con lo stesso metodo è possibile caricare lucidi,
carta intestata o altri supporti di stampa.
Assicurarsi che siano caricati correttamente controllando tutti e quattro gli angoli.
Nota:
Per cambiare il formato della carta nel vassoio,
vedere “Per cambiare il formato della carta nel vassoio”
di seguito.
4
Assicurarsi che la risma si inserisca sotto al fermaglio
metallico e alle linguette di plastica sulle guide
all’estremità.
Se si introduce troppa carta, si possono verificare degli
inceppamenti.
5
Fare rientrare il vassoio nella stampante.
3
Caricare la carta con il lato da stampare rivolto
verso il basso.
A
Caricamento della carta
Per cominciare subito
A

7
1
Stringere la linguetta metallica sul retro della guida
carta per regolare la lunghezza della carta.
Per cambiare il formato della carta nel vassoio
3
Dopo avere caricato la carta, stringere la guida laterale
come mostrato e farla scorrere verso sinistra fino a
quando non tocca la carta.
2
Regolare la guida lunghezza carta in modo che l’indicatore corrisponda al formato della carta desiderato.
LGL
FOLIO
A4
Indicatore
4
Se necessario, utilizzare la guida larghezza posteriore.
Stringere la guida larghezza posteriore come mostrato e
farla scorrere verso sinistra.
Note:
• Non spingere troppo la guida larghezza, altrimenti i
supporti potrebbero spostarsi.
• Se non si regola la guida larghezza, potrebbero verificarsi inceppamenti della carta.
Per cominciare subito
Caricamento della carta
ITALIANO

8
Selezione del vassoio di emissione
La stampante dispone di due posizioni di emissione: il vassoio di emissione posteriore e il vassoio di
emissione superiore. Per utilizzare il vassoio di emissione superiore, assicurarsi che quello posteriore sia
chiuso. Per utilizzare il vassoio di emissione posteriore, aprirlo.
• Se la carta in uscita dal vassoio di emissione superiore presenta dei problemi, come un’eccessiva arricciatura, provare a stampare dal vassoio di emissione posteriore.
• Per evitare inceppamenti, non aprire o chiudere il vassoio di emissione posteriore mentre la stampante è in funzione.
Il vassoio di emissione superiore raccoglie i fogli con la facciata verso il basso,
nell’ordine corretto. Il vassoio di emissione superiore deve essere utilizzato per
la maggior parte dei lavori di stampa ed è consigliato per stampare quanto
segue:
• oltre 250 fogli, continuamente
Stampa sul vassoio di emissione superiore (facciata verso il basso)
Se aperto, la stampante stampa sempre sul vassoio di emissione posteriore. La
carta esce dalla stampante con la facciata rivolta verso l’alto e l’ultima pagi-
na sulle altre. Stampando dal vassoio multifunzione sul vassoio di emissione
posteriore si fornisce un percorso carta diretto. Aprendo il vassoio di emissione
posteriore potrebbe migliorare la qualità di emissione dei seguenti supporti:
• oltre 100 fogli, continuamente
• buste
• etichette
• fogli personalizzati di piccole dimensioni
• cartoline
• carta dal peso inferiore a 75 g/m
2
o superiore a 105 g/m
2
• lucidi
Stampa sul vassoio di emissione posteriore (facciata verso l’alto)
Nota:
Alcuni lucidi speciali potrebbero avere un problema di impilamento a causa di spiegazza-
menti. In guesto caso, utilizzare el vassoio facciata verso il basso.
Selezione del vassoio di emissione
Per cominciare subito

1
Aprire lo sportello posteriore
tirandolo verso il basso
. Il
coperchio ha la funzione di un vassoio di emissione.
Per aprire il vassoio di emissione posteriore:
2
Estrarre la prolunga per estendere al massimo il vassoio di emissione per i fogli di formato più lungo.
3
Per non impilare le pagine stampate nel vassoio di
emissione posteriore, fare rientrare la prolunga e chiudere il vassoio. Le pagine vengono impilate nel vassoio di emissione superiore.
Nota: La capacità del vassoio di emissione posteriore è
uguale a quella del vassoio multifunzione. Se il vassoio è
sovraccarico di pagine stampate potrebbe cadere dalla
stampante. Eliminare le pagine, in modo da non sovraccaricare il vassoio.
Per cominciare subito
Selezione del vassoio di emissione
9
ITALIANO

Caricamento della carta
Vassoio pieno
Vassoio vuoto
Utilizzo del vassoio multifunzione
Il vassoio multifunzione si trova nella parte anteriore della stampante. Quando non è utilizzato, può essere chiuso per rendere la stampante più compatta. Il vassoio multifunzione
può contenere carta di diversi formati e tipi, come lucidi, cartoncini e buste. È anche possibile utilizzare il vassoio multifunzione per lavori di stampa a pagina singola su carta
intestata, carta colorata da utilizzarsi come fogli separatori o altra carta speciale che in
genere non viene conservata nel vassoio.
È possibile caricare circa 100 fogli di carta, 10 buste, 20 lucidi, 10 cartoncini o 25 etichette contemporaneamente.
Quando si stampa dal vassoio multifunzione, è necessario selezionare Vassoio multifun-
zione come Sorgente dall’applicazione software e quindi selezionare il formato e il tipo di
carta dall’applicazione software in base alla carta caricata. Vedere a pagina 5.3 del
Manuale d’uso.
• Caricare nel vassoio multifunzione solo un formato di supporti di stampa alla volta.
• Per evitare inceppamenti, non aggiungere carta nel vassoio multifunzione se non è
esaurita. Ciò è valido anche per gli altri tipi di materiali di stampa.
• I supporti di stampa vanno caricati con il lato da stampare rivolto verso l’alto e con il lato
superiore inserito nel vassoio multifunzione e
affiancato al margine sinistro del vassoio.
• Non posizionare oggetti sul vassoio multifunzione. Inoltre, non premerlo verso il basso o
esercitare una forza eccessiva su di esso.
Un corretto caricamento della carta evita inceppamenti
e assicura una stampa senza problemi. Non rimuovere
i vassoio durante la stampa di un lavoro. Ciò potrebbe
causare un inceppamento.
L’indicatore del livello della carta posto sul lato anteriore dei vassoi mostra la quantità di carta rimasta nel
vassoio. Quando il vassoio si svuota, l’indicatore
diventa rosso.
Nota:
Vedere il manuale d'uso contenuto nel CD - ROM per
maggiori informazioni sul caricamento carta.
Caricamento della carta
Per cominciare subito
10

1
Tirare verso di sé il vassoio multifunzione.
Per caricare la carta nel vassoio multifunzione:
2
Estrarre la prolunga per estendere al massimo il vassoio di emissione per i fogli di formato più lungo.
3
Preparare una risma di carta da caricare piegando o
spiegando a ventaglio i fogli avanti e indietro.
Allineare i bordi su una superficie piana.
Per cominciare subito
Caricamento della carta
11
ITALIANO

4
Posizionare la carta con il lato da stampare rivolto
verso l’alto e affiancata al margine sinistro del
vassoio.
5
Fare scorrere la guida larghezza della carta verso
sinistra fino a quando non tocca leggermente il materiale di stampa senza piegarsi.
6
Dopo la stampa, fare rientrare la prolunga e chiudere
il vassoio multifunzione.
Nota: Assicurarsi di non avere caricato troppi supporti di
stampa. La risma non deve superare il segno dell’altezza.
I supporti di stampa si accartocciano se si carica una
risma troppo in profondità o se viene spinta troppo
lontano.
Segno dell’altezza della risma
Caricamento della carta
Per cominciare subito
12

1
Assicurarsi che la stampante e il computer siano spenti.
2
Collegare il cavo parallelo della stampante nel connettore posto sul retro della stampante.
Spingere verso il basso le clip metalliche in modo che
si inseriscano nelle tacche presenti sulla spina del
cavo.
3
Collegare l’altra estremità del cavo alla porta di
interfaccia parallela nel computer e stringere le viti.
Per ulteriori informazioni, consultare la documentazione del computer.
Connessione al computer con un cavo parallelo
➞➞
Alla porta
parallela del
PC
Se si utilizza un’interfaccia USB
Andare all’appendice B del Manuale d’uso, ‘Utilizzo
della stampante con un cavo USB’.
Se si utilizza un’interfaccia di rete opzionale
Andare all’appendice F del Manuale d’uso, ‘Utilizzo
della stampante nella rete’
Per cominciare subito
Connessione al computer con un cavo parallelo
13
ITALIANO

1
Collegare un’estremità del cavo di alimentazione alla
presa sul retro della stampante.
2
Collegare l’altra estremità a una presa CA dotata di
messa a terra.
3
Accendere la stampante.
Accensione della stampante
➞➞
Alla presa CA
Error
Manual
Paper
Data
Cancel/Reprint
Demo
Toner Save
All’accensione della stampante, tutti gli indicatori luminosi del pannello di controllo della stampante si accendono brevemente. Quando resta acceso solo l’indicatore
luminoso Data, tenere premuto il pulsante Demo.
Tiene premuto il pulsante per circa 2 secondi finché tutti
gli indicatori luminosi lampeggiano lentamente e quindi
lo si rilascia, viene stampata la prova di stampa.
La prova di stampa fornisce un esempio della qualità di
stampa e consente di verificare se la stampante funziona correttamente.
Stampa di una pagina di prova
Accensione della stampante
Per cominciare subito
14

ITALIANO
15
Con la stampante viene fornito un CD-ROM contenente i driver della stampante per
alcune delle più comuni applicazioni software di Windows. Per fare funzionare la
stampante è necessario installare un driver della stampante, che traduce i dati dell’applicazione in dati comprensibili dalla stampante.
Il CD-ROM fornito con la stampante contiene quanto segue:
• Driver della stampante PCL 6 per Windows. Utilizzare questo driver per
sfruttare al meglio tutte le funzioni della stampante.
• File PPD (PostScript Printer Description) per Windows e Macintosh per l’instal-
lazione del driver PostScript.
Se si stampa da un computer con un cavo parallelo
Andare a pagina 16 per informazioni sull’installazione del software di stampa in un
computer collegato direttamente alla stampante tramite un cavo parallelo.
Se si stampa con una porta USB
Andare all’appendice B del Manuale d’uso, “Utilizzo della stampante con un cavo
USB”, per informazioni sull’installazione del software di stampa in un computer abilitato per USB.
Se si stampa da Macintosh
Andare all’appendice C del Manuale d’uso, “Utilizzo della stampante con Macintosh”,
per informazioni sull’installazione dell’opzione PostScript per Macintosh.
Se si stampa da DOS
Andare all’appendice D del Manuale d’uso, “Stampa dalle applicazioni DOS”, per
informazioni sull’installazione del software di stampa DOS e la stampa dalle applicazioni DOS.
Se si stampa con un driver PostScript
Andare all’appendice E del Manuale d’uso, “Utilizzo del driver PostScript per
Windows”, per informazioni sull’installazione del file PPD.
Se si sta utilizzando Linux
Per ulteriori informazioni sull’installazione del driver Linux, passare all’appendice I
del Manuale d’uso, “Utilizzo della stampante in ambiente Linux”.
Installazione del software della stampante
Per cominciare subito
Installazione del software della stampante

16
Verificare quanto segue:
• Nel PC devono essere installati almeno 16 MB di RAM.
• Vi devono essere almeno 30 MB di spazio libero su disco.
• Per iniziare l’installazione, è necessario chiudere tutte le applicazioni.
• Windows 95, Windows 98, Windows NT4.0 o Windows 2000.
1
Inserire il CD-ROM nella relativa unità. L’installazione viene iniziata automaticamente.
Se l’unità CD-ROM non viene attivata automaticamente:
Selezionare Esegui dal menu Avvio/Start e digitare x:\cdsetup.exe
nella casella Apri (dove x è la lettera corrispondente all’unità CD-ROM),
quindi fare clic su OK.
Prima di installare il software della stampante
Installazione del software della stampante da CD-ROM
Nota: Se durante la procedura di installazione viene visualizzata
la finestra di dialogo Nuovo componente hardware individuato,
fare clic sul pulsante di chiusura x nell’angolo in alto a destra
della finestra o fare clic su Annulla.
2
Quando viene visualizzata la schermata di apertura, selezionare la lingua
desiderata.
Installazione del software della stampante
Per cominciare subito
 Loading...