


LINEA
USER GUIDE
Edited/Published/Produced by:
Olivetti S.p.A.
Gruppo Telecom Italia
Via Jervis, 77
Ivrea (TO)
Italy
www.olivetti.com
Copyright © Olivetti, 2007
All rights reserved
Code:535315 gb
Date of publication: May 2007
Trademarks:
trademarks of Microsoft Corporation.
Other trademarks and trade names may be used in this
document to refer to either the entities claiming the
marks and names or their products. Olivetti disclaims any
proprietary interest in trademarks and trade names other
than its own.
Microsoft and Windows are registered

CONTENTS
1 GETTING STARTED . . . . . . . . . . . . . . . . . . . . . . . . . . . . . . . . . . 1
OVERVIEW . . . . . . . . . . . . . . . . . . . . . . . . . . . . . . . . . . . . . . . . . . . . . . . . 2
SAFETY INSTRUCTIONS . . . . . . . . . . . . . . . . . . . . . . . . . . . . . . . . . . . . . . . 2
INFORMATION ON PRINT QUALITY AND THE WARRANTY . . . . . . . . . . . . . 2
LOCATING THE PRINTER COMPONENTS . . . . . . . . . . . . . . . . . . . . . . . . . .3
PRINTER KEYBOARD . . . . . . . . . . . . . . . . . . . . . . . . . . . . . . . . . . . . . . . . .5
Key Functions . . . . . . . . . . . . . . . . . . . . . . . . . . . . . . . . . . . . . . . . . . . 5
LEDS ON THE PRINTER FRONT PANEL . . . . . . . . . . . . . . . . . . . . . . . . . . . . 7
PRINTER POWER SUPPLY . . . . . . . . . . . . . . . . . . . . . . . . . . . . . . . . . . . . . . 7
SWITCHING THE PRINTER ON AND OFF . . . . . . . . . . . . . . . . . . . . . . . . . . .8
Printer Economy Mode . . . . . . . . . . . . . . . . . . . . . . . . . . . . . . . . . . . . 8
LOADING PAPER ONTO THE AUTOMATIC SHEET FEEDER . . . . . . . . . . . . . 8
Loading Different Types of Paper . . . . . . . . . . . . . . . . . . . . . . . . . . . .9
LOADING DOCUMENTS ONTO THE AUTOMATIC DOCUMENT FEEDER . . 10
CONNECTING A DIGITAL CAMERA TO THE PRINTER . . . . . . . . . . . . . . . . 10
CONNECTING THE PRINTER TO THE TELEPHONE NETWORK . . . . . . . . . .11
Connecting to the Telephone Network and Connecting
an External Telephone . . . . . . . . . . . . . . . . . . . . . . . . . . . . . . . .11
INSTALLING THE FAX . . . . . . . . . . . . . . . . . . . . . . . . . . . . . . . . . . . . . . . 13
Installation Procedure . . . . . . . . . . . . . . . . . . . . . . . . . . . . . . . . . . . . 13
SETTING FAX DATE AND TIME . . . . . . . . . . . . . . . . . . . . . . . . . . . . . . . . .14
2 USING THE PRINTER WITHOUT A COMPUTER . . . . . . . . . . . 15
COPYING A DOCUMENT . . . . . . . . . . . . . . . . . . . . . . . . . . . . . . . . . . . . 16
PRINTING PHOTOS FROM A DIGITAL CAMERA . . . . . . . . . . . . . . . . . . . . 16
PRINTING PHOTOS FROM A PICTBRIDGE DIGITAL CAMERA . . . . . . . . . . 17
PRINTING PHOTOS FROM A DPOF DIGITAL CAMERA . . . . . . . . . . . . . . . 17
FAX MANAGEMENT MENU . . . . . . . . . . . . . . . . . . . . . . . . . . . . . . . . . . . 17
Reception . . . . . . . . . . . . . . . . . . . . . . . . . . . . . . . . . . . . . . . . . . . . .17
Installation . . . . . . . . . . . . . . . . . . . . . . . . . . . . . . . . . . . . . . . . . . . . 18
Print Report . . . . . . . . . . . . . . . . . . . . . . . . . . . . . . . . . . . . . . . . . . . 18
Service . . . . . . . . . . . . . . . . . . . . . . . . . . . . . . . . . . . . . . . . . . . . . . . 18
Contents iii

CONFIGURING THE PRINTER TO RECEIVE FAXES . . . . . . . . . . . . . . . . . . . 18
Setting Reception Mode . . . . . . . . . . . . . . . . . . . . . . . . . . . . . . . . . . 18
SENDING A FAX . . . . . . . . . . . . . . . . . . . . . . . . . . . . . . . . . . . . . . . . . . . 19
Sending a Fax From the Keyboard . . . . . . . . . . . . . . . . . . . . . . . . . . 19
Sending a Fax Using the Automatic Document Feeder . . . . . . . . . . . 19
PRINTING FAX REPORTS . . . . . . . . . . . . . . . . . . . . . . . . . . . . . . . . . . . . . 20
Fax Report for Power Failure . . . . . . . . . . . . . . . . . . . . . . . . . . . . . . 20
MODIFYING FAX SETTINGS: RESOLUTION AND CONTRAST . . . . . . . . . . . 20
MODIFYING RING TYPE ON RESPONSE (RING DISTINCTION) . . . . . . . . . . 20
USING THE PHONE BOOK . . . . . . . . . . . . . . . . . . . . . . . . . . . . . . . . . . . . 20
3 USING THE PRINTER WITH A COMPUTER . . . . . . . . . . . . . . .21
BEFORE YOU BEGIN . . . . . . . . . . . . . . . . . . . . . . . . . . . . . . . . . . . . . . . . 22
THE PRINTER STATUS MONITOR . . . . . . . . . . . . . . . . . . . . . . . . . . . . . . . 22
THE TOOLBOX . . . . . . . . . . . . . . . . . . . . . . . . . . . . . . . . . . . . . . . . . . . . 23
PRINTING, COPYING AND SCANNING FROM THE TOOLBOX . . . . . . . . . . 23
PRINTING FROM AN APPLICATION . . . . . . . . . . . . . . . . . . . . . . . . . . . . . 25
Setting Print Preferences from the Computer . . . . . . . . . . . . . . . . . . 26
SCANNING A DOCUMENT FROM AN APPLICATION . . . . . . . . . . . . . . . . 26
PRINTING PHOTOS . . . . . . . . . . . . . . . . . . . . . . . . . . . . . . . . . . . . . . . . . 27
FAX SETUP FROM THE TOOLBOX APPLICATION . . . . . . . . . . . . . . . . . . . 27
Fax Settings . . . . . . . . . . . . . . . . . . . . . . . . . . . . . . . . . . . . . . . . . . . 27
Installation . . . . . . . . . . . . . . . . . . . . . . . . . . . . . . . . . . . . . . . . . . . . 27
Service . . . . . . . . . . . . . . . . . . . . . . . . . . . . . . . . . . . . . . . . . . . . . . . 29
SENDING A FAX USING THE COMPUTER . . . . . . . . . . . . . . . . . . . . . . . . . 29
Sending a Fax From the Scanner Glass Using the
Toolbox Application . . . . . . . . . . . . . . . . . . . . . . . . . . . . . . . . . . 29
Sending a Fax From the Toolbox Application Using the
Automatic Document Feeder . . . . . . . . . . . . . . . . . . . . . . . . . . . 30
Sending a Fax from a File . . . . . . . . . . . . . . . . . . . . . . . . . . . . . . . . . 32
4 INK CARTRIDGES . . . . . . . . . . . . . . . . . . . . . . . . . . . . . . . . . .33
CHECKING INK LEVELS . . . . . . . . . . . . . . . . . . . . . . . . . . . . . . . . . . . . . . 34
Information Required for Purchasing new Ink Cartridges . . . . . . . . . 34
REPLACING THE INK CARTRIDGES . . . . . . . . . . . . . . . . . . . . . . . . . . . . . 35
ALIGNING THE INK CARTRIDGES . . . . . . . . . . . . . . . . . . . . . . . . . . . . . . 36
Aligning the Ink Cartridges from the Toolbox Application . . . . . . . . . 36
MANAGING INK CARTRIDGES IN FAX MODE . . . . . . . . . . . . . . . . . . . . . 37
USING THE PHOTO INK CARTRIDGE . . . . . . . . . . . . . . . . . . . . . . . . . . . . 37
Contentsiv

5 MAINTENANCE AND TROUBLESHOOTING . . . . . . . . . . . . . . 39
CLEANING THE PRINTER . . . . . . . . . . . . . . . . . . . . . . . . . . . . . . . . . . . . . 40
CLEANING THE INK CARTRIDGE NOZZLES . . . . . . . . . . . . . . . . . . . . . . . . 40
TROUBLESHOOTING . . . . . . . . . . . . . . . . . . . . . . . . . . . . . . . . . . . . . . . . 40
Problems When Installing the Printer . . . . . . . . . . . . . . . . . . . . . . . . 40
Problems Switching on the Printer . . . . . . . . . . . . . . . . . . . . . . . . . . 41
Printing, Copying and Scanning Problems . . . . . . . . . . . . . . . . . . . . . 42
FAX ERROR MESSAGES . . . . . . . . . . . . . . . . . . . . . . . . . . . . . . . . . . . . . .43
Messages During Transmission . . . . . . . . . . . . . . . . . . . . . . . . . . . . .43
Messages During Reception . . . . . . . . . . . . . . . . . . . . . . . . . . . . . . . 43
General Messages . . . . . . . . . . . . . . . . . . . . . . . . . . . . . . . . . . . . . . 43
ERROR CODES PRINTED ON THE FAX REPORT . . . . . . . . . . . . . . . . . . . . . 44
Transmission Report Error Codes . . . . . . . . . . . . . . . . . . . . . . . . . . . 44
Activity Report Error Codes . . . . . . . . . . . . . . . . . . . . . . . . . . . . . . . 44
CLEARING PAPER JAMS . . . . . . . . . . . . . . . . . . . . . . . . . . . . . . . . . . . . . 45
6 TECHNICAL SPECIFICATIONS . . . . . . . . . . . . . . . . . . . . . . . . . 47
GENERAL SPECIFICATIONS . . . . . . . . . . . . . . . . . . . . . . . . . . . . . . . . . . .48
PRINTER SPECIFICATIONS . . . . . . . . . . . . . . . . . . . . . . . . . . . . . . . . . . . .49
COPIER SPECIFICATIONS . . . . . . . . . . . . . . . . . . . . . . . . . . . . . . . . . . . . . 50
SCANNER SPECIFICATIONS . . . . . . . . . . . . . . . . . . . . . . . . . . . . . . . . . . .50
FAX SYSTEM SPECIFICATIONS . . . . . . . . . . . . . . . . . . . . . . . . . . . . . . . . .50
PAPER SPECIFICATIONS . . . . . . . . . . . . . . . . . . . . . . . . . . . . . . . . . . . . . .52
Paper Types Supported . . . . . . . . . . . . . . . . . . . . . . . . . . . . . . . . . . . 52
Paper Formats and Sizes Supported . . . . . . . . . . . . . . . . . . . . . . . . . 53
Contents v

All information included herein is subject to change without notice. Olivetti S.p.A. is not responsible for any loss or
damages, direct or indirect, arising from or related to the use of this operation manual.
MIPC (Mobile Imaging and Printing Consortium)
The MIPC is a non-profit industry association founded in 2004 by leading companies in home photo printing and the
mobile phone industry. Its mission is to promote and support the development of interoperability guidelines enabling
printing of images and other content between mobile phones and home printers. The guidelines are promoted for use
internationally to ensure a broad spectrum of products and services for mobile phone consumers.
www.mobileprinting.org.
LINEA office: This Mobile Printing Ready product is designed to provide easy printing from mobile phones. This
product follows Mobile Imaging and Printing Consortium (MIPC) Implementation Guidelines for Home Printing with
Mobile Terminals, Version 2.1, for PictBridge.
Contentsvi

1GETTING STARTED
OVERVIEW
SAFETY INSTRUCTIONS
INFORMATION ON PRINT QUALITY AND THE WARRANTY
LOCATING THE PRINTER COMPONENTS
PRINTER KEYBOARD
LEDS ON THE PRINTER FRONT PANEL
PRINTER POWER SUPPLY
SWITCHING THE PRINTER ON AND OFF
LOADING PAPER ONTO THE AUTOMATIC SHEET FEEDER
LOADING DOCUMENTS ONTO THE AUTOMATIC DOCUMENT FEEDER
CONNECTING A DIGITAL CAMERA TO THE PRINTER
CONNECTING THE PRINTER TO THE TELEPHONE NETWORK
INSTALLING THE FAX
SETTING FAX DATE AND TIME
Getting Started 1

OVERVIEW
This multifunction product provides the integrated functions of a high quality ink-jet printer and of a colour scanner,
photocopier and fax. Copying and faxing multiple page documents is made simple by the automatic document feeder.
For normal printing and copying operations, a colour ink cartridge can be used with a black ink cartridge. For printing
photos, it is recommended that you replace the black cartridge with a photo ink cartridge (sold separately). All
cartridges are also available in a High Capacity version.
The printer can be used without a computer for faxing documents and making copies; you can also print photos by
simply connecting a digital camera to the USB interface on the front panel.
The Installation CD supplied with the printer provides the software for connection with a computer, and an application
called the Toolbox which provides rapid access to all the printer features.
A second CD provides the software for manipulating text and images.
Complete information can also be found in electronic format by selecting Start > Programs or All programs >
Olivetti, which you can browse or print.
Online Help is available for each software screen by just selecting Help.
SAFETY INSTRUCTIONS
Read and follow attentively the following safety instructions:
• Use exclusively the CWT model PAA060P power supply unit and the power cable supplied with the product. If a
different power supply unit is used to that provided in the package, it is the sole responsibility of the user to guarantee
its conformity with current safety standards, and that it meets the correct power supply requirements of the product.
• Connect the power supply cable to a grounded electrical outlet that is near the product, and easily accessible.
•
• Install the printer on a flat, stable surface, in a location where no one can step on or trip over the power cable.
•
• Do not use the printer near water, or with wet hands.
•
• Do not expose the printer to rain or moisture.
•
• Do not attempt to disassemble the printer.
•
• Observe all warnings and instruction markings on the printer.
•
• Read and understand all the documentation supplied with the printer.
INFORMATION ON PRINT QUALITY AND THE WARRANTY
To guarantee correct operation of the printer and top quality printing, use only original Olivetti ink cartridges.
Olivetti declines any responsibility whatsoever for damage to the printer caused by the tampering with, or refilling, ink
cartridges. Such conduct also renders the Warranty void.
Getting Started2

LOCATING THE PRINTER COMPONENTS
Getting Started 3

Reference Part Description
1 Paper guide Guides the paper as it is fed into the printer.
2 Automatic sheet feeder Automatically feeds the paper into the printer for printing.
3 Automatic document
feeder
Automatically feeds the original document to be printed, scanned or
faxed.
4 Document tray Collects the original documents after use by the automatic document
feeder.
5 Scanner glass cover Protects the scanner glass. Comprises the automatic document feeder.
6 Paper output tray An extendible tray that collects the printed paper as it is output from
the printer.
7 Keyboard Provides the keys to switch the printer on and off, and for all the
selection and send operations.
8 PictBridge/DPOF
compatible USB interface
Allows the USB cable of a compatible digital camera or external
memory devices to be connected.
9 Scanner glass Surface on which documents are placed for scanning or copying.
10 High-speed USB
interface
Allows connection of the USB cable (not supplied) so the printer can be
used with a computer.
11 Power connector Printer power supply connector. Connect the plug of the external
power supply unit to the printer. See "LEDS on the Printer Front Panel".
12 External power supply
unit
Supplies the printer with electrical current. Connect the power cable to
the electrical outlet.
13 RJ11 Connector Telephone signal input line (LINE IN).
14 RJ11 Connector Telephone signal output line (LINE EXT), to connect a telephone or an
answering device.
15 Ink cartridge carrier Holds two ink cartridges. The colour cartridge is inserted on the right,
the black cartridge (or photo cartridge, sold separately) is inserted on
the left.
For replacing the cartridges, see "Replacing the Ink Cartridges".
To access the carrier, with both hands raise the upper part of the
printer. The support lever automatically blocks the upper part of the
printer in the open position.
16 Storage/protection
Stores and protects the black or photo cartridge when not being used.
garage for black and
photo ink cartridges
Getting Started4

PRINTER KEYBOARD
The keyboard provides selection and start keys for all the functions available: copy, fax and print from digital camera or
compatible memory device connected to the printer. Under normal operating conditions, the keyboard should be left
open. To open the keyboard, press on the shiny area at the top right of the door.
Key Functions
Reference Part Description
1 On/Off key Switch the printer on and off.
If there is a fax in memory that has been received but not yet printed
(yellow light on), switching off the printer is disabled.
Note: Switching off the printer results in the loss of date and time
settings, it is therefore recommended that you do NOT carry out
this operation which has been replaced by automatic energy saving
mode. If, nevertheless, you want to switch the printer off, press
the On/Off key for 5 seconds.
2 Display Indicates the fax status, and displays the menu and phone book.
3 Alphanumeric
keypad
4 * key Provides access the special functions provided by the telephone company.
5 # key Provides access to the special functions provided by the telephone
You can enter the telephone number or the initial of the name you want to
find in the phone book.
Also allows you to change from “Pulse dialling” to “Tone dialling”.
company.
Getting Started 5

Reference Part Description
6 Phone book The first number displayed is the last number called. The name search can
be effected using the Navigator, or by entering the initial of the name you
want to find.
Entries can be made to the phone book only from the computer.
7 Menu Provides access to all the fax functions.
You can browse using the Navigator, confirm your selections using the
Confirm key, or cancel selections using the Cancel key.
8 Confirm Select and confirm the options shown on the display.
9 Navigator Browse menu items on the display or entries in the phone book.
10 Fax quality Modify the resolution to be used when sending faxes.
11 Copy counter Displays the number of copies setting.
The number displayed decreases as each copy is printed.
12 Select number of
copies
Set the number of copies to be made using the plus (+) and minus (-) keys.
The number selected is displayed on the Copy counter.
13 Cancel Cancel a job immediately. Restore settings to their factory values.
14 Select print quality Select the print and copy quality.
Photo quality is recommended for copying images, or when printing on
special ink-jet paper.
15 Copy contrast Lighten or darken the copy.
16 Start B/W copy Start copying in B/W. Press and keep held down to activate the
"Fit to page" functionality. This functionality is not available when
documents are loaded onto the automatic document feeder.
17 Start colour copy Start copying in colour. Press and keep held down to activate the
"Fit to page" functionality. This functionality is not available when
documents are loaded onto the automatic document feeder.
18 Start scanning Enabled when the printer is connected to a computer.
Press to scan the document on the scanner glass or loaded onto the
automatic document feeder.
A Toolbox application window is displayed on the computer allowing you
to scan the image directly into an application of your choice, and to
customise scan settings.
19 Start B/W fax Start receiving or sending a black and white fax.
20 Start colour fax Start receiving or sending a colour fax.
21 Start printing Enabled when a digital camera or a compatible memory device is
connected to the printer.
This key flashes when printing is in progress.
Getting Started6
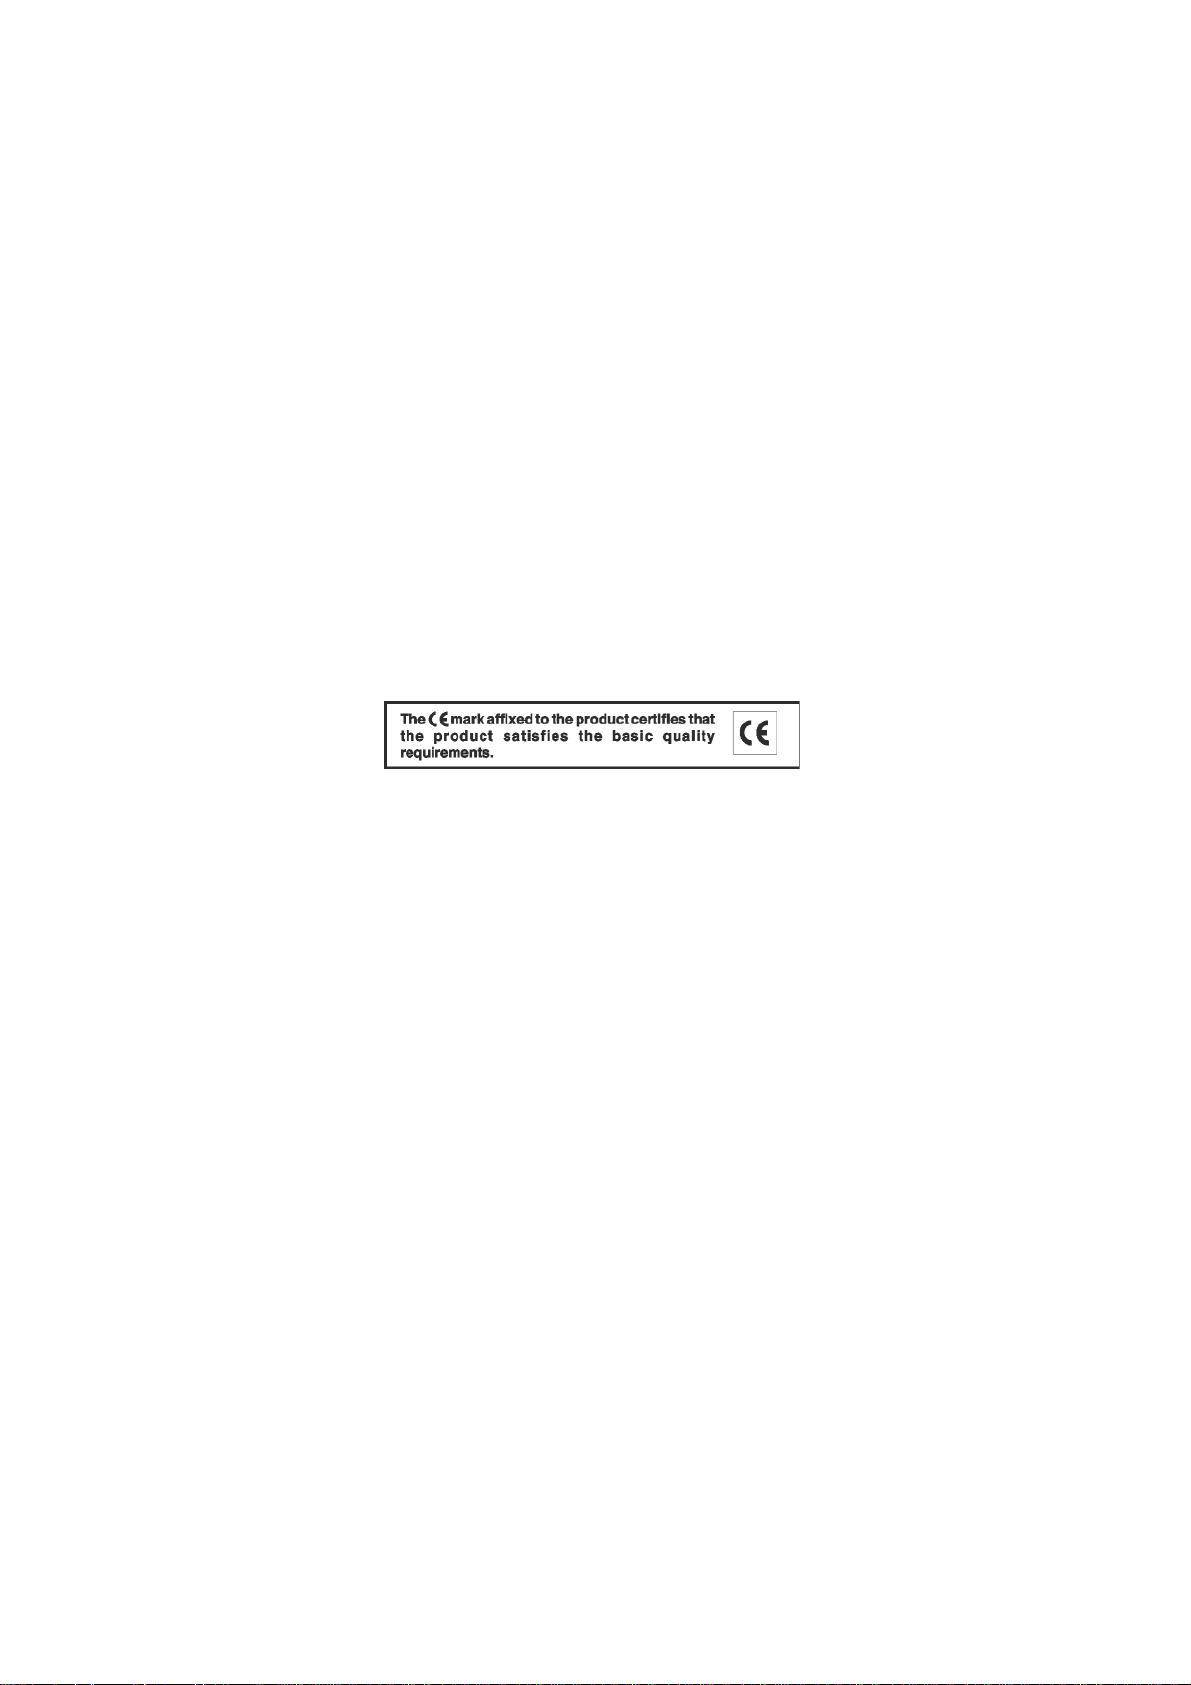
LEDS ON THE PRINTER FRONT PANEL
Open out the keyboard to access the compartment where the LEDs can be seen.
Reference Indicator Description
1 USB status • A green light indicates that a digital camera or compatible memory
device is connected. A flashing light indicates that data is being
transferred to the printer.
2 Fax present
in memory
• A fax is present in memory (i.e. was not printed when it was
received).
The printer cannot be switched off without correcting the reason for
the error, and printing the faxes present in memory.
• A fax transmission or reception error has occurred.
3 Paper error Indicates:
• Paper jam.
• No paper in feeder.
4 Out-of-ink The LEDs flash when the black, photo or colour cartridges are nearly out
of ink. A steady orange light indicates that the ink has run out.
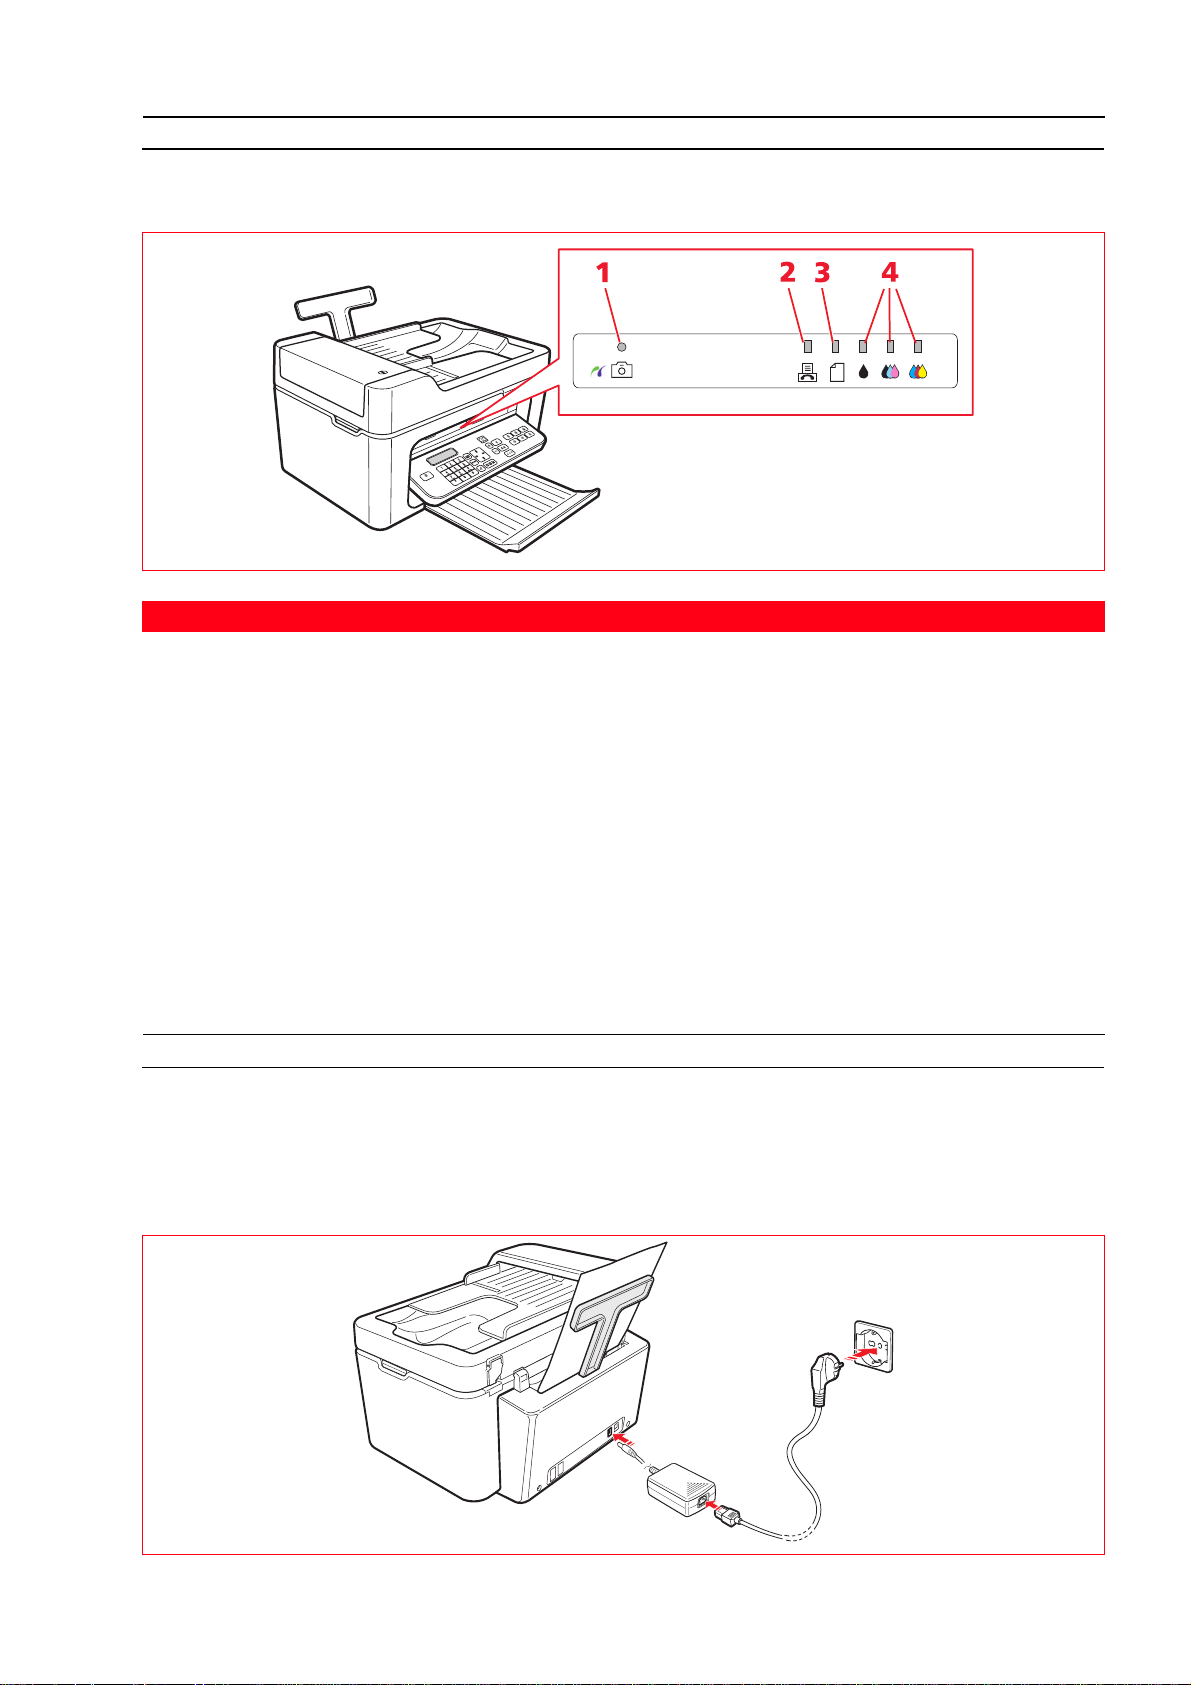
PRINTER POWER SUPPLY
The printer is powered from the mains using the external AC power supply unit provided.
Proceed as follows to connect the power supply unit to the electrical outlet:
1 Insert the plug of the external AC power supply unit cable into the printer socket.
2 Insert one end of the power cable into the power supply unit and the other end into the electrical outlet.
Getting Started 7
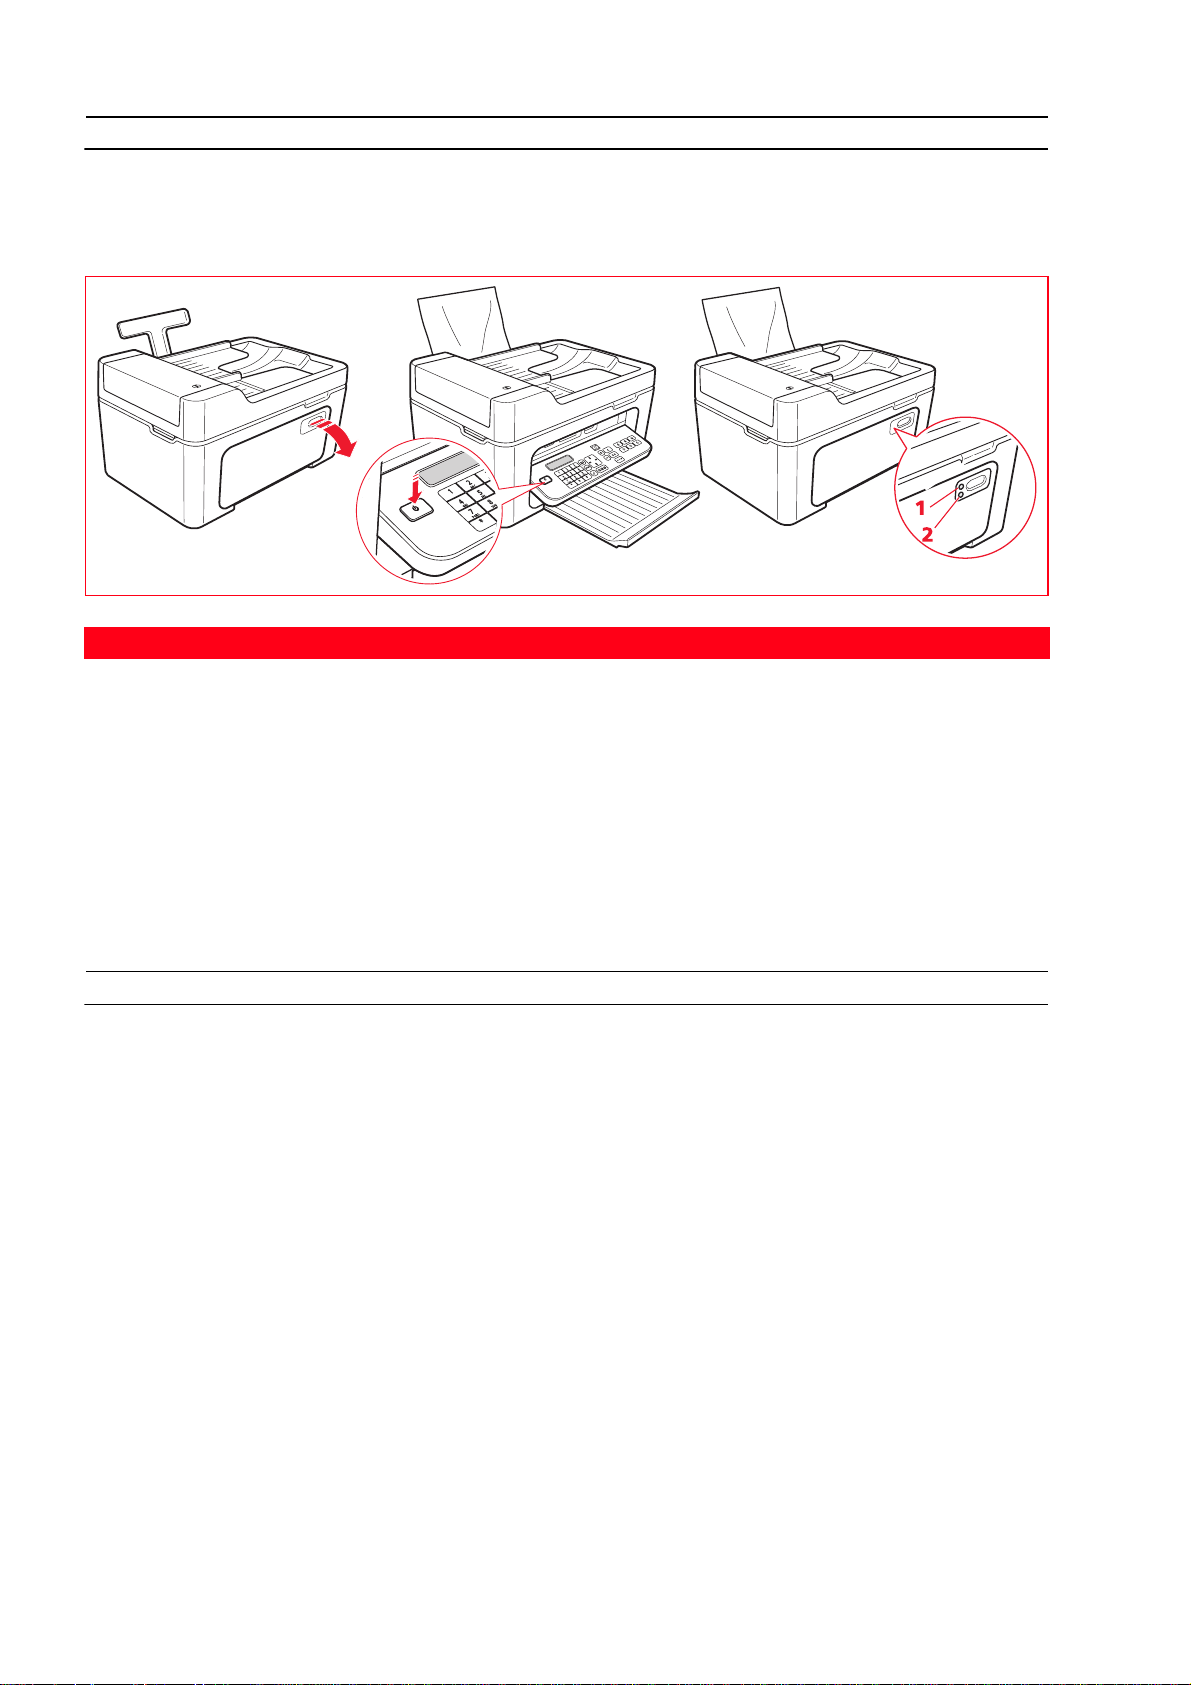
SWITCHING THE PRINTER ON AND OFF
Press the On/Off key.
When the keyboard is closed, the two LEDs indicate if the printer is switched on and if any operating errors have
occurred.
Reference Indicator
Description
1 On/Off LED A green light indicates that the printer is switched on.
2 Error LED An orange light indicates that errors are signalled by the LEDs on the
printer front panel.
Printer Economy Mode
After a time interval that can be modified from the Toolbox, the printer enters energy saving mode and the keyboard is
disabled.
The printer re-activates on receiving any signal from the computer or the keyboard.
Note: Switching off the printer is not recommended as it results in the loss of the date and time.
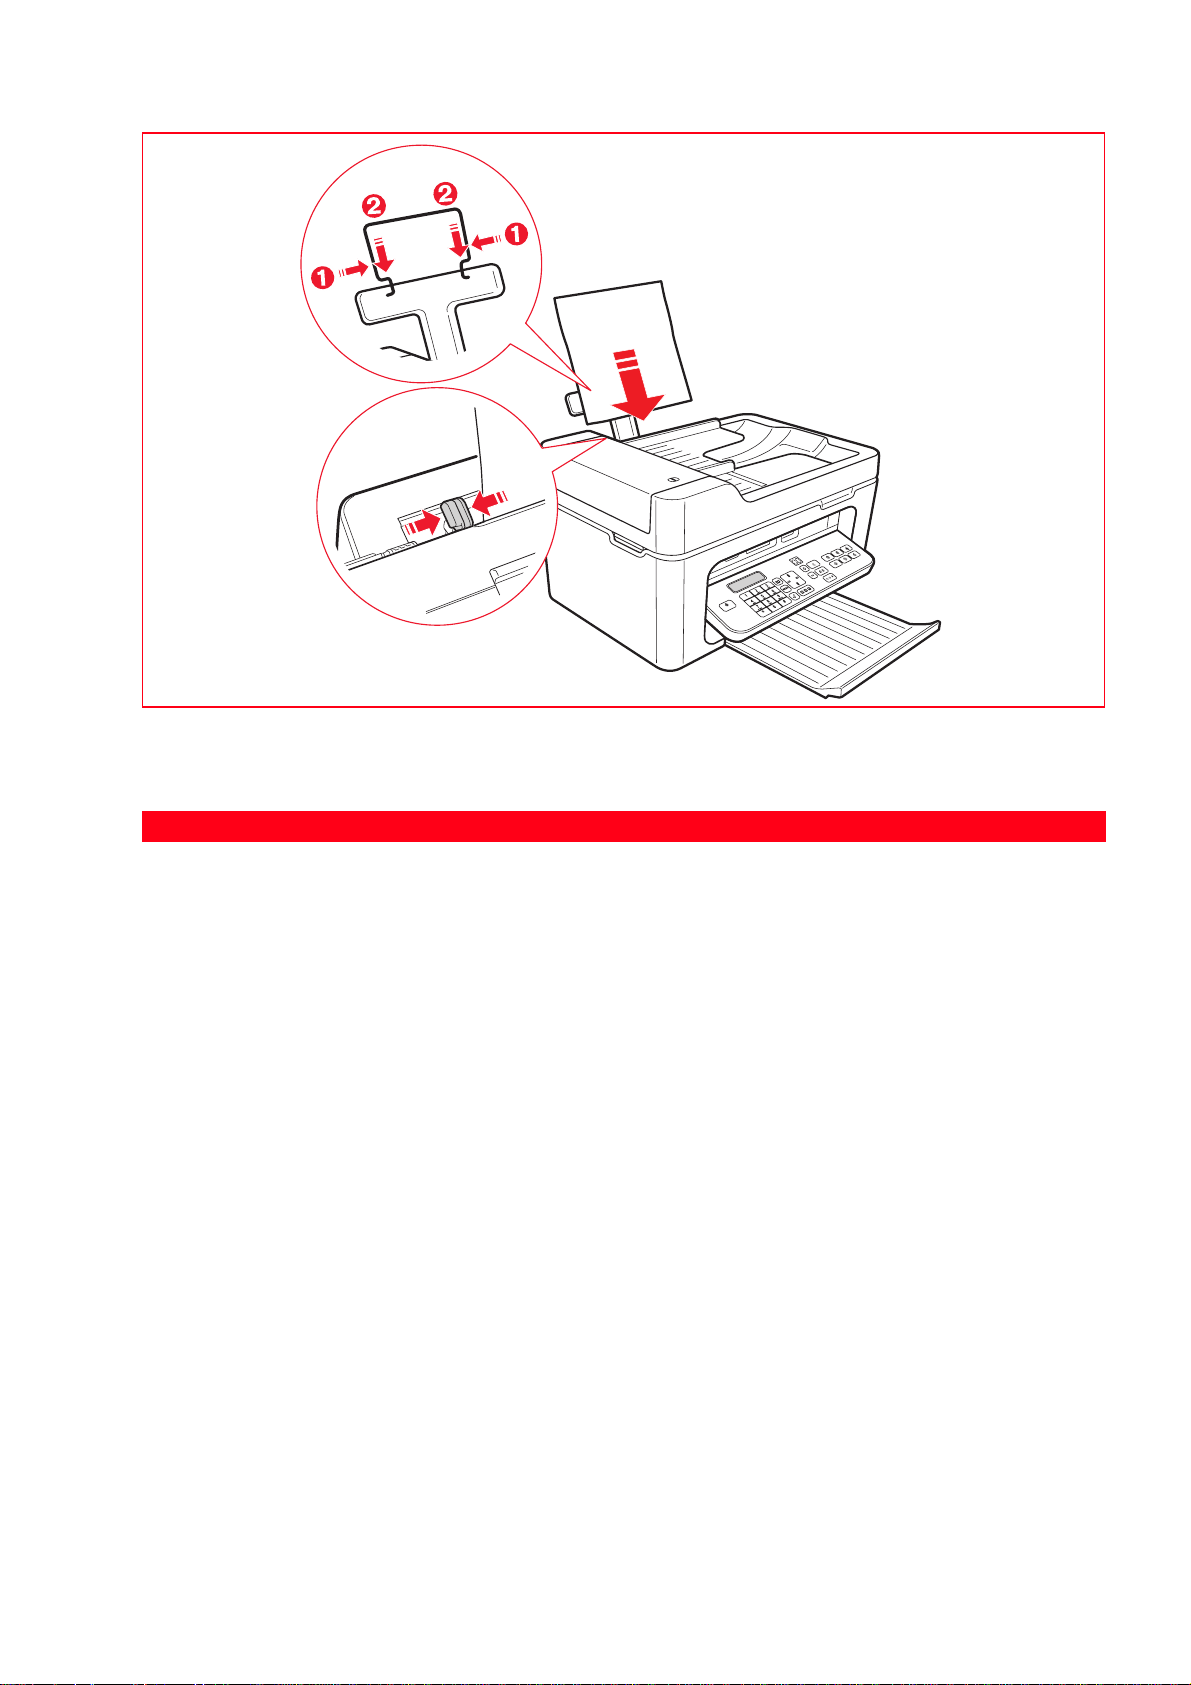
LOADING PAPER ONTO THE AUTOMATIC SHEET FEEDER
1 Raise the automatic sheet feeder into its upright position, then press the paper width guide and slide it to its
outermost position.
2 Load the paper vertically (portrait orientation), with the side to print on facing the front of the printer, and
positioned against the right-side guide.
2
Note: The feeder capacity is 100 sheets of 80 g/m
3 Press the left paper guide and slide it up against the left edge of the paper.
plain paper.
Getting Started8
Loading Different Types of Paper
To load: Proceed as follows:
Plain paper, coated paper,
photo paper, greeting
cards, index cards or post
cards, envelopes, ink-jet
labels.
• Load the media vertically, against the right side of the automatic sheet feeder, and
with the print side facing up.
• Pressing the paper guide, slide it up against the left edge of the paper.
Note: Load letterhead paper with the top of the letterhead entering the printer first,
facing up.
Transparencies • Transparencies that can be used must have a white backing paper, or a removable
white stripe on the leading edge to be inserted first into the printer.
Note: Transparencies must be inserted into the printer without removing the
protection as indicated in the supplier’s instructions.
Banner paper • Remove all paper from the feeder.
Insert the leading edge of the banner paper vertically into the printer,
•
right side of the automatic sheet feeder
, and with the print side facing up
against the
.
Note: Do not use perforated fan-fold banner paper.
• Press the paper guide and slide it up against the left edge of the banner paper.
Iron-on transfers • Read the instructions supplied with the transfers.
• Load the sheets vertically against the right side of the automatic sheet feeder and
with the side to be printed facing towards the front of the machine.
• Press the paper guide and slide it up against the left edge of the transfer.
Getting Started 9
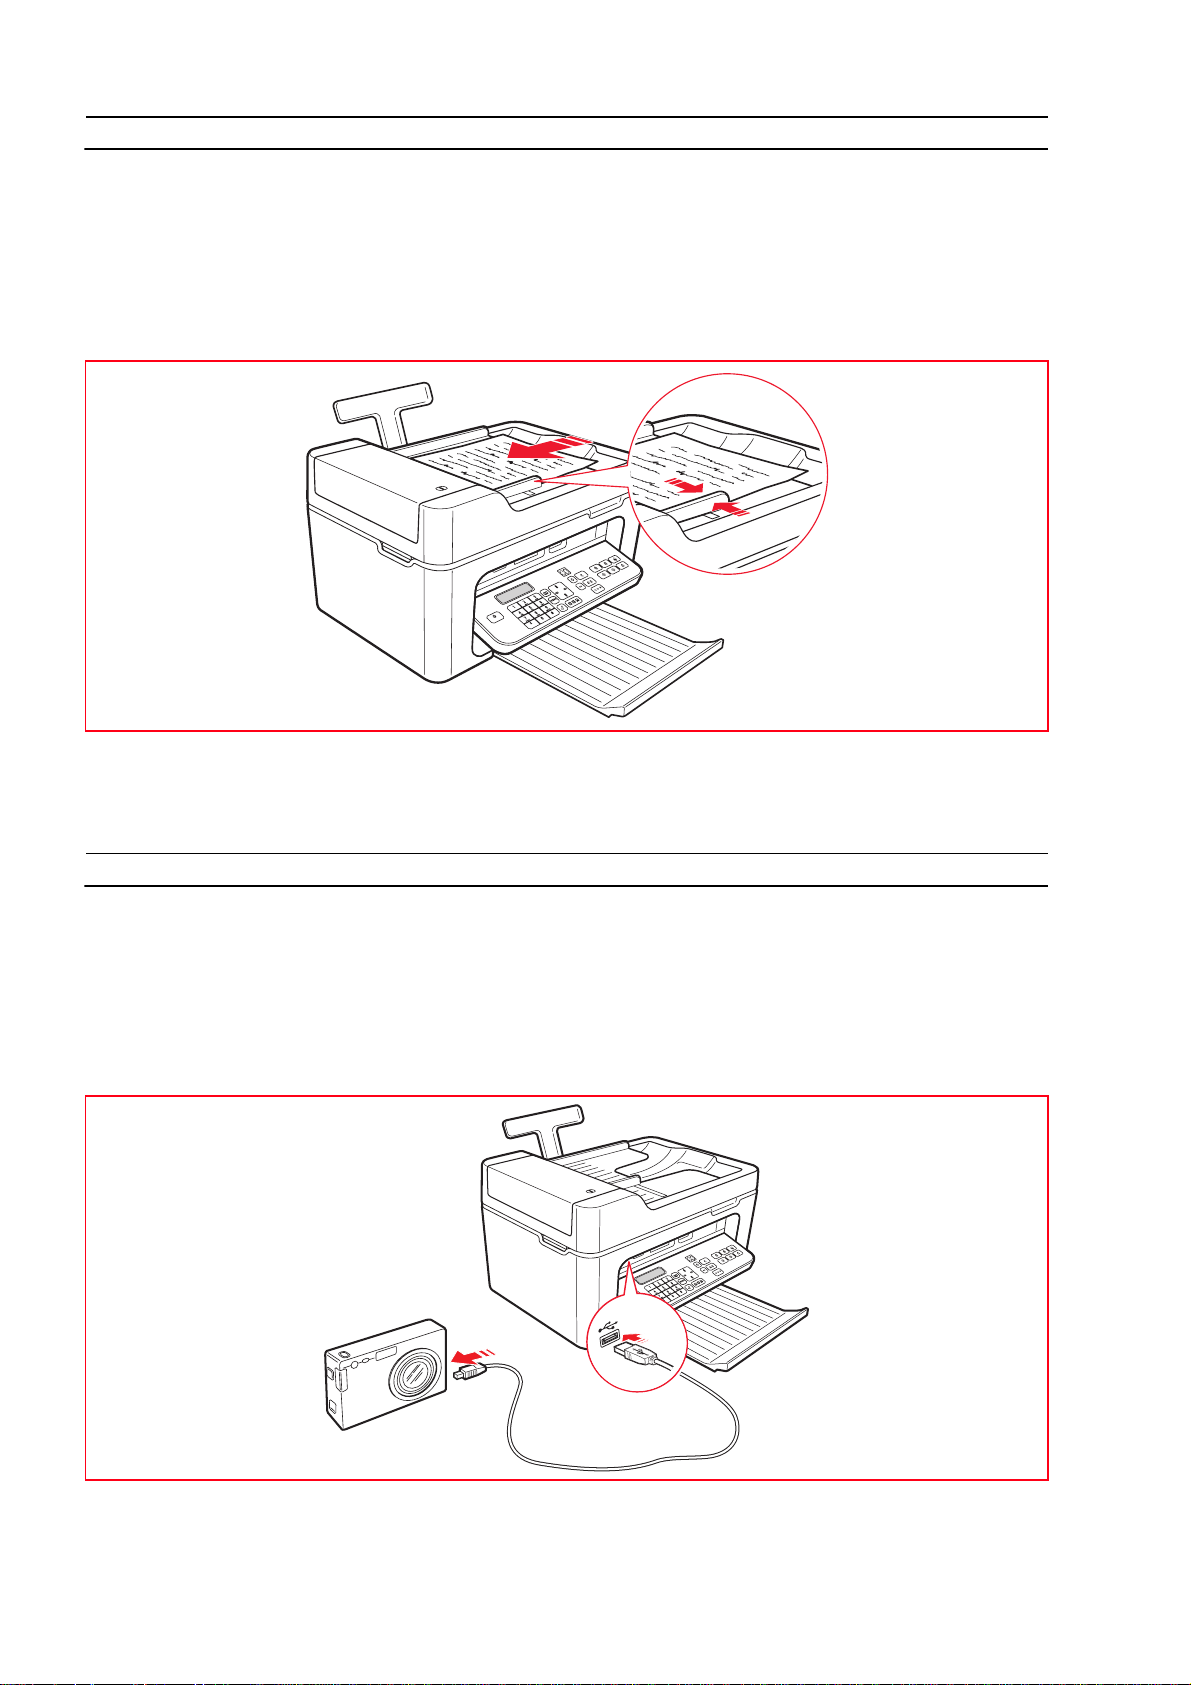
LOADING DOCUMENTS ONTO THE AUTOMATIC DOCUMENT FEEDER
The automatic document feeder for copying or faxing documents can contain a maximum of 35 sheets of 80 g/m2 plain
paper.
The document sizes supported are: A4, Legal, Letter and A5.
Note: Do not insert postcards, photos, small items or light materials (such as newspaper cuttings). For these types of
materials, use the scanner and the computer.
1 The original document must be inserted with the printed side to be copied facing upwards.
2 Adjust the paper width guide of the automatic document feeder and make sure that it is positioned against the
edge of the paper.
CONNECTING A DIGITAL CAMERA TO THE PRINTER
11 Switch on the digital camera. For more information, read the digital camera’s User Guide.
2 With the printer switched on, connect one end of the USB cable to the USB connector of the digital camera, and
the other end to the USB connector on the printer front panel. The connection LEDs and the Start printing key
icon illuminate.
Note: If you are connecting a PictBridge digital camera, the Start printing key icon does not illuminate because
printing is controlled directly from the digital camera.
The green USB status LED illuminates to indicate that a correct connection has been established.
If the connection is not established, make sure you have connected a compatible device.
Getting Started10
CONNECTING THE PRINTER TO THE TELEPHONE NETWORK
Two RJ11 connectors are present on the back of the printer: “LINE” (on the right) and "EXT" (on the left). Using the
telephone cable provided, connect the telephone line to the "LINE" socket.
You can connect an external telephone or an answering device to the "EXT" socket.
If the socket is protected by a cover, remove it.
A telephone connected in a cascade can be used to make and reply to calls, and to send a START signal to receive a fax
(the default DTMF code * * can be customised by selecting Toolbox > Settings > Fax settings > Installation >
Configuration ).
In this case, the keyboard display indicates that an additional telephone is connected.
Connecting to the Telephone Network and Connecting an External Telephone
As connecting an additional telephone or other device to the fax telephone line is subject to national regulations, which
vary from country to country, the illustrations on the next pages show connection examples.
If, in the destination country, connection to the telephone line differs from those shown in the examples, refer to the
regulations in force in the destination country.
• The fax is set up to be connected to the
•
public line, refer to the section “Installing the Fax”.
•
• In the case of a
sockets available provided that the system is of the type with
always present when the handsets of the existing telephone devices are lifted simultaneously.
• If the dial tone is not present when the hand-sets of the pre-existing telephone devices are lifted simultaneously, this
means that the telephone system is of the type with
devices must be connected directly to the printer as already explained above.
If this is not possible, connect the printer to the socket with the highest priority.
Each country uses a specific type of telephone plug. The most frequently-used connections are illustrated below.
multiple-socket telephone system
public telephone line
, additional telephone devices can be connected to any of the
multiple sockets in parallel
multiple sockets in series.
. To connect it to a private line and use it also on a
. In this case, the dial tone is
In this case, the additional telephone
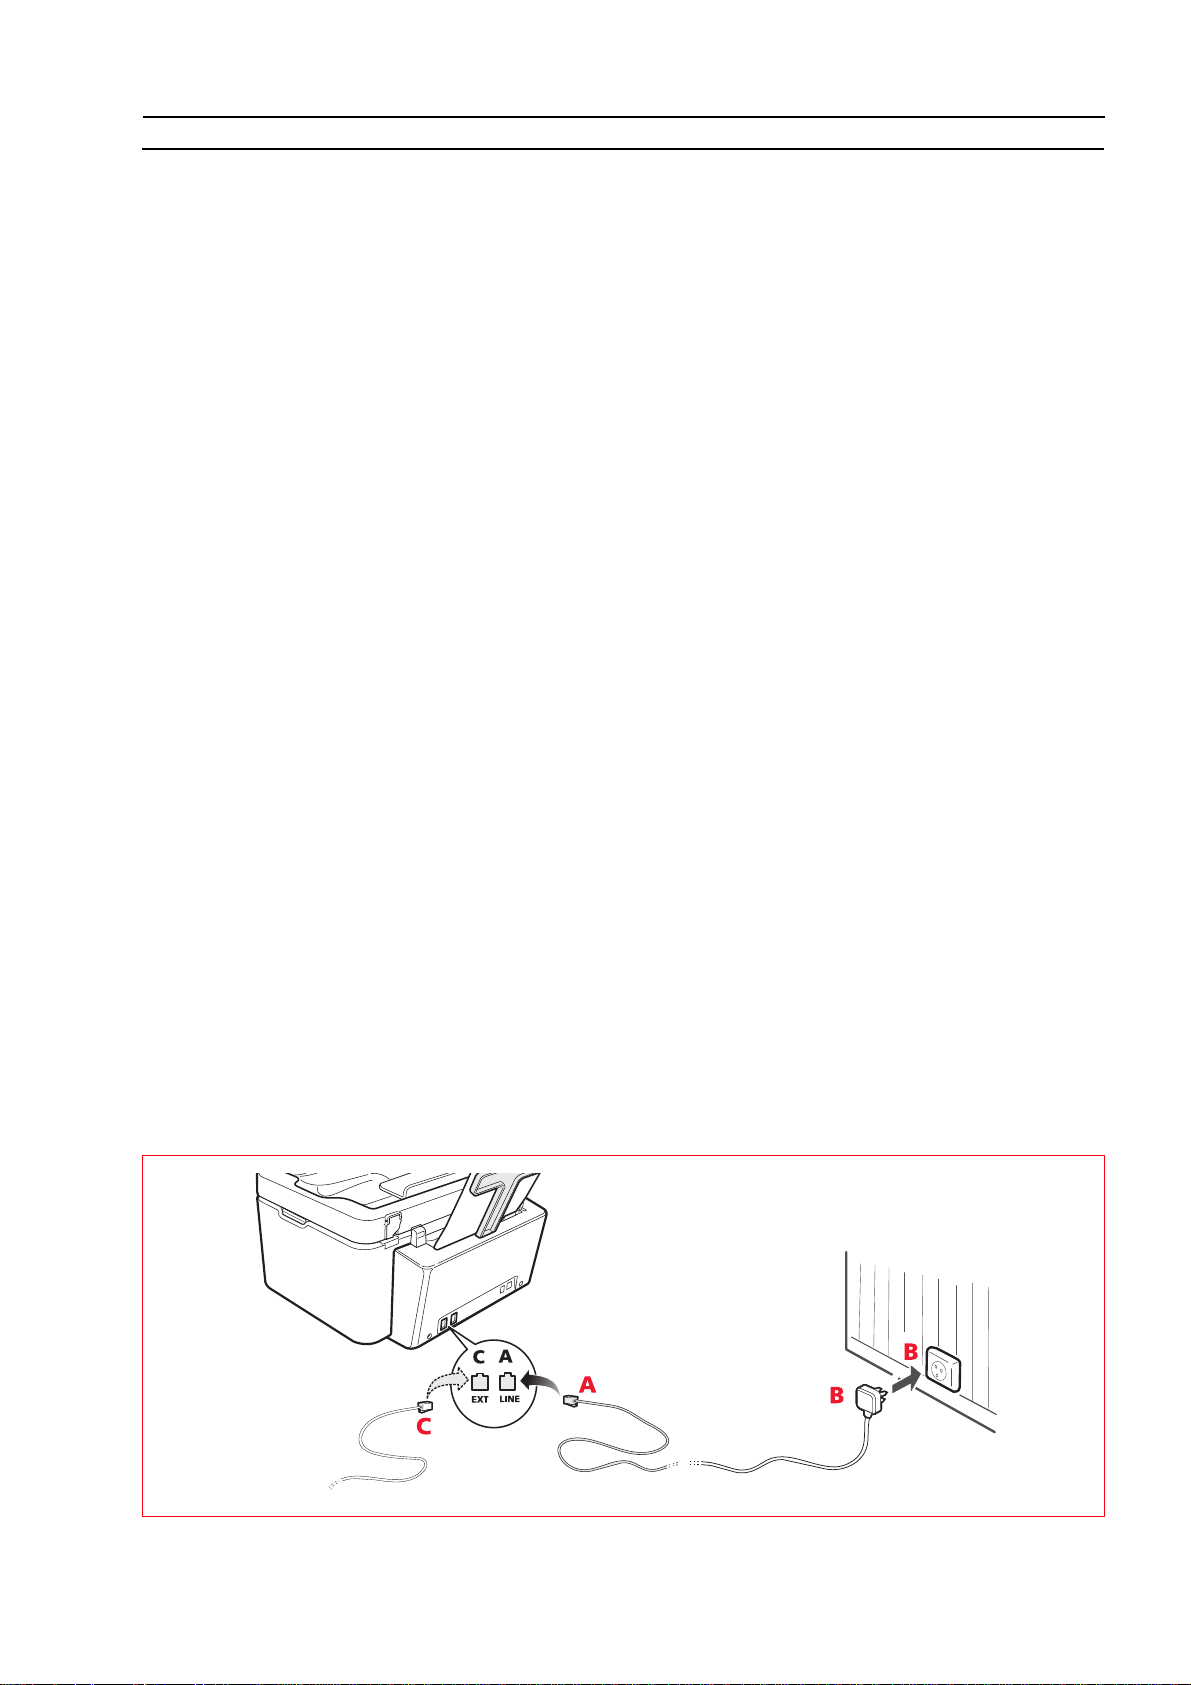
Connection Case 1 (Italy and Switzerland)
Insert the connector of the additional telephone or other device (see the related illustration) into the "EXT" socket. If it
is not possible to connect the additional telephone directly to the "EXT" socket, use the specific adapter supplied with
the additional telephone.
A = telephone line input (LINE IN)
B = wall socket for telephone plug
C = external telephone with or without adapter, telephone answering device (EXT)
D = socket for external telephone, telephone answering device or other unit.
Connection Case 1 Italy
Getting Started 11

Connection Case 1 Switzerland
Connection Case 2
Insert the connector or plug of the additional device into the socket (see the related illustration).
A = telephone line input (LINE IN)
B = wall socket for telephone plug
C = external telephone, with or without adapter, telephone answering device (EXT)
D = socket for external telephone, telephone answering device or other unit.
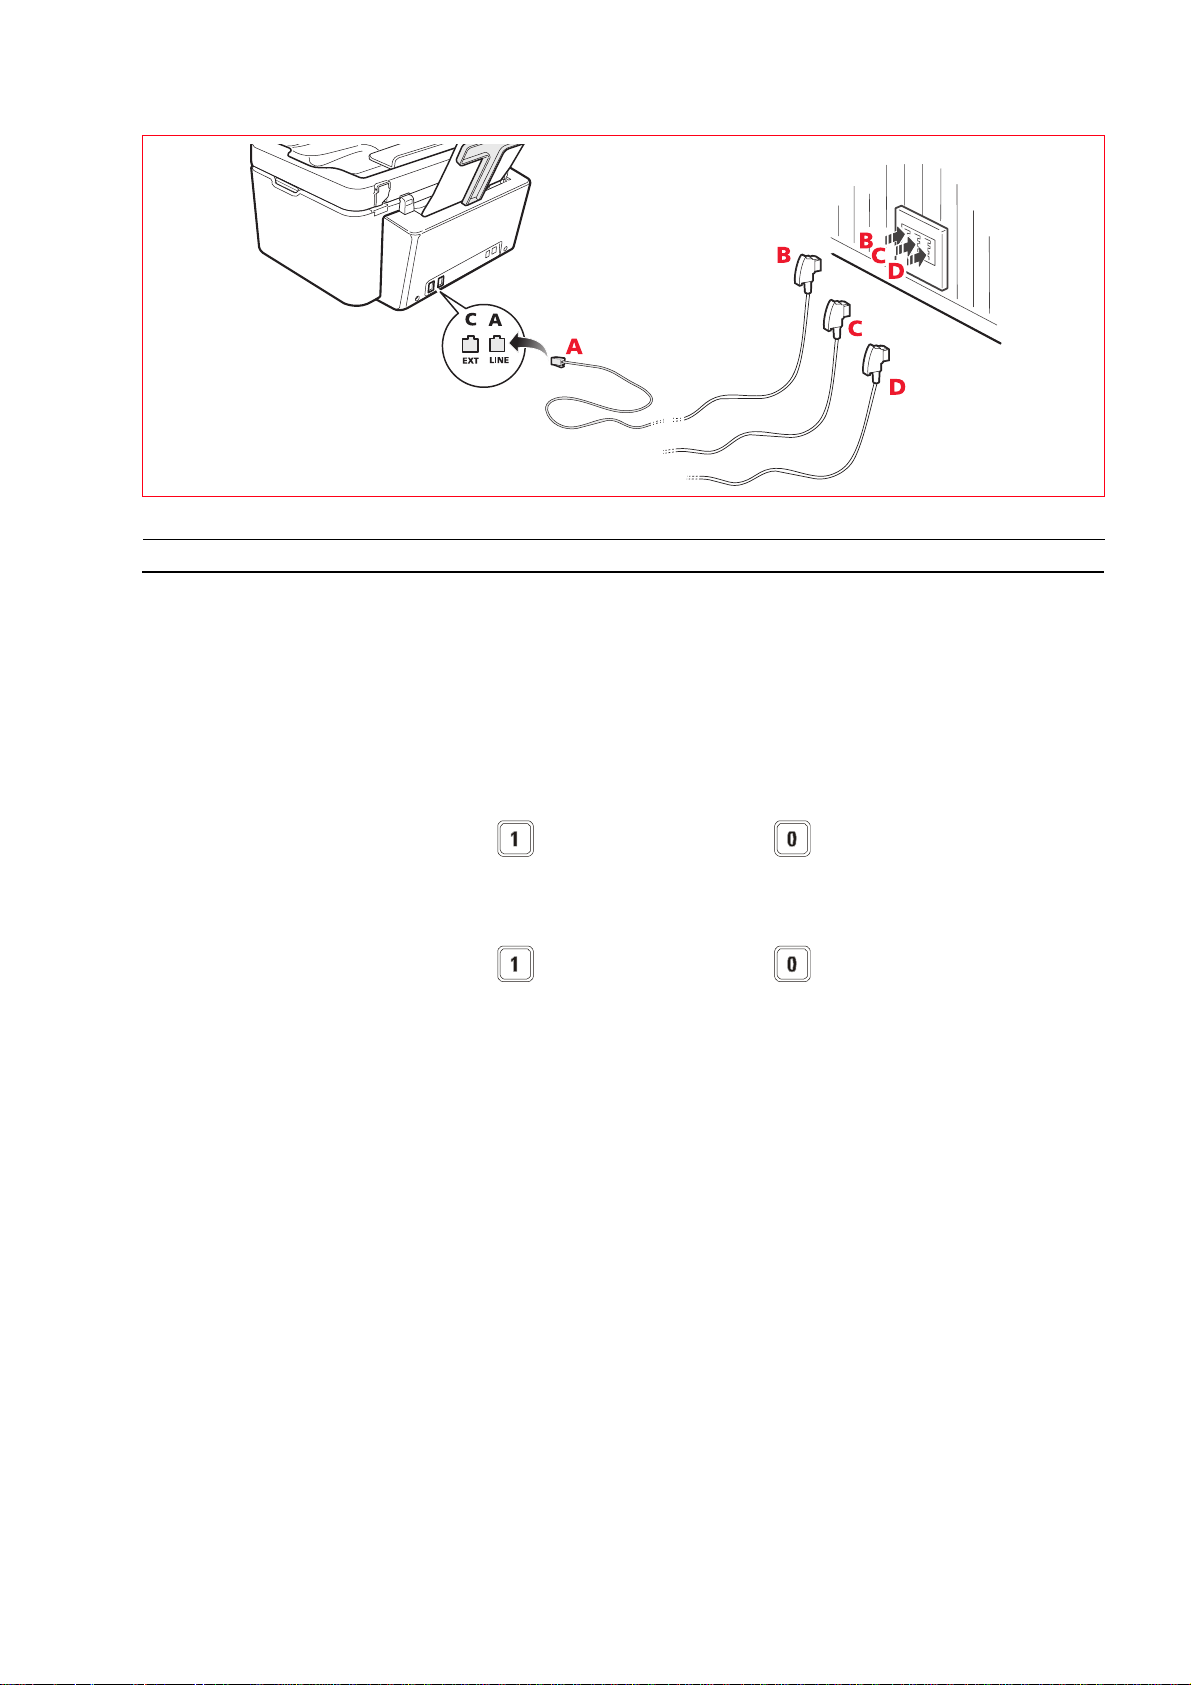
Connection Case 3
Insert the plug of the additional unit into the wall socket of the telephone line (see the related illustration).
Using the specific adapter (as for the first type of connection), you can connect another device to the printer "EXT"
socket for connection to the telephone line.
A = telephone line input (LINE IN)
B = wall socket for telephone plug
C = external telephone, with or without adapter, telephone answering device (EXT)
D = socket for external telephone, telephone answering device or other unit.
Getting Started12
INSTALLING THE FAX
After having connected the telephone cable and the power supply cable, press the On/Off key to switch on the printer.
The printer executes a series of autodiagnostic tests displaying, at the end, a message indicating that the printer is ready
for use as a fax.
Installation Procedure
1 When switched on, the display shows the languages available in sequence, each uniquely identified by a 2-digit
code "nn".
Enter the keys relative to the number "nn" corresponding to the language you want to set.
2 Confirm your selection by pressing the key. Alternatively, press the key to return to step 1.
3 The possible choices for the destination country are shown on the display.
Each country is uniquely identified by a 2-digit code "nn".
Enter the keys relative to the number "nn" corresponding to the destination country you want to set.
4 Confirm your selection by pressing the key. Alternatively, press the key to return to step 3.
5 Installation is terminated.
6 To enter the date and time, press the Menu key followed by the Confirm key. The message "SET DATE/TIME"
appears on the display.
7 Enter the data using the alphanumeric keypad then press the Confirm key.
Note: The date and time can also be sent from the computer by selecting Toolbox > Settings > Fax settings.
Note: If there is a power failure, the date and time settings are lost. When the printer is next switched on, a
message is displayed prompting you for the date and time again.
Note: If you want to change the Destination country setting, press in sequence the keys C + * + *. The display
allows you to choose your language and Destination country. Enter the data and then switch off the printer.
When you switch the printer on again, you must enter the correct date and time.
Getting Started 13

Country Selection Country Selection
Argentina
Australia
Austria
Belgium
Brazil
Chile
China
Colombia
Czech Republic
Denmark
Finland
France
Germany
Greece
Hong Kong
India
Israel
Italy
AMERICA LATINA
NZL/AUSTRIA
ÖSTERREICH
BELGIUM
BRASILE
AMERICA LATINA
CHINA
AMERICA LATINA
CZECH
DANMARK
FINLAND
FRANCE
DEUTSCHLAND
GREECE
SINGAPORE
INDIA
ISRAEL
ITALIA
Ireland
Luxembourg
Mexico
New Zealand
Norway
Netherlands
Portugal
Peru
Rest of the world
Spain
South Africa
Sweden
Switzerland
Turk ey
UK
Uruguay
Venez uela
SETTING FAX DATE AND TIME
To set the date and time manually when you switch on the printer:
•
• In stand-alone mode, press the
Enter the date and time using the alphanumeric keypad and press
•
• You can also send the date and time from the computer by selecting
Menu
key. The message
"SET DATE/TIME"
Confirm
UK/IRLANDA
BELGIUM
AMERICA LATINA
NZL/AUSTRALIA
NORGE
HOLLAND
PORTUGAL
AMERICA LATINA
INTERNATIONAL
ESPAÑA
S. AFRICA
SVERIGE
SCHWEIZ
TURKEY
U.K. / IRELAND
AMERICA LATINA
AMERICA LATINA
is displayed.
again at the end.
Toolbox > Settings > Fax settings
.
Getting Started14

2USING THE PRINTER
WITHOUT A COMPUTER
COPYING A DOCUMENT
PRINTING PHOTOS FROM A DIGITAL CAMERA
PRINTING PHOTOS FROM A PICTBRIDGE DIGITAL CAMERA
PRINTING PHOTOS FROM A DPOF DIGITAL CAMERA
FAX MANAGEMENT MENU
CONFIGURING THE PRINTER TO RECEIVE FAXES
SENDING A FAX
PRINTING FAX REPORTS
MODIFYING FAX SETTINGS: RESOLUTION AND CONTRAST
MODIFYING RING TYPE ON RESPONSE (RING DISTINCTION)
USING THE PHONE BOOK
Using the Printer Without a Computer 15

COPYING A DOCUMENT
11 Switch on the printer. See "Switching the Printer On and Off".
2 Make sure that the out-of-ink indicators on the front panel are switched off. If either indicator is on, you should
replace the corresponding ink cartridge.
For more information, see “Replacing the Ink Cartridges”.
3 Load the paper on which you want to print.
4 Place the document you want to copy on the scanner glass or, if it consists of multiple pages, in the automatic
document feeder.
5 Select the copy quality: Photo or Normal, pressing the Select print quality key.
a To copy a normal B/W text, or a mixed document in B/W and colour, select
b To copy a document and print it on special ink-jet paper, select
Photo
Normal
.
. For more information, see "Printer
Keyboard”.
6 Select the contrast: dark, medium or light, pressing the Copy contrast key. For more information, see "
Keyboard
".
Printer
7 To make more than one copy, press the "+" (plus) key the number of times necessary to display the number of
copies required on the counter.
8 Press the Start B/W copy or Start colour copy key, as required.
Note: If you want to copy the document onto a different sized page, keep the Start B/W copy or Start colour
copy key pressed to activate the Fit to page function. The printer automatically resizes the original to
correspond to the size of paper loaded.
Note: The Fit to page function is not available if the documents to copy are loaded onto the automatic document
feeder.
PRINTING PHOTOS FROM A DIGITAL CAMERA
When a digital camera or a compatible memory device is connected to the printer, the Start printing key illuminates.
Pressing the Start printing key causes the Photo Index to be printed, a document reproducing all the images present
in the memory connected to the printer, and that allows you to choose the images to print, the number of copies and
the paper size.
To print the Photo Index:
1 Leave connected the memory used for printing the Photo Index.
2 Position the Photo Index, completed in all its parts, on the scanner glass.
3 Press the Start printing key until the print operation starts (approx. 8 seconds): the photos are printed as indicated.
• The pre-configured print quality is suitable for special ink-jet paper, and can be modified from the printer
keyboard.
• The photos printed are automatically adjusted to fit the size of the paper in the automatic feeder.
Using the Printer Without a Computer16

PRINTING PHOTOS FROM A PICTBRIDGE DIGITAL CAMERA
To obtain the best results when printing photos, you should use a colour cartridge with a photo cartridge. See
“Replacing the Ink Cartridges”.
1 Load photo paper onto the printer.
2 Make sure the PictBridge digital camera is switched on and connected to the printer.
3 Printing is controlled directly from the camera, therefore the Start printing key is disabled.
Read the camera’s User Guide for instructions on how to print photos.
During printing, the Start printing key flashes.
Note: If the paper size loaded is different from the paper size set from the digital camera, printing will not be correct,
or an error message is displayed.
PRINTING PHOTOS FROM A DPOF DIGITAL CAMERA
To obtain the best results when printing photos, you should use a colour cartridge with a photo cartridge. See
“Replacing the Ink Cartridges”
The printer is able to recognise the DPOF information that has been associated with the images to be printed. The Start
printing key illuminates on recognising the DPOF format files.
11 Load photo paper onto the printer.
2 Make sure the DPOF digital camera is turned on and connected to the printer.
3 Select the print quality according to your printing requirements.
4 Press the Start printing key on the keyboard to print the photos you have selected, associating the DPOF
indications of the digital camera.
FAX MANAGEMENT MENU
To access the fax management menu, press the Menu key until it appears on the display.
The menu includes the following options:
•Reception
• Installation
• Print Report
• Service
Use the fax management menu with the following keys:
•the
•the
•the
.
Navigator
Confirm key
Cancel key
, to browse items that appear on the display.
, to confirm the selection.
, to go back or cancel the current operation.
Reception
Press the Menu key to display "Reception" then press Confirm.
The following options available: Automatic, Manual, Phone/fax, Answering device/fax.
For more information, see "Configuring the Printer to Receive Faxes".
Using the Printer Without a Computer 17

Installation
Press the Menu key to display "Installation" then press Confirm.
The following options are available:
•
Date and time:
•
Language:
select.
Number:
•
to enter the date and time.
to select the language required. Use the
enter the fax number of the sender and then press
Navigator
to scroll through the list and then press
Confirm
.
Confirm
to
Print Report
Press the Menu key to display "Print Report" then press Confirm.
The following reports can be printed:
•
Last transmission:
Fax activities:
•
press
press
Confirm
Confirm
to start printing.
to start printing.
Service
Provides a list of reserved information on the printer for the use of field engineers. A password has to be entered to
consult the information which is only available to field service.
CONFIGURING THE PRINTER TO RECEIVE FAXES
In the Fax mode, the printer is set to respond automatically to all calls.
If faxes are configured to be replied to manually, incoming calls must be replied to personally from an additional
telephone, and you must enter the code * * on the telephone (or the personal code entered from the Toolbox
application) to receive the fax.
The printer is able to distinguish automatically between fax calls and telephone calls, using one of the reception modes
configured as described below.
Setting Reception Mode
The reception mode establishes whether or not the printer is to answer incoming calls.
To set the reception mode, switch on the printer and wait until it comes online.
Press the Menu key on the keyboard, select the option "Reception" and then select the mode from: AUTOMATIC,
MANUAL, PHONE/FAX or ANSWERING DEVICE/FAX.
The modes available are:
•
AUTOMATIC
•
This setting must be changed if an external device, additional telephone or answering device is connected.
•
MANUAL:
be diverted to the printer by entering the chosen code (default code is
(if Remote has been chosen for Fax Configuration in the Toolbox application).
Note: If an additional telephone is connected to the printer, the Reception Mode setting should be MANUAL.
•
PHONE/FAX:
Installation
or voice call. In case of a voice call, the printer’s ring tone changes (after the default number of rings), and it rings for
the time defined by Fax/tel timer
Reception
call, the fax is received and printed.
(default setting): The printer is set to reply automatically to all calls.
The call is always received by the telephone. If, on replying, the user recognises that the call is a fax, it can
* *
) on the numeric pad of the additional phone
After a certain number of rings (modifiable selecting
>
Reception
), to allow the call to be answered. If the call is not answered, it returns to the printer. In the case of a Fax
), the printer connects to the telephone line and is able to detect if the incoming call is a fax
(modifiable selecting
Toolbox > Settings > Fax settings > Installation >
Toolbox > Settings > Fax settings >
Using the Printer Without a Computer18

• ANSWERING DEVICE/FAX: The answering device must be connected to the printer. In this Reception mode, the
number of rings preceding intervention of the answering device (see the answering device’s manual), must be less
than that (modifiable selecting Toolbox > Settings > Fax settings > Installation > Reception) after which the
incoming call is received by the printer; in this way the answering device receives the line first.
Even when the call is answered by the answering device, the printer modem is able to recognise if it is a Voice or Fax
call. In the case of a Voice call it does not intervene, otherwise it receives and prints the fax.
Note: If an answering device is connected to the printer, the Reception mode selected must be the ANSWERING
DEVICE/FAX.
SENDING A FAX
Faxes can be sent in a number of ways:
• From the keyboard
• Using the automatic document feeder
• From the computer, see "Using the Printer with a Computer".
Sending a Fax From the Keyboard
1 To send a fax, switch on the printer, check that it is connected to the telephone line and wait for it to come online.
2 Place the original on the scanner glass, press the Start colour fax or Start B/W fax key to scan the document
using the scanner, and load it into memory.
While the document is being scanned, the message "SAVING PAGE" appears on the display.
Note: When sending a colour document, make sure that recipient is able to receive colour faxes.
3 When scanning completes, the display prompts you to scan other pages.
4 Press the key to scan another page, or the key to terminate the scanning phase and send the fax.
5 Enter the telephone number of the fax device to which you want to send the fax, using:
• The alphanumeric keypad (manual send); at the end press the
• The phone book, selecting the number from the list of numbers present (automatic send with phone book); at the end
press the
Start fax
key
.
Start fax
key
.
Sending a Fax Using the Automatic Document Feeder
1 To send a fax, switch on the printer, make sure that it is connected to the telephone line and wait until it comes
online.
2 Place the document (or documents) in the automatic document feeder.
3 Enter the fax number of the recipient using the alphanumeric keypad on the keyboard, or call up the number from
the phone book, then press the Start fax key.
Note: When sending a colour document, make sure first that the contact is able to receive colour faxes.
4 The printer automatically scans all the pages present in the automatic document feeder, and sends them to the
destination fax.
Using the Printer Without a Computer 19

PRINTING FAX REPORTS
Printing fax activity reports can be activated from the printer keyboard by pressing the Menu key and selecting Print
report using the Navigator.
The printer proposes two printing possibilities on the display:
•
Last transmission:
•
Fax activities:
The last transmission report is also printed automatically whenever a transmission fails.
You can change the report printing settings from the computer by selecting Toolbox > Settings > Fax settings, and
choosing between: Always, Failed (default setting), Never.
The fax report provides a printout of the fax journal, made up of a list of 42 items, relating to the fax activities.
The journal is printed automatically for every 32 operations executed.
Press
Press
Confirm
Confirm
to print.
to print.
Fax Report for Power Failure
If a power failure occurs, any messages which have been saved are lost. When the printer is next switched on, an
activity report is printed with the date and time of the power failure, and indicating the presence of any documents in
memory. The correct date and time must be re-entered.
MODIFYING FAX SETTINGS: RESOLUTION AND CONTRAST
You can adjust fax resolution by pressing the Fax quality key.
The following options are available: Normal, Fine and Photo, for both B/W and Colour modes.
For example, when sending a document such as a photo, the resolution must be set as either Fine or Photo.
You can also modify the resolution while a multiple-page document is being scanned. The change takes effect from the
next page printed after the modification.
MODIFYING RING TYPE ON RESPONSE (RING DISTINCTION)
The printer emits sounds by means of its ring, buzzer and internal speaker.
You can change the volume for each of these:
•
Ring volume:
Voice call and redirects it to the telephone. This function is only active in Phone/fax mode).
Volume buzzer:
•
Volume speaker:
•
settings.)
These 3 volumes can be changed only from the Toolbox application.
this is the ring of the telephone or the Answering device/Fax (the printer has recognised an incoming
signals a reception or transmission error.
can be used to hear the line tone when dialling the number. (This option is disabled in the default
USING THE PHONE BOOK
When you press the Phone book key, the display shows the last fax number used.
To search for a given name, press the Phone book key again. The first number in the list is displayed. You can now:
• Scroll through the numbers entered using the
call by pressing on the
Alternatively:
• Press the numeric key associated with the initial letter of the name present in the phone book. Use the
scroll to the name you are looking for and press the
Note: To call up a name beginning with the letter A, you must press key 2 once only; to call up a name beginning
with the letter C, you must press the key 2 three times.
This same method must be used for the other letters in the alphabet present on the alphanumeric keypad.
Start colour fax
Navigator
or
Start B/W fax key
Start colour fax
and, when you find the name you are looking for, start the
.
Navigator
or
Start B/W fax key
to call the number.
to
Using the Printer Without a Computer20

3USING THE PRINTER WITH A
COMPUTER
BEFORE YOU BEGIN
THE PRINTER STATUS MONITOR
THE TOOLBOX
PRINTING, COPYING AND SCANNING FROM THE TOOLBOX
PRINTING FROM AN APPLICATION
SCANNING A DOCUMENT FROM AN APPLICATION
PRINTING PHOTOS
FAX SETUP FROM THE TOOLBOX APPLICATION
SENDING A FAX USING THE COMPUTER
Using the Printer with a Computer 21

BEFORE YOU BEGIN
This chapter provides the basic information necessary to use the printer connected to a computer. For more information
on the functions available, consult the User Guide by selecting Start > Programs > Olivetti.
Other information can be obtained by selecting Help in the dialogue boxes.
Before you begin:
1 Make sure that the printer and computer are connected correctly, and that the CD software has been installed
successfully on the computer as indicated in the Installation Guide supplied with the printer.
2 Load the paper on which to print.
3 Make sure that the out-of-ink indicators on the front panel are switched off. If either is not, you are advised to
replace the corresponding ink cartridge. See "Replacing the Ink Cartridges" for more information.
THE PRINTER STATUS MONITOR
The printer Status Monitor provides information on the current printer status. It is installed when you install the
software contained on the “Installation” CD.
The Status Monitor displays automatically at the beginning of a print or copy job:
•
A graphical representation of the percentage of the print or copy job already completed.
•
The number of pages already printed, or copied, out of the total number of pages in the job.
•
A graphical representation of the estimated amount of ink, as a percentage, still available in the colour and black
cartridges.
•
The possibility to cancel the print or copy job.
•
The address of the manufacturer’s web site where you can access information on purchasing new ink cartridges.
The Status Monitor closes automatically at the end of a print or copy job, but you can close it at any time.
If you close the Status Monitor during a print or copy job, it is automatically redisplayed.
•
When the printer is in the out-of-ink or almost out-of-ink conditions. A coloured exclamation mark indicates the
cartridge in a low-ink condition (colour, black, or both), and the relative percentages.
Pop-ups are displayed with the address of the manufacturer’s web site where you can access information on purchasing
new ink cartridges.
The printer Status Monitor also displays an error pop-up when:
•
One or both cartridges are missing.
•
•
The scanner unit is raised.
•
The keyboard is closed and a print or copy operation is started.
•
The printer runs out of paper.
•
A paper jam occurs.
••An incorrect paper size is detected.
••The printer is busy with another task.
••The printer is not recognised.
••The ink cartridge carriage is jammed.
••The printer is not working (system error).
The pop-up windows displayed also allow you to choose whether you want to continue printing or to cancel the print
operation.
Using the Printer with a Computer22

THE TOOLBOX
The Toolbox application allows you to print, copy, scan, send and receive faxes, from a single window on the computer
screen.
From the Toolbox main screen, you can:
•
Print images and make copies.
•
Scan documents, choosing beforehand the destination.
•
Check the amount of ink left in the cartridges installed.
•
Access a
–
–
–
Solutions and Assistance
facility where you can:
Clean and test the ink cartridge nozzles.
Automatically align the ink cartridges to improve print quality.
Find the address of the manufacturer’s web site, where you can access information on purchasing new ink
cartridges.
–
Access troubleshooting and maintenance information.
–
Print a test page.
•
Access the
Settings
function.
PRINTING, COPYING AND SCANNING FROM THE TOOLBOX
To access the Toolbox:
1 Select with your right mouse button the Olivetti icon in the Windows task bar and run the Toolbox application, or
select Start > Programs or All Programs > Olivetti > Olivetti Toolbox. The Toolbox main screen is displayed.
Note: In the Mac OS X environment, the Toolbox program is available by clicking on the icon present on the
desktop, or by selecting it from the list of programs installed.
The main area of the Toolbox contains icons representing the different tools available.
Icon You ca n :
Print photos • Browse the hard disk or memory of the non-PictBridge/DPOF digital camera
connected to the computer to find the folder containing the photos to print.
• Select all the photos stored in the folder, or just the individual ones you want,
and indicate the number of copies to print of each.
• Choose the type and size of the paper.
• Specify if the photos are to be printed on a single page, two to a page or four to
a page.
• Print a photo index.
• Print the selected photos.
Photocopier • Define the type of document to be copied.
• Choose the type and size of paper to print on.
• Define the copy quality.
• Lighten or darken the copy, and select colour or black and white.
• Select the layout for the printed copy: scan multiple pages and print them on a
single page; make poster format copies indicating the number of pages over
which to fit the image, clone the image the number of times required without
resizing, or simply print the image on a single page.
Not all types of layout are available if the copy operation is executed with the
document to be copied loaded onto the automatic document feeder.
• Enlarge or reduce the document or photo to be copied, or automatically adjust
its size so that it fits onto the paper size selected.
Note: Not all the functions for modifying the image size or selecting different
layouts are available when the documents for copying are loaded onto the
automatic document feeder.
• Select the number of copies to make.
Using the Printer with a Computer 23

Icon You c a n :
Scan to file
Scan to application
Scan to email
Scan to fax
• Scan a preview of the document or photo placed on the scanner glass.
• Use selection handles to delimit the area of the preview image to scan.
• Rotate, flip, enlarge or reduce the preview image.
• Define the type of document to be scanned, and whether it is in full-colour,
shades of grey or black and white.
• Define the resolution, colour depth, brightness and contrast of the image to be
scanned.
Note: When documents are loaded onto the automatic document feeder, pages
can be scanned one at a time, or all pages in sequence.
Depending on the tool selected:
• Scan to file, save the scanned image in TIFF (.tif), bitmap (.bmp) or JPEG (.jpg)
formats in a computer folder
• Scan to application, send the scanned image of the document or photo to an
application of your choice (such as a graphics program, word processor or
desktop publisher).
• Scan to email, save the scanned image of the document or photo in
compressed .jpg format, and attach it to an e-mail message opened by the
default e-mail application on the computer.
• Scan to fax, save the scanned image of the document or photo in
compressed.jpg format, and send it to the fax application of your choice.
The Toolbox main screen also provides links to Help, Solutions and Assistance, and Settings.
Link You can:
Help • Read more information on the topic currently displayed on the computer.
Solutions and Assistance • Clean and test the ink cartridges.
• Automatically align the ink cartridges.
• Find the address of the manufacturer’s web site, where you can access
information on purchasing new ink cartridges.
• Access troubleshooting and maintenance information.
Settings • Modify the default settings of all the functions available.
Using the Printer with a Computer24

PRINTING FROM AN APPLICATION
11 With the document or photo open in the application you are using, select File > Print to open the Print dialogue.
2 Select Preferences or Properties, depending on the operating system.
The printer driver user interface screen is displayed from which you can use the multifunction printer, as indicated in
the following table.
Preferences/Properties: You ca n :
Paper/quality • Select manually the composition of the document to print:
only black text or graphics, a combination of black text, colour graphics and
photos, photos only; or set automatic detection of the original as a combination
of black text, colour graphics or photos.
• Select the type and size of the paper to use.
• Define the size in inches or millimetres of any custom-sized paper to use.
• Select printing without borders when coated paper, glossy paper or postcard
format is set.
• Specify manual paper loading when printing in banner format. Single sheet
feeding is also recommended when loading envelopes, labels and iron-on
transfers.
• Select the print quality required.
• Set printing in photo quality when photographic paper is loaded and Photo is
selected as the document type; the printer will require a longer printing time.
• Print multiple page documents in reverse order, starting last page first.
The selection can be cancelled.
• Specify if the image must be printed in Portrait or Landscape (the printer rotates
the image as required).
• Specify whether to print in B/W or in colour, depending on the original
document.
• Define the number of copies to print, and if printing order is last page first.
• Restore the settings to their default values, or save the settings so that they can
be applied to the next print operation.
Layout • Set printing of each page of the document, or photos, on a single sheet.
• Set printing of multiple pages on a single sheet, inserting 2, 3, 4 or 8 pages of
the document, or photos, on a single sheet of paper.
• Define the order in which the multiple pages will be inserted on the single sheet
of paper, and whether or not to insert a border around each image on the single
sheet of paper.
• Set printing of multiple pages in poster format, expanding the contents of a
single page over more than one sheet of paper.
• Define the number of sheets on which to print the selected poster image, and
whether or not to insert a border around each image composing the poster.
• Restore the settings to their default values, or save the settings so that they can
be applied to the next print operation.
Ink levels • Display the estimated quantity of ink left in the black and colour cartridges.
• Find a direct link to the Toolbox and, selecting Solutions and Assistance,
access maintenance and troubleshooting information.
• Find a direct link to the address of the manufacturer’s web site, where you can
access information on purchasing new ink cartridges.
Using the Printer with a Computer 25

Setting Print Preferences from the Computer
When printing a document or a photo, you can choose between several modes:
•
SPEED:
high print speed with low resolution, with savings in ink cartridges.
•
NORMAL:
text and graphics. Printing detailed photos or images is not recommended.
•
PHOTO:
•
HIGHEST RESOLUTION:
laboratories. This option is only active when you choose
and paper type.
average print speed and resolution, this is the best compromise with regards to print speed when printing
low print speed with high resolution. Recommended for printing photos.
low speed combined with a print quality comparable to that guaranteed by photo
Manual
paper feeding and
Photo
for both document type
SCANNING A DOCUMENT FROM AN APPLICATION
1
1 Place the document on the scanner glass or, if it consists of multiple pages, on the automatic document feeder.
2 Scan the image from the application you are using.
When the document is placed on the scanner glass, the scanner driver user interface is displayed with a low
resolution preview of the document on the left of the screen, and you can customise the settings to be used for
scanning.
Scanner Driver You can:
Standard • Define the composition of the document to be scanned: black text and graphics
only, a combination of black text, colour graphics and photos, or just photos.
• Return settings to their default values, or save the settings so they are applied to
the next print job.
Custom • Select the scanning resolution.
• Set full-colour scanning at 24 bits/pixel, scanning in grey shades at 8 bits/pixel or
in B/W at 1 bit/pixel.
• Lighten or darken the image to be scanned.
• Increase or decrease the contrast of the image to be scanned.
• Return the settings to their default values, or save the settings so they are
applied to the next print job.
Note: If the documents are loaded onto the automatic document feeder, the preview function is not available, and you
cannot customise the scan settings.
Depending on the application you are using, you may be able to choose to scan pages singly, or the whole
document sequentially.
Using the Printer with a Computer26

PRINTING PHOTOS
1 Open the Toolbox application to access the functions for improving image quality.
2 Select Print photos to apply a correction filter.
3 Choose the computer folder that contains the photos to print.
4 Select the photos you want to print, applying to each your chosen image enhancement filter: the effect of the filter
on the image can be seen in the Toolbox preview frame on the left of the screen.
The filters available are:
•
contrast enhancement
•
border sharpening
•
white balance
•
recovering old images
(old photos with faded colours can be scanned and then processed by this filter)
•
printing with sepia tonality
•
red eyes correction
5 Select Print to open the dialogue for choosing the print mode and size.
The images are printed, applying the settings indicated.
FAX SETUP FROM THE TOOLBOX APPLICATION
The Toolbox application (installed with the product software) allows you to control closely all the principal functions
carried out in fax mode. To access the fax configuration environment, select Toolbox > Settings > Fax settings.
Fax settings opens a drop-down menu listing the settings possible, divided in:
•
Fax settings
•
Installation (Setup
•
Service
.
and
Reception
)
Fax Settings
The options available are:
•
Sleep time:
•
••Phone book:
number and name.
••Date and time:
set the time period after which the printer enters in energy saving mode.
enter a maximum of 10 names into the phone book, identifying each with a position number, telephone
enter the date and time. These can also be transferred from the computer connected to the printer.
Installation
The settings available include:
•
•
Name
and
Number
••Language
••Paper size
••Use the colour ink cartridge also for printing in black when the ink level in the black cartridge is low (
••Format
The other settings are: Setup and Reception (*).
to be used in command interface.
to use for printing and managing faxes received in different sizes to that of the paper loaded for printing.
of date and time.
of fax sender.
black trichromic
).
Using the Printer with a Computer 27

Configuration
Note: To confirm the settings chosen, select INSTALLATION followed by Send setting.
Telephone line configuration requires these settings:
•
Line type
–
Public
: Managed by national telecommunications provider.
–
Private (PBX):
the internal (private) lines without the need to use the public telephone network. Selecting the private line, only
telephone numbers on the internal phone line are enabled.
•
Line mode:
•
PBX flash:
and you want to send faxes using the public phone line only
•
Caller ID:
telephone network provider.
••Remote:
phone line, you can enable the fax to receive the incoming document by entering the (default) code
pad of the telephone.
••Line Monitor:
••Fax header:
of pages. You can also define the positioning for the header.
•
Error correction mode:
•
TX report:
•
TX speed:
this speed.
•
Volume buzzer
Allows you to display the caller's name or telephone number. This functionality must be requested from the
If you choose Manual as Reception mode because an external phone is connected to the printer, or to the
Managed by an exchange, in turn connected to one or more public lines, that routes and connects
Tone or pulse. Select dialling mode.
Choose this setting when the printer is connected to a private exchange (PBX) that supports FLASH pulses,
.
Enables the printer speaker to transmit the telephone line tones.
The document sent contains also the sender's name and telephone number, the time, date and number
Errors caused by interference on the telephone line can be corrected.
This is only printed if transmission fails (default), never or always.
33600 bit/sec. is the default setting. The transmission speed can be reduced for phone lines not supporting
and
Volume speaker:
Can be set from 0 to 8.
* *
on the numeric
Reception (*)
•
Ring Volume:
•
Number of rings:
configured; its subsequent behaviour depends on the Reception mode (*) chosen.
•
Distinctive ring:
assigns two different ring tones that the printer is able to recognise during the installation procedure (this setup cannot
be used in France).
•
Fax/tel timer:
call as a fax. From 15 to 40 seconds can be set.
Set from 0 to 8.
The printer modem listens on the telephone line and responds only after the number of rings
Must be selected if two telephone numbers are active on the same line. The telephone exchange
For the Tel/Fax reception mode, allows you to set the length of time after which the printer receives the
(*) The RECEPTION MODE must be selected during printer installation by following the
instructions given below.
To configure reception, switch on the printer and wait until it comes online.
Press the Menu key on the fax keypad and choose the Reception mode: AUTOMATIC, MANUAL, PHONE/FAX
or ANSWERING DEVICE/FAX.
AUTOMATIC Mode (Default setting)
The printer is enabled for receiving and printing faxes. You must change this setting if an external telephone or
answering device is connected.
MANUAL Mode
The call is always received by the telephone. If, on replying, the user recognises that the call is a fax, it can be diverted to
the printer by entering the chosen code (the default code is * *) on the numeric pad of the additional phone (if Remote
has been chosen for Fax setup in the Toolbox application).
Note: If an additional telephone is connected to the printer, the Reception mode selected must be MANUAL.
Using the Printer with a Computer28

PHONE/FAX Mode
After a certain number of rings (modifiable selecting Toolbox > Settings > Fax settings > Installation > Reception),
the printer connects to the telephone line and is able to detect if the incoming call is a fax or voice call.
In the cae of a voice call, the printer’s ring tone changes (after the default number of rings), and it rings for the time
defined by Fax/tel timer (modifiable selecting Toolbox > Settings > Fax settings > Installation > Reception), to
allow the call to be answered. If the call is not answered, it is returned to the printer. In the case of a fax call, it is
received and printed.
ANSWERING DEVICE/FAX Mode
The answering device must be connected to the printer.
In this Reception mode, the number of rings preceding intervention of the answering device (see the answering device’s
manual), must be less than that (modifiable selecting Toolbox > Settings > Fax settings > Installation > Reception)
after which the incoming call is received by the printer; in this way the answering device receives the line first. Even
when the call is answered by the answering device, the printer modem is able to recognise if it is a Voice or Fax call. In
the case of a Voice call it does not intervene, otherwise it receives and prints the fax.
Note: If an answering device is connected to the printer, the Reception mode selected must be
ANSWERING DEVICE/FAX.
Service
Reserved information is provided on the fax module for use by service engineers. The list contains the hardware and
software adjustment data for the printer
Note: The data listed must not be changed. To be used exclusively by the field engineering service.
SENDING A FAX USING THE COMPUTER
A fax can be sent from the Toolbox application, either placing the originals on the scanner glass or in the automatic
document feeder, and then using the Send Fax from File function.
Sending a Fax From the Scanner Glass Using the Toolbox Application
1 From the Toolbox application, select Scan to fax.
Raise the scanner glass cover and place the document or the photo on the glass, with the side to be scanned face
down. Make sure that the upper left corner of the document or photo is aligned with the upper left corner of the
scanner glass.
2 The scanner driver interface is automatically displayed on the computer screen, and provides a low resolution
preview of the image (the number of pixels in the image are indicated below the preview). If necessary, modify the
characteristics of the previewed image to obtain the final image you desire using the special tools available (for
example, rotate image, flip image along the vertical/horizontal axes, enlarge or reduce image).
3 Open the Standard tab and select the scan settings:
•
Ty pe :
select the type of document to be scanned and select the appropriate button:
Mixed
(a combination of black text, colour graphics or photos) or
•
Colour:
(scan in full colour at 600 dpi),
4 Open the Custom tab and select the scan parameters:
•
Resolution:
The following resolution is available: 200 dpi.
Note: To send a document in fax mode, it is not necessary to use high resolutions.
•
Colour depth:
following values are available: 1-bit, 8-bit or 24-bit (B/W, grey shades, colour).
•
Adjust the
towards the right to lighten the image or towards the left to darken it. Move the contrast cursor towards the right to
increase contrast, or towards the left to reduce it.
In both cases, a central position corresponds to a medium setting.
•
Select the
uniform, for example, when scanning the pages of a newspaper.
select the colour scale of the document or the photo to be scanned and select the appropriate button:
Grey
(scan in grey shades at 300 dpi) or
select the scan resolution from the pull-down list.
from the pop-up, select the number of colours that are represented by the number of bits. The
Brightness
Descreen
and
Contrast
check box (remove background) to activate a filter for making the background of the image
of the document or the photo to be scanned. Move the brightness cursor
Photo
(colour photos only).
B/W
(scan in black and white at 150 dpi).
Te xt
(black text or graphics),
Colour
Using the Printer with a Computer 29

5 Select Scan to scan the document or photo.
6 At the end of scanning, a pop-up appears prompting you to scan other pages. Select No to end scanning or Yes
to continue, scanning other pages.
7 When scanning of the document to be sent terminates (or the pages comprising it), the screen displays:
•
the settings relative to the fax send mode, if the
Fax Office Line
printer has been set as the default printer in the
default parameters of the Toolbox application.
or
•
the possibility of choosing the fax device to which to send the scanned document.
8 Select the Fax Office Line printer and confirm with OK. Open the Fax settings tab.
9 Complete the dialogue with the fax settings, entering the details you want for the various fields. The destination fax
number is the only obligatory field which permits the fax to be sent.
The following information can be entered into the fields for sending the fax:
•
Contact's Name and Surname
•
Company
•
Fax number
•
Title.
You can also use the Windows address book to store, recall and modify contact details.
Note: If a name has been entered into the Phone book, it can be recalled selecting it from the address book.
Other options available are:
•
Fax cover page.
•
Message to be sent to contact.
•
Print faxed document.
Note: Select Default (default settings) if you wish to restore the initial Toolbox application settings.
10 Open the Quality tab:
•
Set the fax quality, choosing between:
–
Photo, Normal
–
Photo
and
•
Set the contrast level using the sliding cursor.
and
High
High
for colour mode.
for B/W mode.
11 Send the fax with the settings just entered. The document is sent to the destination fax.
Sending a Fax From the Toolbox Application Using the Automatic Document Feeder
1 From the Toolbox application, select the option Scan to fax.
Place the document (or documents) in the automatic document feeder.
Note: For more information, see "Loading Paper Onto the Automatic Sheet Feeder".
2 The scanner driver interface is automatically displayed on the computer screen, providing a low resolution preview
of the image (the number of pixels in the image are indicated below the preview).
3 Two buttons under the preview allow you to choose whether to scan all pages of the document in sequence, or one
page at a time.
Using the Printer with a Computer30

4 If you have chosen to scan the document one page at a time, select the scan settings available from:
•
Ty pe :
select the type of document to be scanned and press the appropriate button:
Mixed
(a combination of black text, colour graphics or photos) or
•
Colour:
(full-colour scan),
Resolution:
Photo
(colour photos only).
select the colour scale of the document or photo to be scanned and press the appropriate button:
Grey
(scan in grey shades) or
B/W
(scan in black and white).
from the pull-down list, select the scan resolution: When sending a document by fax, high resolutions are
Te xt
(only black text or graphics),
Colour
unnecessary.
•
Brightness
and
Contrast
: move the brightness cursor towards the right to lighten the image or towards the left to
darken it. Similarly, move the contrast cursor towards the right to increase the contrast, or towards the left to reduce it.
In both cases, a central position corresponds to a medium setting.
5 If necessary, modify the appearance of the preview to obtain the type of image desired using the various tools
provided (for example, flip the image along vertical or horizontal axes, rotate it clockwise or anti-clockwise, enlarge
or reduce it).
6 Select Scan to execute final scanning of the document.
7 At the end of scanning, a pop-up appears prompting you to scan other pages. Select No to end scanning, or Yes
to scan other pages.
If you have chosen to scan all the pages in sequence, the tools for modifying the preview are disabled, and the
pages of the document are scanned without interruption.
8 When scanning of the document (or pages comprising it) completes, the screen displays:
•
the settings relative to the fax sending mode, if the
default parameters for the
Toolbox
application.
Fax Office Line
printer has been defined as the default printer in the
or
•
the choice of fax devices to which to send the document obtained from scanning.
9 Select the Fax Office Line printer and confirm with OK; then open the Fax settings tab.
10 Complete the dialogue with the fax settings, entering the details you want for the various fields The destination fax
number is the only obligatory field required for the fax to be sent.
The following information can be entered into the fields for sending the fax:
•
Contact's Name and Surname
•
Company
•
Fax number
•
Title.
You can also use the Windows address-book to store, recall and modify contact details.
Note: If a name has been entered into the Phone book, it can be recalled selecting it from the address book.
Other options available are:
•
Fax cover page.
•
Message to be sent to contact.
•
Print faxed document.
Note: Select Default (default settings) if you wish to restore the initial Toolbox application settings.
11 Open the Quality tab:
•
Set the fax quality, choosing between:
–
Photo, Normal
–
Photo
and
•
Set the contrast level using the sliding cursor.
and
High
High
for colour mode.
for B/W mode.
12 Send the fax with the settings entered. The document is sent to the destination fax.
Using the Printer with a Computer 31

Sending a Fax from a File
1 Open the file stored on the computer using the appropriate application.
2 From the application, open the Print menu and select the Fax Office Line printer.
3 Select OK to open the Fax settings tab.
4 Complete the dialogue with the fax settings, entering the details you want for the various fields. The destination fax
number is the only obligatory field, necessary for sending the fax.
The following information can be entered into the fields for sending the fax:
•
Contact's Name and Surname
•
Company
•
Fax number
•
Title.
You can also use the Windows address book to store, recall and modify the contact's details.
Note: If a name has been entered into the Phone book, it can be recalled by selecting it from the address book.
Other options available are:
•
Fax cover page.
•
Message to be sent to contact.
•
Print faxed document.
Note: Select Default (default settings) if you wish to restore the initial Toolbox application settings.
5 Open the Quality tab:
•
Set the fax quality, choosing between:
–
Photo, Normal
–
Photo
and
•
Set the contrast level using the sliding cursor.
and
High
High
for colour mode.
for B/W mode.
6 Send the fax with the settings entered. The document is sent to the destination fax.
Using the Printer with a Computer32

4INK CARTRIDGES
CHECKING INK LEVELS
REPLACING THE INK CARTRIDGES
ALIGNING THE INK CARTRIDGES
MANAGING INK CARTRIDGES IN FAX MODE
USING THE PHOTO INK CARTRIDGE
INK CARTRIDGEs 33

CHECKING INK LEVELS
You can check the cartridge ink levels directly from the printer front panel, the printer and scanner drivers, the Toolbox
application and the Status Monitor.
From the printer front panel:
••When the black or colour indicators begin to flash, the levels in the ink cartridges
••When the indicators are on steadily, the printer is in the
cartridge is recommended.
almost out-of-ink
are getting low.
condition and replacement of the ink
From the printer driver:
11 With a document open in the application you are using, select File > Print.
The Print dialogue is displayed on the screen.
2 Select Preferences or Properties, depending on the operating system.
The printer driver user interface is displayed on the screen.
3 Select the Ink Levels tab: the two ink level indicators indicate the estimated amount of ink left in the cartridges,
expressed as a percentage.
From the Toolbox application:
11 Open the Toolbox application from the Olivetti icon in the task bar or on the desktop, or otherwise select Start >
Programs or All programs > Olivetti > Olivetti Toolbox.
The Toolbox main screen appears.
2 Select Solutions and Assistance.
3 Select Select > New ink cartridges.
In the New ink cartridges dialogue, the ink level indicators show the estimated amount of ink left in the
cartridges, expressed as percentages.
From the scanner driver:
When you scan a document or photo, the ink level indicators appear in the bottom part of the window, indicating the
estimated amount of ink left in the cartridges, as percentages.
From the Status Monitor:
When a print or copy operation is executed from the computer, the printer Status Monitor is displayed on the screen.
The window displays print information and the level of ink left in the cartridges. For more information, see "The Printer
Status Monitor”.
Information Required for Purchasing New Ink Cartridges
To guarantee the correct operation of the printer and a high print quality, use exclusively original Olivetti ink cartridges.
Use the following product order codes when purchasing ink cartridges:
•
Black ink cartridge, order code
•
Tri-colour ink cartridge, order code
•
Photo ink cartridge, order code
•
High-capacity black ink cartridge, order code
•
High-capacity, Tri-colour ink cartridge, order code
•
High-capacity, photo ink cartridge, order code
CAUTION: The cartridges can be used once only.
B0631 - IN701
B0632 - IN703
B0633 - IN705
B0628 - IN702
B0629 -
B0630 - IN706
IN
704
INK CARTRIDGEs34

REPLACING THE INK CARTRIDGES
It is recommended that you use only original ink cartridges. Print quality cannot be guaranteed, nor is there guarantee
cover for problems arising from the use of non-original accessories, parts or components.
CAUTION: Before carrying out the procedures listed in this section, read and follow carefully the information on safety
standards contained in this guide.
11 Switch on the printer.
2 With both hands raise the upper part of the printer.
The support lever automatically blocks the upper part of the printer in the open position. The carriage moves to the
centre of the printer to facilitate cartridge insertion.
3 Press the lever to remove the ink cartridge you want to replace.
CAUTION: The black (or photo) cartridge must always be inserted into the carrier on the left, the colour cartridge in the
carrier on the right.
4 If the cartridge removed is to be reused in the future place it in the storage/protection garage for black and photo
ink cartridges, located inside the printer.
5 When installing a new cartridge, remove the protection tape on the cartridge.
INK CARTRIDGEs 35

Note: This procedure illustrates how to replace a colour cartridge, however the same procedure applies for
replacing black and photo cartridges.
6 Insert the new cartridge, pressing it towards the back of the printer until it clicks into place.
7 Lift the upper part of the printer and move the support lever. Lower the upper part of the printer until it is
completely closed.
8 The printer automatically executes ink cartridge alignment, and ends printing a test page. Load an A4 sheet of
paper and wait for printing to complete
.
ALIGNING THE INK CARTRIDGES
The ink cartridges are aligned automatically by the printer whenever a new cartridge is installed. However, it is
necessary to manually align the cartridges when the printed characters are not well-defined, or when lines appear wavy.
Alignment can improve print quality even after having cleaned the ink cartridge nozzles.
Aligning the Ink Cartridges from the Toolbox Application
Open the Toolbox application from the Olivetti icon present in the task bar or by selecting Start > Programs or All
programs > Olivetti > Olivetti Toolbox. The main screen of the Toolbox application is displayed.
1 Select Solutions and Assistance > Print the Alignment Page.
2 Select Print.
3 When the alignment page is printed, the ink cartridges are aligned.
4 Select Close to return to the Toolbox application main screen.
INK CARTRIDGEs36

MANAGING INK CARTRIDGES IN FAX MODE
When the black cartridge is almost out of ink, printing in black can be achieved using the colour cartridge (black
trichromatic).
With this feature, you are able to receive a fax even if the black ink has run out. It is suggested that you replace the
black ink cartridge with minimum delay.
When you install the new black cartridge, fax printing is automatically reconfigured to print using both the cartridges
again (black and colour).
To manually set up how cartridges are managed in fax mode, use the Toolbox application from the computer (select
Toolbox > Settings > Fax settings).
USING THE PHOTO INK CARTRIDGE
The photo cartridge is used together with the colour cartridge to achieve the best results when printing photos. For
normal printing operations in B/W and in colour, you should use the colour cartridge with the black cartridge.
The printer contains a storage/protection garage where you can store the black or photo ink cartridge when it is not in
use.
To replace ink cartridges:
1 With both hands raise the upper part of the printer.
2 Remove the cartridge you want to replace.
3 Open the lid of the storage/protection garage.
4 Insert the cartridge into storage/protection garage with the nozzles pointing downwards, and the contacts facing
right.
5 Close the lid of the cartridge in the storage/protection garage by gently pressing it downward.
6 Insert the new cartridge into the printer. For more information, see "Replacing the Ink Cartridges".
7 Lift the upper part of the printer and move the support lever. Lower the upper part of the printer until it is
completely closed.
INK CARTRIDGEs 37

INK CARTRIDGEs38

5MAINTENANCE AND
TROUBLESHOOTING
CLEANING THE PRINTER
CLEANING THE INK CARTRIDGE NOZZLES
TROUBLESHOOTING
FAX ERROR MESSAGES
ERROR CODES PRINTED ON THE FAX REPORT
CLEARING PAPER JAMS
Maintenance and Troubleshooting 39

CLEANING THE PRINTER
CAUTION: Do not clean the inside of the printer and do not use stain removers, acetone-based products, liquid or
aerosol cleaners. Doing so could damage the printer case and scanner glass.
1 Clean the printer casing using a soft dry cloth, or one moistened with warm water, to wipe dust, dirt or smears off
the outer case of the printer only.
2 Clean gently the white underside of the scanner glass cover with a soft dry cloth, or one moistened with warm
water.
3 Clean the scanner glass with a soft cloth moistened with warm water or with a glass cleaning solution.
CLEANING THE INK CARTRIDGE NOZZLES
Clean the nozzles when:
•
White or colour lines appear on the printouts.
•
Colours are faded, or do not print in parts or at all.
•
Vertical lines in printout are jagged.
To clean the nozzles:
1 Make sure the printer is loaded with A4 paper. See "Loading Documents onto the Automatic Document Feeder".
2 Open the Toolbox application from the Olivetti icon in the task bar, or select Start > Programs or All programs >
Olivetti > Olivetti Toolbox. The main screen of the Toolbox application is displayed.
3 Select Solutions and Assistance.
4 Select the "Clean and test the nozzles" option
5 Select Print.
The printer automatically cleans the nozzles and prints a test page.
6 At the end, select Close to return to the Toolbox main screen.
TROUBLESHOOTING
Problems When Installing the Printer
Before reading this section:
1 Make sure the printer is properly connected to a working grounded electrical outlet compliant with the
printer’s power requirements (100 - 240 Vac, 50 - 60 Hz), and that it is switched on.
2 If the printer is connected to a computer, make sure that both the printer and the computer are switched on.
3 These operating systems are supported: Microsoft Windows 2000 (Service Pack 4 or later), XP (Service Pack 2 or
later) or Vista, also MAC OS X 10.2, OS X 10.3 or OS X 10.4.
Problem Possible Reason Corrective Action
The printer does not switch on. • The power cable is not
connected correctly to the
printer and/or to the electrical
outlet.
• The electrical outlet is not
working.
You have inserted the “Installation”
CD into the computer drive and the
installation program does not start
automatically.
• An operating system
incompatible with the CD
software may be running on the
computer.
Make sure that both ends of the
1
cable are connected correctly
2
Make sure that the grounded
electrical outlet is working.
Use the Windows CD for
1
Windows 2000/XP/Vista, or the
MAC CD for MAC
OS X 10.3 or OS X 10.4
OS X 10.2,
.
Maintenance and Troubleshooting40

Problem Possible Reason Corrective Action
The printer name is not available
selecting File > Print from an
application. The printer does not
appear in the Printer folder in the
Windows control panel.
• Automatic execution of the CD
is disabled
• The computer cannot find
setup.exe on the CD.
• The printer driver has not been
installed correctly.
• In Windows environment:
1
Remove and re-insert the
installation CD in the drive with
the label facing upwards.
2
Select
Start
>
Run
>
Browse
3
Find the identifier of the CD drive
4
and select
Select
Open
Setup
>
.
Open
. The file
setup.exe is displayed in the
dialogue.
5
Select OK and follow the
instructions displayed.
• In Macintosh environment:
Switch on the computer and insert
1
the MAC Installation CD in the
drive.
2
Select the CD icon to start the
software installation and follow the
instructions provided on the screen.
Close all open applications.
1
2
Remove the printer software
installation.
3
Reinstall the printer software as
instructed in the "Setting Up
Your Printer" guide, or as
indicated in the step above.
.
When the printer is connected to the
computer with the USB cable but
cannot be used.
When the printer is connected to a
computer with the USB cable, "New
hardware device" is not displayed on
the computer screen.
• The computer has not found
one of the printer drivers.
• The USB cable is not connected
correctly between the printer
and the computer.
1
Remove the printer software.
2
Reinstall the printer software.
3
Connect the printer to a USB port
Switch the printer off and
1
disconnect the USB cable from
both devices.
2
Reattach the USB cable to the
two devices following the
instructions in the "Setting Up
Your Printer" guide. Switch on
the printer first, followed by the
computer.
• The printer driver has not been
installed correctly.
1
Remove the printer software.
2
Reinstall the printer software.
3
Connect the printer to a USB port.
Problems Switching on the Printer
Problem Possible cause Corrective Action
The printer does not turn on when
the On/Off key is pressed on the
keyboard.
• The power cable is not properly
attached to the printer and/or to
a working electrical outlet.
• Unplug the power cable from
the printer and from the
electrical outlet and then plug it
back.
Maintenance and Troubleshooting 41

Problem Possible cause Corrective Action
• Make sure that the electrical
outlet is working by attaching
another appliance that you
know works into it, then switch
on the appliance.
Some LEDs are illuminated on the
printer front panel.
• Specific printer error indicated
by the LED.
• Proceed with the corrective
action for the corresponding
LED that is illuminated.
Printing, Copying and Scanning Problems
Problema Possible cause Corrective Action
The print command of the
application is not active.
• The printer is not set as the
default printer.
• The printer is not properly
connected to the computer.
• In Windows environment:
1
Select
Start
Printers and fax
2
Select with your right mouse
button the icon of the printer
required and select
default
.
• In Macintosh environment:
Reinstall the software provided
1
with the printer, and check the
printing settings and the spooler
of the Mac OS X system.
1
Switch off the printer and
computer, then unplug the USB
cable from these two devices.
2
Reattach the USB cable, then
switch on the printer first
followed by the computer.
>
Settings
>
.
Set as
The printing stops in the middle of a
• The paper is jammed. 1
print job.
The black and/or colour cartridge is
completely missing.
• The protective tape has not
been removed from the black
and/or colour cartridge.
Horizontal lines are printed. • The cartridge is temporarily not
working.
The printed characters are not
properly defined.
A completely white or black copy
• The cartridges are no longer
aligned.
• Faulty Contact Image Sensor. • Contact technical support.
has been printed.
Clear the paper jam. See
"Clearing Paper Jams".
2
Select
Cancel
to remove the error
condition. The print job restarts
from the next page.
• Remove the protective tape and
reinsert the cartridge.
• Clean the cartridges. See
"Cleaning the ink cartridge
Nozzles".
• Align the cartridges from the
computer. See "Aligning the Ink
Cartridges from the Toolbox
Application".
Maintenance and Troubleshooting42

FAX ERROR MESSAGES
The printer display normally indicates the date and time and informs the user on the current fax activities. Messages that
appear do not obstruct normal operation of the printer and can be displayed until the next time the fax module is used.
To clear the message displayed, press the Cancel ("C") key on the printer keyboard.
Messages During Transmission
Message Description
TX INTERRUPTED • The user has interrupted the transmission in course by pressing the Cancel key.
TX NOT POSSIBLE • The scanner is already busy with other operations, for example, from the computer.
Wait until the operations in course on the printer complete before scanning the new
document to be sent by fax.
TX MEMORY FULL • The memory available on the fax is full because too many documents have been
scanned, and it is not possible to store other documents. Send the documents
present in memory by fax, or delete them.
TX ERROR • This is displayed at the end of a failed fax transmission. Try to send another
document by fax.
Messages During Reception
Message Description
RX INTERRUPTED • The user has interrupted the reception in course by pressing the Cancel key.
RX ERROR • This is displayed at the end of a failed fax reception. Try receiving another document
by fax.
MEMORY FULL • The memory available on the fax is full because many documents have been
received. If this type of error occurs, a generic error code appears on the fax report.
Print the documents received which are in memory, or delete them if unwanted.
General Messages
Message Description
EMPTY • No data is present in the fax memory. This is displayed when, for example, you
try to print inexistent fax reports, or when you access the phone book but no
information is found stored in it.
ILLEGAL SETTING • Error setting the date and time. Repeat data entry making sure to enter valid
values.
FAX NOT WORKING • Warning displayed during the diagnostics phase at printer start-up. Indicates
that the fax module is malfunctioning. When this message appears, switch the
printer off and on again. If the problem persists, call technical support.
PRINTER ERROR • Generic error in printer module. One possible reason may be that the ink is
exhausted in one of the cartridges installed, paper is missing in the feeder, a
paper jam etc.).
For more information, check the LEDs on the printer front panel or, if connected
to a computer, use the Status Monitor to search for any error messages.
Maintenance and Troubleshooting 43

ERROR CODES PRINTED ON THE FAX REPORT
Error codes are automatically printed on the fax transmission and activity reports.
Transmission Report Error Codes
The error codes printed on the fax transmission report consist of 2-digits indicating the reason for the error, and a brief
description to help understanding.
Code Message Description Action Required
00 OK No error. No action required. The fax has
been sent correctly.
03 RECEIVER DOES NOT
ANSWER
04 ERR. WHILE
TRANSMITTING
RESEND FROM PAGE nn
06 LINE BUSY The line is busy. Retry when the line is free.
09 STOP PRESSED Transmission has been interrupted No action.
14 ERR. WHILE
TRANSMITTING
15 RETRY B/W You are trying to send a colour
The recipient is not replying to the
call or is not a fax.
An anomaly has been detected
during transmission.
"nn" indicates the number of the
page where the error occurred.
During fax transmission an error
has occurred, or the recipient has
interrupted fax reception.
document but the recipient is not
able to receive it
Make sure that the recipient’s
number is correct.
Repeat the transmission starting
from the page indicated on the
report.
Try to resend the fax or make sure
that the recipient consents to
receiving the fax.
Resend the fax selecting black and
white mode (B/W).
Activity Report Error Codes
The error codes printed on the fax activity report include both the transmission error codes described above, and the
reception error codes listed below.
The error codes are represented by 2-digits that indicate the reason for the error. For reasons of space, the fax report
gives only the 2-digit code without any description.
Code Message Description Action Required
10
11
RX ERROR
MEMORY FULL
An error occurred during fax
reception, or the sender interrupted
fax transmission.
The memory available on the fax is
full because many documents have
been received.
Ask sender to resend fax.
Print the documents received and present
in the memory, or delete them, if they are
not wanted.
Maintenance and Troubleshooting44

CLEARING PAPER JAMS
1 Take firm hold of the jammed paper and pull it out gently from the place where it is jammed. If the paper tears,
make sure you remove all the torn pieces from the printer.
2 To cancel an error condition occurring during a print or copy operation, press the corresponding button
illuminated on the keyboard to restart printing from the next page. If an error occurs during fax reception, press the
Cancel ("C") key to restart printing from the page that caused the error.
Maintenance and Troubleshooting 45

Maintenance and Troubleshooting46

6TECHNICAL SPECIFICATIONS
GENERAL SPECIFICATIONS
PRINTER SPECIFICATIONS
COPIER SPECIFICATIONS
SCANNER SPECIFICATIONS
FAX SYSTEM SPECIFICATIONS
PAPER SPECIFICATIONS
Technical Specifications 47

GENERAL SPECIFICATIONS
General Specifications
Keyboard • Display consisting of two lines of 16 characters each.
• Fax keypad with 10 numeric dialling keys, * key and
# key.
• Four keys for fax functions: Phone book, Fax quality,
Start colour fax or Start B/W fax.
• Menu, Navigator and Confirm keys to configure and
modify fax settings, use the Phone book and print
reports.
• Four key functions: Start printing, Start B/W copy,
Start colour copy, Start scanning with computer.
• One key for selecting print and copy quality.
• 2-digit display showing the number of copies set
using the +/- keys.
• Cancel key to terminate the operations under way,
and clear any error conditions.
• On/Off key.
LEDs • One green colour LED that indicates USB
connection.
• Four LEDs that indicate errors related to paper,
colour cartridges, black cartridges and photo
cartridges.
• One LED to indicate that the memory contains a
received fax to be printed, or a fax transmission or
reception error.
2
Automatic sheet feeder • Can contain approx. 100 sheets of A4 80 g/m
paper.
• Approx. 10 envelopes, 30 postcards, 20 adhesive
sheets.
• 20 transparencies, 20 pages of photo paper.
2
Automatic document feeder • Can contain approx. 35 sheets of A4 80 g/m
paper.
• Paper sizes: A4, Legal, Letter, A5.
Memory size • Read Only Memory (ROM): from 2 MB.
• Random Access Memory (RAM): from 32 MB.
Dimensions and weight • Height: 24 cm
• Width: 44 cm
• Depth: 35 cm
• Weight: 8.5 kg
Power supply unit Autoranging external universal power supply unit, model
CWT PAA060P.
Input voltage 100 - 240 Vca, 50-60 Hz, 1.7 A max. grounded.
Output voltage 30 Vdc, 2 A.
Connectivity • High-speed USB 2.0 on the rear of the printer for
connecting a personal computer.
• PictBridge-compliant USB 1.1 on front panel for
connecting a digital camera.
Temperature ranges • Operating: 15 °C to 35 °C
• Storage: -5 °C to +45 °C
• Transportation: -15 °C to +55 °C
Technical Specifications48

General Specifications
Humidity ranges • Operating: 15% to 85%, non-condensing.
• Storage: 15% to 85%, non-condensing.
• Transportation: 5% to 95%, non-condensing.
Software and documentation • Printer and scanner driver (WIN/MAC).
• Toolbox Application program (WIN/MAC).
• User documentation (WIN/MAC).
• Additional software (WIN).
Minimum requirements for computer connected Operating system: Microsoft Windows 2000 (Service
Pack 3 or later), XP (Service Pack 2 or later), Vista or
MAC OS X 10.2, 10.3,OS X 10.4
RAM:
• 256 MB for Windows 2000/XP
(recommended 512 MB).
• 512 MB for Vista (recommended 1 GB)
Free hard disk space: 500 MB.
PRINTER SPECIFICATIONS
Printer Specifications
Printing technology Bubble ink-jet.
Printing system With the following ink cartridges:
• Tri-colour (cyan, magenta, yellow)
•Black
• Tri-colour photo.
For printing photos, replace the black cartridge with the
photo cartridge (sold separately).
Print resolution • Up to 4800 dpi optimised.
Margins Borderless on all types of special ink-jet paper.
Direct printing mode Available from:
• Photo Index.
• PictBridge/DPOF-compatible devices.
• Compatible devices (USB pen or drive).
Technical Specifications 49

COPIER SPECIFICATIONS
Copier Specifications
Resolution • Max. 1200 x 1200 dpi
Copy mode • In stand-alone mode
– 100%, fit to page.
– Paper type/speed: plain and photo paper.
– Contrast adjustment: light, normal, dark.
• From the Toolbox application:
– Reduction/enlargement from 25% to 400%,
clone mode, poster mode (only if document is
placed on scanner glass).
Maximum number of copies • Up to 99.
SCANNER SPECIFICATIONS
Scanner Specifications
Type Flatbed, CIS (Contact Image Sensor).
Optical Resolution • Up to 1200 x 1200 dpi
• Interpolation: up to 9600 dpi
Max. scan area 215 mm (width) x 297 mm (length).
Compatibility • Twain and WIA supported.
Functionality • Scan to file
• Scan to email
• Scan to application
• Scan to fax.
FAX SYSTEM SPECIFICATIONS
Fax Specifications
Send fax • The fax functions can be accessed from both the
keyboard and the computer.
• Send a colour or B/W fax.
• Compatibility with the G3-ITU T30 E standard.
• Speed 33.6 Kb/sec with auto fall back.
• Coding method for files in formats:
MH, MR, MMR and JPG.
• RX Mode:
Automatic, Manual, Answering device/Fax,
Phone/Fax.
Call • In automatic or manual.
Transmission mode without using a computer • Manually from the scanner, with automatic sheet
loading using the automatic document feeder.
• Activity and confirmation reports.
• Fax CCITT/ITU Group 3 with error correction mode.
Technical Specifications50

Fax Specifications
Liquid Crystal Display (LCD) • Display consisting of two lines of 16 characters each.
Functions available • Print fax activity reports.
• Print reports in the case of power failures.
Fax memory capacity • Over 150 pages (Slerexe letter)
• 15 colour pages
Telephone functions • Automatic reception, manual reception, phone/fax,
Answering device/fax.
• Acoustic signal possible in the case of telephone call
for phone/fax reception mode.
Connection to a computer • Transmission from the computer
• Set up from Toolbox application
• Phone book entry.
Additional functions • Report printing:
TX transmission activity and power failure.
• Print settings from Toolbox application, or from the
printer keyboard in stand-alone mode.
• On/Off key disabled if documents are present in
memory.
• Phone book for 100 contacts, and search function.
• Automatic function for using black trichromic
printing when less than 5% of the ink is left in the
cartridge.
Technical Specifications 51

PAPER SPECIFICATIONS
Paper Types Supported
Paper Type Paper Weight
A4 Plain paper From 70 to 80 g/m
A4 Plain paper From 80 to 90 g/m
2
2
A4 Coated paper From 100 to 170 g/m
A4 Transparency (with white stripe
170 g/m
2
or protective sheet)
A4 Photo paper From 160 to 280 g/m
A4 Glossy paper From 160 to 180 g/m
A4 Iron-on transfer paper From 150 to 180 g/m
A4 ink-jet labels From 80 to 110 g/m
A4 Banner paper From 80 to 90 g/m
2
10x15 cm Note Cards From 130 to 280 g/m
10x15 cm and 13x18 cm Photo
From 170 to 280 g/m
paper
Envelopes From 75 to 100 g/m
Maximum Feeder Capacity
100 sheets
Over 50 sheets
2
50 sheets
20 sheets (manual feeding is
recommended).
2
2
2
2
20 sheets
20 sheets
5 sheets
20 sheets (manual feeding is
recommended).
20 sheets for banners, manual
feeding
2
2
2
20 cards
20 sheets
10 envelopes (manual feeding is
recommended).
Note: The maximum thickness for A4 size paper is 250 g/m2.
Technical Specifications52

Paper Formats and Sizes Supported
Format Size
A4 8.27 x 11.7 in. (210 x 297 mm)
A5 5.85 x 8.27 in. (148.5 x 210 mm)
US Letter 8.5 x 11 in. (216 x 279 mm)
US Legal 8.5 x 14 in. (216 x 356 mm)
US Executive 7.25 x 10.5 in. (184 x 267 mm)
US Folio 8.5 x 13 in. (215.9 x 330.2 mm)
US Statement 5.5 x 8.5 in. (139.7 x 215.9 mm)
B5 7.2 x 10.1 in. (182 x 256 mm)
4x6" cards 4 x 6 in. (102 x 152 mm)
5x8" cards 5 x 8 in. (127 x 203 mm)
A6 4.135 x 5.85 in. (105 x 148.5 mm)
13 x 18 cards 5.12 x 7.09 in. (130 x 180 mm)
Index cards 3 x 5 in. (76.2 x 127 mm)
Hagaki card 3.9 x 5.8 in. (100 x 148 mm)
L 3.5 x 5 in. (89 x 127 mm)
2L 5 x 7 in. (127 x 177.8 mm)
US # 10 4.12 x 8.85 in. (105 x 225 mm)
C5 envelope 6.38 x 9.0 in. (162 x 229 mm)
DL envelope 4.33 x 8.66 in. (110 x 220 mm)
C6 envelope 4.46 x 6.37 in. (114 x 162 mm)
B6 4.92 x 6.93 in. (125 x 176 mm)
B5 envelope 6.93 x 9.84 in. (176 x 250 mm)
Monarch 3.875 x 7.50 in. (98.43 x 190 mm)
Chokei 3 envelope 4.72 x 9.25 in. (120 x 235 mm)
Chokei 4 envelope 3.54 x 8.0 in. (90 x 205 mm)
Chokei 40 envelope 3.54 x 8.8 in. (90 x 225 mm)
Karugata 3 envelope 8.5 x 11 in. (216 x 277 mm)
Karugata 4 envelope 7.75 x 10.5 in. (197 x 267 mm)
Karugata 5 envelope 7.47 x 9.44 in. (190 x 240 mm)
Banner (A4) 8.27 x 223.8 in. (210 x 5938 mm)
Note: All the sizes listed above are automatically detected by the printer. Sheets of other formats can be used by
entering their sizes in the appropriate print and copy driver dialogues (customised print format).
Technical Specifications 53

Technical Specifications54

Code: 535315 gb
 Loading...