


Ref: 535238
LINEA
Realizzato/Pubblicato/Prodotto da:
Edited/Published/Produced by:
Herausgegeben/Erschienenen/Erzeugt:
Edité/Publié/Produit par:
Realizado/Publicado/Producto:
Realizado/Publicado/Fabricado por:
Samengesteld/Uitgegeven/Geproduceerd door:
Olivetti S.p.A.
Gruppo Telecom Italia
Via Jervis, 77 - 10015 Ivrea (TO)
Italy
www.olivetti.com
2007
Printed in China
Code: 535238
Date of publication: June 2007
I requisiti qualitativi di questo prodotto
sono attestati dall’apposizione della
marcatura sul prodotto.
Die Qualitätsanforderungen dieses Produkts
werden durch die -Kennzeichnung
bescheinigt, die am Produkt angebracht ist.
Les qualités requises pour ce produit sont
garanties par le label appliqué sur le
produit même.
Information
Los requisitos de calidad de este producto
son atestiguados mediante la aplicación de
la Marca en il producto.
A marca afixada ao produto certifica que
o produto satisfaz os requisitos básicos
de qualidade.
Het CE-merk dat op dit product is
aangebracht getuigt ervan dat het product
aan de kwaliteitseisen voldoet.
Trademarks: Microsoft and Windows are registered trademarks
of Microsoft Corporation.
Other trademarks and trade names may be used in this document
to refer to either the entities claiming the marks and names or
their products. Olivetti disclaims any proprietary interest in
trademarks and trade names other than its own.

INDICE
PER INIZIARE . . . . . . . . . . . . . . . . . . . . . . . . . . . . . . . . . . . . . . . . .2
Generalità . . . . . . . . . . . . . . . . . . . . . . . . . . . . . . . . . . . . . . . .2
Istruzioni inerenti la sicurezza . . . . . . . . . . . . . . . . . . . . . . . . . .2
Informazioni inerenti la qualità di stampa e la garanzia . . . . . . .3
Accensione e spegnimento della stampante . . . . . . . . . . . . . . .3
Modalità Economy della stampante . . . . . . . . . . . . . . . . . .3
Tastiera della stampante . . . . . . . . . . . . . . . . . . . . . . . . . . . . . .3
Funzione dei tasti . . . . . . . . . . . . . . . . . . . . . . . . . . . . . . . .4
Indicatori luminosi del pannello frontale della stampante . . . . .6
Collegamento alla stampante di una macchina
fotografica digitale . . . . . . . . . . . . . . . . . . . . . . . . . . . . . . . .6
Collegamento della stampante alla rete telefonica . . . . . . . . . .7
Collegamento alla rete telefonica e di una
apparecchiatura telefonica esterna . . . . . . . . . . . . . . . . . . .7
Collegamento caso 1 (Italia e Svizzera) . . . . . . . . . . . . . . . .8
Collegamento caso 2 . . . . . . . . . . . . . . . . . . . . . . . . . . . . .9
Collegamento caso 3 . . . . . . . . . . . . . . . . . . . . . . . . . . . .10
Installazione del fax . . . . . . . . . . . . . . . . . . . . . . . . . . . . . . . .10
Procedura d’installazione . . . . . . . . . . . . . . . . . . . . . . . . .11
Impostazione data e ora del fax . . . . . . . . . . . . . . . . . . . . . . . .12
UTILIZZO DELLA STAMPANTE SENZA UN COMPUTER . . . . . . .12
Copia di un documento . . . . . . . . . . . . . . . . . . . . . . . . . . . . .12
Stampa di foto da una macchina fotografica digitale . . . . . . .13
Stampa di foto da una macchina fotografica digitale
PictBridge . . . . . . . . . . . . . . . . . . . . . . . . . . . . . . . . . . . . . .13
Stampa di foto da una macchina fotografica digitale DPOF . . .14
LE CARTUCCE . . . . . . . . . . . . . . . . . . . . . . . . . . . . . . . . . . . . . . .14
Verifica dei livelli d’inchiostro . . . . . . . . . . . . . . . . . . . . . . . . .14
Informazioni necessarie per l’acquisto di nuove cartucce . . . . .15
Sostituzione delle cartucce . . . . . . . . . . . . . . . . . . . . . . . . . . .15
INDICE
iii

UTILIZZO DELLA STAMPANTE DA UN COMPUTER . . . . . . . . . .18
Prima di iniziare . . . . . . . . . . . . . . . . . . . . . . . . . . . . . . . . . . .18
Il Monitor di stato della stampante . . . . . . . . . . . . . . . . . . . . .18
Il Toolbox . . . . . . . . . . . . . . . . . . . . . . . . . . . . . . . . . . . . . . . .19
Stampa, copia e scansione mediante il Toolbox . . . . . . . . . . . .20
Stampa da un applicativo . . . . . . . . . . . . . . . . . . . . . . . . . . . .22
Acquisizione di un documento da un applicativo . . . . . . . . . .23
Impostazioni fax dall’applicativo Toolbox . . . . . . . . . . . . . . . .24
Impostazioni fax . . . . . . . . . . . . . . . . . . . . . . . . . . . . . . .24
Installazione . . . . . . . . . . . . . . . . . . . . . . . . . . . . . . . . . . .24
Assistenza . . . . . . . . . . . . . . . . . . . . . . . . . . . . . . . . . . . .26
UTILIZZO DEL FAX . . . . . . . . . . . . . . . . . . . . . . . . . . . . . . . . . . .27
Impostazione della stampante per la ricezione di fax . . . . . . . .27
Impostazione della Modalità di ricezione . . . . . . . . . . . . .27
Invio di un fax . . . . . . . . . . . . . . . . . . . . . . . . . . . . . . . . . . . .28
Invio di un fax dalla tastiera . . . . . . . . . . . . . . . . . . . . . . .28
Invio di un fax utilizzando l’alimentatore
automatico di documenti . . . . . . . . . . . . . . . . . . . . . . . . .28
Stampa dei rapporti del fax . . . . . . . . . . . . . . . . . . . . . . . . . .29
Rapporto del fax in caso di interruzione di
corrente elettrica . . . . . . . . . . . . . . . . . . . . . . . . . . . . . . .29
MESSAGGI DEL FAX . . . . . . . . . . . . . . . . . . . . . . . . . . . . . . . . . .29
Messaggi in fase di trasmissione . . . . . . . . . . . . . . . . . . . . . . .29
Messaggi in fase di ricezione . . . . . . . . . . . . . . . . . . . . . . . . .30
Messaggi generici . . . . . . . . . . . . . . . . . . . . . . . . . . . . . . . . . .30
Codici di errore stampati sul rapporto del Fax . . . . . . . . . . . . .31
Codici di errore sul rapporto di trasmissione . . . . . . . . . . .31
Codici di errore sul rapporto di attività . . . . . . . . . . . . . . .31
INDICE ANALITICO. . . . . . . . . . . . . . . . . . . . . . . . . . . . . . . . . . . .33
INDICE
iv

DIRETTIVA 2002/96/CE SUL TRATTAMENTO, RACCOLTA, RICICLAGGIO E SMALTIMENTO
DI APPARECCHIATURE ELETTRICHE ED ELETTRONICHE E LORO COMPONENTI
INFORMAZIONI
1. PER I PAESI DELL'UNIONE EUROPEA (UE)
È vietato smaltire qualsiasi apparecchiatura elettrica ed elettronica come rifiuto solido urbano: è
obbligatorio effettuare una sua raccolta separata. L'abbandono di tali apparecchiature in luoghi non
specificatamente predisposti ed autorizzati, può avere effetti pericolosi sull'ambiente e sulla salute. I
trasgressori sono soggetti alle sanzioni ed ai provvedimenti a norma di Legge.
Per smaltire correttamente le nostre apparecchiature potete:
a Rivolgervi alle Autorità Locali che vi forniranno indicazioni e informazioni pratiche sulla corretta
gestione dei rifiuti, ad esempio: luogo e orario delle stazioni di conferimento, ecc.
b All'acquisto di una nostra nuova apparecchiatura, riconsegnare al nostro Rivenditore
un'apparecchiatura usata, analoga a quella acquistata.
Il simbolo del contenitore barrato, riportato sull'apparecchiatura, significa che:
• L'apparecchiatura, quando sarà giunta a fine vita, deve essere portata in centri di
raccolta attrezzati e deve essere trattata separatamente dai rifiuti urbani;
• Olivetti garantisce l'attivazione delle procedure in materia di trattamento,
raccolta, riciclaggio e smaltimento della apparecchiatura in conformità alla
Direttiva 2002/96/CE (e succ. mod.).
2. PER GLI ALTRI PAESI (NON UE)
Il trattamento, la raccolta, il riciclaggio e lo smaltimento di apparecchiature elettriche ed elettroniche
dovrà essere effettuato in conformità alle Leggi in vigore in ciascun Paese.
INDICE
v

Tutte le informazioni qui contenute sono soggette a modifiche senza preavviso. Olivetti S.p.a. non è responsabile per
perdite o danni, diretti o indiretti, derivanti da o connessi all'uso di questo manuale di istruzioni.
MIPC (Mobile Imaging and Printing Consortium)
Il MIPC è un’associazione di settore senza scopo di lucro fondata nel 2004 da Aziende leader nei settori della stampa
fotografica consumer e dei telefoni cellulari. La sua missione è di promuovere e supportare lo sviluppo di linee guida
che definiscano l’inter-operabilità e la stampa di immagini ed altri contenuti, tra Telefoni Cellulari e Stampanti. Queste
linee guida sono promosse internazionalmente per garantire agli utenti di telefoni cellulari un ampio spettro di prodotti
e servizi. http://www.mobileprinting.org
LINEA office: Questo prodotto “Mobile Printing Ready” è stato concepito per facilitare la stampa di immagini da
telefono cellulare. Il prodotto supporta infatti le specifiche del “Mobile Image Printing Consortium” (MIPC) –
“Implementation Guidelines for Home Printing with Mobile Terminals versione 2.1”, per: PictBridge.
INDICE
vi

GUIDA RAPIDA
PER INIZIARE
UTILIZZO DELLA STAMPANTE SENZA UN COMPUTER
LE CARTUCCE
UTILIZZO DELLA STAMPANTE DA UN COMPUTER
UTILIZZO DEL FAX
MESSAGGI DEL FAX
GUIDA RAPIDA 1

PER INIZIARE
GENERALITÀ
Questo prodotto multifunzione svolge le funzioni di stampante a getto d’inchiostro ad alta qualità, scanner a
colori, copiatrice e fax. La gestione di documenti composti da più pagine in copia e fax è semplificata
dall’alimentatore automatico di documenti.
Per le normali operazioni di stampa e copia si può utilizzare la cartuccia nera e la cartuccia a colori.
Per stampare fotografie si consiglia di sostituire la cartuccia nera con quella fotografica (venduta separatamente).
Le cartucce sono disponibili anche in versione ad Alta Capacità.
La stampante può essere utilizzata anche senza computer per inviare documenti via fax, per copiare e per
stampare fotografie semplicemente collegando una macchina fotografica digitale all'interfaccia USB del pannello
frontale.
In dotazione con la stampante sono forniti i CD di installazione che contengono il software per l’utilizzo con il
computer e comprendono anche l’applicativo Toolbox che consente un accesso facilitato a tutte le funzioni
disponibili.
L’altro CD fornito con la stampante contiene il software per l’elaborazione dei testi e delle immagini.
Le informazioni complete si trovano anche in formato elettronico selezionando Start > Programmi o Tutti i
programmi > Olivetti e si possono sfogliare o stampare.
È anche disponibile un Help Online richiamabile con il tasto Help in ogni videata del software.
Nota: Requisiti minimi di sistema per il PC collegato.
Sistema operativo: Microsoft Windows 2000 (con Service Pack 3 o successivi) o XP (con Service Pack 2 o successivi)
o Vista, oppure MAC OSX 10.2, OSX 10.3, OSX 10.4
RAM: 256 MB per Windows 200/XP (si consiglia 512 MB di memoria)
RAM: 512 MB per Windows Vista (si consiglia 1 Gb di memoria)
Spazio disponibile sull’hard disk: 500 MB.
ISTRUZIONI INERENTI LA SICUREZZA
Leggere e seguire scrupolosamente le seguenti informazioni ai fini della sicurezza:
• Utilizzare esclusivamente l’alimentatore CWT model PAA060P ed il cavo di alimentazione forniti insieme al
prodotto. Se si utilizzano alimentatori diversi da quello fornito nell'imballo, sarà responsabilità dell'utente
garantire la conformità con le norme di sicurezza e con le corrette alimentazioni richieste dal prodotto stesso.
• Collegare il cavo di alimentazione ad una presa elettrica con messa a terra in prossimità del prodotto e facilmente
accessibile.
• Installare la stampante su una superficie piana e stabile, in una collocazione tale che non sia possibile calpestare il
cavo di alimentazione o inciamparvi.
Non utilizzare la stampante in ambienti umidi o con le mani bagnate. Non esporre la stampante a pioggia o umidità.
•
• Non cercare di smontare la stampante.
• Rispettare tutte le avvertenze e le istruzioni riportate direttamente sulla stampante.
• Leggere e seguire attentamente la documentazione fornita in dotazione con la stampante.
• Lo scanner è considerato emettitore di radiazioni laser di Classe 1M: non osservare direttamente con strumenti
ottici (lenti d'ingrandimento).
GUIDA RAPIDA2
INFORMAZIONI INERENTI LA QUALITÀ DI STAMPA E LA GARANZIA
Al fine di garantire il corretto funzionamento della stampante e un’elevata qualità di stampa, è fondamentale
utilizzare esclusivamente cartucce Olivetti originali.
Olivetti declina qualsiasi responsabilità per danni alla stampante causati dalla manomissione o dalla rigenerazione
delle cartucce. Inoltre, tali azioni fanno decadere la garanzia.
ACCENSIONE E SPEGNIMENTO DELLA STAMPANTE
Premere il tasto On/Off. Quando la tastiera è chiusa, due indicatori luminosi segnalano che la stampante è accesa
e se si sono manifestati degli errori di funzionamento.
Riferimento Indicatore Descrizione
1
LED di On/Off Si illumina di colore verde per indicare che la stampante è accesa.
2 LED di errore Si illumina di colore arancione per segnalare gli errori evidenziati dai
LED presenti sul pannello frontale della stampante.
Modalità Economy della stampante
Dopo un intervallo di tempo, modificabile dal Toolbox, la stampante si predispone in uno stato di risparmio
energetico: la tastiera è spenta. La stampante si riattiva al ricevimento di qualunque segnale dal computer o dalla
tastiera.
Nota: è sconsigliato lo spegnimento della stampante perché provoca la cancellazione della data e l’ora.
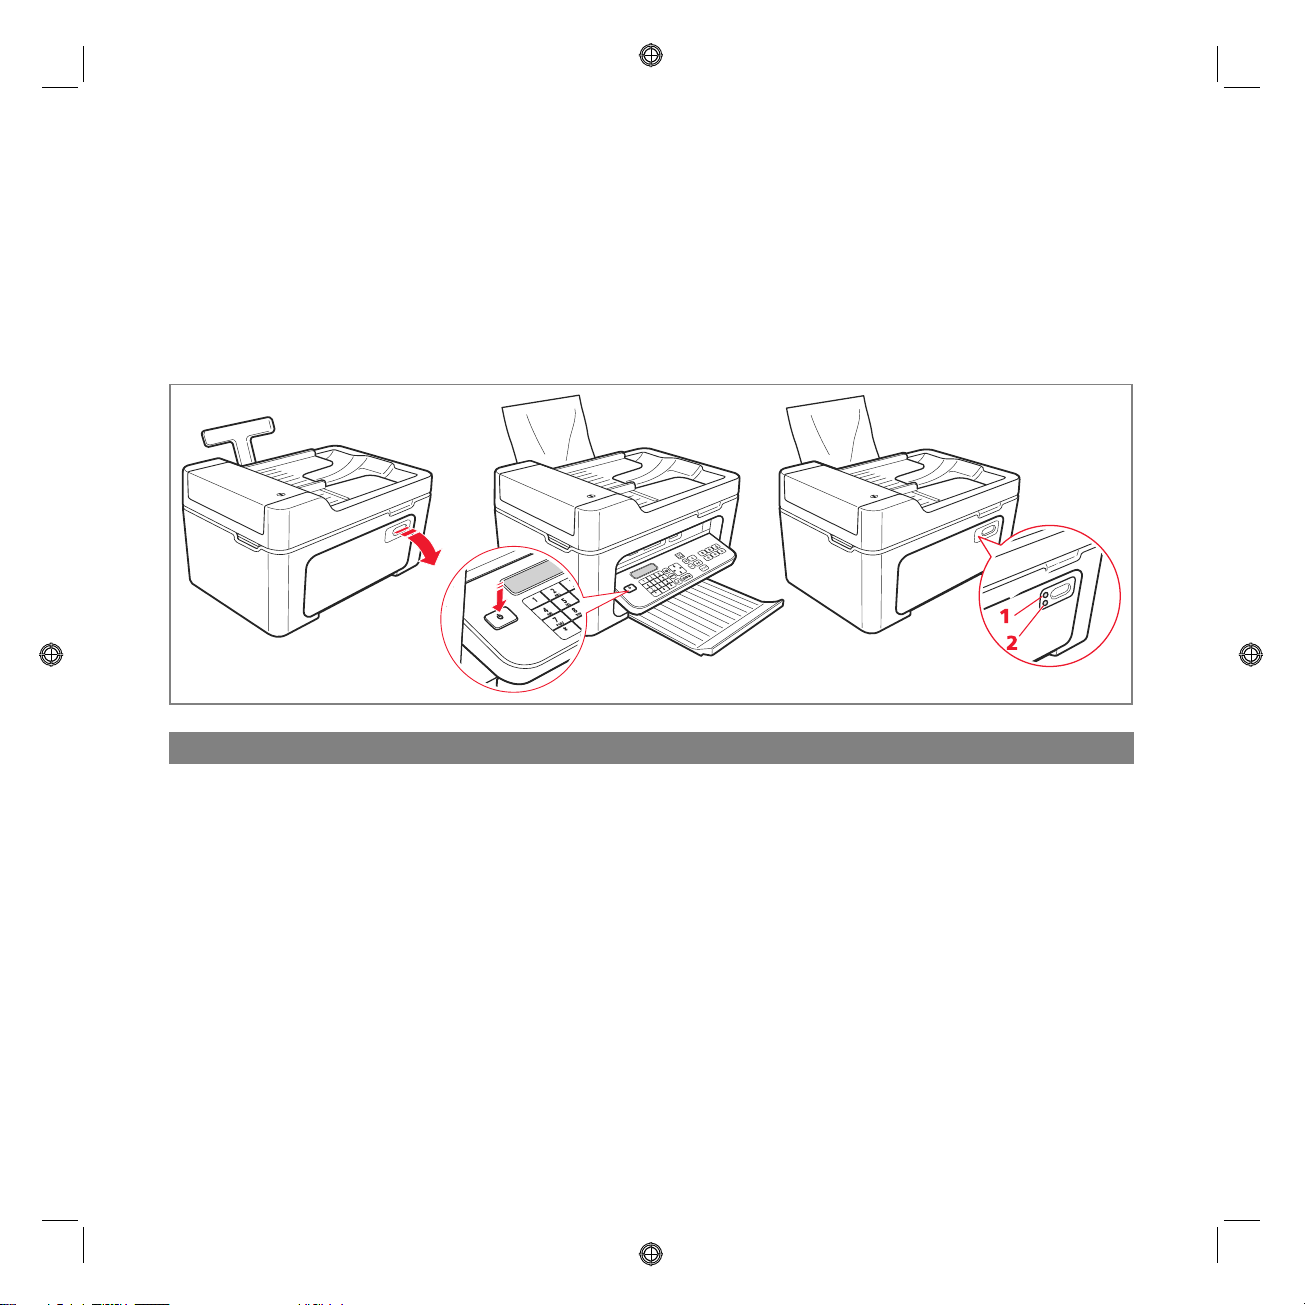
TASTIERA DELLA STAMPANTE
La tastiera comprende i tasti di selezione e avvio per tutte le funzioni disponibili: copia, fax, stampa da macchina
fotografica digitale o da supporto di memoria collegato alla stampante. Per le normali condizioni di utilizzo la
tastiera deve essere aperta. Per aprire la tastiera, premere sulla zona lucida in alto a destra dello sportello.
GUIDA RAPIDA 3
Funzione dei tasti
Riferimento Parte Descrizione
1
Tasto On/Off Consente di accendere e spegnere la stampante.
Se la memoria contiene un fax ricevuto che non è stato stampato (luce
gialla accesa), non è possibile spegnere la stampante.
Nota: lo spegnimento della stampante comporta la perdita delle
impostazioni di data e ora, quindi si consiglia di NON effettuare questa
operazione che è stata sostituita dalla modalità automatica di risparmio di
energia. Se si vuole comunque spegnere la stampante, premere il tasto
On/Off per 5 secondi.
2 Display Fornisce indicazioni sullo stato del fax e visualizza il menu e l’agenda.
3 Ta st ie ra
alfanumerica
Consente di comporre il numero telefonico o di inserire l’iniziale del nome
che si desidera trovare in agenda.
4 Tasto * Permette di eseguire funzioni speciali fornite dal gestore telefonico. Viene
utilizzato anche per passare da “Selezione Decadica” a “Selezione Toni”.
5 Tasto # Consente di eseguire funzioni speciali fornite dal gestore telefonico.
6 Agenda Il primo numero visualizzato è l’ultimo chiamato. La ricerca dei nomi può
essere effettuata utilizzando il Navigatore o inserendo l’iniziale del nome
che si vuole richiamare.
La compilazione dell’agenda è possibile solo dal computer.
7 Menu Consente di accedere alle funzioni fax.
Si scorre con il Navigatore, si conferma la selezione con il tasto Conferma
e si cancella, durante l’inserimento, con il tasto Cancella.
8 Conferma Seleziona e conferma le voci visualizzate sul display.
GUIDA RAPIDA4

Riferimento Parte Descrizione
9 Navigatore Permette di spostarsi tra le voci di menu visualizzate sul display e di
sfogliare l’agenda.
10 Qualità fax Modifica la risoluzione da inviare via fax.
11 Contatore copie Visualizza il numero di copie selezionate.
Il numero visualizzato decresce con le copie stampate.
12 Selezione numero
di copie
Consente la selezione del numero di copie da effettuare con i tasti più (+) e
meno (-). Il numero selezionato è visualizzato dal contatore copie.
13 Cancella Consente di annullare immediatamente una stampa, una scansione o una
copia in corso. Riporta le impostazioni a quelle di fabbrica.
14 Selezione Qualità
di stampa
Consente di selezionare la qualità di stampa e di copia.
È consigliata la scelta della modalità foto se l’originale da copiare è
un’immagine oppure se si stampa su carta speciale per ink-jet.
15 Contrasto di copia Consente di schiarire o scurire la copia.
16 Avvio copia B/N Avvia le copie in B/N. Premere e tenere premuto per attivare la
funzionalità "Adatta alla pagina ". Questa funzionalità non è attiva per
i documenti inseriti nell'alimentatore automatico.
17 Avvio copia a colori Avvia le copie a colori. Premere e tenere premuto per attivare la
funzionalità "Adatta alla pagina". Questa funzionalità non è attiva per i
documenti inseriti nell’alimentatore automatico.
18 Avvio scansione È attivo quando la stampante è collegata ad un computer.
Premere questo tasto per eseguire la scansione del documento posizionato
sul piano dello scanner o nell'alimentatore automatico di documenti.
Sul computer sarà visualizzata una finestra dell’applicativo Toolbox che
consente di acquisire l’immagine direttamente nell’applicativo desiderato e
di personalizzare le impostazioni di scansione.
19 Avvio fax in
Avvia la ricezione o la trasmissione di un fax in bianco e nero.
bianco e nero
20 Avvio fax a colori Avvia la ricezione o la trasmissione di un fax a colori.
21 Avvio stampa È disponibile quando una macchina fotografica digitale o una memoria
esterna compatibile è connessa alla stampante.
Questo tasto lampeggia per indicare una stampa in corso.
GUIDA RAPIDA 5
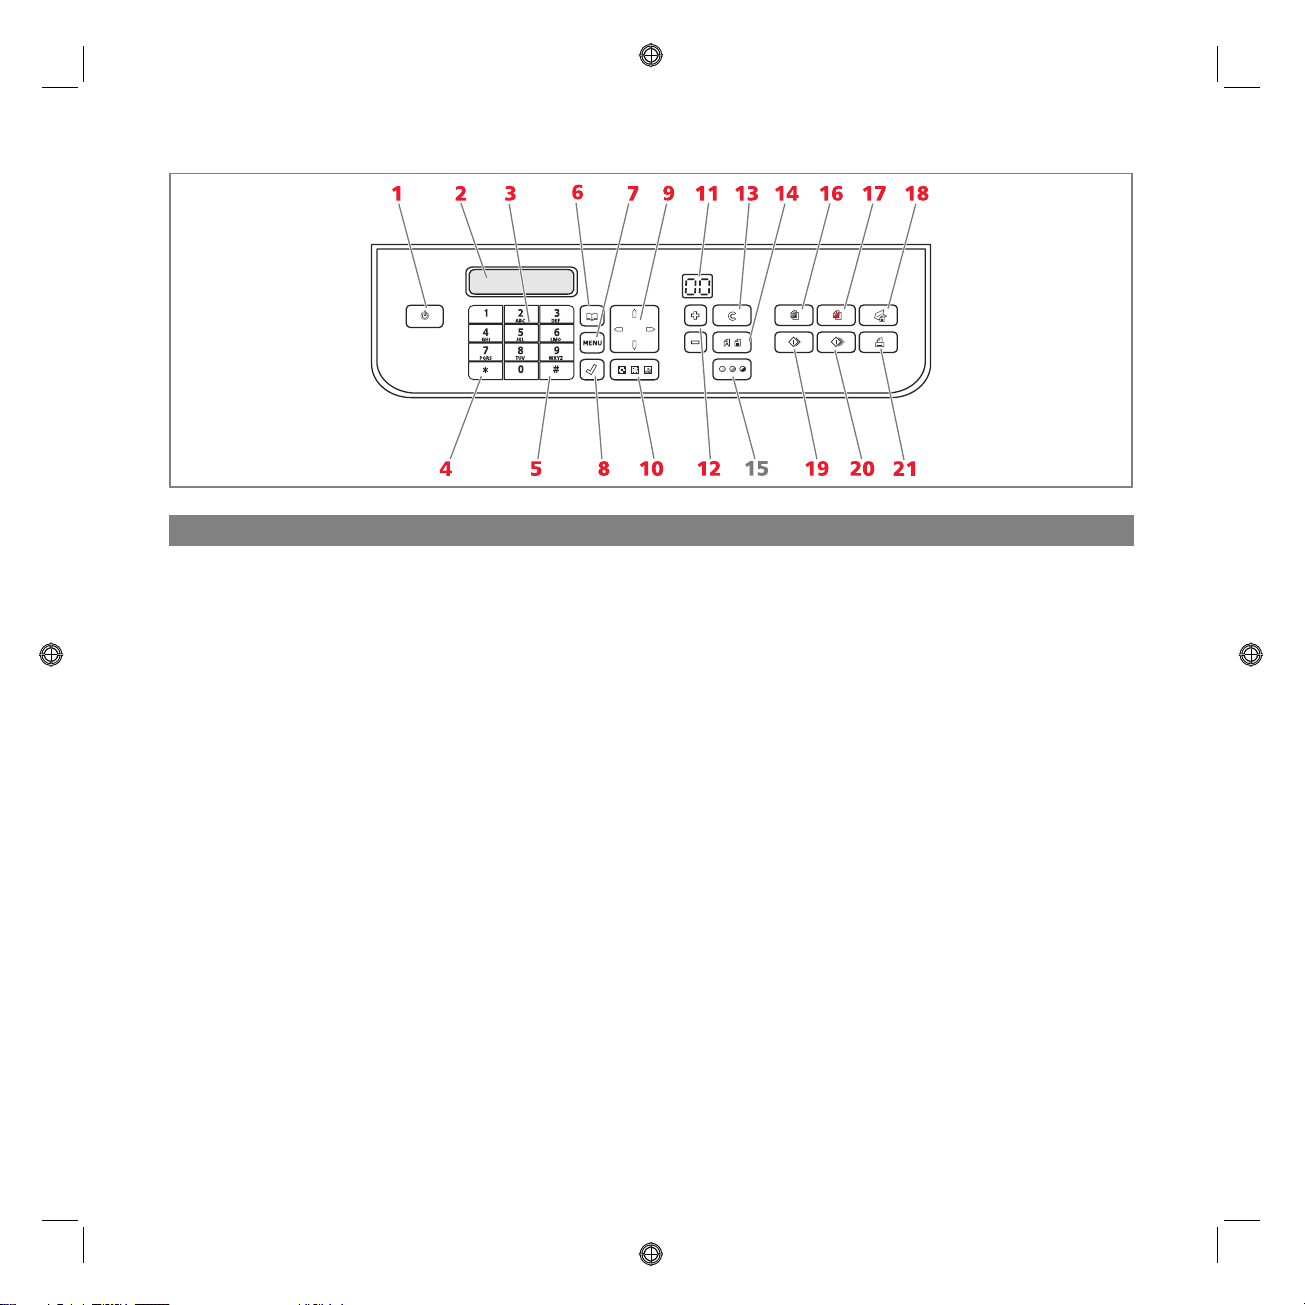
INDICATORI LUMINOSI DEL PANNELLO FRONTALE DELLA STAMPANTE
Aprire la tastiera per accedere al vano in cui sono visibili gli indicatori luminosi.
Riferimento Indicatore Descrizione
1
Stato USB • Verde: indica la connessione di una macchina fotografica digitale o
di una memoria esterna compatibile; lampeggiante: indica il
trasferimento dei dati alla stampante.
2 Presenza fax
in memoria
• È presente un fax in memoria (non è stato stampato al momento
della ricezione).
Non è possibile spegnere la stampante senza aver rimosso la causa
dell’errore e aver stampato prima i fax presenti in memoria.
• Si è verificato un errore di trasmissione o ricezione fax.
3 Errore carta Indica:
• Inceppamento della carta.
• Assenza di carta negli alimentatori.
4 Fine inchiostro Lampeggiano per indicare che gli inchiostri nero, fotografico e colore
sono prossimi all’esaurimento. La luce arancione diventa fissa per
segnalare il fine inchiostro.
COLLEGAMENTO ALLA STAMPANTE DI UNA MACCHINA FOTOGRAFICA DIGITALE
1 Accendere la macchina fotografica digitale. Per maggiori informazioni, leggere la Guida Utente della macchina
fotografica.
2 Con la stampante accesa, collegare un’estremità del cavo USB al connettore USB della macchina fotografica e
l’altra estremità al connettore USB presente nel pannello frontale della stampante: si accendono il LED di
connessione e l’icona del tasto Avvio stampa.
Nota: se si collega una macchina fotografica digitale PictBridge, l’icona del tasto Avvio stampa non si accende
perché la stampa è controllata direttamente dalla macchina fotografica.
GUIDA RAPIDA6
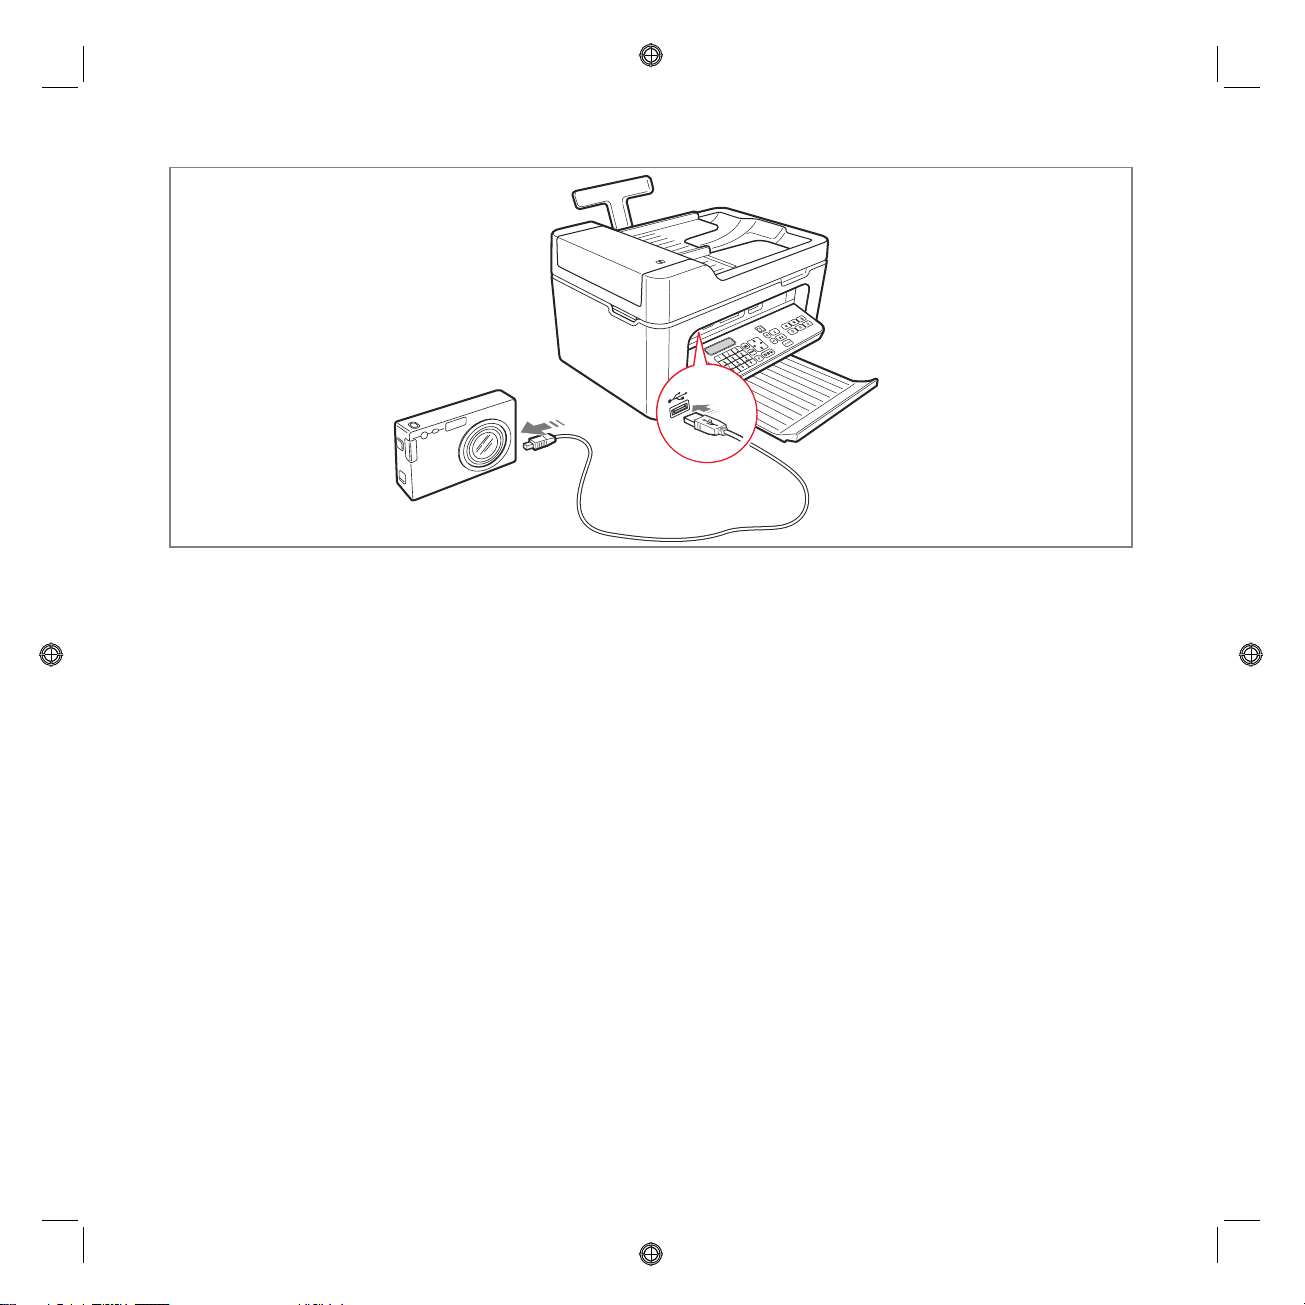
Il LED verde di stato USB si accende per indicare il collegamento corretto.
In caso di mancata connessione, accertarsi di avere collegato un dispositivo compatibile.
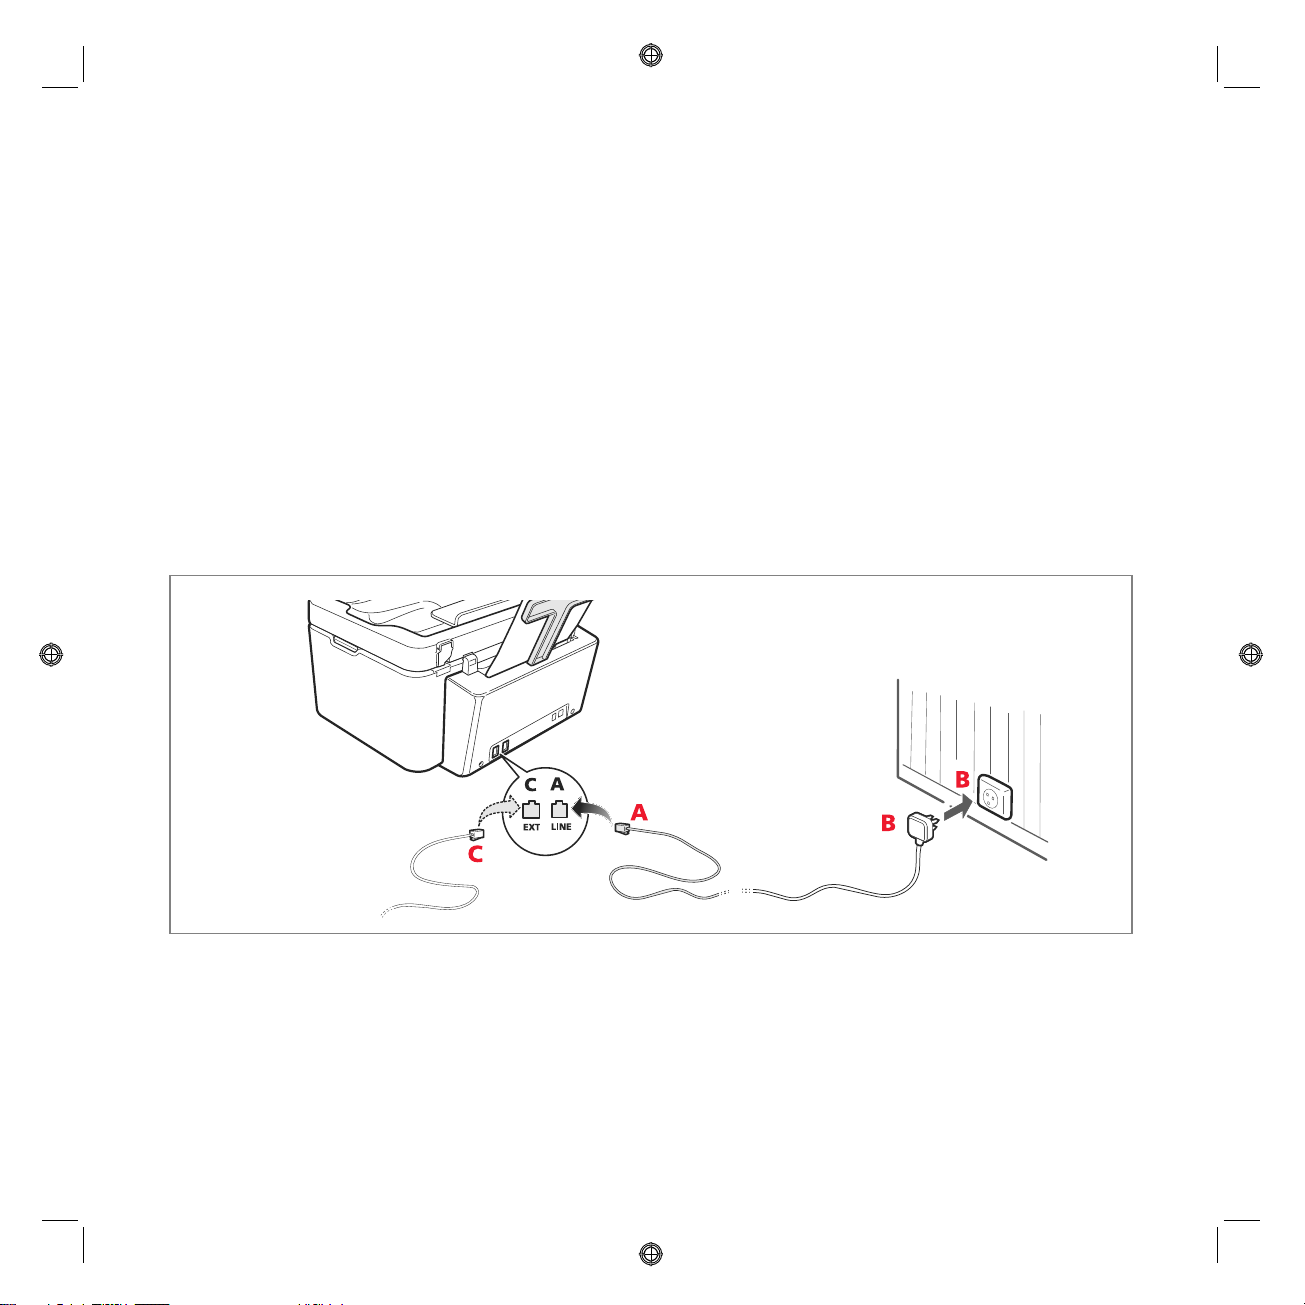
COLLEGAMENTO DELLA STAMPANTE ALLA RETE TELEFONICA
Sul retro della stampante sono presenti due connettori RJ11, uno "LINE" (a destra) ed uno "EXT" (a sinistra).
Mediante cavo telefonico in dotazione, collegare la linea telefonica alla presa "LINE".
Alla presa "EXT" è possibile collegare un telefono esterno oppure una segreteria telefonica.
Se la presa è chiusa da un coperchio, rimuoverlo.
Il telefono collegato in cascata può essere usato per effettuare chiamate, rispondere oppure per inviare un segnale
di START per la ricezione di un fax (codice DTMF di default
* *
, può essere personalizzato selezionando
Toolbox
>
Impostazioni > Impostazioni Fax > Installazione > Configurazione).
In questo caso, il display della tastiera fax della stampante indica che un telefono addizionale è in linea.
Collegamento alla rete telefonica e di una apparecchiatura telefonica esterna
Poiché il collegamento alla linea telefonica del fax dal telefono addizionale, o di altre apparecchiature, è
subordinato a norme nazionali che variano da paese a paese, gli schemi che seguono esemplificano alcuni
collegamenti.
Tuttavia, se nel paese di destinazione il collegamento alla linea telefonica fosse diverso da quelli specificati negli
schemi riportati sulle pagine seguenti, fare riferimento alle norme vigenti del paese di destinazione.
• Il fax è impostato per essere collegato alla linea telefonica pubblica. Per collegarlo ad una linea privata ed
utilizzarlo anche su una linea pubblica, vedere "Installazione del fax".
•In caso d’impianto telefonico a prese multiple, si possono collegare le apparecchiature telefoniche addizionali
ad una qualsiasi delle prese disponibili purché l’impianto sia a più prese in parallelo. In questo caso, il tono di linea
è sempre presente quando si sollevano contemporaneamente i ricevitori degli apparecchi telefonici preesistenti.
GUIDA RAPIDA 7
• Se il tono di linea non fosse presente quando si sollevano contemporaneamente i ricevitori delle apparecchiature
telefoniche addizionali, significa che è un impianto a più prese in serie. In questo caso, le apparecchiature
telefoniche addizionali devono essere collegate direttamente alla stampante come già descritto precedentemente.
Se tuttavia questo non fosse possibile, collegare la stampante alla presa prioritaria.
Ogni paese utilizza una spina telefonica specifica. Di seguito vengono riportate le connessioni più frequentemente
utilizzate.
Collegamento caso 1 (Italia e Svizzera)
Inserire il connettore del telefono addizionale o altro dispositivo nella presa "EXT" (vedere lo schema relativo).
Se non è possibile collegare il telefono addizionale direttamente nella presa "EXT", utilizzare l’adattatore fornito
con il telefono addizionale.
A = ingresso linea telefonica (LINE IN)
B = presa a muro per spina telefonica
C = telefono esterno, con o senza adattatore, segreteria telefonica (EXT)
D = presa per un telefono esterno, una segreteria telefonica o altre apparecchiature.
Collegamento caso 1 Italia
GUIDA RAPIDA8
Collegamento caso 1 Svizzera
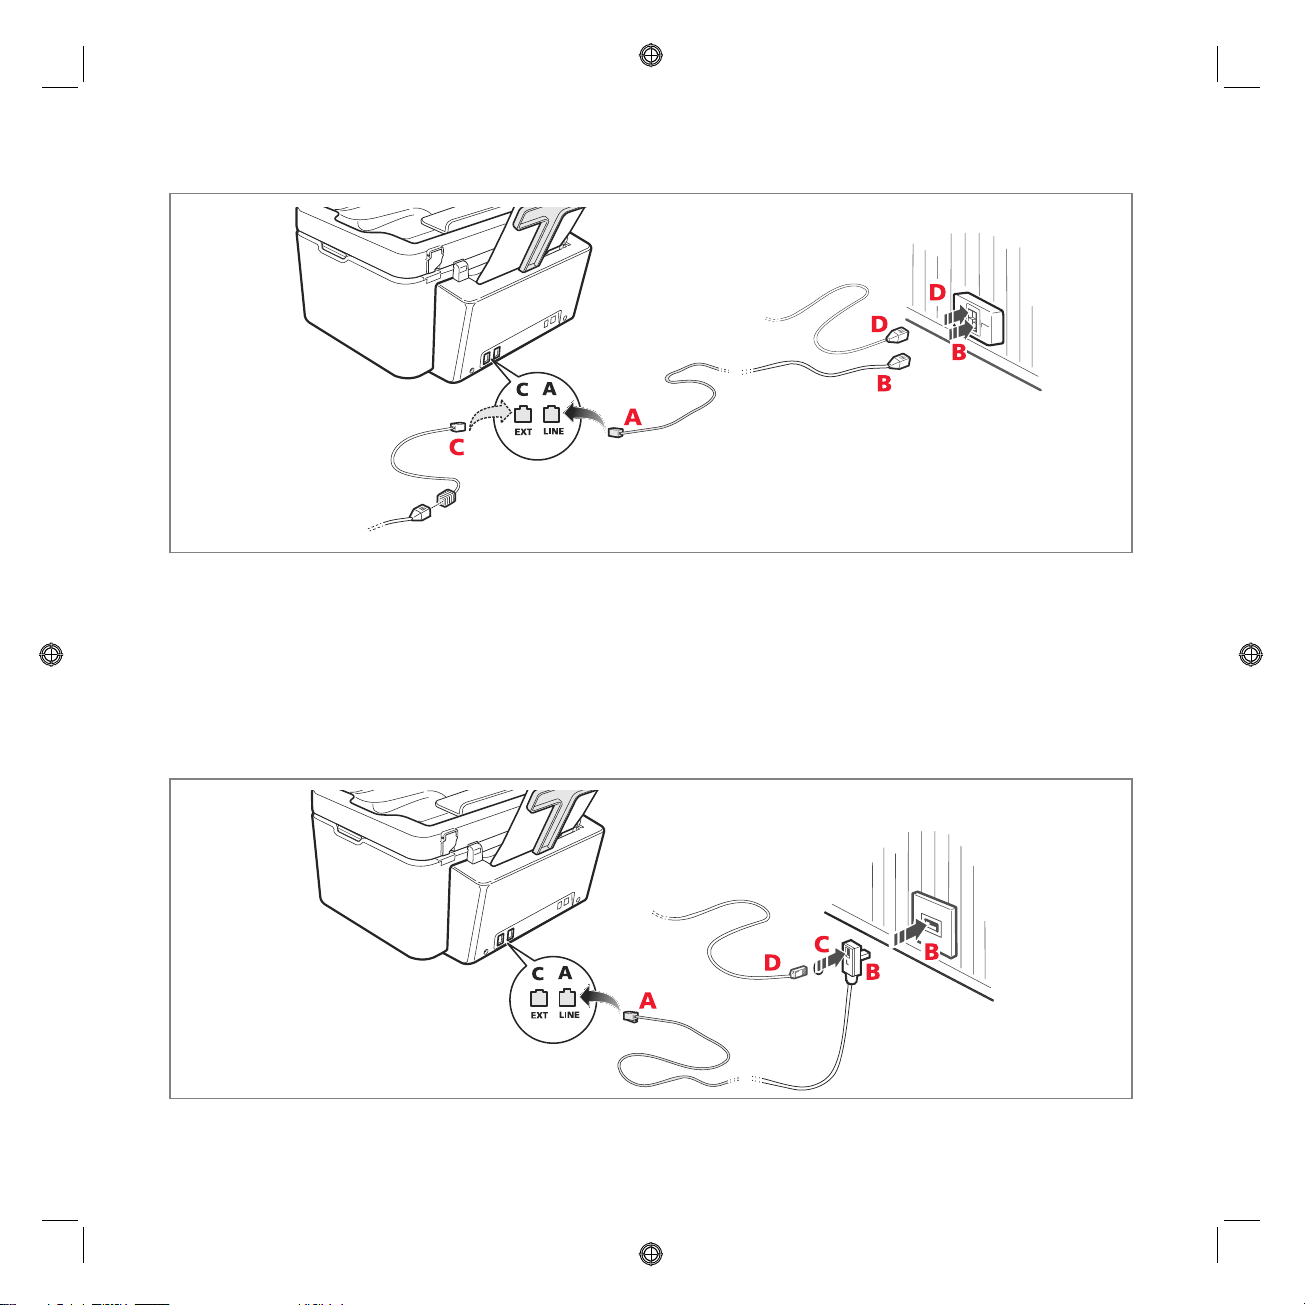
Collegamento caso 2
Inserire il connettore o la spina dell’apparecchiatura addizionale nella spina-presa (vedere lo schema relativo).
A = ingresso linea telefonica (LINE IN)
B = presa a muro per spina telefonica
C = telefono esterno, con o senza adattatore, segreteria telefonica (EXT)
D = presa per un telefono esterno, una segreteria telefonica o altre apparecchiature.
GUIDA RAPIDA 9
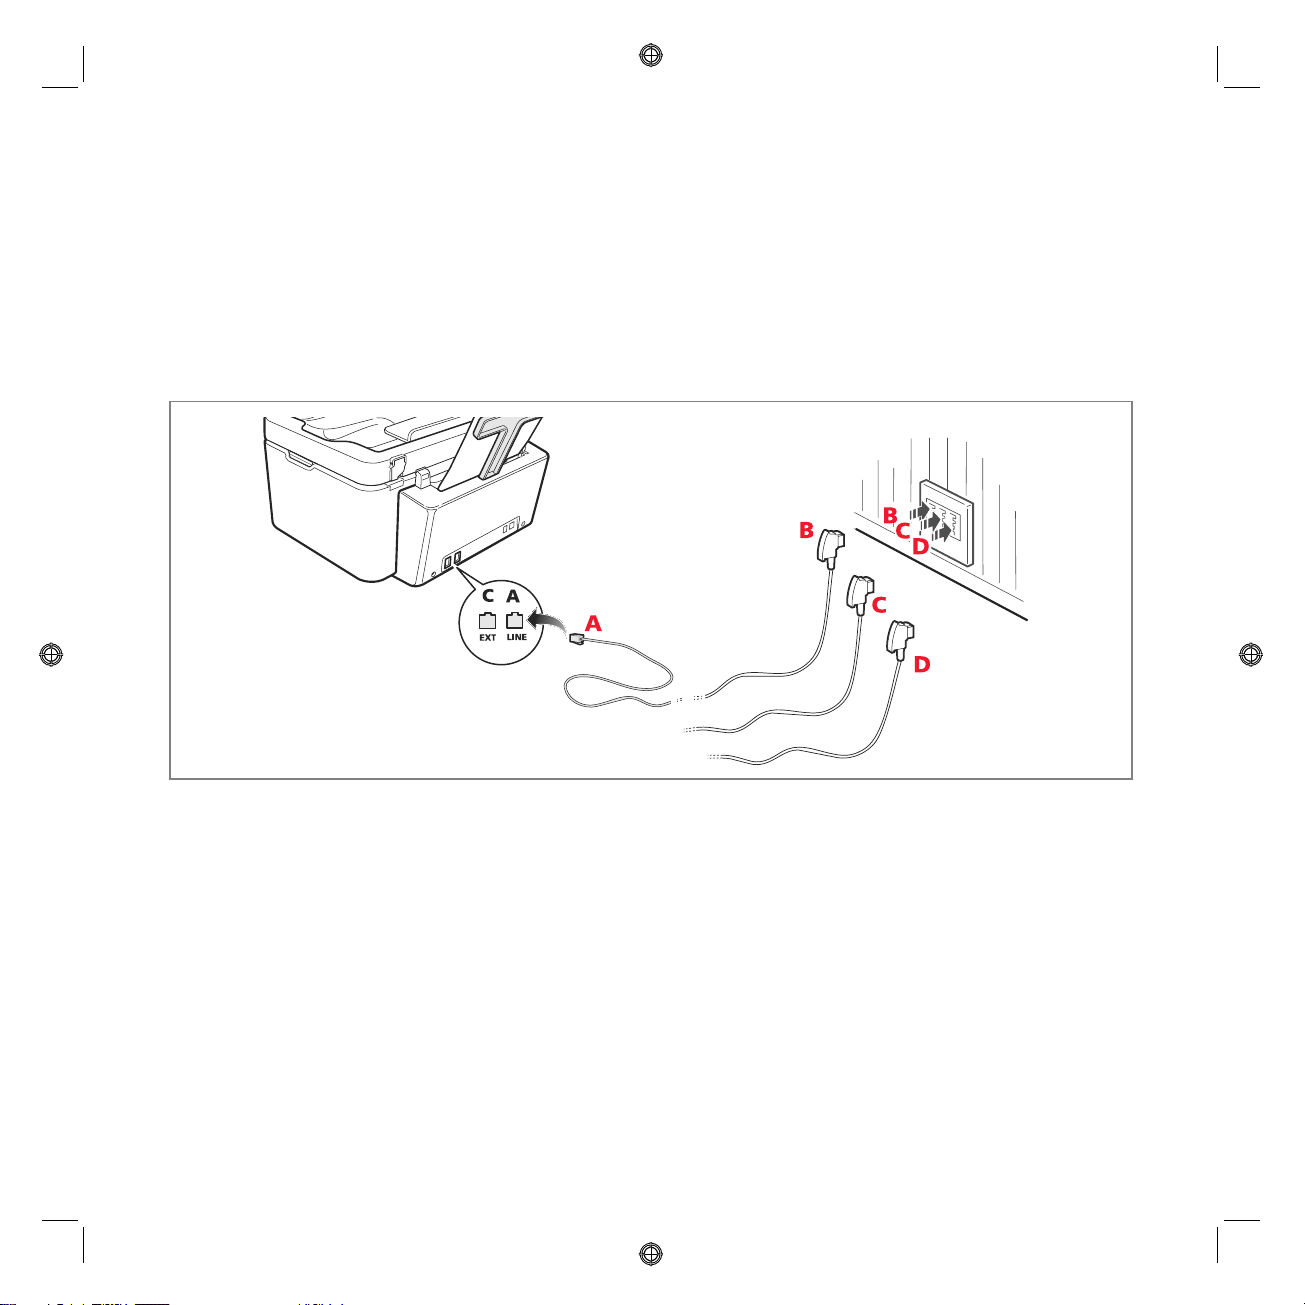
Collegamento caso 3
Inserire la spina dell’apparecchiatura addizionale nella presa (a muro) di collegamento alla linea telefonica (vedere
lo schema relativo).
Inoltre, tramite l'apposito adattatore (come per il primo tipo di collegamento), è possibile collegare un'ulteriore
apparecchiatura nella presa "EXT" di collegamento alla linea telefonica sulla stampante.
A = ingresso linea telefonica (LINE IN)
B = presa a muro per spina telefonica
C = telefono esterno, con o senza adattatore, segreteria telefonica (EXT)
D = presa per un telefono esterno, una segreteria telefonica o altre apparecchiature.
INSTALLAZIONE DEL FAX
Dopo aver collegato il cavo telefonico ed il cavo di alimentazione premere il tasto di accensione della stampante;
viene eseguito un ciclo di auto diagnosi e, al termine, sul display viene visualizzato il messaggio che la stampante è
pronta all’utilizzo come fax.
GUIDA RAPIDA10
Procedura d’installazione
1 All’accensione, il display visualizza in sequenza le lingue disponibili con 2 cifre "nn" che le identificano. Premere i
tasti relativi al numero "nn" corrispondente alla lingua desiderata.
2 Confermare la selezione premendo il tasto . Premendo il tasto si ritorna al punto 1.
3 Il display visualizza le possibili scelte per il Paese di destinazione.
Ogni paese visualizzato sul display è identificato con un numero "nn" a cui è associato.
Premere i tasti relativi al numero "nn" corrispondente al Paese di destinazione desiderato.
4 Confermare la selezione premendo il tasto . Premendo il tasto si ritorna al punto 3.
5 L’installazione è terminata.
6 Per inserire la data e l’ora premere il tasto Menu seguito dal tasto Conferma.
Sul display viene visualizzato il messaggio "IMP. DATA/ORA".
7 Inserire i dati utilizzando la tastiera alfanumerica e premere il tasto Conferma.
Nota: la data e l’ora possono anche essere inviate dal computer selezionando Toolbox > Impostazioni >
Impostazioni fax.
Nota: se si manifesta un'interruzione di corrente elettrica la data e l'ora saranno perse. All’accensione la
stampante visualizza sul display la richiesta di inserimento data e ora.
Nota: nel caso in cui fosse necessario modificare la scelta del Paese di destinazione, digitare in sequenza i tasti:
C + * + *. Sul display compare la scelta della lingua e del Paese di destinazione. Inserire le scelte desiderate e al
termine, quando richiesto, spegnere la stampante. All’accensione sarà necessario reinserire la data e l’ora.
Paese Selezione Paese Selezione
Argentina
Australia
Austria
Belgium
Brazil
Chile
China
Colombia
Czech Republic
Denmark
Finland
France
Germany
Greece
Hong Kong
India
Israel
Italy
AMERICA LATINA
NZL/AUSTRIA
ÖSTERREICH
BELGIUM
BRASILE
AMERICA LATINA
CHINA
AMERICA LATINA
CZECH
DANMARK
FINLAND
FRANCE
DEUTSCHLAND
GREECE
SINGAPORE
INDIA
ISRAEL
ITALIA
Ireland
Luxembourg
Mexico
New Zealand
Norway
Netherlands
Portugal
Perù
Rest of the world
Spain
South Africa
Sweden
Switzerland
Turkey
UK
Uruguay
Venezuela
UK/IRLANDA
BELGIUM
AMERICA LATINA
NZL/AUSTRALIA
NORGE
HOLLAND
PORTUGAL
AMERICA LATINA
INTERNATIONAL
ESPAÑA
S. AFRICA
SVERIGE
SCHWEIZ
TURKEY
U.K. / IRELAND
AMERICA LATINA
AMERICA LATINA
GUIDA RAPIDA 11
IMPOSTAZIONE DATA E ORA DEL FAX
Per impostare manualmente la data e l'ora all’accensione della stampante:
• In modalità stand-alone, premere il tasto Menu. Viene visualizzato il messaggio "IMP. DATA/ORA".
Inserire la data e l’ora con la tastiera alfanumerica e al termine premere nuovamente il tasto Conferma.
• È anche possibile inviare la data e l’ora dal computer selezionando Toolbox > Impostazioni > Impostazioni fax.
UTILIZZO DELLA STAMPANTE SENZA UN COMPUTER
COPIA DI UN DOCUMENTO
1 Accendere la stampante. Vedere "Accensione e spegnimento della stampante".
2 Accertarsi che gli indicatori di fine inchiostro sul pannello frontale siano spenti. In caso contrario, si consiglia di
sostituire la cartuccia corrispondente. Per maggiori informazioni, vedere “Sostituzione delle cartucce”.
3 Inserire la carta sulla quale si desidera stampare.
4 Inserire il documento da copiare sul piano dello scanner o, se costituito da più pagine, nell’alimentatore
automatico di documenti.
5 Selezionare la qualità di copia, Foto o Normale, premendo il tasto Selezione Qualità di stampa.
a Per copiare un testo normale in bianco e nero oppure un documento misto bianco e nero e a colori,
selezionare Normale.
b Per copiare un documento e stamparlo su carta speciale ink-jet, selezionare Foto. Per maggiori informazioni,
vedere "Tastiera della stampante".
6 Selezionare il contrasto, scuro, bilanciato o chiaro, premendo il tasto Contrasto di copia.
Per maggiori informazioni, vedere "
Tastiera della stampante
".
7 Per eseguire più di una copia, premere più volte il tasto "+" (più) fino alla visualizzazione del numero corretto di
copie sul contatore.
GUIDA RAPIDA12

8 Premere il tasto Avvio Copia B/N o Avvio Copia a colori a seconda delle necessità.
Nota: se si desidera copiare il documento su un foglio di formato diverso, premere e tenere premuto il tasto
Avvio Copia B/N o Avvio Copia a colori per attivare la funzionalità Adatta alla pagina. La stampante regolerà
automaticamente il formato dell’originale affinché corrisponda al formato della carta caricata.
Nota: la funzione Adatta alla pagina non è disponibile se i documenti da copiare sono inseriti nell’alimentatore
automatico di documenti.
STAMPA DI FOTO DA UNA MACCHINA FOTOGRAFICA DIGITALE
Quando si collega alla stampante una macchina fotografica digitale o una memoria esterna compatibile, si
illumina il tasto Avvio stampa.
Premendo il tasto Avvio stampa si ottiene la stampa del Photo Index, un documento che riproduce tutte le
immagini presenti nella memoria collegata alla stampante e che consente di scegliere le immagini da stampare, il
numero di copie ed il formato della carta.
Per stampare dal Photo Index:
1 Mantenere collegata la memoria usata per stampare il Photo Index.
2 Posizionare il Photo Index, compilato in tutte le sue parti, sul piano dello scanner.
3 Premere il tasto Avvio stampa fino all’avvio della procedura di stampa (circa 8 sec.): le fotografie saranno
stampate come indicato.
• La qualità di stampa preselezionata è adatta a carte speciali per ink-jet ed è modificabile dalla tastiera della
stampante.
• Le fotografie stampate saranno adattate automaticamente al formato carta presente nell’alimentatore automatico
di documenti.
STAMPA DI FOTO DA UNA MACCHINA FOTOGRAFICA DIGITALE PICTBRIDGE
Per ottenere i migliori risultati di stampa delle foto, si consiglia di installare la cartuccia a colori e la cartuccia
fotografica. Vedere "Sostituzione delle cartucce".
1 Inserire nella stampante la carta fotografica.
2 Accertarsi che la macchina fotografica digitale PictBridge sia accesa e collegata alla stampante.
3 La stampa è gestita direttamente dalla macchina fotografica e quindi il tasto Avvio stampa non è attivo.
Per le istruzioni inerenti la procedura di stampa delle foto, leggere la Guida Utente della macchina fotografica.
Durante il processo di stampa, il tasto Avvio stampa lampeggia.
Nota: se il formato della carta caricata differisce dal formato impostato sulla macchina fotografica digitale, le
stampe non saranno eseguite correttamente oppure comparirà un messaggio di errore.
GUIDA RAPIDA 13

STAMPA DI FOTO DA UNA MACCHINA FOTOGRAFICA DIGITALE DPOF
Per ottenere i migliori risultati di stampa delle foto, si consiglia di installare la cartuccia a colori e la cartuccia
fotografica. Vedere "Sostituzione delle cartucce".
La stampante è in grado di riconoscere le informazioni DPOF che l’utente ha associato alle immagini che desidera
stampare, il tasto Avvio stampa si accende al riconoscimento dei file DPOF.
1 Inserire nella stampante la carta fotografica.
2 Accertarsi che la macchina fotografica digitale DPOF sia accesa e collegata alla stampante.
3 Selezionare la qualità di stampa a seconda delle proprie necessità.
4 Premere il tasto Avvio stampa sulla tastiera per stampare le foto selezionate, associando le indicazioni DPOF della
macchina fotografica digitale.
LE CARTUCCE
VERIFICA DEI LIVELLI D’INCHIOSTRO
È possibile verificare i livelli d’inchiostro delle cartucce direttamente dal pannello frontale della stampante, dal
driver di stampa, dall’applicativo Toolbox, dal driver dello scanner oppure dal Monitor di stato.
Dal pannello frontale della stampante:
•
Quando gli indicatori nero o a colori iniziano a lampeggiare, i livelli nelle cartucce stanno diventando bassi.
• Quando gli indicatori si accendono a luce fissa, la stampante si trova nella condizione di quasi fine cartuccia ed è
consigliata la sostituzione della cartuccia.
Dal driver di stampa:
1 Con un documento aperto in un applicativo, selezionare File > Stampa.
Sullo schermo compare la finestra di dialogo Stampa.
2 Selezionare Preferenze o Proprietà, a seconda del sistema operativo utilizzato.
Sullo schermo compare l’interfaccia utente del driver della stampante.
3 Selezionare la scheda Livelli d’inchiostro. I due indicatori del livello indicano la quantità d’inchiostro stimata
rimanente nelle cartucce, espressa in percentuale.
Dall’applicativo Toolbox:
1 Aprire l’applicativo Toolbox dall’icona Olivetti presente nella barra delle applicazioni o sul desktop, oppure
selezionando Start > Programmi o Tutti i programmi > Olivetti > Olivetti Toolbox.
Compare la finestra principale del Toolbox.
2 Selezionare Soluzioni e assistenza.
3 Selezionare Seleziona > Nuove cartucce d’inchiostro.
Nella finestra di dialogo Nuove cartucce d’inchiostro, gli indicatori di livello indicano la quantità stimata
d’inchiostro rimanente nelle cartucce, espressa in percentuale.
Dal driver dello scanner:
Quando si esegue la scansione di un documento o di una foto, nella parte inferiore della finestra sono presenti gli
indicatori di livello che indicano la quantità stimata d’inchiostro rimanente nelle cartucce, espressa in percentuale.
GUIDA RAPIDA14
Dal Monitor di stato:
Durante una stampa o una copia eseguita dal computer, viene visualizzato sullo schermo il Monitor di stato della
stampante. La finestra visualizza le informazioni di stampa ed il livello d’inchiostro rimanente nelle cartucce. Per
maggiori informazioni, vedere "ll Monitor di stato della stampante".
INFORMAZIONI NECESSARIE PER L’ACQUISTO DI NUOVE CARTUCCE
Al fine di garantire il corretto funzionamento della stampante e un’elevata qualità di stampa, è fondamentale
utilizzare esclusivamente cartucce Olivetti originali.
Utilizzare i seguenti codici di prodotto per l’acquisto delle cartucce:
• Cartuccia d’inchiostro nero, codice B0631 - IN701
• Cartuccia d’inchiostro a tre colori, codice B0632 - IN703
• Cartuccia d’inchiostro fotografica, codice B0633 - IN705
• Cartuccia d’inchiostro nero ad alta capacità, codice B0628 - IN702
• Cartuccia d’inchiostro a tre colori ad alta capacità, codice B0629 - IN704
• Cartuccia d’inchiostro fotografica ad alta capacità, codice B0630 - IN706
Attenzione: le cartucce sono da intendersi per un solo utilizzo.
SOSTITUZIONE DELLE CARTUCCE
Si consiglia di utilizzare cartucce originali. La qualità di stampa non è assicurata e la garanzia non copre eventuali
problemi determinati dall'uso di accessori, parti o componenti non originali.
Attenzione: prima di eseguire le procedure elencate in questa sezione, leggere e attenersi alle informazioni sulle
1 Accendere la stampante.
2 Sollevare con entrambe le mani la parte superiore della stampante.
La leva di sostegno blocca automaticamente la parte superiore della stampante in posizione aperta.
Il carrello si posiziona al centro della stampante in modo da agevolarne l'inserimento.
norme di sicurezza contenute in questa guida.
GUIDA RAPIDA 15
3 Premere la leva di bloccaggio per rimuovere la cartuccia che si desidera sostituire.
Attenzione: la cartuccia nera (o fotografica) deve essere inserita sempre nell’alloggiamento di sinistra, mentre
quella a colori deve essere inserita nell’alloggiamento di destra.
4 Se la cartuccia rimossa sarà riutilizzata in seguito, inserirla nell’alloggiamento per cartuccia nera o fotografica
presente nella stampante.
5 Per installare una cartuccia nuova, rimuovere il nastro di protezione presente sul corpo della cartuccia stessa.
Nota: in questa procedura è illustrata una cartuccia a colori. La sostituzione della cartuccia nera o fotografica
richiede la stessa procedura.
GUIDA RAPIDA16
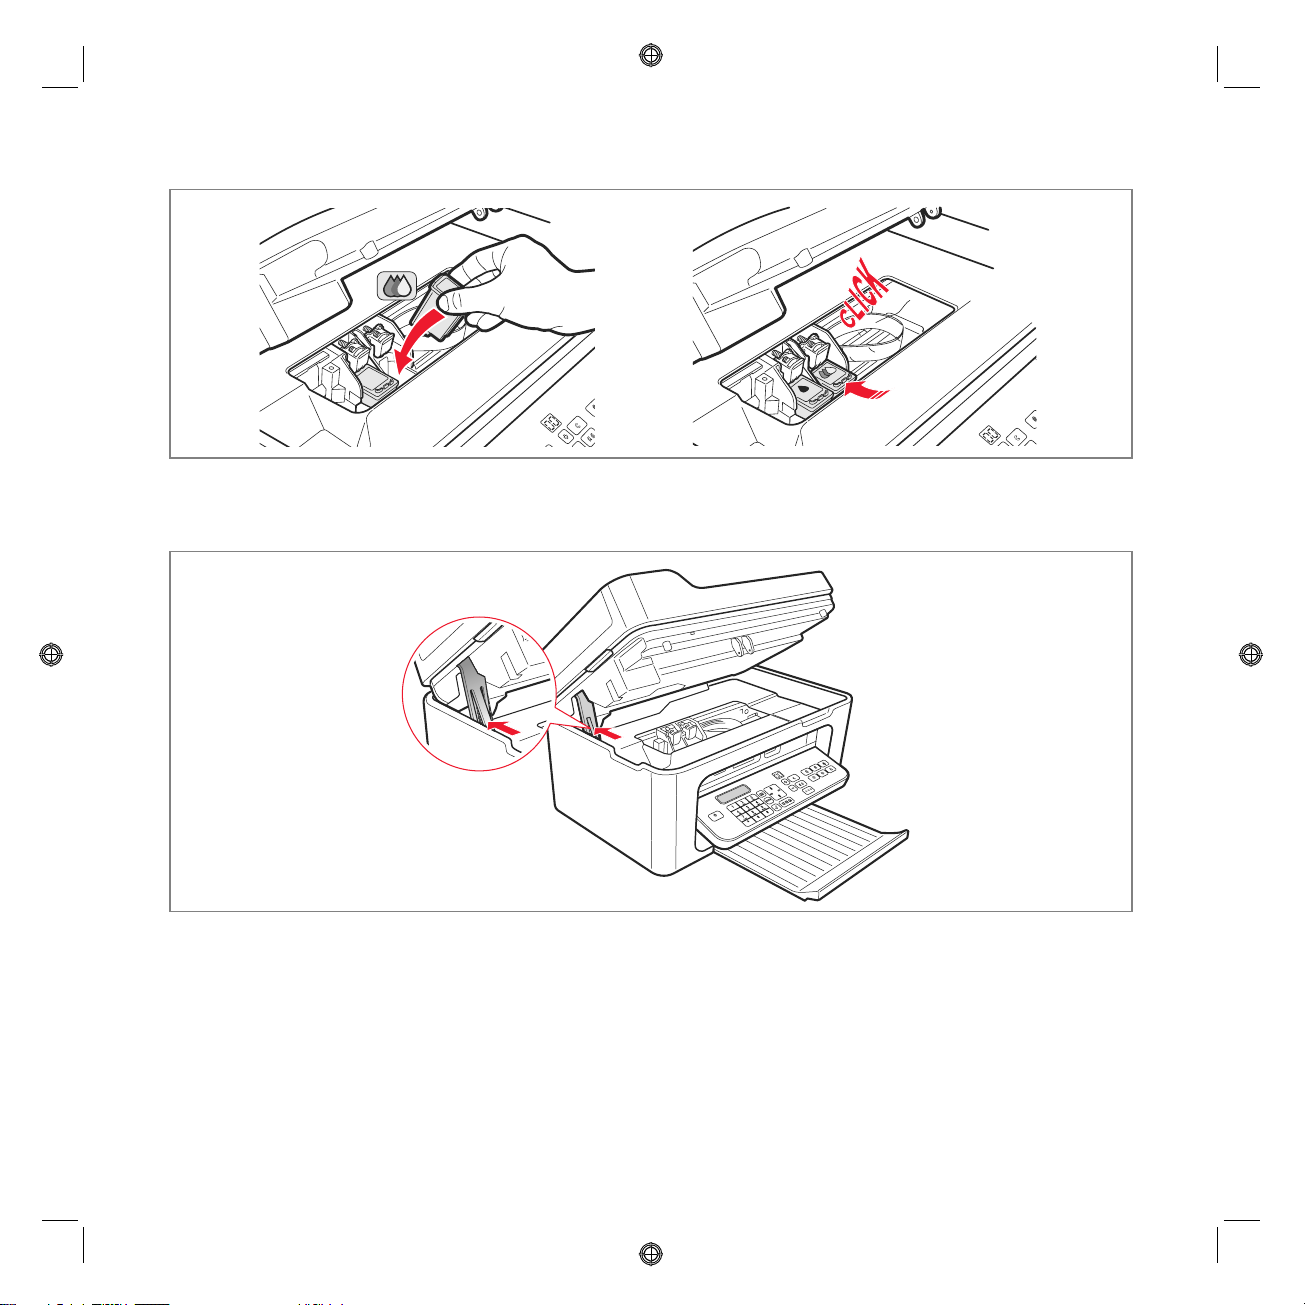
6 Inserire la nuova cartuccia e premerla verso il retro della stampante fino a quando non viene agganciata.
7 Sollevare la parte superiore della stampante e spingere la leva di sostegno. La parte superiore della stampante si
abbassa fino alla completa chiusura.
8 La stampante esegue automaticamente l’allineamento delle cartucce che si conclude con la stampa di un testo
tecnico. Inserire un foglio di carta A4 e attendere la stampa.
GUIDA RAPIDA 17

UTILIZZO DELLA STAMPANTE DA UN COMPUTER
PRIMA DI INIZIARE
Questo capitolo fornisce le informazioni di base necessarie per utilizzare la stampante quando è collegata ad un
computer. Per maggiori informazioni sulle funzionalità offerte, consultare la Guida Utente selezionando
Start > Programmi > Olivetti.
Altre informazioni sono disponibili selezionando Help nelle finestre di dialogo.
Prima di iniziare:
1 Accertarsi che la stampante ed il computer siano collegati correttamente e che il software contenuto nel CD sia
stato installato come indicato nella guida Installazione della stampante fornita con la stampante.
2 Caricare la carta da stampare.
3 Accertarsi che gli indicatori di fine inchiostro sul pannello frontale siano spenti. In caso contrario si consiglia di
sostituire la cartuccia corrispondente.
Per maggiori informazioni, vedere "Sostituzione delle cartucce".
IL MONITOR DI STATO DELLA STAMPANTE
Il Monitor di stato della stampante fornisce informazioni sullo stato corrente della stampante ed è installato
insieme al software contenuto nel CD di installazione.
Il Monitor di stato visualizza automaticamente, all’inizio di un’operazione di stampa o copia:
• Una rappresentazione grafica della percentuale di stampa o copia già completata.
• Il numero di pagine già stampate o copiate rispetto al numero totale di pagine da stampare.
• Una rappresentazione grafica della quantità stimata d’inchiostro, espressa in percentuale, ancora disponibile nelle
cartucce nera e a colori.
• La possibilità di annullare un’operazione di stampa o copia.
• L’indirizzo del sito web del produttore, dove è possibile accedere alle informazioni necessarie all’acquisto di nuove
cartucce.
Il Monitor di stato si chiude automaticamente al termine dell’operazione di stampa o copia, ma può essere chiuso
in qualsiasi momento.
Se il Monitor di stato è chiuso durante un’operazione di stampa o copia, sarà automaticamente visualizzato.
• Quando la stampante è nella condizione di quasi fine inchiostro o di fine inchiostro, un punto esclamativo colorato
indicherà la condizione di basso livello d’inchiostro (colori, nero o entrambi) e le percentuali relative.
Saranno visualizzate delle pop-up, con l’indirizzo del sito web del produttore dove è possibile accedere alle
informazioni necessarie all’acquisto di nuove cartucce.
GUIDA RAPIDA18

Inoltre il Monitor di stato della stampante visualizza una pop-up di errore quando:
• Manca una o entrambe le cartucce.
• Il piano scanner è sollevato.
• La tastiera è chiusa ed è stato avviato un processo di stampa o di copia.
• La stampante esaurisce la carta.
• La carta si inceppa.
• È rilevato un formato di carta errato.
• La stampante è impegnata con un’altro applicativo.
• La stampante non è riconosciuta.
• Il carrello delle cartucce è bloccato.
• La stampante non funziona (errore di sistema).
Le pop-up elencate presentano anche la scelta se continuare o se annullare l’operazione di stampa.
IL TOOLBOX
L’applicativo Toolbox consente di stampare, copiare, eseguire scansioni, inviare e ricevere fax utilizzando una
singola finestra sul monitor del computer.
Dalla videata principale dell’applicativo Toolbox, è possibile:
• Stampare immagini ed effettuare copie.
• Eseguire la scansione di documenti scegliendo preventivamente la destinazione
• Controllare la quantità d’inchiostro rimanente nelle cartucce installate.
• Accedere alla funzionalità Soluzioni e assistenza, che consente di:
– Pulire e verificare gli ugelli delle cartucce.
– Allineare automaticamente le cartucce per migliorare la qualità di stampa.
– Reperire l’indirizzo del sito web del produttore, dove è possibile accedere alle informazioni necessarie
all’acquisto di nuove cartucce.
– Accedere alle informazioni inerenti la ricerca guasti e la manutenzione.
– Stampare la pagina di prova.
• Accedere alla funzionalità Impostazioni.
GUIDA RAPIDA 19

STAMPA, COPIA E SCANSIONE MEDIANTE IL TOOLBOX
Per accedere al Toolbox:
1 Selezionare con il tasto destro del mouse l’icona Olivetti sulla barra delle applicazioni di Windows ed eseguire
l’applicativo Toolbox, oppure selezionare Start > Programmi o Tutti i programmi > Olivetti > Olivetti
Toolbox. Sarà visualizzata la videata principale del Toolbox.
Nota: in ambiente Mac OS X, l’applicativo Toolbox è disponibile selezionando l’icona presente sul desktop
oppure dall’elenco dei programmi installati.
La sezione principale del Toolbox comprende le icone che indicano i vari strumenti disponibili.
Icona È possibile:
Stampa foto • Scorrere l’hard disk o la memoria della macchina fotografica digitale non-
PictBridge/DPOF collegata al computer, per cercare la cartella contenente le foto
da stampare.
• Selezionare tutte le foto salvate nella cartella oppure le singole foto desiderate,
quindi scegliere quante copie stampare.
• Selezionare il tipo ed il formato carta.
• Selezionare se stampare le foto su una pagina singola, oppure due foto su una
pagina o quattro su una pagina.
• Stampare un indice delle foto.
• Stampare le foto selezionate.
Fotocopiatrice • Definire il tipo di documento da copiare.
• Selezionare il tipo ed il formato di carta su cui stampare.
• Definire la qualità di copia.
• Schiarire o scurire la copia e selezionare la copia B/N o a colori.
• Selezionare il layout della copia stampata: eseguire più scansioni e stamparle su
una pagina singola; effettuare copie formato poster definendo il numero di
pagine su cui adattare l’immagine copiata; riprodurre l’immagine copiata (clone)
per il numero di volte necessario senza ridimensionare l’immagine, oppure
stampare semplicemente l’immagine copiata su una pagina.
Tutti i layout non sono disponibili se la copia viene effettuata con il documento
da copiare inserito nell’alimentatore automatico di documenti.
• Ingrandire o ridurre il documento o la foto da copiare, oppure regolare
automaticamente la dimensione in modo da adattarlo al formato di carta
selezionato.
Nota: tutte le funzioni di modifica del formato immagine o impaginazioni
diverse, non sono disponibili se i documenti vengono inseriti nell’alimentatore
automatico di documenti.
• Selezionare il numero di copie da eseguire.
GUIDA RAPIDA20

Icona È possibile:
Acquisisci in un file
Acquisisci in un applicativo
Acquisisci in una e-mail
Acquisisci in un fax
• Eseguire la scansione di un’anteprima del documento o della foto collocati sul
piano dello scanner.
• Utilizzare gli appositi comandi di selezione per delimitare l’area dell’anteprima
che si desidera sottoporre a scansione.
• Ruotare, ribaltare, ingrandire o ridurre l’immagine di anteprima.
• Definire il tipo di documento da sottoporre a scansione e selezionare la modalità
a colori reali, sfumature di grigio o bianco e nero.
• Definire la risoluzione, l’intensità del colore, la luminosità ed il contrasto
dell’immagine sottoposta a scansione.
Nota: se i documenti sono inseriti nell’alimentatore automatico di documenti, è
possibile acquisire una pagina alla volta, oppure tutti i documenti in sequenza.
A seconda dello strumento selezionato:
•Con Acquisisci in un file, salvare l’immagine sottoposta a scansione in formato
TIFF (.tif), bitmap (.bmp) o JPEG (.jpg) in una cartella del PC.
•Con Acquisisci in un applicativo, eseguire la scansione del documento o della
foto in un applicativo selezionabile (come un programma di grafica, un word
processor o un desktop publisher).
•Con Acquisisci in una e-mail, allegare il documento o la foto sottoposto a
scansione, in formato .jpg compresso, ad un messaggio di posta elettronica
aperto dall’applicativo e-mail di default del computer.
•Con Acquisisci in fax, eseguire la scansione del documento o della foto, in
formato .jpg compresso, in un applicativo fax selezionabile.
La videata principale del Toolbox fornisce anche i link a Help, Soluzioni e assistenza, e Impostazioni.
Link È possibile:
Help • Visualizzare ulteriori informazioni sull’elemento visualizzato sul computer.
Soluzioni e assistenza • Pulire e verificare le cartucce.
• Allineare automaticamente le cartucce.
• Reperire l’indirizzo del sito web del produttore, dove è possibile accedere alle
informazioni necessarie all’acquisto di nuove cartucce.
• Accedere alle informazioni inerenti la ricerca guasti e la manutenzione.
Impostazioni • Modificare le impostazioni di default delle varie funzioni disponibili.
GUIDA RAPIDA 21

STAMPA DA UN’APPLICATIVO
1 Con il documento o la foto aperti nell’applicativo in uso, selezionare File > Stampa per aprire la finestra di dialogo
Stampa.
2 Selezionare Preferenze o Proprietà, a seconda del sistema operativo utilizzato.
Sarà visualizzata la videata dell’interfaccia utente del driver della stampante dalla quale è possibile utilizzare la
stampante multifunzione, come indicato nella seguente tabella.
Preferenze/Proprietà: È possibile:
Carta/qualità • Selezionare manualmente la composizione del documento da stampare:
solo testo o grafica nero, combinazione di testo nero o grafica a colori o foto,
solo foto; oppure impostare il rilevamento automatico dell’originale come una
combinazione di testo nero o grafica a colori o foto.
• Selezionare il tipo ed il formato della carta che si desidera utilizzare.
• Definire il formato, in pollici o in millimetri, di qualsiasi tipo di carta
personalizzata che si desidera utilizzare.
• Selezionare la stampa senza bordi qualora sia stata impostata carta patinata,
lucida o formato cartolina.
• Alimentare manualmente la carta nel caso in cui si desideri stampare su formato
striscione, buste, fogli per etichette e fogli per trasferimento a caldo.
• Selezionare la qualità di stampa desiderata.
• Selezionare la stampa in qualità fotografica quando è caricata carta fotografica
ed è selezionato Foto come tipo di documento; la stampante richiederà un
tempo di stampa più lungo.
• Stampare documenti composti da più pagine, dall’ultima pagina alla prima;
la selezione può essere annullata.
• Scegliere se l’immagine deve essere stampata in Verticale o in Orizzontale (la
stampante ruoterà l’immagine come richiesto).
• Scegliere di stampare in B/N o a colori, a seconda del documento originale.
• Definire il numero di copie da stampare, iniziando o meno dall’ultima pagina.
• Riportare le impostazioni ai relativi valori di default, oppure salvare le
impostazioni in modo che siano applicate alla successiva operazione di stampa.
GUIDA RAPIDA22

Preferenze/Proprietà: È possibile:
Layout • Impostare la stampa delle singole pagine del documento, o foto, su una singola
pagina.
• Impostare la stampa di pagine multiple su un singolo foglio, inserendo 2, 3, 4 o 8
pagine del documento, o foto, sul singolo foglio di carta.
• Definire l’ordine con cui le pagine multiple saranno inserite sul singolo foglio di
carta, e impostare o meno l’inserimento di un bordo attorno alle singole
immagini sul singolo foglio di carta.
• Impostare la stampa di pagine multiple in formato poster, espandendo quindi il
contenuto di una singola pagina su più di un foglio di carta.
• Definire il numero di fogli su cui stampare l’immagine del poster selezionata e
decidere se inserire o meno un bordo attorno a ciascuna immagine di cui si
compone il poster.
• Riportare le impostazioni ai relativi valori di default, oppure salvare le
impostazioni in modo che siano applicate alla successiva operazione di stampa.
Livelli d’inchiostro • Visualizzare la quantità stimata d’inchiostro rimanente nelle cartucce nera e a
colori.
• Disporre di un collegamento diretto al Toolbox dove, selezionando Soluzioni e
assistenza, è possibile visualizzare informazioni sulla manutenzione e sulla
ricerca guasti.
• Avere un link diretto all’indirizzo del sito web del produttore, dove è possibile
accedere alle informazioni necessarie all’acquisto di nuove cartucce.
ACQUISIZIONE DI UN DOCUMENTO DA UN APPLICATIVO
1 Posizionare il documento sul piano dello scanner o, se costituito da più pagine, nell'alimentatore automatico di
documenti.
2 Acquisire l’immagine dall’applicativo in uso.
Se il documento è posizionato sul piano dello scanner, viene visualizzata l'interfaccia utente del driver dello
scanner stesso. Sul lato sinistro dello schermo sarà visualizzata un'anteprima a bassa risoluzione del documento o
dell'immagine in modo da poter personalizzare l'acquisizione:
Driver dello scanner È possibile:
Standard • Definire la composizione del documento da acquisire: solo testo o grafica in
bianco e nero, combinazione di testo in bianco e nero o grafica a colori o foto,
oppure solo foto.
• Riportare le impostazioni ai relativi valori di default, oppure salvare le
impostazioni in modo che siano applicate alla successiva operazione di stampa.
GUIDA RAPIDA 23

Driver dello scanner È possibile:
Personalizzato • Selezionare la risoluzione di scansione.
• Impostare se eseguire la scansione a colori reali a 24 bit/pixel, in tonalità di grigio
a 8 bit/pixel o in B/N a 1 bit/pixel.
• Schiarire o scurire l’immagine da sottoporre a scansione.
• Aumentare o diminuire il contrasto dell’immagine da sottoporre a scansione.
• Riportare le impostazioni ai relativi valori di default, oppure salvare le
impostazioni in modo che siano applicate alla successiva operazione di stampa.
Nota: se i documenti sono inseriti nell'alimentatore automatico di documenti non è disponibile l'anteprima e
neppure la possibilità di personalizzare l'acquisizione.
L'applicativo utilizzato può consentire o meno la scelta tra l'acquisizione a pagine singole o di tutti i documenti in
sequenza.
IMPOSTAZIONI FAX DALL’APPLICATIVO TOOLBOX
L'applicativo To ol bo x (installato con il software del prodotto) permette di controllare in maniera accurata tutte le
principali funzioni svolte in modalità fax. Per accedere alla configurazione dell'ambiente fax, selezionare
Toolbox > Impostazioni > Impostazioni fax.
Impostazioni fax apre un menu a tendina che elenca le possibili impostazioni suddivise in:
• Impostazioni fax
• Installazione (Configurazione e Ricezione)
• Assistenza.
Impostazioni fax
Sono disponibili:
• Tempo sospensione: per impostare dopo quanto tempo la stampante entra in modalità di risparmio energia.
• Agenda telefonica: per inserire un massimo di 10 nomi in agenda identificandoli con un numero di posizione, un
numero di telefono e un nominativo.
• Data e ora: per inserire data e ora che possono essere anche trasferite dal computer collegato alla stampante.
Installazione
Le impostazioni disponibili comprendono:
• Nome e Numero di fax del mittente.
• Lingua da utilizzare nell'interfaccia dei comandi.
• Formato carta utilizzato per la stampa e la gestione di formati di Fax ricevuti diversi da quello della carta
introdotta per la stampa.
• Utilizzo della testina colore per stampare anche in nero quando il livello d’inchiostro nero è basso (nero in
tricromia)
• Formato della data e dell'ora.
Le altre impostazioni sono: Configurazione e Ricezione (*).
GUIDA RAPIDA24

Configurazione
Nota: per confermare le impostazioni scelte, selezionare INSTALLAZIONE e premere il tasto Invia impostazione.
La configurazione della linea telefonica richiede:
• Tipo linea
– Pubblica: gestita dall’operatore di telecomunicazioni a livello nazionale.
– Privata (PBX): gestita da un centralino, connesso a sua volta con una o più linee pubbliche, che commuta e
connette varie linee interne (private) senza necessità di utilizzare la rete telefonica pubblica. Selezionando la
linea privata i numeri telefonici abilitati sono soltanto
• Modo linea: a multifrequenza oppure a impulsi. Selezionare il modo multifrequenza.
• PBX flash: selezionare questa impostazione quando la stampante è connessa ad un centralino privato (PBX) con
gestione dell'impulso di FLASH e si desidera inviare i fax soltanto
• ID chiamante: consente di visualizzare il numero di telefono o il nome di chi chiama.
La ricezione dell'ID del chiamante è una funzionalità da richiedere al gestore della rete telefonica.
• Remoto: se è stata selezionata Manuale come Modalità di ricezione (*), è stato collegato un telefono esterno alla
stampante o alla stessa linea telefonica, digitando il codice * * (predefinito) sulla tastiera del telefono si abilita il
fax a ricevere il documento in entrata.
• Monitor di linea: abilita l'altoparlante della stampante a trasmettere i toni della linea telefonica.
• Intestazione fax: il documento inviato conterrà anche nominativo e numero di telefono del mittente, data e ora
e numero di pagine. Si può impostare anche la posizione di questa intestazione.
• Modalità correzione errori: consente di correggere gli errori provocati da evetuali disturbi della linea telefonica
• Rapporto TX: prevede la stampa solo in caso di trasmissione fallita (predefinito), mai o sempre.
• Velocità TX: 33600 bit/sec. è predefinito; la velocità di trasmissione può essere ridotta in caso di linee telefoniche
che non la supportino.
• Volume cicalino e Volume altoparlante: impostabile da 0 a 8.
quelli della linea interna.
sulla linea pubblica.
Ricezione (*)
• Volume suoneria: selezionabile da 0 a 8.
• Numero di squilli: il modem della stampante è in ascolto sulla linea telefonica e la riceve solo dopo il numero di
squilli impostato; il comportamento successivo dipende dalla Modalità di ricezione (*) scelta.
• Tipo suoneria: deve essere selezionato se sono attivi due numeri telefonici sulla stessa linea, la centrale telefonica
assegna due diversi squilli che la stampante può riconoscere durante la procedura di installazione (questa
impostazione non è utilizzabile in Francia).
• Tempo fax/tel: per le Modalità di ricezione Tel/Fax consente di impostare il tempo al termine del quale la
stampante riceve la chiamata come fax. È impostabile da15 a 40 secondi.
(*) La MODALITÀ DI RICEZIONE deve essere selezionata durante l'installazione della
stampante seguendo le istruzioni riportate di seguito.
Per impostare la ricezione, accendere la stampante e attendere che sia in linea.
Premere il tasto Menu dalla tastiera del fax sulla stampante e quindi Modo Ricezione; scegliere la modalità
AUTOMATICA, MANUALE, TELEFONO/FAX, o SEGRETERIA/FAX.
GUIDA RAPIDA 25

Modalità AUTOMATICA (impostazione di default)
La stampante è abilitata alla ricezione e stampa di fax. È necessario cambiare impostazione se si collega un
apparecchio esterno, telefono o segreteria telefonica.
Modalità MANUALE
La chiamata viene ricevuta sempre dal telefono. Se alla risposta l'utente identifica una chiamata Fax, questa può
essere deviata alla stampante inserendo il codice scelto (il codice predefinito è * *) con la tastiera del telefono
addizionale (se si è scelto Remoto nella Configurazione fax dall’applicativo Toolbox).
Nota: se un telefono addizionale è collegato alla stampante, la Modalità di ricezione selezionata deve essere
MANUALE.
Modalità TELEFONO/FAX
Dopo un certo numero di squilli (modificabile selezionando Toolbox > Impostazioni > Impostazioni fax >
Installazione > Ricezione), la stampante si collega alla linea telefonica ed è in grado di riconoscere se la
chiamata in entrata è Fax o Voce. Se le chiamata è Voce, il tipo di squillo della stampante cambia (dopo gli squilli di
default) e suona per il tempo definito da Tempo Attivazione Fax/Tel (modificabile selezionando Toolbox >
Impostazioni > Impostazioni fax > Installazione > Ricezione) per permettere di rispondere al telefono, poi la
chiamata ritorna alla stampante. Se la chiamata è Fax, il fax viene ricevuto e stampato.
Modalità SEGRETERIA/FAX
La segreteria telefonica deve essere collegata alla stampante.
In questa Modalità di ricezione, il numero di squilli che precede l'entrata in funzione della segreteria telefonica
(vedere manuale della segreteria) deve essere inferiore a quello (modificabile selezionando Toolbox >
Impostazioni > Impostazioni fax > Installazione > Ricezione) dopo il quale la chiamata in entrata viene
ricevuta dalla stampante, in modo tale che la segreteria riceva la linea per prima. Anche quando la linea viene
ricevuta dalla segreteria, il modem della stampante è in grado di identificare se la chiamata è Voce o Fax. Se la
chiamata è Voce, non interviene. Se la chiamata è Fax, il fax viene ricevuto e stampato.
Nota: se una segreteria telefonica è collegata alla stampante, la Modalità di ricezione selezionata deve essere
SEGRETERIA/FAX.
Assistenza
Contiene un elenco di informazioni riservate del modulo fax e disponibili per un tecnico di assistenza. L'elenco
contiene i dati delle regolazioni hardware e software della stampante.
Nota: i dati contenuti in questo elenco non devono essere modificati. L'uso è riservato al servizio di
manutenzione.
GUIDA RAPIDA26

UTILIZZO DEL FAX
IMPOSTAZIONE DELLA STAMPANTE PER LA RICEZIONE DI FAX
In modalità fax, la stampante è impostata per rispondere automaticamente a tutte le chiamate.
Se viene impostata per rispondere manualmente ai fax, è necessario poter rispondere di persona alla chiamata in
entrata con un telefono addizionale e successivamente digitare sul telefono * * (o il codice personale inserito
dall’applicativo Toolbox) per ricevere il fax.
La stampante è in grado di distinguere automaticamente le chiamate fax da quelle telefoniche impostando una
delle modalità di risposta di seguito descritte.
Impostazione della Modalità di ricezione
La modalità di risposta stabilisce se la stampante deve rispondere o meno alle chiamate in entrata.
Per impostare la ricezione, accendere la stampante e attendere che sia in linea.
Premere il tasto MENU, successivamente la voce "Ricezione" e poi scegliere la modalità AUTOMATICA,
MANUALE, TELEFONO/FAX, o SEGRETERIA/FAX.
Le modalità disponibili sono:
• AUTOMATICA (impostazione di default): la stampante è abilitata alla ricezione e stampa di fax.
È necessario cambiare impostazione se si collega un apparecchio esterno, telefono o segreteria telefonica.
• MANUALE: la chiamata viene ricevuta sempre dal telefono. Se alla risposta l'utente identifica una chiamata Fax,
questa può essere deviata alla stampante inserendo il codice scelto (il codice predefinito è * *) con la tastiera del
telefono addizionale (se si è scelto Remoto nella Configurazione fax dall’applicativo Toolbox).
Nota: se un telefono addizionale è collegato alla stampante, la Modalità di ricezione selezionata deve essere
MANUALE.
• TELEFONO/FAX: dopo un certo numero di squilli (modificabile selezionando Too l bo x > Impostazioni >
Impostazioni fax > Installazione > Ricezione), la stampante si collega alla linea telefonica ed è in grado di
riconoscere se la chiamata in entrata è Fax o Voce. Se la chiamata è Voce, il tipo di squillo della stampante cambia
(dopo gli squilli di default) e suona per il tempo definito da Tempo Attivazione Fax/Tel (modificabile selezionando
Toolbox > Impostazioni > Impostazioni fax > Installazione > Ricezione) per permettere di rispondere al
telefono, poi la chiamata ritorna alla stampante. Se la chiamata è Fax, il fax viene ricevuto e stampato.
• SEGRETERIA/FAX: la segreteria telefonica deve essere collegata alla stampante. In questa Modalità di ricezione, il
numero di squilli che precede l'entrata in funzione della segreteria telefonica (vedere il manuale della segreteria)
deve essere inferiore a quello (modificabile selezionando Toolbox > Impostazioni > Impostazioni fax >
Installazione > Ricezione) dopo il quale la chiamata in entrata viene ricevuta dalla stampante in modo tale che la
segreteria riceva la linea per prima.
Anche quando la linea viene ricevuta dalla segreteria, il modem della stampante è in grado di identificare se la
chiamata è Voce o Fax. Se la chiamata è voce, non interviene. Se la chiamata è Fax, il fax viene ricevuto e
stampato.
Nota: se una segreteria telefonica è collegata alla stampante, la Modalità di ricezione selezionata deve essere
SEGRETERIA/FAX.
GUIDA RAPIDA 27

INVIO DI UN FAX
È possibile inviare un fax in vari modi:
• Utilizzando la tastiera
• Utilizzando l’alimentatore automatico di documenti
• Dal computer. Vedere "Utilizzo della stampante da un computer".
Invio di un fax dalla tastiera
1 Per inviare un fax, accendere la stampante, verificare che sia connessa alla linea telefonica e attendere che sia in
linea.
2 Posizionare l’originale sul piano dello scanner, premere tasto Avvio fax a colori o Avvio fax in bianco e nero
per acquisire il documento mediante lo scanner e caricarlo in memoria.
Il display del fax sulla tastiera visualizza il messaggio "MEMORIZZAZ. PAG."durante la fase di acquisizione del
documento.
Nota: se si invia un documento a colori, verificare che il corrispondente sia abilitato alla ricezione di fax a colori.
3 Al termine della scansione, il display visualizza la possibilità di acquisire altre pagine.
4 Premere tasto per l’acquisizione di altre pagine oppure tasto per terminare la fase di acquisizione e
inviare il fax.
5 Comporre il numero telefonico del fax a cui si intende inviare il documento tramite:
• La tastiera alfanumerica (invio manuale); al termine premere il tasto di Avvio fax.
• L’Agenda, selezionando dall’elenco dei numeri presenti (invio automatico con agenda). Al termine premere il tasto
di Avvio fax.
Invio di un fax utilizzando l’alimentatore automatico di documenti
1 Per inviare un fax, accendere la stampante, verificare che sia connessa alla linea telefonica e attendere che sia in
linea.
2 Posizionare il documento (o più documenti) nell’alimentatore automatico di documenti.
3 Inserire il numero di fax del destinatario con la tastiera alfanumerica oppure richiamarlo dall’agenda e premere il
tasto di Avvio Fax.
Nota: se si invia un documento a colori, verificare che il corrispondente sia abilitato alla ricezione di fax a colori.
4 La stampante esegue l’acquisizione automatica di tutte le pagine prensenti nell’alimentatore automatico di
documenti e le invia al destinantario.
GUIDA RAPIDA28

STAMPA DEI RAPPORTI DEL FAX
La stampa dei rapporti dell'attività svolta dal fax è disponibile sulla tastiera della stampante premendo il tasto
Menu e selezionando Rapporto di stampa con il tasto Navigatore.
La stampante visualizza sul display due possibilità di stampa:
• Ultima trasmissione: premere il tasto Conferma per stampare.
• Attività fax: premere il tasto Conferma per stampare.
Il rapporto di ultima trasmissione viene anche stampato in modo automatico ad ogni trasmissione fallita.
Dal computer, selezionando Toolbox > Impostazioni > Impostazioni fax si può cambiare l’impostazione di
stampa dei rapporti scegliendo tra: sempre, fallito (impostazione predefinita), no.
Il rapporto attività fax fornisce una stampa del giornale del fax in cui sono presenti 42 posizioni memorizzate
sull'attività svolta dal fax stesso. In automatico il giornale viene stampato ogni 32 operazioni svolte.
Rapporto del fax in caso di interruzione di corrente elettrica
Se si verifica un'interruzione di corrente elettrica, eventuali messaggi memorizzati andranno persi e alla successiva
accensione della stampante viene stampato un rapporto con la data e l'ora in cui si è verificata l'interruzione e
l'eventuale presenza di documenti in memoria. Le informazioni relative alla data e l'ora devono essere reinserite.
MESSAGGI DEL FAX
Il display del fax sulla tastiera, che normalmente visualizza la data e l'ora, informa l'utente sullo stato dell'attività
corrente del fax. I messaggi visualizzati non impediscono il normale funzionamento della stampante e possono
restare visualizzati fino al successivo utilizzo del modulo fax.
Per rimuovere il messaggio visualizzato, premere il tasto Cancella ("C") sulla tastiera del fax.
MESSAGGI IN FASE DI TRASMISSIONE
Messaggio Descrizione
TX INTERROTTA • L'utente ha interrotto la trasmissione in corso premendo il tasto Cancella.
TX NON POSSIBILE • Lo scanner è già occupato per altre operazioni, per esempio dal computer. Attendere
il completamento dell’operazione in corso sullo scanner per poter acquisire un
nuovo documento da inviare via fax.
MEM. PIENA IN TX • La memoria disponibile del fax è piena perchè sono stati acquisiti troppi documenti
dallo scanner; non è più possibile memorizzare altri documenti. Inviare via fax i
documenti presenti nella memoria oppure cancellarli.
ERRORE TX • Viene visualizzato al termine di una trasmissione via fax che ha avuto esito negativo.
Provare a inviare un altro documento via fax.
GUIDA RAPIDA 29

MESSAGGI IN FASE DI RICEZIONE
Messaggio Descrizione
RX INTERROTTA • L'utente ha interrotto la ricezione in corso premendo il tasto Cancella.
ERRORE RX • Viene visualizzato al termine di una ricezione fax che ha avuto esito negativo.
Provare a ricevere un nuovo documento via fax.
MEMORIA PIENA • La memoria disponibile sul fax è piena perchè sono stati ricevuti molti documenti.
Nel caso si verifichi questo tipo di errore, sul rapporto del fax, viene riportato un
codice di errore generico. È consigliato stampare i documenti ricevuti presenti nella
memoria, oppure cancellarli se indesiderati.
MESSAGGI GENERICI
Messaggio Descrizione
VUOTO • Non sono disponibili dati nella memoria del fax. Viene visualizzato per esempio
quando si tenta di stampare dei rapporti del fax che non sono presenti o quando
si accede all’agenda che però non ha informazioni memorizzate nel suo archivio.
IMPOST. ERRATA • Errore nella impostazione della data e dell'ora. Ripetere l’inserimento dei dati
verificando che i valori inseriti siano validi.
FAX NON DISPON. • Segnalazione visualizzata in fase di diagnostica durante l'accensione della
stampante. Indica un problema di funzionamento sul modulo fax; quando
compare, spegnere e riaccendere la stampante. Se il problema persiste chiamare
l'assistenza tecnica.
ERRORE STAMPANTE • Errore generico sul modulo di stampa. Una possibile causa può essere il fine
inchiostro in una delle cartucce installate, la mancanza carta nel vassoio, un
inceppamento carta, etc.).
Per avere maggiori informazioni verificare gli indicatori sul pannello frontale
della stampante; oppure, se è collegata ad un computer, utilizzare il Monitor di
stato per ricercare eventuali segnalazioni di errore.
GUIDA RAPIDA30

CODICI DI ERRORE STAMPATI SUL RAPPORTO DEL FAX
I codici di errore vengono stampati automaticamente sul rapporto di trasmissione o di attività del fax.
Codici di errore sul rapporto di trasmissione
I codici di errore stampati sul rapporto di trasmissione del fax sono rappresentati da due cifre indicanti la causa
dell’errore e da una breve descrizione per facilitarne la comprensione.
Codice Messaggio Descrizione Intervento
00 OK Nessun errore. Nessuna azione. Il fax è stato
03 RISPOSTA NON RICEVUTA Il corrispondente non risponde alla
04 ERRORE IN TRASMISSIONE
RITRASMETTI DA PAGINA
nn
06 LINEA OCCUPATA La linea è occupata. Ritentare quando la linea è libera.
09 TX INTERROTTA CON STOP La trasmissione è stata interrotta. Nessuna azione.
14 ERRORE IN TRASMISSIONE Durante la trasmissione del fax si è
15 RIPROVA IN B/N Si sta inviando un documento a
chiamata oppure non è un fax.
È stata rilevata un’anomalia
durante la trasmissione.
"nn" indica il numero di pagina su
cui si è rilevato l’errore.
verificato un errore oppure il
corrispondente a interrotto la
ricezione del fax.
colori ma il corrispondente non è
in grado di riceverlo.
inviato correttamente.
Verificare che il numero del
corrispondente sia corretto.
Ripetere la trasmissione a partire
dalla pagina indicata sul rapporto.
Provare a rimandare il fax oppure
accertarsi che il corrispondente
intenda ricevere il fax.
Rimandare il fax selezionando la
modalità in bianco e nero (B/N).
Codici di errore sul rapporto di attività
I codici di errore stampati sul rapporto di attività del fax comprendono sia i codici di errore in trasmissione descritti
in precedenza, sia quelli in ricezione elencati di seguito.
I codici di errore sono rappresentati da due cifre e indicano la causa dell’errore. Per motivi di spazio, sul rapporto
del fax, viene riportato soltanto il codice a due cifre senza alcun descrizione.
Codice Messaggio
10 ERRORE RX Durante la ricezione del fax si è
11 MEMORIA PIENA La memoria disponibile sul fax è
Descrizione Intervento
verificato un errore oppure il
corrispondente a interrotto la
trasmissione del fax.
piena perché sono stati ricevuti
molti documenti.
Richiedere al corrispondente l’invio
di un nuovo fax.
Stampare i documenti ricevuti e
presenti nella memoria, oppure
cancellarli se indesiderati.
GUIDA RAPIDA 31

GUIDA RAPIDA32

INDICE ANALITICO
A
Accensione della stampante 3
Acquisto di nuove cartucce
d’inchiostro 15
Agenda 4
Avvio
copia a colori 5
copia B/N 5
fax a colori 5
fax in bianco e nero 5
C
Cartucce
acquisto 15
sostituzione 15
Codici di errore
sul rapporto di trasmissione 31
sul rapporto di attività 31
Collegamento
alla rete telefonica 7
alla stampante di una macchina
della stampante alla rete
Contatore copie 5
Contrasto di copia 5
Copia 20
di documento 12
d’inchiostro
fotografica digitale 6
telefonica 7
14
D
Display 4
E
Errore carta 6
F
Fax
assistenza 26
configurazione 25
installazione 24
ricezione 25
in memoria 6
Fine inchiostro 6
G
Garanzia 3
I
Impostazione
data e ora del fax 12
della modalità di risposta 27
della stampante per la
ricezione di fax 27
Impostazioni fax 24
Indicatori luminosi del
pannello frontale 6
Installazione del fax 10
Invio di un fax
dalla tastiera 28
utilizzando l’alimentatore
automatico di
documenti 28
L
LED di errore 3
LED di on/off 3
M
Menu 4
Messaggi del fax 29
generici 30
in fase di ricezione 30
in fase di trasmissione 29
Modalità
di ricezione fax 25
economy della stampante 3
Monitor di stato 18
O
On/off 4
P
Pannello frontale
fine inchiostro 6
errore carta 6
INDICE ANALITICO
33

fax in memoria 6
USB 6
Photo Index 13
Pop-up di errore
monitor di stato 19
Procedura d’installazione 11
Propietà di stampa
layout 23
livelli d’inchiostro 23
carta/qualità 22
Q
Qualità fax 5
R
Ricezione di fax
automatica 27
modalità automatica 26
modalità manuale 26
modalità segreteria/fax 26
modalità telefono/fax 26
S
Scansione 5, 20
personalizzato 24
standard 23
di un originale 23
Selezione
numero di copie 5
qualità di stampa 5
Sicurezza 2
Sostituzione delle cartucce 15
Spegnimento della
stampante 3
Stampa 5, 20
Stampa da un’applicativo 22
Stampa dei repporti del fax 29
Stampa di foto
da una macchina fotografica
digitale DPOF 14
da una macchina fotografica
PictBridge 13
Stampa di foto da una
macchina fotografica
digitale 13
Stato USB 6
T
Tastiera alfanumerica 4
Tastiera della stampante 3
Tasto # 4
Tasto * 4
Toolbox 19, 20
acquisisci in un applicativo 21
acquisisci in un fax 21
acquisisci in un file 21
acquisisci in una e-mail 21
fotocopiatrice 20
stampa 20
Toolbox link 21
help 21
impostazioni 21
soluzioni e assistenza 21
U
Utilizzo del fax 27
Utilizzo della stampante
da un computer 18
senza un computer 12
V
Verifica dei livelli
d’inchiostro 14
INDICE ANALITICO
34

CONTENTS
GETTING STARTED . . . . . . . . . . . . . . . . . . . . . . . . . . . . . . . . . . . .2
Overview . . . . . . . . . . . . . . . . . . . . . . . . . . . . . . . . . . . . . . . . .2
Safety Instructions . . . . . . . . . . . . . . . . . . . . . . . . . . . . . . . . . .2
Information on Print Quality and the Warranty . . . . . . . . . . . . .3
Switching the Printer On and Off . . . . . . . . . . . . . . . . . . . . . . .3
Printer Economy Mode . . . . . . . . . . . . . . . . . . . . . . . . . . .3
Printer Keyboard . . . . . . . . . . . . . . . . . . . . . . . . . . . . . . . . . . .3
Key Functions . . . . . . . . . . . . . . . . . . . . . . . . . . . . . . . . . .4
LEDs on the Printer Front Panel . . . . . . . . . . . . . . . . . . . . . . . . .6
Connecting a Digital Camera to the Printer . . . . . . . . . . . . . . .6
Connecting the Printer to the Telephone Network . . . . . . . . . .7
Connecting to the Telephone Network and Connecting
an External Telephone . . . . . . . . . . . . . . . . . . . . . . . . . . . .7
Connection Case 1 (Italy and Switzerland) . . . . . . . . . . . . .8
Connection Case 2 . . . . . . . . . . . . . . . . . . . . . . . . . . . . . .9
Connection Case 3 . . . . . . . . . . . . . . . . . . . . . . . . . . . . .10
Installing the Fax . . . . . . . . . . . . . . . . . . . . . . . . . . . . . . . . . .10
Installation Procedure . . . . . . . . . . . . . . . . . . . . . . . . . . .11
Setting Fax Date and Time . . . . . . . . . . . . . . . . . . . . . . . . . . .12
USING THE PRINTER WITHOUT A COMPUTER . . . . . . . . . . . . .12
Copying a Document . . . . . . . . . . . . . . . . . . . . . . . . . . . . . . .12
Printing Photos from a Digital Camera . . . . . . . . . . . . . . . . . .13
Printing Photos from a PictBridge Digital Camera . . . . . . . . . .13
Printing Photos from a DPOF Digital Camera . . . . . . . . . . . . .14
INK CARTRIDGES . . . . . . . . . . . . . . . . . . . . . . . . . . . . . . . . . . . .14
Checking the Ink Levels . . . . . . . . . . . . . . . . . . . . . . . . . . . . .14
Information Required for Purchasing New Ink Cartridges . . . .15
Replacing the Ink Cartridges . . . . . . . . . . . . . . . . . . . . . . . . . .15
CONTENTS
iii

USING THE PRINTER WITH A COMPUTER . . . . . . . . . . . . . . . . .18
Before You Begin . . . . . . . . . . . . . . . . . . . . . . . . . . . . . . . . . .18
The Printer Status Monitor . . . . . . . . . . . . . . . . . . . . . . . . . . .18
The Toolbox . . . . . . . . . . . . . . . . . . . . . . . . . . . . . . . . . . . . . .19
Printing, Copying and Scanning from the Toolbox . . . . . . . . . .20
Printing From an Application . . . . . . . . . . . . . . . . . . . . . . . . .22
Scanning a Document from an Application . . . . . . . . . . . . . . .23
Fax setup from the Toolbox Application . . . . . . . . . . . . . . . . .24
Fax Settings . . . . . . . . . . . . . . . . . . . . . . . . . . . . . . . . . . .24
Installation . . . . . . . . . . . . . . . . . . . . . . . . . . . . . . . . . . . .24
Service . . . . . . . . . . . . . . . . . . . . . . . . . . . . . . . . . . . . . . .26
USING THE FAX . . . . . . . . . . . . . . . . . . . . . . . . . . . . . . . . . . . . .27
Configuring the Printer to Receive Faxes . . . . . . . . . . . . . . . . .27
Setting Reception Mode . . . . . . . . . . . . . . . . . . . . . . . . .27
Sending a Fax . . . . . . . . . . . . . . . . . . . . . . . . . . . . . . . . . . . .28
Sending a Fax from the Keyboard . . . . . . . . . . . . . . . . . .28
Sending a Fax Using the Automatic Document Feeder . . .28
Printing Fax Reports . . . . . . . . . . . . . . . . . . . . . . . . . . . . . . . .28
Fax Report for Power Failure . . . . . . . . . . . . . . . . . . . . . .29
FAX MESSAGES . . . . . . . . . . . . . . . . . . . . . . . . . . . . . . . . . . . . .29
Messages During Transmission . . . . . . . . . . . . . . . . . . . . . . . .29
Messages During Reception . . . . . . . . . . . . . . . . . . . . . . . . . .29
General Messages . . . . . . . . . . . . . . . . . . . . . . . . . . . . . . . . .30
Error Codes Printed on the Fax Report . . . . . . . . . . . . . . . . . . .31
Transmission Report Error Codes. . . . . . . . . . . . . . . . . . . .31
Activity Report Error Codes . . . . . . . . . . . . . . . . . . . . . . . .31
iv
INDEX . . . . . . . . . . . . . . . . . . . . . . . . . . . . . . . . . . . . . . .33
CONTENTS

DIRECTIVE 2002/96/CE ON THE TREATMENT, COLLECTION, RECYCLING AND DISPOSAL OF
ELECTRIC AND ELECTRONIC DEVICES AND THEIR COMPONENTS
INFORMATIONS
1. FOR COUNTRIES IN THE EUROPEAN UNION (EU)
The disposal of electric and electronic devices as solid urban waste is strictly prohibited: it must be
collected separately. The dumping of these devices at unequipped and unauthorized places may have
hazardous effects on health and the environment. Offenders will be subjected to the penalties and
measures laid down by the law.
To dispose of our devices correctly:
a Contact the Local Authorities, who will give you the practical information you need and the
instructions for handling the waste correctly, for example: location and times of the waste
collection centres, etc.
b When you purchase a new device of ours, give a used device similar to the one purchased to our
dealer for disposal.
The crossed dustbin symbol on the device means that:
• When it to be disposed of, the device is to be taken to the equipped waste
collection centres and is to be handled separately from urban waste;
• The manufacturer guarantees the activation of the treatment, collection,
recycling and disposal procedures in accordance with Directive 2002/96/CE (and
subsequent amendments).
2. FOR OTHER COUNTRIES (NOT IN THE EU)
The treatment, collection, recycling and disposal of electric and electronic devices will be carried out in
accordance with the laws in force in the country in question.
CONTENTS
v

All information included herein is subject to change without notice. Olivetti S.p.A. is not responsible for any loss or
damages, direct or indirect, arising from or related to the use of this operation manual.
MIPC (Mobile Imaging and Printing Consortium)
The MIPC is a non-profit industry association founded in 2004 by leading companies in home photo printing and the
mobile phone industry. Its mission is to promote and support the development of interoperability guidelines enabling
printing of images and other content between mobile phones and home printers. The guidelines are promoted for use
internationally to ensure a broad spectrum of products and services for mobile phone consumers.
www.mobileprinting.org.
LINEA office: This Mobile Printing Ready product is designed to provide easy printing from mobile phones. This
product follows Mobile Imaging and Printing Consortium (MIPC) Implementation Guidelines for Home Printing with
Mobile Terminals, Version 2.1, for PictBridge.
vi
CONTENTS

QUICK REFERENCE GUIDE
GETTING STARTED
USING THE PRINTER WITHOUT A COMPUTER
INK CARTRIDGES
USING THE PRINTER WITH A COMPUTER
USING THE FAX
FAX MESSAGES
QUICK REFERENCE GUIDE 1

GETTING STARTED
OVERVIEW
This multifunction product provides the integrated functions of a high quality ink-jet printer and of a colour
scanner, photocopier and fax. Copying and faxing multiple page documents is made simple by the automatic
sheet feeder.
For normal printing and copying operations, a colour ink cartridge can be used with a black ink cartridge. For printing
photos, it is recommended that you replace the black cartridge with a photo ink cartridge (sold
separately). All
cartridges are also available in a High Capacity version.
The printer can be used without a computer for faxing documents and making copies; you can also print photos
by simply connecting a digital camera to the USB interface on the front panel.
The Installation CD supplied with the printer provides the software for connection with a computer, and an
application called the Toolbox which provides rapid access to all the printer features.
A second CD provides the software for manipulating text and images.
Complete information can also be found in electronic format by selecting Start > Programs or All programs >
Olivetti, which you can browse or print.
Online Help is available for each software screen by just selecting Help.
Note: Minimum requirements for computer connected.
Operating systems supported: Microsoft Windows 2000 (Service Pack 3 or later), XP (Service Pack 2 or later) or
Vista; also MAC OS X 10.2, OS X 10.3 or OS X 10.4.
RAM: 256 MB for Windows 2000/XP (512 MB of memory is recommended); 512 MB for Windows Vista (1 GB of
memory is recommended).
Free hard disk space: 500 MB.
SAFETY INSTRUCTIONS
Read and follow attentively the following safety instructions:
• Use exclusively the CWT model PAA060P power supply unit and the power cable supplied with the product. If a
different power supply unit is used to that provided in the package, it will be the sole responsibility of the user to
guarantee its conformity with current safety standards, and that it meets the correct power supply requirements of
the product.
• Connect the power supply cable to a grounded electrical outlet that is near the product, and easily accessible.
• Install the printer on a flat, stable surface, in a location where no one can step on or trip over the power cable.
• Do not use the printer near water, or with wet hands. Do not expose the printer to rain or moisture.
• Do not attempt to disassemble the printer.
• Observe all warnings and instruction markings on the printer.
• Read and understand all the documentation supplied with the printer.
• The scanner is considered a Class 1M laser radiation emitter: do not look at it directly with optical instruments
(magnifying glass).
QUICK REFERENCE GUIDE2

INFORMATION ON PRINT QUALITY AND THE WARRANTY
To guarantee correct operation of the printer and top quality printing, use only original Olivetti ink cartridges.
Olivetti declines any responsibility whatsoever for damage to the printer caused by the tampering with, or refilling,
ink cartridges. Such conduct also renders the Warranty void.
SWITCHING THE PRINTER ON AND OFF
Press the On/Off key. When the keyboard is closed, the two LEDs indicate if the printer is switched on and if any
operating errors have occurred.
Reference Indicator Description
1
On/Off LED A green light indicates that the printer is switched on.
2 Error LED An orange light indicates that errors are signalled by the LEDs on the
printer front panel.
Printer Economy Mode
After a time interval that can be modified from the Toolbox, the printer enters energy saving mode and the
keyboard is disabled.
The printer re-activates on receiving any signal from the computer or the keyboard.
Note: Switching off the printer is not recommended as it results in the loss of the date and time.
PRINTER KEYBOARD
The keyboard provides selection and start keys for all the functions available: copy, fax and print from digital
camera or memory device connected to the printer. Under normal operating conditions, the keyboard should be
left open. To open the keyboard, press on the shiny area at the top right of the door.
QUICK REFERENCE GUIDE 3

Key Functions
Reference Part Description
1
On/Off key Switch the printer on and off.
If there is a fax in memory that has been received but not yet printed
(yellow light on), switching off the printer is disabled.
Note: Switching off the printer results in the loss of date and time settings, it is
therefore recommended that you do NOT carry out this operation which has
been replaced by automatic energy saving mode. If, nevertheless, you want to
switch the printer off, press the On/Off key for 5 seconds.
2 Display Indicates the fax status, and displays the menu and phone book.
3 Alphanumeric
keypad
You can enter the telephone number or the initial of the name you want to
find in the phone book.
4 * key Provides access the special functions provided by the telephone company.
Also allows you to change from “Pulse dialing” to “Tone dialing”.
5 # key Provides access to the special functions provided by the telephone
company.
6 Phone book The first number displayed is the last number called. The name search can
be effected using the Navigator, or by entering the initial of the name you
want to find.
Entries can be made to the phone book only from the computer.
7 Menu Provides access to all the fax functions.
You can browse using the Navigator, confirm your selections using the
Confirm key, or cancel selections using the Cancel key.
8 Confirm Select and confirm the options shown on the display.
9 Navigator Browse menu items on the display or entries in the phone book.
QUICK REFERENCE GUIDE4

Reference Part Description
10 Fax quality Modify the resolution to be used when sending faxes.
11 Copy counter Displays the number of copies setting.
The number displayed decreases as each copy is printed.
12 Select number of
copies
Set the number of copies to be made using the plus (+) and minus (-) keys.
The number selected is displayed on the Copy counter.
13 Cancel Cancel a job immediately. Restore settings to their factory values.
14 Select print quality Select the print and copy quality.
Photo quality is recommended for copying images, or when printing on
special ink-jet paper.
15 Copy contrast Lighten or darken the copy.
16 Start B/W copy Start copying in B/W. Press and keep held down to activate the "Fit to
page" functionality. This functionality is not available when documents are
loaded onto the automatic document feeder.
17 Start colour copy Start copying in colour. Press and keep held down to activate the "Fit
to page" functionality. This functionality is not available when documents
are loaded onto the automatic document feeder.
18 Start scanning Enabled when the printer is connected to a computer.
Press to scan the document on the scanner glass or loaded onto the
automatic document feeder.
A Toolbox application window is displayed on the computer allowing you
to scan the image directly into an application of your choice, and to
customise scan settings.
19 Start B/W fax Start receiving or sending a black and white fax.
20 Start colour fax Start receiving or sending a colour fax.
21 Start printing Enabled when a digital camera or a compatible memory device is
connected to the printer.
This key flashes when printing is in progress.
QUICK REFERENCE GUIDE 5

LEDS ON THE PRINTER FRONT PANEL
Open out the keyboard to access the compartment where the LEDs can be seen.
Reference Indicator Description
1
USB status • A green light indicates that a digital camera or compatible memory
device is connected. A flashing light indicates that data is being
transferred to the printer.
2 Fax present
in memory
• A fax is present in memory (i.e. was not printed when it was
received).
The printer cannot be switched off without correcting the reason for
the error, and printing the faxes present in memory.
• A fax transmission or reception error has occurred.
3 Paper error Indicates:
• Paper jam.
• No paper in feeder.
4 Out-of-ink LED flashes when the black, photo or colour cartridges are nearly out of
ink. A steady orange light indicates that the ink has run out.
CONNECTING A DIGITAL CAMERA TO THE PRINTER
1 Switch on the digital camera. For more information, read the digital camera’s User Guide.
2 With the printer switched on, connect one end of the USB cable to the USB connector of the digital camera, and
the other end to the USB connector on the printer front panel. The connection LEDs and the Start printing key
icon illuminate.
Note: If you are connecting a PictBridge digital camera, the Start printing key icon does not illuminate because
printing is controlled directly from the digital camera.
QUICK REFERENCE GUIDE6

The green USB status LED illuminates to indicate that a correct connection has been established.
If the connection is not established, make sure you have connected a compatible device.
CONNECTING THE PRINTER TO THE TELEPHONE NETWORK
Two RJ11 connectors are present on the back of the printer: "LINE" (on the right) and "EXT" (on the left). Using
the telephone cable provided, connect the telephone line to the "LINE" socket.
You can connect an external telephone or an answering device to the "EXT" socket.
If the socket is protected by a cover, remove it.
A telephone connected in a cascade can be used to make and reply to calls, and to send a START signal to receive
a fax (the default DTMF code * * can be customised by selecting Toolbox > Settings > Fax settings >
Installation > Configuration ).
In this case, the keyboard display indicates that an additional telephone is connected.
Connecting to the Telephone Network and Connecting an External Telephone
As connecting an additional telephone or other device to the fax telephone line is subject to national regulations,
which vary from country to country, the illustrations on the next pages show connection examples.
If, in the destination country, connection to the telephone line differs from those shown in the examples, refer to
the regulations in force in the destination country.
• The fax is set up to be connected to the public telephone line. To connect it to a private line and use it also on a
public line, refer to the section “Installing the Fax”.
• In the case of a multiple-socket telephone system, additional telephone devices can be connected to any of
the sockets available provided that the system is of the type with multiple sockets in parallel. In this case, the
dial tone is always present when the handsets of the existing telephone devices are lifted simultaneously.
QUICK REFERENCE GUIDE 7

• If the dial tone is not present when the hand-sets of the pre-existing telephone devices are lifted simultaneously,
this means that the telephone system is of the type with multiple sockets in series. In this case, the additional
telephone devices must be connected directly to the printer as already explained above. If this is not possible,
connect the printer to the socket with the highest priority.
Each country uses a specific type of telephone plug. The most frequently-used connections are illustrated below.
Connection Case 1 (Italy and Switzerland)
Insert the connector of the additional telephone or other device into the "EXT" socket (see the related
illustration). If it is not possible to connect the additional telephone directly to the "EXT" socket, use the specific
adapter supplied with the additional telephone.
A = telephone line input (LINE IN)
B = wall socket for telephone plug
C = external telephone with or without adapter, telephone answering device (EXT)
D = socket for external telephone, telephone answering device or other unit.
Connection Case 1 Italy
QUICK REFERENCE GUIDE8

Connection Case 1 Switzerland
Connection Case 2
Insert the connector or plug of the additional device into the socket (see the related illustration).
A = telephone line input (LINE IN)
B = wall socket for telephone plug
C = external telephone, with or without adapter, telephone answering device (EXT)
D = socket for external telephone, telephone answering device or other unit.
QUICK REFERENCE GUIDE 9

Connection Case 3
Insert the plug of the additional unit into the wall socket of the telephone line (see the related illustration).
Using the specific adapter (as for the first type of connection), you can connect another device to the printer
"EXT" socket for connection to the telephone line.
A = telephone line input (LINE IN)
B = wall socket for telephone plug
C = external telephone, with or without adapter, telephone answering device (EXT)
D = socket for external telephone, telephone answering device or other unit.
INSTALLING THE FAX
After having connected the telephone cable and the power supply cable, press the On/Off key to switch on the
printer. The printer executes a series of autodiagnostic tests displaying, at the end, a message indicating that the
printer is ready for use as a fax.
QUICK REFERENCE GUIDE10

Installation Procedure
1 When switched on, the display shows the languages available in sequence, each uniquely identified by a 2-digit
code "nn".
Enter the keys relative to the number "nn" corresponding to the language you want to set.
2 Confirm your selection by pressing the key. Alternatively, press the key to return to step 1.
3 The possible choices for the Destination country are shown on the display.
Each country is uniquely identified by a 2-digit code "nn".
Enter the keys relative to the number "nn" corresponding to the Destination country you want to set.
4 Confirm your selection by pressing the key. Alternatively, press the key to return to step 3.
5 Installation is terminated.
6 To enter the date and time, press the Menu key followed by the Confirm key. The message "SET DATE/TIME"
appears on the display.
7 Enter the data using the alphanumeric keypad then press the Confirm key.
Note: The date and time can also be sent from the computer by selecting Toolbox > Settings > Fax settings.
Note: If there is a power failure, the date and time settings are lost. When the printer is next switched on, a
message is displayed prompting you for the date and time again.
Note: If you want to change the Destination country setting, press in sequence the keys C + * + *. The display
allows you to choose your language and Destination country. Enter the data and then switch off the printer. When
you switch the printer on again, you must enter the correct date and time.
Country Selection Country Selection
Argentina
Australia
Austria
Belgium
Brazil
Chile
China
Colombia
Czech Republic
Denmark
Finland
France
Germany
Greece
Hong Kong
India
Israel
Italy
AMERICA LATINA
NZL/AUSTRIA
ÖSTERREICH
BELGIUM
BRASILE
AMERICA LATINA
CHINA
AMERICA LATINA
CZECH
DANMARK
FINLAND
FRANCE
DEUTSCHLAND
GREECE
SINGAPORE
INDIA
ISRAEL
ITALIA
Ireland
Luxembourg
Mexico
New Zealand
Norway
Netherlands
Portugal
Peru
Rest of the world
Spain
South Africa
Sweden
Switzerland
Turkey
UK
Uruguay
Venezuela
UK/IRLANDA
BELGIUM
AMERICA LATINA
NZL/AUSTRALIA
NORGE
HOLLAND
PORTUGAL
AMERICA LATINA
INTERNATIONAL
ESPAÑA
S. AFRICA
SVERIGE
SCHWEIZ
TURKEY
U.K. / IRELAND
AMERICA LATINA
AMERICA LATINA
QUICK REFERENCE GUIDE 11

SETTING FAX DATE AND TIME
To set the date and time manually when you switch on the printer:
• In stand-alone mode, press the Menu key. The message "SET DATE/TIME" is displayed.
Enter the date and time using the alphanumeric keypad and press Confirm again at the end.
• You can also send the date and time from the computer by selecting Toolbox > Settings > Fax settings.
USING THE PRINTER WITHOUT A COMPUTER
COPYING A DOCUMENT
1 Switch on the printer. See "Switching the Printer On and Off".
2 Make sure that the out-of-ink indicators on the front panel are switched off. If either indicator is on, you should
replace the corresponding ink cartridge.
For more information, see “Replacing the Ink Cartridges”.
3 Load the paper on which you want to print.
4 Place the document you want to copy on the scanner glass or, if it consists of multiple pages, in the automatic
document feeder.
5 Select the copy quality: Photo or Normal, pressing the Select print quality key.
a To copy a normal B/W text, or a mixed document in B/W and colour, select Normal.
b To copy a document and print it on special ink-jet paper, select Photo. For more information, see "Printer
Keyboard”.
6 Select the contrast: dark, medium or light, pressing the Copy contrast key. For more information, see "
Keyboard
".
Printer
7 To make more than one copy, press the "+" (plus) key the number of times necessary to display the number of
copies required on the counter.
QUICK REFERENCE GUIDE12

8 Press the Start B/W copy or Start colour copy key, as required.
Note: If you want to copy the document onto a different sized page, keep the Start B/W copy or Start colour
copy key pressed to activate the Fit to page function. The printer automatically resizes the original to correspond
to the size of paper loaded.
Note: The Fit to page function is not available if the documents to copy are loaded onto the automatic
document feeder.
PRINTING PHOTOS FROM A DIGITAL CAMERA
When a digital camera or a compatible memory device is connected to the printer, the Start printing key
illuminates.
Pressing the Start printing key causes the Photo Index to be printed, a document reproducing all the images
present in the memory connected to the printer, and that allows you to choose the images to print, the number of
copies and the paper size.
To print the Photo Index:
1 Leave connected the memory used for printing the Photo Index.
2 Position the Photo Index, completed in all its parts, on the scanner glass.
3 Press the Start printing key until the print operation starts (approx 8 secs.): the photos are printed as indicated.
• The pre-configured print quality is suitable for special ink-jet paper, and can be modified from the printer
keyboard.
• The photos printed are automatically adjusted to fit the size of the paper in the automatic feeder.
PRINTING PHOTOS FROM A PICTBRIDGE DIGITAL CAMERA
To obtain the best results when printing photos, you should use a colour cartridge with a photo cartridge. See
“Replacing the Ink Cartridges”.
1 Load photo paper onto the printer.
2 Make sure the PictBridge digital camera is switched on and connected to the printer.
3 Printing is controlled directly from the camera, therefore the Start printing key is disabled. Read the camera’s
User Guide for instructions on how to print photos.
During printing, the Start printing key flashes
Note: If the paper size loaded is different from the paper size set from the digital camera, printing will not be
correct, or an error message is displayed.
QUICK REFERENCE GUIDE 13

PRINTING PHOTOS FROM A DPOF DIGITAL CAMERA
To obtain the best results when printing photos, you should use a colour cartridge with a photo cartridge. See
“Replacing the Ink Cartridges”.
The printer is able to recognise the DPOF information that has been associated with the images to be printed. The
Start printing key illuminates on recognising the DPOF format files.
1 Load photo paper onto the printer.
2 Make sure the DPOF digital camera is switched on and connected to the printer.
Select the print quality according to your printing requirements.
3
4 Press the Start printing key on the keyboard to print the photos you have selected, associating the DPOF
indications of the digital camera.
INK CARTRIDGES
CHECKING THE INK LEVELS
You can check the cartridge ink levels directly from the printer front panel, from the printer and scanner drivers,
the Toolbox application and the Status Monitor.
From the printer front panel:
• When the black or colour indicators begin to flash, the levels in the ink cartridges are getting low.
• When the indicators are on steadily, the printer is in the almost out-of-ink condition and replacement of the ink
cartridge is recommended.
From the printer driver:
1 With a document open in the application you are using, select File > Print.
The Print dialogue appears on the screen.
2 Select Preferences or Properties, depending on the operating system.
The printer driver user interface is displayed on the screen.
3 Select the Ink Levels tab: the two ink level indicators indicate the estimated amount of ink left in the cartridges,
expressed as a percentage.
From the Toolbox application:
1 Open the Toolbox application from the Olivetti icon in the task bar or on the desktop, or otherwise select Start >
Programs or All programs > Olivetti > Olivetti Toolbox.
The Toolbox main screen is displayed.
2 Select Solutions and assistance.
3 Select Select > New ink cartridges.
In the New ink cartridges dialogue, the ink level indicators show the estimated amount of ink left in the
cartridges, expressed as percentages.
From the scanner driver:
When you scan a document or photo, the ink level indicators appear in the bottom part of the window, indicating
the estimated amount of ink left in the cartridges, as percentages.
QUICK REFERENCE GUIDE14

From the Status Monitor:
When a print or copy operation is executed from the computer, the printer Status Monitor is displayed on the
screen. The window displays print information and the level of ink left in the cartridges. For more information, see
"The Printer Status Monitor”.
INFORMATION REQUIRED FOR PURCHASING NEW INK CARTRIDGES
To guarantee the correct operation of the printer and a high print quality, use exclusively original Olivetti ink
cartridges.
Use the following product order codes when purchasing ink cartridges:
• Black ink cartridge, order code B0631 - IN701
• Tri-colour ink cartridge, order code B0632 - IN703
• Photo ink cartridge, order code B0633 - IN705
• High-capacity black ink cartridge, order code B0628 - IN702
• High-capacity, Tri-colour ink cartridge, order code B0629 - IN704
• High-capacity, photo ink cartridge, order code B0630 - IN706
Caution: The cartridges can be used once only.
REPLACING THE INK CARTRIDGES
It is recommended that you use only original ink cartridges. Print quality cannot be guaranteed, nor is there
guarantee cover for problems arising from the use of non-original accessories, parts or components.
Caution: Before carrying out the procedures listed in this section, read and follow carefully the information on
1 Switch on the printer.
2 With both hands raise the upper part of the printer. The support lever automatically blocks the upper part of the
printer in the open position. The carriage moves to the centre of the printer to facilitate cartridge insertion.
safety standards contained in this guide.
QUICK REFERENCE GUIDE 15

3 Press the lever to remove the ink cartridge you want to replace.
Warning: The black (or photo) cartridge must always be inserted into the carrier on the left, the colour cartridge
in the carrier on the right.
4 If the cartridge removed is to be reused in the future place it in the storage/protection garage for black and photo
cartridges located inside the printer.
5 When installing a new cartridge, remove the protection tape on the cartridge.
Note: This procedure illustrates how to replace a colour cartridge, however the same procedure applies for
replacing black and photo cartridges.
QUICK REFERENCE GUIDE16

6 Insert the new cartridge, pressing it towards the back of the printer until it clicks into place.
7 Lift the upper part of the printer and move the support lever. Lower the upper part of the printer until it is
completely closed.
8 The printer automatically executes ink cartridge alignment, and ends printing a test page. Load an A4 sheet of
paper and wait for printing to complete
.
QUICK REFERENCE GUIDE 17

USING THE PRINTER WITH A COMPUTER
BEFORE YOU BEGIN
This chapter provides the basic information necessary to use the printer connected to a computer. For more
information on the functions available, consult the User Guide by selecting Start > Programs > Olivetti.
Other information can be obtained by selecting Help in the dialogue boxes.
Before you begin:
1 Make sure that the printer and computer are connected correctly, and that the CD software has been installed
successfully on the computer as indicated in the Installation Guide supplied with the printer.
2 Load the paper on which to print.
3 Make sure that the out-of-ink indicators on the front panel are switched off. If either is not, you are advised to
replace the corresponding ink cartridge. See "Replacing the Ink Cartridges" for more information.
THE PRINTER STATUS MONITOR
The printer Status Monitor provides information on the current printer status. It is installed when you install the
software contained on the “Installation” CD.
The Status Monitor displays automatically at the beginning of a print or copy job:
• A graphical representation of the percentage of the print or copy job already completed.
• The number of pages already printed, or copied, out of the total number of pages in the job.
• A graphical representation of the estimated amount of ink, as a percentage, still available in the colour and black
cartridges.
• The possibility to cancel the print or copy job.
• The address of the manufacturer’s web site where you can access information on purchasing new ink cartridges.
The Status Monitor closes automatically at the end of a print or copy job, but you can close it at any time.
If you close the Status Monitor during a print or copy job, it is automatically redisplayed.
• When the printer is in the out-of-ink or almost out-of-ink conditions. A coloured exclamation mark indicates the
cartridge in a low-ink condition (colour, black, or both), and the relative percentages.
Pop-ups are displayed with the address of the manufacturer’s web site where you can access the information for
purchasing new ink cartridges.
QUICK REFERENCE GUIDE18

The printer Status Monitor also displays an error pop-up when:
• One or both cartridges are missing.
• The scanner unit is raised.
• The keyboard is closed and a print or copy operation is started.
• The printer runs out of paper.
• A paper jam occurs.
• An incorrect paper size is detected.
• The printer is busy with another task.
• The printer is not recognised.
• The ink cartridge carriage is jammed.
• The printer is not working (system error).
The pop-up windows displayed also allow you to choose whether you want to continue printing or to cancel the
print operation.
THE TOOLBOX
The Toolbox application allows you to print, copy, scan, send and receive faxes, from a single window on the
computer screen.
From the Toolbox main screen, you can:
• Print images and make copies.
• Scan documents, choosing beforehand the destination.
• Check the amount of ink left in the cartridges installed.
• Access a Solutions and assistance facility where you can:
– Clean and test the ink cartridge nozzles.
– Automatically align the ink cartridges to improve print quality.
– Find the address of the manufacturer’s web site, where you can access information on purchasing new ink
cartridges.
– Access troubleshooting and maintenance information.
– Print a test page.
• Access the Settings function.
QUICK REFERENCE GUIDE 19

PRINTING, COPYING AND SCANNING FROM THE TOOLBOX
To access the Toolbox:
1 Select with your right mouse button the Olivetti icon in the Windows task bar and run the Toolbox application, or
select Start > Programs or All Programs > Olivetti > Olivetti Toolbox. The Toolbox main screen is displayed.
Note: In the Mac OS X environment, the Toolbox program is available by selecting the icon present on the
desktop, or by selecting it from the list of programs installed.
The main area of the Toolbox contains icons representing the different tools available.
Icon You can:
Print photos • Browse the hard disk or memory of the non-PictBridge/DPOF digital camera
connected to the computer to find the folder containing the photos to print.
• Select all the photos stored in the folder, or just the individual ones you want,
and indicate the number of copies to print of each.
• Choose the type and size of the paper.
• Specify if the photos are to be printed on a single page, two to a page or four to
a page.
• Print a photo index.
• Print the selected photos.
Photocopier • Define the type of document to be copied.
• Choose the type and size of paper to print on.
• Define the copy quality.
• Lighten or darken the copy, and select colour or black and white.
• Select the layout for the printed copy: scan multiple pages and print them on a
single page; make poster format copies indicating the number of pages over
which to fit the image, clone the image the number of times required without
resizing, or simply print the image on a single page.
Not all types of layout are available if the copy operation is executed with the
document to be copied loaded onto the automatic document feeder.
• Enlarge or reduce the document or photo to be copied, or automatically adjust
its size so that it fits onto the paper size selected.
Note: Not all the functions for modifying the image size or selecting different
layouts are available when the documents for copying are loaded onto the
automatic document feeder.
• Select the number of copies to make.
QUICK REFERENCE GUIDE20

Icon You can:
Scan to file
Scan to application
Scan to email
Scan to fax
• Scan a preview of the document or photo placed on the scanner glass.
• Use selection handles to delimit the area of the preview image to scan.
• Rotate, flip, enlarge or reduce the preview image.
• Define the type of document to be scanned, and whether it is in full-colour,
shades of grey or black and white.
• Define the resolution, colour depth, brightness and contrast of the image to be
scanned.
Note: When documents are loaded onto the automatic document feeder, pages
can be scanned one at a time, or all pages in sequence.
Depending on the tool selected:
• Scan to file, save the scanned image in TIFF (.tif), bitmap (.bmp) or JPEG (.jpg)
formats in a computer folder
• Scan to application, send the scanned image of the document or photo to an
application of your choice (such as a graphics program, word processor or
desktop publisher).
• Scan to email, save the scanned image of the document or photo in
compressed .jpg format, and attach it to an e-mail message opened by the
default e-mail application on the computer.
• Scan to fax, save the scanned image of the document or photo in
compressed.jpg format, and send it to the fax application of your choice.
The Toolbox main screen also provides links to Help, Solutions and assistance, and Settings.
Link You can:
Help • Read more information on the topic currently displayed on the computer.
Solutions and assistance • Clean and test the ink cartridges.
• Automatically align the ink cartridges.
• Find the address of the manufacturer’s web site, where you can access
information on purchasing new ink cartridges.
• Access troubleshooting and maintenance information.
Settings • Modify the default settings of all the functions available.
QUICK REFERENCE GUIDE 21

PRINTING FROM AN APPLICATION
1 With the document or photo open in the application you are using, select File > Print to open the Print dialogue.
2 Select Preferences or Properties, depending on the operating system.
The printer driver user interface screen is displayed from which you can use the multifunction printer, as indicated
in the following table.
Preferences/Properties: You can:
Paper/quality • Select manually the composition of the document to print:
only black text or graphics, a combination of black text, colour graphics and
photos, photos only; or set automatic detection of the original as a combination
of black text, colour graphics or photos.
• Select the type and size of the paper to use.
• Define the size in inches or millimetres of any custom-sized paper to use.
• Select printing without borders when coated paper, glossy paper or postcard
format is set.
• Specify manual paper loading when printing in banner format. Single sheet
feeding is also recommended when loading envelopes, labels and iron-on
transfers.
• Select the print quality required.
• Set printing in photo quality when photographic paper is loaded and Photo is
selected as the document type; the printer will require a longer printing time.
• Print multiple page documents in reverse order, starting last page first.
The selection can be cancelled.
• Specify if the image must be printed in Portrait or Landscape (the printer rotates
the image as required).
• Specify whether to print in B/W or in colour, depending on the original
document.
• Define the number of copies to print, and if printing order is last page first.
• Restore the settings to their default values, or save the settings so that they can
be applied to the next print operation.
Layout • Set printing of each page of the document, or photos, on a single sheet.
• Set printing of multiple pages on a single sheet, inserting 2, 3, 4 or 8 pages of
the document, or photos, on a single sheet of paper.
• Define the order in which the multiple pages will be inserted on the single sheet
of paper, and whether or not to insert a border around each image on the single
sheet of paper.
• Set printing of multiple pages in poster format, expanding the contents of a
single page over more than one sheet of paper.
• Define the number of sheets on which to print the selected poster image, and
whether or not to insert a border around each image composing the poster.
• Restore the settings to their default values, or save the settings so that they can
be applied to the next print operation.
QUICK REFERENCE GUIDE22

Preferences/Properties: You can:
Ink levels • Display the estimated quantity of ink left in the black and colour cartridges.
• Find a direct link to the Toolbox and, selecting Solutions and Assistance,
access maintenance and troubleshooting information.
• Find a direct link to the address of the manufacturer’s web site, where you can
access information on purchasing new ink cartridges.
SCANNING A DOCUMENT FROM AN APPLICATION
1 Place the document on the scanner glass or, if it consists of multiple pages, on the automatic document feeder.
2 Scan the image from the application you are using.
When the document is placed on the scanner glass, the scanner driver user interface is displayed with a low
resolution preview of the document on the left of the screen, and you can customise the settings to be used for
scanning.
Scanner Driver You can:
Standard • Define the composition of the document to be scanned: black text and graphics
only, a combination of black text, colour graphics and photos, or just photos.
• Return settings to their default values, or save the settings so they are applied to
the next print job.
Custom • Select the scanning resolution.
• Set full-colour scanning at 24 bits/pixel, scanning in grey shades at 8 bits/pixel or
in B/W at 1 bit/pixel.
• Lighten or darken the image to be scanned.
• Increase or decrease the contrast of the image to be scanned.
• Return the settings to their default values, or save the settings so they are
applied to the next print job.
Note: If the documents are loaded onto the automatic document feeder, the preview function is not available,
and you cannot customise the scan settings.
Depending on the application you are using, you may be able to choose to scan pages singly, or the whole
document sequentially.
QUICK REFERENCE GUIDE 23

FAX SETUP FROM THE TOOLBOX APPLICATION
The Toolbox application (installed with the product software) allows you to control closely all the principal
functions carried out in fax mode. To access the fax configuration environment, select
Toolbox > Settings > Fax settings.
Fax settings opens a drop-down menu which lists the settings possible, divided in:
• Fax settings
• Installation (Setup and Reception)
• Service.
Fax Settings
The options available are:
• Sleep time: set the time period after which the printer enters in energy saving mode.
• Phone book: enter a maximum of 10 names into the phone book, identifying each with a position number,
telephone number and name.
• Date and time: enter the date and time. These can also be transferred from the computer connected to the
printer.
Installation
The settings available include:
• Name and Number of fax sender.
• Language to be used in command interface.
• Paper size to use for printing and managing faxes received in different sizes to that of the paper loaded for
printing.
• Use the colour ink cartridge also for printing in black when the ink level in the black cartridge is low (black
trichromic).
• Format of date and time.
The other settings are: Setup and Reception (*).
Configuration
Note: To confirm the settings chosen, select INSTALLATION and then select Send setting.
Telephone line configuration requires these settings:
• Line type
– Public: Managed by national telecommunications provider.
– Private (PBX): Managed by an exchange, in turn connected to one or more public lines, that routes and
connects the internal (private) lines without the need to use the public telephone network. Selecting the
private line, only telephone numbers on the internal phone line are enabled.
• Line mode: Tone or pulse. Select dialing mode.
• PBX flash: Choose this setting when the printer is connected to a private exchange (PBX) that supports FLASH
pulses, and you want to send faxes using the public phone line only
QUICK REFERENCE GUIDE24
.

• Caller ID: Allows you to display the caller's name or telephone number. This functionality must be requested from
the telephone network provider.
• Remote: If you choose Manual as Reception mode because an external phone is connected to the printer, or to
the phone line, you can enable the fax to receive the incoming document by entering the (default) code * * on the
numeric pad of the telephone.
• Line Monitor: Enables the printer speaker to transmit the telephone line tones.
• Fax header: The document sent contains also the sender's name and telephone number, the time, date and
number of pages. You can also define the positioning for the header.
• Error correction mode: Errors caused by interference on the telephone line can be corrected.
• TX report: This is only printed if transmission fails (default), never or always.
• TX speed: 33600 bit/sec. is the default setting. The transmission speed can be reduced for phone lines not
supporting this speed.
• Volume buzzer and Volume speaker: Can be set from 0 to 8.
Reception (*)
• Ring Volume: Set from 0 to 8.
• Number of rings: The printer modem listens on the telephone line and responds only after the number of rings
configured; its subsequent behaviour depends on the Reception mode (*) chosen.
• Distinctive ring: Must be selected if two telephone numbers are active on the same line. The telephone
exchange assigns two different ring tones that the printer is able to recognise during the installation procedure
(this setup cannot be used in France).
• Fax/tel timer: For the Tel/Fax reception mode, allows you to set the length of time after which the printer receives
the call as a fax. From 15 to 40 seconds can be set.
(*) The RECEPTION MODE must be selected during printer installation by following the
instructions given below.
To configure reception, switch on the printer and wait until it comes online.
Press the Menu key on the fax keypad and choose the Reception mode: AUTOMATIC, MANUAL, PHONE/FAX
or ANSWERING DEVICE/FAX.
AUTOMATIC Mode (Default setting)
The printer is enabled for receiving and printing faxes. You must change this setting if an external telephone or
answering device is connected.
MANUAL Mode
The call is always received by the telephone. If, on replying, the user recognises that the call is a fax, it can be
diverted to the printer by entering the chosen code (the default code is * *) on the numeric pad of the additional
phone (if Remote has been chosen for Fax setup in the Toolbox application).
Note: If an additional telephone is connected to the printer, the Reception mode selected must be MANUAL.
QUICK REFERENCE GUIDE 25

PHONE/FAX Mode
After a certain number of rings (modifiable selecting
Reception
), the printer connects to the telephone line and is able to detect if the incoming call is a fax or voice call.
Toolbox > Settings > Fax settings > Installation
>
In the cae of a voice call, the printer’s ring tone changes (after the default number of rings), and it rings for the time
defined by Fax/tel timer (modifiable selecting
Toolbox > Settings > Fax settings > Installation > Reception
), to
allow the call to be answered. If the call is not answered, it is returned to the printer. In the case of a fax call, it is
received and printed.
ANSWERING DEVICE/FAX Mode
The answering device must be connected to the printer.
In this Reception mode, the number of rings preceding intervention of the answering device (see the
answering device’s manual), must be less than that (modifiable selecting Toolbox > Settings > Fax settings >
Installation > Reception) after which the incoming call is received by the printer; in this way the answering
device receives the line first. Even when the call is answered by the answering device, the printer modem is able to
recognise if it is a Voice or Fax call. In the case of a Voice call it does not intervene, otherwise it receives and prints
the fax.
Note: If an answering device is connected to the printer, the Reception mode selected must be ANSWERING
DEVICE/FAX.
Service
Reserved information is provided on the fax module for use by service engineers. The list contains the hardware
and software adjustment data for the printer.
Note: The data listed must not be changed. To be used exclusively by the field engineering service.
QUICK REFERENCE GUIDE26

USING THE FAX
CONFIGURING THE PRINTER TO RECEIVE FAXES
In Fax mode, the printer is set to respond automatically to all calls.
If faxes are configured to be replied to manually, incoming calls must be replied to personally from an additional
telephone, and you must enter the code * * on the telephone (or the personal code entered from the Toolbox
application) to receive the fax.
The printer is able to distinguish automatically between fax calls and telephone calls, using one of the reception
modes configured as described below.
Setting Reception Mode
The reception mode establishes whether or not the printer is to answer incoming calls.
To set the reception mode, switch on the printer and wait until it comes online.
Press the Menu key on the keyboard, select the option "Reception" and then select the mode from:
AUTOMATIC, MANUAL, PHONE/FAX, or ANSWERING DEVICE/FAX.
The modes available are:
• AUTOMATIC (default setting): the printer is set to reply automatically to all calls.
This setting must be changed if an external device, additional telephone or answering device is connected.
• MANUAL: The call is always received by the telephone. If, on replying, the user recognises that the call is a fax, it
can be diverted to the printer by entering the chosen code (default code is * *) on the numeric pad of the
additional phone (if Remote has been chosen for Fax Configuration in the Toolbox application).
Note: If an additional telephone is connected to the printer, the Reception Mode setting should be MANUAL.
• PHONE/FAX: After a certain number of rings (modifiable selecting To ol bo x > Settings > Fax settings >
Installation > Reception), the printer connects to the telephone line and is able to detect if the incoming call is a
fax or voice call. In case of a voice call, the printer’s ring tone changes (after the default number of rings), and it
rings for the time defined by Fax/tel timer (modifiable selecting Toolbox > Settings > Fax settings >
Installation > Reception), to allow the call to be answered. If the call is not answered, it returns to the printer. In
the case of a Fax call, the fax is received and printed.
• ANSWERING DEVICE/FAX: The answering device must be connected to the printer. In this Reception mode, the
number of rings preceding intervention of the answering device (see the answering device’s manual), must be less
than that (modifiable selecting Toolbox > Settings > Fax settings > Installation > Reception) after which the
incoming call is received by the printer; in this way the answering device receives the line first.
Even when the call is answered by the answering device, the printer modem is able to recognise if it is a Voice or
Fax call. In the case of a Voice call it does not intervene, otherwise it receives and prints the fax.
Note: If an answering device is connected to the printer, the Reception mode selected must be the ANSWERING
DEVICE/FAX.
QUICK REFERENCE GUIDE 27

SENDING A FAX
Faxes can be sent in a number of ways:
• From the keyboard.
• Using the automatic document feeder.
• From the computer, see "Using the Printer With a Computer".
Sending a Fax From the Keyboard
1 To send a fax, switch on the printer, check that it is connected to the telephone line and wait for it to come online.
2 Place the original on the scanner glass, press the Start colour fax key or Start B/W fax key to scan the
document using the scanner, and load it into memory.
While the document is being scanned, the message "SAVING PAGE" is displayed.
Note: When sending a colour document, make sure that recipient is able to receive colour faxes.
3 When scanning completes, the display prompts you to scan other pages.
4 Press the key to scan another page, or the key to terminate the scanning phase and send the fax.
5 Enter the telephone number of the fax device to which you want to send the fax, using:
• The alphanumeric keypad (manual send); at the end press the Start fax key.
• The phone book, selecting the number from the list of numbers present (automatic send with phone book); at the
end press the Start fax key.
Sending a Fax Using the Automatic Document Feeder
1 To send a fax, switch on the printer, make sure that it is connected to the telephone line and wait until it comes
online.
2 Place the document (or documents) in the automatic document feeder.
3 Enter the fax number of the recipient using the alphanumeric keypad on the keyboard, or call up the number from
the phone book, then press the Start fax key.
Note: When sending a colour document, make sure first that the contact is able to receive colour faxes.
4 The printer automatically scans all the pages present in the automatic document feeder, and sends them to the
destination fax.
During the scanning phase, the display indicates the number of the page being saved.
PRINTING FAX REPORTS
Printing fax activity reports can be activated from the printer keyboard by pressing the Menu key and selecting
Print report using the Navigator.
The printer proposes two printing possibilities on the display:
• Last transmission: Press Confirm to print.
• Fax activities: Press Confirm to print.
The last transmission report is also printed automatically whenever a transmission fails.
You can change the report printing settings from the computer by selecting Toolbox > Settings > Fax settings,
and choosing between: Always, Failed (default setting), Never.
The fax report provides a printout of the fax journal, made up of a list of 42 items, relating to the fax activities. The
journal is printed automatically for every 32 operations executed.
QUICK REFERENCE GUIDE28

Fax Report for Power Failure
If a power failure occurs, any messages which have been saved are lost. When the printer is next switched on, an
activity report is printed with the date and time of the power failure, and indicating the presence of any
documents in memory. The correct date and time must be re-entered.
FAX MESSAGES
The printer display normally displays the date and time, and informs the user on the status of the current fax
activities. The messages that are displayed do not impede the normal operation of the printer, and can remain
displayed until the next time the fax module is used.
To remove the message displayed, you can press Cancel ("C") on the fax keypad.
MESSAGES DURING TRANSMISSION
Message Description
TX INTERRUPTED • The user has interrupted the transmission in course by pressing the Cancel key.
TX NOT POSSIBLE • The scanner is already busy with another operations, for example, from the
computer. Wait until the operation in course on the scanner completes before
scanning the new document to be sent by fax.
TX MEMORY FULL • The fax memory available is full because too many documents have been received
from the scanner; no more documents can be saved. Send the documents present in
memory by fax, or delete them.
TX ERROR • Displayed at the end of a failed fax transmission. Try faxing another document.
MESSAGES DURING RECEPTION
Message Description
RX INTERRUPTED • The user has interrupted the fax reception in course by pressing the Cancel key.
RX ERROR • Displayed at the end of a failed fax reception. Try receiving another document via
fax.
MEMORY FULL • The memory available on the fax is full because many documents have been
received. If this type of error occurs, a generic error code appears on the fax report
Print the documents received that are present in memory, or delete them if not
required.
QUICK REFERENCE GUIDE 29

GENERAL MESSAGES
Message Description
EMPTY • No data is present in the fax memory. Displayed, for example, when you try to
print fax reports that are inexistent, or when you access the phone book but no
information is stored in it.
ILLEGAL SETTING • Error when setting the date and time. Repeat data entry, making sure that the
values you enter are valid.
FAX NOT WORKING • Warning that is displayed during diagnostics phase on switching on the printer.
Indicates that the fax module is malfunctioning. When this message appears,
switch the printer off and on again. If the problem persists, call technical
support.
PRINTER ERROR • Generic error in print module. Possible reasons are: one of the installed
cartridges has run out of ink, no paper in the feeder, paper jam etc.
For more information, check the indicators on the printer front panel or, if the
printer is connected to a computer, use the Status Monitor to search for any
error warnings.
QUICK REFERENCE GUIDE30

ERROR CODES PRINTED ON THE FAX REPORT
Error codes are automatically printed on the fax transmission or activity reports.
Transmission report error codes
The error codes printed on the fax transmission report consist of two digits indicating the reason for the error,
and a brief description to help understanding.
Code Message Description Action Required
00 OK No error. No action required. The fax has
03 RECEIVER DOES NOT
ANSWER
04 ERR. WHILE
TRANSMITTING
RESEND FROM PAGE nn
06 LINE BUSY The line is busy. Retry when the line is free.
09 STOP PRESSED Transmission has been interrupted No action.
14 ERR. WHILE
TRANSMITTING
15 RETRY B/W You are trying to send a colour
The recipient is not replying to the
call or is not a fax.
An anomaly has been detected
during transmission.
"nn" indicates the number of the
page where the error occurred.
During fax transmission an error
has occurred, or the recipient has
interrupted fax reception.
document but the recipient is not
able to receive it
been sent correctly.
Make sure that the recipient’s
number is correct.
Repeat the transmission starting
from the page indicated on the
report.
Try to resend the fax or make sure
that the recipient consents to
receiving the fax.
Resend the fax selecting black and
white mode (B/W).
Activity Report Error Codes
The error codes printed on the fax activity report include both the transmission error codes described above and
those for reception, listed below.
The error codes are represented by two digits that indicate the reason for the error. For reasons of space, the fax
report gives only the 2-digit code without any description.
Code Message Description Action Required
10 RX ERROR An error occurred during fax
reception, or the sender interrupted
fax transmission.
11 MEMORY FULL The memory available on the fax is
full because many documents have
been received.
Ask sender to resend fax.
Print the documents received and
present in the memory, or delete
them, if they are not wanted.
QUICK REFERENCE GUIDE 31

QUICK REFERENCE GUIDE32

INDEX
A
Alphanumeric keypad 4
B
# button 4
* button 4
C
Cancel 5
Cartridges 14
replacing 15
Checking ink levels 14
Configuring your printer to
receive faxes 27
Connecting
a digital camera to the printer 6
the printer to the telephone
network 7
to the telephone network 7
Copy contrast 5
Copy counter 5
copying 20
Copying a document 12
D
Display 4
E
Error codes
Activity report 31
Transmission report 31
Error pop-up
Status monitor 19
F
Fax
assistance 26
configuration 24
fax settings 24
installation 24
reception 25
Fax messages 29
during reception phase 29
during transmission phase 29
general 30
Fax quality 5
Fax reception
Answering Device/Fax Mode 26
Automatic Mode 25
Manual Mode 25
Telephone/Fax Mode 26
Fax setup 24
Front panel
Fax in memory 6
Out-of-ink 6
Paper error 6
USB Status 6
I
Ink cartridges
purchasing 15
K
Key functions 4
L
LEDs on the printer front
panel 6
M
Menu 4
P
Photo Index 13
Printer Economy Mode 3
Printer keyboard 3
Printing 5, 20
Printing fax reports 28
INDEX
33

Printing photos
from a digital camera 13
from a DPOF digital camera 14
from a PictBridge digital
camera 13
Purchasing new ink
cartridges 15
R
Reception mode 25
Replacing ink cartridges 15
Print photos 20
Toolbox
Ink Levels 23
Layout 22
Paper/Quality 22
Properties 22
Scan to application 21
Scan to email 21
Scan to fax 21
Scan to file 21
Toolbox link
Help 21
Settings 21
Solutions and Assistance 21
S
Safety 2
Scanning 20
custom 23
an original 23
Select number of copies 5
Select print quality 5
Sending a fax
from the Keyboard 28
Sending a fax 28
Setting fax date and time 12
Start B/W Copy 5
Start B/W Fax 5
Start Colour Copy 5
Start Colour Fax 5
Start scanning 5
Status monitor 18
Switching your printer on 3
Switching your printer off 3
U
Using the fax 27
Using the printer without a
computer 12
Using the printer with a
computer 18
W
Warranty 3
T
Toolbox 19, 20
Photocopier 20
INDEX
34

INHALT
ZU BEGINN . . . . . . . . . . . . . . . . . . . . . . . . . . . . . . . . . . . . . . . . . .2
Allgemeines . . . . . . . . . . . . . . . . . . . . . . . . . . . . . . . . . . . . . . .2
Sicherheitshinweise . . . . . . . . . . . . . . . . . . . . . . . . . . . . . . . . .2
Angaben zur Druckqualität und Garantie . . . . . . . . . . . . . . . . .3
Drucker ein- und ausschalten . . . . . . . . . . . . . . . . . . . . . . . . . .3
Economy-Modus des Druckers . . . . . . . . . . . . . . . . . . . . . .3
Tastatur des Druckers . . . . . . . . . . . . . . . . . . . . . . . . . . . . . . . .3
Funktion der Tasten . . . . . . . . . . . . . . . . . . . . . . . . . . . . . .4
Leuchtanzeigen auf der Fronttafel des Druckers . . . . . . . . . . . .6
Anschluss einer Digitalkamera an den Drucker . . . . . . . . . . . . .6
Anschluss des Druckers an das Telefonnetz . . . . . . . . . . . . . . . .7
Anschluss eines externen Telefons an das Telefonnetz . . . .7
Anschluss Fall 1 (Italien und Schweiz) . . . . . . . . . . . . . . . . .8
Anschluss Fall 2 . . . . . . . . . . . . . . . . . . . . . . . . . . . . . . . . .9
Anschluss Fall 3 . . . . . . . . . . . . . . . . . . . . . . . . . . . . . . . .10
Installation des Faxgerätes . . . . . . . . . . . . . . . . . . . . . . . . . . .10
Installationsverfahren . . . . . . . . . . . . . . . . . . . . . . . . . . . .11
Datum und Uhrzeit des Faxgerätes einstellen . . . . . . . . . . . . .12
VERWENDUNG DES DRUCKERS OHNE COMPUTER . . . . . . . . .12
Dokument kopieren . . . . . . . . . . . . . . . . . . . . . . . . . . . . . . . .12
Fotos von einer Digitalkamera ausdrucken . . . . . . . . . . . . . . .13
Fotos von einer PictBridge Digitalkamera
ausdrucken . . . . . . . . . . . . . . . . . . . . . . . . . . . . . . . . . . . . .13
Fotos von einer DPOF Digitalkamera ausdrucken . . . . . . . . . .14
DIE TINTENPATRONEN . . . . . . . . . . . . . . . . . . . . . . . . . . . . . . . .14
Überprüfung des Tintenstands . . . . . . . . . . . . . . . . . . . . . . . .14
Nötige Informationen für den Kauf neuer
Tintenpatronen . . . . . . . . . . . . . . . . . . . . . . . . . . . . . . . . . .15
Tintenpatronen ersetzen . . . . . . . . . . . . . . . . . . . . . . . . . . . . .15
INHALT
iii

VERWENDUNG DES DRUCKERS ÜBER EINEN COMPUTER . . . .18
Vor beginn . . . . . . . . . . . . . . . . . . . . . . . . . . . . . . . . . . . . . . .18
Der Statusmonitor des Druckers . . . . . . . . . . . . . . . . . . . . . . .18
Die Toolbox . . . . . . . . . . . . . . . . . . . . . . . . . . . . . . . . . . . . . .19
Drucken, kopieren und scannen über die Toolbox . . . . . . . . . .20
Aus einem Anwendungsprogramm drucken . . . . . . . . . . . . . .22
Einscannen eines dokuments aus einer anwendung . . . . . . . . . . .23
Faxeinstellungen über die Applikation Toolbox . . . . . . . . . . . .24
Faxeinstellungen . . . . . . . . . . . . . . . . . . . . . . . . . . . . . . .24
Installation . . . . . . . . . . . . . . . . . . . . . . . . . . . . . . . . . . . .24
Serviceleistungen . . . . . . . . . . . . . . . . . . . . . . . . . . . . . . .26
VERWENDUNG DES FAXGERÄTES . . . . . . . . . . . . . . . . . . . . . . .27
Einstellung des Druckers für den Empfang von
Faxdokumenten . . . . . . . . . . . . . . . . . . . . . . . . . . . . . . . . . .27
Einstellung des Empfangsmodus . . . . . . . . . . . . . . . . . . .27
Ein Fax senden . . . . . . . . . . . . . . . . . . . . . . . . . . . . . . . . . . . .28
Fax über Tastatur senden . . . . . . . . . . . . . . . . . . . . . . . . .28
Fax unter Verwendung der automatischen
Dokumentenzuführung senden . . . . . . . . . . . . . . . . . . . .28
Faxberichte ausdrucken . . . . . . . . . . . . . . . . . . . . . . . . . . . . .29
Faxbericht im Falle einer Stromunterbrechung . . . . . . . . .29
FAXMITTEILUNGEN . . . . . . . . . . . . . . . . . . . . . . . . . . . . . . . . . .29
Mitteilungen während des Sendens . . . . . . . . . . . . . . . . . . . .29
Mitteilungen während des Empfangs . . . . . . . . . . . . . . . . . . .30
Allgemeine Mitteilungen . . . . . . . . . . . . . . . . . . . . . . . . . . . .30
Im faxbericht enthaltene Fehlercodes . . . . . . . . . . . . . . . . . . .31
Fehlercodes im Sendebericht . . . . . . . . . . . . . . . . . . . . . .31
Fehlercodes im Bericht der Fax-Aktivitäten . . . . . . . . . . . .31
STICHWORTVERZEICHNIS . . . . . . . . . . . . . . . . . . . . . . . . . . . . . .33
INHALT
iv

RICHTLINIE 2002/96/CE FÜR DIE BEHANDLUNG, SAMMLUNG, WIEDERVERWERTUNG UND
ENTSORGUNG VON ELEKTRO- UND ELEKTRONIK ALTGERÄTEN UND DEREN BESTANDTEILE
INFORMATIONEN
1. FÜR DIE LÄNDER DER EUROPÄISCHEN UNION (EG)
Es ist verboten, jede Art von Elektro- und Elektronik-Altgeräten als unsortierten Siedlungsabfall zu
entsorgen: es ist Pflicht, diese separat zu sammeln.
Das Abladen dieser Geräte an Orten, die nicht speziell dafür vorgesehen und autorisiert sind, kann
gefährliche Auswirkungen für Umwelt und Gesundheit haben.
Widerrechtliche Vorgehensweisen unterliegen den Sanktionen und Maßnahmen laut Gesetz.
Um unsere geräte ordnungsgemäß zu entsorgen, können sie:
a Sich an die örtliche Behörde wenden, die Ihnen praktische Auskünfte und Informationen für die
ordnungsgemäße Verwaltung der Abfälle liefert, beispielsweise: Ort und Zeit der Sammelstation
etc.
b Beim Neukauf eines unserer Geräte ein benutztes Gerät, das dem neu gekauften entspricht, an
unseren Wiederverkäufer zurückgeben.
Das durchkreuzte Symbol auf dem Gerät bedeutet, dass:
• Nach Ableben des Gerätes, dieses in ausgerüstete Sammelzentren gebracht
werden und separat von Siedlungsabfällen behandelt werden muss;
• Olivetti die Aktivierung der Behandlungs-, Sammel-, Wiederverwertungs- und
Entsorgungsprozedur der Geräte in Konformität mit der Richtlinie 2002/96/CE
(u. folg.mod.) garantiert.
2. FÜR DIE ANDEREN LÄNDER (NICHT-EG-STAATEN)
Das Behandeln, Sammeln, Wiederverwerten und Entsorgen von Elektro- und Elektronik-Altgeräten
muss nach den geltenden Vorschriften des jeweiligen Landes erfolgen.
INHALT
v

Sämtliche enthaltene Informationen können ohne vorherige Ankündigung geändert werden. Olivetti S.p.A. übernimmt
keine Verantwortung für Verluste oder Beschädigungen direkter oder indirekter Art, die aus der Verwendung dieses
Handbuchs entstehen.
MIPC (Mobile Imaging and Printing Consortium)
Das MIPC ist ein gemeinnütziger Industrieverein, der 2004 von führenden Unternehmen aus den Bereichen der
Heimfotodruck- und Mobiltelefonindustrie gegründet wurde. Sein Ziel ist es, die Entwicklung von
Interoperabilitätsrichtlinien, die das Drucken von Bildern und anderen Inhalten zwischen Mobiltelefonen und
Heimdruckern ermöglichen, zu fördern und unterstützen. Die Richtlinien werden international gefördert, um eine
breites Spektrum von Produkten und Dienstleistungen für die Endverbraucher der mobilen Telefone zu sichern.
http://www.mobileprinting.org.
LINEA office: Dieses "Mobile Printing Ready" Produkt ist dafür vogesehen, ein einfaches Drucken aus Mobiltelefonen
heraus zu ermöglichen. Es folgt den Richtlinien der "Mobile Imaging and Printing Consortium (MIPC) Implementation
Guidelines for Home Printing with Mobile Terminals, Version 2.1" für PictBridge.
INHALT
vi

KURZANLEITUNG
ZU BEGINN
VERWENDUNG DES DRUCKERS OHNE COMPUTER
DIE TINTENPATRONEN
VERWENDUNG DES DRUCKERS ÜBER EINEN COMPUTER
VERWENDUNG DES FAXGERÄTES
FAXMITTEILUNGEN
KURZANLEITUNG 1

ZU BEGINN
ALLGEMEINES
Dieses Multifunktionsprodukt übt die Funktionen eines hochwertigen Tintenstrahldruckers, eines Farbscanners,
eines Kopiergerätes und eines Faxgerätes aus. Der Umgang mit mehrseitigen Dokumenten beim Kopieren und
Faxen wird durch die automatische Dokumentenzuführung erleichtert.
Für die normalen Druck- und Kopiervorgänge können die schwarze Patrone und die Farbpatrone verwendet werden.
Zum Ausdruck von Fotos wird empfohlen, die schwarze Patrone durch die Fotopatrone zu ersetzen (die separat
verkauft wird). Die Tintenpatronen sind auch in der Version mit hoher Kapazität erhältlich.
Der Drucker kann auch ohne Computer verwendet werden, um Dokumente via Fax zu senden, Dokumente zu
kopieren und um Fotos auszudrucken, indem einfach eine Digitalkamera an die USB-Schnittstelle der Fronttafel
angeschlossen wird.
Mit dem Drucker mitgeliefert werden die Installations-CDs, welche die Software für die Verwendung mit dem
Computer enthalten sowie die Applikation Toolbox für einen leichteren Zugriff auf alle verfügbaren Funktionen.
Die andere mit dem Drucker gelieferte CD enthält die Software für die Text- und Bildbearbeitung.
Die vollständigen Informationen stehen durch Anwahl von Start > Programme oder Alle Programme > Olivetti
auch in elektronischem Format zur Verfügung und können durchsucht oder ausgedruckt werden.
Es ist auch eine Online-Hilfe verfügbar, die über den Hilfe-Button auf jeder Seite der Software aufgerufen werden
kann.
Hinweis: Mindestsystemanforderungen des angeschlossenen Computers.
Betriebssystem: Microsoft Windows 2000 (mit Service Pack 3 oder folgende) oder XP oder Vista (mit Service Pack
2 oder folgende) oder MAC OS X 10.2, OS X 10.3, OS X 10.4.
RAM Speicher: 256 MB für Windows 2000/XP (es werden 512 MB empfohlen); 512 MB für Windows Vista (es
wird 1 GB empfohlen).
Verfügbarer Platz auf der Festplatte: 500 MB.
SICHERHEITSHINWEISE
Zum Zwecke der Sicherheit bitten wir Sie, die folgenden Informationen aufmerksam zu lesen und gewissenhaft zu
befolgen:
• Ausschließlich das Netzteil CWT model PAA060P und das Netzkabel verwenden, die mit dem Produkt mitgeliefert
werden. Werden andere Netzteile als das in der Verpackung enthaltene Netzteil verwendet, ist der Benutzer dafür
verantwortlich, die Übereinstimmung mit den Sicherheitsvorschriften und mit den korrekten, für das Produkt
erforderlichen Versorgungswerten zu garantieren.
• Das Netzkabel an eine Steckdose mit Erdung anschließen, die sich in der Nähe des Produktes befindet und leicht
zugänglich ist.
• Den Drucker auf einer ebenen und stabilen Fläche installieren und derart anordnen, dass es nicht möglich ist, auf
das Netzkabel zu treten oder darüber zu stolpern.
• Den Drucker nicht in feuchten Räumen verwenden oder mit nassen Händen bedienen. Den Drucker vor Regen
oder Feuchtigkeit schützen.
• Nicht versuchen, den Drucker auseinanderzubauen.
• Alle Warnhinweise und Anweisungen beachten, die direkt auf dem Drucker angegeben sind.
• Die mit dem Drucker mitgelieferte Dokumentation sorgfältig durchlesen und beachten.
• Der Scanner wird als Laserstrahlgerät der Klasse 1M eingestuft: Es darf nicht auf dem direkten Wege mit optischen
Leseinstrumenten (Vergrößerungsgläser) beobachtet werden.
KURZANLEITUNG2

ANGABEN ZUR DRUCKQUALITÄT UND GARANTIE
Um den korrekten Betrieb des Druckers und eine hohe Druckqualität zu garantieren, ist es grundlegend,
ausschließlich Olivetti Original-Tintenpatronen zu verwenden.
Olivetti lehnt jede Haftung für Schäden am Drucker ab, die durch die Manipulation oder das Recycling der
Tintenpatronen entstehen. Solche Tätigkeiten führen außerdem zum Verfall der Garantie.
DRUCKER EIN- UND AUSSCHALTEN
Drücken Sie die Taste On/Off
Ist die Tastatur geschlossen, zeigen zwei Leuchtdioden an, ob der Drucker eingeschaltet ist und ob sich
Funktionsfehler ereignet haben.
Bezug Komponente Beschreibung
1
LED für On/Off Leuchtet grün um anzuzeigen, dass der Drucker eingeschaltet ist.
2 LED für Fehler Leuchtet orange, um die Fehler anzuzeigen, die durch die LED auf der
Frontkonsole des Druckers signalisiert werden.
Economy-Modus des Druckers
Nach einem, über die Toolbox einstellbaren Zeitintervall, schaltet sich der Drucker in den Energiesparmodus: die Tastatur
ist ausgeschaltet. Nach einem beliebigen Signal des Computers oder der Tastatur schaltet sich der Drucker wieder ein.
Hinweis: Das Ausschalten des Druckers ist nicht ratsam, da dies die Löschung von Datum und Uhrzeit
zur Folge hat.
TASTATUR DES DRUCKERS
Die Tastatur enthält die Tasten für die Auswahl und den Start aller zur Verfügung stehenden Funktionen: Kopieren,
Fax senden, Drucken von Digitalkamera oder von einem an den Drucker angeschlossenen Speichermedium. Unter
normalen Betriebsbedingungen muss die Tastatur aufgeklappt sein. Dazu auf den glänzenden Bereich oben
rechts an der Klappe drücken.
KURZANLEITUNG 3

Funktion der Tasten
Bezug Komponente Beschreibung
1
On/Off-Taste Dient zum Ein- und Ausschalten des Druckers.
Wenn der Speicher ein eingegangenes und nicht ausgedrucktes Fax enthält
(gelbes Licht leuchtet), kann der Drucker nicht ausgeschaltet werden.
Hinweis: Das Ausschalten des Druckers hat den Verlust der Datum- und
Uhrzeiteinstellungen zur Folge und ist daher NICHT ratsam. Dieser
Vorgang wurde durch die automatische Energiesparmodalität ersetzt.
Wenn der Drucker dennoch ausgeschaltet werden soll, drücken Sie 5
Sekunden lang die On/Off-Taste.
2 Display Liefert Angaben zum Zustand des Faxgerätes und zeigt das Menü und das
Telefonbuch an.
3 Alphanumerisches
Ta st en fe l d
Dient dazu, die Telefonnummer oder den Anfangsbuchstaben des Namens
einzugeben, den man im Telefonbuch suchen möchte.
4 Taste * Gestattet, spezielle Funktionen auszuführen, die vom Telefonbetreiber zur
Verfügung gestellt werden. Wird auch verwendet, um von "Impulswahl"
auf "Tonwahl" überzugehen.
5 Taste # Gestattet, spezielle Funktionen auszuführen, die vom Telefonbetreiber zur
Verfügung gestellt werden.
6 Telefonbuch Die an erster Stelle angezeigte Nummer ist die zuletzt angerufene Nummer.
Die Namen können mit Hilfe der Navigationstaste gesucht werden oder
durch Eingabe des Anfangsbuchstabens des Namens, den man aufrufen
möchte. Das Telefonbuch kann nur über den Computer erstellt werden.
7 Menü Gestattet den Zugang zu den Faxfunktionen.
Das Menü mit der Navigationstaste durchsuchen, die Auswahl mit der
Ta st e Bestätigen bestätigen und zum Löschen während der Eingabe die
Ta st e Löschen verwenden.
KURZANLEITUNG4

Bezug Komponente Beschreibung
8 Bestätigen Dient zur Anwahl und Bestätigung der auf dem Display angezeigten
Menüpunkte.
9 Navigationstaste Gestattet, die auf dem Display angezeigten Menüpunkte und das
Telefonbuch zu durchsuchen.
10 Faxqualität Dient dazu, die Auflösung des zu sendenden Faxdokuments zu ändern.
11 Kopienzähler Zeigt die Anzahl der ausgewählten Kopien an.
Die angezeigte Zahl nimmt mit den ausgedruckten Kopien ab.
12 Auswahl der
Kopienzahl
Gestattet, mit den Tasten Plus (+) und Minus (-) die Anzahl der
anzufertigenden Kopien auszuwählen. Die ausgewählte Anzahl wird vom
Kopienzähler angezeigt.
13 Löschen Mit dieser Taste kann ein laufender Druck-, Scan- oder Kopiervorgang
sofort abgebrochen werden. Die Einstellungen werden dabei auf die
werkseitigen Einstellungen zurückgesetzt.
14 Auswahl
Druckqualität
Dient zur Auswahl der Druck- und Kopierqualität.
Die Wahl des Fotomodus wird empfohlen, wenn das zu kopierende
Original ein Bild ist oder wenn auf spezielles Inkjetpapier gedruckt wird.
15 Kontrast der Kopie Dient dazu, die Kopie heller oder dunkler zu machen.
16 S/W-Kopie starten Startet die Schwarz/Weiß-Kopien. Diese Taste drücken und gedrückt
halten, um die Funktion "An Druckseite anpassen" zu aktivieren.
Diese Funktion ist für die im automatischen Einzug eingelegten Dokumente
nicht aktiviert.
17 Farbkopie starten Startet die Farbkopien. Diese Taste drücken und gedrückt halten, um
die Funktion "An Druckseite anpassen" zu aktivieren. Diese Funktion
ist für die im automatischen Einzug eingelegten Dokumente nicht aktiviert.
18 Scannen starten Ist aktiv, wenn der Drucker an einen Computer angeschlossen ist.
Drücken Sie diese Taste, um den Scan-Vorgang für das auf dem
Scannerfenster oder im automatischen Dokumenteneinzug liegenden
Dokuments auszuführen.
Auf dem Computer wird ein Fenster der Applikation Too lb ox angezeigt,
das ermöglicht, das Bild einzuscannen und direkt in der gewünschten
Anwendung zu öffnen sowie die Scaneinstellungen zu personalisieren.
19 S/W-Fax starten Startet den Empfang oder die Übersendung eines Schwarz/Weiß-Faxes.
20 Farbfax starten Startet den Empfang oder die Übersendung eines Farbfaxes.
21 Druck starten Steht zur Verfügung, wenn eine Digitalkamera oder ein kompatibles,
externes Speichermedium an den Drucker angeschlossen ist.
Diese Taste blinkt, um auf einen laufenden Druckvorgang hinzuweisen.
KURZANLEITUNG 5

LEUCHTANZEIGEN AUF DER FRONTTAFEL DES DRUCKERS
Für den Zugang zum Bereich, in dem die Leuchtanzeigen sichtbar sind, die Tastatur aufklappen.
Bezug Komponente Beschreibung
1
USB-Status • Grün: zeigt den Anschluss einer Digitalkamera oder eines
kompatiblen, externen Speichermediums an; blinkend: weist
darauf hin, dass die Daten an den Drucker übertragen werden.
2 Fax im Speicher
vorhanden
• Im Speicher befindet sich ein Fax (das im Moment des Empfangs
nicht ausgedruckt wurde).
Der Drucker kann nicht ausgeschaltet werden, solange die
Fehlerursache nicht behoben wurde und die im Speicher
vorhandenen Faxdokumente nicht ausgedruckt wurden.
• Es ist ein Fehler beim Senden oder Empfangen eines Faxdokuments
aufgetreten.
3 Papierfehler Weist auf folgendes hin:
• Papierstau.
• Kein Papier in den Zuführungen.
4 Tinte zu Ende Diese Anzeigen blinken, um darauf hinzuweisen, dass die schwarze
Tinte, die Fototinte und die Farbtinte bald zu Ende sind. Ein
orangefarbenes Dauerlicht weist darauf hin, dass die Tinte zu Ende ist.
ANSCHLUSS EINER DIGITALKAMERA AN DEN DRUCKER
1 Die Digitalkamera einschalten. Für nähere Informationen die Bedienungsanleitung der Kamera lesen.
2 Bei eingeschaltetem Drucker ein Ende des USB-Kabels an den USB-Stecker der Kamera und das andere Ende an
den USB-Stecker auf der Fronttafel des Druckers anschließen: es leuchten die LED für Verbindung und das Icon der
Ta st e Drucken starten auf.
Hinweis: Wird eine PictBridge Digitalkamera angeschlossen, leuchtet das Icon der Taste Drucken starten nicht
auf, weil der Druck direkt von der Kamera gesteuert wird.
KURZANLEITUNG6

Die grüne LED des USB-Status schaltet sich ein, um den richtigen Anschluss anzuzeigen.
Stellen Sie bei fehlendem Anschluss sicher, ob ein kompatibles Gerät angeschlossen wurde.
ANSCHLUSS DES DRUCKERS AN DAS TELEFONNETZ
Auf der Rückseite des Druckers befinden sich zwei Buchsen RJ11, eine mit der Bezeichnung "LINE" (rechts) und
eine mit "EXT" (links).
Die Telefonleitung mit Hilfe des mitgelieferten Telefonkabels an die Buchse "LINE" anschließen.
An die Buchse "EXT" kann ein externes Telefon oder ein Anrufbeantworter angeschlossen werden.
Ist die Buchse durch eine Abdeckung verschlossen, diese entfernen.
Das in Kaskade geschaltete Telefon kann verwendet werden, um Anrufe zu tätigen und entgegenzunehmen oder
um ein START-Signal für den Empfang eines Faxdokuments zu senden (defaultmäßiger DTMF Code * *, kann
personalisiert werden durch Auswahl von Toolbox > Einstellungen > Faxeinstellungen > Installation >
Konfiguration).
In diesem Fall zeigt das Display des Fax-Tastenfeldes des Druckers an, dass ein zusätzliches Telefon angeschlossen ist.
Anschluss eines externen Telefons an das Telefonnetz
Da der Anschluss des Faxgerätes, des zusätzlichen Telefons oder anderer Geräte an die Telefonleitung nationalen
Normen untergeordnet ist, die von Land zu Land variieren, dienen die folgenden Darstellungen als Beispiel für
einige Anschlüsse.
Sollte sich der Anschluss an die Telefonleitung im Bestimmungsland dennoch von den in den Abbildungen
dargestellten Beispielen unterscheiden, ist auf die im Bestimmungsland gültigen Normen Bezug zu nehmen.
• Das Fax ist für den Anschluss an die öffentliche Telefonleitung ausgelegt. Um es an eine private Leitung
anzuschließen und es auch auf einer öffentlichen Leitung zu verwenden, siehe "Installation des Faxgerätes".
• Im Falle einer Telefonanlage mit Vielfachsteckdosen können die zusätzlichen Telefonapparate an eine
beliebige der zur Verfügung stehenden Steckdosen angeschlossen werden, vorausgesetzt, die Anlage verfügt über
mehrere parallel geschaltete Steckdosen. In diesem Fall ist der Leitungston immer vorhanden, wenn gleichzeitig
die Hörer der zuvor bestehenden Telefonapparate abgenommen werden.
KURZANLEITUNG 7

• Ist der Leitungston nicht vorhanden, wenn gleichzeitig die Hörer der zusätzlichen Telefonapparate abgenommen
werden, so bedeutet dies, dass es sich um eine Anlage mit mehreren in Reihe geschalteten Steckdosen
handelt. In diesem Fall müssen die zusätzlichen Telefonapparate wie bereits zuvor beschrieben direkt an den
Drucker angeschlossen werden.
Sollte dies nicht möglich sein, den Drucker an die Hauptsteckdose anschließen.
Jedes Land verfügt über einen spezifischen Telefonstecker. Im Folgenden sind die am häufigsten verwendeten
Anschlüsse dargestellt.
Anschluss Fall 1 (Italien und Schweiz)
Den Stecker des zusätzlichen Telefons oder eines anderen Gerätes in die Buchse "EXT" stecken (siehe
entsprechende Darstellung).
Ist es nicht möglich, das zusätzliche Telefon direkt an die Buchse "EXT" anzuschließen, den mit dem zusätzlichen
Telefon gelieferten Adapter verwenden.
A = Eingang Telefonleitung (LINE IN)
B = Wandsteckdose für Telefonstecker
C = Externes Telefon, mit oder ohne Adapter, Anrufbeantworter (EXT)
D = Buchse für ein externes Telefon, einen Anrufbeantworter oder andere Geräte.
Anschluss Fall 1 Italien
KURZANLEITUNG8

Anschluss Fall 1 Schweiz
Anschluss Fall 2
Den Stecker des zusätzlichen Gerätes in die Buchse-Steckdose stecken (siehe entsprechende Darstellung).
A = Eingang Telefonleitung (LINE IN)
B = Wandsteckdose für Telefonstecker
C = Externes Telefon, mit oder ohne Adapter, Anrufbeantworter (EXT)
D = Buchse für ein externes Telefon, einen Anrufbeantworter oder andere Geräte.
KURZANLEITUNG 9

Anschluss Fall 3
Den Stecker des zusätzlichen Gerätes in die (Wand)-Steckdose für den Anschluss an die Telefonleitung stecken
(siehe entsprechende Darstellung).
Außerdem ist es über den entsprechenden Adapter (wie beim ersten Anschlusstyp) möglich, ein weiteres Gerät
über die Buchse "EXT" des Druckers an die Telefonleitung anzuschließen.
A = Eingang Telefonleitung (LINE IN)
B = Wandsteckdose für Telefonstecker
C = Externes Telefon, mit oder ohne Adapter, Anrufbeantworter (EXT)
D = Buchse für ein externes Telefon, einen Anrufbeantworter oder andere Geräte.
INSTALLATION DES FAXGERÄTES
Nach dem Anschluss des Telefonkabels und des Netzkabels die Einschalttaste des Druckers betätigen. Jetzt wird
eine Selbstdiagnose durchgeführt und am Ende erscheint auf dem Display die Mitteilung, dass der Drucker zur
Verwendung als Fax bereit ist.
KURZANLEITUNG10

Installationsverfahren
1 Das Display zeigt die verfügbaren Sprachen mit 2 Ziffern "nn" an, welche diese identifizieren.
Die Tasten drücken, die der Nummer "nn" der gewünschten Sprache entsprechen.
2 Die Auswahl durch Drücken der Taste bestätigen. Durch Drücken der Taste erfolgt die Rückkehr zum
Punkt 1.
3 Das Display zeigt die Wahlmöglichkeiten für das Bestimmungsland an.
Jedes auf dem Display angezeigte Land ist durch eine ihm zugeordnete Nummer "nn" identifiziert.
Die Tasten drücken, die der Nummer "nn" des gewünschten Bestimmungslands entsprechen.
4 Die Auswahl durch Drücken der Taste bestätigen. Durch Drücken der Taste erfolgt die Rückkehr zum
Punkt 3.
5 Die Installation ist abgeschlossen.
6 Um das Datum und die Uhrzeit einzugeben, drücken Sie die Taste Menü und dann die Taste Bestätigen. Am
Display erscheint die Meldung "EINST. DAT/ZEIT".
7 Geben Sie die Daten mit der alphanumerischen Tastatur ein und drücken Sie die Taste Bestätigen.
Hinweis: Datum und Uhrzeit können vom Computer aus gesendet werden, indem Toolbox > Einstellungen >
Fax-Einstellungen gewählt wird.
Hinweis: Tritt eine Stromunterbrechung auf, gehen das Datum und die Uhrzeit verloren. Beim Einschalten
erscheint auf dem Display des Druckers die Aufforderung, das Datum und die Uhrzeit einzugeben.
Hinweis: Falls das gewählte Bestimmungsland geändert werden soll, drücken Sie nacheinander die Tasten:
C + * + *. Am Display erscheinen zur Auswahl Sprache und Bestimmungsland. Geben Sie Ihre gewünschte
Auswahl ein und schalten Sie nach Beendigung den Drucker aus, sobald Sie dazu aufgefordert werden. Beim
Wiedereinschalten wird es erforderlich sein, Datum und Uhrzeit erneut einzugeben.
Land Auswahl Land Auswahl
Argentina
Australia
Austria
Belgium
Brazil
Chile
China
Colombia
Czech Republic
Denmark
Finland
France
Germany
Greece
Hong Kong
India
Israel
Italy
AMERICA LATINA
NZL/AUSTRIA
ÖSTERREICH
BELGIUM
BRASILE
AMERICA LATINA
CHINA
AMERICA LATINA
CZECH
DANMARK
FINLAND
FRANCE
DEUTSCHLAND
GREECE
SINGAPORE
INDIA
ISRAEL
ITALIA
Ireland
Luxembourg
Mexico
New Zealand
Norway
Netherlands
Portugal
Perù
Rest of the world
Spain
South Africa
Sweden
Switzerland
Turkey
UK
Uruguay
Venezuela
UK/IRLANDA
BELGIUM
AMERICA LATINA
NZL/AUSTRALIA
NORGE
HOLLAND
PORTUGAL
AMERICA LATINA
INTERNATIONAL
ESPAÑA
S. AFRICA
SVERIGE
SCHWEIZ
TURKEY
U.K. / IRELAND
AMERICA LATINA
AMERICA LATINA
KURZANLEITUNG 11

DATUM UND UHRZEIT DES FAXGERÄTES EINSTELLEN
Für die manuelle Einstellung von Datum und Uhrzeit beim Einschalten des Druckers:
•
Im Stand-Alone-Modus die Taste
Menü
drücken. Es erscheint die Mitteilung "
EINST. DAT/ZEIT
".
Das Datum und die Uhrzeit über das alphanumerische Tastenfeld eingeben und am Ende die Taste Bestätigen
drücken.
• Datum und Uhrzeit können auch vom Computer aus gesendet werden, indem Toolbox > Einstellungen >
Faxeinstellungen ausgewählt wird.
VERWENDUNG DES DRUCKERS OHNE COMPUTER
DOKUMENT KOPIEREN
1 Den Drucker einschalten. Siehe "Drucker ein- und ausschalten".
2 Sicherstellen, dass die Anzeigen für Tintenende auf der Fronttafel erloschen sind.
Andernfalls wird geraten, die entsprechende Tintenpatrone zu ersetzen.
Für nähere Informationen siehe "Tintenpatronen ersetzen".
3 Das Papier einlegen, das Sie zum Ausdruck verwenden möchten.
4 Legen Sie das zu kopierende Dokument auf das Scannerfenster, oder in den automatischen Dokumenteneinzug,
falls das Dokument aus mehreren Seiten besteht.
5 Die Kopierqualität, Foto oder Normal, auswählen, indem Sie die Taste Auswahl Druckqualität drücken.
a Zum Kopieren eines normalen Schwarzweißtextes oder eines Dokuments, das schwarzweiß und farbig ist,
Normal wählen.
b Um ein Dokument zu kopieren und auf Ink-Jet-Spezialpapier zu drucken, wählen Sie Foto. Weitere
Informationen finden Sie unter "Tastatur des Druckers".
6 Den Kontrast wählen, dunkel, normal oder hell, indem Sie die Taste Kontrast der Kopie drücken.
Für nähere Informationen siehe "Tastatur des Druckers".
7 Um mehr als eine Kopie anzufertigen, mehrmals die Taste "+" (Plus) drücken, bis die gewünschte Anzahl der
Kopien auf dem Zähler angezeigt wird.
KURZANLEITUNG12

8 Die Taste S/W-Kopie starten oder Farbkopie starten drücken.
Hinweis: Soll das Dokument auf ein Blatt mit einem anderen Format kopiert werden, die Taste S/W-Kopie
starten oder Farbkopie starten drücken und gedrückt halten, um die Funktion "An Druckseite anpassen" zu
aktivieren. Der Drucker passt dann automatisch das Format des Originals an das Format des eingelegten Papiers
an.
Hinweis: Die Funktion An Druckseite anpassen ist nicht verfügbar, wenn die zu kopierenden Dokumente im
automatischen Dokumenteneinzug einliegen.
FOTOS VON EINER DIGITALKAMERA AUSDRUCKEN
Wird eine Digitalkamera oder ein kompatibles, externes Speichermedium an den Drucker angeschlossen, leuchtet
die Taste Druck starten auf.
Bei Drücken der Taste Druck starten wird der Photo Index ausgedruckt, ein Dokument, das alle Bilder
wiedergibt, die in dem an den Drucker angeschlossenen Speichermedium enthalten sind und das die Möglichkeit
bietet, die auszudruckenden Bilder, die Anzahl der Kopien und das Papierformat auszuwählen.
Zum Ausdrucken über Photo Index:
1 Zum Ausdrucken des Photo Index muss des verwendete Speichermedium angeschlossen bleiben.
2 Den vollständig ausgefüllten Photo Index auf die Scanfläche legen.
3 Die Taste Druck starten bis zum Start des Druckvorgangs drücken (ca. 8 Sekunden): die Fotos werden wie
festgelegt ausgedruckt.
• Die vorgewählte Druckqualität ist für spezielles Inkjetpapier geeignet und kann über die Tastatur des Druckers
geändert werden.
• Die auszudruckenden Fotos werden automatisch an das in der automatischen Zuführung vorhandene
Papierformat angepasst.
FOTOS VON EINER PICTBRIDGE DIGITALKAMERA AUSDRUCKEN
Um die beste Druckqualität der Fotos zu erreichen wird empfohlen, die Farbpatrone und die Fotopatrone zu
installieren. Siehe "Tintenpatronen ersetzen".
1 Das Fotopapier in den Drucker einlegen.
2 Sicherstellen, dass die PictBridge Digitalkamera eingeschaltet und an den Drucker angeschlossen ist.
3 Der Druck wird direkt über die Kamera gesteuert und daher ist die Taste Druck starten nicht aktiv.
Hinsichtlich der Anweisungen zum Ausdruck der Fotos bitten wir Sie, die Bedienungsanleitung der Kamera zu lesen.
Während des Druckvorgangs blinkt die Taste Druck starten.
Hinweis: Stimmt das Format des eingelegten Papiers nicht mit dem auf der Digitalkamera eingestellten Format
überein, erfolgt der Ausdruck nicht korrekt oder es erscheint eine Fehlermeldung.
KURZANLEITUNG 13

FOTOS VON EINER DPOF DIGITALKAMERA AUSDRUCKEN
Um die beste Druckqualität der Fotos zu erreichen wird empfohlen, die Farbpatrone und die Fotopatrone zu
installieren. Siehe "Tintenpatronen ersetzen".
Der Drucker ist in der Lage, die DPOF-Angaben zu erkennen, die der Benutzer den auszudruckenden Bildern
zugeordnet hat. Die Taste Druck starten leuchtet bei Erkennung der DPOF-Dateien auf.
1 Das Fotopapier in den Drucker einlegen.
2 Sicherstellen, dass die DPOF Digitalkamera eingeschaltet und an den Drucker angeschlossen ist.
3 Die Druckqualität wie gewünscht auswählen.
4 Die Taste Druck starten auf der Tastatur drücken, um die ausgewählten Fotos auszudrucken, wobei die DPOF-
Angaben der Digitalkamera zugeordnet werden.
DIE TINTENPATRONEN
ÜBERPRÜFUNG DES TINTENSTANDS
Der Tintenstand der Patronen kann direkt über die Tastatur des Druckers, über den Druckertreiber, über die
Applikation Toolbox, über den Treiber des Scanners oder über den Statusmonitor überprüft werden.
Über die Tastatur des Druckers:
•
Beginnen die Anzeigen für schwarze Tinte oder Farbtinte zu blinken, ist der Tintenstand in den Patronen niedrig.
• Leuchten die Anzeigen mit Dauerlicht, so ist die Tintenpatrone fast zu Ende und es wird der Austausch der
Tintenpatrone empfohlen.
Über den Druckertreiber:
1 Ein Dokument in einem Anwendungsprogramm öffnen und Datei > Drucken auswählen.
Auf dem Bildschirm erscheint das Dialogfenster für den Druck.
2 Je nach verwendetem Betriebssystem Einstellungen oder Eigenschaften auswählen.
Auf dem Bildschirm erscheint die Benutzerschnittstelle des Druckertreibers.
3 Das Register Tintenstand anklicken. Die beiden Tintenstandanzeigen geben die geschätzte restliche Tintenmenge
in den Patronen in Prozent an.
Über die Applikation Toolbox:
1 Die Applikation Toolbox über das Olivetti Icon in der Anwendungsleiste oder auf dem Desktop oder durch
Auswahl von Start > Programme oder Alle Programme > Olivetti > Olivetti Toolbox öffnen.
Es erscheint das Hauptfenster der Toolbox.
2 Problemlösungen und Pflege auswählen.
3Auswählen > Tintenpatronen bestellen auswählen.
Die Tintenstandanzeigen im Dialogfenster Tintenpatronen bestellen geben die geschätzte restliche
Tintenmenge in den Patronen in Prozent an.
Über den Treiber des Scanners:
Beim Einscannen eines Dokuments oder eines Fotos sind im unteren Bereich des Fensters die Tintenstandanzeigen
vorhanden, welche die geschätzte restliche Tintenmenge in den Patronen in Prozent angeben.
KURZANLEITUNG14

Über den Statusmonitor:
Während eines über den Computer ausgeführten Druck- oder Kopiervorgangs wird auf dem Bildschirm der
Statusmonitor des Druckers angezeigt. Das Fenster zeigt Angaben zum Druck und den restlichen Tintenstand in
den Patronen. Für nähere Informationen siehe "Der Statusmonitor des Druckers".
NÖTIGE INFORMATIONEN FÜR DEN KAUF NEUER TINTENPATRONEN
Um den korrekten Betrieb des Druckers und eine hohe Druckqualität zu garantieren, ist es grundlegend, dass
ausschließlich Olivetti Original-Tintenpatronen verwendet werden.
Beim Kauf der Tintenpatronen auf die folgenden Produktcodes Bezug nehmen:
• Tintenpatrone schwarz, Code B0631 - IN701
• Tintenpatrone dreifarbig, Code B0632 - IN703
• Fototintenpatrone, Code B0633 - IN705
• Tintenpatrone schwarz mit hoher Kapazität, Code B0628 - IN702
• Tintenpatrone dreifarbig mit hoher Kapazität, Code B0629 - IN704
• Fototintenpatrone mit hoher Kapazität, Code B0630 - IN706
Achtung: Die Tintenpatronen sind nur für den einmaligen Gebrauch bestimmt.
TINTENPATRONEN ERSETZEN
Es wird empfohlen, Original-Tintenpatronen zu verwenden. Bei Verwendung von nicht Original-Zubehör, -Teilen
oder -Komponenten wird die Druckqualität nicht garantiert und die Garantie deckt keine eventuell dadurch
entstehenden Probleme.
Achtung: Vor der Durchführung der in diesem Abschnitt enthaltenen Verfahren bitten wir Sie, die in diesem
1 Den Drucker einschalten.
2 Den Oberteil des Druckers mit beiden Händen anheben.
Dank des Stützhebels wird der Oberteil des Druckers automatisch in offener Position arretiert.
Der Wagen fährt in die Mitte des Druckers, so dass der Austausch der Patronen erleichtert wird.
Kurzanleilung enthaltenen Angaben zu den Sicherheitsvorschriften durchzulesen und zu beachten.
KURZANLEITUNG 15

3 Den Sperrhebel drücken, um die zu ersetzende Tintenpatrone herauszunehmen.
Achtung: Die schwarze Tintenpatrone (oder Fototintenpatrone) muss immer in die Aufnahme links, die
Farbpatrone immer in die Aufnahme rechts eingesetzt werden.
4 Wird die herausgenommene Tintenpatrone später wieder verwendet, diese in die Aufnahme für die schwarze
Tintenpatrone oder Fototintenpatrone im Drucker einsetzen.
5 Bei der Installation einer neuen Tintenpatrone, die auf dem Gehäuse der Patrone vorhandene Schutzfolie
abziehen.
Hinweis: Hier wird das Verfahren mit einer Farbpatrone erläutert. Beim Austausch der schwarzen Tintenpatrone
oder der Fototintenpatrone ist gleichermaßen vorzugehen.
KURZANLEITUNG16

6 Die neue Tintenpatrone einsetzen und in Richtung Rückseite des Druckers schieben, bis sie einrastet.
7 Den Oberteil des Druckers anheben und den Stützhebel nach hinten drücken. Der Oberteil des Druckers kann jetzt
vollständig geschlossen werden.
8 Der Drucker führt jetzt automatisch die Ausrichtung der Tintenpatronen durch, die mit dem Ausdruck eines
technischen Textes endet. Ein Blatt A4 Papier einlegen und den Ausdruck abwarten.
KURZANLEITUNG 17

VERWENDUNG DES DRUCKERS ÜBER EINEN COMPUTER
VOR BEGINN
Dieses Kapitel liefert die nötigen Basisinformationen, um den Druck zu verwenden, wenn er an einen Computer
angeschlossen ist. Für nähere Informationen zu den angebotenen Funktionen bitten wir Sie, Ziehen Sie das
Benutzerhandbuch zu Rate, indem Sie Start > Programme > Olivetti wählen.
Andere Informationen stehen zur Verfügung, indem Sie Hilfe im Dialogfenster wählen.
Vor Beginn:
1 Sicherstellen, dass der Anschluss zwischen Drucker und Computer korrekt ausgeführt wurde und dass die auf der
CD enthaltene Software gemäß den Angaben in der mit dem Drucker gelieferten "Einrichten ihres Druckers"
installiert wurde.
2 Das für den Druck zu verwendende Papier einlegen.
3 Sicherstellen, dass die Anzeigen für Tintenende auf der Fronttafel erloschen sind.
Andernfalls wird geraten, die entsprechende Tintenpatrone zu ersetzen.
Für nähere Informationen siehe "Tintenpatronen ersetzen".
DER STATUSMONITOR DES DRUCKERS
Der Statusmonitor des Druckers liefert Angaben zum aktuellen Zustand des Druckers und wird zusammen mit der
auf der Installations-CD enthaltenen Software installiert.
Der Statusmonitor zeigt zu Beginn eines Druck- oder Kopierauftrags automatisch:
• Eine grafische Darstellung des Prozentanteils des bereits abgeschlossenen Druck- oder Kopiervorgangs.
• Die Anzahl der bereits ausgedruckten oder kopierten Seiten in Bezug auf die Gesamtzahl der auszudruckenden
Seiten.
• Eine grafische Darstellung der geschätzten, noch in der schwarzen Patrone und in der Farbpatrone enthaltenen
Tintenmenge in Prozent.
• Die Möglichkeit, einen Druck- oder Kopierauftrag abzubrechen.
• Die Adresse der Website des Herstellers, auf der die zum Kauf neuer Tintenpatronen nötigen Informationen
aufgerufen werden können.
Der Statusmonitor wird am Ende des Druck- oder Kopiervorgangs automatisch geschlossen, kann aber jederzeit
vom Benutzer geschlossen werden.
Wurde der Statusmonitor während eines Druck- oder Kopiervorgangs geschlossen, wird er automatisch erneut
eingeblendet.
• Ist die Tinte des Druckers fast oder vollständig zu Ende, so gibt ein farbiges Ausrufezeichen den niedrigen
Tintenstand (Farbtinte, schwarze Tinte oder beide Tintenpatronen) und die entsprechenden Prozentwerte an.
Es werden Pop-ups mit der Adresse der Website des Herstellers angezeigt, auf der die zum Kauf neuer
Tintenpatronen nötigen Informationen aufgerufen werden können.
KURZANLEITUNG18
 Loading...