

Page 1

1
User manual
OLCT 80
Part Number: NPO80GB
Revision: E.1
The Fixed Gas Detection Experts
Page 2

2
Copyright july 2018 by Oldham S.A.S
All rights reserved. No reproduction of all or part of this document, in any for mis
permitted without the written consent of Oldham S.A.S.
All information provided in this document is accurate to the best of our
knowledge.
As a result of continuous research and development, the specifications of this
product may be changed without prior notice.
Oldham S.A.S
Rue Orfila
Z.I. Est – CS 20417
F – 62027 ARRAS Cedex
Tel: +33 (0)3 21 60 80 80
Fax: +33 (0)3 21 60 80 00
Page 3

Table of Contents
iii
Table of Contents
Chapter 1 │ Overview ........................................................... 1
Limitation of Liability .........................................................................................1
Ownership clauses ...........................................................................................1
Warnings ...........................................................................................................1
Warranty ...........................................................................................................1
Important Information ........................................................................................2
Destruction of equipment ..................................................................................2
Symbols used ...................................................................................................3
Chapter 2 | Transmitter Overview ......................................... 5
Purpose.............................................................................................................5
Versions ............................................................................................................5
External components ........................................................................................6
Internal components .........................................................................................8
Device markings ...............................................................................................8
Indicators ..........................................................................................................9
Infrared remote control .................................................................................. 11
Chapter 3 | Menus ................................................................ 13
Accessing the menus ..................................................................................... 13
Tree structure of the main menus .................................................................. 14
Complete tree structure of the menus ........................................................... 14
Index of menu settings................................................................................... 18
AFF MES ....................................................................................................... 21
DATE TIME .................................................................................................... 22
PROGR .......................................................................................................... 23
PG SENSOR ................................................................................................. 25
PG SENSOR ................................................................................................. 26
PG CH1.......................................................................................................... 28
PG CH2.......................................................................................................... 30
PG AL/REL .................................................................................................... 31
AL SENSOR .................................................................................................. 32
AL CH1 .......................................................................................................... 34
AL CH2 .......................................................................................................... 34
RELAIS 1 ....................................................................................................... 35
RELAIS 2 ....................................................................................................... 37
RELAIS D ...................................................................................................... 38
PG SERIE ...................................................................................................... 39
PG PASSW .................................................................................................... 41
MAINT ............................................................................................................ 42
CALIBRA ....................................................................................................... 44
Cal sensor ...................................................................................................... 45
Chgt sens ....................................................................................................... 47
Cal CH1 ......................................................................................................... 48
Page 4

Table of Contents
iv
Cal CH2 ......................................................................................................... 48
4-20 mA ......................................................................................................... 49
INFOS ............................................................................................................ 50
TEST .............................................................................................................. 51
Chapter 4 | Installation ......................................................... 53
Regulations and operating conditions ........................................................... 53
Pre-installation Hardware Configuration ........................................................ 53
Equipment required ....................................................................................... 54
Positioning the detector ................................................................................. 54
Mounting the detector .................................................................................... 54
Power supply ................................................................................................. 55
Preparing the connection cables ................................................................... 56
Wiring ............................................................................................................. 57
Transfer curve ................................................................................................ 60
Chapter 5 | Wireless Version ............................................... 61
Purpose.......................................................................................................... 61
Concept.......................................................................................................... 61
Components .................................................................................................. 62
Connection ..................................................................................................... 62
Configuration ................................................................................................. 63
Configuring the addresses ............................................................................. 64
Start-up .......................................................................................................... 66
Chapter 6 | Operation ........................................................... 69
Configuring the transmitter ............................................................................ 69
Start-up .......................................................................................................... 70
Gas reading display ....................................................................................... 70
Acknowledging an alarm................................................................................ 71
Zeroing ........................................................................................................... 72
Gas sensitivity test ......................................................................................... 72
Chapter 7 | Pre-installation Hardware Configuration ........ 73
Purpose.......................................................................................................... 73
Access the internal printed circuit board ........................................................ 73
Locate the solder pads .................................................................................. 73
Configuring the auxiliary inputs to connect a 2-wire 4-20mA sensor ............ 74
Configuring the auxiliary inputs to connect a 3-wire 4-20mA sensor ............ 75
Configuring the auxiliary inputs to connect a 4-wire 4-20mA sensor ............ 75
Chapter 8 | Preventative Maintenance .................................. 77
Maintenance frequency ................................................................................. 77
OLCT 80 ........................................................................................................ 77
Chapter 9 | Maintenance ...................................................... 79
Possible transmitter errors ............................................................................. 79
Replacing the sensor cell............................................................................... 80
Cross gas factors for combustible gases ....................................................... 80
Maintaining the remote control ...................................................................... 83
Chapter 10 | Accessories ...................................................... 85
Page 5

Table of Contents v
Chapter 11 | Replacement Parts ........................................... 87
Accessories for the OLCT 80 ........................................................................ 87
Flameproof approved replacement sensors .................................................. 87
Intrinsically-safe approved replacement sensors .......................................... 88
Chapter 12 | EU Declarations of Conformity ........................ 89
OLCT 80 without antenna .............................................................................. 90
OLCT 80 with antenna ................................................................................... 92
IR20 remote control of the OLCT 80 ............................................................. 94
Chapter 13 | Technical Specifications .................................. 95
Dimensions .................................................................................................... 95
Metrological characteristics ........................................................................... 95
JBus communication specifications ............................................................... 99
Chapter 14 | Special instructions for use in explosive
atmospheres and fonctional safety........................................ 103
General comments ...................................................................................... 103
Warnings ...................................................................................................... 103
Requirements for use in dust explosive atmospheres ................................. 103
Cable entries ................................................................................................ 103
Threaded joints ............................................................................................ 103
Limitations of use ......................................................................................... 104
Marking ........................................................................................................ 105
Chapter 15 | Errors and Faults ............................................ 111
Page 6

Table of Contents
vi
Page 7

1 – Overwiew 1
Chapter 1 │ Overview
Thank you for choosing this OLDHAM instrument.
All necessary actions have been taken to ensure your complete satisfaction
with this equipment.
It is important that you read this entire manual carefully and thoroughly.
Limitation of Liability
■ OLDHAM shall not be held responsible for any damage to the equipment or for any
physical injury or death resulting in whole or in part from the inappropriate use or
installation of the equipment, non-compliance with any and all instructions, warnings,
standards and/or regulations in force.
■ No business, person or legal entity may assume responsibility on behalf of OLDHAM,
even though they may be involved in the sale of OLDHAM products.
■ OLDHAM shall not be responsible for any direct or indirect damage, or any direct or
indirect consequence, resulting from the sale and use of any of its products UNLESS
SUCH PRODUCTS HAVE BEEN SELECTED BY OLDHAM ACCORDING TO THE
APPLICATION.
Ownership clauses
■ The drawings, specifications, and information herein contain confidential information
that is the property of OLDHAM.
■ This information shall not, either in whole or in part, by physical, electronic, or any
other means whatsoever, be reproduced, copied, divulged, translated, or used as the
basis for the manufacture or sale of OLDHAM equipment, or for any other reason
without the prior written consent of OLDHAM.
Warnings
■ This is not a contractual document. OLDHAM reserves the right to alter the technical
features of its equipment at any time and for any reason without prior notice.
■ READ THESE INSTRUCTIONS CAREFULLY BEFORE USING FOR THE FIRST
TIME: these instructions should be read by all persons who have or will have
responsibility for the use, maintenance, or repair of the instrument.
■ This instrument shall only be deemed to be in conformance with the published
performance if used, maintained, and repaired in accordance with the instructions of
OLDHAM, by OLDHAM personnel, or by personnel authorized by OLDHAM.
Warranty
Under normal conditions of use and on return to the factory, parts and workmanship are
guaranteed for 2 years, excluding consumables such as sensors, filters, etc.
Page 8

1 – Overwiew 2
Important Information
The modification of the material and the use of parts of an unspecified origin
shall entail the cancellation of any form of warranty.
The use of the unit has been projected for the applications specified in the
technical characteristics. Exceeding the indicated values cannot in any case
be authorized.
Catalytic sensors are susceptible to poisoning by traces of several
substances. This leads to an inhibition which can be permanent or temporary
depending on the contaminant, the concentration of the contaminant, the
duration of exposure to the contaminant.
Poisoning may result from exposure to substances as:
• silicones (e.g. waterproofing, adhesives, release agents, special oils
and greases, certain medical products, commercial cleaning agents)
• tetraethyl lead (e.g. leaded petrol, particularly aviation petrol ‘Avgas’)
• sulfur compounds (sulfur dioxide, hydrogen sulfide)
• halogenated compounds (R134a, HFO, etc.)
• organo-phosphorus compounds (e.g. herbicides, insecticides, and
phosphate esters in fireproof hydraulic fluids)
Oldham recommends regular testing of fixed gas detection installations (read
Chapter 8).
Destruction of equipment
European Union only. This symbol indicates that, in conformity with
directive DEEE (2002/96/CE) and in accordance with local regulations,
this product must not be discarded with household waste.
It must be disposed of in a collection area that is designated for this
purpose, for example at a site that is officially designated for recycling of
electrical and electronic equipment (EEE) or a point of exchange for
authorized products in the event of the acquisition of a new product of the
same type.
The OLCT80 transmitter contains a lithium ion battery intended to supply
power to certain parts of the electronic circuit. The battery will be removed
prior to the destruction of the transmitter and deposited in a collection
center for used batteries.
Page 9
1 – Overwiew 3
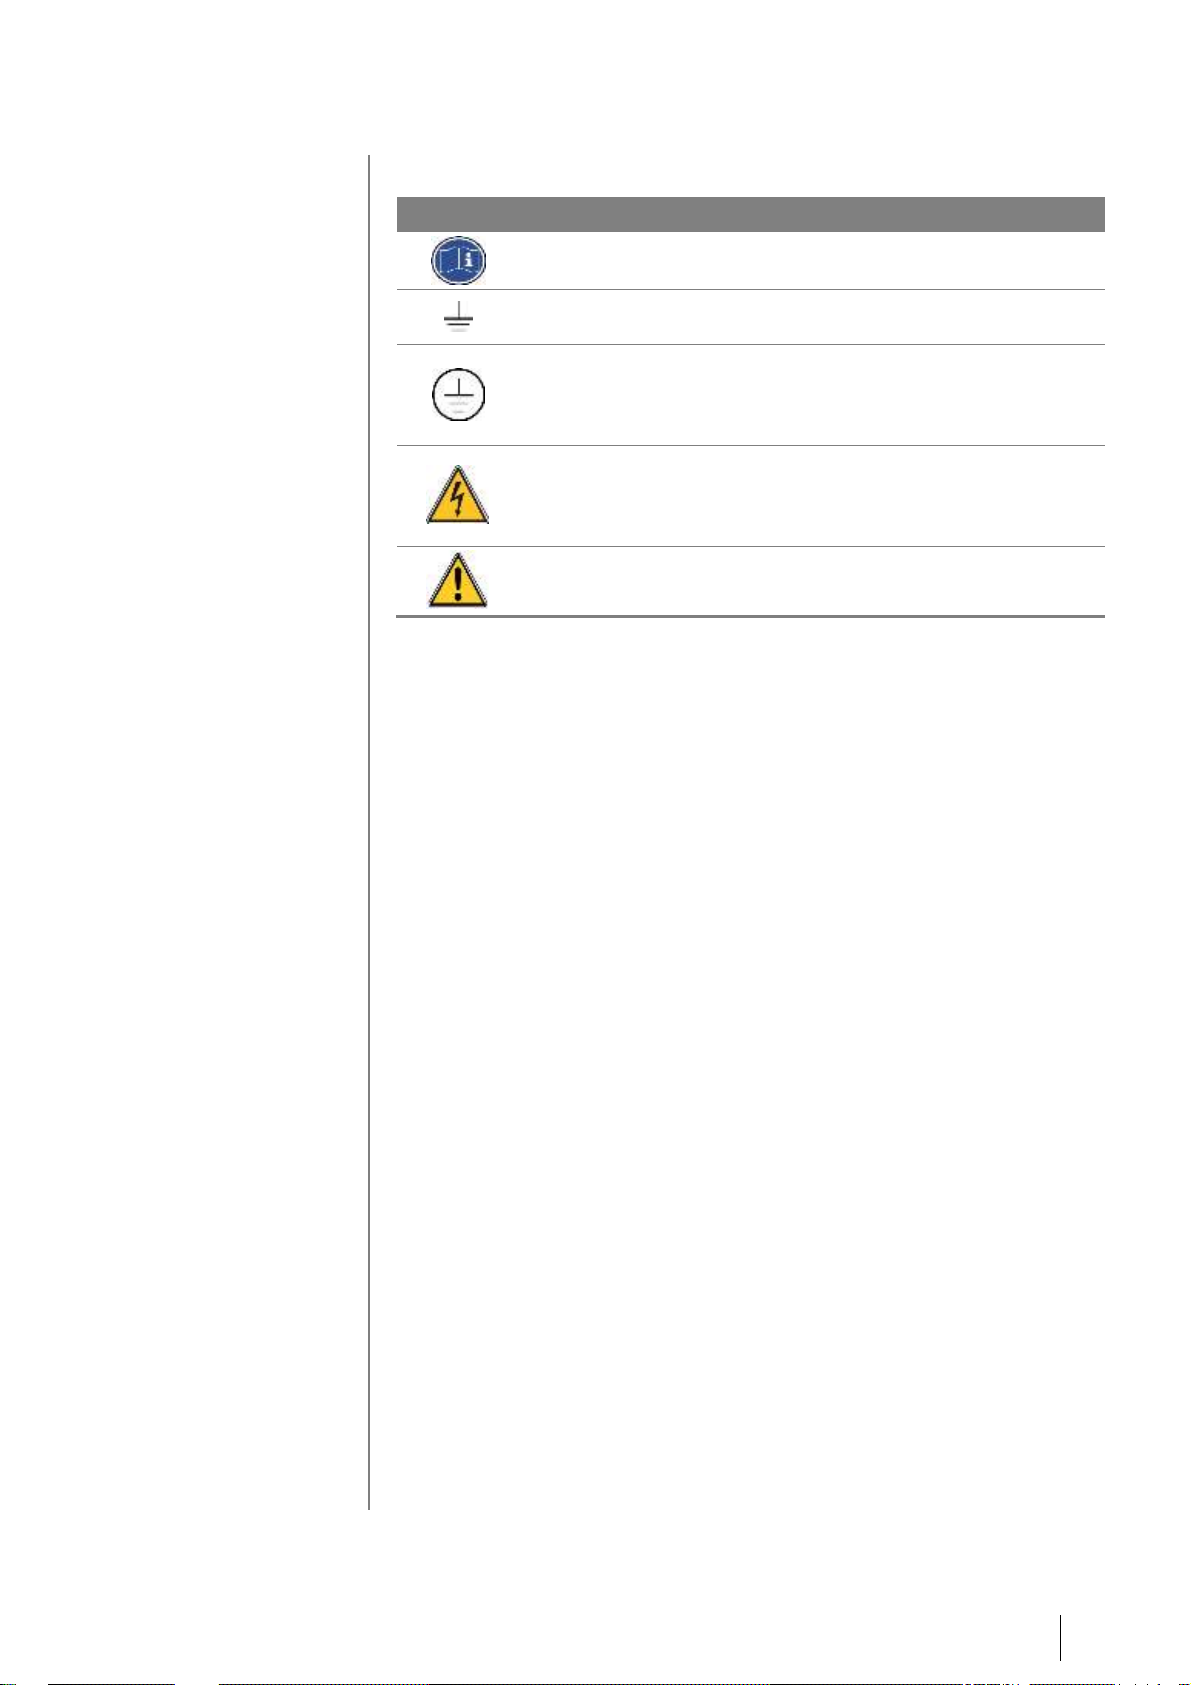
Symbols used
Icon
Signification
This symbol indicates:
useful additional information.
This symbol indicates:
This equipment must be connected to ground.
This symbol denotes:
Protective earth terminal. A cable of the adequate diameter
must be connected to ground and to the terminal having this
symbol
This symbol denotes:
Attention! In the present mode of use, failure to adhere to
the instructions preceded by this symbol can result in a
risk of electric shock and/or death.
This symbol indicates:
You must refer to the instructions.
Page 10

1 – Overwiew 4
Page 11

2 – Transmitter Overview 5
Chapter 2 | Transmitter Overview
Purpose
Gas detector OLCT 80 is a digital and analog transmitter designed to measure
combustible and toxic gases, as well as oxygen levels, in ATEX zones. The
OLCT 80 has 2 auxiliary inputs, ANA1 and ANA2, with a 4-20 mA signal, to
monitor up to 3 parameters simultaneously.
The transmitter also includes a digital LCD display, two alarm relays with
programmable thresholds and a fault relay.
The device is programmed using an intrinsically-safe infrared remote control
that can be used in ATEX zones.
Versions
Explosion-proof, intrinsically-safe versions
The following types of transmitters are available:
■ Explosion-proof: the enclosure and sensor pack assembly is explosion-
proof. The explosion-proof certified version is designated OLCT 80d.
■ Explosion-proof + intrinsically-safe: the transmitter's enclosure is explosion-
proof and the sensor pack is intrinsically-safe. Only the versions using an
electrochemical sensor are available in this style. The explosion-proof,
intrinsically-safe certified version is designated OLCT 80id.
The table below lists the versions available.
OLCT 80d
OLCT 80id
Catalytic sensor
Electrochemical sensor
XPIR infrared sensor
Table 1: comparison of OLCT 80 detectors.
Page 12
2 – Transmitter Overview 6
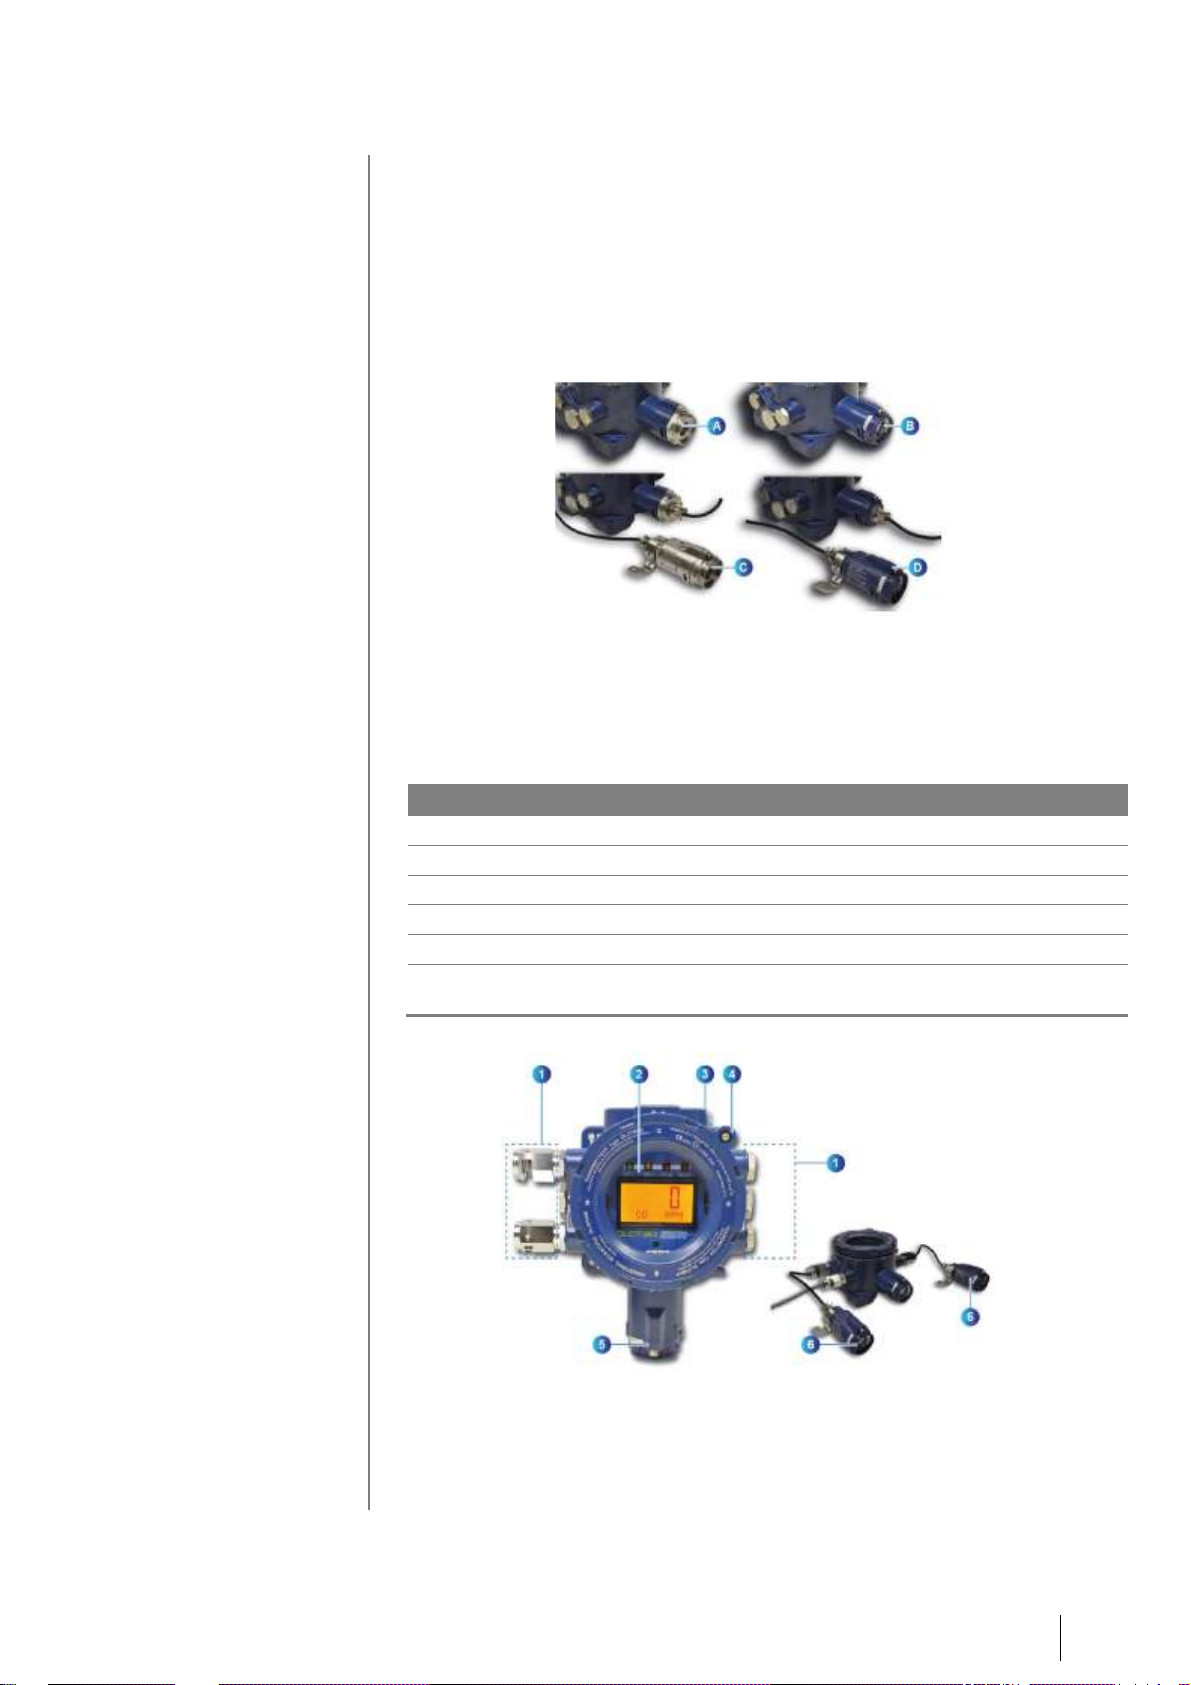
Local and remote sensor versions
There are two different options for the OLCT 80:
■ OLCT 80, which uses a local sensor. It consists of an explosion-proof
transmitter with an integrated intrinsically-safe detection module (B) or
explosion-proof detection module (A).
■ OLCT 80D, which uses a remote sensor. It consists of an explosion-proof
transmitter with a remote intrinsically-safe detection module (D) or explosionproof detection module (C).
Figure 1: OLCT 80 types
External components
Overview
Item
Description
1.
Cable glands (4 x M20 and 2 x M25) or threaded caps.
2.
Digital display and indicator lights. See Figure 4 for further detail.
3.
Grounding terminal (not visible in figure).
4.
Cover locking screw.
5.
Integrated or remote sensor pack (main sensor). See page 6 for further detail.
6.
Additional detectors; maximum of two per OLCT 80. See page 6 for further
detail.
Figure 2: external view of the components of an OLCT 80 transmitter.
Page 13
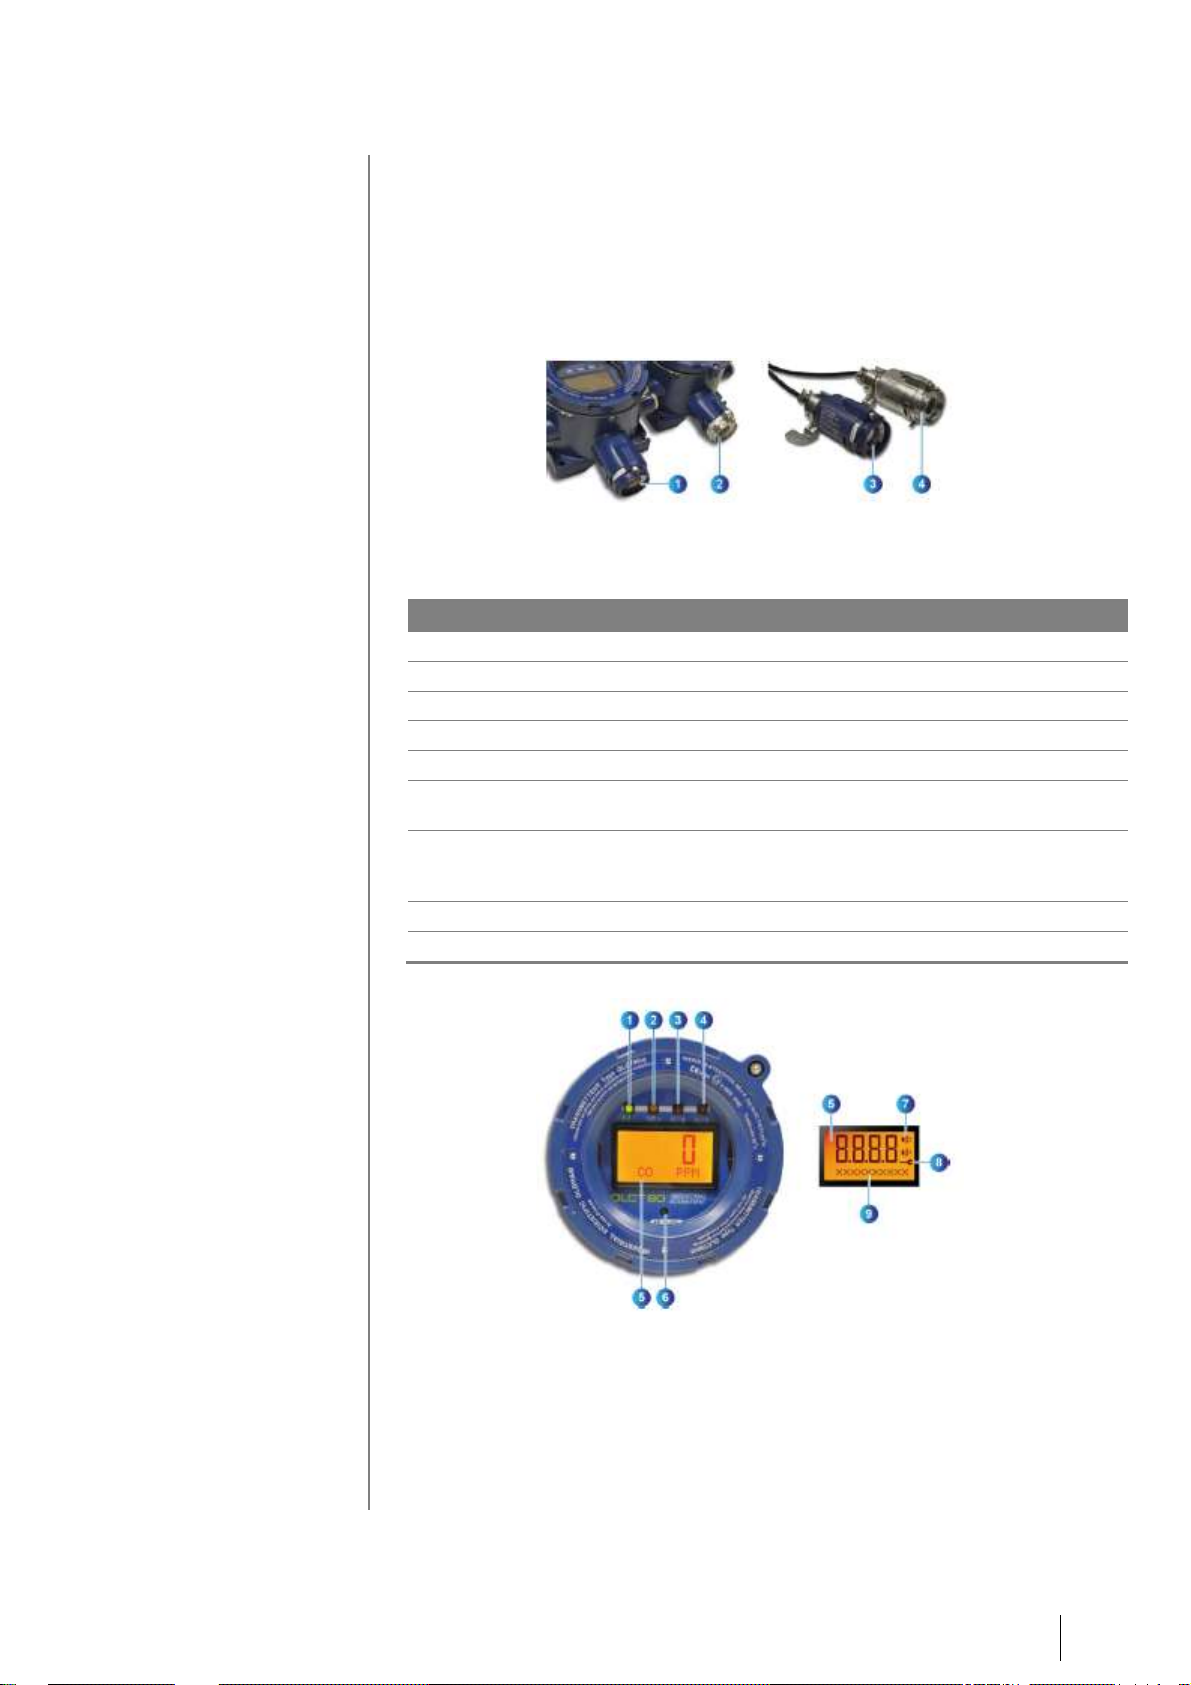
2 – Transmitter Overview 7
Differentiating explosion-proof and intrinsically-safe sensors
In addition to different ATEX markings, explosion-proof and intrinsically-safe
sensors can also be distinguished by the color of their sensor pack:
■ Explosion-proof sensor: unpainted stainless steel sensor equipped with a
sintered metal piece (2 and 4).
■ Intrinsically-safe sensor: blue stainless steel sensor equipped with a
protective Teflon membrane (1 and 3).
Figure 3: intrinsically-safe and explosion-proof sensors.
Displays and indicator lights
Item
Description
1.
Green power indicator light.
2.
Orange fault indicator light.
3.
Red level 1 alarm indicator light.
4.
Red level 2 alarm indicator light.
5.
LCD digital display, backlit.
6.
Infrared receptor for the signal coming from the IR20 remote control. See
Infrared remote control on page 11.
7.
Level 1 and level 2 alarm icons. The icons blink in the event of an alarm, but
changes to a solid icon once the alarm is acknowledged using the IR20 remote
control.
8.
Maintenance/fault icon (sensor, electronic, connection fault etc.).
9.
Text field (type of gas, unit, configuration-related text).
Figure 4: front view.
Page 14

2 – Transmitter Overview 8
Internal components
The main items accessible to the user are the connectors located on the
motherboard. See page 57 for the connections.
Item
Description
1.
24 VDC power supply and RS485 connection.
2.
4-20 mA analog output and ANA1/ANA2 analog inputs.
3.
Relays (default, Rel1 and Rel2).
4.
Fault relay dry contact output.
5.
Rel2 relay dry contact output.
6.
Rel1 relay dry contact output.
7.
24 VDC power output and RS485 connection.
Figure 5: internal components of the transmitter.
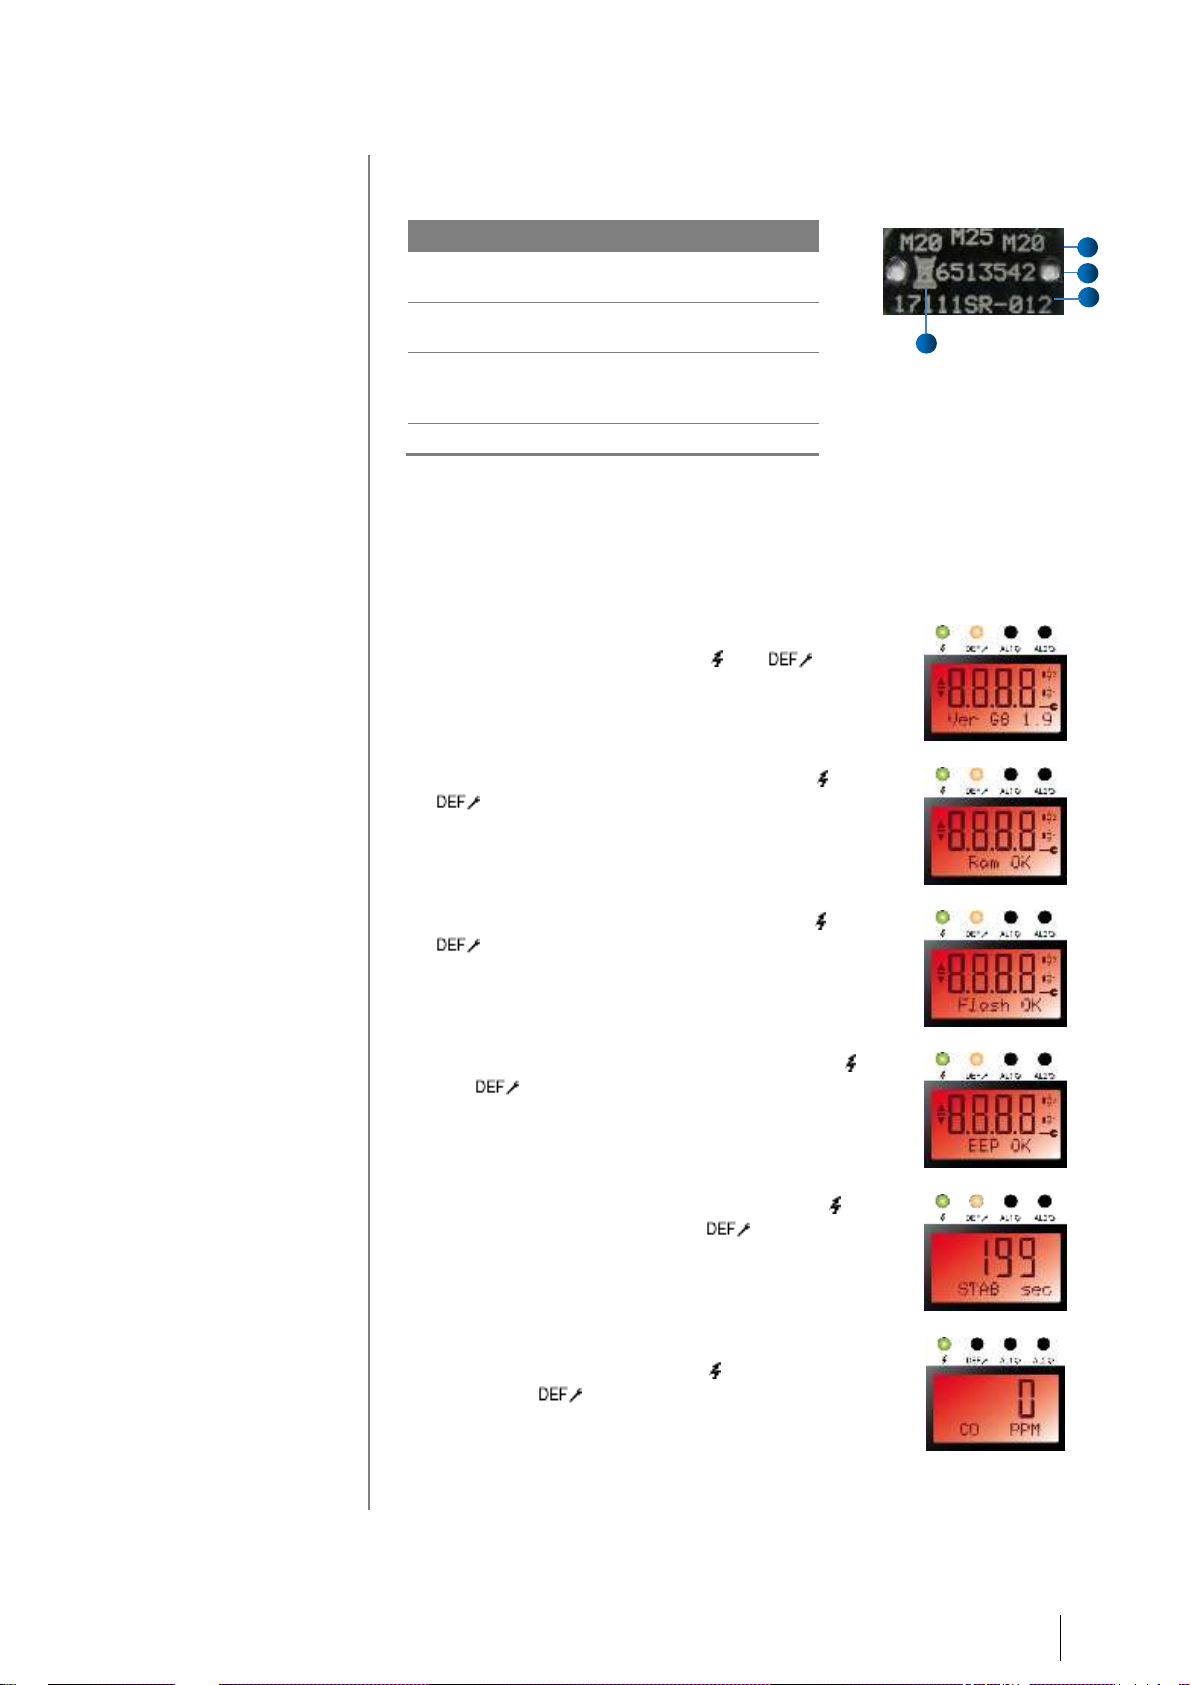
Device markings
Name plate
This area on the cover lists all necessary information regarding the detector's
characteristics:
Item
Description
1.
ATEX marking. Product type.
2.
Warning in French.
3.
Manufacturer name.
4.
CE and ATEX markings (excluding
metrological performance).
5.
Maximum rated temperature.
6.
Warning in English.
Figure 6: name plate
Page 15
2 – Transmitter Overview 9
Side label
This label, located on the housing, includes the following information:
Figure 7: side label
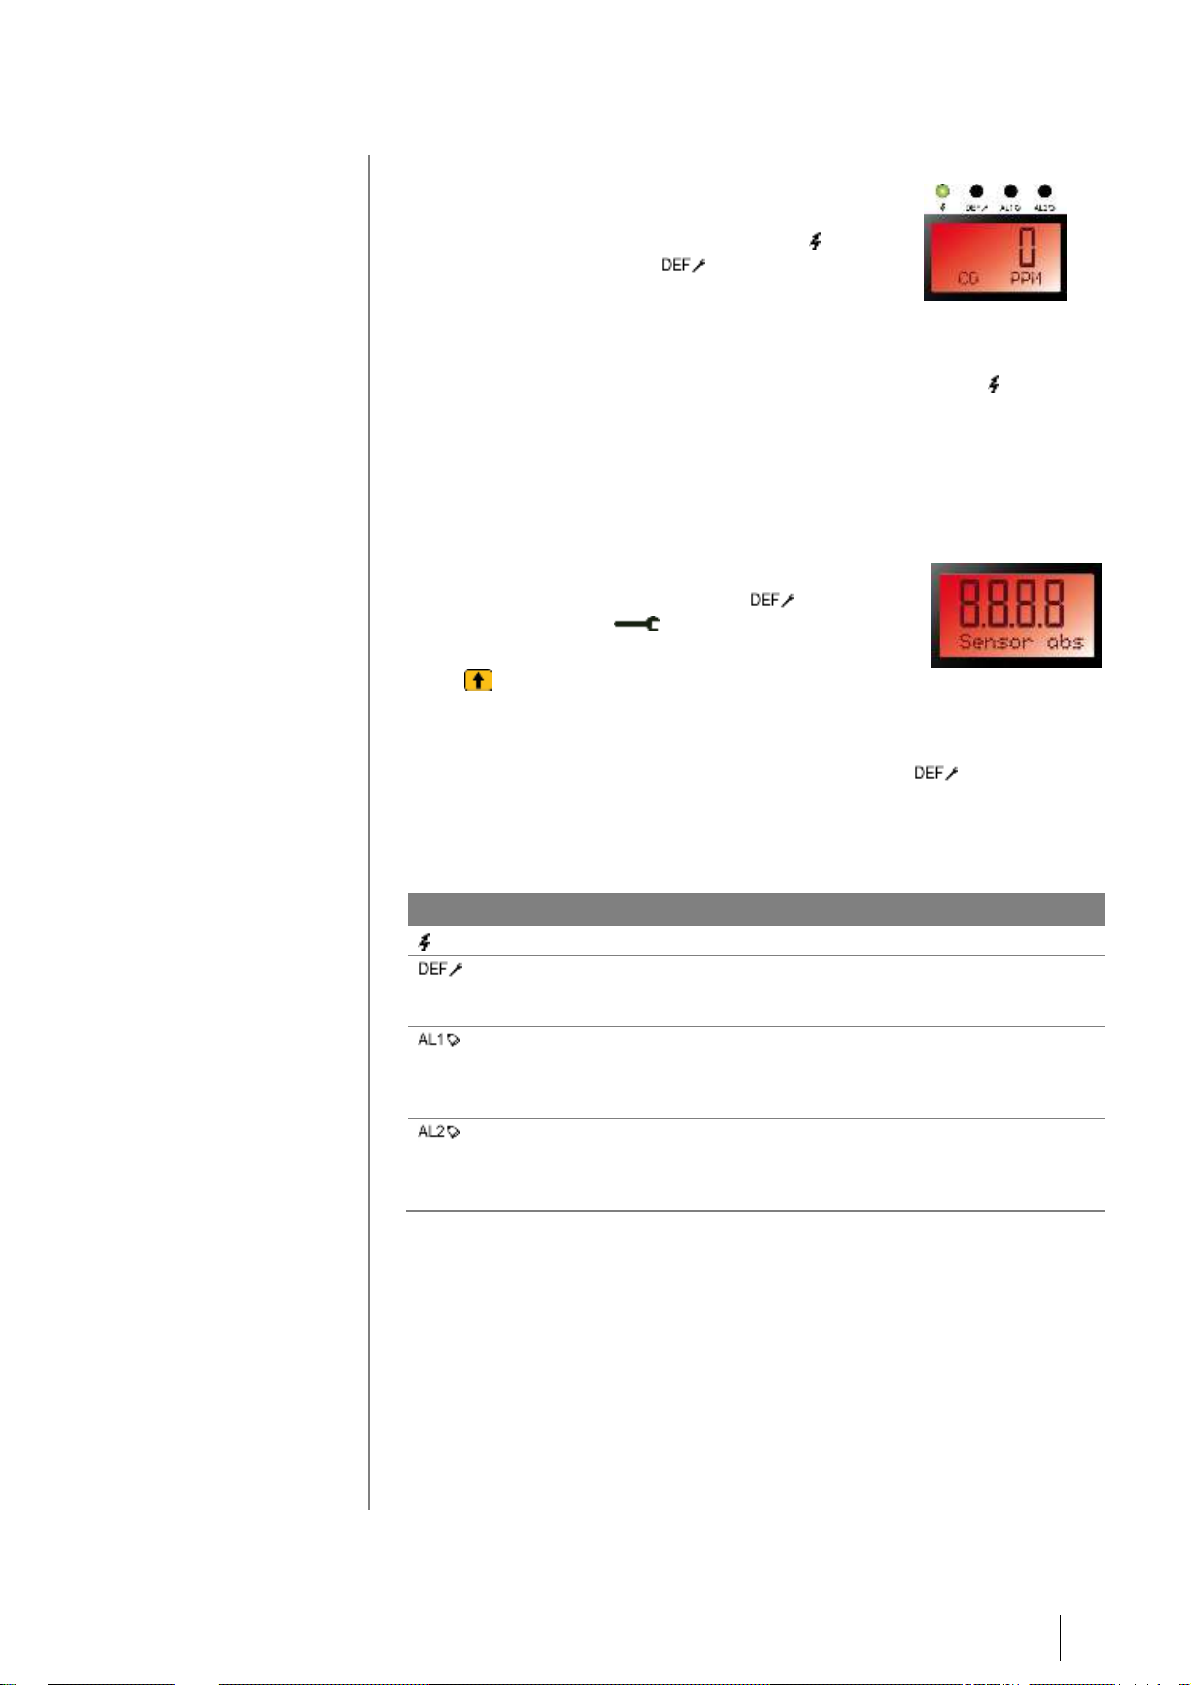
Indicators
At start-up
The following sequence of indicators/text is displayed:
■ All LCD segments are displayed to ensure that
they are working properly. The and
indicators turn on as solid lights.
■ The result of the RAM memory check. The and
indicators remain on as solid lights.
■ The result of the flash memory check. The and
indicators remain on as solid lights.
■ The result of the EEprom memory check. The
and indicators remain on as solid lights.
■ The stabilization time is then displayed. The
indicator light blinks, while the indicator light
is a solid light.
■ The post-stabilization gas concentration and
sensor test are displayed. The indicator light
blinks. The indicator light is off.
Figure 8: display sequence at start-up.
Item
Description
1.
Thread diameter and pitch of the cable
entries (here 2x M20 and 1x M25)
2.
P/N of transmitter (here OLCT80 d
variant) without the sensor cell
3.
S/N of transmitter : first two digits (here
17) correspond to the year of
construction (here 2017).
4.
Recycling symbol
2
3
1
4
Page 16
2 – Transmitter Overview
10
During normal operation
■ Single sensor: the display indicates the
concentration measured and also alternates
between the type of gas and the unit. The
indicator light blinks. The indicator light is
off.
■ At least 2 sensors connected: the display can be
configured in one of two ways:
- To display the readings in succession (normal
mode).
- To display a single reading (see page Erreur !
Signet non défini.).
Figure 9: display
under normal
operating conditions.
The green indicator
light blinks.
If a fault or error is detected
The display indicates an error or fault message (see
list of faults on page 111). The orange indicator
light comes on and the icon is displayed at the
same time.
Press to list any other faults that may be present,
until you come to the word "FIN."
Figure 10: in the event
of an alarm or fault, the
type of fault is
displayed. The orange
fault indicator
light remains on as a
solid light.
Understanding the indicator lights
Light
Off
Blinking
Solid
No power to detector.
Detector powered.
Not applicable.
No detector fault.
Detector fault or
detector in
maintenance mode.
Level 1 alarm not
triggered.
Level 1 alarm
triggered and not
acknowledged.
Level 1 alarm
triggered and
acknowledged (remote
control).
Level 2 alarm not
triggered.
Level 1 alarm
triggered and not
acknowledged.
Level 2 alarm
triggered and
acknowledged (remote
control).
-
Page 17
2 – Transmitter Overview
11
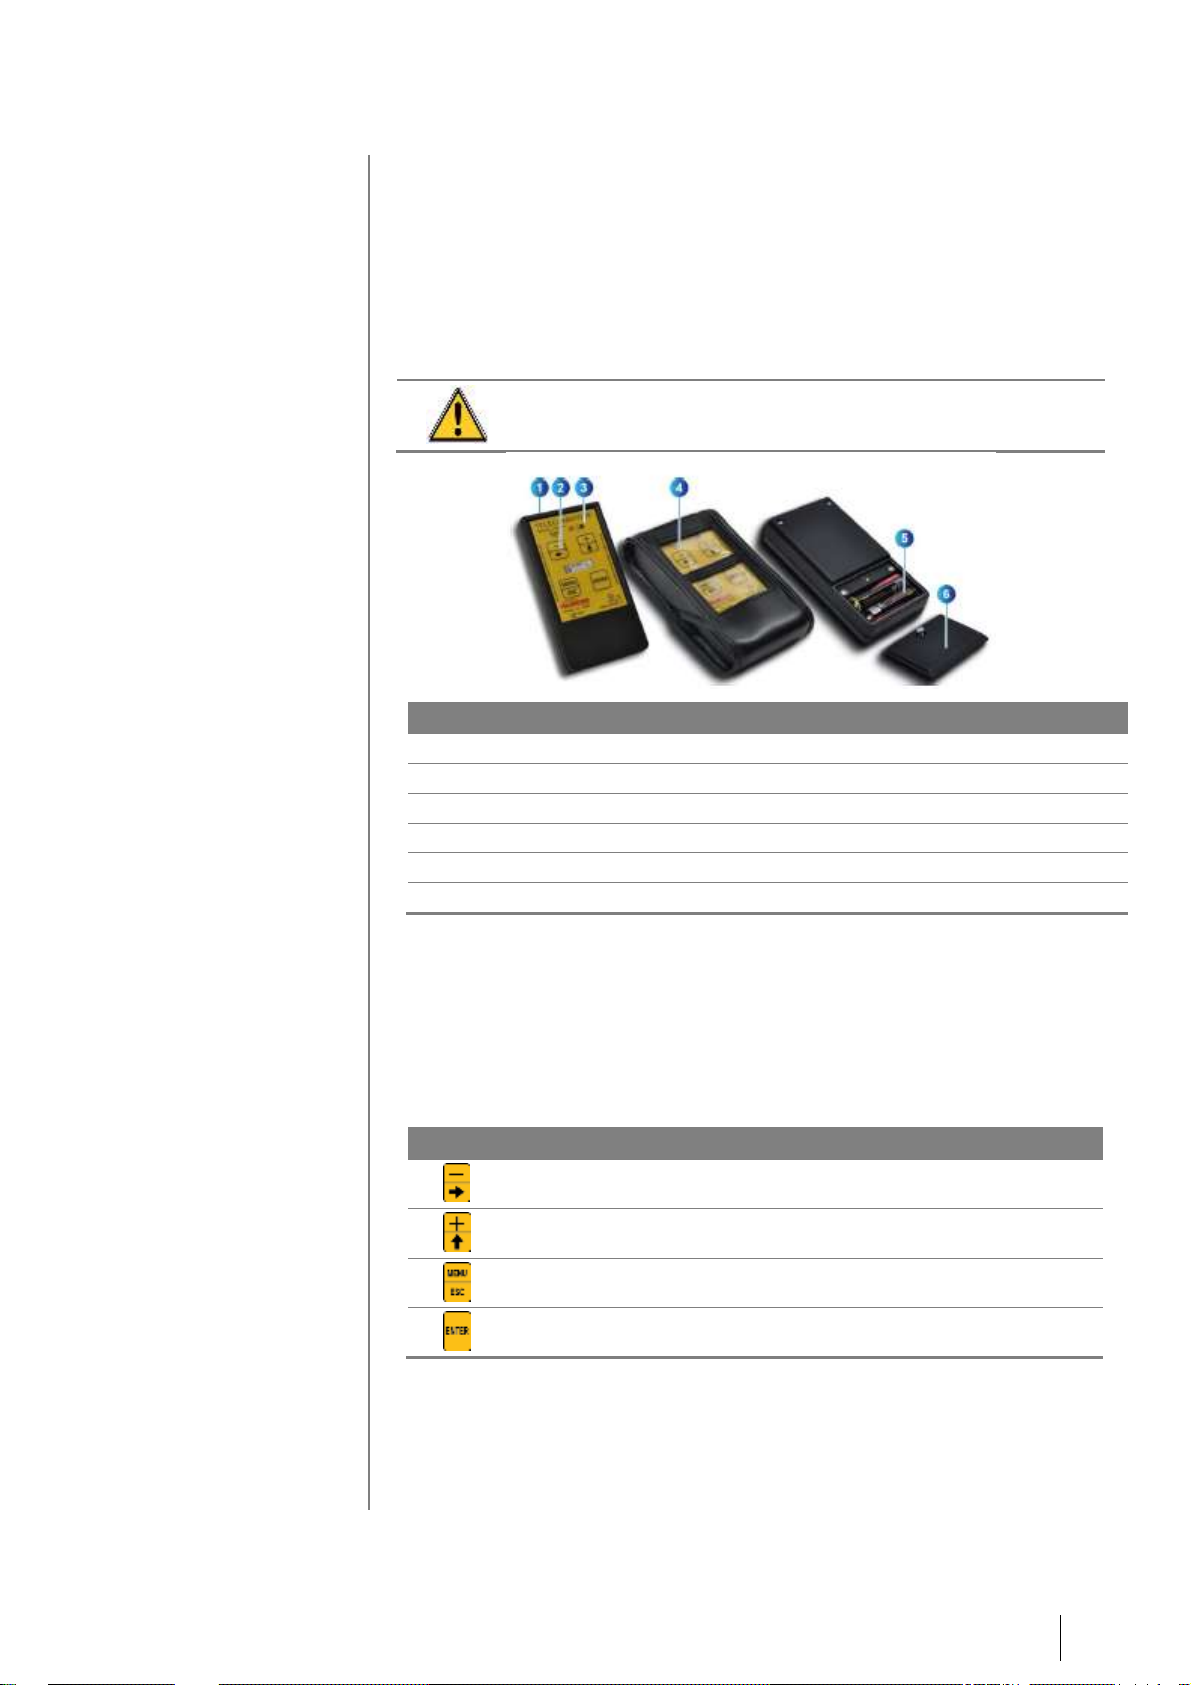
Infrared remote control
Description
The IR20 infrared remote control is a stand-alone device that can be used to
configure and control the OLCT 80 remotely without opening its housing.
Certified intrinsically safe, it can be used in IIC-type explosive atmospheres in
surface industries. The maximum range of this remote control is approximately
5 meters under normal daylight conditions. The remote control's rear battery
slot holds two AA 1.5-V batteries.
The leather case must be used in ATEX zones.
Item
Description
1.
Infrared transmitter.
2.
Soft-touch buttons.
3.
Operating light.
4.
The remote control in its leather case.
5.
Two AA 1.5 V batteries.
6.
Battery slot cover (removable after removing screw).
Figure 11: IR20 infrared remote control.
Using the remote control
To control the gas detector, point the front of the remote control (Figure 11, 1)
toward the detector. Refer to Chapter 3, page 13, for instructions on how to
access the menus and perform the various maintenance tasks.
Using the remote control's buttons
Button
Related action
Decrease a value or navigate between sub-menus at the same level.
Increase a value, modify a setting or navigate between sub-menus at
the same level.
Access and leave menus.
Confirm.
Page 18

2 – Transmitter Overview
12
Page 19
3 – Menus
13
Chapter 3 | Menus
Purpose of the menus
The menus allow the user to perform various operations in relation to the OLCT
80's settings (configure the ANA1/ANA2 sensors, alarm thresholds and relays,
RS485 connection, date and time, etc.).
These menus can be accessed using the infrared remote control,
without opening the cover of the OLCT 80. It is important to take the
necessary safety precautions before opening the cover if the device
is installed in an ATEX zone. These precautions include:
■ Obtaining a hot-work permit from the relevant department.
■ Using a portable for detection of combustible gases at all times.
■ Using an intrinsically-safe multimeter, where applicable.
■ Performing the operation as quickly as possible.
This pertains to all OLCT 80 versions, whether equipped with an
explosion-proof or intrinsically-safe sensor pack.
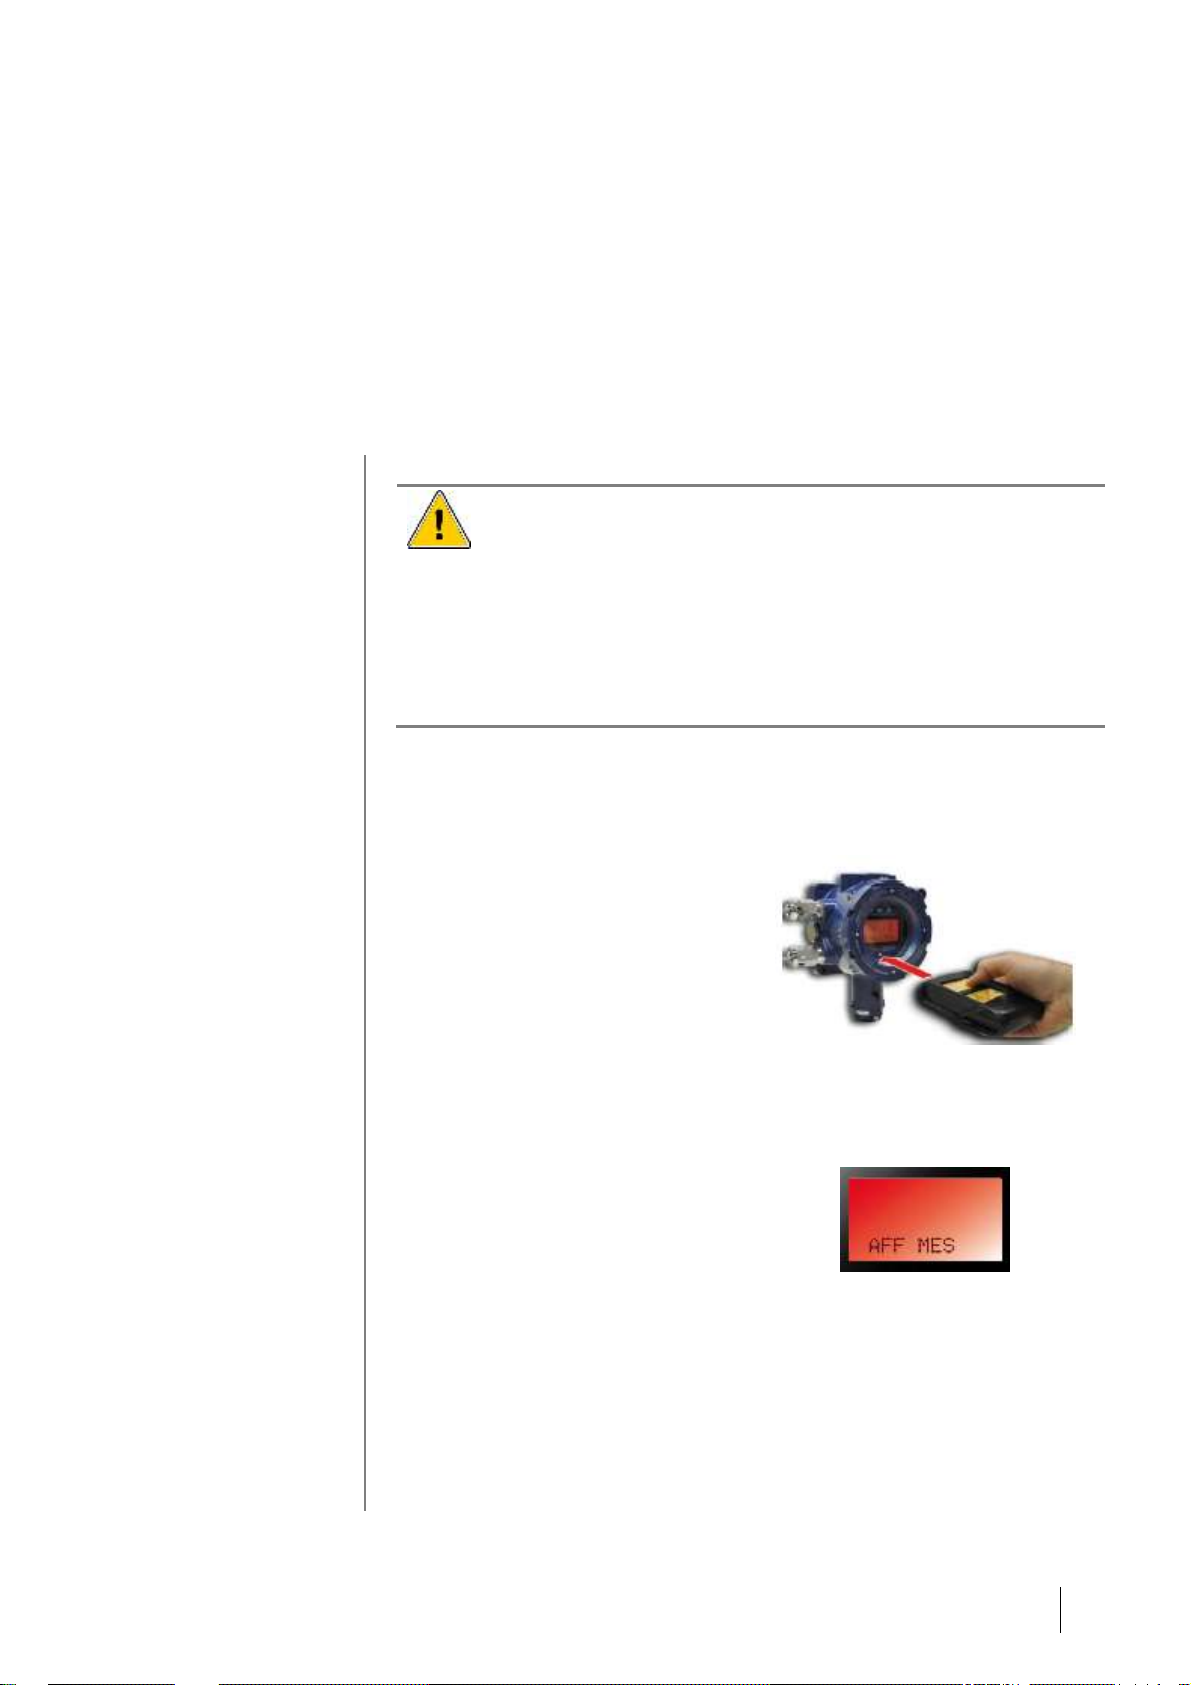
Accessing the menus
Follow the steps below:
■ Point the infrared remote control
toward the OLCT 80.
Figure 12: the remote control pointed
toward the OLCT 80.
■ Push the Menu button on the
remote control.
■ The AFF MES menu will appear
on the display of the OLCT 80.
Figure 13: the start menu.
Page 20

3 – Menus
14
Tree structure of the main menus
The menus are shown below. Each of these menus is described under
Complete tree structure of the menus below.
Figure 14: main menus of the OLCT 80.
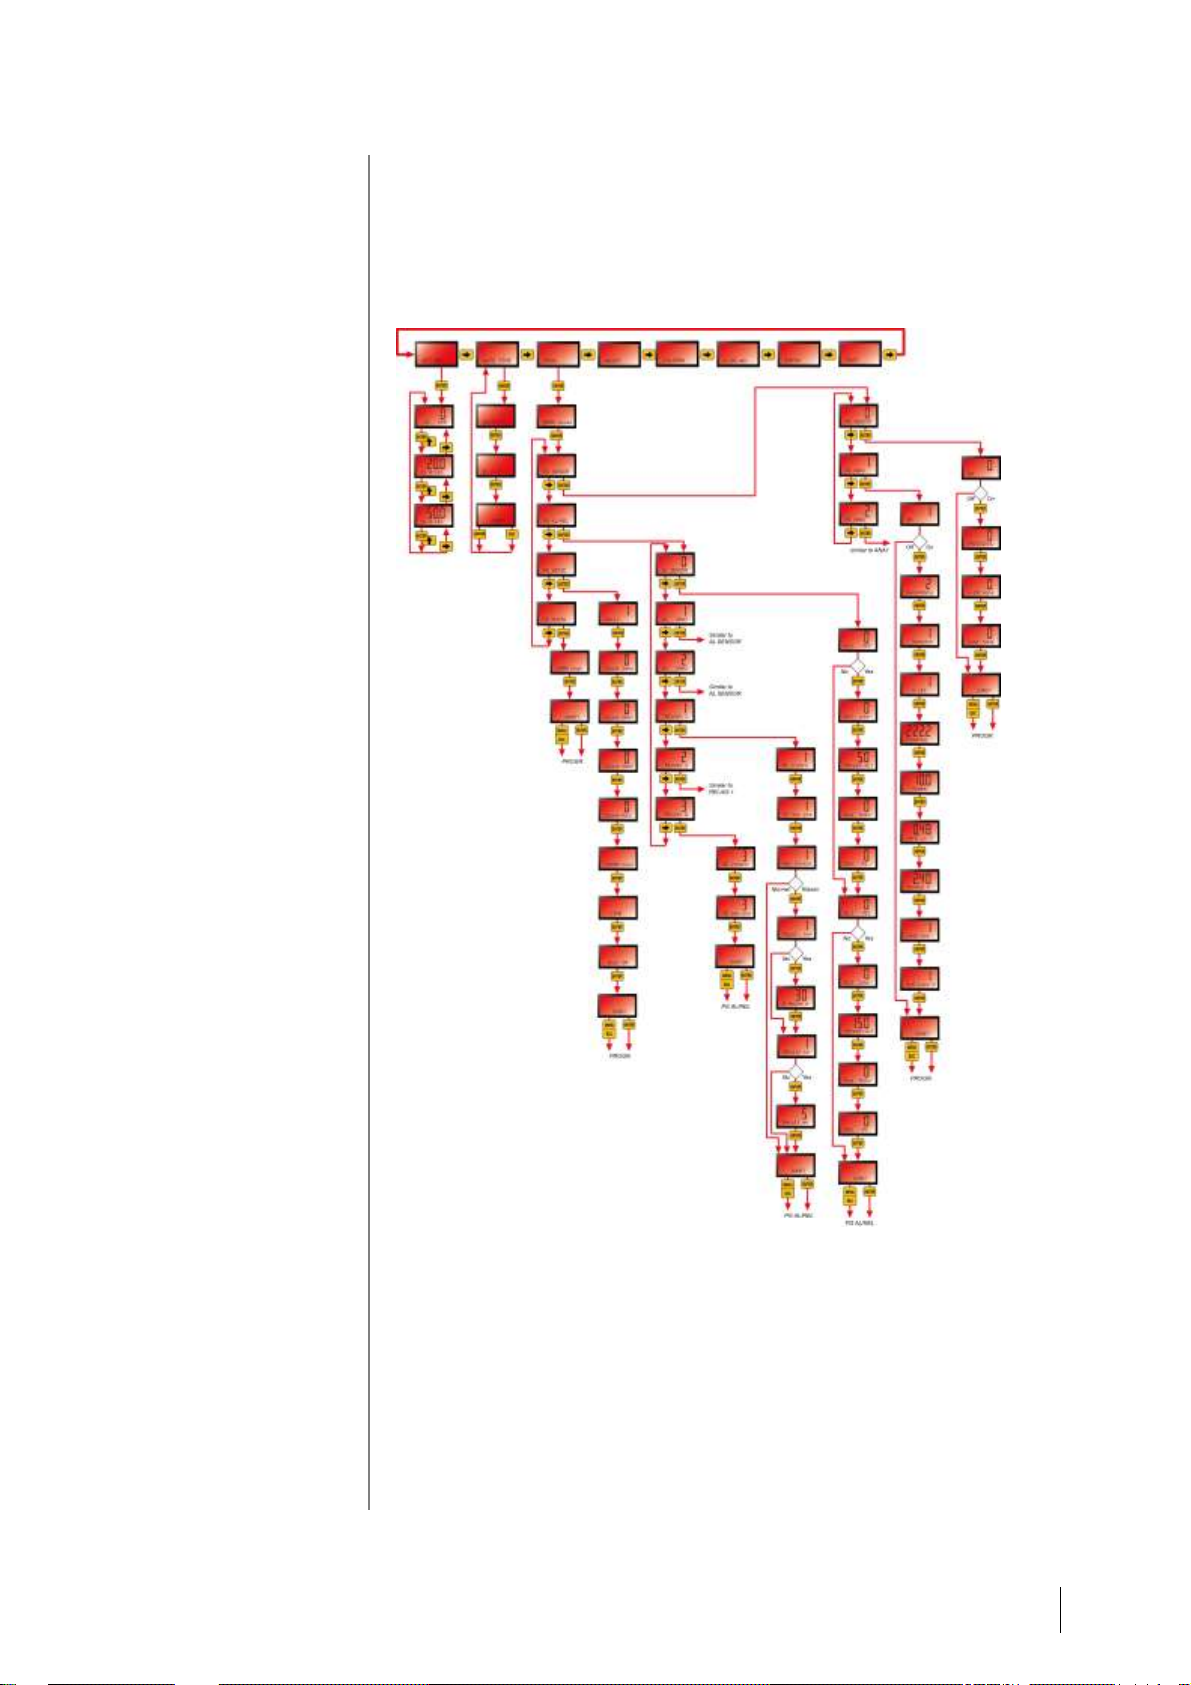
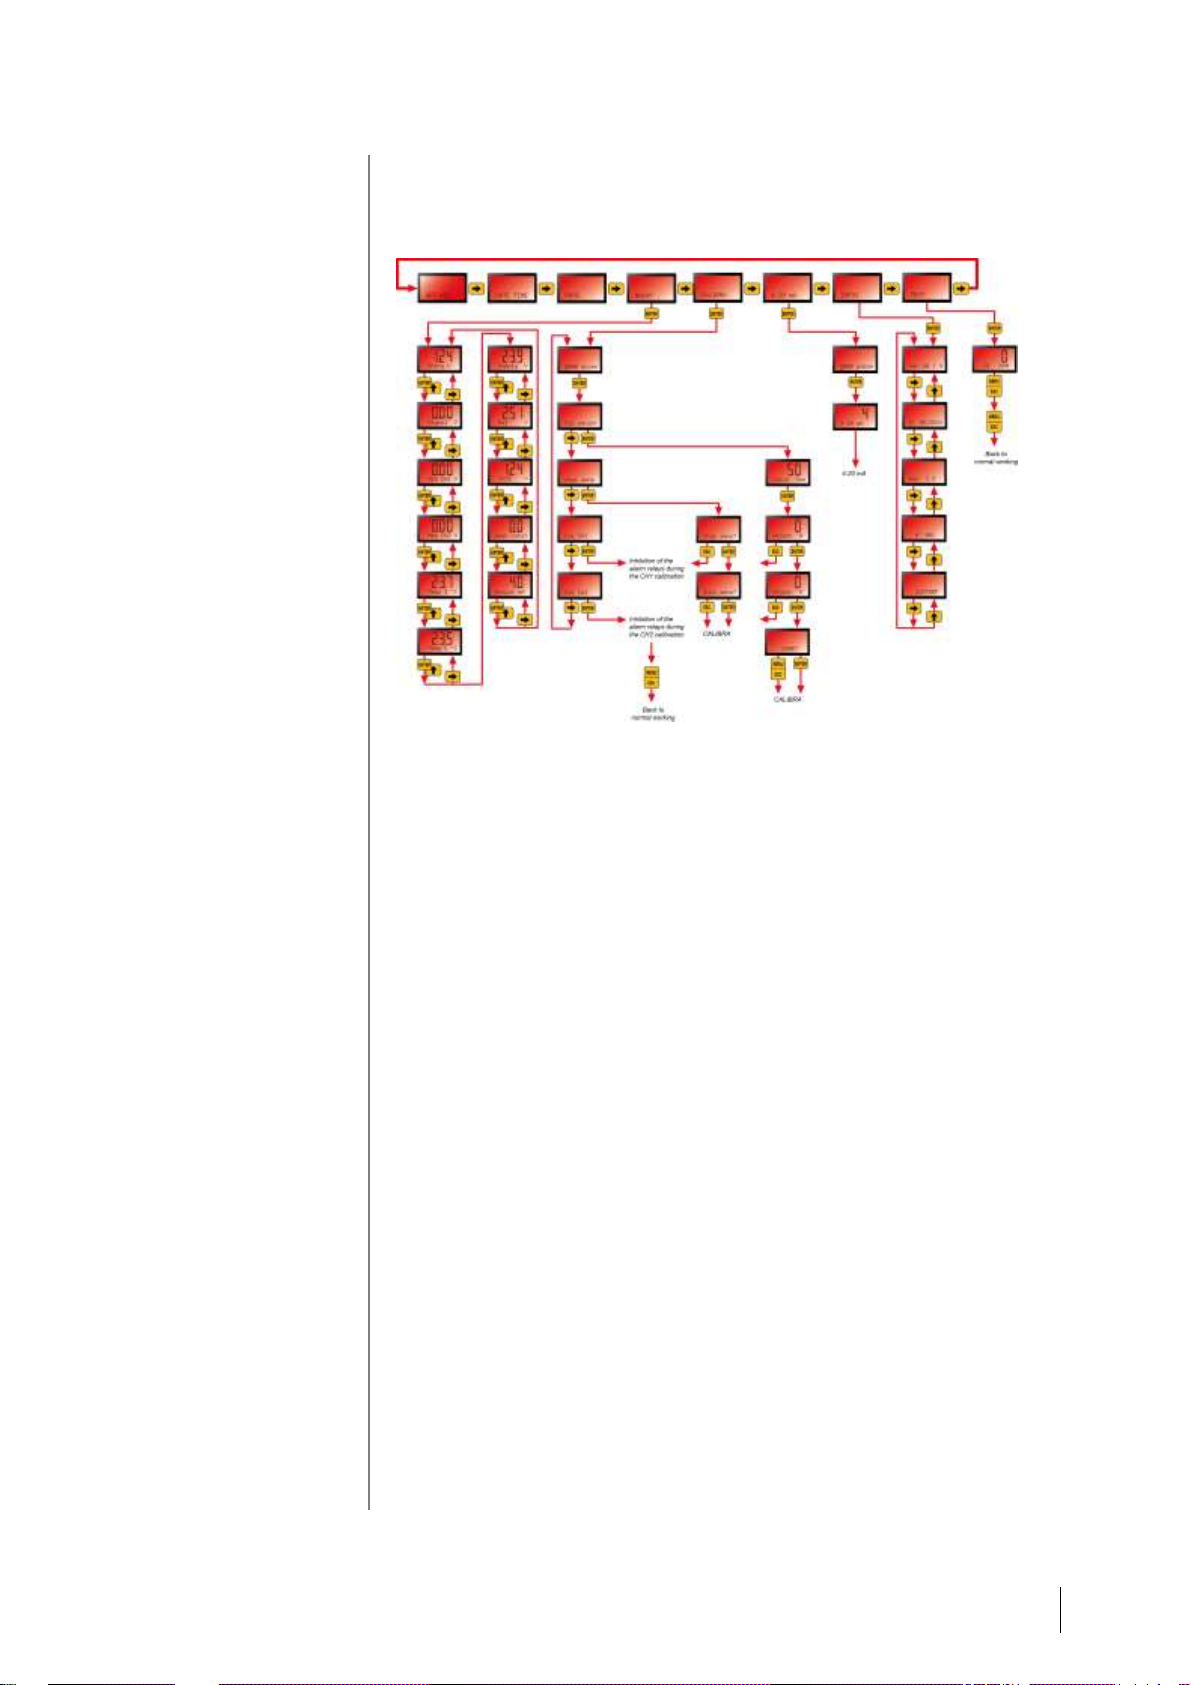
Complete tree structure of the menus
See Figure 15 and Figure 16.
Menu
Sub-menu
Description
Page
AFF MES
Display values for the
selected channel.
21
DATE TIME
Set the date and time.
22
PROGR.
Configure the transmitter.
Access code required to
access this menu.
23
PG
SENSOR
Access the channel
configuration sub-menus.
25
PG SENSOR
Configure the main channel
(local sensor).
26
PG CH1
Configure the ANA1 sensor.
27
PG CH2
Configure the ANA2 sensor.
30
PG
AL/REL
Access the configuration
sub-menus for the alarm
thresholds and relays.
31
AL SENSOR
Configure the alarm
thresholds for the main
sensor.
31
AL CH1
Configure the alarm
thresholds for the ANA1
sensor.
31
AL CH2
Configure the alarm
thresholds for the ANA2
sensor.
32
RELAIS 1
Configure the conditions that
trigger the 1st alarm relay.
35
RELAIS 2
Configure the conditions that
trigger the 2nd alarm relay.
37
RELAIS D
Configure the conditions that
trigger the fault relay.
37
PG SERIE
Configure the serial
connection and the
backlighting of the LCD
display.
38
Page 21

3 – Menus
15
Menu
Sub-menu
Description
Page
PG
PASSW.
Define the code to access
the configuration menus.
41
MAINT
Display maintenance-related
settings.
42
CALIBRA
Display the 3 calibration submenus for the main sensor,
the ANA1 sensor and the
ANA2 sensor. Access code
required to access this
menu.
44
Cal sensor
Calibrate the main sensor.
45
Chgt sens.
Reset the stored wear rate to
zero after replacing the main
sensor.
47
Cal CH1
Calibrate the ANA1 sensor.
48
Cal CH2
Calibrate the ANA2 sensor.
48
4-20 mA
Override the 4-20 mA output.
49
INFOS
Display the serial number,
software version, etc.
50
TEST
Perform gas test without
triggering relays.
51
Page 22
3 – Menus
16
Figure 15: the OLCT 80's sub-menus under AFF MES, DATE TIME and PROG.
Page 23
3 – Menus
17
Figure 16: the OLCT 80's sub-menus under MAINT, CALIBRA, 4-20mA, INFOS and
TEST.
Page 24

3 – Menus
18
Index of menu settings
This section lists the programmable settings and the corresponding pages in
this manual.
Setting
Menu
See page
4-20 mA
4-20 mA – control the output current for
testing purposes
4-20 mA
49
4-20 mA – manage the analog output
signal of the OLCT 80
PROG. > PG SENSOR >
PG SENSOR > Normal /
Synth / CAPEX
26
Display
Display readings
AFF.MES
21
24 VDC power supply
Display current voltage
MAINT > Entry V
42
Sensor – main sensor
Sensor – verify
PROG. > PG SENSOR >
PG SENSOR > OvR Lock
Y
26
Sensor – display
PROG. > PG SENSOR >
PG SENSOR > Display /
Principal / Secondary
26
Sensor – calibration
CALIBRA >
44
Sensor – on/off
PROG. > PG SENSOR >
PG SENSOR > ON/OFF
26
Sensor – adjust sensitivity
CALIBRA > Cal sensor >
Adjust. ‘S’
45
Sensor – zeroing
CALIBRA > Cal sensor. >
Adjust. ‘0’
45
Sensor – wear rate (display)
MAINT > User rate%
42
Sensor – replace sensor
CALIBRA > Chgt sens.
47
Sensor – reading integration time
PROG. > PG SENSOR >
PG SENSOR > coef none
25
Sensor – 4-20 mA output type
PROG. > PG SENSOR >
PG SENSOR > Normal /
Synth / CAPEX
25
Sensor – input signal value
MAINT > Signal V
42
Sensor – input voltage value
MAINT > Entry V
42
Main sensor – slave number
PROG. > PG SERIE >
Slave Sens
38
Date
Date
DATE TIME
22
ANA1 sensor
ANA1 sensor – input voltage value
MAINT > Meas CH1 V
42
ANA1 sensor – acknowledge reading or
function
PROG. > PG SENSOR >
PG ANA1 >
Measure/Acquit
27
ANA1 sensor – display
PROG. > PG SENSOR >
PG ANA1 > Display /
Principal / Secondary
27
ANA1 sensor – range minimum
PROG. > PG SENSOR >
PG ANA1 > Zero in V
27
ANA 1 sensor – measurement range
PROG. > PG SENSOR >
PG ANA1 > Gamme
27
Page 25

3 – Menus
19
Setting
Menu
See page
ANA1 sensor – range maximum
PROG. > PG SENSOR >
PG ANA1 > Zero in V
27
ANA1 sensor – verify
PROG. > PG SENSOR >
PG ANA1 > Gamme
27
ANA1 sensor – on/off
PROG. > PG SENSOR >
PG ANA1 > Zero in V
27
ANA1 sensor – slave number
PROG. > PG SENSOR >
PG ANA1 > Gamme
38
ANA1 sensor – decimal places in display
PROG. > PG SENSOR >
PG ANA1 > Zero in V
27
ANA1 sensor – reading integration time
PROG. > PG SENSOR >
PG ANA1 > Gamme
27
ANA1 sensor – units
PROG. > PG SENSOR >
PG ANA1 > Zero in V
27
ANA2 sensor
Refer to the section above on the ANA1 sensor as the information is similar.
Calibration gas
Calibration gas – define the value
CALIBRA > Cal sens. >
Calib. Gas
45
Time
Time
DATE TIME
22
LCD
LCD backlighting
PG SERIE > Back On/Off
38
Current reading (value, reading type, unit)
AFF.MES
21
Password
Password – change
PROG > PG PASSW >
chgt
41
Serial number, etc.
Transmitter serial number
INFO > N°
50
Software version number
INFO > Ver GB
50
Alarm #1 - main sensor
Alarm #1 – activate
PROG. > PG AL/REL >
AL SENSOR > AL1
YES/NO
31
Alarm #1 – acknowledge
PROG. > PG AL/REL >
AL SENSOR > Acq
auto/manu
31
Alarm #1 – assign to a relay
PROG. > PG AL/REL >
AL SENSOR > Rel
R1/R2/NONE
31
Alarm #1 – increasing/decreasing
PROG. > PG AL/REL >
AL SENSOR > AL1 incre
/decre
31
Alarm #2 - main sensor
Alarm #2 – activate
PROG. > PG AL/REL >
AL SENSOR > AL2
YES/NO
31
Alarm #2 – acknowledge
PROG. > PG AL/REL >
AL SENSOR > Acq
auto/manu
31
Alarm #2 – assign to a relay
PROG. > PG AL/REL >
AL SENSOR > Rel
R1/R2/NONE
31
Page 26

3 – Menus
20
Setting
Menu
See page
Alarm #2 – increasing/decreasing
PROG. > PG AL/REL >
AL SENSOR > AL2 incre
/decre
31
Alarms #1 and #2 - ANA1 and ANA2
sensors
Refer to the Alarm #1 and Alarm #2 settings for the main sensor, since the
information is similar.
Alarm relay #1
Relay #1 – internal/external
PROG. > PG AL/REL >
REL 1 > R1 intern/extern
35
Relay #1 – horn-duration
PROG. > PG AL/REL >
REL 1 > D. Maint s
35
Relay #1 – horn-deactivation
PROG. > PG AL/REL >
REL 1 > Maint YES/NO
35
Relay #1 – horn-normal
PROG. > PG AL/REL >
REL 1 > Rel
normal/klaxon
35
Relay #1 – horn-reminder
PROG. > PG AL/REL >
REL 1 > Recalll YES/NO
35
Relay #1 – horn-reminder length
PROG. > PG AL/REL >
REL 1 > Recalll mn
35
Relay #1 – energized or de-energized
during alarm
PROG. > PG AL/REL >
REL 1 > R1 sec pos/sec
neg
35
Alarm relay #2
Procedural similar to alarm relay #1.
Fault relay
Fault relay – internal/external
PROG. > PG AL/REL >
RELAIS D. > RD
intern/extern
37
Fault relay – horn-normal
PROG. > PG AL/REL >
RELAIS D > Rel
normal/klaxon
37
Fault relay – energized or de-energized
during alarm
PROG. > PG AL/REL >
RELAIS D>RD sec
pos/sec neg
37
LCD backlighting
LCD backlighting
PG SERIE > Back On/Off
38
RS485
RS485 – all settings
PG SERIE >
38
Wear rate
Sensor wear rate (display)
MAINT > User rate%
42
Sensor wear rate (reset to zero)
CALIBRA > Chgt. Sens.
47
Page 27
3 – Menus
21
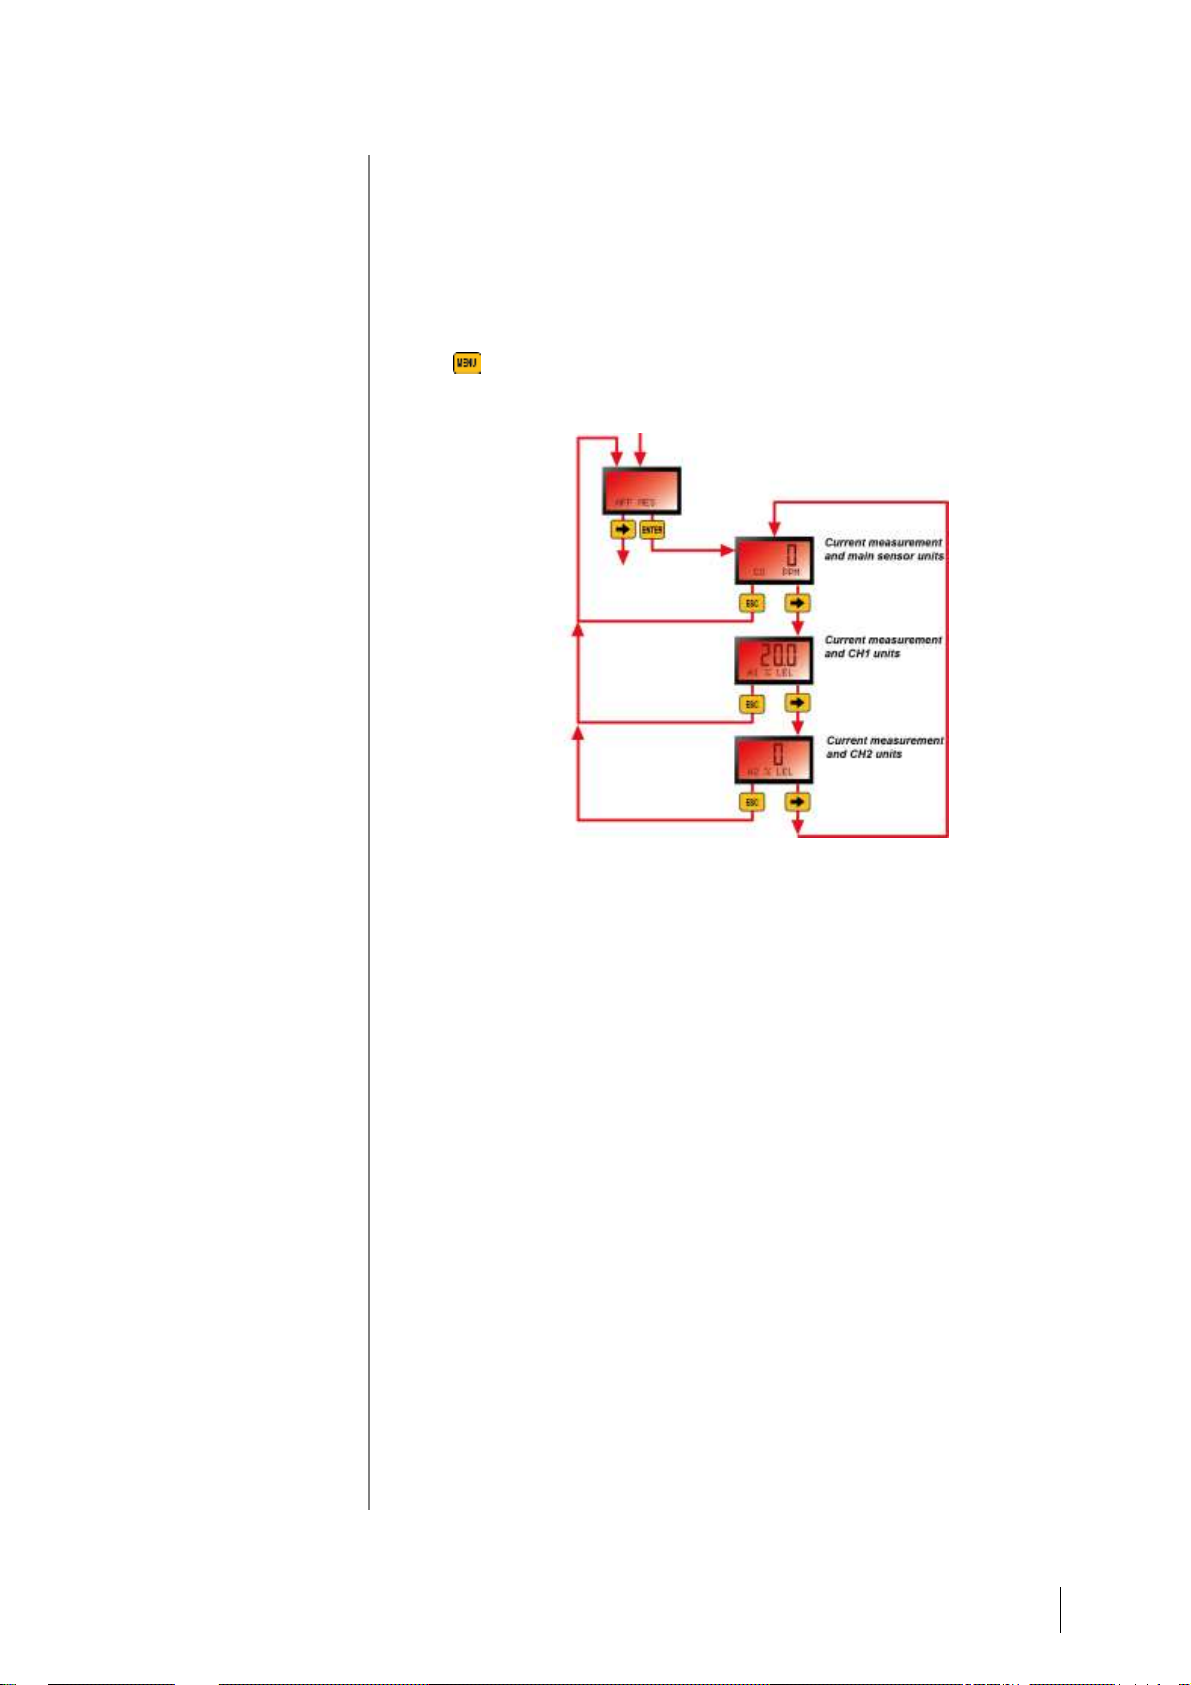
AFF MES
Purpose
Display values for the main sensor, ANA1 sensor or ANA2 sensor on the
screen, as selected using the IR20 remote control. The menu serves mainly to
display a particular item temporarily.
How to access
Press .
Tree structure
Figure 17: the Reading Display menu.
Use
Use the buttons on the remote control to navigate the menu's tree structure as
shown in figure 17.
As long as the OLCT 80 is on this menu, the system will continue to operate
normally and monitor gas levels.
To leave this menu and return to normal operating mode, push the ESC button
on the remote control two times.
Page 28
3 – Menus
22
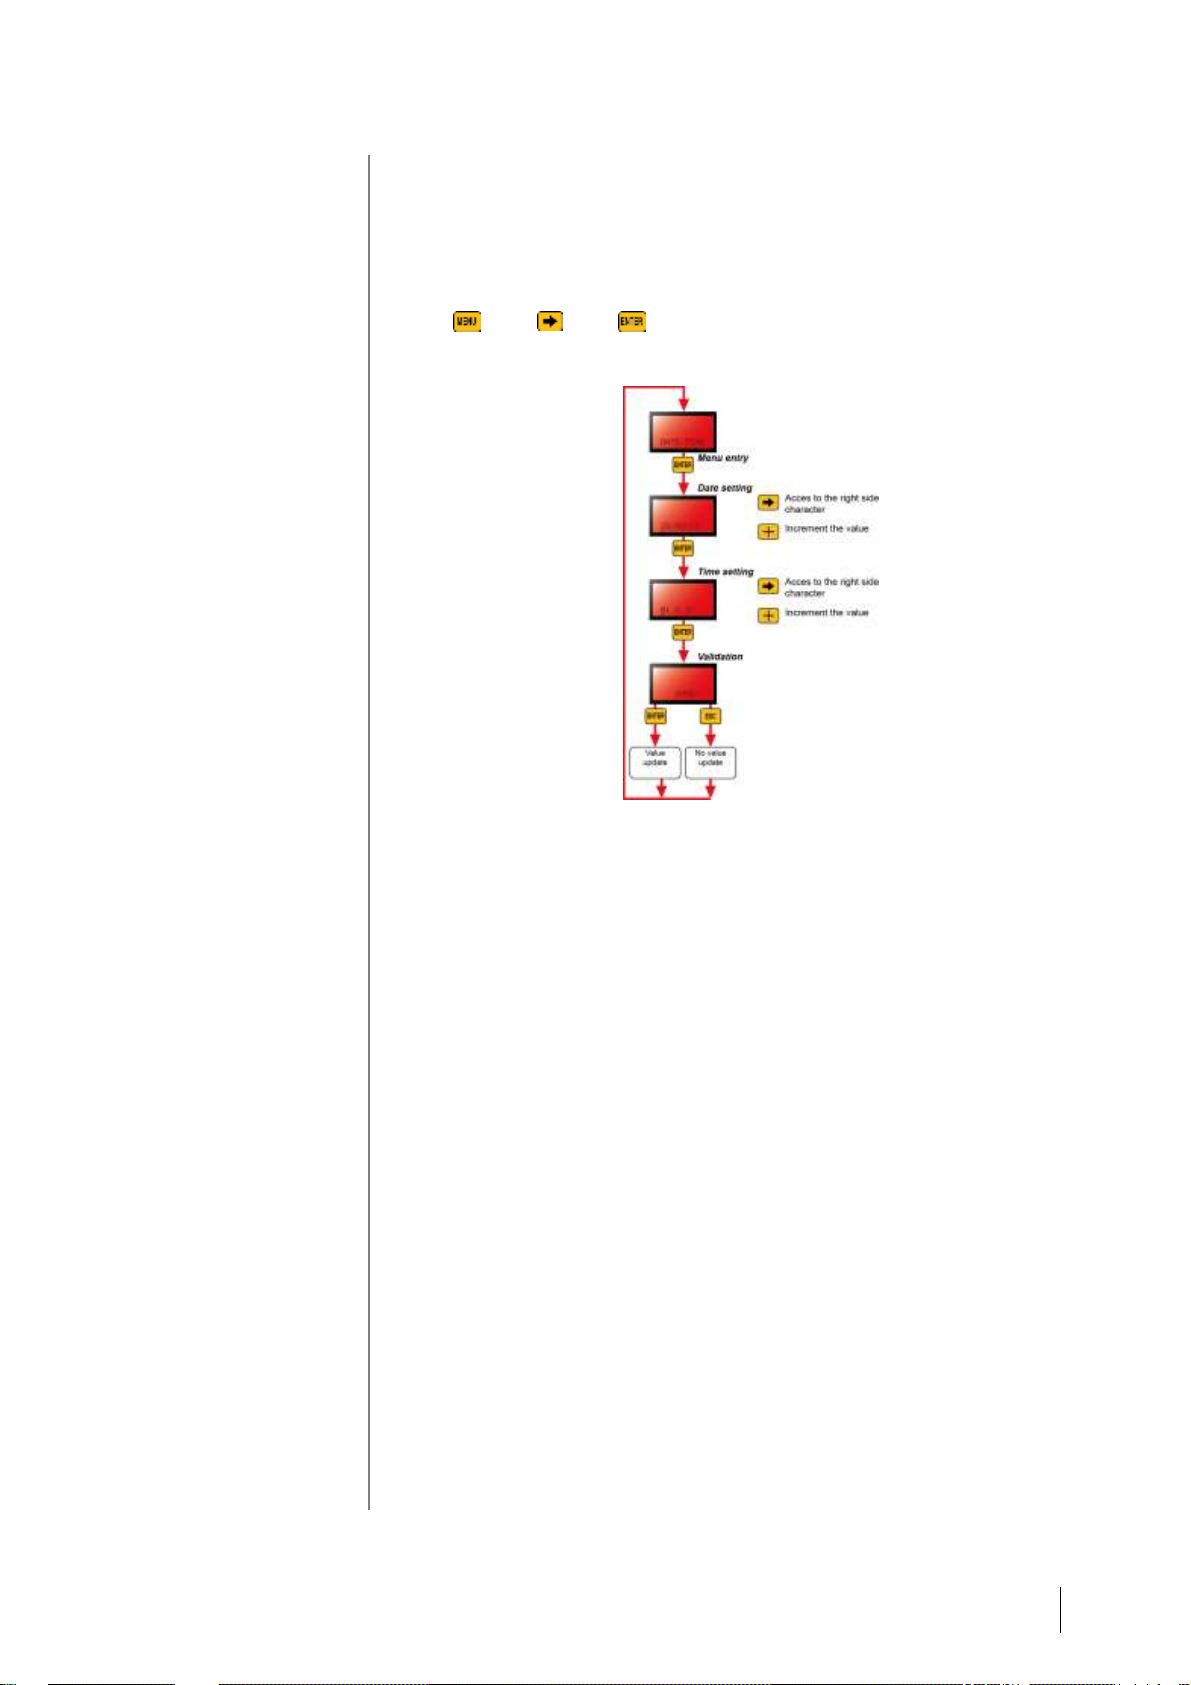
DATE TIME
Purpose
Define the internal Date and Time settings of the OLCT 80 transmitter.
How to access
Press , then , then . See Figure 14.
Tree structure
Figure 18: the Date and Time menu.
Use
Use the buttons on the remote control to change the date and time values as
indicated in Figure 18.
The date is in DD/MM/YY format and the time is in HH/MM format (24-hour
clock).
Press ESC to return to the reading display.
Page 29
3 – Menus
23
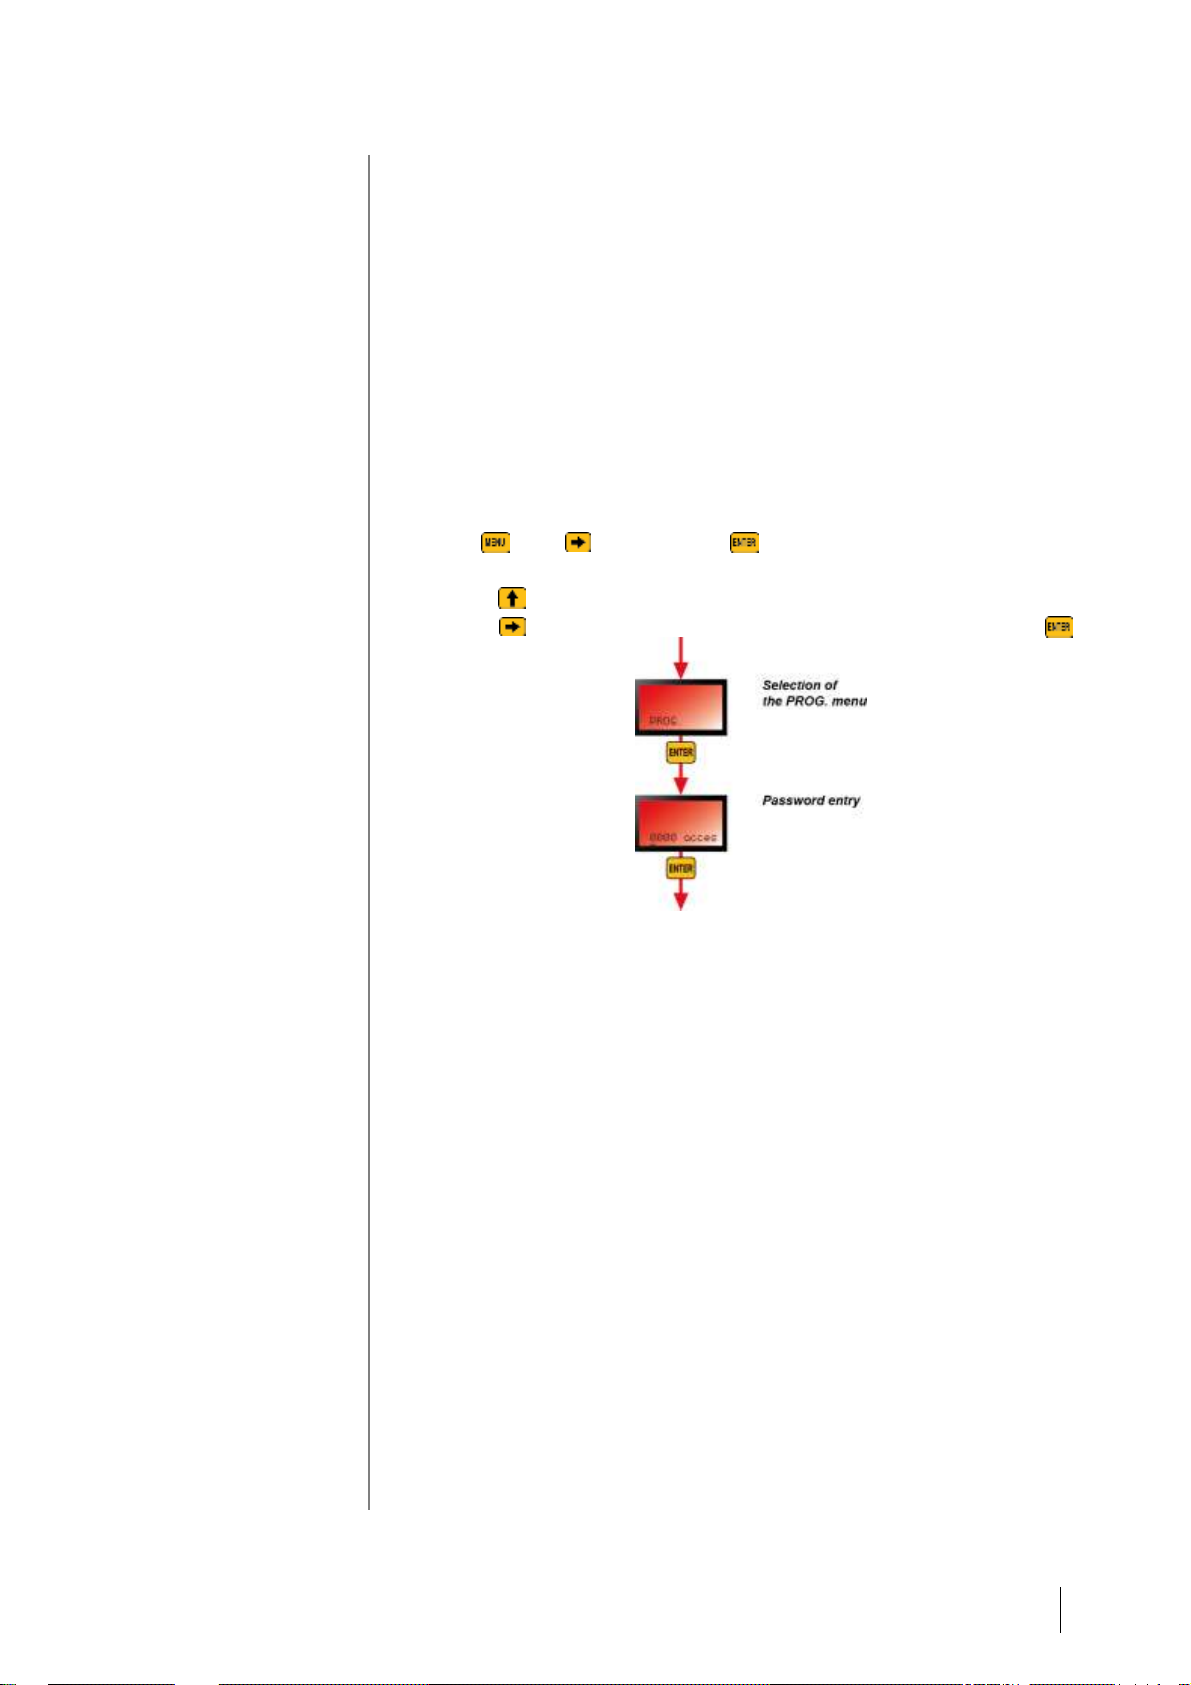
PROGR
Purpose
Access the following sub-menus:
■ PG SENSOR (configure the settings of the main sensor and the ANA1 and
ANA2 sensors).
■ PG AL/REL (configure the alarms and the 3 internal relays).
■ PG SERIE (configure the settings of the serial connection and the
backlighting of the LCD display).
■ PG PASSW (configure the access code).
How to access
Follow the steps below (see Figure 14):
1. Press , then twice and then .
2. Enter the access code (1000 by default).
Use the button to increase or decrease the value indicated by the cursor.
Use the button to move to the next character. Confirm by pressing .
Figure 19: password required (default password: "1000") to access the PROG submenus. Press ESC repeatedly to return to the reading display.
Page 30
3 – Menus
24
Tree structure
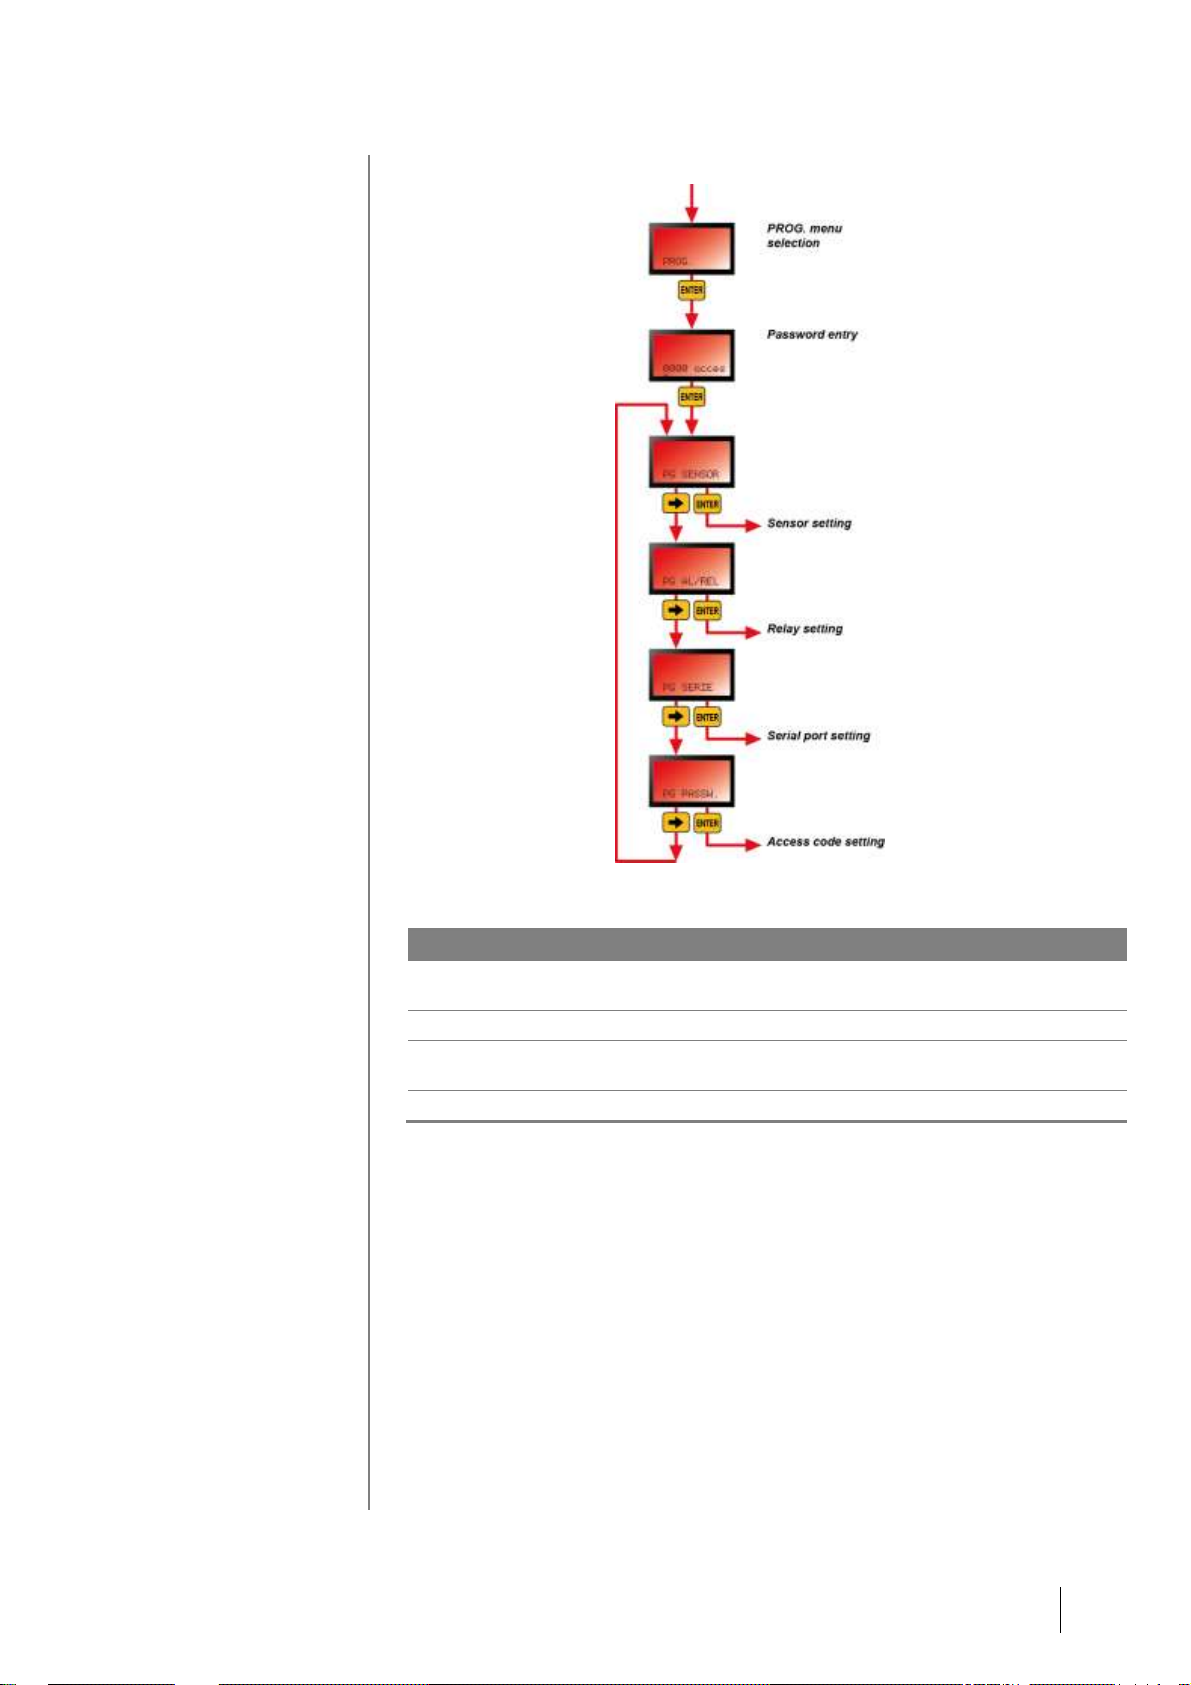
Figure 20: the Configuration menu leads to 4 different sub-menus. Press ESC
repeatedly to return to the reading display.
Menu
Description
See page
PG SENSOR
Configure the main channel (local sensor), the ANA1
channel and the ANA2 channel.
23
PG AL/REL
Configure the alarms and relays.
31
PG SERIE
Configure the serial connection and the backlighting of
the LCD display.
38
PG PASSW
Manage the access code.
41
Page 31

3 – Menus
25
PG SENSOR
Purpose
This menu leads to the following sub-menus:
■ PG SENSOR (configure the settings of the local sensor).
■ PG CH1 (configure the settings of the ANA1 sensor).
■ PG CH2 (configure the settings of the ANA2 sensor).
Tree structure
Figure 21: the Channel Configuration menu.
Page 32

3 – Menus
26
PG SENSOR
Purpose
Configure the main sensor.
How to access
See Figure 21.
Tree structure
Figure 22: the Sensor Configuration menu. Press ESC repeatedly to return to the
reading display.
The settings of the main sensor (range, type of gas, etc.) are factory-set
and cannot be changed.
Page 33

3 – Menus
27
Menu
Description
ON
Turn the main sensor on or off.
PRINCIPAL
■ Display: display the reading from the main sensor.
■ Primary: display the reading from the main sensor and go to the
4-20 mA menu (see step below).
■ Secondary: the reading is not displayed.
Note: if multiple sensors (main sensor, ANA1 sensor or ANA2
sensor) are configured as the Primary, the -4-20 mA output will use
the current corresponding to the Main sensor.
4-20 mA
Define the output current type (see the Note on the 4-20 mA current
type on page 27).
■ Normal: standard 4-20 mA signal.
■ Combined: signal uses predefined values representing the alarm
statuses of the 3 sensors. This option is automatically selected if
the Secondary option was defined in the previous step.
■ CAPEX: all-or-nothing signal indicating normal operation or a fault
condition.
Coef none
Defines the reading integration time (none, 5 seconds, 30 seconds,
1 minute, 2, 5, 10 or 15 minutes). The reading will be averaged over
the given period.
Ovr Lock
■ Yes: verification is activated. If the device detects a gas
concentration above 100% LEL, it will display the word "Sup." The
reading is blocked and the output signal is fixed at 23.2 mA. The
verification request is acknowledged using the infrared remote
control. See the section on Verification on page 71.
■ No: verification is not activated.
Sure ??
■ ENTER: confirm the changes made.
■ ESC: cancel the changes made and return to the PROG menu.
Note on the 4-20 mA current type
Normal mode
0 mA signal: no power.
1 mA signal: fault code.
2 mA signal: in calibration.
Signal from 4-20 mA: reading from the main channel (Menu > PROG).
Signal greater than 20 mA: line fault, out-of-range, verification.
Combined mode
1 mA : 1 faulty sensor.
2 mA : in stabilization or calibration.
4 mA : no fault and no alarm
8 mA : 1 sensor out of 3 in alarm #1
12 mA : 2 sensors out of 3 in alarm #1
16 mA : 3 sensors in alarm #1.
19 mA : 1 sensor out of 3 in alarm #2
22 mA : 1 sensor out-of-range or to be verified.
Note: an alarm always takes priority over a fault, unless the alarm is
generated by the faulty channel.
CAPEX function
Comprises 2 statuses: Good or Bad.
0.1 mA : in fault, alarm, calibration or stabilization.
20 mA : no fault and no alarm
Page 34

3 – Menus
28
PG CH1
Purpose
Configure the ANA1 sensor.
How to access
See Figure 21.
Tree structure
See Figure 23.
Menu
Description
ON
Turn the ANA1 sensor on or off.
PRINCIPAL
■ Display: display the reading from the ANA1 sensor.
■ Primary: display the reading from the ANA1 sensor and go to the
4-20 mA menu (see step below).
■ Secondary: the reading is not displayed.
Note: if multiple sensors (main sensor, ANA1 sensor or ANA2
sensor) are configured as the Primary, the -4-20 mA output will use
the current corresponding to the Main sensor.
4-20 mA
Define the output current type (see the Note on the 4-20 mA current
type on page 27).
■ Normal: standard 4-20 mA signal.
■ Combined: signal uses predefined values representing the alarm
statuses of the 3 sensors. This option is automatically selected if
the Secondary option was defined in the previous step.
■ CAPEX: all-or-nothing signal indicating normal operation or a fault
condition.
Measure
■ Reading: the channel will be used to input an analog reading (4-
20 mA current only).
■ Acknowledge: the channel will be assigned to a dry contact for
remote acknowledgment (function used only in the absence of the
IR20 remote control). The contact will be wired between the S and
E terminals of the 4-20 mA input, labeled IN1. See Figure 5, 2 .
% LEL
Defines the unit of measure displayed on the LCD (%LEL, %O2, %,
ppm H2S, ppm NH3, ppm HCL, ppm CO2, ppm NO, ppm ETO, ppm
H2, ppm HCN, ppm HF, ppm O3, ppm CLO2, ppm, ppb, °C, V, hPa,
[blank]).
Display
Define the position of the decimal point, e.g., 22.22.
Gamme
Define the reading range on the LCD (001-100 in increments of one,
100-1000 in increments of ten or 1000-9900 in increments of one
hundred).
Zero in V
Define the bottom of the range in volts.
0.48 V corresponds to 4 mA through a 120 ohm resistor.
Scale in V
Define the top of the range in volts.
2.40 V corresponds to 20 mA through a 120 ohm resistor.
Coef
Defines the reading integration time (none, 5 seconds, 30 seconds,
1 minute, 2, 5, 10 or 15 minutes). The reading will be averaged over
the given period.
Page 35

3 – Menus
29
Figure 23: the ANA1 Configuration menu. Press ESC repeatedly to return to the
reading display.
Page 36

3 – Menus
30
Menu
Description
OvR Lock
■ Yes: verification is activated. If the device detects a gas
concentration above 100% LEL, it will display the word "Sup." The
reading is blocked and the output signal is fixed at 23.2 mA. The
verification request is acknowledged using the infrared remote
control. See the section on Verification on page 71.
■ No: verification is not activated.
Sure ??
■ ENTER: confirm the changes made.
■ ESC: cancel the changes made and return to the PROG menu.
PG CH2
Purpose
Configure the ANA2 sensor.
How to access
See Figure 21.
Tree structure
Same as for the ANA1 sensor. See Figure 23.
Page 37

3 – Menus
31
PG AL/REL
Purpose
Configure the alarms of the local sensor and the alarm relays.
How to access
See Figure 20.
Tree structure
Figure 24: the Alarm/Relay Configuration menu. Press ESC repeatedly to return to
the reading display.
Menu
Description
See page
AL SENSOR
Configure the alarms of the local sensor.
31
AL ANA1
Configure the alarms of the ANA1 sensor.
34
AL ANA2
Configure the alarms of the ANA2 sensor.
34
RELAIS 1
Configure the level-1 alarm relays.
35
RELAIS 2
Configure the level-2 alarm relays.
37
RELAIS D
Configure the fault relay.
37
Page 38

3 – Menus
32
AL SENSOR
Configure the alarm thresholds of the main sensor and assign relays.
How to access
See Figure 24.
Tree structure
Menu
Description
AL1
■ Yes: the level-1 alarm is used. The following menus are used to
define the settings for this alarm.
■ No: the level-1 alarm is not used.
AL1
■ Increasing: increasing alarm (e.g., for combustible or toxic gases,
etc.). A reading above the threshold will trigger the alarm.
■ Decreasing: decreasing alarm (e.g., for oxygen levels). A reading
below the threshold will trigger the alarm.
Thresh AL1
Define the threshold value to trigger the alarm (from 0-9900, in
increments that depend on the value).
Acq
■ Auto: the alarm (relay and indicator light) will be acknowledged
automatically once the measured value is less than (increasing
threshold) or greater than (decreasing threshold) the defined
threshold (AL1 threshold).
■ Manual: the alarm (relay and indicator light) must be
acknowledged manually once the measured value is less than
(increasing threshold) or greater than (decreasing threshold) the
defined threshold (AL1 threshold). The alarm will be
acknowledged using the remote control of via remote
acknowledgment (see Reading under ANA1 configuration on
page 28).
Rel
Define the relay(s) to be activated if a certain threshold is exceeded
(AL1 threshold):
■ None: no relay activated.
■ R1: relay R1 activated.
■ R2: relay R2 activated.
■ R1 & R21: relays R1 and R2 activated.
AL2
AL2 incre.
Thresh AL2
Acq auto
RELAIS 2
The following options pertain to the level-2 alarm threshold. The
settings are identical to those for the alarm-1 threshold.
Sure ??
■ ENTER: confirm the changes made and return to the Alarm/Relay
Configuration menu.
■ ESC: cancel the changes made and return to the PROG menu.
Page 39

3 – Menus
33
Figure 25: the Alarm/Relay Configuration menu. Press ESC repeatedly to return to
the reading display.
Page 40

3 – Menus
34
AL CH1
Configure the thresholds of the ANA1 sensor and assign relays.
How to access
See Figure 24.
Tree structure
See Figure 25. The steps are identical to those described for the main sensor.
AL CH2
Configure the thresholds of the ANA2 sensor and assign relays.
How to access
See Figure 24.
Tree structure
See Figure 25. The steps are identical to those described for the main sensor.
Page 41

3 – Menus
35
RELAIS 1
Configure relay R1.
How to access
See Figure 24.
Tree structure
Menu
Description
R1 intern
■ Internal: the relay is triggered by the internal electronics of the
transmitter.
■ External: the relay is triggered by the MX 62 central measuring
controller or an API via the RS485 (Modbus) connection.
R1 sec. pos.
■ Positive security: the relay will be powered as long as there is no
alarm (positive security). It will be deactivated in the event of an
alarm. This option is recommended.
■ Negative security: the relay will be de-energized as long as there
is no alarm. It will be activated in the event of an alarm.
Rel normal
■ Normal : the relay does not trigger an audible warning.
■ klaxon: the relay triggers a warning horn. Two complementary
settings will need to be defined in this case (whether and how
long the audible warning will continue to sound).
Maint.
This setting is only displayed if Horn was selected under Normal
Relay. It is used to define how the alarm is stored.
■ Yes: the relay will remain in alarm position once an alarm
condition is detected. The audible warning will be activated for a
duration to be defined in the next step.
■ No: the audible warning will be deactivated once the alarm
condition is eliminated.
D. maint. s
This setting is only displayed if Horn was selected under Normal
Relay. It is used to set the duration of the audible warning. This
duration can be set to any value up to 900 seconds in 5-second
increments. In the event of an alarm, the audible warning will sound
for the defined amount of time, at a minimum.
Recall
This setting is displayed only if Horn was selected under Normal
Relay:
■ Yes: the relay will be reactivated after the number of minutes
defined in the next step if the corresponding alarm condition
persists.
■ No: the relay will not be reactivated in this case.
Recall mn
This setting is displayed only if Yes was selected in the previous
step. Enter the time in minutes (5-minute increments from 5 to 900
minutes) after which the relay will be reactivated if the alarm is still
present.
Sûre ??
■ ENTER: confirm the changes made and return to the Alarm/Relay
Configuration menu.
■ ESC: cancel the changes made and return to the Alarm/Relay
Configuration menu.
Page 42

3 – Menus
36
Figure 26: RELAY 1 menu. Press ESC repeatedly to return to the reading display.
Page 43

3 – Menus
37
RELAIS 2
Configure relay R2.
How to access
See Figure 24.
Tree structure
See Figure 26. The steps are identical to those described for Relay 1.
Page 44

3 – Menus
38
RELAIS D
Configure the fault relay.
How to access
See Figure 24.
Tree structure
Figure 27: the Fault Relay menu. Press ESC repeatedly to return to the reading
display.
Menu
Description
RD intern
■ Internal: the relay is triggered by the internal electronics of the
transmitter.
■ External: the relay is triggered by the MX 62 central measuring
controller or an API via the RS485 (Modbus) connection.
RD sec. pos.
■ Positive security: the relay will be powered as long as there is no
alarm (positive security). It will be deactivated in the event of a
fault. This option is recommended.
■ Negative security: the relay will be de-energized as long as there
is no fault. The relay will be activated in the event of a fault.
Sûre ??
■ ENTER: confirm the changes made and return to the Alarm/Relay
Configuration menu.
■ ESC: cancel the changes made and return to the Alarm/Relay
Configuration menu.
Page 45

3 – Menus
39
PG SERIE
Purpose
Configure the serial connection and the backlighting of the LCD display.
How to access
See Figure 20.
Tree structure
Menu
Description
Ascii
Define the data transmission format:
■ Ascii: data are transmitted in 7-bit format; a byte thus contains the
code for 2 characters. Threads are coded in hexadecimal format.
■ Binary: data are transmitted in 8-bit format; a byte thus contains
the code for 1 character.
Slave Sens
Define the slave number of the main sensor (value between 1 and
255). The number 0 indicates that all of the slaves are affected;
therefore, it is best to avoid using this value.
Slave ANA1
Define the slave number of the ANA1 sensor (value between 1 and
255).
Slave ANA2
Define the slave number of the ANA2 sensor (value between 1 and
255).
Slave Rel.
Define the slave number of each of the 3 alarm relays (value
between 1 and 255).
38400 Baud
Define the data transmission speed. The pre-defined speeds are
1200, 2400, 4800, 9600, 19200 and 38400 bauds.
LINE
■ Line: used if the OLCT 80 is connected to the line of an MX 43.
■ Loop: used if the OLCT 80 is connected to the loop of an MX 62
or an API, for example.
Back ON
■ Yes: the display is always backlit.
■ No: the display illuminates once a button is pressed on the IR 20
remote control.
Sûre ??
■ ENTER: confirm the changes made and return to the PROG
menu.
■ ESC: cancel the changes made and return to the PROG menu.
Communication with an MX 43 central controller: configure
binary mode at 9600 bauds.
Communication with an MX62 central controller: configure
ASCII mode at 38400 bauds.
Page 46

3 – Menus
40
Figure 28: the Alarm/Relay Configuration menu. Press ESC repeatedly to return to
the reading display.
-
Page 47

3 – Menus
41
PG PASSW
Purpose
Configure (modify) the access code for the OLCT 80. The default code is 1000.
Important: if multiple OLCT 80s are in range of the remote control, assign
them different access codes
How to access
See Figure 20.
Tree structure
Menu
Description
1000 chgt
View the current access code. To change this code, use the + and ➡
buttons. Characters that may be used include 0…9 and A…F.
Sûre ??
■ ENTER: confirm the changes made and return to the PROG
menu.
■ ESC: cancel the changes made and return to the PROG menu.
Figure 29: the Access Configuration menu. Press ESC repeatedly to return to the
reading display.
Page 48

3 – Menus
42
MAINT
This menu displays certain settings related to maintenance
How to access
See Figure 14.
Tree structure
Figure 30: the Maintenance menu. Press ESC repeatedly to return to the reading
display.
Page 49

3 – Menus
43
Menu
Value displayed
Entry V
Internal value of the main sensor's signal.
Signal V
Main signal in volts.
Meas CH1 V
Signal from the ANA1 sensor in volts.
Meas CH2 V
Signal from the ANA2 sensor in volts.
Temp I °C
Internal temperature within the housing.
Temp C °C
Temperature of the main sensor.
Supply V
Supply voltage to the terminals of the OLCT 80.
Ref V
Internal reference voltage (normally 2.5 V).
1V25 V
Internal reference voltage (normally 1.25 V).
User rate %
Wear rate of the main sensor. A value of 50% represents a 50%
loss of sensitivity. The sensor must be replaced once a 75% wear
rate is reached. This value is recalculated after each calibration.
Output mA
Output current value at the OUT pin (see Figure 5, 2).
Page 50

3 – Menus
44
CALIBRA
Display the 3 calibration sub-menus for the main sensor, the ANA1 sensor and
the ANA2 sensor.
How to access
See Figure 14.
Tree structure
Menu
Description
See page
0000 acces
Enter the access code (1000 by default).
-
Cal sensor
Calibrate the main sensor.
45
Chgt capt
Reset the wear rate value of the sensor to zero after
replacing the main sensor.
47
Cal CH1
Calibrate the ANA1 sensor.
48
Cal CH2
Calibrate the ANA2 sensor.
48
Figure 31: the Calibration menu. Press ESC repeatedly to return to the reading
display.
Page 51

3 – Menus
45
Cal sensor
Calibrate the main sensor (adjust zero and sensitivity).
How to access
See Figure 31.
Tree structure
Figure 32: the Calibration menu. Press ESC repeatedly to return to the reading
display.
Menu
Description
Calib. Gas
Configure the value of the calibration gas to be used.
Adjust.’0’’
■ Place the injection hood over the device and inject clean air from
the bottle (flow rate of 30-60 l/h).
■ Wait for the reading to stabilize (at least 2 minutes).
■ Press Enter to confirm the zero.
Note: a CO2 sensor pack must always be zeroed using
reconstituted air or nitrogen. Never use ambient air as the zero
since it naturally contains 300-500 ppm of CO2.
Adjust. ‘S’’
Place the calibration hood over the detector head and open the
valve on the bottle of calibration gas (flow rate of 30-60 l/h).
The reading displayed will fluctuate until it reaches the stabilization
point. Wait for the reading to stabilize (at least 2 minutes).
Press Enter to confirm the reading.
Page 52

3 – Menus
46
Menu
Description
Sûre ??
■ ENTER: confirm the changes made and return to the CALIBRA
menu.
■ ESC: cancel the changes made and return to the CALIBRA menu.
Close the valve on the bottle of calibration gas and remove the
injection hood.
Once the countdown is over, the detector will resume operation in
measurement mode.
Restore the transmission of alarms within the central system.
▪ Each step under the Calibration menu is limited to 5 minutes.
▪ The detector will resume operation in measurement mode and
disregard the previous changes after a 1-minute countdown, as long as
no commands are detected.
▪ If "8888" appears on the display followed by a code, the sensor is not
working. Check the fault code (see page 103) and take the appropriate
corrective action. See also the section on Possible transmitter errors on
page 80.
▪ Before calibrating, block the transmission of alarms within the system to
avoid accidentally triggering an alarm during the operation. Restore the
alarms once the procedure is completed.
Indication sur les reports d’alarme ????
Page 53

3 – Menus
47
Chgt sens
This procedure must be carried out after the main sensor is replaced. This
menu resets the wear rate value for the main sensor, which is displayed under
the Maintenance menu (see T. usure % on page 42). The zeroing and
sensitivity adjustment procedure must be carried out for the new sensor (see
Sensor calibration on page 45).
How to access
See Figure 31.
Tree structure
Figure 33: the Sensor Replacement menu. Press ESC repeatedly to return to the
reading display.
Menu
Description
Chgt sens.?
Confirm that you want to begin the wear rate reset procedure for the
main sensor.
Init sens ?
■ ENTER: reset the wear rate value for the main sensor and return
to the CALIBRA menu.
■ ESC: cancel the reset of the wear rate value for the main sensor
and return to the CALIBRA menu.
Page 54

3 – Menus
48
Cal CH1
Calibrate the sensor connected to the ANA1 inlet (see the documentation for
this sensor) with the relays blocked for 5 minutes. The two indicators lights (
and ) will blink.
The AL1 and AL2 alarm indicator lights will be activated if the threshold is
exceeded. They will turn off automatically once the value falls below the
setpoint.
How to access
See Figure 31.
Cal CH2
Calibrate the sensor connected to the ANA2 inlet (see the documentation for
this sensor) with the relays blocked for 5 minutes. The two indicators lights (
and ) will blink.
The AL1 and AL2 alarm indicator lights will be activated if the threshold is
exceeded. They will turn off automatically once the value falls below the
setpoint.
How to access
See Figure 31.
Page 55

3 – Menus
49
4-20 mA
Define the output current value available from the OUT terminal (Figure 5, 2)
from 1 to 25 mA for servo control purposes.
How to access
See Figure 14.
Tree structure
Menu
Description
0000 passw
Enter the access code (1000 by default).
4 20 mA
Define the output current value available from the OUT terminal
(Figure 5, 2), from 1 to 25 mA. The analog output will then be
controlled by the OLCT 80.
Figure 34: the 4-20 mA menu. Press ESC repeatedly to return to the reading
display.
Page 56

3 – Menus
50
INFOS
Display the version number of the application and other reference numbers.
How to access
See Figure 14.
Tree structure
Menu
Description
Ver GB 1.9
Version number of the application
R 65135xx
Part number of the OLCT 80 without sensor (housing only).
eep 2.0
Version number of the EEPROM software.
N° 001
Serial number of the OLCT 80.
1303000
Manufacturer batch number.
Figure 35: the Info menu. Press ESC repeatedly to return to the reading display.
Page 57

3 – Menus
51
TEST
This menu blocks the #1 alarm, #2 alarm and fault relays so that gas tests can
be performed.
If Rel1 or Rel2 is activated before accessing this menu, this relay will remain
activated until the user leaves the menu.
How to access
See Figure 14.
Tree structure
Figure 36: the Test menu. Press ESC repeatedly to return to the reading display.
After 5 minutes the OLCT 80 will automatically switch back into normal
operating mode.
Page 58

3 – Menus
52
Page 59

4 – Installation
53
Chapter 4 | Installation
It is recommended that you read the relevant guides for installing,
operating and maintaining flammable gas and oxygen detectors
(EN 60079-29-2) and toxic detectors (EN 45544-4).
Regulations and operating conditions
■ Installation must comply with current edition of EN 60079-14 for systems
installed in explosive atmospheres and eventually with any local or national
additional requirements that may apply in the country of installation.
In general, the ambient temperature, the power supply voltage and power
mentioned in this document pertain to safety precautions against explosion.
These temperatures are not the detector's operating temperatures.
■ The equipment is authorized for use in zones 1, 2, 21 and 22 for ambient
temperatures ranging between -20°C to +60°C.
■ For the OLCT 80D id version, the sensor pack may be used in zones 0, 1, 2,
20, 21 and 22 if it is operated remotely with respect to the transmitter. The
transmitter is not authorized for use in zone 0 or 20.
■ The detection sensor must always be in contact with the ambient air.
Therefore:
- Do not cover the detection module.
- Do not apply paint on the detection module.
- Keep dust from building up.
Pre-installation Hardware Configuration
If one or two of the 4-20 mA inputs (ANA1/ANA2 sensor inputs) is going to be
used, see Chapter 7 on page 73.
Page 60

4 – Installation
54
Equipment required
■ Complete detector.
■ Connection cable.
■ Tools for mounting the device.
■ Mounting materials.
Positioning the detector
The detector should be positioned at ground level, on the ceiling, at the height
of the respiratory tract or near air extraction ducts, depending on the application
or the density of the gas to be detected. Heavy gases should be detected at
ground level, while light gases should be detected at ceiling height.
Mounting the detector
All versions with local sensor
The detector must be installed with the detection sensor pointing downwards.
For combustible gas detectors, tilting the device more than 45° past vertical can
lead to imprecise readings.
The housing should be mounted using 4 M6 screws and appropriate anchors
for the mounting surface.
Figure 37: sensor pointing downward (left); maximum angle for an combustible
gas detector (right).
All versions with remote sensor
For combustible gas detectors, tilting the sensor more than 45° past vertical can
lead to imprecise readings.
The housing should be mounted using 4 M6 screws and appropriate anchors
for the mounting surface. The sensor pack should be mounted using 2 M4
screws and appropriate anchors for the mounting surface.
Page 61

4 – Installation
55
Figure 38: sensor pointing downward (left); maximum angle for an combustible
gas detector (right).
Power supply
Current in the power line
The power consumption listed in the table below corresponds to an OLCT 80
equipped with a main sensor. It does not include the power consumption of an
ANA1/ANA2 sensors used.
Detector type
Sensor type
Power
supply
(VDC)
Max.
current
(mA)
Power
consumption
(W)
Combustible
Catalytic
16 to 28
170
2.72
Combustible
XPIR infrared
16 to 28
130
1.84
Freon
Semiconductor
16 to 28
170
2.72
Oxygen
Electrochemical
12 to 30
100
1.2
Toxic
Electrochemical
12 to 30
100
1.44
Length of the power line
The detector must be connected to a dedicated power supply or a central power
source (central measuring controller, PLC) using a shielded, armored (where
necessary) cable. The cable should be selected based on distance, the detector
type and any requirements specific to the facility.
Detector type
Sensor type
Maximum length (km) depending on
the cable gauge (cross sectional
area)
0.5 mm2
0.9mm2
1.5 mm2
Combustible
Catalytic
0.75
1.31
2.33
Combustible
XPIR infrared
1.11
1.95
3.44
Freon
Semiconductor
0.75
1.31
2.33
Oxygen
Electrochemical
1.92
3.36
5.95
Toxic
Electrochemical
1.6
2.8
4.95
Page 62

4 – Installation
56
Preparing the connection cables
Preparing the cable
The cable will be brought to the detection point. Professional standards for
running wires and maintaining and protecting cables must be followed.
Disconnecting power
If the central system to which the transmitter will be connected is already
activated:
1. Block the system's alarms during the operation to avoid accidentally
triggering them.
2. Disconnect power to the detector or the corresponding line.
Opening the detector
Remove the 4-mm hexagonal cover locking screw before unscrewing the
detector's cover (Figure 2, 4).
Running the cable
Follow all instructions provided by the manufacturer of the cable
gland and be sure to properly connect the braided shield.
Figure 39: example of a double-compression cable gland to secure armored cable.
Sensor
Sealing ring
Cable shield grounding
device
Armored
Sealing ring
Page 63

4 – Installation
57
Wiring
Power must be disconnected during the wiring process. The site
must be grounded.
Stand-alone OLCT 80
Figure 40: wiring for a stand-alone OLCT 80.
Item
Description
A.
Analog output (4-20 mA).
B.
Auxiliary input #1, 4-20 mA, 24 VDC.
C.
Auxiliary input #2, 4-20 mA, 24 VDC.
D.
Fault relay output. Dry contact. Interrupting capacity: 30 VDC - 250 VAC – 2A.
E.
Rel2 relay output. Dry contact. Interrupting capacity: 30 VDC - 250 VAC – 2A.
F.
Rel1 relay output. Dry contact. Interrupting capacity: 30 VDC - 250 VAC – 2A.
G.
24 VDC power supply.
Page 64

4 – Installation
58
OLCT 80 linked to a central controller or PLC – analog mode
Figure 41: wiring to a central detection controller (analog mode).
Item
Description
A.
Analog output (4-20 mA).
B.
Auxiliary input #1, 4-20 mA, 24 VDC.
C.
Auxiliary input #2, 4-20 mA, 24 VDC.
D.
Fault relay output. Dry contact. Interrupting capacity: 30 VDC - 250 VAC – 2A.
E.
Rel2 relay output. Dry contact. Interrupting capacity: 30 VDC - 250 VAC – 2A.
F.
Rel1 relay output. Dry contact. Interrupting capacity: 30 VDC - 250 VAC – 2A.
G.
Instrumentation-type shielded cable with 3 wires
H.
24 VDC power supply.
Note on 4-20 mA connection cable
The cable must be equipped with a braided shield to reduce the impact of
electrical noise and radiofrequencies. Examples of compatible cable types:
■ Non-ATEX zone: CNOMO FRN05 VC4V5-F.
■ ATEX zone: GEVELYON (U 1000RHC1).
■ ATEX zone: GVCSTV RH (U 1000).
■ ATEX zone: xx-xx-09/15- EG-SF or EG-FA or EG-PF (M87202-compatible U
300).
Page 65

4 – Installation
59
OLCT 80 in RS485 network topology (Modbus)
Figure 42: wiring in RS485 network topology (Modbus).
Item
Description
A.
24 VDC power supply. RS485 line.
B.
Auxiliary input #1, 4-20 mA, 24 VDC.
C.
Auxiliary input #2, 4-20 mA, 24 VDC.
D.
Fault relay output. Dry contact. Interrupting capacity: 30 VDC - 250 VAC – 2A.
E.
Alarm #2 relay output. Dry contact. Interrupting capacity: 30 VDC - 250 VAC – 2A.
F.
Alarm #1 relay output. Dry contact. Interrupting capacity: 30 VDC - 250 VAC – 2A.
G.
120 Ω end-of-line resistor. (To be connected if the sensor is the last in the line.)
H.
RS485 line output to subsequent sensor. Parallel terminal on A2.
J.
24 VDC power output to the next sensor in series. Parallel terminal at A1.
Recommended cable type:
Shielded cable designed for RS485 communication, e.g., Belden 3841 cable.
Grounding the housing
Connect the housing's earth terminal to the ground in accordance with
regulation. The OLCT 80 has a dedicated terminal for grounding located on the
outside of the housing (Figure 2, 3).
Closing the cover
The cover must be tightly closed before connecting the cable to the terminal of
the central system. Insert and tighten the locking screw (Figure 2, 4).
Page 66

4 – Installation
60
Transfer curve
The curve below gives the transmitter output current as a function of gas
concentration. In the event that the user connects the transmitter to a nonOldham central controller, the user must ensure that the transfer curve is
compatible with the equipment's input characteristics to correctly interpret the
data coming in from the transmitter. Similarly, the central controller must
provide sufficient voltage to compensate for any voltage drop caused by the
cable.
Figure 43: transfer curve for a 4-20 mA detector.
Output
current (mA)
% range
Page 67

5 – Wireless Version
61
Chapter 5 | Wireless Version
Purpose
The OLCT 80 is available in a wireless version that may be appropriate in the
following situations:
■ Data transmission over long distances.
■ Gas detection on moving equipment (e.g., crane bucket).
■ Situations where wiring would be problematic, if not impossible (e.g., across
a road, waterway or railway).
■ Situations in which installation costs would be prohibitive.
The OLCT 80 communicates with the central measuring controller or PLC via
2.4 GHz radio waves in Europe or 900 MHz in the US over a distance of up to
3200 or 9600 meters, respectively, under free-field conditions.
Concept
The wireless OLCT 80 transmitters (A) communicate between one another until
the signal reaches a master receiver (B), which is connected to the MX 43
central controller (via an RS485 Modbus connection). This master receiver is
used to manage a mesh network of up to 49 OLCT 80transmitters.
Figure 44: mesh network topology.
Page 68

5 – Wireless Version
62
Components
The RS485 output of the OLCT 80 is connected to an integrated wireless card
(rep.B) within the transmitter. A certified antenna (rep.A) transmits the radio
waves to a master receiver (rep.C), which is connected to an MX43 central
controller (rep.D).
Figure 45: wireless OLCT 80 and master receiver (rep.C).
Connection
Master receiver
The master receiver must be connected to the RS485 input of an MX43 central
controller or supervision system following the figure and table below.
Figure 46: connecting the master receiver's 5-pin connector.
Page 69

5 – Wireless Version
63
Prong
Function
Wire color
1
Positive terminal (+), 10-40 VDC power supply.
Brown
2
RS485 / +.
White
3
Common power supply (ground).
Blue 4 RS485 / -.
Black
5
Unused.
Gray
Wireless OLCT 80 transmitter
Figure 47: wireless OLCT 80 connections.
Item
Description
B.
Auxiliary input #1, 4-20 mA, 24 VDC.
C.
Auxiliary input #2, 4-20 mA, 24 VDC.
D.
Fault relay output. Dry contact. Interrupting capacity: 30 VDC - 250 VAC – 2A.
E.
Alarm #2 relay output. Dry contact. Interrupting capacity: 30 VDC - 250 VAC – 2A.
F.
Alarm #1 relay output. Dry contact. Interrupting capacity: 30 VDC - 250 VAC – 2A.
J.
24 VDC power supply.
Configuration
This procedure must be performed in a workshop, i.e., a nonhazardous area.
The data transmission speed of the Modbus serial connection is 9600 bauds,
no parity.
Modifying the microswitches
In a mesh network, the OLCT 80's wireless cards must be configured in
repeater mode. Follow the steps below:
■ Cut off power to the OLCT 80 before modifying the position of the
microswitches.
■ Position the microswitches as shown below (Figure 48, A) on the wireless
card of each OLCT 80:
Page 70

5 – Wireless Version
64
Switch No.
8 7 6 5 4 3 2 1 Position
OFF
OFF
OFF
OFF
OFF
OFF
OFF
ON
Figure 48: micro switch configuration on the OLCT 80.
■ Position the microswitches as shown below (Figure 49, A) after opening the
cover of the master receiver:
Switch No.
1 2 3 4 5 6 7 8 Position
ON
ON
OFF
OFF
OFF
OFF
OFF
OFF
Figure 49: micro switch configuration on the master receiver.
Configuring the addresses
Configuring addresses on OLCT 80s
Each sensor (main sensor, ANA1, ANA2) will have its own address for
communication with the MX43 central controller according to the configuration
of the controller (refer to the document entitled MX43 Central Digital and Analog
Measurement Unit - User Manual).
Follow the steps below:
■ Configure the addresses of the OLCT 80 as indicated under Serial
connection configuration on page 39.
■ Calculate the address of the OLCT 80's internal wireless care by adding 50
to the slave number of the main sensor.
Page 71

5 – Wireless Version
65
Example: one OLCT 80 transmitter with one ANA1 input used:
Address of the main sensor: 1.
Address of the ANA1 sensor: 2.
Address of the OLCT 80's internal wireless card: 51 (i.e., 50 + 1).
The @50 address is reserved for the master receiver.
Configuring the addresses of the OLCT 80's wireless cards
To configure the address of the OLCT 80's wireless card, move the 10s-place
switch (B) and the 1s-place switch (A) to the desired values (i.e., 51 in the case
of the example above).
Figure 50: configuring the address of the wireless card.
Configuring the addresses on the master receiver
Selecting the address for the master receiver wireless cards
The master receiver's address must be set to @50.
Figure 51: configuring the master receiver's address to @50.
Page 72

5 – Wireless Version
66
Start-up
Follow safety rules for opening explosion-proof equipment
(hot-work permit, etc.) when powering and coupling the
system.
Figure 52: buttons and indicator lights on the master receiver.
Follow the steps below:
1. Check that the addresses have been configured properly (rotary switches,
OLCT 80 wireless cards (Figure 50, A and B) and master receiver wireless
cards (Figure 52, D).
2. Turn on power to the OLCT 80s and the master receiver.
3. On the master receiver (see: Figure 52: buttons and indicator lights on the
master receiver.press three times fast on the button marked "E" in the figure.
The two LEDs (B and F) blink on and off in red and the LCD screen (C)
displays the words "BINDING" and " MASTER."
4. On the OLCT 80 wireless card (see Figure 53: OLCT 80 wireless
card.press three times fast on the coupling button marked "A" in the figure.
The LED (B) will change from red to green and then orange for 4 seconds
before blinking 4 times to indicate that it has found the master receiver.
Once the coupling code transmitted by the master receiver is received, the
wireless card will automatically exit coupling mode.
Figure 53: OLCT 80 wireless card.
Page 73

5 – Wireless Version
67
5. Repeat step 4 for each OLCT 80.
6. Once all of the wireless codes are coupled, leave coupling mode on the
master receiver by pressing twice on the button marked "E" in Figure 52.
In normal operating mode, the LED (Figure 53, B) of the OLCT 80 's wireless
card blinks orange, while the LED (Figure 52, F) of the master receiver
blinks red.
7. Close the housings
The OLCT 80s must be at least 2 meters away from the
master receiver.
Page 74

5 – Wireless Version
68
Page 75

6 – Operation
69
Chapter 6 | Operation
The operations explained in this section must be performed
by authorized, qualified personnel because they could affect
detection reliability.
Configuring the transmitter
Configure the sensor following the standard steps described in the table below:
Step
Description
See section
See page
1.
System date and time.
Date and time
22
2.
Main sensor.
PG sensor
26
3.
ANA1 sensor (if used).
PG CH1
27
4.
ANA2 sensor (if used).
PG CH2
30
5.
Settings for the main sensor's alarms.
AL SENSOR
31
6.
Settings for the #1 input alarms, ANA1 sensor.
AL CH1
32
7.
Settings for the #2 input alarms, ANA2 sensor.
AL CH2
34
8.
Conditions triggering the Rel1 relay.
RELAIS 1
35
9.
Conditions triggering the Rel2 relay.
RELAIS 2
37
10.
Conditions triggering the fault relay.
RELAIS D
37
11.
Configure the RS485 connection (if used).
PG SERIE
38
12.
Configure the LCD backlighting.
PG SERIE
38
13.
Change the code to access the configuration
menus.
PG PASSW
41
14.
Zero and calibration gas test for the main sensor.
Cal sens.
45
15.
Calibration test for the ANA1 sensor (if used).
Cal CH1
48
16.
Calibration test for the ANA2 sensor (if used).
Cal CH2
48
Page 76

6 – Operation
70
Start-up
Preliminary inspection
Check the following:
■ That wiring was performed correctly.
■ That the detector housing is grounded.
■ That the braided shield of the connection cable is connected to the ground of
the central system.
■ That the device is securely mounted (screws, cable gland, cover screwed on
and locked).
Powering the detector
1. Block the central measuring controller or PLC to avoid accidentally triggering
any alarms during the procedure.
2. Power the detector.
3. Once the reading has stabilized, switch the central controller to normal
mode.
Stabilization time
After the device is mounted, it is important to allow the detector's temperature to
stabilize. Also, once the detector is powered, certain sensors require additional
pre-heating time If adjustments are made before the time indicated below has
passed, readings may be incorrect, which could put people and goods in
danger. Total wait time is summarized below:
■ Combustible sensor: 2 hours
■ Oxygen sensor: 1 hour
■ Electrochemical sensor: 1 hour, except for:
- NO (nitric oxide): 12 hours
- HCl (hydrochloric acid): 24 hours
- ETO (ethylene oxide): 36 hours
■ Semiconductor sensor: 4 hours
■ Infrared sensor (XPIR): 2 hours
Gas reading display
Normal display (no fault)
■ The display indicates the concentration measured,
the type of gas and the unit for the selected
channels (Channel Configuration menu, on page
Erreur ! Signet non défini.).
■ The indicator light ( ) blinks.
Figure 54: display
under normal
operating conditions.
Page 77

6 – Operation
71
Display in the event of a fault
■ The display will read "8888" followed by a fault
code.
■ The DEF fault indicator light will illuminate. See
page 111 for a list of error and fault codes.
Figure 55: display in
the event of a fault.
Verification
This pertains to catalytic sensors if the Verification setting has been activated
for the channel (see page 27 or 30).
■ For safety reasons, when measuring a gas
concentration above 100% LEL, the word "sup"
will appear on the display and the fault and alarm
indicator lights will illuminate. Meanwhile, the
reading will be interrupted and the output signal
will remain at 23.2 mA.
■ To exit this mode (after verifying the absence of
an explosive atmosphere using a portable
explosimeter for instance), press ENTER on the
IR20 remote control. Once "ACQUIT ?" appears,
press ENTER again. The alarm indicator lights
will turn off and the alarm relays will switch to
non-alarm positions.
Figure 56: detection of
high LEL
concentration.
Acknowledging an alarm
■ For alarms configured for Manual
acknowledgment, point the infrared remote
control to the sensor reporting the alarm and
press ENTER. The word "ACQUIT ?" will appear
on the display. Press ENTER again to
acknowledge the alarm. The alarm indicator
lights will turn off and the alarm relays will switch
to non-alarm positions if the measurement has
fallen below/risen above the defined alarm
threshold.
Figure 57: press
ENTER on the reading
to acknowledge an
alarm.
■ The user can press ESC to leave the menu
without acknowledging the alarm(s).
Figure 58: alarm acknowledgment diagram.
Page 78

6 – Operation
72
Zeroing
Figure 59: zero test.
1. Go to the Test menu using the IR20 remote control. The relays will be
blocked for 5 minutes.
2. Place the calibration hood over the detector head (Figure 59, B).
3. Connect the calibration hood to the bottle of clear air (Figure 59, E) using a
piece of flexible tubing (Figure 59, C).
4. Open the valve on the bottle of clear air (flow rate of 30-60 l/h or 60-120 l/h
for OLCT IR versions) (Figure 59, D).
5. After the reading has stabilized (after about 2 minutes) read the detector's
display (Figure 59, A).
6. If the value does not fall within the proper range, follow the calibration
procedure (Zeroing and adjusting sensitivity, on page 80).
7. Continue to the instructions under Gas sensitivity test below.
Gas sensitivity test
1. Once the zero test has been performed, connect the calibration hood to the
calibration gas bottle (Figure 59, E) using a piece of flexible tubing (Figure 59, C).
2. Open the valve (Figure 59, D) on the calibration gas bottle (flow rate of 30-60 l/h
or 60-120 l/h for OLCT IR versions).
3. Once the reading has stabilized (after about 2 minutes), view the display.
4. If the value does not fall within the proper range, follow the calibration
procedure (Zeroing and adjusting sensitivity, on page 80).
5. Close the bottle's valve (Figure 59, D) and remove the calibration hood
(Figure 59, B). Wait until the measurement reading returns to zero and leave
the Test menu by pressing ESC on the IR20 remote control. This completes
the zero and gas sensitivity test procedure. The detector may now be used.
Page 79

7 – Pre-installation Hardware Configuration
73
Chapter 7 | Pre-installation Hardware
Configuration
These steps only need to be followed if one or both of the 4-20 mA
inputs (ANA1/ANA2 sensor inputs) is used.
This procedure must be performed by qualified, licensed
personnel. Since transmitters are factory configured, there is no
need to adjust these settings unless the configuration changes.
Since solder joints need to be created, this procedure must be
performed in a workshop with a non-explosive atmosphere.
The OLCT 80 must be disconnected from power during the
soldering procedure.
Purpose
This procedure is used to configure the connections on the printed circuit board
for 2 auxiliary inputs (In1 and/or In2) depending on the type of sensor to be
connected (4-20 mA with 2, 3 or 4 wires).
Access the internal printed circuit board
Remove the display circuit board as follows:
■ Open the housing in a non-hazardous zone.
■ Remove the 4 screws used to secure the display circuit board. Remove the
circuit board. The flat connection cable and the lower printed circuit board
can remain in place.
■ The lower printed circuit board is now accessible.
Locate the solder pads
There are 3 solder pads (Figure 35) for each auxiliary input:
■ In 1 input: pads PPS1, PPS2 and PPS7 (A and B in the figure).
■ In 2 input: pads PPS3, PPS4 and PPS8 (A and B in the figure).
Page 80

7 – Pre-installation Hardware Configuration
74
Configuration principle
The ANA1/ANA2 sensors are each configured by creating a solder joint.
■ Item C in the figure: no solder joint created.
■ Item D in the figure: solder joint formed.
Figure 60: example of a solder pad with and without a solder joint.
Configuring the auxiliary inputs to connect a 2-wire
4-20mA sensor
■ In 1 input used: apply a solder joint to PPS2 and PPS7, remove PPS1.
■ In 2 input used: apply a solder joint to PPS4 and PPS8, remove PPS3.
Figure 61: auxiliary input configuration for a 2-wire 4-20mA sensor.
Page 81

7 – Pre-installation Hardware Configuration
75
Configuring the auxiliary inputs to connect a 3-wire
4-20mA sensor
■ In 1 input used: apply a solder joint to PPS2 and PPS7, remove PPS1.
■ In 2 input used: apply a solder joint to PPS4 and PPS8, remove PPS3.
Figure 62: auxiliary input configuration for a 3-wire 4-20mA sensor.
Configuring the auxiliary inputs to connect a 4-wire
4-20mA sensor
■ In 1 input used: apply a solder joint to PPS1 and PPS7, remove PPS2.
■ In 2 input used: apply a solder joint to PPS3 and PPS8, remove PPS4.
Figure 63: auxiliary input configuration for a 4-wire 4-20mA sensor.
.
Page 82

7 – Pre-installation Hardware Configuration
76
Page 83

8 – Preventative Maintenance
77
Chapter 8 | Preventative Maintenance
Periodic inspections ensure that the equipment and system is functioning
properly and providing reliable detection services. The section describes the
preventative maintenance procedures required and how often they are to be
performed. Inspection and maintenance must be carried out in accordance with
the current editions of EN60079-17 and eventually with any local or national
additional requirements that may apply in the country of installation.
Maintenance frequency
Gas detectors are safety devices. Oldham recommends regular testing of fixed
gas detection installations. This type of test involves injecting a standard gas of
sufficient concentration into the detector to trigger pre-set alarms. This test does
not, in any event, replace a full calibration of the detector.
Frequency of gas testing depends on the industrial application in which the
detector is used. Inspection should occur frequently during the months following
installation start-up; later it may be spaced out if no significant problem is
observed. If a detector does not react upon contact with gas, it must be
calibrated. Calibration frequency will depend on the results of these tests
(moisture, temperature, dust, etc.); however, the device should be calibrated at
least once per year.
The site manager is responsible for implementing the safety procedures at the
site. Oldham is not responsible for implementing safety procedures.
OLCT 80
Periodic maintenance involves the following steps:
■ Remove dust from the sensor's protective housing, using a dry cloth only.
Do not use water or any type of solvent.
■ When using the equipment in dusty explosive atmospheres, the equipment
should be thoroughly cleaned on a regular basis to prevent the build-up of
dust. If a layer of dust does build up on the detector, this layer may not
exceed 5 mm.
■ Replace the screws: use high-quality screws > A4.70.
■ Perform the zero test with clean air: follow the steps described under Sensor
calibration on page 45 in the event of deviation.
■ Perform the gas sensitivity test: follow the steps described under Sensor
calibration on page 45 in the event of deviation.
Page 84

8 – Preventative Maintenance
78
Page 85

9 – Maintenance
79
Chapter 9 | Maintenance
Maintenance mainly involves replacing any sensors that no longer meet their
original metrological specifications.
The operations explained in this section must be performed by
authorized, qualified personnel because they could affect detection
reliability. Inspection and maintenance must be carried out in
accordance with the current editions of EN60079-17 and eventually
with any local or national additional requirements that may apply in
the country of installation.
Possible transmitter errors
The table below lists various potential detector errors.
Fault observed
Possible cause
Action
Page
0 mA line current
Connection cable
Check the cable.
-
Power supply
Check the voltage at the
transmitter's terminals (see
Alim V under the
Maintenance menu).
42
Electronic board
Replace the board.
-
Line current
> 0 mA and < 1mA
Sensor
Replace the sensor (see
Sensor Replacement menu).
47 and 80
Line resistance too high
Check the cable.
Power supply
Check the voltage at the
transmitter's terminals (see
Alim V under the
Maintenance menu).
42
Improper calibration gas
Check the concentration of
the calibration gas
-
Check the input value (see
Calibration gas under Sensor
Replacement menu)
45
Zeroing not
possible
Sensor
Replace the sensor (see
Sensor Replacement menu).
47 and 80
Sensitivity
adjustment
impossible
Sensor
Replace the sensor (see
Sensor Replacement menu).
47 and 80
"SUP" displayed
Verification required
Acknowledge verification.
71
Page 86

10 – Accessories
80
Replacing the sensor cell
(combustible, oxygen, toxic and XPIR sensors)
A defective sensor should only be replaced using an identical
sensor (same gas, same range).
Replacement frequency
The sensor back needs to be replaced any time it is not possible to perform
zeroing, gas calibration or preventative calibration.
Replacing the sensor
Step
Action
1.
Gather the following items:
■ New sensor pack.
■ 4- and 5-mm hex key.
■ Calibration kit (bottle, hood, etc.).
2.
Block the transmission of alarms within the central system.
3.
Disconnect the OLCT 80 from its power source.
4.
Unscrew the locking screw from the detector head and rotate the detector head 30°
counter-clockwise.
5.
Unplug the connector and remove the defective detector head.
6.
Replace the used detector head with an identical new one.
7.
Reverse the procedure to reassemble the device; insert and tighten the locking screw.
8.
Restore the signal from the OLCT 80 to the central system.
9.
Reset the OLCT 80's wear rate to zero as described under Sensor replacement on
page 47.
10.
Perform a gas sensitivity test as explained on page 72.
Zeroing and adjusting sensitivity (calibration)
Refer to the instructions under Sensor calibration on page 45.
Cross gas factors for combustible gases
Poison resistant catalytic sensor, type 4F
Gas
Methane
Pentane
Hydrogen
Acetone
1.80
0.90 Acetylene
1.40
0.70
Ammonia
1.00
0.50
Benzene
2.10
1.05 n-Butane
1.80
0.90 Ethane
1.40
0.70 Ethanol
1.60
0.80 Ethylene
1.40
0.70 n-Hexane
2.85
1.40 Hydrogen
1.00
Isopropanol
1.80
0.90
JP-4
3.00
1.50 JP-5
3.10
1.55 JP-8
3.20
1.60 Methane
1.00
Methanol
1.35
0.65 n-Pentane
2.00
1.00
Page 87

10 – Accessories
81
Gas
Methane
Pentane
Hydrogen
Propane
1.60
0.80 Styrene
2.40
1.20
Toluene
2.50
1.25
Xylene
2.40
1.20
Table 2: calibration coefficients for 4F-type combustible sensors
Gas
Molecular
formula
LEL
(% v/v)
UEL
(% v/v)
CH4
coef.
H2
coef.
C4H10
coef.
C5H12
coef.
Ethyl acetate
C4H8O
2
2.10
11.50
1.65 0.90
0.80
Acetone
C3H6O
2.15
13.00
1.65 0.90
0.80
Acetylene
C2H
2
2.30
100
2.35
1.90
1.25
1.15
Acrylic acid
C3H4O
2
2.40
8.00
5.00 2.65
2.40
Butyl acrylate
C7H12O
2
1.20
8.00
3.50 1.85
1.70
Ethyl acrylate
C5H8O
2
1.70
13.00
3.05 1.65
1.50
Acrylonitrile
C3H3N
2.80
28.00
1.45
1.20
0.80
0.70
Ammonia
NH
3
15.00
30.20
0.90
0.75
0.50
0.45
Benzene
C6H
6
1.20
8.00
4.00 2.15
1.90
1,3-butadiene
C4H
6
1.40
16.30
2.55 1.35
1.25
Butane
C4H
10
1.50
8.50
1.90 1.00
0.90
Butanol (butyl alcohol
)
C4H10O
1.4
11.3
1.95 1.05
0.95
2-butanone (MEK)
C4H8O
1.80
11.50
3.90 2.10
1.90
Cyclohexane
C6H
12
1.20
8.30
2.00 1.10
1.00
Dimethylether
C2H6O
3.00
27.00
1.80 0.95
0.90
Dodecane
C12H
26
0.60
~6.0
4.00 2.15
1.90
Ethane
C2H
6
3.00
15.50
1.50 0.80
0.75
Ethanol
C2H6O
3.30
19.00
2.15
1.75
1.15
1.05
Ether (diethylether)
(C2H5)2O
1.70
36.00
1.90 1.00
0.90
Ethylene
C2H
4
2.70
34.00
1.65
1.35
0.90
0.80
G.P.L.2
Prop+But
1.65
~9.0
1.9 1.00
0.90
Diesel
mixture
0.60
~6.0
3.20 1.70
1.55
Natural gas
CH
4
5.00
15.00
1.05 0.60
0.50
Heptane 4
C7H
16
1.10
6.70%
2.20 1.20
1.05
Hexane 4
C6H
14
1.20
7.40
2.10 1.15
1.00
Hydrogen
H
2
4.00
75.60
1.00
Isobutane
C4H
10
1.50
8.40
1.50 0.80
0.75
Isobutylene
C4H
8
1.60
10.00
2.20 1.20
1.05
Isopropanol
C3H8O
2.15
13.50
1.60 0.85
0.80
Kerosene (JP-4)
C10-C
16
0.70
5.00
5.00 2.65
2.40
Methyl methacrylate
C5H8O
2
2.10
12.50
2.25 1.20
1.10
Methane
CH
4
5.00
15.00
1.00
Methanol (methyl
alcohol )
CH3OH
5.50
44.00
1.40
1.15
0.75
0.70
Naphtha
mixture
0.90
5.90%
3.50 1.85
1.70
Nonane
C9H
20
0.70
5.60
4.40 2.35
2.10
Page 88

10 – Accessories
82
Gas
Molecular
formula
LEL
(% v/v)
UEL
(% v/v)
CH4
coef.
H2
coef.
C4H10
coef.
C5H12
coef.
Octane
C8H
18
1.00
6.00
2.70 1.45
1.30
Ethylene oxide
(epoxyethane)
C2H4O
2.60
100
2.10
1.70
1.15
1.00
Propylene oxide
(epoxypropane)
C3H6O
1.90
37.00
2.35
1.90
1.25
1.15
Pentane
C5H
12
1.40
8.00
2.10 1.15
1.00
Propane
C3H
8
2.00
9.5
1.55 0.85
0.75
Propylene
C3H
6
2.00
11.70
1.65 0.90
0.80
Styrene (vinyl
benzene)
C8H
8
1.1
8.00
6.30 3.35
3.00
Premium unleaded
gasoline (95)
-
1.10
~6.0
1.80 0.95
0.90
Toluene
C7H
8
1.20 7 4.00 2.15
1.90
Turpentine oil
-
0.8
6.0
3.50 1.85
1.70
Triethylamine
C6H15N
1.20 8 2.05 1.10
1.00
White spirit
mixture
1.10
6.50
3.50 1.85
1.70
Xylene
C8H
10
1.00
7.60
4.00 2.15
1.90
Items in gray: recommended gas for calibrating the detector.
Table 3: calibration coefficients for standard catalytic sensors (VQ1)
Example
Calibration of an “acetone” detector using a calibration gas with 1% butane
Value to be displayed:
1% (injected butane) x 100 x 0.90 (butane/acetone coefficient) = 60% LEL
1.5% (butane LEL)
Note:
■ LELs vary according to the source.
■ Coefficients are accurate to ± 15%.
Page 89

10 – Accessories
83
Maintaining the remote control
Replacing the batteries
The two AA batteries (1.5 V) in the device need to be replaced if transmission
quality decreases. In this case, remove the remote control (1) from its case (2),
remove the cover from the battery compartment (4) and replace the old
batteries (3) with two new identical batteries. Replace the cover (4), insert and
tighten the screws, and put the remote control (1) back into its case (2).
Figure 64: installing new AA batteries (1.5 V).
Page 90

10 – Accessories
84
Page 91

10 – Accessories
85
Chapter 10 | Accessories
Accessory
Use
Illustration
Code
Tool kit
Tool kit for maintenance.
6147870
6145856
Gas injection pipe
Inject the calibration gas onto the
measurement sensor.
Impact on reading: measurement
similar to measurement in diffusion
mode.
Impact on response time: none.
6331141
Plastic material.
Risk of electrostatic
charges. Wipe with
a damp cloth
Gas flow head
Used to take bypass readings.
Impact on reading: none if
calibration is performed under the
same conditions (pipe, flow rate).
Impact on response time: none.
6327910
Plastic material.
Risk of electrostatic
charges. Wipe with
a damp cloth
Splash guard
Protects the detector from liquids.
Impact on reading: none.
Impact on response time: response
time in diffusion mode may
increase for certain gases; contact
us for more information.
6329004
Plastic material.
Risk of electrostatic
charges. Wipe with
a damp cloth
Splash guard in
Stainless Steel
Protects the detector from liquids.
Impact on reading: none.
Impact on response time: response
time in diffusion mode may
increase for certain gases; contact
us for more information.
6129010
Splash guard
(high risk)
Protects the detector from liquids.
Impact on reading: none.
Impact on response time: response
time may increase for certain
gases; contact us for more
information.
6329014
Plastic material.
Risk of electrostatic
charges. Wipe with
a damp cloth
Remote gas
injection head
Used to detect ambient gases
while a calibration gas injection
pipe is being used. Only for
combustible gases,
Impact on reading: none.
Impact on response time:
negligible.
6327911
Plastic material.
Risk of electrostatic
charges. Wipe with
a damp cloth
Removable PTFE
protection filter
Protects the gas inlet from liquids
and dust.
Impact on reading: none, but this
part cannot be used for the
detection of O3, HCL, HF and CL2.
Impact on response time: response
time may increase for certain
gases; contact us for more
information.
6335975
Plastic material.
Risk of electrostatic
charges. Wipe with
a damp cloth
Page 92

10 – Accessories
86
Accessory
Use
Illustration
Code
Ceiling gas
collector
Allows the sensor to detect
gases more quickly. (ceilingmounted)
Impact on reading: none.
Impact on response time: may
increase by 10%.
6331168
Weather guard
Protects outdoor-mounted
detectors.
Impact on reading: none.
Impact on response time:
negligible.
6123716
IR20 remote
control
Used to configure and maintain the
OLCT 80.
6327878
Page 93

11 – Replacement Parts
87
Chapter 11 | Replacement Parts
All replacement parts must be Oldham-manufactured parts.
The use of non-Oldham parts could jeopardize the
instrument's safety.
Accessories for the OLCT 80
Part number
Description
6 343 490
M25 cable grand kit for armored cable
6 343 489
M20 cable grand kit for armored cable
6 343 492
M25 stainless steel cap kit
6 343 491
M20 stainless steel cap kit
6 111 147
IR20 remote control battery
Flameproof approved replacement sensors
Part number
Description
6 313 685
OLCT 80 sensor pack, 0-100% LEL, type VQ1
6 313 872
OLCT 80 sensor pack, 0-100% LEL, butadiene/acetylene, type VQ1
6 313 974
OLCT 80 poison control sensor pack, 0-100% LEL, type 4F
6 313 687
OLCT 80 sensor pack, 0-100% vol. CH4
6 313 986
OLCT 80 sensor pack, 0-100% vol. SF6
6 313 203
OLCT 80 sensor pack, 0-100% vol. H2
6 314 100
Infrared sensor pack, 0-5% vol. CO2, for OLCT 80 XP IR
6 314 101
Infrared sensor pack, 0-10% vol. CO2, for OLCT 80 XP IR
6 314 146
Infrared sensor pack, 0-100% vol. CO2, for OLCT 80 XP IR
6 313 710
OLCT 80 O2 sensor pack, 0 - 30% vol.
6 313 707
OLCT 80 NH3 sensor pack, 0-100 ppm
6 313 708
OLCT 80 NH3 sensor pack, 0-1000 ppm
6 313 894
OLCT 80 NH3 sensor pack, 0-5000 ppm
6 313 690
OLCT 80 CO sensor pack, 0-100 ppm
6 313 691
OLCT 80 CO sensor pack, 0-300 ppm
6 313 692
OLCT 80 CO sensor pack, 0-1000 ppm
6 313 693
OLCT 80 CO sensor pack, 0-1000 ppm compensated H2
6 313 695
OLCT 80 H2S sensor pack, 0-30 ppm
6 313 965
OLCT 80 H2S sensor pack, 0-30 ppm, no HC interference
6 313 696
OLCT 80 H2S sensor pack, 0-100 ppm
6 313 697
OLCT 80 H2S sensor pack, 0-1000 ppm
6 313 698
OLCT 80 sensor pack, 0-100 ppm NO
6 313 699
OLCT 80 sensor pack, 0-300 ppm NO
Page 94

11 – Replacement Parts
88
Part number
Description
6 313 700
OLCT 80 sensor pack, 0-1000 ppm NO
6 313 706
OLCT 80 sensor pack, 0-2000 ppm H2
6 313 772
OLCT 80 explosion-proof methylene/methylene chloride sensor pack
6 313 773
OLCT 80 explosion-proof sensor pack, R12
6 313 774
OLCT 80 explosion-proof sensor pack, R134a
6 313 775
OLCT 80 explosion-proof sensor pack, MOS
Intrinsically-safe approved replacement sensors
Part number
Description
6 313 748
OLCT 80 intrinsically-safe O2 sensor pack, 0 - 30% vol.
6 313 728
OLCT 80 intrinsically-safe NH3 sensor pack, 0-100 ppm
6 313 729
OLCT 80 intrinsically-safe NH3 sensor pack, 0-1000 ppm
6 313 895
OLCT 80 intrinsically-safe NH3 sensor pack, 0-5000 ppm
6 313 694
OLCT 80 intrinsically-safe CO sensor pack, 0-1000 ppm compensated H2
6 313 711
OLCT 80 intrinsically-safe CO sensor pack, 0-100 ppm
6 313 712
OLCT 80 intrinsically-safe CO sensor pack, 0-300 ppm
6 313 713
OLCT 80 intrinsically-safe CO sensor pack, 0-1000 ppm
6 313 716
OLCT 80 intrinsically-safe H2S sensor pack, 0-30 ppm
6 313 717
OLCT 80 intrinsically-safe H2S sensor pack, 0-100 ppm
6 313 718
OLCT 80 intrinsically-safe H2S sensor pack, 0-1000 ppm
6 313 719
OLCT 80 intrinsically-safe NO sensor pack, 0-100 ppm
6 313 720
OLCT 80 intrinsically-safe NO sensor pack, 0-300 ppm
6 313 721
OLCT 80 intrinsically-safe NO sensor pack, 0-1000 ppm
6 313 722
OLCT 80 intrinsically-safe NO2 sensor pack, 0-10 ppm
6 313 723
OLCT 80 intrinsically-safe NO2 sensor pack, 0-30 ppm
6 313 727
OLCT 80 intrinsically-safe H2 sensor pack, 0-2000 ppm
6 313 730
OLCT 80 intrinsically-safe HCl sensor pack, 0-30 ppm
6 313 731
OLCT 80 intrinsically-safe HCl sensor pack, 0-100 ppm
6 313 724
OLCT 80 intrinsically-safe SO2 sensor pack, 0-10 ppm
6 313 725
OLCT 80 intrinsically-safe SO2 sensor pack, 0-30 ppm
6 313 726
OLCT 80 intrinsically-safe SO2 sensor pack, 0-100 ppm
6 313 734
OLCT 80 intrinsically-safe Cl2 sensor pack, 0-10 ppm
6 313 746
OLCT 80 intrinsically-safe ETO sensor pack, 0-50 ppm
6 313 732
OLCT 80 intrinsically-safe HCN sensor pack, 0-10 ppm
6 313 733
OLCT 80 intrinsically-safe HCN sensor pack, 0-30 ppm
6 313 736
OLCT 80 intrinsically-safe COCl2 sensor pack, 0-1 ppm
6 313 740
OLCT 80 intrinsically-safe CIO2 sensor pack, 0-3 ppm
6 313 735
OLCT 80 intrinsically-safe O3 sensor pack, 0-1 ppm
6 313 737
OLCT 80 intrinsically-safe PH3 sensor pack, 0-1 ppm
6 313 739
OLCT 80 intrinsically-safe HF sensor pack, 0-10 ppm
6 313 738
OLCT 80 intrinsically-safe AsH3 sensor pack, 0-1 ppm
6 313 747
OLCT 80 intrinsically-safe SiH4 sensor pack, 0-50 ppm
Page 95

12 – EU Declarations of Conformity
89
Chapter 12 | EU Declarations of Conformity
The following pages represent copies of the EU declarations of conformity for
the following devices related to the OLCT 80 detector:
■ OLCT 80 without antenna
■ OLCT 80 with antenna
■ IR 20 remote control
Page 96

12 – EU Declarations of Conformity
90
OLCT 80 without antenna
Page 97

12 – EU Declarations of Conformity
91
Page 98

12 – EU Declarations of Conformity
92
OLCT 80 with antenna
Page 99

12 – EU Declarations of Conformity
93
Page 100

12 – EU Declarations of Conformity
94
IR20 remote control of the OLCT 80
 Loading...