

Page 1

FIXED POINT
SINGLE OR DUAL GAS MONITOR WITH
DUAL ANALOG OUTPUTS
Installation • Operation • Wiring • Troubleshooting
Part Number: 77036429-EN
Version: 01
Release Date: June 29, 2013
Page 2
2
© 2013 Industrial Scientific - Oldham. All rights reserved.
is a trademark of Industrial Scientific - Oldham.
ModBus® is a registered trademark of Schneider Automation Inc.
ModBus® protocol™ is a trademark of Schneider Automation Inc.
All other trademarks and registered trademarks are the property of their
respective owners.
Although every effort is made to ensure accuracy, the specifications of this
product and the content herein are subject to change without notice.
Industrial Scientific - Oldham
1001 Oakdale Road
Oakdale, PA 15071-1500
USA
Tel: +1 412-788-4353
Toll Free: 1-800-DETECTS (1-800-338-3287)
Fax: +1 412-788-8353
Service: 1-888-788-4353
Web: www.oldhamgas.com
Page 3

3
Warnings and Cautionary Statements
CAUTION: Failure to perform certain procedures or note certain conditions
may impair the performance of the monitor. For maximum safety and
performance, please read and follow the procedures and conditions outlined
below.
Oxygen deficient atmospheres may cause combustible gas readings
that use catalytic LEL sensors to be lower than actual concentrations.
Oxygen enriched atmospheres may cause combustible gas readings
that use catalytic LEL sensors to be higher than actual concentrations.
Calibrate the catalytic combustible gas sensor after each incident where
the combustible gas content causes the instrument to enter in the
OVER-RANGE alarm condition.
The catalytic and IR sensors are factory configured to accurately
monitor the gas for which they are designated. It should be noted,
however, that the LEL sensors WILL respond to other combustible
gases and are not gas-specific.
Silicone compound vapors may affect the catalytic combustible gas
sensor and cause readings of combustible gas to be lower than actual
gas concentrations. If the sensor has been used in an area where
silicone vapors were present, always calibrate the instrument before
continued use to ensure accurate measurements.
Sensor openings must be kept clean. Obstruction of the sensor
openings may cause readings to be lower than actual gas
concentrations.
Sudden changes in atmospheric pressure may cause temporary
fluctuations in the oxygen readings.
Alarms relays are non-latching.
When connecting 4-20 mA outputs to inductive loads, Industrial
Scientific - Oldham recommends using an isolation barrier in line with
the 4-20 mA signal.
Interior grounding terminal is to be used for grounding, the exterior
terminal is only to be used for bonding.
Page 4

4
FOR IR SENSORS:
The output of the IR sensors can be disrupted by sudden changes in
temperature. If there is an excessive change in the ambient
temperatures, gas sample temperature or flow rate, then the output
signal will be momentarily frozen. Correct operation is restored when
the effects of the transient have settled. Rates of change in the ambient
temperature should be restricted to 2 °C/minute and gas flow rates kept
below 0.6 L/minute.
Extreme pressure variations will cause errors in readings. The unit
should be recalibrated if the atmospheric pressure change is greater
than 10% from the original pressure.
Do not expose the sensor to corrosive gases such as Hydrogen
Sulphide.
Do not allow condensation to occur inside the sensor.
CALIBRATION ALERT: Gas detection instruments are potential life-saving
devices. Recognizing this fact, calibration for the toxic and catalytic LEL
sensors should be at least at quarterly intervals, while the infrared sensor
should be calibrated on an annual basis with function test every 6 months.
Further, Industrial Scientific - Oldham recommends prudent testing and/or
includes calibration after a gas alarm. All calibration service to sensors
should be recorded and accessible.
CAUTION: For safety reasons, this equipment must be operated and
serviced by qualified personnel only.
Page 5

5
Our Mission
Preserving human life: on, above and below the earth.
Delivering highest quality, best customer service…
every transaction, every time.
In practical terms, that means developing both portable instruments and
fixed-point systems for detecting, measuring and monitoring a wide variety
of gases, including toxic and combustible gases, as well as oxygen.
From research and development through final manufacturing, we never
forget that human lives depend on what we do. Workers all over the world
enter confined spaces, face the risk of asphyxiation, poisoning or explosion,
and depend on our instruments to ensure their safety. That's why every one
of our products is designed and manufactured with just one question in
mind:
“Would you bet your life on it?”
Page 6

6
Page 7

7
Contents
Chapter 1 | Overview ............................................................ 11
Overview of the Gas Monitor .................................................. 11
Specifications .......................................................................................... 12
Agency Approvals - CSA ......................................................................... 14
Chapter 2 | Hardware Overview ........................................... 15
Main Electronics Unit (Housing) .............................................................. 15
Sensor ..................................................................................................... 16
Display ..................................................................................................... 16
Inputs – Intrusive and Non-Intrusive ........................................................ 17
Electronics Modules ................................................................................ 18
Chapter 3 | Installation ......................................................... 21
Introduction .............................................................................................. 21
Installation Considerations ...................................................................... 21
Wall Mounting .......................................................................................... 21
Column Mounting .................................................................................... 21
Chapter 4 | System Wiring ................................................... 23
Introduction .............................................................................................. 23
Wiring Preparation ................................................................................... 23
Alarm Relay Wiring (J1, J5, and J6) ........................................................ 24
Power and Output Wiring (J1) ................................................................. 25
Sensor Wiring (J3) ................................................................................... 26
Digital ModBus RTU Interface Wiring (J1) .............................................. 32
Wiring Conclusion .................................................................................... 36
Chapter 5 | Operation ........................................................... 37
Initial Start-up .......................................................................................... 37
Warm-up Period ...................................................................................... 37
Normal Operating Mode .......................................................................... 37
Programming Mode Overview ................................................................. 39
Programming Mode – Non-intrusive Operation ....................................... 40
Programming Mode – Push Button Operation ........................................ 44
Chapter 6 | Modbus Interface .............................................. 53
Introduction .............................................................................................. 53
Page 8

8
Sample Gas Reading via ModBus Network ............................................ 54
ModBus Register List ............................................................................... 54
ModBus Resources ................................................................................. 59
Termination .............................................................................................. 59
Chapter 7 | Maintenance ...................................................... 61
Introduction .............................................................................................. 61
Sensor Replacement ............................................................................... 62
Zero and Calibration ................................................................................ 62
Chapter 8 | Troubleshooting ............................................... 63
Introduction .............................................................................................. 63
Diagnosing Common Problems ............................................................... 63
Fault Codes .............................................................................................. 64
Function Codes ........................................................................................ 64
Chapter 9 | Warranty ............................................................ 67
Warranty .................................................................................................. 67
Limitation of Liability ................................................................................ 67
Appendix A | HART Interface .................................................. 69
Introduction .............................................................................................. 69
Hardware Overview ................................................................................. 70
Installation ................................................................................................ 71
System Wiring .......................................................................................... 71
Operation ................................................................................................. 76
HART Interface ........................................................................................ 79
User Commands ...................................................................................... 81
Appendix B | Acronyms and Abbreviations .......................... 87
Appendix C | Decimal, Binary, And Hex Equivalents ............ 91
Appendix D | Ordering Matrix ................................................. 95
Appendix E | Factory Default Settings ................................... 99
Appendix F | Infrared Sensors ............................................. 101
Appendix G | LEL Correlation Factors ................................. 103
Page 9

9
Page 10

10
Page 11

11
Chapter 1 | Overview
Overview of the Gas Monitor
The fixed gas monitor is an
independent monitor capable of
displaying one or two gas
concentrations as well as sensor or
instrument specific diagnostics.
The comes standard with
independent 4-20 mA outputs for
each channel, making it ideal for
interfacing to control units. A digital
ModBus RTU interface is also
available, allowing the to
interface to digital control systems.
The is available with an
optional relay board, allowing the
unit to directly control external
devices such as fans, pumps, alarm
horns, or warning lights. Two of the
relays can be programmed for alarm
activation, while the third relay is a
fault protection relay. Calibration,
changing span gas concentration,
and checking the instrument’s
configuration are easily
accomplished using the nonintrusive magnetic wand.
The is powered with a 24
VDC (12-28 VDC) power supply and
provides a 4-20 mA control signal
for each sensor.
Figure 1-1 Typical Gas Monitor
with Single Gas Sensor (Stainless Steel
Option)
Page 12

12
Specifications
Item
Description
Enclosure
Cast aluminum, poly-bonded coating or 316 stainless steel. Both are
explosion-proof, NEMA 4X, IP66 rated.
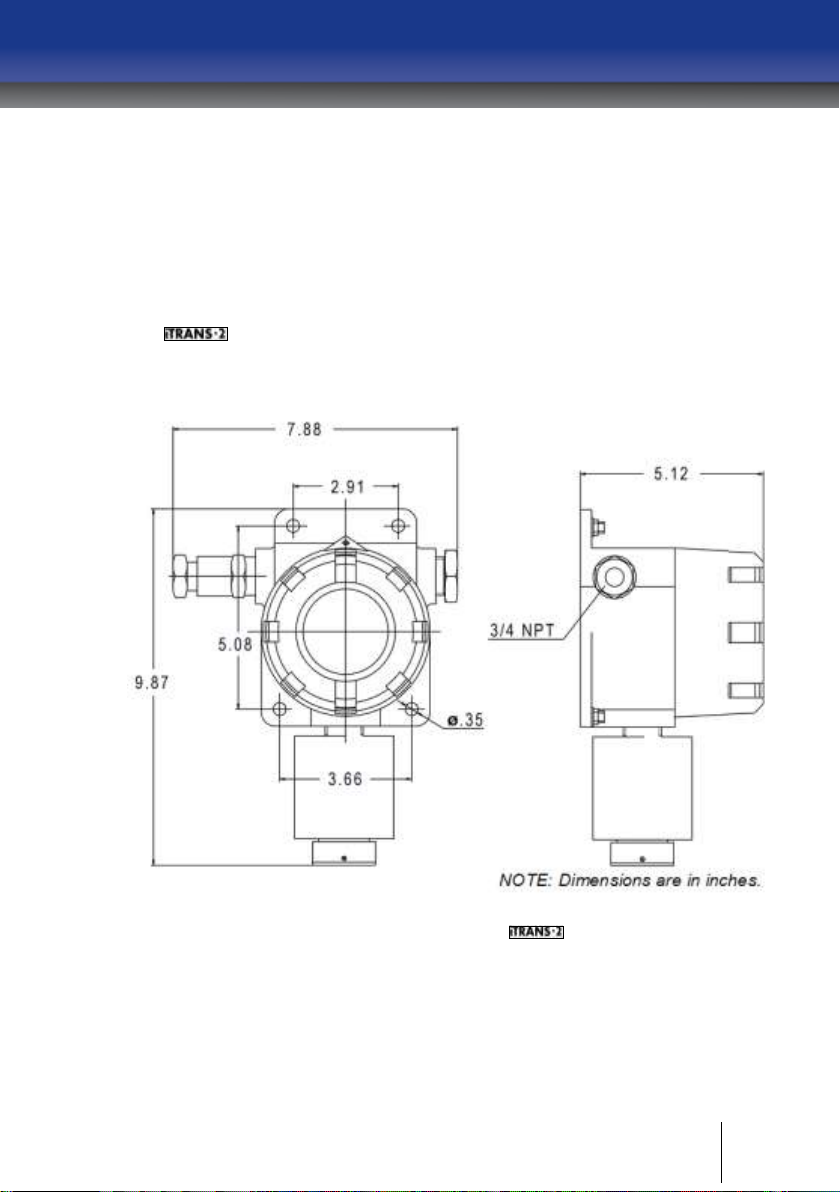
Dimensions
5.0 × 6.0 × 5.0 inches (127 x 153 x 129 mm)
Sensors
Combustible Gases: Catalytic bead and/or Non-Dispersive Infrared
(NDIR) Oxygen/Toxic Gases: Electrochemical diffusion
Input Voltage
12-28 VDC operating range (24 VDC typical)
Input Current
(Max)
Toxic Gas/Oxygen
150 mA@24 VDC (single gas)
200 mA@24 VDC (single gas + HART)
Combustible
Gases (Catalytic)
250 mA@24 VDC, 0.8 A peak (single gas)
300 mA@24 VDC, 0.8 A peak (single gas + HART)
Combustible
Gases (Infrared)
170 mA@24 VDC, 0.5 A peak (single gas)
220 mA@24 VDC, 0.5 A peak (single gas + HART)
Combined
Catalytic/Infrared
350 mA@24 VDC, 1.2 A peak (two gas)
400 mA@24 VDC, 1.2 A peak (two gas + HART)
Display
Dual-channel split-screen LED display (4-digit, 7-segment
arrangement per channel) provides simultaneous display of one or
two gases.
Signal
Outputs
Digital
ModBus RTU: RS485 digital communication
with ModBus RTU software protocol system
at 9600 baud. Three- or four-wire system
accommodates over 200 devices in bus
configuration. Address selection through
on-board 8-position DIP switch. NOTE:
ModBus is not to be used for CSA C22.2 No.
152 compliance.
Analog
4-20 mA (linear analog)
Alarm Relays
Quantity
3 alarm relays: Two user-programmable
relays, SPST, N.O.; plus one fault relay,
SPST, N.C.
Contact Capacity
5A @ 30 VDC
5A @ 30 VAC
Temperature
Range
-40 ºC ~ +75 ºC (-40 ºF ~ +167 ºF)
Humidity
Range
10% - 90% RH (non-condensing), typical
Pressure
Atmospheric pressure ±10%
Weight
2.9 Kg (6.4 lbs.)
Specifications for the gas monitor are listed in Table 1-1.
Table 1-1 Specifications for the Monitor
Page 13

13
Sensor
Gas
Range/Resolution
Combustible Gases
LEL
0 -100% LEL in 1% increments
Hydrogen
H2
0 - 999 ppm in 1 ppm increments
Oxygen
O2
0 - 30.0% by vol in 0.1% increments
Ammonia
NH3
0 - 200 ppm in 1 ppm increments
Carbon Monoxide
CO
0 - 999 ppm in 1 ppm increments
Carbon Monoxide/H2 Null
CO
0 - 999 ppm in 1 ppm increments
Hydrogen Sulfide
H2S
0 - 500 ppm in 1 ppm increments
Sulfur Dioxide
SO2
0.2 - 99.9 ppm in 0.1 ppm increments
Hydrogen Cyanide
HCN
0.2 – 30.0 ppm in 0.1 ppm increments
Hydrogen Chloride
HCl
0.2 - 30.0 ppm in 0.1 ppm increments
Phosphine
PH3
0 - 1.00 ppm in 0.01 ppm increments
Nitrogen Dioxide
NO2
0.2 - 99.9 ppm in 0.1 ppm increments
Nitric Oxide
NO
0 - 999 ppm in 1 ppm increments
Chlorine
Cl2
0.2 - 99.9 ppm in 0.1 ppm increments
Chlorine Dioxide
ClO2
0.02 - 1.00 ppm in 0.01 ppm increments
Methane (by Vol, IR)
CH4
0 – 100% Vol in 1% Vol increments
Methane (by LEL, IR)
CH4
0 – 100% LEL in 1% increments
Propane (IR)
C3H8
0 – 100% LEL in 1% increments
Propylene (IR)
C3H6
0 – 100% LEL in 1% increments
Pentane (IR)
C5H12
0 – 100% LEL in 1% increments
Butane (IR)
C4H10
0 – 100% LEL in 1% increments
Ethylene (IR)
C2H4
0 – 100% LEL in 1% increments
Ethanol (IR)
C2H6O
0 – 100% LEL in 1% increments
Hexane (IR)
C6H14
0 – 100% LEL in 1% increments
Carbon Dioxide (IR)
CO2
0 – 0.50% Vol in 0.01% increments
Carbon Dioxide (IR)
CO2
0 – 5.00% Vol in 0.01% increments
Carbon Dioxide (IR)
CO2
0 – 100% Vol in 1% Vol increments
Table 1-2 Sensor Ranges
Page 14

14
Agency Approvals - CSA
The is certified by CSA, a NRTL laboratory, to the following US and
Canadian Standards.
UL Std No. 916-Energy Management Equipment
UL Std No. 1203-Explosion-Proof and Dust-Ignition-Proof
o Electrical Equipment for Use in Hazardous (Classified) Locations
UL Std No. 1604-Division 2 Hazardous Location Electrical Equipment
ISA S12.13 Part I-2000-Performance Requirements, Combustible Gas
Detectors (iTrans 2 with catalytic sensors only)
CSA Std C22.2 No.30-M1986-Explosion-Proof Enclosures for Use in
Class I Hazardous Locations
CSA Std C22.2 No.142-M1987-Process Control Equipment
CSA Std C22.2 No. 152-M1984-Combustible Gas Detection
Instruments (iTrans 2 with catalytic sensors only)
CSA Std C22.2 No. 213-M1987-Non-incendive Electrical Equipment
for Use in Class I, Division 2 Hazardous Locations
# # #
Page 15
15
Chapter 2 | Hardware Overview
Main Electronics Unit (Housing)
The body is a cast aluminum housing that contains the electronics
of the gas monitor. Details of a single-gas housing are shown in Figure 2-1.
Figure 2-1 Details of a Single-Gas Gas Monitor
Page 16
16
Sensor
Item
Descriptions
Sensor Housing
Material
Aluminum, Anodized, Explosion-proof: Class I, Divisions 1 and 2
Groups B, C, D, and Ex d IICT6 Gb (China)
Aluminum, Anodized w/Gore-Tex Membrane (Division 2/Zone 2
toxics), Suitable for Class I, Division 2 Groups A, B, C, D
Dimensions
3.0 × 3.0 inches (76 × 76 mm)
Accuracy
< ± 3% Toxic and Oxygen
For Combustibles:
For test gas concentrations up to and including 50% of full scale,
the deviation shall not exceed ±3% of full scale gas
concentration.
For test gas concentrations above 50% of full scale, the deviation
shall not exceed ±5% of full scale gas concentration.
Protection Class
IP 66 or NEMA 4X
Table 2-1 Sensor Specifications
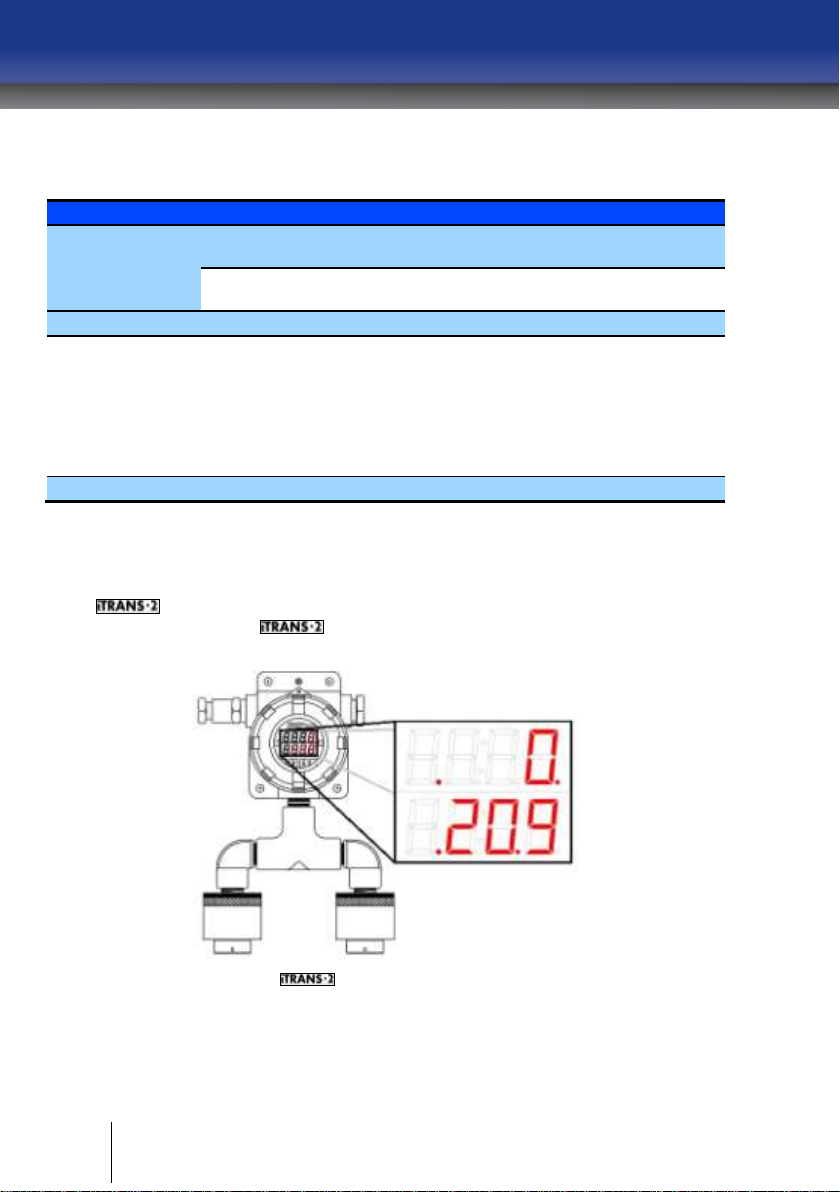
Display
The gas monitor has a 4-digit, 7-segment LED display for each of 2
channels. A dual-gas sensor and sample display are shown in
Figure 2-2.
Figure 2-2 The Display (Dual-Gas Monitor Shown)
Page 17
17
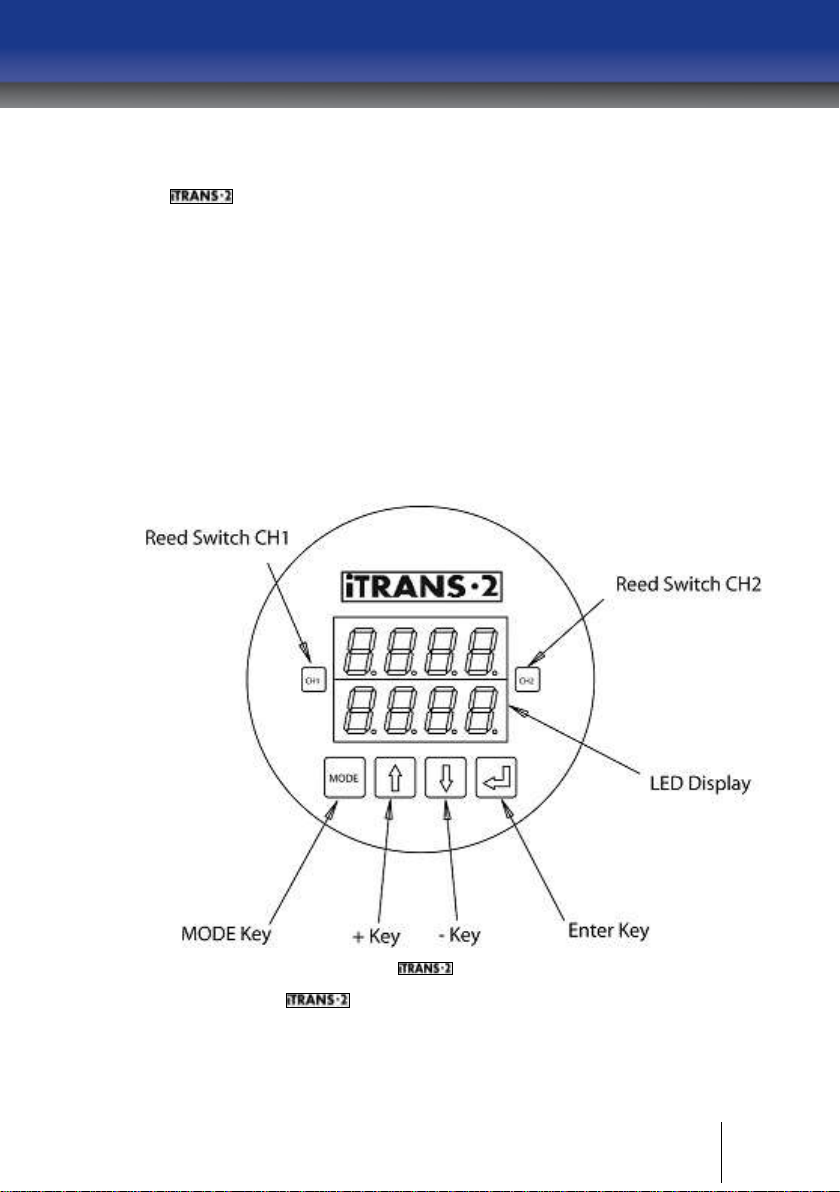
Inputs – Intrusive and Non-Intrusive
The gas monitor can be configured using intrusive and nonintrusive means. Both methods of configuration are accomplished through
physical inputs that are visible behind the glass panel of the gas monitor.
A set of four keys are used when intrusive programming is appropriate (i.e.,
when the enclosure can be removed and when the keys can be manually
pressed). These keys are the mode, increment (+), decrement (-), and enter
keys. Refer to Figure 2-3.
For applications that require non-intrusive manipulation, two magneticallyactivated reed switches are used to accomplish programming without
removing the cover. A magnetic wand is positioned over the appropriate
reed switch (above the glass face plate) without the wand physically
touching the reed switches. The locations of the reed switches are shown in
Figure 2-3.
Figure 2-3 Locations of Input Keys and Reed Switches
Programming the gas monitor in both intrusive and non-intrusive
modes is explained in detail in Chapter 5.
Page 18

18
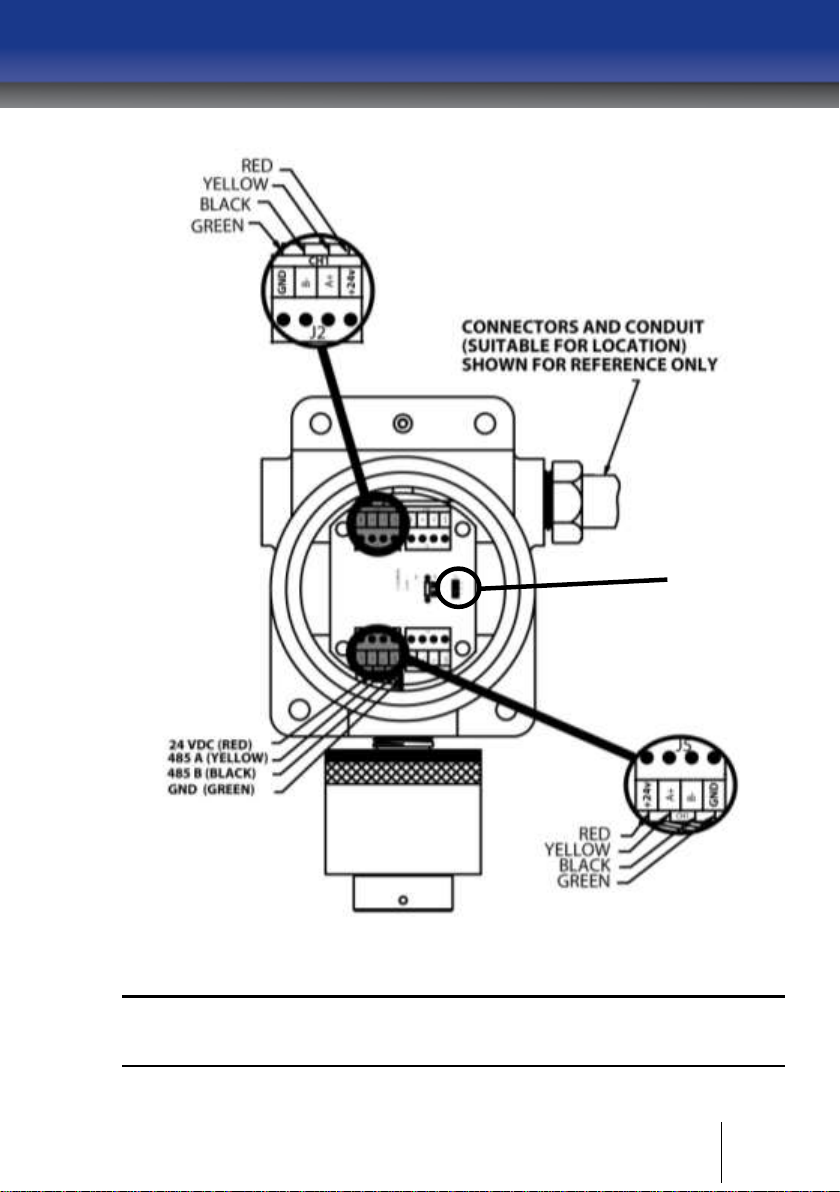
Electronics Modules
The electronics module of the gas monitor contains connectors and
jumpers for wiring and configuring the device. The electronics module for a
main unit is shown in Figure 2-4. The electronics module for a
remote unit is shown in Figure 2-5. Wiring details are explained in Chapter 4
| System Wiring.
Figure 2-4 Electronics Module for (Main Unit)
Page 19
19
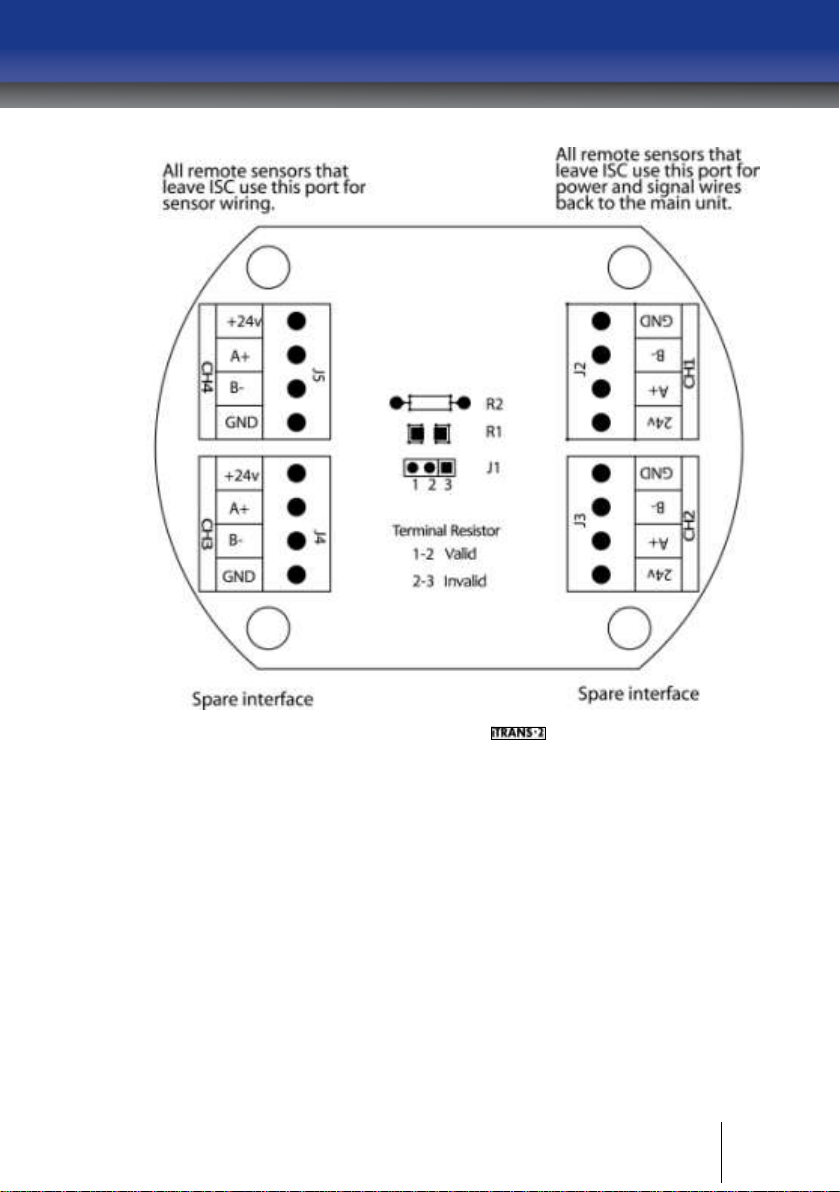
Figure 2-5 Electronics Board for Remote Sensor
# # #
Page 20

20
Page 21

21
Chapter 3 | Installation
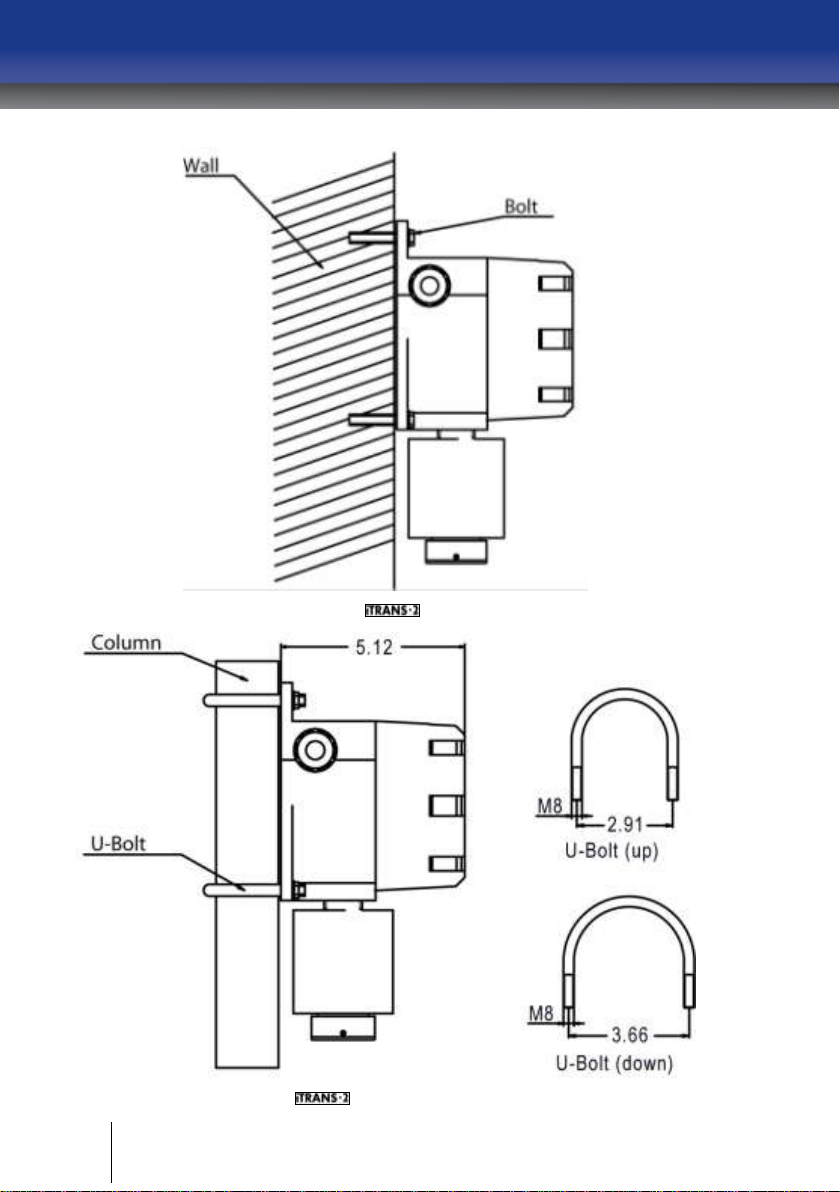
Introduction
The can be mounted in one of two ways. The unit can be wallmounted using the wall mounting holes in the enclosure, or it can be
mounted onto a column using U-bolts. Each of these options is discussed in
this chapter. Be sure to review the installation considerations before
mounting the gas monitor.
Installation Considerations
Regardless of the installation type (wall mounting or column mounting), the
should be installed at or near the location of a possible leak or the
source of emissions. Installation height depends on the density of the gas
being monitored. Moreover, speed and direction of air flow, and relative
position to potential leaking points should also be considered.
IMPORTANT: The gas monitor must not be installed on vibrating or
heat generating sources.
Wall Mounting
If your application is best addressed using a wall-mounted gas monitor,
then use the four 8 mm mounting holes in the enclosure to secure the
to an appropriate location on the wall. Refer to Figure 3-1.
Column Mounting
If your application is best addressed using a column-mounted gas monitor,
then use the four 8 mm mounting holes and two U-bolts to secure the
to an appropriately located segment of a target pipe or conduit.
Refer to Figure 3-2.
Page 22
22
Figure 3-1 Mounting the Gas Monitor on a Wall
Figure 3-2 Mounting the Gas Monitor on a Column Using U-Bolts
Page 23

23
Chapter 4 | System Wiring
Introduction
This chapter outlines the steps required for wiring the gas monitor.
These steps include the following:
Wiring Preparation
Sensor Wiring
Alarm Relay Wiring
Each of these steps is outlined in the sections that follow.
IMPORTANT: Perform all wiring in accordance with local electrical codes
and local authorities having jurisdiction.
Power and Output Wiring
ModBus Interface Wiring
IMPORTANT: DC signal and AC power should not be run in the same
conduit.
NOTE: All field wiring colors are arbitrary (unless provided by ISC).
Wiring Preparation
1. Collect the appropriate types and lengths of wire.
For control wire, use #18 AWG (0.9 mm²) insulated, shielded
cable.
For analog signal and power wire, use three-conductor (or four-
conductor for dual channel) #18 AWG (0.9 mm²) insulated and
shielded cable.
For digital ModBus signal and power, use a minimum of five-
conductor #18 AWG (0.9 mm²) insulated and shielded cable.
2. Power down the unit.
3. Unthread the windowed top from the housing.
4. Gently pull out the electronics module and place it safely to the side
of the unit.
Page 24
24
5. Thread control, signal, and power wires into the transmitter housing.
6. Shielding from either the controller or remote sensors should be
bonded to the enclosure screw located inside the .
IMPORTANT: Use of this product in areas where it may be subject to large
amounts of electromagnetic interference may affect the reliable operation of
this device and should be avoided.
WARNING: Supply wire with a minimum rating of 90°C must be used for
interconnection to the .
NOTE: For classified locations, a “poured” wire seal must be installed within
18 inches (457mm) of the main unit for both power entry and remote
sensors.
NOTE: Remove power from the before making any wiring
connections.
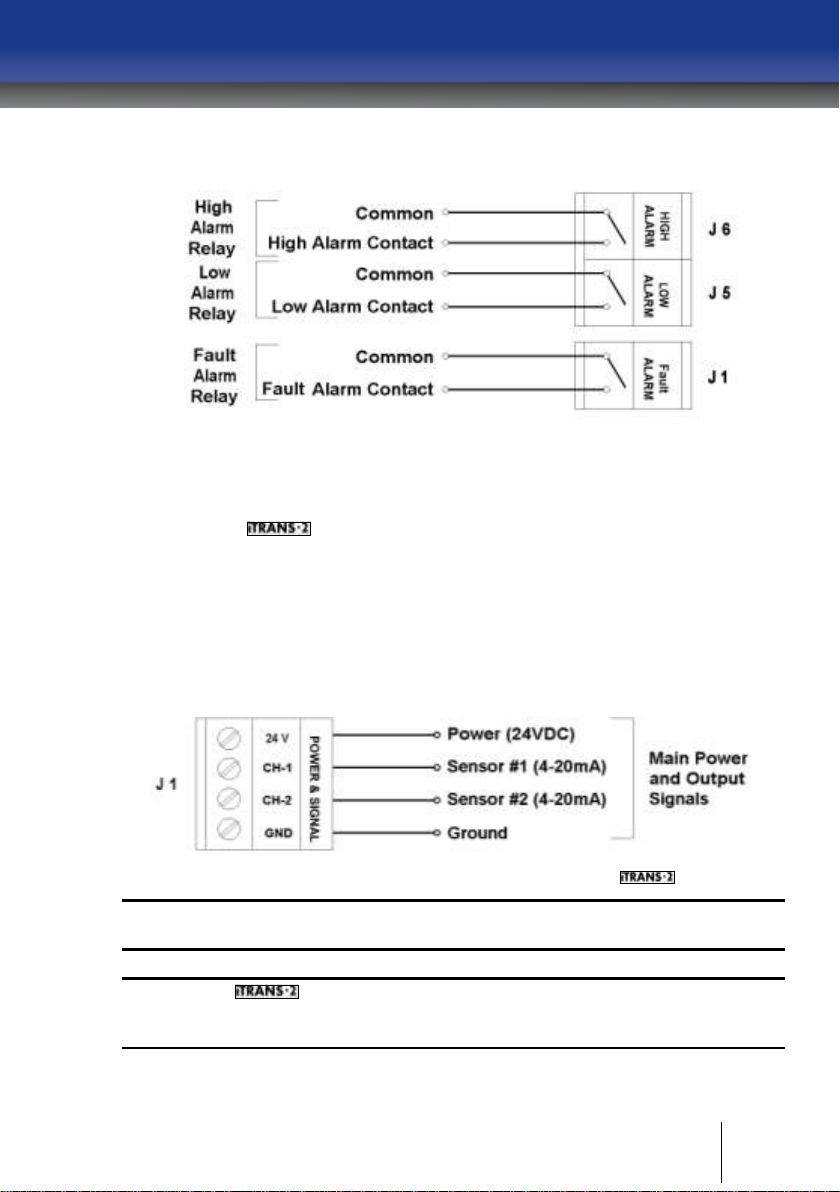
Alarm Relay Wiring (J1, J5, and J6)
To connect the control wires to the three relay terminals on the relay
board, wire the unit to the connectors shown in Figure 2-4. The low alarm
relay is activated when the low alarm threshold is met. This is a nonlatching, Normally Open (NO) contact. The high alarm relay is activated
when the high alarm threshold is met. This is a non-latching, Normally Open
(NO) contact. The fault alarm relay is activated upon power-up of the
. When the fault condition is met, the circuit opens. This is an
Electronically closed (NC) contact. See Figure 4-1 for relay wiring.
NOTE: It is recommended that on-board relays should not be used to drive
loads directly. On-board relays should be used to drive a secondary, higherpower relay which is connected to the control device (e.g., strobe, siren,
exhaust fan, etc.).
Page 25
25
Figure 4-1 Alarm Relay Connectors J6, J5 and J1
Power and Output Wiring (J1)
Connect the power and signal wires to the appropriate wiring
terminals as follows.
24 V: Connect 24 VDC (12-28 VDC) supply power
CH 1: Channel 1, 4-20 mA output signal
CH 2: Channel 2, 4-20 mA output signal
GND: DC return
Figure 4-2 Power and Signal Connector J1 on the
NOTE: Use supplied green conductor for enclosure ground. Public 485 GND
is to be used for ModBus digital ground.
NOTE: The is a 3- or 4-wire 4-20 mA device. For dual sensor
configuration you must have a second 4-20 mA signal wire pulled to the
unit.
Page 26
26
NOTE: When not using 4-20 mA outputs, use the supplied resistors to
connect CH-1 and CH-2 to GND. If these resistors are not connected and the
4-20 mA outputs are not used, a “P” will appear on the display, indicating an
open loop condition.
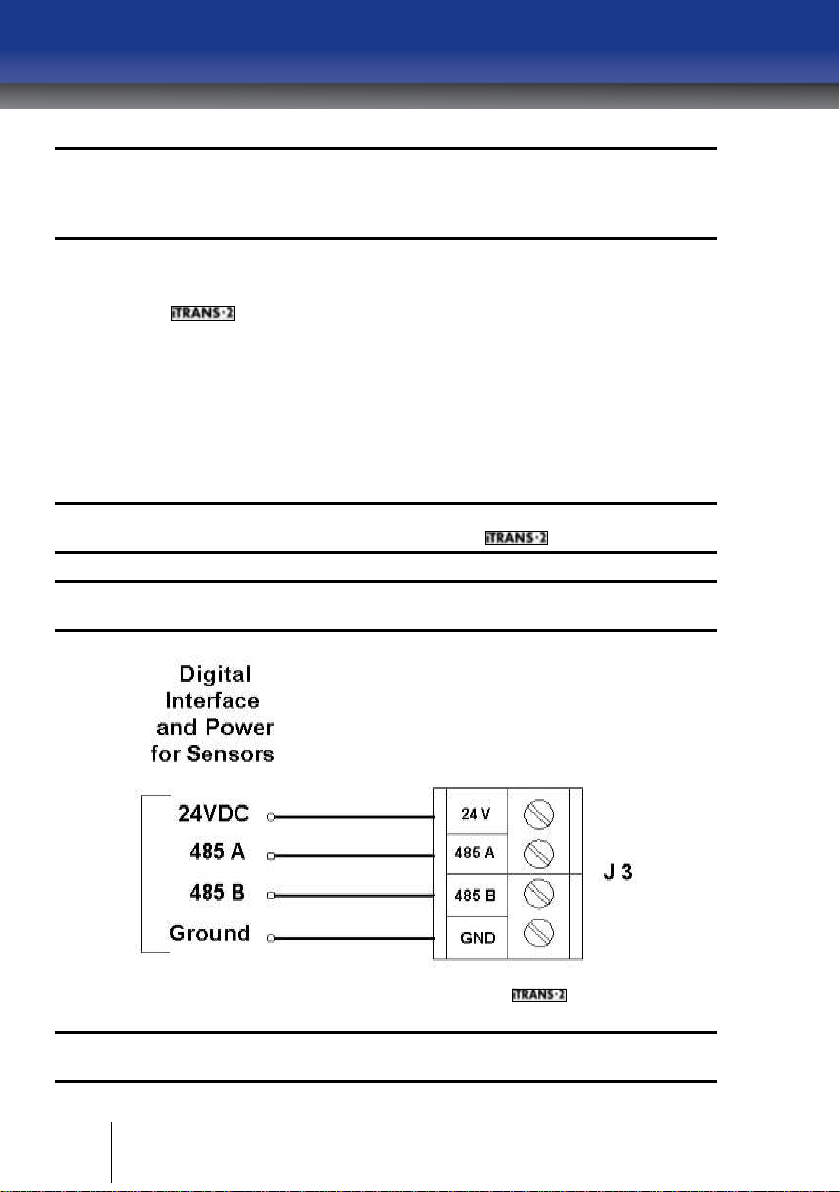
Sensor Wiring (J3)
Connect the sensor wires (for on-board, remote or stand-alone) to
the appropriate wiring terminals as follows.
24 V: Red wire from sensor head
485A: Yellow wire from sensor head
485B: Black wire from sensor head
GND: Green wire from sensor head
NOTE: Shielding from either the controller or remote sensors should be
bonded to the enclosure screw located inside the .
NOTE: The 24 V terminal supplies 24 VDC to the sensor for power. This
terminal should not be connected to the output of a 24 VDC power supply.
Figure 4-3 Sensor Connector J3 on the
NOTE: For dual-sensor configurations, place both of the same colored wires
in the appropriate terminal block and firmly tighten.
Page 27

27
NOTE: Use #18 AWG (0.9 mm²) shielded cable for remote sensors. Maximum
distance is 200 meters.
NOTE: When wiring remote sensors to the , “485 B” on J3 should be
connected to “B-” in the remote sensor enclosure, and “485 A” on J3 should
be connected to “A+” in the remote sensor enclosure.
NOTE: For remote or standalone sensors, there are four terminal blocks
located in the remote sensor housing. These terminal blocks are all tied
together and follow the same wiring scheme mentioned above.
Page 28
28
Figure 4-4 Wiring Diagram for a Single On-board Sensor
Page 29
29
J1
Figure 4-5 Wiring Diagram for a Remote Sensor (Stand Alone)
NOTE: When the remote sensor is at distances of 200 meters or further, and
the sensor is not communicating, the jumper J1 may need to be moved to
terminals 1-2.
Page 30
30
NOTE: If using remote sensors and the does not recognize the
sensor upon power up (displays a sensor fault), check the placement of this
jumper. If the jumper J1 is on terminals 1-2, move the jumper to terminals 2-
3.
For digital ModBus signal and power use a minimum of 4 conductors #18
AWG (0.9 mm²) insulated and shielded cable.
Shielding from either the controller or remote sensors should be bonded to
the enclosure screw located inside the .
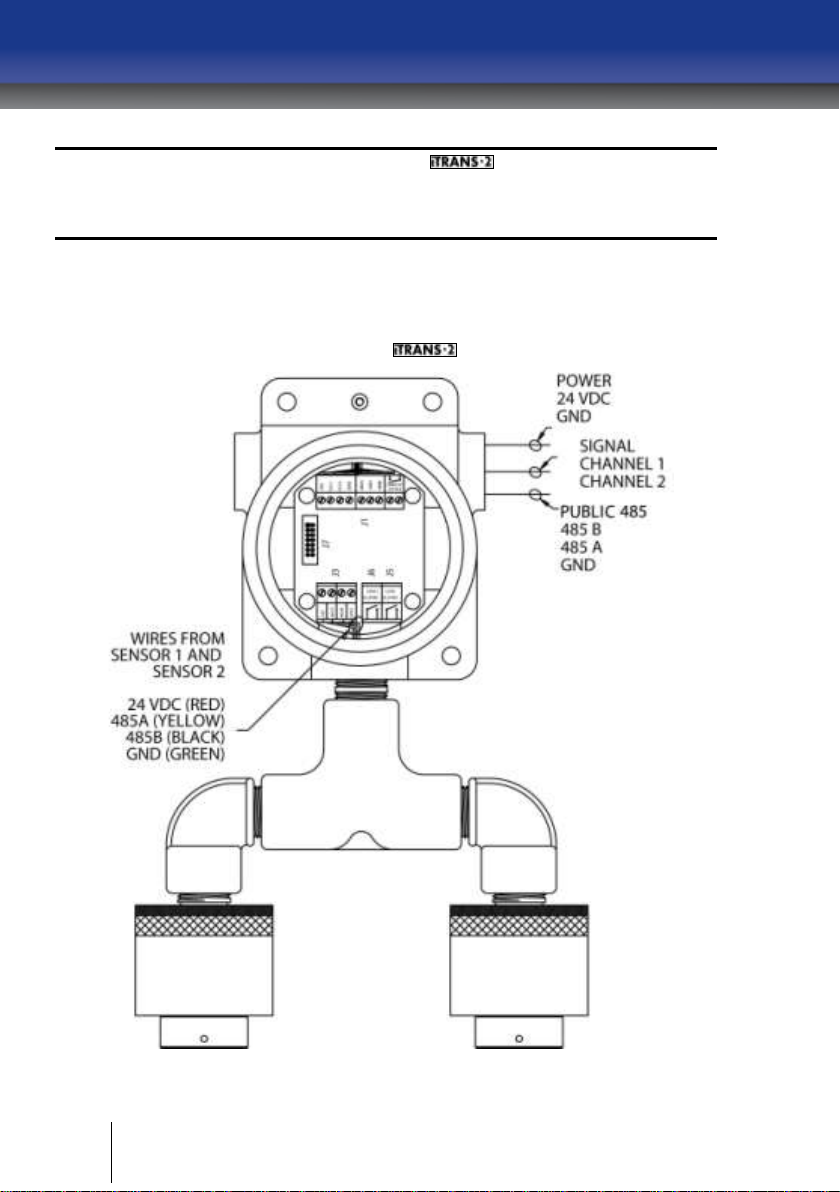
Figure 4-6 Wiring Diagram for Dual On-board Sensors
Page 31

31
Figure 4-7 Wiring Remote Sensors Back to
Page 32

32
Figure 4-8 Wiring Dual Remote Sensors
Digital ModBus RTU Interface Wiring (J1)
ModBus Interface Wiring Overview
To interface the to a digital controller, PLC, or HMI, connect the
power and ground to the appropriate terminals mentioned above. The digital
Page 33

33
signals are wired into the RS485A and RS485B terminals on the board. See
Figure 4-9.
Figure 4-9 Wiring Diagram for the ModBus Interface
Setting the ModBus Address on the
Located on the back of the electronics module is an 8-position DIP switch.
This switch bank is used to set the ModBus Slave Address for the
unit. The address can be set from 1 to 255. Use the DIP switches to set the
binary representation of the desired address. 1 is bit zero, and 8 is bit 7. ON
represents a 1, and OFF represents zero. Refer to Appendix B for hex-todecimal equivalents.
Figure 4-10 Switch Bank for Setting ModBus Slave Address
Page 34

34
Figure 4-11 Setting the ModBus Address (Example Address of 240 Decimal)
Setting the ModBus Address for Stand-Alone Sensors
NOTE: This section is only necessary if you are connecting a sensor directly
to a ModBus controller, PLC, or digital system.
For stand-alone sensor heads used in a ModBus network, the address is set
in the same manner. Once the aluminum sensor head is removed with the
sensor board, the sensor electronics module is exposed. On the back of the
sensor electronics module is a small 8-position DIP switch. The address can
be set from 10 to 255 in a similar manner as setting the ModBus address on
the except pin 8 on the sensor’s 8-position DIP switch is the least
significant bit, and pin 1 is the most significant bit.
Page 35

35
Figure 4-12 Location of Address DIP Switch on Sensor Electronics Module
Figure 4-13 Setting the ModBus Address for a Stand-Alone Sensor
Page 36

36
NOTE: If adding a second sensor to an existing module, set the ModBus
address to ↑↑↑↑↓↓↓↓ which represents 11110000 binary (and 240 decimal).
See Chapter 6 | for more information on the ModBus interface. (Note that
DIP switches are pre-set at the factory for all dual-sensor units).
Wiring Conclusion
Once wiring is complete, place the electronics module back in the
housing by pressing the standoff banana jacks into the mating plugs. Be
careful not to pinch any of the wiring. After the module is in place, secure
the windowed top back on the housing and power up the unit.
# # #
Page 37

37
Chapter 5 | Operation
Initial Start-up
Once power is applied (12-28 VDC), the is operational. The LED
display powers up, and the system enters a start-up period. During this
start-up period, the identifies the sensors that are connected and
then enters a three minute warm-up period.
Warm-up Period
During this warm-up period, the 4 20
mA outputs are limited to 3 mA (16
mA for oxygen). After the three
minute warm-up, the unit will enter
the Normal Operating Mode. If
during the warm-up period, the unit
fails a self test, the display will show
a fault code, and the fault relay will
be activated. Fault codes are located
in Chapter 8 |.
Figure 5-1 Sample Fault Code Display
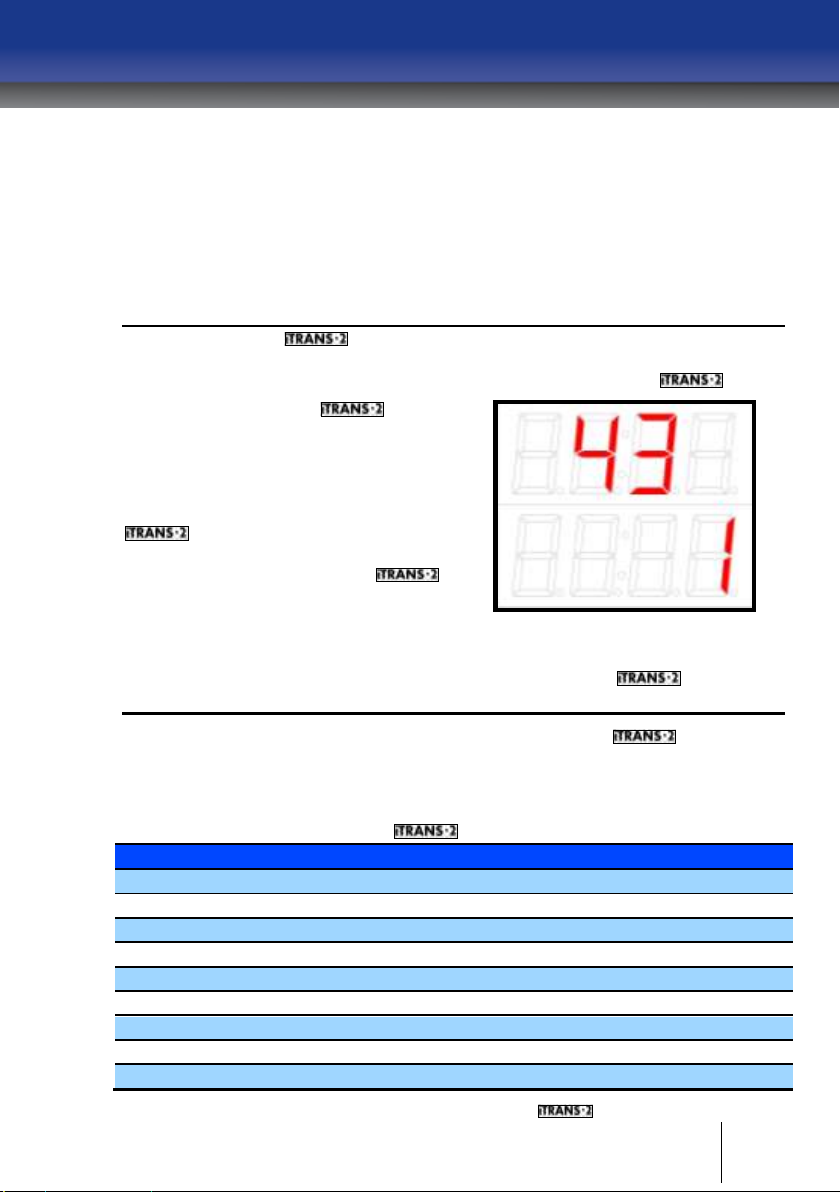
Normal Operating Mode
In Normal Operating Mode, the
gas monitor will display the
instantaneous readings for each
sensor wired into the unit. The top
of the display shows the gas
reading for Sensor 1. Sensor 1
should have the internal dip
switches set to 00 hex or 0F hex.
The bottom row of the
display shows the gas reading for
Sensor 2. Sensor 2 should have the
internal dip switches set to F0 hex.
Figure 5-2 Sample Dual-Sensor Display
Page 38

38
As gas concentrations increase, the
respective channel’s readings will
respond accordingly. If low or high
alarm levels are exceeded, an alarm
indication will appear in the first
digit of the display. An “L” indicates
a low alarm while an “H” indicates a
high alarm. If a 4-20mA fault occurs,
either a “P” indicating an open loop,
or an “U” indicating 4-20 over-range
will be present. From the Normal
Operating Mode, the can
enter into the program mode in one
Figure 5-3 Sample Low and High Alarm
Displays
of two ways.
To enter the Program Mode without opening the enclosure, pass over the
embedded reed switch located under CH1 with the magnetic wand (see
Figure 5-4). This will enter you into the non-intrusive program mode.
In this mode you can check sensor type, zero the unit, calibrate the unit,
change the span gas value, and view sensor span. With the enclosure top
removed, Program Mode can be entered using the “MODE” key. The
available functions are listed in Chapter 8 | Troubleshooting.
Page 39

39
Figure 5-4 Locations of Reed Switches and Push Buttons
Programming Mode Overview
NOTE: Zeroing and calibrating the instrument can be accomplished one of
two ways via programming mode. Zeroing and calibrating (as well as other
programming options) can be entered either from the keypad or nonintrusively using the magnetic wand. Refer to the sections and subsections
within this chapter for detailed information.
When in the Programming Mode, either via the magnetic wand or keypad
operation, the top line of the main display area shows a status bit and three
data bits. The bottom line of the display shows the timers (see Figure 5-5).
The decimals on the far right of each line of the display are channel
indicators. The top decimal indicates channel 1 is being programmed, and
the bottom decimal indicates channel 2.
Page 40

40
Figure 5-5 Components of the Display
Programming Mode – Non-intrusive Operation
Introduction
Non-intrusive calibration and programming is accomplished using a
magnetic wand that comes with the unit. Placing the magnetic wand
over the embedded reed switches located under the CH1 and CH2
designations (see Figure 5-4) of the faceplate will allow you to scroll through
menus and enter the desired function. The functions available through nonintrusive operation are as follows.
Sensor Type
Zero
Calibration
Span Gas Value
Span Reserve (in this order)
NOTE: Please see the Chapter 8 | for a complete list of functions and
function codes.
Page 41

41
Sensor Type
To enter non-intrusive operation
during the Normal Operating Mode,
place the magnetic wand over the
CH1 designation. The will
display the sensor type for channel
1 for 5 seconds then enter in the
Zero Menu.
NOTE: If you want to operate
channel 2, place the magnetic wand
on CH2 first to enter the setup
menu.
Figure 5-6 Sample Display Entering
Non-Intrusive Mode
Once non-intrusive mode is entered, placing the magnetic wand over CH1,
will allow scrolling through all of the functions that are available. Once the
desired function is reached, a 10-second timer will appear on the bottom
row of the LED display. During this 10-second time out, if the magnetic wand
is placed over CH2, that function is entered. Once a function is entered, a
new timer will appear.
Zeroing
Zeroing is the first option in the
setup menu. A “0 ” is displayed in
the status bit of the display to
designate this function. A 10 second
timer is displayed on the bottom line
of the LED display. To initiate
zeroing, place the magnetic wand
over CH2 during the 10-second
countdown. If you do not initiate
zeroing during the 10-second
countdown, the will return
to the Normal Operating Mode. To
Figure 5-7 Sample Zeroing Display
abort zeroing at any time, place the
magnatic wand over CH1.
If you initiate zeroing, the status bit will start to flash. Once zeroing is
complete, the unit will return to the Normal Operating Mode.
Page 42

42
Calibration
Calibration is the next available
option. Calibration is designated
with a “C” in the status bit. A 10
second timer is displayed on the
bottom line of the LED display. To
initiate calibration, place the
magnetic wand over CH2 during the
10-second countdown. If you do not
initiate calibration during the 10second countdown, the will
return to the Normal Operating
Mode. If you initiate calibration, the
Figure 5-8 Sample Calibration Display
status bit will start to flash and the
will enter the zeroing
process.
NOTE: Before the will calibrate, the unit will enter the zeroing
process. Please make sure that you apply Zero Air to the instrument while it
is zeroing.
The will automatically zero
before calibration. Zeroing is
designated with a flashing “0” in the
status bit. Once zeroing is complete,
NOTE: See Appendix D for a
complete list of factory default span
gases.
the will automatically enter
the calibration routine. Calibration is
designated with a flashing “C” in the
status bit.
After zeroing finishes, the is
ready to calibrate. When the flashing
“C” appears on the display, apply
calibration gas. As the
responds to the gas, the current
reading will be displayed on the top
line of the LED display. To abort
Figure 5-9 Sample Zeroing Display
calibration at any time, place the
magnetic wand over CH1.
NOTE: Check and verify span
setting before starting a calibration.
Page 43

43
Figure 5-10 Apply CalGas Display
NOTE: Flow rate for calibration is 0.5 liter per minute (LPM) except for NH3,
ClO2, Cl2, NO2, SO2, and HCl which require 1.0 LPM.
Changing Span Gas Concentration
The option after calibration is Span
Gas Concentration. The span option
is designated with a flashing “S” in
the status bit with the current span
value next to it. To change the span
value, place the magnetic wand over
CH2 during the 10-second
countdown. If you do not place the
magnet over CH1 during the 10second countdown, the will
return to the Normal Operating
Mode. If you initiate the change span
option, the status bit will start to
Figure 5-11 Sample Span Gas
Concentration Display
flash and the span value can
now be changed.
The current span value is displayed
on the top line of the LED display.
To increment the span value, pass
the magnetic wand over CH1. When
the desired value is reached, pass
the magnetic wand over CH2 to
accept and save changes. Passing
over CH1 or letting the timer count
down to zero without saving the new
value, will take you back into the
Programming Mode.
Figure 5-12 Flashing Status Bit
NOTE: Span Gas Concentration for combustibles can be set from 0% to
100%LEL. For the sake of resolution, the Span Gas Concentration should be
set above 20% LEL.
Page 44

44
Sensor Span Reserve
The last option available is viewing
the sensor span reserve.
The span reserve option is
designated with an “r” in the status
bit. The current span reserve is
displayed on the top line of the LED
display.
Figure 5-13 Sample Span Reserve
Display
Programming Mode – Push Button Operation
Introduction
In a safe environment where the
windowed top of the transmitter can
be removed, there are more
programming options available.
These programming options include
all of the functions available in the
non-intrusive mode as well as a few
others. These items are
password protected. To enter the
programming options, press the
“Mode” key. The access code is
“Mode”, “Up”, “Down”, “Up”,
“Enter”. Once the correct password
has been entered, the user will have
to select a channel for programming
but in case of wrong password or
time out (10 second) the display will
revert back to Normal Operating
Mode
Figure 5-14 Sample Enter Password
Display
NOTE: If display shows “iNet” confirm setting is “0” to ensure proper
function of onboard relay.
NOTE: Please see Chapter 8 | for a complete list of functions and function
codes.
Page 45

45
Entering Programming Mode and Selecting a Channel
On entering the correct password,
the channel selection screen will be
displayed on the LED display. Press
the “Mode” button to switch
between the available channels then
press the “ ” button to confirm the
channel selection.
Once a channel is selected, the gas
type for that sensor is displayed on
the top row of the LED display for 57 second. After that the LED display
will show the list of available
Figure 5-15 Sample Channel Selection
Display
functions. Use the arrow keys to
scroll through the list of functions
available.
NOTE: If you have a dual-sensor unit, use the “Mode” button to switch
between the channel.
Page 46

46
Set Low Alarm
The low alarm setpoint is designated
with an “L” displayed in the status
bit and current low alarm value
displayed next to it. To change the
low alarm setpoint, press the “ ”
button during the 10-second
countdown. If you do not press “ ”
during the 10-second countdown,
the will return to the Normal
Operating Mode. If you initiate the
low alarm option, the status bit will
start to flash and the low
alarm setpoint can be changed by
Figure 5-16 Sample Low Alarm Setpoint
Display
using the “↑” and “↓” keys.
When the desired value is reached, press the “ ” key to accept and save the
new value. If the value is not saved before the time-out, the will go
back to the Programming Mode.
Set High Alarm
The high alarm setpoint is
designated with an “H” displayed in
the status bit and the current high
alarm value displayed next to it. To
change the high alarm setpoint,
press the “ ” button during the 10second countdown. If you do not
press “ ” during the 10-second
countdown, the will return to
the Normal Operating Mode. If you
initiate the high alarm option, the
status bit will start to flash and the
high alarm setpoint can be
Figure 5-17 Sample High Alarm Setpoint
Display
changed by using the “↑” and “↓”
keys.
When the desired value is reached, press the “ ” key to accept and save the
new value. If the value is not saved before the time-out, the will go
back to the Programming Mode.
Page 47

47
4-20 mA Analog Output Range
The range of 4-20 mA analog output is set to full range as factory default.
For full range values, see Appendix D. If the user desires to change the
output scaling of the 4-20 mA analog signal, they can do so.
NOTE: Only the upper end range can be changed. The low end is always set
for 4 mA.
The 4-20 mA setpoint is designated with a “4” displayed in status bit and the
current high end range next to it. To change the range, press the “ ” button
during the 10 second countdown.
If you do not press “ ” during the
10-second countdown, the
will return to the Normal Operating
Mode. If you initiate the 4-20 mA
range option, the status bit will start
to flash and the range
setpoint can be changed by using
the “↑” and “↓” keys.
When the desired value is reached,
press the “ ” key. If the value is not
saved before the time-out, the
will go back to the
Programming Mode.
Figure 5-18 Changing the Analog Output
Upper Value
Set System Time – Minute
The system’s clock minute setting is
designated with a “1” in the status
bit and current value next to it. To
change the minutes, press the “ ”
button during the 10 second
countdown. If you do not press “ ”
during the 10-second countdown,
the will return to the Normal
Operating Mode. If you initiate the
minutes option, the status bit will
start to flash and the minute
can be changed by using the “↑”
Figure 5-19 Setting System Time
(Minutes)
and “↓” keys.
When the desired value is reached, press the “ ” key. If the value is not
saved before the time-out, the will go back to the Programming
Mode.
Page 48

48
Set System Time – Hour
The system’s clock hour setting is
designated with an “h” in the status
bit and current value next to it. To
change the hour, press the “ ”
button during the 10 second
countdown. If you do not press “ ”
during the 10-second countdown,
the will return to the Normal
Operating Mode. If you initiate the
hours option, the status bit will start
to flash and the hour can be
changed by using the “↑” and “↓”
keys. When the desired value is
reached, press the “ ” key. If the
value is not saved before the time-
Set System Time – Date
The system’s day of the month
setting is designated with a “d” in
the status bit and current value next
to it. To change the day, press the
“ ” button during the 10-second
countdown. If you do not press “ ”
during the 10-second countdown,
the will return to the Normal
Operating Mode. If you initiate the
days option, the status bit will start
to flash and the day can be
changed by using the “↑” and “↓”
keys. When the desired value is
reached, press the “ ” key. If the
value is not saved before the time-
out, the will go back to the
Programming Mode.
Figure 5-20 Setting System Time (Hour)
out, the will go back to the
Programming Mode.
Figure 5-21 Setting System Date
Set System Time – Month
The system’s month setting is designated with an “E” in the status bit and
current value next to it. To change the month, press the “ ” button during
the 10-second countdown. If you do not press “ ” during the 10-second
countdown, the will return to the Normal Operating Mode.
Page 49

49
If you initiate the month option, the status
bit will start to flash and the month
value can be changed by using the “↑” and
“↓” keys. When the desired value is
reached, press the “ ” key. If the value is
not saved before the time-out, the
will go back to the Programming
Mode.
Zeroing
Zeroing is an option available both
through the keypad and non-
intrusively. A “0 ” is displayed in the
status bit of the display to designate
this function. A 10 second timer is
displayed on the bottom line of the
LED display. To initiate zeroing,
press the “ ” key during the 10second countdown. If you do not
initiate zeroing during the 10-second
countdown, the will return to
the Normal Operating Mode. If you
initiate zeroing, the status bit will
start to flash. Once zeroing is
complete, the unit will return to the
Figure 5-22 Setting System Month
Normal Operating Mode. To abort
zeroing at any time, press the
“Mode” key.
Figure 5-23 Sample Zeroing Display
Calibration
The calibration option is also
available through the keypad.
process.
Calibration is designated with a “C”
in the status bit. A 10 second timer
is displayed on the bottom line of
the LED display. To initiate
calibration, press the “ ”key during
the 10-second countdown. If you do
not initiate calibration during the 10second countdown, the will
return to the Normal Operating
Mode. If you initiate calibration, the
status bit will start to flash and the
will enter the zeroing
Figure 5-24 Sample Calibration Display
Page 50

50
NOTE: Before the will calibrate, the unit will enter the zeroing
process. Please make sure that you do not apply gas to the instrument while
it is zeroing.
The will automatically zero before calibration. Zeroing is designated
with a flashing “0” in the status bit. Once zeroing is complete, the
will automatically enter the calibration routine. Calibration is designated
with a flashing “C” in the status bit.
After zeroing finishes, the is ready to calibrate. When the flashing
“C” appears on the display, apply calibration gas. As the responds
to the gas, the current reading will be displayed on the top line of the LED
display. To abort calibration at any time, press the “Mode” key.
NOTE: Check and verify span setting before starting a calibration.
NOTE: Please refer to Appendix D for a complete list of factory default span
gases.
NOTE: Flow rate for calibration is 0.5 liter per minute (LPM) except for NH3,
ClO2, Cl2, NO2, SO2, and HCl which require 1.0 LPM.
Changing Span Gas Concentration
The span option is designated with a flashing “S” in the status bit with the
current span value next to it. To change the span value, press the
“ ” key during the 10-second countdown. If you do not press the “ ” during
the 10-second countdown, the will return to the Normal Operating
Mode.
Page 51

51
If you initiate the change span
option, the status bit will start to
flash and the span value can
now be changed. The current span
value is displayed on the top line of
the LED display. Use the “↑” and “↓”
keys to change the span value.
When the desired value is reached,
press the “ ” key to save changes.
Pressing the “Mode” key or letting
the timer count down to zero without
saving the new value, will take you
back into the Programming Mode.
NOTE: If the “ ” key is not pressed,
the new span value will not be
saved.
NOTE: Span Gas Concentration for
combustibles can be set from 0% to
100%LEL. For the sake of resolution,
we suggest that Span Gas
Concentration should be set above
20% LEL.
Figure 5-25 Sample Span Gas
Concentration Display
Figure 5-26 Flashing Status Bit
Sensor Span Reserve
The span reserve option is
designated with an “r” in the status
bit. The current span reserve is
displayed on the top line of the LED
display.
NOTE: There are a few other options
that appear that do not have any
function associated with them.
These are reserved for future
functionality.
Figure 5-27 Sample Span Reserve
Display
# # #
Page 52

52
Page 53
53
Chapter 6 | Modbus Interface
Characteristic
Description
Hardware
2-wire mode (not 4-wire)
Baud Rate
9600
Electrical Standard
TIA/EIA-485
Transmission Mode
RTU mode (not ASCII)
Message Coding System
8-bit
Start Bits
1
Data Bits
8 (LSB sent first)
Parity Bits
0
Stop Bits
1
Introduction
IMPORTANT: The device with public Modbus interface can also be
configured to operate with a MX43 controller from Oldham. Please follow the
procedure given below to enable MX43-compatibility mode on .
Set the Modbus ID of using
dip-switches as shown in Figure
4-10 according to MX43
configuration (for details please see
the user manual of MX43 controller).
The MX43-compatibility menu on
is password protected. To
enter MX43-compatibility menu,
remove the front cover of
and press “Enter” key. The access
code is “Enter”, “Up”, “Down”,
Figure 6-1 MX43-compatibilty Menu
“Up”, “Mode”.
Once the correct access code has been entered then the user can select to
enable (1) or disable (0) the MX43-compatibility mode on using “Up”
or “Down” key then the selection is confirmed by pressing the “Enter” key.
When programming the ModBus ID address on the electronics
module or on the smart sensor board, use the binary reference chart on the
following page. A “1” represents “ON” on the switch bank, and position 1 of
the switch bank represents the right most binary digit (LSB).
ModBus characteristics for the are listed below.
Table 6-1 ModBus Characteristics for the Gas Monitor
Page 54

54
IMPORTANT: When commissioning master and slave units on a ModBus
Addr
Inst
R/W
Host
R/W
Range
Description
40101
R/W
R/W
MSB = $01 to
$FF
LSB = $01 to
$F7
Sensor Type
Holds the sensor instrument type code
and ModBus address. The most
significant byte (MSB) holds a value
indicating the type of instrument (see
below). The least significant byte (LSB)
holds a value which is the ModBus
address of the sensor.
MSB = Instrument type code $01 to $FF
$03 = IR (infrared)
$04 = TOX (toxic)
$05 = OXY (oxygen)
$06 = AAW (toxic)
$07 = CAT (catalytic)
LSB = MODBUS sensor address $01 to
$F7 (1 to 247)
40102
W R $0000 to $FFFF
Gas Reading
Holds the gas reading in ppm or percent
depending upon the sensor in the
instrument. The range is from $0000 to
$FFFF and represents a signed decimal
value range from -32768 to +32767.
network, it is critical to ensure that every device on the ModBus network
must have a unique address. Otherwise, abnormal behavior of the entire
serial bus can occur.
Sample Gas Reading via ModBus Network
To get a gas reading for Channel 1, you must read register 40102. This
register holds the gas reading in ppm.
Example: Gas reading of 5 ppm = register value of $0005.
Example: Gas reading of 20.9% = register value of $0209.
For Channel 2 you can access the gas reading by looking at register 40202.
For a full list of ModBus commands and registers that are accessible on the
, refer to the next section.
ModBus Register List
ModBus register addresses are provided in Table 6-1.
Page 55

55
Addr
Inst
R/W
Host
R/W
Range
Description
Examples:
+5 ppm = register value of 0000510 = $0005
-5 ppm = register value of 6553110 = $FFFB
40103
R*
R*
MSB = $01 to
$FF
LSB = $01 to
$FF
Gas Type
Holds the decimal place holder and the
gas type code. The most significant byte
(MSB) holds the number of decimal places
to be used in calculations for this gas.
This decimal locator applies to all
subsequent values of gas readings within
other registers. This can be read by the
instrument. The least significant byte
(LSB) holds a code which identifies the
gas type. This can be read by the host.
MSB = Decimal place holder $01 to $FF
LSB = Gas type code $01 to $FF
$01 CO Carbon Monoxide
$02 H2S Hydrogen Sulfide
$03 SO2 Sulfur Dioxide
$04 NO2 Nitrogen Dioxide
$05 Cl2 Chlorine
$06 ClO2 Chlorine Dioxide
$07 HCN Hydrogen Cyanide
$08 PH3 Phosphine
$09 H2 Hydrogen
$0B CO
2
Carbon Dioxide
$0C NO Nitric Oxide
$0D NH3 Ammonia
$0E HCl Hydrogen Chloride
$14 O2 Oxygen
$15 CH4 Methane
$16 LEL Lower Explosive Limit
(Combustible Gases)
$17 C6H14 Hexane
$1A C5H12 Pentane
$1B C3H8 Propane
$4D C2H6O Ethanol
$50 C2H4 Ethylene
$6F C3H6 Propylene
$C9 C4H10 Butane
Examples:
Page 56

56
Addr
Inst
R/W
Host
R/W
Range
Description
$0107 = 1 decimal place for gas type HCN
$0002 = 0 decimal places for gas type H2S
$0206 = 2 decimal places for ClO2
40105
W
R/W
$0000 to $FFFF
Instrument Mode
Holds code for current mode of
instrument. Possible working modes of
instrument are listed below.
$0001 Normal
$0002 Calibration
$0003 Warm-up
$0006 Zeroing
$0008 Fault
$0009 Reset
Examples:
Sensor in zero fault = $0008
Sensor zeroing = $0006
40106
W R $0000 to $FFFF
Status Bits
Holds 16 bits of status for various
parameters in the instrument. A bit value
of “1” indicates that the associated fault
condition is present.
Bit 15 = current loop open
Bit 14 = current loop shorted
Bit 13 = power fault
Bit 12 = 5 volt fault
Bit 11 = missing sensor
Bit 10 =
(not defined)
Bit 6 = configuration fault
Bit 5 = zero fault
Bit 4 = calibration fault
Bit 3 = over-range
Bit 2 = failed sensor
Bit 1 = high alarm
Bit 0 = low alarm
Examples:
Missing sensor = Bit 11 is set =
$0800
Power fault and
failed sensor = Bits 13 and 2 set =
$2004
Page 57

57
Addr
Inst
R/W
Host
R/W
Range
Description
40115
W R
Last Alarm Date (mmdd)
Holds the month and day when the
instrument had the last alarm.
High byte = $01 to $0C
Low byte = $01 to $1F
Examples:
Dec 25 is represented as $0C19
June 31 is represented as $061F
40116
W R
Last Alarm Date (00yy)
Holds the last two digits of the year when
the instrument was last in alarm. The first
two digits are assumed to be “20”.
High byte = $00, Low byte = $02 to
$63
Examples:
2002 is represented by $02
2099 is represented by $63
40117
R
R/W
MSB=$01 to
$0C,
LSB=$01 to $1F
RTC Month and Day
Holds the month and day to which the real
time clock (RTC) calendar should be set.
The most significant byte (MSB)
represents the month from $01 to $0C (1-
12). The least significant byte (LSB)
represents the day of the month from $01
to $1F (1-31).
Examples:
December 25 = $0C19
June 30 = $061E
40118
R
R/W
$0002 to $0063
RTC Year (00yy)
Holds the year to which the real time clock
(RTC) should be set. The most significant
byte (MSB) is always $00. The least
significant byte (LSB) represents the twodigit year (within the 21st century), from
$02 (which represents 2002) to $063
(which represents 2099).
Examples:
2002 = 02 (+ base year of 2000) =
$0002
2010 = 10 (+ base year of 2000) =
$000A
2099 = 99 (+ base year of 2000) =
Page 58

58
Addr
Inst
R/W
Host
R/W
Range
Description
$0063
40119
R
R/W
MSB=$00 to
$18, LSB=$00 to
$3C
RTC Hours and Minutes
Holds the hours and minutes to which the
RTC should be set. The most significant
byte (MSB) represents the hour from $00
to $18 (00-24). The least significant byte
(LSB) represents the minutes from $00 to
$3C (00 to 60). Note that the seconds
default to zero ($00) each time the hours
and minutes are set.
Examples:
13:05 = $0D05
24:00 = $1800
40124
R
R/W
$0000 to $FFFF
Low Alarm Display Setting
Holds the value of the gas reading at
which the low alarm display will activate.
40125
R
R/W
$0000 to $FFFF
High Alarm Display Setting
Holds the value of the gas reading at
which the high alarm display will activate.
40126
R
R/W
$0000 to $03E8
Cal Gas Value
Holds the value of the calibration gas to
be used on the instrument. The range is
from $0000 to $03E8 (0 to 100010).
40127
R/W R $0000 to $FFFF
Loop High Scaling
Holds a value which indicates the gas
reading represented by a 20 mA loop
output signal. The range is from $0000 to
$FFFF.
440102
R R $0000 to $FFFF
WX Scaled Reading
Use with WX series controller.
Table 6-2 ModBus Registers
NOTE: To get the ModBus reading, register 40103 must be read as well as
register 40102. Register 40103 specifies where the decimal should be
placed.
Page 59

59
ModBus Resources
ModBus is a public protocol that can be freely adopted by any developer or
manufacturer desiring to implement it. While a detailed discussion of
ModBus protocol is beyond the scope of this manual, there are a number of
up-to-date resources available on the internet for those wishing to
investigate ModBus further. The most complete resource is
www.modbus.org.
Termination
When putting devices on the ModBus network, a terminating resistor may be
required for the last device on the network (please see www.modbus.org for
more details). The has a blue jumper on the “public” jumper
that can be used to jumper in a 120-Ohm terminating resistor. By default,
this jumper is not in place. Industrial Scientific - Oldham does not
recommend changing the placement of any of the other jumpers on this
board.
Figure 6-2 Location of Jumpers
# # #
Page 60

60
Page 61

61
Chapter 7 | Maintenance
Introduction
Sensors have a variable life dependent on the sensor and the environment
in which they operate. Oxygen sensor life is about 2 years and toxic gas
sensor life is normally 2 years or greater. The catalytic combustible gas
sensors normally operate in excess of 3 years, while the infrared sensors
have a MTBF greater than 5 years.
Sensors have baseline drift and their characteristics change with time. Thus,
the must be calibrated on a regular basis. Gas detection instruments
are potential life-saving devices. In recognition of this fact, calibration for
the toxic and catalytic LEL sensors should be at least at quarterly intervals,
while the Infrared sensor should be calibrated on an annual basis with
functional tests every 6 months.
Further, Industrial Scientific - Oldham recommends prudent testing and/or
calibration after a gas alarm. All calibration/service to the sensors should be
recorded and accessible.
NOTE: Other than regular calibrations, the require no other routine
maintenance.
NOTE: Take special care with handling and storing sensors. They are
delicate and can be damaged by storage in environments outside the
specified temperature, pressure, and humidity limits.
NOTE: Sensors are susceptible to damage from high pressure or low
pressure, especially if the change is sudden. Also, sensors should not be
operated at pressures that are 10% above or below atmospheric pressure.
NOTE: If sensors and the surrounding environment must be washed down
at any time, cover the opening of the sensor housing to protect it from water
or excess moisture. Remove cover when wash down is complete. An
optional splashguard is available for continuous protection.
Page 62

62
Sensor Replacement
Sensor replacement must be done by qualified personnel. To replace the
sensor, shut down power to the unit. Un-thread the sensor-housing cap
from the sensor housing. There is a set screw that secures the cap to the
housing. Once the cap is removed, remove the old sensor and sensor board.
When installing the new sensor/sensor board make sure you line up the
notch in the board with the alignment pin. After the new sensor is in place,
screw the sensor cap back on to the housing and secure the set screw.
Once the new sensor is in place and has time to settle out, it should be
zeroed and calibrated for accuracy.
Zero and Calibration
Zeroing and calibrating the instrument can be accomplished one of two
ways. These routines can be entered either from the keypad or nonintrusively using the magnetic wand. See Chapter 5 | Operation for step-bystep procedures for zeroing and calibrating the using the magnetic
wand. Chapter 5 | also contains information on keypad zeroing and
calibration.
# # #
Page 63

63
Chapter 8 | Troubleshooting
Symptom
Problem
Solution
LED display does not
light up.
Input voltage is too
low
Electronics module
has failed
Check for presence of input
voltage.
Output outside
4-20 mA range
Unit in calibration
mode
Electronics module
has failed
Exit calibration mode.
Replace electronics module.
Output does not
change when gas
concentration
changes
Electronics module
has failed
Replace electronics module.
Cannot calibrate
SPAN
Sensor has failed
Electronics module
has failed
Replace sensor and calibrate.
Replace electronics module and
calibrate.
Reading drifts by 10
counts over a short
time period (in a
stable temperature
environment)
Sensor has failed
Electronics module
has failed
Replace sensor and calibrate.
Replace electronics module and
calibrate.
In calibration, LED
displays wrong value.
Sensor has failed
Electronics module
has failed
Replace sensor and calibrate.
Replace electronics module and
calibrate.
Reed Switch does not
work
Electronics module
has failed
Reed Switch is
damaged
Replace electronics module and
calibrate.
Replace the reed switch.
“P” appears on the
display
Open loop on a 4-20
mA channel
Place a 100-Ohm load resistor
from the mA output pin to
Introduction
This chapter provides troubleshooting information for the gas
monitor.
Diagnosing Common Problems
Page 64

64
Symptom
Problem
Solution
ground.
“U Or” appears on the
display
4-20 mA signal goes
into over range for
about 5 seconds
before settling at
1mA
Ensure the sensor is working
properly via a second ary gas
detection source and the 4-20
mA is scaled correctly.
Fault Codes
Fault
Display
Status Bit
4-20 mA Output
Description
0.FFF
Flashing
1 mA
Zeroing error – Recover after
calibrating
C.FFF
Flashing
1 mA
Calibration error – Recover after
calibrating or replacing the sensor
1.FFF
Flashing
1 mA
SMART sensor error
2.FFF
Flashing
1 mA
Sensor error
U-Or
Flashing
1mA
Sensor under-range
U Or
Flashing
22mA for ~5 seconds
then settled at 1mA
Sensor over-range
Function
Code
LED Display
Description
Status
Bit
Data Area
L
L.
Low Alarm
Set the relay low alarm value
H
H.
High Alarm
Set the relay high alarm value
4
4.
Range of 4-20 mA
Set the range of 4-20 mA
output
1
1.
Minute
Set system time – minute
H
h.
Hour
Set system time – hour
D
d.
Date
Set system time – date
E
E.
Month
Set system time – month
8
8.
Year
Set system time – year
0
0. Zeroing
C
C. Calibration
Table 8-1 Common Problems
Function Codes
Table 8-2 Fault Codes
Page 65

65
Function
LED Display
Description
S
S.
Span Gas
Concentration
Set span gas concentration
R
r.
Sensor Span Reserve
Check the span reserve
2
2.
Date
The latest alarm time-date
3
3.
Month
The latest alarm time-month
6
6.
Date
The latest calibration time-date
7
7.
Month
The latest calibration timemonth
9
9.
Year
The latest calibration time-year
Table 8-3 Function Codes
# # #
Page 66

66
Page 67

67
Chapter 9 | Warranty
Warranty
Industrial Scientific - Oldham fixed system products are warranted to be free
from defects in material and workmanship for a period of twenty-four (24)
months from the date of shipment.
The above warranty does not include consumables such as pumps, or
filters, all of which are warranted to be free from defects in material and
workmanship for one year from the date of shipment, except where
otherwise stated in writing in Industrial Scientific - Oldham literature
accompanying the product.
In addition, Industrial Scientific - Oldham warrants sensors to be free from
defects in material and workmanship for the indicated periods below from
the date of shipment, except where otherwise stated in writing in Industrial
Scientific - Oldham literature accompanying the product.
Infrared sensors: three (3) years
Catalytic, CO and H2S sensors: two (2) years
O2 sensors: eighteen (18) months
Other sensors: twelve (12) months
Limitation of Liability
Industrial Scientific - Oldham makes no other warranties, either expressed
or implied, including, but not limited to the warranties of merchantability or
fitness for particular purpose.
Should the product fail to conform to the above warranty, buyer’s only
remedy and Industrial Scientific - Oldham’s only obligation shall be, at
Industrial Scientific - Oldham’s sole option, replacement or repair of such
non-conforming goods or refund of the original purchase price of the nonconforming goods. In no event will Industrial Scientific - Oldham be liable
for any other special, incidental or consequential damages, including loss of
profit or loss of use, arising out of the sale, manufacture or use of any
products sold hereunder whether such claim is pleaded in contract or in
tort, including strict liability in tort.
It shall be an express condition to Industrial Scientific - Oldham’s warranty
that all products be carefully inspected for damage by buyer upon receipt,
be properly calibrated for buyer’s particular use, and be used, repaired, and
maintained in strict accordance with the instructions set forth in Industrial
Page 68

68
Scientific - Oldham’s product literature. Repair or maintenance by nonqualified personnel will invalidate the warranty, as will the use of nonapproved consumables or spare parts. As with any other sophisticated
product, it is essential and a condition of Industrial Scientific - Oldham’s
warranty that all personnel using the products be fully acquainted with their
use, capabilities and limitations as set forth in the applicable product
literature. Buyer acknowledges that it alone has determined the intended
purpose and suitability of the goods purchased. It is expressly agreed by
the parties that any technical or other advice given by Industrial Scientific Oldham with respect to the use of the goods or services is given without
charge and at buyer’s risk; therefore, Industrial Scientific - Oldham assumes
no obligation or liability for the advice given or results obtained.
SPECIFICATIONS SUBJECT TO CHANGE
# # #
Page 69

69
Appendix A | HART Interface
Introduction
IMPORTANT: This portion of the instruction manual is only applicable if
your unit has been shipped HART Enabled.
The fixed-point gas monitor is designed to provide continuous
monitoring of hazardous gases in the workplace. The is capable of
displaying one or two gas concentrations as well as sensor or instrument
specific diagnostics.
The HART supported comes
with a channel-1 4-20mA output
equipped with standard FSK HART
interface capability. The channel-1
HART output can be used to access
the process variables on digital
control systems or a HART
handheld device can be used to
access process variables of
from anywhere in the 4-20mA loop
as long as the handheld device is on
the modem side of the 250 ohm
Figure A - 1 HART Board
load. parameterization can
also be accomplished through HART
interface.
channel-2 has a standard 4-20mA output. is available with
an optional relay board, allowing the device to directly control external
devices such as fans, pumps, alarm horns, or warning lights. Also there are
three onboard relays available; two of the relays can be programmed for
alarm activation, while the third relay is a fault protection relay.
The is powered with a 24 VDC (12-28 VDC) power supply and
provides a 4-20mA control signal for each sensor.
For more details on specifications, supported sensor types, agency
approvals and EU, please see Chapter 1 |.
IMPORTANT: In Chapter 1 |, under “Specifications” section the “Signal
Outputs” specification is replaced with Table A - 1.
Page 70

70
Items
Description
Signal
Outputs
Digital
4-20mA FSK HART (HCF Compliant )
Analog
4-20mA (linear analog)
Table A - 1 HART Supported Signals
Hardware Overview
For details please see Chapter 2 |.
IMPORTANT: In Chapter 2 |, the “Electronic Modules” section is replaced
with the following section.
Electronics Modules
The electronics module of the gas monitor contains connectors and
jumpers for wiring and configuring the device. The electronics module for a
main unit is shown in the figure. The electronics module for a
remote sensors unit is shown in the figure. The wiring details of
main unit electronics module are explained in “System Wiring” section of
this appendix and for the wiring details of remote sensors unit
electronic module please see Chapter 4 |.
Figure A - 2 Electronics Module for HART Supported (Main Unit)
Page 71

71
Figure A - 3 Electronics Board for Remote Sensor Unit
Installation
For details please see Chapter 3 |.
System Wiring
For details please see Chapter 4 |.
IMPORTANT: In Chapter 4 |, the “Power and Output Wiring (J1)” section is
replaced with the following section.
Power and Output Wiring (J1)
In most applications the power is supplied from the controller that is
receiving the 4-20mA output. In these applications only three wires are
required in case of single sensor unit and only four wires are required in
case of dual sensor unit since common is shared.
If the 4-20mA output is going to another device other than the one that is
powering it, or the transmitter has its own local power supply, another
connection from GND must be extracted for the 4-20mA loop to function.
Page 72

72
Figure A - 4 Wiring Diagram of Single Sensor HART Supported
Page 73

73
Figure A - 5 Wiring Diagram of Dual Sensor HART Supported
Page 74

74
Connect the power and signal wires to the appropriate wiring
terminals as follows.
24 V: Connect 24 VDC (12-28 VDC) supply power
CH-1: Channel 1, HART 4-20 mA output signal
CH-2: Channel 2, 4-20 mA output signal
GND: DC return
Figure A - 6 Power and Signal Connector J1 on HART Supported
HART 4-20mA Wiring (CH-1)
CH-1 and GND on J1 connector are used as HART 4-20mA interface
terminals. The HART 4-20mA output must be loaded with at least 250 ohms
of impendence to properly establish the HART communication. Some
devices receiving the 4-20mA output already have a large enough
terminating resistor installed from the factory, but others may need
additional resistance to be added. This is accomplished by adding a resistor
in series with the output from HART board, preferably at the controller end
of the 4-20mA current loop. Adding the additional resistor at the controller
allows the HART handheld device to be connected anywhere in the loop,
because it must have the full 250 ohm load after its connection point to
function properly. If the additional resistor is added at the transmitter, in CH1, the HART handheld device will only be able to access variables locally, at
the transmitter.
The Figure A - 7 shows a 150 ohm resistor added to the output loop since
the controller has a 100 ohm terminating resistor installed from the factory.
Page 75

75
Figure A - 7 Example of HART Supported Wiring
NOTE: Use supplied green conductor for enclosure ground.
NOTE: The is a 3- or 4-wire 4-20mA device. For dual sensor
configuration you must have a second 4-20mA signal wire pulled to the unit.
NOTE: When not using isolated 4-20mA or HART 4-20mA outputs, use the
supplied resistors to connect CH-1 and CH-2 to GND. If these resistors are
not connected and the 4-20mA outputs are not used, a “P” will appear on
the display, indicating an open loop condition.
IMPORTANT: In Chapter 4 |, the “Digital ModBus RTU Interface Wiring”
section is not applicable for HART supported as ModBus interface is
not available on HART supported unit.
Page 76

76
Operation
For details please see Chapter 5 |.
IMPORTANT: All the details given in Chapter 5 | regarding the operation of
the are valid for a HART supported unit. This section only provides
the details on operation of HART interface.
Initial Start-up
The HART 4-20mA interface is
disabled during the initial start-up
after the is powered up.
During the initial start-up, the
connected sensors are detected and
initialized. The initial start-up mode
lasts for approximately 45 seconds.
Figure A - 8 Main Unit Start-up Display
Warm-up Mode
After the initial start-up, the
enters the warm-up mode which
lasts for three minutes. During the
warm-up mode, all gas reading
related alarms are disabled, the
current on the HART 4-20mA
channel remains fixed at 3mA (16mA
for oxygen sensor) and the HART
interface is enabled for
communication.
Normal Mode
After the warm-up mode, the
enters the normal gas reading mode,
During the normal mode, all gas
reading related alarms are enabled
and the current on the HART 4-20mA
channel linearly follows the sensor 1
gas reading between zero reading to
measurement range with 4mA and
20mA being the corresponding
current values. In case of an under
range or an over range reading the
channel current value is fixed at
Figure A - 9 Warm-up Display
1mA. HART interface is enabled
throughout the normal mode.
Figure A - 10 Normal Mode Display
Page 77

77
Calibration and Zeroing Modes
The enters the calibration or
zeroing mode when the user selects
the corresponding operation on
sensor 1 through intrusive/nonintrusive programming screen or
through HART 4-20mA interface.
During both of zeroing and
calibration modes the HART channel
current remains fixed at 3mA (16mA
for oxygen sensor). A successful
zeroing or calibration operation is
followed by a warm-up mode and an
unsuccessful operation is followed
Figure A - 11 Calibration Display
by a corresponding fault mode.
HART interface is enabled throughout the zeroing and calibration modes.
Fault Mode
The enters the fault mode
whenever it is not able to provide
the gas reading to the user interface.
There are different types of sensor
faults which have been listed in the
Table A - 2. The fault detection is
enabled throughout the
operation after the device is
powered on, and the fault codes are
indicated on the display
after the initial start-up mode.
During the fault mode on sensor 1
the HART 4-20mA channel current
remains fixed at 1mA and HART
interface is enabled throughout fault
Figure A - 12 Fault Mode Display
mode.
Page 78

78
Fault
Code
Fault Type
4-20mA
Output
Description
1FFF
Failed Sensor
1 mA
Smart sensor communication error
2FFF
Missing Sensor
1 mA
Sensor board communication error
ConF
Sensor
Configuration
1mA
Sensor internal parameters error –
Recover after factory configuration of
sensor
CFFF
Calibration
Failed
1 mA
Calibration error – Recover after
calibrating or replacing the sensor
0FFF
Zeroing Failed
1 mA
Zeroing error – Recover after zeroing or
calibrating
Table A - 2 Fault Code Description
Open Loop Condition
When any of the 4-20mA channels is
not being used it should be
terminated by inserting the
specifically provided (250 ohms for
HART CH-1 and 100 ohms for
isolated CH-2) resistor between the
respective channel output terminal
and ground terminal.In case an
unused channel is not terminated
with the provided resistor, a ‘P’ will
appear at the status bit indicating
the open loop condition. Also in
case the channel output is being
used but one of the connecting
wires is damaged or disconnected,
same condition will be displayed to
let the user know about the
disconnection in the wiring. HART
communication cannot be
established with a physical
disconnection under this condition.
Figure A - 13 Sensor 1 Open Loop
Condition Display
Page 79

79
HART Interface
Electronic Device Descriptor (EDD)
An Electronic Device Descriptor (EDD) is available for which is
easiest and the quickest way to access all the process variables of
.The EDD can be either loaded on a PC host simulator or on a
handheld unit. Figure A - 14 shows the EDD loaded using a PC host
simulator. Figure A - 16 shows the connection diagram of to a PC.
Figure A - 14 EDD Menus List View
Page 80

80
Figure A - 15 EDD GUI View
Figure A - 16 PC to HART Interface Wiring Diagram
Page 81

81
User Commands
Command 128 – Read Firmware Revision – Response Length: 8 Bytes
Byte Number
Parsing
Parameter
0-1
Unsigned-16
iTrans HART Board Firmware Version
2-3
Unsigned-16
iTrans Main Unit Firmware Version
4-5
Unsigned-16
Sensor 1 Firmware Version
6-7
Unsigned-16
Sensor 2 Firmware Version
Command 129 – Read Live Channels Gas Data – Response Length: 24 Bytes
Byte Number
Parsing
Parameter
0-3
Float IEEE 754
Gas Reading Channel 1
4-7
Float IEEE 754
Temperature Reading Channel 1
8-9
Unsigned-16
Channel 1 Mode
10-11
Unsigned-16
Channel 1 Status
12-15
Float IEEE 754
Gas Reading Channel 2
16-19
Float IEEE 754
Temperature Reading Channel 2
20-21
Unsigned-16
Channel 2 Mode
22-23
Unsigned-16
Channel 2 Status
Command 130 – Read Real Time Clock – Response Length: 18 Bytes
Byte Number
Parsing
Parameter
0
Unsigned-8
RTC Minute Channel 1
1
Unsigned-8
RTC Hour Channel 1
2
Unsigned-8
RTC Day Channel 1
supports all the standard universal HART commands. This section
only provides the details of the device-specific commands.
Read Commands
All read commands are dispatched without any request data and the
response data is then translated to get the requested process variables. In
case of a single sensor the parameters of disconnected sensor are
uninitialized and a warning is indicated in the response code of the
command. The translation/parsing details along with response length of the
commands are given in the Table A - 3.
Page 82

82
3
Unsigned-8
RTC Month Channel 1
4
Unsigned-8
RTC Year Channel 1
5-8
Unsigned-32
Total Operation Time (In Minutes) Channel 1
9
Unsigned-8
RTC Minute Channel 2
10
Unsigned-8
RTC Hour Channel 2
11
Unsigned-8
RTC Day Channel 2
12
Unsigned-8
RTC Month Channel 2
13
Unsigned-8
RTC Year Channel 2
14-17
Unsigned-32
Total Operation Time (In Minutes) Channel 2
Command 131 – Read User Configuration – Response Length: 36 Bytes
Byte Number
Parsing
Parameter
0-3
Float IEEE 754
Low Alarm Threshold Channel 1
4-7
Float IEEE 754
High Alarm Threshold Channel 1
8-11
Float IEEE 754
Analog Output Range Channel 1
12-15
Float IEEE 754
Cal Gas Value Channel 1
16-17
Unsigned-16
Calibration Interval In Days Channel 1
18-21
Float IEEE 754
Low Alarm Threshold Channel 2
22-25
Float IEEE 754
High Alarm Threshold Channel 2
26-29
Float IEEE 754
Analog Output Range Channel 2
30-33
Float IEEE 754
Cal Gas Value Channel 2
34-35
Unsigned-16
Calibration Interval In Days Channel 2
Command 132 – Read Live Channels Information – Response Length: 26 Bytes
Byte Number
Parsing
Parameter
0-3
Float IEEE 754
User Peak Channel 1
4-5
Unsigned-16
Previous OR Channel 1
6
Unsigned-8
Last Alarm Day Channel 1
7
Unsigned-8
Last Alarm Month Channel 1
8
Unsigned-8
Last Alarm Year Channel 1
9-10
Unsigned-16
Max Temperature Channel 1
11-12
Unsigned-16
Min Temperature Channel 1
Page 83

83
13-16
Float IEEE 754
User Peak Channel 2
17-18
Unsigned-16
Previous OR Channel 2
19
Unsigned-8
Last Alarm Day Channel 2
20
Unsigned-8
Last Alarm Month Channel 2
21
Unsigned-8
Last Alarm Year Channel 2
22-23
Unsigned-16
Max Temperature Channel 2
24-25
Unsigned-16
Min Temperature Channel 2
Command 133 – Read Live Channels Identifier – Response Length: 66 Bytes
Byte Number
Parsing
Parameter
0
Unsigned-8
Sensor Type Code Channel 1
1
Unsigned-8
Gas Type Code Channel 1
2
Unsigned-8
Decimal Place Channel 1
3-4
Latin-1 ASCII
Sensor ID Byte Channel 1
5-6
Latin-1 ASCII
Sensor ID Number Channel 1
7-16
Latin-1 ASCII
Sensor Part Number Channel 1
17-32
Latin-1 ASCII
Sensor Serial Number Channel 1
33
Unsigned-8
Sensor Type Code Channel 2
34
Unsigned-8
Gas Type Code Channel 2
35
Unsigned-8
Decimal Place Channel 2
36-37
Latin-1 ASCII
Sensor ID Byte Channel 2
38-39
Latin-1 ASCII
Sensor ID Number Channel 2
40-49
Latin-1 ASCII
Sensor Part Number Channel 2
50-65
Latin-1 ASCII
Sensor Serial Number Channel 2
Command 134 – Read Instrument Identifier – Response Length: 50 Bytes
Byte Number
Parsing
Parameter
0-1
Latin-1 ASCII
Instrument Config Map Version
2-17
Latin-1 ASCII
Instrument Part Number
18-33
Latin-1 ASCII
Instrument Serial Number
34-37
Latin-1 ASCII
Technician Initials
38-43
Latin-1 ASCII
Instrument Job Number
Page 84

84
44-49
Latin-1 ASCII
Manufacture Date
Command 135 – Read Calibration Data – Response Length: 18 Bytes
Byte Number
Parsing
Parameter
0-3
Float IEEE 754
Span Reserve Value Channel 1
4
Unsigned-8
Last Cal Day Channel 1
5
Unsigned-8
Last Cal Month Channel 1
6
Unsigned-8
Last Cal Year Channel 1
7-8
Unsigned-16
Next Cal Due In Days Channel 1
9-12
Float IEEE 754
Span Reserve Value Channel 2
13
Unsigned-8
Last Cal Day Channel 2
14
Unsigned-8
Last Cal Month Channel 2
15
Unsigned-8
Last Cal Year Channel 2
16-17
Unsigned-16
Next Cal Due In Days Channel 2
Command 140 – Write Real Time Clock – Response/Request Length: 18 Bytes
Byte Number
Parsing
Parameter
0
Unsigned-8
RTC Minute Channel 1
1
Unsigned-8
RTC Hour Channel 1
2
Unsigned-8
RTC Day Channel 1
3
Unsigned-8
RTC Month Channel 1
4
Unsigned-8
RTC Year Channel 1
5-8
Unsigned-32
Total Operation Time (In Minutes) Channel 1
9
Unsigned-8
RTC Minute Channel 2
10
Unsigned-8
RTC Hour Channel 2
11
Unsigned-8
RTC Day Channel 2
12
Unsigned-8
RTC Month Channel 2
Table A - 3 Read Commands
Write Commands
All write commands are dispatched with specific number of data bytes
which are written to specified parameters after parsing process. In case of a
single sensor the parameters of disconnected sensor are also
included in the request data although those can be set at 0. The response of
a write command is the same as the request. The details are provided in the
Table A - 4.
Page 85

85
13
Unsigned-8
RTC Year Channel 2
14-17
Unsigned-32
Total Operation Time (In Minutes) Channel 2
Command 141 – Write User Configuration – Response/Request Length: 36 Bytes
Byte Number
Parsing
Parameter
0-3
Float IEEE 754
Low Alarm Threshold Channel 1
4-7
Float IEEE 754
High Alarm Threshold Channel 1
8-11
Float IEEE 754
Analog Output Range Channel 1
12-15
Float IEEE 754
Cal Gas Value Channel 1
16-17
Unsigned-16
Calibration Interval In Days Channel 1
18-21
Float IEEE 754
Low Alarm Threshold Channel 2
22-25
Float IEEE 754
High Alarm Threshold Channel 2
26-29
Float IEEE 754
Analog Output Range Channel 2
30-33
Float IEEE 754
Cal Gas Value Channel 2
34-35
Unsigned-16
Calibration Interval In Days Channel 2
Table A - 4 Write Commands
Command 150 – Start/Abort Selected Live Channel Calibration – Response/Request
Length: 2
Byte Number
Parsing
Parameter
0
Unsigned-8
Selected Sensor (“1 = Sensor 1” and “2 = Sensor
2”)
1
Unsigned-8
Calibration Condition (“1 = Abort” and “2 = Start”)
Command 151 – Start/Abort Selected Live Channel Zeroing – Response/Request
Length: 2
Byte Number
Parsing
Parameter
0
Unsigned-8
Selected Sensor (“1 = Sensor 1” and “2 = Sensor
2”)
1
Unsigned-8
Zeroing Condition (“1 = Abort” and “6 = Start”)
Operation Commands
Operation commands are similar to write commands where specific values
are written on specific sensor to get the desired operation done. The details
are enlisted in the Table A - 5.
Table A - 5 Operation Commands
# # #
Page 86

86
Page 87

87
Appendix B | Acronyms and
Abbr
Definition
A
Ampere
ABS
acrylonitrile butadiene styrene
ASCII
American Standard Code for Information Interchange
bit
binary digit
bps
bits per second
C
centigrade
C2H4
ethylene
C2H6O
ethanol
C3H6
propylene
C3H8
propane
C4H10
butane
C5H12
pentane
C6H14
hexane
C2H4
ethylene
CALI
calibration
CAT
catalytic
Ch
channel
CH4
methane
chem
chemical
Cl2
chlorine
ClO2
chlorine dioxide
CO
carbon monoxide
CO2
carbon dioxide
Abbreviations
This appendix contains acronyms and abbreviations that are used within
this document.
Page 88

88
Abbr
Definition
CSA
Canadian Standards Association
DC
direct current
DCS
distributed control system
DIP
dual in-line package
DISP
display
F
Fahrenheit
FAQ
frequently asked questions
FAUL
fault
FIFO
first-in-first-out
GND
ground
H2
hydrogen
H2S
hydrogen sulfide
HCl
hydrogen chloride
HCN
hydrogen cyanide
ISC
Industrial Scientific Corporation
LED
light emitting diode
LEL
lower explosive limit (combustible gases)
LSB
least significant bit
mA
milliampere
mm
millimeter
MSB
most significant bit
NC
normally closed
NDIR
non-dispersive infrared
NEMA
National Electrical Manufacturers Association
NH3
ammonia
NO
normally open, Nitric Oxide
NO2
nitrogen dioxide
NOR
normal mode
NRTL
nationally recognized testing laboratory
O2
oxygen
OXY
oxygen
Page 89

89
Abbr
Definition
PH3
phosphine
PLC
programmable logic controller
ppm
parts per million
REST
restart
RH
relative humidity
RTC
real time clock
RTU
remote terminal unit
SO2
sulfur dioxide
SPST
single-pole, single-throw
TOX
toxic
V
Volts
Table B - 1 Acronyms and Abbreviations
# # #
Page 90

90
Page 91

91
Appendix C | Decimal, Binary, And
0x00 = 000
0x20 = 032
0x40 = 064
0x60 = 096
0x80 = 128
0xA0 = 160
0xC0 = 192
0xE0 = 224
0x01 = 001
0x21 = 033
0x41 = 065
0x61 = 097
0x81 = 129
0xA1 = 161
0xC1 = 193
0xE1 = 225
0x02 = 002
0x22 = 034
0x42 = 066
0x62 = 098
0x82 = 130
0xA2 = 162
0xC2 = 194
0xE2 = 226
0x03 = 003
0x23 = 035
0x43 = 067
0x63 = 099
0x83 = 131
0xA3 = 163
0xC3 = 195
0xE3 = 227
0x04 = 004
0x24 = 036
0x44 = 068
0x64 = 100
0x84 = 132
0xA4 = 164
0xC4 = 196
0xE4 = 228
0x05 = 005
0x25 = 037
0x45 = 069
0x65 = 101
0x85 = 133
0xA5 = 165
0xC5 = 197
0xE5 = 229
0x06 = 006
0x26 = 038
0x46 = 070
0x66 = 102
0x86 = 134
0xA6 = 166
0xC6 = 198
0xE6 = 230
0x07 = 007
0x27 = 039
0x47 = 071
0x67 = 103
0x87 = 135
0xA7 = 167
0xC7 = 199
0xE7 = 231
0x08 = 008
0x28 = 040
0x48 = 072
0x68 = 104
0x88 = 136
0xA8 = 168
0xC8 = 200
0xE8 = 232
0x09 = 009
0x29 = 041
0x49 = 073
0x69 = 105
0x89 = 137
0xA9 = 169
0xC9 = 201
0xE9 = 233
0x0A = 010
0x2A = 042
0x4A = 074
0x6A = 106
0x8A = 138
0xAA = 170
0xCA = 202
0xEA = 234
0x0B = 011
0x2B = 043
0x4B = 075
0x6B = 107
0x8B = 139
0xAB = 171
0xCB = 203
0xEB = 235
0x0C = 012
0x2C = 044
0x4C = 076
0x6C = 108
0x8C = 140
0xAC = 172
0xCC = 204
0xEC = 236
0x0D = 013
0x2D = 045
0x4D = 077
0x6D = 109
0x8D = 141
0xAD = 173
0xCD = 205
0xED = 237
0x0E = 014
0x2E = 046
0x4E = 078
0x6E = 110
0x8E = 142
0xAE = 174
0xCE = 206
0xEE = 238
0x0F = 015
0x2F = 047
0x4F = 079
0x6F = 111
0x8F = 143
0xAF = 175
0xCF = 207
0xEF = 239
0x10 = 016
0x30 = 048
0x50 = 080
0x70 = 112
0x90 = 144
0xB0 = 176
0xD0 = 208
0xF0 = 240
0x11 = 017
0x31 = 049
0x51 = 081
0x71 = 113
0x91 = 145
0xB1 = 177
0xD1 = 209
0xF1 = 241
0x12 = 018
0x32 = 050
0x52 = 082
0x72 = 114
0x92 = 146
0xB2 = 178
0xD2 = 210
0xF2 = 242
0x13 = 019
0x33 = 051
0x53 = 083
0x73 = 115
0x93 = 147
0xB3 = 179
0xD3 = 211
0xF3 = 243
0x14 = 020
0x34 = 052
0x54 = 084
0x74 = 116
0x94 = 148
0xB4 = 180
0xD4 = 212
0xF4 = 244
0x15 = 021
0x35 = 053
0x55 = 085
0x75 = 117
0x95 = 149
0xB5 = 181
0xD5 = 213
0xF5 = 245
0x16 = 022
0x36 = 054
0x56 = 086
0x76 = 118
0x96 = 150
0xB6 = 182
0xD6 = 214
0xF6 = 246
Hex Equivalents
This appendix lists the hexadecimal and binary equivalents of decimal
numbers. ModBus device addresses are entered in hexadecimal format. This
table provides a cross reference if only decimal addresses are known.
Hexadecimal numbers are shown in 0x00 format on the left. Decimal
equivalents are shown on the right. Refer to Table C - 1. Decimal and binary
equivalents are shown in Table C - 2.
Page 92

92
0x00 = 000
0x20 = 032
0x40 = 064
0x60 = 096
0x80 = 128
0xA0 = 160
0xC0 = 192
0xE0 = 224
0x17 = 023
0x37 = 055
0x57 = 087
0x77 = 119
0x97 = 151
0xB7 = 183
0xD7 = 215
0xF7 = 247
0x18 = 024
0x38 = 056
0x58 = 088
0x78 = 120
0x98 = 152
0xB8 = 184
0xD8 = 216
0xF8 = 248
0x19 = 025
0x39 = 057
0x59 = 089
0x79 = 121
0x99 = 153
0xB9 = 185
0xD9 = 217
0xF9 = 249
0x1A = 026
0x3A = 058
0x5A = 090
0x7A = 122
0x9A = 154
0xBA = 186
0xDA = 218
0xFA = 250
0x1B = 027
0x3B = 059
0x5B = 091
0x7B = 123
0x9B = 155
0xBB = 187
0xDB = 219
0xFB = 251
0x1C = 028
0x3C = 060
0x5C = 092
0x7C = 124
0x9C = 156
0xBC = 188
0xDC = 220
0xFC = 252
0x1D = 029
0x3D = 061
0x5D = 093
0x7D = 125
0x9D = 157
0xBD = 189
0xDD = 221
0xFD = 253
0x1E = 030
0x3E = 062
0x5E = 094
0x7E = 126
0x9E = 158
0xBE = 190
0xDE = 222
0xFE = 254
0x1F = 031
0x3F = 063
0x5F = 095
0x7F = 127
0x9F = 159
0xBF = 191
0xDF = 223
0xFF = 255
Dec
Binary
Dec
Binary
Dec
Binary
Dec
Binary
0
00000000
64
01000000
128
10000000
192
11000000
1
00000001
65
01000001
129
10000001
193
11000001
2
00000010
66
01000010
130
10000010
194
11000010
3
00000011
67
01000011
131
10000011
195
11000011
4
00000100
68
01000100
132
10000100
196
11000100
5
00000101
69
01000101
133
10000101
197
11000101
6
00000110
70
01000110
134
10000110
198
11000110
7
00000111
71
01000111
135
10000111
199
11000111
8
00001000
72
01001000
136
10001000
200
11001000
9
00001001
73
01001001
137
10001001
201
11001001
10
00001010
74
01001010
138
10001010
202
11001010
11
00001011
75
01001011
139
10001011
203
11001011
12
00001100
76
01001100
140
10001100
204
11001100
13
00001101
77
01001101
141
10001101
205
11001101
14
00001110
78
01001110
142
10001110
206
11001110
15
00001111
79
01001111
143
10001111
207
11001111
16
00010000
80
01010000
144
10010000
208
11010000
17
00010001
81
01010001
145
10010001
209
11010001
18
00010010
82
01010010
146
10010010
210
11010010
Table C - 1 Hexadecimal and Decimal Equivalents
Page 93

93
Dec
Binary
Dec
Binary
Dec
Binary
Dec
Binary
19
00010011
83
01010011
147
10010011
211
11010011
20
00010100
84
01010100
148
10010100
212
11010100
21
00010101
85
01010101
149
10010101
213
11010101
22
00010110
86
01010110
150
10010110
214
11010110
23
00010111
87
01010111
151
10010111
215
11010111
24
00011000
88
01011000
152
10011000
216
11011000
25
00011001
89
01011001
153
10011001
217
11011001
26
00011010
90
01011010
154
10011010
218
11011010
27
00011011
91
01011011
155
10011011
219
11011011
28
00011100
92
01011100
156
10011100
220
11011100
29
00011101
93
01011101
157
10011101
221
11011101
30
00011110
94
01011110
158
10011110
222
11011110
31
00011111
95
01011111
159
10011111
223
11011111
32
00100000
96
01100000
160
10100000
224
11100000
33
00100001
97
01100001
161
10100001
225
11100001
34
00100010
98
01100010
162
10100010
226
11100010
35
00100011
99
01100011
163
10100011
227
11100011
36
00100100
100
01100100
164
10100100
228
11100100
37
00100101
101
01100101
165
10100101
229
11100101
38
00100110
102
01100110
166
10100110
230
11100110
39
00100111
103
01100111
167
10100111
231
11100111
40
00101000
104
01101000
168
10101000
232
11101000
41
00101001
105
01101001
169
10101001
233
11101001
42
00101010
106
01101010
170
10101010
234
11101010
43
00101011
107
01101011
171
10101011
235
11101011
44
00101100
108
01101100
172
10101100
236
11101100
45
00101101
109
01101101
173
10101101
237
11101101
46
00101110
110
01101110
174
10101110
238
11101110
47
00101111
111
01101111
175
10101111
239
11101111
48
00110000
112
01110000
176
10110000
240
11110000
49
00110001
113
01110001
177
10110001
241
11110001
Page 94

94
Dec
Binary
Dec
Binary
Dec
Binary
Dec
Binary
50
00110010
114
01110010
178
10110010
242
11110010
51
00110011
115
01110011
179
10110011
243
11110011
52
00110100
116
01110100
180
10110100
244
11110100
53
00110101
117
01110101
181
10110101
245
11110101
54
00110110
118
01110110
182
10110110
246
11110110
55
00110111
119
01110111
183
10110111
247
11110111
56
00111000
120
01111000
184
10111000
248
11111000
57
00111001
121
01111001
185
10111001
249
11111001
58
00111010
122
01111010
186
10111010
250
11111010
59
00111011
123
01111011
187
10111011
251
11111011
60
00111100
124
01111100
188
10111100
252
11111100
61
00111101
125
01111101
189
10111101
253
11111101
62
00111110
126
01111110
190
10111110
254
11111110
63
00111111
127
01111111
191
10111111
255
11111111
Table C - 2 Decimal and Binary Equivalents
# # #
Page 95

95
Appendix D | Ordering Matrix
Base part number iTrans2-ABCDEFG
Single or dual on-board or remote toxic, combustible and oxygen sensors with dual
4-20 mA outputs (one per sensor) or ModBus RTU outputs. Remote sensor capable of
operation up to 200 meters from main transmitter. Operating temperature range –20 C
to +50 C.
Example:
iTrans2-1C21241 =On-board LEL (4-20 mA scale 0-100) and remote mount
H2S (4-20 mA scale 0-500) with relays
A = Sensor 1 Configuration
E = Sensor 2 Configuration
B = Gas sensor 1
F = Gas sensor 2
C= 4-20 mA output scale for sensor 1
G = 4-20 mA output scale for sensor 2
D = Optional on-board relays
A - Sensor 1
E – Sensor 2
0 = No sensor
1 = Explosion Proof / On-board
1 = Explosion Proof / On-board
2 = Explosion Proof / Remote
2 = Explosion Proof / Remote
3 = Non-hazardous Remote/Duct Mount
3 = Non-hazardous Remote/Duct Mount
4 = Explosion Proof / On-board with
Splash Guard
4 = Explosion Proof / On-board with
Splash Guard
5 = Explosion Proof / Remote with Splash
Guard
5 = Explosion Proof / Remote with
Splash Guard
6 = Stainless Steel / On-board
7 = Stainless Steel / Remote
7 = Stainless Steel / Remote
B - Gas sensor 1
F - Gas sensor 2
1 = Carbon Monoxide (CO)
1 = Carbon Monoxide (CO)
2 = Nitric Oxide (NO)
2 = Nitric Oxide (NO)
3 = Ammonia (NH3)
3 = Ammonia (NH3)
This appendix provides an ordering matrix for the gas monitor.
Page 96

96
4 = Hydrogen Sulfide (H2S)
4 = Hydrogen Sulfide (H2S)
5 = Sulfur Dioxide (SO2)
5 = Sulfur Dioxide (SO2)
6 = Nitrogen Dioxide (NO2)
6 = Nitrogen Dioxide (NO2)
7 = Chlorine (Cl2)
7 = Chlorine (Cl2)
8 = Chlorine Dioxide (ClO2)
8 = Chlorine Dioxide (ClO2)
9 = Hydrogen Cyanide (HCN)
9 = Hydrogen Cyanide (HCN)
A = Oxygen (O2)
A = Oxygen (O2)
B = LEL Catalytic Plug-In (factory
Methane calibration)
B = LEL Catalytic Plug-In (factory
Methane calibration)
C = LEL Catalytic Plug-In (factory
Pentane calibration)
C = LEL Catalytic Plug-In (factory
Pentane calibration)
D = Carbon Monoxide - Hydrogen Null
(CO - H2)
D = Carbon Monoxide - Hydrogen Null
(CO - H2)
F = Hydrogen Chloride (HCl)
F = Hydrogen Chloride (HCl)
K = Phosphine (PH3)
K = Phosphine (PH3)
L = Hydrogen (H2)
L = Hydrogen (H2)
M = Methane IR (CH4) by Vol
M = Methane IR (CH4) by Vol
N = Methane IR (CH4) by LEL
N = Methane IR (CH4) by LEL
O = Propane IR (C3H8)
O = Propane IR (C3H8)
P = Propylene IR (C3H6)
P = Propylene IR (C3H6)
Q = Pentane IR (C5H12)
Q = Pentane IR (C5H12)
R = Butane IR (C4H10)
R = Butane IR (C4H10)
S = Ethylene IR (C2H4)
S = Ethylene IR (C2H4)
T = Ethanol IR (C2H6O)
T = Ethanol IR (C2H6O)
U = Hexane IR (C6H14)
U = Hexane IR (C6H14)
V = Carbon Dioxide (0-5% CO2)
V = Carbon Dioxide (0-5% CO2)
W = Carbon Dioxide (0-100% CO2)
W = Carbon Dioxide (0-100% CO2)
X = Carbon Dioxide (0-0.5% CO2)
X = Carbon Dioxide (0-0.5% CO2)
C - 4-20 mA Output Scale for Sensor 1
G - 4-20 mA Output Scale for Sensor 2
0 = 0 - 999
0 = 0 - 999
1 = 0 - 500
1 = 0 - 500
2 = 0 - 100
2 = 0 - 100
Page 97

97
3 = 0 - 50
3 = 0 - 50
4 = 0 - 30
4 = 0 - 30
5 = 0 - 10
5 = 0 - 10
6 = 0 - 2
6 = 0 - 2
7 = 0 - 1
7 = 0 - 1
8 = 0 - 20
8 = 0 - 20
9 = 0 - 200
9 = 0 - 200
A = 0 – 5.00
A = 0 – 5.00
B = 0 – 0.50
B = 0 – 0.50
D – Optional On-Board Relays
0 = No Relay Module (Modbus)
1 = With Optional On-Board Relays (Modbus)
2 = No Relay Module (HART)
3 = With Optional On-Board Relays (HART)
# # #
Page 98

98
Page 99

99
Sensor Name
Range
Resolution
Cal Gas
Default Low
Alarm
Default
High Alarm
CO
0-999 ppm
1 ppm
100 ppm
35 ppm
70 ppm
H2S
0-500 ppm
1 ppm
25 ppm
10 ppm
20 ppm
SO2
0-99.9 ppm
0.1 ppm
5 ppm
2.0 ppm
4.0 ppm
NO2
0-99.9 ppm
0.1 ppm
5 ppm
1.0 ppm
2.0 ppm
Cl2
0-99.9 ppm
0.1 ppm
10 ppm
0.5 ppm
1.0 ppm
ClO2
0-1.00 ppm
0.01 ppm
0.90 ppm
0.30 ppm
0.50 ppm
HCN
0-30.0 ppm
0.1 ppm
10 ppm
5.0 ppm
10.0 ppm
PH3
0-1.00 ppm
0.01 ppm
1.0 ppm
0.30 ppm
0.60 ppm
CO/H2 NULL
0-999 ppm
1 ppm
100 ppm
35 ppm
70 ppm
NO
0-999 ppm
1 ppm
25 ppm
25 ppm
50 ppm
NH3
0-200 ppm
1 ppm
25 ppm
25 ppm
50 ppm
HCl
0-30.0 ppm
0.1 ppm
10 ppm
5.0 ppm
10.0 ppm
H2
0-999 ppm
1 ppm
100 ppm
50 ppm
100 ppm
O2
0-30% Vol.
0.1% Vol.
20.9%
19.5%
23.5%
Infrared, LEL
0-100% LEL
1% LEL
50% LEL
10% LEL
20% LEL
Catalytic Bead,
LEL Methane
0-100% LEL
1% LEL
50% LEL
10% LEL
20% LEL
Catalytic Bead,
LEL Pentane
0-100% LEL
1% LEL
25% LEL
10% LEL
20% LEL
CH4 by Vol.
0-100% Vol.
1% Vol.
50% Vol.
10% Vol
20% Vol
CO2
0-0.05% Vol.
0.01% Vol.
0.25%Vol.
0.10% Vol
0.20% Vol
CO2
0-5.00% Vol.
0.01% Vol.
2.50% Vol.
1.00% Vol
2.00% Vol
CO2
0-100% Vol.
1% Vol.
50% Vol.
10% Vol
20% Vol
Appendix E | Factory Default
Settings
This appendix lists factory default settings based on the individual
sensor(s) used. Refer to Table E - 1.
Table E - 1 Factory Default Settings
# # #
Page 100

100
 Loading...