

Page 1

Quick Setup
59296202
Page 2

Every effort has been made to ensure that the information
in this document is complete, accurate, and up-to-date.
Okidata assumes no responsibility for the results of errors
beyond its control. Okidata also cannot guarantee that
changes in software and equipment made by other manufacturers and referred to in this guide will not affect the
applicability of the information in it. Mention of software
products manufactured by other companies does not
necessarily constitute endorsement by Okidata.
Copyright 2000 by Okidata. All rights reserved.
Second edition January, 2000.
Written and produced by the Okidata Training & Publications Department. Please address any comments on this
publication
• by mail to:
Training & Publications Department
Okidata
2000 Bishops Gate Blvd.
Mount Laurel, New Jersey 08054-4620
• or by email to:
pubs@okidata.com
We welcome you to visit our multilingual web site:
http://www.okidata.com
OKI, OKIDATA, and OKIPAGE are registered trademarks/
marques déposées/marcas registradas of Oki Electric Industry
Company, Ltd.
ENERGY STAR is a registered trademark of the United States Environmental Protection Agency. Windows is either a registered
trademark or a trademark of Microsoft Corporation in the United
States and/or other countries.
Page 3

Customer Support
Call 1-800-OKIDATA. Assistance is
available 24 hours a day, 7 days a week.
8 Quick Steps to Printing
1 Unpack Your Printer ..................5
2 Install the Paper Feed Tray .......6
Internet
Visit our web site for the latest printer
drivers, manuals, application notes, and
more.
http://www.okidata.com
e-mail: pubs@okidata.com
3 Remove the Protective Sheet .....7
4 Install the Toner Cartridge ........9
5 Connect to Your Computer......12
6 Load Paper ................................13
7 Install the Printer Software .....14
8 Print a Demo Page ....................16
Quick Setup 3
Page 4

Getting to Know Your Printer
Open Latch
On/Off Switch
Image Drum Cartridge
4 Quick Setup
LED Array
Power/Status LED
Paper Input Tray
Manual Feed Slot
Paper Exit
Power Cord Receptacle
IEEE 1284
Parallel Interface Port
Page 5

1 Unpack Your Printer
■ Unpack your printer and place it on a flat,
stable surface you’ve selected.
■ Remove the printer from the plastic bag.
Note: As you unpack the accessories, please
save the packing material in the event you
need to repack the printer for shipping or
moving.
Check the contents
➊ OKIPAGE 6w Printer
➋ Paper Feed Tray
➌ Toner Cartridge with LED lens cleaner
➍ Power Cord
➎ Software Support CD
➏ Light-shield bag
➐ Quick Start and Warranty booklets
If you are missing anything, contact your dealer.
You will need to purchase:
■ Paper (see page 13 for paper specifications)
■ Interface cable: bi-directional IEEE-1284 parallel
cable
Quick Setup 5
Page 6

2 Install the Paper Feed Tray
■ Insert the tabs on the bottom of the tray into the
slots in the printer.
6 Quick Setup
■ Swing the tray up and insert the tabs on the sides into
the slots near the top of the printer. Push forward to
install. (You may need to install one side at a time).
Page 7

3 Remove the Protective Sheet
■ Lift the cover. ■ Lift out the Image Drum Cartridge.
Quick Setup 7
Page 8

Remove the Protective Sheet (continued)
Guides
■ Pull out the protective sheet.
8 Quick Setup
■ Replace the Image Drum
Cartridge:
a. Place front under the guides. b. Press down to lock.
Page 9
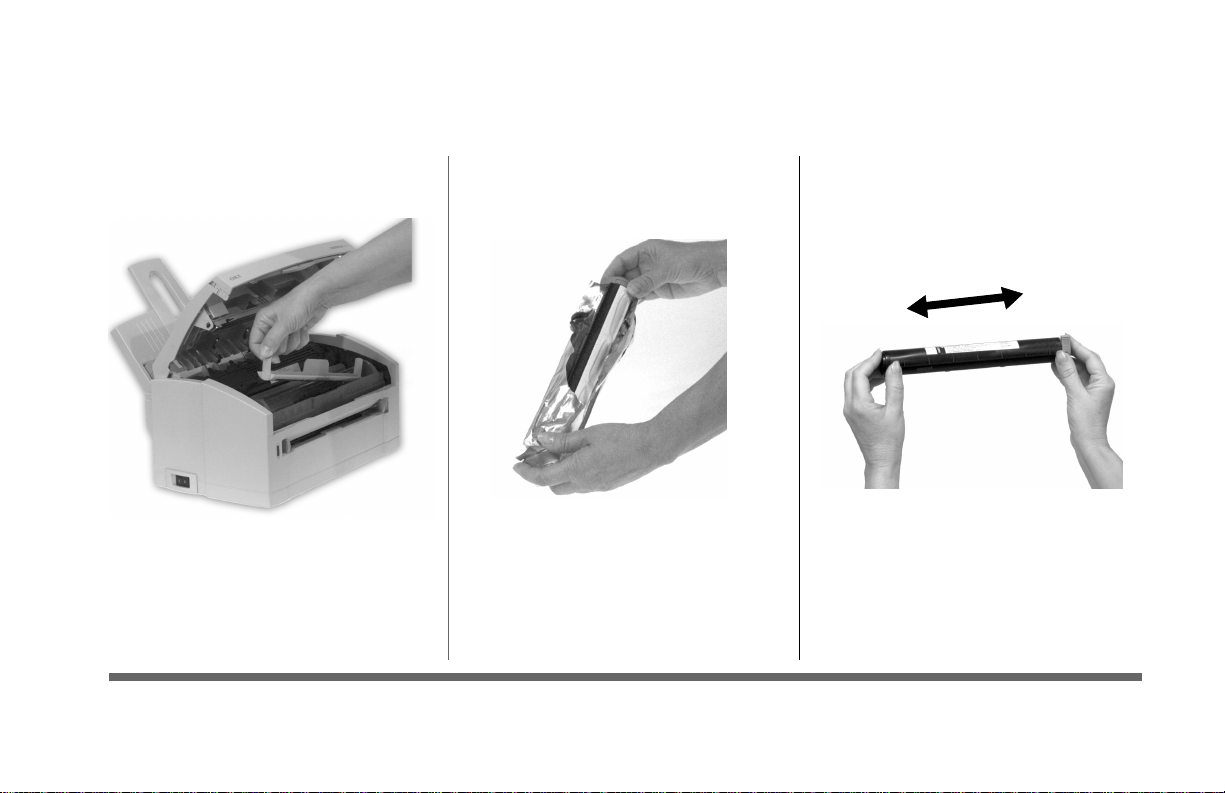
4 Install the Toner Cartridge
■ Lift out and discard toner well
cover.
■ Unwrap toner cartridge. ■ Shake cartridge side to side to
distribute toner.
Quick Setup 9
Page 10

Install the Toner Cartridge (continued)
Tab
■ Remove tape from the toner cartridge.
10 Quick Setup
■ Install the toner cartridge:
a. Align the left side under the tab.
b. Lower the right side into the well.
Page 11

Install the Toner Cartridge (continued)
■ Push the lock lever forward until it stops. ■ Close the cover.
Quick Setup 11
Page 12
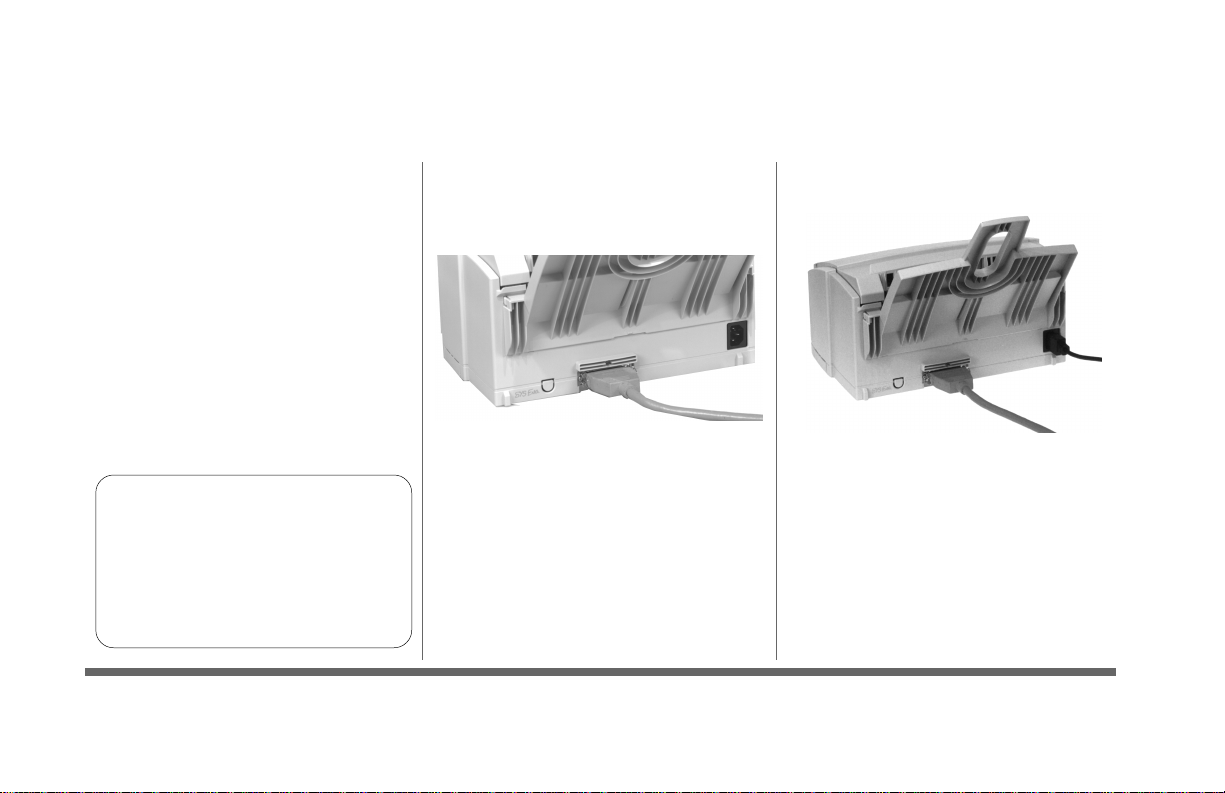
5 Connect to Your Computer
We recommend that you use a
✔ Bi-directional parallel
printer cable. Purchase a cable
marked “IEEE 1284 compliant.”
✔ To comply with FCC regula-
tions, the cable must be shielded
and UL and CSA approved.
Note: OKIDATA has tested and
approved the following bidirectional cable: Part Number
70000803. See page 21 for
purchasing information.
12 Quick Setup
■ Make sure both your printer
and computer are OFF.
■ Insert the wide connector into
the parallel port on your
printer, then snap both wire
clips into the notches on the
cable connector.
■ Insert the other end into the
parallel port on your computer
and tighten the screws.
■ Install the power cord into the
printer receptacle, then into an
outlet.
■ Turn power ON.
Page 13

6 Load Paper
■ Adjust the paper guides.
■ Fan a stack of paper (up to
100 sheets/20 lb. max.)
■ Place paper into the paper
input tray .
• Use smooth, low moisture
paper rated for copier and laser
printers.
Paper Feeding
• Feeder: 100 sheets/20 lb. max./
letter and legal size
Stacking capacity: 30 sheets/
face-up
• Letter, legal 13, legal 14,
executive, A4, A5, B5, A6, user
defined (min. 3" x 5" )
Letterhead /Preprinted Forms
• Ink must withstand 392°F
(200°C) for 0.1 second.
See the online User’s
Manual for additional
information on paper.
Quick Setup 13
Page 14

7 Install the Printer Software
You are now ready to install the printer software. The
CD-ROM packed with your printer includes the software you need to use your printer.
■ Printer drivers - needed to use all printer features
■ Status Monitor software - for on-screen monitoring
of printer status and features
■ Readme files - timely information and notes
■ Online User’s Guide - for viewing or printing
Follow these steps to install the printer software for your
operating system.
No CD-ROM Drive? Download the printer
drivers from the Okidata web site at
http://www.okidata.com or find someone who
has a CD-ROM drive and make a set of
diskettes using the Create Diskettes utility on
the CD.
14 Quick Setup
Windows 95/98/NT 4.0
1. Close all open applications.
2. Insert the OKIPAGE 6w CD into your CD-ROM
drive.
3. Select Start ® Run in Windows Program Manager.
4. Type D:\install (if “D” is your CD-ROM drive).
Click OK.
5. Proceed with the installation following the instructions on your screen.
After the installation is complete, an OKIPAGE 6w icon
should appear in the Printers folder. To access Printer
Properties, right click on the printer icon and select
Properties from the menu.
Page 15

Install Printer Software (continued)
Windows 3.1x
1. Close all open applications.
2. Insert the OKIPAGE 6w CD into your CD-ROM
drive.
3. Select File ® Run in Windows Program Manager .
4. T ype D:\install (if “D” is your CD-ROM drive).
Click OK.
5. Proceed with the installation following the instructions on your screen.
To change the printer default, or to setup printer
properties from the Program Manager: select
Main ® Control Panel ® Printers, click Setup.
Quick Setup 15
Page 16

8 Print a Demo Page
Print a demo page to test your printer
and view the Status Monitor.
■ Click the Start button on the
Windows Taskbar.
■ Select Programs
6w Hi-perW ® OKIPAGE 6w
Status Monitor.
Win 3.1x Users:
1. Open the OKIPAGE 6w
Hiper-w program group.
2. Double click on Status
Monitor.
16 Quick Setup
®
OKIPAGE
■ The Status Monitor Dialog box
appears. Click the Printer Setup
tab.
■ Click the Printer Menu button.
■ Click the Maintenance tab.
Page 17

Print a Demo Page (continued)
■ Click the Demo button.
Click for more information about
Status Monitor features.
Help
■ The Demo page prints.
Quick Setup 17
Page 18

Printing Transparencies, Labels and Special Media
■ Adjust the guides. ■ Insert media face-up, top of page
in first.
■ Set Manual Feed and media size
in your software. Select print.
• Single Sheet Sizes: legal,
letter, executive, A4, A5, B5,
A6, user defined (min. 3" x 5" )
• Letterhead Stationery/
Preprinted Forms: Ink must
withstand 392°F (200°C) for
0.1 second.
• Labels and Transparencies:
– Transparencies, label carrier
sheet and adhesive must
withstand the fusing process
heat of 392° F (200°C) for
1 second. Labels must cover
the entire carrier sheet.
– Use transparencies and
label sheets designed for
laser printers.
Quick Setup 18
Page 19

Printing Envelopes
■ Adjust the guides.
■ Insert the envelope flap down and
to the left.
■ Select manual feed-envelope in
your software. Select print.
Use this type
– Use envelopes with a
smooth, even surface that
are designed for laser
printers: no metal clasps,
snaps, windows, or selfadhesive flaps
– Maximum weight 24 lbs.
– Monarch, Com-9, Com-10,
DL, C5
19 Quick Setup
Page 20

Purchasing Supplies
■ Consult the dealer where you purchased your
printer.
■ Consult an Okidata Authorized Sales and Service
Dealer.
■ Call 1-800-OKIDATA (North America only) for the
nearest Authorized Sales and Service location.
■ Order toll-free by phone at 1-800-OKIDATA
(1-800-654-3282, North America only), using a
major credit card.
■ Check office supply catalogs or your local statio-
nery store. Most carry OKI brand supplies.
20 Quick Setup
OKIPAGE 6w Toner Cartridge (Type 6)
Part Number: 52111701
OKIPAGE 6w Image Drum Cartridge (Type 6)
Part Number: 40709901
Page 21

More OKIPAGE 6w features....
Double-click the OKIP AGE 6w icon in the Printers
dialog box, then open the properties dialog box. Click
the appropriate tab to see these features. Click
for instructions.
Help
Watermarks
A watermark is an image which appears behind the
print on a page. You can show a company’s name
in a large, lightened version behind faxes, letters
and memos, or mark a draft document.
2-up/4-up Layout
Multiple-up printing makes it possible to print two
or four pages on a single sheet of paper, with or
without a border.
Collated Page Printing
Normally the printer feeds the printed pages into
the output tray face up with the first page at the
bottom of the stack. Use this feature to print multipage documents so that the first page is at the top
of the stack.
Image Settings
Select mirror or negative print, dithering, gray scale
printing and print quality settings.
Paper Setting
Select paper size, orientation, thickness, multipleup printing, and page sequence.
Quick Setup 21
Page 22

Online Manual
For more information about using your
printer, including maintenance,
problem solving, support and service,
see the online User’s Manual:
Click on Start ® Programs ® OKIPAGE
6w Hi-perW ® Online manual.
Win 3.1x Users:
1. Open the OKIPAGE 6w Hiper-W program group
2. Double click on User’s Manual.
22 Quick Setup
 Loading...