

Page 1

Table of Contents
PRINT MEDIA ...........................................................................................................14
Paper: General Information....................................................................................................14
Changing the Media Type in the Printer Driver ......................................................................15
To change Media Type in the printer driver:.................................................................................................15
Paper/Print Media Feed Paths.................................................................................................16
Paper/Print Media Exit Paths..................................................................................................17
Top Exit.................................................................................................................................18
To use the top exit:......................................................................................................................................18
Rear Exit ............................................................................................................................... 19
To use rear exit:........................................................................................................................................... 19
The Paper Tray Gauge ........................................................................................................... 20
Paper Size Indicator...............................................................................................................21
Storing Paper.........................................................................................................................22
Selecting Paper........................................................................Error! Bookmark not defined.
Selecting Paper.................................................................................. Error! Bookmark not defined.
Selecting Paper: Basis Weight..........................................................................................................23
Bond Paper.............................................................................................................................................23
Cover stock .............................................................................................................................................23
Selecting Paper: Brightness ..............................................................................................................24
Selecting Paper: Pulp/Rag Content...................................................................................................25
Selecting Paper: Opacity..................................................................................................................26
Paper/Print Media Specifications......................................................................................................27
Tray 1 Media Specifications.............................................................................................................28
Manual Feed: Media Specifications.................................................................................................. 29
2nd Paper Tray Media Specifications ...............................................................................................30
Multi-Purpose Feeder Media Specifications .....................................................................................31
Manual Feeder.......................................................................................................................32
Manual Feed: General Information................................................................................................... 32
Manual Feed: Standard Paper........................................................................................................... 33
Manual Feed: Envelopes..................................................................................................................34
Manual Feed: Heavy Paper .............................................................................................................. 35
Manual Feed: Transparencies (Overheads).......................................................................................36
Printable Area ........................................................................................................................37
Printable Area: Letter Size...............................................................................................................37
Printable Area: Executive Size......................................................................................................... 38
Printable Area: A4 Size....................................................................................................................39
Printable Area: A5 Size....................................................................................................................40
1
Page 2

Printable Area: B5 Size ....................................................................................................................41
Printable Area: C5 Envelopes........................................................................................................... 42
Printable Area: COM-10 Envelopes .................................................................................................43
Printable Area: COM-9 Envelopes ................................................................................................... 44
Printable Area: DL Envelopes.......................................................................................................... 45
Printable Area: Monarch Envelopes .................................................................................................46
Printable Area: A6 Size....................................................................................................................47
Printable Area: Legal Sizes..............................................................................................................48
13-Inch Legal..........................................................................................................................................48
14-Inch Legal..........................................................................................................................................48
FRONT PANEL............................................. ERROR! BOOKMARK NOT DEFINED.
BUTTON FUNCTIONS................................. ERROR! BOOKMARK NOT DEFINED.
Front Panel ............................................................................................................................49
Lights .........................................................................................................................................................49
Display Language........................................................................................................................................49
Buttons .......................................................................................................................................................49
Display Language ..................................................................................................................50
Ready Light (green)...............................................................................................................51
Buttons.................................................................................................................................. 52
Overview Buttons........................................................................................................................... 52
< / Recover Button...........................................................................................................................53
> / Reset Button...............................................................................................................................54
ENTER / Power Save Button ...........................................................................................................55
FORM FEED / Print Demo Button................................................................................................... 56
MENU 1 / Menu 2 Button................................................................................................................ 57
ON LINE Button ............................................................................................................................. 58
PAPER SIZE / Print Menu Button....................................................................................................59
TRAY TYPE / Print Fonts ...............................................................................................................60
PRINTER CONTROLS.............................................................................................. 61
Level-1 Menu ........................................................................................................................61
Level-1 Menu.................................................................................................................................. 61
Level-1 Menu Overview .................................................................................................................. 62
Using the Level-1 Menu...................................................................................................................64
Level-1 Menu Settings.....................................................................................................................65
Level-1 Menu: A4 PRINT WIDTH (HP Emulation Only)............................................................... 66
Settings (Default)....................................................................................................................................66
Level-1 Menu: AUTO TRAY SWITCH..........................................................................................67
Settings (Default)....................................................................................................................................67
Level-1 Menu: CHARACTER PITCH (IBM and Epson Emulations).............................................. 68
Settings (Default)....................................................................................................................................68
Level-1 Menu: CHARACTER SET (IBM & Epson Emulations) ....................................................69
2
Page 3

Settings (Default)....................................................................................................................................69
Level-1 Menu: COPIES.................................................................................................................. 70
Settings (Default)....................................................................................................................................70
Level-1 Menu: CR FUNCTION (HP Emulation Only)....................................................................71
Settings (Default)....................................................................................................................................71
Level-1 Menu: CR FUNCTION (IBM & Epson Emulations)..........................................................72
Settings (Default)....................................................................................................................................72
Level-1 Menu: EDIT SIZE..............................................................................................................73
Selections (Default):................................................................................................................................73
Notes:.....................................................................................................................................................73
Level-1 Menu: EMULATION......................................................................................................... 74
Settings (Default)....................................................................................................................................74
Level-1 Menu: EURO SIGN...........................................................................................................75
Settings (Default)....................................................................................................................................75
Level-1 Menu: FIT TO LETTER (IBM & Epson Emulations) ........................................................ 76
Settings (Default)....................................................................................................................................76
Level-1 Menu: FONT CONDENSE (IBM Emulation Only) ...........................................................77
Settings (Default)....................................................................................................................................77
Level-1 Menu: FONT HEIGHT (HP Emulation Only) ....................................................................78
Settings (Default)....................................................................................................................................78
Level-1 Menu: FONT No. (HP emulation Only).............................................................................79
Settings (Default)....................................................................................................................................79
Level-1 Menu: FONT PITCH (HP Emulation Only).......................................................................80
Settings (Default)....................................................................................................................................80
Level-1 Menu: FONT SOURCE (HP Emulation Only)...................................................................81
Settings (Default)....................................................................................................................................81
Level-1 Menu: FORM LENGTH (IBM & Epson Emulations) ........................................................82
Settings (Default)....................................................................................................................................82
Level-1 Menu: LEFT MARGIN (IBM & Epson Emulations).......................................................... 83
Settings (Default)....................................................................................................................................83
Level-1 Menu: LETTER O STYLE (IBM & Epson Emulations).....................................................84
Settings (Default)....................................................................................................................................84
Level-1 Menu: LF FUNCTION (IBM Emulation Only)..................................................................85
Settings (Default)....................................................................................................................................85
Level-1 Menu: LF FUNCTION (HP Emulation Only) ....................................................................86
Settings (Default)....................................................................................................................................86
Level-1 Menu: LINE LENGTH (IBM & Epson Emulations) .......................................................... 87
Settings (Default)....................................................................................................................................87
Level-1 Menu: LINE PITCH (IBM and Epson Emulations)............................................................88
Settings (Default)....................................................................................................................................88
Level-1 Menu: LINES PER PAGE..................................................................................................89
Settings (Default)....................................................................................................................................89
Level-1 Menu: MANUAL FEED.................................................................................................... 90
Settings (Default)....................................................................................................................................90
Level-1 Menu: MEDIA TYPETRAY1...........................................................................................91
Settings (Default)....................................................................................................................................91
3
Page 4

Level-1 Menu: MEDIA TYPE TRAY2...........................................................................................92
Settings (Default)....................................................................................................................................92
Level-1 Menu: MEDIA TYPE — FRONT/MANUAL..................................................................... 93
Settings (Default)....................................................................................................................................93
Level-1 Menu: MEDIA TYPE — MULTIFEEDER ........................................................................ 94
Settings (Default)....................................................................................................................................94
Level-1 Menu: ORIENTATION .....................................................................................................95
Settings (Default)....................................................................................................................................95
Level-1 Menu: PAPER FEED.........................................................................................................96
Settings (Default)....................................................................................................................................96
Level-1 Menu: PAPER SIZE CHECK.............................................................................................97
Settings (Default)....................................................................................................................................97
Level-1 Menu: PAPER SIZE, Tray 1...............................................................................................98
Selections (Default):................................................................................................................................98
Notes:.....................................................................................................................................................98
Level 1 Menu: PAPER SIZE TRAY 2.............................................................................................99
Selections (Default):................................................................................................................................99
Notes:.....................................................................................................................................................99
Level-1 Menu: PAPER SIZE — MANUAL .................................................................................. 100
Settings (Default).................................................................................................................................. 100
Level-1 Menu: PAPER SIZE — MULTIFEEDER ........................................................................101
Settings (Default).................................................................................................................................. 101
Level-1 Menu: Parallel..................................................................................................................102
Level-1 Menu: RS232C ................................................................................................................ 103
Settings (Default).................................................................................................................................. 103
Level-1 Menu: SYMBOL SET (HP Emulation Only) ...................................................................104
Settings (Default).................................................................................................................................. 104
Level-1 Menu: SYMBOL SET (IBM & Epson Emulations).......................................................... 107
Settings (Default).................................................................................................................................. 107
Level-1 Menu: TOF POSITION (IBM & Epson Emulations)........................................................109
Settings (Default).................................................................................................................................. 109
Level-1 Menu: BLNK PAGE SKIP (HP Emulation Only) ............................................................110
Settings (Default).................................................................................................................................. 110
Level-1 Menu: BLNK PAGE SKIP (IBM & Epson Emulations)...................................................111
Settings (Default).................................................................................................................................. 111
Level-1 Menu: USB......................................................................................................................112
Settings (Default).................................................................................................................................. 112
Level-1 Menu: ZERO CHARACTER ...........................................................................................113
Settings (Default).................................................................................................................................. 113
Changing the Media Type in the Printer Menu ...............................................................................114
Level-2 Menu ..........................................................................Error! Bookmark not defined.
Level-2 Menu.................................................................................... Error! Bookmark not defined.
Level-2 Menu Overview ................................................................................................................115
Using the Level-2 Menu.................................................................................................................116
Level-2 Menu Settings...................................................................................................................117
Level-2 Menu: AUTO CONTINUE ..............................................................................................118
4
Page 5

HP PCL 6 (LaserJet 5 compatible) Mode ...............................................................................................118
PostScript Mode (14i) ...........................................................................................................................118
Settings (Default).................................................................................................................................. 118
Level-2 Menu: BAUD RATE........................................................................................................ 119
Settings (Default).................................................................................................................................. 119
Level-2 Menu: BI-DIRECTION....................................................................................................120
Settings (Default).................................................................................................................................. 120
Level-2 Menu: MIN. BUSY..........................................................................................................121
Settings (Default).................................................................................................................................. 121
Level-2 Menu: CLEARABLE WARNINGS.................................................................................. 122
HP PCL 6 (LaserJet 6p compatible).......................................................................................................122
PostScript mode (14i) ............................................................................................................................122
Settings (Default).................................................................................................................................. 122
Level-2 Menu: DARKNESS CONTROL ......................................................................................123
Settings (Default).................................................................................................................................. 123
Level-2 Menu: DATA BITS .........................................................................................................124
Settings (Default).................................................................................................................................. 124
Level-2 Menu: ERROR REPORT.................................................................................................125
HP PCL 6 (LaserJet 5 compatible) Mode ...............................................................................................125
PostScript Mode (14i) ...........................................................................................................................125
Settings (Default).................................................................................................................................. 125
Level-2 Menu: FLOW CONTROL................................................................................................126
Settings (Default).................................................................................................................................. 126
Level-2 Menu: I-PRIME (IBM & Epson Emulations)....................................................................127
Settings (Default).................................................................................................................................. 127
Level 2 Menu: FONT PROTECTION...........................................................................................128
Settings (Default).................................................................................................................................. 128
Level-2 Menu: LANGUAGE........................................................................................................129
Settings (Default).................................................................................................................................. 129
Level-2 Menu: TONER SAVING ................................................................................................. 130
Settings (Default).................................................................................................................................. 130
Level-2 Menu: MANUAL TIMEOUT...........................................................................................131
Settings (Default).................................................................................................................................. 131
Level 2 Menu: MEMORY FREE AREA........................................................................................132
Level-2 Menu: PARITY...............................................................................................................133
Settings (Default).................................................................................................................................. 133
Level-2 Menu: PARALLEL SPEED ............................................................................................. 134
Settings (Default).................................................................................................................................. 134
Level-2 Menu: POWER SAVING................................................................................................. 135
Settings (Default).................................................................................................................................. 135
Level-2 Menu: RESOLUTION .....................................................................................................136
Settings (Default).................................................................................................................................. 136
Level-2 Menu: WAIT TIMEOUT ................................................................................................. 137
HP PCL 6 (LaserJet 5 compatible) Mode ...............................................................................................137
PostScript Mode (14i) ..........................................................................................................................137
Settings (Default).................................................................................................................................. 137
Level-2 Menu: LOW TONER....................................................................................................... 138
5
Page 6

Settings (Default).................................................................................................................................. 138
User Maintenance Menu ...................................................................................................... 139
User Maintenance Menu Overview.................................................................................................139
User Maintenance Menu: Using the User Maintenance Menu ........................................................ 140
User Maintenance Menu: 2ND TRAY...........................................................................................141
Settings (Default).................................................................................................................................. 141
User Maintenance Menu: REC BUFF............................................................................................ 142
Settings (Default).................................................................................................................................. 142
User Maintenance Menu: DRUM CNT RESET .............................................................................143
User Maintenance Menu: ECP ....................................................................................................... 144
Settings (Default).................................................................................................................................. 144
User Maintenance Menu: HEX DUMP..........................................................................................145
User Maintenance Menu: JAM RCVR...........................................................................................146
User Maintenance Menu: OP MENU ............................................................................................147
Settings (Default).................................................................................................................................. 147
User Maintenance Menu: PLACE PG ...........................................................................................148
Settings (Default).................................................................................................................................. 148
User Maintenance Menu: PWR SAVE .......................................................................................... 149
User Maintenance Menu: MENU RESET......................................................................................150
User Maintenance Menu: RSRC SAV............................................................................................151
Settings (Default).................................................................................................................................. 151
User Maintenance Menu: SETTING .............................................................................................152
Settings (Default).................................................................................................................................. 152
User Maintenance Menu: X ADJUST............................................................................................153
Settings (Default).................................................................................................................................. 153
User Maintenance Menu: Y ADJUST............................................................................................154
Settings (Default).................................................................................................................................. 154
PRINTING A LISTING OF CURRENT MENU SETTINGS ................................ 155
PRINTING THE FONT SAMPLE PAGE............................................................... 156
QUICK ACCESS MENUS ....................................................................................... 157
PAPER SIZE MENU................................................................................................ 158
POWER SAVE MENU............................................................................................. 159
TRAY TYPE MENU................................................................................................. 160
PRINTING THE DEMO PAGE............................................................................... 156
SELECTING AN EMULATION ............................................................................. 161
Selecting a Specific Emulation .......................................................................................................161
SELECTING PRINTER SETTINGS....................................................................... 162
Using Software..............................................................................................................................162
6
Page 7

Using the Printer Driver.................................................................................................................162
Using the Printer Main Menus........................................................................................................162
TIME TO PRINT: ADJUSTING ............................................................................. 163
ADVANCED OPERATIONS................................................................................... 164
Adjusting Print Quality ........................................................................................................164
Adjusting the Print Quality: Level-1 Menu..........................................................................165
Level-2 Menu: ADJUSTING PRINT QUALITY................................................................. 166
Adjusting the Print Quality: Maintenance Menu...................................................................167
Manual Feed: Standard Paper & Letterhead Stationery.........................................................168
Manual Feed: Labels............................................................................................................ 169
Manual Feed: Envelopes...................................................................................................... 171
Manual Feed: Heavy Paper (Index, Card Stock) ..................................................................173
Automatic Tray Switching ................................................................................................... 174
DISPLAY MESSAGES............................................................................................. 175
Display Messages ................................................................................................................175
ACTIVE message ................................................................................................................177
CHANGE DRUM Message.................................................................................................. 178
COVER OPEN Message......................................................................................................179
COVER T2 message............................................................................................................ 180
COPY Message....................................................................................................................181
DATA Message...................................................................................................................182
EEPROM RESETTING Message......................................................................................... 183
HOST I/F ERROR RS232 Message ...................................................................................184
MEMORY OVERFLOW Message ......................................................................................185
ERROR nn Message ............................................................................................................186
ERROR PRINT OVERRUN Message..................................................................................187
ERROR PS Adobe PS message (14i)..................................................................................188
ERROR RECEIVE BUFFER OVERFLOW Message ..........................................................189
FLUSHING Message...........................................................................................................190
INITIALIZING Message .....................................................................................................191
MANUAL REQUEST Message........................................................................................... 192
OFF-LINE Message............................................................................................................. 193
ON-LINE Message .............................................................................................................. 194
MENU Message...................................................................................................................195
7
Page 8

PAPER EXIT JAM Message................................................................................................196
PAPER FEED JAM Message ...............................................................................................197
PAPER INPUT JAM Message............................................................................................. 198
PAPER OUT Message......................................................................................................... 199
PAPER REQUEST message................................................................................................200
PWR SAVE Message...........................................................................................................201
PRINT CLEANING Message ..............................................................................................202
PRINT DEMO Message....................................................................................................... 203
PRINT FONTS Message......................................................................................................204
PRINT MENU Message....................................................................................................... 205
PRINTING message ............................................................................................................206
RESET Message.................................................................................................................. 207
RESET TO SAVE Message.................................................................................................208
ROM-SIMM Error Message.................................................................................................209
SIZE ERR Message ............................................................................................................. 210
TONER LOW Message .......................................................................................................211
TONER EMP CHG CART Message.................................................................................... 212
TONER SENSOR Message .................................................................................................213
FONTS....................................................................................................................... 214
Fonts....................................................................................................................................214
Fonts: Bar Codes..................................................................................................................215
Fonts: Epson & IBM Emulations..........................................................................................216
Fonts: HP Emulation............................................................................................................ 217
Fonts: PostScript (14i) .........................................................................................................218
Fonts: Printing a Sample of Resident Fonts ..........................................................................219
Fonts: Selecting ................................................................................................................... 220
Fonts: Symbol Sets .............................................................................................................. 221
INTERFACING........................................................................................................ 222
Interfacing with the Computer..............................................................................................222
Parallel Interface (lpt) .......................................................................................................... 223
Parallel Interface (lpt)....................................................................................................................223
Parallel Cable Requirements ..................................................................................................................223
Connecting the Parallel Port ..................................................................................................................223
ECP Mode ............................................................................................................................................ 223
Disabling ECP ......................................................................................................................................223
8
Page 9

Pin Assignments ...................................................................................................................................223
Menu Settings.......................................................................................................................................223
Parallel Cable Requirements ..........................................................................................................224
Connecting the Parallel Port ...........................................................................................................225
Changing Parallel Interface Menu Settings.....................................................................................226
ECP Mode..................................................................................................................................... 227
Disabling ECP............................................................................................................................... 228
Parallel Interface Pin Assignments: Compatible Mode ....................................................................229
Parallel Interface Pin Assignments: ECP Mode...............................................................................230
Parallel Interface Pin Assignments: Nibble Mode ........................................................................... 231
Standard Parallel Interface Menu Settings ......................................................................................232
Serial Interface (COM) ........................................................................................................233
Serial Interface (COM) ..................................................................................................................233
Cable Requirements .............................................................................................................................. 233
Connecting the Serial Port.....................................................................................................................233
Pin Assignments ...................................................................................................................................233
Menu Settings.......................................................................................................................................233
Serial Port Cable Requirements ......................................................................................................234
Connecting the Serial Port..............................................................................................................235
Serial Interface Pin Assignments....................................................................................................236
Standard Serial Interface Menu Settings.........................................................................................237
Changing Serial Interface Menu Settings ........................................................................................238
USB Interface......................................................................................................................239
USB Interface................................................................................................................................ 239
USB Cable Requirements...............................................................................................................240
Connecting the USB Port...............................................................................................................241
USB Menu Setting .........................................................................................................................242
Network Accessories............................................................................................................ 243
OkiLAN® 6010e 10 Base-T External Ethernet Print Server, OKI P/N 70034401.........................................243
Network Print Server ...........................................................................................................244
ACCESSORIES ........................................................................................................ 245
Ways to Purchase Supplies...................................................................................................245
2 Slot Memory Expansion Board with 0 MB resident........................................................... 246
OKI P/N 70036201........................................................................................................................ 246
250 Sheet Letter/Legal/Universal Tray.................................................................................247
OKI P/N 70028101........................................................................................................................ 247
2nd Paper Tray Mechanism.................................................................................................. 248
OKI P/N 70028701........................................................................................................................ 248
500 Sheet Letter/Legal/Universal Sheet Tray OKI P/N 70028001........................................249
Multi-Purpose Feeder, OKI P/N 70025101...........................................................................250
Serial I/F Card ..................................................................................................................... 251
9
Page 10

OKI P/N 70036301........................................................................................................................ 251
Flash SIMMS ......................................................................................................................252
4 MB Flash SIMM OKI P/N 70035701..........................................................................................252
8 MB Flashs SIMM OKI P/N 70035801......................................................................................... 252
Memory SIMMs..................................................................................................................253
Ÿ 16 MB DRAM Memory SIMM, OKI P/N 70033901.......................................................................... 253
Ÿ 32 MB DRAM Memory SIMM, OKI P/N 70034001.......................................................................... 253
OkiLAN 6010e External Print Server...................................................................................254
OKI P/N 70034401........................................................................................................................ 254
OkiLAN 6020e External Print Server...................................................................................255
OkiLAN 3100e Internal Print Server for the 14i ................................................................. 256
OKI P/N 70036101........................................................................................................................ 256
Parallel I/F Cable IEEE-1284 Bi-Directional....................................................................... 257
OKI P/N 70000803........................................................................................................................ 257
USB Cable........................................................................................................................... 258
Part #: 70037901............................................................................................................................258
MAINTENANCE...................................................................................................... 259
Printer Maintenance............................................................................................................. 259
Cleaning the LED Array............................................................................................................................259
Generating a Drum Cleaning Page .............................................................................................................259
Image Drum.............................................................................................................................................. 259
Toner Cartridge......................................................................................................................................... 259
Generating a Drum Cleaning Page........................................................................................ 260
The Toner Cartridge .............................................................................................................262
Special Toner Formulation...................................................................................................263
Toner Cartridge Life ............................................................................................................ 264
Toner Cartridge, "Type 8", OKI P/N 41331701.................................................................... 265
Replacing the Toner Cartridge (Type 8, OKI P/N 41331701) ..............................................266
The Image Drum ..................................................................................................................269
Image Drum Life .................................................................................................................270
Image Drum Precautions......................................................................................................271
Replacing the Image Drum (Type 8, OKI P/N 41331601).................................................... 272
Image Drum, "Type 8".........................................................................................................276
OKI P/N 41331601..............................................................................................................276
Resetting the Drum Counter................................................................................................. 277
PROBLEM SOLVING ............................................................................................. 278
An oblong area of faint print appears on each page. ..............................................................278
10
Page 11

Blank pages appear between printed pages........................................................................... 279
Bold characters and dark lines are smeared...........................................................................280
Cannot get justified right margin with a proportionally spaced font ...................................... 281
Change Drum message appears after only 4000 to 5000 pages..............................................282
Cleaning the LED Array ...................................................................................................... 283
Clearing a Paper Exit Jam....................................................................................................284
Clearing a Paper Feed Jam...................................................................................................285
Clearing a Paper Input Jam................................................................................................... 286
Data sent to printer does not print but DATA PRESENT message appears ...........................287
Distorted print......................................................................................................................288
Entire page prints faintly......................................................................................................289
Faded print after installation .................................................................................................290
Faded vertical stripes ...........................................................................................................291
Fuzzy print...........................................................................................................................292
''Garbage'' prints...................................................................................................................293
Graphic image prints partly on one page partly on the next ...................................................294
Graphics won't position properly.......................................................................................... 295
Nothing happens, but printer indicates it is ready to receive data ..........................................296
Odors from Printer...............................................................................................................297
Page has gray background....................................................................................................298
Page has repeating marks..................................................................................................... 299
Page prints all black.............................................................................................................300
Pages curl excessively ..........................................................................................................301
Paper Full Mark...................................................................................................................302
Paper Jams ...........................................................................................................................303
Print is darker than usual...................................................................................................... 304
Print is smeared or blotched .................................................................................................305
Print job started with italics changed to bold but italics still output.......................................306
Printed page is light or blurred ............................................................................................. 307
Printer freezes or displays error message when computer is rebooted....................................308
Printer ignores control codes sent prior to printing a document.............................................309
Size of top margin increases with each page printed.............................................................310
Strange symbols appear during normal printing.................................................................... 311
Vertical black lines ..............................................................................................................312
Vertical white streaking or faint areas on page......................................................................313
11
Page 12

White blotches or faded gray areas and temperature or humidity is high or low .................... 314
Why Paper Jams Occur........................................................................................................315
SERVICE AND SUPPORT...................................................................................... 316
Service & Support................................................................................................................ 316
Finding a Service Dealer............................................................................................................................ 316
Contacting the Oki Data Customer Support Center.....................................................................................316
Getting Service & Support .........................................................................................................................316
Repacking the Printer for Shipment............................................................................................................316
Contacting the Oki Data Customer Support Center............................................................... 317
U.S. & Canada Only: Call 1-800-OKI-DATA (1-800-654-3282)................................................................ 317
Finding a Service Dealer......................................................................................................318
Finding a Service Dealer in the U.S. & Canada ....................................................................319
OKI Regional Service Depots 1-800-OKI-DATA (1-800-654-3282)..........................................................319
Oki Data Service Depot Information: U.S. & Canada................................................................................. 319
Finding a Service Dealer in Latin America...........................................................................320
Oki Data Service Location Information: Latin America .............................................................................320
Getting Service & Support................................................................................................... 321
Repacking the Printer for Shipment ......................................................................................322
To Repack The Printer...............................................................................................................................322
SPECIFICATIONS................................................................................................... 323
Specifications ......................................................................................................................323
Paper/Print Media Specifications ...............................................................................................................323
Electrical................................................................................................................................................... 323
Physical ....................................................................................................................................................323
Environmental...........................................................................................................................................323
Emulations................................................................................................................................................323
Fonts.........................................................................................................................................................323
Interfacing.................................................................................................................................................323
Print Method.............................................................................................................................................323
Print Speed................................................................................................................................................ 323
Printable Area...........................................................................................................................................323
RAM......................................................................................................................................................... 323
Resolution.................................................................................................................................................323
ROM ........................................................................................................................................................323
Specifications: Electrical...................................................................................................... 324
Specifications: Emulations...................................................................................................325
Selecting an Emulation..............................................................................................................................325
Specifications: Environmental ..............................................................................................326
Specifications: Interfacing....................................................................................................327
Specifications: Physical........................................................................................................ 328
12
Page 13

Print Method........................................................................................................................ 329
Specifications: Print Speed Pages per Minute (ppm)............................................................ 330
Specifications: Printable Area ..............................................................................................331
Sheets.......................................................................................................................................................331
Envelopes .................................................................................................................................................331
Specifications: RAM ............................................................................................................332
Specifications: Resolution....................................................................................................333
Specifications: ROM............................................................................................................334
OVERNIGHT EXCHANGE .................................................................................... 335
WARRANTY INFORMATION............................................................................... 336
COPYRIGHTS.......................................................................................................... 338
Copyright Information .........................................................................................................338
ENERGY STAR®................................................................................................................ 339
Year 2000 Compliance.........................................................................................................340
13
Page 14

Print Media
Paper: General Information
When you buy paper, keep in mind that page printers require a smooth finish
paper. For most everyday applications, paper rated for copiers and laser printers
should work well with your printer.
Before buying any large quantity of a particular paper, always test a sample first.
Caution! Print media (including ink on preprinted forms) must be able to
withstand 392°F (200°C) for 0.1 second.
See also Selecting Paper.
14
Page 15

Changing the Media Type in the Printer Driver
The printer is optimized for printing on 20-lb. (75 g/m2) paper.
If you consistently use much lighter or heavier paper in Tray 1 (or Tray 2 if
installed), or transparencies in the manual feed tray, you must change the Media
setting to match what you are using.
You can do this:
1. In your software application by clicking on the Properties button in the
Print dialog box.
2. In the printer driver.
3. In the printer menu.
Note: Changes made in the printer driver will be overridden by your software
settings.
To change Media Type in the printer driver:
For the PCL 6e driver:
1. From the Windows Taskbar, click Start →Settings → Printers.
2. Double-click the OKIPAGE 14 icon.
3. Click Printers → Document Defaults.
4. In the Paper Thickness drop-down list box, select the setting you want.
5. Click OK.
For the PostScript (14i) driver:
1. From the Windows Taskbar, click Start →Settings → Printers.
2. Double-click the OKIPAGE 14 icon.
3. Click Printers → Document Defaults.
4. Click the Advanced tab.
5. Click on Media <Printer Setting>.
6. In the Media Setting list box, select the setting you want.
15
Page 16

Paper/Print Media Feed Paths
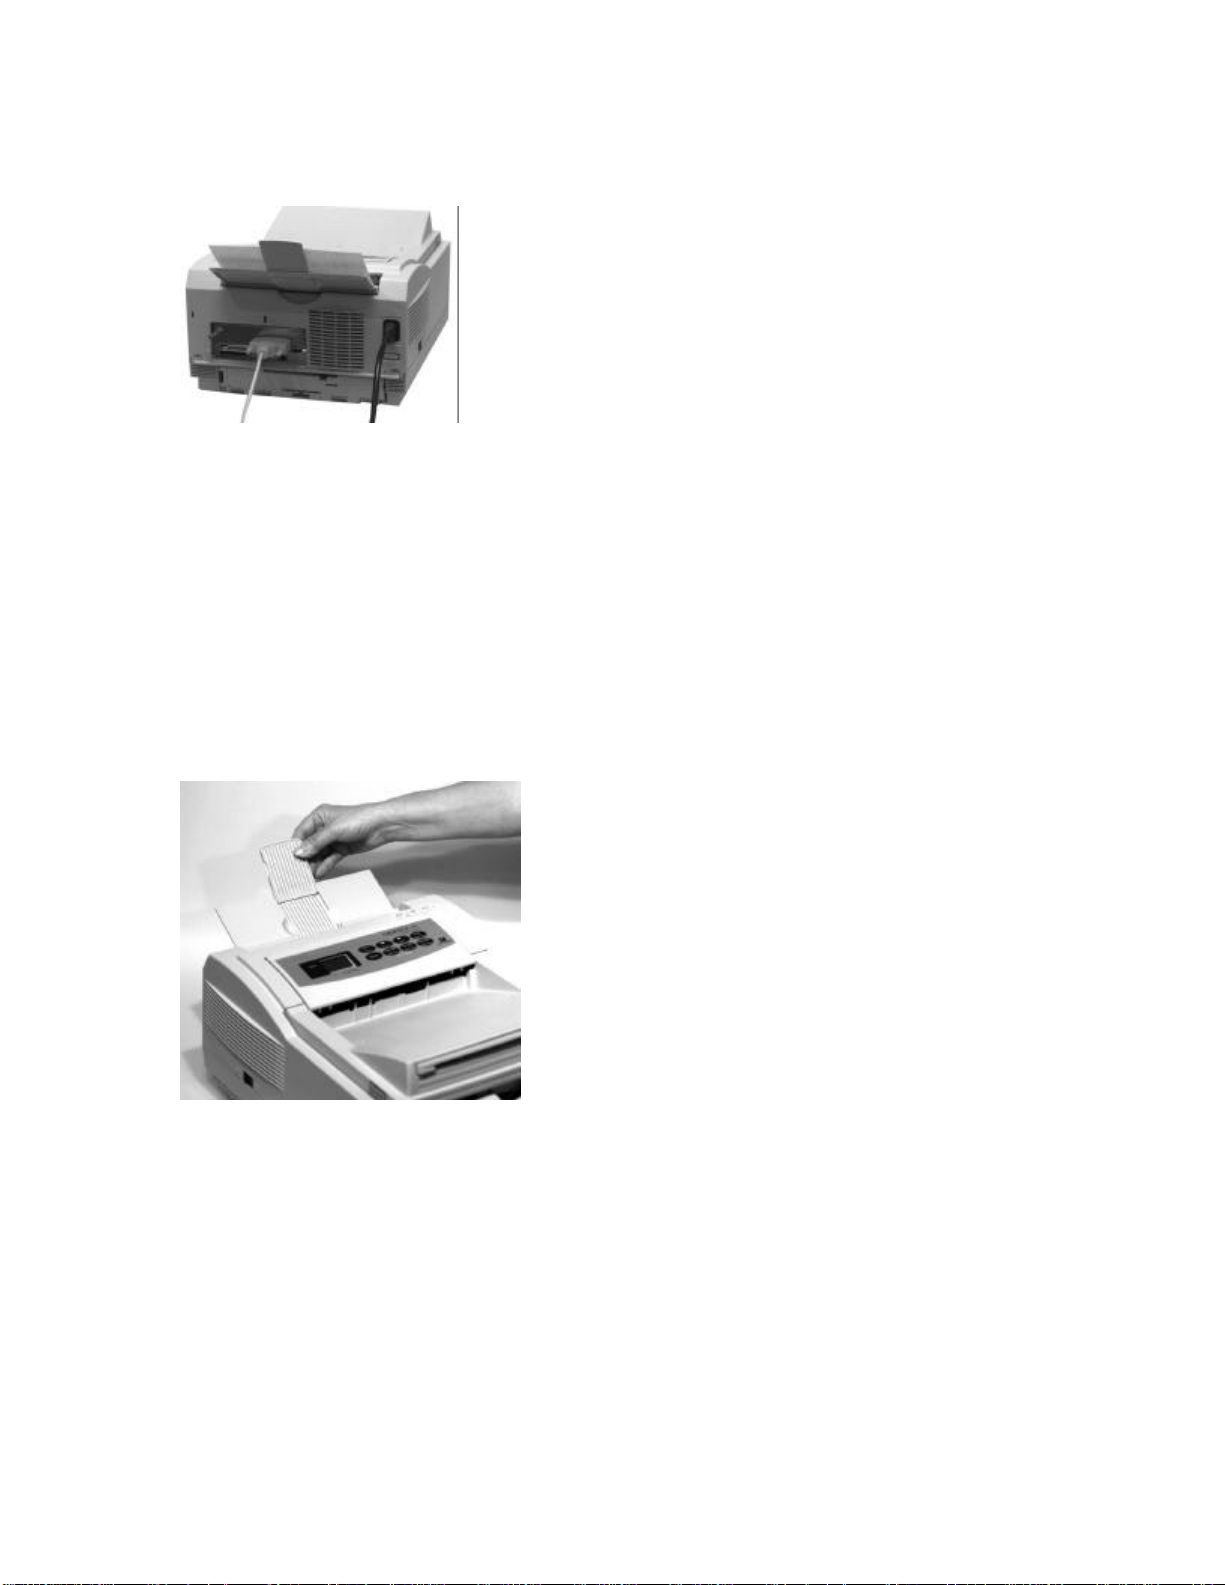
Print media can be supplied to the printer in five ways:
Ÿ From Tray 1, which takes up to 250 sheets of 20-lb. paper
Ÿ From the Manual Feeder, which takes 1 sheet of 20-lb. paper or 1
envelope, as well as transparencies, label sheets or heavy paper
Ÿ From the optional Multi-Purpose Feeder which takes up to 100 sheets of
20-lb. paper or 50 envelopes
Ÿ From the optional 2nd Paper Tray Mechanism which takes up to 500
sheets of 20-lb. paper.
16
Page 17

Paper/Print Media Exit Paths
The printer has two exit paths:
Ÿ Top Exit: The normal exit used for routine printing
Ÿ Rear Exit: Used for special types of print media such as envelopes, labels,
transparencies, etc.
17
Page 18
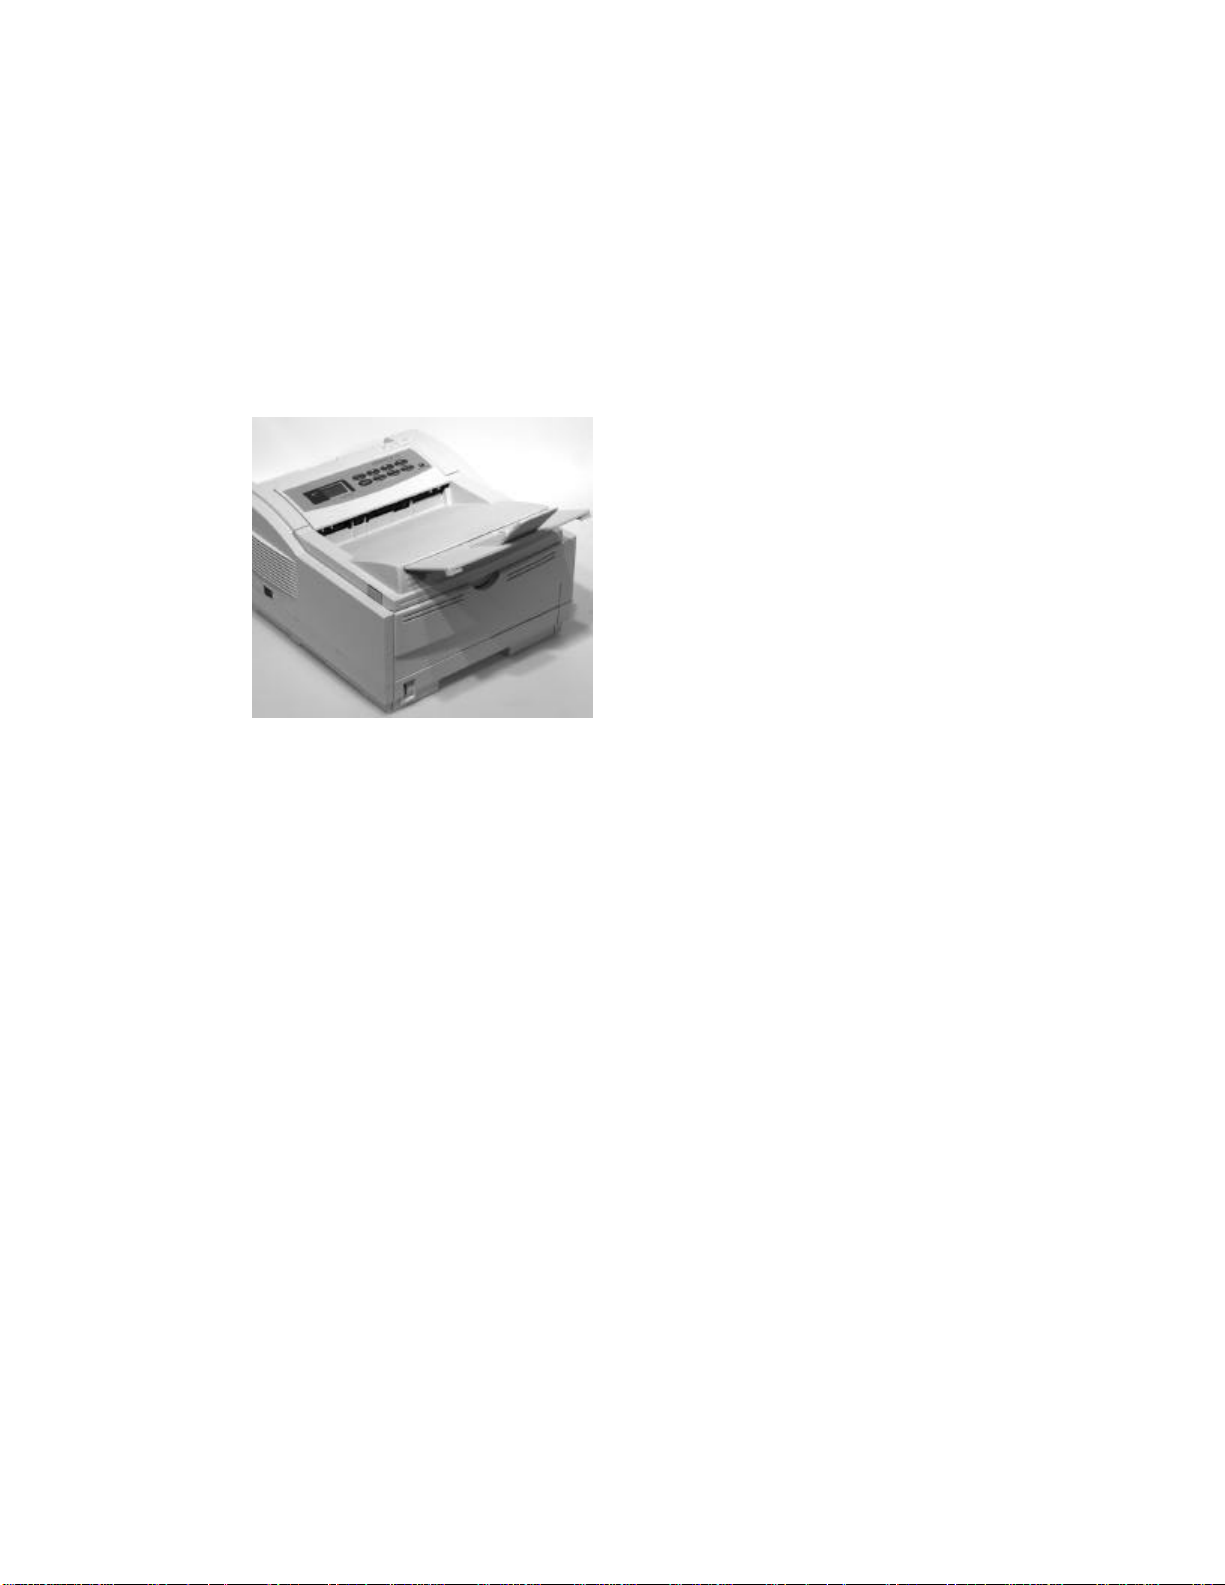
Top Exit
The top exit is the one normally used for routine printing.
Ÿ Printed pages feed face down into the bin on top of the printer.
Ÿ The bin holds 150 sheets of 20 lb. paper.
Ÿ Pages stack in the correct order.
To use the top exit:
1. Lift out the tray extender and pull it toward the front of the printer until it
stops. Pull out the support bar.
18
Page 19
Rear Exit
Use rear exit when printing on heavy paper, envelopes, labels, and
transparencies.
Ÿ Printed pages feed face up into the rear tray.
Ÿ The tray holds a maximum of 50 sheets of 20 lb. paper
Ÿ Pages stack in reverse order.
Ÿ To avoid paper jams, remove print media when rear exit tray is full.
To use rear exit:
Caution! Do not extend the rear exit tray while printing: a print media jam may
occur.
1. Pull out the rear exit tray.
2. Lift out the extender.
19
Page 20
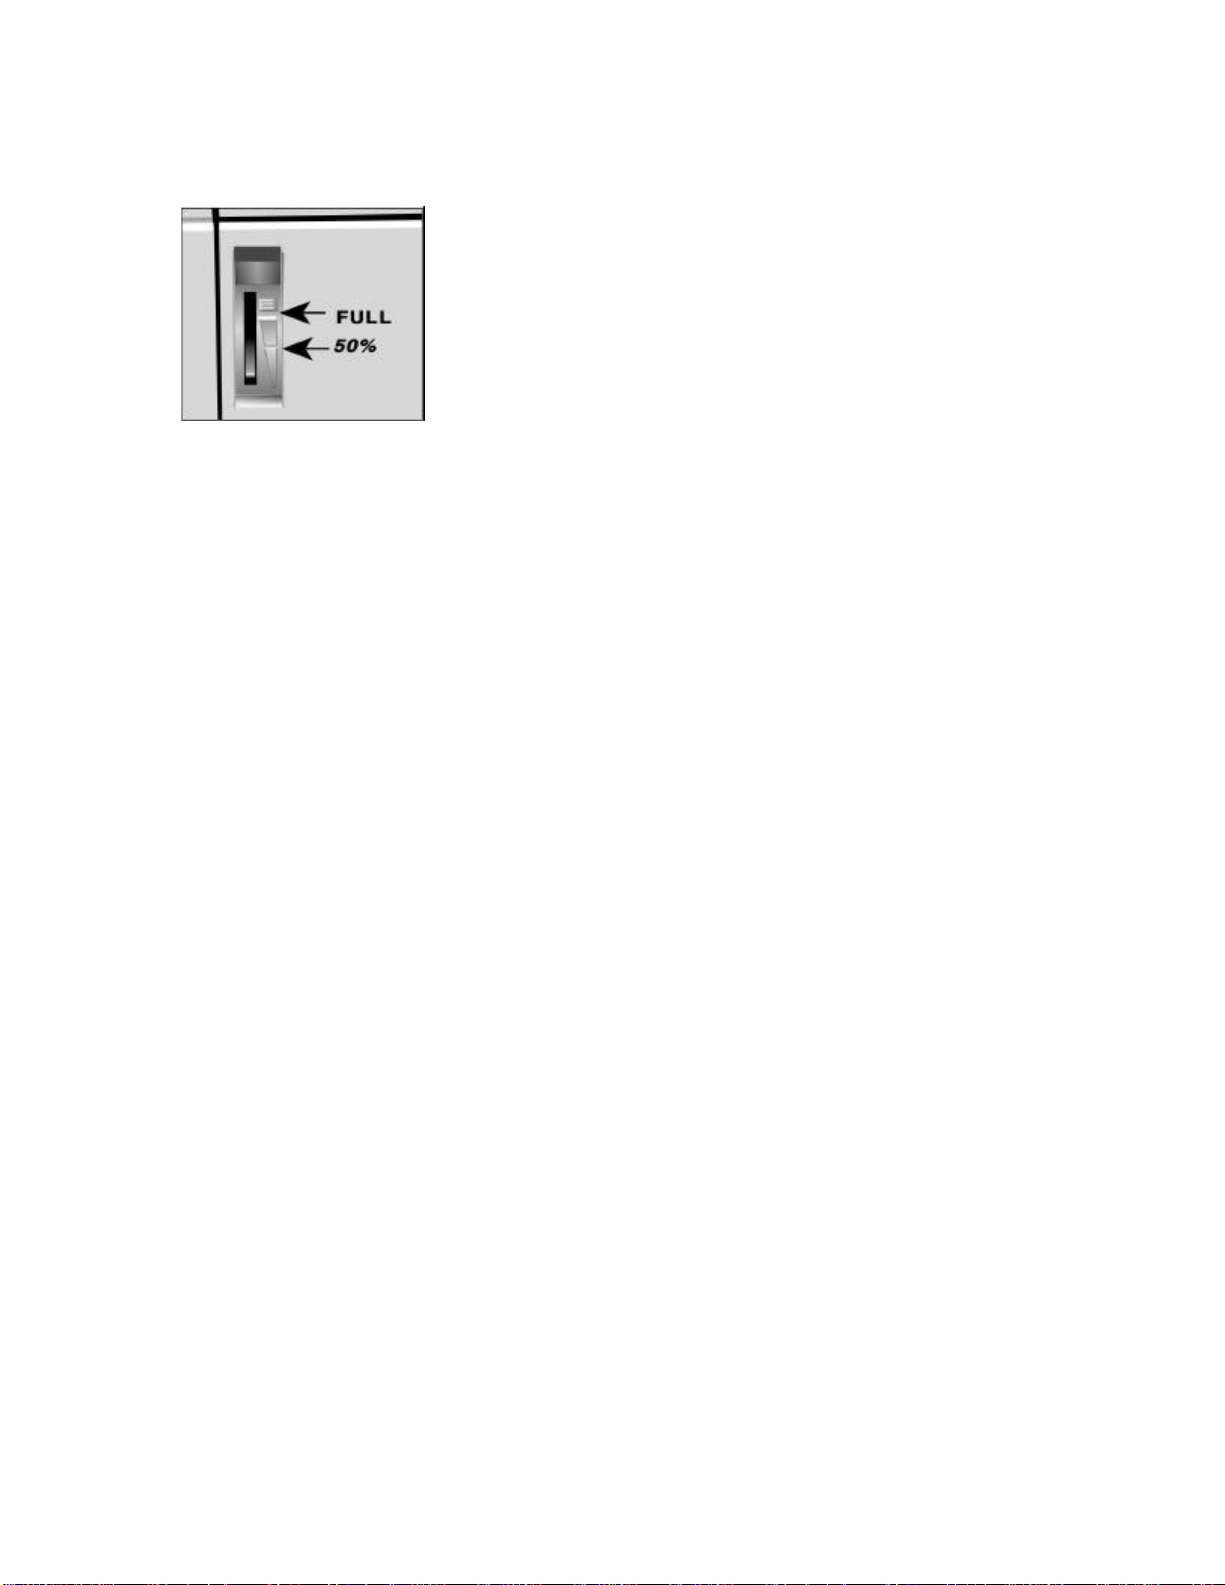
The Paper Tray Gauge
The paper tray gauge indicates the amount of paper left in the tray. This
eliminates having to open the tray to check how much paper remains.
20
Page 21

Paper Size Indicator
The flashing marker (—) in the printer display window indicates the paper size
installed in the paper tray. For example, in the picture above, legal (LGL) size
paper is installed.
This feature eliminates having to open the paper tray to see which paper size is
loaded.
21
Page 22

Storing Paper
If paper is stored improperly, print quality could be affected.
Ÿ Store paper in a dark, dry place such as a closet or a cabinet.
Ÿ Don't open the package until you are ready to use it.
Ÿ Always store paper lying flat, or it may curl.
Ÿ Store your paper in a static-free environment.
Ÿ Ideally, store paper at a constant temperature of 70°F (21.1°C) with less
than 50% humidity.
Discard the top sheet from each ream of paper before loading it into the
paper tray - it may be contaminated with glue or dust.
22
Page 23

Selecting Paper: Basis Weight
Bond Paper
Ÿ Automatic feed: use 16-lb. to 28-lb. bond—do not use automatic feed for
bond paper over 28 lb.
Ÿ Manual feed: use 16-lb. to 32-lb. bond.
Cover stock
Other types of paper measure weight differently. For example, 45-lb. cover stock
is approximately equivalent to 32-lb. bond paper.
23
Page 24

Selecting Paper: Brightness
Brightness is:
Ÿ The amount of light reflected off of the page
Ÿ Measured on a scale of 1 to 100 (copier paper has a brightness of about
84)
Many catalogs list brightness values for paper, but your eye is generally the best
judge.
Brighter paper increases contrast with the image: text and graphics
Ÿ Look crisper
Ÿ Reproduce better
Paper that isn't as bright gives a softer effect and can be easier to read for long
documents.
24
Page 25

Selecting Paper: Pulp/Rag Content
Ideally, paper should be made from 100% wood pulp. However, most papers
have some cotton or rag content.
Note: Paper with high cotton content, unless designed for laser printers,
generally does not print well because the surface is too rough.
25
Page 26

Selecting Paper: Opacity
Opacity determines how much print shows through from one side of the paper to
the other. This is more important for multi-page documents.
Opaque paper generally lets very little light pass through it.
Your eye is generally the best judge.
26
Page 27

Paper/Print Media Specifications
Caution! Print media (including ink on preprinted forms) must be able to
withstand 392°F (200°C) for 0.1 second.
Before buying any large quantity of print media, always test a sample first.
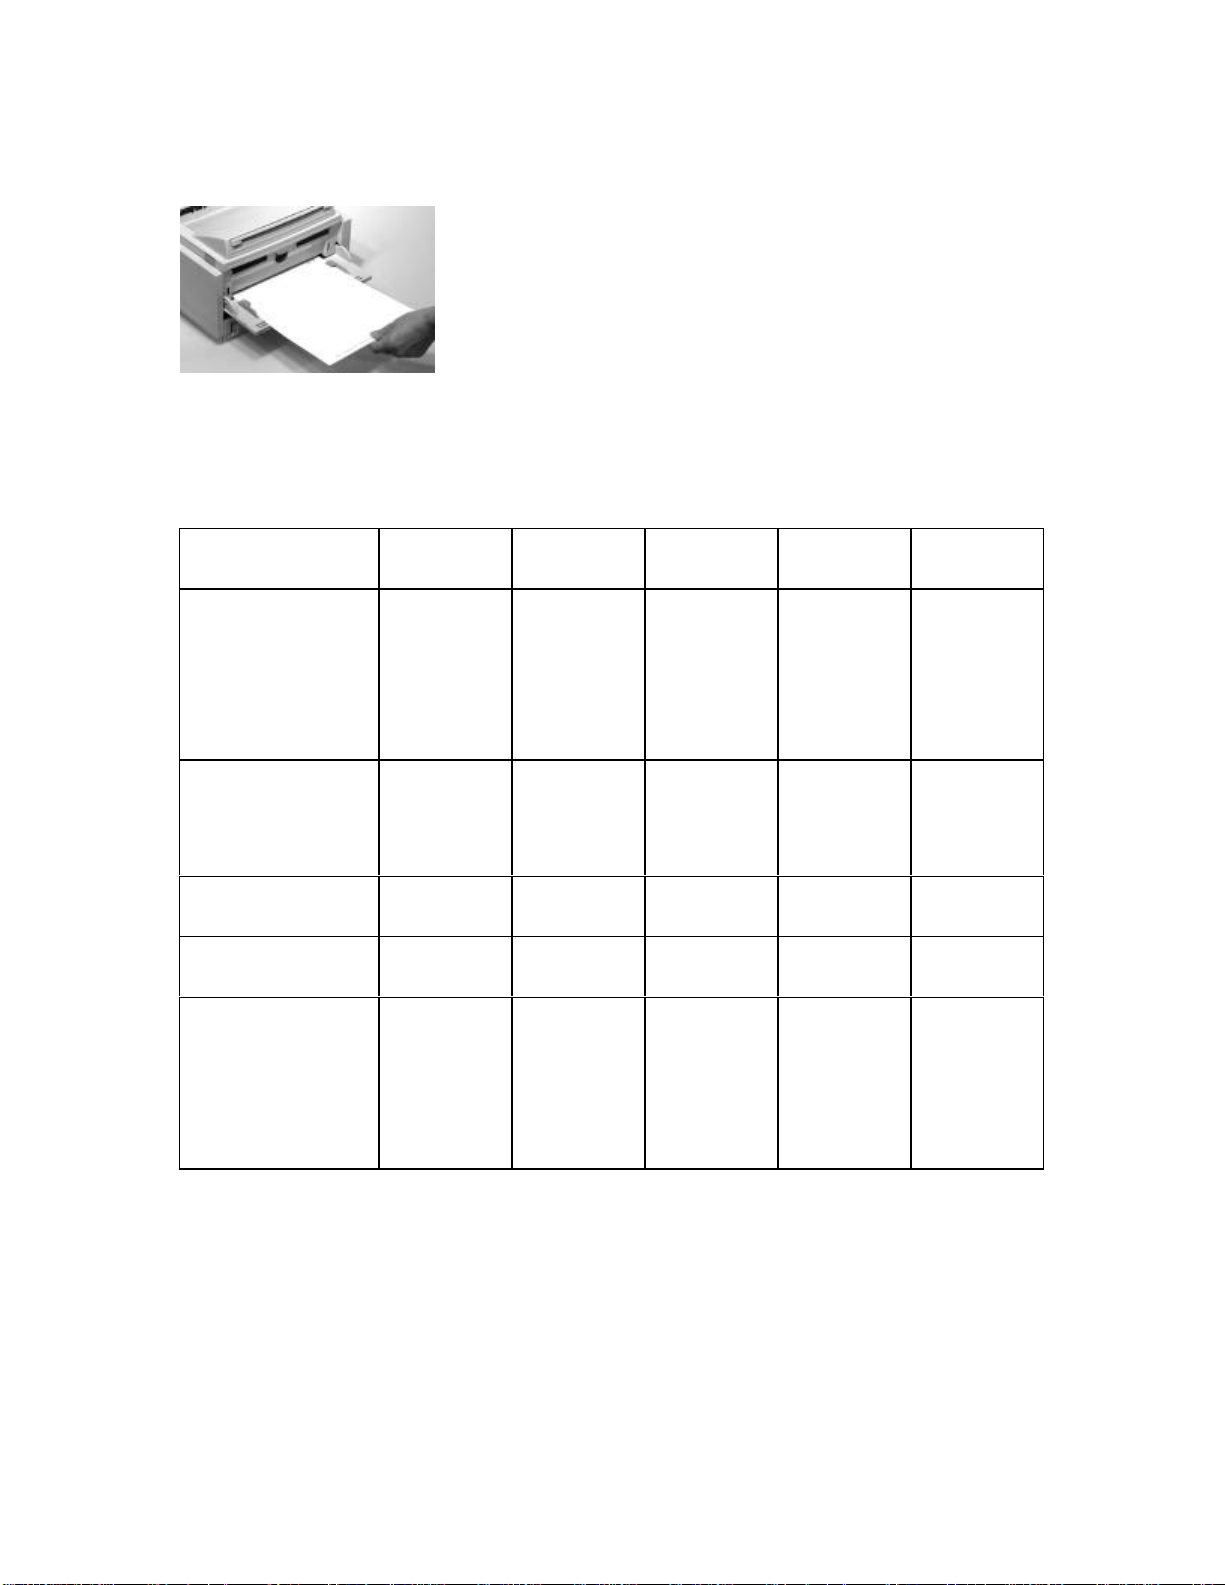
Tray 1
Manual Feeder
2nd Paper Tray (option)
Multi-Purpose Feeder (option)
27
Page 28

Tray 1 Media Specifications
Caution! Print media (including ink on preprinted forms) must be able to
withstand 392°F (200°C) for 0.1 second.
Note: Media specifications are the same for Tray 2 (option).
The default media size is in bold italic.
Media Qty Weight
Paper 250 sheets,
20 lb.
16 to 28 lb. Width: 5.8"
Size Range
to 8.5"
Length: 8.3"
to 14"
Takes
Letter, 13"
or 14" Legal,
Executive,
A4, A5, B5,
C5, Free
Exit Path
Top or Rear
28
Page 29
Manual Feed: Media Specifications
Caution! Print media (including ink on preprinted forms) must be able to
withstand 392°F (200°C) for 0.1 second.
Before buying any large quantity of print media, always test a sample first.
The default media size is in bold italic.
Size Range
Media Qty Weight
Paper Single
sheet, 20
lb.
Envelopes Single 24 to 28 lb. — COM 9,
Transparencies
(Overheads)
Labels Single — — Letter orA4Rear Only
Card Stock
(Heavy Paper)
Single — — Letter orA4Rear Only
Single Up to 32 lb.
16 to 32 lb. Width: 3.4"
to 8.6"
Length:
5.5" to 14"
Width: 3.4"
to 8.6"
Length:
5.5" to 14"
Takes
Letter, 13"
or 14"
Legal,
Executive,
A4, A5, B5,
C5, Free
COM 10,
Monarch,
DL, C4, C5
Letter, 13"
or 14"
Legal,
Executive,
A4, A5, B5,
C5
Exit Path
Top or Rear
Rear Only
Rear Only
29
Page 30

2nd Paper Tray Media Specifications
Caution! Print media (including ink on preprinted forms) must be able to
withstand 392°F (200°C) for 0.1 second.
Media Qty Weight
Paper 500 sheets,
20 lb.
16 to 28 lb. Width: 3.4"
Size Range
to 8.6"
Length: 8.3"
to 14"
Takes
Letter, Legal:
13" or 14",
Executive,
A4, A5, B5,
C5, Free
Exit Path
Top or
Rear
30
Page 31

Multi-Purpose Feeder Media Specifications
Caution! Print media (including ink on preprinted forms) must be able to
withstand 392°F (200°C) for 0.1 second.
Size Range
Media Qty Weight
Paper 100 sheets,
20 lb.
Envelopes Up to 50 16 to 28 lb. — COM 9, COM
16 to 28 lb. Width: 3.4"
to 8.6"
Length: 5.5"
to 14"
Takes
Letter,
Executive, A4,
A5, B5, C5
10, Monarch,
DL, C5
Exit Path
Top or
Rear
Rear Only
31
Page 32

Manual Feeder
Manual Feed: General Information
Use the manual feed tray to print on special media without having to change the
paper you have loaded in the tray(s). You can use the manual feed tray to print
individual pieces "on-the-fly."
Important! For media other than standard paper, you must use the rear exit.
This eliminates curling, and for labels, it eliminates peeling.
You can use the manual feed tray to print on the following media:
Ÿ Standard paper that is different from the paper loaded in the paper tray:
e.g., letterhead, different size
Ÿ Envelopes
Ÿ Labels
Ÿ Transparencies
Ÿ Heavy paper such as index or card stock
32
Page 33

Manual Feed: Standard Paper
Ÿ Single sheet
Ÿ 16 to 32 lb.
Ÿ Letter, 13" & 14" Legal, Executive, A4, A5, B5, C5 (minimum 3.4" x 2.8";
maximum 8.5" x 14")
Ÿ Use either top or rear exit path
33
Page 34

Manual Feed: Envelopes
Ÿ Single envelope
Ÿ 16 to 28 lb.
Ÿ Com 10, Com 9, Monarch, DL, C5
Ÿ Use envelopes that have a squared-off flap and seams that run down the
sides: envelopes with v-type flap are not recommended.
Yes!
No!
Ÿ Use envelopes with a smooth, even surface that are designed for laser
printers: no metal clasps, snaps, windows, or self-adhesive flaps
Ÿ Use rear exit only
34
Page 35

Manual Feed: Heavy Paper
Ÿ Single sheet
Ÿ Up to 32-lb.
Ÿ Letter, 13" & 14" Legal, Executive, A4, A5, B5, C5 (minimum 3.4" x 5.5";
maximum 14")
Ÿ Use rear exit only
35
Page 36

Manual Feed: Transparencies (Overheads)
Caution! Transparencies must withstand the fusing process heat of 392°F
(200°C) for 0.1 second without wrinkling or gumming up.
Ÿ Use transparencies designed for laser printers.
Ÿ Use rear exit to avoid curling.
To print a transparency:
1. In your software program:
a. Enter the printer setup menu.
b. Select Manual Feed.
c. Select the transparency size.
2. Pull out the rear exit tray and rear exit extender.
3. Lower the manual feed tray.
4. If necessary, adjust the paper width guides.
5. Insert the transparency with the side to be printed facing up.
6. Send the print command from your software. The printed transparency will
exit at the rear.
36
Page 37

Printable Area
Printable Area: Letter Size
The solid black area represents the portion of the page where print quality is
assured. The area enclosed in dotted lines represents the usable print area in the
HP Emulation.
37
Page 38

Printable Area: Executive Size
The solid black area represents the portion of the page where print quality is
assured. The area enclosed in dotted lines represents the usable print area in the
HP Emulation.
38
Page 39

Printable Area: A4 Size
The solid black area represents the portion of the page where print quality is
assured. The area enclosed in dotted lines represents the usable print area in the
HP Emulation.
39
Page 40

Printable Area: A5 Size
The solid black area represents the portion of the page where print quality is
assured. The area enclosed in dotted lines represents the usable print area in the
HP Emulation.
40
Page 41

Printable Area: B5 Size
The solid black area represents the portion of the page where print quality is
assured. The area enclosed in dotted lines represents the usable print area in the
HP Emulation.
41
Page 42

Printable Area: C5 Envelopes
The solid black area represents the portion of the page where print quality is
assured. The area enclosed in dotted lines represents the usable print area in the
HP Emulation.
42
Page 43

Printable Area: COM-10 Envelopes
The solid black area represents the portion of the page where print quality is
assured. The area enclosed in dotted lines represents the usable print area in the
HP Emulation.
43
Page 44

Printable Area: COM-9 Envelopes
The solid black area represents the portion of the page where print quality is
assured. The area enclosed in dotted lines represents the usable print area in the
HP Emulation.
44
Page 45
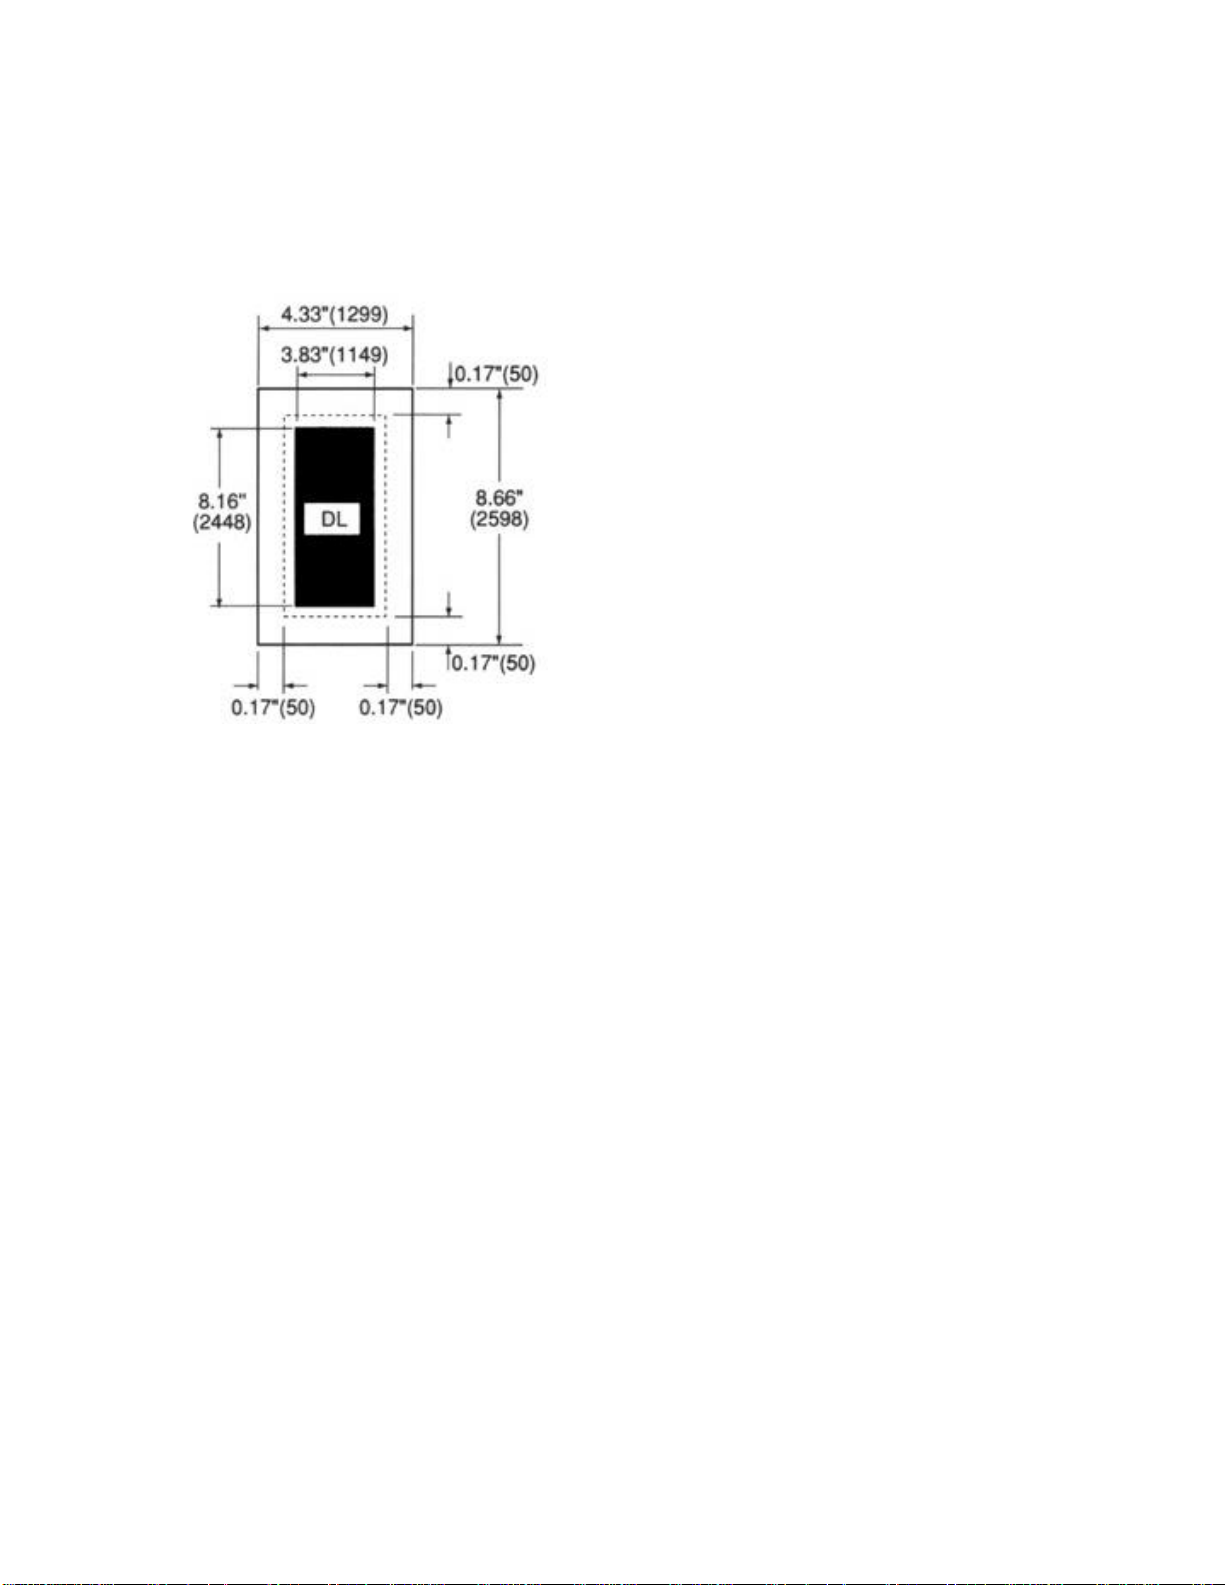
Printable Area: DL Envelopes
The solid black area represents the portion of the page where print quality is
assured. The area enclosed in dotted lines represents the usable print area in the
HP Emulation.
45
Page 46

Printable Area: Monarch Envelopes
The solid black area represents the portion of the page where print quality is
assured. The area enclosed in dotted lines represents the usable print area in the
HP Emulation.
46
Page 47
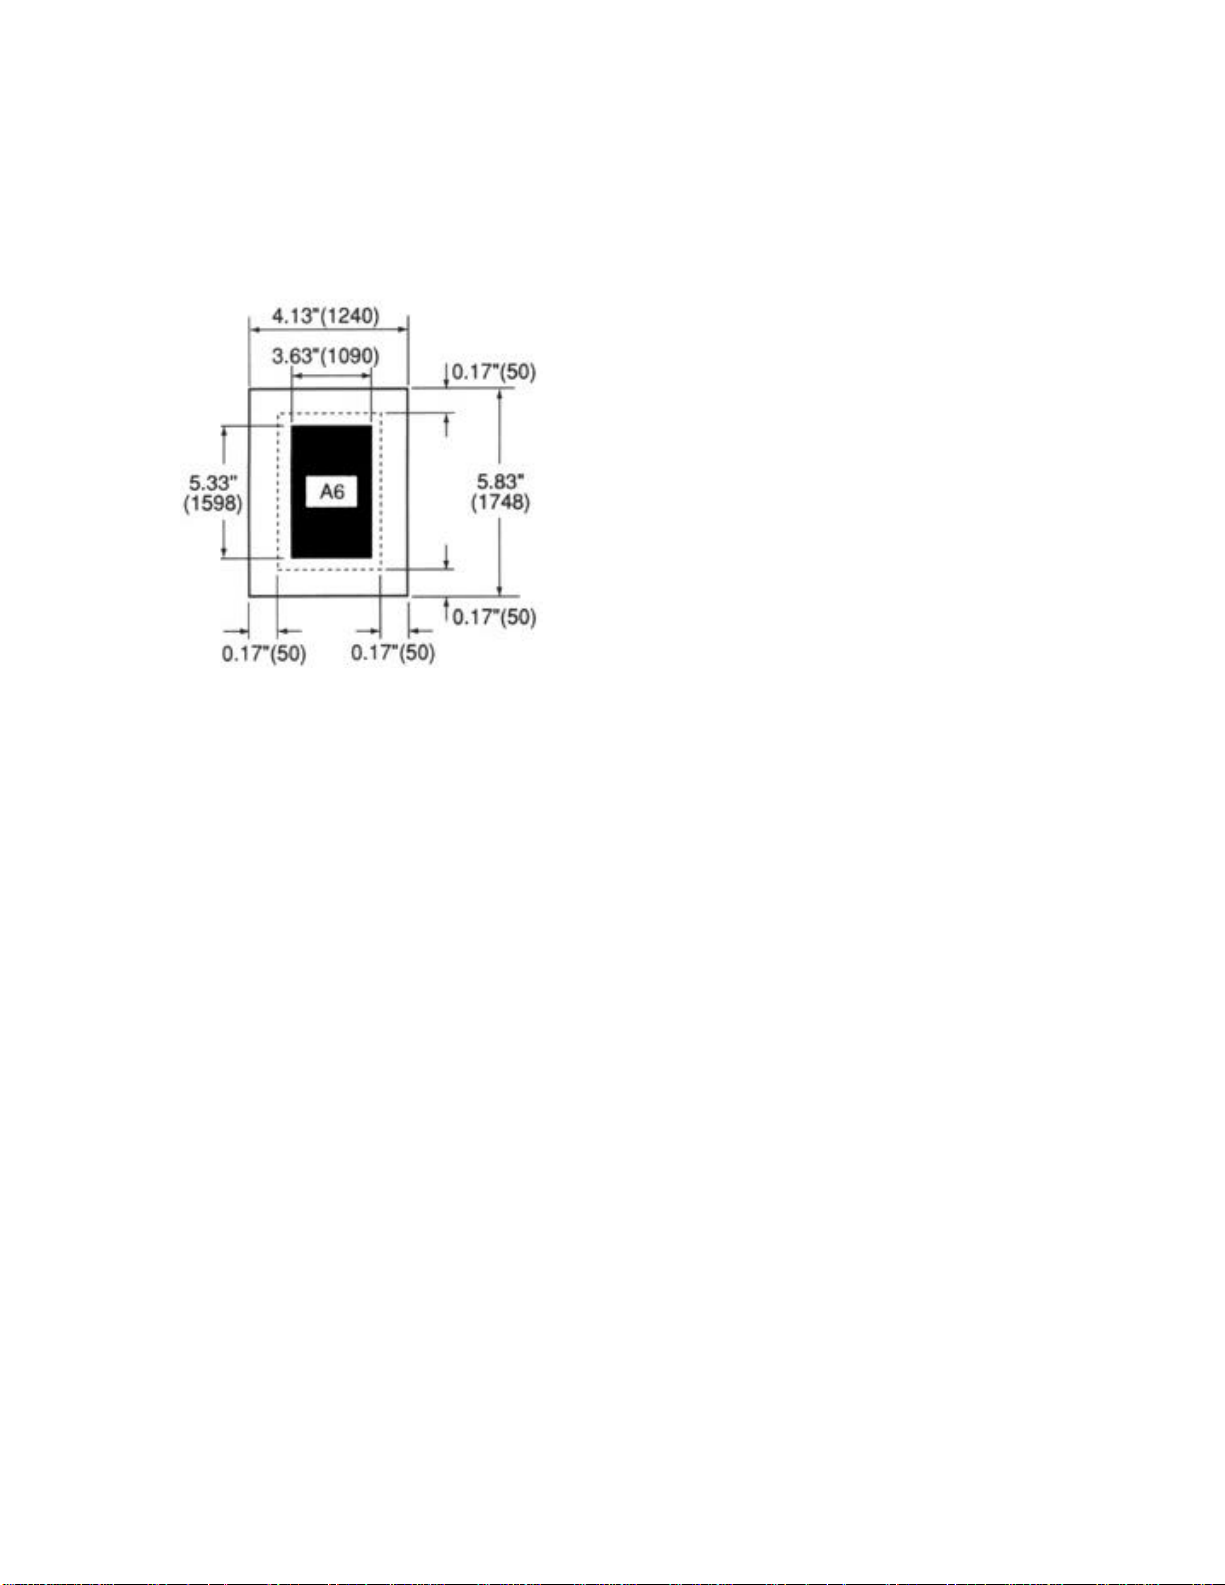
Printable Area: A6 Size
The solid black area represents the portion of the page where print quality is
assured. The area enclosed in dotted lines represents the usable print area in the
HP Emulation.
47
Page 48

Printable Area: Legal Sizes
The solid black area represents the portion of the page where print quality is
assured. The area enclosed in dotted lines represents the usable print area in the
HP Emulation.
13-Inch Legal
14-Inch Legal
48
Page 49

Front Panel
Lights
READY light
Paper Size Indicator
Display Language
The printer comes with the front panel display language set to English. You can
change the display language to French, Spanish, Portuguese, etc. using the
Level-2 Menu.
Buttons
Button Functions
To access printer functions from the front panel, place the printer off line (press
ON LINE: OFF-LINE appears on the display).
Ÿ To access the top function of each button, press the button and release.
Ÿ To access the bottom function, press and hold the button for 2 to 3
seconds.
49
Page 50

Display Language
Printer messages can be displayed in the front panel window in a number of
languages. The default language is English.
To change the display language:
1. Press ON LINE to change the printer status to off line.
2. Press MENU 1/Menu 2 and hold for 2 seconds. PRINT MODE displays.
3. Press MENU 1 until LANGUAGE displays.
4. Press ENTER. ENGLISH displays.
5. Press > / Reset until the desired language displays.
6. Press ENTER to select the new language as the default setting.
7. Press ON LINE to engage the change and place the printer back on line.
50
Page 51

Ready Light (green)
On
Off
Blinking
Ÿ On-Line
Ÿ Warming up
Ÿ Off-Line
Ÿ Initializing
Ÿ Warming up or error
Ÿ Executing printing when FORM FEED key is pressed.
Ÿ Executing development process during font printing.
51
Page 52

Buttons
Overview
Buttons
< / Recover
> / Reset
ENTER / Power Save
FORM FEED / Print Demo
MENU 1/Menu 2
ON LINE
PAPER SIZE / Print Menu
TRAY TYPE / Print Fonts
52
Page 53
< / Recover Button
Press
Press & Hold* Clears error condition and returns printer on-line.
* For at least 2 seconds
In Menu Mode returns to previous item; press and hold to
cycle backwards through all the items within a category.
Also used with > / Reset to generate a drum cleaning
page.
53
Page 54

> / Reset Button
Press
Press & Hold*
* For at least two seconds
In Menu Mode advances to the next item.
Also used with < / Recover to generate a drum cleaning
page.
Deletes data in buffer and executes internal reset.
54
Page 55

ENTER / Power Save Button
Press In Menu Mode: sets displayed Menu item as the user
default.
Press & Hold*
* For at least two seconds
Enters the Power Saving quick menu (off-line mode).
55
Page 56

FORM FEED / Print Demo Button
Press Ejects the current page (on-line mode) Unprinted data being
stored is printed out (off-line mode)
Press & Hold*
* For at least two seconds
Prints a Demo Page (HP PCL 6, IBM Proprinter III XL,
Epson FX, PostScript [14i]).
(off-line mode)
56
Page 57

MENU 1 / Menu 2 Button
Press
Press & Hold*
Hold while power is
turned on
* For at least two seconds
Enters Level-1 menu (off-line mode).
Once in the Level-1 menu, press this button to move to the
next menu item, or press and hold to cycle backwards
through all the Level-1 menu categories.
Enters Level-2 menu (off-line mode).
Enters Maintenance menu (off-line mode).
57
Page 58

ON LINE Button
Press Changes printer status from receive data mode (on-line) to local
function mode (off-line).
58
Page 59
PAPER SIZE / Print Menu Button
Press
Press & Hold*
* For at least two seconds
Enters the Paper Size quick menu (off-line mode).
Prints a listing of the current and default menu settings
(HP PCL 6, IBM Proprinter III XL, or Epson FX) (off-line
mode).
59
Page 60
TRAY TYPE / Print Fonts
Press
Press & Hold*
* For at least two seconds
Enters the Tray Select quick menu (off-line mode).
Prints a sample of installed printer fonts (HP PCL 6, IBM
Proprinter III XL, Epson FX, or PostScript [14i]) (off-line
mode).
Note: Printer must be in appropriate emulation for printout
of requested fonts list.
60
Page 61

Printer Controls
Level-1 Menu
Level-1 Menu
Overview
Using the Level-1 Menu
61
Page 62
Level-1 Menu Overview
Group Item(s)
PERSONALITY EMULATION
TRAY SELECT MANUAL FEED
PAPER FEED
AUTO TRAY SWITCH
EDIT SIZE —
PAPER SIZE TRAY 1
MANUAL
TRAY 2 (if installed)
MULTIFEEDER (if installed)
MEDIA TYPE
PAPER SIZE CHECK —
COPIES —
EURO SIGN —
FONTS & SYMBOLS (HP
Emulation)
FONTS & SYMBOLS (IBM
& Epson Emulations)
PAGE LAYOUT1 (HP
Emulation)
PAGE LAYOUT1 (IBM &
Epson Emulations)
TRAY1
TRAY2 (if installed)
FRONT/MANUAL
MULTIFEEDER (if installed)
FONT SOURCE
FONT No.
FONT PITCH
FONT HEIGHT
SYMBOL SET
CHARACTER PITCH
FONT CONDENSE
CHARACTER SET
SYMBOL SET
LETTER O STYLE
ZERO CHARACTER
A4 PRINT WIDTH
WHITE PAGE SKIP
CR FUNCTION
LF FUNCTION
LINE PITCH
WHITE PAGE SKIP
CR FUNCTION
LF FUNCTION
LINE LENGTH
FORM LENGTH
TOF POSITION
LEFT MARGIN
62
Page 63

FIT TO LETTER
PAGE LAYOUT2
HOST INTERFACE PARALLEL
ORIENTATION
LINES PER PAGE
RS232C (If installed)
USB
63
Page 64

Using the Level-1 Menu
Example
1. Press ON LINE to place the printer off-line.
2. Press MENU 1/Menu 2 to enter the Level-1 menu.
3. Continue to press MENU 1/Menu 2 repeatedly to advance through the
Level-1 menu categories.
4. Press ENTER to select a category. The current default setting displays.
Note: Some categories include more than one item. In such categories,
after you press ENTER, press MENU 1/Menu 2 to advance to the next
item before proceeding to step 5.
5. Press > / Reset repeatedly to display the selections. Stop when you see
the selection you want.
6. Press ENTER to set a selection as the default. An asterisk (*) appears to
indicate the new default setting.
7. Repeat steps 3 through 6 until you have made all the menu changes you
wish to make, then press ON LINE to exit the Menu Mode and place the
printer back on line.
Note: If the MENU 1/Menu 2 button is pressed and held while in Menu Mode, the
printer cycles through the categories in reverse order.
Note: If you enter the Level-1 menu and make a selection while there is data
present in the buffer, or while a DLL/Macro is present, the RESET TO SAVE
message appears on the display. When you press the > / Reset button, all data
in the buffer and any temporary soft fonts or macros will be cleared.
64
Page 65

Level-1 Menu Settings
The following groups will be found in the Level-1 menu:
PERSONALITY: Sets a specific printer emulation.
TRAY SELECT: Sets the paper feed parameters, including manual feed, the
default paper tray, automatic tray switching, etc.
EDIT SIZE: HP PCL6 mode only. Sets the paper size when the software does
not specify
PAPER SIZE: Sets the paper size for Tray 1, the Manual Feeder and the optional
Tray 2, or Multi-Purpose Feeder.
MEDIA TYPE: Sets the weight (thickness) of paper in the various paper feed
sources (Tray1, Manual Feeder, Tray 2 if installed, etc.)
PAPER SIZE CHECK: Determines if the printer will accept any paper size
specified by the software, regardless of whether or not it matches the paper size
actually loaded in tray.
COPIES: Sets the number of copies to be printed.
EURO SIGN: Use to enable/disable the Euro currency symbol.
FONTS & SYMBOLS, HP Emulation: Selects font and Symbol Set.
FONTS & SYMBOLS, Epson & IBM Emulations: Selects font and Symbol Set.
PAGE LAYOUT1, HP Emulation: Sets:
Ÿ For A4 paper, the number of columns (characters per line)
Ÿ whether or not a blank page prints
Ÿ carriage return function
Ÿ line feed function
PAGE LAYOUT1, IBM & Epson Emulations: Sets
Ÿ number of lines per inch
Ÿ whether or not a blank page prints
Ÿ carriage return function
Ÿ line feed function (available only in IBM PPR mode)
Ÿ number of columns (characters per line)
Ÿ page length
Ÿ Top of Form (position at top of page where printing starts)
Ÿ left margin
Ÿ fit data inside letter size printable area
PAGE LAYOUT2: Sets orientation (portrait or landscape) and lines per page.
HOST INTERFACE: Use to select the interface (parallel, serial, USB, network) to
be used.
65
Page 66

Level-1 Menu:
A4 PRINT WIDTH
(HP Emulation Only)
Using the Level-1 Menu
Use for A4 size paper to select 78 columns or condense 80 columns to fit all
characters on a line.
Settings (Default)
Ÿ 78 COLUMN
Ÿ 80 COLUMN
66
Page 67

Level-1 Menu:
AUTO TRAY SWITCH
Using the Level-1 Menu
To engage auto tray switching, select ON. When Tray 1 is empty, the printer
automatically switches to the 2nd Paper Tray Mechanism, if installed, then to the
Manual Feeder, then to the Multi-Purpose Feeder, if installed.
Settings (Default)
Ÿ OFF
Ÿ ON
67
Page 68

Level-1 Menu:
CHARACTER PITCH
(IBM and Epson Emulations)
Using the Level-1 Menu
Sets the character pitch, in characters per inch, or proportional printing (narrow
characters such as " l " take up less width than wide characters such as "m").
Settings (Default)
Ÿ 10 CPI
Ÿ 12 CPI
Ÿ 17 CPI
Ÿ 20 CPI
Ÿ PROPORTIONAL
68
Page 69

Level-1 Menu:
CHARACTER SET
(IBM & Epson Emulations)
Using the Level-1 Menu
Selects the character set to be used.
Settings (Default)
Ÿ SET-2
Ÿ SET-1
69
Page 70

Level-1 Menu:
COPIES
Using the Level-1 Menu
Selects the number of copies to print for each document.
Settings (Default)
1 to 999 in increments of one
70
Page 71

Level-1 Menu:
CR FUNCTION
(HP Emulation Only)
Using the Level-1 Menu
Change to CR + LF if you wish to add the LF (line feed) command to each CR
(carriage return) command.
Settings (Default)
Ÿ CR
Ÿ CR + LF
71
Page 72

Level-1 Menu:
CR FUNCTION
(IBM & Epson Emulations)
Using the Level-1 Menu
Change to CR + LF if you wish to add the LF (line feed) command to each CR
(carriage return) command.
Settings (Default)
Ÿ CR
Ÿ CR + LF
72
Page 73

Level-1 Menu:
EDIT SIZE
Using the Level-1 Menu
In HP PCL6 mode, sets the paper size when the software does not.
Note: Paper size specified in your software program will override this menu
setting.
Selections (Default):
Ÿ CASSETTE SIZE
Ÿ LETTER
Ÿ EXECUTIVE
Ÿ LEGAL14
Ÿ LEGAL13
Ÿ A4 SIZE
Ÿ A5 SIZE
Ÿ A6 SIZE
Ÿ B5
Ÿ COM-9
Ÿ COM-10
Ÿ MONARCH
Ÿ DL ENVELOPE
Ÿ C5 ENVELOPE
Notes:
HP PCL6 mode: With the default selected, the paper size will be whatever is
detected in tray 1, or tray 2. If manual feed or the front feeder are being used, the
paper size will be the one selected in the Level-1 menu (default is letter).
PostScript mode (14i): Ignored.
73
Page 74

Level-1 Menu:
EMULATION
Using the Level-1 Menu
Auto Emulation automatically switches between HP PCL6 (LaserJet 5), IBM PPR
III XL, Epson FX and Adobe PostScript emulations, depending on what the
printer detects in the incoming data to be printed.
Settings (Default)
Ÿ AUTO Emulation
Ÿ HP® PCL®6
Ÿ IBM® PPR III XL
Ÿ Epson® FX
Ÿ Adobe® PostScript® (14i only)
74
Page 75

Level-1 Menu:
EURO SIGN
Using the Level-1 Menu
Change to Enable to switch to Euro Currency (Euro dollar mark).
Settings (Default)
Ÿ DISABLE
Ÿ ENABLE
75
Page 76

Level-1 Menu:
FIT TO LETTER
(IBM & Epson Emulations)
Using the Level-1 Menu
Fits print data within the printable area of a letter-size page.
Settings (Default)
Ÿ DISABLE
Ÿ ENABLE
76
Page 77

Level-1 Menu:
FONT CONDENSE
(IBM Emulation Only)
Using the Level-1 Menu
Selects the 12 cpi pitch when condense is specified.
Settings (Default)
Ÿ 12 CPI TO 20 CPI
Ÿ 12 CPI TO 12 CPI
77
Page 78

Level-1 Menu:
FONT HEIGHT
(HP Emulation Only)
Using the Level-1 Menu
This item displays only when the font selected by the FONT No. item is a
proportional spacing, scalable font such as Arial, Garamond, etc.
Settings (Default)
Ÿ 12.00 POINT
Ÿ Range 4.00 to 999.75 points
78
Page 79

Level-1 Menu:
FONT No.
(HP emulation Only)
Using the Level-1 Menu
Prefix indicates font source:
Ÿ I = internal (resident); I000 = Courier.
Ÿ C = Card Font (appears only if optional Flash SIMM is installed).
Ÿ S = downloaded soft font (appears only if soft font is loaded).
Settings (Default)
Ÿ I000 to I0048
Ÿ C000
Ÿ S001
79
Page 80

Level-1 Menu:
FONT PITCH
(HP Emulation Only)
Using the Level-1 Menu
Displays only when the font selected by the FONT No. item is a fixed spacing
scalable font such as Courier or Letter Gothic. Values are characters per inch
(cpi).
Settings (Default)
Ÿ 10.00
Ÿ Range: 0.44 to 99.99
80
Page 81

Level-1 Menu:
FONT SOURCE
(HP Emulation Only)
Using the Level-1 Menu
Selects the font source.
Note: SIMM appears only if the optional Flash SIMM is installed.
DOWNLOADED appears only if a soft font is loaded.
Settings (Default)
Ÿ RESIDENT
Ÿ SIMM
Ÿ DOWNLOADED
81
Page 82

Level-1 Menu:
FORM LENGTH
(IBM & Epson Emulations)
Using the Level-1 Menu
Sets the paper length.
Settings (Default)
Ÿ 11INCH (LETTER)
Ÿ 11.7INCH (A4)
Ÿ 12INCH
82
Page 83

Level-1 Menu:
LEFT MARGIN
(IBM & Epson Emulations)
Using the Level-1 Menu
Shifts the horizontal print position to the right, relative to the start of the printable
area on the left edge of the page.
Settings (Default)
Ÿ 0.0INCH
Ÿ 0.1INCH
Ÿ 1.0INCH
83
Page 84

Level-1 Menu:
LETTER O STYLE
(IBM & Epson Emulations)
Using the Level-1 Menu
Selects the style to be used for the letter O.
Settings (Default)
Ÿ DISABLE
Ÿ ENABLE
84
Page 85

Level-1 Menu:
LF FUNCTION
(IBM Emulation Only)
Using the Level-1 Menu
Change to LF + CR if you wish to add the CR (carriage return) command to each
LF (line feed) command.
Settings (Default)
Ÿ LF
Ÿ LF + CR
85
Page 86

Level-1 Menu:
LF FUNCTION
(HP Emulation Only)
Using the Level-1 Menu
Change to LF + CR if you wish to add the CR (carriage return) command to each
LF (line feed) command.
Settings (Default)
Ÿ LF
Ÿ LF + CR
86
Page 87

Level-1 Menu:
LINE LENGTH
(IBM & Epson Emulations)
Using the Level-1 Menu
Sets the number of characters per line.
Settings (Default)
Ÿ 80 COLUMN
Ÿ 136 COLUMN
87
Page 88

Level-1 Menu:
LINE PITCH
(IBM and Epson Emulations)
Using the Level-1 Menu
Sets the number of lines per inch (lpi).
Settings (Default)
Ÿ 6 LPI
Ÿ 8LPI
88
Page 89

Level-1 Menu:
LINES PER PAGE
Using the Level-1 Menu
Sets the number of lines per page in one-line increments.
Settings (Default)
Ÿ 60 LINES
Ÿ Range: 5 to 128 LINES, in 1-line increments
89
Page 90

Level-1 Menu:
MANUAL FEED
Using the Level-1 Menu
Change the setting to ON if you wish the printer to feed paper from the Manual
Feeder regardless of the PAPER FEED setting. When the job is ready to print,
MANUAL REQUEST appears on the display.
Settings (Default)
Ÿ OFF
Ÿ ON
90
Page 91

Level-1 Menu:
MEDIA TYPETRAY1
Using the Level-1 Menu
Use this feature to improve print quality and toner fusing when printing from Tray
1.
Settings (Default)
Ÿ LIGHT
Ÿ MEDIUM LIGHT
Ÿ MEDIUM
Ÿ MEDIUM HEAVY
Ÿ HEAVY
Note:
Light = 16 lb. (60 g/m2)
Medium Light = 18 lb. (68 g/m2)
Medium = 20 lb. (75 g/m2)
Medium Heavy = 24 lb. (90 g/m2)
Heavy = 28 lb. (105 g/m2)
Item Setting (Default) Notes
MULTI- FEEDER
(appears if option
is installed)
LIGHT
MEDIUM LIGHT
MEDIUM
MEDIUM HEAVY
HEAVY
TRANSPARENCY
Specify print media weight/type to
improve print quality and toner fusing.
Light to Heavy weight values are same
as specified for Tray 1.
For overhead projector slides, set
Transparency.
91
Page 92

Level-1 Menu:
MEDIA TYPE TRAY2
Using the Level-1 Menu
Use this feature to improve print quality and toner fusing when printing from Tray
2.
Note: This item only appears if the 2nd paper tray is installed.
Settings (Default)
Ÿ LIGHT
Ÿ MEDIUM LIGHT
Ÿ MEDIUM
Ÿ MEDIUM HEAVY
Ÿ HEAVY
Note:
Light = 16 lb. (60 g/m2)
Medium Light = 18 lb. (68 g/m2)
Medium = 20 lb. (75 g/m2)
Medium Heavy = 24 lb. (90 g/m2)
Heavy = 28 lb. (105 g/m2)
92
Page 93

Level-1 Menu:
MEDIA TYPE — FRONT/MANUAL
Using the Level-1 Menu
Use this feature to improve print quality and toner fusing.
Settings (Default)
Ÿ LIGHT
Ÿ MEDIUM LIGHT
Ÿ MEDIUM
Ÿ MEDIUM HEAVY
Ÿ HEAVY
Ÿ TRANSPARENCY
Note:
Light = 16 lb. (60 g/m2)
Medium Light = 18 lb. (68 g/m2)
Medium = 20 lb. (75 g/m2)
Medium Heavy = 24 lb. (90 g/m2)
Heavy = 28 lb. (105 g/m2)
93
Page 94

Level-1 Menu:
MEDIA TYPE — MULTIFEEDER
Using the Level-1 Menu
Use this feature to improve print quality and toner fusing when printing from the
optional Multi-Purpose Feeder.
Settings (Default)
Ÿ LIGHT
Ÿ MEDIUM LIGHT
Ÿ MEDIUM
Ÿ MEDIUM HEAVY
Ÿ HEAVY
Ÿ TRANSPARENCY
Note:
Light = 16 lb. (60 g/m2)
Medium Light = 18 lb. (68 g/m2)
Medium = 20 lb. (75 g/m2)
Medium Heavy = 24 lb. (90 g/m2)
Heavy = 28 lb. (105 g/m2)
94
Page 95

Level-1 Menu:
ORIENTATION
Using the Level-1 Menu
Sets printing oriented with the width of the page (portrait) or with the length of the
page (landscape).
Settings (Default)
Ÿ PORTRAIT
Ÿ LANDSCAPE
95
Page 96

Level-1 Menu:
PAPER FEED
Using the Level-1 Menu
Selects paper source.
Settings (Default)
Ÿ TRAY 1
Ÿ TRAY 2 (if 2nd paper tray is installed)
Ÿ Manual
Ÿ MULTI FEEDER (if optional Multi-Purpose Feeder is installed)
96
Page 97

Level-1 Menu:
PAPER SIZE CHECK
Using the Level-1 Menu
The printer is set at the factory to only accept a paper size selected in software
which matches the size of paper actually loaded in the tray.
Change to Disable to have the printer accept any paper size selected in your
software, regardless of the paper size actually loaded in the tray.
Settings (Default)
Ÿ ENABLE
Ÿ DISABLE
97
Page 98

Level-1 Menu:
PAPER SIZE, Tray 1
Using the Level-1 Menu
In HP PCL6 mode, sets the paper size when the software does not.
Note: Paper size specified in your software program will override this menu
setting.
Selections (Default):
Ÿ CASSETTE SIZE
Ÿ LETTER
Ÿ EXECUTIVE
Ÿ LEGAL14
Ÿ LEGAL13
Ÿ A4 SIZE
Ÿ A5 SIZE
Ÿ A6 SIZE
Ÿ B5
Notes:
HP PCL6 mode: With the default selected, the paper size will be whatever is
detected in tray 1, or tray 2. If manual feed or the front feeder are being used, the
paper size will be the one selected in the Level-1 menu (default is letter).
PostScript mode: Ignored.
98
Page 99

Level 1 Menu:
PAPER SIZE TRAY 2
In HP PCL6 mode, sets the paper size when the software does not.
Note: Paper size specified in your software program will override this menu
setting.
Selections (Default):
Ÿ CASSETTE SIZE
Ÿ LETTER
Ÿ EXECUTIVE
Ÿ LEGAL14
Ÿ LEGAL13
Ÿ A4 SIZE
Ÿ A5 SIZE
Ÿ A6 SIZE
Ÿ B5
Notes:
HP PCL6 mode: With the default selected, the paper size will be whatever is
detected in tray 1, or tray 2. If manual feed or the front feeder are being used, the
paper size will be the one selected in the Level-1 menu (default is letter).
PostScript mode: Ignore
99
Page 100

Level-1 Menu:
PAPER SIZE — MANUAL
Using the Level-1 Menu
Selects the paper size installed in the Manual Feeder.
Settings (Default)
Ÿ LETTER
Ÿ EXECUTIVE
Ÿ LEGAL 13
Ÿ LEGAL 14
Ÿ A4 SIZE
Ÿ A5 SIZE
Ÿ A6 SIZE
Ÿ B5 SIZE
Ÿ COM-9
Ÿ COM-10
Ÿ MONARCH
Ÿ DL ENVELOPE
Ÿ C5 ENVELOPE
Ÿ C4 ENVELOPE
Note: If paper size installed does not match setting, the printer will display a
message requesting the size set in the menu.
100
 Loading...