

Page 1
84sugb.fm Page 1 Monday, August 9, 1999 4:05 PM
English
English
Setup Guide
OKIOFFICE 44 1
Page 2
y
84sugb.fm Page 2 Monday, August 9, 1999 4:05 PM
English
Every effort has been made to ensure that the information in this document
is complete, accurate, and up-to-date. The manufacturer of this equipment
assumes no responsibility for the results of errors beyond its control. The
manufacturer of this equipment also cannot guarantee that changes in
software and equipment made by other manufacturers and referred to in
this guide will not affect the applicability of the information in it.
Mention of software products manufactured by other companies does not
necessarily constitute endorsement by the manufacturer of this equipment.
This user’s guide is subject to change without notification.
Copyright 1999 by Oki. All rights reserved.
Written and produced by Oki Europe Ltd.
OKI and OKIOFFICE are registered trademarks of Oki Electric Industry
Company, Ltd.
Energy Star is a trademark of the United States Environmental Protection
Agency.
This product complies with the requirements of the Council
Directives 89/336/EEC and 73/23/EEC on the
approximation of the laws of the member states relating to
electromagnetic compatibility and low voltage.
Energy Star
As an Energy Star Partner, the manufacturer has determined
that this product meets the Energy Star guide-lines for energy
efficienc
2 Setup Guide
.
Page 3

84sugb.fm Page 3 Monday, August 9, 1999 4:05 PM
Contents
SAFETY. . . . . . . . . . . . . . . . . . . . . . . . . . . . . . . . . . . . . 4
General . . . . . . . . . . . . . . . . . . . . . . . . . . . . . . . . . . . 4
Installation Hints . . . . . . . . . . . . . . . . . . . . . . . . . . . . 4
Operation & Maintenance . . . . . . . . . . . . . . . . . . . . . 5
INSTALLATION. . . . . . . . . . . . . . . . . . . . . . . . . . . . . . 6
Unpacking . . . . . . . . . . . . . . . . . . . . . . . . . . . . . . . . . 6
Installing Paper Trays & Stackers. . . . . . . . . . . . . . . 7
Installing Toner Cartridge . . . . . . . . . . . . . . . . . . . . . 8
Connecting Power Cable. . . . . . . . . . . . . . . . . . . . . 11
Connecting Telephone Line . . . . . . . . . . . . . . . . . . 12
Loading Printing Paper . . . . . . . . . . . . . . . . . . . . . . 12
Control Panel. . . . . . . . . . . . . . . . . . . . . . . . . . . . . . 13
Setting Answering Mode . . . . . . . . . . . . . . . . . . . . 13
Setting Machine Identification . . . . . . . . . . . . . . . . 14
Loading Documents . . . . . . . . . . . . . . . . . . . . . . . . 15
Sending Faxes . . . . . . . . . . . . . . . . . . . . . . . . . . . . . 16
Receiving Faxes . . . . . . . . . . . . . . . . . . . . . . . . . . . 16
Making Copies . . . . . . . . . . . . . . . . . . . . . . . . . . . . 16
English
OKIOFFICE 44 3
Page 4

84sugb.fm Page 4 Monday, August 9, 1999 4:05 PM
English
SAFETY
Your machine has been carefully designed to give you years of safe,
reliable performance. As with all electrical equipment, however, there are
a few basic precautions you should take to avoid hurting yourself or
damaging the machine.
General
• Read this user's guide carefully and keep it in a safe but accessible place
so that you can use it for future reference.
• Read and follow all warning and instruction labels on the machine
itself.
• Disconnect the machine before you clean it. DO NOT use liquid or
aerosol cleaners to clean the machine.
• Place your machine on a firm, solid surface. If you place the machine
on something unsteady, it may fall and become damaged or injure
someone. If you place the machine on a soft surface, such as a rug, sofa,
or bed, the vents may become blocked causing the machine to overheat.
• Do not use your machine near water, or spill liquid of any kind into it.
Installation Hints
• Install your machine in a dust-free location away from direct sunlight.
• Do not connect your machine to a power source that is used by other
equipment producing electrical noise (i.e., air conditioners, etc.).
• Leave electronic adjustments to authorized service personnel.
•The
To avoid damage to your telephone system or to the machine, do not
connect your machine into anything other than a standard telephone
socket.
• Your machine has an earthed, 3-pin plug as a safety feature and it will
only connect to an earthed outlet. If you cannot connect this plug to
your power outlet, then it is possible that you have an older, nonearthed outlet. Contact an electrician to have your power outlet
replaced. Do not use an adapter to defeat the earthing.
• The electrical power outlet should be located near the machine and
should be easily accessible.
4 Setup Guide
terminal connects your machine to a standard telephone line.
LINE
Page 5

84sugb.fm Page 5 Monday, August 9, 1999 4:05 PM
English
• The two
ports on the back of the machine are only suitable for 2
TEL
wire devices. Not all standard telephones will respond to incoming
ringing when connected to an extension socket.
• This machine may not necessarily provide an effective hand-over of a
call from a telephone connected to the same line.
• The operation of this machine on the same line as a telephone or other
equipment with audible warning devices or automatic ring detectors
will give rise to bell tinkle or noise and may cause false tripping of the
ring detector. Should such problems occur, the user is not to contact the
telephone company.
Operation & Maintenance
• Use a dry cloth to clean the control panel and the main body of the unit.
• Aside from the instructions specifically mentioned in this User’s Guide,
your machine is not user serviceable. DO NOT attempt to service the
machine or lubricate moving parts by yourself.
• Disconnect the power cable before trying to remove any objects that
may have fallen into the machine.
• Immediately disconnect the machine if it becomes physically damaged
and arrange for its repair or disposal.
• When relocating your machine, always disconnect the telephone line
before disconnecting the power cable. When reconnecting your
machine, connect the power cable first, then the telephone line.
• This machine is not intended to be used in parallel with any other
telephone devices.
OKIOFFICE 44 5
Page 6

84sugb.fm Page 6 Monday, August 9, 1999 4:05 PM
English
INSTALLATION
To install your new machine, follow the instructions below.
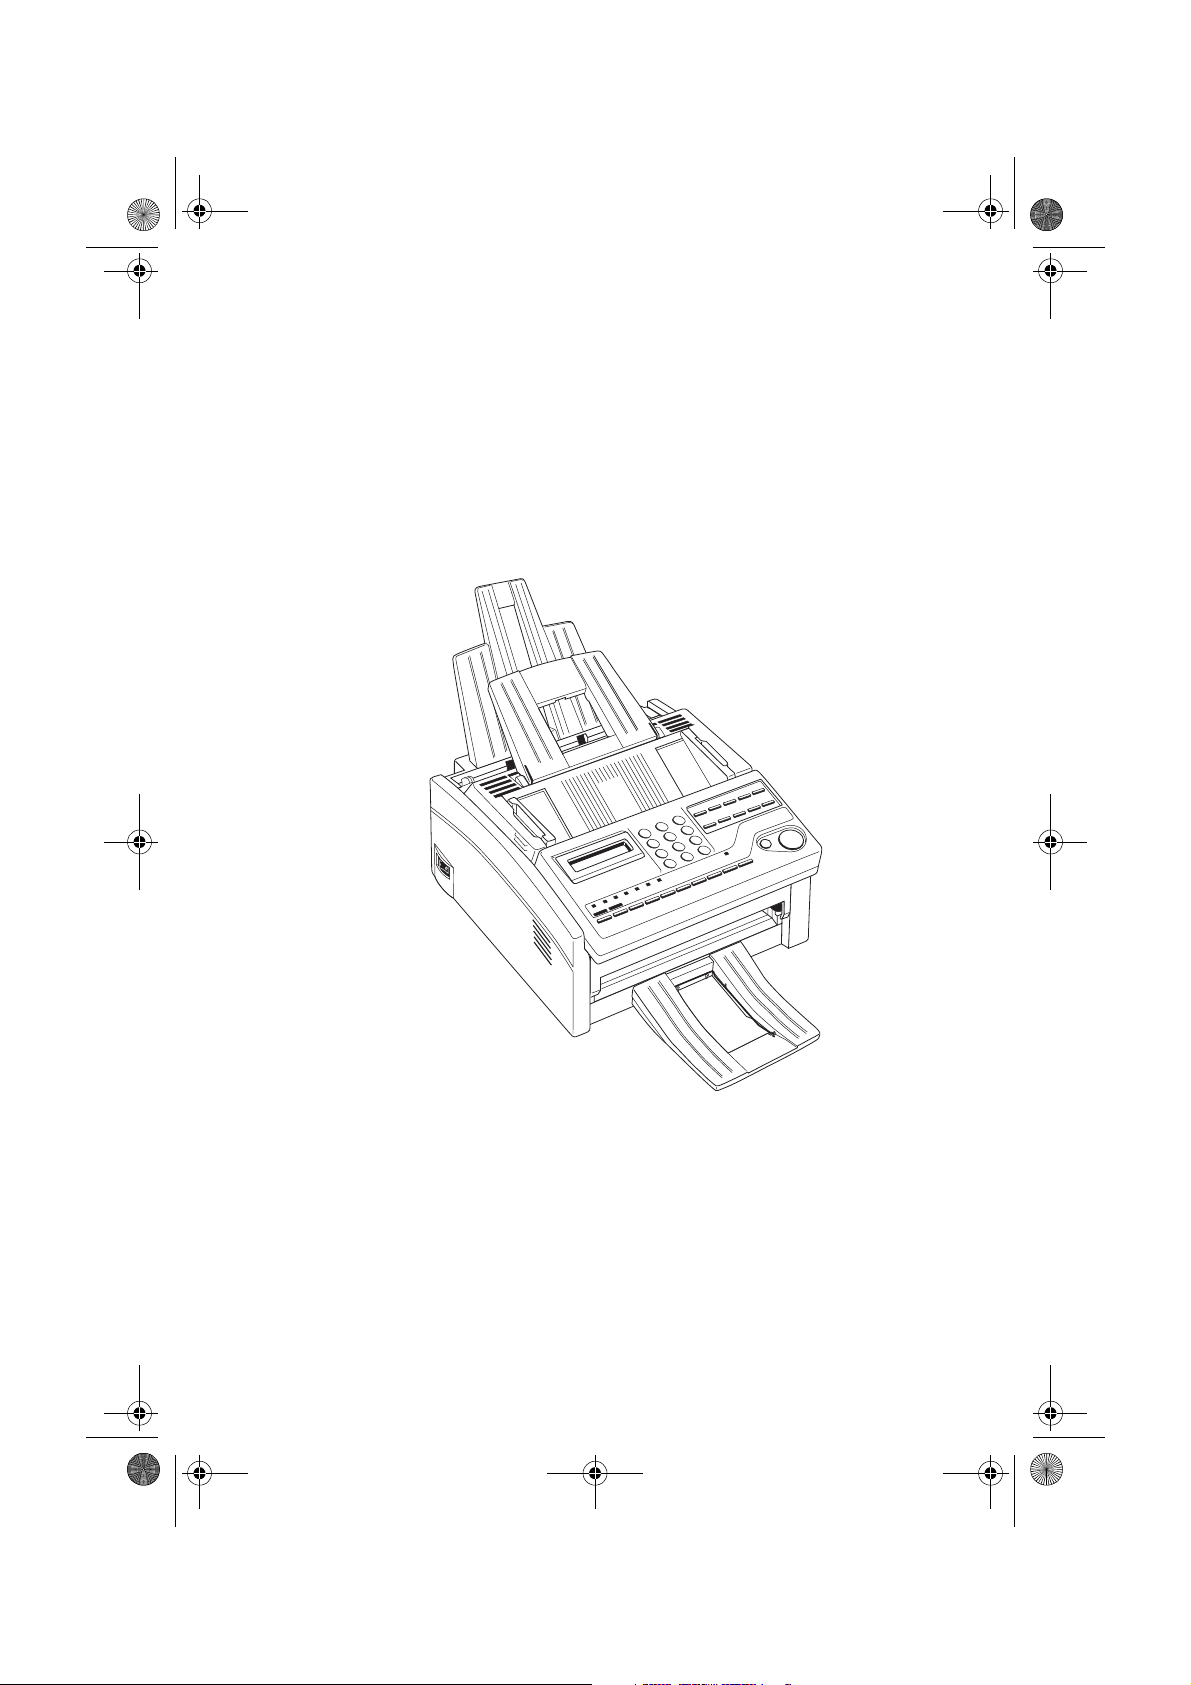
Unpacking
Before you begin, make sure that all items listed below are included in
your package. Remove the contents from the carton placing them on a
sturdy surface.
OKIOFFICE 44
1
Toner cartridge
2
Image drum unit (inside unit)
3
Power cable
4
Telephone line cable
5
Paper tray/Copy stacker
6
Document tray
7
Document stacker
8
MFP software on CD-ROM disk
9
This Instruction manual
10
Note:
A telephone handset, handset cradle and handset cable may also be
included. If any items are missing, notify your dealer immediately
for a replacement.
.
5
4
3
2
6 Setup Guide
6
7
8
9
1
Page 7

84sugb.fm Page 7 Monday, August 9, 1999 4:05 PM
Installing Paper Trays & Stackers
Slot the tabs of the paper tray/copy stacker into the rearmost slots in the
1
top of the machine until the tabs lock into place.
Insert the document tray into the long horizontal slot on the top of the
2
unit until it locks into place.
English
Slot the tabs of the document stacker into the slots at the front of the
3
machine until the tabs lock into place.
OKIOFFICE 44 7
Page 8

84sugb.fm Page 8 Monday, August 9, 1999 4:05 PM
English
Installing Toner Cartridge
Carefully remove the protective sheet from the document feeder.
1
Open the top cover.
2
Grasp the control panel. Pull upward and toward you until the control
3
panel releases, then swing it out of the way.
Caution:
Never expose the image drum unit to light for more than 5 minutes. Never expose the image drum unit to direct sunlight. Always
hold the image drum unit by the ends. Never touch the surface of
the green drum inside the image drum unit.
Lift the image drum unit out and keeping the image drum unit out of
4
direct sunlight. DO NOT touch the green surface of the drum.
8 Setup Guide
Page 9

84sugb.fm Page 9 Monday, August 9, 1999 4:05 PM
Carefully remove the protective sheet from the image drum unit.
5
Place the image drum unit back into your machine. Ensure that the tabs
6
on both sides of the image drum are inserted correctly as shown. Then
press down firmly on both ends of the image drum until it snaps into
place.
English
Remove the protective plastic cover from the toner well in the image
7
drum unit.
WARNING:
BE CAREFUL WHEN HANDLING THE TONER CARTRIDGE.
DO NOT LET TONER SPILL ONTO YOUR CLOTHING OR
OTHER POROUS MATERIALS AS IT MAY STAIN.
OKIOFFICE 44 9
Page 10

84sugb.fm Page 10 Monday, August 9, 1999 4:05 PM
English
Remove the toner cartridge from its package and gently shake it from
8
side to side to distribute the toner. Then carefully peel the white plastic
tape from the bottom of the toner cartridge.
Caution:
Be careful not to insert the toner cartridge backwards into the image drum unit.
With the ridged sides facing up and the coloured lever on your right,
9
insert the toner cartridge into the image drum unit. Slide the left end of
the cartridge in first, then lower the right end into place.
Once the toner cartridge is in place, push the coloured lever all the way
10
forward to secure it and release the toner.
10 Setup Guide
Page 11

84sugb.fm Page 11 Monday, August 9, 1999 4:05 PM
Close the top cover of the machine until it snaps into place.
11
Close the control panel by pressing down until the cover snaps into
12
place.
English
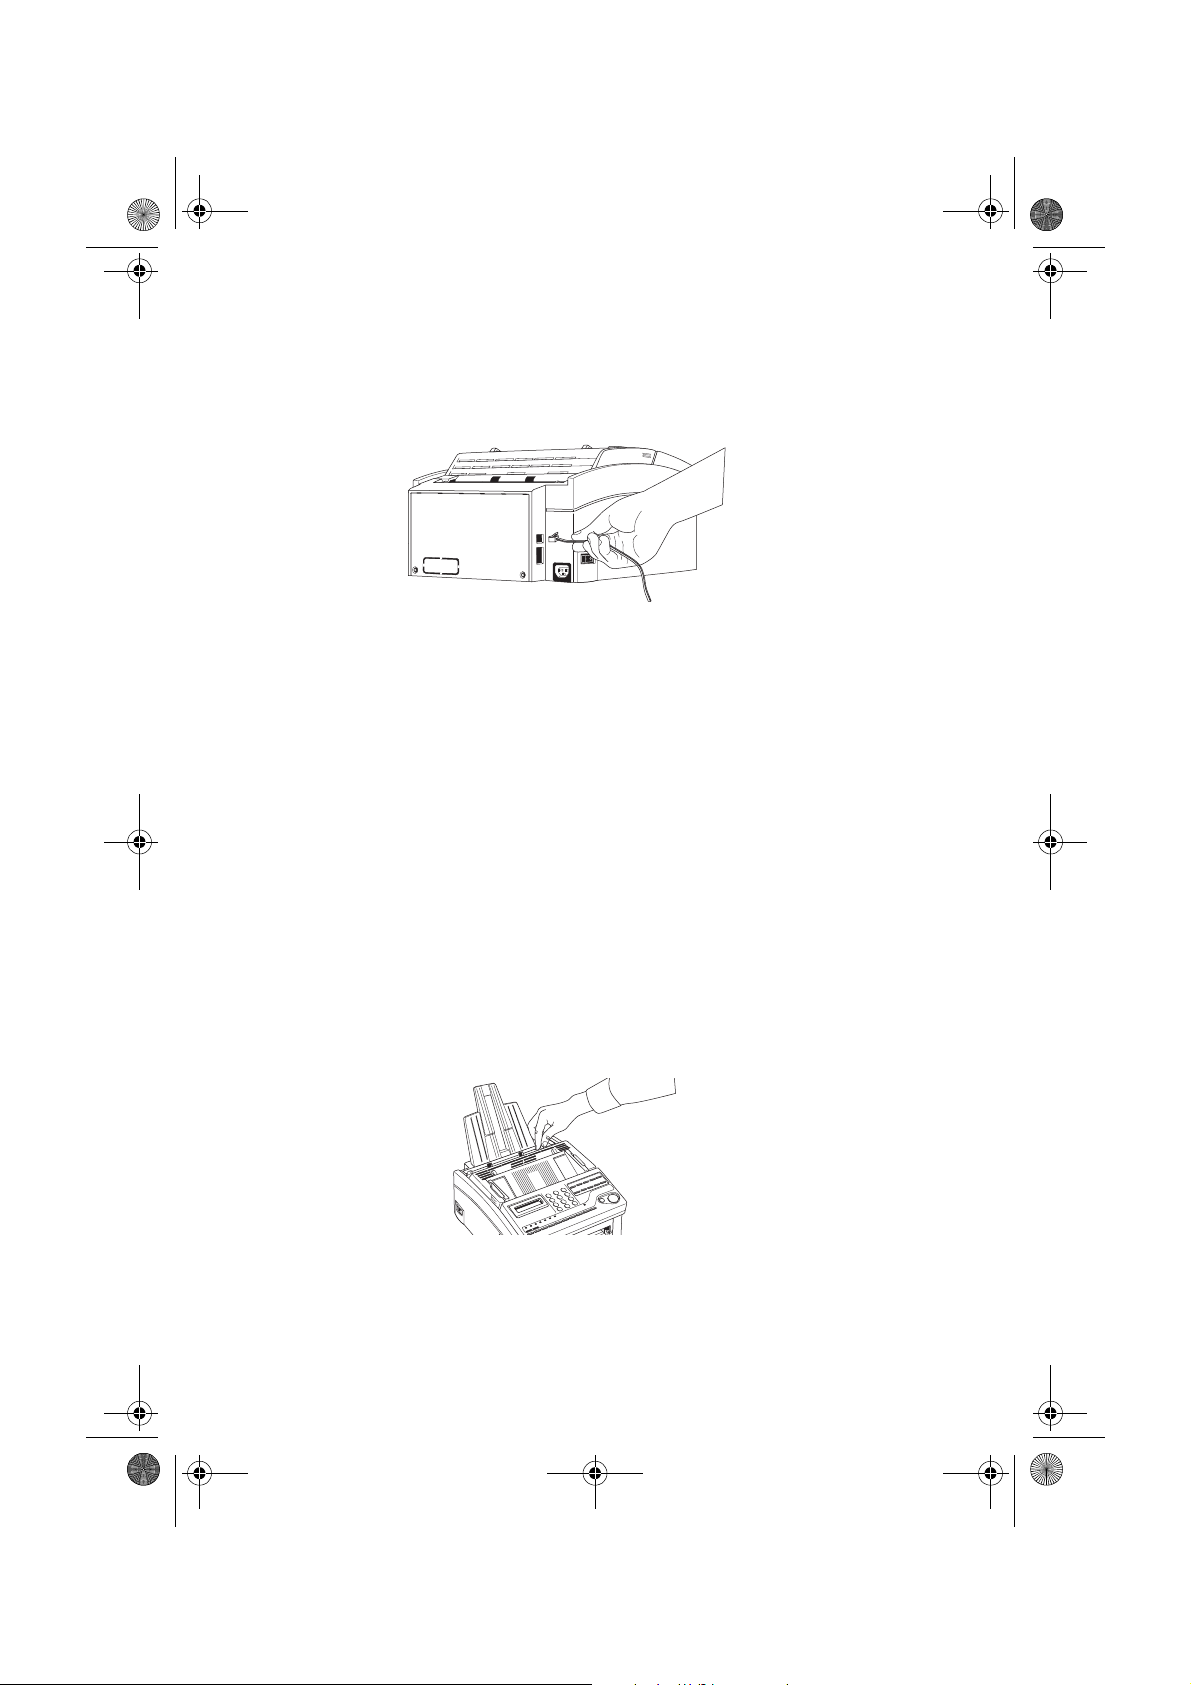
Connecting Power Cable
Caution:
Before connecting power, ensure that the power switch is OFF
(“0” is in depressed position)
Insert the power cable into the power inlet socket located on the back
1
of the machine.
Connect the unattached end of the power cable into an earthed AC
2
power outlet.
OKIOFFICE 44 11
Page 12
84sugb.fm Page 12 Monday, August 9, 1999 4:05 PM
English
Connecting Telephone Line
Insert one end of the telephone cable into the
1
terminal at the back
LINE
of the machine.
Insert the other end of the telephone cable into your wall telephone
2
socket.
Switch your machine on using the power switch. The time and current
3
answering mode will appear on the display. Your machine is now in
stand-by mode, ready to send or receive faxes.
Loading Printing Paper
Your machine can hold up to 100 sheets of standard weight (80 gsm)
paper. For best results, use paper specially made for laser printers or
photocopiers.
Note:
Your machine is set at the factory to use A4 paper. If you intend to
use a different paper size, change the 1’ST PAPER SIZE user
function setting to match your new paper size. See the ‘Programming’ section in the User’s Guide on the CD for instructions.
Adjust the right paper guide to the width size of your paper.
1
Remove the paper from its wrapper (up to 100 sheets). Note the “print
2
side” notice printed on the label. Fan and restack the paper to prevent
paper jams.
12 Setup Guide
Page 13

84sugb.fm Page 13 Monday, August 9, 1999 4:05 PM
Insert sheets of paper into the paper tray, print side down.
3
Adjust the left paper guide so that it is aligned to the paper width.
4
Caution
Be sure to grasp the paper tightly to avoid slipping of the uppermost sheet of paper.
Control Panel
English
1
LCD Panel
2
Transmit Resolution/
YES Key
3
Type of Original/NO
Key
4
AUTO REC Key
5
HYPHEN Key
6
SEARCH Key
7
HOOK/V.REQUEST
Key
8
REDIAL Key
9
AUTO D IAL Key
10
SELECT FUNCTION
Key
11
COPY Key
12
STOP Key
13
START Key
14
ALARM Indicator
15
Plus (+) Key
16
PAU SE K e y
17
SPACE Key
18
One Touch Keypad
19
One Touch Labels
20
#/Group Key
21
0/UNIQUE Key
22
Numeric Keypad
23
*/Tone Key
For a comprehensive description of button and one touch key functions see
the ‘Control Panel Keys and Indicators’ section in the User’s Guide on the
CD.
Setting Answering Mode
Your machine has a number of answering modes which determine how it
handles incoming calls (both fax and voice). The current answering mode
appears on your machine’s stand-by display.
OKIOFFICE 44 13
Page 14

84sugb.fm Page 14 Monday, August 9, 1999 4:05 PM
English
The answering mode which is best for you will vary depending on how
you use your machine and what external telephone devices are connected
to it. See the ‘Answering Mode Options’ section in the User’s Guide on the
CD to select the mode you require.
To change the Answering Mode:
Press the
1
AUTO REC
key. Your machine displays your current
answering mode.
Continue pressing the
2
AUTO REC
key until the answering mode you
want appears on the display. After a short pause, your machine
programs the new answering mode and returns to stand-by mode
displaying the new answering mode setting.
Setting Machine Identification
The machine uses the information you enter here to identify itself during
communications. In most countries programming this information into
your machine is a legal requirement.
Press the
1
SELECT FUNCTION
Touch key followed by 4 on the numeric keypad. The display shows:
4:SYSTEM DATA PRG
YES (!!!!) NO (""""/1-7)
Press the
2
NO=<TSI/CSI>
ID=<SENDER ID>
After the display clears, enter the full telephone number of your fax
3
key. The display shows:
YES
machine using the numeric keypad up to twenty characters. Use the
HYPHEN
or 8/+ One Touch key to enter a “+” character before the
number to indicate the international access code before the country
dialling code. The
9/SPACE
a number.
key then the
USER PROG
One
One Touch key is used to enter spaces in
Press the
4
Enter your Sender ID. This is a descriptive title up to 32 characters long.
5
START
key to save your entry.
See the ‘Setting Machine Identification’ section in the User’s Guide on
the CD for instructions on entering special characters.
Press the
6
NO=<CALL BACK NO.>
14 Setup Guide
START
key to save your entry. The display shows:
Page 15

84sugb.fm Page 15 Monday, August 9, 1999 4:05 PM
After the display clears, use the numeric keypad to enter the telephone
7
number you want to use for call back messages. Enter up to 20
characters.
English
Press the
8
Press the
9
START
SELECT FUNCTION
key to save your entry.
key to finish.
Loading Documents
To prevent paper jams and problems during scanning, neatly stack your
documents, aligning their edges, before loading. Do not load documents of
different sizes at the same time.
Note:
You can load and prepare to transmit a document while your machine is still sending or receiving another message (as long as the
document feeder is clear). To do this, load the document, select your
location and press the
START
into memory and sent when the current communication ends.
Adjust the document guides to the width of the paper you are using.
1
Neatly stack your documents, then insert them face down into the document
2
feeder. If necessary, readjust the document guides for a snug fit.
Your machine will grip the documents and pull the bottom page into the
3
machine.
If necessary, use the Transmit Resolution or
4
resolution of your document.
key. Your document will be scanned
key to set the
YES
Document Type Resolution to Use
Normal office documents STD (Standard)
Docments with small type or other fine detailS FINE or EX. FINE
Documents with photos or many shades of grey PHOTO
If necessary, use the Type of Original or NO key to set the level of
5
contrast in your document.
Document Type Contrast to Use
Documents with normal contrast NORMAL
Documents which are too light LIGHT
Documents which are too dark DARK
Your documents are now ready for faxing or copying.
6
OKIOFFICE 44 15
Page 16

84sugb.fm Page 16 Monday, August 9, 1999 4:05 PM
English
Sending Faxes
Load your documents.
1
Select a location. Refer to the instructions below.
2
To Dial Using Do This
One Touch key Press the One Touch key
AUTO DIAL number Press the AUTO DIAL key, then
Numeric keypad Dial as you would on a nor mal
enter the two digit AUTO DIAL
number on the numeric keypad
telephone. If you make a mistake,
press the YES key to go back and
re-enter the number
If necessary, press the
3
START
key to begin the transmission.
Stopping a Transmission
To stop a transmission while it is in progress, press the
STOP
key twice.
If documents are stuck part way through the document feeder, press the
key again to feed the documents out.
STOP
Receiving Faxes
Your machine receives faxes automatically unless the machine has been
set to the manual receive [
] mode. For details on receiving faxes
TEL
manually see the ‘Receiving Faxes Manually’ section of the User’s Guide
on the CD.
Making Copies
Your machine can also be used to make copies. You can make up to 50
copies at one time. Your machine automatically makes all copies in
mode.
EX.FINE
the
1
key.
YES
Load your documents and press the
PRG. NO. OF COPIES
[1SETS] ENTER 1 - 50
If you want to make just one copy, you are finished. Your machine
waits a moment, then begins copying.
and
PHOTO
mode can be selected manually by pressing
key. The display shows:
COPY
FINE
To make multiple copies, enter the number of copies you want to make
2
on the numeric keypad. Then press the
key again. Your machine
COPY
begins making the required number of copies.
16 Setup Guide
 Loading...