

Page 1
English
Setup Guide
Page 2

English
Every effort has been made to ensure that the information in this document
is complete, accurate, and up-to-date. The manufacturer of this equipment
assumes no responsibility for the results of errors beyond its control. The
manufacturer of this equipment also cannot guarantee that changes in
software and equipment made by other manufacturers and referred to in
this guide will not affect the applicability of the information in it.
Mention of software products manufactured by other companies does not
necessarily constitute endorsement by the manufacturer of this equipment.
While all reasonable efforts have been made to make this document as
accurate and helpful as possible, we make no warranty of any kind,
expressed or implied, as to the accuracy or completeness of the
information contained herein.
Copyright 2002 by Oki. All rights reserved.
Written and produced by Oki Europe Ltd.
OKI and OKIOFFICE are registered trademarks of Oki Electric Industry
Company, Ltd.
Energy Star is a trademark of the United States Environmental Protection
Agency.
This product complies with the requirements of the Council
Directives 89/336/EEC (EMC), 73/23/EEC (LVD) and
1999/5/EC (R&TTE), as amended where applicable, on the
approximation of the laws of the member states relating to
Electromagnetic Compatibility, Low Voltage and Radio &
Telecommunications Terminal Equipment.
Energy Star
As an Energy Star Program Participant, the manufacturer has
determined that this product meets the Energy Star guidelines for energy efficiency.
ii SetupGuide
Page 3

Contents
Safety.......................................v
General ...................................v
InstallationHints............................v
Operation&Maintenance.....................vi
Notes,cautionsandwarnings.................vii
Introduction ..................................1
Unpacking ...................................2
Removingtheequipmentfromthebox...........2
Checkingtheboxcontents ....................3
Whatthepartsarecalled ........................5
Fitting the Control Panel Sheet . . . . . . . . . . . . . . . . . 5
Identifyingtheparts .........................5
ControlPaneloverview.......................8
Setting up . . . . . . . . . . . . . . . . . . . . . . . . . . . . . . . . . . . 13
Choosingtheinstallationlocation..............13
Checkingthepowersupply...................13
Unlockingthemirrorcarriage.................14
Installingconsumables ......................15
Attachingthetray ..........................19
Connectingandpoweringup..................19
Loadingpaper(A4size) .....................20
Howtousethekeys ........................23
Enteringcharacters.......................23
Deletingcharacters.......................24
Instructionformat........................24
EasyStart (Initial settings) . . . . . . . . . . . . . . . . . . . . 24
Gettingstarted .......................... 24
Clearingstoredsettings ...................25
Entering initial settings. . . . . . . . . . . . . . . . . . . . 25
TurningoffTransportMode..................27
Gettingstarted ...............................29
Changingmodes ...........................29
Sendingfaxes .............................29
UsingtheADF..........................30
UsingtheFBS...........................31
Receiving faxes . . . . . . . . . . . . . . . . . . . . . . . . . . . . 33
Answeringcallsmanually .................33
Selecting reception mode . . . . . . . . . . . . . . . . . . 33
English
OKIOFFICE 1200/1600 iii
Page 4

English
Makingcopies..............................36
Makingasinglecopy......................36
Stacking multiple copies . . . . . . . . . . . . . . . . . . .36
Sorting multiple copies (using the ADF). . . . . . .37
Makingenlargedorreducedcopies...........38
Makingcopysettings......................39
Clearingpaperjams............................41
Originaldocumentjams......................41
Printoutjams...............................43
iv SetupGuide
Page 5

Safety
Your machine has been carefully designed to give you years of safe,
reliable performance. As with all electrical equipment, however, there are
a few basic precautions you should take to avoid hurting yourself or
damaging the machine.
General
• Read this setup guide carefully and keep it in a safe but accessible place
so that you can use it for future reference.
• Read and follow all warning and instruction labels on the machine
itself.
• Disconnect the machine before you clean it. DO NOT use liquid or
aerosol cleaners to clean the machine.
• Place your machine on a firm, solid surface. If you place the machine
on something unsteady, it may fall and become damaged or injure
someone. If you place the machine on a soft surface, such as a rug, sofa,
or bed, the vents may become blocked causing the machine to overheat.
• Do not use your machine near water, or spill liquid of any kind into it.
English
Installation Hints
• Install your machine in a dust-free location away from direct sunlight.
• Do not connect your machine to a power source that is used by other
equipment producing electrical noise (e.g. air conditioners).
• Leave electronic adjustments to authorized service personnel.
•TheLINE terminal connects your machine to a standard telephone line.
To avoid damage to your telephone system or to the machine, do not
connect your machine into anything other than a standard telephone
socket.
• Your machine has an earthed plug as a safety feature and it will only
connect to an earthed outlet. If you cannot connect this plug to your
power outlet, then it is possible that you have an older, non-earthed
outlet. Contact an electrician to have yourpower outlet replaced. Do not
use an adapter to defeat the earthing.
• The electrical power outlet should be located near the machine and
should be easily accessible.
OKIOFFICE 1200/1600 v
Page 6

English
•ThetwoTEL ports on the back of the machine are only suitable for 2
wire devices. Not all standard telephones will respond to incoming
ringing when connected to an extension socket.
• This machine may not necessarily provide an effective hand-over of a
call from a telephone connected to the same line.
• The operation of this machine on the same line as a telephone or other
equipment with audible warning devices or automatic ring detectors
will give rise to bell tinkle or noise and may cause false tripping of the
ring detector. Should such problems occur, the user is not to contact the
telephone company.
Operation & Maintenance
• Use a dry cloth to clean the control panel and the main body of the unit.
• Aside from the instructions specifically mentioned in this setup guide,
your machine is not user serviceable. DO NOT attempt to service the
machine or lubricate moving parts by yourself.
• Disconnect the power cable before trying to remove any objects that
may have fallen into the machine.
• Immediately disconnect the machine if it becomes physically damaged
and arrange for its repair or disposal.
• When relocating your machine, always disconnect the telephone line
before disconnecting the power cable. When reconnecting your
machine, connect the power cable first, then the telephone line.
• This machine is not intended to be used in parallel with any other
telephone devices.
vi SetupGuide
Page 7

Notes, cautions and warnings
Note:
A note appears in this manual like this. A note provides additional
information to supplement the main text which may help you to use
and understand the product.
Caution:
A caution appears in this manual like this. A caution provides additional information which, if ignored, may result in equipment
malfunction or damage.
WARNING:
A WARNING APPEARS IN THIS MANUAL LIKE THIS. A
WARNING PROVIDES ADDITIONAL INFORMATION
WHICH, IF IGNORED, MAY RESULT IN A RISK OF PERSONAL INJURY.
English
OKIOFFICE 1200/1600 vii
Page 8

English
viii SetupGuide
Page 9

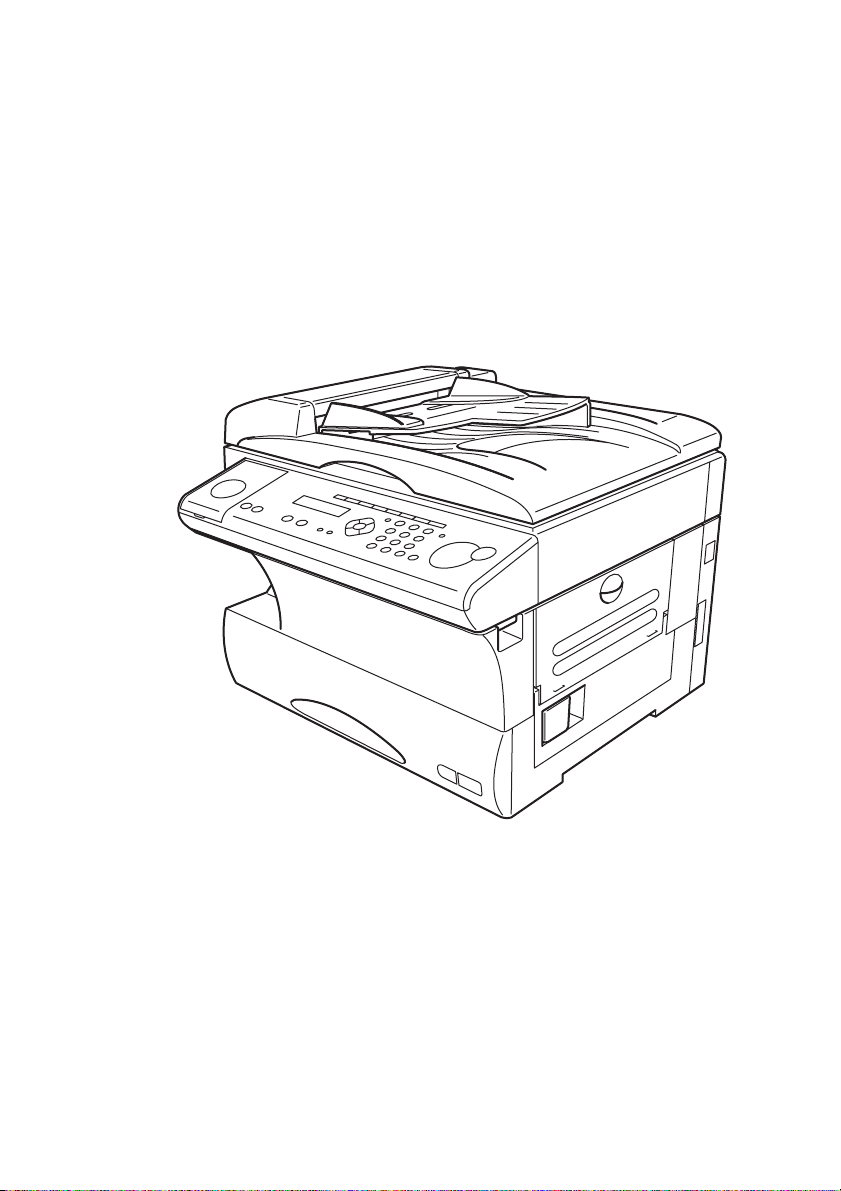
Introduction
This document explains how to carry out the following operations in
respect of the OKIOFFICE 1200/1600 Plain-paper Digital Copier/Fax/
Printer:
• Unpacking
• Getting to know the main parts
• Setting up
• Getting started
• Clearing paper jams
English
OKIOFFICE 1200/1600 1
Page 10

English
Unpacking
Ensure that you have sufficient space to accommodate the items you
unpack from the box.
Removing the equipment from the box
1 Remove the fastening bands from the box.
2 Open the box and remove all the items and packaging until only the
OKIOFFICE 1200/1600 and its base packaging remains.
3 Pull the release tabs on the handle insert in each side of the box, pull out
the handle inserts and allow the lower flaps (which had been retained
by the handle inserts) to drop.
4 Lift the box sides away from the base, leaving the OKIOFFICE 1200/
1600 and its base packaging exposed in the base.
WARNING:
THE OKIOFFICE 1200/1600 WEIGHS 33KG. DO NOT
ATTEMPTTOLIFTITWITHOUTASSISTANCE.
5 Remove the OKIOFFICE 1200/1600 from its packaging and place it in
a position where you have easy access to it.
6 Retain the box and packaging for possible future reshipment.
2 SetupGuide
Page 11
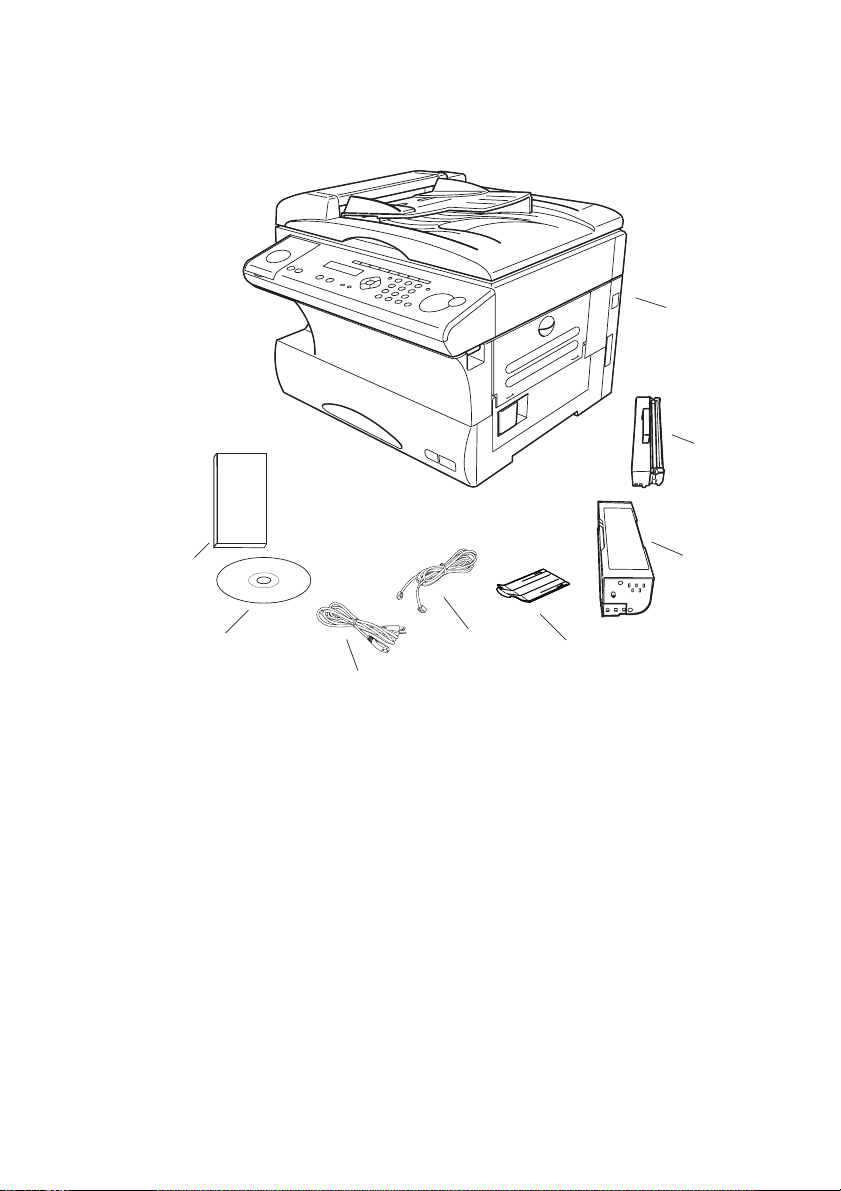
Checking the box contents
Check that you have unpacked all of the following items:
English
1
2
8
7
6
5
4
3
1 Main unit with 500-sheet paper cassette installed
2 Drum cartridge
3 Toner cartridge
4 Extension paper tray
5 Telephone line cord
6 AC power cord
7 Operating Instructions (on CD)
8 Setup Guide
9 Labels and stickers (not illustrated)
– Control Panel Sheet
OKIOFFICE 1200/1600 3
Page 12

English
– Paper size stickers
– One-touch labels
– Soft Key labels
4 SetupGuide
Page 13
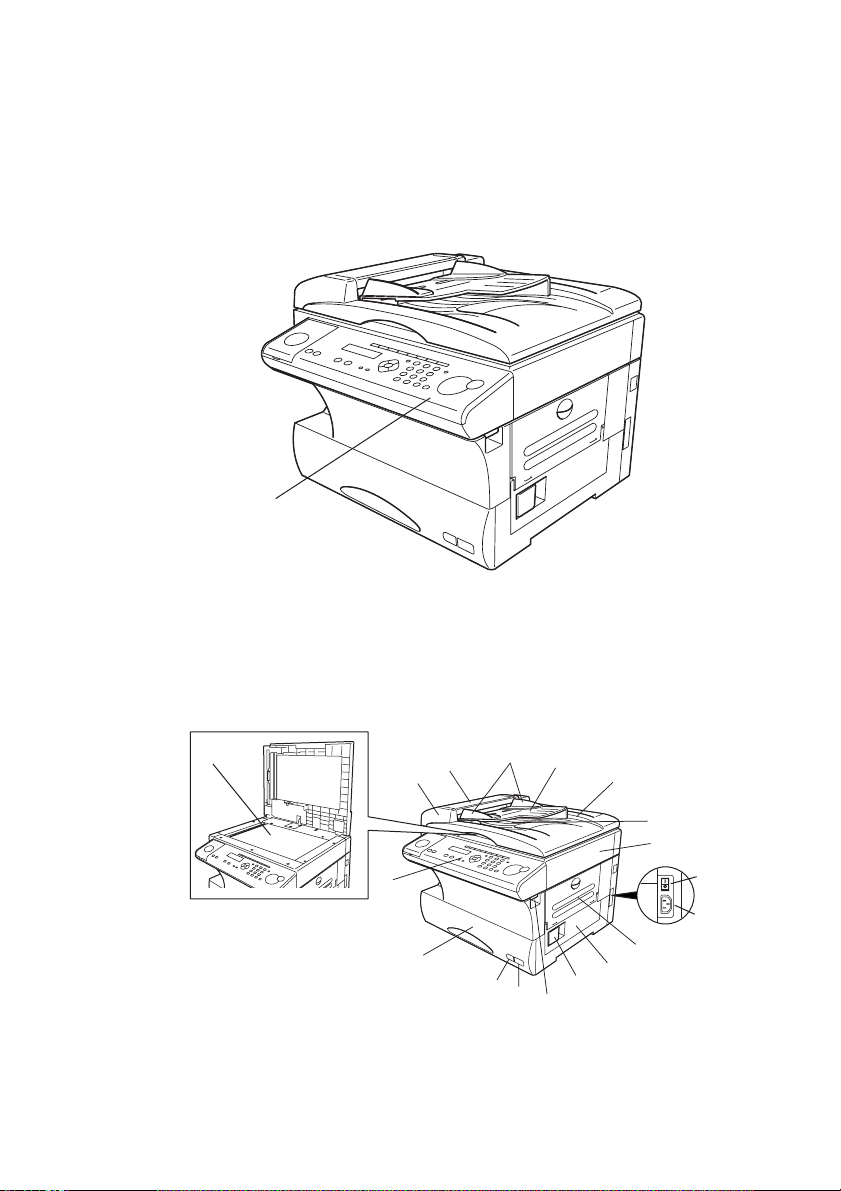
What the parts are called
Fitting the Control Panel Sheet
Remove the blank Control Panel Sheet from the Control Panel (1) and fit
the supplied Control Panel Sheet.
1
English
Identifying the parts
In this section, the names for the different parts of your machine are
introduced and a brief description of each part is provided.
18
3
2
1
17
1 Control Panel — The keys you use to operate your machine. (See
Control Panel overview for more details.)
OKIOFFICE 1200/1600 5
4
5
16
15
14
6
7
8
9
10
11
12
13
Page 14

English
2 ADF (Automatic Document Feeder) — The ADF automatically feeds
original documents into the machine, one at a time. It can hold up to 50
pages.
3 Scanner cover — Open this cover to remove original document jams.
4 Document guides — Adjust these to fit the width of the original
document so it will feed properly into the machine.
5 Document tray — Holds original documents placed for scanning into
the machine.
6Platencover—Opens to scan an original document using the FBS
(Flatbed Scanner) glass.
7 Original document exit — Where your original document comes out
after being scanned.
8 Top cover — Opens to provide access for changing the toner and drum
cartridge (or, occasionally, clearing printout jams).
9ACpowerswitch—Turns your fax machine on and off.
AC
10 AC power jack — Where you plug in the
power cord.
11 Bypass tray — Open and use the bypass tray for paper that cannot be
used in the paper cassette. It can hold up to 50 sheets of paper.
12 Side cover — Open to fix a printout jam.
13 Side cover release — Pull this to open the side cover.
14 Top cover release — Pull up on this to open the top cover.
15 Recording paper size sticker — Shows the size of the paper that is set
in the paper cassette.
16 Recording paper level indicator — Shows the level of the current
paper supply without requiring you to open the paper cassette.
17 Paper cassette — Load paper here. It can hold up to 500 sheets.
6 SetupGuide
Page 15
English
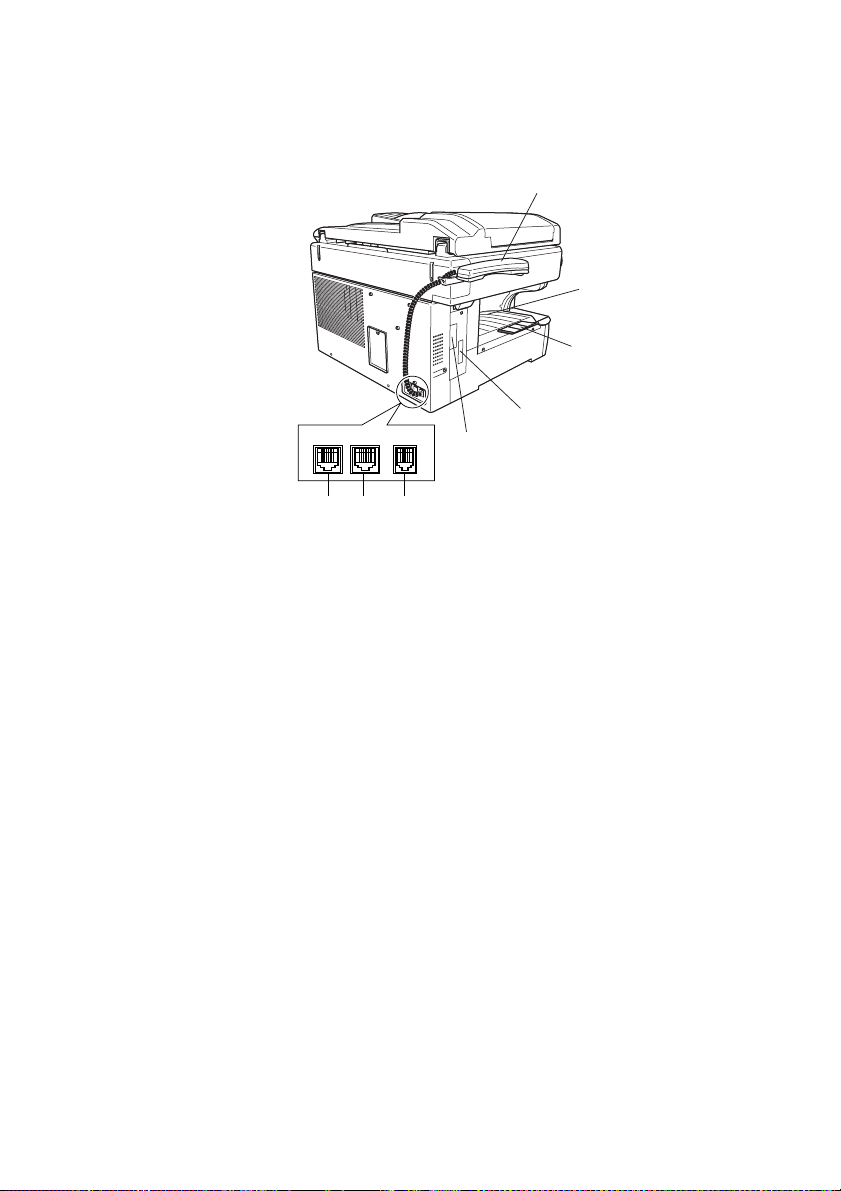
18 FBS (Flatbed Scanner) glass — Makes it possible for you to fax or
copy objects and even irregularly shaped sheets, just as in a
conventional copier.
26
25
24
LINE
19 20 21
PHONE1PHONE2
23
22
19 LINE jack — Where you plug in the telephone line cord. Theother end
of the cord plugs into a wall telephone jack.
20 PHONE2 jack — If you connect a second telephone to your machine,
this is where you plug in the cord.
21 PHONE1 jack — Where you plug in the optional handset.
22 RS-232C interface port (optional) — Where you plug in the RS-232C
cable when you use the optional RS-232C interface kit.
23 PRINTER PARALLEL port (optional) — Where you plug in the
printer cable when you use the optional printer controller.
24 Extension paper tray — Supports the printout after it emerges.
25 Printed document exit — Where the printout emerges.
26 Handset (optional) — Used for voice communication.
OKIOFFICE 1200/1600 7
Page 16
English
0
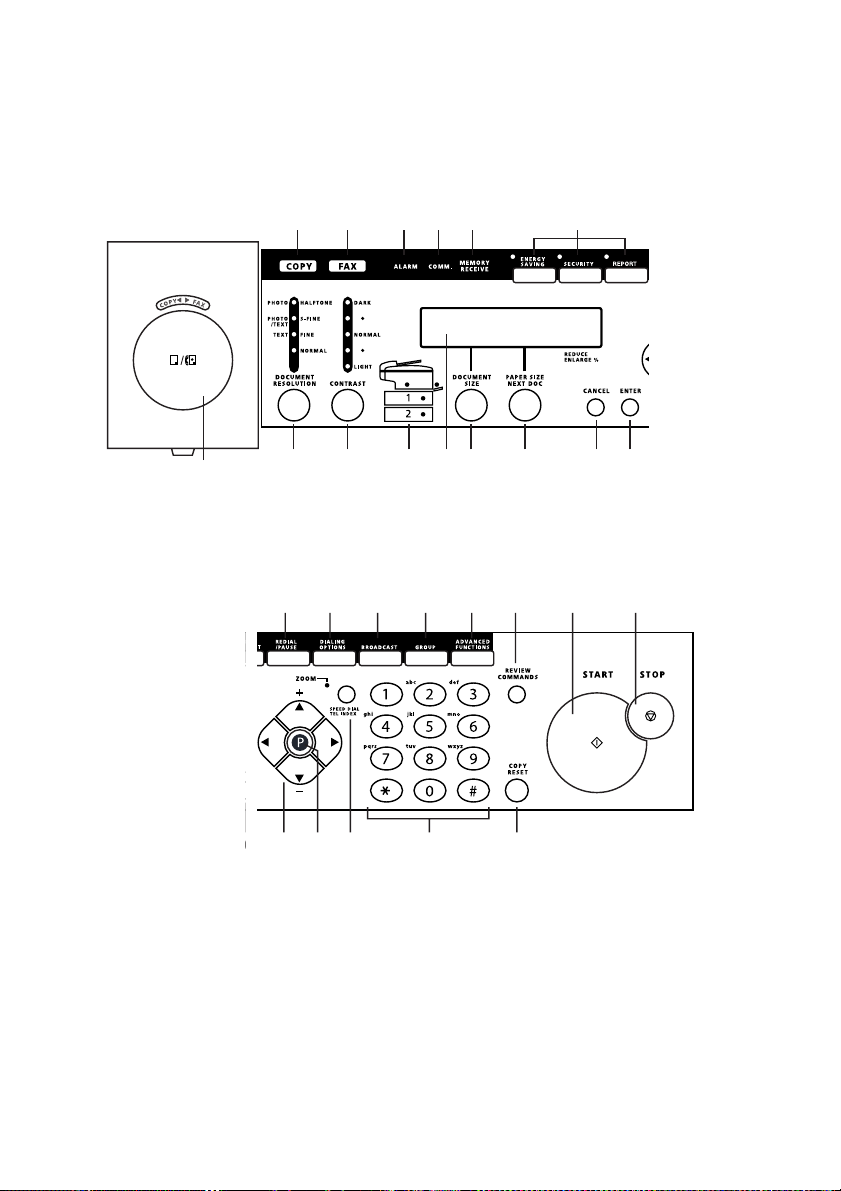
Control Panel overview
Note:
Not all of these controls will be required in this Setup Guide.
12 345 6
28
78 9101112 13 14
1516171819
2021222324252627
1 COPY light — Glows when the machine is in the Copy mode.
2 FAX light — Glows when the machine is in the Fax mode.
3 ALARM light — Glows when a problem occurs during fax
communication, printing or scanning. The light stays on until the
machine prints a Check Message report.
8 SetupGuide
Page 17

English
4 COMM. light — Glows when the machine is communicating with
another machine.
5 MEMORY RECEIVE light — Glows when the machine is receiving
an incoming fax document into its electronic memory.
6SoftKeys—Shortcut keys. Any function that can be turned on or off
can be programmed into these three keys. If the light above one of these
keys glows, this indicates the setting that has been programmed into it
is turned on. These keys are programmed at the factory to turn the
following functions on or off:
a) Soft Key 1: ENERGY SAVING — Press to turn the energy saving
mode on or off.
b) Soft Key 2: SECURITY — Press to turn the security reception on
or off.
c) Soft Key 3: REPORT — Presstoturntheconfirmationreportonor
off for the next fax transmission.
7REDIAL/PAUSE—Redials the last number you dialled. In certain
operations, it also produces a special pause character which can be
useful when dialling long-distance numbers.
8 DIALLING OPTIONS — Press this to insert special symbols into
telephone numbers.
9 BROADCAST — Press to send a broadcast fax (sending the same
document to more than one location).
10 GROUP — Press this to set up a fax transmission to a call group, aset
of fax numbers which will receive the same document in one fax
operation.
11 ADVANCED FUNCTIONS —
In Fax mode: Chooses from the following fax options – Delayed
transmission, Polling, F-Code transmission, F-Code polling and Batch
transmission.
In Copy mode: Chooses from the following copy options – Nega/Posi
copy, Combine copy (only for OKIOFFICE1600) or Ultra copy (only
for OKIOFFICE1600).
12 REVIEW COMMANDS — Press to review pending fax commands
or to view a brief description of delayed commands.
OKIOFFICE 1200/1600 9
Page 18

English
13 START — Press to begin a fax transmission, reception or copying.
14 STOP — Press to stop the current operation and eject a document from
the ADF.
15 COPY RESET — Use in copy mode only. Press to reset the copy
settings to their defaults.
16 Numeric keypad — Just like the numeric keys on a tone-dialling
phone. Use these to dial phone and fax numbers and to enter numbers
when you are setting up the machine.
17 In Fax mode:
SPEED DIAL/TEL INDEX — Starts a speed-dialling operation,
which you finish by pushing three of the keys on the numeric keypad.
Also displays one-touch and speed-dial entries sorted
alphanumerically, as in a telephone directory.
In Copy mode:
ZOOM – PresstoturnonorofftheZOOM light. When the ZOOM
light glows, you can set the copy reproduction ratio at 1% steps by
using the
choose one of several fixed copy reproduction ratios by using the
T
SorT
key.
key. When the ZOOM light is not lit, you can
S
or
18 Program key — Any function can be started by first pressing this key
and then entering the function number.
19 Cursor Keys
WXST
as displayed on the LCD.
20 ENTER — Confirms user settings, begins operations and moves
through command levels.
21 CANCEL — Press to delete characters on the LCD and cancel
commands you have entered into the machine.
22 PAPER SIZE/NEXT DOC
In Copy mode:
Selects the printout paper you want to use.
While scanning a document:
Press to tell your machine to scan one or more additional documents
after the current scanning ends.
10 Setup Guide
— Scrolls (moves) through features and command options
Page 19

English
23 DOCUMENT SIZE — Instructs the fax to scan A4, A5 or F4 sized
documents when you use the FBS (flatbed scanner) glass.
24 Liquid Crystal Display (LCD) — Shows the machine’s status and lets
you see what you are programming into the machine. The display
shows 2 lines at 20 characters per line. If the LCD is blank, the machine
is off.
25 Printer status lights — Green lights indicate acceptable paper sources.
The red light glows if a printer problem (such as a paper jam) has
occurred.
26 CONTRAST — Press to adjust the contrast level
27 DOCUMENT/RESOLUTION
In Fax mode:
Press to toggle through the three resolution modes and grayscale.
In Copy mode:
Press to select your document type.
28 COPY/FAX — Press this key to toggle between Fax mode and Copy
mode.
29 30 31
M1 and M2) can
29 Macro Keys — Programming the Macro keys
(
reduce multi-step operations toa simple press of a key. You can “teach”
the Macro keys to carry out one of several operations.
OKIOFFICE 1200/1600 11
Page 20

English
30 Programmable One-Touch Keys — The keys labelled P1 and P2
enable you to “teach” your machine an advanced multi-step function
just once, then recall the function at any time by pressing one of these
keys.
31 One-Touch Keys — The keys labelled 01-55 offer one-touch dialling
convenience. Also, you may use these keys to enter characters when
you are setting up the machine.
12 Setup Guide
Page 21

Setting up
Choosing the installation location
Ensure that your intended installation location is:
• capable of supporting your fax machine (33kg) safely
• dust-free (but do not use a cover on your fax machine)
• well ventilated (allow at least 30cm clearance around your machine)
• away from direct sunlight to avoid overheating
• away from any possible liquid contamination
• level and vibration-free
• close to a telephone jack
• close to an AC power outlet
Checking the power supply
The power requirements are as follows:
• Voltage: 230VAC +/- 10%, 50 - 60Hz
English
• Consumption:
– Standby: 20.6W
– Transmission: 21.3W
– Reception: 21.5W
– Copying: 1020W
– Maximum: 1060W
Your intended power source should be:
• a standard 3-pin earthed 230VAC outlet
• protected by an electrical surge suppressor (preferably one which
protects both telephone and electrical lines)
Your intended power source should not be:
• controlled by a wall switch (to avoid inadvertent switch off situations)
• supplying power also to a large appliance such as an air conditioner (to
avoid temporary drops in power which could damage your machine)
OKIOFFICE 1200/1600 13
Page 22

English
Unlocking the mirror carriage
Your fax machine is shipped with the mirror carriage locked to avoid
possible damage during shipping.
Caution:
You must unlock the mirror carriage before applying power to
your fax machine.
1 Pull up the top cover release and open the top cover.
2 Loosen the mounting screw which secures the mirror carriage locking
plate and slide the plate to the UNLOCK position.
LO
C
K
U
N
LO
C
K
3 After unlocking the mirror carriage, tighten the mirror carriage locking
plate mounting screw.
4 With your fingers clear of the edges, carefully but firmly close the top
cover.
14 Setup Guide
Page 23

Note:
The fax machine will not operate if the top cover is not properly
closed.
Caution:
Before using your fax machine, you must turn off Transport Mode
(see Turning off Transport Mode)
Note:
If you have to ship your machine, turn on the Transport Mode, turn
the power off and then lock the mirror carriage (i.e. undo the above
procedure).
Installing consumables
The consumables to be installed at this point are:
– the toner cartridge
– the drum cartridge
Proceed as follows:
1 Pull up the top cover release and open the top cover.
English
OKIOFFICE 1200/1600 15
Page 24

English
2 Slide the printer cover release controls towards each other and open the
printer cover.
3 Unpack a new toner cartridge. Avoiding touching the cartridge roller,
hold the cartridge with both hands and shake it slowly several times in
the directions indicated to distribute the toner evenly inside the
cartridge.
16 Setup Guide
Page 25

English
4 Carefully insert the toner cartridge into the printer, ensuring that the
two pins on the cartridge engage in the slots in the printer frame.
5 Unpack a drum cartridge, taking care not to expose it to the light for
more than 5 minutes or to direct sunlight.
6 Carefully insert the drum cartridge into the printer, ensuring that the
four pins on the cartridge engage in the slots in the printer frame.
7 Using the cleaning paper included in the toner cartridge box, gently
clean the LED print head.
OKIOFFICE 1200/1600 17
Page 26

English
Note 1:
For continued print quality, clean the LED print head every time you
change a toner cartridge.
Note 2:
Do not use abrasive materials on the LED print head.
Note 3:
Do not subject the LED print head to shock.
8 Carefully close the printer cover.
9 With your fingers clear of the edges, carefully but firmly close the top
cover.
Note:
The fax machine will not operate if the top cover is not properly
closed.
18 Setup Guide
Page 27
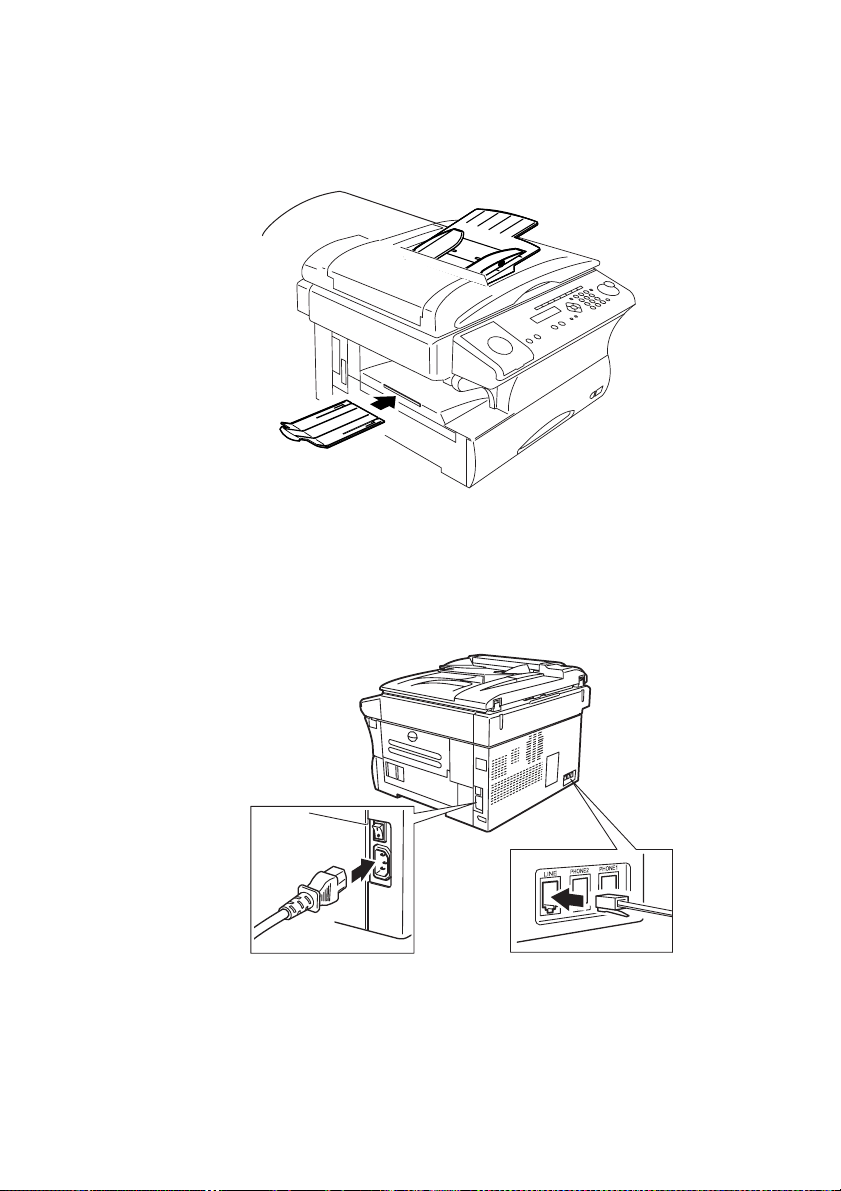
Attaching the tray
Attach the extension paper tray by inserting its two pegs at a slightly
upward angle into the appropriate hole.
Connecting and powering up
1 Plug one end of the telephone line cord into the LINE jack at the back
of the machine and the other end into a standard telephone wall jack.
English
2 Plug the non-pronged end of the AC power cord into the AC power cord
jack on the right side of the machine and the pronged end into a 230V
electrical outlet (preferably on a surge suppressor, as mentioned in
Checking the power supply).
OKIOFFICE 1200/1600 19
Page 28

English
Caution:
Be sure that you have unlocked the mirror carriage locking plate
before you turn the power on (next step). (see Unlocking the
mirror carriage)
3 Use the AC power switch to turn on your machine. The markings are
international standards: I means ON, O means OFF.
It takes a few seconds for the machine to warm up. The LCD shows:
** Warming Up **
When the machine is ready to use (standby mode), you will see:
Fax Ready
1 Jan 2001 0:00
Note 1:
To switch the power OFF, set the AC power switch to the O position.
Note 2:
Fax documents stored in memory will be lost 72 hours after you turn
the AC power switch OFF or otherwise remove power from the
machine
Loading paper (A4 size)
Note:
Your machine is set to accept A4 paper by default. If a different size
of paper is to be used, you must change the Paper Size setting as
described in the manual entitled Operating Instructions.
20 Setup Guide
Page 29
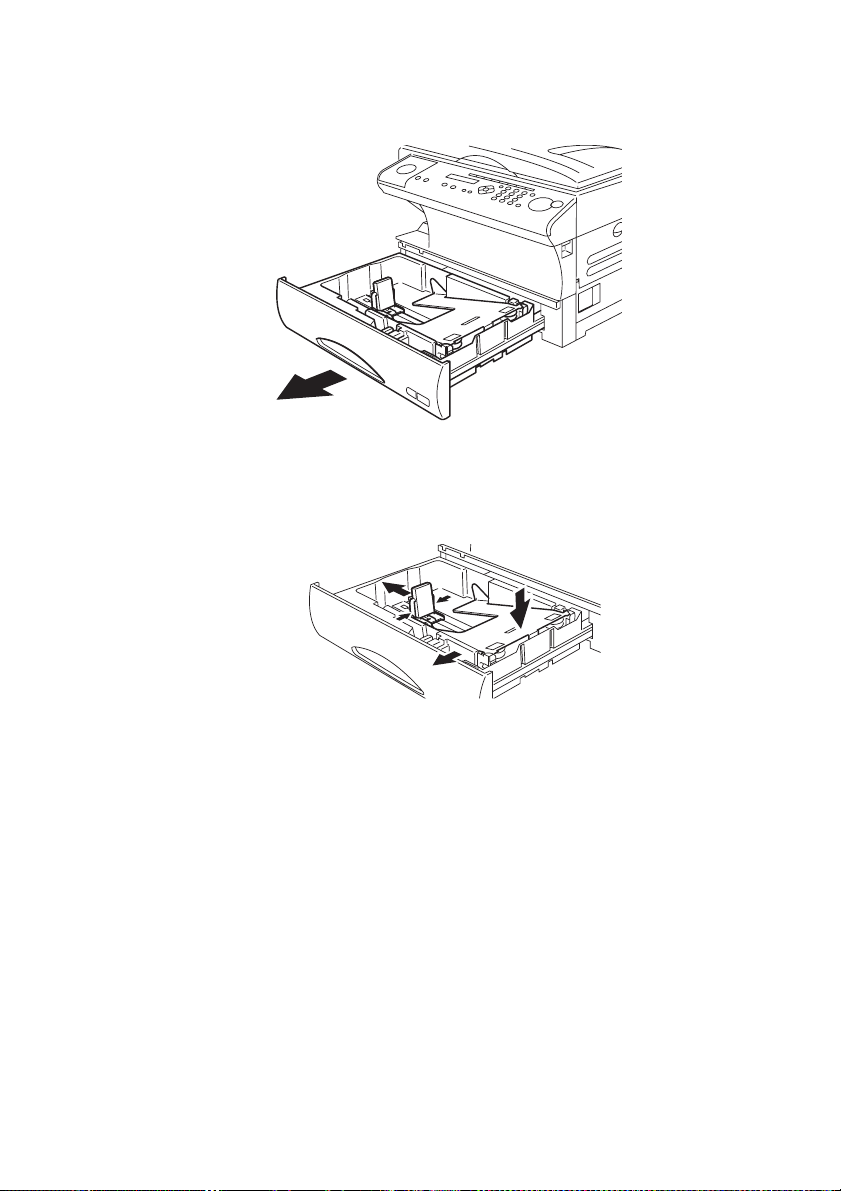
English
1 Open the paper cassette from the front of your machine by gently
pulling it towards you.
2 Check that the paper length guide is set to A4. (If not, press the release
levers on the side of the paper length guide and slide the paper length
guide to the A4 position.)
3 Press down the paper lifting plate.
4 Insert the paper into the cassette as follows:
Before you insert paper in the cassette, stack it so that the leading edge
and sides of the paper are even.
Do not stack the paper above the limit mark inside the cassette.
OKIOFFICE 1200/1600 21
Page 30

English
Place the edges of the top sheet under the metal tabs on the left and right
sides of the cassette.
5 If required, adjust the paper guide(s) to fit the paper snugly.
6 Gently push the paper cassette back into its original (closed) position.
You will feel a click when it has located properly in place.
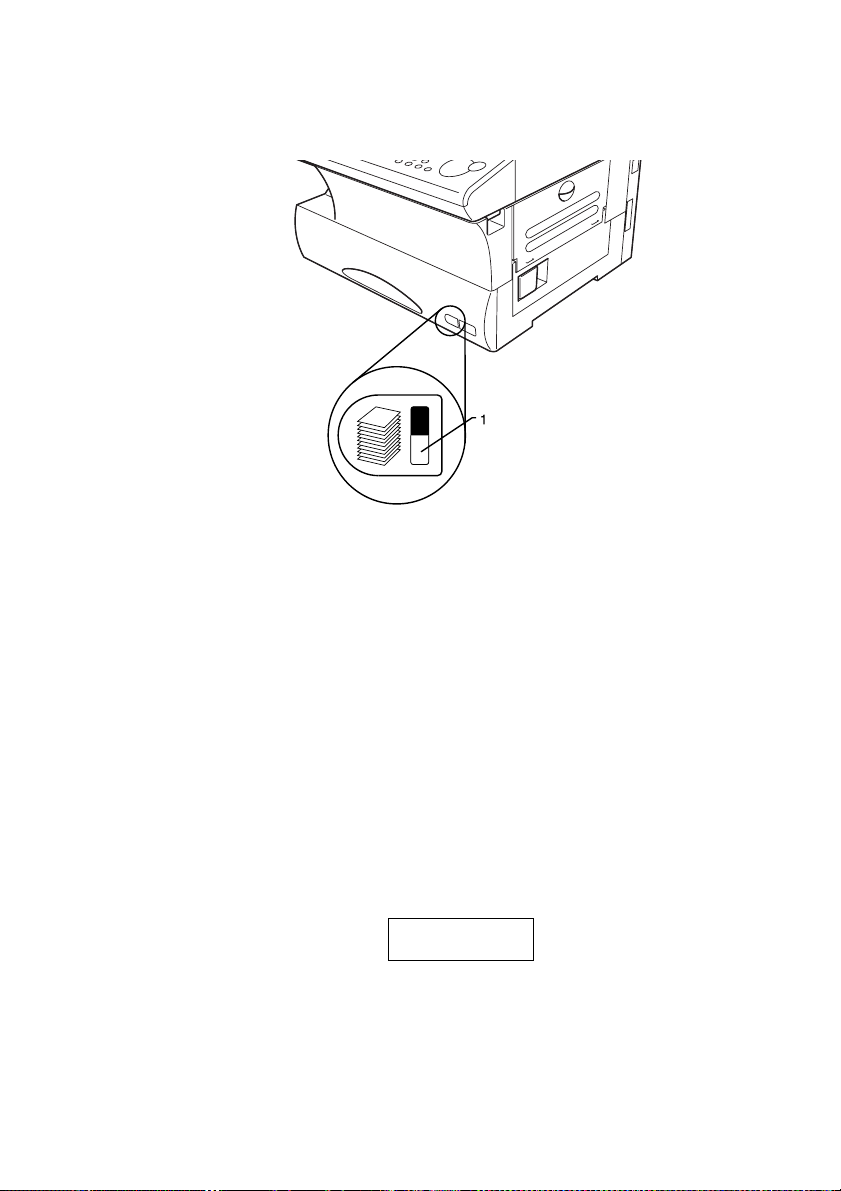
7 Attach the A4 paper size sticker on the front of the cassette.
Note 1:
The paper level indicator (1) on the front of the paper cassette lets
you see how much paper is in the cassette without your having to
open the cassette. When you see the paper level indicator drop (i. e.
it shows more blue), make sure you have a supply of paper nearby.
22 Setup Guide
Page 31
English
Then, when you see the “Please Supply Paper” message on the LCD
display, you will be ready to refill the cassette.
Note 2:
To avoid paper jams, do not refill the paper cassette without first
removing any paper remaining in it i.e. do not just add sheets to an
already-loaded stack.
How to use the keys
Entering characters
• To enter a numeric character (0 through 9), # or * use the numeric
keypad
• To enter an alphabetic character, open the one-touch cover and use the
one-touch key labelled with that character.
The case of the alphabetic character you are about to enter is indicated
at the top right of the LCD, for example:
You r Na me ;U p pe r
_
To toggle between Upper and Lower case, use the ALPHABET onetouch key.
• To enter spaces, punctuation and symbols (other than # and *) use the
one-touch keys.
OKIOFFICE 1200/1600 23
Page 32

English
Deleting characters
• To delete an incorrect character you have just entered, use CANCEL.
• To change a single character, press
character and press CANCEL to delete it then re-enter the character
correctly.
Instruction format
Carry out an instruction (given in the following format in this manual) as
follows:
Press Programkey,A,1,0,1,ENTER
– press the Program key
– then A (one-touch key 01(A))
– then 1 (numeric keypad)
– then 0 (numeric keypad)
– then 1 (numeric keypad)
– then the ENTER key
Note:
The commas in the above instruction are purely to separate one item
from another and are not part of the instruction.
WorX
to move the cursor to that
EasyStart (Initial settings)
EasyStart software is already installed on your fax machine. It guides you
through the process of entering your machine’s settings. The settings you
make here can be changed later if required.
Getting started
Determine the following before you go any further:
The name and fax number you want to appear on your faxes — Every
fax page you send arrives at the receiving machine with a single line oftext
at the top of the page. This text lists a name, called the Transmit Terminal
Identifier (TTI), and a fax number. The TTI cannot be longer than 22
characters.
24 Setup Guide
Page 33

Clearing stored settings
Before using EasyStart, clear your machine’s built-in user data memory.
This ensures the memory will hold only your settings.
Note:
After you use EasyStart, do not clear the memory again unless an
authorised person asks you to do so.
To clear the machine’s memory:
1 Press Program key, *, 2
The LCD now asks if you want to clear the memory:
Clear User Settings
Check Enter/cancel
Note:
If you do not want to clear the memory, press CANCEL.
2 If you do want to clear the memory, press ENTER.
Entering initial settings
Note:
If you press STOP during EasyStart, your fax machine returns to
standby mode (its normal condition) but it will keep any settings you
saved by pressing ENTER as described in these instructions.
1 Press Program key, I, ENTER
LCD
The
shows the current language setting.
English
Language :English
Enter
←⁄→⁄
2 Press
WorX
until the language you want appears.
3 Press ENTER to save the setting and continue EasyStart.
4 The LCD now shows the current calendar/clock setting, with a cursor
appearing under the first digit.
Enter Time
0
1/01 ‘01 00:00
5 Use the numeric keypad to enter the correct date and time, using a
DDMMYY format for the date and 24-hour format for the time. For
OKIOFFICE 1200/1600 25
Page 34

English
instance,toset8:30PMon11June,2000,press1106002030,
which results in:
Enter Time
1/06 ‘00 20:30
1
Note:
Your fax machine automatically inserts the spaces and date-slash.
All you have to do is enter the digits.
To change a digit, press
to move the cursor left orXto move it right,
W
then enter the correct digit.
6 Press ENTER to save the clock setting and continue.
7 The LCD now asks you to enter your faxnumber (Subscriber ID) as you
want it to appear on other fax machines’ displays or printouts.
Your Fax Number
_
8 Use the numeric keypad to enter the fax number. To insert a dash, as
shown here, press DIALING OPTIONS once. The number may contain
up to 20 characters (numbers and dashes).
Your Fax Number
972-555-5525_
Note:
If you make a mistake, press CANCEL to erase to the left.
to move left, orXto move right.
To change just one digit, press
W
Press CANCEL to erase the number. Then re-enter the Fax number
correctly.
9 Press ENTER to save the number.
10 The LCD now asks you to enter the name you want to appear at the top
of faxes you send. The name may be up to 22 characters in length.
Use the one-touch keys to enter letters and other non-numeric
characters. (See How to use the keys)
Your Name ;Upper
_
11 Press ENTER to save the setting and continue.
26 Setup Guide
Page 35

12 TheLCDnowshowsthetypeofdialling:
Phone Type :Tone
Enter
←⁄→⁄
13 Press ENTER and continue.
14 The LCD now shows the machine’s current reception mode.
Fax Ready
Enter
←⁄→⁄
English
15 Press
WorX
until the setting Fax Ready appears. (This setting can be
changed later if required. See the Operating Instructions manual)
16 Press ENTER to save the setting. Your machine returns to standby
mode.
Turning off Transport Mode
Caution:
After unlocking the mirror carriage (see Unlocking the mirror
carriage), you must turn off Transport Mode before proceeding any
further.)
When the machine is in the transport mode, the LCD shows:
Mirror Locked
To turn off the transport mode:
1 Press Program key, *, E (a beeping sound is heard after pressing *)
Mirror Locked :On
Enter
←⁄→⁄
2 Select Off by pressing
WorX
Transport Mode. The mirror carriage moves to the home position.
.ThenpressENTER to turn off the
Mirror Locked :Off
Enter
←⁄→⁄
OKIOFFICE 1200/1600 27
Page 36

English
Caution:
If you have to reship the machine, turn on Transport Mode to
move the mirror carriage to the transport position (in step 2, above,
press
WorX
and lock the mirror carriage using the mirror carriage locking
plate (see Unlocking the mirror carriage).
to set the Transport Mode to On), then power off
28 Setup Guide
Page 37

Getting started
Changing modes
Use the COPY/FAX key to select either COPY mode or FAX mode. The
corresponding COPY or FAX light on the Control panel is illuminated.
The standby display for each mode is as follows:
COPY mode:
Copy Ready 1
A4 [ A4 ] 100%
FAX mode:
Fax Ready 1
1 Jan 2001 0:00
Note:
You cannot switch modes in any of the following cases:
When scanning a fax message for transmission.
During real time transmission.
When programming any function settings.
English
Sending faxes
You can send a fax message using different sizes of paper in the ADF
(Automatic Document Feeder) or on the FBS (Flatbed Scanner) glass. (For
more details see the Operating Instructions manual)
A4 paper is assumed in the following examples.
To avoid paper jams and damage to your machine, do not insert:
• Folded, curled, torn, wrinkled or very thin pages
• Documents with staples, glue, tape, paper clips or correction fluid that
is still wet
• “Sticky notes” (or documents with “sticky notes” attached)
• Cardboard, newspaper or fabric
• Pages with duplicating carbon on either side
• Credit cards or any small, thick items
• OHP transparency film
OKIOFFICE 1200/1600 29
Page 38

English
Using the ADF
1 Press COPY/FAX to change to Fax mode.
2 Insert the document face up, top edge first. (If your document is multi-
page, fan the pages slightly.) Adjust the document guides — by sliding
either of them to the left or right — to fit the page(s) you are faxing.
Your fax machine’s ADF (Automatic Document Feeder) will hold up
to 50 sheets of A4-sized normal weight paper.
When a document is in the feeder, the LCD shows the scanning width
and the amount of memory available:
Document Ready
A4 Mem100%
3 Use the default settings of resolution and contrast here and refer to the
Operating Instructions manual if you wish to change these.
4 Enter the fax number. Also, enter any access codes necessary, just as
you would for a normal phone call. (e.g. enter 9 to “dial out” from an
office telephone system)
Press Start
919725552009_
5 Press START.
By pressing START, you give your machine a command. In turn, your
machine gives this action a command number as it scans the fax
document. This command number appears on the first line of the LCD
for a few seconds:
== Command:01 ==
30 Setup Guide
Page 39
(You need to know this command number if you later wish to cancel
the transmission or to print a stored document.)
6 Your machine now scans the document and transmits the scanned data
to the receiving machine.
7 At the end of the operation, your fax machine beeps and displays:
919725552009
** Complete **
Note:
Whenever you transmit a document, what actually appears on the
top line of the display depends on information stored in the remote
fax. The line may even be blank.
Using the FBS
English
1 Press COPY/FAX to change to Fax mode.
2 Remove any documents that are in the ADF.
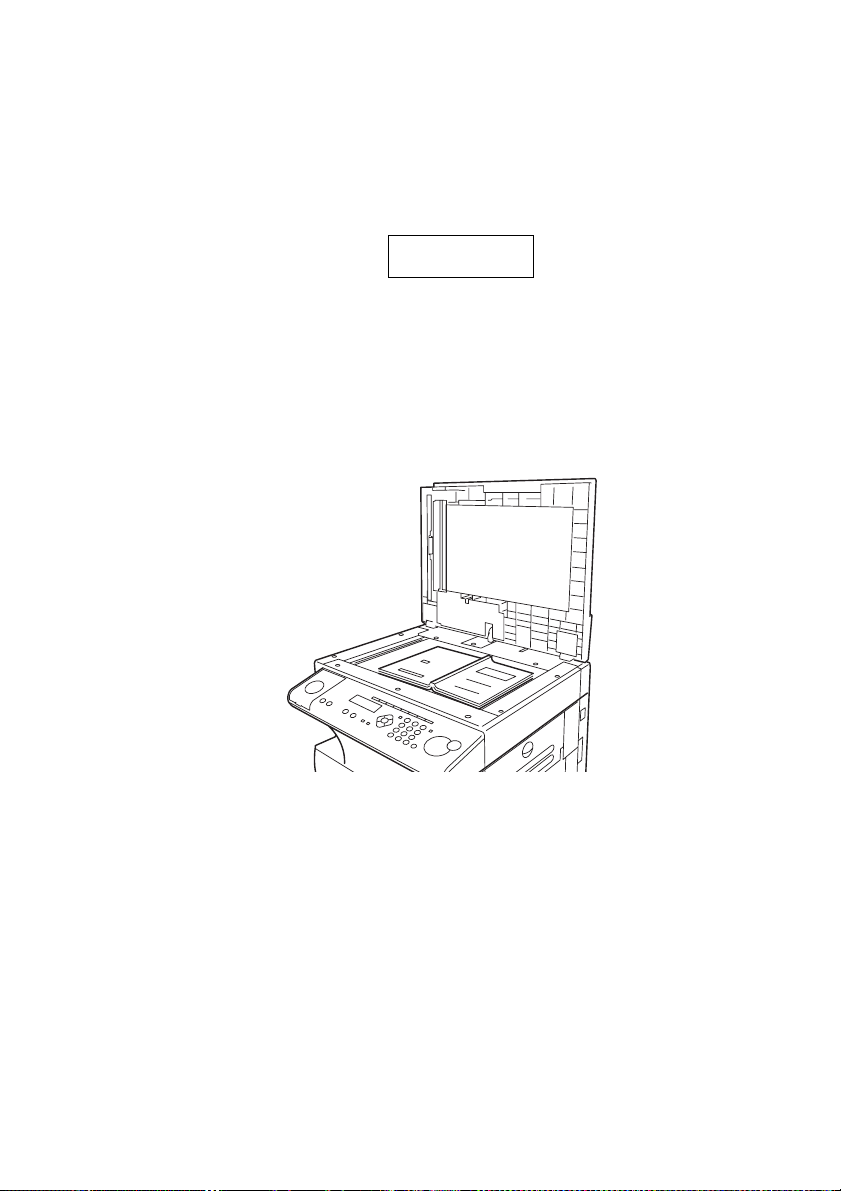
3 Open the platen cover.
4 Place the document face down on the FBS glass and align it with the
document scale on the right, then gently close the platen cover.
The document should be aligned to the right front corner.
5 Check DOCUMENT SIZE is set to A4.
6 Use the default settings of resolution and contrast here and refer to the
Operating Instructions manual if you wish to change these.
OKIOFFICE 1200/1600 31
Page 40

English
7 Enter the fax number. Also, enter any access codes necessary, just as
you would for a normal phone call. (e.g. enter 9 to “dial out” from an
office telephone system)
Press Start
919725552009_
8 Press START.
By pressing START, you give your machine a command. In turn, your
machine gives this action a command number as it scans the fax
document. This command number appears on the first line of the LCD
for a few seconds:
== Command:01 ==
(You need to know this command number if you later wish to cancel
the transmission or to print a stored document.)
Then your machine will scan the document into the memory.
While your machine scans the document, the LCD shows:
919725552009
A4 NextDoc Mem100%
9 When the scanning is complete, the LCD shows:
Start Scan ->NextDoc
Tx Start ->Start
If you want to send more pages, proceed to step 10.
Otherwise, press START to start the transmission, and skip to step 11.
10 Place the next page on the glass, then press NEXT DOC to start
scanning.
To send any more pages, repeat steps 9-10.
Otherwise, press START to start the transmission, and skip to step 11.
11 Now, when it makes contact with the receiving machine, your machine
transmits the stored document from memory.
12 At the end of the operation, your fax machine beeps and displays:
919725552009
** Complete **
32 Setup Guide
Page 41

Note:
Whenever you transmit a document, what actually appears on the
top line of the display depends on information stored in the remote
fax. The line may even be blank.
Receiving faxes
Answering calls manually
Your fax machine has five different reception modes but in any reception
mode, you can always answer calls manually if you have an optional
handset installed. Just pick it up, as you would if using a normal phone. If
you hear someone speaking to you, use your optional handset to speak
back.
If you hear fax tones (“beep — beep — beep”), press START and hang up
the optional handset. The fax machine will begin receiving a fax.
Note:
Do not try to answer a call by pressing MONITOR/CALL. The
monitor function is for dialling only.
Selecting reception mode
Your fax machine has five different reception modes:
English
• Tel Ready
• Fax Ready
• Fax/Tel Ready
• Tel/Fax Ready
• Ans/Fax Ready.
Tel Ready mode
Use it if:
you want to use the same line for both fax and phone calls
and
on that line, you are using at least one other phone which is not
connected to your fax machine
or
you have an optional handset installed on your fax machine
OKIOFFICE 1200/1600 33
Page 42

English
In this mode:
your fax machine never answers calls automatically. You must answer
each call as described in “Answering calls manually”.
Fax Ready mode
Use it if:
your fax machine uses its own phone line and doesn’t share it with a
phone or an answering machine.
In this mode:
your fax machine answers each call and attempts to receive a fax.
Fax/Tel Ready mode
The Fax/Tel Ready mode is a combination of the Fax Ready and Tel
Ready modes.
Use it if:
an optional handset is installed on your fax machine
and
you are using the machine as both a fax machine and a telephone
In this mode:
Your fax machine receives faxes silently but also alerts you when a
regular voice call comes in. (Your fax machine also beeps once at the
end of each reception.) If a voice call comes in, your fax machine
detects it and sounds a special ring. If you hear it, answer using your
optional handset.
Tel/Fax Ready mode
The Tel/Fax Ready mode is a combination of the Tel Ready and Fax
Ready modes.
Use it if:
an optional handset is installed on your fax machine
and
you are using the machine as both a telephone and a fax machine
34 Setup Guide
Page 43

English
In this mode:
your fax machine rings the number of times you’ve identified in the
user settings (the default setting is two times). If you don’t use the
optional handset to answer the call, your fax machine answers the call.
If a caller sends a fax, your machine begins receiving it. If a voice call
comes in, your machine detects it and sounds a special ring, telling you
to answer using the optional handset.
Ans/Fax Ready mode
Use it if:
you are using an answering machine that is connected directly to your
fax machine.
In this mode:
an answering machine connected to your fax machine answers each
call. If a voice call comes in, the answering machine begins to record
the incoming message. If your fax machine hears a fax tone, it begins
receiving the fax message.
Selecting the reception mode
1 Press Program key, I, and then press ENTER six times. The LCD shows
your current fax reception mode:
Fax Ready
Enter
←⁄→⁄
2 Press
WorX
until your desired reception mode appears.
3 Press ENTER to save the setting.
OKIOFFICE 1200/1600 35
Page 44

English
Making copies
Making a single copy
1 Press COPY/FAX (1) to change to Copy mode.
When the machine is in Copy mode, the LCD displays:
Copy Ready 1
A4 [ A4 ] 100%
– the Copy Ready message and Number of Copies on its top line
– the Document Size, Recording Paper Size (in brackets) and the
Reduction/Enlargement percentage on its bottom line
2 Place your original document in the ADF face up, or on the FBS glass
face down just as you would to send a fax.
3 Ensure the DOCUMENT SIZE is set to A4.
4 As required, carry out the following:
Select document type and adjust image contrast
Set copy reduction or enlargement ratio
Note:
For details about each item, see “Making copy settings”.
5 Press START.
Note:
To stop the copying, press STOP.
Stacking multiple copies
1 Press COPY/FAX to change to Copy mode.
2 Turn the sort setting from its default setting of On to Off. (See Making
copy settings)
36 Setup Guide
Page 45

3 Place your original document in ADF face up, or on the FBS glass face
down just as you would to send a fax.
4 Enter the document size by pressing the DOCUMENT SIZE.
5 Use the numeric keypad to enter the number of copies you want (up to
99).
6 As required, do the following:
Select document type and adjust image contrast
Set copy reduction or enlargement ratio
Note:
For details about each item, see “Making copy settings”.
7 Press START.
Note:
To stop the copying, press STOP.
Sorting multiple copies (using the ADF)
Note:
You cannot use the FBS glass for sorting multiple copies.
1 Press COPY/FAX to change to Copy mode.
2 Make sure the Sort setting is turned on. (See Making copy settings)
English
3 Place your original document in ADF face up, just as you would to send
afax.
4 Enter the document size by pressing the DOCUMENT SIZE.
5 Use the numeric keypad to enter the number of copies you want (up to
99).
6 As required, set the following:
Select document type and adjust image contrast
Set copy reduction ratio
Note:
For details about each item, see “Making copy settings”.
7 Press START.
Note:
To stop the copying, press STOP.
OKIOFFICE 1200/1600 37
Page 46

English
Making enlarged or reduced copies
Your fax machine is capable of enlargement and reduction when copying
(but not when faxing) and enlargement can be done only on the FBS (and not
using the ADF).
1 Press COPY/FAX to change to Copy mode.
2 Place your original document in ADF face up, or on the FBS glass face
down just as you would send a fax.
Note:
If you want an enlarged copy, use the FBS glass.
3 Enter the document size by pressing the DOCUMENT SIZE.
4 Choose an enlargement or reduction ratio using the
You can reduce to 86%, 81%, 70% or 50% of the original size
or
You can enlarge to 115%, 122%, 141% or 200%
or
Press ZOOM to turn the ZOOM light on, and adjust the ratio at 1%
steps using the
200%.
or
Directly enter any percentage between 50% and 200% by following
procedure.
–Press#.
– Use the numeric key to enter your desired ratio (50 to 200).
–Press# again.
5 As required, do the following:
• Select document type and adjust image contrast
• Enter the number of copies
6 Press START.
SorT
key. You can enter a ratio between 50% and
SorT
key.
Note:
To stop the copying, press STOP.
38 Setup Guide
Page 47

Making copy settings
When the machine is in the Copy mode, the LCD shows:
Copy Ready 1
A4 [ A4 ] 100%
– the Copy Ready message and Number of Copies on its top line
– the Document Size, Recording Paper Size (in brackets) and the
Reduction/Enlargement percentage on its bottom line
Setting number of pages
Use the numeric keypad to enter the desired number of copies.
Copy reduction or enlargement rate
Your fax machine can make enlarged and reduced copies. For more
information, see Making enlarged or reduced copies.
Selecting document size
To select the document size manually, press DOCUMENT SIZE
repeatedly until your desired document size appears. You can choose A4,
A5 or F4.
English
Note:
When the document size is set to “Auto” the document size displayed
in the LCD is enclosed in brackets.
Selecting recording paper size
As default, your machine selects the paper source automatically, however
if you wish to select the paper source manually, press PAPER SIZE
repeatedly until your desired paper size is displayed.
Selecting document type
• PHOTO — Select this mode when copying photographs or drawings.
• PHOTO/TEXT — Select this mode when copying documents
containing photographs or drawings with text.
• TEXT — Select this mode when copying text.
To select the document type, press DOCUMENT repeatedly. A glowing
LED indicates the machine is using the setting named by that LED.
OKIOFFICE 1200/1600 39
Page 48

English
Adjusting image contrast
Setting the contrast allows you to compensate for any excessive light or
darkness, of the document pages you are copying.
To change the contrast setting, press CONTRAST repeatedly. A glowing
LED indicates the machine is using the setting indicated by that LED.
Note:
To avoid confusing the Light and Dark settings, remember “Light
lightens” and “Dark darkens”.
Sort copy setting
Defaultsetting:On
1 Press Program key, B,3,0,6
2 Press ENTER.
The LCD shows the current setting:
Sort Copy :On
Enter
←⁄→⁄
3 Press
WorX
until the setting you want appears.
In this example, Off has been chosen:
Sort Copy :Off
Enter
←⁄→⁄
4 Press ENTER to save the setting.
40 Setup Guide
Page 49

Clearing paper jams
Original document jams
1 If an original document jams in the ADF while scanning the document
into the memory for faxing or copying, the LCD will show:
Document Jam
ContStor Enter/Cancl
If you wish to continue the operation, press ENTER and proceed to step
2.
To abort the operation, press CANCEL. This will erase from memory
all pages stored during this operation and the machine will return to
standby mode.
Note:
If you wait more than 60 seconds without pressing any key, the
machine will erase from memory all pages stored during this
operation and the machine will return to the standby mode.
If the following message appears, the machine will abort the operation.
You will have to perform the job again from scratch.
Open&Close ScanCover
Reset Document
English
2 The LCD will show which page (i. e. which page number) is jammed.
To continue scanning from the jammed page forward, press START
after clearing the jam.
Note:
If you wait more than 60 seconds without pressing any keys, the
machine will begin to send or copy the document(s) it has.
If you wish to cancel this operation, press STOP. The machine will
delete all pages from memory and then return to its standby mode.
OKIOFFICE 1200/1600 41
Page 50
English
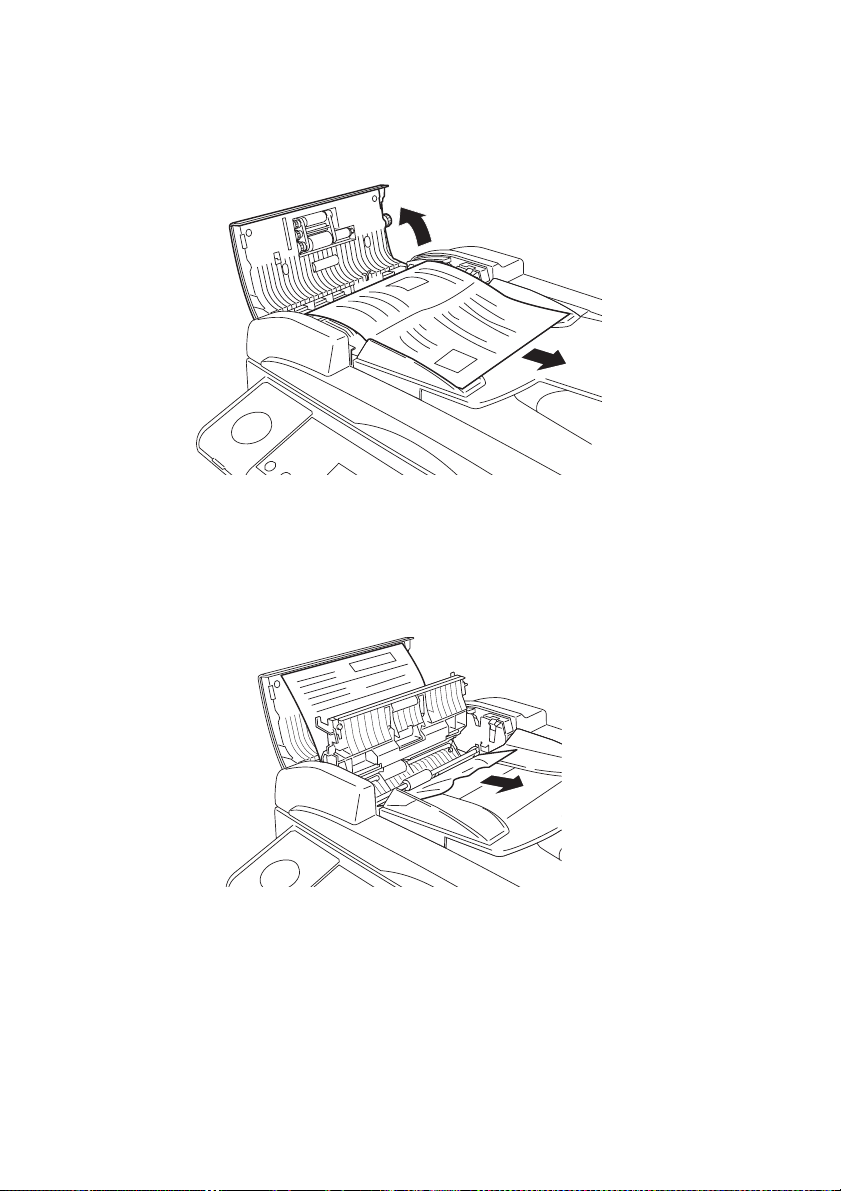
Clearing the jam
1 Open the scanner cover.
2 Lift the original document from the machine.
Note:
If you cannot remove the original document, open the inner cover,
then remove the document.
3 Carefully close the scanner cover, making sure both sides are snapped
down securely.
Note:
If the original document has become wrinkled or torn, do not resend it.
42 Setup Guide
Page 51

Printout jams
To clear a printout jammed inside your machine:
1 Open the top cover.
2 Open the printer cover.
English
OKIOFFICE 1200/1600 43
Page 52

English
3 Remove the toner and drum cartridges.
Note:
Shield the drum cartridge from light, especially strong sunlight.
WARNING:
AS THE FUSER UNIT BECOMES VERY HOT DURING
OPERATION, DO NOT TOUCH THE FUSER UNIT WHEN
YOU ARE REMOVING A PAPER JAM.
4 Remove the jammed paper, taking care to avoid getting “unfixed” toner
on your hands and clothes.
44 Setup Guide
Page 53

If necessary, open the side cover and pull up the jam release lever to
remove the jammed paper.
5 Refit the toner and drum cartridge.
English
OKIOFFICE 1200/1600 45
Page 54

English
6 Gently close the printer cover, pressing firmly on both sides of the
printer cover until you hear it click.
7 Carefully close the top cover, pressing firmly on both sides of the top
cover until you hear it click.
46 Setup Guide
 Loading...