


P
REFACE
Every effort has been made to ensure that the information in this document is complete,
accurate, and up-to-date. The manufacturer assumes no responsibility for the results of
errors beyond its control. The manufacturer also cannot guarantee that changes in software
and equipment made by other manufacturers and referred to in this guide will not affect
the applicability of the information in it. Mention of software products manufactured by
other companies does not necessarily constitute endorsement by the manufacturer.
While all reasonable efforts have been made to make this document as accurate and helpful
as possible, we make no warranty of any kind, expressed or implied, as to the accuracy or
completeness of the information contained herein.
The most up-to-date drivers and manuals are available from:
http://www.okiprintingsolutions.com
07112301 iss.01; Copyright © 2010 Oki Europe Ltd. All rights reserved.
Oki is a registered trademark of Oki Electric Industry Company, Ltd.
Oki Printing Solutions is a trademark of Oki Data Corporation.
Energy Star is a trademark of the United States Environmental Protection Agency.
Microsoft, MS-DOS and Windows are registered trademarks of Microsoft Corporation.
Apple, Macintosh, Mac and Mac OS are trademarks of Apple Inc.
Other product names and brand names are registered trademarks or trademarks of their
proprietors.
As an Energy Star Program Participant, the manufacturer has determined that
this product meets the Energy Star guidelines for energy efficiency.
This product complies with the requirements of the Council Directives 2004/
108/EC (EMC), 2006/95/EC (LVD) and 2009/125/EC (ErP) as amended where
applicable on the approximation of the laws of the member states relating to
electromagnetic compatibility, low voltage and energy using products.
This product complies with EN55022 Class B. However, when fitted with the
optional network interface card, RS-232 C serial interface card or optional cutsheet feeder, compliance to EN55022 is class A. In a domestic environment
this configuration may cause radio interference, in which case the user may be
required to take adequate measures.
The following cables were used to evaluate this product to achieve EMC directive 2004/108/
EC compliance and configurations other than this may affect that compliance.
CABLE TYPE LENGTH
(METRE)
Power 1.8
USB 5.0
Serial 1.5
Parallel 5.0
CORE SHIELD
✘✘
✘ ✔
✘ ✔
✘✘
LAN 2.1
✘ ✔
Preface > 2

M
ANUFACTURER
Oki Data Corporation,
4-11-22 Shibaura, Minato-ku,
Tokyo 108-8551,
Japan
I
MPORTER TO THE
Oki Europe Limited (trading as Oki Printing Solutions)
Blays House
Wick Road
Egham
Surrey, TW20 0HJ
United Kingdom
For all sales, support and general enquiries contact your local distributor.
E
NVIRONMENTAL INFORMATION
EU/
AUTHORISED REPRESENTATIVE
Manufacturer > 3

C
ONTENTS
Preface . . . . . . . . . . . . . . . . . . . . . . . . . . . . . . . . . . . . . . . . . . . . . . . . . . .2
Manufacturer. . . . . . . . . . . . . . . . . . . . . . . . . . . . . . . . . . . . . . . . . . . . . . .3
Importer to the EU/authorised representative. . . . . . . . . . . . . . . . . . . . . . 3
Environmental information . . . . . . . . . . . . . . . . . . . . . . . . . . . . . . . . . . . 3
Contents . . . . . . . . . . . . . . . . . . . . . . . . . . . . . . . . . . . . . . . . . . . . . . . . . .4
Notes, cautions and warnings. . . . . . . . . . . . . . . . . . . . . . . . . . . . . . . . . .6
Introduction . . . . . . . . . . . . . . . . . . . . . . . . . . . . . . . . . . . . . . . . . . . . . . .7
About this guide . . . . . . . . . . . . . . . . . . . . . . . . . . . . . . . . . . . . . . . . . . 7
On-line usage . . . . . . . . . . . . . . . . . . . . . . . . . . . . . . . . . . . . . . . . . . 7
Printing pages. . . . . . . . . . . . . . . . . . . . . . . . . . . . . . . . . . . . . . . . . . 8
Getting started . . . . . . . . . . . . . . . . . . . . . . . . . . . . . . . . . . . . . . . . . . . . .9
Location . . . . . . . . . . . . . . . . . . . . . . . . . . . . . . . . . . . . . . . . . . . . . . . . 9
Unpacking . . . . . . . . . . . . . . . . . . . . . . . . . . . . . . . . . . . . . . . . . . . . . . 9
Installing the ribbon cartridge. . . . . . . . . . . . . . . . . . . . . . . . . . . . . . . . .11
Ribbon cartridge handling. . . . . . . . . . . . . . . . . . . . . . . . . . . . . . . . . .11
Powering on your printer . . . . . . . . . . . . . . . . . . . . . . . . . . . . . . . . . . . .12
Powering off your printer . . . . . . . . . . . . . . . . . . . . . . . . . . . . . . . . . . . .13
Computer connections . . . . . . . . . . . . . . . . . . . . . . . . . . . . . . . . . . . . . .13
Parallel. . . . . . . . . . . . . . . . . . . . . . . . . . . . . . . . . . . . . . . . . . . . . . .13
USB . . . . . . . . . . . . . . . . . . . . . . . . . . . . . . . . . . . . . . . . . . . . . . . . .14
Loading paper. . . . . . . . . . . . . . . . . . . . . . . . . . . . . . . . . . . . . . . . . .15
Printer drivers . . . . . . . . . . . . . . . . . . . . . . . . . . . . . . . . . . . . . . . . . . . . .18
Emulations . . . . . . . . . . . . . . . . . . . . . . . . . . . . . . . . . . . . . . . . . . . . . .18
Printing from the computer. . . . . . . . . . . . . . . . . . . . . . . . . . . . . . . . .18
Oki DIPUS . . . . . . . . . . . . . . . . . . . . . . . . . . . . . . . . . . . . . . . . . . . . . .18
Controlling the printer using DIPUS . . . . . . . . . . . . . . . . . . . . . . . . . . .18
Using your printer . . . . . . . . . . . . . . . . . . . . . . . . . . . . . . . . . . . . . . . . . .20
Components: Rear feed (continuous forms) . . . . . . . . . . . . . . . . . . . . . . .20
Components: Top feed (single sheets). . . . . . . . . . . . . . . . . . . . . . . . . . .20
Loading paper. . . . . . . . . . . . . . . . . . . . . . . . . . . . . . . . . . . . . . . . . . . .20
Rear feed . . . . . . . . . . . . . . . . . . . . . . . . . . . . . . . . . . . . . . . . . . . . .20
Top feed (single sheets). . . . . . . . . . . . . . . . . . . . . . . . . . . . . . . . . . .29
Top of form (TOF) . . . . . . . . . . . . . . . . . . . . . . . . . . . . . . . . . . . . . . . . .30
Forms tear-off. . . . . . . . . . . . . . . . . . . . . . . . . . . . . . . . . . . . . . . . . . . .31
Setting top of form (TOF). . . . . . . . . . . . . . . . . . . . . . . . . . . . . . . . . . . .32
Temporarily changing the top of form . . . . . . . . . . . . . . . . . . . . . . . . . . .33
Resetting top of form to the factory default . . . . . . . . . . . . . . . . . . . . . . .33
Forms tear-off feature . . . . . . . . . . . . . . . . . . . . . . . . . . . . . . . . . . . . . .33
Potential issues with software packages . . . . . . . . . . . . . . . . . . . . . . . .34
Changing the forms tear-off setting. . . . . . . . . . . . . . . . . . . . . . . . . . . . .34
Manual forms tear-off . . . . . . . . . . . . . . . . . . . . . . . . . . . . . . . . . . . . . .35
Paper park . . . . . . . . . . . . . . . . . . . . . . . . . . . . . . . . . . . . . . . . . . . . . .35
Changing paper paths . . . . . . . . . . . . . . . . . . . . . . . . . . . . . . . . . . . . . .35
Continuous forms to single sheets . . . . . . . . . . . . . . . . . . . . . . . . . . . .35
Single sheets to continuous forms . . . . . . . . . . . . . . . . . . . . . . . . . . . .36
Printhead gap . . . . . . . . . . . . . . . . . . . . . . . . . . . . . . . . . . . . . . . . . . . .38
Print quality . . . . . . . . . . . . . . . . . . . . . . . . . . . . . . . . . . . . . . . . . . . . .38
Character pitch . . . . . . . . . . . . . . . . . . . . . . . . . . . . . . . . . . . . . . . . . . .39
Printer reset . . . . . . . . . . . . . . . . . . . . . . . . . . . . . . . . . . . . . . . . . . . . .40
Changing emulations . . . . . . . . . . . . . . . . . . . . . . . . . . . . . . . . . . . . .40
Contents > 4

Menu mode . . . . . . . . . . . . . . . . . . . . . . . . . . . . . . . . . . . . . . . . . . . . . . .41
Menu mode keys . . . . . . . . . . . . . . . . . . . . . . . . . . . . . . . . . . . . . . . . .41
Entering and exiting menu mode. . . . . . . . . . . . . . . . . . . . . . . . . . . . .41
Resetting the menu to the factory defaults. . . . . . . . . . . . . . . . . . . . . .41
Printing the menu settings . . . . . . . . . . . . . . . . . . . . . . . . . . . . . . . . .41
Printing all menu settings. . . . . . . . . . . . . . . . . . . . . . . . . . . . . . . . . .42
Changing the menu settings . . . . . . . . . . . . . . . . . . . . . . . . . . . . . . . .42
Menu settings . . . . . . . . . . . . . . . . . . . . . . . . . . . . . . . . . . . . . . . . . . . .43
Maintenance . . . . . . . . . . . . . . . . . . . . . . . . . . . . . . . . . . . . . . . . . . . . . .54
Replacing the ribbon cartridge . . . . . . . . . . . . . . . . . . . . . . . . . . . . . . . .54
Ribbon cartridge handling. . . . . . . . . . . . . . . . . . . . . . . . . . . . . . . . . .54
Cleaning your printer. . . . . . . . . . . . . . . . . . . . . . . . . . . . . . . . . . . . . . .56
Printer exterior . . . . . . . . . . . . . . . . . . . . . . . . . . . . . . . . . . . . . . . . .56
Cleaning the housing . . . . . . . . . . . . . . . . . . . . . . . . . . . . . . . . . . . . .56
Troubleshooting . . . . . . . . . . . . . . . . . . . . . . . . . . . . . . . . . . . . . . . . . . .58
Clearing paper jams . . . . . . . . . . . . . . . . . . . . . . . . . . . . . . . . . . . . . . .58
Rear feed jams . . . . . . . . . . . . . . . . . . . . . . . . . . . . . . . . . . . . . . . . .58
Rear feed, repeating paper jams . . . . . . . . . . . . . . . . . . . . . . . . . . . . .59
Single sheet paper jams. . . . . . . . . . . . . . . . . . . . . . . . . . . . . . . . . . .61
General problems . . . . . . . . . . . . . . . . . . . . . . . . . . . . . . . . . . . . . . . . .62
Parts and accessories . . . . . . . . . . . . . . . . . . . . . . . . . . . . . . . . . . . . . . .64
Specifications . . . . . . . . . . . . . . . . . . . . . . . . . . . . . . . . . . . . . . . . . . . . .65
Index . . . . . . . . . . . . . . . . . . . . . . . . . . . . . . . . . . . . . . . . . . . . . . . . . . . .66
Oki contact details. . . . . . . . . . . . . . . . . . . . . . . . . . . . . . . . . . . . . . . . . .67
Contents > 5

N
OTES, CAUTIONS AND WARNINGS
NOTE
A note provides additional information to supplement the main text.
CAUTION!
A caution provides additional information which, if ignored, may
result in equipment malfunction or damage.
WARNING!
A warning provides additional information which, if ignored, may
result in a risk of personal injury.
For the protection of your product, and in order to ensure that you benefit from its full
functionality, this model has been designed to operate only with genuine original ribbon
cartridges. Any other ribbon cartridge may not operate at all, even if it is described as
“compatible”, and if it does work, your product's performance and print quality may be
degraded.
Use of non-genuine products may invalidate your warranty.
Specifications subject to change without notice. All trademarks acknowledged.
Notes, cautions and warnings > 6

I
NTRODUCTION
Congratulations on purchasing this printer!
This printer series is designed to provide highly reliable letter quality printing and high
resolution graphics for the desktop/office printing environment. It combines state-of-theart, 9-pin (ML5520ECO/ML5521ECO) and 24-pin (ML5590ECO/ML5591ECO), serial impact
dot matrix printing technology with advanced materials and superior construction to
provide high performance and versatility in a desktop sized unit. Careful attention to
ergonomics and application needs provides user friendly operation for operators of varying
technical capabilities.
A
BOUT THIS GUIDE
This manual is your user’s guide (check the web site, www.okiprintingsolutions.com, for the
most up-to-date version) for your printer and forms part of the overall user support listed
below:
> Installation Safety booklet: provides information as to safe use of the printer.
This is a paper document that is packaged with the printer and should be read before
setting up your printer.
> Set-up guide: to describe how to unpack, connect and turn on your printer.
This is a paper document that is packaged with the printer.
> This User’s Guide: to help you to become familiar with your printer and make the
best use of its many features. Also included are guidelines for troubleshooting and
maintenance to ensure that it performs at its best.
This is an electronic document stored on the manuals CD.
> Network Configuration Guide: to provide detailed technical information for
network administrators to configure the optional accessory network interface.
This is an electronic document stored on the CD that accompanies the network
interface card optional accessory.
> On-line Help: on-line information accessible from the printer driver and utility
software.
ON-
LINE USAGE
This guide is intended to be read on screen using an Adobe Acrobat Reader. Use the
navigation and viewing tools provided in Acrobat.
You can access specific information in two ways:
> In the list of bookmarks down the left hand side of your screen, click on the topic of
interest to jump to the required topic. (If the bookmarks are not available, use the
“Contents” on page 4.)
> In the list of bookmarks, click on Index to jump to the Index. (If the bookmarks are
not available, use the “Contents” on page 4.) Find the term of interest in the
alphabetically arranged index and click on the associated page number to jump to
the page containing the term.
Introduction > 7

P
RINTING PAGES
The whole manual, individual pages, or sections may be printed. The procedure is:
1. From the toolbar, select File, then Print (or press the Ctrl + P keys).
2. Choose which pages you wish to print:
(a) All pages, (1), for the entire manual.
(b) Current page, (2), for the page at which you are looking.
1
2
3
(c) Pages from and to, (3), for the range of pages you specify by entering their
page numbers.
3. Click on OK.
Introduction > 8
G
ETTING STARTED
L
OCATION
> Place your printer on a firm, solid surface.
> Allow enough space around the printer to easily access the platen knob and the
various paper feed paths.
> Make sure a suitable grounded power outlet is available nearby.
U
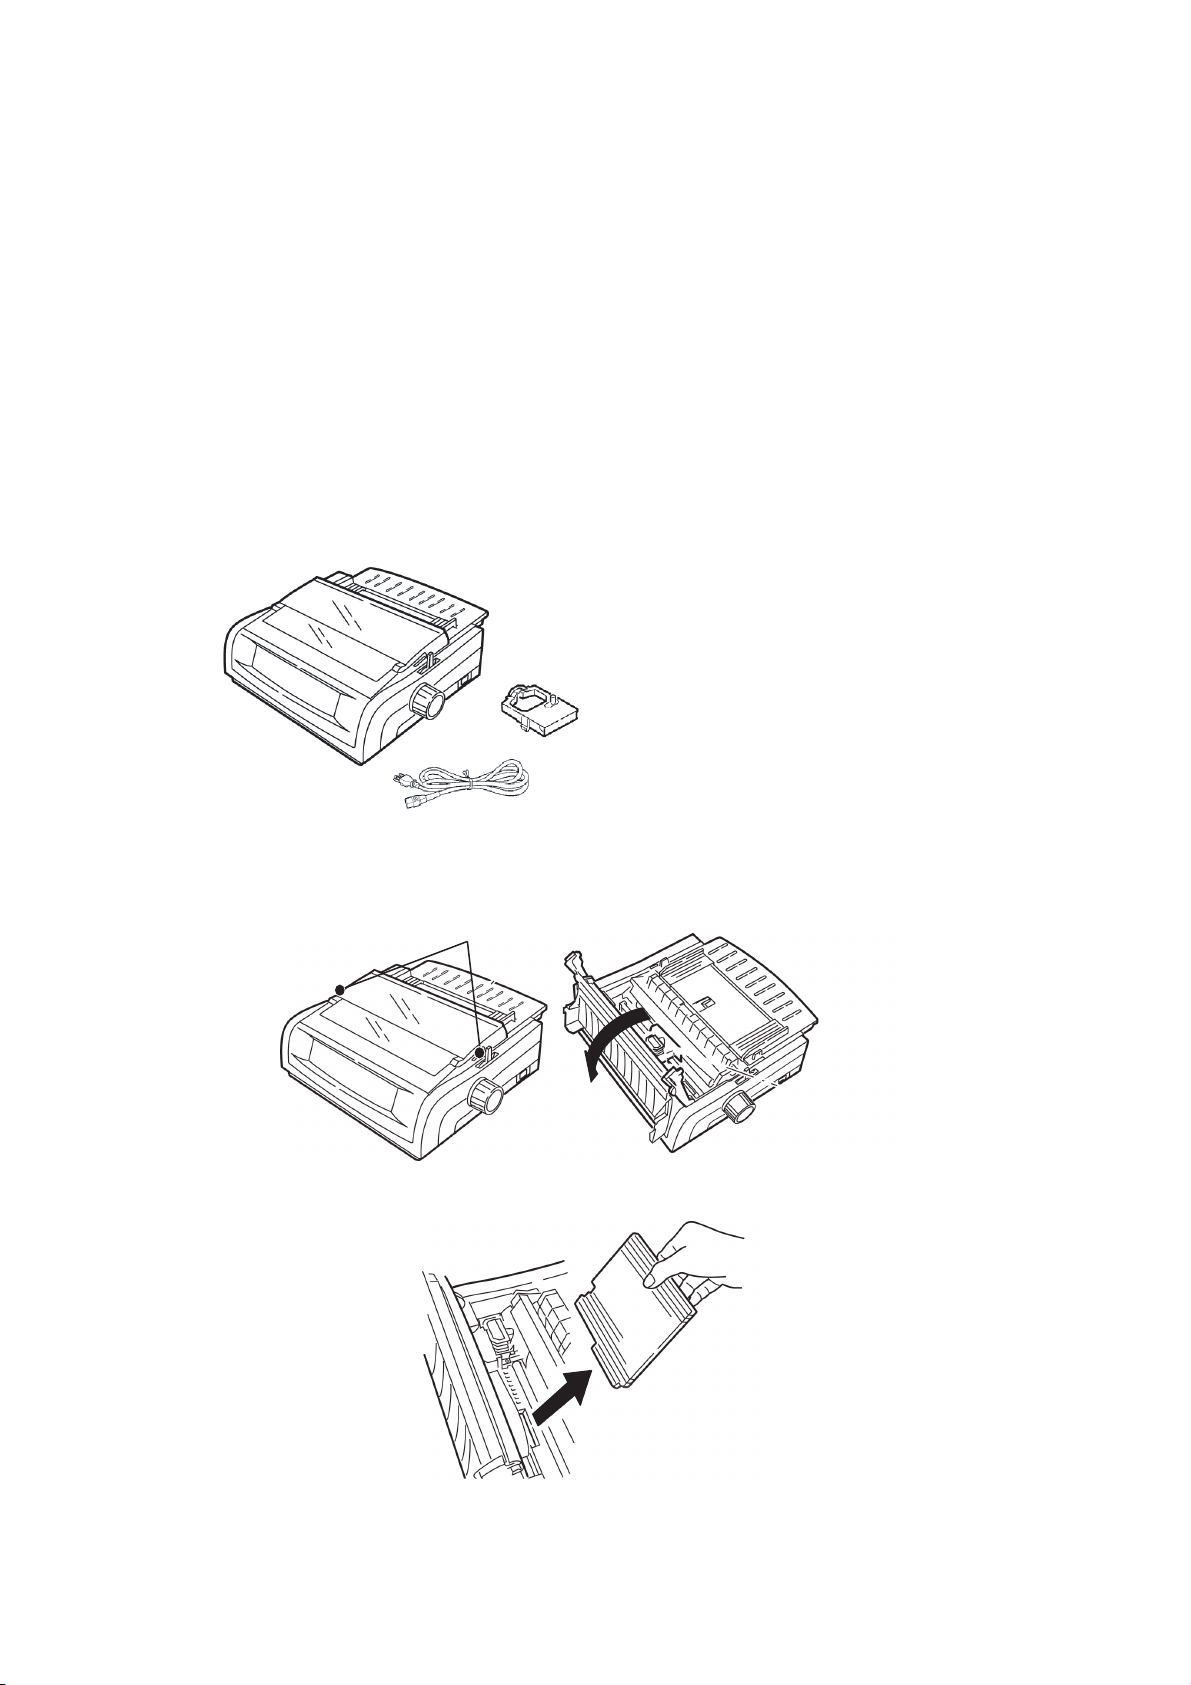
NPACKING
> If any items are missing, contact your dealer immediately.
> Keep your packing materials and carton in case you ever need to ship or transport
the printer.
> Interface cable and paper are sold separately.
1. Printer
2. Ribbon Cartridge
3. Power Cord
1
2
3
1. Remove any packing tape, then grasp the tabs (1) at either end of the access cover
and pivot it towards the front of the printer as far as it will go.
1
2. Remove the printhead shipping restraint.
Getting started > 9
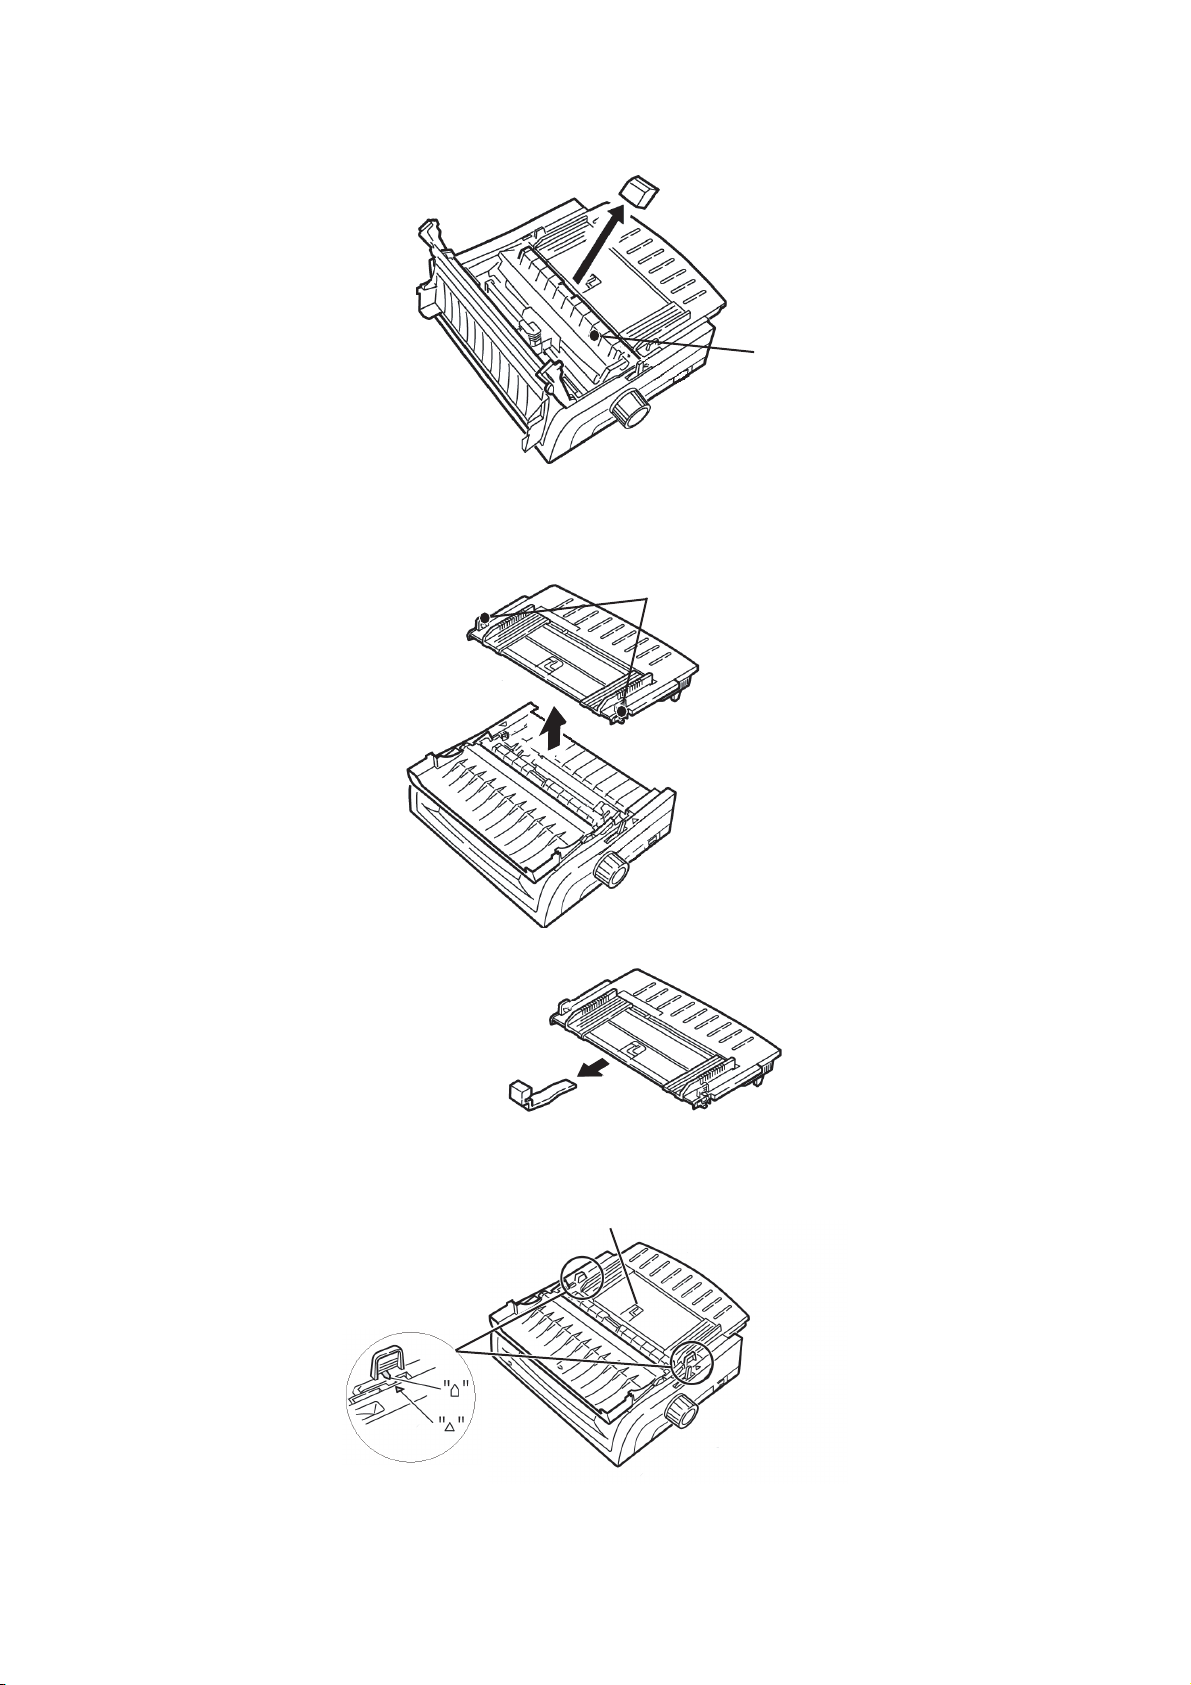
3. Remove the shipping restraint from the pull-up roller assembly (1).
1
4. Use the tabs (1) to lift and remove the sheet guide, then remove the shipping
restraint.
1
5. Reinstall the sheet guide: insert the clips on either side of the separator into the
notches marked with a triangle, then press down to secure the separator in place.
1
Getting started > 10
I
NSTALLING THE RIBBON CARTRIDGE
CAUTION!
Make sure you have the correct replacement ribbon for your
printer. The wrong ribbon will not print when installed in your
printer.
R
IBBON CARTRIDGE HANDLING
> Leave unused ribbon cartridges in their packages until needed.
> Careful; the ribbon ink may cause permanent stains.
> Ribbon ink on skin or clothing can usually be removed with soap and water.
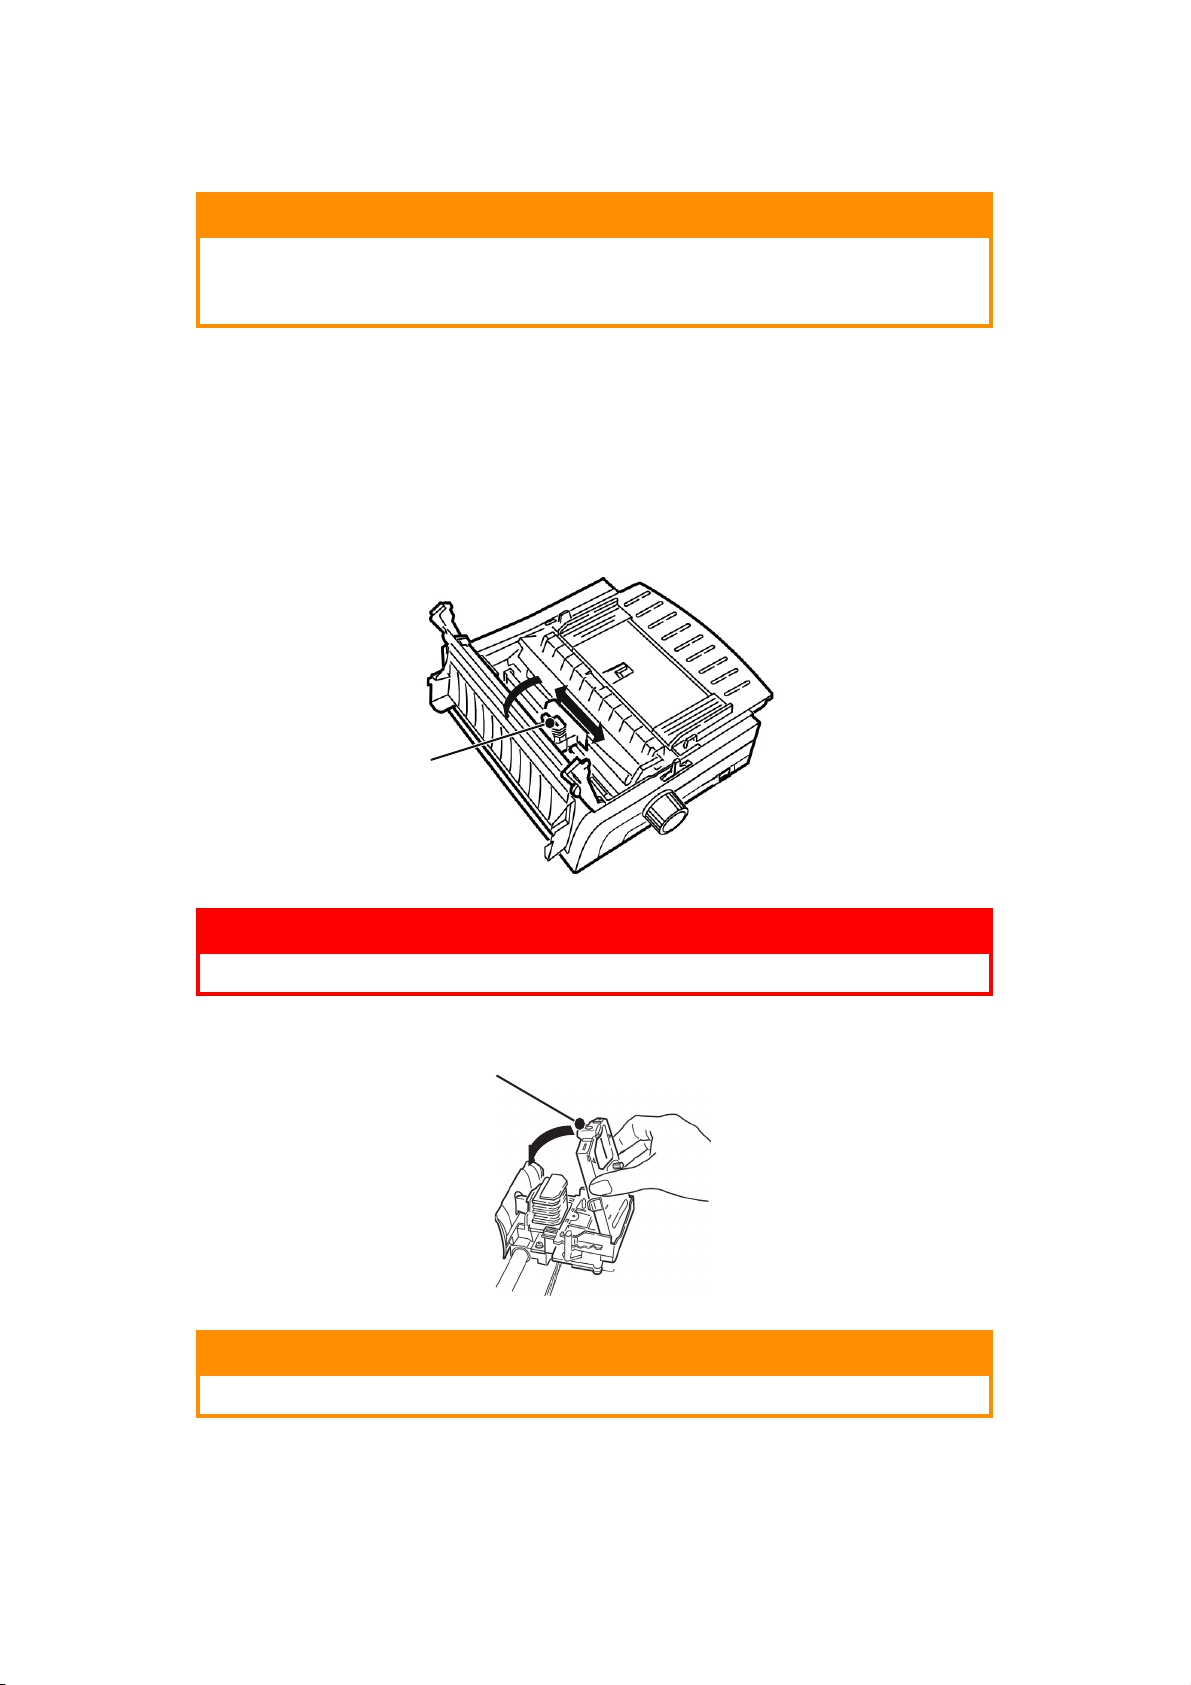
Make sure the printer is turned OFF.
1. Open the access cover and center the printhead (1).
1
WARNING!
The printhead may be HOT.
2. Unpack the new ribbon cartridge and install it on the printhead.
1
CAUTION!
Do not remove the ribbon shield (1) from the ribbon.
Getting started > 11
3. Turn the take-up knob (1) in the direction of the moulded arrow to take up any
ribbon slack.
1
4. Close the access cover and turn the printer ON.
P
OWERING ON YOUR PRINTER
WARNING!
Operations of this equipment are not warranted when the
equipment is connected to UPS (Uninterruptible Power Supply)
and/or inverter. Doing so may result in damage of this equipment.
Do not use an UPS and/or inverter.
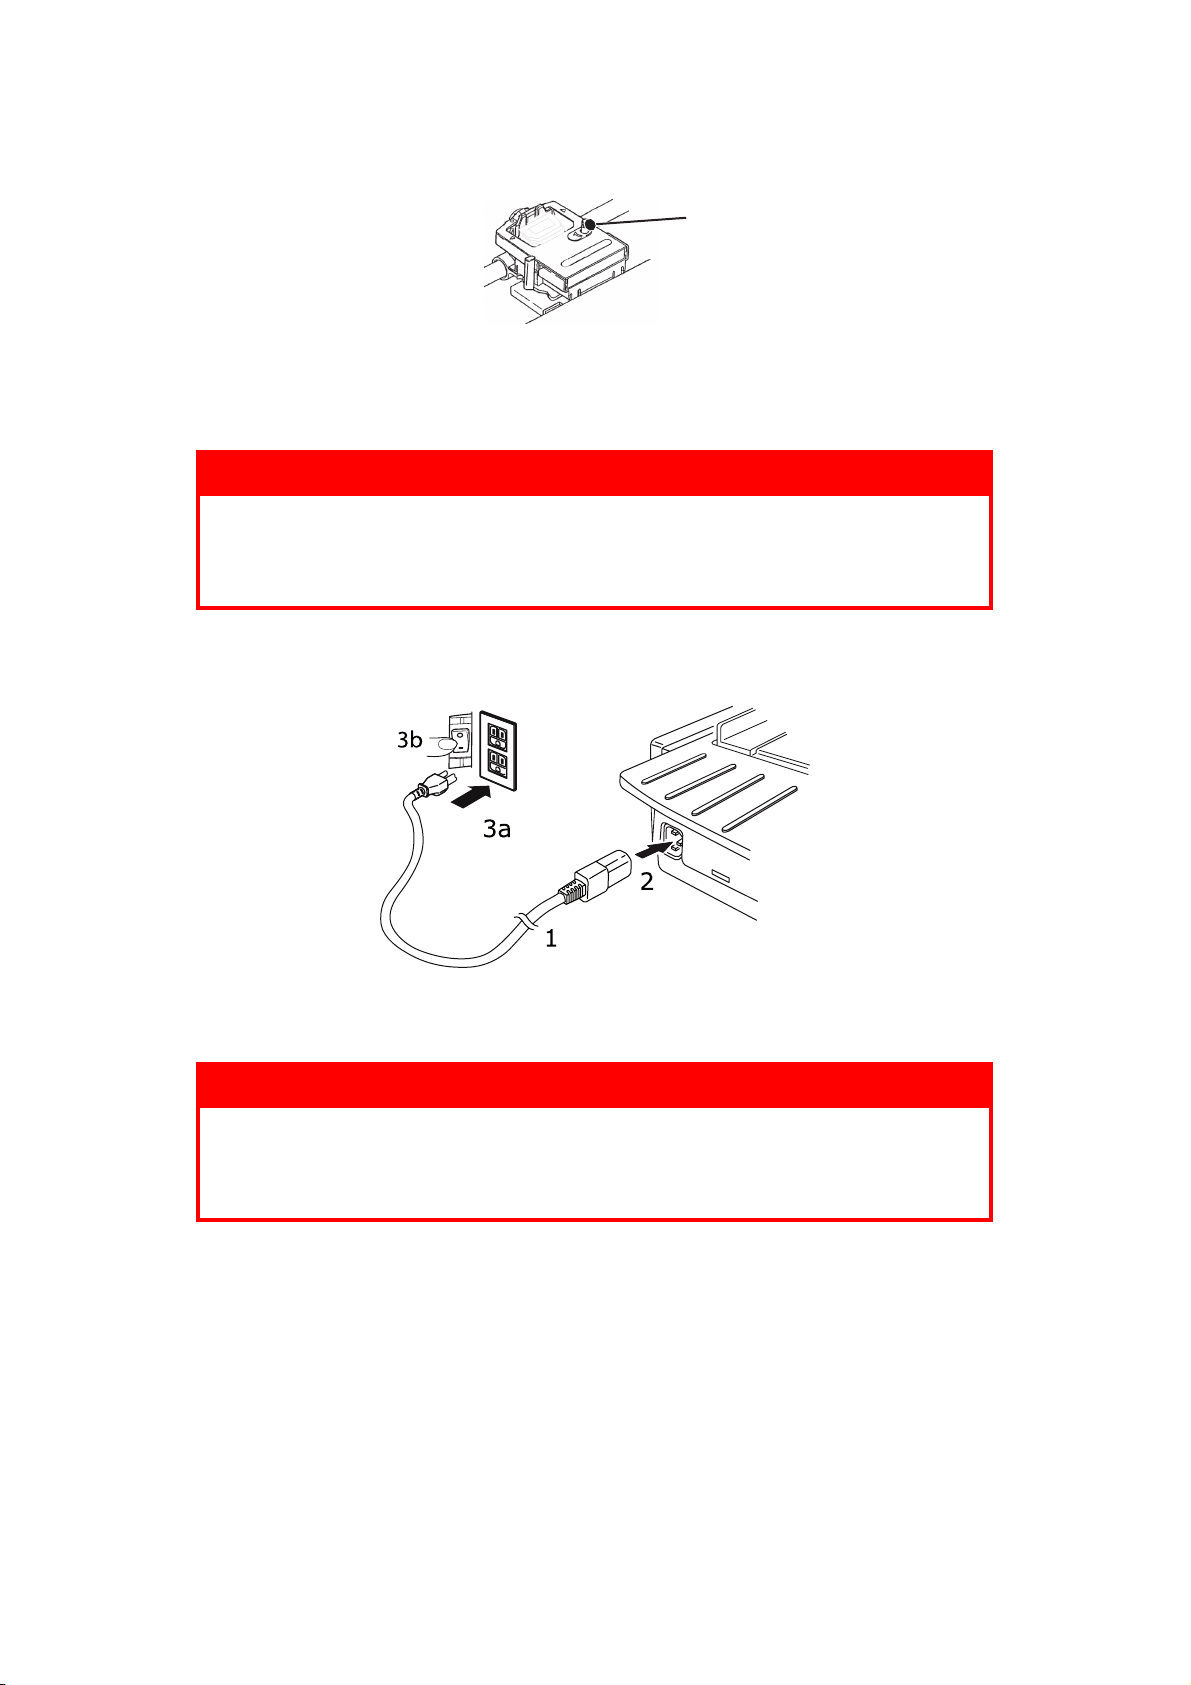
1. Ensure that your printer power switch is set to OFF.
2. Connect the power cable connector (1) to the A/C input (2) on the printer.
3. Connect the power cable to a 220/240 V A/C power outlet (3a) and switch on the
outlet power (3b).
WARNING!
Be careful when inserting a three-pronged A/C plug. Before
plugging it in, check the position of the FG terminal. Incorrect
insertion may cause damage not only to the printer main body but
also peripheral devices and electric shock, smoke and ignition.
4. Turn the printer power switch ON.
5. Check that the power indicator on the control panel illuminates.
Getting started > 12
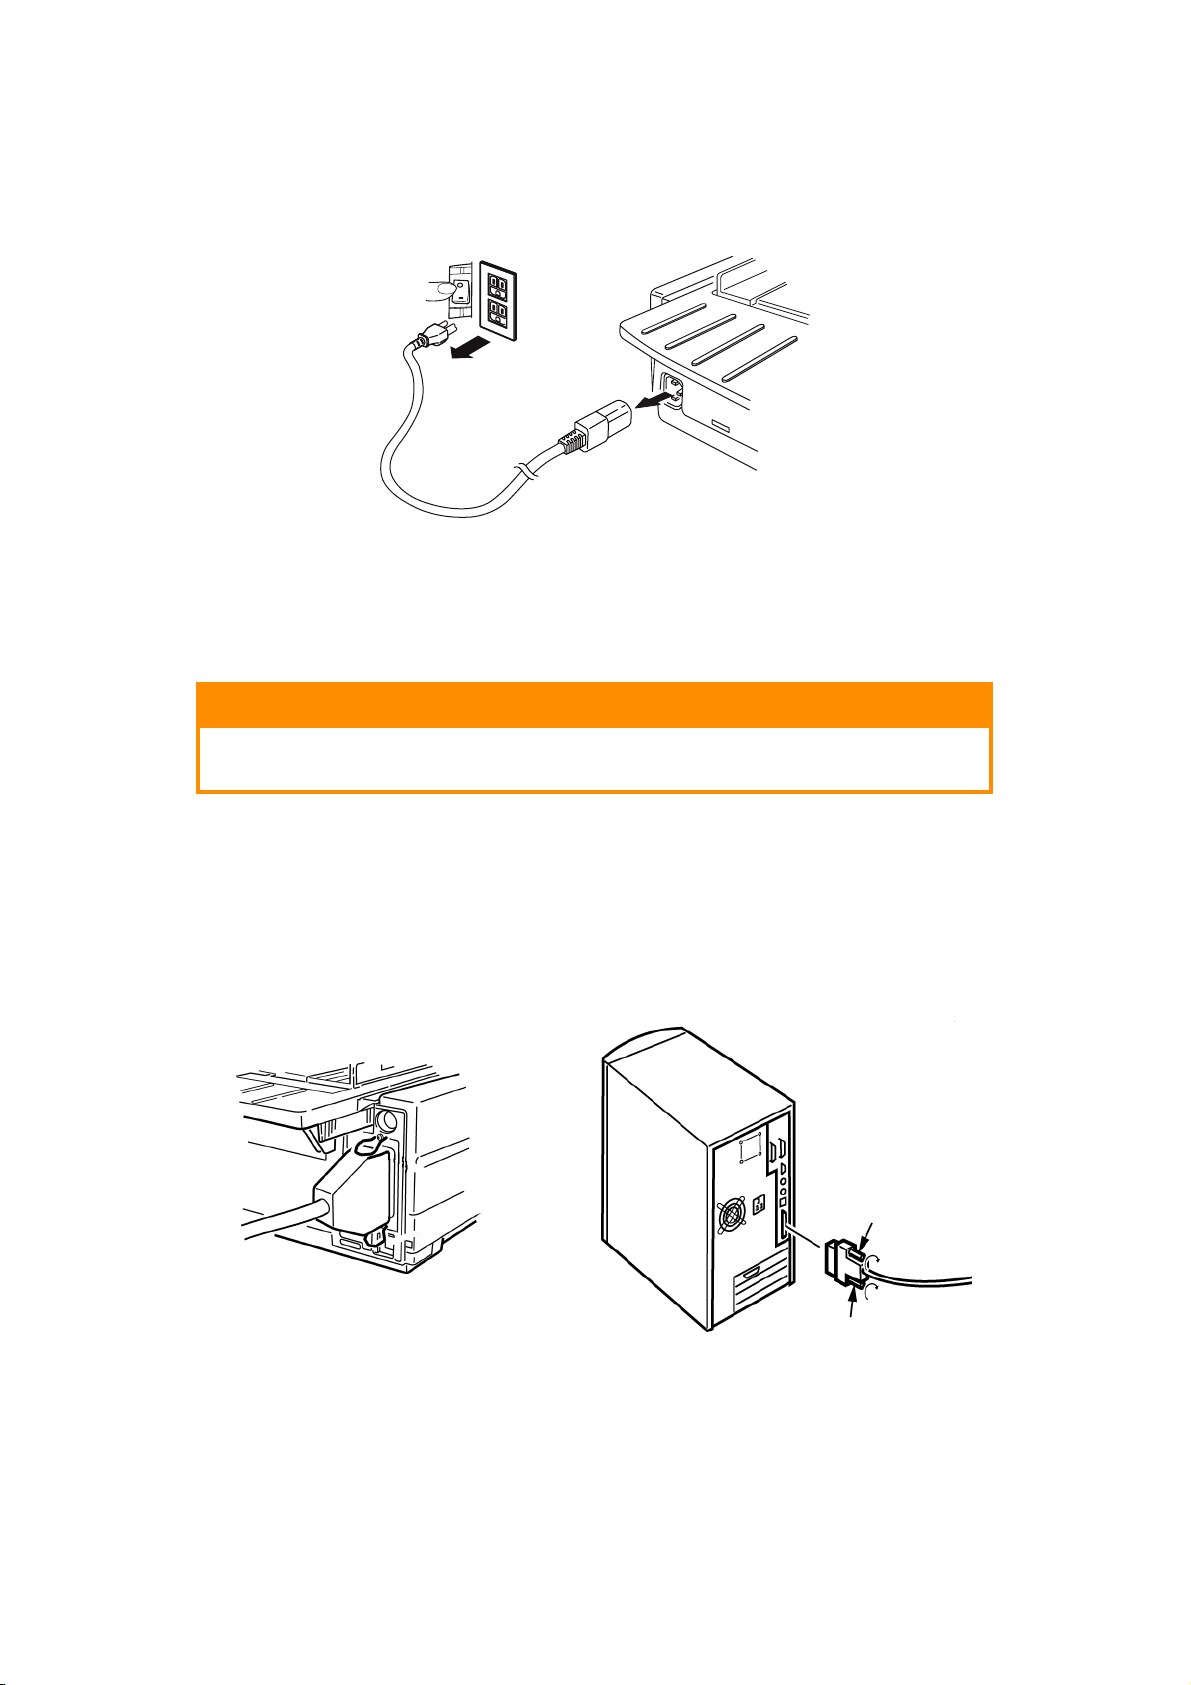
P
OWERING OFF YOUR PRINTER
1. Turn the printer power switch to OFF.
2. Switch off the outlet power (1a) and then unplug from the power outlet (1b).
1a
1b
3
2
3. Unplug the power cable connector (2) from the printer (3).
C
OMPUTER CONNECTIONS
Your printer is equipped with two standard data interfaces.
CAUTION!
Under no circumstances attempt to use both the parallel and USB
ports simultaneously.
P
ARALLEL
> For direct connection to a PC. This port requires a bi-directional (IEEE 1284
Make sure the printer and computer are both turned OFF.
1. Attach a suitable bi-directional cable to the parallel connector on the back of the
compliant parallel cable.
printer. Then attach and secure the cable to your computer.
2. Turn the printer and computer back ON.
Getting started > 13
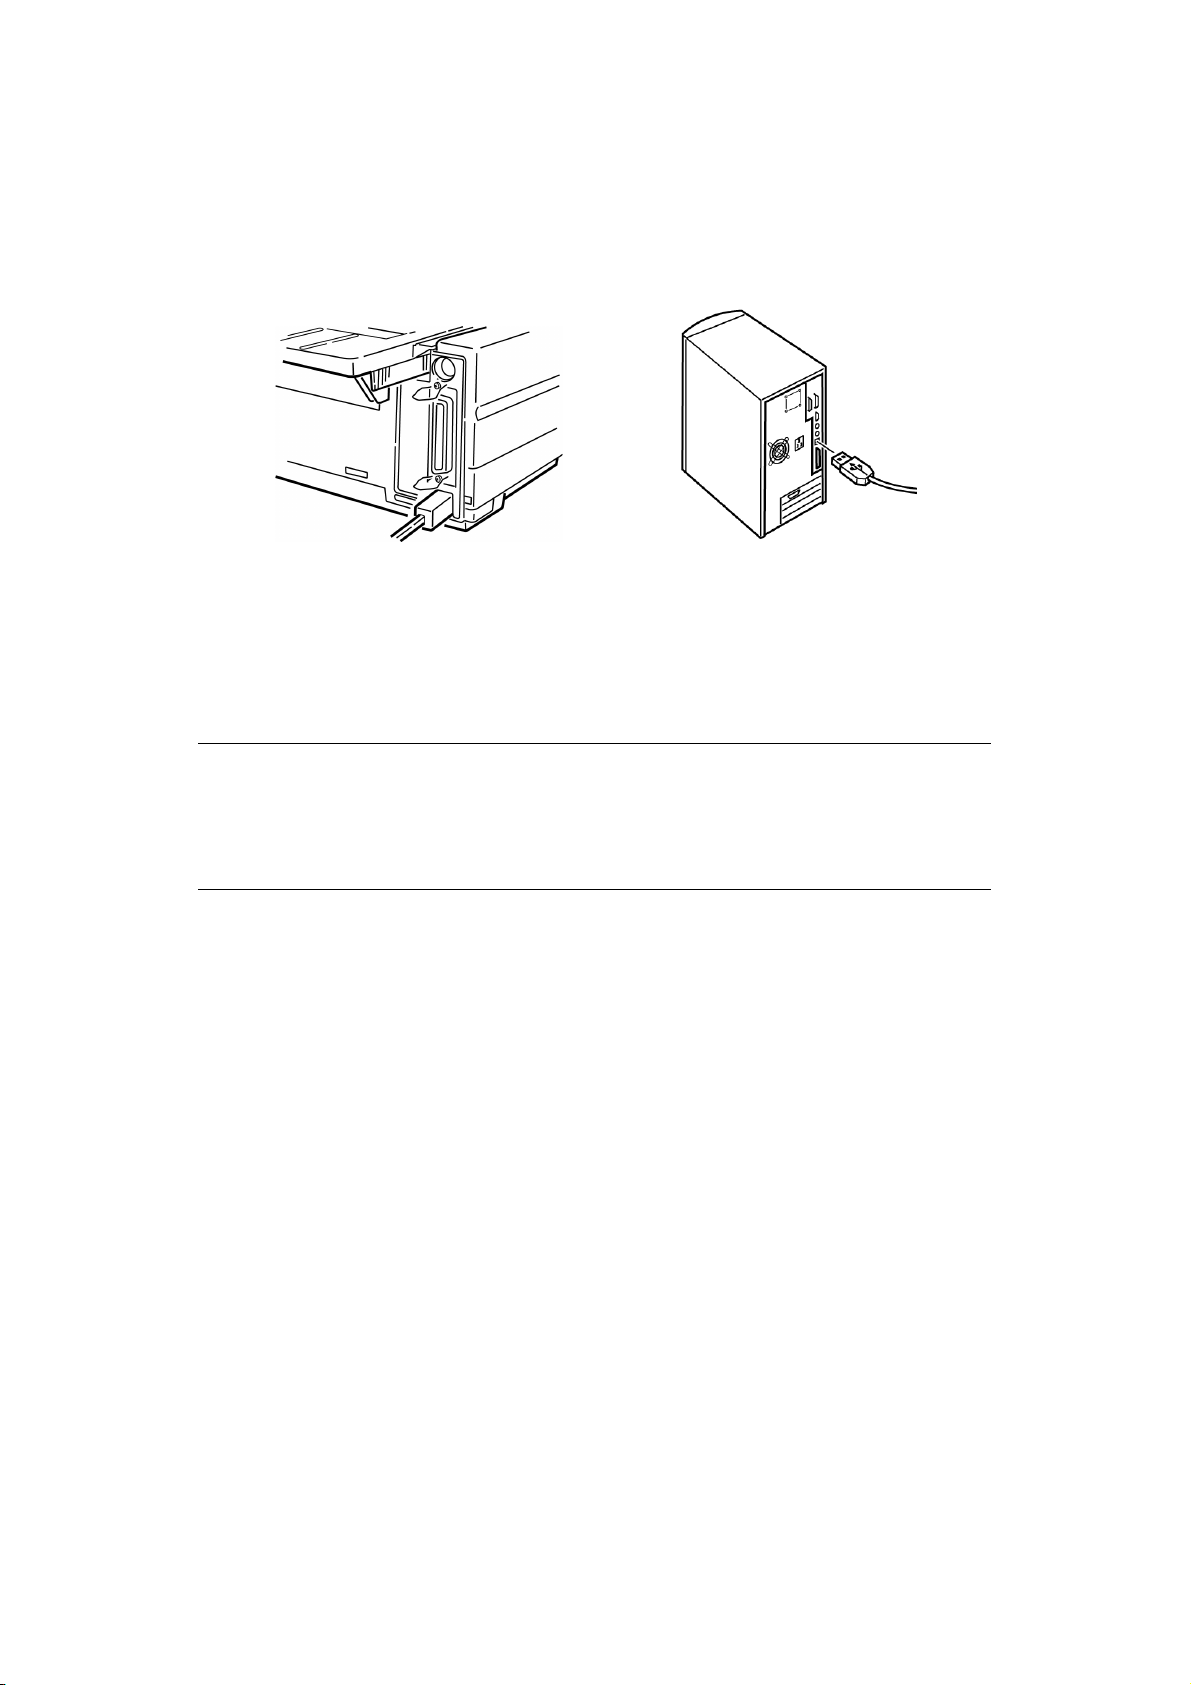
USB
> For connection to a PC running Windows 2000 or above. This port requires a shielded
cable 5m long confirming to USB version 2.0.
Make sure the printer and computer are both turned OFF.
1. Attach a suitable USB cable to the printer. Then attach the cable to your computer.
2. Turn the computer and printer back on.
The following interfaces are available as optional accessories and are described in their
accompanying installation documentation:
> RS-232 C Serial interface
> 100BASE-TX/10BASE-T network connection
NOTE
> Refer to the Network Configuration Guide for setting up the network
connection.
> It is not recommended that you use either the Parallel or USB port when
the RS-232 C or OL7120E3 option is installed in this printer.
Getting started > 14
L
OADING PAPER
For instructions on loading paper, see “Loading paper” on page 20.
Testing the printer
> Font Sample Test
> Rolling ASCII Test
> Hexadecimal Dump Mode
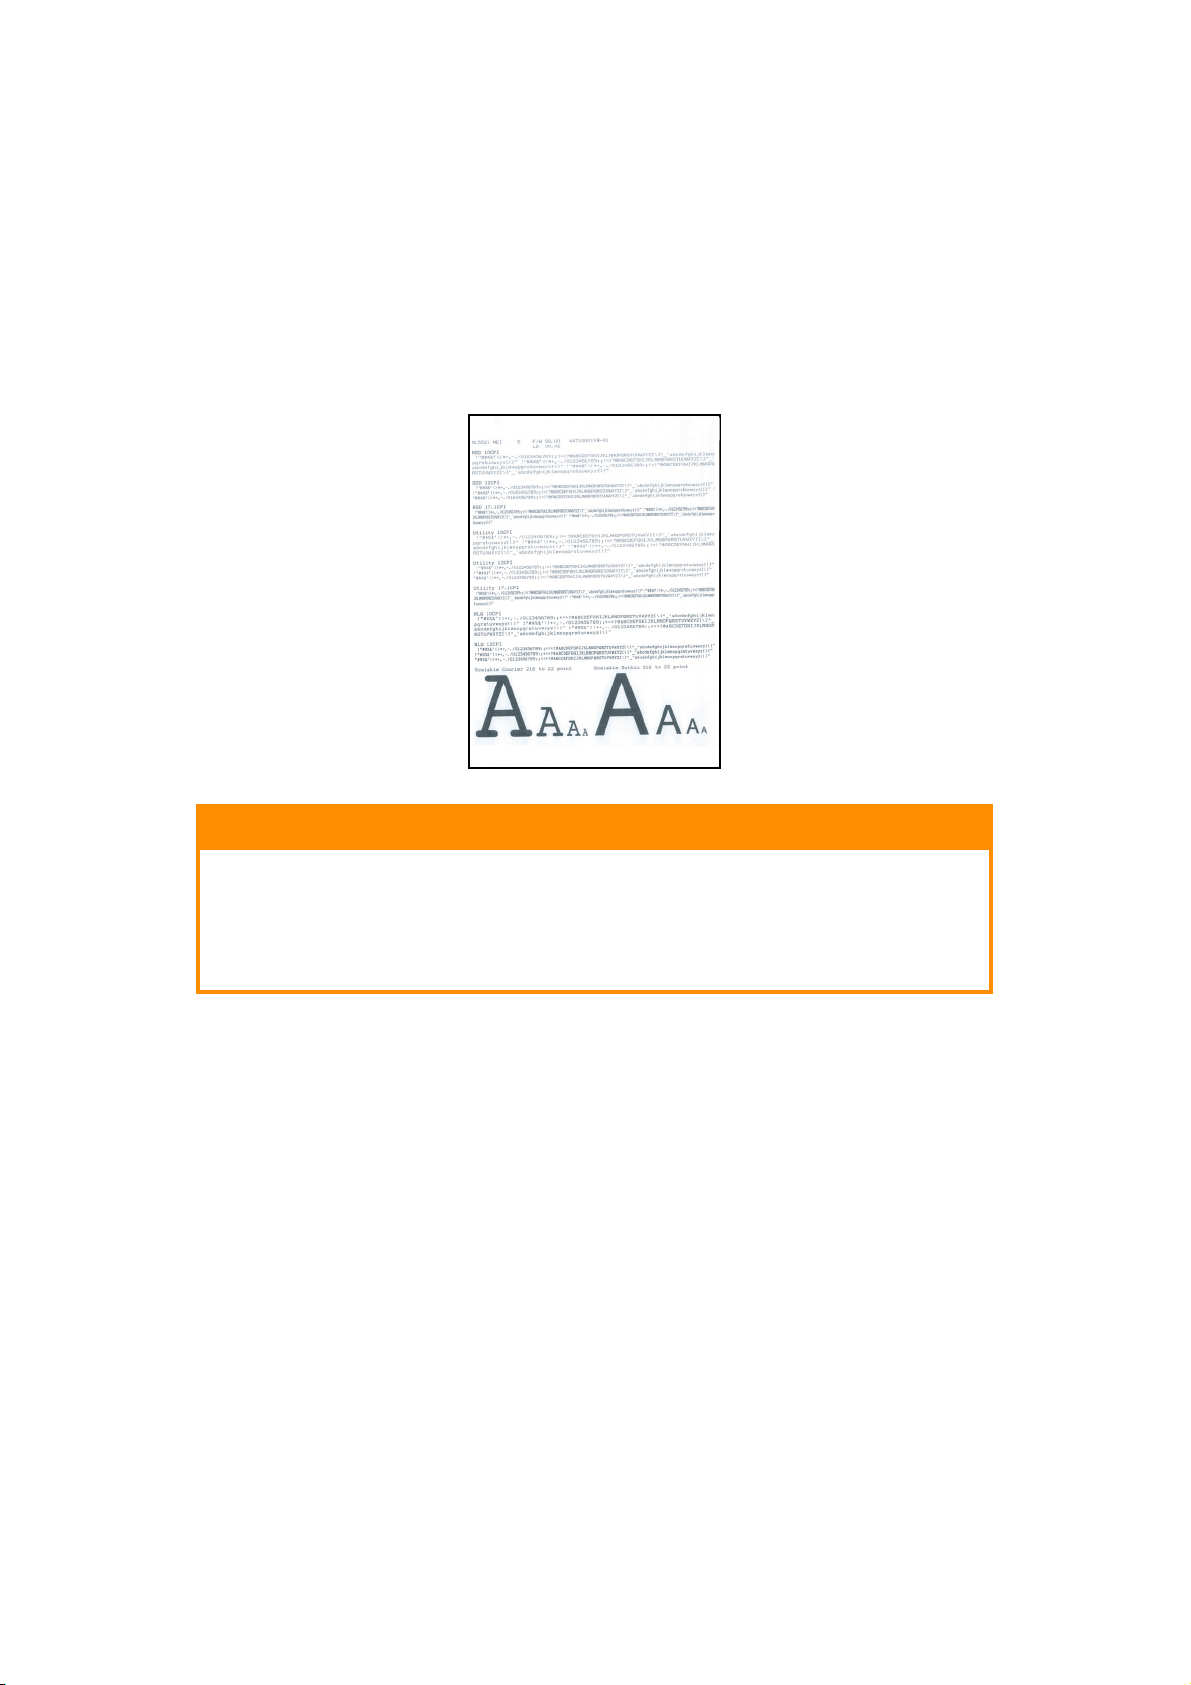
Font sample test
CAUTION!
Wide carriage model: ML5521ECO/ML5591ECO:
If you are using 8.5 inch paper to run the tests, make sure the
paper width selection in the printer menu is set to 8.5 inches.
Otherwise, printing on the platen may damage the printer. See
“Menu mode” on page 41 for more information.
The Font Sample Test prints a sample of the fonts standard to the printer.
The top of the printout shows the Printer Model, Emulation, Country Code, Interface, and
Firmware Revision Level.
Make sure paper is loaded.
1. Turn the printer OFF.
2. Press and hold the LF key while turning the printer back ON.
The printer will print a page of font samples and the test ends.
Getting started > 15

Rolling ASCII test
CAUTION!
Wide carriage Model ML5521ECO/ML5591ECO:
If you are using 8.5 inch paper to run the tests, make sure the
paper width selection in the printer menu is set to 8.5 inches.
Otherwise, printing on the platen may damage the printer. See
“Menu mode” on page 41 for more information.
The Rolling ASCII Print Test produces a continuous printout of all 96 ASCII characters in a
rolling pattern in whatever typeface is selected (ML5521ECO default = Utility; ML5591ECO
default = LQ Courier).
The top of the printout shows the Printer Model, Emulation, Country Code, and Firmware
Revision Level.
Make sure continuous forms paper is loaded.
1. Turn the printer OFF.
2. Press and hold the QUIET/TOF key while turning the printer back ON. (If the printer
comes on without starting the Rolling ASCII test print, you did not hold the QUIET/
TOF key long enough.)
The printer prints the rolling ASCII text continuously.
3. Press SEL to end the test.
Getting started > 16

Hexadecimal dump mode
When the printer is placed in the Hexadecimal Dump Mode, all data received, including text
and printer commands, is printed in both hexadecimal and ASCII format.
For example, the following line of BASIC code
LPRINT CHR$ (27);”0”;CHR$ (30);”THIS IS AN EXAMPLE OF A HEXADECIMAL DUMP.”
would print like this:
NOTE
In the ASCII format, all non-printable characters are represented by a period.
To engage the Hexadecimal Dump Mode:
Make sure paper is loaded.
1. Turn the printer OFF.
2. Hold the SEL and FF/LOAD keys for several seconds while turning on the printer.
To exit the Hexadecimal Dump Mode:
1. Press the SEL key.
or
Turn the printer off, then on again.
Getting started > 17
P
RINTER DRIVERS
The driver for your printer is provided on the CD included with the printer. You can either
load the driver or select one of the compatible drivers listed below in your software
application.
1. Insert the CD into your CD-ROM drive.
NOTE
If the CD does not AutoPlay, click Start
CD-ROM drive, double-click Setup.exe and click OK.
2. Select your Language.
3. Click I agree to accept the terms of the Software Licence Agreement.
4. When the Menu Installer window appears, click the Install Driver button.
5. Follow the on-screen instructions.
E
MULATIONS
The factory default emulation for your printer is:
MODEL EMULATION (DEFAULT)
ML5520ECO/ML5521ECO IBM PPR
>
Run > Browse, then browse to your
ML5590ECO/ML5591ECO EPSON LQ
If you wish to change to other emulations, see “Changing emulations” on page 40.
P
RINTING FROM THE COMPUTER
When printing to your printer from, for example, a Windows application on your computer,
make your printing selections from the driver windows that appear on screen. These driver
windows have been designed to be easy to use and intuitive while supplementary on-line
help is available by clicking each window help button.
OKI DIPUS
The OKI DIPUS utility allows you remote access to the printer settings using the available
applications. You can access DIPUS from Start > All Programs > Okidata > OKI DIPUS.
C
ONTROLLING THE PRINTER USING
There are four utilities available within OKI DIPUS. Each utility provides access to the
printer settings from your computer. Using these utilities you can change the button
settings, menu settings, top of form settings and also view the current status of the printer.
Any changes made can then be uploaded to the printer and it will be saved to the printer
as new settings. These utilities are an alternative to the printer operator panel.
Button setup utility
DIPUS
Using this utility you can activate or deactivate buttons on your printer operator panel. Each
button and its function is described in a message view.
Menu setup utility
Using this utility you can view and change your printers’ Menu settings.
Printer drivers > 18

Status monitor
The Status Monitor utility allows you to view your printers’ current status for example, Online, On-line (power saving) and so on. In the event of a printer error occurring, a warning
message is also displayed.
TOF setup utility
Using this utility you can now set the first line of print (TOF) for each page. This utility
allows you to treat each print job individually.
For detailed information on each utility and the different settings contained within, refer to
the on-line help, by clicking each window Help button.
Printer drivers > 19
U
SING YOUR PRINTER
C
OMPONENTS
The serial number of your printer is on a label fixed to the back of the printer.
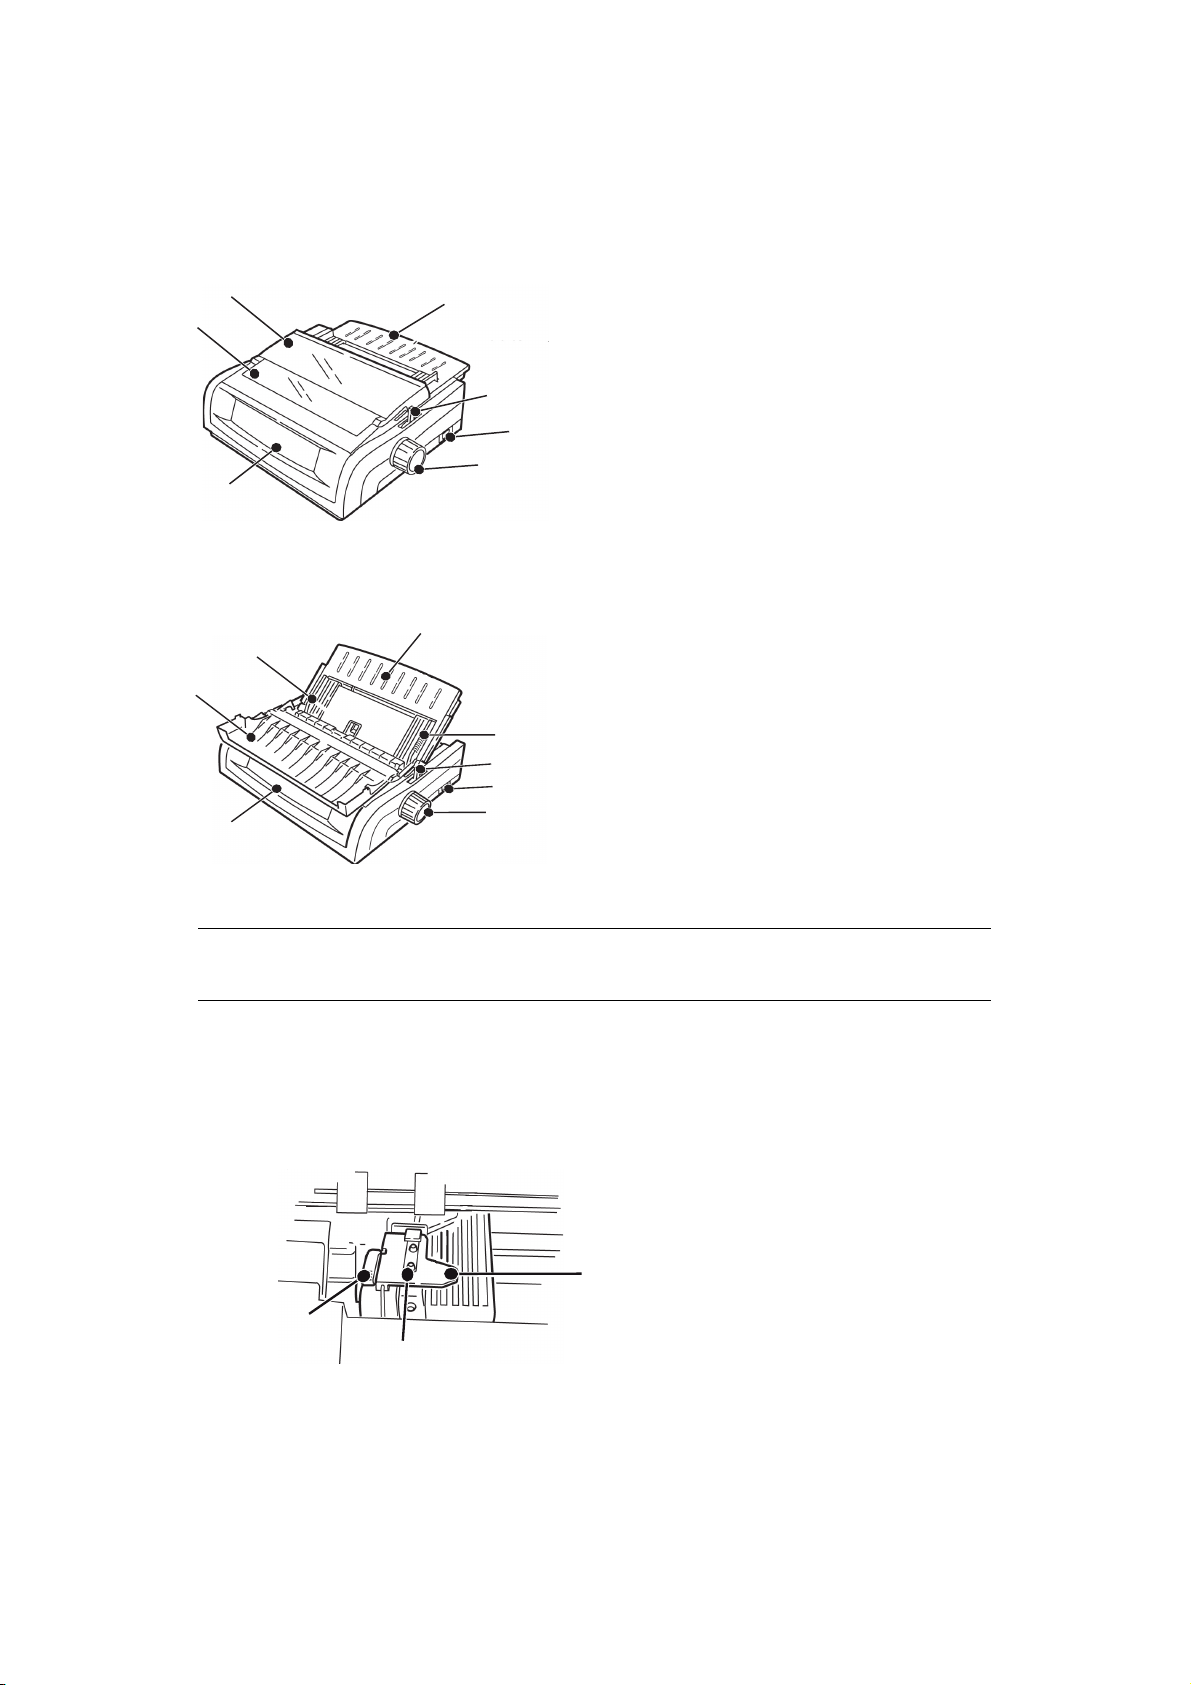
: R
EAR FEED (CONTINUOUS FORMS
)
7
6
5
C
OMPONENTS
1
7
6
: TOP
1
2
3
4
FEED (SINGLE SHEETS
2
1
3
4
5
1. Sheet Guide
2. Paper Lever
3. ON-OFF Switch
4. Platen Knob
5. Control Panel
6. Acoustic Cover
7. Access Cover
)
1. Paper Guides
2. Sheet Guide
3. Paper Lever
4. ON-OFF Switch
5. Platen Knob
6. Control Panel
7. Acoustic Cover
NOTE
For single sheet printing, the paper lever must be in the middle position.
L
OADING PAPER
R
EAR FEED
If you have any paper in the paper path, remove it before installing rear feed paper.
1. Lock Lever
2. Upper Tractor Cover
3. Pins
2
1
3
Using your printer > 20

Loading rear feed paper from the back of the printer
These instructions assume you have ready access to the back of the printer. If you do not,
go to “Loading rear feed paper from the front of the printer” on page 25.
Make sure the paper lever is forward (position marked “REAR”).
1. Open the access cover (1).
1
2. Grasp the sheet guide (1). Lift it slightly, then slide it back.
1
2
Using your printer > 21

3. Pivot the sheet guide forward and gently rest it against the roller assembly (2).
If you push the sheet guide too hard against the roller assembly, it may dislodge it.
If it does, be sure to reseat the roller assembly before continuing.
4. From the back of the printer, locate the tractors (1).
1
1
1
5. Open the lock levers (1) and move the right tractor (as viewed from the back of the
printer) to the reference mark (2) matching the width of the paper you are loading.
Then close the lock lever on the right tractor:
1
5920
15
16
5921
10
1
9.5
2
NOTE
The movement of the right tractor is limited to ensure that the paper covers
the paper sensor.
Using your printer > 22

6. Open the tractor covers.
7. Place continuous forms paper on the first two pins of either tractor.
NOTE
You must keep the number of paper holes engaged on either pin the same. If
you don’t the paper will skew and jam.
8. Close the right tractor cover.
Using your printer > 23

9. Adjust the left tractor until the holes in the paper are centered on the pins then lock
the lever and close the left tractor cover.
NOTE
If the paper is too loose, or too tight, it can cause jams.
10. Lower the sheet guide and slide it towards the front of the printer until the marks
align.
11. Place the wire guide in the sheet guide on the pull-up roller assembly.
12. Press FF/LOAD.
NOTE
The factory default setting for the Top of Form (where the printing should
begin) is 1" down from the top of the page. To change the setting, see “Top
of Form (TOF)” in the previous chapter.
Using your printer > 24

Loading rear feed paper from the front of the printer
These instructions assume you do not have ready access to the back of the printer. If you
do, go back to “Loading rear feed paper from the back of the printer” on page 21.
1. Lock Lever
2. Upper Tractor Cover
3. Pins
2
1
3
Make sure the paper lever is forward (position marked “REAR”).
1. Open the access cover (1).
1
Using your printer > 25

2. Grasp the tabs and lift off the sheet guide.
3. Pull up on the lock levers to release them.
NOTE
The movement of the left tractor (as viewed from the front of the printer) is
restricted to ensure that the paper covers the paper out sensor.
4. Move the left tractor to the position to match your paper size and push back on the
lever to lock it in place, then move the right tractor to fit the width of the paper. You
will find reference marks (1 in illustration below) on the printer for the two most
common paper sizes:
10 15
9.5
5520/5590 5521/5591
16
1
Using your printer > 26

5. Open the tractor covers and place continuous forms paper on the first two pins of
either tractor, then close the left tractor cover.
15 16
NOTE
You must keep the number of paper holes engaged on either pin the same. If
you don’t the paper will skew and jam.
6. Adjust the position of the right tractor to center the holes in the paper on the pins.
Then, close the right tractor cover and push back the lock lever. Do not stretch the
paper.
If the paper is too loose or too tight it can cause jams.
Using your printer > 27

7. Reinstall the sheet feeder.
8. Place the wire guide (1) in the sheet guide on the pull-up roller assembly.
1
Using your printer > 28

9. Press FF/LOAD.
NOTE
The factory default setting for the Top of Form (where the printing should
begin) is 1" down from the top of the page. To change the setting, see “Top
of Form (TOF)” in the previous chapter.
TOP
FEED (SINGLE SHEETS
)
If you have continuous form paper in the path, press PARK to remove it before loading
single sheets.
Make sure the printer is on and deselected (SEL light off).
1. Move the paper lever (1) to the center position (marked “TOP”).
1
2. Open the acoustic cover (1) and raise the sheet guide (2) to the single sheet
position. Pivot the wire feed guide (3) up into the sheet guide.
1
2
3
Using your printer > 29

3. Adjust the paper feed guides (1) for the width of the paper, then place a sheet of
paper in the separator. The paper will feed into the printer.
1
1
NOTE
> If the paper does not feed in, remove it. Check the paper lever position.
Make sure the ALARM light is ON: if it is flashing, hold the SHIFT key and
press the CHARACTER PITCH/RESET key. Reload the sheet of paper.
> The factory default setting for the Top of Form (where the printing should
begin) is 1" down from the top of the page. To change the setting, see
“Top of Form (TOF)” in the previous chapter.
TOP OF
Top of Form (TOF) sets the print start position. The factory default is 1" from the top.
The TOF can be changed in increments of 1/144” (ML5520ECO/ML5521ECO) and 1/180"
(ML5590ECO/ML5591ECO), for either a single print job, or all print jobs. The overall
amount of adjustment is limited to avoid paper jams.
The first line prints at the red line of the plastic paper shield (1) on the printhead.
FORM
(TOF)
1
CAUTION!
If you turn the platen knob when the printer is not at Top of Form,
the TOF will misalign. Always feed the paper to TOF before turning
the platen knob!
Using your printer > 30

NOTE
> Your software may print the first line of print above or below where TOF is
set. You may need to adjust the TOF to meet your software’s
requirements.
> The Top of Form and Forms Tear-Off settings of your printer interact. How
you set the Top of Form depends on whether Forms Tear-Off is ON (set to
500 ms, 1 sec, or 2 sec) or OFF (the factory default setting).
F
ORMS TEAR-OFF
The Forms Tear-Off feature allows a printed continuous forms page to be torn off without
wasting paper or adjusting the printer.
When printing stops, Forms Tear-Off automatically moves the paper to align the perforation
with the tear bar (located under the access cover), after a time interval which you select
through the menu.
Paper remains in the tear-off position until the printer receives more data. Then, the paper
moves back down for printing.
This feature has to be enabled.
There are two ways to determine the status of the Forms Tear-Off menu setting:
> Print the Menu.
> Use the TEAR key.
To print the Menu:
1
2
3
1. Make sure paper is loaded.
2. Hold SHIFT (2), then press SEL (1) to enter the Menu Mode.
3. Press PARK (4) to print the menu.
4. Look for the Form Tear-Off setting in the paper feed group you are using (Rear Feed,
Bottom Feed or Top Feed—Forms Tear–Off appears in the Top Feed group only if the
optional Roll Paper Stand is installed).
4
To use the TEAR key:
1. Make sure paper is loaded, and wait 2 seconds.
2. Press TEAR (3).
> If the paper moves up, Forms Tear-Off is OFF.
> If the paper moves down, Forms Tear-Off is ON.
Using your printer > 31

S
ETTING TOP OF FORM
(TOF)
CAUTION!
If you turn the platen knob when the printer is not at Top of Form,
the TOF will misalign. Always feed the paper to TOF before turning
the platen knob.
The first line prints at the red line of the plastic paper shield on the printhead.
Forms Tear-off set to OFF - default
With paper loaded and the printer ON and selected:
1
1. Press PARK (6) to park the paper.
The SEL light goes off and the red alarm light comes on.
2. Press FF/LOAD (4) to load the paper.
3. If the printer is ON line, press SEL|MENU (1) to take the printer OFF line.
The SEL light goes out.
4. Press and hold SHIFT (2), then:
> Press LF|Micro Feed Down (3) to set the TOF higher (the paper moves down).
> Press FF/LOAD|Micro Feed Up (4) to set the TOF lower (the paper moves up).
(When you begin pressing the Micro Feed key, the printhead will move to the right).
5. Press SEL|MENU(1) to place the printer back on line.
To reset the Top of Form to the factory default, see “Resetting Top of Form to the Factory
Default” later in this chapter.
2
3
4
5
76
Forms Tear-Off set to ON
With paper loaded and the printer ON and selected:
1
1. Press PARK(6) to park the paper.
The SEL light goes off and the red alarm light comes on.
2. Press FF/LOAD (4) to load the paper.
3. Wait briefly until the paper moves up to the tear position, then press and hold TEAR
(5).
The paper moves to the current TOF and the SEL light is illuminated.
2
3
Using your printer > 32
4
5
76

4. If the printer is ON line, press SEL|MENU (1) to take the printer Offline.
The SEL light goes out.
5. Press and Hold SHIFT, then:
> Press LF|Micro Feed Down (3) to set the TOF higher (the paper moves down).
> Press FF/LOAD|Micro Feed Up (4) to set the TOF lower (the paper moves up).
(When you begin pressing the Micro Feed key, the printhead will move to the right).
6. Press SEL|MENU (1) to save the setting and place the printer back on line.
To reset the Top of Form to the factory default, see “Resetting top of form to the factory
default” on page 33.
T
EMPORARILY CHANGING THE TOP OF FORM
CAUTION!
If you turn the platen knob when the printer is not at Top of Form,
the TOF will misalign. Always feed the paper to TOF before turning
the platen knob.
To move the Top of Form position lower for one page only:
1. Press SEL to deselect the printer.
2. Press LF to lower the position of the Top of Form.
R
ESETTING TOP OF FORM TO THE FACTORY DEFAULT
The factory default setting for the Top of Form (where the printing should begin) is 1" down
from the top of the page.
To reset the Top of Form to the factory default:
1. Remove paper from the paper path.
2. Turn the printer off.
3. Press and hold PARK + QUIET|TOF while turning on the printer.
4. Reload paper.
F
ORMS TEAR-OFF FEATURE
This feature is normally turned off. To use Forms Tear-Off, you must enter the menu and
change the setting to the desired time interval (see “Changing the forms tear-off setting”
on page 34).
The Forms Tear-Off feature allows a printed continuous forms page to be torn off without
wasting paper or adjusting the printer. It can be used for rear feed continuous forms,
bottom feed continuous forms (with the optional push tractor installed), or for top feed roll
paper (with optional roll paper stand installed).
When the printer is turned on, the paper feeds to the tear-off position.
When data is received, the paper automatically moves down to the print position (TOF) and
printing begins.
NOTE
You can also move the paper down to the print position manually by pressing
TEAR.
Using your printer > 33
When printing stops, Forms Tear-Off automatically moves the paper to align the perforation
with the tear bar (located under the access cover), after the time interval which you
selected through the menu.
Paper remains in the tear-off position until the printer receives more data. Then, the paper
moves back down for printing.
NOTE
> The status of the Forms Tear-Off menu setting affects how you set the
Top of Form: see “Top of Form (TOF) and Forms Tear-Off” earlier in this
chapter.
> Do not use Forms Tear-Off with labels or multipart forms!
> Forms Tear-Off cannot be used when the optional pull tractor is engaged.
P
OTENTIAL ISSUES WITH SOFTWARE PACKAGES
If Forms Tear-Off is set to ON and the software package you are using “pauses” for a long
enough interval while sending data to the printer, Forms Tear-Off may be activated. No
data is lost, but this causes uneven print registration due to the paper movement.
If this occurs, use the menu to turn off this feature, then use the TEAR key to move the
paper up to the tear position manually (see "Changing the forms tear-off setting").
C
HANGING THE FORMS TEAR-OFF SETTING
The default setting for Forms Tear-Off is OFF.
1
2
3
4
5
76
To change the Forms Tear-Off setting:
1. Press SHIFT (2) + SEL (1).
2. Press GROUP (3) repeatedly until the Rear Feed or Bottom Feed group shows in the
first column of the printed line, depending on which paper feed you are using,
3. Press ITEM (4) repeatedly until Form Tear-Off appears in the second column:
Rear Feed Form Tear-Off Off
4. Press SET (5) until the time interval you wish to select appears in the third column:
Rear Feed Form Tear-Off 1 Sec
5. Press SHIFT (2) + SEL (1) to exit Menu Mode and save the setting.
Using your printer > 34

M
ANUAL FORMS TEAR-OFF
If you don’t wish to engage the Forms Tear-Off feature, you can advance:
> rear-feed continuous forms loaded on the built-in tractor
or
> bottom-feed continuous forms loaded on the optional push tractor
up to the tear-off position manually, by pressing TEAR (5).
P
APER PARK
CAUTION!
Never park labels.
Paper park allows you to switch to single sheet printing without removing continuous feed
paper from the printer.
When you wish to print single sheets, simply press PARK (6) to retract the continuous form
paper from the paper path, then lift the sheet guide, load the sheet and send the print job.
C
HANGING PAPER PATHS
C
ONTINUOUS FORMS TO SINGLE SHEETS
1. Tear off any printed pages, then press PARK.
2. Raise the sheet guide (1) to the single sheet feed position.
1
3. Pivot the wire feed guide into the sheet guide.
Using your printer > 35

4. Move the paper lever (1) to the middle position marked “TOP.”
1
5. Adjust the paper guides (1) for the size of paper you are using, then place a sheet of
paper in the sheet guide.
1
1
S
INGLE SHEETS TO CONTINUOUS FORMS
1. Press FF/LOAD to remove the single sheet paper.
2. Lower the sheet guide into the continuous forms position.
3. Swing the wire feed guide over onto the pull-up roller.
Using your printer > 36

4. Move the paper lever to the appropriate position.
> Rear feed:
> Bottom feed:
> If necessary, load continuous form paper.
5. Press FF/LOAD.
Using your printer > 37

P
RINTHEAD GAP
1. The printhead gap is the distance between the printhead and the platen.
CAUTION!
Make sure the printer is turned OFF before you open the access
cover.
To adjust the gap, open the access cover and move the coloured lever (1) to the
recommended setting from the table.
1
NOTE
When the head gap is set to 2, 3, 4 or 5, the printer automatically slows down
for better print quality with multipart forms.
P
RINT QUALITY
ML5520ECO/ML5521ECO
1
SETTING MEDIA
1 Standard paper
2 2-part form (with carbon)
3 3-part form (with carbon)
4 4-part form (with carbon)
5 Envelopes or extra thick paper
Press PRINT QUALITY (1) to select:
High Speed Draft > Lower quality, lower speed
Utility > Medium quality, medium speed
> Gothic typeface only
> Gothic typeface only
Using your printer > 38

Near Letter Quality > Highest quality, lowest speed
Super Speed Draft > Lowest quality, highest speed
ML5590ECO/ML5591ECO
1
Press PRINT QUALITY (1) to select:
Letter Quality > Highest quality, slowest speed
High Speed Draft > Lower quality, higher speed
> Courier or Gothic
> Gothic typeface only
> Choice of 7 typefaces
> Gothic typeface only
Utility > Medium quality, medium speed
> Gothic typeface only
NOTE
Front panel settings for print quality and character pitch are normally
overridden by software commands.
To select the typeface you want, press PRINT QUALITY (1) until the appropriate front panel
lights are on.
C
HARACTER PITCH
1
Character pitch determines how many characters will print on each line. You can choose a
specific fixed width (10 to 20) for each character in characters per inch (CPI). The higher
cpi settings are often used for spreadsheets.
Proportional (PROP) sets character widths based on the character itself: e.g., the letter i is
assigned a narrower width than the letter m. This provides a more polished, typeset
appearance.
To select Proportional, press the CHARACTER PITCH key until both the cpi value and PROP lights are illuminated.
To select non-proportional, press the CHARACTER PITCH key until the light for the cpi value
you wish to use is illuminated.
Using your printer > 39

P
RINTER RESET
1
2
3
4
5
Clearing some error conditions requires that you reset (reinitialise) the printer. To do this:
1. Press and release SEL (1) to take the printer off line.
The SEL light goes out.
2. Press and hold SHIFT
NOTE
Pressing SHIFT and RESET reinitialises the printer, but does not affect any
menu settings and does not reset the printer to the factory defaults. For
information on resetting the printer to the factory defaults, see “Resetting the
menu to the factory defaults” on page 41.
C
HANGING EMULATIONS
(2), then press the RESET/CHARACTER PITCH key (5).
Make sure paper is loaded.
1. Press and hold SHIFT
(2), then press SEL (1).
2. Press LF(3).
The following line will print:
Printer Control Emulation Mode IBM PPR (ML5520ECO/ML5521ECO)
EPSON LQ (ML5590ECO/ML5591ECO)
3. Press TEAR (4) repeatedly until the emulation you wish to select prints in the
right-hand column.
4. Press and hold SHIFT (2), then press SEL (1) to save your setting and exit the Menu
Mode.
Using your printer > 40

M
ENU MODE
In Menu Mode, use the front panel keys to change the defaults for the printer parameters.
The changes made in the Menu Mode are automatically saved when you exit the Menu Mode
and are retained, even when the printer is turned off.
NOTE
Please print the current Menu Mode settings before you reset or change them.
This is the only way to have a record of the settings
M
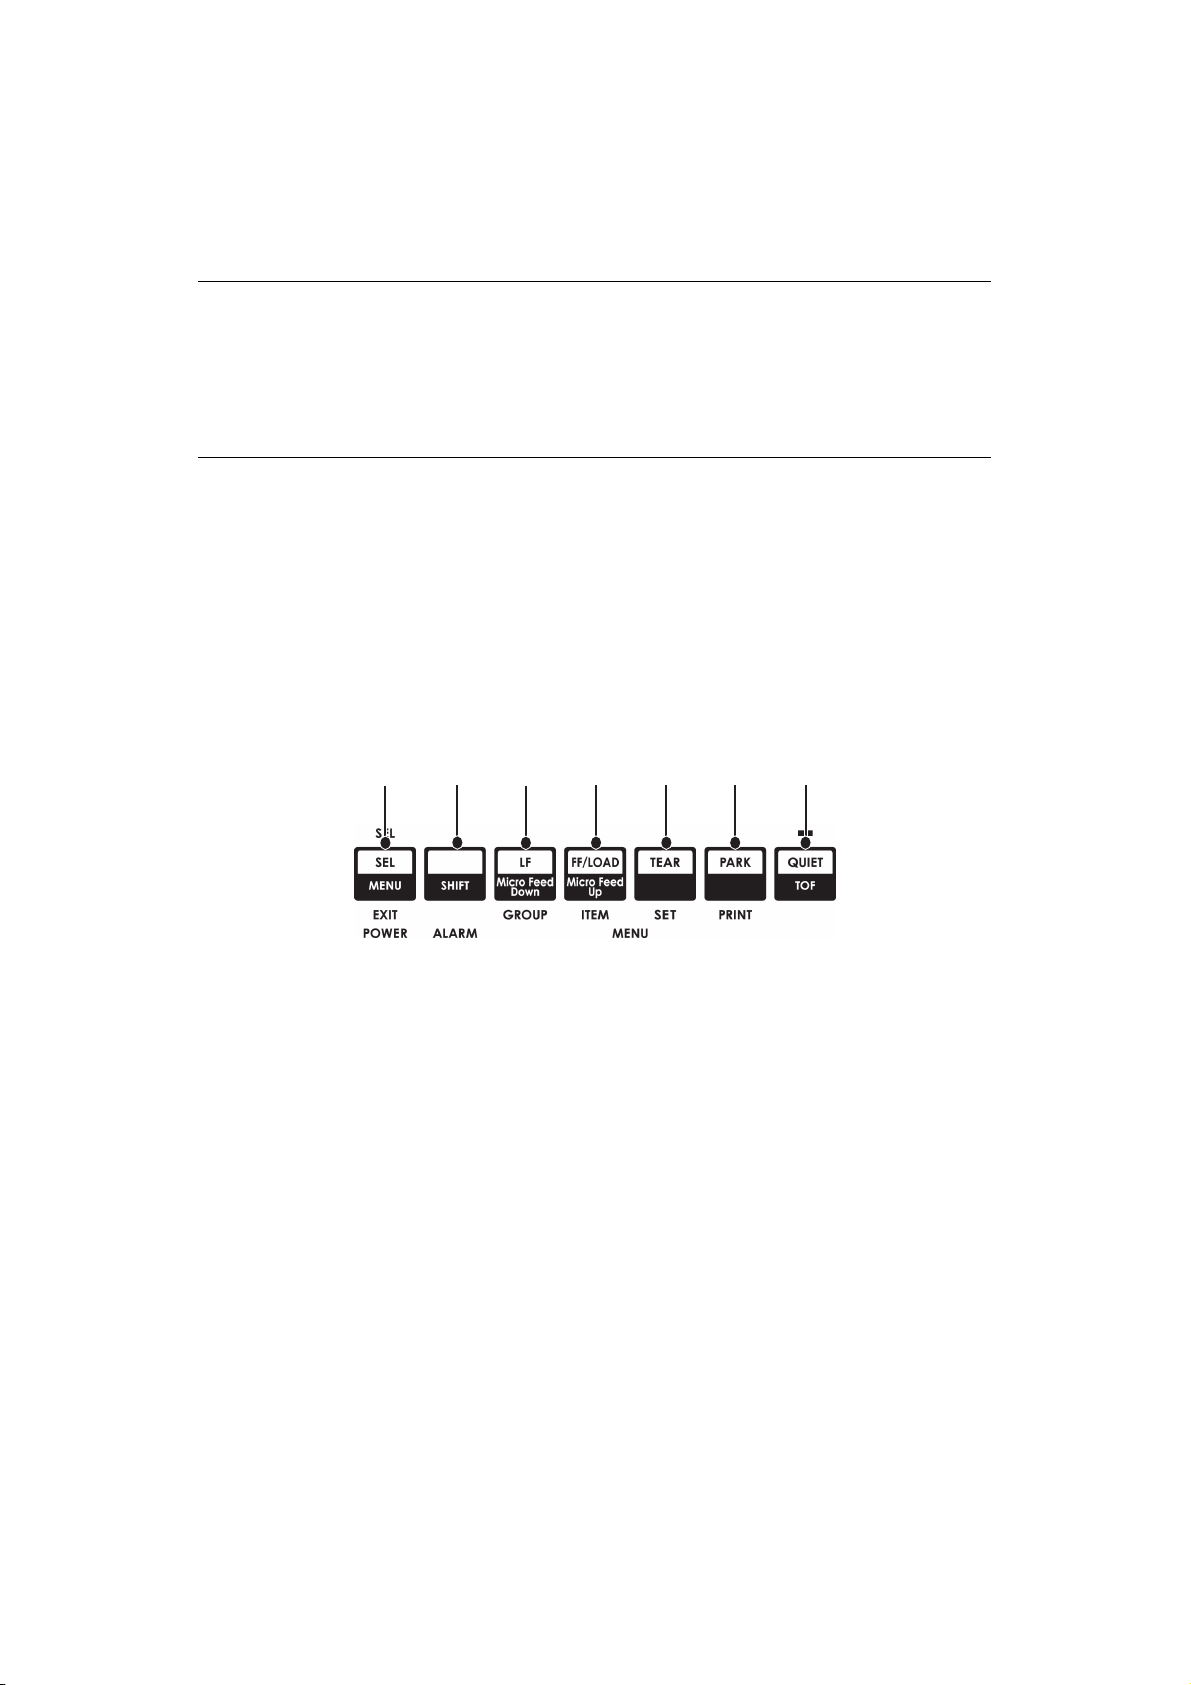
ENU MODE KEYS
.
1
3
2
4
5
NO. KEY/LIGHT FUNCTION
1. GROUP Prints the next Group in the Menu.
With the SHIFT key, prints the previous Group.
2. ITEM Prints the next Item in the Group.
With the SHIFT key, prints the previous Item in
the Group.
3. SET Prints the next setting for an Item.
With the SHIFT key, prints the previous setting
for an Item.
4. PRINT Prints a copy of all the Menu settings.
With the SHIFT key, prints the current settings
for the Group selected.
5. Menu Light Illuminated when the printer is in Menu mode.
E
NTERING AND EXITING MENU MODE
Hold down the SHIFT key while pressing SEL.
R
ESETTING THE MENU TO THE FACTORY DEFAULTS
1. Turn the printer OFF.
2. Press SEL and LF while turning the printer ON.
P
RINTING THE MENU SETTINGS
1. Make sure paper is loaded in the printer.
2. Press and hold SHIFT, then press SEL to enter the Menu Mode.
3. Press PRINT (PARK key).
Menu mode > 41

P
RINTING ALL MENU SETTINGS
To print out a listing of the settings for all menu items, regardless of the emulation selected
or the accessories installed:
Make sure paper is loaded in the printer.
1. Press and hold SHIFT, then press SEL to enter the Menu Mode.
2. Press and hold SHIFT, then press PRINT QUALITY.
C
HANGING THE MENU SETTINGS
1. Press and hold SHIFT, then press SEL to enter the Menu Mode.
2. Use the GROUP, ITEM and SET keys to make your changes:
3. Press GROUP until the Group you wish to change appears in the first column.
4. Press ITEM until the Item you wish to change appears in the second column.
5. Press SET until the setting you want appears in the third column.
6. Press and hold SHIFT, then press SEL to exit the Menu Mode and save your settings.
NOTE
If you turn off the printer without first exiting the Menu Mode, the changes you
have made will be lost.
Controlling access to the printer
> You can control access to the printer by changing the setting for the Operator Panel
Function in the Menu from Full Operation (the factory default) to Limited Operation.
> When Limited Operation is selected, the PRINT QUALITY and CHARACTER PITCH keys
don’t work. This prevents these settings from being changed from the control panel
when several people are using the printer.
Menu mode > 42

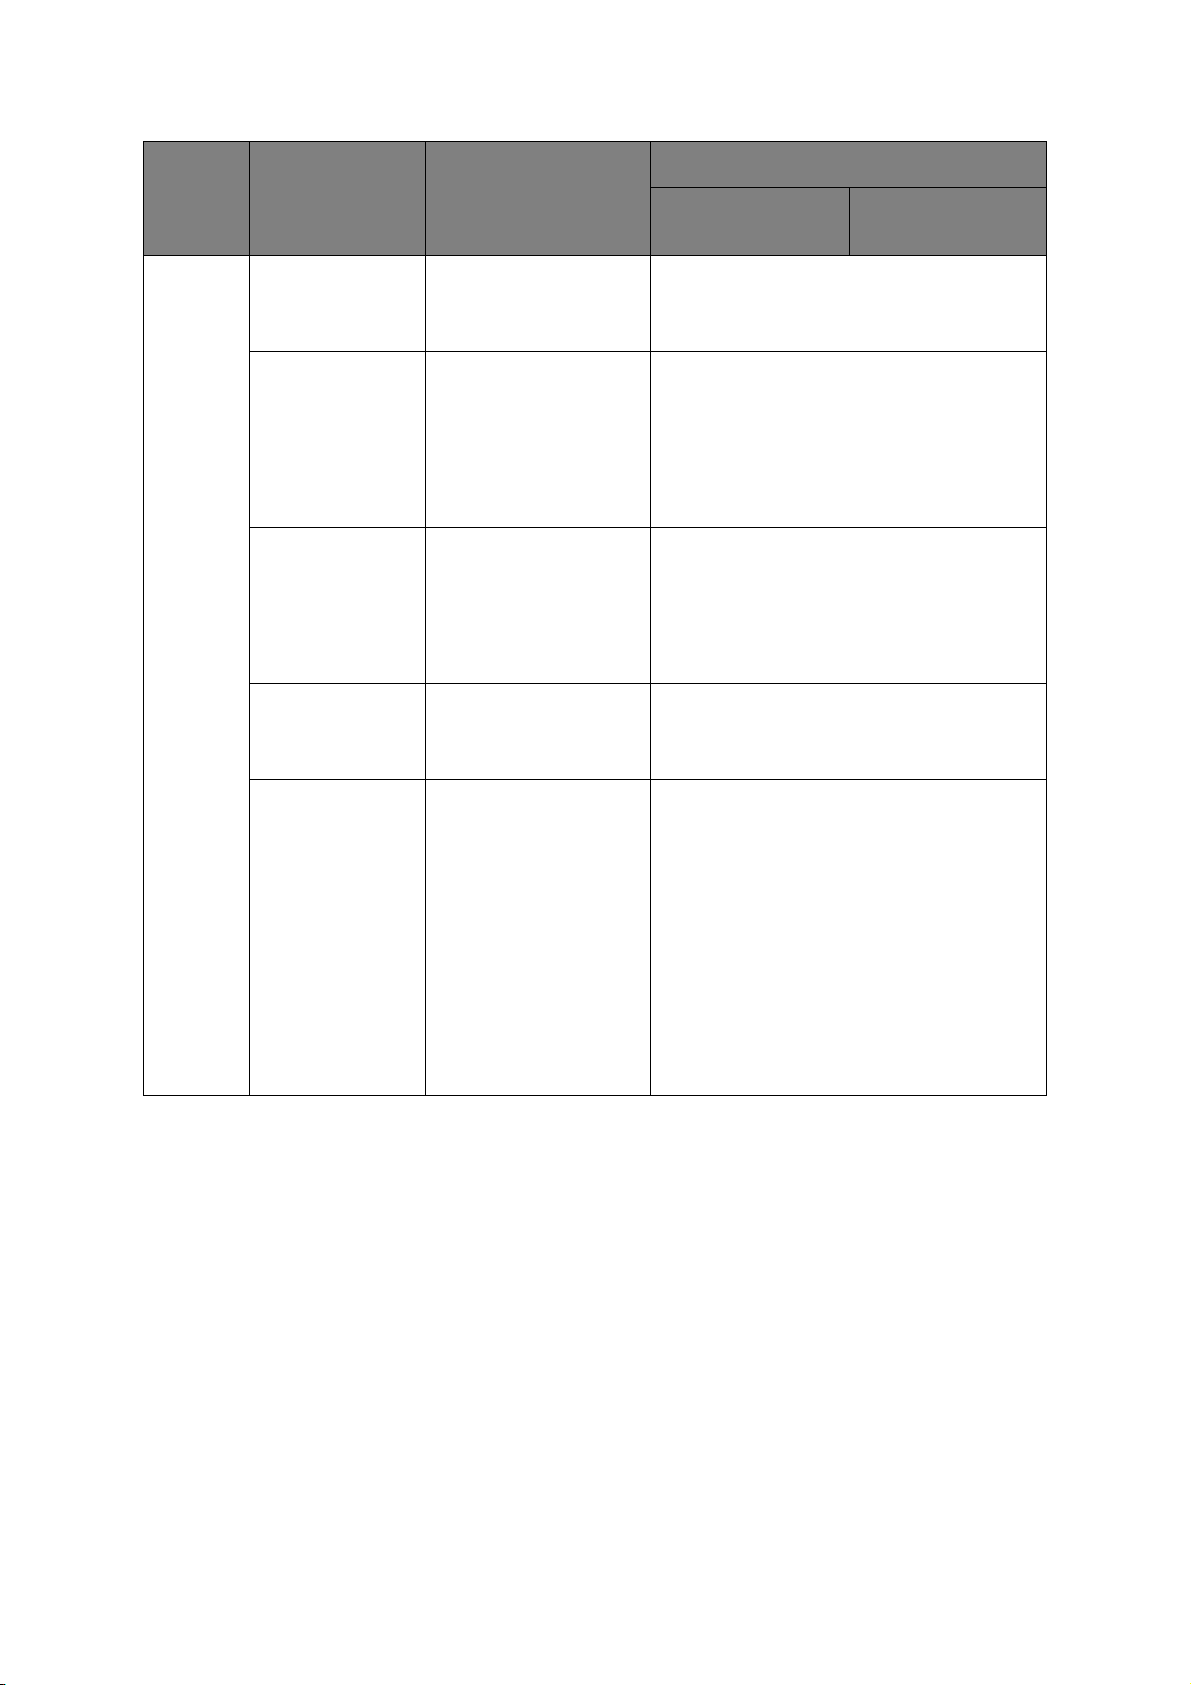
M
ENU SETTINGS
The table following shows the items which may appear in the menu. Settings which are
engaged at the factory (defaults) are set in bold. Some groups or entries will only appear
when a specific emulation is engaged, as noted.
GROUP ITEM FUNCTION SETS
Printer
Control
Font Print Mode Choose the quality and
Emulation Mode Selects the printer
command set
(emulation) you want to
engage.
typeface of printing.
Draft mode Applies only when the
Print Mode is set to
DRAFT. Selects the draft
mode to be used: HSD
(High Speed Draft) or
SSD (Super Speed
Draft).
Pitch Choose the character
width in characters per
inch (cpi).
ML5520ECO/
ML5521ECO
IBM PPR
EPSON FX
ML
NLQ Courier
NLQ Gothic
NLQ OCR-B
Utility
HSD
HSD
SSD
10 CPI
12 CPI
15 CPI
17.1 CPI
20 CPI
ML5590ECO/
ML5591ECO
EPSON LQ
IBM PPR
IBM AGM
LQ Courier
LQ Roman
LQ Swiss
LQ Swiss Bold
LQ Orator
LQ Gothic
LQ Prestige
LQ OCR- A
LQ OCR- B
Utility
HSD
-
Proportional
Spacing
Style Change to italics if you
Size Select the character
Select whether to use
proportional spacing or
not.
want the printed
characters to be slanted.
scale size.
Selects both double
width and double height
character or single width
and single height
characters.
Yes
No
Normal
Italics
Single
Double
Menu mode > 43

GROUP ITEM FUNCTION SETS
Symbol
Sets
Character Set Select character code
table.
Language Set Select a language
character set. Replaces
certain standard
symbols with special
characters used in
foreign languages.
ML5520ECO/
ML5521ECO
Set I
Set II (Epson and
IBM mode)
Standard (ML mode
only)
Line Graphics (ML
mode only)
Block Graphics (ML
mode only)
ASCII
French
German
British
Danish I
Swedish I
Italian
Spanish I
Japanese
Norwegian
Danish II
Spanish II
Latin American
French Canadian
Dutch
TRS80
Swedish II
Swedish III
Swedish IV
Turkish
Swiss I
Swiss II
Publisher
ML5590ECO/
ML5591ECO
Set I
Set II
ASCII
French
German
British
Danish I
Swedish I
Italian
Spanish I
Japanese
Norwegian
Danish II
Spanish II
Latin American
French Canadian
Dutch
Swedish II
Swedish III
Swedish IV
Turkish
Swiss I
Swiss II
Publisher
Zero Character Select either print font
pattern to receive a zero
character located at 30H
in ANK code.
Slashed
Unslashed
Menu mode > 44

GROUP ITEM FUNCTION SETS
Symbol
Sets cont.
ML5520ECO/
ML5521ECO
Code Page Select a code page. USA
Canada French
Multilingual
Portugal
Norway
Turkey
Greek_437
Greek_869
Greek_928
Greek_437 CYPRUS
Polska Mazovia
Serbo Croatic I
Serbo Croatic II
ECMA-94
Hungarian CWI
Windows Greek
Windows East Europe
Windows Cyrillic
East Europe Latin II 852
Cyrillic I - 855
Cyrillic II - 866
Kamenicky(MJK)
ISO Latin 2
Hebrew NC (862)
Hebrew OC
Turkey_857
Latin 5 (Windows
Turkey)
Windows Hebrew
Ukrainian
Bulgarian
ISO Latin 6 (8859/
10)
Windows Baltic
Baltic_774
KBL-Lithuanian
Cyrillic Latvia
Roman-8
Icelandic-861
Multilingual 858
ISO 8859-15
Greek_737
POL1
Macedonian
ML5590ECO/
ML5591ECO
USA
Canada French
Multilingual
Portugal
Norway
Turkey
Greek_437
Greek_869
Greek_928
Greek_437 CYPRUS
Polska Mazovia
Serbo Croatic I
Serbo Croatic II
ECMA-94
Hungarian CWI
Windows Greek
Windows East Europe
Windows Cyrillic
East Europe Latin II 852
Cyrillic I-855
Cyrillic II-866
Kamenicky (MJK)
ISO Latin 2
Hebrew NC (862)
Hebrew OC
Turkey_857
Latin 5 (Windows
Turkey)
Windows Hebrew
Ukrainian
Bulgarian
ISO Latin 6 (8859/
10)
Windows Baltic
Baltic_774
KBL-Lithuanian
Cyrillic Latvia
Roman-8
Icelandic-861
Multilingual 858
ISO 8859-15
Greek_737
Asmo 449+
Asmo 708
Arabic 864
Windows Arabic
POL1
Macedonian
Slashed Letter 0 Set whether to convert
slashed 0 located at 9BH
and 9DH in USA code
page or not.
Menu mode > 45
Yes
No
GROUP ITEM FUNCTION SETS
Rear Feed Line Spacing Select line feed pitch.
Form Tear-Off When printer is idle (0.5,
Skip Over
Perforation
Page Width
(Displayed only for
ML5521ECO and
ML5591ECO)
Change to 8 lines per
inch (lpi) to get more
lines per page.
1.0 or 2.0 sec), paper is
advanced from the
current print position to
the tear position. When
data is received, paper is
moved to its original
printing position.
Select whether to skip
over perforation or not.
(When a skip over
perforation command is
received, the received
command is given
priority.)
Change to 8” to print on
narrow paper.
ML5520ECO/
ML5521ECO
6 LPI
8 LPI
Off
0.5 sec
1.0 sec
2.0 sec
No
Yes
345.44 mm (13.6”)
203.2 mm (8”)
ML5590ECO/
ML5591ECO
Page Length Select the length of a
continuous form. This
enables the printer to
keep track of the initial
printing position (TOF)
on each page.
279.4 mm (11”)
296.3 mm (11 2/3”)
304.8 mm (12”)
355.6 mm (14”)
431.8 mm (17”)
76.2 mm (3”)
82.6 mm (3.25”)
88.9 mm (3.5”)
101.6 mm (4”)
127.0 mm (5”)
139.7 mm (5.5”)
152.4 mm (6”)
177.8 mm (7”)
203.2 mm (8”)
215.9 mm (8.5”)
Menu mode > 46

GROUP ITEM FUNCTION SETS
Bottom
Feed
ML5520ECO/
ML5521ECO
Line Spacing Select line feed pitch. 6 LPI
Form Tear-Off When printer is idle (0.5,
1.0 or 2.0 sec), paper is
advanced from the
current print position to
the tear position. When
data is received, paper is
moved to its original
printing position.
Skip Over
Perforation
Page width
(Displayed only for
ML5521ECO/
ML5591ECO)
Page Length Select the length of a
Select whether to skip
over perforation or not.
(When a skip over
perforation command is
received, the received
command is given
priority.)
Change to 8” to print on
narrow paper.
continuous form.
8 LPI
Off
0.5 sec
1.0 sec
2.0 sec
No
Yes
345.44 mm (13.6”)
203.2 mm (8”)
279.4 mm (11”)
296.3 mm (11 2/3”)
304.8 mm (12”)
355.6 mm (14”)
431.8 mm (17”)
76.2 mm (3”)
82.6 mm (3.25”)
88.9 mm (3.5”)
101.6 mm (4”)
127.0 mm (5”)
139.7 mm (5.5”)
152.4 mm (6”)
177.8 mm (7”)
203.2 mm (8”)
215.9 mm (8.5”)
ML5590ECO/
ML5591ECO
Menu mode > 47

GROUP ITEM FUNCTION SETS
ML5520ECO/
ML5521ECO
Top Feed Line Spacing Select line feed pitch. 6 LPI
Form Tear-Off
(Displayed when
IBM emulation is
selected.)
Bottom Margin Change to Invalid if you
Page width
(Displayed only for
ML5521ECO/
ML5591ECO)
Page Length Select the page length of
When printer is idle (0.5,
1.0 or 2.0 sec), paper is
advanced from the
current print position to
the tear position. When
data is received, paper is
moved to its original
printing position.
want the printer to
ignore the bottom
margin setting.
Change to 8” to print on
narrow paper.
cut sheet.
8 LPI
Off
0.5 sec
1.0 sec
2.0 sec
Valid
Invalid
345.44 mm (13.6”)
203.2 mm (8”)
279.4 mm (11”)
296.3 mm (11 2/3”)
304.8 mm (12”)
355.6 mm (14”)
420.9 mm (16.57”)
76.2 mm (3”)
82.6 mm (3.25”)
88.9 mm (3.5”)
101.6 mm (4”)
127.0 mm (5”)
139.7 mm (5.5”)
152.4 mm (6”)
177.8 mm (7”)
203.2 mm (8”)
215.9 mm (8.5”)
ML5590ECO/
ML5591ECO
Wait Time Select the waiting time
between setting paper
on the tray and feeding
it while the printer is
waiting for paper to be
fed in cut sheet manual
feed mode.
Paper Length
Control
Control the page length
of cut sheet.
0.5 sec
1.0 sec
2.0 sec
by MENU setting
by Actual Page
Length
by MENU setting
by Actual Page
Length
Menu mode > 48

GROUP ITEM FUNCTION SETS
Set-up Graphics Select the printing
7 or 8 Bits
Graphics
(Displayed only for
ML Emulation)
Receive Buffer
Size
Paper Out
Override
Print Registration Change the setting as
direction when doubleheight print data exists
in a line.
Select to change
graphics settings.
Select size of the
received buffer.
When “1 Line” is
selected, the receive
buffer size is set to 2 k
bytes.
Senses when less than
1” (25mm) of paper
remains and stops
printing. Change to YES
to override the sensor
and print closer to the
bottom of the page.
required to obtain the
best registration for bidirectional printing.
ML5520ECO/
ML5521ECO
Uni-directional
Bi-directional
7
8
1 Line
32 K
64 K
128 K
Yes
No
0.25mm Right, 0.20mm Right, 0.15mm Right,
0.10mm, Right, 0.05mm, Right, 0. 0.05mm
Left, 0.10mm Left, 0.15mm Left, 0.20mm
Left, 0.25mm Left
ML5590ECO/
ML5591ECO
-
7 or 8 Bits Data
Word
Operator Panel
Function
Reset Inhibit Changing this to Yes
Print Suppress
Effective
Select data word
lengths.
Select full or limited
operation. Change to
Limited Operation to
deactivate the PRINT
QUALITY and
CHARACTER PITCH
buttons, so that these
features can only be
controlled through your
software. This prevents
these being changed
from the control panel
when several people are
using the printer.
prevents a reset signal
from the computer from
resetting the printer to
its defaults.
If your system uses the
DC1 and DC3 codes for
something other than
the print suppress
mode, change the
setting to NO.
7
8
Full Operation
Limited Operation
No
Yes
No
Yes
-
Menu mode > 49

GROUP ITEM FUNCTION SETS
Set-up
cont.
Auto LF Select whether to
Auto CR
(Displayed only for
IBM emulation)
CSF Bin Select Appears only when the
Print DEL Code
(Displayed only for
ML Emulation)
SI Select Pitch (10
CPI) (Displayed
only for IBM
emulation)
perform auto LF
operation or not upon
receiving a CR code. If
your print out is
consistently double
spaced, select No, if it
overprints, select Yes.
Select Yes to add a
carriage return when a
Line Feed is received at
the end of a line.
optional Dual-Bin cut
Sheet Feeder is
installed. Use this to
switch to Bin 2 as the
default.
Change the setting to
Yes to print the DEL
code (decimal 27) as a
solid box.
Select how to handle an
SI command received in
10 CPI mode.
ML5520ECO/
ML5521ECO
No
Yes
No
Yes
Bin 1
Bin 2
No
Yes
17.1 CPI
15 CPI
ML5590ECO/
ML5591ECO
-
SI Select Pitch (12
CPI) (Displayed
only for IBM
emulation)
Time Out Print Select valid or invalid.If
Auto Select Determines whether or
Graphics Speed Change to High for
Select how to handle an
SI command received in
12 CPI mode.
your software spends a
long time processing
between portions of data
it feeds to the printer,
change the setting to
Invalid to keep your
printer from dumping
the received data while
it is waiting for more.
not the printer will
automatically be
selected after you load
in paper. Select No if
you want to set the Top
of Form position. If you
always want to use the
same Top of Form
position, change the
setting to YES.
faster printing when the
optimum print quality is
not an issue.
12 CPI
20 CPI
Invalid
Valid
Yes
No
High
Low
Menu mode > 50

GROUP ITEM FUNCTION SETS
Set-up
cont.
Centering Position Used to limit printhead
CSF Type To avoid paper jams,
ESC SI Pitch
(Displayed only for
IBM emulation)
Select Language
Set (Displayed
only when Epson
emulation is
selected.)
travel when printing
narrow columns. Select
Mode 1 for the narrow
carriage printer. Select
Mode 1 or Mode 2 for
the wide carriage
printer.
change the setting to
Narrow if you are using
the optional Cut-Sheet
Feeder on the wide
model (ML5521ECO and
ML5591ECO)
Sets the character pitch
used when the ESC SI
command is received.
Enable/disable the
combination of the code
page setting and the
language conversion.
Combined: Enable the
combination of the code
page and the language
conversion.
Code Page Only: Enable
the code page only and
suppress the language
conversion.
Changing the language
set replaces certain
standard symbols with
special characters used
in foreign languages.
ML5520ECO/
ML5521ECO
DEFAULT
Mode 1
Mode 2
Wide
Narrow
17.1 CPI
20 CPI
Combined
Code Page Only
ML5590ECO/
ML5591ECO
Power Saving Change to disable if you
wish to prevent the
printer from entering the
Power Save mode after
the selected interval.
Power Save Time Sets the interval the
printer waits for more
data before it goes onto
the power save mode.
Power Saving must be
set to Enable (default)
for this to be effective.
Time Out FF The printer will feed or
eject paper if no data is
received during a set
period of time.
Menu mode > 51
Enable
Disable
5 min
10 min
15 min
30 min
60 min
Invalid
200ms
500ms
1 sec

GROUP ITEM FUNCTION SETS
Parallel
I/F
Serial I/F
(Displayed
when
connected to
Serial
Interface)
I-prime Select whether to print
Auto Feed XT
(Displayed only for
EPSON emulation)
Bi-direction Set whether to return a
Parity None: Absence of parity
Serial Data 7/8
Bits
or clear buffer contents
upon initialisation by
receiving I-PRIME.
If your system uses pin
14 of the parallel
interface to control
automatic line feed,
change the setting to
Valid.
device ID or not in
accordance with
IEEE1284.
bit
Odd: Odd parity
Even: Even parity
Ignore: Do not convert
the character to ox40 in
case of parity error.
Select Serial bit. 8 bit
ML5520ECO/
ML5521ECO
Invalid
Buffer Print
Buffer Clear
Valid
Invalid
Enable
Disable
None
Odd
Even
Ignore
7 bit
ML5590ECO/
ML5591ECO
Protocol Select an I/F Busy
control method.
Diagnostic Test Select to perform input/
output diagnosis of
RS-232C interface
signals.
Busy Line Select to set the Busy
Line.
Baud Rate Select to set the Baud
Rate.
DSR Signal Select the DSR Signal. Valid
DTR Signal Select a method to
switch a DTR signal of a
serial interface.
Busy Time Select the minimum
time between BUSY to
READY.
Ready/Busy
X-On/X-OFF
Ready/Busy & X-ON/X-OFF
No
Yes
SSD-
SSD+
DTR
RTS
9,600 bps
4,800 bps
2,400 bps
1,200 bps
600 bps
300 bps
19,200 bps
Invalid
Ready on Power Up
Ready on Select
0.2 sec
1.0 sec
Menu mode > 52

GROUP ITEM FUNCTION SETS
CSF Bin 1
(Display-
ed when
Single-bin
Cut-sheet
feeder is
installed)
ML5520ECO/
ML5521ECO
Line Spacing Select line feed pitch 6 LPI
Bottom Margin Change to Invalid if you
want the printer to
ignore the bottom
margin setting.
Page Width
(Displayed only for
ML5521ECO/
ML5591ECO)
Page Length Select the length of cut
Change to 8 inch to print
on letter size paper.
sheet.
8 LPI
Valid
Invalid
203.2 mm (8”)
345.44 mm (13.6”)
279.4 mm (11”)
296.3 mm (11 2/3”)
304.8 mm (12”)
355.6 mm (14”)
420.9 mm (16.57”)
88.9 mm (3.5”)
101.6 mm (4”)
127.0 mm (5”)
139.7 mm (5.5”)
152.4 mm (6”)
177.8 mm (7”)
203.2 mm (8”)
215.9 mm (8.5”)
ML5590ECO/
ML5591ECO
CSF Bin
2(Display
-ed when
Doublebin Cutsheet
feeder is
installed)
Line Spacing Select line feed pitch. 6LPI
8LPI
Bottom Margin Change to Invalid if you
want the printer to
ignore the bottom
margin setting.
Page Length Select the length of cut
sheet.
Valid
Invalid
279.4 mm (11”)
296.3 mm (11 2/3”)
304.8 mm (12”)
355.6 mm (14”)
420.9 mm (16.57”)
88.9 mm (3.5”)
101.6 mm (4”)
127.0 mm (5”)
139.7 mm (5.5”)
152.4 mm (6”)
177.8 mm (7”)
203.2 mm (8”)
215.9 mm (8.5”)
Menu mode > 53

M
AINTENANCE
R
EPLACING THE RIBBON CARTRIDGE
Make sure you have the correct replacement ribbon for your printer. The wrong ribbon will
not print when installed in your printer. Look for the printer model number on the ribbon
package.
R
IBBON CARTRIDGE HANDLING
> Leave unused ribbon cartridges in their packages until needed.
> Careful; the ribbon ink may cause permanent stains.
> Ribbon ink on skin or clothing can usually be removed with soap and water.
Make sure the printer is turned OFF.
1. Open the access cover and center the printhead (1).
1
2. Swing the used ribbon cartridge up off the printhead, lift it out, and discard it.
WARNING!
The printhead may be HOT.
Maintenance > 54

3. Unpack the new ribbon cartridge and install it.
Do not remove the ribbon shield (1) from the ribbon!
1
4. Turn the take-up knob (1) in the direction of the arrow to take up any ribbon slack.
1
5. Close the access cover and turn the printer back on.
CAUTION!
> If ribbon should contact the eyes: Flush eyes with large
quantities of water for 15 minutes, keeping eyelids open with
fingers. Seek medical attention.
> If ribbon should contact the skin: Wash thoroughly with soap and
water.
Maintenance > 55

C
LEANING YOUR PRINTER
To keep your printer in good operating condition, you are advised to clean it regularly.
WARNING!
Set the printer Power Switch to OFF and disconnect the power
cable from the printer before cleaning the printer.
P
RINTER EXTERIOR
CAUTION!
Keep the access cover closed to avoid the possibility of detergent
entering the printer.
Clean the exterior of the printer as required, but at least every six months or 300 hours of
operation, whichever comes first.
> Moisten a piece of cotton cloth with diluted natural detergent and carefully wipe the
printer exterior.
C
LEANING THE HOUSING
WARNING!
> As the print head becomes hot during printing, allow it to cool
before carrying out any cleaning inside the printer.
> Do not use any flammable solvents for cleaning the printer to
avoid any risk of fire or electric shock.
You should clean the printer housing every six months (or after about 300 hours of
operation.
CAUTION!
Never use strong solvents or strong detergents on the cabinet—
they could damage the housing.
1. Turn off the printer.
2. Use the platen knob to back the paper out of the printer.
CAUTION!
Make sure the printer is turned off before you open the access
cover.
Maintenance > 56

3. Open the access cover (1) and remove the pull-up roller assembly (2).
2
1
4. Use a clean, dry cloth to dust around the carriage shaft and platen. Remove any
loose bits of paper.
CAUTION!
> When you clean the interior of the printer with a vacuum cleaner,
do not attempt to clean any parts smaller than the suction nozzle.
> Do not clean any interior working parts with suction nozzle to
avoid possible damage to the printer.
5. Reinstall the pull-up roller assembly and close the access cover.
Maintenance > 57

T
ROUBLESHOOTING
C
LEARING PAPER JAMS
R
EAR FEED JAMS
1. Turn off the printer.
2. Use the platen knob to back the paper all the way out of the printer.
CAUTION!
Make sure the printer is turned OFF before you open the access
cover.
3. Open the access cover (1) and remove the pull-up roller assembly (2). Remove any
torn paper.
2
1
4. Lift the sheet guide (1) and reload paper. Make sure you lock the tractor covers.
1
Troubleshooting > 58

5. Lower the sheet guide, then install the pull-up roller assembly and close the access
cover.
6. Turn ON the printer and press FF/LOAD.
R
EAR FEED, REPEATING PAPER JAMS
If the paper keeps jamming, you may have:
> defective paper
> misaligned paper
> bits of paper stuck in the paper path
Defective paper
Replace the defective paper with a fresh stack.
Misaligned paper
1. Turn off the printer.
2. Use the platen knob to back the paper all the way out of the printer.
3. Tear off a couple of sheets of paper, leaving a new, clean, square-cut edge.
4. Reload the paper and turn the printer back on.
Fragments of paper in the paper path
1. Turn off the printer.
2. Use the platen knob to back the paper all the way out of the printer.
CAUTION!
Make sure the printer is turned OFF before you open the access
cover.
Troubleshooting > 59

3. Open the access cover (1) and remove the pull-up roller assembly (2). Then grasp
the tabs (3) on the sheet guide (4) and lift it off the printer.
2
3
4
3
1
4. Remove any torn pieces of paper.
5. Fold some continuous form paper over three times to make a page four sheets thick.
Then, load it on the tractors and close and lock the covers.
6. Use the platen knob to draw the quadruple-thick page around the platen. This brings
out jammed pieces of paper.
7. Remove the paper pieces. Then, use the platen knob to back the paper out.
8. Load standard paper, close and lock the tractor covers.
Troubleshooting > 60

9. Install the sheet guide, then install the pull-up roller assembly and close the access
cover.
10. Turn the printer on and press FF/LOAD.
S
INGLE SHEET PAPER JAMS
1. Turn off the printer.
2. Use the platen knob to back the paper out.
3. Open the access cover (1) and remove the pull-up roller assembly (2).
2
1
4. Remove any torn pieces from around the carriage.
5. Reinstall the pull-up roller assembly and close the access cover.
Troubleshooting > 61

G
ENERAL PROBLEMS
Here are some general things to check before proceeding with detailed troubleshooting.
> Is the printer plugged in and turned ON?
> Are the connections (power and interface) secure?
> Is the product being operated under the proper ambient conditions?
> Does the paper being used meet the specifications for this product?
> Is the paper properly installed?
> Is the ribbon properly installed?
> Is an Oki ribbon being used?
> Is the printhead gap correctly set?
> Are the correct printer drivers being used for the printer?
NOTE
> Settings in your software application will normally override any settings in
your printer driver.
> Printer driver settings normally override settings from the printer menu or
printer front panel.
PROBLEM SOLUTION
My word processor files
do not print the way I
have the menu and front
panel set.
Nothing happens when I
turn ON the printer.
The printer does not
print when the computer
sends data.
Remember:
> Settings in your software application can override settings
in your printer driver.
> Your printer driver settings can override any settings from
the printer menu or printer front panel.
Before sending a file to the printer, many word processors send
either an “initialisation string” or an I-Prime signal to the printer.
The initialisation string contains codes that override the panel
and menu settings. To change your printer to ignore the reset
code, enter the Menu Mode, go to the Set-Up group and change
the setting for Reset Inhibit to YES.
The I-Prime signal will automatically override any front panel
settings you have made. To eliminate this problem, enter the
Menu Mode, go to the Parallel Interface group and change the
setting for I-Prime to Invalid.
For more information on changing menu settings, see “Changing
the menu settings” on page 42.
Check the power cord connection to the outlet and to the printer.
If you are using a power strip, make sure it is turned ON, and
that the fuse hasn’t blown or that the circuit breaker hasn’t
tripped.
1. Is the SEL light on? If not, press the SEL key.
2. Check that the interface cable is securely connected to both
the printer and the computer.
3. If you have the optional serial interface board installed, check
to be sure that it is firmly seated in the printer.
I'm getting strange
symbols, incorrect fonts,
etc., when I try to print
a document.
1. Check to be sure that the printer driver you have selected in
your software matches the printer emulation.
2. Press SHIFT and SEL keys, then press GROUP key.
This will print a line showing the emulation you have
selected.
3. If you have embedded any printer commands in your
software, check to be sure that you entered them correctly
Troubleshooting > 62

PROBLEM SOLUTION
Ink smears on the paper
when I print narrow
columns.
I've installed a new
ribbon and the printing
is smeared and
streaked.
There are dots missing
in my printouts.
The ALARM light is
flashing.
The ALARM light is ON
and the Character Pitch
10 light is flashing.
This may be caused by excessive printhead travel from the
centering position. Enter the Menu and set the Centering Position
to MODE 1. See “Using Your Printer, Menu Mode.”
For the wide-carriage printer, if MODE 1 doesn't work, try setting
the Centering Position to MODE 2.
The ribbon shield (1) is either loose or missing.
1
Remove the ribbon cartridge and check the ribbon shield.
> If it is loose, secure it.
> If it is missing, find it and install it.
The head gap may not be set correctly. Try moving the headgap
lever.
Try turning the printer OFF and then back ON again. If the light
still blinks, call for service.
This indicates that the paper lever is set at the wrong position for
the paper you are trying to use. Move it to the proper setting.
The ALARM light is ON
and the Character Pitch
15 light is flashing.
The printer needs paper.
The ALARM is not ON
and I can’t load paper.
Continuous form paper
sticks to the sheet
guide.
The Print Quality and
Character Pitch keys on
the front panel don't
work.
This indicates a paper jam. Press the SEL key and correct the
paper jam situation. See “Clearing paper jams” on page 58.
1. Press and release the SEL key.
2. Press and hold the SHIFT key and press the RESET/
CHARACTER PITCH key.
The ALARM light illuminates and you can now load paper.
In cold dry weather, static charges can build up and make the
paper cling to the sheet guide. Try moving the paper guides
together so that the paper rests on the guides rather than on the
separator.
The Operator Panel Function in the printer menu can be used to
disable these buttons (Limited Function). If the printer is part of
a customized system or if it is used by a number of people, the
system manager may have used this option to make sure the
printer is always set properly.
Check with your system manager before changing any menu
settings.
Troubleshooting > 63

P
ARTS AND ACCESSORIES
Purchasing Parts & Accessories
Before you purchase parts and accessories, make a note of your prin ter mo del number (see
the front of the unit) and have the correct part number and description of the item you wish
to purchase.
3
5
5
7
7
Installation instructions are supplied with the accessories.
1
3
2
4
x 2
4
1. Ribbon Cartridge
2. Platen Knob
1
1
6
5
3. Power Cord (UK, Euro)
4. Printhead
2
5. Access Cover
6. Sheet Guide
7. Pull-up Roller Assembly
1. Pull Tractor, Top-Mount
2. Push Tractor, Bottom-Mount
3. Cut Sheet Feeder Single Bin
4. Roll Paper Stand
5. Serial Interface RS-232C
or
Cut Sheet Feeder Double Bin
(ML5520ECO/ML5590ECO)
(ML5520ECO/ML5590ECO)
Parts and accessories > 64
or
LAN7120E3 100BASE-TX/
10BASE-T Network Interface

S
PECIFICATIONS
ITEM SPECIFICATION
Print Method Impact dot matrix
Printhead
ML5520ECO/ML5521ECO
ML5590ECO/ML5591ECO
Dimensions (W x D x H)
(Without platen knob, acoustic
cover and paper separator)
ML5520ECO/ML5590ECO
ML5521ECO/ML5591ECO
MODEL MODEL NUMBER
ML5520ECO D22900B
ML5521ECO D22910B
ML5590ECO D22920B
ML5591ECO D22930B
9 pins, 0.30 mm diameter, thermal protection
24 pins, 0.20 mm diameter, thermal protection
398 x 345 x 120 mm
552 x 345 x 120 mm
Weight
ML5520ECO/ML5590ECO
ML5521ECO
ML5591ECO
Power Rating
Voltage
Frequency
Power Consumption
(Without options attached)
ML5520ECO/ML5521ECO
Operation
Powersave mode
ML5590ECO/ML5591ECO
Operation
Powersave mode
Environmental Requirements Operating Temperature: 5 to 35C
Noise Level The acoustic noise of this product is less than
5.9 kg
7.7 kg
7.8 kg
220 - 240V ± 10%
50/60 Hz ± 2%
Typ. 51W (ISO/IEC10561/Letter/Draft/Range 1)
Max. 2.0W
Typ. 60W (ISO/IEC10561/Letter/Draft/Range 1)
Max. 2.0W
Storage Temperature: -10 to +50C
Operating Humidity: 20 to 80%RH (max. wet bulb
temp. 30C)
Storage Humidity: 5 to 95%RH (max. wet bulb
temp. 40C)
56dB(A) as measured in accordance with
EN ISO7779
Specifications subject to change without notice.
Specifications > 65

I
NDEX
C
Centering printhead
position
Clearing paper jams
Computer Connections.......... 13
Connections
............................... 63
rear feed
single sheets..................... 61
parallel
USB................................... 14
........................... 58
.............................. 13
D
DIPUS.................................... 18
button setup utility........... 18
menu setup utility ............ 18
status monitor .................. 19
TOF setup utility ............... 19
E
Emulations .......................18, 40
F
Font Sample Test.................. 15
Forms Tear-Off
Top of Form
...................... 34
I
Installing the Ribbon
Cartridge
............................. 11
T
Testing the printer
font sample test
hexadecimal dump
mode
.............................. 17
rolling ASCII test .............. 16
Top of Form
Forms Tear-Off
Paper Shield ..................... 30
Troubleshooting
general problems
............... 15
................. 34
.............. 62
U
Unpacking ............................... 9
user guide
list
...................................... 7
printing............................... 8
Using your printer................. 20
L
Limited Operation ................. 63
Loading paper ....................... 15
rear feed........................... 20
top feed ............................ 29
M
Maintenance
cleaning your printer
replace ribbon cartridge ...54
MENU light ............................ 41
Menu mode ........................... 41
Menu settings........................ 43
........ 56
O
Operator Panel Function ....... 63
Options.................................. 64
P
Paper Jams............................ 63
Paper Lever........................... 63
Paper Out.............................. 63
Printer
power off
power on........................... 12
Printer drivers ....................... 18
Printing from the
computer
.......................... 13
............................ 18
R
Ribbon Shield ............. 11, 55, 63
S
Serial Interface Option.......... 62
Software
Matching drivers to
emulations
...................... 62
Index > 66

OKI
Oki Systems (UK) Limited
550 Dundee Road
Slough Trading Estate
Slough
Berkshire
SL1 4LE
Tel:+44 (0) 1753 819819
Fax:+44 (0) 1753 819899
http://www.oki.co.uk
Oki Systems Ireland Limited
The Square Industrial Complex
Tallaght
Dublin 24
Tel:+353 (0) 1 4049590
Fax:+353 (0)1 4049591
http://www.oki.ie
Oki Systems Ireland Limited Northern Ireland
19 Ferndale Avenue
Glengormley
BT36 5AL
Northern Ireland
Tel:+44 (0) 7767 271447
Fax:+44 (0) 1 404 9520
http://www.oki.ie
Technical Support for all Ireland:
Tel:+353 1 4049570
Fax:+353 1 4049555
E-mail: tech.support@oki.ie
OKI Systems (Czech and Slovak),
s.r.o.
IBC – Pobřežní 3
186 00 Praha 8
Czech Republic
Tel: +420 224 890158
Fax:+420 22 232 6621
Website: www.oki.cz, www.oki.sk
Oki Systems (Deutschland) GmbH
Hansaallee 187
40549 Düsseldorf
Tel: 01805/6544357**
Fax: +49 (0) 211 59 33 45
Website:
www.okiprintingsolutions.de
info@oki.de
**0,14€/Minute aus dem dt. Festnetz
der T-Com (Stand 11.2008)
Διανομέας των συστημάτων OKI
CPI S.A1 Rafailidou str.
177 78 Tavros
Athens
Greece
Τel: +30 210 48 05 800
Fax:+30 210 48 05 801
EMail:sales@cpi.gr
Oki Systems (Iberica), S.A.U
C/Teide, 3
San Sebastian de los Reyes
28703, Madrid
Tel:+34 91 3431620
Fax: +34 91-3431624
Atención al cliente: 902 36 00 36
Website: www.oki.es
CONTACT DETAILS
01805/OKIHELP**
Oki Systèmes (France) S.A.
44-50 Av. du Général de Gaulle
94246 L'Hay les Roses
Paris
Tel:+33 01 46 15 80 00
Télécopie:+33 01 46 15 80 60
Website: www.oki.fr
OKI Systems (Magyarország) Kft.
Capital Square
Tower 2
7th Floor
H-1133 Budapest,
Váci út 76
Hungary
Telefon: +36 1 814 8000
Telefax: +36 1 814 8009
Website: www.okihu.hu
OKI Systems (Italia) S.p.A.
via Milano, 11,
20084 Lacchiarella (MI)
Tel:+39 (0) 2 900261
Fax:+39 (0) 2 90026344
Website: www.oki.it
OKI Printing Solutions
Platinium Business Park II, 3rd Floor
ul. Domaniewska 42
02-672 Warsaw
Poland
Tel:+48 22 448 65 00
Fax:+48 22 448 65 01
Website: www.oki.com.pl
E-mail: oki@oki.com.pl
Hotline: 0800 120066
E-mail: tech@oki.com.pl
Oki Systems (Ibérica) S.A.
Sucursal Portugal
Edifício Prime Av. Quinta Grande 53
7º C Alfragide
2614-521 Amadora
Portugal
Tel:+351 21 470 4200
Fax:+351 21 470 4201
Website:www.oki.pt
E-mail : oki@oki.pt
Oki Service
Serviço de apoio técnico ao
Cliente
Tel: 808 200 197
E-mail : okiserv@oki.pt
OKI Europe Ltd. (Russia)
Office 702, Bldg 1
Zagorodnoye shosse
117152, Moscow
Tel: +74 095 258 6065
Fax: +74 095 258 6070
e-mail: info@oki.ru
Website: www.oki.ru
Technical support:
Tel: +7 495 564 8421
e-mail: tech@oki.ru
Oki Systems (Österreich)
Campus 21
Businesszentrum Wien Sued
Liebermannstrasse A02 603
22345 Brun am Gebirge
Tel: +43 223 6677 110
Drucker Support:
+43 (0) 2236 677110-501
Fax Support:
+43 (0) 2236 677110-502
Website: www.oki.at
OKI Europe Ltd. (Ukraine)
Raisy Opkinoy Street,8
Building B, 2
Kiev 02002
Ukraine
Tel: +380 44 537 5288
e-mail: info@oki.ua
Website: www.oki.ua
OKI Sistem ve Yazıcı Çözümleri Tic.
Ltd. Şti.
Harman sok Duran Is Merkezi,
No:4, Kat:6,
34394, Levent
İstanbul
Tel: +90 212 279 2393
Faks: +90 212 279 2366
Web: www.oki.com.tr
www.okiprintingsolutions.com.tr
Oki Systems (Belgium)
Medialaan 24
1800 Vilvoorde
Helpdesk: 02-2574620
Fax: 02 2531848
Website: www.oki.be
AlphaLink Bulgaria Ltd.
2 Kukush Str.
Building "Antim Tower", fl. 6
1463 Sofia, Bulgaria
tel: +359 2 821 1160
fax: +359 2 821 1193
Website: http://bulgaria.oki.com
OKI Printing Solutions
Herstedøstervej 27
2620 Albertslund
Danmark
Adm.: +45 43 66 65 00
Hotline: +45 43 66 65 40
Salg: +45 43 66 65 30
Fax: +45 43 66 65 90
Website: www.oki.dk
Oki Systems (Finland) Oy
Polaris Capella
Vänrikinkuja 3
02600 Espoo
Tel: +358 (0) 207 900 800
Fax: +358 (0) 207 900 809
Website: www.oki.fi
Oki Systems (Holland) b.v.
Neptunustraat 27-29
2132 JA Hoofddorp
Helpdesk: 0800 5667654
Tel:+31 (0) 23 55 63 740
Fax:+31 (0) 23 55 63 750
Website: www.oki.nl
nd
Floor,
Oki contact details > 67

 Loading...