

Page 1
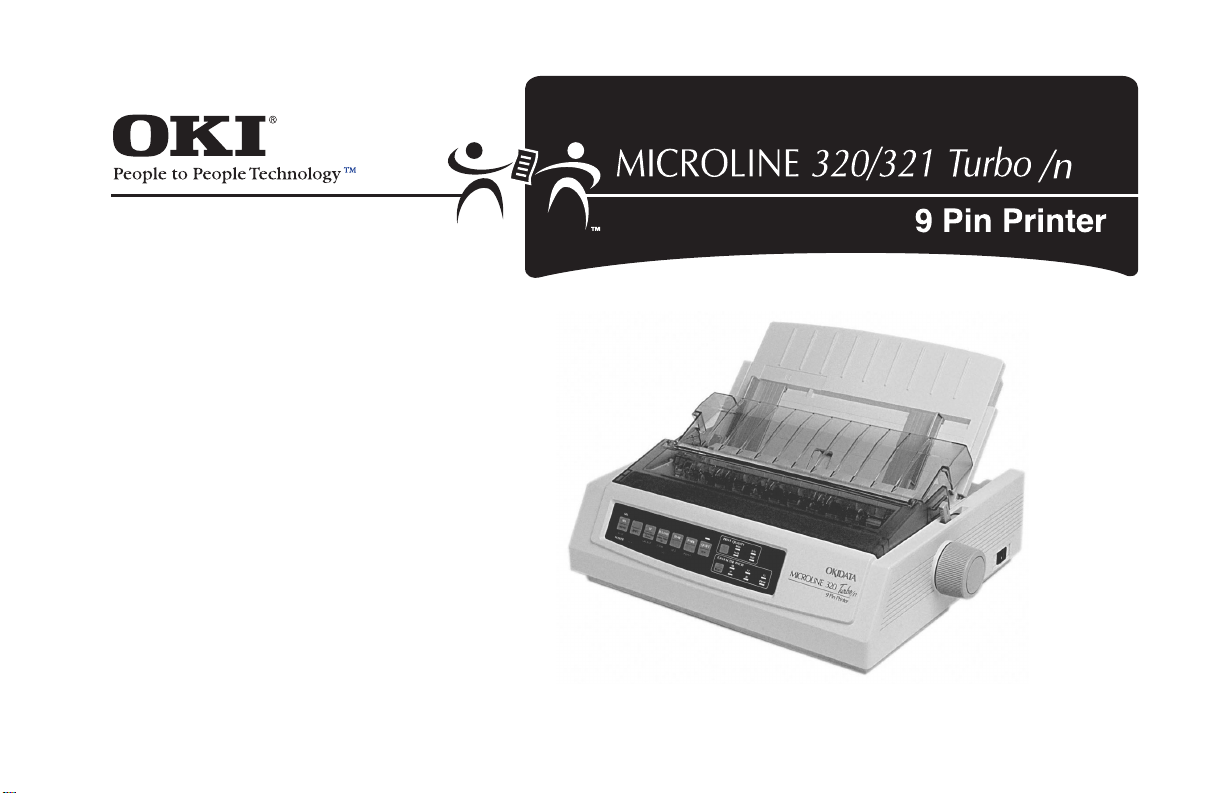
320T_n_tp.jpg
User’s
Guide
P/N 59270107
Page 2

Document Title and Part Number
Microline 320/321 Turbo/n User’s Guide
Rev. 1.1
Disclaimer
Every effort has been made to ensure that the information in
this document is complete, accurate, and up-to-date. Oki Data
assumes no responsibility for the results of errors beyond its
control. Oki Data also cannot guarantee that changes in
software and equipment made by other manufacturers and
referred to in this guide will not affect the applicability of the
information in it. Mention of software products manufactured
by other companies does not necessarily constitute
endorsement by Oki Data.
Copyright Information
Copyright 2007 by Oki Data. All rights reserved.
February, 2007
Written and produced by the Oki Data Training and
Publications Department.
Contact Information
Please address any comments on this publication to:
Mailing Address
Oki Data Americas, Inc.
Training & Publications Dept.
2000 Bishops Gate Blvd.
Mt. Laurel, NJ 08054-4620
e-Mail Address
pubs@okidata.com
Web Site
Please visit Oki Data’s multilingual web site at:
http://www.okiprintingsolutions.com
Trademark Information
OKI and MICROLINE are registered trademarks of Oki Electric
Industry Company, Ltd.
Epson is a registered trademark of Epson America, Inc.
IBM is a registered trademark of International Business Machines
Corp.
Microsoft and Windows are either registered trademarks or
trademarks of Microsoft Corporation in the United States and other
countries.
2 Microline 320/321 Turbo/n
|
Page 3

Contents
Helpful Hints ............................................................... 8
Saving Money ........................................................................ 9
Saving Money: Forms T ear -Off............................................ 9
Saving Money: Draft Mode ................................................. 9
Saving Time ......................................................................... 10
Saving Time: Internet Support ..........................................1 0
Saving Time: Draft Mode ..................................................10
Saving Time: Paper Park....................................................10
Saving Time: Moving Through the Menu ........................10
Operation Tips......................................................................1 1
Operation Tip: Top of Form ...............................................11
Operation Tip: Turning the Platen Knob........................... 1 2
Operation Tip: Using the Parallel Port ..............................12
Operation Tip: Control Access to the Printer.....................12
Introduction.............................................................. 13
Printer Features .....................................................................14
Parts Identification .................................................. 1 5
Printer Serial Number ...........................................................15
Parts Identification: Rear Feed (Continuous Forms)............16
Parts Identification: Top Feed (Single-Sheet) ......................17
Front Panel Lights ................................................................1 8
Front Panel Keys ..................................................................19
User’s Guide: English 3
|
Page 4

Installation................................................................ 20
Installation Hints .................................................................. 2 0
Installation Overview ...........................................................21
Installation Location ............................................................ 21
Customizing the Installation ................................................ 22
Unpacking the Machine .......................................................24
Shipping Restraints .............................................................. 2 5
Ribbon Cartridge .................................................................. 26
Ribbon Cartridge Handling ............................................... 2 7
Ribbon Cartridge Emergency First Aid .............................27
Power Connections...............................................................28
Paper Loading ...................................................................... 2 9
Testing the Printer ................................................................33
Font Sample Test................................................................34
Rolling ASCII Test .............................................................35
Local Printer Installation......................................................36
Installing Printer Software .................................................36
Windows 95, 98, Me, NT4.0 ............................................36
Windows 2000 .................................................................37
Network Printer Installation .................................................38
Connecting the Network Cable ......................................... 3 8
Network Installation .......................................................... 3 9
Connecting to the Parallel Port ............................................40
Product Registration ............................................................ 41
my.okidata.com .................................................................. 41
Registering Y our Printer.....................................................41
4 Microline 320/321 Turbo/n
|
Page 5

Using Your Printer ................................................... 4 2
T op of Form (TOF)................................................................42
T op of Form (TOF) and Forms Tear -Off..............................43
Forms T ear-Of f Status (ON or OFF) ....................................43
Setting T op of Form, Forms T ear -Off ON (Step A) .............44
Setting T op of Form, Forms T ear -Off OFF (Step B)............46
T emporary Top of Form Change ........................................48
Reset Top of Form to Factory Default................................49
Printer ON ........................................................................49
Printer OFF.......................................................................49
Forms T ear-Off ......................................................................50
Changing the Forms Tear-Off Setting................................51
Automatic Forms T ear-Off..................................................52
TEAR Key and Automatic Forms T ear-Off ......................53
Manual Forms T ear-Off ......................................................54
TEAR Key ............................................................................55
Forms T ear-Off set OFF ......................................................55
Forms T ear-Of f set ON ........................................................55
Paper Park .............................................................................56
Changing Paper Paths .......................................................... 5 7
Continuous-forms to single-sheet feed ..............................57
Single-sheet feed to continuous forms ..............................57
Printhead Gap .......................................................................58
Expanded Printhead Gap ...................................................59
Print Quality .........................................................................6 3
Super Speed Draft...............................................................64
Printer Reset .........................................................................64
Character Pitch .....................................................................65
Emulations ...........................................................................66
Printer Drivers.......................................................................67
Selecting Printer Drivers ....................................................67
Obtaining Drivers...............................................................68
Installing Printer Drivers....................................................68
Menu Mode .......................................................................... 6 9
Moving Through the Menu ...............................................70
Moving Forward ..............................................................70
Moving Backward ........................................................... 7 0
Resetting Menu to Factory Defaults..................................7 1
Printing the Menu Settings ................................................7 1
Changing the Menu Settings ............................................. 7 2
Menu Settings Table .......................................................... 7 3
Explanations of Menu Items..............................................7 8
Maintenance ............................................................. 81
Replacing the Ribbon Cartridge .......................................... 8 1
Printer Cleaning ................................................................... 82
Paper Jams ............................................................................83
User’s Guide: English 5
|
Page 6

Troubleshooting ....................................................... 88
General Information .............................................................88
Internet Support ................................................................. 88
List of Problems....................................................................89
Problem 1:
My word processor files do not print the way I have the
menu and front panel set. ............................................... 90
Problem 2:
Nothing happens when I turn on the printer. ..................91
Problem 3:
The printer does not print when the computer
sends data. ...................................................................... 91
Problem 4:
I'm getting strange symbols, incorrect fonts, etc., when I
try to print a document. ..................................................91
Problem 5:
Ink smears on the paper when I print on narrow forms...92
Problem 6:
I've installed a new ribbon and the printing is smeared and
streaked........................................................................... 92
Problem 7:
The ALARM light is flashing.........................................92
Problem 8:
The ALARM light is on and the Character Pitch 10 light is
flashing. ..........................................................................92
Problem 9:
The ALARM light is on and the Character Pitch 15 light is
flashing. ..........................................................................93
Problem 10:
The printer needs paper, but the ALARM light is not on
and I cannot load the paper. ...........................................93
Problem 11:
The Print Quality and Character Pitch keys on the front
panel don't work. ............................................................93
Problem 12:
Continuous-form paper sticks to the paper separator.....94
Problem 13:
Nothing happens when I print to the parallel port. ........94
6 Microline 320/321 Turbo/n
|
Page 7

Specifications............................................................ 95
Service and Support .............................................. 10 0
General Information .......................................................... 100
Documentation .................................................................. 101
Purchase Location ............................................................. 10 1
Internet Support................................................................. 102
www.okidata.com ......................................................... 10 2
my.okidata.com ............................................................ 1 0 2
Telephone Support ............................................................ 1 03
Service Centers .................................................................. 104
Service and Support: United States and Canada............... 1 05
Service and Support: Latin America ................................. 106
Accessories ............................................................. 107
Purchasing Accessories...................................................... 107
Accessories: Part Numbers ................................................ 108
Consumables: Part Numbers ........................................... 108
Options: Part Numbers .................................................... 108
Replacement Parts: Part Numbers ................................... 109
Documentation ............................................................... 110
Printer Control Codes .......................................... 1 11
Epson FX Commands ........................................................ 112
IBM Proprinter III Commands........................................... 114
Oki Data MICROLINE Standard Commands .................... 116
Warranty, Regulatory, and Safety Information 1 18
Limited Warranty: United States and Canada................... 11 8
Limited W arranty: Latin America...................................... 120
Service and Support: United States and Canada............... 1 21
Sales and Service Dealers: United States and Canada . 121
Telephone Support: United States and Canada............ 122
Service and Support: Latin America ................................. 123
Sales and Service Centers: Latin America.................... 123
Customer Support Professionals: Latin America.......... 123
Oki Data on the Internet .................................................... 1 24
www.okidata.com ......................................................... 124
my.okidata.com ............................................................ 124
Oki Data Service Centers................................................... 125
Material Safety Data Sheet (MSDS) .................................. 126
Emergency Information: MSDS...................................... 126
Safety Information .......................................................... 130
Regulatory Information ..................................................... 1 31
Year 2000 Compliance ................................................... 13 1
Energy Star®................................................................... 131
Federal Communications Commission (FCC)................ 132
Industry Canada (IC)....................................................... 133
European Union Council of the European Communities134
Index ........................................................................ 1 35
User’s Guide: English 7
|
Page 8

Helpful Hints
Your printer has many features and capabilities that will help
you
• save money
• save time
• operate the machine
8 Microline 320/321 Turbo/n
|
This section summarizes the features and capabilities directly
connected to saving money and time.
Details for these features and capabilities are provided in
other sections of this document.
You may want to use some of our Helpful Hints when
working with your machine.
Page 9

Saving Money
Saving Money: Forms Tear-Off
The Forms T ear-Of f feature allows a printed page (rear feed,
continuous form) to be torn off without wasting paper or
adjusting the printer.
Forms Tear-Off automatically moves the paper from the
initial printing position (print start position) to the tear-off
position, after a time interval (which you select through the
menu).
The top of the page (perforation) is even with the tear bar.
The tear bar is located under the clear top of the access cover.
Paper remains in the tear-off position until the printer
receives more data. Then, the paper moves back down for
printing (retracts to the initial print position).
When printing stops, the paper will advance to the tear-off
position.
This feature is normally turned off.
Forms Tear-Off and the Top of Form settings interact.
For more information, refer to “Using Your Printer , Forms
T ear-Off” and “Using Y our Printer , Top of Form.”
Saving Money: Draft Mode
When printing drafts of documents, use either the High Speed
Draft or Super Speed Draft mode. These modes use less ink
than the Utility or Near Letter Quality Modes, thus extending
the life of your ribbon. The draft modes also print at high
speeds, reducing the time required to complete a print job.
For more information, refer to “Using Your Printer , Print
Quality.”
User’s Guide: English 9
|
Page 10

Saving Time
Saving Time: Internet Support
Oki Data provides support via the Internet.
Oki Data’s main web site, www.okidata.com, is the gateway to
Oki Data’s products and services.
my .okidata.com is a powerful area of Oki Data’ s web site
designed to help you personalize the information and service
you get from Oki Data.
You can find information at your convenience, at any time.
For more information, refer to “Service and Support, Internet
Support.”
Saving Time: Draft Mode
When printing drafts of documents, use either the High Speed
Draft or Super Speed Draft mode. The draft modes print at
high speeds, reducing the time required to complete a print
job. These modes also use less ink than the Utility or Near
Letter Quality Modes, thus extending the life of your ribbon.
For more information, refer to “Using Your Printer, Print
Quality.”
Saving Time: Paper Park
Your printer’s paper park feature allows you to print a single
sheet (cut-sheet) page without removing continuous feed
paper from the printer.
For more information, refer to “Using Your Printer, Paper
Park.”
Saving Time: Moving Through the Menu
When the printer is in Menu Mode, you can move forward or
backwards through the menu.
T o move forward, press GROUP , ITEM, or Set, whichever is
appropriate.
T o move backward, press and hold SHIFT , then GROUP,
ITEM, or Set, whichever is appropriate.
For more information, refer to “Using Your Printer, Menu
Mode.”
10 Microline 320/321 Turbo/n
|
Page 11

Operation Tips
Operation Tip: Top of Form
If you turn the platen knob when the printer is turned
!
on, you will cause the Top of Form to mis-align. Always
turn the printer off before turning the platen knob!
Always determine the status of the Forms T ear-Off menu
!
setting BEFORE setting the T op of Form. Refer to
“Using Your Printer, Top of Form, Forms T ear-Off
Status (ON or OFF).”
T op of Form sets the print start position for the printer. It is
adjustable in increments of 1/144 of an inch. The amount of
adjustment is limited to avoid paper jams.
The Top of Form may be left at the factory default (1 inch),
changed for a single print job, or set to a new (permanent)
default.
The first line prints at the red line of the plastic paper shield
(1) on the printhead.
The T op of Form and Forms Tear-Off settings of your printer
interact.
How you set the Top of Form depends on the status of the
Forms T ear-Off menu setting.
For more information, refer to “Using Your Printer, Top of
Form (TOF).”
32T-18.eps
1
M
User’s Guide: English 11
|
Page 12

Operation Tip: Turning the Platen Knob
If you turn the platen knob when the printer is turned
!
on, you will cause the Top of Form to mis-align. Always
turn the printer off before turning the platen knob!
Operation Tip: Using the Parallel Port
If you want to use the parallel port, you MUST remove
!
the Network Card from the printer.
See the OkiLAN 6120e User’s Guide for details.
Operation Tip: Control Access to the Printer
You can control access to the printer by changing the setting
for the Operator Panel Function (in the Menu).
When the Operator Panel Function is set to Full Operation
(the factory default), all keys on the front panel operate.
When the Operator Panel Function is set to Limited
Operation, the PRINT QUALITY and CHARACTER PITCH
keys don’t work. This prevents these settings from being
changed from the control panel when several people are
using the printer.
For more information, refer to “Using Your Printer, Menu
Mode, Menu Settings Table, Setup, Operator Panel
Function.”
12 Microline 320/321 Turbo/n
|
Page 13

Introduction
Thank you for purchasing this printer.
This rugged 9-pin network printer can meet the needs of
harsh and demanding environments. The expanded printhead
gap, zero-tear capability, and multiple paper feed paths allow
the printer to handle a wide variety of media, including 6part forms. Your printer will provide years of dependable and
efficient service.
In addition to the many standard features, options can
expand the machine’s capabilities.
For information on the options, see “Accessories.”
Oki Data on the Internet
The Oki Data Web Sites provide the most current information
available on your product.
An on-line version of this document is available for viewing
and downloading via Oki Data’s Web Sites.
You may reach Oki Data via the Internet at:
• www.okidata.com
• my.okidata.com
For more information on the Oki Data Web Sites, refer to
“Service and Support, Internet Support.”
User’s Guide: English 13
|
Page 14

Printer Features
• Super reliable, durable operation: 10,000 hours Mean
Time Between Failures (MTBF)!
• Expandable head gap for handling forms up to 0.031"
(0.79 mm) thick through the bottom feed path using the
optional push and/or pull tractor.
• Advanced paper handling, with built-in rear push tractor
and zero-tear forms capability.
• Blazing print speeds:
— 300 characters per second (cps) in Utility mode
— 390 cps in High Speed Draft (HSD) mode
— 435 cps in Super Speed Draft (SSD) mode
14 Microline 320/321 Turbo/n
|
Page 15

Parts Identification
The parts identified here are parts of the unit that you will use
during normal operation.
For accessories (consumables, options, replacement parts, and
documentation), refer to “Accessories.”
Printer Serial Number
The serial number of your machine is on a label on the back
of your machine.
The label says “S/N.”
An example serial number is: 401A0154693.
You will need your printer serial number if your
!
machine requires servicing.
A written receipt for the product, showing the date of
purchase, dealer’s name, and both the model and serial
numbers of the product must accompany any request or
claim for work to be performed under Limited
Warranty.
User’s Guide: English 15
|
Page 16
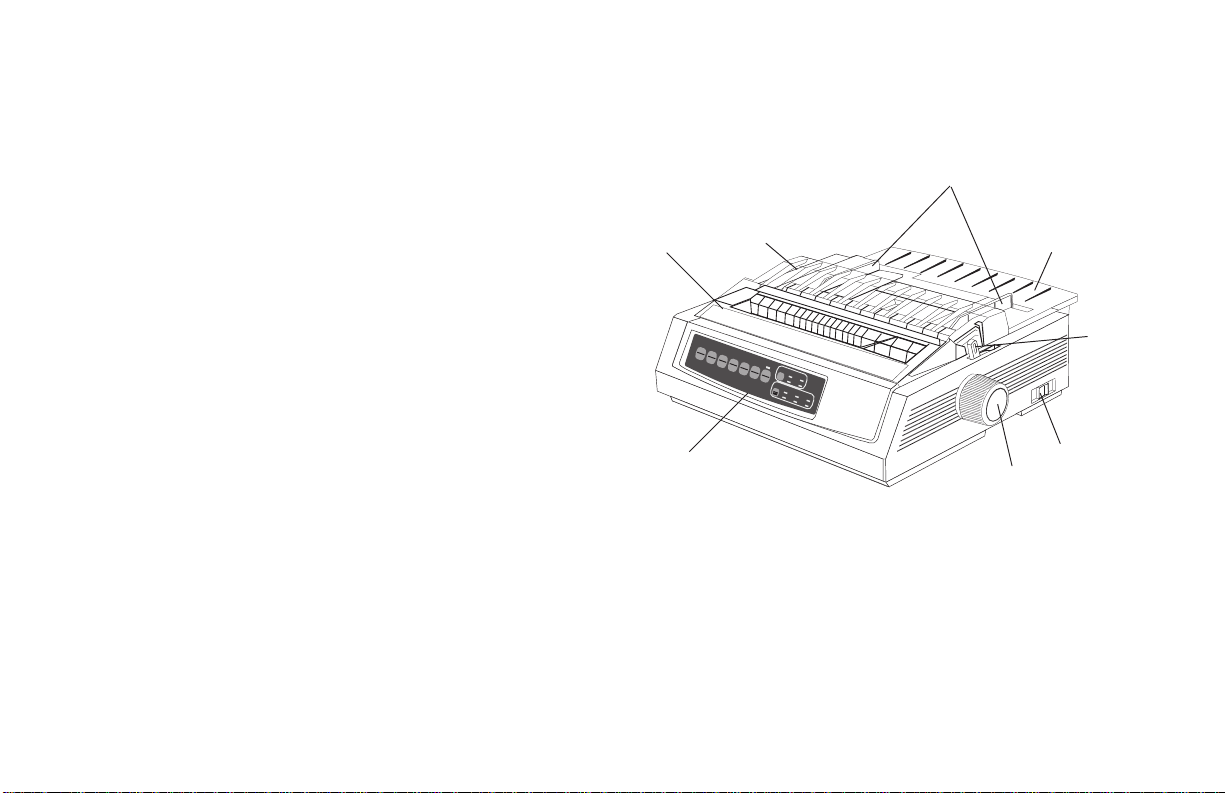
Parts Identification: Rear Feed (Continuous Forms)
1 Paper Guides
2 Paper Separator
3 Paper Lever
4 On-Off Switch
5 Platen Knob
6 Control Panel
7 Acoustic Cover
8 Access Cover
Move the paper lever to the position marked “REAR.”
!
For rear feed, the paper lever is towards the front of the
printer.
32T -01c.eps
1
SEL
SEL
MENU
LF
SHIFT TOF
Micro Feed
Down
GROUPEXIT
ITEM SET
8
FF/LOAD
Micro Feed
PRINT QUALITY
Up
QUIETPARKTEAR
HSD
MENU
UTL
NLQ
PRINT
SSD
CHARACTER PITCH
10 12 15
17
20 PROP
7
POWER ALARM
6
2
3
4
5
16 Microline 320/321 Turbo/n
|
Page 17
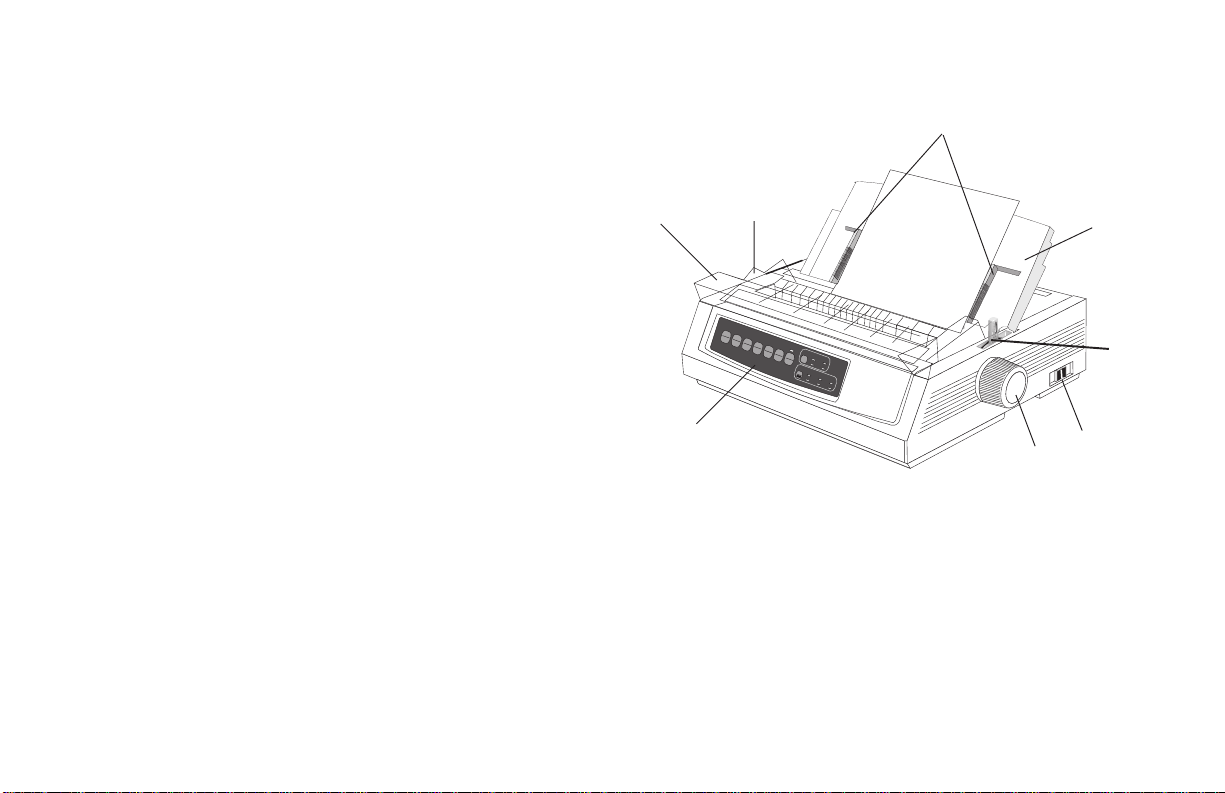
Parts Identification: Top Feed (Single-Sheet)
1 Paper Guides
2 Paper Separator
3 Paper Lever
4 On-Off Switch
5 Platen Knob
6 Control Panel
7 Acoustic Cover (open)
8 Access Cover
1
MENU
POWER ALARM
8
SEL
SEL
LF
SHIFT
FF/LOAD
Micro Feed
Down
Micro Feed
PRINT QUALITY
Up
GROUPEXIT
ITEM SET
QUIETPARKTEAR
HSD
UTL
TOF
MENU
NLQ
PRINT
SSD
CHARACTER PITCH
10 12 15
17
20 PROP
2
3
7
Move the paper lever to the position marked “TOP.”
!
The paper lever is towards the back of the printer.
32T-15.eps
6
4
5
User’s Guide: English 17
|
Page 18
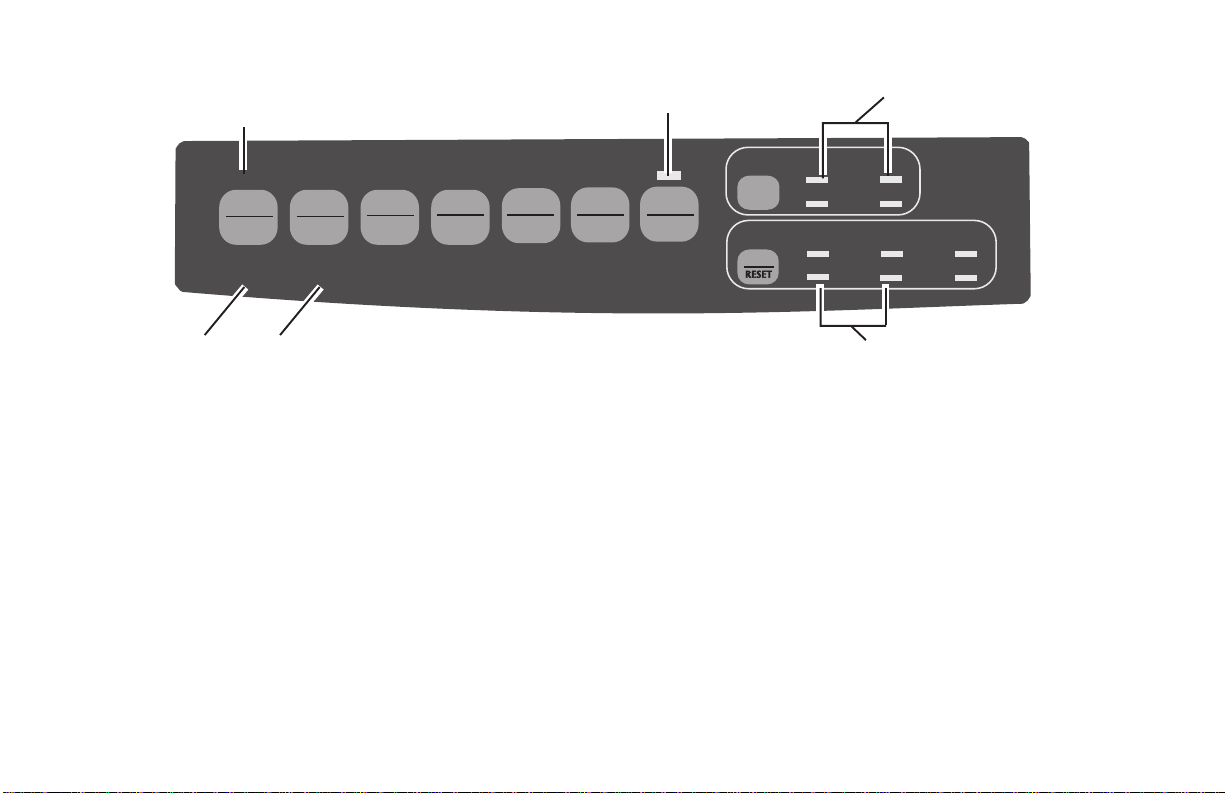
Front Panel Lights
1
32T-FP.eps
2
3
SEL
FF/LOAD
SEL
MENU
POWER ALARM
SHIFT TOF
LF
Micro Feed
Down
GROUPEXIT
Micro Feed
Up
ITEM SET
MENU
54
1 SEL: Glows = printer selected, ready to receive data
Flashes = printer in Print Suppress Mode
Not lit = printer deselected (cannot receive data)
2 QUIET: Glows = printer is in Quiet state.
3 HSD / UTL / NLQ / SSD: Indicate print quality selected.
4 POWER: Glows = printer is turned on.
PRINT
PRINT QUALITY
QUIETPARKTEAR
CHARACTER PITCH
HSD
NLQ
10 12 15
17
UTL
SSD
20 PROP
6
5 ALARM: Glows = error condition exists:
• out of paper (no other lights blinking)
• paper jam if 15 cpi light is also blinking
• paper lever is set to wrong position if 10 cpi light is also
blinking.
• Blinks = error condition. Turn printer off, then on; if
light still flashes, contact service dealer.
6 10 / 12 / 15 / 17 / 20 / PROP:
Indicate selected character pitch.
18 Microline 320/321 Turbo/n
|
Page 19
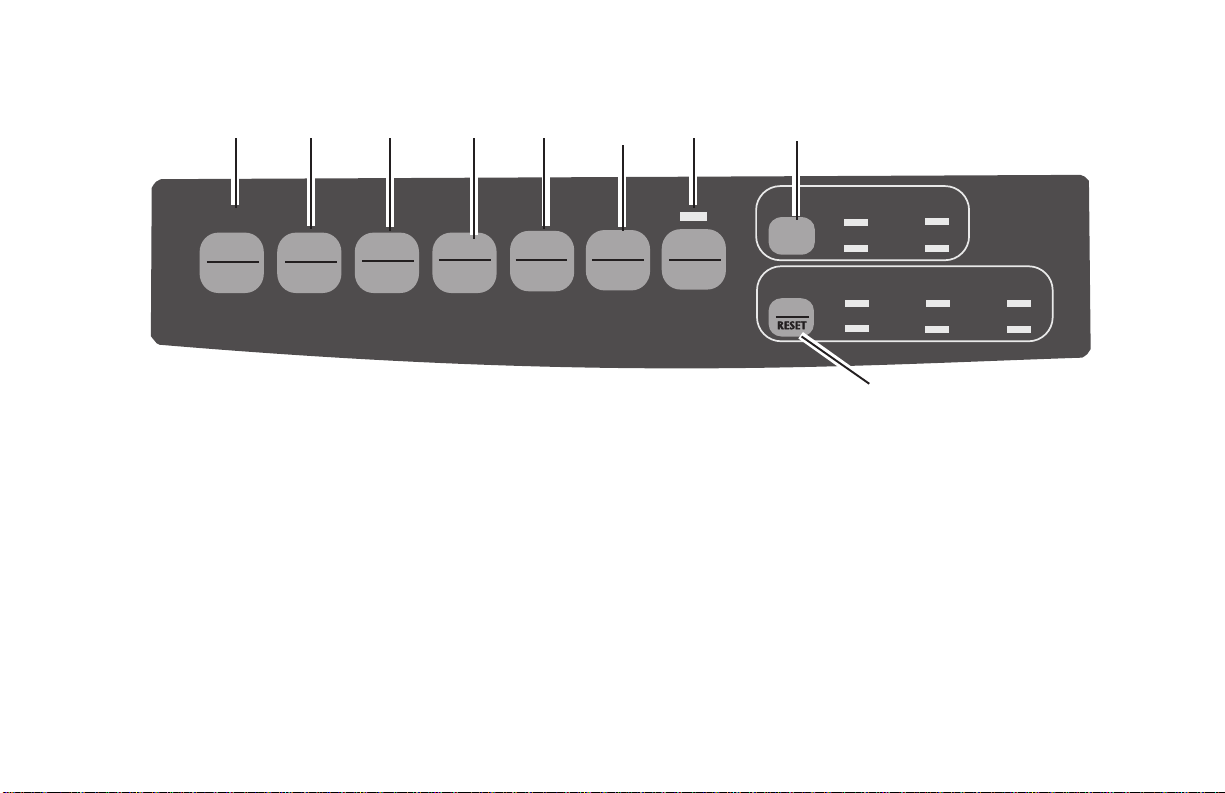
Front Panel Keys
1
SEL
SEL
MENU
POWER ALARM
2 3
SHIFT TOF
LF
Micro Feed
Down
GROUPEXIT
4
FF/LOAD
Micro Feed
Up
ITEM SET
MENU
5
1 SEL: Selects/deselects printer (printer on-line / off-line).
When held on power up, or with SHIFT key , engages
Menu Mode.
2 SHIFT: Press and hold while pressing another key to
engage the alternate function for that key (e.g., “Micro
Feed Down” for LF key).
3 LF: Moves paper up one line: press and hold for
repetitive line feeds. When held on power up, activates
Font T est.
4 FF/LOAD: Loads/ejects single sheet of paper; loads
continuous-form paper or feeds it to next page.
6
32T-FP.eps
PRINT
7
QUIETPARKTEAR
8
PRINT QUALITY
CHARACTER PITCH
HSD
NLQ
10 12 15
17
UTL
SSD
20 PROP
9
5 TEAR: Moves continuous-form paper up for tear-off or
back down for printing.
6 PARK: Retracts continuous-form paper from the path.
7 QUIET: Turns Quiet Mode on and off. When held on
power up, activates Rolling ASCII Test.
8 PRINT QUALITY : Selects print quality and font.
9 CHARACTER PITCH: Selects the character pitch. Used
with SHIFT key to reset the printer and clear the buffer.
User’s Guide: English 19
|
Page 20

Installation
Installation Hints
• Read the setup and operating instructions in this
document carefully. Be sure to save this document for
future reference.
• Read and follow all warning and instruction labels on the
printer itself.
• Place your printer on a firm, solid surface. If you put in on
something unsteady, it might fall and be damaged. If you
place it on a soft surface (such as a rug, sofa, or bed) the
vents may be blocked, causing it to overheat.
• The printer must be installed near a power outlet which
will remain easily accessible.
• The printer must be installed near a network outlet which
will remain easily accessible.
• Be certain that your power source matches the rating listed
on the back of the printer. If you are not sure, check with
your dealer or with your local power company.
20 Microline 320/321 Turbo/n
|
• Your printer has a grounded, 3-prong plug as a safety
feature, and it will only fit into a grounded outlet. If you
can not plug it in, chances are that you have an older, nongrounded outlet. Contact an electrician to have it
replaced with a grounded outlet. Do not use an adapter to
defeat the grounding.
• To avoid damaging the power cord, do not put anything
on it or place it where it will be walked on. If the cord
becomes damaged or frayed, replace it immediately.
Page 21

Installation Overview
• If you’re using an extension cord or power strip with the
printer, make sure that the total of the amperes required by
all the equipment on the extension is less than the
extension’s rating. Generally, the total ratings of all
equipment plugged into any one power line should not
exceed 15 amperes. Don’t exceed this unless you know
that the power line your equipment is plugged into has a
rating above 15 amperes.
• To protect your printer from overheating, make sure no
openings on the printer are blocked. Do not put the printer
on or near a heat source, such as a radiator or heat register.
If you put the printer in any kind of enclosure, make sure
it is well ventilated.
To install your printer, follow the instructions in this section.
You must complete these steps for your printer to operate
properly.
If you have purchased an option package for your printer,
refer to the documentation you received with that option for
installation instructions.
Installation Location
• Place your printer on a firm, solid surface.
• Allow enough space on each side of the machine to easily
access the platen knob and the various paper feed paths.
• Make sure a power outlet is available nearby.
• If you are using the network connection, make sure a
network connection is available nearby.
User’s Guide: English 21
|
Page 22

Customizing the Installation
Your printer has many settings (defaults) that do not need to
be adjusted as part of a standard installation.
However, you may need to adjust settings to fit your
standards.
Some settings you may need to adjust as part of your
installation are:
• Top of Form (T OF)
• Paper Path
• Printhead Gap
To adjust these settings, refer to the appropriate section in
“Using Y our Printer.”
22 Microline 320/321 Turbo/n
|
Page 23

Top of Form (TOF)
PRINT QUALITY
If you turn the platen knob when the printer is turned
!
on, you will cause the Top of Form to mis-align. Always
turn the printer off before turning the platen knob!
The factory default setting for the T op of Form (where
!
the printing should begin) is one inch down from the top
of the page.
Your software may print the first line of print above or
!
below where TOF is set. You may need to adjust the
TOF to meet your software’s needs. Use the procedures
in “Using Your Printer, Top of Form, Forms T ear-Off
Status (ON or OFF).”
The first line prints at the red line of the plastic paper
!
shield (1) on the printhead.
32t-18.eps
M
1
The T op of Form and Forms Tear-Off settings of your printer
interact.
How you set the Top of Form depends on the status of the
Forms T ear-Off menu setting.
If Forms T ear-Of f is activated (set to ON), set the Top of Form
using “Using Your Printer, Setting Top of Form, Forms Tear Off ON (Step A).”
If Forms T ear-Of f is NOT activated (set to OFF), set the Top of
Form using “Using Your Printer, Setting Top of Form, Forms
Tear -Off OFF (Step B).”
User’s Guide: English 23
|
Page 24
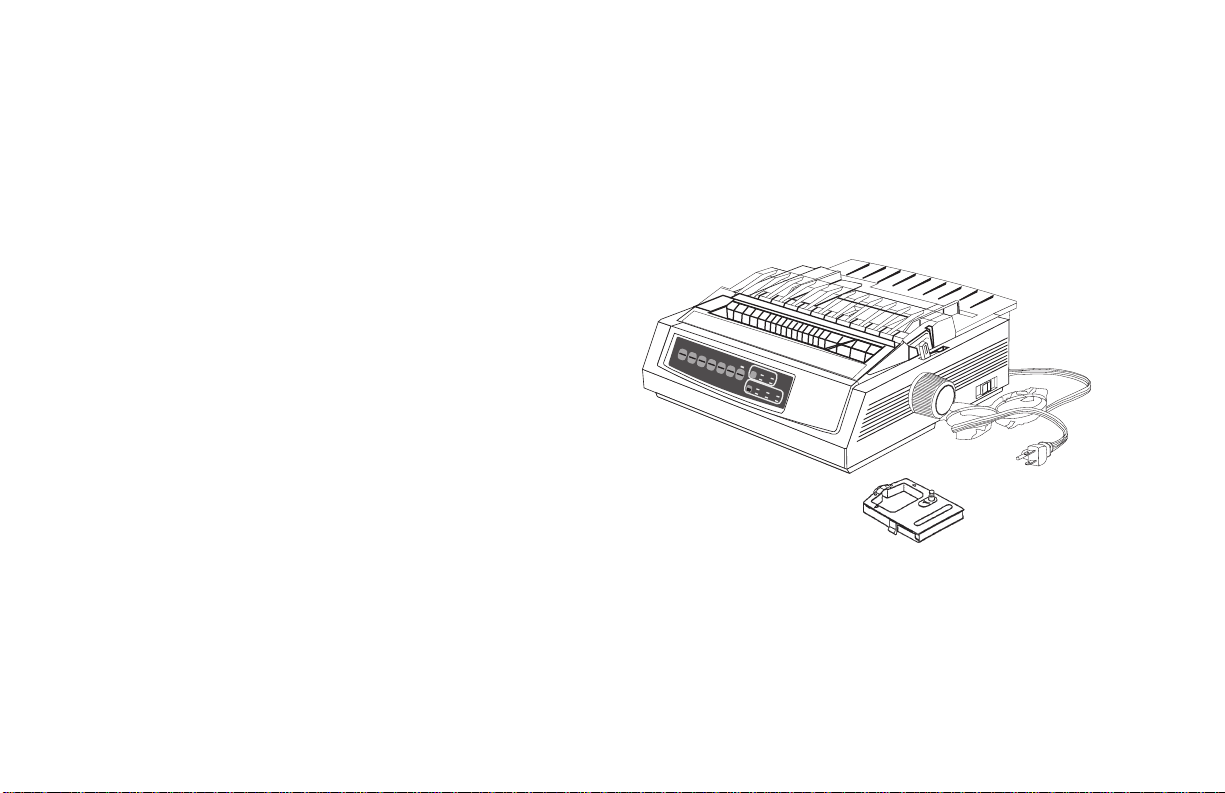
Unpacking the Machine
Before you begin, be sure that all the items listed below are
included in your package.
If any items are missing, contact your dealer
!
immediately. Keep you packing materials and carton in
case you ever need to ship or transport the unit.
1 Printer
2 Ribbon Cartridge
3 Power Cord
32t-14.eps
SEL
SEL
MENU
SHIFT TOF
Micro Feed
POWER ALARM
GROUPEXIT
1
LF
FF/LOAD
Down
Micro Feed
PRINT QUALITY
Up
ITEM SET
QUIETPARKTEAR
HSD
MENU
UTL
NLQ
PRINT
SSD
CHARACTER PITCH
10 12 15
17
20 PROP
3
2
24 Microline 320/321 Turbo/n
|
Page 25
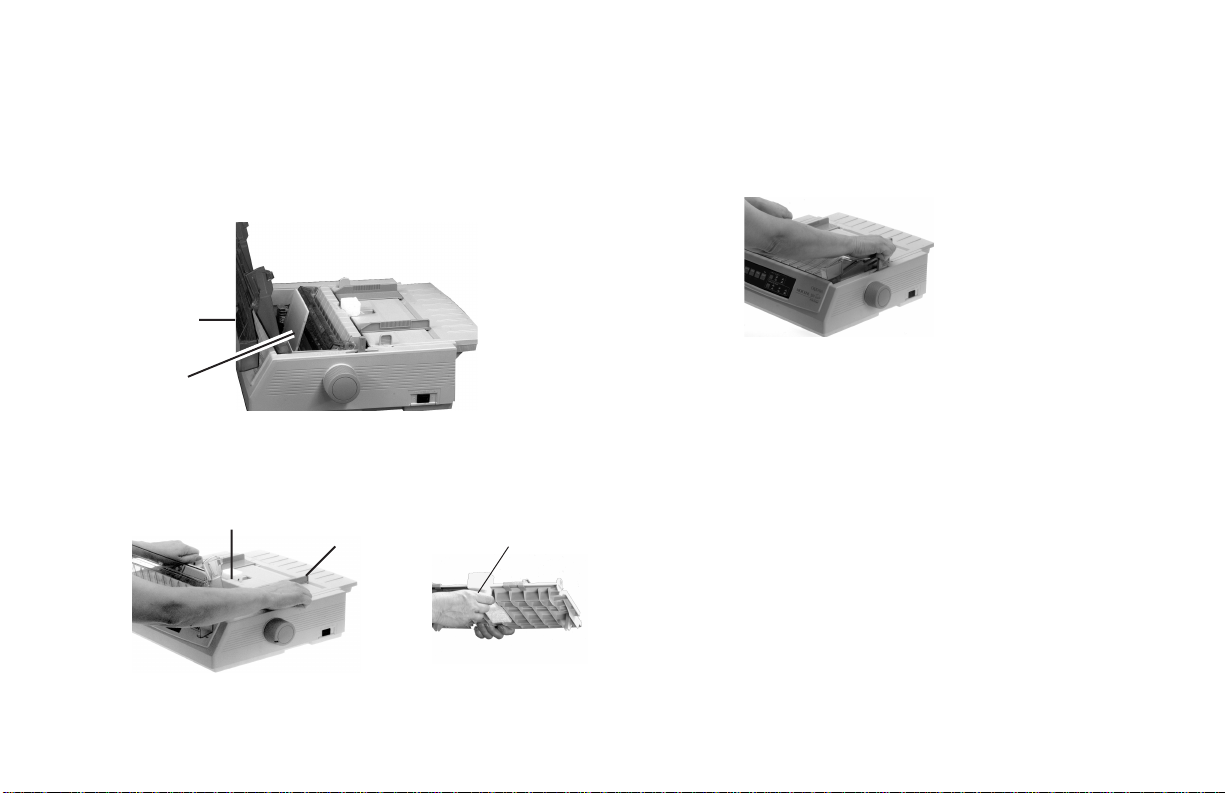
Shipping Restraints
1 Open the access cover (1). Remove the printhead
shipping restraint (2) and tape.
Turbo-1.eps
1
2
2 Grasp the tabs and lift off the paper separator (1).
Remove the shipping restraint (2).
Turbo-15.eps and Turbo-16.eps
2
1
2
3 Install the paper separator.
Turbo-17.eps
Keep your packing materials and carton in case you
!
ever need to ship or transport the unit.
User’s Guide: English 25
|
Page 26
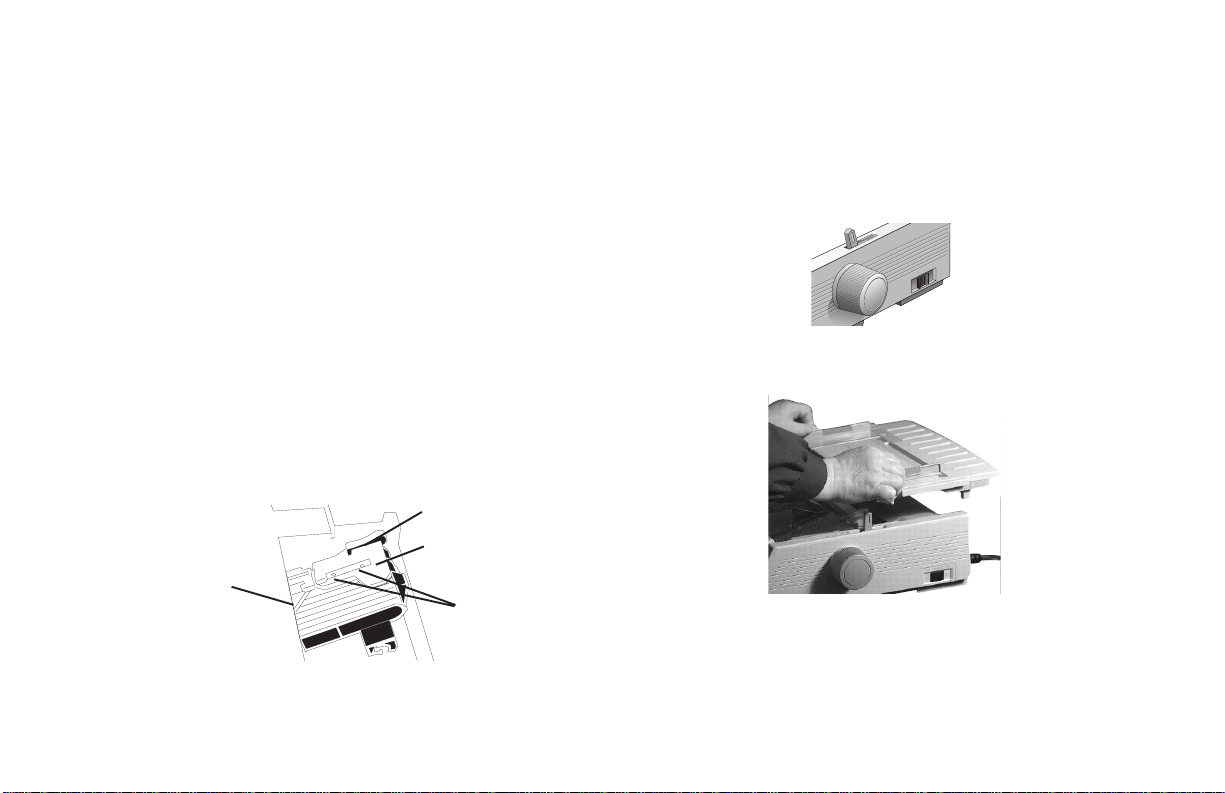
Ribbon Cartridge
1 Make sure the printer is turned OFF.
2 Center the printhead (1).
32T-18.eps
M
3 If you are replacing the ribbon: swing the front of the
cartridge up off the printhead, then lift the cartridge out
and discard it.
Caution! The printhead may be HOT!
!
32T-19_up.eps
1
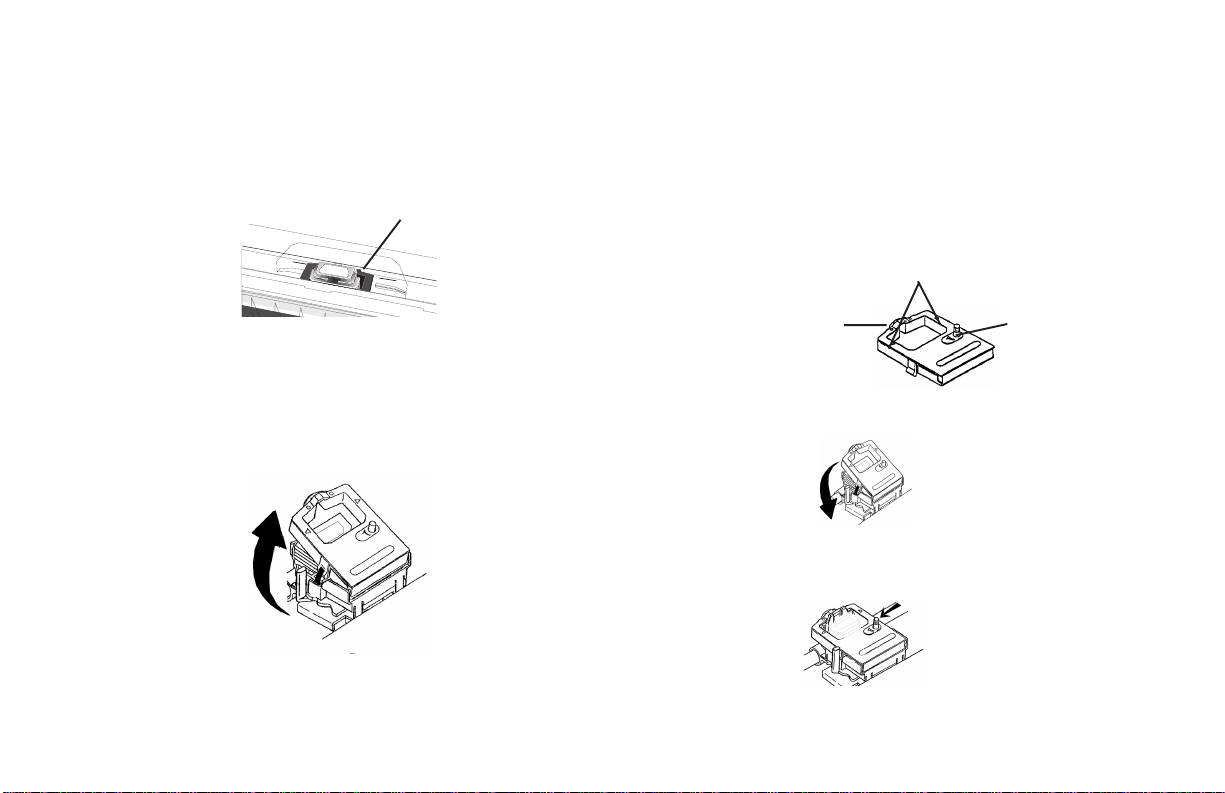
4 Unpack the ribbon cartridge.
Important! DO NOT remove the ribbon shield from the
!
ribbon!
1 Ribbon Shield
2 Grip Points
3 Take-up Knob
32t-20.eps
1
2
3
5 Install the new ribbon cartridge.
6 Turn the take-up knob in the direction of the arrow to
take up any ribbon slack.
32T-19dn.eps
32t-39.eps
26 Microline 320/321 Turbo/n
|
Page 27

Ribbon Cartridge Handling
Ribbon Cartridge Emergency First Aid
• Leave unused ribbon cartridges in their packages until
needed.
• When replacing a ribbon cartridge, re-use the packaging
to dispose of the old ribbon cartridge.
• Be careful when removing the ribbon cartridge. Do not let
it touch your clothing or porous materials. The ribbon ink
may cause permanent stains.
• Ribbon ink on skin or clothing can usually be removed
with soap and water.
Contact occurs with eyes.
Flush eyes with large quantities of water for 15 minutes,
keeping eyelids open with fingers. Seek medical attention.
Contact occurs with skin
Wash thoroughly with soap and water.
For more information
Refer to the Material Safety Data Sheet in “Warranty,
Regulatory, and Safety Information.”
User’s Guide: English 27
|
Page 28
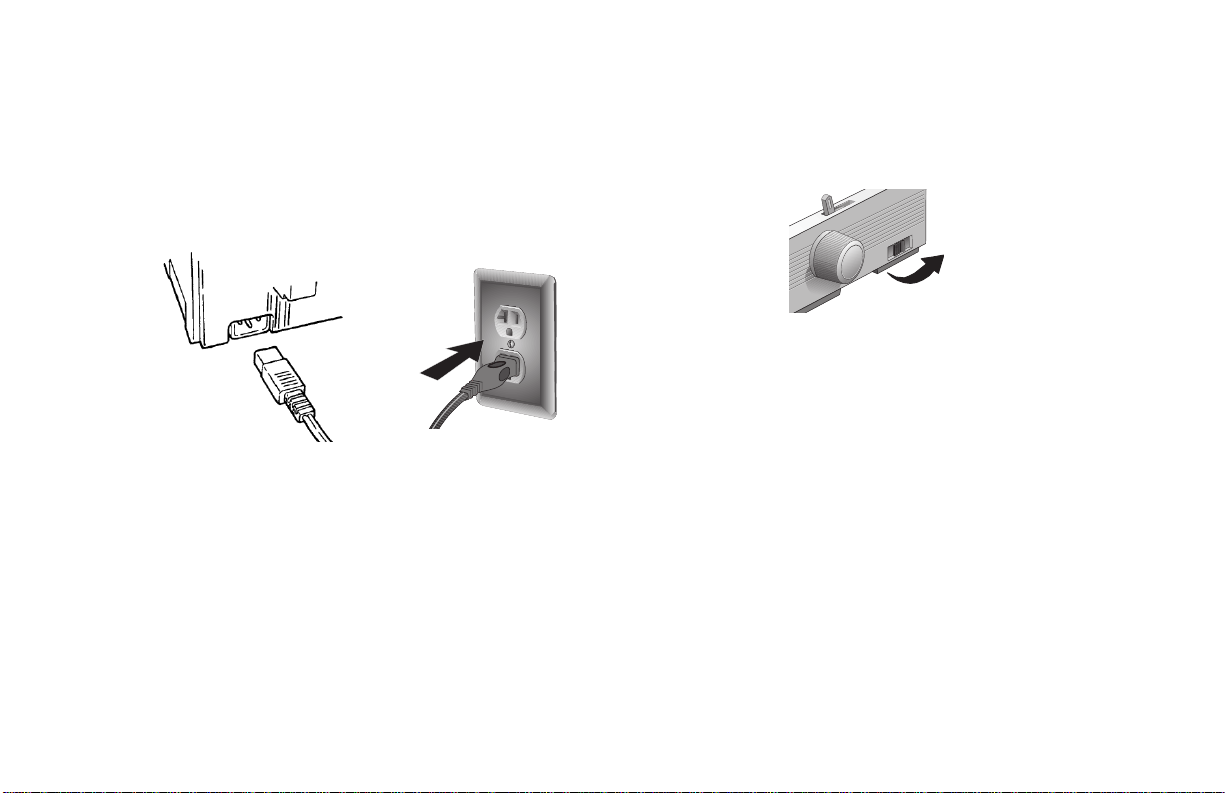
Power Connections
1 Make sure both the printer and the computer are OFF.
2 Plug the power cord into the back of the printer (1), then
into a grounded outlet (2).
59#11.eps and Plugin.eps
2
1
3 Turn on the printer.
32T-01A.eps
28 Microline 320/321 Turbo/n
|
Page 29
Paper Loading
Rear Feed, Continuous Forms
Use the rear-feed path for printing on single-thickness,
continuous-form paper.
Use the single-sheet path (top feed) for graphics or charts.
If you have paper in the paper path, be sure to remove it
!
before installing rear-feed paper.
1 Lock Lever
2 Upper Tractor Cover
3 Pins
4 Lower Tractor Cover
32T-26.eps
1
2
4
3
1 Move the paper lever to the position marked “REAR.”
32T-11.eps
2 Grasp the tabs and lift off the paper separator .
32T-23A.eps
User’s Guide: English 29
|
Page 30
3 Pull up on the lock levers and open the tractor covers.
Then, move the right tractor to fit the width of the paper.
32T-27.eps
4 Place the first two holes in the paper over the tractor
pins on either side. Close the tractor covers.
32T-29.eps
5 Move the left tractor to align the edge of the paper with
the appropriate reference mark (1). Then, push back the
lock lever.
1
32T-29A.eps
6 Adjust the position of the right tractor to center the holes
in the paper on the pins. Then, push back the right lock
lever.
32T-29.eps
30 Microline 320/321 Turbo/n
|
Page 31

Top Feed (Single Sheets)
7 Install the paper separator. Place the wire guide (1) on
the pull-up roller assembly (2).
1
32T-31.eps
2
8 Press FF/LOAD. The paper feeds into the printer .
The factory default setting for the T op of Form (where
!
the printing should begin) is one inch down from the top
of the page. To change the setting, see “Using Y our
Printer, Top of Form (TOF).”
Use the single-sheet path for letterhead stationery, memos,
and individual envelopes.
If you have continuous-form paper in the path, press
!
PARK to remove it before loading single sheets.
1 Make sure the printer is on and deselected (SEL light
off).
2 Place the paper lever in the position marked “TOP.”
32T-12.eps
3 Open the carriage cover. Raise the paper separator to the
single-sheet position.
32T-32.eps
SEL
SEL
MENU
LF
SHIFT
FF/LOAD
Micro Feed
Down
POWER ALARM
Micro Feed
PRINT QUALITY
Up
GROUPEXIT
ITEM SET
QUIETPARKTEAR
HSD
UTL
TOF
MENU
NLQ
PRINT
SSD
CHARACTER PITCH
10 12 15
17
20 PROP
User’s Guide: English 31
|
Page 32

4 Make sure the wire feed guide (1) is secured in the sheet
guide.
32T-33.eps
1
Important!
!
If the paper does not feed in, remove it. Check the paper
lever position. Make sure the ALARM light is on: if it is
flashing, hold the SHIFT key and press the
CHARACTER PITCH (RESET) key. Reload the sheet
of paper.
SEL
SEL
MENU
LF
SHIFT
FF/LOAD
Micro Feed
Down
POWER ALARM
Micro Feed
PRINT QUALITY
Up
GROUPEXIT
ITEM SET
QUIETPARKTEAR
HSD
UTL
TOF
MENU
NLQ
PRINT
SSD
CHARACTER PITCH
10 12 15
17
20 PROP
5 Adjust the paper feed guides (1) for the width of the
paper. Place a sheet of paper in the separator. The paper
will feed into the printer.
SEL
SEL
MENU
LF
SHIFT
FF/LOAD
Micro Feed
Down
POWER ALARM
Micro Feed
PRINT QUALITY
Up
GROUPEXIT
ITEM SET
QUIETPARKTEAR
HSD
UTL
TOF
MENU
NLQ
PRINT
SSD
CHARACTER PITCH
10 12 15
17
20 PROP
32 Microline 320/321 Turbo/n
|
32T-15.eps
1
The factory default setting for the T op of Form (where
!
the printing should begin) is one inch down from the top
of the page. T o change the setting, see “Using Your
Printer, Top of Form (TOF).”
Page 33

Testing the Printer
Running the printer self tests is a good way to check the
installation of your printer.
The two self tests are:
• Font Sample Test
• Rolling ASCII Test
Wide Carriage Model
!
Microline 321 Turbo/n
If you are using 8.5 inch paper to run the test, make sure
the paper width selection in the printer menu is set to
8.5 inches. Otherwise, printing on the platen may
damage the printer. Refer to “Using Your Printer, Menu
Mode, Explanations of Menu Items.”
User’s Guide: English 33
|
Page 34

Font Sample Test
Wide Carriage Model
!
Microline 321 Turbo/n
If you are using 8.5 inch paper to run the test, make sure
the paper width selection in the printer menu is set to
8.5 inches. Otherwise, printing on the platen may
damage the printer. Refer to “Using Your Printer , Menu
Mode, Explanations of Menu Items.”
The Font Sample Test automatically stops after all the
!
available fonts print.
The Font Sample Test prints a sample of the fonts standard to
the printer.
The top of the printout has the Printer Model, Emulation,
Country Code, Interface, and Firmware Revision Level for
your printer.
To run the test:
• Turn the printer off, then press and hold the LF key
while turning the printer back on.
To exit the test:
• Press SEL.
LF.eps
LF
Micro Feed
Down
GROUP
SEL.eps
SEL
SEL
MENU
34 Microline 320/321 Turbo/n
|
Page 35

Rolling ASCII Test
Wide Carriage Model
!
Microline 321 Turbo/n
If you are using 8.5 inch paper to run the test, make sure
the paper width selection in the printer menu is set to
8.5 inches. Otherwise, printing on the platen may
damage the printer. Refer to “Using Your Printer , Menu
Mode, Explanations of Menu Items.”
The Rolling ASCII Test DOES NOT automatically stop.
!
You must manually stop it.
The Rolling ASCII Print Test produces a continuous printout
of all 96 ASCII characters in a rolling pattern. The type style
set in the printer menu will be utilized.
Use the Rolling ASCII Test to check the following.
• Print Quality
Across the entire length of a line
Down the entire page
• Line Spacing
• Character Formation
The top of the printout has the Printer Model, Emulation,
Country Code, and Firmware Revision Level.
To run the test:
• Turn the printer off. Then, press and hold the QUIET
key while turning the printer back on.
To exit the test:
• Press SEL.
QUIET.eps
QUIET
TOF
SEL.eps
SEL
SEL
MENU
User’s Guide: English 35
|
Page 36

Local Printer Installation
You MUST install your printer as a Local Printer before
!
you perform any network installation.
During this part of your printer installation, you DO
NOT connect a cable between your printer and your
computer.
You are making an installation to a logical port, which
is done through software, not physical connections.
If you want to use the parallel port, you MUST remove
!
the Network Card from the printer. See the OkiLAN
6120e User’s Guide for details.
Installing Printer Software
Windows 95, 98, Me, NT4.0
1 With the OKI ML 320/321 Turbo/n CD in your CD-ROM
drive, click Start® Run.
2 Browse to your CD-ROM drive, then double-click
install.exe.
3 On the OKI Menu Installer main menu, click Printer
Software.
4 Make sure that at least the ML320/1 Tn Driver is
selected. Click Next.
5 Select Local Printer. Click Next.
6 Select LPT1. Click Next.
7 Click Finish.
36 Microline 320/321 Turbo/n
|
Page 37

Installing Printer Software
Windows 2000
1 With the OKI ML 320/321 Turbo/n CD in your CD-ROM
drive, click Start® Run.
2 Browse to your CD-ROM drive, then double-click
install.exe.
3 On the OKI Menu Installer main menu, click Printer
Software. This launches the Add Printer W izard.
4 Select Local. Clear Automatically detect and install my
Plug and Play printer. Click Next.
5 Click Next to accept LPT1 as the port selection.
6 Click Have disk.
7 Click Browse.
8 Locate CD-ROM in the pull-down menu.
9 Open the Win2k\English\ folder.
10 Select OEMSETUP.INF. Click Open.
11 Click OK.
12 OKI ML320/1 Tn displays in the Printers window.
Click Next—do not select Have disk.
13 Rename the printer if you wish. Click Next.
14 Select Do not share this printer. Click Next.
15 Do not print a test page. Click Next.
16 Click Finish.
17 If the Digital Signature Not Found window appears, click
Yes.
User’s Guide: English 37
|
Page 38

Network Printer Installation
You MUST install your printer as a Local Printer before
!
you perform any network installation.
If you want to use the parallel port, you MUST remove
!
the Network Card from the printer. See the OkiLAN
6120e User’s Guide for details.
Connecting the Network Cable
1 Plug the power adapter wire into the power jack on the
OkiLAN 6120e. Then plug the power adapter into a 120
V AC wall outlet.
Some countries may require a different adapter for
!
local voltages, such as 240 V AC.
6120e_5.jpg
38 Microline 320/321 Turbo/n
|
Page 39

2 Attach the 10/100 Base-T UTP cable to the receptacle on
the back of the OkiLAN 6120e. Attach the other end of
the cable to the Network.
6120e_6.jpg
3 Plug the printer power cord into the power outlet.
6120e_7.jpg
Network Installation
For detailed information on installing network software and
setting up your printer on a network, refer to the on-line
OkiLAN 6120e User’s Guide.
From the OKI Menu Installer, click Network and Admin
Software® Network Documentation.
User’s Guide: English 39
|
Page 40

Connecting to the Parallel Port
If you want to use the parallel port, you MUST remove
!
the Network Card from the printer. See the OkiLAN
6120e User’s Guide for details.
FCC regulations require the use of a shielded cable no
!
longer than 6 ft. (1.8 m).
An IEE 1284-compatible parallel cable is needed for
bi-directional communications.
1 Plug the interface cable into the parallel port (1) and
secure it with the wire loops.
32T-22.eps
2 Attach the other end of the cable to your computer.
1
40 Microline 320/321 Turbo/n
|
Page 41

Product Registration
my.okidata.com
Y our Personal Solutions Center
Register your printer and create your own personalized
support center with my.okidata.com.
My.okidata.com is a powerful new area of our web site designed to help you get the most from your OKI printer. It represents our commitment to providing you with solutions, finding out the latest updates about your OKI products, and getting the details on OKI programs and services that can help your bottom line.
You can also
• Choose to receive product updates via e-mail.
• Have private access to our solutions section.
• Check out the What’s New section to see what’s changed
since your last visit.
• Get your own Solutions Specialist that you can contact
directly via e-mail when you need assistance.
my.okidata.com offers you support, solutions and more, all
personalized for you and your specific OKI printer.
Start using my.okidata.com today!
Registering Your Printer
You can register your printer by:
• visiting our website at http://www.okidata.com.
Click on Product Registration.
• using the OKI Menu Installer (PC Users).
1 Insert the OKI CD in your CD-ROM Drive.
2 Browse to your CD-ROM drive and double-click
INST ALL.EXE in the root directory . Click OK.
3 Select the language and your printer model.
Click Continue.
4 When the OKI Menu Installer screen appears,
click the On-Line Registration button.
• filling out the enclosed registration form and
mailing it in
or
faxing it in.
Service and Support
If you need further assistance or have questions, please refer
to “Service and Support.”
User’s Guide: English 41
|
Page 42

Using Your Printer
Top of Form (TOF)
If you turn the platen knob when the printer is turned
!
on, you will cause the Top of Form to mis-align. Always
turn the printer off before turning the platen knob!
The factory default setting for the T op of Form (where
!
the printing should begin) is one inch down from the top
of the page.
Your software may print the first line of print above or
!
below where TOF is set. You may need to adjust the
TOF to meet your software’s needs. Use the procedures
in “Using Your Printer, Top of Form, Forms T ear-Off
Status (ON or OFF).”
42 Microline 320/321 Turbo/n
|
T op of Form sets the print start position for the printer. It is
adjustable in increments of 1/144 of an inch. The amount of
adjustment is limited to avoid paper jams.
The first line prints at the red line of the plastic paper shield
(1) on the printhead.
32T-18.eps
M
1
Page 43

Top of Form (TOF) and Forms Tear-Off
Forms Tear-Off Status (ON or OFF)
If you turn the platen knob when the printer is turned
!
on, you will cause the Top of Form to mis-align. Always
turn the printer off before turning the platen knob!
Your software may print the first line of print above or
!
below where TOF is set. You may need to adjust the
TOF to meet your software’s needs. Use the procedures
in “Using Your Printer, Top of Form, Forms T ear-Off
Status (ON or OFF).”
The Top of Form and Forms Tear-Of f settings of your printer
interact.
How you set the Top of Form depends on the status of the
Forms T ear-Of f menu setting.
If Forms T ear-Of f is activated (set to ON), set the Top of Form
using Step A.
Refer to “Using Your Printer, Setting Top of Form, Forms
T ear-Off ON (Step A).”
If Forms T ear -Off is NOT activated (set to OFF), set the T op of
Form using Step B.
Refer to “Using Your Printer, Setting Top of Form, Forms
T ear-Off OFF (Step B).”
Before you set the Top of Form, you need to know the status
of the Forms T ear-Of f menu setting (whether it is ON or OFF).
There are two ways to determine the status of the Forms T ear Off menu setting:
• print the Menu.
• use the TEAR key.
T o print the Menu, refer to “Using Your Printer, Menu Mode,
Print the Menu Settings.”
To use the TEAR key:
1 Load paper.
2 Press TEAR.
3 If the paper moves up, then Forms T ear -off is OFF.
If the paper moves down, then Forms T ear -off is ON.
User’s Guide: English 43
|
Page 44

Setting Top of Form, Forms Tear-Off ON (Step A)
If you turn the platen knob when the printer is turned
!
on, you will cause the Top of Form to mis-align. Always
turn the printer off before turning the platen knob!
Always determine the status of the Forms T ear-Off menu
!
setting BEFORE setting the T op of Form. Refer to
“Using Your Printer, Top of Form, Forms T ear-Off
Status (ON or OFF).”
44 Microline 320/321 Turbo/n
|
1 Turn the printer ON.
2 Park the paper.
3 With paper out of the unit, (red alarm light should be on)
press SHIFT (1) and QUIET/TOF (5) to reset the current
T op of Form.
4 Press FF/LOAD (3) to load the paper.
5 Press SEL/MENU (6) to take the printer off line.
The SEL light goes out.
6 Wait until the paper moves up to the tear position, then
press and hold TEAR (4).
The paper moves to the current Top of Form.
Keep pressing and holding TEAR.
7 Press and hold SHIFT and release TEAR.
Page 45

8 As you continue to hold SHIFT, press the LF / Micro
Feed Down (2), or FF/LOAD / Micro Feed Up (3),
depending on which direction you want to move the
paper to align Top of Form.
Press LF / Micro Feed Down to decrease the space (move
T op of Form higher). The paper moves down.
Press FF/LOAD / Micro Feed Up to increase the space
(move Top of Form lower). The paper moves up.
32T -FP.eps
4
LF
Micro Feed
Down
GROUPEXIT
2
3
FF/LOAD
Micro Feed
Up
ITEM SET
MENU
1
SEL
6
SEL
SHIFT TOF
MENU
POWER ALARM
5
QUIETPARKTEAR
PRINT
The first line prints at the red line of the plastic paper
!
shield (7) on the printhead.
32T-18.eps
M
7
9 Keep holding SHIFT and press QUIET/TOF a few times
to set the Top of Form.
10 When the Top of Form is at the correct position, release
all keys.
11 Press SEL/MENU to place the printer on-line.
User’s Guide: English 45
|
Page 46

Setting Top of Form, Forms Tear-Off OFF (Step B)
If you turn the platen knob when the printer is turned
!
on, you will cause the Top of Form to mis-align. Always
turn the printer off before turning the platen knob!
Always determine the status of the Forms T ear-Off menu
!
setting BEFORE setting the T op of Form. Refer to
“Using Your Printer, Top of Form, Forms T ear-Off
Status (ON or OFF).”
46 Microline 320/321 Turbo/n
|
1 Turn the printer ON.
2 Press SEL/MENU (6) to take the printer off line. The
SEL light goes out.
3 Press and hold SHIFT (1).
Then, press LF / Micro Feed Down (2) or FF/LOAD /
Micro Feed Up (3), depending on which direction you
want to move the paper to align the tear-off position.
Page 47

Press LF / Micro Feed Down to decrease the space (move
T op of Form higher). The paper moves down.
Press FF/LOAD / Micro Feed Up to increase the space
(move Top of Form lower). The paper moves up.
32T -FP.eps
4
1
3
2
5
The first line prints at the red line of the plastic paper
!
shield (7) on the printhead.
32T-18.eps
M
7
SEL
6
SEL
SHIFT TOF
MENU
POWER ALARM
LF
Micro Feed
Down
GROUPEXIT
FF/LOAD
Micro Feed
Up
ITEM SET
MENU
PRINT
QUIETPARKTEAR
4 Keep holding SHIFT and press QUIET/TOF a few times
to set the Top of Form.
5 When Top of Form is at the correct position, release all
keys.
6 Press SEL/MENU to place the printer on line.
If you turn the platen knob when the printer is turned
!
on, you will cause the Top of Form to mis-align. Always
turn the printer off before turning the platen knob!
For information on resetting the T op of Form to the
!
factory default, refer to “Using Your Printer, Top of
Form, Reset T op of Form to Factory Default.”
User’s Guide: English 47
|
Page 48

Temporary Top of Form Change
If you turn the platen knob when the printer is turned
!
on, you will cause the T op of Form to mis-align.
Always turn the printer off before turning the platen
knob!
The factory default setting for the T op of Form (where
!
the printing should begin) is one inch down from the
top of the page.
To change the Top of Form (move it lower) for one page
only:
1 Press SEL to deselect the printer.
2 Press LF to change the position of the Top of Form.
48 Microline 320/321 Turbo/n
|
Page 49

Reset Top of Form to Factory Default
If you turn the platen knob when the printer is turned
!
on, you will cause the Top of Form to mis-align. Always
turn the printer off before turning the platen knob!
The factory default setting for the T op of Form (where
!
the printing should begin) is one inch down from the top
of the page.
There are two ways to reset the Top of Form to the factory
default:
• with the printer ON.
• with the printer OFF .
Printer ON
1 With the printer ON, and paper parked (out of the printer)
Press QUIET / TOF .
Printer OFF
1 With the printer OFF, and no paper installed,
Press and hold P ARK + QUIET/TOF while turning on
the printer.
User’s Guide: English 49
|
Page 50

Forms Tear-Off
The status of the Forms T ear-Off menu setting af fects
!
how you set the T op of Form.
T o determine the status of the Forms T ear-Of f menu
setting, refer to “Using Your Printer, T op of Form,
Forms T ear-Off Status (ON or OFF).”
For information on setting the T op of Form, refer to
“Using Your Printer, T op of Form, Setting Top of Form,
Forms T ear-Off (ON or OFF).”
The Forms Tear-Off feature allows a printed page (continuous
forms, rear or bottom feed, with no pull tractor option
installed) to be torn off without wasting paper or adjusting
the printer.
Forms Tear Off automatically moves the paper from the initial
printing position to the tear-off position, after a time interval
(which you select through the menu).
The top of the page (perforation) is even with the tear bar.
The tear bar is located under the clear top of the access cover.
Paper remains in the tear-off position until the printer
receives more data. Then, the paper moves back down for
printing (retracts to the initial print position).
When printing stops, the paper advances to the tear-off
position.
The default setting for Forms T ear-Of f is OFF .
There are two types of Forms T ear-Off:
• Automatic Forms T ear-Of f
• Manual Forms T ear -Off
If the software package you are using “pauses” while
!
sending data to the printer, Forms Tear-Off may be
activated (if it is enabled through the Menu). The pause
must be for two or more seconds. No data is lost. Uneven
print registration will occur due to the paper movement.
If the problem occurs, use the menu to turn off this
feature.
DO NOT use Forms T ear-Off with labels or multi-part
!
forms!
Forms T ear-Off CANNOT be used when the optional
!
pull tractor is engaged.
50 Microline 320/321 Turbo/n
|
Page 51

Changing the Forms Tear-Off Setting
The default setting for Forms T ear-Of f is OFF .
1
SEL
SEL
SHIFT TOF
MENU
POWER ALARM
2
LF
Micro Feed
Down
GROUPEXIT
32T -FP .eps
3
FF/LOAD
Micro Feed
Up
ITEM SET
4
MENU
5
QUIETPARKTEAR
PRINT
T o change the Forms Tear-Off setting:
1 Press SEL (1) + SHIFT (2).
2 Press GROUP (3) until one of the following lines appears,
depending on which paper feed you are using
REAR FEED Form T ear-Off O FF
BOTTOM FEED Form T ear-Off OFF
3 Press ITEM (4) until Form T ear -Of f appears in the second
column.
4 Press SET (5) until the time interval you wish to select
appears in the third column.
5 Press SEL (1) + SHIFT (2) to exit Menu Mode and save
the setting.
The status of the Forms T ear-Off menu setting af fects
!
how you set the T op of Form.
If the software package you are using “pauses” while
!
sending data to the printer, Forms Tear-Off may be
activated (if it is enabled through the Menu). The pause
must be for two seconds or more. No data is lost. Uneven
print registration will occur due to the paper movement.
If the problem occurs, use the menu to turn off Forms
T ear-Off.
DO NOT use Forms T ear-Off with labels or multi-part
!
forms!
Forms T ear-Off CANNOT be used when the optional
!
pull tractor is engaged.
User’s Guide: English 51
|
Page 52

Automatic Forms Tear-Off
Forms T ear -Of f must be set to ON in the menu for Automatic
Forms T ear-Off to occur .
Automatic Forms Tear-Off automatically moves the paper
from the initial printing position (print start position) to the
tear-off position, after a time interval which you select
through the menu.
The top of the page (perforation) is even with the tear bar. The
tear bar is located under the clear top of the access cover.
Paper remains in the tear-off position until the printer
receives more data. Then, the paper moves back down for
printing (retracts to the initial print position).
When printing stops, the paper advances to the tear-off
position.
The status of the Forms T ear-Off menu setting af fects
!
how you set the T op of Form.
T o determine the status of the Forms T ear-Of f menu
setting, refer to “Using Your Printer, T op of Form,
Forms T ear-Off Status (ON or OFF).”
For information on setting the T op of Form, refer to
“Using Your Printer, T op of Form, Setting Top of Form,
Forms T ear-Off (ON or OFF).”
If the software package you are using “pauses” while
!
sending data to the printer, Forms Tear Off may be
activated (if it is enabled through the Menu). The pause
must be for two or more seconds. No data is lost. Uneven
print registration will occur due to the paper movement.
If the problem occurs, use the menu to turn off this
feature.
DO NOT use Forms T ear Off with labels or multi-part
!
forms!
Forms T ear-Off CANNOT be used when the optional
!
pull tractor is engaged.
52 Microline 320/321 Turbo/n
|
Page 53

TEAR Key and Automatic Forms Tear-Off
If you press TEAR (1) when Forms T ear -Of f is turned on
(activated in the printer menu), the printer retracts the paper
to the Top of Form position.
32T-FP.eps
1
SEL
SEL
SHIFT TOF
MENU
POWER ALARM
Micro Feed
GROUPEXIT
LF
Down
FF/LOAD
Micro Feed
Up
ITEM SET
MENU
PRINT
QUIETPARKTEAR
User’s Guide: English 53
|
Page 54

Manual Forms Tear-Off
Manual Forms Tear-Off allows you to advance a single page
to the tear-off position.
Manual Forms T ear-Of f works when Forms T ear-Of f is turned
off (deactivated in the printer menu).
When Forms Tear-Off is turned on (activated in the printer
menu), and you attempt Manual Forms Tear-Off, the printer
retracts the paper to the Top of Form position.
DO NOT use Forms T ear-Off with labels or multi-part
!
forms!
Forms T ear-Off CANNOT be used when the optional
!
pull tractor is engaged.
1 Press TEAR (1) to advance continuous-form paper up to
the tear position.
SEL
SEL
SHIFT TOF
MENU
POWER ALARM
LF
Micro Feed
Down
GROUPEXIT
32T-FP.eps
FF/LOAD
Micro Feed
Up
ITEM SET
MENU
1
QUIETPARKTEAR
PRINT
54 Microline 320/321 Turbo/n
|
Page 55

QUIETPARKTEAR
FF/LOAD
LF
SEL
SEL
POWER ALARM
MENU
GROUPEXIT
ITEM SET
PRINT
MENU
SHIFT TOF
Micro Feed
Up
Micro Feed
Down
TEAR Key
Forms Tear-Off set OFF
If you press TEAR (1) when Forms T ear -Off is turned of f
(deactivated in the printer menu), the printer advances
continuous-form paper up to the tear position.
Manual Forms Tear-Off allows you to advance a single page
to the tear-off position.
Manual Forms T ear-Of f works when Forms T ear-Of f is turned
off (deactivated in the printer menu).
!
Forms T ear-Off CANNOT be used when the optional
pull tractor is engaged.
SEL
LF
Micro Feed
Down
GROUPEXIT
SEL
MENU
POWER ALARM
SHIFT TOF
32T-FP.eps
FF/LOAD
Micro Feed
Up
ITEM SET
MENU
1
QUIETPARKTEAR
PRINT
Forms Tear-Off set ON
If you press TEAR (1) when Forms T ear -Off is turned on
(activated in the printer menu), the printer retracts the paper
to the Top of Form position.
Forms T ear-Off CANNOT be used when the optional
!
pull tractor is engaged.
32T-FP.eps
1
User’s Guide: English 55
|
Page 56

Paper Park
Never park labels!
!
Paper park allows you to print a single sheet (cut-sheet) page
without removing continuous feed paper from the printer.
Press P ARK (1) to retract rear -feed paper from the paper path.
32T-FP.eps
SEL
SEL
SHIFT TOF
MENU
POWER ALARM
LF
Micro Feed
Down
GROUPEXIT
FF/LOAD
Micro Feed
Up
ITEM SET
MENU
1
QUIETPARKTEAR
PRINT
56 Microline 320/321 Turbo/n
|
Page 57

Changing Paper Paths
Continuous-forms to single-sheet feed
1 Tear off any printed pages.
2 Press P ARK.
3 Raise the paper separator to the single-sheet feed
position.
4 Place the wire feed guide in the paper separator.
5 Move the paper lever to the position marked “TOP.”
The paper lever is towards the back of the printer.
6 Place a sheet of paper in the paper separator.
32T-12.eps
Single-sheet feed to continuous forms
1 Press FF/LOAD to remove the single-sheet paper.
2 Lower the paper separator into the continuous-forms
position. Swing the wire feed guide over onto the
pull-up roller.
3 Move the paper lever to the appropriate position
For rear feed (1), the paper lever is towards the front of
the printer.
For bottom feed, (2), the paper lever is in the center
position.
4 If necessary, load continuous-form paper.
5 Press FF/LOAD.
1
32T-11.eps and Turbo-1.eps
2
User’s Guide: English 57
|
Page 58

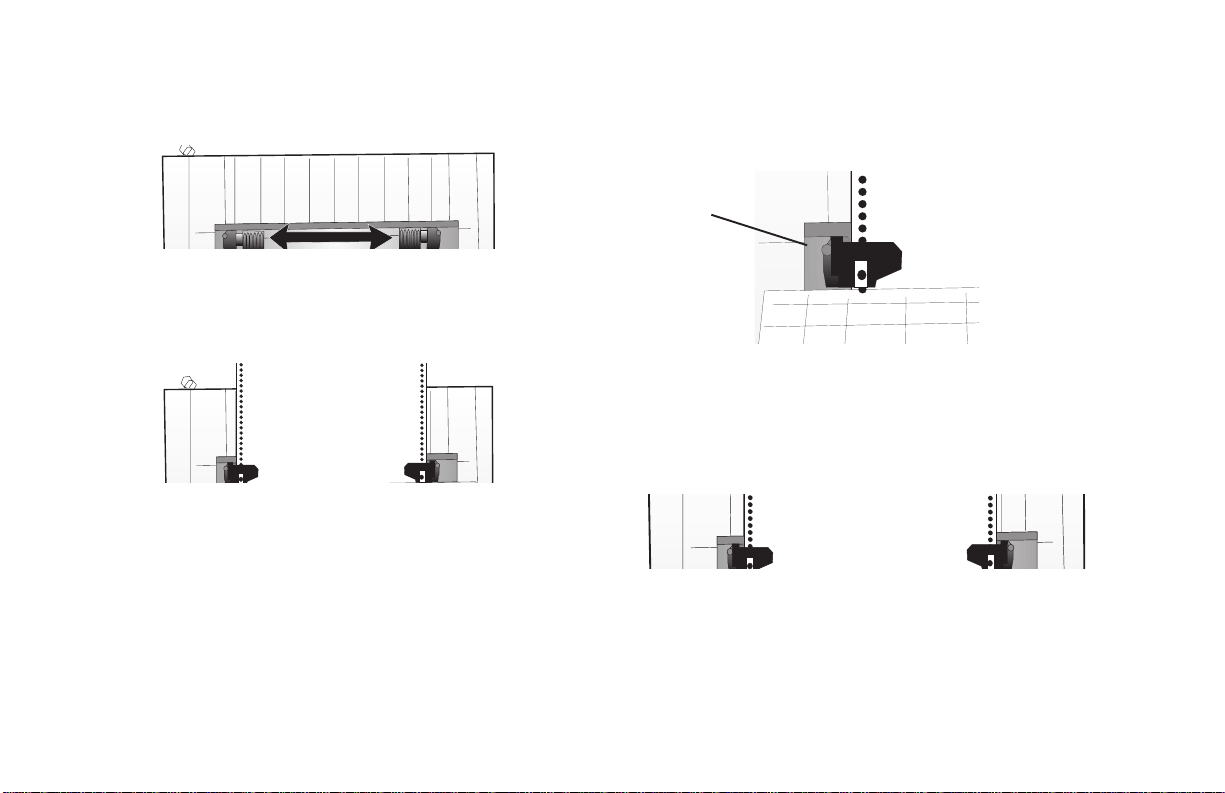
Printhead Gap
The printhead gap is the distance between the printhead and
the platen.
Make sure the printer is turned off before you open the
!
access cover.
To adjust the gap, open the access cover and move the blue
lever (1) to the recommended setting from the table.
32T-35.eps
1
Media Setting
12-20 lb paper 1
20-24 lb bond paper 2
Labels 3 or 4
Envelopes 4 or 5
2-part form (with carbon) 1 or 2
3-part form (with carbon) 2 or 3
4-part form (with carbon) 3 or 4
5-part form (with carbon) 4 or 5
6-part form (with carbon) 5
For dedicated, bottom-feed printing of extra-thick
!
continuous forms (requires optional push and/or pull
tractor), the printhead gap range can be expanded to
take forms up to 0.031" (0.79 mm) thick. For more
information, refer to “Using Your Printer, Printhead
Gap, Expanded Printhead Gap.”
58 Microline 320/321 Turbo/n
|
Page 59

Expanded Printhead Gap
Your printer can be used for dedicated bottom-feed printing
on extra-thick multi-part forms. Extra-thick multi-part forms
range from 0.017-inch (0.43 mm) to a maximum of 0.03 inch
(0.79 mm). To print on extra-thick multi-part forms, you
engage the expanded printhead gap feature. This expands the
head gap settings for extra-thick forms and heavy card stock.
It also increases the impact strength of the pins in the
printhead.
CAUTION! Once the expanded printhead gap is
!
engaged, you cannot print on single sheets without
changing the gap back. If you try to print on single
sheets without adjusting the printhead gap, you can
damage the printhead and void your warranty.
To disengage the expanded printhead gap, reverse the
following steps.
To engage the expanded printhead gap:
1 Turn the printer off.
2 Remove the access cover and the pull-up roller assembly.
32T-02.eps and 32T-04UP.eps
SEL
SEL
MENU
LF
SHIFT TOF
FF/LOAD
Micro Feed
Down
POWER ALARM
Micro Feed
PRINT QUALITY
Up
GROUPEXIT
ITEM SET
QUIETPARKTEAR
HSD
UTL
MENU
NLQ
PRINT
SSD
CHARACTER PITCH
10 12 15
17
20 PROP
3 Move the printhead to the center of the platen.
4 Remove the ribbon cartridge.
32T-19_up.eps
User’s Guide: English 59
|
Page 60

5 Swing up the printhead clamp, then remove it by
pushing forward (toward the platen) and to the left.
32T-hg01.eps and 32T-hg02.eps
7 Lift the printhead plate off the carriage assembly (1).
32T-hg04.eps
CAUTION
HOT
ATTENTION
CHAUD
VORSICHT
HEISS
55091086
6 Remove the printhead.
32T-hg03.eps
55091086
60 Microline 320/321 Turbo/n
|
T
CAUTION
ATTENTION
VORSICHT
1
CAUTION
HOT
ATTENTION
CHAUD
VORSICHT
HEISS
55091086
8 Turn the printhead plate around and reinsert it on the
other side of the carriage assembly (1).
32T-hg05.eps
HOT
CHAUD
HEISS
1
Page 61

9 Replace the printhead, making sure that the circuit board
at the bottom of the printhead firmly engages the slot (1)
in the carriage.
32T-hg06.eps
1
CAUTION! Be sure the printhead is fully inserted before
!
proceeding.
10 Reinstall the printhead clamp and swing it back over to
lock the printhead in place.
32T-hg07.eps
CAUTION
HOT
ATTENTION
CHAUD
VORSICHT
HEISS
55091086
Important! The clamp must be between the black
!
projection on the printhead and the metal plate on the
carriage, on both sides.
User’s Guide: English 61
|
Page 62

11 Reinstall the ribbon cartridge.
32T-19dn.eps
12 Replace the pull-up roller assembly and the access cover,
then turn the printer on.
32T-04DN.eps and 32T-02.eps
SEL
SEL
MENU
LF
SHIFT TOF
FF/LOAD
Micro Feed
Down
POWER ALARM
Micro Feed
PRINT QUALITY
Up
GROUPEXIT
ITEM SET
QUIETPARKTEAR
HSD
UTL
MENU
NLQ
PRINT
SSD
CHARACTER PITCH
10 12 15
17
20 PROP
13 Change the printer's secondary menu (make sure paper is
loaded!) to engage the expanded printhead gap:
a) Press SEL + TEAR while turning the printer back on.
b) Press LF to advance through the menu to the Technical
group (last option in menu).
c) Press FF/LOAD to advance through the items to
Expanded Gap.
d) Press TEAR to change the setting for Expanded Gap to
Valid.
e) Press SHIFT + MENU to exit the menu and save your
setting.
62 Microline 320/321 Turbo/n
|
Page 63

Print Quality
Important!
!
Front panel settings for print quality and character
pitch are overridden by software commands.
The lights will always reflect the printer's state.
PRINT QUALITY
32T -FP.eps
HSD
NLQ
UTL
SSD
Press PRINT QUALITY to select:
NLQ: Near Letter Quality
• Highest quality, slowest speed
• Courier or Gothic fonts
• Recommended for correspondence
UTL: Utility
• Medium quality, medium speed
• Gothic font only
• Recommended for internal documents and high-volume
data.
HSD: High Speed Draft
• Lower quality, faster speed
• Gothic font only
• Recommended for drafts.
SSD: Super Speed Draft
• Lowest quality (12 cpi only), fastest speed
• Gothic font only
• Recommended for fastest output of drafts.
User’s Guide: English 63
|
Page 64

Super Speed Draft
Printer Reset
T o use Super Speed Draft (SSD), enter the Menu Mode and
make changes as follows:
1 Press SHIFT + SEL.
2 Press GROUP twice.
3 Press SET until DRAFT prints as the setting for the Print
Mode.
4 Press ITEM.
5 Press SET (SSD prints).
6 Press SHIFT + SEL to exit Menu Mode and save your
changes.
When you reset the printer, you reinitialize it.
You will need to reset the printer to clear some error
conditions
To reset the printer:
1 Press and release the SEL key to take the printer off-line.
The SEL light will be out.
2 Then, press and hold the SHIFT key and press the
RESET (CHARACTER PITCH) key .
3 The printer is reset.
Important!
!
A printer reset is NOT the same as a reset to factory
defaults.
A printer reset reinitializes the printer, but does NOT
affect any menu settings.
A reset to factory defaults returns ALL menu settings to
the factory defaults.
64 Microline 320/321 Turbo/n
|
Page 65

Character Pitch
Press CHARACTER PITCH/RESET to select the width of
characters in characters per inch, or Proportional.
32T -FP.eps
CHARACTER PITCH
10 12 15
17
20 PROP
10 cpi
• Recommended for standard text
• Not available for SSD
12 cpi
• Recommended for standard text
• Yields more text per page
15 cpi
• Recommended for spreadsheets
• Yields more text per page
17.1 cpi, 20 cpi
• Recommended for spreadsheets
• Smallest print
• Not available for SSD
PROP
• Recommended for a more polished appearance
• Proportional spacing
• NLQ and Utility only
User’s Guide: English 65
|
Page 66

Emulations
Available Emulations
Your printer has three emulations:
• Epson® FX (ESC/P)
• IBM® Proprinter III (PPSII) — factory setting
• OKI DA T A® MICROLINE® Standard
Changing Emulations
1 Make sure paper is loaded.
2 Press SHIFT + SEL. The printer enters the Menu Mode.
3 Press LF . The following line prints:
Printer Control Emulation Mode IBM
PPR
4 Press TEAR consecutively until the emulation you wish
to select prints in the right-hand column.
5 Press SHIFT + SEL to save your setting and exit the
Menu Mode.
66 Microline 320/321 Turbo/n
|
Page 67

Printer Drivers
Selecting Printer Drivers
Before you can use your printer, you must select the correct
printer driver in your software. If you select the wrong driver,
you will see strange characters, incorrect fonts, etc.
See your software documentation for information on
!
how to select a printer driver.
The drivers below are listed by decreasing compatibility
with your printer. Use one as close to the top of the list as
possible.
Epson FX
Oki Data ML320/1T Epson
Oki Data ML320/1 Epson
Epson FX286e
Epson FX 850/1050
Epson FX 800/1000
Epson FX
IBM Proprinter III
Oki Data ML320/1T IBM
Oki Data ML320/1 IBM
IBM Proprinter III
IBM Proprinter II
IBM Proprinter
IBM Graphics Printer
Oki Data Microline Standard
Oki Data Microline 320/321T
Oki Data Microline 320/321
Oki Data Microline 520/521
Oki Data Microline 292/293
Oki Data Microline 192/193
User’s Guide: English 67
|
Page 68

Obtaining Drivers
Installing Printer Drivers
The driver included on the MICROLINE 320/321 Turbo/n
CD-ROM is an IBM Proprinter II driver for use with W indows
operating systems.
Drivers are available for a variety of operating systems.
You can obtain the drivers by downloading them from the
web site at
http://www.okidata.com
Installation procedures vary according to the driver you
select. Follow the instructions provided with the selected
driver.
68 Microline 320/321 Turbo/n
|
Page 69

Menu Mode
ALWAYS print the current Menu Mode settings before
!
you reset or change the Menu settings.
Printing the settings is the only way to have a record of
the settings.
To print the Menu Mode Settings, refer to “Using Y our
Printer, Menu Mode, Printing the Menu Settings.”
In Menu Mode, you use the front panel keys to change the
defaults for the printer parameters. The changes you make in
the Menu Mode are automatically saved when you exit the
Menu Mode and are retained, even when you turn the printer
off.
32T-FP.eps
1
SEL
SEL
SHIFT TOF
MENU
POWER ALARM
LF
Micro Feed
Down
GROUPEXIT
FF/LOAD
Micro Feed
Up
ITEM SET
MENU
2
PRINT
4
3
QUIETPARKTEAR
5
1 GROUP: Prints the next Group in the Menu. W ith the
SHIFT key , prints the previous Group.
2 ITEM: Prints next Item in the Group. With the SHIFT
key, prints previous Item in the Group.
3 SET: Prints next Setting for an Item. With the
SHIFT key , prints previous Setting for an Item.
4 PRINT: Prints a copy of all the Menu settings. With the
SHIFT key , prints the current settings for the Group
selected.
5 MENU light: Glows when the printer is in the Menu
Mode.
User’s Guide: English 69
|
Page 70

Entering and Exiting Menu Mode
Moving Through the Menu
To enter or exit the Menu Mode, hold SHIFT while pressing
SEL.
When the printer is in Menu Mode, you can move forward or
backwards through the menu.
Moving Forward
T o move forward, press GROUP , ITEM, or SET , whichever is
appropriate.
For more information, refer to “Using Your Printer, Menu
Mode.”
Moving Backward
T o move backward, press and hold SHIFT , then GROUP,
ITEM, or SET, whichever is appropriate.
For more information, refer to “Using Your Printer, Menu
Mode.”
70 Microline 320/321 Turbo/n
|
Page 71

Resetting Menu to Factory Defaults
Printing the Menu Settings
ALWAYS print the current Menu Mode settings before
!
you reset or change the Menu settings.
Printing the settings is the only way to have a record of
the settings.
To print the Menu Mode Settings, refer to “Using Y our
Printer, Menu Mode, Printing the Menu Settings.”
To reset the Menu to the standard settings (factory defaults):
1 Turn the printer off.
2 Press SEL + LF while turning the printer on.
ALWAYS print the current Menu Mode settings before
!
you reset or change the Menu settings.
Printing the settings is the only way to have a record of
the settings.
1 Make sure paper is loaded in the printer.
2 Enter the Menu Mode (SHIFT + SEL).
3 Press PRINT (P ARK key).
To print out a listing of the settings for all menu items,
!
regardless of the emulation selected or the accessories
installed, enter the Menu Mode, then press SHIFT +
PRINT QUALITY .
User’s Guide: English 71
|
Page 72

Changing the Menu Settings
ALWAYS print the current Menu Mode settings before
!
you reset or change the Menu settings.
Printing the settings is the only way to have a record of
the settings.
To print the Menu Mode Settings, refer to “Using Y our
Printer, Menu Mode, Printing the Menu Settings.”
1 Press SHIFT + SEL to enter the Menu Mode.
2 Use the GROUP, ITEM and SET keys to make your
changes:
Press GROUP until the Group you wish to change
appears in the first column.
Press ITEM until the Item you wish to change appears in
the second column.
Press SET until the setting you want appears in the third
column.
3 Press SHIFT + SEL to exit the Menu Mode and save your
settings.
Important!
!
If you turn off the printer without first exiting the Menu
Mode, the changes you have made will be lost.
72 Microline 320/321 Turbo/n
|
Page 73

Menu Settings Table
For a complete explanation of each menu item, refer to “Using Your Printer, Menu Mode, Explanations of Menu Items.”
The table below shows the items which may appear in the menu. Settings which are engaged at the factory (defaults) are set in
bold italic. Some groups or entries will only appear when a specific emulation is engaged, as noted.
Group Item Settings (Defaults are set in bold italic) Printer Control Emulation Mode IBM PPR, EPSON FX, ML Font Print Mode Utility, NLQ Courier, NLQ Gothic, Draft
Draft Mode HSD, SSD Pitch 10 cpi, 12 cpi, 15 cpi, 17.1 cpi, 20 cpi Proportional Spacing No, Y es Style Normal, Italics Size Single, Double
Symbol Sets Character Set Standard*, Set I+**, Set II+**, Line Graphics, Block Graphics
Language Set American, French, German, British, Danish I, Swedish, Italian, Spanish I,
Japanese, Norwegian, Danish II, Spanish II, Latin American,
French Canadian, Dutch, Publisher
Zero Character Slashed, Unslashed
Code Page USA, Canada French, Multilingual, Portugal, Norway , BRASC II,
Abicomp, Multilingual 858, ISO 8859-15
* Appears only when the MICROLINE Standard emulation is selected.
+** Appears only when the IBM or Epson emulation is selected.
User’s Guide: English 73
|
Page 74

Menu Settings Table (Continued)
For a complete explanation of each menu item, refer to “Using Your Printer, Menu Mode, Explanations of Menu Items.”
The table below shows the items which may appear in the menu. Settings which are engaged at the factory (defaults) are set in
bold italic. Some groups or entries will only appear when a specific emulation is engaged, as noted.
Group Item Settings (Defaults are set in bold italic) Rear Feed Line Spacing 6 LPI, 8 LPI
Form T ear-Off Off, 500 ms, 1 sec, 2 sec Skip Over Perforation No, Y es Page Width (wide model only) 13.6", 8" Page Length 11", 11 2/3", 12", 14", 17", 3", 3.5", 4", 5.5", 6", 7", 8", 8.5"
Bottom Feed Line Spacing 6 LPI, 8 LPI
Form T ear-Off Off, 500 ms, 1 sec, 2 sec Skip Over Perforation No, Y es Page Width (wide model only) 13.6", 8" Page Length 11", 11-2/3", 12", 14", 17", 3", 3.5", 4", 5.5", 6", 7", 8", 8.5"
74 Microline 320/321 Turbo/n
|
Page 75

Menu Settings Table (Continued)
For a complete explanation of each menu item, refer to “Using Your Printer, Menu Mode, Explanations of Menu Items.”
The table below shows the items which may appear in the menu. Settings which are engaged at the factory (defaults) are set in
bold italic. Some groups or entries will only appear when a specific emulation is engaged, as noted.
Group Item Settings (Defaults are set in bold italic) Top Feed Line Spacing 6 LPI, 8 LPI
Bottom Margin Valid, Invalid Page Width (wide model only) 13.6", 8" Page Length 11", 11-2/3", 12", 14", 17", 3", 3.5", 4", 5.5", 6", 7", 8", 8.5" Wait Time 500 ms, 1 sec, 2 sec Page Length Control By MENU Setting, By Actual Page Length
Set-Up Graphics Bi-directional, Uni-directional
7 or 8 Bit Graphics* 8, 7
Receive Buffer Size 64K, 88 K, 1 Line, 32 K
Paper Out Override No, Y es
Print Registration 0, set in 0.05 mm increments: press SEL to shift registration to the left;
press SHIFT + SEL to shift registration to the right.
* Appears only when the MICROLINE Standard emulation is selected.
User’s Guide: English 75
|
Page 76

Menu Settings Table (Continued)
For a complete explanation of each menu item, refer to “Using Your Printer, Menu Mode, Explanations of Menu Items.”
The table below shows the items which may appear in the menu. Settings which are engaged at the factory (defaults) are set in
bold italic. Some groups or entries will only appear when a specific emulation is engaged, as noted.
Group Item Settings (Defaults are set in bold italic)
Set-Up 7 or 8 Bits Data W ord* 8, 7
(continued) Operator Panel Function Full Operation, Limited Operation
Reset Inhibit No, Y es Print Suppress Effective Yes, No Auto LF No, Y es Auto CR+ No, Y es Print DEL Code* No, Y es SI Select Pitch (10 cpi)+ 17.1 cpi, 15 cpi SI Select Pitch (12 cpi)+ 20 cpi, 12 cpi Time Out Print Valid, Invalid Auto Select No, Y es Centering Position DEFAULT, MODE 1, MODE 2
* Appears only when the MICROLINE Standard emulation is selected.
+ Appears only when the IBM emulation is selected.
76 Microline 320/321 Turbo/n
|
Page 77

Menu Settings Table (Continued)
For a complete explanation of each menu item, refer to “Using Your Printer, Menu Mode, Explanations of Menu Items.”
The table below shows the items which may appear in the menu. Settings which are engaged at the factory (defaults) are set in
bold italic. Some groups or entries will only appear when a specific emulation is engaged, as noted.
Group Item Settings (Defaults are set in bold italic) Parallel I/F I-Prime Buffer Print, Invalid, Buf fer Clear
Pin 18 +5V, Open Auto Feed XT** Invalid, V alid Bi-Direction Enable, Disable
** Applies only when the Epson emulation is selected.
User’s Guide: English 77
|
Page 78

Explanations of Menu Items
Refer to “Using Your Printer, Menu Mode, Menu Settings Table” for an overview of the menu structure.
7 or 8 Bits Data W ord (ML). If your computer system uses
seven bits to make up each unit of data, change this setting to 7.
7 or 8 Bit Graphics (ML). Choose the graphics your system
uses: 7 or 8 dots in each column printed.
Auto CR (IBM). If you want the printer to automatically add
a carriage return when a Line Feed is received at the end of a
line, change the setting to Yes.
Auto LF. If your printout is consistently double spaced,
select No; if it overprints, select Yes.
Auto Feed XT (Epson). If your system uses pin 14 of the
parallel interface to control automatic line feed, change the
setting to Valid.
Auto Select. If you always use the same Top of Form position,
change the setting to Yes.
Bi-Direction. Leave this set to Enable to allow the printer to
communicate with the network.
78 Microline 320/321 Turbo/n
|
Bottom Margin. Change to Invalid if you want the printer to
ignore the bottom margin setting. Caution!! This can cause
loss of data and damage the printhead.
Centering Position. Used to limit printhead travel when
printing narrow columns.
Select Mode 1 for the narrow carriage printer.
Select Mode 1 or Mode 2 for the wide carriage printer.
Character Set. IBM or Epson: Choose Set I or Set II.
Microline: Choose Standard, Line Graphics, or Block
Graphics.
Code Page. Choose the Code Page character set you wish to
use: USA (IBM 437), Canada French (IBM 863),
Multilingual (IBM 850), Portugal (IBM 860), Norway (IBM
865), BRASC II, Abicomp, Multilingual 858, or ISO 8859-15.
Draft Mode. Change to SSD if you wish to use the Super
Speed Draft mode of printing. Note: Print Mode must be set
to DRAFT for this setting to be effective.
Emulation Mode. Choose the printer emulation.
Page 79

Explanations of Menu Items (Continued)
Refer to “Using Your Printer, Menu Mode, Menu Settings Table” for an overview of the menu structure.
Form Tear-Off. Choose 500 ms, 1 sec, or 2 sec to turn the
Form Tear-Off feature on and to set the time interval for the
printer to wait before advancing the paper.
Graphics. Change to bi-directional graphics for faster
printing. Optimize the registration using the Print
Registration setting in the Menu.
I-Prime. Determines what the printer will do when it receives
the I-Prime signal from the software.
Buffer Print prints out the buffer contents before resetting.
Buffer Clear dumps the buffer contents immediately.
Invalid causes the printer to ignore the I-Prime command.
Language Set. Replaces certain standard symbols with
special characters used in foreign languages.
Line Spacing. Change to 8 lines per inch to get more lines on
a page.
Operator Panel Function. Change to Limited Operation to
deactivate the PRINT QUALITY and CHARACTER PITCH
buttons. This prevents these from being changed from the
control panel when several people are using the printer.
Page Length. Selects the length of the paper you are using.
Page Width (Wide Carriage only). Change to 8" to print on
letter-size paper.
Paper Out Override. Senses when less than 1" (25 mm) of
paper remains and stops printing. Change to Yes to override
the sensor. Caution!! This can cause loss of data and damage
the printhead!
Pin 18. Sets the signal on pin 18 to +5 volts or to open.
Pitch. Choose the character width, in character per inch (cpi).
Print DEL Code (ML). Change to Yes if you wish to print the
DEL code (decimal 127) as a solid box.
Print Mode. Choose the quality and speed of printing.
Print Registration. Change the setting as required to obtain
the best registration for bi-directional printing.
User’s Guide: English 79
|
Page 80

Explanations of Menu Items (Continued)
Refer to “Using Your Printer, Menu Mode, Menu Settings Table” for an overview of the menu structure.
Print Suppress Effective. If your system uses the DC1 and
DC3 codes for something other than the print suppress mode,
change the setting to No.
Proportional Spacing. Change the setting to Yes to engage
proportional spacing of characters.
Receive Buffer Size. Selects the amount of memory devoted
to holding received data. Choosing 1 Line will tie up your
computer while printing, but if you abort the print job, the
printer will stop much sooner.
Reset Inhibit. Select Yes to prevent your software from
resetting your printer's settings.
SI Select Pitch, 10 cpi (IBM). Sets the pitch to be engaged
when the printer control panel is set for 10 cpi and the SI
command is received.
SI Select Pitch, 12 cpi (IBM). Sets the pitch to be engaged
when the printer control panel is set for 12 cpi and the SI
command is received.
Size. Change to Double for double width and height printing.
80 Microline 320/321 Turbo/n
|
Skip Over Perforation. Change to Yes if you want the printer
to go to the next page when it comes within 1" (25 mm) of
the bottom of the page. Keep it set to No if your software has
its own page formatting controls.
Style. Change to italics if you want the printed characters to
be slanted.
Time Out Print. If your software spends a long time
processing between portions of data it feeds to the printer,
change the setting to Invalid to keep your printer from
dumping the received data while it is waiting for more.
Wait T ime. Sets the amount of time the printer will wait for
more data before moving to the form tear-off position.
Zero Character. If you do not want the printer to use a slash
to distinguish the number zero from the capital letter O,
change the setting to Unslashed.
Page 81

Maintenance
Replacing the Ribbon Cartridge
If you need instructions for replacing the ribbon cartridge,
you can refer to the
• packaging of the new cartridge
• web site
• “Installation, Ribbon Cartridge.”
For the best results, use genuine OKI ribbons.
For information on obtaining consumables, refer to
“Accessories.”
For information on the web site, refer to “Service and
Support, Internet Support.”
User’s Guide: English 81
|
Page 82

Printer Cleaning
You should clean the printer every six months (or after about
300 hours of operation).
Never use solvents or strong detergents on the cabinet:
!
they could cause damage.
1 Turn off the printer. Then, use the platen knob to back the
paper out of the printer.
2 Open the access cover. Remove the pull-up roller
assembly.
32T-04Up.eps
3 Use a clean, dry cloth to dust around the carriage shaft and
platen. Remove any loose bits of paper.
4 Install the pull-up roller assembly. Close the access cover.
32T-04Dn.eps
82 Microline 320/321 Turbo/n
|
Page 83

Paper Jams
Rear-Feed Paper Jams
1 Turn off the printer. Then, use the platen knob to back the
paper out of the printer.
32T-01B.eps and 32T-37BK.eps
Make sure the printer is turned off before you open the
!
access cover.
2 Open the access cover. Remove the pull-up roller
assembly.
32T-04UP.eps
User’s Guide: English 83
|
Page 84

3 Remove any torn pieces of paper.
4 Grasp the tabs and lift off the paper separator . Load paper.
32T-23A.eps
5 Install the paper separator. Install the pull-up roller
assembly . Close the access cover.
32T-23A.eps and 32T-04DN.eps
6 Turn on the printer.
7 Press FF/LOAD.
32T-01a.eps
FF.eps
FF/LOAD
Micro Feed
Up
ITEM
84 Microline 320/321 Turbo/n
|
Page 85

Rear-Feed, Repeating Paper Jams
If the paper keeps jamming, you probably have bits of paper
stuck in the paper path.
1 Turn off the printer. Then, use the platen knob to back the
paper out of the printer.
2 Open the access cover. Remove the pull up roller
assembly. Remove any torn pieces of paper.
32T-04up.eps
3 Grasp the tabs and lift off the paper separator .
32T-23A.eps
4 Fold some continuous-form paper over three times to
make a page four sheets thick. Then, load it on the
tractors and close the covers.
32T-41R.eps
5 Use the platen knob to draw the quadruple-thick page
around the platen. This clears any jammed bits of paper.
32T-42R.eps
User’s Guide: English 85
|
Page 86

6 Remove any paper pieces. Then, use the platen knob to
back the paper out.
32T-42R.eps
7 Load regular paper. Install the paper separator.
32T-23A.eps
8 Install the pull-up roller assembly. Close the access cover.
32T-04DN.eps
9 Turn on the printer.
32T-01A.eps
10Press FF/LOAD.
FF.eps
FF/LOAD
Micro Feed
Up
ITEM
86 Microline 320/321 Turbo/n
|
Page 87

QUIETPARKTEAR
FF/LOAD
LF
SEL
SEL
POWER ALARM
MENU
GROUPEXIT
ITEM SET
PRINT
MENU
SHIFT
TOF
Micro Feed
Up
Micro Feed
Down
PRINT QUALITY
CHARACTER PITCH
HSD
NLQ
UTL
SSD
10 12 15
17
20 PROP
Single-Sheet Paper Jams
1 Turn off the printer.
2 Then, use the platen knob to back the paper out.
32T-43.eps
SEL
SEL
MENU
LF
SHIFT
FF/LOAD
Micro Feed
Down
POWER ALARM
Micro Feed
PRINT QUALITY
Up
GROUPEXIT
ITEM SET
QUIETPARKTEAR
HSD
UTL
TOF
MENU
NLQ
PRINT
SSD
CHARACTER PITCH
10 12 15
17
20 PROP
4 Remove any torn pieces from around the carriage.
5 Install the pull-up roller assembly. Close the access cover.
32T-44Dn.eps
6 Turn on the printer. Load paper.
32T-01A.eps and 32T-15.eps
3 Open the access cover. Remove the pull-up roller
assembly.
32T-44Up.eps
User’s Guide: English 87
|
Page 88

Troubleshooting
General Information
Here are some general things to check before proceeding with
detailed troubleshooting.
• Is the printer plugged in and turned on?
• Are the connections (power and interface) secure?
• Is the product being operated under the proper ambient
conditions?
• Does the paper being used meet the specifications for this
product?
• Is the paper properly installed?
• Has the ribbon been replaced as recommended?
• Is the ribbon properly installed?
• Is an OKI ribbon being used?
• Is the printhead gap correctly set?
• Are the correct printer drivers being used for the printer?
88 Microline 320/321 Turbo/n
|
Settings in your software application will override any
!
settings in your printer driver.
Your printer driver settings will override any settings
from the printer menu or printer front panel.
Internet Support
Oki Data provides support via the Internet.
Oki Data’s main web site, www.okidata.com, is the gateway to
Oki Data’s products and services.
my.okidata.com is a powerful area of Oki Data’s web site
designed to help you personalize the information and service
you get from Oki Data.
For more information, refer to “Service and Support, Internet
Support.”
Page 89

List of Problems
Problem 1:
My word processor files do not print the way I have the menu
and front panel set.
Problem 2:
Nothing happens when I turn on the printer.
Problem 3:
The printer does not print when the computer sends data.
Problem 4:
I'm getting strange symbols, incorrect fonts, etc., when I try to
print a document.
Problem 5:
Ink smears on the paper when I print on narrow forms.
Problem 6:
I've installed a new ribbon and the printing is smeared and
streaked.
Problem 7:
The ALARM light is flashing.
Problem 8:
The ALARM light is on and the Character Pitch 10 light is
flashing.
Problem 9:
The ALARM light is on and the Character Pitch 15 light is
flashing.
Problem 10:
The printer needs paper, but the ALARM light is not on and I
cannot load the paper.
Problem 11:
The Print Quality and Character Pitch keys on the front panel
don't work.
Problem 12:
Continuous-form paper sticks to the paper separator.
Problem 13:
Nothing happens when I print to the parallel port.
User’s Guide: English 89
|
Page 90

Problem 1:
My word processor files do not print the way I have the
menu and front panel set.
Solution:
Always remember that:
1 Settings in your software application will override any
settings in your printer driver.
2 Your printer driver settings will override any settings from
the printer menu or printer front panel.
90 Microline 320/321 Turbo/n
|
Solution:
Before sending a file to the printer, many word processors
send either an “initialization string” or an I-Prime signal to
the printer.
The initialization string contains codes that override the
panel and menu settings. To change your printer to ignore the
reset code, enter the Menu Mode, go to the Set-Up group and
change the setting for Reset Inhibit to Yes. Refer to “Using
Y our Printer , Menu Mode.”
The I-Prime signal will automatically override any front
panel settings you have made. To eliminate this problem,
enter the Menu Mode, go to the Parallel Interface group and
change the setting for I Prime to Invalid. Refer to “Using
Y our Printer , Menu Mode.”
Page 91

Problem 2:
Nothing happens when I turn on the printer.
Solution:
Check the power cord connection to the outlet. If you are
using a power strip, make sure it is turned on, and that a fuse
hasn’t blown or that a circuit breaker hasn’t tripped.
Problem 3:
The printer does not print when the computer sends
data.
Solutions:
1 Is the SEL light on? If not, press the SEL key.
2 Check that all interface cables are securely connected to
the printer and the computer.
Problem 4:
I'm getting strange symbols, incorrect fonts, etc., when I
try to print a document.
Solutions:
1 Check to be sure that the printer driver you have selected
in your software matches the printer emulation.
Press SHIFT and SEL keys, then press GROUP key .
This will print a line showing the emulation you have
selected.
2 If you have embedded any printer commands in your
software, check to be sure that you entered them correctly.
User’s Guide: English 91
|
Page 92

Problem 5:
Ink smears on the paper when I print on narrow forms.
Problem 7:
The ALARM light is flashing.
Solution:
This may be caused by excessive printhead travel from the
centering position. Enter the Menu and set the Centering
Position to MODE 1. Refer to “Using Your Printer, Menu
Mode.”
For the wide-carriage printer, if MODE 1 doesn't work, try
setting the Centering Position to MODE 2.
Problem 6:
I've installed a new ribbon and the printing is smeared
and streaked.
Solution:
The ribbon shield is either loose or missing. Remove the
ribbon cartridge and check the ribbon shield.
If it is loose, secure it.
If it is missing, find it and install it.
Solution:
Try turning the printer off and then back on again. If the light
still blinks, call for service.
Problem 8:
The ALARM light is on and the Character Pitch 10 light
is flashing.
Solution:
This indicates that the paper lever is set at the wrong position
for the paper you are trying to use. Move it to the proper
setting.
92 Microline 320/321 Turbo/n
|
Page 93

Problem 9:
The ALARM light is on and the Character Pitch 15 light
is flashing.
Problem 11:
The Print Quality and Character Pitch keys on the front
panel don't work.
Solution:
This indicates a paper jam. Press the SEL key and correct the
paper jam situation. Refer to “Maintenance, Paper Jams.”
Problem 10:
The printer needs paper, but the ALARM light is not on
and I cannot load the paper.
Solution:
Press and release the SEL key.
Then, press and hold the SHIFT key and press the RESET
(CHARACTER PITCH) key.
The printer is reset.
Solution:
The Operator Panel Function in the printer menu can be used
to disable these buttons (Limited Function). If the printer is
part of a customized system or if it is used by a number of
people, the system manager may have used this option to
make sure the printer is always set properly.
Check with your system manager before changing any menu
settings.
Refer to “Using Your Printer, Menu Mode.”
User’s Guide: English 93
|
Page 94

Problem 12:
Continuous-form paper sticks to the paper separator.
Problem 13:
Nothing happens when I print to the parallel port.
Solution:
In cold dry weather, static charges can build up and make the
paper cling to the paper separator. Try moving the paper
guides together so that the paper rests on the guides rather
than on the separator.
Solution:
Remove the Network Card from the printer.
If you want to use the parallel port, you MUST remove
!
the Network Card from the printer. See the OkiLAN
6120e User’s Guide for details.
94 Microline 320/321 Turbo/n
|
Page 95

Specifications
Specifications subject to change without notice.
!
Network specifications are in the OkiLAN 6120e User’s
Guide.
Print Method
Impact dot matrix
Printhead
9 pins, 0.34 mm diameter, thermal protection
Print Speed
ModeCharacters per second
Super Speed Draft (SSD) 435 cps
High Speed Draft (HSD) 390 cps
Utility (UTL) 300 cps
Near Letter Quality (NLQ) 75 cps
Characters per Line (cpl)
Setting ML320 Turbo/n ML321 Turbo/n
10 cpi 80 cpl 136 cpl
12 cpi 96 cpl 163 cpl
15 cpi 120 cpl 204 cpl
17.1 cpi 137 cpl 233 cpl
20 cpi 160 cpl 272 cpl
Emulations
Epson FX (ESC/P)
IBM Proprinter III(PPSII)
Oki Data Microline Standard co-resident
User’s Guide: English 95
|
Page 96

Interface
Standard:
Ethernet
Centronics parallel, IEEE-1284 compliant
If you want to use the parallel port, you MUST remove
!
the Network Card from the printer. See the OkiLAN
6120e User’s Guide for details.
Graphics Resolution
Emulation Maximum Resolution
Epson/IBM 240 (H) x 216 (V) dpi
OKIDA T A 288 (H) x 144 (V) dpi
Resident Fonts
Print Quality A vailable Fonts
Near Letter Quality Courier, Gothic
Utility Gothic
High Speed Draft Gothic
Super Speed Draft Gothic
Resident Scalable Fonts*
Courier and Gothic, in sizes from 22 to 216 points
*Selectable through software only.
Bar Codes
Code 39, UPC A, UPC E, EAN 8, EAN 13,
Interleaved 2 of 5, Code 128, Postnet
Receive Buffer Size
1 Line, 16 K, 28K, 64K
Reliability
Mean Time Between Failures (MTBF)
10,000 hours at 25% duty cycle and 35% page density
Mean Time to Repair (MTTR)
15 minutes
Printhead Life
200 million characters average in 10 cpi draft mode at 25%
duty and 35% page density
Ribbon Life
3 million characters, on average, 10 cpi utility
96 Microline 320/321 Turbo/n
|
Page 97

Paper Specifications
Narrow Carriage: Microline 320 Turbo/n
Paper T ype: Cut Sheet
Feed: Top
Weight: 14-24 lb. (52.5-90 g/m2)
Width Range: 7.2" to 8.5" (182.8 to 215.9 mm)
Paper T ype: Single-part, continuous forms
Feed: Rear , Bottom
Weight: 12-24 lb. (45-90 g/m2)
Width Range: 3" to 10" (76.2 to 254 mm)
Paper T ype: Carbonless continuous forms Feed: Rear , Bottom Weight: 9-11 lb. (33.75-41.25 g/m2) Width Range: 3-10" (76.2 to 254 mm)
Paper T ype: Interleaf continuous forms Feed: Rear , Bottom Weight: Not applicable Width Range: 3-10" (76.2 to 254 mm)
Paper T ype: Labels Feed: Bottom Weight: Not applicable Width Range: 3-10" (76.2 to 254 mm)
Paper Type: Envelopes, single feed
Feed: Top
Weight: 24 lb. max. (90 g/m2)
Width Range: 6.5" to 9.5" (165.1 to 241.3 mm)
Paper Type: Envelopes, continuous feed, non-overlap
Feed: Bottom
Weight: 24 lb. max. (90 g/m2)
Width Range: 6.5" to 9.5" (165.1 to 241.3 mm)
Paper Type: Card stock Feed: Bottom Weight: 120 lb. max. (450 g/m2) Width Range: Not applicable
Paper Type: Transparencies Feed: Top Weight: Not applicable Width Range: Not applicable
Standard Transparencies are
8.5" x 11" (215.9 - 279.4 mm)
User’s Guide: English 97
|
Page 98

Paper Specifications
Wide Carriage: Microline 321 Turbo/n
Paper T ype: Cut Sheet
Feed: Top
Weight: 14-24 lb. (52.5-90 g/m2)
Width Range: 7.2" to 14.3" (182.8 to 363.2 mm)
Paper T ype: Single-part, continuous forms
Feed: Rear, Bottom
Weight: 12-24 lb. (45-90 g/m2)
Width Range: 3" to 16" (76.2 to 406.4 mm)
Paper T ype: Carbonless continuous forms
Feed: Rear, Bottom
Weight: 9-11 lb. (33.75-41.25 g/m2)
Width Range: 3" to 16" (76.2 to 406.4 mm)
Paper T ype: Interleaf continuous forms
Feed: Rear, Bottom
Weight: Not applicable
Width Range: 3" to 16" (76.2 to 406.4 mm)
Paper T ype: Labels
Feed: Bottom
Weight: Not applicable
Width Range: 3" to 16" (76.2 to 406.4 mm)
Paper Type: Envelopes, single feed
Feed: Top
Weight: 24 lb. max. (90 g/m2)
Width Range: 6.5" to 9.5" (165.1 to 241.3 mm)
Paper Type: Envelopes, continuous feed, non-overlap
Feed: Bottom
Weight: 24 lb. max. (90 g/m2)
Width Range: 6.5" to 9.5" (165.1 to 241.3 mm)
Paper Type: Card stock
Feed: Bottom
Weight: 120 lb. max. (450 g/m2)
Width Range: Not applicable
Paper Type: Transparencies
Feed: Top
Weight: Not applicable
Width Range: Not applicable
Standard Transparencies are
8.5" x 11" (215.9 - 279.4 mm)
98 Microline 320/321 Turbo/n
|
Page 99

Paper Thickness
Rear Feed
0.014" (0.36 mm) maximum
Bottom Feed*
0.017" (0.43 mm) maximum
expandable to 0.031" (0.79 mm) maximum
* Requires optional push or pull tractor.
Printer Weight
Narrow Carriage
ML 320 Turbo/n
17.2 lbs. (7.8 kg)
Wide Carriage
ML321 Turbo/n
22.2 lbs. (10.1 kg)
Printer Dimensions
Width x Depth x Height
Narrow Carriage
ML 320 Turbo/n
15.7 x 13.6 x 4.6 inches
389 x 355 x 116 mm
Wide Carriage
ML321 Turbo/n
21.7 x 13.6 x 4.6 inches
550 x 355 x 116 mm
Environmental Requirements
T emperature
Operating 41 to 104°F (5 to 40°C) Storage 14 to 122°F (-10 to 50°C)
Humidity
Operating 20 to 80% RH
Storage 5 to 95% RH
Electrical Requirements
120 volts ac (+5.5%, -15%), 60 Hz (±2%)
Also available: 230 or 240 volts ac, 50 or 60 Hz (±2%)
Specifications subject to change without notice.
!
User’s Guide: English 99
|
Page 100

Service and Support
General Information
Oki Data offers service and support to you through a variety
of methods.
Please chose the service and support method that is best for
you.
Oki Data’s service and support methods are:
• the documentation provided with your machine
• the store location where you purchased your machine
• Internet Support
• Telephone Support
100 Microline 320/321 Turbo/n
|
Details of each support method are provided in this section
Oki Data’s service and support methods are different in these
two areas:
• United States and Canada
• Latin America
Details for each area are provided in this section.
Service Centers are trained by Oki Data and are authorized to
service OKI products. For more information about Service
Centers, refer to “Service and Support, Service Centers.”
 Loading...