

Page 1

- 1 -
Page 2
●● About the Product Warranty
Every effort has been made to ensure that the information in this document is complete, accurate,
and up-to-date. The manufacturer assumes no responsibility for the results of errors beyond its
control. The manufacturer also cannot guarantee that changes in software and equipment made by
other manufacturers and referred to in this guide will not affect the applicability of the information
in it. Mention of software products manufactured by other companies does not necessarily constitute
endorsement by the manufacturer.
While all reasonable efforts have been made to make this document as accurate and helpful as
possible, we make no warranty of any kind, expressed or implied, as to the accuracy or completeness
of the information contained herein.
All rights are reserved by Oki Data Corporation. You must not copy, transfer, translate, etc. the content
herein without authorization. You must obtain written permission from Oki Data Corporation before
doing any of the above.
© 2012 Oki Data Corporation
OKI is a registered trademark of Oki Electric Industry Co., Ltd.
Microsoft, Windows, Windows Server and Windows Vista are registered trademarks of Microsoft
Corporation.
Bonjour is registered trademarks of Apple Inc.
Other product names and brand names are registered trademarks or trademarks of their proprietors.
This product complies with the requirements of the Council Directives 2004/108/EC (EMC)
and 2006/95/EC (LVD), as amended where applicable on the approximation of the laws of
the member states relating to electromagnetic compatibility, low voltage.
WARNING!
This is a class A product as dened in EN55022. In a domestic environment this product may cause
radio interference,in which case the user may be required to take adequate measures.
- 2 -
Page 3

●● Manufacturer
Oki Data Corporation,
4-11-22 Shibaura, Minato-ku,
Tokyo 108-8551,
Japan
For all sales, support and general enquiries contact your local distributor.
●● Importer to the EU/Authorized representative
OKI Europe Limited (trading as OKI Printing Solutions)
Blays House
Wick Road
Egham
Surrey, TW20 0HJ
United Kingdom
For all sales, support and general enquiries contact your local distributor.
●● Environmental information
- 3 -
Page 4
●● For Your Safety
WARNING
CAUTION
WARNING
Read the User’s Manual for your safety before using the product.
Cautions related to safety
Indicates the presence of a hazard for which not following the instructions noted may result in
serious injury or death.
Indicates the presence of a hazard for which not following the instructions noted may result in
injury.
General cautions
Do not touch the safety
switch inside the printer.
Doing so may cause electric
shock when high voltage
occurs. In addition, the
rotating gears may result in
injury.
Unplug the power cord and
contact a customer service
center if a liquid such as
water enters in the internal
parts of the printer.
Failure to do so may lead to
a re.
Unplug the power cord
and contact a customer
service center if the printer
is dropped or the cover is
damaged.
Failure to do so may cause
electric shock and/or re,
leading to injuries.
Do not put items such as
cups with water on the
printer. Doing so may cause
electric shock and/or re,
leading to injuries.
Do not use highly ammable
sprays near the printer. Doing
so may cause re as parts of
the printer are hot.
Unplug the power cord and
remove foreign materials
such as paper clips if they
fall inside the printer. Failure
to do so may cause electric
shock and/or re, leading to
injuries.
Unplug the power cord
periodically to clean plug
blades and base section
between the blades.
If the power plug remains
inserted for a long time, the
base section will get dusty,
and the plug may short
circuit, which may cause re.
Do not use power cords,
cables, or ground wires other
than those that are indicated
in the User’s Manual.
Doing so may cause re.
Unplug the power cord
and contact a customer
service center if the cover
is unusually hot, smoking,
giving off an unusual odor,
or making strange noises.
Failure to do so may lead to
a re.
Do not operate and/or
disassemble the printer other
than as directed in User’s
Manual. Doing so may cause
electric shock and/or re,
leading to injuries.
Do not insert materials in
the ventilation hole. Doing
so may cause electric shock
and/or re, leading to
injuries.
We do not guarantee
operation where an
uninterruptible power system
(UPS) or inverter is used.
Do not use an uninterruptible
power system (UPS) or
inverter.
Doing so may cause re.
CAUTION
Stay away from the paper’s output area when turning on the power and while in printing.
Doing so may result in personal injury.
- 4 -
Page 5
●● Manual Composition
WARNING
The following manuals are included with this product.
● User’s Manual ---- This document
The initial setup descriptions of network interface card are noted along with troubleshooting.
The infomation of a utility and applied setting of network is included,too.
● Instruction sheet -guide for setup
This sheet illiusrates a method to attach a network card to a printer.
●● About This Manual
Terms in this document
The following terms are used in this manual.
Note
● Indicates important information on operations. Make sure to read sections with this mark.
Memo
● Indicates additional information on operations. You should read sections with this mark.
Reference
● Indicates where to look when you want to know more detailed or related information.
● A warning provides additional information which, if ignored, may result in a risk of personal injury.
CAUTION
● A caution provides additional information which, if ignored, may result in equipment malfunction or
damage.
Symbols in this document
The following symbols are used in this manual.
Symbols Description
[ ] ● Indicates menu, window, and dialog names on the computer.
" " ● Indicates input text.
● Indicates le names on the computer.
● Indicates reference titles.
< > button/key Indicates a key on the keyboard of the computer.
> Indicates how to get to the item you want in the menu of this printer or the computer.
- 5 -
Page 6

Notation used in this manual
The following notations may be used in this manual.
● Microsoft® Windows® 8 64-bit Edition operating system→ Windows 8 (64bit version) *
● Microsoft® Windows Server® 2012 64-bit Edition operating system→ Windows Server 2012 *
● Microsoft® Windows® 7 64-bit Edition operating system→ Windows 7 (64bit version) *
● Microsoft® Windows Vista® 64-bit Edition operating system→ Windows Vista (64bit version) *
● Microsoft® Windows Server® 2008 R2 64-bit Edition operating system→ Windows Server 2008 *
● Microsoft® Windows Server® 2008 64-bit Edition operating system→ Windows Server 2008 (64bit version) *
● Microsoft® Windows® XP x64 Edition operating system → Windows XP (x64 version) *
● Microsoft® Windows Server® 2003 x64 Edition operating system→ Windows Server 2003 (x64 version) *
● Microsoft® Windows® 8 operating system→ Windows 8 *
● Microsoft® Windows® 7 operating system→ Windows 7 *
● Microsoft® Windows Vista® operating system→ Windows Vista *
● Microsoft® Windows Server® 2008 operating system→ Windows Server 2008 *
● Microsoft® Windows® XP operating system→ Windows XP *
● Microsoft® Windows Server® 2003 operating system→ Windows Server 2003 *
● Microsoft® Windows® 2000 operating system→ Windows 2000
● Generic name for Windows 8, Windows Server 2012, Windows 7, Windows Vista, Windows Server 2008,
Windows XP, Windows Server 2003, and Windows 2000→ Windows
* If there is no special description, 64bit version is included in Windows 8, Windows Server 2012, Windows 7,
Windows Vista, Windows Server 2008, Windows XP, and Windows Server 2003. (64bit version and Windows
Server 2008 R2 is included in Windows Server 2008.)
If there is no special description, Windows 8 is used as Windows, ML5791 is used as the printer and “D:” is used as
the CD-ROM drive for examples in this document.
Depending on your OS or model, the description on this document may be different.
- 6 -
Page 7

Contents
About the Product Warranty .....................................................................2
Manufacturer ..........................................................................................3
Importer to the EU/Authorized representative .............................................3
Environmental information .......................................................................3
For Your Safety ....................................................................................... 4
Manual Composition ................................................................................5
About This Manual ...................................................................................5
1. Setup ................................................................................... 9
Checking Products ...................................................................................9
Checking Package Contents ........................................................................................ 9
Part Names of the Network Card .............................................................10
Connecting to a Computer ...................................................................... 11
Network Connection ................................................................................................ 11
2. Using Utility Software ........................................................ 17
Overview of Utilities ..............................................................................17
Installing Utilities .................................................................................. 18
Install from the Network Software CD-ROM ................................................................ 18
Download from the Oki Data website and install .......................................................... 18
Windows utility .....................................................................................19
Web page .............................................................................................................. 19
AdminManager .....................................................................................21
Operating environment ............................................................................................ 21
Quick Setup .........................................................................................23
Operating environment ............................................................................................ 23
OKI LPR Utility........................................................................................................ 24
TELNET ................................................................................................................. 27
3. Network Settings ............................................................... 28
Printing conguration information of the network ........................................................ 28
Initializing the network system ................................................................................. 28
Setting IP Address ................................................................................29
Changing Network Settings From the Web Page ........................................ 32
Informing the Printer Errors by E-mail (E-mail Alert) ................................................... 32
Controlling Access Using IP Address (IP Filtering) ........................................................ 33
- 7 -
Page 8

Contents
Controlling Access Using MAC Address (MAC Address Filtering) ..................................... 34
Encrypting Communication by SSL/TLS ...................................................................... 34
Encrypting Communication by IPSec .......................................................................... 37
Using SNMPv3 ........................................................................................................ 40
Using IPv6 ............................................................................................................. 40
Using IEEE802.1X ................................................................................................... 41
Other Operations ..................................................................................42
Using DHCP ........................................................................................................... 42
4. Troubleshooting ................................................................. 44
If you cannot print ................................................................................44
If the printer cannot be detected ............................................................. 45
If running directly from the CD-ROM without installing AdminManager ........................... 45
If the printer name does not display correctly even after installing AdminManager ........... 45
If the printer still does not display after taking the aforementioned actions ..................... 46
Other Issues ........................................................................................48
Unable to Print from a Computer ............................................................................... 48
OS-Specic Constraints .......................................................................................... 49
5. Appendix ........................................................................... 50
Index ...................................................................................... 51
Oki contact details ................................................................... 52
- 8 -
Page 9

Checking Products
1. Setup
How to set up is explained in this chapter.
●● Checking Products
Checking Package Contents
Check that you have everything shown below.
● Network card
● Installation guide
1
1. Setup
● Network Software CD-ROM
● Mounting screws (2 pcs.)
Note
● An Ethernet cable is not supplied with your packege.
Procure them separately.
- 9 -
Page 10
1
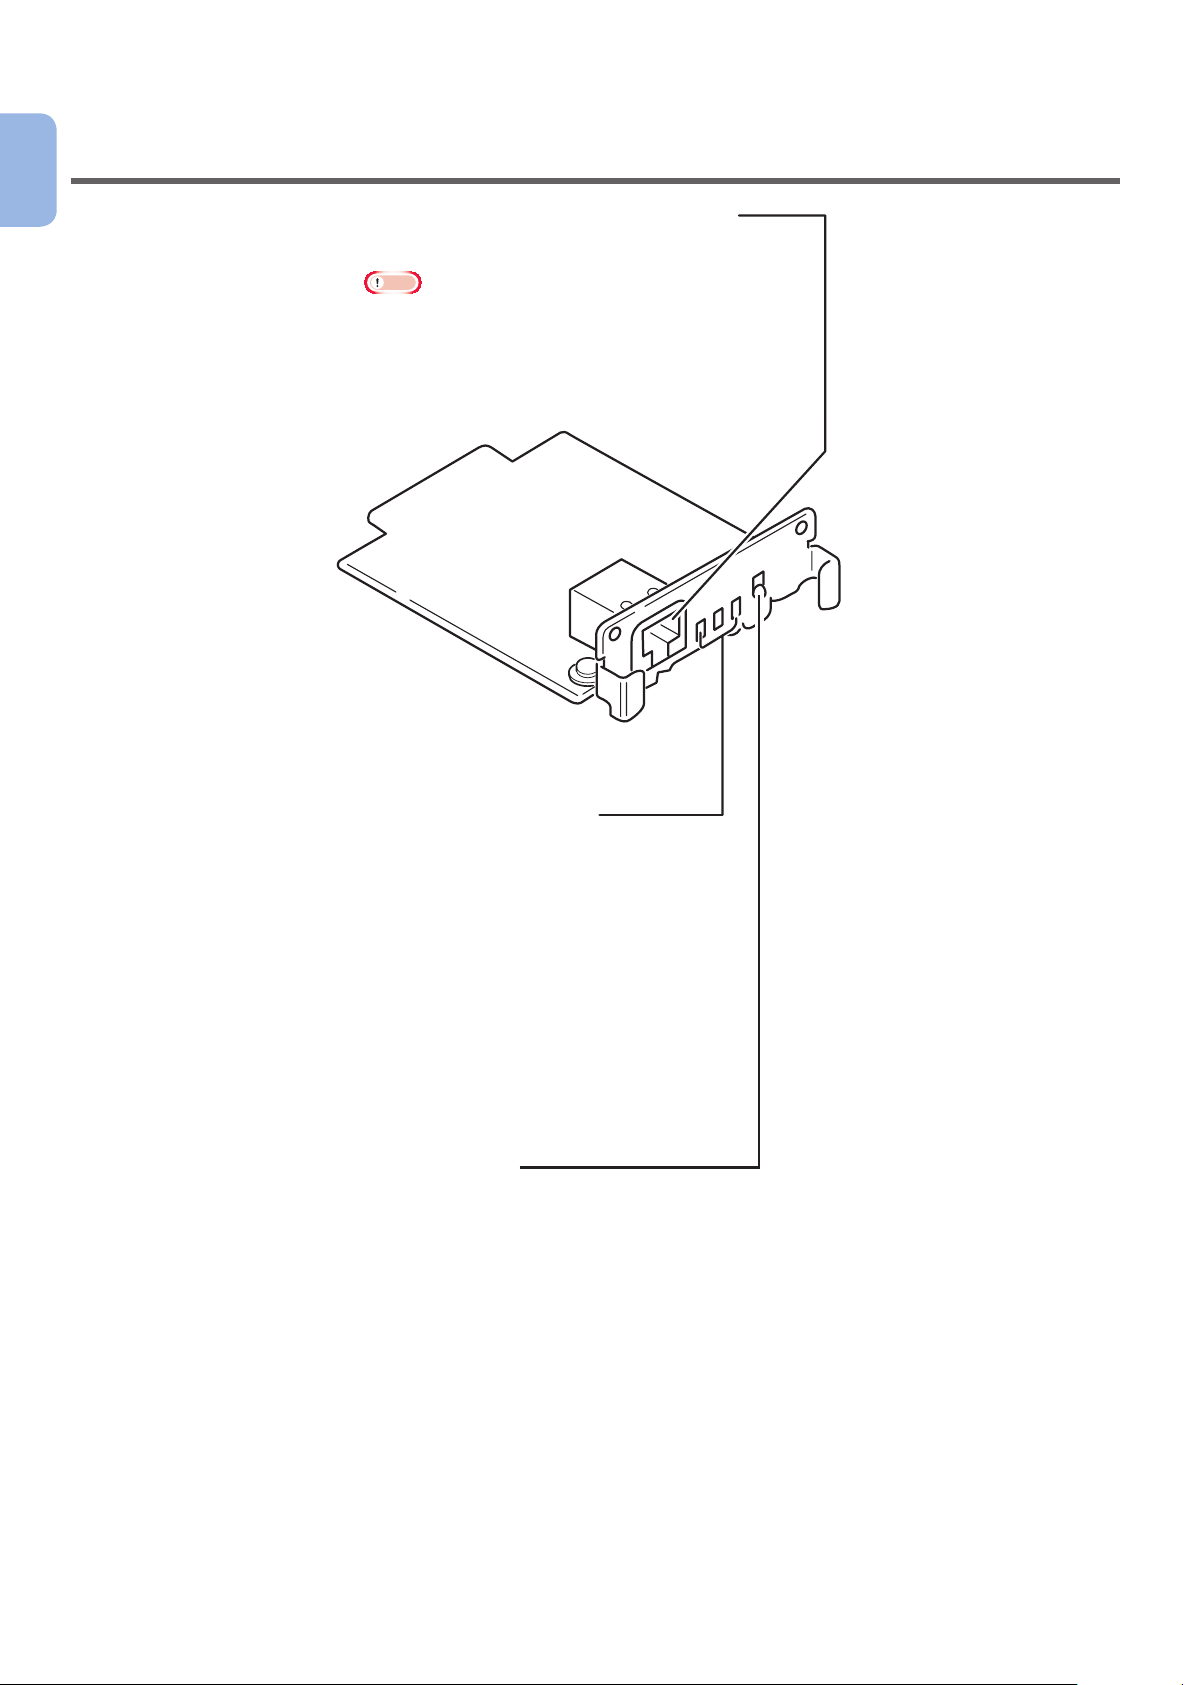
●● Part Names of the Network Card
1. Setup
100 BASE-TX/10 BASE-T connector
Connect with a twisted pair cable.
Note
● Switching between 10 BASE-T and 100 BASE
TX is automatic.
STAT lamp (Orange)
Flashes when data is being
received.
LINK 10M lamp (Green)
Lights up when connected
by 10 BASE-T
LINK 100M lamp (Green)
Lights up when connected
by 100 BASE-T
Push switch
This allows you to initialize the
Ethernet port, conduct a self-diagnosis
test and print the details of settings.
- 10 -
Page 11
Connecting to a Computer
●● Connecting to a Computer
This section explains how to connect your printer to a computer via network and install a printer driver
software using the provided “CD-ROM”.
Prepare a computer with a CD-ROM drive.
Product Requirements
Supports the following operating systems:
● Windows 8/Windows 8 (64bit version)
● Windows Server 2012
● Windows 7/Windows 7 (64bit Version)
● Windows Vista/Windows Vista (64bit Version)
● Windows Server 2008 R2
● Windows Server 2008/Windows Server 2008 (x64 Version)
● Windows XP/Windows XP (x64 Version)
● Windows Server 2003/Windows Server 2003 (x64 Version)
● Windows 2000
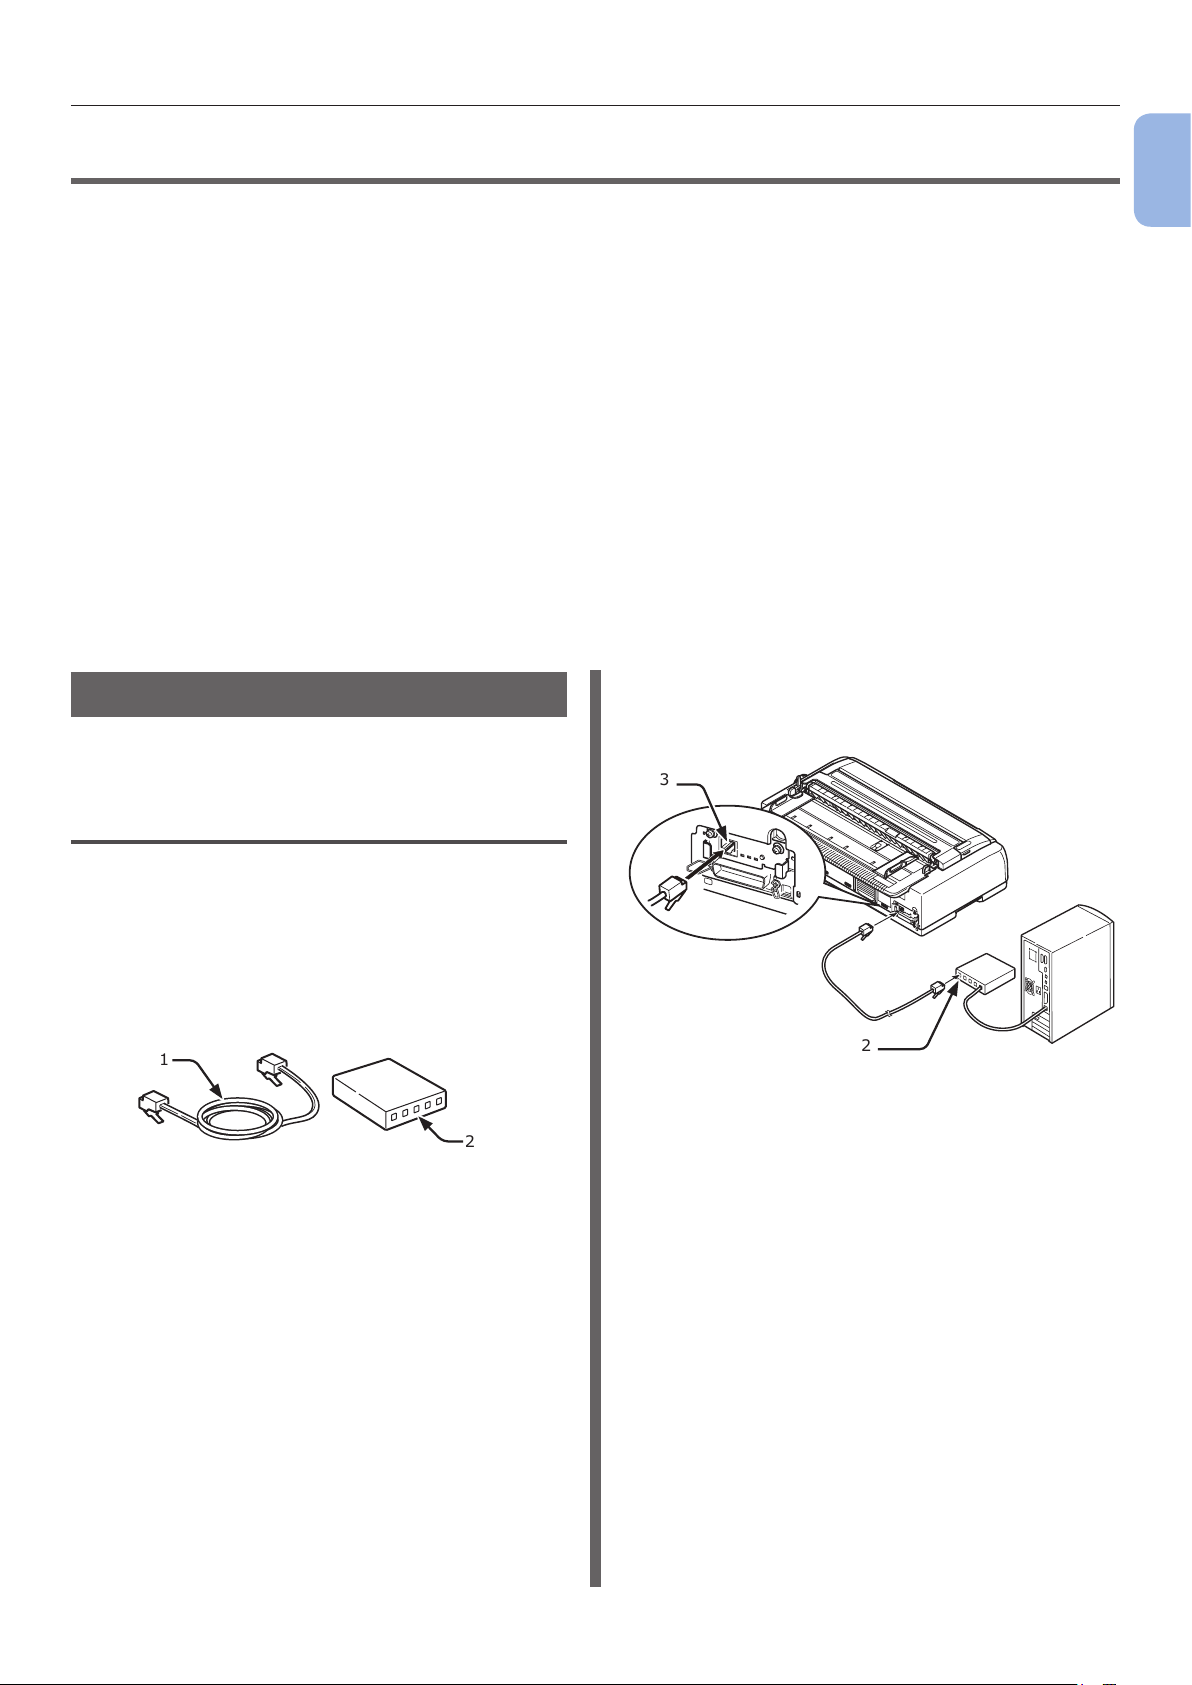
Network Connection
Perform the following procedure to connect your
printer to a computer via network.
4 Plug the other end of the Ethernet cable
into the hub (2).
3
1
1. Setup
Connecting an Ethernet Cable
Be sure to connect your printer to a network
with an Ethernet cable before driver installation.
1 Prepare an Ethernet cable (1) and a hub
(2).
Prepare an Ethernet cable (category 5, twisted
pair, straight) and a hub separately.
1
2
2 Turn off your printer and computer.
3 Plug one end of the Ethernet cable into
the network interface connection (3) on
the back of the printer.
2
- 11 -
Page 12
Connecting to a Computer
Installing a Printer Driver
1
To complete the network connection with a
Windows computer, rst set IP addresses for the
1. Setup
printer, and then install a printer driver on the
computer.
If there is no DHCP server or BOOTP server on
the network, you need to manually congure the
IP address on the computer or printer.
If your network administrator or internet service
provider species an unique IP address for the
computer and your printer, you need to set the
IP addresses manually.
Note
● You need to complete the network setting of the computer
before this procedure.
● To complete this procedure, you must be logged in as an
administrator.
● When setting an IP address manually, ask the network
administrator or your internet service provider which
IP address to use. If the IP address is set wrong, the
network may go down or Internet access may be disabled.
Memo
● If conguring a small network consisting of only your
printer and a computer, set IP addresses as shown below
(according to RFC1918).
For the computer
IP address : 192.168.0.1 - 254
Subnet mask : 255.255.255.0
Default gateway : not used
DNS server : not used
For the printer
IP address Set : Manual
IP address:
Subnet Mask : 255.255.255.0
Default Gateway : 0.0.0.0
192.168.0.1 - 254 (select a
different value from that of the
computer)
First, Set the IP address of the printer.
Install the “AdminManager” to set the
printer network. For details, please refer to
“AdminManager” P.21.
1 If the [Start] screen is displayed, click
[Desktop] at the top of the screen.
2 Insert the “Network Software CD-ROM”
provided with the network card.
3 If [Tap to choose what happens with
this disc.] is displayed, click the display.
4 If [Choose what to do with this disc.]
is displayed, click [Run Setup.exe].
Memo
● If the [Auto Play] dialog appears in Windows Vista,
double-click on [Run Setup.exe].
● If the dialog does not appear even if you have placed the
network software CD-ROM in the CD-ROM drive, double
click on [D:\Setup.exe].
5 Select the language and click [Next].
6 Read the license agreement and then
click [I Agree].
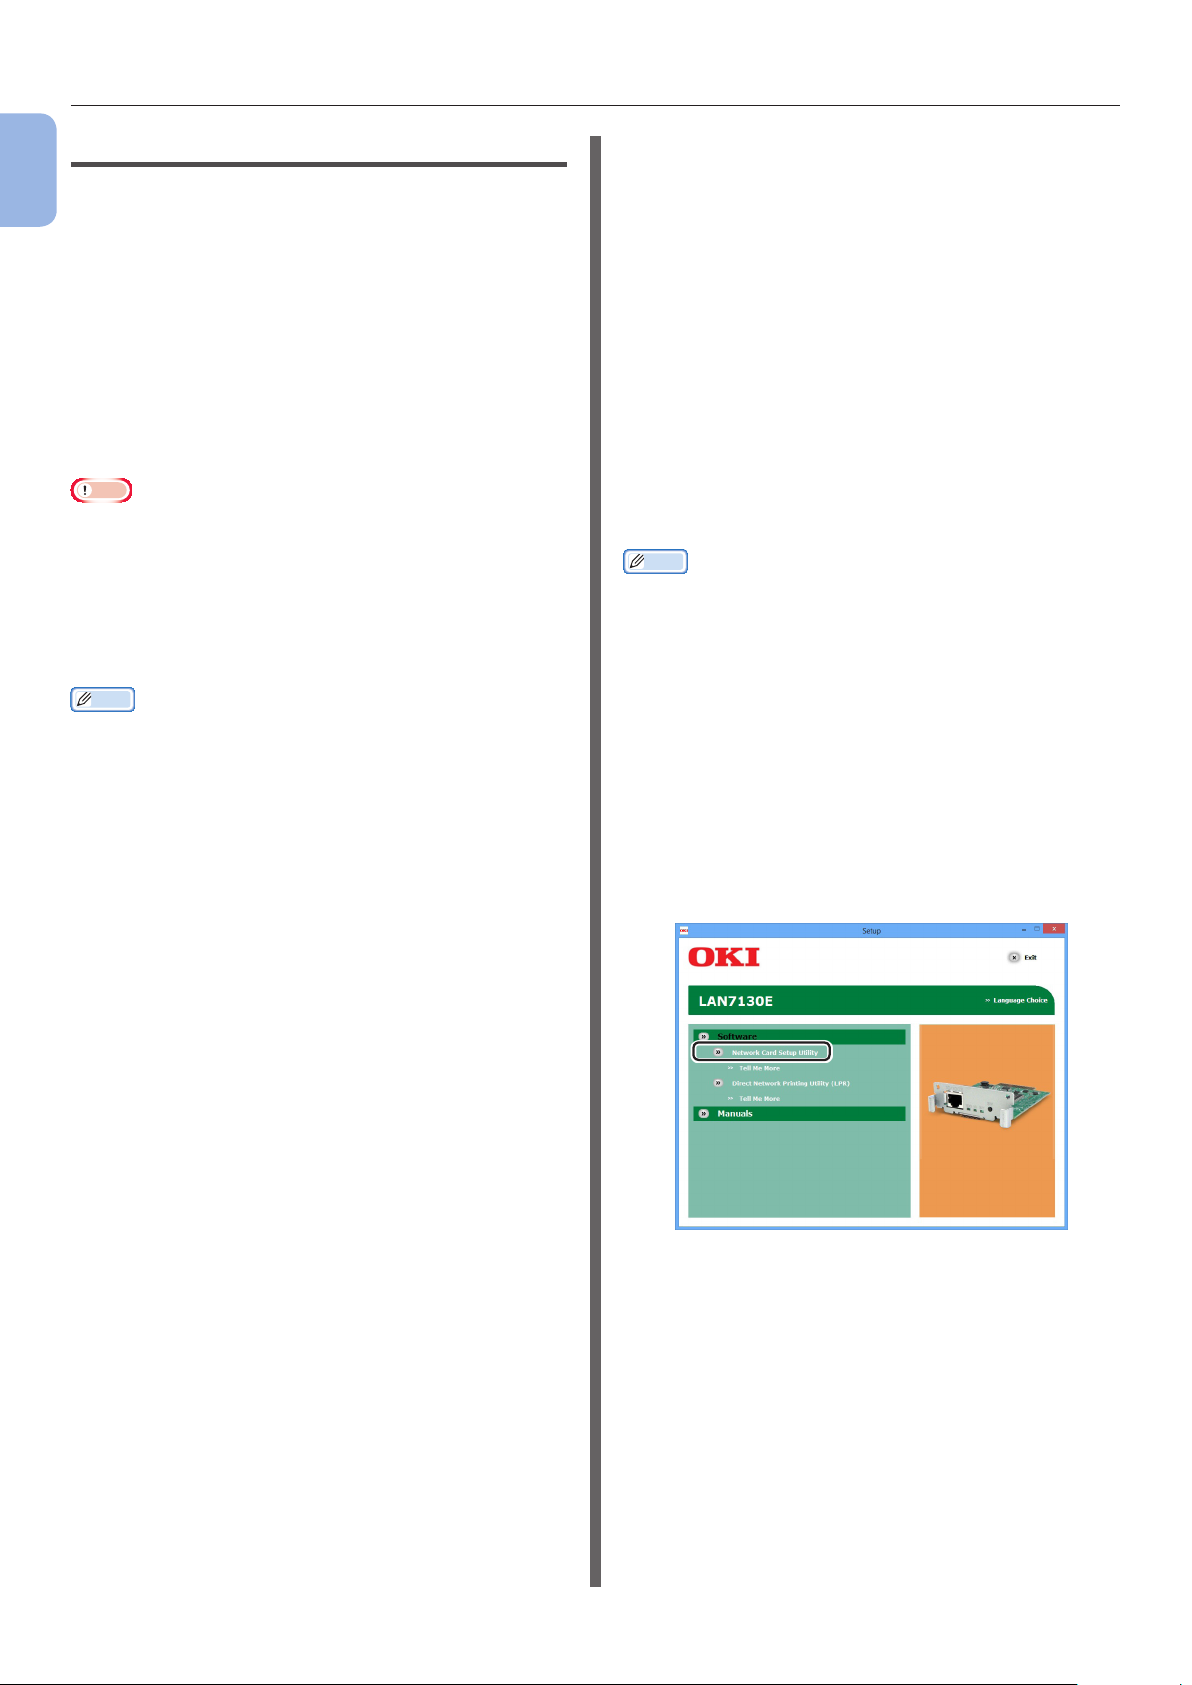
7 When the following screen appears, click
on [Network Card Setup Utility] to
select that.
- 12 -
8 When the Setup Utility starts, click on
the language to use.
9 Click [OKI Device Standard Setup].
Page 13
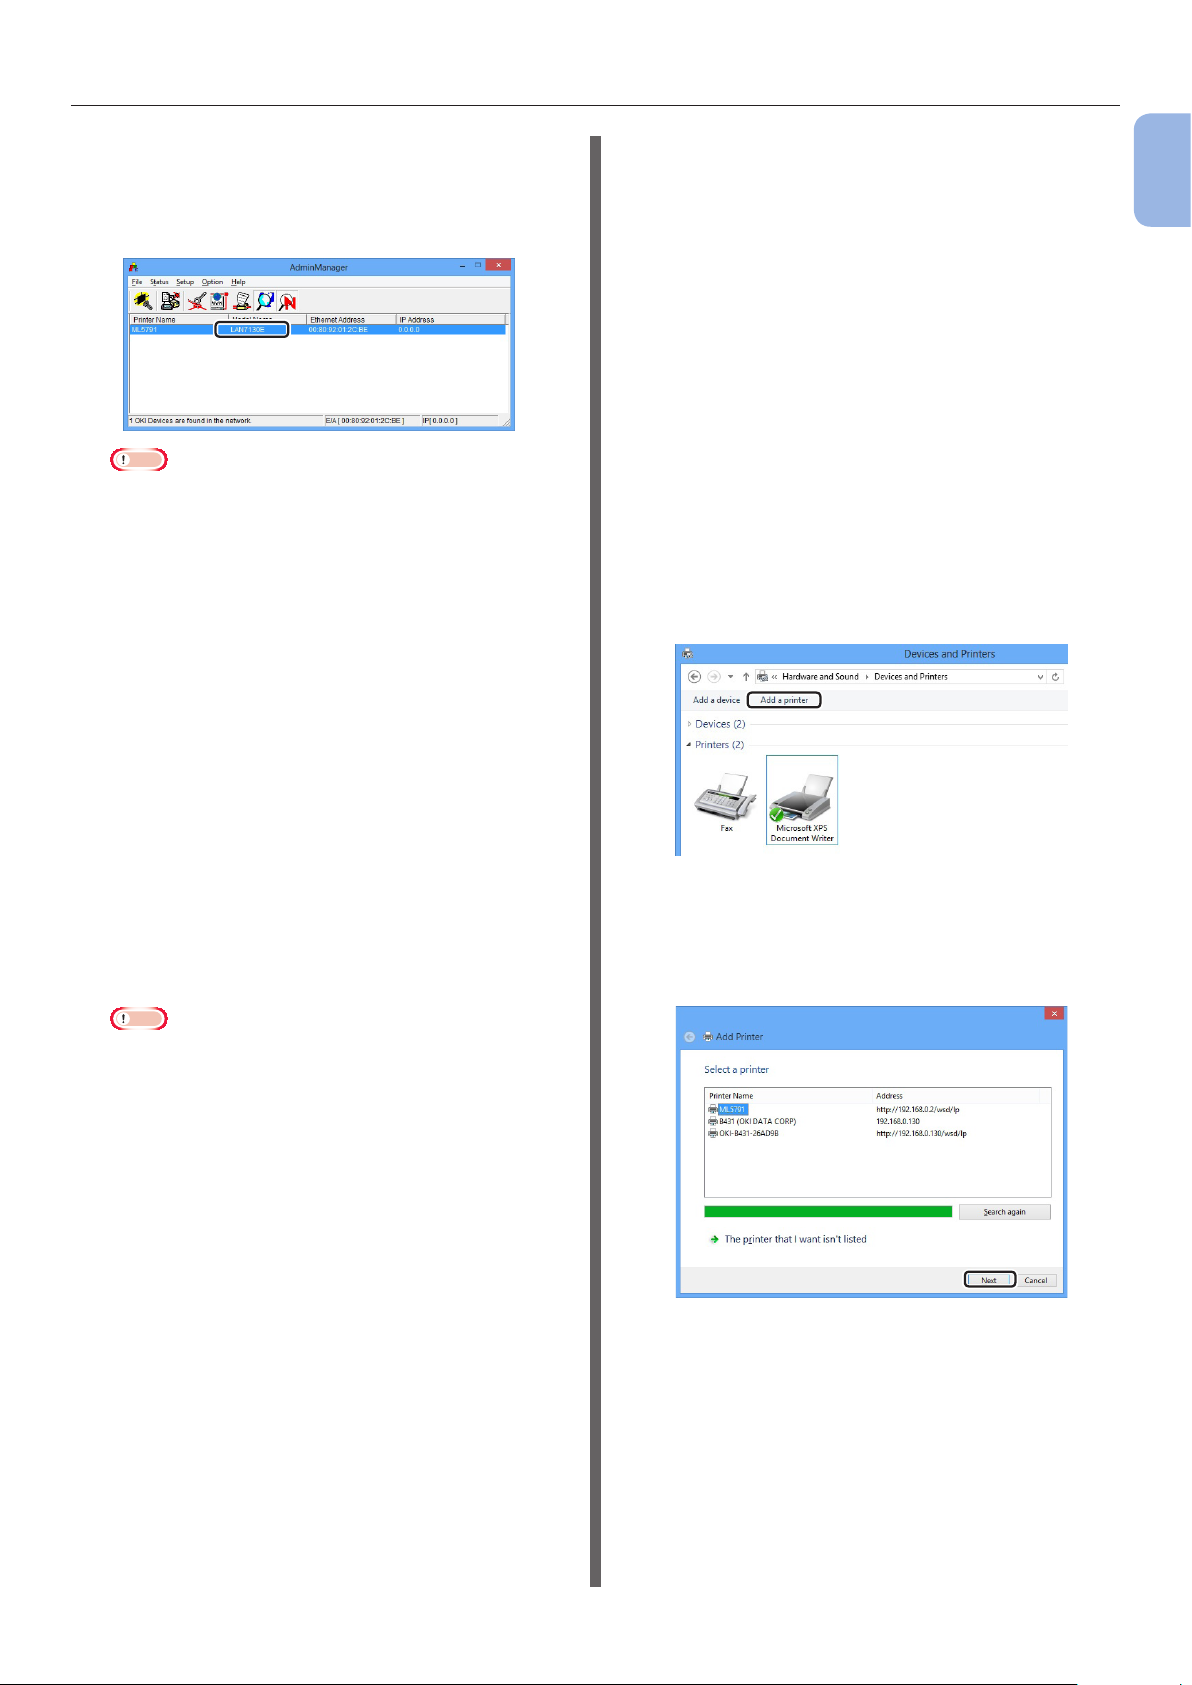
Connecting to a Computer
10 Select the Ethernet address from the
list, and then select the printer you want
to congure.
The Model Name will be displayed as “LAN7130E”.
Note
● The Ethernet address is displayed in [NIC Check] in
the conguration information of the network.
● [DHCP/BOOTP protocol] is set to [ENABLE] by
default. If a DHCP/BOOTP server is present on the
network, the IP address obtained by the server will
be displayed.
● The printer may not be detected if rewall or other
security software has been set. In this case, stop
the rewall or other security software or register
AdminManager as an exception and try again.
For details, please refer to “If the printer cannot be
detected” P.45.
Next, install the printer driver on the
computer.
Windows 8/Server 2012
1 If the [Start] screen is displayed, click
[Desktop] at the top of the screen.
2 Move the mouse cursor to the top
right corner of the screen to display
the charm bar, and click [Settings] >
[Control Panel] in this order.
(If you are using a touch-operated computer, ick
the right side of the screen to display the charm
bar.)
3 Click [View devices and printers].
4 Click [Add a printer] in the [Devices
and Printers] screen.
1
1. Setup
11 From the [Setup] menu, select [OKI
Device Setup].
12 If the settings conrmation message
appears, click on [YES].
13 Set the IP address and click on [OK].
14 Enter a password in the [Input
Password], and click on [OK].
Note
● The default password is the last 6 alphanumerical
digits of the [Ethernet address].
● The password entered will be displayed as “******”
on the screen.
● The password is case sensitive.
15 If a message indicating that IP address
setting is complete appears, click on
[Yes].
16 Conrm that the IP address has
been set correctly, and then exit the
AdminManager.
5 In the displayed screen, select the
printer that corresponds to the IP
address set for the printer, and click
[Next].
- 13 -
Page 14
Connecting to a Computer
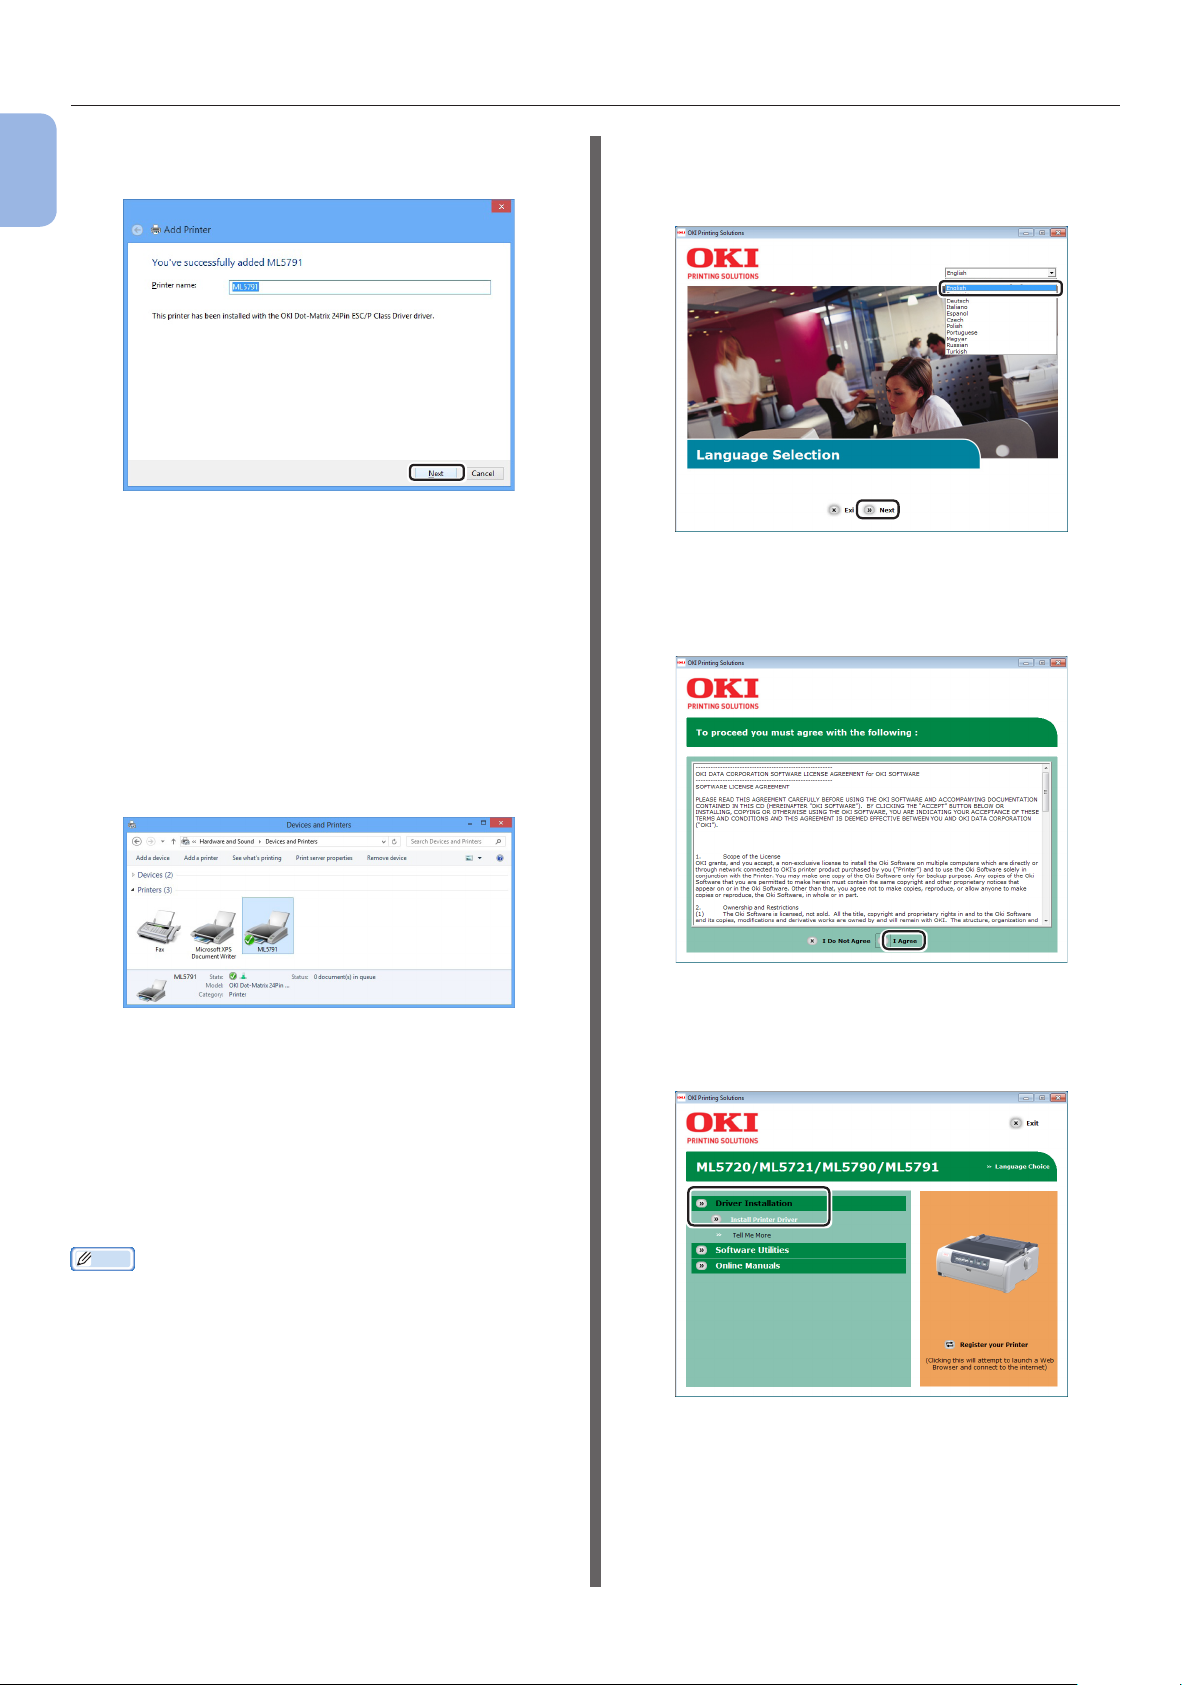
6 Check the printer name in the displayed
1
1. Setup
screen, and click [Next].
7 In the [Printer Sharing] screen, select
[Do not share this printer] and click
[Next].
8 In the displayed screen, click [Print test
page].
9 Click [Finish].
When the printer icon appears in the
[Devices and Printers] screen, setup
is complete.
2 When the [Language Selection] screen
appears, select the appropriate language
and click on [Next].
3 If the [Software License Agreement]
screen appears, read the license
agreement and click on [I Agree].
OS other than Windows 8/Server 2012
1 Insert the “Printer Software CD-ROM”
supplied with the printer.
If the [Auto Play] screen appears, click on
[Run Setup.exe].
Also, if the [User Account Control] screen
appears, click on [Yes].
Memo
● If the [Auto Play] dialog appears in Windows Vista,
double-click on [Run Setup.exe]. Also, if the [User
Account Control] screen appears, click on [Continue].
● If the dialog does not appear even if you have placed the
network software CD-ROM in the CD-ROM drive, double
click on [D:\Setup.exe].
4 When the following screen appears,
select the [Driver Installation] and
click on [Install Printer Driver].
- 14 -
Page 15
Connecting to a Computer
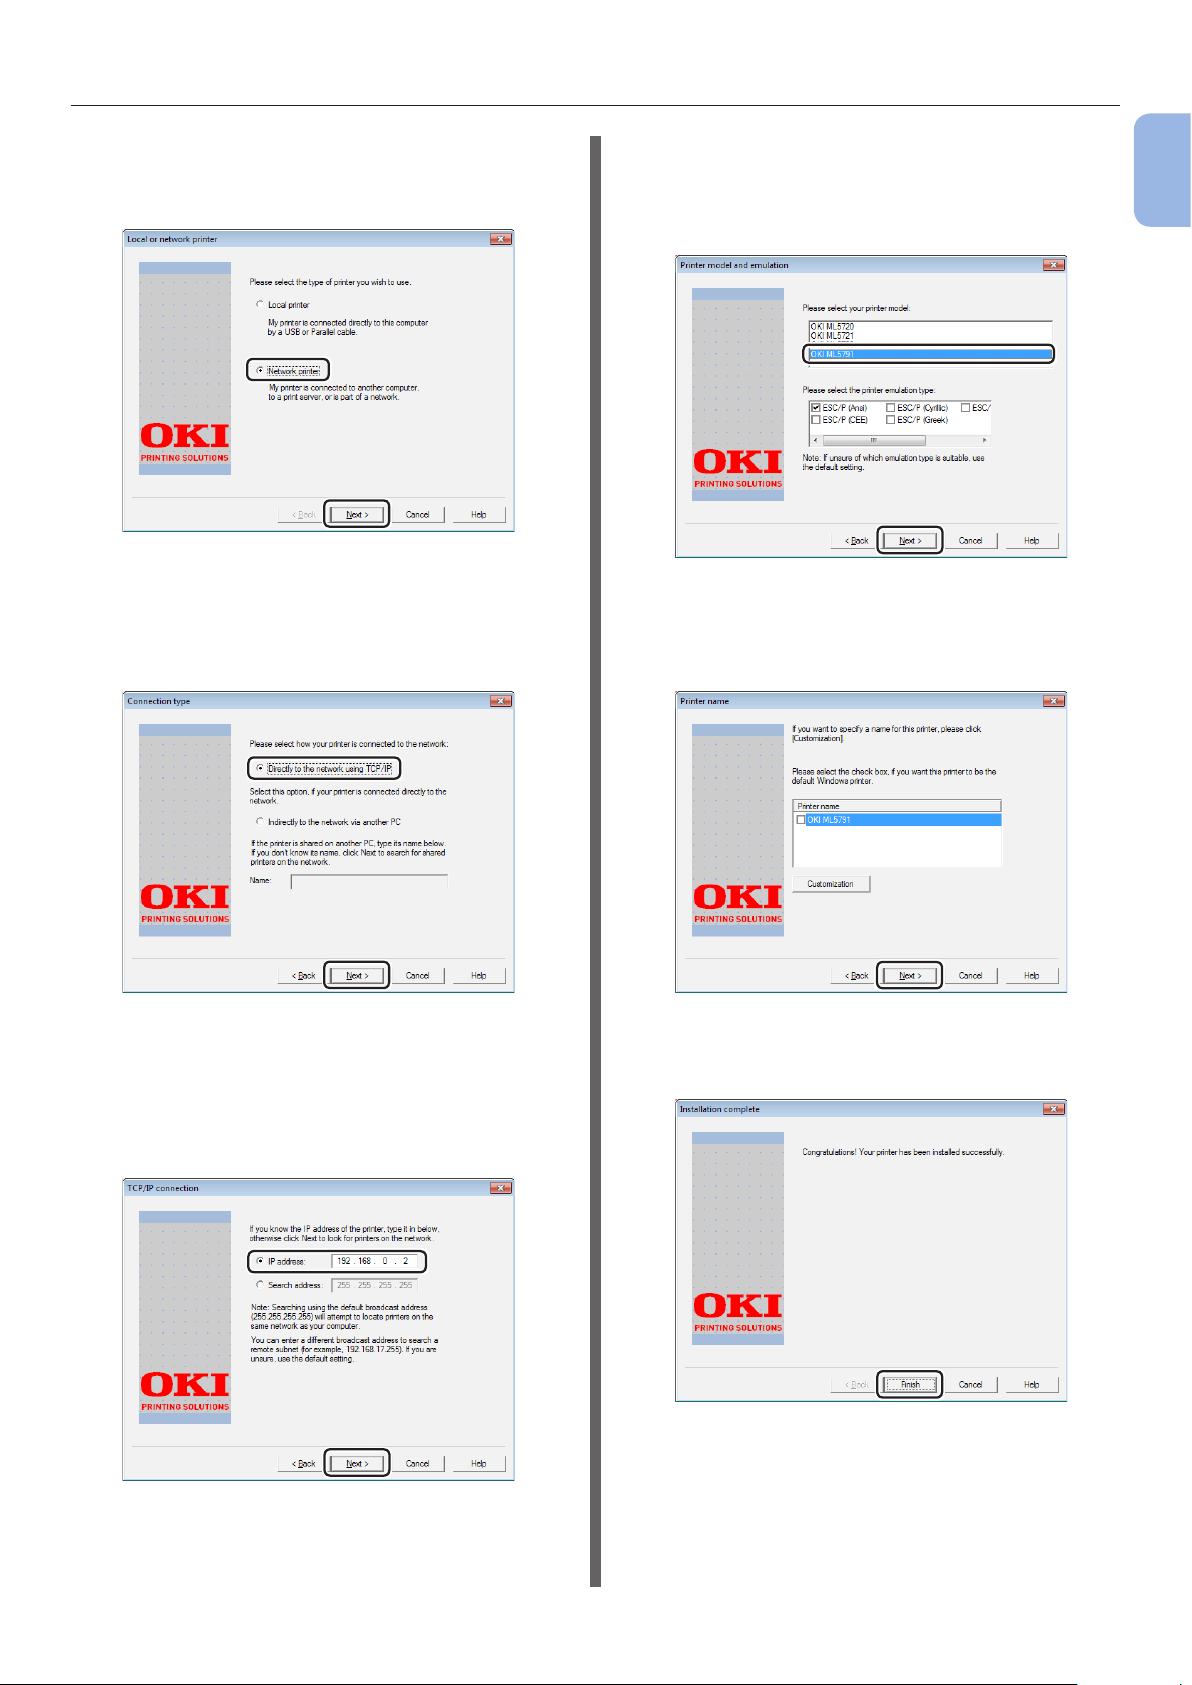
5 When the [Local or network printer]
screen appears, select the [Network
printer] and click on [Next].
6 When the [Connection type] screen
appears, select the [Directly to the
network using TCP/IP] and click on
[Next].
8 When the [Printer model and
emulation] screen appears, select the
Printer model and Emulation, and then
click on [Next].
9 If the [Printer name] screen appears,
set the default printer and printer name
if necessary, and then click on [Next].
1
1. Setup
7 If the [TCP/IP Connection] screen
appears, select [IP address] and set
the IP address that is set to the printer.
(The IP address in the diagram is an
example for reference purposes.)
10 When the [Installation complete]
screen appears, installation is complete.
11 Click [Start] > [Devices and Printers].
- 15 -
Page 16
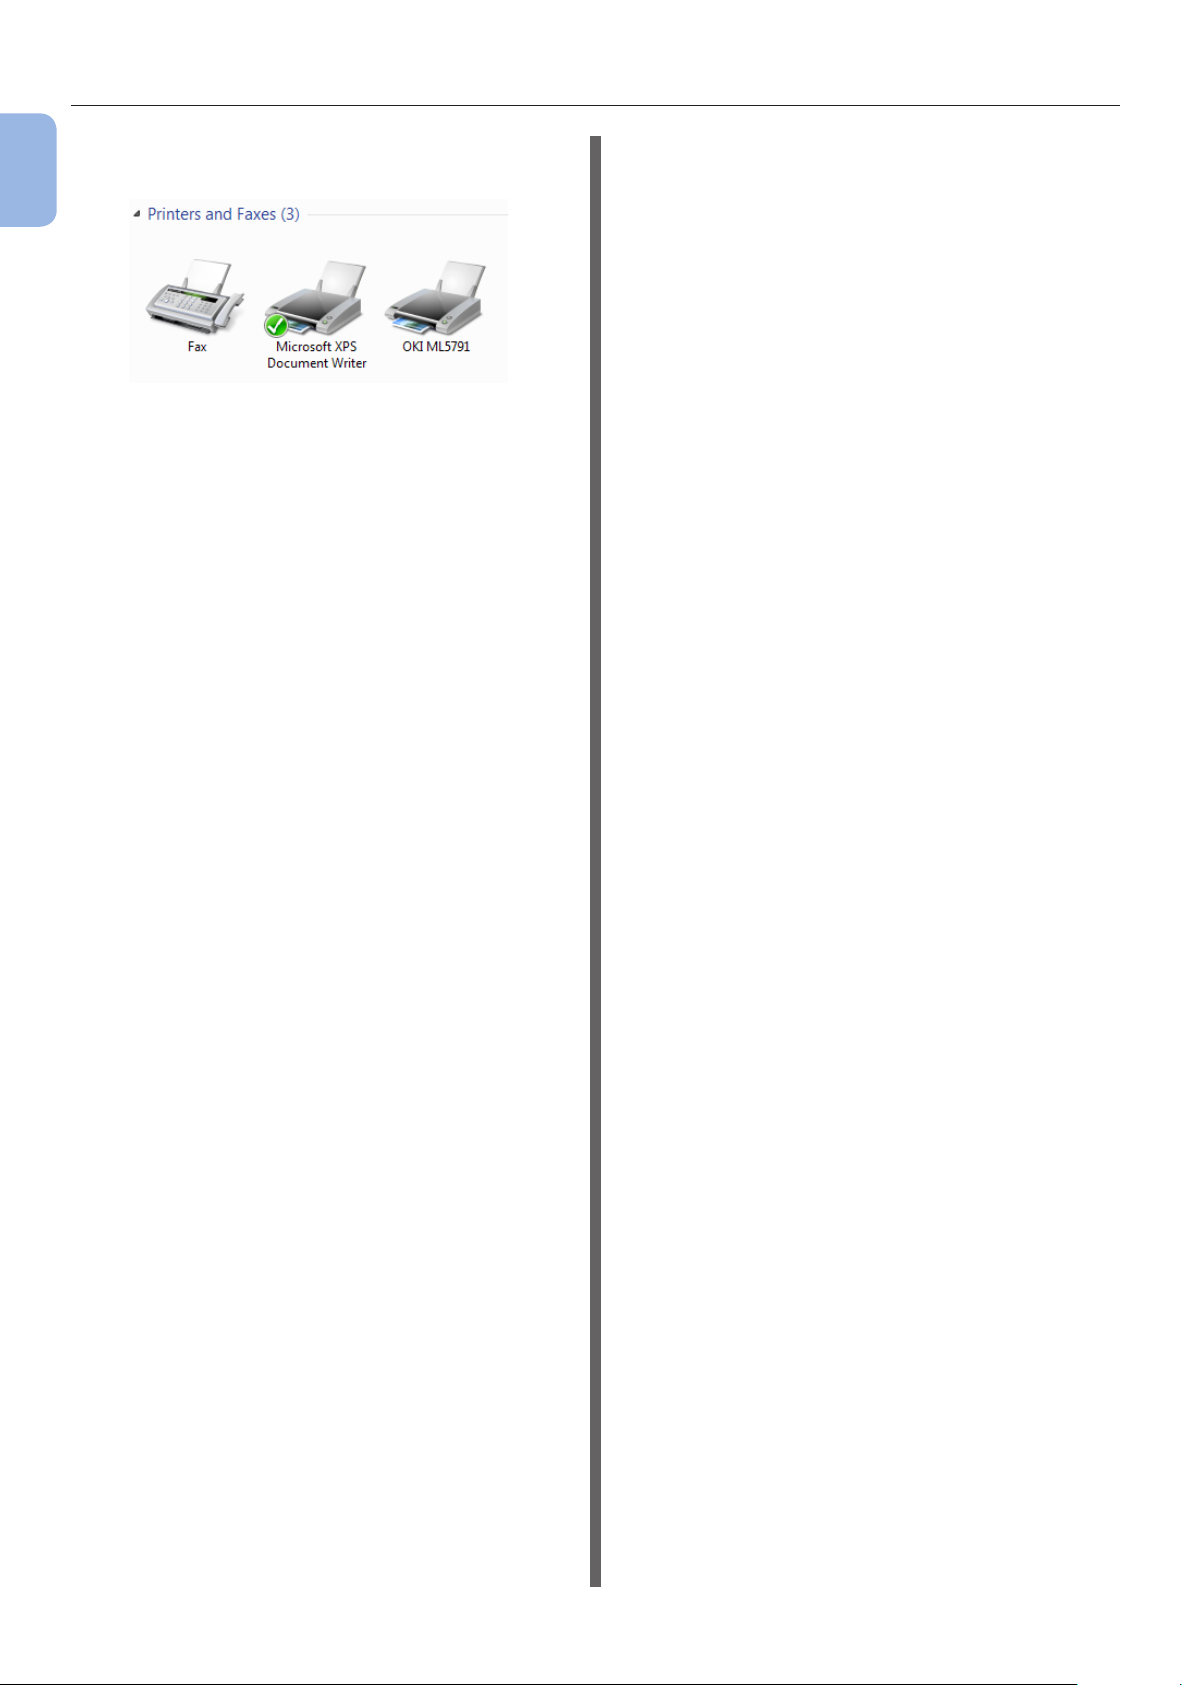
Connecting to a Computer
12 Check that the [ML5791] icon is
1
1. Setup
displayed.
13 Remove the “Printer Software CD-ROM”
from the computer.
Finish by test printing from a computer.
1 Open a printer driver property.
2 Click Test Print.
The installation is complete.
- 16 -
Page 17

Overview of Utilities
2. Using Utility Software
This chapter explains useful software functions for using your printer.
●● Overview of Utilities
The following is a list of utilities that you can use for your printer. For details on how to use these
utilities, refer to their respective sections.
Windows Utilities
2
2. Using Utility Software
Item
AdminManager Network card
Quick Setup Simple protocol
OKI LPR Utility Printing You can print a document
PrintSuperVision
MultiPlatform Edition
*1
Function
Scope
settings
settings
Managing the
printer
Details
You can congure the printer
network settings and check
the status. You can also
change the IP address.
Simple set to enable/disable
for each protocol.
via the network connection,
manage print jobs, and check
the printer status. And, when
an IP address of a printer
is changed, the setting is
changed automatically.
This is a web-based
application for managing
printers connected to the
network. You can check the
conguration information
and supplies information of
multiple devices.
You can also display graphs
by individual printer for dayto-day print volumes.
System
Requirements
Windows 8/
Windows Server 2012/
Windows 7/
Windows Vista/
Windows Server 2008 R2/
Windows Server 2008/
Windows XP/
Windows Server 2003/
Windows 2000
Windows 8/
Windows Server 2012/
Windows 7/
Windows Vista/
Windows Server 2008 R2/
Windows Server 2008/
Windows XP/
Windows Server 2003/
Windows 2000
Windows 8/
Windows Server 2012/
Windows 7/
Windows Vista/
Windows Server 2008 R2/
Windows Server 2008/
Windows XP/
Windows Server 2003/
Windows 2000 SP4
For details on the support
status of new operating
systems, see the Oki Data
website.
Refer to
page 21
page 23
page 24
*1
Not included in the “Network Software CD-ROM”. Please download from the Oki Data website.
- 17 -
Page 18

Installing Utilities
●● Installing Utilities
Install from the Network Software CD-ROM
2
If there is a utility that you would like to use,
follow the procedure below.
2. Using Utility Software
1 If the [Start] screen is displayed, click
[Desktop] at the top of the screen.
2 Insert the “Network Software CD-ROM”
provided with the network card.
3 If [Tap to choose what happens with
this disc.] is displayed, click the display.
4 If [Choose what to do with this disc.]
is displayed, click [Run Setup.exe].
If the [User Account Control] dialog box
appears, click [Yes].
5 Select a language and click [Next].
6 Read the user license agreement and
select [I Agree].
Download from the Oki Data website and install
If there is a utility that you would like to use,
follow the procedure below.
1 Access the Oki Data website (http://
www.oki.com).
2 Select the utility you would like to use,
and follow the onscreen instructions to
download.
3 Double-click on the icon of the software
downloaded to your computer.
4 Follow the onscreen instructions to
install.
7 Select the utility you would like to
install.
8 Click [Exit].
- 18 -
Page 19

●● Windows utility
This section explains web pages that can be used by both Windows.
When using web pages, the following conditions must be met.
Windows utility
● TCP/IP must be enabled.
● One of the following must be installed: Microsoft Internet Explorer 6.0 or later.
Memo
● Either set your web page security settings to a medium level, or enable cookies.
● In order to access the [Admin Setup] menu, the administrator password is required. The default password is “aaaaaa”.
Web page
1 Click on [Administrator Login] on the
main page.
You can carry out the following operations from
the web page.
● Display the printer status.
● Congure tray, network, function default, and
printer settings.
Memo
● In order to change the printer settings on the web page,
you need to be logged in as the administrator.
Reference
● For details on how to congure the network settings,
refer to “Changing Network Settings From the Web Page”
P.32.
2 Enter “root” in [Username] and
enter the administrator password in
Accessing the Printer Web page
[Password], and then click [OK].
2
2. Using Utility Software
1 Launch your web browser.
2 Type in “http:// (printer’s IP address)”
in the address bar and press the
<Enter> key.
Logging In as the Administrator
Note
● You must be authorized as the administrator.
Memo
● The default administrator password of the printer is
“aaaaaa”.
3 Click [SKIP].
If you have made changes to the settings on this
screen, click [OK].
The menus available only for the administrator
will be displayed.
- 19 -
Page 20

Windows utility
Changing the Administrator’s
password
You can change the printer administrator’s
password from the web page.
The administrator’s password set on the web
2
page can be used when logging into the printer
through the web page.
2. Using Utility Software
Memo
● The password should be 4-24 characters long, and should
be in one-byte (alphanumeric) characters.
● The password is case sensitive.
1 Launch your web browser and enter the
printer’s IP address.
2 Login using [Administrator Login],
select [Admin Setup].
3 [Network Setup] > [Security] >
[Change Network Password].
4 Enter a new password in
[New Web Password].
5 Reenter the password in
[Verify Web Password].
The entered password will not be displayed. Write
down your password and store it in a safe place.
4 Enter a new password in
[New Network Password].
5 Reenter the password in
[Verify Network Password].
The entered password will not be displayed. Write
down your password and store it in a safe place.
6 Click on [Submit].
The network system reboots to enable the new
settings.
Checking Printer Status
You can check the status of your printer from
the web page.
1 Launch your web browser and enter the
printer’s IP address.
The status of the printer is displayed.
Note
● It may take some time to obtain the printer status. If the
web page cannot be displayed properly, wait for a while
and try again.
Memo
● When logging in as the administrator, you can also click
on [Status Window] in order to view the simplied
display of the printer status.
6 Click on [Submit].
The network system reboots to enable the new
settings.
Memo
● You do not need to restart the printer. Next time when
you log in as the administrator, use the new password.
Changing the password for
AdminManager and Telnet
You can change the AdminManager and Telnet’s
password from the web page.
Memo
● The password should be up to 15 characters long, and it
should be in one-byte (alphanumeric) characters.
● The password is case sensitive.
● The AdminManager and Telnet passwords are the same.
1 Launch your web browser and enter the
printer’s IP address.
2 Login using [Administrator Login],
select [Admin Setup].
Changing Printer Settings
You can change the main unit’s settings from the
web page.
1 Launch your web browser and log in as
the administrator.
2 Change the settings and click [Submit].
3 [Network Setup] > [Security] >
[Change Network Password].
- 20 -
Page 21

AdminManager
●● AdminManager
You can use the AdminManager to congure the printer network settings and check the status.
Operating environment
Computer running Windows 8/Server 2012/
Windows 7/Server 2008 R2/Server 2008/
Vista/Server 2003/XP/2000 Computer
running with TCP/IP.
Note
● The computer must be on the same segment as the
printer.
● Administrator privileges are required for setup.
The following explanation uses Windows 8
for examples.
Launching the AdminManager
1 Turn on the printer.
2 If the [Start] screen is displayed, click
[Desktop] at the top of the screen.
3 Insert the “Network Software CD-ROM”
provided with the network card.
8 Click on [Network Card Setup Utility].
2
2. Using Utility Software
9 Click on [Languege].
10 Click on [OKI Device Standard
Setup].
11 Select [Install and Execute] and click
on [Next].
AdminManager launches.
Congure Your Printer’s Network
4 If [Tap to choose what happens with
this disc.] is displayed, click the display.
5 If [Choose what to do with this disc.]
is displayed, click [Run Setup.exe].
If the [User Account Control] dialog box
appears, click [Yes].
Memo
● If the [Auto Play] dialog appears in Windows Vista,
double-click on [Run Setup.exe].
● If the dialog does not appear even if you have placed the
network software CD-ROM in the CD-ROM drive, double
click on [D:\Setup.exe].
6 Select a language and click [Next].
7 Read the license agreement and then
click [I Agree].
1 Select the Ethernet address from the
list, and then select the printer you want
to congure.
The Model Name will be displayed as “LAN7130E”.
Note
● The Ethernet address is displayed in “NIC Check” in the
conguration information of the network.
● “DHCP/BOOTP protocol” is set to “ENABLE” by default. If
a DHCP/BOOTP server is present on the network, the IP
address obtained by the server will be displayed.
● The printer may not be detected if rewall or other
security software has been set. In this case, stop
the rewall or other security software or register
AdminManager as an exception and try again. For details,
please refer to “If the printer cannot be detected” P.45.
2 Select [OKI Device Setup] from the
[Setup] menu.
- 21 -
Page 22
AdminManager
3 Enter a password in the [Input
Password] eld, and click on [OK].
Note
● The default password is the last 6 alphanumerical digits of
the [Ethernet address].
● The password entered will be displayed as “******” on
2
2. Using Utility Software
the screen.
● The password is case sensitive.
4 Enter the required items, and click on
[Set].
Item Settings
General tab
TCP/IP tab Set the IP address, etc.
NetWare tab Set if using NetWare.
NetBEUI tab Set if using NetBEUI.
SNMP tab Set if using SNMP.
SNTP tab Set if using SNTP.
Maintenance tab
SSL/TLS tab Set if using SSL / TLS.
Change the password.
Set constraints on network
service use.
Conguring the Environment
You can set the environment for AdminManager.
The [Option] menu, select [Environment
Setup].
Item Settings
TCP/IP tab Set whether or not to search for
printers by TCP/IP.
Set the broadcast address.
SNMP tab Set whether or not to obtain the
printer name with SNMP. Set the
applicable community name.
Timeout tab Set in seconds the time to wait for
printer response.
Set in seconds the time before
timeout in communications between
AdminManager and the printer.
Set the number of retries to
attempt in communications between
AdminManager and the printer.
Kerberos tab Set if using Kerberos.
Printer Port tab Set constraints on network
service use.
5 If there are no mistakes in the settings,
click on [OK].
6 To enable settings, click on [Yes].
Note
● After rebooting, the printer will run with the new settings.
7 Exit the AdminManager.
- 22 -
Page 23

●● Quick Setup
You can use Quick Setup to easily congure the printer.
Quick Setup
Operating environment
Computer running Windows 8/Server 2012/
Windows 7/Server 2008 R2/Server 2008/
Vista/Server 2003/XP/2000 Computer
running with TCP/IP.
Note
● The computer must be on the same segment as the
printer.
● Administrator privileges are required for setup.
The following explanation uses Windows 8 for
examples.
Launching the Quick Setup
1 Turn on the printer.
2 If the [Start] screen is displayed, click
[Desktop] at the top of the screen.
3 Insert the “Network Software CD-ROM”
provided with the network card.
8 Click on [Network Card Setup Utility].
2
2. Using Utility Software
9 Click on [Languege].
10 Click on [OKI Device Quick Setup].
11 Click on [Next].
12 Select the Ethernet address of the
printer to congure, and click on [Next].
The Model Name will be displayed as “LAN7130E”.
4 If [Tap to choose what happens with
this disc.] is displayed, click the display.
5 If [Choose what to do with this disc.]
is displayed, click [Run Setup.exe].
If the [User Account Control] dialog box
appears, click [Yes].
Memo
● If the [Auto Play] dialog appears in Windows Vista,
double-click on [Run Setup.exe].
● If the dialog does not appear even if you have placed the
network software CD-ROM in the CD-ROM drive, double
click on [D:\Setup.exe].
6 Select a language and click [Next].
7 Read the license agreement and then
click [I Agree].
Note
● The Ethernet address is displayed in “NIC Check” in the
conguration information of the network.
- 23 -
Page 24

Quick Setup
Conguring with Quick Setup
1 Congure TCP/IP, and click on [Next].
2 Congure NetWare, and click on [Next].
2
3 Congure NetBEUI, and click on [Next].
2. Using Utility Software
4 Check the settings, and click on
[Execute].
Settings are then sent to the printer.
5 To enable settings, click on [Finish].
6 Quitting Quick Setup.
Note
● After rebooting, the printer will run with the
new settings.
OKI LPR Utility
You can use the OKI LPR utility to perform a
print job via network, manage print jobs, and
check the printer status.
For how to install OKI LPR utility, please refer to
“2. Using Utility Software” P.17.
In order to use OKI LPR Utility, TCP/IP must be
activated.
Note
● The OKI LPR utility cannot be used for shared printers.
Please use the standard TCP/IP port.
Launching the Utility
Windows 8/Server 2012
1 If the [Start] screen is displayed, click
[Desktop] at the top of the screen.
2 Move the mouse cursor to the top right
corner of the screen to display the
charm bar, and click [Search] from the
displayed items.
(If you are using a touch-operated computer, ick
the right side of the screen to display the charm
bar.)
3 Click [OKI LPR Utility] from [Okidata].
OS other than Windows 8/Server 2012
1 Click on [Start], and select [All
Programs] ([Program] in windows
2000)>[Okidata]>[OKI LPR Utility]>
[OKI LPR Utility].
- 24 -
Page 25

Quick Setup
Adding a Printer
You can add a printer to the OKI LPR utility.
Note
● Administrator privileges are required.
● If you cannot add a printer in Windows 7/Windows
Vista/Windows Server 2008 R2/Windows Server
2008, shut down the OKI LPR utility, right-click on
[Start] > [All Programs] > [Okidata] > [OKI
LPR Utility] > [OKI LPR Utility], and then select
[Run as administrator] to launch.
● If you cannot add the printer in Windows 8/
Windows Server 2012, exit the OKI LPR utility, select
[Search]>[Okidata] from the charm bar and right-click
on [OKI LPR Utility], and click [Run as administrator]
to launch the utility.
Memo
● You cannot add the printer already registered in the
OKI LPR utility. If you want to change the port, select
[Conrm Connections] in [Remote Print] menu.
1 Launch the OKI LPR utility.
2 Select [Add Printer] from the [Remote
Print] menu.
3 Select [Printer Name] and enter the IP
address.
Network printers and printers connected to the
LPR port are not displayed.
Checking/Deleting/Forwarding Jobs
You can conrm and delete print jobs. Also, if
you cannot print because the selected printer is
busy, ofine or out of paper, you can forward the
print jobs to another OKI printer.
Note
● Print jobs can only be forwarded to the same OKI printer
as the one you are using.
● Before forwarding a job, you need to add another same
OKI printer.
1 Launch the OKI LPR utility.
2 Select [Job Status] from the [Remote
Print] menu.
3 If you want to delete a print job, select
the job and then select [Delete Job]
from the [Job] menu.
4 If you want to forward a print job, select
the job and then select [Redirect] from
the [Job] menu.
Printing with Multiple Printers
You can print with multiple printers with a single
command.
2
2. Using Utility Software
4 When selecting a network printer, select
[Discover].
5 Click on [OK].
Downloading Files
You can download a le to the printer you have
added to the OKI LPR utility.
1 Launch the OKI LPR utility.
2 Select the download destination printer.
3 Select [Download] from the [Remote
Print] menu.
4 Select a le and click on [Open].
Displaying the Printer Status
1 Launch the OKI LPR utility.
2 Select a printer.
Note
● This function sends remote print jobs to multiple printers
and prints simultaneously.
● Administrator privileges are required.
1 Launch the OKI LPR utility.
2 Select the printer you would like to
congure.
3 Select printer [Conrm Connections]
from [Remote Print] menu.
4 Click on [Details].
5 Select the [Print to more than one
printer at a time] checkbox.
6 Click on [Options].
7 Click on [Add].
8 Enter the IP address of the printer for
simultaneously printing and click on
[OK].
3 Select [Printer Status] from [Remote
Print].
9 Click on [OK].
- 25 -
Page 26

Quick Setup
Opening a Webpage
You can open the printer web page from the OKI
LPR utility.
1 Launch the OKI LPR utility.
2
2 Select a printer.
2. Using Utility Software
3 Select [Web Setting] from the
[Remote Print] menu.
Memo
● You cannot open the web page when the web port
number has been changed. Carry out the following
procedure, and recongure the OKI LPR utility port
number.
a Select a printer.
b Select [Conrm Connections] from
[Remote Print].
c Click on [Advanced].
d Enter the port number into [Port
Numbers].
e Click on [OK].
1 Launch the OKI LPR utility.
2 Select [Setup] from the [Option]
menu.
3 Select the [Auto Reconnect] checkbox
and click on [OK].
Uninstalling the OKI LPR Utility
Note
● Administrator privileges are required.
Windows 8/Server 2012
1 If the [Start] screen is displayed, click
[Desktop] at the top of the screen.
2 Conrm that the OKI LPR utility is
closed.
3 Move the mouse cursor to the top right
corner of the screen to display the
charm bar, and click [Search] from the
displayed items.
(If you are using a touch-operated computer, ick
the right side of the screen to display the charm
bar.)
Adding Comments to Printers
You can add comments to the printers added
into the OKI LPR utility in order to identify them.
1 Launch the OKI LPR utility.
2 Select a printer.
3 Select [Conrm Connections] from
[Remote Print].
4 Enter a comment and click on [OK].
5 Select [Show comments] from the
[Option] menu.
Automatically Conguring the IP
Address
You can set it to ensure that the connection with
the original printer is maintained even if the
printer’s IP address is changed.
Note
● Administrator privileges are required.
Memo
● The IP address may change if DHCP is being used
to dynamically assign IP addresses or the network
administrator manually changes the printer’s IP address.
4 Click [Uninstall OKI LPR Utility] from
[Okidata].
If the [User Account Control] dialog is
displayed, click [Yes].
OS other than Windows 8/Server 2012
1 Conrm that the OKI LPR utility is
closed.
2 Click on [Start], and then select [All
Programs] ([Program] in Windows
2000)>[Okidata]>[OKI LPR Utility]>
[Uninstall OKI LPR Utility].
If the [User Account Control] dialog box
appears, click [Yes].
3 On the conrmation screen, click on
[Yes].
- 26 -
Page 27

Quick Setup
TELNET
You can congure settings with Telnet
commands.
Note
● Telnet access to the printer settings is turned off in the
initial settings.
In order to use Telnet commands, set [Telnet] to
[ENABLE], either on the webpage.
● For Windows 8/Windows 7/Windows Vista/Windows Server
2012/Windows Server 2008 R2/Windows Server 2008,
Telnet commands are inactive in the initial settings.
In order to use Telnet commands, select [Start]
(In Windows 8, [Settings] from the charm bar) >
[Control Panel] > [Programs] > [Programs &
Functions] > [Activate or Deactivate Windows
Functions]. Set [Telnet Client] to active in the displayed
dialog box.
Memo
● For the next procedure, the following environment will be
used as an example. The details may differ depending on
the OS you are using.
- OS: Windows 8
- IP Address: 192.168.0.2
6 If a menu command is displayed, enter
the menu number you would like to
change, and press the <Enter> key.
7 Change the settings if necessary.
8 Save settings and log out.
2
2. Using Utility Software
- MAC Address: 00:80:92:84:9C:9B
1 Click [Search] from the charm bar,
and click [Command Prompt] in
the Windows system tools. When
using an OS other than Windows
8, lick on [Start] and select [All
Programs]>[Accessories]>
[Command Prompt].
2 Following “(Driver Password): /Users/
Username>” enter “ping (Space) printer
IP Address”. Press the <Enter> key and
check that access is enabled.
E.g.: “C:/Users/WINDOWS > ping 192.168.0.2”
3 Following “telnet (Space)”, enter the
IP address of the printer and press the
<Enter> key in order to access the
printer through Telnet.
E.g.: “C:/Users/WINDOWS>telnet 192.168.0.2”
4 After “login:”, enter “root” and press the
<Enter>.
5 If a prompt is displayed, enter your
password following “Password” and press
the <Enter> key.
Enter E.g: “password: 849C9B”.
Memo
● The default “root” password is the last 6
alphanumerical digits of the printer’s MAC address.
- 27 -
Page 28

3. Network Settings
This chapter provides solutions to the problems you may encounter while operating your printer.
Printing conguration
information of the network
1 Connect the computer and printer with
3
3. Network Settings
an Ethernet cable, and turn on the
computer.
2 Turn on the printer, and make sure its
status is online.
3 Hold down the push switch for 3 seconds
or more, and then release it.
PushSwitch
Initializing the network
system
Note
● Initializing will return all network setting items to their
defaults.
1 Turn off the printer.
Memo
● Please refer to the printer User’s Manual for
instructions on turning off the printer.
2 Turn on the printer while holding down
the push switch, and continue holding
down the push switch for 5 seconds or
more.
PushSwitch
Conguration information of the network is then
printed.
Network settings are then initialized.
- 28 -
Page 29

●● Setting IP Address
Setting IP Address
What is IP address?
For connecting a computer and printer through
a network by using TCP/IP, IP addresses need
to be set up. IP addresses are the addresses of
computers and printers on the network. If an
IP address is not set correctly, the computer
and printer cannot communicate because the
address to send data to is not specied.
(Example)
Computer
IP address :192. 168. 0. 3
Network address Host ID
Subnet mask :255. 255. 255. 0
Not any numbers or values can be used for
the IP address. There is a rule to specify the
IP address. An IP address has 4 segments and
each segment consists of 3-digit number. In
the example above, “192. 168. 0” is the portion
called the “network address”, and the last
segment, such as “3” or “2” in the example,
is the portion called the “host ID”. In the
general network, the network address of the
computer and printer needs to be the same to
communicate.
The host ID needs to be specied by using a
unique number for each device within the range
from 1 to 254.
In addition to the IP address, the subnet mask
and gateway also need to be set up. Basically,
set the subnet mask to “255. 255. 255. 0”.
Use the IP address of the router in the network
for the setting of the gateway. For a general
network conguration, use the same subnet
mask and gateway for the computer and printer.
IP address of the computer
Check the current IP address of your computer.
The IP address of the computer differs
depending on the network environment to which
the computer is connected.
3
3. Network Settings
Gateway :192. 168. 0. 1
Printer
IP address :192. 168. 0. 2
Network address Host ID
Subnet mask :255. 255. 255. 0
Gateway :192. 168. 0. 1
When using the Internet, the IP address of the
computer is set to the value specied by the
provider or the router maker. Ask the provider
or the router maker about the setting value of
IP address or whether they use a server, such
as a DHCP server. If the computer is connected
to an ofce network and there is a network
administrator, ask the administrator about the IP
address.
Generally, the default setting of the IP address
on the computer is set to the “automatically
obtaining the IP address” setting. Most home
routers (ADSL routers or ISDN routers) have
the function of a DHCP server, if the computer
is connected to one of those home routers, the
IP address is automatically obtained from the
server when the computer is turned on.
In case you are not sure what IP address your
computer obtains, follow the procedure below
to check the IP address on your computer. The
procedure to check the IP address may differ
depending on the version of the operating
system. Refer also to the instruction manual of
the operating system for details.
- 29 -
Page 30

Setting IP Address
For Windows
1 Start up Windows.
2 Select Command Prompt (MS-DOS
prompt).
<Windows 8>
Click [Search] from the charm bar, and click
[Command Prompt] in the Windows system
tools.
3
3. Network Settings
<For Windows Server 2012/Windows7/Windows
Vista/Windows Server 2008/Windows XP/
Windows Server 2003>
Select [Start] > [All Programs] >
[Accessories] > [Command Prompt].
<For Windows 2000>
Select [Start] > [Programs] > [Accessories] >
[Command Prompt].
3 Enter “ipcong” using the keyboard,
then press the [Enter] key.
The current settings of the IP address, subnet
mask, and gateway are displayed.
Setting the IP address of the printer
Set the IP address of the printer according to the
network environment.
(1) Use the default IP address setting.
● When there is a DHCP/BOOTP server, etc. in
the network:
The [DHCP/BOOTP] and [RARP] setting of the
printer is set to [Enable] as the factory default.
If there is a DHCP/BOOTP server, etc. in the
network, the IP address is automatically
obtained from the server when the printer is
connected to the network and turned on.
IP address setting is not required if the settings
of the computer and printer are as follows:
- The computer and printer have a same
network address in their IP addresses.
- The computer and printer have different
host IDs in their IP addresses.
- The computer and printer use the same
settings for the subnet mask and gateway.
● When there is no DHCP/BOOTP server, etc. in
the network and all the computers connected
to the network are Windows XP:
The [DHCP/BOOTP] and [RARP] setting of the
printer is set to [Enable] as the factory default.
When [Enable] is selected to the setting, the
function of the address resolution without using
a server is available.
Checking the IP address of the
printer
Check the current IP address of the printer.
The current IP address of the printer is displayed
in the conguration information of the network.
Print out the conguration information of the
network, and check the IP address of the printer.
(P. 28)
In this case, even if there is no DHCP/BOOTP
server, etc. in the network, the IP address
is automatically set by communicating with
Windows XP.
IP address setting is not required if the settings
of the computer and printer are as follows:
- The computer and printer have a same
network address in their IP addresses.
- The computer and printer have different
host IDs in their IP addresses.
- The computer and printer use the same
settings for the subnet mask and gateway.
● When there is no DHCP/BOOTP server, etc.
in the network, all the computers connected
to the network are Macintosh, and no web
browser or Setup Utility will be used:
For the connection with a Macintosh through
a network, EtherTalk protocol is used. In this
case, IP address setting is not required.
- 30 -
Page 31

(2) Set the IP address manually.
● When the case (1) does not apply to your
network environment, for example, when
there is no DHCP/BOOTP server, etc. in the
network and computers connected to the
network have different system congurations,
or when an IP address specied by the
network administrator of the company is
required, set the specied IP address to the
printer manually. The IP address can be set
by using the control panel of the printer, etc.,
For details, please refer to “AdminManager”
P.21 and “TELNET” P.27.
Structure of IP Address Setting
(Reference Information)
The following is the structure of functions for the
IP address setting.
Setting IP Address
3
3. Network Settings
IP address
Automatically
obtaining
Manually
setting up
DHCP/BOOTP
Address
resolution
without using
a server
- 31 -
Page 32

Changing Network Settings From the Web Page
●● Changing Network Settings From the Web Page
This section explains how to change the network settings from the printer’s web page.
To access the printer’s web page, your computer must meet the following conditions.
● TCP/IP must be enabled.
● Microsoft Internet Explorer 6.0 or later is installed.
Memo
● Ensure that the security setting of the web browser is set to a medium level.
● To enter the [Admin Setup] menu, it is necessary to log in as the administrator. The factory default administrator password is
3
3. Network Settings
“aaaaaa”.
Informing the Printer Errors by E-mail (E-mail Alert)
You can set the printer to send an error
notication e-mail when an error occurs. You can
set when to be notied:
● On a periodical basis
● Only when an error occurs
Periodic Alerts
1 Access the printer’s web page and log in
as the administrator.
2 Select [Admin Setup].
3 Select [Network Setup] > [Email] >
[Alert Settings].
Conguring Your Printer
You can congure the settings for e-mail alert
using the web page.
Memo
● When you specify a domain name in [SMTP Server],
congure the DNS server in the [TCP/IP] setting.
● You need to set the mail server to allow the printer to
send E-mail. For details on the mail server setting, ask to
your network administrator.
● If you use Internet Explorer 7, be sure to congure
the settings below before you send a test mail. In the
browser, select [Tools] > [Internet Options], then
click [Custom Level] on the [Security] tab. Then
select [Enable] in [Allow websites to prompt for
information using scripted windows].
1 Access the printer’s web page and log in
as the administrator.
2 Select [Admin Setup].
3 [Network Setup] > [Email] > [Send
Settings]
4 Enter an e-mail address to receive the
alerts.
5 Click [Setting] for the specied address.
6 Follow the on-screen instructions to
specify detailed settings.
7 Click [OK].
8 Click [Submit].
The network card reboots to enable the new
settings.
Memo
● Alert e-mail will not be sent if errors to notify about have
not occurred.
4 Follow the on-screen instructions to
specify detailed settings.
5 If necessary, you can congure
[Security Settings], [attached
Information].
6 Click [Submit].
The network card reboots to enable the new
settings.
- 32 -
Page 33

Changing Network Settings From the Web Page
Alert When Error Occurs
1 Perform steps 1 to 6 in “Periodic Alerts”
P.32.
When an error or warning requiring notication is
selected, a window will display to specify the time
between error occurrence and sending the alert.
2 Specify the time before sending error
alerts and then click [OK].
If you specify a longer time, you are only notied
of persisting errors.
3 Click [OK].
4 Click [Submit].
The network card reboots to enable the new
settings.
Controlling Access Using IP Address (IP Filtering)
You can control access to the printer using
IP addresses. You can set whether to allow
conguration or printing from the IP addresses
specied. By factory default, IP ltering is
disabled.
Note
● Be sure to specify the correct IP address. If you specify a
wrong IP address, you cannot access the printer using the
IP protocol.
● When you enable IP ltering, access by hosts that are not
specied in these steps is rejected.
Memo
● You can use only IPv4 for IP ltering.
1 Access the printer’s web page and log in
as the administrator.
2 Select [Admin Setup].
3 Select [Network Setup] > [Security]
> [IP Filtering].
3
3. Network Settings
4 Follow the on-screen instructions to
specify detailed settings.
Note
● If nothing is registered in [Administrator’s IP
Address Setting], you may not be able to access
the printer depending on the specied IP address
range.
● If you use a proxy server, [Your Current Local
Host/Proxy IP Address] and the IP address of
your host may not match.
5 Click [Submit].
The network card reboots to enable the new
settings.
- 33 -
Page 34

Changing Network Settings From the Web Page
Controlling Access Using MAC Address (MAC Address Filtering)
You can control access to the printer using MAC
addresses. You can allow or reject access from
the specied MAC addresses.
Note
● Be sure to specify the correct MAC address. If you specify
the wrong MAC address, you cannot access the printer via
3
3. Network Settings
a network.
Memo
● You cannot specify to accept or to reject for each address
individually.
1 Access the printer’s web page and log in
as the administrator.
2 Select [Admin Setup].
3 Select [Network Setup] > [Security]
> [MAC Address Filtering].
4 Follow the on-screen instructions to
specify detailed settings.
Note
● If nothing is registered in [Administrator’s MAC
Address Setting], you may not be able to access
the printer depending on the specied MAC address.
● If you use a proxy server, [Your Current Local
Host/Proxy MAC Address] and the MAC address of
your host may not match.
Encrypting Communication by SSL/TLS
You can encrypt communication between your
computer and the printer. Communication is
encrypted by SSL/TLS in the following cases.
● Changing printer settings from the web page
● IPP printing
Creating a Certicate
You can create a certicate on the web page.
The following two certicates are available.
● A self-signed certicate.
● A certicate created by a certicate authority.
Note
● If you change the printer IP address after you create a
certicate, the certicate becomes invalid. Be sure not to
change the printer’s IP address after creating a certicate.
1 Access the printer’s web page and log in
as the administrator.
2 Select [Admin Setup].
3 Select [Network Setup] > [Security]
> [SSL/TLS].
4 Select the certicate to use.
5 Click [Submit].
The network card reboots to enable the new
settings.
5 Enter the required information in
[CommonName], [Organization], etc.
6 Click [OK].
The information entered is displayed.
7 Check the information entered and click
[OK].
When you are creating a self-signed certicate,
the setting procedure is nished. Follow the on-
screen instructions and close the web page.
When you are obtaining a certicate issued by a
certicate authority, go to step 8.
8 Follow the on-screen instructions to send
a CSR to a certicate authority.
9 Follow the on-screen instructions to
install a certicate from the certicate
authority.
Copy the text between [----- BEGIN CERTIFICATE
-----] and [----- END CERTIFICATE -----], and
paste it in the text box.
- 34 -
Page 35

Changing Network Settings From the Web Page
10 Click [Submit].
The setting procedure for a certicate issued by a
certicate authority is nished.
Opening the Web Page
1 Launch a web browser.
2 Enter “https://your printer’s IP address”
in the URL address bar and then press
the <Enter> key.
IPP Printing
IPP printing allows you to transmit your print job
data from your computer to the printer via the
Internet.
Enabling IPP Printing
To perform IPP printing, enable IPP rst.
1 Access the printer’s web page and log in
as the administrator.
2 Select [Admin Setup].
3 Select [Network Setup] > [IPP] >
[Setting].
4 Select [Enable] in [IPP].
5 Click [Submit].
Setting Up Your Printer As an IPP
Printer
Add the printer to your computer as an IPP
printer.
3
3. Network Settings
Windows 8/Server 2012
1 If the [Start] screen is displayed, click
[Desktop] at the top of the screen.
2 Move the mouse cursor to the top
right corner of the screen to display
the charm bar, and click [Settings] >
[Control Panel] from the displayed
items.
(If you are using a touch-operated computer, ick
the right side of the screen to display the charm
bar.)
3 Click [View devices and printers].
4 In the [Devices and Printers] screen,
click [Add a printer].
5 In the [Select a printer] screen, click
[The printer that I want isn’t listed].
6 In the [Find a printer by other
options] screen, click [Select a shared
printer by name].
- 35 -
Page 36

Changing Network Settings From the Web Page
7 Enter “http:// your printer’s IP address//
ipp” or “http://your printer’s IP
address//ipp/lp” and click [Next].
3
3. Network Settings
8 In the [Add Printer Wizard] screen,
select [OKI] for [Manufacturer] and
[OKI Dot-Matrix 24Pin ESC/P Class
Driver] in [Printers], and click [OK].
OS other than Windows 8/Server 2012
1 Click [Start] and select [Devices and
Printers] > [Add a printer].
2 On the [Add Printer] wizard, select
[Add a network, wireless or
Bluetooth printer].
3 In the list of available printers, select
[The printer that I want isn’t listed].
4 Select [Select a shared printer by
name].
5 Enter “http://your printer’s IP address/
ipp” or “http://your printer’s IP address/
ipp/lp” and then click [Next].
6 Click [Have Disk].
7 Insert the “Printer Software CD-ROM”
into the computer.
9 Conrm the printer name in the
displayed screen, and click [Next].
10 In the displayed screen, click [Print a
test page].
11 Click [Finish].
When the printer icon is displayed in the
[Devices and Printers] screen, setup
is complete.
8 Enter the following value in
[Copy from], and then click [Use].
- For ESC/P (Ansi)
D:\Drivers\ENU\Ansi
- For ESC/P(Cyrillic)
D:\Drivers\ENU\Cyrillic
- For ESC/P(Turkish)
D:\Drivers\ENU\Turkish
- For ESC/P(CEE)
D:\Drivers\ENU\CEE
- For ESC/P(Greek)
D:\Drivers\ENU\Greek
Memo
● In the above examples, the CD-ROM drive is setup as
the D drive.
9 Select the NFL le and click [Open].
10 Click [OK].
11 Select a model and click [OK].
12 Click [Next].
13 Click [Finish].
- 36 -
14 Print the test page after installation is
complete.
Page 37

Changing Network Settings From the Web Page
Performing IPP Printing
Memo
● The following steps are explained using NotePad as an
example. The steps and menus may differ depending on
the application you use.
1 Open the le you want to print.
2 From the [File] menu, select [Print].
3 Select the IPP printer you created from
[Select Printer], and then click [Print].
Encrypting Communication by
IPSec
You can encrypt communication between your
computer and the printer.
The communication is encrypted by IPSec. When
IPSec is enabled, encryption is applied for all the
applications using IP protocols.
You can specify up to 5 hosts by their IP
addresses. When a host that is not registered
tries to access the printer, it is rejected. When
you try to access a host that is not registered,
the attempt is invalid.
Be sure to congure the printer before
conguring your computer.
Memo
● You must have a pre-shared key readied in advance.
Conguring Your Printer
In order to enable IPSec, your printer must rst
be congured from the web page.
3
3. Network Settings
Note
● When you enable IPSec, communication with a host not
specied in this procedure is rejected.
Memo
● Be sure to make a note of the values you specify in these
steps. They are necessary when you congure the IPSec
settings on your computer.
1 Access the printer’s web page and log in
as the administrator.
2 Select [Admin Setup].
3 Select [Network Setup] > [Security]
> [IPSec].
4 Follow the on-screen instructions to
specify detailed settings.
Memo
● Either [ESP] or [AH] must be enabled in the
conguration for “Phase2 Proposal”.
5 Click [Submit].
The network card reboots to enable the new
settings.
- 37 -
Note
● If you were unable to set up IPSec because of an
inconsistency between the parameters that were
specied, you will be unable to access the web page. In
this case, initialize the network settings.
Page 38

Changing Network Settings From the Web Page
Conguring Your Computer
Memo
● Be sure to congure the printer before conguring your
computer.
1 Click [Start] (In Windows 8, [Settings]
from the charm bar) and select [Control
Panel]>[Administrative Tools].
2 Double-click [Local Security Policy].
3
3 On the [Local Security Policy] window,
3. Network Settings
click [IP Security Policies on Local
Computer].
4 From the [Action] menu, select [Create
IP Security Policy].
5 On the [IP Security Policy Wizard],
click [Next].
6 Enter a [Name] and a [Description]
and then click [Next].
7 Deselect the [Activate the default
response rule (earlier versions of
Windows only)] check box and then
click [Next].
14 Specify [Integrity algorithm],
[Encryption algorithm] and
[Dife-Hellman group].
Note
● Select the same value that was specied
in [IKE Encryption Algorithm],
[IKE Hush Algorithm], and
[Dife-Hellman group] at the time of conguration
for “Phase1 Proposal” in “Conguring Your Printer”
P.37.
15 Click [OK].
16 On the [Key Exchange Security
Methods] window, click [OK].
17 On the [Key Exchange Settings]
window, click [OK].
18 On the IP security policy properties
window, select the [Rules] tab.
19 Click [Add].
20 On the [Security Rule Wizard], click
[Next].
21 On the [Tunnel Endpoint] screen,
select [This rule does not specify a
tunnel] and then click [Next].
8 Select [Edit Properties] and then click
[Finish].
9 On the IP security policy properties
window, select the [General] tab.
10 Click [Settings].
11 On the [Key Exchange Settings]
window, enter a value (minutes) for
[Authenticate and generate a new
key after every].
Note
● Specify the same value as [Lifetime] specied in the
conguration for “Phase1 Proposal” in “Conguring
Your Printer” P.37. Although [Lifetime] is specied
in seconds, enter a value in minutes for this step.
12 Click [Methods].
13 On the [Key Exchange Security
Methods] window, click [Add].
22 On the [Network Type] screen, select
[All Network Connections] and then
click [Next].
23 On the [IP Filter List] screen, click
[Add].
24 On the [IP Filter List] window, click
[Add].
25 On the [IP Filter Wizard], click [Next].
26 On the [IP Filter Description and
Mirrored Property] screen, click
[Next].
27 On the [IP Trafc Source] screen, click
[Next].
28 On the [IP Trafc Destination] screen,
click [Next].
29 On the [IP Protocol Type] screen, click
[Next].
- 38 -
30 Click [Finish].
Page 39

Changing Network Settings From the Web Page
31 On the [IP Filter List] window, click
[OK].
32 On the [Security Rule Wizard], select
the new IP lter from the list and then
click [Next].
33 On the [Filter Action] screen, click
[Add].
34 On the [Filter Action Wizard], click
[Next].
35 On the [Filter Action Name] screen,
enter a [Name] and a [Description]
and then click [Next].
36 On the [Filter Action General Options]
screen, select [Negotiate security] and
then click [Next].
37 On the [Communicating with
computers that do not support
IPsec] screen, select [Do not allow
unsecured communication] and then
click [Next].
45 Select [New Filter Action] and then
click [Next].
46 On the [Authentication Method]
screen, select the authentication method
you want and then click [Next].
47 Click [Finish].
48 On the IP security policy properties
window, click [OK].
49 On the [Local Security Policy] window,
select the new IP security policy.
50 From the [Action] menu, select
[Assign].
51 Make sure that for the new IP security
policy, [Policy Assigned] is displayed
as [Yes].
52 Click [X] on the [Local Security Policy]
screen.
3
3. Network Settings
38 On the [IP Trafc Security] screen,
select [Custom] and then click
[Settings].
39 On the [Custom Security Method
Settings] window, congure the
settings and then click [OK].
Note
● Congure the AH and ESP settings to the same
settings as congured for the “Phase2 Proposal” in
“Conguring Your Printer” P.32.
40 On the [IP Trafc Security] screen,
click [Next].
41 Select [Edit Properties] and then click
[Finish].
42 On the lter action properties window,
select [Use session key perfect
forward secrecy (PFS)] if you want to
enable Key PFS.
43 Select [Accept unsecured
communication, but always respond
using IPsec] if you perform IPSec
communication by the IPv6 global
address.
44 Click [OK].
- 39 -
Page 40

Changing Network Settings From the Web Page
Using SNMPv3
When you use an SNMP manager that supports
SNMPv3, management of the printer can
encrypted by SNMP.
1 Access the printer’s web page and log in
as the administrator.
2 Select [Admin Setup].
3
3 Select [Network Setup]>[SNMP]>
3. Network Settings
[Setting].
4 Follow the on-screen instructions to
specify detailed settings.
5 Click [Submit].
The network card reboots to enable the new
settings.
Using IPv6
Your printer supports IPv6. The printer obtains
the IPv6 address automatically. You cannot set
the IPv6 address manually.
The printer supports the following protocols.
● For Printing:
- LPR
- IPP
- RAW (Port9100)
- FTP
● For Conguration:
- HTTP
- SNMPv1/v3
- Telnet
Note
● To use IPv6 on Windows XP, install IPv6.
Enabling IPv6
1 Access the printer’s web page and log in
as the administrator.
2 Select [Admin Setup].
3 Select [Network Setup]>[TCP/IP].
4 Select [IPv4 + IPv6] for [IP Version].
5 Click [Submit].
The network card reboots to enable the new
settings.
Checking IPv6 Address
The IPv6 address is automatically assigned.
1 Select [View Info].
2 Select [Network]>[TCP/IP].
Memo
● When the global address is displayed only as zeros, it may
be an error due to the router being used.
- 40 -
Page 41

Changing Network Settings From the Web Page
Using IEEE802.1X
Your printer supports IEEE802.1X authentication.
Be sure to congure the printer and your
computer before performing the following steps.
Conguring Your Printer for
IEEE802.1X
Using PEAP
1 Access the printer’s web page and log in
as the administrator.
2 Select [Admin Setup].
3 Select [Network Setup]>
[IEEE802.1X].
4 Select [Enable] for [IEEE802.1X].
5 Select [PEAP] for [EAP Type].
6 Enter a user name in [EAP User].
7 Enter a password in [EAP Password].
4 Select [Enable] for [IEEE802.1X].
5 Select [EAP-TLS] for [EAP Type].
6 Enter a user name in [EAP User].
7 Click [Import].
8 Enter the le name of the certicate.
Only a PKCS#12 le can be imported.
9 Enter the password of the certicate and
then click [OK].
10 Select [Authenticate Server] and then
click [Import].
11 Enter the le name of the CA certicate
and then click [OK].
Specify a certicate issued by the certicate
authority from which the RADIUS server obtained
a certicate. A PEM, DER, and PKCS#7 le can be
imported.
12 Click [Submit].
The network card reboots to enable the new
settings.
3
3. Network Settings
8 Select [Authenticate Server] and then
click [Import].
9 Enter the le name of the CA certicate
and then click [OK].
Specify a certicate issued by the certicate
authority from which the RADIUS server obtained
a certicate. A PEM, DER, and PKCS#7 le can be
imported.
10 Click [Submit].
The network card reboots to enable the new
settings.
11 When the standby screen appears on the
printer, turn off the printer.
12 Go to “Connecting Your Printer to an
Authentication Switch” P.41.
Using EAP-TLS
1 Access the printer’s web page and log in
as the administrator.
13 When the standby screen appears on the
printer, turn off the printer.
14 Go to “Connecting Your Printer to an
Authentication Switch” P.41.
Connecting Your Printer to an
Authentication Switch
1 Make sure that the printer is turned off.
2 Connect an Ethernet cable to the
network interface port.
3 Connect the Ethernet cable to the
authentication port of an authentication
switch.
4 Turn on the printer.
5 Set up the printer.
2 Select [Admin Setup].
3 Select [Network Setup]>
[IEEE802.1X].
- 41 -
Page 42

Other Operations
●● Other Operations
This section explains how to initialize the network settings and how to set up your printer and computer
to use DHCP.
Using DHCP
You can obtain an IP address from the DHCP
server.
3
3. Network Settings
Note
● Administrator privileges are required.
Memo
● You can obtain an IP address from the BOOTP server.
Conguring DHCP Server
DHCP assigns an IP address to each host on the
TCP/IP network.
Note
● The printer must have a static IP address if you want to
print via a network. For details on how to assign a static
IP address, refer to the manual of your DHCP server.
Memo
● The following OSs are supported:
- Windows Server 2012, Windows Server 2008 R2,
Windows Server 2008, and Windows Server 2003
● The following steps are explained using Windows Server
2012 as an example. The steps and menus may differ
depending on the OS you use.
1 Click the [Server Manager] icon at the
left corner of the task bar.
If [DHCP] is already shown in [Administrative
Tools] continue to step 10.
2 Click [Add roles and features] in
[QUICK START] of the [Dashboard].
3 Click [Next] in the [Before you begin]
screen.
4 In the [Select installation type]
screen, check the [Role-based or
feature-based installation] check box
and click [Next].
7 Follow the on-screen instructions and
congure the settings as necessary.
8 On the [Conrm Installation
Selection] screen, check the settings
and click [Install].
9 When the installation nishes, click
[Close].
10 Click [Settings] > [Control Panel]
> [System and Security] >
[Administrative Tools] from the charm
bar and select [DHCP] to launch the
[DHCP] wizard.
11 On the DHCP list, select a server to use.
12 From the [Action] menu, select [New
Scope].
13 On the [New Scope Wizard], follow the
on-screen instructions and congure the
settings as necessary.
Memo
● Be sure to congure the default gateway settings.
● On the [Activate Scope] screen, select [Yes, I
want to activate the scope now].
14 Click [Finish].
15 Select the new scope from the DHCP list
and then select [Reservations].
16 From the [Action] menu, select [New
Reservation].
17 Congure the settings.
18 Click [Add].
5 In the [Select destination server]
screen, check the [Select a server
from the server pool] check box,
select the server and click [Next].
6 6. In the [Select server roles] screen,
check the [DHCP Server] check box
and click [Next].
19 Click [Close].
20 From the [File] menu, select [Exit].
- 42 -
Page 43

Other Operations
Conguring Your Printer
The following explains how to congure your
printer to use AdminManager and Windows 8.
Note
● [DHCP/BOOTP] is set to [ENABLE] at the
printer’s default settings. If the printer is
being used for the rst time, it does not need
to be congured.
1 Turn on the printer.
2 If the [Start] screen is displayed, click
[Desktop] at the top of the screen.
3 Insert the “Network Software CD-ROM”
provided with the network card.
4 If [Tap to choose what happens with
this disc.] is displayed, click the display.
5 If [Choose what to do with this disc.]
is displayed, click [Run Setup.exe].
If the [User Account Control] dialog box
appears, click [Yes].
Memo
● If the [Auto Play] dialog appears in Windows Vista,
double-click on [Run Setup.exe].
● If the dialog does not appear even if you have placed
the network software CD-ROM in the CD-ROM drive,
double click on [D:\Setup.exe].
10 Click on [OKI Device Standard
Setup].
11 Select the [Execute from CD-ROM],
and then click [Next].
AdminManager launches.
12 Select the Ethernet address from the
list, and then select the printer you want
to congure.
The Model Name will be displayed as “LAN7130E”.
● The Ethernet address is displayed in [NIC Check] in
the conguration information of the network.
13 Select [OKI Device Setup] from the
[Setup] menu.
14 Select the [Use DHCP/BOOTP] check
box in the [TCP/IP] tab, and then click
on [Apply].
15 If there are no mistakes in the settings,
click on [OK].
Settings are then sent to the printer.
16 To enable settings, click on [Yes].
Note
● After rebooting, the printer will run with the
new settings.
3
3. Network Settings
6 Select a language and click [Next].
7 Read the license agreement and then
click [I Agree].
8 When the following screen appears, click
on [Network Card Setup Utility] to
select that.
9 Click on the language to use.
- 43 -
Page 44

4. Troubleshooting
This chapter provides solutions to the problems you may encounter while operating your printer.
●● If you cannot print
Check the following rst.
Phenomenon
● Check the LINK 100M lamp (green)/LINK 10M
lamp (green). The corresponding lamp will
4
4. Troubleshooting
light up when connected by 100BASE-TX or
10BASE-T respectively. If it does not light up,
the network is not operating normally.
● Check the STAT lamp (orange). It ashes
when data is being received. If it is always
on or always off, the network is not operating
normally.
● The hub’s LINK lamp does not light up.
● There is no response to a ping.
● Printing does not complete or printing is
canceled.
If the cause is the network
connection
● Check that the printer is turned on.
● Check that the cable is plugged into the
printer securely.
● Check that the correct cable is connected.
There are two types of Ethernet cable: straight
through and crossover. Use a straight through
cable for connection to the hub.
● Turn the printer on after connecting the cable.
The printer may not be able to connect to
the network if the power is turned on before
connecting the cable.
If the problem is still not solved
● From the charm bar, select [Settings] >
[Control Panel] > [Network and Internet]
> [View network status and tasks] >
[Change adapter settings].
● With Windows 7, click on [Start] and select
[Control Panel] > [Network and Internet]
> [View network status and tasks] >
[Change adapter settings].
With Windows Vista, click on [Start] and
select [Network] > [Network and Sharing
Center] > [Manage network connections].
With Windows Server 2003, click on [Start]
and select [Control Panel] > [Network
Connections].
With Windows XP, click on [Start] and select
[Control Panel] > [Network and Internet
Connections] > [Network Connections].
With Windows 2000, click on [Start] and
select [Settings] > [Network and Dial-up
Connections]. Double-click on [Local Area
Connections], and make sure [Internet
Protocol TCP/IP] or [Internet Protocol
Version 4 (TCP/IPv4)] is displayed
● If an IP address is specied for the printer
at setup, make sure there is not a “0” at
the head of each octet. For example, set
an address such as “192.169.1.2”. With an
address such as “192.169.001.002”, you may
not be able to print correctly. This is according
to Windows specications.
● Right click on the [ML5791] icon in the
[Device and Printers] (or [Printers] or
[Printers and Faxes]) folder, select [Printer
Properties] (or [Properties]), click on
[Congure Port] in the [Ports] tab, and
then make sure that [Printer Name or IP
Address] matches the printer’s IP address.
● On the “OKI LPR Utility” screen, select
[Printer used] then [Remote print menu]
and [Reset printer]. Then make sure [IP
address] matches the printer’s IP address.
The latest version OKI LPR Utility can be found
on the Oki Data website (http://www.okidata.
com). If you have an older version installed,
delete “OKI LPR Utility” and reinstall with the
latest version.
● For small-scale networks, congure as follows.
[IP address] Windows 192.168.0.3
Printer 192.168.0.2
[Subnet Mask] Windows 255.255.255.0
Printer 255.255.255.0
[Gateway] Windows Not used
Printer 0.0.0.0
- 44 -
Page 45

If the printer cannot be detected
●● If the printer cannot be detected
The printer may not be detected in AdminManager if rewall or other security software has been set.
In this case, stop the rewall or other security software or register AdminManager as an exception as
described below and try again.
Memo
● If you have already set the network card’s IP address, make the IP address segment the same as
that of the PC if it is currently different.
If running directly from the CD-ROM without installing AdminManager
1 Exit AdminManager if it is running.
2 Place the “Network Software CD-ROM” in
the drive, then click [Install Network
Card Utility Tool] > [Language] >
[OKI Device Standard Setup].
3 Select the [Execute from CD-ROM],
and then click [Next].
4 If installing AdminManager, select
[Install and launch] and click on
[Next] to display the following message.
● If the following message is displayed with Windows
Vista/Windows7/Windows 8, select [Yes].
5 Finally, the [Complete] window
is displayed. Click [Finish] and
AdminManager will launch.
If the printer name does not display correctly even after installing AdminManager
Stop the rewall or other security software
or register AdminManager as an exception.
If using Windows XP (SP1)
1 If using TCP/IP in a Windows XP
(SP1) environment, go to [Local
Area Connection Properties] >
[Advanced], and deselect the [Protect
my computer by limiting…] check
box.
If using Windows XP (SP2)
1 If using TCP/IP in a Windows XP (SP2)
environment, go to [Control panel] >
[Windows Firewall] > [Exceptions],
and select the [AdminManager] check
box.
Note
● If AdminManager is not displayed in the [Programs
and Services] list, click the [Add Program] button,
and select AdminManager.
If using Windows 7/Vista
4
4. Troubleshooting
6 Make sure the printer name is displayed
in AdminManager.
1 If using TCP/IP in a Windows 7/
Vista environment, go to [Control
Panel] > [System and Security] (or
[security]), and deselect the[Allow a
program through Windows Firewall]
check box.
- 45 -
Page 46

If the printer cannot be detected
If using Windows 8
1 To use the TCP/IP protocol in the
Windows 8 environment, click
[Settings] > [Control Panel] in the
charm bar.
2 Click [System and Security] > [Allow
an app through Windows Firewall].
3 Click the [Change settings] button.
4 Click the [Allow another app] button.
5 Select [AdminManager] and click
4
4. Troubleshooting
[Add].
If the printer still does not display after taking the aforementioned actions
Make the following settings. Conrm the
Ethernet address by following steps (1) to (4).
(1) Connect the computer and printer
with an Ethernet cable, and turn on
the computer.
(2) Turn on the printer, and make sure
its status is online.
(3) Hold down the network card push
switch for 3 seconds or more, and
then release it.
PushSwitch
Conguration information of the network is then
printed.
(4) Find the Ethernet address on the rst
page printed.
Ethernet address/MAC address is shown.
1 In AdminManager, select [Setup] >
[Congure IP address].
- 46 -
2 In the IP address conguration window,
enter the Ethernet address just
conrmed and the IP address to set.
Page 47

3 The password entry screen will appear.
Enter the nal six digits of the Ethernet
password in the password entry eld,
and then click on [OK].
4 Make sure the printer name is displayed
in AdminManager.
If the printer cannot be detected
4
4. Troubleshooting
- 47 -
Page 48

Other Issues
●● Other Issues
This section explains the issues you may encounter while operating your printer and how to solve them.
Unable to Print from a Computer
Memo
● If the following information does not solve the issue, contact your dealer.
● For issues caused by an application, contact the manufacturer of the application.
General Causes
Cause Remedy Reference
The printer is turned off. Turn on the printer. -
4
An Ethernet cable is unplugged. Check that the cable is plugged into the printer and
4. Troubleshooting
Something is wrong with a cable. Replace it with a new cable. The printer is off line. Press the <SEL> button. -
An alarm displays on the printer
operation panel.
The interface setting is disabled. Check the setting of the interface. Something is wrong with the print
function.
The printer is not set as the default
printer.
The output port for the printer driver is
incorrect.
A print job from another interface is in
progress.
Using a crossover cable. Use a straight cable. The printer is turned on before a cable
was connected.
IP address is incorrect. ● Check that the same IP address is set for the printer
computer properly.
See the documentation for the printer, please cancel the
alarm.
Check if you can print the contents of the settings. -
Set the printer as the default printer. -
Select the output port to which the Ethernet cable is
connected.
Wait until the print job is done. -
Connect cables before turning on the printer. page 11
and the printer’s port setting on the computer.
● If using LPR Utility, check the IP address setting in
OKI LPR Utility.
-
-
-
page 24
- 48 -
Page 49

Other Issues
OS-Specic Constraints
Constraints with Windows 8/Windows Server 2012/Windows 7/Windows
Vista/Windows Server 2008 R2/Windows Server 2008
Item Symptom Cause/Remedy
Printer drivers The [User Account Control]
dialog appears.
Constraints with Windows Server 2003 Service Pack 1 and Windows XP
Service Pack 2
When you launch an installer or utility, the [User Account
Control] dialog may appear. Click [Yes] or [Continue] to
run the installer or utility as an administrator. If you click
[No], the installer or utility does not start.
4
Constraints with Windows Firewall
On Windows Server 2003 Service Pack 1 and Windows XP Service Pack 2, the Windows rewall
functionality is enhanced. The following constraints may apply to printer drivers and utilities.
Memo
● The following procedures are explained using Windows XP Service Pack 2 as an example. The procedure and menu names may
differ on Windows Server 2003 Service Pack 1.
Item Symptom Cause/Remedy
Printer driver You cannot print a le when
using the printer as a shared
printer on a network.
LPR Utility Unable to nd a printer. If the [Don't allow exceptions] check box is selected
On the server, click [Start] and then select [Operator
panel] > [Security Center] > [Windows Firewall].
Select the [Exceptions] tab and select the [File and
Printer Sharing] check box. Click [OK].
on the [General] tab of the Windows rewall, you cannot
search for a printer in a segment that is connected to
another router. Only printers within the same segment as
the printer can be searched.
When you cannot nd a printer, specify the IP address of
the printer in the [Add Printer] or [Conrm Connections]
screen.
4. Troubleshooting
- 49 -
Page 50

5. Appendix
Network Specications
7130E
Interface Ethernet 10BASE-T/100BASE-TX
Protocol TCP/IPv4, TCP/IPv6, SMTP, POP3, HTTP, SNMPv1/v3, DHCP, DNS, LPR, Port9100,
BOOTP, ARP, FTP, SLP, Bonjour, Web Services Discovery (WSD), NetWare, NetBEUI
Supported browsers Microsoft IE 6.0 or later
Network interface specications
7130E
Network protocol TCP/IP related, NetWare related, NetBEUI related
Connector 100 BASE-TX / 10 BASE-T (Automatic switching, no simultaneous use)
Cable Unshielded twisted pair cable with RJ-45 connector (Category 5
5
Connector pin arrangement
5. Appendix
recommended)
Interface signal
Pin No. Signal name Direction Function
1 TxD+ FROM PRINTER Transmit +
2 TxD- FROM PRINTER Transmit 3 RXD+ TO PRINTER Receive +
4 − − Reserved
5 − − Reserved
6 RXD- TO PRINTER Receive 7 − − Reserved
8 − − Reserved
- 50 -
Page 51

Index
Roman
A
AdminManager ......... 17, 20, 21
C
Cautions related to safety ....... 4
D
DHCP ................. 26, 29, 42, 50
DHCP/BOOTP ...................... 31
E
E-mail ................................ 32
Encrypting ............... 34, 37, 40
Ethernet address ............13, 22
M
MAC Address Filtering .......... 34
MultiPlatform Edition ............ 17
N
NetBEUI ........................22, 50
NetWare ........................22, 50
Network card ...................9, 17
Network Card
Setup Utility ....12, 21, 23, 43
Network conguration
information ..................... 46
Network Connection ............. 11
Network settings ...... 28, 32, 42
Network Specications ......... 50
O
T
TCP/IP ......... 19, 22, 29, 32, 50
TELNET ................... 20, 27, 40
U
Utility Software ................... 17
W
Web page ...........19, 26, 32, 37
Ethernet cable ............ 9, 11, 48
F
Firewall .............................. 49
G
Gateway .................. 12, 29, 44
I
IEEE802.1X ........................ 41
Interface .......................48, 50
IP Address .......... 12, 27, 30, 31
IP Filtering .......................... 33
IPP ...............................35, 40
IPSec ................................. 37
IP Trafc Security ................ 39
IPv6 .............................40, 50
L
OKI LPR Utility ......... 17, 24, 48
P
Password .......................20, 22
PrintSuperVision .................. 17
Push switch ........................ 10
Q
Quick Setup ................... 17, 23
S
Setup .................................. 9
SNMP ............................ 22, 40
SNMPv3 ............................. 40
SSL/TLS ........................22, 34
STAT lamp .......................... 10
Subnet Mask ............ 12, 29, 44
LINK 10M lamp ................... 10
LINK 100M lamp .................. 10
- 51 -
Page 52

Oki contact details
OkicontactName. Oki Systems
Oki Systems (Iberica), S.A.U
OKI Europe Ltd. (Russia)
(UK) Limited
OkicontactAddress.550 Dundee Road
Slough Trading Estate
Slough
Berkshire
SL1 4LE
Tel:+44 (0) 1753 819819
Fax:+44 (0) 1753 819899
http://www.oki.co.uk
Oki Systems Ireland Limited
The Square Industrial Complex
Tallaght
Dublin 24
Tel:+353 (0) 1 4049590
Fax:+353 (0)1 4049591
http://www.oki.ie
Oki Systems Ireland Limited Northern Ireland
19 Ferndale Avenue
Glengormley
BT36 5AL
Northern Ireland
Tel:+44 (0) 7767 271447
Fax:+44 (0) 1 404 9520
http://www.oki.ie
Technical Support for all Ireland:
Tel:+353 1 4049570
Fax:+353 1 4049555
E-mail: tech.support@oki.ie
OKI Systems (Czech and Slovak),
s.r.o.
IBC – Pobřežní 3
186 00 Praha 8
Czech Republic
Tel: +420 224 890158
Fax:+420 22 232 6621
Website: www.oki.cz, www.oki.sk
Oki Systems (Deutschland) GmbH
Hansaallee 187
40549 Düsseldorf
Tel: 01805/6544357**
01805/OKIHELP**
Fax: +49 (0) 211 59 33 45
Website:
www.okiprintingsolutions.de
info@oki.de
**0,14€/Minute aus dem dt. Festnetz
der T-Com (Stand 11.2008)
Διανομέασ των συστημάτων OKI
CPI S.A1 Rafailidou str.
177 78 Tavros
Athens
Greece
Tel: +30 210 48 05 800
Fax:+30 210 48 05 801
EMail:sales@cpi.gr
C/Teide, 3
San Sebastian de los Reyes
28703, Madrid
Tel:+34 91 3431620
Fax: +34 91-3431624
Atención al cliente: 902 36 00 36
Website: www.oki.es
Oki Systèmes (France) S.A.
44-50 Av. du Général de Gaulle
94246 L'Hay les Roses
Paris
Tel:+33 01 46 15 80 00
Télécopie:+33 01 46 15 80 60
Website: www.oki.fr
OKI Systems (Magyarország) Kft.
Capital Square
Tower 2
7th Floor
H-1133 Budapest,
Váci út 76
Hungary
Telefon: +36 1 814 8000
Telefax: +36 1 814 8009
Website: www.okihu.hu
OKI Systems (Italia) S.p.A.
via Milano, 11,
20084 Lacchiarella (MI)
Tel:+39 (0) 2 900261
Fax:+39 (0) 2 90026344
Website: www.oki.it
OKI Printing Solutions
Platinium Business Park II, 3rd Floor
ul. Domaniewska 42
02-672 Warsaw
Poland
Tel:+48 22 448 65 00
Fax:+48 22 448 65 01
Website: www.oki.com.pl
E-mail: oki@oki.com.pl
Hotline: 0800 120066
E-mail: tech@oki.com.pl
Oki Systems (Ibérica) S.A.
Sucursal Portugal
Edifício Prime Av. Quinta Grande 53
7º C Alfragide
2614-521 Amadora
Portugal
Tel:+351 21 470 4200
Fax:+351 21 470 4201
Website:www.oki.pt
E-mail : oki@oki.pt
Oki Service
Serviço de apoio técnico ao
Cliente
Tel: 808 200 197
E-mail : okiserv@oki.pt
Office 702, Bldg 1
Zagorodnoye shosse
117152, Moscow
Tel: +74 095 258 6065
Fax: +74 095 258 6070
e-mail: info@oki.ru
Website: www.oki.ru
Technical support:
Tel: +7 495 564 8421
e-mail: tech@oki.ru
Oki Systems (Österreich)
Campus 21
Businesszentrum Wien Sued
Liebermannstrasse A02 603
22345 Brun am Gebirge
Tel: +43 223 6677 110
Drucker Support:
+43 (0) 2236 677110-501
Fax Support:
+43 (0) 2236 677110-502
Website: www.oki.at
OKI Europe Ltd. (Ukraine)
Raisy Opkinoy Street,8
Building B, 2
Kiev 02002
Ukraine
Tel: +380 44 537 5288
e-mail: info@oki.ua
Website: www.oki.ua
OKI Sistem ve Yazıcı Çözümleri
Tic. Ltd. Şti.
Harman sok Duran Is Merkezi,
No:4, Kat:6,
34394, Levent
İstanbul
Tel: +90 212 279 2393
Faks: +90 212 279 2366
Web: www.oki.com.tr
www.okiprintingsolutions.com.tr
Oki Systems (Belgium)
Medialaan 24
1800 Vilvoorde
Helpdesk: 02-2574620
Fax: 02 2531848
Website: www.oki.be
AlphaLink Bulgaria Ltd.
2 Kukush Str.
Building "Antim Tower", fl. 6
1463 Sofia, Bulgaria
tel: +359 2 821 1160
fax: +359 2 821 1193
Website: http://bulgaria.oki.com
nd
Floor,
- 52 -
Page 53

OKI Printing Solutions
Oki Systems (Schweiz)
Oki Systems (Thailand) Ltd.
Herstedøstervej 27
2620 Albertslund
Danmark
Adm.: +45 43 66 65 00
Hotline: +45 43 66 65 40
Salg: +45 43 66 65 30
Fax: +45 43 66 65 90
Website: www.oki.dk
Oki Systems (Finland) Oy
Polaris Capella
Vänrikinkuja 3
02600 Espoo
Tel: +358 (0) 207 900 800
Fax: +358 (0) 207 900 809
Website: www.oki.fi
Oki Systems (Holland) b.v.
Neptunustraat 27-29
2132 JA Hoofddorp
Helpdesk: 0800 5667654
Tel:+31 (0) 23 55 63 740
Fax:+31 (0) 23 55 63 750
Website: www.oki.nl
Oki Systems (Norway) AS
Tevlingveien 23
N-1081 Oslo
Tel:+47 (0) 63 89 36 00
Telefax:+47 (0) 63 89 36 01
Ordrefax:+47 (0) 63 89 36 02
Website: www.oki.no
General Systems S.R.L.
(Romania)
Sos. Bucuresti-Ploiesti Nr. 135.
Bucharest 1
Romania
Tel: +40 21 303 3138
Fax: +40 21303 3150
Website: http://romania.oki.com
Var vänlig kontakta din Återförsäljare
i första hand, för konsultation. I
andra hand kontakta
Oki Systems (Sweden) AB
Borgafjordsgatan 7
Box 1191
164 26 Kista
Tel. +46 (0) 8 634 37 00
e-mail:
info@oki.se för allmänna frågor om
Oki produkter
support@oki.se för teknisk support
gällandes Oki produkter
Vardagar: 08.30 - 12.00,
13.00 - 16.00
Website: www.oki.se
Baslerstrasse 15
CH-4310 Rheinfelden
Support deutsch +41 61 827 94 81
Support français +41 61 827 94 82
Support italiano +41 061 827 9473
Tel: +41 61 827 9494
Website: www.oki.ch
Oki Data Americas Inc.(United
States • États-Unis)
2000 Bishops Gate Blvd.
Mt. Laurel, NJ 08054
USA
Tel: 1-800-654-3282
Fax: 1-856-222-5247
WWW.OKIPRINTINGSOLUTIONS.COM
http://
http://my.okidata.com
Oki Data Americas Inc.(Canada •
Canadá)
4140 B Sladeview Crescent Units 7&8
Mississauga, Ontario
Canada L5L 6A1
Tél: 1-905-608-5000
Téléc: 1-905-608-5040
http://
WWW.OKIPRINTINGSOLUTIONS.COM
Oki Data Americas Inc.(América
Latina (OTRO))
2000 Bishops Gate Blvd.
Mt. Laurel, NJ 08054
USA
Tel (Español): 1-856-222-7496
1-856-222-5276
Fax: 1-856-222-5260
Email: LASatisfaction@okidata.com
Oki Data de Mexico, S.A. de C.V.
Mariano Escobedo #748, Piso 8
Col. Nueva Anzures
C.P. 11590, México, D.F.
Tel: 52-555-263-8780
Fax: 52-555-250-3501
http://
WWW.OKIPRINTINGSOLUTIONS.COM
Oki Data do Brasil, Ltda.
Rua Avenida Alfrefo Egidio de souza Aranha
100-4° andar-Bloco C Chacara Santo Antonio
Sao Paulo, Brazil 04726-170
Tel: 55-11-3444-6747 (Grande São
Paulo)
0800-11-5577 (Demais
localidades)
Fax: 5511-3444-3501
e-mail: okiserv@okidata.com.br
WWW.OKIPRINTINGSOLUTIONS.COM
http://
Oki Data (Singapore) Pte. Ltd.
438A Alexandra Road #02-11/12,
Lobby 3, Alexandra Technopark
Singapore(119967)
Tel:(65) 6221 3722
Fax:(65) 6594 0609
http://www.okidata.com.sg
1168/81-82 Lumpini Tower,
27th Floor Rama IV Road
Tungmahamek, Sathorn
Bangkok 10120
Tel:(662) 679 9235
Fax:(662) 679 9243/245
http://www.okisysthai.com
Oki Systems (Hong Kong) Ltd.
Suite 1908, 19/F, Tower 3,
China Hong Kong City
33 Canton Road, TsimShaTsui,
Kowloon, Hong Kong
Tel: (852) 3543 9288
Fax: (852) 3549 6040
http://
Oki Data(Australia) Pty Ltd.
146 O'Riordan Street Mascot,
NSW 2020, Australia
Tel: +61 (02) 9667 7240
Fax: +61 (02) 9667 7333
http://www.oki.com.au
Comworth Systems Ltd.
8 Antares Place Mairangi Bay,
Auckland, New Zealand
Tel:(64) 9 477 0500
Fax:(64) 9 477 0549
http://www.comworth.co.nz
Oki Data(S) P Ltd. Malaysia Rep
Office
Suite 21.03, 21st Floor Menara IGB,
Mid Valley City,
Lingkaran Syed Pura 59200,
Kuala Lumpur, Malaysia
Tel: (60) 3 2287 1177
Fax: (60) 3 2287 1166
www.okiprintingsolutions.com.hk
- 53 -
Page 54

 Loading...