

Page 1
Chapter 0
Front Cover
ML395 ( 96-02-07 )
Page 2
Chapter 1
Setup - Preliminaries
Setup - Preliminaries
After unpacking the printer, there are a few minor tasks that must be performed before you can begin.
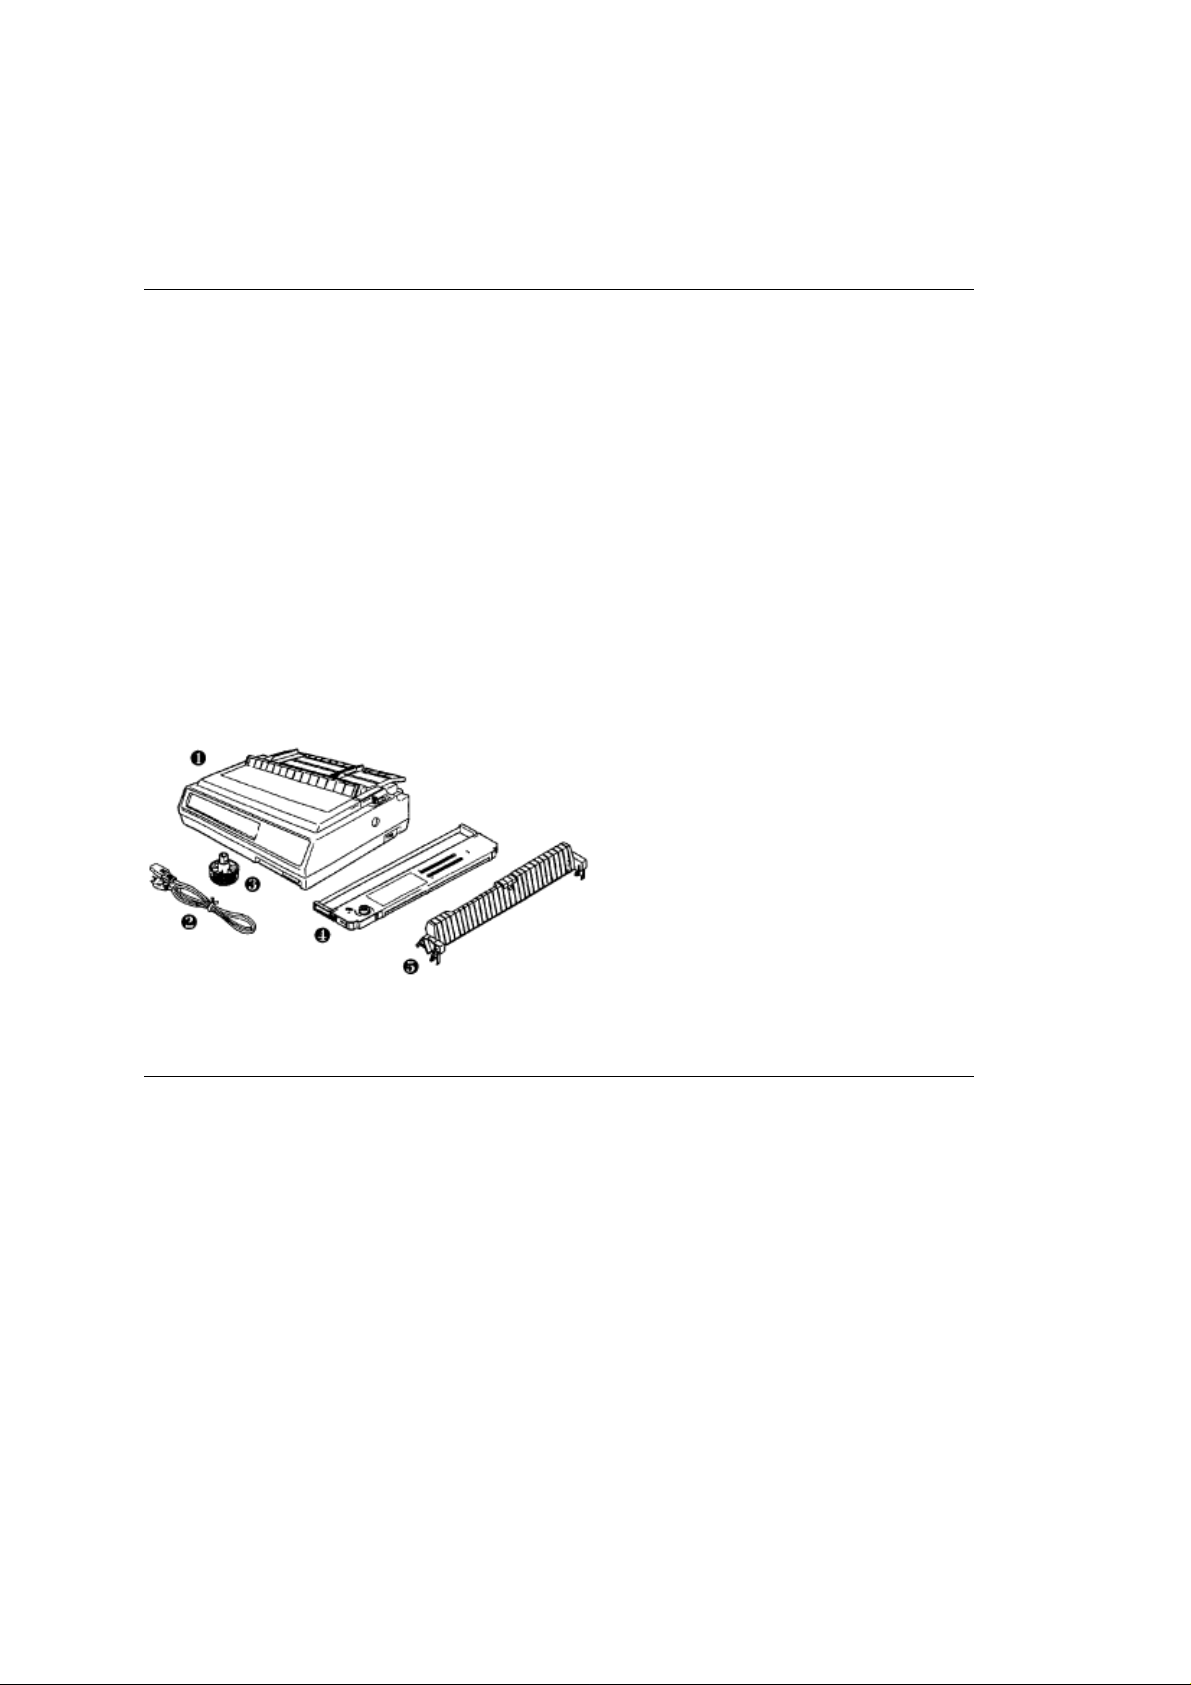
Removing the Shipping Restraint
1. Open front cover of printer.
2. Remove shipping restraint located under printhead.
Note:
It's a good idea to save the shipping restraint and the packing material in case you ever need to
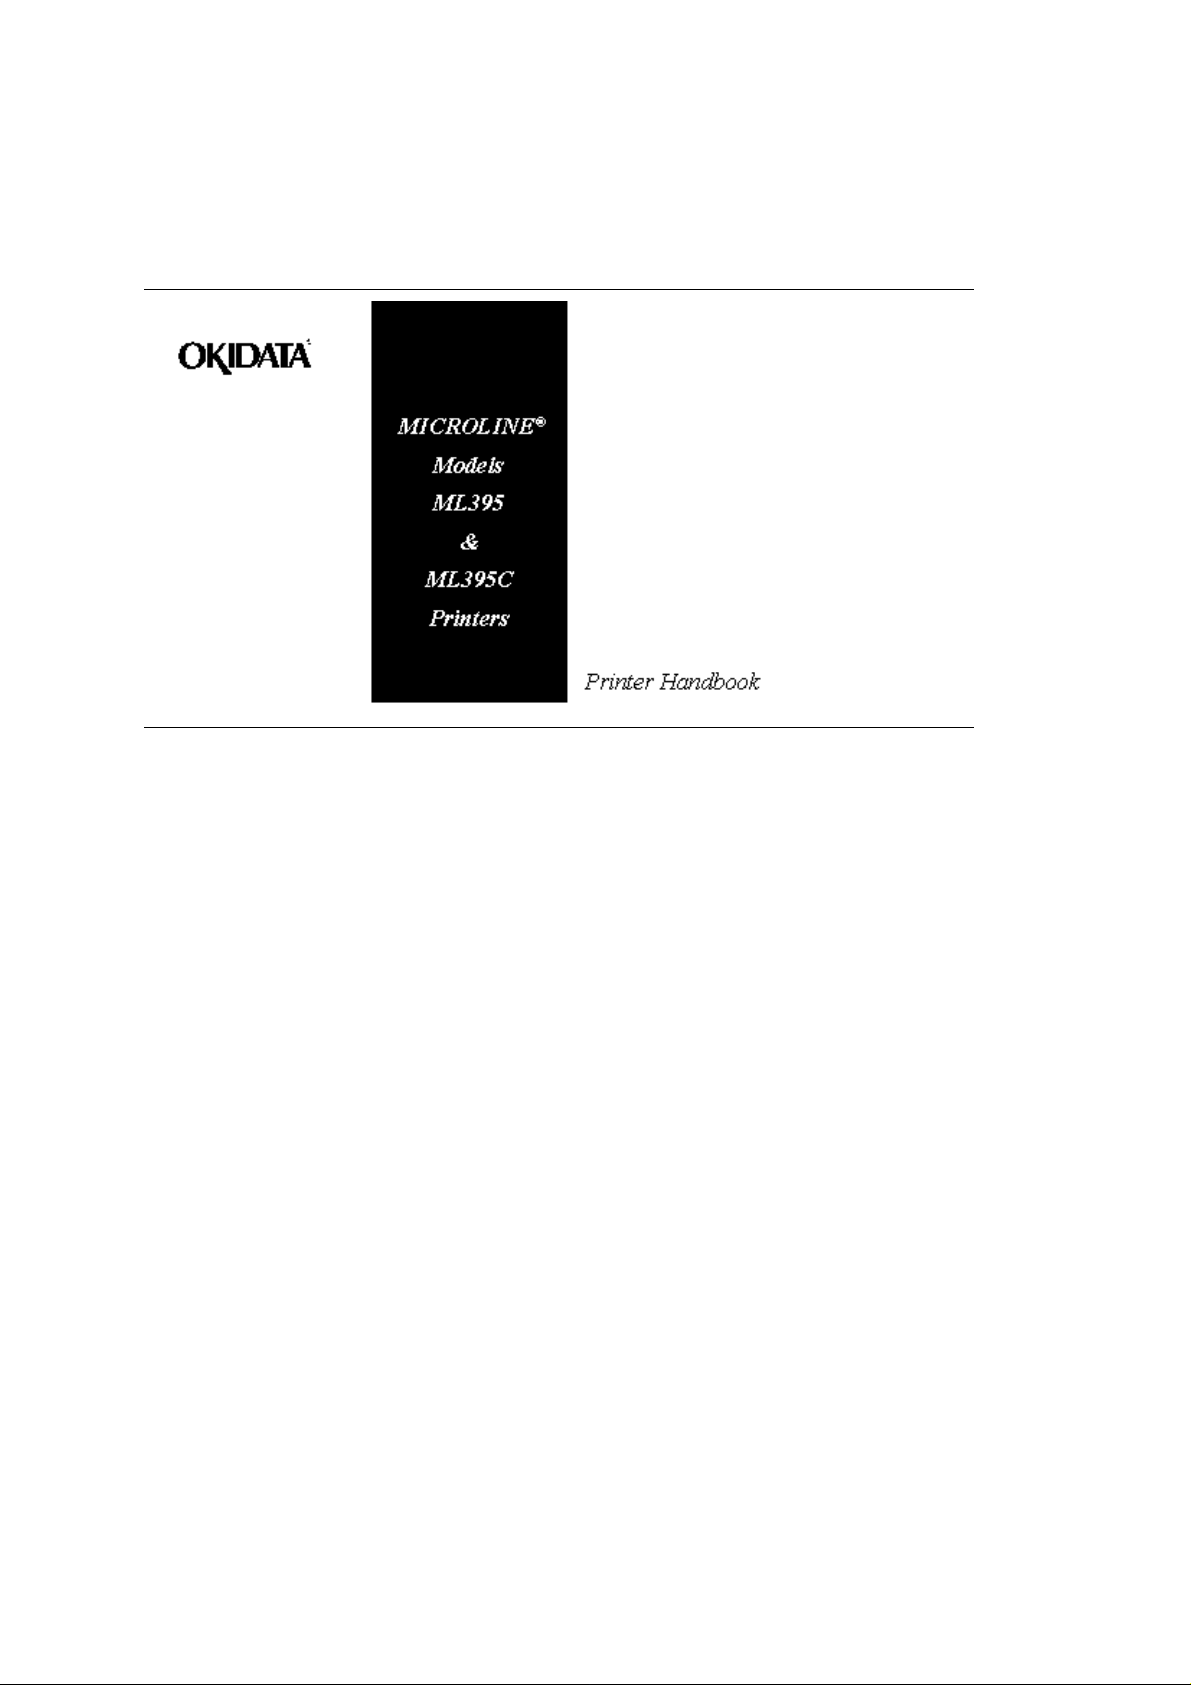
ship the printer.Unpack your printer and make sure you have the following items:
1) ML 395 Printer
2) Power cord
3) Platen knob
4) Ribbon cartridge
5) Sheet Separator
If you are missing any of these items, contact your dealer.
ML395 ( 96-02-07 )
Page 3
Preliminaries - Removing the Shipping Restraint
Preliminaries
After unpacking the printer, there are a few minor tasks that must be performed before you can begin.
Removing the Shipping Restraint
1. Open front cover of printer.
2. Remove shipping restraint located under printhead.
: It's a good idea to save the shipping restraint and the packing material in case you ever need to
Note
ship the printer.
ML395 ( 96-02-07 )
Page 4
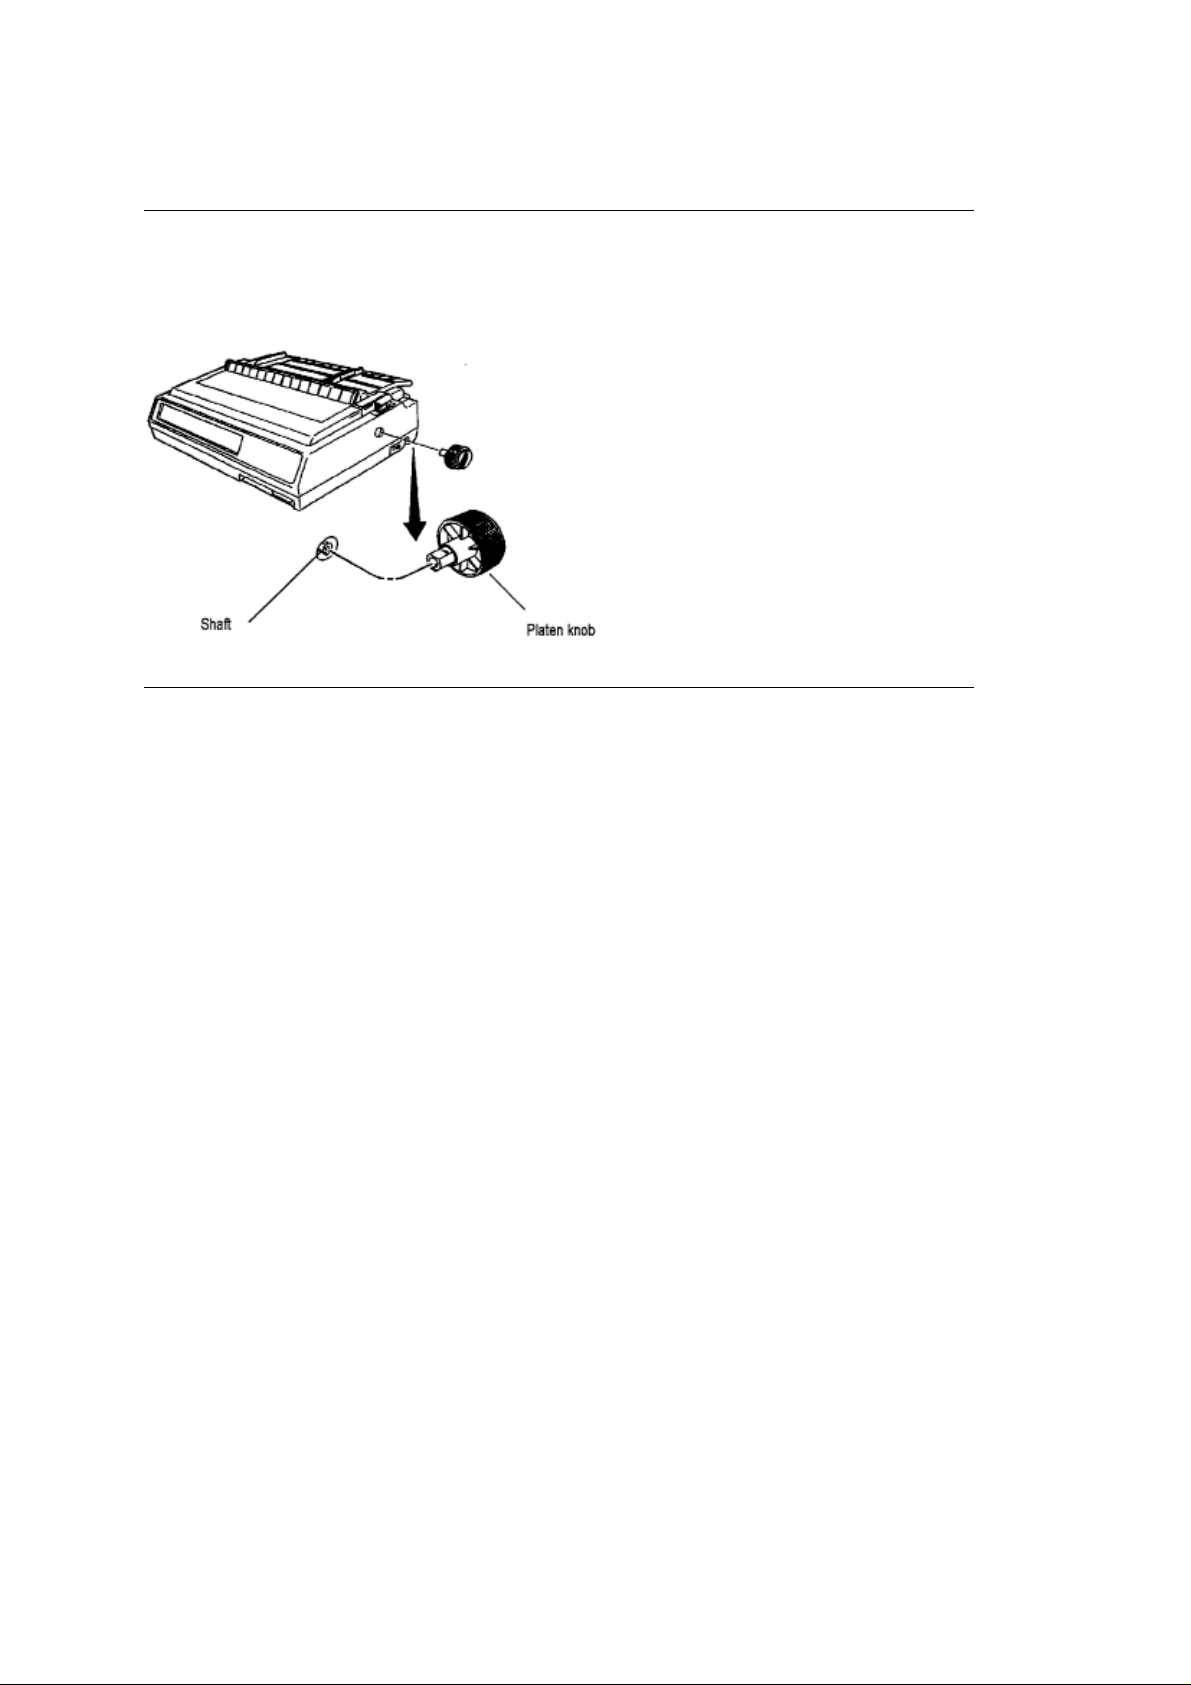
Installing the Platen Knob
Installing the Platen Knob
You will notice that the shaft on the platen knob has a flat side that matches the flat side of the shaft in
the printer. Line up these two flat sides and push the knob into place.
ML395 ( 96-02-07 )
Page 5

Installing/Replacing the Ribbon
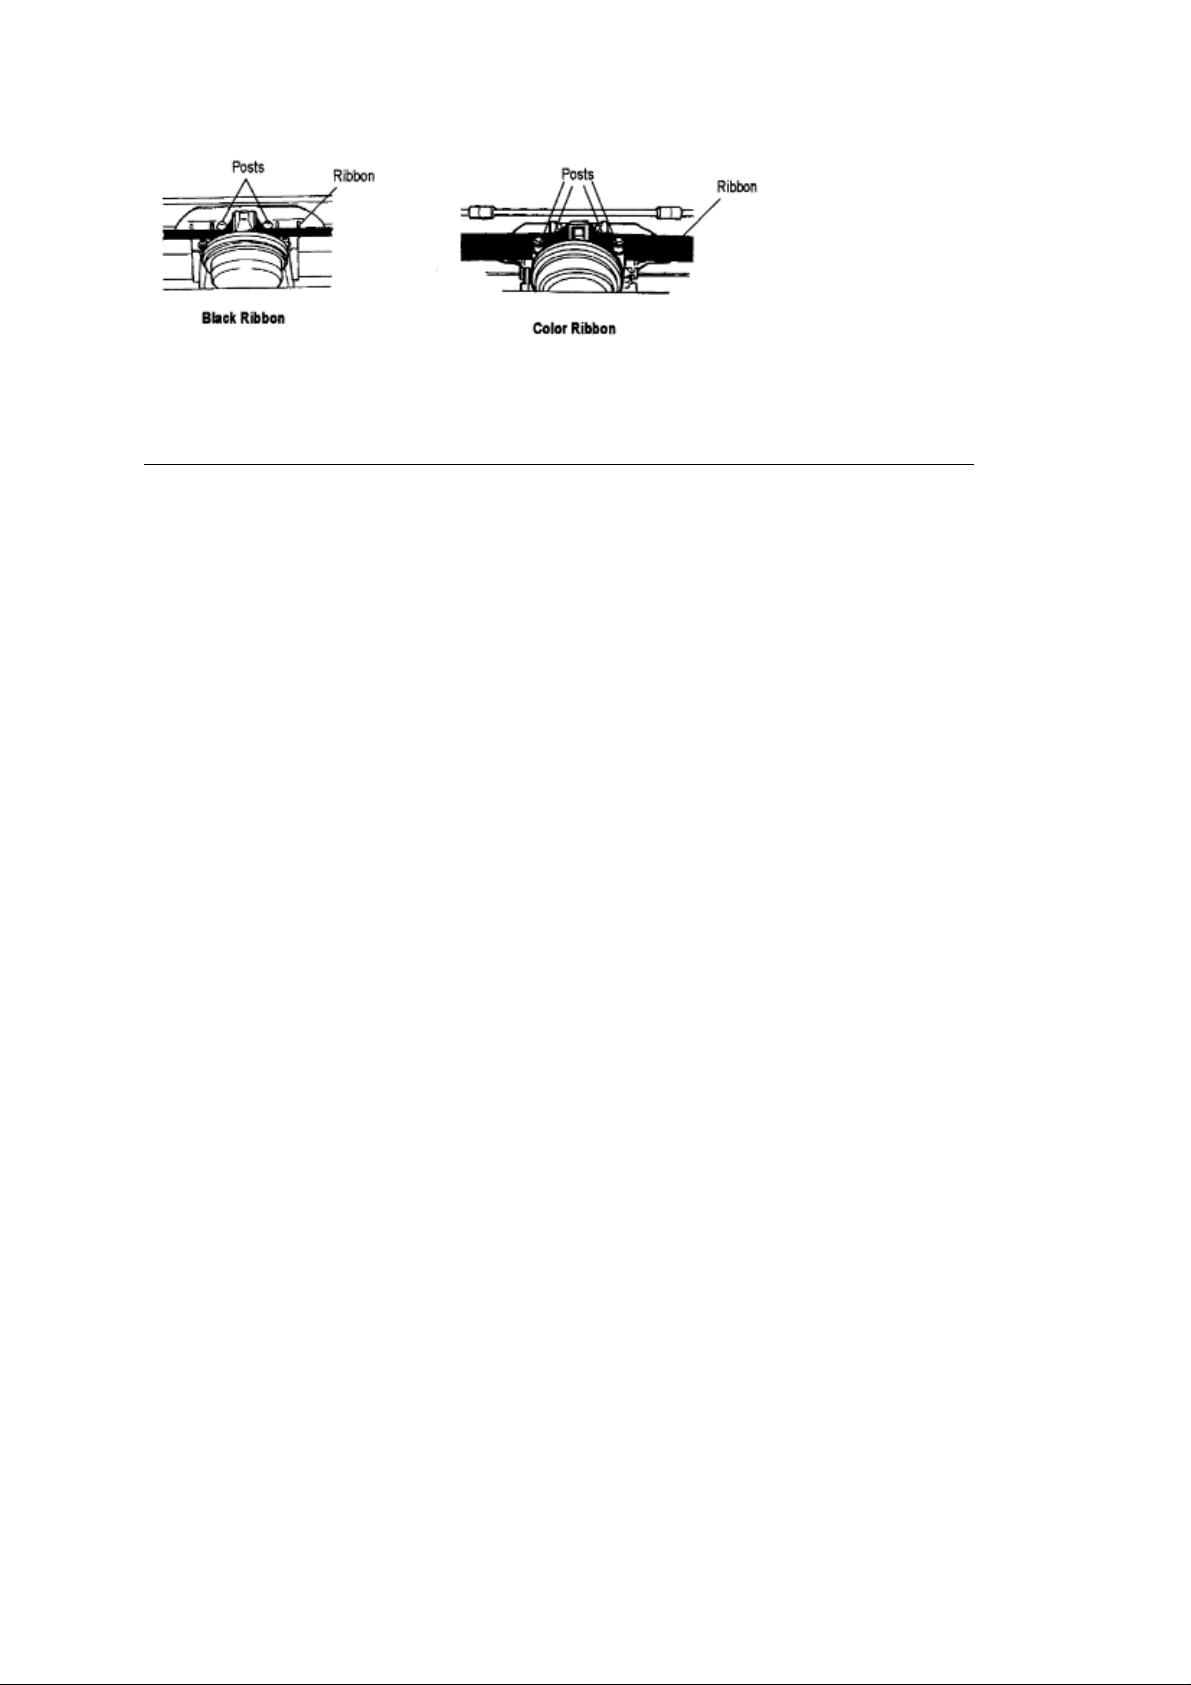
Installing/Replacing the Ribbon
1. Make sure printer is turned off.
2. Holding the posts, move printhead to center of platen.
Caution! If you are replacing the ribbon, printhead may be HOT!
3. If you are replacing the ribbon: slide ribbon off printhead posts, remove cartridge from printer, and
discard used cartridge.
4. Unpack ribbon, remove its shipping restraint, and push idler roller latch in.
5. Place ribbon cartridge in printer: pins on either end of car-tridge fit in notches in plates on either
side of printer platen. Push down on cartridge until it clicks into place (see diagram on cartridge).
Note Turn knob in direction of arrow if cartridge does'nt fit into place easily.
5. Thread ribbon around posts as shown, then turn take-up knob clockwise to eliminate ribbon
slack.Making Connections
ML395 ( 96-02-07 )
Page 6
The power cable and the interface cable have to be connected before you can use your printer.
Caution! Before you begin, make sure power switch is OFF.
ML395 ( 96-02-07 )
Page 7
Power Connection
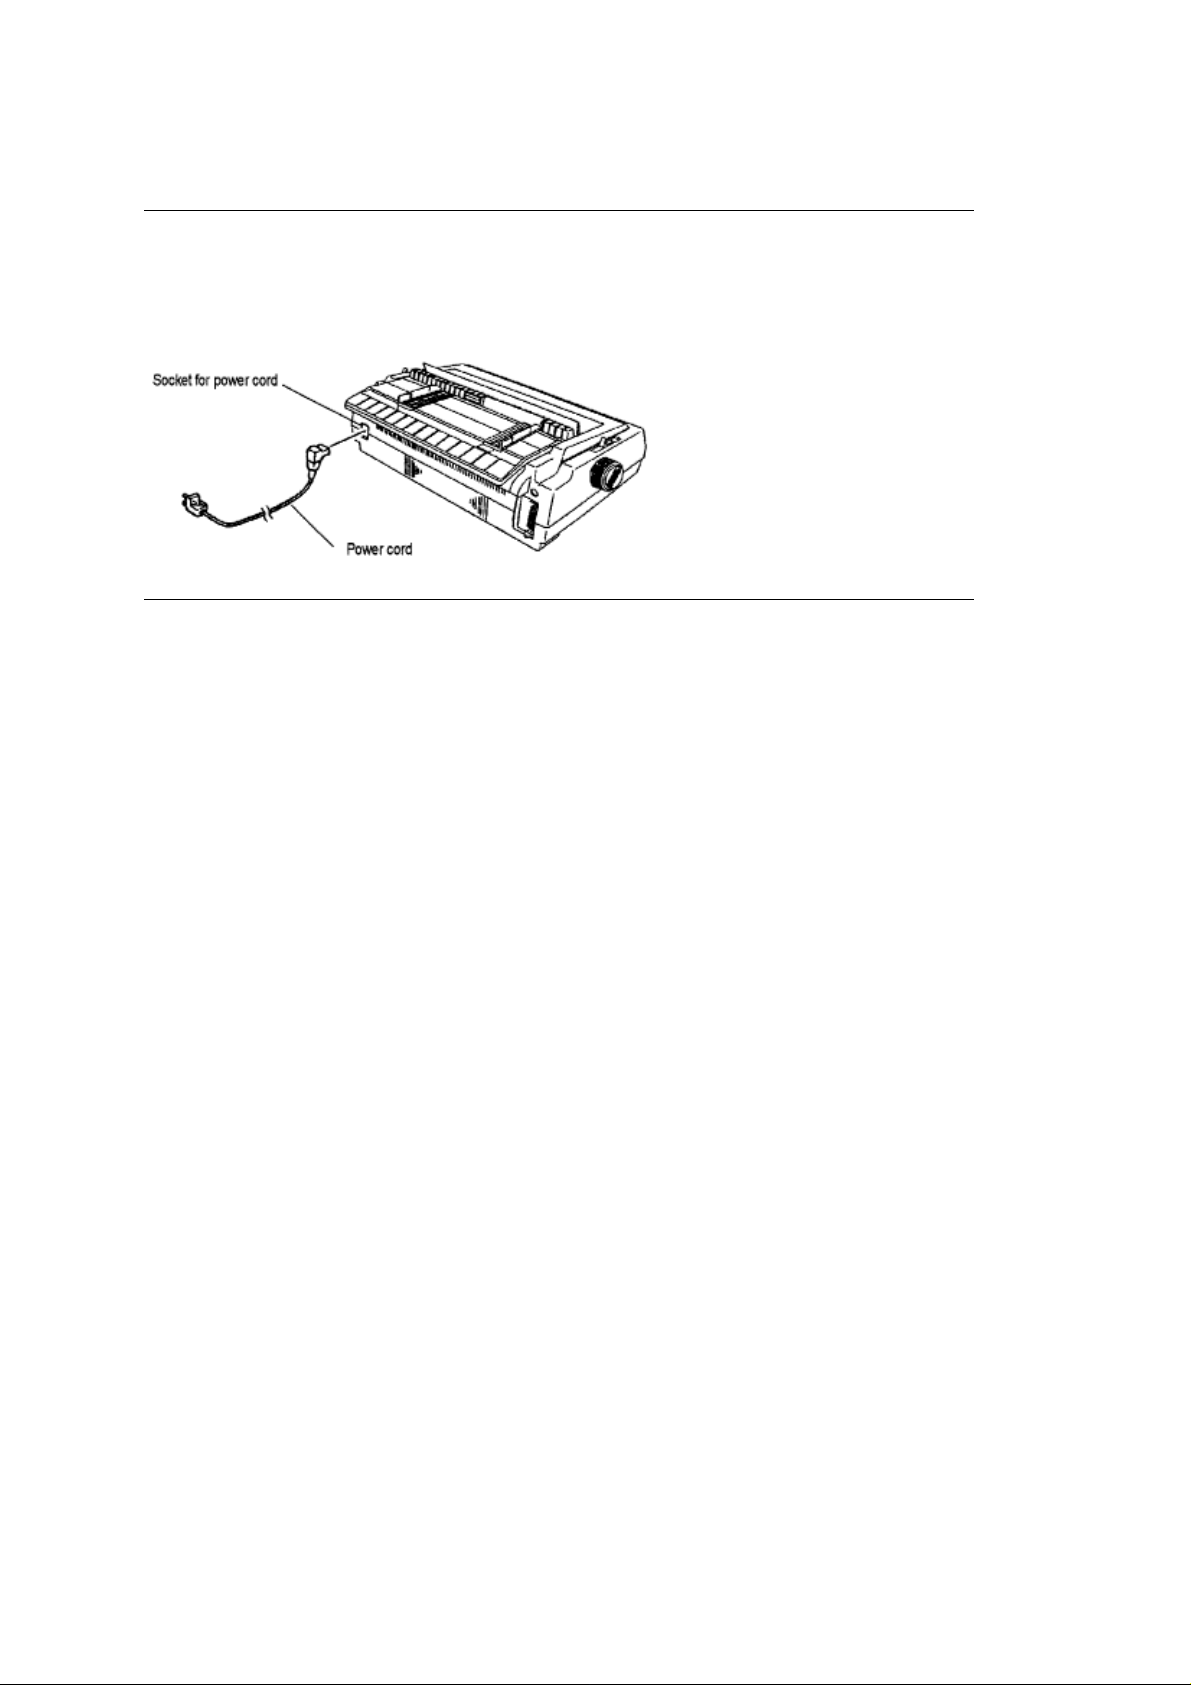
Power Connection
Plug the power cord into the printer, but do not plug it into an electrical outlet until setup is complete.
ML395 ( 96-02-07 )
Page 8
Computer Connection
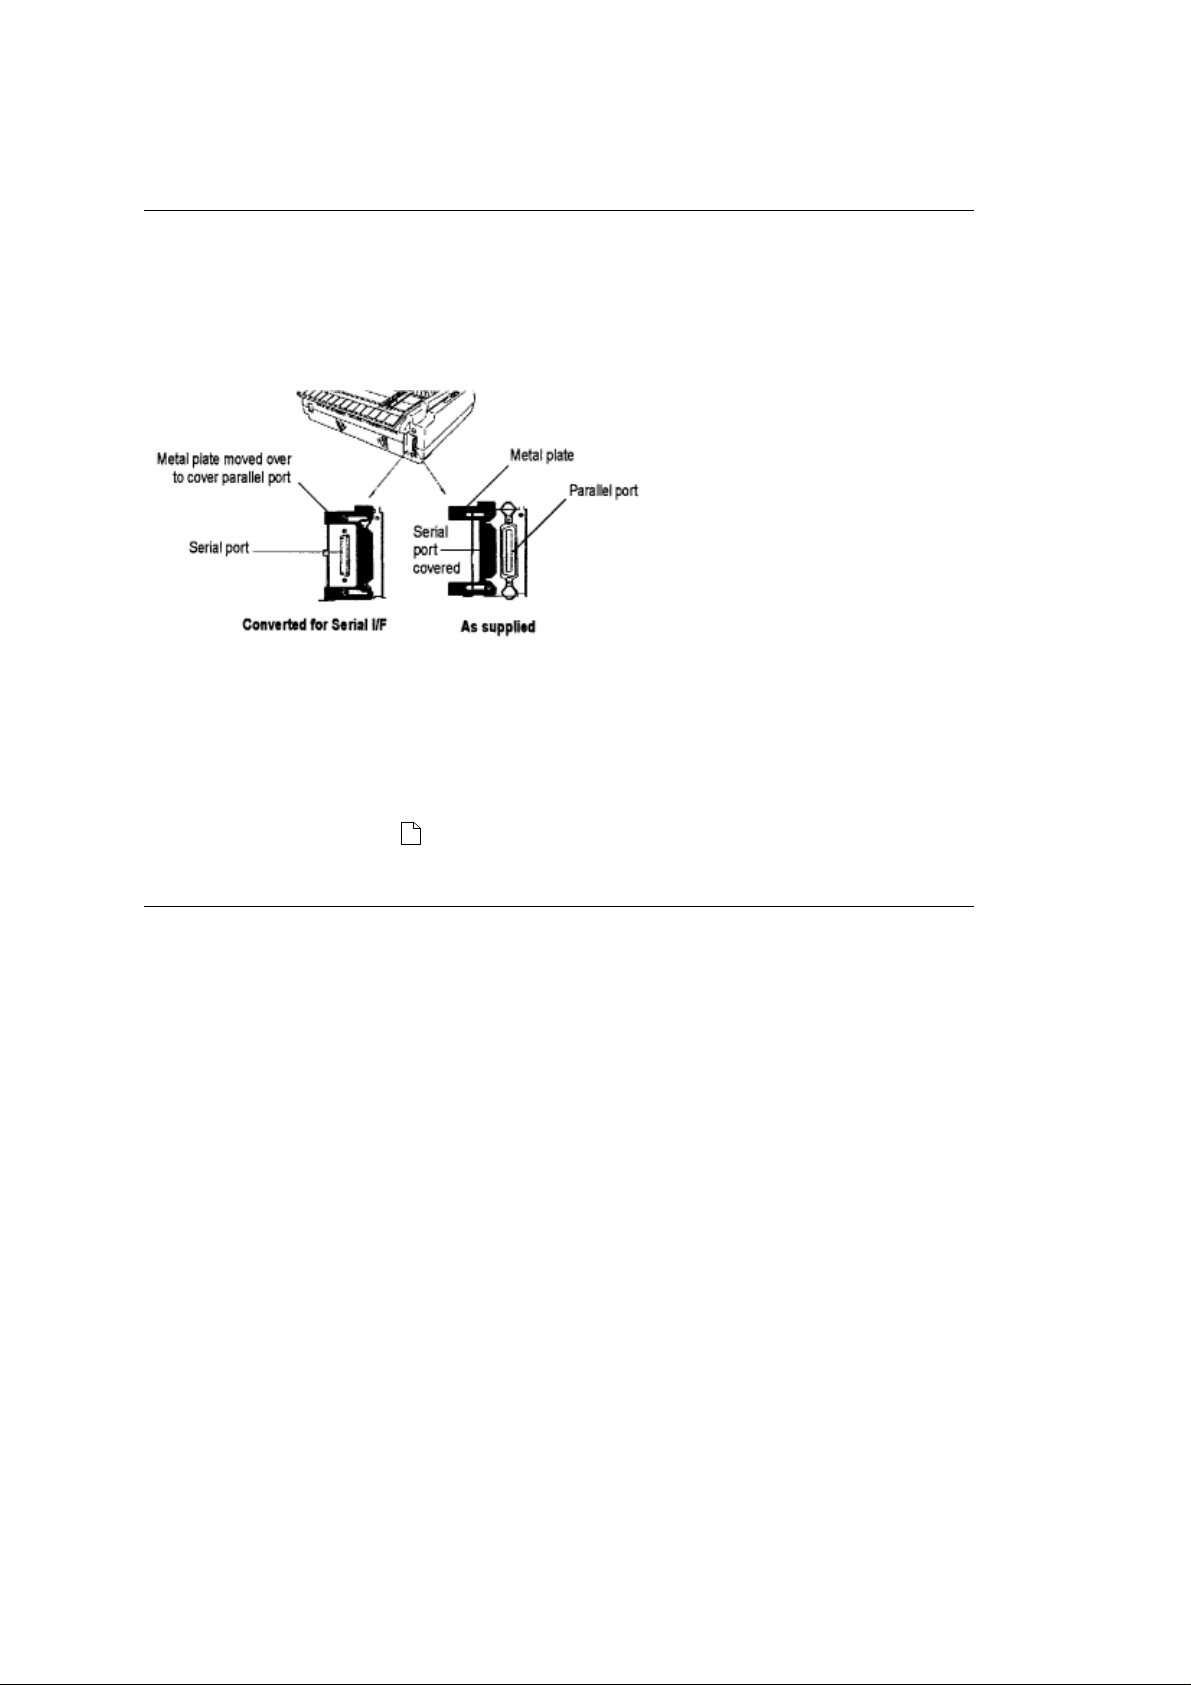
Computer Connection
Your printer has both a parallel and a serial port: you can only use one at a time. When you take the
printer out of the box, there will be a metal plate over the serial port.
Using the Parallel Port
Plug in your parallel cable and fasten the printer's clips to it.
Using the Serial Port
To use the serial interface, loosen the metal plate with a Phillips screwdriver and slide it to the right
to cover the parallel port. Plug your cable into the serial port and fasten it in place by screwing it
in. Then tighten the screws on the plate.
If you use the serial port, you may need to enter the Menu Select mode and adjust the menu
settings (see Chapter 5)(
).
ML395 ( 96-02-07 )
Page 9
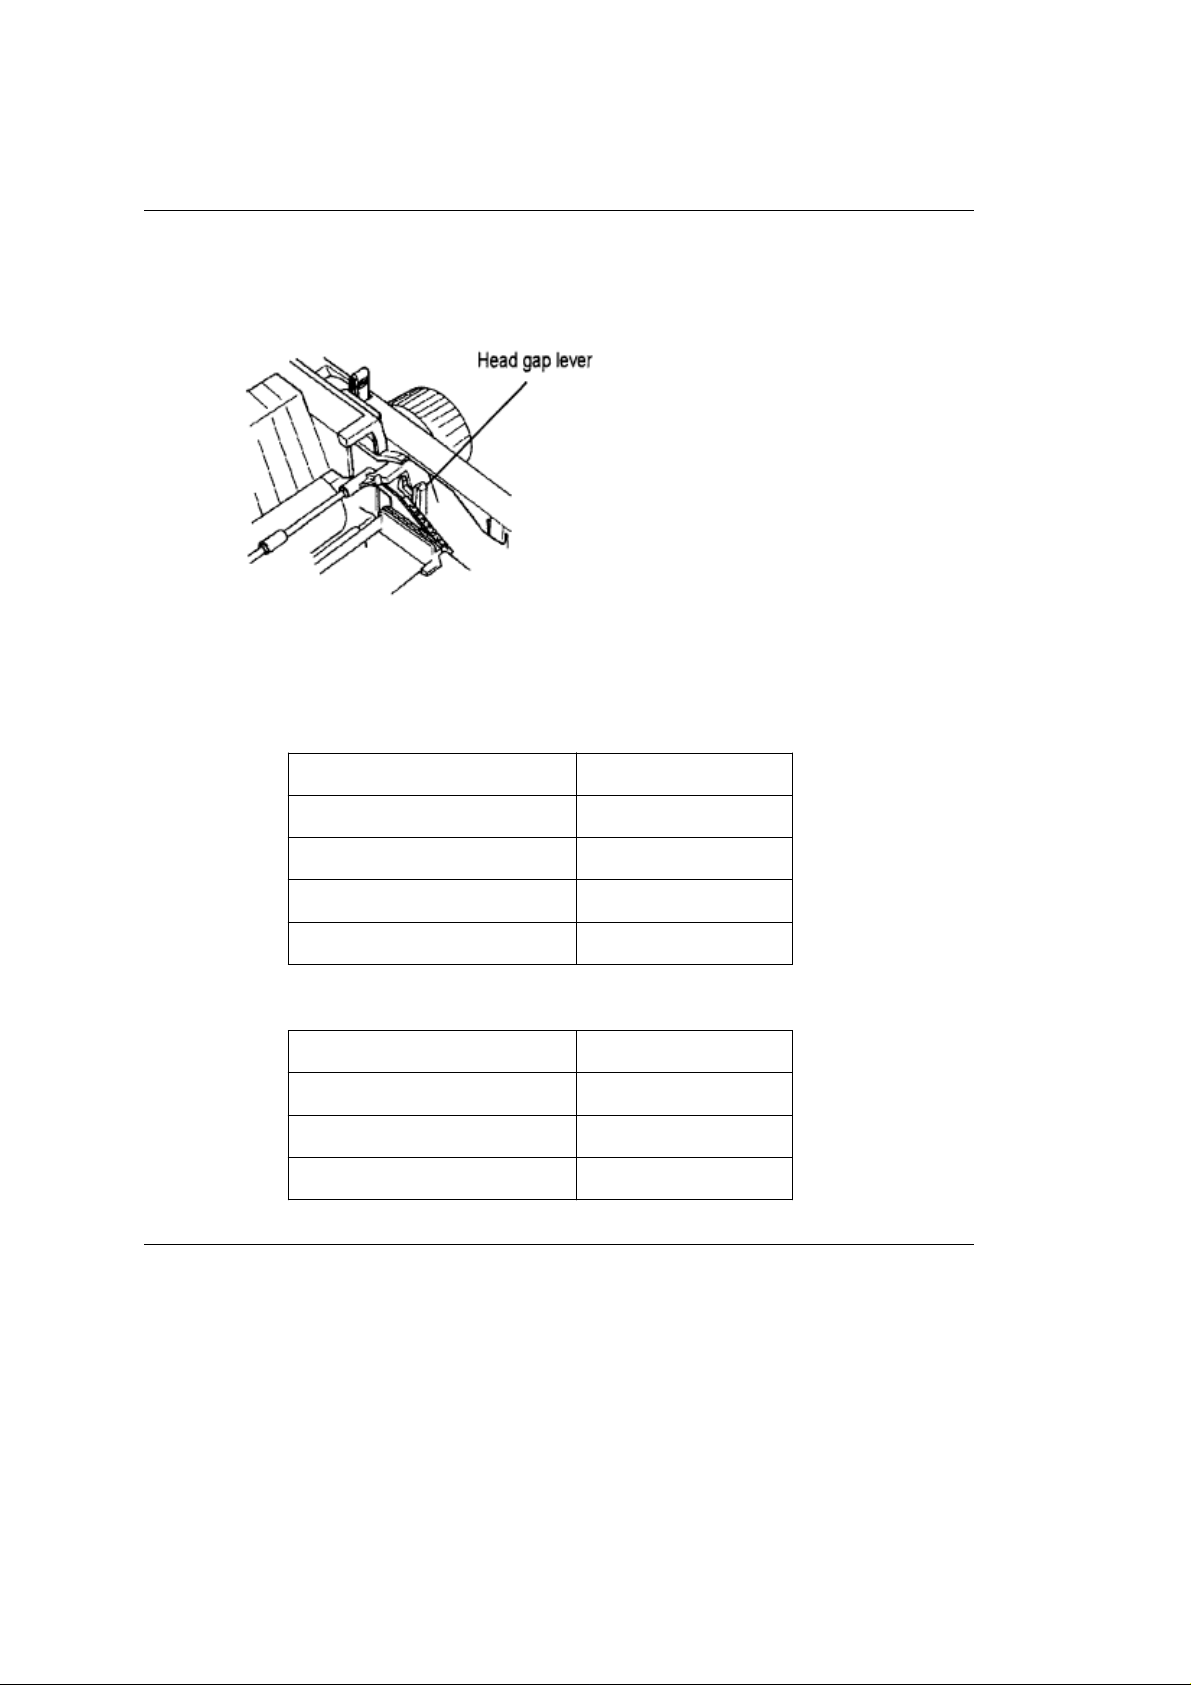
Adjusting the Head Gap
Adjusting the Head Gap
The head gap is the distance between the printhead and the platen. When you use envelopes or
multi-part forms, you need a larger head gap than when you use plain paper.
To adjust the head gap, open the access cover. The blue head gap lever is located on the right side of
the printer. Use the recommended head gap from the table below to ensure the best print quality and
proper paper feeding.
Adjusting the Head Gap Headgap Setting
12-20 lb paper 1
20-24 lb bond 2
Labels 3-4
Envelopes 5-9
Form (w/carbon) Headgap Setting
Two-part 3-4
Three-part 4-5
Four-part 7
ML395 ( 96-02-07 )
Page 10

Chapter 2
Loading Paper
Loading Paper
Your printer has two standard paper handling configurations: rear-feed continuous forms and top-feed
single sheets. You can also use bottom-feed continuous forms if you install the op-tional push tractor unit
and/or the optional pull tractor.
You can also expand top-feed convenience by installing one of the optional cut sheet feeders on top of
the printer platen. These cut sheet feeders automatically feed in single pages one after another from a
stack of over 100 sheets (see Accessories in Appendix B)(
).
ML395 ( 96-02-07 )
Page 11
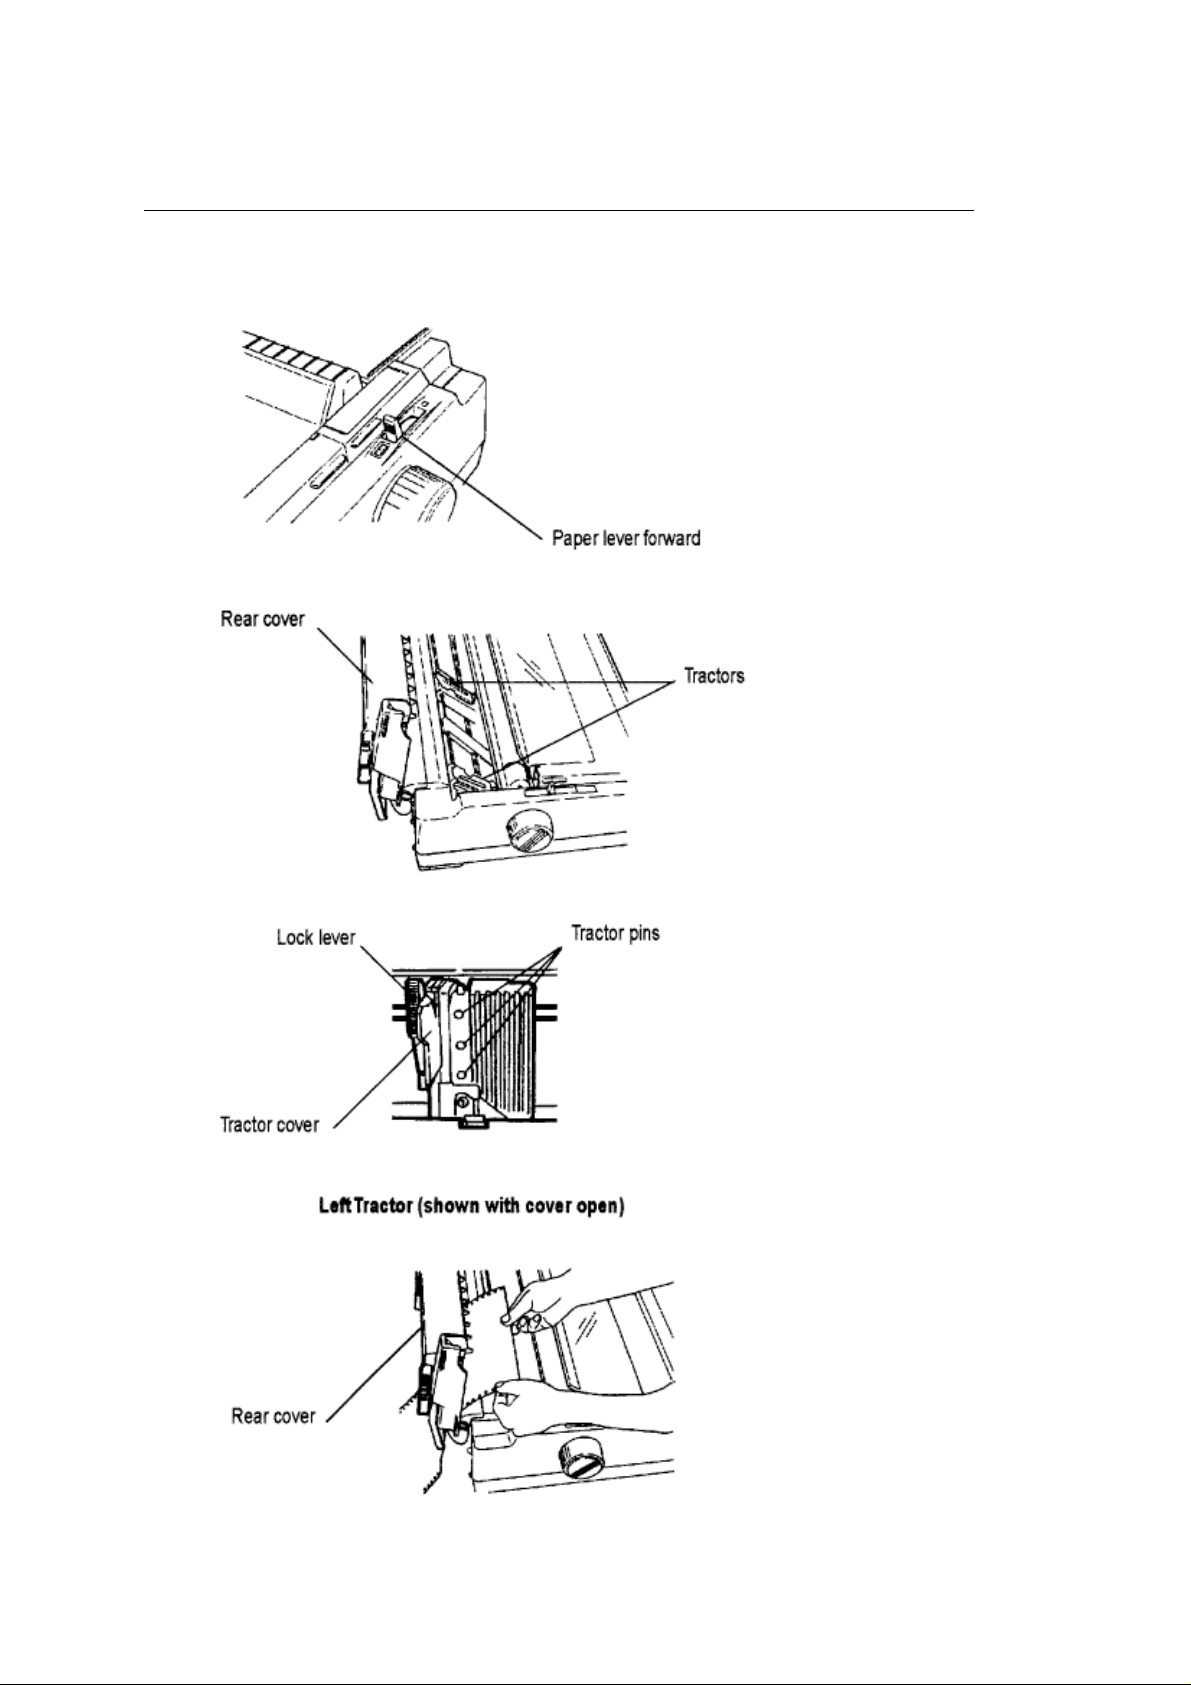
Loading Rear-Feed Continuous Forms
Loading Rear-Feed Continuous Forms
1. Pull paper lever forward to continuous forms position.
2. Open rear cover and locate tractors.
3. Open both tractor covers and pull forward on right-hand lock lever to unlock right tractor.
4. Insert paper under rear cover and pull it through.
5. Slide right-hand tractor to adjust it to width of paper, then set paper on tractor pins at either end and
ML395 ( 96-02-07 )
Page 12
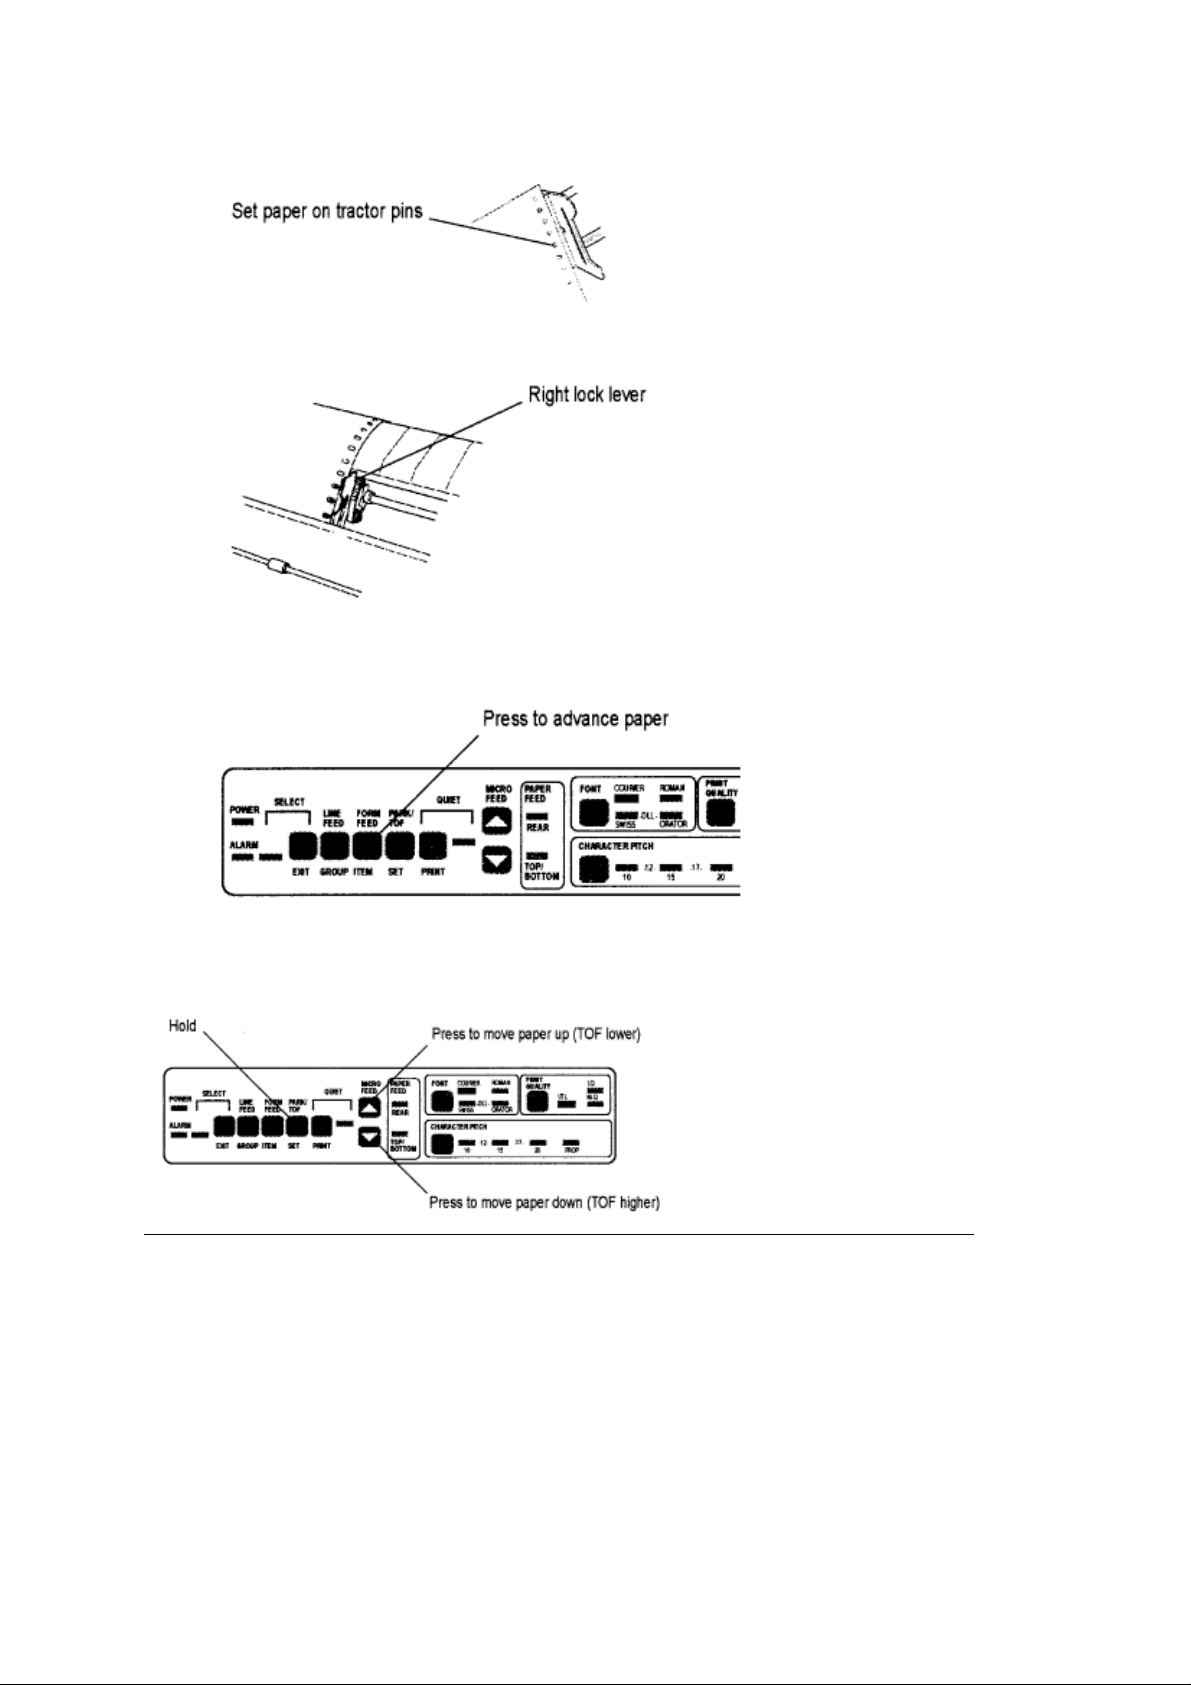
close tractor covers.
6. Push right lock lever back to lock tractor in position. Don't stretch paper tightly it can cause paper to
tear.
7. Close rear cover.
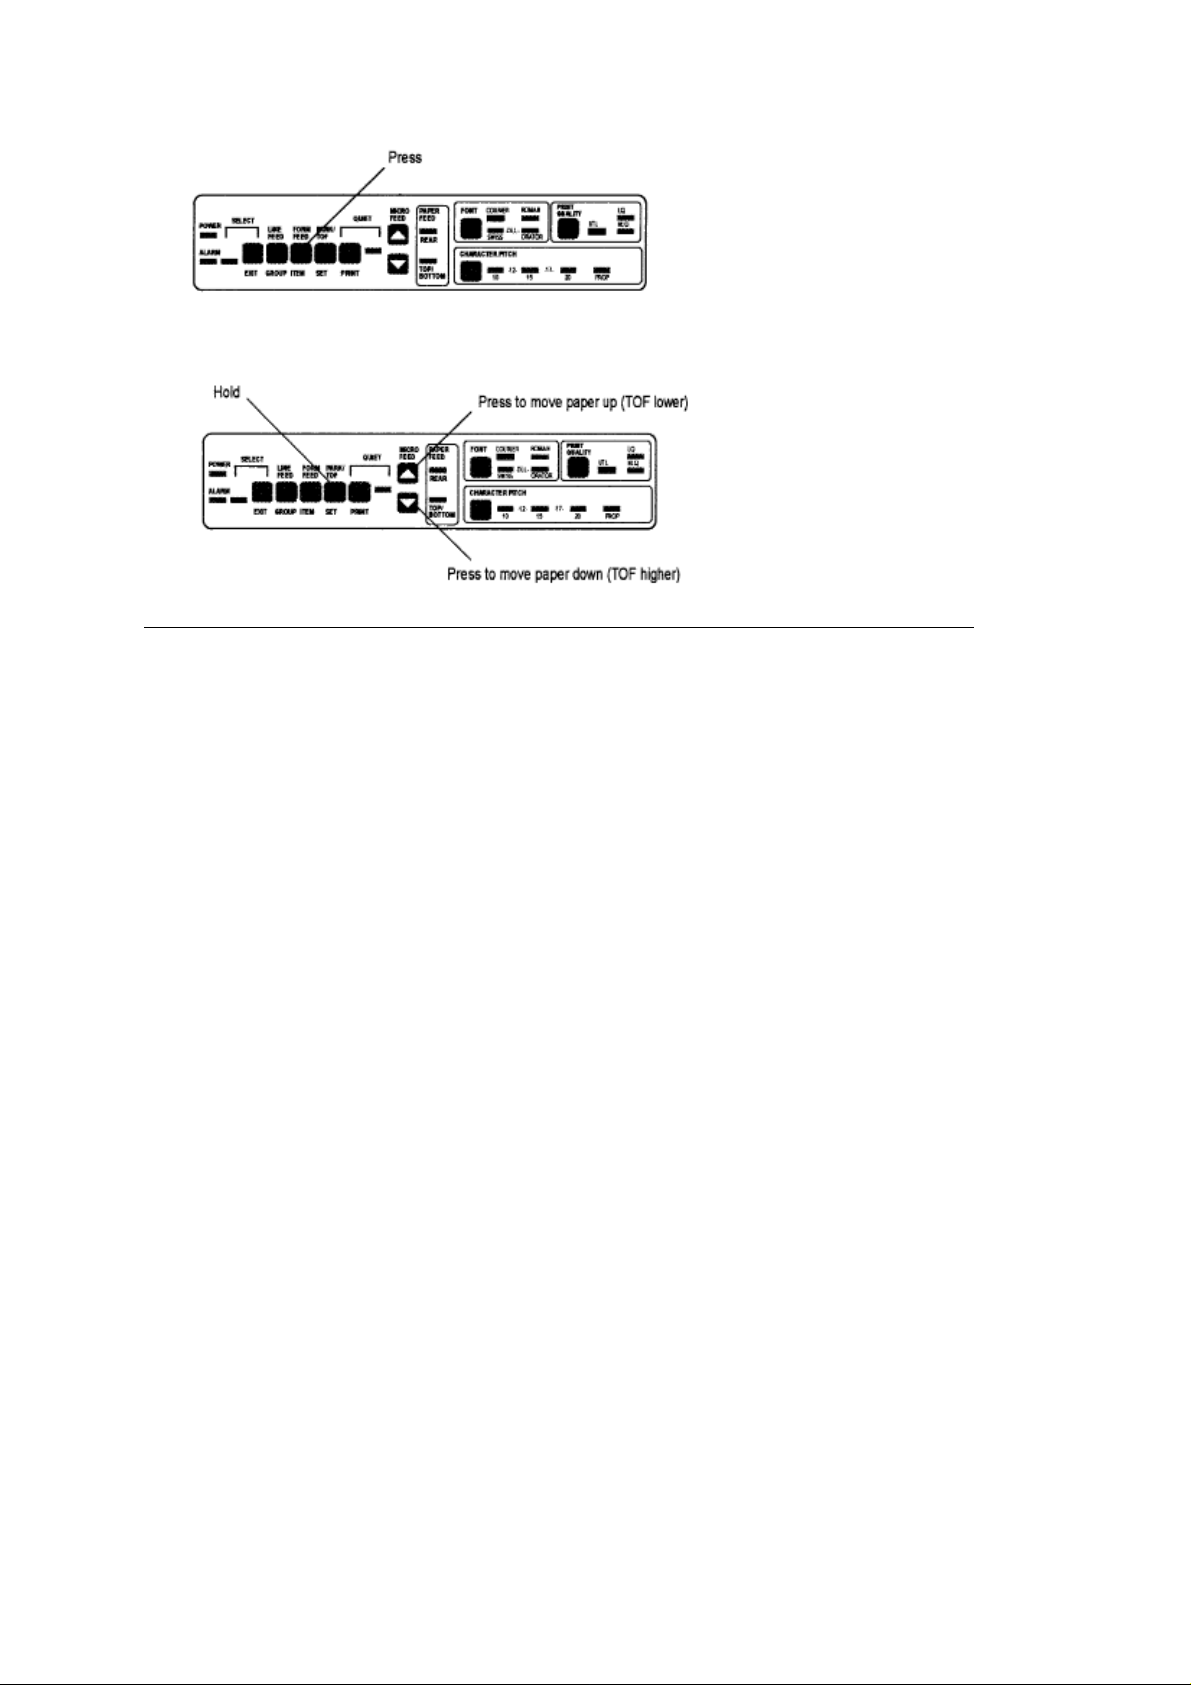
8. Press FORM FEED button to advance paper.
9. Set Top of Form (TOF) by holding PARK button while pressing appropriate MICRO FEED button.
Paper will advance up or down in direction of arrow on button youre pressing. (For more details, see
Setting Top of Form later in this chapter.)
ML395 ( 96-02-07 )
Page 13
Loading Single-Sheet Paper
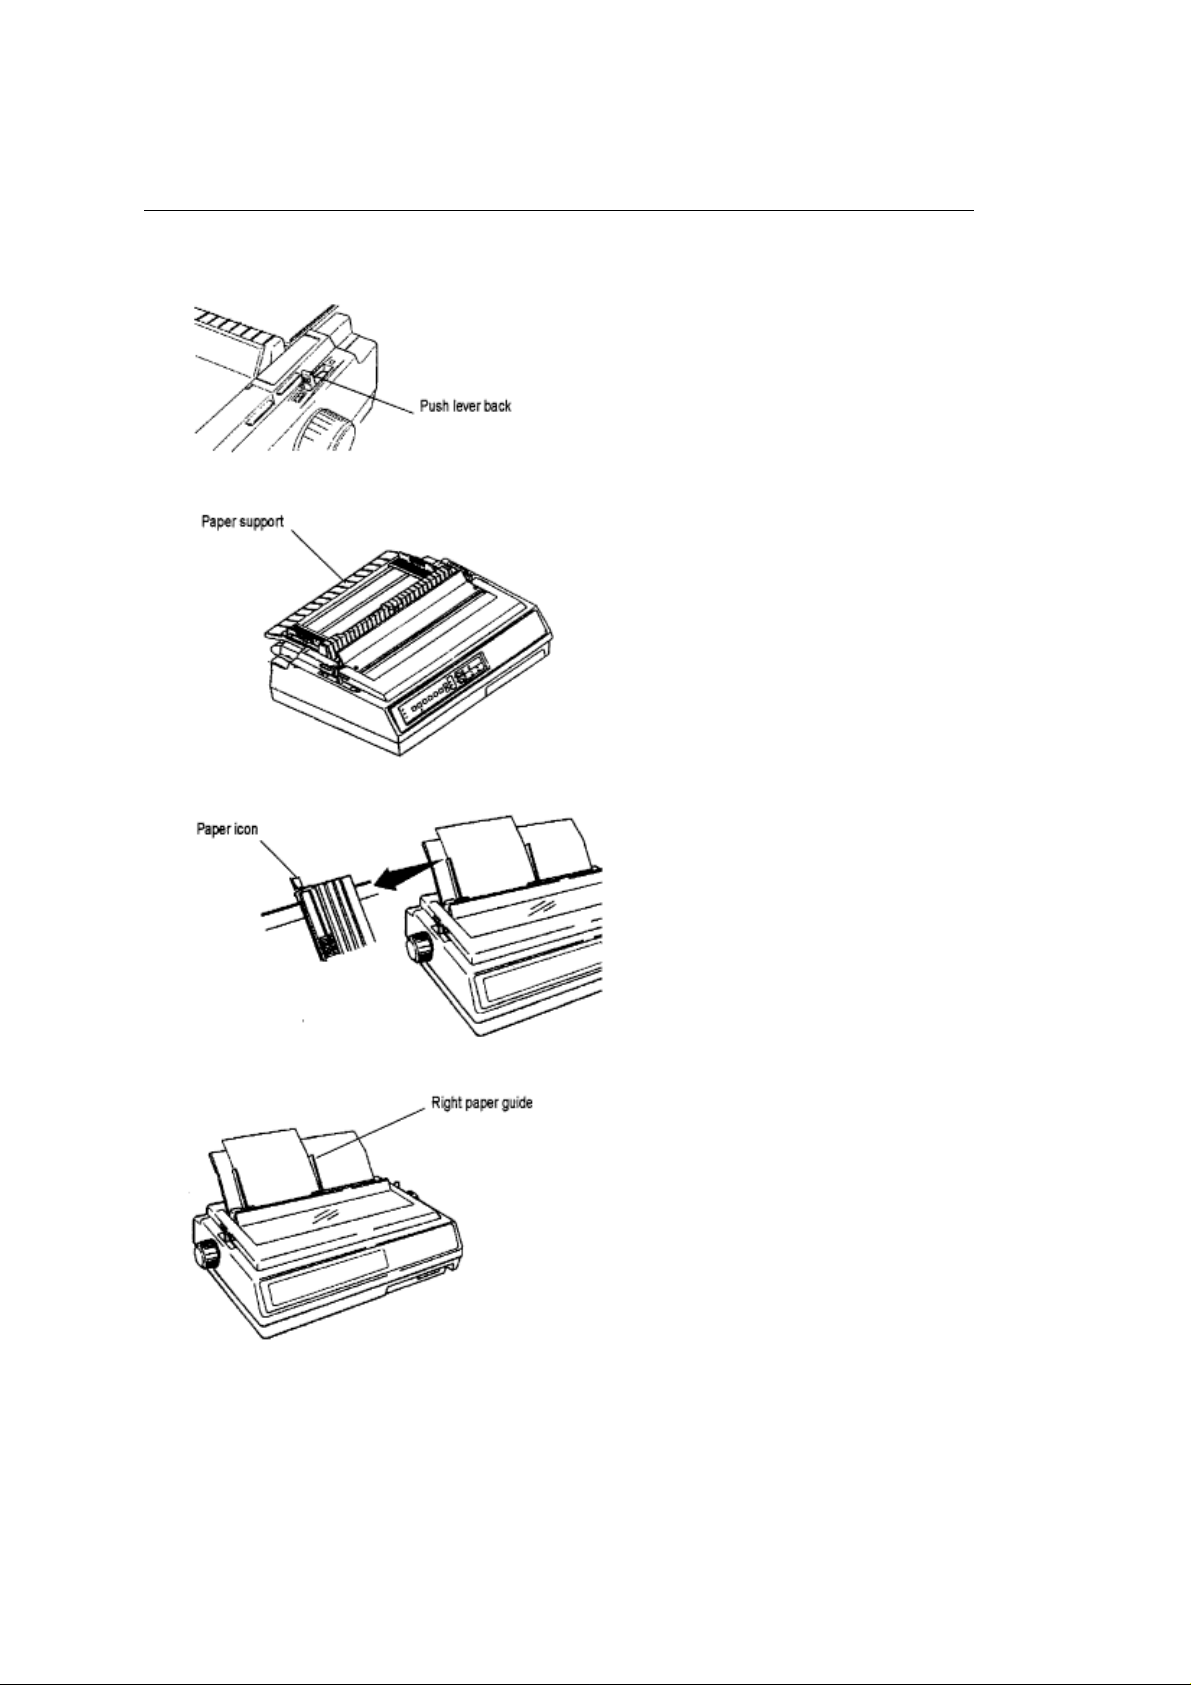
Loading Single-Sheet Paper
1. Push paper lever back to single-sheet position.
2. Lift paper support to upright position.
3. Align left paper guide with paper icon on support.
4. Insert a piece of single-sheet paper and adjust right paper guide to width of paper.
5. Press FORM FEED button to feed sheet into printer.
ML395 ( 96-02-07 )
Page 14
6. Set top of form by holding PARK button while pressing appropriate MICRO FEED button. Paper
will advance up or down in direction of arrow on button youre pressing.
ML395 ( 96-02-07 )
Page 15

Changing Paper Paths
Changing Paper Paths
You don't have to remove continuous-form paper in order to print a single sheet.
To change from continuous forms to single sheets:
1. Remove any printed pages from printer.
2. Press PARK button to retract continuous forms paper from paper path.
3. Move paper lever to single sheet position if you're switching from rear feed.
4. Lift paper support to upright position and align left paper guide with paper icon on support.
5. Insert a piece of single-sheet paper and adjust right paper guide to width of paper.
6. Press FORM FEED button to feed sheet into printer.
ML395 ( 96-02-07 )
Page 16

To switch back to continuous forms:
To switch back to continuous forms:
1. Remove any single-sheet paper in printer.
2. Move paper lever to continuous forms position if you're switching to rear feedleave it set for single
sheets if you're switching to bottom feed.
3. Lower paper support.
4. Press FORM FEED button to feed continuous forms paper into printer.
ML395 ( 96-02-07 )
Page 17
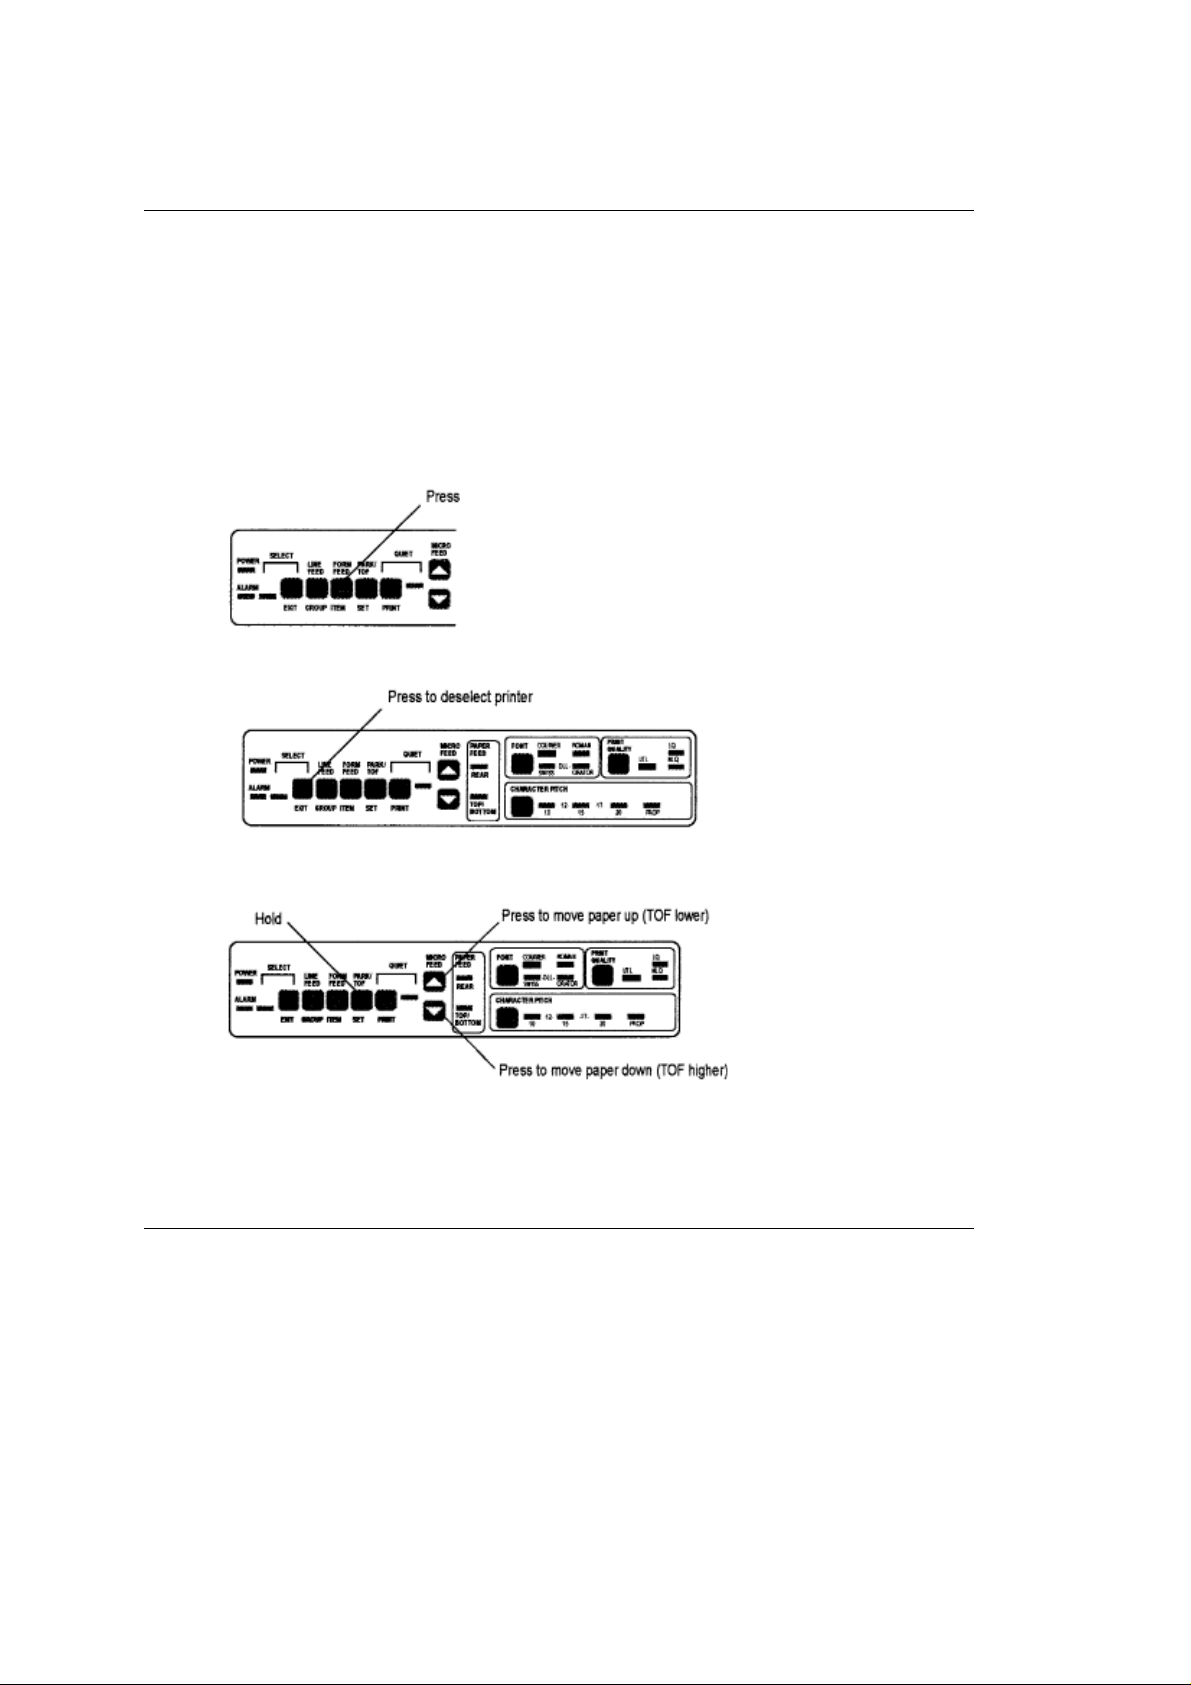
Setting Top of Form
Setting Top of Form
The top of form is the place on the page where printing starts. When the printer advances to the next
page, it stops at the top of form.
Your printer stores the top of form position independently for the three standard types of paper feeding:
top, rear, and bottom.
The method of setting top of form is the same for all types of paper:
1. Feed a page into printer by pressing FORM FEED button.
2. Make sure printer is deselected (SELECT light off). If it's not, press SELECT/EXIT button to deselect
it.
3. Press and hold PARK button while you adjust page up or down using MICRO FEED buttons. Red line
on plastic ribbon shield marks base of printing line: use this as a guide.
4. When you release PARK button, position will be registered in printer's memory until you change it.
ML395 ( 96-02-07 )
Page 18
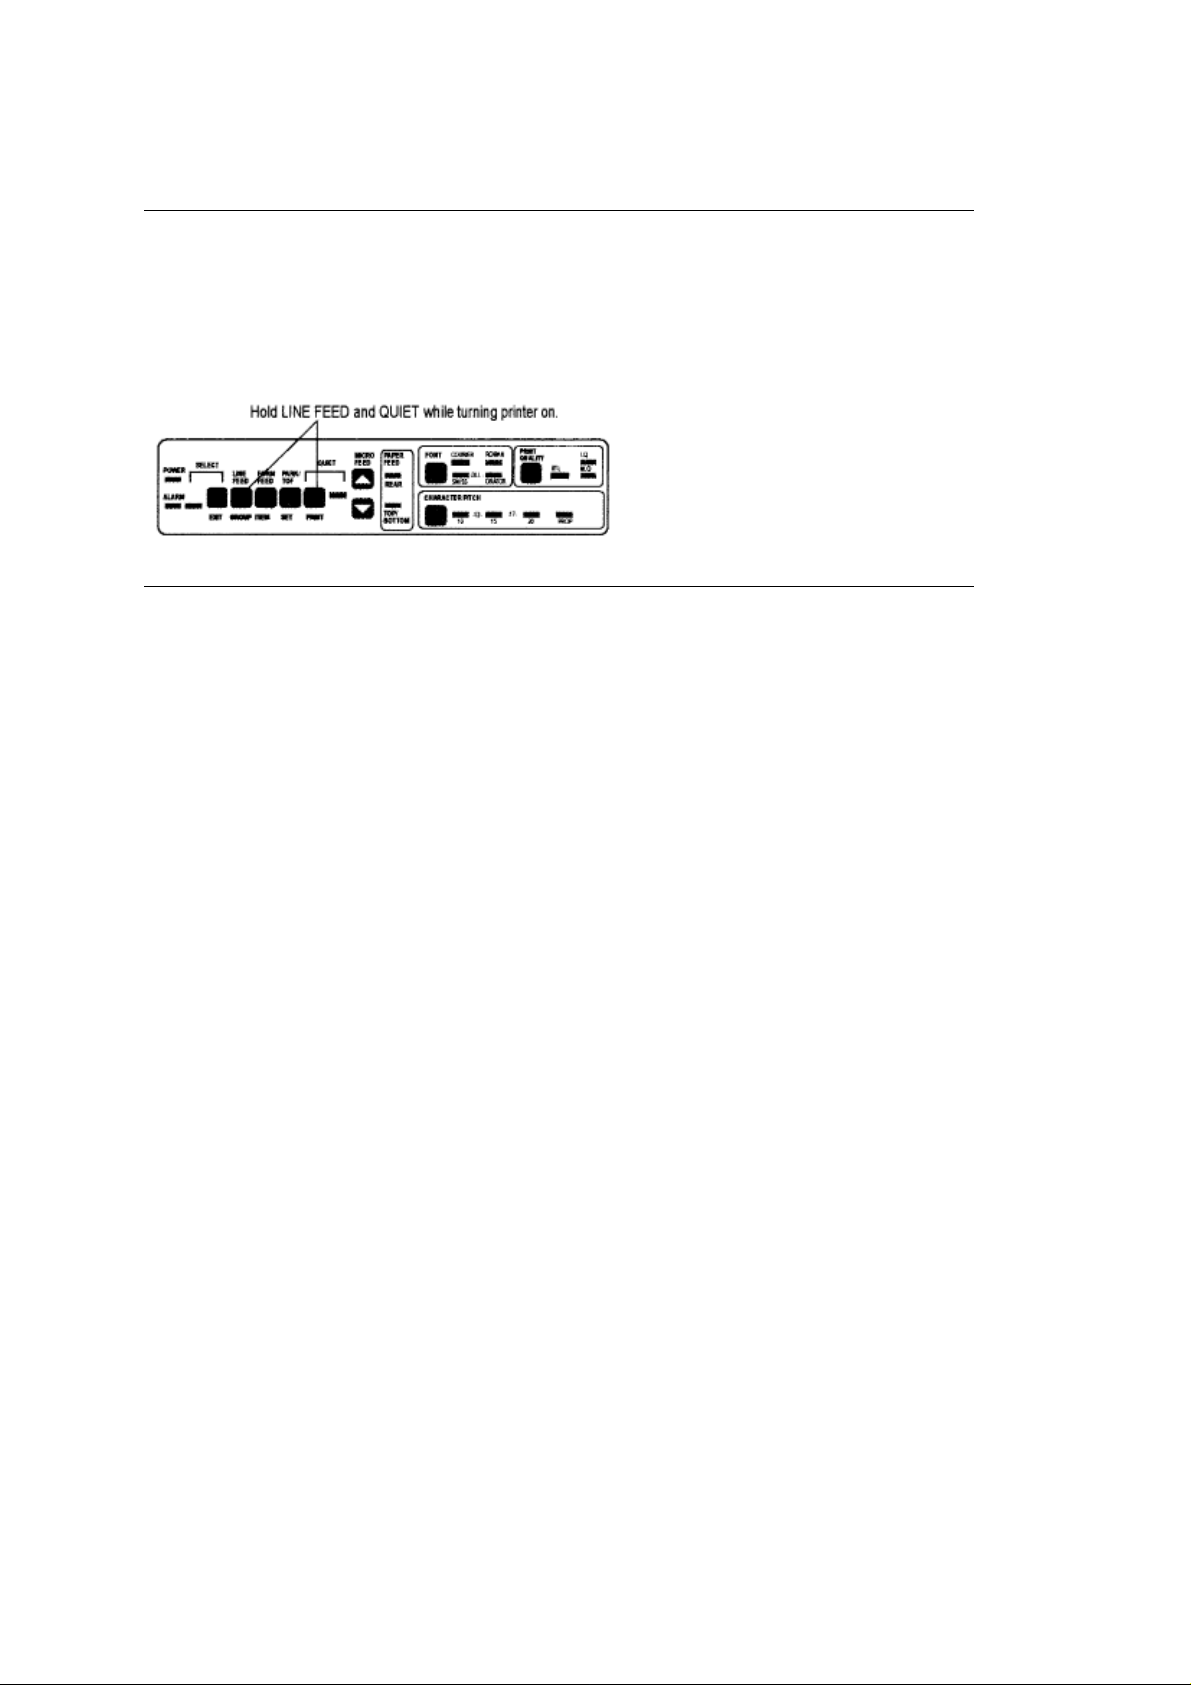
Resetting Top of Form
Resetting Top of Form
To reset the Top of Form to the factory default:
1. Turn off printer.
2. Hold down LINE FEED and QUIET buttons while turning printer back on.
ML395 ( 96-02-07 )
Page 19

Paper Handling
Paper Handling
Your printer has the following handy paper handling features:
- Form Tear Off
- Paper Park
ML395 ( 96-02-07 )
Page 20

Form Tear Off Feature (Continuous-Form Paper Only)
Form Tear Off Feature (Continuous-Form Paper Only)
Caution! Do not use Form Tear Off when printing on labels.
The Form Tear-Off feature allows you to remove a printed continuous-form page without wasting paper. It
does this by automatically advancing the continuous-form paper to the tear bar position when printing
stops.
The printer is shipped with this feature turned off. To activate the feature, you need to enter the Menu
Mode (see Chapter 5) and select a setting other than Off for the Form Tear-Off item under General
Control. Each setting is explained below.
Settings 300 ms, 2 sec & 4 sec
These settings activate the Form Tear-Off feature so that the print paper automatically advances to the
tear bar position shortly after printing stops: the interval between the time the printer stops and the time
the paper advances is determined by the setting you select. When data is received again, the
continuous-form paper will automatically move back down for printing
When running continuous invoices, select the 300 ms setting. The printer will print the invoices
Note:
without stopping. If the last invoice does'nt print, add the Form Feed command at the end of the program.
Offline:
tear-off position. The paper will then remain in the tear-off position until you place the printer back on line
by pressing the SELECT button.
In Point of Sale situations, this setting permits you to tear off each individual receipt before the next
receipt is printed.
Settings:
These settings are similar to the 300 ms/2 sec/4 sec settings above, but are specifically for use with
programs written for the former MICROLINE 393/393C Plus printer. They provide backward compatibility
for those who have replaced their Microline 393/393C Plus printer with the Microline 395/395C.
Note:
data to the printer. If the pause lasts more than the selected interval, the paper will advance to the
tear-off position until more data is received. No data will be lost, but this extra paper movement can
cause uneven print registration in graphics. If you have this problem, use the menu to set the Form Tear
Off feature to OFF.
This setting causes the printer to go offline (deselected) after it moves the paper up to the
300 ms
Some programs, such as high resolution graphics packages, pause occasionally while sending
(ML393PLUS),
2 sec
(ML393PLUS), &
(ML393PLUS)
4 sec
ML395 ( 96-02-07 )
Page 21
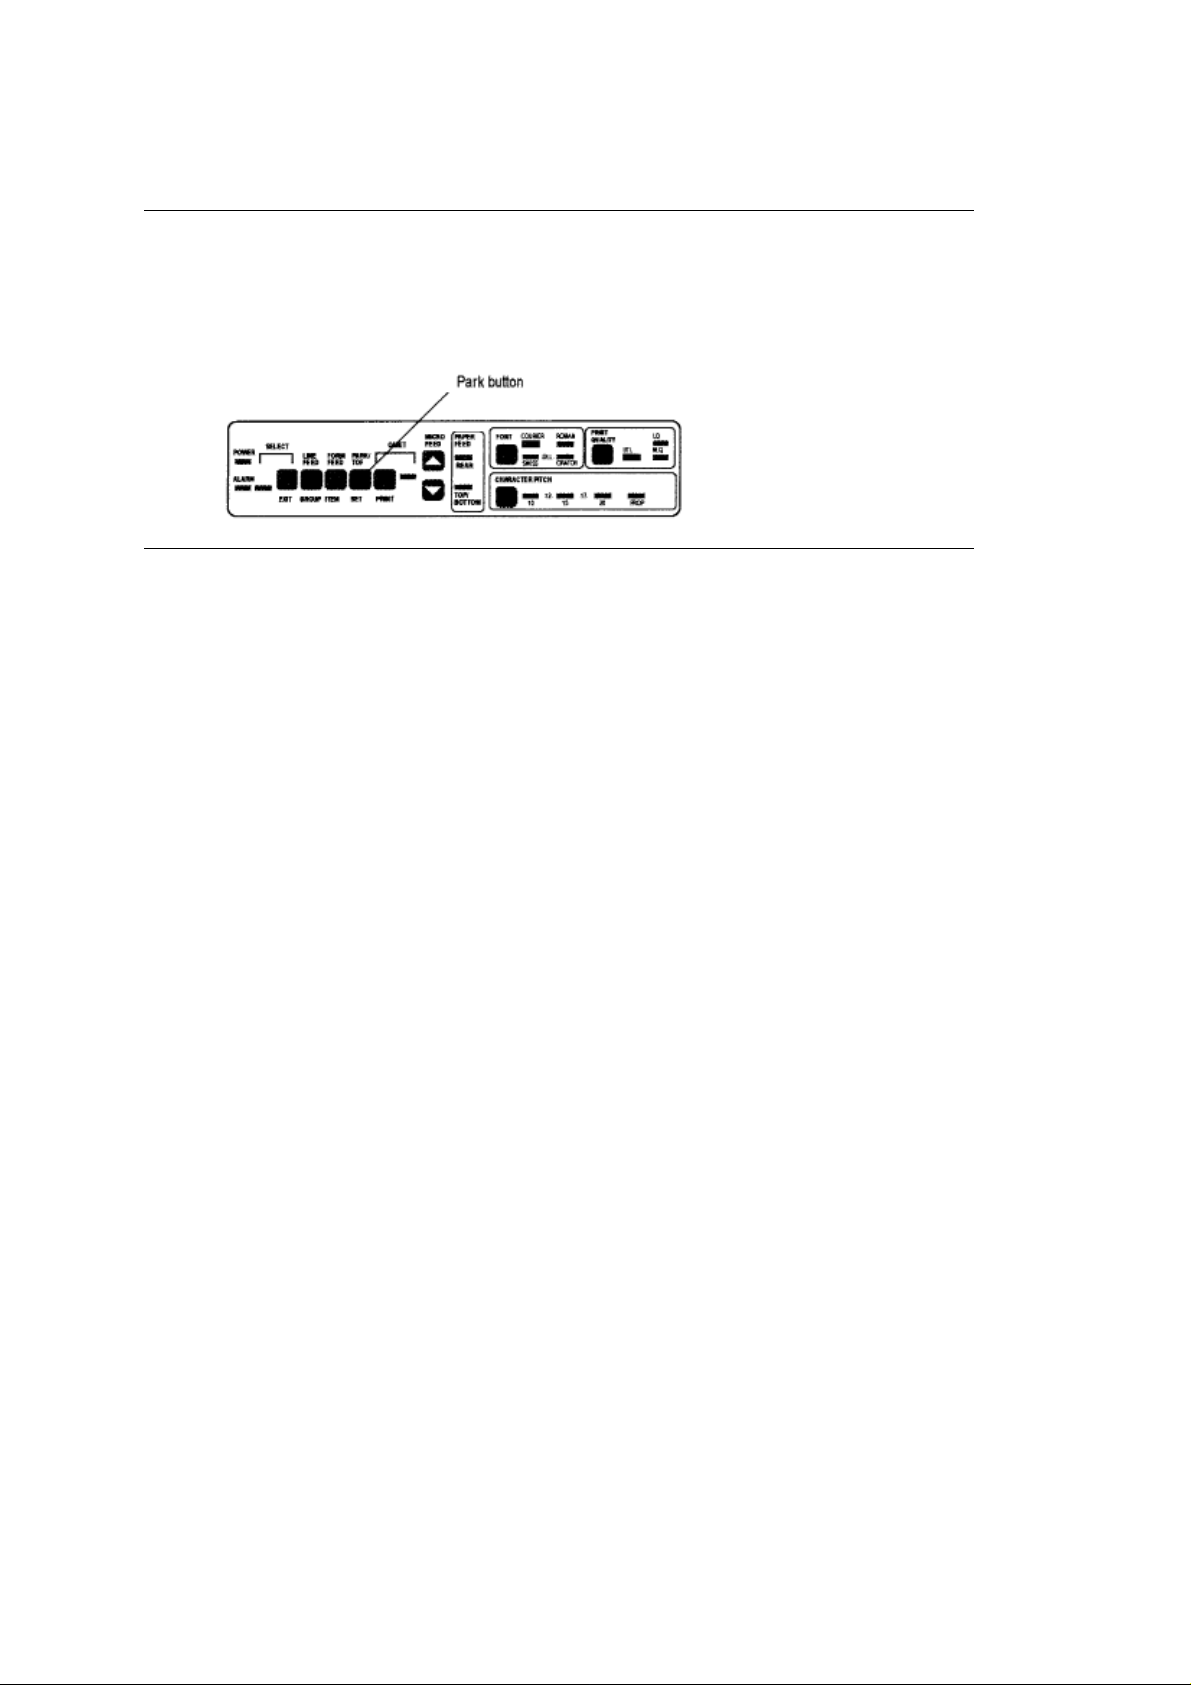
Paper Park
Paper Park
If you have continuous-form paper loaded and you wish to switch to another paper path, first tear off the
printed pages, then simply press the PARK button. The continuous-form paper will immediately retract
from the paper path.
ML395 ( 96-02-07 )
Page 22

Chapter 3
Font Test & Rolling ASCII Test
Important! Use only continuous forms paper to run tests.
Font Test
Note: The top of the Font Test and Rolling ASCII Test contains information on your printer model. Be
sure to have a copy of the printout handy if you call for service.
The Font Test prints samples of the available fonts.
To run the Font Test:
1. Be sure paper is loaded, then turn off printer
2. Hold LINE FEED button while turning printer back on. Note If printer turns on without starting to print,
you didnt hold LINE FEED button long enough.
To stop the Font Test:
Press the SELECT button or turn off the printer.
Rolling ASCII Test
The Rolling ASCII Test produces a continuous printout of all 96 ASCII characters in a rolling pattern
using the default type style. Heres a sample portion of a Rolling ASCII Test:
To run the Rolling ASCII Test:
1. Be sure paper is loaded, then turn off printer
2. Hold PARK button while turning printer back on.
If printer turns on without starting to print, you did'nt hold PARK button long enough.
Note:
To stop the Rolling ASCII Test:
Press the SELECT button or turn off the printer.
ML395 ( 96-02-07 )
Page 23

Chapter 4
Printer Commands
Printer Commands
If you're using commercial software with an appropriate printer driver (see Printer Drivers below),
Note:
the printer commands will normally be sent to the printer by your software and you won't need to think
about them.
Printer commands are signals sent by your PC to the printer which guide and control its operation. They
usually begin with the ESC character and can be sent in decimal, ASCII, or hexadecimal form (see
Appendix C for a listing of commands).
ML395 ( 96-02-07 )
Page 24

Emulations
Emulations
Your printer has three emulations:
Epson LQ (factory default)
IBM Proprinter
IBM AGM
ML395 ( 96-02-07 )
Page 25

Changing Emulations
Changing Emulations
Your printer is set at the factory for the Epson LQ emulation. To change the emulation, enter the Menu
Mode by deselecting the printer (press SELECT button), then pressing the QUIET button.
The following line will print:
Printer Control Emulation Mode Epson LQ
Press the SET button until the emulation you wish to select prints. Then exit the Menu and save your
setting by pressing the EXIT button.
ML395 ( 96-02-07 )
Page 26

Printer Drivers
Printer Drivers
Commercial software packages use printer drivers to control the appearance of printed documents. A
printer driver is a list of printer commands which cause the printer to perform various functions at the
request of the software When you use your printer with a software package, you must use the software to
select a printer driver which is compatible with your printer.
The table on the next page summarizes the various drivers which will work with your printer. They are
listed in order by decreasing compatibility as you go down the list: select one from as high up on the list
as possible, based on what is available from among the drivers supplied with your software.
If you don't see one from near the top of the list, give the software manufacturer a call to see if they have
added any drivers to those supplied when you purchased your software.
Important:
Check your software documentation for instructions on how to install a printer driver!
*Use this driver for color printing.
OKIDATA MICROLINE 395/395C drivers are available for Microsoft
Note:
obtain the drivers, call the OKILINK
II BBS at (609) 234-5344 and download them, or mail your request
®
Windows ® 3.0 and 3.1. To
®
for a driver diskette (#MS-8854 for 3½", or #MS-8855 for 5¼") to OKIDATA, P.O. Box 4618, Trenton, NJ
08650-9850.
Because there are some differences in characteristics such as speed or access to various features, you
may wish to experiment with several different drivers.
If you must select a driver that is not listed in the table, be sure to check it thoroughly for print features
such as boldface, underline and changes in pitch. Don't be surprised if boldfaced items are printed twice,
underlines are misplaced, wide spaces are left between lines or the printer behaves chaotically (turn off
the printer if the latter occurs). These are all characteristics of an incompatible driver selection.
ML395 ( 96-02-07 )
Page 27

Software Driver Selection
Software Driver Selection
Selecting a software printer driver is usually a part of the program installation process. Changing printers
may require use of an external routine, or may be possible from within the program through menu
selection.
ML395 ( 96-02-07 )
Page 28

Chapter 5
Control Panel Indicator Lights
Control Panel Indicator Lights
ML395 ( 96-02-07 )
Page 29

Control Panel Buttons: Menu Mode
ML395 ( 96-02-07 )
Page 30

Control Panel Buttons: Print Mode
Control Panel Buttons: Print Mode
ML395 ( 96-02-07 )
Page 31

Combinations of Buttons
Combinations of Buttons
Several of the front panel buttons can also be used in combination on power up to perform different
functions:
Buttons
SELECT + FORM FEED Activates Hex Dump Mode.
SELECT + PARK Resets Menu to defaults.
QUIET + LINE FEED Resets Top of Form to default.
Function, held on power up
ML395 ( 96-02-07 )
Page 32

Print Mode - Selecting a Font
Print Mode - Selecting a Font
You can select Courier, Roman, Swiss or Orator fonts. You can also downline load fonts you generate
using your computer.
To select a font, press the FONT button repeatedly until the light next to the font you wish to select
glows. To select DLL, press until both the SWISS and ORATOR lights are glowing.
ML395 ( 96-02-07 )
Page 33

Selecting Print Quality
Selecting Print Quality
Letter Quality (LQ)
the slowest of the print modes, but it produces the best quality printing. Usable at 10, 12, 15,
17.1, and 20 cpi.
Near Letter Quality (NLQ)
almost as sharp. It is good for documents that dont need that extra polished appearance. Usable
at 10 and 12 cpi.
Utility (UTL)
faster than LQ or NLQ printing. Usable at 10, 12, 15, 17, and 20 cpi.
High Speed Draft (HSD)
HSD printing is the fastest. HSD is available at 15 and 17.1 cpi. (To select HSD, you must use
the printer Menu see next page)
Using HSD or UTL printing whenever possible will help to extend the life of your ribbon.
Note
To select UTL, NLQ or LQ print quality, press the PRINT QUALITY button repeatedly until the light below
the print quality you wish to select glows. If you wish to activate HSD, youll need to enter the printer
Menu and change the setting for Print Mode under the group Font (see Chapter 5)(
printing is designed for printing rough drafts or internal correspondence. It is much
printing produces sharp, crisp, clean characters, almost like a typewriter. It is
printing is faster than LQ printing, and produces characters that are
printing is designed for high-volume printing of rough drafts or reports.
).
ML395 ( 96-02-07 )
Page 34

Selecting Character Pitch
Selecting Character Pitch
The character pitch determines the width of the individual characters and is measured in characters per
inch (cpi).
To select the character pitch, press the CHARACTER PITCH button repeatedly until the light next to the
pitch you wish to use glows. To select 12 cpi, keep pressing until the lights above both 10 and 15 cpi are
glowing; to select 17 cpi, press until the lights above both 15 and 20 cpi are glowing.
ML395 ( 96-02-07 )
Page 35

Menu Mode
Menu Mode
When your printer is in the Menu Mode, the functions written below the buttons are active. For
Note
example, in the Menu Mode the SELECT button becomes the EXIT button.The Menu Mode allows you to
change your printers default configuration. These changes remain even when the printer is turned off until
you (or in some cases, your software) change them again.
Important! Certain printing features on the menusuch as font, character size, and line spacingare
controlled by most software packages. In that case, the software will override the menu settings.
ML395 ( 96-02-07 )
Page 36

Entering the Menu Mode
Entering the Menu Mode
To place your printer in the Menu Mode, first make sure the printer is deselected (SELECT light off: press
SELECT to deselect printer), then press the QUIET button, or hold down the QUIET button while you turn
on the printer.
The following line will print across the page:
Printer Control Emulation Mode Epson LQ
Press to enter Menu Mode
Press if you need to deselect printer.
ML395 ( 96-02-07 )
Page 37

Exiting the Menu Mode
Exiting the Menu Mode
To exit the Menu Mode, press the EXIT button.
ML395 ( 96-02-07 )
Page 38

Resetting Menu to Factory Defaults
Resetting Menu to Factory Defaults
To reset your printer Menu to the factory defaults, turn the printer off, then hold the SELECT and PARK
buttons while turning the printer back on.
ML395 ( 96-02-07 )
Page 39

Printing the Menu
Printing the Menu
The Menu is made up of groups. Within each group (column 1) are items (column 2); each item has
several settings (column 3). To print out a list of the settings currently engaged, enter the Menu Mode,
then press the PRINT button. For example:
GROUP ITEMS SETTINGS
ML395 ( 96-02-07 )
Page 40

Changing Menu Settings
Changing Menu Settings
To make changes in the Menu settings, first enter the Menu Mode. When you do this, the first
Group/Item/Setting will print out.
To change the setting, press the SET button.
To move to the next group, press the GROUP button.
To change to another item within a group, press the ITEM button.
ML395 ( 96-02-07 )
Page 41

Summary of Menu Settings
Summary of Menu Settings
The table below shows a summary of the various items which may appear in the Menu. Settings which
are engaged at the factory (defaults) are set in bold italic.
Note Entries under the group Serial I/F appear in the menu only if you have the Serial Interface board
installed, additional entries will appear in the Menu
Group Item Setting
Printer Control Emulation Mode Epson LQ, IBM PPR, IBM X24 AGM
Font Print Mode LQ, NLQ, Utility, HSD
Typestyle Courier, Roman, Swiss, Orator, DLL
Pitch 10 cpi, 12 cpi, 15 cpi, 17.1 cpi, 20 cpi, Proportional
Style Normal, Italics
Size Single, Double, Triple
Smoothing No, Yes
Group Item Setting
General Control Graphics Bi-directional, uni-directional
Paper Out Override No, Yes
Print Registration +5, +4, +3, +2, +1, 0, -1, -2, -3 ,-4, -5
Operator Panel Function Full Operation, Limited Operation
Ribbon Selection* Black Ribbon, Film Ribbon, Black, Yellow, Magenta,
Cyan, Violet, Orange, Green
Ribbon Selection** Black Ribbon, Film Ribbon
Reset Inhibit No, Yes
Page Width 13.6", 8"
Auto LF No, Yes
Auto CR (IBM only) No, Yes
Form Tear-Off Off, 300 ms, 2 sec, 4 sec, offline, 300 ms (ML393PLUS),
1 sec (ML393PLUS),
2 sec (ML393PLUS)
Menu Line 6, 1
Rear Feed Line Spacing 6 LPI, 8 LPI
Skip Over Perforation No, Yes
Page Length 12", 11", 11-2/3, 14", 17", 3", 3.5", 4", 5.5", 6", 7", 8", 8.5"
* Appears for Color-Ribbon Model 395C Only. ** Appears for Black-Ribbon Model 395 Only.
ML395 ( 96-02-07 )
Page 42

Group Item Setting
Bottom Feed Line Spacing 6 LPI, 8 LPI
Skip Over Perforation No, Yes
Page Length 12", 11", 11-2/3, 14", 17", 3", 3.5", 4", 5.5", 6", 7", 8", 8.5"
Cut Sheet Line Spacing 6 LPI, 8 LPI
Page Length 12", 11", 11-2/3, 14", 17", 3", 3.5", 4", 5.5", 6", 7", 8", 8.5"
Paper Transparency Paper, Transparency
Symbol Sets Character Set Set I, Set II, Epson
Code Page USA, Multilingual, Canada French
Language Set American, French, German, British, Danish I,
Swedish, Italian, Spanish I, Japanese,
Norwegian, Danish II, Spanish II, Latin American,
French Canadian, Dutch, Publisher
Zero Character Slashed, Unslashed
General Interface Max. Receive Buffer 1 Line, 8K, 23K
Print Suppress Effective No, Yes
Auto Feed XT Invalid, Valid
CPU Compensation Standard, Special
Group Item Setting
+
Serial Interface
Parity None, Odd, Even
Serial Data 7/8 Bits 8 Bits, 7 Bits
Protocol Ready/Busy, X-ON/XOFF
Busy Line SSD-, SSD+, DTR, RTS
Baud Rate 19200 BPS, 9600 BPS, 4800 BPS, 2400 BPS,
1200 BPS, 600 BPS, 300 BPS
DSR Signal Valid, Invalid
DTR Signal Ready on Power Up, Ready on Select
Busy Time 200 mS, 1 sec
ML395 ( 96-02-07 )
Page 43

Explanation of Menu Items
Explanation of Menu Items
These explanations are in alphabetical sequence to make it easier to look them up. Some of the items
apply only to a specific emulation, model, or if you are using the Serial Interface, as noted.
Auto LF.
Change to Yes if your printer prints one line over another. Keep this set to No if your software adds a line
feed when a carriage return is received at the end of a line or if your printout is consistently double
spaced.Auto CR (IBM mode only). Choose Yes to make your printer automatically perform a carriage
return when an LF is received at the end of the line.
Auto Feed XT
(Epson mode only). In the Epson emulation, the XT signal on pin 14 of the parallel interface can control
auto-matic line feed. Some interface cables are wired in such a way that automatic line feed is always in
effect; the Auto Feed XT item eliminates this potential problem. The factory setting allows your system to
use pin 14 to control automatic line feed; to cause the printer to ignore this signal, change the setting to
Invalid.
Baud Rate (Serial Interface only).
Choose a transmission rate of 19,200 bps, 9600 bps (factory default), 4800 bps, 2400 bps, 1200 bps, 600
bps, or 300 bps.
Busy Line (Serial Interface only).
If Ready/Busy protocol (factory default) is selected, you can choose which line your system monitors for a
busy signal: SSD -9V, select SSD-SSD +9V, select SSD+ DTR -9V, select DTR RTS -9V, select RTS
Busy Time (Serial Interface only).
Choose 200 mS (factory default) or 1 sec. Sets the length of the busy signal when the Ready/Busy
protocol (factory default) is engaged.
Character Set.
Choose IBM Set I (factory default), IBM Set II, or Epson character set.
Code Page. Choose USA (factory default), Multilingual, or Canada French.
CPU Compensation.
Used to adjust interface timing between your PC and the printer. Do not change this setting unless
advised to by an Okidata-Certified Technician.
Diagnostic Test (Serial Interface only).
Select Yes if you want to perform a diagnostic test of the serial interface.
DSR Signal (Serial Interface only).
Used with Ready/Busy protocol to select how your system handles the DSR Signal.DTR Signal (Serial
Interface only). Change to •Ready on Select• if the DTR signal is required when the printer is selected;
leave as •Ready on Power Up• if DTR signal is required when printer is turned on.
Emulation Mode.
Selects the printer command set you want your printer to use: Epson LQ 1000/1050/2500/2550, IBM
XL24 Proprinter, or IBM XL24 Alternate Graphics Mode (AGM).
Form Tear Off.
Off (factory default), 300 ms, 2 sec, 4 sec, offline, 300 ms (ML393PLUS), 1 sec (ML393PLUS), 2 sec
ML393PLUS). To engage Form Tear Off, select a time interval for the printer to wait before advancing the
paper. Choose one of the ML393PLUS settings to provide backward compatibility with programs written
for the Microline 393 Plus printer. Choose offline to cause your printer to go offline after moving the paper
ML395 ( 96-02-07 )
Page 44

up to the tear bar: you must press the SELECT button to put the printer back on-line before it will move
the paper back down.
Graphics.
Bi-directional graphics print faster than uni-directional graphics, but uni-directional graphics have better
print registration. Bi-directional graphics printing can be optimized by adjusting the Print Registration
setting in the Menu.
Language Set.
American (factory default), French, German, British, Danish I, Swedish, Italian, Spanish I, Japanese,
Norwegian, Danish II, Spanish II, Latin American, French Canadian, Dutch, or Publisher. Replaces
certain symbols with special characters used in the respective foreign languages.
Line Spacing.
set separately for each paper path.
Max. Receive Buffer.
Choose 1 line, 8K (factory default), or 23K. Selects the amount of memory devoted to holding re-ceived
data. Choosing 1 line will tie up your computer during printing, but if you abort the print job the printer will
stop printing much sooner.
Menu Line.
Sets number of lines skipped down after each line prints when you are making changes in the Menu.
Switch to 1 if you want to conserve paper when making changes in the Menu.
Operator Panel Function.
Change to Limited Operation to deactivate the FONT, PRINT QUALITY and CHARACTER PITCH
buttons on the control panel so that you can control these features only through your software. This can
be useful when several people are using the printer and you dont want its settings changed.
Note This feature also prevents access to the Menu. To access the Menu, turn the printer off, then hold
down the QUIET key while turning on the printer.
Page Length.
12", 11" (factory default), 11-2/3, 14", 17", 3", 3.5", 4", 5.5", 6", 7", 8", 8.5". Set separately for each paper
path.
Page Width.
Choose a page width of 13.6" (factory default) or 8".Paper Out Override. The paper out detector senses
when less than an inch of paper remains in the printer and stops printing at that point. Changing this
setting to Yes overrides the detector so you can print closer to the bottom of the page if youre using
single sheets. Be careful if you use this feature: it lets the printer continue printing when theres no more
paper, which can cause loss of data and can damage the printhead.
Choose 8 lines per inch for tighter line spacing, to get more lines per page. This item is
Paper/Transparency.
Choose Paper (factory default) or Transparency as your print medium for Cut Sheet feed.
Parity (Serial Interface only)
None (factory default), Odd, or Even. Selects the type of parity your system uses.
Pitch.
10 cpi (factory default), 12 cpi, 15 cpi, 17.1 cpi, 20 cpi, or Proportional. Selects the character width
measured in characters per inch (cpi).
Print Mode.
Change to NLQ for slightly faster near-letter-quality printing; Utility for higher-speed printing with reduced
quality; HSD (High Speed Draft) for the fastest, but lowest quality printing.
Print Registration. Change the setting as required to obtain the best registration for bi-directional printing.
ML395 ( 96-02-07 )
.
Page 45

Print Suppress Effective.
Enables/disables print suppress command. The factory default enables the print suppress command: the
printer will ignore all data it receives after it accepts the print suppress command. Change to No to cause
your printer to ignore the print suppress command.
Protocol (Serial Interface only)
Selects the type of protocol your system uses: Ready/Busy (factory default) or X-On/X-Off.
Reset Inhibit.
Change to Yes if you want your printer to ignore the reset command sent by software. This will prevent
your software reset command from changing the settings you have made through the front panel controls
or through printer com-mands. If you engage this feature, don't forget that it will also prevent your
software from clearing out existing settings when you finish printing one document and switch to another.
Ribbon Selection.
The selections for this item depend on which model you have. For Model 395 (black ribbon), the
selections include Black Ribbon (factory default) or Film Ribbon. For Model 395C (color ribbon), the
selections include Black Ribbon, Film Ribbon, Black, Yellow, Magenta (factory default), Cyan, Violet,
Orange, or Green. If you have the black ribbon installed, choose Black Ribbon or Film Ribbon, as
appropriate.
Serial Data 7/8 Bits (Serial Interface only).
Change to 7 bits if your system uses a 7-bit data format.
Size.
Choose Single (factory default), Double, or Triple width and height printing.
Skip Over Perforation.
Change to Yes if you want the printer to advance automatically to the next page when it comes within one
inch of the bottom of the page. If your software has its own page formatting controls, keep this item set to
No to avoid interference. This item is set separately for the rear and bottom-feed paths.Smoothing.
Change to Yes to set the printer to smooth the edges of bit-mapped graphics.
.
Style.
Choose Normal (factory default) or Italics.
Typeface.
Choose Courier (factory default), Roman, Swiss, Orator, or DLL (down line loaded).
Zero Character.
The factory default will cause a slash to appear in zeros to distinguish them from the capital letter O. To
disengage the slashed zero, change this to Unslashed.
ML395 ( 96-02-07 )
Page 46

Chapter 6
Problem Solving
Problem Solving
Here are some of the most common printer problems and how to solve them. If youre still having
difficulties, see Appendix B, where you will find information on how to get help from your dealer or from
OKIDATA, and how to get your printer serviced.
What if ... ... nothing happens when I turn on the printer?
The printer may not be plugged in. Check the power cord connection to the outlet and to your printer. If
youre using a power strip, make sure its turned on. Check to be sure that the fuse hasnt blown or that the
circuit breaker hasnt tripped.
... the printer doesnt print when the computer sends data?
The printer may be deselected. If the SELECT light is out, press the SELECT button to select the printer.
The printer cable may not be securely connected. Check the cable to be sure that it is properly connected
to both the PC and the printer
.... Im getting strange symbols, incorrect fonts, etc., when I try to print a document?
The printer driver you have engaged does not agree with the emulation selected for your printer, or you
have embedded incorrect printer commands within your software.
To check the emulation selected, first make sure paper is loaded, then with the printer deselected (press
the SELECT button to deselect the printer if necessary), press the QUIET button to enter the Menu
Mode. This will print a line indicating the emulation selected.
If the emulation is not the one you want to use, press the SET button to change it, then press the
SELECT button to exit the Menu Mode.
If the emulation is correct, check your software documentation on how to select a printer driver, then
check to be sure that you have selected one of the drivers listed for that emulation on page 16. The
closer the driver is to the top of the list, the more compatible it will be with your printer. If your software
doesnt have any of the indicated drivers available, check with the software manufacturer to see if they
have added any additional drivers since you purchased your software.
If you have embedded any printer commands in your software, check to be sure that you entered them
correctly.
What if ...
... my word processor files dont print the way I have the menu and front panel set?
Before sending a file to the printer, many word processors send an initialization string to the printer. The
initialization string contains codes that reset the printer to a default set of features: otherwise the printer
might accidentally print using features set for a previous job. These codes will override panel or menu
settings. To set your printer to ignore the reset code, enter the printer Menu (deselect printer, then press
QUIET button) and change the Reset Inhibit item (under General Control) to Yes. Please note that while
this will stop the reset code from reset-ting your printer, other codes in the initialization string may still
override the printer Menu and/or front panel settings.
... the Font, Print Quality and Character Pitch buttons on the front panel wont work?
The Operator Panel Function item on the printer menu can be used to disable these buttons. If the printer
is part of a custom-ized system or if it is used by a number of people, the system manager may have
used this option to make sure the printer is always set properly.... static electricity causes the paper to
stick?
ML395 ( 96-02-07 )
Page 47

In cold, dry weather, static charges can build up on continuous-form paper. This can make the paper
cling to the rear cover. If you have this problem during high-volume printing jobs, try moving the single
sheet paper guides on the cover together so that the paper rests on the guides rather than on the cover
itself.
ML395 ( 96-02-07 )
Page 48

Maintenance - Replacing The Ribbon Cartridge
Maintenance - Replacing The Ribbon Cartridge
When replacing the ribbon, be sure to use only ribbons specifically for use with 393 series and 395/395C
printers.
For best results, use genuine OKIDATA ribbons:
Black ribbon: Part No. 52103601
Black film ribbon: Part No. 52103801
Color ribbon: Part No. 52103701
To replace the ribbon cartridge, see Installing/Replacing the Ribbon on page 2(
).
ML395 ( 96-02-07 )
Page 49

Clearing Paper Jams
Clearing Paper Jams
Important: Always turn printer off before you turn platen knob!
Rear Feed Jams To clear a rear-feed paper jam:
1. Turn off printer.
2. Back paper out of printer carefully using platen knob.
3. Open access cover and rear cover and remove any torn pieces of paper.
4. Reload paper, close covers and turn printer back on.
5. Press FORM FEED button.
ML395 ( 96-02-07 )
Page 50

Repeated Rear-Feed Jams
Repeated Rear-Feed Jams
If your rear-feed paper keeps jamming, chances are you have bits of paper stuck in the paper path.
To eliminate this problem:
1. Turn off printer.
2. Use platen knob to back paper out of printer.
3. Lift up rear cover, open tractors and remove paper.
4. Fold some single-sheet, continuous-feed paper over three times to produce a page four sheets
thick.
5. Load this quadruple-thick sheet onto tractor pins and close tractor covers.
6. Turn platen knob to draw quadruple-thick paper around platen. This will bring jammed pieces of
paper up and out so you can dispose of them.
7. Back quadruple-thick sheet out of printer using platen knob.
8. Reload regular paper.
9. Close rear cover, turn printer on and press FORM FEED button to load in paper.
ML395 ( 96-02-07 )
Page 51

ML395 ( 96-02-07 )
Page 52

Single Sheet Feed Jams
Single Sheet Feed Jams
To remove jammed single sheets of paper (top feed):
1. Turn off printer.
2. Use platen knob to back paper out of printer.
3. If necessary, open access cover and remove any torn pieces from around carriage.
ML395 ( 96-02-07 )
Page 53

Bottom Feed Jams
Bottom Feed Jams
If bottom-feed paper jams:
1. Turn off printer.
2. Use platen knob to back paper out of printer.
3. If you have bottom-feed push tractor unit installed, open the printer access cover and the tractor
access door and remove any shreds of paper jammed in tractor mechanism.
4. Reload paper.
ML395 ( 96-02-07 )
Page 54

Cleaning the Housing
Cleaning the Housing
You should clean the printer every six months (or after about 300 hours of operation).
To do this:
1. Turn off printer and remove paper from paper path.
2. Open access cover and rear cover.
3. Use clean, dry cloth to dust area around carriage shaft and platen. Be sure to remove any loose
particles of paper.
4. Close covers.
Caution! Never use solvents or strong detergents on the cabinet. They could damage the
housing.
ML395 ( 96-02-07 )
Page 55

Specifications
Print Method: Impact dot matrix
Printhead
Print Speed
*cpi = characters per inch *cps = characters per second
Pitch Characters per line
: 24 pins, 0.20 mm diameter, with thermal protection
Characters per Line (Cpl)
Resident Fonts
LQ and NLQ: Courier: 10/12/15/17.1/20 cpi, proportional & superscript/subscript
Roman: 10 cpi, proportional & superscript/subscript
Swiss: 10 cpi, proportional, superscript/subscript & double/triple width/height
Swiss 18 point: outline & shadow
Orator: 10/12 cpi & superscript/subscript
Utility: Gothic: 10/12/15/17.1/20 cpi
HSD: Gothic: 15 cpi
Bar Code: Code 39, UPC A, UPC E, EAN 8, EAN 13, Interleaved 2 of 5, Code 128, Postnet
Emulations
Interface
Centronics parallel, RS-232C serial
Graphics Resolution
Buffer Size
Reliability
Mean Time
: Epson LQ, IBM Proprinter, IBM XL24 AGM
: 360 x 360 dots per inch maximum
: 23K print buffer, 64K total
Between 8000 hours at 25% duty cycle, Failures (MTBF) 35% page density
ML395 ( 96-02-07 )
Page 56

Mean Time to Repair
15 minutes (MTTR)
Printhead life
Ribbon Life
Black Ribbon: 5 million characters (on average,
Color Ribbon: (10 cpi utility)
Film Ribbon: 400,000 characters
Dimensions
Weight
Environmental Requirements
Operating Temperature: 41 to 104°F (5 to 40°C)
Storage Temperature: 14 to 122°F (-10 to +70°C)
Operating Humidity: 20 to 80% RH
Storage Humidity: 5 to 95% RH
Electrical requirements 120 volts ac (+10%, -15%), 50/60 Hz (+/-2%)
Also available for 230/240 volts ac• (+10%, -15%), 50/60 Hz (+/-2%)
Paper Specifications
Minimum Width: 3"
Maximum Width: 16"
Weight: 16 to 24 lb
Thickness: 0.014" (0.36 mm)
200 million characters average in 10 cpi utility mode
black = 2.1 million characters
cyan = 1.8 million characters
magenta = 1.8 million characters
yellow = 1.3 million characters
22.4" W x 16.4" D x 7.1" H (570 x 417 x 180 mm)
37 lbs. (16.8 kg)
Paper type
ML395 ( 96-02-07 )
Page 57

Appendix C
Printer Commands
Normally the commands in this table override Menu settings. Except as noted, these commands
Note
are cancelled and the printer returns to the factory and Menu settings when the printer receives an
Initialization, Software I-Prime, or Change Emulation command, or when it is turned off.
ML395 ( 96-02-07 )
Page 58

Epson LQ Commands
Normally the commands in this table override Menu settings. Except as noted, these commands
Note
are cancelled and the printer returns to the factory and Menu settings when the printer receives an
Initialization, Software I-Prime, or Change Emulation command, or when it is turned off.
Epson LQ Commands
This section contains the commands for the Epson LQ emulation, grouped by function.
Epson Function Command Notes
Horizontal Control
Carriage Return
Set Horizontal Tabs
Set relative tab
stops
Execute relative tab
Horizontal Tab
Absolute Horizontal
Position
ASCII: CR
Dec: 13
Hex: 0D
ASCII: ESC D n1 n2 ... n
NUL
Dec: 27 68 n
Hex: 1B 44 n
... nk 0
1 n2
n2 ... nk
1
00
ASCII: ESC e n m
Dec: 27 101 n m
Hex: 1B 65 n m
ASCII: ESC f n m
Dec: 27 102 n m
Hex: 1B 66 n m
ASCII: HT
Dec: 9
Hex: 09
ASCII: ESC $ n1 n
Dec: 27 36 n1 n
Hex: 1B 24 n1 n
2
2
2
Prints data in print buffer and performs carriage
return.
Sets horizontal tab stop positions.
k
n = position of tab stop--maximum one less than #
of characters per line
k = 1 to 32
= 0: clear tabs
n
1
Default: every 8 columns
Once tabs are set, they remain the same even if
character pitch is changed.
n = 0: Horizontal tabs
n = 1: Vertical tabs
m = 0 to 127
n = 0: Horizontal tabs
n = 1: Vertical tabs
m = 0 to 127
Move to next horizontal tab stop
Move to new horizontal position. Amount of
movement from left margin is calculated as follows:
+ (n2 x 256)] / 60 inches
[n
1
= 0 to 255
n
1
= 0 to 255
n
2
= n2 = 0: left margin
n
1
Max. value: n
= 48, n2 = 3 (13.6" shift)
1
Space moved using this command will not be
underlined. DEL command will not delete the
skipped amount.
Relative Horizontal
Position
ML395 ( 96-02-07 )
ASCII: ESC \ n1 n
Dec: 27 92 n1 n
2
Hex: 1B 5C n1 n
2
Move to new horizontal position, relative to present
position. Amount of movement is calculated as
2
follows: ( n
= 0 to 255
n
1
= 0 to 255
n
2
= n2 = 0: no movement
n
1
+ [n2 x 256]) / 120 dpi
1
+ moves to right; - moves to left
Page 59

Set Print Position
ASCII: ESC DLE @ Pn
A
A
2 P1 P2 P3 P4
Dec: 27 16 64 [data]
Hex: 1B 10 40 [data]
OKI unique command. Sets next horizontal position
of printhead.
= number of parameter bytes to follow, range 0 to
P
n
255
specifies whether motion is absolute or relative:
A
1
even = absolute from left margin; odd = relative
from present position
specifies direction of relative movement: even =
A
2
toward right margin (forward); odd = toward left
margin (reverse)
= 4-digit number representing number of
P
1P2P3P4
units to move (size of unit depends on character
pitch)
Left Margin Set
Right Margin Set
Auto Justification
Repeat Printing
Unidirectional Print
On/Off
ASCII: ESC l n
Dec: 27 108 n
Hex: 1B 6C n
ASCII: ESC Q n
Dec: 27 81 n
Hex: 1B 51 n
ASCII: ESC a n
Dec: 27 97 n
Hex: 1B 61 n
ASCII: ESC V n
Dec: 27 86 n
Hex: 1B 56 n
ASCII: ESC U n
Dec: 27 85 n
Hex: 1B 55 n
Sets left margin n character spaces from printhead
home position; must be at least 2 spaces to left of
right margin.
n = 0 to 255
n = 0: home position
Sets right margin n character spaces from printhead
home position; must be greater than the left margin.
n = 1 to 255
n = 0: command ignored
Justifies text according to the value of n:
n = 0: Left
n = 1: Center
n = 2: Right
n = 3: Full (left & right)--use carriage return only at
end of paragraph.
n = 1 to 255: Reprint data n times
n = 0: End repeat printing
Turns unidirectional (left to right only) printing on
and off.
n = 1: Unidirectional printing On
n = 0: Unidirectional printing Off (normal
bidirectional printing)
One-Line
Unidirectional
Printing
Backspace
Delete One
Character
Vertical Control
Set 1/6" Line
Spacing
Set 1/8" Line
Spacing
ML395 ( 96-02-07 )
ASCII: ESC <
Dec: 27 60
Hex: 1B 3C
ASCII: BS
Dec: 8
Hex: 08
ASCII: DEL
Dec: 127
Hex: 7F
ASCII: ESC 2
Dec: 27 50
Hex: 1B 32
ASCII: ESC 0
Dec: 27 48
Hex: 1B 30
Turns on unidirectional (left to right) printing for one
line.
Prints data in print buffer and moves one character to
the left according to the current character pitch.
Deletes last character in print buffer.
Sets line spacing of 1/6" (6 lines per inch). This is
standard typewriter spacing.
Sets line spacing of 1/8" (8 lines per inch).
Page 60

Set n/60" Line
Spacing
ASCII: ESC A n
Dec: 27 65 n
Hex: 1B 41 n
Sets line spacing of n/60".
n = 0 to 255
n = 0: no line feed.
Set n/180" Line
Spacing
Set n/360" Line
Spacing
Line Feed
n/180" Line Feed
n/180" Reverse
Line Feed
n/360" Line Feed
ASCII: ESC 3 n
Dec: 27 51 n
Hex: 1B 33 n
ASCII: ESC + n or ESC
[ n
Dec: 27 43 n or 27 93 n
Hex: 1B 2B n or 1B 5B
n
ASCII: LF
Dec: 10
Hex: 0A
ASCII: ESC J n
Dec: 27 74 n
Hex: 1B 4A n
ASCII: ESC j n
Dec: 27 106 n
Hex: 1B 6A n
ASCII: ESC ] n
Dec: 27 93 n
Hex: 1B 5D n
Sets a line spacing of n/180".
n = 0 to 255
n = 0: no line feed
Sets line spacing of n/360". ESC [ n is OKI unique
command
n = 0 to 255
n = 0: no line feed
Prints buffer data and moves the printhead by the
current line spacing value. Cancels SO and ESC SO
commands.
Executes one n/180" line feed without changing line
spacing.
n = 0 to 255
n = 0: no line feed, but initiates printing
Executes one n/180" reverse line feed without
changing line spacing.
n = 0 to 255
n = 0: no line feed, but initiates printing
OKI unique command. Executes n/360" line feed
without changing line spacing.
n = 0 to 255
n = 0: no line feed, but initiates printing
Form Feed
Vertical Tab
Set Vertical Tab
Stops
Set Vertical Format
Unit (VFU)
Select Vertical Tab
Channel
ASCII: FF
Dec: 12
Hex: 0C
ASCII: VT
Dec: 11
Hex: 0B
ASCII: ESC B n1 n2 ... n
NUL
Dec: 27 66 n
Hex: 1B 42 n
ASCII: ESC b m n
1 n2
1 n2
... nk 0
... nk 00
1
n2 ... nk NUL
Dec: 27 96 m n
1 n2
... nk
0
Hex: 1B 62 m n
1 n2
... n
00
ASCII: ESC / n
Dec: 27 47 n
Hex: 1B 2F n
Prints data in buffer and advances paper to next top
of form. Cancels SO and ESC SO command. With
Cut Sheet Feeder, inserts or ejects paper depending
on status of paper when command is issued.
Print buffer data and move to next vertical tab stop.
Sets vertical tab stops at specified lines relative to
k
Top of Form position.
k = 1 to 16: number of tabs
n = 1 to 255: line number where tab is to be set
n = 0: clears tab setting for Vertical Format Unit
channel 0
Programs up to 8 separate sets (channels) of vertical
tab stops.
m = 0 to 7: channel number (0 is default set by ESC
B command)
k = 1 to 16: number of tab stops in channel
k
n = 1 to 255: number of lines down from Top of
Form position
n = 0: clear tab settings for channel m
Activates preprogrammed vertical tab channel n. VT
moves to stops in this channel.
n = 0 to 7: channel number (0 is default)
ML395 ( 96-02-07 )
Page 61

Set Page Length
in Lines
ASCII: ESC C n
Dec: 27 67 n
Hex: 1B 43 n
Sets page length in lines. Current position becomes
top of form. Printer calculates page length by
multiplying current line feed pitch by value entered
for ``n.''
n = 1 to127.
Cancels Skip over Perforation setting.
Page length set by this command will not change
even if line spacing is changed.
Set Page Length
in Inches
Set Skip Over
Perforation area
(bottom margin)
Cancel Skip Over
Perforation
Cut Sheet Feeder
Option
Cut Sheet Feeder
Control
ASCII: ESC C NUL n
Dec: 27 67 0 n
Hex: 1B 43 00 n
ASCII: ESC N n
Dec: 27 78 n
Hex: 1B 4E n
ASCII: ESC O
Dec: 27 79
Hex: 1B 4F
ASCII: ESC EM n
Dec: 27 25 n
Hex: 1B 19 n
Sets page length in"es. Current position becomes top
of form.
n = 1 to 22.
Cancels Skip over Perforation setting.
Activates Skip Over Perforation feature and sets it
for n lines at the current line spacing. When
Perforation Skip area is entered, printer will
automatically feed paper down to top of form on
next page. Once this command is entered, the Skip
Over Perforation setting will remain the same even if
line spacing is changed.
n = 1 to 255
Deactivates Skip Over Perforation. Command
overrides menu.
Controls Cut Sheet Feeder accessory.
n = 1: Select bin 1
n = 2: Select bin 2 (if present)
n = 73 (ASCII ``I''): Insert sheet
n = 82 (ASCII ``R''): Eject sheet
Character Sets
Download Custom
Characters
Copy ROM
Character Set to
RAM Character Set
Select DLL Block
ASCII: ESC & m n1 n2 d
0
d1 d2 [data]
Dec: 27 38 109 n
1
1 n2 d0
d2 [data]
Hex: 1B 26 6D n
1
1 n2 d0
d2 [data]
ASCII: ESC : NUL m n
Dec: 27 58 0 m n
Hex: 1B 3A 00 m n
ASCII: ESC v n
Dec: 27 118 n
Hex: 1B 76 n
n1 = 0 to 127
= 0 to 127
n
2
n2, range of characters to be replaced
n
1
d
= 0 to 255: clearance before character
d
0
= 0 to 37: number of columns character occupies
d
1
= 0 to 255: clearance after character
d
2
d
Copies ROM characters 32 to 127 to RAM 32 to 127
m = 0: Roman
m = 1: Swiss
m = 2: Courier
m = 3: Prestige
m = 7: Orator
m = 122: Swiss Bold
m = 124: Gothic
m = 126: Menu setting
n = 0
n = 1: Block 1
n = 2: Block 2
n = 0: command ignored
ML395 ( 96-02-07 )
Page 62

Custom Character
Set On/Off
ASCII: ESC % n
Dec: 27 37 n
Hex: 1B 25 n
Engages/disengages custom character set.
n = 0: Select default character set
n = 1: Select custom character set
Select International
Character Set
(Set Code Page)
Select Epson
Character Set
Permit Printing of
Upper Range
Control Codes
Cancel Printing of
Upper Range
Control Codes
ASCII: ESC R n
Dec: 27 82 n
Hex: 1B 52 n
ASCII: ESC t n
Dec: 27 116 n
Hex: 1B 74 n
ASCII: ESC 6
Dec: 27 54
Hex: 1B 36
ASCII: ESC 7
Dec: 27 55
Hex: 1B 37
Select character set containing 15 special characters
used in foreign language printing:
n = 0: American n = 8: Japanese
n = 1: French n = 9: Norwegian
n = 2: German n = 10: Danish
n = 3: British n = 11: Spanish II
n = 4: Danish In = 12: Latin American
n = 5: Swedishn = 13: French Canadian
n = 6: Italian n = 14: Dutch
n = 7: Spanish I n = 15: Publisher
Selects Epson character set according to value of n:
n = 0: Selects Epson italic character set
n = 1: Selects Epson graphic character set
n = 2: Re-allocates custom character set
Enables printing of characters in upper ASCII code
range (128 to 159).
Cancels ESC 6 command.
Bar Code
Commands
ML395 ( 96-02-07 )
Page 63

Select Industrial
Bar Code
Type and Size
ASCII: ESC DLE A m
... n
n
1
8
Dec: 27 16 65 m n1 ... n
Hex: 1B 10 41 m n1 ... n
8
OKI unique command
m = number of parameters specified (m = 0, 1 or 3:
command ignored)
8
, n2: selects bar code style
n
1
, n2 = 0, 1: EAN8
n
1
, n2 = 0, 2: EAN13
n
1
, n2 = 1, 0: UPC-A
n
1
, n2 = 1, 4: UPC-E
n
1
, n2 = 2, 0: Code 39
n
1
, n2 = 3,0: Interleaved 2 of 5
n
1
, n2 = 4, 0: Code 128 (Set A)
n
1
, n2 = 4, 1: Code 128 (Set B)
n
1
, n2 = 4, 2: Code 128 (Set C)
n
1
, n4: sets vertical length of bars, in units of
n
3
15/180", calculated as
x 10] + n4) x 15/180"
([n
3
: sets black bars; n5 = 1 to 7
n
5
: sets spacing; n6 = 1 to 7
n
6
: sets ratio of wide element to narrow element; n7 =
n
7
1 to 7
: specifies whether or not characters are to be
n
8
attached
= 0: characters not attached
n
8
= 1 or more: LQ characters attached
n
8
Print Industrial
Bar Code Data
Select and Print
Postnet Bar Code
Data
Print Features
Utility/LQ Selection
HSD/NLQ Selection
Select LQ Typeface
ASCII: ESC DLE B m
n
[data]
Dec: 27 16 66 m n
[data]
Hex: 1B 10 42 m n
[data]
ASCII: ESC DLE C n
[data]
Dec: 27 16 67 n [data]
Hex: 1B 10 43 n [data]
ASCII: ESC x n
Dec: 27 120 n
Hex: 1B 78
ASCII: ESC ( n
Dec: 27 40 n
Hex: 1B 28 n
ASCII: ESC k n
Dec: 27 107 n
Hex: 1B 6B n
Prints bar code data.
m = amount of data (in bytes) to follow
n specifies Code 128 mode (when Code 128 is
selected):
n = 65: Set A
n = 66: Set B
n = 67: Set C
n = amount of data (in bytes) to follow:
n = 1 to 20
Data consists of single-digit numbers (0 to 9).
n = 0: Utility printing
n = 1: LQ printing
n = 0: HSD printing (15 or 18 cpi)
n = 2: NLQ printing
n = 0: Roman n = 1: Swiss
n = 2: Courier n = 3: Prestige
n = 7: Orator n = 122: Swiss Bold
n = 124: Gothicn = 126: Menu setting
Proportional
Spacing
Select 10 cpi Pitch
(Pica)
ML395 ( 96-02-07 )
ASCII: ESC p n
Dec: 27 112 n
Hex: 1B 70 n
ASCII: ESC P
Dec: 27 80
Hex: 1B 50
See also ESC ! n command.
n = 1: Start proportional spacing
n = 0: Stop proportional spacing
Normally, selects 10 cpi (Pica). In compressed
mode, selects 17.1 cpi.
Page 64

Select 12 cpi Pitch
(Elite)
ASCII: ESC M
Dec: 27 77
Hex: 1B 4D
Normally, selects 12 cpi (Elite). In compressed
mode, selects 20 cpi.
Select 15 cpi Pitch
Select Compressed
Print
Cancel Compressed
Print
Set Character
Spacing
Select Italic
Characters
Cancel Italics
Turn Underlining
On/Off
ASCII: ESC g
Dec: 27 103
Hex: 1B 67
ASCII: SI or ESC SI
Dec: 15 or 27 15
Hex: 0F or 1B 0F
ASCII: DC2
Dec: 18
Hex: 12
ASCII: ESC SP n
Dec: 27 32 n
Hex: 1B 20 n
ASCII: ESC 4
Dec: 27 52
Hex: 1B 34
ASCII: ESC 5
Dec: 27 53
Hex: 1B 35
ASCII: ESC n
Dec: 27 45 n
Hex: 1B 2D n
Selects 15 cpi pitch.
Pitch depends on current pitch selected:
10 cpi becomes 17.1 cpi
12 cpi becomes 20 cpi
Cancels 15 cpi print selected by SI or ESC SI
command.
Adds n dots of space (depending on the current
pitch) between characters.
n = 0 to 127
See also ESC ! n, ESC 7.
Clears italic printing engaged by ESC 4 command.
Underlines all text except tabs.
n = 1: Start underlining
n = 0: Stop underlining
Start
Superscript/Subscri
pt
Stop
Superscript/Subscri
pt
Select Character
Style (normal,
shadow, outline,
outline & shadow)
Start Emphasized
Printing
Stop Emphasized
Printing
Start Enhanced
(Double Strike)
Printing
ASCII: ESC S n
Dec: 27 83 n
Hex: 1B 53 n
ASCII: ESC T
Dec: 27 84
Hex: 1B 54
ASCII: ESC q n
Dec: 27 113 n
Hex: 1B 71 n
ASCII: ESC E
Dec: 27 69
Hex: 1B 45
ASCII: ESC F
Dec: 27 70
Hex: 1B 46
ASCII: ESC G
Dec: 27 71
Hex: 1B 47
n = 0: Start superscript
n = 1: Start subscript
n = 0: Normal
n = 1: Outline
n = 2: Shadow
n = 3: Outline with shadow
Prints horizontally shifted double dots in utility
mode at half speed.
See also ESC ! n command.
Overrides Menu until Initialize, Software I-PRIME
or Change Emulation command is received, or until
printer is turned off.
Clears emphasized printing engaged by ESC E
command.
Prints vertically shifted double dots in two passes.
See also ESC ! n command.
Stop Enhanced
Printing
ML395 ( 96-02-07 )
ASCII: ESC H
Dec: 27 72
Hex: 1B 48
Clears double strike printing set by ESC G
command.
Page 65

Double Width
(Expanded)
Printing
ASCII: ESC W n
Dec: 27 87 n
Hex: 1B 57 n
n = 2: Start triple width printing
n = 1: Start double width printing
n = 0: Stop double or triple width printing
Immediate Double
Width
Stop Immediate
Double Width
Printing
Start Triple Width
Printing
Double Height
Printing
Graphics, 8 &
24-Pin Mode
Note:
For all
graphics commands
the number of dot
columns of graphic
data is as follows:
dots = n
+ (n2 x 256)
1
ASCII: SO or ESC SO
Dec: 14 or 27 14
Hex: 0E or 1B 0E
ASCII: DC4
Dec: 20
Hex: 14
ASCII: ESC m
Dec: 27 109
Hex: 1B 6D
ASCII: ESC w n or
ESC US n
Dec: 27 119 n or 27 31
n
Hex: 1B 77 n or 1B 1F
n
Prints double width only to end of line; can also be
canceled by DC4, ESC W 0 and ESC ! n.
Only cancels double width set by SO or ESC SO.
Canceled by ESC W 0 and ESC ! n.
OKI unique command
n = 2: Start triple height
n = 1: Start double height
n = 0: Stop double or triple height
Graphics
Select/Print
Graphics, 8-Pin
Mode
ASCII: ESC * m n1 n
[graphic data]
Dec: 27 42 m n
1 n2
[graphic data]
Hex: 1B 2A m n
1 n2
[graphic data]
Selects 8-pin and 24-pin graphic modes and prints
2
graphic data.
m = 0: Single density, 8-pin 60 dpi
m = 1: Double density, 8-pin, 120 dpi
m = 2: Double speed, double density, 8-pin,
quasi-120 dpi (dots can not be printed
directly adjacent to one another)
m = 3: Quadruple density, 8-pin, quasi240 dpi (dots
can not be printed directly
adjacent to one another)
m = 4: CRT I, 8-pin, 80 dpi
m = 6: CRT II, 8-pin, 90 dpi
m = 32: Single density, 24-pin, 60 dpi
m = 33: Double density, 24-pin, 120 dpi
m = 38: CRT III, 24-pin, 90 dpi
m = 39: Triple density, 24-pin, 180 dpi
m = 40: Hex-density, 24-pin, quasi-360 dpi (dots
can not be printed directly
adjacent to one another)
, n2 = 0 to 255: specifies amount of subsequent Bit
n
1
Image bytes received,
calculated as n
+ (n2 x 256)
1
ML395 ( 96-02-07 )
Page 66

Single Density
Graphics
ASCII: ESC K n1 n
[graphic data]
Dec: 27 75 n
1 n2
[graphic data]
Hex: 1B 4B n
1 n2
[graphic data]
Dot density 60 dpi horizontal
2
Maximum data per line: 816 bytes
, n2 = 0 to 255: specifies amount of subsequent Bit
n
1
Image bytes received, calculated as n
+ (n2 x 256)
1
Double Density
Graphics
Double Density/
Double Speed
Graphics
Quadruple Density
Graphics
Quasi Double
Density Graphics
Reassign Graphics
ASCII: ESC L n1 n
[graphic data]
Dec: 27 76 n
1 n2
[graphic data]
Hex: 1B 4C n
1 n2
[graphic data]
ASCII: ESC Y n1 n
[graphic data]
Dec: 27 89 n
1 n2
[graphic data]
Hex: 1B 59 n
1 n2
[graphic data]
ASCII: ESC Z n1 n
[graphic data]
Dec: 27 90 n
1 n2
[graphic data]
Hex: 1B 5A n
1 n2
[graphic data]
ASCII: ESC y n
Dec: 27 121 n
Hex: 1B 79 n
ASCII: ESC ? m n
Dec: 27 63 m n
Hex: 1B 3F m n
Dot density 120 dpi horizontal
2
Maximum data per line: 1632
, n2 = 0 to 255: specifies amount of subsequent Bit
n
1
Image bytes received, calculated as n
Same as double density graphics (120 dpi), but
2
+ (n2 x 256)
1
printer can't put two adjacent dots in the same row.
Dot density 240 dpi horizontal. Printer can't put two
2
adjacent dots in the same row.
Maximum data per line: 3264
, n2 = 0 to 255: specifies amount of subsequent Bit
n
1
Image bytes received, calculated as n
+ (n2 x 256)
1
n = 0: Turn off quasi 8-bit graphics
n = 1: Turn on quasi 8-bit graphics
Converts ESC K, ESC L, ESC Y, or ESC Z
command to a graphics select command:
For ESC K: m = 75 For ESC Y: m = 89
For ESC L: m = 76 For ESC Z: m = 90
n = 0: Single density, 8-pin 60 dpi
n = 1: Double density, 8-pin, 120 dpi
n = 2: Double speed, double density, 8-pin,
quasi-120 dpi (dots can not be printed
directly adjacent to one another)
n = 3: Quadruple density, 8-pin, quasi240 dpi (dots
can not be printed directly
adjacent to one another)
n = 4: CRT I, 8-pin, 80 dpi
n = 6: CRT II, 8-pin, 90 dpi
n = 32: Single density, 24-pin, 60 dpi
n = 33: Double density, 24-pin, 120 dpi
n = 38: CRT III, 24-pin, 90 dpi
n = 39: Triple density, 24-pin, 180 dpi
n = 40: Hex-density, 24-pin, quasi-360 dpi (dots can
not be printed directly adjacent
to one another)
Composite
Command
ML395 ( 96-02-07 )
ASCII: ESC ! n
Dec: 27 33 n
Hex: 1B 21 n
Calculate n as the sum of the values of the features
to be activated. If a feature's value is not included in
the sum, it will be deactivated.
n = 0: 10 cpi n = 16: Enhanced
n = 1: 12 cpi n = 32: Double width
n = 2: Proportional spacing n = 64: Italics
n = 4: Compressed n = 128: Underlining
n = 8: Emphasized
Page 67

Miscellaneous
Commands
Select Emulation
Mode.
Select Color (color
ribbon installed)
Initialize Printer
ASCII: ESC { n
Dec: 27 123 n
Hex: 1B 7B n
ASCII: ESC r n
Dec: 27 114 n
Hex: 1B 72 n
ASCII: ESC @
Dec: 27 64
Hex: 1B 40
OKI unique command. Switches printer emulation
mode, copying the custom character data in buffer
and saving the print and receive buffers. Menu
settings unaffected.
n = 0, 2: IBM XL24 Proprinter
n = 3: IBM XL24 AGM
n = 66: Epson LQ 850, Epson LQ 1050
Selects print color mode as follows:
n = 0: black
n = 1: magenta
n = 2: cyan
n = 3: violet (produced in two superimposed
printing passes, magenta/cyan)
n = 4: yellow
n = 5: orange (produced in two superimposed
printing passes, yellow/magenta)
n = 6: green (produced in two superimposed printing
passes, yellow/cyan)
This command will be ignored if the Ribbon
Selection in the Menu has been set to Black.
Clears print buffer (receive buffer unaffected), resets
printer to menu defaults, current position becomes
top of page. Custom character data is not touched.
This command is acknowledged only if Reset Inhibit
in Menu is set to No (factory default).
Cancel
Set Most Significant
Bit (MSB) to 1
Set Most Significant
Bit (MSB) to 0
Reset Most
Significant Bit
(MSB)
Print Suppress
Mode On
Print Suppress
Mode Off
ASCII: CAN
Dec: 24
Hex: 18
ASCII: ESC >
Dec: 27 62
Hex: 1B 3E
ASCII: ESC =
Dec: 27 61
Hex: 1B 3D
ASCII: ESC #
Dec: 27 35
Hex: 1B 23
ASCII: DC3
Dec: 19
Hex: 13
ASCII: DC1
Dec: 17
Hex: 11
Clears print buffer (receive buffer unaffected) and
executes carriage return; commands and custom
character data unaffected.
Sets the MSB (8th bit) to 1 (Shift Out character set).
Sets the MSB (8th bit) to 0 (Shift In character set).
Cancels ESC > or ESC =. MSB accepted ``as is''
from computer.
Places printer in Print Suppress Mode after printing
data in print buffer. Ignores all further commands
except DC1 command.
Print Suppress Effective item in Menu must be set to
Yes for this command to take effect.
Clears Print Suppress Mode, re-activating printer to
once again process all data received.
ML395 ( 96-02-07 )
Page 68

Disable
Paper-Out Sensor
ASCII: ESC 8
Dec: 27 56
Hex: 1B 38
OKI unique command. Disables paperout sensor,
even if Paper Out Override in Menu is set to On the
(factory default). If data flows onto next page and
reaches top of form setting for that page, printer
ALARM light will come on to indicate paper-out
error.
Enable
Paper-Out Sensor
Half-Speed Printing
On/Off
ASCII: ESC 9
Dec: 27 57
Hex: 1B 39
ASCII: ESC s n
Dec: 27 115 n
Hex: 1B 73 n
OKI unique command. Enables paperout sensor to
detect when less than 1/2" of paper is left. When
ALARM light is on, pressing SELECT prints 1 line
of data at a time until the top of from setting for the
next page is reached. Sensor can also be controlled
by the menu.
Prints at 50% of normal speed to reduce noise.
n = 1: Half-speed printing On
n = 0: Half-speed printing Off
ML395 ( 96-02-07 )
Page 69

IBM Commands
IBM Commands
This section contains the commands for the IBM XL24 Proprinter and XL24 AGM emulations, grouped by
function.
Normally the commands in this table will override the Menu settings. Except as noted, these
Note:
commands are canceled and the printer returns to the factory and Menu settings when the printer
receives an Initialization, Software I-Prime, or Change Emulation command, or when it is turned off and
then on again.
IBM Function Command Notes
Horizontal Control
Carriage Return
Set Horizontal Tabs
Horizontal Tab
Reset Tabs to Default
Set Left & Right
Margins
ASCII: CR
Dec: 13
Hex: 0D
ASCII: ESC D n1 n2 ... n
NUL
Dec: 27 68 n
Hex: 1B 44 n
1 n2
1 n2
... nk 0
... nk 00
ASCII: HT
Dec: 9
Hex: 09
ASCII: ESC R
Dec: 27 82
Hex: 1B 52
ASCII: ESC X n m
Dec: 27 88 n m
Hex: 1B 58 n m
Prints data in buffer and performs carriage return.
k
Sets horizontal tab stop positions
n = 1 to 255: specifies position of tab stopmaximum is number of
characters per
line
k = 1 to 28; n1 = 0: clear tabs
Default: every 8 columns
Moves to next horizontal tab stop
Resets horizontal tabs for default: every 8th character. Also resets
vertical tabs to default of 1 line.
Sets left (n) and right (m) margins in character columns at current
pitch. Once set, margins remain fixed even if character pitch is
changed.
n = 0 to 255; n = 0: left margin unchanged
m = 0 to 255; m = 0: right margin unchanged
m must be at least 1 character space (at 10 cpi) to the right of n.
Start/Stop
Unidirectional Printing
Backspace
ML395 ( 96-02-07 )
ASCII: ESC U n
Dec: 27 85 n
Hex: 1B 55 n
ASCII: BS
Dec: 8
Hex: 08
n = 1: Unidirectional printing On
n = 0: Unidirectional printing Off (return to bidirectional)
Prints data in buffer and moves one character to the left according
to current character pitch.
Page 70

Set Print Position
ASCII: ESC DLE @ Pn A1 A2
P
1 P2 P3 P4
Dec: 27 16 64 [data]
Hex: 1B 10 40 [data]
OKI unique command. Sets horizontal position of printhead.
specifies number of bytes to follow, range 0 to 127 (MSB
P
n
ignored)
specifies if motion is absolute (even number) or relative (odd
A
1
number)
specifies direction of relative movement right (even number) or
A
2
left (odd number)
= 4-digit number specifying print position. Unit of print
P
1P2P3P4
position is 1/360" in LQ mode; 1/240" in Utility mode.
Maximum default value for left and right margins: 4896.
Set Relative Print
Position
Vertical Control
Set 1/8" Line Spacing
Set 7/72" Line Spacing
Activate Line Spacing
Set n/60" Line Spacing
Set n/360"
Line Spacing
ASCII: ESC d n1 n
Dec: 27 100 n1 n
Hex: 1B 64 n1 n
2
2
ASCII: ESC 0
Dec: 27 48
Hex: 1B 30
ASCII: ESC 1
Dec: 27 49
Hex: 1B 31
ASCII: ESC 2
Dec: 27 50
Hex: 1B 32
ASCII: ESC A n
Dec: 27 65 n
Hex: 1B 41 n
ASCII: ESC % 8 n
Dec: 27 37 56 n
Hex: 1B 25 38 n
2
n1, n2 = 0 to 255
+ (n2 x 256) 1632
1 n
1
1/8" Line Spacing = 8 lines per inch.
This is the line spacing used for graphics.
This command is required to activate the line spacing set by the
ESC A n command (see below).
n = 1 to 255
n = 0: no change in line spacing.
OKI unique command. Sets line spacing to n/360".
n = 1 to 255
n = 0: no line feed
Set n/216" or n/180"
Line Spacing
Set Line Feed
Increments
Line Feed
ML395 ( 96-02-07 )
ASCII: ESC 3 n
Dec: 27 51 n
Hex: 1B 33 n
ASCII: ESC [ \ n1 n2 g1 g
Dec: 27 91 92 n1 n2 g1 g
Hex: 1B 5B 5C n1 n2 g1 g
ASCII: LF
Dec: 10
Hex: 0A
n = 1 to 255
n = 0: command is ignored
2
n1 = 0 to 255
= 0 to 255
n
2
+ (n2 x 256) 65535
0 n
1
+ g2 = 180 or 216: sets increment
g
1
2
2
Prints buffer data and moves printhead down by current line
spacing value.
In PPR emulation, performs carriage return only if Auto CR in
Menu has been changed to Yes (factory default is No).
In AGM emulation performs carriage return regardless of Auto
CR setting.
Page 71

Automatic Line Feed
ASCII: ESC 5 n
Dec: 27 53 n
Hex: 1B 35 n
n = 0: Deactivate auto line feed
n = 1: Activate auto line feed
Reverse Line Feed
n/360" Line Feed
n/216" or n/180"
Line Feed
Form Feed
Vertical Tab
ASCII: ESC ]
Dec: 27 93
Hex: 1B 5D
ASCII: ESC % 4 n
Dec: 27 37 52 n
Hex: 1B 25 34 n
ASCII: ESC J n
Dec: 27 74 n
Hex: 1B 4A n
ASCII: FF
Dec: 12
Hex: 0C
ASCII: VT
Dec: 11
Hex: 0B
Prints buffer data and perofrms one reverse line feed at the current
line spacing. Movement will not go above top of form. Not
recommended for use with optional pull tractor.
OKI unique command. Prints data in buffer and executes a single
n/360" line feed without changing line spacing.
n = 1 to 255
n = 0: no line feed
In PPR emulation, prints data in buffer and executes a single
n/216" line feed; in AGM emulation, executes a single n/180" line
feed, both without changing line spacing. Carriage Return
determined by Menu setting.
n = 1 to 255
n = 0: no line feed
Prints data in buffer and advances paper to next top of form. With
Cut Sheet Feeder installed, will eject or insert paper depending on
status of feeder.
Prints buffer data and moves to next vertical tab stop.
Set Vertical Tab Stops
Set Page Length Inches
Set Page Length in
Lines
Set Skip Over
Perforation
ASCII: ESC B n1 n2 ... n
NUL
Dec: 27 66 n
Hex: 1B 42 n
1 n2
1 n2
... nk 0
... nk 00
ASCII: ESC C NUL n
Dec: 27 67 0 n
Hex: 1B 43 00 n
ASCII: ESC C n
Dec: 27 67 n
Hex: 1B 43 n
ASCII: ESC N n
Dec: 27 78 n
Hex: 1B 4E n
k
Sets vertical tab stops at specified lines.
k = 1 to 64: number of tabs
n = 1 to 255: line number where tab is to be set
Sets page length inches.
n = 1" to 255"
n = 0: Command ignored
This command cancels Skip Over Perforation setting.
Sets page length in lines, relative to currently selected line
spacing, calculated by multiplying value of n by line spacing
ratio.
n = 1 to 127, Epson emulation
n = 1 to 255, IBM emulation
This command cancels Skip Over Perforation setting.
Activates Skip Over Perforation feature and sets it for n lines at
the current line spacing. When the printer reaches the bottom of
the page, it will skip n lines to next top of form. Command
overrides menu.
n = 1 to 255 lines
n = 0: command ignored
Cancel Skip Over
Perforation
ML395 ( 96-02-07 )
ASCII: ESC O
Dec: 27 79
Hex: 1B 4F
Deactivates Skip Over Perforation.
Command overrides menu.
Page 72

Set Top of Form
Cut Sheet Feeder
(Option)
ASCII: ESC 4
Dec: 27 52
Hex: 1B 34
Sets top of form at current printhead position. Command ignored
in CSF or Auto-Feed mode.
Cut Sheet Feeder
Control
Character Sets
Down Line Load
Select International
Character Set
ASCII: ESC EM n
Dec: 27 25 n
Hex: 1B 19 n
ASCII: ESC = l h # a1 a
Dec: 27 61 l h 35 a1 a
Hex: 1B 3D l h 23 a1 a
ASCII: ESC ! n
Dec: 27 33 n
Hex: 1B 21 n
OKI unique command. Controls Cut Sheet Feeder accessory.
n = 1: Select bin 1
n = 2: Select bin 2 (if present)
n = 73 (ASCII ``I''): Insert sheet
n = 82 (ASCII ``R''): Eject sheet
2
2
2
Initializes down line loading
l, h = 0 to 255: specifies number of bytes to follow, calculated as
l + (h x 256)
, a2 = 0 to 255: indicate storing address of loading data,
a
1
calculated as
+ (a2 x 256)
a
1
OKI unique command. Selects character set containing special
characters used in foreign language printing:
n = 64: US ASCII, slashed zero n = 71: Norwegian
n = 65: US ASCII (unslashed zero) n = 72: Dutch
n = 66: British n = 73: Italian
n = 67: German n = 74: French Canadian
n = 68: French n = 75: Spanish
n = 69: Swedish n = 76: Latin American
n = 70: Danish n = 90: Publisher
Print from IBM
Character Set III
Print One Character
from IBM
Character Set III
Select IBM
Character Set I
Select IBM
Character Set II
Bar Code Commands
ML395 ( 96-02-07 )
ASCII: ESC \ n1 n
Dec: 27 92 n1 n
2
Hex: 1B 5C n1 n
ASCII: ESC ^ n
Dec: 27 94 n
Hex: 1B 5E n
ASCII: ESC 7
Dec: 27 55
Hex: 1B 37
ASCII: ESC 6
Dec: 27 54
Hex: 1B 36
2
2
This character set includes printable characters for commands.
Specify total number of characters to be printed, calculated as n
x 256).
(n
2
1
+
Prints character n from IBM Character Set III.
n = 0 to 255
Selects IBM Character Set I
Selects IBM Character Set II
Page 73

Select Industrial
Bar Code
Type and Size
ASCII: ESC DLE A m
... n
n
1
8
Dec: 27 16 65 m n1 ... n
Hex: 1B 10 41 m n1 ... n
OKI unique command
m = number of parameters specified (m = 0, 1 or 3: command
8
8
ignored)
, n2: selects bar code style
n
1
, n2 = 0, 1: EAN8
n
1
, n2 = 0, 2: EAN13
n
1
, n2 = 1, 0: UPC-A
n
1
, n2 = 1, 4: UPC-E
n
1
, n2 = 2, 0: Code 39
n
1
, n2 = 3,0: Interleaved 2 of 5
n
1
, n2 = 4, 0: Code 128 (Set A)
n
1
, n2 = 4, 1: Code 128 (Set B)
n
1
, n2 = 4, 2: Code 128 (Set C)
n
1
, n4: sets vertical length of bars, in units of 15/180", calculated
n
3
as
x 10] + n4) x 15/180"
([n
3
: sets black bars; n5 = 1 to 7
n
5
: sets spacing; n6 = 1 to 7
n
6
: sets ratio of wide element to narrow element; n7 = 1 to 7
n
7
: specifies whether or not characters are to be attached
n
8
= 0: characters not attached
n
8
= 1 or more: LQ characters attached
n
8
Print Industrial
Bar Code Data
Select and Print Postnet
Bar Code Data
Print Features
Select LQ Typeface
Proportional Spacing
ASCII: ESC DLE B n m
[data]
Dec: 27 16 66 n m [data]
Hex: 1B 10 42 n m [data]
ASCII: ESC DLE C n [data]
Dec: 27 16 67 n [data]
Hex: 1B 10 43 n [data]
ASCII: ESC k n
Dec: 27 107 n
Hex: 1B 6B n
ASCII: ESC P n
Dec: 27 80 n
Hex: 1B 50 n
OKI unique command
n: specifies amount of data to follow
m: selects Code 128 mode (Code 128 must be selected for this
command to be recognized)
m = 65: Set A
m = 66: Set B
m = 67: Set C
OKI unique command.
n: designates amount of data to follow
n = 1 to 20
Data consists of single-digit numbers.
OKI unique command. Selects typeface according to value of n:
n = 0: Roman n = 7: Orator
n = 1: Swiss n = 122: Swiss Bold
n = 2: Courier n = 124: Gothic
n = 3: Prestigen = 254: Menu setting
Controls proportional spacing
n = 0 to 255:
n = odd number: start proportional spacing
n = even number: stop proportional spacing
When printer is in utility mode, this command will switch it to LQ
proportional until it is canceled.
Set 10 Cpi Pitch
ML395 ( 96-02-07 )
ASCII: DC2
Dec: 18
Hex: 12
This is standard pica typewriter size.
Page 74

Set 12 Cpi Pitch
ASCII: ESC :
Dec: 27 58
Hex: 1B 3A
Changes to 12 cpi except if Menu item ``SI Select (12 CPI)'' is set
to ``20'', then
ESC : will change 17.1 cpi to 20 cpi and will not change 20 cpi.
Set 15 Cpi Pitch
Set Compressed Pitch
Set 20 Cpi Pitch
Select HSD or NLQ
Select Print Parameters
ASCII: ESC g
Dec: 27 103
Hex: 1B 67
ASCII: SI
Dec: 15
Hex: 0F
ASCII: ESC SI
Dec: 27 15
Hex: 1B 0F
ASCII: ESC ( n
Dec: 27 40 n
Hex: 1B 28 n
ASCII: ESC I n
Dec: 27 73 n
Hex: 1B 49 n
OKI unique command. Sets 15 cpi.
Sets 17.1 cpi
OKI unique command.
Selects High Speed Draft or Near Letter Quality print mode as
follows:
n = 0: HSD mode.
n = 1: NLQ mode.
Selects pitch, print mode and ROM versus RAM Custom
Graphics, according to the value of n:
n = 0: 10 cpi, utility (UTL), ROM n = 14: 12 cpi, LQ,
RAM
n = 2: 10 cpi, letter quality (LQ), ROM n = 16: 17 cpi, UTL,
ROM
n = 3: Proportional, LQ, ROM n = 18: 17 cpi, LQ, ROM
n = 4: 10 cpi, UTL, RAM n = 20: 17 cpi, UTL, RAM
n = 6: 10 cpi, LQ, RAM n = 22: 17 cpi, LQ, RAM
n = 7: Proportional, LQ, RAM n = 24: 15 cpi, UTL, ROM
n = 8: 12 cpi, UTL, ROM n = 26: 15 cpi, LQ, ROM
n = 10: 12 cpi, LQ, ROM n = 32: 20 cpi, UTL, ROM
n = 12: 12 cpi, UTL, RAM n = 34: 20 cpi, LQ, ROM
Start Italic Printing
Stop Italic Printing
Underlining
Start
Subscript/Superscript
ML395 ( 96-02-07 )
ASCII: ESC % G
Dec: 27 37 71
Hex: 1B 25 47
ASCII: ESC % H
Dec: 27 37 72
Hex: 1B 25 48
ASCII: ESC n
Dec: 27 45 n
Hex: 1B 2D n
ASCII: ESC S n
Dec: 27 83 n
Hex: 1B 53 n
OKI unique command. Italic characters may overlap slightly.
OKI unique command. Cancels italic printing engaged by ESC %
G command.
Underlines all text except tabs.
n = 0 to 255
n = odd: start underlining
n = even: stop underlining
Engages subscript or superscript printing
n = 0 to 255
n = odd: start subscript
n = even: start superscript
Page 75

Stop
Subscript/Superscript
ASCII: ESC T
Dec: 27 84
Hex: 1B 54
Cancels subscript or superscript printing.
Start Emphasized
Printing
Stop Emphasized
Printing
Start Enhanced
(Doublestrike) Printing
Stop Enhanced Printing
Double Width
(Expanded) Printing
Immediate Double
Width
ASCII: ESC E
Dec: 27 69
Hex: 1B 45
ASCII: ESC F
Dec: 27 70
Hex: 1B 46
ASCII: ESC G
Dec: 27 71
Hex: 1B 47
ASCII: ESC H
Dec: 27 72
Hex: 1B 48
ASCII: ESC W n
Dec: 27 87 n
Hex: 1B 57 n
ASCII: SO
Dec: 14
Hex: 0E
Prints horizontally shifted double dots in utility mode at half
speed.
Cancels emphasized printing.
Prints vertically shifted double dots in two unidirectional passes.
Cancels enhanced printing.
n = odd: start double width printing
n = even: stop double width printing
Prints double width only to end of line; can be canceled by DC4,
CAN, or ESC W 1 command.
Stop Immediate
Double Width Printing
Start Triple Width
Printing
Control Double
Height/Width
Overscore
ASCII: DC4
Dec: 20
Hex: 14
ASCII: ESC m
Dec: 27 109
Hex: 1B 6D
ASCII: ESC [ @ l m n1 n
n3 n
4
Dec: 27 91 64 l m n1 n2 n
n
4
Hex: 1B 5B 40 l m n1 n2 n
n
4
ASCII: ESC _ n
Dec: 27 95 n
Hex: 1B 5F n
Cancels double width set by SO command
Triple wide printing will be stopped by ESC W 0 command.
Sets double height, double width, or both double height and
2
double width
l = 0 to 255
3
m = 0 to 255
, n2 ignored
n
3
1
: specifies character height and line feed
n
3
= 17: single line feed, standard height
n
3
= 34: double line feed, double height
n
3
: specifies character width
n
4
= 1: standard width
n
4
= 2: double width
n
4
Command will be ignored when printing bit image graphics.
Prints a continuous overscore over all text characters except for
tab spaces.
n = 0 to 255
n = odd: start overscore
n = even: stop overscore
ML395 ( 96-02-07 )
Page 76

Graphics, 8-Pin Mode
Note: For all 8-pin
graphics commands the
number of dot columns of
graphic data = n1 + (n2 x
256)
Single Density Graphics
Double Density
Half Speed Graphics
Double Density
Full Speed Graphics
Quasi Double Density
Graphics
ASCII: ESC K n1 n
2
[graphic data]
Dec: 27 75 n
1 n2
[graphic data]
Hex: 1B 4B n
1 n2
[graphic data]
ASCII: ESC L l h
[graphic data]
Dec: 27 76 l h [graphic data]
Hex: 1B 4C l h
[graphic data]
ASCII: ESC Y l h
[graphic data]
Dec: 27 89 l h [graphic data]
Hex: 1B 59 l h
[graphic data]
ASCII: ESC y n
Dec: 27 121 n
Hex: 1B 79 n
Dot density 60 dpi horizontal, 72 dpi vertical.
Maximum data per line = 816
, n2 = 0 to 255: specifies amount of subsequent bit image bytes
n
1
received, calculated as n
+ (n2 x 256).
1
Dot density 120 dpi horizontal, 72 dpi vertical.
Maximum data per line: 1632
l, h = 0 to 255: specifies amount of subsequent bit image bytes
received, calculated as l + (h x 256).
Same as low speed double density (120 dpi), but printer can't put
two adjacent dots in the same row.
n = 1: Engages Quasi Double Density graphics
n = 0: Disengages Quasi Double Density graphics
Applies to the following commands:
ESC K n
[data] ESC * m n1 n2 ESC ? m n
1 n2
Quadruple Density
Graphics
Graphics, 8 & 24-Pin
Mode
ASCII: ESC Z l h
[graphic data]
Dec: 27 90 l h [graphic data]
Hex: 1B 5A l h
[graphic data]
Dot density 240 dpi horizontal, 72 dpi vertical. Printer can't put
two adjacent dots in the same row. Maximum data per line: 3264
l, h = 0 to 255: specifies amount of subsequent bit image bytes
received, calculated as l + (h x 256).
ML395 ( 96-02-07 )
Page 77

Graphics Select/Print
ASCII: ESC * m n1 n
[graphic data]
Dec: 27 42 m n
1 n2
[graphic data]
Hex: 1B 2A m n
1 n2
[graphic data]
2
Selects 8-pin and 24-pin graphic modes and prints graphic data.
Valid only for IBM AGM.
m = 0: Single density, 8-pin, 60 dpi
m = 1: Double density, 8-pin, 120 dpi
m = 2: Double speed, double density, 8-pin, quasi-120 dpi (dots
can not be printed
directly adjacent to one another)
m = 3: Quadruple density, 8-pin, quasi-240 dpi (dots can not be
printed directly
adjacent to one another)
m = 4: CRT I, 8-pin, 80 dpi
m = 6: CRT II, 8-pin, 90 dpi
m = 32: Single density, 24-pin, 60 dpi
m = 33: Double density, 24-pin, 120 dpi
m = 38: CRT III, 24-pin, 90 dpi
m = 39: Triple density, 24-pin, 180 dpi
m = 40: Hex-density, 24-pin, quasi-360 dpi (dots can not be
printed directly
adjacent to one another)
, n2 = 0 to 255: specifies amount of subsequent bit image bytes
n
1
received,
calculated as n
+ (n2 x 256)
1
Graphics Select
Miscellaneous
Commands
Select Emulation Mode.
ASCII: ESC [ g n1 n2 m
[graphic data]
Dec: 27 91 103 n
1 n2
m
[graphic data]
Hex: 1B 5B 67 n
1 n2
m
[graphic data]
ASCII: ESC { n
Dec: 27 123 n
Hex: 1B 7B n
Selects graphics and prints
m = 0: Single density, 8-pin, 60 dpi (same as ESC * 0)
m = 1: Double density, 8-pin, 120 dpi (same as ESC * 1)
m = 2: Double speed, double density, 8-pin, quasi-120 dpi (same
as ESC * 2)
m = 3: Quadruple density, 8-pin, quasi-240 dpi (same as ESC *
3)
m = 8: Single density, 24-pin, 60 dpi (same as ESC * 32)
m = 9: Double density, 24-pin, 120 dpi (same as ESC * 33)
m = 11: Triple density, 24-pin, 180 dpi (same as ESC * 39)
m = 12: Hex-density, 24-pin, quasi-360 dpi (same as ESC * 40)
, n2 = 0 to 255: specifies amount of subsequent bit image bytes
n
1
received,
calculated as n
+ (n2 x 256)
1
OKI unique command. Switches printer emulation mode, copying
the custom character data in buffer and saving the print and
receive buffers. Menu settings unaffected.
n = 0, 2: IBM Proprinter
n = 3: IBM XL24 AGM
n = 64, 66: Epson LQ 850, LQ 1050
Select color (color
ribbon installed)
ML395 ( 96-02-07 )
ASCII: ESC r n
Dec: 27 114 n
Hex: 1B 72 n
OKI unique command. Selects print color mode as follows:
n = 0: black
n = 1: magenta
n = 2: cyan
n = 3: violet (two superimposed passes, magenta/cyan)
n = 4: yellow
n = 5: orange (two superimposed passes, yellow/magenta)
n = 6: green (two superimposed passes, yellow/cyan)
Command will be ignored if the Ribbon Selection in Menu is set
to Black.
Page 78

Cancel
ASCII: CAN
Dec: 24
Hex: 18
Clears buffer and cancels single double-width set by SO or ESC
SO command; does not affect custom characters or other
commands.
Print Suppress Mode
On
Print Suppress Mode
Off
Stop Printing
Disable Paper-Out
Sensor
Enable Paper-Out
Sensor
ASCII: ESC Q n
Dec: 27 81 n
Hex: 1B 16 n
ASCII: DC1
Dec: 17
Hex: 11
ASCII: ESC j
Dec: 27 106
Hex: 1B 6A
ASCII: ESC 8
Dec: 27 56
Hex: 1B 38
ASCII: ESC 9
Dec: 27 57
Hex: 1B 39
Prints out data in print buffer and puts printer in Print Suppress
Mode until DC1 command is received.
Command will be ignored unless Print Suppress Effective item in
Menu is set to Yes.
n = 23
Cancels Print Suppress Mode. Printer becomes active, processes
all data received.
Deselects the printer. Press SELECT to reactivate. No data is lost.
Paper-out sensor is deactivated: printer will print to next top of
form before registering paper end error.
This command will be ignored if the Paper Out Override in Menu
is set to No (the factory default).
Sensor detects when less than 1/2" of paper is left. When PAPER
OUT light is on, pressing SELECT prints 1 line of data at a time
until top of form position on next page is reached. Sensor can also
be controlled by the Menu.
ML395 ( 96-02-07 )
Page 79

Appendix D
IBM Serial Cable Configurations
IBM Serial Cable Configurations
IBM 25-Pin Serial Cable Configuration
IBM 9-Pin Serial Cable Configuration
ML395 ( 96-02-07 )
 Loading...