

Page 1

Chapter 0
Front Cover
Microline
380
Printer Handbook
ML 380 ( 96-02-03 )
Page 2

%Introduction
Introduction
Your ML380 is a 24-pin, dot matrix printer which will give you years of high-quality printing service. It
features six resident letter quality (LQ) fonts, a direct access control panel, automatic paper feed, paper
park, no-waste paper tear-off, and a quick-change cartridge ribbon.
With six resident LQ fonts, its easy to give your manuscript the polished, professional appearance of a
typeset document.
With all the controls in the front at your fingertips, you dont have to go poking around looking for the
switch you need.
With automatic paper feed, all you have to do is position the paper on the tractor pins (for
continuous-form paper) or on the paper separator (single sheet feed) and then pull the bail lever
forward_the printer will automatically feed the paper around the bail and into position for printing!
With paper park, all you need to do to change from continuous-form paper to single sheet feed is press a
button_the printer will park the continuous-form paper out of the way and be ready for you to insert single
sheets.
With no-waste paper tear-off, you can have the printer automatically advance continuous-form paper so
that you can tear off the last printed page without losing the next blank page_the printer will then move
the paper back down into position for printing the next page. This eliminates paper waste.
With a cartridge ribbon, you just pop it in and out in seconds_no need to fuss with the messy job of
threading ribbon through a printhead. What could be easier?
This Handbook will help you to get your ML380 printer set up and running. It also explains the printers
control codes and how to use them.
Heres how its organized:
Chapter 1: Setup gives you the basics: how to get your printer ready to operate, how to make the
connections, and how to load paper.
Chapter 2: Features, Self Tests and Options describes your ML380's features and how to use them. It
also explains how to run the self tests and how to install the pull tractor and serial interface options.
Chapter 3: Control Panel shows you how to use the front panel controls on your printer.
Chapter 4: Software discusses how to use your ML380 with software. It explains how to choose the
correct printer driver, gives examples of how to set printer parameters with your software, and illustrates
how to employ your software to produce graphics on your ML380.
Chapter 5: Control Codes defines the various commands you can use to control your printer, either by
placing them within your software or by using them in your own computer program.
Chapter 6: Cleaning and Problem Solving explains how to clean your printer and poses a series of what
if...? questions to help you with the most common problems people run into when operating a printer.
The Appendices provide you with a variety of useful information, including the ASCII character sets, a
summary of the control codes, and a discussion of computer interfacing, in addition to a listing of your
ML380's specifications.
To top it all off, youll find a Glossary on page 143 to help you with the jargon.
In addition to this Handbook, youll also find a Customer Service Guide included with your printer. It
explains how to get help in the unlikely event that you have a problem not covered in this handbook; youll
also find there a list of replacement parts, the warranty statement and your printer registration card.
ML 380 ( 96-02-03 )
Page 3

Chapter 1
%What's Included
What's Included
When you remove your ML380 Printer from the carton, place it on a sturdy surface such as a printer
stand, desk, or table. As you proceed to unpack the printer, it's a good idea to save the packing materials
and carton in case you ever need to ship the printer.
Along with this manual, your printer carton should contain the following items:
1) Printer
2) Paper Separator
3) Platen Knob
4) Ribbon
5) Grounding Screw
Note:You must purchase a computer interface cable and paper separately.
If you are missing any of these items, or if any are damaged, please notify your dealer immediately for a
replacement.
Note:Some interface cables have a separate grounding wire. If you have this type of cable, use the
grounding screw to attach the grounding wire to the printer. The grounding screw is also needed if you
are installing the optional serial interface adapter.
ML 380 ( 96-02-03 )
Page 4
%Choosing the Interface
Choosing the Interface
How you connect your ML380 to your computer depends on whether you are using a parallel or a serial
interface. The printer has a parallel interface; for serial interfacing you need a serial interface adapter,
sold separately. If you already know which type you will use, skip down to the appropriate
heading:"Installing the Parallel Interface Cable" on the next page or "Installing the Serial Interface
Adapter" on page 36.
Generally, a parallel interface is used for a printer operated with an individual PC or computer, while a
serial interface is used for networks in which more than one computer will be operated with a single
printer. A serial interface is also required if the printer is to be placed more than 10 feet from the
computer. The following table summarizes the difference between the two types of interface.
Parallel Interface Serial Interface
Data is transferred 8 bits (one byte) at a time,
in parallel, over 8 wires.
Data transmission rate is faster. Data transmission rate is slower.
On IBM PCs and compatibles, the port
connected to printer is referred to as LPT1,
LPT2, or LPT3 (maximum of three ports
allowed).
Cable length is limited to 10 feet (3 meters). Cable can be virtually any length.
Requires Centronics 36-pin parallel interface
connector.
Data is transferred serially, 1 bit at a time over
1 wire.
On IBM PCs and compatibles, the port
connected to printer is referred to as COM1,
COM2, etc. (no maximum number of ports).
Requires RS-232, DB-25 serial interface
connector.
ML 380 ( 96-02-03 )
Page 5
%Installing the Parallel Interface Cable
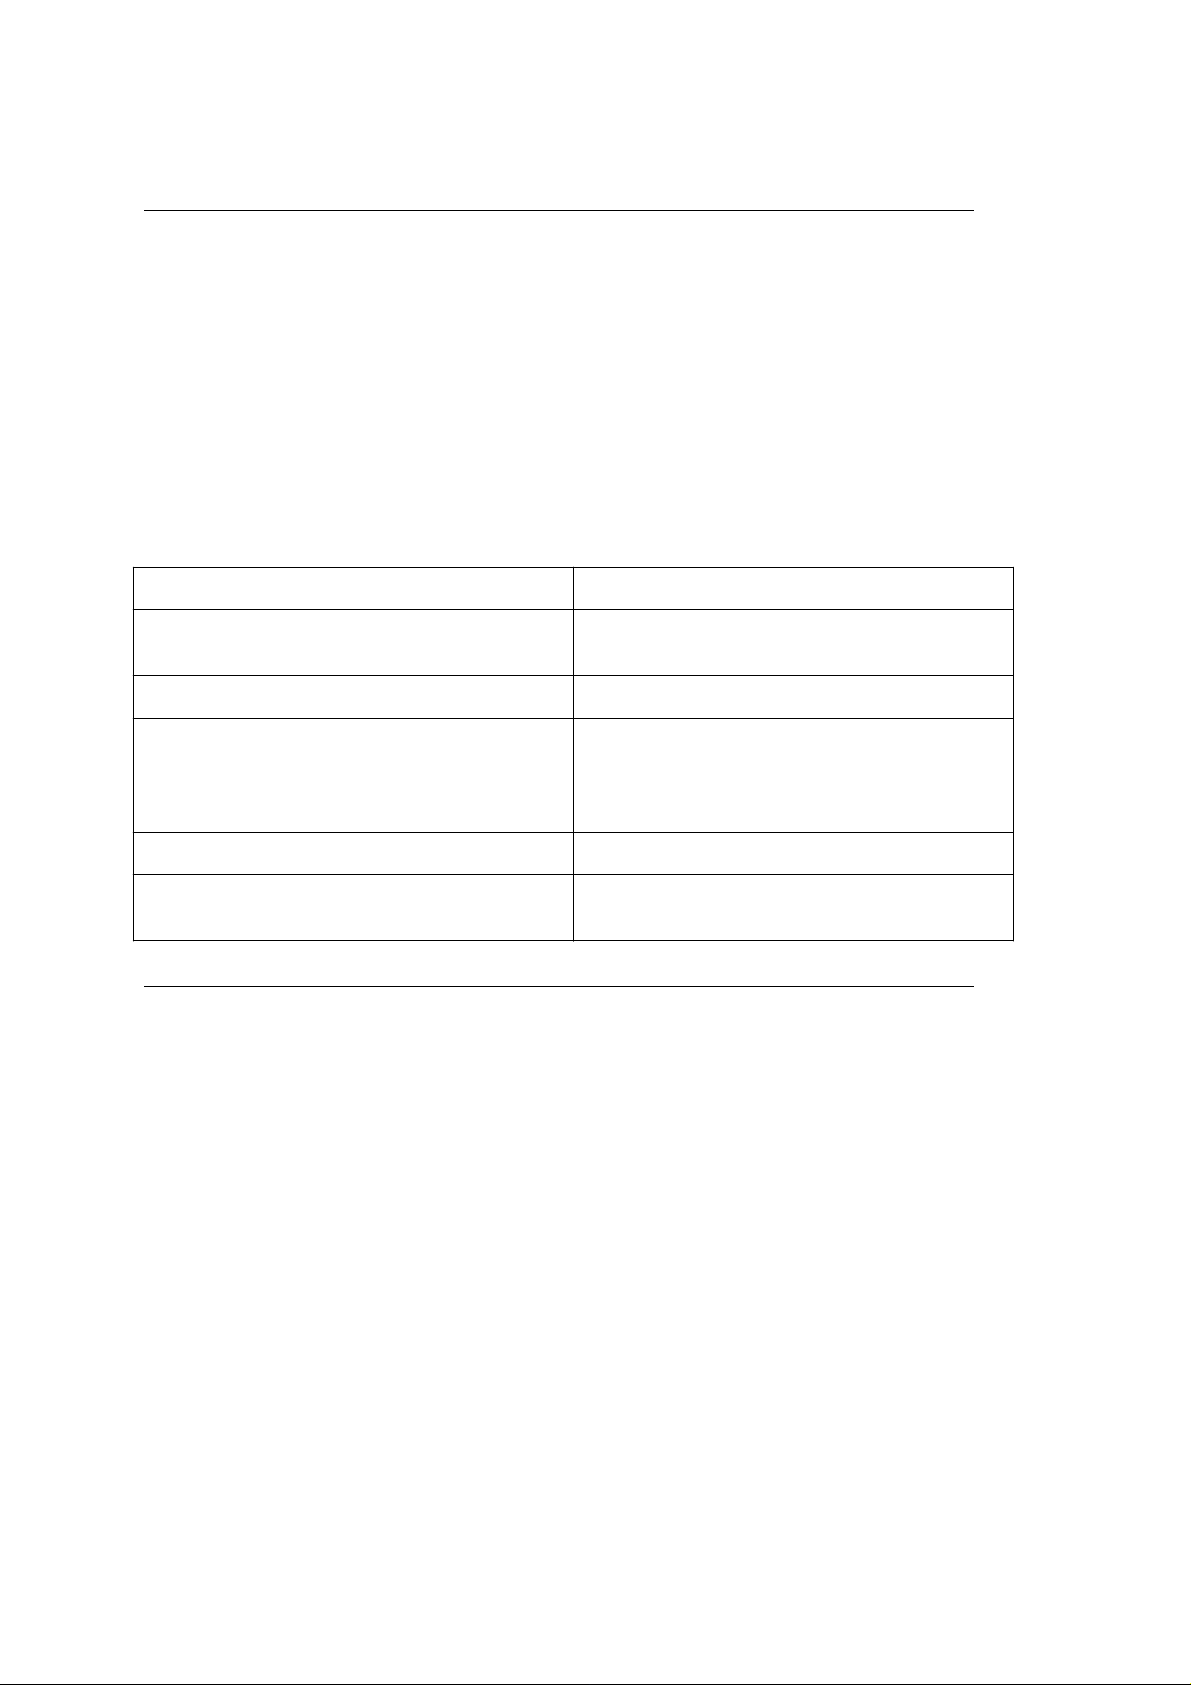
Installing the Parallel Interface Cable
You'll need a shielded parallel interface cable not more than 10 feet (3 meters) long, with a Centronics
36-pin male connector for attachment to your printer.
1.If you have not already done so, remove the styrofoam end pieces and the plastic wrapping from
the printer.
2.Make sure the printer is unplugged and the computer is turned off.
3.Turn the printer over and place it gently on a sturdy, flat surface.
4.Locate the parallel interface connector and push the wire clips out to the side.
5.Plug your parallel interface cable into the port on the bottom of the printer.
6.Fasten the wire clips to the cable.
7.Snap the interface cable into the cable channel.
8.Turn the printer back over.
9.Connect the other end of the cable with the parallel connector on your PC.
ML 380 ( 96-02-03 )
Page 6
%Setting Up
Setting Up
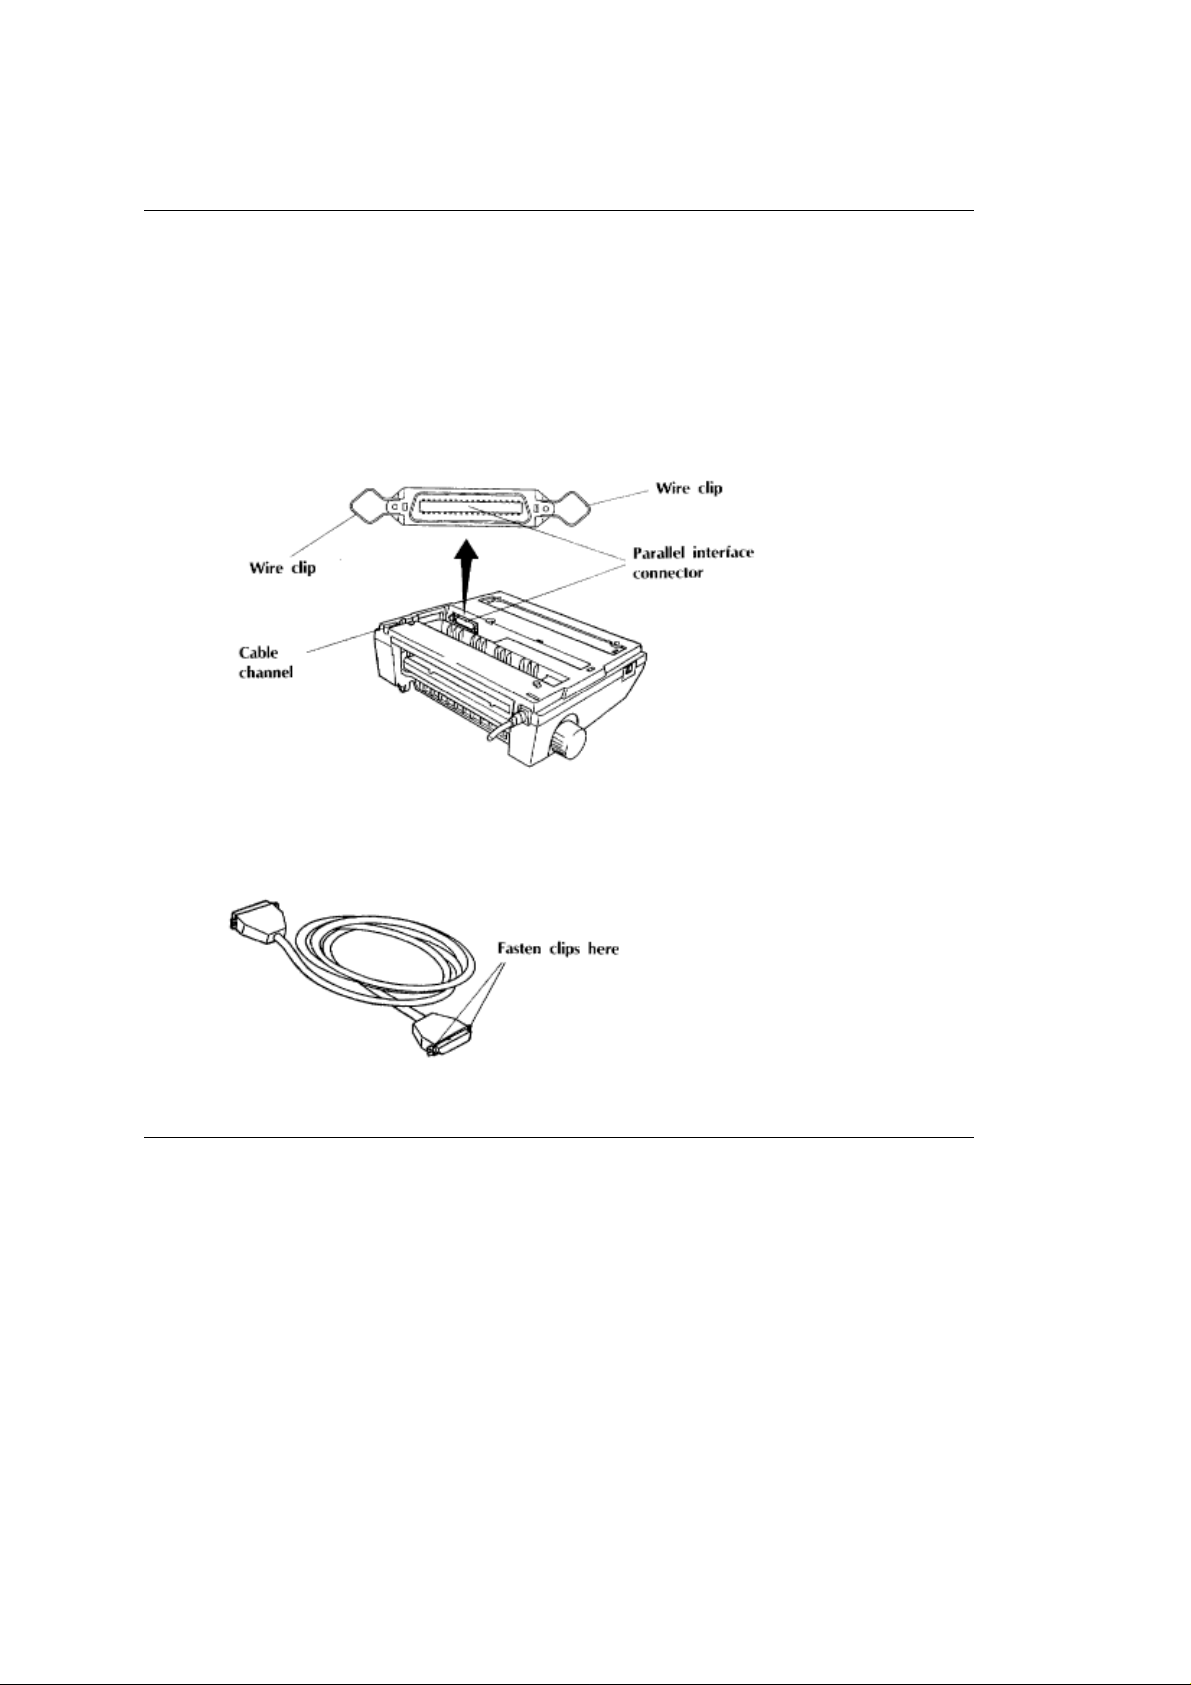
Note:Don't plug in the printer until it is set up and ready to operate!
1.Open the access cover and remove the shipping retainer. The printhead won't move freely until
you do so.
2.Hold the paper separator at an angle of about 30ñ to the printer housing and slide the slots at
either end onto the pins at the back of the printer. When properly installed, the paper separator
will swing up and rest in the top well on the printer for use in single sheet feed, and will swing
down and rest in the bottom well for use with continuous-form paper.
3.Insert the platen knob in the right side of the printer, aligning the flat side of the knob shaft with
the flat side on the platen shaft.
4.Make sure the printer power switch is OFF. Plug the power cord into a grounded outlet.
Note:Use only a properly grounded outlet. Do not use an ungrounded outlet with an adapter to
ML 380 ( 96-02-03 )
Page 7
%Installing the Ribbon Cartridge
Installing the Ribbon Cartridge
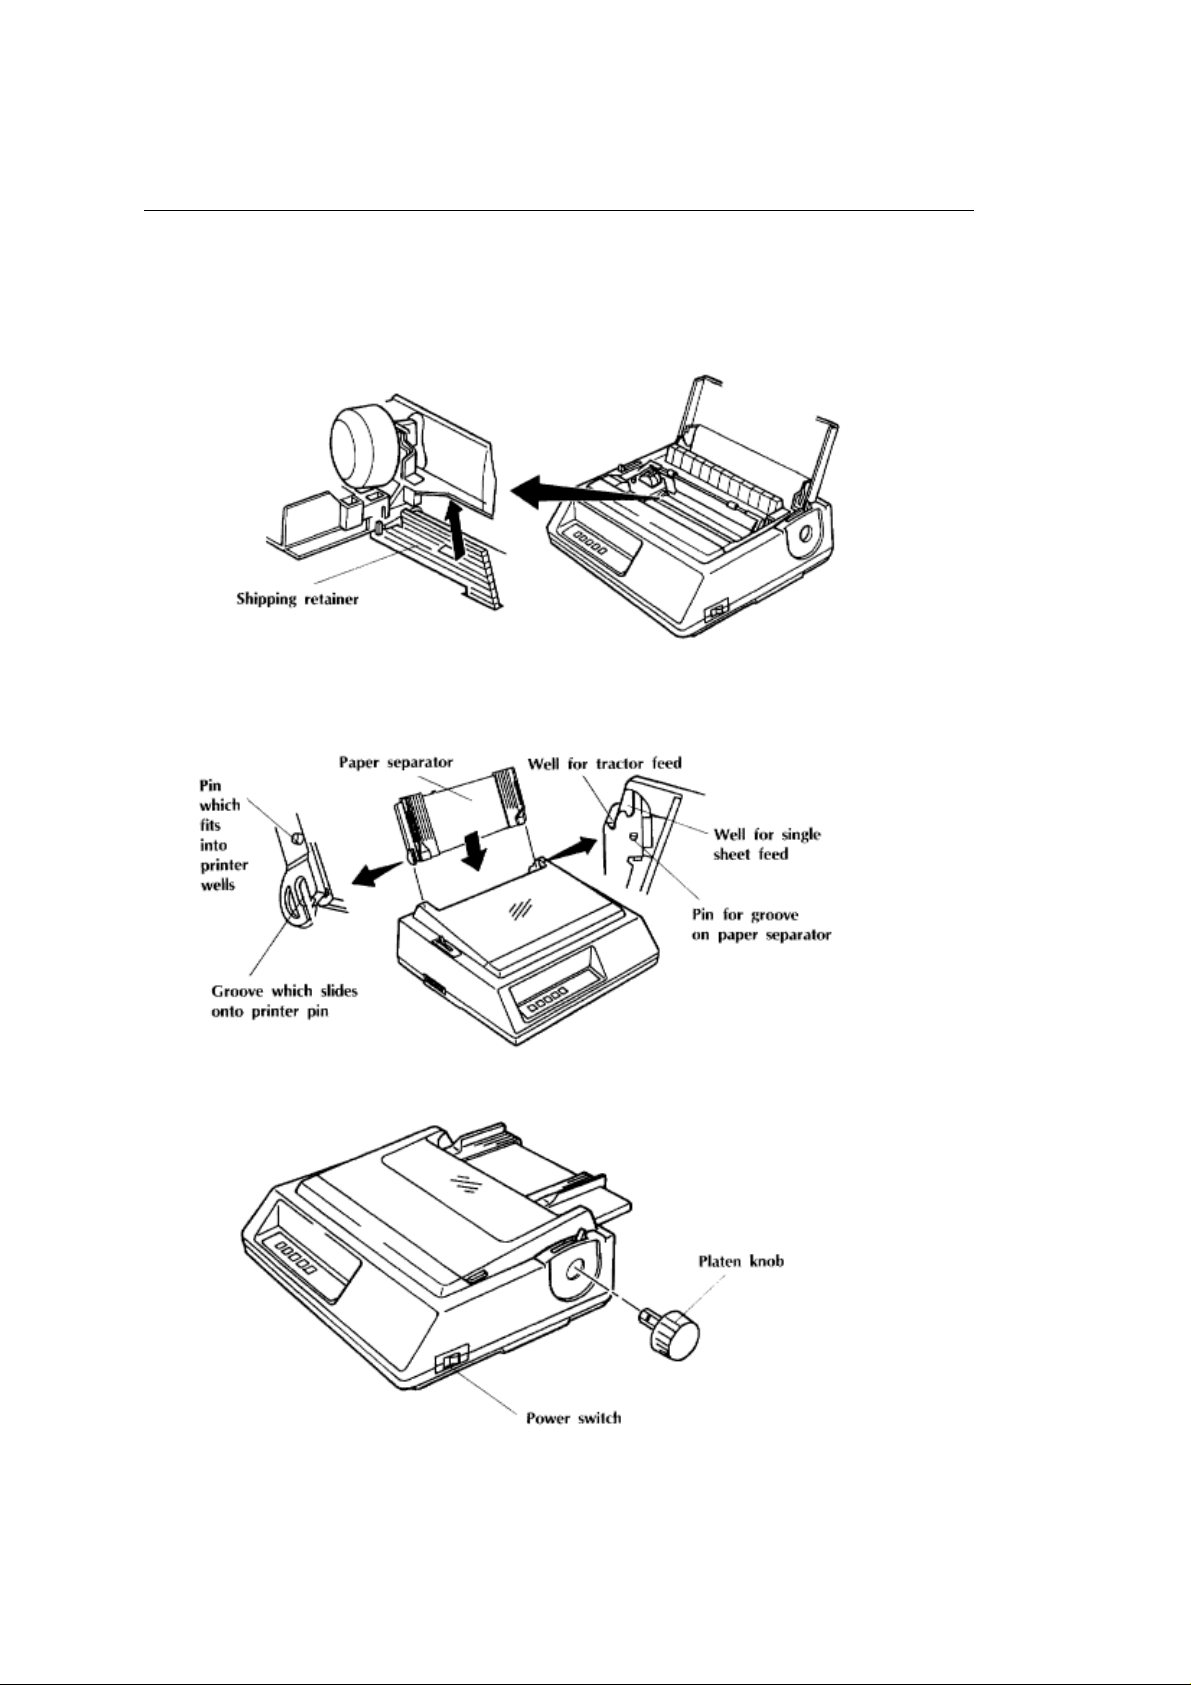
Your printer ribbon is a cartridge type which pops in and out.
Note:When you open the bag containing the ribbon cartridge, do not remove the clear plastic shield
mounted over the ribbon.
1.Lift the access cover.
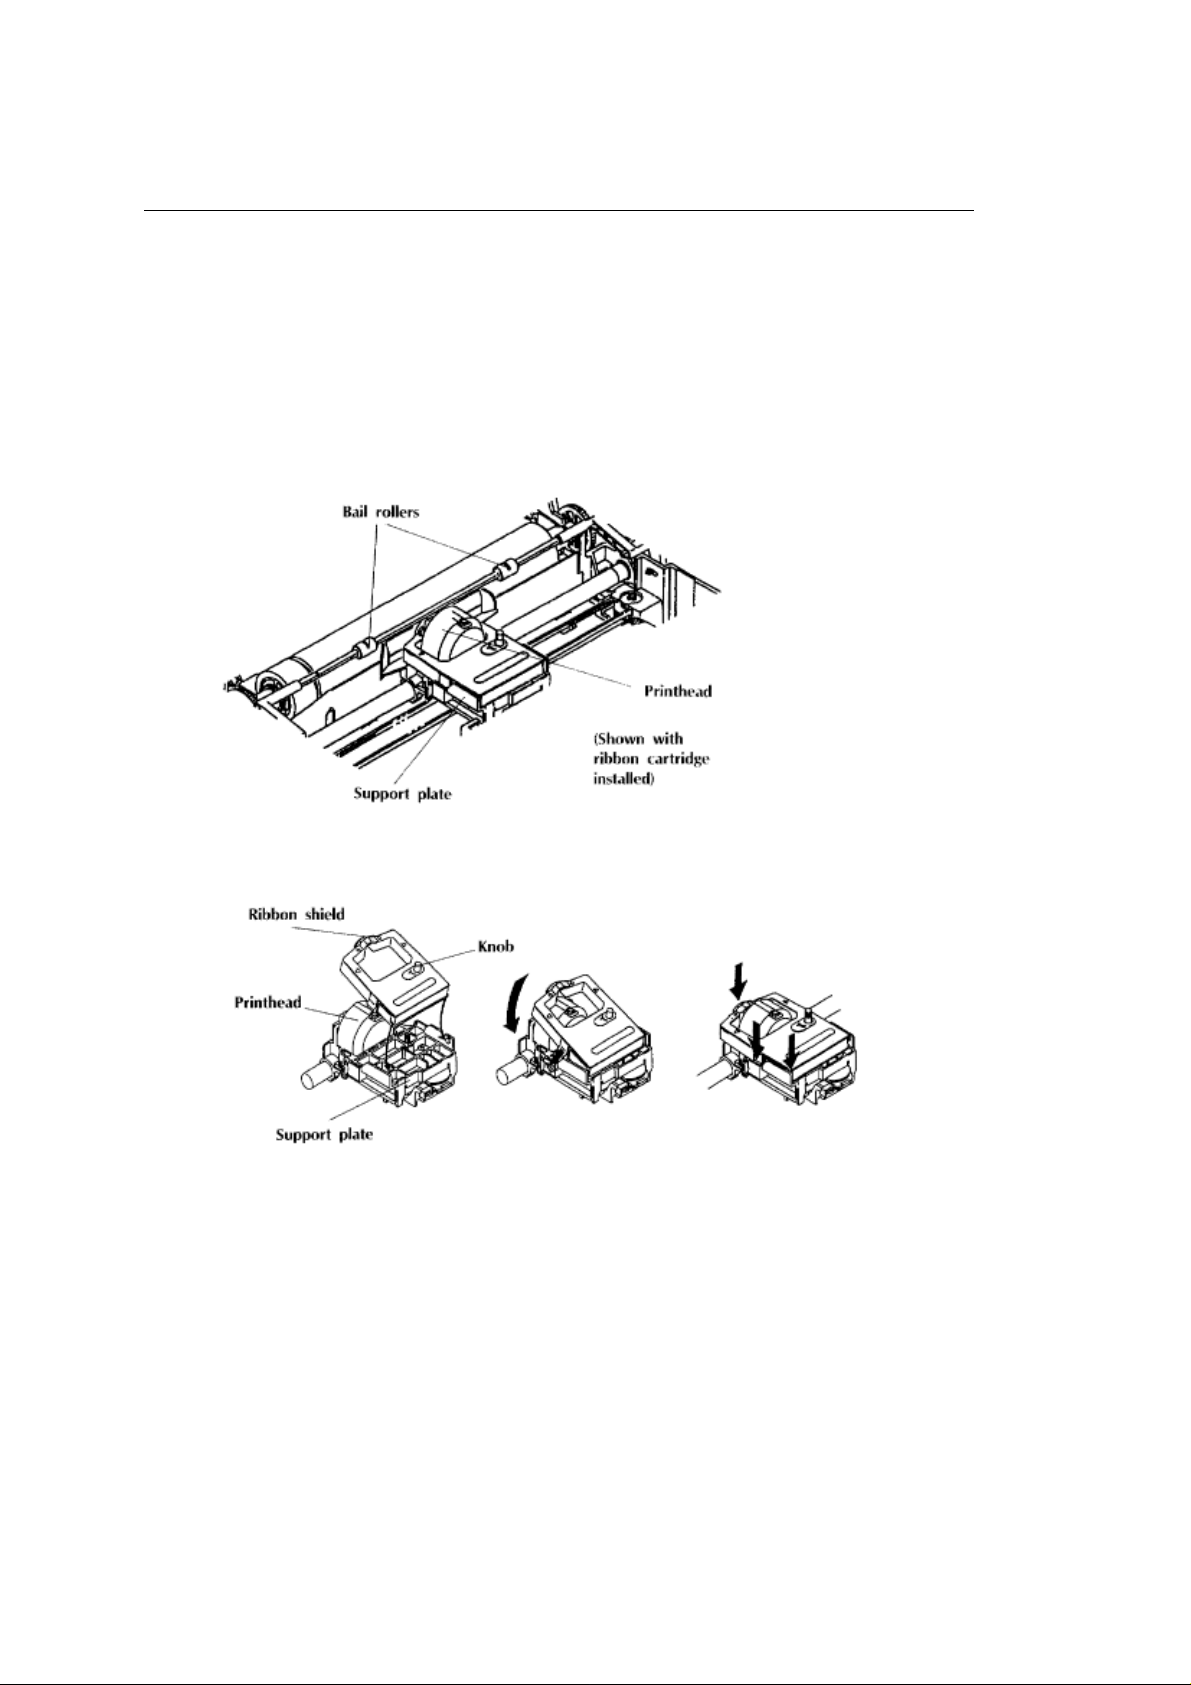
2.Make sure that the bail is positioned against the platen (bail lever back). Grasp the black plastic
support plate in front of the printhead and slide the printhead to a position between the bail
rollers.
Note:The printhead gets HOT during extended printing. Be sure to let it cool before you touch it!
3.Hold the ribbon cartridge with the knob facing up and the ribbon/shield facing away from you.
4.Insert the flat side of the cartridge (side closest to you) into the front of the support plate. The
slots on either side of the cartridge will engage the pins on the plate.
5.Swing the ribbon cartridge down over the printhead and press until it snaps into place.
6.Turn the knob in the direction of the arrow to take up any slack in the ribbon.
To remove the ribbon cartridge, simply squeeze the tabs on either side and lift it out.
ML 380 ( 96-02-03 )
Page 8

Note:Use only ribbons specifically made for MICROLINE 380, 390, or 391 printers. The use of
ribbon not designed for the MICROLINE 380/380/391 printers could damage the printhead.
Please also note that while ribbon cartridges for other MICROLINE printers look similar, they will
either not fit the ML380 or they will give poor print quality because the ribbon and ink don't meet
the requirements of 24-pin printers.
For best results, use genuine OKIDATA ribbons, part number 52104001.
ML 380 ( 96-02-03 )
Page 9
%Adjusting the Printhead Gap
Adjusting the Printhead Gap
Your ML380 comes preset for single-sheet paper. If you'll be using multiple sheets, envelopes or very
thick paper, you'll need to adjust the gap between the printhead and the platen.
1.Make sure the printer is turned off.
2.Open the access cover.
3.If necessary, grasp the ribbon support plate and move the printhead away from the left end of the
platen.
Note:The printhead gets HOT during extended printing. Be sure to let it cool before you touch it!
4.Pull the bail lever forward to raise the bail off the platen.
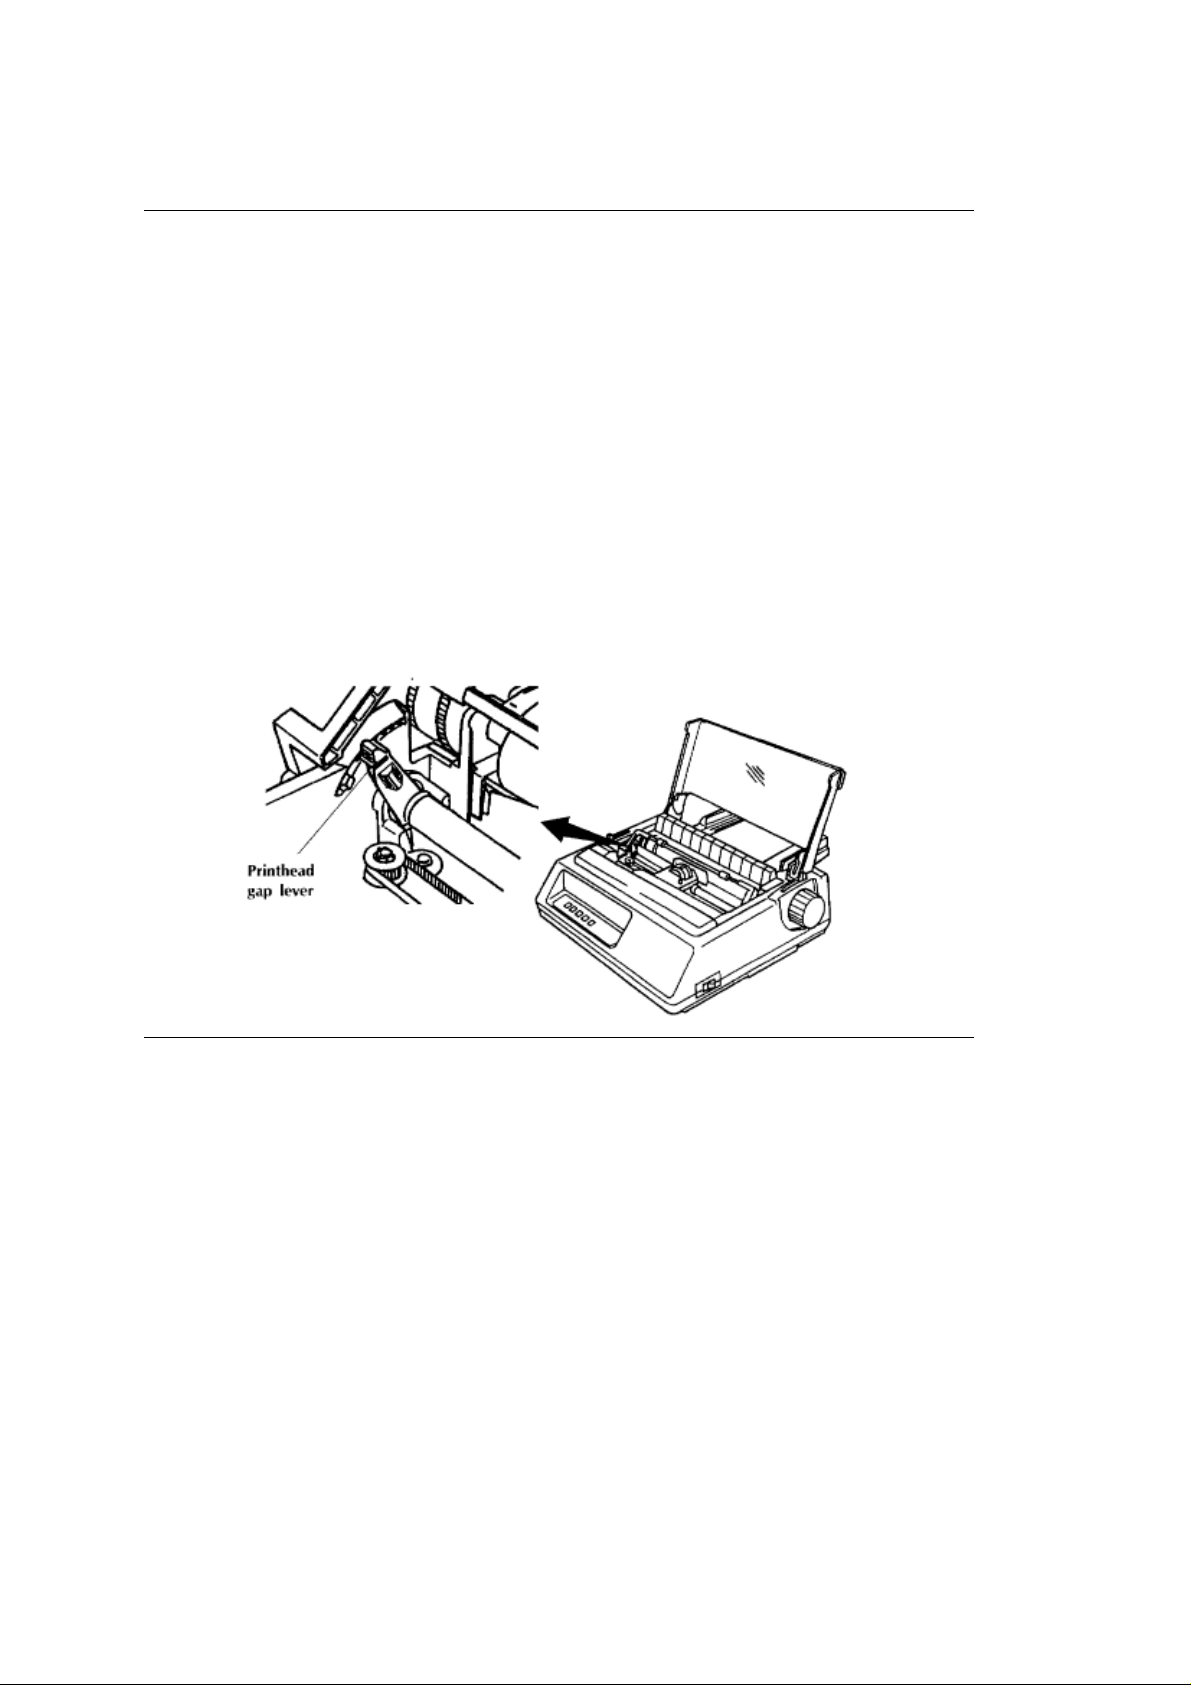
5.The printhead gap lever is located on the left side of the housing at the end of the platen. Push
the lever toward the printer housing, then pull it toward you to change the setting: use settings 2,
3, or 4 for multiple sheets or forms, equivalent to the number of sheets of paper; use setting 5 for
envelopes and extra-thick paper.
ML 380 ( 96-02-03 )
Page 10

%Loading Paper
Loading Paper
Your ML380 Printer takes standard paper, weight 14 to 22 lbs., with a maximum thickness of 0.01 inches
(0.25 mm). It can be used with single sheets, forms, continuous-form paper, and envelopes. It can also
be used to print labels, but the labels must be fed in from the bottom, requiring the optional pull tractor
(see page 33). Bottom feed is also recommended for heavier papers such as card stock. (See Appendix
E for additional information on paper specifications.)
ML 380 ( 96-02-03 )
Page 11
%Loading Single Sheets
Loading Single Sheets
Note:If you have continuous-form paper in the printer and wish to switch to single sheets, use the
paper park feature described on page 27 to move the continuous-form paper out of the paper
path.
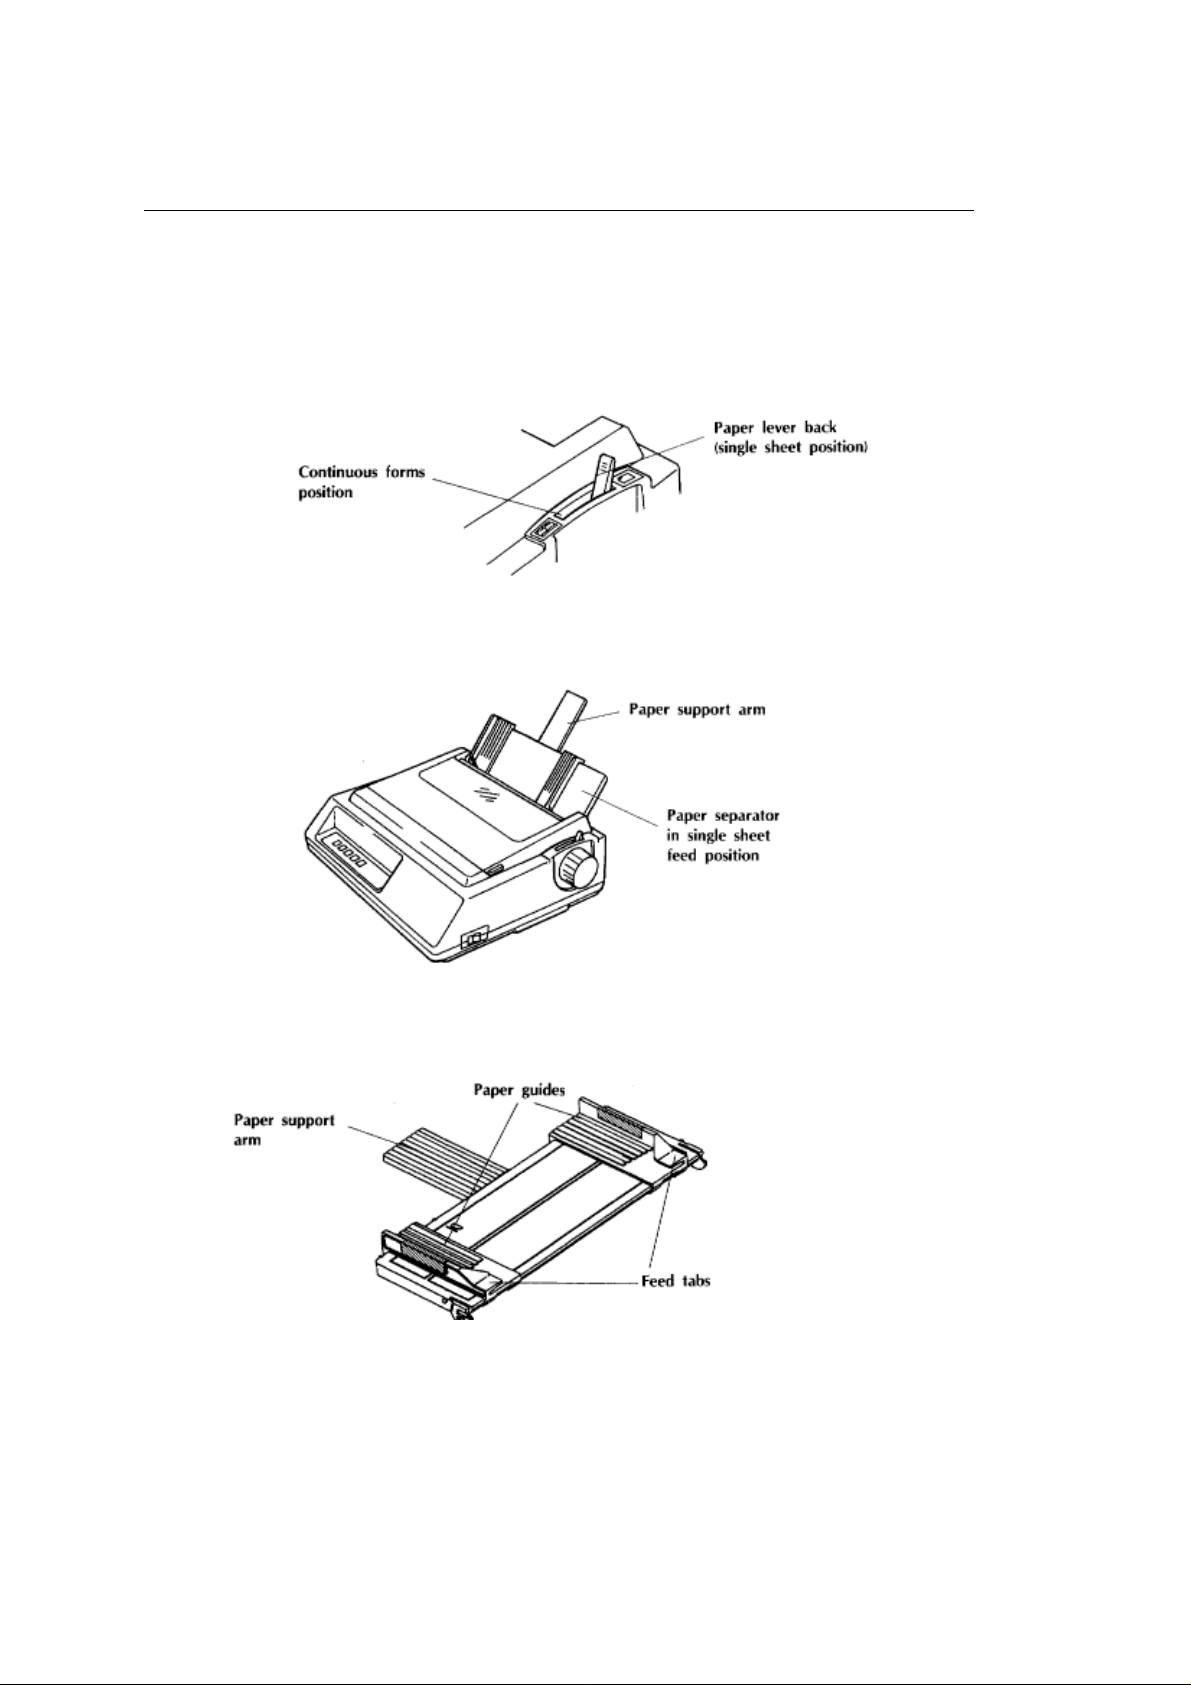
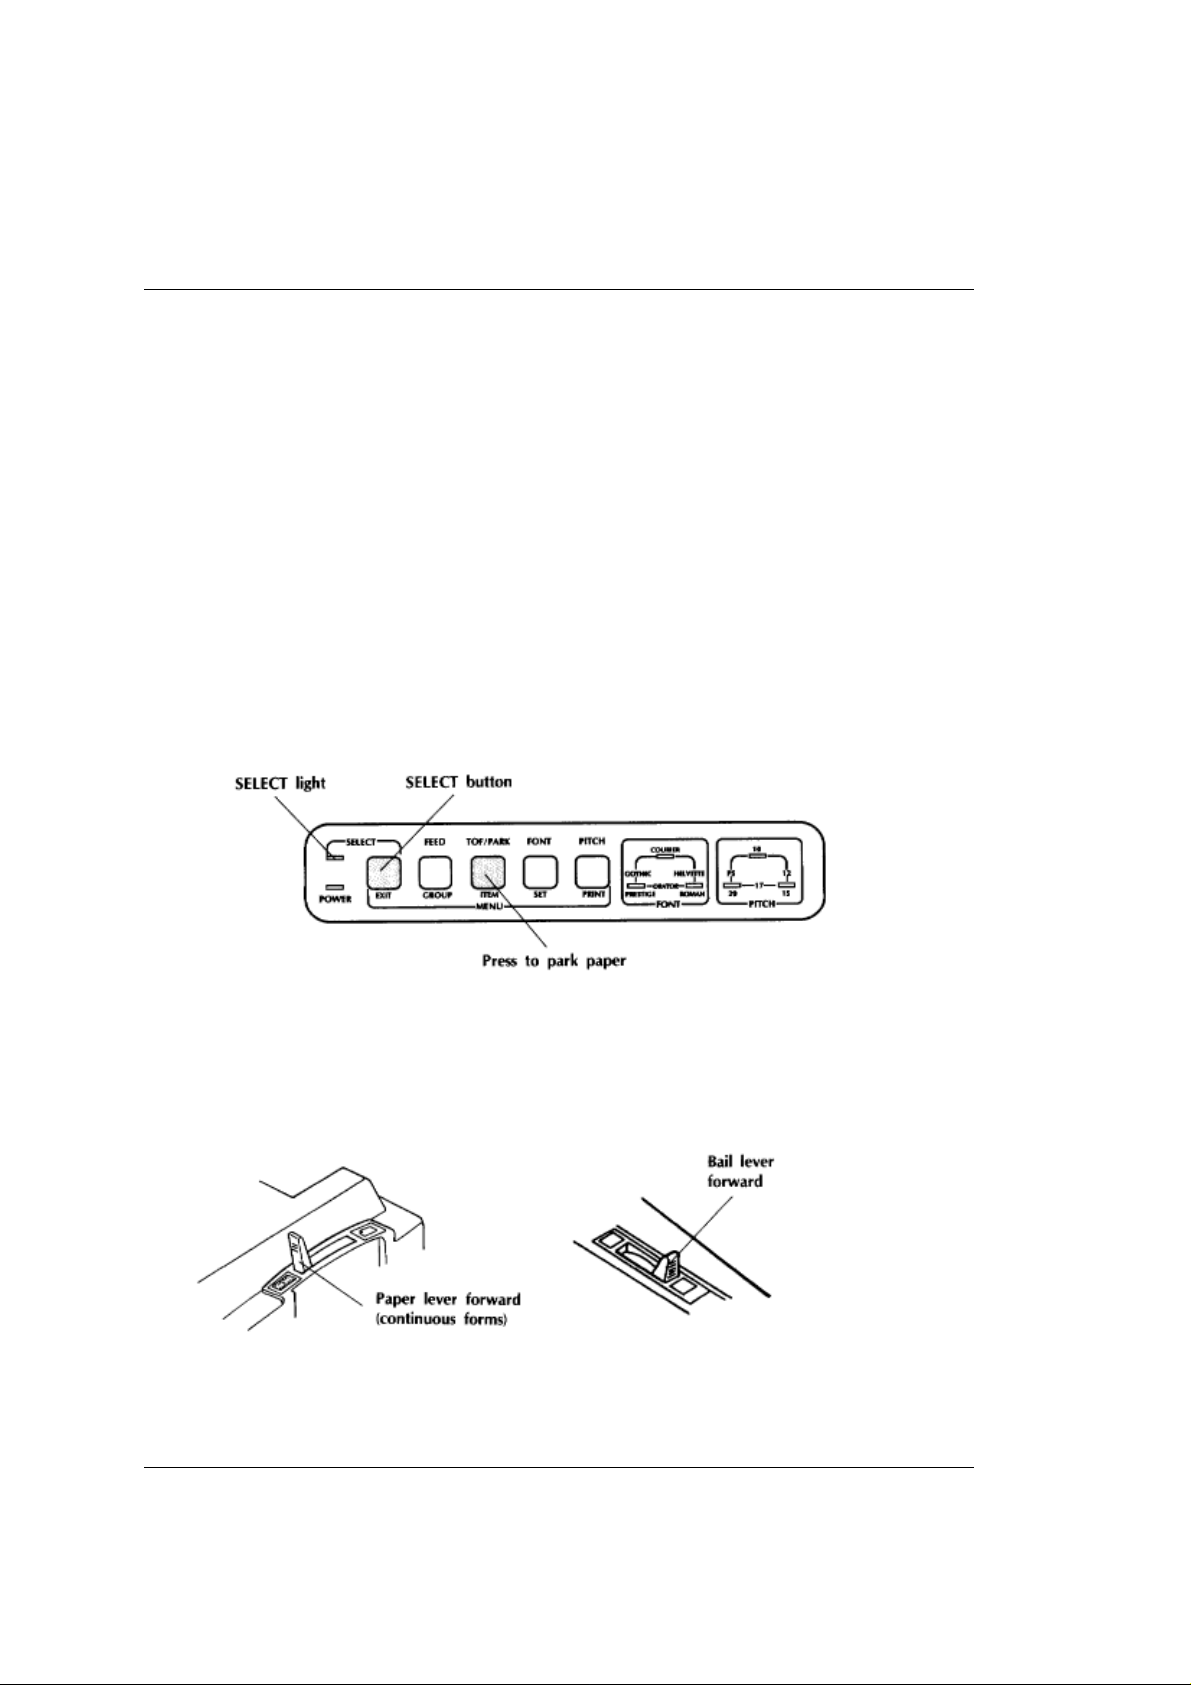
1.Make sure the paper lever is toward the back, in the single sheet feed position.
2.Swing the paper separator up into the single sheet feed position and lock it in place by pressing
down gently until the pins slide down into the wells on the printer.
3.Reach behind the left paper guide, grasp the paper support arm and swing it up into place.
4.Place a sheet of paper in the separator and slide the paper guides to adjust them for the sheet
size you will be using. The guides should just barely touch the edges of the paper. Be sure you
tuck the bottom edges of the paper under the feed tabs on the guides.
Note:The movement of the left guide is restricted. It should be positioned so that the paper covers
the groove in the left side of the platen. If it doesn't, the printer will signal paper out (SELECT light
flashing) even with paper installed.
ML 380 ( 96-02-03 )
Page 12
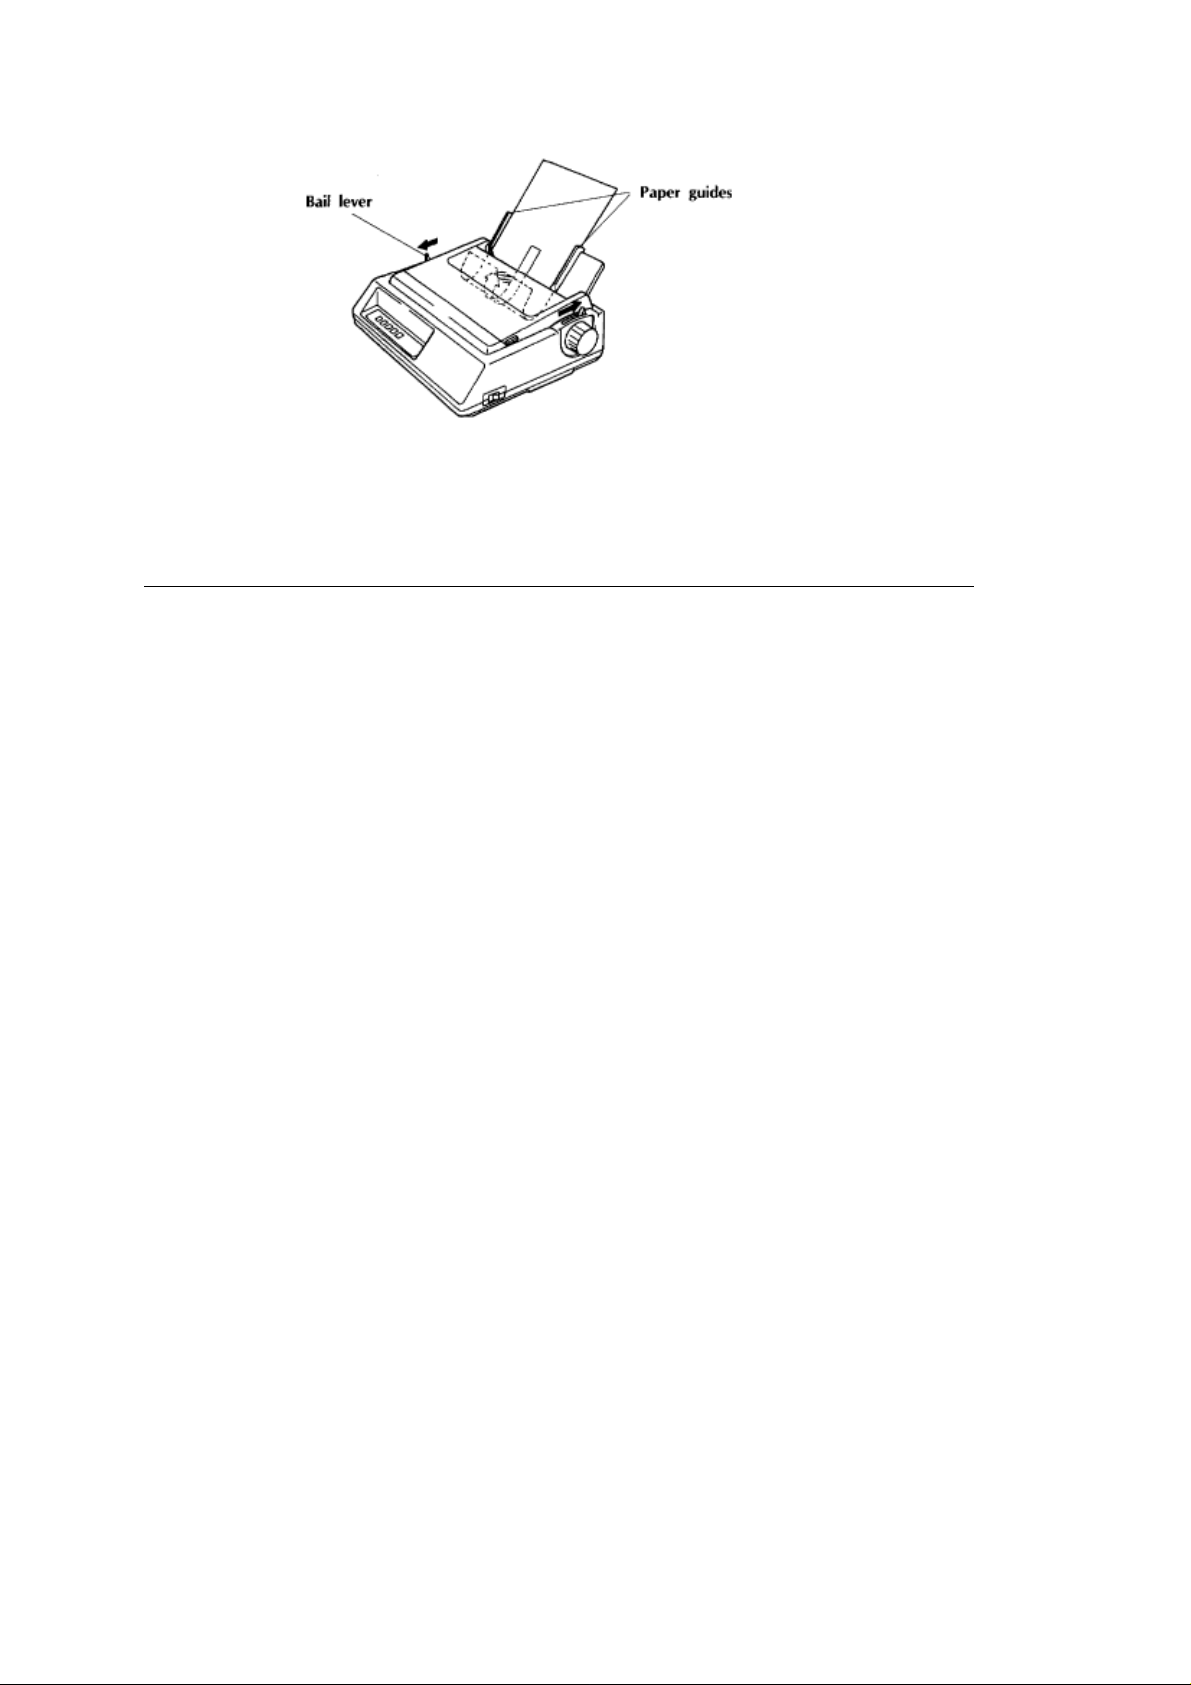
5.Pull the bail lever forward. Your ML380 will automatically load the sheet of paper into the printer,
and the select light will go out.
6.Push the bail lever back. The SELECT light will automatically come back on and glow
continuously to indicate that the printer is selected.
7.Set the top of form, following the instructions below.
ML 380 ( 96-02-03 )
Page 13
%Setting Top of Form for Single Sheets
Setting Top of Form for Single Sheets
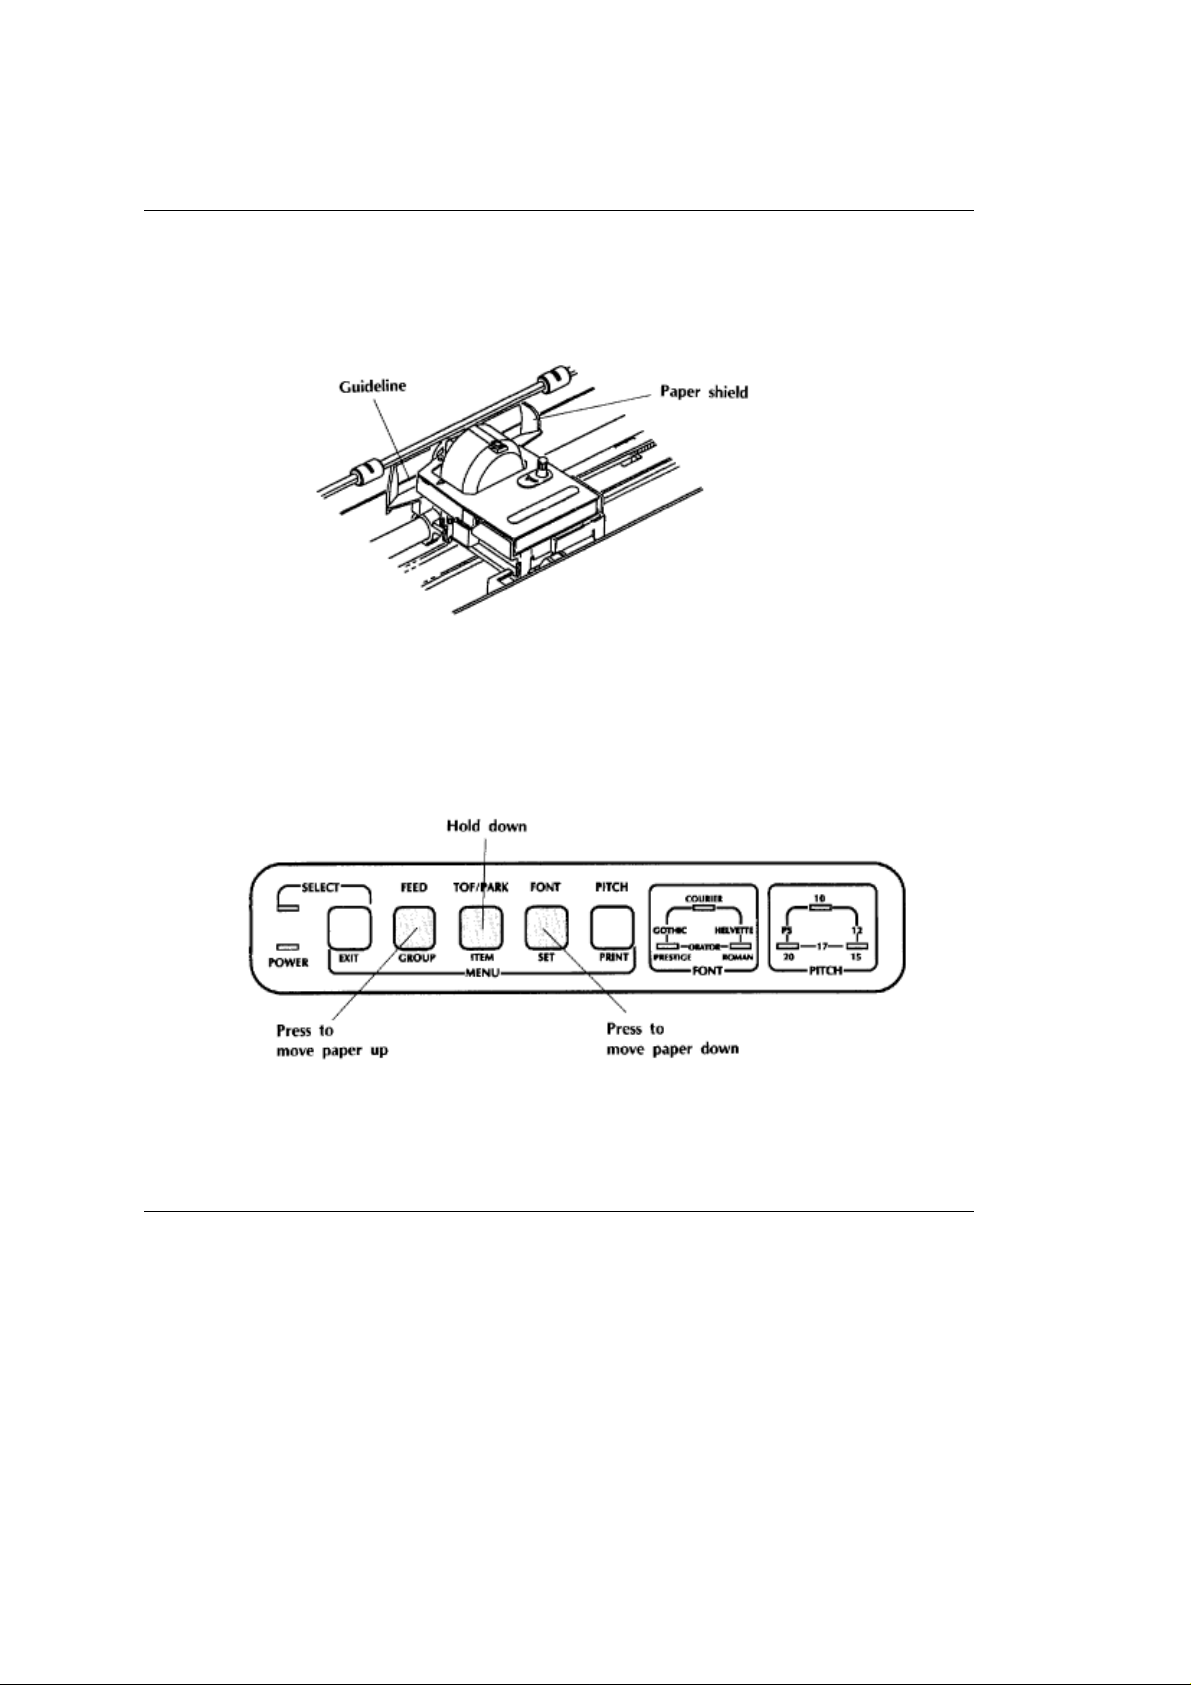
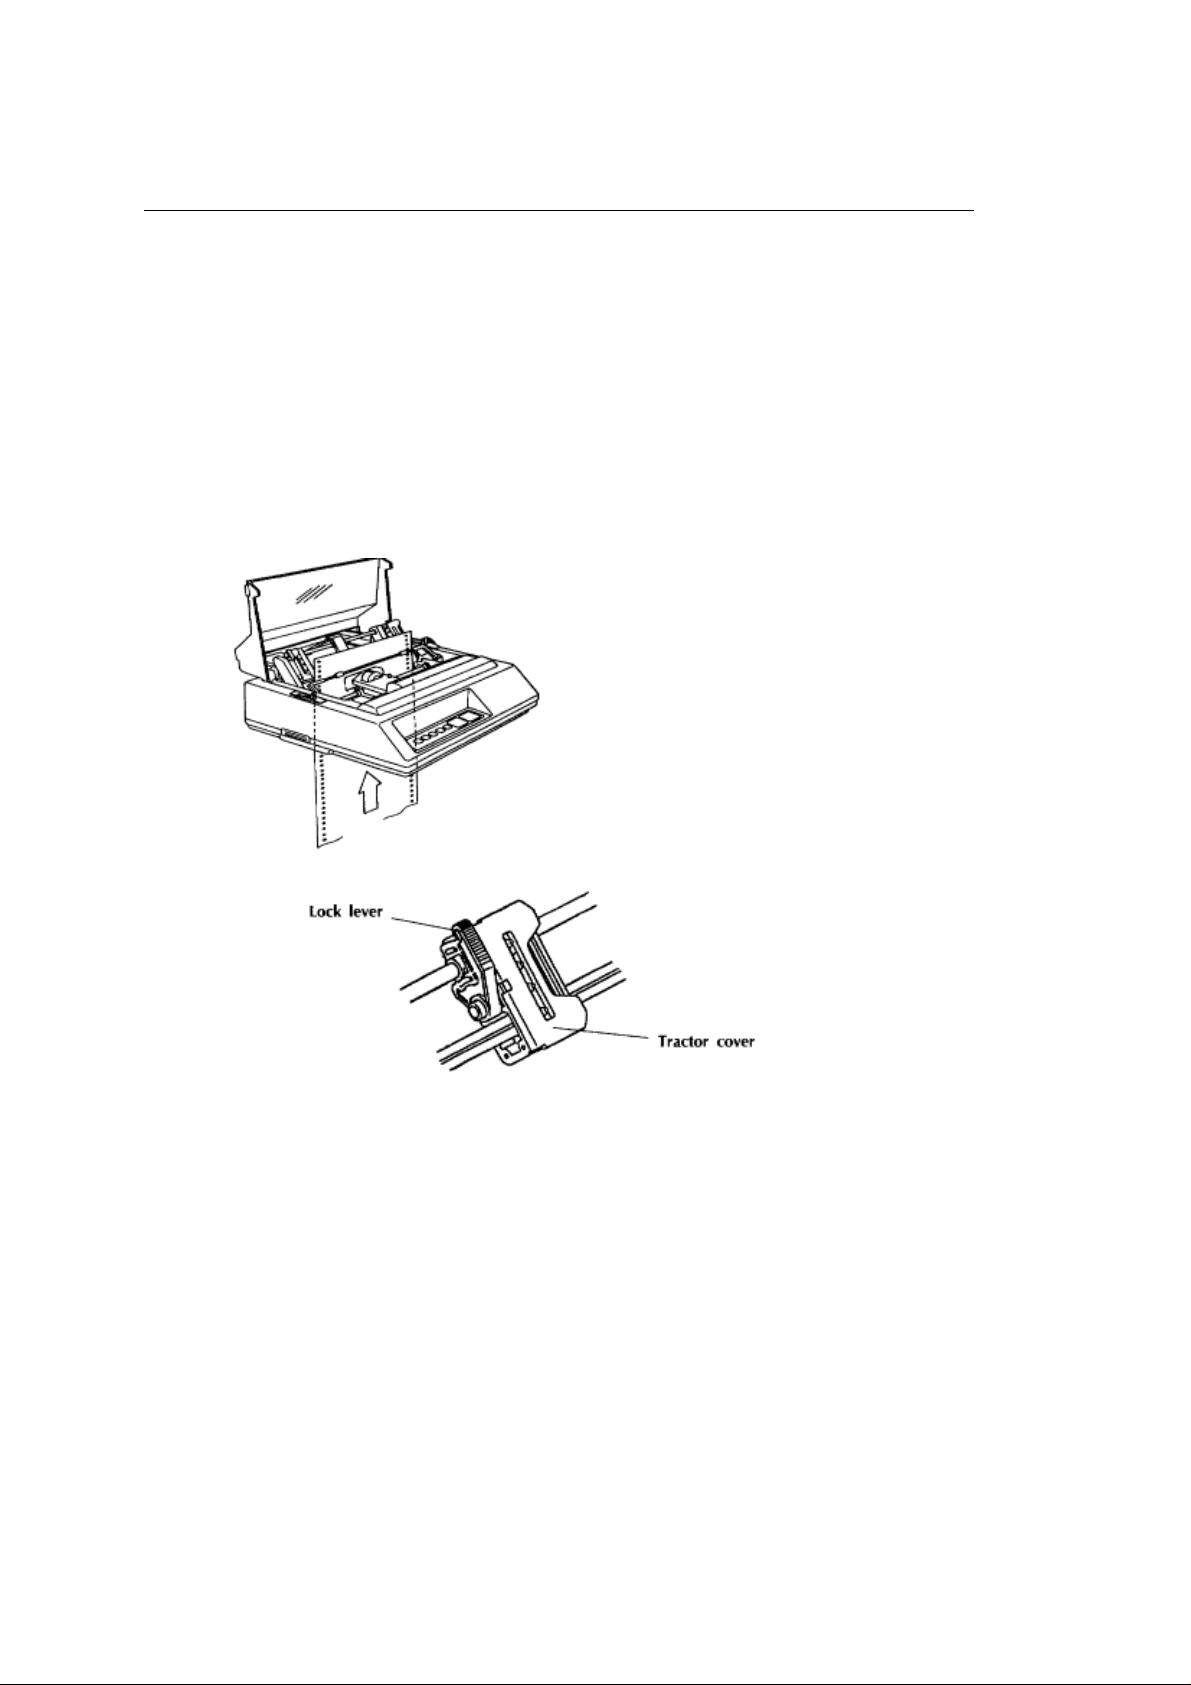
When setting the position on the page where you want the first line of printing to appear, use the
lower red line on the paper shield as a guideline_it shows the baseline of the current printing
position.
1.Press the SELECT button to deselect the printer (SELECT light goes out).
2.To move the paper up, hold down the TOF/PARK button and press FEED. To move the paper
down, hold down the TOF/PARK button and press FONT. This moves the paper in very fine
increments
(1/180-inch), so you can position the location of your first line of print precisely. The amount you
can move the paper using this method is limited to avoid potential paper jams.
3.Press the TOF/PARK button to store your chosen setting permanently in ML380's memory. The
setting will be retained, even when the printer is off, until you reset it.
4.Press the SELECT button to select the printer. The SELECT light will come on.
ML 380 ( 96-02-03 )
Page 14
%Loading Rear Feed Paper
Loading Rear Feed Paper
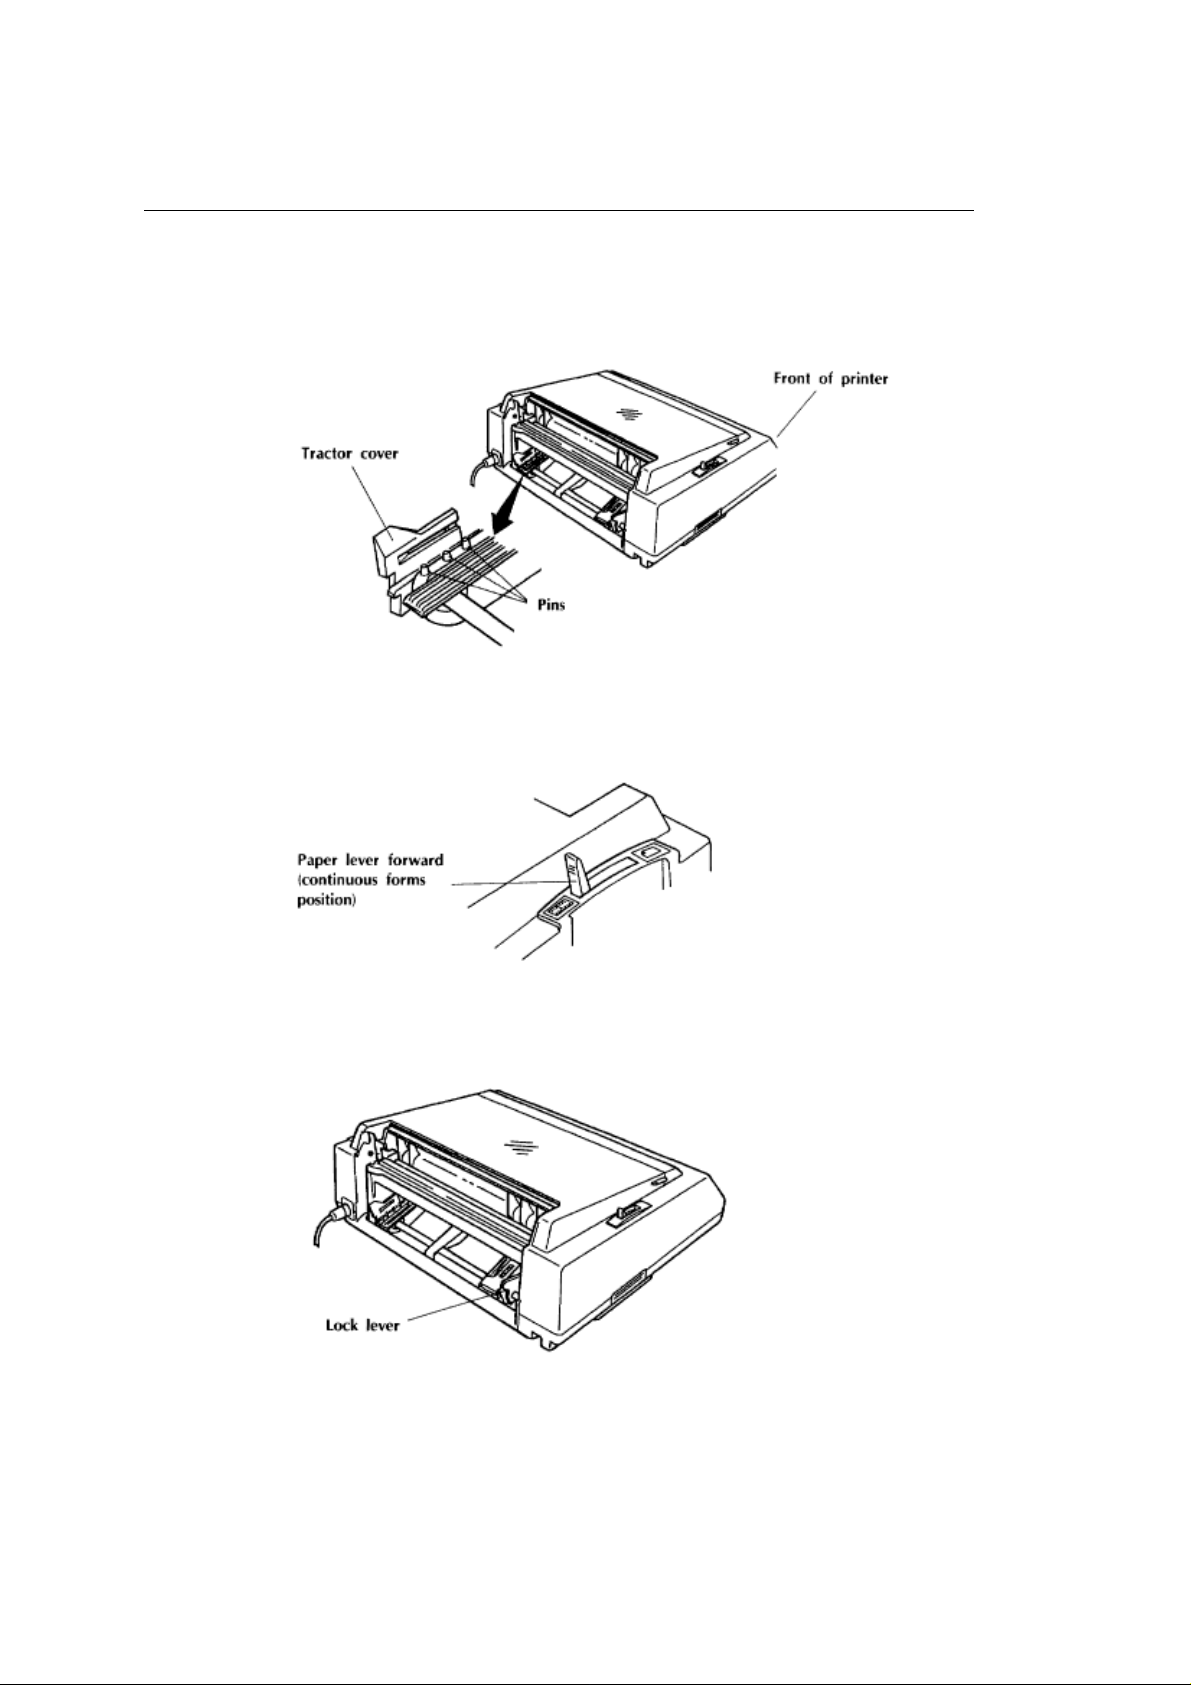
The tractor feed mechanism for use with continuous-form paper is located at the rear of the printer.
If you wish to load continuous-form paper from the bottom of the printer, you will need to
purchase and install the optional pull tractor: see page 33.
1.Although it's not necessary to do so, it's easier to install continuous-form paper from the rear if
you first remove the paper separator.
2.Make sure the paper selection lever is forward.
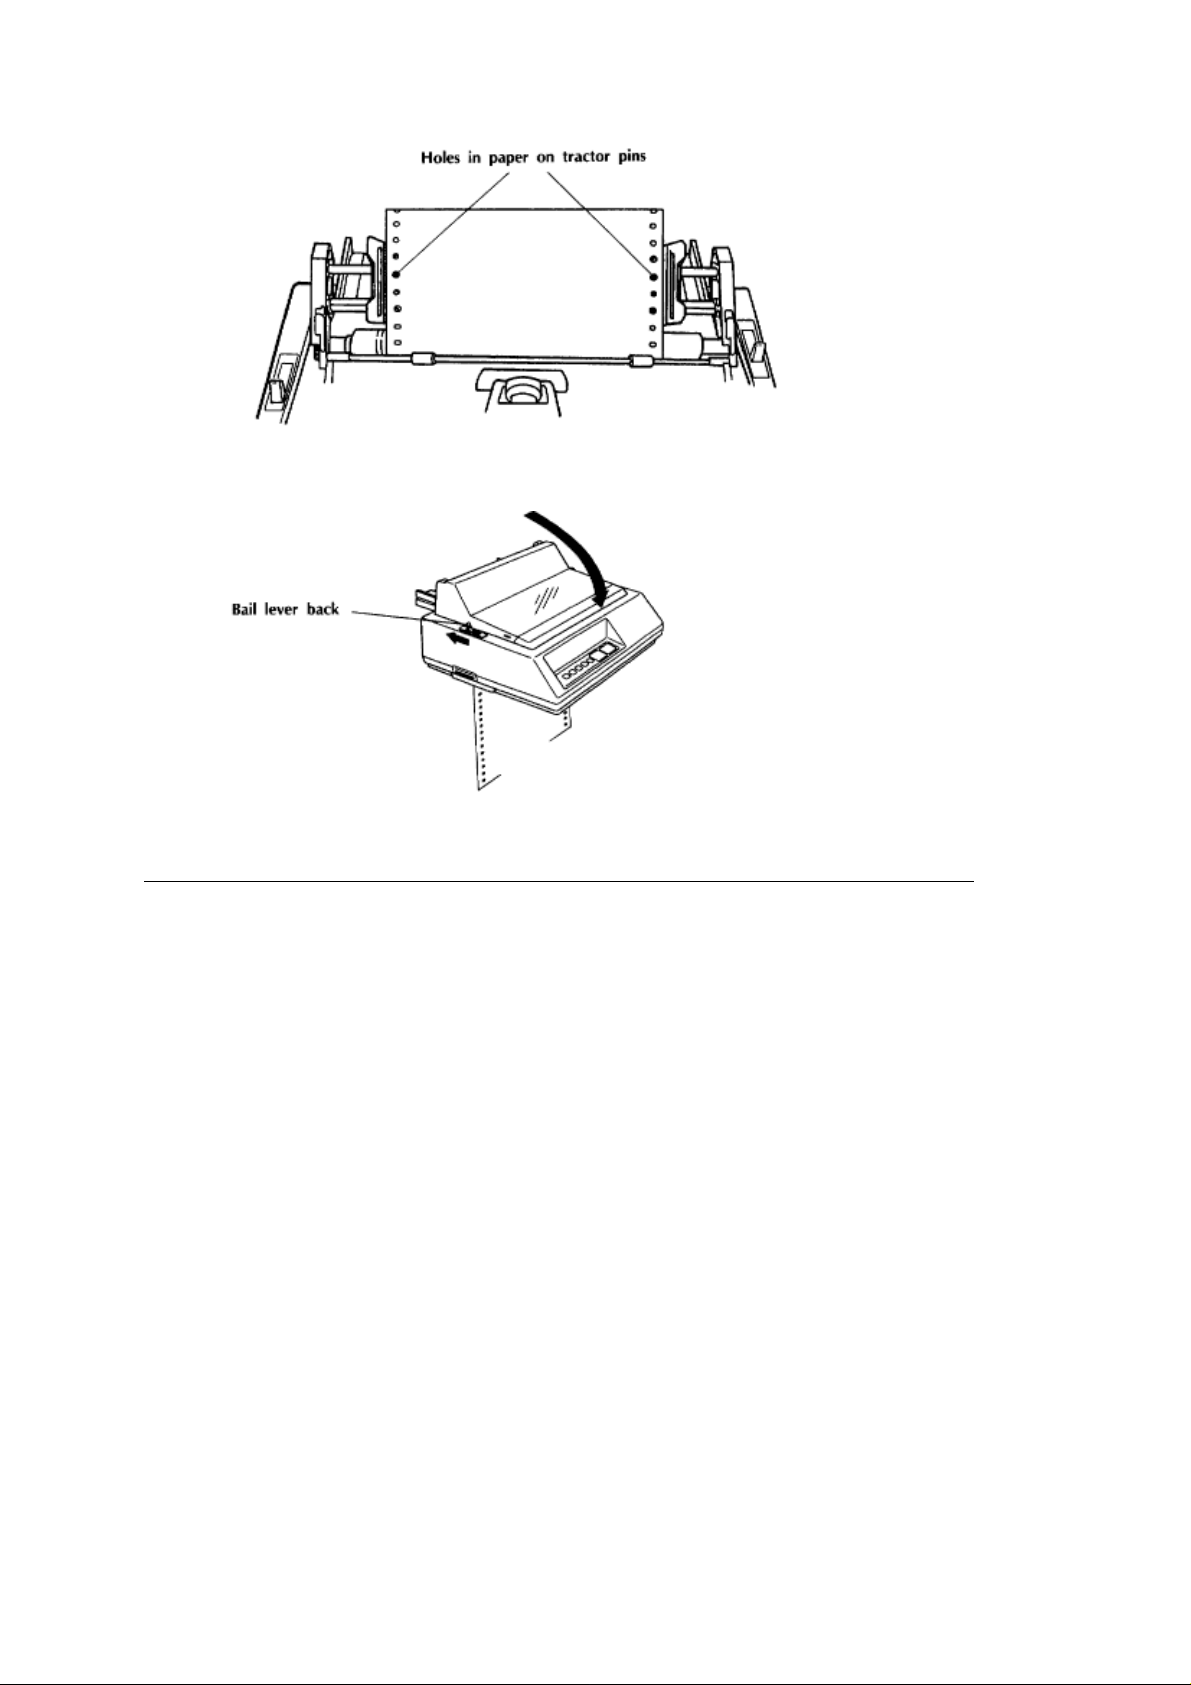
3.Release the tractor lock levers by pulling up on them. Slide the tractors to position them for your
paper width. The movement of the left tractor is limited, so you'll need to use the right tractor for
any large adjustments in width.
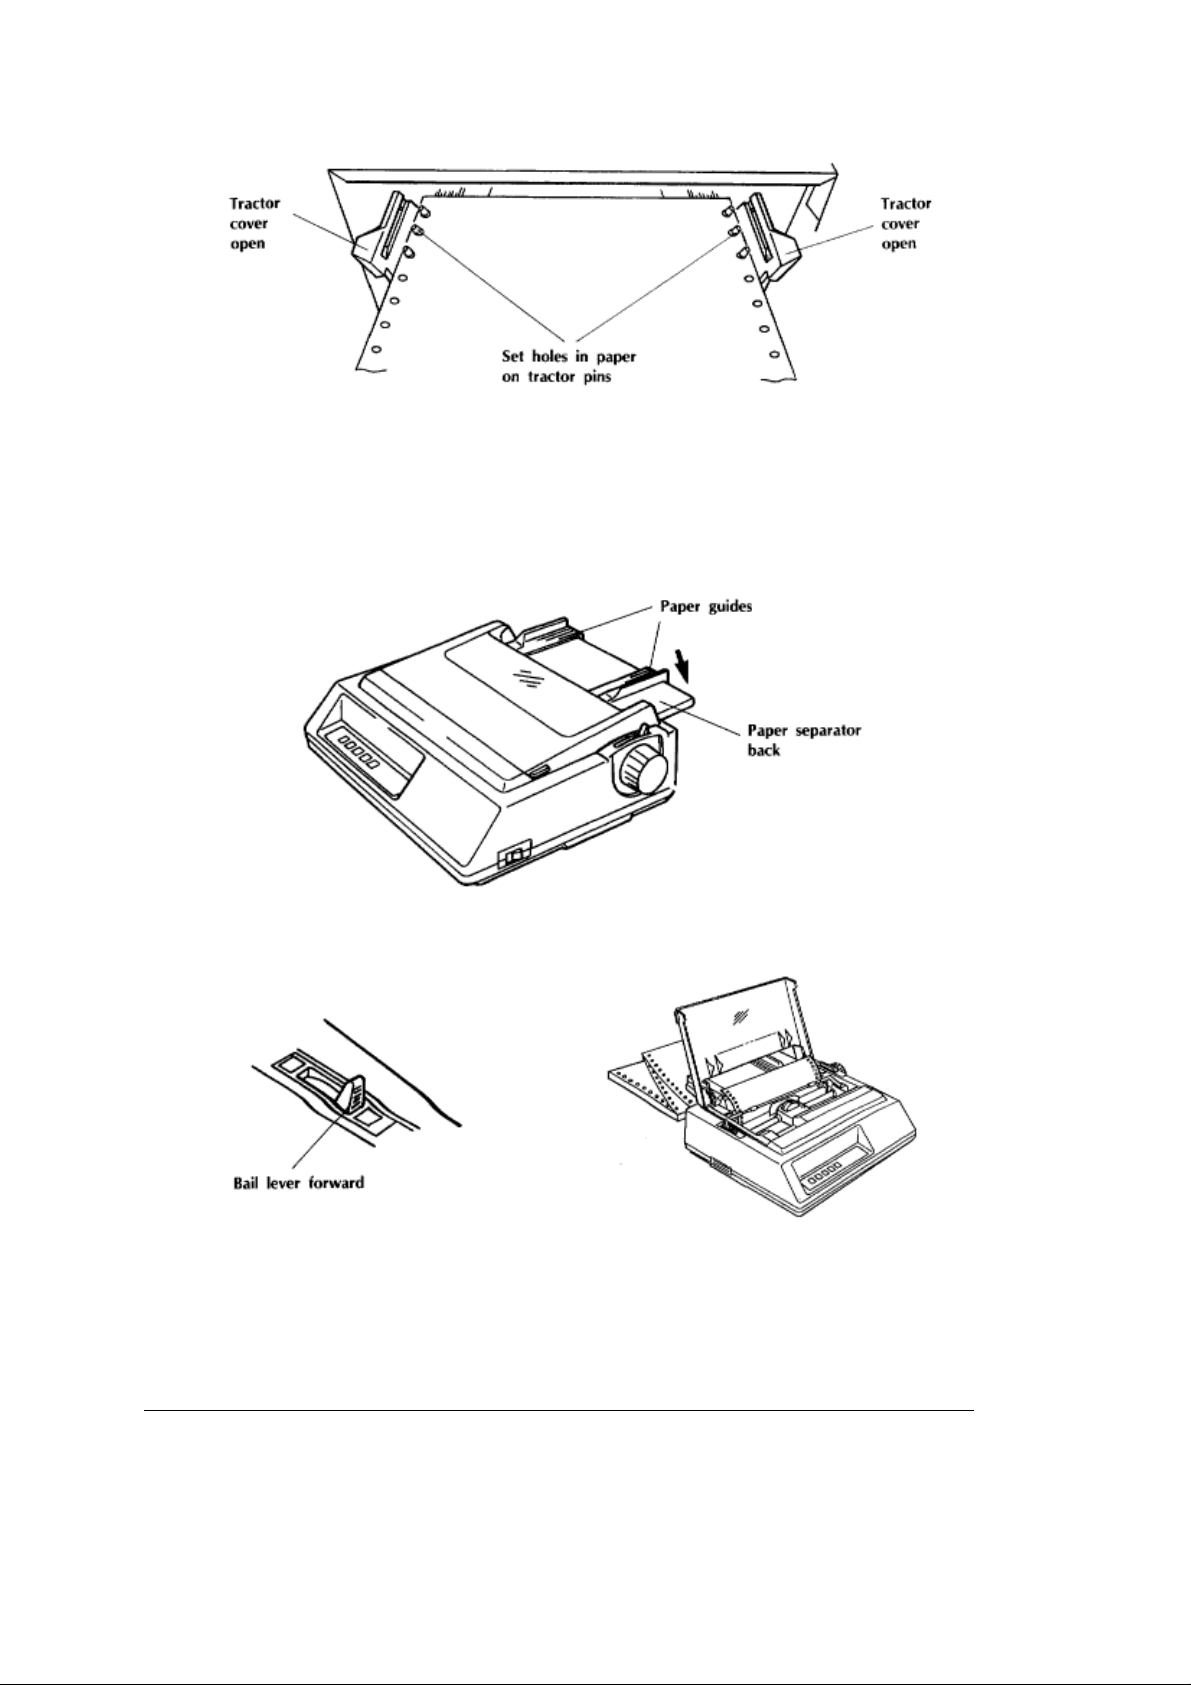
4.Open the tractor covers and place the sprocket holes on either side of the paper over the tractor
pins. Close the tractor covers.
ML 380 ( 96-02-03 )
Page 15
5.Readjust the tractors as necessary to ensure that the left edge of the paper will cover the groove
in the left side of the platen. If it doesn't, the printer will signal paper out (SELECT light flashes).
6.Press the lock levers back to lock the tractors in place.
7.If you removed the paper separator, reinstall it. Make sure the paper support arm is swung down
out of the way.
8.Swing the paper separator back to the continuous-form position and slide the paper guides out as
far as they'll go.
9.Press the TOF/PARK button to position the paper properly for automatic feed.
10.Pull the bail lever forward. ML380 will automatically advance the continuous-form paper into
position.
Note: In the illustration above, the access cover is shown open to provide a clearer picture of the
interior. It is not necessary to open the access cover while installing rear feed paper.
11.Push the bail lever back.
12.Set the top of form, following the instructions below.
ML 380 ( 96-02-03 )
Page 16

%Setting Top of Form for Rear Feed Paper
Setting Top of Form for Rear Feed Paper
When setting the position on the page where you want the first line of printing to appear, use the lower
red line on the paper shield as a guideline_it shows the baseline of the current printing position.
1.Press the SELECT button to deselect the printer (SELECT light goes out).
2.To move the paper up, hold down the TOF/PARK button and press FEED. To move the paper
down, hold down the TOF/PARK button and press FONT. This moves the paper in very fine
increments (1/180- inch), so you can position the location of your first line of print precisely. The
amount you can move the paper using this method is limited to avoid potential paper jams.
3.Press the TOF/PARK button to store your chosen setting permanently in ML380's memory. The
setting will be retained, even when the printer is off, until you reset it.
4.Press the SELECT button to select the printer. The SELECT light will come on.
ML 380 ( 96-02-03 )
Page 17
%Loading Rear Feed Paper w/ Optional Pull Tractor
Loading Rear Feed Paper with Optional Pull Tractor Installed
The superior paper control provided by using both tractors for rear paper feed is especially good when
you're printing on multi-part forms. See page 33 for instructions on how to install the optional pull tractor.
Don't use the Paper Park feature when the pull tractor is installed_the paper will disengage from the pull
tractor if you do.
Be sure the Form Tear-Off feature is set to OFF (the factory default) when you are using the optional pull
tractor. It doesn't work with the pull tractor installed.
Labels should only be fed into the printer from the bottom. This prevents the labels from peeling off and
jamming the printer.
1.Follow steps 1 through 10 above for loading rear feed paper with the built-in tractor.
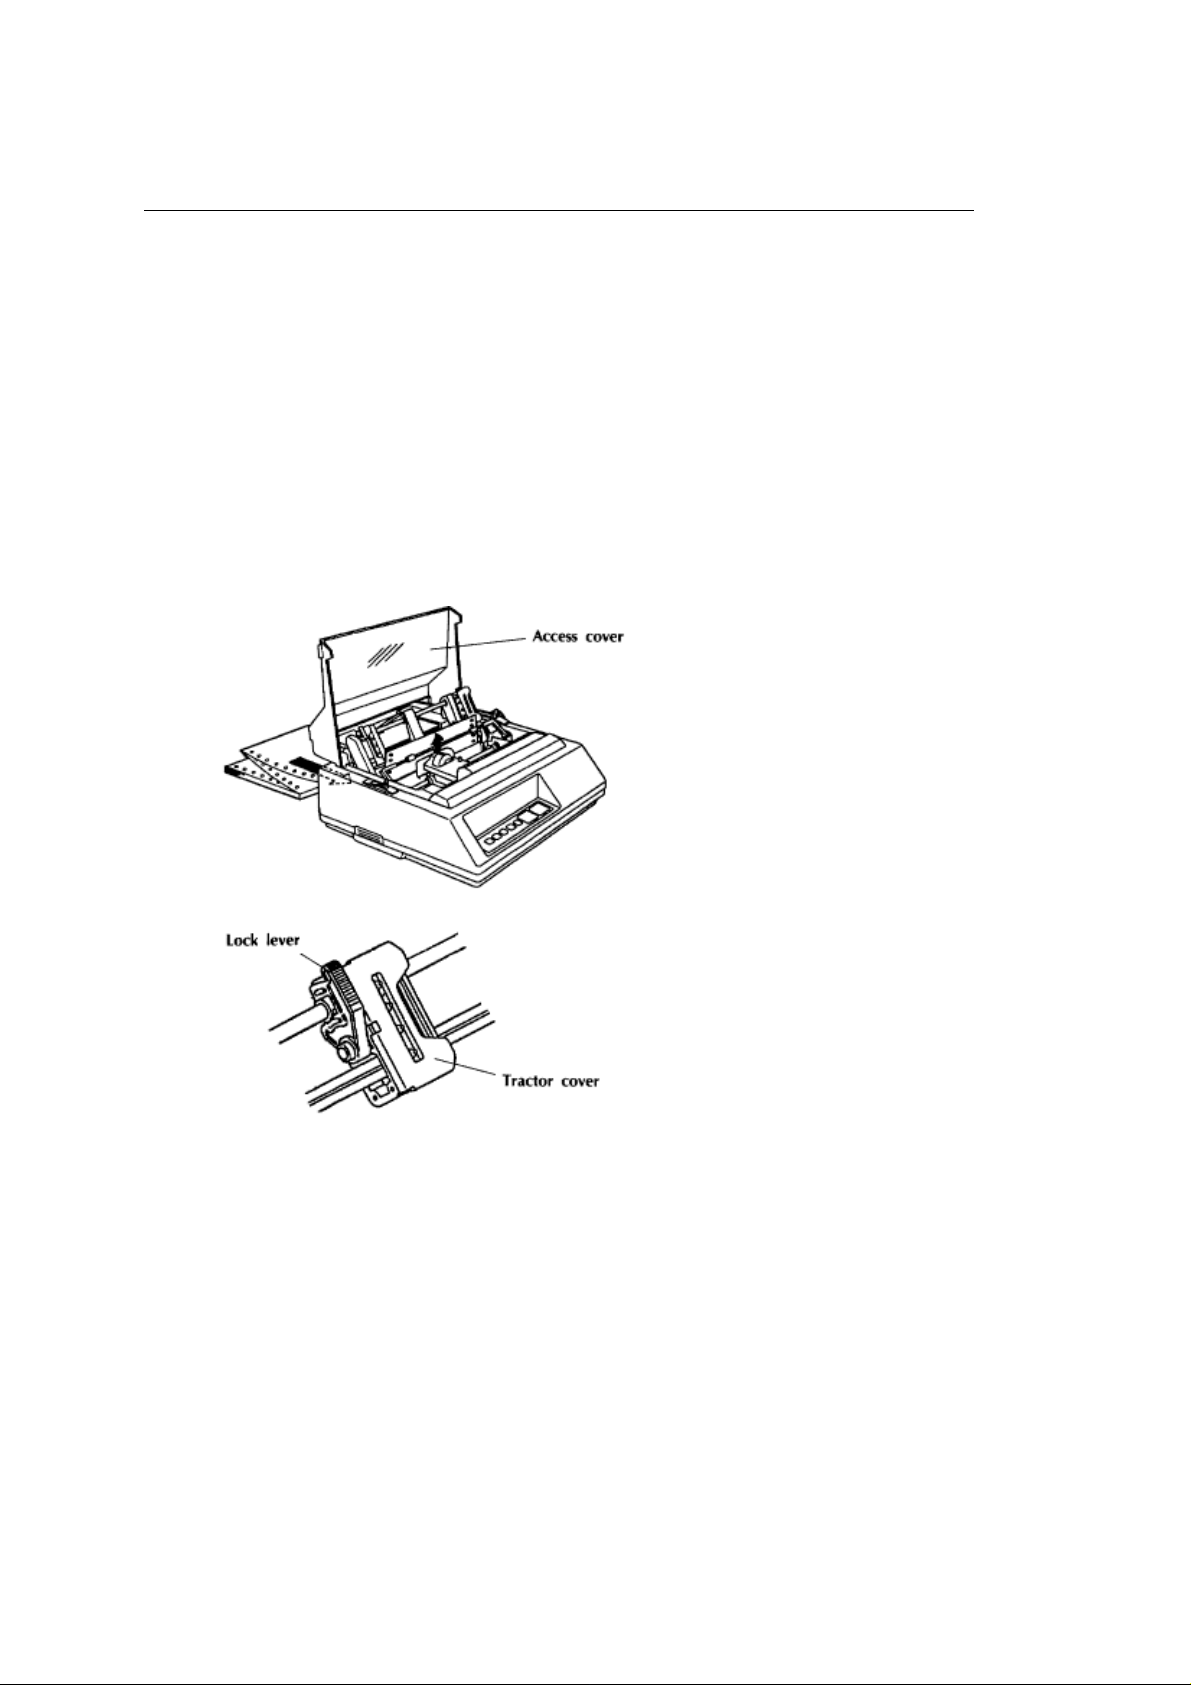
2.Open the pull tractor access cover.
3.Release the lock levers and open the tractor covers on the pull tractors.
4.Adjust the position of the pull tractors to align their pins with the holes in the paper.
5.Press the SELECT button to deselect the printer.
6.Rotate the platen knob to bring the paper up to the pull tractors.
7.Push the paper lever back to disengage the built-in tractor from the platen so that you can install
the paper on the optional pull tractor.
8.Place the paper holes on the sprocket pins of the pull tractor. You may have to pull the paper up a
bit to align the holes with the pins.
ML 380 ( 96-02-03 )
Page 18
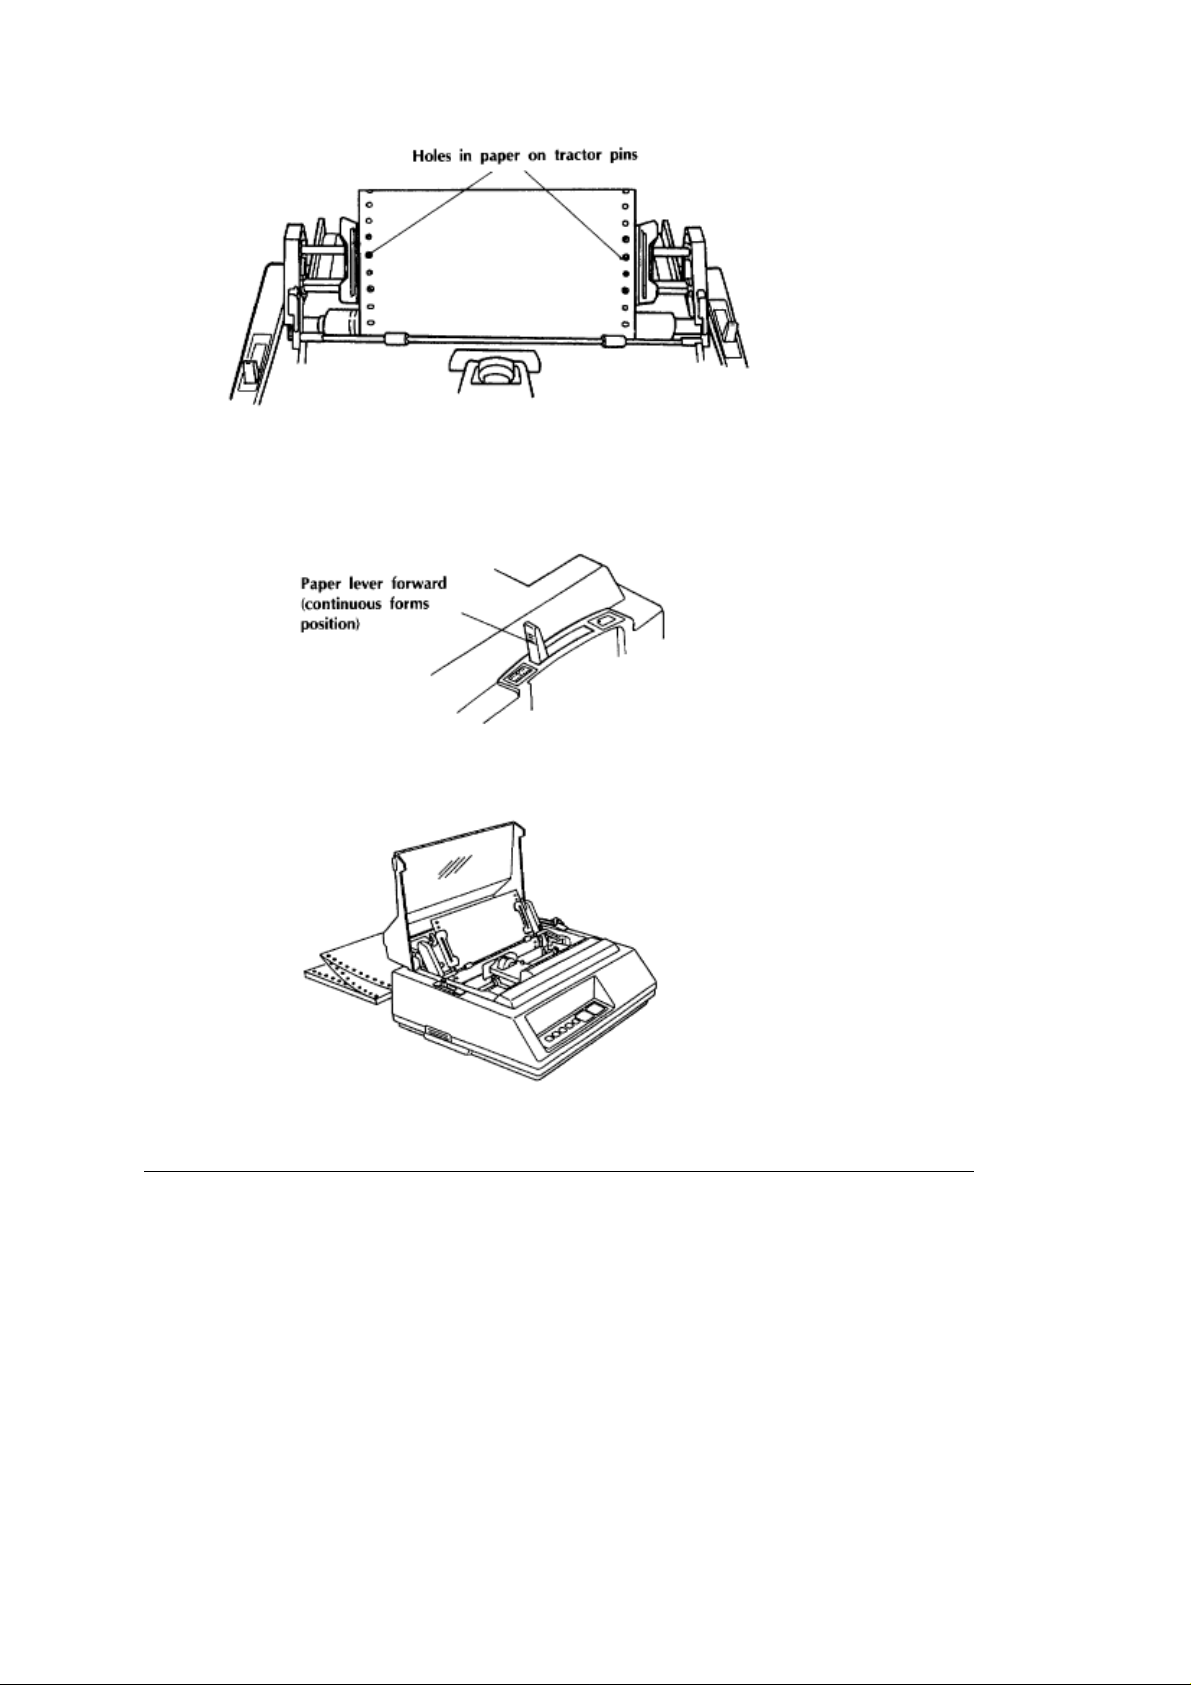
9.Close the pull tractor covers and make any necessary final adjustments to the position of the
tractors. Push the lock levers back to lock the tractors in place.
10.Pull the paper selection lever forward to the continuous-form position to re-engage the built-in
tractor.
11.Push the bail lever back to place the bail against the platen.
12.Close the access cover and press the SELECT button to select the printer.
13.Press and hold the FEED button to form feed the paper. Then adjust the top of form following
the instructions below.
ML 380 ( 96-02-03 )
Page 19
%Setting Top of Form for Rear Feed with Pull Tractor
Setting Top of Form for Rear Feed with Pull Tractor
1. Press the SELECT button to deselect the printer (SELECT light goes out).
2. Use the platen knob to move the paper to the position you want for top of form. The lower red line
on the paper shield serves as a guideline_it shows the baseline of the current printing position.
3. Press the TOF/PARK button.
4. Press the SELECT button to reselect the printer. The SELECT light will come on.
ML 380 ( 96-02-03 )
Page 20
%Loading Bottom Feed Paper
Loading Bottom Feed Paper
You must have the optional pull tractor installed in order to feed continuous-form paper into the
printer through the bottom. See page 33 for instructions on how to install the pull tractor. Bottom
feed is required for printing labels. The straighter paper path also makes it more convenient for
heavier papers, such as card stock, which may have trouble wrapping around the platen roller.
1.Place the printer on a stand with a slot for bottom paper feed. Put the paper in a stack underneath
the slot.
2.Turn the printer OFF.
3.Make sure the paper selection lever is forward (continuous-form
position).
4.Open the access cover and pull the bail lever forward.
5.Feed the paper into the printer through the slot in the bottom of the printer.
6.Release the lock levers and open the tractor covers on the pull tractors.
7.Position the left edge of the paper no further than 1/ÿ inch from the left end of the platen.
Note: The paper must cover the groove in the left side of the platen. If it doesn't, the printer will
signal paper out (flashing the SELECT light).
8.Adjust the position of the pull tractors to align their pins with the holes in the paper.
9.Place the paper holes on the sprocket pins of the pull tractor and close the tractor covers.
ML 380 ( 96-02-03 )
Page 21
10.Make any final adjustments in the positioning of the tractors and push the lock levers back to
lock them in place.
11.Push the bail lever back and close the access cover.
12.Turn the printer ON and press the SELECT button to deselect it.
13.Press and hold the FEED button to form feed the paper. Adjust the top of form following the
directions below.
ML 380 ( 96-02-03 )
Page 22
%Setting Top of Form for Bottom Feed Paper
Setting Top of Form for Bottom Feed Paper
1.Press the SELECT button to deselect the printer (SELECT light goes out).
2.Use the platen knob to move the paper to the position you want for top of form. The lower red line
on the paper shield serves as a guideline_it shows the baseline of the current printing position.
3.Press the TOF/PARK button.
4.Press the SELECT button to reselect the printer. The SELECT light will come on.
ML 380 ( 96-02-03 )
Page 23
Chapter 2
%Using the Paper Park Feature
Using the Paper Park Feature
This feature permits you to switch back and forth between continuous-form paper and single sheets.
It parks the continuous-form paper for you so you can use single-sheet feed. The
continuous-form paper will retract back off the platen and down into the printer housing without
disengaging from the built-in tractor. When youre ready, you can easily bring it back into printing
position by pulling the bail lever forward.
This feature cant be used with the optional pull tractor installed.
To park continuous-form paper:
1.Tear off any printed pages.
2.Make sure the printer is selected (SELECT light on). If its not, press the SELECT button.
3.Press the TOF/PARK button. The paper will retract from the paper path.
4.Push the paper selection lever back to the single sheet position. Youre now ready to load single
sheets_see Loading Single Sheets on page 11.
To return continuous-form paper to the printing position:
1.Pull the paper selection lever forward to the continuous form position.
2.Pull the bail lever forward. The paper will advance to the loading position.
3.Push the bail lever back and adjust the top of form as needed. See page 18 for details on setting
the top of form.
ML 380 ( 96-02-03 )
Page 24
%Using the Paper Tear-Off Feature
Using the Paper Tear-Off Feature
This feature permits you to set your ML380 to automatically advance continuous-feed paper to the
tear-off position after it finishes printing the last page in your document. This lets you tear off the
last printed page without wasting paper or readjusting the printer. When the printer again receives
data to print, it automatically brings the paper back down to the preset top of form position for
printing.
This feature can only be used with continuous-form paper fed in from the rear on the built-in push
tractor. It cant be used with the optional pull tractor installed.
To activate this feature:
1.Make sure the printer is selected (SELECT light ON). If not, press the SELECT button.
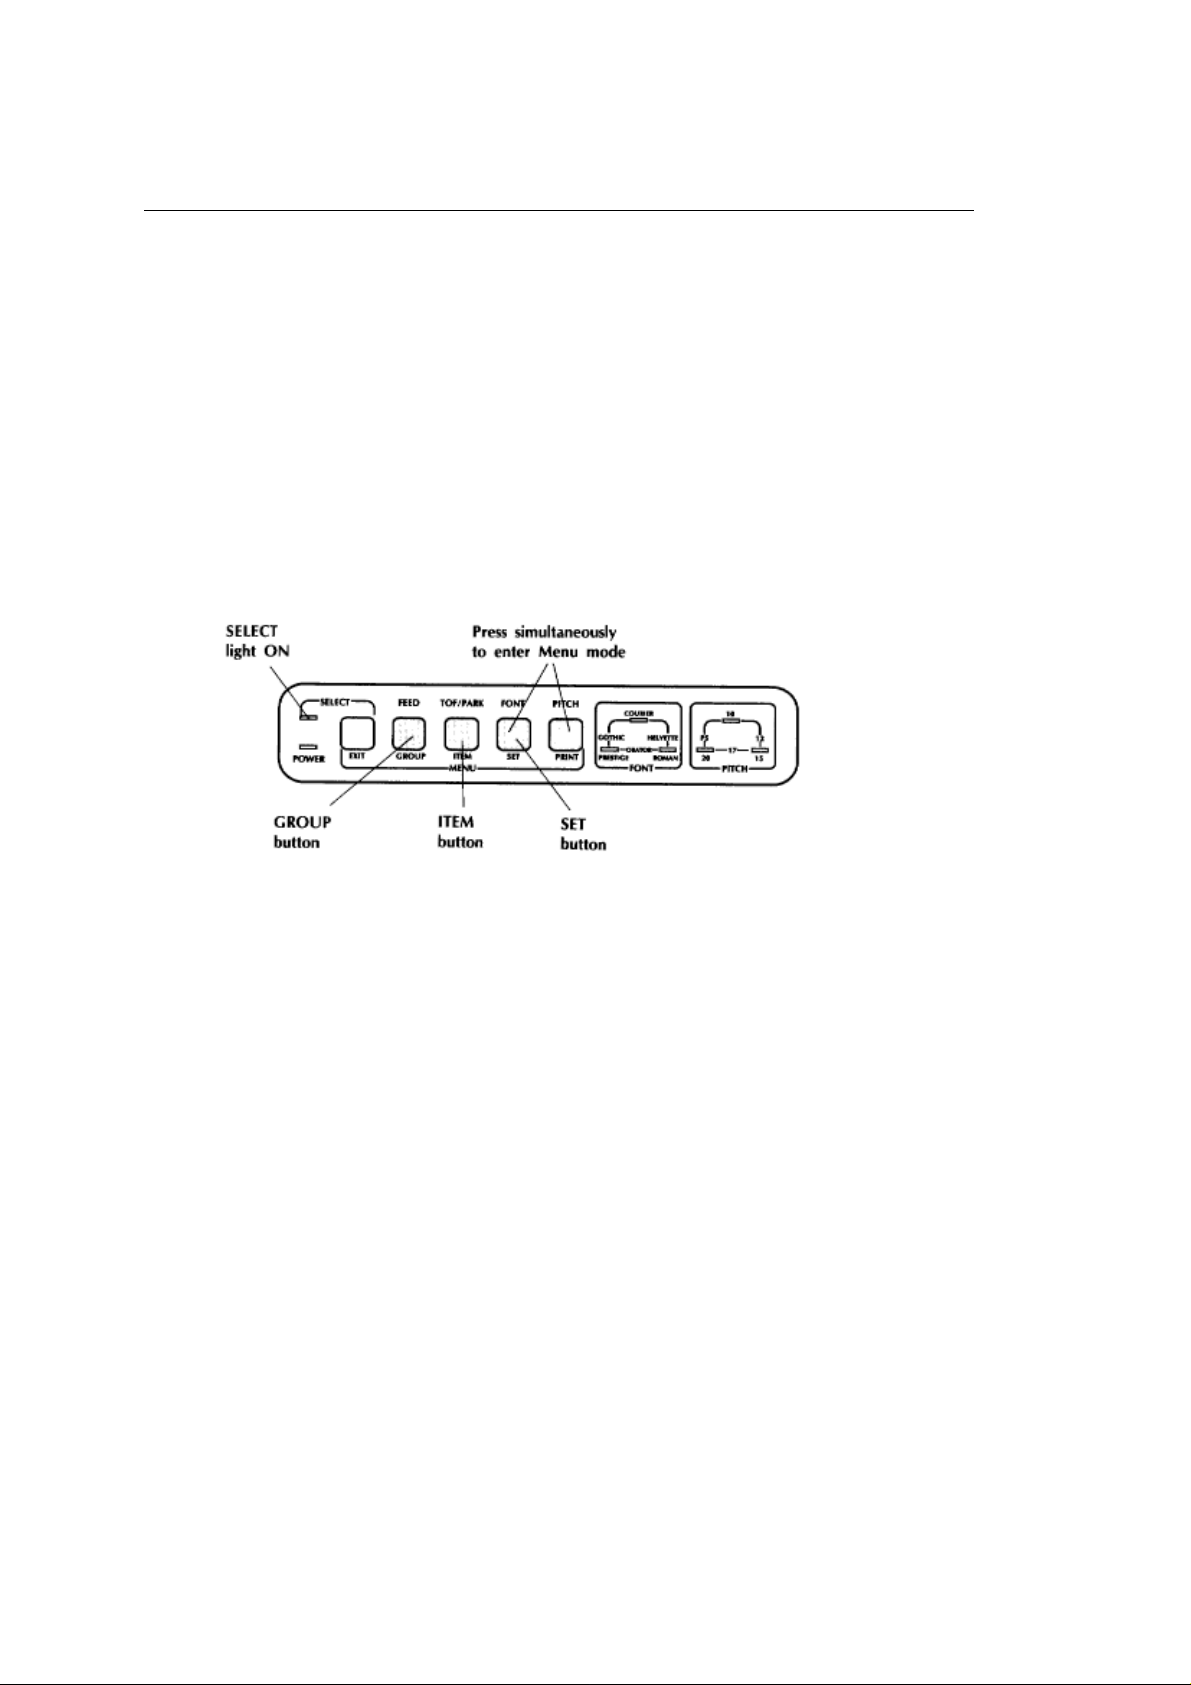
2.Press the FONT and PITCH buttons simultaneously. This will place the printer in the Menu mode.
The SELECT light will go off and Menu Mode will print.
3.Press the GROUP button until the following line prints out:
Vertical ControlLine Spacing 6 LPI
4.Press the ITEM button to advance the menu selection to Form Tear-Off. The menu setting should
be Off. (If its On, you already have Form Tear-Off engaged and you should press the SELECT
button to exit the Menu mode.)
5.Press the SET button once. This will change the menu setting for Form Tear-Off from Off to On.
You now have the paper tear-off feature engaged.
6.Press the SELECT button to exit the Menu mode.
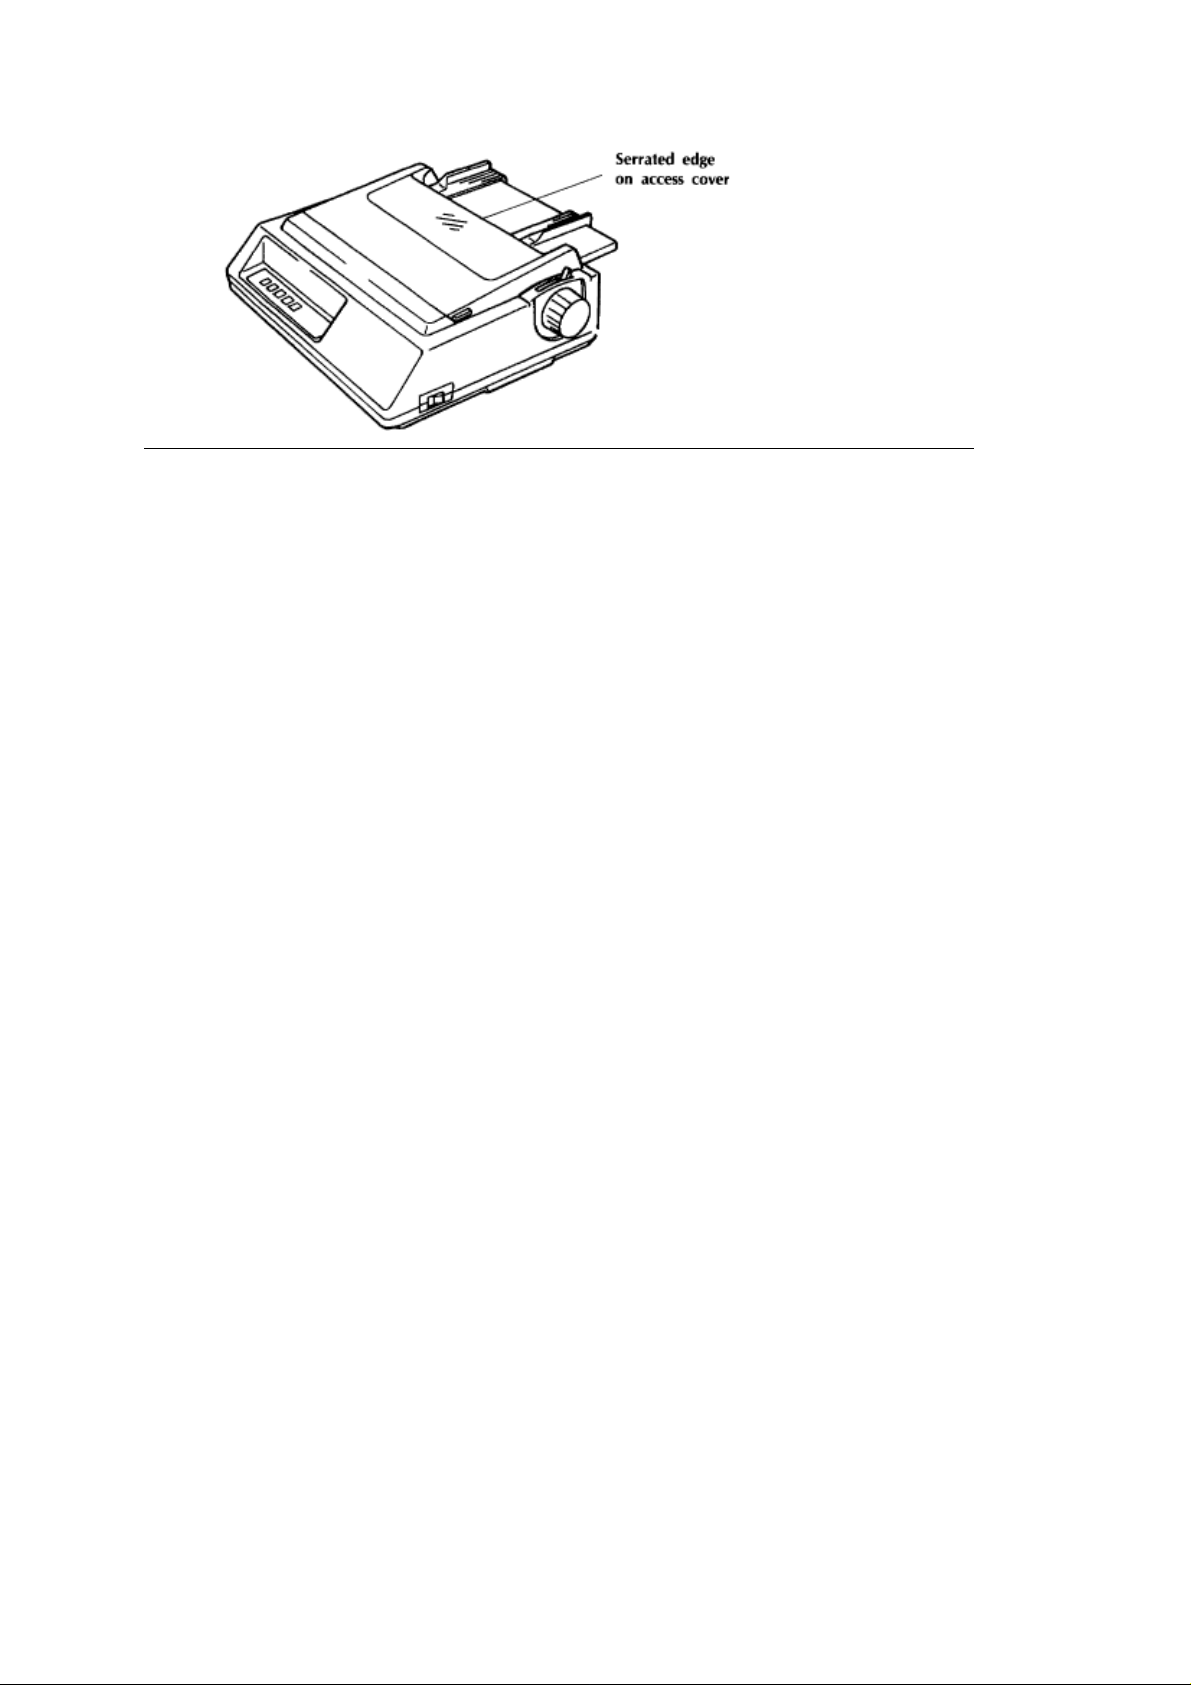
With the paper tear-off feature engaged, when the printer receives data, the paper automatically
moves down to your selected top of form position to print. A few seconds after the printing stops,
the printer will move the paper up to the tear-off position, aligning the perforation with the serrated
edge on the access cover. You can then easily remove the printed page by simply tearing it off
against the access cover.
ML 380 ( 96-02-03 )
Page 25
ML 380 ( 96-02-03 )
Page 26
%Running the Self Tests
Running the Self Tests
Your ML380 has two self tests: the Font Test which gives samples of the various fonts and sizes
available and the Rolling ASCII Test which gives a continuous sample of the default print style. You can
run the tests any time you want to make sure the printer is functioning properly.
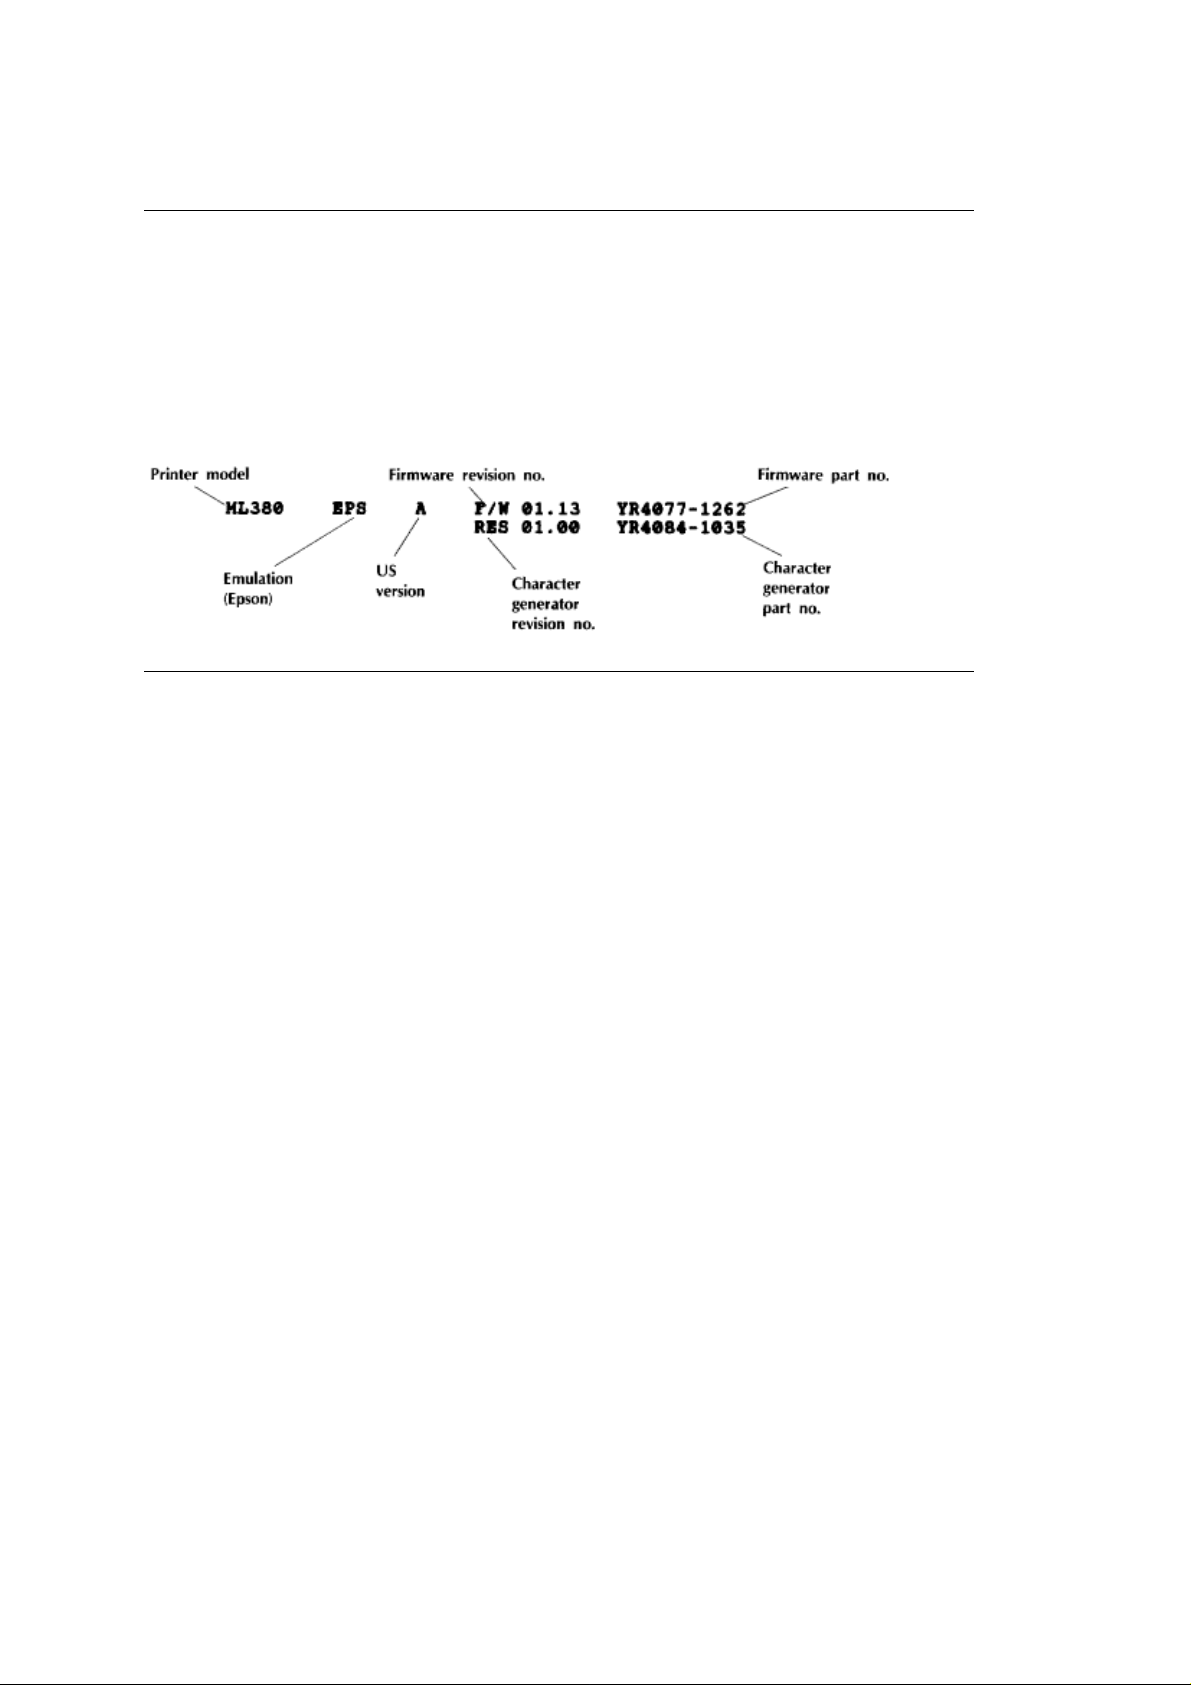
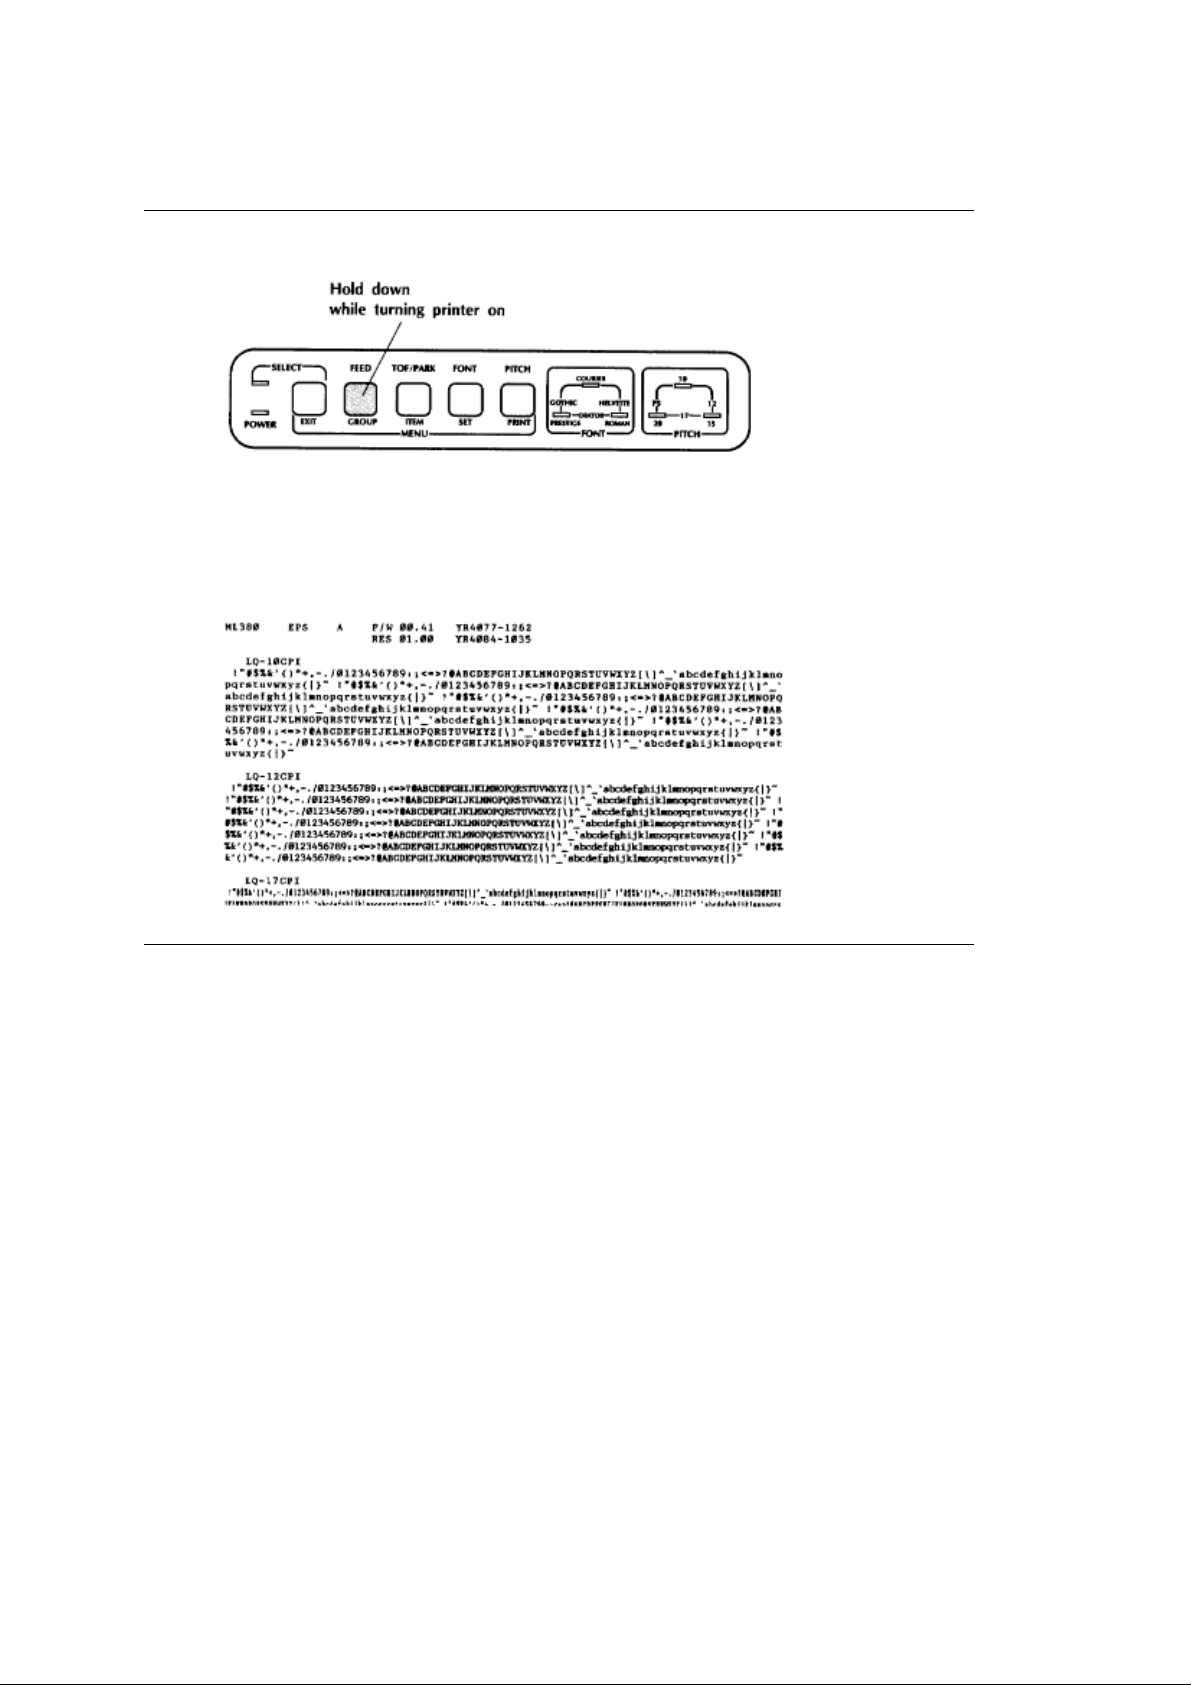
Each time you run a self test, ML380 will print a header which provides information about your printer.
You should have this information at hand if you ever need to call for service. For example:
ML 380 ( 96-02-03 )
Page 27
%Printing the Font Test
Printing the Font Test
To print the Font Test, hold down the FEED button while turning on the printer. ML380 will print a limited
sample of the print styles available. When the test is complete (prints about two pages), the printer will
stop and the SELECT light will come on. If you wish to stop the printer before it has completed the Font
Test printout, simply press the SELECT button; the printer will finish printing the current line and perform
a line feed and carriage return.
ML 380 ( 96-02-03 )
Page 28
%Printing the Rolling ASCII Test
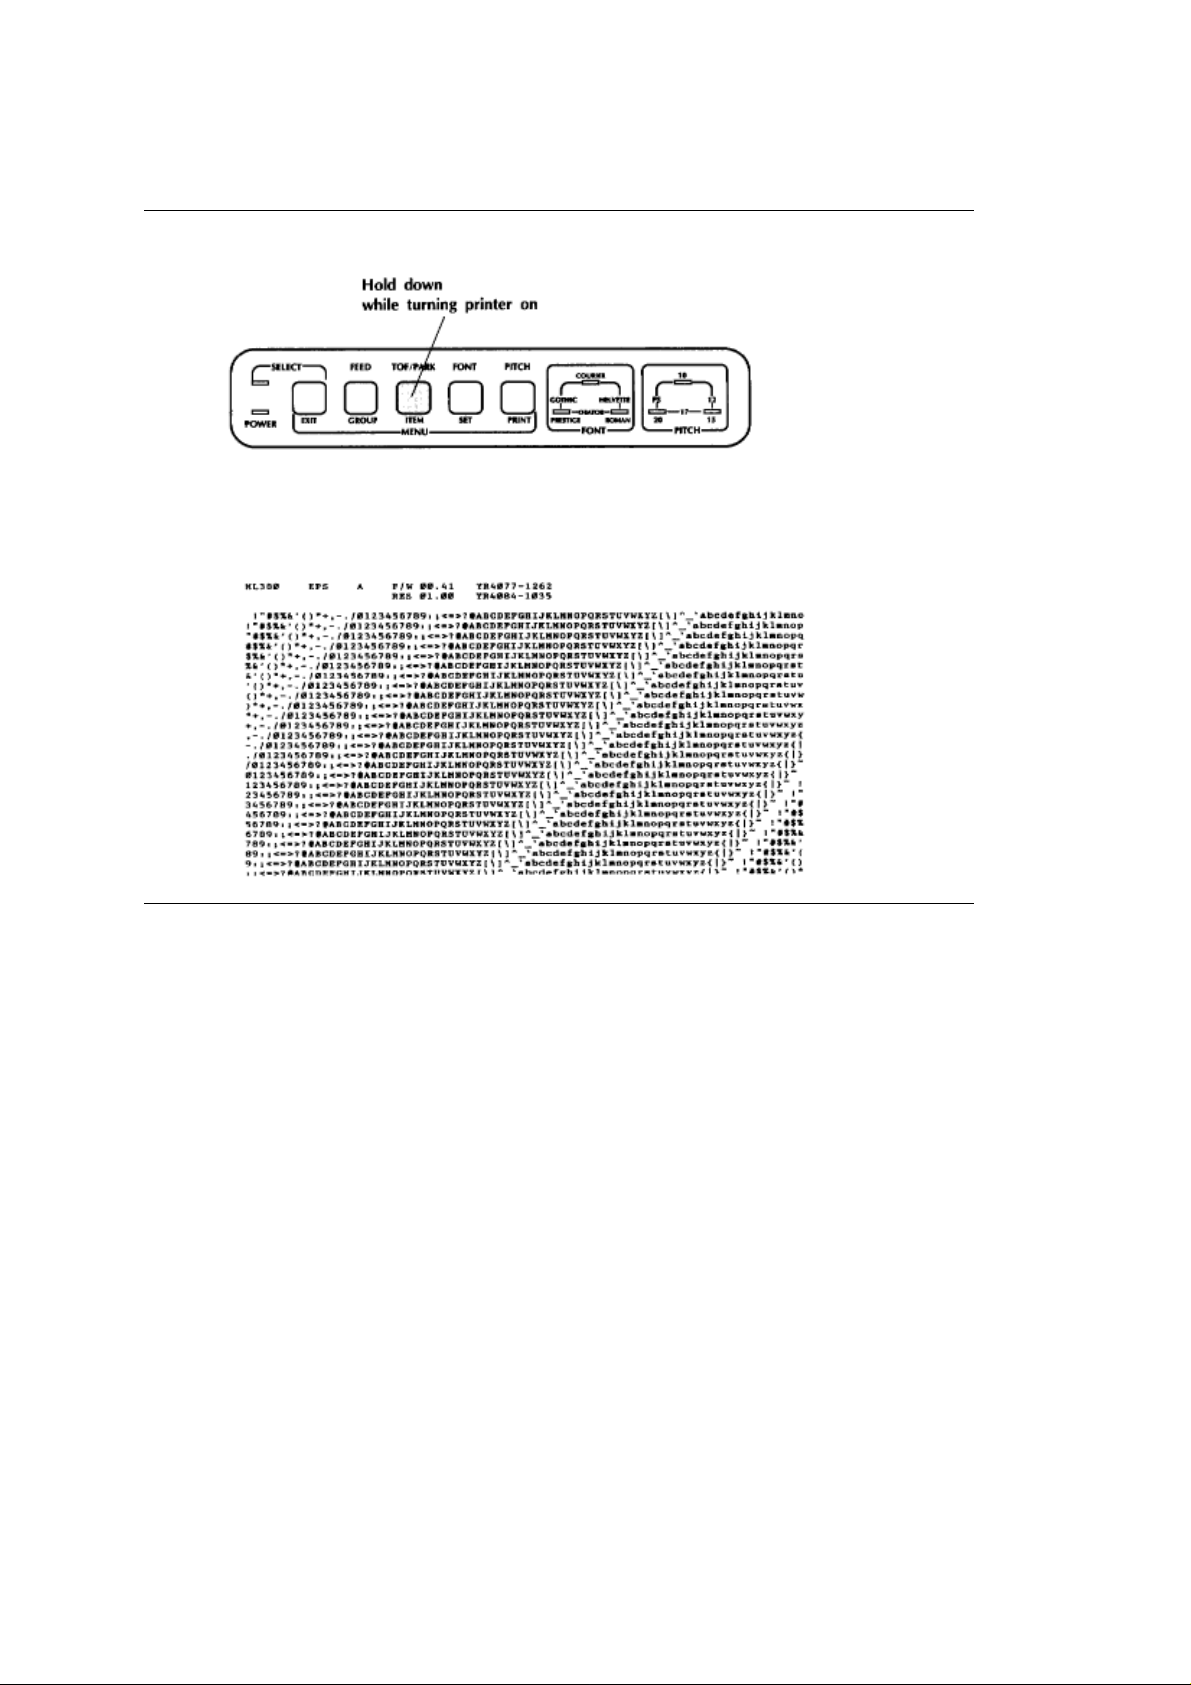
Printing the Rolling ASCII Test
To print the Rolling ASCII Test, hold down the TOF/PARK button while turning on the printer. ML380 will
print a continuous sample of the default print style and will keep printing until you press the SELECT
button to stop it.
ML 380 ( 96-02-03 )
Page 29

%Installing Options
Installing Options
If you wish to use bottom paper feed on your printer (necessary for printing labels), youll need to install
the optional pull tractor. If you require a serial interface connection to your computer, youll need to install
the optional serial interface adapter. If youll be using single-sheet feed on a regular basis, youll want to
install the optional cut sheet feeder which automatically feeds sheets of standard letter-size or legal-size
paper into the printer. Installation instructions for the pull tractor and serial intrface adapter are given
below. For information on installing the cut sheet feeder (OKIDATA model CSF 3800), see the instruction
manual provided with the cut sheet feeder.
ML 380 ( 96-02-03 )
Page 30
%Installing the Optional Pull Tractor
Installing the Optional Pull Tractor
The optional pull tractor includes the tractor assembly and a special, high-top access cover. The pull
tractor is required for feeding continuous-form paper or labels from the bottom of the printer. You
can also use the pull tractor together with the built-in push tractor for feeding paper in from the
rear to provide more precise paper control.
Make sure the Form Tear-Off feature is turned off in the menu before installing and using this
option.
1.Turn the printer OFF.
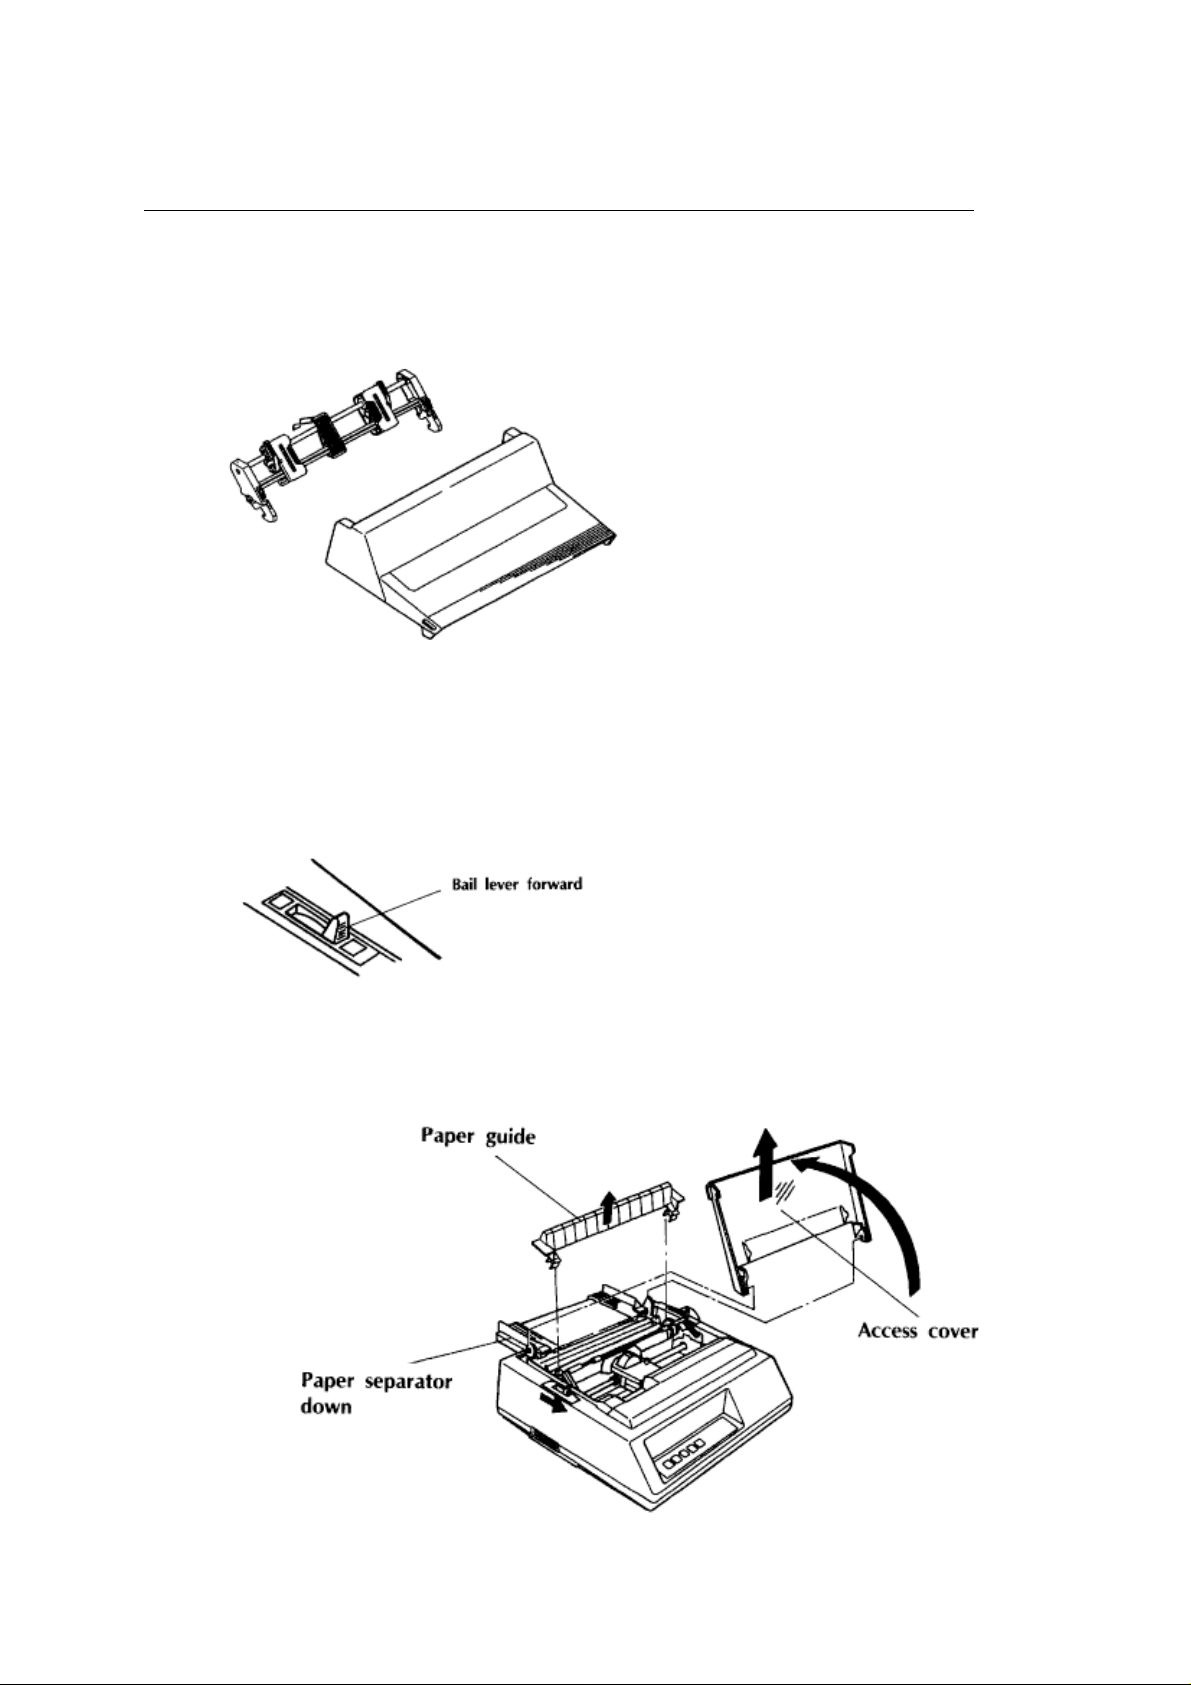
2.Make sure the bail lever is in the forward position and the paper separator is down in the tractor
feed position.
3.Remove the access cover by lifting it up and detaching it from the pins at either side. Put it
aside_youll be replacing it with the access cover supplied with your pull tractor.
4.Remove the paper guide by pivoting it back until it unclips from the platen shaft. Then lift it off the
printer. Store it with the access cover_the paper guide isnt used with the pull tractor.
ML 380 ( 96-02-03 )
Page 31

5.Swing the paper guide wire on the tractor unit to the back. Rest the wire on the paper separator
while lowering the tractor until the tractor pins engage the notches at either end behind the platen.
6.Swivel the tractor unit forward until the clips at either end clamp onto the platen shaft.
7. Install the pull tractor access cover by sliding the grooves at either end over the pins on the
printer housing.
ML 380 ( 96-02-03 )
Page 32

%Installing the Serial Interface Adapter
Installing the Serial Interface Adapter
The serial interface adapter mounts in the parallel interface cavity on the bottom of the printer.
1.Unplug the printer.
2.Remove the paper separator, optional pull tractor cover and the optional pull tractor, if installed.
3.Remove the knock-out from the side of the printer housing. When you are through installing the
serial interface adapter, the serial interface connector will be located here.
4.Turn the printer over and place it gently on a sturdy, flat surface.
5.Locate the parallel interface connector and push the wire clips to either side.
6.Hold the serial interface adapter with the parallel interface connector and metal tab facing you.
Tilting the adapter, slide the metal tab into the screw hole well and align the connector with the
connector on the printer.
ML 380 ( 96-02-03 )
Page 33

7.Push in the adapter just until the connectors begin to engage, then swing the adapter down and
press on it until the tabs engage the tabs on the printer housing (youll hear a loud snap).
8.While pressing down on the top of the adapter, grasp the molded finger grips and push in the
adapter until the parallel interface connection is firm. If you have installed the adapter properly,
you will not be able to lift it and the hole in the metal tab will align with the screw hole on the
printer housing.
9.Secure the adapter in place by installing the grounding screw in the metal tab.
10.Enter the Menu Select mode (see page 45) and change the item Interface under the General
Control group from Parallel (factory default) to Serial.
To remove the serial interface adapter, first remove the screw from the metal tab. Then, push on
the molded finger grips to gently pry the adapter off the connector, and lift it out.
Be sure to save the screw with the adapter_youll need it should you ever wish to reinstall the
adapter.
ML 380 ( 96-02-03 )
Page 34

Chapter 3
%Control Panel
Control Panel
The ML380's control panel does more than manipulate paper: it gives you fingertip command over most
of the printing features that affect the look of your documents. You can change basic features of each
document straight from the panel. Using the Menu Select mode_entered directly from the panel_you can
alter the default settings of other features. (The defaults are those characteristics set automatically when
you turn on or reset the printer.) You can also configure the printer for your system without setting hard
to-reach switches.
All buttons on the control panel are active regardless of whether the printer is selected or deselected.
ML 380 ( 96-02-03 )
Page 35

%Basic Controls
Basic Controls
There are five control buttons on your ML380. The functions represented by the labels at the top of
each button are engaged when the printer is operating in the Print Mode. When the printer is
operating in the Menu Select Mode, the functions represented by the labels at the bottom of each
button are engaged and you can use the front panel controls to change the printers default
settings.
Print Mode
When you turn your printer on, it will be in the Print Mode, ready to receive data or commands from
your computer.
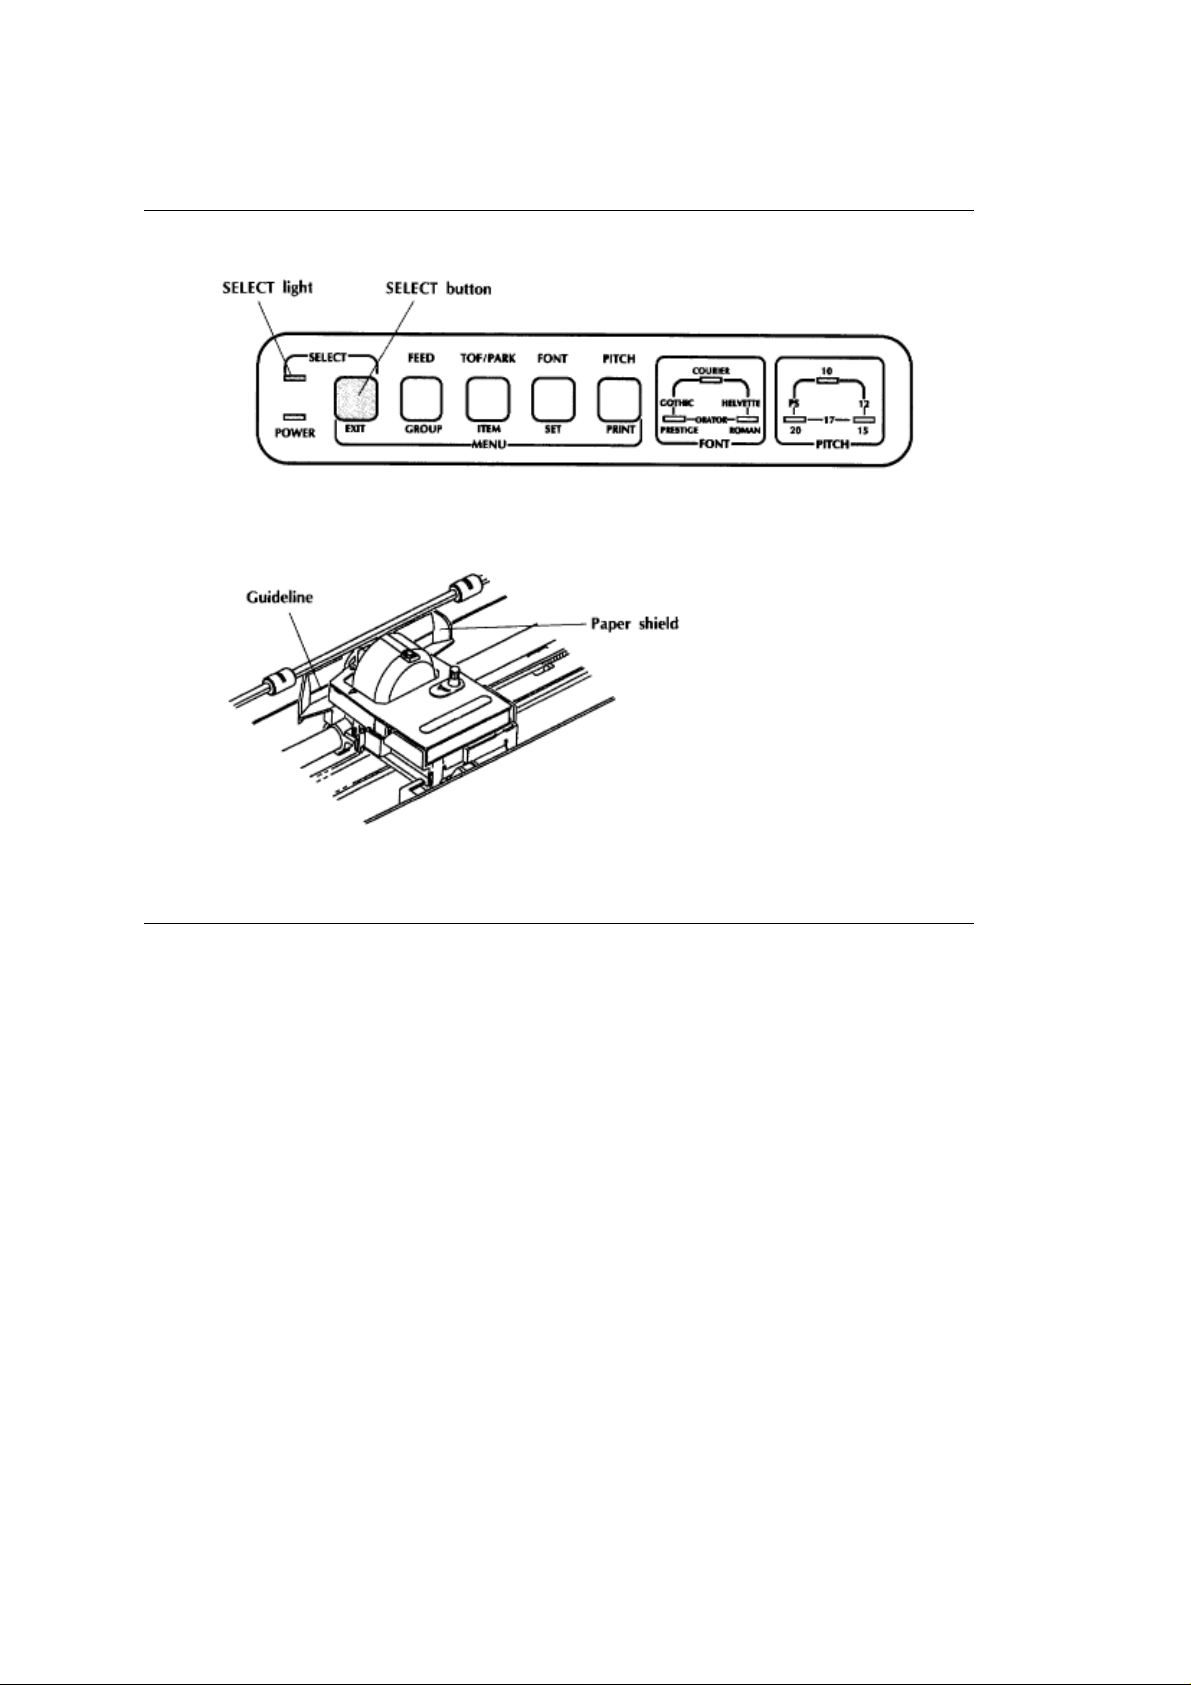
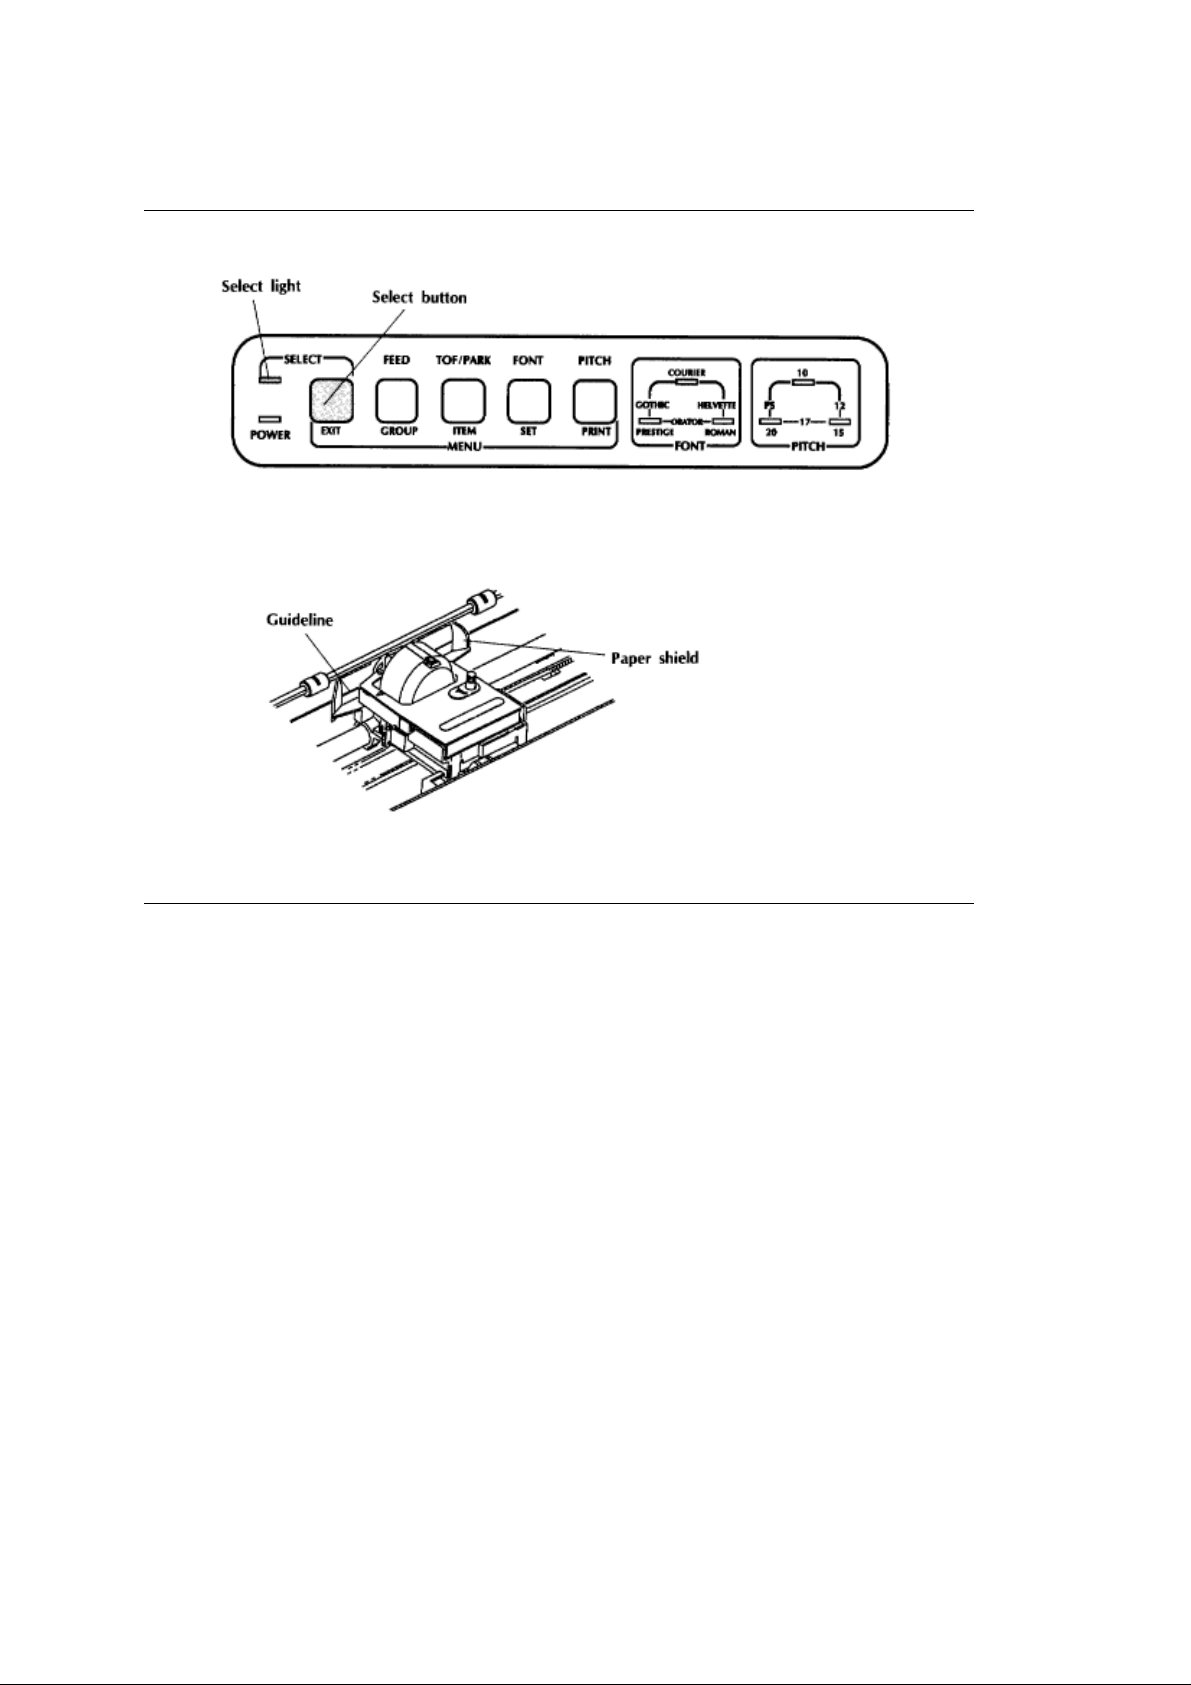
Lights
ZPOWER light: This light indicates that the printer is turned on.
&SELECT light: When this light is ON, the printer is selected and ready to receive data from the
computer. When the light is OFF, the printer is deselected and cant receive data. When the light
is flashing, the printer is out of paper or an error (such as a paper jam) has occured.
1FONT lights: These lights indicate which font is engaged. When all the font lights are off, the
printer is in the Utility print mode.
2PITCH lights: These lights indicate which pitch is engaged.
Control Buttons
1.SELECT button: Push this button to select or deselect the printer (SELECT light is ON or OFF).
If you hold down this button and the FEED button while turning on the printer, it will reset the printer
menu to the factory settings. (See Appendix B for more information on the menu factory
settings.)
If you hold down this button and the TOF/PARK button while turning on the printer, it will place the
printer in the hexadecimal dump (See page 112 for more information on the hex dump mode.)
2.FEED button: Push and release this button to advance the paper one line. If you push the button
and hold it for approximately one second, the printer will advance the paper to the first print line of
the next page.
If you hold down this button while turning on the printer, it will engage the self test mode. (See page
31 for more information on the self test mode.)
If you hold down this button and the SELECT button while turning on the printer, it will reset the
printer menu to the factory settings. (See Appendix B for more information on the menu factory
settings.)
3.TOF/PARK button: When the printer is selected, push this button to park continuous-form paper.
The paper will retract from the front of the printer so you can use single sheets without completely
removing the continuous forms. (See page 27 for more information on the paper park feature.)
ML 380 ( 96-02-03 )
Page 36

When the printer is deselected, push this button to set the position of the first print line on the page
(top of form).
If you hold down this button while turning on the printer, it will engage the Rolling ASCII test. (See
page 32 for more information on the Rolling ASCII test.)
If you hold down this button and the SELECT button while turning on the printer, it will place the
printer in the hexadecimal dump mode (See page 112 for more information on the hex dump
mode.)
4.FONT button: Push this button (printer selected or deselected) to select the font you wish to use.
(See page 51 for more information on fonts and font usage.)
The FONT lights to the right of the FONT button indicate which font is engaged. If only one light is
glowing, then the font associated with it is engaged (Courier, Roman, or Prestige). If two lights
are glowing, then the font between them is engaged (Swisst, Orator, or Gothic). For example:
When the printer is placed in the Utility print mode, all of the FONT lights stop glowing.
If you push this button while turning on the printer, the printer will enter the Menu Select Mode. (See
below for more information on the Menu Select Mode.)
5.PITCH button: Push this button (printer selected or deselected) to select the pitch (character
width) you wish to use. (See page 73 for more information on pitch.)
The PITCH lights to the right of the PITCH button indicate which pitch is engaged. If only one light
is glowing, then the pitch associated with it is engaged (10, 15, or 20), in characters per inch
(cpi). If two lights are glowing, then the pitch between them is engaged (12, 17, or PS). For
example:
ML 380 ( 96-02-03 )
Page 37

%Menu Select Mode
Menu Select Mode
In this mode, you can customize your printer so that the features you want are automatically active
when you turn it on. The selections you make on the menu are stored in the printers permanent
memory and, in effect, become default settings, although they can be changed through software
commands, through the control panel, or by resetting the menu.
When the printer is in the Menu Select Mode, the function of the control panel buttons corresponds
to the label below them: EXIT, GROUP, ITEM, SET, and PRINT.
For a listing of all the menu selections, see Appendix B.
You can override features set on the menu using either the front panel or commands sent from your
computer. However, when you turn off the printer, features set by those methods will be
cancelled. Features set on the menu will stay in effect, even when the printer is unplugged.
You can enter the Menu Select Mode either directly from the Print Mode or from the power off state.
To enter the Menu Select Mode from the Print Mode:
1.Make sure the printer has ribbon and paper.
2.Press the FONT and PITCH buttons simultaneously. The SELECT light will go off and Menu
Mode will print. You can then proceed to make menu changes by using the control panel.
3.To return to the Print Mode, press the EXIT button. The SELECT light will come on.
ML 380 ( 96-02-03 )
Page 38

%To enter the Menu Select Mode from the Power Off State
To enter the Menu Select Mode from the Power Off State:
1.Make sure the printer has ribbon and paper, and that it is turned off.
2.Hold down the FONT button while turning the printer on. The POWER light will come on
(SELECT light remains off) and Menu Mode will print. You can then proceed to make menu
changes by using the control panel.
3.To switch to the Print Mode, press the EXIT button. The SELECT light will come on.
ML 380 ( 96-02-03 )
Page 39

%Control Buttons
Control Buttons
1.GROUP Button: Push this button to move to the next Group in the menu.
2.ITEM Button: Push this button to move to the next Item within the Group.
3.SET Button: Push this button to move to the next Setting within the Item. Once you have changed
a setting, it will be stored in the printers permanent memory, even if you turn off the printer, until
you once again press the SET button with that Group and Item selected.
4.PRINT Button: Press this button at any time while in Menu Select Mode to print a listing of all the
current menu settings. We recommend that you print out the menu whenever you change it to
keep for reference.
5.EXIT Button: Push this button to exit the Menu Select Mode and return the printer to the Print
Mode.
Example
If you are in the Menu Select Mode and wish to engage the Form Tear-Off feature (look at Appendix
B and youll see that this feature is under the Group Vertical Control):
Press the GROUP button three times to get to the group you want to change. Each time you press
the button you must wait for the printer to print out a line. Pressing the Group button three times
will produce the following lines of print:
Font
Print Mode
LQ Courier
General Control
Cut Sheet Feeder
Not Installed
Vertical Control
Line Spacing
6 LPI
Press the ITEM button once. This will produce the following line of print:
ML 380 ( 96-02-03 )
Page 40

Vertical Control
Form Tear-Off
Off
Press the SET button once to change the setting from Off to On. ML380 will print:
Vertical Control
Form Tear-Off
On
You have now engaged the Form Tear-Off feature. If youre through making menu changes, simply
press the EXIT button to enter the Print mode.
ML 380 ( 96-02-03 )
Page 41

%Explanation of Menu Items
Explanation of Menu Items
The listings here are organized alphabetically for your convenience in looking up a particular item.
The listing in Appendix B is in the sequence in which the groups and items appear as you press
the control buttons in the Menu Select Mode.
Auto Feed XT. For parallel interface. Some systems use a signal on pin 14 of the parallel interface
to control automatic line feed. Interface cables wired in such a way that automatic line feed is
always in effect can cause a problem with such systems. The factory setting, Invalid, eliminates
this problem by causing the printer to ignore the signal. If your system uses pin 14 to control
automatic line feed, select the Valid setting.
Auto LF. Choose Yes to have the printer automatically add a Line Feed command to each Carriage
Return command it receives. The choice depends on whether your computer adds a Line Feed. If
you want single spacing and your printout is consistently double spaced, select No. If you want
single spacing and your printout consistently has one line printed over another, select Yes.
Baud Rate. (Serial interface) Sets data transmission speed.
Busy Line. (Serial interface) Selects pin used for busy signal when the printer is operating in the
serial mode. Choose from SSD- (pin 11), SSD+ (pin 11), DTR (pin 20), or RTS (pin 4).
Busy Time. (Serial interface) Sets busy signal timing.
Character Set. Choose IBM Character Set I, IBM Character Set II, or the Epson character set. (See
Appendix A.)
Cut Sheet Feeder. If you wish to use your ML380 with the optional Cut Sheet Feeder, choose
Installed.
Diagnostic Test. (Serial interface) Select Yes to activate the printers serial interface diagnostic test.
(See page 138.)
The diagnostic test disables the menu. When you are through running the test, turn the printer off,
then turn it on again while holding the FONT button. This will place you in the Menu Select Mode
so you can disable the diagnostic test by selecting No for the Diagnostic Test item in the menu.
DSR Signal. (Serial interface) Choose Invalid to deactivate the Data Set Ready (DSR) signal in the
serial interface.
DTR Signal. (Serial interface) Normally the Data Terminal Ready (DTR) signal in the serial interface
is Ready on Power Up. If you wish to use your software to control the DTR signal, choose Ready
on Select.
Form Tear-Off. Use this item to turn the forms tear-off feature On or Off. When this feature is
active, you can easily remove continuous-form paper from the printer without wasting paper. (See
page 28.)
Graphics. Choose Uni-directional (left to right only) for better graphics print registration at slower
ML 380 ( 96-02-03 )
Page 42

speed. Choose Bi-directional for faster print speed.
I-Prime Signal. For parallel interface. Choose Invalid if you want the printer to ignore your softwares
I-Prime signal. This will permit you to enter settings through the printers control panel which will
not be automatically overridden by the softwares settings when the I-Prime signal is sent.
Interface. Sets whether your printer will operate in parallel or serial mode. Operation in the serial
mode requires installation of the optional serial interface adapter (see page 36).
Language Set. These sets replace certain symbols with special characters used in the respective
foreign languages. (See page 83 for a listing of the various characters in each set.)
Line Spacing. Choose the number of lines to be printed per inch. Select from 6 LPI (1/6-inch line
spacing) or 8 LPI (1/8-inch line spacing).
Number of DLL Sets. Choose 1 if you wish to downline load custom characters.
Operator Panel Functions. Full Operation is the normal setting. Choose Limited Operation to
deactivate the FONT and PITCH buttons on the control panel so that you can control these
features only through your software. This can be useful when several people are using the printer
and you dont want its settings changed.
Choosing Limited Operation disables the Menu Select Mode. If you wish to make menu changes or
to return to Full Operation, you must turn the printer off and then turn it on again while holding
down the FONT button. This will put the printer in the Menu Select Mode.
Page Length. Sets the form length or sheet length of the paper you will be using. The printer uses
this setting to keep track of the initial printing position on each page (top of form).
Paper Out Override. The paper out detector senses when less than one inch of paper remains in
the printer and stops printing at that point. Choosing Yes overrides the detector so you can print
closer to the bottom of
the page if youre using single sheets. Be careful if you use this feature; it lets the printer continue
printing when theres no more paper, which causes loss of data and may damage the printhead
and platen.
Parity. (Serial interface) Sets serial interface parity of None, Odd, or Even. (See Glossary for a
discussion of parity.)
Pin 18 Output. For parallel interface. Sets the signal on pin 18 for 0 or +5 volts.
Pitch. Choose uniform character width measured in characters per inch (10 CPI, 12 CPI, 15 CPI,
17.1 CPI, or 20 CPI) or choose Proportional Spacing (PS) in which the space allocated to a
character is proportional to the characters width. Proportional spacing is available only in Letter
Quality print mode.
Print Mode. For built-in letter quality fonts, choose from LQ Courier, LQ Gothic, LQ Prestige, LQ
Roman, LQ Swiss, or LQ Orator. For high-speed printing (lower quality), choose Utility (only the
Gothic font will print in utility mode). For more information on fonts, see page 51.
Print Registration. Use this to improve registration when printing bidirectional bit image graphics.
Choose 0 for no movement. Choose + settings to produce movement to the right increasing in
0.05 mm increments as you increase the setting value (i.e., a setting of +1 produces 0.05 mm
movement, +5 produces 0.25 mm movement). Choose - settings in a similar way to produce
movement to the left increasing in 0.05 mm increments. You may need to experiment a bit with
ML 380 ( 96-02-03 )
Page 43

this setting: the optimum setting can vary from program to program. If for some reason you cant
seem to get the registration right, try switching to unidirectional printing.
Protocol. For serial interface. Sets serial interface protocol. Select X-ON/X-OFF if you wish to use
X-ON/X-OFF protocol rather than Ready/Busy.
Serial Data 7/8 Bits. For serial interface. Choose serial interface data format of 7 bits or 8 bits.
Size. Choose Single or Double width and height.
Skip Over Perforation. Choose Yes if you want the printer to advance automatically to the next page
when it comes within one inch of the bottom of the page. If your software has its own page
formatting controls, set this item to No to avoid interference.
Style. Choose printing style of Normal (upright) or Italics (slanted).
Zero Character. Choose Slashed when its important to distinguish between the number zero and
capital letter O in your printed document.
ML 380 ( 96-02-03 )
Page 44

%Fonts
Fonts
A font is a collection of printing characteristics, all of which combine to produce a distinctive and unique
style of print. These printing characteristics include the actual shape of the characters, the spacing
between characters and between words, and the size of the characters. There are generally several fonts
within a type family, whose characters are similar in shape, but differ in thickness, angle, or style. For
example, many typefaces come in a choice of regular, bold, italics, and bold italics.
In addition, your ML380 has special character sets for technical, legal and foreign language uses and
sets of line drawing characters which you can use in your font.
ML 380 ( 96-02-03 )
Page 45

%Selecting Fonts
Selecting Fonts
Your ML380 printer has six built-in type styles:
Courier
Gothic
Orator
Prestige
Roman
Swiss
Each type family can be printed in five different non-proportional sizes expressed in characters per
inch (cpi)_10, 12, 15, 17, or 20 cpi_as well as in proportional.
For each type family and size, you can use any combination of the following characteristics:
Regular
Italics
Emphasized
Enhanced
Double Height
Double Width
Outline
Shadow
The easiest way to select fonts is by using the front panel controls.
You can also select fonts by using printer commands. Each font has an escape command,
beginning with the escape character (decimal 27). For a complete listing of these commands, see
Appendix C.
ML 380 ( 96-02-03 )
Page 46

%Type Styles
Type Styles
Using the right type style is important if you want to create a professional-looking document. Your ML380
provides a choice of three types styles: typewriter, serif, and sans-serif.
Courier is an example of a typewriter type style. It looks just like what youre used to seeing when you
type a letter on a pica typewriter. Use this type style for everyday memos, letters, etc.
If you want to get fancier, try Prestige or Roman. These are serif type styles, which means that their
letters have decorative hairline extensions at the tips. Serif type styles are used for text in books and
newspapers.
The Gothic type style is a combination serif and sans-serif style. It has a neat, clean appearance with
more interest than plain Courier. Its good for text, but can also be used for headlines.
For a clean, bold look, try Swiss or Orator. Swiss is a sans serif type style featuring plain letters without
the hairline extensions (serifs). It is recommended for headlines, but can also be used for text. Orator is
basically a sans-serif type style, but it does include serifs in a few of the letters. Orator uses all upper
case letters, in small and large, instead of the traditional upper and lower case letters. Its good for
headlines and can be used to set off small blocks of text. Orator was originally developed for printing
speeches that orators can easily read. If youre using Orator for this purpose, print in the double height
mode for the best effect.
In selecting a type style for text, the first thing you should look at is readability. Next, you should decide
whether the type style is appropriate. Each typeface has its own special qualities which affect the feel of
the document. A very upright serifed Roman font creates a formal impression, while a wide, rounded
sans serif font such as Swiss creates a breezy, arts atmosphere. The type style should fit the nature of
the text you are setting, as well as the type of publication.
ML 380 ( 96-02-03 )
Page 47

%Type Size (Pitch)
Type Size (Pitch)
Choose your type size carefully. Most body text should be set no smaller than 10 or 12 cpi. Use the 10 or
12 cpi pitch settings for routine memos, letters, etc., that you want to appear to be typewritten. For a
polished, professional typeset look in your document, use the proportional pitch setting. With proportional
printing, narrow letters like i and l take up less width than wide letters like w and m.
The smaller type sizes (15, 17, 20 cpi) should be reserved for illustration labels, sidebars, footnotes, etc.
Theyre also ideal for printing spreadsheets with lots of data to squeeze in.
For headlines, youll want to use some of the special effects described below.
ML 380 ( 96-02-03 )
Page 48

%Special Effects
Special Effects
Your ML380 provides the special effects of emphasized/enhanced (equivalent to bold face type), outline,
shadow, double height, and double width printing which can be applied to either regular or italic type in
any combination you like, to produce headlines for your document. Here are some examples:
ML 380 ( 96-02-03 )
Page 49

%Formatting Guidelines
Formatting Guidelines
Your ML380 printer can be used to create all sorts of documents. If youre going to use the type
fonts available with your printer, you should adhere to a few simple rules of typesetting in order to
gain maximum impact from the printed page.
1.Dont mix a lot of different typefaces. Choose one or two to use in your document and stick to
them. A hodge-podge of typefaces not only looks awful, but also can obliterate your intended
message. Worse yet, it can be so discouraging to readers that they just skip over it entirely!
2.Give the proper respect to each element on the page. Titles and headlines should be printed in
large, bold face type. Copy should be printed in smaller, regular weight type, preferably one which
is different from the headlines.
3.Have mercy on your readers_always leave sufficient white space! Simple white space (space on
the page where there is no printing) can be most effective in highlighting elements on a page, as
well as in providing a quick visual organization to the page. Consider what it would be like to read
a page with no breaks between paragraphs, headings, etc.
ML 380 ( 96-02-03 )
Page 50

%BASIC programming
BASIC programming
The LPRINT command in BASIC makes output go to the printer rather than to the screen. To send text to
the printer, simply enclose the words in double quotes:
LPRINT "A line of text"
The statement above will cause the printer to print the text, then move the printing position to the
beginning of the next line. If you don't want this automatic carriage return and line feed, put a semicolon
(;) after the data, outside the quote:
LPRINT "A line of text";
LPRINT "...and this text is on the same line"
For serial printers
If you're using your printer with a serial interface, you have to be sure to redirect output from the
computer to the serial port you're using, either COM1: or COM2:, rather than to the default port, LPT1:.
There are two ways to do this:
1.If you're using DOS, you can use the MODE command, as described on page 65. Then use the
LPRINT command in your BASIC programs, just as we do in our examples.
2.You can also redirect output to COM1: or COM2: from within BASIC, by opening the port as a file and
printing your data to that file. If you want to run any of our sample programs, you'll need to modify them.
At the beginning of your program, include one of these statements:
OPEN "COM1:9600,N,8,1" AS #1
or
OPEN "COM2:9600,N,8,1" AS #1
Then, to print data, use the PRINT#1 command, being sure to include a comma between the #1 and the
data:
PRINT#1,"A line of text"
Like the LPRINT command, PRINT#1 automatically moves the print position to the next line unless you
use a semicolon (;) after the data.
When you send an LPRINT statement, the text between the quotation marks is converted to a string of
numbers, which are then processed by the printer and output as the dot patterns that make up the
individual characters. Each character is assigned a numeric value according to the American Standard
Code for Information Interchange (ASCII). Since ASCII is a standard coding system, most computers,
printers and other electronic devices can interpret ASCII data.
There are 256 ASCII codes. The codes from 0 to 127 are completely standardized (with a handful of
minor exceptions), while those from 128 to 255 are used in a less standard way to represent a variety of
special characters. The table of ASCII codes in Appendix C shows the low ASCII codes from 0 to 127.
Although most of the ASCII codes represent alphanumeric and punctuation symbols, you'll notice that the
codes from 0 to 31, as well as 127, don't correspond to normal characters. These are control codes,
special characters used to control a wide range of peripheral equipment, from monitors to modems to the
devices that interest us here, printers.
One of the most important control codes is the ESC character, decimal 27, hexadecimal 1B. Many of the
more complicated commands begin with ESC, which serves as a signal to the printer that what follows is
to be interpreted as a command rather than just a string of characters to be printed.
ML 380 ( 96-02-03 )
Page 51

Since the control codes don't represent any character on your keyboard, you can't send them to the
printer enclosed in double quotes, as you would with text. Instead, you have to use the CHR$ function,
which lets you send the decimal or hexadecimal value for a character. For example, the escape character
is represented as CHR$(27), or, in hexadecimal, as CHR$(&H1B). (Notice that hexadecimal numbers in
BASIC are preceded by &H to distinguish them from simple letters or decimal numbers.)
Of course, you can also use the CHR$ function to output printable characters; for instance, CHR$(65)
represents the letter A. However, it's usually easier to type letters, numbers and punctuation marks, and
your BASIC programs will be much easier to read if you use literal characters, enclosed in quotes,
wherever possible.
Some printer commands expect you to supply a numeric value representing tab stops, line spacing, etc.
These values can be entered by using the CHR$ function.
Graphics
One of the strengths of dot matrix printer technology is the flexibility that comes from printing patterns of
dots. If you can control where the dots are printed, you can print almost any kind of graphic image. If you
look closely at a photo in a newspaper, you'll notice that it's made up of thousands of tiny dots. You can
use your ML380 printer to print similar dot graphics.
Your ML380 printhead has two columns of 12 pins, for a total of 24 pins. Images are created as the pins
"fire", striking the ribbon against the paper to produce dots. White spaces appear where the pins don't
fire.
In general, it's best to use unidirectional printing for graphics; this provides much better control of print
registration. If you use bidirectional printing, the dots may be out of sync with each other as the printhead
moves back and forth across the platen. To correct for this, change the Print Registration setting in the
Menu Select Mode (see page 45).
While you can write your own programs to design graphics, this process can be very tedious--the
simplest graphic image can contain several hundred dots and designing graphics can involve a lot of trial
and error as well as considerable programming effort. Fortunately there are many software packages for
preparing and printing graphics--among the most common are GEM, Harvard Graphics, Harvard
Graphics Total Project Manager, Microsoft Windows Paint, PC Paintbrush and SuperProject Plus.
(See page 60 for information on selecting drivers for your ML380 within these software packages.)
See page 98 for information on the control codes used in programming your own graphics.
ML 380 ( 96-02-03 )
Page 52

Chapter 5
Control Codes
This chapter describes your ML380's print command set. It's not just for
programmers; if you want to modify your software to add a
particular function, or if you want to embed extra commands in a
document, you'll find the necessary information here. Even if you
just use the front panel to control your printer, the explanations
of the features and how they work will be helpful.In this
chapter we give both the ASCII and the decimal equivalents for each
control code (command). For the hexadecimal equivalents, see the
control code table in Appendix C.
ML 380 ( 96-02-03 )
Page 53

%Character Style
Character Style
Print Quality Control Codes
Use LQ print quality for letter quality printing in any of the six available typefaces. The FONT lights on the
front panel indicate which typeface is engaged. Enter the typeface command described below to choose
the typeface you wish to use.
Use utility print quality for drafts and other documents that you want to print quickly. In this mode, ML380
will print only the Letter Gothic typeface in 10, 12, 15, 17, or 20 cpi pitch. It will not print in any of the
other typefaces, nor will it print in the proportional spacing pitch. If you wish to select one of the other
typefaces or proportional spacing, you must first enter the ESC x 1 command to engage the LQ mode;
otherwise the printer will ignore the typeface or the proportional spacing command and continue to print in
the utility mode. All the FONT lights on the front panel are off
when ML380 is operating in the utility mode.
Note: You can also use the front panel controls of the Menu Select Mode to choose
print quality.Typeface
ML 380 ( 96-02-03 )
Page 54

%Typeface
Typeface
Use these commands to select the
typeface (font) you wish to use. If your ML380 is set for printing
in the Utility mode, you must first enter the command ESC x 1 in
order to change from the Utility mode to the LQ mode. If you don't,
the Utility mode will override the typeface commands. See page 51
for more information on selecting fonts, including type
samples.
Typeface can also be selected using the front panel controls or the
Menu Select Mode.
As we go to press, special ML380 drivers are being
developed for use with Microsoft Word 4.0 and 5.0, as well as
WordPerfect 4.2 and 5.0. These drivers will permit direct selection
of any of the six resident fonts, without your having to enter
printer command codes or modify existing drivers. Check with your
dealer or call 1-800-OKIDATA to find out more about the
availability of these special drivers.
ML 380 ( 96-02-03 )
Page 55

%Italics
Italics
Italics printing is slanted like this, and is used to lend emphasis to phrases,
sentences or entire paragraphs.If you intend to print an entire document in italics, you may choose to
select this printing style in the Menu Select Mode.You can also use the ESC ! n command to specify or
end italic printing (see page 81).
ML 380 ( 96-02-03 )
Page 56

%Emphasized and Enhanced Printing
Emphasized and Enhanced Printing
Emphasized and enhanced printing provides the
equivalent of bold face type. Your ML380 produces bold type by
printing each dot of a character twice instead of once. In
emphasized printing, the pairs of dots are offset horizontally. In
enhanced printing, the dots are printed on top of each
other.You can use a combination of both emphasized and
enhanced printing to produce an even bolder effect. For headlines,
try using them in combination with double width characters; you can
also combine emphasized printing with double height characters.
You can also use the ESC ! n print mode combination command
to engage emphasized or enhanced printing (see page 81).
ML 380 ( 96-02-03 )
Page 57

%Outline and Shadow
Outline and Shadow
Use the outline and shadow effects to produce more interesting and stylish headings. They can be
combined together as well as with emphasized and/or enhanced printing, double width, etc., for an even
more striking effect.
Outline and shadow can only be used for printing characters; they can't be used to print line graphics.
ML 380 ( 96-02-03 )
Page 58

%Character Size - Pitch
Character Size Pitch
This pitch requires two commands: the compression command (SI) plus the pitch command.
Character pitch, or width, is measured in characters per inch (cpi). For example, at 10 cpi, each character
is 1/10-inch wide. The double width and compressed printing commands interact with the basic pitches
listed above to produce a range of character widths.
See the "Character Width Values" table below for all possible widths.Pitch can also be set using the front
panel controls or in the Menu Select Mode.Selecting a new pitch will automatically cancel the previous
pitch, but it will not cancel compressed printing. To cancel compressed printing, you must enter the
command DC2 (ASCII) or 18 (decimal). (See page 75.)
These pitch commands will not override the double width command (see page 75).
ML 380 ( 96-02-03 )
Page 59

%Character Width Values
Character Width Values
ML 380 ( 96-02-03 )
Page 60

%Compressed Printing
Compressed Printing
If the current pitch is 10 cpi, the compressed
printing command will produce 17.1 cpi printing. If the current
pitch is 12 cpi, the compressed printing command will produce 20
cpi printing.When you send the DC2 command, the printer
will return to whatever basic pitch was in effect before you began
compressed printing.
ML 380 ( 96-02-03 )
Page 61

%Double Width
Double Width
Use these commands to produce characters twice as wide as regular characters. They can be used with
any of the character pitches. For example, if the current pitch is 12 cpi, double width characters will print
at 6 cpi. The "Character Width Values" table on page 74 shows all the possible combinations.The
one-line double width commands are especially convenient for titles and headlines, since they turn off the
double width printing automatically at the end of the line. If you want to cancel one-line double width
printing before the line ends, send the command DC4 or ESC W 0. You can also cancel one-line double
width printing with the command LF (see page 92) or ESC ! n (see page 81).
nOTE: The DC4 command will have no effect if you have engaged double width printing with the ESC W
1 or the ESC ! n command; in these cases, only the ESC W 0 or ESC ! n command will cancel double
printing.
You can also use the ESC ! n command (see page 81) or the Menu Select Mode to choose continuous
double width printing.
ML 380 ( 96-02-03 )
Page 62

%Double Height
Double Height
Double height printing produces characters that are twice as tall as normal size characters. It can be
mixed with standard height characters on the same line, in which case the double height characters will
print twice as high as the normal height characters, on the same baseline.Double height can be combined
with double width and emphasized printing for an even more striking effect. It can be used for LQ printing,
utility printing, and for downline loaded characters (see page 101).You'll probably want to adjust the line
spacing to accommodate the taller characters when you use double height printing; otherwise the lines
appear to run together. See page 91 for the line spacing commands.
ML 380 ( 96-02-03 )
Page 63

%Superscripts and Subscripts
Superscripts and Subscripts
Superscript characters are printed above the normal print line and are used for exponents, footnotes, and
other special typographic effects (x2). Subscripts are handy for chemical formulas (H2>O). Both are
printed in a smaller size than standard characters.Superscripts and subscripts can't be used with double
height printing.
ML 380 ( 96-02-03 )
Page 64

%Character Spacing - Proportional Spacing
Character Spacing - Proportional Spacing
When the pitch is set to proportional spacing, the printer automatically adjusts the space between letters
to compensate for the varying widths of individual characters. Unlike fixed spacing, where all characters
are formed within a matrix of uniform width at a specified pitch, proportional spacing gives more
horizontal space to wide characters, like w or M, and less space to narrow characters, like I or f. The
resulting print gives the impression of a typeset document and is more attractive and easier to read than
fixed-space printing. Proportional spacing is available only with LQ printing; it can't be used for utility
printing.Because the characters have different widths, proportionally spaced fonts have no fixed pitch;
therefore, margin settings are only approximate unless your software specifically supports proportional
spacing.When you end proportional spacing by sending the ESC p 0 command, the printer will return to
whatever basic pitch was in effect before you began proportional spacing.You can also use the ESC ! n
command (see page 81), the front panel controls, or the Menu Select Mode to select proportional
spacing.
ML 380 ( 96-02-03 )
Page 65

%Set Character Spacing
Set Character Spacing
Use this command to adjust the amount of space to the right of each character. This value (n) is
expressed in dots. The number of dots per inch (dpi) depends on the current print mode: in utility mode
there are 120 dpi; in LQ mode, there are 360 dpi. If you use double width printing, the printer will
automatically double the designated amount of space.
ML 380 ( 96-02-03 )
Page 66

%Print Features - Underlining
Print Features - Underlining
Use this command to underline all text, including spaces and punctuation marks. The underlining will print
at the same time the character is printed. This command will not underline spaces produced by the
horizontal position commands (see page 93), nor will it underline bit-image or line draw graphics.
Normally, underlining prints two dots high. It will print three dots high if the double height print mode is
engaged.
ML 380 ( 96-02-03 )
Page 67

%Unidirectional Printing
Unidirectional Printing
Your printer is designed to maximize speed by printing alternately from the left and right (bidirectional
printing), rather than by moving the printhead back to the left margin so that each line prints from left to
right (unidirectional printing). Use unidirectional printing when precise vertical alignment from line to line is
critical, such as when printing high-resolution graphics.If you use the one-line unidirectional printing
command, the printer will automatically turn off the unidirectional printing at the end of the line. This is
especially convenient for use with special effects in titles and headlines.You can also select continuous
unidirectional graphics printing in the Menu Select Mode.
ML 380 ( 96-02-03 )
Page 68

%Combined Print Characteristics Command
Combined Print Characteristics Command
This command provides a shortcut for specifying combinations of features in a single escape sequence.
To determine the value of n in this command, add up the values for each of the features you wish to use.
To turn off these features and return to 10 cpi printing, send the command ESC ! 0.For example, to print
text at 12 cpi, in italics and underlined, assign n the value 193 (164128).Each time you send the ESC ! n
command, it sets or cancels the values for all of the features it controls. This means that if you've
requested 12 cpi underlined italics, and then want to add emphasized printing to these features, you must
add 8 (the value for emphasized printing) to 193 and send the command ESC ! 201. If you send the
command ESC ! 8, you would turn on the emphasized printing, but at the same time you would be turning
off all the other features!
Example
To see the range of print styles you can produce with the ESC ! n command, run the following short
BASIC program. This program prints a sample of each of the 256 possible combinations. It will take a few
minutes and about 12 pages for the entire sample to print.
10 FOR I=0 TO 255
20 LPRINT:LPRINT
30 LPRINT CHR$(27);"!";CHR$(I);"ESC !";I;" selects this combination."
40 NEXT I
Emphasized printing engaged by this command can also be turned off by the ESC F command (see page
71). Enhanced printing engaged by this command can also be turned off by the ESC H command (see
page 71). Proportional spacing engaged by this command can also be turned off by the ESC p 0
command (see page 78).
ML 380 ( 96-02-03 )
Page 69

%Character Sets International
Character Sets International
This command allows you to select character sets that replace some less-frequently used characters with
symbols used in a variety of foreign languages. You can print these symbols both in the normal and the
italics print mode.To access these character sets, replace n with the appropriate value from the table.The
character set will automatically revert to the factory default (USA), if the printer receives the command
ESC @, the command ESC R 0, or the I-Prime signal (see page 111).
You can also use the Menu Select Mode to change the character set.
ML 380 ( 96-02-03 )
Page 70

%Italics and Graphics Characters
Italics and Graphics Characters
You can use this command to specify the set of characters which is to occupy decimal values 128 to 255
to be italics characters, special symbols and graphics characters, or custom characters you have stored
using the custom character commands (see page 101). When transferring the custom characters, this
command copies them from the lower ASCII set where you have them stored to a comparable location in
the upper ASCII set. For example, it would copy the custom characters you have stored under decimal
33 and 34 to upper decimal 161 and 162.If you want to use one of the IBM character sets, you must first
send the ESC t 1 command to select the graphics characters.You can also use the ESC 4 command (see
page 72) or the ESC ! n command (see page 81) to begin italics.
ML 380 ( 96-02-03 )
Page 71

%IBM Character Sets
IBM Character Sets
Both these character sets contain special symbols and graphics characters in addition to the standard
alphanumerics. The difference is that in Set II, decimal values 3 to 6 , 21, and 128 to 159 represent
printable characters, while in Set I, these positions are either occupied by control codes or are unused.
Refer to Appendix A for the tables of these characters. Before sending either of these character set
commands, you must first send the ESC t 1 command to select graphics characters.
ML 380 ( 96-02-03 )
Page 72

%Page Setup Commands - Left and Right Margins
Page Setup Commands - Left and Right Margins
Use these commands to set margins by character columns. The actual position of the margin depends on
the current pitch; a margin of 10 columns will come out as one inch in 10 cpi and one-half inch in 20 cpi. If
the current pitch is proportional, the margin is set as though it were 10 cpi. However, once you've set a
margin, its absolute position remains the same, even if you change the pitch, until you specifically reset
the margin. This saves you the work of adjusting margins with every pitch change in your document. The
table "Range of Margin Settings" below gives the column setting range for left and right margins for each
of the various pitches.You should always send margin commands at the beginning of a line. Be sure to
specify a right margin that is at least one column to the right of the left margin. Sending the left or right
margin command will cancel any horizontal tab stops you may have set, returning the printer to its default
(tab stops every eight columns). Be sure to set horizontal tabs (see page 87) after you set the margins.
ML 380 ( 96-02-03 )
Page 73

%Justification
Justification
These commands let you specify the alignment of the text on the page. You can align the text with the left
margin or with the right margin. You can set the text for full justification, where the printer adds space as
needed to align the text with both margins. Or, you can set the text for center justification which will
center the text on the page.When you're using right, full, or center justification, the backspace character
(ASCII BS, decimal 8) and the horizontal tabs won't function. If you're using full justification, use a
carriage return only at the end of a paragraph, not at the end of each line.
ML 380 ( 96-02-03 )
Page 74

%Tabs - Horizontal Tabs
Tabs - Horizontal Tabs
When you turn on your printer, the horizontal tab stops are automatically set for every eight columns.
Each time you send a tab character (ASCII HT, decimal 9), the printhead moves to the next tab stop
position before printing the next character.You can use the ESC D n1...nk NUL command to set up to 32
horizontal tab stops at specific columns on the page. As with margins, the actual position of the stops
depends on the pitch you're using, and won't change if you switch to a different character width. Be sure
to give the stops in ascending order, and after you have specified all the stops, end the sequence with a
NUL character (use CHR$(0) in BASIC).If you send the command ESC D NUL, with no stops specified,
all horizontal tab stops will be cleared, including the 8-column default stops. To restore the printer's
default tab stops of every eight columns, you can either send the reset command ESC @ (see page 107)
or turn the printer off and on. The I-Prime signal sent by some software will also restore the default tabs
(assuming Parallel Interface I-Prime Signal in the menu is set to Valid). When you have underlining
engaged, the spaces generated by the horizontal tab will not be underlined.
ML 380 ( 96-02-03 )
Page 75

%Vertical Tabs
Vertical Tabs
Substitute the line number(s) where you wish the stop(s) to occur for the n's in the command. Be sure to
enter the stops in ascending order. Once you've set the stops, each time you send the VT command, the
printer will print out any data in the buffer and move to the next stop position. The VT command will end
one-line double width printing.
Note: The actual position of the stops depends on the line spacing in effect when you send the ESC B
n1...nk command. For example, at 6 lines per inch, a tab stop of 24 will appear four inches from the top of
the page, whereas at 8 lines per inch, the stop would be positioned three inches from the top of the page.
However, once you've set the vertical tab stops, their position is absolute and won't change, even if you
later change the line spacing. If you send the command ESC B NUL, with no stops specified, all vertical
tab stops set with the ESC B n1...nk NUL command will be cleared.You can use the ESC b n m1...mk
NUL command to set up to eight separate sets of vertical tab stops, each set called a channel. You can
set up to 16 stops per channel. This command works similarly to the ESC B n1..nk NUL command above,
except that you also have to specify which channel you're setting stops for by giving a value of from 0 to
7 for the variable n. Once you've set up the stops in the channels you're using, you perform the vertical
tabs by sending the ESC / n command to specify a channel, followed by the VT command.If you send the
command ESC b n NUL, substituting a channel number for the n, all vertical tab stops set for that
channel will be cleared.
When you use the ESC B n1..nk NUL command to set tab stops, the printer automatically stores the tab
stops in channel 0. If you then decide you want more than one set of tab stops, simply use the ESC b n
m1..mk NUL command to store the other sets, substituting a channel number n of other than 0. Then, to
engage the ESC B set, send the command VT; to engage one of the other sets, precede the command
VT with the ESC / n command.
The following example uses the ESC b n m1..mk command to set stops in a BASIC program.
Example
This program sets stops in three channels and then performs a series of vertical tabs in the different
channels:
ML 380 ( 96-02-03 )
Page 76

ML 380 ( 96-02-03 )
Page 77

%Line Spacing
Line Spacing
The most common spacings for text are 6 and 8 lines per inch
(lpi). A spacing of 8 lpi works well with compressed character
pitches and lets you fit more lines on a page.The ESC 3 n
command sets the line spacing in increments of as little as
1/180-inch. The ESC A n command sets the line spacing in increments
as little as 1/60-inch. These commands let you control vertical
movement in very fine units, which helps with the precise placement
of graphics.
ML 380 ( 96-02-03 )
Page 78

%Line Feed Control
Line Feed Control
The line feed command (ASCII LF, decimal 10)
tells the ML380 to print a line and then move the print position
down one line on the page. The amount of vertical movement depends
on the current line spacing (see above). This command also cancels
one-line double width printing.Use the ESC J n command to
execute fine line feeds in increments of 1/180-inch. Unlike the
simple LF code, the ESC J n code doesn't cancel one-line double
width printing. If you substitute 0 for the n, no line feed will be
performed.
ML 380 ( 96-02-03 )
Page 79

%Horizontal Dot Placement Commands
Horizontal Dot Placement Commands
These commands let you place text or graphics very precisely on the page. (For precise vertical
positioning, see the description of the fine line feed and line spacing on pages 92 and 91.) The ESC $ n1
n2 command uses the left margin as a reference point and moves the print position horizontally in
1/60-inch increments, regardless of the pitch. To determine how many dots you wish to move, multiply
the number of inches you wish to move the print position by 60, the number of dots per inch.Example
Suppose you want to set an absolute horizontal dot position of six inches over from the left margin. First,
multiply 6 inches by 60 dots/inch to obtain 360 dots. Then divide the number of dots by 256: this yields a
value of 1 (n2) with a remainder of 104 (n1). Therefore, the command you would send would be ESC $ h
SOH (ASCII) or 27 36 104 01 (decimal).For values above 99, you can use hexadecimal for n1; in this
case n1 would be 68 hexadecimal.
The ESC \ n1 n2 command lets you move the print position to either the right or the left of the current
print position. To determine the values of the two variables (n1 and n2), first determine how many dots
over you wish to move. To do this, divide the number of inches you wish to move by the number of dots
per inch. For this command, the number of dots per inch depends on the print mode you have engaged.
The "Horizontal Position Units" table below gives the number of dots per inch for each of the print modes,
to be used in calculating how many dots you wish to move.If you want to move the print position to the
right, divide the number of dots to be moved by 256, then assign the whole number result to n2 and the
remainder to n1. If you want to move the print position to the left, subtract the number of dots to be
moved from 65,536, then divide the result by 256: assign the whole number result to n2 and the
remainder to n1.
ML 380 ( 96-02-03 )
Page 80

%Horizontal Print Positions
Horizontal Print Positions
Example
Suppose you have the LQ print mode engaged and want to instruct the printer to move the print position
2 inches to the left of the current position. From the table, the number of dots per inch in the LQ print
mode is 180. Multiply 2 inches by 180 dots per inch to obtain 360 dots. Subtract this from 65,536 to
produce 65,176. Divide this by 256: this yields a value of 254 for n2 and a value of 152 for n1. Converting
these decimal values to hexadecimal, n1 then becomes 98 and n2 becomes FE.When you have
underlining engaged, the spaces generated by these horizontal dot position commands will not be
underlined.
ML 380 ( 96-02-03 )
Page 81

%Forms Control - Form Feed
Forms Control - Form Feed
When you send a form feed command, ML380 prints any data that is in its buffer, executes a carriage
return, and moves the printhead to the next top of form position. This command also cancels one-line
double width printing.You can also use the FEED button on the control panel to feed a page through the
printer.
ML 380 ( 96-02-03 )
Page 82

%Form Length
Form Length
You can specify the form length in either inches or lines. If you will most often be using one of the
standard page lengths listed on the menu, we recommend that you use the Menu Select Mode to set a
default form length, and then use one of the form length commands whenever you want to change it
temporarily.When you use either of these commands to change the form length, the skip over perforation
setting returns to the menu default (0) and the top of form is set at the current print position.When setting
the form length by lines, remember that the actual depth of the form in inches will depend on the current
line spacing.
ML 380 ( 96-02-03 )
Page 83

%Skip Over Perforation
Skip Over Perforation
If skip over perforation is set to Yes on the menu, the printer will automatically skip an inch from the
bottom of one page to the top of form on the next page. Use the ESC N n command to change the
number of lines skipped. The actual amount of space skipped between pages varies with the current line
spacing; however, after you've set the skip size, it won't increase or decrease if you change line spacing.
The ESC O command returns the perforation skip to its default.You can also use the ESC @ reset
command (see page 107) to reset the perforation skip to the default. The skip over perforation feature will
interfere with page formatting controlled by software packages such as word processors. If you're using a
package that controls page length directly, you should set the Skip Over Perforation item in the menu to
OFF.Note
ML 380 ( 96-02-03 )
Page 84

%Cut Sheet Feeder Control
Cut Sheet Feeder Control
The following commands are active only when the Cut Sheet Feeder accessory is installed on the printer.
Use the ESC EM I command to feed a sheet of paper from the cut sheet feeder to the top of form
position. If paper is already in the printer, the printer will eject the page and load another sheet. Any data
that is in the print buffer when this command is received will print before the paper is ejected and
replaced.The ESC EM R command instructs ML380 to print the data in the print buffer and eject the
page. A line feed code (see page 92) at the end of the page causes the next page to feed into the printer
automatically.
Bit-Image Graphics
ML 380 ( 96-02-03 )
Page 85

%Bit-Image Graphics
Bit-Image Graphics
The ESC K, ESC L, ESC Y, and ESC Z commands are shortened versions of the ESC * m n1 n2
command and are used to set the density of your graphics in dots per inch. They are set up at the factory
to represent the first four 8-pin graphics modes shown in the "Graphics Codes" table below. When ML380
is printing in these modes, it will only use eight of the 24 pins in the printhead, imitating the dot patterns of
9-pin printers. These 8-pin modes can be used with graphics software packages that don't support 24-pin
graphics. You can change any of these four commands to represent any of the other graphics modes
selected by the ESC * m n1 n2 command by using the ESC ? m n command described below.
The variables n1 and n2 tell the printer how many bytes of graphics data to expect. To calculate the
values for these variables, first determine how many columns of dots there will be in your graphics image.
Divide this number by 256: assign the whole number result to n2 and assign the remainder to n1.
When calculating the values for your 8-pin graphics data, remember that there is one byte of data per dot
column.
Note: The ESC * m n1 n2 command provides access to eleven graphics features, including six 8-pin
graphics modes and five 24-pin graphics modes. The 24-pin graphics modes use all the pins to create a
column of 24 dots (three bytes of data per column). Images produced in the 24-pin modes can be sharper
and more detailed than the 8-pin graphics. The variable m is used to specify the density of the image as
well as the number of pins which will fire, as detailed in the "Graphic Codes" table below. The values for
variables n1 and n2 for this command are calculated in the same manner as described in the preceding
paragraph.
When calculating the values for your 24-pin graphics data, bear in mind that there are three bytes of data
per dot column.
ML 380 ( 96-02-03 )
Page 86

%Graphic Codes
Graphic Codes
You can use the ESC ? m n command to change the ESC K, ESC L, ESC Y, or ESC Z command to be
any of the eleven possible ESC * m n1 n2 commands. The m designates which command (K, L, Y, or Z)
will be changed. The n designates which ESC * m n1 n2 command it will become, as detailed in the
"Values of n" table below.
ML 380 ( 96-02-03 )
Page 87

%Custom Characters
Custom Characters
Your printer's custom (downline loadable) character feature enables you to design your own characters
and symbols, even entire character sets if you choose, and download them from your computer to the
printer. You can design and store up to 256 characters. Your custom characters are assigned to the keys
of your choice on your keyboard. Then, whenever you need a particular character, all you have to do is
invoke the custom character set and press the key assigned to your character. The actual designing of
these characters requires some work on your part and can become tedious. Once again, we strongly
recommend using a commercial software package to help you create new characters and download them
to your printer. There are also packages that provide character sets already designed for you.When
setting up a grid to design custom characters, use the matrix width values given in the "Custom
Character Widths" table below. Note that the width of the grid depends on both the print mode and the
character pitch being used. The height of the grid is 24 dots. You must leave blank rows and columns
where necessary around the perimeter of the figure to allow for spacing. In all print modes, you can't
place two dots next to each other horizontally--you must skip one column between dots.
ML 380 ( 96-02-03 )
Page 88

%Custom Character Widths
Custom Character Widths
Use the ESC % command to switch between the standard character set and the custom character set.
The custom character set will stay in the printer's memory until:you turn the printer offyou overwrite them
with new custom charactersyou use the ESC : NUL NUL NUL command to overwrite them with the
standard character set.
Use the ESC : NUL n NUL command to copy a complete set of characters resident in the printer to the
area of its memory reserved for custom characters. The new character or characters will become a part
of the character set by replacing one or more of the characters already in the set. The value of n you
choose depends on the font to which you wish to add the custom character.Use the ESC & NUL n1 n2 d0
d1 d2 command to begin downloading a custom character:The variables n1 and n2 represent the decimal
values for the regular characters being replaced by custom characters. If you're downloading more than
one custom character, the characters to be replaced must be adjacent to each other: n1 represents the
first character to be replaced in the series and n2 represents the last character to be replaced in the
series. Custom characters can be assigned to decimal values of 32 to 127. The variables d0, d1, and d2
indicate how the character is to be positioned within the grid.d0 is the width of space to the left of the
character, in dotsd1 is the width of the character itself, in dotsd2 is the width of space to the right of the
character, in dots.
If you're downloading several characters, you only need one ESC & NUL command, and you only need to
include n1 and n2 once, but you must include values for d0, d1, and d2 for each character.
ML 380 ( 96-02-03 )
Page 89

%Miscellaneous - Backspace
Miscellaneous - Backspace
The backspace command prints any data that's in the print buffer and moves the printhead one character
to the left. The actual width of the backspace depends on the current pitch. If you're using proportional
spacing, the BS command moves the printhead 1/10-inch to the left. If the printer is set for double wide
printing, the printhead will move back two characters to the left.
ML 380 ( 96-02-03 )
Page 90

%Carriage Return
Carriage Return
When the printer receives the carriage return command, it will print data from the print buffer and return
the printing position to the beginning of the line. If the Auto Line Feed item is On (factory default is Off) in
the menu, the printer will add a line feed to each carriage return. This command cancels one-line double
width printing.
ML 380 ( 96-02-03 )
Page 91

%Clear Buffer
Clear Buffer
This command clears all the data from the print buffer, but does not reset the printing features that have
been set using control codes.
ML 380 ( 96-02-03 )
Page 92

%Delete
Delete
This command deletes the last character sent to the printer. It will not delete graphics data, nor will it
delete a horizontal tab or skip. Control codes are not affected. If the justification is set for other than left
margin justification, the delete command will be ignored.
ML 380 ( 96-02-03 )
Page 93

%Most Significant Bit (MSB)
Most Significant Bit (MSB)
The ESC > command sets the most significant bit (MSB) of an 8-bit data input to 1. The ESC command
sets the MSB to 0. The ESC # command cancels MSB control established by either of these commands
and all data is interpreted exactly as sent from the computer.
ML 380 ( 96-02-03 )
Page 94

%Print Suppress
Print Suppress
Begin print suppress mode DC3 19 End print suppress mode DC1 17When the printer receives the
command to begin Print Suppress mode, it ignores all data until it receives the DC1 code. This means
that any data received after the print suppress command will be lost.
ML 380 ( 96-02-03 )
Page 95

%Reset to Defaults
Reset to Defaults
This command removes any data in the printer's buffer and returns the printer to the current menu
settings. It will override any features set on the printer's front panel. This is also called initialization.Many
software packages send the reset command to initialize the printer before or after printing. This is done to
make sure that settings from a previous print job don't accidentally carry over into the next one. However,
this could interfere with settings you have made on the control panel or through control codes.If your
software lets you add or modify initialization strings (also called setup strings), you can eliminate reset
commands you don't want, or add them where you want to be sure the printer is set to its defaults (the
menu settings). Check your software manual for details on modifying initialization strings.
ML 380 ( 96-02-03 )
Page 96

Chapter 6
%Cleaning the Printer
Cleaning the Printer
You should clean the printer every six months (or after about 300 hours of operation). To do this, turn the printer
OFF and use a clean, dry cloth to dust the area around the carriage shaft and platen. Be sure to remove any loose
particles of paper.
Don't use solvents or strong detergents on the cabinet!
ML 380 ( 96-02-03 )
Page 97

%Problem Solving
Problem Solving
Here are some of the most common printer problems and how to solve them. If you're still having
difficulties, see the Customer Service Guide, included with your printer. It will tell you how to get help from
your dealer or from OKIDATA, and how to get your printer serviced.
What if ...
... nothing happens at all when I turn on the printer?
The printer may not be plugged in. Check the power cord connection to the outlet. If you're using a power
strip, make sure it's turned on. Check to be sure that the fuse hasn't blown or that the circuit breaker
hasn't tripped.
... the printer doesn't print when the computer sends it data?
The printer may be deselected. If the SELECT light is out, press the SELECT button.
... the paper keeps jamming?
Be sure to set the top of form so that the paper is held in place by the bail. If the top of the page is below
the bail, it will catch on the bail as it advances. Don't use the FEED button to load paper into the printer,
use the bail lever (see pages 13 and 17). If you're using continuous forms, be sure that you have the
paper loaded squarely onto the tractors--if the sprocket holes are out of sync on either side, the paper will
jam.
If the paper does jam, back it out of the printer carefully using the platen knob.
Be sure to remove any shreds of paper from the printer before reloading paper. If
you're using continuous-form paper, you can do this by:
backing the paper out of the printer, folding the paper over three times to produce a page four sheets
thick, loading this quadruple-thick sheet onto the tractor pins, and turning the platen knob to bring the
paper around the platen.
This will clear the pieces of jammed paper out of the tractor path and bring them up
and out so you can dispose of them. Don't forget to remove the
quadruple-thick sheet from the printer before you return to
printing!
... there are dots missing on my printouts?
The head gap may not be set correctly.
Try moving the head gap lever to a lower setting (see page 11.) If
that doesn't help, the printhead may be damaged; call for
service.
... my word processor files don't print the way I have the menu and front panel set?
Before sending a file to the printer, many word processors send either
an "initialization string" or an I-Prime signal to the printer.
The initialization string contains codes that reset the printer to a
ML 380 ( 96-02-03 )
Page 98

default set of features; otherwise the printer might accidentally
print using features set for a previous job. These codes will
override panel or menu settings. Check your word processor's manual
to see if you can customize the initialization string; if so,
remove any codes that interfere with your printer's
settings.
The I-Prime signal is sent over the parallel
interface (pin 31) and will automatically override any settings you
have made using the front panel buttons. To eliminate this problem,
go into the Menu Select Mode and change the I-Prime item to
Invalid. This will cause the printer to ignore the I-Prime
signal.
... the FONT and PITCH buttons won't work?
The Operator Panel Functions item on the
printer menu can be used to disable these buttons. If the printer
is part of a customized system or if it is used by a number of
people, the system manager may have used this option to make sure
the printer is always set properly.
... none of the lights in the FONT indicator on the front panel are lit?
The lights in the FONT indicator on the front
panel all go out when the printer is operating in the utility mode.
The lights will come on again as soon as you select an LQ
font.
... I want to check the data my computer is sending to the printer?
Use the hexadecimal dump mode. To enter
this mode, hold the SELECT and TOF/PARK buttons down while you
switch on the printer. All data sent to the printer, including text
and printer commands, will print in both hexadecimal and ASCII
format. (In the ASCII format, all non-printable codes will be
represented by a period.) For example, this line of BASIC
code:
LPRINT CHR$(27);"0";CHR$(30);"
This is an example of a hexadecimal dump."
would print like this:
art sak2-1
To return to normal printing, switch the printer off, then on again.
... static electricity causes the paper to stick?
In cold, dry weather, static charges can build up on continuous-form paper. This can make the paper
cling to the paper separator. If you have this problem during high-volume printing jobs, try moving the
single sheet paper guides on the separator together so that the paper rests on the guides rather than on
the separator itself.
ML 380 ( 96-02-03 )
Page 99

Appendix A
Lower ASCII Character Set
Character Sets
Lower ASCII Character Set
These characters apply to all three character sets (Epson, IBM Set I, IBM Set II), except the characters in
red which print ony when IBM Character Set II is selected.
Hex. Dec. Character Width
00 0 NUL
01 1 SOH
02 2 STX
03 3 ETX
04 4 EOT
05 5 ENQ
06 6 ACK
07 7 BEL
08 8 BS
09 9 HT
0A 10 LF
0B 11 VT
0C 12 FF
0D 13 CR
0E 14 SO
0F 15 SI
10 16 DLE
11 17 DC1
12 18 DC2
13 19 DC3
14 20 DC4
15 21 NAK
16 22 SYN
17 23 ETB
18 24 CAN
ML 380 ( 96-02-03 )
Page 100

19 25 EM
1A 26 SUB
1B 27 ESC
1C 28 FS
1D 29 GS
1E 30 RS
1F 31 US
20 32 (SPACE) 30
Hex. Dec. Character Width
21 33 ! 18
22 34 " 30
23 35 # 30
24 36 $ 30
25 37 % 36
26 38 & 36
27 39 18
28 40 ( 24
29 41 ) 24
2A 42 * 30
2B 43 + 30
2C 44 , 18
2D 45 - 30
2E 46 . 18
2F 47 / 30
30 48 0 30
31 49 1 30
32 50 2 30
33 51 3 30
34 52 4 30
35 53 5 30
36 54 6 30
37 55 7 30
38 56 8 30
ML 380 ( 96-02-03 )
 Loading...