

Page 1

This manual contains cautions on how to use this product safety.
Before you use this product, please make sure that you read this manual.
User’s Manual
Basic Guide
Page 2

This manual supports the following models.
MB760dnfax, MB770dn, MB770dnfax, MB770dfnfax, ES7170dn MFP, ES7170dfn MFP, MB760, MB770,
MB770f, MPS5502mb, MPS5502mbf
● About the Manuals
The following user manuals are included with this product.
An electronic manual is included in the software DVD-ROM.
Step
Read the Setup Guide first.
1
Installing the machine
Setup Guide
Before using this machine, please read the
warnings and precautions to ensure the safe use of
this machine. We have also provided explanations
about necessary preparations such as installation
procedures and how to load the paper.
Step
After you have completed the setup of this machine, read the Basic Guide.
2
Testing the machine, copier, fax, and scanner
Basic Guide (This manual)
This guide describes each function and basic
methods of use. In addition, we have provided
an explanation about how to register data in the
address book.
Step
Read these guides as necessary.
3
Making full use of the machine
Advanced Guide
This guide describes the use of convenient print
functions such as summarizing or sorting, and
advanced functions such as job memory, user
authentication, and access control. Explanations
are also provided about settings that can be
configured from the operator panel, as well as
network settings.
• Checking the Product
• Installing the Machine
• Turning Power ON/OFF
• About Paper
• About Document Copies
• Using Each Function
• Printing
• Copying
• Fax
• Scanning
• Utilities that can be used with this
machine
• Printing Operations
• Copying Operations
• FAX Operations
• Scanning Operations
• Registering Functions and Settings
• Setting Items/Printing Reports
When there is a problem or you need to repair the machine
Troubleshooting Guide
This guide describes how to deal with error
messages, such as those that accompany paper
jams, describes regular maintenance and
cleaning of the device, and explains how to
replace consumables. The machine specifications
are included as well.
- 2 -
• Troubleshooting
• Maintenance
Page 3

Step
Read these guides as necessary. (continue)
3
Controlling/Setting from the Computer
Utility Guide
This guide describes the utility software for your
computer.
Using the TopAccess
TopAccess Guide
This guide describes how to use the
TopAccess.
Using the e-Filing
e-Filing Guide
This guide describes how to use the e-Filing.
• List of Utilities
• About AddressBook Viewer
• About e-Filing Backup/Restore Utility
• About TWAIN Driver and File
Downloader
• About Remote Scan driver
• About WIA driver
• Overview
• [Device] Tab Page
• [Job Status] Tab Page
• [Logs] Tab Page
• [Registration] Tab Page
• [Counter] Tab Page
• [User Management] Tab Page
• [Administration] Tab Page
• [My Account] Tab Page
• Functional Setups
• e-Filing OVERVIEW
• OPERATIONS WITH THIS
EQUIPMENT
• OVERVIEW OF e-Filing WEB UTILITY
• HOW TO MANAGE USER
BOXES/FOLDERS
• MANAGING DOCUMENTS
• EDITING DOCUMENTS
• SYSTEM ADMINISTRATION
- 3 -
Page 4

● About This Manual
Notation used in this manual
The following notations may be used in this manual.
If there is no special description, Windows 7 is used as Windows, Mac OS X 10.7 is used as Mac OS X, and MB770dn is used as the
machine for examples in this document.
Depending on your OS or model, the description on this document may be different.
• About the Administrator
- Administrator: The person who makes settings of this equipment and operates the equipment.
When the multiple persons use this equipment, the administrator is the person who manages the equipment.
- Network administrator: The person who manages the computer and the network.
Terms in this document
The following terms are used in this manual.
Note
• Indicates important information on operations. Make sure to read sections with this mark.
Memo
• Indicates additional information on operations. You should read sections with this mark.
• Indicates where to look when you want to know more detailed or related information.
• A warning provides additional information which, if ignored, may result in a risk of personal injury.
• A caution provides additional information which, if ignored, may result in equipment malfunction or damage.
Illustrations in this document
The illustrations of the machine used in this document may be different from what you actually see on your machine.
- 4 -
Page 5

Table of contents
About the Manuals....................................2
About This Manual....................................4
Notation used in this manual................................4
Terms in this document........................................4
Illustrations in this document................................4
Convenient Functions ..............................7
1 Printing.......................................... 11
Installing drivers on your computer......12
Operating Environment ..........................13
Windows Operating Environment ......................13
Macintosh Operating Environment.....................13
Preparations to print from Windows.....14
Setup via a network (Windows) .........................14
Setup via USB (Windows)..................................16
Preparations to print from Mac OS X ....19
Setup via a network (Mac OS X)........................19
PRINTING FROM WINDOWS ..................21
Before Using the Printer Driver ..........................21
Configuring the options ..........................................21
Setting the department code.................................. 22
Copying the PPD file for Windows ......................... 24
Printing From Application ...................................24
Considerations and limitations ...............................24
How to print............................................................24
PRINTING FROM Macintosh ..................26
Printing From Application on Mac OS X ............26
Considerations and limitations ...............................26
How to print from Mac OS X .................................. 26
2 Copying......................................... 27
HOW TO MAKE COPIES .........................28
Before Making Copies........................................28
Forgery prevention function ...................................28
Placing Originals ................................................28
Acceptable originals............................................... 28
Placing originals on the original glass....................28
Book-type originals ................................................29
Using the RADF (Reversing Automatic Document
Feeder) ................................................................29
Making Copies ...................................................31
Basic copying procedure........................................31
Scanning the next original during copying .............33
Interrupting copying and making other copies .......33
Proof copy.............................................................. 33
Selecting face down/up stacker ............................. 34
Bypass Copying .................................................35
Bypass copying on standard size paper ................ 36
Bypass copying on non-standard size paper ......... 40
Using the Offline Stapler ....................................42
BASIC COPY MODES ............................. 43
Before Using Copying Functions .......................43
Default settings ......................................................43
Confirming the set functions ..................................43
Clearing the set functions ...................................... 43
Restrictions on function combinations ................... 43
Paper Selection..................................................44
Automatic Paper Selection (APS).......................... 44
Selecting desired paper manually.......................... 44
Copying mixed-size originals in one operation ...... 45
Setting Original Modes.......................................46
Density Adjustment ............................................46
Enlargement and Reduction Copying ................47
Automatic Magnification Selection (AMS).............. 47
Specifying both the original size and the copy paper
size separately..................................................... 48
Specifying reproduction ratio manually.................. 49
Selecting Finishing Mode...................................49
Finishing modes and optional finishing devices..... 49
Sort/Group mode ................................................... 50
Staple sort mode.................................................... 51
Magazine sort ........................................................ 52
Duplex Copying..................................................52
Making a 1-sided copy........................................... 53
Making a 2-sided copy........................................... 54
Performing Copy & File ......................................54
Setting share folder................................................56
3 Fax .................................................57
SENDING/RECEIVING A FAX.................58
Sending a Fax....................................................58
Basic procedures ...................................................58
Handling an original ............................................... 59
Setting the transmission conditions ....................... 62
Specifying the recipient.......................................... 64
Other transmissions............................................... 67
Receiving a Fax .................................................69
Reception mode..................................................... 69
Originals and paper ............................................... 69
- 5 -
Page 6

Table of contents
CHECKING AND CANCELING THE
COMMUNICATIONS...............................71
Checking Communications ................................71
Checking reserved transmissions .......................... 71
Checking communication status (log) .................... 71
Canceling the Transmission...............................72
Canceling the memory transmission...................... 72
Canceling direct transmissions ..............................73
Canceling reserved transmissions ......................... 73
4 Scanning....................................... 75
BASIC OPERATION ................................76
Viewing Touch Panel for Scan Menu.................76
Default Settings..................................................76
Scan to e-Filing ..................................................77
Scan to File ........................................................77
Scan to E-mail....................................................81
Scan to USB ......................................................84
Web Service (WS) Scan ....................................86
Using Saved Scan Data .....................................87
Using scan data saved as e-Filing documents ...... 87
Using scan data saved as files .............................. 87
Viewing the Scan Job Status and Log ...............88
Viewing the scan job status ................................... 88
Viewing the scan job log ........................................ 88
5 Utilities that can be used with this
machine ....................................... 89
List of Utilities .........................................90
Common Utilities for Windows/Macintosh..........90
6 Index.............................................. 91
- 6 -
Page 7

1
2
3
4
5
6
● Convenient Functions
Automatically rotate sent or received
document data
Images are rotated when documents are sent
by fax, and the optimum paper size is
automatically selected from the available
paper, even if the orientation of received fax
documents differs from the orientation of the
paper. This allows you to send and receive
faxes without having to worry about paper size
or the orientation of documents.
Copy documents while saving paper
Using the duplex function or multiple page
function allows you to combine several different
pages onto a single page. For example, you
can print 16 pages of a document onto just two
pages by printing four pages on each side
(multiple page), and by printing on both sides of
the paper (duplex). You will save 14 pages
compared to copying every page.
A
A
Send received faxes, or save attachments
included with sent and received emails
This allows faxes received while you are
away from the machine to be sent to a laptop
computer to be checked. Configuring the
machine to save communication data saves
sent and received faxes or email
attachments to a pre-configured location.
Convenient Functions
A
A
A
A
AA
AA
A
A
Send
Save
B
B
- 7 -
Page 8

1
2
3
4
5
6
Convenient Functions
Use the machine as a network printer
High-quality images can be printed at high
speed from various applications (printing A4,
black documents : MB760:47pages/min,
MB770:52pages/min).
The machine can be connected to networks
and used to print documents from multiple
computers, which saves space in the office
and lowers costs.
Scan printed documents
The full-color scanner can scan documents.
Scans can be saved in shared folders on
computers or USB memory (Scan to Network
PC, Scan to USB Memory), or sent as
attachments via email (Scan to Email).
Scan documents with ease
Scan documents with the scanner after
scanning with the automatic document
feeder, or scan documents with the
automatic document feeder after scanning
with the scanner. This function is convenient
when documents have stapled pages mixed
in with them.
Print from various applications
The machine is equipped with PostScript3
emulation and PCL6 emulation, which allows
printing from a wide range of applications.
USB
memory
Scan To
USB Memory
Full-color
scan
Scan To
Network PC
Email
Scan To Email
Compatible with
PostScript3
&
PCL6
- 8 -
Page 9
1
2
3
4
5
6
Convenient Functions
Restrict the types of users who can use the
machine, or the types of functions that they can use.
Configuring user authentication means the
machine can only be used by users who have
been authorized by an administrator. This
reduces the likelihood that the machine will be
accessed by ordinary users, which helps to
prevent information from being leaked.
Configuring access restrictions means the
functions that are available to each user can also
be limited. This reduces unnecessary printing,
which helps to conserve toner and paper.
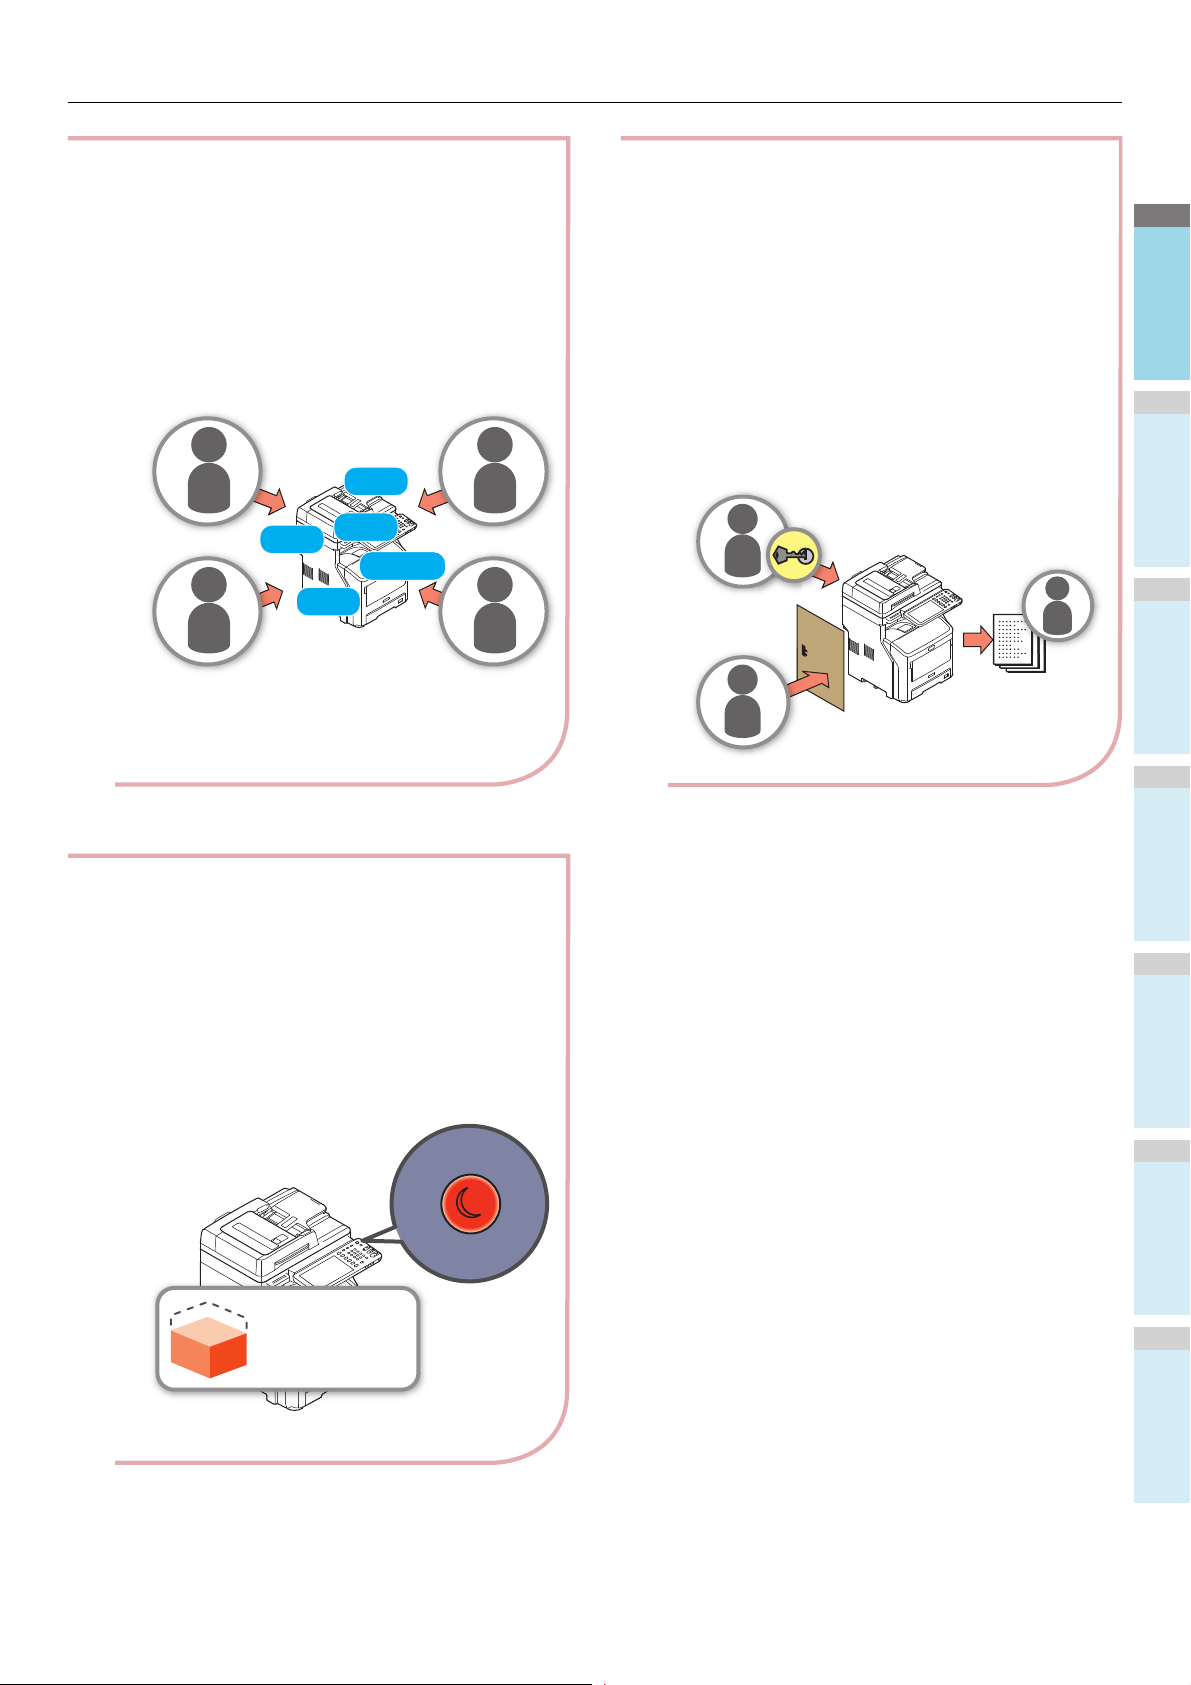
Perform several functions at the same time
The machine is capable of performing
several functions at the same time, including
sending a fax while copying a document, or
printing from a computer while scanning a
document. This allows several users to use
the machine at the same time.
Reducing power consumption when the
machine is not in use
When the machine has been idle for a certain
period of time, it automatically enters power
save mode to reduce power consumption. You
can enter the power save mode manually by
pressing the [POWER SAVE] button on the
operator panel. The [POWER SAVE] button will
glow red when Power Save Mode is active.
Fax &
Print &
Copy &
Scan &
Registration &
A
B
A
Power
consumption
- 9 -
Page 10

1
2
3
4
5
6
Convenient Functions
Increase the types and amounts of paper that
can be used.
Store frequently used functions and settings
in memory.
• [TEMPLATE]
A series of operations that is used regularly
can be stored in [TEMPLATE] on the touch
panel. For example, the following steps"Reduce B4 documents by 81% to A4 size,
copy and sort them, and create five sets"-can
be stored in [TEMPLATE] and then be
completed with a single touch of a key, using
fewer keystrokes and greatly simplifying
operation.
Original
document
A4
81%
reduction
A5
Sort and copy
five sets
Operate with a
single touch
- 10 -
Page 11

1
2
3
4
5
6
1
Printing
Installing drivers on your computer ··························· P.12
Operating Environment ············································ P.13
Preparations to print from Windows ·························· P.14
Preparations to print from Mac OS X·························· P.19
PRINTING FROM WINDOWS ····································· P.21
PRINTING FROM Macintosh······································ P.26
Page 12

1
2
3
4
5
6
Installing drivers on your computer
● Installing drivers on your computer
Connect the machine to your computer
For Windows
Connected
via a network
Configure the IP address and
other settings in Windows
Connected
via USB
For Macintosh
Connected via a network
Configure the IP address and
other settings of the machine
Install the printer drivers
Add the equipment to the computer configuration
Check operations from the computer
- 12 -
Page 13

1
2
3
4
5
6
● Operating Environment
Operating Environment
Windows Operating Environment
• Windows 8/Windows 8 (64-bit version)
• Windows 7/Windows 7 (64-bit version)
• Windows Server 2008 R2
• Windows Vista/Windows Vista (64-bit version)
• Windows Server 2008/Windows Server 2008 (64-bit
version)
• Windows XP/Windows XP (x64 version)
• Windows Server 2003/Windows Server 2003 (x64 version)
• Windows Server 2012
Note
• The machine will not operate under Windows 3.1/NT3.51/
NT4.0/Me/98/95/2000.
• Printer drivers may differ from the information listed here
due to driver updates.
Macintosh Operating Environment
Note
• Printer drivers may differ from the information listed here
due to driver updates.
• Mac OS X 10.4 to 10.8
- 13 -
Page 14

1
2
3
4
5
6
Preparations to print from Windows
● Preparations to print from Windows
Memo
Setup via a network (Windows)
Setup procedures
Turn the power to the machine and the computer ON.
• This machine is compatible with network Plug&Play. If all
connected computers are running Windows 8/Windows 7/
Windows Vista/Windows XP/Windows Server 2012/
Windows Server 2008/Windows Server 2003, or if the
connected router is compatible with network Plug&Play, an
IP address will be configured automatically, even if there is
no server on the network. There is no need to configure an
IP address for the computer and printer manually, so start
setting up the machine from Step 4.
Configure the IP address and other settings of the computer.
Configure the IP address and other settings of the machine.
Install the drivers and Standard TCP/IP Port using the
"software DVD-ROM" supplied with the machine, and
configure the network printer.
Set up the equipment
If there is no DHCP server on the network, you will need to
configure the IP address of the computer and printer manually.
If you have been instructed to configure a static IP address by
your company network administrator, internet provider, or
router manufacturer, you will need to configure the IP address
of the computer and printer manually.
Check the IP address of this equipment by printing the system
setting list or pressing the [SETTING] button on the operation
panel and [ADMIN] - [NETWORK] - [IPv4].
Turn the power to the machine and the
1
computer ON.
Configure the IP address and other settings
2
in Windows.
Note
• Skip to Step 3 if an IP address and other settings have
already been configured in Windows, or if they are
obtained automatically.
(1) Start Windows.
(2) Click [Start] and select [Control Panel].
(3) Click [View network status and tasks].
Note
• An incorrect IP address configuration may prevent the
network from working or the internet from connecting.
Check with your company network administrator or internet
connection provider the IP address and other settings that
can be configured for the machine.
• The servers (such as DHCP) that are available on the
network may differ depending on the network environment
being used. Check with your company network
administrator, internet provider, or router manufacturer.
• Administrator rights are required for the setup.
• Unless otherwise noted, procedures required when using
Windows 7 are listed in the section "Set up in Windows."
Screens and procedures may differ depending on the OS.
(4) Click [Local Area Connection], and click
[Properties] from the [Local Area
Connection Status] screen.
- 14 -
Page 15

Preparations to print from Windows
1
2
3
4
5
6
(5) Select [Internet Protocol Version 4 (TCP/
IPv4)] and click [Properties].
(2) When [AutoPlay] is displayed, click [Run
Setup.exe].
(3) Select the language and click "Next".
(6) Enter the numbers for the IP address,
(4) Select the device you want to use and click
"Next".
subnet mask, default gateway, and DNS
server, and click [OK].
(5) Read the license agreement and click "I
Agree".
Memo
• If an IP address is to be obtained automatically
from a DHCP server, select [Obtain an IP address
automatically] and do not enter an IP address.
• Do not enter numbers for the default gateway and
DNS server if they are not being used.Close
[Local Area Connection].
(7) Close [Local Area Connection].
Configure the IP address and other settings
3
of the machine.
Memo
• Skip to Step 4 if an IP address and other settings have
already been configured for the machine, or if they are
obtained automatically.
(1) Turn the power to the machine ON, check
that Windows has started, and load the
"Software DVD-ROM" supplied with the
machine.
- 15 -
Page 16

Preparations to print from Windows
1
2
3
4
5
6
(6) Read "Environmental Advice for Users"
(10)Click "Finish".
and click "Next".
(11)Click "Exit" button to finish.
(7) Select the driver you want to install and
click the "Multi Installation" button to install
them all at once.
Select [Start] - [Control Panel] - [Devices
4
and Printers].
(8) Click Network to search the device.
Setup is complete when an icon appears in the "Devices
and Printers" folder.
Setup via USB (Windows)
Installing PCL printer drivers
Note
• Computer administrator rights are required.
• Unless otherwise noted, procedures required when using
(9) When the target device is detected, select
the device in the list, then click "Next". The
installation begins.
If the device cannot be detected, specify
the device's IP address and install it
directly.
Windows 7 are listed. Screens and procedures may differ
depending on the OS.
Turn the power to the computer ON and
1
start Windows.
The "Add New Hardware Wizard" is displayed when the
machine power is ON. If this happens, click [Cancel] and
turn the power to the machine OFF before proceeding to
the next step.
- 16 -
Page 17

Preparations to print from Windows
1
2
3
4
5
6
Load the "Software DVD-ROM" supplied
2
with the machine.
When [AutoPlay] is displayed, click [Run
3
Setup.exe].
Select the language and click "Next".
4
Select the device you want to use and click
5
"Next".
Read "Environmental Advice for Users" and
7
click "Next".
Select the driver you want to install and
8
click the "Multi Installation" button to install
them all at once.
Turn on the power of the device by
9
following the on-screen guidance.
When the device cannot be detected, click
Read the license agreement and click "I
6
Agree".
the "Install using another port" button.
- 17 -
Page 18

Preparations to print from Windows
1
2
3
4
5
6
Click "Next".
10
Click "Exit" button to finish.
11
Select [Start] - [Control Panel] - [Devices
12
and Printers].
Setup is complete when an icon appears in the "Devices
and Printers" folder.
Memo
• To use this machine as a printer, install any of [PCL
driver], [PS driver] or [XPS driver].
• To use this machine as a facsimile, install [FAX driver].
• To use this machine as a scanner, install [Scanner
driver] and [ActKey].
- 18 -
Page 19

1
2
3
4
5
6
● Preparations to print from Mac OS X
Setup via a network (Mac OS X)
Note
• Mac OS X and printer drivers may differ from information
listed here due to driver updates.
The print method (protocol)
There is a method available to print from Mac OS X uses
Bonjour (Rendezvous).
Print method Features
Bonjour(Rendezvo
us)
Setup procedures
Uses the functions that are included as
standard with Mac OS X
Preparations to print from Mac OS X
(3) Enter the administrator password, and
click [Install Software].
(4) Click [Close] after the installation is
complete.
Bonjour
(Rendezvous)
Install the printer drivers.
■ Use Bonjour
Create a network printer.
Note
• If [Print & Fax] is open, click X to close it.
(1) Select [Apple Menu] - [System
Preference].
Configure the machine using Bonjour.
Turn the power to the machine ON.
1
Install the printer drivers.
2
Note
• Turn OFF any virus protection software.
(2) Click [Print & Scan].
(1) Insert the "Software DVD-ROM" into the
Macintosh.
(2) Double-click [XXXXX.pkg] within the [OKI]
> [Drivers] > [OSX] > [OS X 10.7-10.8 ]
folder.
- 19 -
Page 20

Preparations to print from Mac OS X
1
2
3
4
5
6
(3) Click [+].
(4) Click [Default] and select the machine
name is displayed, then click [Add].
(5) In [Name] Box, the name that you selected
in the list is displayed automatically.
Memo
• Clicking [Device Settings] in the control panel, and
[Printer Information] - [Network] displays the MAC
address.
(6) Select the option device, and click [OK].
Note
• The machine name will not be displayed correctly if the
printer driver cannot load the PPD file correctly. If this
happens, delete the machine and add it again.
- 20 -
Page 21

1
2
3
4
5
6
● PRINTING FROM WINDOWS
Before Using the Printer Driver
PRINTING FROM WINDOWS
Setting the [Device Settings] tab manually
Before printing, you have to configure the following options:
• Configuration Settings
To use optional devices such as optional trays or the
Finisher, you must first configure these devices. The
features of these optional devices are not available unless
you inform the system that the optional devices are
installed.
Before printing, you can configure the following option if
necessary:
• Department Code
You can use department codes to manage each job. For
example, a system administrator can check how many
sheets of copies a certain department has made. When the
Department code is enabled, you are prompted to enter a
department code before printing. If you enter the
department code in the corresponding field in advance, you
can print without having to do this every time. Ask your
administrator about the codes. When SNMP
communication between the equipment and your computer
is enabled, you are also prompted to enter the code before
printing.
Configuring the options
To use this equipment properly, you need to save the
configuration of the options installed on the [Device Settings]
tab menu after you installed the printer drivers. In the default
setting, you can obtain the configuration data of options
installed automatically by opening the [Device Settings] tab
menu. If SNMP communication between this equipment and
your computer is not available, or you want to configure options
manually, see the following page:
P.21 "Configuring options manually"
Note
• When SNMP communication between this equipment and
your computer is enabled, you can retrieve the option
configuration information by clicking [Update Now].
Note
• You need to log in to Windows with the “Administrator”
privilege.
Click [Start] menu and select [Devices and
1
Printers].
The Printers folder appears.
Select the printer driver for this equipment,
2
and then click [Printer properties] in the
[File] menu.
The printer driver properties dialog box appears.
• If the [File] menu is not displayed, press [Alt].
• If the dialog box displayed does not allow the printer
driver properties to be changed, follow the procedure
below.
- For Windows 7, some tab menus have a button
in the printer driver properties. To change the
properties, click on it. If the properties cannot be
changed, ask your network administrator.
• To change a network-installed printer driver, the
administrator privilege is necessary. Ask your network
administrator for details.
Configuring options manually
If SNMP communication between this equipment and your
computer is not available:
- 21 -
Page 22

PRINTING FROM WINDOWS
1
2
3
4
5
6
Display the [Device Settings] tab menu, and
3
set the following options.
Model Selection — This sets the model type. The setup
items of the printer driver are changed according to the
model selected.
Option — This option sets whether the following optional
devices are installed.
• Trays — This sets whether or not the Paper Feed Unit
is installed.
• Finisher — This sets whether or not the Inner Finisher
is installed.
Memo
• Setup items differ depending on the model and the
option configuration.
• For more information about each item, see the
descriptions about the [Device Settings] tab.
Advanced Guide
Click [Tray Settings].
4
The [Tray Settings] dialog box appears.
Set the following options and click [OK].
5
Tray 1 — Select the size and type of paper that is loaded
in the 1st tray.
Tray 2 — Select the size and type of paper that is loaded
in the 2nd tray.
Tray 3 — Select the size and type of paper that is loaded
in the 3rd tray.
Tray 4 — Select the size and type of paper that is loaded
in the 4th tray.
LCF — Select the size and type of paper that is loaded in
the Large Capacity Feeder (LCF).
MPT — Select the type of paper that is loaded in the
Multi-Purpose Tray (MPT).
Override Application Paper Source Settings — Select
this check box to use the paper source setting in the
printer driver rather than the application setting.
Memo
• Setup items differ depending on the model and the
option configuration.
• For more information about each item, see the
descriptions about the Tray Settings.
Advanced Guide
Click [Apply] or [OK] to save settings.
6
Setting the department code
When this equipment is managed by department codes, you
have to enter yours on the printer driver.
This allows a network administrator to check the number of
copies printed by specific department members. Also users
can check who submitted the print jobs, by touch panel display
and monitoring tools.
Please ask your administrator whether you should enter the
Department Code.
- 22 -
Page 23
PRINTING FROM WINDOWS
1
2
3
4
5
6
Note
• When the User Management setting is enabled, it is used to
manage a print job instead of the Department Code
Management setting. In this case, a user name that has
been entered to log in to your computer is used for the
authentication of the print job. Therefore, you do not need to
set your department code to the printer driver but you must
register your user name in advance. If your user name is not
registered, the print job is processed as an invalid one
according to the User Authentication Enforcement setting.
Also if a print job is sent in RAW format, it is processed
according to the RAW Print Job setting. For more
information about the User Authentication Enforcement
setting or the RAW Print Job setting, refer to the TopAccess
Guide.
Memo
• How the equipment performs printing for an invalid
department code print job, for which an invalid department
code is specified, varies depending on the Invalid
Department Code Print Job setting that can be set in the
TopAccess Administrator mode and whether SNMP
communication is enabled or not.
- When SNMP communication is enabled and Invalid
Department Code Print Job is set to [Store to invalid job
list], an error message will be displayed when an invalid
department code is entered.
- When SNMP communication is disabled and Invalid
Department Code Print Job is set to [Store to invalid job
list], the invalid department code print job will be stored
in the invalid department code print job list without
printing.
- When the Invalid Department Code Print Job is set to
[Print], the invalid department code print job will be
printed.
- When the Invalid Department Code Print Job is set to
[Delete], the invalid department code print job will be
deleted.
• A department code needs to be entered every time you
begin printing. If you have to use a different department
code for each print job, enter it when you begin printing.
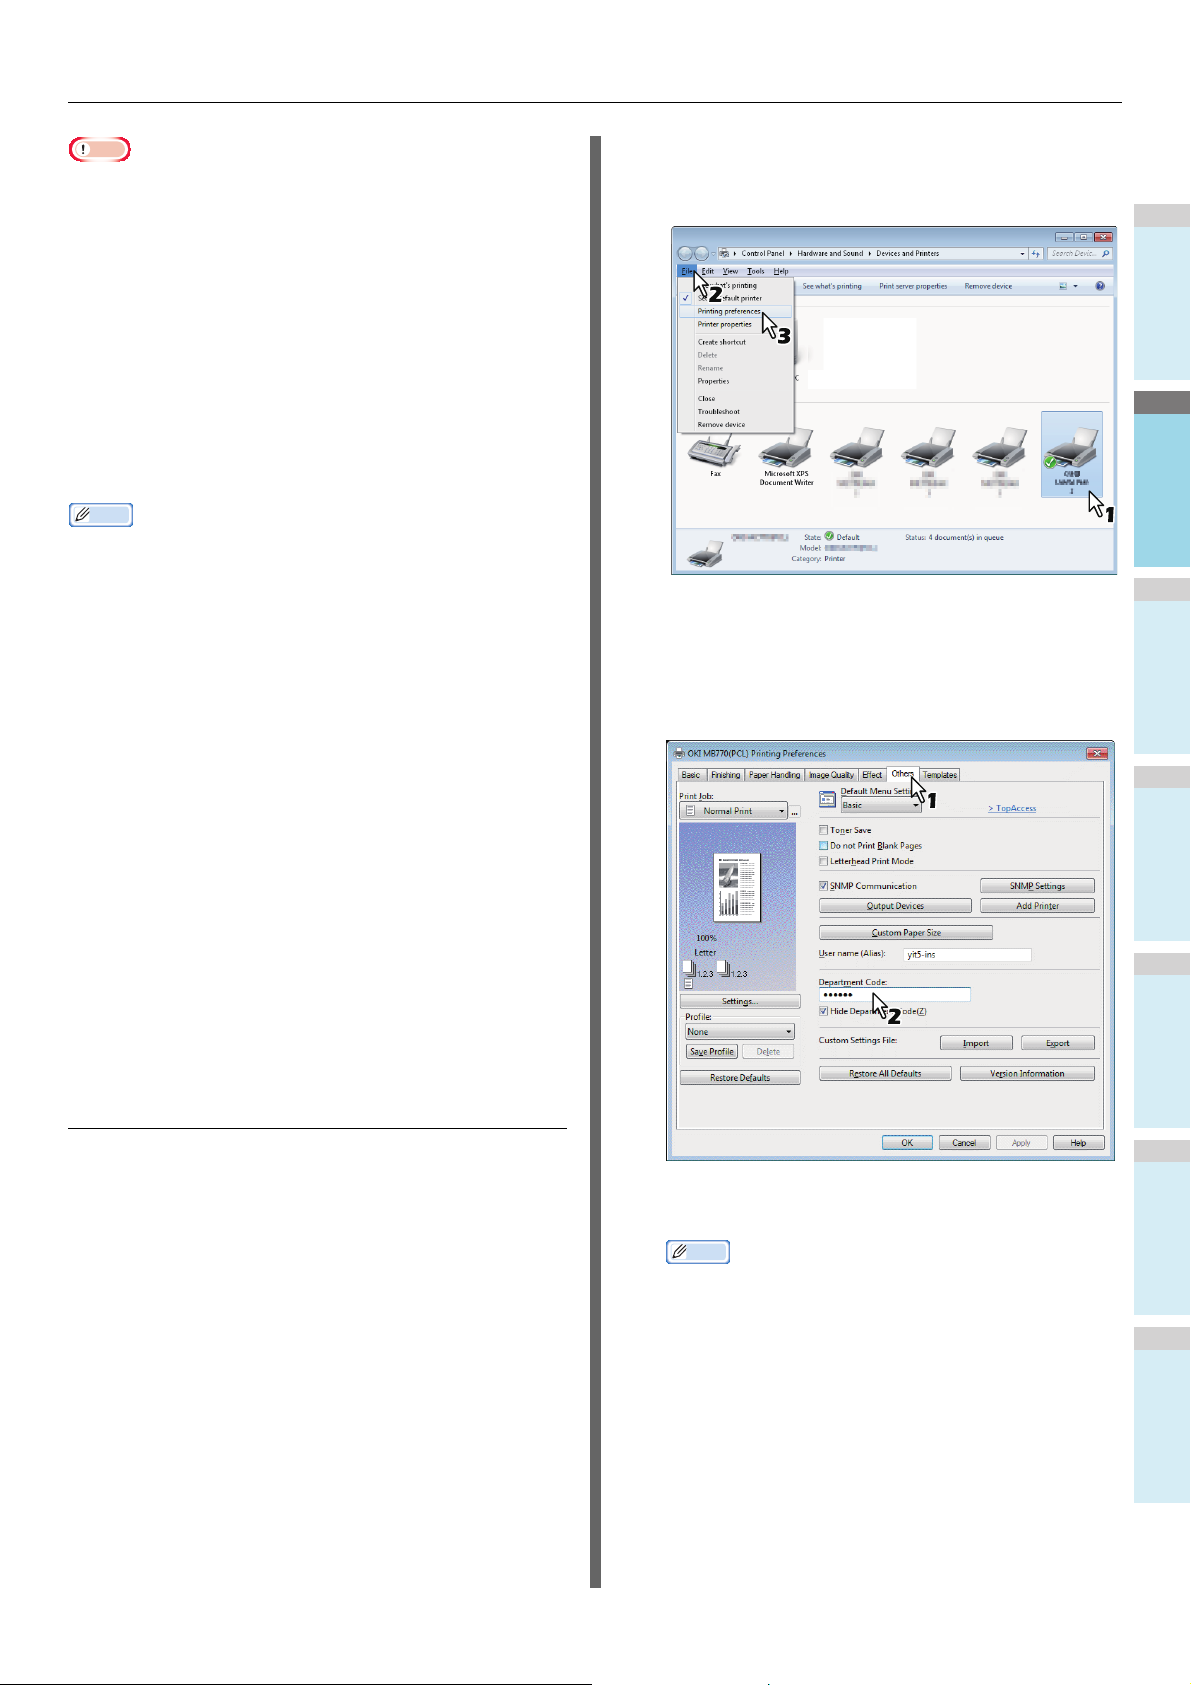
Select the printer driver of this equipment,
2
and then click [File] menu and select
[Printing Preferences].
• If the [File] menu is not displayed, press [Alt].
• The printing preferences dialog box appears.
Display the [Others] tab menu and enter
3
your department code in the [Department
Code] box.
Entering department code
Click [Start] menu and select [Devices and
1
Printers].
The Printers folder appears.
- 23 -
In the [Department Code] box, you can enter a
department code within 63 characters.
Memo
• A department code must consist of one-byte
characters such as numbers from 0 to 9, letters of the
alphabet from A to Z (both capital and small ones), a
hyphen (-), an underscore (_), and a period (.).
Click [Apply] or [OK] to save the settings.
4
Page 24

PRINTING FROM WINDOWS
1
2
3
4
5
6
Copying the PPD file for Windows
The software DVD-ROM contains a printer description file for
popular Windows applications. For applications not allowing
the automatic installation of PPD files, copy the PPD file to a
proper directory in order to enable printer-specific settings in
the [Print] dialog box or the [Page] Setup dialog box.
Printing From Application
This section describes how to print a document from
application.
P.24 "Considerations and limitations"
P.24 "How to print"
Considerations and limitations
• When the User Management setting is enabled, it is used
to manage a print job instead of the Department Code
Management setting. In this case, a user name that has
been entered to log in to your computer is used for the
authentication of the print job. Therefore, you do not need
to set your department code to the printer driver but you
must register your user name in advance. If your user
name is not registered, the print job is processed as an
invalid one according to the User Authentication
Enforcement setting. Also if a print job is sent in RAW
format, it is processed according to the RAW Print Job
setting. For more information about the User Authentication
Enforcement setting or the RAW Print Job setting, refer to
the TopAccess Guide.
When the Windows Domain Authentication is used for the
User Management Setting, your computer must log in the
domain.
• Some print options can be set from both the application and
the printer driver, such as collation. If the collation is set
from the application, documents may not be properly
printed. If that happens, use the printer driver to set the
collation. Depending on the application, some print options
such as the orientation need to be set from the application.
For print options that can be set from both the application
and the driver, refer to the manual of the application.
Cautionary points when using the PS3 printer driver
• When printing with the PS3 printer driver from Adobe
Acrobat, this option is disabled.
• When any of the following functions is set in the PS3 printer
driver, the print function will work appropriately even if print
data are generated in the application side since this
happens in the printer driver side by ignoring the passthrough printing of the application.
- Print to Overlay file
- Print Overlay Image
- Nin1
- Booklet
- Interleave (Duplicate)
- Templates printing
-Print Paper Size
- Image Scale
-Poster Print
- Tandem Print
How to print
Once you have installed the printer driver and configured it
properly, you can print directly from most Windows
applications. Simply choose the Print command from your
application.
You can print using the various functions by setting print
options on the printer driver.
Printing from Windows applications
The following describes an example for printing from Notepad
on Windows 7.
Open a file and select [Print] from the [File]
1
menu of the applications.
The [Print] dialog box appears.
Select the printer driver of the equipment to
2
be used and click [Preferences].
The printing preferences dialog box appears.
Memo
• The procedures for displaying the properties dialog for
the printer driver may be different depending on the
application that you are using. See your application’s
manual about displaying the machine properties dialog
box.
- 24 -
Page 25

PRINTING FROM WINDOWS
1
2
3
4
5
6
Setting the print options on each tab
3
according to how you want to print.
• Setting the print options varies depending on how you
want to print a document.
• You can also set the print options using setting profiles.
Click [OK] to save the settings.
4
Click [Print] to print a document.
5
Cautionary points when the [Enter the user
credentials manually] option is used
When this option is enabled on this equipment, you are
prompted to enter your user name and password before
printing a document.
When the dialog box below appears, enter your user name and
password, and then click [OK].
Note
• Up to 128 characters can be entered in the [User Name]
box, and up to 64 characters in the [Password] box.
• The values entered in the above boxes are not stored.
Therefore, you must enter your user name and password
every time you print a document.
• You can make settings for this option on the [Device
Settings] tab.
- 25 -
Page 26

1
2
3
4
5
6
PRINTING FROM Macintosh
● PRINTING FROM Macintosh
Printing From Application on Mac OS X
Considerations and limitations
• If any double-byte character is included in the user name or
document name when printing is performed, the printing job
is displayed with [OSX User] or [OSX Document] on the
touch panel display of the equipment. The user name and
document name are displayed as they are only for one-byte
characters.
• The Cover Pages option of the Printer Features menu and
the booklet printing cannot be used at the same time.
• The Cover Pages option of the Printer Features menu and
the N-up printing (multiple pages per sheet) cannot be used
at the same time.
• The Cover Pages option of the Printer Features menu and
the Cover Page option for sending a print job with a banner
page cannot be used at the same time.
• The e-Filing function cannot be used together with Custom
Paper Size, Magazine Sort, Hold Print, Proof Print, or
Private Print.
• To perform proof printing, private printing, hold printing,
scheduled printing or e-Filing on Mac OS X 10.5, use LPR,
AppleTalk or Bonjour.
• To perform proof printing, private printing, hold printing,
scheduled printing or e-Filing on Mac OS X 10.6.x to Mac
OS X 10.8.x, use LPR or Bonjour.
• To use the user authentication function on Mac OS X
10.4.x, perform the domain settings on [Applications] >
[Utilities] > [Directory Access] > [Services] > [BSD Flat and
NIS].
• To use the user authentication function on Mac OS X
10.5.x, perform the domain settings on [Applications] >
[Utilities] > [Directory Utilities] > [Services] > [BSD Flat and
NIS].
• To use the user authentication function on Mac OS X 10.6.x
to Mac OS X 10.8.x, perform the domain settings on
[Accounts] > [Login Option] > [Network Account Server] >
[Open the Directory Utility] > [Services] > [BSD Flat and
NIS].
Printing from Macintosh applications
Open a file and select [Page Setup] from the
1
[File] menu of the application.
Select the name of the equipment in the
2
[Format For] box and specify the Page
Setup settings for your print job.
Setting the Page Setup varies depending on how you
want to print a document.
Click [OK] to save the Page Setup settings.
3
Select [Print] from the [File] menu of the
4
application.
In the dialog box that appears, make sure
5
the name of the equipment is selected at
the [Printer] box and specify the Print
settings for your print job.
How to print from Mac OS X
You do not need to switch printers before starting printing
because they are all managed under the setting of [Print & Fax]
of [System Preferences]. Once a printer is added to the Printer
List, you can select any printer directly from the [Page Setup]
dialog box or the [Print] dialog box.
Setting options and printing from
Macintosh Computers
In Mac OS X applications, print options are set from both the
[Page Setup] dialog box and the [Print] dialog box.
- 26 -
Setting the Print Setup varies depending on how you
want to print a document.
Note
• The [Print] dialog boxes vary depending on
applications.
Click [Print] to print a document.
6
Note
• The content set in the [Print] dialog box can be saved
as [Presets]. Select [Save as] in the [Presets] box and
save it under the desired name. If you use this preset
content as a default setting, select it in the [Presets]
box.
Page 27

1
2
3
4
5
6
2
Copying
HOW TO MAKE COPIES ··········································· P.28
BASIC COPY MODES ··············································· P.43
Page 28

1
2
3
4
5
6
HOW TO MAKE COPIES
● HOW TO MAKE COPIES
Before Making Copies
Forgery prevention function
This equipment has a forgery prevention function. Therefore,
scan or copy function might not operate correctly.
• Do not place any heavy objects (8 Kg(18lb.) or over) on the
original glass and do not press on it with force.
• When using the RADF, be sure to place A5-size originals in
a landscape direction, aligning the guides.
• A maximum of 1000 sheets can be scanned per 1 copy job
or up until the embedded memory becomes full.
Placing originals on the original glass
Placing Originals
Acceptable originals
When the RADF (Reversing Automatic Document Feeder) is
used, 2-sided originals can be automatically scanned one
sheet after another. When the original glass is used, originals
such as OHP films, tracing paper, booklet or 3-dimensional
objects, that cannot be placed on the RADF can be scanned,
as well as plain paper.
Location
Original glass Length:
RADF Legal 14
Maximum
size
216mm
(8.5")
Width:
355.6mm
(14")
(8.5 x 14")
Paper weight Original size
-
60 - 105 g/m
(16 - 28lb.)
A/B format:
A4, A5, A6, B5,
Folio, 16K
LT f o r m a t :
Letter, Legal,
Legal 13, Legal
13.5, EX, ST,
8.5SQ-R
2
1-sided originals:
A/B format:
A4, A5, A6, B5,
Folio, 16K
LT f o r m a t :
Letter, Legal,
Legal 13, Legal
13.5, Legal 14
EX, ST, 8.5SQ-R
2-sided originals:
A/B format:
A4, A5, B5, Folio,
16K
LT f o r m a t :
Letter, Legal,
Legal 13, Legal
13.5, EX, ST,
8.5SQ-R
The original glass can be used for originals such as OHP films
or tracing paper, as well as plain paper, that cannot be placed
on the RADF.
Do not place any heavy objects (8 Kg(18lb.) or over) on the
original glass and do not press on it with force.
Breaking the glass could injure you.
Raise the RADF.
1
Place the original with its face down on the
2
original glass and align it with the left rear
corner of the glass.
When you copy highly transparent originals
When you copy highly transparent originals such as OHP
films or tracing paper, place a blank sheet, which is the
same size as the original or larger, over the original.
Note
• Automatic size detection does not work properly when A/B
format originals are used in equipment for North America. It
does not work properly when LT format originals are used in
equipment other than that for North America.
• In some models, automatic size detection does not work
properly when K format paper is used for printing. (K format
is a standard paper size in China.)
- 28 -
Lower the RADF carefully.
3
Page 29

HOW TO MAKE COPIES
1
2
3
4
5
6
Book-type originals
You can place book-type originals on the original glass.
Do not place any heavy objects (8 Kg(18lb.) or over) on the
original glass and do not press on it with force.
Breaking the glass could injure you.
Raise the RADF.
1
Open the desired page of the original and
2
place it with its face down. Align it with the
left rear corner of the original glass.
When you make 2-sided copies from book-type originals
in modes such as book-type original to 2-sided copying or
dual page copying, align the center of the original on the
yellow indicator line of the original glass.
Using the RADF (Reversing Automatic Document Feeder)
• When scanning the duplex original with the RADF, do
not put your hand on the RADF. Paper may damage the
hand.
• When scanning the duplex original with the RADF, do
not put an object on the RADF. This could cause a paper
misfeed.
Precautions
Do not use the types of originals 1 to 9 shown below because
such originals may cause misfeeding or damage to the
equipment.
1. Badly wrinkled, folded or curled originals
2. Originals with carbon paper
3. Taped, pasted or cut-out originals
4. Originals with multiple perforations such as loose leaf
paper
5. Clipped or stapled originals
6. Originals with holes or tears
7. Damp originals
8. OHP films or tracing paper
9. Coated paper (with wax, etc.)
Use the types of originals 10 and 11 shown below with extra
care.
10. Originals which resist sliding with the fingers, or
surface-treated originals (The sheets of such originals may
not be separated.)
11. Folded or curled originals (They should be fully
smoothed out before being used.)
1342
6
Lower the RADF carefully.
3
Note
• Do not lower the RADF forcibly when the original is
very thick. There will be no problem in copying even if it
is not fully lowered.
• Do not look directly at the original glass because
intensive light may escape during copying.
P.48 "Specifying both the original size and the copy
paper size separately"
89510
When black streaks appear
If the scanning area or the guide area is dirty, image trouble
such as black streaks may occur on printouts. Weekly cleaning
of these areas is recommended.
7
11
- 29 -
Page 30

HOW TO MAKE COPIES
1
2
3
4
5
6
Continuous feed mode
The feeding mode is set at “continuous feed mode” by default.
Once you set the originals and then press the [START] button,
they are scanned page by page continuously. It is useful when
you want to copy more than one original at one time.
Align all the originals.
1
Collate the originals in the order that you want them to be
copied. The top sheet of the originals will be copied first.
Place the originals with their face up and
2
align the side guides to the original length.
Note
• Regardless of their sizes, originals are acceptable up
to 100 sheets (35 to 80 g/m
(0.62") in height.
• For mixed-size originals, see the following page:
P.45 "Copying mixed-size originals in one
operation"
2
(9.3 to 20 lb.)) or 16 mm
Memo
• When there are too many originals to be scanned at one
time, divide the originals into several sets before copying.
Place the first set of the originals and then press
[CONTINUE] on the touch panel while the data of this set
are being scanned. When this scanning is finished, place
the next set of the originals and press the [START] button on
the control panel. (If you press [CONTINUE], this button
may not work shortly before scanning is finished.)
Single feed mode
When the feeding mode is set at “single feed mode”, an
original is fed automatically as it is placed on the RADF. It is
For long originals
The original stopper prevents the scanned originals from
falling off. Pull it out from the RADF and raise the substopper.
Note
• Lower the sub-stopper and slightly lift the original
stopper to push it back in after you have finished using
it.
2
1
useful when you want to copy only 1 original sheet.
Align the side guides to the original length.
1
Insert the original with its face up and
2
straight along the side guides.
The original is automatically pulled in and then the menu
of step 3 will be displayed on the touch panel.
Note
• Be sure to let go of the original when it starts being
pulled.
- 30 -
Page 31

HOW TO MAKE COPIES
1
2
3
4
5
6
If there is another original, insert it in the
3
same way.
Making Copies
Basic copying procedure
Make copies following the procedure below.
2
After all the originals are pulled in, press
4
[JOB FINISH].
Memo
• If you want to stop copying, press [JOB CANCEL].
1
Make sure that paper is placed in the
1
tray(s).
534
Place the original(s).
2
For the types and sizes of originals and how to place
them, see the following pages:
P.28 "Acceptable originals"
P.29 "Using the RADF (Reversing Automatic
Document Feeder)"
P.28 "Placing originals on the original glass"
P.29 "Book-type originals"
Key in the desired number of copies if you
3
want more than one copy.
Press the [CLEAR] button on the control panel to delete
the number keyed in.
Select the copy modes as required.
4
P.43 "BASIC COPY MODES"
- 31 -
Page 32

HOW TO MAKE COPIES
1
2
3
4
5
6
Press the [START] button on the control
5
panel.
Copying starts. The paper exits with its copied side down.
Note
• Be careful because the paper exiting area and the
paper itself are hot.
The menu shown below may appear when you are using
particular modes.
Stopping and restarting copying
Press the [STOP] button on the control
1
panel.
Copying or scanning stops.
Press [JOB CANCEL] on the touch panel to
2
stop copying. Press [NEXT COPY] on the
touch panel or the [START] button on the
control panel to restart.
This menu appears when “SADF (single feed mode)” is
set to the document feeder or in modes where the original
is placed on the original glass and the scanned data are
temporarily stored in the memory, such as sort copying or
1-sided to 2-sided copying. When this menu appears,
follow the procedure below.
Memo
• There are different messages displayed on the upper
part of the menu for when the originals are scanned
through the RADF and for when scanning is performed
6
7
through the original glass.
Place the next original, and then press the
[START] button on the control panel or
[NEXT COPY] on the touch panel.
Scanning starts. (When “SADF (single feed mode)” is set
to the document feeder, an original is fed automatically
when it is placed on the RADF.)
Press [JOB FINISH] on the touch panel after
all the originals have been scanned.
Copying starts.
Memo
• If you want to stop copying, press [JOB CANCEL].
• When the tray runs out of paper during copying,
another tray can feed paper instead if it holds paper of
the same size and orientation, and copying will not
stop. If there is no such tray, copying stops and “Add
paper” appears on the touch panel. In this case, add
paper to the tray.
When you press [JOB CANCEL], the scanned data will be
deleted and any waiting jobs will be performed.
Memo
• Even if you do not press [JOB CANCEL], the scanned
data will be deleted by means of the automatic function
clear.
- 32 -
Page 33

HOW TO MAKE COPIES
1
2
3
4
5
6
Scanning the next original during copying
Even if copying is in progress or “READY (WARMING UP)” is
displayed on the touch panel, you can scan the next original
(auto job start).
Place the original(s).
1
Set the number of copy sets and the copy
2
modes as required.
Note
• The new job starts in the copy modes that you
previously selected unless you select other modes.
Press the [START] button on the control
3
panel.
Memo
• A maximum of 1000 sheets can be scanned per 1 copy
job or up until the embedded memory becomes full.
Interrupting copying and making other copies
You can interrupt the copy job in progress to make other copies
(interrupt copying). When restarting the interrupted job, you do
not have to reselect copy modes that have been set because
they are memorized in this equipment.
Note
• The following functions cannot be used together with
interrupt copying:
Cover sheet copying, Sheet insertion copying, Job build,
Store to e-Filing, Copy & File
• During interrupt copying, the mode cannot be changed to a
non-copying one, such as e-Filing, scanning, printing or fax.
To change the mode, first press the [INTERRUPT] button to
clear the interrupt copying.
Press the [INTERRUPT] button on the
1
control panel.
“Job interrupted job 1 saved” appears, and
“COPY(Interrupt)” is displayed on the function display.
Memo
• If the original is being scanned, the message above
appears after the scanning has finished.
Confirming auto jobs
You can confirm which jobs are in waiting on the touch panel or
cancel them as required. For details, see the following Guide:
Advanced Guide
Canceling jobs being scanned
Press the [STOP] button on the control panel to stop a job
while originals are being scanned.
When you press [JOB CANCEL] on the touch panel or the
[RESET] button on the control panel while the scanning is
being paused, the scanning will end. (In this case, the data
which were scanned before the job was paused will be copied.)
To restart the scanning, press the [START] button.
Replace the original with a new one.
2
Select other copy modes as required and
3
then press the [START] button on the
control panel.
Press the [INTERRUPT] button again after
4
the interrupt copying has finished.
“Ready to resume job 1” appears and the interrupted job
restarts.
Proof copy
When you make a large amount of copies, you can check if
they will be made exactly as you desire by copying only one
page before copying them all (proof copy). Then you can
change the modes or settings (e.g. the number of copy sets,
receiving tray, page number, time stamp, sort/stapling) after
checking the proof copy.
- 33 -
Page 34

HOW TO MAKE COPIES
1
2
3
4
5
6
Note
• If you want to change settings such as the reproduction
ratio, density, original mode or 1/2-sided copying, you must
finish the proof copy first. Then change these settings and
scan the original again.
Place paper in the tray(s).
1
Place the original(s).
2
Select the number of copy sets and copy
3
modes.
Press [PROOF COPY] on the touch panel.
4
“PROOF COPY is set. Press START button to copy.”
appears for approx. 2 seconds.
Change the number of copy sets and copy
6
modes as required after checking the proof
copy.
Modes or settings such as the number of copy sets, the
receiving tray, page number, time stamp, and sort/stapling
can be changed.
Note
• If you want to change settings such as the reproduction
ratio, density, original mode or 1/2-sided copying, you
must finish the proof copy first. Then change these
settings and scan the original again. Press [MEMORY
CLEAR] on the touch panel or the [RESET] button on
the control panel to end the proof copy.
Press the [START] button on the control
7
panel.
If you did not change the number of copies in step 6
above, the number of copies printed out will be one fewer
5
Note
• If [NON-SORT NON-STAPLE] or [GROUP] is selected
as a finishing mode, the mode will be changed to
[SORT] automatically.
Press the [START] button on the control
panel.
Scanning starts. 1 set of copies will be printed out.
than that previously set because you have already copied
one as a proof copy. (However, if the number of copies
you previously set was 1, another set of copies will be
printed out besides the proof copy.)
Selecting face down/up stacker
You can select the face down/up stacker if the Inner finisher is
installed.
Note
• The available face down/up stacker may be restricted
depending on copy modes and paper sizes.
• Face down/up stacker selection is set at automatic selection
by default.
Changing the face down/up stacker
The face down/up stacker currently selected is displayed on
the equipment status indication area. To change the face down/
up stacker, press [OUTPUT BIN]. Every time you press this,
the display changes from the face down/up stacker of the
equipment, the face down/up stacker of the Inner Finisher, and
automatic selection in this order.
- 34 -
Page 35

1
2
3
4
5
6
Current face down/up stacker
Face down/up stacker
auto-selection indication
[
OUTPUT BIN] button
Bypass Copying
When you make copies on OHP film, sticker labels, envelopes
or non-standard size paper, place the copy paper on the multipurpose tray (MPT). Bypass copying is also recommended for
copying on standard size paper which is not set in any of the
trays.
HOW TO MAKE COPIES
When placing copy paper, open the paper set cover then adjust
the manual feeding paper guide.
If thick paper cannot be fed, printing takes a long time after
feeding or the quality is poor, turn over the paper and place it
again as shown in the figure or place fewer sheets.
Memo
• If you select the paper size, you can utilize various functions
such as the automatic paper selection (APS) or the
automatic magnification selection (AMS). For details, see
the following Guide:
Advanced Guide
Open the multi-purpose tray for bypass copying.
If the paper is large, pull out the paper holder.
The operating procedure for bypass copying differs depending
on the paper size to be used. See the table below for the
operating procedure of each size.
Paper size Procedure
Other than
North America:
A4, A5, B5
North America:
Standard size
Others (Non-standard sizes) P.40 "Bypass copying on
Memo
Letter, Legal
Other than the
above
Envelope P.39 "Copying on an
P.36 "Copying on A4, A5 and
B5 size paper (in equipment
other than for North America) /
Letter and Legal size paper (in
equipment for North America)"
P.37 "Copying on other than
the above standard sizes of
paper"
envelope"
non-standard size paper"
• Bypass copying stops when the paper placed on the multipurpose tray (MPT) runs out during copying, even if the
paper of the same size is in any of the trays. Copying
restarts when paper is supplied to the multi-purpose tray
(MPT).
• When bypass copying has been completed, the [RESET]
button on the control panel blinks. Press this button to
switch bypass copying to normal copying using the trays.
• (Even if you do not press the [RESET] button, the bypass
copying mode will be cleared when the automatic function
clear mode kicks in after a specified period of time.)
- 35 -
Page 36

HOW TO MAKE COPIES
1
2
3
4
5
6
Bypass copying on standard size paper
Copying on A4, A5 and B5 size paper
(in equipment other than for North
America) / Letter and Legal size paper
(in equipment for North America)
Place the original(s).
1
Place the paper with its copy side face up
2
on the multi-purpose tray.
Select the same size button under “COPY”
4
as that of the paper you placed on the multipurpose tray.
The paper size is now set.
Press [PAPER TYPE] on the touch panel if
5
the paper type of the paper you placed on
the multi-purpose tray is other than plain
paper.
3
Note
• The height of the paper must not exceed the indicator
on the side guides.
• When you use more than one sheet of paper, fan the
sheets well before placing them on the multi-purpose
tray. Be careful not to cut your fingers when fanning.
• Do not push paper into the entrance of the multipurpose tray (MPT). This could cause a paper misfeed.
Open the paper set cover, then Align the
manual feeding paper guides to the paper
length, and close the paper set cover.
2
1
"Zoom" screen is automatically displayed.
- 36 -
Page 37

HOW TO MAKE COPIES
1
2
3
4
5
6
Select the paper type.
6
1) Select the paper type.
2) Press [OK].
Note
• If you select a wrong paper type, this could cause a
paper misfeed or significant image trouble.
• When you select a paper type, you can confirm it with
the icons displayed on the equipment status indication
area as shown below.
ENVELOPE 1
ENVELOPE 2
ENVELOPE 3
ENVELOPE 4
After setting the paper size and type, press
7
[OK].
The menu returns to the BASIC menu.
Select other copy modes as required, and
8
then press the [START] button on the
control panel.
• When you copy on sheets of OHP film, remove the
Paper type Icon
Note
copied OHP film one sheet at a time as they exit onto
the receiving tray. If the sheets of OHP film pile up,
they may get curled and may not be projected properly.
Copying on other than the above
standard sizes of paper
Place the original(s) and paper in the same
1
procedure noted in steps 1 to 5 in "Copying
on A4, A5 and B5 size paper (in equipment
Paper type Icon
PLAIN
PLAIN (THIN)
THICK 1
THICK 2
THICK 3
THICK 4
—
other than for North America) / Letter and
Legal size paper (in equipment for North
America)" ( P. 3 6)
Press [SIZE SETTING] on the touch panel.
2
THICK 5
SPECIAL 1
SPECIAL 2
SPECIAL 3
- 37 -
Page 38

HOW TO MAKE COPIES
1
2
3
4
5
6
Press the button of the same size as the
3
paper you placed on the multi-purpose tray.
The selected size will be registered as an “OTHER” size.
Press [OTHER] under “COPY”.
4
Select the paper type.
6
1) Select the paper type.
2) Press [OK].
Note
• If you select a wrong paper type, this could cause a
paper misfeed or significant image trouble.
• When you select a paper type, you can confirm it with
the icons displayed on the equipment status indication
area. For details, see the following page:
Table in step 6 in "Copying on A4, A5 and B5 size
paper (in equipment other than for North America) /
Letter and Legal size paper (in equipment for North
America)" ( P.36)
After setting the paper size and paper type,
7
press [OK].
The paper size is now set to the one registered as
“OTHER” size.
Note
• If the paper size is not selected in this step, copying
may be slowed down.
Press [PAPER TYPE] if the paper you
5
placed on the multi-purpose tray is other
The menu returns to the BASIC menu.
Select other copy modes as required, and
8
then press the [START] button on the
control panel.
than plain paper.
- 38 -
Page 39

HOW TO MAKE COPIES
1
2
3
4
5
6
Copying on an envelope
Note
• The acceptable envelope sizes are as follows:
DL (110 mm x 220 mm), COM9 (3 7/8" x 8 7/8"), COM10 (4
1/8" x 9 1/2"), Monarch (3 7/8" x 7 1/2"), CHO-3 (120 mm x
235 mm), CHO-4 (90 mm x 205 mm), YOU-4 (105 mm x
235 mm)
Notes for using envelopes
Do not use the following envelopes as they may cause paper
misfeeding or damage to the equipment.
1. Badly curled, wrinkled or folded envelopes
2. Extremely thick or thin envelopes
3. Wet or damp envelopes
4. Torn envelopes
5. Envelopes which include the contents
6. Non-standard size envelopes (ones with a special
shape)
7. Envelopes with eyelets or windows
8. Envelopes sealed with adhesive paste or tape
9. Partly-opened or perforated envelopes
10. Envelopes with special coating on the surface
11. Envelopes with glue or double-sided adhesive tape
Place the envelope on a flat clean surface
2
and press it with your hands in the
direction of the arrow to expel any air.
Press it well to prevent the flap from rolling upward.
Correct any bent corners on the envelope.
Place the envelope with its copy side face
3
up on the multi-purpose tray.
Place the envelope with its flap side at the front.
1
4
Note
• Store envelopes at room temperature and away from heat
and moisture.
Place the original on the original glass.
1
5 687
2
91110
3
1
Open the paper set cover, then Align the
4
manual feeding paper guides to the paper
length, and close the paper set cover.
2
1
"Zoom" screen is automatically displayed.
Press [SIZE SETTING] on the touch panel.
5
ABC
- 39 -
Page 40

HOW TO MAKE COPIES
1
2
3
4
5
6
64 - 216 mm
127 - 356 mm
1
2
Press the button of the same size as the
6
envelope you placed on the multi-purpose
tray.
Bypass copying on non-standard size paper
You can use non-standard size paper within the sizes shown
on the right.
The size of the selected envelope will be registered as an
“OTHER” size.
Press [OTHER] under “COPY”.
7
The paper size is now set to the size of the envelope
placed on the multi-purpose tray. The paper type is
automatically set to [ENVELOPE].
Select other copy modes as required, and
8
then press the [START] button on the
control panel.
Copying starts.
When the Inner Finisher is installed, the envelope exits to
the receiving tray of the finisher.
Note
Place the original on the original glass.
1
Place the paper with its copy side face up
2
on the multi-purpose tray.
Note
• The height of the paper must not exceed the indicator
on the side guides.
• When you use more than one sheet of paper, fan the
sheets well before placing them on the multi-purpose
tray. Be careful not to cut your fingers when fanning.
• Do not push paper into the entrance of the multipurpose tray (MPT). This could cause a paper misfeed.
Open the paper set cover, then Align the
3
manual feeding paper guides to the paper
length, and close the paper set cover.
• Every 10 copies, take the envelopes out from the face
down/up stacker.
"Zoom" screen is automatically displayed.
- 40 -
Page 41

HOW TO MAKE COPIES
1
2
3
4
5
6
Press [CUSTOM PAPER] on the touch
4
panel.
6
Memo
• To register dimension data into the memory, see the
following page:
P.41 "Registering non-standard size in the memory"
Select other copy modes as required, and
then press the [START] button on the
control panel.
Registering non-standard size in the
memory
Key in the dimension.
5
1) Press [Length] and key in the value. (127mm to
356mm)
2) Press [Width] and key in the value. (64mm to 216mm)
3) Press [OK].
Follow the same procedure noted in steps 1
1
to 6 in "Bypass copying on non-standard
size paper" ( P.4 0 ) .
Register dimensions.
2
1) Select a desired memory number.
2) Press [Length] and key in the value. (127mm to
356mm)
3) Press [Width] and key in the value. (64mm to 216mm)
4) Press [MEMORY].
Length and width are indicated as shown on the right:
To call up the dimension data registered previously, press
the desired button from [MEMORY 1] to [MEMORY 4],
and then press [OK].
- 41 -
Page 42

HOW TO MAKE COPIES
1
2
3
4
5
6
Using the Offline Stapler
You can use the stapler when installing the offline stapler.
Insert paper deep into the stapler.
1
Paper is automatically stapled.
- 42 -
Page 43

1
2
3
4
5
6
● BASIC COPY MODES
Before Using Copying Functions
Default settings
This equipment is under its “default settings” when the power is
turned ON, namely, if no setting change has been applied yet,
the equipment’s settings return to the default ones when the
energy saving mode is cleared or the [RESET] button on the
control panel is pressed. The default settings for basic copy
modes at installation are shown below.
Item Default setting
Reproduction ratio 100%
Copy quantity 1
Paper selection Automatic Paper Selection
Simplex/Duplex 1-sided original -> 1-sided copy
Density adjustment Automatic adjustment
Original mode TEXT/PHOTO
Finishing mode When using the original glass:
Feeding mode when using the
RADF
The default settings are changeable.
(APS)
NON-SORT NON-STAPLE
When using the RADF
(Reversing Automatic Document
Feeder):
SORT
Continuous feed mode
BASIC COPY MODES
Switching to the function setting menu
To change the functions on the current menu, press the
corresponding buttons. The desired setting menu will then
appear.
Clearing the set functions
If you want to clear any copy function setting, press [RESET]
on the corresponding setting menu.
Confirming the set functions
If you press [SETTINGS] on the touch panel, the menu shown
below is displayed. On this menu, you can view the functions
that are currently set.
Clearing all settings changed
When you press the [RESET] button on the control panel, all
the function changes will be cleared.
Even if you do not do so, the changes will be cleared if the
equipment is left idle for 45 sec. (default setting).
Restrictions on function combinations
Several copy functions can be used together. However some
functions may not be used with other ones. For details, see the
following Guide:
Advanced Guide
- 43 -
Page 44

BASIC COPY MODES
1
2
3
4
5
6
Paper Selection
Automatic Paper Selection (APS)
When copying from the RADF (Reversing Automatic
Document Feeder), this equipment detects the size of an
original and selects paper of the same size automatically. This
function is called Automatic Paper Selection (APS).
Memo
• When paper of the size you want to use is not in any tray,
place it in a tray or on the bypass multi-purpose tray (MPT).
P.35 "Bypass Copying"
Place paper in the tray(s).
1
When using bypass copying, be sure to set the paper
size.
Memo
• For the original sizes detectable, see the following page:
P.28 "Acceptable originals"
• Some original sizes may not be detected with this function.
In this case, select the desired size manually.
P.44 "Selecting desired paper manually"
Place paper in the tray(s).
1
Place the original(s) in the RADF.
2
Press [APS] on the touch panel.
3
Place the original(s).
2
Press the tray button corresponding to the
3
desired paper size.
Select other copy modes as required, and
4
then press the [START] button on the
control panel.
The paper selection mode is now set at Automatic Paper
Selection.
Memo
• The paper selection mode is set at Automatic Paper
Selection by default.
Select other copy modes as required, and
4
then press the [START] button on the
control panel.
Selecting desired paper manually
You need to select paper by yourself when copying by placing
the original on the original glass, or when copying the following
originals whose sizes cannot be detected correctly:
• Highly transparent originals (e.g. OHP film, tracing paper)
• Totally dark originals or originals with dark borders
• Non-standard size originals (e.g. newspapers, magazines)
- 44 -
Page 45

BASIC COPY MODES
1
2
3
4
5
6
When original widths are the same
Copying mixed-size originals in one operation
You can copy a set of originals whose widths are the same and
lengths are different, using the RADF (Reversing Automatic
Document Feeder).
The original sizes that can be mixed are as follows:
Other than North America: A4, FOLIO
North America: Letter, Legal
Place paper in the tray(s).
1
The multi-purpose tray cannot be used. Use the trays.
Adjust the side guides to the widest
2
original, and then align the originals
against the side guide on the front side.
Press [AMS] to make copies on paper in
5
one size. To make copies on paper of the
same size as the originals, press [OK] or
[CANCEL] so that the menu returns to the
BASIC menu, and then press [APS].
When [AMS] is selected:
Note
• Before you use Automatic Paper Selection, be sure
that all paper sizes corresponding to the original sizes
have been placed in the tray.
Select other copy modes as required, and
6
Press [ZOOM] on the touch panel.
3
Press [MIXED SIZE].
4
then press the [START] button on the
control panel.
- 45 -
Page 46

BASIC COPY MODES
1
2
3
4
5
6
Setting Original Modes
You can make copies with the optimal image quality by
selecting the following modes for your original.
Original mode Description
TEXT/PHOTO Originals with text and photographs mixed
TEXT Originals with text (or text and line art) only
Originals with general photographs on
PHOTO
Press [ORIGINAL MODE] on the touch
1
panel.
photographic printing paper
Originals with photographs
Density Adjustment
This equipment detects the density level of originals and
automatically adjusts the density level of the copied image to
the optimal one. Alternatively, you can manually adjust it to the
desired level.
Adjusting automatically (automatic density
adjustment)
Press [AUTO] on the touch panel.
Memo
Select the original mode, and then press
2
[OK].
• The automatic density adjustment is set by default at
installation.
Adjusting manually
Press either or to select the desired density level.
- 46 -
Page 47

1
2
3
4
5
6
Enlargement and Reduction Copying
You can change the reproduction ratio of copied images in the
following procedures:
Automatic Magnification Selection (AMS):
You need to specify the copy paper size in advance. Then this
equipment will detect the original size and automatically select
the optimal reproduction ratio for the copy paper size.
Specifying both original size and copy paper size
separately:
You need to specify both the original size and the copy paper
size separately in advance. According to the sizes you
specified, the optimal reproduction ratio is selected
automatically. This feature is used when Automatic
Magnification Selection is not available, such as when copying
OHP film originals.
Specifying reproduction ratio manually:
You can select the desired reproduction ratio by pressing
[ZOOM] or one-touch zoom buttons on the touch panel.
BASIC COPY MODES
Press [ZOOM] on the touch panel.
2
Select the desired paper size, press [AMS]
3
and then [OK].
Memo
• The available range of reproduction ratio differs depending
on whether the original is placed on the original glass or on
the RADF (Reversing Automatic Document Feeder).
Original glass: 25 to 400%
RADF: 25 to 200%
Automatic Magnification Selection (AMS)
When using the RADF (Reversing Automatic Document
Feeder), specify the copy paper size in advance so that this
equipment will detect the original size and automatically select
the optimal reproduction ratio to the copy paper size.
This function is available when the size of the originals is as
follows:
Other than North America: A4, A5, B5, FOLIO
North America: Letter, Legal
Note
• This function does not work properly when copying on the
original glass or using the originals below. Select other
methods when copying them.
• Highly transparent originals (e.g. OHP film, tracing paper)
• Totally dark originals or ones with dark borders
• Non-standard size originals (e.g. newspapers, magazines)
Place paper in the tray(s).
1
Memo
• If you want to select a paper size other than the
following, you need to register the size as “OTHER”.
Once you register this size, it will be specified every
time you press [OTHER] on the touch panel.
Other than North America: A4, A5, B5
North America: Letter, Legal
For how to register, see the following page:
P.48 "Registering paper sizes to “OTHER” size"
• Paper sizes can also be registered by pressing the
desired tray button of the equipment status indication
area on the BASIC menu.
Place the original(s).
4
If the original is placed on the original glass, the
reproduction ratio is set when the original is placed. If the
original is placed on the RADF, the reproduction ratio is
set when the original is scanned.
Select other copy modes as required, and
5
then press the [START] button on the
control panel.
- 47 -
Page 48

BASIC COPY MODES
1
2
3
4
5
6
Specifying both the original size and the copy paper size separately
Place paper in the tray(s).
1
Place the original(s).
2
Press [ZOOM] on the touch panel.
3
Select the desired sizes for the original and
4
copy paper, and then press [OK].
Registering paper sizes to “OTHER”
size
If you want to select a size other than the following for the
original size and copy paper size, you need to register the size
as “OTHER” following the procedures below. Once you register
this size, it will be specified every time you press [OTHER] on
the touch panel.
Other than North America: A4, B5, A5
North America: Letter, Legal
Note
• You can register only standard sizes as [OTHER] and
cannot register any non-standard sizes.
Press [SIZE SETTING] on the touch panel.
1
Select the desired size.
2
Memo
• If you want to select a size other than the following for
the original size and copy paper size, you need to
register the size as “OTHER”. Once you register this
size, it will be specified every time you press [OTHER]
on the touch panel.
Other than North America: A4, B5, A5
North America: Letter, Legal
For how to register, see the following page:
P.48 "Registering paper sizes to “OTHER” size"
• Paper sizes can also be registered by pressing the
desired tray button of the equipment status indication
area on the BASIC menu.
The selected size will be registered as an “OTHER” size.
Select other copy modes as required, and
5
then press the [START] button on the
control panel.
- 48 -
Page 49

BASIC COPY MODES
1
2
3
4
5
6
Specifying reproduction ratio manually
Place paper in the tray(s).
1
Place the original(s).
2
Press [ZOOM] on the touch panel.
3
Press the buttons below to select the
4
desired reproduction ratio.
[ UP] and [ DOWN] buttons
The reproduction ratio changes by 1% every time
either of them is pressed. When you hold either down,
the ratio goes up or down automatically.
One-touch zoom buttons
Select the desired ratio from [400%], [200%], [100%],
[50%] and [25%].
Note
Select the desired size, and then press
5
[OK].
Note
• If you want to select a paper size other than the
following, you need to register the size as “OTHER”.
Once you register this size, it will be specified every
time you press [OTHER] on the touch panel.
Other than North America: A4, B5, A5
North America: Letter, Legal
For how to register, see the following page:
P.48 "Registering paper sizes to “OTHER” size"
• Paper sizes can also be registered by pressing the
desired tray button of the equipment status indication
area on the BASIC menu.
Select other copy modes as required, and
6
then press the [START] button on the
control panel.
• When the RADF is used, the maximum ratio available
is 200%.
Selecting Finishing Mode
Finishing modes and optional finishing devices
See the table below for each finishing mode.
Finishing mode Description
Non-sort Non-staple Copies exit without being sorted or
stapled.
Sort ( P. 5 0 ) Copies exit in the same page order
as the originals one set after another.
Group ( P. 5 0 ) Copies grouped by page exit.
Staple sort ( P. 5 1) Copies exit with their corner stapled.
Magazine sort (
P. 5 2)
The available finishing modes differ depending on the type of
optional finishing devices (Inner Finisher) installed. Finishing
devices available for this equipment are as follows:
Copies exit in a book-type page
order.
- 49 -
Page 50

BASIC COPY MODES
1
2
3
4
5
6
Finisher
• Inner Finisher
Use the table below to check the available finishing modes.
Devices
Finishing mode
With device Without device
Non-sort Non-staple Yes Yes
Sort Yes Yes
Group Yes Yes
Stap le sor t Yes —
Magazine sort Yes Yes
Name of each part of the Finisher
Sort/Group mode
When you make more than one set of copies, they can be
made to exit in the same page order as that of the originals.
This mode is called the sort mode. Copies can also be made to
exit grouped by page. This mode is called the group mode.
Sort mode
1
2
3
Group mode
1
2
3
1
2
Place paper in the tray(s).
1
1
2
3
1
1
2
2
3
1
2
3
3
1. Upper cover
2. Receiving tray
• Do not let your hand come close to the tray moving up
or down.
The hand may get caught, which may result in personal
injury.
Place the original(s).
2
Note
• When you place originals on the RADF (Reversing
Automatic Document Feeder), the display of the sorting
mode button will change to “SORT”.
Press [FINISHING] on the touch panel.
3
- 50 -
Page 51

BASIC COPY MODES
1
2
3
4
5
6
Select [SORT] or [GROUP], and then press
4
[OK].
Key in the desired number of copies.
5
Select other copy modes as required, and
6
then press the [START] button on the
control panel.
Staple sort mode
Press [FINISHING] on the touch panel.
3
Select the desired stapling position from
4
[LEFT] or [RIGHT] and then press [OK].
When you make more than one set of copies, the copied paper
can be automatically stapled set by set. This mode is called the
staple sort mode. You can choose from 2 different stapling
positions.
Example: When [LEFT] is selected
Note
• Special paper such as OHP film or sticker labels is not
applicable.
• Copies in different sizes cannot be stapled unless their
length is the same.
Place paper in the tray(s).
1
When using bypass copying, be sure to set the paper
size.
Select other copy modes as required, and
5
then press the [START] button on the
control panel.
Memo
• When the number of sheets exceeds the maximum
number of sheets available for stapling, this equipment
automatically enters into the sort mode.
Place the original(s).
2
- 51 -
Page 52

BASIC COPY MODES
1
2
3
4
5
6
112
94
76
12
3
2
1
Maximum number of sheets available
for stapling
The maximum number of sheets available for stapling differs
depending on the type of the finishing device installed, paper
size or paper weight.
Inner Finisher
Paper weight
2
Paper size
A4, B5, Letter,
8.5"SQ, 16K
FOLIO, Legal,
13" Legal, 8K
Note
• 2 cover sheets (106 to 209g/m2 (29 lb. Bond to 110 lb.
Index)) can be added. In this case, the number of sheets
available includes the 2 cover sheets.
60 - 80 g/m
(16 - 20 lb.
Bond)
50 sheets 50 sheets 30 sheets
30 sheets 30 sheets 15 sheets
81 - 90 g/m
(21 - 24 lb.
Bond)
2
91 - 105 g/m
Magazine sort
(25 - 28 lb.
Bond)
Press [FINISHING] on the touch panel.
4
2
Select the desired mode from [MAGAZINE
5
SORT].
You can copy more than one original and bind them in a
booklet format (Magazine sort).
Magazine sort mode
Place paper in the tray(s).
1
Note
• Special paper such as OHP film or sticker labels is not
applicable.
Select the desired paper size.
2
Place the original(s).
3
When placing the originals on the RADF, place them
according to the illustration on the previous page.
When placing the originals on the original glass, place
them in the following order:
Magazine sort: Place the first page of the original
first.
Select other copy modes as required, and
6
then press the [START] button on the
control panel.
Duplex Copying
You can copy a 1-sided original to a 2-sided copy or vice versa,
or copy a 2-sided original to a 2-sided copy. This is useful when
you want to save the paper, or when you want to copy a booktype original maintaining the same page order.
1-sided original -> 1-sided copy ( P. 5 3 )
- 52 -
Page 53

BASIC COPY MODES
1
2
3
4
5
6
2-sided original -> 1-sided copy ( P. 5 3 )
1-sided original -> 2-sided copy ( P. 5 4 )
2-sided original -> 2-sided copy ( P. 5 4 )
Making a 1-sided copy
Memo
• When you copy 2-sided portrait originals which open to the
left/right on only 1 side of the paper, use the image direction
function on the EDIT menu so that all the copied paper will
exit in the proper direction.
Note
• Use plain or THICK 1 for duplex copying.
Place paper in the tray(s).
1
When using bypass copying, be sure to set the paper
size.
Place the original(s).
2
Press [2-SIDED] on the touch panel.
3
- 53 -
Page 54

BASIC COPY MODES
1
2
3
4
5
6
Select the desired mode, and then press
4
[OK].
[1->1 SIMPLEX]: 1-sided original to 1-sided copy
[2->1 SPLIT]: 2-sided original to 1-sided copy
Select other copy modes as required, and
5
then press the [START] button on the
control panel.
Making a 2-sided copy
Press [2-SIDED] on the touch panel.
3
Select the desired mode, and then press
4
[OK].
[1 -> 2 DUPLEX]: 1-sided original to 2-sided copy
[2 -> 2 DUPLEX]: 2-sided original to 2- sided copy
Memo
• If 1-sided portrait originals have been placed in a landscape
direction and you copy them on both sides of the paper,
copied sheets are usually in the open to top/bottom
direction. You can make copies in the open to left/right
direction with the image direction function.
Place paper in the tray(s).
1
When using bypass copying, be sure to set the paper
size.
Place the original(s).
2
Select other copy modes as required, and
5
then press the [START] button on the
control panel.
When placing the original on the original glass, follow
steps 6 and 7 on P.31 "Basic copying procedure".
Performing Copy & File
With the Copy & File function, you can store the copied data in
the share folder of the hard disk of this equipment or a
specified PC on a network. The data can be stored in any of
PDF, TIFF and XPS formats.
Note
• The data will be stored as black images. (Resolution: 600
dpi only) The data stored with this function are suited for
printing but not for being imported as an image into your PC.
To obtain the optimal image quality for importing, it is
recommended to store the data with the Scan to File
function of this equipment.
• The network administrator must make settings for Copy &
File in advance. For details, refer to the TopAccess Guide.
• It is recommended to back up the data stored in the share
folder.
- 54 -
Page 55

BASIC COPY MODES
1
2
3
4
5
6
Memo
• You can store data in an e-Filing box with the Store to eFiling function. For details, refer to the e-Filing Guide.
Place the original(s).
1
Press [STORAGE] on the touch panel.
2
Press [COPY & FILE] on the touch panel.
3
Note
• You can select up to 2 of [MFP LOCAL], [REMOTE 1]
and [REMOTE 2]. You can cancel the selected item by
pressing the same button again.
• When a user who has the privilege of changing the
setting of [REMOTE 1] and [REMOTE 2] has pressed
either of them, the menu for specifying a directory
appears. In this case, see the following page to specify
the directory:
P.56 "Setting share folder"
FILE NAME: Press this to display the on-screen
keyboard. Then enter the file name within 128 letters.
Note
• The trailing characters in a file name (maximum 74)
may be deleted depending on the type of letters used.
FILE FORMAT: Select the file format in which the data
are stored from PDF, TIFF or XPS.
MULTI / SINGLE: These are for selecting whether the
data are stored as a multiple page file or a single page
file. If you select “MULTI”, all the scanned data will be
stored as one file. If you select “SINGLE”, a folder is
created and each page of the scanned data will be
stored individually as one file in the folder.
Press the [START] button on the control
5
panel.
When the original is placed on the RADF (Reversing
Automatic Document Feeder), copying and storing start
simultaneously.
When the original is placed on the original glass, follow
the procedure below.
Place the next original on the original glass,
6
and then press [NEXT COPY] on the touch
panel or the [START] button on the control
Press the necessary buttons for entering
4
information about the data to be stored.
panel.
Repeat this step until the scanning of all the originals is
finished.
Then press [OK].
When all have been scanned, press [JOB
7
FINISH] on the touch panel.
MFP LOCAL: Press this to store the data into the share
folder of this equipment.
REMOTE 1, REMOTE 2: Press either of them to store the
data into the share folder of a PC that is connected
with this equipment via a network.
Copying and storing start.
- 55 -
Page 56

BASIC COPY MODES
1
2
3
4
5
6
Setting share folder
When a user who has the privilege of setting a share folder has
pressed [REMOTE 1] or [REMOTE 2], the menu for specifying
a directory appears.
The setting items differ depending on the file transfer protocol
to be used. FTP, SMB, NetWare IPX/SPX, NetWare TCP/IP
and FTPS are selectable for a file transfer protocol.
FTP / FTPS
When you press any of the buttons below, the on-screen
keyboard appears. Enter with the buttons on the touch panel or
the digital keys on the control panel. When you finish the entry,
press [OK].
When you press any of the buttons below, the on-screen
keyboard appears. Enter with the buttons on the touch panel or
the digital keys on the control panel. When you finish the entry,
press [OK].
NETWORK PATH: Press this to enter a network path to the
folder where the data are to be stored.
LOGIN USER NAME: Press this to enter a user name to
access the network folder. Enter this as required.
PASSWORD: Press this to enter a password to access the
network folder. Enter this as required.
Memo
• If you selected [SMB], the settings for [SERVER NAME] and
[COMMAND PORT] are not required.
NetWare IPX / NetWare IP
SERVER NAME: Press this to enter the IP address of FTP
server. For example, if the data should be transferred to an
FTP folder ftp://10.10.70.101/user01/scan/, key in
“10.10.70.101”.
NETWORK PATH: Press this to enter a network path to an
FTP folder where the data are to be stored. For example, if
the data should be transferred to an FTP folder ftp://
10.10.70.101/user01/scan/, enter “user01\scan”.
LOGIN USER NAME: Press this to enter a user name to login
to the FTP server. Enter this as required.
PASSWORD: Press this to enter a password to login to the
FTP server. Enter this as required.
COMMAND PORT: Press this to key in a command port
number for executing commands. Normally “-” is entered in
this field, which means that a port number set by the
administrator will be used. Change this only when you want
to use any other port number.
SMB
When you press any of the buttons below, the on-screen
keyboard appears. Enter with the buttons on the touch panel or
the digital keys on the control panel. When you finish the entry,
press [OK].
SERVER NAME: When you select [NetWare IPX], enter either
the server name of NetWare server or Tree/Context (if NDS
is usable). When you select [NetWare IP], enter the IP
address of NetWare server.
NETWORK PATH: Press this to enter a network path to a
NetWare server folder where the data are to be stored. For
example, if the data should be transferred to a folder
“sys\scan” of NetWare server, enter “\sys\scan”.
LOGIN USER NAME: Press this to enter a user name to login
NetWare server. Enter this as required.
PASSWORD: Press this to enter a password to login NetWare
server. Enter this as required.
- 56 -
Page 57

1
2
3
4
5
6
3
Fax
SENDING/RECEIVING A FAX····································· P.58
CHECKING AND CANCELING THE COMMUNICATIONS
············································································· P.71
Page 58

1
2
3
4
5
6
SENDING/RECEIVING A FAX
● SENDING/RECEIVING A FAX
Note
Initializing the FAX is required to use the FAX for the first time.
For details, refer to the Advanced Guide.
Sending a Fax
Basic procedures
This section describes the basic procedures to send a fax. For
details of in-depth operations, see the page under each
procedure as required.
Besides the basic sending functions described in this page,
there are various useful ways to send a fax. These procedures
are described in the following pages.
P.67 "Other transmissions"
Advanced Guide
Place the original(s).
1
Press [OPTION] and set the transmission
3
conditions.
The transmission condition setting screen is displayed.
Set the transmission conditions such as resolution,
original mode, exposure and transmission mode, as
required.
P.62 "Setting the transmission conditions"
Specify the recipient.
4
Check the original size and scanning range, etc. Place
the original(s) on the original glass or RADF (Reversing
Automatic Document Feeder) in the correct direction.
(The illustration above shows the original placed on the
original glass.)
P.59 "Handling an original"
Press the [FAX] button on the control panel.
2
The fax screen is displayed. If you leave the screen
unattended for the period of the auto clear setting time
(45 sec. by manufacturer default), the screen returns to
the default one automatically.
To specify the recipient, dial the number using the digital
keys on the control panel or use the address book.
P.64 "Specifying the recipient"
- 58 -
Page 59

SENDING/RECEIVING A FAX
1
2
3
4
5
6
To display the preview screen, press
5
[PREVIEW].
Batch transmission function
If there are multiple transmission jobs to the same recipient in
memory, you can send them at once using this function,
resulting in reduction of communication costs. However, if their
recipients are the same but their transmission conditions vary
or if users or departments are different when this equipment is
managed under the department management or user
management, this function is not applied to those reserved
jobs.
Sending the next original
If an original is placed on the original glass and its scanning is
completed, the confirmation screen for the next original is
displayed. If you want to continue scanning of the next original,
place it on the original glass, and then press the [START]
Press [SEND].
6
button on the control panel. Once all the originals are scanned,
press [JOB FINISH]. If you place an original on the RADF
(Reversing Automatic Document Feeder) and press the
[CONTINUE] button during scanning, the confirmation screen
for the next original can be displayed after the scanning is
completed.
The fax is sent or reserved.
Memo
• Alternatively, you can press the [START] button on the
control panel.
• In the memory transmission mode, the original is
scanned into memory. Once a connection has been
made, this equipment automatically starts sending the
scanned document. In the direct transmission mode,
the fax number is dialed immediately, and the scanned
document will be sent. (Transmission conditions can be
set in the transmission condition setting screen.)
• If memory becomes full during scanning in the memory
transmission mode, that original will not be stored in
memory. When that happens, reduce the number of
originals you are sending, or try sending them in the
direct transmission mode.
• You can check the status of the current sending. You
can also cancel the transmission (deletes the job).
P.71 "CHECKING AND CANCELING THE
COMMUNICATIONS"
Redial function
In the memory transmission mode, if the fax cannot be sent
due to a busy-line, the fax number is redialed automatically to
send the fax. By default, this equipment redials 3 times at 1minute intervals.
• If you leave the screen unattended for a period of the
auto clearance setting time (45 sec. by manufacturer
default), a copy of the scanned originals is sent.
• To cancel the transmission in the memory transmission
mode, press [JOB CANCEL].
P.72 "Canceling the memory transmission"
• To change the transmission conditions for each page,
press [OPTION].
P.63 "Changing the settings for each page"
Handling an original
Originals that can be sent
This equipment can send a fax of the following originals.
You can place 1-sided or 2-sided originals of the media types,
such as standard paper, recycled paper and paper having
holes (2, 3 or 4 holes) for filing, on the RADF (Reversing
Automatic Document Feeder). On the original glass, you can
place 1-sided originals of the above media types as well as
OHP film, tracing paper, booklets and three-dimensional
objects.
- 59 -
Page 60

SENDING/RECEIVING A FAX
1
2
3
4
5
6
Location
Maximum
size
Paper weight Original size
Raise the RADF (Reversing Automatic
1
Document Feeder), and place the original
with its face down on the glass.
Original glass Length:
RADF Legal 14
Note
• Do not place any heavy objects (8 Kg(18lb.) or over) on
the original glass and do not press on it with force.
216mm (8.5")
Width:
355.6mm
(14")
(8.5 x 14")
- Other than
North
America: A4,
B5, A5,
FOLIO
North
America:
Letter, Legal,
ST
2
60 - 105 g/m
(16 - 28lb.)
Other than
North
America: A4,
B5, FOLIO
North
America:
Letter, Legal
(A5 and ST is
not
available.)
Raise it 60 degrees or more for the detection of the
original.
Align the original against the left inner
2
corner of the glass.
A
Original scanning range
The following figures show the original scanning area. Any
information in the shaded area is not printed on the paper.
A4, A5, B5, Legal, Letter, ST, FOLIO
5 mm
(0.2 inch)
5 mm
(0.2 inch)
5 mm
(0.2 inch)
5 mm
(0.2 inch)
Placing the original(s) on the original
glass
This section describes how to set an original on the original
glass. Originals are sent in the order they are placed on the
original glass.
B
• Different size originals can also be sent in one
transmission.
• When an original of any size other than A4/Letter is
placed in the direction shown in the upper figure,
transmission to a recipient is carried out so that the
pre-entered sender information is printed in position A
in the figure.
• When an original of A4/Letter size is placed in the
direction shown in the lower figure, transmission to a
recipient is carried out so that the pre-entered sender
information is printed in position B in the figure.
• The pre-entered sender information shows what is
registered in the Terminal ID.
Advanced Guide
Lower the RADF slowly.
3
Do not place any heavy objects (8 kg/18 lb. or over) on the
original glass and do not press on it with force.
Breaking the glass could injure you.
- 60 -
Page 61

SENDING/RECEIVING A FAX
1
2
3
4
5
6
A
B
(1) Badly wrinkled or folded originals. In
particular, originals whose leading edge
are curled may fail to be fed.
(4) Clipped or stapled originals
(2) Originals with carbon paper (5) Originals with holes or torn originals
(3) Taped, pasted or clipped (cut out)
originals
(6) Damp originals (7) OHP film originals
(1) Folded or curled originals should be smoothed out
before being used.
(2) Originals sticking to each other, or originals that are
surface-treated may fail to separate properly.
Placing the original(s) on the RADF
This section describes how to set the original(s) on the RADF
(Reversing Automatic Document Feeder). When the originals
are placed on the RADF, the uppermost page is the first to be
scanned and sent.
• When scanning the duplex original with the RADF, do
not put your hand on the RADF. Paper may damage the
hand.
• When scanning the duplex original with the RADF, do
not put an object on the RADF. This could cause a paper
misfeed.
After aligning the originals, place them with
1
their face up and slide the guides to rest
against the edges of the originals.
• When an original of A4/Letter size is placed in the
direction shown in the lower figure, transmission to a
recipient is carried out so that the pre-entered sender
information is printed in position B in the figure.
• The pre-entered sender information shows what is
registered in the Terminal ID.
Advanced Guide
Sending different size originals
You can set different size originals together, using the RADF
(Reversing Automatic Document Feeder). Available
combinations of the original size are as follows.
• Other than North America: A4, FOLIO
• North America: Letter, Legal
Memo
• To send different size originals, you need to enable “MIXED
ORIGINAL SIZES” as a transmission condition.
P.62 "Setting the transmission conditions"
• Regardless of their sizes, originals are acceptable up
to 100 sheets (35 to 80 g/m2 (9.3 to 20 lb.)) or 16 mm
(0.62") in height.
• 2-sided originals can be set and sent.
Precautions for using the RADF
Do not use the following originals as they may misfeed or
become damaged:
Advanced Guide
The following originals should be handled carefully:
• When an original of any size other than A4/Letter is
placed in the direction shown in the upper figure,
transmission to a recipient is carried out so that the
pre-entered sender information is printed in position A
in the figure.
- 61 -
Page 62

SENDING/RECEIVING A FAX
1
2
3
4
5
6
Setting the transmission conditions
You can set the fax transmission conditions.
Memo
• The transmission conditions are only applied to the current
transmission. They return to the default settings after the
transmission.
• Each default setting of resolution, original mode, exposure,
transmission mode and ECM is adjustable.
Advanced Guide
Making settings
Pressing [OPTION] on the fax screen will display the
transmission condition setting screen as shown below. Set
each setting item, and then press [OK].
Memo
• If the recipient’s fax machine is not capable of receiving
originals at the same resolution, the resolution is
automatically converted before being sent to the recipient.
The higher the resolution is, the longer it takes to send an
original.
TX TYPE
Set the fax transmission mode.
MEMORY TX: Send the original after the scanned data are
saved in the memory. Up to 100
transmissions of up to 1000 pages per 1
transmission can be reserved.
DIRECT TX: Send the original directly as it is being
scanned. Once a page has been scanned
and sent, the next page is scanned and
sent. Therefore, it takes longer to scan and
send all pages. However, you can confirm
on the fly that each page is sent to the
recipient.
ORIGINAL MODE
Set the scanning mode based on the type of the original.
TEXT: This is suitable for an original with text and
line drawings.
TEXT/
PHOTO:
PHOTO: This is suitable for an original with photos.
This is suitable for an original with a mixture
of text and photos.
• Press or to switch the pages.
• To cancel the operation and return to the previous screen,
press [RESET].
RESOLUTION
Set the resolution based on the fineness of the original.
STANDARD: This is suitable for an original with regular
FINE: This is suitable for an original with small size
U-FINE: This is suitable for an original with ultra-fine
size text.
text and fine illustrations.
illustrations.
Memo
• In the TEXT/PHOTO mode or PHOTO mode, transmission
time may be longer than that in the TEXT mode.
ORIGINAL SIZE
Set the scan size of the original.
AUTO: The size of the original is automatically
determined before the original is scanned.
MIXED
ORIGINAL
SIZES:
Specified
size:
Memo
• If the recipient’s fax machine is not capable of receiving
originals of B5 size, this equipment may reduce that size
before sending it. To avoid this, when the original to be set is
B5 size, specify A4 size respectively.
Select this function to load the originals with
different width into the RADF (Reversing
Automatic Document Feeder).
The original is scanned at the preset size
regardless of its actual size.
EXPOSURE
Set the density at which the original is to be scanned.
AUTO: This equipment automatically detects the
contrast of the original, and scans it with the
optimum density.
Manual:
Press or to set the desired
contrast.
- 62 -
Page 63

SENDING/RECEIVING A FAX
1
2
3
4
5
6
ECM
Switch the ECM (Error Correction Mode) communication ON or
OFF. ECM is an internationally standardized communication
mode that automatically corrects errors that occur during fax
transmissions. With this setting option ON, even when the
transmitted data have been affected by noise during
communication, this mode allows good communication without
image distortion by automatically resending the parts that have
been affected.
Note
• Both the sender and the receiver must have the ECM
function to make ECM communication available.
• When affected by noise during communication,
communication time is slightly longer than usual. Even when
the ECM communication is used, an error may occur
depending on the line status.
• The ECM communication is not available for voice
communication.
QUALITY TX
Switch Quality TX ON or OFF. When this mode is set to ON,
originals are sent at a slower speed than usual and the
chances of errors occurring decrease.
MAIL BOX COMMUNICATION
For the communication compatible with ITU-T (International
Telecommunications Union-Telecommunications) standards,
specify a subaddress or password to be sent to the recipient's
fax machine. (Up to 20 digits can be entered.)
SUB
(Subaddress):
SEP (Selective
Polling):
SID (Sender
Identification):
PWD (Password): Password for SEP.
Information to send data of the original
to the fax machine.
Information to retrieve data of the
original from the fax machine.
Password for SUB.
Changing the settings for each page
You can change the scanning conditions (RESOLUTION,
MODE, EXPOSURE and ORIGINAL) for each page.
Specify the recipients and press [SEND] to
1
start scanning a document. When the
scanning of the original is completed, the
confirmation screen for the next original is
displayed. Press [OPTION].
The illustration above shows the original placed on the
original glass. If you place an original on the RADF
(Reversing Automatic Document Feeder) and press the
[CONTINUE] button during scanning, the confirmation
screen for the next original is displayed after the scanning
is completed. If you press the [STOP] button during
scanning, the scanning halts and the confirmation screen
for the next original can be displayed.
The setting screen for the scanning
2
conditions is displayed. Change the
setting, and then press [OK].
P.62 "Making settings"
Memo
• To use this function, the recipient’s fax machine must be
capable of setting an ITU-T compatible subaddress or
password.
INTERNET FAX
SUBJECT: The subject of the Internet Fax
BODY: The body of the Internet Fax
This is not used for sending a standard fax.
- 63 -
Page 64

SENDING/RECEIVING A FAX
1
2
3
4
5
6
Specifying the recipient
There are various ways to specify the recipient, such as Direct
entry with the control panel and Address book entry.
Memo
• To use the address book, you need to register recipients’ fax
numbers to the book in advance. For details of the
operation, refer to the Advanced Guide or TopAccess
Guide.
Direct entry with digital keys
You can specify the recipient by entering its fax number on the
control panel.
Press [INPUT FAX No].
1
Confirm the fax number displayed on the
3
fax screen.
• To delete each entered value, press [BACK SPACE].
• To delete all the entered values at once, press the
[CLEAR] button on the control panel.
• In the memory transmission mode, you can specify
multiple recipients to send the same document at once.
Press [MULTI], and enter the recipient’s fax number.
Repeat this operation until all the recipients are
specified. You can also specify the recipients’ fax
numbers by combining with other entry methods. The
number of recipients you can simultaneously specify is
limited to 400.
• To confirm all the selected recipients or delete
unnecessary recipients, press [DESTINATION].
P.67 "Confirming the recipients"
Specifying the recipient in the
Key in the recipient's fax number and press
2
[OK].
• You can also enter the recipient's address with the
digital key on the control panel.
• To delete the entered fax number one number at a
time, press [BACK SPACE].
• To delete the entire entered fax number in one go,
press the [CLEAR] button.
address book
In the address book, you can specify the recipient.
Press [SINGLE] tab to display the list of the
1
addresses, and then press the recipient’s
FAX icon ( ).
• Press or to switch the pages.
• Alternatively, you can select the recipient by pressing
the address name box. In such case, if a fax number
and an E-mail address have been registered to the
recipient's address, both of them are selected.
• To cancel the selected recipient, press it again.
- 64 -
Page 65

SENDING/RECEIVING A FAX
1
2
3
4
5
6
• In the memory transmission mode, you can specify
multiple recipients to send the same document at once.
Repeat the recipient selection operation until all the
recipients are selected. For the multi-address
transmission, you can also specify recipients by
combining with other entry methods. The number of
recipients you can simultaneously specify is limited to
400.
• To confirm all the selected recipients or delete
unnecessary recipients, press [DESTINATION].
P.67 "Confirming the recipients"
• To refine your search only for items including specified
characters, press the pull-up menu.
• A list of recipients can be displayed using 11 to 15
characters per name.
Group entry
In the address book, you can specify the group to which you
want to send a fax.
Press [GROUP] tab to display the list of the
1
groups, and then press the group name.
Searching by ID number
You can search for a specific recipient from the address book
using the ID number.
Press [KNOWN ID].
1
Key in the desired ID number (1 to 1000)
2
using the digital keys on the control panel,
and then press [OK].
• Press or to switch the pages.
• To cancel the selected group, press it again.
• To confirm the addresses registered in that group,
press [CONTENTS].
• In the memory transmission mode, you can specify
multiple groups to send the same document at once.
Repeat the recipient selection operation until all the
recipients are selected. For the multi-address
transmission, you can also specify recipients by
combining with other entry methods. The number of
groups you can simultaneously specify is limited to 200
groups of up to 400 recipients per 1 group.
• To confirm all the selected recipients or delete
unnecessary recipients, press [DESTINATION].
P.67 "Confirming the recipients"
• To refine your search only for items including specified
characters, press the pull-up menu.
The ID number is the one shown in the destination name
box. The number ranges from 001 to 1000.
The page including the entered ID number
3
is displayed. Press the FAX icon ( ).
• Press or to switch the pages.
• Alternatively, you can select the recipient by pressing
the address name box. In such case, if a fax number
and an E-mail address have been registered to the
recipient's address, both of them are selected.
• To cancel the selected recipient, press it again.
- 65 -
Page 66

SENDING/RECEIVING A FAX
1
2
3
4
5
6
• In the memory transmission mode, you can specify
multiple recipients to send the same document at once.
Repeat the recipient selection operation until all the
recipients are selected. For the multi-address
transmission, you can also specify recipients by
combining with other entry methods. The number of
recipients you can simultaneously specify is limited to
400.
• To confirm all the selected recipients or delete
unnecessary recipients, press [DESTINATION].
P.67 "Confirming the recipients"
Searching for the recipient's fax
number
You can search for the recipient's fax number from the address
book and LDAP server.
Memo
• To search for the recipient's fax number from the LDAP
(Lightweight Directory Access Protocol) server, the name of
the LDAP server to be connected is required to be
registered to this equipment in advance. For details of the
LDAP server, ask your network administrator.
Press [SEARCH].
1
• To cancel the entered keyword, press [CLEAR].
• You can search for the desired recipient's fax number
by specifying multiple keywords.
Selecting the LDAP server
To search for the recipient's fax number in the LDAP
server, press the pull-down menu in the recipient search
menu. The list of the LDAP servers is displayed. Press
the LDAP server name you want to search, and then
press [OK].
The search result is displayed. Press the
3
desired FAX icon ( ), and then press [OK].
• To display the recipient search menu, press [SEARCH]
while the address list is displayed. Perform this
operation when you want to search the LDAP server.
• To display the group search menu, press [SEARCH]
2
while the group list is displayed.
Press the button of the keyword category
you want to search. Enter the keyword.
Press [SEARCH].
• Press or to switch the pages. Pressing or
allows you to skip 5 pages.
• Alternatively, you can select the recipient by pressing
the address name box. In such case, if a fax number
and an E-mail address have been registered to the
recipient's address, both of them are selected.
• To cancel the selected recipient, press it again.
• In the memory transmission mode, you can specify
multiple recipients to send the same document at once.
Repeat the recipient selection operation until all the
recipients are selected. For the multi-address
transmission, you can also specify recipients by
combining with other entry methods. The number of
recipients you can simultaneously specify is limited to
400.
• To confirm all the selected recipients or delete
unnecessary recipients, press [DESTINATION].
P.67 "Confirming the recipients"
• If you want to change the results of the search, press
[RESEARCH]. You will be returned to the Step 2
screen. Specify the search string again.
• For details of the operation to enter characters, refer to
the Setup Guide.
- 66 -
Page 67

SENDING/RECEIVING A FAX
1
2
3
4
5
6
Confirming the recipients
You can confirm the recipients which you specified or delete
unnecessary recipients.
Press [DESTINATION].
1
The recipient list screen is displayed.
2
Select the recipient you want to delete, and
then press [DELETE].
Press [MONITOR].
4
• Make sure that you hear the dial tone from the built-in
speaker.
• To cancel the operation, press [MONITOR] again.
Note
• To use the [SEARCH] to specify the recipients, you
must specify the recipient in advance by following the
procedures below. Specify the recipients, and then
press [MONITOR].
Specify the recipients.
5
P.64 "Specifying the recipient"
• Press or to switch the pages.
• Press [CLOSE] to return to the previous screen.
Other transmissions
On-hook transmission
In this mode, you can dial and perform direct fax transmission
without picking up the handset of the external telephone. On-
hook Transmission is available when on the upper right of
the screen is OFF.
Place the original(s).
1
P.59 "Handling an original"
Press the [FAX] button on the control panel.
2
P.58 "Basic procedures"
Press [OPTION] and set the transmission
3
conditions.
P.62 "Setting the transmission conditions"
Note
• For direct entry, each press of a digital key on the
control panel dials a number. If you make a mistake
when dialing the fax number, press [MONITOR] to cut
the line, and then press it again to redial.
• If you specified the recipient with the [SEARCH], press
[MONITOR], and then [DIAL].
When you hear the answer tone (short high-
6
pitched tone) through the built-in speaker
indicating the connection has been made
with the recipient’s machine, press [SEND].
P.58 "Basic procedures"
Note
• When you hear the other party’s voice answering the
call before pressing [SEND], pick up the handset of the
external telephone. Then ask him/her to perform
operation of the fax reception.
Off-hook transmission
In this mode, you can pick up the handset of the external
telephone to dial and perform direct fax transmission. Off-hook
Transmission is available when on the upper right of the
screen is OFF.
Place the original(s).
1
P.59 "Handling an original"
Press the [FAX] button on the control panel.
2
P.58 "Basic procedures"
- 67 -
Page 68

SENDING/RECEIVING A FAX
1
2
3
4
5
6
Press [OPTION] and set the transmission
3
conditions.
P.62 "Setting the transmission conditions"
Pick up the handset of the external
4
telephone.
Use the external telephone to dial the fax
5
number.
P.64 "Specifying the recipient"
Note
• When you use the external telephone to dial, the
machine dials each number you enter. If you make a
mistake when dialing the fax number, replace the
handset to cut the line, and then pick up the handset
again to redial.
When you hear the answer tone (short high-
6
pitched tone) through the built-in speaker
Press [SEND].
2
Check the fax image after the preview is
3
displayed. Press [OK] if you send it without
any change. The fax will then be sent.
indicating the connection has been made
with the recipient’s machine, press [SEND].
P.58 "Basic procedures"
Note
• When you hear the other party’s voice answering the
7
call before pressing [SEND], ask him/her to perform
operation of the fax reception.
Replace the handset of the external
telephone.
Displaying the preview
Before sending a fax, you can check the image on the touch
panel with this preview function.
Press [PREVIEW] on the fax menu.
1
• To send another original, place it on the original glass
or RADF (Reversing Automatic Document Feeder),
and then press the [START] button on the control
panel.
• To delete the page being previewed, press [DELETE
PAGE].
• To replace the page being previewed with another
page, press [REPLACE PAGE].
• To insert another scan before the page being
previewed, press [INSERT PAGE].
• Press [OPTION] to change the setting.
P.62 "Setting the transmission conditions"
• To use the preview function, specify the recipient and
then press [PREVIEW].
- 68 -
Page 69

1
2
3
4
5
6
Receiving a Fax
5 mm
(0.2 inch)
5 mm
(0.2 inch)
5 mm
(0.2 inch)
5 mm
(0.2 inch)
5 mm
(0.2 inch)
5 mm
(0.2 inch)
5 mm
(0.2 inch)
5 mm
(0.2 inch)
Reception mode
This section describes how to receive a fax. Refer to the
appropriate section for your current reception mode. The
reception mode can be set on the ADMIN menu. For details of
the current setting, ask your administrator. Besides the
receiving methods described in this page, there are various
useful ways to receive a fax. These procedures are described
in the following Guide.
Advanced Guide
AUTO reception
SENDING/RECEIVING A FAX
Memory reception
In the following conditions, faxes cannot be printed. If this
happens, received fax data are stored in the memory, and
printing is resumed as soon as this equipment is ready. As the
memory reception function is always enabled, you do not need
to make any setting.
• During copying or printing
• During printing of received copy of the originals
• During printing of lists and reports
• When paper has run out
• When a paper misfeed occurs
• When toner has run out
Originals and paper
Faxes are automatically received during an incoming call.
Users do not have to do anything when receiving a fax.
MANUAL reception
Faxes are manually received by using an external telephone
when you have an incoming call.
Pick up the handset of the external
1
telephone when you have an incoming call.
If the incoming call is a telephone call, you can start
talking.
If you hear a tone (fax signal) through the
2
handset of the external telephone, press
the [FAX] button on the control panel.
P.58 "Basic procedures"
Press the [ADVANCED] tab, and then press
3
[MANUAL RECEIVE].
Acceptable size of paper
A4, B5, A5, FOLIO, Legal, Letter and ST sized paper are
available.
The printing range of each size of paper is as follows: As
shown in the figures below, if an original document contains
any information in the shaded area, it is not printed on the
paper.
Memo
• Set the paper in the trays. The multi-purpose tray is not
available.
• Regardless of whether or not the Finisher is installed, paper
exits on the receiving tray.
• Trays can be set for fax use only.
When a message appears indicating that
4
you can send a fax, press the [START]
button on the control panel and replace the
handset of the external telephone.
Default setting for RX printing
To print the received fax, the paper with the same width as the
original is used. Depending on the length of the original, “RX
reduction printing” or “Discard printing” (both of them are set to
ON by manufacturer default) are applied.
Advanced Guide
When an original is shorter or the same as the paper
printing area
It is printed in the original size.
- 69 -
Page 70

SENDING/RECEIVING A FAX
1
2
3
4
5
6
When an original is longer than the paper printing
area
It is printed according to the following priority:
• When an original is up to 10 mm (0.4 inch) longer than the
printing area: the part of the originals that exceeds the
paper printing area is discarded.
• When an original exceeds the printing area by more than
10 mm (0.4 inch): the original image is reduced to 75 %
(reduction printing). If the image still cannot be fitted into
the printing area, paper larger than the original is selected.
In case there is no larger paper available, the original is
printed with the image divided.
Paper priority when there is no same
size paper
When both “RX reduction printing” and “Discard printing” are
set to ON, paper is selected according to the following priority:
1. Paper of the same size as the original
2. Paper larger than the original
Note
• When the corresponding paper size is not available, in most
cases, the scanned original is printed on paper of a larger
size. However, the sender’s fax machine may reduce the
scanned original to fit the paper size available in the
recipient’s fax machine (this equipment).
• The paper priority varies according to the “RX reduction
printing” and “Discard printing” settings. For details, contact
your dealer.
- 70 -
Page 71

CHECKING AND CANCELING THE COMMUNICATIONS
1
2
3
4
5
6
● CHECKING AND CANCELING THE COMMUNICATIONS
Checking communication status (log)
Checking Communications
You can check the log of fax transmissions and receptions.
Checking reserved transmissions
You can check reserved fax transmissions.
Press [JOB STATUS].
1
Select [FAX].
2
Press [JOB STATUS].
1
Select the [LOG] tab, and then press
2
[SEND] or [RECEIVE].
The list of the communication status is
3
displayed.
• Reserved transmission jobs are listed in the reversed
chronological order from top to bottom.
• Press or to switch the pages.
• To print the list of the reserved transmissions jobs,
press [RESERVATION LIST].
• In the “Status” column, the status of each job is
indicated as follows:
Line1: Sending on the 1st line.
Network: Reserved for sending via Internet Fax.
Delayed: Reserved with the time to send specified.
Wait: Communication is in the standby queue.
Invalid: Under standby due to an invalid
department code (Network Fax). For
details of Network Fax function, refer to
the Advanced Guide.
• Transmissions or receptions are listed in the reversed
chronological order from top to bottom.
• Press or to switch the pages.
• Up to the latest 40 or 120 transmission/reception
records can be listed on the log. The maximum number
can be set on the ADMIN menu. For details of the
operation, refer to the Advanced Guide.
- 71 -
Page 72

CHECKING AND CANCELING THE COMMUNICATIONS
1
2
3
4
5
6
• To print the log of transmissions or receptions, press
[JOURNAL].
Advanced Guide
• In the “Status” column, the status is indicated as
follows:
OK: Transmission or reception
succeeded.
4-digit error code: Transmission or reception failed.
Troubleshooting Guide
Registering recipients’ fax numbers to the address
book
To register recipient's fax numbers in the address book
from the send/receive log screen, select a record in the
send or receive log, and then press [ENTRY]. For details
of the registration to the address book, refer to the
Advanced Guide.
Note
• Fax and E-mail transmissions whose recipients are
specified with direct entry or entry using the LDAP
server can be registered to the address book from the
Send log.
• Polling and E-mail receptions whose recipients are
specified with direct entry or entry using the LDAP
server can be registered to the address book from the
Receive log.
The confirmation screen for the deletion is
2
displayed. Press [YES].
When using the RADF (Reversing
Automatic Document Feeder)
This section describes how to cancel the memory transmission
when an original is placed on the RADF.
Press the [STOP] button on the control
1
panel while the originals are being scanned.
Canceling the Transmission
Canceling the memory transmission
You can cancel the memory transmission during scanning.
When using the original glass
This section describes how to cancel the memory transmission
when an original is placed on the original glass.
When scanning is completed, the
1
confirmation screen for the next original is
displayed. Press [JOB CANCEL].
Scanning is paused.
If you leave the screen unattended for a period of the
auto clearance setting time (45 sec. by manufacturer
default) after the confirmation screen for the next original
is displayed, a copy of the scanned originals is sent.
- 72 -
Page 73

CHECKING AND CANCELING THE COMMUNICATIONS
1
2
3
4
5
6
The confirmation screen for the next
2
original is displayed. Press [JOB CANCEL].
The scanning and transmission are stopped.
Canceling reserved transmissions
You can display the list of the reserved transmissions, and
cancel the reserved transmissions that are in the queue or in
progress.
Press [JOB STATUS], and then select the
1
[FAX] tab.
The list of the reserved transmissions is displayed. This
step is the same as that for checking the reserved
transmission.
P.71 "Checking reserved transmissions"
• If you press [JOB FINISH], the scanned originals are
sent.
• If you leave the screen for the next original unattended
for the period of the auto clear setting time (45 sec. by
3
manufacturer default) after it appears, the memory
transmission is canceled.
The confirmation screen for the deletion is
displayed. Press [YES].
Select the reserved transmission you want
2
to delete, and then press [DELETE].
More than one job can be selected.
Canceling direct transmissions
You can cancel the direct transmission during scanning.
Note
• Even if you cancel transmission in the direct TX mode, the
part of the original that was scanned before transmission is
canceled has been sent.
Press the [STOP] button on the control
1
panel while the original is being scanned.
In the “Status” column, you can check the status of the
reservation. “Wait” indicates that the data are waiting to
be sent. “Line1” indicates that the data are being sent.
Delayed transmission reservation and polling
transmission/reception can be canceled.
- 73 -
Page 74

CHECKING AND CANCELING THE COMMUNICATIONS
1
2
3
4
5
6
The confirmation screen for the deletion is
3
displayed. Press [DELETE].
- 74 -
Page 75

1
2
3
4
5
6
4
0.Scanning
BASIC OPERATION ················································· P.76
Page 76

1
2
3
4
5
6
BASIC OPERATION
● BASIC OPERATION
Viewing Touch Panel for Scan Menu
When you press the [SCAN] button on the control panel, the
SCAN menu is displayed on the touch panel.
Note
• If the equipment is managed by the Department
Management or User Management features, you need to
enter a department code or the user information, such as
the user name and password.
1
2
3
4
5
1) Message Display Area
Operational instructions and the status of the equipment
are displayed.
2) Function Buttons
Press one of these buttons when you select the scan
function. Pressing one of these buttons displays the set-up
screen specific to the selected scan function.
6) [JOB STATUS]
Press this button when you want to monitor your copy, fax,
scan, and/or print jobs or view the job logs.
P.88 "Viewing the scan job status"
P.88 "Viewing the scan job log"
7) [SCAN]
Press this button to perform scanning.
8) [PREVIEW]
Press this button when you want to preview your scans.
9) [SCAN SETTING]
Press this button to change scan settings applicable to
“Scan to e-Filing”, “Scan to File”, “Scan to E-mail” and
“Scan to USB”.
10) Scan Settings Display Area
The selected scan settings are displayed.
11) [?] (Help Button)
111213
Press this button for descriptions on each function or button
on the touch panel.
12) [TEMPLATE]
Press this button when you want to use a template.
10
9
13) [SETTINGS]
Press this button to display a list of the selected options for
scan settings.
8
7
6
Default Settings
A default refers to a setting selected automatically when you
turn on the equipment, when the equipment wakes up from
Sleep Mode, or when the [RESET] button is pressed on the
control panel. To scan your document, the default settings can
be used as they are whereas pressing [SCAN SETTING]
during the scan operation allows you to select the preferred
settings for each scan job.
Advanced Guide
3) Destination Display Area
The scan jobs are displayed before their performance in
the saving destinations or addresses.
4) Alert Message Display Area
Alert messages are displayed when the equipment needs a
toner cartridge replacement, the waste toner box needs
cleaning, etc. For details on these messages, refer to the
Troubleshooting Guide.
5) Date and Time
- 76 -
Page 77

BASIC OPERATION
1
2
3
4
5
6
The available settings in the scan mode and their factory
defaults are listed in the table below.
Settings Factory Defaults
Color Mode BLACK
Resolution 200 (dpi)
Original Mode TEXT
Rotation 90 (degrees)
Single/2-sided Scan SINGLE
Original Size AUTO
Compress MID
Omit Blank Page OFF
Outside Erase OFF
Range Adjustment ±0
Exposure AUTO
Contrast ±0
Background Adjustment ±0
Sharpness ±0
Saturation ±0
RGB Adjustment
Red (R) ±0
Green (G) ±0
Blue (B) ±0
Memo
• To display a list of the selected options for scan settings,
press [SETTINGS].
P.76 "Viewing Touch Panel for Scan Menu"
• The default settings can be changed using the [SETTING]
button on the control panel.
Scan to e-Filing
• To prevent loss of data, we recommended that you back up
the data saved in the equipment’s hard disk. You can back
up the data with the computer using File Downloader or
Filing Box Backup/Restore Utility.
• Delete documents stored in Filing Box when they are no
longer needed.
Scan to File
The Scan to File function sends and stores scans to a shared
folder in the equipment’s hard disk or a specified network
folder. The data stored in the shared folder can be accessed
directly from the computer via a network.
You can scan up to 1000 pages per job until the equipment's
memory is full.
The network administrator has to make settings for storing the
scanned data to the client computers. For details, refer to the
TopAccess Guide.
Note
• The maximum capacity in the shared folder differs
depending on your model or operating environment. The
total available space in the shared folder and Filing Box can
be checked on the [Device] tab in TopAccess.
• The shared folder in the equipment’s hard disk can contain
a maximum of 2000 files.
• We recommend that you back up the data stored in the
shared folder.
• Delete documents stored in the shared folder when they are
no longer needed.
Scanning to files
With this function, you can scan originals and store the scans
in Filing Box. You can scan 200 pages per job.
When saving your scans, you can specify a public box or one
of the user boxes. The public box is a pre-defined box and is
used to store documents that any users of the equipment may
need to work with. A user box is one created by the user. If a
password has been set for a user box, you need to enter the
correct password to access it.
The stored data can be printed out any time from the touch
panel. You can also manage the data using the e-Filing web
utility. With the Filing Box web utility, you can create user boxes
and folders, print documents, and even merge several
documents to create a new one.
For instructions on how to store your scans with Scan to eFiling, create user boxes, and print Filing Box documents, refer
to the e-Filing Guide.
Note
• The maximum capacity in e-Filing differs depending on your
model or operating environment. The total available space
in e-Filing and the shared folder can be checked on the
[Device] tab in TopAccess.
• Before saving your scans in a user box, you need to set up
the user box.
Place the original(s).
1
On the control panel, press the [SCAN]
2
button to enter the SCAN menu.
Press [FILE].
3
- 77 -
Page 78

BASIC OPERATION
1
2
3
4
5
6
• To store the scan in the equipment’s shared folder,
proceed to step 4.
• To store the scan in a network folder, proceed to step
5.
Note
• Storing data in a network folder requires the
administrator to set the equipment configuration. For
details, refer to the TopAccess Guide.
Make sure that [MFP LOCAL] is selected
4
and highlighted.
6
Memo
• If saving data in a network folder is enabled by the
administrator, you can select 2 file destinations from
[MFP LOCAL], [REMOTE 1] and [REMOTE 2].
Select the desired file destination from the
list.
1) Select the file destination.
2) Press [OK].
• If FTP, NetWare IPX, NetWare IP or FTPS is selected
Proceed to step 9.
Memo
• If saving data in a network folder is enabled by the
administrator, you can select 2 file destinations from
[MFP LOCAL], [REMOTE 1] and [REMOTE 2]. If you
select [MFP LOCAL], you can specify a network folder
(REMOTE 1 or 2) as a remote destination. To set a
network folder as a remote destination, proceed to step
5.
To store the scan in a network folder, press
5
[REMOTE 1] or [REMOTE 2].
7
for the file destination, proceed to Step 9.
• If SMB is selected for the file destination, proceed to
Step 7.
• If your desired file destination has not been registered
in the equipment, press [DIRECT INPUT] and proceed
to Step 8.
If SMB is selected for the file destination,
select the folder to be stored.
1) Select the folder to be stored.
2) Press [OK].
Proceed to Step 9.
• If the selected remote destination (REMOTE 1 or 2) is
configured by the administrator so that you can specify
a desired network folder, the screen for setting up the
remote destination is displayed. Proceed to step 6.
• If the selected remote destination (REMOTE 1 or 2) is
already defined by the administrator so that the scan is
saved in a specified network folder, pressing the button
does not display the screen for specifying the file
destination. In this case, you cannot change the file
destination. Proceed to step 9. If you need to change
the remote destination, ask your network administrator
for help.
- 78 -
Page 79

BASIC OPERATION
1
2
3
4
5
6
Select a folder for the remote destination.
8
1) Select FTP, SMB, NetWare IPX, NetWare IP, or FTPS
as a protocol to transfer the file.
2) Press [SERVER NAME], [NETWORK PATH], [LOGIN
USER NAME], [PASSWORD] and/or [COMMAND
PORT] and specify the file destination.
3) Finally, press [OK].
• [SERVER NAME] (FTP, NetWare IPX, NetWare IP, and
FTPS only)
When you select [FTP]:
Enter the IP address of the FTP server. For example,
to transfer the scanned data to “ftp://10.10.70.101/
user01/scan/,” enter “10.10.70.101” in this box.
When you select [NetWare IPX]:
Enter the name of the NetWare file server or the Tree/
Context (when NDS is available).
When you select [NetWare IP]:
Enter the IP address of the NetWare file server.
When you select [FTPS]:
Enter the IP address of the FTP server. For example,
to transfer the scanned data to “ftps://10.10.70.101/
user01/scan/,” enter “10.10.70.101” in this box.
• [NE T W O R K PATH]
When you select [FTP]:
Enter the path to a folder in the FTP server where you
want to store the scanned data. For example, to
transfer the scanned data to “ftp://10.10.70.101/
user01/scan/,” enter “user01\scan” in this box.
When you select [SMB]:
Enter the network path to the folder where you want to
store the scanned data.
When you select [NetWare IPX] or [NetWare IP]:
Enter the path to a folder in the NetWare file server
where you want to store the scanned data. For
example, to transfer the scanned data to the “sys\scan”
folder in the NetWare file server, enter “\sys\scan” in
this box.
When you select [FTPS]:
Enter the path to a folder in the FTP server where you
want to store the scanned data. For example, to
transfer the scanned data to “ftps://10.10.70.101/
user01/scan/,” enter “user01\scan” in this box.
• [LOGIN USER NAME]
When you select [FTP]:
Enter the log-in user name for the FTP server if
required.
When you select [SMB]:
Enter the user name to access the network folder if
required.
When you select [NetWare IPX] or [NetWare IP]:
Enter the log-in user name for the NetWare file server if
required.
9
When you select [FTPS]:
Enter the log-in user name for the FTP server if
required.
• [PASSWORD]
When you select [FTP]:
Enter the log-in password for the FTP server if
required.
When you select [SMB]:
Enter the password for accessing the network folder if
required.
When you select [NetWare IPX] or [NetWare IP]:
Enter the log-in password for the NetWare file server if
required.
When you select [FTPS]:
Enter the log-in password for the FTP server if
required.
• [COMMAND PORT] (FTP and FTPS only)
Enter the port number to be used for command
execution. By default, a hyphen “-” is entered in this
box, and the port number set by the administrator is
used. Change the entry in this box only when you want
to use another port number.
Memo
• Pressing each button displays an on-screen keyboard.
Enter each item using the keyboard and digital keys,
and then press [OK] to set the entry.
• To store files in [SMB], enter the network path, login
user name and password then press, so that you
can select the folder.
Define the settings for the new file as
required.
1) Press [FILE NAME] and change the file name.
2) Select an option for each of the FILE FORMAT,
MULTI/SINGLE PAGE and/or SECURITY settings.
3) Finally, press [OK].
Memo
•To clear the settings, press [RESET].
•[FILE NAME]
Pressing the button displays an on-screen keyboard.
Change the file name using the keyboard and digital
keys, and then press [OK] to set the entry. The file
name can consist of a maximum of 128 characters.
- 79 -
Page 80

BASIC OPERATION
1
2
3
4
5
6
Memo
•Pressing adds a meaningful number, such as
date and time, to the file name. The number is
assigned according to the format selected for the
Date Format setting, which is available for the
administrator on TopAccess. For details, refer to the
TopAccess Guide.
•The trailing characters in a file name (maximum 74)
may be deleted depending on the type of letters
used.
•FILE FORMAT
[PDF] — Press this button to store your scan as a PDF
file.
[TIFF] — Press this button to store your scan as a
TIFF file.
[XPS] — Press this button to store your scan as an
XPS file.
[SLIM PDF] — Press this button to store your scan as
a slim PDF file. This option is suitable when minimizing
the file size is more important than the image quality.
This option is available only when [FULL COLOR] or
[GRAY SCALE] is selected for the color mode setting.
[JPEG] — Press this button to store your scan as a
JPEG file. This option is available only when [FULL
COLOR] or [GRAY SCALE] is selected for the color
mode setting.
Press [SCAN].
10
Memo
• To scan 2-sided documents or change settings such as
Color Mode and Resolution, press [SCAN SETTING].
• Press [PREVIEW] and then [SCAN] to preview your
scans.
• You can select and set [e-FILING], [E-MAIL] or [USB]
as another scan function. (Dual Agents)
If the screen below appears, place another
11
original on the original glass and press
[SCAN] or the [START] button to continue
scanning. To finish the job, press [JOB
FINISH], followed by the [RESET] button.
Memo
•XPS files are supported only by the following
operating systems:
- Windows Vista
- Windows 7
- Windows 8
- Windows Server 2012
- Windows Server 2008 SP1 or later versions
- Windows XP SP2 or later versions with .NET
Framework 3.0 installed
- Windows Server 2003 SP1 or later versions with
.NET Framework 3.0 installed
•If the forced encryption setting is enabled, PDF is the
only available file format.
• MULTI/SINGLE PAGE
[MULTI] — Press this button to store your scan as a
multiple page file. When you scan several pages, the
equipment stores all the pages as a single file.
[SINGLE] — Press this button to store your scan as a
single file for each page. When you scan several
pages, the equipment stores each page as a separate
file.
• SECURITY
When PDF is selected for the file format, you can
decide whether or not to encrypt the PDF file. To
encrypt the PDF file, press [ON]. For further
instructions on how to encrypt PDF files, see the
following Guide:
Advanced Guide
• The above screen is not displayed under the following
conditions:
- You scan the original from the Reversing
Automatic Document Feeder without pressing
[CONTINUE] to scan additional originals.
- A scan preview is displayed.
• To cancel the operation, press [JOB CANCEL].
• To change the scan settings, press [SCAN SETTING].
Advanced Guide
Note
• When the equipment has scanned more than 1000
pages in a job, the “The number of originals exceeds
the limits. Will you save stored originals?” message
appears. If you want to save the scans, press [YES].
• When the temporary workspace is full on the
equipment’s hard disk, a message appears and the job
is canceled. The available workspace can be viewed
on the TopAccess [Device] tab.
- 80 -
Page 81

BASIC OPERATION
1
2
3
4
5
6
• If the number of jobs waiting to store scans in the
equipment's hard disk exceeds 20, a message appears
to indicate that the equipment’s memory is full. In this
case, wait a while until memory becomes available
again or delete unnecessary jobs from [JOB STATUS].
P.88 "Viewing the scan job status"
Scan to E-mail
With this scan function, you can send your scans to a specified
e-mail address as an attached file.
The mail server and the domain name server are set by the
administrator. For details, refer to the TopAccess Guide.
Scanning to e-mail
Place the original(s).
1
On the control panel, press the [SCAN]
2
button to enter the SCAN menu.
On the AUTHENTICATION screen, complete
4
the user authentication.
1) Press [USER NAME] and enter the user name.
2) Press [PASSWORD] and enter the password.
3) Finally, press [OK].
Memo
• Pressing each button displays an on-screen keyboard.
Enter each item using the keyboard and digital keys,
and then press [OK] to set the entry.
Note
• The above screen is displayed only when the User
Authentication for Scan to E-mail setting is enabled on
Press [E-MAIL].
3
• If the User Authentication for Scan to E-mail setting is
enabled by the administrator on TopAccess, the
AUTHENTICATION screen is displayed. In this case,
proceed to step 4.
• If the User Authentication for the Scan to E-mail setting
is disabled by the administrator, proceed to step 5.
Memo
5
TopAccess by the administrator. If this screen is
displayed, you must enter your user name and
password to log in to the SCAN TO E-MAIL screen. For
the user name and password, ask your network
administrator.
Press [TO].
• Press [PREVIEW] in this step and then select the scan
function in order to preview your scans at the end of
the operation.
- 81 -
Page 82

BASIC OPERATION
1
2
3
4
5
6
Specify the e-mail address(es) that you
6
want to send to.
1) Press [INPUT @].
2) Enter an e-mail address using the keyboard and
digital keys, and then press [OK] to set the entry.
3) Finally, press [OK].
You can specify e-mail addresses in various ways. For
details, see the following Guide:
Advanced Guide
Memo
• The entry in the FROM ADDRESS box (→ step 9) may
already be set by the administrator on TopAccess.
(Refer to the TopAccess Guide for descriptions of the
E-mail Setting and/or the User Authentication for Scan
to E-mail setting.) In this case, you can start sending
your scans by specifying the e-mail address(es) and
then pressing [SEND] or the [START] button.
• Pressing adds a meaningful number, such as date
and time, to the subject. For details, refer to the
TopAccess Guide.
If necessary, make the following settings
8
for the attached file.
1) Press [FILE NAME] and change the file name.
2) Select an option for each of the FILE FORMAT,
MULTI/SINGLE PAGE and/or SECURITY settings.
3) Finally, press .
•[FILE NAME]
Pressing the button displays an on-screen keyboard.
Enter the file name using the keyboard and digital
keys, and then press [OK] to set the entry. The file
name can consist of a maximum of 128 characters.
Memo
Press [SUBJECT] and [BODY] and enter
7
each item.
Memo
• To clear the settings, press [RESET].
• Pressing each button displays an on-screen keyboard.
Enter each item using the keyboard and digital keys,
and then press [OK] to set the entry. The maximum
number of characters allowed for each box is as
follows:
- [SUBJECT]: 128 characters
- [BODY]: 1000 characters
• To add another contact, press [CC] or [BCC] to add the
E-mail address of the contact.
• When the e-mail is sent, the date and time are
automatically added to the subject.
• The administrator can change the body text. For
details, refer to the TopAccess Guide.
•Pressing adds a meaningful number, such as
date and time, to the file name. The number is
assigned according to the format selected for the
Date Format setting, which is available for the
administrator on TopAccess. For details, refer to the
TopAccess Guide.
•The trailing characters in a file name (maximum 74)
may be deleted depending on the type of letters
used.
•FILE FORMAT
[PDF] — Press this button to store your scan as a PDF
file.
[TIFF] — Press this button to store your scan as a TIFF
file.
[XPS] — Press this button to store your scan as an
XPS file.
[SLIM PDF] — Press this button to store your scan as
a slim PDF file. This option is suitable when minimizing
the file size is more important than the image quality.
This option is available only when [FULL COLOR] or
[GRAY SCALE] is selected for the color mode setting.
[JPEG] — Press this button to store your scan as a
JPEG file. This option is available only when [FULL
COLOR] or [GRAY SCALE] is selected for the color
mode setting.
- 82 -
Page 83

BASIC OPERATION
1
2
3
4
5
6
Memo
•XPS files are supported only by the following
operating systems:
- Windows Vista
- Windows 7
- Windows 8
- Windows Server 2012
- Windows Server 2008 SP1 or later versions
- Windows XP SP2 or later versions with .NET
Framework 3.0 installed
- Windows Server 2003 SP1 or later versions with
.NET Framework 3.0 installed
•If the forced encryption setting is enabled, PDF is the
only available file format.
• MULTI/SINGLE PAGE
[MULTI] — Press this button to store your scan as a
multiple page file. When you scan several pages, the
equipment stores all the pages as a single file.
9
[SINGLE] — Press this button to store your scan as a
single file for each page. When you scan several
pages, the equipment stores each page as a separate
file.
• SECURITY
When PDF is selected for the file format, you can
decide whether or not to encrypt the PDF file. To
encrypt the PDF file, press [ON].
Specify the following items as required, and
then press [OK].
10
Memo
• Pressing [FROM ADDRESS] or [FROM NAME]
displays an on-screen keyboard. Enter each item using
the keyboard and digital keys, and press [OK] to set
the entry.
• You can start sending your scans on the above screen
by pressing the [START] button on the control panel.
Press [SCAN] or the [START] button.
Memo
• To scan 2-sided documents or change settings such as
Color Mode and Resolution, press [SCAN SETTING].
• Press [PREVIEW] and then [SCAN] to preview your
scans.
• You can select and set [e-FILING], [E-MAIL] or [USB]
as another scan function. (Dual Agents)
If the screen below appears, place another
11
original on the original glass and press
[SCAN] or the [START] button to continue
scanning. To finish the job, press [JOB
FINISH], followed by the [RESET] button.
• FRAGMENT MESSAGE SIZE (KB)
Select the size of message fragmentation. If the size of
the attached file exceeds that selected here, the
equipment transmits the file by dividing the data into
smaller blocks.
Note
• If the data size of the e-mail exceeds the maximum
allowed for transmission, the attached file will not be
sent. The maximum data size for e-mail transmission
can be set by the administrator on the TopAccess
SMTP Client page.
• [FROM ADDRESS]
Press this button to edit the sender’s e-mail address.
You cannot edit the box if the administrator sets the
sender’s e-mail address so that it cannot be edited.
•[FROM NAME]
Press this button to edit the sender’s name.
• The above screen is not displayed under the following
conditions:
- You scan the original from the Reversing
Automatic Document Feeder without pressing
[CONTINUE] to scan additional originals.
- A scan preview is displayed.
• To cancel the operation, press [JOB CANCEL].
• To change the scan settings, press [SCAN SETTING].
Advanced Guide
Note
• When the equipment has scanned more than 1000
pages in a job, the “The number of originals exceeds
the limits. Will you save stored originals?” message
appears. If you want to save the scans, press [YES].
- 83 -
Page 84

BASIC OPERATION
1
2
3
4
5
6
USB Port
USB Storage Device
• When the temporary workspace is full on the
equipment’s hard disk, a message appears and the job
is canceled. The available workspace can be viewed
on the TopAccess [Device] tab.
Scan to USB
The Scan to USB function stores scans to a USB storage
device.
To store data in a USB storage device, the Save to USB Media
setting must be enabled by the administrator. For details, refer
to the TopAccess Guide.
Note
• USB storage devices must meet requirements below.
However, some USB storage devices may not be used with
this equipment even though the requirements below are
met.
- FAT16 or FAT32 format
- Single-partition (USB storage devices with multiple
partitions are not supported.)
Scanning to USB
Place the original(s).
1
On the control panel, press the [SCAN]
2
button to enter the SCAN menu.
When “Found USB DEVICE.” message
4
appears on the touch panel, press [USB].
Note
• When you store scans in a USB storage device, never
attempt to remove the device from the equipment until
data transmission is completed. Removing the USB
storage device during data transmission may corrupt
the device.
Memo
• Storing scans to a USB storage device may take a long
time depending on the volume of the scans.
• Press [PREVIEW] in this step and then select the scan
function in order to preview your scans at the end of
the operation.
Define the settings for the new file as
5
required.
1) Press [FILE NAME] to change the file name.
2) Select an option for each of the FILE FORMAT,
MULTI/SINGLE PAGE and SECURITY settings.
3) After the settings are done, press [OK].
To store scans in a USB storage device,
3
connect the device to the equipment and
wait a few seconds.
Note
• Connect the USB storage device to the USB port.
Memo
• To clear the settings, press [RESET].
•[FILE NAME]
Pressing this button displays an on-screen keyboard.
Change the file name using the keyboard and digital
keys, and then press [OK] to set the entry. A maximum
of 128 letters can be used for the file name.
- 84 -
Page 85

BASIC OPERATION
1
2
3
4
5
6
Note
•Pressing adds some numbers such as date and
time to the file name. These numbers can be set in
the format selected in the Date Format setting of the
TopAccess menu, which can be set by the
administrator. For details, refer to the TopAccess
Guide.
•The trailing characters in a file name (maximum 74)
may be deleted depending on the type of letters
used.
•FILE FORMAT
[PDF] – Press this button to store scans as a PDF file.
[TIFF] – Press this button to store scans as a TIFF file.
[XPS] – Press this button to store scans as an XPS file.
[SLIM PDF] – Press this button to store scans as a
slim PDF file. This option is suitable when minimizing
the file size is more important than the image quality.
This option is available only when [FULL COLOR] or
[GRAY SCALE] is selected for the color mode setting.
[JPEG] – Press this button to store scans as a JPEG
file. This option is available only when [FULL COLOR]
or [GRAY SCALE] is selected for the color mode
setting.
Press [SCAN] to scan data.
6
Memo
• To scan 2-sided documents or set Color Mode or
Resolution, etc., press [SCAN SETTING].
• Press [PREVIEW] and then [SCAN] to preview your
scans.
• You can select and set [e-FILING], [E-MAIL] or [USB]
as another scan function. (Dual Agents)
If the screen below appears, place another
7
original on the original glass and press
[SCAN] or the [START] button to continue
Memo
•XPS files are supported only by the following
operating systems:
- Windows Vista
- Windows 7
- Windows 8
- Windows Server 2012
- Windows Server 2008 SP1 or later versions
- Windows XP SP2 or later versions with .NET
Framework 3.0 installed
- Windows Server 2003 SP1 or later versions with
.NET Framework 3.0 installed
•If the forced encryption setting is enabled, PDF is the
only format available.
scanning. To finish the job, press [JOB
FINISH], followed by the [RESET] button.
• MULTI/SINGLE PAGE
[MULTI] – Press this button to store scans as a
multiple page file. When you scan several pages, the
equipment stores all the pages as a single file.
[SINGLE] – Press this button to store scans as a single
file for each page. When you scan several pages, the
equipment stores each page as a separate file.
• SECURITY
When PDF is selected for the file format, you can
decide whether or not to encrypt the PDF file. To
encrypt the PDF file, press [ON]. For the details of the
encryption setting, see the following Guide:
Advanced Guide
• The above screen is not displayed under the following
conditions:
- You scan the original from the Reversing
Automatic Document Feeder without pressing
[CONTINUE] to scan additional originals.
- A scan preview is displayed.
• To cancel the operation, press [JOB CANCEL].
• To change the scan settings, press [SCAN SETTING].
Advanced Guide
Note
• When the equipment has scanned more than 1000
pages in a job, the “The number of originals exceeds
the limits. Will you save stored originals?” message
appears. If you want to save the scans, press [YES].
• When the temporary workspace is full on the
equipment’s hard disk, a message appears and the job
is canceled. The available workspace can be viewed
on the TopAccess [Device] tab.
- 85 -
Page 86

BASIC OPERATION
1
2
3
4
5
6
• If the number of jobs waiting to store scans in the
equipment's hard disk exceeds 20, a message appears
to indicate that the equipment’s memory is full. In this
case, wait a while until memory becomes available
again or delete unnecessary jobs from [JOB STATUS].
P.88 "Viewing the scan job status"
Web Service (WS) Scan
Web Service (WS) Scan uses the functions of Windows
operating systems such as Windows Vista to scan images from
a client computer through the network. Scanning can be
performed through the touch panel operation or from a client
computer running Windows operating systems such as
Windows Vista. The images scanned on the equipment can be
loaded to your client computer and viewed on an application
supporting the Windows Imaging Acquisition (WIA) Scan
Driver.
System Requirements
The WS Scan function is available under the following
environments:
•OS
Windows Vista / Windows 7 / Windows 8 / Windows Server
2008 / Windows Server 2012
•Software
Windows Imaging Acquisition (WIA)-compliant applications
Scanning with Web Service Scan
Place the original(s).
1
On the control panel, press the [SCAN]
2
button to enter the SCAN menu.
Press [WS SCAN].
3
Scan Driver Installation
WS Scan uses the WIA Scan Driver included with Windows
operating systems such as Windows Vista. The WIA Scan
Driver is automatically installed to your client computer when
you install client software for Web Service Printing.
Note
• To install the WIA Scan Driver on a client computer, the Web
Service Scan setting must be enabled by the administrator
on TopAccess. For details, refer to the TopAccess Guide.
Memo
• The User Documentation DVD includes the WIA Driver for
users of Windows XP/Windows Vista/Windows 7/Windows
8/Windows Server 2003/Windows Server 2008/Windows
Server 2012. This driver can be used together with a WIAcompliant application, such as Microsoft Paint supported by
Windows XP or Windows Vista, to scan images on the
equipment and load them to your client computer.
This guide provides instructions for using the touch panel to
scan images on the equipment. For operational instructions on
the client computers, refer to the documentation that comes
with your WIA-compliant application.
Select the client that fits your needs, and
4
then press [SCAN].
Memo
• If the desired client name is not shown on the screen,
use and to switch between pages.
The following screen is displayed.
- 86 -
Page 87

1
2
3
4
5
6
Memo
• To cancel the operation, press [CANCEL].
BASIC OPERATION
When scans are sent to a sub-folder:
When the Local Storage Path setting is set to send the scans to
a sub-folder in the path, the equipment automatically creates a
sub-folder. The name of the sub folder depends on how you
operate the Scan to File function.
Note
• If the above screen does not appear, make sure that
the selected client is running.
Using Saved Scan Data
Using scan data saved as e-Filing documents
You can display a list of the scan data stored in e-Filing and
use it in various ways from the touch panel or with the e-Filing
web utility. For instructions on how to use the data stored in eFiling, refer to the e-Filing Guide.
Using scan data saved as files
To access your scans stored in the equipment’s shared folder,
a USB storage device, or a network folder, use the Windows
Explorer search function or the Macintosh Finder.
Using scans saved in MFP LOCAL
When you select [MFP LOCAL] to save your scans, they are
stored in the equipment’s shared folder named “file_share.”
You can access this folder from a computer running a Windows
OS or Mac OS X 10.3.x or later.
The sub-folders created under “file_share” are as follows:
• “SCAN” — This sub-folder contains files created by the
Scan to File function.
• “000-PUBLIC_TEMPLATE_GROUP-[Template Name]”
— This sub-folder contains files created using a scan
template in the Public Template group.
• “[Group No.]-[Group Name]-[Template Name]” — This
sub-folder contains files created using a scan template in
the User Template group.
The sub-folders are automatically deleted when the folder
becomes empty.
When scans are sent directly to the shared folder:
When the Local Storage Path setting is set to send the scan
data directly to storage, they are stored in the equipment under
the “file_share” folder.
Using scans saved in USB storage
device
When you select [USB] to save your scans, they are stored in
the USB storage device connected to the equipment.
When you save your scans in the USB storage device, a subfolder is automatically created. The name of the sub-folder
depends on how you operate the Scan to USB function.
Note
• The equipment’s shared folder cannot be accessed from
Mac OS X 10.2.x or earlier because these versions do not
support SMB.
Memo
• If you access the equipment’s shared folder from Macintosh
OS X 10.3.x or later, connecting to the network from the
Finder displays the SMB/CIFS File dialog box. Enter your
user name and password in the dialog box as required.
Whether your scans are stored directly in the shared folder or
in a sub-folder is controlled by the Local Storage Path setting
on TopAccess. The administrator can change this setting from
the Setup page by clicking the “Save as file” submenu. For
details, refer to the TopAccess Guide.
• “SCAN” — This sub-folder contains files created by the
Scan to USB function.
• “000-PUBLIC_TEMPLATE_GROUP-[Template Name]”
— This sub-folder contains files created using a scan
template in the Public Template group.
• “[Group No.]-[Group Name]-[Template Name]” — This
sub-folder contains files created using a scan template in
the User Template group.
- 87 -
Page 88

BASIC OPERATION
1
2
3
4
5
6
Using scans saved in network folders
(REMOTE 1/2)
When you select [REMOTE 1] or [REMOTE 2] to store data,
they are stored in the Scan folder automatically created in the
specified network folder. When these data contain a template,
they are stored in a folder that has been specified in the
template setting.
Viewing the Scan Job Status and Log
The status and log of scan jobs can be viewed on the touch
panel.
Note
• If the equipment is managed by the User Management
feature, you need to enter the user information, such as the
user name and password.
Viewing the scan job status
Pressing [JOB STATUS] > [JOBS] > [SCAN] on the touch
panel displays a list of the scan jobs in progress. The jobs can
be deleted if needed.
Viewing the scan job log
A record of scan jobs can be displayed on the [LOG] tab of the
JOB STATUS screen. To display the record on the touch panel,
press [JOB STATUS] > [LOG] > [SCAN].
On the [LOG] tab, you can view each job’s destination/file
name, agent (scan function), date and time, number of pages,
and status (job result).
Up to 1000 jobs can be listed.
To display the previous or next page, press or . The
number of jobs displayed on a page varies depending on the
equipment used.
If you want to register an e-mail address on the list to the
address book, press [ENTRY].
Advanced Guide
In the list, you can view each job’s destination/file name, agent
(scan function), date and time, number of pages, and current
status. The maximum number of displayed jobs differs
depending on your model or operating environment.
To display the previous or next page, press or . The
number of jobs displayed on a page varies depending on the
equipment used.
To delete jobs, select one on the list and press [DELETE]. You
can select more than one job to be deleted.
To exit from the JOB STATUS screen, press [CLOSE].
To exit from the SCAN LOG screen, press [CLOSE].
Memo
• For details of the job record displayed on the [LOG] tab,
refer to the TopAccess Guide.
• For details on error codes displayed in the “Status” column,
refer to the Troubleshooting Guide.
• The scan job log can be exported to a USB storage device.
- 88 -
Page 89

1
2
3
4
5
6
5
Utilities that can be
used with this machine
List of Utilities························································· P.90
Page 90

List of Utilities
1
2
3
4
5
6
● List of Utilities
Common Utilities for Windows/Macintosh
You can use the following utilities.
For details, refer to the Utility Guide.
• AddressBook Viewer
• Filing Box Backup/Restore
• TWAIN Driver
• File Downloader
• Remote Scan Driver
• WIA Driver
- 90 -
Page 91

1
2
3
4
5
6
6
Index
Page 92

1
2
3
4
5
6
A
Advanced Guide ................................... 2
Alert Message Display Area ............... 76
AMS (Automatic Magnification Selection)
........................................................ 47
[APS] ................................................... 44
APS (Automatic Paper Selection) ....... 44
Auto job start ....................................... 33
Automatic Paper Selection (APS) ....... 44
B
Background Adjustment ...................... 77
Basic Guide .......................................... 2
Batch transmission function ................ 59
Blue (B) ............................................... 77
[BODY] ................................................ 82
Bypass copying
bypass copying ........................... 35
envelope ..................................... 39
non-standard size paper ............. 40
standard size paper .................... 36
C
Canceling direct transmissions ........... 73
Canceling reserved transmissions ...... 73
Canceling the memory transmission ... 72
Clearing the set functions ................... 43
Color mode ......................................... 77
[COMMAND PORT] ............................ 79
Communication status ........................ 71
Compress ........................................... 77
Configuration Settings ........................ 21
Confirmation screen ............................ 43
Considerations .............................. 24, 26
Continuous feed mode ........................ 30
Contrast .............................................. 77
Convenient Functions ........................... 7
COPY & FILE ...................................... 54
Copy quantity ...................................... 43
Copying
auto job start ............................... 33
basic procedure .......................... 31
before making copies .................. 28
book-type originals ...................... 29
bypass copying ........................... 35
copy & file ................................... 54
copy quantity ............................... 43
duplex copying ............................ 52
envelope ..................................... 39
interrupting .................................. 33
making copies ............................. 31
mixed-size originals .................... 45
non-standard size paper ............. 40
number of copies ........................ 31
proof copy ................................... 33
reproduction ratio .................. 43, 47
restarting ..................................... 32
stopping ...................................... 32
Copying functions
before using copying functions ... 43
clearing the set functions ............ 43
confirming the set functions ........ 43
D
Date and Time .................................... 76
Default settings ............................. 43, 76
Density adjustment ....................... 43, 46
Department Code ......................... 21, 23
Destination Display Area .................... 76
[Device Settings] tab ........................... 22
Different width originals ...................... 61
DIRECT TX ......................................... 62
Duplex copying
1-sided original -> 1-sided copy .. 52
1-sided original -> 2-sided copy .. 53
2-sided original -> 1-sided copy .. 53
2-sided original -> 2-sided copy .. 53
simplex/duplex setting ................ 52
E
ECM .................................................... 63
e-Filing .......................................... 77, 87
Enter the user credentials manually ... 25
Envelope ............................................. 39
EXPOSURE ........................................ 62
Exposure ............................................ 77
External telephone ........................ 67, 69
F
Feeding mode ..................................... 30
File formats ................................... 80, 82
[FILE NAME] ................................. 79, 82
Finisher ............................................... 22
Inner Finisher .............................. 50
name of each part ....................... 50
Finishing mode
finishing mode ............................. 43
group ..................................... 49, 50
magazine sort ....................... 49, 52
non-sort non-staple ..................... 49
selecting ...................................... 49
sort ........................................ 49, 50
staple sort ............................. 49, 51
FRAGMENT MESSAGE SIZE ............ 83
[FROM ADDRESS] ............................. 83
[FROM NAME] .................................... 83
FTP ..................................................... 56
FTPS .................................................. 56
Function Buttons ................................. 76
G
Green (G) ........................................... 77
Group ............................................ 49, 50
H
[?] (Help Button) ................................. 76
How to print ........................................ 24
I
Install ................................ 12, 14, 16, 19
INTERNET FAX .................................. 63
Internet Fax .........................................71
[INTERRUPT] button ...........................33
Interrupting copying .............................33
ITU-T ...................................................63
J
[JOB STATUS] ....................................76
L
Limitations .....................................24, 26
List of Utilities ......................................90
Log
scan .............................................88
[LOGIN USER NAME] .........................79
M
Magazine sort ................................49, 52
MAIL BOX COMMUNICATION ...........63
MEMORY TX .......................................62
Menu
Scan ............................................76
Message Display Area ........................76
[MFP LOCAL] ................................78, 87
Model Selection ...................................22
Multi/Single ....................................80, 83
Multi-purpose tray (MPT) .....................36
N
NetWare IP ..........................................56
NetWare IPX .......................................56
Network Fax ........................................71
Network folder ...............................77, 88
[NETWORK PATH] .............................79
Next original ........................................59
Non-sort Non-staple ............................49
Number of copies ................................31
O
Off-hook transmission .........................67
OHP film ........................................35, 37
Omit Blank Page .................................77
On-hook transmission .........................67
Operating Environment .......................13
[OPTION] .................................58, 62, 63
Original
original scanning range ...............60
originals that can be sent ............59
placing the original(s) on the original
glass .........................................60
placing the original(s) on the RADF
.................................................61
Original glass .......................................28
[ORIGINAL MODE] .............................46
ORIGINAL MODE ...............................62
Original mode ......................................77
original mode .........................43, 46
PHOTO ........................................46
TEXT ...........................................46
TEXT/PHOTO .............................46
- 92 -
Page 93

1
2
3
4
5
6
ORIGINAL SIZE .................................. 62
Original size ........................................ 77
Original stopper .................................. 30
Originals
acceptable originals .................... 28
mixed-size originals .................... 45
placing ......................................... 28
using the RADF ........................... 29
Outside Erase ..................................... 77
Override Application Paper Source
Settings ........................................... 22
P
Paper
acceptable size of paper ............. 69
default setting for RX printing ...... 69
out of paper ................................. 32
paper priority when there is no same
size paper ................................ 70
Paper holder ....................................... 35
Paper selection ............................. 43, 44
[PASSWORD] ..................................... 79
PHOTO ............................................... 46
PPD .................................................... 24
Preparations ................................. 14, 19
[PREVIEW] ............................. 59, 68, 76
Print .............................................. 14, 19
Printer description file ......................... 24
Printer drivers ...................................... 12
Proof copy ........................................... 33
Q
QUALITY TX ....................................... 63
RADF (Reversing Automatic Document
Feeder)
precautions ................................. 29
unacceptable originals ................ 29
using the RADF ........................... 29
Range adjustment ............................... 77
Receiving
AUTO reception .......................... 69
MANUAL reception ..................... 69
Memory reception ....................... 69
Receiving tray selection ...................... 34
Recipient
confirming the recipients ............. 67
direct entry with digital keys ........ 64
group entry .................................. 65
searching for by ID number ......... 65
searching for the recipient’s fax
number .................................... 66
specifying the recipient in the
address book ........................... 64
Red (R) ............................................... 77
Redial function .................................... 59
[REMOTE 1] ................................. 78, 88
[REMOTE 2] ................................. 78, 88
Reproduction ratio ........................ 43, 47
Reserved transmissions ...................... 71
[RESET] button ............................. 35, 43
R
RESOLUTION .................................... 62
Resolution ........................................... 77
RGB adjustment ................................. 77
Rotation .............................................. 77
S
Saturation ........................................... 77
[SCAN] ................................................ 76
[SCAN SETTING] ............................... 76
Scan Settings Display Area ................ 76
Scan to e-Filing ................................... 77
Scan to E-mail .................................... 81
Scan to File ......................................... 77
Scan to USB ....................................... 84
Security ......................................... 80, 83
Sending .............................................. 58
[SERVER NAME] ............................... 79
[SETTINGS] ........................................ 76
Setup Guide .......................................... 2
Share folder ........................................ 56
Shared folder ................................ 77, 87
Sharpness .......................................... 77
Side guides of the RADF
(Reversing Automatic Document
Feeder) ............................................ 30
Simplex/duplex setting ........................ 43
Single feed mode ................................ 30
Single/2-sided Scan ............................ 77
SMB .................................................... 56
Sort ............................................... 49, 50
Staple sort .................................... 49, 51
[START] button ............................. 32, 33
Status
scan job ...................................... 88
Sticker labels ...................................... 35
[STOP] button ..................................... 32
Sub-folder ........................................... 87
[SUBJECT] ......................................... 82
T
[TEMPLATE] ....................................... 76
TEXT .................................................. 46
TEXT/PHOTO ..................................... 46
Touch panel
Scan ............................................ 76
Transmission conditions
changing the settings for each page
................................................ 63
making settings ........................... 62
Tray .................................................... 22
Troubleshooting Guide ......................... 2
TX TYPE ............................................. 62
U
USB storage device ............................ 87
User Documentation DVD .................. 86
Utility Guide .......................................... 2
W
Web Service (WS) Scan ..................... 86
Windows Imaging Acquisition (WIA) Scan
Driver ...............................................86
Z
[ZOOM] ................................................47
- 93 -
Page 94

May 2013
45611202EE Rev1
 Loading...