


C5150/C5200ne/C5200n Technical Reference, Macintosh
59351301 Rev 1.2
August 2005
Every effort has been made to ensure that the information in this
document is complete, accurate, and up-to-date. The manufacturer
assumes no responsibility for the results of errors beyond its control.
The manufacturer also cannot guarantee that changes in software
and equipment made by other manufacturers and referred to in this
Guide will not affect the applicability of the information in it. Mention
of software products manufactured by other companies does not
necessarily constitute endorsement by the manufacturer.
While all reasonable efforts have been made to make this document
as accurate and helpful as possible, we make no warranty of any
kind, expressed or implied, as to the accuracy or completeness of
the information contained herein.
The most up-to-date drivers and manuals are available from the Oki
Data website
http://www.okidata.com and http://my.okidata.com.
Copyright © 2005. All rights reserved.
ENERGY STAR
As an
®
Program Participant, the
manufacturer has determined that this product meets the
ENERGY STAR guidelines for energy efficiency.
Oki and Microline are registered trademarks of Oki Electric Industry Company
Ltd. ENERGY STAR is a registered trademark of the United States
Environmental Protection Agency. Apple, Macintosh and Mac OS are registered
trademarks of Apple Computers Inc. Other product names and brand names are
registered trademarks or trademarks of their proprietors.

Contents
Color Print Matching . . . . . . . . . . . . . . . . . . . . . . . . . . . . 6
Factors That Affect the Appearance of Printed Documents . . . . . . .6
Range of Colors: Monitors Versus Printers . . . . . . . . . . . . . . . . .6
Viewing conditions . . . . . . . . . . . . . . . . . . . . . . . . . . . . . . . . . . . .6
Printer driver color settings. . . . . . . . . . . . . . . . . . . . . . . . . . . . . .7
Monitor settings . . . . . . . . . . . . . . . . . . . . . . . . . . . . . . . . . . . . . .7
How Your Software Application Displays Color. . . . . . . . . . . . .8
Paper Type . . . . . . . . . . . . . . . . . . . . . . . . . . . . . . . . . . . . . . . . . .8
Choosing a Color Matching Method . . . . . . . . . . . . . . . . . . . . . . . . .8
RGB or CMYK? . . . . . . . . . . . . . . . . . . . . . . . . . . . . . . . . . . . . . .9
Matching Photographic Images . . . . . . . . . . . . . . . . . . . . . . . . . .9
Matching Specific Colors . . . . . . . . . . . . . . . . . . . . . . . . . . . . . .10
Printing Vivid Colors . . . . . . . . . . . . . . . . . . . . . . . . . . . . . . . . .10
OS X Printer Driver . . . . . . . . . . . . . . . . . . . . . . . . . . . . . 11
Printer Drivers . . . . . . . . . . . . . . . . . . . . . . . . . . . . . . . . . . . . . . . . .11
Adjusting Options . . . . . . . . . . . . . . . . . . . . . . . . . . . . . . . . . . . . . .11
Accessing Print Features . . . . . . . . . . . . . . . . . . . . . . . . . . . . . . . . .12
Setting Black-Only Print Options:
Grey Scale . . . . . . . . . . . . . . . . . . . . . . . . . . . . . . . . . . . . . . . . . . . .13
Brightness . . . . . . . . . . . . . . . . . . . . . . . . . . . . . . . . . . . . . . . . . .13
Saturation . . . . . . . . . . . . . . . . . . . . . . . . . . . . . . . . . . . . . . . . . .13
Setting Color Print Options . . . . . . . . . . . . . . . . . . . . . . . . . . . . . . .14
Auto Color Mode . . . . . . . . . . . . . . . . . . . . . . . . . . . . . . . . . . . .14
Advanced Color Mode . . . . . . . . . . . . . . . . . . . . . . . . . . . . . . . .15
Copies & Pages Settings . . . . . . . . . . . . . . . . . . . . . . . . . . . . . . . . .17
Copies . . . . . . . . . . . . . . . . . . . . . . . . . . . . . . . . . . . . . . . . . . . . .17
Collated. . . . . . . . . . . . . . . . . . . . . . . . . . . . . . . . . . . . . . . . . . . .18
Pages . . . . . . . . . . . . . . . . . . . . . . . . . . . . . . . . . . . . . . . . . . . . . .18
Layout Settings . . . . . . . . . . . . . . . . . . . . . . . . . . . . . . . . . . . . . . . .18
Pages per Sheet . . . . . . . . . . . . . . . . . . . . . . . . . . . . . . . . . . . . . .18
Layout Direction. . . . . . . . . . . . . . . . . . . . . . . . . . . . . . . . . . . . .18
Border . . . . . . . . . . . . . . . . . . . . . . . . . . . . . . . . . . . . . . . . . . . . .19
Two Sided Printing (only if the duplexer is installed) . . . . . . . .19
Paper Source Settings . . . . . . . . . . . . . . . . . . . . . . . . . . . . . . . . . . .20
Auto . . . . . . . . . . . . . . . . . . . . . . . . . . . . . . . . . . . . . . . . . . . . . .20
Multi Purpose Tray / Tray1 . . . . . . . . . . . . . . . . . . . . . . . . . . . .20
Print Quality Settings . . . . . . . . . . . . . . . . . . . . . . . . . . . . . . . . . . .21
3

Print Quality . . . . . . . . . . . . . . . . . . . . . . . . . . . . . . . . . . . . . . . .21
Photo Enhance . . . . . . . . . . . . . . . . . . . . . . . . . . . . . . . . . . . . . .21
Toner saving . . . . . . . . . . . . . . . . . . . . . . . . . . . . . . . . . . . . . . . .21
Printer Option Settings . . . . . . . . . . . . . . . . . . . . . . . . . . . . . . . . . .22
Thickness . . . . . . . . . . . . . . . . . . . . . . . . . . . . . . . . . . . . . . . . . .22
Auto tray switch . . . . . . . . . . . . . . . . . . . . . . . . . . . . . . . . . . . . .23
Paper size check . . . . . . . . . . . . . . . . . . . . . . . . . . . . . . . . . . . . .23
Multi Purpose Tray is Manual feed . . . . . . . . . . . . . . . . . . . . . .23
Always create 100% Black(K) Toner. . . . . . . . . . . . . . . . . . . . .23
Run maintenance cycle before printing . . . . . . . . . . . . . . . . . . .23
OSX General Printing . . . . . . . . . . . . . . . . . . . . . . . . . . . 24
Collating . . . . . . . . . . . . . . . . . . . . . . . . . . . . . . . . . . . . . . . . . . . . .24
Multiple Pages on One Sheet
(N-Up Printing) . . . . . . . . . . . . . . . . . . . . . . . . . . . . . . . . . . . . . . . .26
Duplex Printing
(Printing on Both Sides of the Sheet) . . . . . . . . . . . . . . . . . . . . . . .27
Media Type Select. . . . . . . . . . . . . . . . . . . . . . . . . . . . . . . . . . . . . .30
Paper Feed Select . . . . . . . . . . . . . . . . . . . . . . . . . . . . . . . . . . . . . .33
OS X Utilities . . . . . . . . . . . . . . . . . . . . . . . . . . . . . . . . . . 34
Apple ColorSync Utility . . . . . . . . . . . . . . . . . . . . . . . . . . . . . . . . .34
Setting the Display (Monitor) Profile . . . . . . . . . . . . . . . . . . . . .34
Setting the Printer Profile . . . . . . . . . . . . . . . . . . . . . . . . . . . . . .37
Job Accounting . . . . . . . . . . . . . . . . . . . . . . . . . . . . . . . . . . . . . . . .39
Account ID . . . . . . . . . . . . . . . . . . . . . . . . . . . . . . . . . . . . . . . . .39
Activating Job Accounting . . . . . . . . . . . . . . . . . . . . . . . . . . . . .39
Using Job Accounting. . . . . . . . . . . . . . . . . . . . . . . . . . . . . . . . .40
4
Note / Important Boxes
NOTE
A note appears like this. A note provides additional
information to supplement the main text which helps
you to use and understand the product.
Important!
An important message appears like this. An important message
provides supplemental information which can prevent potential
problems.
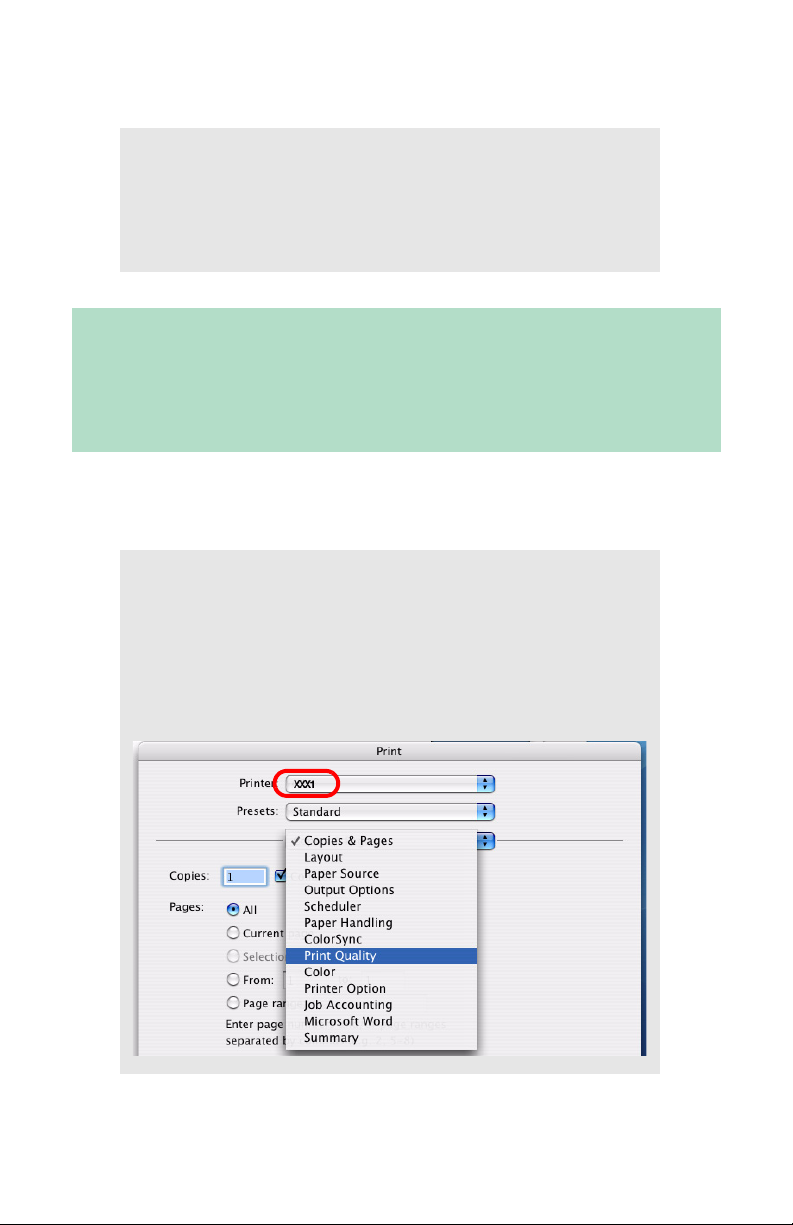
Generic Screen Shots
NOTE
The screen shots in this manual are generic. When
you see
a specific model number which will vary depending on
which models are being used in your system.
For example:
XXX1, XXX2, etc., in a screen, they represent
5

Color Print Matching
The install utility provides a color matching profile for your printer. In
general, using these Color Matching settings will provide reasonable
default settings that produce good results for most documents.
Many applications have their own color settings and these may override
the settings in the printer driver. Please refer to the documentation for
your software application for details on how that particular program’s
color management functions.
Factors That Affect the Appearance of
Printed Documents
If you wish to manually adjust the color settings in your printer driver,
please be aware that color reproduction is a complex topic, and
there are many factors to take into consideration. Some of the most
important factors are listed below.
Range of Colors: Monitors Versus Printers
• Neither a printer nor a monitor is capable of reproducing the full
range of colors visible to the human eye. Each device is restricted to
a certain range of colors. In addition to this, a printer cannot
reproduce all of the colors displayed on a monitor, and vice versa.
• Both devices use very different technologies to represent color. A
monitor uses Red, Green and Blue (RGB) phosphors (or LCDs), a
printer uses Cyan, Magenta, Yellow and Black (CMYK) toner or ink.
• A monitor can display very vivid colors such as intense reds and
blues and these cannot be easily produced on any printer using
toner or ink. Similarly, there are certain colors, (some yellows for
example), that can be printed, but cannot be displayed accurately on
a monitor. This disparity between monitors and printers is often the
main reason that printed colors do not match the colors displayed on
screen.
Viewing conditions
A printed document can look very different under different lighting
conditions. For example, the colors may look different when viewed
Color Print Matching • 6

standing next to a sunlit window, compared to how they look under
standard office fluorescent lighting.
Printer driver color settings
The driver settings for Manual color can change the appearance of
a printed document. There are several options available to help
match the printed colors with those displayed on screen. These
options are explained in subsequent sections.
To access the color matching options in the driver discussed below:
1. Access the printer settings page via the Print dialog from any
application (usually accessed via
2. Click on the General drop down menu and select Color Option.
File — Print).
Monitor settings
The brightness and contrast controls on your monitor can change
how your document looks on-screen. Additionally, your monitor’s
color temperature influences how “warm” or “cool” the colors look.
NOTE
Several of the Color Matching options make reference
to your monitor’s Color Temperature. Many modern
monitors allow the color temperature to be adjusted
using the monitor’s control panel.
Color Print Matching • 7

There are several settings found on a typical monitor:
• 5000k*
Warmest; yellowish lighting, typically used in graphics arts
environments.
• 6500k
Cooler; approximates daylight conditions.
• 9300k
Cool; the default setting for many monitors and television sets.
*k = degrees Kelvin, a measurement of temperature
How Your Software Application Displays Color
Some graphics applications such as CorelDRAW® or Adobe®
®
Photoshop
such as Microsoft
may display color differently from "office" applications
®
Word. Please see your application’s on-line help
or user manual for more information.
Paper Type
The type of paper used can also significantly affect the printed color.
For example, a printout on recycled paper can look duller than one
on specially formulated glossy paper.
Choosing a Color Matching Method
There is no one correct way to achieve a good match between the
document displayed on your monitor and its printed equivalent.
There are many factors involved in achieving accurate and
reproducible color.
Color Print Matching • 8

The following guidelines may help in achieving good color output
from your printer. There are several suggested methods, depending
on the type of document you are printing.
NOTE
These suggestions are for guidance only. Your results
may vary depending on the application from which you
are printing. Some applications will override any color
matching settings in the printer driver without warning.
RGB or CMYK?
The guidelines for choosing a color matching method make
distinctions between Red, Green, Blue (RGB) and Cyan, Magenta,
Yellow, Black (CMYK).
Generally, most documents you print will be in RGB format. This is
the most common, and if you do not know your document’s color
mode, assume that it is RGB.
Typically CMYK documents are only supported in professional
Desktop Publishing and Graphics applications.
Matching Photographic Images
RGB only
Oki Color Matching (found in the printer driver under Color Control)
is a generally a good choice. Select a matching method appropriate
to your monitor.
Color Print Matching • 9

RGB or CMYK
If you are printing photographic images from a graphics application
such as Adobe Photoshop, you may be able to use Soft-Proofing to
simulate the printed image on your monitor. To do this, you can use
the ICC-Profiles provided by Oki, and then print using the ICC
profiles as the Print Space (or Output space).
Matching Specific Colors
(For instance, a company logo.)
RGB only
• Oki Color Matching, and the sRGB setting.
• PostScript Color Matching using the Absolute Colorimetric option.
• Use the Color Swatch Utility to print out a chart of RGB swatches
and enter your desired RGB values in your application's color picker.
RGB or CMYK
• If you are printing from a graphics application such as Adobe
Photoshop, you may be able to use Soft-Proofing to simulate the
printed image on your monitor. To do this, you can use the ICC
Profiles provided with your printer, and then print using the ICC
profiles as the Print Space (or Output space).
• Alternatively, use PostScript Color Matching with the Absolute
Colorimetric setting.
Printing Vivid Colors
RGB only
• Use Oki Color Matching, with either the Monitor 6500k Vivid, sRGB
or Digital Camera settings.
RGB or CMYK
• Use PostScript Color Matching with the Saturation option.
Color Print Matching • 10

OS X Printer Driver
Printer Drivers
See your printed Software Installation Guide for information on
installing the driver supplied with your printer.
You can also go to http://my.okidata.com to see/download a copy
of the Software Installation Guide or for the latest information on
printer drivers.
Adjusting Options
Apple Computer has not enabled Configure Printer... as of release
OS 10.2. Therefore, direct configuration of the printer driver is
unavailable at this time.
OS X Printer Driver: • 11
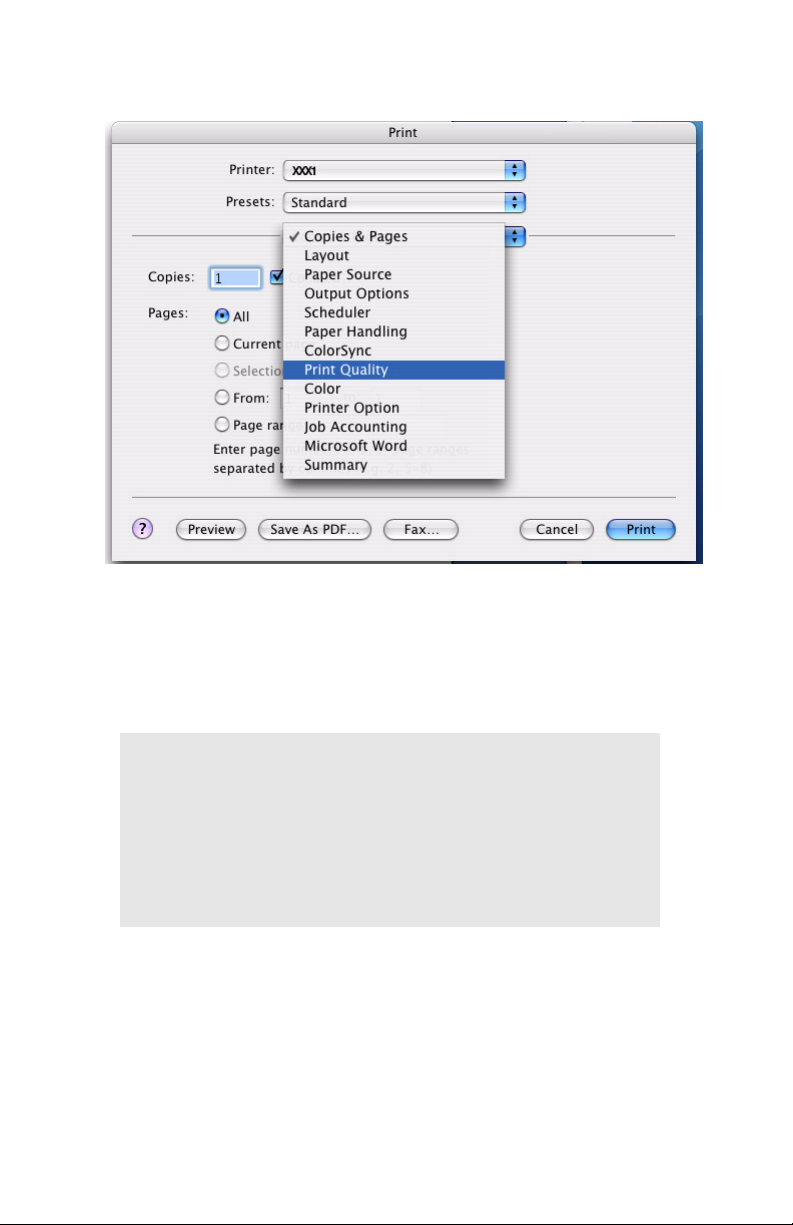
Accessing Print Features
1. To access the print features, open your print driver from within an
application by selecting
File → Print.
2. Then open the drop-down list below Presets and select the
feature you wish to set.
NOTE
If you use a particular group of settings for many
documents, you can make the settings then save
them as a Preset. Then you can engage those
settings from the drop-down Preset list as you print a
job.
OS X Printer Driver: • 12

Setting Black-Only Print Options:
Grey Scale
Normally, the printer prints black as a combination of the four toner
colors (CYMK). To print a black-only document using only the black
toner, select
conserves the cyan, magenta and yellow toner required for color
print jobs.
Gray Scale. This produces true black printing and
Brightness
Use this slide bar to lighten or darken the appearance of the black
printing, especially when printing black graphics.
Saturation
Use this slide bar to adjust the vividness of the printed document.
OS X Printer Driver: • 13

Setting Color Print Options
Auto Color Mode
This uses the default color print settings. It is recommended to
provide the best results for general color printing.
OS X Printer Driver: • 14

Advanced Color Mode
Use the Advanced Color selection to change the color settings
when needed to optimize the printing of specific documents.
Auto Color
The default. Produces the best results for a general office
environment.
OS X Printer Driver: • 15

Natural Color
Monitor (6500K)/Perceptual
Optimized for printing photographs when using a monitor with a
color temperature of 6500K, This is best for printing photographic
images.
Monitor (6500K)/Vivid
Optimized for printing bright colors when using a monitor with a
color temperature of 6500K. Ideal for office graphics and text.
Vivid or Digital Camera settings produce brightest colors.
Monitor (9300K)
Optimized for printing photographs when using a monitor with a
color temperature of 6500K.
Digital Camera
Optimized for printing photographs taken with a digital camera.
This tends to produce prints with lighter and brighter colors. For
some photographs, other settings may be better depending on
the subjects and the conditions under which they were taken.
Vivid or Digital Camera settings produce brightest colors.
sRGB
Optimized for matching specific colors, such as a company logo
color. This option attempts to simulate RGB color. The colors
within the printer's color gamut are printed without any
modification, and only colors that fall outside the printable colors
are modified.
Unadjust
Undoes any color setting adjustments you have made.
OS X Printer Driver: • 16

Brightness
Use this slide bar to lighten or darken the appearance of the printed
document
Saturation
Use this slide bar to adjust the vividness of the printed document.
Black Finish
Gloss
This option produces printing with a more glossy finish.
Matte
This option uses more Black and less CMYK while producing a
flatter black.
Copies & Pages Settings
Copies
Set the number of copies to be printed.
OS X Printer Driver: • 17

Collated
Collating can be carried out with or without a hard disk drive
installed. However, printers with a hard disk drive will provide greater
performance. This option is useful when printing multiple copies of
large documents and you want to print them in sequence
Pages
Use to select which pages in the document are to be printed.
Layout Settings
Pages per Sheet
Use this to print up to 16 pages on one sheet.
Layout Direction
Use this to set the orientation in which multiple pages are printed on the
sheet.
OS X Printer Driver: • 18

Border
When printing multiple pages on one sheet, use this to print a border
between the sheets, if desired.
Two Sided Printing (only if the duplexer is
installed)
This section only appears when you have the duplex unit installed.
•Off: Printing on one side only.
• Long-Edge Binding:
• Short Edge Binding:
OS X Printer Driver: • 19

Paper Source Settings
Auto
The printer automatically selects the paper feed source.
Multi Purpose Tray / Tray1
Set a specific print tray. For example, if you are printing a particular
job on special media such as letterhead stationery, place the media
in the Multi-Purpose Tray and the select it here when printing the job.
OS X Printer Driver: • 20

Print Quality Settings
Print Quality
•Fine: high resolution, slower speed: Provides optimum results
when printing graphics
• Normal: medium resolution, medium speed. For routine print jobs.
•Draft: low resolution, fast speed. Choose this for quick proofing of
.
drafts
Photo Enhance
If you’re printing photographs, select Photo Enhance for best
quality.
Toner saving
Checking this will enable toner saving but reduce print quality.
OS X Printer Driver: • 21

Printer Option Settings
Thickness
Select the thickness/type of media on which you are printing a
particular job, to produce optimum print results. This setting will
override the setting in the printer menu (the default printer menu
setting is Medium (20-27 lb. US Bond, 75-101 g/m
you are printing transparencies, select
OHP Sheet.
2
). For example, it
Important!
If you are printing on a thick media such as card stock, be sure
to select one of the thicker settings to get proper fusion of the
toner to the page and to prevent possible damage to the
printer.
For more information, see “Media Type Select” on page 30.
OS X Printer Driver: • 22

Auto tray switch
If two trays contain identical print media, the printer can
automatically switch to the other tray if the media runs out in the
middle of a print job. If you will be using different media in the
different trays, deselect this.
Paper size check
Deselect this if you do not want the printer to check to see if the size
paper loaded in the selected tray matches that required for the
document being printed.
Multi Purpose Tray is Manual feed
Select the option desired. The default is No.
Always create 100% Black(K) Toner
Normally the printer uses all four toner cartridges to print black text.
Use this to set the printer to always print black text using only the
black toner cartridge.
Run maintenance cycle before printing
Use this to generate a cleaning page which runs through the printer
before the job is printed. This should eliminate any fading, streaking
or erratic marks from the printed pages.
OS X Printer Driver: • 23

OSX General Printing
This section explains how to use common features while printing a
job.
Collating
NOTE
The optional Hard Disk Drive (see the “Options”
section in your on-line User’s Guide) is recommended
to increase performance if you use collating
frequently.
If your software application has a collate print option, to prevent any
conflicts in printing, use either the software application’s collate
feature or the printer driver’s collate feature.
1. With the file to be printed open in your application, click File →
Print
.
OSX General Printing: • 24

2. The Copies & Pages dialog box should already be displayed. If
not, select
Presets.
3. Select the number of copies to be printed, then make sure there
is a check mark in the box next to
Copies & Pages from the drop-down menu below
Collate: if not, click the box to
enable the function.
4. Click Print.
OSX General Printing: • 25

Multiple Pages on One Sheet
(N-Up Printing)
1. With the file to be printed open in your application, click File →
Print
.
2. Select Layout from the drop-down menu below Presets.
3. From the Layout screen, select the options desired.
a
b
c
a. For Multiple Pages, set the number of Pages per sheet (up to
16).
b. Select the desired Layout Direction for the pages.
c. Select a Border to be printed on the sheet between the individual
pages, if desired.
4. Click Print.
OSX General Printing: • 26

Duplex Printing
(Printing on Both Sides of the Sheet)
IMPORTANT!
• Your printer must be equipped with the duplex unit to use this
feature.
• The duplex unit can be used for paper only, at weights up to 28-lb.
Us Bond (105 g/m2 metric, 58 lb. Index)
• Do not use duplex printing for labels, envelopes, transparencies
or paper heavier than 28 lb. US Bond.
• Paper must be loaded into the paper tray with the print side facing
upwards. The multi purpose tray cannot be used for duplex
printing.
1. With the file to be printed open in your application, click File →
Print
.
2. Select Layout from the drop-down menu below Presets.
OSX General Printing: • 27

3. Select the duplex option desired.
• Long-Edge Binding:
OSX General Printing: • 28

• Short Edge Binding:
4. Click Print.
OSX General Printing: • 29

Media Type Select
Use the Printer Option screen to select print media for the job being
printed.
1. With the file to be printed open in your application, click File →
Print
.
2. Select Printer Option from the drop-down menu below Presets.
OSX General Printing: • 30

3. Select the desired print media from the Thickness drop-down
menu.
Normal, Thick, Thicker, Thickest
For printing paper of various thicknesses:
• Normal: 16-19 lb. US Bond (60-71 g/m
• Thick: 20-27 lb. US Bond (75-101 g/m
2
)
2
)
• Thicker: 28-32 lb. US Bond, 58-67 lb. Index (105-120 g/m
• Thickest: 33-54 lb. US Bond, 68-113 lb. Index (124-203 g/m
2
)
2
)
Label1, Label2
For printing labels:
•Label1: For labels 0.1 to 0.169 mm thick.
•Label2: For labels 0.17 to 0.2 mm thick.
NOTE
Recommended labels for best print results: Avery
5161 White Laser Label (Letter size); Avery 7162,
7664, 7666 White Laser Labels (size A4).
OSX General Printing: • 31

Rough
Printing on rough (textured) media is not recommended. The print
quality can vary depending on the media used. If you experience
poor quality printing on rough media, try the Thicker or Thickest
setting instead. If this does not work, switch to a different media.
For example, try Strathmore 24 or 28 lb. paper using the Thicker
or Thickest setting.
NOTE
Do not use rough print media for duplex printing.
OHP Sheet
For printing transparencies.
NOTE
Use only recommended transparencies (3M CG3720,
Oki 52205701).
4. Click Print.
OSX General Printing: • 32

Paper Feed Select
Use the Paper Source screen to tell the printer what tray to use to
print the job. This is especially helpful if you wish to print on media
which is basically the same as that in Tray 1, but is a different color
or is a preprinted form. Load your special media in either the
Multi-Purpose Tray or Tray 2 (if installed), and use this to tell the
printer where the media is.
1. With the file to be printed open in your application, click File →
Print
.
2. Select Paper Source from the drop-down menu below Presets.
3. Select the paper feed tray where you have your special media
loaded.
4. Click Print.
OSX General Printing: • 33

OS X Utilities
Apple ColorSync Utility
Apple provides a ColorSync Utility that allows selection of the ICC
color profile for your display and for the printer.
Setting the Display (Monitor) Profile
The Display profile will attempt to calibrate the display to more
closely match the printer’s output. However, merely selecting the
profile will not automatically produce perfect results as many factors
will contribute to the gamut of color selection.
1. Navigate to the utility by accessing your Local Hard Drive →
Applications → Utilities → ColorSync Utility → Devices
.
OS X Utilities: • 34

2. Click the arrow next to Displays and select your monitor. In the
Current Profile area click the arrow and select Other... to access
the Color Profile.
OS X Utilities: • 35

3. Click the desired ICC Profile and then click Open.
OS X Utilities: • 36

Setting the Printer Profile
1. Navigate to the utility by accessing your Local Hard Drive →
Applications → Utilities → ColorSync Utility → Devices
.
OS X Utilities: • 37

2. Click the arrow next to Printers and select your printer, then click
Color(sRGB). Under Current Profile, click the arrow and select
Other... to access the Color Profile.
OS X Utilities: • 38

3. Click the desired profile, then click Open.
Job Accounting
This utility, designed specifically for Oki printers, allows you to track
printer usage, calculate printing costs, and specify user access to
the printer, including setting rights to print black and white only or to
print color as well.
Account ID
The Account ID is the number utilized to identify the users. Before
you can log in, you must be set up as a user in the Administration
Utility.
Activating Job Accounting
Normally the Oki Job Accounting utility is automatically installed
when you install the printer driver. Before using Job Accounting, you
must activate it:
1. Select Print Desktop... on the File menu.
2. Ensure that your printer model is selected, then click General
and select
Plug-in Preferences.
OS X Utilities: • 39

3. Open the Print Time Filters menu, then check Print Time Filters,
JobType
4. Click Save Settings, then click OK.
5. Click Cancel.
and JobAccounting.
Using Job Accounting
1. Select Print Windows... on the File menu.
2. Ensure that your printer model is selected, then open the
drop-down menu directly underneath the printer and select
Accounting
.
Job
3. Enter your User Name and Job Account ID (Password) and
press the
Print button to proceed with your print job.
NOTE
You r User Name is not necessarily the same as your
network login.
OS X Utilities: • 40
 Loading...