

Page 1
Oki B6100 Reference Guide
Feb 03
Page 2

ii Oki B6100 Reference Guide
Document Title and Part Number
B6100 Reference Guide
P/N 07039301
Disclaimer
Every effort has been made to ensure that the information in this docum ent is complete, ac curate, and up-to-dat e. Oki
assumes no responsibility for the results of errors or omissions beyond its control. Oki also cannot guarantee that
changes in software and equipment made by other manufacturers and referred to in this document will not affect the
applicability of the information in it. Mention of software products manufactured by other companies does not necessarily constitute endorsement by Oki.
Copyright Information
Copyright 2002 by Oki. All Rights Reserved
First Edition: February, 2003
Written and produced by the Oki Publications Department.
Trademark Information
The following are trademarks or re gistered trademarks of their respecti v e o wners. Other product names mentioned in
this manual may also be trademarks or registered trademarks of their respective owners. Registered trademarks are
registered in the United States Patent and Trademark Of fice; some trademarks may also be registered in other countries. OKI, and OkiLAN are registered trademarks of Oki Electric Industry Company, Ltd. PostScript is a trademark
of Adobe Systems Incorporated for a page description language and may be registered in certain jurisdictions.
Throughout this manual, “PostScript Level 3” (PS-3) is used to refer to a set of capabilities defined by Adobe Systems for its PostScript Level 3 page descrip tion language. Adobe, Adobe PhotoShop, Adobe PageMaker/Adobe Systems Incorporated. Apple, AppleTalk, Ether Talk, LaserWriter, LocalTalk, Macintosh, TrueType/Apple Computer,
Inc. Banyan, VINES/Banyan. DEC, DECnet, LN03, VMS/Digital Equipment Corporation. Hewlett-Packard, HP,
PCL, HP-GL, HP-UX, LaserJet/Hewlett-Packard Co. IBM PC, Token-Ring/International Business Machines Corporation. Intel/Intel Corporation. Microsoft, MS-DOS, Windows/Microsoft Corporation. Novell and NetWare/Novell,
Inc. The ENERGY STAR logo/United States Environmental Protection Agency. The ENERGY STAR emblem does
not represent EPA endorsement of any product or service. UNIX/UNIX Systems Laboratories.
◆ ◆ ◆
Feb 03
Page 3

Contents
1-i
1-vii
Preface 1-vii
About this Manual 1-viii
Scope 1-viii
Overview 1-viii
Printer Orientation 1-ix
Conventions 1-ix
Chapter 1 Getting Started 1-1
Safety Precautions 1-2
Handling the Printer 1-2
Printer Location Requirements 1-3
Printer Weight and Dimensions 1-3
Space Requirements 1-3
Environment 1-4
Feb 03 Genicom
Page 4

ii Oki B6100 Reference Guide
Parts of the Printer 1-5
Optional Printer Accessories 1-8
Paper Path 1-9
Chapter 2 Using the Printer 2-1
Connecting the Power Cord 2-2
Turning Power On and Off 2-3
Connecting the Printer to the Host Computer 2-4
Parallel Port 2-5
USB Port 2-7
Selecting Print Media 2-11
Paper and Print Media To Avoid 2-11
Correct Paper Storage 2-11
Print Media Capacities 2-12
Print Media Weight, Type, and Size 2-13
Loading the Universal Paper Tray 2-14
Loading the Front Tray 2-19
Chapter 3 Understanding and Navigating the Control Panel
Menus 3-1
Control Panel Features 3-3
LCD Display 3-3
LED Indicators 3-4
Pushbuttons 3-5
Navigating the Control Panel Menus 3-6
Menu Structure 3-8
Paper Menu 3-9
Interface Menu 3-11
PS Menu 3-13
PCL Menu 3-14
System Menu 3-17
Quality Menu 3-19
Functions Menu 3-20
Status Menu 3-21
Chapter 4 Maintaining the Printer 4-1
Replacing Printer Components 4-3
Replacing the Print Cartridge 4-3
Feb 03
Page 5

Cleaning the Printer 4-6
Cleaning the Exterior 4-6
Cleaning the Interior 4-8
Moving the Printer 4-9
Moving the Printer a Short Distance 4-9
Moving the Printer a Long Distance 4-10
Storing the Printer for Long Periods of Time 4-10
Chapter 5 Troubleshooting 5-1
Installation Problems 5-2
Inoperative Printer 5-3
No Ready Message 5-3
Noise, Smoke, or Smell 5-4
Paper Jams 5-5
Clearing an E2 Paper Jam 5-7
Clearing an E3 Paper Jam 5-10
Clearing an E4 Jam 5-12
Clearing an E7 Paper Jam 5-15
Clearing an E6 Paper Jam 5-18
Print Image Quality Problems 5-20
Other Print Image Quality Problems 5-24
Miscellaneous Problems 5-25
Printer is Inoperative 5-26
Printer Operates Erratically 5-27
Printer Makes Unusual Noises 5-28
Room Lights Dim or Flicker When Printer Starts 5-29
Printer Interferes with Nearby Radio or Television Reception 5-30
Warning Messages and Error Messages 5-31
Warning Messages Table 5-31
Error Messages Table 5-32
Printing a Test Page or Configuration Summary 5-34
Test Page 5-34
Configuration Summary 5-35
Oki B6100 Reference Guide iii
Chapter 6 Using the Duplexer 6-1
About the Duplexer 6-2
Major Components of the Duplexer 6-2
Feb 03
Page 6

iv Oki B6100 Reference Guide
Installing the Duplexer 6-3
Testing the Duplexer 6-6
Solving Duplexer Problems 6-7
Interpreting Duplexer Error Codes 6-7
Installation Problems 6-8
Clearing Duplex Paper Jams 6-9
Correcting Miscellaneous Duplexer Problems 6-12
Removing the Duplexer 6-16
Chapter 7 Using the 550 Sheet Feeder 7-1
About the 550 Sheet Feeder 7-2
Major Components of the 550 Sheet Feeder 7-3
Installing the 550 Sheet Paper Feeders 7-4
Installing One Paper Feeder 7-5
Installing Two Paper Feeders 7-9
Testing the 550 Sheet Feeder 7-14
Selecting Print Media 7-14
Paper and Print Media To Avoid 7-14
Correct Paper Storage 7-15
Print Media Weight, Type, and Size 7-15
Loading Print Media 7-16
Loading the A4/Letter/Legal Paper Tray 7-16
Solving 550 Sheet Feeder Problems 7-20
Interpreting Paper Feeder Error Messages 7-21
Installation Problems 7-22
Clearing an E2 Paper Jam 7-23
Correcting Miscellaneous Paper Feeder Problems 7-24
Removing the 550 Sheet Feeder 7-28
Moving the 550 Sheet Feeder 7-30
Moving the Printer and 550 Sheet Feeder a Short Distance 7-30
Moving the Printer and 550 Sheet Feeder a Long Distance 7-30
Chapter 8 Using the Envelope Feeder 8-1
About the Envelope Feeder 8-2
Installing the Envelope Feeder 8-3
Testing the Envelope Feeder 8-7
Selecting Print Media 8-8
Paper and Print Media To Avoid 8-8
Correct Paper Storage 8-9
Print Media Weight, Type, and Size 8-9
Feb 03
Page 7

Oki B6100 Reference Guide v
Loading the Envelope Feeder 8-10
Solving Envelope Feeder Problems 8-12
Envelopes Become Creased when Printing 8-13
Interpreting Envelope Feeder Error Messages 8-15
Correcting Miscellaneous Envelope Feeder Problems 8-15
Maintaining the Envelope Feeder 8-19
Cleaning the Exterior of the Envelope Feeder 8-19
Chapter 9 Using the Offset Catch Tray 9-1
About the Offset Catch Tray 9-2
Major Components of the Offset Catch Tray 9-3
Installing the Offset Catch Tray 9-4
Testing the Offset Catch Tray 9-9
Solving Offset Catch Tray Problems 9-10
Interpreting Offset Catch Tray Error Messages 9-10
Installation Problems 9-11
Clearing an Offset Catch Tray Paper Jam 9-12
Correcting Miscellaneous Offset Catch Tray Problems 9-14
Maintaining the Offset Catch Tray 9-18
Cleaning the Exterior of the Offset Catch Tray 9-18
Moving the Offset Catch Tray 9-19
Moving the Offset Catch Tray a Short Distance 9-19
Moving the Offset Catch Tray a Long Distance 9-19
Removing the Offset Catch Tray 9-20
Feb 03
Page 8

vi Oki B6100 Reference Guide
Feb 03
Page 9

Preface
In this Chapter . . .
■ “Welcome” on page viii
■ “About this Manual” on page viii
Feb 03
Page 10

viii Oki B6100 Reference Guide
About this Manual
Welcome
Thank you for selecting this printer. This Guide contains important information about the operation and care of your printer . Please read t his manual in its entirety and keep it at hand for later
reference.
About this Manual
Scope
This Guide contains all of the information necessary to operate and care for your printer. It is
intended to be used with the pictorial unpacking instructions included in the printer packaging.
If you have not already unpacked and installed the printer , please refer to these documents. This
guide does not contain instructions for unpacking and installing the printer.
Overview
Preface
The Preface contains information about this guide and about the features and available configurations of the printer.
Chapter 1: Getting Started
This chapter reviews the contents of the printer packaging, explains the parts of the printer, and
describes the space and environment requirements of the printer.
Chapter 2: Using the Printer
This chapter provides information concerning the daily use of the printer, including procedures
for connecting the printer and loading print media, and guidelines for selecting print media.
Chapter 3: Understanding and Navigating the Control Panel
This chapter explains the control panel and its functions, and also demonstrates how to na vigate
throughout the various menus and submenus that allow you to view and change the printer settings.
Chapter 4: Maintaining the Printer
This chapter provides information about maintaining your printer . Alt hough the printer requires
very little maintenance, with normal daily use you will need to perform some routine maintenance procedures, including replacing consumable items and cleaning the printer. This chapter
also contains information about moving and storing the printer.
Chapter 5: Troubleshooting
This chapter describes the problems that you may encounter when using your printer, and provides procedures for resolving the problems. This chapter also lists the warning and error messages that appear on the control panel display.
Chapter 6: Using the Duplexer
This chapter provides all of the information necessary to install, use, and maintain the duplex er.
Feb 03
Page 11
Oki B6100 Reference Guide ix
About this Manual
Chapter 7: Using the 550-Sheet Feeder
This chapter provides all of the information necessary to install, use, and maintain the 550-sheet
paper feeder option, including procedures for cleaning the feeder and removing paper jams.
Chapter 8: Using the Envelope Feeder
This chapter provides all of the information necessary to install, use, and maintain the envelope
feeder, including procedures for removing paper jams.
Chapter 9: Using the Offset Catch Tray
This chapter provides all of the information necessary to install, use, and maintain the offset
output tray, including procedures for cleaning and removing paper jams.
Printer Orientation
Throughout this guide, the four sides of the printer are referred to as front, rear, right, and left.
The front of the printer is the side near the control panel, and the rear of the printer is opposite
the front. The left and right sides of the printer are defined as the sides to the left and right,
respectively, of a person who is facing the front of the printer.
Conventions
This following con v entions are used throughout thi s manual to emphasize certain procedures or
information:
NOTE: A note is a tip or extra information that may be helpful in installing or using the printer.
CAUTION: A caution message provides information that may help you avoid equipment damage, process failure, or inconvenience. Read all caution messages carefully.
WARNING! A warning message indicates the possibility of personal injury if a specific procedure is not performed exactly as described in the guide. Pay close attention to these sections and
read them fully to prevent possible injury.
Feb 03
Page 12

x Oki B6100 Reference Guide
About this Manual
Feb 03
Page 13

Getting Started
Chapter 1
In this Chapter. . .
■ “About this Chapter” on page 1-2
■ “Printer Location Requirements” on page 1-3
■ “Parts of the Printer” on page 1-5
■ “Optional Printer Accessories” on page 1-8
■ “Paper Path” on page 1-9
Feb 03
Page 14
2 Oki B6100 Reference Guide
Safety Precautions
About this Chapter
This chapter reviews the contents of the printer packaging, explains the parts of the printer, and
describes the space and environment requirements of the printer.
Safety Precautions
This printer is available in either of the following power specifications: 110V and 220V. The
specifications that apply to your printer depend on your machine configuration. To prevent fire
or shock hazards, connect the power plug only to a properly rated power outlet.
Handling the Printer
Follow the guidelines below when lifting or moving the printer:
■ The printer is very heavy, and should always be lifted by two people. The weight of the
printer without paper tray, toner cartridge, and paper is about 51 lbs (23 kg). Never
attempt to lift the printer alone.
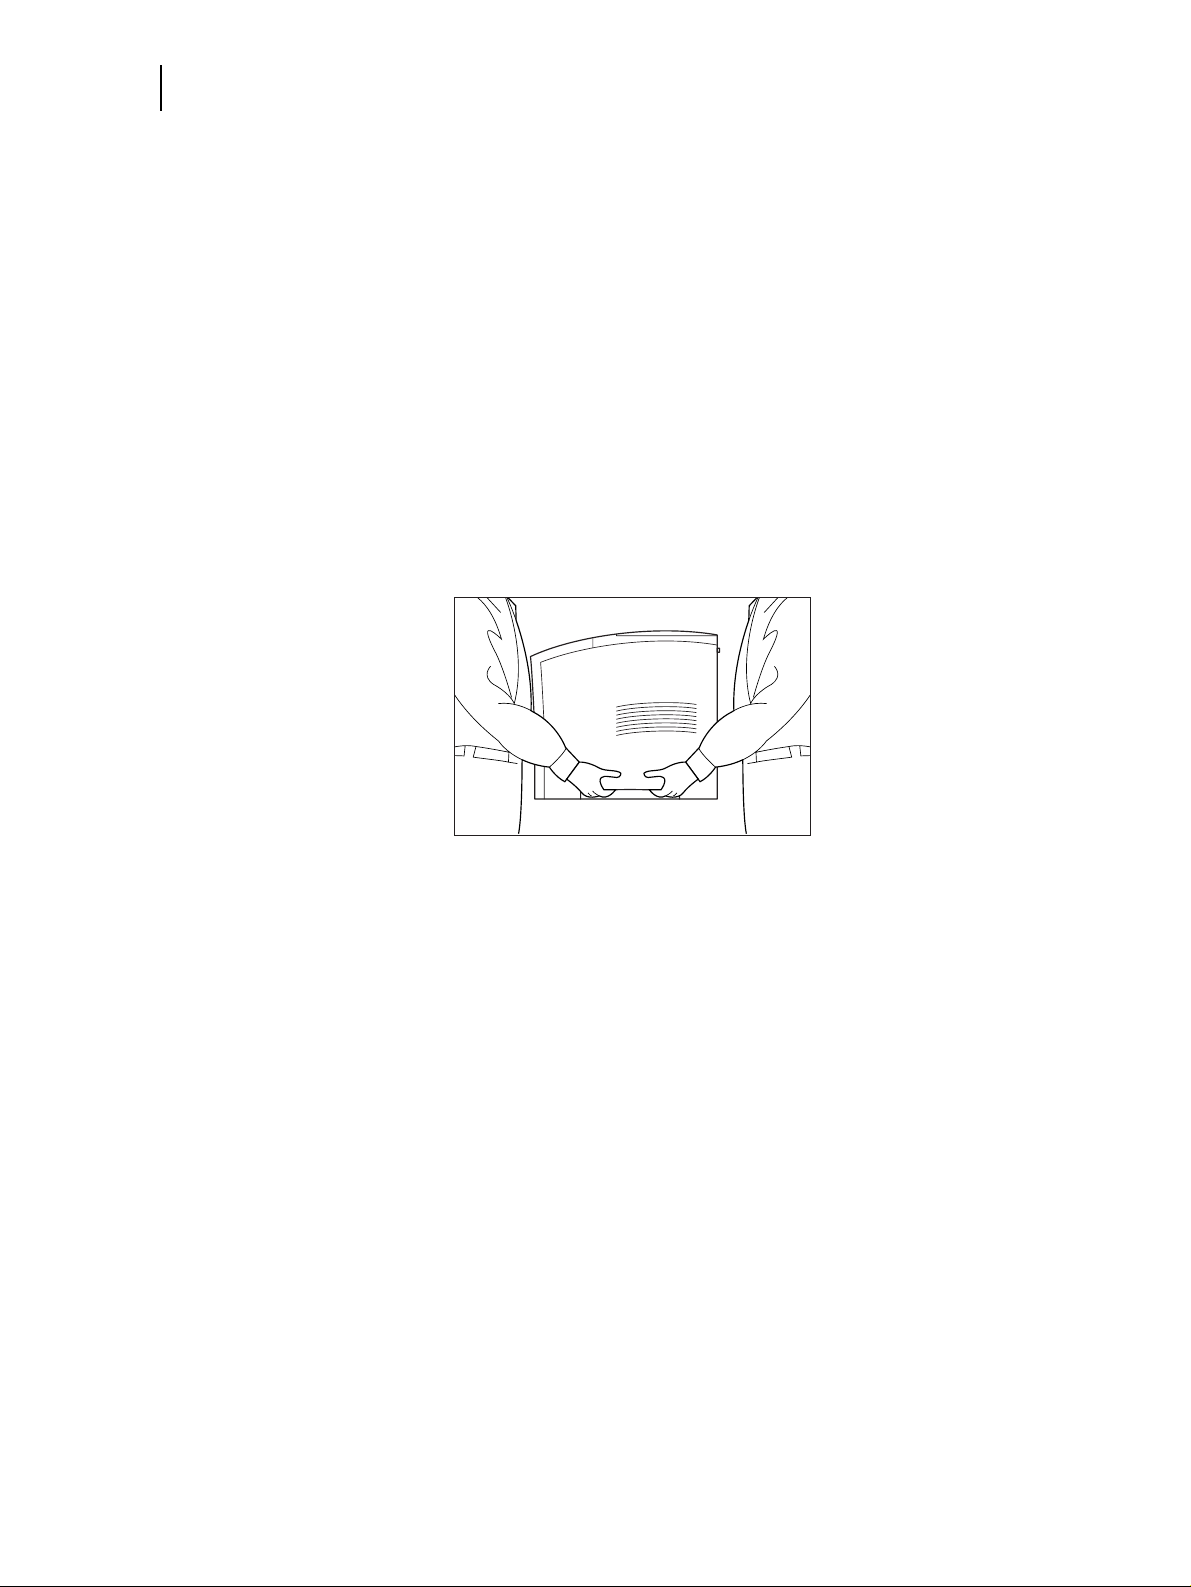
■ T o lift the pri nter , ha ve tw o indi viduals facing each other from the front and the rear of the
printer grasp the recessed areas on each side of the printer. Do not lift the printer b y grasping any area other than these recessed areas.
■ When lifting the printer, maintain proper lifting posture to prevent injuries.
Feb 03
Page 15
Printer Location Requirements
Printer Weight and Dimensions
This printer weighs approximately 51 lbs (23 kg) and should always be lifted by two people.
The dimensions of the printer are listed below.
■ Printer Height: 16.3 in (413 mm)
■ Printer Width (left to right): 16.6 in (422 mm)
■ Printer Depth (front to back): 17.3 in (439 mm)
Space Requirements
A certain amount of space is required for proper operation of the printer and also for performing
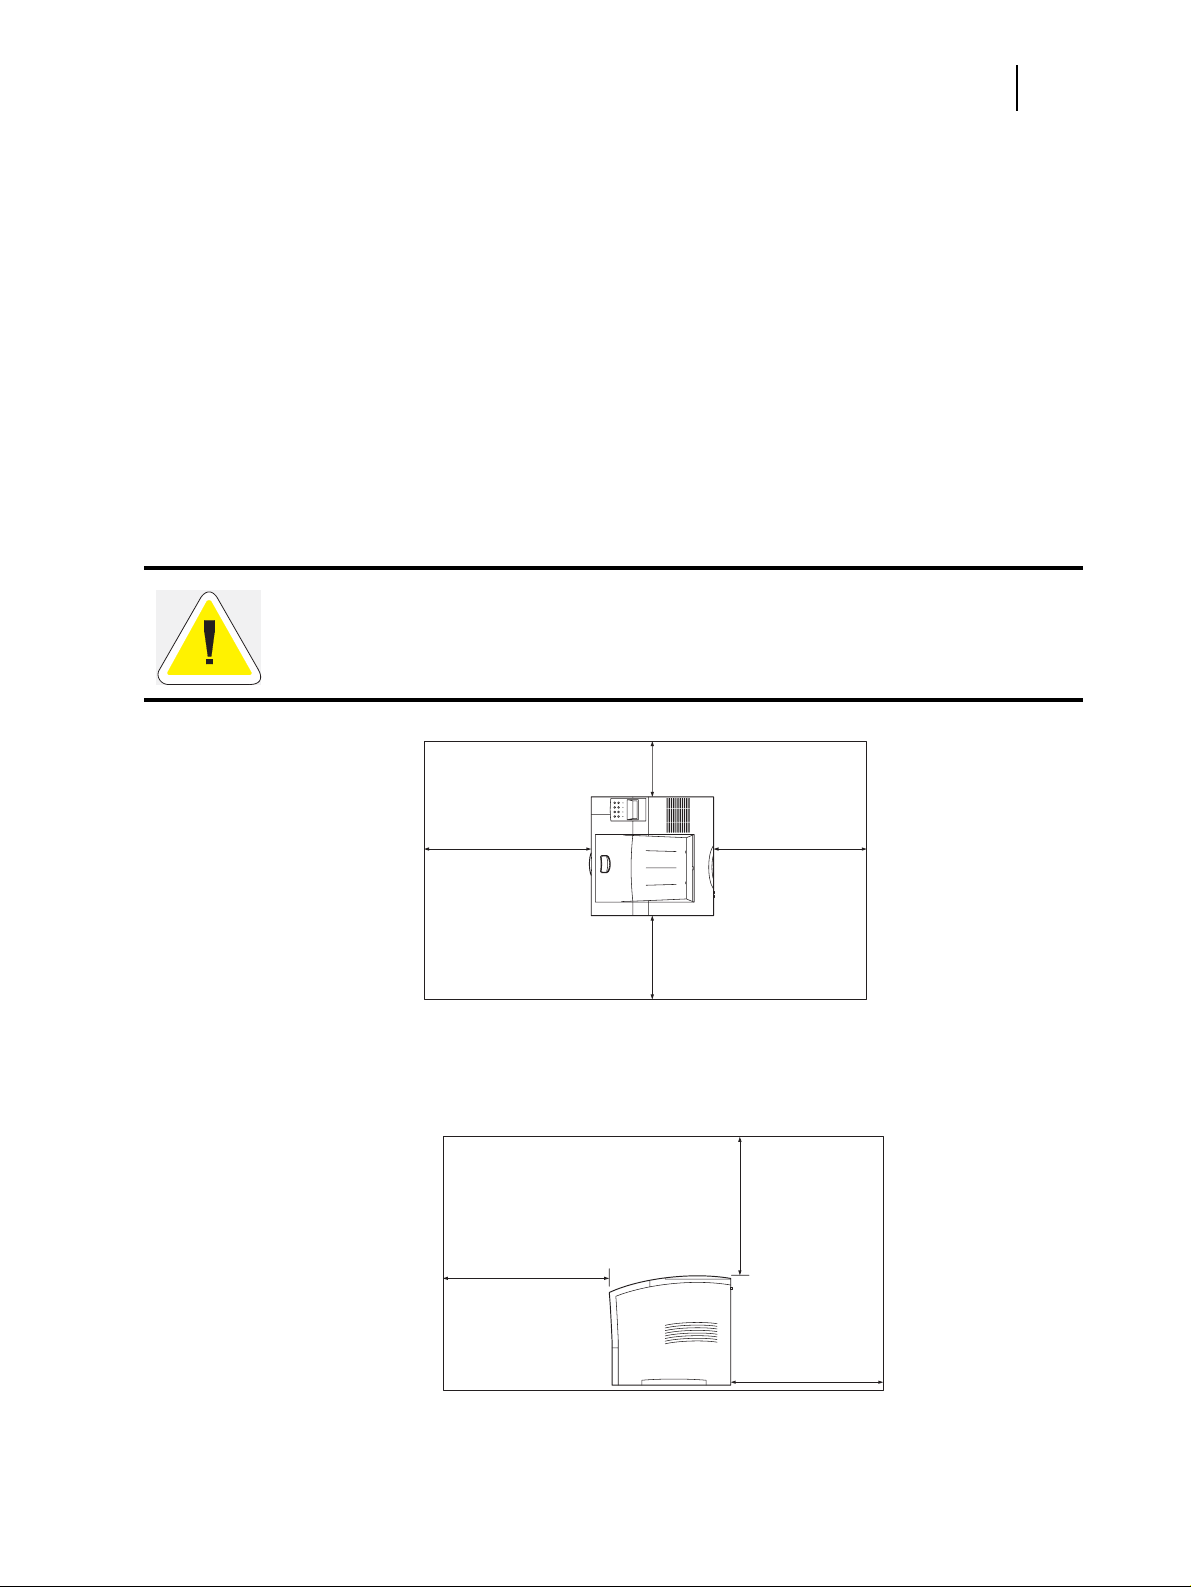
printer maintenance and replacing consumables. Use the following figures to plan for appropriate clearances when determining a location for your printer.
CAUTION: There is a ventilation opening on the left side of the printer. To avoid overheating
and fire hazards, be sure to leave a clearance of at least 8 inches (200 mm) between this opening and the nearest wall or other surface.
Oki B6100 Reference Guide 3
Printer Location Requirements
24 inches
(600 mm)
24 inches
(600 mm)
8 inches
(200 mm)
24 inches
(600 mm)
12 inches
(300 mm)
Figure 1-1: Top view of the printer.
20 inches
(500 mm)
Feb 03
24 inches
(600 mm)
Figure 1-2: Side view of the printer
Page 16
4 Oki B6100 Reference Guide
Printer Location Requirements
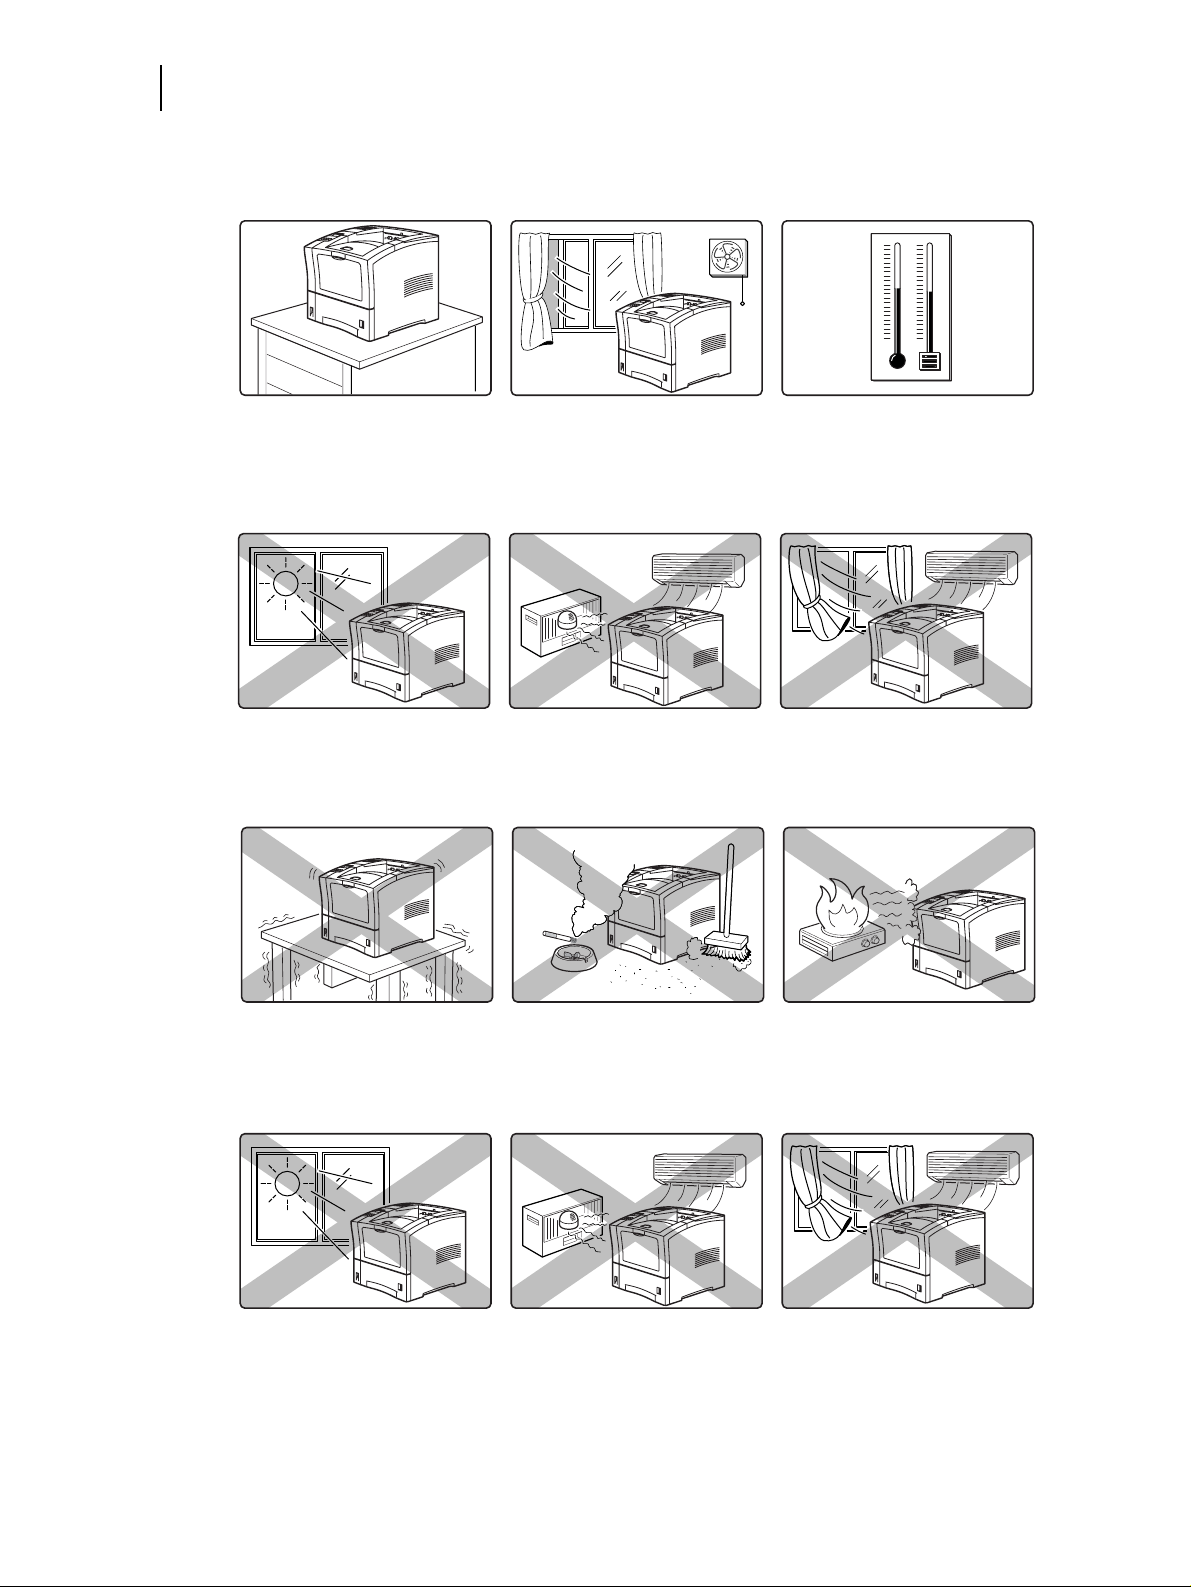
Environment
Use the following guidelines to determine the best location for the printer:
Horizontal, sturdy, and stable
surface
Exposed to direct sunlight Near heating appliances Exposed to direct air currents
Location with good ventilation Location with stable
temperature and humidity
Subject to vibrations Exposed to high levels of dust
and contamination
Exposed to water and high
humidity
Exposed to magnetic fields Subject to extreme variations
Near an open flame
in temperature and humidity.
Feb 03
Page 17
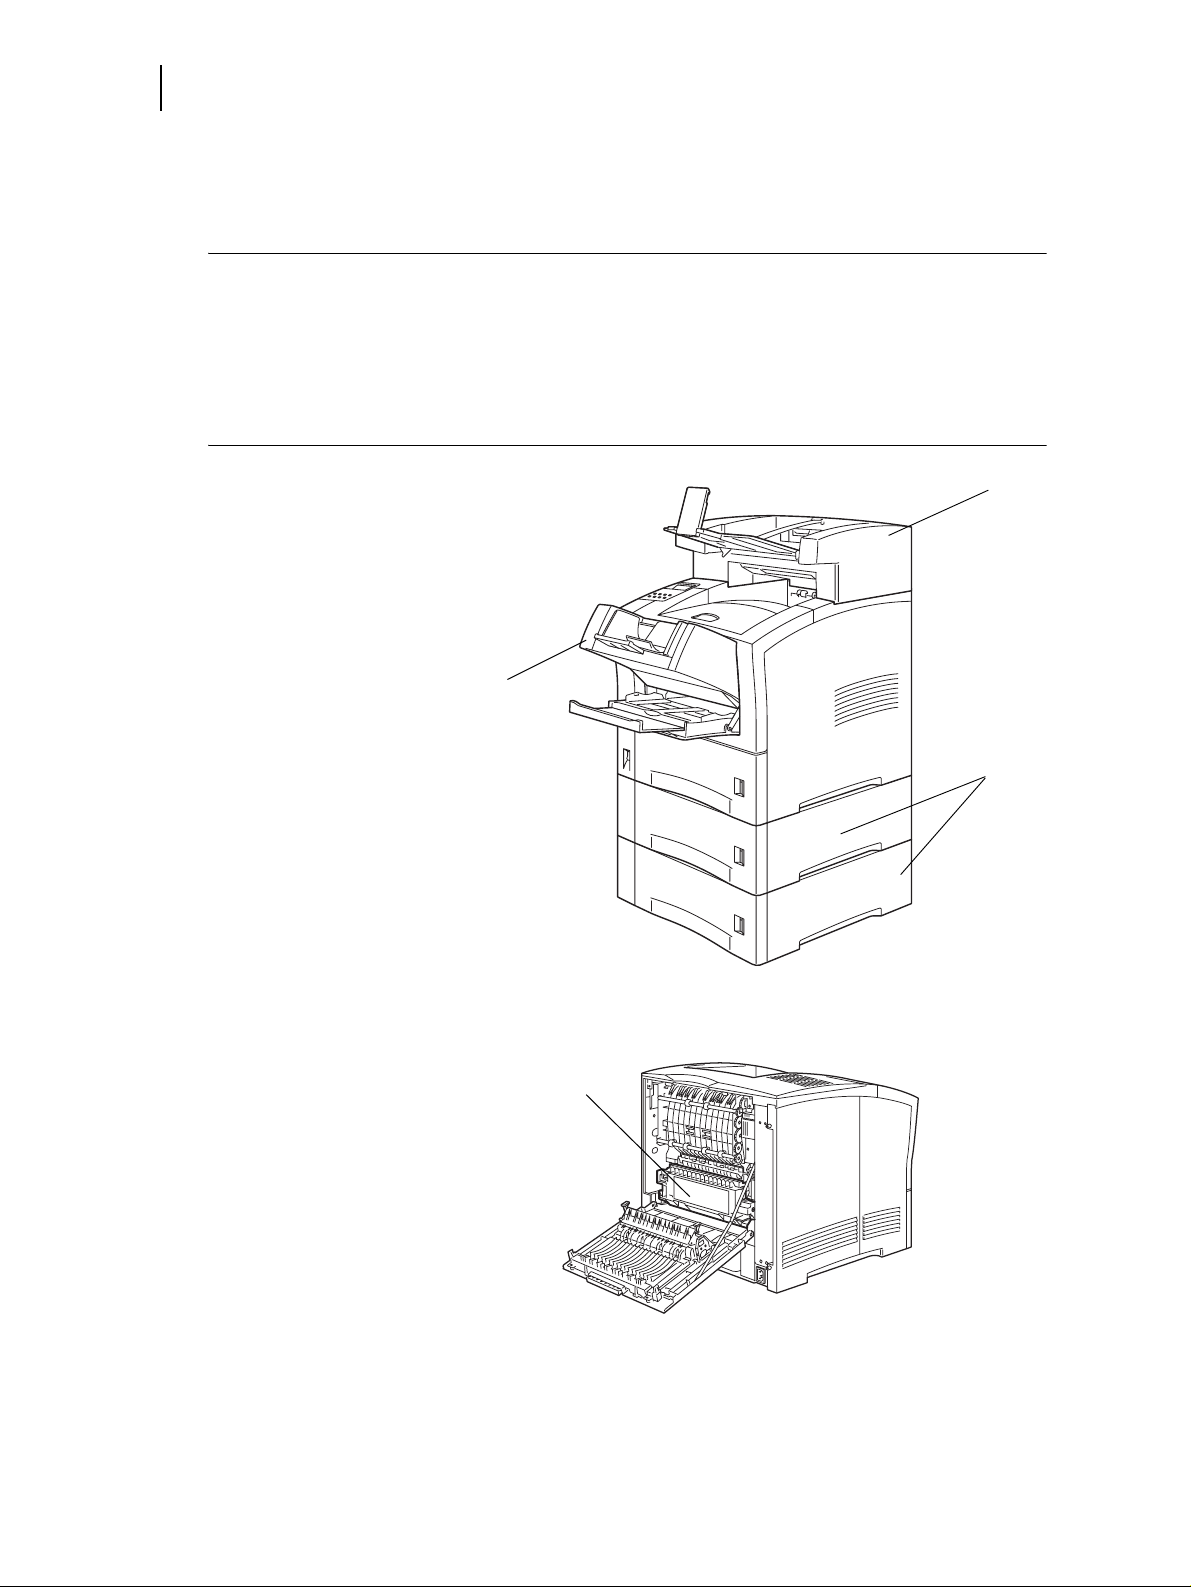
Parts of the Printer
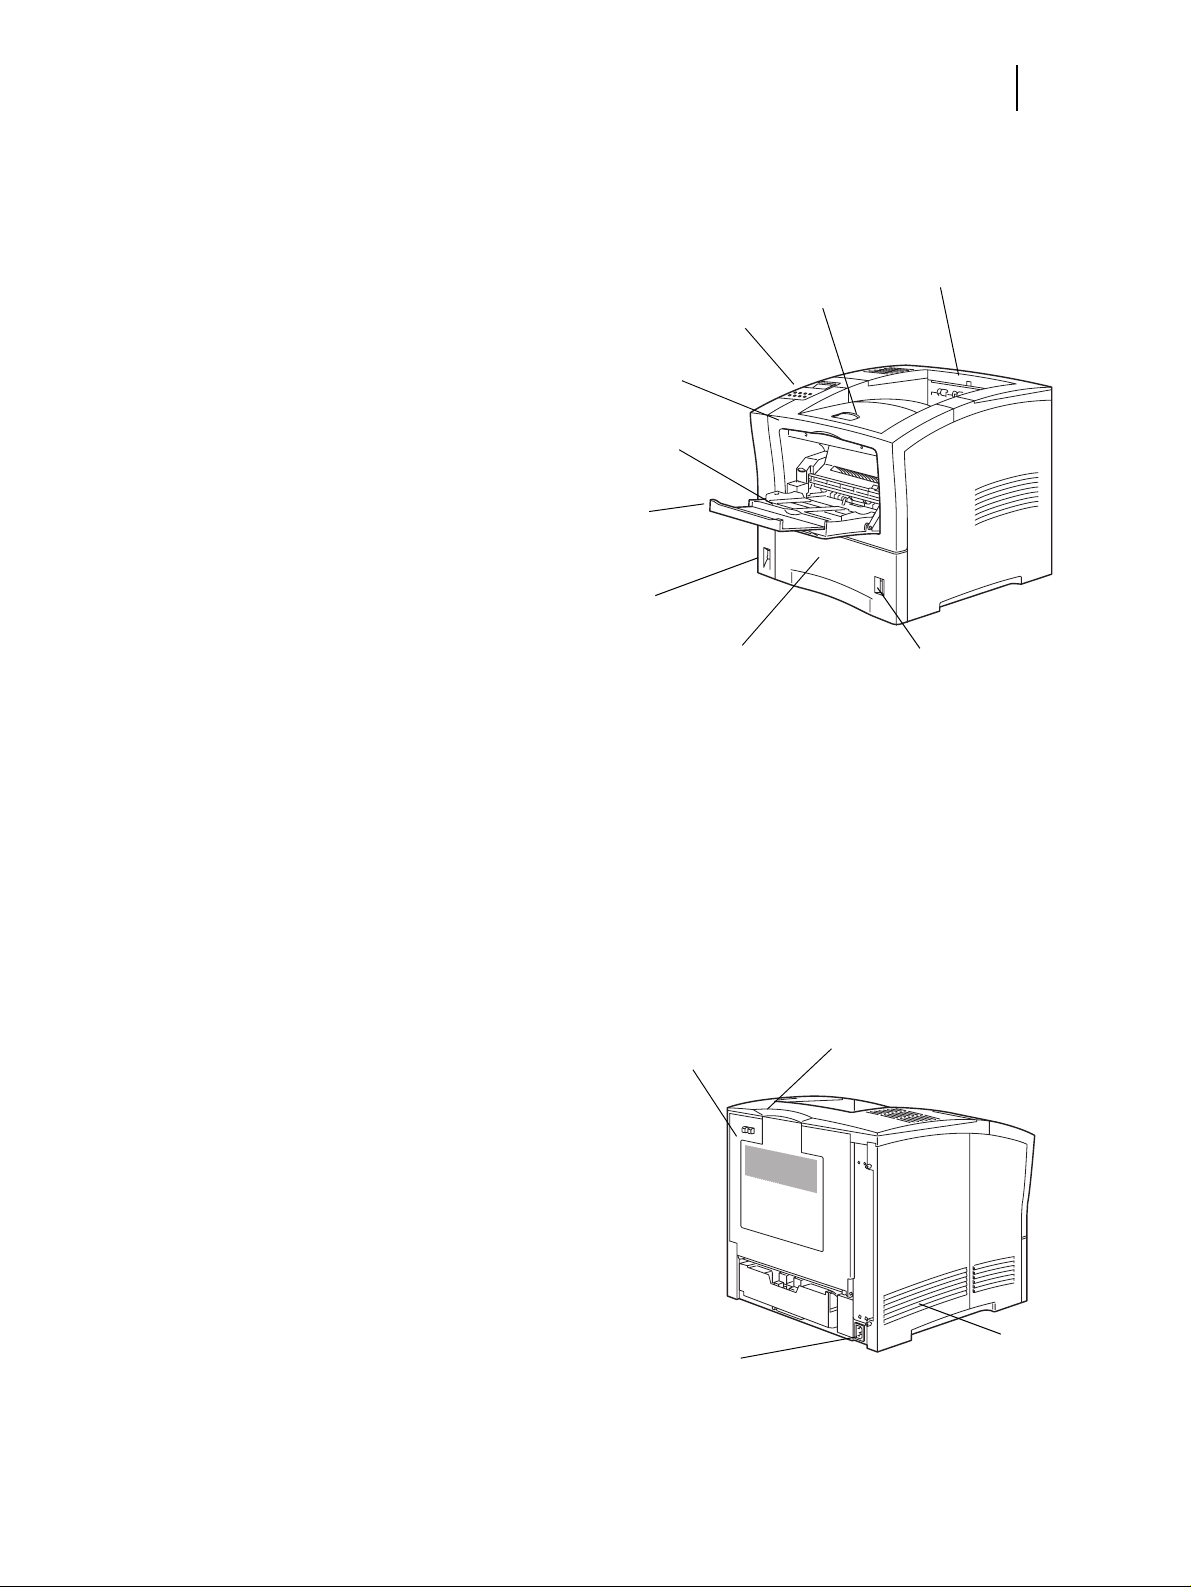
The following figures indicate the names and functions of the main parts of the printer
Figure 1-3: Front of the Printer.
1. Paper Exit Slot
2. Paper Output Tray
Oki B6100 Reference Guide 5
Parts of the Printer
1
2
3
3. Control Panel
4
Provides access to all controls
required to operate the printer.
5
4. Front Cover
Provides access to the inside of the
6
printer, allows you to replace the
toner cartridge or remove jammed
paper.
7
5. Front Tray
Provides an alternate method of
89
feeding paper to the printer.
Accommodates various print media, including envelopes, transparencies, and labels.
6. Tray Extension
Allows you to load large paper sizes in the front tray.
7. Power switch
8. 550-sheet Universal Paper Tray
Holds paper from postcard size to Legal size.
9. Paper amount indicator
Feb 03
Indicates the approximate remaining amount of paper.
Figure 1-4: Rear of the Printer.
10. Top cover
Provides access to the inside of the
printer; removing it allows you to
install the offset catch tray.
11. Rear cover
Provides access to the rear of the
printer; allows you to remove jammed
paper or install the duplexer.
12. Power cord connector
13. Ventilation slot
Releases hot air produced inside the
printer to prevent overheating.
11
10
13
12
Page 18
6 Oki B6100 Reference Guide
Parts of the Printer
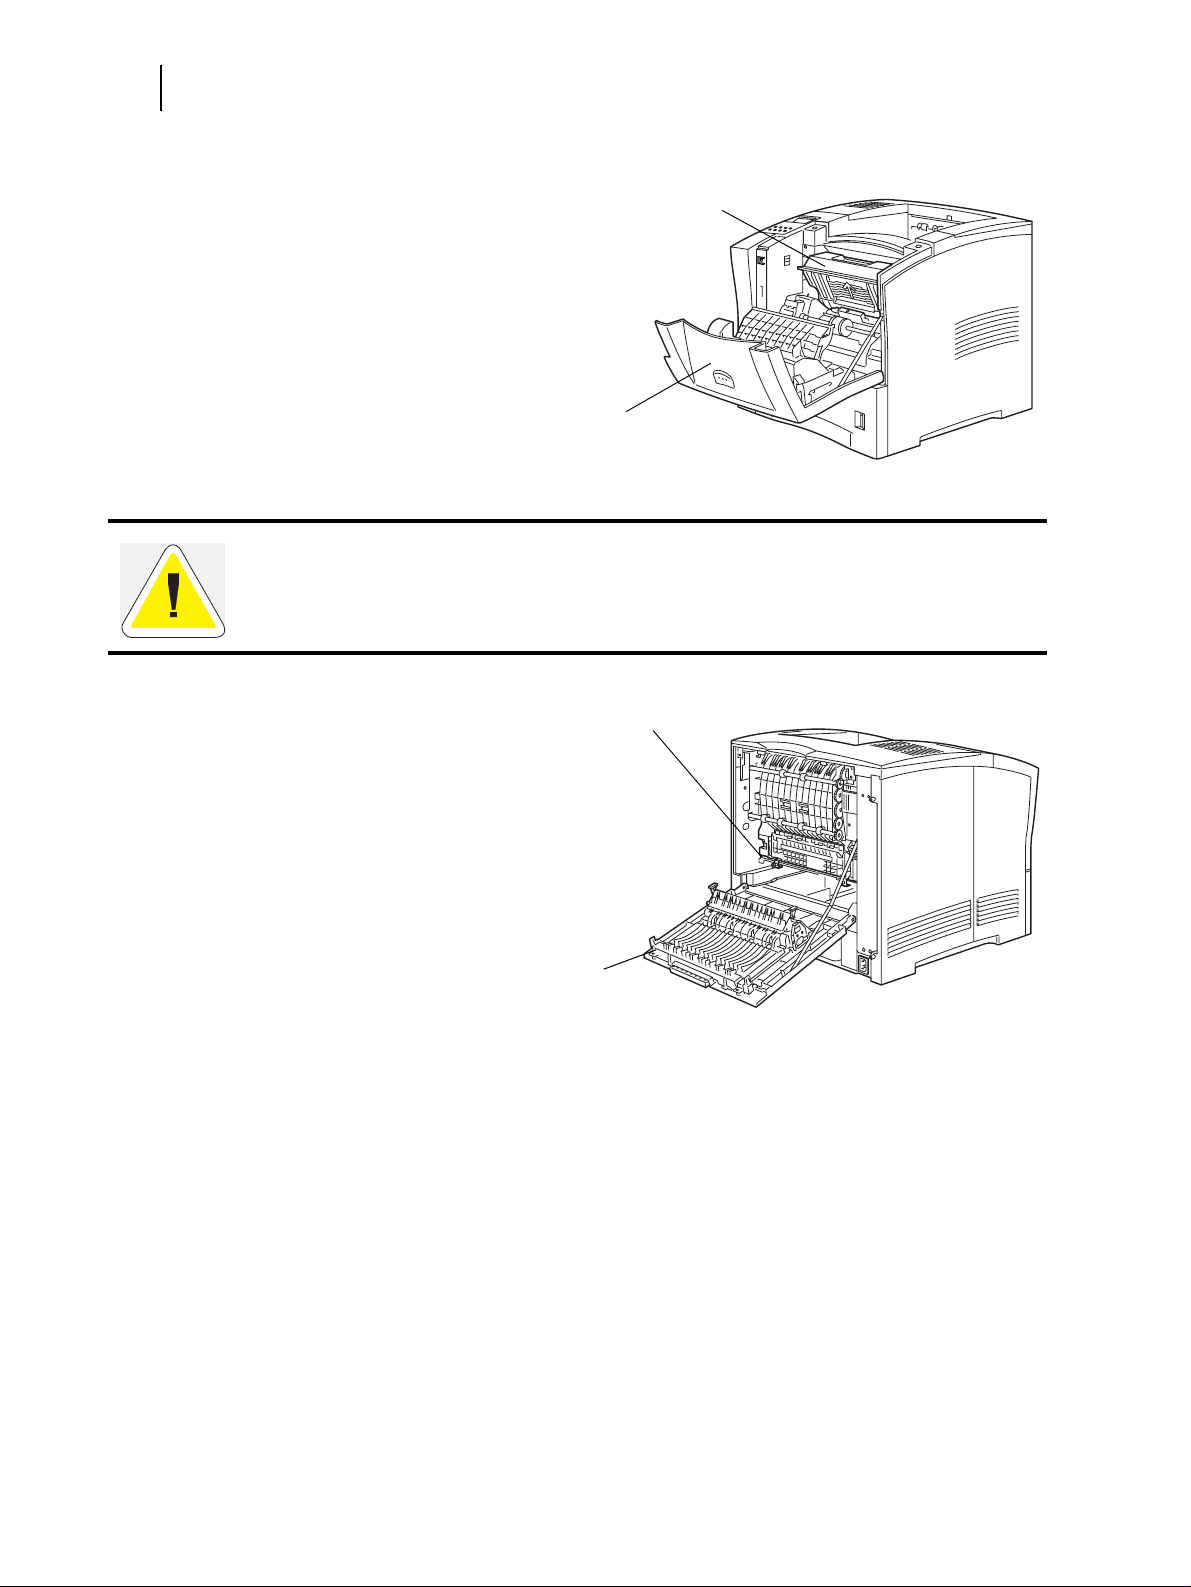
Figure 1-5: Internal Parts of the Printer
(Front)
14. Print Cartridge
Integrated cartridge
contains the toner and the photosensitive drum.
15. Front Cover
14
Provides access to the interior of
the printer. Allows you to replace
the print cartridge or remove
jammed paper.
CAUTION: The fuser becomes very hot while the printer is operating. If you need to remove
the print cartridge to remove a paper jam, turn the power off and wait at least 10 minutes before
removing the print cartridge and touching the fuser.
Figure 1-6: Internal Parts of the Printer
(Rear).
16. Fuser
Fixes toner onto the paper.
17. Rear Cov er
Provides access to the interior of
the printer. Allows you to install
the optional duplexer or remove
jammed paper.
15
16
17
Feb 03
Page 19
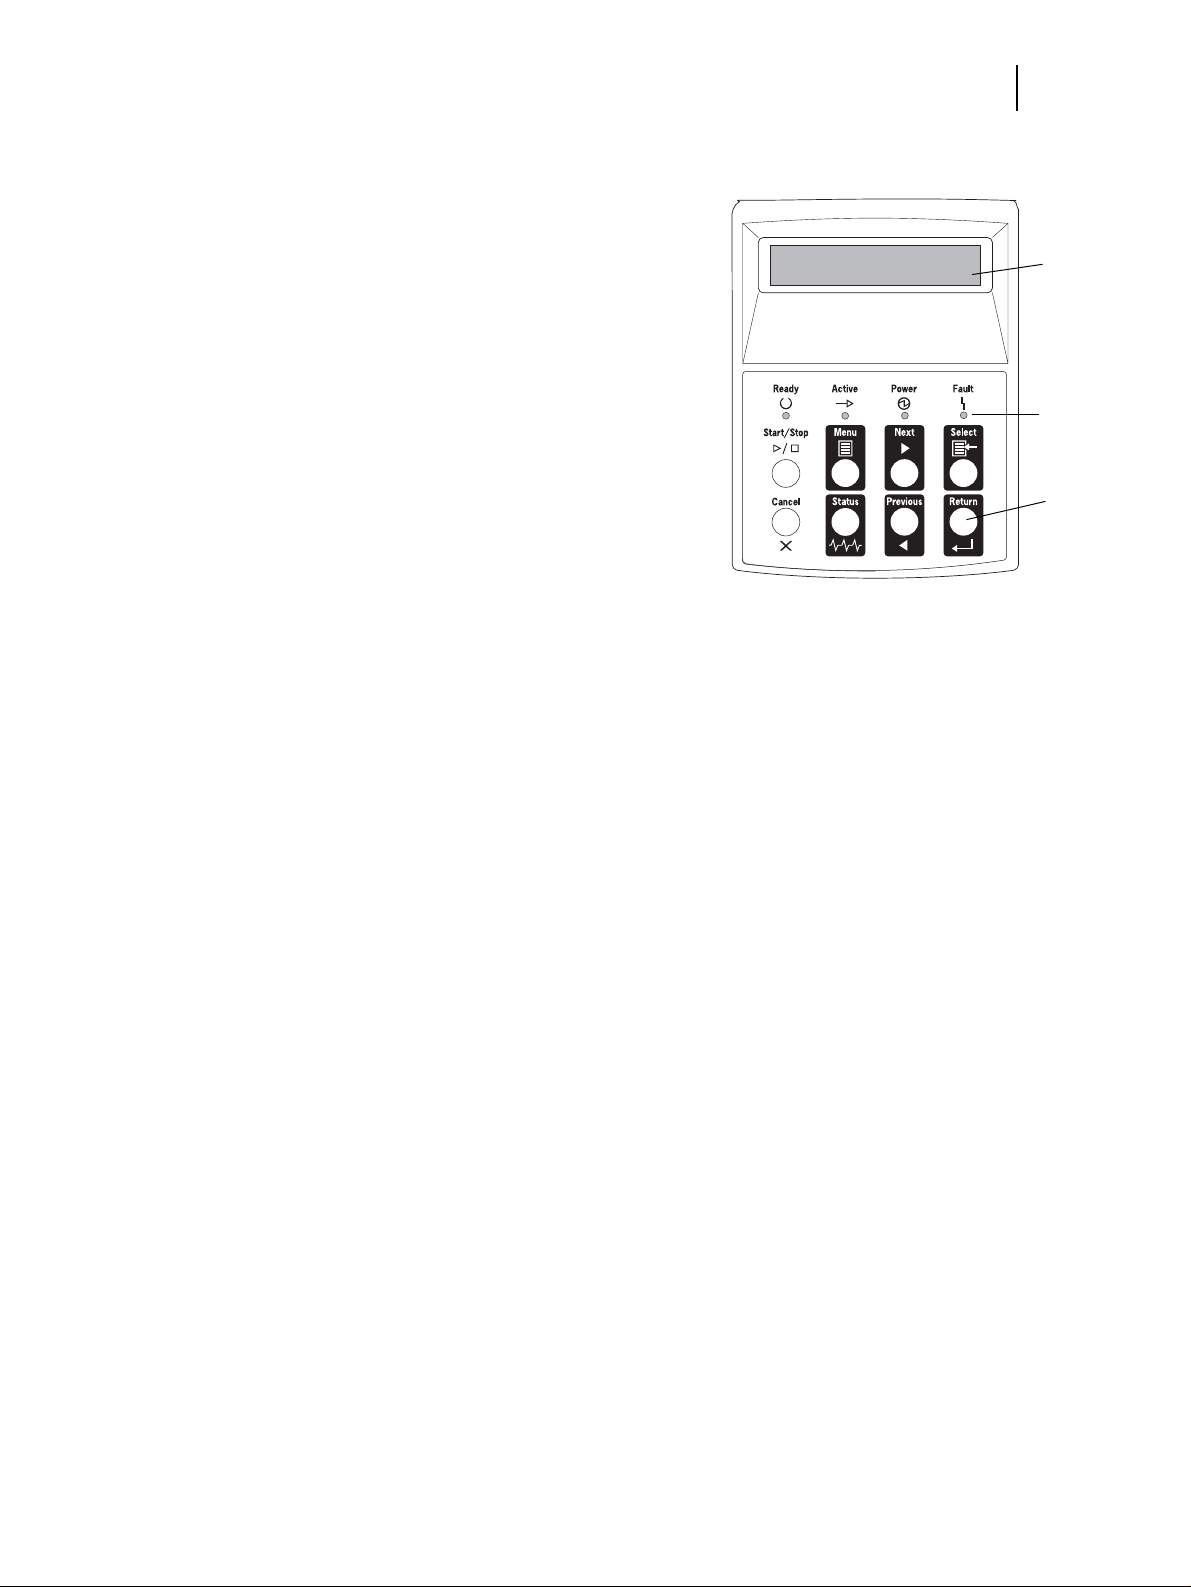
Figure 1-7: Control Panel.
18. LCD Display
Oki B6100 Reference Guide 7
Parts of the Printer
Shows error messages and other status messages; also displays menus, submenus, and settings.
19. LED Indicators
Show printer status.
20. Pushbuttons
Allow you to navigate through menus, place a
printer offline, or cancel a print job.
18
19
20
Feb 03
Page 20
8 Oki B6100 Reference Guide
Optional Printer Accessories
Optional Printer Accessories
The following figure shows all of the available accessories as installed on the printer.
NOTE: The printer automatically recognizes an option after the option is installed. The printer driver does
not. You must enable (activate) the option in the printer driver after the option is installed.
The steps you will follow vary according to both your operating system and your installed printer
driver. Here are the general steps you will follow.
Select the driver you want to work with.
Locate the printer properties section within the printer driver.
Use the pull-down window to select the option.
Activate the option.
Figure 1-8: Optional Accessories.
1. Offset Catch Tray
Holds and separates
large print jobs by offsetting.
2. Envelope Feeder
Holds a maximum of
75 envelopes or 100
postcards.
3. 550-Sheet Feeder
Holds a 550-sheet
paper tray and provides extra paper
capacity. The printer
can accommodate two
additional 550-sheet
feeders.
4. Duplexer
Enables two-sided
printing.
1
2
3
4
Feb 03
Page 21
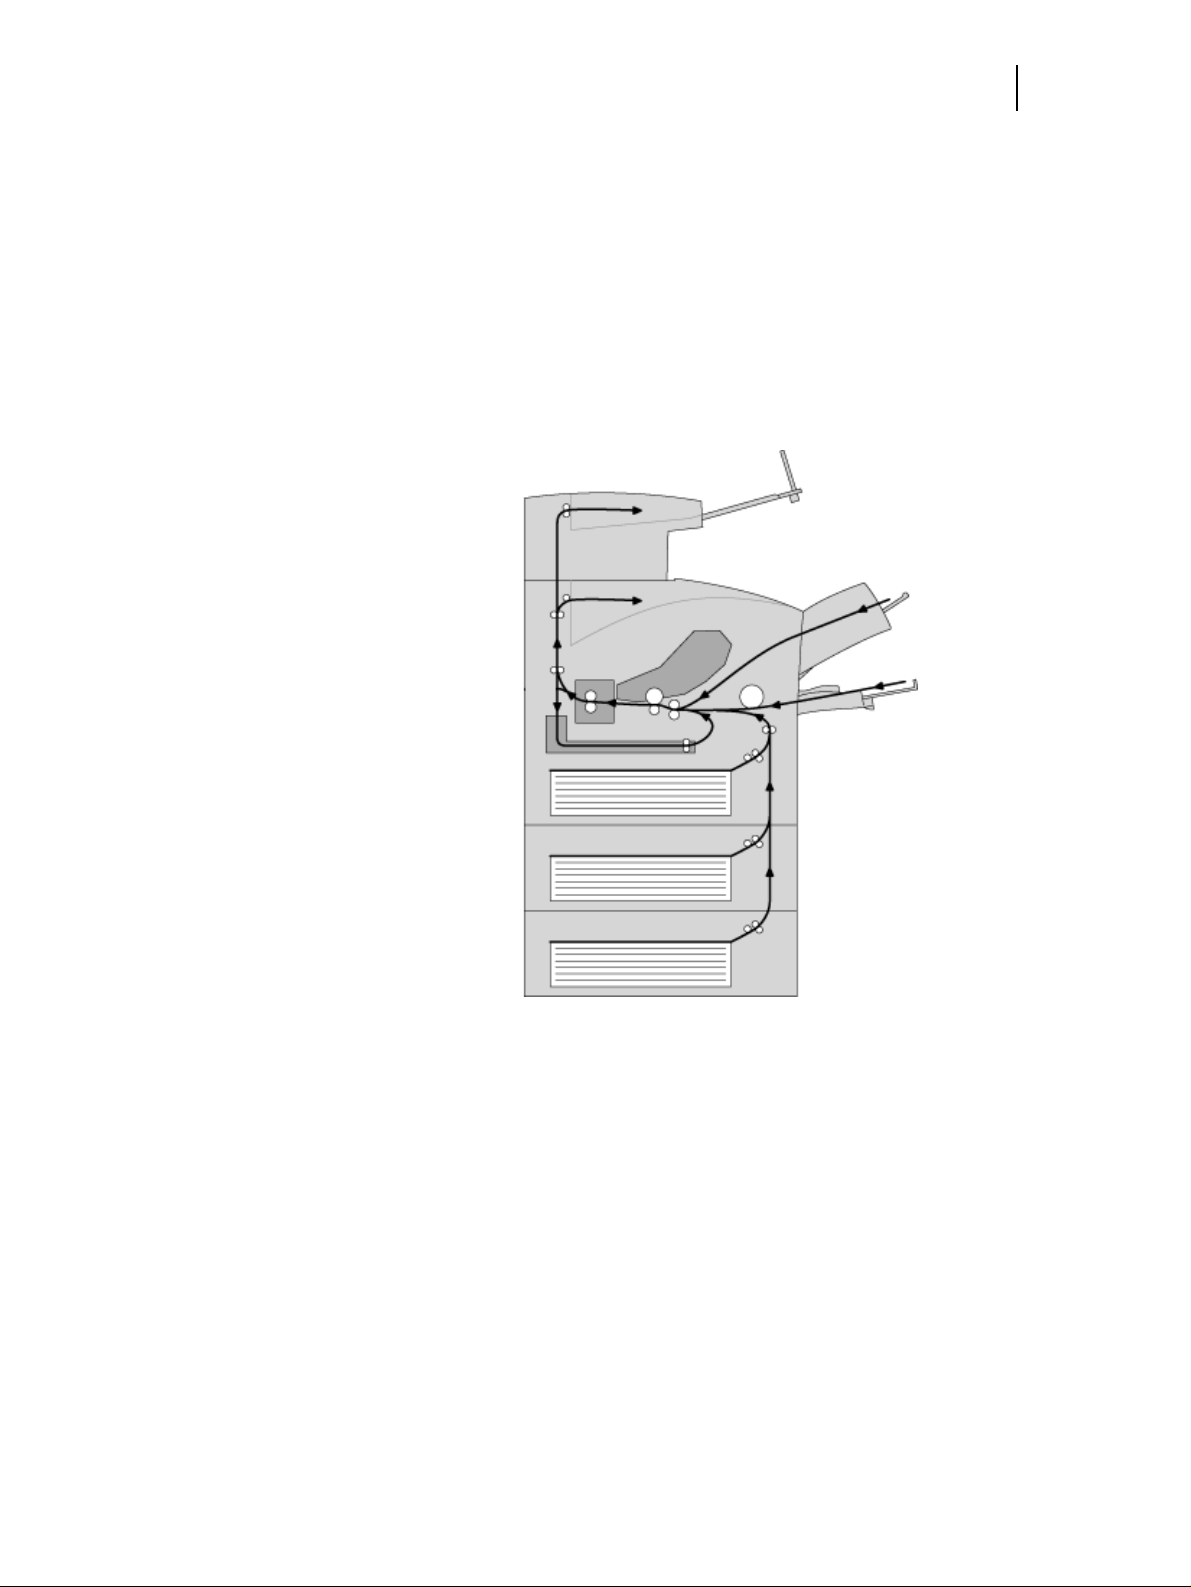
Paper Path
The following figure shows the path that paper travels through the printer:
Oki B6100 Reference Guide 9
Paper Path
1. The paper is initially fed from the front paper tray or one of the other paper trays (1).
2. The image is transferred from the photosensitive drum onto the paper (2).
3. The fuser fixes the toner permanently on the paper (3).
4. After passing through the duplexer, if installed, the paper is fed once more through Steps
2 and 3.
5. The paper emerges onto the output tray (5), or the offset output tray, if installed (4).
4
5
3
Figure 1-9: Paper Path.
2
1
1
1
1
1
Feb 03
◆ ◆ ◆
Page 22

10 Oki B6100 Reference Guide
Paper Path
Feb 03
Page 23

Using the Printer
Chapter 2
In this Chapter. . .
■ “About this Chapter” on page 2-2
■ “Connecting the Power Cord” on page 2-2
■ “Turning Power On and Off” on page 2-3
■ “Connecting the Printer to the Host Computer” on page 2-4
■ “Selecting Print Media” on page 2-11
■ “Loading the Universal Paper Tray” on page 2-14
Feb 03
Page 24

2-2 Oki B6100 Reference Guide
Connecting the Power Cord
About this Chapter
This chapter provides information concerning the daily use of the printer, including procedures
for connecting the printer and loading print media, and guidelines for selecting print media.
Connecting the Power Cord
Use the following procedure to connect the power cord.
1. Insert the power cord into the AC connector on the rear of the printer.
2. Verify that the power switch of the printer is in the [O] (off) position. Then, insert the plug
of the power cord into the AC outlet.
Feb 03
Page 25
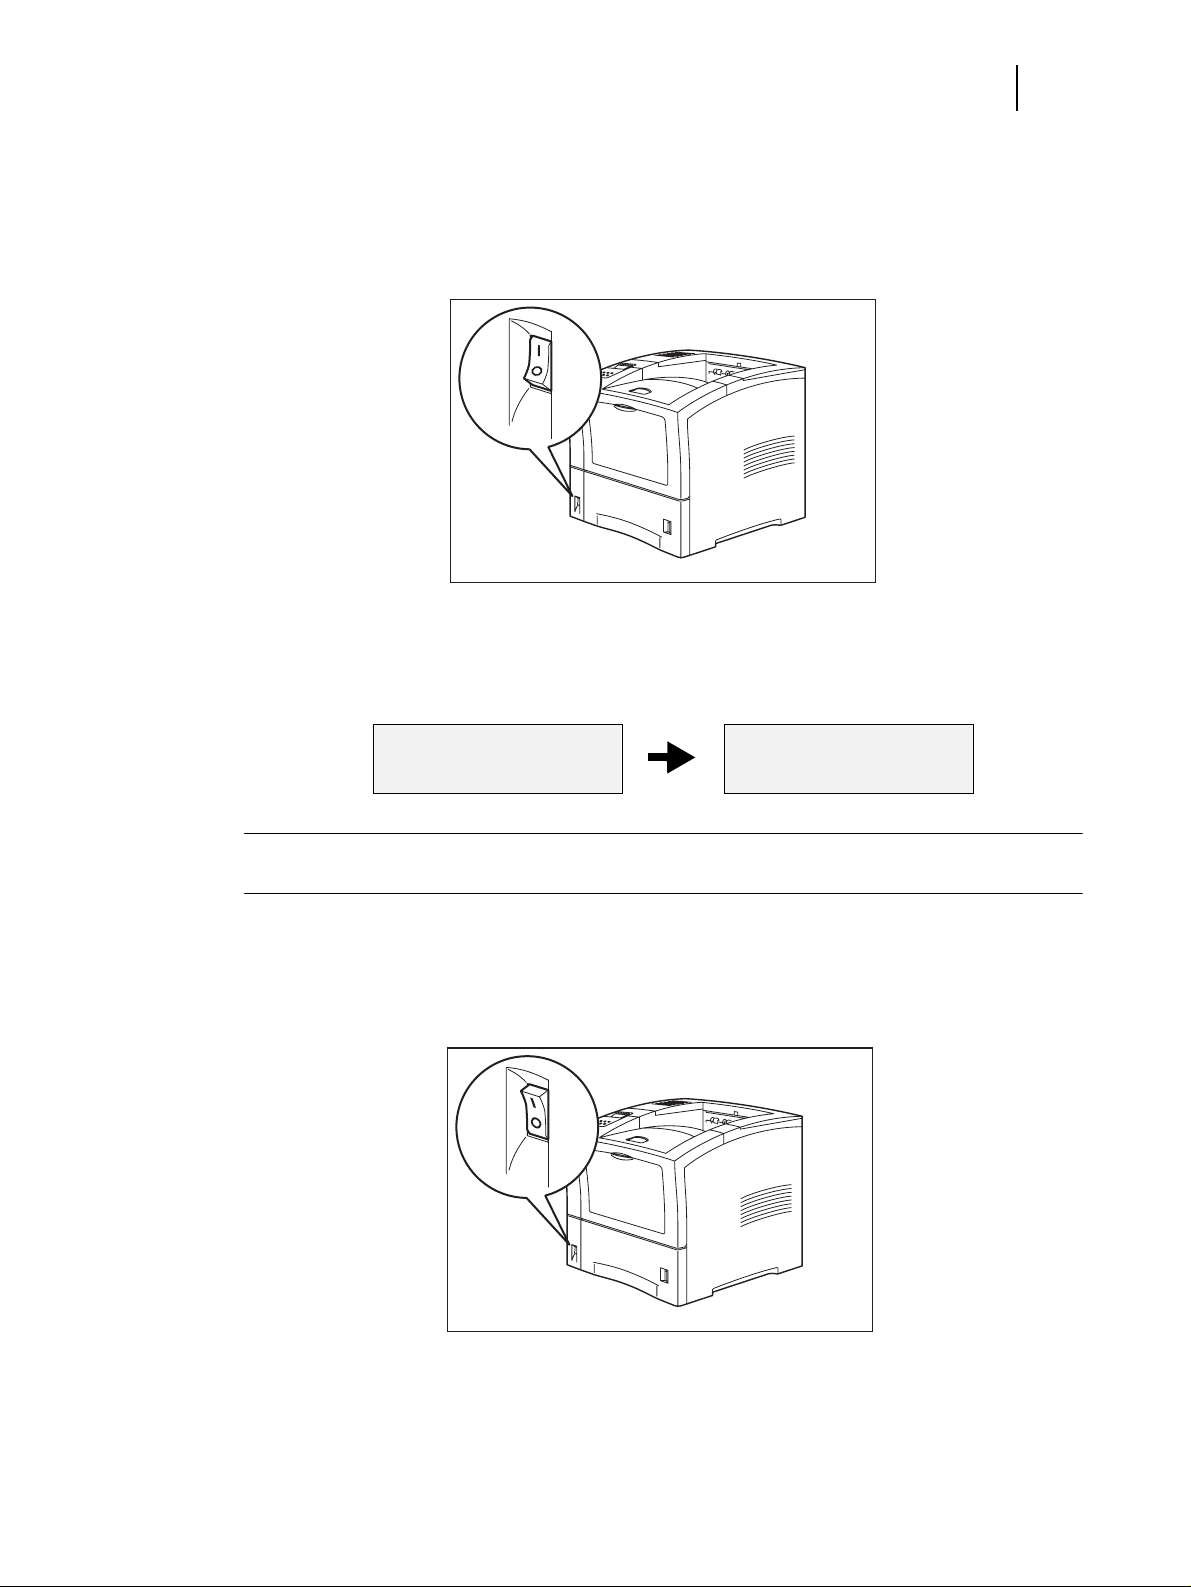
Turning Power On and Off
Use the following procedure to turn the printer on.
1. Turn the printer on by pressing [I] on the power switch on the left front of the printer.
The status message “Loading” appears on the display. This message indicates that the
printer is warming up and is not ready to print. After about 65 seconds, the status message
changes to “Ready”, indicating that the printer is ready to print.
Oki B6100 Reference Guide 2-3
Turning Power On and Off
Loading
NOTE: If an error message appears on the display after you turn the printer on, refer to “Warning Messages
and Error Messages” on page 5-31.
Ready
Use the following procedure to turn the printer off:
1. Turn the printer off by pressing the [O] on the power switch on the right side of the
printer.
Feb 03
Page 26

2-4 Oki B6100 Reference Guide
Connecting the Printer to the Host Computer
Connecting the Printer to the Host Computer
You must connect the printer to your computer using an IEEE 1284 parallel cable or a USB
cable.
These cables are user-supplied. The printer does not include either of these cables.
The default configuration of your printer has the USB port turned off.
Feb 03
Page 27

Oki B6100 Reference Guide 2-5
Connecting the Printer to the Host Computer
Parallel Port
The parallel port is the default port. To connect the printer to your computer using the parallel
port, simply connect the parallel cable to the parallel port on the printer, then connect the cable
to your computer . Use the follo wing procedure to v erify that the parallel port is turned on and to
change the parallel port Interface, Format, and Mode settings:
1. Press the MENU button on the control panel.
2. Press the NEXT button until the text “Interface Menu” is shown on the second line of
the display .
3. Press the SELECT button to enter the interface menu.
4. Press the NEXT button until the text “Port” is shown on the second line of the display.
5. Press the SELECT button to enter the port submenu.
6. Press the NEXT button until the text “Parallel” is shown on the second line of the dis-
play.
7. Press the SELECT button to enter the parallel submenu.
8. Verify that the second line of the display contains the text “On,” or press the NEXT but-
ton until the text “On” is shown on the second line of the display.
9. Press the SELECT b utton to change the parallel setting to On. After you hav e pressed the
SELECT button, the first line of the control panel display should contain the te xt “Port,”
and the second line should contain the text “Parallel.”
10. Press the RETURN button to return to the interface menu. The first line of the display
should contain the text “Interface Menu,” and the second line should contain the text
“Port.”
11. Press the NEXT b u tton until the text “Parallel Setup” is shown on the second line of the
display.
12. Press the SELECT button to enter the parallel setup submenu.
13. Press the NEXT button until the te xt “Interpreter” is shown on the second line of the dis-
play.
14. Press the SELECT button to enter the interpreter submenu.
15. Press the NEXT button until the desired interpreter is shown on the second line of the dis-
play. The available interpreter settings include Auto Switch, PCL, and PostScript 3.
16. Press the SELECT button to select the interpreter that you specified in the previous step.
After you have pressed the SELECT button, the first line of the display should contain
the text “Parallel Setup,” and the second line should contain the text “Interpreter.”
17. Press the NEXT button until t he te xt “Format” is shown on the second line of the display.
18. Press the SELECT button to enter the format submenu.
19. Press the NEXT button until the desired format is sho wn on the second line of the display.
The available format settings include Raw, Normal, and Binary.
Feb 03
20. Press the SELECT button to select the format that you specified in the previous step.
After you have pressed the SELECT button, the first line of the display should contain
the text “Parallel Setup,” and the second line should contain the text “Format.”
21. Press the NEXT button until the text “Mode” is shown on the second line of the display.
Page 28

2-6 Oki B6100 Reference Guide
Connecting the Printer to the Host Computer
22. Press the SELECT button to enter the mode submenu.
23. Press the NEXT button until the desired mode is shown on the second line of the display.
The available mode settings include Bidirectional and Standard.
24. Press the SELECT button to select the mode that you specif ied in the pre vious step. After
you have pressed the SELECT button, the first line of the display sh ou ld contain the text
“Parallel Setup,” and the second line should contain the text “Mode.”
25. Press the RETURN button twice to return to the main menu.
26. Press the START/STOP button to exit the menu system.
Feb 03
Page 29

Oki B6100 Reference Guide 2-7
Connecting the Printer to the Host Computer
USB Port
The USB port of your printer prov ides a reliable, high-speed, bi-directional connection between
your printer and PC. The USB standard is designed to deli v er comple x, graphic-rich documents
to the printer with speed and accuracy. USB-enabled printers and PCs allow up to 127 devices
to be attached to a single USB port. With USB, f ast, absolutely reliable,12Mbps communication
from your PC and printer is achieved.
OS Support
The USB port of your printer supports the following operating system environments:
■ Microsoft Windows 95b and 95c (also known as OSR 2.0, OSR 2.1 and OSR 2.5)
If you are using one of these operating systems, your PC may require an optional upgrade
to work properly with USB. This upgrade is called USBSUPP.EXE and is provided in the
\OTHER\USB directory of your W in do ws 95 CD-R OM. We do not supply this update. To
find out if your hardware/operating system combination supports USB, run the free program USBREADY.EXE, available from www.usb.org.
■ Microsoft Windows 98 and 98se, ME, 2000, and XP
These operating systems come with complete support for USB. You should still run
USBREADY.EXE from www.usb.org to ensure that the required software and hardware
are installed.
■ Apple Mac OS 8.6 and above
This version of Apple's operating system ships with the USB equipped systems and contains the necessary code to support USB. No additional software or hardware should be
required.
Hardware Support
The USB port of your printer supports the following hardware:
■ Intel
Most recent Intel systems will contain the needed components. However , there are a number of older systems that, while having USB hardware, have an obsolete USB implementation. Your USB printer will not work with these older systems unless a separate USB
controller card is installed in your system. It is possible to have working hardware b ut not
have a physical port, in which case the proper connector must be purchased from the system supplier.
NOTE: Systems made in 1996 and earlier probably do not support USB correctly on the motherboard;
systems made in 1997 may or may not properly support USB; and systems made since 1998
probably do support USB correctly.
■ Apple
The Apple iMac and G3/G4 systems come with working USB hardware and fully support
your USB printer. Older PCI-based Macintosh systems may be upgraded with a USB
card. This configuration should work with the correct version of the operating system.
Feb 03
Page 30

2-8 Oki B6100 Reference Guide
Connecting the Printer to the Host Computer
Installation for Windows
Use the following procedure to install USB for Windows:
1. Verify that your system supports USB and has an available USB connector. If you do not
have an available connector, you may need to purchase a USB hub.
NOTE: You may use an unpowered USB hub, since the printer is considered a self-powered device and will
not draw power from the USB port.
2. Power on the host system and the printer and allow the two systems to finish booting.
3. Attach the USB cable to both the printer and the host. It does not matter which host con-
nector you attach the cable to; however, make sure you always attach it to the same connector.
NOTE: The USB printer port created is associated with the actual port t o which the device is attached. If the
printer is attached to a different hardware port, a new USB printer port will be created, even though
it is attached to the same printer.
The maximum length of a USB cable is 16 feet (5 meters). Longer distances may be spanned if
intervening hubs are used. There is a limit of 5 hubs between the host and any given device, giving a
maximum distance of 98 feet (30 meters).
4. Windows displays a dialog box stating that new hardware has been found and Windows is
searching for a driver.
5. Browse to the location of the USB port software and select the appropriate version for
either Windows 95 or Windows 98 (\Software\USB\Win95 or \Software\USB\Win98 on
your CD-ROM or the location where you expanded the driver files).
6. Windows creates a GNUSBn printer port.
7. At this point, you may install the printer normally, either by using the “Add Printer” wiz-
ard or by running the appropriate setup program, or your system may announce that “Ne w
Hardware has been found.” In either case, install the dri ver required for your printer at this
time.
8. After the printer has been installed, make sure that it prints to the GNUSBn port.
9. Ensure that the Spooler settings for the printer have “Disable bi-directional support for
this printer” checked.
10. Your USB printer is now ready to print.
Feb 03
Page 31

Oki B6100 Reference Guide 2-9
Connecting the Printer to the Host Computer
Installation for Mac OS 8.6
1. Power on the printer and the host computer.
2. Ensure that the “Apple LaserWriter Software” is installed.
3. Attach the USB cable to the host and the printer. Note that the printer is considered a “self
powered” device and as such may be plugged into any available USB port on the Macintosh, including the one on the keyboard.
4. Open the “Desktop Printer Utility” (installed when you installed the Apple Laser Writer
Software).
5. Choose the correct driver to use, depending on the printer you are installing.
6. Choose “Printer (USB)” and press “OK.”
7. Choose the PPD file that corresponds to your printer.
8. Choose the correct printer.
9. Press “Create.”
10. You now have a desktop shortcut to the USB printer and are ready to print.
Using the USB Port
If you would like to use the USB port inst ead of the parallel port, use the follo wing procedure to
turn the USB port on and change the USB interface and format settings on the printer:
1. Press the MENU button on the control panel.
2. Press the NEXT button until the text “Interface Menu” is shown on the second line of
the display .
3. Press the SELECT button to enter the interface menu.
4. Press the NEXT button until the text “Port” is shown on the second line of the display.
5. Press the SELECT button to enter the port submenu.
6. Press the NEXT button until the text “USB” is shown on the second line of the display.
7. Press the SELECT button to enter the USB submenu.
8. Press the NEXT button until the text “On” is shown on the second line of the display.
9. Press the SELECT button to change the USB setting to On. After you have pressed the
SELECT button, the first line of the control panel display should contain the te xt “Port,”
and the second line should contain the text “USB.”
10. Press the RETURN button to return to the interface menu. The first line of the display
should contain the text “Interface Menu,” and the second line should contain the text
“Port.”
11. Press the NEXT button unt il the t e xt “USB Setup” is shown on the second line of the dis-
play.
12. Press the SELECT button to enter the USB setup submenu.
13. Press the NEXT button until the te xt “Interpreter” is shown on the second line of the dis-
play.
Feb 03
14. Press the SELECT button to enter the interpreter submenu.
Page 32

2-10 Oki B6100 Reference Guide
Connecting the Printer to the Host Computer
15. Press the NEXT button unti l the desired interpreter is shown on the second line of the dis-
play. The available interpreter settings include Auto Switch, PCL, and PostScript 3.
16. Press the SELECT button to select the interpreter that you chose in the previous step.
After you have pressed the SELECT b utton, the f irst line of the display should contain the
text “USB Setup”, and the second line should contain the text “Interpreter.”
17. Press the NEXT button until the te xt “Format” is shown on the second line of the display.
18. Press the SELECT button to enter the format submenu.
19. Press the NEXT button until the desired format is sho wn on the second line of the display.
The available format settings include Raw, Normal, and Binary.
20. Press the SELECT button to select the format setting that you specified in the previous
step. After you have pressed the SELECT button, the first line of the display should contain the text “USB Setup,” and the second line should contain the text “Format.”
21. Press the RETURN button twice to return to the main menu.
22. Press the START/STOP button to exit the menu system.
USB Resources
If you would like more information about USB, refer to the www.usb.org website. This organization is responsible for the determining the USB standard and has a number of F AQ's available
that should answer most questions.
Feb 03
Page 33

Selecting Print Media
Your printer can print on a variety of media, including plain paper, labels, transparencies, and
envelopes. Alw ays use print media that meet the guidelines for use with this printer. Print media
that is not recommended for use with this printer may cause frequent paper jams or poor print
quality.
Paper and Print Media To Avoid
Do not use paper or print media that has any of the following characteristics:
■ Does not meet the paper and media size and weight specifications for this printer
■ Is not labeled for use with xerographic printers or xerographic copiers
■ Cannot withstand temperatures of up to 310°F/155°C
■ Is in a sealed package that is obviously damaged or wet
■ Is excessively wrinkled, curled, torn, or warped
■ Is folded or creased
■ Has either an extremely slick surface or an extremely textured surface
■ Has an exposed adhesive surface
■ Has paper pieces glued or taped to the media
■ Has staples or paper clips attached
■ Is categorized as thermal paper, coated paper, or carbon paper
■ Is an envelope that is embossed, is made of extremely thick paper, or is padded
■ Is an envelope that has metal clasps
■ Is an envelope with gummed or adhesive surfaces
■ Is a sheet of labels that has the backing sheet exposed between individual labels
Oki B6100 Reference Guide 2-11
Selecting Print Media
Correct Paper Storage
It is important to store paper correctly prior to placing it in the printer, since improper storage
can cause frequent paper jams and poor print quality. Use the fol lowing guidelines when storing
paper for use in the printer:
■ Store reams of paper on a flat surface, and always store them stacked horizontally.
■ Store reams of paper in an area away from both direct sunlight and high humidity.
■ Open sealed reams only when you are ready to load the paper into the paper tray, and
always close and seal partial reams of paper.
■ Do not stack partial reams of paper.
■ Store paper in a dry area, with a temperature of 10 to 30 degrees Celsius and relative
humidity of 30% to 60%.
Feb 03
Page 34

2-12 Oki B6100 Reference Guide
Selecting Print Media
Print Media Capacities
Your printer can hold up to 1750 sheets of standard weight paper, depending upon the options
installed. The printer can be configured in the following three variations:
■ Printer (550 sheets)
■ Printer with 550 sheet feeder(1100 sheets)
■ Printer with two 550 sheet feeders (1650 sheets)
The following table shows the f ive configurations and the breakdown of paper capacity:
Front Tray
(standard)
Tray 1
(standard)
Tray 2
(option)
Tray 3
(option)
Total Pa per
Capacity
-- 550 550
100 550 -- -- 650
-- 550 550 -- 1100
100 550 550 -- 1200
-- 550 550 550 1,650
100 550 550 550 1,750
If you want to use paper that is an odd size or weight, you must use the front paper tray. The
front tray can hold the following quantities of print media:
■ Envelopes: 10
■ Transparencies: 30
■ Labels: 30
■ Standard Paper: 100
■ Other paper: Stack Height 11.5mm
■ Standard Postcard: 30
Use in Front Tray Do not use
Shiny backing sheet exposedFully covered with labels
NOTE: Expect a slight reduction in image quality when you print on envelopes, labels, transparencies, or
postcards.
Feb 03
Page 35

Oki B6100 Reference Guide 2-13
Selecting Print Media
Print Media Weight, Type, and Size
The following table defines print media that you can use in each of the paper sources, and also
indicates the feed orientation—long edge feed (LEF) or short edge feed (SEF). If you have concerns about a specific brand or type of media, try samples of the media to determine if the
resulting printer performance and print quality meet your expectations.
Paper Source Metric Weight Paper Type and F eed
Direction
2
Universal Paper Tray
(main tray and optional
550 sheet paper feeder)
Do not use label stock
or other special media
in the 550 sheet paper
tray.
Front Tray 60 to 216g/m
60 to 216g/m
Any paper Width:
A4 SEF 297 x 210mm
Letter SEF 279.4 x 215.9mm
Legal 13 inch 330.2 x 215.9mm
Legal 14 inch 355.6 x 215.9mm
Executive SEF 266.7 x 184.5mm
A5 SEF 210 x 149mm
B5 SEF 257 x 182mm
2
Envelopes
Transparencies
Labels
Postcards
Standard Paper (LEF
and SEF)
Other Paper
Paper Sizes
Accommodated
98.4mm to 215.9mm
3.87 to 8.5 inches
Length:
148.5mm to 355.6mm
5.85 to 14 inches
11.7 x 8.27 inches
11 x 8.5 inches
13 x 8.5 inches
14 x 8.5 inches
10.5 x 7.2 inches
8.27 x 5.9 inches
10.12 x 7.17 inches
Width:
3.0 to 8.5 inches
76.2mm to 215.9mm
Length:
5.0 to 14 inches
127mm to 355.6mm
Feb 03
Page 36

2-14 Oki B6100 Reference Guide
Loading the Universal Paper Tray
Loading the Universal Paper Tray
The 550-sheet universal paper tray that sits inside the printer can accommodate paper sizes
from postcard to legal. The 550-sheet univ ersal paper tray has two width guides that are located
on the sides of the tray, and one length guide that is located near the center of the tray. These
guides allow you to adjust the size of the area that holds paper.
NOTE: The following procedure shows you how to load paper into the main paper tray. To load paper into
the optional 550 sheet paper feeder, simply complete the procedure using the 550 sheet paper tray
and feeder rather than the main paper tray.
Use the following procedure to load paper into the 550 sheet universal paper tray:
1. Place the paper tray on a level surface.
2. Squeeze the locking mechanism on the rear length guide, lift it up, and slide it all the way
to the rear of the tray.
Feb 03
Page 37

Oki B6100 Reference Guide 2-15
Loading the Universal Paper Tray
3. If the paper you are using is long er than A4 (11. 7 inches/ 297 cm), press the squ are green
button on the bottom of the paper tray to release the rear of the tray, and pull the tray out
to extend it. This is known as the extended position.
4. Squeeze the right-side width guide, lift it up, and slide the guides to the sides of the tray.
Feb 03
Page 38

2-16 Oki B6100 Reference Guide
Loading the Universal Paper Tray
5. Verify that the paper tray plate has dropped down into the base of the paper tray. If the tray
is locked in the up position, pull the lever near the front of the tray to release the plate, or
push the paper tray completely into the printer and then remove it.
CAUTION: Do not overload the tray. Verify that the paper stack is beneath the retaining clips
on both sides of the tray . F an paper before placing it in the tray, and place paper in the tray with
the print side down.
NOTE: To avoid paper jams and other paper transportation problems, make sure the length and width
guides are adjusted to match the paper size and are locked firmly into place.
6. Align the edges of the paper and place the paper in the center of the paper tray with the
print side down. Verify that you place the paper at the center of the paper tray.
Feb 03
Page 39

Oki B6100 Reference Guide 2-17
Loading the Universal Paper Tray
7. Squeeze the right width guide, lift it up, and adjust the guides to match the paper width.
8. Squeeze the length guide, lift it up, and adjust t he guide to match the paper length. Verify
that the length guide is firmly seated into the gradations on the base of the paper tray.
9. Grasp the paper tray with both hands and insert it into the paper tray well on the printer.
Feb 03
Page 40

2-18 Oki B6100 Reference Guide
Loading the Universal Paper Tray
10. Push the paper tray completely into the printer. Verify that the tray is properly seated.
11. Use the paper level indicator on the front right of the printer to determine when the paper
supply is low.
Feb 03
Page 41

Loading the Front Tray
The front tray located on the front of the printer can accommodate a maximum of 100 sheets of
paper, and can also accommodate a maximum of 30 sheets of standard label s, transparencies, or
postcards, and a maximum of 10 standard en velo pes. The tray has two guides that are located on
the left and right sides of the tray. These guides allow you to adjust the size of the area that
holds the print media. Use the following guidelines when loading the front tray:
■ Do not mix print media in the front tray. For example, do not load a stack that includes
both envelopes and standard paper. Load only one type of print media.
■ Do not mix print media sizes in the front tray. For example, do not load a stack that
includes two or more different sizes of paper.
■ Do not load print media that is obviously damaged, wet, creased, or wrinkled.
■ Do not overfill the front tray.
Use the following procedure to load paper in the front tray:
1. Open the front tray by pulling the hand grip on the top of the front tray cover.
Oki B6100 Reference Guide 2-19
Loading the Front Tray
Feb 03
2. If you are using paper that is letter size or larger, pull out the input tray extension.
Page 42

2-20 Oki B6100 Reference Guide
Loading the Front Tray
3. Slide the paper guides so they match the size of the paper that you are loading.
4. Stack the paper that you will load in the front tray, making sure that the edges are aligned
and neat. Position the paper stack so the surface to be printed faces up.
5. Load the stack of paper into the front tray by sliding the stack between the paper guides
and then pushing the paper stack into the tray until it will not go any further.
6. Check the paper stack to make sure it is not loaded at an angle and that the guides barely
touch the stack.
CAUTION: Do not press the guides tightly against the stack; the guides should just barely
touch the stack of paper. Paper guides that are too tight can cause feed jams.
◆ ◆ ◆
Feb 03
Page 43

Understanding and Navigating the Control Panel Menus
Chapter 3
In this Chapter. . .
■ “About this Chapter” on page 3-2
■ “Control Panel Features” on page 3-3
■ “Navigating the Control Panel Menus” on page 3-6
■ “Menu Structure” on page 3-8
■ “Paper Menu” on page 3-9
■ “Interface Menu” on page 3-11
■ “PS Menu” on page 3-13
■ “PCL Menu” on page 3-14
■ “System Menu” on page 3-17
■ “Quality Menu” on page 3-19
■ “Functions Menu” on page 3-20
■ “Status Menu” on page 3-21
Feb 03
Page 44

3-2 Oki B6100 Reference Guide
About this Chapter
This chapter explains the control panel and its functions. It explains ho w to nav igate throughout
the various menus and submenus that allow you to view and change the printer settings.
NOTE: Settings in your software application will override any settings in your printer driver.
Your printer driver settings will override any settings from the printer menu or printer front panel.
Feb 03
Page 45

Control Panel Features
The control panel is located on the front of the printer. It contains the display, indicators, and
pushbuttons that allow you to view and change the printer settings.
NOTE: Settings in your software application will override any settings in your printer driver.
Your printer driver settings will override any settings from the printer menu or printer front panel.
The figure below shows the control panel features.
1 LCD Display
2 LED Indicators
3 Push Buttons
Oki B6100 Reference Guide 3-3
Control Panel Features
1
2
3
Figure 3-1: Control Panel.
LCD Display
The LCD display shows status and error messages that inform you of the current status of the
printer, and also displays menus, submenus, and printer settings when you are in the menu system. The display contains two lines of text, each with a maximum of sixteen characters.
NOTE: Settings in your software application will override any settings in your printer driver.
Your printer driver settings will override any settings from the printer menu or printer front panel.
Feb 03
Page 46

3-4 Oki B6100 Reference Guide
Control Panel Features
LED Indicators
The LED indicators also indicate printer status. The four indicators can each be on, off, or
blinking, indicating different phases of printer operation. The table below explains the LED
indicators.
LED Color When Off When On When Blinking
Green Printer is NO T
READY
Green Printer is IDLE Printer is ACTIVE
Green POWER is off POWER is on Power Saver Mode ON
Yellow Printer is not in
error mode
Printer is READY N/A
Printer is WAITING (a partial job
(processing a job)
There is an error that requires
user intervention, such as a
paper jam, a service call
required, etc.
has been printed, and the printer
is waiting for additional job data)
N/A
Feb 03
Page 47

Oki B6100 Reference Guide 3-5
Control Panel Features
Pushbuttons
The control panel pushbuttons allow you to access and navigate menus, and also assist you in
recovering from printer errors. The table below explains the functions of the eight pushbuttons.
Pushbutton Function
START/STOP—Push this button to start or stop the printer, or to exit the menu
system.
MENU—Push this button to enter the menu system.
NEXT—Push this button to move to the next menu, submenu, or setting within
the same level of the menu structure.
SELECT—Push this button to select the menu or submenu that is shown on the
second line of the display or to choose and save the setting shown on the second
line of the display.
CANCEL—Push this button to cancel an action.
ST ATUS—Push this button to enter the Status Menu and view the current status of
printer.
PREVIOUS—Push this button to return to the pre vious menu, submenu, or op tion
within the same leve l of the menu structure.
RETURN—Push this button to move up one level in the menu structure to the
menu shown on the fi rst line of the display.
Feb 03
Page 48

3-6 Oki B6100 Reference Guide
Navigating the Control Panel Menus
Navigating the Control Panel Menus
NOTE: Settings in your software application will override any settings in your printer driver.
Your printer driver settings will override any settings from the printer menu or printer front panel.
When you press the MENU button on the control panel, you enter the printer’s menu system. At
that point, the first line of the display contains the text “Menu,” indicating that you are in the
menu system. The second line of the display lists the active menu, which you can change by
pressing the NEXT or PREVIOUS button.
If you press the NEXT button repeatedly, the second line of the display cycles through the main
menus in the following order:
■ Paper Menu
■ Interface Menu
■ PS Menu
■ PCL Menu
■ System Menu
■ Quality Menu
■ Functions
Menu
Paper Menu
NOTE: Additional menus and submenus may appear in the printer menu system when other options are
installed.
Feb 03
Page 49

Oki B6100 Reference Guide 3-7
Navigating the Control Panel Menus
The following figure sho ws the sequence of pushbuttons and display messages th at allo w you to
change the number of copies printed. This example illustrates the basic relationship between
menus and submenus and demonstrates how the NEXT, PREVIOUS, SELECT, and
RETURN buttons help you to navigate through the menus.
Menu
Paper Menu
Copies
2
Copies
3
Menu
Interface Menu
Copies
1
Paper Menu
Copies
Figure 1-2: Navigating the Paper Menu.
Menu
Paper Menu
Paper Menu
Copies
Menu
Paper Menu
1. Press the MENU button on the control panel.
2. Press the NEXT button until the text “Paper Menu” is shown on the second line of the
display.
Feb 03
3. Press the SELECT button to enter the paper menu.
4. Press the NEXT button until the text “Copies” is shown on the second line of the display.
5. Press the SELECT button to enter the copies submenu.
6. Press the NEXT or PREVIOUS button to increase or decrease the number of copies
printed.
7. Press the SELECT button to save this setting.
8. Press the START/STOP button to exit the menu system.
NOTE: Settings in your software application will override any settings in your printer driver.
Your printer driver settings will override any settings from the printer menu or printer front panel.
Page 50

3-8 Oki B6100 Reference Guide
Menu Structure
Menu Structure
NOTE: Settings in your software application will override any settings in your printer driver.
Your printer driver settings will override any settings from the printer menu or printer front panel.
The following figure shows the structure of the control panel main menus and submenus. For
more specific information about using and na vigating the printer menu system, refer to the other
sections in this chapter.
Paper Menu
Copies
Default Source
Manual Feed
Output Tray
Media Size/Type
Front
Tray 1
Tray 2 (optional)
Tray 3 (optional)
Blank Pages
Tray Linking
System Menu
Factory Defaults
Display Language
Powersaver
Wait Timeout
Job Timeout
Jam Recovery
Hex Print
Reset Toner Life
Interface Menu
Port
Parallel
Network Card 1
USB
Parallel Setup
Interpreter
Format
Mode
Delay Out Close
USB Setup
Interpreter
Format
Delay Out Close
Quality Menu
Resolution
Toner Saver
Print Density
PS Menu
Print PS Errors
Manual Feed TO
Functions
Reset Printer
Print Summary
Print Test
Print Fonts
PCL Menu
Orientation
Font Source
Font Number
Pitch
Symbol Set
Macro Filter
Lines Per Page
CR Mode
LF Mode
FF Mode
Parameter Values
Print Area
Figure 1-3: Printer Menu Structure.
NOTE: Additional menus and submenus may appear in the printer menu system when other options are
installed.
Feb 03
Page 51

Paper Menu
NOTE: Settings in your software application will override any settings in your printer driver.
The Paper Menu provides access to the printer settings for various paper-handling functions.
Use the following procedure to enter the paper menu:
1. Press the MENU button on the control panel.
2. Press the NEXT button until the text “Paper Menu” is shown on the second line of the
3. Press the SELECT button to enter the Paper Menu.
4. Press the NEXT b utton to mov e through the submenus: Copies, Default Source, Manual
5. Use the procedures in the following table to access and change the printer paper-handling
Oki B6100 Reference Guide 3-9
Paper Menu
Your printer driver settings will override any settings from the printer menu or printer front panel.
display.
Feed, Output Tray, Media Size/Type, Tray Linking, Blank Pages, and Output Linking.
settings:
Submenus Default Setting Available Settings Procedure for Changing Setting
Copies
This submenu allows
you to change the
number of copies
printed.
Duplex
This submenu allows
you to turn the duplexer
on or off.
Duplex Bind
This submenu allows
you to define the
binding edge for
duplexed sheets.
Default Source
This submenu allows
you to choose a default
paper source from a list
of all installed sources.
Manual Feed
This submenu allows
you to turn the manual
feed on or off.
1 Numbers 1 - 999 1. Press NEXT or PREVIOUS to increase
or decrease the number of copies
printed.
2. Press SELECT to save this setting.
Off Off
On
Long Edge Long Edge
Short Edge
Tray 1 Front
Tray 1
Tray 2 (optional)
Tray 3 (optional)
Off On
Off
1. Press NEXT or PREVIOUS to toggle
between ON and OFF .
2. Press SELECT to save this setting.
1. Press NEXT or PREVIOUS to toggle
between LONG EDGE and SHORT
EDGE.
2. Press SELECT to save this setting.
1. Press NEXT or PREVIOUS to scroll
through the list of available sources of
paper.
2. Press SELECT to set a source as the
default.
1. Press NEXT or PREVIOUS to toggle
between ON and OFF .
2. Press SELECT to save this setting.
Output Tray
This submenu allows
you to choose a default
output tray from a list
of all installed output
trays.
Feb 03
Face Down Tray Face Down Tray
Offset Tray (optional)
1. Press NEXT or PREVIOUS to scroll
through the list of available output
trays.
2. Press SELECT to set a tray as the
default.
Page 52

3-10 Oki B6100 Reference Guide
Paper Menu
Media Size/Type
This submenu allows
you to set the media
size and type for the
Front Tray and set the
medial type for all other
trays.
Tray Linking
This submenu allows
you to turn the tray
linking function on or
off.
Front Tray
Size: Letter LEF
Type: Plain
Tray 1
Type: Plain
Tray 2 (optional)
Type: Plain
Tray 3 (optional)
Type: Plain
Size
Front Tray:
Letter, A4 ,
B5, A5,
Statement,
Executive,
C5 Envelope,
DL
Envelope,
Com10
Envelope,
Monarch
Envelope,
Legal, Folio,
A6
On On
Off
Type
Front Tray:
Plain,
Transparency,
Prepunched,
Letterhead,
Colored,
Preprinted,
Bond, Label,
Card Stock,
Postcard,
Envelope,
Other
Other Trays:
Plain,
Transparency,
Prepunched,
Letterhead,
Colored,
Preprinted,
Bond, Other
1. Press NEXT or PREVIOUS to scroll
through the list of available sources of
paper.
2. Press SELECT to choose a tray.
3. Press NEXT or PREVIOUS to toggle
between MEDIA SIZE and MEDIA
TYPE.
4. Press SELECT to choose either.
5. Press NEXT or PREVIOUS to scroll
through the available sizes or types.
6. Press SELECT to set a size or type.
1. Press NEXT or PREVIOUS to toggle
between ON and OFF .
2. Press SELECT to save this setting.
Blank Pages
This submenu allows
you to choose to either
print or not print blank
pages of a document.
Output Linking
This submenu allows
you to turn the output
linking function on or
off.
Print Print
Do Not Print
Off On
Off
1. Press NEXT or PREVIOUS to toggle
between PRINT and DO NOT PRINT.
2. Press SELECT to save this setting.
1. Press NEXT or PREVIOUS to toggle
between ON and OFF .
2. Press SELECT to save this setting.
Feb 03
Page 53

Interface Menu
NOTE: Settings in your software application will override any settings in your printer driver.
The Interface Menu provides access to the printer interface settings. Use the following procedure to enter the interface menu:
1. Press the MENU button on the control panel.
2. Press the NEXT button until the text “Interface Menu” is shown on the second line of
the display .
3. Press the SELECT button to enter the interface menu.
4. Press the NEXT button to move through the submenus: Port, Parallel Setup, and USB
Setup.
5. Use the procedures in the following table to access and change the printer interface set-
tings:
Oki B6100 Reference Guide 3-11
Interface Menu
Your printer driver settings will override any settings from the printer menu or printer front panel.
An installed port in your printer is automatically ON.
If your printer is on a network, be sure to advise your network administrator of any changes you
make to the port settings. If you turn a port off, you may disrupt the ability of the printer to be used
by others on the network.
Submenus Default
Setting
Port
This submenu allows you
to choose the type of
interface.
Parallel:
On
USB:
On
Available
Settings
Parallel:
On, Off
USB:
On, Off
Procedure for Changing Setting
1. Press NEXT or PREVIOUS to toggle between
PARALLEL and USB.
2. Press SELECT to save this setting.
Feb 03
Page 54

3-12 Oki B6100 Reference Guide
Interface Menu
Parallel Setup
This submenu allows you
to set up the parallel
interface.
USB Setup
This submenu allows you
to set up the USB interface.
Interpreter:
Auto Switch
Format:
Raw
Mode:
Bidirectional
Delay Out
Close:
Off
Interpreter:
Auto Switch
Format:
Raw
Interpreter:
Auto Switch
PCL
PostScript 3
Format:
Raw
Normal
Binary
Mode:
Bidirectional
Standard
Delay Out Close:
On
Off
Interpreter:
Auto Switch
PCL
PostScript 3
Format:
Raw
Normal
Binary
1. Press NEXT or PREVIOUS to scroll through the
INTERPRETER, FORMAT, and MODE
submenus.
2. Press SELECT to choose a submenu.
3. Press NEXT or PREVIOUS to scroll through the
settings.
4. Press SELECT to choose and save a setting.
1. Press NEXT or PREVIOUS to toggle between
INTERPRETER and FORMAT submenus.
2. Press SELECT to choose either submenu.
3. Press NEXT or PREVIOUS to scroll through the
settings.
4. Press SELECT to save this setting.
Feb 03
Page 55

PS Menu
Oki B6100 Reference Guide 3-13
PS Menu
NOTE: Settings in your software application will override any settings in your printer driver.
Your printer driver settings will override any settings from the printer menu or printer front panel.
The PS Menu provides access to the PostScript settings. Use the following procedure to enter
the PS Menu:
1. Press the MENU button on the control panel.
2. Press the NEXT button until the text “PS Menu” is shown on the second line of the dis-
play.
3. Press the SELECT button to enter the PS menu.
4. Press the NEXT button to move through the submenus: Print PS Errors, and Manual
Feed TO.
5. Press the SELECT button to enter a submenu.
6. Use the procedures in the following table to access and change the PostScript settings:
Submenus Default
Setting
Print PS Errors
This submenu allows you
to choose to either print or
not print PS errors.
Manual Feed TO
This submenu allows you
to set the manual feed
timeout—the number of
seconds the printer should
wait for a manual feed. A
setting of 0 will cause
printer to wait indefinitely
for a manual feed.
Off On
0 0 - 99999 1. Press NEXT or PREVIOUS to increase or decrease
Available Settings Procedure for Changing Settings
1. Press NEXT or PREVIOUS to toggle between ON
Off
(print) and OFF (do not print).
2. Press SELECT to save this setting.
each digit of the five-digit number.
2. Press SELECT to move to the next number.
3. Press SELECT after setting the last digit to sav e the
setting.
Feb 03
Page 56

3-14 Oki B6100 Reference Guide
PCL Menu
PCL Menu
NOTE: Settings in your software application will override any settings in your printer driver.
Your printer driver settings will override any settings from the printer menu or printer front panel.
The PCL Menu provides access to the PCL settings. Use the following procedure to enter the
PCL menu:
1. Press the MENU button on the control panel.
2. Press the NEXT b utton until the te xt “PCL Menu” is shown on the second line of the dis-
play.
3. Press the SELECT button to enter the PCL menu.
4. Press the NEXT button to move through the submenus: Print PS Errors, Manual Feed
TO.
5. Press the SELECT button to enter a submenu.
6. Use the procedures in the following table to access and change the PCL settings:
Submenus Default Setting Available Settings Procedure for Changing Setting
Orientation
This submenu allows
you to choose the
orientation of the
page.
Font Sour ce
This submenu allows
you to choose a font
source.
Font Number
This submenu allows
you to set the font
number.
Pitch
This submenu allows
you to change the
pitch of text.
Portrait Portrait
Landscape
Internal Internal 1. Press NEXT or PREVIOUS to
0 Numbers 0- 1. Press NEXT or PREVIOUS to
10.00 0.08 - 100.00 1. Press NEXT or PREVIOUS to
1. Press NEXT or PREVIOUS to
toggle between PORTRAIT and
LANDSCAPE.
2. Press SELECT to choose and save
an orientation.
scroll through the available font
sources.
2. Press SELECT to choose and set a
source.
increase or decrease the font
number.
2. Press SELECT to save this
setting.
increase or decrease the pitch.
2. Press SELECT to save this
setting.
Feb 03
Page 57

Oki B6100 Reference Guide 3-15
PCL Menu
Symbol Set
This submenu allows
you to choose a
symbol set.
Macro Filter
This submenu allows
you to turn the macro
filter on or off.
Lines Per Page
This submenu allows
you to change the
number of lines per
page.
10U:PC-8 CP437 10U:PC-8 CP437
11U:PC-8 D/N
12U:PC-850
17U:PC-852
9T:PC-Turkish
19U:WIN Latin1
9E:WIN Latin2
5T:WIN Latin5
7J:Desk Top
10J:PS Text
13J:Ventura Intl
14J:Ventura US
6J:Microsoft Pub
8M:Math-8
PS:Math
15U:Pi Font
1U: Legal
1E: ISO4 UK
0U:ISO6 ASCII
0U:ISO11 Swedish
0I:ISO15 Italian
2S:ISO17 Spanish
1G:ISO21 German
0D:ISO60 Norweg.
1F:ISO69 French
9U:WIN3.0 Latin1
8U:Roman 8
0N:ISO 8859-1
2N:ISO 8859-2
5N:ISO 8859-5
1. Press NEXT or PREVIOUS to
scroll through the available
symbol sets.
2. Press SELECT to choose and set a
symbol set.
6M:Ventura Math
Off On
Off
1. Press NEXT or PREVIOUS to
toggle between ON and OFF .
2. Press SELECT to save this
setting.
64 5 - 128 1. Press NEXT or PREVIOUS to
increase or decrease the lines per
page.
2. Press SELECT to save this
setting.
CR Mode
This submenu allows
you top define the
action prompted by a
carriage return—a
carriage return equals
either a carriage
return alone, or a
carriage return and a
line feed together.
LF Mode
This submenu allows
you to define the
action prompted by a
line feed—a line feed
equals either a line
feed alone or a
carriage return and a
line feed together.
CR = CR CR = CR
CR = CR/LF
LF = LF LF = LF
LF = CR/LF
1. Press NEXT or PREVIOUS to
choose from CR=CR or
CR=CR/LF.
2. Press SELECT to save this
setting.
1. Press NEXT or PREVIOUS to
choose from LF=LF or
LF=CR/LF .
2. Press SELECT to save this
setting.
Feb 03
Page 58

3-16 Oki B6100 Reference Guide
PCL Menu
FF Mode
This submenu allows
you to define the
action prompted by a
form feed—a form
feed equals either a
form feed alone or a
carriage return and a
form feed together.
Print Area
This submenu allows
you to expand the
print area.
FF = FF FF = FF
FF = CR/FF
Normal Normal
Expanded
1. Press NEXT or PREVIOUS to
choose from FF=FF or
FF=CR/FF .
2. Press SELECT to save this
setting.
1. Press NEXT or PREVIOUS to
toggle between Normal and
Expanded.
2. Press SELECT to save this
setting.
Feb 03
Page 59

Oki B6100 Reference Guide 3-17
System Menu
System Menu
NOTE: Settings in your software application will override any settings in your printer driver.
Your printer driver settings will override any settings from the printer menu or printer front panel.
The system menu provides access to system settings. Use the following procedure to enter the
system menu:
1. Press the MENU button on the control panel.
2. Press the NEXT button until the text “System Menu” is shown on the second line of the
display.
3. Press the SELECT button to enter the system menu.
4. Press the NEXT button to move through the submenus: Fa ctory Defaults, Display Lan-
guage, Power Saver, Wait Timeout, Job Timeout, Jam Recovery, and Hex Print.
5. Press the SELECT button to enter a submenu.
6. Use the procedures in the following table to access and change the system settings :
Submenus Default Setting Available Settings Procedure for Changing Setting
Factory Defaults
This submenu allows you to reset the
printer to U.S. or Non-U.S. factory
defaults.
Display Language
This submenu allows you to change
the language of the display messages.
Power Saver
This submenu allows you to set the
number of minutes the printer is idle
before it reverts to Power Saver
Mode.
Wait Timeout
This submenu allows you to increase
or decrease the length of time (in
seconds) that the printer will remain
in the waiting state—a job is being
processed, no end-of-file has been
detected, and there is no more data to
process. This setting applies to both
PCL and P ostScript print jobs.
U.S. U.S.
Non-U.S.
English English
French
German
Italian
Spanish
15 0 - 999 1. Press NEXT or PREVIOUS to
20 0 - 99999 1. Press NEXT or PREVIOUS to
1. Press NEXT or PREVIOUS to toggles
between U.S. and NON-U.S.
2. Press SELECT to choose and set the
factory defaults.
1. Press NEXT or PREVIOUS to scroll
through the available languages:
English, French (Francais), German
(Deutsch), Italian (Italiano), or
Spanish (Espanol).
2. Press SELECT to choose and set the
language.
increase or decrease the number of
minutes.
2. Press SELECT to save this setting.
increase or decrease each digit of the
five-dig it number.
2. Press SELECT set one digit and move
to the next digit.
3. Press SELECT after changing the last
digit to save this setting.
Feb 03
Page 60

3-18 Oki B6100 Reference Guide
System Menu
Job Timeout
0 0 - 99999 1. Press NEXT or PREVIOUS to
This submenu allows you to increase
or decrease the time limit (in
seconds) for PostScript jobs. A 0
setting indicates no timeout. This
setting applies only to P ostScript
jobs.
Jam Recovery
This submenu allows you to turn jam
On On
Off
recovery on or off.
Hex Print
This submenu allows you to print
Off On
Off
hexadecimal characters.
Reset Toner Life Press SELECT to reset the toner page count.
increase or decrease each digit of the
five-dig it number.
2. Press SELECT set one digit and move
to the next digit.
3. Press SELECT after changing the last
digit to save this setting.
1. Press NEXT or PREVIOUS to toggle
between ON and OFF .
2. Press SELECT to save this setting.
1. Press NEXT or PREVIOUS to toggle
between ON and OFF .
2. Press SELECT to save this setting.
Feb 03
Page 61

Oki B6100 Reference Guide 3-19
Quality Menu
Quality Menu
NOTE: Settings in your software application will override any settings in your printer driver.
Your printer driver settings will override any settings from the printer menu or printer front panel.
The Quality Menu provides access to the printer settings that are related to print quality. Use the
following procedure to enter the Quality Menu:
1. Press the MENU button on the control panel.
2. Press the NEXT button until the text “Quality Menu” is shown on the second line of the
display.
3. Press the SELECT button to enter the system menu.
4. Press the NEXT button to move through the submenus: Resolution, Toner Saver, and
Enhancement.
5. Press the SELECT button to enter a submenu.
6. Use the procedures in the following table to access and change the system settings :
Submenus Default Setting Available Settings Procedure for Changing Setting
Resolution
This submenu allows you to set the
resolution (dpi).
Toner Saver
This submenu allows you to
choose from several toner-saving
settings.
Print Density
This submenu allows you to adjust
the printed image to be lighter or
darker.
600 dpi 600 dpi
1200 dpi
Off Off/On 1. Press NEXT or PREVIOUS to scroll
51 - 7
1 - lightest
7 - darkest
1. Press NEXT or PREVIOUS to scroll
through the available resolutions.
2. Press SELECT to choose and set the dpi.
through the available toner settings.
2. Press SELECT to choose and save this
setting.
1. Press NEXT or PREVIOUS to scroll
through the available print density
settings.
2. Press SELECT to choose and save this
setting.
Feb 03
Page 62

3-20 Oki B6100 Reference Guide
Functions Menu
Functions Menu
NOTE: Settings in your software application will override any settings in your printer driver.
Your printer driver settings will override any settings from the printer menu or printer front panel.
The Functions Menu provides access to sev eral printer functions that can supply you with information about the printer and its settings. Use the following procedure to enter the Functions
Menu:
1. Press the MENU button on the control panel.
2. Press the NEXT button until the text “Functions Menu” is shown on the se cond line of
the display.
3. Press the SELECT button to enter the system menu.
4. Press the NEXT button to move through the available functions: Reset Printer, Print
Summary, Prin t Test, and Print Fonts.
5. Use the procedures in the following table to execute the functions:
Functions Procedure for Executing Function
Reset Printer
This function resets the printer.
Print Summary
This function prints a list of all printer
settings.
Print Test
This function allows you to print a single test
page or a continuous test page.
Print Fonts
This function allows you to print Postscript or
PCL font lists.
Press SELECT to reset the printer.
Press SELECT to print a summary of the printer settings.
1. Press NEXT or PREVIOUS to toggle between
SINGLE PAGE and CONTINUOUS.
2. Press SELECT to print the test page(s).
1. Press NEXT or PREVIOUS to toggle between
POSTSCRIPT and PCL.
2. Press SELECT to select and print the specific fonts
list.
Feb 03
Page 63

Status Menu
NOTE: Settings in your software application will override any settings in your printer driver.
In addition to the main menus listed above, the printer also provides a status menu that allows
you to view the current settings for the input and output trays and the toner cartridge. Use the
following procedure to enter the Status Menu:
1. Press the STATUS button on the control panel.
2. Press the NEXT button to move through the submenus: Front, Tray 1, Tray 2, Tray 3,
3. Press the SELECT button to enter a submenu.
4. Use the procedures in the following table to view the status of the printer:
Oki B6100 Reference Guide 3-21
Status Menu
Your printer driver settings will override any settings from the printer menu or printer front panel.
Face Down, and Toner.
Submenu Procedure for Executing Function
Front
This submenu allows you to view
the current Media Size and Media
Type for the front tray.
Tray 1
This submenu allows you to view
the current Media Size, Media
Type, and Level for Tray 1.
Tray 2
This submenu allows you to view
the current Media Size, Media
Type, and Level for Tray 2.
Tray 3
This submenu allows you to view
the current Media Size, Media
Type, and Level for Tray 3.
Face Down Tray
This submenu allows you to view
the status of the face down tray.
Toner
Press SELECT to view the status of the toner cartridge.
1. Press NEXT or PREVIOUS to scroll through the media size,
media type, and level settings for the Front Tray.
2. Press SELECT to view a specific setting.
1. Press NEXT or PREVIOUS to scroll through the media size,
media type, and level settings for Tray 1.
2. Press SELECT to view a specific setting.
1. Press NEXT or PREVIOUS to scroll through the media size,
media type, and level settings for Tray 2.
2. Press SELECT to view a specific setting.
1. Press NEXT or PREVIOUS to scroll through the media size,
media type, and level settings for Tray 3.
2. Press SELECT to view a specific setting.
1. Press SELECT to view the status of the Face Down Tray.
Feb 03
◆ ◆ ◆
Page 64

3-22 Oki B6100 Reference Guide
Status Menu
Feb 03
Page 65

Maintaining the Printer
Chapter 4
In this Chapter. . .
■ “About this Chapter” on page 4-2
■ “Replacing Printer Components” on page 4-3
■ “Cleaning the Printer” on page 4-6
■ “Moving the Printer” on page 4-9
■ “Storing the Printer for Long Periods of Time” on page 4-10
Feb 03
Page 66

4-2 Oki B6100 Reference Guide
About this Chapter
This chapter provides information about maintaining your printer . Alt hough the printer requires
very little maintenance, with normal daily use you will need to perform some routine maintenance procedures, including replacing consumable items and cleaning the printer. This chapter
also contains information about moving and storing the printer.
Feb 03
Page 67

Replacing Printer Components
Replacing the Print Cartridge
The print cartridge contains the dry ink as well as the xerographic drum and associated components that create the xerographic image on a sheet of paper. The print cartridge will eventually
run out of ink through normal use. When the toner is low , printed images will be une ven or v ery
light. Use the following guidelines when using or storing a print cartridge:
■ An unopened and correctly stored print cartridge has a shelf life of approximately two
years.
■ Do not open the box containing the print cartridge until you are ready to install the car-
tridge into the printer.
■ Store the print cartridge box horizontally—not on end.
■ Keep the cartridge out of the reach of children. Store it in an area where the temperature
remains between 32
and 85%. If you bring a cold print cartridge into a warm room, wait a least an hour for the
temperature to stabilize before opening the cartridge box.
■ Do not disassemble the print cartridge.
■ Toner is a safe material. If you get any on your hands, DO NOT wash them in hot water.
Use only COLD water to wash off toner. Hot water sets the toner and makes it difficult to
remove.
■ A shutter (1) protects the photosensitive drum from ambient light. Do not open the drum
shutter by hand.
Oki B6100 Reference Guide 4-3
Replacing Printer Components
°F and 95°F (0°C and 35°C) and the humidity remains between 15%
Feb 03
1
CAUTION: Do not expose the new print cartridge to strong light for more than a few minutes
before installing it into the printer.
WARNING! Do not dispose of used print cartridges in an incinerator or in an open fire.
Page 68

4-4 Oki B6100 Reference Guide
Replacing Printer Components
Use the following procedure to replace the print cartridge:
1. Place a drop-cloth or some paper on the table or floor near the printer.
2. Press the button on the top of the printer to open the front cover, and pull the cover all the
way open.
3. Remove the old print cartridge from the printer and carefully place it on the drop-cloth.
4. Remo ve the new print cartridge from its packaging and remove the protective paper sheet
from the drum shutter.
5. Rock the print cartridge back and forth. Then, shake it horizont ally to ensure that the toner
is evenly distributed.
Feb 03
Page 69

Oki B6100 Reference Guide 4-5
Replacing Printer Components
6. On le v el surface, f irmly hold down the pri nt cartridge. Pull the plastic sealing tape straight
out (horizontally) from the cartridge.
7. Slide the pe gs on the print cartridge into the channels on the inside of the printer , and push
the print cartridge into the printer.
8. Close the front cover. Verify that it securely locks into place.
Disposing of the Print Cartridge
1. Place the used print cartridge inside the new print cartridge box and seal the box.
2. Dispose of or recycle the used print cartridge.
WARNING! Do not dispose of the old print cartridge in an incinerator or in an open fire.
Feb 03
Page 70

4-6 Oki B6100 Reference Guide
Cleaning the Printer
Cleaning the Printer
Cleaning the Exterior
The covers and tray faces of the printer may collect dust and dirt through normal use. Although
exterior dirt should not affect printer performance, an occasional exterior cleaning helps maintain the appearance of the printer. Use the following procedure to clean the exterior of the
printer:
1. Turn the printer off by pressing the [O] on the power switch on the right side of the
printer, and disconnect the AC power cord from the wall outlet.
2. Using a soft cloth that is slightly damp with cold water, wipe the printer covers and tray
faces. Use a very mild, non-abrasive soap to remove heavy dirt and toner stains.
Do not use solvents or abrasive cleaners to clean printer cov ers. Use only cold water and a very
mild soap.
3. Use a soft, dry cloth to thoroughly dry the covers and tray faces.
Feb 03
Page 71

Oki B6100 Reference Guide 4-7
Cleaning the Printer
4. Verify that the power switch of the printer is in the [O] (off) position, then insert the plug
of the power cord into the AC outlet.
5. Turn the printer on by pressing [I] on the power switch on the right side of the printer.
Feb 03
Page 72

4-8 Oki B6100 Reference Guide
Cleaning the Printer
Cleaning the Interior
The interior of the printer does not generally need to be cleaned unless a paper jam drops toner
onto the paper path or you accidentally spill toner inside the printer when installing a new toner
cartridge. Use the following procedure to clean the interior of the printer only when necessary:
Careless or vigorous cleaning methods may damage delicate printer components. ONLY clean
the interior if you are instructed to do so by a service representative OR as part of a troubleshooting procedure presented in this document.
1. After remo ving a paper jam or replacing the print cartridge, remove any paper scraps from
inside the printer and wipe off paper dust with a clean, dry cloth.
Feb 03
Page 73

Moving the Printer
Follow the guidelines below when lifting or moving the printer:
■ The printer is very heavy. It should always be lifted by two people. The weight of the
printer without paper tray, toner cartridge, and paper is about 55 lbs (25 kg). Never
attempt to lift the printer alone.
■ T o lift the pri nter , ha ve tw o indi viduals facing each other from the front and the rear of the
printer grasp the recessed areas on each side of the printer. Do not lift the printer by grasping any area other than these recessed areas.
■ When lifting the printer, maintain proper lifting posture to prevent injuries.
Oki B6100 Reference Guide 4-9
Moving the Printer
Moving the Printer a Short Distance
Use the following procedure to move the printer a short distance:
1. Turn the printer off by pressing the [O] on the power switch on the back of the printer.
2. Unplug the AC power cord from the AC wall outlet.
3. Disconnect the printer from the host computer.
4. Wait 30 minutes for the printer to cool.
5. Refer to Chapters 6 through 9 for instructions on moving installed paper-handling
options.
6. Remove the toner cartridge and cover it with an opaque plastic sheet.
7. Move the printer to the new location.
8. Once the printer is in the new location, refer to the Installation Guide (included in the
original printer packaging) for installation instructions.
Feb 03
Page 74

4-10 Oki B6100 Reference Guide
Storing the Printer for Long Periods of Time
Moving the Printer a Long Distance
Use the following procedure to move the printer a long distance:
1. Turn the printer off by pressing the [O] on the power switch on the right side of the
printer.
2. Unplug the AC power cord from the wall outlet and from the back of the printer.
3. Disconnect the printer from the host computer.
4. Remove the paper from all of the paper trays.
5. Wait 30 minutes for the printer to cool.
6. Remove all installed paper-handling options. Refer to Chapters 6 through 9 for instruc-
tions for removing installed paper-handling options.
7. Remove the toner cartridge and place it in an opaque plastic bag, then seal the bag with
tape and place it in a sturdy box.
8. Repack the printer, paper trays, AC power cord and toner cartridge into the original ship-
ping box or boxes.
9. Once the printer is in the new location, refer to the Installation Guide (included in the
original printer packaging) for installation instructions.
Storing the Printer for Long Periods of Time
If you will not be using the printer for several months, use the following procedure to prepare
the printer for storage:
1. Turn the printer off by pressing the [O] on the power switch on the right side of the
printer.
2. Unplug the AC power cord from the AC wall outlet.
3. Disconnect the printer from the host computer.
4. Remove the paper from all of the paper trays.
5. If you will be storing the printer for six months or longer, remove the toner cartridge and
place it in an opaque plastic bag, and seal the bag with tape.
NOTE: After prolonged inactivity the toner cartridge may degrade to the point where it is no longer usable
and must be replaced. Poor print quality and frequent paper jams may indicate that the toner has
solidified and that the drum has oxidized during storage.
6. Cover the printer with a plastic sheet and tape down the corners.
7. Store the printer in an area where the temperature and humidity are moderate, as
described in "Environment" on page 1-4.
NOTE: Do not stack other items on top of the printer when storing the printer.
◆ ◆ ◆
Feb 03
Page 75

Troubleshooting
Chapter 5
In this Chapter . . .
■ “About this Chapter” on page 5-2“
■ “Installation Problems” on page 5-2
■ “Paper Jams” on page 5-5
■ “Print Image Quality Problems” on page 5-20
■ “Miscellaneous Problems” on page 5-25
■ “Warning Messages and Error Messages” on page 5-31
■ “Printing a Test Page or Configuration Summary” on page 5-34
Feb 03
Page 76

5-2 Oki B6100 Reference Guide
Installation Problems
About this Chapter
This chapter describes the problems that you may encounter when using your printer, and provides procedures for resolving the problems. This chapter also lists the warning and error messages that appear on the control panel display.
There are four basic types of printer problems:
■ Installation problems
If there is a problem with the printer when you first turn in on, refer to “Installation Prob-
lems” on page 5-2 for information about possible installation problems.
■ Paper Jams
If there is a paper jam, refer to “Paper Jams” on page 5-5 for procedures to remove the
jam.
■ Print quality problems
If the finished prints delivered to the output tray display image problems such as image
black spots or vertical lines on the page, refer to “Print Image Quality Problems” on page
5-20 and complete the procedure provided for the specific image problem that you have
encountered.
■ Miscellaneous problems
If you have a printer problem but the control panel does not display a warning message or
error message, refer to “Miscellaneous Problems” on page 5-25 and follow the directions
for correcting that problem.
Many of these printer problems are indicated by a warning or error message appearing on the
control panel display. If the printer control panel displays a warning message or error message,
refer to “Warning Messages and Error Messages” on page 5-31 and complete the actions pre-
scribed for the specific warning or error message.
Installation Problems
It is common for simple oversights during printer installation to cause problems when you first
turn the printer on, resulting in noise, smoke, or smell; an inoperative printer; or the absence of
a ready message on the control panel.
Feb 03
Page 77

Oki B6100 Reference Guide 5-3
Installation Problems
Inoperative Printer
If you have problems turning on the printer, check the possible causes listed in the table below.
If the printer will not start after checking these items, turn the printer off, disconnect the power
cord from the AC outlet, and contact your dealer or an authorized service provider.
Description Possible Cause Action
There is no power. The power switch is not set to
[I] (on).
The power cord is not properly
plugged into an AC outlet or
into the AC connector on the
rear of the printer.
Voltage of the AC power is not
correct.
The fuse on the power cord is
not functioning. (UK only)
The AC wall outlet is not
functioning.
There is interference from other
electrical devices on the same
circuit.
Thermal sensors may have shut
down the printer.
Power is frequently
interrupted.
The printer is malfunctioning. Turn the printer off and disconnect the power
Check the power switch. Refer to the
Installation Guide.
Set the power switch to [O] (off) and then
connect the power cord firmly to the AC
connector and to the AC outlet.
Refer to the Installation Guide.
V eri fy that the A C outlet is rated for the v oltage
of your printer.
Verify that the fuse on the power cord is intact.
(UK only)
Verify that voltage is present at the AC wall
outlet by connecting another electrical device
to the outlet. If power does not flow to the other
device, check the AC wall outlet circuit
breakers for a tripped breaker.
Unplug all electrical devices from the AC wall
outlet circuit, and then reconnect only the
printer. Turn printer power on.
Turn the printer off and wait 20 minutes, then
turn the printer back on.
cord from the AC outlet. Contact your dealer or
an authorized service provider.
Feb 03
No Ready Message
After warming up, the printer control panel displays the text “Ready,” indicating that the printer
is ready to print. If the printer does not show this message, but sho ws an error message instead,
refer to “Warning Messages and Error Messages” on page 5-31 to determine the appropriate
action for the specific error message that is shown. If the printer does not display either the
“Ready” message or an error message, contact your retailer or sales representative.
Page 78

5-4 Oki B6100 Reference Guide
Installation Problems
Noise, Smoke, or Smell
If you notice unusual noise, smoke, or smell after turning the printer on, turn the printer off
immediately and disconnect it from the AC wall outlet. Use the following procedure to deter-
mine the cause of and alleviate the problem:
1. Refer to the pictorial unpacking sheet and the Installation Guide included in the printer
packaging and make sure you have removed all shipping spacers and protective tape from
the inside of the printer, the paper trays, and the print cartridge.
2. Open the covers on the printer and carefully inspect the fuser area. Remove any pieces of
paper that may be stuck in the fuser.
CAUTION: To remove the paper near the fuser, turn the printer off and wait at least 10 minutes
to allow the fuser to cool before removing the paper.
3. Check the inside of the printer for any obviously broken or detached parts. If you find a
broken part, contact your retailer or sales representative.
4. Check the exterior of the printer for broken covers. If you find a broken cover, contact
your retailer or sales representative.
5. Verify that the AC wall outlet is the correct voltage for your printer.
6. Remove any paper you have loaded in the main tray, check the inside of the tray well for
stray sheets of paper, and reload the paper into the main tray.
7. Connect the printer to the AC wall outlet and turn the printer on by pressing the [I] on the
power switch on the right side of the printer.
8. If this procedure does not eliminate the noise, smoke or smell, or if the problem returns,
turn the printer off, unplug the AC power cord from the AC wall outlet, and contact your
retailer or sales representative.
Feb 03
Page 79

Paper Jams
Paper jams are generally the most common and reoccurring problem encountered when using
any printer. Paper may jam anywhere along the paper path—from the paper tray to the output
tray . Sensors within the printer constantly monitor paper tra vel, so when a sheet of pap er fails to
arrive at a certain point within a specific time, the printer interprets that to mean that the paper
has stopped between two sensors along the paper path. The printer then displays a Paper Jam
error message that corresponds to that specific jam.
When paper gets jammed inside the printer, printing stops and an error code indicating the position of the jam appears on the display.
Oki B6100 Reference Guide 5-5
Paper Jams
Error Code Paper Jam Location
E2 Between the paper feed section (front paper tray, main tray, or
optional feeder tray) and the print cartridge
E3 Between the print cartridge and the fuser unit
E4 At the paper exit slot
E6 At the offset output tray
E7 At the duplexer
E6
E4
E7
E3
E2
Feb 03
Figure 1-4: Paper Jam Locations and Error Codes.
Page 80

5-6 Oki B6100 Reference Guide
Paper Jams
The most common causes of paper jams are:
■ The printer is not placed on a level surface.
■ The print media does not conform to the specifications.
■ The paper is not loaded correctly in the front paper tray or the cassette.
■ The paper is wrinkled or curled.
■ The paper guide is not set correctly .
Occasional paper jams result from simple things such as static electricity sticking paper
together— causing several sheets to feed at the same time—or from the feed rolls becoming
slippery from an accumulation of paper dust. Occasional paper jams usually require mi nor user
intervention that involves reloading the paper or cleaning the feed rolls.
Frequent paper jams can be caused by anything from foreign material in the paper path to a
broken or malfunctioning component. Frequent paper jams may require involved user intervention that includes replacing a consumable item or calling a service technician to troubleshoot
and correct the problem.
Feb 03
Page 81

Oki B6100 Reference Guide 5-7
Paper Jams
Clearing an E2 Paper Jam
If an E2 error code precedes the error message on the first line of the control panel display,
paper has jammed somewhere between the feed area and the registration sensor. Use the following procedure to clear a paper jam in this location:
1. Remove any printed pages from the output tray.
2. If the jam occurred while feeding from the front paper tray, remove all paper from the
front tray, including any paper that may be jammed inside the tray.
Feb 03
3. If the jam occurred while feeding from the main paper tray, remove the main paper tray.
Page 82

5-8 Oki B6100 Reference Guide
Paper Jams
4. Remove any jammed or wrinkled paper from the paper tray.
5. Remove any jammed paper from the inside of the paper tray well.
6. If the jam occurred while feeding from Tray 2 or 3, remove the paper tray associated with
that feeder and remove any jammed paper.
7. Remove any jammed paper from the inside of the paper tray well.
Feb 03
Page 83

Oki B6100 Reference Guide 5-9
Paper Jams
8. Insert each paper tray into the appropriate paper tray well, either on the optional feeder or
on the printer.
9. If the front tray is open, close it. Then pull on the recessed area on the front co v er to open
it.
10. Return the front cover to its original position, pressing on the center of the cover to close
it securely .
Feb 03
Page 84

5-10 Oki B6100 Reference Guide
Paper Jams
Clearing an E3 Paper Jam
If an E3 error message appears on the printer display, there is a paper jam between the print cartridge and the paper exit slot. Use the following procedure to remove a paper jam from this
location.
1. Remove any printed sheets from the output tray.
2. Remove all paper from the front tray.
3. Press the b utton on the top of the front cove r to release the co v er, and open the front cover.
4. Remove the print cartridge from the inside of the printer.
NOTE: To prevent stains, place the print cartridge on a surface covered with newspaper or other disposable
material.
Feb 03
Page 85

Oki B6100 Reference Guide 5-11
Paper Jams
5. Lift up on the green lever on the left side of the inside of the printer, and fold the cover
toward you. Remove any jammed paper.
6. Insert the pegs on the sides of the print cartridge into the channels on the inside of the
printer, and push the cartridge into the printer.
7. Close the front cover, pressing on the center of the front cover until it closes securely.
Feb 03
Page 86

5-12 Oki B6100 Reference Guide
Paper Jams
Clearing an E4 Jam
If an E4 error code precedes the error message on the first line of the control panel display,
paper has jammed somewhere near the paper exit slot. Use the following procedure to clear a
paper jam in this location:
1. If you are using the paper tray in its extended position (Legal 13, 14, or A4), remove it
from the printer.
2. Squeeze the tabs on the top rear of the printer and pull the rear cover toward you to open
it.
3. If there is paper jammed in the space behind the rear cover, remove it.
Feb 03
Page 87

Oki B6100 Reference Guide 5-13
Paper Jams
4. If you are using the duplexer, push the green tabs toward the center of the duplexer and
pull the duplexer toward you to remove it.
CAUTION: To remove the paper jammed near the fuser, turn the printer off and wait at least 10
minutes to allow the fuser to cool before removing the paper.
5. If there is paper jammed around the fuser unit, lift up the fuser unit release levers (1) on
the left and right sides of the fuser and remove the jammed paper (2).
6. Return the fuser release levers to their original position.
Feb 03
Page 88

5-14 Oki B6100 Reference Guide
Paper Jams
7. If you removed the duplexer, insert the duplexer into the printer.
8. Push the green tabs at the sides of the duplexer out toward the sides of the printer.
9. Close the rear cover.
Feb 03
Page 89

Oki B6100 Reference Guide 5-15
Paper Jams
Clearing an E7 Paper Jam
When an E7 error message is shown on the display screen, there is a paper jam in the duplexer.
Use the following procedure to clear a duplex paper jam:
1. If you are using the paper tray in its extended position (Legal 13, 14, or A4), remove the
paper tray from the printer.
2. Squeeze the tabs on the rear of the printer and pull the rear cover toward you to open it.
Feb 03
3. Remove any jammed paper from the duplex area.
Page 90

5-16 Oki B6100 Reference Guide
Paper Jams
4. Push the green tabs on the sides of the duplexer toward the center of the duplexer, and
grasp the recessed areas on the sides of the duplexer and remove it from the printer.
5. Push the tabs (1) out toward the sides of the duplexer, and lift to open (2) the duplexer.
6. Remove any jammed paper from inside the duplexer unit.
Feb 03
Page 91

Oki B6100 Reference Guide 5-17
Paper Jams
7. Slide the tabs on the left and right sides of the duplexer into the channels inside the
printer, and push the duplexer completely into the printer.
8. Push the green tabs on the sides of the duplexer out toward the sides of the printer to
secure the duplexer to the printer.
Feb 03
9. Close the rear cover.
Page 92

5-18 Oki B6100 Reference Guide
Paper Jams
Clearing an E6 Paper Jam
If an E6 error code precedes the error message on the first line of the control panel display,
paper has jammed at the offset catch tray. Use the following procedure to clear a paper jam in
this location:
1. Pull on the recessed area on the rear of the offset catch tray to open the rear cover.
2. Remove any jammed paper from the interior of the offset catch tray.
3. Close the rear cover of the offset catch tray.
4. Squeeze the latch on the upper part of the rear cover, and pull the cover toward you to
open it. If there is paper jammed in the space behind the rear cover, remove it.
Feb 03
Page 93

Oki B6100 Reference Guide 5-19
Paper Jams
NOTE: If the paper tray is in the extended position (Legal 13, 14, or A4), remove the tray before
opening the rear cover.
5. Close the rear cover.
Feb 03
Page 94

5-20 Oki B6100 Reference Guide
Print Image Quality Problems
Print Image Quality Problems
When functioning correctly, the printer should produce printed paper that is relatively flat and
undamaged, containing a fused image of correct intensity—without streaks, smears, spots, or
missing areas. If the printed sheets that your printer produces do not meet these qualifications,
there is a print image quality problem.
■ Minor Print Image Quality Problems can be caused by exhausted or damaged consum-
ables, such as the print cartridge. These problems area easily corrected by simply replacing the consumable.
■ Major Print Image Quality Problems can be caused by a malfunctioning or broken
component. These problems may require you to call a service technician to determine and
correct the problem.
This section describes possible quality problems during printing. Go through the list below to
find the condition that most resembles the problem, and follow the recommended action. If the
trouble persists, turn the printer off and disconnect the power cord from the AC outlet. Then
contact your dealer or an authorized service provider.
Description Possible Cause Action
Faded print The print media is moist.
The print cartridge is old or damaged.
Toner in the print ca rtridge is low.
Black dots The print media is outside the
recommended specifications.
The print cartridge is old or damaged.
Remove the moist media and load new, dry
media.
Replace the print cartridge.
Replace the print cartridge.
Use the recommended print media.
Replace the print cartridge.
Feb 03
Page 95

Oki B6100 Reference Guide 5-21
Print Image Quality Problems
Vertical black
The print cartridge is old or damaged. Replace the print cartridge.
streaks
Repetitive defects The paper path is dirty.
The print cartridge is old or damaged.
Character voids The print media is outside the
recommended specifications.
Print out several blank sheets.
Replace the print cartridge.
Use the recommended print media.
Toner smears when
rubbed
The print cartridge is old or damaged.
The print media is moist.
The print media is outside the
recommended specifications.
The front cover not fully closed.
Replace the print cartridge.
Remove the moist media and load new, dry
media.
Use the recommended print media.
Close the front cover properly.
Feb 03
Page 96

5-22 Oki B6100 Reference Guide
Print Image Quality Problems
Black page The print cartridge is old or damaged.
The high-voltage power supply may
be defective.
Blank page The sealing tape of the print cartridge
is not pulled out.
The printer feeds two or more sheets
at a time.
The print cartridge is old or damaged.
The toner in the print cartridge is low.
The high-voltage power supply may
be defective.
Partial blanks The print media is moist.
Replace the print cartridge.
Contact your dealer or an authorized service
provider.
Pull out the sealing tape.
Avoid adding paper to a nearly full stack.
Replace the print cartridge.
Replace the print cartridge.
Contact your dealer or an authorized service
provider.
Remove the moist media and load new, dry
media.
The print media is outside the
recommended specifications.
The sealing tape of the print cartridge
is not fully pulled out.
Creased paper The print media is outside the
recommended specifications.
The print media is moist.
Use the recommended print media.
Replace the print cartridge.
Use the recommended print media.
Remove the moist media and load new, dry
media.
Feb 03
Page 97

Oki B6100 Reference Guide 5-23
Print Image Quality Problems
Blotchy print The print media is outside the
Use the recommended print media.
recommended specifications.
The print media is moist.
Remove the moist media and load new, dry
media.
The print cartridge is old or damaged.
Vertical blanks The print cartridge is not installed
Replace the print cartridge.
Remove the print cartridge and reinstall it.
correctly.
The print cartridge is old or damaged.
Replace the print cartridge.
Blurred print The print cartridge is old or damaged. Replace the print cartridge.
Feb 03
Bold print appears
shaded
The print cartridge is old or damaged. Replace the print cartridge.
Page 98

5-24 Oki B6100 Reference Guide
Print Image Quality Problems
Other Print Image Quality Problems
The following characteristics define this print image problem:
■ The finished print has a problem that is not identified by any of the other procedures in
this manual.
■ The control panel does not display an error code.
The following procedure guides you through multiple actions that may solve this print image
quality problem. Proceed one step at a time until the problem is solved—you may not need to
complete the entire procedure. If one of the steps in this procedure corrects the problem but the
identical problem returns in less than 50 prints, call for service.
1. Replace all of the paper in the paper trays with newly opened paper.
The paper in the trays may be damp or damaged, resulting in poor image quality. New
paper may correct the problem.
2. Replace the print cartridge with a new one.
The print cartridge may have reached end of life or is damaged.
3. Disconnect then reconnect the interface cable that runs between the printer and the host
computer.
There may be a bad connection between the printer and the computer. Reconnecting both
ends should reestablish a good electrical connection. If you have another interf ace cable
available, substitute that cable for the one currently connecting the printer and the computer.
4. Reinstall the printer driver software.
The printer driver software that is running on the host computer may be damaged. Reinstalling the software is an easy and inexpensive way to isolate or eliminate the source of
the problem. Refer to the Installation Guide for instructions on installing the driver.
5. Call your service technician.
This image quality problem may be caused by a malfunctioning or broken component that
requires service.
Feb 03
Page 99

Miscellaneous Problems
Some printer problems may not generate error codes or produce observable print image defects.
These miscellaneous problems may effect only the printer or they may effect things outside of
the printer, such as the room lights or a nearby radio receiver.
This section contains detailed procedures for correcting the following problems:
■ Printer is Inoperative
■ Printer Operates Erratically
■ Printer Makes Unusual Noises
■ Room Lights Dim or Flicker When Printer Starts
■ Printer Interferes with Nearby Radio or Television Reception
Oki B6100 Reference Guide 5-25
Miscellaneous Problems
Feb 03
Page 100

5-26 Oki B6100 Reference Guide
Miscellaneous Problems
Printer is Inoperative
The following characteristics define this type of problem:
■ The printer appears to have no power.
■ The control panel does not light up or display characters.
■ The printer motors do not run and the printer does not warm up.
■ The control panel does not display an error code.
The following procedure guides you through multiple actions that may solve this problem. Proceed one step at a time until the problem is solved. You may not need to complete the entire procedure. If one of the steps in this procedure corrects the problem but the identical problem
returns in less than 50 prints, call for service.
1. Make sure that you push the [I]on the main power switch to turn on the printer.
2. Check to make sure the AC power cord is firmly plugged into the AC wall outlet and that
the other end of the AC power cord is firmly plugged into the printer.
Sometimes the AC power cord is only partially plugged in and is not making good electri-
cal contact. If the AC power cord keeps working loose you might consider moving the
printer to a safer location. If the AC wall outlet is broken, allowing the power cord to easily fall out, replace the outlet.
3. Test for voltage present by plugging an AC electrical device, such as a lamp, into the AC
wall outlet. If the lamp does not light, inspect the building circuit breakers or check for a
broken AC wall outlet.
A circuit breaker trips because there was an overload on the line. A tripped breaker may
indicate that you have too many AC devices working off the same line or that you have
faulty building wiring. If the breaker is not tripped, but the lamp doesn’t light when
plugged into the outlet, replace the outlet or have an electrician check the line.
4. Turn the printer off and wait 20 minutes, then turn the printer on.
Thermal sensors may have shut down the printer. Waiting 20 minutes for the printer to
reset may return the printer to normal operation. A thermal shutdown may indicate there
is a more serious problem with the printer. If the problem reoccurs, call for service.
5. Call your service technician.
This problem may be caused by a malfunctioning or broken component that requires service.
Feb 03
 Loading...