

Page 1

Page 2

Copyright Information
Copyright © 2006 by Oki Data. All Rights Reserved
Document Information ________________________________
Microline 8810FB User’s Guide
P/N 59385801, Revision 1.1
July, 2006
Disclaimer__________________________________________
Every effort has been made to ensure that the information in this document is
complete, accurate, and up-to-date. The manufacturer assumes no responsibility
for the results of errors beyond its control. The manufacturer also cannot guarantee
that changes in software and equipment made by other manufacturers and referred
to in this guide will not affect the applicability of the information in it. Mention of
software products manufactured by other companies does not necessarily
constitute endorsement by the manufacturer .
Whi l e a ll r e aso n a bl e e f fo r t s ha v e b ee n m a de t o ma k e t hi s d o cu m e n t a s a ccu r a t e a n d
helpful as possible, we make no warranty of any kind, expressed or implied, as to
the accuracy or completeness of the information contained herein.
The most up-to-date drivers and manuals are available from the web site:
http://www.okiprintingsolutions.com
Trademark Information _______________________________
Oki and Microline are registered trademarks of Oki Electric Industry Company Ltd.
Apple, Macintosh and Mac OS are registered trademarks of Apple Computers Inc.
ENERGY STAR is a trademark of the United States Environmental Protection
Agency.
Hewlett-Packard, HP, and LaserJet are registered trademarks of Hewlett-Packard
Company.
Microsoft, MS-DOS and Windows are either registered trademarks or trademarks of
Microsoft Corporation in the United States and/or other countries.
Other product names and brand names are registered trademarks or trademarks of
their proprietors.
Regulatory Information _______________________________
As an ENERGY STAR® Program Participant, the manufacturer has
determined that this product meets the ENERGY STAR guidelines
for energy efficiency.
ENE_crt_b_p.jpg
This product complies with the requirements of the Council
Directives 89/336/EEC (EMC), 73/23/EEC (LVD) and 1999/5/EC
(R&TTE), as amended where applicable, on the approximation of
the laws of the member states relating to Electromagnetic
Compatibility, Low Voltage and Radio & Telecommunications
Terminal Equipment. CE.jpg
Microline 8810FB User’s Guide
2
Page 3

Contents
Copyright Information . . . . . . . . . . . . . . . . . . . . . . . . . . . . . 2
Document Information. . . . . . . . . . . . . . . . . . . . . . . . . . . . . . 2
Disclaimer . . . . . . . . . . . . . . . . . . . . . . . . . . . . . . . . . . . . . . 2
Trademark Information . . . . . . . . . . . . . . . . . . . . . . . . . . . . . 2
Regulatory Information . . . . . . . . . . . . . . . . . . . . . . . . . . . . . 2
Introduction . . . . . . . . . . . . . . . . . . . . . . . . . . . . . . . . . . . . . 5
Features . . . . . . . . . . . . . . . . . . . . . . . . . . . . . . . . . . . . . . . 5
Front View, Outside. . . . . . . . . . . . . . . . . . . . . . . . . . . . . . . . 6
Front View, Inside (1) . . . . . . . . . . . . . . . . . . . . . . . . . . . . . . 7
Front View, Inside (2) . . . . . . . . . . . . . . . . . . . . . . . . . . . . . . 7
Rear View . . . . . . . . . . . . . . . . . . . . . . . . . . . . . . . . . . . . . . 8
Control Panel . . . . . . . . . . . . . . . . . . . . . . . . . . . . . . . . . . . . 9
Quick Reference: Control Panel Functions . . . . . . . . . . . . . . . 15
Print Modes. . . . . . . . . . . . . . . . . . . . . . . . . . . . . . . . . . . . . 16
Change Print Mode . . . . . . . . . . . . . . . . . . . . . . . . . . . . . . . 16
Loading Print Media . . . . . . . . . . . . . . . . . . . . . . . . . . . . . . 17
Individual Sheets/Forms (“MANUAL”) . . . . . . . . . . . . . . . . . . 17
Continuous Forms (“FRONT”) . . . . . . . . . . . . . . . . . . . . . . . . 20
Switch between Single Sheets and Continuous Forms . . . . . . . 23
The Printer Menu . . . . . . . . . . . . . . . . . . . . . . . . . . . . . . . . 25
Print the Menu . . . . . . . . . . . . . . . . . . . . . . . . . . . . . . . . . . 25
Navigating the Menu . . . . . . . . . . . . . . . . . . . . . . . . . . . . . . 26
Reset to Factory Defaults . . . . . . . . . . . . . . . . . . . . . . . . . . . 29
Print the Menu . . . . . . . . . . . . . . . . . . . . . . . . . . . . . . . . . . 30
Menu Summary . . . . . . . . . . . . . . . . . . . . . . . . . . . . . . . . . 33
Explanation of Menu Items. . . . . . . . . . . . . . . . . . . . . . . . . . 49
Auto Align . . . . . . . . . . . . . . . . . . . . . . . . . . . . . . . . . . . . . . 69
Disabling Auto Align . . . . . . . . . . . . . . . . . . . . . . . . . . . . . . 69
Set Top of Form (TOF) . . . . . . . . . . . . . . . . . . . . . . . . . . . . 70
General Information . . . . . . . . . . . . . . . . . . . . . . . . . . . . . . 70
Use the Printer Menu. . . . . . . . . . . . . . . . . . . . . . . . . . . . . . 70
Use 1Chr Set Pos . . . . . . . . . . . . . . . . . . . . . . . . . . . . . . . . 71
Manual Feed (Single Sheets/Forms) . . . . . . . . . . . . . . . . . . . 72
Microline 8810 User’s Guide
3
Page 4

Temporary TOF. . . . . . . . . . . . . . . . . . . . . . . . . . . . . . . . . . 73
Form Tear Off . . . . . . . . . . . . . . . . . . . . . . . . . . . . . . . . . . . 75
Turn On Forms Tear Off . . . . . . . . . . . . . . . . . . . . . . . . . . . . 75
Move Continuous Forms Up for Tear Off. . . . . . . . . . . . . . . . . 75
Tests . . . . . . . . . . . . . . . . . . . . . . . . . . . . . . . . . . . . . . . . . . 76
Rolling ASCII Test . . . . . . . . . . . . . . . . . . . . . . . . . . . . . . . . 76
Font Sample Test . . . . . . . . . . . . . . . . . . . . . . . . . . . . . . . . 76
Hex Dump Mode . . . . . . . . . . . . . . . . . . . . . . . . . . . . . . . . . 77
Setting the Printhead Gap . . . . . . . . . . . . . . . . . . . . . . . . . 78
General Information . . . . . . . . . . . . . . . . . . . . . . . . . . . . . . 78
Printhead Gap Settings . . . . . . . . . . . . . . . . . . . . . . . . . . . . 79
Change to a Manual Printhead Gap Setting . . . . . . . . . . . . . . 80
Troubleshooting . . . . . . . . . . . . . . . . . . . . . . . . . . . . . . . . . 82
Paper Jams, Individual Sheets/Forms . . . . . . . . . . . . . . . . . . 82
Paper Jams, Continuous Forms . . . . . . . . . . . . . . . . . . . . . . . 84
Paper Jams, Repetitive . . . . . . . . . . . . . . . . . . . . . . . . . . . . 85
Error Messages . . . . . . . . . . . . . . . . . . . . . . . . . . . . . . . . . . 88
Maintenance . . . . . . . . . . . . . . . . . . . . . . . . . . . . . . . . . . . . 91
Replace the Ribbon . . . . . . . . . . . . . . . . . . . . . . . . . . . . . . . 91
Clean the Housing. . . . . . . . . . . . . . . . . . . . . . . . . . . . . . . . 96
Specifications . . . . . . . . . . . . . . . . . . . . . . . . . . . . . . . . . . . 97
Utilities . . . . . . . . . . . . . . . . . . . . . . . . . . . . . . . . . . . . . . . 104
Overview . . . . . . . . . . . . . . . . . . . . . . . . . . . . . . . . . . . . . 104
Accessing. . . . . . . . . . . . . . . . . . . . . . . . . . . . . . . . . . . . . 104
Descriptions of Utilities . . . . . . . . . . . . . . . . . . . . . . . . . . . 105
Installing the Utilities. . . . . . . . . . . . . . . . . . . . . . . . . . . . . 106
Direct Network Printing Utility (LPR) . . . . . . . . . . . . . . . . . . 107
OKI DIPUS (Dot Impact Printer Utilities) . . . . . . . . . . . . . . . 109
Network Setup Utility . . . . . . . . . . . . . . . . . . . . . . . . . . . . 111
Microline 8810 User’s Guide
4
Page 5

Introduction
Features
• Precise registration control for printing complicated forms
• Flexible handling of multi-part forms
– Individual or continuous feed
– Maximum = original + 7
– Up to 0.02-inch (0.48 mm) thick
• Automatic alignment when feeding individual forms/sheets.
• Fast through-put
• Reliable, durable operation
• Automatic adjustment for paper thickness
•Paper Park
•Form Tear Off
• Choice of Print Modes: Normal or Quiet
Microline 8810 User’s Guide
5
Page 6

Front View, Outside
Front_View with sheet supports.JPG
1 Sheet Guide
2 Cover, Top Assembly
3 Platform for Manual Feed
4 Display Panel
5 On/Off Switch
6 Platen Knob
7 Control Panel
8 Sheet Supports
Microline 8810 User’s Guide
6
Page 7
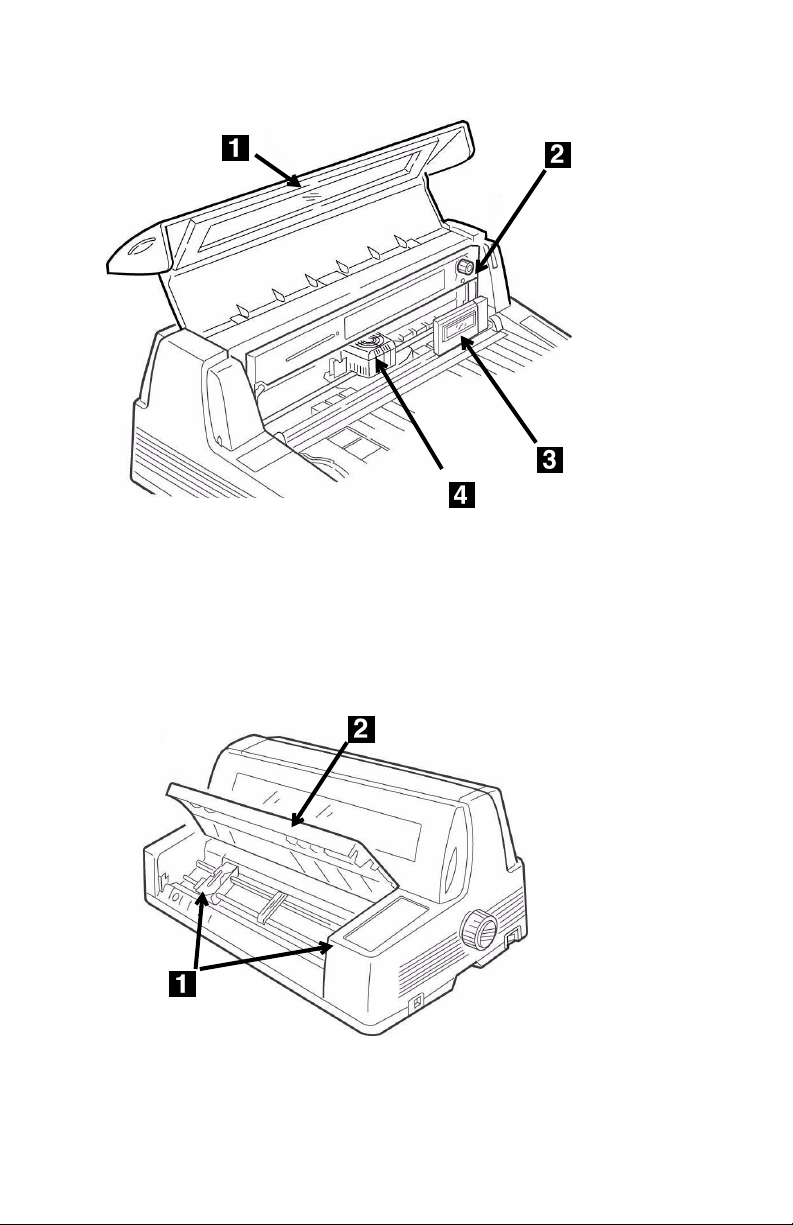
Front View, Inside (1)
1 Cover, Top Assembly
2 Ribbon Cartridge
3 LCD Display Panel
4 Printhead
F2_15d.JPG
Front View, Inside (2)
1 Tra cto r s
2 Cover Upper Assembly
Microline 8810 User’s Guide
F5-03c.JPG
7
Page 8
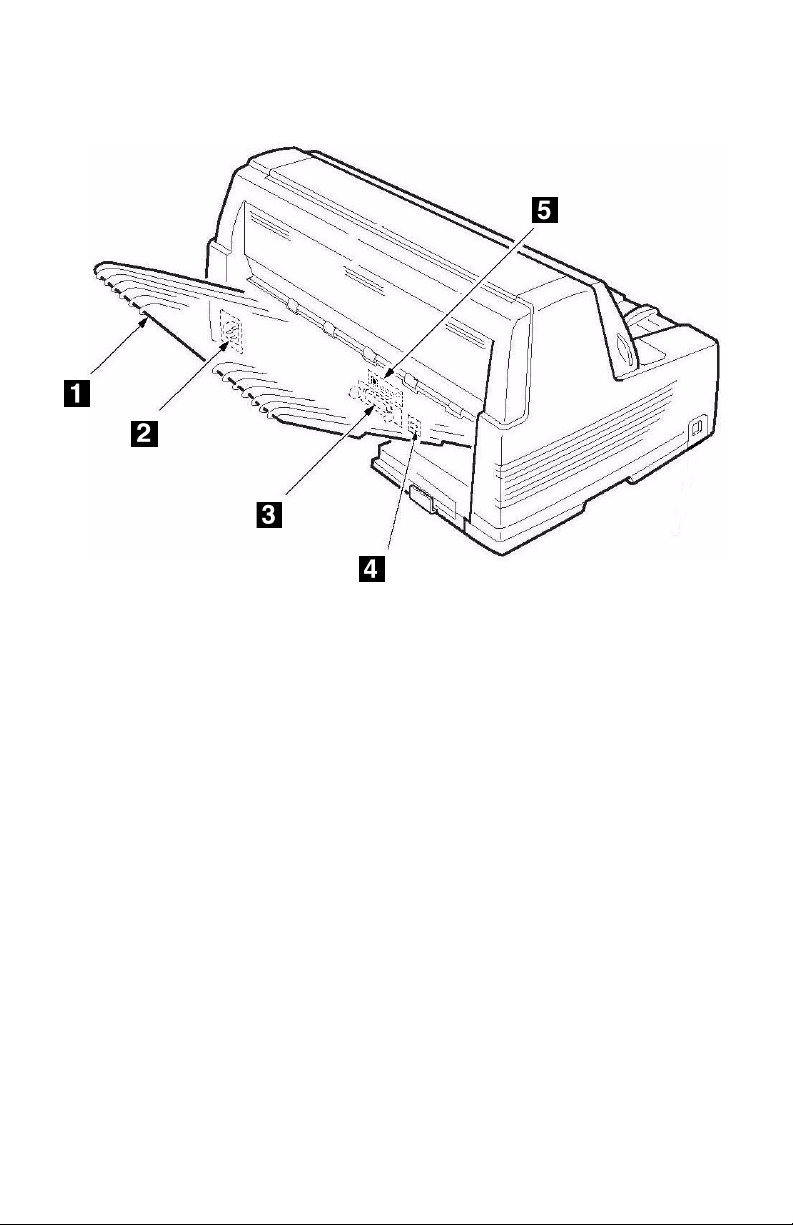
Rear View
F1_24b2.JPG
1 Stacker
2 Power Cord Connector
3 Parallel Port
4 USB Port
5 Ethernet 10/100 Base-T Port (standard on network model Microline
8810n, optional on Microline 8810)
OR
RS-232C Serial Port (optional, for model Microline 8810 only)
Microline 8810 User’s Guide
8
Page 9
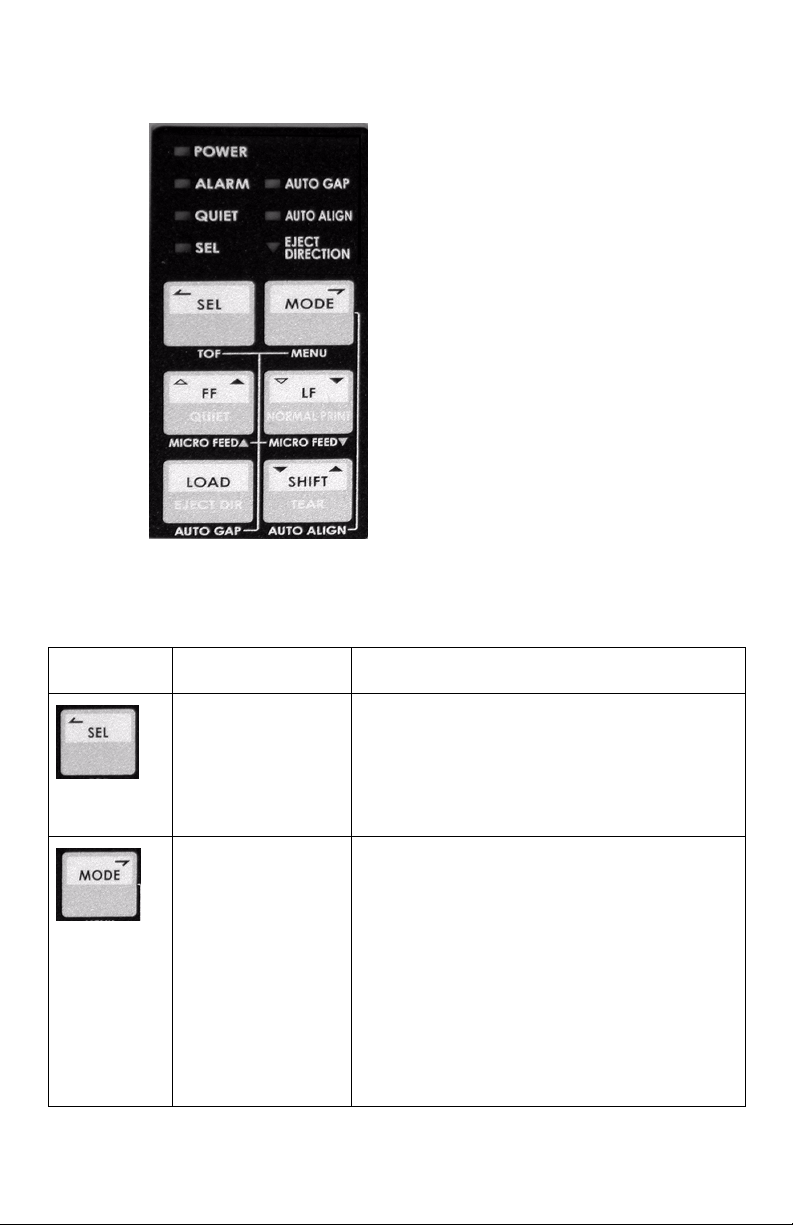
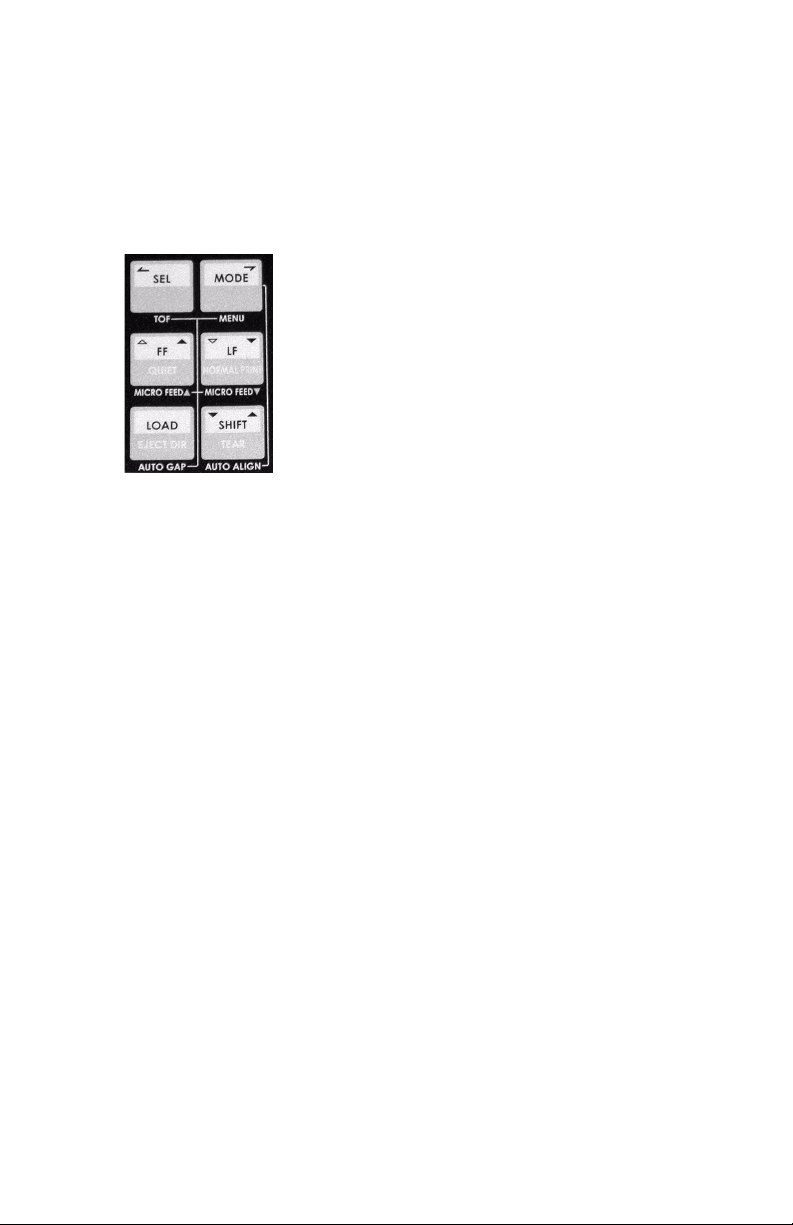
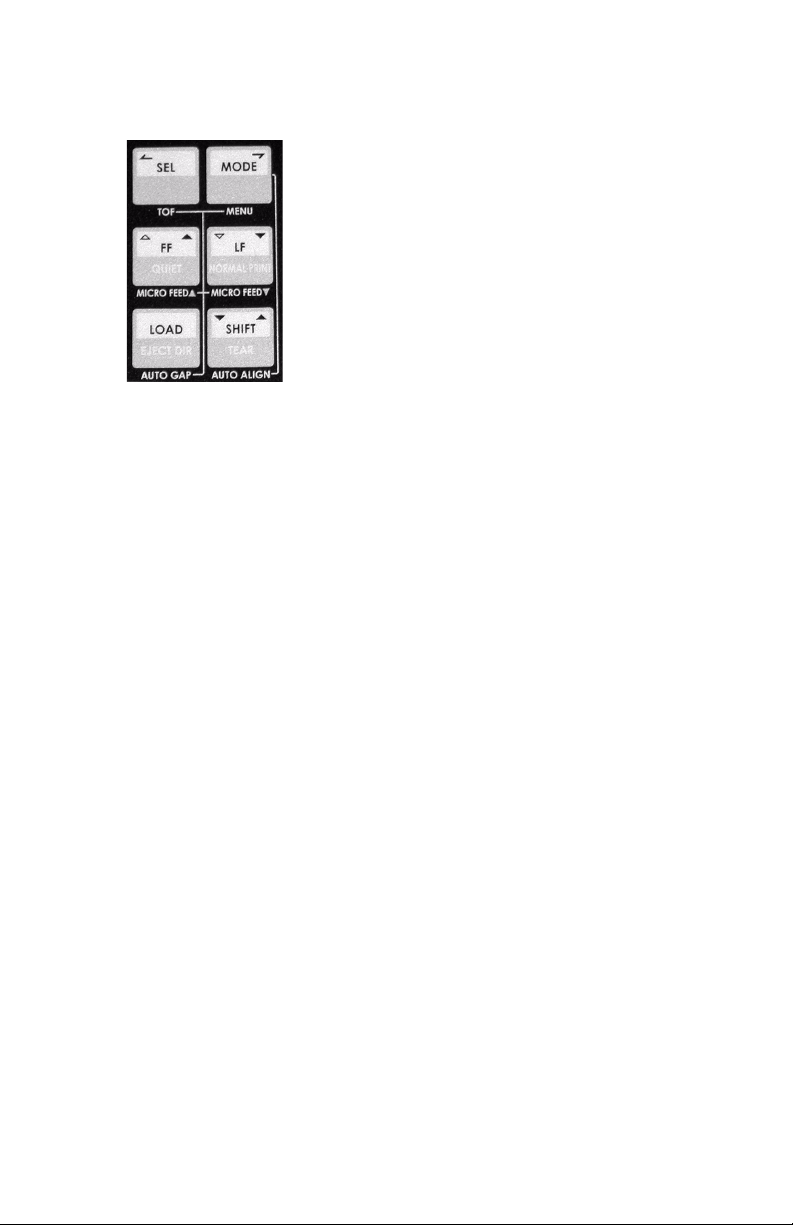
Control Panel
Individual Switches
8810 Control Panel.jpg
Switch Printer On Line Printer Off Line (Deselected)
8810
SEL.jpg
Press to place the
printer off line.
Press to place the printer on line.
Menu Mode
• Scrolls backwards through available
settings for an item.
Not applicable. Used to switch back and forth between
Manual Feed (single forms fed from the
platform) and Front Feed (continuous
forms). See page 23.
8810
MODE.jpg
If the optional CSF and/or Rear Push Tractor
are installed, use MODE to cycle through the
various print paths (e.g., Manual, Front,
Rear, CSF Front, CSF Rear).
Menu Mode
• Scrolls forward through available settings
for an item.
Microline 8810 User’s Guide
9
Page 10
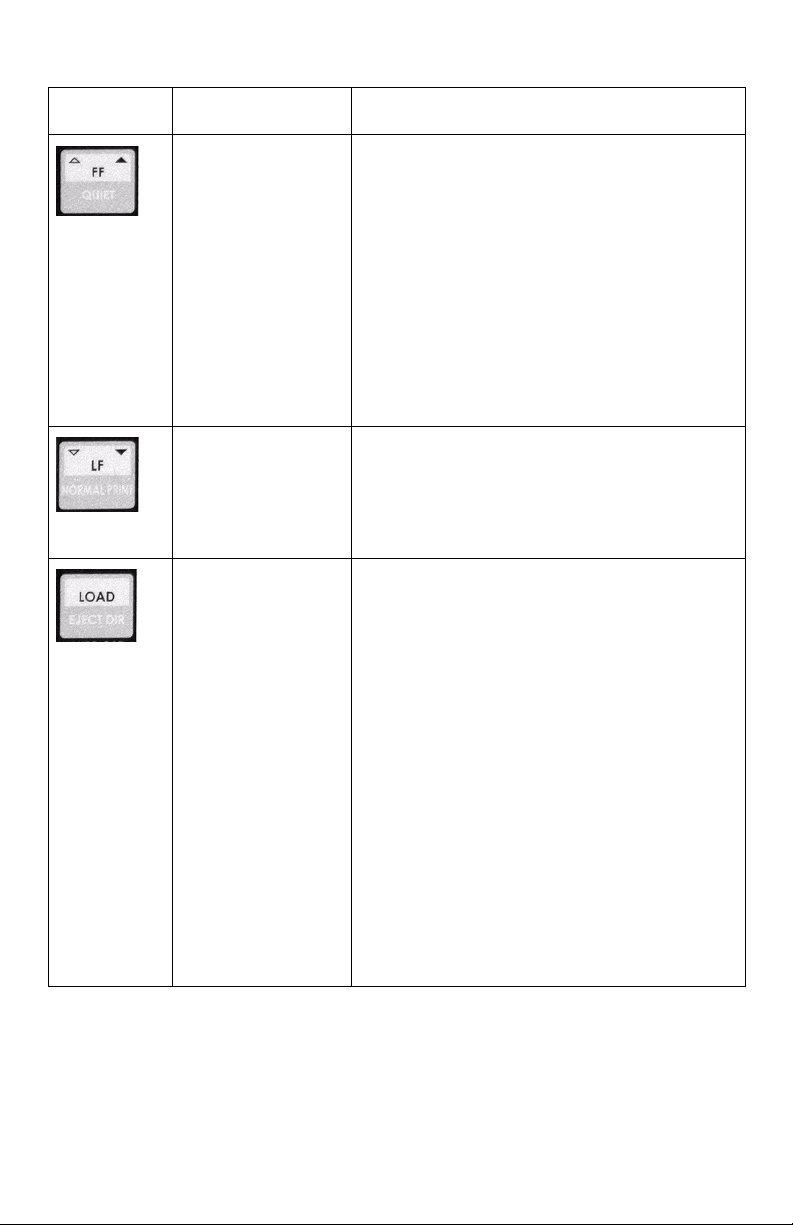
Individual Switches (Continued)
Switch Printer On Line Printer Off Line (Deselected)
8810 FF.jpg
8810 LF.jpg
8810
LOAD.jpg
Engages the Quiet
Print mode.
Engages the
Normal Print mode.
Toggles the eject
direction for single
sheets between
the front and back
of the printer.
Continuous Forms
• In the print position: form feeds to next
TOF position.
• Loaded on the tractors, but not in the
print position: the paper advances to the
print position.
Single Forms
• If a form is loaded into the printer, it is
ejected.
Menu Mode
• Scrolls forward through available items
within a group.
Advances forms one line at a time. Press
and hold for repetitive line feeds.
Menu Mode
• Scrolls backward through available items
within a group.
Continuous Forms
• In the print position: parks the paper
(moves it out of the print path, back to
the tractors).
• Loaded on the tractors, but not in the
print position: the paper advances to the
print position.
Single Forms
• If a form is loaded into the printer, it is
ejected.
• In the Auto Feed mode, with the optional
CSF installed, if no paper is loaded on the
platform, press LOAD to feed a sheet
from the CSF into the print position.
Menu Mode
• Saves any changes made in the menu
and exits the Menu Mode, placing the
printer back on line.
Microline 8810 User’s Guide
10
Page 11
Individual Switches (Continued)
Switch Printer On Line Printer Off Line (Deselected)
Moves continuous
forms forward to
Used with other switches to change their
function (see table below).
the tear off
position. See
8810
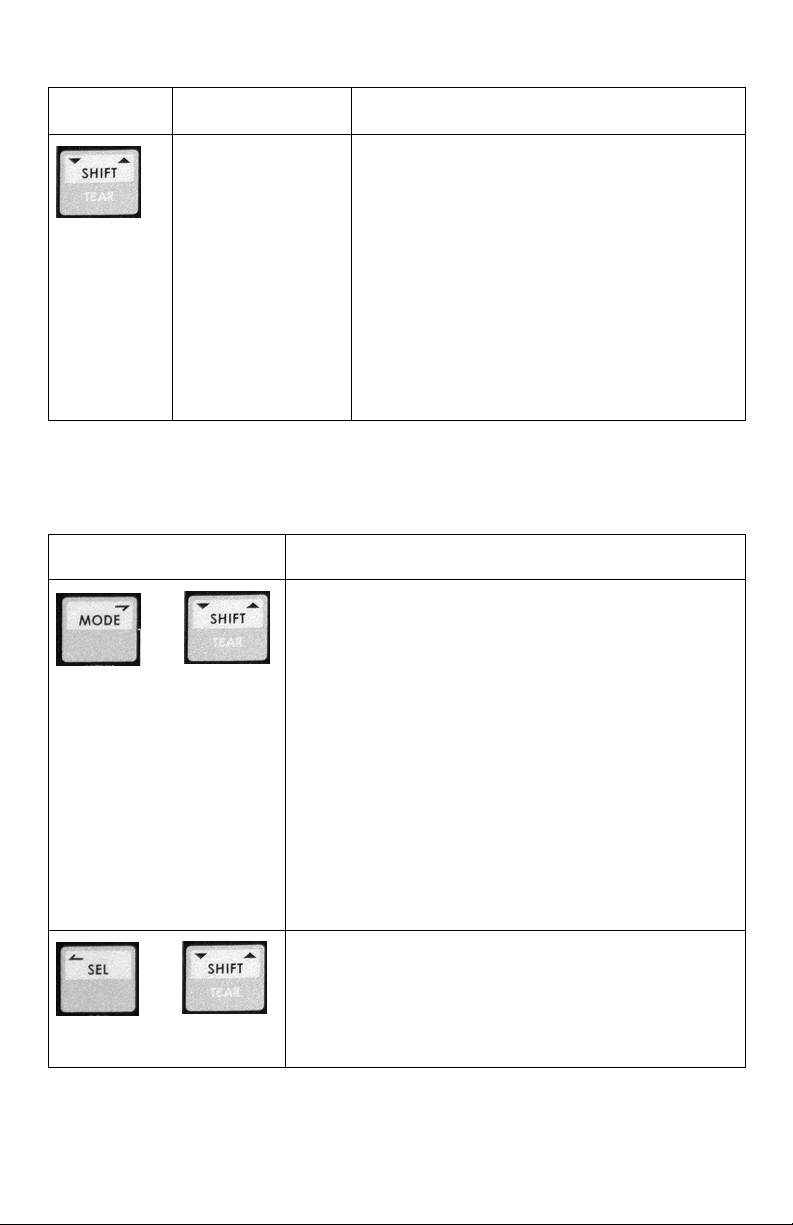
SHIFT.jpg
page 75. Press
again to move the
forms back.
Note: Form Tear
Off must be
engaged. The
factory default is
Off.
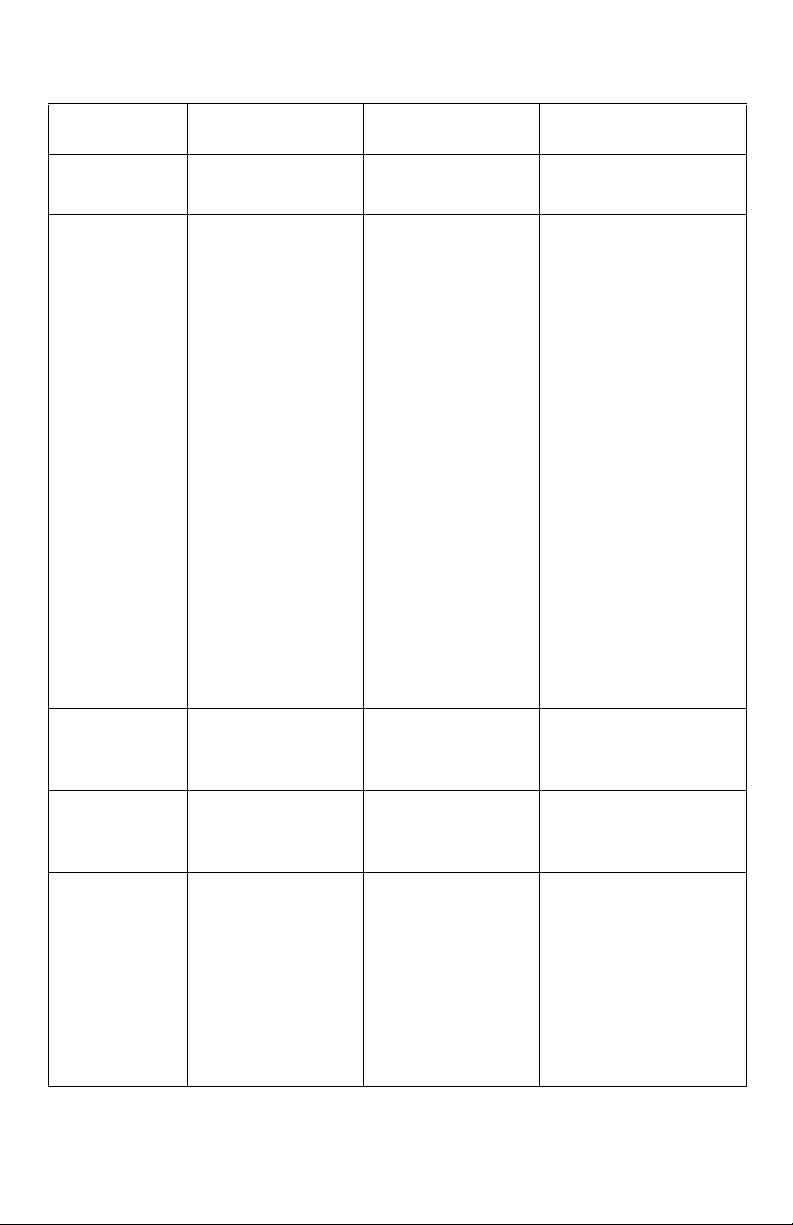
Combined Switches
With the Printer Powered Up and Off Line
Switches Task Performed
Select Align 1, Align 2, Align 3, or Align 4:
+
8810 MODE.jpg
8810 SHIFT.jpg
Memory Auto ALign Cross Ref
Press and hold the MODE switch,
SHIFT switch
repeatedly to select Align 1, Align 2,
Align 3, or Align 4 as the setting for Auto Align.
See page 50.
• Auto Align (POW) must be set to SelectAutoALign
(the default). See page 51.
• The setting made using these switches is stored
in Memory Auto Align unless it has been
changed to Invalid. See page 60.
Enter the Menu:
Press
both
the MODE and the SHIFT switches
simultaneously
to place the printer in the Menu
mode.
then press the
+
8810 SEL.jpg
8810 SHIFT.jpg
Simultaneously press and hold the SHIFT and SEL
switches to place the printer in the TOF setting
mode. Then use SHIFT + FF and/or SHIFT + LF to
set the new TOF position.
Microline 8810 User’s Guide
11
Page 12

Combined Switches (Continued)
With the Printer Powered Up and Off Line
Switches Task Performed
Press and hold SHIFT, then press FF repeatedly to
+
8810 SHIFT.jpg
8810 FF.jpg
+
8810 SHIFT.jpg
8810 LF.jpg
+
8810 LOAD.jpg
8810 SHIFT.jpg
move loaded paper (single sheets or continuous
forms) forward 1/144-inch (0.18 mm) at a time.
If you press and hold SHIFT, then press and hold
LF, the paper will advance in rapid-fire 1/144-inch
(0.18 mm) increments.
Press and hold SHIFT, then press LF repeatedly to
move loaded paper (single sheets or continuous
forms) backward 1/144-inch (0.18 mm) at a time.
Maximum allowed backward movement is 1/3-inch
(8.5 mm).
If you press and hold SHIFT, then press and hold
LF, the paper will advance backward in rapid-fire
1/144-inch (0.18 mm) increments.
Press and hold both the LOAD and the SHIFT
switches to change the printhead gap setting. The
factory default is Auto Gap in which the required
printhead gap is sensed automatically by the
printer. Use these switches to change the setting to
a manual head gap setting if you are not getting
good print results with AutoGap. See “Gap Control”
on page 57 for more information.
Microline 8810 User’s Guide
12
Page 13
Control Panel Lights
Light On Off
POWER Printer is turned
on.
ALARM • Paper is out.
• A paper jam has
Printer is turned
off.
Printer operation is
normal.
occurred.
See
“Troubleshooting”
on page 82.
Blinking
a
N.A.
• Awaiting removal of
single sheet/form.
• Media switch is
taking place.
•Skew detection
alarm.
• If both the ALARM
and SEL lights are
blinking, the cover
is open.
• If both the ALARM
and AUTO ALIGN
lights are blinking,
there is an
unrecoverable
error. Try turning
the printer off, then
on again. If this
doesn‘t clear the
problem call your
service dealer
AUTO GAP Auto Gap mode is
selected (the
default).
QUIET The printer is in
the Quiet print
mode.
AUTO ALIGN The printer is set
to automatically
align single
sheets/ forms.
Microline 8810 User’s Guide
A Manual Gap
setting is engaged.
The printer is in
the Normal print
mode.
Auto Align is
disabled
13
Manual Gap setting
alarm.
N.A.
If both AUTO ALIGN
and ALARM are
blinking, it indicates
an unrecoverable
error. Try shutting the
printer off and turning
it on again. If this
doesn’t work, call your
service dealer.
Page 14

Control Panel Lights (Continued)
Light On Off
SEL The printer is on
line.
EJECT
DIRECTION
a. N.A. = Not Applicable.
Paper is being
ejected to the
platform.
The printer is off
line.
Paper is being
ejected to the
stacker.
Blinking
• Menu Mode:
• With ALARM light:
N.A.
a
indicates the menu
is being set up.
cover open alarm.
Microline 8810 User’s Guide
14
Page 15

Quick Reference: Control Panel Functions
Note Unless otherwise specified, these instructions assume that the
Enter the Menu
Print the Menu
Change Print Modes
With the printer on line:
Change the Printhead Gap
printer is selected (on line).
1. Press SEL.
2. Press both the MODE and the
SHIFT switches simultaneously.
1. With the printer in the Manual
Mode, turn it off.
2. Press and hold SELECT and
MODE while turning the printer
on.
3. When prompted, load a sheet
of paper (minimum letter or
A4) on the platform.
1. Press FF to engage the Quiet
print mode.
2. Press LF to engage the Normal
print mode.
1. Press SEL.
2. Press and hold the SHIFT
switch, then press the LOAD
switch repeatedly to scroll
through the various settings for
the printhead gap.
3. Press SEL
Change Paper Paths
1. Press SEL.
2. Press MODE repeatedly to
change the paper path.
The printer automatically
reinitializes in the new path.
Move Continuous Forms to
the Print Position
1. Press SEL.
2. Press FF.
Park Continuous Forms
1. Press SEL.
2. Press LOAD.
Move Continuous Forms to
the Tear Off Position
Note Form Tear Off must be
activated. See page 75.
1. Press SHIFT to move
continuous forms up to the tear
off position.
Change Align x Setting
1. Press SEL.
2. Press and hold the MODE
switch, then press the SHIFT
switch repeatedly to select
Align 1, Align 2, Align 3, or
Align 4
Microline 8810 User’s Guide
15
Page 16
Print Modes
Your printer has two print modes:
• Normal: corresponds to the printer settings. The factory default is
utility, high speed draft.
• Quiet: reduces noise by printing at one-half the speed.
Change Print Mode
8810_3_crop.jpg
Change to Quiet
Note If you change the print mode while printing, the printer immediately
The QUIET light goes on.
switches to the new print mode.
1. Make sure the printer is turned on and that the SEL light is on.
2. Press FF. FF.jpg
Change to Normal
Note If you change the print mode while printing, the printer immediately
switches to the new print mode.
1. Make sure the printer is turned on and that the SEL light is on.
2. Press LF. LF.jpg
3. The QUIET light goes out.
Microline 8810 User’s Guide
16
Page 17
Loading Print Media
Individual Sheets/Forms (“MANUAL”)
The printer is set at the factory for
•single sheets/forms
• Auto Align mode
• Normal print mode
• automatic printhead gap
IMPORTANT!
If you are using individual multi-part forms which have multiple
pages of differing lengths such as the one shown below, switch to
the rear Eject Direction to eliminate possible jams.
• To temporarily switch, press the LOAD/EJECT DIR switch.
• To permanently change to the rear Eject Direction, go into the
menu and change the setting for Eject Dir. in the Manual Feed (or
CSF Front and/or CSF Rear if these options are installed) group to
Rear:
1. Press SEL to deselect the printer.
2. Press MODE + SHIFT simultaneously.
3. Press and hold SHIFT, then press FF repeatedly until you see
Manual Feed on the display.
4. Press FF repeatedly until you see Eject Dir. on the display.
5. Press MODE to change the setting to Rear.
6. Press LOAD to save the setting and exit the menu.
Specifications
Individual Sheets/Forms, for Use with Auto Align Mode
Microline 8810 User’s Guide
17
Page 18
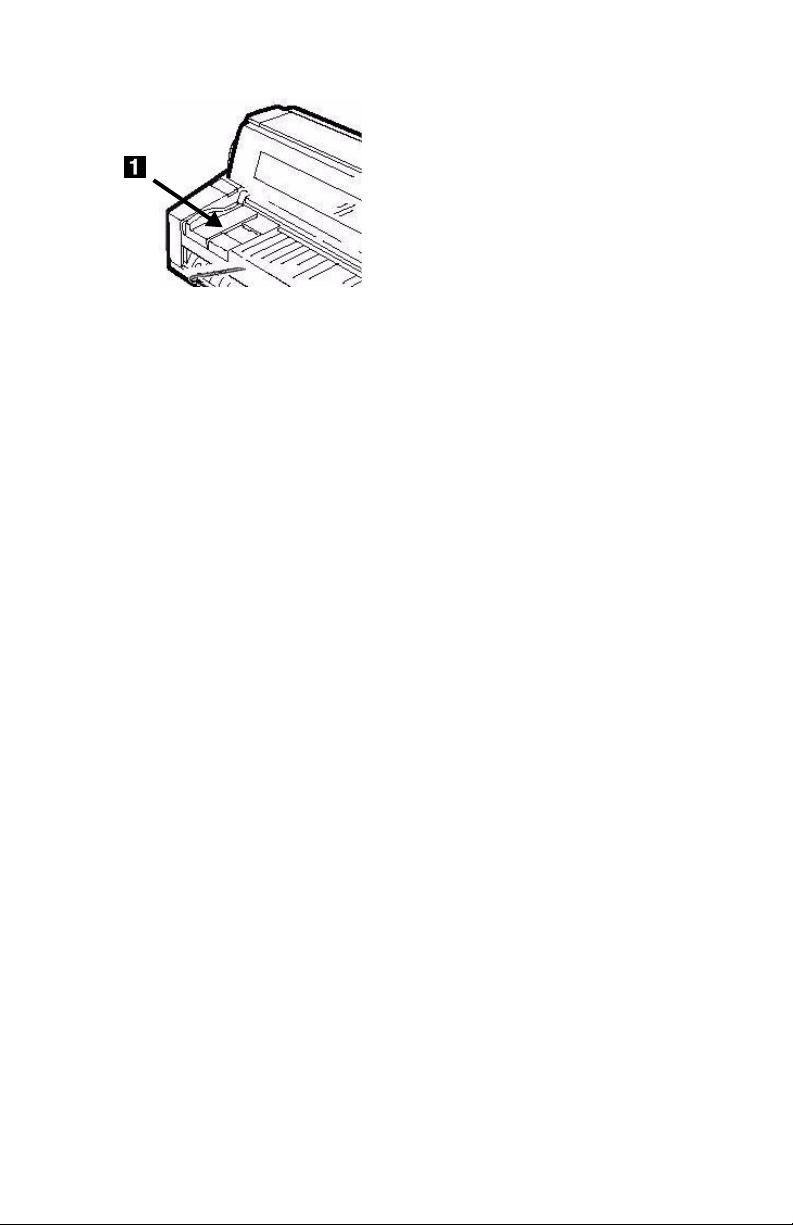
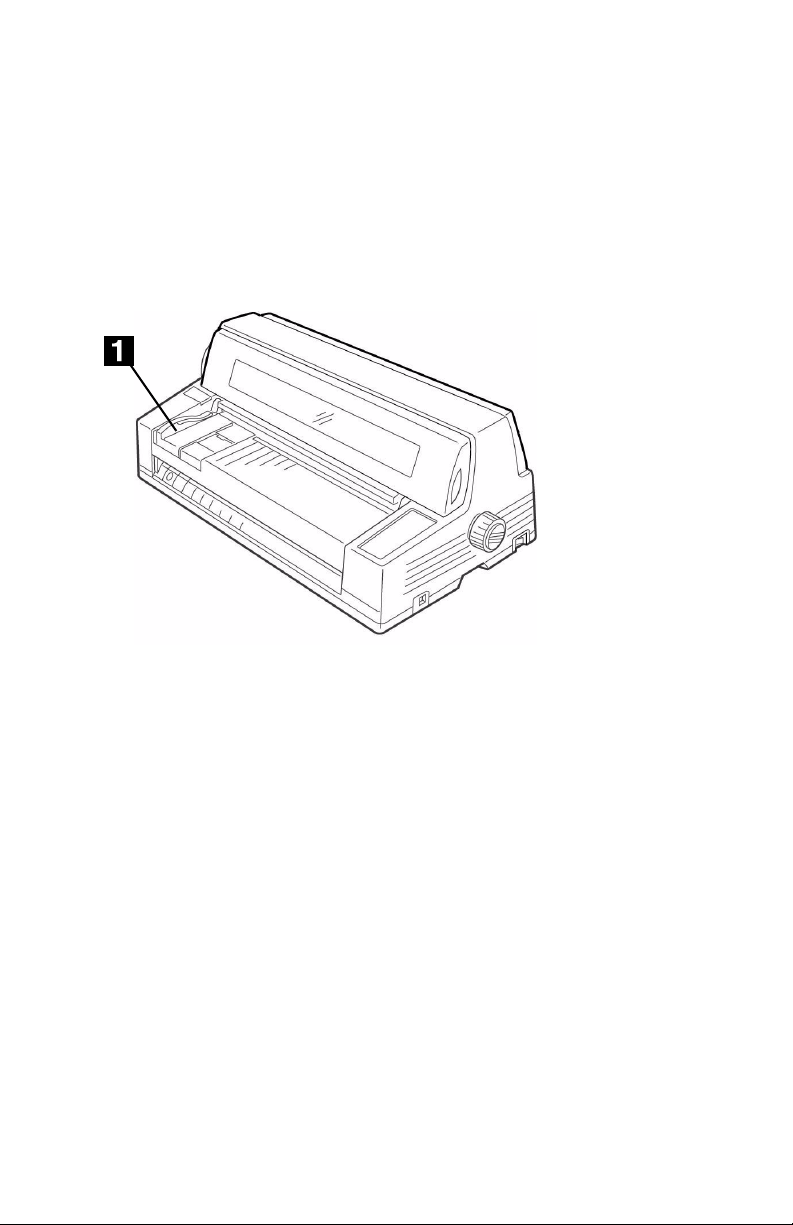
Note Printing envelopes requires use of the sheet guide (1) instead of the
Auto Align mode. See “Disabling Auto Align” on page 69.
Sheet_Guide_crop1.JPG
Minimum Print Margins
• 1/4-inch (6.4 mm) on all sides
Individual Sheets
Size
• Minimum Width x Length
2.2" (55 mm) x 2.8" (70 mm)
3.9" (100 mm) x 2.8" (70mm) Auto Align Mode
• Maximum Width x Length
16.5" (420 mm) x 16.5" (420 mm)
14.3" (364 mm) x 16.5" (420 mm) Auto Align Mode
Weight Range
• 14 lb. to 56 lb. US Bond (52 to 210 g/m2)
Individual Multipart Forms
Size
• Minimum Width x Length
2.2" (55 mm) x 2.8" (70 mm)
3.9" (100 mm) x 2.8" (70mm) Auto Align Mode
• Maximum Width x Length
16.5" (420 mm) x 16.5" (420 mm)
14.3" (364 mm) x 16.5" (420 mm) Auto Align Mode
Thickness
• Up to 8-part forms (original + 7)
• Maximum Thickness: 0.0189” (0.48 mm)
Load Individual Sheets/Forms
1. If you are using long paper, pull out the sheet supports (1).
Microline 8810 User’s Guide
18
Page 19

2. Move the sheet guide (2) to the right as far as it will go. This ensures
that the single sheet/form is within the “Paper range when Auto Align is
ON” area on the platform.
Sheet_Guide_crop.JPG
3. Place a letter size or larger sheet of paper on the platform anywhere
within the “Paper range when Auto Align is ON” area.
F5-11a.JPG
The sheet loads in to the print position, automatically aligning so
that it is square with the print path.
Microline 8810 User’s Guide
19
Page 20
Continuous Forms (“FRONT”)
Specifications
Width
• Minimum: 4” (102 mm)
• Maximum: 16” (406 mm)
Single Thickness Forms
• Weight range: 14 to 56 lb. US Bond (52 to 210 g/m2)
Multi-part Forms
• up to 8-part forms (original + 7)
• Maximum Thickness: 0.0189” (0.48 mm)
Load Continuous Forms
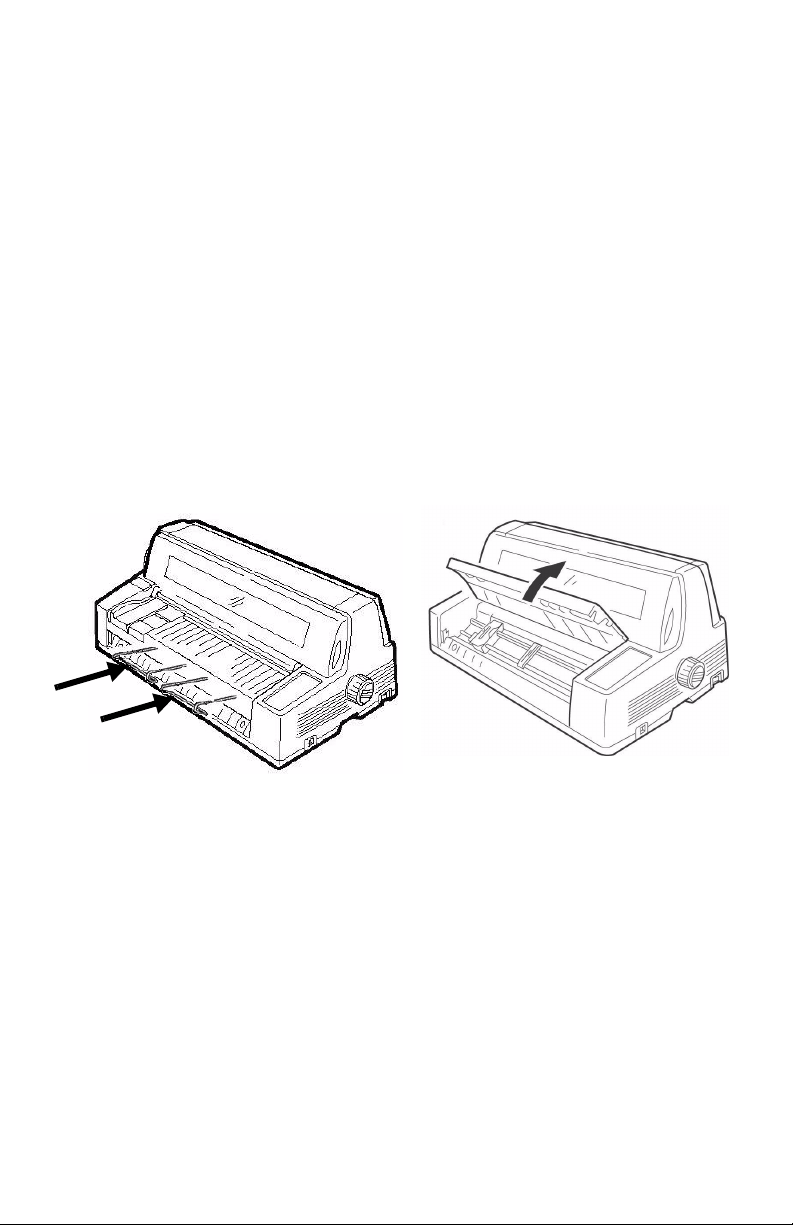
1. Push the sheet supports in and lift the sheet feed platform.
Sheet_Guide_crop.JPG
Microline 8810 User’s Guide
F5-03a.JPG
20
Page 21
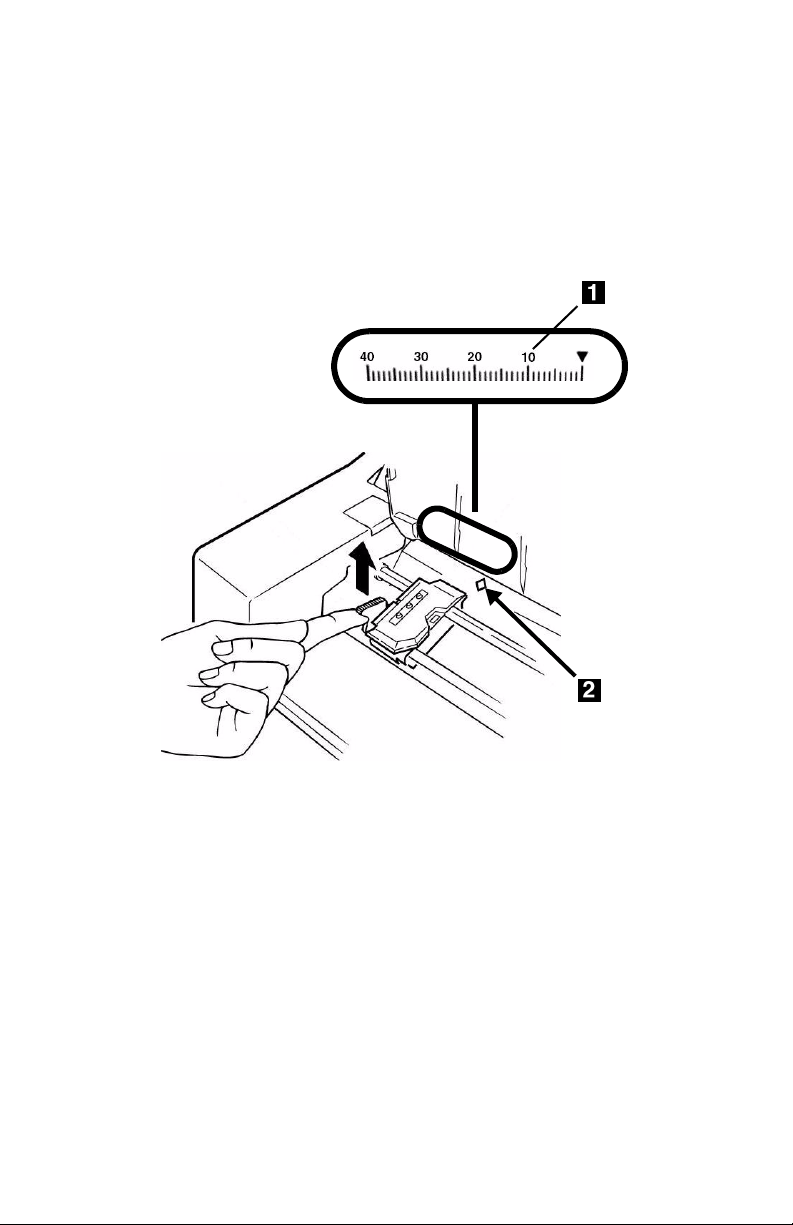
2. Lift the lock lever on the left tractor, then move the left tractor to set the
desired left margin for printing.
•The ▼ mark on the gauge (1)—or the center of the diamond shaped
hole (2)—represents the location of the center of the first character
printed.
• For printing forms, move the left tractor to the right as far as it will
go (the movement of the left tractor is limited to ensure that the
paper covers the paper out sensor).
F5-04a.JPG
8480_2_crop.JPG
3. Push the lock lever down to lock the left tractor in place.
Microline 8810 User’s Guide
21
Page 22
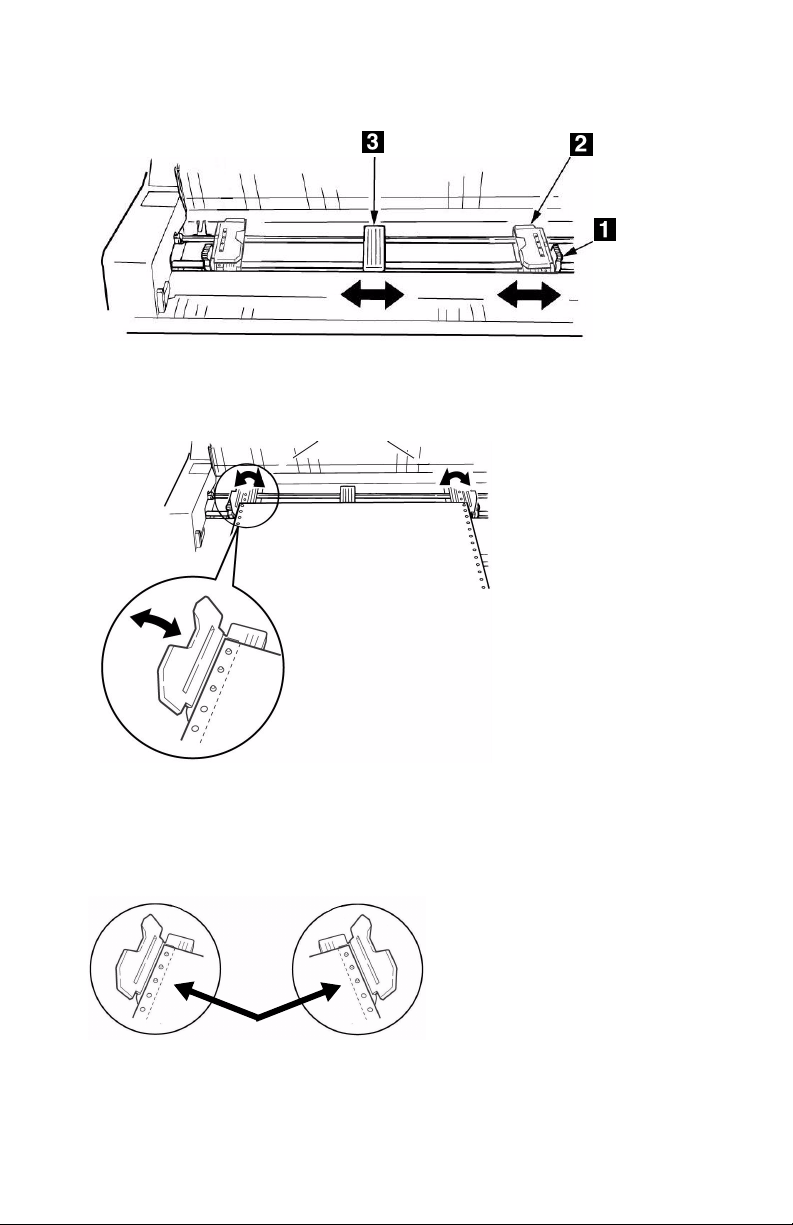
4. Lift the lock lever (1) on the right tractor (2) and move the tractor over
to correspond to the width of the continuous forms you are using.
Center the paper support (3) between the two tractors.
F5-05a.JPG
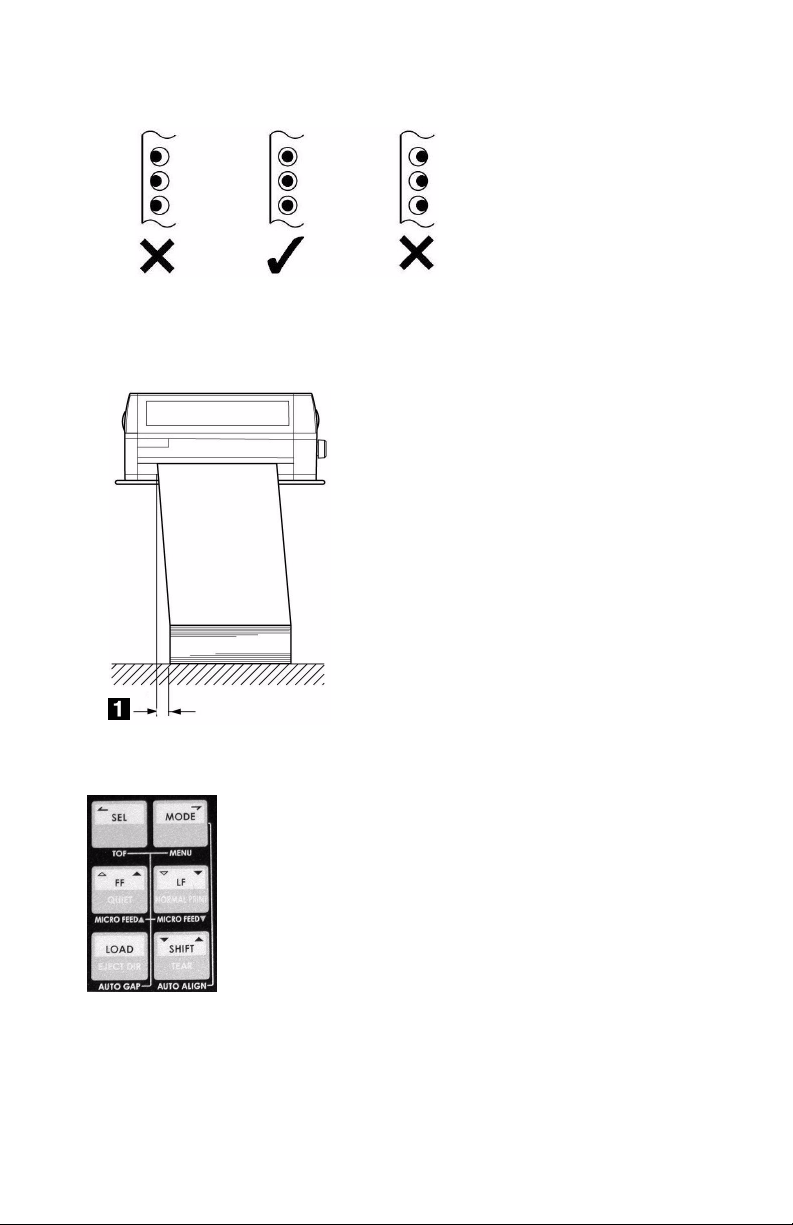
5. Open both tractor covers and place the first three holes in the
continuous forms paper over the pins.
F5-06a.JPG
Important!
Make sure that an equal number of paper holes are engaged
on each tractor. If not, the paper will jam.
F5-06b.JPG
Microline 8810 User’s Guide
22
Page 23
6. Close the tractor covers and fine tune the position of the right tractor
until the holes in the paper are centered on the pins, then push back the
right tractor lock lever.
F5-07a.JPG
7. Lower the platform.
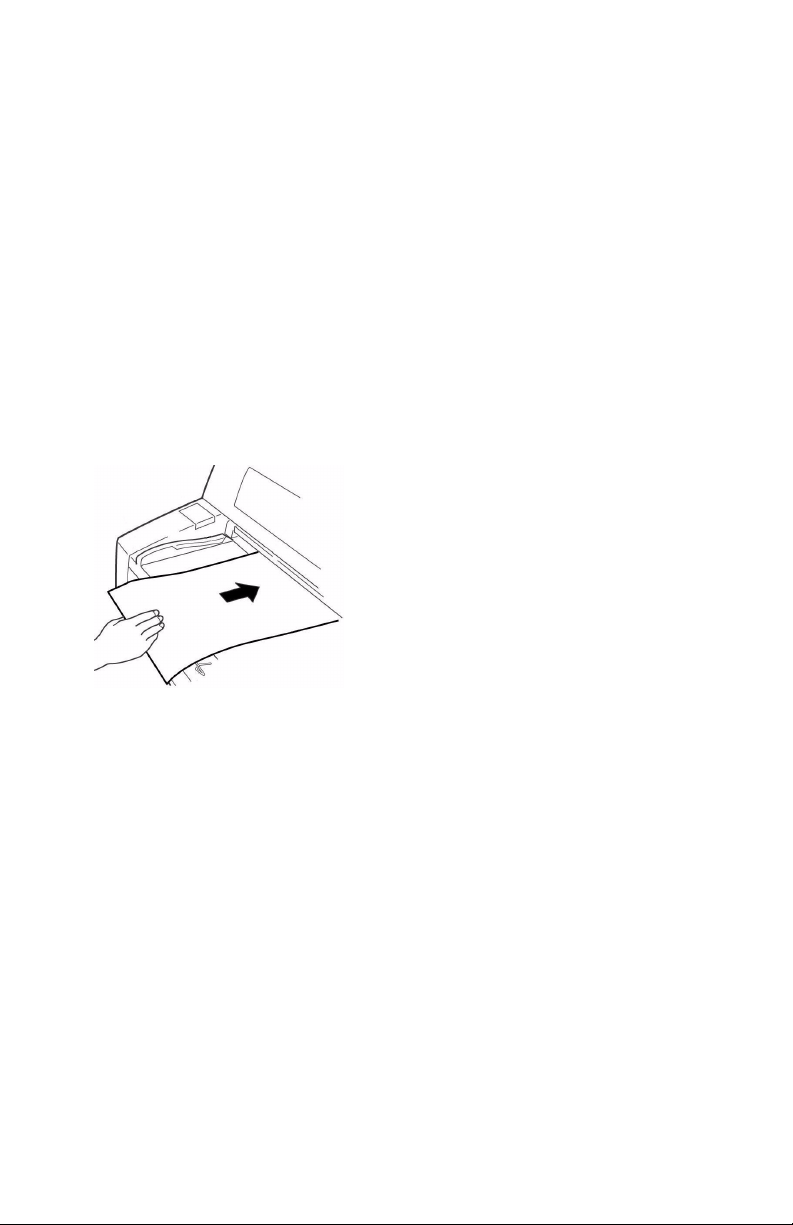
8. Position the continuous forms stack below the printer with no more than
about 1 inch (3 cm) offset (1).
F5-08a.JPG
Switch between Single Sheets and Continuous Forms
8810_3_crop.JPG
Note If the optional Cut Sheet Feeder (CSF) and/or Rear Push Tractor are
installed, additional paper paths (e.g., Front CSF, Rear CSF, etc.)
appear on the display.
Microline 8810 User’s Guide
23
Page 24

Single Sheets to Continuous Forms
Manual Feed to Front Feed
1. With the printer turned on, press SEL to place the printer off line.
2. If there is a single sheet loaded into the printer, press LOAD to eject it.
3. Press MODE repeatedly until you see
display.
The printer switches paths and returns to the on-line state.
4. If there are continuous forms in the parked position, the printer
automatically pulls them into the print position.
5. If continuous forms are not loaded, the display prompts you to
PAPER
LOAD to advance them to the print position.
. Load continuous forms on the tractors (see page 20). Press
FRONT on the second line of the
INSERT
Continuous Forms to Single Sheets
Front Feed to Manual Feed
1. Press SEL to place the printer off line.
2. Press LOAD to park the continuous forms.
The continuous forms retract back to the tractors.
3. Press MODE repeatedly until you see
the display.
The printer switches paths and returns to the on-line state.
4. Load a sheet or form on the platform.
MANUAL on the second line of
Microline 8810 User’s Guide
24
Page 25
The Printer Menu
Make changes in the menu settings using the front panel keys. The changes
are automatically saved when you exit the Menu and are retained, even
when you turn the printer off.
Note Always print the Menu before you reset or change the settings. This
Print the Menu
For more information, see “Print the Menu” on page 30.
is the only way to have a record of the settings.
1. Make sure the printer is in the manual mode.
2. Turn the printer off.
3. Press and hold SELECT and MODE while turning the printer on.
4. When "RELEASE SW" displays, release the switches.
5. When prompted, load a sheet of paper (minimum letter or A4) on the
platform.
F5-11a.JPG
The menu prints.
Microline 8810 User’s Guide
25
Page 26
Navigating the Menu
Groups, Items, and Settings
Each Group includes multiple Items, each of which has selectable Settings:
Group 1 Item 1 Setting 1
…
Setting X
… Setting 1
…
Setting X
Item X Setting 1
…
Setting X
Access the Menu
8810_3_crop.jpg
1. With the printer turned on and on line, press SEL.
OFFLINE displays.
2. Simultaneously press the SHIFT and MODE switches.
PRINTER CONTROL displays.
Microline 8810 User’s Guide
26
Page 27

Scrolling Through Groups, Items and Settings
Groups
Press and hold SHIFT, then press FF to scroll forward.
Press and hold SHIFT, then press LF to scroll backwards.
Items
Press FF to scroll forward.
Press LF to scroll backwards.
Settings
Press MODE to scroll forward.
Press SEL to scroll backwards.
Exit the Menu
Press LOAD.
Microline 8810 User’s Guide
27
Page 28
Example: Turn on Proportional Spacing and Form Tear-Off
8810_3_crop.j
1. Turn on the printer.
2. Press SEL.
The printer goes off-line.
3. Simultaneously press SHIFT and MODE.
4. Press and hold SHIFT, then press FF repeatedly until
5. Press FF repeatedly until PROP. SPACING displays.
6. Press MODE.
The setting changes to
7. Press and hold SHIFT, then press FF repeatedly until
displays.
8. Press FF repeatedly until FORM TEAR-OFF displays.
9. Press MODE repeatedly until the time interval you wish to select
appears.
10. Press LOAD: this saves your setting and exits the menu mode.
YES.
FONT displays.
FRONT FEED
Microline 8810 User’s Guide
28
Page 29

Reset to Factory Defaults
Note Always print the Menu before you reset or change the settings.
Printing the Menu is the only way to have a record of the settings.
See page 30
1. Turn the printer off.
2. Press and hold SEL and SHIFT while turning the printer on.
MENU INITIALIZE
FNC. MENU
displays.
Microline 8810 User’s Guide
29
Page 30
Print the Menu
Note Always print the Menu before you reset or change the settings.
Printing the Menu is the only way to have a record of the settings.
Single Sheet (Manual Feed)
Before Starting
1. Have a sheet of letter size or larger paper ready to print the menu.
2. Slide the sheet guide (1) to the right as far as it will go.
Front_View.JPG
3. Make sure the Page Length set in the menu matches the paper you are
using to print the menu. See page 38.
4. Make sure manual feed is selected.
If manual feed is not selected:
a. Press SEL to place the printer off-line.
b. Press MODE repeatedly until MANUAL appears on the
second line of the display.
The printer automatically switches to the manual path and returns on
line.
Microline 8810 User’s Guide
30
Page 31

Print the Menu on Single Sheets
1. Turn the printer off.
2. Press and hold SELECT and MODE while turning the printer on.
3. When "RELEASE SW" displays, release the switches.
4. Load the paper on the platform.
F5-11a.JPG
5. The menu prints.
Continuous Forms (Front Feed)
Before Starting
1. Make sure continuous forms are loaded.
F7_10_e.JPG
2. Make sure front feed is selected. If manual feed is selected, the second
line of the display reads ALIGN1 (the default, or whatever alignment
method you have selected).
Microline 8810 User’s Guide
31
Page 32

To switch to continuous forms:
a. Press SEL to place the printer off-line.
b. Press MODE repeatedly until FRONT appears on the second
line of the display.
The printer automatically switches to the front path and returns on line.
Print the Menu on Continuous Forms
1. Turn the printer off.
2. Press and hold SELECT and MODE while turning the printer on.
3. When "RELEASE SW" displays, release the switches.
The Function Settings menu prints.
4. Press the SHIFT switch.
The printed sheet advances to the stacker for tear off.
5. Tear off the printed form.
6. Press the SHIFT switch to move the continuous forms back down to the
print position.
Microline 8810 User’s Guide
32
Page 33

Menu Summary
The menu groups are:
• Printer Control: see page 34
• Font: see page 34
• Symbol Set: see page 35
• Setup: see page 36
• Manual Feed: see page 38
• CSF Front: see page 40
• CSF Rear: see page 41
• Front Feed: see page 42
• Rear Feed: see page 43
• Parallel I/F: see page 44
• Serial I/F: see page 45
• Adjustment: see page 46
Microline 8810 User’s Guide
33
Page 34

Printer Control
Note The default setting is in bold blue type.
Item Settings
Emulation Mode
IBM PPR
, Epson FX, ML
Font
Note The default setting is in bold blue type.
Item Settings
Print Mode
DRAFT Mode
Pitch
Prop. Spacing
Style
Size
Utility
, NLQ Courier, NLQ Gothic, DRAFT
HSD
, SSD
10
, 12, 15, 17.1, 20 cpi
No
, Yes
Normal
Single
, Italic
, Double
Microline 8810 User’s Guide
34
Page 35

Symbol Set
Note The default setting is in bold blue type.
Item Settings
Character Set
Language Set
Zero Character
Code Page
Set I
, Set II, Standard, Line Graphics, Block Graphics
(ML emulation only)
American
, French, German, British, Danish 1,
Swedish, Italian, Spanish I, Japanese, Norwegian,
Danish II, Spanish II, Latin American, French
Canadian, Dutch, Publisher
Slashed
USA
, Unslashed
, Canada French, Multilingual, Portugal, Norway,
BRASCII, Abicomp, Multilingual 858, ISO 8859-15
Microline 8810 User’s Guide
35
Page 36

Setup
Note The default setting is in bold blue type.
Item Settings
Multi Pass
Graphics
Graphics Data
Bi-directional
Bi-directional
8 Bits,
(ML Only)
Rcv. Buffer
Data Word (ML Only)
Panel Function
Path Change
CutSheet Smooth
128
, 0 K
8 Bits
Full
, Limited
Not Tear Off
Valid
, Invalid
Skp Ovr Binding Invalid,
High Skip
Eject Condition
Sheet Feed Mode
Yes, No
Bottom Detect
Manual
(Applies only if the optional
CSF is installed.)
CSF Select
CSF Front,
(Applies only if the optional
CSF is installed.)
7 Bits
, 7 Bits
Valid 1
, CSF
CSF Rear
, Uni-directional
, Uni-directional
, Tear Off
, Valid 2
, FF Code
Print Suppress
Auto LF
Auto CR
Print DEL Code
No
No
No
No
, Yes
, Yes
, Yes
, Yes
SI Pitch (10) 15 CPI,
SI Pitch (12) 12 CPI,
Reset Inhibit
No
, Yes
Microline 8810 User’s Guide
36
17.1 CPI
20 CPI
Page 37

Item Settings
ESC SI Pitch (IBM Only)
Time Out Print
Auto Select
Impact Mode
Print Dir. Command Invalid,
Host Interface
I/F Time Out
Appears only if Host Interface
(above) is set to Interface.
Buzzer
Buzzer Volume
Power Saving
Power Save Time 5 min,
Tea r Mo d e
(Applies only if the optional
Rear Push Tractor is installed.)
17.1 CPI
Valid
, Invalid
No
, Yes
Normal
Auto Interface
15 sec
min, 4 min, 5 min
Enable
Low
, Middle, High
Enable
FF + Tear Up
, 20 CPI
, Quiet
Valid
, Parallel, USB, Option I/F
, 30 sec, 45 sec, 1 min, 2 min, 3
, Disable
, Disable
10 min
, 15 min, 30 min, 60 min
, Tear Up
Microline 8810 User’s Guide
37
Page 38

Manual Feed
Note The default setting is in bold blue type.
Item Settings
Line Spacing
Auto Eject Pos. 3.18 mm (1/8”),
Pa ge W i dth 8”. 1 0 .6”, 1 3.2 ”,
6 LPI
, 8 LPI
6.35 mm (1/4”)
13.6”
8” = 203,20 mm, 10,6” = 269,24 mm, 13,2 = 335,28,
345,44
13,6 =
Page Length 76.2 mm (3"), 82.6 mm (3.25"), 88.9 mm (3.5"),
101.6 mm (4"), 127.0 mm (8"), 139.7 mm (5.5"),
152.4 mm (6"), 177.8 mm (7"), 203.2 mm (8"), 215.9
mm (8.5"),
279.4 mm (11")
, 296.3 mm (11.67"),
304.8 mm (12"), 355.6 mm (14"), 431.8 mm (17")
TOF 2.12 mm (1/12”), 3.18 mm (1/8”),
6.35 mm (1/4”)
7.62 mm (3/10”), 8.47 mm (1/3”), 10.58 mm (5/12”),
21.59 mm (0.85"), 23.28 mm (11/12”), 25.4 mm (1”),
27.52 mm (13/12”), 1Chr. Set Pos.
Note:
1Chr. Set Pos. automatically appears as the
setting when the front panel has been used to set a
1Chr. Set Pos value for the Manual Feed path. See
page 71.
Wait Tim e
2.0 sec
, 1.5 sec, 1.0 sec, 0.5 sec
Auto Alignment
must be disabled to
use Wait Time
.
,
Load LF Speed
Eject Dir.
Paper End
Gap Control
Fast Speed
Front
On-line
Auto
, Manual Gap x
, Slow Speed
, Rear
, Off-line
x = 1 - 8, A - E. See page 80
Gap Pos.
50.8 mm (2”)
, 101.6 mm (4”)
Auto Align (POW) Align 1, Align 2, Align 3, Align 4,
Auto Align
Align 1
, Align 2, Align 3, Align 4, Invalid
Microline 8810 User’s Guide
38
SelectAutoAlign
Page 39

Item Settings
MemoryAutoAlign
Align1 Pos.Adj.
(Align 1 must be
selected)
Align2 Pos.Adj.
(Align 2 must be
selected)
Align3 Pos.Adj.
(Align 3 must be
selected)
Align4 Pos.Adj.
(Align 4 must be
selected)
AutoAlignDetect Valid Level 1,
Skew Detect Valid Level 1,
Check Print Area
Valid
, Invalid
0 mm,
Adjusts in 1/90 inch (0.28 mm) increments from initial
setting
0 mm,
Adjusts in 1/90 inch (0.28 mm) increments from initial
setting
0 mm,
Adjusts in 1/90 inch (0.28 mm) increments from initial
setting
0 mm,
Adjusts in 1/90 inch (0.28 mm) increments from initial
setting
Valid
5.1 mm
5.1 mm
5.1 mm
5.1 mm
, Invalid
, 45.4 mm
, 45.4 mm
, 45.4 mm
, 45.4 mm
Valid Level 2
Valid Level 2
, Invalid
, Invalid
Microline 8810 User’s Guide
39
Page 40

CSF Front
Note The default setting is in bold blue type.
Item Settings
Line Spacing
Auto Eject Pos. 3.18 mm (1/8”),
Pa ge W i dth 8”. 1 0 .6”, 1 3.2 ”,
6 LPI
, 8 LPI
6.35 mm (1/4”)
13.6”
8” = 203,20 mm, 10,6” = 269,24 mm, 13,2 = 335,28,
345,44
13,6 =
Page Length 76.2 mm (3"), 82.6 mm (3.25"), 88.9 mm (3.5"), 101.6
mm (4"), 127.0 mm (8"), 139.7 mm (5.5"), 152.4 mm
(6"), 177.8 mm (7"), 203.2 mm (8"), 215.9 mm (8.5"),
279.4 mm (11")
, 296.3 mm (11.67"), 304.8 mm
(12"), 355.6 mm (14"), 431.8 mm (17")
TOF 2.12 mm (1/12”), 3.18 mm (1/8”),
6.35 mm (1/4”)
,
7.62 mm (3/10”), 8.47 mm (1/3”), 10.58 mm (5/12”),
21.59 mm (0.85"), 23.28 mm (11/12”), 25.4 mm (1”),
27.52 mm (13/12”), 1Chr. Set Pos.
Note: 1Chr. Set Pos. automatically appears as the
setting when the front panel has been used to set a
1Chr. Set Pos value for the Manual Feed path. See
page 71.
Eject Dir.
Auto Gap Timing Every Paper,
Gap Control
Front
, Rear
Auto
, Manual Gap x
1st Paper
x = 1 - 8, A - E. See page 80.
Gap Pos.
50.8 mm (2”)
Skew Detect Valid Level1,
Valid
CSF
, Invalid
, Manual
ManualFeedCSF
ManualSheetCSF
Microline 8810 User’s Guide
, 101.6 mm (4”)
Valid Level2
40
, Invalid
Page 41

CSF Rear
Note The default setting is in bold blue type.
Item Settings
Line Spacing
Auto Eject Pos. 3.18 mm (1/8”),
Pa ge W i dth 8”. 1 0 .6”, 1 3.2 ”,
6 LPI
, 8 LPI
6.35 mm (1/4”)
13.6”
8” = 203,20 mm, 10,6” = 269,24 mm, 13,2 = 335,28,
345,44
13,6 =
Page Length 76.2 mm (3"), 82.6 mm (3.25"), 88.9 mm (3.5"), 101.6
mm (4"), 127.0 mm (8"), 139.7 mm (5.5"), 152.4 mm
(6"), 177.8 mm (7"), 203.2 mm (8"), 215.9 mm (8.5"),
279.4 mm (11")
, 296.3 mm (11.67"), 304.8 mm
(12"), 355.6 mm (14"), 431.8 mm (17")
TOF 2.12 mm (1/12”), 3.18 mm (1/8”),
6.35 mm (1/4”)
,
7.62 mm (3/10”), 8.47 mm (1/3”), 10.58 mm (5/12”),
21.59 mm (0.85"), 23.28 mm (11/12”), 25.4 mm (1”),
27.52 mm (13/12”), 1Chr. Set Pos.
Note: 1Chr. Set Pos. automatically appears as the
setting when the front panel has been used to set a
1Chr. Set Pos value for the Manual Feed path. See
page 71.
Eject Dir.
Auto Gap Timing Every Paper,
Gap Control
Front
, Rear
Auto
, Manual Gap x
1st Paper
x = 1 - 8, A - E. See page 80.
Gap Pos.
50.8 mm (2”)
RemoveSheetWait Alarm,
ManualFeedCSF
ManualSheetCSF
Valid
CSF
, Manual
Microline 8810 User’s Guide
, 101.6 mm (4”)
Wait Paper Feed
, Invalid
41
Page 42

Front Feed
Note The default setting is in bold blue type.
Item Settings
Line Spacing
Form Tear-Off
Skip Over Perf.
Pa ge W i dth 8”. 1 0 .6”, 1 3.2 ”,
6LPI
, 8LPI
Off
, On
No
, Yes
13.6”
8” = 203,20 mm, 10,6” = 269,24 mm, 13,2 = 335,28,
345,44
13,6 =
Page Length 76.2 mm (3"), 82.6 mm (3.25"), 88.9 mm (3.5"), 101.6
mm (4"), 127.0 mm (8"), 139.7 mm (5.5"), 152.4 mm
(6"), 177.8 mm (7"), 203.2 mm (8"), 215.9 mm (8.5"),
279.4 mm (11")
, 296.3 mm (11.67"), 304.8 mm
(12"), 355.6 mm (14"), 431.8 mm (17")
TOF 2.12 mm (1/12”), 3.18 mm (1/8”),
6.35 mm (1/4”)
,
8.47 mm (1/3”), 10.58 mm (5/12”), 19.05 mm (9/12”),
23.28 mm (11/12”), 25.4 mm (1”), 27.52 mm
(13/12”), 1Chr. Set Pos.
Note:
1Chr. Set Pos. automatically appears as the
setting when the front panel has been used to set a
1Chr. Set Pos value for the Front Feed path. See
page 71.
Print
Initial Pos.
PE Pos. 3.18 mm (1/8”),
, Tear Off
6.35 mm (1/4”)
Paper End
Gap Control
Gap Pos.
On-Line
Auto
, Off-Line
, Manual Gap x
x = 1 to 8, A to E. See page 80.
50.8 mm (2”)
, 101.6 mm (4”)
Microline 8810 User’s Guide
42
Page 43

Rear Feed
Note The default setting is in bold blue type.
Item Settings
Line Spacing
Form Tear-off
Skip Over Perf.
Pa ge W i dth 8”. 1 0 .6”, 1 3.2 ”,
6LPI
, 8LPI
Off
, 500mS, 1 sec, 2 sec
No
, Yes
13.6”
8” = 203,20 mm, 10,6” = 269,24 mm, 13,2 = 335,28,
= 345,44
Page Length 76.2 mm (3"), 82.6 mm (3.25"), 88.9 mm (3.5"),
101.6 mm (4"), 127.0 mm (8"), 139.7 mm (5.5"),
152.4 mm (6"), 177.8 mm (7"), 203.2 mm (8"), 215.9
mm (8.5"),
279.4 mm (11")
, 296.3 mm (11.67"),
304.8 mm (12"), 355.6 mm (14"), 431.8 mm (17")
TOF 2.12 mm (1/12”), 3.18 mm (1/8”),
6.35 mm (1/4”)
7.62 mm (3/10”), 8.47 mm (1/3”), 10.58 mm (5/12”),
21.59 mm (0.85"), 23.28 mm (11/12”), 25.4 mm (1”),
27.52 mm (13/12”), 1Chr. Set Pos.
Note: 1Chr. Set Pos. automatically appears as the
setting when the front panel has been used to set a
1Chr. Set Pos value for the Manual Feed path. See
page 71.
Print
Initial Pos.
PE Pos. 3.18 mm (1/8”),
, Tear Off
6.35 mm (1/4”)
13,6
,
Paper End
Gap Control
Gap Pos.
On-Line
Auto
, Off-Line
, Manual Gap x
x = 1 to 8, A to E. See page 80.
50.8 mm (2”)
, 101.6 mm (4”)
Microline 8810 User’s Guide
43
Page 44

Parallel I/F
Note The default setting is in bold blue type.
Item Settings
I-Prime Invalid,
Cont. I-Prime
AUTO FEED XT
Valid
, Invalid
Invalid
Bi-Direction Disable,
Buffer Print
, Valid
Enable
, Buffer Clear
Microline 8810 User’s Guide
44
Page 45

Serial I/F
Note The default setting is in bold blue type.
Note Appears only when the optional RS-232C Serial Interface is installed
Item Settings
Parity
Serial Data
Protocol
Diagnostic Test
Busy Line
None
, Odd, Even
8Bits
, 7Bits
Ready/Busy
No
, Yes
SSD-
, SSD+, DTR, RTS
, X-ON/X-OFF
Baud Rate 300 BPS, 600 BPS, 1200 BPS, 2400 BPS, 4800 BPS,
DSR Signal
DTR Signal
Busy Time
9600 BPS
Valid
Power UP
200mS
, 19200 BPS, 38400 BPS
, Invalid
, Select
, 1 sec
Microline 8810 User’s Guide
45
Page 46

Adjustment
Note The default setting is in bold blue type.
Group Item Settings
Adjustment TOF Adj. (Cut) -40 to 0 to +40
in increments of 1/14-inch
TOF Adj.(CSFF)
Same as above.
(Applies only if the
optional CSF is
installed.)
TOF Adj.(CSFR)
Same as above.
(Applies only if the
optional CSF is
installed.)
Front Load Adj. -40 to
in increments of 1/144-inch
Rear Load Adj.
Same as above.
(Applies only if the
optional Rear Push
Tractor is installed.)
PE Adj. (Cut) -15 to
in increments of 1/144-inch
PE Adj. (CSFF)
Same as above.
(Applies only if the
optional CSF is
installed.)
0
to +40
0
to +15
Microline 8810 User’s Guide
46
Page 47

Group Item Settings
Adjustment (cont.) PE Adj. (CSFR)
(Applies only if the
optional CSF is
installed.)
PE Adj. (Front) -15 to
PE Adj. (Rear)
(Applies only if the
optional Rear Push
Tractor is installed.)
1stDotAdjCut Left x,
1stDotAdjAlign Same as above.
1stDotAdjCSFF
(Applies only if the
optional CSF is
installed.)
1stDotAdjCSFR
(Applies only if the
optional CSF is
installed.)
Same as above.
0
to +15
in increments of 1/144-inch
Same as above.
0
, Right y
x = 10 through 1
y = 1 through 10
adjustable in increments of
1/180 inch (0.14 mm)
Same as above.
Same as above.
1stDotAdjFront Same as above
1srDotAdjRear
(Applies only if the
optional Rear Push
Tractor is installed.)
Microline 8810 User’s Guide
Same as above.
47
Page 48

Group Item Settings
Adjustment (cont.) Regist. Low -5 through +5,
adjustable in increments of
1/360 inch (0.14 mm)
Regist. Normal Same as above.
Regist. High 1 Same as above.
Regist. High 2 Same as above.
LF Revise (Cut) -10 to
See table below.
LF Revise (CSFF)
(Applies only if the
optional CSF is
installed.)
LF Revise (CSFR)
(Applies only if the
optional CSF is
installed.)
Same as above.
Same as above.
0
to +10
Microline 8810 User’s Guide
48
Page 49

Explanation of Menu Items
The menu items are listed in alphabetical order.
For a summary of the menu groups, items and settings, see “Menu
Summary” on page 33.
1stDotAdjAlign
Note Auto Alignment must be enabled. See page 50.
Adjusts the set horizontal location for printing the first character
on a form when using manual feed from the platform. Selectable
settings: Left 10, Left 9, … Left 2, Left 1, Right 1, Right 2 … Right
9, Right 10, in increments of 1/180 inch (0.14 mm).
The default is 0.
1stDotAdj: Single Sheets/Forms
Note Auto Alignment must be enabled. See page 50.
•1stDotAdjCSFF
Applies to sheets/forms fed through the optional CSF mounted in
the front of the printer.
•1stDotAdjCSFR
Applies to sheets/forms fed through the optional CSF mounted in
the rear of the printer.
•1stDotAdjCut
Applies to sheets/forms fed manually through the platform.
Adjusts the set horizontal location for printing the first character
when using single sheets/forms. Selectable settings: Left 10,
Left 9, … Left 2, Left 1, Right 1, Right 2 … Right 9, Right 10, in
increments of 1/180 inch (0.14 mm).
The default is 0.
1stDotAdj: Continuous Forms
•
1stDotAdjFron
Applies to continuous forms fed through the front tractor.
•1stDotAdjRear
t
Microline 8810 User’s Guide
49
Page 50

Applies to continuous forms fed through the optional Rear Push
Trac to r.
Adjusts the set horizontal location for printing the first character
on a form when using manual feed from the platform. Selectable
settings: Left 10, Left 9, … Left 2, Left 1, Right 1, Right 2 … Right
9, Right 10, in increments of 1/180 inch (0.14 mm).
The default is 0.
Align1 Pos. Adj.
Align2 Pos. Adj.
Align3 Pos. Adj
Align4 Pos. Adj.
Note To use this setting, The corresponding Align 1/ Align 2/
Align 3 / Align 4 setting must be selected for Auto Align or
Auto Align (POW).
Use these to set up to four custom values for the left margin on
forms when you are using manual feed from the platform. This
represents the distance from the left edge of the page to the left
side of the first printed character. Adjusts within a range of 0 to
45.4 mm, in 1/90-inch [0.26 mm] increments.
The default setting is 5.1 mm.
Auto Align
Applies only to manual feed from the platform.
When Auto Align is engaged (the printer default), you can use
the front panel switches to change to a different preset left
margin value (Align 1, 2, 3, or 4). The values are set in the menu
under Align1 Pos. Adj., etc.
This lets you quickly switch to another form which requires a
different left margin. For more information on using the front
panel to change Align settings, see page 11.
If MemoryAutoAlign (see page 60) is set to Valid [the default],
whichever Align setting you last used will be saved in memory
and engaged the next time you turn on the printer.
Note This setting does not apply when the printer initializes in
response to an I-PRIME signal.
Microline 8810 User’s Guide
50
Page 51

Available settings: Align 1 [the default], Align 2, Align 3, Align 4,
or Invalid (skew adjustment disabled).
Auto Align Detect
Detects and corrects paper skew when manual feed through the
platform is being used with Auto Align enabled [the default].
Available settings: Valid Level 1, Valid Level 2 [the default], or
Invalid.
Change to Valid Level 1 if you wish the detection to be more
precise.
Change to Invalid if you are experiencing difficulty getting forms
to load into the printer when using preprinted forms with
anomalies at the top such as a large dark area on one side or a
cutout. Such types of forms defeat the skew sensor.
Form Unusable with Auto Align.bmp
Auto Align (POW)
Note This setting interacts with the other "Align" items in the
Manual Feed group. See page 38.
Sets the alignment method (skew adjustment) engaged for
manual feed from the platform when the printer is turned on.
Note This setting does not affect the printer when it initializes in
response to an I-Prime signal.
Available settings: Align 1, Align 2, Align 3, Align 4, or
SelectAutoAlign [the default].
• Select Auto Align [the default]: Skew adjustment is set by Auto
Align in the Manual Feed group. See page 38.
• Align x (x = 1, 2, 3, or4): Skew adjustment is set by the
corresponding Alignx Pos.Adj in the Manual Feed group. See
page 50.
Auto CR
IBM emulation only.
Microline 8810 User’s Guide
51
Page 52

The default is No. If you want the printer to automatically add a
carriage return when a Line Feed is received at the end of a line,
change the setting to Yes.
Auto Eject Pos.
This sets when the paper ejects, based on the distance between
the vertical center of the characters on the last line of the page
and the bottom of the page. Choose 3.18 mm (1/8") or 6.35 mm
(1/4") [the default].
Auto Feed XT
The default is Invalid. Change it to Valid if your system uses pin
14 of the parallel interface to control automatic line feed.
Auto Gap Timing
Applies only when the optional CSF is installed.
Normally the gap is detected only on the first sheet when the
path is switched to the CSF. If you want the printer to detect the
gap for every sheet that feeds in from the CSF, change the
setting to Every Paper.
Auto LF
The default is No. If you want the printer to automatically add a
line feed, change the setting to Yes.
Auto Select
If you always use the same Top of Form position, change the
setting to Yes.
Baud Rate
Applies only when the optional RS-232C Serial Interface is
installed.
Select a transmission speed of 300 BPS, 600 BPS, 1200 BPS,
2400 BPS, 4800 BPS, 9600 BPS [the default], 19200 BPS, or
38400 BPS.
Bi-Direction
For the parallel interface, in the nibble mode. To disable the
bi-directional interface, change the setting to Disable.
Microline 8810 User’s Guide
52
Page 53

Busy Line
Applies only when the optional RS-232C Serial Interface is
installed.
Selects which line your system monitors for a busy signal if the
Ready/Busy protocol (the default) s engaged. Set SSD- [the
default], SSD+, DTR, or RTS.
Busy Time
Applies only when the optional RS-232C Serial Interface is
installed.
Sets the length of the busy signal when the Ready Busy protocol
(the default) is engaged. Select 200 milliseconds [the default],
or 1 second.
Buzzer
The default is Enable. Change to Disable to turn off the printer’s
audible alarm.
Buzzer Volume
Choose the volume of the buzzer: Low [the default], Middle, or
High.
Character Set
Choose the Character Set: Set I [the default], Set II, Standard,
Line Graphics, or Block Graphics (available only when the OKi ML
emulation is selected).
Check Print Area
Applies to manual feed from the platform with Auto Alignment
enabled. Determines whether or not data which is outside the
normal print area specified for the page prints.
The default is Valid: data overflow does not print. This prevents
such data from printing on the platen.
Caution! If you change this setting to Invalid, data could
print directly on the platen and damage the printhead.
Code Page
Choose the Code Page character set you wish to use: USA [the
default], Canada French, Multilingual, Portugal, Norway,
BRASCII, Abicomp, Multilingual 858, or ISO 8859-15.
Microline 8810 User’s Guide
53
Page 54

Cont. I-Prime
Sets what happens when an I-Prime signal is received. To
prevent any movement of the printhead when an I-Prime signal
is received, change the setting to Invalid.
CSF Select
Applies only when two optional CSFs are installed.
Determines which CSF (front or rear) is used/selected first.
CutSheet Smooth
Helps to correct for paper curl when feeding in a form manually
through the platform. Available settings: Valid [the default] or
Invalid.
Data Word
ML emulation only.
Sets the character code and graphics data for 8Bits [the default]
or 7 Bits.
Diagnostic Test
Applies only when the optional RS-232C Serial Interface is
installed.
To run the diagnostic test, enter the menu and select Yes.
DRAFT Mode
Choose HSD (High Speed Draft) [the default] or SSD (Super
Speed Draft).
DSR Signal
Applies only when the optional RS-232C Serial Interface is
installed.
Sets the way your system handles the DSR signal when the
Ready/Busy protocol (the default) is engaged. Change the
setting to Invalid if you want the printer to ignore the DSR
signal.
DTR Signal
Applies only when the optional RS-232C Serial Interface is
installed.
Microline 8810 User’s Guide
54
Page 55

The default is Power Up. Change the setting to Select if the DTR
signal is required when the printer is selected.
Eject Direction
Applies only if the optional CSF is installed.
Change to FF Code if you want the printer to eject a cut sheet
when it receives the FF command.
Eject Dir.
Choose where the paper is ejected when you are using manual
feed from the platform or the optional CSF(s): Front [the
default] or Rear.
Emulation Mode
Choose the printer emulation: IBM PPR [the default], , Epson FX,
or ML (Oki Microline).
ESC SI Pitch
IBM emulation only.
Sets the character pitch used when the ESC SI command is
received. Select 17.1 cpi [the default] or 20 cpi.
FF Function
Applies to the manual feed from the platform.
Sets what happens when the printer receives the FF command.
Eject [the default] or Form Feed.
Form Tear-Off
The default is Off. To activate Form Tear-Off, change the setting
to On.
The Forms Tear-Off feature allows a printed continuous form
page to be torn off without wasting paper or adjusting the
printer.
For more information, see page 75.
Front Load Adj.
For fine tuning the Top of Form (TOF) location when using
continuous forms (front feed). Settable from -40 to +40 in
increments of 1/144 inch. The default is 0.
Microline 8810 User’s Guide
55
Page 56

Negative values decrease the space down from the top of the
form:
•TOF moves up
•paper moves down.
Positive numbers increase the space down from the top of the
form:
•TOF moves down
•paper moves up.
Microline 8810 User’s Guide
56
Page 57

Gap Control
Sets whether the printhead gap is set automatically [the default]
or manually.
Manual Gap Settings
Setting Used for
Manual Gap 1
Manual Gap 2
Manual Gap 3
Manual Gap 4 • Postcards
Manual Gap 5 • 5-Part Multi-Part Forms (carbon-backed)
Manual Gap 6 • 6-Part Multi-Part Forms (carbon-backed)
Manual Gap 7 • 7-Part Multi-Part Forms (carbon-backed)
Manual Gap 8 • 8-Part Multi-Part Forms (carbon-backed)
• Single sheets 14 to 22 lb. US Bond (52 to 81 g/m
• Thickness range 0.06 to 0.10 mm
• Single sheets 22 to 34 lb. US Bond (81 to 128 g/m2)
• 2-Part Multi-Part Forms (carbon-backed)
• Thickness range0.10 to 0.15 mm
• Single sheets 34 to 42 lb. US Bond
• 3-Part Multi-Part Forms (carbon-backed)
• Thickness range 0.15 to 0.20 mm
• 4-Part Multi-Part Forms (carbon-backed)
• Thickness range 0.20 to 0.25 mm
• Thickness range 0.25 to 0.30 mm
• Thickness range 0.30 to 0.35 mm
• Thickness range 0.35 to 0.40 mm
• Thickness range 0.40 to0.45 mm
(128 to 156 g/m2)
2
)
Manual Gap A • Heavy paper, 0.45 to 0.50 mm thick
Manual Gap B • Heavy paper, 0.50 to 0.55 mm thick
Manual Gap C • Heavy paper, 0.55 to 0.60 mm thick
Manual Gap D • Heavy paper, 0.60 to 0.65 mm thick
Manual Gap E • Heavy paper, 0.65 to 0.70 mm thick
Microline 8810 User’s Guide
57
Page 58

Gap Pos.
When Auto Gap detection is enabled, this sets how far in from
the left edge of the form the gap detection begins: 2 inches (51
mm) [the default] or 4 inches (102 mm).
Graphics
The default is Bi-directional. Changing to Uni-directional will
improve the print registration, but slow the print speed.
Graphics Data
Sets graphics data to print 7 Bits [the default] or 8 Bits.
High Skip
The default is Yes. This enables the low-vibration mode, which
reduces printer vibration during printing. To switch low-vibration
mode off, change this setting to No.
Host Interface
Choose the interface mode: Auto Interface [the default],
Parallel, USB, or Option I/F.
I-Prime
The default is Enable: print out the buffer contents when the
I-Prime signal is received. Change to Disable if you wish the
printer to ignore the I-Prime signal.
I/F Time Out
Appears only if Host Interface is set to Auto Interface [the
default].
Choose the amount of time the printer waits (while receiving
data) before going into idle mode: 15 sec [the default], 30 sec,
45 sec, 1 min, 2 min, 3 min, 4 min, or 5 min.
If your software spends a long time processing between portions
of data it feeds to the printer, choose a longer time interval value
to keep your printer from dumping the received data while it is
waiting for more.
Impact Mode
Selects the print mode, Normal [the default] or Quiet, engaged
on power up.
Microline 8810 User’s Guide
58
Page 59

Initial Pos.
Choose where continuous form paper will be positioned when the
printer is turned on.
Print [the default]: the paper is in a ready-for-printing position.
Tear: the paper is at the tear-off position.
Language Set
Replaces certain standard symbols with special characters used
in foreign languages. Choose American [the default], French,
German, British, Danish 1, Swedish, Italian, Spanish I,
Japanese, Norwegian, Danish II, Spanish II, Latin American,
French Canadian, Dutch, or Publisher.
Line Spacing
The default is 6 LPI (lines per inch). Change to 8 LPI to get more
lines on a page.
LF Revise
•LF Revise (Cut)
Applies to sheets/forms fed manually using the platform.
•LF Revise (CSFF)
Applies to sheets/forms fed from the optional CSF mounted on the
front of the printer.
•LF Revise (CSFR)
Applies to sheets/forms fed from the optional CSF mounted on the
rear of the printer.
Adjust the line feed value for individual sheets/forms. Settable
from -10 to +10. The default setting is 0.
Load LF Speed
Choose the paper feed speed for inserting sheets when you are
using manual feed from the platform: Fast Speed [the default] or
Slow Speed.
Manual Feed CSF
Applies only when the optional CSF is installed.
Allows you to manually feed in print media through the platform
with the CSF selected, so long as no paper is currently loaded on
the platform.
Microline 8810 User’s Guide
59
Page 60

Manual Sheet CSF
Applies only when the optional CSF is installed.
Determines which TOFs and Eject Direction settings will be used
for manual feed sheets printed while the CSF is selected. If you
want the printer to use the Manual Feed menu settings, change
the setting to Manual.
Memory Auto Align
Applies only to manual feed from the platform.
The default is Valid. This causes the Auto Align setting made
using the front panel switches MODE and SHIFT (see page 11) to
be stored in the printer’s memory. Change to Invalid if you do
not wish this value to be stored.
Multi Pass
Select the print direction (Bi-directional: the default, or
Uni-directional) for a line containing double-height print.
Page Length
Choose the length of the media you are using:76.2 mm (3"),
82.6 mm (3.25"), 88.9 mm (3.5"), 101.6 mm (4"), 127.0 mm
(8"), 139.7 mm (5.5"), 152.4 mm (6"), 177.8 mm (7"), 203.2
mm (8"), 215.9 mm (8.5"), 279.4 mm (11") [the default], 296.3
mm (11.67"), 304.8 mm (12"), 355.6 mm (14"), 431.8 mm
(17").
Note If the printer receives a page length setting command, it
will override this menu setting.
Page Width
Choose the width of the media you are using: 8", 10.6", 13.2",
or 13.6" [the default].
Panel Function
When the Panel Function setting is changed to Limited, the
QUIET (SHIFT + FF) and NORMAL PRINT (SHIFT + LF) switches
don’t work. This prevents these settings from being changed
when several people are using the printer.
Microline 8810 User’s Guide
60
Page 61

Paper End
Choose what happens when paper end is detected when you are
using manual feed from the platform: On-line [the default] or
Off-line.
Parallel I/F
Only Nibble Mode supports bi-directional.
Choose the printing used by the parallel interface:
Uni-directional or Bi-directional [the default].
Parity
Applies only when the optional RS-232C Serial Interface is
installed.
Settings include None [the default], Odd and Even.
Path Change
Choose whether or not the Tear Off feature is engaged when you
change to the continuous forms path. See page 75. The default
is off (Not Tear Off). To set the printer to automatically engage
the Form Tear feature when it switches to continuous forms
printing, change the setting to Tear Off.
Microline 8810 User’s Guide
61
Page 62

PE Adj. [Paper End Adjust]
For fine tuning the location of the last line of printing (Paper End)
for a specific paper feed path. See below for a list of paper feed
paths.
Settable from -15 to +15 in increments of 1/144-inch. The
default is 0.
Negative values allow printing further down on the form.
• Paper End moves down
•paper moves up.
Positive values stop the printing further up on the form.
•Paper End moves up
•paper moves down
Paper Feed Paths
•PE Adj. (Cut)
Applies to sheets fed manually through the platform.
• PE Adj. (CSFF)
Applies to sheets fed through the optional CSF mounted on
the front of the printer.
• PE Adj. (CSFR)
Applies to sheets fed through the optional CSF mounted on
the rear of the printer.
•PE Adj. (Front)
Applies to continuous forms fed through the front tractor.
•PE Adj. (Rear)
Applies to continuous forms fed through the optional Rear
Push Tractor.
PE Pos. [Paper End Position]
This sets when the the printer will move to the next continuous
form, based on the distance between the center of the
characters on the last line of the form and the bottom of the
form. Available settings: 3.18 mm (1/8") or 6.35 mm (1/4")
[the default].
Microline 8810 User’s Guide
62
Page 63

Pitch
Choose the character width, in characters per inch (cpi): 10 [the
default], 12, 15, 17.1, or 20 cpi.
Power Save Time
Sets the time the printer waits before entering the Power Save
Mode when Power Saving is set to Enable [the default]: 5 min,
10 min [the default], 15 min, 30 min, or 60 min.
Power Saving
Sets whether or not the printer enters the energy-saving Power
Save Mode after the interval specified under Power Save Time.
The default is Enable.
Print DEL Code
IBM emulation only.
The default is No. Change he setting to Yes if you want to print
the DEL code (decimal 127) as a solid box.
Print Dir. Cmd.
The default is Valid: the printer will recognize a command for
unidirectional printing. Change to Invalid if you do not wish the
printer to recognize uni-directional printing commands.
Print Mode
Choose the print quality and speed: Utility [the default], NLQ
Courier, NLQ Gothic, or DRAFT.
Print Suppress
The default is No. If your system uses the DC1 and DC3 codes
for print suppress mode, change the setting to Yes.
Prop. Spacing
The default is No. Choose Yes to engage proportional spacing of
characters.
Protocol
Applies only when the optional RS-232C Serial Interface is
installed.
Microline 8810 User’s Guide
63
Page 64

Sets the protocol used: Ready/Busy [the default] or
X-ON/X-OFF.
Rcv. Buffer
Sets the amount of memory ( 0 or 128 Kbytes) devoted to
holding received data. The default is 128 Kbytes. Changing this
to 0 will tie up your computer while printing, but if you abort the
print job, the printer will stop much sooner.
Rear Load Adj.
Applies only when the optional Rear Push Tractor is installed.
For fine tuning the Top of Form (TOF) location when using
continuous forms with the rear push tractor. Settable from -40 to
+40 in increments of 1/144 inch. The default is 0.
Negative values decrease the space down from the top of the
form:
•TOF moves up.
•paper moves down.
Positive numbers increase the space down from the top of the
form:
•TOF moves down.
•paper moves up.
Regist. Low
Regist. Normal
Regist. High 1
Regist. High 2
For print registration adjustment These are set at the factory.
Remove Sheet Wait
Applies only when the optional CSF is installed on the rear of the
printer.
Change the setting to Alarm if you want the printer to sound an
alarm when a printed sheet has exited the the rear CSF and is
sitting on the platform.
Microline 8810 User’s Guide
64
Page 65

Reset Inhibit
The default is No. Change this to Yes to prevent your software
from resetting your printer’s settings. The printer will ignore an
INITIAL command.
Sheet Feed Mode
Applies only when the optional CSF is installed.
Sets whether Manual [the default] or Auto cut sheet feed mode
(CSF) is engaged when the printer is initialized.
SI Pitch (10)
IBM emulation only.
Sets the pitch to be engaged when the printer control panel is
set for 10 cpi and the SI command is received. Choose 15 cpi or
17.1 cpi [the default].
SI Pitch (12)
IBM emulation only.
Sets the pitch to be engaged when the printer control panel is
set for 12 cpi and the SI command is received. Choose 12 cpi or
20 cpi [the default].
Size
The default is Single. Choose Double for double width and height
printing.
Skew Detect
Detects and corrects paper skew when manual feed through the
platform—or the optional CSF mounted on the front—is being
used with Auto Align disabled. Available settings: Valid Level 1,
Valid Level 2 [the default], or Invalid.
Change to Valid Level 1 if you wish the detection to be more
precise.
Change to Invalid if you are experiencing difficulty getting forms
to load into the printer when using preprinted forms with
Microline 8810 User’s Guide
65
Page 66

anomalies at the top such as a large dark area on one side or a
cutout. Such types of forms defeat the skew sensor.
Form Unusable with Auto Align.bmp
Serial Data
Applies only when the optional RS-232C Serial Interface is
installed.
Sets the serial data length: 8Bits [the default] or 7Bits.
Skp Ovr Binding
Choose Invalid, Valid 1 [the default] or Valid 2.
Valid 1
• Continuous forms only
• before Form Feeding
• before Perforation Skip
• line feeding of 18 mm (.71") or more
Valid 2
• Continuous forms and manual feed
• before Form Feeding
Skip Over Perf.
Sets what happens when the printer comes within 1-inch (25
mm) of the bottom of the page. The default is No, for use when
your software has its own page formatting controls. Change to
Yes if you want the printer to go to the next page when it comes
within 1” (25 mm) of the bottom of the page.
Style
The default is Normal. Choose Italic if you want the printed
characters to be slanted.
Tear Mode
Applies only when the optional Rear Push Tractor is installed.
Microline 8810 User’s Guide
66
Page 67

Change to Tear Up if you do not wish the printer to execute a
form feed before moving the forms to the tear off position.
Time Out Print
If your software spends a long time processing between portions
of data it feeds to the printer, change the setting to Invalid to
keep your printer from dumping the received data while it is
waiting for more.
TOF
Top of Form sets the position down from the top of the page at
which printing starts. The default is 6.35 mm (1/4") from the top
of the page to the vertical middle of the first print line.
Note The amount of adjustment is limited to avoid paper jams.
Manual feed settings: 2.12 mm (1/12"), 3.18 mm (1/8"),
6.35 mm (1/4"), 7.62 mm (3/10"), 8.47 mm (1/3")*, 10.58 mm
(5/12"), 21.59 mm (0.85"), 23.28 mm (11/12"), 25.4 mm (1"),
27.52 mm (13/12"), 1 Chr. Set Pos.
Continuous form settings: 2.12 mm (1/12”), 3.18 mm (1/8”),
6.35 mm (1/4”), 8.47 mm (1/3”)*, 10.58 mm (5/12”), 19.05
mm (9/12”), 21.59 mm (0.85"), 23.28 mm (11/12”), 25.4 mm
(1”), 27.52 mm (13/12”), 1 Chr. Set Pos.
* When 1/3-inch is selected, the distance is from the top of the page to
the top of the first print line, not the vertical middle.
TOF Adj. (Cut)
For fine tuning the Top of Form (TOF) location when using
manual feed from the platform. Settable from -40 to +40 in
increments of 1/144-inch. The default is 0.
Negative values decrease the space down from the top of the
form:
•TOF moves up
•paper moves down.
Positive numbers increase the space down from the top of the
form:
•TOF moves down
•paper moves up.
Microline 8810 User’s Guide
67
Page 68

TOF Adj. (CSSF)
Applies only when the optional CSF is mounted on the front of
the printer.
For fine tuning the Top of Form (TOF) location when the
front-mounted CSF is selected.
Available settings and information are the same as described for
TOF Adj. (Cut) above.
TOF ADj. (CSFR)
Applies only when the optional CSF is mounted on the rear of the
printer.
For fine tuning the Top of Form (TOF) location when the
rear-mounted CSF is selected.
Available settings and information are the same as described for
TOF Adj. (Cut) above.
Wait Time
Note Auto Alignment must be disabled to use Wait Time. See
page 50.
Choose the amount of time the printer waits for paper to be
inserted after print data is received when you are using manual
feed from the platform: 2.0 sec [the default], 1.5 sec, 1.0 sec,
or 0.5 sec.
Zero Character
The default is Unslashed. Change to Slashed if you wish to use a
slash to distinguish the number zero from the capital letter 0.
Microline 8810 User’s Guide
68
Page 69

Auto Align
The printer is set at the factory for Auto Align enabled. This feature
automatically aligns single sheets or forms placed on the platform with the
platen as they are drawn into the printer.
Auto Align cannot be used with envelopes. To print envelopes, you must
disable Auto Align (see below), then use the sheet guide (1) to load and align
the envelope.
Sheet_Guide_crop1.jpg
Disabling Auto Align
To disable Auto Align, you must go into the printer menu:
8810_3_crop.jpg
1. Press SEL.
The printer goes off-line.
2. Simultaneously press SHIFT and MODE.
The printer enters the Menu Mode. PRINTER CONTROL displays.
3. Simultaneously press SHIFT and FF repeatedly until MANUAL FEED
displays.
4. Press FF repeatedly until
5. Press MODE repeatedly until the setting
6. Press LOAD to save your new setting and exit the menu mode.
AUTO ALIGN displays.
INVALID displays.
Microline 8810 User’s Guide
69
Page 70

Set Top of Form (TOF)
General Information
The default top of form is set in the printer menu.
The factory default for TOF is 1/4-inch (6.4 mm), equivalent to the distance
down from the top of the sheet to the horizontal midpoint of the first line of
printed characters.
TOF.jpg
You can establish one custom TOF setting for each feed path (Manual and
Front) and store it in the printer’s memory as 1Chr Set Pos. This selection
will then automatically appear as the setting for TOF for the corresponding
group in the Menu.
You can also use the control panel switches to set a temporary TOF for one
sheet or one continuous form.
Use the Printer Menu
8810_3_crop.jpg
Note The printer default for TOF is 1/4-inch (6.4 mm).
1. Press SEL.
The printer goes off-line.
2. Simultaneously press SHIFT and MODE.
The printer enters the Menu.
3. Press and hold SHIFT, then press FF repeatedly until the feed path for
which you wish to change the TOF appears: MANUAL FEED or FRONT
.
FEED
4. Press FF repeatedly until TOF displays.
Microline 8810 User’s Guide
PRINTER CONTROL displays.
70
Page 71

5. Press MODE repeatedly until the setting you wish to engage displays:
2.12 mm (1/12”), 3.18 mm (1/8”), 6.35 mm (1/4”), 7.62 mm (3/10”),
8.47 mm (1/3”), 10.58 mm (5/12”), 21.59 mm (0.85"), 23.28 mm
(11/12”), 25.4 mm (1”), or 27.52 mm (13/12”).
6. Press LOAD: this saves your setting and exits the menu mode.
Use 1Chr Set Pos
You can set and use two different custom Top of Forms:
• Front Feed (continuous forms)
• Manual Feed (single forms).
Front Feed (Continuous Forms)
8810_3_crop.jpg
1. Make sure the printer is set to the Front Feed path.
2. Press SEL, then press LOAD to park the continuous forms.
3. Simultaneously press SHIFT and SEL.
The continuous forms move to the printer’s default TOF position
(1/4-inch [6.4 mm]).
The display reads 1CHR. SET POS.
4. Adjust the print start position as follows:
a. If you are fine tuning the TOF you set for a preprinted form, you
can move the form to the position you last set for Front Feed 1Chr.
Set Pos. by pressing the FF switch.
b. To move the TOF further down on the page (print paper advances
further into the printer):
– In 1/144-inch (0.18 mm) increments: press and hold the SHIFT
switch, then press FF.
– In 10/144-inch (1.75 mm) increments: press and hold the SHIFT
switch, then press SEL.
– One line at a time: press LF.
Microline 8810 User’s Guide
71
Page 72

c. To move the TOF further up on the page (print paper retracts
further out of the printer):
– In 1/144-inch (0.18 mm) increments: press and hold the SHIFT
switch, then press LF.
– In 10/144-inch (1.75 mm) increments: press and hold the SHIFT
switch, then press MODE.
5. Store the TOF position in the printer’s memory:
a. To store the position as the 1Chr. Set Pos setting, press the SEL
switch. The setting will be retained, even if you turn the printer off,
until you use this procedure to change the setting. This also
automatically sets the TOF setting in the Front Feed group to 1Chr.
Set Pos.
Note If you reset the printer to the factory defaults, the 1Chr. Set
Pos you have established will be deleted.
b. To store the position in the printer’s memory only until it is turned
off or it receives an I-Prime signal, press the LOAD switch.
6. Press SEL to return the printer to the on-line state.
Use 1Chr Set Pos
Manual Feed (Single Sheets/Forms)
8810_3_crop.jpg
1. Make sure the printer is set to the Manual Feed path.
2. Press SEL, then press LOAD to remove the paper from the manual feed
path.
3. Simultaneously press SHIFT and SEL.
The SEL light starts blinking and the display reads
1CHR. SET MODE
INSERT PAPER.
4. Load a sheet/form on the platform.
The sheet/form advances to the printer’s default TOF (1/4-inch [6.4
mm]) and the display reads 1CHR. SET POS.
Microline 8810 User’s Guide
72
Page 73

5. Adjust the print start position as follows:
a. If you are fine tuning the TOF you set for a preprinted form, you
can move the sheet/form to the position you last set for Manual
Feed 1Chr. Set Pos. by pressing the FF switch.
b. To move the TOF further down on the page (print paper advances
further into the printer):
– In 1/144-inch (0.18 mm) increments: press and hold the SHIFT
switch, then press FF.
– In 10/144-inch (1.76 mm) increments: press and hold the SHIFT
switch, then press SEL.
– One line at a time: press LF.
c. To move the TOF further up on the page (print paper retracts
further out of the printer):
– In 1/144-inch (0.18 mm) increments: press and hold the SHIFT
switch, then press LF.
– In 10/144-inch (1.76 mm) increments: press and hold the SHIFT
switch, then press MODE.
6. Store the TOF position in the printer’s memory:
a. To store the position as the 1Chr. Set Pos setting, press the
SEL switch. The setting will be retained, even if you turn the printer
off, until you use this procedure to change the setting. This also
automatically sets the TOF setting in the Manual Feed group to
1Chr. Set Pos.
Note If you reset the printer to the factory defaults, the 1Chr. Set
Pos you have established will be deleted.
b. To store the position in the printer’s memory only until it is
turned off or receives an I-Prime signal, press the LOAD
switch.
7. Press SEL to return the printer to the on-line state.
Temporary TOF
Use the Control Panel
This TOF setting applies only to the sheet or continuous form loaded into the
printer when the setting is made. The next sheet or form feeds to the
selected default TOF.
1. With paper loaded in the print path, press SEL to put the printer offline.
2. Change the location of the first line of printing:
a. To move the TOF further down on the page (print paper advances
further into the printer):
Microline 8810 User’s Guide
73
Page 74

– In 1/144-inch (0.18 mm) increments: press and hold the SHIFT
switch, then press FF.
– One line at a time: press LF.
b. To move the TOF further up on the page (print paper retracts
further out of the printer):
– In 1/144-inch (0.18 mm) increments: press and hold the SHIFT
switch, then press LF.
3. Press SEL to return the printer to the on-line state.
4. Send the print job.
Microline 8810 User’s Guide
74
Page 75

Form Tear Off
The Form Tear Off feature allows you to advance continuous forms to the
stacker for tear off.
The printer default for Forms Tear Off is Off. To use this feature, you must
enter the Function Settings Menu and turn it on.
Turn On Forms Tear Off
8810_3_crop.jpg
1. Press SEL.
The printer goes off-line.
2. Simultaneously press SHIFT and MODE to enter the Function Settings
Menu.
PRINTER CONTROL displays.
3. Press and hold SHIFT, then press FF repeatedly until FRONT FEED
displays.
4. Press FF repeatedly until
5. Press MODE repeatedly until the interval you want to select (2 seconds,
1 second, or 500 milliseconds) displays.
6. Press LOAD: this saves your setting and exits the menu mode.
FORM TEAR-OFF displays.
Move Continuous Forms Up for Tear Off
Press the SHIFT/TEAR switch to move continuous forms to the tear off
position.
Microline 8810 User’s Guide
75
Page 76

Tests
Rolling ASCII Test
Note When the printer is running a test, it always uses a left margin of 5.1
This test provides a one-page continuous printout of the ASCII characters.
mm (0.2-inch).
1. Turn off the printer.
2. Simultaneously press and hold the LF and FF switches while turning on
the printer, until RELEASE SW displays.
3. When prompted, load a sheet of paper on the platform.
4. The Rolling ASCII test will run and the sheet will eject.
Font Sample Test
Note When the printer is running a test, it always uses a left margin of 5.1
This test provides a sample of each of the available fonts in the printer.
Note The Font Sample test takes two letter-size sheets.
mm (0.2-inch).
1. Turn off the printer.
2. Simultaneously press and hold the MODE and LF switches while turning
on the printer, until RELEASE SW displays.
3. When prompted, load a sheet of paper on the platform.
4. The Font Sample test will run and the sheet will eject.
5. Remove the first printed sheet from the platform and load another
sheet.
6. The test finishes printing and the sheet ejects.
Microline 8810 User’s Guide
76
Page 77

Hex Dump Mode
Note When the printer is running a test, it always uses a left margin of 5.1
When the printer is in the Hex Dump Mode, all data received, including text
and printer commands, will be printed in both hexadecimal and ASCII
format.
Note In the ASCII format, all non-printable characters will be represented
mm (0.2-inch).
by a period.
Engaging the Hex Dump Mode
1. Be sure paper is loaded.
2. Turn the printer off.
3. Simultaneously press and hold the MODE + LF + SHIFT switches while
turning the printer on, until
RELEASE SW displays.
HEXDUMP displays and “Hex Dump Mode” prints at the top of the
paper.
Running a Hex Dump Test
To run the test, send data to the printer while it is in the Hex Dump Mode.
Exiting Hex Dump Mode
Turn the printer off, then on again.
Microline 8810 User’s Guide
77
Page 78

Setting the Printhead Gap
General Information
The printhead gap is the distance between the printhead and the platen.
Your printer comes from the factory set to automatically detect the printhead
gap (Auto Gap selected) for the media being fed in. Certain media, especially
media with uneven thickness, may not work well with the Auto Gap feature
and could produce unsatisfactory print results.
To correct for this, change from Auto Gap to a manually set gap. You may
need to experiment a bit to determine the best manual setting for a
particular media.
Note Because their thickness varies, envelopes do not work with Auto
Gap.
Microline 8810 User’s Guide
78
Page 79

Printhead Gap Settings
Setting Used for
Manual Gap 1
• Single sheets 14 to 22 lb. US Bond (52 to 81 g/m
• Thickness range 0.06 to 0.10 mm
Manual Gap 2
• Single sheets 22 to 34 lb. US Bond (81 to 128 g/m
• 2-Part Multi-Part Forms (carbon-backed)
• Thickness range 0.10 to 0.15 mm
Manual Gap 3
• Single sheets 34 to 42 lb. US Bond
(128 to 156 g/m2)
• 3-Part Multi-Part Forms (carbon-backed)
• Thickness range 0.15 to 0.20 mm
Manual Gap 4 • Postcards
• 4-Part Multi-Part Forms (carbon-backed)
• Thickness range 0.20 to 0.25 mm
Manual Gap 5 • 5-Part Multi-Part Forms (carbon-backed)
• Thickness range 0.25 to 0.30 mm
Manual Gap 6 • 6-Part Multi-Part Forms (carbon-backed)
• Thickness range 0.30 to 0.35 mm
Manual Gap 7 • 7-Part Multi-Part Forms (carbon-backed)
• Thickness range 0.35 to 0.40 mm
Manual Gap 8 • 8-Part Multi-Part Forms (carbon-backed)
• Thickness range 0.40 to 0.45 mm
2
)
2
)
Manual Gap A • Heavy paper, 0.45 to 0.50 mm thick
Manual Gap B • Heavy paper, 0.50 to 0.55 mm thick
Manual Gap C • Heavy paper, 0.55 to 0.60 mm thick
Manual Gap D • Heavy paper, 0.60 to 0.65 mm thick
Manual Gap E • Heavy paper, 0.65 to 0.70 mm thick
Microline 8810 User’s Guide
79
Page 80

Change to a Manual Printhead Gap Setting
“On-the-Fly”
If you are switching to a different print media and wish to temporarily
change the printhead gap setting for that media, you can use the control
panel switches to change the printhead gap setting. The setting will be
maintained until the printer is turned off or until it it receives an I-Prime
signal.
You can also use this feature to try different settings for your media, then set
the best one(s) as the printer default in the Menu (see below).
1. Press the SEL switch to deselect the printer.
2. Press and hold the SHIFT switch, then press the LOAD switch repeatedly
to scroll through the various settings for the printhead gap.
3. When the desired setting appears on the display, press the SEL switch
to place the printer back on line.
In the Menu
If you wish to change the printhead gap and continue to use the manual
setting even if the printer is turned off, it must be done in the printer Menu.
You can establish two different printhead gap settings in the menu: one in
the Manual Feed group and one in the Form Feed group.
Note You can also use the menu to set the printhead gap for the optional
CSF and the optional Rear Push Tractor.
8810_3_crop.jpg
1. Press the SEL switch to deselect the printer.
2. Press SEL.
The printer goes off-line.
3. Simultaneously press SHIFT and MODE.
PRINTER CONTROL displays.
4. Press and hold SHIFT, then press FF repeatedly until MANUAL FEED
displays.
Microline 8810 User’s Guide
80
Page 81

5. Press FF repeatedly until
6. Press MODE repeatedly until the desired printhead gap setting appears
on the display.
7. Press and hold SHIFT, then press FF repeatedly until
displays.
8. Press FF repeatedly until
9. Press MODE repeatedly until the desired printhead gap setting appears
on the display.
GAP CONTROL displays.
FRONT FEED
GAP CONTROL displays.
Note To set the gap for the optional CSF and/or the optional Rear
Push Tractor, repeat steps 7-9 for CSF FRONT, CSF REAR,
and/or
10. Press LOAD: this saves your setting and exits the menu mode.
REAR FEED.
Microline 8810 User’s Guide
81
Page 82

Troubleshooting
Paper Jams, Individual Sheets/Forms
IMPORTANT!
If you are using individual multi-part forms which have multiple
pages of differing lengths such as the one shown below, switch to
the rear Eject Direction to eliminate possible jams.
• To temporarily switch, press the LOAD/EJECT DIR switch.
• To permanently change to the rear Eject Direction, go into the
menu and change the setting for Eject Dir. in the Manual Feed (or
CSF Front and/or CSF Rear if these options are installed) group to
Rear:
1. Press SEL to deselect the printer.
2. Press MODE + SHIFT simultaneously.
3. Press and hold SHIFT, then press FF repeatedly until you see
Manual Feed on the display.
4. Press FF repeatedly until you see Eject Dir. on the display.
5. Press MODE to change the setting to Rear.
6. Press LOAD to save the setting and exit the menu.
If a paper jam is indicated on the display panel, use the following method to
clear it.
Caution! Do not open the access cover with the power on, as
injury may result.
Caution! The printhead may be very hot after printing. Allow
the printhead to cool before touching it.
1. Turn OFF the power switch.
Microline 8810 User’s Guide
82
Page 83

2. Open the cover and move the printhead [Caution! Printhead may be
HOT!] to an area off the sheet of paper.
F7_07.jpg
3. Turn the platen knob forward or backward to bring out the jammed
sheet.
F7_08b.jpg
Microline 8810 User’s Guide
83
Page 84

Paper Jams, Continuous Forms
If a paper jam is indicated on the display panel, use the following method to
clear it.
Caution! Do not open the access cover with the power on, as
injury may result.
Caution! The printhead may be very hot after printing. Allow
the printhead to cool before touching it.
1. Turn OFF the power switch.
2. Tear off the continuous form from the paper stack.
F7_10_a.jpg
3. Turn the platen knob to bring out the continuous forms.
F7_10_b.jpg
Microline 8810 User’s Guide
84
Page 85

Paper Jams, Repetitive
If a paper jam is indicated on the display panel, use the following method to
clear it.
Caution! Do not open the access cover with the power on, as
injury may result.
Caution! The printhead may be very hot after printing. Allow
the printhead to cool before touching it.
If paper keeps jamming you probably have bits of paper stuck in the paper
path.
1. If you have continuous forms loaded, park the paper by pressing SEL to
deselect the printer, then pressing LOAD.
2. Turn OFF the printer.
3. Open the cover and remove any visible pieces of paper with a pair of
tweezers.
F2_03_open_cover.JPG
4. Fold a single sheet into three thicknesses.
F7_09a.JPG
5. Place the folded sheet on the platform and feed it through by turning
the platen knob.
F7_08b_back.JPG
Microline 8810 User’s Guide
85
Page 86

6. Remove any bits of paper that come out.
7. Use the platen knob to remove the continuous forms paper.
F7_08b_forward.JPG
8. Lift the sheet feed platform.
F5-03a.JPG
9. Fold some single-sheet thick continuous forms paper over three times to
make a page four sheets thick, then load it on the tractors.
10. Use the platen knob to draw the quadruple-thick form around the platen
and out of the printer.
F7_10_d.JPG
11. Remove any bits of paper that come out.
Microline 8810 User’s Guide
86
Page 87

12. Reload your continuous forms paper.
13. Close the sheet feed platform and the cover.
F5-06a.JPG
F7_10_c.JPG
14. Turn on the printer.
Microline 8810 User’s Guide
87
Page 88

Error Messages
Manual paper End
Insert Paper
Load paper on the platform and press SEL.
Paper end alignx
insert paper
Load paper on the platform and press SEL.
Front Paper End
Insert Paper
Load continuous forms paper on the front tractors.
Rear Paper End
Insert Paper
Only appears when the optional Rear Push Tractor is installed. Load
continuous forms paper on the rear tractor.
CSFF Paper End
Set Paper to CSF
Applies only when the optional CSF is installed. Load paper in the CSF.
CSFR Paper End
Set Paper to CSF
Applies only when the optional CSF is installed. Load paper in the CSF.
Paper Jam
Remove paper
Remove the jammed paper and press SEL. See page 82.
Data Present
Insert Paper
The printer has received data, but there is no print media loaded in the
selected path. Load print media.
Data Present
Press SEL SW
The printer has received data and paper is loaded, but the printer is off line.
Press the SEL switch to place the printer on line.
Microline 8810 User’s Guide
88
Page 89

Path Changing
Remove Cut Sheet
The printer is attempting to change paper paths from Manual Feed to Front
Feed, but print media is loaded on the platform. Press FF to remove the
media from the platform.
Path Changing
Remove Paper
The printer is attempting to change paper paths from continuous forms to
individual sheets/forms, but print media from the front tractor or the
optional Rear Push Tractor is loaded. Press LOAD to park the continuous
forms.
Press LOAD SW
The printer is waiting for paper to load from the optional CSF. Press LOAD.
Cover Open
Close Cover
Close the top cover.
Paper Feed Alarm
Re-Set Paper
Print media on the platform has miss-fed into the printer. Press SEL, then
press LOAD to eject the media, then try loading it again.
Paper Set Alarm
Re-Set Paper
The paper is not installed correctly. Remove and reinstall it.
Left Margin Err
Check Margin
The left margin setting needs to be adjusted for the print media. Check to be
sure that the Align x Pos. Adjust value you have selected as appropriate.
See page 50.
Head Thermal
Single Pass
The printhead has a thermal sensor which has detected that the printhead is
too hot. The printer has switched to uni-directional printing until the
printhead cools down.
High Duty Print
Single Pass
The print density is high and the printer has switched to uni-directional
printing.
Microline 8810 User’s Guide
89
Page 90

Gap NG
Reload
The printhead gap has been set to a manual setting that does not suit the
media. Change the setting or restore it to the default Auto Gap before
printing.
Microline 8810 User’s Guide
90
Page 91

Maintenance
Replace the Ribbon
Note Use only genuine OKI replacement ribbons.
1. Turn off the printer.
2. Open the cover.
3. Tilt the display panel forward.
F2_15e.JPG
4. Pull the ribbon out a bit at the left end of the cartridge to give some
slack, then unthread it from the printhead.
Microline 8810 User’s Guide
91
F2_13b.JPG
Page 92

5. Remove the used ribbon cartridge and discard it in accordance with local
regulations.
F2_18a.JPG
6. Unpack the ribbon cartridge and remove the lock pieces (1).
F2_09.jpg
7. Swing out the ribbon arms on either end of the cartridge until they snap
into place.
F2_10a.JPG
Microline 8810 User’s Guide
92
Page 93

8. Feed the ribbon arms (1) in beside the guides (2), position the take-up
knob (3) over the pin, then press the cartridge in firmly at either end.
F2_11a.JPG
9. Pull the ribbon out a bit at the left end of the cartridge to give some
slack, then slide the ribbon underneath the printhead. Be careful that
the ribbon is not twisted, folded or pulled off the ribbon arms during this
process.
Microline 8810 User’s Guide
93
F2_13a.JPG
Page 94

10. Make sure the ribbon is threaded through the indentation in each ribbon
guide arm.
F2_13b.JPG
Caution!
Always turn the ribbon knob clockwise (to the right):
turning it counterclockwise (to the left) can cause the
ribbon to jam.
11. Turn the ribbon knob clockwise (in the direction of the molded arrow) to
take up any excess slack in the ribbon.
Microline 8810 User’s Guide
94
F2_15a.JPG
Page 95

12. Push the display panel back to its original position.
F2_15b.JPG
13. Close the cover.
F2_03_close_cover.JP
G
Caution!
If the cover does not close easily, do not force it. The right
end of the ribbon cartridge is not properly seated in the
printer. Open the cover and reseat it. Then reclose the
cover.
14. Turn the printer back on.
Microline 8810 User’s Guide
95
Page 96

Clean the Housing
You should clean the inside of the printer every six months (or after about
300 hours of operation).
Note If you are consistently using recycled paper, you need to clean the
Caution!
housing more often because recycled paper generates more paper
dust.
Never use solvents or strong detergents on the cabinet:
they could damage the housing.
1. Turn the printer off and remove any paper that is loaded.
2. Open the platform and use a clean, dry cloth to clean away any bits of
paper and paper dust.
F5-03b.JPG
3. Close the platform.
4. Open the cover.
5. Tilt the display panel forward and remove the ribbon cartridge.
F2_18a.JPG
6. Use a clean, dry cloth to clean any bits of paper or paper dust from
around the platen.
7. Replace the ribbon cartridge. See page 91. Tilt the display panel back
into place.
8. Close the cover.
Microline 8810 User’s Guide
96
Page 97

Specifications
Specifications subject to change without notice.
Print Method
• Impact dot matrix
Printhead
• Dual 9 pin, 0.3 mm diameter
• Thermal protection
Emulations
•IBM Proprinter
•Epson FX
•ML
Interfaces (Standard)
• Centronics Parallel, IEEE-1284 compliant
•USB 1.1
• Microline 8810n only: Ethernet 10/100 Base-T
Receive Buffer Size
• Selectable 0 or 128 Kbytes
Print Speed
Print speed varies according to the paper thickness/number of copies,
font size, and print quality.
Print Mode Speed
HSD 720 cps
NLQ 150 cps
Utility 600 cps
SSD 810 cps, 12 cpi only
Characters per Line (CPL)
Setting Pitch
10 cpi 136 cpl
12 cpi 163 cpl
15 cpi 204 cpl
Microline 8810 User’s Guide
97
Page 98

Graphics Resolution
• 240 dpi horizontal x 144 dpi vertical
Resident Fonts
•Utility
•NLQ Courier
•NLQ Gothic
Reliability
Parameter Reliability
Mean Time Between Failures (MTBF) 10.000 hours at 25% duty cycle
and 35% page density
Mean Time to Repair (MTTR) 30 minutes
Printhead life 400 million characters
Ribbon Life (on average, utility) 10 million characters
Microline 8810 User’s Guide
98
Page 99

Print Media Specifications
Single Sheets
Note Recycled paper can be printed, but please note the following:
• Recycled paper tends to leave behind more paper dust, requiring
more frequent cleaning of the printer.
• Recycled paper is easily affected by humidity and should not be
used in humid environments.
Width
Minimum
•2.2 inches (55 mm)
• 3.94 inches (100 mm) Auto Align Mode
Maximum
• 16.5 inches (420 mm)
• 14.3 inches (364 mm) Auto Align Mode
Length
Minimum
•2.8 inches (70 mm)
Maximum
• 16.5 inches (420 mm)
Weight
• 14 to 56 lb. US Bond (52 to 210 g/m2 )
Microline 8810 User’s Guide
99
Page 100

Print Media Specifications (cont.)
Individual Multi-Part Forms
Note Recycled paper can be printed, but please note the following:
• Recycled paper tends to leave behind more paper dust, requiring
more frequent cleaning of the printer.
• Recycled paper is easily affected by humidity and should not be
used in humid environments.
Width
Minimum
• 2.17 inches (55 mm)
• 3.94 inches (100 mm) Auto Align Mode
Maximum
• 16.54 inches (420 mm)
• 14.33 inches (364 mm) Auto Align Mode
Length
Minimum
•2.8 inches (70 mm)
Maximum
• 16.54 inches (420 mm)
Thickness
Normal Mode
• Up to 6 parts (original + 5)
• Up to 0.014-inch (0.36 mm) thick
High Impact Mode
• Up to 8 parts (original + 7)
• Up to 0.019-inch (0.48 mm) thick
Microline 8810 User’s Guide
100
 Loading...