

Page 1
MULTIFUNCTION PRINTER
User’s Guide
Page 2

Every effort has been made to ensure that the information in this document is complete, accurate, and up-to-date. Oki Data assumes no responsibility for the results of errors beyond its control. Oki Data also
cannot guarantee that changes in software and equipment made by other
manufacturers and referred to in this guide will not affect the applicability
of the information in it. Mention of software products manufactured by
other companies does not necessarily constitute endorsement by Oki
Data.
Copyright 2001 by Oki Data Americas, Inc. All rights reserved.
Revised edition September, 2001.
Written and produced by the Oki Data T raining & Publications Depart-
ment. Please address any comments on this publication
by mail to: or by email to:
Training & Publications Dept. pubs@okidata.com
Oki Data Americas, Inc.
2000 Bishops Gate Blvd.
Mt. Laurel, NJ 08054-4620
For the latest product information, printer drivers, manuals, special offers,
etc., we welcome you to visit our multilingual web site:
http://www.okidata.com
Year 2000 Compliance
All products currently sold by Oki Data are Year 2000 compliant. Each
product contains information technology that accurately processes date
and time data between the years 1999 and 2000, and carries no issue for
the September 9, 1999 (9999) programming concern. These products,
when used in combination with products purchased from other manufacturers, whose products properly exchange data and time information, will
accurately process the date and time. All future products are committed to
meeting the same Year 2000 compliance.
ENERGY STAR
As an ENERGY STAR partner, Oki Data has determined that
this product meets the ENERGY STAR guidelines for energy
efficiency .
OKI and OKIOFFICE are registered trademarks/marques déposées/marcas registradas of
Oki Electric Industry Company, Ltd. ENERGY STAR is a registered trademark of the United
States Environmental Protection Agency. Windows is either a registered trademark or a
trademark of Microsoft Corporation in the United States and other countries.
®
Page 3

Safety
Installation Hints
- Install the machine in a dust-free location away from direct sunlight.
- Place the machine near an electrical outlet that is easily accessible.
- Do not plug the machine into a power source shared by items that
produce electric noise (e.g., air conditioner, etc.).
- The design of this machine requires electrical grounding, and is thus
supplied with a three-wire grounded power cord. For your safety as
well as that of others who may operate the machine, please do not
attempt to alter the power cord by modifying the grounding prong.
- The Line jack is for connecting the machine to a standard telephone
line. To avoid damage to telephone systems and/or the machine, do
not plug the machine into anything other than a standard RJ-1 1C
jack.
- The TEL jacks on the back of the machine are only suitable for twowire devices. Some standard telephones may not respond to
incoming signals when connected to an extension socket.
- The machine may not necessarily provide the effective transfer of a
call from a telephone connected to the same line.
- The operation of this machine on the same line as that of a telephone or other device equipped with an audible warning device or
automatic call detector may result in bell vibration (sporadic ringing)
or false tripping of the call detector. If such a problem occurs, the
user is requested to NOT contact the telephone company.
- Adjustment of the electrical/electronic components in the machine
requires an authorized service technician. Do not attempt to make
adjustments yourself. Any alterations made by an individual other
than an authorized service technician may be cause for nullification
of the product warranty .
Safety Information 1
Page 4

Operation and Maintenance
- Aside from the instructions specifically stipulated in the handbook,
do not attempt to disassemble or service this machine, including the
lubrication of moving parts. Please contact an authorized service
center for assistance.
- Use a soft dry cloth to clean the control panel and main body of the
unit. Do not apply any cleanser to the cloth or surface of the machine.
- Remove the power cord from the wall socket before trying to recover any object(s) that may have fallen into the machine.
- If the machine is physically damaged, immediately disconnect it and
arrange for its repair or disposal.
- When moving the machine, always disconnect the telephone line
before disconnecting the power cord. Accordingly, reconnect the
power cord before reconnecting the telephone line.
- This machine is not intended for use in parallel with any other
telephone devices.
2 OKIOFFICE 87 User’s Guide
Page 5

Toner Cartridge and Image Drum Unit
Warning: This OKI facsimile machine will not operate if any toner
cartridge or image drum unit other than that specified by
OKI is installed. Please be sure to read the labeling on
the toner package and image drum unit package to
ensure that you have purchased the correct cartridge or
unit. The installation of any other toner cartridge or
image drum unit will cause the system to lock, and the
operations panel will display an error.
- Leave unused toner cartridges and image drum units sealed in their
packaging until needed. When replacing a toner cartridge or image
unit, re-use the packaging to dispose of the old toner cartridge or
image drum unit.
- Do not expose interior components of the machine to light for more
than five minutes. Never expose the green drum (located inside the
image drum unit) to direct sunlight.
- Please be careful when handling the image drum unit and only
touch it at the ends (never in the middle). Never touch the green
drum inside the image drum unit.
- Please be careful when removing the toner cartridge. Do not let it
come in contact with clothing or porous materials. (The toner
powder will cause permanent staining.)
- Small amounts of toner that come in contact with skin or clothing
can be readily removed with soap and cold water if attended to
immediately . The use of hot water will make removal of the stain
much more difficult.
Safety Information 3
Page 6

Emergency First Aid
- IF TONER IS SW ALLOWED: Dilute by having the person drink two
glasses of water and induce vomiting by administering Syrup of
Ipecac (follow manufacturer’s instructions). Seek medical attention
immediately . Never attempt to induce vomiting or give anything by
mouth to a person who is unconscious.
- IF TONER IS INHALED: Take the person to an open area for fresh
air. Seek medical attention immediately.
- IF TONER GETS IN THE EYES: Flush eyes with large quantities of
cool water for 15 minutes, keeping eyelids open with fingers. Seek
medical attention immediately .
4 OKIOFFICE 87 User’s Guide
Page 7

Contents
Safety ....................................................................................................1
Introduction ..........................................................................................1
Features.............................................................................................1
Handset Kit.........................................................................................2
Component Identification ....................................................................3
What You Should Receive..................................................................3
Components 1....................................................................................4
Components 2....................................................................................5
Control Panel Keys and Indicators .....................................................6
Control Panel .....................................................................................6
The One-Touch Keypad ...................................................................10
Using the One-Touch Keys for Dialing .........................................10
Using the One-Touch Keys for Selecting Functions
and Programming ....................................................................10
Signal Tones ................................................................................ 11
Installation ..........................................................................................13
Getting Started .................................................................................13
Where to Install Your MFP Machine .............................................1 3
Unpacking....................................................................................13
Setting Up Your MFP Machine .........................................................14
Install the Paper Tray/Copy Stacker.............................................14
Install the Document Tray ............................................................14
Install the Toner Cartridge ............................................................14
Connect to the Telephone Line.....................................................18
Connecting an External Telephone or Answering Machine...........1 9
Connect Power ............................................................................19
Loading Paper..............................................................................20
Setting the Clock ..............................................................................21
Setting the Answering Mode.............................................................22
Answering Mode Options .............................................................22
Changing the Answering Mode ....................................................23
Contents v
Page 8

Setting the Fax Identification ............................................................24
Setting Language .............................................................................26
Connecting to a PBX ........................................................................26
MFP Function...................................................................................28
Driver Setup .....................................................................................28
Windows 2000 .............................................................................28
Windows Me/98/95 ......................................................................30
Windows NT 4.0...........................................................................31
Unimessage Setup...........................................................................32
Printer Status Icon............................................................................32
Dial Directories ...................................................................................33
Programming One-Touch Keys ........................................................33
Chain Dialing................................................................................35
Programming Auto Dial Numbers.....................................................36
Programming Groups .......................................................................38
Basic Operations ................................................................................39
Preparing Documents.......................................................................39
Document Size ............................................................................39
Multiple Page Documents ............................................................39
Loading Documents .........................................................................40
Sending a Fax to a Single Location ..................................................41
Search Key Dialing ......................................................................42
Real-Time Dialing.........................................................................42
Redialing......................................................................................42
Confirming Results.......................................................................42
Stopping a Transmission..............................................................43
Sending a Fax to Multiple Locations (Broadcasting).........................43
Performing a Broadcast Operation...............................................43
To make corrections.....................................................................44
Faxing to a Group ............................................................................44
Sending a Fax to a Group ............................................................44
Receiving Faxes Manually ...............................................................45
Receiving Faxes in Memory .............................................................46
Memory Reception mode .............................................................46
No Paper Reception.....................................................................46
No T oner Reception .....................................................................47
Canceling Messages Stored in Memory.......................................47
vi OKIOFFICE 87 User’s Guide
Page 9

Rejecting Unsolicited Fax Messages................................................48
Power Failures and Memory ............................................................49
Making Copies .................................................................................49
Making Copies with the Manual Paper Feeder.............................50
Using Voice Request........................................................................51
To Initiate a Voice Request...........................................................51
To Answer a Voice Request .........................................................51
Advanced Operations ........................................................................53
Sending a Fax at a Later Date and Time..........................................53
Sending a Delayed Fax from the Document Feeder ....................53
Sending a Delayed Fax From Memory.........................................54
Canceling a Delayed Transmission..............................................55
Sending a Confidential Fax or Sub-address Transmission ...............56
Receiving Confidential Faxes ...........................................................57
Creating a Confidential Mailbox (Personal Box) ...........................57
Closing a Mailbox.........................................................................58
To Change Your Password...........................................................58
Printing Confidential Messages ........................................................59
To print a received confidential fax message................................59
Relay Broadcasting ..........................................................................60
Relay Initiating Station .................................................................60
Relay Key Station ........................................................................60
Relay Broadcast Report...............................................................60
Initiating a Relay Broadcast .........................................................61
Sending Documents Requested by Another Fax Machine (Polling
Transmission) ................................................................................62
Setting Your MFP Machine to be Polled .......................................62
Dialing Another Fax Machine to Request Documents (Polling
Reception)......................................................................................63
Polling Documents from Other Fax Machines ..............................63
Dual Access .....................................................................................64
What You Can Do While Sending a Fax.......................................64
What You Can Do While Receiving a Fax: ...................................64
What You Can Do While Making Copies: .....................................64
Contents vii
Page 10

Programming ......................................................................................65
Customizing Features and Operations .............................................65
Viewing Your Current Settings......................................................65
User Function Settings .....................................................................66
User Function Settings List ..........................................................66
Changing Your User Function Settings ........................................72
Setting Your MFP Machine’s Distinctive Ring...............................72
Personal Box Programming (Polling) ...........................................73
Personal Box Programming (Confidential) ...................................74
Personal Box Programming (Close).............................................74
Forward No. Programming...........................................................75
Memory Password Programming (Register) ................................75
Memory Password Programming (Delete) ...................................76
Dial Parameter Settings ...................................................................76
Dial Parameter Settings List.........................................................76
Changing Your Dial Parameter Settings .......................................78
Service Function Settings.................................................................79
Service Function Settings List......................................................79
User Functions .................................................................................80
Reports................................................................................................83
Understanding Reports ....................................................................83
Active Memory Files Report .........................................................83
Activity Report..............................................................................84
Confidential Reception Report .....................................................84
Broadcast Confirmation Report....................................................85
Broadcast Entry Report................................................................85
Message Confirmation Report .....................................................85
Configuration Report ....................................................................86
T elephone Directory.....................................................................86
Power Outage Report ..................................................................86
Protocol Dump .............................................................................86
Printing Reports ...............................................................................87
Printing a Message Confirmation Report......................................87
Printing Other Reports .................................................................87
Codes Used in Reports ....................................................................87
Result Codes ...............................................................................87
Communication Codes.................................................................88
viii OKIOFFICE 87 User’s Guide
Page 11

Problem Solving .................................................................................89
Clearing a Document Jam................................................................89
Clearing a Printing Paper Jam..........................................................90
Replacing the Toner Cartridge (OKI P/N 521 11701) .........................94
Replacing the Image Drum Unit (OKI P/N 40709901) ......................98
Shipping the MFP Machine ............................................................100
Reading Your Print Counters ..........................................................101
Problem Checklist ..........................................................................101
Display Panel Messages ................................................................105
Normal Display...........................................................................105
Error Messages .........................................................................105
Other Error Messages................................................................108
Specifications ...................................................................................109
Index .................................................................................................. 111
Contents ix
Page 12

x OKIOFFICE 87 User’s Guide
Page 13

Introduction
Thank you for purchasing this OKIOFFICE 87 machine. This MFP machine uses advanced Light Emitting Diode technology to transfer received
and copied images to plain paper. It has been designed to make sending
and receiving faxes a fast and trouble-free process.
Features
The OKIOFFICE 87 includes the following features:
- 10 One-Touch keys for automatic, single-key dialing of pre-programmed telephone numbers.
- 100 Auto Dial numbers for automatic dialing of additional preprogrammed telephone numbers.
- 5 Groups can be programmed to allow you to transmit a document
to multiple locations with a single selection.
- A search feature to allow you to look for pre-programmed telephone
numbers by name.
- Halftone transmission in up to 64 shades of gray .
- Fax communication at up to 33,600 bits per second.
- Automatic redial and page re-transmission when a telephone
number is busy or when problems occur in communication.
- Advanced transmission and reception features, including delayed
transmission, transmission to multiple locations, confidential, relay
broadcast initiate and polling.
- Advanced memory transmission and reception features, including
automatic reception into memory .
- Reports to help you keep track of your MFP machine’s operations
and settings.
- Automatic power save mode.
- Answering modes for manual and automatic fax reception, automatic switching between incoming voice and fax messages, and to
allow an answering machine to work on the same telephone line.
Introduction 1
Page 14

- A closed network feature to allow you to limit who can send faxes to
your MFP machine, or to limit both where faxes can be sent to and
received from.
- Your MFP machine can also make up to 50 sorted copies of an
original document (using standard-weight 20 lb. paper).
- 2 MB of built-in memory .
- During transmissions, your MFP machine begins scanning data into
memory as it begins dialing (called Instant Dialing), thus saving time
since it does not wait for a connection on the receiving end.
- When printing out a received message at standard size, any data
outside those parameters doesn’t print. By setting your MFP to
automatic reduction, (User Function Setting a No.27 WIDTH REDUCTION) the width of the transmitted document is reduced to
about 95% to bring data within printable parameters. This function
is also active during copying.
- By entering a previously registered 4-digit ID number (Restrict ID),
you can restrict operation of this MFP device to only those who
know the ID.
- MFP Function (PC Printer Mode/PC Scanner Mode/PC Fax Mode)
Unimessage software that enables your MFP machine to act as a
PC printer or scanner and enables the PC fax mode to be used.
For details, see the separate booklet on this option.
Handset Kit
This optional handset connects directly to you MFP and works like a
telephone. Order Number 70031801.
2 OKIOFFICE 87 User’s Guide
Page 15
Component Identification
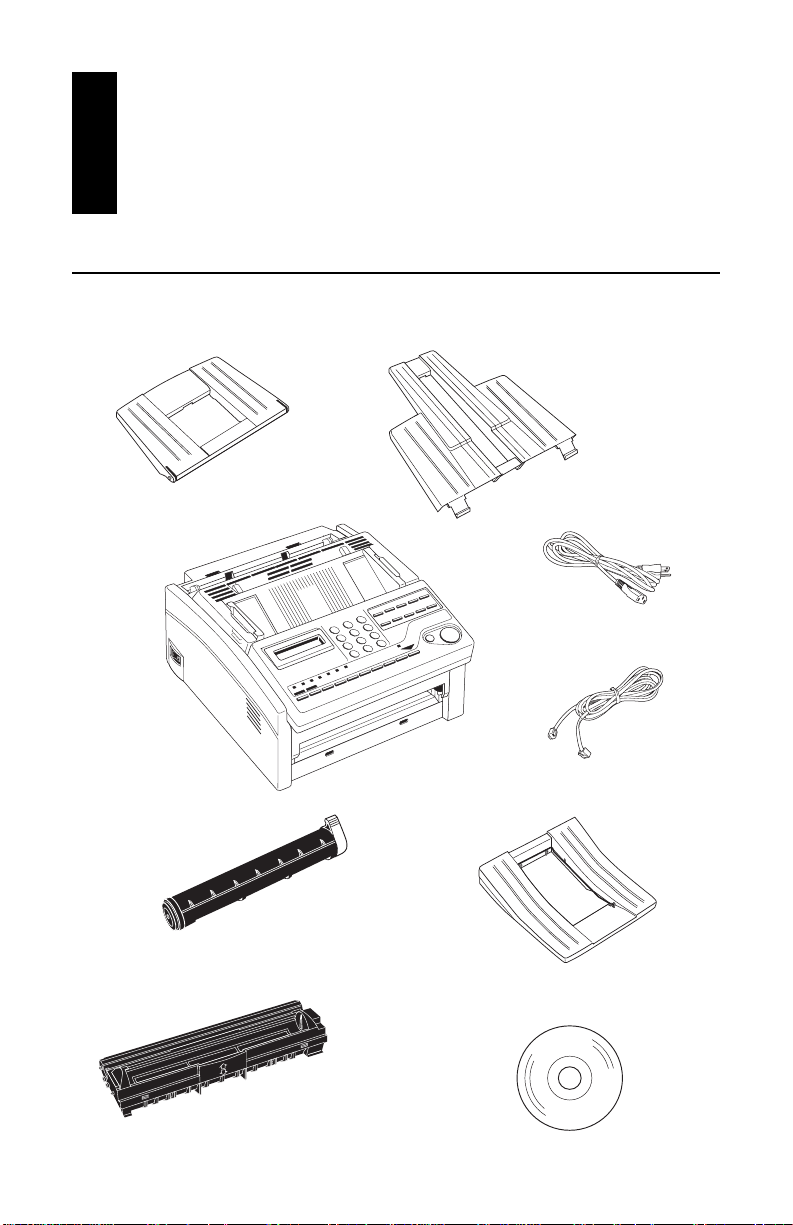
What You Should Receive
Document Tray
Facsimile Unit
Toner Cartridge
Paper Tray/Copy Stacker
Power Cord
T elephone Cord
Document Stacker
Image Drum Unit(Inside MFP machine)
Software CD-ROM
Components 3
Page 16
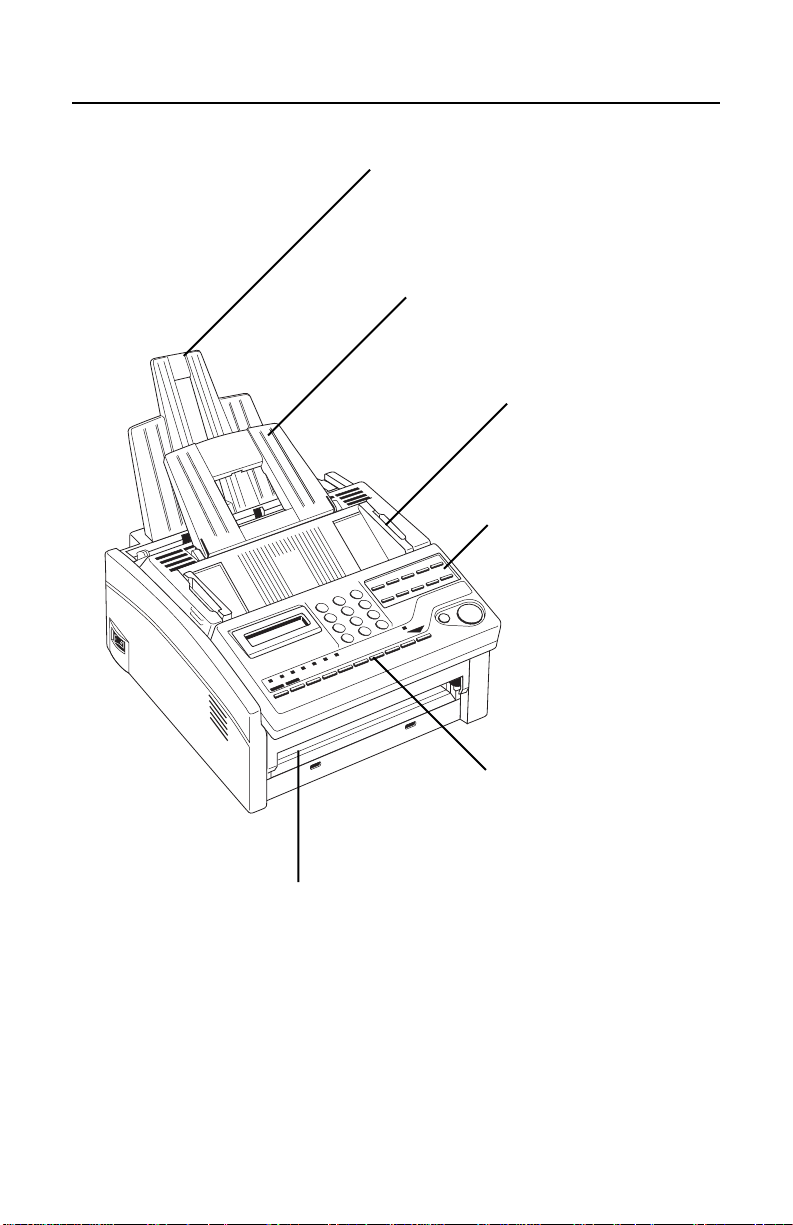
Components 1
Paper Tray/Copy Stacker
Up to 100 sheets of paper can be loaded onto this
tray. Up to 30 sheets of finished copies or received
faxes can be stacked on top of this tray.
Document Tray
Holds original documents that
are to be faxed or copied.
Document Guides
Adjust these guides to the
page width of the
documents that are to be
copied or faxed.
One-Touch Keypad
Manual Paper Feeder
Load paper into this slot when you want to use a type of
paper different from the paper in the paper tray.
4 OKIOFFICE 87 User’s Guide
Control Panel
Page 17

Components 2
PC Connector
Plug the computer cable
into this connector.
LINE T erminal
Terminal for connecting the
unit to an outside telephone
line.
TEL Terminal
Terminal for connecting the
MFP machine to an external
telephone.
Power Switch
AC Power Inlet
Plug the AC power cord into this inlet.
Image Drum Unit
The image drum unit contains the green
photosensitive drum which receives images
from the LED print head and transfers them to
the printing paper.
LED Print Head
This black bar is the part of
your MFP machine which
writes received or copied
images onto the image drum
unit. You should clean this bar
each time you change your
toner cartridge.
T oner Cartridge
This black cylinder,
installed inside the
image drum unit,
contains the black
powder which is your
MFP machine’s ink. You
need to install a new
toner cartridge when the
REPLACE TONER
CART message appears
on the display.
Components 5
Page 18
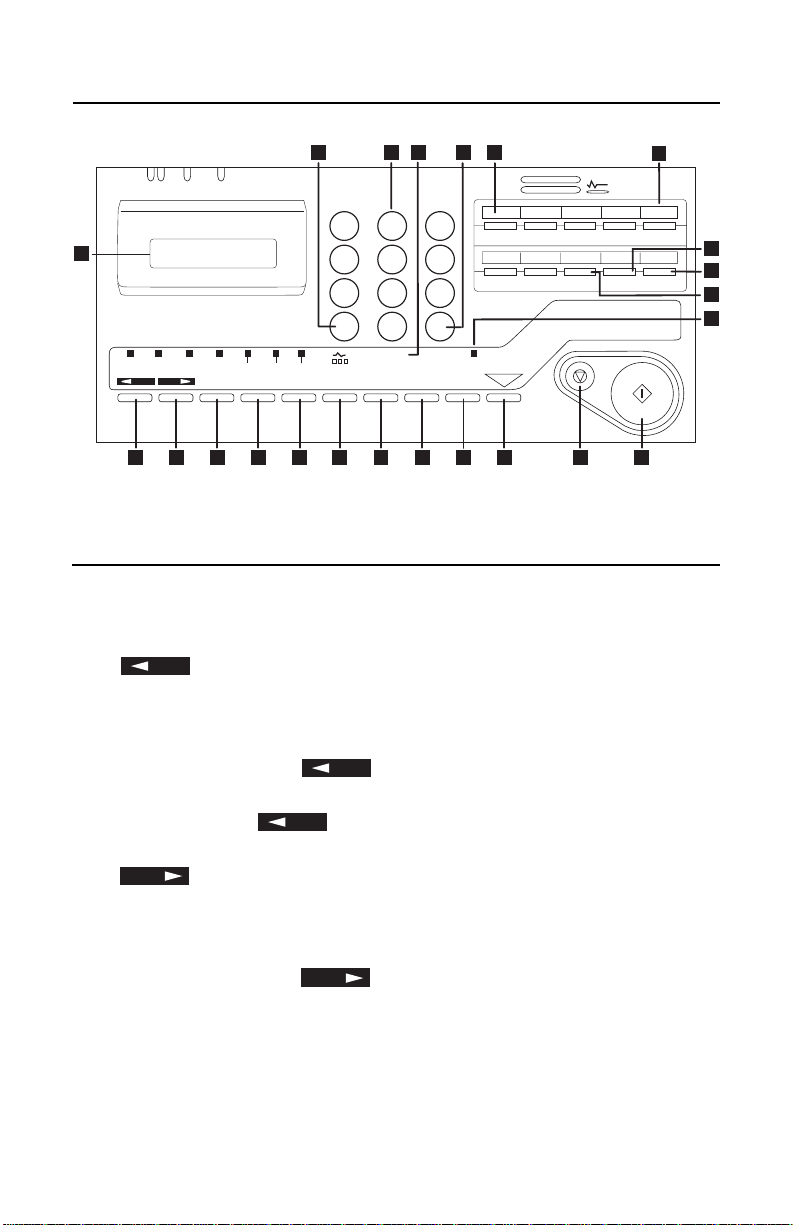
Control Panel
1223 2021
8.5* A4 B5 A5
1
PHOTO
EX FINE STD
NO
YES
32 4 95 6 7 8 10
LIGHT NORMAL DARK
AUTO REC HYPHEN SEARCH
V. REQUEST
22
ABC
1 2 3
JKL MNO
GHI
4 5 6
TUV WXYZ
PQRS
7 8 9
0
*
UNIQUE
HOOK
REDIAL AUTO DIAL
19
1 2 3 4 5
DEF
DELAYEDTXPRINT
OPERATION
6 7
REPORT
COUNTER
PRINT
#
ALARM
SELECT
COP
FUNCTION
11 12 13
DISPLAY
CONF. TX
9/SPACE 10/PAUSE
8/+
LOCATION
PROG.
STOP START
Control Panel Keys and Indicators
1 LCD Display Panel: Refer to this display for instructions and
information while your MFP machine is performing operations or
while you are programming.
YES
2
mitting documents. Use STD for standard originals, FINE and
EX.FINE for detailed or small print originals, and PHOTO for originals that include colors or many shades of gray .
Also use this key as
your cursor while programming.
When copying,
once to select the copy resolution.
NO
3
load a document for transmission. Use LIGHT for originals that are
too light, NORMAL for documents with good contrast, and DARK for
originals that are too dark.
Also use this key as
your cursor while programming.
4 AUTO REC Key: Use this key to switch your MFP machine’s
answering mode. The answering mode controls how your MFP
machine answers incoming calls and receives faxes. Your MFP
machine’s display always indicates your current selection. See
key: Use this key to change the resolution used for trans-
YES
when making selections or to move
YES
can be used after the copy key is pressed
key: Use this key to select the document contrast after you
NO
when making selections or to move
RELAY
INIT.-TX
USER
PROG.
18
POLLING
PRINTER
CLEANING
17
16
15
14
6 OKIOFFICE 87 User’s Guide
Page 19

Setting the Answering Mode in the Installation section for more
information about the answering modes available in your MFP
machine.
5 HYPHEN Key: When programming One-Touch keys and Auto Dial
telephone numbers, use this key to tell your MFP machine to wait
for the outside or international line to become available before it
proceeds with dialing the rest of the telephone number. When
programming the TSI/CSI or call back numbers into your MFP
machine, use this key to enter a “+” symbol.
6 SEARCH Key: The One-Touch keys and Auto Dial numbers can be
programmed to have a name or location ID associated with their
telephone numbers. Using this key by itself or in combination with
the numeric keypad, you can search for these numbers alphabetically . You can also use the SEARCH key to search for unassigned
One-Touch keys and Auto Dial numbers.
7 HOOK/V. REQUEST Key: Press this key to open a telephone line
for manual dialing. You can hear the dialing through your MFP
machine’s speaker . If you have an external telephone connected to
your MFP machine, you can also use this key to initiate or answer a
request for voice communication. During a fax communication,
press this key to tell the operator at the other fax machine that you
want to talk to him or her at the end of your transmission or after
reception of any page has been completed. To answer a voice
request, press this key after lifting your telephone handset.
8 REDIAL Key: Press this key to manually redial the last number
dialed on your MFP machine.
Tip:
Once the MFP machine has entered power save mode (after
the machine has been inactive for three minutes), this manual redial
function does not work.
9 AUTO DIAL Key: Auto Dial numbers are abbreviated numbers for
rapid dialing. Rather than dialing the entire telephone number, you
can enter a 3-digit Auto Dial number instead. You can also use the
Location IDs (names) associated with Auto Dial numbers to search
for these locations by name using the Search key .
10 SELECT FUNCTION Key: Use this key to activate your MFP
machine’s advanced transmission and reception functions, to obtain
reports and for programming. To select a function, press the SELECT FUNCTION key, and then press the One-T ouch key labeled
with the function you want to use. When programming or selecting
other functions, pressing the SELECT FUNCTION key a second
time returns you to the standby mode.
Components 7
Page 20

11 COPY Key: After loading a document, press this key to make a
copy . When no documents are loaded, press this key once to
obtain a Message Confirmation Report about your last transmission on the LCD Display Panel, and a second time to receive a
printed report. You can also use the Copy key as a shortcut for
programming One-Touch keys and Auto Dial numbers. After you
have loaded a document and manually dialed a telephone number,
press COPY to instantly program that number into a One-Touch
Key or Auto Dial number.
12 STOP Key: This key cancels the operation currently in progress
and turns off the Alarm Indicator. After loading paper or installing a
new toner cartridge, press this key to cancel alarm conditions after
the condition has been corrected. When programming, pressing
the STOP key takes you back step-by-step through the programming functions you have already selected.
13 START Key: Press the START key to initiate the operation indi-
cated on the display or to confirm information you have entered
into the display . When the MFP machine is in power save mode,
press the ST A R T key to exit power save mode.
14 ALARM Indicator: When there is a problem, this indicator lights
(red) and an alarm sounds. To turn the alarm indicator off, press
the STOP key and correct the problem.
15 8/+ key (One-Touch key 8): Each fax number you enter or pro-
gram into your MFP machine can be up to 40 digits long. If you
need to dial a number which is longer than 40 digits, you can dial a
number using any combination of One-Touch keys, Auto Dial
numbers or the numeric keypad. When programming a chain dial
number into a One-Touch key or Auto Dial number, press the 8/+
key at the end of the first part of the number to indicate to the MFP
machine that this is a chain dial number.
16 10/PAUSE Key (One-Touch key 10): Use this key on the
One-Touch keypad to enter automatic 3-second pauses in dialing
when programming telephone numbers. For example, you may
want to use this key to tell your machine to wait for an outside or
international line to open. Pauses in telephone numbers are
marked by a “P” symbol.
17 9/SPACE Key (One-Touch key 9): Use this key on the One-Touch
Keypad to enter spaces while programming. Unlike the P AUSE
key, spaces are used for easier reading only and have no effect on
dialing.
8 OKIOFFICE 87 User’s Guide
Page 21

18 One-Touch Keypad: For a description of all the functions of the
One-Touch keypad, see the next section, “The One-Touch Keypad.” below
19 One-Touch Labels: After programming a location into a
One-Touch key, write the location’ s name on the One-Touch label.
Lift off the plastic cover above the One-Touch label, use a pencil to
write in the name, then replace the cover.
20 # Key: Once you have programmed some One-T ouch keys or
Auto Dial numbers, use this key to create groups to allow you to
send the same fax to multiple locations. After you have loaded a
document, use this key to select the group you want to send your
fax to.
21 0/UNIQUE Key: When dialing, use this key to enter a “0.” When
programming your Sender ID or a Location ID, you can use this
key to enter a variety of unique characters, including: ! @ \ “ _ % ~
# & ‘ ( ) * + , - . / : ; = ? · ä ß ñ ö ü Æ Å Ø æ å ø.
22 Numeric Keypad: When dialing, these 12 keys work just like the
keypad on a telephone. Also use the keypad to enter numbers,
letters and other characters while programming. After pressing the
SEARCH key , you can also use the numeric keypad to alphabetically search for the names of locations programmed into your MFP
machine.
23 * Key: If your MFP machine is set to pulse dialing, this key allows
you to switch the dialing operation of your MFP machine from
pulse to tone dialing during your current call. You can also use this
key while programming to create numbers with mixed
pulse-then-tone operation.
Components 9
Page 22

The One-Touch Keypad
The One-Touch keys are your MFP machine’s most important tool. Use
them for quick, one-touch dialing, and to access most of your MFP
machine’s functions and programming options.
Using the One-T ouch Keys for Dialing
To use a One-Touch key for dialing, just press the appropriate One-T ouch
key. For each key, you may program up to two telephone numbers: a
primary number, which is always dialed first, and an alternate number
which is automatically dialed if the first number is busy or if there is no
answer. You can also use the Location IDs (names) associated with
One-Touch keys to search for these locations by name using the
SEARCH key.
Using the One-T ouch Keys for Selecting Functions
and Programming
Use the One-Touch keys for selecting special transmission and reception
functions, for obtaining reports and for programming.
To select a function from the One-Touch keypad, press the SELECT
FUNCTION key , and then press the corresponding One-Touch key.
1/DELAYED TX Key: Use this key to send a fax at a later time and
date which you specify (within three days).
2/PRINT OPERA TION Key: Use this key to print out a confidential
received document stored in memory using a single digit personal box
number.
3/CONF. TX Key: Use this key to send a confidential document to a
mail box (a memory storage area) in the receiving fax machine.
4/RELAY INIT.-TX Key: Use this key to set up a relayed fax transmission. During a relayed fax transmission, your MFP machine initiates
the transmission by sending a document to a second fax machine,
which then broadcasts the message to a number of other fax machines.
5/POLLING Key: When a document is loaded on the document table,
use this key to set your MFP machine to wait for another fax machine
to call and request the document to be sent (polling transmission).
When no document is loaded on the document table, use this key to
call another fax machine and ask it to send the documents loaded into
it (polling reception).
10 OKIOFFICE 87 User’s Guide
Page 23

6/REPORT PRINT Key: Use this key to manually print reports from
your MFP machine.
7/COUNTER DISPLAY Key: Y our MFP machine keeps track of the
number of pages it has printed in several ways. Use this key to check
your MFP machine’s print counter and the scan counter. It can also
be used to reset your MFP machine’s drum counter after replacing the
image drum unit.
8/LOCA TION PROG. Key: Use this key to program your MFP
machine’s One-Touch keys, Auto Dial numbers and groups.
9/USER PROG. Key: Use this key to program your MFP machine’s
identification information, to set your MFP machine’s clock, to set up
mailboxes for confidential message reception, and to change your
MFP machine’s function settings.
10/PRINTER CLEANING Key: Use this key to print a cleaning page
for clearing accumulated toner from your MFP machine’s image drum.
Signal T ones
Your MFP machine emits a number of sounds to inform you of specific
conditions.
Key Select T one: This is a short beep that is generated each time
that you press a key .
Error Tones: If you press a wrong or inappropriate key, your MFP
machine emits three short beeps. If your MFP machine experiences a
problem during communications, it emits five long beeps. Press the
STOP key to turn the error tone of f, then print a Message Confirmation
Report to check the source of the problem (to do this, press the COPY
key twice with no documents loaded).
V oice Request Tone: During a fax session, either you or the person
at the remote fax machine may initiate a voice request. When the
person at the remote fax machine either initiates or answers your
voice request, your MFP machine emits a repetitive warbling sound.
End of Session T one: At the end of every successful fax session,
your MFP machine emits a beep to inform you that there were no
errors or problems in the communication.
Off-Hook Alarm Tone: If your MFP machine is equipped with a
handset, and if the handset is left off the hook, your MFP machine
emits an intermittent warbling sound. To turn off the sound, hang up
the handset or press the STOP key.
Components 11
Page 24

12 OKIOFFICE 87 User’s Guide
Page 25

Installation
Getting Started
To install your new MFP machine, follow the instructions from Unpacking
to Setting the Fax Identification. You must complete these steps for your
MFP machine to operate properly.
If you have purchased an option package for your MFP machine, refer to
the documentation you received with that option.
Where to Install Your MFP Machine
- Install your MFP machine in a dust-free location away from direct
sunlight.
- Allow several inches on each side of the MFP machine to ensure
adequate ventilation.
- Make sure that both power and telephone outlets are available
nearby .
- Choose a location where the relative humidity is between 20% and
80%, and where the temperature is between 10°C/50°F and 32°C/
92°F .
Unpacking
Before you begin, be sure that all the items listed below are included in
your package. Remove the contents from the carton and place them on a
sturdy surface.
- MFP unit
- Toner cartridge - Image drum unit (inside MFP unit)
- Power cord - Telephone line cord
- Paper tray/Copy stacker - Setup Guide & Warranty booklet
- Document Tray - Document Stacker
- Unimessage Software CD-ROM
Refer to the illustrations in the Component Identification section.
Installation 13
Page 26
Setting Up Your MFP Machine
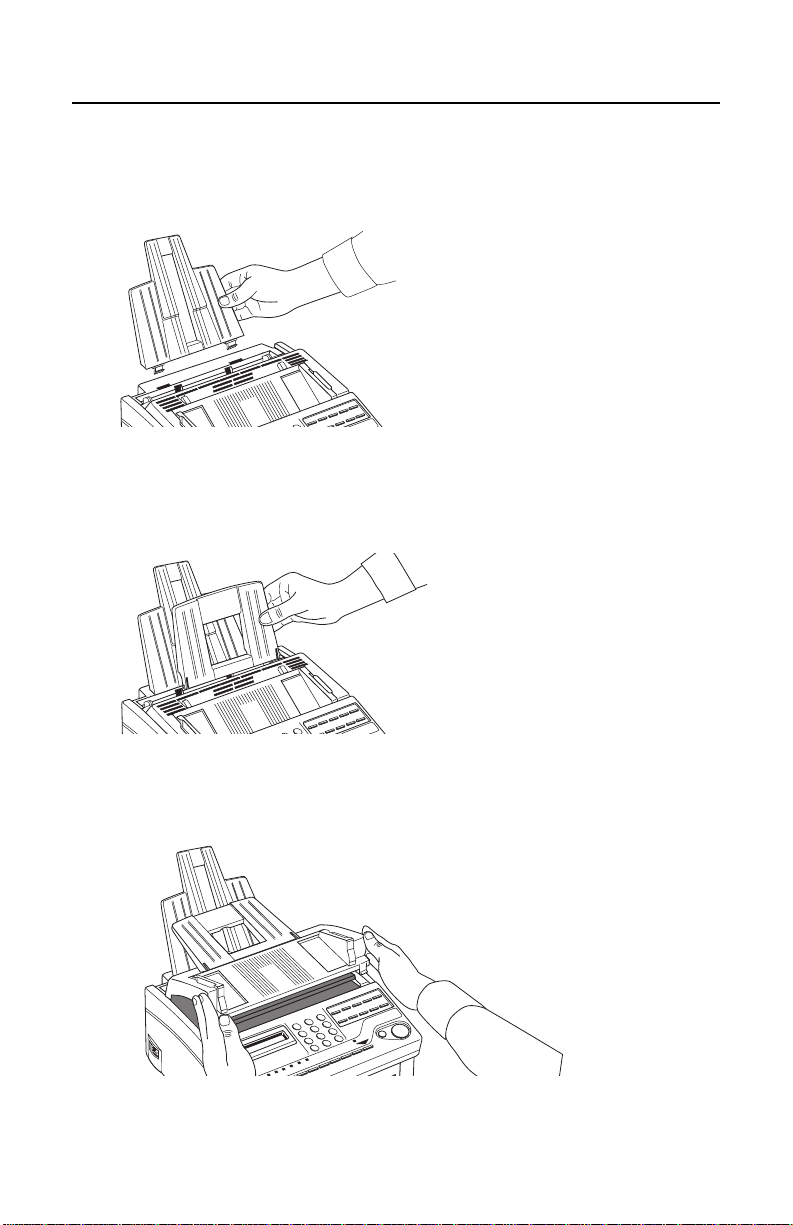
Install the Paper Tray/Copy Stacker
Slip the paper tray/copy stacker tabs into the rearmost slots in the top of
the unit. You will feel them lock into place.
Install the Document Tray
Insert the document tray into the long horizontal slot on the top of the unit.
You will feel it lock into place.
Install the T oner Cartridge
1
Open the MFP machine’s top cover.
14 OKIOFFICE 87 User’s Guide
Page 27
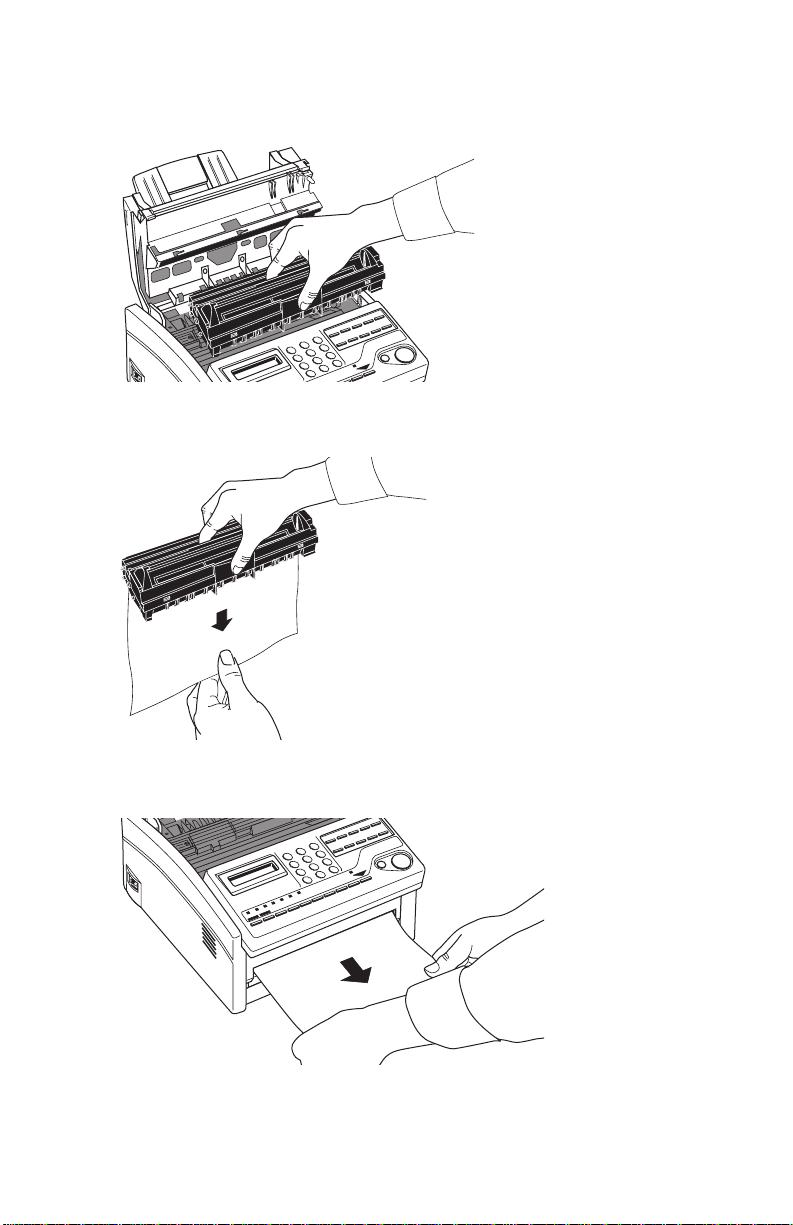
2
Lift the image drum unit out and set it aside. Keep it out of direct
sunlight. Do not touch the green surface of the drum.
3
Pull and detach the protective cover.
4
Hold both ends of the protective cover that is sandwiched in the
manual paper feeder, and gently pull out and detach.
Installation 15
Page 28
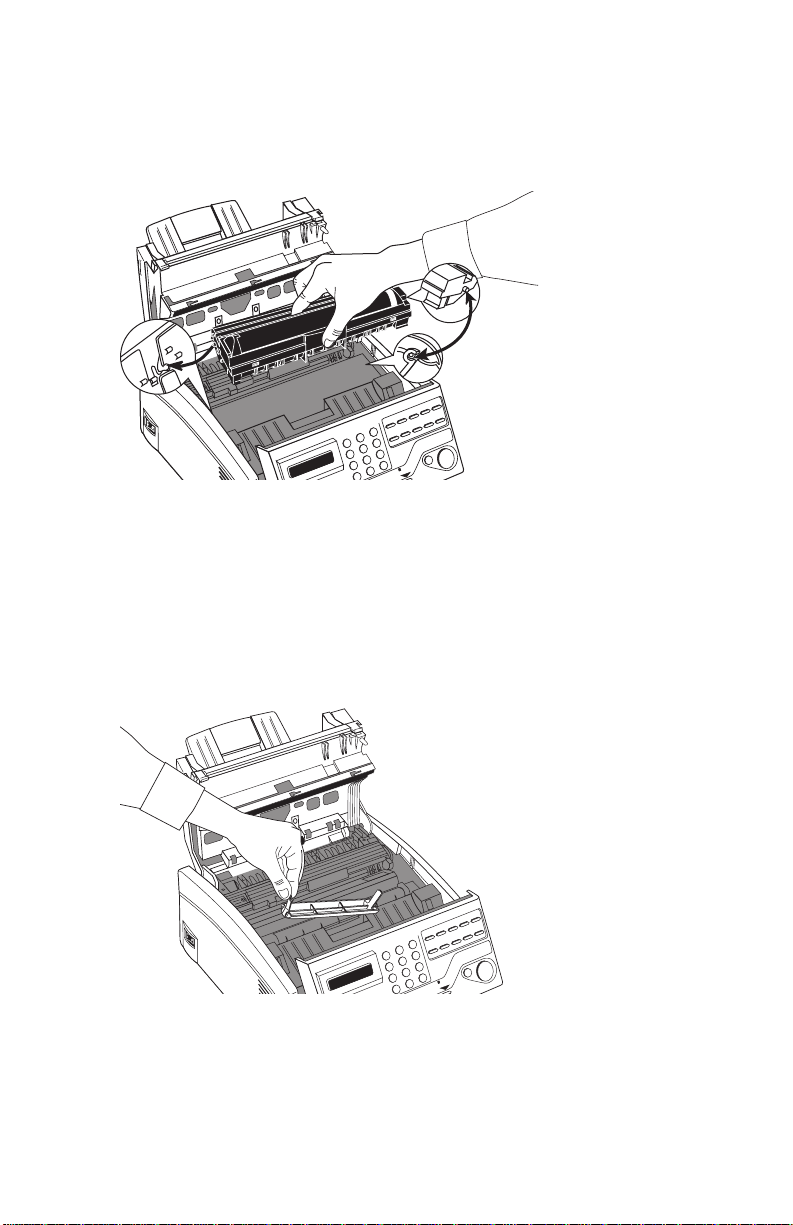
5
Place the image drum unit back into your MFP machine. Ensure
that the tabs on both sides of the image drum are inserted correctly
as shown below. Then press down firmly on both ends of the image
drum until it snaps into place.
Warning: Never expose the image drum unit to light for more than
5 minutes. Never expose the image drum unit to direct
sunlight. Always hold the image drum unit by the ends.
Never touch the surface of the green drum inside the
image drum unit.
6
Remove the protective plastic cover from the toner well in the image
drum unit.
Warning: Be careful when handling the toner cartridge. Do not let
toner spill onto your clothing or other porous materials. If
you experience any problems with toner, see the Safety
section.
16 OKIOFFICE 87 User’s Guide
Page 29
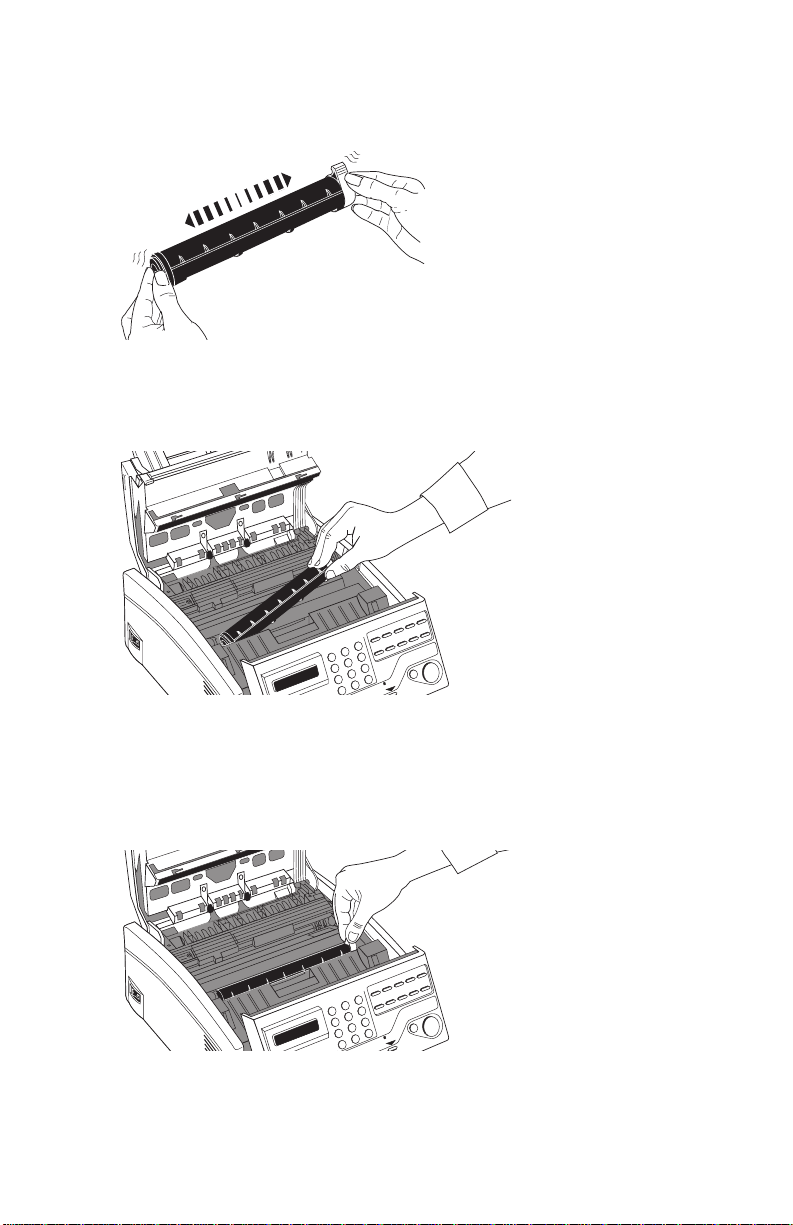
7
Remove the toner cartridge from its package and gently shake it
from side to side to distribute the toner. Then carefully peel the
white plastic tape from the bottom of the toner cartridge.
8
With the ridged side facing up and the gray lever on your right,
insert the toner cartridge into the image drum unit. Slide the left end
of the cartridge in first, then lower the right end into place.
Warning: Be careful not to insert the toner cartridge backwards
into the image drum unit.
9
Once the toner cartridge is in place, push the gray lever all the way
forward to secure it and release the toner.
Installation 17
Page 30

10
Close the top cover of the MFP machine.
Tip:
Ensure that the top cover is firmly closed by pressing down hard
on both sides of the top cover.
Connect to the T elephone Line
1
Insert one end of the telephone cord into the LINE terminal at the
back of the machine.
2
Insert the other end of the cord into your wall telephone jack.
Tip:
Now, you can connect either an external telephone or the
external handset option for your MFP machine. See the
instructions below.
18 OKIOFFICE 87 User’s Guide
Page 31

Connecting an External T elephone or Answering Machine
1
Insert one end of the telephone cord into the TEL terminal on the
back of the machine.
2
Insert the other end of the cord into the jack in your external device.
Tip:
To connect both an answering machine and a telephone, first
connect your answering machine to your MFP machine, then plug
your external telephone’s cord into the telephone jack on your
answering machine.
Tip:
You need to have the T AD mode feature turned on for an
answering machine to work with your MFP machine. See Setting
the Answering Mode in this section.
Connect Power
Warning: Before connecting power, ensure that the power switch is
OFF (“O” is pressed in)
1
Plug the power cord into the power inlet located on the back of the
unit.
Installation 19
Page 32

2
Plug the unattached end of the power cord into a grounded AC
power outlet.
3
Turn the power switch to ON.
The time and current answering mode appears on the display . Your
MFP machine is now in standby mode, ready to send or receive
faxes.
Tip:
The LCD display does not immediately disappear if the power
is turned off while idling in the Power Save mode. This is not a
malfunction and the display disappears momentarily .
Loading Paper
Your MFP machine can hold up to 100 sheets of standard-weight (20 lb.)
paper. For best results, use paper specially made for laser printers or
photocopiers. A vailable sizes are A4, letter size and legal size.
Your MFP machine automatically reduces the vertical length of the page
images it receives to fit on the paper loaded in your MFP machine (down
to 75% of the original length). For example, if you are sent a document
created originally on legal-size paper, your MFP machine can reduce the
received pages to fit on A4 or letter-size paper.
Tip:
Your MFP machine is set at the factory to use letter size paper. If
you intend to use a different paper size, change the PAPER SIZE user
function setting to match your new paper size. See the Programming
chapter for instructions.
1
Adjust the paper guides to the width of your paper.
Tip:
Adjust the paper guide on the right side to the mark of the width
of your paper. After completing paper setting (Item 3), the paper
guide on the left side should be aligned to the paper’s width.
20 OKIOFFICE 87 User’s Guide
Page 33

2
Remove the paper from its wrapper (up to 100 sheets). Note the
“print side” notice printed on the label. Fan the paper.
3
Insert the paper into the paper tray , print side down.
Tip:
Be sure to insert at least 1 1 sheets of paper into the paper tray.
Any less than that brings up the “No-feed” response.
Caution: Be sure to grasp the paper tightly to avoid slipping of the
uppermost sheet of paper.
Setting the Clock
Follow these instructions to set the time and date on your MFP machine.
SELECT
FUNCTION
1
Press the SELECT FUNCTION key.
2
Press the 9/USER PROG. One-Touch key.
3
On the numeric keypad, press 3. The display shows 3:CLOCK
9/SPACE
++
USER
PROG.
DEF
3
3:
CLOCK ADJUSTMENT
YES (
) NO ( /1-8)
ADJUSTMENT.
4
Press
5
Using the numeric keypad, enter the new date and time.
6
Press
7
Press the SELECT FUNCTION key to finish.
YES
. The display shows the currently set date and time.
YES
to confirm your entry.
Installation 21
Page 34

Setting the Answering Mode
Your MFP machine has a number of answering modes, which determine
how it handles incoming calls (both fax and voice). The current answering
mode appears on your MFP machine’s standby display.
Answering Mode Options
The answering mode which is best for you varies depending on how you
use your MFP machine and what external telephone devices are connected to it. Read through the answering modes that are listed here, then
follow the instructions below.
Manual Receive Mode [TEL]: If you use the same line for both fax
and telephone calls and the majority of your incoming calls are telephone calls, then the TEL answering mode is your best choice. Each
time someone calls, your MFP machine rings like a telephone. You can
answer from an external telephone connected to your MFP machine. If
you pick up the handset and hear fax tones, press the ST A RT key to
receive the fax. If you do not answer the phone and someone tries to
send you a fax message, your machine does not accept it.
Auto Receive Mode [FAX]: If your MFP machine is connected to a
telephone line reserved only for fax communications, use the Auto
Receive mode. Your MFP machine assumes all incoming calls are fax
messages and automatically receives all incoming fax messages.
T elephone/Fax Mode [T/F]: When incoming calls are a mixture of fax
and telephone calls, your best choice is the Telephone/Fax mode. In
this mode, your MFP machine detects whether the incoming call is a
fax or voice call. When the call is from another fax machine, your
machine switches to fax mode and receives the message. When the
call is a voice call, your MFP machine rings like a telephone. If you do
not answer, your MFP machine switches back to fax mode to allow the
calling party to manually send a fax.
T elephone Answering Device Mode [TAD]: Use this mode if you
have connected an answering machine to your MFP machine. Like
Telephone/Fax mode, the Telephone Answering Device mode detects
whether an incoming call is a fax or voice call. If the call is a fax call,
your MFP machine receives the fax. Your answering machine does not
activate. If the incoming call is a voice call, your MFP machine rings
just as it does in Manual Receive mode. If no one answers the call,
your answering machine activates, allowing the calling party to leave a
message. If the calling party decides to send a fax, your MFP machine
automatically receives the fax.
22 OKIOFFICE 87 User’s Guide
Page 35

Tip:
In some countries, the Telephone Answering Device mode is
turned off. To have it turned on, contact your dealer .
Memory Reception Mode [MEM]: The received data is not printed
and is stored into memory even if there is fax paper on which to print.
Use the Print Operation function when you want to print out data that
was stored in memory during the Memory Reception mode.
You can set a password for when you want to disable the Memory
Reception mode.
The password is set by USER PROGRAMMING under MEM. P ASS-
WORD PRG.
PC Receive mode [PC]: Use this mode when your MFP machine is
connected to your PC. The call signal from your exchange is sent
directly to your PC. Your MFP machine does not respond to the signal.
Fax reception by your PC is enabled upon receiving the call signal.
Tip:
You need to install a special driver into your PC in order to use
this function.
Forwarding Mode [FWD]: The forwarding mode allows received
facsimiles to be forwarded to another number. The forwarding numbers
are entered or registered at One-Touch Key 6. Up to ten forwarding
numbers can be registered.
Changing the Answering Mode
Follow these instructions to change your MFP machine’s answering
mode.
1
Press the AUT O REC key. Your MFP machine displays a description of your current selection.
2
Press the AUT O REC key again. Your MFP machine switches to the
next setting.
3
Continue pressing the AUT O REC key until the selection you want
appears on the display . After a short pause, your MFP machine
returns to standby mode displaying the new answering mode
setting.
Tip:
If a password has been set in the Memory Reception mode,
you need to enter the password in order to disable the Memory
Reception mode.
Installation 23
Page 36

Setting the Fax Identification
MFP machines use the information you enter here to identify themselves
during communications. In most countries programming this information
into your MFP machine is a legal requirement. The information you enter
here includes:
TSI/CSI: This is the telephone number of your MFP machine. This
number is printed at the top of the faxes you send, and appears on the
displays and reports of other fax machines you are communicating
with.
Sender ID: This is a descriptive title (usually the location of your MFP
machine or the name of your company or office). This description is
printed at the top of every fax you send. You can enter up to 32 characters. The first 16 characters of your Sender ID are also be used as
your Personal ID, which may appear on the displays or reports of other
fax machines you are communicating with.
Call Back Number: The Call Back Number is a telephone number (not
a fax number) which the operator of the remote machine can use to
reach you. If you use the voice request function while communicating
with another fax machine and no one is there to answer, your MFP
machine automatically sends a cover letter with a call back message.
The call back message is printed in a separate sheet with the message
“Please call back” and a telephone number where you can be reached.
The call back number entered here is the number that appears on the
call back message.
SELECT
FUNCTION
1
Press the SELECT FUNCTION key.
2
Press the 9/USER PROG. One-Touch key.
3
On the numeric keypad, press 4. The display shows 4:SYSTEM
9/SPACE
++
USER
PROG.
GHI
4
4:SYSTEM DATA PRG.
YES ( ) NO (
/1-8)
DATA PRG.
4
Press
YES
. The display shows NO=<TSI/CSI>, ID=<SENDER
ID>.
24 OKIOFFICE 87 User’s Guide
Page 37

5
After the display clears, enter the full telephone number of your MFP
machine using the numeric keypad.
Tip:
Use the Hyphen key to enter a “+” character before the number, and use the Space One-Touch key to enter spaces.
6
Press the ST ART key to save your entry.
7
Enter your Sender ID. This is a descriptive title up to 32 characters
long. Refer to the instructions below.
To Do This Use
Enter numbers Numeric keypad (press once)
Enter spaces 9/SPACE One-Touch key
Enter hyphens HYPHEN key
Enter alphabet characters Locate the character you want on the numeric keypad.
Enter a unique character Press the 0/UNIQUE key repeatedly until the character
Move the cursor to
make corrections.
8
Press the ST A RT key to save your entry. The display shows
Press that key repeatedly until the character appears.
you want appears.
The following characters are available: ! @ \ “ _ % ~ #
& ‘ ( ) * + , - . / : ; = ? · ä ß ñ ö ü Æ Å Ø æ å ø.
Note:
Some unique characters can be inputted using
One-Touch keys.
YES
and
NO
.
NO=<CALL BACK NO.>.
9
After the display clears, use the numeric keypad to enter the telephone number you want to use for call back messages. Enter up to
20 characters.
Tip:
Use the HYPHEN key to enter a “+” character before the
number, and use the SPACE One-Touch key to enter spaces.
10
Press the ST ART key to save your entry.
11
Press the SELECT FUNCTION key to finish.
Installation 25
Page 38

Setting Language
YES
Your MFP machine comes with two languages installed, which appear on
the display and in reports. Follow the instructions below to switch languages.
Tip:
Your dealer may be able to provide you with additional languages.
SELECT
FUNCTION
1
Press the SELECT FUNCTION key.
2
Press the 9/USER PROG. One-Touch key. The display shows
9/SPACE
++
USER
PROG.
+
1
YES
+
1
14:USER LANGUAGE
[ENG.] YES(
GHI
+
4
) NO(
)
1:FUNC. PROGRAMMING.
3
Press
4
Using the numeric keypad, enter 14. This display shows USER
YES
. The display shows FUNCTION NO. [ ].
LANGUAGE.
5
Press
6
To accept the language change, press
7
Press the SELECT FUNCTION key to finish.
NO
to switch to the other installed language.
.
Connecting to a PBX
A PBX (Private Branch Exchange) is a private telephone system used to
route internal calls. If you have to dial a prefix (access) number to get an
outside line, then your line is connected to a PBX.
If you are connecting your MFP machine to a PBX, follow the instructions
below. These setting changes allow your MFP machine to identify your
PBX’ outside line dial prefix digits in the numbers that you program or dial
in your MFP machine. After it dials the prefix digits, your MFP machine
waits until it sees that the outside line is available before dialing the rest
of the number.
26 OKIOFFICE 87 User’s Guide
Page 39

Warning: Some PBX installations may require additional adjust-
ments to your MFP machine. If you continue to have
difficulty with fax communication after following these
steps, contact your dealer.
SELECT
FUNCTION
1
Press the SELECT FUNCTION key.
2
Press the 9/USER PROG. One-Touch key.
3
On the numeric keypad, press 2. The display shows 2:DIAL PA-
9/SPACE
+++
USER
PROG.
ABC
2
YES YES
PBX LINE
[OFF] YES(
) NO(
)
RAMETER.
NO
NO
YES
until the display shows PBX LINE, [OFF].
. The display changes to PBX LINE, [ON].
YES
until the display shows DIAL PREFIX, [OFF].
. The display changes to DIAL PREFIX, [ ] ENTER 4
4
5
6
7
Press
Press
Press
Press
DIGITS.
8
Using the numeric keypad, enter the number you normally dial from
your PBX to obtain an outside line.
9
Press
10
Press the SELECT FUNCTION key to finish.
Tip:
YES
.
Keep in mind that all of the outside telephone numbers you
program into your MFP machine must begin with your PBX’s dial
prefix.
Tip:
To later turn off the PBX LINE and DIAL PREFIX functions,
follow Steps 1-7 above. At Step 8, press the 9/SPACE One-Touch
key four times.
Installation 27
Page 40

MFP Function
To use your MFP machine as a PC Printer or PC Scanner, you need to
install the MFP (Multi-Function Peripheral) software. A PC Connector is
already included in the MFP machine as standard equipment. For details
regarding MFP software, please refer to the separate booklet on the
“MFP Function.”
Driver Setup
Windows 2000
Note:
Administrator’s authority is required for installation with
Windows 2000.
1
Make sure that both the printer and the computer are turned OFF.
2
Connect the fax machine and computer with a parallel interface
cable.
3
Turn the computer ON and allow Windows to start.
4
Turn the fax machine ON. At the prompt telling that a new device
has been detected, select Cancel.
5
Insert the Unimessage Pro XL CD-ROM into your CD-ROM drive.
6
After the setup program has automatically started, click Setup
device driver and Unimessage Pro and follow the on-screen
instructions as appropriate This installs both the printer driver and
the Unimessage Pro software.
Note:
If you want to install only the driver, click
Note:
If the setup program does not automatically start or
notification
D:\SETUP.EXE (where D is the drive letter of your CD-ROM
drive) and click
7
When the Fax Port Installation dialog appears, click OK.
is turned off, click
OK.
Start®Run...
Setup device driver
28 OKIOFFICE 87 User’s Guide
.
Auto insert
. Type in
Page 41

8
When the Add/Remove Hardware Wizard dialog appears, do the
following:
a
When the Welcome to the Add/Remove Hardware Wizard
dialog appears, click Next.
b
When the Choose a Hardware T ask dialog appears, select Add/
Troubleshoot a device and click Next.
c
When the New Hardware Detection dialog appears, select Add
a new device from the device list and click Next.
d
When the Find New Hardware dialog appears, select No, I want
to select the hardware from a list and click Next.
e
When the Hardware T ype dialog appears, select Ports
(COM&LPT) from the list and click Next.
f
When the Select a Device Driver dialog appears, click Have
Disk.
g
When the Install From Disk dialog appears, type
D:\DRIVER\SETUP\DISK1\WIN2K (where D is the drive letter of
your CD-ROM drive) in Copy manufacturer’s files from and
click OK.
h
Select Okidata Fax Port from the list and click Next.
i
When the Start Hardware Installation dialog appears, click
Next.
j
When the Completing the Add/Remove Hardware Wizard
dialog appears, click Finish.
9
During copying, the Find Fax Port dialog appears and the fax port
is found; then click OK.
10
When the Modem Installation dialog appears, click OK.
11
If the Location Information dialog appears, enter information about
your current location and click OK.
12
When the Phone and Modem Options dialog appears, do the
following:
a
Open the Modems tab and click Add.
b
Check Don’t detect my modem; I will select it from a list. and
click Next.
c
Click Have Disk and when Install From Disk dialog appears,
type D:\DRIVER\SETUP\DISK1\WIN2K (where D: is the drive
letter of your CD-ROM drive) in Copy manufacturer’s files
from and click OK.
Installation 29
Page 42

d
When the Install New Modem screen appears, select the
appropriate device and click Next.
e
Check Selected ports, select the port displayed in Step 8, and
click Next.
f
When Digital Signature Not Found appears, click Yes.
g
Click Finish and when the Modems Properties dialog appears,
click OK.
13
When Install Complete screen appears, click OK and the setup of
the driver is now complete.
Windows Me/98/95
1
Make sure that both the printer and the computer are turned OFF.
2
Connect the fax machine and computer with a parallel interface
cable.
3
Turn the fax machine and computer ON and allow Windows to start.
If you see a prompt telling you that a new device has been detected,
press Cancel.
4
Insert the Unimessage Pro XL CD-ROM into your CD-ROM drive.
5
After the setup program has automatically started, click Setup
device driver and Unimessage Pro and follow the on-screen
instructions as appropriate. This installs both the printer driver and
the Unimessage Pro software.
Note:
If you want to install only the driver, click
Note:
If the setup program does not automatically start or
notification
D:\SETUP.EXE (where D is the drive letter of your CD-ROM
drive) and click OK.
6
When the Install Complete screen appears, click Finish. After the
computer restarts, setup of the driver is complete.
is turned off, click on
Start®Run...
Setup device driver
. Type in
30 OKIOFFICE 87 User’s Guide
.
Auto insert
Page 43

Windows NT 4.0
Note:
Administrator’s authority is required for installation with
Windows NT 4.0.
1
Make sure that both the printer and the computer are turned OFF.
2
Connect the fax machine and computer with a parallel interface
cable.
3
Turn the fax machine and computer ON and allow Windows to start.
If you see a prompt telling you that a new device has been detected,
press Cancel.
4
Insert the Unimessage Pro XL CD-ROM into your CD-ROM drive.
5
After the setup program has automatically started, click Setup
device driver and Unimessage Pro and follow the on-screen
instructions as appropriate This installs both the printer driver and
the Unimessage Pro software.
Note:
If you want to install only the driver, click
Note:
If the setup program does not automatically start or
notification
D:\SETUP.EXE (where D is the drive letter of your CD-ROM
drive) and click OK.
6
During copying, the Find Fax Port dialog appears and the fax port
is found.
7
When the Modem Installation dialog appears, click OK.
8
When the Install New Modem dialog appears, do the following:
is turned off, click
Start®Run...
Setup device driver
Type in
.
Auto insert
Note: If the Modems Properties dialog appears, click Add and the
Install New Modem
a
Check Don’t detect my modem; I will Select it from a list., and
click Next.
b
Click Have Disk, and when Install From Disk dialog appears,
type D:\DRIVER\SETUP\DISK1\WINNT40 (where D is the drive
letter of your CD-ROM drive) in Copy manufacturer’s files from
and click OK.
c
When the Install New Modem screen appears, select the
appropriate device and click Next.
d
Check Selected ports, then select the port displayed in Step 6
and click Next.
e
Click Finish, and when Modems Properties dialog appears,
click Close.
dialog pops up.
Installation 31
Page 44

9. When the Install Complete screen appears, click OK.
10. The setup of the driver is complete.
Unimessage Setup
After the installation of the OKIFAX driver is complete, the installation of
the Unimessage Pro software should begin. If this does not happen or
you are re-installing the Unimessage software:
a
Insert the Unimessage Pro XL CD-ROM into your CD-ROM drive.
b
After the setup program has automatically started, click Setup
Unimessage Pro and follow the on-screen instructions.
Note:
If the setup program does not automatically start or
notification
D:\SETUP.EXE (where D is the drive letter of your CD-ROM
drive) and click OK.
1
The first screen asks you to select a language. If the highlighted
language is appropriate, click OK. Otherwise, select a language and
click OK.
2
When following the on-screen instructions, make sure you select the
following when prompted: Yes, look for devices connected to this
computer and install the appropriate drivers and CLASS 1
device
3
Details of all the installation options can be found in the User’s
Guide—click View Unimessage Pro User’s Guide on the CD’s
setup menu.
4
When the Unimessage Pro installation is complete, you must restart
your PC. When your computer restarts, user registration dialogs
appear.
is turned off, click
Start®Run...
. Type in
Auto insert
Printer Status Icon
The Windows printer driver for your fax machine includes a status monitor, which appears in the system tray on the taskbar. If you close this you
cannot fax from the PC, but you can scan and print. For best performance with all MFP functions, we recommend that you leave the status
monitor on.
32 OKIOFFICE 87 User’s Guide
Page 45

Dial Directories
Programming One-Touch Keys
Your MFP machine has ten One-Touch keys for rapid dialing. Y ou can
store up to two fax numbers with 40 digits for each One-Touch key, a
main number and an alternate number, which is used if the main number
is busy . You can also enter a 15-character Location ID (name) for each
One-Touch key.
Tip:
To find One-Touch keys which are not yet registered, repeatedly
press the SEARCH key.
SELECT
FUNCTION
1
Press the SELECT FUNCTION key.
2
Press the 8/LOCATION PROG. One-T ouch key. The display shows
+
8/
++
LOCATION
PROG.
1~10
OT
LOCATION PROGRAMMING
ENTER(SRCH,OT,A/D,#)
LOCA TION PROGRAMMING.
3
Press a One-Touch key to program.
4
The display briefly shows NO=<FAX NO.>, ID=<LOCATION ID> (or
a previously programmed fax number and Location ID).
5
After the display clears, enter the main fax number. Refer to the
instructions below.
To Do This Use
Enter numbers Numeric keypad (press once)
Enter spaces SPACE One-Touch key
Enter hyphens HYPHEN key
Enter pauses (i.e., to wait for long distance Pause key
or outside lines)
Add a switch from pulse to tone dialing for key
part of the call
Move the cursor to make corrections
YES
and
NO
6
Press the START key.
Dial Directories 33
Page 46

7
NO
Enter the Location ID. This is a descriptive title up to 15 characters
long. Refer to the instructions below.
To Do This Use
Enter numbers Numeric keypad (press once)
Enter spaces SPACE One-Touch key
Enter hyphens HYPHEN key
Enter alphabet characters Locate the character you want on the numeric keypad.
Enter a unique character Press the 0/UNIQUE key repeatedly until the character
Enter two letters using Press
the same key.
Move the cursor to
make corrections.
8
Press the ST ART key. The display shows NO=<OR LOCATION>.
9
Enter the alternate fax number. Refer to the instructions following
Press that key repeatedly until the character appears.
you want appears.
The following characters are available: ! @ \ “ _ % ~ # &
‘ ( ) * + , - . / : ; = ? · ä ß ñ ö ü Æ Å Ø æ å ø.
Note:
Some unique characters can be entered using
One-Touch keys.
to move to the next character.
YES
and
NO
Step 5.
10
The display shows G3 COMMUN. SPEED [33.6K]. Press
to adjust the speed and
11
The display shows G3 ECHO PROTECTION [ON]. Press
to change the setting and
12
Press the ST AR T key to finish programming the One-T ouch key.
YES
to select it.
YES
to select it.
The display shows LOCA TION PROGRAMMING.
13
To continue programming One-Touch keys, go back to Step 3. If you
are finished programming, press the SELECT FUNCTION key.
14
Lift off the plastic cover above the One-Touch label. Using a pencil,
write in the name for your newly programmed One-Touch key . Then
replace the cover.
NO
NO
34 OKIOFFICE 87 User’s Guide
Page 47

Chain Dialing
Each fax number that you enter or program into your MFP machine can
be up to 40 digits long. when it is necessary to dial a number which is
longer than 40 digits, use the chain dial feature.
To create a chain dial number, program the first 31 digits of the number
into a One-Touch key or Auto Dial number. Then press the 8/+ One-Touch
key to make this a chain dial number. Next, program the rest of the
number into another One-Touch key or Auto Dial number (or, you can
leave the second part of the number unprogrammed and enter it manually
on the numeric keypad).
To use a chain dial number, select the One-Touch key or Auto Dial number programmed with the first part of the chain dial number. The display
shows PRESS OT/AD/SRCH KEY. Then select the One-Touch key or
Auto Dial number programmed with the second part of the chain dial
number. If the second part of the chain dial number was not programmed,
enter it manually on the numeric keypad. Press the ST ART key to begin
sending the fax.
Dial Directories 35
Page 48

Programming Auto Dial Numbers
Your MFP machine has 100 Auto Dial numbers available for quick, threedigit selection and dialing. For each auto dial number, you can enter a fax
number up to 32 digits long and a Location ID (name) up to 15 characters
long.
SELECT
FUNCTION
1
Press the SELECT FUNCTION key.
2
Press the 8/LOCATION PROG. One-T ouch key. The Display shows
+
8/
++
LOCATION
PROG.
AUTO DIAL
AUTO DIAL NO. [_ ]
ENTER 01-70
100
LOCA TION PROGRAMMING.
3
Press the AUT O DIAL key.
4
Using the numeric keypad, enter a 3-digit number (001-100) for the
Auto Dial number you want to program.
5
The display briefly shows NO=<FAX NO.>, ID=<LOCATION ID> (or
a previously programmed fax number and location).
6
After the display clears, enter the fax number. Refer to the instructions below.
To Do This Use
Enter numbers Numeric keypad (press once)
Enter spaces SPACE One-Touch key
Enter hyphens HYPHEN key
Enter pauses (i.e., to wait for long 19/PAUSE key
distance or outside lines)
Add a switch from pulse to tone dialing key
for part of the call
Move the cursor to make connections.
YES
and
NO
7
Press the START key.
36 OKIOFFICE 87 User’s Guide
Page 49

8
NO
NO
Enter the Location ID. This is a descriptive title up to 15 characters
long. Refer to the instructions below.
To Do This Use
Enter numbers Numeric keypad (press once)
Enter spaces SPACE One-Touch key
Enter hyphens HYPHEN key
Enter alphabet characters Locate the character you want on the numeric keypad.
Enter a unique character . Press the 0/UNIQUE key repeatedly until the character
Enter two letters Press
using the same key.
Move the cursor to
make corrections.
Press that key repeatedly until the character appears.
you want appears.
The following characters are available: ! @ \ “ _ % ~ # &
‘ ( ) * + , - . / : ; = ? · ä ß ñ ö ü Æ Å Ø æ å ø.
Note:
Some unique characters can be entered using
one-touch keys.
to move to the next character.
YES
and
9
The display shows G3 COMMUN. SPEED [33.6K]. Press
to adjust the speed and
10
The display shows G3 ECHO Protection [ON]. Press
change the setting and
11
Press the ST AR T key to finish programming the One-T ouch key.
YES
to select it.
YES
to select it.
NO
The display shows AUT O DIAL NO. [ ].
12
To continue programming Auto Dial numbers, go back to Step 4. If
you are finished programming, press the SELECT FUNCTION key .
Note:
When programming a telephone number, the ID and
communication parameters are unnecessary .
NO
to
Dial Directories 37
Page 50

Programming Groups
Once you have programmed some One-Touch keys or Auto Dial numbers, you can program groups to allow you to send the same fax to
multiple locations. You can program up to 5 groups each containing up to
1 10 numbers into your MFP machine.
1
Press the SELECT FUNCTION key.
2
Press the 8/LOCATION PROG. One-Touch key. The display shows
LOCA TION PROGRAMMING.
3
On the numeric keypad, press the # key . The display shows
GROUP SETTING.
4
Using the numeric keypad, enter the group number (1-5) you want
to program.
5
The display shows the number of your current group and SELECT
LOC.(S). You can now add a location to your group (or delete a
location from it). Refer to the instructions below.
To Do This Use
Add a One-Touch location Press the One-T ouch key. Press STAR T to add it to the
Add an Auto Dial location Press AUTO DIAL. Enter the 3-digit Auto Dial number.
Delete a previously added Press the One-Touch key. Press START to delete it
One-Touch location from the group.
Delete an Auto Dial Press the AUTO DIAL key. Enter the 3-digit Auto Dial
location number. Press START to delete it from the group.
Search for a location Press the SEARCH key continuously until the location
by name to add or delete appears. If the location is not yet in the group, press
group.
Press START to add it to the group.
START to add it. If the location is in the group, press
START to delete it.
6
After you have completed your selection (by pressing ST AR T key,
YES
or
NO
, the display shows SELECT LOC. again.
Continue to add or delete locations from your group. Each group
can contain up to a maximum of all of the One-Touch and Auto Dial
locations available on your MFP machine.
7
When you are finished programming your group, press
The display shows LOCA TION PROGRAMMING.
8
To program another group, go back to Step 3. If you are finished,
press the SELECT FUNCTION key.
38 OKIOFFICE 87 User’s Guide
NO
.
Page 51

Basic Operations
Preparing Documents
- Try to use good quality documents for your transmissions. Documents that are typed or created in felt-tip black ink on white (or light)
paper work best.
- Do not send documents which are not rectangular.
- Never use documents that have wet or sticky surfaces, wrinkles,
staples or paper clips. However, your MFP machine can transmit
documents that have been subject to normal wear, such as documents with staple holes, letter folds and minor corner folds.
- If you are not sure how a document will fax, try making a copy first
on your MFP machine (load the document face down and press the
COPY key).
- If your documents are bent, creased or torn, make a copy on a
photocopier and send the copy instead. You can also use a photocopier to enlarge or reduce documents before sending.
Document Size
All documents must have a minimum width of 148 mm (5.8") and a
minimum length of 128 mm (5"). Documents cannot be wider than 216
mm (8.5") or longer than 356 mm (14").
Multiple Page Documents
Your MFP machine can scan paper with a base weight between 16
pounds (60 g/m2) and 28 pounds (105 g/m2). You can load up to 20
sheets of standard 20-pound paper (like photocopier paper) at the same
time. If you use a heavier paper, you can load up to 15 sheets. For very
heavy paper, load and send pages sheet-by-sheet.
When loading multiple-page documents, do not load paper which is
thinner than 0.08 mm or thicker than 0.13 mm. For documents, do not
load paper which is thinner than 0.06 mm or thicker than 0.15 mm.
Basic Operations 39
Page 52

Loading Documents
To prevent paper jams and problems during scanning, neatly stack your
documents, aligning their edges, before loading. Do not load documents
of different sizes at the same time.
Tip:
You can load and prepare to transmit a document while your MFP
machine is still sending or receiving another message (as long as the
document feeder is clear). To do this, load the document, select your
location and press the ST AR T key. Your document is sent when the
current communication ends.
1
Adjust the document guides to the width of the paper you are using.
2
Neatly stack your documents, then insert them face down into the
document feeder. Readjust the document guides for a snug fit.
3
Your MFP machine grips the documents, and pulls the bottom page
into the machine.
40 OKIOFFICE 87 User’s Guide
Page 53

4
If necessary , use
YES
to set the resolution of your document.
Document T ype Resolution to Use
Normal office documents STD (Standard)
Documents with small type or other fine details FINE or EX. FINE
Documents with photos or many shades of gray PHOTO
5
If necessary , use
NO
to set the level of contrast in your docu-
ment.
Document T ype Contrast to Use
Documents with normal contrast NORMAL
Documents which are too light LIGHT
Documents which are too dark DARK
6
Your documents are now ready for faxing or copying.
Sending a Fax to a Single Location
1
Load your documents.
2
Select a location. Refer to the instructions below.
To Dial Using Do This
A One-Touch key Press the One-Touch key.
An Auto Dial number Press the AUTO DIAL key, then enter the 3-digit Auto
The numeric keypad Dial as you would on a normal telephone. If you make a
An external telephone Pick up the handset of your external telephone and dial the
3
If necessary , press the START key to begin the transmission. Refer
to the table below to understand some of the messages you may
see during a typical fax transmission.
Dial number on the numeric keypad.
mistake, press
number of the machine you wish to transmit to. If the
receiving fax machine is in automatic reception mode, you will
hear a high-pitched tone. If a person answers the phone, ask
them to press the START key on their fax machine.
YES
to go back and re-enter the number.
Message Explanation
(location) The remote location’s Personal ID, TSI/CSI, Location
CALLING The line is ringing.
SENDING Your MFP machine is sending the message.
RESULT = OK The fax was sent successfully.
COMMUN. ERROR If you see this or another error message, a problem occurred
ID or the telephone number you entered identifies the
location during transmission.
during the communication. Try resending the fax. Refer to
the chapter on Problem Solving for assistance.
Basic Operations 41
Page 54

Search Key Dialing
If you are not sure which One-Touch key or Auto Dial number contains
the location you want to communicate with, use the SEARCH key to look
through an alphabetical list of all of the Location IDs programmed into
your MFP machine.
1
When selecting locations, press the SEARCH key. The display
shows ENTER 1-ST CHAR.
2
Repeatedly press the SEARCH key to look through the entire list of
locations in alphabetical order, or locate the letter you want on the
numeric keypad, and press that key repeatedly to look through
Location IDs beginning with that letter.
Real-Time Dialing
Normally , your MFP machine dials the entire number of the location you
have selected at one time. Occasionally , it may be necessary to dial
numbers in real time (one digit at a time).
If your MFP machine is equipped with a handset, you can dial in real time
by picking up the handset. Or, press the HOOK/V. REQUEST key.
Redialing
If the line is busy or if there is no answer, your MFP machine waits, and
then automatically redials the number.
If your MFP machine is transmitting from memory and a communication
error occurs, it automatically redials the number and tries to send the fax
again.
You can redial a number manually at any time by pressing the REDIAL
key.
Confirming Results
After transmission, press the COPY key once (with no documents
loaded) to see a report confirming your transmission on your MFP
machine’s display. To print the report, press the COPY key a second time.
See the section on Reports for more information.
42 OKIOFFICE 87 User’s Guide
Page 55

Stopping a Transmission
To stop a transmission while it is in progress, follow the instructions
below.
1
Press the STOP key twice. The display shows ST OPPED.
2
If documents are stuck partway through the document feeder, you
may see a RELOAD DOCUMENT message on the display. Press
the STOP key again. Your MFP machine feeds the document the
rest of the way through the document feeder.
Sending a Fax to Multiple Locations (Broadcasting)
Your MFP machine’s broadcasting feature allows you to send a document
to many different locations at the same time. For each broadcast operation, you can select as many One Touch keys, groups, and Auto Dial
Codes as you like. You can also manually enter up to ten telephone
numbers on the numeric keypad.
Performing a Broadcast Operation
1 Load your documents.
2 Select a location. Refer to the instructions below.
To Select Using Do This
A One Touch key Press the One Touch key.
An Auto Dial number Press the AUTO DIAL key, then enter the two digit
A group Using the numeric keypad, press the # key, then enter
A number dialed on the Dial the number as you would on a
numeric keypad normal telephone, then press START.
Auto Dial number on the numeric keypad.
the number of the group.
3 Select another location within 3 seconds after step 2.
4 Repeat steps 2 and 3 as often as necessary to continue selecting
locations.
5 When you are finished selecting locations, press START. ENTR Y IS
OK? displays.
6 Press START. Your MFP begins scanning the document and dialing
the numbers.
Basic Operations 43
Page 56

T o make corrections
1 At step 5, when ENTRY IS OK? displays, press
NO
. PRINT
ENTRY REPORT? displays.
2 Press
NO
YES
. PRINTING displays and the report prints. Or, Press
to skip printing the report. CHECK LOCA TIONS YES
(START) displays.
3 Press the START key. Each entry displays. Press the START key
to accept each entry or press
NO
to delete a location.
4 When all the entries have been displayed and CHECK LOCA-
TIONS displays again, press
NO
. ENTRY IS OK? displays.
5 Press the START key. Your MFP scans the documents into
memory and begins transmitting the message.
Faxing to a Group
Once you have programmed some One Touch keys or Auto Dial numbers, you can use these programmed locations to create groups. You
can then easily send the same fax to multiple locations. This is useful if,
for example, you need to send weekly status updates to all the members
of a team working in separate locations.
• You can program up to five groups (see “Programming Groups” under
Dial Directories).
• Each group can have up to 110 numbers.
Sending a Fax to a Group
To send a group fax, do the following:
1
Load your document.
2
Press the AUT O DIAL key. The display shows AUTO DIAL NO.
3
Press the # key . The display shows GROUP SETTING.
4
Press the number of the group you want to send to on your numeric keypad.
5
Press START. The display shows ENTRY IS OK?.
6
Press START.
44 OKIOFFICE 87 User’s Guide
Page 57

To see a list of the groups and the locations within each group, print a
Telephone Directory . To do this:
1 Press SELECT FUNCTION.
2 Press the 6/REPORT PRINT One-Touch key .
3 Press
4 Press
NO
repeatedly until PHONE DIRECTORY appears.
YES
.
Receiving Faxes Manually
As long as your MFP machine is not set to the manual receive [TEL]
mode, your MFP machine automatically receives faxes. If your MFP
machine is set to the manual receive [TEL] mode, follow the instructions
below.
1
When the MFP machine rings, press the HOOK/V. REQUEST key.
2
Press the ST A RT key. MANUAL START appears on the display.
3
After you receive the fax, a long beep tells you that the transmission
was successful.
If you have the optional handset installed:
1
When your telephone or MFP machine rings, pick up the telephone
handset. If a person is on the line, carry on your conversation.
2
If a remote fax machine is on the line, or if a person wishes to fax
you a document after a conversation, press the START key .
3
When MANUAL START appears on the display, hang up the handset.
4
After you receive the fax, a long beep tells you that the transmission
was successful.
Basic Operations 45
Page 58

Receiving Faxes in Memory
Your MFP machine automatically receives messages into memory (and
does not immediately print them) in a few different situations.
Memory Reception mode
When your MFP machine is set to Memory Reception mode, it receives
data into its memory without printing and the display shows MSG. IN
MEMORY.
Printing out a message stored in memory can be done in two ways:
(1) Switch to Auto Receive mode.
After disabling the Memory Reception mode, all messages stored
in memory print out.
(2) Print out Operation
Messages stored up in memory can also be printed out by the
following process:
SELECT
FUNCTION
1
Press the SELECT FUNCTION key.
2
Press the 2/PRINT OPERATION One-Touch key. The display
2
+
PRINT
OPERATION
PRINT MEMORY MSG. ?
YES(
) NO( )
asks PRINT MEMORY MSG?
3
Press
Tip:
YES
. The stored message begins printing.
If a memory reception password has been set, you need to
enter your password.
No Paper Reception
When your MFP machine has run out of paper, a NO PAPER, REPLACE
P APER message appears on the display. Even when your MFP machine
runs out of paper, it continues to receive faxes in memory.
Your MFP machine prints out any messages received in memory when
the paper is replaced.
46 OKIOFFICE 87 User’s Guide
Page 59

No T oner Reception
If the user setting No. 22 (NO TONER MEM. RX) is set to ON and your
MFP machine is low on toner , it displays a TONER LOW, REPLACE
TONER CART. message, and begins receiving data into memory (rather
than risk printing an unreadable message). If your MFP machine has
received a message in memory because toner is low, MSG. IN MEMORY
appears on the display . To print out a message stored in memory when
toner is running low, follow the instructions below.
SELECT
FUNCTION
1
Press the SELECT FUNCTION key.
2
Press the 2/PRINT OPERATION One-T ouch key. The display
2
+
PRINT
OPERATION
PRINT MEMORY MSG. ?
) NO( )
YES(
shows PRINT MEMORY MSG?
3
Press
Tip:
YES
. The stored message begins printing.
If a memory reception password has been set, you need to
enter your password.
Tip:
Even if you see a TONER LOW message on your MFP machine, you may be able to use the 2/PRINT OPERATION OneTouch key to continue printing faxes, but the print quality cannot be
guaranteed. Replace your toner cartridge as soon as possible.
Canceling Messages Stored in Memory
It is also possible to erase messages received in memory without printing
them.
1
After you have followed the instructions to print out messages
stored in memory, the display shows MSG. IN MEMORY, PRINTING.
2
To erase the message instead of printing it, press the STOP key.
The display shows CANCEL?
3
Press
memory .
YES
to erase the message from your MFP machine’s
Basic Operations 47
Page 60

Rejecting Unsolicited Fax Messages
The closed network option allows you to limit the locations your MFP
machine can communicate with. Using this function, you can set your
MFP machine to refuse to receive any incoming faxes from locations
whose telephone numbers are not programmed into your One-Touch
keys or Auto Dial numbers. In this way, your MFP machine automatically
rejects unsolicited fax messages such as advertising. You can also set
your MFP machine to neither send faxes to nor receive faxes from
locations whose telephone numbers are not programmed into your OneTouch keys or Auto Dial numbers (T/R). The available settings are limit
reception only (RX), limit both transmission and reception (T/R), and no
limitation on transmission or reception (OFF). To use the closed network
function, follow the instructions below.
SELECT
FUNCTION
1
Press the SELECT FUNCTION key.
2
Press the 9/USER PROG. One-Touch key. The display shows
+
9/SPACE
USER
PROG.
YES
+
+
TUV
+
0
8
08:CLOSED NETWORK
[OFF] YES( ) NO( )
1:FUNC. PROGRAMMING.
3
Press
4
Using the numeric keypad, enter 08. The display shows
YES
. The display shows FUNCTION NO. [ ].
08:CLOSED NETWORK, and the current setting of this function.
5
Press
6
Press
7
Press the SELECT FUNCTION key to finish.
NO
until the setting you want appears in the display .
YES
to confirm the new setting.
48 OKIOFFICE 87 User’s Guide
Page 61

Power Failures and Memory
If power is interrupted to your MFP machine, the following problems
occur:
- Any messages your MFP machine has scanned into memory but
not yet transmitted are lost.
- Any messages your MFP machine has received into memory but
not yet printed are lost.
- If you have loaded documents on your MFP machine’s document
feeder, any dialing or transmission settings are lost.
Your MFP machine prints a power off report to inform you in the event of
a power failure. Use this report to determine which received messages
you may have lost, and to determine which transmissions you may have
to resend. See the Reports section for more information.
Making Copies
Your MFP machine can also be used to make copies. You can make up
to 50 copies at one time. Your MFP machine automatically makes all
copies in FINE mode.
1
Load your documents.
2
Press the COPY key. The display shows PRG. NO. OF COPIES,
[1SETS]. If you want to make just one copy , you are finished. Your
MFP machine waits a moment, then begins copying.
3
To make multiple copies, enter the number of copies you want to
make on the numeric keypad. Then press the COPY key again.
Your MFP machine begin making copies.
Tip:
When the message PRG. NO OF COPIES is displayed, you
can change the degree of print resolution.
Basic Operations 49
Page 62

Making Copies with the Manual Paper Feeder
Your MFP machine’s manual paper feeder allows you to make copies on
a different type of paper than what you normally keep in the paper tray. To
make copies using the manual paper feeder, follow the instructions below.
1
Load your documents.
2
Insert a sheet of paper face up into the manual paper feeder slot,
until you feel the MFP machine grab hold of the paper.
3
Press the COPY key (see the instructions above). If you are making
more than one copy , you need to continue inserting sheets of paper
into the manual paper feeder.
50 OKIOFFICE 87 User’s Guide
Page 63

Using Voice Request
The voice request feature allows you to have a conversation with a
person at a remote fax machine during a fax communication. Either the
person sending or receiving the fax can initiate a voice request. If you are
sending a fax, you can answer a voice request only after all pages have
been transmitted.
If you are receiving a fax, you can answer a voice request after reception
of each page.
You will know if the person on the other fax machine has issued a voice
request when you hear a warbling tone. If you do not respond in approximately six seconds, the voice request is automatically cancelled.
Tip:
You need to have either an attached handset or an external tele-
phone to use the voice request function.
T o Initiate a Voice Request
1
During a fax communication, press the HOOK/V. REQUEST key.
2
When the other party answers your request, your MFP machine
emits a repetitive warbling sound. The display shows LIFT HANDSET, AND PRESS VOICE REQUEST.
3
Lift your handset and press the HOOK/V. REQUEST key.
Tip: If you press your HOOK/V. REQUEST key to initiate a voice
request at TX mode but no one is there to answer , your MFP machine automatically sends a call back message to the remote site.
This message includes a telephone number where you can be
reached.
T o Answer a Voice Request
Lift the handset and press the HOOK/V. REQUEST key .
Basic Operations 51
Page 64

52 OKIOFFICE 87 User’s Guide
Page 65

Advanced Operations
Sending a Fax at a Later Date and Time
The delayed transmission feature allows you to send documents at a
specified date and time, and frees you from the need to manually start
the transmission. You can program a transmission delay to occur at any
time on the day of your transmission, or at any time over the next three
days.
You can program your MFP machine to send one delayed fax at a time
either from the document feeder or from memory . Refer to the table
below to decide which method you want to use.
Delayed TX Feature/Limitation From Feeder From Memory
Number of locations One Multiple
Fax machine can be used for other
transmissions while a delayed fax
is waiting to be sent? No Yes
Sending a Delayed Fax from the Document Feeder
Note:
In order to send a delayed fax from the document feeder,
function 17: MEM./FEED S/W must be set to Feed and funtcion
25:INSTANT DIAL must be set to Off.
SELECT
FUNCTION
1
Load your documents.
2
Press the SELECT FUNCTION key.
3
Press the 1/DELAYED TX One-T ouch key. The display shows
+
1
DELAYD
TX
DELAYED TX DA TE
[07/01] YES(
) NO (
)
DELA YED TX and today’ s date.
4
Press
transmission is to occur on the same day , press
NO
. The display shows DELAYED TX DATE or, if the
YES
Step 6.
Advanced Operations 53
and go to
Page 66

5
Using the numeric keypad, enter the date on which you wish the
transmission to begin.
6
Press
7
Using the numeric keypad, enter the time on which you wish the
YES
. The display shows DELAYED TX TIME.
transmission to begin.
Tip:
Be sure to enter the time using the 24-hour clock (i.e., 8:00
a.m. would be entered as 08:00, and 8:00 p.m. would be entered as
20:00).
8
Press
9
Select a location. Refer to the following instructions.
YES
. The display shows SELECT LOCATIONS.
To Select Using Do This
A One-Touch key Press the One-Touch key.
An Auto Dial number Press the AUTO DIAL key, then enter the three digit
A number dialed on Dial as you would on a normal telephone.
the numeric keypad
10
Press the ST A RT key. Your MFP machine begins waiting for the
Auto Dial number on the numeric keypad.
time and date you have set before sending the fax.
Sending a Delayed Fax From Memory
SELECT
FUNCTION
1
Load your documents.
2
Press the SELECT FUNCTION key.
3
Press the 1/DELA YED TX One-Touch key. The display shows
+
1
DELAYD
TX
DELAYED TX DA TE
[07/01] YES(
) NO (
)
DELA YED TX and today’s date.
4
Press
NO
. The display shows DELAYED TX DA TE. Or, if the
transmission is to occur on the same day , press
Step 6.
5
Using the numeric keypad, enter the date on which you wish the
transmission to begin.
6
Press
YES
. The display shows DELAYED TX TIME.
54 OKIOFFICE 87 User’s Guide
YES
and go to
Page 67

7
Using the numeric keypad, enter the time on which you wish the
transmission to begin.
Tip:
Be sure to enter the time using the 24-hour clock (i.e., 8:00
a.m. would be entered as 08:00, and 8:00 p.m. would be entered as
20:00).
8
Press
9
Select a location. Refer to the instructions below.
YES
. The display shows SELECT LOCATIONS.
To Select Using Do This
A One-Touch key Press the One-Touch key.
An Auto Dial number Press the AUTO DIAL key, then enter the three digit
A number dialed on Dial as you would on a normal telephone.
the numeric keypad
10
Press the START key to finish the programming.
Auto Dial number on thenumeric keypad.
Canceling a Delayed Transmission
To cancel a delayed transmission from the document feeder or from
memory before it has been sent, follow the instructions below.
1
Press the STOP key. The display shows COMMUNICATION CANCEL.
2
Press
YES
. The display shows the Location ID of the delayed
transmission currently loaded in your MFP machine.
3
Press
4
If the delayed transmission was a feeder transmission, press the
YES
.
STOP key again to remove the document from the document
feeder.
Advanced Operations 55
Page 68

Sending a Confidential Fax or Sub-address Transmission
Fax machines are often placed in public places where everyone can look
through the received faxes. To send confidential documents, use the
confidential fax feature. The receiving fax machine stores the message in
a confidential mailbox (in memory) and does not print it until a password
is entered.
Also, if the receiving fax machine is equipped with a sub-address function, you can enter a sub-address number, as a mailbox number enabling
sub-address communication.
Tip:
To send a confidential fax, you must know in advance the mailbox
the message should be sent to. Ask the person who will receive the fax to
tell you their mailbox number.
SELECT
FUNCTION
1
Load your documents.
2
Press the SELECT FUNCTION key.
3
Press the 3/CONF. TX One-Touch key . The display asks you to
3
+
CONF.TX
MAIL BOX NO.
_
enter the number of a confidential mailbox on the receiving fax
machine.
4
Using the numeric keypad, enter the number of the confidential
mailbox you are transmitting to.
5
Press the START key to confirm your entry . The display shows
SELECT LOCATION.
6
Select a location. Refer to the instructions below.
To Select Using Do This
A One-Touch key Press the One-Touch key.
An Auto Dial number Press the AUTO DIAL key, then enter the three digit
A number dialed on Dial as you would on a normal telephone.
the numeric keypad
7
Press the ST A RT key. Your MFP machine begins sending the fax.
Auto Dial number on the numeric keypad.
56 OKIOFFICE 87 User’s Guide
Page 69

Receiving Confidential Faxes
YES
If you need to receive a fax that should not be seen by anyone else, have
the person send the message as a confidential fax from another Oki Data
Fax-compatible unit, or from a fax machine of a different maker that is
equipped with the sub-address transmission function.
In order to do this, you must first set up a confidential mailbox, as explained below. Then, give your mailbox number to the person sending
the message.
An incoming confidential fax is stored in memory until you enter your
password.
Creating a Confidential Mailbox (Personal Box)
The number of confidential mailboxes you can set up depends on your
OKIFAX model.
Your MFP can have up to 8 confidential mailboxes (Personal Boxes).
1
Press the SELECT FUNCTION key.
2
Press the 9/USER PROG. One-Touch key. The display shows 1:
FUNC. PROGRAMMING.
3
Press 5 on the numeric keypad. The display shows 5: PERSONAL
BOX PRG.
4
Press
5
Using the numeric keypad, enter the number of the mailbox you
want to use. Specify the box number using a single-digit number
between 1 and 8.
YES
. The display shows PERSONAL BOX No. [ ].
NO
YES
. A PERSONAL BOX [CLOSE] message displays.
to select [CONF] and press
.
6
Press
7
Press
8
Using the numeric keypad, enter the 4-digit password you want to
use with your mailbox.
9
Press
10
Your MFP then asks you to enter another mailbox number. To
YES
to confirm your entry.
continue programming mailboxes, go back to Step 5. When you are
finished, press the SELECT FUNCTION key.
Note:
The personal box can also be used for bulletin transmissions.
To program it for such, follow the same flow but select "POLL"
instead of "CONF." The box can be closed also by following the
procedure indicated next.
Advanced Operations 57
Page 70

Closing a Mailbox
To change the password of an existing mailbox, or to delete one, follow
the instructions below. Remember that a mailbox must be empty before
you can modify or delete it.
1
Press the SELECT FUNCTION key.
2
Press the 9/USER PROG. One-Touch key . The display shows 1:
FUNC. PROGRAMMING.
3 Press 5 on the numeric keypad. The display shows 5: PERSONAL
BOX PROG.
4
Press
5
Using the numeric keypad, enter the number of the mailbox you
YES
. The display shows PERSONAL BOX NO. [ ].
want to modify or delete.
6
The display shows PERSONAL BOX [CONF]. Press
To close a mailbox, press
NO
until CLOSE appears in brackets.
The display asks DELETE PERSONAL BOX? Press
Tip:
If the message, ILLEGAL OPERATION is displayed, the
YES
YES
.
.
mailbox you have selected contains one or more messages. You
must print out any messages in the mailbox before you change its
password.
T o Change Your Password
1
Press the SELECT FUNCTION key.
2
Press the 9/USER PROG. One-Touch key . The display shows 1:
FUNC. PROGRAMMING.
3
Press 5 on the numeric keypad. The display shows 5: PERSONAL
BOX PROG.
4
Press
5
Using the numeric keypad, enter the number of the mailbox you
YES
. The display shows PERSONAL BOX NO. [ ].
want to modify or delete.
6
The display shows PERSONAL BOX [CONF]. Press
YES
. The
display shows PRG. PASSWORD.
7
Using the numeric keypad, enter the 4-digit password currently used
with that mailbox.
8
Press
9
To create a new password, enter a new 4-digit number on the
NO
. The display shows PRG. PASSWORD again.
numeric keypad.
58 OKIOFFICE 87 User’s Guide
Page 71

10
Press
11
Your MFP machine asks you to enter another mailbox number. To
YES
to accept the new password or close the mailbox.
continue programming mailboxes, go back to Step 5. If you are
finished programming, press the SELECT FUNCTION key.
Printing Confidential Messages
Each time your MFP receives a confidential message, it automatically
prints a confidential received transmission report that tells you which
mailbox number received the message.
T o print a received confidential fax message
1
Press the SELECT FUNCTION key.
2
Press the 2/PRINT OPERATION One-Touch key. The display asks
PRINT PERSONAL BOX? when your MFP machine has received
messages stored in its memory .
3
Press
4
Using the numeric keypad, enter the number of the mailbox you
want to print from. The display shows PRG. PASSWORD [ ].
(Mailbox Numbers from 0 ~ 8)
Tip:
DATA IN MEMORY.
5
Using the numeric keypad, enter the 4-digit password for the mailbox you want to print from.
6
Press
Tip:
press the STOP key at this point. The display changes to CANCEL.
Press
YES
. The display shows PERSONAL BOX NO. [ ].
If no message is stored in that mailbox, the display shows NO
YES
. The message begins printing.
If you want to clear the mailbox without waiting for printouts,
YES
to clear the mailbox.
Advanced Operations 59
Page 72

Relay Broadcasting
Relay broadcasting allows one fax machine to send a document to
another fax machine, which then re-sends (broadcasts) the document to
a number of other locations.
Two dif ferent fax machines are involved in transmitting a relay broadcast:
the relay initiating station and the relay key station.
Relay Initiating Station
Your MFP machine can act as the relay initiating station, which starts the
relay broadcast by sending the original documents. Before you can
program your MFP machine to initiate a relay broadcast, you need to
obtain the following information from the operator of the fax machine you
intend to use as a relay key station:
Relay Password: This is the relay key word (up to 20 digits), which is
programmed into the relay key station.
Relay Group Numbers: These numbers (up to 20 digits) are the
numbers of locations or groups of locations programmed into the relay
key station.
Relay Key Station
The relay key station is the fax machine, which receives the original fax
message and then automatically relays or broadcasts the message to
other remote fax machines.
The only OKIFAX units that can serve as relay key stations are the
OKIFAX 2600 and OKIFAX 5950. Units of another company can act as a
relay key station when it is a SUB function relay request if that unit has a
SUB function.
Relay Broadcast Report
After the relay broadcast is completed, it is possible for the relay key
station to send a fax back to your MFP machine confirming the success
of the relay broadcast. For this function to work, your MFP machine’s own
telephone number must be programmed into your MFP machine’s last
Auto Dial number (Auto Dial number 100).
60 OKIOFFICE 87 User’s Guide
Page 73

Initiating a Relay Broadcast
1
Load your documents.
2
Press the SELECT FUNCTION key.
3
Press the 4/RELA Y INIT .-TX One-Touch key. The display shows
RELAY PASSWORD.
4
Using the numeric keypad, enter a password of up to 20 digits
which is the same as the relay keyword programmed into the relay
key station.
5
Press the ST ART key. The display shows REMOTE LIST NO.
6
Using the numeric keypad, enter a number of up to 20 digits which
corresponds to a relay group programmed into the relay key station.
7
Press the ST ART key. The display shows SELECT LOCATION.
8
Select the location of the relay key station. Refer to the instructions
below.
To Select Using Do This
A One-Touch key Press the One-Touch key.
An Auto Dial number Press the AUTO DIAL key, then enter the three digit
A number dialed on Dial as you would on a normal telephone.
the numeric keypad
Auto Dial number on the numeric keypad.
9
Press the ST A RT key. Your MFP machine begins sending the fax.
Advanced Operations 61
Page 74

Sending Documents Requested by Another Fax Machine (Polling T ransmission)
When you normally send faxes, you load documents into your MFP
machine, select a location, and then press the ST AR T key to begin
sending the documents.
However, sometimes it is more useful to be able to simply load your
documents on your MFP machine and set it to wait for the receiving fax
machine to call and collect them. This is called setting your MFP machine
to be polled, or polling transmission.
Setting Your MFP Machine to be Polled
1
Load your documents.
2
Press the SELECT FUNCTION key.
3
Press the 5/POLLING One-Touch Key. The display shows BULLETIN POLL.
4
For standard polling, press
scanning the message into memory and completes the set up
process for the polling text.
For Bulletin Polling, press
BOX NO. [ ]. Enter a mailbox number between 0 ~ 8.
Tip:
With Bulletin Polling, a text message is stored in memory until
you delete it. You can therefore conduct polling transmission as
many times as you want.
Also, when using a box number, the remote fax must also be
equipped with a box function. Set the box number to 0 for polling
without a box number.
NO
. The MFP machine begins
YES
. The display shows PERSONAL
62 OKIOFFICE 87 User’s Guide
Page 75

Dialing Another Fax Machine to Request Documents (Polling Reception)
Calling a remote fax machine to receive documents someone else has
loaded is called polling or polling reception.
Polling Documents from Other Fax Machines
1
With no documents loaded, press the SELECT FUNCTION key.
2
Press the 5/POLLING One-Touch key. The display shows NO.=<
MAILBOX NO. >.
3
Enter a mailbox number.
4
Press the ST ART key and POLLING RX SELECT LOCATION
displays.
5
Select a location. Refer to the instructions below.
To Select Using Do This
A One-Touch key Press the One-Touch key.
An Auto Dial number Press the AUTO DIAL key, then enter the three digit
A number dialed on Dial as you would on a normal telephone.
the numeric keypad
6
Press the START key . Your MFP machine begins polling the remote
fax machine.
Auto Dial number on the numeric keypad.
Advanced Operations 63
Page 76

Dual Access
Your MFP’s dual access feature allows you to load and prepare to transmit a document while your MFP machine is receiving or sending another
fax from memory . This feature increases your productivity and reduces
the time you must spend waiting for other operations to finish.
Once you have loaded a document and the display shows SELECT
LOCATION, your MFP is ready for you to load the next transmission.
What You Can Do While Sending a Fax
After your MFP has finished scanning a document into memory—and
while it is transmitting from memory—you can:
- Load another document and prepare it for transmission. You can
continue to load documents as long as memory is available in your
MFP. When the first transmission is complete, the next fax will
automatically be sent.
- Enter the fax number before loading the next document.
- Make copies.
What You Can Do While Receiving a Fax:
- Load another document and prepare it for transmission. You can
continue to load documents as long as memory is available in your
MFP. When the first transmission is complete, the next fax you
have loaded will automatically be sent.
- Enter the fax number before loading the next document.
- Continue to receive faxes while earlier received messages are
printing, if your MFP is set to receive faxes into memory.
What You Can Do While Making Copies:
- Continue to receive faxes while copies are printing, if your MFP is
set to receive faxes into memory .
64 OKIOFFICE 87 User’s Guide
Page 77

Programming
Customizing Features and Operations
Many of your MFP machine’s features and functions have settings which
can be changed to customize the operations of your MFP machine.
Because each country has different regulations, you may not be able to
access all of the settings listed in this chapter. If you have trouble changing a setting, contact your dealer for assistance.
Viewing Your Current Settings
Follow these instructions to obtain a configuration report showing your
MFP machine’s current settings.
SELECT
FUNCTION
1
Press the SELECT FUNCTION key.
2
Press the 6/REPORT PRINT One-Touch key. The display shows
+
6
REPORT
PRINT
JKL
+
5
5:CONFIGURATION
) NO( /1-6)
YES(
1:ACTIVITY REPORT.
3
Using the numeric keypad, press 5. The display shows 5:CONFIGURA TION.
4
Press
YES
. The report begins printing.
Programming 65
Page 78

User Function Settings
User function settings allow you to customize the general operation of
your MFP machine. Refer to the User Function Settings List to determine
which settings you may need to change, then refer to Changing Your
User Function Settings to make the change.
User Function Settings List
01 MCF (SINGLE-LOC.): This function automatically prints a Mes-
sage Confirmation Report after each single-location transmission or
polling transmission. A vailable settings are on and of f.
02 MCF (MUL TI-LOC.): This function automatically prints a Message
Confirmation Report after each multiple-location transmission. A vailable settings are on and off.
03 ERR REPORT (MCF): This function automatically prints a Message Confirmation Report each time an error occurs during a transmission or polling transmission operation. A vailable settings are on
and off.
04 IMAGE IN MCF: When a message confirmation is printed, this
function adds a portion of the first page your MFP machine transmitted. This is printed at the bottom of the message confirmation report.
Available settings are on and off.
05 SENDER ID: This function controls the printing of your MFP
machine’s Sender ID on the faxes you send. When turned on, your
MFP machine’s Sender ID is printed on each page slightly outside the
image area of your document. When turned off, your MFP machine’s
Sender ID doesn’t print.
Note:
In order to meet FCC requirements, you must have this feature
set to ON and have a valid Sender ID programmed in your MFP
machine.
06 MONITOR VOLUME: This function sets the volume your MFP
machine uses for telephone line monitoring sounds during dialing.
Available settings are off, low , mid, high mid and high.
66 OKIOFFICE 87 User’s Guide
Page 79

07 BUZZER VOLUME: This function sets the volume of the various
beep and alarm tones your MFP machine emits during operations.
Available settings are low , middle and high.
08 CLOSED NETWORK: This function allows you to program your
MFP machine to refuse to receive faxes from or transmit faxes to
locations whose telephone numbers have not been programmed into
your MFP machine’s One-Touch keys or Auto Dial numbers. Using this
function, you can set up a closed network of fax machines. If you do
not want your MFP machine to transmit faxes to or receive faxes from
locations outside your network, select T/R. If you only want your MFP
machine to refuse to receive faxes from outside your network, select
RX. A vailable settings are OFF, T/R and RX.
09 TX MODE DEFAULT: This function allows you to change your MFP
machine’s default type of original and transmit resolution settings.
Unless you select otherwise using the Transmit Resolution/
Type of Original/
NO
, your MFP machine is set to use the STD
YES
or
and NORMAL settings. If you are constantly sending faxes, which
require some other combination of transmission modes, use this
function setting to change the default transmission modes to any other
combination of settings. While you are programming, the new default
combinations appear on the LEDs above the Transmit Resolution/
YES
or Type of Original/
NO
.
10 T/F TIMER PROG.: When set to the telephone/ fax answering
mode, your MFP machine automatically distinguishes between incoming voice and fax calls. If the incoming call is a voice call, your MFP
machine rings to tell you to pick up the handset. If you do not answer,
your MFP machine automatically switches back to facsimile mode to
allow the calling party to send a fax. The T/F TIMER function controls
how long your MFP machine waits before switching back to fax mode.
Available settings are 20 seconds or 35 seconds.
Programming 67
Page 80

11 RING RESPONSE: This function controls how long your MFP
machine waits before answering an incoming telephone call. The
available settings are 1 ring, 5 seconds, 10 seconds, 15 seconds or 20
seconds.
Note:
At the default 1-ring setting, your MFP machine answers calls
immediately , and you won’t hear any ring. If you need to hear
the ring, change this to one of the other settings
12 DISTINCTIVE RING: Distinctive ringing is a service offered by
some telephone carriers that allow you to have different numbers on
one line, each with its own distinctive ring. In this way , when you get
an incoming call, you can identify what number is being called by the
ring pattern. (Your local telephone carrier can provide you with more
information about this service. The service is usually offered as a
monthly charge to your normal phone bill.) To use this function, refer to
Setting Your MFP Machine’s Distinctive Ring in this section.
13 P APER SIZE: This function allows you to tell your MFP machine
what size paper you are using in the paper tray . Available settings are
A4, letter, legal 13, legal 14, executive, A5, A6, and JIS B5.
When using the MFP machine as a PC printer, you can load executive, A5, A6 and JIS B5 size paper into the paper tray. Be sure to
reset the machine to a standard paper size when you are finished
printing.
Incoming faxes received while the additional paper sizes are active
are stored in memory and not printed.
Also, power outage reports
do not print. Power outage reports are the only notification that
power to the MFP machine has been disrupted.
14 USER LANGUAGE: This function allows you to switch between
the two languages programmed into your MFP machine.
68 OKIOFFICE 87 User’s Guide
Page 81

15 INCOMING RING: This function controls the telephone ringing
sound your MFP machine makes when a call comes in. When this
function is set to off, your MFP machine does not ring during incoming
calls. When set to on, your MFP machine only rings when set to
manual receive mode or RING RESPONSE is set to 5-20 seconds
(except 1 ring). When set to DRC, your MFP machine rings for each
incoming call with the same tone even if you have used function
setting 12 to turn the DISTINCTIVE RING on. A vailable settings are
on, off and DRC.
16 REMOTE RECEIVE: This function allows you to tell your MFP
machine to switch from telephone to fax mode to receive an incoming
fax. To use this function, use the keypad of the optional handset or of
an external telephone to enter the remote receive number you have
programmed into your MFP machine. A vailable settings are of f, 00, 11,
22, 33, 44, 55, 66, 77, 88, 99, ** AND ##.
17 MEM./FEEDER SW.: This function controls how your MFP machine normally transmits fax messages (by scanning the document
into memory first, or by transmitting directly from the document
feeder). A vailable settings are memory and feeder.
Note:
See Function Setting 25, Instant Dial.
18 POWER SAVE MODE: Not used.
19 ECM FUNCTION: The error correction mode function helps your
MFP machine to improve communication in areas where telephone
line conditions are poor. Available settings are on and off.
20 REMOTE DIAGNOSIS: The remote diagnostics feature allows a
service person to remotely dial and service your MFP machine.
Available settings are on and off.
21 PC/FAX SWITCH: If this function is set to on, your MFP machine
automatically transfers received faxes directly to the PC (and does not
receive and print them itself). However, if you are experiencing a
problem with your PC, you can tell your MFP machine to receive and
print faxes locally by setting this function to off. A vailable settings are
on and off.
Programming 69
Page 82

22 NO TONER MEM RX: With this function turned on, your MFP
machine automatically receives and stores messages in its memory
when it is low on toner. When turned of f, messages print even if toner
is low or empty . Available settings are on and off.
23 MEM FULL SAVE: With “Broadcast Transmission” and other
functions, “call origination” starts after an entire document is read into
memory . If during this process, memory becomes full and an “operator time out” seems likely , a message to that ef fect is shown in the
Display Panel if this MEM full save function is on. If it is off, data that
could not be read into memory is automatically deleted. A vailable
settings are on and off.
24 CONTINUOUS TONE: With this function on, you can choose
whether to have a warning tone sound when receiving a transmission.
Pressing the STOP key turns off the tone. Set this function to of f for
no warning sound. A vailable settings are on and of f.
25 INST ANT DIAL: Set this function to start reading documents upon
“call origination” when transmitting. A vailable settings are on and off.
Broadcast mode:
•
Memory available
before call origination.
•
Memory full
25 Instant Dial = ON:
•
Memory available
•
Memory full—Feeder transmission
receiving the CFR signal of the remote machines after call origination.
: all the documents are read into the memory
: reading is impossible.
: document reading starts upon call origination.
: starts reading document when
25 Instant Dial = OFF, 17 Mem./Feeder SW = MEMORY:
•
Memory Available:
into memory .
•
Memory Full—Feeder transmission
when receiving the CFR signal of the remote machines after call
origination.
call origination after all documents are read
: starts reading document
70 OKIOFFICE 87 User’s Guide
Page 83

25 Instant Dial = OFF, 17 Mem./Feeder SW = FEEDER:
•
Memory Available—Feeder transmission
ment when receiving the CFR signal of the remote machines after
call origination.
•
Memory Full—Feeder transmission
when receiving the CFR signal of the remote machines after call
origination.
26 RESTRICT ACCESS: Select whether or not you want restricted
access. Turning on this function renders your restricted ID registration
active. A vailable settings are on and of f.
: starts reading docu-
: starts reading document
Important! You cannot generate a report listing the Restrict
Access IDs. Be sure to record all Restrict Access
IDs. If you forget a Restrict Access ID, you must
contact an Authorized Service Dealer for assistance.
27 WIDTH REDUCTION: Turning this function on enables you to
print received data at a slightly reduced width.
28 TONER SAVE: This function allows you to select whether to use
toner saving during facsimile printing. The settings are on and off.
29 CNG COUNT: This function allows you to switch to a facsimile
reception mode at a certain CNG signal quantity (1-5) when the unit is
operating in T/F, TAD and as a parallel telephone.
Programming 71
Page 84

Changing Your User Function Settings
SELECT
FUNCTION
1
Press the SELECT FUNCTION key.
2
Press the 9/USER PROG. One-Touch key. The display shows
9/SPACE
++
USER
PROG.
YES
FUNCTION NO.[_ ]
ENTER 01-34
1:FUNC. PROGRAMMING.
3
Press
4
Using the numeric keypad, enter the 2-digit number of the function
YES
. The display shows FUNCTION NO. [ ].
you want to change. This display shows the name of the selected
function.
5
Repeatedly press
NO
until the setting you want appears in the
display .
Tip:
If you are changing your MFP machine’s TX MODE DEFAUL T
settings, the new settings appears on the LEDs above the Transmit
Resolution/
6
Press
YES
and the T ype of Original/
YES
to confirm your selection. The name of the next
NO
function setting appears in the display .
7
Press the SELECT FUNCTION key to finish.
Setting Your MFP Machine’s Distinctive Ring
To use Distinctive Ring:
• You must have your local telephone carrier’s Distinctive Ring service.
• Your unit must be in F AX or PC answer mode, and the PBX dial parameter must be set to off. Other modes—TEL, TEL/FAX, or T AD—override
Distinctive Ring.
• You must have a genuine OKI optional handset connected to your unit.
This feature may not work properly if you have a telephone other than a
genuine Oki optional handset connected to your MFP machine.
SELECT
FUNCTION
1
Press the SELECT FUNCTION key.
9/SPACE
++
USER
PROG.
YES
72 OKIOFFICE 87 User’s Guide
ABC
+
+
1
12:DISTINCTIVE RING
[OFF] YES(
2
) NO( )
Page 85

2
Press the 9/USER PROG. One-Touch key. The display shows
1:FUNC. PROGRAMMING.
3
Press
4
Using the numeric keypad, enter 12. The display shows DISTINC-
YES
. The display shows FUNCTION NO. [ ].
TIVE RING, [OFF].
5
6
Press
Press
NO
. The display changes to DISTINCTIVE RING, [ON].
YES
. The display changes to SETUP FAX RING, CALL
FAX NUMBER NOW.
7
Using a separate telephone line, immediately dial the number
assigned to the fax machine (you must do this within 90 seconds).
When your MFP machine begins to ring, it automatically detects and
remembers its assigned ring pattern. When it has finished programming its ring pattern, the display shows RESUL T=OK.
Tip:
Occasionally , your MFP machine may not be able to detect its
ring pattern on the first try . If this happens, the display shows
RESUL T=NG. Follow the instructions again from Step 6.
8
Press
9
Press the SELECT FUNCTION key to finish.
YES
to confirm your selection.
Personal Box Programming (Polling)
SELECT
FUNCTION
1
Press the SELECT FUNCTION key.
2
Press the 9/USER PROG. One-Touch key. The display shows 1:
+
9/SP A CE
USER
PROG.
JKL
+
5
5:PERSONAL BOX PRG.
YES(
) NO (
/1-8)
FUNC. PROGRAMMING.
3
On the numeric keypad, press 5. The display shows 5: PERSONAL
BOX PRG.
NO
YES
. The display shows PERSONAL BOX NO. [ ].
YES
. The display shows PERSONAL BOX [CLOSE].
. The display switches between [CONF], [POLL],
4
Press
5
On the numeric keypad, enter a personal box number (from 1 ~ 8).
6
Press
7
Press
[CLOSE] in that order.
8
When the display shows [POLL], press
YES
. This sets up your
personal box number for Polling.
Programming 73
Page 86

Personal Box Programming (Confidential)
SELECT
FUNCTION
1
Press the SELECT FUNCTION key.
2
Press the 9/USER PROG. One-Touch key. The display shows 1:
+
9/SP A CE
USER
PROG.
JKL
+
5
5:PERSONAL BOX PRG.
YES(
) NO (
/1-8)
FUNC. PROGRAMMING.
3
On the numeric keypad, press 5. The display shows 5: PERSONAL
BOX PRG.
NO
YES
. The display shows PERSONAL BOX NO.[ ].
YES
. The display shows PERSONAL BOX [CLOSE].
. The display switches between [CONF], [POLL],
4
Press
5
On the numeric keypad, enter your personal box number (from 1 ~ 8).
6
Press
7
Press
[CLOSE] in that order.
8
When the display shows [CONF], press
YES
. The display then
shows PRG. PASSWORD[ ].
9
On the numeric keypad, enter a four-digit password.
10
Press
Tip:
YES
to set up your confidential use personal box.
Make sure to keep a record of your registered password so as
not to forget it.
Personal Box Programming (Close)
SELECT
FUNCTION
1
Press the SELECT FUNCTION key.
2
Press the 9/USER PROG. One-Touch key. The display shows
+
9/SP A CE
USER
PROG.
JKL
+
5
5:PERSONAL BOX PRG.
YES(
) NO (
/1-8)
1:FUNC. PROGRAMMING.
3
On the numeric keypad, press 5. The display shows 5: PERSONAL
BOX PRG.
74 OKIOFFICE 87 User’s Guide
Page 87

4
Press
5
On the numeric keypad, enter your personal box number (from 1 ~
YES
. The display shows PERSONAL BOX NO.[ ].
8).
NO
YES
. The display shows PERSONAL BOX [CONF].
. The display switches between [CONF], [POLL],
6
7
Press
Press
[CLOSE] in that order.
8
When the display shows [CLOSE], press
YES
. The display
then asks DELETE PERSONAL BOX?
9
Press
YES
to delete (close) your Personal Box.
Forward No. Programming
SELECT
FUNCTION
1
Press the SELECT FUNCTION key.
2
Press the 9/USER PROG. One-Touch key. The display shows 1:
+
9/SP A CE
USER
PROG.
MNO
+
6
6:FORWARD NO.PRG.
YES(
) NO (
/1-8)
FUNC. PROGRAMMING.
3
On the numeric keypad, press 6. The display shows 6: FORW ARD
NO. PRG.
4
Press
5
Enter the number and press ST A R T, then press SELECT FUNC-
YES
. NO = (FORWARDING NO.) displays.
TION.
Memory Password Programming (Register)
SELECT
FUNCTION
1
Press the SELECT FUNCTION key.
2
Press the 9/USER PROG. One-Touch key. The display shows 1:
+
9/SP A CE
USER
PROG.
PORS
+
7
7:
MEM P ASSWORD PRG.
YES(
) NO (
/1-8)
FUNC. PROGRAMMING.
3
On the numeric keypad, press 7. The display shows 7: MEM
PASSWORD PRG.
4
Press
YES
. The display shows PRG PASSWORD [ ].
Programming 75
Page 88

5
On the numeric keypad, enter a four-digit password.
6
Press
Tip:
YES
to register your Memory Password.
Make sure to keep a record of your registered password so as
not to forget it.
Memory Password Programming (Delete)
SELECT
FUNCTION
1
Press the SELECT FUNCTION key.
2
Press the 9/USER PROG. One-Touch key. The display shows 1:
+
9/SP A CE
USER
PROG.
PORS
+
7
7:
MEM P ASSWORD PRG.
YES(
) NO (
/1-8)
FUNC. PROGRAMMING.
3
On the numeric keypad, press 7. The display shows 7: MEM
PASSWORD PRG.
4
Press
5
Enter in a one-digit space. The display asks DELETE PASS-
YES
. The display shows PRG. PASSWORD [xxxx].
WORD?
6
Press
YES
to delete your Memory Reception mode password.
Dial Parameter Settings
These functions allow you to control the way your MFP machine dials
telephone numbers. Refer to the Dial Parameter Settings List to determine which settings you may need to change, then refer to Changing
Your Dial Parameter Settings to make the change.
Tip:
Some settings are not available in some countries. If you have
trouble accessing a dial parameter setting listed here, contact your dealer
for assistance.
Dial Parameter Settings List
REDIAL TRIES: This function controls how many times your MFP
machine automatically redials a number which is busy or which does
not answer. Available settings are from 0 to 10 tries.
76 OKIOFFICE 87 User’s Guide
Page 89

REDIAL INTERVAL: Controls how long your MFP machine waits
between each automatic redial attempt. A vailable settings are from 1
to 6 minutes.
DIAL TONE DETECT: This function allows your MFP machine to wait
for and detect a dial tone before proceeding with dialing. A vailable
settings are on and off.
BUSY TONE DETECT: This function allows your MFP machine to
detect a busy tone when sending a fax. A vailable settings are on and
off.
MF(TONE)/DP(PULSE): This function controls what method your
MFP machine uses for dialing. Two dialing methods are in common
use. DP, or dial pulse dialing, uses monotone pulses to dial a number
(like a rotary telephone). MF, or multi-frequency dialing (touch-tone),
uses different tones to dial a number . Available settings are MF and
DP.
PULSE DIAL RA TE: If your MFP machine is set to pulse dialing, this
function controls how quickly your MFP machine sends out dialing
pulses (the dial pulse rate varies in different countries). A vailable
settings are 10 pps, 16 pps and 20 pps.
PULSE MAKE RA TIO: A vailable settings are 33%, 39% and 40%.
PULSE DIAL TYPE: If your MFP machine is set to pulse dialing, this
function controls the type of pulse dialing used (different types of
pulse dialing are used in different countries). A vailable settings are N,
10-N and N+1.
MF(TONE) DURATION: If your MFP machine is set to tone dialing,
this function controls the duration of the tones used for dialing (the
tone duration varies in different countries). A vailable settings are 75
ms, 85 ms, and 100 ms.
PBX LINE: Turn this function on if your MFP machine is connected to
a PBX. Once this function has been turned on and the access digit
function has been programmed, your MFP machine recognizes the
access digit you use in your PBX to get an outside line. After it dials
your access digit, your MFP machine pauses to wait for an outside
line before dialing the rest of the telephone number. Available settings
are on and off. See Connecting to a PBX in the Installation section for
instructions on changing this setting.
Programming 77
Page 90

FLASH/EARTH/NORMAL: If your MFP machine is connected to a
PBX, this function tells your MFP machine about the type of PBX line
your MFP machine is connected to. A vailable settings are normal (N),
flash (F) and earth (E).
AUTO START : When this function is turned on, your MFP machine
automatically begins dialing as soon as you have selected a location
by pressing a One-Touch key or entering an Auto Dial code. You do
not have to press ST AR T. Available settings are on and off.
DIAL PREFIX: If your MFP machine is connected to a PBX, use this
function to tell your MFP machine what access number is used to
obtain an outside line from your PBX. You can enter up to 4 digits. See
Connecting to a PBX in the Installation section for instructions on
changing this setting.
Changing Your Dial Parameter Settings
SELECT
FUNCTION
1
Press the SELECT FUNCTION key.
2
Press the 9/USER PROG. One-Touch key.
3
On the numeric keypad, press 2. The display shows 2:DIAL PA-
9/SPACE
++
USER
ABC
2
2:DIAL PARAMETER
YES(
) NO( /1-8)
RAMETER.
4
Press
YES
until the display shows the dial parameter you want
to change.
5
Repeatedly press
NO
until the setting you want appears in the
display .
6
Press
YES
to confirm your selection. The name of the next dial
parameter setting appears in the display .
7
Press the SELECT FUNCTION key to finish.
78 OKIOFFICE 87 User’s Guide
Page 91

Service Function Settings
Service function settings in many cases greatly change the way your
MFP machine operates. To change any of these settings, contact your
dealer.
Service Function Settings List
LONG DOC. TX: Normally, your MFP machine does not scan docu-
ments longer than 360 mm. When this function is on, your MFP
machine scans and transmits documents of any length for up to one
hour.
MDY/DMY: This function controls how your MFP machine displays and
prints the date (month/day/year or day/month/year).
TIME/DATE PRINT: This function controls how the time and date are
printed on the fax messages, which you receive. Your MFP machine
can be set to not print the time and date, to print it at the top the first
page only , or to print it at the top of every page.
TSI PRINT: When this function is on, the telephone number of the fax
machine sending you a fax message is printed at the top of each page
of the message.
Programming 79
Page 92

User Functions
STANDBY MODE
(FUNCTION)
SELECT FUNCTION
One-Touch key 1: DELAYED TX
One-Touch key 2: PRINT OPERATION
PRINT MEMORY MSG.
PRINT PERSONAL BOX
One-Touch key 3: CONFIDENTIAL TX
One-Touch key 4: RELA Y INITIATE-TX
One-Touch key 5: POLLING TX/RX
One-Touch key 6: REPORT PRINT
1: ACTIVITY REPORT
2: BROADCAST MCF.
3: ACTIVE MEM. FILES
4: PHONE DIRECTORY
5: CONFIGURA TION
6: PROTOCOL DUMP
One-Touch key 7: COUNTER DISP (CLEAR)
DRUM COUNTER CLEAR
TONER COUNTER CLEAR
PRINT COUNTER
SCAN COUNTER
One-Touch key 8: LOCATION PROGRAM
ONE-TOUCH KEY PRG.
AUTO DIAL key
# key (GROUP SETTING)
80 OKIOFFICE 87 User’s Guide
Page 93

One-Touch key 9: USER PROGRAMMING
(1) FUNC. PROGRAMMING
01: MCF (SINGLE-LOC.)
02: MCF (MUL TI-LOC.)
03: ERR. PERORT (MCF)
04: IMAGE IN MCF.
05: SENDER ID
06: MONITOR VOLUME
07: BUZZER VOLUME
08: CLOSED NETWORK
09: TX MODE DEFAULT
10: T/F TIMER PRG.
11: RING RESPONSE
12: DISTINCTIVE RING
13: PAPER SIZE
14: USER LANGUAGE
15: INCOMING RING
16: REMOTE RECEIVE
17: MEM/FEEDER SW
18: NOT USED
19: ECM FUNCTION
20: REMOTE DIAGNOSIS
21: PC/FAX SWITCH
22: NO TONER MEM RX
23: MEM FULL SAVE
24: CONTINUOUS TONE
25: INST ANT DIALING
26: RESTRICT ACCESS
27: WIDTH REDUCTION
28: TONER SA VE
29: CNG COUNT
30: NOT USED
31: NOT USED
32: NOT USED
33: NOT USED
34: NOT USED
Programming 81
Page 94

2 key: DIAL PARAMETER
REDIAL TRIES
REDIAL INTERVAL
DIAL TONE DETECT
BUSY TONE DETECT
MF (TONE)/DP (Pulse)
PULSE DIAL RATE
PULSE MAKE RATIO
PULSE DIAL TYPE
MF (TONE) DURATION
PBX LINE
FLASH/EARTH/NORMAL
AUTO START
DIAL PREFIX
3 key: CLOCK ADJUSTMENT
4 key: SYSTEM DATA PRG.
TSI/CSI
SENDER ID
CALL BACK NO.
5 key: PERSONAL BOX PRG.
6 key: FORWARDING NO. PRG.
7 key: MEM. PASSWORD PRG.
One-Touch key 10: PRINTER CLEANING
82 OKIOFFICE 87 User’s Guide
Page 95

Reports
Understanding Reports
Your MFP machine provides a variety of useful reports, which help you
understand your MFP machine’s current settings, programming and
operations. Refer to the reports listing below to determine which reports
you may want to print, then refer to Printing Reports for instructions on
printing a report.
Active Memory Files Report
The active memory files report provides a list of all messages stored in
your MFP machine’s memory, either documents waiting for transmission
or documents, which have been received and not yet printed. Information provided on this report includes:
RECEPTION: prints out memory reception information. ENTRIES lists
the number of received messages stored up in your facsimile unit’s
memory . PAGES lists the total number of pages received.
PERSONAL BOX: prints out set up status of your Personal Boxes
(Confidential, Bulletin Polling). MODE describes the Box types.
ENTRIES lists the number of received messages stored up in each
Box. P AGES lists the total number of pages in each Box.
POLLING TX / RX: prints out information on polling reception and
Polling transmission not using a Box. Polling transmissions are
indicated in the mode column along with scanned number of pages
(empty for Feeder Polling Transmission). Polling Reception lists the
date & time of reception, the sender and the transmission mode.
TRANSMISSION: prints out information on Delayed Fax and
Redialing Wait transmissions. (However , Polling reception information
are listed in the above POLLING TX / RX).
Transmission date & time, receivers and transmission modes are
listed.
- This report does not print if there is no message stored in memory .
Reports 83
Page 96

Activity Report
The activity report provides a record of your MFP machine’s communications. Information provided on this report includes:
- The total amount of time your MFP machine spent sending faxes
and the total amount of time spent receiving faxes.
- The date, time and duration (S,R-TIME) of each transmission or
reception.
- The name or telephone number of the fax machine you were com
municating with (DISTANT STATION ID). If you were sending a fax,
the telephone number or the Location ID prints. If you were receiving a fax, the remote fax machine’s Personal ID or its telephone
number prints.
- The communication mode used for each transmission or reception.
- The number of pages sent or received.
- The result of each communication.
- Service codes.
Tip: This report does not contain the results of messages, which
were received without errors.
Confidential Reception Report
This report is automatically printed each time your MFP machine receives
a confidential message into a mailbox. Information in this report includes.
- The date the message was received.
- The total amount of time your MFP machine spent receiving the
message (S,R-TIME).
- The Location ID or telephone number of the fax machine you were
communicating with (DIST ANT STA TION ID).
- The number of the mail box into which the message was received.
- The number of pages received.
- The result of the communication.
- Service codes.
84 OKIOFFICE 87 User’s Guide
Page 97

Broadcast Confirmation Report
Use this report to confirm the results of a multiple-location transmission
(or broadcast). Information provided on this report includes:
- The date and time at which the broadcast started.
- The total amount of time used to complete the broadcast.
- For each location, the Location ID, the number of pages sent and
the result of the communication.
Broadcast Entry Report
Each time you program a multiple-location transmission (or broadcast),
your MFP machine gives you the option of printing this report to confirm
your entries. Information in this report includes:
- The Location ID of the One-Touch keys and Auto Dial codes you
have selected.
- Telephone numbers you have manually entered using the numeric
keypad.
Message Confirmation Report
This report provides information about your last single-location fax transmission or polling transmission. Information in this report includes:
- The date of the communication.
- The total amount of time your MFP machine spent sending or
receiviing (S,R-TIME).
- The Location ID or telephone number of the fax machine you were
communicating with (DIST ANT STA TION ID).
- The communication mode used.
- The number of pages sent or received.
- The result of the communication.
- Service codes.
- If any error occurred during the communication, a portion of the
page which experienced a problem prints after the report.
Reports 85
Page 98

Configuration Report
The configuration report provides a list of the current operational settings
of your fax machine. The information includes:
- The current settings of all your MFP machine’s user functions.
- The Sender ID (ID=), TSI/CSI (TEL NO.), and call back number
currently programmed into your MFP machine.
- Y our MFP machine’ s current dial parameter settings.
T elephone Directory
This report provides a complete listing of all of the telephone numbers
programmed into your MFP machine’s One-Touch keys, Auto Dial codes
and groups. The information includes:
- The Location ID and main fax number for each One-Touch key and
Auto Dial code.
- The alternate number (OR) for each One-Touch key .
- The One-Touch Parameter settings for each One-Touch key (PRM.
ECHO).
- A listing of all of the One-Touch keys and Auto Dial codes included
in each group.
Power Outage Report
If power is interrupted to your MFP machine, then the power failure may
have interfered with delayed transmissions, messages received into
memory or other communications. In this case, your MFP machine
automatically prints a power off report to alert you.
Protocol Dump
In the event of obstructions to transmission, the following report prints.
This report can be helpful in analyzing the cause of the obstruction. Send
this report to the dealer or service center if so requested.
86 OKIOFFICE 87 User’s Guide
Page 99

Printing Reports
Printing a Message Confirmation Report
After transmission, press the COPY key once (with no documents
loaded) to see a report confirming your transmission on your MFP
machine’s display .
To print the report, press the COPY key a second time.
Printing Other Reports
SELECT
FUNCTION
1
Press the SELECT FUNCTION key.
2
Press the 6/REPORT PRINT One-Touch key. The display shows
6
+
REPORT
1:ACTIVITY REPORT
YES(
) NO( /1-6)
1:ACTIVITY REPORT.
3
Press
NO
repeatedly until the report you want to print appears
on the display .
4
Press
YES
. The report begins printing.
Codes Used in Reports
Result Codes
Result codes indicate the results of communications.
Code Description
BUSY The other machine’s line was busy or there was no answer.
CANCL A message was erased after being held in memory for 10 days.
COMP. A multiple-location transmission was completed.
COVER The fax machine’s cover was opened during the communication.
NO The transmission or reception failed due to a communication error.
OK The communication was completed successfully.
PUNIT This error code indicates a problem with the printing unit. Contact your
R_JAM A paper jam occurred in your MFP machine while it was receiving a fax,
S_JAM A document jam occurred in the sending fax machine.
STOP The STOP key was pressed, ending the communication session.
service person.
and your fax machine was nable to receive the entire message
in memory.
Reports 87
Page 100

Communication Codes
Communication codes indicate the communication mode was used for a
communication.
Code Description
TX A communication initiated by your fax machine.
RX A communication initiated by a remote fax machine.
POLL RX Polling Reception
POLL TX Polling Transmission
POLL=** Bulletin Polling Transmission (** is the Box No.)
CONF=** Confidential Reception (**is the Box No.)
FWD-T Forwarding Transmission
FWD-R Forwarding Reception
B.C. Broadcast Transmission
88 OKIOFFICE 87 User’s Guide
 Loading...