

Öhlins Racing AB
Box 722
S-194 27 Upplands Väsby, Sweden
Phone +46 8 590 025 00
fax +46 8 590 025 80
© Öhlins Racing AB. All rights
reserved. Any reprinting or
unauthorized use without the written
permission of Öhlins Racing AB
is prohibited.
www.ohlins.com
Öhlins products are subject to
continuous improvement and
development, therefore, although
these instructions include the most
up-to-date information available at
the time of printing, minor updates
may occur.
To find the latest information contact
your Öhlins distributor. Please
consult your Öhlins dealer if you
have any questions regarding the
contents in this document.
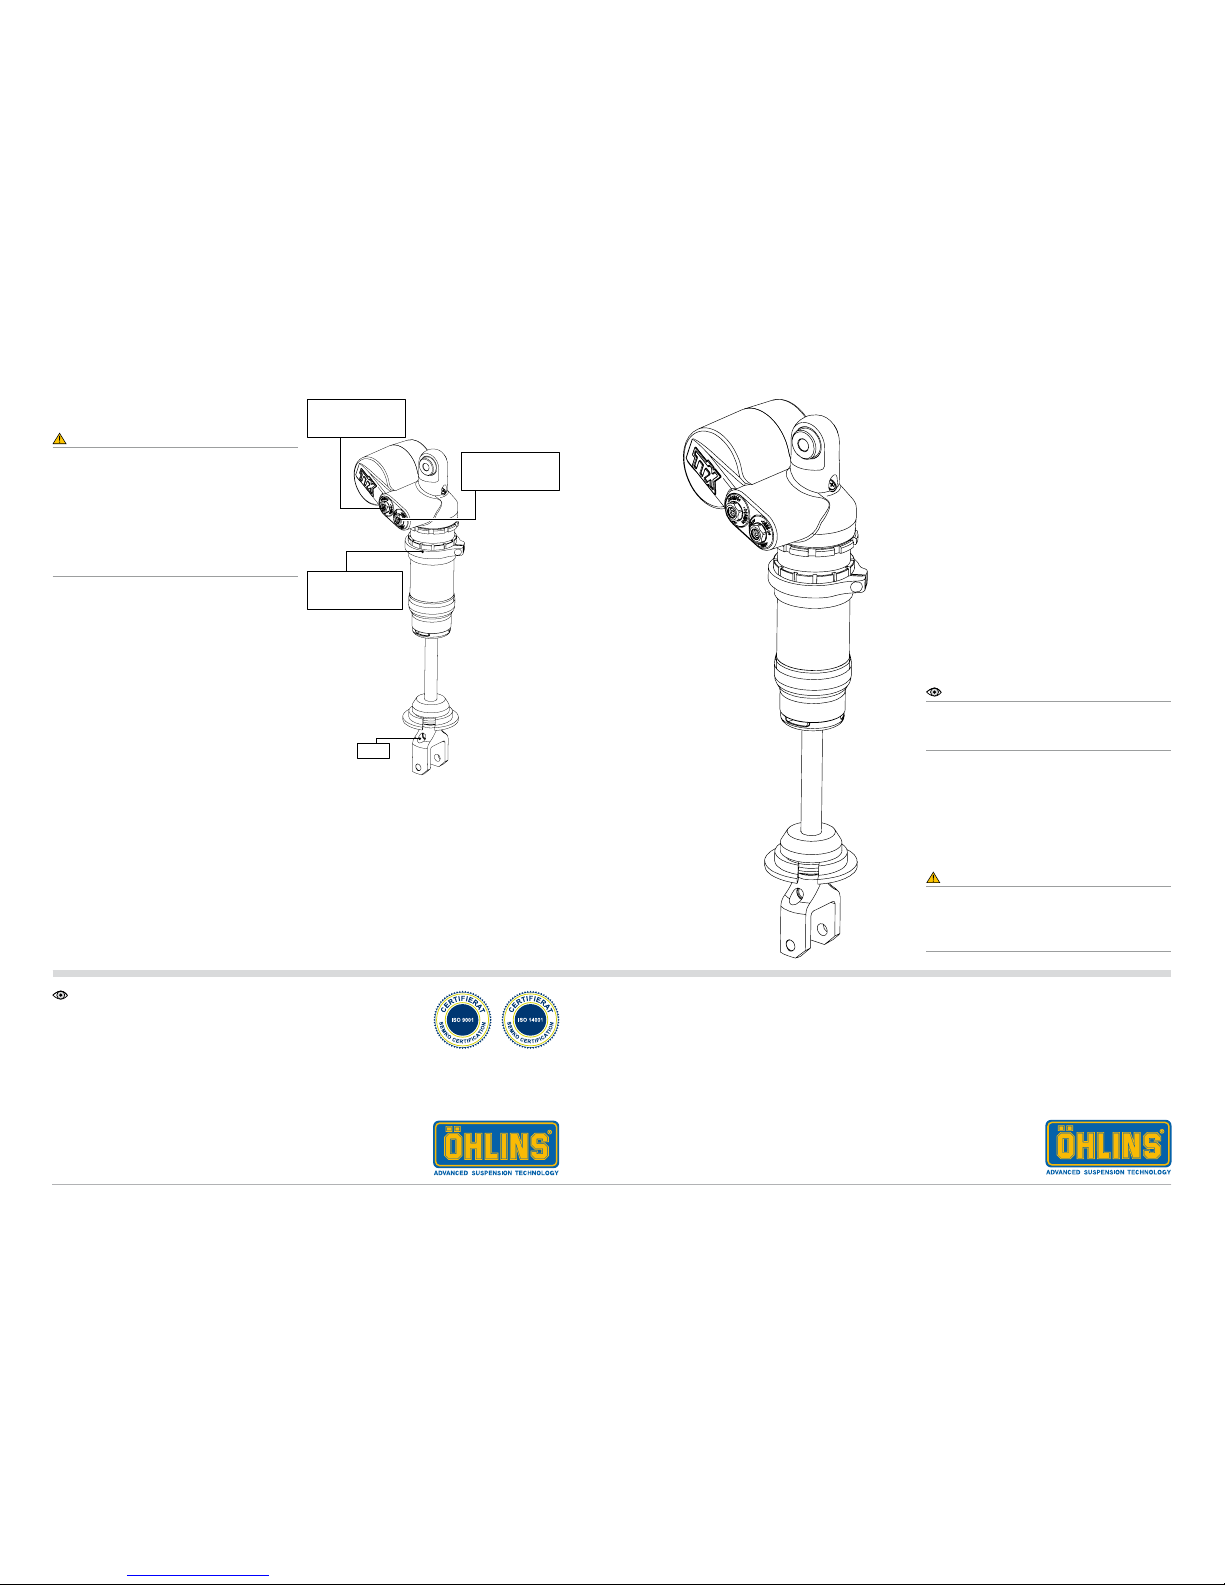
Shock Absorber for Honda TRX 450 - rear
HO 1072
Mounting Instructions
Part No. Pcs.
Shock absorber HO1072 1
C-spanner 00710-02 1
Spring clip 00516-01 1
Spring adapter 00543-05 1
Sticker 00191-23 2
Öhlins Sticker 00197-01 2
Memo Notes Sticker 01180-01 1
General Info Sheet TTX 01198-01 1
Owner’s Manual ATV 07235-01 1
Before installing this product, check the
contents of the kit. If anything is missing, please
contact an Öhlins dealer.
Kit Contents
Please note that during storage and
transportation, especially at high ambient
temperature, some of the oil and grease used for
assembling may leak and stain the packaging.
This is in no way detrimental to the product,
wipe off the excessive oil/grease with a cloth.
Part no. HO1072_0
Issued 2010-04-15
Warning!
Before installing this product, read the Öhlins
Owner’s Manual. The shock absorber is an
important part of your vehicle and will affect the
stability.
Note!
No spring included in this kit. See spring
recommendation in this folder. Consult an Öhlins
dealer for advice.
Set-up Data
Spring Guide
Warning!
Before riding, always make sure that the
basic settings made by Öhlins are according
to recommended Set-up Data. Read about
adjustments and setting up in the Öhlins
Owner’s Manual before you make any
adjustments. Contact an Öhlins dealer if you
have any questions about setting up the shock
absorber.
Spring Preload
Adjuster
Recommended set-up
Rebound 10 clicks
Compression 10 clicks
Spring Preload 1 mm
CSC 24 clicks
Shock Absorb er Data
Length 388 mm
Stroke 110 mm
Free Sag and R ide Height
Free sag, front 60±5 mm
2½±¼’’
Free sag, rear 30±5 mm
1¼±¼’’
Ride height, front 80±5 mm
3¼±¼’’
Ride height, rear 105±5 mm
4½±¼’’
Rider’s weight Spring Rate
75kg/ 165 lbs 06320-08 48N/mm
85kg/ 187 lbs 06320-09 50N/mm
95kg/ 209 lbs 06320-11 54N/mm
CSC
Compression
Damping Adjuster
Adjustments
Rebound
Damping Adjuster
1 2
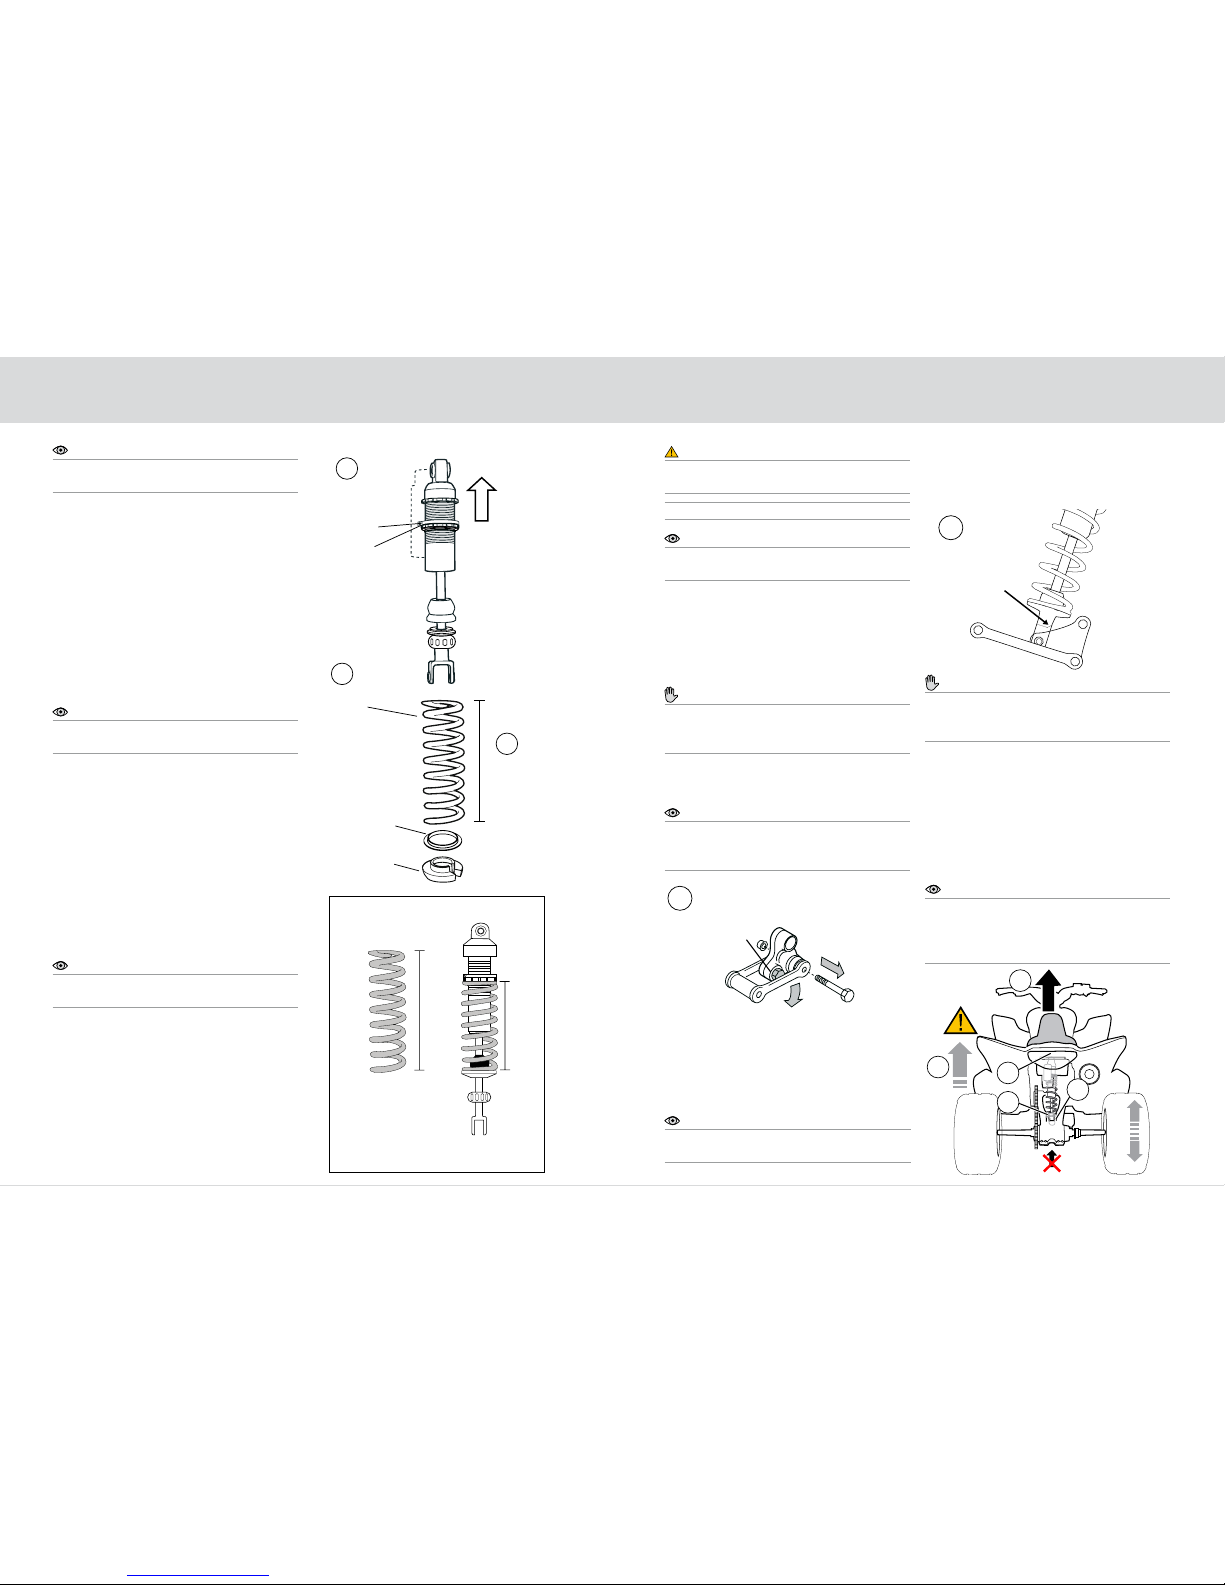
Install the Spring Install the Shock Absorber
Spring
Spring clip
A
1
2
Spring
platform
clamp
Spring
platform
Spring Preload = A - B
A Free spring length
B Installed spring length
A
B
Note!
Install the spring to the shock absorber before
installing the shock absorber on the vehicle.
1
Measure the free length of the spring (A).
2
Loosen the screw on the spring platform
clamp so that you can move the spring
platform as far up as needed to install the
spring.
3
Put the shock absorber up-side-down in a
vice so that you can install the spring, adapter
and the spring clip.
Note!
The spring platform and spring are press fitted.
Push hard to install the spring.
4
Measure the spring length. Adjust the spring
preload to the recommended setting, see
section Adjustments and Set-up data in this
folder.
5
Install the shock absorber to the vehicle
according to the procedure in this folder.
Check sag and ride height (see the
Owner’s Manual) and adjust the spring
preload again if necessary.
Note!
Tighten the screw on the spring platform clamp
before riding the vehicle.
3
Warning!
It is advisable to have an Öhlins dealer install the
shock absorber.
When installing, consult the Vehicle Service Manual.
Note!
Before installing the shock absorber, make sure
that the correct spring is installed.
1
Remove the seat.
2
Raise the rear end of the vehicle so that the
original shock absorber is in an unloaded position.
Caution!
Do not apply lifting force to the swing arm. Make
sure that the vehicle is securely supported so
that it will not fall over.
3
Remove the original shock absorber.
Note!
Remove the lower bolt of the triangle link so that
the lower bolt of the shock absorber can be
removed.
3
Remove
bolt
Fold out
the arm
Triangle link
Lower shock
absorber
bolt
4
Install the Öhlins shock absorber in the same
position as the original unit. Fasten the upper
attachment rst.
Note!
The piggy back reservoir should be at the top,
towards the rear and slightly to the left.
Side view
Chamfered side
down
5
Triangle link
2
Caution!
4
3
5
5
Fasten the lower attachment. Raise the
wheels slightly to make the attachment t.
Reattach the triangle link!
Caution!
Make sure that the chamfered side of the
end bracket is pointing downwards, or the
movement can be restricted!
6
Tighten the attachment screws to the correct
torque. Consult your ATV Owner’s manual.
7
Check sag and ride height according to the
Öhlins Owner’s Manual. See also Set-up data
in this manual.
Note!
Make sure that all bolts are tightened to the
correct torque and that nothing fouls or restricts
movement of the shock absorber when the
suspension is being fully compressed or extended.
1
Spring
adapter
 Loading...