


MX & Enduro TTX Front Fork
Cartridge Kit
Workshop Manual

 Safety Precautions
 Note!
Note!
The front fork is a very important part of the vehicle and will therefore affect the stability of the vehicle.
 Read and make sure that you understand the information in this manual and the mounting instructions before you use this product. If you have any questions regarding installation or maintenance please contact your nearest Öhlins dealer.
 Öhlins Racing AB can not be held responsible for any damage to the cartridge kit, vehicle, other property or injury to persons, if the instructions for installing and maintenance are not followed exactly.
 Warning!
This product was developed and designed exclusively for a specific vehicle model and should only be installed on the intended vehicle model in its original condition as delivered from the vehicle manufacturer.
 This product contains pressurized nitrogen gas (N2). Do not open, service or modify this product without proper education (authorized Öhlins dealer/distributor) or proper tools.
 After installing this product, take a test ride at low speed to make sure that your vehicle has maintained its stability.
 Note!
Note!
When working on this product, always consult your Vehicle Service Manual.
 This Manual should be considered as a part of the product and should therefore accompany the product throughout its life cycle.
Safety Symbols
In this manual, mounting instructions and other technical documents, important information concerning safety is distinguished by the following symbols:
The Safety Alert Symbol means: Warning! Your safety is involved.
 Warning!
The Warning Symbol means: Failure to follow warning instructions can result in severe or fatal injury to anyone working with, inspecting or using the cartridge kit, or
to bystanders.
 Caution!
The Caution Symbol means: Special precautions must be taken to avoid damage to the cartridge kit.
 Note!
Note!
The Note Symbol indicates information that is important regarding procedures.
© Öhlins Racing AB. All rights reserved. Any reprinting or unauthorized use without the written permission of Öhlins Racing AB is prohibited. Printed in Sweden.
Service Interval
Rec. service interval for Cartridge kit: every 25 hrs
At 25 hour service, replace the following:
|
Part no. |
- Top-out rubber |
15486-01 |
- 8 mm seal |
15428-01 |
- Piston ring |
15409-01 |
- Separating piston seal |
|
years 2010-2011: part no. 00338-96 (2x) years 2008-2009: part no. 01027-12 (2x)
In This Manual
|
|
Page |
|
Safety Precautions |
1 |
|
Recommended Tools |
2 |
1 |
Remove Cartridge kit from Fork Leg |
3 |
2 |
Replace Spring and/or Preload Washer |
4 |
3 |
Measure Spring Preload |
5 |
4 |
Disassemble Cartridge Kit |
6 |
5 |
Assemble Cartridge Kit |
8 |
6 |
Reinstall Cartridge Kit into Fork Leg |
10 |
7 |
Reinstall Fork Leg on the Vehicle |
10 |
1
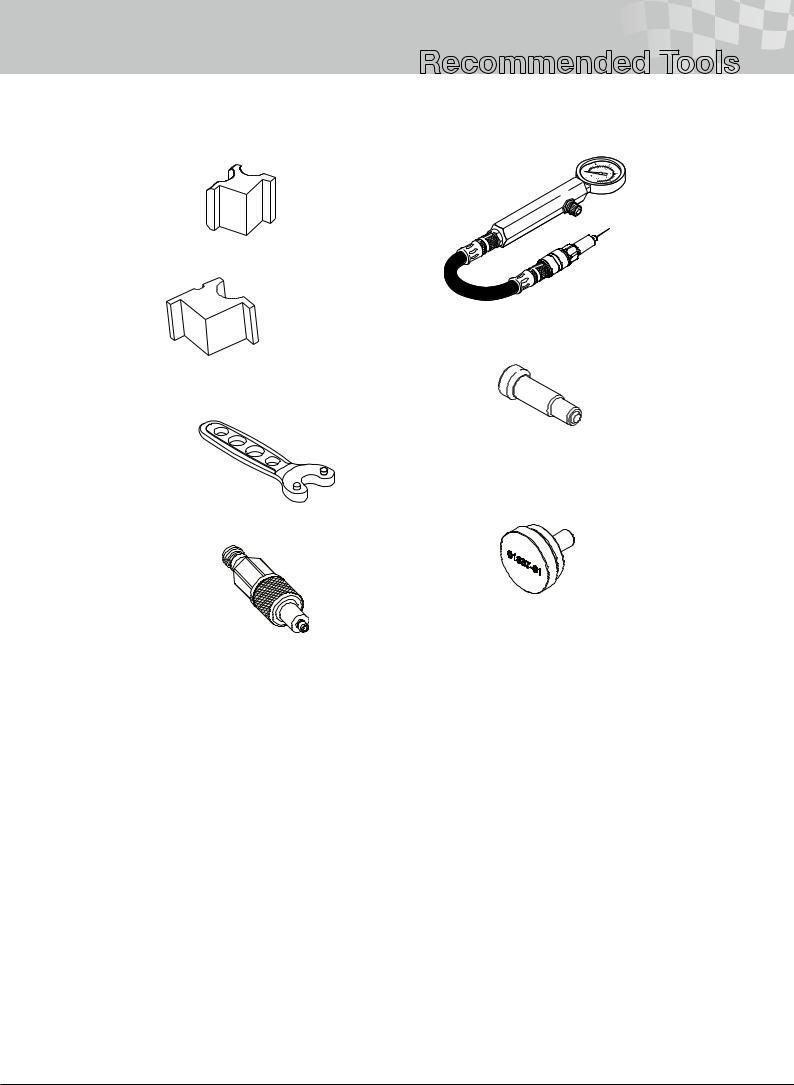
Recommended Tools


Tool 00727-06 |
Tool 01781-01 |
Soft jaws for cartridge tube |
Gas filling device assy |
Tool 00727-08
Soft jaws
Tool 01890-01
Oil plug tool
Tool 01761-01
Peg spanner for top-cap
Tool 01820-27 |
Tool 01837-01 |
|
Gas Piston Set Tool |
||
Adapter for oil filling machine |
||
|
2
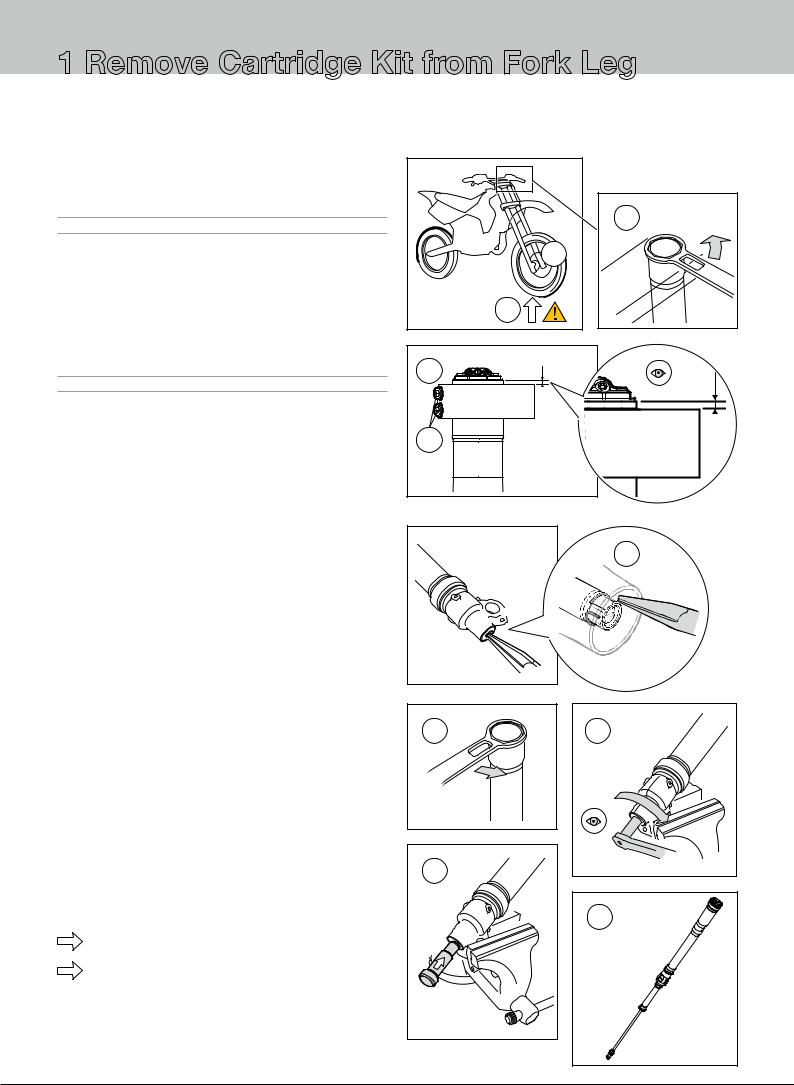

 1 Remove Cartridge Kit from Fork Leg
1.1
Put the motorcycle on a workstand so that the front wheel barely touches the ground and the suspension is unloaded.
 Warning!
Make sure that the vehicle is securely supported so that it will not tip.
1.2
Remove the front wheel and the brake caliper. Consult your Vehicle Service Manual
1.3
Measure the position of the front fork. Measure the distance from the top of the fork leg to the top of the upper triple clamp according to the figure.
 Note!
Note!
Note this dimension as fork height position.
1.4
Loosen the screws that hold the fork legs in the upper triple clamps.
1.5
Use a 50 mm fork top cap tool. Loosen the top cap ½ turn. Do not remove the top cap yet.
1.6
Loosen the screws that hold the fork legs in the lower triple clamps.
1.7
Remove the front fork legs from the vehicle. Clean the fork legs thoroughly. Make sure to clean underneath the fork bottoms.
1.8
Remove the security snap-ring at the bottom of the fork with a pair of pliers.
1.9
Remove the top cap from the fork leg.
1.10
Use a 12 mm socket. Loosen the shaft end of the cartridge kit.
Note, clockwise rotation.
1.11
At the same time when pulling the cartridge assembly out of the fork leg, install the tool 01890-01 (oil plug) by pushing the plug into the fork bottom. The plug will keep the oil in the fork while working with the cartridge kit.
1.12
Remove the cartridge kit from the fork leg.
1.13
Note that spring seat and washer will, depending on cartridge version, stay in fork tube or come out with cartridge.
To replace spring and/or spacers – go to chapter 2
To disassemble Cartridge Kit – go to chapter 4
1.5
1.2 |
1.1 |
1.3 |
1.4 |
1.8
1.9 |
1.10 |
1.11
1.12
3
 Loading...