

TABLE OF CONTENTS
INTRODUCTION………………………………………….2
OVERVIEW............................................................. 2
FEATURES..............................................................3
PRODUCT OVERVIEW ........................................ 4
INSTALLATION.................................................... 5-6
OPER A TION GU IDE...........................................7-8
SAVING AND PLAYING FILE..................................9
PC C A MER A..........................................................10
PA CK I N G C ON T E N T...............................................11
SPECIFICATIONS ................................................... 12
Warranty condition ...........................................13
EN
1
INTRODUCTION
Thank you for purchasing ODYS Mini Sporty DV.
ODYS Mini Sporty DV has the unique, ultra-small
EN
and delicate design. It can be used in many
recording situations. ODYS Mini Sporty DV brings
more convenience, safety and funs to your daily life.
OVERVIEW
ODYS Mini Sporty DV, a high-tech product, just
meets a plenty of needs of people and market. It
possesse s a s eri e s o f adv anced functions including
digital photography, voice memory, sound trigger
recording, high speed USB data transferring and US B
charging.
Tips regarding environmental protection
At the end of its operating life, this product may not be disposed
of by way of your normal household waste. Instead it must be
delivered to a collection point for recycling electrical and
electronic equipment. The icon on the product, in the operating
instructions or on the packaging, indicates this.
The materials used in manufacturing this product are recyclable,
depending on their identifying markings. By recycling this
equipment, by recycling its components, or through other
procedures of re-using outdated equipment, you are making an
important contribution to protection our environment. Please ask
you local municipal administration for the location of the
corresponding recycling point.
2

FEATURES
>Thumb size alloy housing
>Manually and sound activated recording
>Web camera for online video chat
>Support AVI video format
>Low illumination, high resolution image with 2000K
pixels
>High speed recording and quick light response
>30 frames per second for 640*480 video output
>Support USB1.1/2.0
>Support 8G Micro SD card (Max)
>Built-in Li rechargeable battery lasting for 2 hours
and standby time for 250 hours
>Easy operation with LED indicator
>Flexible installation with clip and bracket
>Professional sports mount for action recording
EN
3
PRODUCT OVERVIEW
EN
USB Jack
Hanging Ring
Sound Trigger Switch
Micro SD Card
Slot
Multi-Bracket
4
LED Indicator
Record Switch
Power
Switch
Multi-Clip

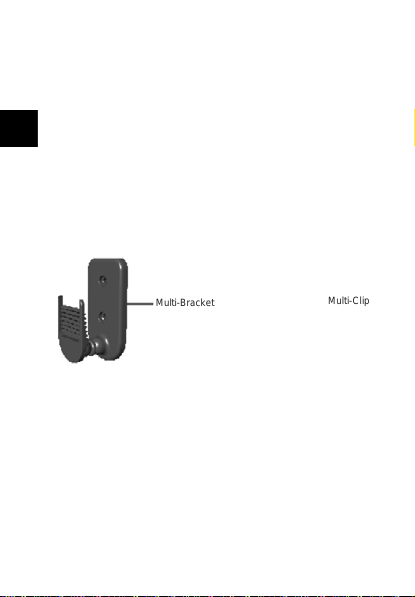
INSTALLATION
1. With unique clip design and flexible installation, Mini
Sporty DV can be fixed on the backpack, hat, pocket,
collar and other suitable locations per various
monitoring demands.
EN
Load camera into dip Load clip into bracket Finis he d m ou nt
2. Unique bracket design can support wide angle
shooting, pan: 360°, tilt: 150", bracket can be mounted
with nails, screws, velcro or magnet.
3. Special clip and strap mounts:
Unique clip and strap mounts allow for the camera to
be mounted on helmet, a wrist, mountain bike or
anywhere else you need for great video exhibited in
the diagram below.
5

EN
6

Operating Guide
no
M
i
croSDc
ard
.Pl
eas
e
i
n
s
e
r
t
a Card
.
3.
MiniDVwill
enterstandb
y
m
ode
i
fiti
s
notus
edfo
r
2
m
i
nute
s
w
h
en
batte
ryi
s
no
t
low
.
3
Recordigod
e
eco
dganuay:hentesoud
t
g
g
esitc
(
VO
X)i
s
o
f
f
,
p
r
ess"Re
cord
S
w
i
t
ch"tost
a
rtr
ecord
i
ng
when
po
wer o
n,m
ean
whi
le
t
h
e
g
r
e
e
n
indi
c
ato
r
flashes
s
loy. Press
Record S
itch "ag
a
t
o stop
reco
dga
dteesbesavedaso
a
t.
NO
CE:
1. Insert a Micro SD card.
2. The indicator will be blue when the power is on.
NOTICE:
1. The blue indicator will flash slowly when the battery is
low, after 2 minutes, Mini DV will power of f automatically.
2. The indicator turns green and flash quickly when there is
no Micro SD card. Please insert a Card.
3. Mini DV will enter stand by mode if it is not used for2
minutes when battery is not low.
3. Recording mode
Recording manually: When the sound trigger switch
(VOX) is off, press "Record Switch" to start recording
when power on, meanwhile the green indicator
flashes slowly. Press "Record Switch "again to stop
recording and the files will be saved as "*.AVI" format.
NOTICE:
1. In standby mode, press "Record Switch" once to wake up
the system. While the indicator displays blue color, and
press "Record Switch" again.To activate recording mode
while the indicator displays green color and flashes slowly.
2. The indicator will keep in green and stop recording when the
Micro SD card is full, then stop displaying after 30 minutes.
You can not press any switch to operate Mini Sporty DV
when the indicator keep in green.
7
NE

Sound trigger recording:
aga
i
n
t
eecod
g
,
t
eesbesaedautoatc
a
y
NO
CE:
uofthepoedungeco
di
g
th
outsto
p
p
ng,
eco
dgstea
notbesaedas
e
t
hecaseothe
ong
t
edeoecod
ng.
hede
o
besa
vedasaeth800auto
aticaye
ey30s
5edicatoshoeden
ispoered
byUSoCa
d
apt
e,heisuloc
a
ge,
t
he
ndicatocusou
t.
6
.Th
e
indicatorsketc
h
map.
When the sound trigger switch (VOX) is on.
• Turn on the power, Mini Sporty DV will enter
E
N
recording mode if the sound outside is up to 65
decibel.
• Mini DV will automatically enter standby mode when
the sound outside is lower than 65 decibel standing
for 2 minutes.
• In the standby mode ,if the sound outside is up to
65 decibel, Mini DV will enter recording mode
again
4. After recording, the files will be saved automatically.
NOTICE:
1. Turn off the power during recording without stopping,
recording stream will not be saved as file.
2. ln the case of the long-time video recording. The video will
be saved as a file with 800MB automatically every30mins.
5. The indicator will show red when Mini DV is powered
by USB or AC adapter, when Mini DV is full of charge,
the indicator will crush out.
6. The indicator sketch map.
Indicator State Motion
blue crush out Standby
(Power instruction! flash slowly low battery
green flash quickly no card
(Record instruction) flash slowly recording
red always bright charge up
(Charge instruction) crush out full of charge
always bright Power on
flash quickly Copy data
always bright full of card
8

9
N
E
NOTICE: When charge up the Mini DV, it can also support
record, standby and file transfer, meanwhile, the red indicator
would keep on, and the indicator is shown normally in any other
states. When mix up more indicators, the color of the indicator
would be changed.
SAVING AND PLAYING FILE
Connect Mini DV to PC by USB cable after recording, then
copy the data from Mini DV to PC. You also can use card
reader directly. Recommend software that Media Player
and KM Player for playing.
NOTICE:
Pay attention to the following conditions after connecting Mini DV to PC with
USB cable:
1. You can only copy the data from Mini DV when the power is on and the
sound trigger switch (VOX) is off.
2. Mini DV can be used as a PC camera when the power is on and the
sound trigger switch is on.
3. When the power is off, Mini DV can be charged and the indicator turns
red.
4. Turn off the power before plug and pull the USB cable.
Mini Sporty DV
USB Cable
PC
US
B Jack
are
c
t
ly.mmeftr
e
t
h
a
t
P
l
aye
r
dye
opa
y
g
T
ICE
:
S
t
y
ble
P
C
J
a
c

PC CAMERA
Please install the camera driver before using PC
E
camera. After connecting Mini DV to PC with USB
N
cable, turn on the power and sound trigger switch,
then a video device will appear on the PC which
indicates Mini DV can be used as a PC camera now.
PC camera function is also applicable to some thirdparty application software by which the real-time
video can be saved on the local computer. Such as
Amcap.
NOTICE:
You can only copy the data from Mini DV when the sound
trigger switch is off and the power is on.
10

PACKING CONTENT
EN
11

SPECIFICATIONS
Pixel 2000000 color CMOS
EN
View Angle 72"
Minimum Illumination 1 Lux(min)
Battery Capacity 260mAH
Usage Duration 2h
Standby Time 250h
Consumption Current 120mA/3.7V(Max.)
Store Temperature -10--70-C
Operation Temperature -10-C-60-C
Operation Humidity 15-85%RH
Memory medium Micro SD card(TF Card)
SD Capability Max 8GB Micro SD Card
Video Function and
Format
USB Jack USB1.1/2.0
Operation System 2000/XP/Vista 32
Store Consumption 1GB per 40 min
Charge Time 2h(approx.)
Weight 50g(approx.)
Dimension 55x28x20mm(approx.)
Video decode use motion JPEG,
recording for AVI format. VGA(640 x
480@30frame/second)
12

Warranty condition
The following conditions comprise the requirements and
scope of our warranty conditions and do not affect our legal
and contractual warranty obligations.
We offer a warranty on our products in
accordance with the following conditions:
1. Odys products are covered by a 24 month warranty. We will resolve damages or
defects on Odys products free of charge within 12 months of the purchase date
under the following warranty conditions. For any damage or defect determined
later than 12 months after the purchase date, proof of a manufacturing fault
must be submitted for repair under warranty.
The warranty does not cover batteries and other parts, which are considered
consumables, parts that break easily such as glass or plastic or defects based
on normal wear and tear. There is no warranty obligation in the event of
marginal differences compared to the target appearance and workmanship
provided these have a negligible effect on the product's fitness for use, in the
event of damage caused by chemical or electrochemical effects, by water or
generally from abnormal conditions.
2. The warranty will be performed in such a way that we shall decide whether to
repair the defective parts or to replace them with working parts free of charge.
AXDIA reserves the right to exchange the product for a replacement product of
equal value if the product that is sent in cannot be repaired within a reasonable
time or at reasonable cost. The product can also be exchanged for a different
model of the same value. Requests cannot be made for repairs to be carried out
on site. Parts that have been replaced or exchanged become our property.
3. The warranty claim does not apply if repairs or other work is carried out by
unauthorized persons or if our products are equipped with additional parts or
accessories that are not approved for our products.
4. Warranties that have been activated do not cause the warranty period to be
extended, nor do they trigger a new warranty period. The warranty period for
any replacement parts installed ends with the warranty period for the entire
product.
5. Any other or further claims are excluded, especially those for replacement due
to damage caused outside of the product, provided there is no obligatory legal
liability. We therefore accept no liability for accidental, indirect or other
consequential damage of any kind, which leads to usage restrictions, data loss,
loss of earnings or interruption to business.
EN
13

Asserting a warranty claim
1. To make use of the warranty servic e, you must contact the AXDIA
Service Center by e-mail, fax or ph one (see below for c ontact details).
You can also use the service form on our website or on the bac k of the
EN
warranty conditions.
2. AXDIA Service Center will try to diagnose and solve your problem. If it is
determined that a warranty claim exists, you wil l be given an RMA
number (Return Material Authorization) and you will be asked to send
the product to AXDIA.
IMPORTANT: AXDIA will only accept parcels that
have an RMA number.
Please observe the following when sending the
product:
1. Send the pr oduct suitably packaged with carriage and insur ance paid.
Do not enclose any accessories with the pr oducts (no cables, CD's,
memory cards, manuals, etc.), unless the AXDIA Service Centre
specifies otherwise.
2. Mark the RMA number on the outside of the package in such a way that
it is visible and clearly legible.
3. You must enclose a copy of the sales slip as proof of purchase.
4. Once AXDIA has received the product, it will meet its warranty
obligations in accordance with the warrant y conditions and will return
the product to the sender with carriage and insurance paid.
Service outside of warranty
AXDIA can refuse any service claim made that is not covered by
the warranty. If AXDIA agrees to provide a service outside the
warranty, the customer will be invoiced f o r a ll repair and transport
costs.
AXDIA will not accept any packages that have not first been
approved by AXDIA by means of an RMA (Return Material
Authorization).
14
 Loading...